Руководства пользователя
Версия T4204
1.97 MB
Motherboard Installation Guide (Traditional Chinese)
Версия C4204
1.83 MB
Motherboard Installation Guide (Simplified Chinese)
Версия QJ4204
1.68 MB
Motherboard Installation Guide (Japanese)
Версия QG4204
1.6 MB
Motherboard Installation Guide (German)
Версия QF4204
1.59 MB
Motherboard Installation Guide (French)
Версия Q4204
43.39 MB
Motherboard Installation Guide (Multiple Languages)
Версия F3202
10.04 MB
P5K SE user’s manual(French)
Версия G3202
9.96 MB
P5K SE user’s manual(German)
Версия t3202
2.78 MB
P5K SE user’s manual (Traditional Chinese)
Версия c3202
2.61 MB
P5K SE user’s manual (Simplified Chinese)
Версия E3202
3.36 MB
P5K SE user’s manual(English)
Версия T2437
2.57 MB
Motherboard DIY Troubleshooting Guide (Traditional Chinese version)
-
Contents
-
Table of Contents
-
Bookmarks
Quick Links
Related Manuals for Asus P5K SE — Motherboard — ATX
Summary of Contents for Asus P5K SE — Motherboard — ATX
-
Page 1
P5K SE… -
Page 2
Product warranty or service will not be extended if: (1) the product is repaired, modified or altered, unless such repair, modification of alteration is authorized in writing by ASUS; or (2) the serial number of the product is defaced or missing. -
Page 3: Table Of Contents
Product introduction Welcome! ………………1-1 Package contents …………….. 1-1 Special features …………….1-2 1.3.1 Product highlights …………1-2 1.3.2 ASUS AI Lifestyle features ……….1-4 1.3.3 ASUS Stylish features …………. 1-5 1.3.4 ASUS Intelligent Overclocking features ……1-6 Chapter2: Hardware information Before you proceed …………..
-
Page 4
4.1.1 ASUS Update utility …………4-1 4.1.2 Creating a bootable floppy disk ……..4-4 4.1.3 ASUS EZ Flash 2 utility ……….. 4-5 4.1.4 AFUDOS utility …………..4-6 4.1.5 ASUS CrashFree BIOS 3 utility ……..4-8 BIOS setup program …………..4-9 4.2.1… -
Page 5
4.6.2 Boot Settings Configuration ………. 4-30 4.6.3 Security …………….. 4-31 Tools menu …………….. 4-33 4.7.1 ASUS EZ Flash 2 …………4-33 4.7.2 ASUS O.C. Profile …………4-34 Exit menu ………………4-35 Chapter5: Software support Installing an operating system ……….. 5-1 5.2.1… -
Page 6
Contents 5.3.5 ASUS AI Gear2 …………. 5-22 5.3.6 ASUS AI Nap …………..5-23 5.3.7 ASUS Q-Fan 2 ………….. 5-24 5.3.8 ASUS AI Booster …………5-25 Appendix: CPU features Intel EM64T ………………A-1 ® Enhanced Intel SpeedStep Technology (EIST) ……A-1 ® A.2.1 System requirements …………A-1… -
Page 7: Notices
Notices Federal Communications Commission Statement This device complies with Part 15 of the FCC Rules. Operation is subject to the following two conditions: • This device may not cause harmful interference, and • This device must accept any interference received including interference that may cause undesired operation.
-
Page 8: Safety Information
Safety information Electrical safety • To prevent electrical shock hazard, disconnect the power cable from the electrical outlet before relocating the system. • When adding or removing devices to or from the system, ensure that the power cables for the devices are unplugged before the signal cables are connected.
-
Page 9: About This Guide
Refer to the following sources for additional information and for product and software updates. ASUS websites The ASUS website provides updated information on ASUS hardware and software products. Refer to the ASUS contact information. Optional documentation Your product package may include optional documentation, such as warranty flyers, that may have been added by your dealer.
-
Page 10: Conventions Used In This Guide
Conventions used in this guide To make sure that you perform certain tasks properly, take note of the following symbols used throughout this manual. DANGER/WARNING: Information to prevent injury to yourself when trying to complete a task. CAUTION: Information to prevent damage to the components when trying to complete a task.
-
Page 11: P5K Se Specifications Summary
— Supports up to 8 GB system memory * The chipset officially supports the memory frequency up to DDR2 800MHz. Tuned by the ASUS Super Memspeed Technology, this motherboard natively supports up to DDR2 1066MHz. Refer to www.asus.com or this user manual for the Memory QVL (Qualified Vendors Lists).
-
Page 12
— Memory tuning from 667MHz to 1333MHz for DDR2 — PCI-E frequency tuning from 100MHz to 150MHz at 1 MHz increment Overclocking protection: — ASUS C.P.R. (CPU Parameter Recall) Rear panel connectors 1 x PS/2 keyboard port 1 x External Serial ATA port… -
Page 13
System panel connector (Q-Connector) BIOS features 8 Mb Flash ROM, AMI BIOS, PnP, DMI 2.0, WfM 2.0, SM BIOS 2.3, ACPI 2.0a, ASUS EZ Flash 2, ASUS CrashFree BIOS 3 Manageability WfM 2.0, DMI 2.0, WOL by PME, WOR by PME, PXE… -
Page 15: Chapter1: Product Introduction
This chapter describes the motherboard features and the new technologies it supports. Product introduction…
-
Page 16
Chapter summary Welcome! ………………1-1 Package contents …………….. 1-1 Special features …………….1-2 ASUS P5K SE… -
Page 17: Welcome
® The motherboard delivers a host of new features and latest technologies, making it another standout in the long line of ASUS quality motherboards! Before you start installing the motherboard, and hardware devices on it, check the items in your package with the list below.
-
Page 18: Special Features
Green ASUS This motherboard and its packaging comply with the European Union’s Restriction on the use of Hazardous Substances (RoHS). This is in line with the ASUS vision of creating environment-friendly and recyclable products/packaging to safeguard consumers’ health while minimizing the impact on the environment.
-
Page 19: High Definition Audio
ASUS Super Memspeed Technology To attain top performance, ASUS has managed to break through current FSB and DRAM ratio proportions by utilizing Super Memspeed Technology–the latest technology that provides even more precise overclocking options to unleash the true potential of DDR2 memory. The DDR2 Mode maximizes system performance by eliminating the bottleneck when overclocking both the CPU and memory–…
-
Page 20: Asus Ai Lifestyle Features
1.3.2 ASUS AI Lifestyle features ASUS Quiet Thermal Solution ASUS Quiet Thermal solution makes system more stable and enhances the overclocking capability. AI Gear 2 AI Gear 2 allows you to choose profiles to adjust the CPU frequency and Vcore voltage to minimize system noise and power consumption. You can change the mode in real-time in the operating system to max power saving mode and save up to 50% power when using word processing applications.
-
Page 21: Asus Stylish Features
Smart Support CD It provides a checklist to allow the user to see which drivers are already installed, as well as those that aren’t. When using ASUS PC Probe II, you can easily see the critical parts of the computer.
-
Page 22: Asus Intelligent Overclocking Features
1.3.4 ASUS Intelligent Overclocking features AI Booster The ASUS AI Booster allows you to overclock the CPU speed in Windows environment without the hassle of booting the BIOS. See page 5-26 for details. Precision Tweaker This feature allows you to fine tune the CPU/memory voltage and gradually increase the memory Front Side Bus (FSB) and PCI Express frequency at 1MHz increment to achieve maximum system performance.
-
Page 23: Chapter2: Hardware Information
This chapter lists the hardware setup procedures that you have to perform when installing system components. It includes description of the jumpers and connectors on the motherboard. Hardware information…
-
Page 24
Chapter summary Before you proceed …………..2-1 Motherboard overview …………..2-2 Central Processing Unit (CPU) ……….. 2-6 System memory …………….. 2-13 Expansion slots …………….2-19 Jumpers ………………2-22 Connectors …………….. 2-24 ASUS P5K SE… -
Page 25: Before You Proceed
The illustration below shows the location of the onboard LED. SB_PWR ® Standby Powered P5K SE Onboard LED Power ASUS P5K SE…
-
Page 26: Motherboard Overview
Motherboard overview Before you install the motherboard, study the configuration of your chassis to ensure that the motherboard fits into it. Make sure to unplug the power cord before installing or removing the motherboard. Failure to do so can cause you physical injury and damage motherboard components.
-
Page 27: Motherboard Layout
Lithium Cell PCIEX1_1 CMOS Power SATA2 SATA1 Super ALC883 SPDIF_OUT CLRTC PWR_FAN PCIEX1_2 USBPW9-12 CHA_FAN BIOS SB_PWR PRI_EIDE COM1 USB1112 USB910 AAFP PANEL Refer to 2.7 Connectors for more information about rear panel connectors and internal connectors. ASUS P5K SE…
-
Page 28: Layout Contents
2.2.4 Layout contents Slots Page DDR2 DIMM slots 2-13 PCI slots 2-21 PCI Express x1 slot 2-21 PCI Express x16 slots 2-21 Jumper Page Clear RTC RAM (3-pin CLRTC) 2-22 Keyboard power (3-pin PS2_USBPW) 2-23 USB device wake-up (3-pin USBPW1-4, USBPW5-8, USB9-12) 2-23 Rear panel connectors Page…
-
Page 29
• System power LED (2-pin PLED) • Hard disk drive activity LED (2-pin IDE_LED) • System warning speaker (4-pin SPEAKER) • ATX power button/soft-off button (2-pin PWRSW) • Reset button (2-pin RESET) ASUS Q-connector (system panel) 2-35 ASUS P5K SE… -
Page 30: Central Processing Unit (Cpu)
ASUS will shoulder the cost of repair only if the damage is shipment/transit-related. • Keep the cap after installing the motherboard. ASUS will process Return Merchandise Authorization (RMA) requests only if the motherboard comes with the cap on the LGA775 socket.
-
Page 31: Installing The Cpu
This side of the socket box should face you. To prevent damage to the socket pins, do not remove the PnP cap unless you are installing a CPU. Lift the load lever in the direction of the arrow to a 135º angle. ASUS P5K SE…
-
Page 32
Lift the load plate with your thumb and forefinger to a 100º angle (A), then push the PnP cap from the load plate window to remove (B). Load plate Alignment key Position the CPU over the socket, making sure that the gold triangle is on the bottom-left corner of the socket then fit the socket… -
Page 33: Installing The Cpu Heatsink And Fan
CPU fan connector. Motherboard hole Fastener Narrow end of the groove Make sure to orient each fastener with the narrow end of the groove pointing outward. (The photo shows the groove shaded for emphasis.) ASUS P5K SE…
-
Page 34
Push down two fasteners at a time in a diagonal sequence to secure the heatsink and fan assembly in place. Connect the CPU fan cable to the connector on the motherboard labeled CPU_FAN. CPU_FAN ® P5K SE CPU fan connector Do not forget to connect the CPU fan connector! Hardware monitoring errors can occur if you fail to plug this connector. -
Page 35
Rotate each fastener counterclockwise. Pull up two fasteners at a time in a diagonal sequence to disengage the heatsink and fan assembly from the motherboard. Carefully remove the heatsink and fan assembly from the motherboard. ASUS P5K SE 2-11… -
Page 36
Rotate each fastener clockwise to ensure correct orientation when reinstalling. Narrow end of the groove The narrow end of the groove should point outward after resetting. (The photo shows the groove shaded for emphasis.) Refer to the documentation in the boxed or stand-alone CPU fan package for detailed information on CPU fan installation. -
Page 37: System Memory
Sockets Channel A DIMM_A1 and DIMM_B1 Channel B DIMM_A2 and DIMM_B2 • This chipset officially supports DDR2-800 MHz. With the ASUS Super Memspeed Technology, this motherboard natively supports up to DDR2-1066 MHz. See the table below. DDR2 1333 1066* 1333…
-
Page 38: Memory Configurations
2.4.2 Memory configurations You may install 256 MB, 512 MB, 1 GB, and 2 GB unbuffered non-ECC DDR2 DIMMs into the DIMM sockets. Recommended Memory Configurations Sockets Mode DIMM_A1 DIMM_A2 DIMM_B1 DIMM_B2 Populated Single-Channel Populated Dual-channel (1) Populated Populated Dual-channel (2) Populated Populated Populated…
-
Page 39
Dual-channel memory configuration. • C*: Supports 4 modules inserted into both the yellow and black slots as two pairs of Dual-channel memory configuration. Visit the ASUS website for the latest DDR2-1066/800/667MHz QVL. ASUS P5K SE 2-15… -
Page 40
P5K SE Motherboard Qualified Vendors Lists (QVL) DDR2-800 MHz capability DIMM support Chip Size Vendor Chip No. Part No. Brand 512MB KINGSTON K4T51083QC KVR800D2N5/512 • • • 1024MB KINGSTON Heat-Sink Package 4-4-4-12 KHX6400D2LL/1G • • 1024MB KINGSTON Heat-Sink Package 4-4-4-12 KHX6400D2LLK2/1GN •… -
Page 41
• • 1024MB Hynix HY5PS12821CFP-Y5 Hynix HYMP512U64CP8-Y5 • 256MB CORSAIR MIII00605 VS256MB667D2 • 2048MB NANYA NT5TU128M8BJ-3C NANYA NT2GT64U8HB0JY-3C • • 512MB NANYA NT5TU64M8BE-3C NANYA NT512T64U88B0BY-3C • 512MB A3R12E3GEF637BLC5N AL6E8E63B-6E1K • • • 1024MB A3R12E3GEF637BLC5N AL7E8E63B-6E1K • ASUS P5K SE 2-17… -
Page 42: Installing A Dimm
2.4.3 Installing a DIMM Unplug the power supply before adding or removing DIMMs or other system components. Failure to do so can cause severe damage to both the motherboard and the components. To install a DIMM: DDR2 DIMM notch Unlock a DIMM socket by pressing the retaining clips outward.
-
Page 43: Expansion Slots
IRQ” or that the cards do not need IRQ assignments. Otherwise, conflicts will arise between the two PCI groups, making the system unstable and the card inoperable. Refer to the table on the next page for details. ASUS P5K SE 2-19…
-
Page 44: Interrupt Assignments
2.5.3 Interrupt assignments Standard function System timer Keyboard controller Re-direct to IRQ#9 IRQ holder for PCI steering* Communications port (COM1)* IRQ holder for PCI steering* Floppy disk controller System CMOS/Real Time Clock Microsoft ACPI-Compliant System IRQ holder for PCI steering* IRQ holder for PCI steering* Numeric data processor Intel(R) ICH9 Family SMbus Controller * These IRQs are usually available for PCI devices.
-
Page 45: Pci Slots
PCI Express x1 slot. 2.5.6 PCI Express x16 slot This motherboard supports one PCI Express x16 graphics card that complies with the PCI Express specifications. The figure shows a graphics card installed on the PCI Express x16 slot. ASUS P5K SE 2-21…
-
Page 46: Jumper
Jumpers Clear RTC RAM (3-pin CLRTC) This jumper allows you to clear the Real Time Clock (RTC) RAM in CMOS. You can clear the CMOS memory of date, time, and system setup parameters by erasing the CMOS RTC RAM data. The onboard button cell battery powers the RAM data in CMOS, which include system setup information such as system passwords.
-
Page 47
500mA on the +5VSB lead for each USB port; otherwise, the system would not power up. • The total current consumed must NOT exceed the power supply capability (+5VSB) whether under normal condition or in sleep mode. ASUS P5K SE 2-23… -
Page 48: Connectors
Connectors 2.7.1 Rear panel connectors PS/2 keyboard port (purple). This port is for a PS/2 keyboard. LAN (RJ-45) port. Supported by Gigabit LAN controller, this port allows Gigabit connection to a Local Area Network (LAN) through a network hub. Refer to the table below for the LAN port LED indications. Center/Subwoofer port (orange).
-
Page 49
12. Coaxial S/PDIF Out port. This port connects an external audio output device via a coaxial S/PDIF cable. 13. USB 2.0 ports 5 and 6. These two 4-pin Universal Serial Bus (USB) ports are available for connecting USB 2.0 devices. ASUS P5K SE 2-25… -
Page 50: Internal Connectors
2.7.2 Internal connectors Floppy disk drive connector (34-1 pin FLOPPY) This connector is for the provided floppy disk drive (FDD) signal cable. Insert one end of the cable to this connector, then connect the other end to the signal connector at the back of the floppy disk drive. Pin 5 on the connector is removed to prevent incorrect cable connection when using a FDD cable with a covered Pin 5.
-
Page 51
If any device jumper is set as “Cable-Select,” make sure all other device jumpers have the same setting. ® PRI_EIDE PIN 1 NOTE: Orient the red markings (usually zigzag) on the IDE ribbon cable to PIN 1. P5K SE IDE connector ASUS P5K SE 2-27… -
Page 52
ICH9 Serial ATA connectors (7-pin SATA1-4) These connectors are for the Serial ATA signal cables for Serial ATA hard disk drives. SATA1 SATA2 SATA3 SATA4 SATA4 SATA3 ® P5B SATA Connectors P5K SE SATA connectors SATA2 SATA1 When using the connectors in Standard IDE mode, connect the primary (boot) hard disk drive to the SATA1/2 connector. -
Page 53
Connect the S/PDIF Out module cable to this connector, then install the module to a slot opening at the back of the system chassis. ® SPDIF_OUT P5K SE Digital audio connector The S/PDIF module is purchased separately. ASUS P5K SE 2-29… -
Page 54
Never connect a 1394 cable to the USB connectors. Doing so will damage the motherboard! You can connect the front panel USB cable to the ASUS Q-Connector (USB, blue) first, and then install the Q-Connector (USB) to the USB connector onboard if your chassis supports front panel USB ports. -
Page 55
® PWR_FAN CHA_FAN P5K SE Fan connectors Only the CPU_FAN and CHA_FAN connector support the ASUS Q-FAN 2 feature. Serial port connector (10-1 pin COM1) This connector is for a serial (COM) port. Connect the serial port module cable to this connector, then install the module to a slot opening at the back of the system chassis. -
Page 56
Chassis intrusion connector (4-1 pin CHASSIS) This connector is for a chassis-mounted intrusion detection sensor or switch. Connect one end of the chassis intrusion sensor or switch cable to this connector. The chassis intrusion sensor or switch sends a high-level signal to this connector when a chassis component is removed or replaced. -
Page 57
CPU: Intel Pentium Extreme 3.73GHz ® ® Memory: 512 MB DDR2 (x4) Graphics card: ASUS EAX1900XT Parallel ATA device: IDE hard disk drive Serial ATA device: SATA hard disk drive (x2) Optical drive: DVD-RW ASUS P5K SE 2-33… -
Page 58: System Panel Connector
12. System panel connector (20-8 pin PANEL) This connector supports several chassis-mounted functions. PLED SPEAKER PANEL ® RESET IDE_LED PWRSW Requires an ATX power supply. P5K SE System panel connector • System power LED (2-pin PLED) This 2-pin connector is for the system power LED. Connect the chassis power LED cable to this connector.
-
Page 59: Q-Connector
Q-Connector (system panel) You can use ASUS Q-Connector to connect / disconnect chassis front panel cables by only a few steps. Directions below shows how to install ASUS Q-Connector. Step1. Connect correct front panel to ASUS Q-Connector first. You can refer to the marking on Q-Connector itself to know the detail pin definition.
-
Page 60
2-36 Chapter 2: Hardware information… -
Page 61: Chapter3: Powering Up
This chapter describes the power up sequence, the vocal POST messages, and ways of shutting down the system. Powering up…
-
Page 62
Chapter summary Starting up for the first time …………3-1 Turning off the computer …………. 3-2 ASUS P5K SE… -
Page 63: Starting Up For The First Time
One continuous beep followed by three No VGA detected short beeps One continuous beep followed by four Hardware component failure short beeps At power on, hold down the <Delete> key to enter the BIOS Setup. Follow the instructions in Chapter 4. ASUS P5K SE…
-
Page 64: Turning Off The Computer
Turning off the computer 3.2.1 Using the OS shut down function If you are using Windows ® Click the Start button then select Turn Off Computer. Click the Turn Off button to shut down the computer. The power supply should turn off after Windows ®…
-
Page 65: Chapter4: Bios Setup
This chapter tells how to change the system settings through the BIOS Setup menus. Detailed descriptions of the BIOS parameters are also provided. BIOS setup…
-
Page 66
Chapter summary Managing and updating your BIOS ……….4-1 BIOS setup program …………..4-9 Main menu ……………… 4-12 Advanced menu …………….. 4-16 Power menu …………….4-25 Boot menu ……………… 4-29 Tools menu …………….. 4-33 Exit menu ………………4-35 ASUS P5K SE… -
Page 67: Managing And Updating Your Bios
ASUS Update (Updates the BIOS in Windows environment.) ® ASUS EZ Flash 2 (Updates the BIOS using a floppy disk or USB flash disk.) ASUS AFUDOS (Updates the BIOS using a bootable floppy disk.) ASUS CrashFree BIOS 3 (Updates the BIOS using a bootable floppy disk, USB flash disk or the motherboard support CD when the BIOS file fails or gets corrupted.)
-
Page 68
To update the BIOS through the Internet: desktop by clicking Start Launch the ASUS Update utility from the Windows ® > Programs > ASUS > ASUSUpdate > ASUSUpdate. The ASUS Update main window appears. Select Update BIOS from the Select the ASUS FTP site nearest… -
Page 69
To update the BIOS through a BIOS file: desktop by clicking Start Launch the ASUS Update utility from the Windows ® > Programs > ASUS > ASUSUpdate > ASUSUpdate. The ASUS Update main window appears. Select Update BIOS from a file option from the drop-down menu, then click Next. -
Page 70: Creating A Bootable Floppy Disk
4.1.2 Creating a bootable floppy disk Do either one of the following to create a bootable floppy disk. DOS environment a. Insert a 1.44MB floppy disk into the drive. b. At the DOS prompt, type format A:/S then press <Enter>. Windows XP environment ®…
-
Page 71: Asus Ez Flash 2 Utility
4.1.3 ASUS EZ Flash 2 utility The ASUS EZ Flash 2 feature allows you to update the BIOS without having to go through the long process of booting from a floppy disk and using a DOS-based utility. The EZ Flash 2 utility is built-in the BIOS chip so it is accessible by pressing <Alt>…
-
Page 72: Afudos Utility
Updating the BIOS file To update the BIOS file using the AFUDOS utility: Visit the ASUS website (www.asus.com) and download the latest BIOS file for the motherboard. Save the BIOS file to a bootable floppy disk. Chapter 4: BIOS setup…
-
Page 73
A:>afudos /iP5KSE.ROM The utility verifies the file and starts updating the BIOS. A:>afudos /iP5KSE.ROM AMI Firmware Update Utility — Version 1.19(ASUS V2.07(03.11.24BB)) Copyright (C) 2002 American Megatrends, Inc. All rights reserved. WARNING!! Do not turn off power during flash BIOS Reading file .. -
Page 74: Asus Crashfree Bios 3 Utility
4.1.5 ASUS CrashFree BIOS 3 utility The ASUS CrashFree BIOS 3 is an auto recovery tool that allows you to restore the BIOS file when it fails or gets corrupted during the updating process. You can update a corrupted BIOS file using the motherboard support CD or a USB flash disk that contains the updated BIOS file.
-
Page 75: Bios Setup Program
The BIOS setup screens shown in this section are for reference purposes only, and may not exactly match what you see on your screen. • Visit the ASUS website (www.asus.com) to download the latest BIOS file for this motherboard. ASUS P5K SE…
-
Page 76: Bios Menu Screen
4.2.1 BIOS menu screen Menu items Menu bar Configuration fields General help BIOS SETUP UTILITY Main Advanced Power Boot Tools Exit Use [ENTER], [TAB] or System Time [10:55:25] [SHIFT-TAB] to select System Date [Fri 05/07/2007] a field. Legacy Diskette A [1.44M, 3.5 in] Use [+] or [-] to configure system Time.
-
Page 77: Menu Items
Up/Down arrow keys or <Page Up> /<Page Down> keys to display the other items on the screen. 4.2.9 General help Pop-up window At the top right corner of the menu screen Scroll bar is a brief description of the selected item. ASUS P5K SE 4-11…
-
Page 78: Main Menu
Main menu When you enter the BIOS Setup program, the Main menu screen appears, giving you an overview of the basic system information. Refer to section 4.2.1 BIOS menu screen for information on the menu screen items and how to navigate through them. BIOS SETUP UTILITY Main Advanced…
-
Page 79: Sata 1~4
When set to [Disabled], the data transfer from and to the device occurs one sector at a time. Configuration options: [Disabled] [Auto] PIO Mode [Auto] Selects the PIO mode. Configuration options: [Auto] [0] [1] [2] [3] [4] ASUS P5K SE 4-13…
-
Page 80: Sata Configuration
DMA Mode [Auto] Selects the DMA mode. Configuration options: [Auto] [SWDMA0] [SWDMA1] [SWDMA2] [MWDMA0] [MWDMA1] [MWDMA2] [UDMA0] [UDMA1] [UDMA2] [UDMA3] [UDMA4] [UDMA5] SMART Monitoring [Auto] Sets the Smart Monitoring, Analysis, and Reporting Technology. Configuration options: [Auto] [Disabled] [Enabled] 32Bit Data Transfer [Enabled] Enables or disables 32-bit data transfer.
-
Page 81: System Information
Available : 1024 MB General Help Save and Exit Exit v02.58 (C)Copyright 1985-2007, American Megatrends, Inc. AMI BIOS Displays the auto-detected BIOS information. Processor Displays the auto-detected CPU specification. System Memory Displays the auto-detected system memory. ASUS P5K SE 4-15…
-
Page 82: Advanced Menu
Advanced menu The Advanced menu items allow you to change the settings for the CPU and other system devices. Take caution when changing the settings of the Advanced menu items. Incorrect field values can cause the system to malfunction. BIOS SETUP UTILITY Main Advanced Power…
-
Page 83
DRAM Frequency [Auto] Allows you to set the DDR2 operating frequency. Configuration options: [Auto] [DDR2-667MHz] [DDR2-800MHz] Selecting a very high DRAM frequency may cause the system to become unstable! If this happens, revert to the default setting. ASUS P5K SE 4-17… -
Page 84
DRAM Timing Control [Auto] Allows you to set the DRAM timing control. Configuration options: [Auto] [MANUAL] The following items appear when you set the DRAM Timing Control item to [Manual]. CAS# Latency [ 5] Configuration options: [3] [4] [5] [6] RAS# to CAS# Delay [ 5 DRAM Clocks] Configuration options: [3 DRAM Clocks] [4 DRAM Clocks]~[9 DRAM Clocks] [10 DRAM Clocks]… -
Page 85
Configuration options: [Auto] [1.80V] [1.85V] [1.90V] [1.95V] [2.00V] [2.05V] [2.10V] [2.15V] [2.20V] [2.25V] [2.30V] [2.35V] [2.40V] [2.45V] [2.50V] [2.55V] [2.60V] Refer to the DDR2 documentation before adjusting the memory voltage. Setting a very high memory voltage may damage the memory module(s)! ASUS P5K SE 4-19… -
Page 86: Usb Configuration
4.4.2 USB Configuration The items in this menu allows you to change the USB-related features. Select an item then press <Enter> to display the configuration options. BIOS SETUP UTILITY Advanced USB Configuration Options USB Devices Enabled: Disabled None Enhanced USB Functions [Enabled] USB 2.0 Controller [Enabled]…
-
Page 87: Cpu Configuration
Allows you to enable or disable C1E Support. Configuration options: [Disabled] [Enabled] Max CPUID Value Limit [Disabled] Setting this item to [Enabled] allows legacy operating systems to boot even without support for CPUs with extended CPUID functions. Configuration options: [Disabled] [Enabled] ASUS P5K SE 4-21…
-
Page 88: Chipset
Vanderpool Technology [Enabled] Configuration options: [Enabled] [Disabled] CPU TM Function [Enabled] Configuration options: [Disabled] [Enabled] Execute Disable Bit [Enabled] Allows you to enable or disable the No-Execution Page Protection Technology. Setting this item to [Disabled] forces the XD feature flag to always return to zero (0).
-
Page 89: Onboard Devices Configuration
AC’97 or high-definition audio depending on the audio standard that the front panel audio module supports. Configuration options: [AC97] [HD Audio] Marvell IDE Controller [Enabled] Allows you to disable or enable the onboard Marvell IDE controller. ® Configuration options: [Enabled] [Disabled] ASUS P5K SE 4-23…
-
Page 90: Pci Pnp
Onboard PCIE GbE LAN [Enabled] Configuration options: [Enabled] [Disabled] LAN Option ROM [Disabled] This item appears only when you enable the previous item. Configuration options: [Disabled] [Enabled] Serial Port1 Address [3F8/IRQ4] Allows you to select the Serial Port1 base address. Configuration options: [Disabled] [3F8/IRQ4] [2F8/IRQ3] [3E8/IRQ4] [2E8/IRQ3] 4.4.6 PCI PnP…
-
Page 91: Power Menu
Allows you to enable or disable the Advanced Configuration and Power Interface (ACPI) support in the Advanced Programmable Interrupt Controller (APIC). When set to Enabled, the ACPI APIC table pointer is included in the RSDT pointer list. Configuration options: [Disabled] [Enabled] ASUS P5K SE 4-25…
-
Page 92: Apm Configuration
4.5.5 APM Configuration BIOS SETUP UTILITY Power APM Configuration <Enter> to select whether or not to restart the system after AC power loss. Restore on AC Power Loss [Power Off] Power On By RTC Alarm [Disabled] Power On By External Modems [Disabled] Power On By PCI Devices [Disabled]…
-
Page 93: Hardware Monitor
N/A. CPU Q-Fan Control [Disabled] Allows you to enable or disable the CPU Q-Fan controller. Configuration options: [Disabled] [Enabled] The CPU Fan Profile item appears when you enable the CPU Q-Fan Control feature. ASUS P5K SE 4-27…
-
Page 94
CPU Fan Profile [Optimal] Allows you to set the appropriate performance level of the CPU Q-Fan. When set to [Optimal], the CPU fan automatically adjusts depending on the CPU temperature. Set this item to [Silent Mode] to minimize fan speed for quiet CPU fan operation, or [Performance Mode] to achieve maximum CPU fan speed. -
Page 95: Boot Menu
These items specify the boot device priority sequence from the available devices. The number of device items that appears on the screen depends on the number of devices installed in the system. Configuration options: [1st FLOPPY DRIVE] [Hard Drive] [ATAPI CD-ROM] [Disabled] ASUS P5K SE 4-29…
-
Page 96: Boot Settings Configuration
Configuration options: [Disabled] [Enabled] Full Screen Logo [Enabled] This allows you to enable or disable the full screen logo display feature. Configuration options: [Disabled] [Enabled] Set this item to [Enabled] to use the ASUS MyLogo2 feature. ™ AddOn ROM Display Mode [Force BIOS] Sets the display mode for option ROM.
-
Page 97: Security
Time Clock (RTC) RAM. See section 2.6 Jumper for information on how to erase the RTC RAM. After you have set a supervisor password, the other items appear to allow you to change other security settings. ASUS P5K SE 4-31…
-
Page 98: Change User Password
BIOS SETUP UTILITY Boot <Enter> to change Security Settings password. <Enter> again to Supervisor Password :Installed disabled password. User Password :Installed Change Supervisor Password User Access Level [Full Access] Change User Password Clear User Password Password Check [Setup] Select Screen Select Item Enter Change General Help…
-
Page 99: Tools Menu
4.7.1 ASUS EZ Flash 2 Allows you to run ASUS EZ Flash 2. When you press <Enter>, a confirmation message appears. Use the left/right arrow key to select between [Yes] or [No], then press <Enter> to confirm your choice. Please see section 4.1.3 for details.
-
Page 100: Asus O.c. Profile
4.7.2 ASUS O.C. Profile This item allows you to store or load multiple BIOS settings. BIOS SETUP UTILITY Tools O.C. PROFILE Configuration Save to Profile 1 O.C. Profile 1 Status :Not Installed O.C. Profile 2 Status :Not Installed Save to Profile 1…
-
Page 101: Exit Menu
Setup menus. When you select this option or if you press <F5>, a confirmation window appears. Select Ok to load default values. Select Exit & Save Changes or make other changes before saving the values to the non-volatile RAM. ASUS P5K SE 4-35…
-
Page 102
4-36 Chapter 4: BIOS setup… -
Page 103: Chapter5: Software Support
This chapter describes the contents of the support CD that comes with the motherboard package. Software support…
-
Page 104
Chapter summary Installing an operating system ……….. 5-1 Support CD information ………….. 5-1 Software information …………..5-8 ASUS P5K SE… -
Page 105: Installing An Operating System
The contents of the support CD are subject to change at any time without notice. Visit the ASUS website(www.asus.com) for updates. 5.2.1 Running the support CD Place the support CD to the optical drive. The CD automatically displays the Drivers menu if Autorun is enabled in your computer.
-
Page 106: Drivers Menu
The drivers menu shows the available device drivers if the system detects installed devices. Install the necessary drivers to activate the devices. ASUS InstAll-Drivers Installation Wizard Installs the ASUS InstAll-Drivers Installation Wizard. Intel Chipset Inf Update Program Installs the Intel chipset Inf update program.
-
Page 107: Utilities Menu
Installs all of the utilities through the Installation Wizard. ASUS Update Allows you to download the latest version of the BIOS from the ASUS website. Before using the ASUS Update, make sure that you have an Internet connection so you can connect to the ASUS website.
-
Page 108
You can also install the following utilities from the ASUS Superb Software Library CD. ADOBE Acrobat Reader V7.0 Installs the Adobe Acrobat Reader that allows you to open, view, and print ® ® documents in Portable Document Format (PDF). Microsoft DirectX 9.0c Installs the Microsoft DirectX 9.0 driver. -
Page 109: Manual Menu
Reader from the ASUS Superb Software Library CD before ® ® opening a user manual file. 5.2.5 ASUS Contact information Click the Contact tab to display the ASUS contact information. You can also find this information on the inside front cover of this user guide. ASUS P5K SE…
-
Page 110: Other Information
5.2.6 Other information The icons on the top right corner of the screen give additional information on the motherboard and the contents of the support CD. Click an icon to display the specified information. Motherboard Info Displays the general specifications of the motherboard. Browse this CD Displays the support CD contents in graphical format.
-
Page 111: Technical Support Form
Technical support Form Displays the ASUS Technical Support Request Form that you have to fill out when requesting technical support. Filelist Displays the contents of the support CD and a brief description of each in text format. ASUS P5K SE…
-
Page 112: Software Information
5.3.1 ASUS MyLogo2™ The ASUS MyLogo2™ utility lets you customize the boot logo. The boot logo is the image that appears on screen during the Power-On Self-Tests (POST). The ASUS MyLogo2™ is automatically installed when you install the ASUS Update utility from the Support CD.
-
Page 113
Ratio box. When the screen returns to the ASUS Update utility, flash the original BIOS to load the new boot logo. 10. After flashing the BIOS, restart the computer to display the new boot logo during POST. -
Page 114: Audio Configurations
5.3.2 Audio configurations The Realtek ALC883 audio CODEC provides 8-channel audio capability to deliver ® the ultimate audio experience on your computer. The software provides Jack- Sensing function, S/PDIF Out support, and interrupt capability. The ALC883 also includes the Realtek ®…
-
Page 115: Configuration Options
Click the shortcut buttons or the drop-down menus for options on changing the acoustic environment, adjust the equalizer, or set the karaoke to your desired settings. Click to effect the Sound Effect settings and exit. ASUS P5K SE 5-11…
-
Page 116
Mixer The Mixer option allows you to configure audio output (playback) volume and audio input (record) volume. To set the mixer options: From the Realtek HD Audio Manager, click the Mixer tab. Turn the volume buttons to adjust the Playback and/or Record volume. -
Page 117
From the Realtek HD Audio Manager, click the 3D Audio Demo tab. Click the option buttons to change the sound, moving path, or environment settings. Click to test your settings. Click to effect the 3D Audio Demo settings and exit. ASUS P5K SE 5-13… -
Page 118: Asus Pc Probe Ii
To launch the PC Probe II from the Windows ® > ASUS > PC Probe II > PC Probe II v1.xx.xx. The PC Probe II main window appears. After launching the application, the PC Probe II icon appears in the Windows ®…
-
Page 119
When displayed, the monitor panel for that sensor also turns red. Refer to the Monitor panels section for details. Preferences You can customize the application using the Preference section in the main window. Click the box before each preference to activate or deactivate. ASUS P5K SE 5-15… -
Page 120
Hardware monitor panels The hardware monitor panels display the current value of a system sensor such as fan rotation, CPU temperature, and voltages. The hardware monitor panels come in two display modes: hexagonal (large) and rectangular (small). When you check the Enable Monitoring Panel option from the Preference section, the monitor panels appear on your computer’s desktop. -
Page 121
You can enlarge or reduce the browser size by dragging the bottom right corner of the browser. DMI browser Click to display the DMI (Desktop Management Interface) browser. This browser displays various desktop and system information. Click the plus sign (+) before DMI Information to display the available information. ASUS P5K SE 5-17… -
Page 122
PCI browser Click to display the PCI (Peripheral Component Interconnect) browser. This browser provides information on the PCI devices installed on your system. Click the plus sign (+) before the PCI Information item to display available information. Usage The Usage browser displays real-time information on the CPU, hard disk drive space, and memory usage. -
Page 123
The Preference tab allows you to customize sensor alerts, or change the temperature scale. Loads the default Loads your saved threshold values for Cancels or configuration each sensor ignores your changes Applies your Saves your changes configuration ASUS P5K SE 5-19… -
Page 124: Asus Ai Suite
5.3.4 ASUS AI Suite ASUS AI Suite allows you to launch AI Gear2, AI Booster, AI Nap, and Q-Fan 2 utilities easily. Installing AI Suite To install AI Suite on your computer: Place the support CD to the optical drive. The Drivers installation tab appears if your computer has an enabled Autorun feature.
-
Page 125
Displays the CPU/ system temperature, CPU/memory/PCIE voltage, and CPU/ chassis fan speed Displays the FSB/CPU frequency Click on right corner of the expanded window to switch the temperature from degrees Centigrade to degrees Fahrenheit. ASUS P5K SE 5-21… -
Page 126: Asus Ai Gear2
5.3.5 ASUS AI Gear2 ASUS AI Gear2 provides four system performance options that allows you to select the best performance setting for your computing needs. This easy-to-use utility adjusts the processor frequency and vCore voltage to minimize system noise and power consumption.
-
Page 127: Asus Ai Nap
5.3.6 ASUS AI Nap This feature allows you to minimize the power consumption of your computer whenever you are away. Enable this feature for minimum power consumption and a more quiet system operation. After installing AI Suite from the bundled support CD, you can launch the utility by double-clicking the AI Suite icon on the Windows OS taskbar and click the AI Nap button on the AI Suite main window.
-
Page 128: Asus Q-Fan 2
5.3.7 ASUS Q-Fan 2 This ASUS Q-Fan 2 Control feature allows you to set the appropriate performance level of the CPU Q-Fan 2 or the Chassis Q-Fan 2 for more efficient system operation. After enabling the Q-Fan 2 function, the fans can be set to automatically adjust depending on the temperature, to decrease fan speed, or to achieve the maximum fan speed.
-
Page 129: Asus Ai Booster
5.3.8 ASUS AI Booster The ASUS AI Booster application allows you to overclock the CPU speed in WIndows environment without the hassle of booting the BIOS. ® After installing AI Suite from the bundled support CD, you can launch the utility…
-
Page 130
5-26 Chapter 5: Software support… -
Page 131: Appendix: Cpu Features
The Appendix describes the CPU features and technologies that the motherboard supports. CPU features…
-
Page 132: A.1 Intel ® Em64T
Chapter summary Intel ® EM64T ………………A-1 Enhanced Intel SpeedStep Technology (EIST) ……A-1 ® Intel Hyper-Threading Technology ………..A-3 ® ASUS P5K SE…
-
Page 133: Intel ® Em64T
32-bit operating systems. • The motherboard comes with a BIOS file that supports EM64T. You can download the latest BIOS file from the ASUS website (www.asus.com/ support/download/) if you need to update the BIOS file. See Chapter 4 for details.
-
Page 134: Using The Eist
A.2.2 Using the EIST To use the EIST feature: Turn on the computer, then enter the BIOS Setup. Go to the Advanced Menu, highlight CPU Configuration, then press <Enter>. Set the Intel(R) SpeedStep Technology item to [Automatic], then press <Enter>. See page 4-22 for details. Press <F10>…
-
Page 135: Intel ® Hyper-Threading Technology
Power up the system and enter the BIOS Setup. Under the Advanced Menu, make sure that the item Hyper-Threading Technology is set to [Enabled]. The BIOS item appears only if you installed a CPU that supports Hyper-Threading Technology. Restart the computer. ASUS P5K SE…
-
Page 136
Appendix: CPU features…
-
Драйверы
19
-
Инструкции по эксплуатации
13
Языки:

ASUS P5K SE/EPU инструкция по эксплуатации
(134 страницы)
- Языки:Английский
-
Тип:
PDF -
Размер:
5.23 MB -
Описание:
P5K SE/EPU user’s manual(English)
Просмотр

ASUS P5K SE/EPU инструкция по эксплуатации
(134 страницы)
- Языки:Английский
-
Тип:
PDF -
Размер:
5.23 MB -
Описание:
P5K SE/EPU user’s manual(English)
Просмотр

ASUS P5K SE/EPU инструкция по эксплуатации
(40 страниц)
- Языки:Молдавский, Немецкий
-
Тип:
PDF -
Размер:
1.65 MB -
Описание:
Motherboard Installation Guide (German)
Motherboard Installation Guide (German)
Просмотр

ASUS P5K SE/EPU инструкция по эксплуатации
(134 страницы)
- Языки:Китайский
-
Тип:
PDF -
Размер:
3.7 MB -
Описание:
P5K SE/EPU user’s manual(Traditional Chinese)
Просмотр

ASUS P5K SE/EPU инструкция по эксплуатации
(134 страницы)
- Языки:Китайский
-
Тип:
PDF -
Размер:
3.63 MB -
Описание:
P5K SE/EPU user’s manual(Simplified Chinese)
Просмотр

ASUS P5K SE/EPU инструкция по эксплуатации
(134 страницы)
- Языки:Французский
-
Тип:
PDF -
Размер:
3.35 MB -
Описание:
P5K SE/EPU user’s manual (French)
Просмотр

ASUS P5K SE/EPU инструкция по эксплуатации
(134 страницы)
- Языки:Китайский
-
Тип:
PDF -
Размер:
8.57 MB -
Описание:
P5K SE/EPU user’s manual (Traditional Chinese)
Просмотр

ASUS P5K SE/EPU инструкция по эксплуатации
(44 страницы)
- Языки:Китайский, Молдавский
-
Тип:
PDF -
Размер:
1.88 MB -
Описание:
Motherboard Installation Guide (Simplified Chinese)
Просмотр

ASUS P5K SE/EPU инструкция по эксплуатации
(44 страницы)
- Языки:Китайский, Молдавский
-
Тип:
PDF -
Размер:
2.02 MB -
Описание:
Motherboard Installation Guide (Traditional Chinese)
Просмотр

ASUS P5K SE/EPU инструкция по эксплуатации
(8 страниц)
- Языки:Китайский, Молдавский
-
Тип:
PDF -
Размер:
2.67 MB -
Описание:
Motherboard DIY Troubleshooting Guide (Traditional Chinese version)
Просмотр

ASUS P5K SE/EPU инструкция по эксплуатации
(40 страниц)
- Языки:Молдавский, Японский
-
Тип:
PDF -
Размер:
1.73 MB -
Описание:
Motherboard Installation Guide (Japanese)
Просмотр

ASUS P5K SE/EPU инструкция по эксплуатации
(40 страниц)
- Языки:Молдавский, Французский
-
Тип:
PDF -
Размер:
1.64 MB -
Описание:
Motherboard Installation Guide (French)
Просмотр

ASUS P5K SE/EPU инструкция по эксплуатации
(721 страница)
- Языки:Молдавский
-
Тип:
PDF -
Размер:
43.88 MB -
Описание:
Motherboard Installation Guide (Multiple Languages)
Просмотр
На NoDevice можно скачать инструкцию по эксплуатации для ASUS P5K SE/EPU. Руководство пользователя необходимо для ознакомления с правилами установки и эксплуатации ASUS P5K SE/EPU. Инструкции по использованию помогут правильно настроить ASUS P5K SE/EPU, исправить ошибки и выявить неполадки.
- Инструкции и руководства
- Бренды
- ASUS
- P5K SE
- Справочник Пользователя
![]()
В представленном списке руководства для конкретной модели Материнской платы — ASUS P5K SE/EPU. Вы можете скачать инструкции к себе на компьютер или просмотреть онлайн на страницах сайта бесплатно или распечатать.
- Инструкции и файлы
- Характеристики
- Основные поломки
- Сервисы по ремонту
В случае если инструкция на русском не полная или нужна дополнительная информация по этому устройству, если вам нужны
дополнительные файлы: драйвера, дополнительное руководство пользователя (производители зачастую для каждого
продукта делают несколько различных документов технической помощи и руководств), свежая версия прошивки, то
вы можете задать вопрос администраторам или всем пользователям сайта, все постараются оперативно отреагировать
на ваш запрос и как можно быстрее помочь. Ваше устройство имеет характеристики:Socket: LGA775, Поддерживаемые процессоры: Intel Core2 Quad/Core2 Extreme/Core2 Duo/Pentium Extreme/Pentium D/Pentium 4, Системная шина: 800 МГц — 1600 МГц, Поддержка Hyper-Threading: есть, Поддержка многоядерных процессоров: есть, Чипсет: Intel P35, полные характеристики смотрите в следующей вкладке.
Для многих товаров, для работы с ASUS P5K SE/EPU могут понадобиться различные дополнительные файлы: драйвера, патчи, обновления, программы установки. Вы можете скачать онлайн эти файлы для конкретнй модели ASUS P5K SE/EPU или добавить свои для бесплатного скачивания другим посетителями.
Если вы не нашли файлов и документов для этой модели то можете посмотреть интсрукции для похожих товаров и моделей, так как они зачастую отличаются небольшим изменениями и взаимодополняемы.
Обязательно напишите несколько слов о преобретенном вами товаре, чтобы каждый мог ознакомиться с вашим отзывом или вопросом. Проявляйте активность что как можно бльше людей смогли узнать мнение настоящих людей которые уже пользовались ASUS P5K SE/EPU.

Николай
2020-01-24 01:19:37
Только купил вместо сгоревшей
Николай
2020-01-24 01:21:25
только купил на замену сгоревшей
Основные и самые важные характеристики модели собраны из надежных источников и по характеристикам можно найти похожие модели.
| Процессор | |
| Socket | LGA775 |
| Поддерживаемые процессоры | Intel Core2 Quad/Core2 Extreme/Core2 Duo/Pentium Extreme/Pentium D/Pentium 4 |
| Системная шина | 800 МГц — 1600 МГц |
| Поддержка Hyper-Threading | есть |
| Поддержка многоядерных процессоров | есть |
| Чипсет | |
| Чипсет | Intel P35 |
| BIOS | AMI c возможностью аварийного восстановления |
| Поддержка SLI/CrossFire | нет |
| Память | |
| Память | DDR2 DIMM, 667 — 1200 МГц |
| Количество слотов памяти | 4 |
| Поддержка двухканального режима | есть |
| Максимальный объем памяти | 8 Гб |
| Дисковые контроллеры | |
| IDE | количество слотов: 1, UltraDMA 133 |
| SATA | количество разъемов SATA 3Gb/s: 4, RAID: нет |
| Слоты расширения | |
| Слоты расширения | 1xPCI-E x16, 3xPCI-E x1, 2xPCI |
| Аудио/видео | |
| Звук | 7.1CH, HDA, на основе Realtek ALC 883 |
| Сеть | |
| Ethernet | 1000 Мбит/с |
| Подключение | |
| Наличие интерфейсов | 12 USB, выход S/PDIF, 1xCOM, 1xeSATA, Ethernet, PS/2 (клавиатура) |
| Разъемы на задней панели | 6 USB, коаксиальный выход, 1xeSATA, Ethernet, PS/2 (клавиатура) |
| Основной разъем питания | 24-pin |
| Разъем питания процессора | 4-pin |
| Дополнительные параметры | |
| Форм-фактор | ATX |
| Комплектация | 1 кабель IDE, 1 кабель FDD, 2 кабеля SATA, 2-х портовый кабель питания SATA, заглушка тыловых портов корпуса, Q-коннектор 2-в-1 |
Здесь представлен список самых частых и распространенных поломок и неисправностей у Материнских плат. Если у вас такая поломка то вам повезло, это типовая неисправность для ASUS P5K SE/EPU и вы можете задать вопрос о том как ее устранить и вам быстро ответят или же прочитайте в вопросах и ответах ниже.
| Название поломки | Описание поломки | Действие |
|---|---|---|
| Разрыв Печатных Проводников | ||
| Обрыв Конденсаторов Или Резисторов | ||
| Короткое Замыкание В Электрических Цепях | ||
| Разрушение Разъемов И Слотов | ||
| Поломка Процессорного Разъема | ||
| Выгорание Портов | ||
| Микротрещины В Плате | ||
| Выход Из Строя Сетевого Адаптера | ||
| Перегрев Компонентов | ||
| Не Запускается При Включении | При Включении Не Загружается. В Биос Не Входит. Пост Код — А3 | |
| Какой Компонент | Подскажите Марку Траyзистора Q46? | |
| Не Работает Ps/2 | Сначала Отвалилась Клавиатура, А Через Некоторое Время 6 Коротких Гудков И Не Запускается | |
| Подключить Переднюю Панель | Не Могу Подключить Переднюю Панель | |
| Судя По Всему Отвал Биоса | Материнка Стартует Секунд На 5,Кулер Процессора Берет Обороты И Останавливается.и Так-Циклически,Без Остановок.запуск Невозможен.вечером Либо Завтра Буду Пытаться Его Восстановить,Потом Может Дополню | |
| Пропал Звук На Материнке | Пропал Звук На Материнке, Отображается Только Nvidia Hdmi. Переустановка Драйверов С Офсайта Не Помогла. | |
| Биос | При Старте Звук Через Промежетки Времени Примерно В 1-3 Мин Три Сигнала Потом Стартует Винда , Недавно Вообще Написал Cmos Setting Wrong И C7, Жму Del Меняется На B2 Чтоб Воити В Биос Три Сигнала По Одному Через Промеежутки Времени 1-3 Мин И Черный Экра | |
| Asus M2A-Vm Hdmi | Не Запускается Процессор Phenom Ii X4 945 Rev. C3, На Socket-Ам 3, Нет Даже Сигнала, Черный Экран | |
| Не Включается | После Замены Конденсаторов С34 И С35 Не Включается | |
| Черный Экран | Все Уже Перепробовал И Озу Менял И Переставлял И Ластиком Чистил, И Батарейку Вынимал И Измерял, И Видеокарту С Бп На Заведомо Годную Ставил Исход Один, Черный Экран И Speaker Издает 1 Длинный 2 Коротких, Если Я Не Путаю. | |
| Неправильно Отображается Память | При Установленной Памяти 4 Гигабайта В Биосе Отображается 8. Установил Одну Планку 2 Гига — Отображается 4 | |
В нашей базе сейчас зарегестрированно 18 353 сервиса в 513 города России, Беларусии, Казахстана и Украины.

C1 TECHNOLOGY
⭐
⭐
⭐
⭐
⭐
Адресс:
Холодильный пер., д. 3, к. 1
Телефон:
74959552939
Сайт:
n/a
Время работы
Время работы не указано
ASUS
⭐
⭐
⭐
⭐
⭐
Адресс:
улица Декабристов, д.10 к.3
Телефон:
74999630187
Сайт:
n/a
Время работы
Время работы не указано
ASUS
⭐
⭐
⭐
⭐
⭐
Адресс:
Декабристов, д.10 к.3
Телефон:
74999630187
Сайт:
n/a
Время работы
Время работы не указано
КОМПЬЮТЕРНАЯ СЛУЖБА СПАСЕНИЯ 911
⭐
⭐
⭐
⭐
⭐
Адресс:
пр-т Будённого, д. 53, стр. 2
Телефон:
74957403924
Сайт:
n/a
Время работы
Ежедневно: с 1000 до 2000
АМПЕРВОЛЬТ
⭐
⭐
⭐
⭐
⭐
Адресс:
Сокольническая Слободка ул., д.10
Телефон:
74957965532
Сайт:
n/a
Время работы
Время работы не указано
Обзор Asus P5K-E (Материнская плата).
3:02
Очень доволен
хочу
авпваы
Хочу купить
ирлдоьвап ькеьпрлджыкеь дзьакерджь щзрбкежбрь апкыезрбкыеджрбеджр щзапбкерл
Только приобрела,а инструкции нет
Только приобрела,а инструкции нет
Отвалился распрыскиватель
17-10-2007
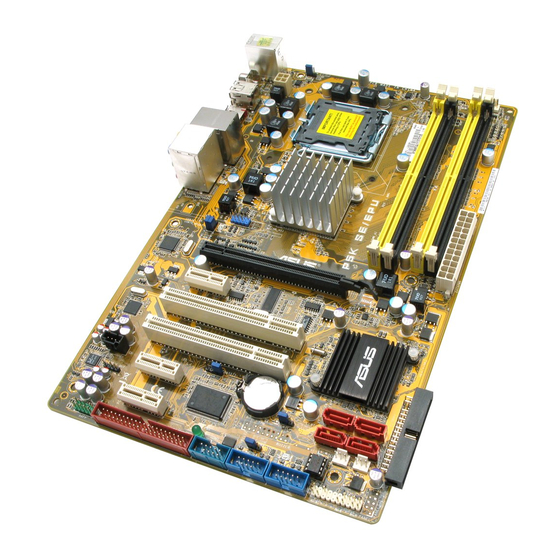
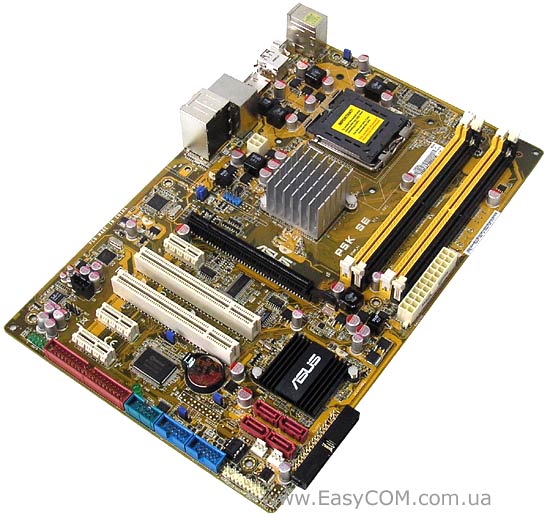
Не так давно на рынке появилась удешевленная версия материнской платы ASUS P5K на чипсете Intel P35 Express, названная P5K SE, теперь самая младшая модель из серии P5K, которая в скором времени окончательно займет свою нишу вместо предыдущей линейки плат на чипсете Intel P965. Хотя на данный момент цена на ASUS P5K SE возможно чуть завышена, в свете ее новизны, но, наверное, уже сейчас есть смысл разобраться, что из себя представляет это эконом-предложение.
Спецификация материнской платы ASUS P5K SE:
|
Производитель |
ASUS |
|
Модель |
P5K SE |
|
Северный мост |
Intel P35 |
|
Южный мост |
Intel ICH9 |
|
Процессорный разъем |
LGA775 |
|
Поддерживаемые процессоры |
Intel Core 2 Quad / Core 2 Extreme / Core 2 Duo / Pentium Extreme / Pentium D / Pentium 4 |
|
Системная шина, МГц |
1333 /1066 / 800 МГц |
|
Используемая память |
DDR2 1066 /800 / 667 МГц |
|
Поддержка памяти |
4 x 240-контактных DIMM двухканальной архитектуры до 8 Гб |
|
Слоты расширения |
1 x PCI-E x16 |
|
Дисковая подсистема |
Южный мост ICH9 поддерживает: Дополнительный контроллер Marvell 88SE611 поддерживает: |
|
Звуковая подсистема |
Realtek ALC 883, 8-канальный High-Definition Audio кодек коаксиальный S/PDIF; |
|
Поддержка LAN |
Сетевой контроллер Attansic L1 PCI-E Gigabit LAN |
|
Питание |
24-контактный разъем питания ATX |
|
Охлаждение |
Радиатор на северном и южном мосте |
|
Разъемы для вентиляторов |
1 x CPU |
|
Внешние порты I/O |
1 x PS/2 порт для подключения клавиатуры |
|
Внутренние порты I/O |
6 x USB |
|
BIOS |
8 Mb Flash ROM, AMI BIOS, PnP, DMI2.0, WfM2.0, SM BIOS 2.3, ACPI 2.0a, ASUS EZ Flash 2, ASUS CrashFree BIOS 3 |
|
Возможности разгона |
Изменение частоты: FSB , PCI-Express, памяти. |
|
Фирменные технологии |
ASUS C.P.R. |
|
Комплектация (важное) |
2 x SATA кабель |
|
Форм-фактор Размеры, мм |
ATX 12″x 7.6″ |
|
Сайт производителя |
http://www.asus.com/ Свежие версии драйверов и BIOS могут быть скачаны с официальной страницы. |
|
Средняя цена |
Посмотреть в price.ru. |

Материнская плата ASUS P5K SE упакована в картонную коробку черного цвета, на которой, в рекламных целях, показана поддержка памяти DDR2 1066, и эффект от работы технологии ASUS Super Memspeed, которая, вроде бы, способна увеличить быстродействие подсистемы памяти до 75%, путем завышения таймингов для лучшего разгона модулей памяти.
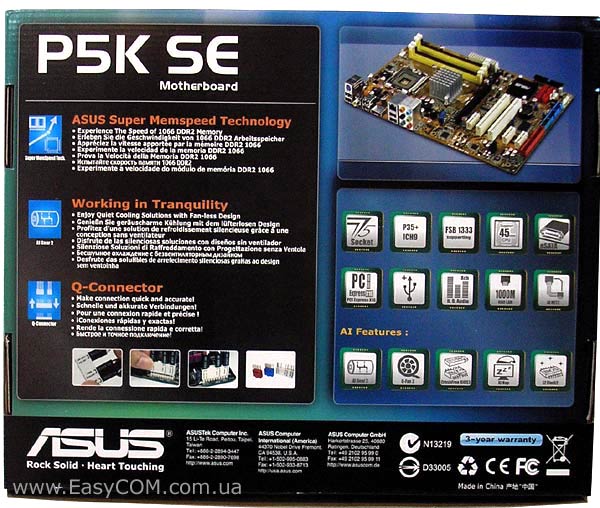
На обратной стороне упаковки выделены три фирменные технологии, которые поддерживает материнская плата, а именно: ASUS Super Memspeed Technology (технология увеличивающая быстродействие подсистемы памяти), AI Gear 2 ( технология обеспечивающая бесшумное охлаждение), Q-Connector (подключение кнопок и индикаторов корпуса, а также разъемов USB и Firewire через специально промаркированный переходник). Кроме того, здесь размещено фото материнской платы ASUS P5K SE, и указаны некоторые ее достоинства.
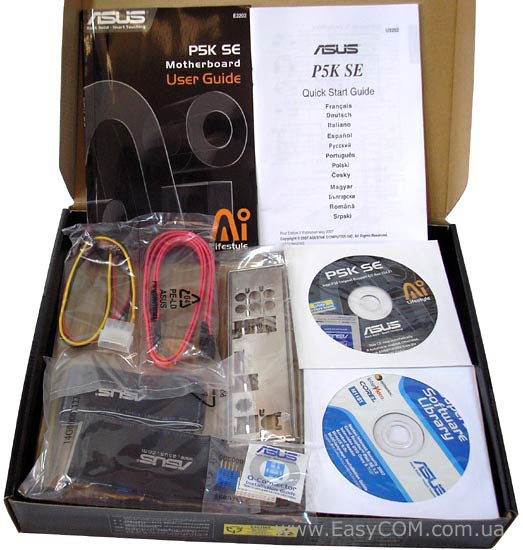
Комплектация материнской платы ASUS P5K SE:
- два CD-диска с ПО и драйверами к Windows Vista;
- руководство пользователя на английском языке, краткая инструкция по установке,
- шлейф FDD,
- шлейф UltraDMA 133/100/66;
- два шлейфа Serial ATA;
- один переходник питания к устройствам SATA;
- фирменная наклейка;
- ASUS Q-Connector (2 х USB, system panel);
- заглушка на заднюю панель корпуса.
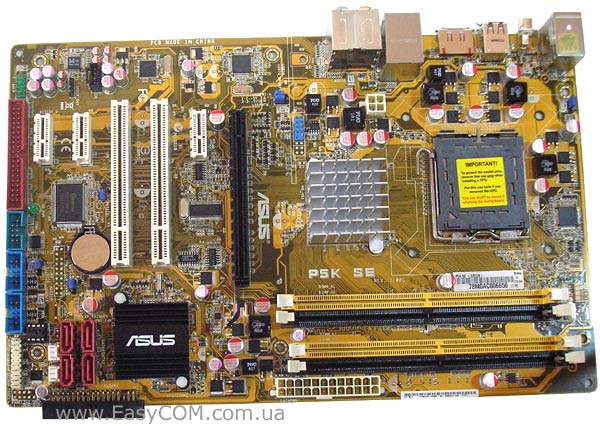
Материнская плата ASUS P5K SE, можно сказать, вполне удачно скомпонована, но все же не обошлось без нескольких небольших недостатков. Так 4-контактный разъем питания расположен не с краю, а возле северного моста. Кроме того, разъем IDE размещен в самом низу c левой стороны, из-за чего могут появиться проблемы, если вы захотите подключить оптический привод, который обычно устанавливаются в верхнем отсеке корпуса. Развернутый разъем для Floppy дисковода к недостатку или достоинствам можно не относить – так как материнская плата ASUS P5K SE выполнена на достаточно узком текстолите, в ширину всего 193 мм, то такое размещение разъема почти необходимость. Правда, по причине компактности платы разъемы слотов оперативной памяти пришлось разместить почти вплотную друг к другу. Из положительных моментов отметим, что абсолютно все конденсаторы на плате являются полимерными и установлены дроссели с ферромагнитными сердечниками. Этот факт конечно не может не радовать, но все же не забывайте, что он влияет на конечную стоимость продукта.
Напомним, что полимерные конденсаторы отличаются от конденсаторов с жидким электролитом гораздо большим сроком службы, лучшим сглаживанием пульсирующих токов и меньшей зависимостью от температуры. По поводу дросселей с ферромагнитным сердечником, можно сказать, что они отличаются меньшими размерами, меньшим количеством витков и, следовательно, меньшей собственной емкостью, поэтому они могут исключать резонансные явления в более широком диапазоне частот.
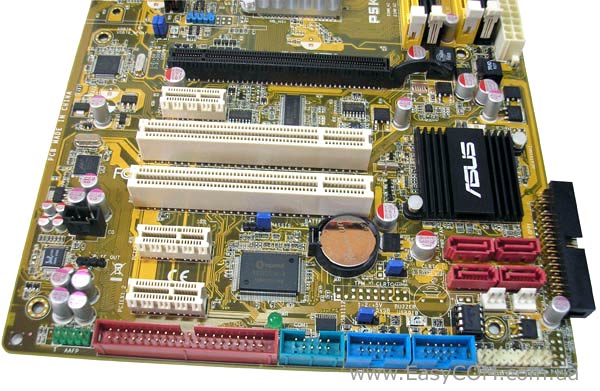
На южном мосте установлен маленький радиатор с надписью «ASUS». Используется Intel ICH9 который поддерживает четыре порта SATA II, без возможности формирования RAID-массивов. Эти четыре разъема SATA расположены в правом углу платы. Для поддержки IDE устройств и одного порта SATA, который вынесен на заднюю панель (e-SATA), был установлен дополнительный контроллер Marvell 88SE611. Материнская плата ASUS P5K SE имеет два слота PCI, три PCIE х1 и один слот для видеокарты PCIE х16. Кроме этого, есть один COM порт и двенадцать портов USB, из которых ровно половина выведена на заднюю панель. С левой стороны на ASUS P5K SE установлен HDA кодек восьмиканального звука Realtek ALC 883 с возможностью вывода звука через коаксиальный выход S/PDIF и технологией подавления шума Noise Filter. Рядом находится сетевой контроллер Attansic L1, поддерживающий режимы 10/100/1000 Base-T и Wake-on-LAN. Аудио разъем фронт панели расположен внизу с левой стороны материнской платы и поддерживает подключение как в формате HDA, так и AC`97.
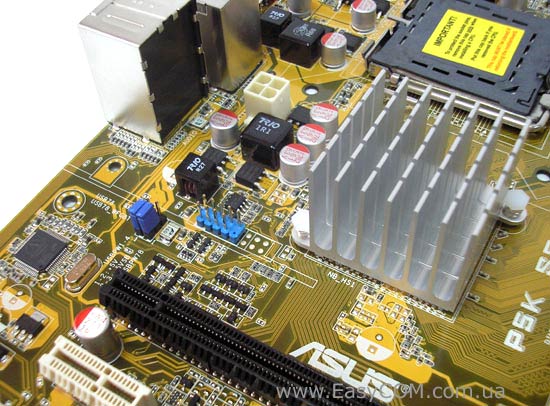
На северном мосте установлен алюминиевый радиатор среднего размера. В текстолите материнской платы рядом с панелью ввода /вывода имеется монтажное отверстие для модуля WiFi, который может быть установлен на более функциональной модификации платы или можно попробовать докупить отдельно.
Стабилизатор питания на материнской плате ASUS P5K SE трехканальный, собран на N-канальных полевых транзисторах P0903BDG (25 В, 9,5 мОм, 50А). Дополнительных средств охлаждения на элементах нет.

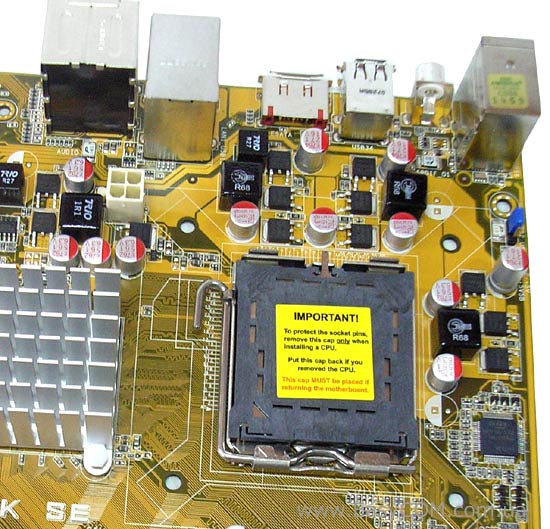
На задней панели выведены следующие порты: один PS/2 для клавиатуры, шесть переключаемых аудио портов, шесть разъемов USB, разъем RJ45 для сетевых соединений, SATA On-the-Go, коаксиальный S/PDIF. Обращаем внимание на отсутствие еще одного разъема PS/2 для мыши – поддерживаются только USB-манипуляторы.
К плате можно подключить три вентилятора, один из которых 4-контактный процессорный, а два остальные трехконтактные. Разъем процессорного кулера немного отдален от LGA775 и находится в верхней части, возле слотов памяти. Два коннектора для корпусных вентиляторов находятся в нижней части платы с правого края. Технология Q-Fan Control позволяет автоматически регулировать скорость вращения процессорного кулера, запитанного от разъема CPU Fan, и еще одного корпусного вентилятора, подключенного к разъему CHA_FAN.
BIOS
В материнской плате ASUS P5K используется AMI BIOS, с большим выбором настроек.
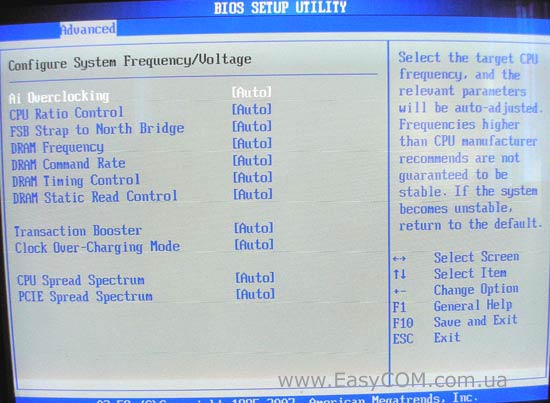
Настойки, касающиеся разгона, находятся в разделе «Advanced»:
- Доступно изменение множителя процессора от 6х до мах;
- Настройка «FSB Strap to North Bridge» отвечает за доступные делители FSB:DRAM (AUTO или 200/266/333 МГц);
- В настройке «FSB Frequency» задается тактовая частота FSB от 200 до 800 МГц с шагом 1 МГц (ручной ввод);
- В настройке «PCIE Frequency» задается частота шины PCI Express от 100 до 150 МГц с шагом 1 МГц;
- В настройке «DRAM Frequency» выбирается рабочая частота памяти DDR2-667/800/889/1067;

- В настройке «DRAM Command Rate» можно установить время задержки ответа памяти, 1T или 2T. Ранее в материнских платах на чипсете P965, нельзя было устанавливать режим 1Т, который может несколько ускорить работу подсистемы памяти.
- В настройке «DRAM Timing Control», можно активировать возможность изменять все основные и некоторые расширенные тайминги памяти (CL, RCD, RP, RAP, TWR, TRFC, TWTR, TRRD, TRTP);
- В следующей настройке можно активировать режим «DRAM Static Read Control», ускоряющий работу контроллера памяти;
- В опции «Transaction Booster» можно активировать режим, увеличивающий производительность подсистемы памяти.
- В недокументированной опции «Clock Over-Charging Mode» можно установить 700, 800, 900 или 1000 мВ, но что это изменяет не совсем ясно.
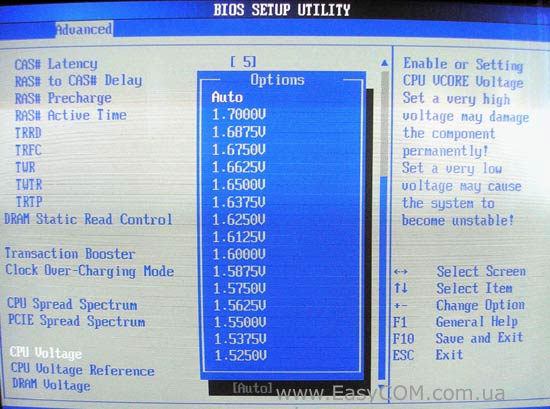
- Изменять напряжение питания ядра процессора можно в опции «CPU Voltage» от 1,1 В до 1,7 В с шагом 0,0125 В;
- В опции «CPU Voltage Reference» можно изменить режим подачи питания на процессор 0.63х, 0.61х, 0.59х, 0.57х (первый вариант считается самым оптимальным);
- В «DRAM Voltage» можно установить напряжение питания памяти DDR2 от 1,8 В до 2,6 В, с шагом 0,05 В;
Из настроек в BIOS, которые в ASUS P5K SE отсутствуют, но часто применяются для разгона, выделим, что нет возможности изменения напряжения питания северного моста и уровня сигналов на шине FSB.
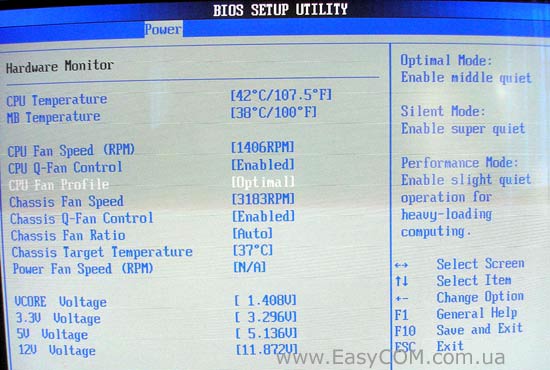
В окне Hardware Monitor можно следить за:
- температурой материнской платы и процессора;
- скоростью вращения процессорного кулера, и двух других вентиляторов в корпусе;
- напряжением питания ядра процессора;
- величиной напряжения основных линий питания 3.3В, 5В, 12В.
Существует возможность выбрать профиль для функции CPU Q-Fan (Optimal, Silent Mode, Performance Mode), по которому автоматически будет регулироваться скорость процессорного кулера. Для функции Chasis Q-Fan, отвечающую за контроль скорости вращения корпусных вентиляторов, интенсивность можно задавать в процентах (90, 80, 70, 60%) от скорости вращения процессорного кулера.
Проводя стандартную процедуру испытания возможностей системной шины, мы смогли поднять ее частоту до 450 МГц. Отсутствие в настройках понижающего множителя оперативной памяти сильно ухудшают возможности разгона на этой материнской плате.
Тестирование
Для проверки возможностей материнских плат использовалось следующее оборудование.
|
Процессор |
Intel Core 2 Duo E6300 (LGA775, 1,86 ГГц, L2 2 Мб) |
|
Кулер |
Thermaltake Sonic Tower (CL-P0071) + Akasa AK-183-L2B 120 мм |
|
Оперативная память |
2x DDR2-800 1024 Mб PQI PC6400 |
|
Видеокарта |
EVGA GeForce 8600GTS 256 Mб DDR3 PCI-E |
|
Жесткий диск |
Samsung HD080HJ, 80 Гб, SATA-300 |
|
Оптический привод |
ASUS DRW-1814BLT SATA |
|
Блок питания |
Chieftec CFT-500-A12S 500W, 120 мм вентилятор |
|
Корпус |
CODEGEN M603 MidiTower, 2х 120 мм вентилятора на вдув/выдув |


По уровню производительности материнская плата ASUS P5K SE практически ни в чем не уступает сравниваемым моделям. Большая разница результатов в графическом тесте PCMark`05 была получена из-за применения разных версий драйверов видеокарты.
Соберем в таблицу наиболее часто сравниваемые материнские платы этого класса.
|
GIGABYTE GA-P35-S3 (Rev 1.0) |
GIGABYTE GA-P35-DS3L (Rev 1.0) |
ASUS P5K |
ASUS P5K SE |
|
|
Просмотреть обзор |
Просмотреть обзор |
Просмотреть обзор |
||
|
Система охлаждения |
Алюминиевый радиатор на NB вдвое больше стандартного |
Стандартный алюминиевый радиатор на NB |
Радиаторы, объединенные тепловой трубкой, на NB и двух каналах VRM |
Стандартный алюминиевый радиатор на NB |
|
Слоты расширения |
1 x PCI-E x16 |
1 x PCI-E x16 |
2 х PCI-E x16 (х16 и х4) поддержка технологии CrossFire |
1 x PCI-E x16 |
|
Дисковая подсистема |
6 x Serial ATA |
4 x Serial ATA |
6 x Serial ATA |
5 x Serial ATA |
|
Звуковая подсистема |
Realtek ALC 889A |
Realtek ALC 888 |
Realtek ALC 883 |
Realtek ALC 883 |
|
Дополнительные контроллеры |
FireWire: VIA VT6308P |
|||
|
Внешние порты I/O |
2 х PS/2 |
2 х PS/2 |
1 х PS/2 |
1 х PS/2 |
|
Разъемы для вентиляторов с функц. регулир. |
1 x CPU (Smart fan) |
1 x CPU (Smart fan) |
1 x CPU (Q-fan) |
1 x CPU (Q-fan) |
|
Полимерные конденсаторы |
в узле VRM и обвязке кодека звука |
Все |
Все |
Все |
|
Узел VRM |
6-фазный, MOSFET NTMFS4835N (30В, 5мОм, 104А) |
4-фазный, |
3-фазный с охлаждением двух фаз, |
3-фазный, |
|
Настройки BIOS |
Отсутствует понижающий делитель памяти |
Отсутствует понижающий делитель памяти, напряжение питания северного моста и FSB Termination |
||
|
Разгон шины FSB |
493 МГц |
510 МГц |
465 МГц |
450 МГц |
|
Разница в цене, в среднем, у.е. |
+9 |
0 |
+36 |
+19 |
Выводы
Материнская плата ASUS P5K SE на чипсете Intel P35 Express со своими возможностями вполне сгодится как основа для игрового компьютера среднего уровня. Она обладает хорошим уровнем производительности и стоит дешевле, чем, к примеру, ASUS P5K. Но при выборе конечно же нужно руководствоваться, в первую очередь, задачами, которые вы будете ставить перед платформой. В BIOS есть достаточное для разгона количество настроек, но все же установленная на чипах система охлаждения не до конца на это рассчитана. Поэтому, для установки «спортивных рекордов» ASUS P5K SE вряд ли подойдет, но при хорошей организации внутренней вентиляции вполне можно попытаться немного разогнать систему.
К достоинствам, можно отнести:
- высокую производительность;
- поддержку процессоров Intel Penryn, выполненных по 45 нм технологии;
- использование полимерных конденсаторов;
- порт External SATA на задней панели;
- большое количество настроек BIOS, необходимых для разгона;
- расширенный набор фирменных технологий ASUS;
- 8-канальный звук High Difinition Audio.
Недостатки:
- слабая система охлаждения;
- упрощенная комплектация;
- отсутствие контроллера FireWire;
- отсутствие поддержки RAID-массивов
- отсутствие разъема PS/2 для мыши;
- отсутствие на задней панели COM-порта и дополнительной панели в комплекте.
Автор: Дмитрий Масюк
Выражаем благодарность фирме ООО ПФ Сервис (г. Днепропетровск) за предоставленные для тестирования материнские платы.
Обсудить на форуме>>>
(скачивание инструкции бесплатно)
Формат файла: PDF
Доступность: Бесплатно как и все руководства на сайте. Без регистрации и SMS.
Дополнительно: Чтение инструкции онлайн

Quick Start Guide
First Edition V1 Published July 2008
Copyright © 2008 ASUSTeK COMPUTER INC. All Rights Reserved.
15G0620441K0
U3750
P5Q SE
Français
Deutsch
Italiano
Español
Русский
Português
Polski
Česky
Magyar
Български
Română
Srpski
Страница:
(1 из 50)
навигация

1

2

3

4

5

6

7

8

9

10

11

12

13

14

15

16

17

18

19

20

21

22

23

24

25

26

27

28

29

30

31

32

33

34

35

36

37

38

39

40

41

42

43

44

45

46

47

48

49

50
Оглавление инструкции
- Страница 1 из 51
U3750 P5Q SE Quick Start Guide Français Deutsch Italiano Español Русский Português Polski Česky Magyar Български Română Srpski First Edition V1 Published July 2008 Copyright © 2008 ASUSTeK COMPUTER INC. All Rights Reserved. 15G0620441K0 - Страница 2 из 51
1. Schéma de la Carte Mère 19.3cm (7.6in) PS2_USBPW56 2 3 1 2 EPU +5VSB +5V (Default) USB56 Intel P45 USBPW1112 PWR_FAN CPU_FAN EATXPWR CHA_FAN AUDIO P5Q SE LAN1_USB12 30.5cm (12in) DDR2 DIMMA1 (64 bit,240-pin module) USB34 DDR2 DIMMB2 (64 bit,240-pin module) LGA775 DDR2 DIMMB1 (64 bit,240-pin - Страница 3 из 51
Pour éviter d’endommager les broches du socle, n’enlevez le capuchon PnP que si vous installez un processeur. Veuillez conserver le capuchon pour le renvoi du produit. La garantie du produit ne couvre pas des dommages liés aux broches du support. Français • • • 2. Soulevez le levier de chargement - Страница 4 из 51
• Français • Vous pouvez installer des modules mémoire de tailles variables dans les canaux mémoire A et B. Le système mappe automatiquement la mémoire totale du canal de la plus petite taille pour une configuration double canal. Tout excès de mémoire du canal de plus grande taille est alors mappé - Страница 5 из 51
4. Informations du BIOS Français La ROM Flash sur la carte mère contient un BIOS. Vous pouvez mettre à jour les informations du BIOS ou configurer ses paramètres en utilisant l’utilitaire de Setup du BIOS. Les écrans BIOS comprennent les clés de navigation et une courte aide en ligne pour vous - Страница 6 из 51
1. Motherboard-Layout 19.3cm (7.6in) PS2_USBPW56 PS/2KBMS T:Mouse B:Keyboard PS2_USBPW56 2 3 1 2 EPU +5VSB +5V (Default) USB56 USBPW1112 PWR_FAN CPU_FAN 30.5cm (12in) Intel P45 EATXPWR CHA_FAN AUDIO P5Q SE LAN1_USB12 DDR2 DIMMB2 (64 bit,240-pin module) Deutsch DDR2 DIMMA1 (64 bit,240-pin module) - Страница 7 из 51
• • • 3. 4. 5. 3. Heben Sie den Ladehebel in Pfeilrichtig bis zu einem Winkel von 135 Grad hoch. Heben Sie die Ladeplatte mit dem Daumen und dem Zeigefinger bis zu einem Winkel von 100 Grad hoch. Drücken Sie die PnP-Kappe von der Ladeplattenaussparung, um sie zu entfernen. Legen Sie die CPU auf den - Страница 8 из 51
• Sie können in Kanal A und Kanal B verschiedene Speichergrößen installieren. Das System bildet die gesamte Größe des kleineren Kanals für die Dual-Channel-Konfiguration ab. Überschüssiger Speicher des größeren Kanals wird dann für die Single-Channel-Verwendung abgebildet. • Für optimale - Страница 9 из 51
4. BIOS-Informationen Das BIOS befindet sich in der Flash ROM auf dem Motherboard. Über das BIOSSetupprogramm können Sie die BIOS-Informationen aktualisieren oder die Parameter konfigurieren. Die BIOS-Anzeigen enthalten Navigations-anleitungen und eine kurze Online-Hilfe, um Ihnen die Verwendung zu - Страница 10 из 51
1. Diagramma disposizione scheda madre 19.3cm (7.6in) PS2_USBPW56 PS/2KBMS T:Mouse B:Keyboard PS2_USBPW56 2 3 1 2 EPU +5VSB +5V (Default) USB56 USBPW1112 PWR_FAN CPU_FAN Italiano 30.5cm (12in) Intel P45 EATXPWR CHA_FAN AUDIO P5Q SE LAN1_USB12 DDR2 DIMMB2 (64 bit,240-pin module) DDR2 DIMMA1 (64 - Страница 11 из 51
• • 4. 5. 3. La garanzia del prodotto non copre i danni ai pin della presa. Sollevare la levetta di carico nella direzione indicata dalla freccia ad un anglo di 135°. Sollevare la placca di carico con il pollice e l’indice ad un angolo di 100º, poi spingere la copertura PnP dalla placca di carico - Страница 12 из 51
• Nel canale A e nel canale B, e’ possibile installare una memoria di dimensioni variabili. Per la configurazione a doppio canale, il sistema esegue una mappatura delle dimensioni complessive del canale di dimensioni inferiori. La memoria in eccesso presente nel canale di maggiori dimensioni è - Страница 13 из 51
4. Informazioni sul BIOS La Flash ROM sulla scheda madre contiene il BIOS. È possibile aggiornare le informazioni del BIOS, o configurare i parametri utilizzando l’utilità di configurazione BIOS Setup. La schermata BIOS include tasti di navigazione ed una concisa guida in linea. Se si riscontrano - Страница 14 из 51
1. Distribución de la placa base 19.3cm (7.6in) PS2_USBPW56 PS/2KBMS T:Mouse B:Keyboard PS2_USBPW56 2 3 1 2 EPU +5VSB +5V (Default) USB56 USBPW1112 PWR_FAN CPU_FAN 30.5cm (12in) Intel P45 EATXPWR CHA_FAN AUDIO P5Q SE LAN1_USB12 DDR2 DIMMB2 (64 bit,240-pin module) DDR2 DIMMA1 (64 bit,240-pin module) - Страница 15 из 51
• • • 2. 3. 4. 5. 3. Para evitar daños en los contactos del zócalo, no retire la tapa PnP, a menos que se esté instalando una CPU. Conserve la tapa en caso de devolución del producto. La garantía del producto no cubre daños producidos en los contactos del zócalo. Levante la palanca de carga en la - Страница 16 из 51
• Puede instalar memorias de diferentes tamaños en los canales A y B. El sistema mapea el tamaño total del canal de menor tamaño para configuraciones de canal dual. Cualquier exceso de memoria en el canal de mayor tamaño será mapeado en operaciones de canal simple. • Es recomendable instalar los - Страница 17 из 51
4. Información sobre la BIOS La BIOS esta contenida en la memoria ROM Flash de la placa madre. Puede actualizar la información de la BIOS o configurar los parámetros usando la utilidad de configuración de la BIOS. Las pantallas de la BIOS incluyen teclas de navegación y una ayuda simple para - Страница 18 из 51
1. Схема системной платы 19.3cm (7.6in) PS2_USBPW56 PS/2KBMS T:Mouse B:Keyboard PS2_USBPW56 2 3 1 2 EPU +5VSB +5V (Default) USB56 PWR_FAN CPU_FAN 30.5cm (12in) Intel P45 EATXPWR CHA_FAN AUDIO P5Q SE LAN1_USB12 DDR2 DIMMA2 (64 bit,240-pin module) DDR2 DIMMA1 (64 bit,240-pin module) USB34 DDR2 DIMMB1 - Страница 19 из 51
• Для предотвращения повреждения контактов разъема не удаляйте крышку PnP до начала установки ЦПУ. • Для возврата товара сохраняйте упаковку. • Гарантия на товар не распространяется на случай повреждения контактов разъема. 2. Поднимите рычак в направлении, указанном стрелкой, до угла 135°. 3. - Страница 20 из 51
• Вы можете установить различный объем памяти в слоты канала A и канала B. Надо учитывать, что для двухканальной конфигурации система будет отображать общий объем памяти, ориентируясь на канал с меньшим объемом установленной памяти. Полный объем установленной памяти в таком случае будет - Страница 21 из 51
4. Информация BIOS На материнской плате в микросхеме EEPROM находится BIOS. Вы можете обновить BIOS или настроить параметры, используя утилиту установки BIOS. Экраны BIOS имеют клавиши навигации и краткую справку. Если у вас появились проблемы с системой или система стала нестабильной после ваших - Страница 22 из 51
1. Disposição da placa-principal 19.3cm (7.6in) PS2_USBPW56 PS/2KBMS T:Mouse B:Keyboard PS2_USBPW56 2 3 1 2 EPU +5VSB +5V (Default) USB56 USBPW1112 PWR_FAN CPU_FAN 30.5cm (12in) Intel P45 EATXPWR CHA_FAN AUDIO P5Q SE LAN1_USB12 DDR2 DIMMB2 (64 bit,240-pin module) DDR2 DIMMA1 (64 bit,240-pin module) - Страница 23 из 51
• • 4. 5. Guarde a tampa, caso seja necessário devolver o produto. • 2. 3. Para evitar danificar os pinos do socket, não remova a tampa PnP a não ser que esteja a instalar uma CPU. A garantia do produto não cobre danos ao nível dos pinos do socket. Levante a alavanca na direcção indicada pela seta - Страница 24 из 51
• Pode instalar memórias de vários tamanhos no canal A e no canal B. O sistema faz o mapeamento do tamanho total do canal de menor capacidade para a configuração de canal duplo. Qualquer memória excedente do canal de maior capacidade é mapeada para a configuração de canal único. • Recomendamos que - Страница 25 из 51
4. Informação da BIOS A memória ROM Flash existente na placa-principal contém a BIOS. Pode actualizar a informação da BIOS ou configurar os seus parâmetros utilizando o utilitário de configuração da BIOS. Os ecrãs da BIOS incluem teclas de navegação e uma breve ajuda online que lhe servirão de - Страница 26 из 51
1. Plan płyty głównej 19.3cm (7.6in) PS2_USBPW56 2 3 1 2 EPU +5VSB +5V (Default) USB56 Intel P45 USBPW1112 PWR_FAN CPU_FAN EATXPWR CHA_FAN AUDIO P5Q SE LAN1_USB12 30.5cm (12in) DDR2 DIMMA1 (64 bit,240-pin module) USB34 DDR2 DIMMB2 (64 bit,240-pin module) LGA775 DDR2 DIMMB1 (64 bit,240-pin module) - Страница 27 из 51
Aby uniknąć uszkodzenia szpilek gniazda, nie należy zdejmować pokrywki PnP, aż do zainstalowania procesora. • Należy zachować pokrywki na wypadek zwrotu produktu. • Gwarancja produktu nie obejmuje uszkodzeń szpilek gniazda. 2. Unieś dźwignię ładowania w kierunku wskazanym strzałką pod kątem 135º. - Страница 28 из 51
W kanale A i kanale B można instalować pamięci o różnych rozmiarach. W konfiguracji dwu-kanałowej, system odwzorowuje całkowity rozmiar kanału o mniejszym rozmiarze. Nadmierna pamięć z kanału o większym rozmiarze jest następnie odwzorowywana dla operacji jedno-kanałowej. • Dla uzyskania lepszych - Страница 29 из 51
4. Informacje BIOS Polski Pamięć Flash ROM na płycie głównej, zawiera BIOS. Informacje BIOS można aktualizować lub konfigurować parametry, poprzez program narzędziowy ustawień BIOS (BIOS Setup utility). Ekrany BIOS zawierają opis klawiszy nawigacji i krótką pomoc online. Po wykryciu problemów - Страница 30 из 51
1. Rozvržení základní desky 19.3cm (7.6in) PS2_USBPW56 PS/2KBMS T:Mouse B:Keyboard PS2_USBPW56 2 3 1 2 EPU +5VSB +5V (Default) USB56 USBPW1112 PWR_FAN CPU_FAN 30.5cm (12in) Intel P45 EATXPWR CHA_FAN AUDIO P5Q SE LAN1_USB12 DDR2 DIMMB2 (64 bit,240-pin module) Česky DDR2 DIMMA1 (64 bit,240-pin - Страница 31 из 51
• • 4. 5. 3. Záruka na desku se nevztahuje na poškození pinů patice. Nadzvedněte zajišťovací páčku ve směru šipky do úhlu 135º. Nadzvedněte vkládací destičku palcem a ukazováčkem do úhlu 100º, pak zmáčkněte ochrannou záslepku (PnP cap) a sundejte ji z vkládací destičky. Umístěte procesor nad paticí - Страница 32 из 51
• Můžete nainstalovat různé velikosti paměti do kanálu A a do kanálu B. Systém namapuje celkovou velikost menšího kanálu pro dvoukanálovou konfiguraci. Přebývající paměť z většího kanálu je potom namapována pro jednokanálový provoz. • Doporučujeme instalovat paměťové moduly od žlutých zásuvek pro - Страница 33 из 51
4. Informace o BIOSu Paměť Flash ROM na základní desce uchovává informace o možnostech nastavení (Setup utility). Pomocí BIOS Setup utility můžete aktualizovat informace, nebo nastavovat parametry. Obrazovka BIOS používá k ovládání navigační klávesy a k dispozici je i nápověda. Pokud budete mít - Страница 34 из 51
1. Az alaplap felépítése 19.3cm (7.6in) PS2_USBPW56 PS/2KBMS T:Mouse B:Keyboard PS2_USBPW56 2 3 1 2 EPU +5VSB +5V (Default) USB56 USBPW1112 PWR_FAN Magyar CPU_FAN 30.5cm (12in) Intel P45 EATXPWR CHA_FAN AUDIO P5Q SE LAN1_USB12 DDR2 DIMMB2 (64 bit,240-pin module) DDR2 DIMMA1 (64 bit,240-pin module) - Страница 35 из 51
• • 4. 5. 3. A foglalat tűinek sérüléseire nem terjed ki a termékgarancia. Hajtsa fel 135°-os szögben a rögzítőkart. Hajtsa fel a processzor rögzítőtálcáját 100°-os szögben, majd pattintsa ki a foglalat védősapkáját. Helyezze a processzort a foglalatra úgy, hogy a CPU megjelölt sarka és a - Страница 36 из 51
• Különböző méretű memóriamodulokat szerelhet be a Channel A és a Channel B jelű foglalatokba. A rendszer a kisebb méretű csatorna teljes kapacitását kétcsatornás konfigurációba állítja. A nagyobb méretű csatorna ezen felüli memóriakapacitását pedig a rendszer egycsatornás üzemmódba állítja. • - Страница 37 из 51
4. BIOS információk Az alaplap BIOS-át az alaplapon található Flash ROM chip tartalmazza. A BIOSjellemzőket a BIOS Setup segédprogramon keresztül állíthatja. A BIOS Setup beépített súgóval (Help) is rendelkezik. Amennyiben a rendszer instabillá válna, vagy más rendszerproblémákat észlel a BIOS - Страница 38 из 51
1. Схема на дънната платка 19.3cm (7.6in) PS2_USBPW56 PS/2KBMS T:Mouse B:Keyboard PS2_USBPW56 2 3 1 2 EPU +5VSB +5V (Default) USB56 USBPW1112 PWR_FAN CPU_FAN 30.5cm (12in) Intel P45 EATXPWR CHA_FAN AUDIO P5Q SE LAN1_USB12 DDR2 DIMMB2 (64 bit,240-pin module) DDR2 DIMMA1 (64 bit,240-pin module) USB34 - Страница 39 из 51
• • 4. 5. 3. Моля пазете тапата в случай че искате да върнете закупения продукт. • 2. 3. За да се предотврати деформация на щифтовете, не премахвайте PnP тапата, освен ако няма да инсталирате процесор. Гаранцията не покрива повреди на щифтовете. Повдигнете лоста за зареждане по посока на стрелката - Страница 40 из 51
• В каналите А и В Вие може да инсталирате модули памет с различен обем. Система определя общия обем на канала с по-малко памет за двуканална конфигурация. Останалият обем от канала с повече памет се определя за едноканален режим. • Препоръчваме да инсталирате модулите памет от жълтите слотове за - Страница 41 из 51
4. BIOS информация Flash ROM на основното табло съдържа BIOS. Можете да допълните BIOS информацията или да конфигурирате параметрите като използвате възможностите за настройка (Setup) на BIOS. Екраните на BIOS включват икони за навигация и кратки описания, за да ви ориентират. Ако срещнете проблеми - Страница 42 из 51
1. Schema plăcii de bază 19.3cm (7.6in) PS2_USBPW56 PS/2KBMS T:Mouse B:Keyboard PS2_USBPW56 2 3 1 2 EPU +5VSB +5V (Default) USB56 USBPW1112 PWR_FAN CPU_FAN 30.5cm (12in) Intel P45 EATXPWR CHA_FAN AUDIO P5Q SE LAN1_USB12 DDR2 DIMMB2 (64 bit,240-pin module) DDR2 DIMMA1 (64 bit,240-pin module) USB34 - Страница 43 из 51
• • • 2. 3. 4. 5. ����������������������������������������������������������������������������� Pentru a împiedica deteriorarea contactelor soclului, nu îndepărtaţi capacul PnP decât dacă instalaţi CPU. ���������������������������������������������������������� Vă rugăm să păstraţi capacul pentru - Страница 44 из 51
• Puteţi instala memorii cu diverse dimensiuni în Canalul A şi Canalul B. Sistemul identifică dimenisunea totală a canalului care are cea mai mică dimensiune pentru configurarea canalului dublu. Orice memorie excedentară a canalului care are cea mai mare dimensiune este apoi identificată pentru - Страница 45 из 51
4. Informaţii despre BIOS Memoria Flash ROM de pe placa de bază conţine BIOS-ul. Puteţi actualiza informaţia sau parametrii din BIOS folosind funcţia de instalare BIOS (BIOS Setup). Ecranele BIOS includ taste de navigaţie şi scurt ajutor on-line pentru a vă ghida. Dacă întâlniţi probleme de sistem, - Страница 46 из 51
1. Izgled matične ploče 19.3cm (7.6in) PS2_USBPW56 PS/2KBMS T:Mouse B:Keyboard PS2_USBPW56 2 3 1 2 EPU +5VSB +5V (Default) USB56 USBPW1112 PWR_FAN CPU_FAN 30.5cm (12in) Intel P45 EATXPWR CHA_FAN AUDIO P5Q SE LAN1_USB12 DDR2 DIMMA2 (64 bit,240-pin module) DDR2 DIMMA1 (64 bit,240-pin module) USB34 - Страница 47 из 51
• Da bi ste zaštitili konektore na podnožju nemojte uklanjati poklopac osim ako ne postavljate procesor. • Zadržite poklopac u slučaju da želite da vratite proizvod. • Garancija npokriva oštećena na konektorima podnožja procesora. 2. Podignite ručicu u pravcu strelice do ugla od 135 stepeni. 3. - Страница 48 из 51
• Možete da instalirate memoriju različite veličine u Kanale A i B. Sistem mapira ukupnu veličinu manjeg kanala za konfiguraciju sa duplim kanalima. Bilo kakva preostala memorija sa višeg kanala se tada mapira za rad sa samo jednim kanalom. • Preporučuje se da instalirate memorijske module iz žutih - Страница 49 из 51
4. BIOS Flash ROM na matičnoj ploči sadrži BIOS. Parametre BIOS-a možete promeniti pomoću uslužnog programa. Ekrani BIOS-a podržavaju navigaciju putem tastature i kratka objašnjenja svakog od parametara. Ukoliko vaš sistem ima probleme, ili je posta nestabilan posle promena parametara, odaberite - Страница 50 из 51
www.asus.com - Страница 51 из 51