-
Contents
-
Table of Contents
-
Troubleshooting
-
Bookmarks
Quick Links
Related Manuals for Mettler Toledo IND780
Summary of Contents for Mettler Toledo IND780
-
Page 1
IND780 Weighing Terminal… -
Page 2
IND780 Weighing Terminal Essential Services for Dependable Performance of Your IND780 Weighing Terminal Congratulations on choosing the quality and precision of METTLER TOLEDO. Proper use of your new equipment according to this Manual and regular calibration and maintenance by our factory- trained service team ensures dependable and accurate operation, protecting your investment. -
Page 3
Copyright 2014 METTLER TOLEDO. This documentation contains proprietary information of METTLER TOLEDO. It may not be copied in whole or in part without the express written consent of METTLER TOLEDO. METTLER TOLEDO reserves the right to make refinements or changes to the product or manual without notice. COPYRIGHT ®… -
Page 4
OTE ON IRMWARE EVISIONS This manual describes features and functions of the IND780 terminal with version 6.4.xx firmware. Terminals with version 6.3.xx firmware or lower will differ in some areas. The following lists indicate the key differences between versions: New in version 5.1 – Continuous Extended Output; enhanced SICS scale interface to … -
Page 5
NOT ALL VERSIONS OF THE IND780 ARE DESIGNED FOR USE IN HAZARDOUS (EXPLOSIVE) AREAS. REFER TO THE DATA PLATE OF THE IND780 TO DETERMINE IF A SPECIFIC TERMINAL IS APPROVED FOR USE IN AN AREA CLASSIFIED AS HAZARDOUS BECAUSE OF… -
Page 6
CAUTION BEFORE CONNECTING/DISCONNECTING ANY INTERNAL ELECTRONIC COMPONENTS OR INTERCONNECTING WIRING BETWEEN ELECTRONIC EQUIPMENT ALWAYS REMOVE POWER AND WAIT AT LEAST THIRTY (30) SECONDS BEFORE ANY CONNECTIONS OR DISCONNECT- IONS ARE MADE. FAILURE TO OBSERVE THESE PRECAUTIONS COULD RESULT IN DAMAGE TO OR DESTRUCTION OF THE EQUIPMENT AND/OR BODILY HARM. -
Page 7: Table Of Contents
Contents Introduction …………….. 1-1 1.1. IND780 Terminal Versions …………. 1-1 1.2. Warnings and Precautions …………. 1-2 1.3. Operating Environment …………..1-3 1.3.1. Temperature and Humidity ………………. 1-3 1.3.2. Environmental Protection ………………1-3 1.3.3. Hazardous Areas ………………..1-3 1.4. Inspection and Contents Checklist ……….. 1-3 1.5.
-
Page 8
Over/Under Applications ………………..2-30 2.6.11.3. Target Comparison Parameter Entry ……………… 2-30 2.6.12. Comparators ………………… 2-32 2.6.12.1. Using Comparators………………….2-33 2.6.13. ID Mode ………………….2-33 2.6.14. SmartTrac™ ………………… 2-35 2.6.14.1. Display Sizes ……………………. 2-35 METTLER TOLEDO IND780 User’s Guide 64057247 08/2014… -
Page 9
Keyboard Test …………………… 3-19 3.7.7.3. Scale ……………………..3-20 3.7.7.4. Load Cell Output ………………….3-20 3.7.7.5. Calibration Values ………………….3-21 3.7.7.6. Shift Values ……………………3-21 3.7.7.7. Diagnose Cell …………………… 3-21 3.7.7.8. Statistics ……………………3-22 64057247 08/2014 METTLER TOLEDO IND780 User’s Guide… -
Page 10
Master Reset ………………… 3-38 3.7.11.1. To initiate a master reset ………………..3-39 3.8. Main PCB ……………… 3-39 3.8.1. To remove a main PCB from an IND780, follow these steps ……..3-39 3.8.2. Main PCB Installation ………………3-41 3.9. ETX Board ……………… 3-41 3.9.1. -
Page 11: Introduction
DIV 2 AND ZONE 2/22 INSTALLATION IF YOU WISH TO INSTALL THE IND780 IN A DIVISION 2 OR ZONE 2/22 AREA, REFER TO THE DIVISION 2 AND ZONE 2/22 INSTALLATION INSTRUCTIONS INCLUDED ON THE RESOURCE CD PROVIDED WITH THE TERMINAL.
-
Page 12: Warnings And Precautions
• Step Calibration procedure • Ethernet network clustering, up to 20 terminals for remote console, data and interface sharing 1.2. Warnings and Precautions Please read these instructions carefully before putting the new terminal into operation. METTLER TOLEDO IND780 User’s Guide 64057247 08/2014…
-
Page 13: Operating Environment
AS HAZARDOUS BY THE NATIONAL ELECTRICAL CODE (NEC) BECAUSE OF COMBUSTIBLE OR EXPLOSIVE ATMOSPHERES. Not all versions of the IND780 can be operated in areas classified as Hazardous by the National Electrical Code (NEC) because of the combustible or explosive atmospheres in those areas. Contact an authorized METTLER TOLEDO representative for information about hazardous applications.
-
Page 14
If shipping the terminal is required, it is best to use the original shipping container. The IND780 terminal must be packed correctly to ensure its safe transportation. The package should include: IND780 Terminal Documentation CD (includes all manuals) … -
Page 15: Model Identification
1.5. Model Identification The IND780 model number is located on the data plate on the back of the terminal along with the serial number. Refer to Figure 1-1 to verify the IND780 that was ordered. Figure 1-1: IND780 Model Identification Numbers…
-
Page 16: Physical Dimensions
1.6. Physical Dimensions The IND780 terminal physical dimensions for the Panel Mount enclosure are shown in Figure 1-2 in inches and [mm]. Figure 1-2: IND780 Panel Mount Enclosure Dimensions The IND780 terminal physical dimensions for the harsh desk/wall-mount enclosure are shown in Figure 1-3 and Figure 1-4 in inches and [mm].
-
Page 17: Specifications
Harsh environment version includes a power cord configured for the country of use Note: When an IND780 is installed in an area classified as Division 2 or Zone 2/22, special AC wiring requirements must be met. See document 64063214, IND780 Division 2, Zone 2/22 Installation Guide.
-
Page 18
Class III, IIII, 10,000e Hazardous Areas (IECEx UL 10.0014X) EX nA nL (nL) IIB T4 Ex tc IIIC T85°C Dc IP69K (Harsh) or IP65 (Panel) -10°C ≤ T amb ≤+40°C Product Safety UL, cUL, CE METTLER TOLEDO IND780 User’s Guide 64057247 08/2014… -
Page 19: Main Pcb
1.8.2. ETX Board, HMI and LCD Updates Newer IND780 terminals are equipped with an updated ETX processor, a new color LCD, and a new HMI board. These updates provide an overall improvement in system performance of 25 to 30%, and a power-saving LED backlight that provides better display readability at all angles.
-
Page 20: Sics Scale Base
PDX load cell. When used with an external power supply, the IND780 PDX interface can support as many as 24 cells. Up to four independent scale bases can be logically addressed by the terminal. When used in combination with a PDX network, the IND780 provides several diagnostic features such as predictive failure, automated alerts and cell performance monitoring.
-
Page 21: Discrete I/O
• Various brackets for wall and column mounting of the harsh enclosure The scale measurement channel, serial and discrete I/O options are connected to the IND780 through six internal option slots. Various combinations of options may be ordered to match the application solution requirements.
-
Page 22: Plc Interfaces
The Analog Output option kit includes a dual-channel option board. This board provides two channels of an isolated 4-20 mA analog signal output for displayed weight, gross weight, rate or application variables (selected in setup). One or two boards can be installed in the IND780, for a maximum of four output channels.
-
Page 23: Profibus Dp
1.11.3.6. Profibus DP The IND780 Terminal communicates to a Profibus-DP master according to DIN 19 245. The Profibus option consists of a module, together with firmware that resides in the IND780 Terminal to implement the data exchange. 1.11.3.7. Profinet The Profinet option allows the IND780 terminal to communicate with Profinet-enabled Programmable Logic Controllers (PLCs) at 100 Mbps speed, via a direct connection to the Profinet network.
-
Page 24: Taskexpert
1.11.6. InSite SL Configuration Tool The IND780 terminal can connect to a PC running InSite SL (version 2.01 or higher) via Ethernet • Save configuration information locally on the PC • Load a saved configuration file into other devices • Restoring to a known state for service purposes 1.12.
-
Page 25
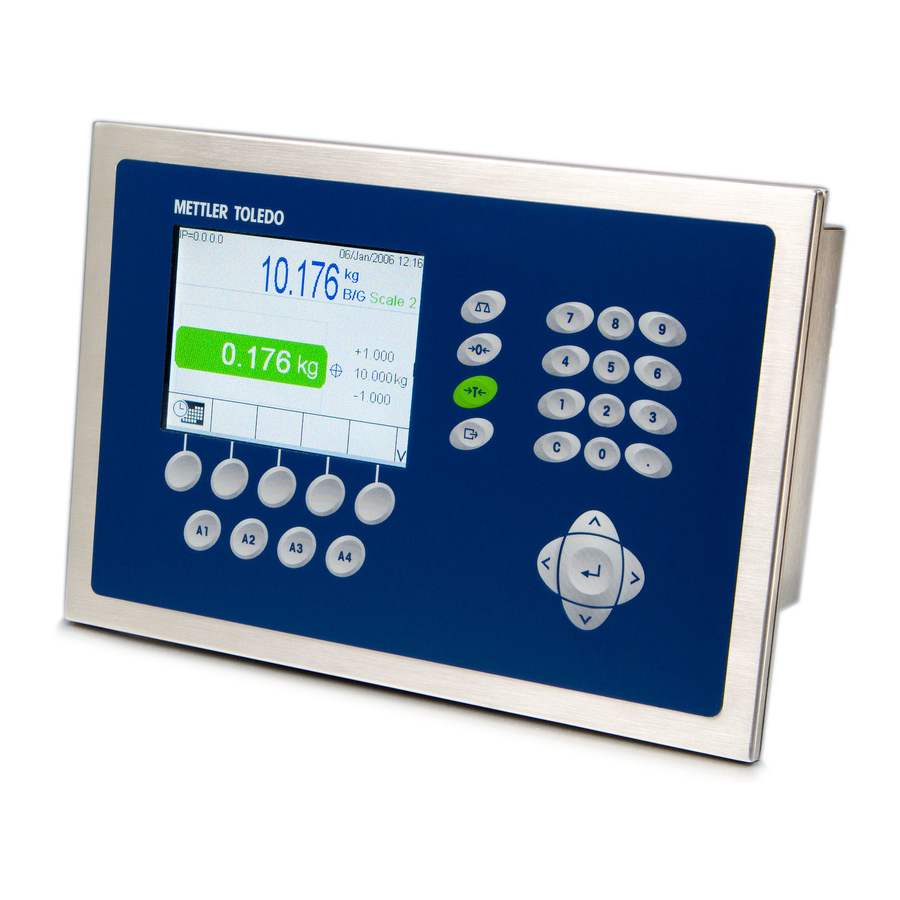
Figure 1-5 shows the IND780’s display and keyboard layout. Scale function keys Navigation keys Softkeys Application keys Enter key Figure 1-5: The IND780 Front Panel Layout 64057247 08/2014 METTLER TOLEDO IND780 User’s Guide 1-15… -
Page 26: Operating Instructions
Administrator rights are reduced to the Maintenance level. This is done to protect metrologically significant parameters that cannot be changed when the terminal is “approved.” Refer to the IND780 Technical Manual Appendix B, Default Settings for the security level of each setup parameter.
-
Page 27: Metrology Switch
An asterisk (*) in the Softkey column indicates that this icon can be assigned to a softkey position. The Setup and Information Recall softkeys are always present – they can be moved, but not deleted. METTLER TOLEDO IND780 User’s Guide 64057247 08/2014…
-
Page 28
Provides access to the test weight sequence for the Weight calibration test Sequence Start Begins the defined sequence Skip Skips a failed step of the Calibration Test Internal Initiates an internal calibration test of a SICS scale Calibration Test 64057247 08/2014 METTLER TOLEDO IND780 User’s Guide… -
Page 29
Prints the selected memory to an attached peripheral – Print Tare or Target Reprints the most recent transaction or Custom Print Repeat Print output, with heading “DUPLICATE” Tare Table Provides access to stored tare values METTLER TOLEDO IND780 User’s Guide 64057247 08/2014… -
Page 30
Initiates ID1 programmed transactional prompt sequence ID2 Sequence Initiates ID2 programmed transactional prompt sequence Target Action Icons Access Comparators table to permit selection of simple Comparators setpoint Defines the current target, spill, fine feed, tolerance, and Target description 64057247 08/2014 METTLER TOLEDO IND780 User’s Guide… -
Page 31
Provides access to edit the hour, minutes, day, month, Time and Date year Select Terminal Switches between clustered IND780 terminals Editing Icons Exit Exits a screen or parameter saving the values Edit Modifies the parameters of the selected object… -
Page 32: Understanding The Navigational Interface
Trigger a log record in the PDX Performance Log 2.3. Understanding the Navigational Interface Navigate in the applications and configure the IND780 using • Navigation keys • Scale function keys • Alpha keys (that appear on-screen when a field requiring •…
-
Page 33: Navigation Keys
Press the DOWN navigation key to move the focus down the rows. When the focus reaches the second to last row the screen moves up to reveal the next row. Press the RIGHT navigation key to move the highlight sideways and view additional columns. METTLER TOLEDO IND780 User’s Guide 64057247 08/2014…
-
Page 34: Softkeys
(to the far right of the softkey icons) indicates that more softkey selections are available. Press the DOWN navigation key to display additional softkey icons. Press the UP navigation key to display the previous softkey set of icons. 64057247 08/2014 METTLER TOLEDO IND780 User’s Guide…
-
Page 35: Application Keys
The IND780 Technical Manual Appendix E, Softkey Mapping and Application Key Configuration, explains in detail how the softkeys can be assigned and edited in Setup. 2.3.3. Application Keys The four application keys, A1 through A4, are indicated in Figure 2-2. These may be assigned (via Setup >…
-
Page 36: Alpha Keys
A4 keys. A1 functions as an ESCAPE key, which takes the display back one level, either to the previous set of alpha keys or, if the display is currently on the first set of alpha keys, out of alpha 64057247 08/2014 METTLER TOLEDO IND780 User’s Guide 2-11…
-
Page 37
Repeat this process until all alpha characters have been entered (Figure 2-8). The CLEAR key on the keypad can be used to backspace and delete unwanted characters in the entry box. 2-12 METTLER TOLEDO IND780 User’s Guide 64057247 08/2014… -
Page 38: Numeric Keys
CLEAR key once for each character to be deleted. When a data entry box is first selected by pressing ENTER, the previous entry will be in focus (white text on a black background). Pressing CLEAR at this point will clear the entire entry. 64057247 08/2014 METTLER TOLEDO IND780 User’s Guide 2-13…
-
Page 39: Home Screen
2.6. Basic Functionality This section provides information about the IND780’s basic functionality. Configuration of these areas of functionality can be accessed through the different areas of the setup menu tree – an example view is shown in Figure 2-10. Additional areas of functionality specific to application…
-
Page 40: Select Scale
IND780, including the Sum Scale. It determines which scale is shown on the display and controlled from the keypad. It is possible to have multiple scales…
-
Page 41: Sum Scale
“v v v v v“. These conditions are shown in the screen images in Figure 2-12. In both cases, the Sum Scale is selected. Figure 2-12: Summed Scales Over Capacity (left) and Under Range (right) 2-16 METTLER TOLEDO IND780 User’s Guide 64057247 08/2014…
-
Page 42: Zero
Figure 2-13: Summed Scales Simultaneously Over Capacity and Under Range 2.6.3. Zero The Zero function is used to set or reset the initial zero reference point of the IND780. There are three types of zero setting modes: • Automatic Zero Maintenance (AZM) •…
-
Page 43: Tare
For detailed information about tare functionality when using SICS balances, please refer to the SICS section in the IND780 Technical Manual Appendix D, Communication. Tare is the weight of an empty container. A tare value subtracts from the gross weight measurement, providing the computation of the net weight (material without the container).
-
Page 44: Keyboard Tare
• Motion—Pushbutton tare cannot be taken when the scale is in motion. If motion is detected when a pushbutton tare command is received, the IND780 will wait up to three seconds for a no-motion condition. If a stable (no motion) weight condition occurs before the three seconds expire, the pushbutton tare command is executed.
-
Page 45: Tare Table
2.6.4.3. Tare Table The IND780 terminal contains a tare table for storing tare weights that can be recalled by the operator for use instead of manually entering them for each transaction. This is especially useful when certain tare values are used repeatedly.
-
Page 46: Auto Tare
2.6.4.5. Auto Tare The IND780 can be configured so that tare is automatically taken (auto tare) after the weight on the scale exceeds a programmed tare threshold weight. Auto tare can be configured in Setup as enabled or disabled. When auto tare is enabled, the display changes to a zero net weight indication after the weight exceeds the threshold value.
-
Page 47: Clearing Tare
Manually clear tare values by pressing the CLEAR key on the numeric keypad when the IND780 is in the net mode and has completed the weighing operation. Motion on the scale will not impact a manual clear. If configured in Setup, pressing the ZERO scale function key…
-
Page 48
Figure 2-16 shows the Home screen after the Unit Switching softkey has been pressed, displaying the gross weight in pounds. Figure 2-16: Home Screen After the Unit Switching Softkey has Been Pressed 64057247 08/2014 METTLER TOLEDO IND780 User’s Guide 2-23… -
Page 49: Idnet Class Ii
IDNet Class II If an IDNet scale base is set up as a Class II W&M approved scale with the appropriate capacity and increment size, the IND780 will show a weight display with the last digit in a smaller size (Figure 2-17).
-
Page 50: Print Interlock
MinWeigh value without entering Setup. If security has been enabled, a valid user must log in before a change can be made. The IND780 compares the current net weight with the programmed MinWeigh value. If the net weight is greater than or equal to MinWeigh, all equipment functions behave normally. If the absolute value of the net weight is less than MinWeigh, the weight display includes an icon ( ) to the left of the weight, and the weight display appears in red.
-
Page 51: Information Recall
Start signal to the IND780 and the IND780 could control the feeder system to fill a container to a desired target. An example of a manual process could be a checkweighing station where an operator is checking net weight of packages.
-
Page 52: Material Transfer Applications
2.6.11.1. Material Transfer Applications If the target comparison of the IND780 will be used to control the flow of material, the application can be classified as a Material Transfer application. These types of applications are usually automated but can also be manual. A single or two-speed feeding system is used to either add weight to or remove weight from the scale.
-
Page 53
When the weight data is invalid (e.g. under zero, over capacity), the Target Control screen will show a status with dashes (- — — — -) and only the BACK softkey will be available. 2-28 METTLER TOLEDO IND780 User’s Guide 64057247 08/2014… -
Page 54
An example of each target control display is shown in Figure 2-18, Figure 2-19 and Figure 2-20. Figure 2-18: Example of Ready State in Target Control Figure 2-19: Example of Running State in Target Control Figure 2-20: Example of Paused State in Target Control 64057247 08/2014 METTLER TOLEDO IND780 User’s Guide 2-29… -
Page 55: Over/Under Applications
2.6.11.2. Over/Under Applications If the target comparison of the IND780 will be used to checkweigh the weight of a product, the application can be classified as an Over/Under application. These types of applications are usually manual processes but can also be automated. The SmartTrac display indicates the classification of the weight placed on the scale and discrete I/O can be used to trigger external lights or other controls.
-
Page 56
If the record is available, the data is loaded. If the record is not found, an “ID not found” error displays and the currently loaded target is retained. 64057247 08/2014 METTLER TOLEDO IND780 User’s Guide 2-31… -
Page 57: Comparators
When the Active value is within (>_ _<) or outside (_< >_) a range, the selected source is compared to a range defined by the Limit and High Limit values. 2-32 METTLER TOLEDO IND780 User’s Guide 64057247 08/2014…
-
Page 58: Using Comparators
• Alphanumeric prompt input • Select Tare ID • Clear Tare • Select Target ID • Numeric prompt input • Start Sequence • Print • Tare Automatically • Select Scale • Tare Preset 64057247 08/2014 METTLER TOLEDO IND780 User’s Guide 2-33…
-
Page 59
Alphanumeric Prompt Tare is cleared automatically Clear Tare The IND780 supports two separate ID sequences, ID1 and ID2. As many as 20 steps may be programmed in each sequence, and the sequence can be triggered in one of two ways: •… -
Page 60: Smarttrac
When the sequence is completed or exited, the display objects will return to their original sizes. Figure 2-23: Single Scale with SmartTrac and ID Sequence Display Figure 2-24: Two Scales plus Sum with SmartTrac and ID Sequence Display For details on ID mode configuration, refer to the IND780 Technical Manual, Chapter 3, Configuration. 2.6.14.
-
Page 61
(see Figure 2-28). Figure 2-25: Small Size SmartTrac, Bar Graph Figure 2-26: Medium Size SmartTrac, Over/Under Figure 2-27: Large Size SmartTrac, Cross Hairs 2-36 METTLER TOLEDO IND780 User’s Guide 64057247 08/2014… -
Page 62: Display Colors
Note the white triangle, indicating that in this case the measured weight is precisely on target. Figure 2-29: Medium Size SmartTrac Bar Graph With Display Ranges 64057247 08/2014 METTLER TOLEDO IND780 User’s Guide 2-37…
-
Page 63: Over/Under Mode
(Figure 2-34). In either case, a black oblong indicates that the current weight is within the acceptable range. Figure 2-30: Example of Over/Under Display 2-38 METTLER TOLEDO IND780 User’s Guide 64057247 08/2014…
-
Page 64
(top) and below the low tolerance limit (bottom). Target Over tolerance description arrow High tolerance Amount over tolerance Target weight tolerance Amount under tolerance Under tolerance arrow Figure 2-31: Elements of the Over/Under SmartTrac Display 64057247 08/2014 METTLER TOLEDO IND780 User’s Guide 2-39… -
Page 65
Figure 2-32. When Tolerance Type is set to either of the other two values, the table requires a target value to be entered. From top to bottom are graphics for over tolerance, under tolerance and in tolerance. Figure 2-32: Over/Under SmartTrac Displays, No Target Weight 2-40 METTLER TOLEDO IND780 User’s Guide 64057247 08/2014… -
Page 66: Cross Hairs Mode
2.6.15. Clustering 2.6.15.1. Overview Clustering is a means of networking up to 20 individual IND780 terminals together in a peer-to- peer Ethernet network. This is accomplished by assigning each IND780 terminal a unique IP 64057247 08/2014 METTLER TOLEDO IND780 User’s Guide…
-
Page 67: Viewing A Clustered Terminal Remotely
Within a cluster, terminals can share Shared Data, operator consoles, printers, and PLC interfaces. The IND780 also extends its clustering services to host PCs or file servers on an Ethernet LAN for data exchange. An IND780 terminal can operate as a remote operator console to any clustered IND780. A…
-
Page 68: Time And Date
When the time is set, seconds are set to 0. The portion of the system line which displays date and time can be enabled or disabled (the default setting) from the Format Time & Date screen. 64057247 08/2014 METTLER TOLEDO IND780 User’s Guide 2-43…
-
Page 69: Reports
4. When the table Search View is on screen, the PRINT softkey displays again. Pressing PRINT will print the entire contents of the table, and a “Printing” system line message appears for 5 seconds. 2-44 METTLER TOLEDO IND780 User’s Guide 64057247 08/2014…
-
Page 70: Calibration Test
2.6.18. Calibration Test The IND780 terminal provides a programmable Calibration Test sequence that can contain up to 25 individual steps. The Calibration Test is designed to lead the tester through a set of predetermined steps and compare the terminal calibration with known test weights.
-
Page 71
After the error is acknowledged, the screen shown in Figure 2-43 displays, and the tester can abort the test (by pressing the EXIT softkey ), retest this step (by pressing the OK softkey ), or skip this step (by pressing the SKIP softkey ) knowing that it failed. 2-46 METTLER TOLEDO IND780 User’s Guide 64057247 08/2014… -
Page 72
Figure 2-44: Calibration Test Complete Screen A full description of how to program the calibration test can be found in Chapter 3 of the IND780 Technical Manual, Configuration, in the Maintenance | Configure/View, Calibration Test section. -
Page 73: Alibi Memory Direct Access
The Alibi Memory stores transaction data that can be retrieved in order to verify transaction information. The information stored in the Alibi Memory includes: • Transaction counter value • Date and time of transaction 2-48 METTLER TOLEDO IND780 User’s Guide 64057247 08/2014…
-
Page 74
Figure 2-47 shows an example of search results for a Tare Table. The UP, DOWN, LEFT and RIGHT arrows can be used to scroll around this view in order to see more rows and columns of data. 64057247 08/2014 METTLER TOLEDO IND780 User’s Guide 2-49… -
Page 75: Table Searches
, and from the setup menu tree. To search a table: 1. Access the table to be viewed using one of the methods noted above. Refer to the IND780 Technical Manual Appendix C, Table and Log File Structure for more information about how to access specific tables.
-
Page 76
* (the “wild-card” character) to view all table information. Options in the search screens are as described in Table 2-9 and Table 2-10. 4. Press the SEARCH softkey . The Search View screen displays with the search results. 64057247 08/2014 METTLER TOLEDO IND780 User’s Guide 2-51… -
Page 77: Service And Maintenance
IF THE KEYBOARD, DISPLAY LENS OR ENCLOSURE IS DAMAGED ON A DIVISION 2 APPROVED OR CATEGORY 3 MARKED IND780 TERMINAL THAT IS USED IN A DIVISION 2 OR ZONE 2/22 AREA, THE DEFECTIVE COMPONENT MUST BE REPAIRED IMMEDIATELY. REMOVE AC POWER IMMEDIATELY AND DO NOT REAPPLY AC POWER UNTIL THE DISPLAY LENS, KEYBOARD OR ENCLOSURE HAS BEEN REPAIRED OR REPLACED BY QUALIFIED SERVICE PERSONNEL.
-
Page 78: List Of Tools Required
3.3. Cleaning and Maintenance Clean the IND780 terminal’s keypad and cover with a clean, soft cloth that has been dampened with a mild glass cleaner. Do not use any type of industrial solvent such as toluene or isopropanol (IPA) that could damage the terminal’s finish. Do not spray cleaner directly on the terminal.
-
Page 79: Firmware Upgrade Procedure
3.4. Firmware Upgrade Procedure There are two ways to install an upgraded version of the IND780’s firmware. The preferred method uses the PC-based InSite™ software tool, but it is also possible to do so without a computer, using a USB flash memory drive (thumb drive) connected to the IND780’s USB port.
-
Page 80
Figure 3-1: InSite Firmware Upgrade File Selection Screen 4. Press the SETUP softkey to access the IND780’s setup tree. When prompted, enter a valid user name and password at an access level that permits setup parameters to be changed. 5. Use the arrow keys to move focus to Maintenance > Run > Install Software Upgrade. When the node is in focus, press ENTER. -
Page 81: Upgrade Using Usb Memory
Figure 3-3: Firmware Upgrade – Waiting for Files 8. If the IND780 finds the files in the UPGRADE directory, the screen shown in Figure 3-4 appears briefly, and the terminal restarts. Figure 3-4: Firmware Upgrade in Progress 9.
-
Page 82
1. Create a folder called UPGRADE in the root of a USB Memory drive (“thumb drive”). 2. Copy the two UPGRADE files into the UPGRADE folder. 3. Connect the USB Memory to the IND780’s USB port, either by plugging it in directly or via a USB extension cable connected to the port. -
Page 83: Power Up And Screen Saver Graphics
Power Up and Screen Saver Graphics The graphic used by the IND780 as a splash screen during start up and the image used as a screen saver (which displays when the Screen Saver setting at Terminal > Display has a value other than zero) can both be changed by downloading replacement files to the terminal’s UPGRADE…
-
Page 84: Restore
A system restore operation does not copy log files from the dataset, and the terminal’s existing log files are not over-written on restore. To restore files to an IND780: 1. Connect a USB (flash) memory device to the IND780’s USB port, either directly or via a USB extension cord. METTLER TOLEDO IND780 User’s Guide…
-
Page 85: Service
Service Only qualified personnel should perform installation, programming, and service. Please contact a local METTLER TOLEDO representative for assistance. In general, once the IND780 is installed, programmed, and calibrated for a given application, only routine calibration service is required. WARNING ONLY PERMIT QUALIFIED PERSONNEL TO SERVICE THE TERMINAL.
-
Page 86: Troubleshooting
3.7. Troubleshooting Troubleshooting activities for the IND780 include: • Board LED interpretation • Internal diagnostic testing • AC power test • MT Service View • Power supply voltage test • External diagnostics • Battery test • Watchdog monitoring • RS-232 serial output voltage test •…
-
Page 87
-5 to +15 VDC RS-232 Serial If either mode fails, replace Serial Option board, or ETX Output Voltage Continuous: Fluctuation board, or Main PCB Test within range -10 to +10 VDC 64057247 08/2014 METTLER TOLEDO IND780 User’s Guide 3-11… -
Page 88: Main Pcb
3.7.2. Board LED Interpretation The following sections describe the function of LEDs visible in the IND780. The functions of the LED arrays found on ControlNet and Ethernet / IP boards are described in the pertinent chapters of the IND780 PLC Interface Manual.
-
Page 89: Option Boards
IDNet, Serial and Discrete I/O Boards All other option boards – IDNet, Serial, Discrete I/O – feature a pair of green LEDs, only one of which is functional in the IND780. Figure 3-10: LED Locations: IDNet (left), Serial (center) and DIO (right) Cards…
-
Page 90
Slow blink (~1 Hz) indicates that the board’s processor is not working correctly I5: IPC Amber Fast blink (~ 3 Hz) indicates that the board’s processor is working correctly 3-14 METTLER TOLEDO IND780 User’s Guide 64057247 08/2014… -
Page 91: Ac Power Test
If no AC power is present, have a qualified electrician restore power at the source. After power is restored, test the IND780 for correct operation. There is no fuse in the IND780. The external AC power is connected directly to the internal power supply.
-
Page 92: Power Supply Voltage Test
RS-232 serial port is operational: 1. Disconnect AC power from both the IND780 terminal and the printer. 2. Disconnect the serial cable from the COM port on the IND780 main PCB. 3. Set the voltmeter to read 20 VDC.
-
Page 93: Battery Test
5. Apply power to the IND780. The meter should read as follows: • Demand mode—The meter should read a stable value (without fluctuation) between −5 and +15 VDC. • Continuous mode—The meter should fluctuate continuously within the range −10 to +10 VDC.
-
Page 94: Internal Diagnostic Testing
Configuration in the IND780 Technical Manual. 3.7.7. Internal Diagnostic Testing The IND780 provides several internal diagnostic tests that are accessible in setup mode. Press the SETUP softkey to view the setup menu tree. Use the DOWN navigation key to scroll down the menu tree to Maintenance.
-
Page 95: Memory Test
Enables testing of the keyboard. Each key that is pressed will be shown on the display. When testing is complete, press the EXIT softkey to return to the menu tree. Figure 3-19: Keyboard Test Screen 64057247 08/2014 METTLER TOLEDO IND780 User’s Guide 3-19…
-
Page 96: Scale
Individual cell counts are the raw output of the load cells, which the indicator translates into weight by calculation, using information it acquires through the calibration process. Figure 3-21: Load Cell Output Screen 3-20 METTLER TOLEDO IND780 User’s Guide 64057247 08/2014…
-
Page 97: Calibration Values
Used for POWERCELL scales only (but not POWERCELL PDX). The purpose of the Diagnose Cell screens is to allow the technician to verify a load cell’s node address and raw counts. If the cell that 64057247 08/2014 METTLER TOLEDO IND780 User’s Guide 3-21…
-
Page 98: Statistics
Statistics cannot be deleted without losing all other setup values. Figure 3-25: Scale Statistics Screen 3-22 METTLER TOLEDO IND780 User’s Guide 64057247 08/2014…
-
Page 99: Serial Test
If a jumper wire is placed between the transmit and the receive terminals (Figure 3-28) on the port being tested, the same data string that is transmitted displays as the receiving field. 64057247 08/2014 METTLER TOLEDO IND780 User’s Guide 3-23…
-
Page 100: Discrete I/O Test
Figure 3-29: Discrete I/O Test Screen WARNING THE DISCRETE OUTPUTS OF THE IND780 TERMINAL WILL BE MANUALLY ENABLED DURING THIS TEST. REMOVE OUTPUT CONTROL POWER SO EXTERNAL EQUIPMENT WILL NOT BE ENERGIZED BY MISTAKE. EXERCISE CARE WHEN MAKING CHECKS, TESTS AND ADJUSTMENTS THAT MUST BE MADE WITH POWER ON.
-
Page 101: Network Test
Timeout, it indicates that the IP address or gateway address has not been programmed in the terminal. Refer to the Communication and Network section of Chapter 3, Configuration, in the IND780 Technical Manual for information on entering the IP and gateway addresses. 3.7.8.
-
Page 102: Scale Load Cell Temperature
Readings should be reasonably close between the cells if there are no obvious differences in external influences (e.g. sunshade, heating pipes). 3-26 METTLER TOLEDO IND780 User’s Guide 64057247 08/2014…
-
Page 103: Scale Load Cell Supply Voltage
Figure 3-33: Scale Load Cell Supply Voltage Screen The nominal supply voltage is based on whether the IND780 uses its internal 12 VDC or the external 24 VDC supply to power the cells. It is normal to have the voltage readings from one cell to another drop in value.
-
Page 104: Load Cell Information
This enables the user to track changes and make data comparisons to a known working condition of the cell. Figure 3-35: Load Cell Information Screen 3-28 METTLER TOLEDO IND780 User’s Guide 64057247 08/2014…
-
Page 105: Pdx Terminal
PDX Terminal screen. This screen provides a view of the minimum and maximum voltages and current detected on the IND780 PDX option board. These values are updated dynamically while the screen is viewed. Figure 3-36: PDX Terminal Screen…
-
Page 106: External Diagnostics
Normal range: ≈ 10 mA – 40 mA per cell. 3.7.9. External Diagnostics The IND780 includes a utility that provides valuable tools for examining the operation of the terminal, its installed options and software, and (for POWERCELL bases only) of associated load cells. Information available in Web Help includes: •…
-
Page 107: Help File
Figure 3-38 shows a portion of the help file. Figure 3-38: Help File At the bottom of the page, a CLOSE PAGE button allows the user to close this browser window without exiting the Web Help utility. 64057247 08/2014 METTLER TOLEDO IND780 User’s Guide 3-31…
-
Page 108: System Information
3.7.9.4. Resource Utilization The resource utilization page (Figure 3-40) gives a snapshot of the current status of the terminal, including CPU usage and information about the various types of memory used by the IND780. Figure 3-40: Resource Utilization Page 3-32…
-
Page 109: Scale Statistics
Once Start is selected, the Stop button is in focus and clickable. The current status of dynamic display (Stopped or Running) is shown in a field between the two buttons. Note that, as 64057247 08/2014 METTLER TOLEDO IND780 User’s Guide 3-33…
-
Page 110
Auto Refresh must be stopped before new shared data names can be entered. For a complete list of available shared data names, refer to the IND780 Shared Data Manual. In the example shown in Figure 3-42, the shared data information displayed is as follows:… -
Page 111: Scale Data
The signal quality display permits troubleshooting of the connection between the IND780 and load cells. When quality is poor, a red bar is displayed. A yellow bar indicates adequate quality, and green bar means the quality is good, as in the example below.
-
Page 112: Pdx Terminal (Powercell Pdx Bases Only)
The PDX Terminal page (Figure 3-45) shows the minimum and maximum voltages and current detected on the IND780 PDX option board. This page can be used to determine if the terminal’s PDX option board is providing the proper electrical parameters to support the CAN Bus communication and to power the cells.
-
Page 113: Load Cell Statistics And Load Cell Data (Powercell And Pdx Bases Only)
Load cell statistics (Figure 3-47) and data (Figure 3-48) are collected for POWERCELL bases. In the examples shown, a POWERCELL option board is installed, but no load cell is connected. Figure 3-47: Load Cell Statistics Page Figure 3-48: Load Cell Data Page 64057247 08/2014 METTLER TOLEDO IND780 User’s Guide 3-37…
-
Page 114: Load Cell Symmetry (Powercell And Pdx Bases Only)
3.7.11. Master Reset A hardware master reset switch is provided, that sets all IND780 terminal settings to the factory default settings (see Appendix B, Default Settings). This includes scale setup and calibration information, log files (except for the error log) and counters. The master reset typically is performed under these circumstances: •…
-
Page 115: To Initiate A Master Reset
3.8. Main PCB 3.8.1. To remove a main PCB from an IND780, follow these steps 1. Remove AC power. 2. Use a grounding strap to prevent risk of electrostatic discharge. 3. At the back of the terminal, identify and label all option board cables.
-
Page 116
13. Unscrew and remove the six screws holding the main PCB to the enclosure. Their locations are circled in Figure 3-52. In the case of a panel mount terminal, the four outer fasteners will be hex post stand-offs, as shown in Figure 3-53. 3-40 METTLER TOLEDO IND780 User’s Guide 64057247 08/2014… -
Page 117: Main Pcb Installation
New ETX board Firmware version 7.x or later To determine which type of ETX board is installed in an IND780 terminal, watch the boot-up display. The processor type will appear in the upper left corner of the screen: MSC ET(e) – PXA255 = original board MSC ET(e) –…
-
Page 118: Etx Board Removal
3.9.2. ETX Board Removal To remove the ETX board from the main PCB, first remove the main board from the IND780 chassis. Then: 1. Remove the two screws holding the lower card guide and the ETX board to the main PCB (Figure 3-52).
-
Page 119: Etx Board Installation
4. Lift the ETX board off the main PCB and set it down on a static-free mat. 3.9.3. ETX Board Installation This procedure must be performed with the main PCB removed from the IND780 enclosure: All mounting screws should be installed with 23 inch pounds (2.6 Nm) of torque. 3.9.3.1.
-
Page 120: Cf Card Removal And Installation
1. Disconnect the incoming power cord and the cord from the main PCB from their connectors on the power supply board. These connectors are keyed and can only be attached in the correct orientation. They are shown attached in Figure 3-62, and disconnected in Figure 3-63. 3-44 METTLER TOLEDO IND780 User’s Guide 64057247 08/2014…
-
Page 121: Power Supply Installation
To install a power supply 1. Mount the power supply PCB to the mounting bracket using four screws, one at each corner. Note the orientation of the power supply relative to the bracket in Figure 3-63. 64057247 08/2014 METTLER TOLEDO IND780 User’s Guide 3-45…
-
Page 122: Option Board Installation
3.12.1. To install a PLC interface module on the main PCB All mounting screws should be installed with 23 inch pounds (2.6 Nm) of torque. 1. Position the module over its connector. 3-46 METTLER TOLEDO IND780 User’s Guide 64057247 08/2014…
-
Page 123
Figure 3-65: PLC Interface Module Socket on Main PCB (left) and Connector Pins on the Underside of a Module (right) 3. Install the three screws indicated in Figure 3-64. 64057247 08/2014 METTLER TOLEDO IND780 User’s Guide 3-47… -
Page 124
To protect your METTLER TOLEDO product’s future: Congratulations on choosing the quality and precision of METTLER TOLEDO. Proper use according to these instructions and regular calibration and maintenance by our factory-trained service team ensure dependable and accurate operation, protecting your investment. Contact us about a METTLER TOLEDO service agreement tailored to your needs and budget.
Технические характеристики — Weighing Terminal IND780
| Весы | X-Base POWERCELL PDX Аналоговый IDNet POWERCELL |
| Передача данных | USB RS232 Ethernet TCP/IP |
| Прикладное ПО | Дистанционное управление |
| Передача данных (дополнительно) | PROFIBUS DP PROFINET DeviceNet Allen-Bradley RIO Для EtherNet/IP ввести: Дискретный ввод/вывод ControlNet |
| Варианты монтажа | Панель Стена Стойка Стол |
| Напряжение | Вариант для переменного тока |
| Дисплей | Дисплей VFD с активной точечной матрицей |
| Размеры (ДxВxШ) | 299 mm x 141 mm x 200 mm |
| Варианты подключения дисплея | Встроенный блок |
| Клавиатура | Буквенно-цифровая клавиатура |
| Калибровка CalFREE | Yes |
| Корпус | Нержавеющая сталь |
| Интерфейсы | 4 вх./4 вых./Аналоговый вывод 4–20 мA/Allen-Bradley RIO/ControlNet/RS232/422/485/Flux/PROFIBUS DP/DeviceNet/EtherNet/IP |
| Степень защиты | IP69k |
| Разрешение на использование во взрывоопасных зонах | Нет |
| Принадлежности | |
| Гигиеничная конструкция | Да |
| Возможность программного конфигурирования | Yes |
2.6.18.
The IND780 terminal provides a programmable Calibration Test sequence that can contain up to
25 individual steps. The Calibration Test is designed to lead the tester through a set of
predetermined steps and compare the terminal calibration with known test weights.
The test is accessed by pressing the CALIBRATION TEST softkey
on the home page or as an
Application key (A1—A4). A screen (Figure 2-39) displays, including a field for the name of the
tester.
Figure 2-39: Calibration Test Name-Entry Screen
Once the technician’s name has been entered, press the Test Weight Information softkey
. The
screen shown in Figure 2-40 opens.
Figure 2-40: Calibration Test Weight View
Use the NEW
and EDIT
softkeys to enter the weight and serial number of each test weight to
be used. The weights and weight units should match those programmed for the Calibration Test.
This information provides a traceable record for the calibration test.
Once the test weights are entered, return to the Calibration Test screen by pressing the EXIT softkey
.
64057247
|
13
|
08/2014
METTLER TOLEDO IND780 User’s Guide
2-45
-
Производитель: Mettler Toledo.
Класс защиты: IP65.
Функция дозирования: есть.
Тензометрических входов: опция.
- Описание
Весовой индикатор IND780 подходит для широкого спектра задач: от простого взвешивания до составления смесей, взвешивания автомобилей, контрольного взвешивания и т.д. Терминал прекрасно справляется почти с любым видом взвешивания во многих промышленных сферах благодаря применению ПЛК, связи с ПК, дискретному вводу-выводу, а также разнообразным возможностям установки: на панели, на рабочем столе, на стене или специальной стойке.
ОСНОВНЫЕ ХАРАКТЕРИСТИКИ
- Возможности подключения цифровых (PowerCell PDX) и аналоговых датчиков.
- Цифровой интерфейс для связи с компьютером : RS232, RS485.
- Тип дисплея: графический, высота символа до 34 мм, частота обновления 10 Гц, разрешение экрана 320 х 240 точек.
- Напряжение для питания аналоговых датчиков: 10 В постоянный ток.
- Подключение до 8 аналоговых датчиков (350 Ом) на один тензоканал.
- Подключение до 16 аналоговых датчиков (350 Ом) на один прибор.
- Подключение до 4 каналов датчиков на один прибор.
- Подключение аналоговых датчиков 2 и 3 мВ/В.
- 6-х и 4-х проводная схема подключения аналоговых датчиков.
- Напряжение для питания цифровых датчиков PowerCell PDX: 12 В и 30 В постоянный ток.
- Сохранение до 256 000 записей взвешиваний.
- Напряжение питания: 85-264 В (49-61 Гц).
- Ток потребления: до 400 мА.
- Размеры прибора: 320 х 220 х 110 мм.
- Вес терминала: не более 5.00 кг.
- Рабочая температура: от -10 до +40 oC
- Температура хранения: от -40 до +60 oC
- Относительная влажность: не более 95%
- Тип монтажа: настольный или в шкаф управления.
- Возможность работы в 2-х и в 3-х диапазонах взвешивания с различной дискретностью отсчета.
- Дополнительные опции: аналоговый выход, ethernet, USB, PROFIBUS, MODBUS, дискретные входа/выхода, измеритель расхода.
ДОПОЛНИТЕЛЬНЫЕ УСЛУГИ ПО ВЕСОВОМУ ТЕРМИНАЛУ
- Диагностика работоспособности прибора.
- Настройка параметров весоизмерителя.
- Подключение дополнительных устройств, таких как выносное табло, управляющих механизмов, компьютера и т.д.
- Калибровка прибора, настройка правильной работы весов.
- Подключение тензометрических датчиков к тензопреобразователю и их диагностика.
- Обучение по работе с данным терминалом.
- Установка и настройка программного обеспечения для работы с данным устройством для ведения учета.
На данный вид весового терминала предоставляется стандартная гарантия 12 месяцев со дня покупки.
ТОО «Мэлком полюс» – отечественный казахстанский производитель электронного весового оборудования и автоматизированных систем управления технологическими процессами – предприятие новых технологий с продукцией с высокой интеллектуальной добавочной стоимостью.
Контакты
- Почта: SaleMelcom@gmail.com
- Телефоны:
+7 727 293 63 92
+7 727 293 63 93
+7 727 978 20 20
WhatsApp: +7 700 978 20 20
- Адрес: 050052, Казахстан, Алматы,
ул. Ыкылас 7/6
█ 16.05.2012 16:59
Доброе время суток уважаемые коллеги!
Помогите пожалуйста с методикой калибровки на весовой терминал Mettler Toledo IND780. Жд весы DigitalReilMate 7260S.
█ 30.07.2012 15:01
Здравствуйте. Есть ли мануал на русском?
█ 11.06.2014 18:24
не подскажите как вы снимаете с них статистику.
у меня стоит софт который пишет взвешивание в текстовый файл, но бывает не все пишется. не подскажите как можно снять результаты взвешивания другими средствами?
Часовой пояс GMT +3, время: 06:00.
Форум на базе vBulletin®
Copyright © Jelsoft Enterprises Ltd.
В случае заимствования информации гипертекстовая индексируемая ссылка на Форум обязательна.