Всем доброго времени суток.
Сегодня пишу свой отзыв о детской швейной машинке «Mini Appliance Set», Китай.

Начну с того, что бродя по магазину игрушек, натолкнулись на детские швейные машинки. Их было там несколько видов. Покрутя коробки, остановили свой выбор на этой. И обошлось сие чудо в 680 рублей+ 3 пальчиковые батарейки ( в комплект не входят)
У дочки моей радости не было предела. Чуть позже, радость сменилась разочарованием. Но об этом чуть позже. Ну теперь о самой машинке.
Машинка работает от 3 пальчиковых батареек. Шьет она нажатием на левую кнопку мыши.

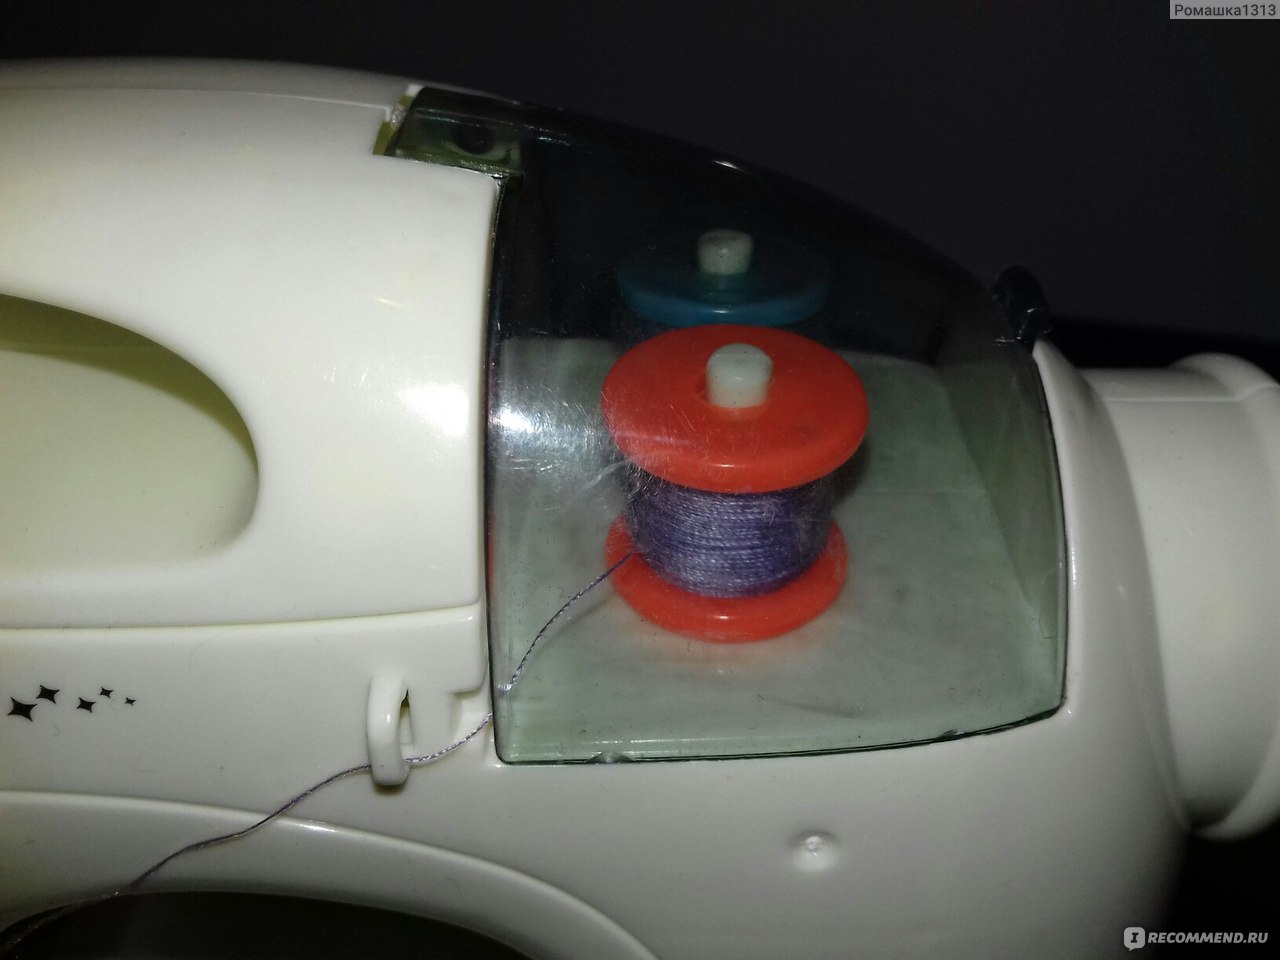
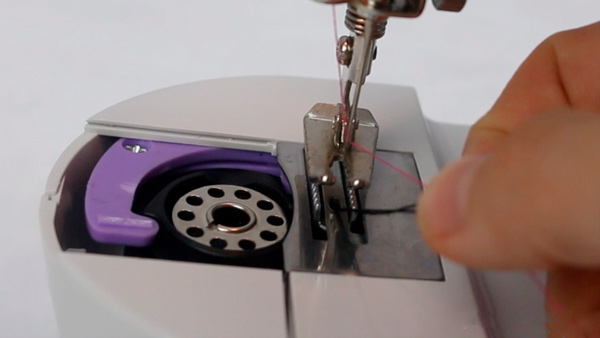
На машинке установлены 2 катушки с нитками.
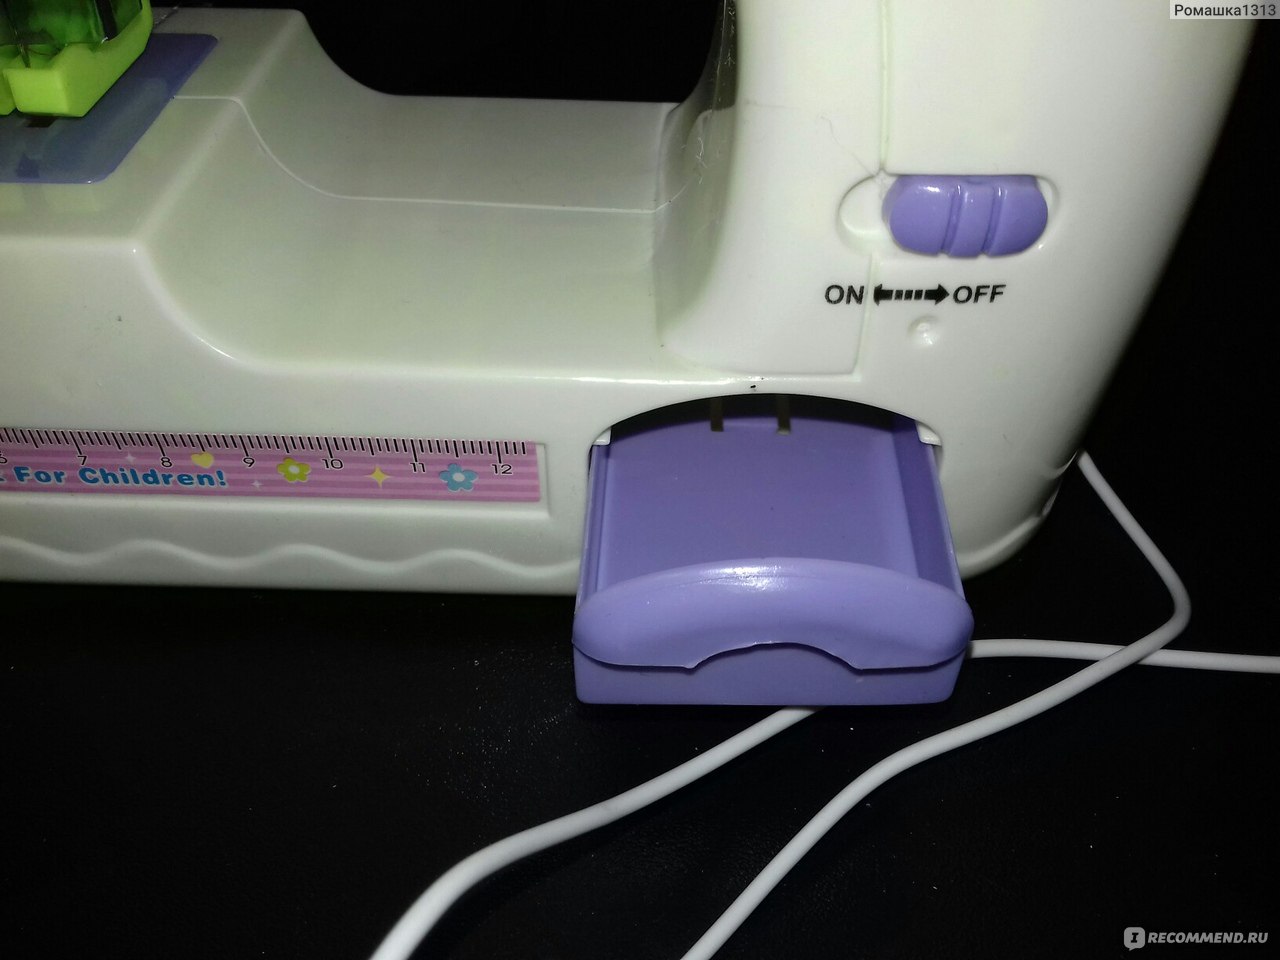
Есть выдвижной ящичек, для мелочевки. И кнопочка для включения подсветки. Подсветка синего цвета.
И….. тадам. В коробке также помимо машинки, есть кабель. Только вот зачем он не понятно!!!!
На самой игрушке нет разъема для него. Зачем он нужен????))))
Дочь долго искала разъем, потом мы искали его. Но нет….

Теперь об иголочке. Иголка закрыта прозрачным пластиком, благодаря этому пальчик не поранишь. Это плюс. НО, есть большое но, если нитка вылетает из иголочки, то вдеть ее ой как трудно!!!! Ребенок точно ее не вденет. А значит замучает взрослых. А вылетает эта нитка постоянно.

Ну а теперь о самом главном, о сшивании материала швейной машинкой.
Сшивает, соединяет ? Да
Но когда начинаешь убирать ткань, то шов распускается. Если взрослый прошьет и аккуратно подтянет нить, то не сразу не распустится. Но ребенок- то не может выполнить таких манипуляций. В итоге шьет, шьет, радуется, а потом сплошное огорчение.
Ну и вот так выглядит сам шов.

А вот так быстро распускается этот шов. Слегка потянуть ткань и все.

Вывод.
Мне жаль потраченных денег, именно из- за расстройства ребенка. Ожидание- реальность. Можно было добавить 400 рублей и купить мини швейную машинку дочке. Ребенку, которой любит шить, было бы самое то.
Хватило ей на один вечер, теперь эта швейная машинка пылится в ящике с игрушками.)
![]()
Download Article
![]()
Download Article
The affordable price and straightforward features of mini sewing machines make them a great choice for sewers and crafters of all ages and skill levels. Whether you’re learning how to sew on a mini sewing machine, or you’re using a mini machine as an alternative to a heavier-duty machine, you’ll enjoy the ease and portability of your new sewing tool. You’ll want to refer to the instruction manual to familiarize yourself with the correct process for threading your machine and adjusting the settings. In general, though, you’ll thread and operate your mini machine much like you would a standard machine.
-

1
Place a spool of thread on the thread spindle. Some mini sewing machines have retractable thread spindles (vertical metal or plastic posts on the top-right of the machine). Fully extend the thread spindle by pulling it directly upwards. Then, slide a spool of thread onto the spindle.[1]
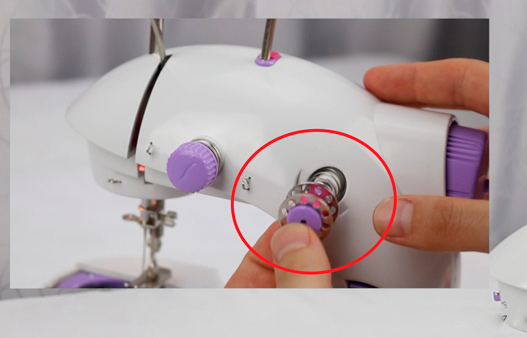
- Some mini sewing machines feature a secondary bobbin spindle on the front of the machine, towards the right side. You can place a bobbin here instead of using a full-sized spool for the top thread.
- To use this secondary bobbin spindle, remove the cap and slide the bobbin onto the post. Then push the cap back on so the bobbin clicks into place securely.[2]
- Keep the machine turned off while you thread it to avoid any accidents.
-
2
Wind an empty bobbin to fill it up with thread. Find an empty bobbin that’s compatible with your machine. With the spool of thread positioned on the thread spindle, wrap the loose end of the thread around the central post of the bobbin about 4 or 5 times in a counterclockwise direction. Press the bobbin onto the winding post, which is in the center of the hand wheel on many mini sewing machines.[3]
Hold the thread out with your hands, turn on the machine, and press down on the foot pedal.- Guide the thread from side to side so it fills up around the entire post of the bobbin.[4]
- When the bobbin is completely full, cut the thread to separate the bobbin from the spool.
Advertisement
- Guide the thread from side to side so it fills up around the entire post of the bobbin.[4]
-
3
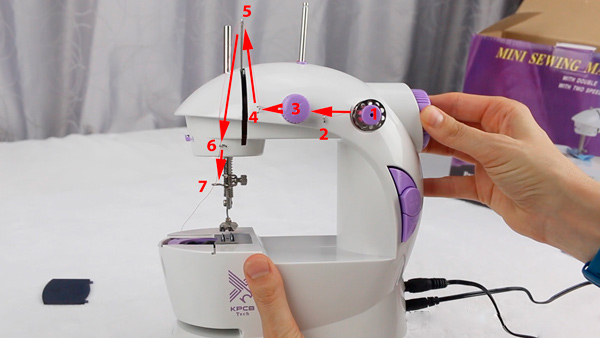
Guide the loose end of the thread through threading mechanisms. The threading procedure for each sewing machine is slightly different, but you can pinch the end of the thread to guide it along, as directed by your machine’s instructions. Usually, you’ll pass the thread through a series of holes or hooks called thread guides along the way.
- With most machines, you’ll push the thread through one loop and then pull it firmly between two tension disks.[5]
- After this, you’ll direct the thread through a hole or hook on the take-up lever, which moves up and down and is located on the left half of the machine, above the needle.[6]
- Finally you’ll draw the thread down towards the needle, often passing through a hole below the take-up lever and another right above the needle.[7]
- With most machines, you’ll push the thread through one loop and then pull it firmly between two tension disks.[5]
-
4
Pass the thread through the eye of the needle. Once the machine is threaded correctly, you’ll direct the end of the thread through the hole (called the eye) in the tip of the machine’s needle. Use the hand wheel to bring the needle to its highest point. Then push the thread through the eye from front to back or left to right, depending on the position of the needle.[8]
- Refer to the machine’s instructions if you’re not sure which direction to thread the needle.
- Trim the end of the thread so that it’s smooth and not frayed, and wet it with your tongue to keep the fibers together.
- Once the needle is threaded, tug about 5 in (13 cm) of thread towards the back. This will prevent it from slipping back through the eye as you begin moving the machine’s mechanisms.
-
5
Drop the bobbin into the bobbin compartment. Slide off the cover to the bobbin compartment first. Pick up the bobbin and press it into the bobbin-shaped chamber. The bobbin should be sitting horizontally in the compartment, with the thread winding around it in a counterclockwise direction.[9]
You’ll usually need to slip the bobbin thread behind a narrow strip of metal or plastic to keep it in alignment, but check the machine’s threading instructions for guidance.- The cover is a thin plastic piece that rests on top of the bobbin compartment. Slide it off, either towards the left (if the bobbin compartment is to the left of the needle) or towards you (if the compartment is directly in front of the needle).[10]
- The bobbin thread should match the color and fiber content of the top spool of thread you’re using.
- The cover is a thin plastic piece that rests on top of the bobbin compartment. Slide it off, either towards the left (if the bobbin compartment is to the left of the needle) or towards you (if the compartment is directly in front of the needle).[10]
-
6
Turn the hand wheel to lower the needle so it catches the bobbin thread. Hold the loose ends of the bobbin thread and the spool of thread together in your left hand. Use your right hand to turn the hand wheel (on the right side of the machine) towards you.[11]
This will move the needle down and the top thread will catch the bobbin thread.- Pull the loose ends of thread until there’s about 5 in (13 cm) of each strand extending past the needle before you turn the hand wheel.
- If your machine has a thread channel next to the bobbin compartment, you can slip both threads into this channel to line them up while you turn the hand wheel.[12]
Make sure you’re still holding the loose ends firmly.
-
7
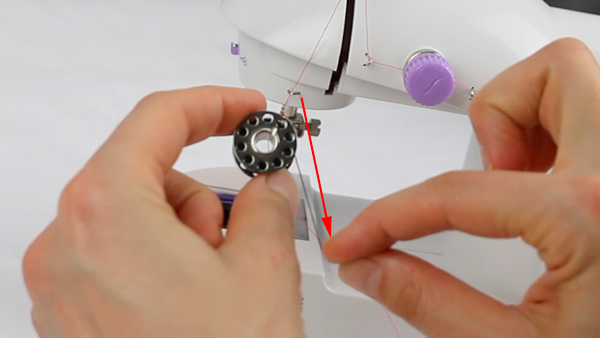
Pull the loop of bobbin thread out above the feed dogs. Keep turning the hand wheel to bring the needle back up. It will pull a loop of bobbin thread up through the gap between the feed dogs (metal bars featuring a toothy texture). Tug on this loop out so that the loose end of the bobbin thread comes out of the bobbin compartment.[13]
- You can gently pull the top thread upwards to expose the loop so it’s easier to grab onto.
- Pull the loose ends of both threads towards the back of the machine, passing them under the presser foot.[14]
Now you have a correctly-threaded machine! - Slide the bobbin compartment cover back into place when you’re done.


Advertisement
-
1
Add batteries to the machine or plug it into an external power source. If your mini sewing machines takes batteries, look at the manual to determine which type and quantity to use.[15]
If your machine uses a power cord, plug the pronged end of the power cord into the power source. Plug the other end into the correct slot (it’s usually labeled) on the lower-right side of the machine.[16]
- Keep the machine turned off as you connect it to its power source to prevent any accidents.
-
2
Plug in the foot pedal and place it on the floor. The foot pedal jack connects to another slot on the right side of the machine. It’s usually labeled and will be located near the slot for the power cord.[17]
With your machine situated on your work table, and your chair set up in at the table, position the foot pedal on the floor. Your right foot should be able to comfortably reach and press the pedal.- The narrow end of the pedal should be closest to you.
- Think of the foot pedal like the gas pedal of a car. When you press it, the machine will run.
-
3
Position your fabric under the raised presser foot and needle. Turn the hand wheel towards you to raise the needle to its highest position. Then, push the presser foot lever upwards with your left hand to raise the presser foot. The lever can usually be found on the back of the machine.[18]
With both mechanisms lifted, slip the edge of the fabric underneath the presser foot. Center the fabric you want to stitch directly under the needle.[19]
- It’s helpful to start with a test scrap of fabric before moving onto your project.
- Align the fabric so that only about 1⁄2 in (1.3 cm) of fabric extends past the needle. The end of the fabric should align with the back side of the presser foot.[20]
- If you don’t have enough fabric past the needle to begin with, it might get sucked down between the presser feet. This will jam up the machine.
- You should never sew directly over pins. Remove any pins as you go, before sewing the seam.
-
4
Lower the presser foot and needle. Push the presser foot lever downwards so that it comes into contact with the fabric.[21]
Then turn the hand wheel to lower the needle into the fabric.[22]
- Before you begin stitching, hold onto the loose ends of both threads, gently pulling them them taut towards the back of the machine. This will ensure your stitching gets off to a good start and that the machine doesn’t come unthreaded.
-
5
Apply steady pressure to the foot pedal to begin sewing. Once the machine is correctly threaded and the fabric is in place, you can turn the machine on using the power switch. Press the foot pedal with your right foot, as you would press the gas pedal on a car, to engage the machine and begin stitching.[23]
- The fabric will move away from you, towards the back of the machine.
- Use your hands to gently guide the fabric, but keep them well away from the needle for safety.
- You can press the backstitch button or lever (usually located on the front of the machine) to make a few stitches in the opposite direction. Do this at the start and end of your row of stitches to prevent them from unraveling.
-
6
Lift up the presser foot and needle before pulling out the fabric. When you’re done stitching, turn the hand wheel towards you to raise the needle out of the fabric. Pull up the presser foot lever to lift the presser foot as well.[24]
With the fabric freed up, you can pull it out from under the machine’s mechanisms.- Move the fabric gently, since the threads are still connected.
- You also don’t want to tug on the fabric too hard as this could break the needle.
-
7
Cut the threads loose. Some machines have a small blade called a thread cutter on the left side or the back of the machine. Pull both threads taut over the blade and tug firmly to cut it.[25]
Alternatively, you can use a pair of snips or scissors to trim the thread.- Trim the thread as closely to the fabric as you can for the neatest finish. This will also help prevent the thread from coming out of the needle, so you’ll be ready for your next stitching project.[26]
- Trim the thread as closely to the fabric as you can for the neatest finish. This will also help prevent the thread from coming out of the needle, so you’ll be ready for your next stitching project.[26]


Advertisement
-
1
Turn the tension dial to get even stitch tension. If you notice your top row of stitches is loose and loopy, twist the tension dial clockwise to tighten the tension on the top thread.[27]
If you have the opposite problem, with tight top stitches and loose bottom stitches, turn the tension dial counterclockwise to loosen the tension on the top thread.[28]
- The tension dial controls the tension disks that you sandwiched the top thread between when you threaded the machine. Sometimes it will feature numbers to indicate which tension setting you’re using.
- If you’re switching between thin fabric and thick fabric or bulky layers of material, you’ll likely need to adjust the tension. It’s always useful to do a test row of stitches on a scrap piece of your fabric to see if you need to adjust the tension.
-
2
Select a high or low speed setting. Although you can control the up-and-down movement of the needle by pressing the foot pedal, you can choose whether you want the needle to move quickly or slowly with the speed setting. Many mini sewing machines come with a button for controlling this. If you push the button inwards, it’ll select the low speed setting, and if you leave it outwards, it’ll operate on the high speed setting.[29]
- Other machines have a side-to-side switch or a numbered speed setting. Check the machine’s manual to for instructions on how to control your machine’s speed.
-
3
Choose a stitch type and length. Some mini sewing machines come with additional features that let you choose between straight, zig-zag, and decorative stitches as well as short, medium, and long stitch lengths. Typically these can be controlled by twisting a dial which is printed with each stitch type, as well as another dial or switch that selects the stitch length.
- Refer to your machine’s manual for the full range of settings.
- Select the stitch type and length before you begin sewing, not while you’re sewing.


Advertisement
Add New Question
-
Question
What do I do if the thread is knotting on my fabric?

Andrea Beaulieu is a Professional Tailor, Fashion Designer, and the Owner of MOORE, a Brooklyn, New York based storefront and apparel workshop for gender-neutral, contemporary streetwear as well as custom-tailored products. Andrea has over 20 years in the fashion design and marketing industries and specializes in pattern making, draping, and the construction of garments. She holds a BS in Fashion Design and Merchandising from the University of North Carolina at Greensboro.
Professional Tailor & Fashion Designer
Expert Answer
-
Question
Why am I having trouble threading the bobbin?
Andrea Beaulieu is a Professional Tailor, Fashion Designer, and the Owner of MOORE, a Brooklyn, New York based storefront and apparel workshop for gender-neutral, contemporary streetwear as well as custom-tailored products. Andrea has over 20 years in the fashion design and marketing industries and specializes in pattern making, draping, and the construction of garments. She holds a BS in Fashion Design and Merchandising from the University of North Carolina at Greensboro.
Professional Tailor & Fashion Designer
Expert Answer
Support wikiHow by
unlocking this expert answer.The tension and bobbin are the most challenging parts of the machine to master, so be patient with yourself and your machine. Make sure to read through the manual before you start, and keep it handy in case you need to do any troubleshooting.
-
Question
Can you make clothes with a mini sewing machine?
This answer was written by one of our trained team of researchers who validated it for accuracy and comprehensiveness.
wikiHow Staff Editor
Staff Answer


See more answers
Ask a Question
200 characters left
Include your email address to get a message when this question is answered.
Submit
Advertisement
Video
-
Use the same safety precautions with a mini sewing machine as you would with any other power tool or electrical appliance. Keep it away from water, turn it off and unplug it while it’s not in use, and use your common sense to prevent accidents.[30]
-
Machine needles can easily break if they strike something or are tugged too hard. Do not sew directly over pins and refrain from yanking the fabric as it runs through the machine.[31]
Advertisement
About This Article
Thanks to all authors for creating a page that has been read 159,037 times.
Did this article help you?
🍒ВСЕМ ЗДРАВСТВУЙТЕ!!!🍒
Хочу оставить свой отзыв на игрушку швейная машинка для девочек Mini Appliance set»
Швейная машинка понравится девочке, которая мечтает научиться шить и стать знаменитым дизайнером

🍒КОМПЛЕКТАЦИЯ🍒
Данная игрушка — функциональная, оснащена ручной педалью в виде мышки и ящичком для хранения швейных принадлежностей. Также в наборе можно найти кусок материала и две катушки ниток.
С таким комплектом девочка может освоить первые азы шитья, ведь машинка шьет по-настоящему, если нажимать на ручную педаль.
Игрушка продается в полупрозрачной упаковке. Это очень удобно, сразу видно что покупаешь.
На коробке есть вся необходимая информация о том, как правильно пользоваться, правда только на английском языке…


Размер машинки:
18х16х6.5 см
Размер упаковки:
29 х 20 х 9?5 см
Для детей от: 3 лет.
Производитель :КНР
Инструкция о том, как правильно заправлять нить (самое нелюбимое мое дело)

Внешне игрушка выглядит достаточно интересно!
Работает от 2-ух АА батареек. Во время работы светится.

Шить можно с помощью педальки или с помощью махового колеса ( если педалька выйдет из строя, так как она держится на тоненьком шнуре)

Продуман даже ящик для хранения мелких деталей))

Катушечные нити спрятаны в небольшой отсек, удобно чтобы ребенок не поранился во время шитья))

👆В ИГРУШКЕ УСТАНОВЛЕНА НАСТОЯЩАЯ ИГОЛКА!!!
Несмотря на то, что в игрушке установлена настоящая игла, опасности для ребёнка она не представляет, так как до неё практически не добраться, даже для заправки нити…

На фото 👇 максимальная высота поднятия лапки)
Посмотриие на фото и представьте, как втянуть нить в ушко иголки)) Нить тонкая, часто рвётся, за весь процес шитья ребенок просит раз 5 заправить нить(( ТЕРПЕНИЕ,ТОЛЬКО ТЕРПЕНИЕ 🤪🧐

🍒ПЛЮСЫ🍒
—развивает мелкую моторику рук
🧐МИНУСЫ
— постоянно рвётся нить
-крайне неудобно заправлять нити
КУПИЛА ЭТУ ИГРУШКУ НА АКЦИИ ЗА 6$, ЕСЛИ БЫ СТОИЛА ДОРОЖЕ, НЕ ПОКУПАЛА БЫ ТОЧНО!!!!
Это руководство для вас, если вы никогда раньше не пользовались мини-швейной машинкой и только начинаете заниматься шитьем. В этом уроке я расскажу вам о достоинствах и недостатках этой швейной машинки, покажу, как заправить нить в швейную машинку и дам несколько советов по шитью.
Эта мини-швейная машинка действительно шьет. Если вы ищете недорогую, портативную и простую швейную машинку, то эта машинка подойдет для вас. Ее можно использовать для подшивки брюк и для других простых работ. Однако вы будете ограничены только одной прямой строчкой. Эта машинка не имеет функции обратного хода, поэтому, чтобы усилить строчку, нужно будет повернуть ткань и прошить по этому месту в обратном направлении еще раз. Эта машинка не занимает много места, она очень маленькая. Она даже может работать от батареек АА.
К концу этого урока вы станете профессионалом и узнаете, как пользоваться этой мини-швейной машинкой!
Итак, что вам понадобится:
- Мини-швейная машинка
- Нитки (я не рекомендую использовать нитки, которые идут в комплекте с машинкой. Только если у вас больше нет никаких)
- Пустая металлическая шпулька
- Нитевдеватель

Как начать работу на мини-швейной машинке:
Шаг 1: Подключите блок питания
Я заменила нитки и ткань, которые шли с этой швейной машинкой на свои.
Подключаем блок питания, либо батарейки (вставляются снизу), подключаем ножную педаль.
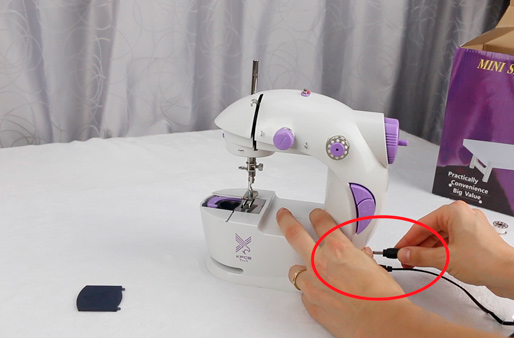
Будьте осторожны! Когда включается питание, машинка включается, если вы случайно нажмете педаль или кнопку включения/выключения, машинка начнет шить.
Шаг 2: Намотайте нить на шпульку
Далее вам нужно будет перемотать немного ниток с основной катушки на шпульку. Вам понадобится катушка ниток, которыми вы собираетесь шить и пустая шпулька. Поместите катушку ниток на шпиндель, расположенный в верхней части машинки (он убран, но вытаскивается при необходимости). Освобождаем штифт для намотки шпульки (он находится посередине маховика). Он освобождается путем нажатия указательным пальцем и поворотом против часовой стрелки. Проденьте конец нити через шпульку и наденьте шпульку на стержень для намотки шпульки. Другой рукой удерживайте нить, чтобы обеспечить натяжение нити, пока она наматывается на шпульку.
Нажмите на педаль или нажмите кнопку включения/выключения, чтобы начать намотку.
Остановитесь, когда на шпульку будет намотано нужное количество нити. Снимите шпульку со стержня и обрежьте нить. Вставьте стержень для намотки шпульки на место.
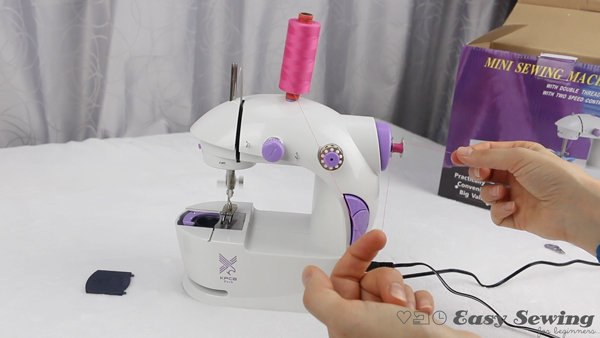
Шаг 3: Заправьте верхнюю нить
Поместите катушку на стержень катушки, расположенную на верхней части машинки (можно также заправить верхнуюю нить со шпульки, которая закрепляется на передней части корпуса машинки (см. фото ниже).
Следуйте нитенаправителям, чтобы заправить нить.
Шаг 4: Вставляем нить в иглу
Чтобы заправить нить в иглу, проденьте конец нити в игольное отверстие слева направо. Я считаю, что заправлять нить в иглу намного проще, если использовать нитевдеватель.
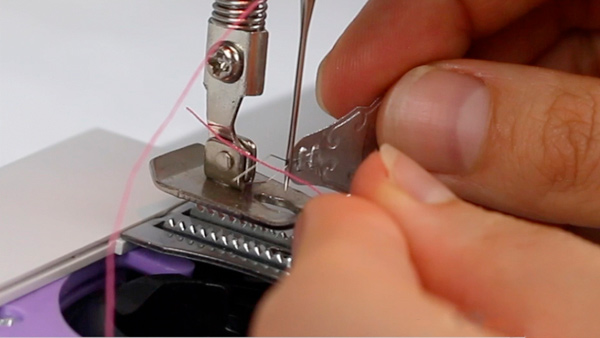
Потяните за нить, чтобы верхняя нить не провисала и оставьте конец нити свободным.
Шаг 5: Загружаем шпульку в швейную машинку
Держите шпульку так, чтобы нить находилась с правой стороны, и нить на шпульку была намотана по часовой стрелке.
Опустите шпульку в шпульный колпачек так, чтобы она осталась лежать ровно. Поместите нить в предусмотренную канавку.
Шаг 6: Поднимите шпульную нить
Чтобы поднять нижнюю нить, держите верхнюю нить в левой руке, слегка тянув на себя. В то де время правой рукой поворачивайте маховик на себя. Это переместит иглу вниз, и вы заметите, что верхняя нить проходит через шпульку. Как только игла полностью опустится и снова поднимется, потяните верхнюю нить на себя, и вы увидите, как нижняя нить поднимается вместе с ней. Возьмите нижнюю нить пальцами или вытяните ее чем-то длинным и тонким.
Поместите концы ниток с задней части машинки. Закройте крышку отверстия для шпульки, и вы готовы к шитью!
Шаг 7: Вы готовы шить!

Дам вам несолько советов, которые помогут вам успешно шить на этой мини-машинке.
Совет №1
Сделайте несколько стежков на ткани с помощью маховика, прежде чем нажимать на педаль и приступить к шитью. Это не даст нити вытягиваться. Это происходило со мной, пока я не приспособилась таким образом.
Совет №2
Эта машинка не имеет функции реверса. Я обычно пользуюсь обратным ходом на большой машинке, чтобы закреплять шов. Если вы хотите закрепить строчку, я рекомендую повернуть ткань, а затем прошить по этим стежкам.
Совет №3
Когда вы дойдете до конца строчки, продолжайте шить, чтобы вытянуть длиннее нить, которую можно обрезать, и оставить достаточно длинный хвостик для следующей строчки. Этой машинке не очень нравится, когда мы тянем нить из нее.
Я надеюсь, что этот урок и дополнительные советы будут полезны для вас. Удачного мини-шитья, увидимся в следующий раз!
Данную технику приобрели на день рождение племяннице. Долго выбирали, консультант магазина порекомендовала именно эту модель. Упакована хорошо в картонную упаковку, в которой еще пластмассовая, прозрачная упаковка. Страна производитель: Китай.


Сама машинка сделана из пластика, качество пластика не очень хорошее. Вид спереди:

Вид сзади:


В комплект входит: сама швейная машинка с педалькой, нажимая на которую машинка начинает шить; три моточка ниток, нитки: белая, фиолетовая и розовая, в прочем цвета везде разные, кусочек ткани.

Машинка работает от трех пальчиковых батареек.


Крышечка закрывающая батарейки прикручивается на болтик.

На переднем плане швейной машинки имеется выключатель при включении в режим off, машинка включается, о чем свидетельствует горящая лампочка и можно начинать шить нажимая на педальку.

Так же имеется небольшой ящичек, в который можно сложить какую-нибудь мелочь, булавочки, пуговки и прочее.

На саму машинку приклеена линеечка.

Что касается шитья: машинка не шьет как обычная взрослая машинка, поскольку нет шпульки и нижней нитки, но она делает стежки. Ребенок может взять любую свою вещь, и прошить ее, тем самым не испортив ее, Вам не придется ее распарывать, так как стежок данной машинкой не делается, дернув за веревочку, она легко вытаскивается из ткани. Можно сказать машинка для баловства.


Тем не менее, я считаю, что данная игрушка может научить Вашего ребенка пользоваться швейными машинками, вдевать нитку в иголку, самой технике работы швейной машинки.
Игла производителем установлена безопасно, со всех сторон ее закрывает пластиковая лапка, под которую ребенок не сможет засунуть свой пальчик.

Стоимость данной игрушки от 500 до 900 рублей. Рекомендую для детей от 3 до 8, более старшим детям она будет не интересна, поскольку не выполняет функцию настоящего шитья.