
If you haven’t yet done so, please take a minute to read the quickstart to get an idea of how Mongoose works.
If you are migrating from 6.x to 7.x please take a moment to read the migration guide.
- Defining your schema
- Creating a model
- Ids
- Instance methods
- Statics
- Query Helpers
- Indexes
- Virtuals
- Aliases
- Options
- With ES6 Classes
- Pluggable
- Further Reading
Defining your schema
Everything in Mongoose starts with a Schema. Each schema maps to a MongoDB
collection and defines the shape of the documents within that collection.
import mongoose from 'mongoose';
const { Schema } = mongoose;

const blogSchema = new Schema({
  title: String, // String is shorthand for {type: String}
  author: String,
  body: String,
  comments: [{ body: String, date: Date }],
  date: { type: Date, default: Date.now },
  hidden: Boolean,
  meta: {
    votes: Number,
    favs: Number
  }
});
If you want to add additional keys later, use the
Schema#add method.
Each key in our code blogSchema defines a property in our documents which
will be cast to its associated SchemaType.
For example, we’ve defined a property title which will be cast to the
String SchemaType and property date
which will be cast to a Date SchemaType.
Notice above that if a property only requires a type, it can be specified using
a shorthand notation (contrast the title property above with the date
property).
Keys may also be assigned nested objects containing further key/type definitions
like the meta property above. This will happen whenever a key’s value is a POJO
that doesn’t have a type property.
In these cases, Mongoose only creates actual schema paths for leaves
in the tree. (like meta.votes and meta.favs above),
and the branches do not have actual paths. A side-effect of this is that meta
above cannot have its own validation. If validation is needed up the tree, a path
needs to be created up the tree — see the Subdocuments section
for more information on how to do this. Also read the Mixed
subsection of the SchemaTypes guide for some gotchas.
The permitted SchemaTypes are:
- String
- Number
- Date
- Buffer
- Boolean
- Mixed
- ObjectId
- Array
- Decimal128
- Map
- UUID
Read more about SchemaTypes here.
Schemas not only define the structure of your document and casting of
properties, they also define document instance methods,
static Model methods, compound indexes,
and document lifecycle hooks called middleware.
Creating a model
To use our schema definition, we need to convert our blogSchema into a
Model we can work with.
To do so, we pass it into mongoose.model(modelName, schema):
const Blog = mongoose.model('Blog', blogSchema);
// ready to go!
Ids
By default, Mongoose adds an _id property to your schemas.
const schema = new Schema();

schema.path('_id'); // ObjectId { ... }
When you create a new document with the automatically added
_id property, Mongoose creates a new _id of type ObjectId
to your document.
const Model = mongoose.model('Test', schema);

const doc = new Model();
doc._id instanceof mongoose.Types.ObjectId; // true
You can also overwrite Mongoose’s default _id with your
own _id. Just be careful: Mongoose will refuse to save a
document that doesn’t have an _id, so you’re responsible
for setting _id if you define your own _id path.
const schema = new Schema({ _id: Number });
const Model = mongoose.model('Test', schema);

const doc = new Model();
await doc.save(); // Throws "document must have an _id before saving"

doc._id = 1;
await doc.save(); // works
Instance methods
Instances of Models are documents. Documents have
many of their own built-in instance methods.
We may also define our own custom document instance methods.
// define a schema
const animalSchema = new Schema({ name: String, type: String },
  {
  // Assign a function to the "methods" object of our animalSchema through schema options.
  // By following this approach, there is no need to create a separate TS type to define the type of the instance functions.
    methods: {
      findSimilarTypes(cb) {
        return mongoose.model('Animal').find({ type: this.type }, cb);
      }
    }
  });

// Or, assign a function to the "methods" object of our animalSchema
animalSchema.methods.findSimilarTypes = function(cb) {
  return mongoose.model('Animal').find({ type: this.type }, cb);
};
Now all of our animal instances have a findSimilarTypes method available
to them.
const Animal = mongoose.model('Animal', animalSchema);
const dog = new Animal({ type: 'dog' });

dog.findSimilarTypes((err, dogs) => {
  console.log(dogs); // woof
});
- Overwriting a default mongoose document method may lead to unpredictable results. See this for more details.
- The example above uses the
Schema.methodsobject directly to save an instance method. You can also use theSchema.method()helper as described here. - Do not declare methods using ES6 arrow functions (
=>). Arrow functions explicitly prevent bindingthis, so your method will not have access to the document and the above examples will not work.
Statics
You can also add static functions to your model. There are three equivalent
ways to add a static:
- Add a function property to the second argument of the schema-constructor (
statics) - Add a function property to
schema.statics - Call the
Schema#static()function
// define a schema
const animalSchema = new Schema({ name: String, type: String },
  {
  // Assign a function to the "statics" object of our animalSchema through schema options.
  // By following this approach, there is no need to create a separate TS type to define the type of the statics functions.
    statics: {
      findByName(name) {
        return this.find({ name: new RegExp(name, 'i') });
      }
    }
  });

// Or, Assign a function to the "statics" object of our animalSchema
animalSchema.statics.findByName = function(name) {
  return this.find({ name: new RegExp(name, 'i') });
};
// Or, equivalently, you can call `animalSchema.static()`.
animalSchema.static('findByBreed', function(breed) { return this.find({ breed }); });

const Animal = mongoose.model('Animal', animalSchema);
let animals = await Animal.findByName('fido');
animals = animals.concat(await Animal.findByBreed('Poodle'));
Do not declare statics using ES6 arrow functions (=>). Arrow functions explicitly prevent binding this, so the above examples will not work because of the value of this.
Query Helpers
You can also add query helper functions, which are like instance methods
but for mongoose queries. Query helper methods let you extend mongoose’s
chainable query builder API.
// define a schema
const animalSchema = new Schema({ name: String, type: String },
  {
  // Assign a function to the "query" object of our animalSchema through schema options.
  // By following this approach, there is no need to create a separate TS type to define the type of the query functions.
    query: {
      byName(name) {
        return this.where({ name: new RegExp(name, 'i') });
      }
    }
  });

// Or, Assign a function to the "query" object of our animalSchema
animalSchema.query.byName = function(name) {
  return this.where({ name: new RegExp(name, 'i') });
};

const Animal = mongoose.model('Animal', animalSchema);

Animal.find().byName('fido').exec((err, animals) => {
  console.log(animals);
});

Animal.findOne().byName('fido').exec((err, animal) => {
  console.log(animal);
});
Indexes
MongoDB supports secondary indexes.
With mongoose, we define these indexes within our Schema at the path level or the schema level.
Defining indexes at the schema level is necessary when creating
compound indexes.
const animalSchema = new Schema({
  name: String,
  type: String,
  tags: { type: [String], index: true } // path level
});

animalSchema.index({ name: 1, type: -1 }); // schema level
See SchemaType#index() for other index options.
When your application starts up, Mongoose automatically calls createIndex for each defined index in your schema.
Mongoose will call createIndex for each index sequentially, and emit an ‘index’ event on the model when all the createIndex calls succeeded or when there was an error.
While nice for development, it is recommended this behavior be disabled in production since index creation can cause a significant performance impact.
Disable the behavior by setting the autoIndex option of your schema to false, or globally on the connection by setting the option autoIndex to false.
mongoose.connect('mongodb://user:pass@127.0.0.1:port/database', { autoIndex: false });
// or
mongoose.createConnection('mongodb://user:pass@127.0.0.1:port/database', { autoIndex: false });
// or
mongoose.set('autoIndex', false);
// or
animalSchema.set('autoIndex', false);
// or
new Schema({ /* ... */ }, { autoIndex: false });
Mongoose will emit an index event on the model when indexes are done
building or an error occurred.
// Will cause an error because mongodb has an _id index by default that
// is not sparse
animalSchema.index({ _id: 1 }, { sparse: true });
const Animal = mongoose.model('Animal', animalSchema);

Animal.on('index', error => {
  // "_id index cannot be sparse"
  console.log(error.message);
});
See also the Model#ensureIndexes method.
Virtuals
Virtuals are document properties that
you can get and set but that do not get persisted to MongoDB. The getters
are useful for formatting or combining fields, while setters are useful for
de-composing a single value into multiple values for storage.
// define a schema
const personSchema = new Schema({
  name: {
    first: String,
    last: String
  }
});

// compile our model
const Person = mongoose.model('Person', personSchema);

// create a document
const axl = new Person({
  name: { first: 'Axl', last: 'Rose' }
});
Suppose you want to print out the person’s full name. You could do it yourself:
console.log(axl.name.first + ' ' + axl.name.last); // Axl Rose
But concatenating the first and
last name every time can get cumbersome.
And what if you want to do some extra processing on the name, like
removing diacritics? A
virtual property getter lets you
define a fullName property that won’t get persisted to MongoDB.
// That can be done either by adding it to schema options:
const personSchema = new Schema({
  name: {
    first: String,
    last: String
  }
}, {
  virtuals: {
    fullName: {
      get() {
        return this.name.first + ' ' + this.name.last;
      }
    }
  }
});

// Or by using the virtual method as following:
personSchema.virtual('fullName').get(function() {
  return this.name.first + ' ' + this.name.last;
});
Now, mongoose will call your getter function every time you access the
fullName property:
console.log(axl.fullName); // Axl Rose
If you use toJSON() or toObject() mongoose will not include virtuals
by default. This includes the output of calling JSON.stringify()
on a Mongoose document, because JSON.stringify() calls toJSON().
Pass { virtuals: true } to either
toObject() or toJSON().
You can also add a custom setter to your virtual that will let you set both
first name and last name via the fullName virtual.
// Again that can be done either by adding it to schema options:
const personSchema = new Schema({
  name: {
    first: String,
    last: String
  }
}, {
  virtuals: {
    fullName: {
      get() {
        return this.name.first + ' ' + this.name.last;
      },
      set(v) {
        this.name.first = v.substr(0, v.indexOf(' '));
        this.name.last = v.substr(v.indexOf(' ') + 1);
      }
    }
  }
});

// Or by using the virtual method as following:
personSchema.virtual('fullName').
  get(function() {
    return this.name.first + ' ' + this.name.last;
  }).
  set(function(v) {
    this.name.first = v.substr(0, v.indexOf(' '));
    this.name.last = v.substr(v.indexOf(' ') + 1);
  });

axl.fullName = 'William Rose'; // Now `axl.name.first` is "William"
Virtual property setters are applied before other validation. So the example
above would still work even if the first and last name fields were
required.
Only non-virtual properties work as part of queries and for field selection.
Since virtuals are not stored in MongoDB, you can’t query with them.
You can learn more about virtuals here.
Aliases
Aliases are a particular type of virtual where the getter and setter
seamlessly get and set another property. This is handy for saving network
bandwidth, so you can convert a short property name stored in the database
into a longer name for code readability.
const personSchema = new Schema({
  n: {
    type: String,
    // Now accessing `name` will get you the value of `n`, and setting `name` will set the value of `n`
    alias: 'name'
  }
});

// Setting `name` will propagate to `n`
const person = new Person({ name: 'Val' });
console.log(person); // { n: 'Val' }
console.log(person.toObject({ virtuals: true })); // { n: 'Val', name: 'Val' }
console.log(person.name); // "Val"

person.name = 'Not Val';
console.log(person); // { n: 'Not Val' }
You can also declare aliases on nested paths. It is easier to use nested
schemas and subdocuments, but you can also declare
nested path aliases inline as long as you use the full nested path
nested.myProp as the alias.
const childSchema = new Schema({
  n: {
    type: String,
    alias: 'name'
  }
}, { _id: false });

const parentSchema = new Schema({
  // If in a child schema, alias doesn't need to include the full nested path
  c: childSchema,
  name: {
    f: {
      type: String,
      // Alias needs to include the full nested path if declared inline
      alias: 'name.first'
    }
  }
});
Options
Schemas have a few configurable options which can be passed to the
constructor or to the set method:
new Schema({ /* ... */ }, options);

// or

const schema = new Schema({ /* ... */ });
schema.set(option, value);
Valid options:
- autoIndex
- autoCreate
- bufferCommands
- bufferTimeoutMS
- capped
- collection
- discriminatorKey
- id
- _id
- minimize
- read
- writeConcern
- shardKey
- statics
- strict
- strictQuery
- toJSON
- toObject
- typeKey
- validateBeforeSave
- versionKey
- optimisticConcurrency
- collation
- timeseries
- selectPopulatedPaths
- skipVersioning
- timestamps
- storeSubdocValidationError
- methods
- query
option: autoIndex
By default, Mongoose’s init() function
creates all the indexes defined in your model’s schema by calling
Model.createIndexes()
after you successfully connect to MongoDB. Creating indexes automatically is
great for development and test environments. But index builds can also create
significant load on your production database. If you want to manage indexes
carefully in production, you can set autoIndex to false.
const schema = new Schema({ /* ... */ }, { autoIndex: false });
const Clock = mongoose.model('Clock', schema);
Clock.ensureIndexes(callback);
The autoIndex option is set to true by default. You can change this
default by setting mongoose.set('autoIndex', false);
option: autoCreate
Before Mongoose builds indexes, it calls Model.createCollection() to create the underlying collection in MongoDB by default.
Calling createCollection() sets the collection’s default collation based on the collation option and establishes the collection as
a capped collection if you set the capped schema option.
You can disable this behavior by setting autoCreate to false using mongoose.set('autoCreate', false).
Like autoIndex, autoCreate is helpful for development and test environments, but you may want to disable it for production to avoid unnecessary database calls.
Unfortunately, createCollection() cannot change an existing collection.
For example, if you add capped: { size: 1024 } to your schema and the existing collection is not capped, createCollection() will not overwrite the existing collection.
That is because the MongoDB server does not allow changing a collection’s options without dropping the collection first.
const schema = new Schema({ name: String }, {
  autoCreate: false,
  capped: { size: 1024 }
});
const Test = mongoose.model('Test', schema);

// No-op if collection already exists, even if the collection is not capped.
// This means that `capped` won't be applied if the 'tests' collection already exists.
await Test.createCollection();
option: bufferCommands
By default, mongoose buffers commands when the connection goes down until
the driver manages to reconnect. To disable buffering, set bufferCommands
to false.
const schema = new Schema({ /* ... */ }, { bufferCommands: false });
The schema bufferCommands option overrides the global bufferCommands option.
mongoose.set('bufferCommands', true);
// Schema option below overrides the above, if the schema option is set.
const schema = new Schema({ /* ... */ }, { bufferCommands: false });
option: bufferTimeoutMS
If bufferCommands is on, this option sets the maximum amount of time Mongoose buffering will wait before
throwing an error. If not specified, Mongoose will use 10000 (10 seconds).
// If an operation is buffered for more than 1 second, throw an error.
const schema = new Schema({ /* ... */ }, { bufferTimeoutMS: 1000 });
option: capped
Mongoose supports MongoDBs capped
collections. To specify the underlying MongoDB collection be capped, set
the capped option to the maximum size of the collection in
bytes.
new Schema({ /* ... */ }, { capped: 1024 });
The capped option may also be set to an object if you want to pass
additional options like max.
In this case you must explicitly pass the size option, which is required.
new Schema({ /* ... */ }, { capped: { size: 1024, max: 1000, autoIndexId: true } });
option: collection
Mongoose by default produces a collection name by passing the model name to
the utils.toCollectionName method.
This method pluralizes the name. Set this option if you need a different name
for your collection.
const dataSchema = new Schema({ /* ... */ }, { collection: 'data' });
option: discriminatorKey
When you define a discriminator, Mongoose adds a path to your
schema that stores which discriminator a document is an instance of. By default, Mongoose
adds an __t path, but you can set discriminatorKey to overwrite this default.
const baseSchema = new Schema({}, { discriminatorKey: 'type' });
const BaseModel = mongoose.model('Test', baseSchema);

const personSchema = new Schema({ name: String });
const PersonModel = BaseModel.discriminator('Person', personSchema);

const doc = new PersonModel({ name: 'James T. Kirk' });
// Without `discriminatorKey`, Mongoose would store the discriminator
// key in `__t` instead of `type`
doc.type; // 'Person'
option: id
Mongoose assigns each of your schemas an id virtual getter by default
which returns the document’s _id field cast to a string, or in the case of
ObjectIds, its hexString. If you don’t want an id getter added to your
schema, you may disable it by passing this option at schema construction time.
// default behavior
const schema = new Schema({ name: String });
const Page = mongoose.model('Page', schema);
const p = new Page({ name: 'mongodb.org' });
console.log(p.id); // '50341373e894ad16347efe01'

// disabled id
const schema = new Schema({ name: String }, { id: false });
const Page = mongoose.model('Page', schema);
const p = new Page({ name: 'mongodb.org' });
console.log(p.id); // undefined
option: _id
Mongoose assigns each of your schemas an _id field by default if one
is not passed into the Schema constructor.
The type assigned is an ObjectId
to coincide with MongoDB’s default behavior. If you don’t want an _id
added to your schema at all, you may disable it using this option.
You can only use this option on subdocuments. Mongoose can’t
save a document without knowing its id, so you will get an error if
you try to save a document without an _id.
// default behavior
const schema = new Schema({ name: String });
const Page = mongoose.model('Page', schema);
const p = new Page({ name: 'mongodb.org' });
console.log(p); // { _id: '50341373e894ad16347efe01', name: 'mongodb.org' }

// disabled _id
const childSchema = new Schema({ name: String }, { _id: false });
const parentSchema = new Schema({ children: [childSchema] });

const Model = mongoose.model('Model', parentSchema);

Model.create({ children: [{ name: 'Luke' }] }, (error, doc) => {
  // doc.children[0]._id will be undefined
});
option: minimize
Mongoose will, by default, «minimize» schemas by removing empty objects.
const schema = new Schema({ name: String, inventory: {} });
const Character = mongoose.model('Character', schema);

// will store `inventory` field if it is not empty
const frodo = new Character({ name: 'Frodo', inventory: { ringOfPower: 1 } });
await frodo.save();
let doc = await Character.findOne({ name: 'Frodo' }).lean();
doc.inventory; // { ringOfPower: 1 }

// will not store `inventory` field if it is empty
const sam = new Character({ name: 'Sam', inventory: {} });
await sam.save();
doc = await Character.findOne({ name: 'Sam' }).lean();
doc.inventory; // undefined
This behavior can be overridden by setting minimize option to false. It
will then store empty objects.
const schema = new Schema({ name: String, inventory: {} }, { minimize: false });
const Character = mongoose.model('Character', schema);

// will store `inventory` if empty
const sam = new Character({ name: 'Sam', inventory: {} });
await sam.save();
doc = await Character.findOne({ name: 'Sam' }).lean();
doc.inventory; // {}
To check whether an object is empty, you can use the $isEmpty() helper:
const sam = new Character({ name: 'Sam', inventory: {} });
sam.$isEmpty('inventory'); // true

sam.inventory.barrowBlade = 1;
sam.$isEmpty('inventory'); // false
option: read
Allows setting query#read options at the
schema level, providing us a way to apply default
ReadPreferences
to all queries derived from a model.
const schema = new Schema({ /* ... */ }, { read: 'primary' });            // also aliased as 'p'
const schema = new Schema({ /* ... */ }, { read: 'primaryPreferred' });   // aliased as 'pp'
const schema = new Schema({ /* ... */ }, { read: 'secondary' });          // aliased as 's'
const schema = new Schema({ /* ... */ }, { read: 'secondaryPreferred' }); // aliased as 'sp'
const schema = new Schema({ /* ... */ }, { read: 'nearest' });            // aliased as 'n'
The alias of each pref is also permitted so instead of having to type out
‘secondaryPreferred’ and getting the spelling wrong, we can simply pass ‘sp’.
The read option also allows us to specify tag sets. These tell the
driver from which members
of the replica-set it should attempt to read. Read more about tag sets
here and
here.
NOTE: you may also specify the driver read preference strategy
option when connecting:
// pings the replset members periodically to track network latency
const options = { replset: { strategy: 'ping' } };
mongoose.connect(uri, options);

const schema = new Schema({ /* ... */ }, { read: ['nearest', { disk: 'ssd' }] });
mongoose.model('JellyBean', schema);
option: writeConcern
Allows setting write concern
at the schema level.
const schema = new Schema({ name: String }, {
  writeConcern: {
    w: 'majority',
    j: true,
    wtimeout: 1000
  }
});
option: shardKey
The shardKey option is used when we have a sharded MongoDB architecture.
Each sharded collection is given a shard key which must be present in all
insert/update operations. We just need to set this schema option to the same
shard key and we’ll be all set.
new Schema({ /* ... */ }, { shardKey: { tag: 1, name: 1 } });
Note that Mongoose does not send the shardcollection command for you. You
must configure your shards yourself.
option: strict
The strict option, (enabled by default), ensures that values passed to our
model constructor that were not specified in our schema do not get saved to
the db.
const thingSchema = new Schema({ /* ... */ })
const Thing = mongoose.model('Thing', thingSchema);
const thing = new Thing({ iAmNotInTheSchema: true });
thing.save(); // iAmNotInTheSchema is not saved to the db

// set to false..
const thingSchema = new Schema({ /* ... */ }, { strict: false });
const thing = new Thing({ iAmNotInTheSchema: true });
thing.save(); // iAmNotInTheSchema is now saved to the db!!
This also affects the use of doc.set() to set a property value.
const thingSchema = new Schema({ /* ... */ });
const Thing = mongoose.model('Thing', thingSchema);
const thing = new Thing;
thing.set('iAmNotInTheSchema', true);
thing.save(); // iAmNotInTheSchema is not saved to the db
This value can be overridden at the model instance level by passing a second
boolean argument:
const Thing = mongoose.model('Thing');
const thing = new Thing(doc, true);  // enables strict mode
const thing = new Thing(doc, false); // disables strict mode
The strict option may also be set to "throw" which will cause errors
to be produced instead of dropping the bad data.
NOTE: Any key/val set on the instance that does not exist in your schema
is always ignored, regardless of schema option.
const thingSchema = new Schema({ /* ... */ });
const Thing = mongoose.model('Thing', thingSchema);
const thing = new Thing;
thing.iAmNotInTheSchema = true;
thing.save(); // iAmNotInTheSchema is never saved to the db
option: strictQuery
Mongoose supports a separate strictQuery option to avoid strict mode for query filters.
This is because empty query filters cause Mongoose to return all documents in the model, which can cause issues.
const mySchema = new Schema({ field: Number }, { strict: true });
const MyModel = mongoose.model('Test', mySchema);
// Mongoose will filter out `notInSchema: 1` because `strict: true`, meaning this query will return
// _all_ documents in the 'tests' collection
MyModel.find({ notInSchema: 1 });
The strict option does apply to updates.
The strictQuery option is just for query filters.
// Mongoose will strip out `notInSchema` from the update if `strict` is
// not `false`
MyModel.updateMany({}, { $set: { notInSchema: 1 } });
Mongoose has a separate strictQuery option to toggle strict mode for the filter parameter to queries.
const mySchema = new Schema({ field: Number }, {
  strict: true,
  strictQuery: false // Turn off strict mode for query filters
});
const MyModel = mongoose.model('Test', mySchema);
// Mongoose will not strip out `notInSchema: 1` because `strictQuery` is false
MyModel.find({ notInSchema: 1 });
In general, we do not recommend passing user-defined objects as query filters:
// Don't do this!
const docs = await MyModel.find(req.query);

// Do this instead:
const docs = await MyModel.find({ name: req.query.name, age: req.query.age }).setOptions({ sanitizeFilter: true });
In Mongoose 7, strictQuery is false by default.
However, you can override this behavior globally:
// Set `strictQuery` to `true` to omit unknown fields in queries.
mongoose.set('strictQuery', true);
option: toJSON
Exactly the same as the toObject option but only applies when
the document’s toJSON method is called.
const schema = new Schema({ name: String });
schema.path('name').get(function(v) {
  return v + ' is my name';
});
schema.set('toJSON', { getters: true, virtuals: false });
const M = mongoose.model('Person', schema);
const m = new M({ name: 'Max Headroom' });
console.log(m.toObject()); // { _id: 504e0cd7dd992d9be2f20b6f, name: 'Max Headroom' }
console.log(m.toJSON()); // { _id: 504e0cd7dd992d9be2f20b6f, name: 'Max Headroom is my name' }
// since we know toJSON is called whenever a js object is stringified:
console.log(JSON.stringify(m)); // { "_id": "504e0cd7dd992d9be2f20b6f", "name": "Max Headroom is my name" }
To see all available toJSON/toObject options, read this.
option: toObject
Documents have a toObject method
which converts the mongoose document into a plain JavaScript object. This
method accepts a few options. Instead of applying these options on a
per-document basis, we may declare the options at the schema level and have
them applied to all of the schema’s documents by default.
To have all virtuals show up in your console.log output, set the
toObject option to { getters: true }:
const schema = new Schema({ name: String });
schema.path('name').get(function(v) {
  return v + ' is my name';
});
schema.set('toObject', { getters: true });
const M = mongoose.model('Person', schema);
const m = new M({ name: 'Max Headroom' });
console.log(m); // { _id: 504e0cd7dd992d9be2f20b6f, name: 'Max Headroom is my name' }
To see all available toObject options, read this.
option: typeKey
By default, if you have an object with key ‘type’ in your schema, mongoose
will interpret it as a type declaration.
// Mongoose interprets this as 'loc is a String'
const schema = new Schema({ loc: { type: String, coordinates: [Number] } });
However, for applications like geoJSON,
the ‘type’ property is important. If you want to control which key mongoose
uses to find type declarations, set the ‘typeKey’ schema option.
const schema = new Schema({
  // Mongoose interprets this as 'loc is an object with 2 keys, type and coordinates'
  loc: { type: String, coordinates: [Number] },
  // Mongoose interprets this as 'name is a String'
  name: { $type: String }
}, { typeKey: '$type' }); // A '$type' key means this object is a type declaration
option: validateBeforeSave
By default, documents are automatically validated before they are saved to
the database. This is to prevent saving an invalid document. If you want to
handle validation manually, and be able to save objects which don’t pass
validation, you can set validateBeforeSave to false.
const schema = new Schema({ name: String });
schema.set('validateBeforeSave', false);
schema.path('name').validate(function(value) {
  return value != null;
});
const M = mongoose.model('Person', schema);
const m = new M({ name: null });
m.validate(function(err) {
  console.log(err); // Will tell you that null is not allowed.
});
m.save(); // Succeeds despite being invalid
option: versionKey
The versionKey is a property set on each document when first created by
Mongoose. This keys value contains the internal
revision
of the document. The versionKey option is a string that represents the
path to use for versioning. The default is __v. If this conflicts with
your application you can configure as such:
const schema = new Schema({ name: 'string' });
const Thing = mongoose.model('Thing', schema);
const thing = new Thing({ name: 'mongoose v3' });
await thing.save(); // { __v: 0, name: 'mongoose v3' }

// customized versionKey
new Schema({ /* ... */ }, { versionKey: '_somethingElse' })
const Thing = mongoose.model('Thing', schema);
const thing = new Thing({ name: 'mongoose v3' });
thing.save(); // { _somethingElse: 0, name: 'mongoose v3' }
Note that Mongoose’s default versioning is not a full optimistic concurrency
solution. Mongoose’s default versioning only operates on arrays as shown below.
// 2 copies of the same document
const doc1 = await Model.findOne({ _id });
const doc2 = await Model.findOne({ _id });

// Delete first 3 comments from `doc1`
doc1.comments.splice(0, 3);
await doc1.save();

// The below `save()` will throw a VersionError, because you're trying to
// modify the comment at index 1, and the above `splice()` removed that
// comment.
doc2.set('comments.1.body', 'new comment');
await doc2.save();
If you need optimistic concurrency support for save(), you can set the optimisticConcurrency option
Document versioning can also be disabled by setting the versionKey to
false.
DO NOT disable versioning unless you know what you are doing.
new Schema({ /* ... */ }, { versionKey: false });
const Thing = mongoose.model('Thing', schema);
const thing = new Thing({ name: 'no versioning please' });
thing.save(); // { name: 'no versioning please' }
Mongoose only updates the version key when you use save().
If you use update(), findOneAndUpdate(), etc. Mongoose will not
update the version key. As a workaround, you can use the below middleware.
schema.pre('findOneAndUpdate', function() {
  const update = this.getUpdate();
  if (update.__v != null) {
    delete update.__v;
  }
  const keys = ['$set', '$setOnInsert'];
  for (const key of keys) {
    if (update[key] != null && update[key].__v != null) {
      delete update[key].__v;
      if (Object.keys(update[key]).length === 0) {
        delete update[key];
      }
    }
  }
  update.$inc = update.$inc || {};
  update.$inc.__v = 1;
});
option: optimisticConcurrency
Optimistic concurrency is a strategy to ensure
the document you’re updating didn’t change between when you loaded it using find() or findOne(), and when
you update it using save().
For example, suppose you have a House model that contains a list of photos, and a status that represents
whether this house shows up in searches. Suppose that a house that has status 'APPROVED' must have at least
two photos. You might implement the logic of approving a house document as shown below:
async function markApproved(id) {
  const house = await House.findOne({ _id });
  if (house.photos.length < 2) {
    throw new Error('House must have at least two photos!');
  }

  house.status = 'APPROVED';
  await house.save();
}
The markApproved() function looks right in isolation, but there might be a potential issue: what if another
function removes the house’s photos between the findOne() call and the save() call? For example, the below
code will succeed:
const house = await House.findOne({ _id });
if (house.photos.length < 2) {
  throw new Error('House must have at least two photos!');
}

const house2 = await House.findOne({ _id });
house2.photos = [];
await house2.save();

// Marks the house as 'APPROVED' even though it has 0 photos!
house.status = 'APPROVED';
await house.save();
If you set the optimisticConcurrency option on the House model’s schema, the above script will throw an
error.
const House = mongoose.model('House', Schema({
  status: String,
  photos: [String]
}, { optimisticConcurrency: true }));

const house = await House.findOne({ _id });
if (house.photos.length < 2) {
  throw new Error('House must have at least two photos!');
}

const house2 = await House.findOne({ _id });
house2.photos = [];
await house2.save();

// Throws 'VersionError: No matching document found for id "..." version 0'
house.status = 'APPROVED';
await house.save();
option: collation
Sets a default collation
for every query and aggregation. Here’s a beginner-friendly overview of collations.
const schema = new Schema({
  name: String
}, { collation: { locale: 'en_US', strength: 1 } });

const MyModel = db.model('MyModel', schema);

MyModel.create([{ name: 'val' }, { name: 'Val' }]).
  then(() => {
    return MyModel.find({ name: 'val' });
  }).
  then((docs) => {
    // `docs` will contain both docs, because `strength: 1` means
    // MongoDB will ignore case when matching.
  });
option: timeseries
If you set the timeseries option on a schema, Mongoose will create a timeseries collection for any model that you create from that schema.
const schema = Schema({ name: String, timestamp: Date, metadata: Object }, {
  timeseries: {
    timeField: 'timestamp',
    metaField: 'metadata',
    granularity: 'hours'
  },
  autoCreate: false,
  expireAfterSeconds: 86400
});

// `Test` collection will be a timeseries collection
const Test = db.model('Test', schema);
option: skipVersioning
skipVersioning allows excluding paths from versioning (i.e., the internal
revision will not be incremented even if these paths are updated). DO NOT
do this unless you know what you’re doing. For subdocuments, include this
on the parent document using the fully qualified path.
new Schema({ /* ... */ }, { skipVersioning: { dontVersionMe: true } });
thing.dontVersionMe.push('hey');
thing.save(); // version is not incremented
option: timestamps
The timestamps option tells Mongoose to assign createdAt and updatedAt fields
to your schema. The type assigned is Date.
By default, the names of the fields are createdAt and updatedAt. Customize
the field names by setting timestamps.createdAt and timestamps.updatedAt.
The way timestamps works under the hood is:
- If you create a new document, mongoose simply sets
createdAt, andupdatedAtto the time of creation. - If you update a document, mongoose will add
updatedAtto the$setobject. - If you set
upsert: trueon an update operation, mongoose will use$setOnInsertoperator to addcreatedAtto the document in case theupsertoperation resulted into a new inserted document.
const thingSchema = new Schema({ /* ... */ }, { timestamps: { createdAt: 'created_at' } });
const Thing = mongoose.model('Thing', thingSchema);
const thing = new Thing();
await thing.save(); // `created_at` & `updatedAt` will be included

// With updates, Mongoose will add `updatedAt` to `$set`
await Thing.updateOne({}, { $set: { name: 'Test' } });

// If you set upsert: true, Mongoose will add `created_at` to `$setOnInsert` as well
await Thing.findOneAndUpdate({}, { $set: { name: 'Test2' } });

// Mongoose also adds timestamps to bulkWrite() operations
// See https://mongoosejs.com/docs/api/model.html#model_Model-bulkWrite
await Thing.bulkWrite([
  {
    insertOne: {
      document: {
        name: 'Jean-Luc Picard',
        ship: 'USS Stargazer'
      // Mongoose will add `created_at` and `updatedAt`
      }
    }
  },
  {
    updateOne: {
      filter: { name: 'Jean-Luc Picard' },
      update: {
        $set: {
          ship: 'USS Enterprise'
        // Mongoose will add `updatedAt`
        }
      }
    }
  }
]);
By default, Mongoose uses new Date() to get the current time.
If you want to overwrite the function
Mongoose uses to get the current time, you can set the
timestamps.currentTime option. Mongoose will call the
timestamps.currentTime function whenever it needs to get
the current time.
const schema = Schema({
  createdAt: Number,
  updatedAt: Number,
  name: String
}, {
  // Make Mongoose use Unix time (seconds since Jan 1, 1970)
  timestamps: { currentTime: () => Math.floor(Date.now() / 1000) }
});
Mongoose supports defining global plugins, plugins that apply to all schemas.
// Add a `meta` property to all schemas
mongoose.plugin(function myPlugin(schema) {
  schema.add({ meta: {} });
});
Sometimes, you may only want to apply a given plugin to some schemas.
In that case, you can add pluginTags to a schema:
const schema1 = new Schema({
  name: String
}, { pluginTags: ['useMetaPlugin'] });

const schema2 = new Schema({
  name: String
});
If you call plugin() with a tags option, Mongoose will only apply that plugin to schemas that have a matching entry in pluginTags.
// Add a `meta` property to all schemas
mongoose.plugin(function myPlugin(schema) {
  schema.add({ meta: {} });
}, { tags: ['useMetaPlugin'] });
option: selectPopulatedPaths
By default, Mongoose will automatically select() any populated paths for
you, unless you explicitly exclude them.
const bookSchema = new Schema({
  title: 'String',
  author: { type: 'ObjectId', ref: 'Person' }
});
const Book = mongoose.model('Book', bookSchema);

// By default, Mongoose will add `author` to the below `select()`.
await Book.find().select('title').populate('author');

// In other words, the below query is equivalent to the above
await Book.find().select('title author').populate('author');
To opt out of selecting populated fields by default, set selectPopulatedPaths
to false in your schema.
const bookSchema = new Schema({
  title: 'String',
  author: { type: 'ObjectId', ref: 'Person' }
}, { selectPopulatedPaths: false });
const Book = mongoose.model('Book', bookSchema);

// Because `selectPopulatedPaths` is false, the below doc will **not**
// contain an `author` property.
const doc = await Book.findOne().select('title').populate('author');
option: storeSubdocValidationError
For legacy reasons, when there is a validation error in subpath of a
single nested schema, Mongoose will record that there was a validation error
in the single nested schema path as well. For example:
const childSchema = new Schema({ name: { type: String, required: true } });
const parentSchema = new Schema({ child: childSchema });

const Parent = mongoose.model('Parent', parentSchema);

// Will contain an error for both 'child.name' _and_ 'child'
new Parent({ child: {} }).validateSync().errors;
Set the storeSubdocValidationError to false on the child schema to make
Mongoose only reports the parent error.
const childSchema = new Schema({
  name: { type: String, required: true }
}, { storeSubdocValidationError: false }); // <-- set on the child schema
const parentSchema = new Schema({ child: childSchema });

const Parent = mongoose.model('Parent', parentSchema);

// Will only contain an error for 'child.name'
new Parent({ child: {} }).validateSync().errors;
With ES6 Classes
Schemas have a loadClass() method
that you can use to create a Mongoose schema from an ES6 class:
- ES6 class methods become Mongoose methods
- ES6 class statics become Mongoose statics
- ES6 getters and setters become Mongoose virtuals
Here’s an example of using loadClass() to create a schema from an ES6 class:
class MyClass {
  myMethod() { return 42; }
  static myStatic() { return 42; }
  get myVirtual() { return 42; }
}

const schema = new mongoose.Schema();
schema.loadClass(MyClass);

console.log(schema.methods); // { myMethod: [Function: myMethod] }
console.log(schema.statics); // { myStatic: [Function: myStatic] }
console.log(schema.virtuals); // { myVirtual: VirtualType { ... } }
Pluggable
Schemas are also pluggable which allows us to package up reusable features into
plugins that can be shared with the community or just between your projects.
Further Reading
Here’s an alternative introduction to Mongoose schemas.
To get the most out of MongoDB, you need to learn the basics of MongoDB schema design.
SQL schema design (third normal form) was designed to minimize storage costs,
whereas MongoDB schema design is about making common queries as fast as possible.
The 6 Rules of Thumb for MongoDB Schema Design blog series
is an excellent resource for learning the basic rules for making your queries
fast.
Users looking to master MongoDB schema design in Node.js should look into
The Little MongoDB Schema Design Book
by Christian Kvalheim, the original author of the MongoDB Node.js driver.
This book shows you how to implement performant schemas for a laundry list
of use cases, including e-commerce, wikis, and appointment bookings.
Next Up
Now that we’ve covered Schemas, let’s take a look at SchemaTypes.
In this article, we’ll learn how Mongoose, a third-party library for MongoDB, can help you to structure and access your data with ease.
What is Mongoose?
Mongoose is an ODM (Object Data Modeling) library for MongoDB. While you don’t need to use an Object Data Modeling (ODM) or Object Relational Mapping (ORM) tool to have a great experience with MongoDB, some developers prefer them. Many Node.js developers choose to work with Mongoose to help with data modeling, schema enforcement, model validation, and general data manipulation. And Mongoose makes these tasks effortless.
If you want to hear from the maintainer of Mongoose, Val Karpov, give this episode of the MongoDB Podcast a listen!
Why Mongoose?
By default, MongoDB has a flexible data model. This makes MongoDB databases very easy to alter and update in the future. But a lot of developers are accustomed to having rigid schemas.
Mongoose forces a semi-rigid schema from the beginning. With Mongoose, developers must define a Schema and Model.
What is a schema?
A schema defines the structure of your collection documents. A Mongoose schema maps directly to a MongoDB collection.

With schemas, we define each field and its data type. Permitted types are:
What is a model?
Models take your schema and apply it to each document in its collection.
Models are responsible for all document interactions like creating, reading, updating, and deleting (CRUD).
An important note: the first argument passed to the model should be the singular form of your collection name. Mongoose automatically changes this to the plural form, transforms it to lowercase, and uses that for the database collection name.
In this example, Blog translates to the blogs collection.
Environment setup
Let’s set up our environment. I’m going to assume you have Node.js installed already.
We’ll run the following commands from the terminal to get going:
This will create the project directory, initialize, install the packages we need, and open the project in VS Code.
Let’s add a script to our package.json file to run our project. We will also use ES Modules instead of Common JS, so we’ll add the module type as well. This will also allow us to use top-level await.
Connecting to MongoDB
Now we’ll create the index.js file and use Mongoose to connect to MongoDB.
You could connect to a local MongoDB instance, but for this article we are going to use a free MongoDB Atlas cluster. If you don’t already have an account, it’s easy to sign up for a free MongoDB Atlas cluster here.
After creating your cluster, you should replace the connection string above with your connection string including your username and password.
The connection string that you copy from the MongoDB Atlas dashboard will reference the myFirstDatabase database. Change that to whatever you would like to call your database.
Creating a schema and model
Before we do anything with our connection, we’ll need to create a schema and model.
Ideally, you would create a schema/model file for each schema that is needed. So we’ll create a new folder/file structure: model/Blog.js.
Inserting data // method 1
Now that we have our first model and schema set up, we can start inserting data into our database.
Back in the index.js file, let’s insert a new blog article.
We first need to import the Blog model that we created. Next, we create a new blog object and then use the save() method to insert it into our MongoDB database.
Let’s add a bit more after that to log what is currently in the database. We’ll use the findOne() method for this.
You should see the document inserted logged in your terminal.
Because we are using nodemon in this project, every time you save a file, the code will run again. If you want to insert a bunch of articles, just keep saving. 😄
Inserting data // method 2
In the previous example, we used the save() Mongoose method to insert the document into our database. This requires two actions: instantiating the object, and then saving it.
Alternatively, we can do this in one action using the Mongoose create() method.
This method is much better! Not only can we insert our document, but we also get returned the document along with its _id when we console log it.
Update data
Mongoose makes updating data very convenient too. Expanding on the previous example, let’s change the title of our article.
We can directly edit the local object, and then use the save() method to write the update back to the database. I don’t think it can get much easier than that!
Finding data
Let’s make sure we are updating the correct document. We’ll use a special Mongoose method, findById(), to get our document by its ObjectId.
Notice that we use the exec() Mongoose function. This is technically optional and returns a promise. In my experience, it’s better to use this function since it will prevent some head-scratching issues. If you want to read more about it, check out this note in the Mongoose docs about promises.
Projecting document fields
Just like with the standard MongoDB Node.js driver, we can project only the fields that we need. Let’s only get the title, slug, and content fields.
The second parameter can be of type Object|String|Array<String> to specify which fields we would like to project. In this case, we used a String.
Deleting data
Just like in the standard MongoDB Node.js driver, we have the deleteOne() and deleteMany() methods.
Validation
Notice that the documents we have inserted so far have not contained an author, dates, or comments. So far, we have defined what the structure of our document should look like, but we have not defined which fields are actually required. At this point any field can be omitted.
Let’s set some required fields in our Blog.js schema.
When including validation on a field, we pass an object as its value.
value: String is the same as value: {type: String}.
There are several validation methods that can be used.
We can set required to true on any fields we would like to be required.
For the slug, we want the string to always be in lowercase. For this, we can set lowercase to true. This will take the slug input and convert it to lowercase before saving the document to the database.
For our created date, we can set the default buy using an arrow function. We also want this date to be impossible to change later. We can do that by setting immutable to true.
Validators only run on the create or save methods.
Other useful methods
Mongoose uses many standard MongoDB methods plus introduces many extra helper methods that are abstracted from regular MongoDB methods. Next, we’ll go over just a few of them.
The exists() method returns either null or the ObjectId of a document that matches the provided query.
Mongoose also has its own style of querying data. The where() method allows us to chain and build queries.
Either of these methods work. Use whichever seems more natural to you.
You can also chain multiple where() methods to include even the most complicated query.
To include projection when using the where() method, chain the select() method after your query.
Multiple schemas
It’s important to understand your options when modeling data.
If you’re coming from a relational database background, you’ll be used to having separate tables for all of your related data.
Generally, in MongoDB, data that is accessed together should be stored together.
You should plan this out ahead of time if possible. Nest data within the same schema when it makes sense.
If you have the need for separate schemas, Mongoose makes it a breeze.
Let’s create another schema so that we can see how multiple schemas can be used together.
We’ll create a new file, User.js, in the model folder.
For the email, we are using a new property, minLength, to require a minimum character length for this string.
Now we’ll reference this new user model in our blog schema for the author and comments.user.
Here, we set the author and comments.user to SchemaTypes.ObjectId and added a ref, or reference, to the user model.
This will allow us to “join” our data a bit later.
And don’t forget to destructure SchemaTypes from mongoose at the top of the file.
Lastly, let’s update the index.js file. We’ll need to import our new user model, create a new user, and create a new article with the new user’s _id.
Notice now that there is a users collection along with the blogs collection in the MongoDB database.
You’ll now see only the user _id in the author field. So, how do we get all of the info for the author along with the article?
We can use the populate() Mongoose method.
Now the data for the author is populated, or “joined,” into the article data. Mongoose actually uses the MongoDB $lookup method behind the scenes.
Middleware
In Mongoose, middleware are functions that run before and/or during the execution of asynchronous functions at the schema level.
Here’s an example. Let’s update the updated date every time an article is saved or updated. We’ll add this to our Blog.js model.
Then in the index.js file, we’ll find an article, update the title, and then save it.
Notice that we now have an updated date!
Besides pre(), there is also a post() mongoose middleware function.
Next steps
I think our example here could use another schema for the comments. Try creating that schema and testing it by adding a few users and comments.
There are many other great Mongoose helper methods that are not covered here. Be sure to check out the official documentation for references and more examples.
Conclusion
I think it’s great that developers have many options for connecting and manipulating data in MongoDB. Whether you prefer Mongoose or the standard MongoDB drivers, in the end, it’s all about the data and what’s best for your application and use case.
I can see why Mongoose appeals to many developers and I think I’ll use it more in the future.
| sidebar_position | title | description | keywords | tags | ||||||||||||||||
|---|---|---|---|---|---|---|---|---|---|---|---|---|---|---|---|---|---|---|---|---|
|
4 |
Руководство по Mongoose |
Руководство по Mongoose |
|
|
Mongoose — это ORM (Object Relational Mapping — объектно-реляционное отображение или связывание) для
MongoDB.Mongooseпредоставляет в распоряжение разработчиков простое основанное на схемах решение для моделирования данных приложения, включающее встроенную проверку типов, валидацию, формирование запросов и хуки, отвечающие за реализацию дополнительной логики обработки запросов.
const mongoose = require('mongoose')

mongoose.connect('mongodb://localhost:27017/test', {
  useNewUrlParser: true,
  useUnifiedTopology: true
})

const Cat = mongoose.model('Cat', { name: String })

const kitty = new Cat({ name: 'Cat' })
kitty.save().then(() => console.log('мяу'))
Быстрый старт
Установка
yarn add mongoose
# или
npm i mongoose
Подключение к БД
const mongoose = require('mongoose')
const { MONGODB_URI } = require('./config.js')

mongoose.connect(MONGODB_URI, {
  useNewUrlParser: true,
  useUnifiedTopology: true
})
Обработка ошибки и подключения
const db = mongoose.connection
db.on('error', console.error.bind(console, 'Ошибка подключения: '))
db.once('open', () => {
  // Подлючение установлено
})
Создание схемы и модели
const { Schema, model } = mongoose

const catSchema = new Schema({
  name: String
})

module.exports = model('Cat', catSchema)
Создание объекта
const Cat = require('./Cat.js')

const kitty = new Cat({ name: 'Cat' })
Добавление метода
catSchema.methods.speak = function () {
  const greet = this.name
    ? `Меня зовут ${this.name}`
    : `У меня нет имени`

  console.log(greet)
}

const kitty = new Cat({ name: 'Cat' })
kitty.speak() // Меня зовут Cat
Сохранение объекта
kitty.save((err, cat) => {
  if (err) console.error(err)
  cat.speak()
})
Поиск всех объектов определенной модели
Cat.find((err, cats) => {
  if (err) console.error(err)
  console.log(cats)
})
Поиск одного объекта (по имени)
Cat.findOne({ name: 'Cat' }, callback)
Для поиска объекта можно использовать регулярное выражение.
Схема
Создание схемы
const { Schema } = required('mongoose')

const blogSchema = new Schema({
  title: String,
  author: String
  body: String
  comments: [
    {
      body: String
      createdAt: Date
    }
  ],
  createdAt: {
    type: Date,
    default: Date.now()
  },
  hidden: Boolean,
  meta: {
    votes: Number,
    favs: Number
  }
})
Дополнительные поля можно добавлять с помощью метода Schema.add()
const firstSchema = new Schema()
firstSchema.add({
  name: 'string',
  color: 'string',
  price: 'number'
})

const secondSchema = new Schema()
secondSchema.add(firstSchema).add({ year: Number })
По умолчанию Mongoose добавляет к схеме свойство _id (его можно перезаписывать)
const schema = new Schema()
schema.path('_id') // ObjectId { ... }

const Model = model('Test', schema)
const doc = new Model()
doc._id // ObjectId { ... }
Кроме методов экземпляра, схема позволяет определять статические функции
catSchema.statics.findByName = function(name) {
  return this.find({ name: new RegExp(name, 'i') })
}

// или
catSchema.static('findByName', function(name) { return this.find({ name: new RegExp(name, 'i') }) })

const Cat = model('Cat', catSchema)
const cats = await Cat.findByName('Kitty')
Также для определения дополнительного функционала можно использовать утилиты для формирования запроса
catSchema.query.byName = function(name) { return this.where({ name: new RegExp(name, 'i') }) }

const Cat = model('Cat', catSchema)

Cat.find().byName('Cat').exec((err, cats) => {
  console.log(cats)
})

Cat.findOne().byName('Cat').exec((err, cat) => {
  console.log(cat)
})
Mongoose позволяет определять вторичные индексы в Schema на уровне пути или на уровне schema
const catSchema = new Schema({
  name: String,
  type: String,
  tags: { type: [String], index: true } // уровень поля
})

catSchema.index({ name: 1, type: -1 }) // уровень схемы
При запуске приложения для каждого индекса вызывается createIndex(). Индексы полезны для разработки, но в продакшне их лучше не использовать. Отключить индексацию можно с помощью autoIndex: false
mongoose.connect(MONGODB_URL, { autoIndex: false })
// или
catSchema.set('autoIndex', false)
// или
new Schema({...}, { autoIndex: false })
Схема позволяет создавать виртуальные свойства, которые можно получать и устанавливать, но которые не записываются в БД
// Схема
const personSchema = new Schema({
  name: {
    first: String,
    last: String
  }
})

// Модель
const Person = model('Person', personSchema)

// Документ
const john = new Person({
  name: {
    first: 'John',
    last: 'Smith'
  }
})

// Виртуальное свойство для получения и записи полного имени
personSchema.virtual('fullName')
  .get(function() { return `${this.name.first} ${this.name.last}` })
  .set(function(str) {
    ;[this.name.first, this.name.last] = str.split(' ')
  })

john.fullName // John Smith
john.fullName = 'Jane Air'
john.fullName // Jane Air
Настройки
Настройки схемы могут передаваться в виде объекта в конструктор или в виде пары ключ/значение в метод set()
new Schema({...}, options)

const schema = new Schema({...})
schema.set(option, value)
autoIndex: bool— определяет создание индексов (по умолчаниюtrue)autoCreate: bool— определяет создание коллекций (по умолчаниюfalse)bufferCommands: boolиbufferTimaoutMs: num— определяет, должны ли команды буферизоваться (по умолчаниюtrue), и в течение какого времени (по умолчанию отсутствует)capped: num— позволяет создавать закрытые коллекции ({ capped: 1024 }, 1024 — размер в байтах)collection: str— определяет название коллекции (по умолчанию используется название модели)id: bool— позволяет отключать получение_idчерез виртуальный геттерid_id: bool— позволяет отключать создание_idminimize: bool— определяет удаление пустых объектов (по умолчаниюtrue). Для определения пустого объекта используется утилита$isEmpty—doc.$isEmpty(fieldName)strict: bool— определяет, должны ли значения, передаваемые в конструктор модели и отсутствующие в схеме, сохраняться в БД (по умолчаниюtrue, значит, не должны)typeKey: str— позволяет определять ключ типа (по умолчаниюtype)validateBeforeSave: bool— позволяет отключать валидацию объектов перед их сохранением в БД (по умолчаниюtrue)collation: obj— определяет порядок разрешения коллизий, например, при совпадении двух объектов ({collation: { locale: 'en_US', strength: 1 }}— совпадающие ключи/значения на латинице будут игнорироваться)timestamps: bool | obj— позволяет добавлять к схеме поляcreatedAtиupdatedAtс типомDate. Данным полям можно присваивать другие названия —{ timestamps: { createdAt: 'created_at' } }. По умолчанию для создания даты используетсяnew Date(). Это можно изменить —{ timestamps: { currentTime: () => ~~(Date.now() / 1000) } }
Метод loadClass() позволяет создавать схемы из классов:
- методы класса становятся методами
Mongoose - статические методы класса становятся статическими методами
Mongoose - геттеры и сеттеры становятся виртуальными методами
Mongoose
class MyClass {
  myMethod() { return 42 }
  static myStatic() { return 24 }
  get myVirtual() { return 31 }
}

const schema = new Schema()
schema.loadClass(MyClass)

console.log(schema.methods) // { myMethod: ... }
console.log(schema.statics) // { myStatic: ... }
console.log(schema.virtuals) // { myVirtual: ... }
SchemaTypes
Что такое SchemaType?
Схема представляет собой объект конфигурации для модели. SchemaType — это объект конфигурации для определенного свойства модели. SchemaType определяет тип, геттеры, сеттеры и валидаторы свойства.
Доступные SchemaTypes (типы)
- String
- Number
- Date
- Buffer
- Boolean
- Mixed
- ObjectId
- Array
- Decimal128
- Map
Пример
const schema = new Schema({
  name: String,
  binary: Buffer,
  livilng: Boolean,
  updated: {
    type: Date,
    default: Date.now
  },
  age: {
    type: Number,
    min: 18,
    max: 65
  },
  mixed: Schema.Types.Mixed,
  _someId: Schema.Types.ObjectId,
  decimal: Schema.Types.Decimal128,
  array: [],
  ofString: [String],
  ofNumber: [Number],
  ofDates: [Date],
  ofBuffer: [Buffer],
  ofBoolean: [Boolean],
  ofMixed: [Schema.Types.Mixed],
  ofObjectId: [Schema.Types.ObjectId],
  ofArrays: [[]],
  ofArrayOfNumber: [[Number]],
  nested: {
    stuff: {
      type: String,
      lowercase: true,
      trim: true
    }
  },
  map: Map,
  mapOfString: {
    type: Map,
    of: String
  }
})
Существует три способа определения типа
// 1
name: String
// 2
name: 'String' | 'string'
// 3
name: {
  type: String
}
type
Для определения свойства с названием type необходимо сделать следующее
new Schema({
  asset: {
    // !
    type: { type: String },
    ticker: String
  }
})
Настройки
При определении типа схемы с помощью объекта можно определять дополнительные настройки.
Общие
required: bool— определяет, является ли поле обязательнымdefault: any | fn— значение поля по умолчаниюvalidate: fn— функция-валидаторget: fn— кастомный геттерset: fn— кастомный сеттерalias: str— алиас, синоним, виртуальный геттер/сеттерimmutable: bool— определяет, является ли поле иммутабельным (неизменяемым)transform: fn— функция, вызываемая при выполненииDocument.toJSON(), включаяJSON.stringify()
const numberSchema = new Schema({
  intOnly: {
    type: Number,
    get: v => Math.round(v),
    set: v => Math.round(v),
    alias: 'i'
  }
})

const Number = model('Number', numberSchema)

const doc = new Number()
doc.intOnly = 2.001
doc.intOnly // 2
doc.i // 2
doc.i = 3.002
doc.intOnly // 3
doc.i // 3
Индексы
index: boolunique: bool— определяет, должны ли индексы быть уникальнымиsparse: bool— определяет, должны ли индексы создаваться только для индексируемых полей
Строка
lowercase: booluppercase: booltrim: boolmatch: RegExp— валидатор в виде регулярного выраженияenum: arr— валидатор, проверяющий, совпадает ли строка с каким-либо элементом массиваminLength: nummaxLength: numpopulate: obj— дефолтные настройки популяции (извлечения данных, заполнения данными)
Число
min: nummax: numenum: arrpopulate: obj
Дата
min: Datemax: Date
ObjectId
populate: obj
Особенности использования некоторых типов
Даты
При изменении даты, например, с помощью метода setMonth(), ее необходимо пометить с помощью markModified(), иначе, изменения не будут сохранены
const schema = new Schema('date', { dueDate: Date })
schema.findOne((err, doc) => {
  doc.dueDate.setMonth(3)
  // это не сработает
  doc.save()

  // надо делать так
  doc.markModified('dueDate')
  doc.save()
})
Mixed (смешанный тип)
Mongoose не осуществляет проверку смешанных типов
new Schema({ any: {} })
new Schema({ any: Object })
new Schema({ any: Schema.Types.Mixed })
new Schema({ any: mongoose.Mixed })
При изменении значений смешанного типа, их, как и даты, необходимо помечать с помощью markModified.
ObjectId
ObjectId — это специальный тип, обычно используемый для уникальных идентификаторов
const carSchema = new Schema({ driver: mongoose.ObjectId })
ObjectId — это класс, а сами ObjectIds — это объекты, которые, обычно, представлены в виде строки. При преобразовании ObjectId с помощью метода toString(), мы получаем 24-значную шестнадцатиричную строку
const Car = model('Car', carSchema)

const car = new Car()
car.driver.toString() // 5e1a0651741b255ddda996c4
Map
MongooseMap — это подкласс JS-класса Map. Ключи карт должны быть строками
const userSchema = new Schema({
  socialMediaHandles: {
    type: Map,
    of: String
  }
})

const User = model('User', userSchema)
const user = new User({
  socialMediaHandles: {}
})
Для получения и установки значений следует использовать get() и set()
user.socialMediaHandles.set('github', 'username')
// или
user.set('socialMediaHandles.github', 'username')

user.socialMediaHandles.get('github') // username
// или
user.get('socialMediaHandles.github') // username
Для популяции элементов в карту используется синтаксис $*
const userSchema = new Schema({
  socialMediaHandles: {
    type: Map,
    of: new Schema({
      handle: String,
      oauth: {
        type: ObjectId,
        ref: 'OAuth'
      }
    })
  }
})
const User = model('User', userSchema)
// заполняем свойство `oauth` данными пользователя
const user = await User.findOne().populate('socialMediaHandles.$*.oauth')
Геттеры
Геттеры похожи на виртуальные свойства для полей схемы. Предположим, что мы хотим сохранять аватар пользователя в виде относительного пути и затем добавлять к нему название хоста в приложении
const root = 'https://examplce.com/avatars'

const userSchema = new Schema({
  name: String,
  avatar: {
    type: String,
    get: v => `${root}/${v}`
  }
})

const User = model('User', userSchema)

const user = new User({ name: 'John', avatar: 'john.png' })
user.avatar // https://examplce.com/avatars/john.png
Схема
В качестве типов полей схемы можно использовать другие схемы
const subSchema = new Schema({})

const schema = new Schema({
  data: {
    type: subSchema,
    default: {}
  }
})
Подключение
Для подключения к MongoDB используется метод mongoose.connect()
mongoose.connect(MONGODB_URL, { useNewUrlParser: true, useUnifiedTopology: true })
Данный метод принимает строку с адресом БД и объект с настройками.
Буферизация
За счет буферизации Mongoose позволяет использовать модели, не дожидаясь подключения к БД. Отключить буферизацию можно с помощью bufferCommands: false. Отключить ожидание создания коллекций можно с помощью autoCreate: false
const schema = new Schema({
  name: String
}, {
  capped: { size: 1024 },
  bufferCommands: false,
  autoCreate: false
})
Обработка ошибок
Существует 2 класса ошибок, возникающих при подключении к БД:
- Ошибка при первоначальном подключении. При провале подключения
Mongooseотправляет событиеerrorи промис, возвращаемыйconnect(), отклоняется. При этом,Mongooseне пытается выполнить повторное подключение - Ошибка после установки начального соединения. В этом случае
Mongooseпытается выполнить повторное подключение
Для обработки первого класса ошибок используется catch() или try/catch
mongoose.connect(uri, options)
  .catch(err => handleError(err))

// или
try {
  await mongoose.connect(uri, options)
} catch (err) {
  handleError(err)
}
Для обработки второго класса ошибок нужно прослушивать соответствующее событие
mongoose.connection.on('error', err => {
  handleError(err)
})
Настройки
bufferCommands: bool— позволяет отключать буферизациюuser: str/pass: str— имя пользователя и пароль для аутентификацииautoIndex: bool— позволяет отключать автоматическую индексациюdbName: str— название БД для подключения
Важные
useNewUrlParser: bool—trueозначает использование нового MongoDB-парсера для разбора строки подключения (должно быть включено во избежание предупреждений)useCreateIndex: bool—trueозначает использованиеcreateIndex()вместоensureIndex()для создания индексов (должно быть включено при индексации)useFindAndModify: bool—falseозначает использование нативногоfindOneAndUpdate()вместоfindAndModify()useUnifiedTopology: bool—trueозначает использование нового движка MongoDB для управления подключением (должно быть включено во избежание предупреждений)poolSize: num— максимальное количество сокетов для данного подключенияsocketTimeoutMS: num— время, по истечении которого неактивный сокет отключается от БДfamily: 4 | 6— версия IP для подключенияauthSource: str— БД, используемая при аутентификации с помощьюuserиpass
Колбек
Функция connect() также принимает колбек, возвращающий промис
mongoose.connect(uri, options, (err) => {
  if (err) // обработка ошибки
  // успех
})

// или
mongoose.connect(uri, options).then(
  () => { /* обработка ошибки */ },
  err => { /* успех */ }
)
События, возникающие при подключении
connecting— начало подключенияconnected— успешное подключениеopen— эквивалентconnecteddisconnecting— приложение вызвалоConnection.close()для отключения от БДdisconnected— потеря подключенияclose— возникает после выполненияConnection.close()reconnected— успешное повторное подключениеerror— ошибка подключенияfullsetup— возникает при подключении к набору реплик (replica set), когда выполнено подключение к основной реплике и одной из вторичныхall— возникает при подключении к набору реплик, когда выполнено подключение ко всем серверамreconnectedFailed— провал всехreconnectTries(попыток выполнения повторного подключения)
Подключение к набору реплик
mongoose.connect('mongodb://<username>:<password>@host1.com:27017,host2.com:27017,host3.com:27017/testdb')

// к одному узлу
mongoose.connect('mongodb://host1.com:port1/?replicaSet=rsName')
Подключение к нескольким БД
Подключение к нескольким БД выполняется с помощью метода createConnection(). Существует два паттерна для выполнения такого подключения:
- Экспорт подключения и регистрация моделей для подключения в одном файле
// connections/fast.js
const mongoose = require('mongoose')

const conn = mongoose.createConnection(process.env.MONGO_URI)
conn.model('User', require('../schemas/user'))

module.exports = conn

// connections/slow.js
const mongoose = require('mongoose')

const conn = mongoose.createConnection(process.env.MONGO_URI)
conn.model('User', require('../schemas/user'))
conn.model('PageView', require('../schemas/pageView'))

module.exports = conn
- Регистрация подключений с функцией внедрения зависимостей
const mongoose = require('mongoose')

module.exports = function connFactory() {
  const conn = mongoose.createConnection(process.env.MONGO_URI)

  conn.model('User', require('../schemas/user'))
  conn.model('PageView', require('../schemas/pageView'))

  return conn
}
Модель
Модели — это конструкторы, компилируемые из определений Schema. Экземпляр модели называется документом. Модели отвечают за создание и получение документов из БД.
Компиляция модели
При вызове mongoose.model() происходит компиляция модели
const schema = new Schema({ name: 'string', age: 'number' })
const User = model('User', schema)
Первый аргумент — название коллекции. В данном случае будет создана коллекция users.
Обратите внимание: функция model() создает копию schema. Убедитесь, что перед вызовом model() полностью настроили schema (включая определение хуков).
Создание и сохранение документа
const User = model('User', userSchema)

const user = new User({ name: 'John', age: 30 })
user.save((err) => {
  if (err) return handleError(err)
  console.log(user)
})

// или
User.create({ name: 'John', age: 30 }, (err, user) => {
  if (err) return handleError(err)
  console.log(user)
})

// или для создания нескольких документов
User.insertMany([
  {
    name: 'John',
    age: 30
  },
  {
    name: 'Jane',
    age: 20
  }
], (err) => {})
Получение документов
Для получения документов из БД используются методы find(), findById(), findOne(), where() и др.
User.find({ name: 'John' }).where('createdAt').gt(oneYearAgo).exec(callback)
Удаление документов
Для удаления документов используются методы deleteOne(), deleteMany() и др.
User.deleteOne({ name: 'John' }, (err) => {})
Обновление документов
Для обновления документов используется метод updateOne() и др.
User.updateOne({ name: 'John' }, { name: 'Bob' }, (err, res) => {
  // Обновляется как минимум один документ
  // `res.modifiedCount` содержит количество обновленных документов
  // Обновленные документы не возвращаются
})
Если мы хотим обновить один документ и вернуть его, то следует использовать findOneAndUpdate().
Поток изменений
Поток изменений позволяет регистрировать добавление/удаление и обновление документов
const run = async () => {
  const userSchema = new Schema({
    name: String
  })
  const User = model('User', userSchema)

  // Создаем поток изменений
  // При обновлении БД отправляется (emitted) событие `change`
  User.watch()
    .on('change', data => console.log(new Date(), data))

  console.log(new Date(), 'Создание документа')
  await User.create({ name: 'John Smith' })
  console.log(new Date(), 'Документ успешно создан')
}
Документ
Документы — это экземпляры моделей. Документ и модель — разные классы Mongoose. Класс модели является подклассом класса документа. При использовании конструктора модели создается новый документ.
Извлечение документа
const doc = await Model.findOne()
Обновление документа с помощью save()
Документы можно изменять с помощью обычного присвоения — Mongoose автоматически преобразует его в оператор обновления MongoDB
doc.name = 'foo'

// `Mongoose` отправляет `updateOne({ _id: doc._id }, { $set: { name: 'foo' } })` в `MongoDB`
await doc.save()
Метод save() возвращает промис, который при успешном завершении операции возвращает сохраненный документ
doc.save().then((savedDoc) => {
  savedDoc === doc // true
})
При отсутствии документа с указанным _id, выбрасывается исключение DocumentNotFoundError.
Обновление документа с помощью запросов
Если нам не хватает save(), то можно создать собственное обновление
// Обновляем все документы в коллекции `users`
await User.updateMany({}, { $set: { name: 'John' } })
Обратите внимание, что update(), updateMany(), findOneAndUpdate() и др. не запускают посредников save().
Валидация
Документы подвергаются кастингу и валидации перед сохранением. Кастинг представляет собой проверку типа, а валидация — проверку дополнительных настроек (например, min для типа Number). Внутренне Mongoose вызывает метод документа validate() перед сохранением
const userSchema = new Schema({ name: String, age: { type: Number, min: 18 } })
const User = model('User', userSchema)

const user = new User({ name: 'John', age: 'many' })
// Кастинг типа `Number` провален для значения `many` поля `age`
await user.validate()

const user2 = new User(name: 'Jane', age: 17)
// Значение поля `age` (17) меньше минимально допустимого значения (18)
Перезапись
Существует два способа перезаписи документов (замены всех ключей документа). Первый способ — функции Document.overwrite() и save()
const user = await User.findOne({ _id })

// Устанавливаем `name` и удаляем остальные свойства
user.overwrite({ name: 'John' })
await doc.save()
Второй способ — метод Model.replaceOne()
await User.replaceOne({ _id }, { name: 'John' })
Субдокумент (документ в документе)
Субдокументы — это документы, встроенные в другие документы. В Mongoose это означает, что одни схемы могут быть вложены в другие.
const childSchema = new Schema({ name: String })

const parentSchema = new Schema({
  // массив субдокументов
  children: [childSchema],
  // единичный вложенный субдокумент
  child: childSchema
})
Что такое субдокументы?
Субдокументы похожи на обычные документы. Вложенные схемы могут иметь посредников, кастомную логику валидации, виртуальные свойства и т.д. Главное отличие субдокументов состоит в том, что они не сохраняются индивидуально, они сохраняются вместе с родительским документом.
const Parent = model('Parent', parentSchema)
const parent = new Parent({ children: [
  { name: 'John' },
  { name:'Jane' }
] })
parent.children[0].name = 'Bob'

// `parent.children[0].save()` запустит посредников
// но не сохранит документ. Для этого нужно сохранить его предка
parent.save()
Вызов save() предка запускает выполнение save() всех потоков. То же самое справедливо для validate().
Дочерние посредники pre('save') и pre('validate') выполняются до родительского pre('save'), но после родительского pre('validate')
// числа 1-4 будут выведены по порядку
const childSchema = new Schema({ name: String })

childSchema.pre('validate', (next) => {
  console.log(2)
  next()
})

childSchema.pre('save', (next) => {
  console.log(3)
  next()
})

const parentSchema = new Schema({
  child: childSchema
})

parentSchema.pre('validate', (next) => {
  console.log(1)
  next()
})

parentSchema.pre('save', (next) => {
  console.log(4)
  next()
})
Субдокументы и вложенные пути
Вложенные пути немного отличаются от субдокументов. В приведенном ниже примере у нас имеется две схемы: одна с субдокументом child, другая с вложенным путем child
// Субдокумент
const subdocSchema = new Schema({
  child: new Schema({
    name: String,
    age: Number
  })
})
const Subdoc = model('Subdoc', subdocSchema)

// Вложенный путь
const nestedSchema = new Schema({
  child: {
    name: String,
    age: Number
  }
})
const Nested = model('Nested', nestedSchema)
Отличия:
- экземпляры
Nestedникогда не имеютchild === undefined. Мы может определять подсвойстваchildдаже при отсутствии самогоchild. Но экземплярыSubdocмогут иметьchild === undefined
const doc1 = new Subdoc({})
doc1.child === undefined // true
doc1.child.name = 'test' // TypeError: cannot read property...

const doc2 = new Nested({})
doc2.child === undefined // false
console.log(doc2.child) // MongooseDocument { undefined }
doc2.child.name = 'test' // работает
- метод
Document.set()выполняет объединение для вложенных путей и перезапись для субдокументов
const doc1 = new Subdoc({
  child: {
    name: 'John',
    age: 30
  }
})
doc1.set({
  child: {
    age: 20
  }
})
doc1.child // { age: 20 }

const doc2 = new Nested({
  child: {
    name: 'John',
    age: 30
  }
})
doc2.set({
  child: {
    age: 20
  }
})
doc2.set({
  child: {
    age: 20
  }
})
doc2.child // { name: 'John', age: 20 }
Значения субдокументов по умолчанию
Пути субдокументов имеют значение undefined (к ним не применяются настройки default) до тех пор, пока им не будет присвоено ненулевое значение
const subdocSchema = new Schema({
  child: new Schema({
    name: String,
    age: {
      type: Number,
      default: 18
    }
  })
})
const Subdoc = model('Subdoc', subdocSchema)

// настройка `default` поля `age` не будет иметь эффекта, поскольку значением `child` является `undefined`
const doc = new Subdoc()
doc.child // undefined
Получение субдокумента
Для поиска субдокумента по его _id (устанавливается по умолчанию) используется специальный метод id()
const subdoc = parent.children.id(_id)
Добавление субдокументов в массив
Такие методы как push(), unshift(), addToSet() и др. осуществляют прозрачный кастинг передаваемых аргументов
const Parent = model('Parent', parentSchema)
const parent = new Parent()

parent.children.push({ name: 'John' })
const subdoc = parent.children[0]
console.log(subdoc) // { _id: '...', name: 'John' }
subdoc.isNew // true

parent.save()
Для того, чтобы создать документ без его добавления в массив, следует использовать метод create()
const subdoc = parent.children.create({ name: 'Jane' })
Удаление субдокументов
У каждого субдокумента есть метод remove(). Для массива субдокументов данный метод эквивалентен вызову pull(). Для единичного субдокумента он эквивалентен установке значения субдокумента в null
// эквивалент `parent.children.pull(_id)`
parent.children.id(_id).remove()

// эквивалент `parent.child = null`
parent.child.remove()

parent.save()
Получение предка субдокумента
Для получения непосредственного предка субдокумента используется функция parent(), а для получения предка верхнего уровня (для глубоко вложенных субдокументов) — функция ownerDocument().
Альтернативный синтаксис
При создании схемы с помощью массива объектов, Mongoose автоматически преобразует объекты в схемы
const parentSchema = new Schema({
  children: [
    {
      name: String
    }
  ]
})
// эквивалент
const parentSchema = new Schema({
  children: [
    new Schema({
      name: String
    })
  ]
})
Обратите внимание, что в случае единичного объекта, вместо схемы создается вложенных путь. Для того, чтобы сообщить Mongoose о необходимости создания схемы для единичного объекта, следует использовать настройку typePojoToMixed: false
const schema = new Schema({
  nested: {
    // `new Schema({ prop: String })`
    type: { prop: String },
    required: true
  }
}, { typePojoToMixed: false })
Запрос
Модель предоставляет несколько статических вспомогательных функций. Каждая функция возвращает объект Query
Model.deleteMany()Model.deleteOne()Model.find()Model.findById()Model.findByIdAndDelete()Model.findByIdAndRemove()Model.findByIdAndUpdate()Model.findOne()Model.findOneAndDelete()Model.findOneAndRemove()Model.findOneAndReplace()Model.findOneAndUpdate()Model.replaceOne()Model.updateMany()Model.updateOne()
Запрос может выполняться двумя способами:
- с помощью колбека — запрос выполняется асинхронно и результат передается в колбек
- с помощью метода
then()запроса, что позволяет использовать его как промис
Выполнение запроса
При выполнении запроса с помощью callback, запрос может быть определен в виде JSON документа
const User = model('User', userSchema)

// Ищем пользователей, фамилия которых совпадает с `Smith`, выбираем поля `name` и `occupation`
User.findOne(
  { 'name.last': 'Smith' },
  'name occupation',
  (err, user) => {
    if (err) return handleError(err)
    console.log(user)
  }
)
Запрос выполняется, его результат передается в callback. Сигнатура колбеков всегда такая: callback(error, result). При возникновении ошибки, параметр error содержит объект ошибки, а result является нулевым. При успешном выполнении запроса error является нулевым, а result заполняется (populate) данными из результата запроса.
result зависит от операции: для findOne() — это потенциально ненулевой единичный документ, для find() — список документов, для count() — количество документов, для update() — количество обновленных документов и т.д.
Пример без колбека
// Ищем пользователей, фамилия которых совпадает с `Smith`
const query = User.findOne({ 'name.last', 'Smith' })

// выбираем поля `name` и `occupation`
query.select('name occupation')

// выполняем запрос
query.exec((err, user) => {
  if (err) return handleError(err)
  console.log(user)
})
В приведенном примере переменная query имеет тип Query. Query позволяет формировать запрос двумя способами
// Документ JSON
User
  .find({
    'name.last': 'Smith',
    // gt - greater than, больше чем; lt - less than, меньше чем
    age: { $gt: 17, $lt: 66 },
    // in - один из вариантов
    likes: { $in: ['playing guitar', 'swimming'] }
  })
  .limit(10)
  .sort({ occupation: -1 })
  .select({ name: 1, occupation: 1 })
  .exec(callback)

// Строитель (builder) запроса
User
  .find({ 'name.last': 'Smith' })
  .where('age').gt(17).lt(66)
  .where('likes').in(['playing guitar', 'swimming'])
  .limit(10)
  .sort('-occupation')
  .select('name occupation')
  .exec(callback)
Запросы не являются промисами
Несмотря на то, что у запросов есть метод then(), это всего лишь соглашение, они не являются промисами. В отличие от промисов, вызов then() запроса может привести к его многократному выполнению.
В приведенном ниже примере updateMany() вызывается 3 раза
const q = Model.updateMany({}, {completed: true}, () => {
  console.log('Первое обновление')
})

q.then(() => {
  console.log('Второе обновление')
})
q.then(() => {
  console.log('Третье обновление')
})
Смешивание колбеков и промисов может привести к дублированию операций.
Валидация
Для валидации характерно следующее:
- Она определяется в
SchemaType(при определении схемы) - Валидация — это посредник (middleware).
Mongooseрегистрирует ее как хукpre('save')для каждой схемы - Автоматическую валидацию, выполняемую перед сохранением документа, можно отключить с помощью настройки
validateBeforeSave: false - Валидаторы можно запускать вручную с помощью
doc.validate(callback)илиdoc.validateSync() - Помечать поля как невалидные можно с помощью
doc.invalidate(...) - Валидаторы не запускаются для неопределенных значений, кроме валидатора
required - Валидаторы выполняются асинхронно и рекурсивно: при вызове
Model.save()также выполняется валидация субдокументов. При возникновении ошибки, ее получает колбекModel.save() - Можно создавать собственные валидаторы
Встроенные валидаторы
Mongoose предоставляет несколько встроенных валидаторов:
- Все
SchemaTypesимеют встроенный валидаторrequired(поле является обязательным для заполнения) - Числа имеют валидаторы
minиmax - Строки имеют валидаторы
enum,match,minLengthиmaxLength
Значением валидатора является либо соответствующий примитив — условие, которому должно удовлетворять значение поля, либо массив, где первым элементом является примитив, а вторым — сообщение об ошибке
const breakfastSchema = new Schema({
  eggs: {
    type: Number,
    min: [3, 'Слишком мало яиц'],
    max: 6
  },
  bacon: {
    type: Number,
    required: [true, 'Без бекона?']
  },
  drink: {
    type: String,
    enum: ['Кофе', 'Чай'],
    required: function () {
      return this.bacon >= 2
    }
  }
})
const Breakfast = model('Breakfast', breakfastSchema)

const badBreakfast = new Breakfast({
  eggs: 2,
  bacon: 2,
  drink: 'Молоко'
})
let error = badBreakfast.validateSync()
error.errors['eggs'].message // Слишком мало яиц
error.errors['drink'].message // `Молоко` is not a valid enum value for path `drink`

badBreakfast.drink = null
error = badBreakfast.validateSync()
error.errors['drink'].message // Path `drink` is required

badBreakfast.bacon = null
error = badBreakfast.validateSync()
error.errors['bacon'].message // Без бекона?
Обратите внимание, что настройка unique не является валидатором. Это утилита для генерации уникальных индексов
const uniqueUsernameSchema = new Schema({
  username: {
    type: String,
    unique: true
  }
})
Кастомные валидаторы
Кастомные валидаторы определяются следующим образом:
const userSchema = new Schema({
  phone: {
    type: String,
    validate: {
      validator: (v) => /+7d{10}/.test(v),
      message: props => `${props.value} не является валидным номером сотового телефона!`
    },
    required: [true, 'Номер телефона является обязательным']
  }
})

const User = model('User', userSchema)
const user = new User()

user.phone = '3214256'
let error = user.validateSync()
error.errors['phone'].message // `3214256` не является валидным номером сотового телефона!

user.phone = ''
error = user.validateSync()
error.errors['phone'].message // Номер телефона является обязательным
Асинхронные кастомные валидаторы
Также существует два способа определения асинхронных кастомных валидаторов:
- с помощью
Promise.reject() - с помощью
Promise.resolve(false)
const userSchema = new Schema({
  name: {
    type: String,
    validate: () => Promise.reject(new Error('Упс!'))
  },
  email: {
    type: String,
    validate: {
      validator: () => Promise.resolve(false),
      message: 'Валидация email провалилась'
    }
  }
})
Ошибки валидации
Если при выполнении валидации возникли ошибки, возвращается объект errors, каждое значение которого представляет собой объект ValidatorError (unique возвращает DuplicateKeyError). Объект ValidatorError содержит свойства kind, path, value и message. Он также может содержать свойство reason. Если в валидаторе было выброшено исключение, данное свойство будет содержать это исключение.
Ошибки кастинга
Перед запуском валидаторов Mongoose выполняет проверку значений на соответствие типам. Данный процесс называется кастингом (casting). При провале кастинга, объект error.errors будет содержать объект CastError. Кастинг выполняется перед валидацией, при провале кастинга валидация не выполняется.
Валидатор required для вложенных объектов
Для того, чтобы сделать вложенный объект обязательным, следует определить его в виде схемы
// Будет выброшено исключение, поскольку `name` не является самостоятельным путем
let userSchema = new Schema({
  name: {
    first: String,
    last: String
  },
  required: true
})

const nameSchema = new Schema({
  first: String,
  last: String
})

// так будет работать
userSchema = new Schema({
  name: {
    type: nameSchema,
    required: true
  }
})
Валидаторы обновления
Mongoose также поддерживает валидацию для операций update(), updateOne(), updateMany() и findOneAndUpdate(). По умолчанию такая валидацию отключена. Для того, чтобы ее включить, следует установить настройку runValidators в значение true
const toySchema = new Schema({
  color: {
    type: String,
    validate: (v) => /red|green|blue/i.test(v), 'Недопустимый цвет'
  },
  name: String
})

const Toy = model('Toy', toySchema)

const opts = { runValidators: true }
Toy.updateOne({}, { color: 'не цвет' }, opts, (err) => {
  console.error(err) // Недопустимый цвет
})
Обратите внимание: валидаторы обновления имеют некоторые особенности, связанные с потерей контекста (this), успешной валидацией несуществующих путей и возможностью их использования только в некоторых операциях.
Посредники
Посредники (промежуточное программное обеспечение, промежуточный слой, middlewares), которые тажке называются пре и пост хуками, являются функциями, перехватывающими выполнение асинхронных функций. Посредники определяются на уровне схемы и часто используются для создания плагинов.
Типы посредников
Mongoose предоставляет 4 типа посредников: посредники документа, посредники модели, посредники агрегации и посредники запроса. В посредниках документов this указывает на документ. Такие посредники поддерживаются для следующих функций документа:
validatesaveremoveupdateOnedeleteOneinit(хукиinitявляются синхронными)
В посредниках запросов this указывает на запрос. Такие посредники поддерживаются для следующих функций моделей и запросов:
countdeleteManydeleteOnefindfindOnefindOneAndDeletefindOneAndRemovefindOneAndUpdateremoveupdateupdateOneupdateMany
Посредники агрегации выполняются при вызове call() на агрегируемом объекте. В таких посредниках this указывает на объект агрегации
aggregate
В посредниках модели this указывает на модель. Поддерживаются следующие посредники модели:
insertMany
Обратите внимание: при определении schema.pre('remove') автоматически регистрируется посредник для doc.remove(). Для того, чтобы посредник выполнялся при вызове Query.remove(), следует указать schema.pre('remove', { query: true, document: false }, fn).
Обратите внимание: в отличие от schema.pre('remove'), Mongoose по умолчанию автоматически регистрирует посредников для Query.updateOne() и Query.deleteOne(). Это означает, что doc.updateOne() и Model.updateOne() запускают хуки updateOne, но this указывает на запрос, а не на документ. Для регистрации updateOne или deleteOne в качестве посредников документа следует указать schema.pre('updateOne', { document: true, query: false }).
Обратите внимание: функция create() запускает хуки save().
Pre
Предварительные посредники выполняются один за другим, когда каждый посредник вызывает next()
const schema = new Schema(...)
schema.pre('save', (next) => {
  // ...
  next()
})
Вместо next() можно использовать функцию, возвращающую промис, или async/await
schema.pre('save', () =>
  doStuff().then(() => doMoreStuff())
)

// или
schema.pre('save', async () => {
  await doStuff()
  await doMoreStuff()
})
Обратите внимание: вызов next() не останавливает выполнение функции.
Случаи использования
Посредники могут использоваться для атомизации логики модели. Другие варианты:
- сложная валидация
- удаление зависимых документов (удаление постов пользователя при удалении самого пользователя)
- асинхронные настройки по умолчанию
- выполнение асинхронных задач
Ошибки в предварительных хуках
При возникновении ошибки в хуке, другие хуки или соответствующая функция не выполняются. Вместо этого, ошибка передается в колбек, а возвращенный промис отклоняется. Существует несколько способов обработки таких ошибок:
schema.pre('save', (next) => {
  const err = new Error('Что-то пошло не так')
  // При вызове `next()` с аргументом, предполагается, что данный аргумент
  // является ошибкой
  next(err)
})

schema.pre('save', () =>
  // Также можно вернуть отклоненный промис
  new Promise((res, rej) => {
    reject(new Error('Что-то пошло не так'))
  })
)

schema.pre('save', () => {
  // или выбросить синхронное исключение,
  throw new Error('Что-то пошло не так')
})

schema.pre('save', async () => {
  await Promise.resolve()
  // или выбросить исключение в асинхронной функции
  throw new Error('Что-то пошло не так')
})

// Позже

// Изменения не будут сохранены в БД, поскольку в предварительном хуке возникает ошибка
doc.save((err) => {
  console.error(err) // Что-то пошло не так
})
Post
Последующие посредники выполняются после метода и всех его предварительных посредников
schema.post('init', (doc) => {
  console.log('%s был получен из БД', doc._id)
})

schema.post('validate', (doc) => {
  console.log('%s был проверен (но еще не сохранен)', doc._id)
})

schema.post('save', (doc) => {
  console.log('%s был сохранен', doc._id)
})

schema.post('remove', (doc) => {
  console.log('%s был удален', doc._id)
})
Асинхронные последующие хуки
Если последующий хук вызывается с 2 аргументами, Mongoose предполагает, что второй параметр — это функция next(), предназначенная для вызова следующего посредника в цепочке
schema.post('save', (doc, next) => {
  const timerId = setTimeout(() => {
    console.log('post1')
    // Запускаем второй хук
    next()

    clearTimeout(timerId)
  }, 100)
})

// Не будет выполняться до вызова `next()` в первом посреднике
schema.post('save', (doc, next) => {
  console.log('post2')
  next()
})
Определение посредников
Посредники и плагины должны определяться до компиляции модели посредством вызова mongoose.model().
Если определение схемы и экспорт модели выполняются в одном файле, глобальные плагины должны определяться перед вызовом require().
Хуки сохранения/валидации
Функция save() запускает хуки validate(), поскольку Mongoose имеет встроенный хук pre('save'), вызывающий validate(). Это означает, что все хуки pre('validate') и post('validate') вызываются перед хуками pre('save').
Конфликты имен
Для remove() поддерживаются как хуки документов, так и хуки запросов.
Для переключения хука remove() между Document.remove() и Model.remove() следует передать объект с настройками в Schema.pre() или Schema.post()
// Только посредник документа
schema.pre('remove', { document: true, query: false }, () => {
  console.log('Удаление документа')
})

// Только посредник запроса. Будет вызываться только для `Model.remove()`,
// но не для `doc.remove()`
schema.pre('remove', { query: true, document: false }, () => {
  console.log('Удаление')
})
Посредники для обработки ошибок
Выполнение посредника, обычно, останавливается при первом вызове next() с ошибкой. Тем не менее, существует специальный тип последующих посредников — посредники для обработки ошибок, которые выполняются при возникновении ошибок. Такие посредники могут использоваться для вывода сообщений об ошибках в удобочитаемом формате.
Посредники для обработки ошибок определяются как посредники, в качестве первого параметра принимающие возникшую ошибку
const chema = new Schema({
  name: {
    type: String,
    // При сохранении дубликата,
    // будет выброшена `MongoError` с кодом 11000
    unique: true
  }
})

// Обработчик принимает три параметра: возникшую ошибку, документ
// и функцию `next()`
schema.post('save', (err, doc, next) => {
  if (err.name === 'MongoError' && err.code === 11000) {
    next(new Error('Попытка сохранения дубликата'))
  } else {
    next()
  }
})

// Это запустит обработчик ошибок `post('save')`
User.create([{ name: 'John Smith' }, { name: 'John Smith' }])
Рассматриваемые посредники также работают с посредниками запросов. Мы может определить хук post('update'), который будет перехватывать ошибки, связанные с дубликатами
schema.post('update', (err, res, next) => {
  if (err.name === 'MongoError' && err.code === 11000) {
    next(new Error('Попытка создания дубликата'))
  } else {
    next()
  }
})

const users = [
  { name: 'John Smith' },
  { name: 'Jane Air' }
]
User.create(users, (err) => {
  User.update({ name: 'Jane Air' }, { $set: { name: 'John Smith' } }, (err) => {
    console.error(err) // Попытка создания дубликата
  })
})
Популяция
Функция populate() позволяет ссылаться на документы из других коллекций.
Популяция (заполнение, population) — это процесс автоматической замены определенных путей в документе документами из других коллекций. Мы можем заполнять пути единичными документами, несколькими документами, единичным объектом, несколькими документами или всеми документами, возвращаемыми запросом. Рассмотрим пример
const { Schema, model } = require('mongoose')

const userSchema = new Schema({
  _id: Schema.Types.ObjectId,
  name: String,
  age: Number,
  posts: [
    {
      type: Schema.Types.ObjectId,
      ref: 'Story'
    }
  ]
})

const postSchema = new Schema({
  author: {
    type: Schema.Types.ObjectId,
    ref: 'User'
  },
  title: String,
  subscribers: [
    {
      type: Schema.Types.ObjectId,
      ref: 'User'
    }
  ]
})

const Post = model('Post', postSchema)
const User = model('User', userSchema)
У нас имеется две модели. У модели User есть поле posts, значением которого является массив ObjectId. Настройка ref сообщает Mongoose, какую модель использовать в процессе популяции, в нашем случае такой моделью является Post. Все сохраняемые здесь _id должны быть _id документов из модели Post.
Обратите внимание: в качестве ссылок могут использоваться ObjectId, String, Number и Buffer. Однако, по возможности всегда следует использовать ObjectId.
Сохранение ссылок
Сохранение ссылок похоже на сохранение обычных свойств: достаточно присвоить значение _id
const author = new User({
  _id: new mongoose.Types.ObjectId(),
  name: 'John Smith',
  age: 30
})

author.save((err) => {
  if (err) return handleError(err)

  const post1 = new Post({
    title: 'Мой первый пост',
    author: author._id // присваиваем `_id` из `author`
  })

  post1.save((err) => {
    if (err) return handleError(err)
    // готово
  })
})
Популяция
Заполним поле author поста с помощью строителя запроса
Post
  .findOne({ title: 'Мой первый пост' })
  .populate('author')
  .exec((err, post) => {
    if (err) return handleError(err)

    console.log('Автором поста является %s', post.author.name)
    // Автором поста является John Smith
  })
Установка заполняемых полей
Post.findOne({
  title: 'Мой первый пост'
}, (err, post) => {
  if (err) return handleError(err)

  post.author = author
  console.log(post.author.name) // John Smith
})
Определение заполняемости поля
Для определения заполняемости поля используется функция populated()
post.populated('author') // truthy

post.depopulate('author')
post.populated('author') // undefined
Это может использоваться для получения id автора. Однако, специально для таких случаев Mongoose предоставляет геттер _id, позволяющий получать идентификатор независимо от заполняемости поля
post.populated('author') // truthy
post.author._id // ObjectId

post.depopulate('author')
post.populated('author') // undefined

post.author._id // ObjectId, это возможно благодаря специальному геттеру
Что если соответствующий документ отсутствует?
В этом случае post.author будет иметь значение null
await User.deleteOne({ name: 'John Smith' })

const post = await User.findOne({ title: 'Мой первый пост' }).populate('author')
post.author // null
При определении authors в postSchema в виде массива, populate() вернет пустой массив.
Выборка значений
Для выполнения выборки достаточно передать методу populate() строку в качестве второго аргумента
Post
  .findOne({ title: 'Мой первый пост' })
  .populate('author', 'name') // вернется только имя автора
  .exec((err, post) => {
    if (err) return handleError(err)

    console.log('Автора зовут %s', post.author.name)
    // Автора зовут John Smith

    console.log('Автору %s лет', post.author.age)
    // Автору null лет
  })
Популяция нескольких путей
Post
  .find()
  .populate('author')
  .populate('subscribers')
  .exec()
Если для одного пути вызывается несколько populate(), эффект будет иметь только последний из них.
Условные запросы и другие настройки
Что если мы хотим заполнить массив подписчиков на основе их возраста и только их именами?
Post
  .find()
  .populate({
    path: 'subscribers',
    match: { age: { $gte: 21 } }, // больше или равно, greater than or equal
    // явно исключаем `_id`
    select: 'name -_id'
  }).exec()
При отсутствии совпадения, массив subscribers будет пустым.
const post = await Post
  .findOne({ title: 'Мой первый пост' })
  .populate({
    path: 'author',
    name: {
      // не равно, not equal
      $ne: 'John Smith'
    }
  }).exec()

post.author // null
perDocumentLimit
Для ограничения количество возвращаемых объектов можно использовать настройку perDocumentLimit (настройка options.limit работает не всегда корректно)
Post.create([
  {
    title: 'Post1',
    fans: [1, 2, 3, 4, 5]
  },
  {
    title: 'Post2',
    fans: [6, 7]
  }
])

const posts = Post
  .find()
  .populate({
    path: 'fans',
    options: {
      limit: 2
    }
  })

posts[0].name // Post1
posts[0].fans.length // 2

// !
posts[1].name // Post2
posts[1].fans.length // 0

const posts = await Post
  .find()
  .populate({
    path: 'subscribers',
    perDocumentLimit: 2
  })

posts[0].name // Post1
posts[0].fans.length // 2

// !
posts[1].name // Post2
posts[1].fans.length // 2
Ссылки на детей
Мы можем обнаружить, что при использовании объекта author, нам недоступен список постов. Это объясняется тем, что объекты story не были помещены (pushed) в author.posts.
Если у нас имеется хорошая причина для сохранения массива дочерних указателей (child pointers), мы можем push() документы в массив
author.posts.push(post1)
author.save()
Это позволит комбинировать find() и populate()
User
  .findOne({ name: 'John Smith' })
  .populate('posts')
  .exec((err, user) => {})
Возможно, мы не хотим иметь два набора указателей. В этом случае мы можем пропустить популяцию и найти нужные посты с помощью find()
Post
  .find({ author: author._id })
  .exec((err, posts) => {})
Популяция существующего документа
Для заполнения полей существующего документа используется цепочка из методов populate() и Document.execPopulate()
const user = await User.findOne({ name: 'John Smith' })

user.populated('posts') // null

await user.populate('posts').execPopulate()

user.populated('posts') // массив `ObjectId`
user.posts[0].name // Post1
Несколько вызовов populate() могут быть объединены в цепочку.
Популяция на нескольких уровнях вложенности
Предположим, что у нас имеется схема пользователя, которая «следит» за друзьями пользователя
const userSchema = new Schema({
  name: String,
  friends: [
    {
      type: ObjectId,
      ref: 'User'
    }
  ]
})
Допустим, что мы хотим получать не только друзей пользователя, но и друзей друзей пользователя
User
  .findOne({ name: 'Имярек' })
  .populate({
    path: 'friends',
    // !
    populate: {
      path: 'friends'
    }
  })
Популяция между БД
Предположим, что у нас имеется схема событий и схема обсуждений. Каждое событие имеет соответствующий поток (thread) обсуждений
const db1 = mongoose.createConnection(MONGO_URI1)
const db2 = mongoose.createConnection(MONGO_URI2)

const conversationSchema = new Schema({ messagesCount: Number })
const Conversation = db2.model('Conversation', conversationSchema)

const eventSchema = new Schema({
  name: String,
  conversation: {
    type: ObjectId,
    ref: Conversation // `ref` - это класс модели, а не строка
  }
})
const Event = db1.model('Event', eventSchema)

const events = await Event
  .find()
  .populate('conversations')

// или когда мы не имеем доступа к `Conversation` при определении `eventSchema`
const events = await Event
  .find()
  .populate('conversations', model: Conversation)
Динамические ссылки
Mongoose также может осуществлять заполнение из нескольких коллекций на основе значения свойства документа. Предположим, что у нас имеется схема для комментариев. Пользователь может оставлять комментарии как к посту, так и к товару
const commentSchema = new Schema({
  body: {
    type: String,
    required: true
  },
  on: {
    type: Schema.Types.ObjectId,
    required: true,
    // Для определения правильной модели `Mongoose` будет использовать свойства `onModel`
    refPath: 'onModel'
  },
  onModel: {
    type: String,
    required: true,
    enum: ['Post', 'Product']
  }
})

const Product = model('Product', new Schema({ name: String }))
const Post = model('Post', new Schema({ title: String }))
const Comment = model('Comment', commentSchema)
Другими словами, refPath позволяет определить, какую модель Mongoose должен использовать для каждого документа
const book = await Product.create({ name: 'Book1' })
const post = await Post.create({ title: 'Post1' })

const commentOnBook = await Comment.create({
  body: 'Comment1',
  on: book._id,
  onModel: 'Product'
})

const commentOnPost = await Comment.create({
  body: 'Comment2',
  on: post._id,
  onModel: 'Post'
})

// `populate()` работает, несмотря на то, что один комментарий
// ссылается на коллекцию `Product`, а другой - на коллекцию `Post`
const comments = await Comment.find().populate('on').sort({ body: 1 })
comments[0].on.name // Book1
comments[1].on.title // Post1
Популяция виртуальных свойств
Виртуальные свойства позволяют определять более сложные или тонкие отношения между документами
const personSchema = new Schema({
  name: String,
  band: String
})

const bandSchema = new Schema({
  name: String
})

bandSchema.virtuals('members', {
  ref: 'Person', // Модель, которую следует использовать
  localField: 'name', // Находим людей, у которых `localField`
  foreignField: 'band', // равняется `foreignField`
  // Если `justOne` равняется `true`, `members` будет единичным документом,
  // а не массивом. По умолчанию `justOne` имеет значение `false`
  justOne: false,
  options: {
    sort: {
      name:
    },
    limit: 5
  } // настройки запроса
})

const Person = model('Person', personSchema)
const Band = model('Band', bandSchema)

/**
  * Предположим, что у есть две группы: `Guns N' Roses` и `Motley Crue`
  * и 4 человека: `Axl Rose` и `Slash` в `Guns N' Roses` и
  * `Vince Neil` и `Nikki Sixx` в `Motley Crue`
*/
Band
  .find({})
  .populate('members')
  .exec((err, bands) => {
    // `bands.members` теперь является массивом экземпляров `Person`
  })
Для дополнительной фильтрации результатов populate() можно использовать настройку match
const personSchema = new Schema({
  name: String,
  band: String,
  isActive: Boolean
})

const bandSchema = new Schema({
  name: String
})

bandSchema.virtual('activeMembers', {
  ref: 'Person',
  localField: 'name',
  foreignField: 'band',
  justOne: false,
  match: { isActive: true }
})

bandSchema.virtual('formerMembers', {
  ref: 'Person',
  localField: 'name',
  foreignField: 'band',
  justOne: false,
  match: { isActive: false }
})
Для получения количества совпавших с foreignField документов используется настройка count
const personSchema = new Schema({
  name: String,
  band: String
})

const bandSchema = new Schema({
  name: String
})

bandSchema.virtual('numMembers', {
  ref: 'Person',
  localField: 'name',
  foreignField: 'band',
  count: true
})

// Позже
const doc = await Band
  .findOne({ name: 'Motley Crue' })
  .populate('numMembers')
doc.numMembers // 2
Популяция карт
Карты — тип, представляющий собой объект с произвольными строковыми ключами
const bandSchema = new Schema({
  name: String,
  members: {
    type: Map,
    of: {
      type: ObjectId,
      ref: 'Person'
    }
  }
})
const Band = model('Band', bandSchema)
Карта имеет ref, что означает, что мы можем использовать populate() для ее заполнения. Допустим, у нас есть такой документ band
const person1 = new Person({ name: 'Vince Neil' })
const person2 = new Person({ name: 'Mick Mars' })

const band = new Band({
  name: 'Motley Crue',
  members: {
    'singer': person1._id,
    'guitarist': person2._id
  }
})
Заполнение карты выполняется с помощью специального синтаксиса $*
const band = await Band.findOne({ name: 'Motley Crue' }).populate('members.$*')

band.members.get('signer') // { _id: ..., name: 'Vince Neil' }
Мы также можем заполнять поля карт субдокументов
const librarySchema = new Schema({
  name: String,
  books: {
    type: Map,
    of: new Schema({
      title: String,
      author: {
        type: 'ObjectId',
        ref: 'Person'
      }
    })
  }
})
const Library = model('Library', librarySchema)

const libraries = await Library.find().populate('books.$*.author')
Популяция в посредниках
// Всегда выполняем заполнение при поиске
MySchema.pre('find', function() {
  this.populate('user')
})

// Выполняем заполнение после поиска
MySchema.post('find', async (docs) => {
  for (const doc of docs) {
    if (doc.isPublish) {
      await doc.populate('user').execPopulate()
    }
  }
})

// Выполняем заполнение после сохранения
MySchema.post('save', (doc, next) => {
  doc.populate('user').execPopulate().then(() => {
    next()
  })
})
API
Mongoose
Mongoose()— конструкторMongoose
const mongoose = require('mongoose')
mongoose instanceof mongoose.Mongoose // true
Mongoose.model()— метод для определения или извлечения модели
const { model } = require('mongoose')

module.exports = model('MyModel', schema)
Mongoose.Schema()— конструктор схемы
const { Schema } = require('mongoose')
const mySchema = new Schema({...})
Mongoose.connect()— метод для подключения кMongoDB
const mongoose = require('mongoose')

const MONGO_URI = require('./config')

const options = {
  useNewUrlParser: true,
  useUnifiedTopology: true
}

// Выполняем подключение с минимальными настройками
mongoose.connect(
  MONGO_URI,
  options,
  (err) => {
    if (err) {
      console.error('Something went wrong: ', err.message || err)
      return
    }
    console.log('The connection to the database is successful')
  })
Mongoose.connection— текущее подключение, эквивалентmongoose.connections[0]
mongoose.connect(...)
mongoose.connection.on('error', (err) => handleError(err))
-
Mongoose.connections— массив всех подключений -
Mongoose.createConnection()— синхронный метод для создания подключения, который используется для управления несколькими подключениями
const db1 = mongoose.createConnection(MONGO_URI1, options)
const db2 = mongoose.createConnection(MONGO_URI2, options)
-
Mongoose.disconnect()— запускаетclose()на всех соединениях одновременно -
Mongoose.plugin()— метод для определения глобальных плагинов -
Mongoose.get(),Mongoose.set()— методы для получения и установки глобальных настроек
mongoose.set('debug', true)
Schema
Schema()— конструктор схемы (Mongoose.Schema())
const { Schema } = require('mongoose')

// автоматическое создание полей `createdAt` и `updatedAt`
const options = {
  timestamps: true
}

const userSchema = new Schema({
  name: {
    type: String,
    trim: true,
    minLength: [2, 'Имя слишком короткое'],
    maxLength: [12, 'Имя слишком длинное'],
    required: [true, 'Имя не может быть пустым']
  },
  age: {
    type: Number,
    min: [18, 'Ты слишком юн'],
    max: [66, 'Ты слишком стар'],
    required: true,
    default: 18
  },
  email: {
    type: String,
    trim: true,
    lowercase: true,
    match: [/w+@w+.w+/, 'Неправильный адрес электронной почты'],
    requred: [true, 'Email не может быть пустым'],
    unique: true
  },
  sex: {
    type: String,
    enum: ['мужской', 'женский', 'не могу определиться'],
    required: true
  },
  phone: {
    type: String,
    validate: {
      validator: (v) => /+7d{10}/.test(v),
      message: () => 'Неправильный номер телефона'
    },
    required: true
  },
  agree: {
    type: Boolean,
    required: true
  }
}, options)
-
Schema.Types— встроенные типы схем:StringNumberBoolean,Array,BufferDate,ObjectIdMixed
-
Schema.add()— метод для добавления полей в схему
parentSchema.add(childSchema).add({ color: String })
-
Schema.clone()— метод для глубокого копирования схемы -
Schema.eachPath()— метод для перебора полей (аналогforEach())
schema.eachPath((pathname, schematype) => {
  console.log(pathname, schematype)
})
Schema.method()— позволяет добавлять методы в схему
const userSchema = new Schema({
  name: {
    first: String,
    last: String
  }
})
userSchema.method('fullName', function() {
  return `${this.name.first} ${this.name.last}`
})

const User = model('User', userSchema)
const user = new User({
  name: {
    first: 'John',
    last: 'Smith'
  }
})
console.log(user.fullName()) // John Smith
Schema.path()— метод для получения/установки путей (типов полей)
schema.path('name') // возвращается тип поля `name`
schema.path('name', Number) // типом `name` теперь является `Number`
-
Schema.post()— метод для определения последующих хуков -
Schema.pre()— метод для определения предварительных хуков -
Schema.remove()— метод для удаления поля или полей в случае передачи массива -
Schema.get(),Schema.set()— методы для получения и установки настроек схемы -
Schema.static()— позволяет добавлять статические методы в схему
schema.static('findByName', function(name) {
  return this.find({ name })
})

const MyModel = model('MyModel', schema)
await MyModel.findByName('Anonymous')
Schema.virtual()— метод для создания виртуальных типов
Model
Model()— класс, который используется для взаимодействия сMongoDB. Экземпляры этого класса называются документами
const { Schema, model } = require('mongoose')

const userSchema = new Schema({...})
const User = model('User', userSchema)

const newUser = new User({...})

// сохраняем пользователя в БД
await newUser.save()

// получаем пользователя из БД
const user = await User.findOne({...})
-
Model.bulkWrite()— позволяет отправить сразу несколько операций (переданных в виде массива) вMongoDB. Поддерживаемые операции:insertOneupdateOneupdateManydeleteOnedeleteManyreplaceOne
-
Model.estimatedDocumentCount()— возвращает количество документов, удовлетворяющих условию
User.estimatedDocumentCount({ type: 'vip' }, (err, count) => {})
Model.create()— метод для сохранения одного или нескольких документов в БД. Данный метод запускаетsave()(и его посредников) для каждого документа
await User.create({ name: 'John Smith' })

await User.create([
  { name: 'John Smith' },
  { name: 'Jane Air' }
])
Model.deleteMany()— удаляет из коллекции все документы, удовлетворяющие условию. Похож наremove(), но удаляет все документы независимо от настройкиsingle
Model.deleteMany(conditions, options?, callback?)

await User.deleteMany({ name: /john/i, age: { $lte: 18 } })
Model.deleteOne(conditions, options?, callback?)— удаляет из коллекции первый документ, удовлетворяющий условию
await User.deleteOne({ name: 'John Smith' })
Model.events— диспетчер событий, который может использоваться для глобальной обработки ошибок
Model.events.on('error', err => handleError(err))
Model.find()— метод для поиска документов
Model.find(filter, projection?, options?, callback?)

// все документы
await User.find({})

// всех пользователей с именем `John`, старше 18
await User.find({ name: 'John', age: { $gt: 18 } }).exec()

// с результатами в колбеке
await User.find({ name: 'John', age: { $gt: 18 } }, (err, docs) => {})

// регулярное выражение и выборка полей
await User.find({ name: /john/i }, 'name friends').exec()

// с настройками
await User.find({ name: /john/i }, null, { skip: 10 }).exec()
Model.findById()— метод для поиска документа по_id.findById(id)почти идентиченfindOne({ _id: id })
Model.findById(filter, projection?, options?, callback?)

await User.findById(id).exec()

await User.findById(id, (err, user) => {})

await User.findById(id, 'name friends').exec()
-
Model.findByIdAndDelete(id, options?, callback?)— метод для поиска и удаления документа по_id.findByIdAndDelete(id)является сокращением дляfindOneAndDelete({ _id: id }) -
Model.findByIdAndRemove(id, options?, callback?)— метод для поиска и удаления документа по_id.findByIdAndRemove(id, ...)является сокращением дляfindOneAndRemove({ _id: id }, ...). Данный метод находит документ, удаляет его и передает обнаруженный документ в колбек -
Model.findByIdAndUpdate(id, update, options?, callback?)— метод для поиска и обновления документа по_id.findByIdAndUpdate(id, ...)является сокращением дляfindOneAndUpdate({ _id: id }, ...). Данный метод находит документ, обновляет его согласно аргументуupdate, применяетoptionsи передает обнаруженный документ в колбек. Важные настройки:new— еслиtrue, возвращает обновленный документ, а не исходныйupsert— еслиtrue, объект создается при отсутствии
await User.findByIdAndUpdate(id, { name: 'Jane Air' }, { new: true }, (err, user) => {})
-
Model.findOne(conditions?, projection?, options?, callback?)— метод для поиска документа по условию. Объект с условиями является опциональным. Однако, если он имеет значениеnullилиundefined, возвращается произвольный документ. Для выполнения поиска документа по_idследует использоватьfindById() -
Model.findOneAndDelete(conditions, options?, callback?)— метод для поиска и удаления документа по условию. Данный метод находит документ, удаляет его и передает обнаруженный документ в колбек -
Model.findOneAndRemove(conditions, options?, callback?)— метод для поиска и удаления документа. Почти идентиченModel.findOneAndDelete() -
Model.findOneAndReplace(filter, replacement?, options?, callback?)— метод для поиска и замены документа по условию. Данный метод находит документ, заменяет его и передает обнаруженный документ в колбек. Для передачи в колбек обновленного документа следует установить настройкуnewв значениеtrue -
Model.findOneAndUpdate(conditions?, update?, options?, callback?)— метод для поиска и обновления документа по условию. Данный метод находит документ, обновляет его согласно аргументуupdate, применяетoptionsи передает обнаруженный документ в колбек. Важные настройки:new— см.findByIdAndUpdate()upsert— см.findByIdAndUpdate()overwrite— еслиtrue, документ заменяется, а не обновляетсяfields— выборка полей, эквивалентselect(fields).findOneAndUpdate()
-
Model.init()— метод для генерации индексов приautoIndex: false -
Model.insertMany(doc(s), options?, callback?)— метод для добавления единичного документа или массива документов в БД. Все добавляемые документы должны быть валидными (если не установленоordered: false). Данный метод быстрееcreate(), поскольку отправляет в БД всего одну операцию (create()отправляет операцию для каждого документа)
const users = [
  { name: 'John' },
  { name: 'Jane' }
]

User.insertMany(users, (err, users) => {})
Model.populate(doc(s), options, callback?)— метод для заполнения ссылок единичного документа или массива документов документами из других коллекций.options— либо строка с указанием пути, либо объект с настройками:path— пути для заполненияselect— выборка полейmatch— условияmodel— название модели для популяцииoptions—sort,limitи т.д.justOne
// Заполнение единичного объекта
User.findById(id, (err, user) => {
  const opts = [
    {
      path: 'company',
      match: { x: 1 },
      select: 'name'
    },
    {
      path: 'notes',
      options: { limit: 10 },
      model: 'override'
    }
  ]

  User.populate(user, opts, (err, user) => {
    console.log(user)
  })
})

// Заполнение массива объектов
User.find(match, (err, users) => {
  const opts = [
    {
      path: 'company',
      match: { x: 1 },
      select: 'name'
    }
  ]

  User.populate(users, opts).then(console.log).end()
})
Model.remove(conditions, options?, callback?)— метод для удаления документов из коллекции по условию. Для удаления первого совпавшего документа следует установитьsingle: true
const result = await User.remove({ name: /john/i })
result.deletedCount // количество удаленных документов
-
Model.replaceOne(filter, doc, options?, callback?)— то же самое, что иupdate(), за исключением того, что существующий документ полностью заменяется переданным (не допускается атомарных операций типа$set) -
Model.update(filter, doc, options?, callback?)— метод для обновления документа без его возвращения. Важные настройки:upsert— см.findByIdAndUpdate()multi— позволяет обновлять несколько документовoverwrite— см.findOneAndUpdate()
await User.update({ age: { $gt: 18 } }, { oldEnough: true }, (err, rawResponse) => {})
-
Model.updateOne(filter, doc, options?, callback?)— то же самое, чтоupdate(), но без настроекmultiиoverwrite -
Model.updateMany(filter, docs, options?, callback?)— то же самое, чтоupdate(), но обновляются все документы, удовлетворяющие условию, независимо от настройкиmulti -
Model.watch(pipeline?, options?)— метод, позволяющий следить за изменениями соответствующей коллекции. Можно регистрировать следующие события:changeerrorendclose
const user = await User.create({ name: 'John Smith' })
const changeStream = User.watch().on('change', change => console.log(change))
// Будет выведено следующее:
// { _id: { _data: ... },
//   operationType: 'delete',
//   ns: { db: '...', coll: 'User' },
//   documentKey: { _id: ... } }
await user.remove()
Model.where(path, val?)— позволяет формировать запрос, передавать ему условия и возвращать его. Например, вместо
User.find({ age: { $gte: 18, $lte: 66 } }, callback)
Можно делать так
User.where('age').gte(18).lte(66).exec(callback)
Document
Document.depopulate(path)— принимает заполняемое поле и возвращает его к незаполненному состоянию
Post.findOne().populate('author').exec((err, post) => {
  console.log(post.author.name) // John Smith
  post.depopulate('author')
  console.log(doc.author) // ObjectId
})
-
Document.equals()— возвращаетtrue, если документ равен другому документу. Документы сравниваются по_id. Если документы не имеют_id, используется функцияdeepEqual() -
Document.execPopulate()— метод для явного выполнения популяции, возвращающий промис. Используется для интеграции промисов
const promise = doc
  .populate('company')
  .populate({
    path: 'notes',
    match: /airlane/,
    select: 'text',
    model: Model,
    options: opts
  })
  .execPopulate()
Вместо doc.populate(options).execPopulate() можно использовать doc.execPopulate(options).
-
Document.get(path, type?, options?)— возвращает значение пути -
Document.id— строковое представление_idдокумента -
Document.isNew— индикатор новизны документа -
Document.markModified(path)— помечает путь как имеющий ожидающие изменения для записи в БД. Обычно, применяется в отношении смешанных типов
doc.mixed.type = 'changed'
doc.markModified('mixed.type')
doc.save()
-
Document.overwrite(obj)— перезаписывает значения документа значениямиobj, кроме иммутабельных свойств. Похож наset(), но те свойства, которых нет вDocument.obj, удаляются -
Document.parent()— если документ является субдокументом, возвращается его предок -
Document.populate(path?, callback?)— заполняет ссылки документа, выполняет колбек после завершения. Для того, чтобы получить промис, данный метод следует использовать совместно сexecPopulate()
doc
  .populate('company')
  .populate({
    path: 'notes',
    match: /airline/,
    select: 'text',
    model: Model,
    options: opts
  }, (err, user) => {
    console.log(doc._id === user._id) // true
  })
Обратите внимание: популяция не выполняется до передачи колбека или вызова execPopulate().
Document.save(options?, callback?)— сохраняет документ в БД или отправляет операциюupdateOne()с изменениями
product.sold = Date.now()
await product.save()
-
Document.schema— схема документа -
Document.set(path, val, type?, options?)— устанавливает значение пути или нескольких путей
doc.set(path, value)

doc.set({
  path: value,
  path2: {
    path: value
  }
})
validate(path(s)?, options?, callback?)иvalidateSync(path(s), options?)— выполняют валидацию документа.validateSync()пропускает асинхронные валидаторы
doc.validate((err) => {})
Query
Query(options?, model?, conditions?, collection?)— конструктор для построения запросов
const query = Model.find()
query.setOptions({ lean: true })
query.collection(Model.collection)
query.where('age').gte(18).exec(callback)
Query.all(path?, val)— определяет условие запроса$all
Model.find().where('pets').all(['dog', 'cat'])
// или
Model.find().all('pets', ['dog', 'cat'])
Query.and(array)— определяет аргументы для условия$and
query.and([{ color: 'green' }, { status: 'ok' }])
Query.circle(path?, area)— определяет условия$centerили$centerSphere
const area = { center: [50, 50], radius: 10, unique: true }
query.where('loc').within().circle(area)
// или
query.circle('loc', area)

// сферические вычисления
const area = { center: [50, 50], radius: 10, unique: true, spherical: true }
query.circle('loc', area)
-
Query.exec(operation?, callback?)— выполняет запрос -
Query.get(path)— для операций обновления. Возвращает значение пути в обновлении$set
const query = Model.updateOne({}, { $set: { name: 'John Smith' } })
query.get('name') // John Smith
-
Условия запросов (
$condition):gt()— больше чемgte()— больше или равноlt()— меньше чемlte()— меньше или равноin()— диапазон,enumnin()— противоположностьin()or()— или то, или другоеnor()— ни то, ни другоеne()— не равноregex()— регулярное выражениеsize()— размерslice()— срез, диапазон
-
Query.limit()— лимит возвращаемых документов -
Query.merge()— объединяет запросы -
Query.near()— определяет условие$nearили$nearSphere
query.where('loc').near({ center: [10, 10] }) query.where('loc').near({ center: [10, 10], maxDistance: 5 }) query.where('loc').near({ center: [10, 10], maxDistance: 5, apherical: true }) query.near('loc', { center: [10, 10], maxDistance: 5 })
-
Query.post(callback)— добавляет последующих посредников -
Query.pre(callback)— добавляет предварительных посредников -
Query.select(arg)— определяет, какие поля документа должны включаться, а какие не должны. Флаг-означает исключение поля, флаг+— принудительное включение (например, для полей, исключенных на уровне схемы)
// включить поля `a` и `b`, исключив остальные query.select('a b') query.select(['a', 'b']) query.select({ a: 1, b: 1 }) // исключить поля `c` и `d` query.select('-c -d')
Query.set(path, val?)— добавляет$setв запрос на обновление без изменения операции
query.updateOne({}, {}).set('updatedAt', new Date()) query.updateMany({}, {}).set({ 'updatedAt', new Date() })
Query.skip(val)— определяет количество пропускаемых документов
Query.sort(arg)— определяет порядок сортировки (asc,desc,ascending,descending,1,-1)
query.sort({ field: 'asc', test: -1 }) // или query.sort('field -test')
Query.where(path?, val?)— определяет путь для выполнения запросов
// вместо User.find({ age: { $gte: 18, $lte: 65 } }, callback) // можно писать так User.where('age').gte(18).lte(65)

If you haven’t yet done so, please take a minute to read the quickstart to get an idea of how Mongoose works.
If you are migrating from 4.x to 5.x please take a moment to read the migration guide.
- Defining your schema
- Creating a model
- Ids
- Instance methods
- Statics
- Query Helpers
- Indexes
- Virtuals
- Aliases
- Options
- With ES6 Classes
- Pluggable
- Further Reading
Defining your schema
Everything in Mongoose starts with a Schema. Each schema maps to a MongoDB
collection and defines the shape of the documents within that collection.
import mongoose from 'mongoose';
const { Schema } = mongoose;
const blogSchema = new Schema({
title: String, // String is shorthand for {type: String}
author: String,
body: String,
comments: [{ body: String, date: Date }],
date: { type: Date, default: Date.now },
hidden: Boolean,
meta: {
votes: Number,
favs: Number
}
});If you want to add additional keys later, use the
Schema#add method.
Each key in our code blogSchema defines a property in our documents which
will be cast to its associated SchemaType.
For example, we’ve defined a property title which will be cast to the
String SchemaType and property date
which will be cast to a Date SchemaType.
Notice above that if a property only requires a type, it can be specified using
a shorthand notation (contrast the title property above with the date
property).
Keys may also be assigned nested objects containing further key/type definitions
like the meta property above. This will happen whenever a key’s value is a POJO
that doesn’t have a type property.
In these cases, Mongoose only creates actual schema paths for leaves
in the tree. (like meta.votes and meta.favs above),
and the branches do not have actual paths. A side-effect of this is that meta
above cannot have its own validation. If validation is needed up the tree, a path
needs to be created up the tree — see the Subdocuments section
for more information on how to do this. Also read the Mixed
subsection of the SchemaTypes guide for some gotchas.
The permitted SchemaTypes are:
- String
- Number
- Date
- Buffer
- Boolean
- Mixed
- ObjectId
- Array
- Decimal128
- Map
Read more about SchemaTypes here.
Schemas not only define the structure of your document and casting of
properties, they also define document instance methods,
static Model methods, compound indexes,
and document lifecycle hooks called middleware.
Creating a model
To use our schema definition, we need to convert our blogSchema into a
Model we can work with.
To do so, we pass it into mongoose.model(modelName, schema):
const Blog = mongoose.model('Blog', blogSchema);
// ready to go!Ids
By default, Mongoose adds an _id property to your schemas.
const schema = new Schema();
schema.path('_id'); // ObjectId { ... }When you create a new document with the automatically added
_id property, Mongoose creates a new _id of type ObjectId
to your document.
const Model = mongoose.model('Test', schema);
const doc = new Model();
doc._id instanceof mongoose.Types.ObjectId; // trueYou can also overwrite Mongoose’s default _id with your
own _id. Just be careful: Mongoose will refuse to save a
document that doesn’t have an _id, so you’re responsible
for setting _id if you define your own _id path.
const schema = new Schema({ _id: Number });
const Model = mongoose.model('Test', schema);
const doc = new Model();
await doc.save(); // Throws "document must have an _id before saving"
doc._id = 1;
await doc.save(); // worksInstance methods
Instances of Models are documents. Documents have
many of their own built-in instance methods.
We may also define our own custom document instance methods.
// define a schema
const animalSchema = new Schema({ name: String, type: String });
// assign a function to the "methods" object of our animalSchema
animalSchema.methods.findSimilarTypes = function(cb) {
return mongoose.model('Animal').find({ type: this.type }, cb);
};Now all of our animal instances have a findSimilarTypes method available
to them.
const Animal = mongoose.model('Animal', animalSchema);
const dog = new Animal({ type: 'dog' });
dog.findSimilarTypes((err, dogs) => {
console.log(dogs); // woof
});- Overwriting a default mongoose document method may lead to unpredictable results. See this for more details.
- The example above uses the
Schema.methodsobject directly to save an instance method. You can also use theSchema.method()helper as described here. - Do not declare methods using ES6 arrow functions (
=>). Arrow functions explicitly prevent bindingthis, so your method will not have access to the document and the above examples will not work.
Statics
You can also add static functions to your model. There are two equivalent
ways to add a static:
- Add a function property to
schema.statics - Call the
Schema#static()function
// Assign a function to the "statics" object of our animalSchema
animalSchema.statics.findByName = function(name) {
return this.find({ name: new RegExp(name, 'i') });
};
// Or, equivalently, you can call `animalSchema.static()`.
animalSchema.static('findByBreed', function(breed) { return this.find({ breed }); });
const Animal = mongoose.model('Animal', animalSchema);
let animals = await Animal.findByName('fido');
animals = animals.concat(await Animal.findByBreed('Poodle'));Do not declare statics using ES6 arrow functions (=>). Arrow functions explicitly prevent binding this, so the above examples will not work because of the value of this.
Query Helpers
You can also add query helper functions, which are like instance methods
but for mongoose queries. Query helper methods let you extend mongoose’s
chainable query builder API.
animalSchema.query.byName = function(name) {
return this.where({ name: new RegExp(name, 'i') })
};
const Animal = mongoose.model('Animal', animalSchema);
Animal.find().byName('fido').exec((err, animals) => {
console.log(animals);
});
Animal.findOne().byName('fido').exec((err, animal) => {
console.log(animal);
});Indexes
MongoDB supports secondary indexes.
With mongoose, we define these indexes within our Schema at the path level or the schema level.
Defining indexes at the schema level is necessary when creating
compound indexes.
const animalSchema = new Schema({
name: String,
type: String,
tags: { type: [String], index: true } // field level
});
animalSchema.index({ name: 1, type: -1 }); // schema levelWhen your application starts up, Mongoose automatically calls createIndex for each defined index in your schema.
Mongoose will call createIndex for each index sequentially, and emit an ‘index’ event on the model when all the createIndex calls succeeded or when there was an error.
While nice for development, it is recommended this behavior be disabled in production since index creation can cause a significant performance impact.
Disable the behavior by setting the autoIndex option of your schema to false, or globally on the connection by setting the option autoIndex to false.
mongoose.connect('mongodb://user:pass@localhost:port/database', { autoIndex: false });
// or
mongoose.createConnection('mongodb://user:pass@localhost:port/database', { autoIndex: false });
// or
animalSchema.set('autoIndex', false);
// or
new Schema({..}, { autoIndex: false });Mongoose will emit an index event on the model when indexes are done
building or an error occurred.
// Will cause an error because mongodb has an _id index by default that
// is not sparse
animalSchema.index({ _id: 1 }, { sparse: true });
const Animal = mongoose.model('Animal', animalSchema);
Animal.on('index', error => {
// "_id index cannot be sparse"
console.log(error.message);
});See also the Model#ensureIndexes method.
Virtuals
Virtuals are document properties that
you can get and set but that do not get persisted to MongoDB. The getters
are useful for formatting or combining fields, while setters are useful for
de-composing a single value into multiple values for storage.
// define a schema
const personSchema = new Schema({
name: {
first: String,
last: String
}
});
// compile our model
const Person = mongoose.model('Person', personSchema);
// create a document
const axl = new Person({
name: { first: 'Axl', last: 'Rose' }
});Suppose you want to print out the person’s full name. You could do it yourself:
console.log(axl.name.first + ' ' + axl.name.last); // Axl RoseBut concatenating the first and
last name every time can get cumbersome.
And what if you want to do some extra processing on the name, like
removing diacritics? A
virtual property getter lets you
define a fullName property that won’t get persisted to MongoDB.
personSchema.virtual('fullName').get(function() {
return this.name.first + ' ' + this.name.last;
});Now, mongoose will call your getter function every time you access the
fullName property:
console.log(axl.fullName); // Axl RoseIf you use toJSON() or toObject() mongoose will not include virtuals
by default. This includes the output of calling JSON.stringify()
on a Mongoose document, because JSON.stringify() calls toJSON().
Pass { virtuals: true } to either
toObject() or toJSON().
You can also add a custom setter to your virtual that will let you set both
first name and last name via the fullName virtual.
personSchema.virtual('fullName').
get(function() {
return this.name.first + ' ' + this.name.last;
}).
set(function(v) {
this.name.first = v.substr(0, v.indexOf(' '));
this.name.last = v.substr(v.indexOf(' ') + 1);
});
axl.fullName = 'William Rose'; // Now `axl.name.first` is "William"Virtual property setters are applied before other validation. So the example
above would still work even if the first and last name fields were
required.
Only non-virtual properties work as part of queries and for field selection.
Since virtuals are not stored in MongoDB, you can’t query with them.
You can learn more about virtuals here.
Aliases
Aliases are a particular type of virtual where the getter and setter
seamlessly get and set another property. This is handy for saving network
bandwidth, so you can convert a short property name stored in the database
into a longer name for code readability.
const personSchema = new Schema({
n: {
type: String,
// Now accessing `name` will get you the value of `n`, and setting `name` will set the value of `n`
alias: 'name'
}
});
// Setting `name` will propagate to `n`
const person = new Person({ name: 'Val' });
console.log(person); // { n: 'Val' }
console.log(person.toObject({ virtuals: true })); // { n: 'Val', name: 'Val' }
console.log(person.name); // "Val"
person.name = 'Not Val';
console.log(person); // { n: 'Not Val' }You can also declare aliases on nested paths. It is easier to use nested
schemas and subdocuments, but you can also declare
nested path aliases inline as long as you use the full nested path
nested.myProp as the alias.
const childSchema = new Schema({
n: {
type: String,
alias: 'name'
}
}, { _id: false });
const parentSchema = new Schema({
// If in a child schema, alias doesn't need to include the full nested path
c: childSchema,
name: {
f: {
type: String,
// Alias needs to include the full nested path if declared inline
alias: 'name.first'
}
}
});Options
Schemas have a few configurable options which can be passed to the
constructor or to the set method:
new Schema({..}, options);
// or
const schema = new Schema({..});
schema.set(option, value);Valid options:
- autoIndex
- autoCreate
- bufferCommands
- bufferTimeoutMS
- capped
- collection
- discriminatorKey
- id
- _id
- minimize
- read
- writeConcern
- shardKey
- strict
- strictQuery
- toJSON
- toObject
- typeKey
- typePojoToMixed
- useNestedStrict
- validateBeforeSave
- versionKey
- optimisticConcurrency
- collation
- selectPopulatedPaths
- skipVersioning
- timestamps
- storeSubdocValidationError
option: autoIndex
By default, Mongoose’s init() function
creates all the indexes defined in your model’s schema by calling
Model.createIndexes()
after you successfully connect to MongoDB. Creating indexes automatically is
great for development and test environments. But index builds can also create
significant load on your production database. If you want to manage indexes
carefully in production, you can set autoIndex to false.
const schema = new Schema({..}, { autoIndex: false });
const Clock = mongoose.model('Clock', schema);
Clock.ensureIndexes(callback);The autoIndex option is set to true by default. You can change this
default by setting mongoose.set('autoIndex', false);
option: autoCreate
Before Mongoose builds indexes, it calls Model.createCollection()
to create the underlying collection in MongoDB if autoCreate is set to true.
Calling createCollection()
sets the collection’s default collation
based on the collation option and establishes the collection as
a capped collection if you set the capped schema option. Like
autoIndex, setting autoCreate to true is helpful for development and
test environments.
Unfortunately, createCollection() cannot change an existing collection.
For example, if you add capped: 1024 to your schema and the existing
collection is not capped, createCollection() will throw an error.
Generally, autoCreate should be false for production environments.
const schema = new Schema({..}, { autoCreate: true, capped: 1024 });
const Clock = mongoose.model('Clock', schema);
// Mongoose will create the capped collection for you.Unlike autoIndex, autoCreate is false by default. You can change this
default by setting mongoose.set('autoCreate', true);
option: bufferCommands
By default, mongoose buffers commands when the connection goes down until
the driver manages to reconnect. To disable buffering, set bufferCommands
to false.
const schema = new Schema({..}, { bufferCommands: false });The schema bufferCommands option overrides the global bufferCommands option.
mongoose.set('bufferCommands', true);
// Schema option below overrides the above, if the schema option is set.
const schema = new Schema({..}, { bufferCommands: false });option: bufferTimeoutMS
If bufferCommands is on, this option sets the maximum amount of time Mongoose buffering will wait before
throwing an error. If not specified, Mongoose will use 10000 (10 seconds).
// If an operation is buffered for more than 1 second, throw an error.
const schema = new Schema({..}, { bufferTimeoutMS: 1000 });option: capped
Mongoose supports MongoDBs capped
collections. To specify the underlying MongoDB collection be capped, set
the capped option to the maximum size of the collection in
bytes.
new Schema({..}, { capped: 1024 });The capped option may also be set to an object if you want to pass
additional options like max
or autoIndexId.
In this case you must explicitly pass the size option, which is required.
new Schema({..}, { capped: { size: 1024, max: 1000, autoIndexId: true } });option: collection
Mongoose by default produces a collection name by passing the model name to
the utils.toCollectionName method.
This method pluralizes the name. Set this option if you need a different name
for your collection.
const dataSchema = new Schema({..}, { collection: 'data' });option: discriminatorKey
When you define a discriminator, Mongoose adds a path to your
schema that stores which discriminator a document is an instance of. By default, Mongoose
adds an __t path, but you can set discriminatorKey to overwrite this default.
const baseSchema = new Schema({}, { discriminatorKey: 'type' });
const BaseModel = mongoose.model('Test', baseSchema);
const personSchema = new Schema({ name: String });
const PersonModel = BaseModel.discriminator('Person', personSchema);
const doc = new PersonModel({ name: 'James T. Kirk' });
// Without `discriminatorKey`, Mongoose would store the discriminator
// key in `__t` instead of `type`
doc.type; // 'Person'option: id
Mongoose assigns each of your schemas an id virtual getter by default
which returns the document’s _id field cast to a string, or in the case of
ObjectIds, its hexString. If you don’t want an id getter added to your
schema, you may disable it by passing this option at schema construction time.
// default behavior
const schema = new Schema({ name: String });
const Page = mongoose.model('Page', schema);
const p = new Page({ name: 'mongodb.org' });
console.log(p.id); // '50341373e894ad16347efe01'
// disabled id
const schema = new Schema({ name: String }, { id: false });
const Page = mongoose.model('Page', schema);
const p = new Page({ name: 'mongodb.org' });
console.log(p.id); // undefinedoption: _id
Mongoose assigns each of your schemas an _id field by default if one
is not passed into the Schema constructor.
The type assigned is an ObjectId
to coincide with MongoDB’s default behavior. If you don’t want an _id
added to your schema at all, you may disable it using this option.
You can only use this option on subdocuments. Mongoose can’t
save a document without knowing its id, so you will get an error if
you try to save a document without an _id.
// default behavior
const schema = new Schema({ name: String });
const Page = mongoose.model('Page', schema);
const p = new Page({ name: 'mongodb.org' });
console.log(p); // { _id: '50341373e894ad16347efe01', name: 'mongodb.org' }
// disabled _id
const childSchema = new Schema({ name: String }, { _id: false });
const parentSchema = new Schema({ children: [childSchema] });
const Model = mongoose.model('Model', parentSchema);
Model.create({ children: [{ name: 'Luke' }] }, (error, doc) => {
// doc.children[0]._id will be undefined
});option: minimize
Mongoose will, by default, «minimize» schemas by removing empty objects.
const schema = new Schema({ name: String, inventory: {} });
const Character = mongoose.model('Character', schema);
// will store `inventory` field if it is not empty
const frodo = new Character({ name: 'Frodo', inventory: { ringOfPower: 1 }});
await frodo.save();
let doc = await Character.findOne({ name: 'Frodo' }).lean();
doc.inventory; // { ringOfPower: 1 }
// will not store `inventory` field if it is empty
const sam = new Character({ name: 'Sam', inventory: {}});
await sam.save();
doc = await Character.findOne({ name: 'Sam' }).lean();
doc.inventory; // undefinedThis behavior can be overridden by setting minimize option to false. It
will then store empty objects.
const schema = new Schema({ name: String, inventory: {} }, { minimize: false });
const Character = mongoose.model('Character', schema);
// will store `inventory` if empty
const sam = new Character({ name: 'Sam', inventory: {} });
await sam.save();
doc = await Character.findOne({ name: 'Sam' }).lean();
doc.inventory; // {}To check whether an object is empty, you can use the $isEmpty() helper:
const sam = new Character({ name: 'Sam', inventory: {} });
sam.$isEmpty('inventory'); // true
sam.inventory.barrowBlade = 1;
sam.$isEmpty('inventory'); // falseoption: read
Allows setting query#read options at the
schema level, providing us a way to apply default
ReadPreferences
to all queries derived from a model.
const schema = new Schema({..}, { read: 'primary' }); // also aliased as 'p'
const schema = new Schema({..}, { read: 'primaryPreferred' }); // aliased as 'pp'
const schema = new Schema({..}, { read: 'secondary' }); // aliased as 's'
const schema = new Schema({..}, { read: 'secondaryPreferred' }); // aliased as 'sp'
const schema = new Schema({..}, { read: 'nearest' }); // aliased as 'n'The alias of each pref is also permitted so instead of having to type out
‘secondaryPreferred’ and getting the spelling wrong, we can simply pass ‘sp’.
The read option also allows us to specify tag sets. These tell the
driver from which members
of the replica-set it should attempt to read. Read more about tag sets
here and
here.
NOTE: you may also specify the driver read pref strategy
option when connecting:
// pings the replset members periodically to track network latency
const options = { replset: { strategy: 'ping' }};
mongoose.connect(uri, options);
const schema = new Schema({..}, { read: ['nearest', { disk: 'ssd' }] });
mongoose.model('JellyBean', schema);option: writeConcern
Allows setting write concern
at the schema level.
const schema = new Schema({ name: String }, {
writeConcern: {
w: 'majority',
j: true,
wtimeout: 1000
}
});option: shardKey
The shardKey option is used when we have a sharded MongoDB architecture.
Each sharded collection is given a shard key which must be present in all
insert/update operations. We just need to set this schema option to the same
shard key and we’ll be all set.
new Schema({ .. }, { shardKey: { tag: 1, name: 1 }})Note that Mongoose does not send the shardcollection command for you. You
must configure your shards yourself.
option: strict
The strict option, (enabled by default), ensures that values passed to our
model constructor that were not specified in our schema do not get saved to
the db.
const thingSchema = new Schema({..})
const Thing = mongoose.model('Thing', thingSchema);
const thing = new Thing({ iAmNotInTheSchema: true });
thing.save(); // iAmNotInTheSchema is not saved to the db
// set to false..
const thingSchema = new Schema({..}, { strict: false });
const thing = new Thing({ iAmNotInTheSchema: true });
thing.save(); // iAmNotInTheSchema is now saved to the db!!This also affects the use of doc.set() to set a property value.
const thingSchema = new Schema({..})
const Thing = mongoose.model('Thing', thingSchema);
const thing = new Thing;
thing.set('iAmNotInTheSchema', true);
thing.save(); // iAmNotInTheSchema is not saved to the dbThis value can be overridden at the model instance level by passing a second
boolean argument:
const Thing = mongoose.model('Thing');
const thing = new Thing(doc, true); // enables strict mode
const thing = new Thing(doc, false); // disables strict modeThe strict option may also be set to "throw" which will cause errors
to be produced instead of dropping the bad data.
NOTE: Any key/val set on the instance that does not exist in your schema
is always ignored, regardless of schema option.
const thingSchema = new Schema({..})
const Thing = mongoose.model('Thing', thingSchema);
const thing = new Thing;
thing.iAmNotInTheSchema = true;
thing.save(); // iAmNotInTheSchema is never saved to the dboption: strictQuery
For backwards compatibility, the strict option does not apply to
the filter parameter for queries.
const mySchema = new Schema({ field: Number }, { strict: true });
const MyModel = mongoose.model('Test', mySchema);
// Mongoose will **not** filter out `notInSchema: 1`, despite `strict: true`
MyModel.find({ notInSchema: 1 });The strict option does apply to updates.
// Mongoose will strip out `notInSchema` from the update if `strict` is
// not `false`
MyModel.updateMany({}, { $set: { notInSchema: 1 } });Mongoose has a separate strictQuery option to toggle strict mode for
the filter parameter to queries.
const mySchema = new Schema({ field: Number }, {
strict: true,
strictQuery: true // Turn on strict mode for query filters
});
const MyModel = mongoose.model('Test', mySchema);
// Mongoose will strip out `notInSchema: 1` because `strictQuery` is `true`
MyModel.find({ notInSchema: 1 });option: toJSON
Exactly the same as the toObject option but only applies when
the document’s toJSON method is called.
const schema = new Schema({ name: String });
schema.path('name').get(function (v) {
return v + ' is my name';
});
schema.set('toJSON', { getters: true, virtuals: false });
const M = mongoose.model('Person', schema);
const m = new M({ name: 'Max Headroom' });
console.log(m.toObject()); // { _id: 504e0cd7dd992d9be2f20b6f, name: 'Max Headroom' }
console.log(m.toJSON()); // { _id: 504e0cd7dd992d9be2f20b6f, name: 'Max Headroom is my name' }
// since we know toJSON is called whenever a js object is stringified:
console.log(JSON.stringify(m)); // { "_id": "504e0cd7dd992d9be2f20b6f", "name": "Max Headroom is my name" }To see all available toJSON/toObject options, read this.
option: toObject
Documents have a toObject method
which converts the mongoose document into a plain JavaScript object. This
method accepts a few options. Instead of applying these options on a
per-document basis, we may declare the options at the schema level and have
them applied to all of the schema’s documents by default.
To have all virtuals show up in your console.log output, set the
toObject option to { getters: true }:
const schema = new Schema({ name: String });
schema.path('name').get(function(v) {
return v + ' is my name';
});
schema.set('toObject', { getters: true });
const M = mongoose.model('Person', schema);
const m = new M({ name: 'Max Headroom' });
console.log(m); // { _id: 504e0cd7dd992d9be2f20b6f, name: 'Max Headroom is my name' }To see all available toObject options, read this.
option: typeKey
By default, if you have an object with key ‘type’ in your schema, mongoose
will interpret it as a type declaration.
// Mongoose interprets this as 'loc is a String'
const schema = new Schema({ loc: { type: String, coordinates: [Number] } });However, for applications like geoJSON,
the ‘type’ property is important. If you want to control which key mongoose
uses to find type declarations, set the ‘typeKey’ schema option.
const schema = new Schema({
// Mongoose interpets this as 'loc is an object with 2 keys, type and coordinates'
loc: { type: String, coordinates: [Number] },
// Mongoose interprets this as 'name is a String'
name: { $type: String }
}, { typeKey: '$type' }); // A '$type' key means this object is a type declarationoption: validateBeforeSave
By default, documents are automatically validated before they are saved to
the database. This is to prevent saving an invalid document. If you want to
handle validation manually, and be able to save objects which don’t pass
validation, you can set validateBeforeSave to false.
const schema = new Schema({ name: String });
schema.set('validateBeforeSave', false);
schema.path('name').validate(function (value) {
return value != null;
});
const M = mongoose.model('Person', schema);
const m = new M({ name: null });
m.validate(function(err) {
console.log(err); // Will tell you that null is not allowed.
});
m.save(); // Succeeds despite being invalidoption: versionKey
The versionKey is a property set on each document when first created by
Mongoose. This keys value contains the internal
revision
of the document. The versionKey option is a string that represents the
path to use for versioning. The default is __v. If this conflicts with
your application you can configure as such:
const schema = new Schema({ name: 'string' });
const Thing = mongoose.model('Thing', schema);
const thing = new Thing({ name: 'mongoose v3' });
await thing.save(); // { __v: 0, name: 'mongoose v3' }
// customized versionKey
new Schema({..}, { versionKey: '_somethingElse' })
const Thing = mongoose.model('Thing', schema);
const thing = new Thing({ name: 'mongoose v3' });
thing.save(); // { _somethingElse: 0, name: 'mongoose v3' }Note that Mongoose’s default versioning is not a full optimistic concurrency
solution. Mongoose’s default versioning only operates on arrays as shown below.
// 2 copies of the same document
const doc1 = await Model.findOne({ _id });
const doc2 = await Model.findOne({ _id });
// Delete first 3 comments from `doc1`
doc1.comments.splice(0, 3);
await doc1.save();
// The below `save()` will throw a VersionError, because you're trying to
// modify the comment at index 1, and the above `splice()` removed that
// comment.
doc2.set('comments.1.body', 'new comment');
await doc2.save();If you need optimistic concurrency support for save(), you can set the optimisticConcurrency option
Document versioning can also be disabled by setting the versionKey to
false.
DO NOT disable versioning unless you know what you are doing.
new Schema({..}, { versionKey: false });
const Thing = mongoose.model('Thing', schema);
const thing = new Thing({ name: 'no versioning please' });
thing.save(); // { name: 'no versioning please' }Mongoose only updates the version key when you use save().
If you use update(), findOneAndUpdate(), etc. Mongoose will not
update the version key. As a workaround, you can use the below middleware.
schema.pre('findOneAndUpdate', function() {
const update = this.getUpdate();
if (update.__v != null) {
delete update.__v;
}
const keys = ['$set', '$setOnInsert'];
for (const key of keys) {
if (update[key] != null && update[key].__v != null) {
delete update[key].__v;
if (Object.keys(update[key]).length === 0) {
delete update[key];
}
}
}
update.$inc = update.$inc || {};
update.$inc.__v = 1;
});option: optimisticConcurrency
Optimistic concurrency is a strategy to ensure
the document you’re updating didn’t change between when you loaded it using find() or findOne(), and when
you update it using save().
For example, suppose you have a House model that contains a list of photos, and a status that represents
whether this house shows up in searches. Suppose that a house that has status 'APPROVED' must have at least
two photos. You might implement the logic of approving a house document as shown below:
async function markApproved(id) {
const house = await House.findOne({ _id });
if (house.photos.length < 2) {
throw new Error('House must have at least two photos!');
}
house.status = 'APPROVED';
await house.save();
}The markApproved() function looks right in isolation, but there might be a potential issue: what if another
function removes the house’s photos between the findOne() call and the save() call? For example, the below
code will succeed:
const house = await House.findOne({ _id });
if (house.photos.length < 2) {
throw new Error('House must have at least two photos!');
}
const house2 = await House.findOne({ _id });
house2.photos = [];
await house2.save();
// Marks the house as 'APPROVED' even though it has 0 photos!
house.status = 'APPROVED';
await house.save();If you set the optimisticConcurrency option on the House model’s schema, the above script will throw an
error.
const House = mongoose.model('House', Schema({
status: String,
photos: [String]
}, { optimisticConcurrency: true }));
const house = await House.findOne({ _id });
if (house.photos.length < 2) {
throw new Error('House must have at least two photos!');
}
const house2 = await House.findOne({ _id });
house2.photos = [];
await house2.save();
// Throws 'VersionError: No matching document found for id "..." version 0'
house.status = 'APPROVED';
await house.save();option: collation
Sets a default collation
for every query and aggregation. Here’s a beginner-friendly overview of collations.
const schema = new Schema({
name: String
}, { collation: { locale: 'en_US', strength: 1 } });
const MyModel = db.model('MyModel', schema);
MyModel.create([{ name: 'val' }, { name: 'Val' }]).
then(() => {
return MyModel.find({ name: 'val' });
}).
then((docs) => {
// `docs` will contain both docs, because `strength: 1` means
// MongoDB will ignore case when matching.
});option: skipVersioning
skipVersioning allows excluding paths from versioning (i.e., the internal
revision will not be incremented even if these paths are updated). DO NOT
do this unless you know what you’re doing. For subdocuments, include this
on the parent document using the fully qualified path.
new Schema({..}, { skipVersioning: { dontVersionMe: true } });
thing.dontVersionMe.push('hey');
thing.save(); // version is not incrementedoption: timestamps
The timestamps option tells mongoose to assign createdAt and updatedAt fields
to your schema. The type assigned is Date.
By default, the names of the fields are createdAt and updatedAt. Customize
the field names by setting timestamps.createdAt and timestamps.updatedAt.
const thingSchema = new Schema({..}, { timestamps: { createdAt: 'created_at' } });
const Thing = mongoose.model('Thing', thingSchema);
const thing = new Thing();
await thing.save(); // `created_at` & `updatedAt` will be included
// With updates, Mongoose will add `updatedAt` to `$set`
await Thing.updateOne({}, { $set: { name: 'Test' } });
// If you set upsert: true, Mongoose will add `created_at` to `$setOnInsert` as well
await Thing.findOneAndUpdate({}, { $set: { name: 'Test2' } });
// Mongoose also adds timestamps to bulkWrite() operations
// See https://mongoosejs.com/docs/api.html#model_Model.bulkWrite
await Thing.bulkWrite([
insertOne: {
document: {
name: 'Jean-Luc Picard',
ship: 'USS Stargazer'
// Mongoose will add `created_at` and `updatedAt`
}
},
updateOne: {
filter: { name: 'Jean-Luc Picard' },
update: {
$set: {
ship: 'USS Enterprise'
// Mongoose will add `updatedAt`
}
}
}
]);By default, Mongoose uses new Date() to get the current time.
If you want to overwrite the function
Mongoose uses to get the current time, you can set the
timestamps.currentTime option. Mongoose will call the
timestamps.currentTime function whenever it needs to get
the current time.
const schema = Schema({
createdAt: Number,
updatedAt: Number,
name: String
}, {
// Make Mongoose use Unix time (seconds since Jan 1, 1970)
timestamps: { currentTime: () => Math.floor(Date.now() / 1000) }
});option: useNestedStrict
Write operations like update(), updateOne(), updateMany(),
and findOneAndUpdate() only check the top-level
schema’s strict mode setting.
const childSchema = new Schema({}, { strict: false });
const parentSchema = new Schema({ child: childSchema }, { strict: 'throw' });
const Parent = mongoose.model('Parent', parentSchema);
Parent.update({}, { 'child.name': 'Luke Skywalker' }, (error) => {
// Error because parentSchema has `strict: throw`, even though
// `childSchema` has `strict: false`
});
const update = { 'child.name': 'Luke Skywalker' };
const opts = { strict: false };
Parent.update({}, update, opts, function(error) {
// This works because passing `strict: false` to `update()` overwrites
// the parent schema.
});If you set useNestedStrict to true, mongoose will use the child schema’s
strict option for casting updates.
const childSchema = new Schema({}, { strict: false });
const parentSchema = new Schema({ child: childSchema },
{ strict: 'throw', useNestedStrict: true });
const Parent = mongoose.model('Parent', parentSchema);
Parent.update({}, { 'child.name': 'Luke Skywalker' }, error => {
// Works!
});option: selectPopulatedPaths
By default, Mongoose will automatically select() any populated paths for
you, unless you explicitly exclude them.
const bookSchema = new Schema({
title: 'String',
author: { type: 'ObjectId', ref: 'Person' }
});
const Book = mongoose.model('Book', bookSchema);
// By default, Mongoose will add `author` to the below `select()`.
await Book.find().select('title').populate('author');
// In other words, the below query is equivalent to the above
await Book.find().select('title author').populate('author');To opt out of selecting populated fields by default, set selectPopulatedPaths
to false in your schema.
const bookSchema = new Schema({
title: 'String',
author: { type: 'ObjectId', ref: 'Person' }
}, { selectPopulatedPaths: false });
const Book = mongoose.model('Book', bookSchema);
// Because `selectPopulatedPaths` is false, the below doc will **not**
// contain an `author` property.
const doc = await Book.findOne().select('title').populate('author');option: storeSubdocValidationError
For legacy reasons, when there is a validation error in subpath of a
single nested schema, Mongoose will record that there was a validation error
in the single nested schema path as well. For example:
const childSchema = new Schema({ name: { type: String, required: true } });
const parentSchema = new Schema({ child: childSchema });
const Parent = mongoose.model('Parent', parentSchema);
// Will contain an error for both 'child.name' _and_ 'child'
new Parent({ child: {} }).validateSync().errors;Set the storeSubdocValidationError to false on the child schema to make
Mongoose only reports the parent error.
const childSchema = new Schema({
name: { type: String, required: true }
}, { storeSubdocValidationError: false }); // <-- set on the child schema
const parentSchema = new Schema({ child: childSchema });
const Parent = mongoose.model('Parent', parentSchema);
// Will only contain an error for 'child.name'
new Parent({ child: {} }).validateSync().errors;With ES6 Classes
Schemas have a loadClass() method
that you can use to create a Mongoose schema from an ES6 class:
- ES6 class methods become Mongoose methods
- ES6 class statics become Mongoose statics
- ES6 getters and setters become Mongoose virtuals
Here’s an example of using loadClass() to create a schema from an ES6 class:
class MyClass {
myMethod() { return 42; }
static myStatic() { return 42; }
get myVirtual() { return 42; }
}
const schema = new mongoose.Schema();
schema.loadClass(MyClass);
console.log(schema.methods); // { myMethod: [Function: myMethod] }
console.log(schema.statics); // { myStatic: [Function: myStatic] }
console.log(schema.virtuals); // { myVirtual: VirtualType { ... } }Pluggable
Schemas are also pluggable which allows us to package up reusable features into
plugins that can be shared with the community or just between your projects.
Further Reading
Here’s an alternative introduction to Mongoose schemas.
To get the most out of MongoDB, you need to learn the basics of MongoDB schema design.
SQL schema design (third normal form) was designed to minimize storage costs,
whereas MongoDB schema design is about making common queries as fast as possible.
The 6 Rules of Thumb for MongoDB Schema Design blog series
is an excellent resource for learning the basic rules for making your queries
fast.
Users looking to master MongoDB schema design in Node.js should look into
The Little MongoDB Schema Design Book
by Christian Kvalheim, the original author of the MongoDB Node.js driver.
This book shows you how to implement performant schemas for a laundry list
of use cases, including e-commerce, wikis, and appointment bookings.
Next Up
Now that we’ve covered Schemas, let’s take a look at SchemaTypes.

by Nick Karnik
Mongoose is an Object Data Modeling (ODM) library for MongoDB and Node.js. It manages relationships between data, provides schema validation, and is used to translate between objects in code and the representation of those objects in MongoDB.
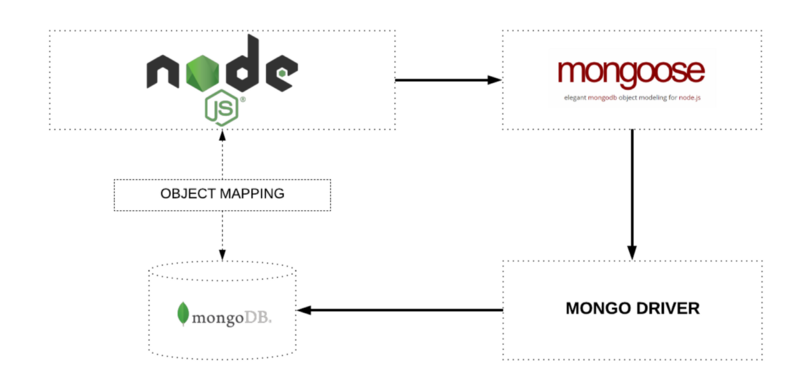
MongoDB is a schema-less NoSQL document database. It means you can store JSON documents in it, and the structure of these documents can vary as it is not enforced like SQL databases. This is one of the advantages of using NoSQL as it speeds up application development and reduces the complexity of deployments.
Below is an example of how data is stored in Mongo vs. SQL Database:
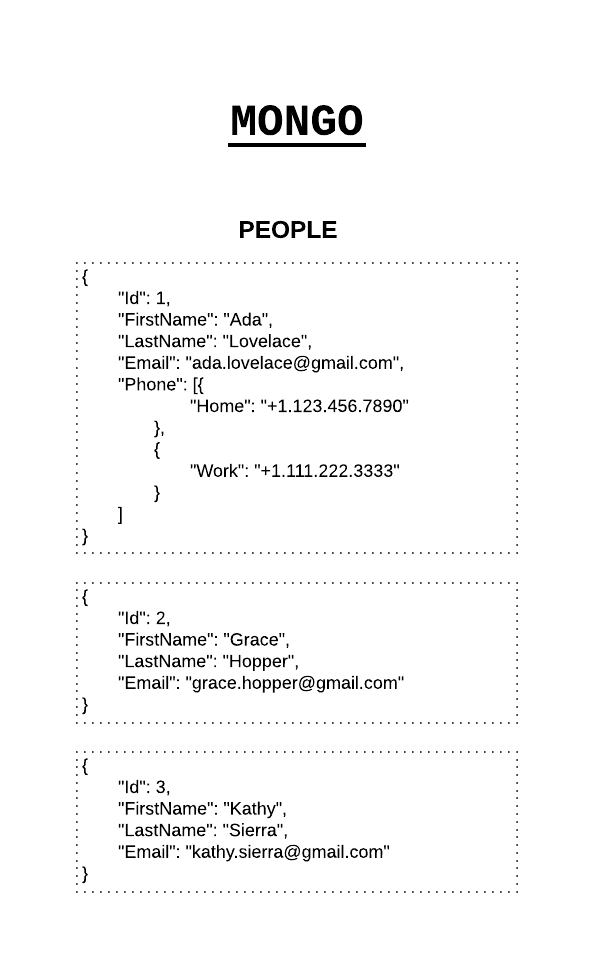
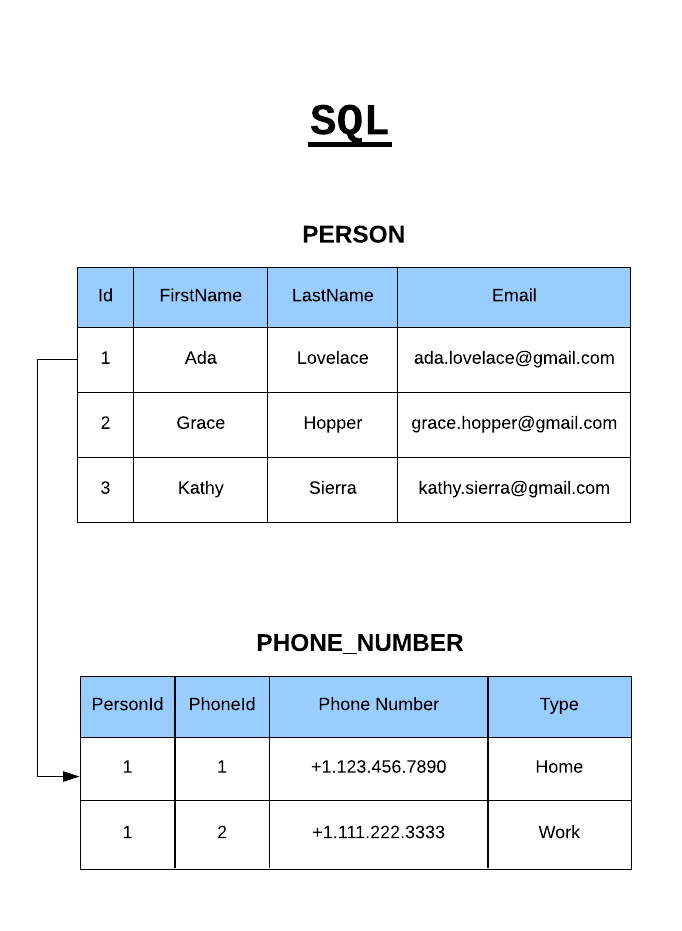
Terminologies
Collections
Collections in Mongo are equivalent to tables in relational databases. They can hold multiple JSON documents.
Documents
Documents are equivalent to records or rows of data in SQL. While a SQL row can reference data in other tables, Mongo documents usually combine that in a document.
Fields
Fields, also known as properties or attributes, are similar to columns in a SQL table. In the image above, FirstName, LastName, Email, and Phone are all fields.
Schema
While Mongo is schema-less, SQL defines a schema via the table definition. A Mongoose schema is a document data structure (or shape of the document) that is enforced via the application layer.
SchemaTypes
While Mongoose schemas define the overall structure or shape of a document, SchemaTypes define the expected data type for individual fields (String, Number, Boolean, and so on).
You can also pass in useful options like required to make a field non-optional, default to set a default value for the field, and many more.
Models
Models are higher-order constructors that take a schema and create an instance of a document equivalent to records in a relational database.
Example
Here’s a small code snippet to illustrate some of the terminology above:
const puppySchema = new mongoose.Schema({
name: {
type: String,
required: true
},
age: Number
});
const Puppy = mongoose.model('Puppy', puppySchema);
In the code above, puppySchema defines the shape of the document which has two fields, name, and age.
The SchemaType for name is String and for age is Number. Note that you can define the SchemaType for a field by using an object with a type property like with name. Or you can apply a SchemaType directly to the field like with age.
Also, notice that the SchemaType for name has the option required set to true. To use options like required and lowercase for a field, you need to use an object to set the SchemaType.
At the bottom of the snippet, puppySchema is compiled into a model named Puppy, which can then be used to construct documents in an application.
Getting Started
Mongo Installation
Before we get started, let’s setup Mongo. You can choose from one of the following options (we are using option #1 for this article):
- Download the appropriate MongoDB version for your Operating System from the MongoDB Website and follow their installation instructions
- Create a free sandbox database subscription on mLab
- Install Mongo using Docker if you prefer to use Docker
Let’s navigate through some of the basics of Mongoose by implementing a model that represents data for a simplified address book.
I am using Visual Studio Code, Node 8.9, and NPM 5.6. Fire up your favorite IDE, create a blank project, and let’s get started! We will be using the limited ES6 syntax in Node, so we won’t be configuring Babel.
NPM Install
Let’s go to the project folder and initialize our project
npm init -yLet’s install Mongoose and a validation library with the following command:
npm install mongoose validatorThe above install command will install the latest version of the libraries. The Mongoose syntax in this article is specific to Mongoose v5 and beyond.
Database Connection
Create a file ./src/database.js under the project root.
Next, we will add a simple class with a method that connects to the database.
Your connection string will vary based on your installation.
let mongoose = require('mongoose');
const server = '127.0.0.1:27017'; // REPLACE WITH YOUR DB SERVER
const database = 'fcc-Mail'; // REPLACE WITH YOUR DB NAME
class Database {
constructor() {
this._connect();
}
_connect() {
mongoose
.connect(`mongodb://${server}/${database}`)
.then(() => {
console.log('Database connection successful');
})
.catch((err) => {
console.error('Database connection error');
});
}
}
module.exports = new Database();
The require(‘mongoose’) call above returns a Singleton object. It means that the first time you call require(‘mongoose’), it is creating an instance of the Mongoose class and returning it. On subsequent calls, it will return the same instance that was created and returned to you the first time because of how module import/export works in ES6.
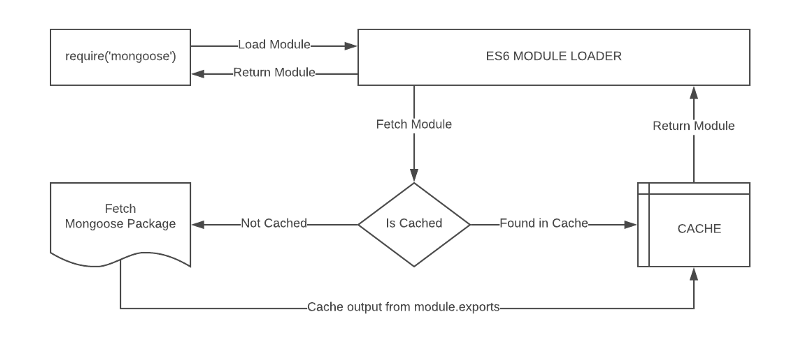
Similarly, we have turned our Database class into a singleton by returning an instance of the class in the module.exports statement because we only need a single connection to the database.
ES6 makes it very easy for us to create a singleton (single instance) pattern because of how the module loader works by caching the response of a previously imported file.
Mongoose Schema vs. Model
A Mongoose model is a wrapper on the Mongoose schema. A Mongoose schema defines the structure of the document, default values, validators, etc., whereas a Mongoose model provides an interface to the database for creating, querying, updating, deleting records, etc.
Creating a Mongoose model comprises primarily of three parts:
1. Referencing Mongoose
let mongoose = require('mongoose');This reference will be the same as the one that was returned when we connected to the database, which means the schema and model definitions will not need to explicitly connect to the database.
2. Defining the Schema
A schema defines document properties through an object where the key name corresponds to the property name in the collection.
let emailSchema = new mongoose.Schema({
email: String
});
Here we define a property called email with a schema type String which maps to an internal validator that will be triggered when the model is saved to the database. It will fail if the data type of the value is not a string type.
The following Schema Types are permitted:
- Array
- Boolean
- Buffer
- Date
- Mixed (A generic / flexible data type)
- Number
- ObjectId
- String
Mixed and ObjectId are defined under require(‘mongoose’).Schema.Types.
3. Exporting a Model
We need to call the model constructor on the Mongoose instance and pass it the name of the collection and a reference to the schema definition.
module.exports = mongoose.model('Email', emailSchema);Let’s combine the above code into ./src/models/email.js to define the contents of a basic email model:
let mongoose = require('mongoose');
let emailSchema = new mongoose.Schema({
email: String
});
module.exports = mongoose.model('Email', emailSchema);
A schema definition should be simple, but its complexity is usually based on application requirements. Schemas can be reused and they can contain several child-schemas too. In the example above, the value of the email property is a simple value type. However, it can also be an object type with additional properties on it.
We can create an instance of the model we defined above and populate it using the following syntax:
let EmailModel = require('./email');
let msg = new EmailModel({
email: 'ada.lovelace@gmail.com'
});
Let’s enhance the Email schema to make the email property a unique, required field and convert the value to lowercase before saving it. We can also add a validation function that will ensure that the value is a valid email address. We will reference and use the validator library installed earlier.
let mongoose = require('mongoose');
let validator = require('validator');
let emailSchema = new mongoose.Schema({
email: {
type: String,
required: true,
unique: true,
lowercase: true,
validate: (value) => {
return validator.isEmail(value);
}
}
});
module.exports = mongoose.model('Email', emailSchema);
Basic Operations
Mongoose has a flexible API and provides many ways to accomplish a task. We will not focus on the variations because that is out of scope for this article, but remember that most of the operations can be done in more than one way either syntactically or via the application architecture.
Create Record
Let’s create an instance of the email model and save it to the database:
let EmailModel = require('./email');
let msg = new EmailModel({
email: 'ADA.LOVELACE@GMAIL.COM'
});
msg
.save()
.then((doc) => {
console.log(doc);
})
.catch((err) => {
console.error(err);
});
The result is a document that is returned upon a successful save:
{
_id: 5a78fe3e2f44ba8f85a2409a,
email: 'ada.lovelace@gmail.com',
__v: 0
}The following fields are returned (internal fields are prefixed with an underscore):
- The
_idfield is auto-generated by Mongo and is a primary key of the collection. Its value is a unique identifier for the document. - The value of the
emailfield is returned. Notice that it is lower-cased because we specified thelowercase: trueattribute in the schema. __vis the versionKey property set on each document when first created by Mongoose. Its value contains the internal revision of the document.
If you try to repeat the save operation above, you will get an error because we have specified that the email field should be unique.
Fetch Record
Let’s try to retrieve the record we saved to the database earlier. The model class exposes several static and instance methods to perform operations on the database. We will now try to find the record that we created previously using the find method and pass the email as the search term.
EmailModel.find({
email: 'ada.lovelace@gmail.com' // search query
})
.then((doc) => {
console.log(doc);
})
.catch((err) => {
console.error(err);
});
The document returned will be similar to what was displayed when we created the record:
{
_id: 5a78fe3e2f44ba8f85a2409a,
email: 'ada.lovelace@gmail.com',
__v: 0
}Update Record
Let’s modify the record above by changing the email address and adding another field to it, all in a single operation. For performance reasons, Mongoose won’t return the updated document so we need to pass an additional parameter to ask for it:
EmailModel.findOneAndUpdate(
{
email: 'ada.lovelace@gmail.com' // search query
},
{
email: 'theoutlander@live.com' // field:values to update
},
{
new: true, // return updated doc
runValidators: true // validate before update
}
)
.then((doc) => {
console.log(doc);
})
.catch((err) => {
console.error(err);
});
The document returned will contain the updated email:
{
_id: 5a78fe3e2f44ba8f85a2409a,
email: 'theoutlander@live.com',
__v: 0
}Delete Record
We will use the findOneAndRemove call to delete a record. It returns the original document that was removed:
EmailModel.findOneAndRemove({
email: 'theoutlander@live.com'
})
.then((response) => {
console.log(response);
})
.catch((err) => {
console.error(err);
});
Helpers
We have looked at some of the basic functionality above known as CRUD (Create, Read, Update, Delete) operations, but Mongoose also provides the ability to configure several types of helper methods and properties. These can be used to further simplify working with data.
Let’s create a user schema in ./src/models/user.js with the fieldsfirstName and lastName:
let mongoose = require('mongoose');
let userSchema = new mongoose.Schema({
firstName: String,
lastName: String
});
module.exports = mongoose.model('User', userSchema);
Virtual Property
A virtual property is not persisted to the database. We can add it to our schema as a helper to get and set values.
Let’s create a virtual property called fullName which can be used to set values on firstName and lastName and retrieve them as a combined value when read:
userSchema.virtual('fullName').get(function () {
return this.firstName + ' ' + this.lastName;
});
userSchema.virtual('fullName').set(function (name) {
let str = name.split(' ');
this.firstName = str[0];
this.lastName = str[1];
});
Callbacks for get and set must use the function keyword as we need to access the model via the this keyword. Using fat arrow functions will change what this refers to.
Now, we can set firstName and lastName by assigning a value to fullName:
let model = new UserModel();
model.fullName = 'Thomas Anderson';
console.log(model.toJSON()); // Output model fields as JSON
console.log();
console.log(model.fullName); // Output the full name
The code above will output the following:
{ _id: 5a7a4248550ebb9fafd898cf,
firstName: 'Thomas',
lastName: 'Anderson' }
Thomas AndersonInstance Methods
We can create custom helper methods on the schema and access them via the model instance. These methods will have access to the model object and they can be used quite creatively. For instance, we could create a method to find all the people who have the same first name as the current instance.
In this example, let’s create a function to return the initials for the current user. Let’s add a custom helper method called getInitials to the schema:
userSchema.methods.getInitials = function () {
return this.firstName[0] + this.lastName[0];
};
This method will be accessible via a model instance:
let model = new UserModel({
firstName: 'Thomas',
lastName: 'Anderson'
});
let initials = model.getInitials();
console.log(initials); // This will output: TA
Static Methods
Similar to instance methods, we can create static methods on the schema. Let’s create a method to retrieve all users in the database:
userSchema.statics.getUsers = function () {
return new Promise((resolve, reject) => {
this.find((err, docs) => {
if (err) {
console.error(err);
return reject(err);
}
resolve(docs);
});
});
};
Calling getUsers on the Model class will return all the users in the database:
UserModel.getUsers()
.then((docs) => {
console.log(docs);
})
.catch((err) => {
console.error(err);
});
Adding instance and static methods is a nice approach to implement an interface to database interactions on collections and records.
Middleware
Middleware are functions that run at specific stages of a pipeline. Mongoose supports middleware for the following operations:
- Aggregate
- Document
- Model
- Query
For instance, models have pre and post functions that take two parameters:
- Type of event (‘init’, ‘validate’, ‘save’, ‘remove’)
- A callback that is executed with this referencing the model instance
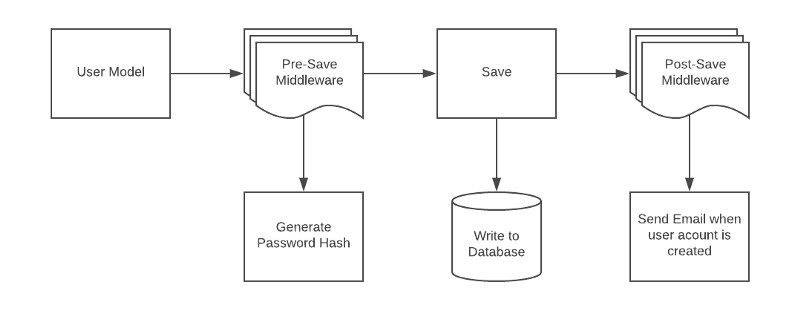
Let’s try an example by adding two fields called createdAt and updatedAt to our schema:
let mongoose = require('mongoose');
let userSchema = new mongoose.Schema({
firstName: String,
lastName: String,
createdAt: Date,
updatedAt: Date
});
module.exports = mongoose.model('User', userSchema);
When model.save() is called, there is a pre(‘save’, …) and post(‘save’, …) event that is triggered. For the second parameter, you can pass a function that is called when the event is triggered. These functions take a parameter to the next function in the middleware chain.
Let’s add a pre-save hook and set values for createdAt and updatedAt:
userSchema.pre('save', function (next) {
let now = Date.now();
this.updatedAt = now;
// Set a value for createdAt only if it is null
if (!this.createdAt) {
this.createdAt = now;
}
// Call the next function in the pre-save chain
next();
});
Let’s create and save our model:
let UserModel = require('./user');
let model = new UserModel({
fullName: 'Thomas Anderson'
});
msg
.save()
.then((doc) => {
console.log(doc);
})
.catch((err) => {
console.error(err);
});
You should see values for createdAt and updatedAt when the record that is created is printed:
{ _id: 5a7bbbeebc3b49cb919da675,
firstName: 'Thomas',
lastName: 'Anderson',
updatedAt: 2018-02-08T02:54:38.888Z,
createdAt: 2018-02-08T02:54:38.888Z,
__v: 0 }Plugins
Suppose that we want to track when a record was created and last updated on every collection in our database. Instead of repeating the above process, we can create a plugin and apply it to every schema.
Let’s create a file ./src/model/plugins/timestamp.js and replicate the above functionality as a reusable module:
module.exports = function timestamp(schema) {
// Add the two fields to the schema
schema.add({
createdAt: Date,
updatedAt: Date
});
// Create a pre-save hook
schema.pre('save', function (next) {
let now = Date.now();
this.updatedAt = now;
// Set a value for createdAt only if it is null
if (!this.createdAt) {
this.createdAt = now;
}
// Call the next function in the pre-save chain
next();
});
};
To use this plugin, we simply pass it to the schemas that should be given this functionality:
let timestampPlugin = require('./plugins/timestamp');
emailSchema.plugin(timestampPlugin);
userSchema.plugin(timestampPlugin);
Query Building
Mongoose has a very rich API that handles many complex operations supported by MongoDB. Consider a query where we can incrementally build query components.
In this example, we are going to:
- Find all users
- Skip the first 100 records
- Limit the results to 10 records
- Sort the results by the firstName field
- Select the firstName
- Execute that query
UserModel.find() // find all users
.skip(100) // skip the first 100 items
.limit(10) // limit to 10 items
.sort({ firstName: 1 }) // sort ascending by firstName
.select({ firstName: true }) // select firstName only
.exec() // execute the query
.then((docs) => {
console.log(docs);
})
.catch((err) => {
console.error(err);
});
Closing
We have barely scratched the surface exploring some of the capabilities of Mongoose. It is a rich library full of useful and and powerful features that make it a joy to work with data models in the application layer.
While you can interact with Mongo directly using Mongo Driver, Mongoose will simplify that interaction by allowing you to model relationships between data and validate them easily.
Fun Fact: Mongoose is created by Valeri Karpov who is an incredibly talented engineer! He coined the term The MEAN Stack.
If this article was helpful, follow me on Twitter.
Learn to code for free. freeCodeCamp’s open source curriculum has helped more than 40,000 people get jobs as developers. Get started

Данный раздел представляет большой выбор инструкций по эксплуатации автомобильных сигнализаций Mongoose. Вы можете бесплатно скачать любое руководство.
Марка автосигнализаций Mongoose является одной из самых популярных охранных систем на российском рынке, Mongoose Logoи за его пределами. Такая популярность объясняется тем, что данная сигнализация обладает отличными показателями надежности охраны автомобиля, а также простотой использования. Кроме того, на рынке присутствует масса моделей данной сигнализации и сопутствующих продуктов. Поэтому каждый автолюбитель может подобрать себе что-нибудь по вкусу, по цене и по другим критериям. Однако, основным отличием Mongoose от других производителей автосигнализаций стала беспрецедентно низкая цена. Уже более семи лет охранные системы данной фирмы доказывают свое превосходство по многим показателям, оставаясь при этом отнюдь не дорогостоящей маркой. А что еще нужно, чтобы завладеть доверием покупателей, как не отличным соотношением показателей цена-качество.
Если Вы утратили инструкцию из комплекта, то, надеемся, без труда сможете найти ее на нашем сайте.
Если, по каким-то причинам, Вы не смогли найти нужное руководство, не стесняясь пишите запрос нам.