-
Contents
-
Table of Contents
-
Troubleshooting
-
Bookmarks
Related Manuals for MOTU 896mk3
Summary of Contents for MOTU 896mk3
-
Page 1
MOTU 896mk3 ™ User Guide for Mac 1280 Massachusetts Avenue Cambridge, MA 02138 Business voice: (617) 576-2760 Business fax: (617) 576-3609 Web site: www.motu.com Tech support: www.motu.com/support… -
Page 2: Important Safeguards
The MOTU 896mk3 is equipped with a three-conductor cord and grounding type plug which has a grounding prong, approved by Underwriters’ Laboratories and the Canadian Standards Association. This plug requires a mating three-conductor grounded type outlet as shown in Figure A below. If the outlet you are planning to use for the MOTU 896mk3 is of the two prong type, DO NOT REMOVE OR ALTER THE GROUNDING PRONG IN ANY MANNER.
-
Page 3: Copyright Notice
Authorization Number on the outside of the box below the shipping address. That license agreement is a contract, and clicking “Accept” binds you and MOTU to This warranty does not apply if the equipment has been damaged by accident, all its terms and conditions.
-
Page 4: Table Of Contents
Contents Quick Reference: 896mk3 Front Panel Quick Reference: 896mk3 Rear Panel Quick Reference: MOTU Audio Setup About the 896mk3 Packing List and Mac System Requirements Installing the 896mk3 Hardware Installing the 896mk3 Mac Software MOTU Audio Setup 896mk3 Front Panel Operation…
-
Page 7: Quick Reference: Motu Audio Setup
192 kHz). going dark. Click the General tab to access these settings. Check this option if you would like the MOTU Audio Setup icon to appear in the application dock as soon as a MOTU FireWire interface is detected (switched on, plugged in, etc.)
-
Page 9: About The 896Mk3
About the 896mk3 CHAPTER Overview ……….9 Two banks of optical digital I/O that provide 16 ■…
-
Page 10
AudioDesk™, full-featured audio workstation 28 inputs and 32 outputs ■ All 896mk3 inputs and outputs can be used simul- software for Mac OS that supports both 16-bit and taneously, for a total of 28 inputs and 32 outputs at 24-bit recording 44.1/48kHz: With a variety of I/O formats, mic preamps, no- latency mixing and processing of live input and… -
Page 11
Similarly, when the 896mk3 is operating at The main outs are equipped with 24-bit 192kHz 192 kHz, MOTU Audio Setup lets you choose a D/A converters and serve as independent outputs word clock output rate of 48 kHz (the Force 44.1/ for the computer or for the 896mk3’s on-board… -
Page 12
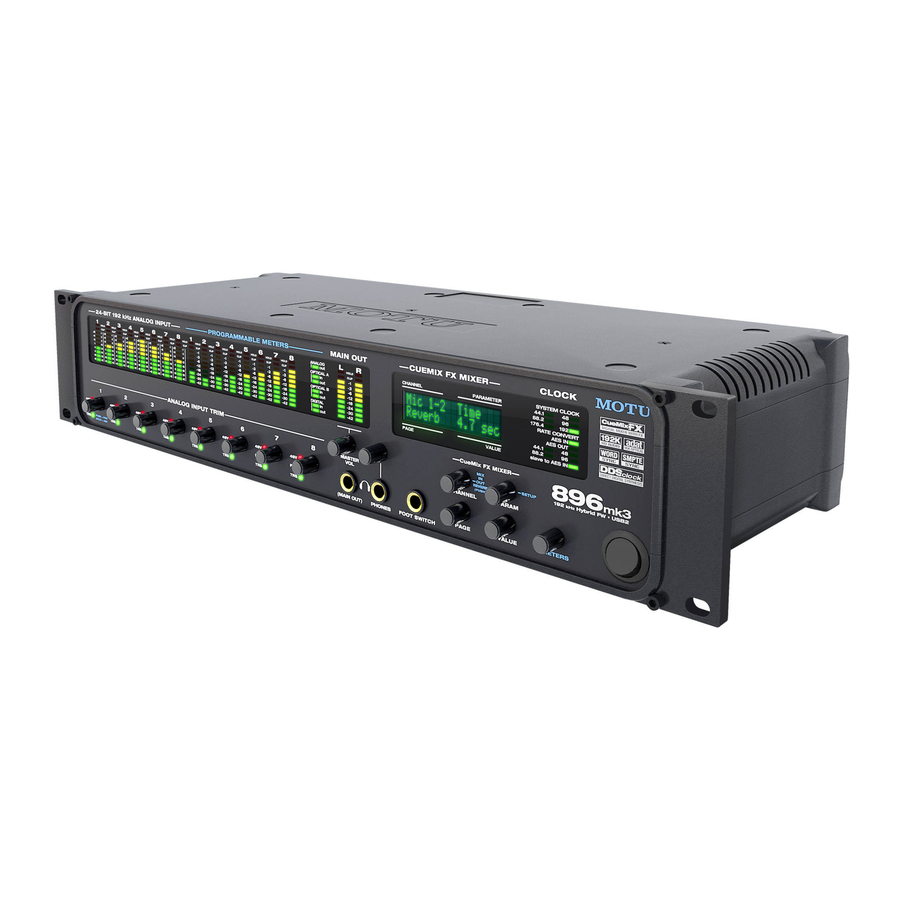
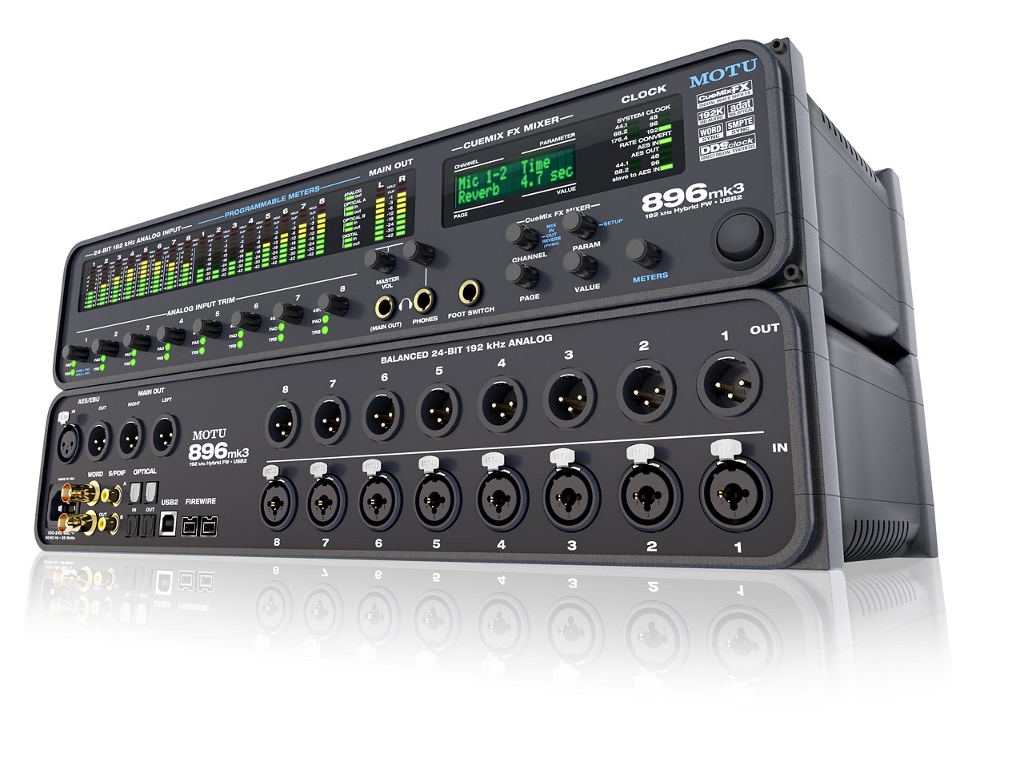
THE 896MK3 FRONT PANEL Foot switch The quarter-inch Foot Switch jack accepts a Metering The front panel of the MOTU 896mk3 displays two standard foot switch. When you push the foot switch, the 896mk3 triggers a programmable eight-channel banks of 10-segment ladder LEDs. -
Page 13
filtering and reverb lengths up to 60-seconds. The 896mk3 system is fully integrated with Two forms of compression are supplied: a standard MOTU’s award-winning Digital Performer audio compressor with conventional threshold/ratio/ sequencer software package. attack/release/gain controls and the Leveler™, an… -
Page 14
A B O U T T H E 8 9 6 M K 3… -
Page 15: Packing List And Mac System Requirements
896mk3 ways to register. box when you first open it, please immediately Visit www.motu.com/register ■ contact your dealer or MOTU. One 896mk3 I/O rack unit ■ Fill out and mail the included product ■…
-
Page 16
P A C K I N G L I S T A N D M A C S Y S T E M R E Q U I R E M E N T S… -
Page 17: Installing The 896Mk3 Hardware
Syncing word clock devices……28 Connecting multiple MOTU FireWire interfaces ..29…
-
Page 18: Connect Audio Inputs And Outputs
20 dB pad CONNECT AUDIO INPUTS AND OUTPUTS If the input signal is too hot with the trim turned all The 896mk3 audio interface has the following the way down, engage (flip up) the 20dB pad audio input and output connectors: switch for the input on the front panel.
-
Page 19: Connect A Foot Switch
896mk3, connect it to the FOOT SWITCH jack. format at a 2x rate, be sure to choose either Type I See “Quick Reference: MOTU Audio Setup” on or Type II operation, as explained in “ADAT SMUX page 7 for information about how to program the Type”…
-
Page 20: A Typical 896Mk3 Setup
AES/EBU Headphone jack (on front panel) Pedal jack (on front panel) foot switch FireWire guitar MOTU 8pre and/or Optical output other optical devices quarter-inch analog outs quarter-inch analog outs synthesizer synths, samplers, effects units, etc. Figure 3-4: A typical 896mk3 studio setup.
-
Page 21: Making Sync Connections
4, “Installing the 896mk3 Mac Software” (page 33). After you install the 896mk3 software, Not phase-locked Phase-locked you’ll open MOTU Audio Setup and set the Clock Device A Source setting to Internal as shown below. For Device B details, see chapter 5, “MOTU Audio Setup”…
-
Page 22: Syncing To Smpte Time Code Directly
Word FireWire cable audio cable cable Launch the MOTU SMPTE Console to specify the time code frame Other digital audio device Mac running AudioDesk, rate and amount of freewheel. Also, confirm that the Clock slaved to the 896mk3 Digital Performer or other sample- Source/Address is SMPTE/SMPTE.
-
Page 23: Syncing To Video And/Or Smpte Time Code Using A
Figure 3-9: If your host audio software does not support sample-accurate sync and the 896mk3’s built-in SMPTE sync features, use a universal synchronizer such as the MOTU MIDI Timepiece AV or Digital Timepiece. I N S T A L L I N G T H E 8 9 6 M K 3 H A R D W A R E…
-
Page 24: Syncing S/Pdif Devices
DAT deck or other SPDIF device Setup With this setup, in the MOTU Audio window, choose Internal, or any other clock source setting except SPDIF. The DAT deck (or other SPDIF device) slaves to the 896mk3 via word clock for SPDIF transfers in both directions.
-
Page 25: Syncing Optical Devices
Digital audio phase lock For details about using the clock source setting and Without sample rate conversion, when you transfer the MOTU Audio Setup software in general, see digital audio between two devices, their audio chapter 5, “MOTU Audio Setup” (page 35).
-
Page 26
film, output with the 896mk3, pay careful attention to video, etc. the following settings in MOTU Audio Setup (see Sample rate conversion the quick reference overview on page 7): With sample rate conversion (SRC), an extra level… -
Page 27
AES/EBU input with rate conversion Other device Master AES/EBU OUT 896mk3 clock source Figure 3-16: The Sample Rate Conversion option in MOTU Audio setting: Internal Setup gives you access the AES/EBU output clock options. AES/EBU IN 896mk3 Sample Rate 896mk3… -
Page 28: Syncing Word Clock Devices
Slaving to a 2x and 1/2x word clock an audio clock master (as explained in “Be sure to All MOTU FireWire audio interfaces that support choose a digital audio clock master” on page 21). 96 kHz operation have the ability to slave to a word…
-
Page 29: Connecting Multiple Motu Firewire Interfaces
Figure 3-19: Connecting multiple 896mk3’s (or other MOTU FireWire audio interfaces) to a computer. I N S T A L L I N G T H E 8 9 6 M K 3 H A R D W A R E…
-
Page 30
(instead of to each other). Connecting other MOTU FireWire interfaces You can add an original MOTU 828 to the end of a FireWire daisy chain (because the 828 has only one FireWire port), or you can mix and match multiple 896mk3s with other MOTU FireWire interfaces using a standard FireWire hub. -
Page 31
Operating multiple FireWire interfaces at high sample rates Four MOTU FireWire interfaces can operate at 44.1 or 48kHz on a single FireWire bus, although you may have to disable optical banks to conserve FireWire bus bandwidth. At the 2x samples rates (88.2 or 96kHz) and 4x sample rates (176.4 and… -
Page 32
I N S T A L L I N G T H E 8 9 6 M K 3 H A R D W A R E… -
Page 33: Installing The 896Mk3 Mac Software
More specifically, MOTU SMPTE Console ……. 34 we use CoreAudio to refer to Mac OS X’s standard…
-
Page 34
896mk3 to SMPTE time code, and to generate SMPTE for striping, regenerating or slaving other devices to the computer. For details, see chapter 12, “MOTU SMPTE Console” (page 103). AUDIODESK WORKSTATION SOFTWARE AudioDesk is an advanced workstation software… -
Page 35: Accessing The 896Mk3 Settings
In Cubase or Nuendo, open the Device Setup ■ window, click VST Audio System and choose MOTU Audio ASIO from the ASIO Driver menu. Then click the MOTU Audio ASIO item in the list and click the Control Panel button.
-
Page 36: 896Mk3′ Tab Settings
MOTU Audio Setup. Figure 5-1: MOTU Audio Setup gives you access to all of the settings in the 896mk3 hardware. M O T U A U D I O S E T U P…
-
Page 37: Clock Source
Use the Internal setting when you want the 896mk3 AES/EBU input connector on the 896mk3. This to operate under its own digital audio clock. For setting allows the MOTU 896mk3 to slave to example, you may be in a situation where all you another AES/EBU device.
-
Page 38
— without having to set up an elaborate details, see “Syncing to SMPTE time code directly” synchronization scenario. on page 22 and chapter 12, “MOTU SMPTE For further details about this setting, see “Syncing Console” (page 103). optical devices” on page 25. -
Page 39: Default Stereo Input/Output
The Default Stereo Input and Default Stereo Output allows you to play and record audio with your host settings in MOTU Audio Setup (Figure 5-1 on audio software via both interfaces at the same time page 36) let you specify the stereo input and output…
-
Page 40: Programmable Meters
Choose the desired AES/EBU Out sample rate the MOTU 896mk3 front panel. Your choices are: options (Figure 3-16 on page 27) when the desired Analog Out, Optical A In, Optical A Out, Optical B AES/EBU output rate needs to be completely In, Optical B Out, or Digital In/Out.
-
Page 41: Peak Hold Time
‘GENERAL’ TAB SETTINGS Launch MOTU Audio Setup when hardware becomes available Check this option if you would like the MOTU Audio Setup icon to appear in the application dock Figure 5-4: 896mk3 channel names as they appear in Digital as soon as a MOTU interface is detected (switched Performer.
-
Page 42
M O T U A U D I O S E T U P… -
Page 43: 896Mk3 Front Panel Operation
896mk3 Front Panel Operation CHAPTER OVERVIEW ANALOG INPUT CONTROLS The 896mk3 is the first FireWire audio interface to The 896mk3 front panel analog input controls offer complete front-panel programming via six (Figure 6-1) allow to work with a wide variety of rotary encoders and a 2×16 backlit LCD display.
-
Page 44: Master Vol And «(Main Out)» Phone Jack
MASTER VOL AND “(MAIN OUT)” PHONE ANALOG INPUT METERS WITH V-LIMIT™ JACK COMPRESSION From the factory, the MASTER VOL knob controls All eight inputs are equipped with V-Limit™, a the main outs (analog 1-2), but MASTER VOL can hardware limiter. With the limiter turned off, be programmed to control any combination of signals that hit zero or above will clip (a hard digital outputs.
-
Page 45: Programmable Meters
LCD. Figure 6-7: The LCD provides feedback as you adjust volume. Three global menus You can also specify the bank in MOTU Audio Push the PARAM knob (Figure 6-6) to cycle the Setup. See “Programmable Meters” on page 40.
-
Page 46: 896Mk3 Setup Menu
896MK3 SETUP MENU Save/Name Preset An 896mk3 preset holds all current CueMix FX To access the 896mk3 SETUP menu, push the mix settings (everything in the CUEMIX menu). PARAM knob until you see 896mk3 SETUP SETUP menu and AUDIO menu parameters are displayed in the LCD.
-
Page 47: Audio Menu
SMUX-compatible hardware products knob until you see AUDIO displayed in the LCD. This menu provides basic settings such as sample Type II — for 2x optical connection to MOTU ■ rate, clock source, optical bank format (ADAT products that are equipped with optical ports and versus TOSLINK), and so on.
-
Page 48
Navigating the four main menus to jump to the next “section” of parameters or to To access the four main menus above, push the jump back to the beginning of the list. This is CHANNEL knob repeatedly. Then turn the roughly the equivalent of moving through the CHANNEL knob to select the desired channel or various channel controls in an individual input… -
Page 49
The MIX (Mixes) menu “ O: ” Indicates The current Access individual parameters the OUT channel. here, such as the frequency Push the CHANNEL button repeatedly until you (outputs) menu. setting for a band of EQ. see “MIX 1” (or “MIX 2”, etc.) in the channel section of the LCD (Figure 6-11). -
Page 50
Working with reverb settings in the LCD REVERB — these are the reverb send and return Once you’ve selected the REVERB menu, you can controls for the bus master fader. Access them with access all settings using the PARAMETER and the PARAMETER knob. -
Page 51: Inputs Menu
INPUTS MENU OUTPUTS MENU CHANNEL PAGE PARAM CHANNEL PAGE PARAM INPUTS INPUT PAIR OUTPUTS ENABLE Analog 1-2 PHASE Main (global) COPY Analog 3-4 L-R/M-S (stereo or M/S) Analog 1-2 PASTE etc. SWAP Analog 3-4, etc. RESET WIDTH ENABLE TRIM (High-pass) SLOPE LIMITER FREQ…
-
Page 52: Mixes Menu
MIXES MENU REVERB MENU CHANNEL PAGE PARAM CHANNEL PAGE PARAM MIXES MASTER ASSIGN REVERB ENABLE Mix 1 MUTE TIME Mix 2 FADER PREDELAY etc. COPY WIDTH PASTE CUT Hz RESET CUT dB ROOM REVERB SEND REFSIZE RETURN REF LEV LO % ANALOG 1-2 MUTE MID %…
-
Page 53: Digital Performer
This window shows some of the 896mk3 settings, such as sample rate and clock source, but to access all of the 896mk3 settings, open MOTU Audio Figure 7-1: Choose Setup menu> Configure Audio System> Configure Setup, as shown in Figure 5-1 on page 36.
-
Page 54
896mk3 that matches the output of one of its page 22. output pairs. Use the Return Assign menu in MOTU Audio Setup to choose which output pair Buffer Size you would like to hear on this return. This can be The Buffer Size setting can be used to reduce the used, for example, to record back a final stereo mix… -
Page 55: Working With 896Mk3 Inputs And Outputs
This setting is saved with the Digital Performer WORKING WITH 896MK3 INPUTS AND project. OUTPUTS Once you’ve enabled the MOTU FireWire Audio PROCESSING LIVE INPUTS WITH DP PLUG-INS driver as explained earlier in “The 896mk3 If you patch a live input (such as MIDI synthesizer) settings”…
-
Page 56: Synchronization
896mk3 to the other components of your trigger a different set of keystrokes with the foot system. switch, visit the MOTU Audio Setup. (See “Enable Pedal” on page 41.) Synchronizing digital audio connections If you have devices connected to the 896mk3…
-
Page 57: Audiodesk
For complete details about the 896mk3 settings, see to access all of the 896mk3 settings, open MOTU chapter 5, “MOTU Audio Setup” (page 35). The Audio Setup, as shown in Figure 5-1 on page 36.
-
Page 58
For details, see “Optical input/output” If you have digital audio devices connected to the on page 39. MOTU 828, or if you are not sure about the clock source of your setup, be sure to read “Making sync Main Outs Assign connections”… -
Page 59: Working With 896Mk3 Inputs And Outputs
AudioDesk’s audio input and Monitoring Latency” (page 69). output menus. If you don’t see the optical inputs and/or outputs, check the MOTU Audio Setup to WORKING WITH CUEMIX FX MIXING AND make sure they are turned on and set to the format EFFECTS you require.
-
Page 60: Synchronization
If you have devices connected to the 896mk3 different set of keystrokes with the foot switch, visit digital inputs (optical or RCA S/PDIF), you need to the MOTU Audio Setup. (See “Enable Pedal” on be concerned with the synchronization of the page 41.) 896mk3’s digital audio clock with other devices…
-
Page 61: Installing The 896Mk3 Mac Os X Drivers
Preparing MIDI input and output ….61 Run MOTU Audio Setup ……61 Choosing the MOTU FireWire Core Audio driver .
-
Page 62: Other Mac Os X Audio Software
Preferences window, click the Audio tab, click the using the optical connectors, turn them off. Drivers tab and click the Core Audio tab as shown in Figure 9-2. Choose the MOTU 896mk3 from the Main Outs Assign Driver menu. For information about the I/O Buffer Use the Main Outs Assign setting to determine Size setting, see “Adjusting the audio I/O buffer”…
-
Page 63
Soundtrack Pro In Soundtrack Pro, access the preferences window, Live click the Recording tab and choose MOTU 896mk3 In Ableton Live, access the preferences window and from the Input and Monitor menu as shown below click the Audio tab. Choose CoreAudio from the in Figure 9-3. -
Page 64: Working With 896Mk3 Inputs And Outputs
For other audio applications, the procedure is window, choose Audio preferences from the menu similar to that shown above. Consult your owner’s and choose MOTU 896mk3 from the Audio Output manual for further information. menu as shown below in Figure 9-6. For…
-
Page 65
Inputs at 1x sample rates Inputs at 4x sample rates Inputs are always listed in the same order as When operating the 896mk3 at a 4x sample rate follows, when operating the 896mk3 at 1x sample (176.4 or 192 kHz), inputs are listed as follows: rates (44.1 or 48 kHz): Input 176.4 /192 kHz Channels… -
Page 66: Number Of Channels
Outputs at 2x sample rates PROCESSING LIVE INPUTS WITH HOST PLUG-INS When operating the 896mk3 at a 2x sample rate If you patch a live input (such as a MIDI (88.2 or 96 kHz), outputs are listed as follows: synthesizer) through a plug-in effect in your host Output software, you might hear a slight delay.
-
Page 67: Using A Foot Switch
To trigger a different set of keystrokes with page 22. the foot switch, visit MOTU Audio Setup. (See “Enable Pedal” on page 41.) O T H E R M A C O S X A U D I O S O F T W A R E…
-
Page 68
O T H E R M A C O S X A U D I O S O F T W A R E… -
Page 69
Reducing Monitoring Latency CHAPTER OVERVIEW Monitoring live input……. . . 70 Monitoring latency is that slight delay you hear Adjusting the audio I/O buffer . -
Page 70: Reducing Monitoring Latency
3. Mic signal is 1. Live input (from ‘patched thru’ back to mic, guitar, etc.) the audio interface enters the MOTU with reverb or other interface. plug-in effects, if any. 2. Mic signal goes immedi- ately to the computer.
-
Page 71
This signal could be dry, or guitar, etc.) enters the with 896mk3 effects processing, such as MOTU interface. EQ, compression or Classic Reverb. Figure 10-2: This diagram shows the signal flow when using CueMix FX no-latency monitoring. Notice that this method does not process the live input with plug-ins in your audio software. -
Page 72
Figure 10-5: In Logic Pro or Logic Express, go to the Audio Driver preferences to access the Buffer Size option shown above. Lower latency versus higher CPU overhead The buffer setting has a large impact on the Figure 10-3: In Digital Performer and AudioDesk, choose Setup following things: menu>… -
Page 73
First, it completely eliminates the patch thru ■ delay (reducing it to a small number of samples — about the same amount as one of today’s digital mixers). Secondly, CueMix FX imposes no strain on the ■ computer. The trade-off, however, is that CueMix FX Figure 10-6: When adjusting the buffer size to reduce monitoring bypasses your host audio software. -
Page 74
independent of your host audio software. For complete details, see chapter 11, “CueMix Console” (page 75). Controlling CueMix FX from your audio software Some audio applications allow you to control CueMix FX monitoring from within the application (without the need to use CueMix FX). In most cases, this support consists of patching an Figure 10-7: Enabling CueMix FX in AudioDesk or Digital Performer. -
Page 75: Cuemix Console
CueMix Console CHAPTER OVERVIEW A 16-BUS MIXER WITH EQ, COMPRESSION AND REVERB CueMix FX is a cross-platform software All 896mk3 inputs and outputs can be routed to the application that provides graphic, on-screen on-board CueMix FX 16-bus (8 stereo bus) digital control for the 896mk3’s flexible CueMix FX mixer driven by hardware-based DSP with 32-bit on-board mixer and effects processing.
-
Page 76: Advantages Over Host-Based Mixing And Processing
Each input, output and mix bus provides a send to CueMix mixing and effects processing imposes ■ the Classic Reverb processor, which then feeds no processor drain on the computer’s CPU. reverb returns to mix busses and outputs, with a CueMix routing can be maintained ■…
-
Page 77: Cuemix Fx Basic Operation
CUEMIX FX BASIC OPERATION Output channels The Outputs tab (Figure 11-6 on page 83) gives you Here is a brief overview of the CueMix FX mixer. access to settings for each 896mk3 output pair, Eight stereo mix busses including EQ, dynamics processing and send/ CueMix provides eight stereo mix busses: Bus 1, return controls for feeding and returning the Bus 2, Bus 3, and so on.
-
Page 78: The Mixes Tab
THE MIXES TAB Assigning a mix bus output Choose the desired output pair for the mix bus Click the Mixes tab (Figure 11-2) to gain access to from the bus output menu (Figure 11-2). The bus the 896mk3’s eight stereo mix busses. The Mixes output menu displays all current available tab displays one mix bus at a time.
-
Page 79
Bus mute page 84). Clicking the mix bus master fader focus The bus mute button (Figure 11-2) disables button brings the assigned output into focus, if (silences) the mix. there is one. Bus level meter Input pan section The bus level meter, which is post-fader, shows you The input pan knob (Figure 11-2) pans the input the output for the mix’s output. -
Page 80: The Inputs Tab
THE INPUTS TAB not apply any changes to it in the Input tab. The The 896mk3 provides many features for managing only exception to this is the reverb send, which analog and digital input signals. Some of these simply splits the input signal and feeds a copy of it features, such as the front panel trim knobs, are to the 896mk3’s reverb processor.
-
Page 81
Input channel focus Input EQ and dynamics Click the channel focus button (Figure 11-3) to The 896mk3 lets you apply 7-band parametric EQ view and edit parameters in the channel settings and dynamics processing (DSP) to any input, section of the CueMix FX window (Figure 11-7 on analog or digital. -
Page 82: The Outputs Tab
EQ/Dynamics enable/disable buttons Click the EQ or Dynamics button at the bottom of Orange the input channel (Figure 11-3) to toggle the effect Green on or off. Note that you can program EQ and Blue EQ band selectors compressor settings, even when the effect is Yellow currently disabled.
-
Page 83
Output channel focus Point is set to Mix to eliminate the possibility for Click the channel focus button (Figure 11-6) to feedback loops created by reverb send/return view and edit parameters in the channel settings loops. See “Split point” on page 96. section of the CueMix FX window (Figure 11-7 on The output reverb return (Figure 11-6) feeds the page 84). -
Page 84: The Channel Settings Section
THE CHANNEL SETTINGS SECTION The Channel tab The Channel tab (Figure 11-8) displays settings for The channel settings section in the CueMix FX input channels. Click any focus button in the window (Figure 11-1) displays three tabs for Inputs tab to view the Channel tab settings for the Channel, EQ and Dynamics settings for the channel.
-
Page 85
Talkback section The Width knob (Figure 11-8) provides control Click the Talkback or Listenback button over the stereo imaging, going from a full stereo (Figure 11-8) to toggle whether the input is the image to mono (both channels panned equally). Talkback or Listenback input. -
Page 86
The Bus Activity LEDs (Figure 11-9) show you The EQ tab The EQ tab (Figure 11-10) displays the EQ settings which mix busses the input signal is being fed to. for the input or output channel that currently has For example, LED #6 will glow under the following the focus. -
Page 87
EQ filter: one of five center bands of EQ that can be high pass filtering are provided. The filter response display provides comprehensive control and visual independently enabled and programmed. feedback of the EQ curve being applied. With Filter type: Lets you choose from one of four or five 64-bit floating point processing, the 896mk3 EQ styles for each independent band of EQ. -
Page 88
types (I, II, III or IV). The two top-most filters EQ filters The EQ filters have three parameters: (orange and green) provide an extra low and high shelf setting, in addition to the four standard band Control unit range settings. The additional low pass and high pass Gain -20.00 to +20.00 filters (lower left) have gray cutoff frequency knobs… -
Page 89
The following sections describe the character of discussed in the following sections might be more each type of EQ filter and their suggested appropriate. This filter type is the most similar to a applications. In the illustrations for each filter style standard parametric EQ. -
Page 90
Type III Type IV Figure 11-16: Type IV EQ filter style. Figure 11-15: Type III EQ filter style. The Type IV EQ filter is a more extreme form of the The Type III EQ filter increases Q as boost is Type III filter. -
Page 91
Shelf filters response corresponds to a second order shelf, still with no overshoot. This is the same response as conventional parametric EQs. In some situations, this form of accurate, clean shelving can sound harsh, especially when compared to legacy analog EQs. -
Page 92
Overshoot tends to produce more of what one would expect to hear when applying shelving and Slope = 6 is therefore considered to be more musical than shelving without overshoot. This effect, which has gained tremendous popularity among audio engineers, was first made popular in original Neve series EQs and later in the SSL G series. -
Page 93
The Dynamics tab Compressor The Dynamics tab (Figure 11-21) displays the The Compressor (Figure 11-21) lowers the level of Dynamics processing settings for the input or the input when it is above the threshold. The output channel that currently has the focus. Click amount of attenuation is determined by the Ratio any focus button in the Inputs or Outputs tab to and the input level. -
Page 94
Output level Automatic gain control using light The Output Level meter (Figure 11-21) displays the The the Automatic Gain Control (AGC) circuit of peaks of the output signal. Trim is applied before the LA-2A uses a vintage opto-coupler known by the Output Level meter. -
Page 95
It is precisely this self-adjusting behavior that Bus activity LEDs (inputs only) makes optical compressors the tool of choice for smoothing out vocals, bass guitar and full- Channel meter program mixes without destroying perceived display dynamics. Meters tab Compressor/Limit buttons The Comp and Limit buttons (Figure 11-21) model Pre/post the original LA-2A Limit/Compress mode switch. -
Page 96
The Reverb tab together. The resulting stereo output from the The Reverb tab (Figure 11-23) provides access to reverb can then be inserted into a mix bus or the 896mk3’s single, global reverb processor, which output using stereo returns. provides high-fidelity reverberation and graphic Reverb sends control over its parameters. -
Page 97: The Monitor Group
☛ Primary controls Here’s a tip: try using initial reflections The Primary Controls section (Figure 11-23) in the without any subsequent reverb (turn the reverb Reverb tab provides the following basic parameters time down as far as it will go). You’ll hear for programming the reverb.
-
Page 98: Dsp Meter
(user dedicated mic in your control room and connect it defined). to a mic input on your MOTU audio interface. For Listenback, set up a dedicated listenback mic in the Monitor group meters…
-
Page 99: Shortcuts
Talkback / Listenback Mic Input Engaging/disengaging Talkback and Listenback To configure the talkback mic in CueMix FX, go to To engage Talk back or Listenback, press on the the Inputs tab (Figure 11-3 on page 80) and click Talk or Listen buttons (Figure 11-26) and then the Focus button for the input that the talkback mic release to disengage.
-
Page 100: File Menu
To disable peak/hold indicators altogether, choose Off from this sub-menu. DEVICES MENU If you are working with more than one MOTU Mix1 Return Includes Computer audio interface product, this menu displays all The Mix1 return includes computer File menu item interfaces that are currently on line.
-
Page 101: Talkback Menu
(last loaded or saved) configuration has a will hear on the headphone output, just like the check mark next to it. Phones setting in MOTU Audio Setup. However, this menu provides one extra option that is Modifying a configuration exclusive to CueMix FX: Follow Active Mix.
-
Page 102
Enabled that is not currently being displayed, CueMix FX Check this menu item to turn on control surface will jump to the appropriate tab to display the operation of CueMix FX. Uncheck it to turn off control you are adjusting. control surface support. -
Page 103: Motu Smpte Console
MOTU SMPTE Setup ……. . 103 shows both the clock and the address (time code or sample location), separated by a forward slash ( / ).
-
Page 104: Reader Section
detect and switch to the incoming frame rate, Freewheel Address Freewheeling occurs when there is a glitch or except that it cannot distinguish between 30 fps drop-out in the incoming time code for some and 29.97 fps time code, or 23.976 and 24 fps time reason.
-
Page 105: Generator Section
Sync command in the Studio menu is checked. code display in the Generator section and type in Make sure the Clock Source setting in the MOTU the desired start time. Or drag vertically on the Audio Setup window is set to SMPTE. Also, make numbers.
-
Page 106: Resolving Cubase Or Nuendo To Smpte Time Code
RESOLVING CUBASE OR NUENDO TO SMPTE TIME CODE To resolve your 896mk3 and Cubase or Nuendo to SMPTE time code, use the setup shown in Figure 3-8 on page 22. M O T U S M P T E C O N S O L E…
-
Page 107: Troubleshooting
Source to Internal and try recording just using the motu.com, or fill out and mail the registration card analog inputs and outputs of the 896mk3. If you included with your 8pre. Doing so entitles you to…
-
Page 108
Please business office at (617) 576-2760 and asking for the write to the 896mk3 Development Team, MOTU customer service department. In the meantime, Inc., 1280 Massachusetts Avenue, Cambridge, MA you can download the latest drivers from 02138. -
Page 109: Index
Index GarageBand menu 5, 73, 75-102 Logic Pro/Express CueMix FX 02R mixer Soundtrack Pro Application follows control surface 1394 connector 6, 12, 17 Application follows control surface 192kHz Attack AudioDesk multiple interfaces compressor Configurations menu operation Audio menu (LCD) control surfaces 20 dB pad Audio Setup software Control Surfaces menu…
-
Page 110
Mic preamps 104, 105 infinite 69, 72, 76 Latency Mic/guitar inputs Frequency lookahead connecting Launch MOTU Audio Setup when hard- V-Limit Front panel 5, 43 ware becomes available option Mic/line inputs Mid-side micing Mix bus Gain contrast 85, 95… -
Page 111
Peak mode Monitoring 12, 19, 41 Pedal thru main outs 3rd party OS X software S/MUX Mono button AudioDesk S/PDIF 33, 35 MOTU Audio Setup configuring clock source setting MOTU SMPTE Setup Digital Performer connection jack metering Performance 6, 11 Naming… -
Page 112
System preferences connecting knob sound input/output 7, 39 Trim 18, 81 System requirements Trim (input) Width minimum Troubleshooting knob recommended computer EQ knobs don’t work reverb feedback loop 55, 59, 62 11, 21, 24, 28 Word clock Type I, II optical mode TACH 2x or one-half x light (SMPTE Setup Console)
В представленном списке руководства для конкретной модели Звуковой карты — MOTU 896mk3. Вы можете скачать инструкции к себе на компьютер или просмотреть онлайн на страницах сайта бесплатно или распечатать.
В случае если инструкция на русском не полная или нужна дополнительная информация по этому устройству, если вам нужны
дополнительные файлы: драйвера, дополнительное руководство пользователя (производители зачастую для каждого
продукта делают несколько различных документов технической помощи и руководств), свежая версия прошивки, то
вы можете задать вопрос администраторам или всем пользователям сайта, все постараются оперативно отреагировать
на ваш запрос и как можно быстрее помочь. Ваше устройство имеет характеристики:Тип: внешняя, Тип подключения: FireWire, Необходимость дополнительного питания: есть, Возможность вывода многоканального звука: есть, Разрядность ЦАП: 24 бит, Максимальная частота ЦАП (стерео): 192 кГц, полные характеристики смотрите в следующей вкладке.
Для многих товаров, для работы с MOTU 896mk3 могут понадобиться различные дополнительные файлы: драйвера, патчи, обновления, программы установки. Вы можете скачать онлайн эти файлы для конкретнй модели MOTU 896mk3 или добавить свои для бесплатного скачивания другим посетителями.
Если вы не нашли файлов и документов для этой модели то можете посмотреть интсрукции для похожих товаров и моделей, так как они зачастую отличаются небольшим изменениями и взаимодополняемы.
Обязательно напишите несколько слов о преобретенном вами товаре, чтобы каждый мог ознакомиться с вашим отзывом или вопросом. Проявляйте активность что как можно бльше людей смогли узнать мнение настоящих людей которые уже пользовались MOTU 896mk3.

Сергей
2019-04-26 00:08:10
Карточка супер!
Норик Тепаносян
2019-06-10 12:01:58
motu 896mk3 мне очень нравится, я пользуюсь уже два года и очень доволен
норик
2019-06-10 12:05:58
я пользуюсь motu 896mk3 уже два года и очень доволен
Вадим
2020-05-16 16:01:35
Очень хороши интерфейс
Как можно написать впечатление о карте, если я ее только купил и хочу прочесть мануал чтоб знать в се возможности девайса!?
Vasya
2020-08-12 22:07:29
Very nice card
Основные и самые важные характеристики модели собраны из надежных источников и по характеристикам можно найти похожие модели.
| Общие характеристики | |
| Тип | внешняя |
| Тип подключения | FireWire |
| Необходимость дополнительного питания | есть |
| Возможность вывода многоканального звука | есть |
| Звуковые характеристики | |
| Разрядность ЦАП | 24 бит |
| Максимальная частота ЦАП (стерео) | 192 кГц |
| Аналоговые входы | |
| Входных аналоговых каналов (балансных) | 8 (8) |
| Входных разъемов jack 6.3 мм | 8 |
| Входных разъемов XLR | 8 |
| Микрофонных входов | 8 |
| Фантомное питание | есть |
| Аналоговые выходы | |
| Выходных аналоговых каналов | 8 |
| Выходных аналоговых разъемов | 10 |
| Независимых выходов на наушники | 1 |
| Прочие разъемы и интерфейсы | |
| Цифровые интерфейсы S/PDIF | коаксиальный вход, коаксиальный выход |
| Поддержка AES/EBU | есть |
| Поддержка ADAT | есть |
| Поддержка внешней синхронизации | есть |
| Поддержка стандартов | |
| Поддержка EAX | нет |
| Поддержка ASIO | v. 2.0 |
Здесь представлен список самых частых и распространенных поломок и неисправностей у Звуковых карт. Если у вас такая поломка то вам повезло, это типовая неисправность для MOTU 896mk3 и вы можете задать вопрос о том как ее устранить и вам быстро ответят или же прочитайте в вопросах и ответах ниже.
| Название поломки | Описание поломки | Действие |
|---|---|---|
| Встроенная Звуковая Карта Вышла Из Строя | ||
| Не Включается | ||
| Перегорели Процессоры | ||
| Tc Konnekt 6 | Питание Через Кабель Есть,Но Панель Управления Пишет No Device | |
| Красный Индикатор | При Подключении Загорается Красный Индикатор И Тухнет, Хотя Должен Заниматься Зеленый И Подключаться | |
| Focusrite Saffire Le | Правый Выход (Гнездо 2)Работает На 25%Тише | |
| При Проверке Колонок 1 Из Колонок Не Воспроизводит | На Виндомс 10 Захожу В Настройки Подключить 5.1 И Там Воспроизводится Левая Передняя Пр-Ва Передняя Центральная Сабвуфер Здания Пр-Ва А Левая Нет И Когда Включа | |
| Infrasonic Quartet | При Воспроизведении Звукового Файла Через Некоторое Время Появляется Хрипы В Обоих Каналах |
В нашей базе сейчас зарегестрированно 18 353 сервиса в 513 города России, Беларусии, Казахстана и Украины.

RSS
⭐
⭐
⭐
⭐
⭐
Адресс:
ул. Верхняя Масловка, д.2
Телефон:
74952762211
Сайт:
n/a
Время работы
Будни: с 0900 до 2100
Суббота: с 1000 до 1800
Воскресенье: выходной
ASUS
⭐
⭐
⭐
⭐
⭐
Адресс:
Зеленый проспект, д.81
Телефон:
74999630187
Сайт:
n/a
Время работы
Время работы не указано
RSS
⭐
⭐
⭐
⭐
⭐
Адресс:
Алтуфьевское шоссе, д. 31, стр.1
Телефон:
74952762211
Сайт:
n/a
Время работы
Будни: с 1000 до 1900
Суббота: выходной
Воскресенье: выходной
СЕРВИС ЦЕНТР SEE-IT
⭐
⭐
⭐
⭐
⭐
Адресс:
ул.Краснобогатырская д 2 стр 2
Телефон:
74997542054
Сайт:
n/a
Время работы
Круглосуточно
ТОЧКА РЕМОНТА
⭐
⭐
⭐
⭐
⭐
Адресс:
ул. Люблинская 27/2
Телефон:
74956644245
Сайт:
n/a
Время работы
Будни: с 1100 до 1900
Суббота: с 1100 до 1800
Воскресенье: с 1100 до 1800
инструкцияMotu 896Mk3 Hybrid

™
MOTU 896mk3 Hybrid
User Guide for Windows
1280 Massachusetts Avenue
Cambridge, MA 02138
Business voice: (617) 576-2760
Business fax: (617) 576-3609
Web site: www.motu.com
Tech support: www.motu.com/support
896mk3 Hybrid book Page 1 Friday, August 19, 2011 2:04 PM
Посмотреть инструкция для Motu 896Mk3 Hybrid бесплатно. Руководство относится к категории DJ-система, 1 человек(а) дали ему среднюю оценку 9.5. Руководство доступно на следующих языках: английский. У вас есть вопрос о Motu 896Mk3 Hybrid или вам нужна помощь? Задайте свой вопрос здесь
Главная
Не можете найти ответ на свой вопрос в руководстве? Вы можете найти ответ на свой вопрос ниже, в разделе часто задаваемых вопросов о Motu 896Mk3 Hybrid.
Когда звук считается слишком громким?
Инструкция Motu 896Mk3 Hybrid доступно в русский?
Не нашли свой вопрос? Задайте свой вопрос здесь
 4 Октября 2011 Mark of the Unicorn объявила о начале продаж 896mk3 Hybrid, усовершенствованной версии своего популярного 896 аудио интерфейса, который теперь обеспечивает гибкое подключение к Mac или Windows компьютерам через Firewire или высокоскоростной USB 2.0.
Возможности интерфейса включают восемь XLR / TRS «комбо» аналоговых входов с высококачественными предусилителями, десять XLR аналоговых выходов, в общей сложности 28 входов и 32 выходов, поддержку работы на частотах до 192 кГц, защиту от перегрузки сигнала, 32-бит с плавающей точкой DSP для цифрового микширования и обработки эффектами, два банка настраиваемых оптических входов / выходов, а также поддержку синхронизации time code.
На задней панели 896mk3 Hybrid расположены два Firewire (400 Mbps) и hi-speed USB 2.0 (480 Mbps) порты. Пользователи могут подключать 896mk3 Hybrid к своему компьютеру, используя любой формат для полнофункциональной работы и сверхнизкой задержки. Firewire гнезда 896mk3 9-контактные типа B, но они могут быть подключены к любому Firewire разъем на компьютере (6-pin Type A, 4-pin Type A «mini» или Type B) с помощью любого стандартного Firewire кабеля, который имеет необходимые разъемы.
Другие обновления включают функцию компьютерного управления микрофонными входами и фантомным питанием 48 В для восьми микрофонных входов. 896mk3 Hybrid включает в себя все особенности от известной и удостоенной многих наград Firewire версии, в том числе:
- CueMix FX ™ — гибкий 28 input/16 шинный микшер со встроенными DSP-эффектами, включая реверберацию с посылами / возвратами, а также эквалайзер и компрессию на каждом входе и выходе.
- 28 входов / 32 выходов (при 44.1/48 кГц) — нет никакого совместного использования каналов 896mk3; микрофонные входы, AES / EBU I / O, S / PDIF вход / выход, выход для наушников и главные выходы работают как отдельные каналы.Управление с передней панели дает доступ к любой настройке во всей 896mk3, включая микшер.
- Автономная работа — пользователи могут запрограммировать миксы в студии, а затем принести 896mk3 на концерт — без использования компьютера. Если им нужно настроить соединение, они могут сделать это на сайте, используя подсветку ЖК-дисплея и передней панели управления.
- Несколько CueMix FX миксов — пользователи могут создавать различные миксы для главных выходов и для выходов на наушники. Или добавить петли посыл / возврат для внешнего оборудования — без задержки.
- Восемь комбо-разъемов на задней панели позволяют подключить 1 / 4 » гитарные / линейные или XLR микрофонные кабели. Микрофонные входы имеют фантомное питание, чувствительность входов регулируемая.
- Clip protection — входной лимитер предотвращает цифровое отсечение и искажения от перегружpузки уровня сигнала до +12 дБ по сравнению с нулем.
- Восемь 24-бит 192 кГц аналоговых входов и выходов на XLR разъемах.
- Precision Digital Trim™ — цифровое управление аналоговыми входами на всех каналах обеспечивает точную корректировку с шагом 1 дБ. Пользователи могут настраивать баланс аналоговых входов, а затем сохранять и загружать обратно из памяти интерфейса предварительно сохраненные конфигурации.
- Гибкие оптические входы / выходы — 16 каналов ADAT lightpipe, 8 каналов SMUX (96 кГц) или две пары стерео TOSLink. Комбинируйте форматы между двумя банками.
- Расширение — добавьте дополнительные интерфейсы для большего количества входов / выходов когда это необходимо.
- Отдельные XLR главные выходы и выходы для наушников, каждый с независимой регулировкой громкости.Стерео 24-бит 96 кГц AES / EBU вход / выход.
- Стерео 24-бит 96 кГц S / PDIF вход / выход.
- Foot switch input — удобно расположен на передней панели; подключение стандартного педального переключателя (приобретается отдельно) для Punch-In и Punch-Out во время записи. Или можно назначить педаль на любую функцию в аудио-редакторе.
- Поставляется с 32 — и 64-битными драйверами для Mac OS X и Windows 7/Vista, в том числе ASIO, WDM, Wave и Core Audio.
- Поддерживает все популярные Mac и Windows аудио-программы.100% совместимость с большинством эффектов в современных популярных аудио программах.
- Поставляется с AudioDesk — полнофункциональной высокоточной программой для рабочих станций Mac с возможностью записи, редактирования, микширования, 32-разрядной обработкой эффектами в реальном времени.
- Расположенный на передней панели регулятор громкости для мониторинга. Stereo, Quad, 5.1, 7.1 и определяемые пользователем варианты surround мониторинга доступны.
- Два разъема для наушников с независимыми регуляторами громкости передней панели.
- Настраиваемые индикаторы уровней сигналов на передней панели для всех аналоговых и цифровых аудио входов / выходов.
- Специальные индикаторы clock status на передней панели.
- Международные 100-240В, 50-60 Гц, автоматически переключаемое питание.
896mk3 Hybrid в настоящее время предлагается производителем по той же цене, что и 896mk3.
MOTU 896 MK3 Hybrid

118845 Р
FireWire/USB2 аудио интерфейс MOTU 896MK3 Hybrid, 28 входов / 32 выходов (при 44.1/48 кГц), работает с Mac или Windows.Подробнее
Прочитано 5884 раз
Последнее изменение Воскресенье, 09 октября 2011 11:38
Добавить комментарий
На рынке не так много многоканальных аудиоинтерфейсов под USB 2.0. Довольно долго был всего один E-MU 0404, но эргономика и малое количество выходов не позволяли использовать его на концертах.
Почему USB 2.0? Просто мне патологически не везло с firewire. Единственный нормальный сетап был Quatafire + iBook, но iBook вообще сам по себе ненадежный, и он быстро сгорел. Дальнейшие комбинации из той-же QuataFire, Firebox и лаптопов Dell D400 и Apple Powerbook G4 в различных сочетаниях (получается, перепробовано 5 вариантов) приводили только к головной боли. Всё могло работать пару месяцев, а потом внезапно, посреди концерта начать трещать, и ни смена буфера, ни клок-мастера не давала результата. Это не смотря на то, что в Dell D400 стоит рекомендуемый всеми производителями аудиокарт чипсет 1394 от Texas Instruments, а макинтоши вообще, считается, идеально работают с firewire.
В общем, как только в начале декабря 2009 года появилось вменяемое решение для USB 2.0, я, не задумываясь, купил его. Драйвера MK3 установились легко, но вот ни один из трех компов, включая мак, карту не видел. Я связался с суппортом, они долго молчали, а 6 января ответили в духе «что ж ты, дружок, мы аж 5 января выпустили новые драйвера, иди и качай!». Да, забавный случай для именитой фирмы продать 5000 неработающих девайсов, а потом на голубом глазу обновить драйвера и сделать вид, что ничего не произошло.
В итоге карта заработала. Я отыграл на ней уже 3 концерта и в целом очень доволен. Карта на порядок превосходит все остальные портативные аудиоустройства, кроме разве RME Fireface UC, но последняя вдвое дороже.
Хотя это, скорее, новый класс оборудования: устройство ввода-вывода + микшер + процессор эффектов.
Как устройство ввода-вывода — это многоканальный 24/96 интерфейс
с блэкджэком и шлюхами
. — см. спецификацию
Как микшер, MK3 может работать даже без компьютера, но и в сочетании с последним, доставляет немало. Плюс — балансные выходы по всем 12 каналам, дибоксы больше не нужны, не говоря о том, что от обычной карты к дибоксу идет некоторое число метров обычного кабеля, и что-то там теряется… А всего 10 входов + 14 выходов + 14 аппаратных шин позволяют нехило извратиться над роутингом. Для чего это может быть нужно? У меня, например, сейчас такой сетап:
1+2 — общий стереовыход
3+4 — стереовыход вокала на порталы
5+6 (он же на наушники, но можно раздельно) — отдельный микс ударнику в уши, включая клик
7 — выход вокала на мониторы (некомпрессированный)
8 — отдельный выход гитары
9 — отдельный выход топшура
10 — выход бас-бочки со своим компрессором и эквалайзером, чтобы прорубалась сквозь бас, как на записях.
SPDIF out — припаян к SPDIF in — это для раздельной обработки микрофона на порталы и на мониторы. Потому что увы, эффекты можно наложить на входы и выходы, но не на шины. Но надеюсь, в будущем разработчики исправят сие недоразумение, т.к. архитектура карты построена вокруг FPGA-чипа.
В числе эффектов — эквалайзер, компрессор классический, компрессор-ретро, ревер. Ревер может быть только один, а компрессоров, EQ и посыл-возвратов ревера — сколько угодно.
Эквалайзер внешне похож на Oxford native EQ, а по качеству обработки вроде даже лучше. С ним я смог тонко настроить форманты для своего горлового пения — то, с чем не всякий клубный звукорежиссер будет возиться.
Компрессоры — пока непонятно.
Ревербератор — хороший.
Ну и наконец, впечатления от звука: намного детальнее, чем хваленый Presonus Firebox и чуть более оформленные басы, чем у ESI Quatafire 610. Хотя для электронной музыки QuataFire лучше. Микрофонные преампы чистые, малошумящие, никакой окраски к вокалу не добавляют. Громкость наушников дотягивает до требуемого уровня, но и только.
И цена: за $600 это очень хорошее профессиональное устройство. По сравнению с RME за $1200, у MK3 только отсутствует управление встроенными эффектами по MIDI, а в остальном карточки сопоставимые.

-
#1
Здравствуйте друзья, недавно приобрёл Motu 896 есть много вопросов, т.к. нет мануала в эл.-м виде
Весь интернет обшарил! Если у кого есть что то, поделитесь пожалуйста. Можно — 828, motu ultralite, Motu Traveler…
Заранее благодарен, Юрий
-
#3
Большое спасибо! Нашёл на оф. сайте Motu мануал, но скачать не могу, приходится читать в онлайне.
-
#4
эмм…. здается мне у них там что то нездоровое происходит. не далее как пару недель назад был на их сайте, все по прежнему упиралось в заветные 20$.
прочитал сейчас сообщение, удивился, пошел проверить с надежной если не почитать в онлайне то хотя бы скриншотиков наделать и…… спокойно скачал кучу мануалов даже тех которые не нужны были. . от неожиданности наверно, на всякий случай, вдруг кому пригодится.. кто их там знает , может у них совсем кукушка поехала. до дня благодарения вроде бы еще месяц целый, а тут такая щедрость неслыханная. мануалы , любые, в pdf, бесплатно…
странно это все однако…

Алр
Интересующийся
-
#5
А мануал на русском может кто подскажет где найти ? )
-
#6
Нигде. Не существует такого в природе)