Перейти к контенту
![]()
Русские электронные инструкции по эксплуатации
Постоянно обновляемый большой каталог документации по эксплуатации и использованию современных устройств и оборудования на русском языке. Бесплатное скачивание файлов.
Поиск:
Главная
♥ В закладки
Просмотр инструкции в pdf


Инструкция по эксплуатации мультиварки Philips Viva Collection HD3133-00.
Скачать инструкцию к мультиварке Philips Viva Collection HD3133-00 (1,61 МБ)

Инструкции мультиварок Philips
« Инструкция к мультиварке GFGRIL GFM-508M, с функцией электрогриля
» Инструкция к мультиварке Steba DD 3 Smar
Вам также может быть интересно

Инструкция к телевизору Smart TV Philips 50PUS7605

Инструкция к фену Philips HPS920-00

Инструкция к наушникам Philips SHE9550-00

Инструкция к тостеру Philips HD2582-00

Инструкция к наушникам Philips SHP6000-10

Инструкция к фену Philips BHD007-00 Essential Care

Инструкция к беспроводным наушникам Philips Flite Ultrlite Black

Инструкция к пылесосу Philips FC9174 01
Добавить комментарий
Имя *
Email *
Сайт
Комментарий


![]()


Сохранить моё имя, email и адрес сайта в этом браузере для последующих моих комментариев.
- Добавить инструкцию
- Заказать инструкцию

Мультиварки Philips Viva Collection HD3133/00 — инструкция пользователя по применению, эксплуатации и установке на русском языке. Мы надеемся, она поможет вам решить возникшие у вас вопросы при эксплуатации техники.
Вы можете скачать инструкцию к Philips Viva Collection HD3133/00 по ссылке ниже, если не хотите ждать загрузки. Если остались вопросы, задайте их в комментариях после инструкции.
«Загружаем инструкцию», означает, что нужно подождать пока файл загрузится и можно будет его читать онлайн. Некоторые инструкции очень большие и время их появления зависит от вашей скорости интернета.
Полезные видео
Остались вопросы?
Не нашли свой ответ в руководстве или возникли другие проблемы? Задайте свой вопрос в форме ниже с подробным описанием вашей ситуации, чтобы другие люди и специалисты смогли дать на него ответ. Если вы знаете как решить проблему другого человека, пожалуйста, подскажите ему


Часто задаваемые вопросы

Как посмотреть инструкцию к Philips Viva Collection HD3133/00?
Необходимо подождать полной загрузки инструкции в сером окне на данной странице или скачать кликнув по специальной кнопке.
Руководство на русском языке?
Все наши руководства представлены на русском языке или схематично, поэтому вы без труда сможете разобраться с вашей моделью
Как можно распечатать инструкцию?
Скачайте ее по специальной кнопке над формой чтения на ваше устройства и отправьте на печать.
Specifications are subject to change without notice
© 2015 Koninklijke Philips N.V.
All rights reserved.
HD4734_HD4749_UM_v1.0
Register your product and get support at
www.philips.com/welcome
HD4734
HD4749
Мультиварка
Мультипісіргіш
English
1 Your multicooker
Congratulations on your purchase, and welcome to Philips!
To fully benefit from the support that Philips offers, register your
product at www.philips.com/welcome.
2 What’s in the box (fig. 1)
a
Multicooker main unit
d
User manual
b
Power cord
e
Recipe booklet
c
Steam basket
f
Warranty card
3 Overview
Product overview (fig. 2)
a
Top lid
g
Main unit
b
Detachable inner lid
h
Cooker handle
c
Inner pot
i
Water level indications
d
Control panel
j
Sealing ring
e
Heating element
k
Detachable steam vent cap
f
Power socket
l
Lid release button
Controls overview (fig. 3)
m Keep-warm button
s Cooking time button
n
My Recipe button
t Menu/Child lock button
o
Multicook Pro button
u Temperature button
p
Preset time button
v
Start/Off button
q
Decrease button
w
Display screen
r Increase button
Menus overview
Menus
Default cooking
time
Cooking time
regulating range
Reheat (разогреть)
25 min
5-60 min
Rice (рис)
30-40 min
/
Grain (крупы)
30-40 min
/
Pilaf (плов)
35 min
/
Porridge (каша)
10 min
5 min — 2 hr
Steam (готовить на
пару)
20 min
5 min — 2 hr
Boil (варить)
20 min
5 min — 2 hr
Soup (суп)
1 hr
20 min-4 hr
Fry (жарить)
15 min
5-60 min
Slow cook (томить)
5 hr
1-15 hr
Stew (тушить)
1 hr
20 min — 10 hr
Drinks (напитки)
10 min
5-40 min
Pasta (паста)
4 min
1-15 min
Egg (яйца)
4 min
1-15 min
Jelly meat (холодец)
6 hr
4-10 hr
Ragout (рагу)
2 hr
20 min — 10 hr
Pizza (пиццa)
35 min
10-60 min
Roast (запекать)
1 hr
/
Bake (печь)
45 min
20 min — 2 hr
Yogurt (йогурт)
8 hr
6-12 hr
Sour milk (кефир)
8 hr
6-12 hr
Manual
(мультиповар)
2 hr
5 min — 10 hr
Multicook Pro
(Мультиповар Pro)
5 min
5 min — 15 hr
Menus
Preset
time
Default cooking
temperature
Temperature
regulating
range
Reheat (разогреть) /
85°C
/
Rice (рис)
1-24 hr
130-140°C
/
Grain (крупы)
1-24 hr
130-140°C
/
Pilaf (плов)
1-24 hr
130-140°C
/
Porridge (каша)
1-24 hr
90-100°C
/
Steam (готовить
на пару)
1-24 hr
100°C
/
Boil (варить)
1-24 hr
100°C
/
Soup (суп)
1-24 hr
90-100°C
/
Fry (жарить)
/
145-160°C
/
Slow cook
(томить)
1-24 hr
80°C
/
Stew (тушить)
1-24 hr
95°C
/
Drinks (напитки)
1-24 hr
100°C
/
Pasta (паста)
/
100°C
/
Egg (яйца)
/
100°C
/
Jelly meat
(холодец)
1-24 hr
90-100°C
/
Ragout (рагу)
1-24 hr
90°C
/
Pizza (пиццa)
/
130°C
/
Roast (запекать)
1-24 hr
120-130°C
/
Bake (печь)
/
130°C
40-160°C
Yogurt (йогурт)
1-24 hr
40±3°C
/
Sour milk (кефир)
1-24 hr
40±3°C
/
Manual
(мультиповар)
1-24 hr
100°C
30-160°C
Multicook Pro
(Мультиповар Pro) 1-24 hr
100°C
30-160°C
Note
•
The cooking time for rice (рис), grain (крупы), and pilaf (плов) is
determined by the multicooker in accordance to the quantity of
ingredients put in the inner pot.
•
You can adjust the cooking temperature for bake (печь), manual
(мультиповар) and multicook Pro (Мультиповар Pro). For bake,
the temperature is available from 40°C to 160°C; for manual and
multicook Pro, the temperature is available from 30°C to 160°C.
•
After the cooking process has started, you can touch the Start/Off
button (СТАРТ/ВЫКЛ) to deactivate the current cooking process,
and the multicooker will switch to the standby mode.
4 Using the multicooker (fig. 4)
Note
•
For all menus, do not exceed the MAX indication on the inside of
the inner pot when putting food, liquid or ingredients in it, otherwise
the food may overflow during cooking (fig. a).
•
The cooking time does not display straight from the beginning for
rice (рис), grain (крупы) and pilaf (плов).
displays on the
screen during most of the cooking time as the multicooker needs
to detect the water/liquid and ingredient volume in the initial
preparation stage. When the multicooker detects the actual cooking
time needed, the remaining cooking time displays on the screen.
For porridge (каша), steam (готовить на пару), boil (варить), jelly
meat (холодец) and beverage (напитки),
displays on the
screen before the water/liquid is brought to boil. When the water/
liquid starts boiling, the set cooking time displays on the screen.
•
Refer to the recipe booklet for more details on cooking with each
menu.
Tip
•
To select a certain menu, touch «menu» (МЕНЮ) repeatedly. You
can also touch «menu» (МЕНЮ) once, and then touch increase (+)
or decrease (-) to do so.
Before first use
1
Take out all the accessories from the inner pot, and remove the
packaging material of the inner pot.
2
Clean all parts of the multicooker thoroughly before using it for
the first time (see chapter ‘Cleaning and Maintenance’).
Note
•
Make sure all parts are completely dry before you start using the
multicooker.
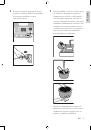
Reheating (разогреть)
1
Loosen the food and evenly distribute it in the inner pot.
2
Pour some water onto the food to prevent it from becoming
too dry. The quantity of the water depends on the amount of
food.
3
Wipe the outside of the inner pot dry (fig. d), and then put it
in the multicooker (fig. e).
4
Close the lid of thepre multicooker (fig. f), and put the plug
in the power socket (fig. g).
5
Touch menu (МЕНЮ) to select “reheat” (разогреть) (fig. h).
»
To choose a different cooking time, refer to chapter
“Setting up the cooking time”.
6
Touch and hold “start” (СТАРТ/ВЫКЛ) for 3 seconds to
confirm and start cooking (fig. i).
7
When the cooking is finished, the appliance beeps and turns
into warm keeping automatically.
Cooking rice (рис) and grain (крупы)
Note
•
If the voltage is unstable at the area you live, it is possible that food
in the multicooker overflows.
•
After the cooking is finished, stir the rice/grain and loosen it
immediately to release excessive moisture for fluffy rice/grain.
•
Depending on the cooking conditions, the bottom portion of the
rice/grain may become slightly browned.
1
Rinse rice, put the washed rice in the inner pot, and fill in water
(fig. b).
Note
•
For details about the ratio of rice/grain and water, refer to the
recipe booklet.
2
Press the lid release button to open the lid (fig. c).
3
Wipe the outside of the inner pot dry (fig. d), and then put it
in the multicooker (fig. e).
Note
•
Make sure that the inner pot is in proper contact with the heating
element.
•
Make sure that the outside of the inner pot is clean and dry, and
that there is no foreign residue on the heating element.
4
Close the lid of the multicooker (fig. f), and put the plug in
the power socket (fig. g).
5
Touch “menu” (МЕНЮ) to select “rice” (рис) (fig. j) or
“grain” (крупы) (fig. k).
6
Touch and hold “start” (СТАРТ/ВЫКЛ) for 3 seconds to
confirm and start cooking (fig. i).
7
When the cooking is finished, the appliance beeps and turns
into warm keeping automatically.
Always there to help you
Question?
Contact
Philips
•
After you have touched “menu” (МЕНЮ) to select the cooking
function, if you touch and hold “start” (СТАРТ/ВЫКЛ) for
3 seconds directly, the keep-warm indicator will light up. After
the cooking is finished, the multicooker will switch to keep-warm
mode directly.
•
After you have touched “menu” (МЕНЮ) to select the cooking
function, if you touch “keep-warm” (ПОДОГРЕВ) first, and
then touch and hold “start” (СТАРТ/ВЫКЛ) for 3 seconds , the
keep-warm indicator will be off. After the cooking is finished, the
multicooker will be in standby mode.
Note
•
After the appliance turns into warm keeping, it remains at warm
keeping for 12 hours, after that it beeps and cease the warm
keeping process.
•
At standby mode, you can touch
«
keep-warm
«
(ПОДОГРЕВ)
to switch to warm keeping. The accumulated warm keeping time
displays on the screen. The appliance remains at warm keeping for
24 hours, after that it beeps and cease the warm keeping process.
•
In keep-warm mode, you can touch
«
keep-warm
«
(ПОДОГРЕВ) to
switch to standby..
Setting up the cooking time
You can adjust the cooking time for some menus. Refer to chapter
“Menus overview” and see which menus have the time regulation as
well as the regulating range.
1
Select the cooking menu you need.
2
Touch “cooking time” (ВРЕМЯ ПРИГОТОВЛЕНИЯ) (fig. ‚).
»
The hour unit starts flashing on the display.
3
Touch “increase” or “decrease” (-) to set the hour unit
(fig. ƒ).
4
After the hour unit is set, touch “cooking time” (ВРЕМЯ
ПРИГОТОВЛЕНИЯ) again (fig. „).
»
The minute unit starts flashing on the display.
5
Touch “increase” or “decrease” (-) to set the minute unit
(fig. …).
6
Touch and hold “start” (СТАРТ/ВЫКЛ) for 3 seconds to
confirm and start cooking (fig. i).
Note
•
If the multicooker is left idle for 15 seconds after «cooking time»
(ВРЕМЯ ПРИГОТОВЛЕНИЯ) is touched, it will turn to standby
mode.
•
For menus with a maximum cooking time of no more than
1 hour, the first time you touch “cooking time” (ВРЕМЯ
ПРИГОТОВЛЕНИЯ), the minute unit starts flashing on the display.
Setting up the cooking time for “boiling
egg” (яйца)
You can set up the cooking time for “boiling egg” to an accuracy of
30 seconds.
1
Select the “boling egg” (яйца) function.
2
Touch “cooking time” (ВРЕМЯ ПРИГОТОВЛЕНИЯ) (fig. †).
»
The minute unit starts flashing on the display.
Note
•
The default cooking time for boiling egg is 4 minutes, and “04:00”
displays on the screen.
3
Touch “increase” (+) or “decrease” (-) to set the minute unit
(fig. ‡).
4
Touch “cooking time” (ВРЕМЯ ПРИГОТОВЛЕНИЯ) again
(fig. ˆ).
»
The second unit starts flashing on the display.
5
Touch “increase” (+) or “decrease” (-) to set the second unit
(fig. ‰).
»
The second unit changes by 30 seconds each time
increase (+) or decrease (-) is touched.
6
Touch and hold “start” (СТАРТ/ВЫКЛ) for 3 seconds to
confirm and start cooking (fig. i).
Preset time for delayed cooking
You can preset the delayed cooking time for some cooking menus.
Refer to chapter “Menus overview” and see which menus can be
preset.
1
Select the cooking menu you need.
2
Touch “preset time” (ОТСРОЧКА) (fig. Š).
»
The hour unit starts flashing on the display.
3
Touch “increase” or “decrease” (-) to set the hour unit
(fig. ‹).
4
After the hour unit is set, touch “preset” (ОТСРОЧКА) again
(fig. Œ).
»
The minute unit starts flashing on the display.
5
Touch “increase” (+) or “decrease” (-) to set the minute unit
(fig. ).
6
Touch and hold “start” (СТАРТ/ВЫКЛ) for 3 seconds to
confirm and start cooking (fig. i).
Note
•
If the multicooker is left idle for 15 seconds after «preset»
(ОТСРОЧКА) is touched, it will turn to standby mode.
•
The cooking process will be finished when the preset time has
elapsed. For example, if you set a preset time of 8 hours at 10:00
in the morning, the cooking process will be finished 8 hours later at
18:00 in the evening.
Setting up the cooking temperature
You can adjust the cooking temperature for some menus. Refer
to chapter “Menus overview” and see which menus have the
temperature regulation as well as the regulating range.
1
Select the cooking menu you need.
2
Touch “temperature” (ТЕМП.) (fig. ).
»
The default cooking temperature displays on the screen.
3
Touch “increase” or “decrease” (-) to set the cooking
temperature (fig. ).
4
Touch and hold “start” (СТАРТ/ВЫКЛ) for 3 seconds to
confirm and start cooking (fig. i).
Note
•
Instead of touching “increase” or “decrease” (-) to set the cooking
temperature, you can also touch “temperature” (ТЕМП.) repeatedly
to adjust the cooking temperature.
Setting up the child lock
To protect children from using the multicooker or to avoid any
misoperation, you can activate the child lock during a cooking process.
•
Touch and hold “menu” (МЕНЮ) for 3 seconds to activate the
child lock (fig. ).
»
“Child lock” (ЗАЩИТА ОТ ДЕТЕЙ) lights up on the display.
•
To unlock, touch and hold “menu” (МЕНЮ) for 3 seconds again
(fig. ‘).
»
“Child lock” (ЗАЩИТА ОТ ДЕТЕЙ) goes off.
5 Cleaning and Maintenance
Note
•
Unplug the multicooker and wait until it has cooled down sufficiently
before cleaning.
Interior
Inside of the top lid and the main body; the heating element:
•
Wipe with a wrung out cloth.
•
Make sure to remove all the food residues stuck to the
multicooker.
Exterior
Surface of the top lid and outside of the main body:
•
Wipe with a cloth damped with soap water.
•
Only use soft and dry cloth to wipe the control panel.
•
Make sure to remove all the food residues around the control
panel.
Accessories
Inner pot, steam basket, and detachable steam vent cap:
•
Soak in hot water and clean with sponge.
6 Recycling
This symbol means that this product shall not be disposed
of with normal household waste (2012/19/EU).
Follow your country’s rules for the separate collection of
electrical and electronic products. Correct disposal helps
prevent negative consequences for the environment and
human health.
7 Guarantee and service
If you need service or information, or if you have a problem, visit the
Philips website at www.philips.com or contact the Philips Customer
Care Center in your country. You can find its phone number in the
worldwide guarantee leaflet. If there is no Customer Care Center in
your country, go to your local Philips dealer.
8 Specifications
Model Number
HD4734, HD4749
Rated voltage
220V-240V~
Rated power output
890W-1070W
Rated capacity
5.0L
9 Troubleshooting
If you encounter problems when using this multicooker, check the
following points before requesting service. If you cannot solve the
problem, contact the Philips Consumer Care Center in your country.
Problem
Solution
The light on the
button does not
go on.
There is a connection problem. Check if the
power cord is connected to the multicooker
properly and if the plug is inserted firmly into
the power outlet.
The light is defective. Take the appliance
to your Philips dealer or a service center
authorized by Philips.
The display does
not function.
The multicooker is not connected to the
power supply. If there is no power supply,
the power failure backup function does not
work and the display does not function.
The ingredients
are not cooked.
You did not touch and hold «start»
(СТАРТ / ВЫКЛ) for 3 seconds.
Make sure that there is no foreign residue on
the heating element and the outside of the
inner pot before switching the multicooker
on.
The heating element is damaged, or the
inner pot is deformed. Take the multicooker
to your Philips dealer or a service center
authorized by Philips.
The rice is too
dry and not well
cooked.
Add more water to the rice, and cook for a
bit longer.
The rice is
scorched.
You have not rinsed the rice properly. Rinse
the rice until the water runs clear.
The multicooker
does not turn into
warm keeping
automatically.
You might have touched “keep-warm”
(ПОДОГРЕВ) before starting the cooking
process. In this case the multicooker will be
in standby mode after the cooking is finished.
The temperature control is defective. Take
the appliance to your Philips dealer or a
service center authorized by Philips.
Water spills out
of the multicooker
during cooking.
Make sure that the ingredients you put in the
inner pot do not exceed the MAX indication.
Problem
Solution
I cannot get to the
desired cooking
function.
Touch «menu» (МЕНЮ) repeatedly to select
the desired function.
Dishes smell bad
after cooking
Clean the inner pot with some washing
detergent and warm water.
After cooking, make sure the steam vent cap,
inner lid and inner pot is cleaned thoroughly.
Error message
(E1, E2, E3, or E4)
appears on the
display.
There has been a power failure during
cooking. Take the appliance to your Philips
dealer or a service center authorized by
Philips.
Қазақша
1 Көп функциялы тағам
пісіргішіңіз
Сатып алғаныңыз құтты болсын және Philips компаниясына қош
келдіңіз!
Philips ұсынатын қолдауды толық пайдалану үшін, өнімді
www.philips.com/welcome торабында тіркеңіз.
2 Қорап ішіндегі заттар
(1-сурет)
a
Көп функциялы тағам
пісіргіштің негізгі бөлігі
d
Пайдаланушы нұсқаулығыъ
b
Тоқ сымы
e
Рецепт кітапшасы
c
Бу себеті
f
Кепілдік картасы
3 Жалпы шолу
Өнімге жалпы шолу (2 -сурет)
a
Жоғарғы қақпақ
g
Негізгі бөлік
b
Алынатын ішкі қақпақ
h
Тағам пісіргіштің тұтқасы
c
Ішкі ыдысы
i
Су деңгейінің көрсеткіштері
d
Басқару панелі
j
Мөрлейтін сақина
e
Қыздыру элементі
k Алынатын бу шығатын
тесікше қақпағы
f
Қуат розеткасы
l
Қақпақты шешу түймесі
Басқару құралдарына шолу (3-сурет )
m
Жылы сақтау түймесі
s Пісіру уақыты түймесі
n
М е н і ң р е ц е п т і м
түймесі
t Мәзір/Балалардан құлыптау
түймесі
o
Көп функциялы тағам
пісіргіш Pro түймесі
u Температура түймесі
p
Уақытты алдын ала
орнату түймесі
v Бастау/Өшіру түймесі
q
Азайту түймесі
w
Дисплей экраны
r Көбейту түймесі
Мәзірлерге шолу
Мәзірлер
Әдепкі пісіру
уақыты
Пісіру уақытын
реттеу ауқымы
Жылыту (разогреть)
25 мин.
5-60 мин.
Күріш (рис)
30-40 мин.
/
Жарма (крупы)
30-40 мин.
/
Палау (плов)
35 мин.
/
Ботқа (каша)
10 мин.
5 мин. — 2 сағ.
Буға пісіру (готовить
на пару)
20 мин.
5 мин. — 2 сағ.
Қайнату (варить)
20 мин.
5 мин. — 2 сағ.
Көже (суп)
1 сағ.
20 мин.-4 сағ.
Қуыру (жарить)
15 мин
5-60 мин.
Демдеп пісіру (томить) 5 сағ.
1-15 сағ.
Бұқтыру (тушить)
1 сағ.
20 мин. — 10 сағ.
Сусындар (напитки)
10 мин.
5-40 мин.
Паста (паста)
4 мин
1-15 мин.
Жұмыртқа (яйца)
4 мин
1-15 мин.
Іркілдек (холодец)
6 сағ.
4-10 сағ.
Рагу (рагу)
2 сағ.
20 мин. — 10 сағ.
Пиццa (пиццa)
35 мин.
10-60 мин.
Қақтап пісіру (запекать) 1 сағ.
/
Пеш ішінде пісіру
(печь)
45 мин.
20 мин. — 2 сағ.
Йогурт (йогурт)
8 сағ.
6-12 сағ.
Айран (кефир)
8 сағ.
6-12 сағ.
Қолмен
(мультиповар)
2 сағ.
5 мин. — 10 сағ.
Көп функциялы аспаз
Pro (Мультиповар Pro) 5 мин.
5 мин — 15 сағ
Мәзірлер
Алдын ала
орнату
уақыты
Әдепкі пісіру
температурасы
Температураны
реттеу ауқымы
Жылыту
(разогреть)
/
85°C
/
Күріш (рис)
1-24 сағ.
130-140°C
/
Жарма (крупы) 1-24 сағ.
130-140°C
/
Палау (плов)
1-24 сағ.
130-140°C
/
Ботқа (каша)
1-24 сағ.
90-100°C
/
Буға пісіру
(готовить на
пару)
1-24 сағ.
100°C
/
Қайнату
(варить)
1-24 сағ.
100°C
/
Көже (суп)
1-24 сағ.
90-100°C
/
Қуыру
(жарить)
/
145-160°C
/
Демдеп пісіру
(томить)
1-24 сағ.
80°C
/
Бұқтыру
(тушить)
1-24 сағ.
95°C
/
Сусындар
(напитки)
1-24 сағ.
100°C
/
Паста (паста)
/
100°C
/
Жұмыртқа
(яйца)
/
100°C
/
Іркілдек
(холодец)
1-24 сағ.
90-100°C
/
Рагу (рагу)
1-24 сағ.
90°C
/
Пиццa (пиццa) /
130°C
/
Қақтап пісіру
(запекать)
1-24 сағ.
120-130°C
/
Пеш ішінде
пісіру (печь)
/
130°C
40-160°C
Йогурт
(йогурт)
1-24 сағ.
40±3°C
/
Айран (кефир) 1-24 сағ.
40±3°C
/
Қолмен
(мультиповар) 1-24 сағ.
100°C
30-160°C
Көп функциялы
аспаз Pro
(Мультиповар
Pro)
1-24 сағ.
100°C
30-160°C
Есте сақтаңыз
•
Күріш (рис), жарма (крупы) және палау (плов) үшін пісіру
уақытын ішкі ыдысқа салынған құрамдастарға қарай көп
функциялы тағам пісіргіш өзі анықтайды.
•
Сіз пеш ішінде пісіру (печь), қолмен пісіру (мультиповар)
және мультипісіргіш Pro (Мультиповар Pro) үшін пісіру
температурасын реттей аласыз. Пісіру үшін 40°C-160°C
аралығындағы температура пайдаланылады; қолмен пісіру және
мультипісіргіш Pro функциясы үшін 30°C — 160°C аралығындағы
температура пайдаланылады.
•
Пісіру басталғаннан кейін тамақ пісіруді тоқтату үшін Бастау/
Өшіру түймесін (СТАРТ/ВЫКЛ) басуыңызға болады, сонда көп
функциялы тағам пісіргіш күту режиміне өтеді.
EN
User manual
KK
Пайдаланушы нұсқаулығы
RU
Руководство пользователя
UK
Посібник користувача
4 Көп функциялы тағам
пісіргішті пайдалану
(4-сурет )
Есте сақтаңыз
•
Барлық мәзірлер бойынша тағамды, сұйық заттарды немесе
құрамдас бөліктерін салған кезде, ішкі кәстрөлдің ішкі жағындағы
MAX көрсеткішінен асырмаңыз, әйтпесе пісіру кезінде тағам
тасып кетуі мүмкін ( a-сур.).
•
Күріш (рис), жарма (крупы) және палау (плов) пісірген кезде
пісіру уақыты ең басынан бастап көрсетілмейді.
Пісіру
уақытының көбісінде экранда көрсетіледі, себебі көп функциялы
тағам пісіргіш бастапқы дайындау кезеңінде суды/сұйықтық
пен құрамдастар көлемін анықтауға тиіс. Көп функциялы тағам
пісіргіш қажетті пісіру уақытын анықтаған кезде, қалған пісіру
уақыты экранда көрсетіледі. Ботқа (каша), буға пісіру (готовить
на пару), қайнату (варить), іркілдек (холодец), және сусындар
(напитки) үшін,су/сұйықтық қайнардан бұрын экранда
көрсетіледі. Су/сұйықтық қайнай бастағанда пісіру уақыты
экранда көрсетіледі.
•
Әр мәзірмен пісіру бойынша толық ақпаратты рецепттер
кітапшасынан қараңыз.
Кеңес
•
Белгілі бір мәзірді таңдау үшін «мәзір» (МЕНЮ) түймесін қайта-
қайта түртіңіз. Сондай-ақ «мәзір» (МЕНЮ) түймесін бір рет
басып, қосу (+) немесе азайту (-) түймесін басуға да болады.
Алғашқы рет қолданар алдында
1
Ішкі ыдыстан барлық қосалқы құралдарды алыңыз, одан
кейін ішкі ыдыстың орам материалын алыңыз.
2
Көп функциялы тағам пісіргішті бірінші рет пайдаланбастан
бұрын оның бөліктерін мұқият тазалаңыз («Тазалау және
техникалық қызмет көрсету» тарауын қараңыз).
Есте сақтаңыз
•
Көп функциялы тағам пісіргішті пайдаланбастан бұрын барлық
бөліктерінің толық кепкенін тексеріңіз.
Жылыту (разогреть)
1
Суыған тағамды қопсытып, ішкі кәстрөлге біркелкі етіп
салыңыз.
2
Қатты құрғақ болмауы үшін тағамға біраз су құйыңыз. Судың
мөлшері тағамның көлеміне байланысты болады.
3
Ішкі кәстрөлдің сыртын құрғатып сүртіңіз ( d-сур.), содан
кейін көп функциялы тағам пісіргішке салыңыз ( e-сур.).
4
Көп функциялы тағам пісіргіштің қақпағын жабыңыз да
( f-сур.), ашаны қуат розеткасына қосыңыз ( g-сур.).
5
“Мәзір” (МЕНЮ) түймесін басып, “жылыту” (разогреть)
тармағын таңдаңыз ( h-сур.).
»
Басқа пісіру уақытын орнату үшін «Пісіру уақытын
реттеу» тарауын қараңыз.
6
Растап, пісіруді бастау үшін «бастау» (СТАРТ/ВЫКЛ)
түймесін 3 секунд басып тұрыңыз ( i-сур.).
7
Пісіру аяқталғанда, құрылғы дыбыстық сигнал шығарып,
жылы сақтау режимі автоматты түрде іске қосылады.
Күріш (рис) пен жарманы (крупы)
пісіру
Есте сақтаңыз
•
Тұратын аймағыңыздағы тоқ кернеуі тұрақты болмаса, көп
функциялы тағам пісіргіштегі тағам тасып кетуі мүмкін.
•
Пісіру аяқталғаннан кейін күрішті/жарманы араластырыңыз
және жұмсақ болуы үшін артық ылғалды кетіру үшін оны бірден
қопсытыңыз.
•
Пісіру жағдайларына байланысты күріштің/жарманың төменгі
бөлігі аздап қоңырлануы мүмкін.
1
Күрішті жуыңыз да, жуылған күрішті ішкі кәстрөлге салып, су
құйыңыз ( b-сур.).
Есте сақтаңыз
•
Күріш/жарма мен судың арақатынасын рецепттер кітапшасынан
қараңыз.
2
Қақпақты ашу үшін қақпақты босату түймесін басыңыз
( c-сур.).
3
Ішкі кәстрөлдің сыртын құрғатып сүртіңіз ( d-сур.), содан
кейін көп функциялы тағам пісіргішке салыңыз ( e-сур.).
Есте сақтаңыз
•
Ішкі ыдыстың қыздыру элементіне дұрыс тиіп тұрғанын
тексеріңіз.
•
Ішкі кәстрөлдің сырты таза әрі құрғақ екенін және қыздырғыш
элементте бөгде қалдықтың жоқ екенін тексеріңіз.
4
Көп функциялы тағам пісіргіштің қақпағын жабыңыз да
( f-сур.), ашаны қуат розеткасына қосыңыз ( g-сур.).
5
“Мәзір” (МЕНЮ) түймесін басып, “күріш” (рис) ( j-сур.)
немесе «жарма» (крупы) ( k-сур.) тармағын таңдаңыз.
6
Растап, пісіруді бастау үшін «бастау» (СТАРТ/ВЫКЛ)
түймесін 3 секунд басып тұрыңыз ( i-сур.).
7
Пісіру аяқталғанда, құрылғы дыбыстық сигнал шығарып,
жылы сақтау режимі автоматты түрде іске қосылады.
Палау (плов) пісіру
1
Палаудың құрамдас бөліктерін ішкі кәстрөлге салыңыз.
2
Ішкі кәстрөлдің сыртын құрғатып сүртіңіз ( d-сур.), содан
кейін көп функциялы тағам пісіргішке салыңыз ( e-сур.).
3
Көп функциялы тағам пісіргіштің қақпағын жабыңыз да
( f-сур.), ашаны қуат розеткасына қосыңыз ( g-сур.).
4
«Мәзір» (МЕНЮ) түймесін басып, «палау» (плов) ( l-сур.)
тармағын таңдаңыз.
5
Растап, пісіруді бастау үшін «бастау» (СТАРТ/ВЫКЛ)
түймесін 3 секунд басып тұрыңыз ( i-сур.).
6
Пісіру аяқталғанда, құрылғы дыбыстық сигнал шығарып,
жылы сақтау режимі автоматты түрде іске қосылады.
Ботқа (каша) пісіру
1
Ботқаның құрамдас бөліктерін ішкі кәстрөлге салып, шамалы
араластырыңыз.
2
Ішкі кәстрөлдің сыртын құрғатып сүртіңіз ( d-сур.), содан
кейін көп функциялы тағам пісіргішке салыңыз ( e-сур.).
3
Көп функциялы тағам пісіргіштің қақпағын жабыңыз да
( f-сур.), ашаны қуат розеткасына қосыңыз ( g-сур.).
4
«Мәзір» (МЕНЮ) түймесін басып, «ботқа» (каша) ( m-сур.)
тармағын таңдаңыз.
»
Басқа пісіру уақытын таңдау үшін «Пісіру уақытын
орнату» тарауын қараңыз.
5
Растап, пісіруді бастау үшін «бастау» (СТАРТ/ВЫКЛ)
түймесін 3 секунд басып тұрыңыз ( i-сур.).
6
Пісіру аяқталғанда, құрылғы дыбыстық сигнал шығарып,
жылы сақтау режимі автоматты түрде іске қосылады.
Есте сақтаңыз
•
су/сұйықтық қайнардың алдында экранда көрсетіледі. Су/
сұйықтық қайнай бастағанда орнатылған пісіру уақыты экранда
көрсетіледі.
•
Құрамдас бөліктер мен сұйықтықтың арақатынасын рецепттер
кітапшасынан қараңыз.
Буға пісіру (готовить на пару)
1
Ішкі ыдысқа біраз су құйыңыз.
Есте сақтаңыз
•
Көкөністі буға пісіру үшін көкөніс түрі мен көлеміне қарай 0,2 л
— 1 л су құйыңыз; етті буға пісіру үшін еттің өлшемі мен көлеміне
қарай 2 л — 0,5 л су құйыңыз.
2
Бу себетін ішкі кәстрөлге салып, тағамды шараға салыңыз да,
шараны бу себетінің үстіне қойыңыз.
»
Құрамдас бөліктер бу себетінің барлық тесіктерін
жауып тастамасын, сонда бу себетінен ыстық бу
жоғары қарай көтеріледі.
3
Ішкі кәстрөлдің сыртын құрғатып сүртіңіз ( d-сур.), содан
кейін көп функциялы тағам пісіргішке салыңыз ( e-сур.).
4
Көп функциялы тағам пісіргіштің қақпағын жабыңыз да
( f-сур.), ашаны қуат розеткасына қосыңыз ( g-сур.).
5
«Мәзір» (МЕНЮ) түймесін басып, «буға пісіру» (готовить
на пару) ( n-сур.) тармағын таңдаңыз.
»
Басқа пісіру уақытын таңдау үшін «Пісіру уақытын
орнату» тарауын қараңыз.
6
Растап, пісіруді бастау үшін «бастау» (СТАРТ/ВЫКЛ)
түймесін 3 секунд басып тұрыңыз ( i-сур.).
7
Пісіру аяқталғанда, құрылғы дыбыстық сигнал шығарып,
жылы сақтау режимі автоматты түрде іске қосылады.
Есте сақтаңыз
•
Тағамды буға пісіріп жатқанда, бу себетін суға батырмаңыз.
•
су/сұйықтық қайнардың алдында экранда көрсетіледі. Су/
сұйықтық қайнай бастағанда орнатылған пісіру уақыты экранда
көрсетіледі.
•
Буға пісіру аяқталғанда, шара мен бу себетін шығарып алу үшін
аспаз қолғабын немесе шүберекті пайдаланыңыз, себебі олар
өте ыстық болуы мүмкін.
www.philips.com/welcome
User manual
www.philips.com/welcome
Warranty
1
3
2
http://www.philips.com/welcome
Recipe
k
a
b
c
d
e
f
j
g
f
l
h
c
a
b
d
e
i
m
o
q
n
p
v
w
u
t
r
s
6
8
10
11
12
14
9
3S
46
47
31
32
33
3S
35
39
43
45
41
37
48
3S
4
15
28
29
30
24
25
26
27
16
21
19
20
22
23
34
36
38
40
42
44
2
4
5
7
13
17
18
49
3S
3
2
Wipe the outside of the inner pot dry (fig. d), and then put it
in the multicooker (fig. e).
3
Close the lid of the multicooker (fig. f), and put the plug in
the power socket (fig. g).
4
Touch “menu” (МЕНЮ) to select “egg” (яйца) (fig. w).
»
To choose a different cooking time, refer to chapter
“Setting up the cooking time”.
5
Touch and hold “start” (СТАРТ/ВЫКЛ) for 3 seconds to
confirm and start cooking (fig. i).
6
When the water is brought to boil, the multicooker beeps 5
times as a reminder for you to open the lid and put the eggs in
the inner pot.
Note
•
displays on the screen before the water is brought to boil.
When the water starts boiling, the set cooking time displays on the
screen.
•
The default cooking time for boiling egg is 4 minutes, and “04:00”
displays on the screen.
•
If the multicooker is left idle for 5 minute after the multicooker
beeps, the multicooker turns into standby mode.
7
After the eggs are put in the inner pot, close the lid and touch
“menu” (МЕНЮ) to resume the cooking process.
8
When the cooking is finished, the appliance beeps and turns
into standby automatically.
Making jelly meat (холодец)
1
Put the ingredients for the jelly meat in the inner pot.
2
Wipe the outside of the inner pot dry (fig. d), and then put it
in the multicooker (fig. e).
3
Close the lid of the multicooker (fig. f), and put the plug in
the power socket (fig. g).
4
Touch “menu” (МЕНЮ) to select “jelly meat” (холодец)
(fig. x).
»
To choose a different cooking time, refer to chapter
“Setting up the cooking time”.
5
Touch and hold “start” (СТАРТ/ВЫКЛ) for 3 seconds to
confirm and start cooking (fig. i).
6
When the cooking is finished, the appliance beeps and turns
into warm keeping automatically.
Note
•
displays on the screen before the water/liquid is brought
to boil. When the water/liquid starts boiling, the set cooking time
displays on the screen.
Making pizza (пиццa)
1
Put the ingredients for the pizza in the inner pot.
2
Wipe the outside of the inner pot dry (fig. d), and then put it
in the multicooker (fig. e).
3
Close the lid of the multicooker (fig. f), and put the plug in
the power socket (fig. g).
4
Touch “menu” (МЕНЮ) to select “pizza” (пиццa) (fig. y).
»
To choose a different cooking time, refer to chapter
“Setting up the cooking time”.
5
Touch and hold “start” (СТАРТ/ВЫКЛ) for 3 seconds to
confirm and start cooking (fig. i).
6
When the cooking is finished, the appliance beeps and turns
into warm keeping automatically.
Note
•
If you cook with frozen pizza, you can adjust the cooking time
according to your own preference. The pizza gets browner as the
cooking time increases.
Roasting (запекать)
1
Put ingredients into the inner pot.
2
Wipe the outside of the inner pot dry (fig. d), and then put it
in the multicooker (fig. e).
3
Close the lid of the multicooker (fig. f), and put the plug in
the power socket (fig. g).
4
Touch “menu” (МЕНЮ) to select “roast” (запекать) (fig. z).
5
Touch and hold “start” (СТАРТ/ВЫКЛ) for 3 seconds to
confirm and start cooking (fig. i).
6
There are 2 stages of roasting. When the first stage (about
35 minutes) is over, the multicooker beeps 5 times every 30
seconds as a reminder for you to open the lid, and turn the
food over in the inner pot.
»
flashes on the screen.
7
Touch “menu” (МЕНЮ) to start the second stage.
»
If menu (МЕНЮ) is not touched within 5 minutes after
the first stage is over, the multicooker will turn into warm
keeping.
8
When the cooking is finished, the appliance beeps and turns
into standby automatically.
Baking (печь)
1
Put the ingredients to bake in the inner pot.
2
Wipe the outside of the inner pot dry (fig. d), and then put it
in the multicooker (fig. e).
3
Close the lid of the multicooker (fig. f), and put the plug in
the power socket (fig. g).
Note
•
When baking cake or bread, keep the lid closed during cooking.
Baking cake at 130°C and by 45 minutes usually delivers best
cooking result.
•
If you bake other food with a temperature above 140°C, keep the
lid open.
4
Touch “menu” (МЕНЮ) to select “bake” (печь) (fig. {).
»
To choose a different baking temperature, refer to chapter
“Setting up the cooking temperature”.
»
To choose a different cooking time, refer to chapter
“Setting up the cooking time”.
5
Touch and hold “start” (СТАРТ/ВЫКЛ) for 3 seconds to
confirm and start cooking (fig. i).
6
When the cooking is finished, the appliance beeps and turns
into warm keeping automatically.
Note
•
If the baking temperature is set below 80°C, when the cooking is
finished, the appliance turns into standby automatically.
•
When removing the inner pot from the multicooker after cooking,
use a kitchen glove or a cloth, as the inner pot could be very hot.
Making yogurt (йогурт) or sour milk
(кефир)
1
Mix the ingredients for the yogurt or sour milk well and put
them in the inner pot.
2
Wipe the outside of the inner pot dry (fig. d), and then put it
in the multicooker (fig. e).
3
Close the lid of the multicooker (fig. f), and put the plug in
the power socket (fig. g).
4
Touch “menu” (МЕНЮ) to select “yogurt” (йогурт) (fig. |)
or “sour milk” (кефир) (fig. }).
»
To choose a different cooking time, refer to chapter
“Setting up the cooking time”.
5
Touch and hold “start” (СТАРТ/ВЫКЛ) for 3 seconds to
confirm and start cooking (fig. i).
6
When the cooking is finished, the appliance beeps and turns
into standby automatically.
Manual (мультиповар)
You may use the manual mode to cook food with more control over
the cooking time and temperature.
1
Put ingredients into the inner pot.
2
Wipe the outside of the inner pot dry (fig. d), and then put it
in the multicooker (fig. e).
3
Close the lid of the multicooker (fig. f), and put the plug in
the power socket (fig. g).
4
Touch “menu” (МЕНЮ) to select “manual” (мультиповар)
(fig. ~).
»
To choose a different baking temperature, refer to chapter
“Setting up the cooking temperature”.
»
To choose a different cooking time, refer to chapter
“Setting up the cooking time”.
5
Touch and hold “start” (СТАРТ/ВЫКЛ) for 3 seconds to
confirm and start cooking (fig. i).
6
When the cooking is finished, the appliance beeps and turns
into warm keeping automatically.
Note
•
If you select a temperature below 80°C, the multicooker
automatically turns into standby after the cooking process is finished.
•
If you select a temperature above 140°C, the top lid must be open
during cooking.
Multicook Pro (Мультиповар Pro)
With the multicook Pro function, you can set up to 9 stages of
cooking with different time and temperature.
For example, you can set the first stage for 5 minutes at 160°C,
the second stage for 10 minutes at 100°C and the last stage for 20
minutes at 80°C.
1
When the multicooker is at standby mode, touch “multicook
Pro” (Мультиповар Pro). (fig. )
»
“1” lights up on the screen.
2
Refer to chapter “Setting up the cooking time” and select the
cooking time for stage 1.
3
Refer to chapter “Setting up the cooking temperature” and
select the cooking temperature for stage 1.
4
Touch “multicook Pro” (Мультиповар Pro) again and move to
stage 2. (fig. €)
»
“2” lights up on the screen.
5
Set the cooking time and temperature for stage 2.
6
Repeat the above steps until you have set all the stages you
need, and then touch and hold “start” (СТАРТ/ВЫКЛ) for
3 seconds to confirm and start cooking (fig. i).
My Recipe (Мой рецепт)
1
After multicook Pro is finished, if you would like to save the
cooking stages you have set, within 10 minutes after the
cooking is finished, touch and hold “My Recipe” (Мой рецепт)
for 3 seconds. (fig. )
»
“F1” displays on the screen.
2
Touch “increase” (+) or “decrease” (-) to select F1, F2, F3, F4
or F5.
3
Touch and hold “My Recipe” (Мой рецепт) for 3 seconds
again to save the cooking stages to the designated slot.
Note
•
You can save up to 5 multicook Pro menus in «My Recipe» (Мой
рецепт), and they are saved as F1, F2, F3, F4 and F5.
•
When the multicooker is at standby mode, touch and hold «My
Recipe» (Мой рецепт) for 3 seconds, and then touch «increase» (+)
or «decrease» (-) to choose the menu you need.
•
If you would like to replace one of the current My Recipe menus
with a new setting, select the menu you no longer need, and save
the new setting to it.
•
The total cooking time for all the cooking stages you have set has a
maximum limitation of 24 hours.
Warm keeping
The multicooker provides you with easy control over the keep-warm
mode.
Making pilaf (плов)
1
Put the ingredients for the pilaf into the inner pot.
2
Wipe the outside of the inner pot dry (fig. d), and then put it
in the multicooker (fig. e).
3
Close the lid of the multicooker (fig. f), and put the plug in
the power socket (fig. g).
4
Touch “menu” (МЕНЮ) to select “pilaf” (плов) (fig. l).
5
Touch and hold “start” (СТАРТ/ВЫКЛ) for 3 seconds to
confirm and start cooking (fig. i).
6
When the cooking is finished, the appliance beeps and turns
into warm keeping automatically.
Cooking porridge (каша)
1
Put ingredients for the porridge into the inner pot and stir a
little bit.
2
Wipe the outside of the inner pot dry (fig. d), and then put it
in the multicooker (fig. e).
3
Close the lid of the multicooker (fig. f), and put the plug in
the power socket (fig. g).
4
Touch “menu” (МЕНЮ) to select “porridge” (каша) (fig. m).
»
To choose a different cooking time, refer to chapter
“Setting up the cooking time”.
5
Touch and hold “start” (СТАРТ/ВЫКЛ) for 3 seconds to
confirm and start cooking (fig. i).
6
When the cooking is finished, the appliance beeps and turns
into warm keeping automatically.
Note
•
displays on the screen before the water/liquid is brought
to boil. When the water/liquid starts boiling, the set cooking time
displays on the screen.
•
For details about the ratio of ingredients and liquid, refer to the
recipe booklet.
Steaming (готовить на пару)
1
Pour some water into the inner pot.
Note
•
To steam vegetable, use 0.2L to 1L water depending on the types
and amount of vegetable; to steam meat, use 0.5L to 2L water
depending on the size and amount of meat.
2
Put the steam basket in the inner pot, put the food in a bowl,
and then put the bowl on the steam basket.
»
Make sure that not all the steaming holes on the steam
basket are covered by the ingredients, so that hot steam
could flow up from under the steam basket.
3
Wipe the outside of the inner pot dry (fig. d), and then put it
in the multicooker (fig. e).
4
Close the lid of the multicooker (fig. f), and put the plug in
the power socket (fig. g).
5
Touch “menu” (МЕНЮ) to select “steaming” (готовить на
пару) (fig. n).
»
To choose a different cooking time, refer to chapter
“Setting up the cooking time”.
6
Touch and hold “start” (СТАРТ/ВЫКЛ) for 3 seconds to
confirm and start cooking (fig. i).
7
When the cooking is finished, the appliance beeps and turns
into warm keeping automatically.
Note
•
When steaming food, do not immerse the steam basket in water.
•
displays on the screen before the water/liquid is brought
to boil. When the water/liquid starts boiling, the set cooking time
displays on the screen.
•
After the steaming is finished, use a kitchen glove or a cloth to
remove the bowl and steam basket, as they could be very hot.
Boiling (варить)
1
Fill the inner pot with some water.
2
Wipe the outside of the inner pot dry (fig. d), and then put it
in the multicooker (fig. e).
3
Close the lid of the multicooker (fig. f), and put the plug in
the power socket (fig. g).
4
Touch “menu” (МЕНЮ) to select “boil” (варить) (fig. o).
»
To choose a different cooking time, refer to chapter
“Setting up the cooking time”.
5
Touch and hold “start” (СТАРТ/ВЫКЛ) for 3 seconds to
confirm and start cooking (fig. i).
6
When the water is brought to boil, the multicooker beeps 5
times as a reminder for you to open the lid and put the food in
the inner pot.
Note
•
displays on the screen before the water/liquid is brought
to boil. When the water/liquid starts boiling, the set cooking time
displays on the screen.
7
When the cooking is finished, the appliance beeps and turns
into standby automatically.
Making soup (Суп)
1
Put ingredients and water/liquid for the soup into the inner pot.
2
Wipe the outside of the inner pot dry (fig. d), and then put it
in the multicooker (fig. e).
3
Close the lid of the multicooker (fig. f), and put the plug in
the power socket (fig. g).
4
Touch “menu” (МЕНЮ) to select “soup” (Суп) (fig. p).
»
To choose a different cooking time, refer to chapter
“Setting up the cooking time”.
5
Touch and hold “start” (СТАРТ/ВЫКЛ) for 3 seconds to
confirm and start cooking (fig. i).
6
When the cooking is finished, the appliance beeps and turns
into warm keeping automatically.
Frying (жарить)
1
Wipe the outside of the inner pot dry (fig. d), and then put it
in the multicooker (fig. e).
2
Put the plug in the power socket (fig. g).
3
Pour some cooking oil into the inner pot.
4
Touch “menu” (МЕНЮ) to select “fry” (жарить) (fig. q).
5
Touch and hold “start” (СТАРТ/ВЫКЛ) for 3 seconds to
confirm and start cooking (fig. i).
6
Let the cooking oil heat up for 5 minutes, and then put the
ingredients and seasonings into the inner pot.
7
Keep the lid open and stir the ingredients constantly with a
spatula.
8
When the cooking is finished, the appliance beeps and turns
into standby automatically.
Simmering (Tомить)
1
Clean the inner pot thoroughly and wipe the inside of the pot
dry with a soft cloth.
2
Wipe the outside of the inner pot dry (fig. d), and then put it
in the multicooker (fig. e).
3
Put the plug in the power socket (fig. g).
4
Touch “menu” (МЕНЮ) to select “simmer” (Tомить) (fig. r).
»
To choose a different cooking time, refer to chapter
“Setting up the cooking time”.
5
Touch and hold “start” (СТАРТ/ВЫКЛ) for 3 seconds to
confirm and start cooking (fig. i).
6
When the cooking is finished, the appliance beeps and turns
into warm keeping automatically.
Making stew (тушить) or ragout (рагу)
1
Put the ingredients for the stew or ragout in the inner pot.
2
Wipe the outside of the inner pot dry (fig. d), and then put it
in the multicooker (fig. e).
3
Close the lid of the multicooker (fig. f), and put the plug in
the power socket (fig. g).
4
Touch “menu” (МЕНЮ) to select “stew” (тушить) (fig. s) or
“ragout” (рагу) (fig. t).
»
To choose a different cooking time, refer to chapter
“Setting up the cooking time”.
5
Touch and hold “start” (СТАРТ/ВЫКЛ) for 3 seconds to
confirm and start cooking (fig. i).
6
When the cooking is finished, the appliance beeps and turns
into warm keeping automatically.
Making beverage (напитки)
1
Put the ingredients for the beverage in the inner pot.
2
Wipe the outside of the inner pot dry (fig. d), and then put it
in the multicooker (fig. e).
3
Close the lid of the multicooker (fig. f), and put the plug in
the power socket (fig. g).
4
Touch “menu” (МЕНЮ) to select “beverage” (напитки)
(fig. u).
»
To choose a different cooking time, refer to chapter
“Setting up the cooking time”.
5
Touch and hold “start” (СТАРТ/ВЫКЛ) for 3 seconds to
confirm and start cooking (fig. i).
6
When the cooking is finished, the appliance beeps and turns
into warm keeping automatically.
Note
•
displays on the screen before the water/liquid is brought
to boil. When the water/liquid starts boiling, the set cooking time
displays on the screen.
Boiling pasta (паста)
1
Fill the inner pot with some water.
2
Wipe the outside of the inner pot dry (fig. d), and then put it
in the multicooker (fig. e).
3
Close the lid of the multicooker (fig. f), and put the plug in
the power socket (fig. g).
4
Touch “menu” (МЕНЮ) to select “pasta” (паста) (fig. v).
»
To choose a different cooking time, refer to chapter
“Setting up the cooking time”.
5
Touch and hold “start” (СТАРТ/ВЫКЛ) for 3 seconds to
confirm and start cooking (fig. i).
6
When the water is brought to boil, the multicooker beeps 5
times as a reminder for you to open the lid and put the pasta
in the inner pot.
Note
•
displays on the screen before the water is brought to boil.
When the water starts boiling, the set cooking time displays on the
screen.
•
If the multicooker is left idle for 1 minute after the multicooker
beeps, the multicooker turns into standby mode.
7
After the pasta is put in the inner pot, touch “menu” (МЕНЮ)
to resume the cooking process.
8
Keep the lid open and constantly stir the pasta with a spatula.
Tip
•
You can also close the lid after the pasta is put in the inner pot for a
soft and tender taste of the pasta.
9
When the cooking is finished, the appliance beeps and turns
into standby automatically.
Boiling egg (яйца)
1
Fill the inner pot with some water.
7
Жұмыртқа ішкі кәстрөлге салынғаннан кейін қақпақты жауып,
пісіруді жалғастыру үшін «мәзір» (МЕНЮ) түймесін басыңыз.
8
Пісіру аяқталғанда, құрылғы дыбыстық сигнал шығарып, күту
режиміне автоматты түрде ауысады.
Іркілдек дайындау (холодец)
1
Іркілдектің құрамдас бөліктерін ішкі кәстрөлге салыңыз.
2
Ішкі кәстрөлдің сыртын құрғатып сүртіңіз ( d-сур.), содан
кейін көп функциялы тағам пісіргішке салыңыз ( e-сур.).
3
Көп функциялы тағам пісіргіштің қақпағын жабыңыз да
( f-сур.), ашаны қуат розеткасына қосыңыз ( g-сур.).
4
“Мәзір” (МЕНЮ) түймесін басып, “іркілдек” (холодец)
тармағын таңдаңыз ( x-сур.).
»
Басқа пісіру уақытын таңдау үшін «Пісіру уақытын
орнату» тарауын қараңыз.
5
Растап, пісіруді бастау үшін «бастау» (СТАРТ/ВЫКЛ)
түймесін 3 секунд басып тұрыңыз ( i-сур.).
6
Пісіру аяқталғанда, құрылғы дыбыстық сигнал шығарып,
жылы сақтау режимі автоматты түрде іске қосылады.
Есте сақтаңыз
•
су/сұйықтық қайнардың алдында экранда көрсетіледі. Су/
сұйықтық қайнай бастағанда орнатылған пісіру уақыты экранда
көрсетіледі.
Пиццa пісіру (пиццa)
1
Пицца ингредиенттерін ішкі ыдысқа салыңыз.
2
Ішкі кәстрөлдің сыртын құрғатып сүртіңіз ( d-сур.), содан
кейін көп функциялы тағам пісіргішке салыңыз ( e-сур.).
3
Көп функциялы тағам пісіргіштің қақпағын жабыңыз да
( f-сур.), ашаны қуат розеткасына қосыңыз ( g-сур.).
4
«Мәзір» (МЕНЮ) түймесін басып, «пицца» (пицца)
( y-сур.) тармағын таңдаңыз.
»
Басқа пісіру уақытын таңдау үшін «Пісіру уақытын
орнату» тарауын қараңыз.
5
Растап, пісіруді бастау үшін «бастау» (СТАРТ/ВЫКЛ)
түймесін 3 секунд басып тұрыңыз ( i-сур.).
6
Пісіру аяқталғанда, құрылғы дыбыстық сигнал шығарып,
жылы сақтау режимі автоматты түрде іске қосылады.
Есте сақтаңыз
•
Қатырылған пиццаны пісірсеңіз, пісіру уақытын қалау бойынша
реттей аласыз. Пісіру уақыты артқанда, пицца қоңырлау болады.
Қақтап пісіру (запекать)
1
Құрамдас бөліктерін ішкі кәстрөлге салыңыз.
2
Ішкі кәстрөлдің сыртын құрғатып сүртіңіз ( d-сур.), содан
кейін көп функциялы тағам пісіргішке салыңыз ( e-сур.).
3
Көп функциялы тағам пісіргіштің қақпағын жабыңыз да
( f-сур.), ашаны қуат розеткасына қосыңыз ( g-сур.).
4
“Мәзір” (МЕНЮ) түймесін басып, “қақтап пісіру” (запекать)
тармағын таңдаңыз ( z-сур.).
5
Растап, пісіруді бастау үшін «бастау» (СТАРТ/ВЫКЛ)
түймесін 3 секунд басып тұрыңыз ( i-сур.).
6
Қыздырып пісірудің 2 кезеңі бар. Бірінші кезең (шамамен 35
минут) аяқталғаннан кейін қақпақты ашып, ішкі кәстрөлдегі
тағамды аударыстыру туралы ескерту үшін тағам пісіргіш әр
30 секунд сайын 5 рет қысқа дыбыс береді.
»
экранда жыпылықтайды.
7
Екінші кезеңді бастау үшін “мәзір” (МЕНЮ) түймесін
басыңыз.
»
Егер бірінші кезең аяқталғаннан кейін 5 минут ішінде
мәзір (МЕНЮ) түймесін баспасаңыз, тағам пісіргіш
жылы сақтау режіміне ауысады.
8
Пісіру аяқталғанда, құрылғы дыбыстық сигнал шығарып, күту
режиміне автоматты түрде ауысады.
Пеш ішінде пісіру (печь)
1
Пеште пісірілетін құрамдас бөліктерді ішкі кәстрөлге
салыңыз.
2
Ішкі кәстрөлдің сыртын құрғатып сүртіңіз ( d-сур.), содан
кейін көп функциялы тағам пісіргішке салыңыз ( e-сур.).
3
Көп функциялы тағам пісіргіштің қақпағын жабыңыз да
( f-сур.), ашаны қуат розеткасына қосыңыз ( g-сур.).
Есте сақтаңыз
•
Торт немесе нан пісірген кезде, қақпақты жауып қойыңыз.
Тортты 130°C-та және 45 минут пісіру әдетте жақсы пісіру
нәтижесін береді.
•
Егер басқа тағамды 140°C-тан артық температурада пісіретін
болсаңыз, қақпағын ашып қойыңыз.
4
“Мәзір” (МЕНЮ) түймесін басып, “пеш ішінде пісіру” (печь)
тармағын таңдаңыз ( {-сур.).
»
Басқа пісіру температурасын таңдау үшін «Пісіру
температурасын орнату» тарауын қараңыз.
»
Басқа пісіру уақытын таңдау үшін «Пісіру уақытын
орнату» тарауын қараңыз.
5
Растап, пісіруді бастау үшін «бастау» (СТАРТ/ВЫКЛ)
түймесін 3 секунд басып тұрыңыз ( i-сур.).
6
Пісіру аяқталғанда, құрылғы дыбыстық сигнал шығарып,
жылы сақтау режимі автоматты түрде іске қосылады.
Есте сақтаңыз
•
Егер пісіру температурасы 80°C-тан төмен орнатылса, тағам
піскен кезде құрылғы күту режіміне автоматты түрде ауысады.
•
Тағамды пісіргеннен кейін тағам пісіргіштен ішкі кәстрөлді алған
кезде аспаз қолғабын немесе шүберекті пайдаланыңыз, себебі
ішкі кәстрөл өте ыстық болуы мүмкін.
Йогурт (йогурт) немесе айран
(кефир) дайындау
1
Йогурттың немесе айранның құрамдас бөліктерін жақсылап
араластырып, ішкі кәстрөлге салыңыз.
2
Ішкі кәстрөлдің сыртын құрғатып сүртіңіз ( d-сур.), содан
кейін көп функциялы тағам пісіргішке салыңыз ( e-сур.).
3
Көп функциялы тағам пісіргіштің қақпағын жабыңыз да
( f-сур.), ашаны қуат розеткасына қосыңыз ( g-сур.).
4
“Мәзір” (МЕНЮ) түймесін басып, “йогурт” (йогурт)
( x-сур.) немесе “айран” (кефир) ( }-сур.) тармағын
таңдаңыз.
»
Басқа пісіру уақытын таңдау үшін «Пісіру уақытын
орнату» тарауын қараңыз.
5
Растап, пісіруді бастау үшін «бастау» (СТАРТ/ВЫКЛ)
түймесін 3 секунд басып тұрыңыз ( i-сур.).
6
Пісіру аяқталғанда, құрылғы дыбыстық сигнал шығарып, күту
режиміне автоматты түрде ауысады.
Көп функциялы аспаз (мультиповар)
Пісіру уақыты мен температурасын көбірек бақылап тағам пісіру
үшін қолмен орындау режимін пайдалана аласыз.
1
Құрамдас бөліктерін ішкі кәстрөлге салыңыз.
2
Ішкі кәстрөлдің сыртын құрғатып сүртіңіз ( d-сур.), содан
кейін көп функциялы тағам пісіргішке салыңыз ( e-сур.).
3
Көп функциялы тағам пісіргіштің қақпағын жабыңыз да
( f-сур.), ашаны қуат розеткасына қосыңыз ( g-сур.).
4
“Мәзір” (МЕНЮ) түймесін басып, “көп функциялы аспаз”
(мультиповар) тармағын таңдаңыз ( ~-сур.).
»
Басқа пісіру температурасын таңдау үшін «Пісіру
температурасын орнату» тарауын қараңыз.
»
Басқа пісіру уақытын таңдау үшін «Пісіру уақытын
орнату» тарауын қараңыз.
5
Растап, пісіруді бастау үшін «бастау» (СТАРТ/ВЫКЛ)
түймесін 3 секунд басып тұрыңыз ( i-сур.).
6
Пісіру аяқталғанда, құрылғы дыбыстық сигнал шығарып,
жылы сақтау режимі автоматты түрде іске қосылады.
Есте сақтаңыз
•
Егер 80°C-тан төмен температураны таңдасаңыз, пісіру
аяқталғаннан кейін тағам пісіргіш күту режіміне автоматты түрде
ауысады.
•
Егер 140°C-тан жоғары температураны таңдасаңыз, онда пісіру
кезінде үстіңгі қақпақ ашық болуы тиіс.
Көп функциялы аспаз Pro
(Мультиповар Pro)
Көп функциялы аспаз Pro функциясы арқылы сіз әр түрлі уақыт
пен температураны таңдай отырып, 9 пісіру кезеңіне дейін орната
аласыз.
Мысалы, бірінші кезеңді 160°C-та 5 минутқа, екінші кезеңді 100°C-
та 10 минутқа және соңғы кезеңді 80°C-та 20 минутқа орната
аласыз.
1
Тағам пісіргіш күту режімінде болғанда, «көп функциялы
аспаз Pro» (Мультиповар Pro) түймесін басыңыз. ( -сур.)
»
Экранда “1” жанады.
2
«Пісіру уақытын орнату» тарауын қарап, 1-кезең үшін пісіру
уақытын таңдаңыз.
3
«Пісіру температурасын орнату» тарауын қарап, 1-кезең үшін
пісіру температурасын таңдаңыз.
4
«Көп функциялы аспаз Pro» (мультиповар Pro) түймесін
қайта басып, 2-кезеңге өтіңіз. ( €-сур.)
»
Экранда “2” жанады.
5
2-кезең үшін пісіру уақыты мен температурасын орнатыңыз.
6
Барлық қажетті кезеңдерді орнату үшін жоғарыда
көрсетілген қадамдарды қайталаңыз, содан кейін пісіруді
растап, бастау үшін «қосу» (СТАРТ/ВЫКЛ) түймесін 3 секунд
бойы басып тұрыңыз ( i-сур.).
Менің рецептім (Мой рецепт)
1
Көп функциялы тағам пісіргіш Pro аяқталғаннан кейін
орнатылған пісіру кезеңдерін сақтау керек болса, пісіруден
кейін 10 минут ішінде «Менің рецептім» (Мой рецепт)
түймесін 3 секунд басып тұрыңыз. ( -сур.)
»
Экранда «F1» көрсетіледі.
2
F1, F2, F3, F4 немесе F5 таңдау үшін «көбейту» (+) немесе
«азайту» (-) түймесін басыңыз.
3
Пісіру кезеңдерін қажетті ұяға сақтау үшін «Менің рецептім»
(Мой рецепт) түймесін 3 секунд басып тұрыңыз.
Есте сақтаңыз
•
«Менің рецептімде» (Мой рецепт) 5 көп функциялы тағам
пісіргіш Pro сақтауға болады және олар F1, F2, F3, F4 және F5
түрінде сақталады.
•
Көп функциялы тағам пісіргіш күту режимінде болған кезде
«Менің рецептімді» (Мой рецепт) 3 секунд басып тұрып,
қажетті мәзірді таңдау үшін «көбейту» (+) немесе «азайту» (-)
түймесін басыңыз.
•
Егер Менің рецептім мәзірлерін жаңа параметрмен ауыстыру
керек болса, енді керек емес мәзірді таңдап, жаңа параметрді
сақтаңыз.
•
Барлық орнатылған пісіру кезеңдерінің жалпы пісіру уақыты ең
көбі 24 сағат болады.
Жылы күйінде ұстау
Көп функциялы тағам пісіргіш жылы сақтау режимін оңай
басқаруға мүмкіндік береді.
•
Пісіру функциясын таңдау үшін “мәзір” (МЕНЮ) түймесін
басқаннан кейін «қосу» (СТАРТ/ВЫКЛ) түймесін 3 секунд бойы
ұстап тұрсаңыз, жылы күйінде ұстау индикаторы жанады. Пісіру
уақыты аяқталғаннан кейін, көп функциялы тағам пісіргіш жылы
сақтау режиміне тікелей ауысады.
•
Пісіру функциясын таңдау үшін «Мәзір» (МЕНЮ) түймесін
басқаннан кейін, егер алдымен «жылы күйінде ұстау»
(ПОДОГРЕВ) түймесін басып, содан кейін «қосу» (СТАРТ/
ВЫКЛ) түймесін 3 секунд бойы ұстап тұрсаңыз, жылы күйінде
ұстау индикаторы сөнеді. Пісіру уақыты аяқталғаннан кейін, көп
функциялы тағам пісіргіш күту режимінде болады.
Есте сақтаңыз
•
Құрылғы жылы күйінде ұстап тұру режіміне ауысқаннан кейін осы
режимде 12 сағат болады, содан кейін қысқа дыбыс беріп, жылы
күйінде ұстауды тоқтатады.
•
Күту режімінде болғанда, жылы күйінде ұстау режімін іске
қосу үшін
«
жылы күйінде ұстау
«
(ПОДОГРЕВ) түймесін басуға
болады. Жылы күйінде ұстаудың барлық уақыты экранда
көрінеді. Құрылғы 24 сағат бойы жылы күйінде ұстау режимінде
болады да, содан кейін қысқа дыбыс беріп, жылы күйінде
ұстауды тоқтатады.
•
Жылы күйінде ұстау режимінде
«
жылы күйінде ұстау
«
(ПОДОГРЕВ) түймесін басып, күту режиміне ауыстыруға
болады.
Пісіру уақытын орнату
Кейбір мәзірлер үшін пісіру уақытын бейімдеуге болады. «Мәзірге
шолу» тарауын қарап, қандай мәзірлердің уақытын реттеуге
болатынын және реттеу ауқымын қараңыз.
1
Қажетті пісіру мәзірін таңдаңыз.
2
«Пісіру уақыты” (ВРЕМЯ ПРИГОТОВЛЕНИЯ) түймесін
басыңыз ( ‚-сур.).
»
Сағат көрсеткіші дисплейде жыпылықтайды.
3
Сағат көрсеткішін орнату үшін «көбейту» немесе «азайту» (-)
түймелерін басыңыз ( ƒ-сур.).
4
Сағат көрсеткіші орнатылғаннан кейін «пісіру уақыты»
(ВРЕМЯ ПРИГОТОВЛЕНИЯ) түймесін қайтадан басыңыз
( „-сур.).
»
Минут көрсеткіші дисплейде жыпылықтайды.
5
Минут көрсеткішін орнату үшін «көбейту» немесе «азайту» (-)
түймелерін басыңыз ( …-сур.).
6
Растап, пісіруді бастау үшін «бастау» (СТАРТ/ВЫКЛ)
түймесін 3 секунд басып тұрыңыз ( i-сур.).
Есте сақтаңыз
•
Егер көп функциялы тағам пісіргіш «пісіру уақыты» (ВРЕМЯ
ПРИГОТОВЛЕНИЯ) түймесін басқаннан кейін 15 секунд бойы
қимылсыз тұрса, ол күту режиміне ауысады.
•
Ең ұзақ пісіру уақыты 1 сағаттан аспайтын мәзірлер үшін
«пісіру уақыты» (ВРЕМЯ ПРИГОТОВЛЕНИЯ) түймесін бірінші
рет басқан кезде минут көрсеткіші дисплейде жыпылықтай
бастайды.
«Жұмыртқа пісіру» (яйца) уақытын
орнату
«Жұмыртқа пісіру» уақытын 30 секунд дәлдікпен орнатуға болады.
1
«Жұмыртқа пісіру» (яйца) функциясын таңдаңыз.
2
«Пісіру уақыты” (ВРЕМЯ ПРИГОТОВЛЕНИЯ) түймесін
басыңыз ( †-сур.).
»
Минут көрсеткіші дисплейде жыпылықтайды.
Есте сақтаңыз
•
Жұмыртқа пісіру бойынша әдепкі пісіру уақыты — 4 минут және
«04:00» жазуы экранда көрсетіледі.
3
Минут көрсеткішін орнату үшін «көбейту» (+) немесе
«азайту» (-) түймелерін басыңыз ( ‡-сур.).
4
«Пісіру уақыты» (ВРЕМЯ ПРИГОТОВЛЕНИЯ) түймесін
қайтадан басыңыз ( ˆ-сур.).
»
Секунд көрсеткіші дисплейде жыпылықтайды.
5
Секунд көрсеткішін орнату үшін «көбейту» (+) немесе
«азайту» (-) түймелерін басыңыз ( ‰-сур.).
»
Көбейту (+) немесе азайту (-) түймесі басылған сайын
секунд бірлігі 30 секундтан өзгереді.
6
Растап, пісіруді бастау үшін «бастау» (СТАРТ/ВЫКЛ)
түймесін 3 секунд басып тұрыңыз ( i-сур.).
Кідіртілген пісіру үшін уақытты алдын
ала орнату
Кейбір пісіру мәзірлері үшін кідіртілген пісіру уақытын алдын ала
орната аласыз. «Мәзірге шолу» тарауын қарап, қандай мәзірлерді
алдын ала орнатуға болатынын қараңыз.
Қайнату (варить)
1
Ішкі кәстрөлге шамалы су құйыңыз.
2
Ішкі кәстрөлдің сыртын құрғатып сүртіңіз ( d-сур.), содан
кейін көп функциялы тағам пісіргішке салыңыз ( e-сур.).
3
Көп функциялы тағам пісіргіштің қақпағын жабыңыз да
( f-сур.), ашаны қуат розеткасына қосыңыз ( g-сур.).
4
«Мәзір» (МЕНЮ) түймесін басып, «қайнату» (варить)
( o-сур.) тармағын таңдаңыз.
»
Басқа пісіру уақытын таңдау үшін «Пісіру уақытын
орнату» тарауын қараңыз.
5
Растап, пісіруді бастау үшін «бастау» (СТАРТ/ВЫКЛ)
түймесін 3 секунд басып тұрыңыз ( i-сур.).
6
Су қайнаған кезде, қақпақты ашып, тағамды ішкі кәстрөлге
салу керегін ескерту үшін көп функциялы тағам пісіргіш
дыбыстық сигнал береді.
Есте сақтаңыз
•
су/сұйықтық қайнардың алдында экранда көрсетіледі. Су/
сұйықтық қайнай бастағанда орнатылған пісіру уақыты экранда
көрсетіледі.
7
Пісіру аяқталғанда, құрылғы дыбыстық сигнал шығарып, күту
режиміне автоматты түрде ауысады.
Көже пісіру (Суп)
1
Көженің құрамдас бөліктері мен суды/сұйықтықты ішкі
кәстрөлге салыңыз.
2
Ішкі кәстрөлдің сыртын құрғатып сүртіңіз ( d-сур.), содан
кейін көп функциялы тағам пісіргішке салыңыз ( e-сур.).
3
Көп функциялы тағам пісіргіштің қақпағын жабыңыз да
( f-сур.), ашаны қуат розеткасына қосыңыз ( g-сур.).
4
«Мәзір» (МЕНЮ) түймесін басып, «көже» (Суп) ( p-сур.).
тармағын таңдаңыз.
»
Басқа пісіру уақытын орнату үшін «Пісіру уақытын
орнату» тарауын қараңыз.
5
Растап, пісіруді бастау үшін «бастау» (СТАРТ/ВЫКЛ)
түймесін 3 секунд басып тұрыңыз ( i-сур.).
6
Пісіру аяқталғанда, құрылғы дыбыстық сигнал шығарып,
жылы сақтау режимі автоматты түрде іске қосылады.
Қуыру (жарить)
1
Ішкі кәстрөлдің сыртын құрғатып сүртіңіз ( d-сур.), содан
кейін көп функциялы тағам пісіргішке салыңыз ( e-сур.).
2
Ашаны қуат розеткасына қосыңыз ( g-сур.).
3
Ішкі кәстрөлге шамалы сұйық май құйыңыз.
4
«Мәзір» (МЕНЮ) түймесін басып, «қуыру» (жарить)
( q-сур.) тармағын таңдаңыз.
5
Растап, пісіруді бастау үшін «бастау» (СТАРТ/ВЫКЛ)
түймесін 3 секунд басып тұрыңыз ( i-сур.).
6
Майды 5 минут қыздырыңыз да, құрамдас бөліктер мен
дәмдеуіштерді ішкі кәстрөлге салыңыз.
7
Қақпағын ашып қойып, құрамдас бөліктерін қалақшамен
үздіксіз араластырып тұрыңыз.
8
Пісіру аяқталғанда, құрылғы дыбыстық сигнал шығарып, күту
режиміне автоматты түрде ауысады.
Демдеп пісіру (Tомить)
1
Ішкі кәстрөлді жақсылап тазалап, ішін жұмсақ шүберекпен
ішін құрғатып сүртіңіз.
2
Ішкі кәстрөлдің сыртын құрғатып сүртіңіз ( d-сур.), содан
кейін көп функциялы тағам пісіргішке салыңыз ( e-сур.).
3
Ашаны қуат розеткасына қосыңыз ( g-сур.).
4
«Мәзір» (МЕНЮ) түймесін басып, «демдеп пісіру» (Tомить)
( r-сур.) тармағын таңдаңыз.
»
Басқа пісіру уақытын орнату үшін «Пісіру уақытын
орнату» тарауын қараңыз.
5
Растап, пісіруді бастау үшін «бастау» (СТАРТ/ВЫКЛ)
түймесін 3 секунд басып тұрыңыз ( i-сур.).
6
Пісіру аяқталғанда, құрылғы дыбыстық сигнал шығарып,
жылы сақтау режимі автоматты түрде іске қосылады.
Бұқтыру (тушить) немесе рагу пісіру
(рагу)
1
Бұқтырылатын немесе рагуға арналған құрамдас бөліктерді
ішкі кәстрөлге салыңыз.
2
Ішкі кәстрөлдің сыртын құрғатып сүртіңіз ( d-сур.), содан
кейін көп функциялы тағам пісіргішке салыңыз ( e-сур.).
3
Көп функциялы тағам пісіргіштің қақпағын жабыңыз да
( f-сур.), ашаны қуат розеткасына қосыңыз ( g-сур.).
4
«Мәзір» (МЕНЮ) түймесін басып, «бұқтыру» (тушить)
( s-сур.) немесе «рагу» (рагу) ( t-сур.) тармағын
таңдаңыз.
»
Басқа пісіру уақытын таңдау үшін «Пісіру уақытын
орнату» тарауын қараңыз.
5
Растап, пісіруді бастау үшін «бастау» (СТАРТ/ВЫКЛ)
түймесін 3 секунд басып тұрыңыз ( i-сур.).
6
Пісіру аяқталғанда, құрылғы дыбыстық сигнал шығарып,
жылы сақтау режимі автоматты түрде іске қосылады.
Сусын дайындау (напитки)
1
Сусынның құрамдас бөліктерін ішкі кәстрөлге салыңыз.
2
Ішкі кәстрөлдің сыртын құрғатып сүртіңіз ( d-сур.), содан
кейін көп функциялы тағам пісіргішке салыңыз ( e-сур.).
3
Көп функциялы тағам пісіргіштің қақпағын жабыңыз да
( f-сур.), ашаны қуат розеткасына қосыңыз ( g-сур.).
4
«Мәзір» (МЕНЮ) түймесін басып, «сусын» (напитки)
( u-сур.) тармағын таңдаңыз.
»
Басқа пісіру уақытын таңдау үшін «Пісіру уақытын
орнату» тарауын қараңыз.
5
Растап, пісіруді бастау үшін «бастау» (СТАРТ/ВЫКЛ)
түймесін 3 секунд басып тұрыңыз ( i-сур.).
6
Пісіру аяқталғанда, құрылғы дыбыстық сигнал шығарып,
жылы сақтау режимі автоматты түрде іске қосылады.
Есте сақтаңыз
•
су/сұйықтық қайнардың алдында экранда көрсетіледі. Су/
сұйықтық қайнай бастағанда орнатылған пісіру уақыты экранда
көрсетіледі.
Паста пісіру (паста)
1
Ішкі кәстрөлге шамалы су құйыңыз.
2
Ішкі кәстрөлдің сыртын құрғатып сүртіңіз ( d-сур.), содан
кейін көп функциялы тағам пісіргішке салыңыз ( e-сур.).
3
Көп функциялы тағам пісіргіштің қақпағын жабыңыз да
( f-сур.), ашаны қуат розеткасына қосыңыз ( g-сур.).
4
«Мәзір» (МЕНЮ) түймесін басып, «паста» (паста) ( v-сур.)
тармағын таңдаңыз.
»
Басқа пісіру уақытын таңдау үшін «Пісіру уақытын
орнату» тарауын қараңыз.
5
Растап, пісіруді бастау үшін «бастау» (СТАРТ/ВЫКЛ)
түймесін 3 секунд басып тұрыңыз ( i-сур.).
6
Су қайнаған кезде, қақпақты ашып, тағамды ішкі кәстрөлге
салу керегін ескерту үшін көп функциялы тағам пісіргіш
дыбыстық сигнал береді.
Есте сақтаңыз
•
су қайнардың алдында экранда көрсетіледі. Су қайнай
бастағанда орнатылған пісіру уақыты экранда көрсетіледі.
•
Егер көп функциялы тағам пісіргіш дыбыс шығарғаннан кейін 1
минут бос тұрса, көп функциялы тағам пісіргіш күту режиміне
ауысады.
7
Паста ішкі кәстрөлге салынғаннан кейін пісіруді жалғастыру
үшін «мәзір» (МЕНЮ) түймесін басыңыз.
8
Қақпағын ашып қойып, пастаны қалақшамен үздіксіз
араластырып тұрыңыз.
Кеңес
•
Сондай-ақ, паста ішкі кәстрөлге салынғаннан кейін оны
жұмсартып, дәмін келтіру үшін қақпағын жабуға болады.
9
Пісіру аяқталғанда, құрылғы дыбыстық сигнал шығарып, күту
режиміне автоматты түрде ауысады.
Жұмыртқа пісіру (яйца)
1
Ішкі кәстрөлге шамалы су құйыңыз.
2
Ішкі кәстрөлдің сыртын құрғатып сүртіңіз ( d-сур.), содан
кейін көп функциялы тағам пісіргішке салыңыз ( e-сур.).
3
Көп функциялы тағам пісіргіштің қақпағын жабыңыз да
( f-сур.), ашаны қуат розеткасына қосыңыз ( g-сур.).
4
«Мәзір» (МЕНЮ) түймесін басып, «жұмыртқа» (яйца)
( w-сур.) тармағын таңдаңыз.
»
Басқа пісіру уақытын таңдау үшін «Пісіру уақытын
орнату» тарауын қараңыз.
5
Растап, пісіруді бастау үшін «бастау» (СТАРТ/ВЫКЛ)
түймесін 3 секунд басып тұрыңыз ( i-сур.).
6
Су қайнаған кезде, қақпақты ашып, тағамды ішкі кәстрөлге
салу керегін ескерту үшін көп функциялы тағам пісіргіш
дыбыстық сигнал береді.
Есте сақтаңыз
•
су қайнардың алдында экранда көрсетіледі. Су қайнай
бастағанда орнатылған пісіру уақыты экранда көрсетіледі.
•
Жұмыртқа пісіру бойынша әдепкі пісіру уақыты — 4 минут және
«04:00» жазуы экранда көрсетіледі.
•
Егер көп функциялы тағам пісіргіш дыбыс шығарғаннан кейін 5
минут бос тұрса, көп функциялы тағам пісіргіш күту режиміне
ауысады.
(скачивание инструкции бесплатно)
Формат файла: PDF
Доступность: Бесплатно как и все руководства на сайте. Без регистрации и SMS.
Дополнительно: Чтение инструкции онлайн
HD3033
Мультиварка
Мультипісіргіш
Мультиварка
Always there to help you
Register your product and get support from
www.philips.com/welcome
Question?
Contact
Philips
RU
Руководство пользователя 2
UK
Посібник користувача
25
Страница:
(1 из 48)
навигация

1

2

3

4

5

6

7

8

9

10

11

12

13

14

15

16

17

18
19

20

21

22

23

24

25

26

27

28

29

30

31

32

33

34

35

36

37

38

39

40

41

42

43
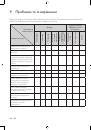
44

45

46

47

48
Оглавление инструкции
- Страница 1 из 49
Always there to help you Register your product and get support from www.philips.com/welcome Question? Contact Philips RU Руководство пользователя 2 HD3033 Мультиварка Мультипісіргіш Мультиварка UK Посібник користувача 25 - Страница 2 из 49
Содержание 1 Важная информация 3 Правильное обращение 3 Неправильное обращение 4 Точно следуйте инструкциям во время эксплуатации прибора 5 Защита окружающей среды 5 Гарантия и послепродажное обслуживание 5 2 Введение Передовые технологии 6 6 3 Описание прибора Аксессуары 7 7 4 Панель - Страница 3 из 49
Важная информация • Перед началом эксплуатации прибора внимательно ознакомьтесь с данным руководством и сохраните его для дальнейшего использования в качестве справочного материала. В целях безопасной эксплуатации прибора в руководстве подробно разъяснены предупреждения, касающиеся безопасности. - Страница 4 из 49
• • • за детьми, не позволяйте детям играть с прибором. Устанавливайте мультиварку на плоскую устойчивую поверхность. Не погружайте прибор в воду, не оставляйте в местах с повышенной влажностью/температурой или рядом с другими источниками тепла. Прежде чем вставить вилку в розетку электросети, - Страница 5 из 49
Точно следуйте инструкциям во время эксплуатации прибора • • • • • Внутреннюю емкость необходимо устанавливать до подключения прибора к источнику питания и включения прибора. Остерегайтесь горячего пара, который выходит из парового клапана, или при открытии крышки. Во избежание ожогов помните, что - Страница 6 из 49
2 Введение В мультварке Philips используется инновационная технология, которая является разработкой нашей компании. мультиварка оснащена удобной панелью управления, расположенной в передней части прибора. Уникальные дизайн, структура и форма делают ее незаменимым помощником на кухне для современной - Страница 7 из 49
Описание прибора Крышка Р усск ий 3 Изоляционная крышка Паровой клапан Внутренняя емкость Ручка Корпус Кнопка управления Подставка для ложки Панель управления Основание Аксессуары Сетевой шнур Пароварка Гарантийный талон Ложка для риса Столовая ложка Register your product and get support at - Страница 8 из 49
4 Панель управления Отсрочка старта Установка времени Спагетти Рис Отсрочка старта Время приготовления Установка времени Выкл. Подогрев Спагетти Рис Пароварка суп каша Время приготовления Выкл. Подогрев Выпечка Жарка Выпечка Жарка Приготовление на пару/отваривание 5 Характеристики модели Номер - Страница 9 из 49
Использование прибора Подготовка к приготовлению 1 Рекомендуемое количество риса указано на рисунке. Промойте рис чистой водой до тех пор, пока вода не станет почти прозрачной. 2 Положите рис во внутреннюю емкость и добавьте воду до указанной отметки. Первое использование 1 2 3 4 Извлеките все - Страница 10 из 49
3 Протрите внешнюю поверхность емкости сухой тканью, установите внутреннюю емкость в прибор и аккуратно поверните ее 2 или 3 раза по направлению, указанному стрелкой, чтобы емкость находилась как можно ближе к нагревательной пластине. 4 Нажмите на крышку, должен прозвучать щелчок, который указывает - Страница 11 из 49
Описание функций Р усск ий 7 Включение функции «Спагетти/Рис» 1 Отсрочка старта Время приготовления Выкл. Подогрев Установка времени Спагетти Рис • Пароварка суп каша Жарка Выпечка Включайте питание прибора непосредственно перед началом приготовления. Нажмите кнопку «Спагетти/ Рис», загорится - Страница 12 из 49
2 Можно включить отсроченный запуск прибора (для начала приготовления в течение 0.5 часов—24 часов). • 3 Отсрочка старта Отсрочка старта Время приготовления Установка времени Выкл. Подогрев Пароварка суп каша Спагетти Рис Жарка Если оставить рис томиться еще на 10—15 минут, раскроется весь аромат. - Страница 13 из 49
Прочитайте раздел «Подготовка к приготовлению» на стр. 9 и 10 и ознакомьтесь с наглядными описаниями функций прибора. 2 Отсрочка старта Включение функции «Пароварка/ Суп/Каша» 1 Можно включить отсроченный запуск прибора (для начала приготовления в течение 0.5 часов—24 часов). Нажмите кнопку - Страница 14 из 49
Установка времени Отсрочка старта Время приготовления Выкл. Подогрев Установка времени Пароварка суп каша Спагетти Рис Жарка Выпечка Жарка Сигнал Приготовление 1 Отсрочка старта Настройка Время Приготовление Время Выкл. Выкл. Подогрев Подогрев Спагетти Рис Пароварка суп каша Нажмите кнопку «Жарка», - Страница 15 из 49
• 2 функции прибор не должен быть накрыт крышкой. Можно также использовать в качестве функции глубокой обжарки, однако количество растительного масла не должно превышать уровень 2. Можно включить отсроченный запуск прибора (для начала приготовления в течение 10— 60 минут). Время Отсрочка старта - Страница 16 из 49
Выпечка Отсрочка старта Старт 1 Нажмите кнопку «Выпечка», загорится индикатор соответствующей функции. Функция будет активирована через 3 секунды (время приготовления, установленное по умолчанию, составляет 45 минут). Установка времени приготовления и отсроченный запуск недоступны. Отсрочка старта - Страница 17 из 49
Уход 3 Промойте водой и протрите тканью. • Рекомендуется проводить очистку парового клапана после каждого использования, чтобы избежать блокировки клапана и переполнения емкости при следующем приготовлении. Удаляйте остатки пищи и посторонние частицы с парового клапана в целях поддержания высокого - Страница 18 из 49
Инструкции по очистке крышки Инструкции по очистке внутренней емкости 1 Для очистки поверхности крышки используйте средство для мытья посуды. 1 2 Въевшуюся грязь с внутренней поверхности удалить очень трудно, поэтому рекомендуется протирать поверхность прибора после каждого использования. Налейте - Страница 19 из 49
Кипятите воду в течение 5 минут, нажмите кнопку «Выкл./Подогрев», отключите прибор от сети электропитания. Отсрочка старта Время приготовления Установка времени Выкл. Подогрев Спагетти Рис Пароварка суп каша 3 Когда прибор остынет, слейте воду из емкости, аккуратно протрите поверхность губкой с - Страница 20 из 49
Инструкции по очистке датчика и нагревательной пластины • Если к датчику в основании емкости или нагревательной пластине во время приготовления прилипают частицы пищи, это может повлиять на качество приготовления или привести к сбоям в работе прибора. Протрите поверхность негрубой наждачной бумагой - Страница 21 из 49
Проблемы и решения Р усск ий 9 При возникновении неисправностей в работе многофункциональной мультиварки , прежде чем обратиться в центр поддержки потребителей Philips, проверьте следующее. Продукт сожжен или покрыт темной коркой √ √ √ √ Продукт плохо вымыт/ промыт Неровная поверхность дна - Страница 22 из 49
1. Ознакомьтесь со списком возможных ошибок. проблема Индикаторнезагораетс я Индикаторзагорается Нагревательнаяпластинане нагреваетс я решение 1. Убедитесь, что переключатель, сетевая вилка,розетка, предохранитель и кабель питания исправны и правильно подключены. 2. Обратитесь в авторизованный - Страница 23 из 49
Таблица параметров функций:: Температурные режимы (максимальное значение) Время приготовления по умолчанию Настраиваемый диапазон времени приготовления Настраиваемые параметры отсрочки старта 130-140ºС До готовности, в зависимости от кол-ва риса/ спагетти и воды нет 0,5-24 часа Пароварка/Суп/ Каша - Страница 24 из 49
Изготовитель: “Филипс Консьюмер Лайфстайл Б.В.”, Туссендиепен 4, 9206 АД, Драхтен, Нидерланды Импортер на территорию России и Таможенного Союза: ООО “ФИЛИПС”, Российская Федерация, 123022 г. Москва, ул. Сергея Макеева, д.13, тел. +7 495 961-1111 Сделано в Китае Дата производства указана в серийном - Страница 25 из 49
1 Важлива інформація Належне застосування Неналежне застосування Точно дотримуйтесь вказівок під час використання пристрою Захист навколишнього середовища Гарантія та обслуговування 26 26 27 2 Вступ Передові технології 29 29 3 Опис пристрою Аксесуари 30 30 4 Панель керування 31 5 Характеристики - Страница 26 из 49
1 Важлива інформація Перед тим як користуватися пристроєм, уважно прочитайте цей посібник користувача і зберігайте його для довідки в майбутньому. Для безпечного користування пристроєм у посібнику користувача детально пояснено попередження, які стосуються безпеки. Недостатнє розуміння чи - Страница 27 из 49
• • Встановлюйте мультиварку на рівну стійку поверхню. Не занурюйте пристрій у воду, не залишайте його в місцях із високою вологістю/ температурою або поряд з іншими джерелами тепла. Перш ніж під’єднувати пристрій до електромережі переконайтеся, що нагрівальні елементи, датчики температури і - Страница 28 из 49
Точно дотримуйтесь вказівок під час використання пристрою • • • • • 28 Внутрішню каструлю потрібно встановлювати перед підключенням пристрою до джерела живлення та його увімкненням. Остерігайтеся гарячої пари, яка виходить із парового отвору, або у разі відкривання кришки. Щоб не обпектися парою, - Страница 29 из 49
2 Вступ Українська У мультиварці Philips використовується інноваційна технологія, яка є розробкою нашої компанії. Мультиварку обладнано зручною панеллю керування, яка знаходиться у передній частині пристрою. Завдяки унікальному дизайну, структурі та формі вона є незамінною помічницею на кухні для - Страница 30 из 49
3 Опис пристрою Кришка Ізоляційна кришка Паровий отвір Внутрішня каструля Ручка Корпус Кнопка керування Підставка для ложки Панель керування Основа Аксесуари Мережевий шнур Пароварка Гарантійний талон Ложка для рису Столова ложка Register your product and get support at www.philips.com/welcome - Страница 31 из 49
Панель керування Попереднє налаштування Налаштування часу Спагеті Рис Отсрочка старта Время приготовления Установка времени Выкл. Подогрев Спагетти Рис Пароварка суп каша Жарка Час приготування Вимк. Збереження тепла Випікання Выпечка Смаження Приготування на парі/варіння 5 Українська 4 - Страница 32 из 49
6 Використання пристрою Підготовка до роботи 1 Рекомендовану кількість рису вказано на малюнку. Промийте рис чистою водою, поки вода не стане майже прозорою. 2 Покладіть рис у внутрішню каструлю і долийте води до вказаної позначки. Перше використання 1 2 3 4 32 Вийміть усі аксесуари із внутрішньої - Страница 33 из 49
Протріть зовнішню поверхню каструлі сухою тканиною, встановіть внутрішню каструлю в пристрій та обережно поверніть її 2 або 3 рази в напрямку, вказаному стрілкою, щоб каструля знаходилася якомога ближче до нагрівальної пластини. 4 Натисніть на кришку до клацання, що вказує на те, що кришку - Страница 34 из 49
7 Опис функцій Увімкнення функції приготування спагеті/рису (Спагетти/Рис) 1 Отсрочка старта Время приготовления Выкл. Подогрев Установка времени Спагетти Рис • Пароварка суп каша Жарка Выпечка Вмикайте живлення пристрою безпосередньо перед початком приготування. Натисніть кнопку приготування - Страница 35 из 49
Можна увімкнути попереднє налаштування пристрою (для початку приготування в межах 0,5–24 годин). • 3 Попереднє налаштування Отсрочка старта Время приготовления Установка времени Выкл. Подогрев Пароварка суп каша Спагетти Рис Жарка Якщо залишити рис томитися ще на 10–15 хвилин, відкриється весь - Страница 36 из 49
3 • Накрийте кришкою і підключіть до джерела живлення. 2 Прочитайте розділ «Підготовка до роботи» на ст. 9 і 10 та ознайомтеся з наочним описом функцій пристрою. Попереднє налаштування Увімкнення функції приготування на парі/супу/каші (Пароварка/Суп/ Каша) 1 Можна увімкнути попереднє налаштування - Страница 37 из 49
Налаштування часу Отсрочка старта Время приготовления Выкл. Подогрев Пароварка суп каша Спагетти Рис Жарка Выпечка Українська Установка времени Смаження (Жарка) Сигнал Приготування 1 Отсрочка старта Настройка Время Приготовление Время Выкл. Выкл. Подогрев Подогрев Спагетти Рис Пароварка суп каша - Страница 38 из 49
Примітки. • Під час використання цієї функції • 2 пристрій не потрібно накривати кришкою. Можна також використовувати як функцію глибокого просмажування, але кількість рослинної олії не має перевищувати рівень 2. Можна увімкнути попереднє налаштування пристрою (для початку приготування в межах - Страница 39 из 49
Випікання (Выпечка) Запуск 1 Натисніть кнопку випікання (Выпечка), засвітиться індикатор відповідної функції. Функцію буде увімкнено через 3 секунди (час приготування, встановлений за замовчуванням, становить 45 хвилин). Налаштування часу приготування та відкладений запуск недоступні. Отсрочка - Страница 40 из 49
8 Догляд 3 Промийте водою і протріть тканиною. • Рекомендується очищувати паровий отвір щоразу після використання, щоб запобігти його блокуванню і переповненню каструлі під час наступного приготування. Видаляйте залишки їжі та сторонні частинки з парового отвору з метою підтримання високої якості - Страница 41 из 49
Вказівки щодо чищення внутрішньої каструлі 1 Для чищення поверхні кришки використовуйте засіб для миття посуду. 1 2 Застарілий бруд із внутрішньої поверхні видалити дуже важко, тому рекомендується протирати поверхню пристрою щоразу після використання. Налийте у внутрішню каструлю відповідну - Страница 42 из 49
2 Кип’ятіть воду протягом 5 хвилин; натисніть кнопку вимкнення/ збереження тепла (Выкл./Подогрев) і відключіть пристрій від мережі електроживлення. Отсрочка старта Время приготовления Установка времени Выкл. Подогрев Спагетти Рис 42 UK Пароварка суп каша 3 Коли пристрій охолоне, злийте воду з - Страница 43 из 49
• • • Якщо до датчика в основі каструлі або нагрівальної пластини під час приготування прилипають часточки їжі, це може вплинути на якість приготування або призвести до збоїв у роботі пристрою. Протріть поверхню негрубим наждаковим папером (зернистість – прибл. 600) або сухою тканиною. Вказівки - Страница 44 из 49
9 Проблеми та їх вирішення Перш ніж звернутися в Центр обслуговування клієнтів Philips у разі виникнення несправностей у роботі багатофункціональної мультиварки, перевірте наступне. Продукт пригорів або покрився темною скоринкою √ √ √ Продукт погано помитий / промитий Нерівна поверхня дна - Страница 45 из 49
1. Ознайомтеся зі списком можливих помилок. Індикатор не засвічується Індикатор засвічується Нагрівальна пластина не нагрівається вирішення 1. Переконайтеся, що перемикач, мережевий штекер, розетка, запобіжник і кабель живлення справні та належним чином підключені. 2. Зверніться в авторизований - Страница 46 из 49
Додаток до інструкції з використання Таблиця параметрів функцій: Функція Спагеті/Рис (Спагетти/Рис) Приготування на парі/Суп/Каша (Пароварка/Суп/ Каша) Смаження/Швидке приготування (Жарка/быстрое приготовление) Випікання (Выпечка) Підігрів (Подогрев) Стандартний час приготування Регульований час - Страница 47 из 49
- Страница 48 из 49
© 2014 Koninklijke Philips N.V. HD3033_UM_EEU_V2.0 - Страница 49 из 49

Specifications are subject to change without notice
© 2014 Koninklijke Philips N.V.
All rights reserved.
HD3165
HD3167
Мультиварка
Мультипісіргіш
Register your product and get support at
www.philips.com/welcome
Always there to help you
Question?
Contact
Philips
http://www.philips.com/welcome
User manual
http://www.philips.com/welcome
Recipe
http://www.philips.com/welcome
Safety leaflet
http://www.philips.com/welcome
Warranty
e
f
a
b
c
g
h
i
k
j
d
m
l
n
o
r
s
t
u
p q
3S
3S
Изготовитель:
“Филипс Консьюмер Лайфстайл Б.В.”, Туссендиепен 4, 9206
АД, Драхтен, Нидерланды
Импортер на территорию России и Таможенного Союза:
ООО «ФИЛИПС», Российская Федерация, 123022 г.
Москва, ул. Сергея Макеева, д.13, тел. +7 495 961-1111
Сделано в Китае
Дата производства указана в серийном номере
устройства. Например, “XP1A1347000001” означает, что
изделие было произведено на 47-ой неделе 2013 года.
Өндіруші:
“Филипс Консьюмер Лайфстайл Б.В.”, Туссендиепен 4, 9206
АД, Драхтен, Нидерланды
Ресей және Кедендік Одақ территориясына импорттаушы:
«ФИЛИПС» ЖШҚ, Ресей Федерациясы, 123022 Мәскеу
қаласы, Сергей Макеев көшесі, 13-үй, тел. +7 495 961-1111
Қытайда жасап шығарылған
Өнімнің сериялық нөмірінен өндірілген күнін табуға болады.
Мысалы, «XP1A1347000001» өнімнің 2013 жылдың 47-ші
аптасында шығарылғанын білдіреді.
1 2 3
3S
English
1 Your multicooker
Congratulations on your purchase, and welcome to Philips!
To fully benet from the support that Philips offers, register your
product at www.philips.com/welcome.
2 What’s in the box (fig.1)
Multicooker main unit Measuring cup
Power cord Steam rack
User manual Recipe
Safety leaet Warranty card
3 Overview (fig.2)
a
Detachable steam vent cap
g
Heating element
b
Lid release button
h
Power socket
c
Top lid
i
Cooker handle
d
Inner pot
j
Water level indications
e
Control panel
k
Sealing ring
f
Main body
Controls overview (g.3)
l
Cooking functions
q
Decrease button
m
Keep-warm button
r
Temperature button
n
Menu button
s
Preset button
o
Cooking time button
t
Start/Cancel button
p
Increase button
u
Display screen
Functions overview
Functions
Default
cooking
time
Adjustable
cooking
time
Preset
time
Default
cooking
temperature
Rice/Grains
(рис/крупы)
40 min / 1-24 hr 130-140
°C
Porridge
(каша)
10 min 5 min — 2 hr 1-24 hr 90-100°C
Plov
(плов)
35 min / 1-24 hr 130-140
°C
Yogurt
(йогурт)
8 hr 6-12 hr 1-24 hr 40±3°C
Soup
(суп)
1 hr
20 min-
10 hr
1-24 hr 100°C
Drinks
(напитки)
10 min 5-40 min 1-24 hr 100°C
Jelly meat
(холодец)
6 hr 4-10 hr 1-24 hr 90-100°C
Reheat
(разогреть)
25 min 5-60 min / 85°C
Bake
(печь)
45 min
20 min —
2 hr
/ 130°C
Stew/Ragout
(тушить/рагу)
1 hr
20 min —
10 hr
1-24 hr 90°C
Functions
Default
cooking
time
Adjustable
cooking
time
Preset
time
Default
cooking
temperature
Steam/Boil
(варить/на
пару)
20 min 5 min — 2 hr 1-24 hr 100°C
Fry
(жарить)
15 min 5-60 min / 145-150°C
Slow cook
(томить)
5 hr 1-15 hr 1-24 hr 80°C
Roast
(Запекать)
1 hr / 1-24 hr 130
°C
Manual
(мультиовар)
2 hr
5 min — 10
hr
1-24 hr 100
°C
Note
• The cooking temperature for the baking and manual functions is
adjustable. You can select temperature for the baking function between
40°C to 160°C, and select temperature for the manual function between
30°C to 160°C The step is 10°C.
• After the cooking has started, you can press and hold the Start/Cancel
button (СТАРТ/ВЫКЛ) for 3 seconds to deactivate the cooking process
and the multicooker will enter the standby mode.
4 Using the multicooker
Before rst use
1 Take out all the accessories from the inner pot. Remove the
packaging material of the inner pot.
2 Clean the parts of the multicooker thoroughly before using it for
the rst time (see chapter ‘Cleaning and Maintenance’).
Note
• Make sure all parts are completely dry before you start using the
multicooker.
Preparations before cooking
Before using the multicooker, you need to do the following steps:
1 Measure the grains using the measuring cup provided.
2 Wash the grains thoroughly.
3 Put the pre-washed grains in the inner pot.
4 Add water to the level indicated on the scale inside the inner pot
and smooth the grains surface.
5 Press the lid release button to open the lid (g.4).
6 Wipe the outside of the inner pot dry (g.5), then put the inner
pot in the multicooker (g.6). Check if the inner pot is in proper
contact with the heating element.
7 Close the lid of the multicooker (g.7), and put the plug in the
power socket (g.8).
Note
• Make sure that the inner pot is proper contact with the heating element.
• For details about the ratio of grains and water, see the recipe.
• The level marked inside the inner pot is just an indication. You can
always adjust the water level for different types of grains and your own
preference.
• Make sure that the outside of the inner pot is clean and dry, and that
there is no foreign residue on the heating element or the magnetic switch.
Cooking rice/grains
1 Follow the steps in “Preparations before cooking”.
2 Press the menu button (МЕНЮ) until the rice/grain cooking
function (рис/крупы) is selected (g.9).
3 Press and hold the start button (СТАРТ/ВЫКЛ) for 3 seconds
to start cooking (g.10).
4 When the cooking is nished, you will hear 4 beeps and the
selected cooking function light will be off.
5 The multicooker will be in keep-warm mode automatically.
» The keep-warm indicator (ПОДОГРЕВ) lights up (g.11).
Note
• If the voltage is unstable at the area you live, it is possible that the
multicooker overows.
• After the cooking is nished, stir the rice and loosen it immediately to
release excessive moisture for uffy rice.
• Depending on the cooking conditions, the bottom portion of the rice may
become slightly browned.
Cooking porridge
1 Follow steps 1 to 7 in “Preparations before cooking”.
Note
• Do not exceed the maximum water level indicated in the inner pot, as this
may cause the multicooker to overow.
Tip
• Besides following the water level indications, you may also add rice and
water at 1:4 ratio for porridge cooking
2 Press the menu button (МЕНЮ) until the porridge function
(каша) is selected (g.12).
» To set a different cooking time, refer to chapter “Adjusting the
cooking time and temperature”.
3 Press the start button (СТАРТ/ВЫКЛ) for 3 seconds to start
cooking (g.10).
4 When the cooking is nished, you will hear 4 beeps and the
selected cooking function light will be off.
5 The multicooker will be in keep warm mode automatically.
» The keep-warm indicator (ПОДОГРЕВ) lights up (g.11).
Making plov
1 Put the food and ingredients into the inner pot.
2 Follow steps 6 and 7 in “Preparations before cooking”.
3 Press the menu button (МЕНЮ) until the plov function (плов) is
selected (g.13).
4 Press and hold the start button (СТАРТ/ВЫКЛ) for 3 seconds
to start cooking (g.10).
5 When the cooking is nished, you will hear 4 beeps and the
selected cooking function light will be off.
6 The multicooker will be in keep-warm mode automatically.
» The keep-warm indicator (ПОДОГРЕВ) lights up (g.11).
Making yogurt
1 Whisk the ingredients for the yogurt well and put them in a glass
container (g.14).
2 Put the glass container in the inner pot (g.15). Make sure that
the container is sealed.
3 Pour some water in the inner pot. Make sure that half of the
container is immersed in water.
4 Follow steps 6 and 7 in “Preparations before cooking”.
5 Press the menu button (МЕНЮ) until the yogurt function
(йогурт) is selected (g.16).
» To set a different cooking time, refer to chapter “Adjusting the
cooking time and temperature”.
6 Press and hold the start button (СТАРТ/ВЫКЛ) for 3 seconds
to start cooking (g.10).
7 When the cooking is nished, you will hear 4 beeps and the
selected cooking function light will be off.
» The multicooker will enter the standby mode automatically.
Making soup
1 Put ingredients and water into the inner pot.
2 Follow steps 6 and 7 in “Preparations before cooking”.
3 Press the menu button (МЕНЮ) until the soup function (cуп) is
selected (g.17).
» To set a different cooking time, refer to chapter “Adjusting the
cooking time and temperature”.
4 Press the start button (СТАРТ/ВЫКЛ) for 3 seconds to start
cooking (g.10).
5 When the cooking is nished, you will hear a few beeps and the
selected cooking function light will be off.
6 The multicooker will be in keep-warm mode automatically.
» The keep-warm indicator (ПОДОГРЕВ) lights up (g.11).
Making drinks
1 Put ingredients and water into the inner pot.
2 Follow steps 6 and 7 in “Preparations before cooking”.
3 Press the menu button (МЕНЮ) until the drinks function
(напиток) is selected (g.18).
» To set a different cooking time, refer to chapter “Adjusting the
cooking time and temperature”.
4 Press the start button (СТАРТ/ВЫКЛ) for 3 seconds to start
cooking (g.10).
5 When the cooking is nished, you will hear a few beeps and the
selected cooking function light will be off.
6 The multicooker will be in keep-warm mode automatically.
» The keep-warm indicator (ПОДОГРЕВ) lights up (g.11).
Making jelly meat/slow cooking
1 Put the food and ingredients in the inner pot.
2 Follow steps 6 and 7 in “Preparations before cooking”.
3 Press the menu button (МЕНЮ) until the jelly meat cooking
function (холодец) or the slow cooking function (томить) is
selected (g.19).
» To set a different cooking time, refer to chapter “Adjusting the
cooking time and temperature”.
4 Press and hold the start button (СТАРТ/ВЫКЛ) for 3 seconds
to start cooking (g.10).
5 When the cooking is nished, you will hear a few beeps and the
selected cooking function light will be off.
6 The multicooker will be in keep-warm mode automatically.
» The keep-warm indicator (ПОДОГРЕВ) lights up (g.11).
Reheating
1 Loosen the cooled food and evenly distribute it in the inner pot
(g.20).
2 Pour some water onto the food to prevent it from becoming too
dry (g.21). The quantity of the water depends on the amount
of food.
3 Follow steps 6 and 7 in “Preparations before cooking”.
4 Press the menu button (МЕНЮ) until the reheating function
(разогреть) is selected (g.22).
» To set a different cooking time, refer to chapter “Adjusting the
cooking time and temperature”.
5 Press and hold the start button (СТАРТ/ВЫКЛ) for 3 seconds
to start cooking (g.10).
6 When the cooking is nished, you will hear 4 beeps and the
selected cooking function light will be off.
7 The multicooker will be in keep warm mode automatically.
» The keep-warm indicator (ПОДОГРЕВ) lights up (g.11).
Baking
1 Put the food and ingredients in the inner pot.
2 Follow step 6 in “Preparations before cooking”.
3 Put the plug in the power socket.
Note
• When baking cake, keep the lid closed during cooking. Baking cake at
130°C and by 45 minutes usually delivers best cooking result.
• It’s recommended to open lid during cooking when the temperature is
above 130°C.
4 Press the menu button (МЕНЮ) until the baking function (печь)
is selected (g.23).
» To set a different cooking time and temperature, refer to
chapter “Adjusting the cooking time and temperature”.
5 Press and hold the start button (СТАРТ/ВЫКЛ) for 3 seconds
to start cooking (g.10).
6 When the baking is nished, you will hear 4 beeps and the
selected function light will be off.
7 The multicooker will be in keep-warm mode automatically.
» The keep-warm indicator (ПОДОГРЕВ) lights up (g.11).
Note
• When removing the inner pot from the multicooker, use a kitchen glove
or a cloth, as the inner pot will be very hot.
Stewing/cooking ragout
1 Put the food and ingredients in the inner pot.
2 Follow steps 6 and 7 in “Preparations before cooking”.
3 Press the menu button (МЕНЮ) until the stewing/ragout
function (тушить/рагу) is selected (g.24).
» To set a different cooking time, refer to chapter “Adjusting the
cooking time and temperature”.
4 Press and hold the start button (СТАРТ/ВЫКЛ) for 3 seconds
to start cooking (g.10).
5 When the cooking is nished, you will hear a few beeps and the
selected cooking function light will be off.
6 The multicooker will be in keep-warm mode automatically.
» The keep-warm indicator (ПОДОГРЕВ) lights up (g.11).
Steaming
1 Pour some water into the inner pot.
2 Put the steam tray into the inner pot (g.25).
3 Put the food to be steamed on a plate or in the steam tray.
4 If you are using a separate plate, put it into the steam tray (g.26).
5 Follow steps 6 and 7 in “Preparations before cooking”.
6 Press the menu button (МЕНЮ) until the steaming function
(варить/на пару) is selected (g.27).
» To set a different cooking time, refer to chapter “Adjusting the
cooking time and temperature”.
7 Press and hold the start button (СТАРТ/ВЫКЛ) for 3 seconds
to start cooking (g.10).
8 When the cooking is nished, you will hear 4 beeps and the
selected cooking function light will be off.
9 The multicooker will be in keep warm mode automatically.
» The keep-warm indicator (ПОДОГРЕВ) lights up (g.11).
10 Open the lid and carefully take out the steamed food from the
plate or steam basket.
Note
• The quantity of water depends on the amount of food in the steam tray.
Do not immerse the steam tray in water.
• Use a kitchen glove or a cloth, as the plate and steam tray will be very hot.
Boiling
1 Put the food and ingredients in the inner pot.
2 Follow steps 6 and 7 in “Preparations before cooking”.
3 Press the menu button (МЕНЮ) until the boiling function
(варить/на пару) is selected (g.27).
» To set a different cooking time, refer to chapter “Adjusting the
cooking time and temperature”.
4 Press the start button (СТАРТ/ВЫКЛ) to start cooking (g.10).
5 When the cooking is nished, you will hear a few beeps and the
selected cooking function light will be off.
6 The multicooker will be in keep-warm mode automatically.
» The keep-warm indicator (ПОДОГРЕВ) lights up (g.11).
Frying
1 Put food and ingredients into the inner pot.
2 Follow step 6 in “Preparations before cooking”.
3 Put the plug in the power socket.
4 Press the menu button (МЕНЮ) until the frying function
(жарить) is selected (g.28).
» To set a different cooking time, refer to chapter “Adjusting the
cooking time and temperature”.
5 Press and hold the start button (СТАРТ/ВЫКЛ) for 3 seconds
to start cooking (g.10).
6 When the cooking is nished, you will hear 4 beeps and the
selected cooking function light will be off.
7 The multicooker will be in keep-warm mode automatically.
» The keep-warm indicator (ПОДОГРЕВ) lights up (g.11).
Note
• Do not close the top lid when cooking in the fry mode.
Roasting
1 Put food and ingredients into the inner pot.
2 Follow step 6 in “Preparations before cooking”.
3 Put the plug in the power socket.
4 Press the menu button (МЕНЮ) until the roasting function
(Запекать) is selected (g.29).
» To set a different cooking time, refer to chapter “Adjusting the
cooking time”.
5 Press and hold the start button (СТАРТ/ВЫКЛ) for 3 seconds
to start cooking (g.10).
6 There are 2 stages of roasting. For the rst stage, cooking time
is about 35 minutes, you will hear 5 beeps to remind to turn the
food.
7 Press the menu button (МЕНЮ) to continue the second stage,
if it beeps for 5 minutes without operation, the multicooker will
enter into keep warm mode until end of the cooking time.
Manual
You may use the manual mode to cook food with more control over
the cooking time and temperature.
1 Put food and ingredients into the inner pot.
2 Follow steps 6 and 7 in “Preparations before cooking”. Press the
menu button (МЕНЮ) until the manual function (мультиовар) is
selected (g.30).
» To set a different cooking time and temperature, refer to
chapter “Adjusting the cooking time and temperature”.
3 Press and hold the start button (СТАРТ/ВЫКЛ) for 3 seconds
to start cooking (g.10).
4 When the cooking is nished, you will hear 4 beeps and the
selected cooking function light will be off.
5 The multicooker will be in keep-warm mode automatically.
» The keep-warm indicator (ПОДОГРЕВ) lights up (g.11).
Note
• If you cook food at a temperature below 70°C, please turn off the keep-
warm mode before start cooking.
• In manual (мультиовар) mode, when cooking at a temperature higher
than 130°C, the top lid must be opened during cooking.
Keep-warm mode
The multicooker provides you with easy control over the keep-warm
mode.
• After you have selected the cooking function using the menu
button (МЕНЮ), if you press the start button (СТАРТ/ВЫКЛ)
for 3 seconds directly, the keep-warm indicator will light up. After
the cooking is nished, the multicooker will switch to keep-warm
mode directly.
• After you have selected the cooking function using the menu
button (МЕНЮ), if you press the keep-warm button rst,
and then the start button (СТАРТ/ВЫКЛ) for 3 seconds, the
keep-warm indicator will be off. After the cooking is nished, the
multicooker will be in standby mode.
Note
• In standby mode, you can press the keep-warm button (ПОДОГРЕВ) to
enter keep-warm mode.
• In keep-warm mode, you can press the keep-warm button (ПОДОГРЕВ)
to enter standby mode.
Adjusting the cooking time and temperature
You can adjust the cooking time for all functions except the rice/grain ,
roast, and plov functions; and you can adjust the cooking temperature
for baking and manual functions. Refer to the “Functions overview”
table for the time and temperature regulation of each function.
After you have selected the desired cooking function using the menu
button, the default cooking time will be displayed on the screen.
1 To set a different cooking time, press the cooking time button
(ВРЕМЯ ПРИГОТОВЛЕНИЯ) (g.31), and the default cooking
time starts ashing on the display.
2 Press the increase (+) or the decrease (—) button to set the hour
unit (g.32).
3 After the hour unit is set, wait for a few seconds before the
hour unit is conrmed, and the minute unit starts ashing on the
display.
4 Press the increase (+) or the decrease (—) button to set the
minute unit.
5 To set a different cooking temperature, press the temperature
button (ТЕMП.) (g.33), and the default temperature starts
ashing on the display.
6 Press the increase (+) or the decrease (—) button to set the
desired cooking temperature (g.34).
Preset time for delayed cooking
You can preset the delayed cooking time for all cooking modes
except the reheating, baking, and frying modes.
1 Follow steps 6 and 7 in “Preparations before cooking”.
2 Press the menu button (МЕНЮ) until your preferred cooking
function is selected.
3 Press the preset time button (ОТСРОЧКА), and the default
preset time starts ashing on the display (g.35).
4 Preset the increase button (+) and the decrease button (—) to set
the desired preset time.
5 Press the start button (СТАРТ/ВЫКЛ) for 3 seconds to conrm
the preset timer (g.10).
6 The cooking will be nished when the preset time has elapsed.
You will hear 4 beeps and the selected cooking function light will
be off.
7 The multicooker will be in keep-warm mode automatically.
» The keep- warm indicator (ПОДОГРЕВ) lights up (g.11).
Note
• The preset function is not available in bake (печь), fry (жарить), and
reheat (разогреть) mode.
• The preset button is not responsive in standby mode.
Setting up child lock
To protect your child from using the multicooker, you may set up the
child lock function.
• Press and hold the preset button (ОТСРОЧКА) for 3 seconds
to enter the child lock mode (g.36).
» The child lock icon lights up on the display.
• To unlock, press and hold the preset button (ОТСРОЧКА) for 3
seconds again.
» The child lock lights off (g.37).
5 Cleaning and Maintenance
Note
• Unplug the multicooker before starting to clean it.
• Wait until the multicooker has cooled down sufciently before cleaning it.
Interior
Inside of the top lid and the main body:
• Wipe with wrung out and damp cloth.
• Make sure to remove all the food residues stuck to the
multicooker.
Heating element:
• Wipe with wrung out and damp cloth.
• Remove food residues with wrung out and damp cloth.
Exterior
Surface of the top lid and outside of the main body:
• Wipe with a cloth damped with soap water.
• Only use soft and dry cloth to wipe the control panel.
• Make sure to remove all the food residues around the
control panel.
Accessories
Inner pot, steam rack, and steam vent cap:
• Soak in hot water and clean with sponge.
EN User manual
RU Руководство пользователя
UK Посібник користувача
6 Environment
Do not throw away the appliance with normal household
waste at the end of its life, but hand it in at an ofcial
collection point for recycling. By doing this, you can help to
preserve the environment.
7 Guarantee and service
If you need service or information, or if you have a problem, visit the
Philips website at www.philips.com or contact the Philips Customer
Care Center in your country. You can nd its phone number in the
worldwide guarantee leaet. If there is no Customer Care Center in
your country, go to your local Philips dealer.
8 Specifications
Model Number HD3165 HD3167
Rated power output 980W 980W
Rated capacity 4.0L 5.0L
9 Troubleshooting
If you encounter problems when using this multicooker, check the
following points before requesting service. If you cannot solve the
problem, contact the Philips Consumer Care Center in your country.
Problem Solution
The light on the button
does not go on.
There is a connection problem. Check
if the power cord is connected to the
multicooker properly and if the plug is
inserted rmly into the power outlet.
The light is defective. Take the appliance
to your Philips dealer or a service center
authorized by Philips.
The display does not
function.
The multicooker is not connected to
the power supply. If there is no power
supply, the power failure backup function
does not work and the display does not
function.
The battery for the display runs out of
power. Take the appliance to your Philips
dealer or a service center authorized by
Philips to have the battery replaced.
The rice is not cooked. There is not enough water. Add water
according to the scale on the inside of the
inner pot.
You did not press the start button
(СТАРТ/ВЫКЛ).
Make sure that there is no foreign residue
on the heating element and the outside
of the inner pot before switching the
multicooker on.
The heating element is damaged, or
the inner pot is deformed. Take the
multicooker to your Philips dealer or a
service center authorized by Philips.
The rice is too dry and
not well cooked.
Add more water to the rice, and cook for
a bit longer.
The multicooker does
not switch to the
keep-warm mode
automatically.
You might have pressed the keep-warm
button (ПОДОГРЕВ) before pressing the
start button (СТАРТ/ВЫКЛ). In this case
the multicooker will be in standby mode
after the cooking is nished.
The temperature control is defective. Take
the appliance to your Philips dealer or a
service center authorized by Philips.
The rice is scorched. You have not rinse the rice properly. Rinse
the rice until the water runs clear.
Water spills out of the
multicooker during
cooking.
Make sure that you add water to the level
indicated on the scale inside the inner pot
that corresponds to the number of cups
of rice used.
I cannot get to the
desired cooking
function.
Press the menu button (МЕНЮ)
repeatedly to select the desired function
as shown by the indicator.
Rice smells bad after
cooking
Clean the inner pot with some washing
detergent and warm water.
After cooking, make sure the steam vent
cap, inner lid and inner pot is cleaned
thoroughly.
Error message (E1, E2,
E3, or E4) appears on
the display.
There has been a power failure during
cooking. Take the appliance to your Philips
dealer or a service center authorized by
Philips.
Русский
1 Мультиварка
Поздравляем с покупкой и приветствуем вас в клубе Philips!
Чтобы воспользоваться всеми преимуществами поддержки Philips,
зарегистрируйте устройство на веб-сайте
www.philips.com/welcome.
2 Комплект поставки (рис. 1)
Мультиварка (основное устройство) Мерный стакан
Шнур питания Корзина для
приготовления на пару
Руководство пользователя Книга рецептов
Буклет с информацией о
безопасности
Гарантийный талон
3 Описание прибора (рис. 2)
a
Съемная крышка
отверстия выхода пара
g
Нагревательный элемент
b
Кнопка открывания
крышки
h
Разъем кабеля питания
c
Верхняя крышка
i
Ручка мультиварки
d
Внутренняя чаша
j
Индикация уровня воды
e
Панель управления
k
Уплотнительное кольцо
f
Основной корпус
Описание элементов управления (рис. 3)
l
Автоматические
программы
q
Кнопка уменьшения значения
m
Кнопка индикации
подогрева и его
отключения
r
Кнопка выбора температуры
n
Кнопка меню
s
Кнопка отсрочки старта
o
Кнопка выбора времени
приготовления
t
Кнопка включения/отмены
p
Кнопка увеличения
значения
u
Дисплей
Обзор функций
Функции
Время
приготовления
по умолчанию
Регулируемое
время
приготовления
Время
отсрочки
старта
Температура
приготовления
по умолчанию
Рис/крупы 40 мин. / 1—24 ч. 130—140 °C
Каша 10 мин. 5 мин. — 2 ч. 1—24 ч. 90—100 °C
Плов 35 мин. / 1—24 ч. 130—140 °C
Йогурт 8 ч. 6—12 ч. 1—24 ч. 40±3 °C
Суп 1 час 20 мин. — 10 ч. 1—24 ч. 100 °C
Напитки 10 мин. 5—40 мин. 1—24 ч. 100 °C
Холодец 6 ч 4—10 ч. 1—24 ч. 90—100 °C
Разогреть 25 мин. 5—60 мин. / 85 °C
Печь 45 мин. 20 мин. — 2 ч. / 130 °C
Тушить/рагу 1 час 20 мин. — 10 ч. 1—24 ч. 90 °C
Варить/на
пару
20 мин. 5 мин. — 2 ч. 1—24 ч. 100 °C
Жарить 15 мин. 5—60 мин. / 145—150 °C
Томить 5 ч 1—15 ч. 1—24 ч. 80 °C
Запекать 1 час / 1—24 ч. 130 °C
Мультиповар 2 ч. 5 мин. — 10 ч. 1—24 ч. 100 °C
Примечание
• Температуру можно настраивать для функции приготовления выпечки
и ручных режимов. Для выпекания можно выбрать температуру от
40 °C до 160 °C, а для режима мультиповара — от 30 °C до 160 °C
(с шагом 10 °C).
• После запуска процесса приготовления для отключения
программы нажмите и удерживайте кнопку включения/выключения
(СТАРТ / ВЫКЛ) в течение 3 секунд. Мультиварка перейдет в режим
ожидания.
4 Использование мультиварки
Перед первым использованием
1 Извлеките все принадлежности из внутренней чаши. Снимите
с внутренней чаши упаковочные материалы.
2 Тщательно очистите все детали мультиварки перед первым
использованием (см. главу «Очистка и уход»).
Примечание
• Перед использованием мультиварки убедитесь, что все части
абсолютно сухие.
Подготовка к работе
Перед использованием мультиварки выполните следующие
действия.
1 Измерьте количество крупы с помощью прилагаемого
мерного стакана.
2 Тщательно промойте крупу.
3 Поместите предварительно промытый рис во внутреннюю
чашу.
4 Налейте воду до уровня, указанного на шкале во внутренней
чашу, и равномерно распределите крупу.
5 Откройте крышку, нажав соответствующую кнопку (рис. 4).
6 Протрите насухо внешнюю поверхность внутренней чаши
(рис. 5), установите чашу в мультиварку (рис. 6). Убедитесь,
что внутренняя чаша касается нагревательного элемента
должным образом.
7 Закройте крышку мультиварки (рис. 7), вставьте вилку в
розетку электросети (рис. 8).
Примечание
• Убедитесь, что внутренняя чаша правильно соединена с
нагревательным элементом.
• Подробности о соотношении количества крупы и воды см. в рецепте.
• Уровень, отмеченный во внутренней чаше, является
рекомендованным. Объем воды можно изменять в соответствии с
типом крупы и вашими предпочтениями.
• Убедитесь, что внешняя поверхность внутренней чаши является
сухой и чистой, а на нагревательном элементе и магнитном
переключателе отсутствуют загрязнения.
Приготовление риса и круп
1 Следуйте инструкциям в главе «Подготовка к работе».
2 С помощью кнопки меню (МЕНЮ) выберите функцию
приготовления риса/круп (рис/крупы) (рис. 9).
3 Нажмите и удерживайте кнопку включения (СТАРТ/ВЫКЛ)
в течение 3 секунд для запуска процесса приготовления
(рис. 10).
4 По окончании приготовления прозвучит 4 звуковых сигнала,
индикатор выбранной функции погаснет.
5 Мультиварка автоматически перейдет в режим подогрева.
» Загорится индикатор режима подогрева (ПОДОГРЕВ)
(рис. 11).
Примечание
• Если в вашем регионе в сети наблюдаются перепады напряжения,
чаша мультиварки может переполняться.
• По окончании приготовления сразу же перемешайте рис, чтобы
разрыхлить его и выпарить лишнюю жидкость. Это позволит
получить более рассыпчатый рис.
• В зависимости от условий приготовления нижний слой риса может
стать золотистым.
Приготовление каши
1 Следуйте шагам 1—7 в главе «Подготовка к работе».
Примечание
• Во избежание переполнения мультиварки не превышайте
максимальный уровень воды, указанный во внутренней чаше.
Совет
• Помимо соблюдения указанного уровня воды, для приготовления
каши можно также использовать рис и воду в пропорции 1:4.
2 С помощью кнопки меню (МЕНЮ) выберите функцию
приготовления каши (каша) (рис. 12).
» Чтобы задать другое время приготовления, см. главу
«Изменение времени и температуры приготовления».
3 Нажмите кнопку включения (СТАРТ/ВЫКЛ) в течение
3 секунд для запуска процесса приготовления (рис. 10).
4 По окончании приготовления прозвучит 4 звуковых сигнала,
индикатор выбранной функции погаснет.
5 Мультиварка автоматически перейдет в режим подогрева.
» Загорится индикатор режима подогрева (ПОДОГРЕВ)
(рис. 11).