-
Contents
-
Table of Contents
-
Troubleshooting
-
Bookmarks
Quick Links
My Book
®
Studio
II
™
User Manual
Related Manuals for Western Digital My Book Studio Edition II
Summary of Contents for Western Digital My Book Studio Edition II
-
Page 1
My Book ® Studio ™ User Manual… -
Page 2: Table Of Contents
Table of Contents WD Service and Support ….. . .1 Registering Your WD Product ……. . 1 Getting Started .
-
Page 3
Turning Off/Disconnecting the Device ..26 Auto-off……….26 ™… -
Page 4: Wd Service And Support
WD Service and Support Should you encounter any problem, please give us an opportunity to address it before returning this product. Most technical support questions can be answered through our knowledge base or e-mail support service at http://support.wdc.com. If the answer is not available or, if you prefer, please contact WD at the best telephone number shown below.
-
Page 5: Getting Started
Getting Started Thank you for purchasing My Book creative professionals, workgroups, small offices, and anyone looking for extra assurance of data safety. This user manual provides step-by-step installation instructions and other important information regarding your WD product. For the latest WD product information and news, visit our website at www.westerndigital.com.
-
Page 6: Compatibility
Compatibility ® ® OS X • Any of the following: – USB port – FireWire 800 port – eSATA port or eSATA adapter card* • Tiger ® • Leopard ® • Snow Leopard ™ Note: Compatibility may vary depending on user’s hardware configuration and operating system. * For a list of compatible eSATA cards, search our knowledge base at http://support.wdc.com for answer ID# 1524.
-
Page 7: Precautions
Precautions WD products are precision instruments and must be handled with care during unpacking and installation. Drives may be damaged by rough handling, shock, or vibration. Be aware of the following precautions when unpacking and installing your external storage product: •…
-
Page 8: About Your Wd Drive
About Your WD Drive Format and Configuration This WD device is preformatted to HFS+ (Journaled) for compatibility with Macintosh operating systems and is pre-configured for RAID 0 (Striped) mode for maximum capacity and accelerated performance. This product also supports RAID 1 (Mirrored) mode for extra data protection with instantaneous and automatic data updates.
-
Page 9: Interfaces
Interfaces FireWire – This device is equipped with two FireWire 800 interfaces. FireWire 800 has a maximum data transfer rate of 800 Mb/s and is backward- compatible with FireWire 400 using a special adapter. Connection to a FireWire 400 device transfers data at FireWire 400 speed (up to 400 Mb/s). USB –…
-
Page 10: Software
MY BOOK STUDIO II USER MANUAL Software In addition to WD Drive Manager, this WD product is shipped with the following bonus software. WD Anywhere Backup (Mac and Windows) is an intuitive and robust backup ™ and recovery application that provides around-the-clock data protection. It features automatic backup to multiple destinations and synchronization of working files to keep them current.
-
Page 11: Setting Up
Setting Up Macintosh FireWire or USB ® Important: Follow the steps below to safely connect the device. 1. Turn on your computer and wait for the operating system to load. 2. Insert the software CD into the CD-ROM drive. 3. Double-click the CD-ROM drive icon. 4.
-
Page 12
8. Click Accept to accept the license agreement and continue with the installation. 9. Click Quit. 10. If you want to install the backup software now, double-click the WD Anywhere Backup icon in the My Book Studio II screen and follow the instructions as prompted. -
Page 13
eSATA Note: The eSATA interface does not support WD Drive Manager 1. Turn on your computer and wait for the operating system to load. 2. Insert the software CD into the CD-ROM drive. 3. Double-click the CD-ROM drive icon. 4. Double-click the WD Drive Manager folder, which contains the software for this device 5. -
Page 14: Windows
Windows Important: You must first install the drivers and utilities on the included CD before connecting the unit. Follow the steps below to safely connect the device. 1. Turn on your computer. 2. Insert the software CD into the CD-ROM drive. 3.
-
Page 15
10. Click on the device, then right-click to bring up the context menu. Click Run Windows Disk Management Tool. 11. The Initialize and Convert Disk Wizard appears. Click Next. 12. The Select Disks to Initialize screen appears. The My Book disk number is selected by default. -
Page 16
13. The Initialize and Convert Disk Wizard completes. Click Finish. 14. The device displays as a large Unallocated partition. Right-click on the black bar (Unallocated space) to see a menu of available options. CAUTION: Be sure to select the Unallocated drive (black bar). Do not select a system drive or any other healthy drive. -
Page 17
16. Select the size of the partition you wish to create and click Next. 17. Select a drive letter to assign to the partition and click Next. 18. The Format Partition screen appears. On this screen, you can select the file system, allocation unit size, and volume label you wish to create on the drive. -
Page 18
Note: In almost all cases, it is best to leave the allocation unit size at default. If you are not dual-booting, it is recommended that you use NTFS as the file system (you can also select FAT16 or FAT32). Dynamic partitions cannot be created on an external hard drive. -
Page 19: Wd Drive Manager Status
WD Drive Manager Status WD Drive Manager Status provides a quick view of the general status of the device. To view WD Drive Manager Status in Mac, click the WD Drive Manager status menu icon and point to WD My Book RAID. Condition Icon To view WD Drive Manager Status in Windows, roll the cursor over the WD Drive Manager system tray icon.
-
Page 20: Wd Raid Manager For Mac
WD RAID Manager for Mac WD RAID Manager is a tool designed to help you easily manage your RAID system, including changing the RAID configuration and formatting the device. To launch WD RAID Manager, click the WD Drive Manager menu extra icon and point to WD My Book.
-
Page 21
1. To configure or change the RAID setting, click on a device from the menu to display the popup menu. The checkmark indicates the current RAID configuration. 2. Select the desired RAID configuration and device format and click Configure. 3. When prompted to confirm, click Configure again. 4. -
Page 22: Raid Troubleshooting
MY BOOK STUDIO II USER MANUAL RAID Troubleshooting WD RAID Manager monitors the activity of the drives in the RAID system so you can view the status of each drive and take the appropriate action. To view the device status as well as the status of each internal hard drive, including which drive (A or B) may have experienced a fault, click on a device and then click Info, which brings up a drawer on the right hand side of the main window.
-
Page 23
RAID Status Messages WD RAID Manager reports the following messages depending on the current status of your drive. Displayed Status Description Text Healthy Array is properly configured and operating normally. Setting Mismatched Drives from different RAID sets detected in slots. Degraded The array configuration is valid and is currently… -
Page 24
Disk Status Messages WD RAID Manager reports the following messages depending on the current status of your Disk A and B. Displayed Status Description Text Good The slot configuration contains valid data. Consult the array status to see if other errors have been detected. -
Page 25: Wd Raid Manager For Windows
WD RAID Manager for Windows WD RAID Manager is a tool designed to help you easily manage your RAID system, including changing the RAID configuration and formatting the device. To launch WD RAID Manager, click the WD Drive Manager system tray icon and point to WD My Book.
-
Page 26: Raid Troubleshooting
MY BOOK STUDIO II USER MANUAL 3. Enter the confirmation number provided, then click Yes. When prompted again, click Yes to confirm. 4. Click Close when finished. You can also use the context menu in WD RAID Manager to run Windows Disk Management Tool, perform NTFS quick format, or change the RAID configuration.
-
Page 27
RAID Status Messages WD RAID Manager reports the following messages depending on the current status of your drive. Displayed Status Description Text Healthy Array is properly configured and operating normally. Setting Mismatched Drives from different RAID sets detected in slots. Degraded The array configuration is valid and is currently… -
Page 28
Disk Status Messages WD RAID Manager reports the following messages depending on the current status of your Disk A and B. Displayed Status Description Text Good The slot configuration contains valid data. Consult the array status to see if other errors have been detected. -
Page 29: Turning Off/Disconnecting The Device
Turning Off/Disconnecting the Device Auto-off My Book turns off automatically when you shut down the computer. You also may follow these steps to turn off the device. Important: To prevent data loss, close all active windows, files, and applications before shutting down the device, which will otherwise prevent successful safe shutdown.
-
Page 30: Replacing A Drive
Replacing a Drive My Book Studio II is a limited user-serviceable product which allows for servicing of one or both internal hard drives in the enclosure. Important: Only WD Caviar the My Book Studio II enclosure. In the event a fault occurs and you would like to service the device yourself, visit WD Technical Support at 1709 for detailed instructions on obtaining a replacement drive.
-
Page 31
3. Loosen the thumbscrew that secures the drive cover plate. Remove the drive cover plate and set aside. Note: Each drive is designated A or B by a color coded decal. 4. Locate the drive you wish to replace (A or B). Using the pulltab, carefully and slowly pull the drive assembly up and out of the enclosure and set aside. -
Page 32
6. Replace the cover plate and secure it with the thumbscrew. Note: Do not overtighten the thumbscrew. 7. Close the cover and firmly push down until it locks into place. 8. Reconnect only the power cable to the device. Do not connect computer interface cables. -
Page 33: Troubleshooting
Troubleshooting If you have problems when installing or using this product, visit our support Web site http://support.wdc.com How to install My Book Studio II on a Windows or Macintosh computer use My Book Studio II with your computer system service My Book Studio II to replace a hard drive change the RAID setting of a WD My Book Studio II format the drive to Mac OS format install, partition, and format the drive in Windows XP/Vista…
-
Page 34: Appendix
Marking by the CE symbol indicates compliance of this system to the applicable Council Directives of the European Union, including the EMC Directive (2004/108/EC) and the Low Voltage Directive (2006/95/EC). A “Declaration of Conformity” in accordance with the applicable directives has been made and is on file at Western Digital Europe. GS Mark (Germany only) Machine noise — regulation 3.
-
Page 35: Gnu General Public License («Gpl»)
Modification of or tampering with the Software, including but not limited to any Open Source Software, is solely at your own risk. Western Digital is not responsible for any such modification or tampering. Western Digital will not support any product in which you have or have attempted to modify the Software supplied by Western Digital.
-
Page 36
WD. WD reserves the right to change specifications at any time without notice. Western Digital, WD, the WD logo, My Book, and WD Caviar are registered trademarks; and My Book Studio, WD Anywhere Backup, WD Caviar Green, and Safe Shutdown are trademarks of Western Digital Technologies, Inc. -
Page 37: Index
Index Auto-off 26 Capacity gauge 5 Compatibility, system 3 Compliance, regulatory 31 Configuring RAID 17, 22 Connecting the device 8, 10 Device connecting 8, 10 disconnecting 26 turning off 26 Drive configuration 5 format 5 replacing 27 Drive status 16 Environmental compliance (China) 31 eSATA 6 FAQs 30…
-
Page 38
service 1 support 1 WD Drive Manager status 16 WD RAID Manager Mac 17 Windows 22 MY BOOK STUDIO II USER MANUAL INDEX – 35…
- Инструкции и руководства
- Бренды
- Western Digital
- My Book Studio Edition II
- Справочник Пользователя
![]()
External
De
skt
o
p
My Book
Studio Edition
™
II
User Manual
®
 Loading…
Studio Edition™ II
User Manual
External Desktop
®

Table of Contents
1 WD Service and Support . . . . . . . . . . . . . . . . . . . . . . .1
Registering Your WD Product . . . . . . . . . . . . . . . . . . . . . . . . . . . . . . . . 1
2 Getting Started . . . . . . . . . . . . . . . . . . . . . . . . . . . . . . .2
Kit Contents . . . . . . . . . . . . . . . . . . . . . . . . . . . . . . . . . . . . . . . . . . . . . . . 2
Optional Accessories . . . . . . . . . . . . . . . . . . . . . . . . . . . . . . . . . . . . . . . 2
Compatibility . . . . . . . . . . . . . . . . . . . . . . . . . . . . . . . . . . . . . . . . . . . . . . 3
Recording Your WD Product Information . . . . . . . . . . . . . . . . . . . . . . . 3
Precautions . . . . . . . . . . . . . . . . . . . . . . . . . . . . . . . . . . . . . . . . . . . . . . . 4
3 About Your WD Drive . . . . . . . . . . . . . . . . . . . . . . . . . .5
Format and Configuration . . . . . . . . . . . . . . . . . . . . . . . . . . . . . . . . . . . . 5
LED Indicators (Lights) . . . . . . . . . . . . . . . . . . . . . . . . . . . . . . . . . . . . . . 5
Power/Activity LED Behavior . . . . . . . . . . . . . . . . . . . . . . . . . . . . . . . . . 5
Capacity Gauge. . . . . . . . . . . . . . . . . . . . . . . . . . . . . . . . . . . . . . . . . . . . 5
Interfaces . . . . . . . . . . . . . . . . . . . . . . . . . . . . . . . . . . . . . . . . . . . . . . . . . 6
Kensington Security Slot . . . . . . . . . . . . . . . . . . . . . . . . . . . . . . . . . . . . 6
Software . . . . . . . . . . . . . . . . . . . . . . . . . . . . . . . . . . . . . . . . . . . . . . . . . . 7
4 Setting Up . . . . . . . . . . . . . . . . . . . . . . . . . . . . . . . . . . .8
Macintosh. . . . . . . . . . . . . . . . . . . . . . . . . . . . . . . . . . . . . . . . . . . . . . . . . 8
Windows . . . . . . . . . . . . . . . . . . . . . . . . . . . . . . . . . . . . . . . . . . . . . . . . 11
5 WD Drive Manager Status . . . . . . . . . . . . . . . . . . . . .16
WD Drive Manager Status Messages . . . . . . . . . . . . . . . . . . . . . . . . . 16
6 WD RAID Manager for Mac . . . . . . . . . . . . . . . . . . . .17
Configuring RAID . . . . . . . . . . . . . . . . . . . . . . . . . . . . . . . . . . . . . . . . . 17
RAID Troubleshooting. . . . . . . . . . . . . . . . . . . . . . . . . . . . . . . . . . . . . . 19
7 WD RAID Manager for Windows. . . . . . . . . . . . . . . .22
Configuring RAID . . . . . . . . . . . . . . . . . . . . . . . . . . . . . . . . . . . . . . . . . 22
RAID Troubleshooting. . . . . . . . . . . . . . . . . . . . . . . . . . . . . . . . . . . . . . 23
TABLE OF CONTENTS – i

8 Turning Off/Disconnecting the Device . . . . . . . . . .26
Auto-off. . . . . . . . . . . . . . . . . . . . . . . . . . . . . . . . . . . . . . . . . . . . . . . . . . 26
Safe Shutdown
Safe Removal. . . . . . . . . . . . . . . . . . . . . . . . . . . . . . . . . . . . . . . . . . . . . 26
Unplugging the Device . . . . . . . . . . . . . . . . . . . . . . . . . . . . . . . . . . . . . 26
™ . . . . . . . . . . . . . . . . . . . . . . . . . . . . . . . . . . . . . . . . . . . . . . . . . . . . . .26
9 Replacing a Drive . . . . . . . . . . . . . . . . . . . . . . . . . . . .27
10 Troubleshooting . . . . . . . . . . . . . . . . . . . . . . . . . . . . .30
11 Appendix. . . . . . . . . . . . . . . . . . . . . . . . . . . . . . . . . . . .31
Regulatory Compliance. . . . . . . . . . . . . . . . . . . . . . . . . . . . . . . . . . . . . 31
GNU General Public License (“GPL”). . . . . . . . . . . . . . . . . . . . . . . . . 32
Warranty Information. . . . . . . . . . . . . . . . . . . . . . . . . . . . . . . . . . . . . . . 32
Index . . . . . . . . . . . . . . . . . . . . . . . . . . . . . . . . . . . . . . .33
TABLE OF CONTENTS – ii

1
MY BOOK STUDIO EDITION II
USER MANUAL
WD Service and Support
Should you encounter any problem, please give us an opportunity to address it before
returning this product. Most technical support questions can be answered through
our knowledge base or e-mail support service at http://support.wdc.com. If the
answer is not available or, if you prefer, please contact WD at the best telephone
number shown below.
Your product includes 30 days of free telephone support during the warranty period.
This 30-day period starts on the date of your first telephone contact with WD
technical support. E-mail support is free for the entire warranty period and our
extensive knowledge base is available 24/7. To help us keep you informed of new
features and services, remember to register your product online at http://
register.wdc.com.
Accessing Online Support
Visit our product support website at http://support.wdc.com and choose from these
topics:
• Downloads — Download drivers, software, and updates for your WD product.
• Registration — Register your WD product to get the latest updates and special
offers.
• Warranty & RMA Services — Get Warranty, Product Replacement (RMA), RMA
Status, and Data Recovery Information.
• Knowledge Base — Search by keyword, phrase, or answer ID.
• Installation — Get online installation help for your WD product or software.
Contacting WD Technical Support
When contacting WD for support, have your WD product serial number, system
hardware, and system software versions available.
North America
English 800.ASK.4WDC Australia 1 800 42 9861
(800.275.4932) China 800 820 6682/+65 62430496
Spanish 800.832.4778 Hong Kong +800 6008 6008
Europe (toll free)*
Europe
Middle East
Africa
* Toll free number available in the following countries: Austria, Belgium, Denmark, France, Germany, Ireland, Italy,
Netherlands, Norway, Spain, Sweden, Switzerland, United Kingdom.
00800 ASK4 WDEU
(00800 27549338)
+31 880062100
+31 880062100
+31 880062100
Asia Pacific
India 1 800 11 9393 (MNTL)/
1 800 200 5789 (Reliance)
011 26384700 (Pilot Line)
Indonesia +803 852 9439
Japan 00 531 650442
Korea 02 703 6550
Malaysia +800 6008 6008/1 800 88 1908/+65 62430496
Philippines 1 800 1441 0159
Singapore +800 6008 6008/+800 608 6008/
+65 62430496
Taiwan +800 6008 6008/+65 62430496
Registering Your WD Product
Your WD product includes 30 days of free technical support during the applicable
warranty period for your product. The 30-day period commences on the date of your
first telephone contact with WD technical support. Register online at http://
register.wdc.com.
WD SERVICE AND SUPPORT – 1
2
MY BOOK STUDIO EDITION II
USER MANUAL
Getting Started
Thank you for purchasing My Book® Studio Edition™ II, the storage solution of choice
for creative professionals, workgroups, small offices, and anyone looking for extra
assurance of data safety. This user manual provides step-by-step installation
instructions and other important information regarding your WD product. For the
latest WD product information and news, visit our website at
www.westerndigital.com.
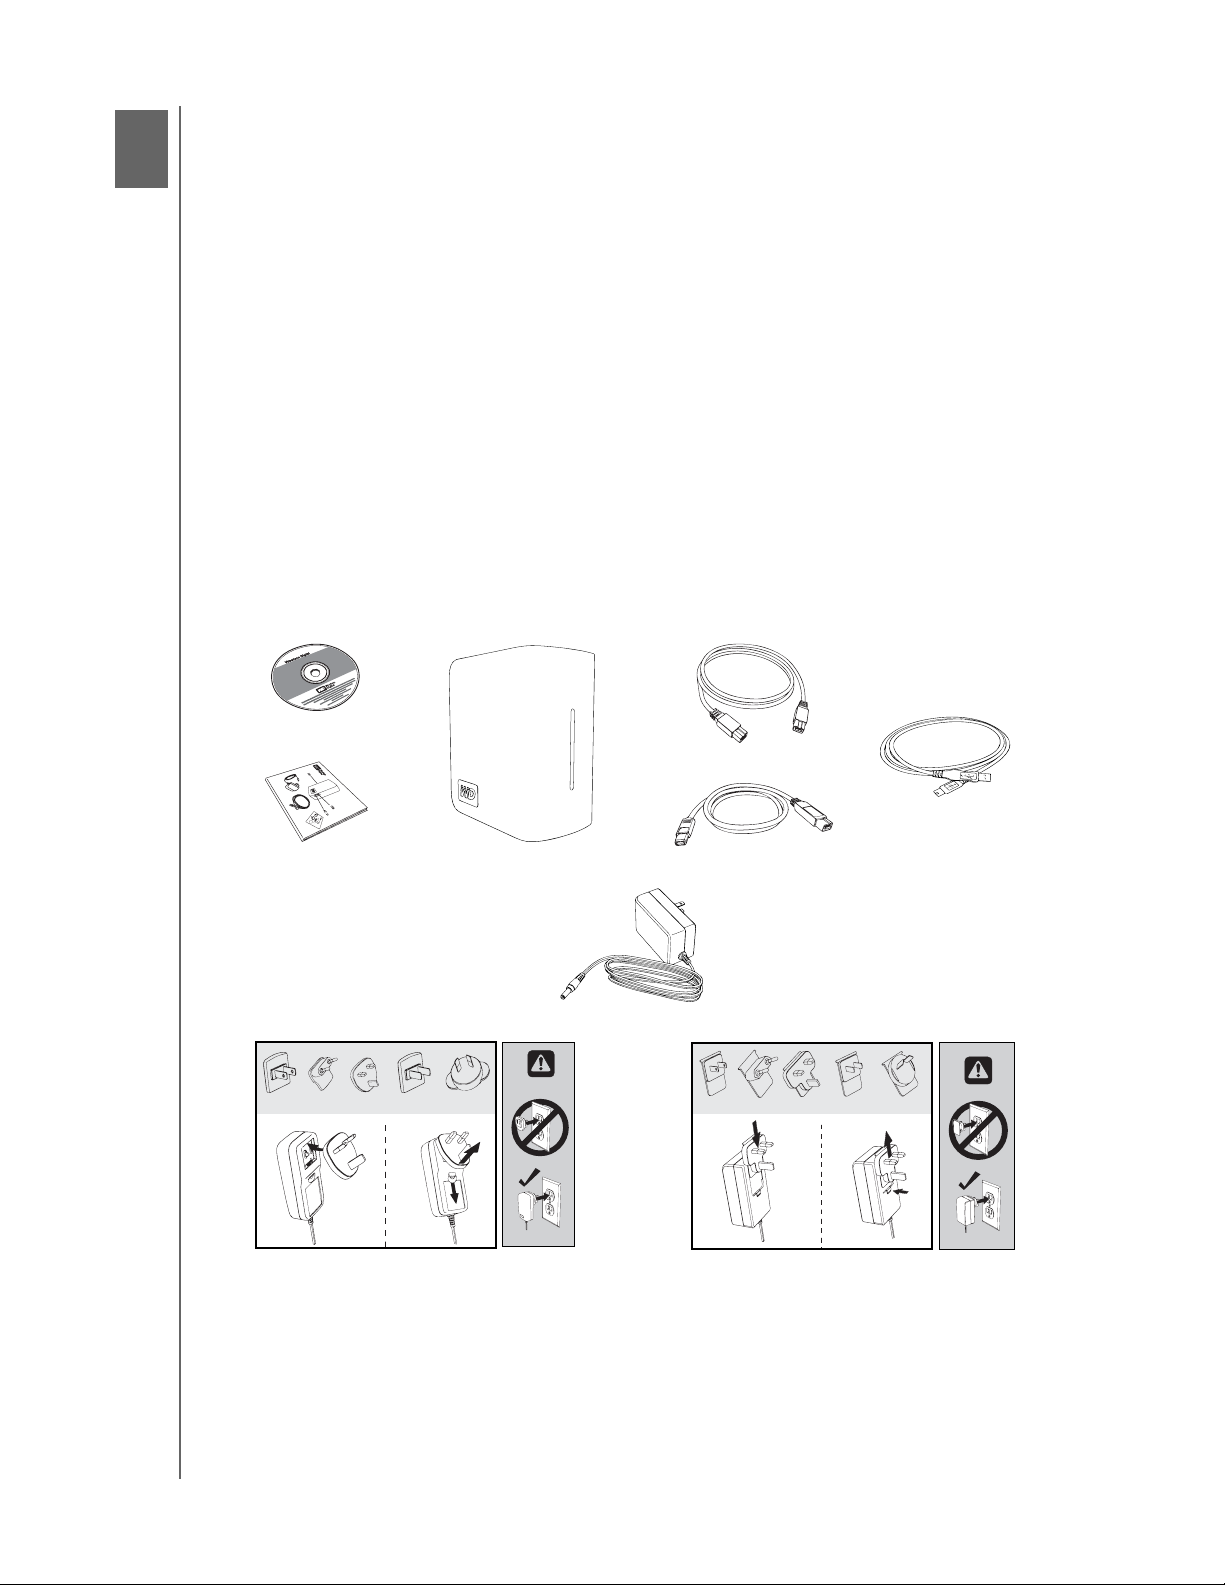
Kit Contents
• Dual-drive storage system
•USB cable
•FireWire® 800 cable (9-pin to 9-pin)
• FireWire 800 to 400 cable (9-pin to 6-pin)
• AC adapter*
• Quick Install Guide
•Software CD
Software CD
Quick Install Guide
*This product may ship with a different AC adapter configuration, depending on your region.
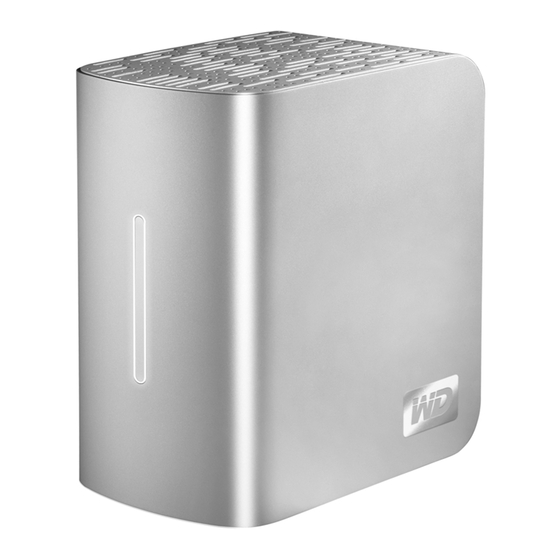
My Book Studio Edition II
AC adapter (U.S.-only)*
or
Global AC adapter configurations*
FireWire 800 cable
USB cable
FireWire 800 to 400 cable
Optional Accessories
For more information on optional accessories for this product, visit http://
store.westerndigital.com (U.S. only). Outside the U.S., visit http://support.wdc.com.
GETTING STARTED – 2
MY BOOK STUDIO EDITION II
USER MANUAL
Compatibility
Mac® OS X
®
Windows
• Any of the following: • Any of the following:
– USB port – USB port
– FireWire 800 or 400 port – FireWire 800 or 400 port
– eSATA port or eSATA adapter card* – eSATA port or eSATA adapter card*
•Tiger
• Leopard
• Snow Leopard
Note: Compatibility may vary depending on user’s hardware configuration and operating system.
* For a list of compatible eSATA cards, search our knowledge base at http://support.wdc.com for
answer ID# 1524.
†
Windows XP has a known limitation that keeps it from recognizing the full capacity of drives greater
than 2 TB. See our Knowledge Base Article# 2754 at http://support.wdc.com for more information.
®
®
.
™
•Windows XP
• Windows Vista
•Windows 7
Important: For highest performance and reliability, it is recommended that you
install the latest updates and service pack (SP). For Macintosh, go to the Apple
menu and select Software Update. For Windows, go to the Start menu and select
Windows Update.
®
†
®
Recording Your WD Product Information
In the following table, write the serial number and model number of your new WD
product found on the label on the bottom of the device. Also, write the purchase date
and other notes such as your operating system and version. This information is
necessary for setup and technical support.
Serial Number:
Model Number:
Purchase Date:
System and Software Notes:
GETTING STARTED – 3

MY BOOK STUDIO EDITION II
USER MANUAL
Precautions
WD products are precision instruments and must be handled with care during
unpacking and installation. Drives may be damaged by rough handling, shock, or
vibration. Be aware of the following precautions when unpacking and installing your
external storage product:
• Do not operate this device outside the temperature range of 5°C–35°C
(41°F–95°F)
• Do not drop or jolt the device.
• Do not move the device during activity.
• Do not use My Book as a portable device.
• To avoid overheating, do not block air slots on the underside, top, or rear of the
enclosure. Do not stack any objects on top of the device that may block
ventilation.
GETTING STARTED – 4

3
MY BOOK STUDIO EDITION II
USER MANUAL
About Your WD Drive
Format and Configuration
This WD device is preformatted to HFS+ (Journaled) for compatibility with Macintosh
operating systems and is pre-configured for RAID 0 (Striped) mode for maximum
capacity and accelerated performance.
This product also supports RAID 1 (Mirrored) mode for extra data protection with
instantaneous and automatic data updates. If one drive fails the system will still run
and your data will be preserved. You can replace the failed drive and restore the
system. For more information, including instructions on changing the RAID
configuration or drive format, see “WD RAID Manager for Mac” on page 17 or “WD
RAID Manager for Windows” on page 22.
LED Indicators (Lights)
The Power/Activity and Capacity Gauge indicators are represented by a single bar of
six LEDs (lights) on the front panel of the drive.
Power/Activity LED Behavior
Appearance Drive State
Steady Power-on state or power-save mode
Slow flashing (every four seconds) System standby
Moving up and down Drive in use
Alternating checkerboard pattern Transitioning from one state to another
Alternate flashing between top and bottom LEDs RAID degraded mode
Cycling from bottom to top RAID rebuild mode
Fast flashing (every second) Over-temperature condition*
* If this condition occurs, read/write activity will stop and the drive will spin down. Disconnect and
power down My Book. Allow it to cool down for 1-2 hours then reconnect and power up the device.
Capacity Gauge
When the device is turned on, the Capacity Gauge indicates space used on the drive
by illuminating six sections in an upward vertical direction. Each section represents
approximately 17 percent of drive capacity. Because this drive is preformatted, the
first section is illuminated upon installation.
USB and FireWire Mode
The Capacity Gauge is enabled only through installation of WD Drive Manager, which
must be installed on each system to which My Book is connected. The Capacity
Gauge is updated automatically as the drive is used.
eSATA Mode
Capacity Gauge is not available in eSATA mode.
ABOUT YOUR WD DRIVE – 5
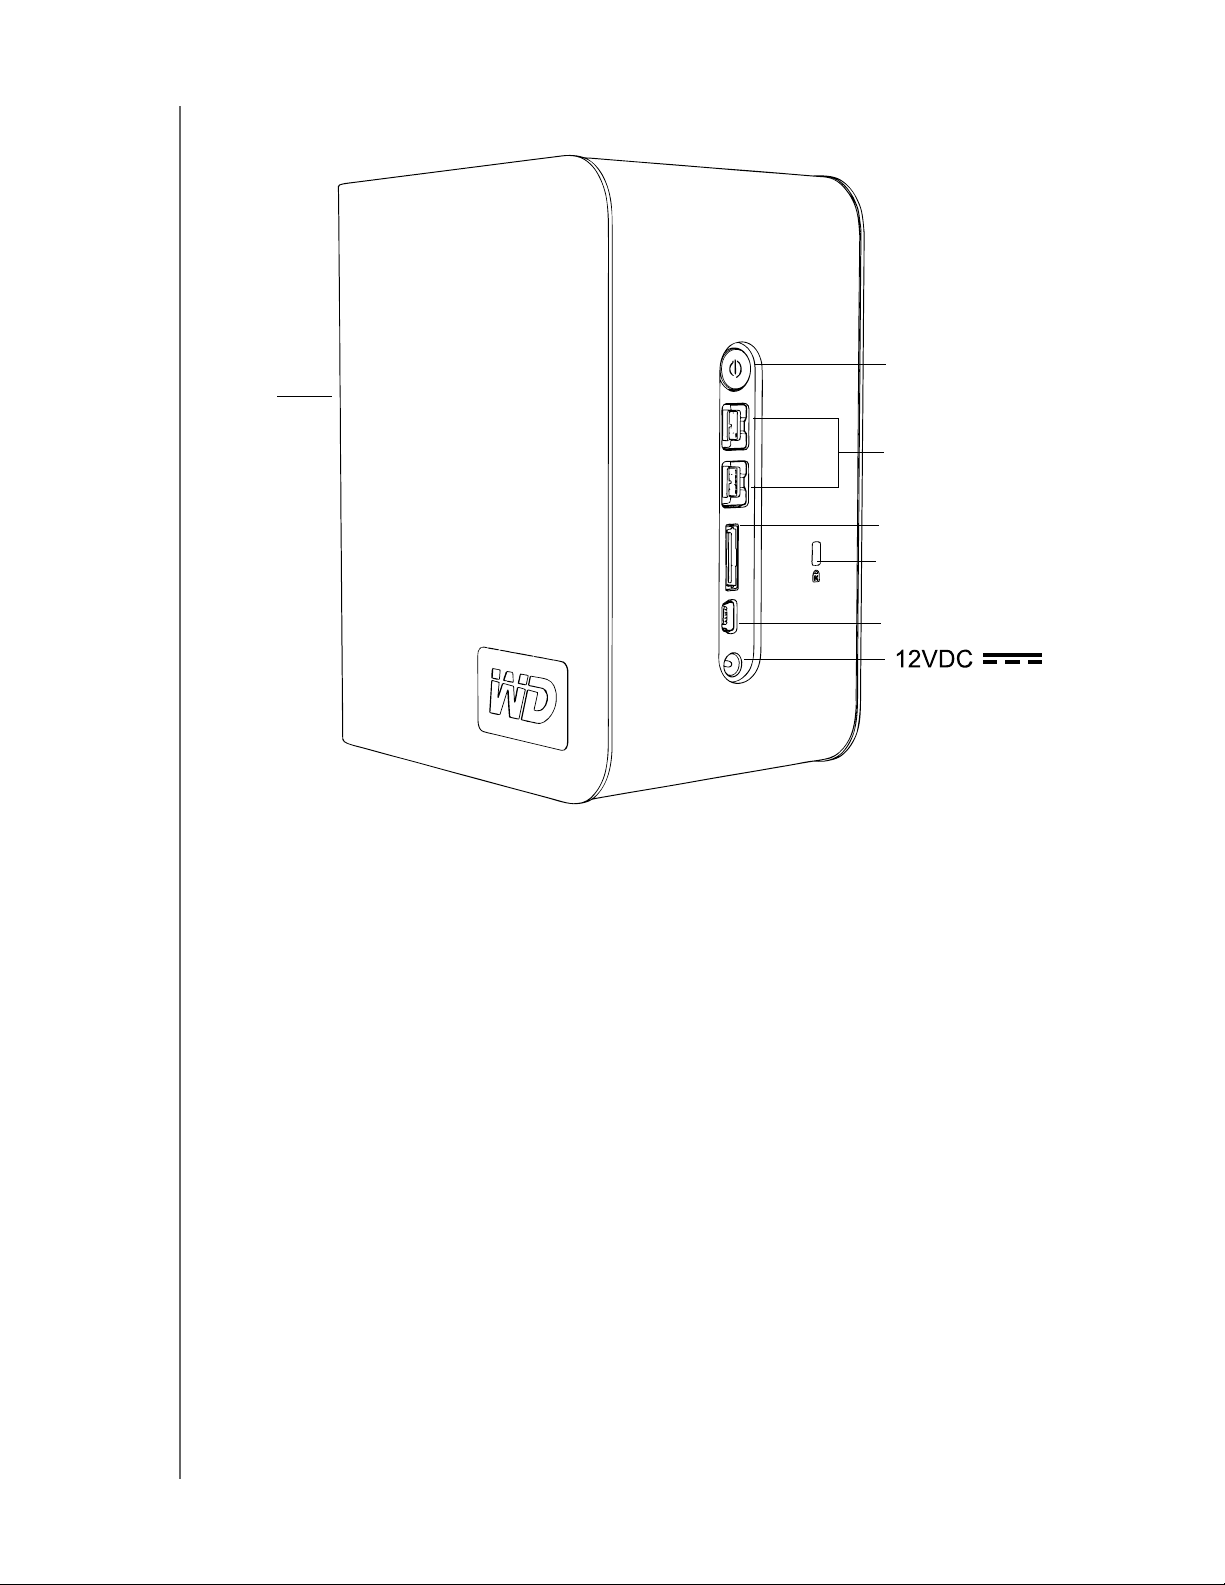
Interfaces
LED
MY BOOK STUDIO EDITION II
USER MANUAL
Power button
FireWire
eSATA
Kensington®
Security Slot
USB
FireWire – This device is equipped with two FireWire 800 interfaces.
FireWire 800 has a maximum data transfer rate of 800 Mb/s and is backwardcompatible with FireWire 400 using a special adapter such as the FireWire 800 to
400 cable included in this kit. Connection to a FireWire 400 device transfers data at
FireWire 400 speed (up to 400 Mb/s).
USB – The industry standard interface for most Windows-based computers.
Hi-Speed USB (USB 2.0) supports data transfer rates up to 480 Mb/s. USB 2.0 is
backward-compatible with USB 1.1. Connection to a USB 1.1 device transfers data
at USB 1.1 speed (up to 1.5 Mb/s).
eSATA — Up to 3 Gb/s data transfers. To use this interface, an eSATA PCI card or
eSATA motherboard port must be present on the host computer.
Kensington Security Slot
For drive security, this device is equipped with a Kensington Security Slot, which
supports a standard Kensington security cable (sold separately). For more
information on the Kensington Security Slot and available products, visit
www.kensington.com.
ABOUT YOUR WD DRIVE – 6

MY BOOK STUDIO EDITION II
USER MANUAL
Software
In addition to WD Drive Manager, this WD product is shipped with the following
bonus software.
WD Anywhere Backup™ (Mac and Windows) is an intuitive and robust backup
and recovery application that provides around-the-clock data protection. It features
automatic backup to multiple destinations and synchronization of working files to
keep them current. A user guide and online help are included with this application.
Copy Application Software allows you to back up the software included with this
device.
ABOUT YOUR WD DRIVE – 7
4
MY BOOK STUDIO EDITION II
Setting Up
Macintosh
FireWire or USB
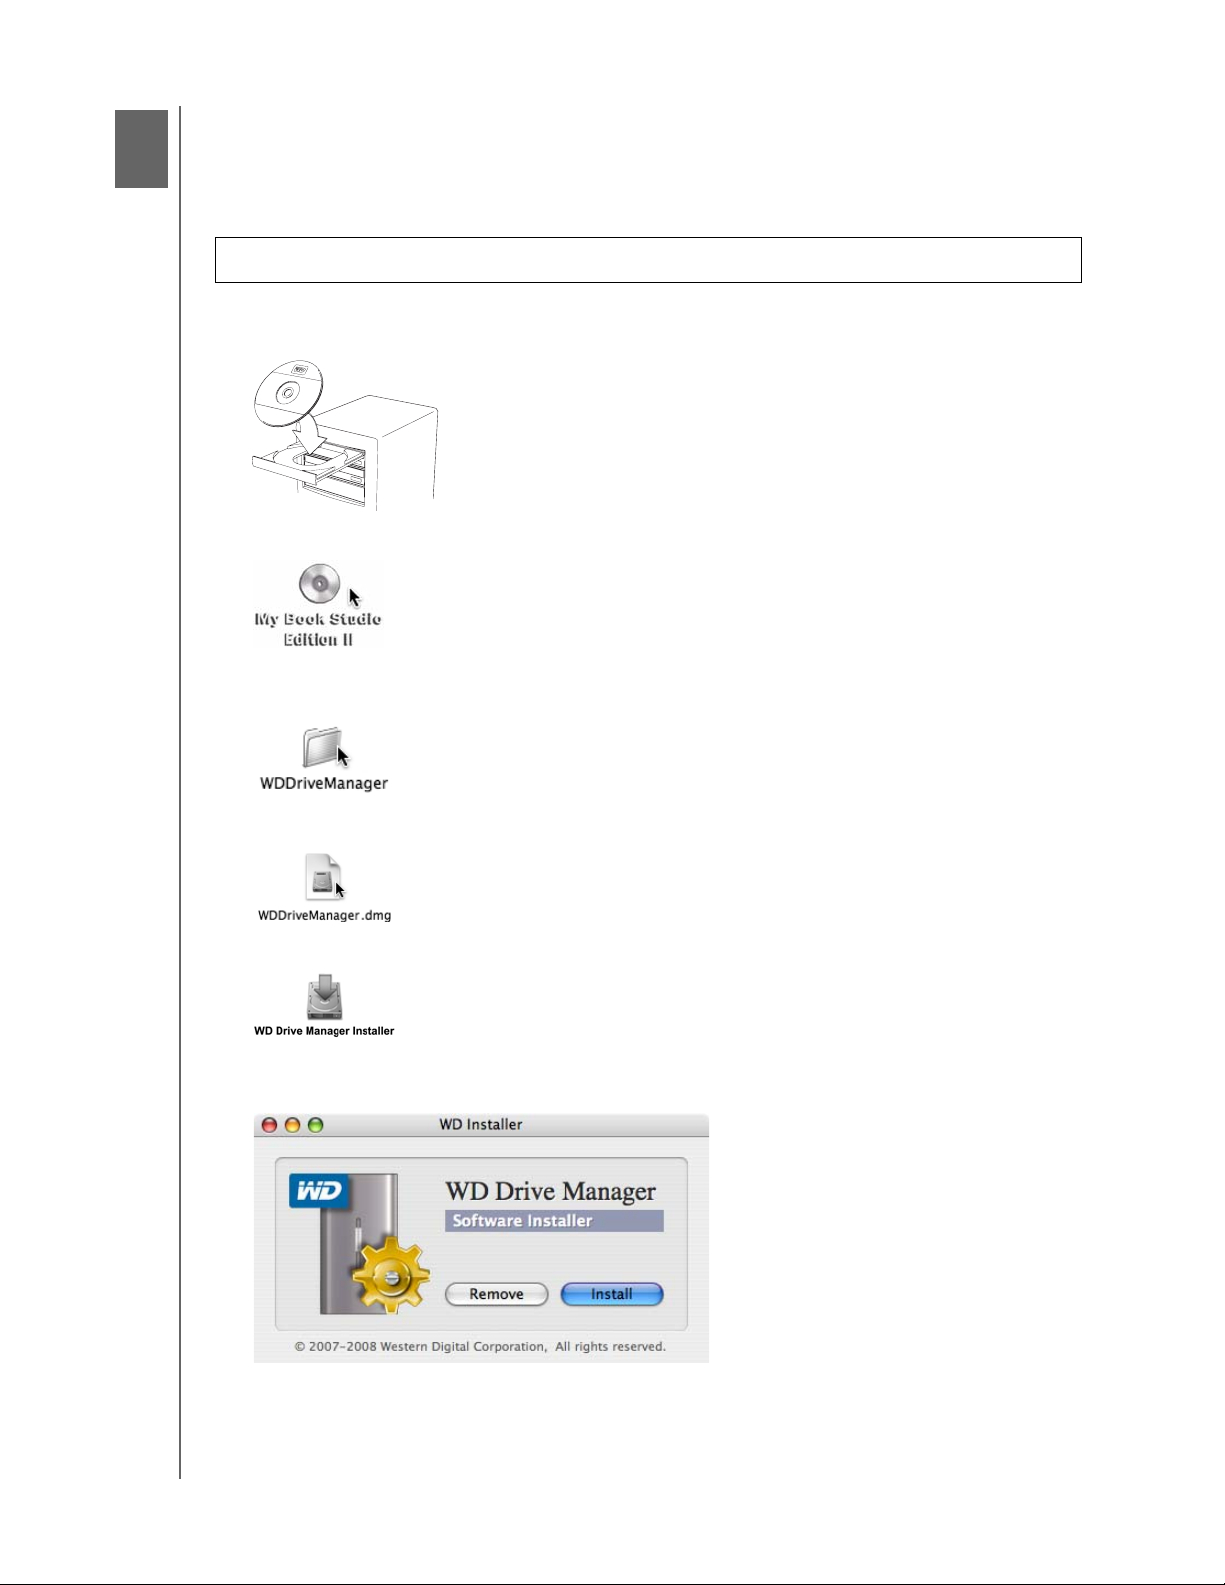
Important: Follow the steps below to safely connect the device.
1. Turn on your computer and wait for the operating system to load.
2. Insert the software CD into the CD-ROM drive.
3. Double-click the CD-ROM drive icon.
®
USER MANUAL
4. Double-click the WD Drive Manager folder, which contains the software for this
device
5. Double-click the WDDriveManager.dmg icon.
6. Double-click the WD Drive Manager Installer icon.
7. Click Install. WD Drive Manager enables the capacity gauge and
Safe Shutdown
™
and also installs WD RAID Manager.
SETTING UP – 8
MY BOOK STUDIO EDITION II
USER MANUAL
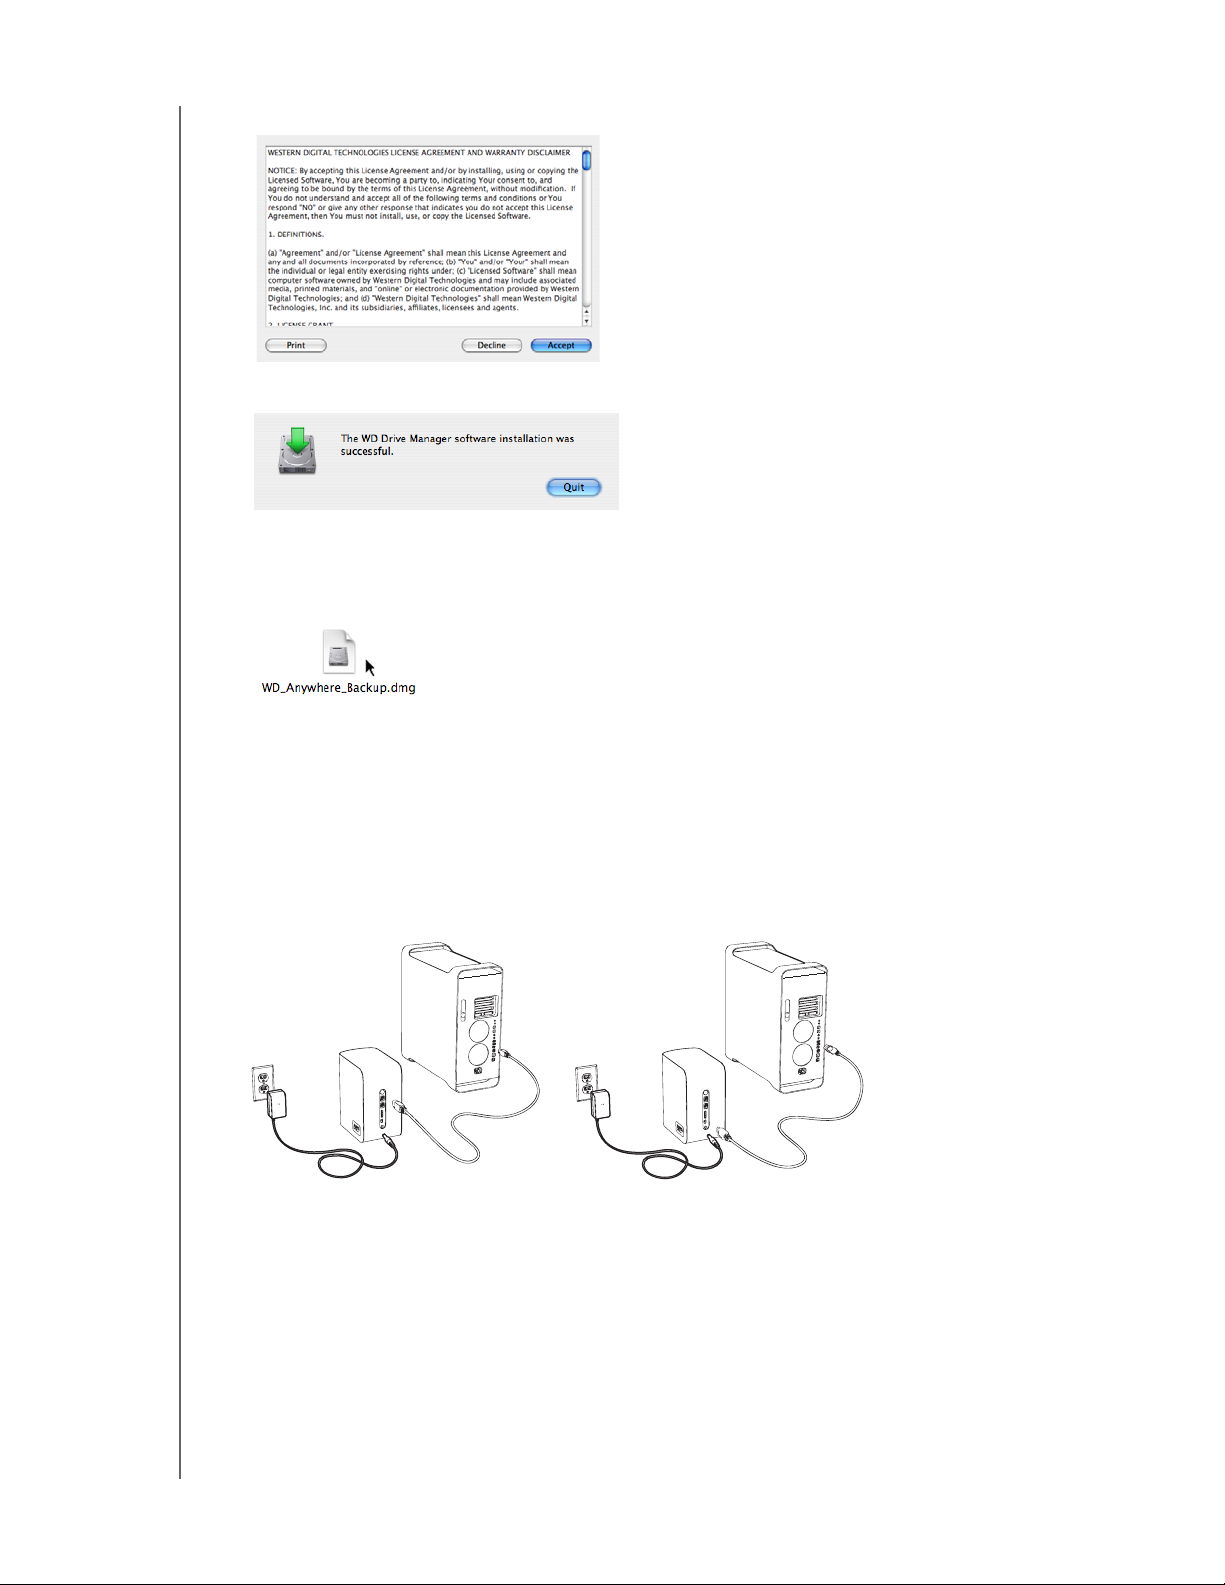
8. Click Accept to accept the license agreement and continue with the installation.
9. Click Quit.
10.If you want to install the backup software now, double-click the WD Anywhere
Backup icon in the My Book Studio Edition II screen and follow the instructions as
prompted.
11.Connect the adapter’s DC cable plug to the DC power input at the rear panel of
the product. Verify that plug type of your wall power adapter is the correct plug
type for your region.*
12.Connect the wall adapter to your AC power receptacle.
13.Plug one end of the interface cable (USB, FireWire 800, or FireWire 800 to 400)
into an available port on your computer.
14.Plug the other end of the interface cable into the device.
FireWire
USB
15.The unit will power up and mount to the system, and WD Drive Manager will
appear in the status menu. Your My Book Studio Edition II is now installed and
ready to use.
*This product may ship with a different AC adapter configuration, depending on your region.
Note: For more information about interface types and connectors, search our knowledge base at http:/
/support.wdc.com for answer ID# 1729.
SETTING UP – 9
- Manuals
- Brands
- Western Digital Manuals
- Storage
- My Book Studio Edition II
Manuals and User Guides for Western Digital My Book Studio Edition II. We have 3 Western Digital My Book Studio Edition II manuals available for free PDF download: User Manual, Specifications
Краткое содержание страницы № 1
External Desktop
®
My Book
™
Studio Edition II
User Manual
Краткое содержание страницы № 2
Table of Contents 1 WD Service and Support . . . . . . . . . . . . . . . . . . . . . . .1 Registering Your WD Product . . . . . . . . . . . . . . . . . . . . . . . . . . . . . . . . 1 2 Getting Started . . . . . . . . . . . . . . . . . . . . . . . . . . . . . . .2 Kit Contents . . . . . . . . . . . . . . . . . . . . . . . . . . . . . . . . . . . . . . . . . . . . . . . 2 Optional Accessories . . . . . . . . . . . . . . . . . . . . . . . . . . . . . . . . . . . . . . . 2 Compatibility . . . . . .
Краткое содержание страницы № 3
8 Turning Off/Disconnecting the Device . . . . . . . . . .26 Auto-off. . . . . . . . . . . . . . . . . . . . . . . . . . . . . . . . . . . . . . . . . . . . . . . . . . 26 ™ . . . . . . . . . . . . . . . . . . . . . . . . . . . . . . . . . . . . . . . . . . . . . . . . . . . . . . 26 Safe Shutdown Safe Removal. . . . . . . . . . . . . . . . . . . . . . . . . . . . . . . . . . . . . . . . . . . . . 26 Unplugging the Device . . . . . . . . . . . . . . . . . . . . . . . . . . . . . . . . . . . . .
Краткое содержание страницы № 4
MY BOOK STUDIO EDITION II USER MANUAL WD Service and Support 1 Should you encounter any problem, please give us an opportunity to address it before returning this product. Most technical support questions can be answered through our knowledge base or e-mail support service at http://support.wdc.com. If the answer is not available or, if you prefer, please contact WD at the best telephone number shown below. Your product includes 30 days of free telephone support during the warranty period.
Краткое содержание страницы № 5
MY BOOK STUDIO EDITION II USER MANUAL Getting Started 2 ® ™ Thank you for purchasing My Book Studio Edition II, the storage solution of choice for creative professionals, workgroups, small offices, and anyone looking for extra assurance of data safety. This user manual provides step-by-step installation instructions and other important information regarding your WD product. For the latest WD product information and news, visit our website at www.westerndigital.com. Kit Contents � Dual-drive
Краткое содержание страницы № 6
MY BOOK STUDIO EDITION II USER MANUAL Compatibility ® ® ® Mac OS X Windows � Any of the following: � Any of the following: – USB port – USB port – FireWire 800 or 400 port – FireWire 800 or 400 port – eSATA port or eSATA adapter card* – eSATA port or eSATA adapter card* ® † �Tiger �Windows XP ® . ® � Leopard � Windows Vista ™ � Snow Leopard �Windows 7 Note: Compatibility may vary depending on user’s hardware configuration and operating system. * For a list of compatible eSATA cards, search our
Краткое содержание страницы № 7
MY BOOK STUDIO EDITION II USER MANUAL Precautions WD products are precision instruments and must be handled with care during unpacking and installation. Drives may be damaged by rough handling, shock, or vibration. Be aware of the following precautions when unpacking and installing your external storage product: � Do not operate this device outside the temperature range of 5°C–35°C (41°F–95°F) � Do not drop or jolt the device. � Do not move the device during activity. � Do not use My Book as
Краткое содержание страницы № 8
MY BOOK STUDIO EDITION II USER MANUAL About Your WD Drive 3 Format and Configuration This WD device is preformatted to HFS+ (Journaled) for compatibility with Macintosh operating systems and is pre-configured for RAID 0 (Striped) mode for maximum capacity and accelerated performance. This product also supports RAID 1 (Mirrored) mode for extra data protection with instantaneous and automatic data updates. If one drive fails the system will still run and your data will be preserved. You can re
Краткое содержание страницы № 9
MY BOOK STUDIO EDITION II USER MANUAL Interfaces Power button LED FireWire eSATA ® Kensington Security Slot USB FireWire – This device is equipped with two FireWire 800 interfaces. FireWire 800 has a maximum data transfer rate of 800 Mb/s and is backward- compatible with FireWire 400 using a special adapter such as the FireWire 800 to 400 cable included in this kit. Connection to a FireWire 400 device transfers data at FireWire 400 speed (up to 400 Mb/s). USB – The industry standard interfac
Краткое содержание страницы № 10
MY BOOK STUDIO EDITION II USER MANUAL Software In addition to WD Drive Manager, this WD product is shipped with the following bonus software. ™ WD Anywhere Backup (Mac and Windows) is an intuitive and robust backup and recovery application that provides around-the-clock data protection. It features automatic backup to multiple destinations and synchronization of working files to keep them current. A user guide and online help are included with this application. Copy Application Software allo
Краткое содержание страницы № 11
MY BOOK STUDIO EDITION II USER MANUAL Setting Up 4 Macintosh ® FireWire or USB Important: Follow the steps below to safely connect the device. 1. Turn on your computer and wait for the operating system to load. 2. Insert the software CD into the CD-ROM drive. 3. Double-click the CD-ROM drive icon. 4. Double-click the WD Drive Manager folder, which contains the software for this device 5. Double-click the WDDriveManager.dmg icon. 6. Double-click the WD Drive Manager Installer icon. 7. Click Inst
Краткое содержание страницы № 12
MY BOOK STUDIO EDITION II USER MANUAL 8. Click Accept to accept the license agreement and continue with the installation. 9. Click Quit. 10.If you want to install the backup software now, double-click the WD Anywhere Backup icon in the My Book Studio Edition II screen and follow the instructions as prompted. 11.Connect the adapter’s DC cable plug to the DC power input at the rear panel of the product. Verify that plug type of your wall power adapter is the correct plug type for your region.*
Краткое содержание страницы № 13
MY BOOK STUDIO EDITION II USER MANUAL eSATA Note: The eSATA interface does not support WD Drive Manager 1. Turn on your computer and wait for the operating system to load. 2. Insert the software CD into the CD-ROM drive. 3. Double-click the CD-ROM drive icon. 4. Double-click the WD Drive Manager folder, which contains the software for this device 5. If you want to install the backup software now, double-click the WD Anywhere Backup icon in the My Book Studio Edition II screen and follow the in
Краткое содержание страницы № 14
MY BOOK STUDIO EDITION II USER MANUAL Windows Important: You must first install the drivers and utilities on the included CD before connecting the unit. Follow the steps below to safely connect the device. 1. Turn on your computer. 2. Insert the software CD into the CD-ROM drive. 3. The CD autoruns. Click Accept in the terms of agreement screen and WD Drive Manager and drivers are installed automatically. WD Drive Manager enables the ™ capacity gauge and Safe Shutdown and also installs WD R
Краткое содержание страницы № 15
MY BOOK STUDIO EDITION II USER MANUAL 10.Click on the device, then right-click to bring up the context menu. Click Run Windows Disk Management Tool. 11.The Initialize and Convert Disk Wizard appears. Click Next. 12.The Select Disks to Initialize screen appears. The My Book disk number is selected by default. Click Next. SETTING UP – 12
Краткое содержание страницы № 16
MY BOOK STUDIO EDITION II USER MANUAL 13.The Initialize and Convert Disk Wizard completes. Click Finish. 14.The device displays as a large Unallocated partition. Right-click on the black bar (Unallocated space) to see a menu of available options. CAUTION: Be sure to select the Unallocated drive (black bar). Do not select a system drive or any other healthy drive. Select New Partition or New Simple Volume from the menu of available options. 15.The Welcome to the New Partition Wizard or New Sim
Краткое содержание страницы № 17
MY BOOK STUDIO EDITION II USER MANUAL 16.Select the size of the partition you wish to create and click Next. 17.Select a drive letter to assign to the partition and click Next. 18.The Format Partition screen appears. On this screen, you can select the file system, allocation unit size, and volume label you wish to create on the drive. It is recommended that you enter “My Book” in the Volume label field and select Perform a quick format to save time in the formatting process. SETTING UP – 1
Краткое содержание страницы № 18
MY BOOK STUDIO EDITION II USER MANUAL Note: In almost all cases, it is best to leave the allocation unit size at default. If you are not dual-booting, it is recommended that you use NTFS as the file system (you can also select FAT16 or FAT32). Dynamic partitions cannot be created on an external hard drive. The Windows 2000 and Windows XP Disk Management utility cannot support the format of a FAT32 partition larger than 32GB. Go to support.microsoft.com and search for Microsoft Knowledge Bas
Краткое содержание страницы № 19
MY BOOK STUDIO EDITION II USER MANUAL WD Drive Manager Status 5 WD Drive Manager Status provides a quick view of the general status of the device. To view WD Drive Manager Status in Mac, click the WD Drive Manager status menu icon and point to WD My Book RAID. Mac Condition Icon To view WD Drive Manager Status in Windows, roll the cursor over the WD Drive Manager system tray icon. Windows Condition Icon WD Drive Manager Status Messages WD Drive Manager Condition icon color Meaning icon color/
Краткое содержание страницы № 20
MY BOOK STUDIO EDITION II USER MANUAL WD RAID Manager for Mac 6 WD RAID Manager is a tool designed to help you easily manage your RAID system, including changing the RAID configuration and formatting the device. To launch WD RAID Manager, click the WD Drive Manager menu extra icon and point to WD My Book. Click Launch WD RAID Manager. Configuring RAID Important: Before you proceed, make sure to back up all files stored in My Book onto another storage device. My Book Studio Edition II is prefo