- Manuals
- Brands
- Riello UPS Manuals
- Network Card
- NetMan 204
- Installation and user manual
-
Contents
-
Table of Contents
-
Bookmarks
Quick Links
Related Manuals for Riello UPS NetMan 204
Summary of Contents for Riello UPS NetMan 204
-
Page 2
INTRODUCTION Thank you for choosing our product. The accessories described in this manual are of the highest quality, carefully designed and built in order to ensure excellent performance. This manual contains detailed instructions on how to install and use the product. This manual must be stored in a safe place and CONSULTED BEFORE USING THE DEVICE for proper usage instructions as well as maximum performance from the device itself. -
Page 3
ENVIRONMENTAL PROTECTION Our company devotes abundant resources to analyzing environmental aspects in the development of its products. All our products pursue the objectives defined in the environmental management system developed by the company in compliance with applicable standards. Hazardous materials such as CFCs, HCFCs or asbestos have not been used in this product. When evaluating packaging, the choice of material has been made favoring recyclable materials. -
Page 4: Table Of Contents
CONTENTS DESCRIPTION ____________________________________________________ 6 ____________________________________________________________ 6 VERVIEW _____________________________________________________ 6 ACKAGE CONTENTS __________________________________________________________ 7 RONT PANEL Network port _____________________________________________________________ 7 Micro-USB port ___________________________________________________________ 7 Serial port _______________________________________________________________ 7 LED _____________________________________________________________________ 7 GSM Modem _____________________________________________________________ 8 Reset button _____________________________________________________________ 8 _______________________________________________________________ 8 SERS _____________________________________________________ 9 ETWORK SERVICES…
-
Page 5
Start menu ______________________________________________________________ 15 Setup __________________________________________________________________ 17 IP config ________________________________________________________________ 18 WEB CONFIGURATION ____________________________________________ 19 Network configuration ____________________________________________________ 20 Device configuration ______________________________________________________ 21 Data log ________________________________________________________________ 22 UDP Firewall ____________________________________________________________ 23 Wake on Lan address _____________________________________________________ 24 SNMP __________________________________________________________________ 25 MODBus/BACNET ________________________________________________________ 26 JSON __________________________________________________________________ 27 Syslog configuration _____________________________________________________ 28… -
Page 6: Description
MODBUS) and is compatible with Ethernet 10/100Mbps IPv4/6 networks. The device can therefore be integrated easily into medium and large-sized networks. NetMan 204 also records device values and events in the history log archive and can manage optional environmental sensors (not supplied with the device, but provided separately)
-
Page 7: Front Panel
This led describes the status of NetMan 204: SOLID RED: NetMan 204 is not communicating with the device (verify PRTK Code). FLASHING RED: the DHCP server does not have assigned a valid IP address to NetMan 204. OFF: regular working. — 7 -…
-
Page 8: Gsm Modem
GSM Modem NetMan 204 can send a notification SMS if one or more alarm conditions occur. The SMS can be sent to up to three recipients and they can be sent for seven different kinds of alarm. An external GSM modem (optional accessory) and a SIM card are required. For more details, see paragraph “GSM Modem”…
-
Page 9: Network Services
NetMan 204 can send “Wake-on-LAN” command for remote computers boot. HTTP Using the HTTP (Hyper Text Transfer Protocol), is possible to configure the NetMan 204 and the status of the device can be monitored by means of a web browser without having to install additional software.
-
Page 10: Modbus Tcp/Ip
IP address of the NetMan 204. Syslog Netman 204 can send events to a syslog server over UDP. This service allow to centralize the log of the IT infrastructure on a single server, in order to have them consumed on the preferred way.
-
Page 11: Device Values And Events History Log Archive
EVICE VALUES AND EVENTS HISTORY LOG ARCHIVE NetMan 204 records the device values (Datalog) and events (Eventlog) in a history log database. Eventlog The Eventlog service is always active and records all relevant device events in the ‘event.db’ file. The file can be downloaded via FTP or can be viewed through the web page without credentials.
-
Page 12: Environmental Sensors ( Optional )
Digital I/O & Temperature: detects the environmental temperature in °C and features a digital input and a digital output. It is possible to connect up to 3 environmental sensor to a NetMan 204 (for sensor installation please see the sensors’ manual).
-
Page 13: Configuration
NetMan 204 comes provided as factory default with DHCP enabled and with the following services active: SSH, HTTP, SNMP, UDP and FTP. In order to change the configuration of NetMan 204, you have to log in as admin (default password “admin”).
-
Page 14: Configuration Via Usb
Configuration via SSH To configure NetMan 204 via SSH it is necessary to: Execute a SSH client on a PC connected in a network to NetMan 204 set with the IP address of the device to be configured. …
-
Page 15: Configuration Menu Description
To configure Wi-Fi connection Wi-Fi setup For Wi-Fi connection, an optional card is required. The Wi-Fi card is not provided with NetMan 204 but it has to be purchased separately. Factory reset Restore factory configuration To enter Expert mode (more information at paragraph “Expert mode”)
-
Page 16
Function Direction keys (Arrow up, down, right, left) To move the cursor within the menus Goes on to next option Choice of submenu Enter Confirmation of characters entered Exit main menu Return to previous menu Some keys can have a different function depending on the menu. To exit from a menu a confirmation (‘Y’… -
Page 17: Setup
To configure the network parameters To configure Wi-Fi connection Wi-Fi setup For Wi-Fi connection, an optional card is required. The Wi-Fi card is not provided with NetMan 204 but it has to be purchased separately. Enable Sensors To enable the environmental sensors Sensors Config To configure the environmental sensors To enter Expert mode (more information at paragraph “Expert mode”)
-
Page 18: Ip Config
With this menu the main network parameters can be set as described in the following table. Field Parameters to be inserted Hostname Enter the NetMan 204 host name Enter the IP address for a static IP; enter “DHCP” for a dynamic IP IP address/DHCP Netmask…
-
Page 19: Web Configuration
WEB CONFIGURATION After setting up the network, all the settings are available on the web configuration when logged is as “admin” user. Is not possible to have multiple concurrent sessions. The login password must contain alphanumeric characters and these special characters: ,._+:@%/-.
-
Page 20: Network Configuration
Network configuration On the web page, is possible to configure in depth the network services of NetMan 204. Field Parameters to be inserted Hostname Enter the NetMan 204 host name Static IP/DHCP Choose between static IP or dynamic IP IP Address…
-
Page 21: Device Configuration
UDP port Enter the port where the UDP/UPSMon service is started UDP Password To change the password used for UDP/UPSMon communication This port must be the same as configured in the UPSMon software Device configuration Field Parameters to be inserted PRTK Code Enter the PRTK code indicated at the back of the device Name…
-
Page 22: Data Log
Data log Field Parameters to be inserted Enable Data log Enables the datalog service Backup UPS data At boot NetMan 204 downloads the data log of the device for quick log at boot access — 22 -…
-
Page 23: Udp Firewall
With this menu the IP addresses or hostnames of the devices enabled for communication with NetMan 204 can be configured. The character “*” can be used for one or more fields of the IP address to indicate that all values between 0 and 255 are accepted in that field. The following table provides some possible configuration examples.
-
Page 24: Wake On Lan Address
Wake on Lan address With this menu is possible to insert up to 8 MAC address to execute Wake-on-LAN, and the delay times for each Wake-on-LAN. The Wake-on-LAN is sent at NetMan 204 boot and when the mains returns from black-out.
-
Page 25: Snmp
SNMP For configuring SNMP, is possible to use the wizard web page for a simple configuration. Advanced configuration requires to edit snmp.conf (please see chapter “SNMP configuration”). Field Parameters to be inserted Enable SNMP Enables the SNMP service protocol Contact Enter the string to be associated with these SNMP variable Name Enter the string to be associated with these SNMP variable…
-
Page 26: Modbus/Bacnet
AuthPassword Enter the authentication password PrivPassword Enter the privacy password Permissions Choose the permissions for each users MODBus/BACNET Field Parameters to be inserted Enable MODBUS Enables the MODBUS protocol Enable BACNET Enables the BACNET protocol BACNET Address Enter the BACNET address of the device (Number) BACNET Client Enter the IP address of the bacnet client…
-
Page 27: Json
JSON Field Parameters to be inserted Enable JSON Enables the JSON notification service Monitoring host Enter the IP address to which send the JSON traps Host port Enter the port where traps will be sent Notification Enter the interval between JSON trap sending interval (minutes) Send notification Choose the even upon which the trap will be sent…
-
Page 28: Syslog Configuration
Syslog configuration This menu allow to configure the syslog service over UDP port. Field Parameters to be inserted Enable remote syslog Enables the syslog service Syslog server IP Enter the IP address of the syslog server Server UDP port Enter the UDP port where the events will be sent — 28 -…
-
Page 29: Date & Time Configuration
Date & Time configuration Field Parameters to be inserted Date Enter the current date Hour Enter the current hour Minutes Enter the current minutes — 29 -…
-
Page 30: Ntp & Timezone Configuration
Enter the day of month when the synchronization should occur, or ‘*’ Day of month Only for UPS with PRTK code SENTR.., if a valid NTP server is configured, NetMan 204 will synchronize the clock of the UPS every time the NTP synchronization occurs.
-
Page 31: Email Configuration
Email configuration This menu may be used to configure the addresses to which to send the alarm notification and report e-mails and other parameters of the e-mail service as described in the following table. Field Parameters to be inserted Enable Email Enables the Email service Enter the name or the address of the SMTP server to be used to Mail host…
-
Page 32
After inserting the data and saving, the service can be tested. If the test is performed, a test email is sent to all the configured email addresses. Report e-mails are sent to all the addresses inserted; for alarm notification e-mails see paragraph “Email logic”. -
Page 33: Email Logic
Device in overload or in overtemperature General Failure Failure of the device On bypass Operation from bypass Input blackout The input source is in blackout Battery low Battery low Communication between the Netman 204 and the device has been Communic lost interrupted — 33 -…
-
Page 34: Gsm Modem
GSM Modem This menu may be used to configure the GSM modem in order to send SMS. Field Parameters to be inserted Enable SMS Enables the SMS service GSM carrier Enter the phone number of the carrier SMS #1 SMS #2 Phone numbers that will receive SMS SMS #3 Device events…
-
Page 35: Sensors
Sensors Field Parameters to be inserted Enable sensors Enables the sensor service Contact logic Choose between normally open or normally closed Ouput contact Choose the output signal to be activated on event Temperature high Enter the high temperature threshold [°C] Temperature low Enter the low temperature threshold [°C]…
-
Page 36: Sensors Config
3) Digital I/O & Temperature [BB0000003BA2FF12] [510000009A154228] Press [Y] to confirm, [N] to insert a new sensor For proper working of the devices, it is necessary to add just one device for each iteration and wait that it is recognized by NetMan 204. — 36 -…
-
Page 37
Example: how to connect a Temperature sensor, a Humidity & Temperature sensor and a Digital I/O & Temperature sensor in exactly this order. Sensor list Press [C] to change sensors, [E] to exit Connect the first sensor (Temperature), and press “C”. Sensor list 1) Temperature [F100000013BE0628]… -
Page 38: Password Recovery
NetMan 204. This code can be read via USB or via HTTP. Via USB log in to NetMan 204 with user «user» and password «user». Via HTTP when you insert an incorrect password you are offered a link to a password recovery.
-
Page 39: Wi-Fi Setup (Optional Card Required)
OK, you want to connect to <Wi-Fi access point> with password <Wi-Fi password>. Confirm [y/n]? > After confirmation, you will return to the Main setup. At the next boot the NetMan 204 will use Wi-Fi instead of Ethernet. — 39 -…
-
Page 40: Expert Mode
If several NetMan 204 have to be configured with similar parameters, you can configure the first NetMan 204, then connect via FTP with the admin user, download all the configuration files in the folder /cfg, and upload all them via FTP in the folder /cfg of all devices to be configured.
-
Page 41: Firmware Upgrade
The NetMan 204 firmware can be updated via HTTP or via FTP. HTTP IRMWARE UPGRADE VIA Connect via HTTP to the NetMan 204 to be upgraded inserting in your web browser the hostname or IP address and then log in as admin (default password: “admin”). Then click on the “Administration” page.
-
Page 42: Snmp Configuration
Advanced configuration requires to edit snmp.conf. This file can be downloaded and uploaded from the web page or via FTP with user “admin” (default password: “admin”). Each line of the file is parsed by NetMan 204 and must begin with one of these keyword: …
-
Page 43
authnopriv (authentication but no privacy) authpriv (authentication and privacy) <contextMatch> the type of match required. Possible values are: exact (the context name must exactly match the value in contextName) prefix (the context name must match the first few starting characters of the value in contextName) <readView>… -
Page 44: Modbus Tcp/Ip Protocol
MODBUS TCP/IP PROTOCOL This service is active on the TCP port 502. The supported function are listed below, together with the accessible registers. UPPORTED FUNCTION SUPPORTED ACCESSIBLE DATA FUNCTION DESCRIPTION FUNCTION AREA (0x01) STATES BIT READING (0x02) STATES (0x03) REGISTERS READING (0x04) (0x06) SINGLE REGISTER WRITING…
-
Page 45
REGISTER UPS — MEASUREMENTS UNIT NUMBER ADDRESS 911 810 Input mains star voltage V1 Input mains star voltage V2 Input mains star voltage V3 Input current phase L1 0.1*A Input current phase L2 0.1*A Input current phase L3 0.1*A Input frequency 0.1*Hz 1921 1820… -
Page 46
REGISTER UPS – NOMINAL DATA UNIT NUMBER ADDRESS 7377 7276 Output nominal voltage (star) Output nominal frequency 0.1*Hz Output nominal power 100*VA 8183 8082 Battery nominal capacity (battery expansion included) Battery benches (1 or 2) Battery type Integer 87112 86111 REGISTER UPS — COMMANDS UNIT… -
Page 47
REGISTER SPECIAL FLAGS (SENTR UPS) UNIT NUMBER ADDRESS Byte 1 of “s = xx..” code / Byte 2 of “s = ..xx” code Flag Byte 1 of “c = xx..” code / Byte 2 of “c = ..xx” code Flag Byte 1 of “b = xx..”… -
Page 48: Bacnet/Ip Configuration
BACNET/IP CONFIGURATION OBJECT DESCRIPTION UNIT Analogue Input 0 Input voltage line 1 Analogue Input 1 Input voltage line 2 Analogue Input 2 Input voltage line 3 Analogue Input 3 Input current line 1 Analogue Input 4 Input current line 2 Analogue Input 5 Input current line 3 Analogue Input 6…
-
Page 49
Analog Input 34 System status group 2 Analog Input 35 System status group 3 Analog Input 36 Bypass module alarms Analog Input 37 Power module 1 alarms Analog Input 38 Power module 2 alarms Analog Input 39 Power module 3 alarms Analog Input 40 Power module 4 alarms Analog Input 41… -
Page 50: Serial Port Configuration
SERIAL PORT CONFIGURATION RJ-12 – SERIAL port POSITION DESCRIPTION Environmental sensors bus NetMan 204 Modem RJ-12 DB-25 DB-9 DESCRIPTION POSITION DESCRIPTION POSITION POSITION LEAVE UNCONNECTED Environmental sensors bus CONNECT TO CONNECT TO CONNECT TO …
-
Page 51: Technical Data
TECHNICAL DATA ETWORK CABLE To connect the device to the Ethernet (10Base-T) or Fast Ethernet (100Base-T) network, a UTP (Unshielded Twisted Pair) or STP (Shielded Twisted Pair) cable with RJ45 connectors is required. The cable must conform to the standard IEEE 802.3u 100Base-T with 2 pairs of UTP cables of category 5 or higher.
-
Page 52
0MNACCSA4ENUF…
Посмотреть инструкция для Riello NetMan 204 бесплатно. Руководство относится к категории Сетевые карты / адаптеры, 1 человек(а) дали ему среднюю оценку 6.7. Руководство доступно на следующих языках: английский. У вас есть вопрос о Riello NetMan 204 или вам нужна помощь? Задайте свой вопрос здесь
- DESCRIPTION
- INSTALLATION
- CONFIGURATION
- FIRMWARE UPGRADE
- SNMPV3 CONFIGURATION
- MODBUS TCP/IP PROTOCOL
- TECHNICAL DATA
Главная
Порты и интерфейсы
| Технология подключения | Проводная |
| Основной интерфейс | — |
| Интерфейс | Ethernet |
| Количество портов Ethernet LAN ( RJ-45) | 1 |
| Количество портов USB | 1 |
Дизайн
| Внутренний | Да |
| Чипсет | — |
| Цвет товара | Зеленый |
| Светодиодные индикаторы | Да |
| Совместимые продукты | TeleNetGuardrnPowerShield3 |
Сеть
| Максимальная скорость передачи данных | 100 Мбит/с |
| Подключение Ethernet | Да |
| Свивка кабеля | 10/100BaseT(X) |
| Скорость передачи данных Ethernet LAN | 10, 100 Мбит/с |
| Стандарты сети | IEEE 802.3, IEEE 802.3u |
| Тип свивки медного Ethernet | 100BASE-T, 100BASE-TX, 10BASE-T |
| Поддерживаемые сетевые протоколы | TCP/IP, HTTP/HTTPS, SSH, DHCP, DNS, FTP, NTP, ICMP |
| Функция Wake-on-LAN | Да |
| Управление через веб-интерфейс | Да |
Прочие свойства
| Протоколы управления | SNMP v1, SNMP v3, IGMP |
| Краткая инструкция пользователя | Да |
Содержимое упаковки
показать больше
Не можете найти ответ на свой вопрос в руководстве? Вы можете найти ответ на свой вопрос ниже, в разделе часто задаваемых вопросов о Riello NetMan 204.
Инструкция Riello NetMan 204 доступно в русский?
Не нашли свой вопрос? Задайте свой вопрос здесь
Brochures and data sheets
Select File Language:
Users Guides
Select File Language:
User’s manual NetMan 204
Rev. M — For Netman with App. 3.xx
User’s manual NetMan 204
Rev. B — For NetMan 204 with App. 1.xx
Quick start NetMan 204
Rev. C
it
de
es
hu
nl
pl
ro
ru
vn
zh

Drivers & Firmware
Select File Language:
Instructions to upgrade NetMan 204 Operating System
The zip file contains also the image writing tool for the microSD
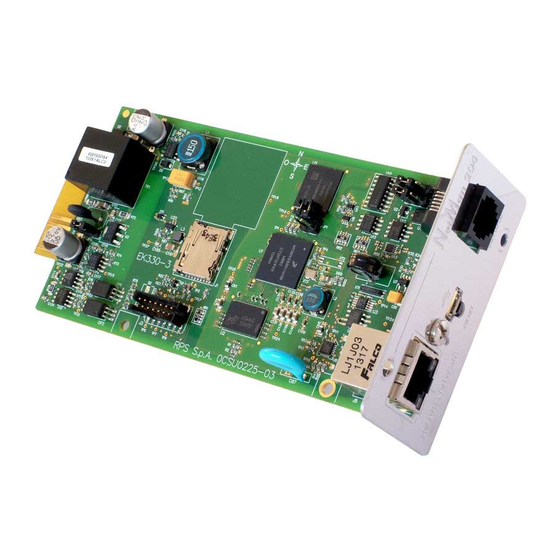
Allowing UPS systems connected over LAN 10/100 Mb connections to be managed using TCP/IP, HTTP, and SNMP protocols, NetMan 204 is Riello UPS’s dedicated network communication card.
It’s designed to help ensure reliable and secure communications when you integrate a UPS into a wider network infrastructure. Full compatibility with management and shutdown software PowerShield³ and PowerNetGuard.
Easily Integrate UPS Into Networks
Connects UPS systems into medium or large networks over Ethernet networks using Modbus/TCP or BACNET/IP protocols. Guarantees secure and reliable communication between all connected devices.
Proven For Virtual Networks
Seamless integration with VMware, helping you manage any virtual networks and perform safe system shutdown of both virtual and physical machines.
Смотреть руководство для Riello NetMan 204 ниже. Все руководства на ManualsCat.com могут просматриваться абсолютно бесплатно. Нажав кнопку «Выбор языка» вы можете изменить язык руководства, которое хотите просмотреть.

MANUALSCAT | RU
Вопросы и ответы
У вас есть вопрос о Riello NetMan 204, но вы не можете найти ответ в пользовательском руководстве? Возможно, пользователи ManualsCat.com смогут помочь вам и ответят на ваш вопрос. Заполните форму ниже — и ваш вопрос будет отображаться под руководством для Riello NetMan 204. Пожалуйста, убедитесь, что вы опишите свои трудности с Riello NetMan 204 как можно более детально. Чем более детальным является ваш вопрос, тем более высоки шансы, что другой пользователь быстро ответит на него. Вам будет автоматически отправлено электронное письмо, чтобы проинформировать вас, когда кто-то из пользователей ответит на ваш вопрос.
Добрый день, проблема с входом по LAN на веб-интерфейс платы. стандартный логин пароль admin/admin не подходит, пароль не меняли. сброс посредством кнопки резет не помогает. как можно решить проблему?
Руслан2020-04-10
как перезапустить карту netman204 не отключая ибп sdh3000 riello
алексей2020-03-16
Задать вопрос о Riello NetMan 204
- Бренд:
- Riello
- Продукт:
- Сетевые карты / адаптеры
- Модель/название:
- NetMan 204
- Тип файла:
- Доступные языки:
- английский
Сопутствующие товары Riello NetMan 204
 ДоставкаДоставка по Москве, МО и России
 Физ. лица и ОООРаботаем с физ. лицами и организациями
 ОплатаОплата наличными, картой или по счету
 КомлпектыЕсть готовые комплекты или соберем под ваши нужды
Низкая цена Riello NetMan 204 card и доставка по городу Москва осуществляется в рабочее время с 9 утра до 18 вечера. Наш магазин располагается по адресу Москва, Большая Никитская улица, 17с2 офис 102 и предлагает покупателю только сертифицированный товар на который распространяется гарантия. Желающим оформить товар в рассрочку, магазин предлагает оформить онлайн кредит без первоначального взноса и переплаты от банка Тинькофф.
Купить Riello NetMan 204 card, характеристики которого удовлетворят запросы клиента, а стоимость приятно порадует, покупатель может на оформить на данной странице сайте магазина. Продажа осуществляется по всем действующим законам РФ, а наши опытные менеджеры помогут Вам выбрать дополнительные аксессуары. Кредит оформляется не выходя из дома без предоплаты, а товар доставит клиенту курьер компании. Продажа осуществляется с возможностью возврата или обмена. Так же перед покупкой Вы можете прочитать отзывы реальных клиентов которые уже пользуется данной моделью.
Доставка выбранных товаров осуществляется по всей России. Отправка в регионы осуществляется в рабочие дни.
- Москва ,Московская область — БЕСПЛАТНО.(с 09:00 до 21:00)
Товар можно забрать самостоятельно со склада: г.Москва Большая Никитская улица, 17с2
офис 102
Наш интернет магазин осуществляет отправку купленной у нас оргтехники во все города России. Мы сотрудничаем с транспортными компаниями «Деловые Линии», «Major», «CДЭК», «ПЭК» . Вы можете выбрать любую удобную для Вас транспортную компанию. Стоимость доставки будет рассчитана в зависимости от выбранной Вами транспортной компании.
При отправке товара транспортной компанией возможна доставка:
- до терминала ТК в вашем городе для дальнейшего самостоятельного самовывоза
- по указанному вами адресу в пределах города
Внимание! Если оператор не сможет дозвониться по указанному вами телефону в течение 2-х дней, Ваш заказ будет аннулирован. Поэтому, если по каким-либо причинам в этот период времени вы не сможете принять звонок, пожалуйста, свяжитесь с оператором по электронной почте
Выбранный товар, Вы можете оплатить несколькими способами: наличным и безналичным расчетом.
| Вид оплаты | Документы | |
|---|---|---|
|
Оплата наличными для физических лиц. Оплата наличными производится в рублях при получении заказа у курьера или на пункте самовывоза. За наличный расчёт, мы предоставляем дополнительную скидку на выбранный товар,в случае отказа от бесплатной доставки. |
Скидка 2 % |
Накладная, Счет-фактура |
|
Оплата безналичным расчётом для Юридических лиц. Для оплаты товара по безналичному расчету Вам необходимо выслать реквизиты Вашей компании на нашу электронную почту. Мы отправим Вам коммерческое предложение для ознакомления и согласования. |
Предоплата 100% |
Счет, счет-фактура, накладная (торг 12) |
Порядок резервирования товара
Уважаемые клиенты! Обращаем ваше внимание на порядок и сроки резервирования товара.
Для Физических лиц:
Срок резерва составляет три календарных дня, по истечению которых, товар автоматически снимается с резерва и поступает в свободную продажу (если заказ не был предварительно оплачен).
Для Юридических лиц:
Срок резерва, при выставлении счета юридическому лицу, составляет пять календарных дней, по истечении которых, товар автоматически снимается с резерва.
Мы оставляем за собой право снять товар с резерва, в случае, если отдел продаж или отдел доставки не может с вами связаться в назначенный день отгрузки.
Оплата банковскими картами осуществляется через АО «АЛЬФА-БАНК».

К оплате принимаются карты VISA, MasterCard, Платежная система «Мир».

Услуга оплаты через интернет осуществляется в соответствии с Правилами международных платежных систем Visa, MasterCard и Платежная система «Мир» на принципах соблюдения конфиденциальности и безопасности совершения платежа, для чего используются самые современные методы проверки, шифрования и передачи данных по закрытым каналам связи. Ввод данных банковской карты осуществляется на защищенной платежной странице АО «АЛЬФА-БАНК».
На странице для ввода данных банковской карты потребуется ввести номер карты, имя владельца карты, срок действия карты, трёхзначный код безопасности (CVV2 для VISA или CVC2 для MasterCard). Все необходимые данные пропечатаны на самой карте.
Трёхзначный код безопасности — это три цифры, находящиеся на обратной стороне карты.
Далее вы будете перенаправлены на страницу Вашего банка для ввода 3DSecure кода, который придет к Вам в СМС. Если 3DSecure код к Вам не пришел, то следует обратится в банк выдавший Вам карту.

Случаи отказа в совершении платежа:
- банковская карта не предназначена для совершения платежей через интернет, о чем можно узнать, обратившись в Ваш Банк;
- недостаточно средств для оплаты на банковской карте. Подробнее о наличии средств на банковской карте Вы можете узнать, обратившись в банк, выпустивший банковскую карту;
- данные банковской карты введены неверно;
- истек срок действия банковской карты. Срок действия карты, как правило, указан на лицевой стороне карты (это месяц и год, до которого действительна карта). Подробнее о сроке действия карты Вы можете узнать, обратившись в банк, выпустивший банковскую карту;
Предоставляемая вами персональная информация (имя, адрес, телефон, e-mail, номер банковской карты) является конфиденциальной и не подлежит разглашению. Данные вашей кредитной карты передаются только в зашифрованном виде и не сохраняются на нашем Web-сервере.
Мы находимся по адресу:
Россия, Москва, Большая Никитская улица, 17с2 офис 102 на проходной сказать в компанию Эледен
Режим работы: Будни с 9:00 — 18:00
Приём заказов через корзину: 24 часа / 7 дней в неделю
Памятка покупателю
- Перед покупкой ознакомьтесь с некоторыми условиями продажи:
- В магазинах представлен не весь товар, сделайте резерв или уточните информацию о наличии.
- Самовывоз не осуществляется: телевизоры, диагональю свыше 43 дюймов; товар, вес которого превышает 25 кг; товар, размеры которого превышают 60x60x60 см; товар, один размер которого превышает 100 см. Для таких товаров возможна только доставка!
- При самовывозе при себе необходимо иметь паспорт или водительское удостоверение!
INTRODUCTION
Thank you for choosing our product.
The accessories described in this manual are of the highest quality, carefully designed and built in
order to ensure excellent performance.
This manual contains detailed instructions on how to install and use the product.
This manual must be stored in a safe place and CONSULTED BEFORE USING THE DEVICE
for proper usage instructions as well as maximum performance from the device itself.
NOTE: Some images contained in this document are for informational purposes only and may not
faithfully demonstrate the parts of the product they represent.
Symbols used in this manual:
Warning
Information
SAFETY
This part of the manual contains SAFETY precautions that must be followed scrupulously.
The device has been designed for professional use and is therefore not suitable for use in
the home.
The device has been designed to operate only in closed environments. It should be
installed in rooms where there are no inflammable liquids, gas or other harmful substances.
Take care that no water or liquids and/or foreign bodies fall into the device.
In the event of a fault and/or impaired operation of the device, do not attempt to repair it but
contact the authorized service centre.
The device must be used exclusively for the purpose for which it was designed. Any other
use is to be considered improper and as such dangerous. The manufacturer declines all
responsibility for damage caused by improper, wrong and unreasonable use.
Indicates important information that must not be ignored.
Provides notes and useful suggestions for the User.
— 2 —