|
Рубрика: Администрирование / Продукты и решения |
Мой мир Вконтакте Одноклассники Google+ |
 ИВАН КОРОБКО
Модификация дистрибутивов
на основе Windows Installer
Возможность модификации дистрибутивов на основе Windows Installer всегда прельщала системных администраторов и специалистов системной поддержки. Рассмотрим один из компонентов Windows Installer Resource Kit – orca.exe. Эта утилита специально разработана для решения задач такого рода.
Решение задач автоматической установки программного обеспечения не ограничивается использованием ключей системы инсталляции Windows Installer. Получив возможность изменить пакет инсталляции, доступ к базе данных всех параметров дистрибутива, администратор может создавать пакеты для автоматической установки, не используя внешние файлы, содержащие различные настройки.
Уделим внимание программному управлению базой данных, хранящейся в msi-файлах.
Windows Installer
Это сервис установки и конфигурирования программных продуктов, который входит в состав операционной системы. Также он может устанавливаться как пакет обновления или отдельный дистрибутив.
В настоящее время используется Windows Installer 4.5, который можно бесплатно загрузить с сайта Microsoft в виде заплатки (hotfix) KB842288 – http://download.microsoft.com/download/2/6/1/261fca42-22c0-4f91-9451-0e0f2e08356d/WindowsXP-KB942288-v3-x86.exe.
Windows Installer, как и любое другое быстрое исправление, поддерживает ряд ключей командной строки, обеспечивающих управление автоматической установкой пакета:
- /norestart – не перезагружать компьютер после установки обновления;
- /queit – выполнить установку в «тихом» режиме;
- /help – вывод справки на экран, содержащей ключи и их краткое описание.
Файл msiexec.exe
Двойным щелчком мыши по файлу с расширением *.msi осуществляется запуск утилиты:
%SystemRoot%System32msiexec.exe /i *.msi
В таблице 1 приведен список часто используемых параметров командной строки, обеспечивающих автоматическую установку приложения.
Таблица 1. Параметры командной строки msiexec.exe
|
Параметр |
Описание |
|
/i |
Установка приложения в обычном режиме |
|
/f [p|o|e|d|c|a|u|m|s|v] |
Переустановка приложения. Если задан только ключ /f, то имеется в виду команда /fpecsm: p – восстановление удаленных файлов; о – обновление до более новой версии; e – полная переустановка приложения той же версии; d – восстановление удаленных файлов и перезапись файлов более старой версии; c – восстановление удаленных файлов или перезапись файлов, если CRC а – переустановка всех файлов; u – перезапись всех ключей реестра, касающихся данного приложения в ветвях HCKU, HCU; m – перезапись всех ключей реестра, касающихся данного приложения в ветви HCLM; s – перезапись всех ярлыков |
|
/a |
Выполнение административной установки приложения |
|
/x |
Деинсталляция продукта |
|
/j[u|m[/g]] |
Управление публикацией программного продукта: u – публикация для текущего пользователя; m – публикация для всех пользователей; g – идентификатор языка (управление установкой языкового интерфейса) |
|
/q[n|b|r|f] |
Определение уровня пользовательского интерфейса во время установки: n – отсутствие интерфейса; b – базовый интерфейс (по умолчанию); r – сокращенный интерфейс; f – полный пользовательский интерфейс |
Обычно для установки приложения в автоматическом режиме используют команду:
%SystemRoot%System32msiexec.exe /fa /qn /jm *.msi
где *.msi – полный путь к файлу с расширением MSI, например:
c:Windowssystem32msiexec.exe /fa/qn/jm «acdsee10.msi»
Windows Installer SDK
Пакет утилит, который можно загрузить бесплатно с сайта компании Microsoft, по адресу – http://download.microsoft.com/download/7/c/4/7c426dfc-46e2-4ded-bab4-3b33600ad7d1/msi45sdk.msi, используется для различного рода манипуляций с MSI-файлами.
По умолчанию каталог установки пакета Windows Installer SDK –%ProgramFiles%Windows Installer 4.5 SDK.
В его комплекте несколько утилит, в том числе дистрибутив программы ORC, расположенный в папке Tools.
Оrca.msi
Программа orca.exe, дистрибутив которой находится в папке %ProgramFiles%Windows Installer 4.5 SDKTools, предназначена для модификации *.msi-файлов. С помощью этой утилиты можно не только управлять устанавливаемыми компонентами, но и указать серийный номер продукта, изменить выводимые сообщения и др.
Установка orca.exe осуществляется в папку %:ProgramFiles%Orca запуском файла orca.msi.
Оrca.exe
Запуск программы осуществляется через «Пуск > Программы > orca.exe» (см. рис. 1). После успешного запуска приложения необходимо открыть msi-файл, который необходимо модифицировать. В данном случае в качестве опытного образца использовать дистрибутив AcdSee10 – файл ACDSee 10 Photo Manager.msi, находящийся в каталоге c:ACDSee.

Рисунок 1. Внешний вид утилиты orca.exe
Замечание: дистрибутив ACDSee 10 представляет собой *.ехе-файл – архив, который при запуске распаковывает msi-файл в папке C:Documents and Settings%username%Local SettingsApplication DataDownloaded Installations{0051E50E-CECD-4E04-A71A-B8C49733542A}ACDSee 10 Photo Manager.msi. Именно этот файл необходимо открыть утилитой orca.exe.
Orca.exe рассматривает msi-файл как SQL-базу данных, где msi-файл – это база данных, левая колонка таблицы (см. рис. 2), в которой хранятся различные настройки и списки. Правая часть – список полей выбранной таблицы с соответствующими значениями.

Рисунок 2. Создание новых полей в таблице
Структура msi-файлов
В базе данных пакета среди множества таблиц, которые можно объединить в группы, выделим самые важные из них:
- базовые таблицы;
- файловые таблицы;
- таблицы информации о программе.
Базовые таблицы
К базовым таблицам относят таблицы, описывающие параметры работы инсталлятора, устанавливаемые компоненты. Группа состоит из 11 связанных таблиц, краткое описание которых приведено в таблице 2.
Таблица 2. Базовые таблицы MSI Installer
|
Имя таблицы |
Краткое описание |
|
Feature |
Содержит список всех функций программного продукта |
|
Condition |
Содержит описание условий, определяющих порядок установки каждой функции, описанной в таблице |
|
FeatureComponents |
Связывает функции с компонентами |
|
Component |
Содержит список всех компонентов приложения |
|
Directory |
Содержит список всех каталогов, необходимых для инсталляции |
|
PublishComponent |
Содержит список функций и компонентов, публикуемых для использования в других приложениях |
|
Assembly |
Задает установки для сборок .NET Framework CLR и Win32 |
|
AssemblyName |
Задает схему для именования сборок .NET Framework CLR и Win32 |
|
Complus |
Содержит информацию, необходимую для установки приложений COM+ |
|
IsolatedComponent |
Связывает компонент, заданный в столбце Component_Application (обычно .exe), с компонентом, заданным в столбце Component_Shared (обычно .dll) |
|
Upgrade |
Содержит информацию для значительных обновлений программного продукта |
Файловые таблицы
Эта группа таблиц содержит информацию обо всех файлах, входящих в комплект поставки программного продукта. Большая часть этих файлов перечислена в таблице File. Хотя таблица Directory не входит в эту группу, она тесно связана с ней, так как отражает структуру каталогов приложения. В таблице 3 приведен список файловых таблиц и их краткое описание.
Таблица 3. Файловые таблицы MSI Installer
|
Имя таблицы |
Краткое описание |
|
File |
Представляет собой список файлов, которые будут распакованы в ходе инсталляции. Эта таблица связана с таблицей Directory, в которой зафиксирована структура каталогов устанавливаемого приложения и таблица Component, с помощью которой обеспечивается связь с компонентами |
|
RemoveFile |
Содержит список файлов, которые необходимо удалить при выполнении операции RemoveFiles |
|
Font |
Включает в себя список шрифтов, которые необходимо зарегистрировать в операционной системе |
|
SelfReg |
Содержит список саморегистрирующихся модулей. Installer не регистрирует EXE-файлы |
|
Media |
В таблице описывается набор дисков инсталляции |
|
BindImage |
Содержит информацию о привязках исполняемых файлов или DLL |
|
MoveFile |
Содержит список файлов, которые необходимо перенести во время инсталляции из исходного каталога в заданный каталог |
|
DuplicateFile |
Содержит список дублируемых файлов либо в другой каталог с тем же именем, что и исходный файл, либо в тот же каталог, но с другим именем |
|
Environment |
Используется для задания переменных окружения |
|
Icon |
Хранит файлы иконок. Каждая иконка этой таблицы во время инсталляции копируется в отдельный файл на диске |
|
MsiFileHash |
Эта таблица хранит 128-разрядное хэш-значение для исходных файлов в пакете инсталляции |
Таблицы информации о программе
Таблицы этой группы содержат важную информацию о пакете инсталляции, используемую на протяжении всего процесса инсталляции. В таблице 4 приведена информация о назначении таблиц.
Таблица 4. Файловые таблицы программы
|
Имя таблицы |
Краткое описание |
|
Property |
Хранятся все свойства пакета инсталляции |
|
Binary |
Содержатся двоичные данные для иконок, растров и т. п. Также здесь хранятся данные для пользовательских операций |
|
Error |
Используется для поиска шаблонов форматирования при обработке ошибок. Installer имеет свой собственный механизм обработки ошибок |
|
Shortcut |
Здесь хранится вся информация, необходимая для создания файловых ярлыков |
|
ReserveCost |
Эта таблица содержит информацию о необходимом дисковом пространстве для каждого компонента приложения |
Доступ к msi-файлам программным способом
Для обеспечения программного управления базой данных, хранящейся в msi-файле, используется шаблон, приведенный в листинге 1. Необходимо отметить, что шаблон чтения данных отличается от шаблона коррекции данных. О нем будет рассказано отдельно.
Листинг 1. Шаблон доступа к базе в msi-файле
Set obj = CreateObject («WindowsInstaller.Installer»)
Set base = obj.OpenDatabase (MSI,Mode)
base.OpenView(SQL-query).Execute
base.Commit
В приведенном шаблоне в первой строке осуществляется подключение к COM-объекту, с помощью которого осуществляется доступ к базе данных.
На следующей строке осуществляется подключение к базе данных с помощью метода OpenDatabase, который имеет два аргумента. Первый из них – имя базы, которым является полный путь к msi-файлу. Второй – режим доступа к базе данных:
- 0 – только чтение;
- 1 – чтение / запись.
На третьей – реализовано выполнение задаваемого запроса. SQL-запрос задается с помощью метода OpenView, а выполнение запроса – с помощью метода Execute.
Напомним, что в SQL-запросе регистр названия полей и имен таблиц имеет значение.
В последней строке осуществляется запись сделанных изменений в базе с помощью команды Commit.
Работа с таблицами в orca.exe
Рассмотрим подробнее структуру таблиц, содержащихся в msi-файле. Orca – мини-редактор SQL-таблиц, хранящихся как составная часть дистрибутива.
С полями таблиц баз можно совершать следующие действия:
- чтение существующих полей;
- создавать новые поля;
- удалять поля;
- изменять поля.
Чтение существующих полей
Для реализации шаблона поиска используется шаблон (см. листинг 2), отличный от приведенного в листинге 1. Это объясняется тем, что запись, удаление, замена осуществляются у единичного поля, а вывод на экран осуществляется для всех полей.
Трансформация листинга осуществляется в третьей строке листинга 1. Она разбивается на две подстроки – это строки 3 и 4 в листинге 2. Здесь разносятся методы OpenView и Execute.
Далее осуществляется чтение массива строк. Обратите внимание на то, что в запросе SELECT поля могут быть перечислены только по именам. Значение «*» в данном случае не работает. А во время чтения данных необходимо указывать нумерацию полей (Record.StringData(1)), начиная с единицы (1).
В листинге 2 приведен пример чтения всех полей (Property, Value) таблицы Property файла ACDSee 10 Photo Manager.msi:
Листинг 2. Чтение полей в указанной таблице
Set obj = CreateObject(«WindowsInstaller.Installer»)
Set ob = obj.OpenDatabase («C:ACDSeeACDSee 10 Photo Manager.msi»,0)
set View=ob.OpenView(«SELECT Property, Value FROM Property»)
View.Execute
Do
Set Record = View.Fetch
If Record Is Nothing Then Exit Do
Wscript.Echo Record.StringData(1) + vbTab+vbTab+Record.StringData(2)
Loop
Set View = Nothing
Создание новых полей
Создание новых полей используется достаточно часто, например, для того чтобы записать в дистрибутив программы ее серийный номер. Для этого необходимо добавить в таблицу Property поле PIDKEY с соответствующим значением, содержащим серийным номер продукта. Чтобы добавить новое поле, необходимо установить курсор на нужную таблицу (см. рис. 3) и, нажав в произвольной ее части правую кнопку мыши, выбрать пункт Add Row или нажать комбинацию клавиш . В появившемся диалоговом окне будет приведен список доступных полей. Необходимые значения можно присвоить в этом же окне.

Рисунок 3. Изменение параметра
Аналогичную операцию можно выполнить программным способом (см. листинг 3). Для этого необходимо вызвать объект WindowsInstaller.Installer. На основе шаблона, приведенного в листинге 1, сформируем листинг 3. В качестве второго параметра метода OpenDatabase необходимо указать 1, поскольку выполняется операция записи данных.
Самым сложным в данном листинге правильно сформировать запрос. Особенность запроса INSERT INFO заключается в том, что в первых по счету скобках, в которых указывается название полей, имя поля должно быть задано с родителем. Все имена параметров в запросе указываются без кавычек; все присваиваемые значения – в кавычках и, наконец, названия полей и таблиц чувствительны к регистру.
Листинг 3. Создание нового атрибута в таблице
Set a = CreateObject(«WindowsInstaller.Installer»)
Set b = a.OpenDatabase («C:acdseeACDSee 10 Photo Manager.msi»,1)
b.OpenView(«INSERT INTO Property ?
(Property.Property, Property.Value) VALUES («PIDKEY», «1234567890»)»).Execute
b.Commit
Удаление существующих полей из таблицы
Удаление какого-либо поля осуществляется в соответствии со следующим алгоритмом:
- установить курсор на таблицу, в которой необходимо удалить параметр;
- установить курсор на удаляемый параметр в таблице;
- нажать кнопку на клавиатуре или правую кнопку мыши, а в контекстном меню – DELETE;
- подтвердить намерение удалить параметр.
Эту же задачу можно решить программным способом (см. листинг 4), используя шаблон 1. Для обеспечения возможности записи в таблице необходимо установить второй параметр метода OpenDatabase равным единице (1).
Листинг 4. Удаление существующего атрибута в таблице
Set a = CreateObject(«WindowsInstaller.Installer»)
Set b = a.OpenDatabase («C:acdseeACDSee 10 Photo Manager.msi»,1)
b.OpenView(«DELETE FROM Property WHERE «PIDKEY»=»1234567890″)»).Execute
b.Commit
Изменение значений существующих полей
Изменение значения осуществляется путем установки курсора в необходимую ячейку двойным щелчком левой кнопки мыши (см. рис. 3).
Программное изменение свойства осуществляется по тем же правилам. По сравнению с предыдущими двумя случаями, изменяется только запрос.
В листинге 5 осуществляется отключение компонента Device Detector.
Листинг 5. Изменение значений существующих полей таблицы
Set a = CreateObject(«WindowsInstaller.Installer»)
Set b = a.OpenDatabase («C:acdseeACDSee 10 Photo Manager.msi»,1)
b.OpenView(«UPDATE Feature SET Level=»0″ WHERE Feature=»DevDetect»»).Execute
b.Commit
Заключение
Внимательно изучив предложенный вариант, читатель без труда сможет либо с помощью сценария на VBScript, либо с помощью программы orca.exe значительно облегчить себе задачу массовой установки программного обеспечения, что позволит сэкономить массу времени и сил.
Мой мир
Вконтакте
Одноклассники
Google+
| description | ms.assetid | title | ms.topic | ms.date |
|---|---|---|---|---|
|
Orca.exe is a database table editor for creating and editing Windows Installer packages and merge modules. |
4dddc262-1271-4e00-a986-53380b957b17 |
Orca.exe |
article |
09/10/2021 |
Orca.exe is a database table editor for creating and editing Windows Installer packages and merge modules. The tool provides a graphical interface for validation, highlighting the particular entries where validation errors or warnings occur.
Installation
This tool is only available in the Windows SDK Components for Windows Installer Developers. It is provided as an msi installation file in a sub directory of bin under the installed Windows Kits. The installer name may be localized, such as Orca-x86_en-us.msi. After installing the Windows SDK Components for Windows Installer Developers, double click the msi file to install Orca.exe.
Syntax
orca [<options>][<source file>]
Command Line Options
Orca.exe uses the following case-insensitive command line options. A slash delimiter may also be used in place of a dash.
| Option | Description |
|---|---|
| -q | Quiet mode |
| -s | <database> Schema database [«orca.dat» — default] |
| -? | Help dialog |
Orca.exe uses the following case-insensitive command line options with merge modules. A slash delimiter may also be used in place of a dash. When performing a merge the -f, -m and <sourcefile> are all required.
| Option | Description |
|---|---|
| -c | Commit merge to database if no errors. |
| -! | Commit merge to a database even if there are errors. |
| -m | <module> Merge Module to merge into database. |
| -f | Feature[:Feature2] Feature(s) to connect to Merge Module. |
| -r | <directory id> Directory entry for the module root redirection. |
| -x | <directory> Extract files to an image under the directory. |
| -g | <language> Language used to open a module. |
| -l | <log file> File to use as a log, append if it already exists. |
| -i | <directory> Extract files to the source image under the directory. |
| -cab | <filename> Extract the MSM cabinet to file. |
| -lfn | Use Long File Names during the extraction. |
| -configure | <filename> Configure the module using data from a file. |
Remarks
If Orca displays the error message “The validation engine could not start” and the application event ID is 1044, view Event Logging (Windows Installer) for a detailed event message.
Related topics
-
Windows Installer Development Tools
-
Released Versions, Tools, and Redistributables
#MSI
#MST
What’s the most efficient way to perform quick edits to an MSI package?
There are various tools that can help you edit an MSI package, but ORCA is the most popular free MSI editor available to achieve this, since it can help to validate and debug errors.
However, it is not a secret that ORCA is a bit challenging to use since you have to perform modifications to the MSI database.
But, we do have a solution for that! Advanced Installer allows you to edit MSI files within its GUI without making any changes in the background.
We will show you how you can use Advanced Installer to edit MSI files as an alternative or complement to the ORCA tool.
But first, let’s see how we can edit the three most common MSI package edit operations using ORCA.
- Modify registry keys,
- Add files,
- Change property values.
Without further ado, let’s download ORCA to get started.
How to download and install Orca — the free MSI Editor
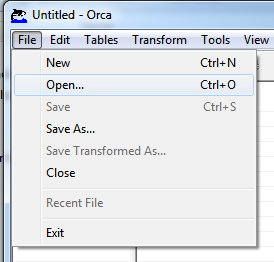
In the past, Orca used to be available as standalone software but these days, you can only install it as a component of Microsoft Windows SDK. To download and install ORCA, follow these steps:
1. Download Microsoft Windows SDK here.

2. Open the installation, go through the basic wizard, and select the MSI TOOL feature when prompted.

3. Go to the SDK install location and run the Orca.msi. This will automatically install ORCA.

4. A start-up shortcut should be created – and Orca will be located in C:Program Files (X86)Orca

How to Edit Your MSI Package using Orca?
Now that you have Orca installed, you can navigate to the location where your MSI package is stored, right-click on it and select Edit with Orca.

This will load your MSI database package into the Orca interface.
Before you start making changes, you should be aware that directly editing vendor MSI packages is NOT recommended.
As a best practice, we suggest using a transform file to save and apply any modifications you make to the MSI when the installation is triggered.
To do that with ORCA, click on Transform/New Transform.

We’re all set – now, we can move on to performing the three most common modifications on an MSI.
1. Change a property value with ORCA
For this example, we want to change the value of the property DISPLAYLANGUAGE which controls the application interface display language.
From the left pane:
1. Navigate to the Property Table.
2. Locate the DISPLAYLANGUAGE property.
3. Double click on the value.
4. Replace it with the value NL.

2. Add registry key with ORCA
For this example, we want to add a registry key that disables the auto-update function of our application.
Let’s assume that the registry key is CheckForUpdate and the value is False. It should be present in the HKLM hive under the following path Software[Manufacturer][ProductName]Settings
To achieve this, navigate to the Registry table, right-click inside the table and choose “Add Row”.

Fill in each row with the corresponding value (as seen below):
- Registry: the identification name of our registry
- Root: the hive (-1) corresponding to HKLM
- Key: the registry key itself
- Name: the name of the registry
- Value: the name’s value that we want it to have
- Component: to which component we want our registry to belong (components can be displayed under the Component table).

3. Add a file with ORCA
For this example, we want to add a file containing additional application settings named settings.config.
To do this, you need to edit the following tables:
- Component;
- FeatureComponents;
- File, Media;
- And if the table is already present, MSIFileHas.
3.1. Component Table
Go to the Component table and add a new row. Complete the information accordingly.
Component: The identification name of the component. Must be unique
ComponentID: For this, use https://www.guidgenerator.com/ to generate a GUID
Directory_: The Directory name where the file will be located
Attributes: Enter 0. For more information, check MSI Documentation

3.2. Feature Component Table
Go to the FeatureComponent table and add a new row. It’s time to link the created component to a feature.

3.3. File Table
Go to the File table and add a new row. It’s time to associate the file to the recently created component. Complete the information accordingly.
- File: File name (Settings.config)
- Component_: The component created on the previous step (ConfigFile)
- FileName: Enter both short and long filename separate by the vertical bar char (|) Short filename can be found by opening a cmd, navigating to the folder containing the file, and typing the dir /x command
- FileSize: The file size in bytes. You can right-click on the file and type property
- Version: Only if needed
- Language: Only if needed
- Attributes: 8192 for uncompressed file. For more information, check MSI Documentation
- Sequence: Should have the value of the current biggest sequence number in table +1.

How to Edit Your MSI Package using Advanced Installer?
Let’s see how we can perform quick-edits from Advanced Installer’s user interface – extremely easy and intuitive.
![]() If you are familiar with the Advanced Installer tool I would suggest you check the predefined support for editing an MSI file using our dedicated dialog: MSI Quick-Edit Mode.
If you are familiar with the Advanced Installer tool I would suggest you check the predefined support for editing an MSI file using our dedicated dialog: MSI Quick-Edit Mode.
Similar to Orca, to edit your MSI package, right-click it and select “Open with Advanced Installer”.

Once the MSI database has loaded in Advanced Installer, you will notice a left menu pane where you will find all the options you need to directly edit your MSI.
The changes you perform in the GUI will be automatically reflected in all the related tables from the MSI. This will save you time from manually editing each MSI table and decrease the chance of human error.
1. Change an MSI property value with Advanced Installer
1.1 From the left pane, navigate to the Property tab,
1.2. Find the property you want to modify and double click on it to edit its value.

2. Add registry key to your MSI
2.1 From the left pane, navigate to the Registry tab,
2.2 Right-click on the registry path,and choose New Value,

2.3. Fill in the Name and the Data field with the corresponding value.

3. Add a file to your MSI package
When you directly modify an MSI with Advanced Installer, Advanced Installer will update the MSI during the build operation following best practices and rules such as “Short-names in the File Table”, “Separating components for each EXE, DLL, and OCX file”, “Setting the key path for each component”.
Advanced Installer generates builds in accordance with ICE Validation Standard and industry best practices gathered in over 15 years of constant contact with our customers.If you are eager to test it for yourself, try our 30-day full feature trial.
When you add any files into the MSI by using a transform file and saving it, a cabinet file will be created alongside the MST. This is NOT an Advanced Installer custom implementation, but a default behavior of MSI databases.
Conclusion
Now you know two ways to edit your MSI packages.
Both Orca and Advanced Installer are perfectly capable of editing an MSI.
However, as you can see, editing your MSI directly through the Advanced Installer GUI saves time and prevents you from having to completely repackage your MSI — which is especially important when making quick edits to your MSI package.
We hope you try this method and let us know what you think.
If you want to see how the MSI Editor works, give it a try through the Advanced Installer 30-day full-featured free trial.
Subscribe to Our Newsletter
Sign up for free and be the first to receive the latest news, videos, exclusive How-Tos, and guides from Advanced Installer.
Popular Articles
The Orca MSI Editor, which is part of the Microsoft Windows SDK for Windows 7, allows you to edit an MSI file to change various settings and disable features.
Contents
- Installing the Orca MSI editor
- Customizing an MSI package
- Wrap-up
- Author
- Recent Posts

Alexander is a Systems Engineer and IT Project Manager with a strong background in Active Directory, PowerShell, System Center, and VMware. You can connect with him on LinkedIn and learn more about the services offered by his consulting company Alxco Consulting
Customizing MSI packages has gotten much easier over the years with the help of vendor-provided packaging and deployment guides. But many of these guides leave out how to disable features and settings that would be useful to systems administrators, such as disabling automatic updates and cleaning up shortcuts. In this guide, I am going to go over the process of customizing MSI packages using Orca.
Installing the Orca MSI editor
First, download the Microsoft Windows SDK for Windows 7 and .NET Framework 3.5 SP1. You will need Microsoft .NET Framework 3.5 installed as a prerequisite. Run through the installer, and on the Installation Options page, uncheck everything except the Windows Development Tools (it will automatically install the subcomponents too).

Windows SDK installation options
When the installation finishes, it places the installer for Orca under C:Program FilesMicrosoft SDKsWindowsv7.0Bin. Run the installer and choose the Complete option. Orca should now be installed and accessible from both the Start menu and the right-click menu for MSI files.

Orca Start menu shortcut
Customizing an MSI package
For this guide, I am going to customize Cisco WebEx Recorder and Player. Right-click the downloaded MSI package and select the Edit with Orca option. This will open the MSI package in Orca for editing. For this guide, we are going to edit the MSI package to achieve the following:
- Place the application shortcut in its own Start menu folder
- Do not create an application shortcut on the desktop
- Disable automatic and manual updates
Before you start editing the MSI file, you need to create a transform to apply during the installation. Per best practice guidelines, you should never edit an MSI package directly. Instead, generate a transform that will apply the customizations to avoid a broken installation. Navigate to the menu bar and go to Transform > New Transform.
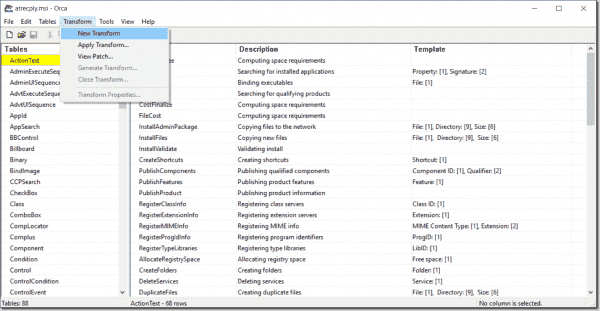
Create a new transform
A «()» will appear next to the name of the MSI package in the window title bar to show it has generated a transform. Looking at the Tables navigation pane, you will notice there are several options.
With most MSI packages, you are only going want to focus on the following: CheckBox, Directory, Launch Condition, Property, and Shortcut. CheckBox controls the settings checked by default when running the installer both attended and unattended.
Directory controls the settings that define all the directories the installer uses. Launch Condition controls the conditions or prerequisites needed before the installer can run. Property controls application options during and after installation. Application vendors will often publish guides that list supported properties you can modify through the command line. Shortcut controls where the installation creates shortcuts.
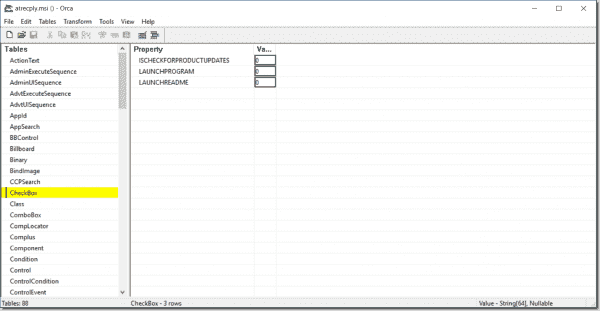
Navigate to the Tables column and select the CheckBox table. Set the properties ISCHECKFORPRODUCTUPDATES, LAUNCHPROGRAM, and LAUNCHREADME to 0. Note that 0 = No and 1 = Yes.
CheckBox table
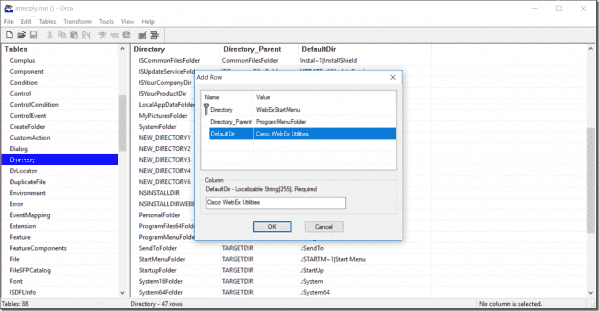
While still in the Tables column, select the Directory table. You will notice there are quite a few directories. Fortunately, you don’t need to worry about any of them as you will be creating your own. Go to the menu bar and select Tables > Add Row, and then add the following to each field:
- Directory: WebExStartMenu
- Directory_Parent: ProgramMenuFolder
- DefaultDir: Cisco WebEx Utilities
Directory refers to the name of the directory row you added; you will use this later when customizing shortcuts. Directory_Parent refers to the root directory where it will add your directory, which in this case is the %PROGRAMDATA%MicrosoftWindowsStart MenuPrograms directory. DefaultDir refers to the actual name of the directory you would like to create, which in this case is Cisco WebEx Utilities.
Directory table
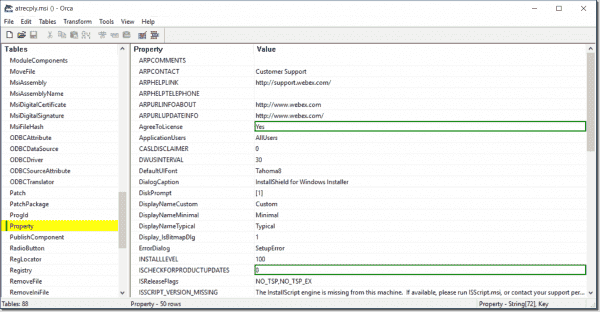
While still in the Tables column, select the Property table. Set the properties listed below to the following values:
- AgreeToLicense = Yes
- ISCHECKFORPRODUCTUPDATES = 0
- RebootYesNo = No
By setting these values, you are suppressing any first-run EULAs, disabling the application from checking for updates after installing, and preventing the application from telling Windows it needs to restart.
Property table
Finally, while still in the Tables column, select the Shortcut table. Right-click the two rows that have DesktopFolder as the directory and select the Drop Row option. This will prevent the installation from generating desktop shortcuts.

Drop Row option
For the remaining two rows, replace the newfolder1 directory with WebExStartMenu (the name of directory we added earlier).
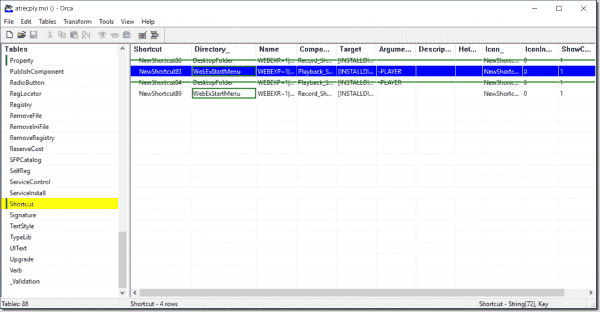
Shortcut table
With all the customizations specified, it is time to save the transform file. In the menu bar, go to Transform > Generate Transform. Save the transform as something memorable and short, such as WebEx_Custom.mst.
Now it is time to install the application using the generated transform. Open a command prompt as an administrator and cd to the directory where your MSI and transform are located. Enter the following command:
msiexec.exe /i “atrecply.msi” /qb /norestart /L*v C:Cisco_WebEx_Utilties.log TRANSFORMS=WebEx_Custom.mst
When the installation finishes, you should notice there are no desktop shortcuts, and that it has created the application Start menu shortcuts in the Cisco WebEx Utilities folder.
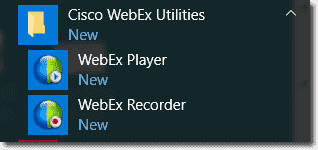
Cisco WebEx Utilities
Wrap-up
Although there are numerous MSI packages with different properties, shortcuts, and directories, the customization process is essentially the same. The benefit of using Orca to generate transforms is that it eliminates the need for lengthy batch scripts that perform actions such as deleting shortcuts and editing the Windows Registry to disable settings post-installation.
![]()
![]()
How to customise MSI installers
An MSI file is a software installation package format that can include files, commands, instructions, registry settings etc. The following steps detail how to open an MSI file and customise…

[Download] Orca MSI Editor
Orca MSI Editor is a tool that allows you to open an MSI install file and edit the properties — such as what commands are ran during the installation, what…

How to silently install and configure Skype using SCCM
The following process has been tested and confirmed as working with Skype 6.16 and Configuration Manager (SCCM) R2. The process involves downloading the MSI installer for Skype and customising it to suit your…
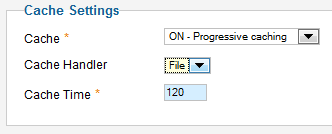
[SOLVED] Joomla 2.5 – File cache option missing
Problem You’re attempting to configure ‘File’ caching in Joomla 2.5 and can not see or select ‘File’ under the ‘Cache Handler’ cache options Solution This problem usually occurs when the…