Содержание
- Профессиональная версия
- Резюме
- Компьютер, полезные советы по компьютеру !
- Поиск по сайту
- Разделы
- Популярное
Для любого пользователя, желающего быть с компьютером на «ты», без утилит разбиения диска и восстановления данных не обойтись. Список этих программ достаточно большой, есть из чего выбирать. Если вы призадумались над приобретением для себя или организации утилиты этого класса, то присмотритесь к Paragon Hard Disk Manager от компании Paragon Software Group (System Utilities), у которого совсем недавно вышла новая версия — 8.5. Среди многих других достоинств этой версии — поддержка новой операционной системы Microsoft Vista.
Paragon Hard Disk Manager 8.5 — программа, осуществляющая полный цикл обслуживания жесткого диска:
- управление процессом загрузки;
- разбиение диска;
- операции копирования и восстановления;
- обеспечение безопасности системы и данных;
- вывод диска из эксплуатации.
Paragon Hard Disk Manager 8.5 вышел в двух редакциях: персональной и профессиональной. Нам на тестирование досталась персональная версия, а об отличиях ее от профессиональной мы расскажем ниже.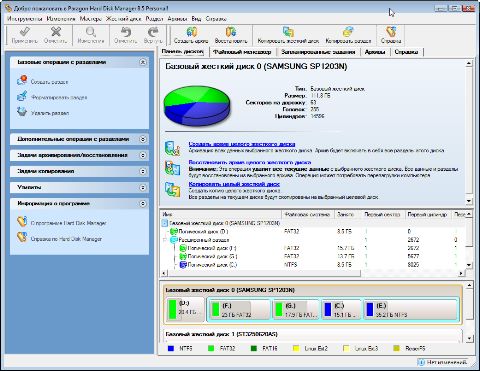
Hard Disk Manager имеет приятный современный интерфейс, в котором, впрочем, есть недостатки по мелочам. В частности, при создании разделов на больших дисках возникает проблема задания точных размеров дисков. Размер задается ползунковым регулятором, который не позволяет точно задать требуемый раздел, а полей для численного ввода размера нет. Особенно это неудобство заметно на современных жестких дисках большой емкости. И чем больше диск по объему, тем труднее попасть в нужные размеры. Конечно, можно потом воспользоваться функцией изменения размера разделов и подкорректировать эти размеры, но это лишние телодвижения.
И еще одно легкое замечание. Смена видов работ реализована в виде вкладок в главном окне программы. Первой вкладкой разработчики выбрали «Панель дисков». Работа по разметке HDD — важная, но разовая. Главное же в Paragon Hard Disk Manager — выполнение операций архивирования в текущей работе, а также восстановление данных из архива. Переключиться на новую вкладку — не проблема, но лучше все же было бы первой сделать вкладку «Файловый менеджер». Или пусть бы программа открывалась с последней использовавшейся вкладкой. А может, это просто я такой излишне привередливый?
Создание дисков выполняется в отложенном режиме. Это означает, что пользователь может осуществлять форматирование жесткого диска в виртуальном режиме, без внесения реальных изменений на HDD. После создания всего цикла операций можно проверить правильность выбранных команд, а затем нажать на одну единственную кнопку «Применить», и программа начнет выполнение всех заданных операций, которые выполняются довольно быстро. После перезагрузки все диски станут видны в системе.
Теперь архивирование. Алгоритм выполнения архивирования типичен: выбирается объект для архивирования, затем место для хранения архива, затем параметры процесса. И выполняется само архивирование. В новой версии персональной редакции добавлена возможность инкрементного архивирования (то есть копирование лишь тех секторов, которые были изменены с момента получения последней копии). Это существенно повышает скорость процедуры архивирования, что особенно важно при ежедневной операции сохранения данных.
Со временем у любого персонального пользователя собирается целый пакет архивов разных дат. (Что уж тут говорить о корпоративном использовании программы?) Порой бывает трудно разобраться в том, что уже можно удалить, а какую копию нужно попридержать. Для удобства пользователей в обеих редакциях (персональной и профессиональной) реализована функция «База архивов». Также в новой версии появилась возможность создавать обширный текстовый комментарий к каждому из архивов. Теперь вы сможете, не надеясь на свою память, фиксировать в текстовом виде все необходимые заметки для каждого из архивов.
В механизме восстановления данных тоже есть несколько важных нововведений. Прежде всего надо отметить возможность восстановления данных из архивной капсулы без создания аварийных дисков. Как известно, программы восстановления данных могут восстанавливать архивные копии даже при «убитой» операционной системе. Но для этого им нужно включить в БИОС загрузку с CD и иметь сам аварийный компакт-диск.
При использовании Paragon Hard Disk Manager 8.5 для восстановления теперь уже не нужно будет менять настройки параметров загрузки, а также беспокоиться о сохранности аварийного диска. Да и сам CD-привод иметь уже не обязательно. Загрузка компьютера и выполнение любых операций восстановления в случае повреждения операционной системы или иных проблем с загрузкой может осуществляться непосредственно из архивной капсулы.
Другая особенность — функция «Сжать». В некоторых случаях приходится восстанавливать данные на разделы, которые по размеру меньше изначальных, но обладают достаточным местом для восстановления самих данных. В этой ситуации восстановление данных раньше было невозможно. Но теперь это можно сделать без труда.
Восстановление раздела целиком — это, в общем-то, тоже редкая операция, как и разметка диска. Гораздо чаще возникает необходимость в восстановлении каких-то конкретных, частных данных, а не целого образа. Для такого восстановления используется функция подключения архива раздела. При таком подключении архива все дальнейшие операции по восстановлению можно выполнять средствами операционной системы Windows — простая функция копирования.
Все операции в программе выполняются с помощью мастеров. Некоторые из них могут работать в расширенном, для опытных пользователей, режиме. Мастера помогут пользователю правильно и в нужной последовательности выполнить операции по работе с диском и работе с архивами.
Профессиональная версия
Изменения в профессиональной версии числом поменьше, чем в персональной. Потому что часть нововведений (в частности, инкрементное копирование) уже присутствовали в профессиональной редакции. Но и здесь разработчикам есть чем похвастать:
- функция «Циклическое резервное копирование», позволяющая регулярно создавать резервные архивы и автоматически управлять ими;
- технология Hot Backup для динамических томов.
Резюме
Paragon Hard Disk Manager — удобный и практичный инструмент работы с жесткими дисками и архивирования данных для пользователей любого уровня подготовки. Он одинаково хорошо может сохранять данные как персонального пользователя, так и на предприятии. Особо ценным новшеством в новой версии можно назвать возможность восстановления данных без создания аварийного диска, функцию инкрементного копирования, а также поддержку новой операционной системы Windows Vista.
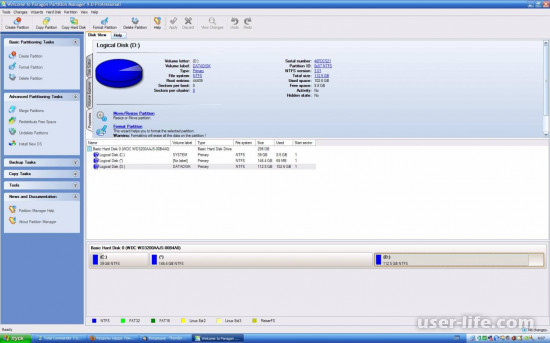
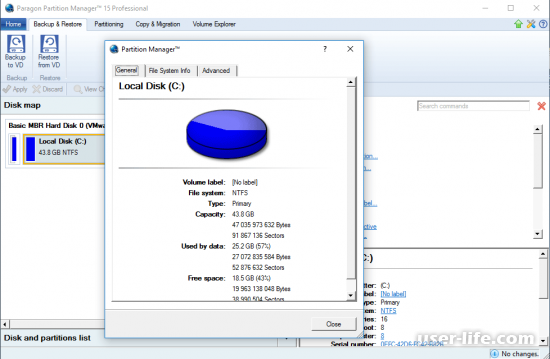
Всем привет! Начиная работу с Paragon Partition Manager в главном окне программы видим простой дизайн, список дисков и структуру его разделов.
Меню имеет состав из нескольких областей. Панель операций находится в верхней строке. При выделении конкретного раздела в правой области интерфейса выводится список доступных действий с ним.
Правая нижняя панель показывает информацию о накопителе, на который в настоящее время установлена ОС. Можно увидеть подробные данные не только об объеме и занятом дисковом пространстве HDD, но и технические характеристики, подразумевающие количество секторов, головок и цилиндров.
Настройки
Во вкладке настроек пользователь может полностью настроить все процессы под себя, используя для этого стандартные способы, предложенные программой. Paragon Partition Manager предоставляет расширенные настройки практически для каждой операции, которые охватывают функции от архивирования до внесения информации в лог-файлы.
Интересная особенность в том, что в этой вкладке можно настроить отправку писем в виде отчетов на вашу электронную почту. Провести налаживание этого процесса можно таким образом, что программа будет отправлять информацию после каждой выполненной операции в графическом виде или в формате HTML.
Программа дает возможность создавать разделы и их конвертировать в такие файловые системы: FAT, NTFS, Apple NFS. Можно также изменять размер кластера во всех предложенных форматах.
Присутствует возможность конвертирования HFS+ в NTFS. Применяется эта операция в тех случаях, когда данные изначально хранились в ОС Windows в формате HFS+. Функция используется с учётом того, что эта файловая система не поддерживает стандартный тип системы Mac OS X, а также сам NFTS. Разработчики уверяют в том, что операция преобразования полностью безопасна с точки зрения сохранения данных, имеющихся в исходной файловой системе.
Расширение и сжатие диска
Paragon Partition Manager позволяет осуществлять операции сжатия или расширения разделов диска, если у него имеется свободное дисковое пространство. Как объединение, так и обрезка могут применяться даже в том случае, когда разделы имеют разные размеры кластеров. Исключением служит файловая система NTFS, с которой ОС Windows не сможет загрузиться, учитывая то, что размер кластера формата равен 64 КБ.

Программа предоставляет возможность записать файл-образ с загрузочной версией Partition Manager. DOS-версия позволяет воспользоваться только основными функциями. Это может помочь пользователю оптимизировать свой ПК в тех случаях, когда его ОС по какой-то причине не запускается.
Осуществлять операции в данной DOS-версии можно и на Linux-системах, нажав на соответствующую кнопку меню. Но к сожалению, в данном случае программа работает некорректно, поэтому, как альтернативу, можно использовать раздел в меню – «PTS-DOS».
Функция подключения образа жесткого диска поможет перенести данные из программы в виртуальный раздел. Поддерживаются все типы виртуальных дисков, включая образы VMware, VirtualBox, Microsoft Virtual PC. Программа также работает с такими файлами, как Parallels-образы и собственные архивы Paragon. Так, можно без проблем осуществить экспорт данных из перечисленных программ в разделы дисков, отображаемые стандартными инструментами ОС.
Запускаем программу Paragon Partition Manager
1. Если при запуске программы появилось меню быстрого запуска, то для вывода основного окна Partition Manager нужно выбрать «Режим для опытных пользователей».
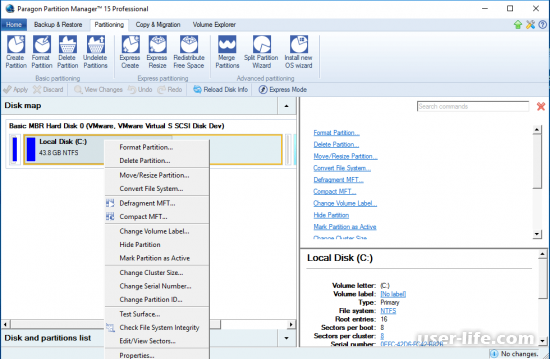
2. Далее открываем вкладку “Список разделов”, на ней выбираем “Панель дисков”. Теперь нажимаем правой кнопкой мыши по тому разделу, который мы хотим отредактировать. Появляется контекстное меню операций с разделами, в нем находим пункт «Переместить или изменить размер раздела» и щелкаем по нему.
3. В следующем окне в строке «Размер тома» вводим в Мб или Гб размер раздела, выбранного нами, а в строке «Свободное место после» вводим объем свободного дискового пространства после данного раздела. Чтобы подтвердить свое решение, кликаем по кнопке «Да».
4. Теперь в списке всех разделов, на панели дисков, мы видим новый сектор под названием «(Не размечен)» – это и есть образовавшееся свободное место на жестком диске. Далее из неразмеченной области нужно создать новый логический диск. Щелкаем правой кнопкой мыши на секторе «Не размечен», в появившемся меню кликаем по пункту «Создать раздел».
5. Далее нужно выбрать параметры раздела, который мы хотим создать: в строке выбора файловой системы для диска рекомендую выбрать тип NTFS, так как эта файловая система очень надежна, стабильна и почти не содержит ошибок, в отличие от систем FAT16 и FAT32. В строках, где нужно задать метку тома и букву диска, вводим метку «новый том» и только ту букву, которая не используется в названиях всех остальных разделов. Для применения параметров щелкаем по кнопке «Да».
6. Следующий шаг – кликаем в главном меню Partition Manager по вкладке «Изменения» и щелкаем по пункту «Применить изменения» в появившемся меню.
7. Откроется меню.
Щелкаем по кнопке «Да»
8. Ждем, пока осуществятся все до этого выбранные операции с заданным разделом.
9. Для завершения процесса перемещения раздела необходимо перезагрузить компьютер. Выбираем соответствующий вариант в открывшемся меню программы и ждем продолжения выполнения операции изменения логического диска.
10. Во время загрузки компьютера процессы создания нового раздела и изменения емкости выбранного диска окончательно завершатся, и после этого компьютер должен еще раз перезагрузиться автоматически.
11. После второй перезагрузки компьютера Windows проверит диски на наличие ошибок (не переживайте, здесь все должно завершиться без проблем) и далее произойдет обычная загрузка системы.
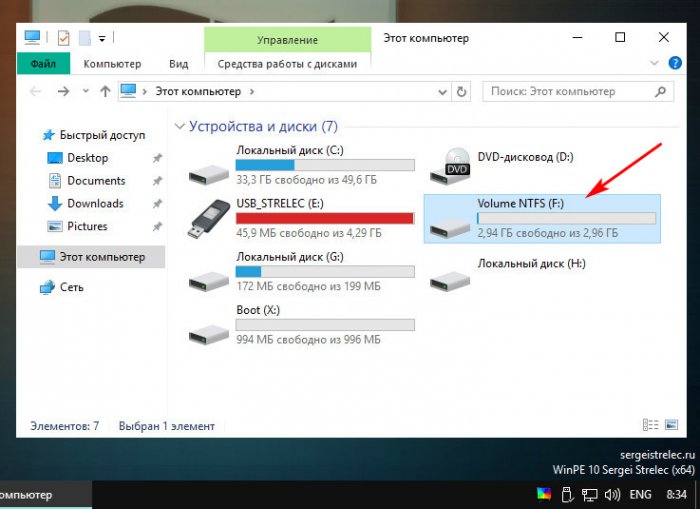
12. Окно программы Paragon Partition Manager должно появиться автоматически, сразу после запуска Windows. Теперь только что созданный новый раздел (на скриншоте это диск J) жесткого диска можно обнаружить на панели списка разделов, там же видим, что изменился размер диска, который мы выбрали в начале работы с программой.
Необходимый набор инструментов для работы с винчестером;
Удобное управление программой;
Русская версия;
Возможность преобразования HFS+/NTFS.
Загрузочная версия может некорректно работать.
Компьютер, полезные советы по компьютеру !
Поиск по сайту
Разделы
Популярное

После приобретения жесткого диска или замене на новый, каждый пользователь сталкивается с принятием ответственного решения: как разбить жесткий диск и нужно ли это делать? Бить по нему молотком не потребуется, а наоборот: чем аккуратнее обращаться, тем дольше срок службы. Разбиение или еще можно сказать разделение – это особая операция, предназначенная для подготовки диска к использованию с существующим программным обеспечением.
Наверняка вы обращали внимание, что у одного человека в операционной системе отображается сразу несколько жестких дисков, а у другого – всего один. Причем, если заглянуть внутрь системного блока, то физически винчестер (Жесткий диск) внутри системного блока (металлическая прямоугольная коробочка) один. Так откуда берутся остальные диски: C, D, E?
Все просто: помните мультфильм про портного, у которого барин заказал не одну, а 10 шапок из единственной шкуры? По похожему принципу работает разбивка, разделяя все доступное дисковое пространство на желаемое количество участков. Такая структура создается программой, поэтому в любой момент она может быть повторно изменена. Каждому разделу присваивается буквенное обозначение, в результате пользователь получает возможность работать с каждым из них, как с независимым диском.
Существует несколько программ для создания разделов, но наибольшей популярностью пользуются Paragon Partition Manager и Acronis Disk Director. Обе обладают понятным графическим интерфейсом, и даже новичок за несколько минут разберется, как разбить жесткий диск. На форумах не утихают споры о том, какая же из них лучше. Так вот, как Paragon, так и Acronis одинаково хорошо работают с разделами, поэтому выбор сводится к пользовательским предпочтениям.
Основной вопрос: «разбивать ли диск на несколько разделов или нет» не так прост, как может показаться на первый взгляд, и требует тщательного анализа всех «за и против». В данной статье мы рассмотрим, как разбить жесткий диск с помощью Paragon Partition Manager 11-й версии (PM).
Существует два способа использования программы:
1) если подготовить второй винчестер, причем с основного можно загрузиться в операционную систему Windows. Характерно для внешних устройств и персональных компьютеров;
2) при наличии лишь одного жесткого диска, с которым необходимо выполнить работу. Используется в основном с новыми ноутбуками.
В первом случае нужно предварительно скачать и установить дистрибутив программы Paragon PM. Затем, подключив новый винчестер, можно выполнить требуемые операции. Обратите внимание: создание нового раздела не разрушает файловую систему, поэтому всегда можно «отщипнуть кусок» от основного диска и создать дополнительный. Это справедливо и для обратного действия – объединения.
Скачать бесплатно, значит выбираем простое скачивание.
В архиве в текстовом документе находятся серийный номер и ключ продукта программы.
Во втором случае придется подготовить компакт-диск Paragon PM BootCD, так как пока нет установленной операционной системы. Загрузившись с него, пользователь получает те же возможности, что и в Windows-приложении. Иногда может потребоваться переключение в BIOS режима дискового контроллера с AHCI в IDE (если винчестер не обнаруживается программой).
Итак, начнем делить жесткий диск программой Paragon Partition Manager.
Скачиваем по ссылке выше программу, извлекаем ее, устанавливаем и запускаем.
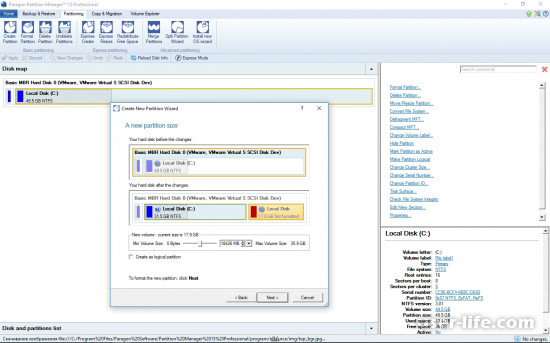
У нас откроется главное окно программы, где мы выбираем Partition Manager. Вот показано на изображении.

Далее у нас откроется список существующих разделов. В моем случае на моем жестком диске разделов два, диск C и диск D. У вас может быть всего один раздел, но для хранения файлов желательно создать еще хотя бы один диск как у меня. Если вы будете хранить все на одном системном разделе, где находится операционная система, то после сбоя или после переустановки системы ваши файлы удалятся.
На примере создания еще одного раздела я буду отрезать свободное место от диска D и создавать еще один раздел под буквой Q.
И так у нас открылся список существующих разделов, в котором я нажимаю правой кнопкой мыши на разделе D и выбираю пункт (Переместить/изменить размер раздела). Вот изображение.

У нас откроется дополнительное окно, где мы с помощью зажатой левой кнопкой мыши за край шкалы можем изменить размер, либо с помощью кнопок со стрелочками вверх или вниз. Это на ваше усмотрение.

После того как я уменьшил раздел на 50 Гб, в списке разделов появилась неразмеченная область размером в 50 Гб. Следующее что нам нужно сделать, так это создать раздел Q, в этой не размеченной области. Нажимаем правой кнопкой мыши в неразмеченной области и выбираем пункт (Создать раздел).

В следующем дополнительном окне вы должны указать букву раздела и подтвердить создание раздела, нажав кнопку (Да).

Далее нужно применить все действия, которые мы произвели с нашими разделами. Для этого нажимаем в левой верхней части программы зеленую галочку и в следующем окне подтверждаем назначенные действия.

После подтверждения откроется дополнительное окно, в котором нужно подтвердить перезагрузку компьютера для выполнения операции. После чего не пугайтесь, компьютер перезагрузится, и программа вас попросит не перезагружать и не отключать компьютер от сети пока не выполнятся заданные задания, а так же проверит диски на наличие ошибок.

После того как программа выполнит задание, у вас появится новый раздел под буквой Q, либо с буквой которую вы задали.

Таким образом, можно подготовить сразу несколько разделов. Важно: данные действия являются всего лишь задачами, чтобы выполнить которые следует вверху нажать зеленую галочку «Применить». Если что-то не так, то тогда заданные действия можно отменить (красный крестик). Вот так все просто: разобраться, как разбить жесткий диск, сможет любой пользователь компьютера.
Для любого пользователя, желающего быть с компьютером на «ты», без утилит разбиения диска и восстановления данных не обойтись. Список этих программ достаточно большой, есть из чего выбирать. Если вы призадумались над приобретением для себя или организации утилиты этого класса, то присмотритесь к Paragon Hard Disk Manager от компании Paragon Software Group (System Utilities), у которого совсем недавно вышла новая версия — 8.5. Среди многих других достоинств этой версии — поддержка новой операционной системы Microsoft Vista.
Paragon Hard Disk Manager 8.5 — программа, осуществляющая полный цикл обслуживания жесткого диска:
- управление процессом загрузки;
- разбиение диска;
- операции копирования и восстановления;
- обеспечение безопасности системы и данных;
- вывод диска из эксплуатации.
Paragon Hard Disk Manager 8.5 вышел в двух редакциях: персональной и профессиональной. Нам на тестирование досталась персональная версия, а об отличиях ее от профессиональной мы расскажем ниже.
Hard Disk Manager имеет приятный современный интерфейс, в котором, впрочем, есть недостатки по мелочам. В частности, при создании разделов на больших дисках возникает проблема задания точных размеров дисков. Размер задается ползунковым регулятором, который не позволяет точно задать требуемый раздел, а полей для численного ввода размера нет. Особенно это неудобство заметно на современных жестких дисках большой емкости. И чем больше диск по объему, тем труднее попасть в нужные размеры. Конечно, можно потом воспользоваться функцией изменения размера разделов и подкорректировать эти размеры, но это лишние телодвижения.
И еще одно легкое замечание. Смена видов работ реализована в виде вкладок в главном окне программы. Первой вкладкой разработчики выбрали «Панель дисков». Работа по разметке HDD — важная, но разовая. Главное же в Paragon Hard Disk Manager — выполнение операций архивирования в текущей работе, а также восстановление данных из архива. Переключиться на новую вкладку — не проблема, но лучше все же было бы первой сделать вкладку «Файловый менеджер». Или пусть бы программа открывалась с последней использовавшейся вкладкой. А может, это просто я такой излишне привередливый?
Создание дисков выполняется в отложенном режиме. Это означает, что пользователь может осуществлять форматирование жесткого диска в виртуальном режиме, без внесения реальных изменений на HDD. После создания всего цикла операций можно проверить правильность выбранных команд, а затем нажать на одну единственную кнопку «Применить», и программа начнет выполнение всех заданных операций, которые выполняются довольно быстро. После перезагрузки все диски станут видны в системе.
Теперь архивирование. Алгоритм выполнения архивирования типичен: выбирается объект для архивирования, затем место для хранения архива, затем параметры процесса. И выполняется само архивирование. В новой версии персональной редакции добавлена возможность инкрементного архивирования (то есть копирование лишь тех секторов, которые были изменены с момента получения последней копии). Это существенно повышает скорость процедуры архивирования, что особенно важно при ежедневной операции сохранения данных.
Со временем у любого персонального пользователя собирается целый пакет архивов разных дат. (Что уж тут говорить о корпоративном использовании программы?) Порой бывает трудно разобраться в том, что уже можно удалить, а какую копию нужно попридержать. Для удобства пользователей в обеих редакциях (персональной и профессиональной) реализована функция «База архивов». Также в новой версии появилась возможность создавать обширный текстовый комментарий к каждому из архивов. Теперь вы сможете, не надеясь на свою память, фиксировать в текстовом виде все необходимые заметки для каждого из архивов.
В механизме восстановления данных тоже есть несколько важных нововведений. Прежде всего надо отметить возможность восстановления данных из архивной капсулы без создания аварийных дисков. Как известно, программы восстановления данных могут восстанавливать архивные копии даже при «убитой» операционной системе. Но для этого им нужно включить в БИОС загрузку с CD и иметь сам аварийный компакт-диск.
При использовании Paragon Hard Disk Manager 8.5 для восстановления теперь уже не нужно будет менять настройки параметров загрузки, а также беспокоиться о сохранности аварийного диска. Да и сам CD-привод иметь уже не обязательно. Загрузка компьютера и выполнение любых операций восстановления в случае повреждения операционной системы или иных проблем с загрузкой может осуществляться непосредственно из архивной капсулы.
Другая особенность — функция «Сжать». В некоторых случаях приходится восстанавливать данные на разделы, которые по размеру меньше изначальных, но обладают достаточным местом для восстановления самих данных. В этой ситуации восстановление данных раньше было невозможно. Но теперь это можно сделать без труда.
Восстановление раздела целиком — это, в общем-то, тоже редкая операция, как и разметка диска. Гораздо чаще возникает необходимость в восстановлении каких-то конкретных, частных данных, а не целого образа. Для такого восстановления используется функция подключения архива раздела. При таком подключении архива все дальнейшие операции по восстановлению можно выполнять средствами операционной системы Windows — простая функция копирования.
Все операции в программе выполняются с помощью мастеров. Некоторые из них могут работать в расширенном, для опытных пользователей, режиме. Мастера помогут пользователю правильно и в нужной последовательности выполнить операции по работе с диском и работе с архивами.
Профессиональная версия
Изменения в профессиональной версии числом поменьше, чем в персональной. Потому что часть нововведений (в частности, инкрементное копирование) уже присутствовали в профессиональной редакции. Но и здесь разработчикам есть чем похвастать:
- функция «Циклическое резервное копирование», позволяющая регулярно создавать резервные архивы и автоматически управлять ими;
- технология Hot Backup для динамических томов.
Резюме
Paragon Hard Disk Manager — удобный и практичный инструмент работы с жесткими дисками и архивирования данных для пользователей любого уровня подготовки. Он одинаково хорошо может сохранять данные как персонального пользователя, так и на предприятии. Особо ценным новшеством в новой версии можно назвать возможность восстановления данных без создания аварийного диска, функцию инкрементного копирования, а также поддержку новой операционной системы Windows Vista.

В случае, когда пользователь устанавливает на свой компьютер новый жесткий диск или же напротив продает за ненадобностью старый, то без этой программы просто не обойтись. Ведь произвести разметку дискового пространства и «гарантировано» затереть информацию, которая хранилась на винчестере с помощью Windows средств — это довольно трудоемкие операции. И уж точно, не вариант для новичка. Поэтому вам, уважаемый читатель, просто необходимо знать о том, где можно скачать Парагон хард диск менеджер бесплатно. Вместе с тем, не лишней окажется и инструкция по использованию упомянутого софта.
Итак, что за «зверь» этот «Paragon Hard Disk Manager»?
Без всякого преувеличения: данное ПО — это своеобразная программная таблетка, которая избавит начинающего пользователя от «жесткой» головной боли: «Как поделить, удалить или же объединить дисковое пространство винчестера?». Более простой способ управлять параметрами и производить редактирование жесткого диска, что называется, нужно еще поискать.
Между тем, если вам по истечению ознакомительного (30-ти дневного) срока программа покажется, скажем прямо, дороговатой, то есть смысл воспользоваться альтернативной версией, которая распространяется на абсолютно бесплатной основе ( здесь вы можете прочесть о традиционном методе управления разделами жесткого диска).
Обратимся к очевидным преимуществам программы:
- Для того чтобы корректным образом произвести разметку дискового пространства теперь не нужно заходить в БИОС и создавать загрузочные флешки — «Paragon Hard Disk Manager» делит винчестер на разделы заданной емкости прямо в среде Windows и не требует от пользователя специализированных знаний из области компьютерного образования.

- Всего несколькими нажатиями можно провести процесс удаления конкретной партиции или же полностью форматировать жесткий диск.
- При использовании условно бесплатной — 15-ой версии Парагона — у пользователя появляется возможность использовать более десятка различных редакционных опций, как говорится, на любой вкус и практически для всех случаев «жизни HDD».
- Многофункциональность Парагона — это понятный интерфейс и легко воспринимаемые несведущим юзером опциональные названия служебных кнопок.
Безусловно, без ошибок наша жизнь стала бы весьма скучным занятием. Тем не менее, Парагон «вразумительно предупредит» об опасности нецелесообразных действий, а посему нет повода не испытать данный инструмент управления разделами жесткого диска, как говорится, в деле.
Однако помните, при использовании этого менеджера нужно быть предельно внимательным и осторожным… В руках незадачливого дилетанта даже такая версия (упомянутого выше продукта) как Paragon Partition Manager Free — это мощное программное оружие, способное напрочь вывести винчестер из строя.

Впрочем, последнее обстоятельство — удел глупых мира сего. Вам же, уважаемый читатель, ничто не угрожает, ведь у вас есть эта инструкция, которая поможет вам понять, основные моменты взаимодействия с программой. Что в конечном итоге приведет вас только к положительному результату.
Организация дискового пространства: практический пример
Итак, скачать «Paragon Hard Disk Manager» можно отсюда . Официальный источник требует пройти короткую регистрацию и только после подтверждения автоматического письма вы сможете скачать демо версию к себе на компьютер.
- Наведите маркер на раздел диска, который необходимо редактировать и с помощью правой кнопки мышки вызовите контекстное меню.

- В зависимости от того какую именно цель вы преследуете, выберете один из представленных пунктов.
Примечание: в нашем случае рассматривается варианты «создание раздела и форматирование определенной области HDD».
- После того как вы произвели все редакционные действия — нажмите на кнопку «Применить».

- Дождитесь завершения всех запущенных процессов.

- В завершение, нажмите клавишу «Закрыть».
Подводя итоги
Безусловно, представленные на фото примеры — это лишь ничтожная часть из того обширного списка функциональных возможностей коими обладает затронутый нами менеджер Парагон. Вместе с тем, для многих пользователей вполне будет достаточно его бесплатной версии «Paragon Partition Manager Free», которую можно загрузить вот отсюда . Впрочем, если ваши интересы в области компьютерной техники чисто профессиональные, то менеджер дисков 15-ой версии — это верный выбор. Железного здоровья вашему винчестеру!
Paragon Hard Disk Manager™ 2009 представляет собой интегрированный набор эффективных в работе инструментов, разработанных специально для разрешения большинства проблем, с которыми может столкнуться пользователь ПК. Его функциональность включает все аспекты жизненного цикла компьютера от выполнения практически любых операций с разделами до установки системы с нуля и обеспечения надежной защиты данных, а также безопасной утилизации жестких дисков.
В этом руководстве Вы найдете ответы на многие технические вопросы, которые могут возникнуть в процессе использования программы.
 Loading…
![]()
PARAGON Software GmbH
Heinrich-von-Stephan-Str. 5c 79100 Freiburg, Germany
Tel. +49 (0) 761 59018201 Fax +49 (0) 761 59018130
Internet www.paragon-software.com Email sales@paragon-software.com
Hard Disk Manager™ 15 Premium
User Manual
Copyright© 1994-2014 Paragon Software GmbH. All rights reserved.
|
2 |
|
|
Contents |
|
|
Introduction ………………………………………………………………………………………………………….. |
7 |
|
What’s New in Hard Disk Manager 15 …………………………………………………………………………………………… |
7 |
|
Product Components………………………………………………………………………………………………. |
8 |
|
Features Overview………………………………………………………………………………………………….. |
8 |
|
Features ………………………………………………………………………………………………………………………………….. |
8 |
|
User Friendly Fault Minimizing Interface……………………………………………………………………………………………………………….. |
8 |
|
Backup Facilities…………………………………………………………………………………………………………………………………………………. |
8 |
|
Restore Facilities………………………………………………………………………………………………………………………………………………. |
10 |
|
Copy Facilities ………………………………………………………………………………………………………………………………………………….. |
10 |
|
Virtualization Facilities………………………………………………………………………………………………………………………………………. |
11 |
|
Boot Management Facilities ………………………………………………………………………………………………………………………………. |
11 |
|
Partition/Hard Disk Management Facilities………………………………………………………………………………………………………….. |
11 |
|
File System Optimization Facilities ……………………………………………………………………………………………………………………… |
12 |
|
Wipe Facilities………………………………………………………………………………………………………………………………………………….. |
12 |
|
Automatization Facilities …………………………………………………………………………………………………………………………………… |
12 |
|
Auxiliary Facilities …………………………………………………………………………………………………………………………………………….. |
12 |
|
Supported Data Erasure Algorithms …………………………………………………………………………………………….. |
13 |
|
Supported Technologies…………………………………………………………………………………………………………….. |
13 |
|
Supported Virtualization Software ………………………………………………………………………………………………. |
14 |
|
Supported virtual hard drive types……………………………………………………………………………………………………………………… |
14 |
|
Supported virtual machines for P2V scenarios……………………………………………………………………………………………………… |
15 |
|
Supported File Systems ……………………………………………………………………………………………………………… |
15 |
|
Supported Media……………………………………………………………………………………………………………………… |
15 |
|
Getting Started…………………………………………………………………………………………………….. |
15 |
|
System Requirements ……………………………………………………………………………………………………………….. |
16 |
|
Installation ……………………………………………………………………………………………………………………………… |
17 |
|
First Start………………………………………………………………………………………………………………………………… |
18 |
|
Building Recovery Media……………………………………………………………………………………………………………. |
19 |
|
Booting from the Linux/DOS Recovery Media………………………………………………………………………………… |
19 |
|
Startup ……………………………………………………………………………………………………………………………………………………………. |
19 |
|
Boot menu ………………………………………………………………………………………………………………………………………………………. |
20 |
|
Booting from the WinPE Recovery Media ……………………………………………………………………………………… |
22 |
|
Startup ……………………………………………………………………………………………………………………………………………………………. |
22 |
Copyright© 1994-2014 Paragon Software GmbH. All rights reserved.
|
3 |
|
|
Basic Concepts……………………………………………………………………………………………………… |
24 |
|
System and Data Protection……………………………………………………………………………………………………….. |
24 |
|
File Backup versus Sector Backup……………………………………………………………………………………………………………………….. |
24 |
|
Backup Types …………………………………………………………………………………………………………………………………………………… |
25 |
|
Backup Storage ………………………………………………………………………………………………………………………………………………… |
27 |
|
Adaptive Restore ……………………………………………………………………………………………………………………………………………… |
28 |
|
System Virtualization ………………………………………………………………………………………………………………… |
29 |
|
Paragon Hot Processing & Volume Shadow Copy Service…………………………………………………………………. |
30 |
|
Offline versus Online Data Processing…………………………………………………………………………………………………………………. |
30 |
|
Paragon Hot Processing Technology …………………………………………………………………………………………………………………… |
30 |
|
Volume Shadow Copy Service ……………………………………………………………………………………………………………………………. |
31 |
|
pVHD Support………………………………………………………………………………………………………………………….. |
31 |
|
Agentless Protection of Hyper-V Guest Machines …………………………………………………………………………… |
31 |
|
Dynamic Disks………………………………………………………………………………………………………………………….. |
32 |
|
GPT versus MBR……………………………………………………………………………………………………………………….. |
33 |
|
uEFI Boot Challenges…………………………………………………………………………………………………………………. |
33 |
|
Apple Boot Camp ……………………………………………………………………………………………………………………… |
34 |
|
64-bit Support………………………………………………………………………………………………………………………….. |
34 |
|
Copy Operations ………………………………………………………………………………………………………………………. |
34 |
|
Drive Partitioning……………………………………………………………………………………………………………………… |
35 |
|
Data Sanitization………………………………………………………………………………………………………………………. |
35 |
|
Data Security Standards …………………………………………………………………………………………………………….. |
36 |
|
Scheduling ………………………………………………………………………………………………………………………………. |
37 |
|
Windows BitLocker …………………………………………………………………………………………………………………… |
37 |
|
Windows Components ………………………………………………………………………………………….. |
38 |
|
Interface Overview …………………………………………………………………………………………………………………… |
38 |
|
General Layout…………………………………………………………………………………………………………………………………………………. |
38 |
|
Tool Button ……………………………………………………………………………………………………………………………………………………… |
39 |
|
Ribbon Panel……………………………………………………………………………………………………………………………………………………. |
39 |
|
Set View Button ……………………………………………………………………………………………………………………………………………….. |
39 |
|
Virtual Operations Bar ………………………………………………………………………………………………………………………………………. |
40 |
|
Express Mode Button ……………………………………………………………………………………………………………………………………….. |
40 |
|
Disk Map …………………………………………………………………………………………………………………………………………………………. |
40 |
|
Disk and Partitions List………………………………………………………………………………………………………………………………………. |
41 |
|
Context-sensitive Menu…………………………………………………………………………………………………………………………………….. |
42 |
Copyright© 1994-2014 Paragon Software GmbH. All rights reserved.
|
4 |
|
|
Properties Panel……………………………………………………………………………………………………………………………………………….. |
42 |
|
Status Bar………………………………………………………………………………………………………………………………………………………… |
43 |
|
Settings Overview…………………………………………………………………………………………………………………….. |
43 |
|
Application Section …………………………………………………………………………………………………………………………………………… |
44 |
|
Backup Section…………………………………………………………………………………………………………………………………………………. |
46 |
|
Partitioning Section ………………………………………………………………………………………………………………………………………….. |
51 |
|
Wipe Section……………………………………………………………………………………………………………………………………………………. |
54 |
|
Include/Exclude Section…………………………………………………………………………………………………………………………………….. |
56 |
|
E-mail Notifications and Logging Section …………………………………………………………………………………………………………….. |
60 |
|
Viewing Disk Properties …………………………………………………………………………………………………………….. |
62 |
|
Viewing Image Properties ………………………………………………………………………………………………………….. |
62 |
|
Using the Restore Wizard ………………………………………………………………………………………………………………………………….. |
62 |
|
Using the Archive Database……………………………………………………………………………………………………………………………….. |
66 |
|
Data Backup and Rescue ……………………………………………………………………………………………………………. |
67 |
|
Creating Backup Images…………………………………………………………………………………………………………………………………….. |
67 |
|
Restoring System and Data………………………………………………………………………………………………………………………………… |
70 |
|
Copy Tasks………………………………………………………………………………………………………………………………. |
75 |
|
Cloning Hard Disks ……………………………………………………………………………………………………………………………………………. |
75 |
|
Cloning Partitions……………………………………………………………………………………………………………………………………………… |
78 |
|
Boot Management ……………………………………………………………………………………………………………………. |
79 |
|
Partition Management………………………………………………………………………………………………………………. |
80 |
|
Basic Partitioning Operations …………………………………………………………………………………………………………………………….. |
81 |
|
Advanced Partitioning Operations………………………………………………………………………………………………………………………. |
89 |
|
Changing Partition Attributes …………………………………………………………………………………………………………………………… |
101 |
|
Hard Disk Management …………………………………………………………………………………………………………… |
104 |
|
Converting Dynamic MBR to Basic ……………………………………………………………………………………………………………………. |
104 |
|
Converting GPT to Basic MBR …………………………………………………………………………………………………………………………… |
105 |
|
Converting Basic MBR to GPT…………………………………………………………………………………………………………………………… |
105 |
|
Updating MBR………………………………………………………………………………………………………………………………………………… |
106 |
|
Changing Primary Slot……………………………………………………………………………………………………………………………………… |
106 |
|
Wipe Tasks ……………………………………………………………………………………………………………………………. |
108 |
|
Task Scheduling ……………………………………………………………………………………………………………………… |
111 |
|
Setting a Timetable…………………………………………………………………………………………………………………………………………. |
111 |
|
Managing Tasks ……………………………………………………………………………………………………………………………………………… |
112 |
|
Creating a Scheduled Task ……………………………………………………………………………………………………………………………….. |
114 |
Copyright© 1994-2014 Paragon Software GmbH. All rights reserved.
|
5 |
|
|
Scripting ……………………………………………………………………………………………………………………………….. |
114 |
|
Extra Functionality………………………………………………………………………………………………………………….. |
116 |
|
View Partition/Hard Disk Properties………………………………………………………………………………………………………………….. |
116 |
|
Volume Explorer …………………………………………………………………………………………………………………………………………….. |
117 |
|
File Transfer Wizard………………………………………………………………………………………………………………………………………… |
118 |
|
Mount Partition ……………………………………………………………………………………………………………………………………………… |
120 |
|
Mount Archive ……………………………………………………………………………………………………………………………………………….. |
121 |
|
Defragment MFT…………………………………………………………………………………………………………………………………………….. |
122 |
|
Compact MFT…………………………………………………………………………………………………………………………………………………. |
123 |
|
Test Surface …………………………………………………………………………………………………………………………………………………… |
123 |
|
Check File System Integrity………………………………………………………………………………………………………………………………. |
124 |
|
Check Archive Integrity……………………………………………………………………………………………………………………………………. |
124 |
|
Check Recovery Discs………………………………………………………………………………………………………………………………………. |
128 |
|
Edit/View Sectors……………………………………………………………………………………………………………………………………………. |
128 |
|
Send Log Files…………………………………………………………………………………………………………………………………………………. |
129 |
|
View Logs ………………………………………………………………………………………………………………………………………………………. |
130 |
|
Typical Scenarios ………………………………………………………………………………………………… |
131 |
|
Backup Scenarios ……………………………………………………………………………………………………………………. |
131 |
|
Creating the Backup Capsule ……………………………………………………………………………………………………………………………. |
131 |
|
New Backup Format………………………………………………………………………………………………………………………………………… |
133 |
|
Legacy Backup Format…………………………………………………………………………………………………………………………………….. |
150 |
|
Hyper-V Guest Protection………………………………………………………………………………………………………………………………… |
180 |
|
Recovery Scenarios …………………………………………………………………………………………………………………. |
186 |
|
New Backup Format………………………………………………………………………………………………………………………………………… |
186 |
|
Legacy Backup Format…………………………………………………………………………………………………………………………………….. |
193 |
|
Hyper-V Guest Recovery………………………………………………………………………………………………………………………………….. |
216 |
|
Fixing Boot Problems without Restore ………………………………………………………………………………………………………………. |
218 |
|
Retrieving/Transferring Individual Files and Folders……………………………………………………………………………………………. |
223 |
|
Resize Scenarios……………………………………………………………………………………………………………………… |
230 |
|
Creating a new partition to detach operating system from the rest of data …………………………………………………………… |
230 |
|
Increasing size of a system partition by taking unused space of an adjacent partition…………………………………………….. |
231 |
|
Increasing size of a system partition by taking unused space from any other…………………………………………………………. |
232 |
|
Increasing size of a system partition by taking unused space of an adjacent logical partition…………………………………… |
236 |
|
Separating OS from media data………………………………………………………………………………………………………………………… |
237 |
|
Merging a system partition with an adjacent logical partition………………………………………………………………………………. |
239 |
|
Shrinking a system partition to increase size of a data partition …………………………………………………………………………… |
241 |
Copyright© 1994-2014 Paragon Software GmbH. All rights reserved.
|
6 |
|
|
Resizing partitions of Apple Boot Camp …………………………………………………………………………………………………………….. |
244 |
|
Creating Dual Boot Systems ……………………………………………………………………………………………………… |
246 |
|
Windows Vista + Windows XP ………………………………………………………………………………………………………………………….. |
246 |
|
Windows XP + Windows Vista ………………………………………………………………………………………………………………………….. |
251 |
|
System Migration Scenarios ……………………………………………………………………………………………………… |
253 |
|
Migrating Windows OS to a solid state drive (Migrate OS to SSD) ………………………………………………………………………… |
253 |
|
Migrating system to a new HDD (up to 2.2TB in size) ………………………………………………………………………………………….. |
256 |
|
Using 2.2TB+ HDD as internal data storage in Windows XP………………………………………………………………………………….. |
258 |
|
Making system bootable on different hardware (P2P Adjust OS)………………………………………………………………………….. |
260 |
|
Virtualizing the current system (P2V Copy)………………………………………………………………………………………………………… |
267 |
|
Virtualizing system from its backup image (P2V Restore)…………………………………………………………………………………….. |
270 |
|
Creating an empty virtual disk (Create VD) ………………………………………………………………………………………………………… |
275 |
|
Making Windows Vista/7 backup bootable on virtual hardware (P2V Adjust OS)……………………………………………………. |
277 |
|
Connecting a virtual disk (Connect VD) ……………………………………………………………………………………………………………… |
280 |
|
Repartitioning a virtual disk……………………………………………………………………………………………………………………………… |
285 |
|
Exchanging data between physical and virtual environments ………………………………………………………………………………. |
288 |
|
Copying data from a parent virtual disk to one of its snapshots……………………………………………………………………………. |
290 |
|
Migrating from one virtual environment to another (V2V)…………………………………………………………………………………… |
290 |
|
Migrating from a virtual environment to physical (V2P)………………………………………………………………………………………. |
290 |
|
Migrating a Windows 7 vhd……………………………………………………………………………………………………………………………… |
291 |
|
Hard Disk Utilization ……………………………………………………………………………………………………………….. |
291 |
|
Extra Scenarios for WinPE ………………………………………………………………………………………………………… |
293 |
|
Adding specific drivers…………………………………………………………………………………………………………………………………….. |
293 |
|
Configuring network ……………………………………………………………………………………………………………………………………….. |
294 |
|
Saving log files………………………………………………………………………………………………………………………………………………… |
297 |
|
How to Work with Bitlocked Volumes ………………………………………………………………………………………… |
298 |
|
In Windows ……………………………………………………………………………………………………………………………………………………. |
299 |
|
In WinPE………………………………………………………………………………………………………………………………………………………… |
300 |
|
Troubleshooter…………………………………………………………………………………………………… |
302 |
|
Glossary…………………………………………………………………………………………………………….. |
303 |
Copyright© 1994-2014 Paragon Software GmbH. All rights reserved.

7
Introduction
Paragon Hard Disk Manager™ 15 Premium is an integrated set of powerful tools that is specially designed to tackle most of the problems you might face while using PC. Its functionality covers all aspects of a computer life cycle beginning from carrying out all the necessary partitioning operations to install the system from scratch and providing its data reliable protection to secure utilization of an outdated hard disk.
In this manual you will find the answers to many of the technical questions, which might arise while using the program.
Our company is constantly releasing new versions and updates to its software, that’s why images shown in this manual may be different from what you see on your screen.
What’s New in Hard Disk Manager 15
Agentless protection of Hyper-V guest machines. Unlike traditional backup tools designed to work with physical machines, our product can operate at the virtualization layer, employing MS VSS (Volume Shadow Copy Service) to agentlessly backup/restore any guest machine of Hyper-V. Thus our solution doesn’t need an agent on a target virtual machine to create its point-in-time copy including its configuration, operating system, apps, etc.
Embedded Recovery Media Builder (RMB) 3.0. Instead of two utilities downloaded from Paragon’s website (BMB and RMB), the new RMB 3.0 is now embedded into the product. Combining the best of the two utilities, it can boast more options, usability, and stability:
—Prepares Linux or WinPE-based bootable environment on a USB thumb drive or in an ISO image;
—Doesn’t obligatory require Windows Assessment and Deployment Kit (ADK) or Automated Installation Kit (WAIK) on Windows 7 and later platforms;
—Can build WinPE-based media on Windows XP, Vista, Server 2003 if there’s WAIK installed in the system;
—Allows injecting additional drivers for storage devices, network controllers, USB controllers, or system during setup;
—Enables to set up a network connection with a pre-mounted network share during setup;
—Prepares hybrid (both, uEFI and BIOS compatible) 64-bit recovery environment on flash or in an ISO image.
File-level backup/restore for virtual containers (pVHD, VHD, VHDX, VMDK). As promised, Paragon’s innovative backup imaging technology has been further improved and now opens up the option of creating file-level virtual containers (full, incremental, as well as file complements), thus offering users rock-stable, high-performance technology to protect system and data not only on sector-level, but file-level as well. This means that the old PBF format will eventually leave the scene.
Refactored P2V Restore Wizard. Instead of the old PBF-based backup images, you can now use virtual containers (pVHD, VHD, VHDX, VMDK) to do P2V migration directly out of backup images. The use of virtual containers has enabled to significantly improve performance and usability for this type of migration operations.
Wiping SSD (Solid State Drive). As you know SSD stores data differently from hard disks, thus existing disk sanitization techniques originally used for HDDs don’t work on SSDs because the internal architecture of an SSD is very different from that of a hard disk. Reliable SSD sanitization requires built-in, verifiable sanitize operations. After some research on the issue, our company has improved our disk wiping technology and can now guarantee irreversible secure data destruction on SSD storage devices.
Copyright© 1994-2014 Paragon Software GmbH. All rights reserved.

8
This feature is only available for the Linux recovery environment at the moment.
Support of Hyper-V 2008 R2, 2012 R1, 2012 R2 (Generation 1 and 2) for P2V scenarios.
Predefined views. The Windows 8 like streamlined, tile-oriented interface has been enhanced by predefined views, which enable to adjust the working environment to particular customer needs.
Product Components
In order to cope with different tasks, the product contains several components:
Windows based set of utilities is the crucial part of the product. With the help of an easy to use launcher you may find and run tasks of any complexity in the field of data and system protection, hard disk partitioning and cloning, etc.
Linux/DOS based recovery environment is a multi-platform bootable media that enables to run utilities under Linux or PTS DOS, and that way to get access to your hard disk for maintenance or recovery purposes. Both platforms have their strong sides, for instance Linux can boast support of FireWire (i.e. IEEE1394) or USB devices. It enables to burn CD/DVD discs. However there can be some difficulties with detecting new hardware. DOS in its turn has no problems of that kind but is limited in features. The Linux/DOS recovery environment requires no installation and can be of great help when the system fails to boot. Besides it offers a Windows XP like environment.
WinPE based recovery environment. Especially for keen followers of Windows, our product offers the option to prepare a WinPE based bootable media. Unlike the Linux/DOS recovery environment it can boast an excellent hardware support and the same interface as the Windows version can. However its system requirements are much tougher.
Features Overview
This chapter dwells upon key benefits and technical highlights of the product.
Features
Let us list some of the features:
User Friendly Fault Minimizing Interface
Graphical representation of the data to gain a better understanding.
A handy Launcher to easily find and run the required tasks.
Comprehensive wizards to simplify even the most complex operations.
A context sensitive hint system for all functions of the program.
Previewing the resulting layout of hard disks before actually executing operations (so-called virtual operations).
Backup Facilities
Archive Database to help the user easily manage backup images (get properties, add, delete, mount, etc.).
Copyright© 1994-2014 Paragon Software GmbH. All rights reserved.

9
This feature is only available for the Windows installation of the program.
Available location for backup images:
—Backup to local mounted partitions.
—Backup to local unmounted (without drive letter assigned) partitions.
—Backup to an external mounted storage to provide for a higher level of data protection and system independence.
—Backup to a special secured place on the hard disk called the Backup Capsule that has an independent system layout (e.g. a separate partition) and will stay operable should the active file system be damaged. To avoid an accidental removing or unauthorized access of the backup data, this partition is hidden and thus cannot be mounted in the operating system.
—Backup to external media (CD/DVD) to guarantee a high level of data protection as long as the backup media is kept secure.
—Backup to a network drive to stand a better chance of success in case of a hard disk failure.
—Backup to an FTP/SFTP server to provide a new level of system and data protection.
Bootable Backup Capsule to get the choice to launch the Linux or PTS DOS recovery environment every time you start up the computer. With its help you will be able to run utilities under Linux or PTS DOS, and that way to get access to your hard disk for maintenance or recovery purposes.
For PBF images:
Smart Backup Wizard to secure system and data with the minimal efforts possible. With a unique intelligent work algorithm and a highly intuitive user interface, you can easily back up exactly what you need — the whole system, e-mail databases (MS Outlook, Express, Windows Mail) media files or office documents of the My Documents folder, or any other files and folders.
Differential backup to a sector image to only archive changes since the last full sector-based image, thus considerably saving the backup storage space. To restore this kind of backup you will require a full image and one of its differentials.
Incremental backup to a sector image is a further way of optimizing the process of disk imaging. Unlike differentials, it may not only contain data changed since the time of creating a full sector-based archive, but one of its increments as well, thus allowing to save more time and the backup storage. Introduction of a special index file that stores backup meta-information minimizes time and resources to create this type of archives.
Incremental backup to a file image to only archive changes since the last full or incremental file-based image. An incremental image is smaller and takes less time to create, but you will require the initial full image and all of its increments to restore the latest point of this kind of backup.
File backup to a sector image. It is a unique technology on the market so far that bridges two principally different approaches of the data backup: the file-based backup and the disk imaging backup. With its help you can now create a sector-based backup of your system to get it back on track in minutes in case of a virus attack or a hardware malfunction and then just make file-based incremental images to the previously created sectorbased backup to keep updated only information that is critical for you. Thus you will considerably save your system resources.
Copyright© 1994-2014 Paragon Software GmbH. All rights reserved.

10
Cyclic Backup Wizard to automate the backup of separate partitions. It is an ideal option if you want to establish a self-acting data protection system.
This feature is only available for the Windows installation of the program.
Synthetic backup to change any property (merge a given differential image with its full image, split/un-split, compress/de-compress, etc.) of an existing backup image without carrying out a physical backup operation.
For Hyper-V guest machines:
Hyper-V Backup Wizard to agentlessly back up entire virtual machines (online/offline) hosted by Hyper-V. Our product supports any guest machines supported by Hyper-V (Windows, Linux, etc.).
Hyper-V Incremental Backup Wizard to create incremental backup chains based on the base image.
Hyper-V Restore Wizard to restore a previously backed up virtual machine to a new location according to a certain time stamp.
For virtual containers:
Backup to VD Wizard to protect separate partitions or entire hard disks.
Incremental Backup to VD Wizard to create incremental backup chains based on the full image.
File Complement to VD Wizard to create a file-level incremental update to a sector-level virtual container.
Retention Wizard for VD to automate the backup of separate partitions or entire hard disks. It is an ideal option if you want to establish a self-acting data protection system.
Restore Facilities
Restore an entire disk, separate partitions or only files you need from the previously created backup image (for PBF and virtual containers).
Restore with Shrink to restore a backup image to a free block of smaller size taking into account only the amount of actual data of the image.
Adaptive Restore to successfully migrate a Windows physical system to a different hardware platform (P2P) by allowing automatic injection of all required drivers and the other actions crucial for a migration of this kind.
This feature is only available for the bootable recovery environment.
Copy Facilities
Migrate OS to SSD to move any Windows OS since XP from a regular hard disk to a fast SSD (Solid State Drive) even of a smaller capacity, thanks to advanced data exclusion capabilities.
Partition/hard disk copy to successfully transfer all on-disk information including standard bootstrap code and other system service structures, thus maintaining the operating system’s working capability.
Copyright© 1994-2014 Paragon Software GmbH. All rights reserved.
![]()
11
Copy functionality can also be used as an alternative way of data protection.
Virtualization Facilities
Connect VD to connect a virtual disk as if it’s an ordinary physical disk, thus opening up all functionality available for physical disks to virtual.
P2V Copy to migrate a Windows physical system to a virtual environment in the online mode.
P2V Restore to migrate a Windows physical system backed up with a Paragon disaster recovery tool to a virtual environment.
P2V Adjust to recover the startup ability after unsuccessful virtualization with a 3rd party tool.
Create VD to create an empty virtual disk or with specific data of one of the supported virtualization vendors.
Virtualization is the latest trend in the system migration, protection, and evaluation.
Boot Management Facilities
Boot Manager Setup Wizard to easily manage several operating systems on one computer.
Partition/Hard Disk Management Facilities
Basic functions for initializing, partitioning and formatting hard disks (create, format, delete). Instead of the standard Windows disk tools, the program supports all popular file systems.
Express Create Partition Wizard to create a new partition in the most appropriate place of a hard disk, format it to NTFS and then make it available in the system by assigning a drive letter.
Split Partition Wizard helps you separate OS and data or different types of data by splitting one partition to two different partitions of the same type and file system.
Merge Partitions Wizard to consolidate the disk space, which originally belongs to two adjacent partitions (NTFS, FAT16/FAT32), into a single, larger partition.
Redistribute Free Space Wizard to increase free space on one partition by up-taking the on-disk unallocated space and the unused space of other partitions.
Express Resize Partitions Wizard to increase free space on one partition by up-taking the unused space of an adjacent partition of a hard disk (including partitions of Apple Boot Camp).
NTFS hot resize upward to enlarge an NTFS partition (system, locked) without rebooting Windows and interrupting its work.
Convert a file system (FAT16/32, NTFS, Apple HFS) without reformatting.
Mount a partition (assign a drive letter) of any file system type to make it available for your operating system.
Modify file system parameters (make active/inactive, hide/unhide, etc.).
Install New OS Wizard to make a system ready to install a new operating system.
Undelete Partitions Wizard to recover an accidentally deleted partition.
Copyright© 1994-2014 Paragon Software GmbH. All rights reserved.

12
File System Optimization Facilities
MFT defragmentation and shrinking to improve performance of NTFS.
Wipe Facilities
Data wiping to successfully destroy all on-disk information including the standard bootstrap code and other system service structures.
Free space clearing to destroy any remnants of deleted files/directories left on disk without affecting the used data.
Automatization Facilities
Task scheduling to automate routine operations. It can be particularly effective when you have to repeat a sequence of actions on a regular basis.
Scheduling is only available for the Windows installation of the program.
Scripting to make the program create a script of any set of operations you need. Besides support of all operations available in the interactive mode, the unattended mode provides some additional features, such as conditional execution, subroutines, repeatable iterations, disk/partition properties analysis, errors management, etc.
Auxiliary Facilities
GPT Loader is a special system driver to allow use of all space of modern ultra high capacity drives (larger than 2.2TB) on systems that don’t support it.
Conversion of basic MBR disks to basic GPT to enjoy all benefits of the newest partitioning scheme with minimal effort.
File Transfer Wizard to make such operations as transferring of files/directories or burning of them to CD/DVD as easy and convenient as possible. Providing access to Paragon backups as regular folders, it may also help to replace corrupted data from a previously created image in case of an operating system failure.
Volume Explorer is a handy tool when you have different file systems on the disk, whether they contain an operating system or just data. Volume Explorer will let you explore a file system of any type and provide access to the necessary files and directories regardless of their security attributes.
Check Integrity Wizards to check integrity of created .pbf images and virtual containers. The function allows distinguishing between valid and corrupted images before using them.
Network Configuration Wizard to establish a network connection on a bootable recovery media either to save a backup of a partition/hard disk or just several files on a network computer or retrieve a previously made backup from a network computer for recovery purposes.
Boot Corrector to fix most of the system boot problems that can be a result of a human factor, program error or a boot virus activity.
Boot Corrector is only available for the bootable recovery environment.
Copyright© 1994-2014 Paragon Software GmbH. All rights reserved.

13
Supported Data Erasure Algorithms
US DoD 5220.22-M
US Navy standards NAVSO P-5239-26
British HMG Infosec Standard No.5
German VSItR Standard
Australian ASCI 33
Russian GOST R 50739-95
Peter Gutmann’s algorithm
Bruce Schneier’s algorithm
Paragon’s algorithm
Custom algorithm
To know more on the subject, please consult the Data Security Standards section.
Supported Technologies
Along with using innovative technologies from outside, Paragon has developed a number of its own original technologies that make its products unique and attractive for customers:
Paragon Hot Backup™ technology to back up locked partitions and hard disks under Windows NT+ family operating systems providing both high operating efficiency as well as low hardware requirements.
Paragon Hot Copy™ technology to copy locked partitions and hard disks under Windows NT+ family operating systems providing both high operating efficiency as well as low hardware requirements.
Paragon Adaptive Restore™ technology to successfully migrate a Windows physical system to a different hardware platform (P2P).
Paragon Power Shield™ technology to provide data consistency in case of a hardware malfunction, power outages or an operating system failure.
Paragon UFSD™ technology to browse partitions of any file system including hidden and unmounted, modify and copy files and folders, etc.
Paragon Hot Resize™ technology to enlarge NTFS partitions (system, locked) without rebooting Windows and interrupting its work.
Paragon Restore with Shrink™ technology to restore a backup image to a free block of smaller size taking into account only the amount of actual data of the image.
Paragon Smart Partition™ technology to securely perform hard disk partitioning operations of any complexity.
Paragon BTE™ technology to set tasks for execution during the system restart, thus saving from the need to use a bootable media when modifying system partitions.
Paragon VIM™ (Virtual Image Management) technology that enables Paragon products work with virtual disks as though they are physical hard disks.
Copyright© 1994-2014 Paragon Software GmbH. All rights reserved.

14
Microsoft Volume Shadow Copy Service (VSS) to provide the copy/backup infrastructure for the Microsoft Windows XP/Vista/7/Server 2003/2008 operating systems. It offers a reliable mechanism to create consistent point-in-time copies of data known as shadow copies. Developed by Microsoft in close cooperation with the leading copy/backup solution vendors on the market, it is based on a snapshot technology concept.
Microsoft Dynamic Disk (simple, spanned, striped, mirrored, RAID-5) to offer more management flexibility without the partition limitation of basic disks. Dynamic storage can be particularly beneficial for large-scale businesses when dealing with many physical hard disks involving complex setup.
GUID Partition Table (GPT). It is the next generation of a hard disk partitioning scheme developed to lift restrictions of the old MBR. GPT disks are now supported by Windows Vista/7, Server 2008, Mac OS X and Linux.
Supported Virtualization Software
For remote connection to virtual hard drives
VMware ESX 4.x and higher
VMware ESX 5.x and higher
VMware ESXi 4.x and higher
VMware ESXi 5.x and higher
The maximum number of simultaneously connected virtual disks is limited:
For ESX 4.x – 9 direct connections or 27 through vCenter Server;
For ESX 5.x – 9 direct connections or 27 through vCenter Server;
For ESXi 4.x – 11 direct connections or 23 through vCenter Server;
For ESXi 5.x – depends on the workload of the host’s hardware resources.
VMware products with prohibited vStorage API (Freeware ESXi, etc.) are not supported.
For direct access to virtual hard drives
Microsoft Virtual PC 2007
Microsoft Windows Virtual PC
Microsoft Hyper-V R1/R2
Oracle Virtual Box 1.0-4.x
VMware Player
VMware Workstation
VMware Fusion
Snapshot disks of Oracle VirtualBox are not supported.
Supported virtual hard drive types
VMware — Virtual Machine Disk Format (VMDK)
Microsoft — Virtual Hard Disk (VHD, VHDX)
Copyright© 1994-2014 Paragon Software GmbH. All rights reserved.

15
Oracle — Virtual Desktop Image (VDI)
Paragon’s backups (PBF/pVHD)
Supported virtual machines for P2V scenarios
Microsoft Virtual PC
Microsoft Hyper-V 2008
Microsoft Hyper-V 2012 R1
Microsoft Hyper-V 2012 R2 (Generation 1 and 2)
VMware Workstation
VMware Fusion
VMware ESX Server
Oracle VirtualBox 4.0
Supported File Systems
Full read/write access to FAT16/FAT32 partitions.
Full read/write access to NTFS (Basic Disks) under Windows, Linux and PTS DOS. Compressed NTFS files are also supported.
Full read/write access to Ext2FS/Ext3FS/Ext4FS partitions.
Full read/write access to reFS partitions.
Limited read/write access to Apple HFS+ partitions.
Unfortunately, support of non-Roman characters for the HFS+ file system is unavailable at the moment. The company is about to implement it in the nearest future.
Supported Media
Support of both MBR and GPT hard disks (2.2TB+ disks included)
IDE, SCSI and SATA hard disks
SSD (Solid State Drive)
AFD (Advanced Format Drive)
Non-512B sector size drives
CD-R, CD-RW, DVD-R, DVD+R, DVD-RW, DVD+RW, DVD-R, DVD+R double layer and also Blu-ray discs
FireWire (i.e. IEEE1394), USB 1.0, USB 2.0, USB 3.0 hard disks
PC card storage devices (MBR and GPT flash memory, etc.)
Getting Started
In this chapter you will find all the information necessary to get the product ready to use.
Copyright© 1994-2014 Paragon Software GmbH. All rights reserved.

16
System Requirements
For the Windows installation package
Windows XP SP3
Windows Server 2003 SP2
Windows Vista
Windows Server 2008
Windows 7
Windows 8
Windows 8.1
Windows Server 2008 R2
Windows SBS 2011
Windows Server 2012
Windows Server 2012 R2
Additional requirements:
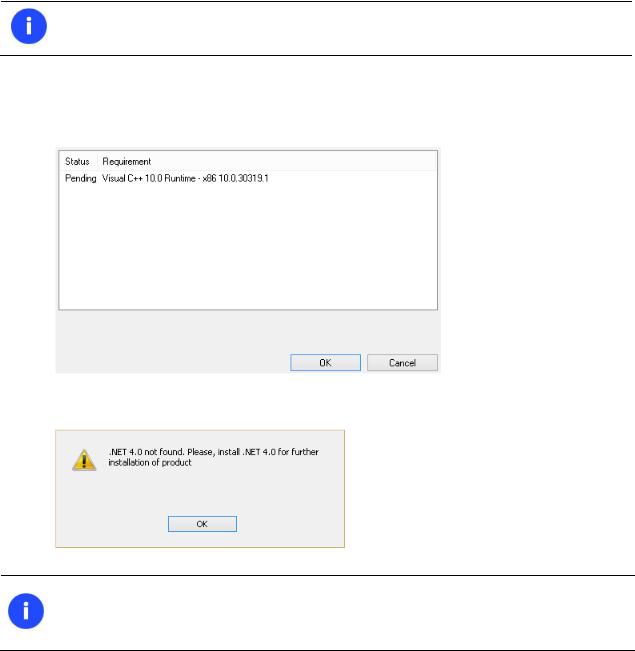
To install and run the product the target OS should have Visual Studio C++ 2010 Runtime Library installed (comes with the installation package – you will be prompted to install it, if it’s not been found in the system).
To install and run the product the target OS should have Microsoft .NET 4.0 or later installed (you should download and install it yourself).
If you installing our product on Windows Server 2003 SP2, you additionally need to have Visual Studio C++ 2005 SP1 Runtime Library installed (you should download and install it yourself).
You can download Microsoft .NET 4.0 from Microsoft’s website: http://www.microsoft.com/downloads/details.aspx?FamilyID=0a391abd-25c1-4fc0-919f- b21f31ab88b7&displaylang=en
During the installation additional free space (up to 1GB) will be required.
For the Linux bootable environment
Intel Pentium CPU or its equivalent, with 300 MHz processor clock speed
256 MB of RAM
SVGA video adapter and monitor
Keyboard
Mouse
For the WinPE bootable environment
Intel Pentium III CPU or its equivalent, with 1000 MHz processor clock speed
At least 1 GB of RAM
SVGA video adapter and monitor
Copyright© 1994-2014 Paragon Software GmbH. All rights reserved.
17
Keyboard
Mouse
Additional requirements
Network card to send/retrieve data to/from a network computer
Recordable CD/DVD drive to burn data to compact discs
External USB hard drive to store data.
Installation
Before the installation, please make sure the systems requirements are met. If everything is OK, please do the following to install the product:
In case there is some previous version of the program installed on the computer, the program will offer the user to uninstall it first.
1.Click on the supplied setup file to initiate the installation. First your system will be checked for the presence of Visual Studio C++ 2010 Runtime Library and if not found, you will be prompted to install it (comes with the installation package). Click Install to continue.
2.Then your system will be checked for the presence of Microsoft .NET 4.0 or later. If not found, the installation won’t continue with the corresponding warning:
You can download Microsoft .NET 4.0 from Microsoft’s website: http://www.microsoft.com/downloads/details.aspx?FamilyID=0a391abd-25c1-4fc0-919f- b21f31ab88b7&displaylang=en
3. The Welcome page will inform that the application is being installed. Click Next to continue.
Copyright© 1994-2014 Paragon Software GmbH. All rights reserved.
18
4.Please Read Paragon License Agreement carefully and then select the appropriate option to accept. Otherwise you won’t be able to proceed with the installation. By clicking the Print button, the license agreement may also be printed out.
5.Provide your product key and serial number.
6.On the Customer Information page you are to provide the standard customer information, i.e. a user name and an organization. Besides you need to decide whether to make the program available for all users of this computer (if several) or only for the current one.
7.On the next page, click Change to install the utility to a different location (by default C:Program FilesParagon SoftwareParagon Hard Disk Manager 15 Premium Edition). Otherwise click Next to continue.
Do not install the program on network drives. Do not use Terminal Server sessions to install and run the program. In both cases, the program functionality will be limited.
8.On the Ready to Install the Program page click Install to start the installation or Back to return to any of the previous pages and modify the installation settings.
9.The Final page reports the end of the setup process. Click Finish to complete the wizard.
First Start
To start Paragon Hard Disk Manager 15 under Windows, please click the Windows Start button and then select
Programs > Paragon Hard Disk Manager™ 15 > Paragon Hard Disk Manager™.
The program provides wide opportunities in the field of hard disk structure modification, so just to be on the safe side, please make a backup of your data before carrying out any operation.
The first component that will be displayed is called the Express Launcher. Thanks to a well thought-out categorization and hint system, it provides quick and easy access to wizards and utilities that we consider worth using on a regular basis. With its help you can also start up the traditional launcher, the help system or go to the program’s home page.
Copyright© 1994-2014 Paragon Software GmbH. All rights reserved.
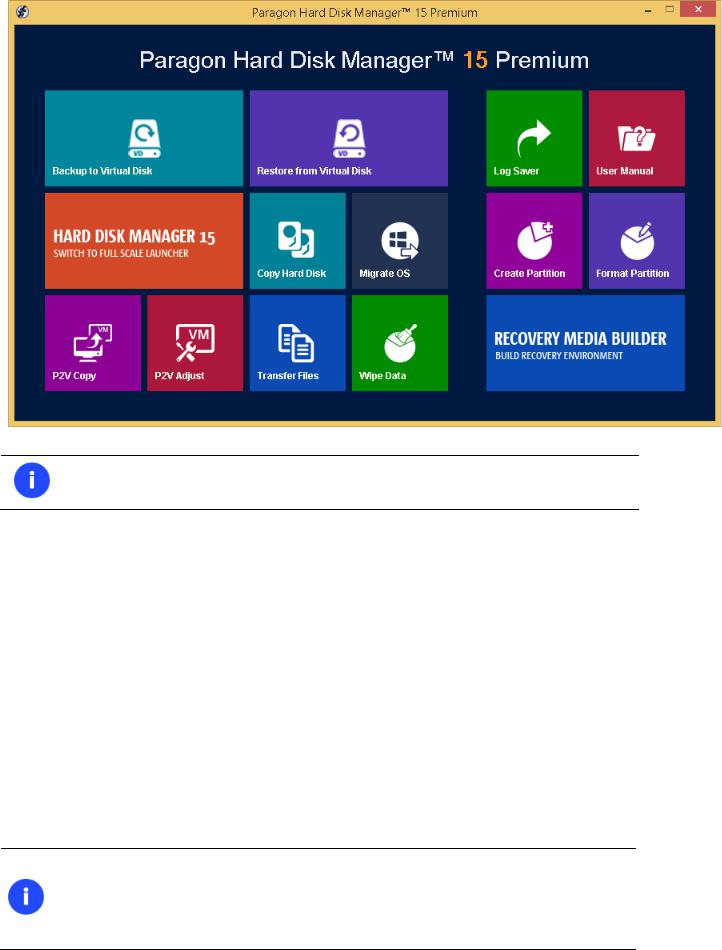
19
To know more on how to handle the product’s interface and accomplish typical operations, please consult the Windows Components chapter.
Building Recovery Media
WinPEand/or Linux-based recovery environments should be prepared on-site with Paragon’s Recovery Media Builder. To know more on the subject, please consult documentation that comes with this utility.
Booting from the Linux/DOS Recovery Media
The Linux/DOS recovery environment can be used to boot your computer into Linux or PTS DOS to get access to your hard disk for maintenance or recovery purposes. It also has the PTS DOS safe mode, which may help in a number of nonstandard situations such as interfering hardware settings or serious problems on the hardware level. In this case, only basic files and drivers (such as hard disk drivers, a monitor driver, and a keyboard driver) will be loaded.
Startup
To start working with the Linux/DOS recovery environment, please take the following steps:
1. Start up the computer from our Linux/DOS recovery media.
Please use Recovery Media Builder to prepare Paragon’s recovery environments on
CD/DVD, flash, or in an ISO-image.
To automatically boot from the recovery media please make sure the on-board BIOS is set up to boot from CD/USB first.
Copyright© 1994-2014 Paragon Software GmbH. All rights reserved.
20
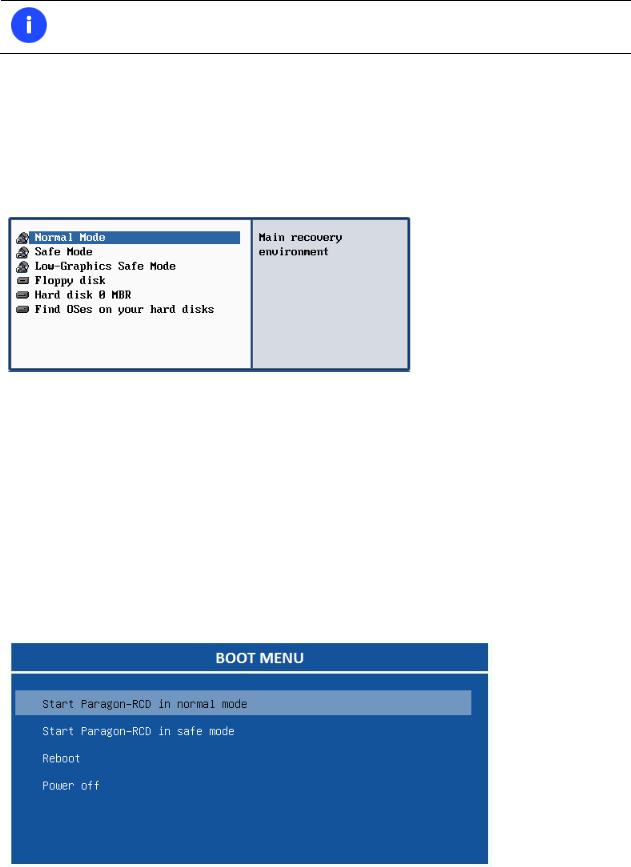
2. Launch a boot mode you need (Normal, Safe, Low-Graphics Safe) in the Boot menu.
By default the Normal Mode will be automatically initiated after a 10 second idle period.
3.Click on the required operation to start. Hints on the selected at the moment item will help you make the right choice.
4.Consult the help system by pressing ALT+F1 to know more on the subject.
Boot menu
32-bit environment
Normal Mode. Boot into the Linux normal mode. This mode uses the full set of drivers (recommended);
Safe Mode. Boot into the PTS DOS mode. This mode can be used as an alternative of the Linux normal mode if it fails to work properly;
Low-Graphics Safe Mode. Boot into the PTS DOS safe mode. In this case, only the minimal set of drivers will be included, like hard disk, monitor, and keyboard drivers. This mode has simple graphics and a simple menu;
Floppy Disk. Reboot the computer from a system floppy disk;
Hard Disk 0. Boot from the primary hard disk;
Find OS(s) on your hard disks. The program will scan hard disks of your computer to find any bootable operating system.
64-bit environment
Normal Mode. Boot into the Linux normal mode. This mode uses the full set of drivers (recommended);
Copyright© 1994-2014 Paragon Software GmbH. All rights reserved.
![]()
21
Safe Mode. Boot into the PTS DOS mode. This mode can be used as an alternative of the Linux normal mode if it fails to work properly;
Reboot. Restart the computer.
Power off. Shut down the computer.
While working with the recovery environment you might experience some inconvenience caused by possible video artifacts. It is just a result of changing video modes and in no way will affect the program functionality. If this is the case, please wait a bit and everything will be OK.
Normal Mode
When the Normal mode is selected, the Linux launch menu appears:
Hard Disk Manager (enables to run wizards and dialogs, to specify program settings, to visualize the operating environment and the hard disk configuration);
Simple Restore Wizard (allows restoring hard disks and partitions);
Disk Copy Wizard (helps to clone a hard disk);
Undelete Partition (allows recovery of accidentally deleted partitions);
Wipe Wizard (enables to destroy all on-disk information or only remnants of deleted files/directories);
Express Resize Wizard (enables to increase free space on one partition by up-taking the unused space of an adjacent partition);
File Transfer Wizard (allows coping files/folders to another disk or a partition as well as recording them to CD/DVD);
Boot Corrector (helps to correct the Windows System Registry without Windows being loaded);
Network Configurator (enables to establish a network connection under Linux);
Copyright© 1994-2014 Paragon Software GmbH. All rights reserved.
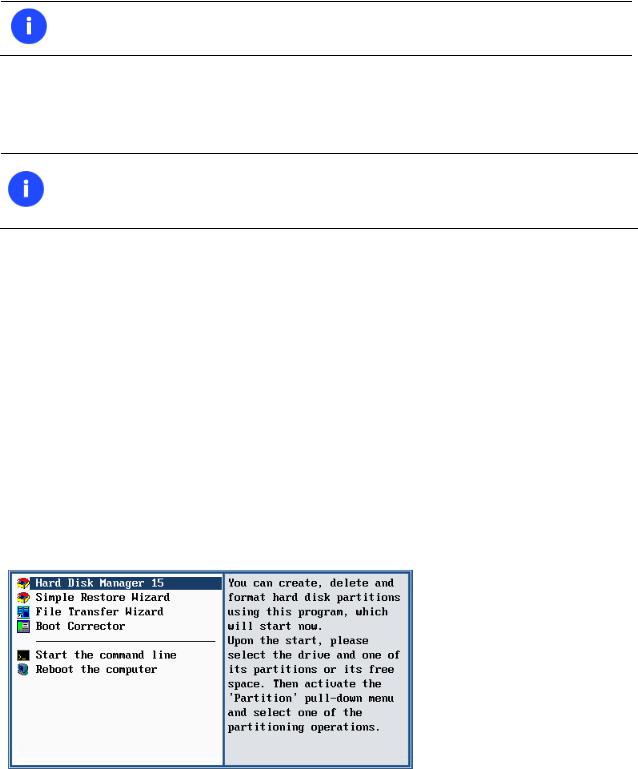
22
If you are going to use network resources, first launch the Network Configuration Wizard to establish a network connection.
Log Saver (helps to collect and send the necessary log files to the Technical Support);
View the mounted partitions (the list of all mounted partitions will be displayed);
The Linux/DOS recovery environment assigns drive letters to partitions the way it is done in DOS, i.e. one after another, primary partitions at first. Thus mounted partitions may have different drive letters from Windows.
Eject CD/DVD;
Command Line (allows experienced users to execute any operation);
Reboot the computer;
Power off the computer.
To move within the menu, please use the arrow keys of the computer keyboard.
Safe Mode
When the Safe mode is selected, the PTS DOS launch menu appears. It has nearly the same functionality as for the Normal mode except for the Network Configurator and Log Saver commands. Besides due to certain limitations of the PTS DOS environment, there is no possibility to burn CD/DVD discs.
Low Graphics Safe Mode
When the Low Graphics mode is selected, the PTS DOS launch menu appears. It has the same functionality and looks similar to the Safe mode but graphically simpler.
Booting from the WinPE Recovery Media
The WinPE recovery environment can be a real alternative to the Linux/DOS recovery environment. Providing nearly the same level of functionality it offers an excellent hardware support and the same interface as the Windows version does.
Startup
To start working with the WinPE recovery environment, please take the following steps:
1. Start up the computer from the WinPE recovery media.
Copyright© 1994-2014 Paragon Software GmbH. All rights reserved.
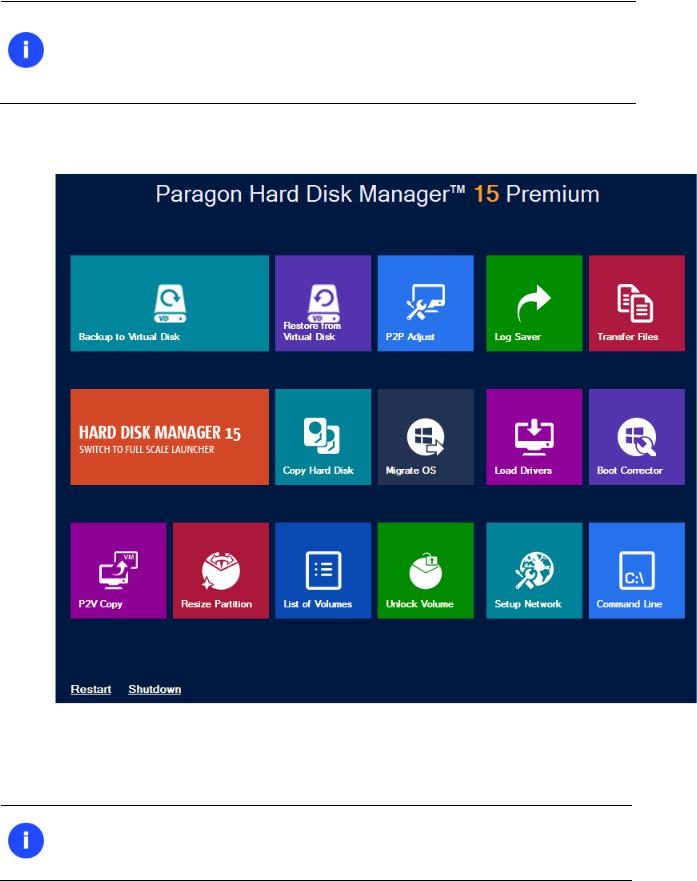
23
Please use Recovery Media Builder to prepare Paragon’s recovery environments on
CD/DVD, flash, or in an ISO-image.
To automatically boot from the recovery media please make sure the on-board BIOS is set up to boot from CD/USB first.
2.Once it has been loaded, you will see the Universal Application Launcher. In general it enables to run components of the product, load drivers for undefined hardware or establish a network connection.
3.Click on the required operation to start. Hints on the selected at the moment item will help you make the right choice.
4.Consult the help system by pressing ALT+F1 to know more on the subject.
The WinPE based recovery environment offers excellent hardware support. However in case it doesn’t have a driver for your disk controller, your hard disks will be unavailable. Please consult the Adding specific drivers scenario to know how to tackle this issue.
Copyright© 1994-2014 Paragon Software GmbH. All rights reserved.

24
Basic Concepts
This chapter explains terms and ideas that show how the program works. To understand these helps to obtain a general notion of the operation performance and makes it easier for the user to operate the program.
System and Data Protection
The data protection issue is a growing cause of worrying for more and more people today. Indeed, it is hardly to find a person who will be particularly happy when all precious information on the hard disk is irreversible lost as a result of its malfunction. So how this tragedy can be prevented?
File Backup versus Sector Backup
Since the advent of the computer age people were in the search of ways to guarantee data safety. As a result we’ve got now two principal approaches: the file-based backup and the sector-based backup. The main difference between the two lies in the way data is treated.
A sector-based backup operates with an image (or a snapshot) of the whole disk system or its separate partitions. It not only includes the contents of all user-made files, but additionally contains the exact structure of directories, information about file allocation, file attributes and other related data. Thus it enables to successfully process system or encrypted partitions of any file system type, no matter what kind of information they contain.
In contrast, a file-based backup takes into account a file system structure and only functions on a file or folder level. So it is very efficient when archiving separate files or folders, but in no way will help you back up a system partition.
You should understand pretty well that each of the two approaches is only good when properly chosen. In the comparison table below you can see when this or that approach will suit you at most.
|
Sector-Based Backup |
File-Based Backup |
Merits
It does not dependent on a particular file system. Thus it can successfully process system or encrypted partitions of any file system type, no matter what kind of information they contain.
Functioning on a file/folder level, it is ideal for archiving separate files or folders.
|
It can create an exact image of a partition, |
It enables to automatically build up contents of |
|
including its service data. Thus it is ideal for a |
the future backup image by using an advanced |
|
backup/restore of a system partition or a fast |
system of filters. |
|
deployment to a bunch of identical computers. |
|
|
It allows archiving data of the same volume with |
|
|
different backup policies. |
|
|
It is easy and efficient when creating backup |
|
|
chains. |
|
|
Demerits |
|
|
Resulted backup images may contain a lot of |
It depends on a file system structure, so you |
|
redundant data. |
won’t be able to process unknown file systems. |
|
It is ineffective when trying to maintain a backup |
It cannot be used to back up a system partition. |
|
chain, especially when little amount of data is |
|
Copyright© 1994-2014 Paragon Software GmbH. All rights reserved.

25
being changed.
It is much slower when processing large amount of data.
Backup Types
At the present moment the market is offering various types of backup imaging to meet the needs of any user. Besides supporting them all, our program offers a unique backup type, called File Increment to a Sector Backup.
Full, Differential, and Incremental Sector Backups
A full sector-based backup image includes all contents of a partition or a hard disk at the moment of its creation. If you roll back your system to the initial state on a regular basis, that’s exactly what you’re looking for. But if you want to have multiple backup archives of the same partition reflecting certain time stamps, unchanged data will inevitable be duplicated in all archives and take additional space on backup media. To tackle this issue there has been developed a supplementary technique called Differential Sector Backup.
A differential archive only contains data changed since the time of creating a full archive, which forms a base (or a parental image) in this case, thus considerably saving your system resources. It is realized by the exact bit-wise comparison of the previous partition’s data (saved in the parental image) with the current data (that is actually the partition itself). To restore this kind of backup you will require a full image and one of its differentials, what is very convenient.
This function is only available for single primary and logical partitions.
Incremental archive is a further way of optimizing the process of disk imaging. Unlike differentials, it may not only contain data changed since the time of creating a full sector-based archive, but one of its increments as well, thus allowing to save more time and the backup storage. The main principal here is the shorter the interval between increments, the less data is backed up. In general this type of backup is great except for one thing – when you restore an incremental archive there will be processed the initial full image and all increments between, which depending on the size of your backup chain, may take plenty of time. Anyway unlike backups, the restore operation is an emergency, which might not happen at all.
Paragon’s incremental sector-based archive employs an innovative technology that significantly improves the backup performance. Its core is in introduction of a special index file (.pfi) that keeps meta-information on the corresponding incremental image. It’s much smaller than the image itself and is used to calculate the difference between the current and previous state of a backup object. Thus, when you’re going to do an increment to a full archive of your system
Copyright© 1994-2014 Paragon Software GmbH. All rights reserved.
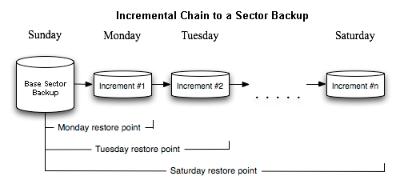
26
partition stored on the network, only its index file is processed over the net (a couple of megabytes at most), not the entire image, which minimizes both, the network traffic and backup time. Another new thing is change of a backup format – all increments are saved in .vhd (Virtual Hard Drive) containers.
Please note that the current version of the product has a number of limitations regarding sector-based increments:
Increments can only be created for full archives of the new type (with a .pfi index file). Any of our flagship products since Hard Disk Manager 12 supports this functionality;
Increments can only be created for full archives stored on a local mounted drive or a network share;
Increments cannot be created for archives of entire GPT disks;
Increments can only be restored under Windows (if no restart is needed) or WinPE;
Increments cannot be processed with the Synthetic Backup Wizard;
Increments cannot be processed with the Check Archive Integrity Wizard;
Increments cannot be processed with the Create File Complement Wizard;
Increments cannot be browsed in Volume Explorer;
Increments can only be used with our software;
Increments cannot be compressed;
Increments cannot be encrypted;
Increments cannot be splitted.
Full and Incremental File Backups
A full file-based archive only contains files and folders. It is really efficient when backing up an e-mail database or particular documents, as no redundant data is processed. But if you care about maintaining a files history, you can benefit from one more supplementary technique called Incremental File Backup.
An incremental archive only contains data changed since the time of creating a full or incremental file-based archive. It is smaller and takes less time to create, but you will require the initial full image and all of its increments to restore the latest point of this kind of backup.
Copyright© 1994-2014 Paragon Software GmbH. All rights reserved.

27
File Increment to a Sector Backup
File Increment to a Sector Backup is a unique technology on the market so far that bridges two principally different approaches of the data backup: the file-based backup and the sector-based backup. With its help you can now create a sector-based backup of your system to get it back on track in minutes in case of a virus attack or a hardware malfunction and then just make file-based incremental images to the previously created sector-based backup to keep updated only information that is critical for you. Thus you will considerably save your system resources.
Backup Storage
Our program supports several techniques of storing backup images. Let’s take a closer look at them all to understand what kind of storage is able to provide better security:
You can place a backup image to a local partition. Despite the fact that it is the most convenient way, try not to use it. You can delete your backup just by accident or lose it as a result of a hardware malfunction, or a virus attack;
You can place a backup image to an external mounted storage to provide for a higher level of data protection and system independence;
You can place a backup image to a special secured place on the hard disk called the Backup Capsule that has an independent system layout (e.g. a separate partition) and will stay operable should the active file system be damaged. To avoid an accidental removing or unauthorized access of the backup data, this partition is hidden and thus cannot be mounted in the operating system. However it won’t help you in case of a hardware malfunction;
You can place a backup image to external media (CD/DVD) to guarantee a high level of data protection as long as the backup media is kept secure;
You can place a backup image to a network drive to stand a better chance of success in case of a hard disk failure. Moreover, by storing it on a special-purpose server you may be pretty sure nothing will happen to it;
Finally you can place a backup image to an FTP server to provide a new level of system and data protection.
Known Issues on FTP/SFTP
1.You need to check out yourself Windows Firewall or programs of this kind let our program work with the required port (21 by default).
2.You cannot restore data selectively (with Restore Wizard) from an FTP/SFTP server.
3.You can browse an FTP server in the passive mode only.
4.Parallel access to several FTP/SFTP servers is limited — only one password for all servers is available.
Copyright© 1994-2014 Paragon Software GmbH. All rights reserved.
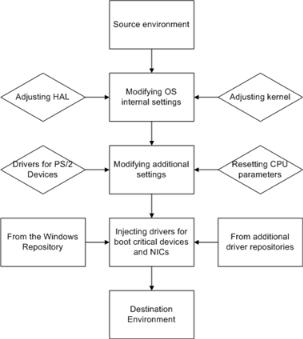
28
Adaptive Restore
Technology Background
Windows family operating systems are notorious for their excessive sensibility to hardware, especially when it turns to replacement of such a crucial device as HDD controller or motherboard – actually Windows will most likely fail to boot as a result of this operation.
In 2008 our company came with an exclusive technology called Paragon Adaptive Restore™. Initially aimed at restore of Windows Vista or Server 2008 from a backup to a different hardware configuration, its current realization, available in the P2P Adjust OS Wizard, enables to make any Windows OS since XP bootable on dissimilar hardware by allowing automatic injection of all required drivers and the other actions crucial for this type of migration.
Technology Concept
Let’s take a closer look at how Paragon Adaptive Restore works.
As you see, successful migration of a Windows system to a different hardware platform involves several actions:
1.Change of the Windows kernel settings according to the new configuration. The program detects the given hardware profile and automatically installs the appropriate Windows HAL and kernel.
2.Installation of drivers for boot critical devices. The program detects those without drivers and automatically tries to install lacking drivers from the built-in Windows repository. If there’s no driver in the repository, it prompts the user to set a path to an additional driver repository, strongly recommending not to proceed until all drivers for the found boot critical devices are installed. In case drivers for these devices are installed, but disabled, they will be enabled.
3.Installation of drivers for a PS/2 mouse and keyboard. This action will only be accomplished for Windows XP/Server 2003.
4.Installation of drivers for network cards. The program detects those without drivers and automatically tries to install lacking drivers from the built-in Windows repository. If there’s no driver in the repository, it prompts the user to set a path to an additional driver repository.
Copyright© 1994-2014 Paragon Software GmbH. All rights reserved.

29
These actions guarantee a Windows system will start up on dissimilar hardware. After the startup, Windows will initiate reconfiguration of all Plug’n’Play devices. It’s a standard procedure, so please don’t worry and prepare the latest drivers at this step to get the most out of the system.
Though all Windows systems have built-in driver repositories, please be prepared to have additional drivers when dealing with Windows XP/Server 2003, because for these systems they are very modest.
Technology Application
Let’s consider a number of situations when the Adaptive Restore technology can help you out:
If you need to migrate to a different hardware platform with minimal effort
If you need to upgrade hardware while keeping all programs and settings intact
If you need to replace failed hardware and cannot find an exact match for original system specifications
Known Issues
1.After transferring Microsoft Vista and later versions to different hardware, you will need to re-activate license of the system. It’s normal behavior as these systems keep tracking any change of hardware. Re-activation is legally justified in this case, as you transfer your system to another PC.
2.If you’ve installed several operating systems on one partition, we can only add drivers to the latest version of
OS. Microsoft highly recommends that you install an operating system on a separate partition.
3.Please note drivers are not cached during selection. That’s why if you select a driver to add to the system, but it’s already unavailable during the operation, the program will end the operation with an error.
System Virtualization
With new powerful x86 computers, system virtualization has become extremely popular. It’s a software technology that enables to run several virtual machines on one physical machine, providing resources of that single computer are shared across several environments. As a result one and the same physical computer can have multiple OSs and applications operating simultaneously, thus opening up enormous opportunities for both, business and home users, exactly:
Avoid underutilization of up-to-date powerful computers;
Increase flexibility of a physical infrastructure;
Provide for increased availability of hardware and applications;
Cut expenses on hardware and energy;
Guarantee smooth and cost saving system migration;
Enjoy working with old applications you can’t launch on your current PC;
Take advantage of having multiple operating systems on one Windows PC, including Linux, Mac OS X, etc.;
Forget about hunting for replacement of the failed hardware, and many more…
Copyright© 1994-2014 Paragon Software GmbH. All rights reserved.

30
Known Issues
1.You should install integration services (e.g. VMware Tools) on the virtual system yourself. We only guarantee its smooth startup.
2.After transferring Microsoft Vista and later versions to a virtual disk, you will need to re-activate license of the system. It’s normal behavior as these systems keep tracking any change of hardware. Re-activation is legally justified in this case, as you transfer your system to another PC.
3.If your system hosts several Windows OSes, our program will find them all and automatically patch to run in a virtual environment. However we cannot guarantee smooth startup of all found Windows systems, but the guest OS, for its configuration parameters may be incompatible with the others.
Paragon Hot Processing & Volume Shadow Copy Service
Offline versus Online Data Processing
In the course of time there have been developed various methods of data processing. Despite different work concept, all of them can be divided into two principal groups: offline (cold) and online (hot) data processing techniques.
As the name infers, offline data processing can only be accomplished when the data is in consistent state (the operating system and all the applications are completely shut down). Actually it is the most preferable way of image creation or data cloning, since software can obtain an exclusive right to process data that guaranties high level of operating efficiency. However, the offline data processing is absolutely out of question when dealing with 24/7 production environments.
In contrast, online data processing enables to create a consistent snapshot even as the data is currently modified. It is particularly useful for systems with high availability requirements, but it won’t be accomplished until all active transactions are complete. The point is to provide a coherent state of all open files and databases involved in a process, taking into account that applications may still keep writing to disks. As a result an online data processing cannot boast high operating speed.
Our program supports both offline and online methods of data processing. As far as online method is concerned it offers its own hot processing algorithm together with the possibility to use snapshot technologies provided by the Microsoft VSS framework.
Paragon Hot Processing Technology
Paragon Hot Processing is an online copy/backup technology for Windows NT+ family operating systems. Developed back in 2001, nowadays it is integrated with all copy/backup solutions offered by the company.
Paragon Hot Processing is not exactly a snapshot technology, though it has much in common with it. During an online copy/backup, the program uses the kernel mode driver HOTCORE.SYS to intercept and control disk write activity of applications and the operating system. The hotcore driver as an integral part of the program is installed during the setup procedure (that’s why the system reboot is required to complete the setup procedure). For the most part the driver is in the idle mode until it is activated with the program. While in this mode it bypasses any calls having no effect on the overall system performance, but a few kilobytes of the system memory.
Paragon Hot Processing technology offers copy/backup of locked partitions and hard disks under Windows NT+ family operating systems providing both high operating efficiency as well as low hardware requirements.
It is not recommended to use Paragon Hot Processing with active SQL Server, Exchange or Oracle databases since the backup image contents may be corrupted.
Copyright© 1994-2014 Paragon Software GmbH. All rights reserved.
![]()
31
Volume Shadow Copy Service
Microsoft Volume Shadow Copy Service (VSS) is designed to provide the copy/backup infrastructure for the Microsoft Windows XP/Vista/Server 2003/2008 operating systems. It offers a reliable mechanism to create consistent point-in- time copies of data known as shadow copies. Developed by Microsoft in close cooperation with the leading copy/backup solution vendors on the market, it is based on a snapshot technology concept.
Initiated by a VSS aware copy/backup utility, VSS creates snapshots for the selected volumes and represents them as virtual read-only devices, called volume shadow copies. Once the shadow copies are created, the copy/backup utility starts processing the data while applications keep writing to original volumes.
Unlike Paragon Hot Processing the VSS technology provides a unique possibility to make a synchronous snapshot of multiple volumes. This very feature can be particularly beneficial when backing up active SQL Server 2003, Exchange 2003 or Oracle databases located on multiple volumes the way it is recommended by Microsoft to improve the level of database performance and reliability, thus providing 100-percent data consistency.
To use VSS it is necessary to have a mounted 300 MB+ NTFS partition.
pVHD Support
Paragon introduces a pVHD (Paragon Virtual Hard Drive) format – a special VHD, optimized for storing backups of virtual and physical machines. It’s very efficient in handling incremental chains, data de-duplication and synchronization. pVHD allows obtaining backups that are up to four times smaller than original backup objects.
In the current version of the product backup images can be made either in the old PBF or the new pVHD. Please note that the pVHD support has a promotional goal. In future releases pVHD will gradually take the primary role.
Below is the list of wizards that allow working with pVHD:
Backup to VD Wizard (Linux, Windows, WinPE);
Incremental Backup to VD Wizard (Linux, Windows, WinPE);
File Complement to VD Wizard (Linux, Windows, WinPE);
Restore from VD Wizard (Linux, Windows, WinPE);
Check VD Integrity Wizard (Windows, WinPE);
Retention Wizard for VD (Windows). What you get by using pVHD:
Incremental imaging works much faster and rock-stable in comparison with the old PBF;
Only pVHD images can be used to do immediate virtualization;
With the new backup technology, available for customers as a new backup image format pVHD, Paragon has also achieved easy support of any virtual containers (VMDK, VHD, VHDX).
Agentless Protection of Hyper-V Guest Machines
Unlike traditional backup tools designed to work with physical machines, our product can operate at the virtualization layer, employing MS VSS (Volume Shadow Copy Service) to agentlessly backup/restore any guest machine of Hyper-V. Thus our solution doesn’t need an agent on a target virtual machine to create its point-in-time copy including its
Copyright© 1994-2014 Paragon Software GmbH. All rights reserved.
32
configuration, operating system, apps, etc. This approach significantly enhances the backup performance, while minimizing the load on target machines and the hypervisor during the process. Besides, there’s no need to provide credentials for every guest to do backups.
The current version can only protect entire virtual machines (online or offline) registered on a local Hyper-V host, where our product is deployed. External hosts with their guest machines are not supported, please use Paragon’s Protect & Restore to accomplish this type of scenarios. Hyper-V guest machines can be backed up directly to pVHD, VMDK, VHD, or VHDX virtual containers. If using VHD/VHDX as target backup format, you can attach the resulted backup image to an existing virtual machine of Hyper-V and OS will be launched successfully. If using pVHD – there will be available additional options like high-level compression, encryption, or image splitting. Resulted virtual containers can be stored on a local disk (mounted/unmounted), a mapped network share, or by UNC path. To optimize storage capacities our product supports the incremental imaging, where each new increment describes the changes between the current state of the backup object and the previous state.
When time comes for disaster recovery, our solution enables to restore a previously backed up virtual machine to a new location according to a certain time stamp (if several available).
Below is the list of wizards that allow working with Hyper-V guest machines:
Hyper-V Backup Wizard (Windows);
Hyper-V Incremental Backup Wizard (Windows);
Hyper-V Restore Wizard (Windows).
Dynamic Disks
As you probably know, MS-DOS, Microsoft Windows 95/98/Me/NT/2000/XP/Vista/Server 2003/2008 support four primary partitions per physical hard disk, one of which can be extended. Certainly there is the possibility to create logical drives within the extended partition. Such types of disks are called basic. Windows XP Professional, Windows 2000, Windows Vista and Windows Server 2003/2008 follow the same strategy: You can have a maximum of four primary partitions, one of which can be an extended partition with logical drives. However, these operating systems also introduce a new disk configuration type — dynamic disk — which must be understood to effectively configure and manage hard disks.
Dynamic disk is a physical disk that doesn’t use partitions or logical drives. Instead, it contains only dynamic volumes. Regardless of what format you use for the file system, only Win2K computers can access dynamic volumes directly. However, computers that aren’t running Win2K can access the dynamic volumes remotely when connected to the shared folders over the network.
Dynamic disks can co-exist on a system with basic disks. The only limitation is that you cannot mix Basic and Dynamic disks on the same hard drive.
There are five types of dynamic volumes: simple (uses free space from a single disk), spanned (created from free disk space that is linked together from multiple disks), striped (a volume the data of which is interleaved across two or more physical disks), mirrored (a fault-tolerant volume the data of which is duplicated on two physical disks, and RAID-5 volumes (a fault-tolerant volume the data of which is striped across an array of three or more disks).
With dynamic storage, you can perform disk and volume management without the need to restart Windows.
Limitations:
Dynamic disks are not supported on portable computers.
Dynamic disks are not supported on Windows XP Home Edition-based computers.
Copyright© 1994-2014 Paragon Software GmbH. All rights reserved.

33
You cannot create mirrored volumes or RAID-5 volumes on Windows XP Home Edition, Windows XP Professional, or Windows XP 64-Bit Edition-based computers.
Thus, the dynamic disk is a new way of looking at hard disk configuration. Dynamic disks offer you more management flexibility without the partition limitation of basic disks. Dynamic disks can contain an unlimited number of volumes, but they cannot contain partitions or logical drives. Dynamic storage can be particularly beneficial for large-scale businesses when dealing with many physical hard disks involving complex setup.
GPT versus MBR
GUID Partition Table (GPT) is the next generation of a hard disk partitioning scheme developed to lift restrictions of the old MBR. Being a part of the Extensible Firmware Interface (EFI) standard proposed by Intel to replace the outdated PC BIOS, it offers a number of crucial benefits:
Up to 128 primary partitions for the Windows implementation (only 4 in MBR);
The maximum allowed partition size is 18 exabytes (only 2 terabytes in MBR);
More reliable thanks to replication and cyclic redundancy check (CRC) protection of the partition table;
A well defined and fully self-identifying partition format (data critical to the platform operation is located in partitions, but not in un-partitioned or hidden sectors as this is the case with MBR)
uEFI Boot Challenges
Introduced back in 2005 by Intel to lift restrictions of the old MBR (Master Boot Record) and PC BIOS (Basic Input/Output System), uEFI (Unified Extensible Firmware Interface) is now a recommended platform for new 64-bit Windows 8 computers. And the reason is easy to catch – besides other unique features impossible for the traditional tandem of BIOS+MBR, only a uEFI-based platform enables to accommodate Windows OS on a partition larger than 2.2TB.
Despite all uEFI advantages however, it has one quite naughty issue: a pretty standard operation with a bootable device for instance involving its connection to another SATA port results in unbootable Windows. You’ll get the same result if trying to boot from a cloned system hard disk or from a restored hard disk. All these problems originate from the way uEFI+GPT bundle is organized.
Microsoft provides how-to guides to tackle this type of problems, but they demand a great deal of experience from the user, involving the use of the cmd, diskpart and bcdedit tools.
Paragon has a better way! Introducing an elegant technology, realized at the user side as one simple option, you can define a system GPT volume you’re willing to boot from.
Below is a list of wizards where the uEFI switch boot device option can be found:
Copy Hard Disk Wizard;
Copy Partition Wizard;
Restore Wizard;
Migrate OS to SSD Wizard;
Boot Corrector.
The uEFI switch boot device option is only available through the 64-bit WinPE media at the moment.
Copyright© 1994-2014 Paragon Software GmbH. All rights reserved.

34
Apple Boot Camp
Boot Camp is a special utility to help you set up a dual boot system (Mac OS X and 32-bit Windows XP/Vista) on Intelbased Macs. It enables to securely re-partition your hard disk (resize an existing HFS+ partition to create a separate partition for Windows) and then launch the installation process. With Boot Camp all the necessary drivers will be at your disposal. Moreover after Windows has been installed it will serve as a boot manager to choose what operating system to start up.
It is strongly recommended not to modify the hard disk configuration with Windows Disk Manager. Otherwise it may lead to unexpected consequences, right up to BSOD and inability to boot in Windows XP/Vista. Please use our program to correctly update both MBR and GPT.
64-bit Support
The bulk of software today is written for a 32-bit processor. It can meet the requirements of almost any end user. However that is not the case when dealing with servers processing large amounts of data with complex calculations of very large numbers. That is where 64-bit architecture comes into play.
It can boast improved scalability for business applications that enables to support more customer databases and more simultaneous users on each server. Besides a 64-bit kernel can access more system resources, such as memory allocation per user. A 64-bit processor can handle over 4 billion times more memory addresses than a 32-bit processor. With these resources, even a very large database can be cached in memory.
Although many business applications run without problems on 32-bit systems, others have grown so complex that they use up the 4 GB memory limitation of a 32-bit address space. With this large amount of data, fewer memory resources are available to meet memory needs. On a 64-bit server, most queries are able to perform in the buffers available to the database.
Some 32-bit applications make the transition to the 64-bit environment seamlessly others do not. For instance, systemlevel utilities and programs that provide direct hardware access are likely to fail. Our program offers a full-fledged support of the 64-bit architecture providing fault-tolerant work for such system dependent modules as Hot Processing.
Copy Operations
Hard drive duplication nowadays is becoming highly popular among PC users. That is due to some definite advantages it can offer. First of all, many people clone hard disks just to back up data for security reasons. The present day copy utilities enable to successfully transfer all on-disk information including standard bootstrap code and other system service structures, thus maintaining the operating system’s working capability. In case of a system malfunction, the user can get the system back on track in minutes. No additional configuration is required, what is very convenient.
The second possible application is the upgrade of a hard disk to a new one. The capacity of a modern hard drive doubles every two years, thus opening up new possibilities for software developers. As a result programs become more complicated and require considerable amount of free space. One day the user realizes that there is no more free space left on the hard disk and the only way out is to upgrade. Usually that means that besides purchasing a new hard disk, the user is to face a large re-installation procedure spanning several days of tedious work. But all of this can be avoided just by copying the contents of the old hard disk to a new one proportionally resizing the partitions.
And the last but not least is the copying of hard disks for cloning purposes. It may be of great use when setting up similar computers. There is no need for a system administrator to install an operating system from scratch on every one of them. It is enough just to configure one and then clone it to the others.
Copyright© 1994-2014 Paragon Software GmbH. All rights reserved.
35
Drive Partitioning
As you probably know a hard drive is to be split into one or more partitions, since it cannot hold data until it is carved up and space is set aside for an operating system. Until recently most PCs used to have just one partition, which filled the entire hard disk and contained an OS. The situation has changed however, thanks to new cost-effective high capacity hard drives, thus opening up numerous possibilities for PC users, such as editing video, archiving music, backing up CD images, etc. Huge increase in space is great, but it poses a number of problems, most important of which are effective data organization and speed.
Large drives are always going to take longer to search than smaller volumes, and an operating system is going to have its work cut out both finding and organizing files. It is for this reason that many people decide to invest in multiple hard drives, but there is an easy solution – drive partitioning. Partitioning lets you divide a single physical drive into a number of logical drives, each of which servers as a container with its own drive letter and volume label, thus enabling the operating system to process data more efficiently. Besides partitioning makes it possible to organize data so that it is easy to find and manage. You can set aside, for instance, 40 GB of a 160 GB hard drive for the OS, 70 GB for storing video and another 50 GB for your favorite music collections to provide transparent data storage.
It is also worth mentioning to that with a hard drive properly partitioned, such routine operations as files defragmentation or consistency check will not be that annoying and time-consuming any more.
By detaching the OS from the rest of the data you can tackle one more crucial issue – in case of a system malfunction, you can get the system back on track in minutes by recovering it from a backup image located on the other partition of the hard drive.
But that is not all drive partitioning may be used for. If you are willing to play games in Windows while browsing the Internet in Linux, 100-percent sure that no virus will attack your PC, drive partitioning is a necessity. In order to run several OSs on a single hard drive you are to create a corresponding number of partitions to effectively delineate the boundaries of each OS.
Data Sanitization
Data security is a two-sided problem. It is to be made clear, that providing confidentiality implies not only information to be stored properly, but also be destroyed according to certain rules. The first step to protecting yourself is to know exactly which security precautions work and which do not.
Many people believe the misconception that repartitioning a disk will result in complete destruction of its contents. Actually that is not quite so. Repartitioning the drive only alters references to partitions in the Partition Table, leaving all file data intact. In fact, there are a number of programs available to successfully recover previously deleted partitions.
Formatting a drive also does not guarantee data destruction. Formatting procedure implies modification of the Master File Table (MFT) that keeps track of where file contents are stored on the disk and verification of each sector for consistency. Even a low-level format does not actually erase the file contents for good, since they can still be resurrected from their deleted state with minimal effort by using the popular today Magnetic Force Microscopy technology.
The only way to make sure that all the data has been erased from a hard drive is to overwrite all on-disk sectors with random patterns of ones and zeros. Although this sounds complex, there is an easy way to do this.
The process of deliberately, irreversibly removing or destroying the data stored on a memory device (magnetic disks, flash memory drives, etc.) is generally known as Data Sanitization. A device that has been sanitized has no usable residual data and even advanced forensic tools should not ever be able to recover it, thus providing maximum level of security.
Copyright© 1994-2014 Paragon Software GmbH. All rights reserved.

36
Data Security Standards
To irreversibly destroy all on-disk information there have been developed a number of disk sanitizing standards. They are distinguished by wiping patterns and number of passes:
1.US DoD 5220.22-M. US Department of Defense recommends to overwrite all addressable locations with a character, its complement and then a random character. Finally, the target data area is to be verified;
2.US Navy standards NAVSO P-5239-26.
NAVSO P-5239-26 for RLL encoded drives. At first to write the fixed value (0xffffffff) to the target data area, then the fixed value (0x27ffffff), and then random values. Finally, the target data area is to be verified;
NAVSO P-5239-26 for MFM encoded drives. At first to write the fixed value (0xffffffff) to the target data area, then the fixed value (0xbfffffff), and then random values. Finally, the target data area is to be verified;
3.British HMG Infosec Standard No.5. At first to write a single character pattern, then its complement and then a random character. Finally, the target data area is to be verified;
4.German VSItR Standard. Overwrite the deleted information 7 times, consistently filling it with the following patterns: 0x00, 0xFF, 0x00, 0xFF, 0x00, 0xFF, 0xAA. Finally, the target data area is to be verified;
5.Australian ASCI 33. Overwrite with a character (C), then verify. Overwrite with –C (the first pass character’s inverse), then verify again. Overwrite everything with both C and –C once again but without verification. Fill everything with random characters;
6.Russian GOST R 50739-95. Destroy information by a single pass with writing random characters into each sector byte;
7.Peter Gutmann’s algorithm. A whopping 35 passes, with 27 random-order passes using specific patterns combined with eight passes using random patterns;
8.Bruce Schneier’s algorithm. Two passes of specific patterns followed by five passes using a cryptographically secure pseudo-random sequence;
9.Paragon’s algorithm.
Overwrite each sector with a forcefully randomized 512-byte string, new for each sector, using CSPRNG (cryptographically secure pseudo-random number generator);
Overwrite each erased sector with its complement;
Overwrite each sector with a 512-byte string (CSPRNG), again forcefully randomized and different from the first pass, and new for each sector;
Fill each erased sector with 0xAA value. Finally, the target data area is to be verified.
Military and government standards always require 100 percent residual data verification. It is necessary to make sure that the operation has been properly accomplished. Besides corrupted sectors discovered during the operation are to be logged to keep the user informed, since these sectors may contain classified information.
The list of supported military and government standards may vary for your product.
Anyway you’ve always got the possibility to create a customized algorithm, defining up to 4 wiping patterns, number of passes for each wiping pattern and for the group of patterns,
Copyright© 1994-2014 Paragon Software GmbH. All rights reserved.

37
thus providing the maximum possible security level.
Scheduling
The automation of operations is particularly effective when you have to repeat a sequence of actions on a regular basis. For example, developing a specific project on a day-to-day basis and having to make a backup every evening so as not to lose the valuable data, you will really appreciate, when this kind of routine operations will be carried out automatically without your participation.
Another aspect of any automation process is that it allows an optimization of your computer’s work-load. This is especially important when operations require a considerable amount of computer resources – processor time, memory and more. A number of tasks, which can decrease the performance, can be run during the night or whenever the computer has the least work-load to perform.
The program has a special tool for scheduling. You can set out a timetable for any operation and it will start at a specified time without interrupting your current activity.
Windows BitLocker
BitLocker is a security feature that enables to protect data of your volumes with 128/256-bit AES (Advanced Encryption Standard) encryption. It has first appeared in Windows Vista Enterprise and Vista Ultimate to protect contents of hard disks from offline attacks for instance, when your hard disk is stolen and connected to another computer to retrieve data it contains.
Our product enables to work with volumes encrypted by BitLocker, but only when they are unlocked. Until that locked volumes will be recognized in the program’s interface as ‘Not formatted’. You can unlock this type of volumes only through Windows-native facilities:
Graphical user interface for Windows,
manage-bde command line tool for Windows and the WinPE recovery media.
To know more on the subject, please consult the How to Work with Bitlocked Volumes chapter.
In the current version of our product the following operations are allowed to accomplish on volumes encrypted by BitLocker:
Backup Partition;
Restore Partition;
Copy Partition;
Delete Partition;
Change Volume Label;
Add/Remove Drive Letter;
Hide/Unhide Partition;
Mark Partition as Active/Inactive;
Change Serial Number;
Change Partition ID;
Test Surface;
Check File System Integrity;
Copyright© 1994-2014 Paragon Software GmbH. All rights reserved.

38
Properties.
Windows Components
In the given section you can find all the information necessary to successfully work with the Windows version of the product.
Interface Overview
This chapter introduces the graphical interface of the program. The design of the interface precludes any mistake being made on the part of the user. Most operations are performed through the system of wizards. Buttons and menus are accompanied by easy understandable icons. Nevertheless, any problems that might occur while managing the program can be tackled by reading this very chapter.
General Layout
When you start the program, the first component that is displayed is called the Launcher. It enables to run wizards and dialogs, to specify program settings, to visualize the operating environment and the hard disk configuration.
The Launcher’s window can be conditionally subdivided into several sections that differ in their purpose and functionality:
Copyright© 1994-2014 Paragon Software GmbH. All rights reserved.

39
1.Tool Button
2.Ribbon Panel
3.Set View Button
4.Virtual Operations Bar
5.Express Mode Button
6.Disk Map
7.Disk and Partitions List
8.Context-sensitive Menu
9.Properties Panel
10.Status Bar
A number of panels offer similar functionality with a synchronized layout. The program enables to conceal some of them to simplify the interface management.
Tool Button
By clicking on this button the user can:
Launch auxiliary wizards,
Get access to the program settings,
Collect and send a log files package to the Support Team,
Go to Paragon’s website to download a free update, register the product, visit Paragon’s Knowledge Base, etc.
Ribbon Panel
An area across the top of the program’s window is called the Ribbon Panel. It makes almost all the product capabilities available to the user in a single place. A Ribbon Tab is an area on the panel that contains buttons organized in groups by functionality. Each button corresponds to a certain program wizard or dialog.
If you’d like to hide all ribbon tabs, click on the arrow button at the right top corner of the program window.
Set View Button
You can adjust the working environment by choosing one of two predefined views: general and legacy. This division is quite logical, allowing the user to filter out legacy wizards and dialogs that have to do with the old PBF backup format. Please note that the legacy mode is not active by default.
Copyright© 1994-2014 Paragon Software GmbH. All rights reserved.

40
Virtual Operations Bar
The program supports previewing the resulting layout of hard disks before actually executing operations (so-called virtual mode of execution). In fact, when the virtual mode is enabled, the program does not accomplish operations immediately, but places them on the List of Pending Operations for later execution.
The Virtual Operations Bar enables to manage pending operations.
BUTTON FUNCTIONALITY
Cancel the last virtual operation on the List of Pending Operations
Cancel the last undo virtual operation on the List of Pending Operations
Display the List of Pending Operations
Launch the real execution of virtual operations
Cancel all virtual operations on the List of Pending Operations
Generate a script out of all pending operations
Schedule pending operations
Virtual mode is an effective way of protection from any troubles, since no operations will be executed until clicking the Apply button for confirmation, thus giving a second chance to weigh all pros and cons of this or that particular operation. The program politely reminds the user that there are unsaved changes by showing the following window:
Express Mode Button
By clicking on this button the user can switch to the express mode of operation at any time.
Disk Map
As the name infers, the Disk Map displays the layout of physical and logical disks. Physical disks are represented with rectangle bars that contain small-sized bars. These small-sized bars represent logical disks. Their color depends on the file system of the appropriate partition. By looking at the size of the bar’s shaded area it is possible to estimate the used disk space. For the selected at the moment object there’s the possibility to call a context-sensitive popup menu with available operations.
Large-sized bars display the following information about physical disks:
Type (basic or dynamic MBR/GPT),
Manufacturer,
Copyright© 1994-2014 Paragon Software GmbH. All rights reserved.
![]()
41
Model.
Small-sized bars display the following information about logical disks and blocks of free space:
Volume label (if exists),
Drive letter,
Total size,
File system.
The Disk Map is synchronized with the Context-sensitive Menu and the Properties Panel. Thus by selecting a disk on the map, the two will automatically display detailed information on it. To know more on the subject, please consult the Viewing Disk Properties chapter.
Since the Disk Map and the Disk and Partitions List have the same purpose, the user is allowed to extend only one at the moment by using a corresponding arrow button.
Disk and Partitions List
The Disk and Partitions List is another helpful tool that helps to get a clear-cut picture on the current state of the system hard disks and partitions. All objects (disks, partitions, or blocks of free space) on the list are sorted according to their starting position. For every item there is the possibility to call a context-sensitive popup menu with available operations.
The Disk and Partitions List provides detailed information on all hard disks and partitions found in the system including the following properties:
—Name,
—Volume label (if exists),
—Drive letter,
—File system type,
—Volume size,
—Amount of used and unused (free) space,
—Active/Inactive attribute,
Copyright© 1994-2014 Paragon Software GmbH. All rights reserved.

42
— Hidden/Unhidden attribute.
The Disk and Partitions List is synchronized with the Context-sensitive Menu and the Properties Panel. Thus by selecting a disk on the list, the two will automatically display detailed information on it. To know more on the subject, please consult the Viewing Disk Properties chapter.
Since the Disk Map and the Disk and Partitions List have the same purpose, the user is allowed to extend only one at the moment by using a corresponding arrow button.
Context-sensitive Menu
The Context-sensitive Menu shows a list of operations available for an object (disk, partition, or block of free space) selected either on the Disk Map or the Disk and Partitions List. If you click a corresponding record the appropriate wizard or dialog will be started. All default values for the operation parameters will correspond to the object’s settings. If there too many items on the list, type in the first word of the required command in the Search commands field to filter the list.
Properties Panel
The Properties Panel provides information on the object (disk, partition, or block of free space) selected either on the Disk Map or the Disk and Partitions List.
Copyright© 1994-2014 Paragon Software GmbH. All rights reserved.

43
The Properties Panel helps to obtain the following data:
For a hard disk
Model,
Serial number,
Type of hard disk (basic or dynamic MBR/GPT),
Total size (in GB),
Information on geometry of the disk (amount of sectors per track, heads and cylinders).
For a partition
Drive letter assigned to the disk,
Volume label (if exists),
Type of the logical disk,
File system,
Root entries,
Serial number,
NTFS version,
Partition ID,
Total size, used space and free space (in GB), etc.
Besides you can modify practically any partition property by clicking on the required value.
For a block of free space
Total size (in GB).
Status Bar
This is the bottom part of the main window. The Status Bar displays menu hints, for each item the cursor points to.
Settings Overview
To call the Settings dialog, please click Tool Button, then select Settings. All the settings are grouped into several sections, which functions are described in the following paragraphs. The list of sections is placed on the left side of the dialog. By selecting a section from the list, you can open a set of options.
To get a detailed description to any setting, control, or field of the program just click the hint button and then the object you need.
Copyright© 1994-2014 Paragon Software GmbH. All rights reserved.

44
Application Section
CD/DVD/BD recording options
This section contains a set of options that will be taken into account during CD/DVD/BD burn operations:
Burn every CD/DVD/BD to the end. By default, the program does not create ISO 9660 compliant burning sessions, as it processes data on-the-fly and can only estimate the resulted session size. That’s why no third party tool will get access to the recorded data. To tackle the issue, mark the checkbox to make the program create a standard Disk-at-Once session. It may slow down the burning process, as every CD/DVD/BD will be recorded up to the end, no matter how much actual information to contain.
Recording speed. The user may define how fast a CD/DVD/BD will be recorded (minimum, normal and maximum). Besides there is an automatic mode when the program will set the most appropriate speed for every CD/DVD/BD.
Bootable ISO image. That’s the image to be placed together with the backup data. By default, the program offers its own bootable ISO image, which contains a Linux/DOS recovery environment. However, the user is free to use any bootable ISO image.
CD/DVD/BD boot capability. The program enables to choose whether any recorded CD/DVD/BD will be bootable, or only the first one for a session, or without that function at all.
Folder where the ISO image is to be placed. When the user decides not to physically burn a CD/DVD/BD, but create an ISO image file, this very folder will be used to contain these images.
Copyright© 1994-2014 Paragon Software GmbH. All rights reserved.

45
FTP sites options
In this section you can manage online backup storages located on FTP or SFTP servers. By clicking on available buttons, you can create, modify, delete an FTP/SFTP location, etc.
To create an FTP/SFTP location, you’ve got to specify a number of options:
Use SFTP connection. Mark the option to connect to the desired SFTP server if necessary;
Address. Type in an address to the desired server;
Port. Specify the required port (21 for FPT and 22 for SFTP by default);
Anonymous login. Mark the option to set up anonymous connection. Typical username for this type of login is “anonymous”;
Use Active Mode (only for FTP). Mark the option if your provider requires this type of authentication;
Allow Open SSH key-based authentication (only for SFTP). If your provider requires this type of authentication, mark the option to specify public and private keys and a passphrase;
Login. Enter a login;
Password. Enter a password. Click Remember password to save it next time you back up to this location;
Name. By default, the program uses the provided address as the connection name, which can be modified however.
You need to check out yourself Windows Firewall or programs of this kind let our program work with the required port (21 for FTP and 22 for SFTP by default).
By clicking the Connect button the provided location will be checked. If ok, you’ll get a new item on the list named after this location. By clicking the + icon you can browse it to specify a more exact location for your backups.
Copyright© 1994-2014 Paragon Software GmbH. All rights reserved.

46
Virtual mode options
In this section you may configure the virtual mode:
Allow virtual mode. Mark the checkbox to enable the virtual mode. It is an effective way of protection from any troubles, since no operation will be executed until confirmation, thus giving you a second chance to weigh all pros and cons of this or that particular operation.
We strongly recommend you to enable this mode.
Close progress dialog automatically. Mark the checkbox to automatically close the progress dialog after accomplishing operations.
Backup Section
Backup image options
This section contains a set of options that will be taken into account during backup/restore operations:
Control archive integrity. Mark the checkbox to guarantee that all backup images created with the program are 100 percent flawless. If you decided not to control the archive integrity, the backup operation would take about 3-5% less time.
Set image file names automatically. Mark the checkbox to make the program automatically set a file name for every volume of a complex backup image. Otherwise you will need to do it manually during the backup operation.
Copyright© 1994-2014 Paragon Software GmbH. All rights reserved.

47
Compression level. From the pull-down list you can select the desired compression level for backup images that will be used by default.
Enable image splitting. Mark the checkbox to automatically split every backup image to volumes of a particular size.
Splitting images enables to tackle problems caused by a maximum file size limitation of some file systems.
Maximum split size. With the spinner control you can specify a maximum size for backup volumes.
General copy and backup options
This section contains a set of options that will be taken into account during copy and backup operations:
HDD raw processing. Mark the checkbox to copy/back up a hard disk in the sector-by-sector mode, thus ignoring its information structure (e.g. unallocated space or unused sectors of existing partitions will be processed as well). This can help to avoid problems with hidden data created by certain applications or the system administrator. However, it will take more time to accomplish the operation.
Partition raw processing. Mark the checkbox to copy a partition in the sector-by-sector mode to successfully process unknown file systems. However it is not recommended to enable this option when working with supported file systems as it takes more time to accomplish the operation.
Skip OS auxiliary files. Mark the checkbox to skip OS auxiliary files (like pagefile.sys, hiberfil.sys, etc.), thus reducing the operation time and the resulted size of the backup image.
Skip archive files stored in archive library. Mark the checkbox to skip backup images registered in the archive database, thus reducing the operation time and the resulted size of the backup image.
Automatic BCD Update. Unmark the checkbox to suppress automatic update of BCD (Boot Configuration Data) after copy/restore operations.
By clicking the link at the bottom of the window you can jump to the Copy/Backup exclude options.
Copyright© 1994-2014 Paragon Software GmbH. All rights reserved.

48
Hot processing options
In this section you may configure the hot processing mode:
Enable hot processing. Mark the checkbox to enable the so called hot data processing mode that is specially designed to process data without restarting your operating system.
Hot processing technology. From the pull-down list you can select the required hot processing technology.
Always use hot processing. Select the option to process partitions without making them locked. Thus you will be able to keep working with them as usual.
Use hot processing only when partition is locked. Select the option to use the hot processing only when partitions are locked and cannot be processed without restarting the computer. Please keep in mind, that once you start any operation on a partition in this mode, it will automatically be locked by the program, thus you won’t be able to keep working with it as usual.
Hot processing temporary drive. Here you can select a disk drive that will be used to store the temporary hot backup data (by default – C:).
Attempts to start VSS. Here you can set how many attempts to start Microsoft VSS the program is to do before automatically rebooting the system and accomplishing the operation in a special boot-up mode.
Timeout between attempts (in seconds). Here you can set a time period between different attempts to start Microsoft VSS.
Switch between hot processing technologies. Mark the checkbox to automatically switch between Paragon Hot Processing and Microsoft VSS if one of them is unavailable at the moment.
By clicking the link at the bottom of the window you can jump to the Run during backup options.
Copyright© 1994-2014 Paragon Software GmbH. All rights reserved.

49
Run during backup options
In this section you can specify external applications to execute at various phases of the backup process. It can be particularly useful when imaging systems with high availability requirements (MS SQL, MS Exchange, etc.), since it enables to create a consistent snapshot even as the data is currently modified. The point is to provide a coherent state of all open files and databases involved in a backup, taking into account that applications may still keep writing to disks.
Actually the backup process consists of two phases: the preparation phase (snapshot) and the data-copying phase. There are three points of the backup when external commands/programs can be launched:
Execute at the beginning of the backup process before taking a snapshot. Here you can specify an executable file that will help you to prepare running applications for taking a snapshot. It may contain specific commands/programs to delete unnecessary files, suspend services, flush transactions or caches, etc. Everything depends on the used applications.
Execute after taking a snapshot. Here you can specify an executable file that will run just after taking a snapshot. It may contain specific commands/programs, e.g. to resume the previously suspended services, etc. Everything depends on the used applications.
Execute after finishing the backup process. Here you can specify an executable file that will run after the backup process has been accomplished. It may include commands/ programs that will move the backup image to a particular location, etc.
By clicking the link at the bottom of the window you can jump to the Hot processing options.
By clicking the Browse button you can get into the browser-like window to choose an executable file.
Copyright© 1994-2014 Paragon Software GmbH. All rights reserved.

50
The program provides the ability to work with three types of executable files (.exe, .bat, .cmd). It is up to the user to write batch files to safely prepare applications for backup. There are some certain general requirements for that:
All programs and commands must execute sequentially and finish before the .bat file completes its work.
It is recommended to use external commands/programs in the following format — Start/wait program.exe. The wait option will help to start an application and wait until it completes its work. This will guarantee that all included commands/programs complete their execution before the batch file does.
This function is only available when the Hot Processing mode is enabled.
The program enables to set parameters for an executable file directly from the line. However, if the file path contains word gaps it is necessary to enclose it in quotes in order to make the program distinguish between the path and the used parameters.
By clicking the link at the bottom of the window you can jump to the Hot processing options.
Copyright© 1994-2014 Paragon Software GmbH. All rights reserved.
Содержание
- Мастер создания резервной копии
- Планировщик резервного копирования
- Выполняемые операции
- Информация о жестких дисках
- Дополнительные функции
- Восстановление разделов
- Настройки копирования и архивации
- Достоинства
- Недостатки
- Скачать пробную версию Paragon Hard Disk Manager
- Вопросы и ответы

Ранее была известна программа Paragon Backup & Recovery, она выполняла функции резервного копирования и восстановления файлов. Сейчас возможности данного софта расширились, и разработчики переименовали его в Paragon Hard Disk Manager, добавив множество всего интересного и полезного. Давайте ознакомимся с возможностями данного представителя подробнее.
Мастер создания резервной копии
Практически каждая программа, основная функциональность которой сосредоточена на работе с дисками, обладает встроенным мастером добавления задач. В Hard Disk Manager он также имеется. От пользователя требуется только читать инструкцию и выбирать необходимые параметры. Например, во время первого шага достаточно только дать название копии, и при желании добавить описание.
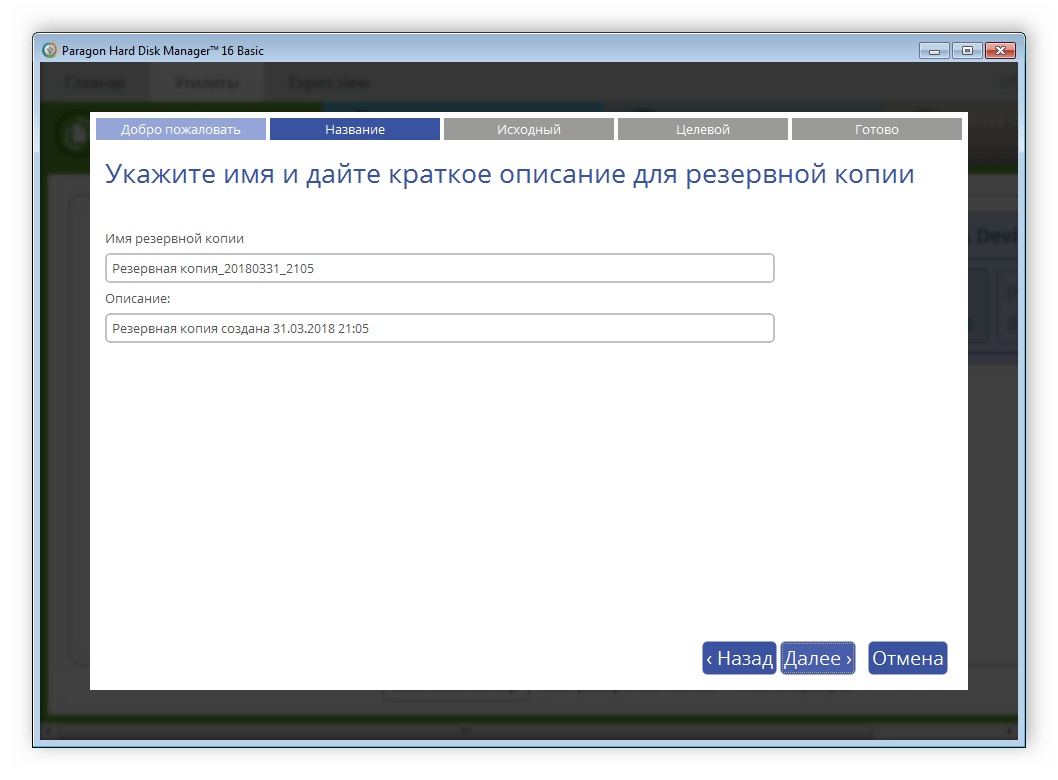
Далее производится выбор объектов резервного копирования. Ими может стать весь компьютер со всеми логическими и физическими дисками, один диск или раздел, некоторые типы папок на всем ПК или определенные файлы и папки. Справа отображается изображение состояния базового жесткого диска, подключенных внешних источников и CD/DVD.
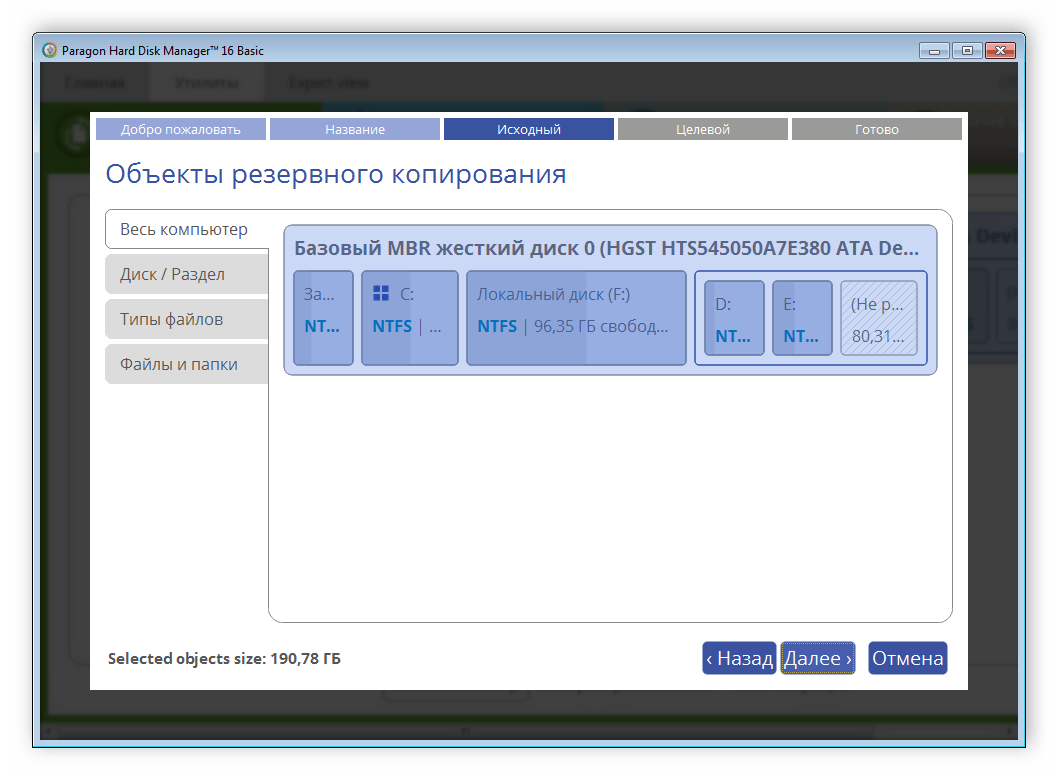
Paragon Hard Disk Manager предлагает делать резервную копию на внешнем источнике, другом разделе жесткого диска, использовать DVD или CD, а также присутствует возможность сохранить копию в сети. Каждый пользователь задействует один из вариантов индивидуально под себя. На этом процесс подготовки к копированию закончен.
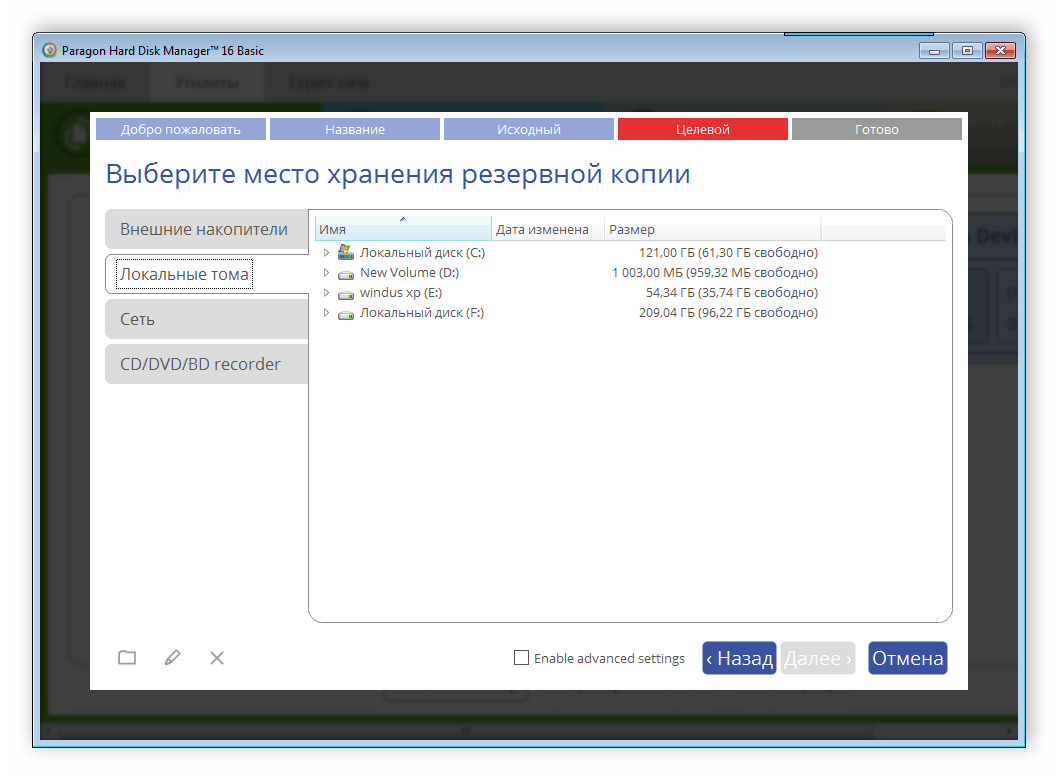
Планировщик резервного копирования
Если вы собираетесь выполнять резервное копирование с определенной периодичностью, то здесь на помощь придет встроенный планировщик. Пользователь выбирает подходящую периодичность копирования, выставляет точную дату и устанавливает дополнительные настройки. Стоит обратить внимание, что мастер создания многократного копирования практически идентичен с первым за исключением наличия планировщика.
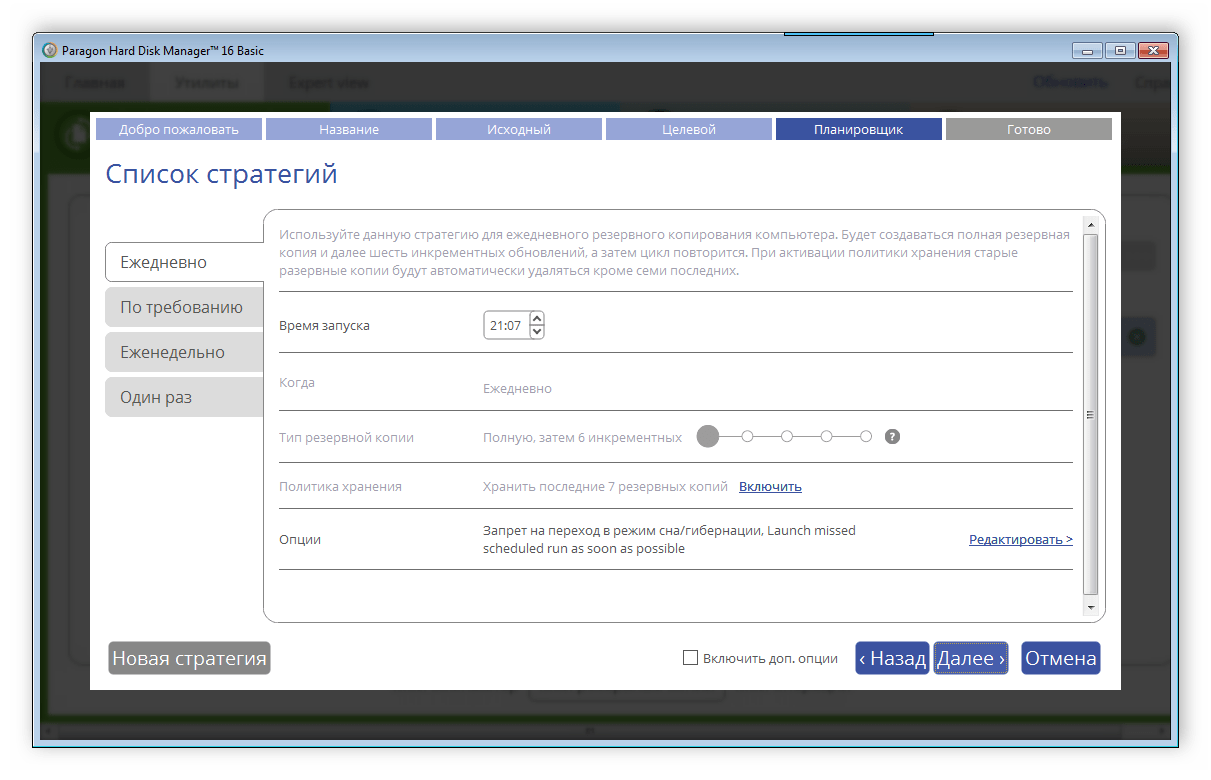
Выполняемые операции
В главном окне программы показаны активные резервные копии, операции с которыми происходят на данный момент. Пользователь может нажать на необходимый процесс левой кнопкой мыши, чтобы получить основную информацию о нем. Отмена копирования также происходит в этом окне.
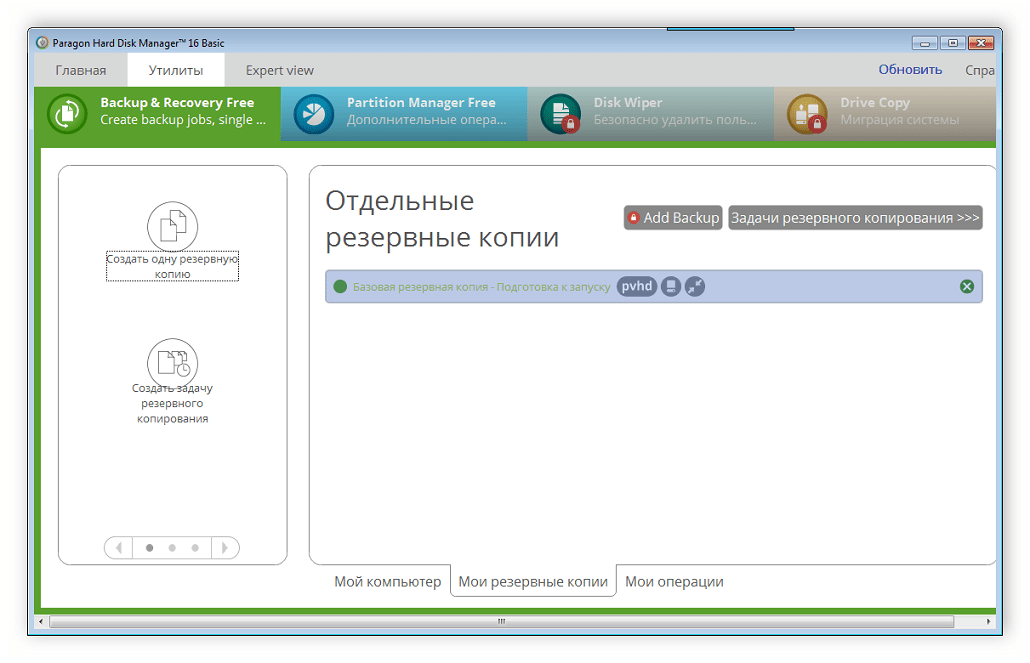
Если вы хотите ознакомиться со всем списком запланированных, активных и выполненных операций, перейдите в следующую вкладку, где все рассортировано и отображаются основные необходимые сведения.
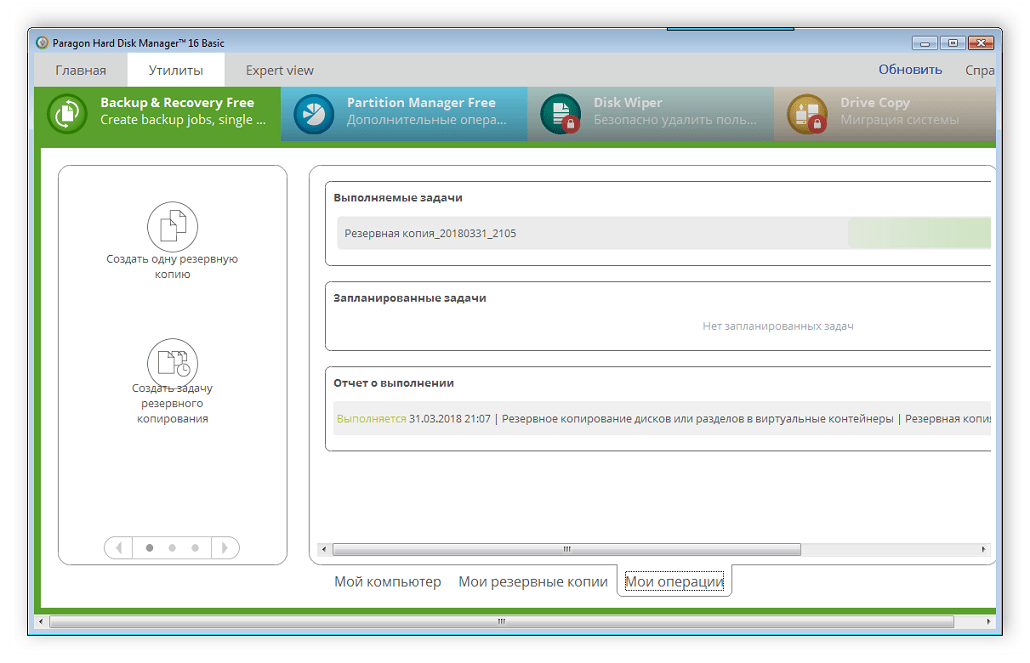
Информация о жестких дисках
Во вкладке «Мой компьютер» выводятся все подключенные жесткие диски и их разделы. Достаточно выбрать один из них, чтобы открылся дополнительный раздел с основной информацией. Здесь указана файловая система раздела, объем занятого и свободного пространства, статус и буква. Кроме этого отсюда можно сразу совершить резервное копирование тома или посмотреть его дополнительные свойства.


Дополнительные функции
Теперь Paragon Hard Disk Manager выполняет не только функцию копирования и восстановления. На данный момент это полноценная программа для работы с дисками. Она умеет объединять, разделять, создавать и удалять разделы, распределять свободное пространство, форматировать и перемещать файлы. Все эти действия выполняются с задействованием встроенных помощников, где присутствуют инструкции, а от пользователя требуется только выбирать необходимые ему параметры.
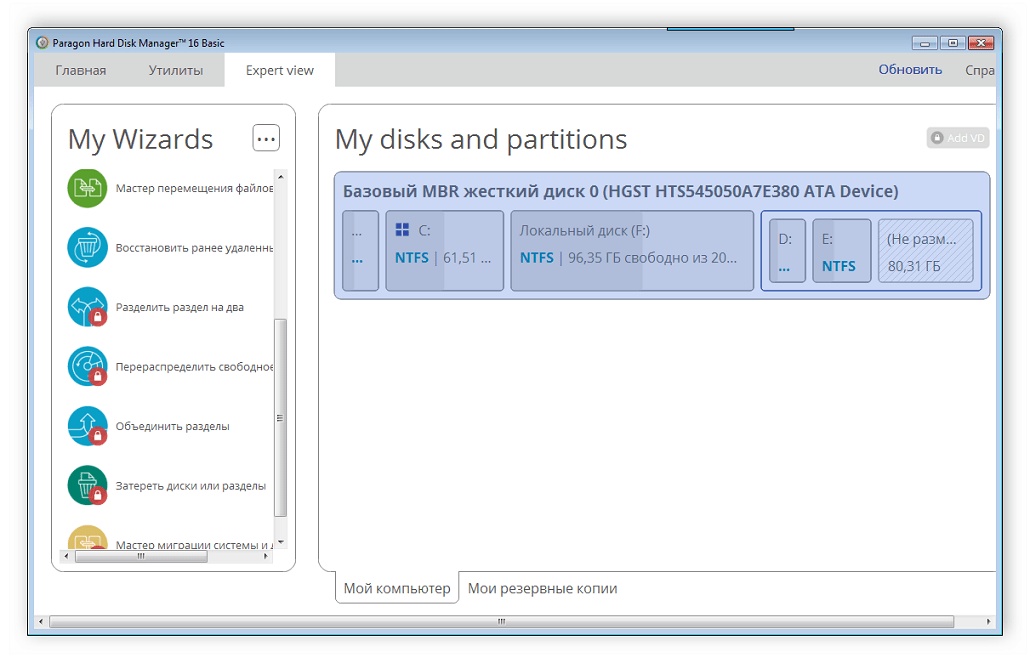
Восстановление разделов
Восстановление ранее удаленных разделов производится в отдельном окне, так же с помощью встроенного мастера. В этом же окне есть и еще один инструмент – разделение одного раздела на два. От вас не требуется никаких дополнительных навыков или знаний, просто следуйте инструкции, а программа автоматически выполнит все необходимые действия.
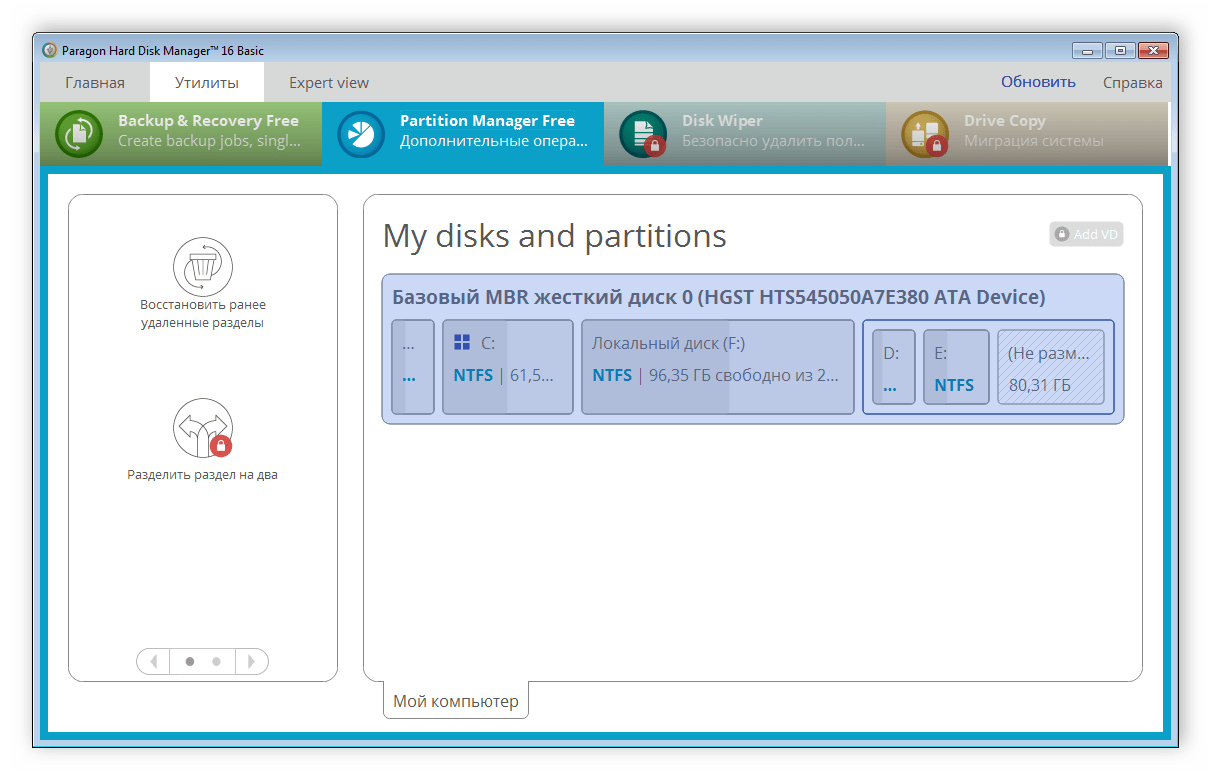
Настройки копирования и архивации
Если на внешние настройки и учетную запись можно не обращать внимания, то настройка копирования и архивации является крайне важным процессом. Для изменения параметров пользователю потребуется перейти в настройки и выбрать соответствующий раздел. Здесь находятся несколько параметров, настраиваемых индивидуально. Стоит учитывать, что обычным пользователям эти настройки ни к чему, они больше подходят для профессионалов.
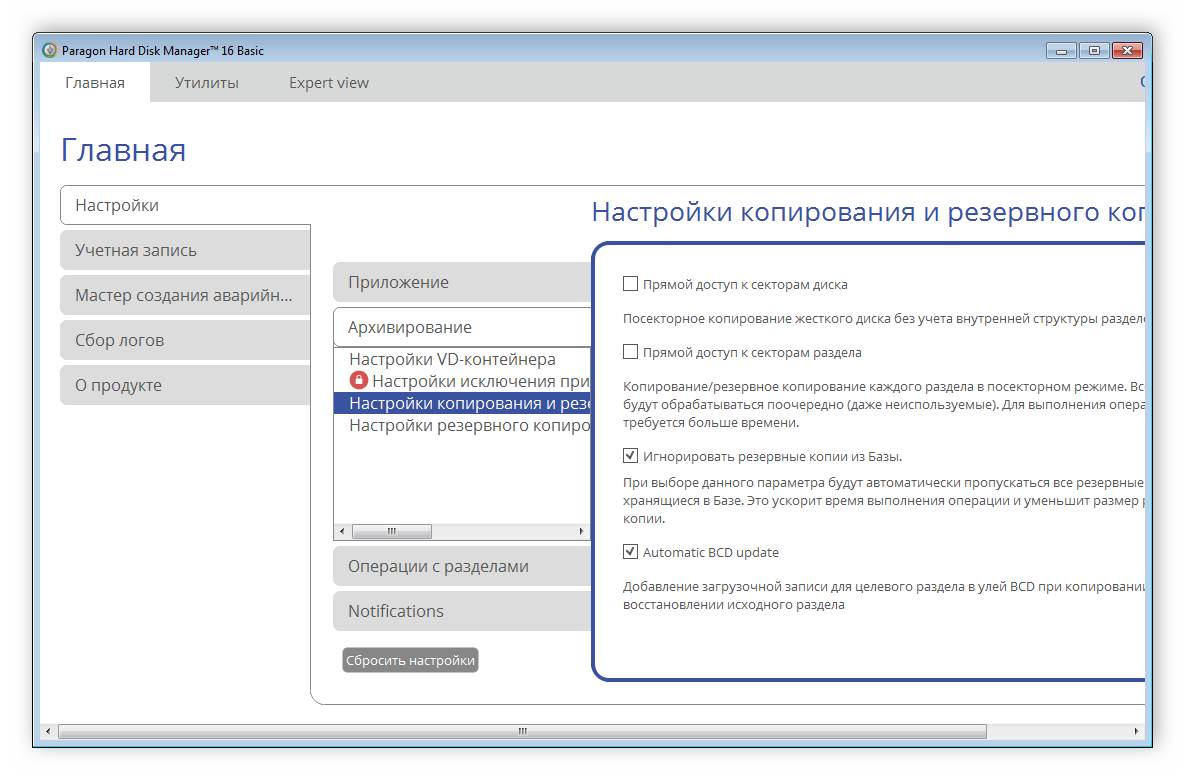
Достоинства
- Программа полностью на русском языке;
- Красивый современный интерфейс;
- Встроенные мастера созданий операций;
- Обширные возможности.
Недостатки
- Hard Disk Manager распространяется платно;
- Иногда не происходит отмена резервного копирования без перезапуска программы.
Paragon Hard Disk Manager — хороший, полезный софт для работы с дисками. Его функциональности и встроенных инструментов хватит как обычному пользователю, так и профессионалу. К сожалению, данный софт распространяется платно. Хоть в пробной версии и ограничены некоторые инструменты, мы все же рекомендуем скачать и ознакомиться с ней перед покупкой.
Загрузить последнюю версию программы с официального сайта
Похожие программы и статьи:
Paragon Hard Disk Manager
Рейтинг:
5 из 5
(1 голосов)
Система: Windows 10, 8.1, 8, 7, XP
Категория: Обзоры программ
Размер: 143 MB
Язык: Русский
Версия: 16.18.1
Paragon Hard Disk Manager — набор инструментов и функций по работе с жесткими дисками. Здесь есть все, что может понадобится во время выполнения различных задач. Сам процесс упрощают встроенные мастера по добавлению операций.
Обновлено: 23.04.2023
При удалении отдельного файла или раздела стирается только информация о его расположении на диске. При этом фактические данные остаются на диске, поэтому их возможно восстановить.
Мастер по затиранию данных позволит Вам полностью уничтожить все данные без возможности восстановления. В процессе затирания на выбранную область диска поверх имеющейся информации записываются ненужные данные (блоками размером по 4 Мб).
В программе Hard Disk Manager Вы можете затирать разделы диска, свободное пространство внутри раздела, нераспределенное пространство или весь жесткий диск целиком.
Освобождение пространства внутри раздела
Для того чтобы исключить возможность восстановления удаленных файлов, используйте данную опцию для затирания секторов свободного пространства раздела диска. Для того, чтобы затереть свободное пространство внутри раздела, нажмите правой кнопкой мыши на раздел (маленький прямоугольник) и выберите Затереть свободное пространство.

Затирание раздела
Используйте эту опцию для затирания всех секторов раздела диска. Раздел будет преобразован в Неформатированный. Чтобы уничтожить раздел, нажмите правой кнопкой мыши на раздел (маленький прямоугольник) и выберите Затереть раздел.

Затирание нераспределенного пространства
Используйте данную опцию, чтобы затереть все сектора нераспределенного дискового пространства.
Чтобы затереть свободное пространство, нажмите правой кнопкой мыши на нераспределенное пространство (маленький прямоугольник с пометкой Свободное) и выберите Затереть раздел.

Затирание диска
Используйте данную опцию, чтобы уничтожить весь жесткий диск.
Чтобы затереть жесткий диск, нажмите правой кнопкой мыши на диск (большая прямоугольная иконка с маленькими прямоугольниками внутри) и выберите Затереть диск.

Все вышеописанные операции осуществляются при помощи Мастера по затиранию.

По умолчанию, выбранная область заполняется нулями, но Вы можете выбрать желаемое значение данных.

Вы можете назначить повтор операции затирания. Обычно это не требуется, но таким образом Вы можете гарантировать невозможность восстановления данных.

Вы также можете настроить Мастер на проверку успешного затирания данных. После операции затирания выполняется тест чтения на выбранном количестве секторов (внутри каждого блока по 4 Мб). Если указанное количество секторов меньше 100 процентов, тест чтения производится на пропорциональной части в начале каждого блока размером в 4 Мб.

После настройки Мастера нажмите кнопку Зачистить.
Нажмите Да для подтверждения операции.
Теперь Вы можете увидеть выбранные изменения в режиме предпросмотра.

Paragon Hard Disk Manager: Расширение и объединение разделов, надежное уничтожение данных в Windows
Paragon Hard Disk Manager 25 Anniversary LE – это программный комплекс в состав которого входят средства для резервного копирования и восстановления файлов, папок, разделов, средства для уничтожения информации, создания загрузочных носителей, а также средства по администрированию дисков.
Важная информация
Перед тем как выполнять различные небезопасные манипуляции с разделами жесткого диска, убедитесь, что у Вас есть в наличии резервная копия. Если Вы начинающий пользователь, то лучше первые шаги администрирования разделов отрабатывать в виртуальной среде (VM VirtualBox, VMware Workstation и др.), чтобы потом с уверенностью работать в реальной среде.
Содержание
Расширение раздела
С помощью Paragon Hard Disk Manager можно увеличить свободное пространство одного раздела за счет нераспределенного пространства на диске, а также неиспользуемого пространства на других разделов.
- Открыть раздел Disks and volumes.
- Выбрать раздел, который необходимо расширить.
- В левом меню выбрать операцию Expand.

Рис.1 Расширение раздела
- В открывшемся окне необходимо выбрать раздел (-ы), за счет которого (-ых) необходимо увеличить размер выбранного ранее раздела и нажать кнопку Next.

Рис.2 Расширение раздела
- Если было нераспределенное пространство, оно будет приобщено к расширяемому разделу. Установить необходимый размер раздела можно с помощью ползунка или задать точное значение в соответствующем поле.

Рис.3 Расширение раздела
- По завершение процедуры расширения раздела нажать кнопку Expand now, чтобы запустить данную операцию сразу или кнопку Place in queue, чтобы добавить эту процедуру в список задач для последующего выполнения.

Рис.4 Результат успешного расширения раздела
Объединение разделов
Paragon Hard Disk Manager позволяет консолидировать дисковое пространство, которое изначально принадлежит двум смежным разделам.
Программа может объединять только два смежных раздела NTFS, FAT32 или FAT, также разделенных нераспределенным пространством.
- Открыть раздел Disks and volumes.
- Выбрать ЛКМ левый раздел из пары разделов, которые необходимо объединить между собой.
- В левом меню выбрать операцию Merge with the right.

Рис.5 Объединение разделов
По умолчанию мастер предлагает переместить все содержимое нужного раздела в папку с именем Files from …. (название раздела) на полученном присоединенном разделе.
В данном примере при объединении разделов TEST и FILES (Рис.5), все файлы из раздела FILES будут перенесены в папку с именем по умолчанию Files from FILES (F). Раздел TEST будет увеличен за счет присоединения раздела FILES. При необходимости можно изменить название папки в поле Folder name.
Рис.6 Объединение разделов (до и после)

Рис.7 Объединение разделов
- Чтобы проверить исходное и полученное расположение разделов, можно использовать кнопки Beforechanges и After changes (Рис.6)
- По завершение процедуры нажать кнопку Merge now, чтобы применить операцию объединения разделов сразу или кнопку Place in queue, чтобы добавить эту процедуру в список задач для последующего выполнения.
- В открывшемся окне предупреждения о том, что операция объединения разделов может привести к потери данных и рекомендуется сделать резервную копию, установить флажок в чекбоксе Yes, I am sure. Merge the volume now! И нажать кнопку Next (Рис.7).

Рис.8 Успешное выполнение процедуры объединения разделов
- По окончании операции можно убедиться в наличии перенесенных файлов в папку Files from ….. В данном примере все файлы корректно были перенесены из раздела FILES в раздел TEST в папку Files from FILES (F).

Рис.9 Отображение результата переноса файлов после процедуры объединения разделов
Надежное уничтожение данных
Для удаления данных служат операции Wipe data и Wipe free space. Операция Wipe data позволяет стереть все данные выбранного раздела, операция Wipe free space позволяет очистить свободное пространство.
- Открыть раздел Disks and volumes.
- Выбрать раздел или диск, который необходимо очистить от данных.
- В левом меню выбрать операцию Wipe data.

Рис.10 Удаление данных
- В раскрывающемся списке Select a wipe algorithm выбрать определенный алгоритм удаления данных или можно создать свой собственный метод.

Рис.11 Выбор алгоритма удаления данных
- Чтобы очистить от данных выбранный раздел жесткого диска, необходимо нажать кнопку Wipe now, чтобы применить операцию сразу или кнопку Place in queue, чтобы добавить эту процедуру в список задач для последующего выполнения.

Рис.12 Удаление данных

Рис.13 Удаление данных

Рис.14 Успешное выполнение процедуры удаления данных раздела
Не рекомендуется применять стандартные алгоритмы удаления информации для твердотельных накопителей. При использовании загрузочного диска Paragon Hard Disk Manager на основе Linux можно применить алгоритм SSD Trim.
Разработчики Paragon рекомендуют использовать при удалении данных с SSD накопителей функцию Secure Erase, которая позволяет необратимо и полностью удалить данные.

Рис.15 Удаление данных на SSD накопителе с помощью загрузочного диска Paragon Hard Disk Manager на основе Linux
Если необходимо уничтожить данные загрузочного раздела, можно также воспользоваться загрузочным диском Paragon Hard Disk Manager.
Резервное копирование с помощью программы Paragon Hard Disk Manager 25 Anniversary LE
Paragon Hard Disk Manager 25 Anniversary LE – это программный комплекс в состав которого входят средства для резервного копирования и восстановления файлов, папок, разделов, средства для уничтожения информации, создания загрузочных носителей, а также средства по администрированию дисков.
Содержание
Системные требования Paragon Hard Disk Manager25 Anniversary LE
Поддерживаемые операционные системы
- Windows 7 SP1
- Windows 8
- Windows 8.1
- Windows 10
Поддерживаемые файловые системы
- FAT16/32;
- NTFS;
- Ext2/Ext3/Ext4;
- XFS;
- BtrFS;
- Apple HFS+.
Установка Paragon Hard Disk Manager25 Anniversary LE
- Запустить файл инсталляции Hard Disk Manager25 Anniversary LE
- В открывшемся окне License Agreement принять лицензионное соглашение, у становив флажок в чекбоксе I accept the Software License Agreement и нажать кнопку Next.

Рис.1 Установка Paragon Hard Disk Manager25 Anniversary LE

Рис.2 Установка Paragon Hard Disk Manager25 Anniversary LE
- Ввести лицензионный ключ к программе и нажать кнопку Install.

Рис.3 Установка Paragon Hard Disk Manager25 Anniversary LE
- Во всплывающем окне установки программного обеспечения для данного устройства нажать кнопку Установить.

Рис.4 Установка Paragon Hard Disk Manager25 Anniversary LE
- По окончании инсталляции нажать кнопку Finish и запустить приложение Paragon Hard Disk Manager

Рис.5 Завершение установки программы Paragon Hard Disk Manager
Создание резервной копии системного раздела в среде рабочей операционной системы
В данном примере резервная копия будет создана в разделе backup второго жесткого диска.
- В главном окне программы на боковой панели выбрать раздел Backup & Recovery (резервное копирование и восстановление)
Раздел Backup & Recovery обеспечивает быстрый доступ к функциям программы, связанным с резервным копированием и восстановлением данных.

Рис.6 Выбор раздела Backup & Recovery
- Для создания резервной копии системного раздела жесткого диска необходимо выбрать Backup source

Рис.7 Выбор источника резервного копирования
- В открывшемся диалоговом окне Select backup source необходимо указать, что нужно резервировать: все локальные диски компьютера (Entire Computer), определенные диски/разделы (Disk/volumes) или файлы/папки (Files/Folders). Для создания резервной копии системного раздела необходимо выбрать Disk/Volumes

Рис.8 Выбор источника резервного копирования
- В следующем диалоговом окне Select disk and/or volumes you need to back up необходимо выбрать системный раздел, в автоматическом режиме будут выделены необходимые скрытые разделы. В данном примере (Рис.9) имеется 3 скрытых раздела (раздел восстановления Windows – 517 Мб, MSR раздел — 16 Мб и шифрованный (EFI) раздел – 100 Мб). Нажать ОК.

Рис.9 Выбор источника резервного копирования
- Далее необходимо указать путь для сохранения образа резервной копии. В данном примере резервная копия будет создана в разделе backup второго жесткого диска. Для этого необходимо выбрать Destination в разделе Backup & Recovery.

Рис.10 Выбор директории для сохранения резервной копии
- В открывшемся диалоговом окне Select backup destination указать директорию для сохранения резервной копии. Можно указать путь к папке, расположенной на одном из разделом внутренних жестких дисков (Local folders), либо выбрать внешний накопитель (External drives), либо указать путь к сетевому ресурсу для сохранения резервной копии (Network locations).

Рис.11 Указание директории для сохранения резервной копии
Также в данном окне можно изменить название задачи резервного копирования (Рис.12).

Рис.12 Изменение названия задачи резервного копирования
Если необходимо произвести тонкие настройки для создаваемой резервной копии, чтобы автоматизировать процесс резервного копирования, защитить данные резервной копии от несанкционированного доступа, можно настроить дополнительные параметры, выбрав вкладки Options или Backup strategy. Данные настройки описаны в статье Дополнительные параметры резервного копирования в программе Paragon Hard Disk Manager 25 Anniversary LE . Как правило, для большинства случаев подходят настройки по умолчанию.
- Чтобы запустить процесс создания резервной копии, необходимо нажать кнопку Back up now.

Рис.13 Запуск создания резервной копии
Запустится процесс создания резервной копии. Его длительность зависит от объема раздела.

Рис.14 Создания резервной копии
- По окончании резервного копирования система оповестит о том, что резервное копирования завершено. Нажать кнопку ОК.

Рис.15 Результат успешного завершения резервного копирования
Восстановление резервной копии в среде рабочей операционной системы
- На временной шкале резервного копирования отображаются созданные ранее резервные копии. Выбрав нужную, можно перейти к процессу восстановления резервной копии.

Рис.16 Восстановление резервной копии системного раздела
- Для восстановления резервной копии системного раздела необходимо выбрать нужную резервную копию на временной шкале и в раскрывшемся списке выбрать операцию восстановления Restore.

Рис.17 Восстановление резервной копии системного раздела
- Выбрав иконку Volume можно указать восстанавливаемые разделы с резервной копии, выбрав иконку Original location – можно указать раздел (-ы), куда резервная копия будет восстановлена.

Рис.18 Восстановление резервной копии системного раздела
- Нажать кнопку Restore now.
- Во всплывающем диалоговом окне Submit restore operations? необходимо выбрать, нужно ли проверить целостность резервной копии перед запуском процесса восстановления. Так как восстановление поврежденной резервной копии может привести к потери данных, рекомендуется выбирать Check, then restore (проверить, затем восстановить).

Рис.19 Восстановление резервной копии системного раздела

Рис.20 Процесс проверки целостности резервной копии
В следующем окне выбрать Restart the computer для перезагрузки компьютера и восстановления резервной копии системного раздела.

Рис.21 Восстановление резервной копии

Рис.22 Процесс восстановления резервной копии
По завершении процесса восстановления резервной копии компьютер будет перезагружен.
[ИНСТРУКЦИЯ] СОЗДАНИЕ ЗАГРУЗОЧНОГО CD/DVD-ДИСКА
Эта статья справедлива для всех программных продуктов Paragon Software версии 15.
Запуск RMB 3.0 из экспресс-режима

Начиная с версии 3.0 при запуске показывается страница приветствия с двумя чекбоксами.

- Расширенный режим. Эта опция взята из Boot Media Builder, и теперь можно настроить сетевое соединение или добавить драйверы в загрузочный носитель.
- Использовать ADK/WAIK. Можно использовать WIM-образ операционной системы для создания.
Рекомендуется использовать значения по умолчанию, если вы не знаете, как создавать продвинутый загрузочный носитель.
Внимание! Из-за внесения корпорацией Microsoft изменений в порядок работы с WIM-файлом в Wimdows начиная с 8.1 НЕВОЗМОЖНО создать аварийный носитель в виде ISO-образа без использования WAIK/ADK.

На этом этапе определяется, какую из двух доступных платформ (сред) использовать в качестве основы для загрузочного носителя.
Среда WinPE может служить настоящей альтернативой восстановительной среде Linux/DOS. Предоставляя практически тот же функционал, она имеет отличную аппаратную поддержку и такой же интерфейс, как Windows-версия. Её можно использовать для запуска на компьютере без операционной системы, чтобы разметить и отформатировать жёсткие диски, скопировать образ диска, или запустить установку Windows с сетевого хранилища.
Среда Linux/DOS может использоваться для загрузки вашего компьютера в Linux или PTS-DOS для получения доступа к жёсткому диску для обслуживания или восстановления. Также имеется безопасный режим PTS-DOS, который может быть полезен в ряде таких нестандартных ситуаций, как конфликтующие аппаратные настройки или серьёзные проблемы а аппаратном уровне. В этом случае будут загружены только базовые файлы и драйверы (такие как драйверы жёсткого диска, монитора и клавиатуры)
Загрузочный носитель на базе Linux требует указания типа прошивки материнской платы (uEFI или BIOS). Во избежание возможной несовместимости рекомендуется использовать WinPE в первую очередь из-за совместимости с обоими интерфейсами прошивок.
Нужно задать имя целевого ISO-файла.


При возникновении ошибок на данном этапе, рекомендуется прочитать о возможных причинах их возникновения и возможных путях решения этих ошибок в этой статье.

После создания ISO-образа перейдите в место его расположения и щёлкните по файлу правой кнопкой мыши. У вас появится возможность записать образ диска.

Можно использовать любое ПО для записи дисков.
Помогла ли Вам эта статья в поиске решения?
(35 оценки, средняя оценка 1.49 из 5)
Читайте также:
- Почему не запускается sas 4 zombie assault на пк
- Где найти бронированную машину в гта 5
- Subdomain takeover что это
- Dragon age как использовать аптечку
- Как сделать игру 60 секунд
Привет, друзья. В этой статье поговорим о решении такой проблемы: если у нас есть загрузочная флешка с файловой системой FAT32, неважно создана она только для компьютеров с BIOS UEFI, или она совместимая с BIOS Legacy, как эту флешку поделить на два раздела, а последний сделать с файловой системой NTFS для возможности хранения файлов весом больше 4 Гб? Это не какая-то сложная операция, её могут выполнить многие менеджеры дисков, эту операцию, друзья, я решил взять в качестве образцово-показательной для демонстрации главного фокуса публикации – возможностей бесплатной версии программы Paragon Hard Disk Manager 17. Те из вас, кто работал с прежними версии этой программы, знают, что она платная, и стоит немалых денег. Но рынок софта не стоит на месте, и вот компания Paragon последовала примеру многих других разработчиков и предусмотрела для некоммерческого использования специальный выпуск знаменитой программы с урезанными возможностями. Давайте рассмотрим отдельные возможности бесплатного выпуска Paragon Hard Disk Manager 17.
Как создать на флешке с FAT32 раздел с NTFS программой Paragon Hard Disk Manager 17
Загрузочная флешка с разделами FAT32 и NTFS
Итак, поставленная задача – необходимость переразметки флешки с созданием на ней раздела с файловой системой NTFS. К постановке такой задачи меня недавно подтолкнул один из читателей сайта: он жаловался на то, что созданная им программой WinSetupFromUSB мультизагрузочная флешка не работает. А ему нужна именно таковая, а не обычная, причём универсальная, совместимая и с Legacy, и с UEFI, и ещё с решением для поддержки файлов больше 4 Гб. Всё это умеет только WinSetupFromUSB: она может создать мультизагрузочную, универсальную флешку с файловой системой FAT32, на которую можно поместить файлы дистрибутива больше 4 Гб. WinSetupFromUSB обладает механизмом разбивки записываемого дистрибутива Windows на части, если в его составе есть файлы, вес которых превышает 4 Гб – максимум, который поддерживает FAT32.
Но вот видимо не всегда все программные возможности работают в идеале, а, возможно, этот читатель где-то допускает какую-то ошибку. Какие у него могут быть альтернативы? Разные. Он может для создания мультизагрузочной флешки попробовать программу WinUSB, однако она не создаёт универсальные флешки, а создаёт либо только Legacy, либо только UEFI. Он может для создания совместимой с обоими типами BIOS флешки использовать ту же программу WinSetupFromUSB, но не брать дистрибутив весом более 4 Гб. Друзья, многие неверно понимают суть ограничения файловой системы FAT32 в 4 Гб на вес одного файла. Здесь важно понимать, что 4 Гб – это лимит веса одного файла в составе установочного ISO Windows, а не веса всего ISO. Взгляните, вот, к примеру, ISO с дистрибутивом последней версии Windows 10 1909 весит 4,75 Гб.
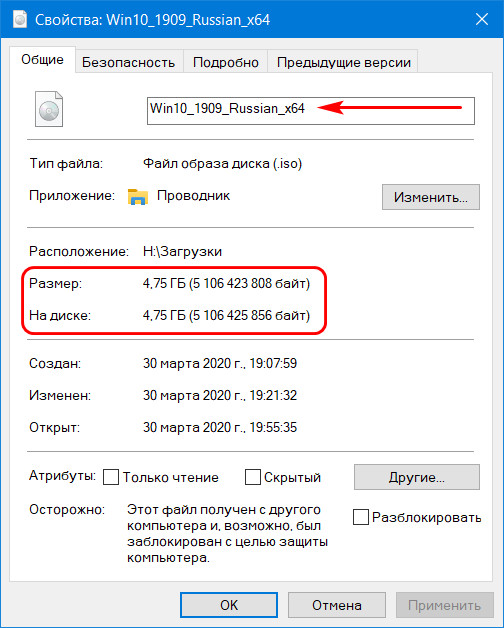
Но самый большой файл install.wim в составе этого дистрибутива весит 3,98 Гб, т.е. вписывается в лимит 4 Гб.
И, соответственно, такой дистрибутив без проблем запишется на флешку UEFI (или совместимую как с Legacy, так и с UEFI) с файловой системой FAT32.
Иной вариант, как может поступить наш читатель – он может не создавать мультизагрузочную флешку, а просто записать обычную. Так, создание мультизагрузочной флешки у этого читателя обусловлено необходимостью содержания на флешке реанимационного LiveDisk’а и нескольких процессов установки разных дистрибутивов Windows. Но если записать в качестве реанимационного LiveDisk’а WinPE 10-8 Sergei Strelec, то нам не нужны никакие пункты установки Windows в меню загрузки флешки. Мы просто после записи LiveDisk’а на флешку создаём на ней папку, можно даже прямо в корне флешки. И в эту папку помещаем все, какие нам надо, установочные ISO с разными версиями и сборками Windows. Если нам надо будет переустановить Windows на компьютере, мы загружаем среду WinPE 10-8 Sergei Strelec. Подключаем установочный ISO Windows.
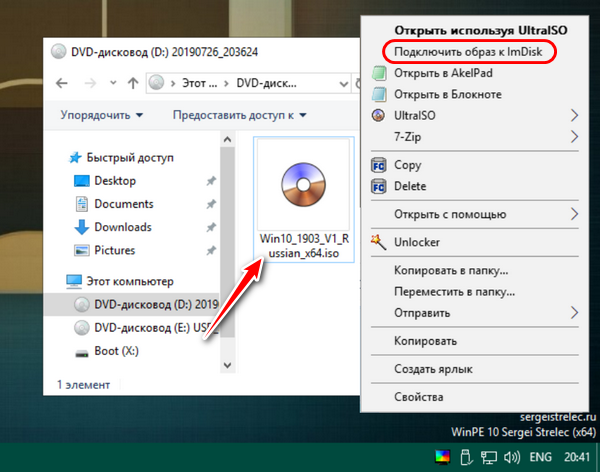
На смонтированном образе запускаем файл setup.exe.
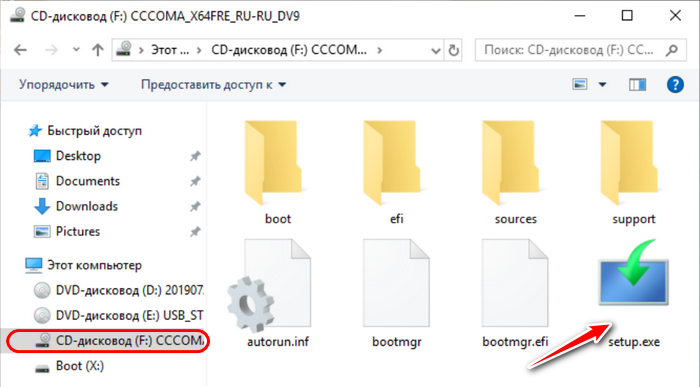
И устанавливаем Windows, как обычно, используя её классический процесс установки.

И это, друзья, не единственный способ установки Windows, присутствующий на LiveDisk’е Стрельца, их несколько, они описаны в статье «Как установить Windows с помощью Live-диска от Sergei Strelec». А если вам не нравится WinPE 10-8 Sergei Strelec, вы можете записать на флешку любой другой LiveDisk, на борту которого имеются средства установки или развёртывания Windows. Но в любом случае, если у нас имеется сборка Windows с весом файла install.wim (или install.esd) более 4 Гб, нам нужно решение типа предлагаемого WinSetupFromUSB механизма разбиения на части дистрибутива. И таким решением может быть создание на флешке раздела с файловой системой NTFS. Ну а для этого нужно после записи загрузочной флешки переразметить её соответствующим образом.
Программа Paragon Hard Disk Manager 17 Community Edition
В переразметке загрузочной флешки, если она создана отдельно или включительно для BIOS Legacy, т.е. с MBR-загрузчиком нет ничего сложного. Такая флешка видится как диск в управлении дисками Windows, и даже этим штатным средством можно сжать её раздел и создать за счёт сжатого места новый раздел, таким образом поделив её на два раздела — с FAT32 и NTFS. А можно это сделать программой AOMEI Partition Assistant. А вот загрузочная флешка UEFI в том же управлении дисками Windows не оперируется в части сжатия дискового пространства. И не каждый программный менеджер дисков видит её как диск. Например, мою флешку UEFI с WinPE 10-8 Sergei Strelec программа AOMEI Partition Assistant не видит. Но её видит программа Paragon Hard Disk Manager 17 и позволяет оперировать разделами.
Многие опытные пользователи знают программу Paragon Hard Disk Manager по её версии 15, это многофункциональный продукт, совмещающий в себе и продвинутый менеджер дисков и средство резервного копирования. Программа активно поддерживается разработчиками, и сейчас уже актуальна её версия 17 с современным интерфейсом. Плюс к этому, компанией Paragon изменена политика поставки программы: Paragon Hard Disk Manager 17 существует не только в полнофункциональной платной версии, которая стоит €79,95, программа поставляется также в функционально ограниченной редакции Community Edition для использования в некоммерческих целях. В этой редакции можно создавать, удалять разделы, менять их размеры, форматировать, восстанавливать, но нельзя проводить слияние разделов. В ней можно оперировать динамическими разделами и конвертировать стиль разметки диска из MBB в GPT и наоборот. Ну и вот, собственно, эта программа подходит нам для решения нашей задачи.
Скачать Paragon Hard Disk Manager 17 в редакции Community Edition можно на сайте Paragon по этой ссылке:
https://www.paragon-software.com/free/pm-express/#resources
Работа с флешкой в программе Paragon Hard Disk Manager 17
Итак, друзья, у меня есть образцовая UEFI-флешка с файловой системой FAT32. Записанный на ней WinPE 10-8 Sergei Strelec занимает 4,24 Гб, а всё остальное место свободно. В моём случае у меня его мало, поскольку у меня флешка объёмом 7,25 Гб.
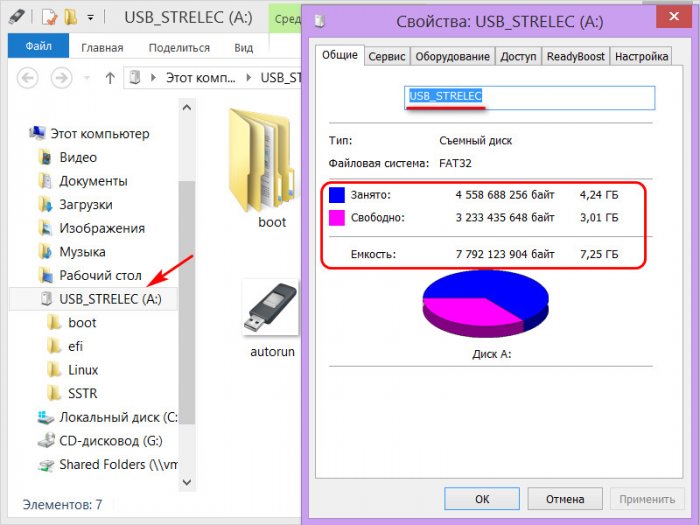
На ней я не храню дистрибутивы Windows, а при переустановке подтягиваю их с жёсткого диска. Но стань вопрос, чтобы прийти к кому-то домой из близких, помочь реанимировать и в крайнем случае переустановить Windows, мне, конечно же, понадобилась бы флешка минимум на 16 Гб, на которую я бы поместил установочные ISO системы. Но представим, что моя флешка объёмом от 16 Гб. Что мы делаем с ней, чтобы свободное место выделить в отдельный раздел NTFS?
Запускаем Paragon Hard Disk Manager 17, идём в раздел операций с дисками, кликаем на карте дисков нашу флешку и выбираем слева операцию «Move or Resize».
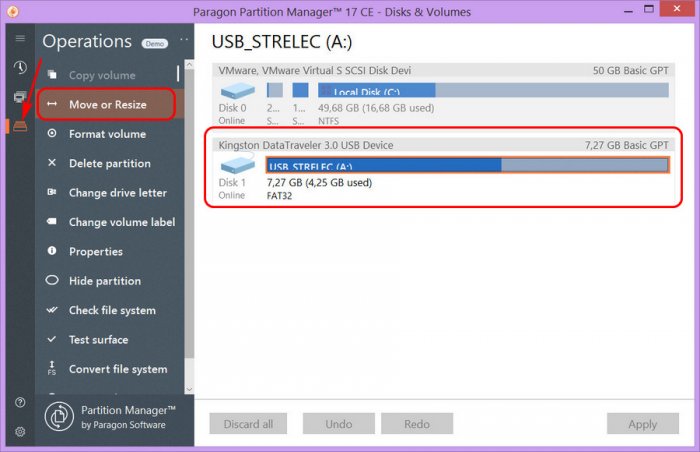
Здесь в графе «New volume size» видим, что программа сама уменьшила существующий раздел флешки до объёма, по факту занимаемого LiveDisk’ом Стрельца – 4,3 Гб. Но в других ситуациях при уменьшении раздела мы ползунком в этой графе мы можем указать свой размер оставляемого раздела. Внизу, в блоке «Before changes/After changes» мы, переключаясь, можем видеть разметку флешки существующую («Before changes») и после применения запланированной операции («After changes»). И вот при переключении на «After changes» увидим уменьшенный первый раздел флешки с FAT32 и пустое место после него. Жмём «Place in queue».
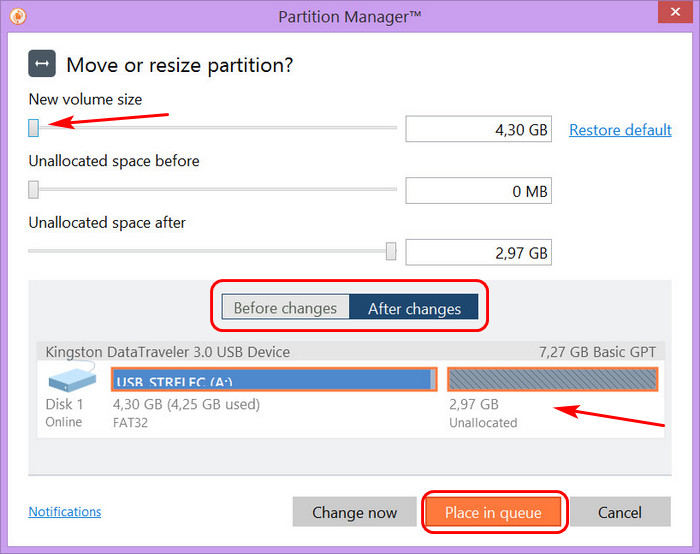
После этого на карте дисков Paragon Hard Disk Manager 17 кликаем это пустое место и применяем к нему операцию слева «Create volume», т.е. создаём раздел.
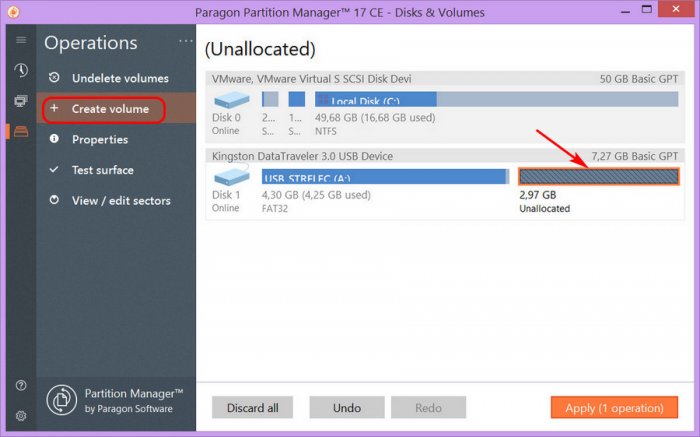
В графе «Volume size» можем ползунком отрегулировать размер создаваемого раздела, если мы хотим создать на пустом месте несколько разделов. Если нет, оставляем всё, как есть. А в графе «Volume label» указываем метку раздела. Метка нужна, поскольку по ней необходимо будет ориентироваться в среде WinPE. Файловую систему NTFS нигде не указываем, она будет выбрана для нового раздела по умолчанию. Жмём «Place in queue».
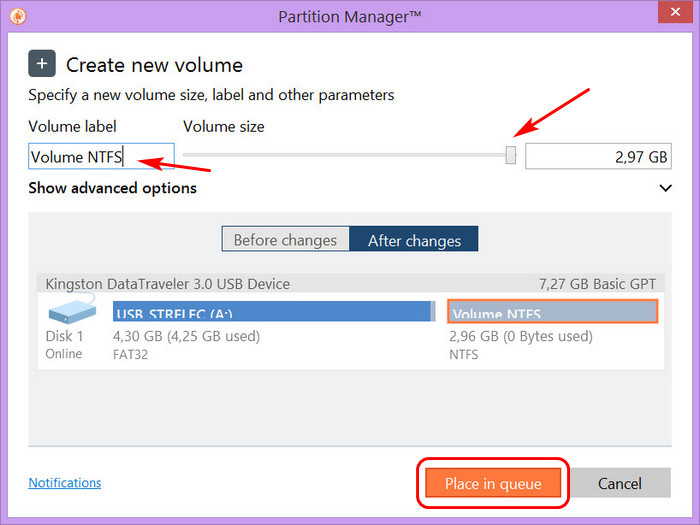
Теперь применяем запанированные операции.
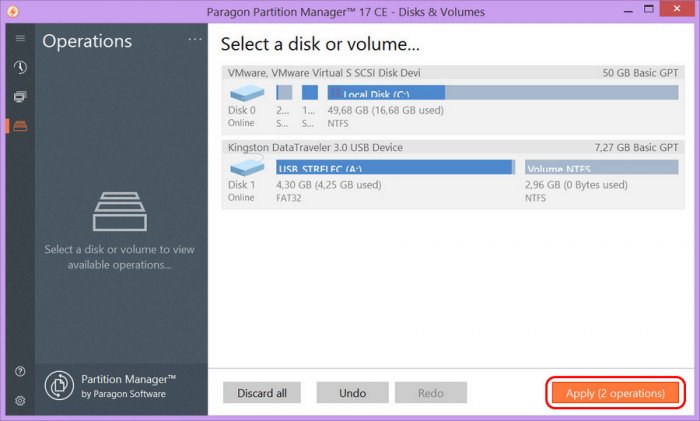
Жмём «Apply».
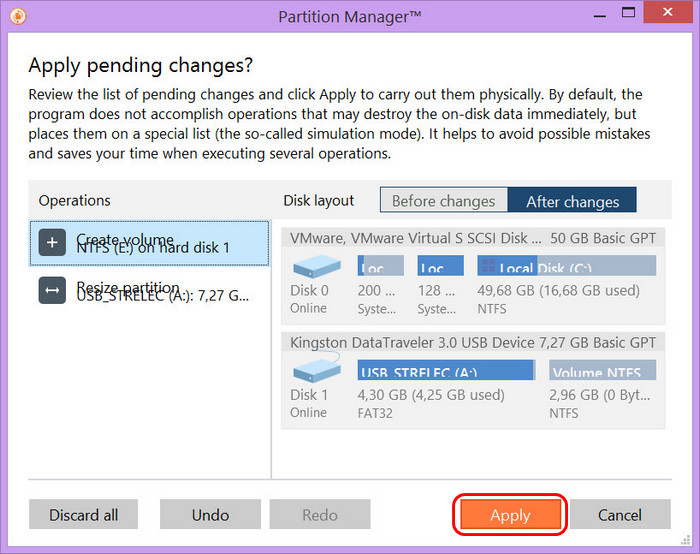
Затем «Yes».
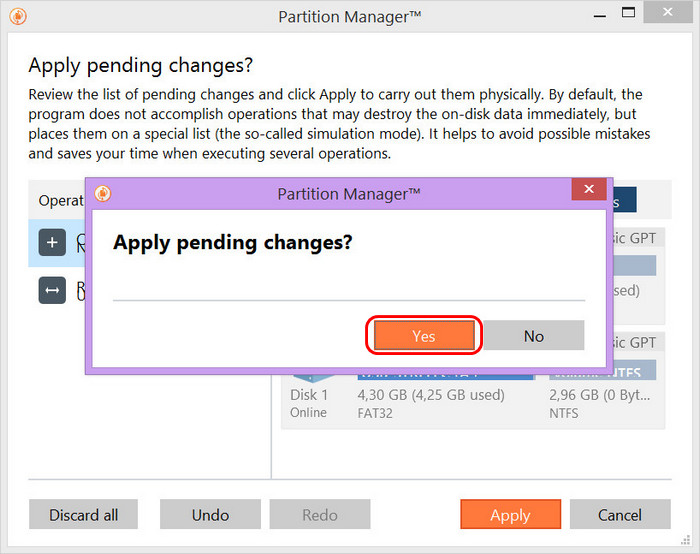
Дожидаемся завершения процесса применения операций.
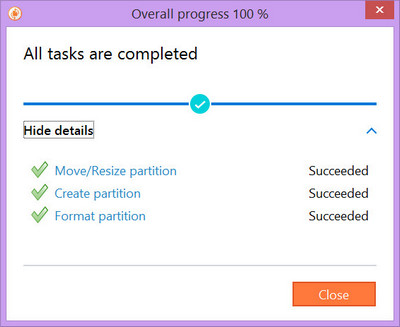
И всё. Смотрим в управление дисками: у нас на флешке теперь два раздела, один с FAT32, другой с NTFS. Созданный раздел почему-то не получил автоматически букву диска, но это дело поправимое, прямо здесь, в управлении дисками можем назначить букву.
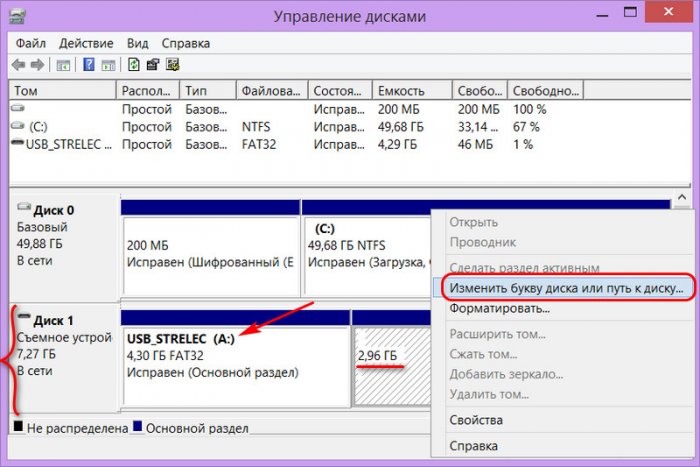
Проверка флешки
Ну и, наконец, проверим нашу флешку. Загружаем среду WinPE.
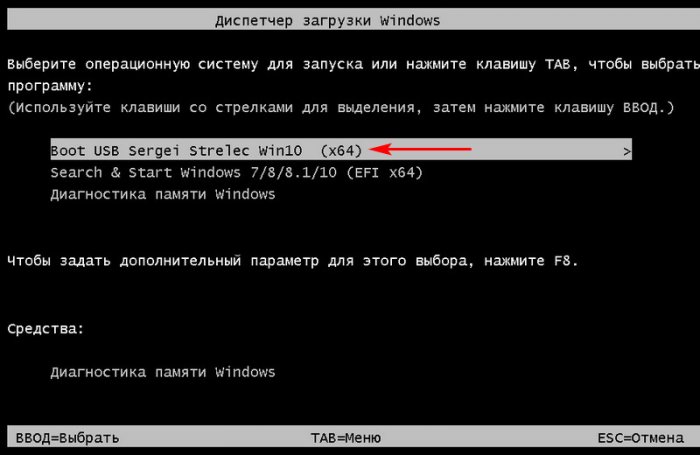
И вот в ней виден наш раздел NTFS, куда мы можем закидывать установочные образы Windows, если в их составе есть файлы весом больше 4 Гб.