PAX S300: Available Instructions
Note for Owners:
Guidesimo.com webproject is not a service center of PAX trademark and does not carries out works for diagnosis and repair of faulty PAX S300 equipment. For quality services, please contact an official service center of PAX company. On our website you can read and download documentation for your PAX S300 device for free and familiarize yourself with the technical specifications of device.
-
VeriFone VX 675
Rev. 3 Paper Roll Size: 57 x 38 mmVX 675 COLOUR OPERATIONS GUIDEHOW DO I KNOW IF THERE ARE STORED EOV TRANSACTIONS?1. Press the scroll button until PRINT UTILITY is displayed2. Select PRINT UTILITY3. Select STORED TOTALS*The report printed will indicate the number of Electronic Ofine Vouchers and the total amount stored.After pressing the stored totals button, if the message “No Pending Tr …
VX 675 Payment Terminal, 2
-
CAN IWL255
Quick IWL255 Merchant Operator GuideKey FunctionsPower on/offTo power the terminal on/off, hold down both the [FUNC] and [CLEAR] keys at the same time. You can also press [CANCEL] then [OK] to confirm shutdown. This must only be done when the terminal is not plugged into power as it will cause the terminal to restart. Terminal Power Setting – Sleep and Shutdown mode1. Press the [MENU] key2. P …
IWL255 Payment Terminal, 6
-
Ingenico iCT220
PAYMENT TERMINAL USER GUIDE ICT220 Payment terminals department: +370 52556086 (on business days 9:00-20:00, other days 10:00-17:00) Customer support: +370 52556085 (24/7 support available in languages: English, Russian, Estonian) Email: [email protected] Nets Estonia A S Tartu mnt 63, 10115 Tallinn …
iCT220 Payment Terminal, 17
-
Equinox Systems APOLLO CFD
Equinox Payments 9045 E. Pima Center Pkwy, Suite 3, Scosdale, AZ 85258, USA | Tel: +1.877.497.3726 | Fax: +1.480.551.7811 | www.EquinoxPayments.com © 2013-2014 Equinox Payments, all rights reserved. Equinox Payments and the Equinox Payments logo are registered trade-marks of Equinox Payments. Informaon within this guide may not match the terminal device and its accessories exactly a …
APOLLO CFD Payment Terminal, 2
-
Ingenico iCT220
Food Stamp Sale Swipe Card or Press 1 – SALESelect 3 – EBTSelect 1 – FOOD STAMPEnter Sale Amount and press ENTERSwipe Card and press ENTERCustomer will enter PIN and press ENTERCash Benefit SaleSwipe Card or Press 1 – SALESelect 3 – EBTSelect 2 – CASH BENEFITEnter Sale Amount and press ENTERSwipe Card and press ENTERCash Back? Select YES or NOEnter Cash Back Amount and press ENTERConf …
iCT220 Payment Terminal, 2
-
dejavoo Z6
Updated July 13, 20211Clearent Dejavoo Z6 Pinpad SetupThe pinpads do not come equipped with a receipt printer, rather, transaction receipts are printed on your ex-isting POS receipt printer. The Dejavoo pinpad utilizes your local network and internet connection to send and receive all data. On the wired Z6 unit, the USB connection is used strictly to power the device. The wireless Z1 and Z11 units …
Z6 Touch terminals, 3
-
Hypercom ICE 5000
This file provided by Switch to Infinity Data Corp for your processing needs! Infinity offers great rates, excellent customer support and a wide range of payment processing solutions. http://www.infinitydata.com/ Call Today! Sales 1 800 393 6665 …
ICE 5000 Protection Device, 3
-
Point Mobile PM260
HANDY TERMINALQuick Reference ManualPM260Red keyBlue key1. Open the coverFront Back3. Insert the battery2. MicroSD cardUsing AC/DC Power Adapter5. Charge the battery4. Attach the plugGetting StartedGetting StartedGetting Started(Press Blue key first)esSlide the lockers upwards and removethe cover by pulling on it with your finger.First, insert the battery into the battery well with the labels faci …
PM260 Payment Terminal, 2
Popular Payment Terminal User Guides:
S300_V1.00.00
2.3
2.4
3.
HOW TO LOAD APPLICATION ……………………………………………………………………………………… 15
4.
HOW TO DO TRANSACTION ……………………………………………………………………………………….. 16
4.1
4.1.1
Credit Sale …………………………………………………………………………………………………………. 16
4.1.2
Credit Return ……………………………………………………………………………………………………… 22
4.1.3
Credit Auth ………………………………………………………………………………………………………… 26
4.1.4
Credit PostAuth ………………………………………………………………………………………………….. 28
4.1.5
Credit Forced ……………………………………………………………………………………………………… 32
4.1.6
Credit Void Sale ………………………………………………………………………………………………….. 36
4.1.7
Credit Void Return………………………………………………………………………………………………. 38
4.1.8
Credit Void Post-Auth …………………………………………………………………………………………. 40
4.1.9
Credit Void Forced ………………………………………………………………………………………………. 42
4.2
4.2.1
Debit Sale ………………………………………………………………………………………………………….. 44
4.2.2
Debit Return ………………………………………………………………………………………………………. 47
4.3
4.3.1
EBT Sale ……………………………………………………………………………………………………………. 50
4.3.2
EBT Return ………………………………………………………………………………………………………… 55
4.3.3
EBT Balance Inquiry ……………………………………………………………………………………………. 57
4.4
4.4.1
Gift Sale…………………………………………………………………………………………………………….. 59
4.4.2
Gift Return ………………………………………………………………………………………………………… 62
4.4.3
Gift Issue …………………………………………………………………………………………………………… 64
4.4.4
Gift Add Value ……………………………………………………………………………………………………. 66
4.4.5
Gift Balance Inquiry ……………………………………………………………………………………………. 68
4.4.6
Gift Void ……………………………………………………………………………………………………………. 70
4.5
4.6
………………………………………………………………………………………………………………. 76
5.
MENU OPTION …………………………………………………………………………………………………………. 78
5.1
5.2
5.3
5.3.1
Authorizations……………………………………………………………………………………………………. 81
5.3.1.1 Trans. Types ………………………………………………………………………………………………………………….. 81
5.3.1.2 Card Types ……………………………………………………………………………………………………………………. 84
5.3.2
Security Settings ………………………………………………………………………………………………… 87
5.3.2.1
User Password ………………………………………………………………………………………………………… 88
5.3.2.2
Batch …………………………………………………………………………………………………………………….. 91
5.3.2.3
Account Truncation …………………………………………………………………………………………………. 93
5.3.2.4
Security Card ………………………………………………………………………………………………………….. 95
5.3.2.5
Card Manually Entry ………………………………………………………………………………………………… 97
5.3.3
Set Batch Time …………………………………………………………………………………………………… 99
5.3.4
Additional Prompts …………………………………………………………………………………………… 102
5.3.4.1
CashBack Prompt ………………………………………………………………………………………………….. 102
5.3.4.2
Gift Sale Mode ……………………………………………………………………………………………………… 104
5.3.4.3
Table Mode ………………………………………………………………………………………………………….. 106
5.3.4.4
Guest No. Mode ……………………………………………………………………………………………………. 108
5.4
5.4.1
Buzzer Setup ……………………………………………………………………………………………………. 110
5.4.2
Operation Mode ………………………………………………………………………………………………. 113
5.4.3
Halo Setup……………………………………………………………………………………………………….. 116
5.5
……………………………………………………………………………………………………….. 120
5.5.1
Host Parameters ………………………………………………………………………………………………. 120
5.5.2 Host URL Params …………………………………………………………………………………………………. 123
5.5.3 AutoDial Setup …………………………………………………………………………………………………….. 126
NOTE: This document is CONFIDENTIAL and must be used exclusively for the operation of PAX programs. It may not be
duplicated, published, or disclosed without PAX prior written permission.
……………………………………………………………………………………………………….. 14
………………………………………………………………………………………………………… 14
………………………………………………………………………………………………….. 16
……………………………………………………………………………………………………. 44
……………………………………………………………………………………………………… 50
…………………………………………………………………………………………………….. 59
…………………………………………………………………………………………………… 73
…………………………………………………………………………………………. 78
…………………………………………………………………………………………………. 79
………………………………………………………………………………………………….. 80
………………………………………………………………………………………………… 110
User Manual
3
Банковский эквайринг позволяет расширить возможности обслуживания клиентов путем приема оплаты платёжными картами.
Подайте заявление на официальном сайте банка и дождитесь ответа.
Подключение самого POS-терминала к устройству и установку необходимого ПО для работы осуществляет сотрудник банка. При интеграции под OC Windows рекомендуется использовать вспомогательное ПО DUAL Connector. Работа с терминалами по протоколу INPAS реализована через службу DC Service, которая является частью Dual Connector 2.0.
Для настройки терминала:
1. Скачайте и распакуйте установщик INPAS Dual Connector;
Скачанный файл установщика можно найти в папке «Загрузки». Он может выглядеть так:

2. Запустите скачанный файл, дважды кликнув на него. Нажмите «Выборочная установка», чтобы продолжить;

3. На следующем шаге необходимо выбрать вариант Dual Connector 2.х и отключить опцию DC Proxy. При необходимости вы можете изменить путь установки. Нажмите Установить, чтобы продолжить;

4. В процессе установки будет установлена платформа Java, если ранее на компьютере она не была установлена. Нажмите Install, чтобы завершить установку Java;

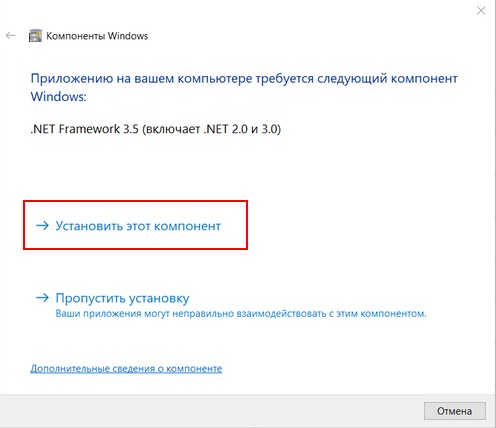
5. На некоторых версиях ОС Windows может потребоваться установка .Net Framework 3.5. Необходимо установку фреймворка выполнить не отдельно, а вкупе с Dual Connector 2.0.
Скачайте файл установки .Net Framework 3.5 по ссылке https://gbsmarket.ru/fls/net-framework-3-5-full/. Скачанный файл должен иметь имя dotnetfx35.exe. Переименуйте его, если имя отличается.
Скопируйте файл dotnetfx35.exe в ту же папку (директорию), где находится файл установки Dual Connector 2.0. В итоге это должно выглядеть, как на скриншоте;

6. После копирования файла dotnetfx35.exe, необходимо повторно запустить установщик Dual Connector 2.0. В процесс установки вы увидите сообщение о необходимости установить .Net Framework. Нажмите «Установить этот компонент»;
7. В случае успешной установки вы увидите окно с соответствующим сообщением. Включите опцию «Запустить DC Control» и нажмите «Завершить», чтобы закрыть установщик и перейти к процессу настройки подключения и проверки связи;

8. После установки Dual Connector 2.0 необходимо перезагрузить компьютер для запуска службы DC Service, которая отвечает за взаимодействие со сторонним ПО или сделать это вручную.
Для того чтобы запустить службу DC Service, откройте диспетчер задач и перейдите на вкладку «Службы».
Найдите в списке службу DC Service и запустите ее, после этого состояние службы изменится на «Выполняется»;

9. При подключении терминала через USB в приложении DC Control необходимо установить драйвера для терминала. Откройте вкладку USB Drivers, выберите производителя терминала и рекомендуемый драйвер, а затем нажмите «Установить».

10. В диспетчере устройств появится новое устройство в разделе «COM и LPT Порты». При этом терминал должен быть подключен к компьютеру.
11. Для того чтобы служба DC Service смогла соединиться с эквайринг-терминалом, необходимо указать корректные настройки подключения. Если терминал подключен через USB, необходимо указать номер COM-порта, который был создан при установке драйвера. После завершения настройки нажмите «Сохранить», чтобы изменения вступили в силу;

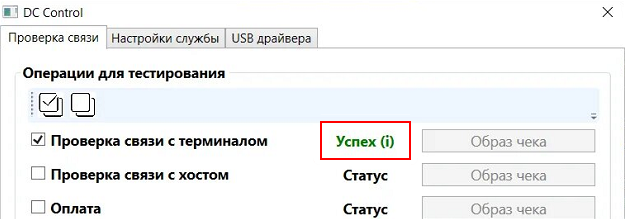
12. После завершения настройки необходимо убедиться, что связь с терминала устанавливается.
Перейдите на вкладку «Проверка связи» в приложении DC Control, включите пункт «Проверка связи с терминалом» и нажмите «Запуск».

Если все настройки выполнены верно, то вы увидите смену статуса на «Успех» в окне проверки связи
1. Откройте Меню → Настройки → Оборудование → Использовать банковский терминал и выберите ИНПАС;

2.Укажите ID терминала(номер TerminalID должен сообщить поставщик пинпада), TCP порт терминала указывается по умолчанию 9015;

3. Нажмите кнопку Сохранить. Устройство готово к работе. Можно приступать к продаже товара.
CONTENTS CHECKLIST
Please check the box contents after unpacking. If any components are missing, please contact the dealer.
| Name | Qty. |
| S300 PIN Pad | 1 |
| Power Supply | 1 |
| Power Adaper | 1 |
| Stylus Pen | 1 |
PRODUCT DESCRIPTION
The following section points out the various hardware features of the S300.
Front View:
![]()
Back View:
![]()
BASIC OPERATING INSTRUCTIONS
The following section provides basic operating instructions for the S300.
Power ON/OFF’
- Power ON: The terminal will automatically power on when connected for a power source.
- Power OFF: Disconnect the terminal from its power source to power off.
SAM Installation
- Remove SAM cover on back of terminal.
- Insert SAM card into corresponding card slot.
- Replace SAM cover.
CARD READERS
The S300 includes the following card readers:
Magnetic Stripe Card
Slide the card through the card reader slot from top to bottom or from bottom to top with the magnetic strip oriented towards the body of the device. Make sure that the card is fully inserted into the card reader while swiping the card.
IC/Smart Card Reader
Insert the card fully into the reader with the metallic contacts facing up and towards the device. Make sure that the card is fully inserted into the card reader while scanning the card.
Contactless Card Reader
The contactless card reader reads cards and devices placed roughly within an inch (2.5 mm). For best results, place as close to the reader as possible and center the card over the terminal’s screen.
CLEANING THE DEVICE
- Do not use industrial strength or abrasive cleaner.
- Do not immerse the device in water or liquid.
- Do not spray water or cleaner into EMV Card Reader or ports.
TERMINAL INSTALLATION AND USAGE TIPS
- If any cables become damaged, seek a replacement.
- Do not insert unknown materials into any port on the S300; this may cause serious damage.
- If repairs are required, please contact a professional technician instead of attempting them on your own.
- Avoid exposing the device to an excessively hot, dusty, or strong electromagnetic environment.
- Do not vibrate, shake, or drop the device.
CAUTION: Changes or modifications not expressly approved by the party responsible for compliance could void the user’s authority to operate the equipment.
INGENICO:
Инструкция по пользованию — Терминал Ingenico iWL2xx (.pdf; 1,33 МБ)
Инструкция по пользованию — Терминал Ingenico (.pdf; 601 KБ)
Инструкция по пользованию — Терминал Ingenico iCT2xx (.pdf; 994 KБ)
Инструкция по пользованию — Пин-пад Ingenico iPP2xx (.pdf; 678 KБ)
Инструкция по пользованию — Подключение пинпада IPP220 к терминалу ICT2x0 (.pdf; 113 KБ)
Инструкция по пользованию — Пин-пад Ingenico iPP 3×0 (.pdf; 992 KБ)
Инструкция по пользованию — Ingenico Desk 1500 (.pdf; 1 679 KБ)
Инструкция по пользованию — Ingenico Desk 3200 (.pdf; 637 KБ)
Инструкция по пользованию — Ingenico Move2500, Move3500, Desk3500, Link2500 (.pdf; 2 825 KБ)
Инструкция по пользованию — Ingenico Lane 3000 (.pdf; 1 679 KБ)
Инструкция по пользованию — Ingenico Lane 5000 (.pdf; 625 KБ)
Инструкция по пользованию — Ingenico Lane 7000 (.pdf; 1 144 KБ)
VERIFONE:
Инструкция по пользованию платежным POS-терминалом Verifone VX675 (.pdf; 526 KБ)
Руководство по установке Omni 5xxx и Verifone 5xx 6xx (.pdf; 1,7 MБ)
Инструкция по проведению операций по платежным картам с использованием терминала в торгово-сервисном предприятии (для терминалов VeriFone VX520, VX680) (.pdf; 309 KБ)
Инструкция по работе с терминалами Verifone (.pdf; 394 KБ)
Руководство пользователя (users guide) по работе с терминалом Verifone 1000se (англ) (.pdf; 409 KБ)
PAX:
Инструкция по работе с пин-падом PAX SP30 (.pdf; 2,27 МБ)
Справочное руководство по работе с терминалом PAX S90 (англ) (.pdf; 9863 KБ)
Руководство пользователя (users guide) по работе с терминалом PAX S90 (англ) (.pdf;3,70МБ)
Инструкция по пользованию — Пин-пад PAX D200 (.pdf; 1451 KБ)