-
Contents
-
Table of Contents
-
Troubleshooting
-
Bookmarks
Quick Links
Operation Manual
CD RECEIVER
FH-P8000BT
English
Related Manuals for Pioneer SUPER TUNER III D FH-P8000BT
Summary of Contents for Pioneer SUPER TUNER III D FH-P8000BT
-
Page 1
Operation Manual CD RECEIVER FH-P8000BT English… -
Page 2: Table Of Contents
Contents Thank you for buying this Pioneer product. Please read through these operating instructions so you will know how to operate your model properly. After you have finished reading the instructions, keep this man- ual in a safe place for future reference.
-
Page 3
Contents – Connecting to a Bluetooth audio player automatically 29 – Displaying BD (Bluetooth Device) address 29 Bluetooth Telephone 30 – Setting up for hands-free phoning 30 – Introduction to connection and pairing 30 – Connecting and disconnecting a cellular phone 31 –… -
Page 4
Contents – Basic operation 56 – Displaying text information on iPod 56 – Browsing for a song 56 – Introduction to advanced operations 56 – Playing songs in a random order (shuffle) 57 XM tuner 57 – Listening to XM Satellite Radio 57 –… -
Page 5: Before You Start
Before You Start Information to User FCC ID: AJDK017 MODEL NO.: FH-P8000BT IC: 775E-K017 This device complies with Part 15 of FCC Rules and RSS-Gen of IC Rules. Operation is subject to the following two conditions: (1) this device may not cause interference, and (2) this device must accept any interference, including inter- ference that may cause undesired operation of this device.
-
Page 6
Section Before You Start CAUTION: USE OF CONTROL OR ADJUSTMENT OR PERFORMANCE OF PROCEDURES OTHER THAN THOSE SPECIFIED HEREIN MAY RESULT IN HAZARDOUS RADIATION EXPOSURE. CAUTION: THE USE OF OPTICAL INSTRUMENTS WITH THIS PRODUCT WILL INCREASE EYE HAZARD. CAUTION ! Do not allow this unit to come into contact with liquids. -
Page 7: Operating Environment
About the SAT RADIO READY mark The SAT RADIO READY mark indicates that the Satellite Radio Tuner for Pioneer (i.e., XM tuner and Sirius satellite tuner which are sold separately) can be controlled by this unit. Please inquire to your dealer or nearest…
-
Page 8: After-Sales Service For Pioneer Products
Pioneer Electronics (USA) Inc. CUSTOMER SUPPORT DIVISION P.O. Box 1760 Long Beach, CA 90801-1760 800-421-1404 CANADA Pioneer Electronics of Canada, Inc. CUSTOMER SATISFACTION DEPARTMENT 300 Allstate Parkway Markham, Ontario L3R 0P2 1-877-283-5901 905-479-4411 For warranty information please see the Lim- ited Warranty sheet included with this unit.
-
Page 9: About The Demo Mode
Before You Start About the demo mode This unit features the feature demo mode. Important The red lead (ACC) of this unit should be con- nected to a terminal coupled with ignition switch on/off operations. If this is not done, the vehicle battery may be drained.
-
Page 10: Operating This Unit
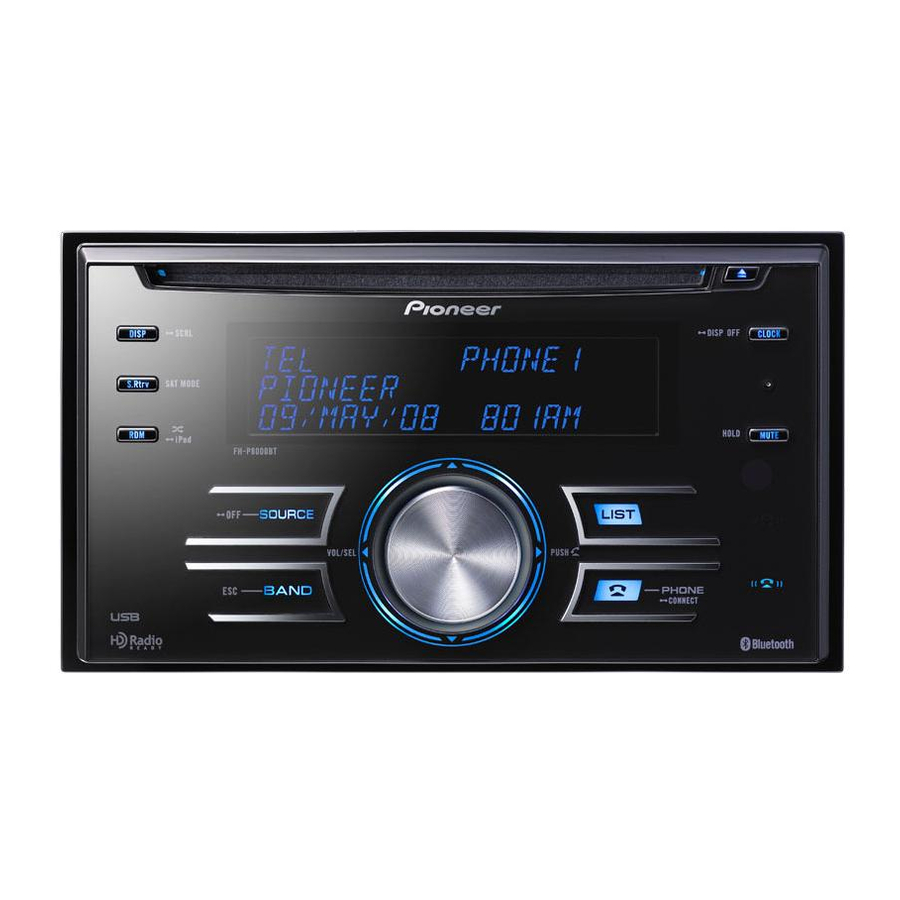
Section Operating this unit What’s What Head unit 1 S.Rtrv/SAT MODE button Press to switch Sound Retriever settings. When XM tuner or SIRIUS tuner is selected as the source, press to change the channel select mode. When SIRIUS tuner is selected as the source, press and hold to perform the In- stant Replay mode.
-
Page 11: Remote Control
Operating this unit f RDM/ /iPod button Press to turn random function on or off while using CD or USB. While using an iPod, press to shuffle all tracks. Press and hold to switch the control mode while using an iPod. If using the iPod with an interface adapter (CD-IB100N), press to switch the shuffle function.
-
Page 12: Display Indication
Section Operating this unit Display indication 1 Main display section Displays band, frequency, elapsed playback time and other settings. (artist) indicator Appears when the disc (track) artist name is displayed on the main display section. Appears when artist search refinement on the iPod browsing function is in use.
-
Page 13: Basic Operations
Operating this unit (phone book) indicator Appears when phone book list is displayed while telephone source is being selected. Basic Operations Power ON/OFF Turning the unit on % Press SOURCE to turn the unit on. Turning the unit off % Press OFF and hold until the unit turns off.
-
Page 14: Adjusting The Volume
DC power source while connecting it to AUX input may generate noise. In this case, stop charging. ! External unit refers to a Pioneer product (such as ones available in the future) that, although incompatible as a source, enables control of basic functions with this unit.
-
Page 15: Introduction To Advanced Operations
Operating this unit Use MULTI-CONTROL to select the de- sired station. Turn to change the station. Press to select. # You can also change the station by pushing MULTI-CONTROL up or down. # To return to the ordinary display, press BAND or LIST.
-
Page 16: Built-In Cd Player
Section Operating this unit The LEVEL 4 setting allows reception of only the strongest stations, while lower settings let you receive progressively weaker stations. Built-in CD Player Basic Operations 1 Folder number indicator Shows the folder number currently playing when the compressed audio is playing. 2 Track number indicator 3 Play time indicator 4 Bit rate/sampling frequency indicator…
-
Page 17: Selecting A Track Directly
Operating this unit % Return to root folder Press and hold BAND. # If folder 01 (ROOT) contains no files, playback commences with folder 02. % Switch between compressed audio and CD-DA Press BAND. # This operation is available only when playing CD-EXTRA or MIXED-MODE CDs.
-
Page 18: Selecting Tracks From The Track Title List
Section Operating this unit ! When playing back VBR (variable bit rate)-re- corded WMA files, the average bit rate value is displayed. ! When playing back VBR (variable bit rate)-re- corded MP3 files, VBR is displayed instead of bit rate value. ! The sampling frequency shown in the display may be abbreviated.
-
Page 19: Selecting A Repeat Play Range
Operating this unit Notes ! You can also select the function by pressing FUNCTION on the remote control. ! To return to the ordinary display, press BAND. ! If you do not operate functions except for TITLE INPUT within about 30 seconds, the dis- play automatically returns to the ordinary dis- play.
-
Page 20: Using Disc Title Functions
Section Operating this unit % Press S.Rtrv repeatedly to select the de- sired setting. OFF (off)—1—2 # 2 is more effective than 1. Note You can also perform this operation in the menu that appears by using MULTI-CONTROL. Using disc title functions You can input CD titles and display the title.
-
Page 21: Playing Songs On Usb Portable Audio Player/Usb Memory
Operating this unit Playing songs on USB portable audio player/USB memory For details about the supported device, refer to Portable audio player compatibility on page 6. Basic Operations 1 Folder number indicator 2 Track number indicator 3 Play time indicator 4 Bit rate/sampling frequency indicator ! When playing back VBR (variable bit rate)-recorded WMA files, the average…
-
Page 22: Introduction To Advanced Operations
Section Operating this unit Introduction to advanced operations Press MULTI-CONTROL to display the main menu. Use MULTI-CONTROL to select FUNCTION. Turn to change the menu option. Press to se- lect. The function menu is displayed. Turn MULTI-CONTROL to select the function.
-
Page 23: Playing Songs On Ipod
! When using an iPod, iPod Dock Connector to USB Cable is required. ! Read the precautions for iPod on page 78. ! While iPod is connected to this unit, PIONEER (check mark)) is displayed on the iPod. ! If an error message is displayed, refer to Error messages on page 73.
-
Page 24: Displaying Text Information On Ipod
Section Operating this unit Use MULTI-CONTROL to select a cate- gory. Turn to change the category. Press to select. Press LIST to switch to alphabet search mode. Turn MULTI-CONTROL to select a de- sired alphabet. Press MULTI-CONTROL to display the al- phabetical list.
-
Page 25: Playing Songs In A Random Order (Shuffle)
Operating this unit Playing songs in a random order (shuffle) Display the function menu. Refer to Introduction to advanced operations on the previous page. Use MULTI-CONTROL to select SHUFFLE MODE in the function menu. Press MULTI-CONTROL to select your fa- vorite setting.
-
Page 26: Changing Audiobook Speed
Section Operating this unit Changing audiobook speed While listening to an audiobook on iPod, play- back speed can be changed. Display the function menu. Refer to Introduction to advanced operations on page 24. Use MULTI-CONTROL to select AUDIOBOOKS in the function menu. Press MULTI-CONTROL to select your fa- vorite setting.
-
Page 27: Connecting A Bluetooth Audio Player
Operating this unit Even though your audio player does not con- tain a Bluetooth module, you can still control it from this unit via Bluetooth wireless technol- ogy using a Bluetooth adapter (sold sepa- rately). 1 Device name Shows the device name of the connected Bluetooth audio player (or Bluetooth adapter).
-
Page 28: Disconnecting A Bluetooth Audio Player
Section Operating this unit Press MULTI-CONTROL to establish con- nection. # While connecting, CONNECTING flashes. If the connection is established, CONNECTED is displayed. # If the connection fails, ERROR is displayed. In this case, try again from the beginning. Disconnecting a Bluetooth audio player This function can be operated only when the Bluetooth wireless connection is being estab-…
-
Page 29: Playing Songs On A Bluetooth Audio Player
Operating this unit Playing songs on a Bluetooth audio player Display the function menu. Refer to Introduction to advanced operations on the previous page. Use MULTI-CONTROL to select PLAY in the function menu. Press MULTI-CONTROL to start play- back. Stopping playback Display the function menu.
-
Page 30: Bluetooth Telephone
Section Operating this unit Bluetooth Telephone Important ! Since this unit is on standby to connect with your cellular phone via Bluetooth wireless technology, using this unit without running the engine can result in battery drainage. ! Advanced operations that require your atten- tion such as dialing numbers on the monitor, using phone book, etc., are prohibited while you are driving.
-
Page 31: Connecting And Disconnecting A
Operating this unit Use MULTI-CONTROL to select CONNECTION. The connection menu is displayed. Turn to change the menu option. Press to se- lect. Turn MULTI-CONTROL to select the function. PAIRED PHONE (paired phone)— BT HANDS FREE (new phone)—SET PHONE (phone registration)—DISCONNECT PHONE (disconnect phone)—DELETE PHONE (delete phone) If the phone is not connected and not…
-
Page 32
Section Operating this unit When you select YES, this unit changes to PH BOOK DOWNLOAD and the download op- eration automatically begins. After complet- ing, DATA DOWNLOADED is displayed. According to the circumstances, this unit changes to PH BOOK TRANSFER. In this case, refer to step 4 on Transferring entries to the phone book on page 40. -
Page 33
Operating this unit Turn MULTI-CONTROL to select PAIRED PHONE. # Push MULTI-CONTROL up or down to select a desired phone. # Push MULTI-CONTROL left or right to display the BD address, group and ID number. Press MULTI-CONTROL to start connec- tion. -
Page 34: Making A Phone Call
Section Operating this unit Push MULTI-CONTROL up or down to select a pairing assignment. P1 (user phone 1)—P2 (user phone 2)—P3 (user phone 3) # Push MULTI-CONTROL left or right to switch the BD address and device name. # If the assignment is empty, NO DATA is dis- played and operation is not possible.
-
Page 35: Using The Phone Number List
Operating this unit Notes ! Pressing MULTI-CONTROL while talking on the phone changes into ECHO CANCEL of FUNCTION. For details on ECHO CANCEL, refer to Echo canceling and noise reduction on page 41. ! The estimated call time appears in the display (this may differ slightly from the actual call time).
-
Page 36: Using The Phone Book
Section Operating this unit # If you do not operate anything within about 30 seconds, the list display is canceled automati- cally. Press MULTI-CONTROL to make a call. # While in the phone number list, press and hold MULTI-CONTROL to add or delete + to the phone number.
-
Page 37: Using Preset Numbers
Operating this unit Press MULTI-CONTROL to store the new number. After the number is stored, the display reverts to the detailed list. Assign genres to phone numbers If there are a lot of entries in the Phone Book it can be useful to assign them to specific gen- res (categories) for easier searching.
-
Page 38
Section Operating this unit Press MULTI-CONTROL to select a preset number that you want to assign a phone number to. Press and hold MULTI-CONTROL to dis- play MEMORY. Push MULTI-CONTROL up or down to switch MEMORY (memory) and DELETE (delete). # If a phone number is already stored in the se- lected preset number, the new phone number will overwrite the old one. -
Page 39: Introduction To Advanced
Operating this unit Assigning preset numbers by using MULTI-CONTROL Push MULTI-CONTROL up or down to switch preset numbers. Perform from step 4 to 10 of Assigning preset numbers on page 37. Assigning preset numbers by using remote control Press thumb pad to display RECENT CALLS (call history list).
-
Page 40: Downloading Phone Books From Your Cellular Phone
Section Operating this unit ! DEVICE INFO is the same as that of the Blue- tooth audio. (Refer to Displaying BD (Bluetooth Device) address on page 29.) ! PH. B. NAME VIEW (phone book name view) cannot be selected for cellular phone regis- tered guest phone.
-
Page 41: Setting The Automatic Connection
Operating this unit Use the cellular phone to perform phone book transfer. Perform phone book transfer using the cellu- lar phone. For detailed instructions, refer to the instruction manual that came with your cellular phone. # Depending on the cellular phone, phone book can only be transferred one by one.
-
Page 42: Making A Call By Entering Phone Number
Section Operating this unit Making a call by entering phone number Important Be sure to park your vehicle and apply the park- ing brake when performing this operation. Display the function menu. Refer to Introduction to advanced operations on page 39. Use MULTI-CONTROL to select NUMBER DIAL.
-
Page 43
Section Operating this unit Press MULTI-CONTROL to select the lan- guage. ENGLISH (English)—PYCCKOE (Russian)— ESPANOL (Spanish) -
Page 44: Audio Adjustments
Section Audio Adjustments Introduction of audio adjustments 1 Audio display Shows the audio adjustment status. Press MULTI-CONTROL to display the main menu. Use MULTI-CONTROL to select AUDIO. Turn to change the menu option. Press to se- lect. The audio menu is displayed. Turn MULTI-CONTROL to select the audio function.
-
Page 45: Adjusting Equalizer Curves
Audio Adjustments Display Equalizer curve POWERFUL Powerful NATURAL Natural VOCAL Vocal CUSTOM1 Custom 1 CUSTOM2 Custom 2 FLAT Flat S.BASS Super bass ! CUSTOM1 and CUSTOM2 are adjusted equalizer curves that you create. Adjust- ments can be made with a 7-band graphic equalizer.
-
Page 46: Adjusting Loudness
Section Audio Adjustments Push MULTI-CONTROL left or right to select the equalizer band to adjust. Each time MULTI-CONTROL is pushed left or right, equalizer bands are selected in the fol- lowing order: 50HZ—125HZ—315HZ—800HZ—2KHZ— 5KHZ—12.5KHZ Push MULTI-CONTROL up or down to adjust the level of the equalizer band.
-
Page 47: Boosting The Bass
Audio Adjustments Push MULTI-CONTROL up or down to adjust the output level of the subwoofer. Each time MULTI-CONTROL is pushed up or down, subwoofer level increases or decreases. +6 to -24 is displayed as the level is increased or decreased. Boosting the bass Bass boost function boosts the bass level of sound.
-
Page 48: Initial Settings
Section Initial Settings Adjusting initial settings Using the initial settings, you can customize various system settings to achieve optimal per- formance from this unit. 1 Function display ! Shows the function status. Press SOURCE and hold until the unit turns off. Press MULTI-CONTROL and hold until the initial setting menu appears in the dis- play.
-
Page 49: Switching The Auxiliary Setting
Initial Settings Note You can match the clock to a time signal by pressing MULTI-CONTROL. ! If 00 to 29, the minutes are rounded down. (e.g., 10:18 becomes 10:00.) ! If 30 to 59, the minutes are rounded up. (e.g., 10:36 becomes 11:00.) Switching the auxiliary setting Auxiliary devices connected to this unit can be…
-
Page 50: Switching The Sound Muting/Attenuation
Section Initial Settings Switching the sound muting/attenuation Sound from this system is muted or attenu- ated automatically when the signal from the equipment with mute function is received. ! The sound is muted or attenuated, TEL MUTE or TEL ATT are displayed and no audio adjustment is possible.
-
Page 51: Entering Pin Code For Bluetooth Wireless Connection
PIN code cannot be stored in mem- ory. Editing device name You can edit the device name. The device name is set to PIONEER W-DIN BT as default. Display the initial setting menu. Refer to Adjusting initial settings on page 48.
-
Page 52: Resetting The Bluetooth Wireless Technology Module
Section Initial Settings Push MULTI-CONTROL left to switch to the version of the Bluetooth module of this unit. # Pushing MULTI-CONTROL right returns to the system version of this unit. Resetting the Bluetooth wireless technology module Bluetooth telephone and Bluetooth Audio data can be deleted.
-
Page 53: Other Functions
For details concerning operation, refer to En- tering disc titles on page 20. Using the external unit External unit refers to a Pioneer product (such as ones available in the future) that, although incompatible as a source, enables control of basic functions with this unit.
-
Page 54: Basic Operation
Section Other Functions Basic operation Functions allocated to the following opera- tions are different depending on the con- nected external unit. For details concerning functions, refer to the connected external unit’s owner’s manual. % Press BAND. % Press and hold BAND. % Push MULTI-CONTROL left or right.
-
Page 55
Other Functions ! USB – USB portable audio player/USB memory ! IPOD – iPod ! BT AUDIO – Bluetooth audio player ! DVD – DVD player/multi-DVD player # To turn pause off, press PGM again. % Press PGM and hold to turn BSM on when selecting tuner or HD Radio as the source. -
Page 56: Available Accessories
Push MULTI-CONTROL left or right. Notes ! Read the precautions for iPod on page 78. ! While iPod is connected to this unit, PIONEER (check mark)) is displayed on the iPod. ! If an error message is displayed, refer to Error messages on page 73.
-
Page 57: Playing Songs In A Random Order (Shuffle)
Available accessories Notes ! You can also select the function by pressing FUNCTION on the remote control. ! To return to the ordinary display, press BAND. ! If you do not operate functions within about 30 seconds, the display automatically returns to the ordinary display.
-
Page 58: Selecting An Xm Channel Directly
Section Available accessories Selecting an XM channel directly When using the remote control, you can select the XM channel directly by entering the de- sired channel number. Press DIRECT. Channel number input display appears. Press 0 to 9 to enter the desired channel number.
-
Page 59: Displaying The Radio Id
Available accessories Selecting a channel in the channel category Select the channel select settings to CATEGORY. Refer to Switching the XM channel select mode on the previous page. Push MULTI-CONTROL up or down to select the desired channel category. Push MULTI-CONTROL left or right to select the desired channel in the selected channel category.
-
Page 60: Selecting A Sirius Channel Directly
Section Available accessories Selecting a SIRIUS channel directly When using the remote control, you can select the SIRIUS channel directly by entering the de- sired channel number. Press DIRECT. Channel number input display appears. Press 0 to 9 to enter the desired channel number.
-
Page 61: Selecting The Sirius Channel Select Mode
Available accessories Selecting the SIRIUS channel select mode You have two methods for selecting a channel: by number and by category. When selecting by number, channels in any category can be selected. Select by category to narrow your search down to only channels in a particular category.
-
Page 62: Displaying The Radio Id
Using Instant Replay function Following functions can be operated during the Instant Replay mode. ! To use this function, Pioneer SIRIUS bus in- terface (e.g. CD-SB10) is required. ! To use this function, SIRIUS plug-and-play unit with Instant Replay Function is re- quired.
-
Page 63: Hd Radio Tuner
Available accessories HD Radio tuner Basic Operations You can use this unit to control an HD Radio tuner (GEX-P10HD), which is sold separately. For details concerning operation, refer to the HD Radio’s operation manual. 1 Band indicator 2 Preset number indicator 3 Frequency indicator % Select a band Press BAND.
-
Page 64: Introduction To Advanced Operations
Section Available accessories Introduction to advanced operations Press MULTI-CONTROL to display the main menu. Use MULTI-CONTROL to select FUNCTION. Turn to change the menu option. Press to se- lect. The function menu is displayed. Turn MULTI-CONTROL to select the function. BSM (best stations memory)—LOCAL (local seek tuning)—SEEK MODE (seek mode)—…
-
Page 65: Multi-Cd Player
Available accessories Multi-CD Player Basic Operations You can use this unit to control a multi-CD player, which is sold separately. ! Only functions described in this manual are supported by 50-disc multi-CD players. ! This unit is not designed to operate disc title list functions with a 50-disc multi-CD player.
-
Page 66: Using Compression And Bass Emphasis
Section Available accessories Function and operation PLAY MODE, RANDOM MODE, SCAN MODE, PAUSE and TITLE INPUT opera- tions are basically the same as that of the built-in CD player. Function name Operation Refer to Selecting a repeat play range on page 19. However, the repeat play ranges you can select are different from that of the built-in CD player.
-
Page 67
Available accessories Push MULTI-CONTROL up to store the currently playing track in the playlist. MEMORY COMPLETE is displayed and the currently playing selection is added to your playlist. Press BAND to return to the playback display. Note After data for 100 discs is stored in memory, data for a new disc will overwrite the oldest one. -
Page 68: Using Disc Title Functions
Section Available accessories Push MULTI-CONTROL down to erase all tracks on the currently playing CD from your ITS playlist. All tracks on the currently playing CD are de- leted from your playlist and MEMORY DELETED is displayed. Press BAND to return to the playback display.
-
Page 69: Dvd Player
Available accessories DVD Player Basic Operations You can use this unit to control a DVD player or multi-DVD player, which is sold separately. For details concerning operation, refer to the DVD player’s or multi-DVD player’s operation manual. This section provides information on DVD operations with this unit which differs from that described in the DVD player’s or multi-DVD player’s operation manual.
-
Page 70: Function And Operation
Section Available accessories # If you do not operate functions except for ITS MEMO and TITLE INPUT within about 30 sec- onds, the display is automatically returned to the ordinary display. Function and operation PLAY MODE, RANDOM MODE, SCAN MODE, PAUSE and TITLE INPUT opera- tions are basically the same as that of the built-in CD player.
-
Page 71: Tv Tuner
Available accessories TV tuner Basic Operations You can use this unit to control a TV tuner, which is sold separately. For details concerning operation, refer to the TV tuner’s operation manual. This section pro- vides information on TV operations with this unit, which differs from that described in the TV tuner’s operation manual.
-
Page 72
Section Available accessories Use MULTI-CONTROL and select FUNCTION to display BSSM. # You can also select the function by pressing FUNCTION on the remote control. Press MULTI-CONTROL to turn BSSM SEARCHING begins to flash. While SEARCHING is flashing, the 12 strongest broadcast stations are stored in order from the lowest channel up. -
Page 73: Additional Information
Error messages When you contact your dealer or your nearest Pioneer Service Center, be sure to have the error message recorded. Built-in CD Player Message Cause Action ERROR-11, 12, Dirty disc Clean disc.
-
Page 74
Appendix Additional Information The USB connec- tor or USB cable CHECK USB is short-circuited. The connected USB portable audio player/ USB memory consumes more than 500 mA (maximum allow- able current). ERROR-19 Communication failure ERROR-23 USB device is not formatted with FAT16 or FAT32 iPod… -
Page 75: Handling Guideline Of Discs And Player
Additional Information Handling guideline of discs and player ! Use only discs featuring either of following two logos. ! Use only conventional, fully circular discs. Do not use shaped discs. ! Use 12-cm or 8-cm CD. Do not use an adapter when playing 8-cm CDs.
-
Page 76: Compressed Audio Files On The Disc
Appendix Additional Information ! MP3i (MP3 interactive), mp3 PRO: No ! Compatible format: AAC encoded by ® iTunes ! Sampling frequency: 11.025 kHz to 48 kHz ! Transmission rate: 16 kbps to 320 kbps ! Apple Lossless: No ! Compatible format: Linear PCM (LPCM), MS ADPCM ! Quantization bits: 8 and 16 (LPCM), 4 (MS ADPCM)
-
Page 77: Handling Guideline And Supplemental Information
Additional Information ! Supply current: 500 mA Notes ! Partitioned USB memory is not compatible with this unit. ! Depending on the kind of USB portable audio player/USB memory you use, this unit may not recognize the USB audio player/USB memory or audio files may not be played back properly.
-
Page 78: Ipod
! For details, refer to the iPod’s manuals. About iPod settings ! You cannot operate the iPod Equalizer on Pioneer products. We recommend that you set the iPod Equalizer to off, before con- Level 3 Level 4 necting to this unit.
-
Page 79: Specifications
Additional Information Specifications General Power source … 14.4 V DC (10.8 V to 15.1 V allowable) Grounding system … Negative type Max. current consumption … 10.0 A Dimensions (W × H × D): Chassis … 178 mm × 100 mm × 160 (7 in.×…
-
Page 80
TEL: (03) 9586-6300 PIONEER ELECTRONICS OF CANADA, INC. 300 Allstate Parkway, Markham, Ontario L3R 0P2, Canada TEL: 1-877-283-5901 TEL: 905-479-4411 PIONEER ELECTRONICS DE MEXICO, S.A. de C.V. Blvd.Manuel Avila Camacho 138 10 piso Col.Lomas de Chapultepec, Mexico, D.F. 11000 TEL: 55-9178-4270 先鋒股份有限公司…
Краткое содержание страницы № 1
English Français Español
CD RECEIVER
AUTORADIO CD
RADIO CD
DEH-22UB
Owner’s Manual
Mode d’emploi
Manual de instrucciones
Краткое содержание страницы № 2
Presection BeforeYouStart orotherreproductiveharm.Washhandsafter ThankyouforpurchasingthisPIONEER product. handling. Toensureproperuse,pleasereadthrough this manual beforeusing thisproduct.Itisespe- CAUTION: ciallyimportantthatyoureadandobserve USEOFCONTROLORADJUSTMENTOR WARNINGsandCAUTIONsinthismanual. PERFORMANCEOFPROCEDURES Please keep the manual in a safe and accessible OTHERTHANTHOSESPECIFIEDHEREIN place for future reference. MAYRESULTINHAZARDOUSRADIATION EXPOSURE. Thisdevicecomplieswithpar
Краткое содержание страницы № 3
English Presection BeforeYouStart purchasedetailsinour filesintheeventof After-salesservicefor lossortheft. Pioneerproducts ! Accessowner’smanuals,sparepartsinfor- Pleasecontactthedealerordistributor from mation,serviceinformation,andmuch whereyoupurchasedthisunitforafter-sales more. service(including warrantyconditions)orany otherinformation.Incasethenecessaryinfor- mationisnotavailable,pleasecontactthe companieslistedbelow: Pleasedonotshipyourunittothecompanies attheaddresseslistedbelowforrepa
Краткое содержание страницы № 4
Section 01 Operatingthisunit Headunit Part Operation Press toincrease ordecreasevo- e VOLUME lume. Press tomute. Pressagaintoun- f MUTE mute. g AUDIO Press toselect anaudio function. Press toselect differentdisplays. h DISP/SCRL Press andhold toscroll through thetextinformation.
i e Press topause orresume. Part Part Press toselect functions. AUXinputjack (3.5 Press andhold torecall theinitial 1 DISP/ /SCRL 8 j FUNCTION mmstereo jack) setting me
Краткое содержание страницы № 5
English Section Operatingthisunit 01 Anuppertieroffolderormenu Removingthefrontpaneltoprotectyour unitfrom 5 c exists. theft 1 Press torelease thefrontpanel. 6 (folder) Thelistfunctionisoperated. 2 Grabthefrontpanelandremove. Alowertieroffolderormenuex- 7 d Re-attachingthefrontpanel ists. 1 Slidethefrontpaneltotheleftuntilitclicks. 8 LOC Thelocalseektuningison. Frontpanelandtheheadunitareconnectedon theleftside.Makesurethatthefrontpanelhas LOUD been properly connectedtotheheadunit. 9 Theloudness
Краткое содержание страницы № 6
Section 01 Operatingthisunit Seewww.dtsc.ca.gov/hazardouswaste/ Useandcareoftheremote perchlorate.(ApplicabletoCalifornia,U.S.A.)” control Important Usingtheremotecontrol 1 Pointtheremotecontrolinthedirection of the ! Donotstoretheremotecontrolinhightem- frontpaneltooperate. peraturesordirectsunlight. When usingfor thefirsttime,pulloutthefilm ! Theremotecontrolmaynotfunctionproperly protruding fromthetray. indirectsunlight. Replacingthebattery ! Donotlettheremotecontrolfallontothe 1 Slidethetray
Краткое содержание страницы № 7
English Section Operatingthisunit 01 Tuner LOCAL (localseektuning) Localseektuningletsyoutuneinonlythoseradiosta- BasicOperations tions withsufficientlystrongsignalsfor goodrecep- tion. Selectingaband 1 PressM.C.todisplaythe settingmode. 1 PressBAND/ESCuntil thedesired band(F1,F2, 2 TurnM.C.toselectthe desired setting. F3for FMorAM)is displayed. FM:OFF—LEVEL1—LEVEL2—LEVEL3—LEVEL Manual tuning(step bystep) 4 1 Presscord. AM:OFF—LEVEL1—LEVEL2 Largersetting numberishigher level.Thehighest Seeking l
Краткое содержание страницы № 8
Section 01 Operatingthisunit ! WhenplayingbackVBR(variablebitrate)-re- Returningtorootfolder cordedMP3files,VBRisdisplayedinsteadof 1 Pressand holdBAND/ESC. bitratevalue. Switching between compressedaudio and CD-DA 1 PressBAND/ESC. Selectingandplayingfiles/ Notes tracksfromthenamelist ! Whenplayingcompressedaudio,thereisno 1 Press toswitchtothefile/track soundduringfastforwardorreverse. namelistmode. ! USBportableaudioplayersthatcanbe chargedviaUSBwillberechargedwhen 2 UseM.C.toselectthedesiredf
Краткое содержание страницы № 9
English Section Operatingthisunit 01 AudioAdjustments Pausingplayback 1 Press2/PAUSE topause orresume. 1 PressM.C.todisplaythemainmenu. Enhancingcompressedaudio and restoringrich sound(sound retriever) 2 TurnM.C.tochangethemenuoption 1 Press1/S.Rtrvtocyclebetween: andpresstoselectAUDIO. OFF(off)—MODE1—MODE2 MODE1iseffectiveforlow compression rates, 3 TurnM.C.toselecttheaudiofunction. andMODE2iseffectivefor high compression Afterselecting,performthefollowingproce- rates. durestosettheaudiofunctio
Краткое содержание страницы № 10
Section 01 Operatingthisunit SLA(sourceleveladjustment) USB(plugand play) SLA(Source leveladjustment) letsyouadjustthevo- This setting allowsyoutoswitchyour sourcetoUSB lume levelofeachsourcetopreventradicalchanges automatically. involume when switchingbetween sources. 1 PressM.C.toturntheplugand playonoroff. ! Settingsarebased ontheFMvolume level,which ON –WhenUSB storagedevice isconnected,the remainsunchanged. source isautomaticallyswitchedtoUSB.Ifyou Beforeadjustingsourcelevels,comparetheFM d
Краткое содержание страницы № 11
T R A T English S N O Section Connections 02 — Securethewiringwithcableclampsorad- WARNING hesivetape.Wrapadhesivetapearound ! Usespeakersover50W(outputvalue)andbe- wiringthatcomesintocontactwithmetal tween4Wto8W(impedancevalue).Donot partstoprotectthewiring. use1Wto3Wspeakersforthisunit. — Placeallcablesawayfrommovingparts, ! Theblackcableisground.Wheninstalling suchasthegearshift andseatrails. thisunitorpoweramp(soldseparately),make — Placeallcablesawayfromhotplaces, suretoconnectthegroundwire
Краткое содержание страницы № 12
Section 02 Connections Connectiondiagram Power amp This product (sold separately) Connect with RCA cables (sold separately) Antenna jack Fuse (10 A) Rear output Yellow System remote control Connect to the constant 12 V Blue/white supply terminal. Connect to system control terminal of the power amp or auto-antenna relay control terminal (max. 300 mA 12 V DC). Red Connect to terminal controlled by ignition switch (12 V DC). With a 2 speaker system, do not connect Black (chassis ground) anyt
Краткое содержание страницы № 13
English Section Installation 03 2 Securethemountingsleevebyusinga Important screwdrivertobendthemetaltabs(90°) ! Checkallconnectionsandsystemsbefore intoplace. finalinstallation. Dashboard ! Donotuseunauthorizedpartsasthismay causemalfunctions. ! Consultyourdealerifinstallationrequiresdril- lingofholesorothermodificationstothevehi- cle. ! Donotinstallthisunitwhere: — itmayinterferewithoperationof thevehi- cle. — itmaycauseinjurytoapassengerasare- sultofasuddenstop. Mountingsleeve ! Thesemiconduc
Краткое содержание страницы № 14
Section 03 Installation 2 Tightentwoscrewsoneachside. Fasteningthefrontpanel Screw If youdonotplantodetach thefrontpanel, thefrontpanelcanbefastenedwiththesup- pliedscrew. Mounting bracket Dashboardorconsole Screw ! Useeithertruss(5mm×8mm)or flush surface(5mm×9mm)screws,depending onthebracketscrewholes. Removingtheunit 1 Extendtopandbottomofthetrimring outwardstoremovethetrimring.(When reattachingthetrimring,pointtheside withthegroovedown.) Trimring ! Releasingthefrontpanelallowseasierac- cessto
Краткое содержание страницы № 15
English Appendix AdditionalInformation Troubleshooting Electrical orme- Turn theignition chanical switchOFFand ERROR-10,11, 12,15,17,30, backON, orswitch Symptom Cause Action toadifferent A0 source,then back Thedisplay Youdidnotper- Performoperation tothe CDplayer. automatically formanyopera- again. returns tothe tionwithinabout ERROR-15 Theinserteddisc Replacedisc. ordinarydis- 30seconds. isblank play. ERROR-22,23 UnsupportedCD Replacedisc. Therepeatplay Depending on Selecttherepeat format rang
Краткое содержание страницы № 16
Appendix AdditionalInformation Theconnected Playan audio file USB storagede- USB storagede- USB storagede- notembeddedwith viceisnotfor- viceshould befor- SKIPPED ERROR-23 vicecontains WindowsMedia mattedwith mattedwithFAT16 WMAfiles em- DRM9/10. FAT16orFAT32 orFAT32. beddedwith WindowsMed- iaäDRM9/10 PROTECT Allthefiles inthe Transferaudio files USB storagede- notembeddedwith Handlingguideline viceareem- WindowsMedia beddedwith DRM9/10tothe Discsandplayer USB storagede- WindowsMedia DRM9/10 vic
Краткое содержание страницы № 17
English Appendix AdditionalInformation Playbackof discsmaynotbepossiblebecauseof Compressedaudio disccharacteristics,disc format,recorded applica- compatibility(disc,USB) tion,playbackenvironment,storageconditions, and soon. WMA Roadshocksmayinterruptdiscplayback. Fileextension: .wma Readthe precautions fordiscsbefore usingthem. Bitrate:48kbps to320kbps(CBR),48kbps to384 kbps (VBR) USBstoragedevice Samplingfrequency:32kHz,44.1kHz,48kHz Addressanyquestionsyouhave aboutyour USB sto- WindowsMediaAu
Краткое содержание страницы № 18
Appendix AdditionalInformation Disc Playablefiles: upto999 Folderselectionsequence orotheroperation Filesystem: ISO9660Level1and 2,Romeo,Joliet maydifferdepending ontheencodingor writ- Multi-sessionplayback:Yes ingsoftware. Packet writedatatransfer:No USBstoragedevice Regardlessof thelength ofblanksectionbetweenthe Playbacksequenceisthesameasrecorded songs of theoriginal recording,compressedaudio sequenceintheUSBstorage device. discsplay withashortpause between songs. Tospecifytheplaybacksequenc
Краткое содержание страницы № 19
English Appendix AdditionalInformation Tone controls: WMA Bass Frequency…………….100 Hz Gain ……………………….±12 dB Mid Frequency…………….1 kHz Gain ……………………….±12 dB Treble Frequency…………….10 kHz Gain ……………………….±12 dB WindowsMediaandtheWindowslogoaretra- CDplayer demarksor registeredtrademarks ofMicrosoft System ……………………………………Compactdiscaudio system CorporationintheUnitedStatesand/orother Usable di
Краткое содержание страницы № 20
Appendix AdditionalInformation CEA2006Specifications Power output ………………………..14 W RMS × 4 Channels(4 Wand≦1%THD+N) S/N ratio …………………………………91 dBA(reference:1Winto 4W) Note Specificationsandthedesignaresubjecttomod- ificationswithoutnotice. 20 En

- 1
- 2
- 3
- 4
- 5
- 6
- 7
- 8
- 9
- 10
- 11
- 12
- 13
- 14
- 15
- 16
- 17
- 18
- 19
- 20
- 21
- 22
- 23
- 24
- 25
- 26
- 27
- 28
- 29
- 30
- 31
- 32
- 33
- 34
- 35
- 36
- 37
- 38
- 39
- 40
- 41
- 42
- 43
- 44
- 45
- 46
- 47
- 48
- 49
- 50
- 51
- 52
- 53
- 54
- 55
- 56
- 57
- 58
- 59
- 60
- 61
- 62
- 63
- 64
- 65
- 66
- 67
- 68
- 69
- 70
- 71
- 72
- 73
- 74
- 75
- 76
- 77
- 78
- 79
- 80
- 81
- 82
- 83
- 84
- 85
- 86
- 87
- 88
- 89
- 90
- 91
- 92
- 93
- 94
- 95
- 96
- 97
- 98
- 99
- 100
- 101
- 102
- 103
- 104
- 105
- 106
- 107
- 108
- 109
- 110
- 111
- 112
- 113
- 114
- 115
- 116
- 117
- 118
- 119
- 120
- 121
- 122
- 123
- 124
- 125
- 126
- 127
- 128
- 129
- 130
- 131
- 132
- 133
- 134
- 135
- 136
- 137
- 138
- 139
- 140
- 141
- 142
- 143
- 144
- 145
- 146
- 147
- 148
- 149
- 150
- 151
- 152
- 153
- 154
- 155
- 156
- 157
- 158
- 159
- 160
- 161
- 162
- 163
- 164
- 165
- 166
- 167
- 168
- 169
- 170
- 171
- 172
- 173
- 174
- 175
- 176
- 177
- 178
- 179
- 180
- 181
- 182
- 183
- 184
- 185
- 186
- 187
- 188
- 189
- 190
- 191
- 192
- 193
- 194
- 195
- 196
- 197
- 198
- 199
- 200
- 201
- 202
- 203
- 204
- 205
- 206
- 207
- 208
- 209
- 210
- 211
- 212
- 213
- 214
- 215
- 216
- 217
- 218
- 219
- 220
- 221
- 222
- 223
- 224
- 225
- 226
- 227
- 228
- 229


Quick Start Guide
This guide is intended to guide you through the basic functions of this navi-
gation system. For details, please refer to Operation Manual.
Searching for your destination
by address
1
Display the “
Destination
Menu
” screen and touch
Address
.
2
Input the information that
you want to set as the des-
tination.
Touch one of the options.
After narrowing down your desti-
nation, the Location confirma-
tion screen will appear.
3
Touch
OK
.
After searching for the destina-
tion, the Route confirmation
screen appears.
4
Touch
OK
.
The navigation system gives you
route guidance both visually and
by voice.
Display the menu screen
Published by Pioneer Corporation.
Copyright © 2010 by Pioneer Corporation.
All rights reserved.
Printed in Thailand
<KYTNX> <10B00000>
<CRB3219-A/N> UC
FLASH MEMORY MULTIMEDIA AV NAVIGATION RECEIVER
AVIC-Z120BT
Destination Menu
Touch
Destination
on the “
Top Menu
” screen.
4
1
6
2
3
1
Searches for location by
address
2
Calculates the route home
3
Searches for a place from
stores, restaurants, and
other businesses in the
points of interest database
4
Searches for POIs by using
the data on external storage
devices (SD card)
5
Selects your stored location
6
Returns to the previous
screen
7
Selects a previously routed
destination
8
Searches for a location by
coordinates
9
Cancels your current route
a
Displays the current route
information
b
Displays information on
MSN
®
Direct
5
7
8
a
9
b
Basic items on the map
1
Name of the street to be
used (or next guidance
point)
2
Current time
3
Estimated time of arrival
4
Current route
5
Current position
6
Street name that your vehi-
cle is traveling along
7
Eco-Meter
8
Zoom in/Zoom out
9
Next direction of travel
Dragging the map
allows scrolling.
8
5
4
3
2
9
AV operation screen
Destination Menu
Phone Menu
Top Menu
Shortcut Menu
7
1
6
Basic Hardware buttons
1
button
Press briefly to start the voice
operation.
Press and hold to mute the AV
source.
2
VOL (+/–) button
Press to adjust the AV (Audio
and Video) source volume.
3
HOME button
Press to display the “
Top
Menu
” screen.
4
MODE button
Press to switch between the
map screen and the AV opera-
tion screen.
5
TRK (◄/
►) button
6
button
Press to display the control
panel of the LCD panel.
1
2
3 4
5
6
Многие автомобильные стереосистемы Pioneer включают тюнер IIID Pioneer Supertuner в качестве альтернативы стандартному AM / FM-радио, присутствующему в большинстве автомобильных стереосистем Pioneer. Pioneer заявляет, что Supertuner IIID обеспечивает превосходное качество звука по сравнению со стандартными радиотюнерами. Многие системы, которые включают в себя тюнер Supertuner IIID, могут воспроизводить файлы MP3, WMA и CD. Часы также включены в дисплей в тире.
Шаг 1
Нажмите и удерживайте кнопку «Источник», чтобы выключить систему.
Шаг 2
Нажимайте кнопку «Функция» несколько раз, пока не отобразится «Часы».
Шаг 3
Используйте кнопки со стрелками влево и вправо для переключения между настройками часов и минут.
Шаг 4
Используйте кнопки со стрелками вверх и вниз для регулировки выбранной настройки.
Шаг 5
Нажмите кнопку «Функция» еще раз, чтобы сохранить настройки часов.
-
Pioneer SUPER TUNER 3D DEH-P25 — page 1
Operation Manual Mode d emploi Multi-CD control Hig h power CD pla yer with FM/AM tuner Syntoniseur FM /AM et lecteur de CD , Puissance éle- vée , a vec contrôleur pour lecteur de CD à chargeu r DEH-P2500 DEH-P25 English Español F rançais …
-
Pioneer SUPER TUNER 3D DEH-P25 — page 2
Thank you for buying this P ioneer product. Please read through these oper ating instructions so you will know how to operate your model prope rly . After you have finished r eading the instr uctio ns, put them away in a safe place for futur e r efer ence. Before Y ou Start F or Canadian model 5 Information to User 5 About this unit 5 About this ma …
-
Pioneer SUPER TUNER 3D DEH-P25 — page 3
Adjusting equalizer cur ves 26 Fine adjusting equalizer cur ve 26 Adjusting loudness 27 F ront image enhancer (F .I.E.) 27 Adjusting source levels 28 Initial Settings Adjusting initial settings 29 Setting the clock 29 Switching the warning tone 29 Switching the auxiliar y setting 29 Other F unctions T urning the clock display on or off 30 U …
-
Pioneer SUPER TUNER 3D DEH-P25 — page 4
Selecting fine audio equipment such as the unit you’ v e just purchased is only the start of your musical enjoyment. Now it’ s time to consider ho w you can maximize the fun and excitement your equipment of fers. This manufacturer and the Electronic Industries Association’ s Consumer Electronics Group want you to get the most out of your equi …
-
Pioneer SUPER TUNER 3D DEH-P25 — page 5
For Canadian model This Class B digital apparatus complies with Canadian ICES-003. Information to User Alteration or modifications carried out without appropriate authorization may invalidate the user s right to operate the equipment. About this unit The tuner frequencies on this unit are allo- cated for use in North America. Use in other areas …
-
Pioneer SUPER TUNER 3D DEH-P25 — page 6
Product r egistration Visit us at the following site: 1 Register your product. W e will keep the details of your purchase on file to help you refer to this information in the event of an insurance claim such as loss or theft. 2 Receive updates on the latest products and technologies. 3 Download owner s manuals, order product catalogues, researc …
-
Pioneer SUPER TUNER 3D DEH-P25 — page 7
Important ! Do not store the remote control in high tem- peratures or direct sunlight. ! The remote control may not function properly in direct sunlight. ! Do not let the remote control fall onto the floor , where it may become jammed under the brake or accelerator pedal. About the XM READY mark The XM READY mark printed on the front panel indicate …
-
Pioneer SUPER TUNER 3D DEH-P25 — page 8
Attaching the front panel % Replace the front panel by holding it upright to this unit and clipping it securely into the mounting hooks. Before Y ou Start En 8 Section 01 HHHHHHHHHHHHHH …
-
Pioneer SUPER TUNER 3D DEH-P25 — page 9
Head unit 1 CLOCK button P ress to change to the clock display . 2 DISPLA Y button P ress to select differ ent displays. 3 P AUSE button P ress to turn pause on or off . 4 AUDIO button P ress to select various sound quality con- trols. 5 OPEN button P ress to open the front panel. 6 a / b / c / d buttons P ress to do manual seek tuning, fast for- w …
-
Pioneer SUPER TUNER 3D DEH-P25 — page 10
Remote control Operation is the same as when using the but- ton on the head unit. See the explanation of the head unit about the operation of each but- ton with the exception of AT T , which is ex- plained below . e CD button P ress to select the built-in or multi- CD player as the source. f TUNER button P ress to select the tuner as the source. g …
-
Pioneer SUPER TUNER 3D DEH-P25 — page 11
T urning the unit on % Press SOURCE to tur n the unit on. When you select a source the unit is turned on. Selecting a source Y ou can select a source you want to listen to . T o switch to the built-in CD player , load a disc in this unit (refer to page 15). 1 When using the head unit, press SOURCE to select a source. P ress SOURCE repeatedly to swi …
-
Pioneer SUPER TUNER 3D DEH-P25 — page 12
Listening to the radio 12 3 4 These are the basic steps necessar y to operate the radio. More advanced tuner operation is explained starting on the next page. 1 Band indicator Shows which band the radio is tuned to, AM or FM. 2 Frequency indicator Shows to which frequency the tuner is tuned. 3 Stereo ( 5 ) indicator Shows that the frequency selecte …
-
Pioneer SUPER TUNER 3D DEH-P25 — page 13
Introduction of advanced tuner operation 1 2 3 1 Function display Shows the function status. 2 LOC indicator Shows when local seek tuning is on. 3 Preset number indicator Shows what preset has been selected. % Press FUNCTION to display the function names. P ress FUNCTION repeatedly to switch be- tween the following functions: BSM (best stations mem …
-
Pioneer SUPER TUNER 3D DEH-P25 — page 14
The LOCAL 4 setting allows reception of only the strongest stations, while lower settings let you receive progressively weaker stations. 4 When you want to return to normal seek tuning, press b to tur n local seek tun- ing off. LOCAL:OFF appears in the display . Storing the strongest broadcast frequencies BSM (best stations memor y) lets you automa …
-
Pioneer SUPER TUNER 3D DEH-P25 — page 15
Playing a CD 1 2 These are the basic steps necessar y to play a CD with your built-in CD player . More ad- vanced CD operation is explained starting on the next page. 1 Play time indicator Shows the elapsed playing time of the cur- rent track. 2 T rack number indicator Shows the track currently playing. 1 Press OPEN to open the front panel. CD load …
-
Pioneer SUPER TUNER 3D DEH-P25 — page 16
Introduction of advanced built-in CD player operation 12 1 RPT indicator Shows when repeat play is turned on. 2 Function display Shows the function status. % Press FUNCTION to display the function names. P ress FUNCTION repeatedly to switch be- tween the following functions: RPT (repeat play) RDM (random play) SCAN (scan play) P AUSE (p …
-
Pioneer SUPER TUNER 3D DEH-P25 — page 17
3 When you find the desired track press b to turn scan play off. SCAN:OFF appears in the display . The track will continue to play . # If the display has automatically returned to the playback display , select SCAN again by press- ing FUNCTION . Note After scanning of a CD is finished, normal play- back of the tracks will begin again. Pausing CD pl …
-
Pioneer SUPER TUNER 3D DEH-P25 — page 18
! After data for 48 discs has been stored in memor y , data for a new disc will overwrite the oldest one. ! If you connect a multi-CD player , you can input disc titles for up to 100 discs. Displaying disc titles Y ou can display the title of any disc that has had a disc title entered. % Press DISPLA Y. P ress DISPLA Y repeatedly to switch between …
-
Pioneer SUPER TUNER 3D DEH-P25 — page 19
Playing a CD 1 23 Y ou can use this unit to contr ol a multi-CD player , which is sold separately . These are the basic steps necessar y to play a CD with your multi-CD player . More advanced CD operation is explained starting on the next page. 1 Disc number indicator Shows the disc currently playing. 2 Play time indicator Shows the elapsed playing …
-
Pioneer SUPER TUNER 3D DEH-P25 — page 20
Introduction of advanced multi-CD player operation 2 1 1 RPT indicator Shows when repeat range is selected to cur- rent track. 2 Function display Shows the function status. % Press FUNCTION to display the function names. P ress FUNCTION repeatedly to switch be- tween the following functions: RPT (repeat play) RDM (random play) SCAN (scan pl …
-
Pioneer SUPER TUNER 3D DEH-P25 — page 21
Scanning CDs and tracks While you are using DSC , the beginning of each track on the selected disc plays for about 10 seconds. When you are using MCD , the be- ginning of the first track of each disc is played for about 10 seconds. 1 Select the repeat range. Refer to Repeating play on the previous page. 2 Press FUNCTION to select SCAN. P ress FUNCT …
-
Pioneer SUPER TUNER 3D DEH-P25 — page 22
3 Select a desired track by pressing c or d . 4 Press a to store the currently playing track in the playlist. IN is displayed briefly and the currently playing selection is added to your playlist. The display then shows ITS again. 5 Press BAND to return to the playback display . Note After data for 100 discs has been stored in mem- or y , data for …
-
Pioneer SUPER TUNER 3D DEH-P25 — page 23
2 Press FUNCTION and hold until TITLE IN appears in the display , then press FUNCTION to select ITS. After TITLE IN is displayed, press FUNCTION until ITS appears in the display . 3 Press b to erase all tracks on the cur — rently playing CD from your ITS playlist. All tracks on the currently playing CD are erased from your playlist and CLEAR is dis …
-
Pioneer SUPER TUNER 3D DEH-P25 — page 24
When you select DISC TTL , the title of the cur- rently playing disc is shown in the display . # If no title has been entered for the currently playing disc, NO TITLE is displayed. Using CD TEXT func tions Y ou can use these functions only with a CD TEXT compatible multi- CD player . Some discs have certain information encoded on the disc during ma …
-
Pioneer SUPER TUNER 3D DEH-P25 — page 25
Introduction of audio adjustments 2 34 5 1 1 CUSTOM indicator Shows when custom equalizer cur ve is pre- sently selected. 2 Equalizer curve Shows which equalizer preset is currently selected. 3 FIE indicator Shows when the front image enhancer is turned on. 4 Audio display Shows the audio adjustments status. 5 LOUD indicator Appears in the display …
-
Pioneer SUPER TUNER 3D DEH-P25 — page 26
Recalling equalizer curves There are six stored equalizer curves which you can easily recall at any time. Here is a list of the equalizer cur ves: Display Equalizer curve S, BASS Super bass POWERFUL P ower ful NA TURAL Natural VOCAL V ocal CUSTOM Custom EQ FLA T Flat ! CUSTOM is an adjusted equalizer cur ve that you create. ! When EQ FLA T is selec …
-
Pioneer SUPER TUNER 3D DEH-P25 — page 27
3 Press c or d to select the desired fre- quency . P ress c or d until the desired frequency ap- pears in the display . Low : 40 80 100 160 (Hz) Mid: 200 500 1k 2k (Hz) High: 3k 8k 10k 12k (Hz) 4 Press a or b to select the desired Q fac- tor . P ress a or b until the desired Q factor ap- pears in the display . 2N …
-
Pioneer SUPER TUNER 3D DEH-P25 — page 28
Adjusting source levels SLA (source level adjustment) lets you adjust the volume level of each source to prevent ra- dical changes in volume when switching be- tween sources. ! Settings are based on the volume level of the FM tuner , which remains unchanged. 1 Compare the FM tuner volume level with the level of the source you wish to ad- just (e.g. …
-
Pioneer SUPER TUNER 3D DEH-P25 — page 29
Adjusting initial settings 1 Initial settings lets you per form initial set up of different settings for this unit. 1 Function display Shows the function status. 1 Press SOURCE and hold until the unit turns off. 2 Press FUNCTION and hold until the clock appears in the display . 3 Press FUNCTION to select one of the in- itial settings. P ress FUNCTI …
-
Pioneer SUPER TUNER 3D DEH-P25 — page 30
T urning the clock display on or off Y ou can turn the clock display on or off . % Press CLOCK to tur n the clock display on or off. Each press of CLOCK turns the clock display on or off . # The clock display disappears temporarily when you per form other operations, but the clock display appears again af ter 25 seconds. Note Even when the sources …
-
Pioneer SUPER TUNER 3D DEH-P25 — page 31
Introduction of XM operation 1 2 Y ou can use this unit with a separately sold uni- versal XM satellite digital tuner system (GEX- FM913XM) or XM satellite digital tuner (GEX- P910XM). F or details concerning operation, refer to the XM tuner s operation manuals. This section provides information on XM operations with this unit which differs fro …
-
Pioneer SUPER TUNER 3D DEH-P25 — page 32
Understanding built-in CD player error messages When problems occur during CD play an error message may appear on the display . If an error message appears on the display refer to the table below to see what the problem is and the suggested method of correcting the pro- blem. If the error cannot be corrected, contact your dealer or your nearest Pio …
-
Pioneer SUPER TUNER 3D DEH-P25 — page 33
CD-R/CD-RW discs ! It may not be possible to play back CD -R/ CD-RW discs recorded on a music CD re- corder or a personal computer because of disc characteristics, scratches or dirt on the disc, or dirt, condensation, etc. on the lens of this unit. ! Playback of discs recorded on a personal computer may not be possible depending on the application …
-
Pioneer SUPER TUNER 3D DEH-P25 — page 34
Specifications General P ower source ……………………….. 1 4 . 4 V D C ( 1 0 . 8 15.1 V al- lowable) Grounding system ………………. Negative type Max. current consumption …………………………………………….. 1 0 . 0 A Dimensions (W × H × D): DIN Chassis ………………… 1 7 8 × 5 0 × 1 5 7 m m (7 × 2 ? …
-
Pioneer SUPER TUNER 3D DEH-P25 — page 35
Nous vous r emercions d avoir acquis cet appareil P ioneer . V euillez lire attentiveme nt ce mode d emp loi de manière à vous familiarise r avec le fonctionnement de l appareil. Cela fait, conser vez ce mode d empl oi afin de pouvoir vous y référ er en cas de be soin. Avant de commencer P our le modèle canadien 38 Quelques mot …
-
Pioneer SUPER TUNER 3D DEH-P25 — page 36
Réglages sonores Introduction aux réglages sonores 59 Réglage de l équilibre sonore 59 Utilisation de l égaliseur 60 Rappel d une courbe d égalisation 60 Réglage des courbes d égalisation 60 Réglage fin de la courbe d égalisation 61 Réglage de la correction physiologique 61 Optimiseur d image sonor …
-
Pioneer SUPER TUNER 3D DEH-P25 — page 37
La sélection d’un équipement audio de qualité comme l’unité que vous v enez d’acheter n’est que le début de v otre plaisir musical. Maintenant, il est temps de penser à la manière de profiter au maximum des plaisirs que v ous offre v otre équipement. Ce fabricant et le Groupe “Consumer Electronics Group” de l’Association des I …
-
Pioneer SUPER TUNER 3D DEH-P25 — page 38
Pour le modèle canadien Cet appareil numérique de la classe B est con- formé à la norme NMB -003 du Canada. Quelques mots sur cet appareil La plage de fonctionnement du syntoniseur correspond aux fréquences allouées à l Améri- que du Nord. T oute tentative d utilisation dans une autre région peut conduire à une impossi- bilité. Q …
-
Pioneer SUPER TUNER 3D DEH-P25 — page 39
en cas de déclaration de sinistre à votre assur — ance pour perte ou vol. 2 Recevez les mises à jour sur les derniers pro- duits et les plus récentes technologies. 3 Téléchargez les manuels de l utilisateur , com- mandez les catalogues des produits, re- cherchez de nouveaux produits, et bien plus. Précautions ! Conser vez ce mode d e …
-
Pioneer SUPER TUNER 3D DEH-P25 — page 40
Utilisation du boîtier de télécommande Dirigez le boîtier de télécommande vers la face de l appareil à commander . Important ! Ne conser vez pas le boîtier de télécommande exposé aux températures élevées ou à la lumi- ère directe du soleil. ! Le boîtier de télécommande peut ne pas don- ner satisfaction lorsqu il est expos …
-
Pioneer SUPER TUNER 3D DEH-P25 — page 41
! Evitez de heurter la face avant. ! Conser vez la face avant à l abri des tempéra- tures élevées et de la lumière directe du soleil. Dépose de la face avant 1 Appuyez sur OPEN pour ouvrir la face avant. 2 Saisissez le côté gauche de la face avant et tirez-le doucement vers l extér — ieur . P renez garde de ne pas la serrer trop fo …
-
Pioneer SUPER TUNER 3D DEH-P25 — page 42
Appareil central 1 T ouche CLOCK Appuyez sur cette touche pour modifier l af- fichage de l heure. 2 T ouche DISPLA Y Appuyez sur cette touche pour choisir un af- fichage différent. 3 T ouche P AUSE Appuyez sur cette touche pour mettre en ser vice ou hors ser vice la pause. 4 T ouche AUDIO Appuyez sur cette touche pour choisir les di- verse …
-
Pioneer SUPER TUNER 3D DEH-P25 — page 43
c VOLUME Appuyez sur cette touche pour augmenter ou diminuer le niveau sonore. d T ouche EQ Appuyez sur cette touche pour choisir les di- verses courbes d égalisation. Boîtier de télécommande Il permet d utiliser l appareil dans les mêmes conditions. Reportez-vous à l explication de l appareil central pour connaître le r? …
-
Pioneer SUPER TUNER 3D DEH-P25 — page 44
Mise en service de l appareil % Appuyez sur SOURCE pour mettre en service l appareil. Le fait de choisir une source met l appareil en ser vice. Choix d une source V ous pouvez choisir la source que vous désir- ez. P our écouter un disque, introduisez un dis- que dans le lecteur de CD intégré (reportez- vous à la page 48). 1 Pou …
-
Pioneer SUPER TUNER 3D DEH-P25 — page 45
Ecoute de la radio 12 3 4 V oici les opérations de base pour l écoute de la radio. Le fonctionnement détaillé du synto — niseur est expliqué à partir de la page sui- vante. 1 Indicateur de gamme Il signale la gamme d accord choisie, AM ou FM. 2 Indicateur de fréquence Il indique la valeur de la fréquence d ac- cord. 3 Indicateur …
-
Pioneer SUPER TUNER 3D DEH-P25 — page 46
Introduction au fonctionnement détaillé du syntoniseur 1 2 3 1 Afficheur de fonction Il indique l état de la fonction. 2 Indicateur LOC Il s éclaire lorsque l accord automatique sur une station locale est en ser vice. 3 Indicateur de numéro de présélection Il indique le numéro de la présélection choi- sie. % Appuyez sur FUNCTI …
-
Pioneer SUPER TUNER 3D DEH-P25 — page 47
2 Appuyez sur a pour mettre en service l accord automatique sur les stations lo- cales. Le niveau de sensibilité pour l accord automa- tique sur les stations locales (par exemple, LOCAL 2 ) apparaît sur l afficheur . 3 Appuyez sur c , ou sur d , pour préciser la sensibilité. En FM, la sensibilité peut prendre quatre va- leurs; en A …
-
Pioneer SUPER TUNER 3D DEH-P25 — page 48
Ecoute d un CD 1 2 V oici les opérations de base pour l écoute d un CD à l aide du lecteur intégré. Le fonctionne- ment détaillé du lecteur de CD est expliqué à partir de la page suivante. 1 Indicateur de temps de lecture Il indique le temps de lecture depuis le début de la plage musicale en cours de lec- ture. 2 Indicateu …
-
Pioneer SUPER TUNER 3D DEH-P25 — page 49
Introduction au fonctionnement détaillé du lecteur de CD intégré 12 1 Indicateur RPT Il indique que la fonction de répétition est en ser vice. 2 Afficheur de fonction Il indique l état de la fonction. % Appuyez sur FUNCTION pour afficher le nom de chaque fonction. Appuyez de manière répétée sur FUNCTION pour choisir une des fonctions …
-
Pioneer SUPER TUNER 3D DEH-P25 — page 50
Examen du contenu d un CD Cette fonction vous permet d écouter les 10 premières secondes de chaque plage musi- cale gravée sur le CD. 1 Appuyez sur FUNCTION pour choisir SCAN. Appuyez sur FUNCTION jusqu à ce que SCAN apparaisse sur l afficheur . 2 Appuyez sur a pour mettre en service l examen du contenu du disque. SCAN:ON ap …
-
Pioneer SUPER TUNER 3D DEH-P25 — page 51
4 Appuyez sur d pour placer le curseur sur la position suivante. Lorsque la lettre que vous désirez utiliser est affichée, appuyez sur d pour placer le curseur sur la position suivante puis choisissez la let- tre suivante. Appuyez sur c pour déplacer le curseur vers le début. 5 Après avoir frappé le titre, placez le cur — seur sur la der niè …
-
Pioneer SUPER TUNER 3D DEH-P25 — page 52
Ecoute d un CD 1 23 V ous pouvez utiliser cet appareil pour comman- der un lecteur de CD à chargeur , vendu séparé- ment. V oici les opérations de base pour l écoute d un CD à l aide du lecteur de CD à chargeur . Le fonctionnement détaillé du lecteur de CD à chargeur est expliqué à partir de la page sui- vante. 1 Indicat …
-
Pioneer SUPER TUNER 3D DEH-P25 — page 53
Introduction au fonctionnement détaillé du lecteur de CD à chargeur 2 1 1 Indicateur RPT Il indique que la plage de répétition choisie pour la plage en cours de lecture. 2 Afficheur de fonction Il indique l état de la fonction. % Appuyez sur FUNCTION pour afficher le nom de chaque fonction. Appuyez de manière répétée sur FUNCTION pour …
-
Pioneer SUPER TUNER 3D DEH-P25 — page 54
3 Appuyez sur a pour mettre en service la lecture au hasard. RDM :ON apparaît sur l afficheur . Les plages musicales sont lues dans un ordre quelcon- que à l intérieur du mode de répétition adopté : MCD ou DSC . 4 Appuyez sur b pour mettre hors service la lecture au hasard. RDM :OFF apparaît sur l afficheur . Les plages musicales …
-
Pioneer SUPER TUNER 3D DEH-P25 — page 55
Utilisation de la programmation en temps réel (ITS) La programmation en temps réel (ITS) vous donne le moyen d établir la liste de vos plages musicales favorites parmi toutes celles que contiennent les disques du lecteur de CD à chargeur . Lorsque la liste est terminée, il vous suffit de mettre en ser vice la fonction ITS pour n écout …
-
Pioneer SUPER TUNER 3D DEH-P25 — page 56
Suppression d une plage musicale sur la liste ITS P our supprimer la référence à une plage musi- cale de la liste ITS, il faut que la fonction ITS soit en ser vice. Si ITS est déjà en ser vice, passez à l opération 2. Si ITS n est pas en ser vice, appuyez sur FUNCTION . 1 Commandez la lecture du CD pour le- quel la plage musicale …
-
Pioneer SUPER TUNER 3D DEH-P25 — page 57
Frappe du titre d un disque Le lecteur de CD à chargeur peut contenir 100 titres de disque de 8 caractères (avec liste ITS). 1 Commandez la lecture du CD dont vous désirez frapper le titre. Appuyez sur a , ou sur b , pour choisir un CD. 2 Maintenez la pression d un doigt sur FUNCTION jusqu à ce que TITLE IN appa- raisse sur l af …
-
Pioneer SUPER TUNER 3D DEH-P25 — page 58
Des informations sont gravées sur certains disques pendant leur fabrication. Ces informa- tions peuvent être le titre du disque, le titre de la plage musicale, le nom de l interprète ou la durée de la lecture; ces disques sont appelés CD TEXT . Seuls les disques CD TEXT sont con- cernés par les fonctions mentionnées ci-des- sous. Afficha …
-
Pioneer SUPER TUNER 3D DEH-P25 — page 59
Introduction aux réglages sonores 2 34 5 1 1 Indicateur CUSTOM Il indique qu une courbe d égalisation per- sonnalisée est actuellement utilisée. 2 Courbe d égalisation Il signale la courbe d égalisation actuelle- ment sélectionnée. 3 Indicateur FIE Il indique que le renforcement de l image avant est en ser vice. 4 Affich …
-
Pioneer SUPER TUNER 3D DEH-P25 — page 60
Utilisation de l égaliseur L égaliseur vous permet de corriger les carac- téristiques sonores de l habitacle du véhicule en fonction de vos goûts. Rappel d une courbe d égalisation La mémoire contient six courbes d égalisation que vous pouvez utiliser à n importe quel mo- ment. V oici la liste de ces six courbes …
-
Pioneer SUPER TUNER 3D DEH-P25 — page 61
Réglage fin de la courbe d égalisation V ous pouvez régler la fréquence centrale et le facteur Q (les caractéristiques de la courbe) de chacune des plages sélectionnées de la courbe ( EQ-L / EQ-M / EQ-H ). Niveau (dB) F réquence centrale Q=2N Q=2W F réquence (Hz) 1 Appuyez sur la touche AUDIO et main- tenez-la enfoncée jusqu à ce …
-
Pioneer SUPER TUNER 3D DEH-P25 — page 62
Précaution Lorsque la fonction F .I.E. est désactivée, les haut- parleurs arrières émettent toutes les fréquences, pas seulement les sons graves. Vous devez donc réduire le volume avant de désactiver la fonction F .I.E. pour éviter une augmentation brutale du ni- veau sonore. 1 Appuyez sur AUDIO pour choisir FIE . Appuyez sur AUDIO jusqu ? …
-
Pioneer SUPER TUNER 3D DEH-P25 — page 63
Ajustement des réglages initiaux 1 Les réglages initiaux vous permettent d établir les conditions de fonctionnement de base de l appareil. 1 Afficheur de fonction Il indique l état de la fonction. 1 Maintenez la pression d un doigt sur SOURCE jusqu à ce que l appareil soit hors service. 2 Appuyez sur FUNCTION et mainten …
-
Pioneer SUPER TUNER 3D DEH-P25 — page 64
1 Appuyez sur FUNCTION pour choisir W ARN. Appuyez de manière répétée sur FUNCTION jusqu à ce que WARN apparaisse sur l affi- cheur . 2 Appuyez sur a ou sur b pour mettre la fonction W ARN en service ou hors service. Une pression sur a ou b met WARN en ser — vice ou hors ser vice et la condition (par exem- ple, W ARN :ON ) est affiché …
-
Pioneer SUPER TUNER 3D DEH-P25 — page 65
Mise en service ou hors service de l affichage de l horloge V ous pouvez mettre l affichage de l horloge en ser vice ou hors ser vice. % Appuyez sur CLOCK pour mettre l af- fichage de l horloge en service ou hors ser — vice. Chaque pression sur CLOCK provoque l affich- age de l horloge ou son extinction. # L affi …
-
Pioneer SUPER TUNER 3D DEH-P25 — page 66
Signification des messages d erreur du lecteur de CD integre En cas d anomalie de fonctionnement du lec- teur de CD, un message d erreur peut s affi- cher . Si un message d erreur apparait sur l afficheur , reportez-vous au tableau ci-des- sous pour connaitre la nature de l anomalie et l action corrective suggeree. S …
-
Pioneer SUPER TUNER 3D DEH-P25 — page 67
! Lorsque, par temps froid, vous mettez le chauffage en ser vice, l humidité peut se condenser à l intérieur du lecteur de CD. La condensation peut provoquer des anoma- lies de fonctionnement du lecteur . Si vous pensez que de la condensation s est for- mée, mettez le lecteur de CD hors ser vice pendant une heure environ, le temps n …
-
Pioneer SUPER TUNER 3D DEH-P25 — page 68
Caractéristiques techniques Généralités Alimentation ………………………… 1 4 , 4 V C C ( 1 0 , 8 à 1 5 , 1 V pos- sibles) Mise à la masse ………………….. P ô l e négatif Consommation maximale . . . 10,0 A Dimensions (L × H × P) : DIN Châssis ………………… 1 7 8 × 5 0 × 1 5 7 m m P anneau avant …… 1 8 8 × …
-
Pioneer SUPER TUNER 3D DEH-P25 — page 69
Gracias por haber comprado este producto P ioneer . Sír vase leer con detenció n estas ins trucciones sobre la operación de modo que aprenda el modo de operar correctam ente su modelo. Una vez que haya leído las in- struccio nes, consér velas en un lugar segur o para con sultarlas en el futur o. Antes de empezar Acerca de este producto 71 Acer …
-
Pioneer SUPER TUNER 3D DEH-P25 — page 70
Ajuste preciso de las cur vas de ecualización 93 Ajuste de la sonoridad 93 Mejora de imagen frontal (F .I.E.) 93 Ajuste de los niveles de la fuente 94 Ajustes iniciales Configuración de los ajustes iniciales 95 Ajuste del reloj 95 Cambio del tono de advertencia 95 Cambio del ajuste de componente auxiliar 96 Otras funciones Activación y desac …
-
Pioneer SUPER TUNER 3D DEH-P25 — page 71
Acerca de este producto Las frecuencias del sintonizador en este pro- ducto están asignadas para su uso en Améri- ca del norte. El uso en otras áreas puede resultar en una recepción incorrecta. Acerca de este manual Este producto viene con diversas funciones sofisticadas que aseguran una recepción y op- eración superior . T odas las funciones …
-
Pioneer SUPER TUNER 3D DEH-P25 — page 72
Precauciones ! Mantenga este manual a mano como una referencia para los procedimientos de oper- ación y precaución. ! Siempre mantenga el volumen suficiente- mente bajo de mod o que pueda escuchar los sonidos fuera del coche. ! P roteja este producto de la humedad. ! Si se desconecta o se descarga la batería, la memoria preajustada se borrará y …
-
Pioneer SUPER TUNER 3D DEH-P25 — page 73
Notas ! XM Satellite Radio está desarrollando una nueva banda de radio en los EE.UU. El sistema utilizará tecnología de transmisión directa de satélite a receptor a fin de ofrecer a los oyentes en sus automóviles y en sus ho- gares un nivel de sonido supertransparente y sin inter ferencias de costa a costa. XM creará y brindará hasta 100 ca …
-
Pioneer SUPER TUNER 3D DEH-P25 — page 74
Unidad principal 1 Botón CLOCK P resione para cambiar a la visualización de reloj. 2 Botón DISPLA Y P resione para seleccionar las diferentes vi- sualizaciones. 3 Botón P AUSE P resione para activar o desactivar la pausa. 4 Botón AUDIO P resione para seleccionar los diversos con- troles de calidad del sonido. 5 Botón OPEN P resione para abrir …
-
Pioneer SUPER TUNER 3D DEH-P25 — page 75
Control r emoto La operación es igual cuando se usa los bo — tones en la unidad principal. Consulte la expli- cación de la unidad principal acerca de la operación de cada botón con excepción de AT T , que se explica a continuación. e Botón CD P resione para seleccionar el lector de CD in- corporado o lector de Multi-CD como la fuente. f Bot? …
-
Pioneer SUPER TUNER 3D DEH-P25 — page 76
Encendido del sistema % Presione SOURCE para encender el sis- tema. Cuando se selecciona una fuente, la unidad se encende. Selección de una fuente P uede seleccionar la fuente que desea escu- char . P ara cambiar al lector de CD incorpora- do, coloque un disco en el sistema (refiérase a la página 80). 1 Cuando utilice la unidad principal, pre- s …
-
Pioneer SUPER TUNER 3D DEH-P25 — page 77
Audición de radio 12 3 4 Estos son los pasos básicos necesarios para operar la radio. Las operaciones más avanza- das del sintonizador se proveen desde la pági- na seguiente. 1 Indicador de banda Visualiza cuál banda la radio está sintoniza- da: AM o FM. 2 Indicador de frecuencia Visualiza la frecuencia en que el sintoniza- dor está sintoniz …
-
Pioneer SUPER TUNER 3D DEH-P25 — page 78
Introducción a las operaciones avanzadas del sintonizador 1 2 3 1 Visualización de función Visualiza el estado de la función . 2 Indicador LOC Aparece cuando la sintonización por bús- queda local está activada. 3 Indicador del número preajustado Visualiza la emisora preajustada selecciona- da. % Presione FUNCTION para visualizar los nombres …
-
Pioneer SUPER TUNER 3D DEH-P25 — page 79
2 Presione a para activar la sintonización por búsqueda local. La sensibilidad de búsqueda local ( LOCAL 2 , por ejemplo) aparece en la pantalla. 3 Presione c o d para ajustar la sensibili- dad. Hay cuatro niveles de sensibilidad para FM y dos niveles para AM: FM: LOCAL 1 LOCAL 2 LOCAL 3 LOCAL 4 AM: LOCAL 1 LOCAL 2 El ajuste LOCA …
-
Pioneer SUPER TUNER 3D DEH-P25 — page 80
Reproducción de un CD 1 2 Estos son los pasos básicos necesarios para reproducir un CD con su lector de CD incor- porado. Las operaciones más avanzadas del lector de CD se proveen desde la página se- guiente. 1 Indicador de tiempo de reproducción Visualiza el tiempo transcurrido de repro — ducción de la pista actual. 2 Indicador de número de …
-
Pioneer SUPER TUNER 3D DEH-P25 — page 81
Introducción a las operaciones avanzadas del Lector de CD incorporado 12 1 Indicador RPT Aparece cuando la reproducción repetida está activada. 2 Visualización de función Visualiza el estado de la función . % Presione FUNCTION para visualizar los nombres de las funciones. P resione FUNCTION repetidamente para cam- biar entre las siguientes fu …
-
Pioneer SUPER TUNER 3D DEH-P25 — page 82
Exploración de las pistas de un CD La reproducción con exploración le permite escuchar los primeros 10 segundos de cada pista de un CD. 1 Presione FUNCTION para seleccionar SCAN. P resione FUNCTION hasta que SCAN aparez- ca en la pantalla. 2 Presione a para activar la reproducción con exploración. SCAN:ON aparece en la pantalla. Los pri- meros …
-
Pioneer SUPER TUNER 3D DEH-P25 — page 83
4 Presione d para mover el cursor a la próxima posición de carácter . Cuando se visualice la letra deseada, presione d para mover el cursor a la próxima posición y seleccione la próxima letra. Presione c para mover hacia atrás en la pant alla. 5 Mueva el cursor a la última posición presionando d después de introducir el título. Al presio …
-
Pioneer SUPER TUNER 3D DEH-P25 — page 84
Reproducción de un CD 1 23 Se puede usar este sistema para controlar un lector de Multi- CD, que se vende separada- mente. Estos son los pasos básicos necesarios para reproducir un CD con su lector de Multi-CD. Las operaciones más avanzadas del lector de Multi-CD se proveen desde la página se- guiente. 1 Indicador de número de disco Visualiza …
-
Pioneer SUPER TUNER 3D DEH-P25 — page 85
Introducción a las operaciones avanzadas de lector de Multi-CD 2 1 1 Indicador RPT Aparece cuando se selecciona la gama de repetición para la pista actual. 2 Visualización de función Visualiza el estado de la función . % Presione FUNCTION para visualizar los nombres de las funciones. P resione FUNCTION repetidamente para cam- biar entre las si …
-
Pioneer SUPER TUNER 3D DEH-P25 — page 86
3 Presione a para activar la reproducción aleatoria. RDM :ON aparece en la pantalla. Las pistas se reproducirán en un orden aleatorio dentro de la gama MCD o DSC seleccionada anterior- mente. 4 Presione b para desactivar la reproduc- ción aleatoria. RDM :OFF aparece en la pantalla. La repro- ducción de las pistas continuará en el orden normal. …
-
Pioneer SUPER TUNER 3D DEH-P25 — page 87
Creación de una lista de reprod ucción con la programación ITS Se puede usar la función ITS para introducir y reproducir hasta 99 pistas por disco, para hasta 100 discos (con título de disco). (Con lectores de Multi- CD vendidos antes del CDX- P1250 y CDX-P650, se pueden almacenar hasta 24 pistas en la lista de reproducción.) 1 Reproduzca el …
-
Pioneer SUPER TUNER 3D DEH-P25 — page 88
1 Reproduzca el CD que desea borrar una pista de la lista de reproducción ITS, y ac- tive la reproducción ITS. Refiérase a Reproducción de la lista de repr o- ducción ITS en la página precedente. 2 Presione FUNCTION hasta que TITLE IN aparezca en la pantalla, y presione FUNCTION para seleccionar ITS . Después que se visualice TITLE IN , pres …
-
Pioneer SUPER TUNER 3D DEH-P25 — page 89
presión de b permite visualizar una letra en el orden inverso, tal como Z Y X … C B A . 4 Presione d para mover el cursor a la próxima posición de carácter . Cuando se visualice la letra deseada, presione d para mover el cursor a la próxima posición y seleccione la próxima letra. Presione c para mover hacia atrás en la pant alla. 5 Mueva …
-
Pioneer SUPER TUNER 3D DEH-P25 — page 90
% Presione DISPLA Y hasta que el título comience a desplazarse hacia la izquierda. El restante del título aparecerá en la pantalla. Uso de la compresión y énfasis de los graves Estas funciones se pueden usar solamente con un lector de Multi-CD que las soporta. El uso de las funciones COMP (compresión) y DBE (énfasis de graves dinámicos) le …
-
Pioneer SUPER TUNER 3D DEH-P25 — page 91
Introducción a los ajustes de audio 2 34 5 1 1 Indicador CUSTOM Aparece cuando se selecciona la cur va de ecualización personalizada. 2 Curva de ecualización Visualiza el ecualizador preajustado que está seleccionado actualmente. 3 Indicador FIE Aparece cuando la función de mejora de imagen frontal está activada. 4 Visualización de audio Vis …
-
Pioneer SUPER TUNER 3D DEH-P25 — page 92
Uso del ecualizador El ecualizador le permite ajustar la ecualiza- ción de acuerdo a las características acústi- cas del interior del coche. Llamada de las curvas de ecualización Hay seis cur vas de ecualizadas almacenadas que se pueden llamar fácilmente a cualquier momento. A continuación se muestra la lista de las cur vas de ecualizació n. …
-
Pioneer SUPER TUNER 3D DEH-P25 — page 93
Ajuste preciso de las curvas de ecualización Se puede ajustar la frecuencia central y el fac- tor Q (características de las cur vas) de cada banda de cur vas actualmente seleccionada ( EQ-L / EQ-M / EQ-H ). Nivel (dB) F recuencia central Q=2N Q=2W F recuencia (Hz) 1 Presione AUDIO y mantenga presiona- do hasta que la frecuencia y el factor Q (F- …
-
Pioneer SUPER TUNER 3D DEH-P25 — page 94
Precaución Cuando se desactiva la función F .I.E., los alta- voces traseros emiten el sonido de todas las fre- cuencias, no sólo los sonidos graves. Disminuya el volumen antes de desactivar la F .I.E. para evitar que el volumen aumente de repente. 1 Presione AUDIO para seleccionar FIE . P resione AUDIO hasta que FIE aparezca en la pantalla. 2 Pr …
-
Pioneer SUPER TUNER 3D DEH-P25 — page 95
Configuración de los ajustes iniciales 1 Los ajustes iniciales le permiten realizar una configuración inicial de los diferentes ajustes de este sistema. 1 Visualización de función Visualiza el estado de la función . 1 Presione SOURCE hasta que se apague el sistema. 2 Presione FUNCTION y mantenga presio- nado hasta que el reloj aparezca en la p …
-
Pioneer SUPER TUNER 3D DEH-P25 — page 96
Cambio del ajuste de componente auxiliar Es posible utilizar un componente auxiliar con esta unidad. Active el ajuste auxiliar cuando utilice un componente auxiliar conectado a esta unidad. 1 Presione FUNCTION para seleccionar AUX. P resione FUNCTION repetidamente hasta que AUX aparezca en la pantalla. 2 Presione a o b para activar o desacti- var A …
-
Pioneer SUPER TUNER 3D DEH-P25 — page 97
Activación y desactivación de la visualización del reloj P uede activar o desactivar la visualización del reloj. % Presione CLOCK para activar o desacti- var la visualización del reloj. Cada presión de CLOCK activa o desactiva la visualización del reloj. # La visualización del reloj desaparece tempor- almente cuando se realizan otras operac …
-
Pioneer SUPER TUNER 3D DEH-P25 — page 98
Comprensión de los mensajes de error del lector de CD incorporado Cuando ocurren problemas durante la repro- ducción de CD, un mensaje de error puede aparecer en la pantalla. Cuando esto ocurra, refiérase a la tabla a continuación para ver la causa del problema y la acción correctiva su- gerida. Si no es posible corregir el error , póngase en …
-
Pioneer SUPER TUNER 3D DEH-P25 — page 99
dad condensada puede causar una falla del lector de CD. Cuando esto ocurra, apa- gue el lector de CD durante una hora más o menos para permitir que el lector de CD seque y limpie cualquier disco húmedo con un paño suave para eliminar la hume- dad. ! Vibraciones en la calle pueden interrumpir la reproducción de CD. Discos CD-R/CD-RW ! Es posible …
-
Pioneer SUPER TUNER 3D DEH-P25 — page 100
Especificaciones General Fu e n t e d e a l i m e n t a c i ó n …….. 1 4 , 4 V C C ( 1 0 , 8 15,1 V per- misible) Sistema de conexión a tierr a …………………………………………….. T i p o n e g a t i v o Consumo de energía máximo …………………………………………….. 1 0 , 0 A Dimensiones (An × Al × P …
-
Pioneer SUPER TUNER 3D DEH-P25 — page 101
Es 101 Español HHHHHHHHHHHHHH …
-
Pioneer SUPER TUNER 3D DEH-P25 — page 102
Es 102 HHHHHHHHHHHHHH …
-
Pioneer SUPER TUNER 3D DEH-P25 — page 103
Es 103 Español HHHHHHHHHHHHHH …
-
Pioneer SUPER TUNER 3D DEH-P25 — page 104
PIONEER CORPORA TION 4-1, MEGURO 1-CHOME, MEGUR O-KU , T OKY O 153-8654, JAP AN PIONEER ELECTRONICS (USA ) INC. P .O . Box 1540, Long Beach, California 90801-1540, U.S.A. TEL: (800) 421-1404 PIONEER EUROPE NV Haven 1087, K eetberglaan 1, B-91 20 Melsele, Belgium TEL: (0) 3/570.05.11 PIONEER ELECTRONICS ASIACENTRE PTE. L TD. 253 Alexandra Road, #04- …
Автор:
Louise Ward
Дата создания:
10 Февраль 2021
Дата обновления:
21 Апрель 2023

Содержание
- Pioneer DEH-11E и DEH-1100MP
- Pioneer DEH-2100IB
- совет

Pioneer Supertuner IIID — это тюнер, входящий в состав нескольких универсальных автомобильных радиоприемников Pioneer, таких как DEH-11E, DEH-1100MP и DEH-2100IB. Хотя установка часов на этих устройствах очень похожа, есть небольшие различия в функциях и элементах управления. Однако в каждом устройстве установка часов занимает всего пару минут и не является сложной задачей.
Pioneer DEH-11E и DEH-1100MP
Нажмите «Функция» на левой стороне устройства, чтобы выбрать «Часы» на экране.
Нажмите «Track Left» или «Track Right», чтобы выбрать настройку, которую вы хотите изменить. Вы можете выбрать «Час» или «Минута».
Нажмите «Audio Up», чтобы увеличить час или минуту; нажмите «Audio Down», чтобы уменьшить час или минуту.
Нажимайте «Track Left» или «Track Right» для переключения между настройками. Нажмите «Audio Up» или «Audio Down», чтобы настроить время положения. Нажмите «Функция», чтобы вернуться в нормальный режим работы.
Pioneer DEH-2100IB
Нажмите и удерживайте «Выкл», пока экран не выключится. Нажмите и удерживайте «Multi-Control», пока на экране не появится время.
Нажмите кнопку «Multi-Control» один раз, чтобы выбрать временной отрезок.
Поверните ручку «Multi-Control» вправо или влево, чтобы настроить время. Нажмите ручку еще раз, если хотите выбрать другой временной отрезок, затем поверните ее, чтобы установить час. Нажмите «Source On», чтобы включить проигрыватель компакт-дисков.
совет
При выделении отображаемые часы или минуты будут мигать. Это позволит вам узнать, какой раздел вы собираетесь настроить.