- Manuals
- Brands
- Polaroid Manuals
- Digital Camera
- impulse series
- User manual
-
Contents
-
Table of Contents
-
Troubleshooting
-
Bookmarks
Quick Links
Impulse Series Camera
User Guide
Related Manuals for Polaroid impulse series
Summary of Contents for Polaroid impulse series
-
Page 1
Impulse Series Camera User Guide… -
Page 2: Important Safeguards
3. Do not disassemble the electronic flash. To reduce the risk of an electronic shock, service or repair work must be done only by an authorized Polaroid Service Center. Incorrect reassembly can cause electrical shock when the electronic flash is used again.
-
Page 3: Table Of Contents
Impulse Series Camera User Guide Table of Contents Important Safeguards …………….The camera ………………Impulse ………………..Impulse AF ………………To take a picture ………………Load the film ………………Raise the electronic flash to activate the camera …….. Position your subject …………….
-
Page 4: The Camera
Impulse Series Camera User Guide The camera Impulse Front View Back View Impulse AF Front View Back View — Electronic flash (shown raised). — Film door latch. A1 — Self-timer button (Impulse AF only). — Picture counter (counts down to show how many A2 — Self-timer indicator (Impulse AF only).
-
Page 5: To Take A Picture
Impulse Series Camera User Guide To take a picture 2. When the light next to the shutter button is green, the electronic flash is ready to fire. Load the film 3. When you are not using the camera, push the electronic flash down. The lens cover will 1.
-
Page 6: Take A Picture
Impulse Series Camera User Guide Take the picture When you have finished retaking the picture, return the control to the center position (c). 1. Hold the camera as you would a pair of binoculars. 2. Frame your subject in the viewfinder.
-
Page 7: Sonar Focusing (Impulse Af Only)
Impulse Series Camera User Guide Sonar focusing (Impulse AF only) Film care When you take a picture, your camera uses For best results, use 600 color film when the sound waves to measure the distance to your temperature is between 55° F (13° C) and subject.
-
Page 8: To Take Better Pictures
Impulse Series Camera User Guide To take better pictures By following these three simple rules, you will • Look for light-colored backgrounds take better pictures indoors and out: indoors –– When your subject is near a light background, both are well lit by the •…
-
Page 9: Troubleshooting
Impulse Series Camera User Guide Troubleshooting Possible picture problems and their solutions Problem Cause Solution Repeated spots The developer rollers inside Open the film door (do not do this or bar pattern the film door need to be in direct sunlight, when there is film cleaned.
-
Page 10
Impulse Series Camera User Guide Possible picture problems and their solutions (cont’d) Problem Cause Solution Unsharp picture An object in the foreground The sound waves travel to the (Impulse AF Camera) prevented the sound waves central part of the scene. Be sure… -
Page 11: Warranty
(within approximately Polaroid instant color film is sold in the U.S., two or three Polaroid business days in the Canada, and Latin America. Before traveling U.S.).
Посмотреть инструкция для Polaroid Impulse бесплатно. Руководство относится к категории Фотокамеры, 1 человек(а) дали ему среднюю оценку 6.9. Руководство доступно на следующих языках: английский. У вас есть вопрос о Polaroid Impulse или вам нужна помощь? Задайте свой вопрос здесь
Не можете найти ответ на свой вопрос в руководстве? Вы можете найти ответ на свой вопрос ниже, в разделе часто задаваемых вопросов о Polaroid Impulse.
Инструкция Polaroid Impulse доступно в русский?
Не нашли свой вопрос? Задайте свой вопрос здесь
Update Summer 2021: I have a new video guide that goes along with this text guide!

The Impulse AF is on when the flash is popped up.
The Impulse AF was my first Polaroid camera, and even after all these years, it’s still one of my favorites. It’s a durable, sharp, no-nonsense 600 type camera that is delightfully simple to use. Once you know the controls, you’ll have no problem producing great pictures.

You’ll need Polaroid Originals 600 type film to operate the camera.
What Film Does the Impulse AF Use?
Before we get started, we need to make sure you have the film you’ll need for the camera. The Polaroid Impulse AF uses 600 type Polaroid film, which was the newer version of the classic ‘square’ Polaroid frame.
Polaroid discontinued 600 type film way back in 2008, but a company called the Impossible Project rose up and started making new film for the camera. In 2017, the Impossible Project renamed itself ‘Polaroid Originals,’ and continues making new film for vintage Polaroid cameras.
New Polaroid film for 600 cameras is what you’ll need to run the camera. The Polaroid Impulse AF is powered by a small battery in the film cartridge itself, so it won’t even turn on until you load a new pack of film. I’ll go over how to load the camera below, but before we get started, make sure you have a fresh pack of film in hand.
You can order new film directly from Polaroid.
Fuji Instax film, and Polaroid Originals film for iType, SX-70, and Spectra will not work with this camera. Also, old packs of vintage Polaroid film will likely have a dead battery. The film is still good, but you’ll need to do a battery transfer, and are still going to need a fresh pack of film to do so.

Pushing on the flash will cause it to pop up and turn on the camera. To turn it off, push it back down.
Turning the Camera On
The flash unit in the top of the camera acts as the on/off switch. When it’s pressed down and flush with the top, the camera is off. To turn it on, push down on it and the flash unit will pop up.

The green light means that the flash is charged and you’re good to shoot.
If the camera is loaded with film, the LED light will glow, showing the status of the flash unit. If the camera is not loaded with film, or the battery in the film cartridge is dead, the LED will not light up.
This camera requires that the flash be on in order to work, which we’ll get into further below.
Identifying Parts of the Camera
This picture identifies all of the primary buttons this camera has. There’s not many to worry about, as this camera is delightfully simple to use.

The shutter is the large button on the back of the camera, which you press to take a picture. Also not visible in the above picture is the slider on the side of the camera, which opens the film compartment.
Loading Film
To load film into the Impulse AF, pull back on the slider on the side of the camera to open the film compartment.

To open the film slot, push back on the black slider on the bottom side of the camera.
Remove the old pack of film (if there is one) by pulling it out by the tab attached to the cartridge.

Insert a new pack of film by pushing it in through the same slot. The ‘wide’ end with the plastic lip should face out, with the darkslide facing up and the metal contacts facing down.
Once the film is fully inserted, you’ll be able to shut the film compartment. As soon as it locks into place, the camera should eject a darkslide out the front. This lets you know that the film pack works, and the Impulse AF is ready to go.
Taking a Picture
After you turn the camera on, simply wait for the LED to turn green to signify that the flash is charged and ready to use. Look through the viewfinder to compose, and hit the shutter button to take a picture.

The image will be ejected through the slot on the front of the camera. For best contrast, make sure the image is hidden away from sunlight as it develops. The image is most sensitive to light when it initially pops out of the camera, so putting it inside a pocket or just flipping it upside down always helps.

It’s best to protect the developing image from light by placing it face down or in a dark pocket. The film is most sensitive to contrast-robbing light immediately upon ejecting from the camera.
Temperature also affects Polaroid film, so if you’re shooting in cold weather, it often helps to put a developing image in a warm pocket.
Using the Impulse AF Timer

The flashing red LED indicator for the timer.
One of the unique features of this camera is a timer button. This allows for the camera to take selfies while on a tripod or flat surface. Simply hit the timer button, and the LED light will ‘count down’ before it takes a picture. There’s no easy way to tell if you’re framed up correctly or not, so it’s a bit of a hit-or-miss setup.
Turning the Flash Off
If you want to use the Impulse AF without flash, there is no button to do so. Instead, you will need to cover up the flash. I often tape a piece of white printer paper over the flash, which still allows it to throw a little light, but doesn’t overwhelm my subject.
Be sure to remove anything covering the flash before turning the camera off by pressing the flash back into the body of the camera.
It’s almost always best to simply let the flash fire. Unless you have powerful studio lights, the flash is almost always needed. Also, if you’re out in bright daylight where there’s enough light, the flash will often help fill in shadows.
Next Steps
That’s it! You got a picture. After it finishes developing, which takes anywhere between five and thirty minutes, depending on the film, you can display or scan it.
I have a whole article how to scan your Polaroid images, and once you get them digitized, you can share them online!
Good luck and happy shooting!
If you enjoyed this article and want to stay up to date with everything happening in the world of instant film photography, check out my monthly newsletter!
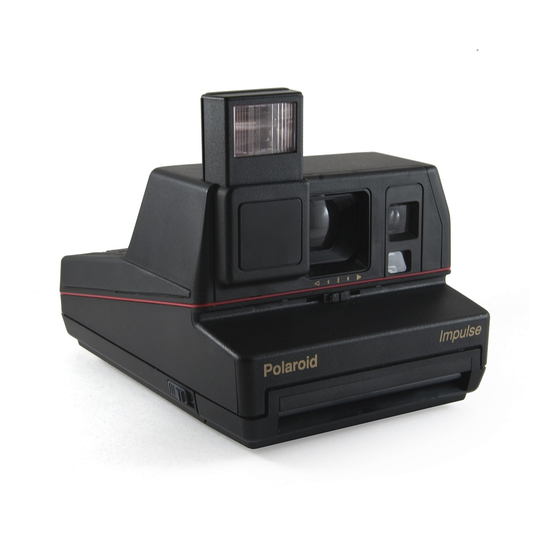
Impulse Series Camera
Impulse
Front View
H
G
Impulse AF
Front View
H
G
A
— Electronic flash (shown raised).
A1 — Self-timer button (Impulse AF only).
A2 — Self-timer indicator (Impulse AF only).
B
— Single -element, 113mm lens (protected by a
lens cover when the flash is lowered).
C
— Photocell (measures light from the scene.
D
— Lighten/darken control.
E
— Film exit slot.
E1 — Sonar rangefinder (Impulse AF only).
F
— Film shade (protects the picture from light as it
exits the camera).
G — Film door.
F
F
A
B
C
D
E
A
A1
A2
B
C
D
E
E1
H
— Film door latch.
I
— Picture counter (counts down to show how many
pictures are left in the film pack).
J
— Green ready light (shows the flash is ready to
fire).
J1 — Flash status light (red when the flash is charging;
green when flash is ready to fire; Impulse AF
only).
K
— Shutter button.
L
— Viewfinder.
M — Tripod socket (underneath the camera).
N
— Neckstrap connector.
4
Back View
N
M
Back View
N
M
User Guide
I
J
K
L
I
J1
K
L
Автор:
John Stephens
Дата создания:
2 Январь 2021
Дата обновления:
22 Апрель 2023

Содержание
- Шаг 1
- Шаг 2
- Шаг 3
- Шаг 4
- Шаг 5
- Шаг 6

Когда вы думаете о камере Polaroid, образ, который вы видите в уме, скорее всего, похож на изображение модели камеры Polaroid Impulse. Выпущенная в 1980-х годах, Impulse представляет собой большую квадратную камеру со встроенной вспышкой и полностью автоматической экспозицией. Эти функции гарантируют, что даже менее технически продвинутые пользователи смогут взломать камеру и сразу же начать фотографировать. А поскольку эта камера является Polaroid, это означает, что вы можете получить полностью проявленные фотографии сразу после того, как сделаете снимок.
Шаг 1
Надежно удерживайте Polaroid Impulse за нижнюю часть устройства, убедившись, что объектив и вспышка направлены прямо вперед. В этом положении вам будет легко получить доступ к видоискателю на задней панели камеры.
Шаг 2
Потяните защелку на задней панели камеры вниз, и дверца отделения для пленки откроется. Вставьте прямоугольную упаковку пленки в камеру до тех пор, пока она не перестанет двигаться дальше, а черный язычок не будет выходить последним. Закройте дверь заднего отсека и полностью потяните за черный язычок, чтобы активировать пленку.
Шаг 3
Сдвиньте фиксатор вспышки в сторону, и лампочка вспышки появится в верхнем правом углу камеры. Крышка объектива одновременно упадет, обнажив объектив, и камера включится.
Шаг 4
Наведите камеру на объект, который вы пытаетесь снять. Убедитесь, что вы находитесь на расстоянии не менее 4 футов (1,2 м) от объекта, поскольку фокусное расстояние камеры гарантирует, что фотографии, сделанные в пределах 4 футов (1,2 м) от объекта, будут короче. качество.
Шаг 5
Нажмите кнопку спуска затвора на боковой стороне камеры, чтобы сделать снимок.
Удалите экспонированную фотографию, когда она выйдет из передней части камеры, обязательно держите ее за белую рамку. Подержите фотографию в воздухе несколько секунд, пока она полностью не экспонируется и фотография не станет видимой.