- Manuals
- Brands
- Polycom Manuals
- Conference System
- HDX 4500
- User manual
-
Contents
-
Table of Contents
-
Bookmarks
Quick Links
®
®
User’s Guide for Polycom
HDX
Desktop Systems
Version 3.0.5
|
July 2012
|
3725-26470-007/A
Related Manuals for Polycom HDX 4000
Summary of Contents for Polycom HDX 4000
-
Page 1
® ® User’s Guide for Polycom Desktop Systems Version 3.0.5 July 2012 3725-26470-007/A… -
Page 2
As between the parties, Polycom, Inc., retains title to and ownership of all proprietary rights with respect to the software contained within its products. The software is protected by United States copyright laws and international treaty provision. -
Page 3: Table Of Contents
Polycom HDX System ……..
-
Page 4
Polycom HDX System …….. -
Page 5
Polycom® HDX® systems can be customized to show only those options used in your organization. Therefore, this guide might cover options that you cannot access on your system. -
Page 6: Using The Remote Control
User’s Guide for Polycom HDX Desktop Systems Using the Remote Control You use the remote control to place calls, adjust the volume, navigate screens, and select options. Press to power the system on; hold to power Access onscreen help; see system off;…
-
Page 7: Using The Keypad
Powering the System On and Off Caution. In order to avoid corrupting the file system, always power off a Polycom HDX system using the power button on the system. After turning the power off in this way, wait at least 15 seconds before you unplug the system from its power source.
-
Page 8: Powering The Polycom Hdx 4500 System On And Off
If a test fails, press Hangup on the remote control or keypad to continue the startup process. However, even if the system appears to start up, Polycom recommends that you contact Technical Support before using your HDX system if any of the system tests fail.
-
Page 9: Calling And Answering
Slow blinking green light indicates standby mode. Answering a Call The way a Polycom HDX system handles incoming calls depends on how it is configured. It either answers the call automatically, rejects the call automatically, or prompts you to answer the call manually.
-
Page 10: Calling From The Recent Calls List
User’s Guide for Polycom HDX Desktop Systems — 2555 (E.164 extension for H.323 or SIP) — stereo.polycom.com (DNS name) — 19782922854 (ISDN or phone number) — user@domain.com (SIP) To enter letters, press Keyboard on the keypad. To delete a number, press Delete on the keypad.
-
Page 11: Calling From The Favorites Screen
Contact your administrator for information about speed dial entries. Calling from the Directory The directory can include a list of sites stored locally on the Polycom HDX system. If the system is registered with a global directory, the directory includes entries from the global directory.
-
Page 12: Calling From The Calendar
60 seconds. In audio-only calls, if the person on an analog telephone hangs up first, you need to disconnect the Polycom HDX system from the call, just as you would hang up a telephone receiver in a regular phone call.
-
Page 13: Types Of Video Calls You Can Make
Depending on your system configuration, you might be able to make calls using ISDN, H.323, SIP, or V.35/RS-449/RS-530. You can place an audio-only call from Polycom HDX systems that have Analog Phone or Voice Over ISDN enabled. The following table lists some possible call combinations.
-
Page 14: Participating In An Encrypted Call
If encryption is required on your system, the far end must support encryption or the call will not be completed. To avoid security risks, Polycom recommends that all participants communicate the state of their padlock icons verbally at the beginning of a call.
-
Page 15: Controlling What You See
VGA port like you would when sending video to a projector. If you use the Polycom HDX 4000 series display as your computer monitor, Polycom recommends that you set up the system so that calls must be answered manually.
-
Page 16
User’s Guide for Polycom HDX Desktop Systems To select a near-site or far-site camera: >> If you are in a call, press Near or Far on the keypad or Near or Far on the remote control to select either near-site or far-site control. -
Page 17: Setting And Using Camera Presets
User’s Guide for Polycom HDX Desktop Systems To open or close the privacy shutter: >> Move the slider to the left to close the privacy shutter, or to the right to open it. You can still make and receive calls when the shutter is closed, but the people at the far site cannot see you.
-
Page 18: Switching Between Full-Screen Video And The Home Screen
User’s Guide for Polycom HDX Desktop Systems To move the camera to a stored preset: If a call is connected, press Near or Far on the keypad or Near or Far on the remote control. Press a number on the keypad or remote control. Depending on how your…
-
Page 19: Changing The Layout During A Video Call
User’s Guide for Polycom HDX Desktop Systems Changing the Layout during a Video Call When the call connects, the system might show your computer desktop if a computer is connected. The far and near video might remain in a smaller window.
-
Page 20
2 Content big, far site small 3 Content and far site same size 4 Content, full screen Polycom HDX 4000 systems with Hardware Version C and Polycom HDX 4500 systems support only two windows in Dual Monitor Emulation. Polycom, Inc. -
Page 21
User’s Guide for Polycom HDX Desktop Systems During point-to-point calls with content on Polycom HDX 4500 systems with a second monitor attached, you can press the Layout button to scroll through the following screen layouts: 1 Far, near sites same size on first monitor. Far site computer full screen on second monitor. -
Page 22: Adjusting The Monitor Brightness
User’s Guide for Polycom HDX Desktop Systems Adjusting the Monitor Brightness You can make the Polycom HDX 4000 series display brighter or dimmer using the + and — controls on the side of the monitor. Controlling What You Hear Adjusting Volume You can raise or lower the volume of the meeting.
-
Page 23: Muting The Microphone
Using a Headset or Desktop Speakers You can connect headphones, a headset, or desktop speakers to the connectors on the side of the Polycom HDX 4000 series system monitor. The microphone input provides audio for video conferencing only; it does not provide input for other computer applications.
-
Page 24: Showing Content
Showing Content from a Computer Connected Directly to the Polycom HDX System If you have a computer connected to your Polycom HDX 4000 series system, you can show your computer desktop (content) during a call. When you send content, the far site can see and hear you, and see and hear what is on your computer screen.
-
Page 25: Showing Content With People+Content™ Ip
Download and install the People+Content IP software. To start showing content: On the computer, start the Polycom People+Content IP application. Enter the IP address or host name of the Polycom HDX system and the meeting password, if one is set. On the computer, click Connect.
-
Page 26: Showing Content With Polycom People On Content
Showing Content with Polycom People on Content™ The Polycom People on Content™ feature allows you to show yourself on top of content that you are sharing. The effect is similar to a weather newscast on television.
-
Page 27: Working With Directory Entries And Favorites
Video Calls on page 39. Sites that you have added are stored on your Polycom HDX system as Favorites. You can remove or edit Favorites. You can also assign Favorites to groups to more easily find them. Everyone at your site who uses the system can use the entries you create, and you can use the entries created by others.
-
Page 28: Searching The Directory
If the search does not start as soon as you enter a character in the search field, select the Search button. Adding, Editing, and Deleting Favorites You can create Contacts and groups and save them in the Polycom HDX system directory. Any changes appear in Favorites. To add a Contact to Favorites: Press Directory on the remote control or keypad.
-
Page 29
User’s Guide for Polycom HDX Desktop Systems Specify the following information: Setting Description Name Name that appears in the directory list and on incoming call messages. Group The group where the new Contact appears. Call Type Call type to use for calls to the site. Depends on the capabilities of your system. -
Page 30: Directory Groups
Choose Options > Add to Favorites. Directory Groups Grouping contacts can make them easier to find. Polycom HDX systems support global groups and Favorites groups. Global directory entries are assigned to a global group by your system administrator. You cannot edit or delete global directory groups.
-
Page 31
User’s Guide for Polycom HDX Desktop Systems Polycom HDX systems support up to 200 Favorites groups. If the system is connected to a global directory server, it can also support one of the following: • Up to 64 additional groups from the Microsoft Office Communications Server or Microsoft Lync Server 2010 directory, which appear in the Favorites group. -
Page 32: Refreshing Entries From The Polycom Global Directory Server
Refreshing Entries from the Polycom Global Directory Server The global directory entries are periodically refreshed on systems registered to the Polycom Global Directory Server. You can also manually refresh the global directory entries on your system. To manually refresh Polycom GDS entries: Press Directory on the remote control or keypad.
-
Page 33: Including Multiple Sites In Calls
You can host multipoint calls using a video conferencing system with multipoint capabilities, or you can use a bridge such as the Polycom RMX 1000, Polycom RMX 2000, or Polycom MGC™. If your multipoint calls disconnect after 5 minutes, your system might be set up for the multipoint trial.
-
Page 34: Passwords For Multipoint Calls
User’s Guide for Polycom HDX Desktop Systems For calls hosted by a Polycom HDX system, you can define a group in the directory to call all of the sites at one time. Alternatively, you can place a call to the first site, and then add other sites after the first call connects. The other sites can call the Polycom HDX system to join the call.
-
Page 35: Multipoint Viewing Modes
The multipoint viewing mode configured on the host system is the one used in the call. To find out more about these modes, please talk to the administrator of your Polycom HDX system. The following table describes the different multipoint viewing modes when an HDX system is hosting the multipoint call.
-
Page 36: Using Chair Control For Multipoint Calls
User’s Guide for Polycom HDX Desktop Systems Setting Description Discussion Multiple sites are displayed in continuous presence. The current speaker’s image is highlighted. Presentation The speaker sees continuous presence while the other sites see the speaker in full screen on the monitor.
-
Page 37
User’s Guide for Polycom HDX Desktop Systems To use the chair control options when you are in a multipoint call: In the browser address line, enter the HDX system’s IP address to access its web interface. To use the HDX web interface, you must use Internet Explorer version 6.x, 7.x, or 8.x and configure your browser to allow cookies. -
Page 38: Changing The Way Calls Are Answered
If you have a Polycom HDX 4000 system that you are using as your computer monitor, Polycom recommends that you set up the system so that you have to answer calls manually.
-
Page 39: Muting Automatically Answered Video Calls
If your system administrator has allowed access to user settings, you can choose whether to allow viewing of the room where the system is located or video of calls in which the system participates. You would use the Polycom HDX web interface’s Web Director to view the room or video.
-
Page 40: Logging In And Out
IP 7000 Conference Phone with a Polycom HDX System When you connect a Polycom SoundStation® IP 7000 conference phone to a Polycom HDX system, the conference phone becomes another interface to dial audio or video calls. The conference phone operates as a microphone, and as a speaker in audio-only calls.
-
Page 41
>> Press the Mute key on the conference phone. You can also mute the audio using the mute button on the Polycom HDX system remote control or keypad or on a connected Polycom HDX microphone. The indicators on the conference phone are red when your audio is muted. The near-site mute icon also appears on the monitor display. -
Page 42: Using Polycom Conferencing For Microsoft Outlook
Calendar screen. If your system is not configured to connect to the Microsoft Exchange Server, you see the standard month-view calendar. To view the Polycom HDX system calendar, do one of the following: • Select Calendar on the Home screen.
-
Page 43: Using Microsoft Office Communications Server 2007 R2 Or Microsoft Lync Server 2010 Features With Video Calls
Changes made to contacts and groups using Office Communicator or Microsoft Lync appear on the Polycom HDX system Favorites screen and in the Favorites group in the directory. Polycom HDX systems support up to 200 contacts and 64 groups from Office Communicator or Microsoft Lync.
-
Page 44: Viewing Microsoft Office Communications Server Or Microsoft Lync Server 2010 Presence States
Multipoint Calls Using Centralized Conferencing Control Protocol (CCCP) If a Polycom HDX system is deployed in a Microsoft Lync Server 2010 environment and Centralized Conferencing Control Protocol (CCCP) is enabled, you can place and participate in multipoint calls that are hosted by Microsoft audio and video servers.
-
Page 45: Muting In A Cccp Call
You cannot unmute until the organizer unmutes the participants unless you are designated as a presenter. If the meeting organizer has muted your Polycom HDX system selectively, you can unmute your system even if the organizer does not. It is important to understand that no one else can unmute your microphone.
-
Page 46: Using Avaya Network Features With Video Calls
To activate call forwarding: Make sure that the Polycom system is not in a call. From the Place a Call screen on the Polycom system, dial the Feature Access Code provided by the Avaya Communication Manager administrator, followed by the E.164 extension of the system to which you want to forward the calls.
-
Page 47: Customizing Your Workspace
User’s Guide for Polycom HDX Desktop Systems Wait for a dial tone, and then dial the extension of the far-site system to which you want to transfer the call. The call connects both audio and video between the local system and the second far-site system. The first far-site system is still on hold.
-
Page 48: Displaying The Far Site’s Name When The Call Connects
If your system administrator has allowed access to user settings, you can use the backlight control to adjust the brightness of the video that the main camera sends to the Polycom HDX system. Adjusting this setting can be helpful when the room arrangement results in strong light coming from behind the people in the picture.
-
Page 49: Polycom Solution Support
Press Home to save your change and return to the Home screen. For information about adjusting the brightness of the Polycom HDX 4000 monitor, refer to Adjusting the Monitor Brightness on page 18.
Как пользоваться?
Наша цель — обеспечить Вам самый быстрый доступ к руководству по эксплуатации устройства Polycom RMX 4000. Пользуясь просмотром онлайн Вы можете быстро просмотреть содержание и перейти на страницу, на которой найдете решение своей проблемы с Polycom RMX 4000.
Для Вашего удобства
Если просмотр руководства Polycom RMX 4000 непосредственно на этой странице для Вас неудобен, Вы можете воспользоваться двумя возможными решениями:
- Полноэкранный просмотр -, Чтобы удобно просматривать инструкцию (без скачивания на компьютер) Вы можете использовать режим полноэкранного просмотра. Чтобы запустить просмотр инструкции Polycom RMX 4000 на полном экране, используйте кнопку Полный экран.
- Скачивание на компьютер — Вы можете также скачать инструкцию Polycom RMX 4000 на свой компьютер и сохранить ее в своем архиве. Если ты все же не хотите занимать место на своем устройстве, Вы всегда можете скачать ее из ManualsBase.
Руководство по эксплуатации Polycom RMX 4000
Печатная версия
Многие предпочитают читать документы не на экране, а в печатной версии. Опция распечатки инструкции также предусмотрена и Вы можете воспользоваться ею нажав на ссылку, находящуюся выше — Печатать инструкцию. Вам не обязательно печатать всю инструкцию Polycom RMX 4000 а только некоторые страницы. Берегите бумагу.
Резюме
Ниже Вы найдете заявки которые находятся на очередных страницах инструкции для Polycom RMX 4000. Если Вы хотите быстро просмотреть содержимое страниц, которые находятся на очередных страницах инструкции, Вы воспользоваться ими.

Руководство администратора систем Polycom HDX
A–14
Polycom, Inc.
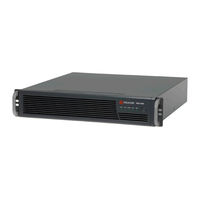
Системы Polycom HDX 4000 и Polycom HDX 4000 HD
Система Polycom HDX 4500
100-240V
A
C
50/60Hz 2.3A
Разъем аналогового телефона:
для вызовов по аналоговой
телефонной линии
Порты LAN: Для вызовов IP
или SIP, People+Content IP и
веб-интерфейса Polycom HDX
Разъем питания: Для подключения
блока питания
Порт ISDN: Для QBRI, PRI или
модуля V.35
Последовательный порт
RS-232 для устройств с
разъемом RS-232
100-240v~
50/60H
z 2.3A
OUTLE
T FOR
DISPLA
Y ONL
Y
100-240v A
C
50/60H
z 2.3A
Порт LAN: Для доступа
к IP-сетям
Разъем питания: Для подключения
блока питания
Разъем питания: Для
встроенного монитора
Последовательный порт RS-232:
Для устройств RS-232
Порт LAN: Для доступа к
IP-сетям
The terms of this Poly Limited Warranty («Limited Warranty») shall apply to purchases of Poly products.
Who Does This Limited Warranty Cover?
The original end user customer who purchased a Poly product.
What Products Does This Limited Warranty Cover?
This Limited Warranty covers Poly products purchased in original Poly packaging.
Poly products must have been purchased as new from Poly, a Poly affiliated company or a Poly authorized reseller. A list of Poly authorized resellers is located at https://partners.poly.com/English/directory/.
This Limited Warranty covers any defects in the materials used in the Poly product, and any defects in the workmanship during the manufacture of the Poly products.
What is the Period of Coverage?
The term of the Limited Warranty begins from the date of purchase by the original end user customer.
The dated sales receipt showing the date of purchase is the proof of purchase. We strongly advise you to keep your receipt of purchase in order to prove the date of purchase of the product.
The period of coverage varies by product and is generally 1, 2 or 3 years; consult your original Poly product packaging or user information provided by Poly at the time of purchase for the warranty term specific to your product or online at www.poly.com/support/ («Warranty Period»).
Poly’s obligation under this Limited Warranty to repair or replace products that manifest a defect in materials or workmanship ceases upon the expiration of the Warranty Period.
You are responsible for shipping charges, insurance, and other transportation-related expenses incurred when returning products to Poly. If you return out-of-warranty products or products not covered under the Limited Warranty, you will be responsible for all return-shipping and other transportation-related expenses.
How to Obtain Warranty Service?
Before submitting a warranty claim for a Poly product, please visit www.poly.com/support/ for technical assistance.
You may obtain warranty support for valid warranty claims through your point of purchase during the first thirty (30) days after purchase. This warranty support may not always be available where you purchased the Poly product and, where it is available, the period may vary depending on where you purchased the Poly product. Please contact your point of purchase for more details.
Poly offers an online system for service requests. Please register your product at www.poly.com/support/. To determine the start of the warranty period you may be asked to provide the dated sales receipt showing the date you purchased the Poly product.
Warranty claims that cannot be processed through your point of purchase and any other Poly product related questions should be addressed directly to Poly. You can find our knowledge base articles, ask a question, receive service over the Internet or speak directly to a representative via www.poly.com/support/.
Any claim under this Limited Warranty is subject to you notifying Poly or your point of purchase of the alleged defect within a reasonable time of it having come to your attention and in any event no later than before the expiry of the Warranty Period.
Obtaining Warranty Support in Another Country
Poly products purchased in one country or region may be eligible for warranty service in other countries or regions where Poly or a Poly authorized service provider offers warranty service for the same Poly product, based on Poly’s product model number.
However, the Warranty Period provided in the country where the product was purchased shall apply. The warranty terms (including those stated here), service availability, and service response times may vary based on the country or region. Warranty service response times are always subject to change due to local conditions (including, without limitation, availability of parts and materials and a Poly authorized service provider).
What Is Not Covered by This Limited Warranty?
This Limited Warranty does not cover:
1) products that are not manufactured by or on behalf of Poly;
2) products purchased from anyone other than from Poly, a Poly affiliated company or a Poly authorized reseller;
3) products purchased through online auctions and second-hand products;
4) products that are operated in combination with software, peripheral or ancillary equipment such as but not limited to batteries, chargers, adapters, headsets, connector cables, and power supplies («Ancillary Equipment») not furnished or otherwise certified by Poly for use with the Poly products or any damage to the Poly products or Ancillary Equipment as a result of such use;
5) Unauthorized use of common carrier communication services provided by another company/third party accessed through the product;
6) damage caused by (a) accident, fire, misuse, neglect, unusual physical or electrical stress, liquid ingress or modification; (b) improper or unauthorized installation, wiring, repair, testing; or (c) use of the product outside Poly published guidelines;
7) instances in which someone other than Poly (or its authorized service centers) tests, alters, modifies or services the products in any way;
 products that have (a) serial numbers or date tags that have been removed or altered, or (b) nonconforming or non-Poly housings or parts; and
9) Limited life consumable components and accessories, that are subject to normal wear and tear, such as cases, cradles, protective coatings, headbands and ear tips, (unless they are found to be non-functional or broken upon purchase of product).
Poly does not provide a warranty for software (whether pre-loaded on hardware or provided as a standalone product) under this Limited Warranty – please refer to the applicable Poly end user license agreement or software license. No warranty is made that any software provided by Poly will meet your requirements or will work in combination with any hardware or applications software products provided by third parties, that the operation of the software will be uninterrupted or error free, or that defects in the software will be corrected.
What Will We Do to Correct Problems?
For an end user customer with a Poly product that is within the applicable Warranty Period and has a defect that is covered by this Limited Warranty, Poly will repair or replace, at its option, the Poly product if you provide notice to Poly and return the product to Poly in the manner described in this Limited Warranty.
Poly may repair or replace products under this Limited Warranty: (a) with new or reconditioned products, parts, or components, or (b) with a similar Poly product if the eligible product under this Limited Warranty has been discontinued.
Poly further warrants on the same terms as this Limited Warranty the repaired or replaced Poly products for the greater of: (a) ninety (90) days following the repair and/or replacement, or (b) the remainder of the original Warranty Period for the Poly product that was repaired or replaced.
When a Poly product is replaced, the replacement product becomes your property, and the returned product becomes the property of Poly.
In the unlikely event that your Poly product has recurring failures or Poly is unable to repair or replace the Poly product, Poly will provide you with a replacement Poly product that is selected by Poly and is the same or similar in performance.
This is your exclusive remedy for a defective Poly product that is covered by this Limited Warranty.
What Exclusions and Limitations Apply to this Limited Warranty?
POLY MAKES NO OTHER EXPRESS WARRANTY WHETHER WRITTEN OR ORAL AND POLY EXPRESSLY DISCLAIMS ALL WARRANTIES AND CONDITIONS NOT STATED IN THIS LIMITED WARRANTY. TO THE EXTENT ALLOWED BY THE LAW, POLY DISCLAIMS ALL IMPLIED WARRANTIES OR CONDITIONS, INCLUDING ANY IMPLIED WARRANTIES OF MERCHANTABILITY AND FITNESS FOR A PARTICULAR PURPOSE.
Limitation of Liability
THE MAXIMUM LIABILITY OF POLY UNDER THIS LIMITED WARRANTY IS EXPRESSLY LIMITED TO THE LESSER OF THE PRICE YOU HAVE PAID FOR THE PRODUCT OR THE COST OF REPAIR OR REPLACEMENT OF THAT PRODUCT OR ANY COMPONENT OR PART THAT MALFUNCTION IN CONDITIONS OF NORMAL USE. EXCEPT AS INDICATED ABOVE, IN NO EVENT WILL POLY BE LIABLE FOR ANY DAMAGES CAUSED BY THE PRODUCT OR THE FAILURE OF THE PRODUCT TO PERFORM, INCLUDING ANY LOST PROFITS OR SAVINGS OR SPECIAL, INCIDENTAL, OR CONSEQUENTIAL DAMAGES. POLY IS NOT LIABLE FOR ANY CLAIM MADE BY A THIRD PARTY OR MADE BY YOU FOR A THIRD PARTY. THIS LIMITATION OF LIABILITY APPLIES WHETHER DAMAGES ARE SOUGHT, OR A CLAIM MADE, UNDER THIS LIMITED WARRANTY OR AS A TORT CLAIM (INCLUDING NEGLIGENCE AND STRICT PRODUCT LIABILITY), A CONTRACT CLAIM, OR ANY OTHER CLAIM. THIS LIMITATION OF LIABILITY CANNOT BE WAIVED OR AMENDED BY ANY PERSONAND IS EFFECTIVE EVEN IF YOU HAVE ADVISED POLY OR AN AUTHORIZED REPRESENTATIVE OF POLY OF THE POSSIBILITY OF ANY SUCH DAMAGES. THIS LIMITATION OF LIABILITY, HOWEVER, WILL NOT APPLY TO CLAIMS FOR PERSONAL INJURY.
What Law Governs This Warranty?
THIS LIMITED WARRANTY IS GOVERNED BY AND CONSTRUED UNDER THE LAWS OF THE COUNTRY IN WHICH THE PRODUCT WAS ORIGINALLY PURCHASED. FOR CONSUMER TRANSACTIONS, THE LIMITED WARRANTY TERMS CONTAINED IN THIS STATEMENT, EXCEPT TO THE EXTENT LAWFULLY PERMITTED, DO NOT EXCLUDE, RESTRICT, OR MODIFY BUT ARE IN ADDITION TO THE MANDATORY STATUTORY RIGHTS APPLICABLE TO THE SALE OF THIS PRODUCT TO YOU.
For United States residents, any disputes arising out of this Limited Warranty or otherwise relating to your purchase of the Poly product that is the subject of this Limited Warranty, whether based on contract, tort, fraud, or any other legal theory, shall be governed by the law of the state in which you currently reside, without regard to its conflict-of-law principles.
What Other Legal Rights May Exist?
THIS LIMITED WARRANTY GIVES YOU SPECIFIC RIGHTS. YOU MAY ALSO HAVE ADDITIONAL RIGHTS THAT MAY VARY IN YOUR STATE OR IN YOUR COUNTRY. SOME STATES AND COUNTRIES DO NOT ALLOW LIMITATIONS ON IMPLIED WARRANTIES OR THE EXCLUSION OR LIMITATION OF INCIDENTAL OR CONSEQUENTIAL DAMAGES, SO THE ABOVE LIMITATIONS MAY NOT APPLY TO YOU. YOU ARE ADVISED TO CONSULT APPLICABLE STATE OR COUNTRY LAWS FOR A FULL DETERMINATION OF YOUR RIGHTS.
Warranty Policy for Australia and New Zealand
The benefits provided under this Limited Warranty are in addition to other rights and remedies provided under Australian and New Zealand Law.
Nothing in this warranty modifies or excludes your legal rights under the Australian Competition and Consumer Act or the New Zealand Consumer Guarantees Act.
If you purchased your Product in New Zealand for the purposes of a business, you acknowledge and agree that the New Zealand Consumer Guarantees Act does not apply.
In Australia, Poly products come with guarantees that cannot be excluded under the Australian Consumer Law. You are entitled to a replacement or refund for a major failure and compensation for any other reasonably foreseeable loss or damage. You are also entitled to have the goods repaired or replaced if goods fail to be of acceptable quality and the failure does not amount to a major failure. What constitutes a major failure is set out in the Australian Consumer Law. Please refer to the information provided by Poly in the materials received at the time of purchase.
This warranty is provided by Plantronics, Inc. (“Poly”), 345 Encinal St., Santa Cruz, CA 95060, USA. Additional Poly office locations and contacts can be found at www.poly.com or in Australia by calling (toll free) 1-800-725-598.
- Manuals
- Brands
- Polycom Manuals
- Server
- RSS 4000
Manuals and User Guides for Polycom RSS 4000. We have 6 Polycom RSS 4000 manuals available for free PDF download: User Manual, Getting Started Manual
Polycom RSS 4000 User Manual (146 pages)
Brand: Polycom
|
Category: Network Hardware
|
Size: 7.24 MB
Table of Contents
-
Table of Contents
3
-
Getting Started
9
-
System Overview
9
-
Installation
10
-
Unpacking and Installing
10
-
System Indicators
11
-
-
System Initial Configuration
12
-
Before You Start
12
-
Obtaining Network Information
12
-
Obtaining the Product Activation Key
12
-
-
System Initial Configuration
13
-
Before You Start
13
-
-
(Optional) Configuring the Gatekeeper Settings
17
-
-
User Interfaces
18
-
Working Mode
19
-
Starting a Recording
19
-
Playing Back Media Archives
22
-
Viewing Live Streams
23
-
-
Using the RSS 4000 Admin UI
25
-
Basics about the Admin UI
25
-
Admin UI Layout
26
-
User Permissions
28
-
Common Operations
28
-
List Sorting, Searching, and Refreshing
28
-
Sizing the Pane
29
-
Detecting IP Address and DNS
29
-
-
-
System Configuration
30
-
IP Settings
30
-
System Time
30
-
Recording Settings
31
-
Multicast Settings
32
-
Before You Start
32
-
Configuring Multicast
33
-
-
Certificate Management
33
-
Installing the Certificate in the System
34
-
Viewing the Certificate Details
36
-
Removing a Certificate
37
-
Using OCSP to Obtain Revocation Status
37
-
-
Client Certification
38
-
Qos
38
-
Security Settings
40
-
Ports
40
-
Diagnostics
41
-
Security Policy
41
-
-
Service Settings
46
-
Active Directory
46
-
Importing Active Directory Users
47
-
Calendar Configuration
48
-
-
Signalling Settings
49
-
Sip
49
-
-
Snmp
50
-
-
System Administration
52
-
Dashboard
52
-
Signaling Connection
52
-
Web Connections
53
-
Hardware Status
53
-
Login Information
53
-
Streaming Sessions
53
-
System Alerts
54
-
System Information
54
-
Gatekeeper Status
54
-
External Server Status
54
-
SIP Server Status
55
-
-
System Configuration Backup/Restore
55
-
Data Backup/Restore
56
-
FTP Server Configuration
56
-
Backing up Image Data
57
-
Restoring User Data
58
-
Media Backup
58
-
-
System Upgrade and Downgrade
59
-
To Update Your System Software to Version 8.5
60
-
To Downgrade Your System Software
60
-
-
Product Activation
61
-
UI Customization
62
-
Customizing IVR
63
-
Customizing UI Logo
63
-
Customizing Endpoint Menu
64
-
Changing System Name
64
-
Customizing the Login Banner
64
-
-
System Logs
65
-
Auditor Actions
65
-
-
Email Settings
66
-
Disk Warning
66
-
Log Settings
67
-
Restart and Shutdown
67
-
-
User Management
69
-
Users
69
-
Viewing Users
69
-
Adding a New User
70
-
Managing Users
71
-
-
Groups
72
-
Creating a New Group
72
-
Managing Groups
73
-
-
-
Virtual Recording Room (VRR)
73
-
Templates
73
-
Managing Templates
76
-
-
Vrrs
77
-
Predetermined VRR
80
-
Multipoint Recording
81
-
Dialing in to a VRR to Start Recording
82
-
Managing Vrrs
83
-
-
-
External Servers
84
-
Live Streaming Meetings to External Media Servers
84
-
Transferring Recordings to FTP Servers
88
-
-
Media Management
89
-
Archives
90
-
Viewing Archive Details
90
-
Playing Back and Downloading Archives
91
-
Archive Status
91
-
Modifying Archives
93
-
Using Dynamic Archiving
93
-
Quick Code
96
-
-
Live Streaming
97
-
Starting a Live Streaming
98
-
Viewing Live Streaming Information
98
-
Viewing Live Streaming Video
98
-
Live Streaming Resources Usage
99
-
-
Capacity
100
-
RSS 4000 Stand-Alone Unicast Live Streaming and Vod
101
-
RSS 4000 and External Stream Servers
102
-
RSS 4000 Stand-Alone Multicast Live Streaming and Vod
103
-
Multi-User Login Capacity
103
-
Hard Disk Capacity
103
-
Multicast
103
-
Multicast of an Archive or a Live Streaming Video
104
-
Viewing Multicast Video
104
-
-
-
My Settings
105
-
-
Using the RSS 4000 TV User Interface
107
-
Introduction to Main Menu Page
108
-
Start Recording Using the TV User Interface
110
-
Viewing Archives Using the TV User Interface
111
-
-
Using the RSS 4000 Viewer Portal
113
-
Using the Polycom RSS 4000 Viewer Portal
113
-
Managing Archives and Live Streams Using the Viewer Portal
114
-
Player Improvement
116
-
Reserving Meeting Recordings Using the Viewer Portal
117
-
-
Appendix A — Regulatory Notices
119
-
Important Safeguards
119
-
Regulatory Notices
119
-
-
Appendix B — Telnet and Terminal Commands
123
-
Before You Start
123
-
Configuring a Terminal Program
123
-
Enabling Telnet in Windows
124
-
-
Login
124
-
Command Introduction
125
-
Help
125
-
Exit
125
-
Viewing Device Information
125
-
Viewing or Setting the System Time Zone
125
-
Idle Timeout Setting
125
-
Reboot Device
126
-
Power off System
126
-
Disable View Permission for All Users
126
-
Resetting Password
127
-
Restoring System Configuration
127
-
Cleaning Activation Key
127
-
Telnet Settings
127
-
Password Modification
128
-
Dtmf
128
-
File System
128
-
Ping
128
-
Network Settings
129
-
Shutting down the System
130
-
Checking Disk Space Usage
130
-
-
-
Appendix C- Configuring External Servers
131
-
Live Streaming Meetings to an External Media Server
131
-
Configuring the Wowza Media Server
131
-
Configuring the IIS7 Media Server
135
-
Configuring the Quicktime Streaming Server
138
-
Configuring the Windows Media Server
140
-
Viewing the Streaming through External Media Server
144
-
-
Index
145
Advertisement
Polycom RSS 4000 User Manual (106 pages)
Brand: Polycom
|
Category: TV Tuner
|
Size: 1.63 MB
Table of Contents
-
Table of Contents
3
-
Polycom® RSS™ 4000 Introduction
7
-
Overview
7
-
System Hardware Installation
8
-
General Safety Precautions
8
-
Unpack the Package
8
-
Install the System
9
-
System Indicators
9
-
-
System Initial Configuration
10
-
Preparations before Configuration
10
-
Modifying the Initial IP Address
11
-
(Optional) Installing Multicast Controls
14
-
(Optional) Configuring the Gatekeeper Settings
14
-
-
User Interface
15
-
Web User Interface
15
-
TV User Interface
15
-
-
Working Mode
16
-
-
Basic Operations
17
-
Introduction to the Web User Interface
17
-
User Permissions
18
-
Common Operations
18
-
-
Starting a Recording
19
-
Playing Back Recorded Files
21
-
-
Ordinary User Configuration
23
-
Personal Settings
23
-
Virtual Recording Room (VRR)
24
-
Dialing-In to a VRR to Start Recording
24
-
Modifying a VRR
25
-
-
Archives
27
-
Viewing Archives
27
-
Playing Back and Downloading Archives
27
-
Modifying Archives
29
-
-
Quick Code
30
-
Live Streaming
31
-
Starting a Live Streaming
31
-
Viewing Live Streaming Information
31
-
Viewing Live Streaming Video
31
-
-
Multicast
32
-
Multicast of an Archive or a Live Streaming Video
32
-
Viewing Multicast Video
33
-
-
-
Administrator Configuration
35
-
Recording Templates
35
-
Viewing Template Information
35
-
Defining a Template
35
-
Managing Templates
38
-
-
Virtual Recording Room (VRR)
38
-
Defining a VRR
38
-
Dialing-Into a VRR to Start Recording
41
-
Managing Vrrs
41
-
-
Multipoint Recording
42
-
Multipoint Recording and Live Streaming Resource Usage
42
-
Creating a Multipoint Recording Room
43
-
-
Reservation VRR
44
-
Creating a Reservation VRR
44
-
-
Channel
45
-
Recording Setting
46
-
Archives
47
-
Re-Transcoding Archives
47
-
-
Live Streaming
47
-
Live Streaming Resources Usage
47
-
-
Multicast
49
-
Configuring Multicast
50
-
Multicast Operation
50
-
-
Network Service
50
-
IP Setting
50
-
Gatekeeper
52
-
Sip
53
-
Qos
54
-
-
User Management
55
-
User
55
-
Viewing Users
56
-
Adding a New User
58
-
Managing Users
59
-
Groups
59
-
Creating a New Group
60
-
Managing Groups
60
-
-
Service Setting
60
-
Active Directory
60
-
Calendar Configuration
61
-
-
System Monitoring
63
-
Dashboard
63
-
Auditor
66
-
Log Setting
67
-
Hard Disk Warning
67
-
-
System Security
68
-
Ports
68
-
Ping
68
-
Security Policy
69
-
-
Certificate Management
71
-
Installing the Certificate in the System
71
-
Viewing the Certificate Details
74
-
Removing a Certificate
74
-
Using OCSP to Obtain Revocation Status
74
-
Enabling the Client Certificate Validation
75
-
-
Maximum Security Mode
75
-
Running the System in Maximum Security Mode
76
-
Antivirus Protection
77
-
-
System Management
79
-
System Configuration Backup/Restore
79
-
Data Backup/Restore
79
-
System Upgrade
82
-
Product Activation
85
-
UI Customization
86
-
System Time
88
-
Restart and Shutdown
89
-
Restoring Factory Default Configuration
89
-
System Recovery
90
-
-
-
TV User Interface Operation
91
-
Introduction to Main Menu Page
91
-
Start Recording
93
-
Viewing Archives
94
-
-
Appendix A — Telnet/Terminal Commands
95
-
Hyperterminal Parameters
95
-
Login
95
-
Command Introduction
96
-
-
Appendix B — Regulatory Notices
103
Polycom RSS 4000 User Manual (89 pages)
Polycom Recording and Streaming Server User Guide
Brand: Polycom
|
Category: Server
|
Size: 2.45 MB
Table of Contents
-
User Guide
1
-
Table of Contents
3
-
Preface
6
-
Polycom® RSS™ 4000 Installation and Preliminary
7
-
Configuration
7
-
General Safety Precautions
7
-
Preparations
7
-
Unpacking and Installing the Polycom® RSS™ 4000
8
-
Initial Polycom® RSS™ 4000 IP Configuration
8
-
-
Web User Interface (UI)
11
-
Logging into Polycom® RSS™ 4000 Via the Web
12
-
Polycom® RSS™ 4000 Web UI Main Screen
13
-
System Information
13
-
Product Information
13
-
System Usage
15
-
Product Activation
16
-
-
System Configuration
18
-
IP Address Settings
18
-
Gatekeeper Settings
19
-
User Customization
20
-
Archives Backup/Delete
23
-
System Settings
24
-
Logger Settings
26
-
Managing Log Files
27
-
Upgrade/Reset System
28
-
SSL Configuration
29
-
-
Account Management
31
-
Endpoint Management
31
-
User Management
33
-
Group Management
34
-
Add Group
35
-
Active Directory Settings
36
-
-
Recording Settings
37
-
Single Point Recording Settings
38
-
Point-To-Point Recording Settings
40
-
Access Rights
42
-
Dial out and Record through the Web
43
-
Multicast Settings
44
-
-
Streaming Settings
46
-
Managing Recording Files
47
-
Viewing Archive Properties
48
-
Looking up Archives
48
-
Sorting Archives
49
-
Changing Archive Properties
49
-
Playing Back Archives Via the Web
50
-
Downloading Archives
50
-
E-Mail Link
51
-
Deleting Archives
51
-
Go to Archive Pages
52
-
-
H.323 Connection Status Display
52
-
-
Onscreen User Interface (UI) — Conference Recording
54
-
Single Point Recording Using an Endpoint Menu (Onscreen UI)
55
-
Main Menu
55
-
Start Recording
57
-
Live Streaming
58
-
Immediate Recording
58
-
Archive Name Format
59
-
-
Using a Polycom MCU for Single Point Recording
60
-
Point-To-Point Recording
60
-
Entering a Recording Room
60
-
Streaming Without Recording
62
-
Leaving a Recording Room
62
-
-
-
Onscreen User Interface (UI) — Archive Playback
63
-
Video Viewing Rights
64
-
Quick Access Codes for Archive Playback
65
-
Sorting Archives
66
-
PIN Codes
67
-
Fast Forward/Reverse/Stop
68
-
Choose Language for Endpoint Menu
68
-
-
Appendix A — Terminal Setting and User Commands
69
-
Hyperterminal Parameters
69
-
Logging in
69
-
Overview of Commands
70
-
Telnet Settings
71
-
Ftp Settings
71
-
-
-
Appendix B — Polycom RSS Media Tools
74
-
Accessing and Installing Polycom RSS Media Tools
75
-
Uninstalling Polycom RSS Media Tools
75
-
Operating Environment
75
-
Using Polycom RSS Multicast Player
75
-
Receiving Multicast Videos
76
-
Playing Multicast Videos
77
-
Adjusting Video Window Size
78
-
Video Statistics
78
-
-
Using Media Converter for Polycom RSS
79
-
Format Conversion
79
-
Starting File Conversion
79
-
-
Using Polycom® RSS™ 4000 Upload
83
-
Overview of Interface Areas
83
-
Starting File Upload
85
-
Pausing File Upload
86
-
Stopping File Upload
86
-
Cancelling File Upload
86
-
-
-
Appendix C — Regulatory Notices
87
Advertisement
Polycom RSS 4000 User Manual (78 pages)
Polycom Recording and Streaming Server User Guide
Brand: Polycom
|
Category: Server
|
Size: 1.56 MB
Table of Contents
-
User Guide
1
-
Table of Contents
3
-
Polycom® RSS™ 4000 Introduction
9
-
Overview
9
-
System Hardware Installation
10
-
General Safety Precautions
10
-
Unpack the Package
10
-
Install the System
11
-
-
System Initial Configuration
11
-
Preparations before Configuration
11
-
Modifying the Initial IP Address
12
-
(Optional) Configuring the Gatekeeper Settings
14
-
-
User Interface
15
-
Web User Interface
15
-
TV User Interface
15
-
-
-
Basic Operations
17
-
Introduction to the Web User Interface
17
-
User Permissions
18
-
Common Operations
18
-
-
Starting a Recording
19
-
Playing Back Recorded Files
20
-
-
Ordinary User Configuration
23
-
Personal Settings
23
-
Virtual Recording Room (VRR)
24
-
Dialing-In to a VRR to Start Recording
24
-
Modifying a VRR
25
-
-
Archives
26
-
Viewing Archives
26
-
Playing Back and Downloading Archives
27
-
Modifying Archives
28
-
-
Live Streaming
29
-
Starting a Live Streaming
29
-
Viewing Live Streaming Information
29
-
Viewing Live Streaming Video
30
-
-
-
Administrator Configuration
31
-
Recording Templates
31
-
Viewing Template Information
31
-
Defining a Template
31
-
Managing Templates
32
-
-
Virtual Recording Room (VRR)
33
-
Defining a VRR
33
-
Dialing a VRR to Start Recording
34
-
Managing Vrrs
35
-
-
Channel
35
-
Recording Setting
36
-
Archives and Live Streaming
37
-
Live Streaming Resources Usage
37
-
-
Network Service
38
-
IP Setting
38
-
Gatekeeper
39
-
Qos
40
-
-
User Management
41
-
User
41
-
Viewing Users
41
-
Adding a New User
42
-
Managing Users
43
-
Groups
44
-
Creating a New Group
44
-
Managing Groups
45
-
-
Service Setting
45
-
Active Directory
45
-
Calendar Configuration
46
-
-
System Monitoring
48
-
Dashboard
48
-
System Alerts
49
-
System Information
49
-
Hardware Status
50
-
-
System Logs
50
-
Hard Disk Warning
51
-
-
System Security
51
-
Certificate Setting
51
-
Ports
52
-
Security Policy
53
-
-
System Management
55
-
System Configuration Backup/Restore
55
-
User Data Backup/Restore
55
-
System Upgrade
57
-
Product Activation
59
-
UI Customization
60
-
System Time
62
-
Restart and Shutdown
62
-
Restoring Factory Default Configuration
62
-
-
-
TV User Interface Operation
65
-
Introduction to Main Menu Page
65
-
Start Recording
67
-
Viewing Archives
67
-
-
Appendix A — Telnet/Terminal Commands
69
-
Hyperterminal Parameters
69
-
Login
69
-
Command Introduction
70
-
Reset Password
71
-
Network Setting
72
-
-
-
Appendix B — Regulatory Notices
75
Polycom RSS 4000 Getting Started Manual (17 pages)
System
Brand: Polycom
|
Category: Server
|
Size: 0.54 MB
Table of Contents
-
Table of Contents
3
-
General Safety Precautions
4
-
System Hardware Installation
4
-
System Indicators
5
-
Preparations before Configuration
6
-
Obtaining the Network Information
6
-
Obtaining the Product Activation Key
7
-
-
Initial IP Address Modification
7
-
Installing Multicast Controls (Optional)
11
-
Gatekeeper Configuration (Optional)
11
-
SIP Configuration (Optional)
12
-
Ready for Use
13
-
Maximum Capacity
14
-
TCP/UDP Port Usage
15
-
Notes Regarding on Demand Archive and Live Streaming
16
-
Configuring Windows Media Player to Receive Streaming Media
16
-
-
Hardware Specification
17
-
Polycom Solution Support Services
17

Polycom RSS 4000 Getting Started Manual (14 pages)
Polycom Recording and Streaming Server Getting Started Guide
Brand: Polycom
|
Category: Server
|
Size: 0.39 MB
Table of Contents
-
Getting Started Guide
1
-
General Safety Precautions
3
-
Preparations before Configuration
3
-
System Hardware Installation
4
-
Ready for Use
9
-
Maximum Capacity
10
-
TCP/UDP Port Usage
11
-
Hardware Specification
12
Advertisement
Related Products
-
Polycom Collaboration Server (RMX) 1500
-
Polycom Collaboration Server (RMX) 1800
-
Polycom ReadiManagerLX100
-
Polycom RealPresence RMX 1500
-
Polycom RealPresence 2000
-
Polycom RealPresence RMX 2000
-
Polycom RAS 200I
-
Polycom RMX 4000
-
Polycom RealPresence Collaboration Server Virtual Edition 1800
-
Polycom RealPresence Collaboration Server Virtual Edition 2000
Polycom Categories
IP Phone
![]()
Telephone
Conference System
Conference Phone
Server
More Polycom Manuals
Посмотреть инструкция для Polycom SoundStation IP 4000 бесплатно. Руководство относится к категории Офисные телефоны, 1 человек(а) дали ему среднюю оценку 7.4. Руководство доступно на следующих языках: английский. У вас есть вопрос о Polycom SoundStation IP 4000 или вам нужна помощь? Задайте свой вопрос здесь
Не можете найти ответ на свой вопрос в руководстве? Вы можете найти ответ на свой вопрос ниже, в разделе часто задаваемых вопросов о Polycom SoundStation IP 4000.
Инструкция Polycom SoundStation IP 4000 доступно в русский?
Не нашли свой вопрос? Задайте свой вопрос здесь
SoundStation
®
IP 4000 Quick Start Guide
Unpacking the SoundStation
®
IP 4000
SoundStation
®
IP 4000 Quick Start Guide
Thank you for choosing the SoundStation
®
IP 4000, a conference telephone that
provides high quality audio conferencing
over an IP network.
Network / Power Cable
Power Adapter
Power Interface Module
Polycom SoundStation IP 4000
The following items are included in your
SoundStation
®
IP 4000 package. Check
the contents before installation to ensure
that you have received each item.
If you are missing any items, contact your
SoundStation
®
IP 4000 reseller.
Extension Microphones
(optional)
Quick Start Guide
Power Cord