ENGLISH
NIGHT VISION
INSTRUCTION MANUAL
Lit. #: 98-0190/04-04
Congratulations on the purchase of your Bushnell Night Vision product.
Bushnell Night Vision products are comprised of high quality image
intensifier tubes and optics. Bushnell Night Vision products amplify
existing light, allowing you to see in dark conditions too dark for the
naked eye.
HOW NIGHT VISION WORKS
Bushnell Night Vision products collect and amplify existing light through the
objective lens, which is then focused on the image intensifier. Inside the intensifier,
a photocathode is «excited» by the light and converts the photon energy into
electrons. These electrons accelerate across an electrostatic field inside the
intensifier and strike a phosphor screen (like a green monochrome TV screen)
which emits an image that you can see. It is the acceleration of electrons which
provides gain and enhances the image. This particular product is a Generation I
device.
FRENCH
NIGHT VISION
MANUEL D’INSTRUCTIONS
Merci de votre achat d’un produit Night Vision de Bushnell. Les produits
Night Vision de Bushnell sont conçus avec des tubes et dispositifs
optiques intensificateurs d’images de haute qualité. Les produits Night
Vision de Bushnell amplifient la lumière existante et permettent de voir
dans une obscurité trop sombre pour toute détection à l’œil nu.
FONCTIONNEMENT DES PRODUITS NIGHT VISION
Les produits Night Vision de Bushnell recueillent et amplifient la lumière existante
dans l’objectif ; celle-ci est alors focalisée sur l’intensificateur d’images. À l’intérieur
de l’intensificateur, une photocathode est excitée par la lumière et convertit
l’énergie des photons en électrons. La vitesse de ces électrons s’accélère dans
un champ électrostatique à l’intérieur de l’intensificateur et ils frappent un écran
luminescent (comme un écran de TV monochrome vert) qui émet une image que
l’on peut voir. C’est l’accélération des électrons qui fournit le gain et rehausse
l’image. Il s’agit d’un dispositif de génération I.
GETTING STARTED
Installing Batteries
• Open the Battery Compartment Cover located on the handle.
®
• Place 2 AA batteries in the Battery Compartment.
• Close the Battery Compartment Cover.
Using The Power Button
• Never turn the scope on in daylight conditions with the lens cap off. The pinhole
in the lens cap allows you to test the scope in daylight conditions.
• To turn the scope on /off, simply press the power button once to turn it on, and
press it once again to turn it off.
• Once the unit is off, the image will slowly fade out. This is normal and is
a defect.
To Focus
• First, remove the Lens Cap.
• Adjust the Objective Lens Focusing Ring to infinity.
• While looking at a distant object (at least 40 ft. away), adjust the Eyepiece
Focusing Ring for the sharpest image.
• Once the Eyepiece Focusing Ring is adjusted, you need only adjust the Objective
Lens Focusing Ring as needed.
To Activate The IR Illuminator
• Your Bushnell Night Vision Product includes a built-in infrared illuminator.
This allows you to see in complete darkness when no ambient light source
is available.
• Turning the unit on automatically activates the infrared illuminator.
TROUBLESHOOTING
Spots in the Image
You may see spots in the image. These vary from scope to scope and are
cosmetic blemishes inside the scope. These are normal for Night Vision scopes
and are not a defect.
Scope will not turn on
Check that the batteries are installed properly. Replace the batteries with
POUR COMMENCER
Mise en place des piles
• Retirer le couvercle pour ouvrir le compartiment de pile situé sur la poignée.
®
• Relier 2 piles de AA au connecteur et la placer à l’intérieur du compartiment.
• Refermer le compartiment de pile en posant le couvercle.
Utilisation du bouton d’alimentation
• Ne jamais mettre la lunette sous tension durant le jour, lorsque le capuchon de
lentille est retiré. Le trou de visée du capuchon permet de tester l’instrument
durant le jour.
• Pour mettre la lunette sous / hors tension, appuyer simplement une fois sur le
bouton d’alimentation pour mettre sous tension et appuyer de nouveau une
fois pour mettre hors tension.
• Une fois l’instrument hors tension, l’image s’efface lentement. C’est un
phénomène normal et non pas un défaut.
Mise au point
• Commencer par retirer le capuchon de lentille.
• Régler la bague de mise au point de l’objectif sur l’infini.
• Tout en regardant un objet distant (à au moins 12 m), régler la bague de mise
au point de l’oculaire pour obtenir une image nette.
• Une fois la bague de mise au point de l’oculaire réglée, il suffit de régler la
bague de mise au point de l’objectif selon le besoin.
Pour activer l’illuminateur infrarouge (IR)
• Votre instrument Night Vision de Bushnell est doté d’un illuminateur infrarouge
intégré. Il permet de voir dans l’obscurité complète lorsqu’aucune source de
lumière ambiante n’est disponible.
• Le fait de mettre l’instrument sous tension active automatiquement l’illuminateur
infrarouge.
DÉPANNAGE
Points sur l’image
Il est possible que des points apparaissent sur l’image. Ils varient selon les
instruments et sont en fait de petites taches cosmétiques internes. Elles sont
normales dans les lunettes Night Vision et ne constituent pas un défaut.
new ones. Check the battery contacts to ensure they are clean and free of
corrosion.
Image is not focused
Adjust the focus on the Focusing Eyepiece. Adjust the Objective Lens
Focusing Ring. You must be at least 5 feet from the object you are viewing.
If still no improvement, clean the lenses; they may be foggy or dusty. (See
«To Focus»).
Visibility decreases or disappears
Bright light sources such as headlights may cause visibility to degrade or
not
disappear completely. Press power button and turn the scope away from the
light source. The unit will restore itself in 1 or 2 minutes. Conditions such as fog
or extremely dark environments will decrease visibility.
Scope flashes
The scope may flash when used in a bright environment. It may also flash during
the first few seconds of use in dark environments.
CARE & MAINTENANCE
• When not using for an extended amount of time, remove batteries and store
the product in a dry location.
• Avoid turning the product on in extremely bright light conditions.
• Handle this product like you would a camera. Though Bushnell Night Vision
products are durably constructed, the image intensifier tube consists of glass
and is subject to breakage.
• Keep the optics clean. We recommend using a camera cleaner kit to clean the
outside of the objective and eyepiece lenses. Follow the directions with the kit.
• Do not disassemble this product. Unauthorized disassembly not only voids
the warranty but may also cause damage from the lack of special tools and
techniques
La lunette ne se met pas sous tension.
Vérifier que les piles sont installées correctement. Remplacer les piles par des
neuves. Vérifier que les contacts des piles sont propres et exempts de corrosion.
L’image n’est pas au point.
Régler la mise au point sur l’oculaire de mise au point. Régler la bague de mise
au point de l’objectif. L’observateur doit se trouver à au moins 1,50 m de l’objet
observé. S’il n’y a toujours pas d’amélioration, nettoyer les lentilles ; elles sont
peut-être couvertes de buée ou de poussière. (Voir « Mise au point »).
La visibilité diminue ou disparaît.
Des sources de lumière intense telles que des phares peuvent faire diminuer
ou disparaître complètement la visibilité. Appuyer sur le bouton d’alimentation
et tourner la lunette à l’écart de la source lumineuse. Elle se remet à l’état initial
en 1 à 2 minutes. Certaines conditions telles que le brouillard ou une obscurité
intense diminuent la visibilité.
Clignotement de la lunette
Il est possible que la lunette clignote dans un environnement lumineux. Elle
risque aussi de clignoter durant les premières secondes d’utilisation dans un
environnement sombre.
PRÉCAUTIONS ET ENTRETIEN
• Lorsque l’instrument n’est pas utilisé pendant une période prolongée, retirer la
pile et le ranger dans un endroit sec.
• Éviter de mettre l’instrument sous tension dans un environnement très
lumineux.
• Manipuler cet instrument en prenant les mêmes précautions que pour un
appareil photo. Bien que les produits Night Vision de Bushnell soient construits
pour durer, le tube intensificateur d’images est en verre et susceptible de se
briser.
• Maintenir les dispositifs optiques propres. Il est recommandé d’utiliser un kit de
nettoyage d’appareil photo pour nettoyer l’extérieur des lentilles de l’objectif et
de l’oculaire. Suivre les instructions fournies avec le kit.
• Ne pas désassembler cet instrument. Tout désassemblage sans autorisation
non seulement annule la garantie mais peut aussi causer des dommages en
raison du manque d’outils spéciaux et de la procédure appropriée.
WARRANTY / REPAIR
TWO-YEAR LIMITED WARRANTY
Your Bushnell ® product is warranted to be free of defects in materials and workmanship for two years
after the date of purchase. In the event of a defect under this warranty, we will, at our option, repair
or replace the product, provided that you return the product postage prepaid. This warranty does
not cover damages caused by misuse, improper handling, installation, or maintenance provided by
someone other than a Bushnell Authorized Service Department.
Any return made under this warranty
must be accompanied by the items listed below:
1) A check/money order in the amount of $10.00 to cover the
cost of postage and handling
2) Name and address for product return
3) An explanation of the defect
4) Proof of Date Purchased
5) Product should be well packed in a sturdy outside shipping carton,
to prevent damage in transit, with return postage prepaid to the
address listed below:
IN U.S.A. SEND TO:
IN CANADA SEND TO:
Bushnell Performance Optics
Bushnell Performance Optics
Attn.: Repairs
Attn.: Repairs
8500 Marshall Drive
25A East Pearce Street, Unit 1
Lenexa, Kansas 66214
Richmond Hill, Ontario L4B 2M9
ForproductspurchasedoutsidetheUnitedStatesorCanadapleasecontactyourlocaldealerfor
applicable warranty information. In Europe you may also contact Bushnell at:
+49 (0)2 21/70 99 39 50
Bushnell Performance Optics Germany GmbH
Morsestrasse 4
50769 — Cologne
Germany
Fax: +49 (0)2 21/70 99 39 9
This warranty gives you specific legal rights.
You may have other rights which vary from country to country.
©2003 Bushnell Performance Optics
Class 1 LED product per IEC 60825-1/nov 1993, appendix EN 60825-1A11/oct 1996
GARANTIE / RÉPARATION
GARANTIE LIMITÉE de DEUX ans
Votre produit Bushnell ® est garanti exempt de défauts de matériaux et de fabrication pendant deux
ans après la date d’achat. Au cas où un défaut apparaîtrait sous cette garantie, nous nous réservons
l’option de réparer ou de remplacer le produit, à condition de nous le renvoyer en port payé. La
présente garantie ne couvre pas les dommages causés par une utilisation, une manipulation, une
installation incorrecte(s) ou un entretien incorrect ou fourni par quelqu’un d’autre qu’un centre de
réparation agréé par Bushnell.
Tout retour effectué dans le cadre de la présente garantie doit être accompagné des articles indiqués
ci-dessous:
1) un chèque ou mandat d’une somme de 10,00 $ US pour couvrir les
frais d’envoi et de manutention
2) le nom et l’adresse pour le retour du produit
3) une description du défaut constaté
4) la preuve de la date d’achat
5) Le produit doit être emballé soigneusement, dans un carton d’expédition
solide, pour éviter qu’il ne soit endommagé durant le transport ; envoyez-le
en port payé, à l’adresse indiquée ci-dessous :
AUX ÉTATS-UNIS, ENVOYEZ À :
AU CANADA, ENVOYEZ À :
Bushnell Performance Optics
Bushnell Performance Optics
Attn.: Repairs
Attn.: Repairs
8500 Marshall Drive
25A East Pearce Street, Unit 1
Lenexa, Kansas 66214
Richmond Hill, Ontario L4B 2M9
Pour les produits achetés en dehors des États-Unis et du Canada, veuillez contacter votre distributeur
local pour tous renseignements concernant la garantie. En Europe, vous pouvez aussi contacter
Bushnell au : +49 (0)2 21/70 99 39 50
Bushnell Performance Optics Germany GmbH
Morsestrasse 4
50769 — Cologne
Allemagne
Fax: +49 (0)2 21/70 99 39 9
La présente garantie vous donne des droits légaux spécifiques.
Vous pouvez avoir d’autres droits qui varient selon les pays.
©2003 Bushnell Performance Optics
Produit à DEL de classe 1 selon IEC 60825-1 / nov. 1993, annexe EN 60825-1A11 / oct. 1996

Бинокль ночного видения цифровой
Bresser 3×20
Art. No. 18-77480
RU
ИНСТРУКЦИЯ ПО
ЭКСПЛУАТАЦИИ

2
СКАЧАТЬ МАНУАЛ НА ДРУГОМ
ЯЗЫКЕ
Вам требуется подробная инструкция на это
изделие на определенном языке? Проверьте
наличие соответствующей версии инструкции,
посетив наш сайт по этой ссылке (QR-коду).
www.bresser.de/P1877480
О данном руководстве
Данное руководство по эксплуатации
является частью устройства.
Сохраните руководство по эксплуата-
ции для последующего использования. При
продаже или передаче устройства руководство
по эксплуатации необходимо передать следую-
щему владельцу (пользователю).
Общие предупреждения
ОПАСНОСТЬ!
Дети могут пользоваться устройством только
под присмотром взрослых. Храните упаковку
(пластиковые пакеты, резиновые ленты и пр.)
в недоступном для детей месте. Существует
опасность УДУШЕНИЯ!
Не подвергайте устройство воздействию
высоких температур. Используйте только
адаптер питания, идущий в комплекте, или
рекомендованные батарейки. Никогда не
закорачивайте устройство или батарейки
и не бросайте их в огонь. Неправильное
использование устройства или высокие
температуры могут привести к короткому
замыканию, пожару и даже взрыву!
ОПАСНОСТЬ ПОЖАРА!
Не оставляйте устройство – в особенности лин-
зы – под прямыми солнечными лучами! Из-за
фокусировки солнечных лучей может возник-
нуть пожар!
ОПАСНОСТЬ ПОРАЖЕНИЯ ЭЛЕКТРОТОКОМ!
Данное устройство содержит электронные
компоненты, приводимые в действие от источ-
ника тока (батарейки). Не оставляйте ребенка
без присмотра. Устройство следует использо-
вать только так, как указано в инструкции, ина-
че есть серьезный риск получить УДАР ТОКОМ.
ОПАСНОСТЬ ПОЛУЧЕНИЯ ОЖОГА!
Исключите доступ детей к батарейкам! При
установке/замене батареек соблюдайте поляр-
ность. Вытекшие или поврежденные батарейки
вызывают раздражения при контакте с кожей.
В случае необходимости надевайте подходя-
щие защитные перчатки.
ВНИМАНИЕ!
Никогда не разбирайте устройство. При воз-
никновении неисправностей обратитесь к ди-
леру. Он свяжется с нашим сервисным центром
и при необходимости отправит устройство в
ремонт.
Используйте только рекомендованные
батарейки. Заменяйте весь комплект
разряженных или использованных батареек
целиком. Не устанавливайте батарейки разных
марок, типов или емкостей. Если устройство не
будет использоваться в течение длительного
времени, выньте из него батарейки!
ЗАЩИТА сферы личной жизни!
Бинокли предназначены для личного исполь-
зования. Соблюдайте права на личную жизнь
окружающих вас людей – не используйте это
устройство, например, для заглядывания в
окна жилых помещений!
RU
3
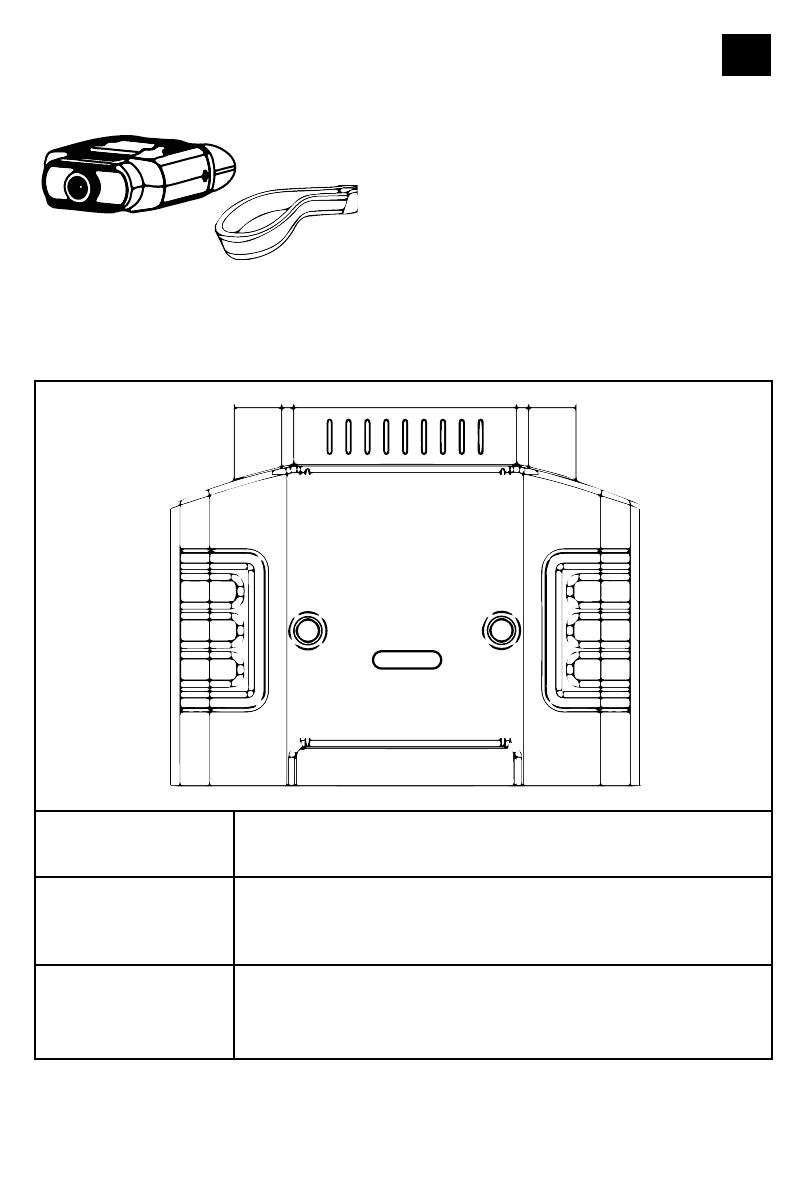
Комплект поставки
ZOOM
POWER
IR
ZOOM
POWER
IR
Прибор ночного видения, шейный ремешок, чехол, инструкция по эксплуатации. Для питания
прибора необходимы батарейки типа AA (LR6) — 8 шт. (не входят в комплект поставки).
Устройство
ZOOM
POWER
IR
b
POWER
(кнопка вкл/выкл)
Нажмите и удерживайте кнопку для включения и выключения
устройства.
c
IR
(кнопка вкл/выкл
ИК-подсветки)
Нажмите IR, чтобы установить один из 7 режимов яркости (0
> 1 > 2 > 3 > 4 > 5 > 6 > 7 > 0 …) для наблюдения в ночное время.
d
ZOOM
(кнопка изменения
масштаба)
Нажмите кнопку ZOOM, чтобы увеличить масштаб.
Максимально возможное увеличение: 6x (3X нормальный +
2X цифровой). При достижении увеличения 6x снова нажмите
кнопку ZOOM, чтобы вернуться к увеличению 3x.
RU
5
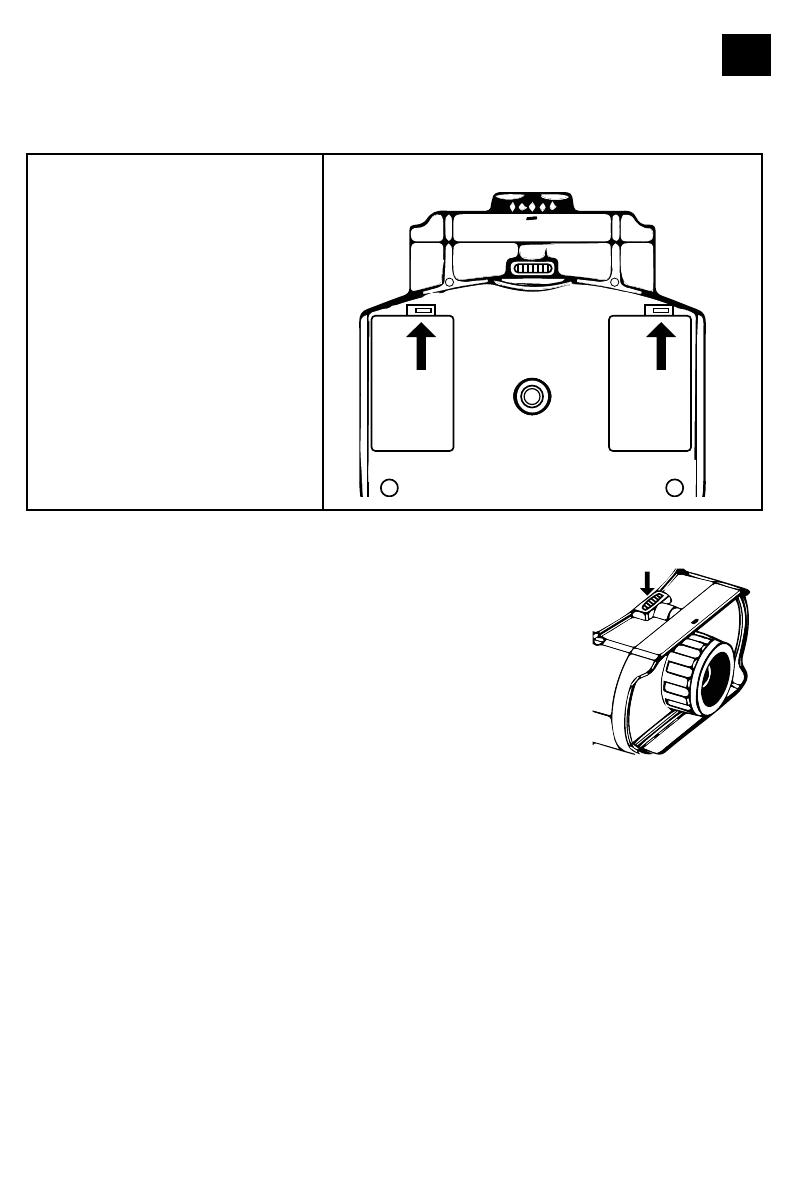
Установка батареек
(1) Откройте крышки
батарейных отсеков (A+B).
(2) Установите по 4
алкалиновые батарейки типа
АА в каждый отсек (A+B). При
установке батареек соблюдайте
полярность (+) и (-).
(3) Закройте батарейные отсеки
крышками (A+B).
BA
Включение устройства
(1) Нажмите и удерживайте кнопку POWER, чтобы включить устрой—
ство. Когда устройство включится, посмотрите на ЖК-экран
устройства.
(2) Настройте фокус, поворачивая колесо фокусировки, которое нахо—
дится на нижней части передней панели устройства.
(3) Для использования устройства в ночное время включите
инфракрасное освещение, нажав кнопку IR. Увеличьте яркость,
многократно нажимая кнопку. Доступно 7 уровней яркости (0 >
1 > 2 > 3 > 4 > 5 > 6 > 7 > 0 …).
(4) Выключите устройство, нажав и удерживая кнопку POWER.
ZOOM
POWER
6
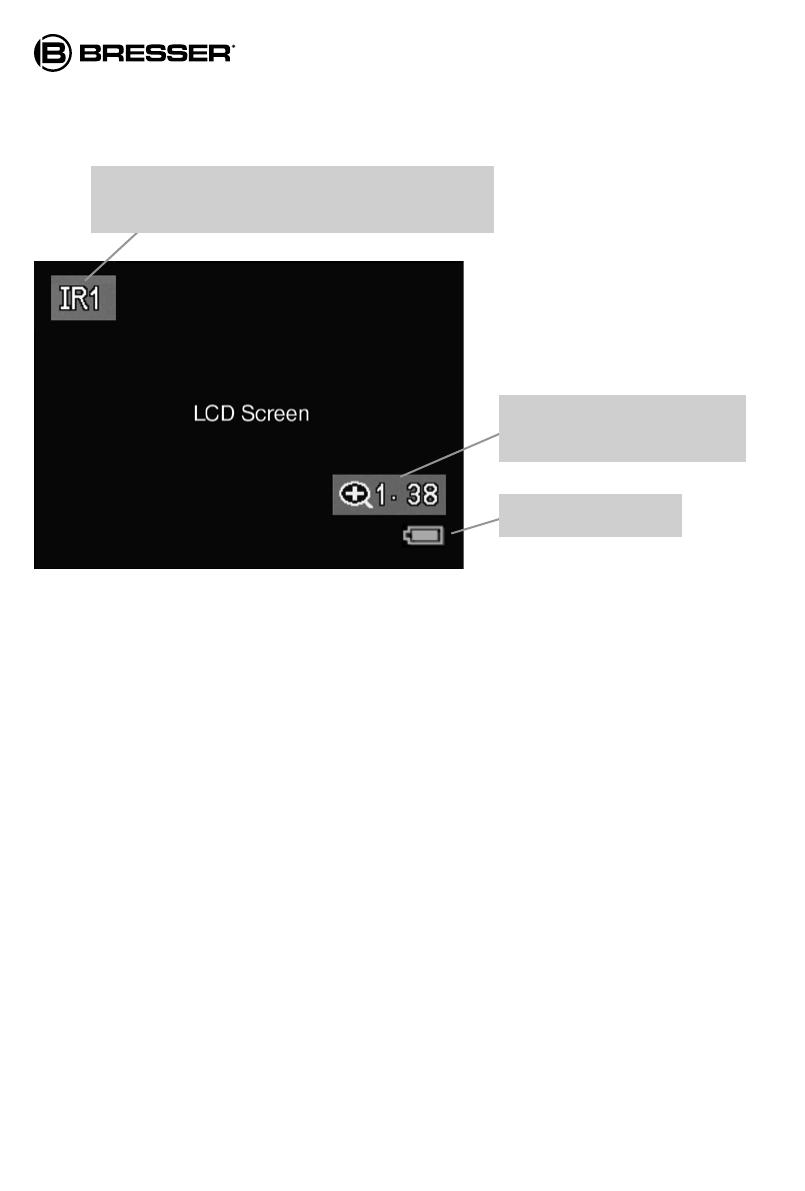
Информация на экране
Индикатор уровня ИК-освещения (1–7). Чем
выше показатель IR, тем ярче изображение.
Индикатор увеличения.
1= 3X / 2= 6X
Состояние батареи
Поиск и устранение неполадок
Питание устройства выключено:
• Если бинокль не включается, проверьте, нет ли неисправных, недостающих или неправильно
установленных батареек. Правильно установите батарейки или замените неисправные. Убеди
—
тесь, что в устройстве используются только алкалиновые батарейки.
Низкое качество изображения:
• Если вы постоянно носите очки, не снимайте их во время использования бинокля.
• Настройте фокус, медленно поворачивая колесо фокусировки, расположенное в нижней части
передней панели бинокля. Убедитесь, что фокусировка выполнена.
СОВЕТЫ по уходу
Перед чисткой отключите устройство от источника питания (выньте батарейки)! Протирайте по-
верхности устройства сухой салфеткой. Не используйте чистящую жидкость, она может повредить
электронные компоненты. Линзы (окуляры и объектив) следует очищать только мягкой нетканой
салфеткой (например, микрофиброй). Не давите слишком сильно – можно поцарапать линзу. Бере
—
гите устройство от пыли и влаги. Храните устройство в кейсе или в оригинальной упаковке. Если
устройство не будет использоваться в течение длительного времени, выньте из него батарейки!
RU
7
Информация на экране
Индикатор уровня ИК-освещения (1–7). Чем
выше показатель IR, тем ярче изображение.
Индикатор увеличения.
1= 3X / 2= 6X
Состояние батареи
Поиск и устранение неполадок
Питание устройства выключено:
• Если бинокль не включается, проверьте, нет ли неисправных, недостающих или неправильно
установленных батареек. Правильно установите батарейки или замените неисправные. Убеди
—
тесь, что в устройстве используются только алкалиновые батарейки.
Низкое качество изображения:
• Если вы постоянно носите очки, не снимайте их во время использования бинокля.
• Настройте фокус, медленно поворачивая колесо фокусировки, расположенное в нижней части
передней панели бинокля. Убедитесь, что фокусировка выполнена.
СОВЕТЫ по уходу
Перед чисткой отключите устройство от источника питания (выньте батарейки)! Протирайте по-
верхности устройства сухой салфеткой. Не используйте чистящую жидкость, она может повредить
электронные компоненты. Линзы (окуляры и объектив) следует очищать только мягкой нетканой
салфеткой (например, микрофиброй). Не давите слишком сильно – можно поцарапать линзу. Бере
—
гите устройство от пыли и влаги. Храните устройство в кейсе или в оригинальной упаковке. Если
устройство не будет использоваться в течение длительного времени, выньте из него батарейки!
СЕРТИФИКАТ СООТВЕТСТВИЯ ЕС
Сертификат соответствия был составлен с учетом действующих правил и соответствую-
щих норм компанией Bresser GmbH. Его можно просмотреть по запросу в любое время.
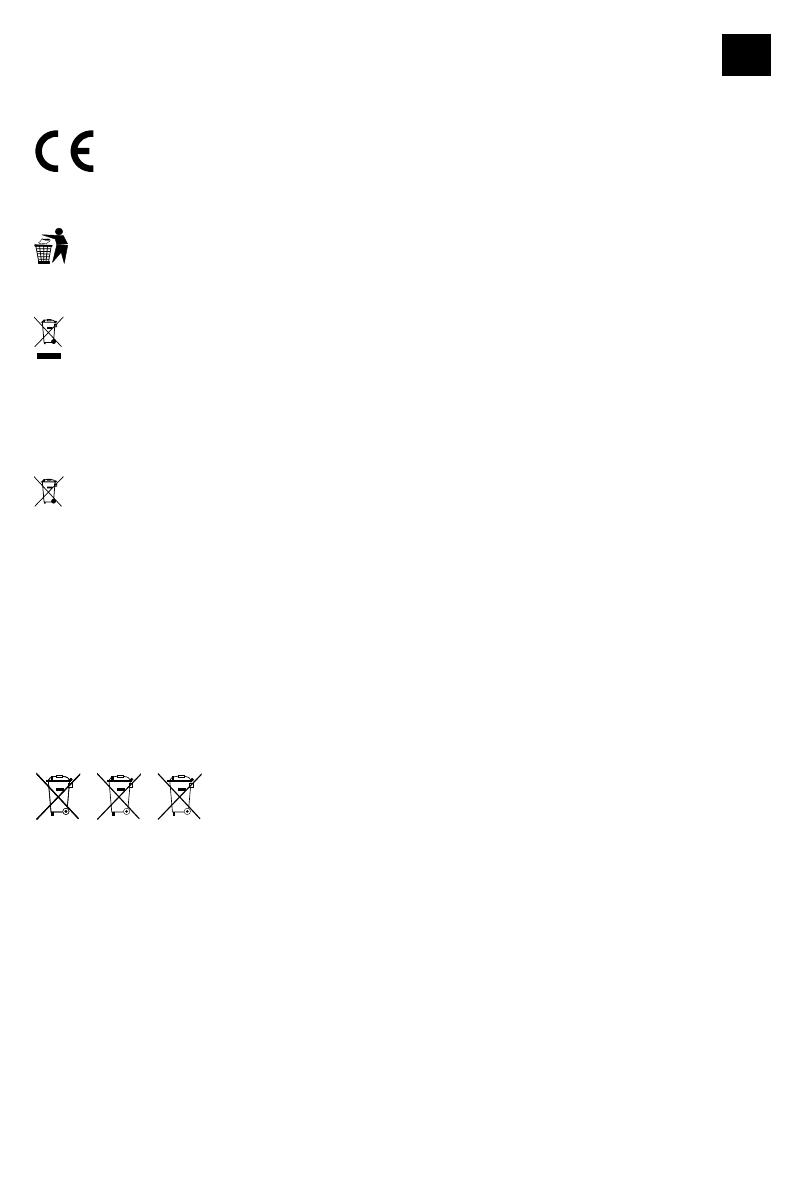
УТИЛИЗАЦИЯ
Утилизируйте упаковку как предписано законом. При необходимости проконсультируйтесь с
местными властями.
Не выбрасывайте электронные детали в обычный мусорный контейнер. Европейская директива
по утилизации электронного и электрического оборудования 2002/96/EU и соответствующие ей
законы требуют отдельного сбора и переработки подобных устройств. Использованные элементы
питания следует утилизировать отдельно. Подробную информацию об утилизации электроники
можно получить у местных властей.
Элементы питания не являются бытовыми отходами, поэтому в соответствии с
законодательными требованиями их необходимо сдавать в пункты приема использованных
элементов питания. Вы можете бесплатно сдать использованные элементы питания в нашем
магазине или рядом с вами (например, в торговых точках или в пунктах приема).
На элементах питания изображен перечеркнутый контейнер, а также указано содержащееся
ядовитое вещество: «Cd» обозначает кадмий, «Hg» – ртуть, а «Pb» – свинец.
1
Элемент питания содержит кадмий
2
Элемент питания содержит ртуть
3
Элемент питания содержит свинец
Cd¹ Hg² Pb³
ГАРАНТИЯ И ОБСЛУЖИВАНИЕ
Стандартный гарантийный срок составляет 2 года, начиная со дня покупки. Чтобы воспользоваться
расширенной гарантией, необходимо зарегистрироваться на нашем сайте. Подробные условия гаран
—
тии, информацию о расширенной гарантии и о наших сервисных центрах можно получить на нашем
сайте www.bresser.de/warranty_terms.

Оставляем за собой право на ошибки и технические изменения.
Manual_1877480_Digital-NV-Bino-3x20_ru_BRESSER_v012020a
Bresser GmbH
Gutenbergstr. 2 · DE-46414 Rhede
Germany
Find us on: