PDF инструкция · 22 страниц(ы) русский
инструкцияDaikin BRC1D52

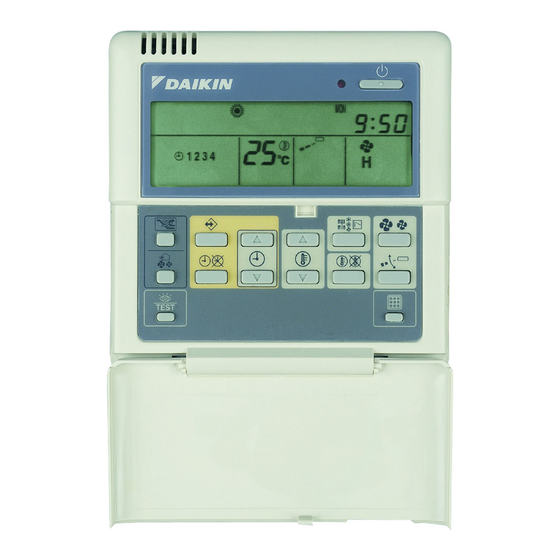
Пульт дистанционного управления
BRC1D527
Инструкция по эксплуатации
Посмотреть инструкция для Daikin BRC1D52 бесплатно. Руководство относится к категории Термостаты, 40 человек(а) дали ему среднюю оценку 8.5. Руководство доступно на следующих языках: русский. У вас есть вопрос о Daikin BRC1D52 или вам нужна помощь? Задайте свой вопрос здесь
Главная
Не можете найти ответ на свой вопрос в руководстве? Вы можете найти ответ на свой вопрос ниже, в разделе часто задаваемых вопросов о Daikin BRC1D52.
Где лучше всего разместить термостат?
Что такое зона нечувствительности термостата?
Какая идеальная комнатная температура?
Инструкция Daikin BRC1D52 доступно в русский?
Не нашли свой вопрос? Задайте свой вопрос здесь
- Manuals
- Brands
- Daikin Manuals
- Remote Control
- BRC1D52
- Installation manual
-
Contents
-
Table of Contents
-
Bookmarks
Quick Links
INSTALLATION MANUAL
Remote controller
BRC1D527
Related Manuals for Daikin BRC1D52
Summary of Contents for Daikin BRC1D52
-
Page 1
INSTALLATION MANUAL Remote controller BRC1D527… -
Page 2
UNIT No. GROUP SETTING P2 P1 P2 P1… -
Page 3: Installation
LEAKS, FIRE OR OTHER DAMAGE TO THE EQUIPMENT. BE SURE ONLY TO Insert a minus screwdriver into the slots (1) in the USE ACCESSORIES MADE BY DAIKIN lower part of the remote controller (2 places), and WHICH ARE SPECIFICALLY DESIGNED remove the upper part of the remote controller.
-
Page 4: Wire The Indoor Unit
3. Wire the indoor unit (Refer to figure 6) NOTE 1. The switch wiring connection are not included. indoor unit 2. Do not directly touch the PC board lower part of the remote controller with your hand. upper part of the remote controller wired from the rear If controlling one indoor unit or one wired from the top…
-
Page 5: Field Settings
5. Permission level function 6. Field settings If required, you can limit the user action by If optional accessories are mounted on the indoor restricting the number of operable buttons. Refer unit, the indoor unit setting may have to be changed. to the chapter «Field settings».
-
Page 6
Example Notes If during group setting and the time to clean the air filter is set to FILTER CONTAMINATION — HEAVY, SET MODE NO. to “10”, FIRST CODE NO. to “0”, and SECOND CODE NO. to “02”. NOTE 1. Setting is carried out in the group mode, however, if the mode number inside the parentheses is selected, indoor… -
Page 7
Mode FIRST SECOND CODE NO. Note 2 CODE Note 1 Description of setting Approx. Approx. Ultra long 10.000 5.000 life filter Filter Contamination — Heavy/Light hrs. hrs. (Setting for spacing time of display time Approx. Approx. to clean air filter) Long life 2.500 1.250… -
Page 8
Mode FIRST SECOND CODE NO. Note 2 CODE Note 1 Description of setting Permission level setting Level 2 Level 3 — — Leave home function Not permitted Permitted — — Thermostat sensor in remote controller (for limit Not use — —… -
Page 9
NOTES… -
Page 10
4PWEN16769-1 Zandvoordestraat 300, B-8400 Oostende, Belgium…
This manual is also suitable for:
Brc1d527
Содержание
- Daikin BRC1D52 Проводной пульт (с таймером программирования)
- ➧ Описание
- ➧ Монтаж
- ➧ Доставка по всей России
- Что входит в стандартный монтаж?
- Внимание!
- Daikin brc1d52 инструкция по монтажу
- Инструкции
- Каталог
- Категории товаров
- Daikin в Европе и Роcсии
- Daikin BRC1D52 — проводной пульт (с таймером программирования)
- Описание Daikin BRC1D52 — проводной пульт (с таймером программирования)
Daikin BRC1D52 Проводной пульт (с таймером программирования)
Осуществляется доставка во всех городах РФ. На многие модели доставка бесплатно.
Гарантия 3 года
Официальная гарантия поддерживается на всей территории РФ.
Выставочный зал «DAIKIN»
Все самые популярные модели представлены в наших шоу-румах.
➧ Описание
➧ Монтаж
➧ Доставка по всей России
- Рабочий диапазон (мин./макс.): температура помещения регулируется в пределах настраиваемых верхнего и нижнего диапазонов. Рабочий диапазон может быть активизирован вручную или по программируемому таймеру.
- Часы реального времени: указывают реальное время и день
- Программируемый таймер:Возможно запрограммировать пульт дистанционного управления для каждого дня недели.Действия в течение пяти дней можно установить следующим образом:
-Установка ВКЛ: блок ВКЛЮЧАЕТСЯ и поддерживается нормальная работа
-Установка ВЫКЛ: блок ВЫКЛЮЧАЕТСЯ
-Пределы: блок ВКЛЮЧАЕТСЯ и регулируется в пределах мин./макс. (более подробно см. Рабочие пределы)
- Работа во время Вашего отсутствия (защита от замораживания): во время отсутствия людей температура внутри помещений может поддерживаться на заданном уровне.
Эта функция может также ВКЛЮЧАТЬ/ВЫКЛЮЧАТЬ блок. - Можно выбрать различные уровни блокировки кнопок следующим образом:
— Уровень 1 : все кнопки разблокированы
— Уровень 2 : все кнопки заблокированы, за исключением:
ВКЛ./ВЫКЛ., установка температуры больше/меньше, скорость вентилятора, режим охлаждения / обогрева, включение/выключение программируемого таймера, кнопка регулировки направления потока
— Уровень 3 : все кнопки заблокированы, за исключением:
ВКЛ./ВЫКЛ., установка температуры больше/меньше, скорость вентилятора - Удобная для пользователя функция HRV (вентиляции с рекуперацией тепла), включаемая соответствующей кнопкой выбора режима вентиляции и скорости вентилятора
- Постоянный контроль системы на предмет неисправности, всего 80 контролируемых параметров
- Вывод места и состояния неисправности
- Сокращение времени и затрат на техническое обслуживание
Рабочие кнопки: ВКЛ./ВЫКЛ., запуск / остановка режима таймера, вкл./выкл. режима таймера, запрограммированное время, установка температуры, регулировка направления потока воздуха, выбор режима работы, регулирование скорости вентилятора, сброс обозначения фильтра, проверка / тестирование
Дисплей: Режим работы, вентиляция с рекуперацией тепла (HRV) при работе, переключение режимов охлаждение / обогрев, индикация централизованного управления, установка температуры, направление потока воздуха, запрограммированное время, проверка/тестирование, скорость вентилятора, чистка воздушного фильтра, режим разморозки / горячего пуска, индикация неисправностей
Внимание, только до 28 февраля, действуют Зимние акции и скидки:
1. Скидки на оборудование до -20%.
2. Скидка на установку — от 20% до 50% (в зависимости от модели).
При покупке с установкой в Москве и Подмосковье стоимость базовых монтажных работ*, включая комплект расходных материалов (до 5 м):
16 900 руб. — 20% = 13 500 руб .
3. При заказе из любого региона России — доставка в Ваш город — БЕСПЛАТНО (на модели с ценой по акции или скидке — бесплатная доставка не распространяется).
Список моделей, участвующих в акциях, уточняйте в отделе продаж. Акции не суммируются.
Что входит в стандартный монтаж?

Внимание!
Такие работы как: монтаж в 2 этапа, штробление стен, установка наружного блока с использованием альпинистского снаряжения или вышки, использование пылесоса при сверлении отверстий, отвод конденсата в канализационные стояки, подключение в электрощите, прокладка кабеля от электрического щита к оборудованию, подъем наружного блока с лестницы, установка на вентилируемый фасад, установка на шпильки и т.п. — не входят в стоимость базовых монтажных работ! И осуществляются либо силами Покупателя, либо обговариваются заранее и оплачиваются покупателем дополнительно.
Осуществляем оперативную доставку по всем городам во всех регионах России.
Официальная гарантия действует и поддерживается на всей территории РФ.
Цены, указанные на сайте, являются справочными, от указанных цен предоставляются скидки и акции, а также выгодные условия доставки.
Отправьте заказ на интересующее Вас оборудование через кнопку «Купить», и мы свяжемся с Вами в ближайшее время или позвоните в отдел продаж для получения более подробной информации о доставке, скидках и заказа оборудования.
- Доставка по Москве в пределах МКАД — от 690 руб. (+300 руб. за каждую следующую единицу товара).
Тел: 8 (800) 775-54-28 (Бесплатный звонок во всех городах РФ)
Источник
Daikin brc1d52 инструкция по монтажу
Информация для покупателей
Представленный в прошлом году компанией Daikin бытовой многофункциональный кондиционер «Urusara X» с функцией вентиляции на практике демонстрирует повышение качества воздуха в обслуживаемом помещении благодаря воздухообмену. В период пандемии COVID-19 достижение высоких показателей воздушной среды жизненно важно, поскольку распространение нового коронавируса тесно связано с его концентрацией во вдыхаемом воздухе.
Чистый воздух дома является основой крепкого здоровья любого человека, его хорошего самочувствия и бодрости. Воздухоочиститель Daikin MC55W не просто очищает воздушный поток, пропуская его через свои фильтры. Он делает воздух действительно целебным , как на весеннем лугу.
Компания Daikin была включена в список «А» «Climate Change» международной экологической организации CDP. Такая высокая оценка дана проводимым Daikin мерам по борьбе с изменением климата, а также степени раскрытия корпоративной информации, касающейся экологии.
Представляем инновационное и экологически безопасное решение — новую серию инверторных чиллеров и тепловых насосов с воздушным охлаждением конденсатора Daikin EWY(A)T-CZ, работающих с применением технологии Bluevolution на наиболее сбалансированном с точки зрения воздействия на окружающую среду хладагенте R-32 с низким потенциалом глобального потепления и с низкой воспламеняемостью.
Компания Daikin представляет новый кассетный внутренний блок серии FXFN с круговым потоком воздуха для системы коммерческого назначения Conveni-Pack, использующей в качестве хладагента экологически безопасный, нетоксичный и негорючий диоксид углерода CO2 с низким потенциалом глобального потепления (GWP=1), класса безопасности A1.
Уважаемые партнёры, коллеги, покупатели, друзья!
Компания «DAIKIN-RUSSIA» поздравляет вас с наступающим Новым годом и Рождеством! Благодарим вас за то, что вы весь 2021 год были с нами. Желаем вам всегда отличного климата дома и на работе, восхитительных праздников, полных чудес и подарков! Профессиональных успехов вам и финансового роста в будущем году!
Компания Daikin представляет обновлённую версию внутренних настенных блоков FAA-B, предназначенных для работы в системе с полупромышленными тепловыми насосами Sky Air серии Alpha с применением хладагента R-32. Новинка отличается оптимальной гибкостью в проектировании и установке.
Источник
Инструкции
Инструкции по эксплуатации кондиционеров Daikin
Настенные кондиционеры
Daikin серия FTXG
Daikin серия FTXN
Daikin серия FTXR
Daikin серия FTX
Daikin серия FDXS
Канальные кондиционеры
Daikin серия FDEQ
Daikin серия FDQ
Daikin серия FBQ
Daikin серия FDXS
Кассетные кондиционеры
Универсальные кондиционеры
Напольные кондиционеры
Каталог
Категории товаров
Daikin в Европе и Роcсии
Москва
111024, Авиамоторная, 30. 8 (499) 229-06-39 8 (800) 200-16-08 daikin-com.ru
DAIKIN EUROPE N.V. — OSTEND
Oostende, Zandvoordestraat 300 8400 +32 59 55 81 11 www.daikin.eu
Мы в социальных сетях — vk.com
Мы гарантируем Вам лучшие цены на оборудование Daikin!
При обращении предоставляются скидки до 20% , и действуют следующие акции:
1. До 28 февраля — скидка на установку — от 20% до 50% (в зависимости от модели).
При покупке с установкой в Москве и Подмосковье стоимость базовых монтажных работ*, включая комплект расходных материалов (до 5 м):
16 900 руб. — 20% = 13 500 руб .
2. Спец ЦЕНА — Daikin 20 (инвертор, до 20-25 метров) — всего за 45 900 руб. Модели на выбор! Спешите, количество ограничено.
3. При заказе из других городов РФ, на оборудование Вам будет предоставлена специальная скидка НА ОБОРУДОВАНИЕ.
Подробности акций и модели, уточняйте по телефону. Или — оформите заказ и отправьте его нам. С Вами (в рабочие часы) свяжется наш менеджер, предложит возможную скидку и переоформит Ваш заказ уже со скидкой! Call-центр на прием заказов работает круглосуточно. Обратная связь и тех. консультации только в рабочее время.
Источник
Daikin BRC1D52 — проводной пульт (с таймером программирования)
![]()


Описание Daikin BRC1D52 — проводной пульт (с таймером программирования)
- Рабочий диапазон (мин./макс.): температура помещения регулируется в пределах настраиваемых верхнего и нижнего диапазонов. Рабочий диапазон может быть активизирован вручную или по программируемому таймеру.
- Часы реального времени: указывают реальное время и день
- Программируемый таймер:Возможно запрограммировать пульт дистанционного управления для каждого дня недели.Действия в течение пяти дней можно установить следующим образом:
-Установка ВКЛ: блок ВКЛЮЧАЕТСЯ и поддерживается нормальная работа
-Установка ВЫКЛ: блок ВЫКЛЮЧАЕТСЯ
-Пределы: блок ВКЛЮЧАЕТСЯ и регулируется в пределах мин./макс. (более подробно см. Рабочие пределы)
- Работа во время Вашего отсутствия (защита от замораживания): во время отсутствия людей температура внутри помещений может поддерживаться на заданном уровне.
Эта функция может также ВКЛЮЧАТЬ/ВЫКЛЮЧАТЬ блок. - Можно выбрать различные уровни блокировки кнопок следующим образом:
Уровень 1 : все кнопки разблокированы
Уровень 2 : все кнопки заблокированы, за исключением:
ВКЛ./ВЫКЛ., установка температуры больше/меньше, скорость вентилятора, режим охлаждения / обогрева, включение/выключение программируемого таймера, кнопка регулировки направления потока
Уровень 3 : все кнопки заблокированы, за исключением:
ВКЛ./ВЫКЛ., установка температуры больше/меньше, скорость вентилятора - Удобная для пользователя функция HRV (вентиляции с рекуперацией тепла), включаемая соответствующей кнопкой выбора режима вентиляции и скорости вентилятора
- Постоянный контроль системы на предмет неисправности, всего 80 контролируемых параметров
- Вывод места и состояния неисправности
- Сокращение времени и затрат на техническое обслуживание
Рабочие кнопки: ВКЛ./ВЫКЛ., запуск / остановка режима таймера, вкл./выкл. режима таймера, запрограммированное время, установка температуры, регулировка направления потока воздуха, выбор режима работы, регулирование скорости вентилятора, сброс обозначения фильтра, проверка / тестирование
Дисплей: Режим работы, вентиляция с рекуперацией тепла ( HRV ) при работе, переключение режимов охлаждение / обогрев, индикация централизованного управления, установка температуры, направление потока воздуха, запрограммированное время, проверка/тестирование, скорость вентилятора, чистка воздушного фильтра, режим разморозки / горячего пуска, индикация неисправностей
Источник


- Описание
- Характеристики
- Документы
- Аналогичные
товары - Совместим с
Проводной пульт:
- Программирование расписания работы кондиционера по таймеру:
- Для одного дня можно запрограммировать до 5 действий, таких как:
- включение кондиционера в заданное время,
- включение и работа кондиционера в заданном температурном диапазоне.
- Для одного дня можно запрограммировать до 5 действий, таких как:
- Никого нет дома: во время Вашего отсутствия кондиционер будет поддерживать температуру воздуха в помещении на заданном уровне. С помощью этой функции можно включить или выключить кондиционер.
- Удобное управление функциями вентиляции воздуха благодаря отдельным кнопкам для включения режима вентиляции и установки скорости вращения вентилятора.
- Постоянная проверка системы на обнаружение ошибок более чем по 80 показателям.
- Немедленное отображение на дисплее ошибки и информации о ней.
- Сокращение времени и затрат на сервисное обслуживание.
Следующие режимы и функции отображаются на дисплее проводного пульта управления:
- Вентиляция с рекуперацией теплоты (HRV) активна.
- Переключение охлаждение/нагрев.
- Индикация централизованного управления работой кондиционера.
- Индикация группового управления работой кондиционера.
- Запрограммированное время.
- Сервисный режим / работа.
- Очистка фильтра.
- Разморозка / Теплый пуск.
- Ошибка.
Технические характеристики:
Каталоги, сертификаты, техническая документация:

Аналогичные товары:

Интерфейсный кабель Daikin BRCW901A03
Длина кабеля 3 метра. Необходим для подключения проводного настеннго пульта для управления внутренними блоками сплит-систем Daikin….
На заказ
5 500 руб.

Интерфейсный кабель Daikin BRCW901A08
Длина кабеля 8 метров. Необходим для подключения проводного настеннго пульта для управления внутренними блоками сплит-систем Daikin….
На заказ
6 500 руб.

Проводной пульт управления Daikin BRC2E52C
Упрощенный пульт управления с кнопкой режима работы.
Упрощенный проводной пульт для гостиниц
Наглядный интерфейс для интуитивно понятного управления.
Функционал ограничен основным набором задач.
Современный дизайн.
Энергосбережение пр…
На заказ
13 400 руб.
Проводной пульт управления Daikin BRC3E52C
Упрощенный пульт управления без кнопки режима работы.
Упрощенный проводной пульт для гостиниц
Наглядный интерфейс для интуитивно понятного управления.
Функционал ограничен основным набором задач.
Современный дизайн.
Энергосбережение п…
На заказ
14 400 руб.

Проводной пульт управления Daikin BRC944
Проводной пульт управления BRC944 для кондиционеров Daikin
Проводной пульт:
Программирование расписания работы кондиционера по таймеру:
Для одного дня можно запрограммировать до 5 действий, таких как:
включение кондиционера в з…
На заказ
15 000 руб.

Проводной пульт управления Daikin BRC1E53C
Удобный проводной пульт управления с современным дизайном.
Функции энергосбережения:
Ограничение диапазона устанавливаемых температур,
Функция отсутствия,
Инфракрасный датчик присутствия людей и измерения температуры на уровне пола (для…
В наличии
17 700 руб.
Проводной пульт управления Daikin BRC1E52A
Удобный проводной пульт управления с современным дизайном.
Функции энергосбережения:
Ограничение диапазона устанавливаемых температур,
Функция отсутствия,
Инфракрасный датчик присутствия людей и измерения температуры на уровне пола (для…
В наличии
20 900 руб.
Проводной пульт управления Daikin BRC1E51A
Удобный проводной пульт управления с современным дизайном.
Функции энергосбережения:
Ограничение диапазона устанавливаемых температур,
Функция отсутствия,
Инфракрасный датчик присутствия людей и измерения температуры на уровне пола (для…
В наличии
20 900 руб.
Проводной пульт управления Daikin BRC073
Кабели BRCW901A03 или BRCW901A08 для пульта BRC073 обязательны.
Характеристики продукта
Удобный пульт дистанционного управления современного дизайна
Простота использования: прямой доступ ко всем основным функциям
Простота ввода в эксплуа…
На заказ
23 400 руб.

Двухпозиционный контроллер Daikin DCS301B51
Обеспечивает одновременное и индивидуальное управление 16 группами внутренних блоков.
возможность контроля вплоть до 16 групп (128 внутренних блоков)
возможность использования 2 пультов дистанционного управления в разных помещениях
oтметка…
На заказ
60 400 руб.

Таймер Daikin DST301B51
Возможность программирования 64 групп.
возможность контроля вплоть до 128 внутренних блоков
8 типов еженедельного программирования
максимальное резервное электропитание 48 часов
максимальная длина проводки 1 000 м (всего: 2 000 м)…
На заказ
73 900 руб.

Центральный пульт Daikin DCS302C51
Централизованное управление системы SkyAir и VRV достигается посредством 3 компактных, удобных для пользователя устройств: централизованного пульта дистанционного управления, объединенного пульта управления вкл/выкл и программируемого таймера. Эти эл…
На заказ
95 500 руб.
View a manual of the Daikin BRC1D52 below. All manuals on ManualsCat.com can be viewed completely free of charge. By using the ‘Select a language’ button, you can choose the language of the manual you want to view.

MANUALSCAT | EN
Question & answers
Have a question about the Daikin BRC1D52 but cannot find the answer in the user manual? Perhaps the users of ManualsCat.com can help you answer your question. By filling in the form below, your question will appear below the manual of the Daikin BRC1D52. Please make sure that you describe your difficulty with the Daikin BRC1D52 as precisely as you can. The more precies your question is, the higher the chances of quickly receiving an answer from another user. You will automatically be sent an e-mail to inform you when someone has reacted to your question.
Ask a question about the Daikin BRC1D52
Page: 1
2
2
Start
5s
5s
5s
+
5s
5s
End
Page: 2
Operation manual
1
BRC1D528
Remote controller
4PW23717-1
WARNING
— Never let the remote controller get wet, this may
cause an electric shock or fire.
— Never press the buttons of the remote controller
with a hard, pointed object. The remote controller
may be damaged.
— Never inspect or service the remote controller
yourself, ask a qualified service person to do this.
Contents page
1. Features and functions……………………………………1
2. Name and function of switches and icons………….2
3. Setting up the controller ………………………………….4
4. Description of the operation modes ………………….5
5. Operation………………………………………………………5
6. Programming the schedule timer ……………………10
1. Features and functions
The BRC1D528 is a state of the art remote controller
that offers full control over your installation.
1 BASIC REMOTE CONTROLLER
The basic remote controller functions are:
• ON/OFF,
• operation mode change-over,
• temperature adjustment,
• air volume adjustment
• air flow direction adjustment.
2 CLOCK FUNCTION
The clock functions are:
• 24 hours real time clock,
• day of the week indicator.
3 SCHEDULE TIMER FUNCTION
The schedule timer functions are:
• a maximum of 5 actions can be programmed
for each day of the week (totalling 35 actions),
• schedule timer can be enabled/disabled at any
time,
• linked to a set temperature or a LIMIT
operation or an OFF operation,
• «last command» overrules previous command
until next scheduled command.
4 LIMIT OPERATION
Limit operation provides thermostat control within the
range of the set minimum and maximum temperature.
The minimum temperature setting will trigger heating,
the maximum temperature setting will trigger cooling.
BRC1D528 Remote controller Operation manual
THANK YOU FOR PURCHASING THIS
CONTROLLER. READ THE MANUAL
ATTENTIVELY BEFORE USING THE
INSTALLATION. AFTER READING THE
MANUAL, STORE IT IN A SAFE PLACE
FOR FUTURE USE.
Before initial operation, contact your dealer
to obtain all details concerning your air
conditioning installation.
Page: 3
BRC1D528
Remote controller
4PW23717-1
Operation manual
2
5 LEAVE HOME
The leave home function prevents the room
temperature from dropping when the occupants are
out for a longer period. If the room temperature drops
below 10°C, heating is started automatically. As soon
as 15°C is reached, the controller returns to its
original status.
6 BUTTON PERMISSION LEVEL
Three hierarchical permission levels can be set to
limit the user action.
2. Name and function of switches and
icons (Refer to figure 1)
1 ON/OFF BUTTON
Press the ON/OFF button to start or stop the system.
2 OPERATION LAMP
The operation lamp lights up during operation or
blinks if a malfunction occurs.
3 OPERATION MODE ICON
These icons indicate the current operation mode
(FAN, DRY, AUTOMATIC, COOLING, HEATING).
4 VENTILATION MODE ICON
These icons indicate the current ventilation mode
( only) (AUTOMATIC, HEAT EXCHANGE,
BYPASS).
5 VENTILATION ICON
The ventilation icon appears when the ventilation is
adjusted with the ventilation amount button (
only). Simultaneously, the ventilation amount is
indicated by the fan speed icon (see 22).
6 AIR CLEANING ICON
This icon indicates that the air cleaning unit (option) is
operational.
7 LEAVE HOME ICON
The leave home icon shows the status of the leave
home function.
8 EXTERNAL CONTROL ICON
This icon indicates that another controller with higher
priority is controlling or disabling your installation.
9 CHANGE-OVER UNDER CENTRALISED
CONTROL ICON
This icon indicates that the change-over of the
installation is under centralised control assigned to
another indoor unit or optional cool/heat selector
connected to the outdoor unit (= master remote
controller).
10 DAY OF THE WEEK INDICATOR
The day of the week indicator shows the current week
day (or the set day when reading or programming the
schedule timer).
11 CLOCK DISPLAY
The clock display indicates the current time (or the
action time when reading or programming the
schedule timer).
ON Leave home is enabled
FLASHING Leave home is active
OFF Leave home is disabled
Page: 4
Operation manual
3
BRC1D528
Remote controller
4PW23717-1
12 MAXIMUM SET TEMPERATURE
The maximum set temperature indicates the
maximum set temperature when in limit operation.
13 MINIMUM SET TEMPERATURE
The minimum set temperature indicates the minimum
set temperature when in limit operation.
14 SCHEDULE TIMER ICON
This icon indicates that the schedule timer is enabled.
15 ACTION ICONS
These icons indicate the actions for each day of the
schedule timer.
16 OFF ICON
This icon indicates that the OFF action is selected
when programming the schedule timer.
17 INSPECTION REQUIRED and
These icons indicate that inspection is required.
Consult your installer.
18 SET TEMPERATURE DISPLAY
This indicates the current set temperature of the
installation (not shown in LIMIT operation or in FAN or
DRY mode).
19 SETTING
Not used, for service purposes only.
20 AIR FLOW DIRECTION ICON
This icon indicates the air flow direction (only for
installations with motorised air flow flaps).
21 NOT AVAILABLE
is displayed whenever a non-installed option
is addressed or a function is not available.
22 FAN SPEED ICON
This icon indicates the set fan speed.
23 DEFROST/HOTSTART MODE ICON
This icon indicates that the defrost/hotstart mode is
active.
24 AIR FILTER CLEANING TIME ICON
This icon indicates the air filter must be cleaned.
Refer to the manual of the indoor unit.
25 ELEMENT CLEANING TIME ICON
This icon indicates the element must be cleaned
( only).
26 VENTILATION MODE BUTTON
The ventilation mode button operates the ; refer
to the manual for more details.
27 VENTILATION AMOUNT BUTTON
This button sets the ventilation amount; refer to the
manual for more details.
28 INSPECTION/TEST OPERATION BUTTON
Not used, for service purposes only.
29 PROGRAMMING BUTTON
This button is a multi-purpose button.
Depending on the previous manipulations of the user,
the programming button can have various functions.
Page: 5
BRC1D528
Remote controller
4PW23717-1
Operation manual
4
30 SCHEDULE TIMER BUTTON
This button enables or disables the schedule timer.
31 TIME ADJUST BUTTON
These buttons are used to adjust the clock or, when in
programming mode, to adjust the programmed action
time. Both buttons have an auto-repeat function.
32 TEMPERATURE ADJUST BUTTONS
These buttons are used to adjust the current setpoint
or, when in programming mode, to adjust the
programmed setpoint temperature (step = 1°C). Both
buttons are also used to adjust the day of the week.
33 OPERATION CHANGE/ BUTTON
This button is a multi-purpose button. Depending on
the previous manipulations of the user, it can have
following functions:
34 SETPOINT/LIMIT BUTTON
This button toggles between setpoint, limit operation
or (programming mode only).
35 FAN SPEED BUTTON
This button toggles between L (Low), H (High), HH
(very High), (Automatic).
36 AIR FLOW DIRECTION ADJUST BUTTON
This button enables to adjust the air flow direction.
37 AIR FILTER CLEANING TIME ICON RESET
BUTTON
This button is used to reset the air filter cleaning time
icon.
3. Setting up the controller
After initial installation, the user can set the clock and
day of the week.
The controller is equipped with a schedule timer that
enables the user to operate the installation
automatically; setting the clock and day of the week is
required to be able to use the schedule timer.
1 CLOCK SETTING FUNCTION
Hold down the button for 5 seconds. The clock
read-out and the day of week indicator will blink, both
can now be adjusted.
Use the & buttons to adjust the
clock. Each time pressing the time adjust button will
in/decrease the time by 1 minute. Keeping the
or button pressed will in/decrease
the time by 10 minutes.
Use the & buttons to adjust the day
of the week. Each time pressing the or
buttons will display the next or previous day.
Press the button to confirm the current set time
and day of the week.
If the controller, with blinking clock and day of week
read-out, is left untouched for 5 minutes, the clock
and day of the week will return to their previous
settings; the clock setting function is no longer active.
2 SETTING UP THE SCHEDULE TIMER
To set up the schedule timer, refer to chapter 6.
«Programming the schedule timer» on page 10.
1 select the operation mode of the installation
(FAN, DRY, AUTOMATIC, COOLING, HEATING)
2 toggle between minimum temperature and
maximum temperature when in limit operation
Page: 6
Operation manual
5
BRC1D528
Remote controller
4PW23717-1
4. Description of the operation modes
1 FAN ONLY OPERATION
In this mode, air only circulates without heating or
cooling.
2 DRY OPERATION
In this mode, the air humidity will be lowered with a
minimal temperature decrease.
The temperature and fan speed are controlled
automatically and cannot be controlled by the remote
controller.
Dry operation will not function if the room temperature
is too low.
3 AUTOMATIC OPERATION
In this mode, the controller will automatically switch
between heating and cooling as required by the
setpoint or limit temperature.
4 COOLING OPERATION
In this mode, cooling will be activated as required by
the setpoint or limit temperature.
5 HEATING OPERATION
In this mode, heating will be activated as required by
the setpoint or limit temperature.
Hot start (heat pump types only)
At the start of a heating operation, the indoor fan is
stopped until a certain indoor heat exchanger
temperature is reached and is displayed.
This prevents cold air from leaving the indoor unit.
Defrost (heat pump types only)
In heating operation, freezing of the outdoor heat
exchanger may occur. If so, the heating capacity of
the system lowers and the system goes into defrost
operation. The indoor unit fan stops and is
displayed. After maximum 10 minutes of defrost
operation, the system returns to heating operation
again.
6 LIMIT OPERATION &
Limit operation is an additional mode that enables to
keep the room temperature within certain limits. The
& icons are displayed to confirm the
activation of the limit operation.
7 LEAVE HOME
LEAVE HOME is a feature that enables to keep the
room temperature above 10°C when the occupants
are out. This function will switch on heating if the
installation is switched off.
5. Operation
Manual operation
In manual operation, the user decides about the
settings of the installation. The last setting remains
active until the user changes it.
As the controller can be implemented for a wide
variety of installations and features, it might occur that
you select a function that is not available on your
installation; if this is the case, the message
will appear.
Page: 7
BRC1D528
Remote controller
4PW23717-1
Operation manual
6
Use the button to select the desired operation
mode.
Press the button to toggle between limit
operation and the operations listed above.
In limit operation, use the button to select
minimum and maximum temperature settings. Use
the or buttons to adjust the
minimum and maximum temperature settings.
1 FAN ONLY OPERATION
User adjustable parameters:
• Fan speed, use the button,
• Air flow direction adjust, use the button,
• Ventilation mode, use the button,
• Ventilation amount, use the button.
2 DRY OPERATION
User adjustable parameters:
• Air flow direction adjust, use the button,
• Ventilation mode, use the button,
• Ventilation amount, use the button.
3 AUTOMATIC OPERATION
User adjustable parameters:
• Setpoint temperature, use the &
buttons,
• Fan speed, use the button,
• Air flow direction adjust, use the button,
• Ventilation mode, use the button,
• Ventilation amount, use the button.
4 COOLING OPERATION
User adjustable parameters:
• Setpoint temperature, use the &
buttons,
• Fan speed, use the button,
• Air flow direction adjust, use the button,
• Ventilation mode, use the button,
• Ventilation amount, use the button.
5 HEATING OPERATION
User adjustable parameters:
• Setpoint temperature, use the &
buttons,
• Fan speed, use the button,
• Air flow direction adjust, use the button,
• Ventilation mode, use the button,
• Ventilation amount, use the button.
6 LIMIT OPERATION
User adjustable parameters:
• Fan speed, use the button,
• Air flow direction adjust, use the button,
• Ventilation mode, use the button,
• Ventilation amount, use the button.
Fan only operation
Dry operation
Automatic operation
Cooling operation
Heating operation
Page: 8
Operation manual
7
BRC1D528
Remote controller
4PW23717-1
ADDITIONAL FEATURES OF THE CONTROLLER
1 LEAVE HOME
Press the and buttons
simultaneously to enable the LEAVE HOME function.
2 Adjusting the air flow direction
Use the button to adjust the air flow direction.
Press the button to switch between fixed or variable
air flow direction. Use the icon to determine the
fixed air flow direction by pressing the button
when the icon indicates the desired direction.
3 SCHEDULE TIMER
All features and operation and programming of the
schedule timer are described below.
Schedule timer operation
In schedule timer operation, the installation is also
controlled by the schedule timer. The actions
programmed in the schedule timer will be executed
automatically.
The schedule timer always executes the last
command; this means the user can temporarily
overrule the last executed programmed action. Refer
to «Manual operation» on page 5. The next
programmed action (in the schedule timer) will return
control to the schedule timer.
Use the button to enable or disable the
schedule timer.
To set up the SCHEDULE TIMER refer to chapter 6.
«Programming the schedule timer» on page 10.
KEEP IN MIND THAT THE BUTTON
MUST BE OFF TO GUARANTEE
TRIGGERING OF THE LEAVE HOME
FUNCTION.
NOTE Even if fixed air flow direction is selected,
variable air flow direction can be enabled
automatically to preserve proper
operation of your installation.
NOTE The schedule timer overrules the
button, only use the button to
enable or disable the schedule timer. The
schedule timer is enabled when the
icon is visible. The button only
overrules the schedule timer until the next
programmed action.
The programmed schedule is time driven.
Make sure that the clock and day of the week
are set correctly. Refer to «CLOCK SETTING
FUNCTION» on page 4.
Manually adjust the clock for summertime
and wintertime. Refer to «CLOCK SETTING
FUNCTION» on page 4.
A power failure exceeding 1 hour will reset
the clock and the day of the week. Refer to
«CLOCK SETTING FUNCTION» on page 4
to adjust the clock and the day of the week.
The actions programmed in the schedule
timer will not be lost after a power failure;
reprogramming the schedule timer is not
required.
Page: 9
BRC1D528
Remote controller
4PW23717-1
Operation manual
8
What can the schedule timer do?
The concept of the schedule timer is simple,
straightforward though powerful.
The schedule timer can order 3 actions:
The schedule timer can accept a maximum of 5
actions per day.
For each day of the week a maximum of 5 actions can
be programmed, totalling a maximum of 35
programmed actions. The action that was
programmed first for a certain day is action 1, the last
programmed action for a day could be action 1 (in
case only one action is programmed for that day) to 5.
What will the schedule timer do?
If enabled, the schedule timer will execute the
programmed actions.
It will order the installation to:
• cool or heat, depending on the current
operation, if applicable; the setpoint will be
displayed,
OR
• switch off the installation (the schedule timer
remains enabled and reactivates the
installation as programmed); the operation
lamp will turn off,
OR
• cool or heat, whichever is required to keep the
room temperature within a specified range
(limit operation); and are displayed.
To be able to verify the programmed actions, you can
browse the programmed actions, see below.
What will the schedule timer NOT do?
The schedule timer will not:
• control fan speed,
• control air flow direction,
• control ventilation mode,
• control ventilation amount,
• change the operation mode for a scheduled
setpoint.
The parameters listed above can be set manually,
without interfering with the schedule timer.
More sophisticated remote controllers are available.
Consult your dealer for more information.
Browsing the programmed actions in
the schedule timer (read-out only)
Refer to figure 2.
Browsing the programmed actions of the schedule
timer is a sequential process. Only 2 buttons are used
to browse the entire schedule timer program.
The button is used to start browsing, to display
the next programmed action or to exit browsing when
displaying the last programmed action.
1 switch on the installation at a scheduled time, in
combination with a setpoint (exact temperature
control)
2 switch off the installation (end of control)
3 switch on the installation at a scheduled time, in
limit operation
It is of utmost importance to understand that
the number assigned to the programmed
action, DOES NOT DETERMINE WHEN the
programmed action will be executed. Only
the TIME, being a part of the data entered
when programming the action, will determine
when the programmed action will be
executed.
The schedule timer will change the operation
mode in LIMIT operation only.
Page: 10
Operation manual
9
BRC1D528
Remote controller
4PW23717-1
The button is used to exit browsing at once
(without having to scroll through all programmed
actions).
Press the button to enter the browse mode, the
icon appears, will blink.
Check the icon. If at least 1 action is
programmed for Monday, will appear.
The clock indicates the time when the programmed
action is scheduled, either , or and
is being displayed.
If does not appear, it indicates that there are no
programmed actions for Monday.
Press the button again to go to the next day of
the week. will blink, this indicates that the
programmed actions for Tuesday are being browsed.
The process described above is now restarted.
If at least 1 action is programmed for Tuesday, will
appear. The clock indicates the time when the
programmed action will be enabled, either ,
or and is being displayed.
If does not appear, it indicates that there are no
programmed actions for Tuesday.
Press the button to display the next programmed
action. If a second action is programmed for Tuesday,
will still be blinking and will appear.
Assuming that 5 actions were programmed for
Tuesday, a total of 5 presses will be required to
display all programmed actions.
Continue pressing the button until the day of the
week indicator displays the current day (not blinking),
you have now quit browsing.
How do I interpret the programmed
actions
To be able to understand the behaviour of your
installation when the schedule timer is enabled, it is
important to look at all programmed actions for the
current day and maybe the last programmed action of
yesterday.
If the first programmed action for today is not active
yet, the current status of your installation depends,
most probably but not necessarily, on the last
programmed action from yesterday. Read the
important note below.
If the first programmed action for today is already
active, the current status of your installation depends,
most probably but not necessarily, on the parameters
programmed in the first programmed action for today.
Read the important note below.
Conclusion: Although is displayed, somebody
might have altered the settings. The next
programmed action will overrule the altered settings
and all settings return as programmed.
NOTE Browsing always starts on Monday and
ends on Sunday.
NOTE The temperatures mentioned above are
for clarifying purposes only, temperature
values on your controller may vary.
NOTE
The number of times that the button
will have to be pressed to quit browsing
depends on the number of programmed
actions in the schedule timer.
NOTE To keep the operation of your installation
simple, the schedule timer settings can
easily be overruled by altering the current
setting («last command» overrules
previous command until next scheduled
command).
Page: 11
BRC1D528
Remote controller
4PW23717-1
Operation manual
10
Programmed actions might overlap; due to the «last
command overrules» logic, the last scheduled
command will rule.
How do I interpret the readings on the
display when the schedule timer is
active
As described above, the schedule timer settings, (and
as a consequence the display readings) might be
overruled temporarily by a manual intervention.
If you want to be absolutely sure about the schedule
timer settings for this very moment, you must browse
the schedule timer programmed actions. Refer to
«Browsing the programmed actions in the schedule
timer» on page 8.
6. Programming the schedule timer
What do I have to program?
As the schedule timer is based on a week program
(the same actions will be repeated every week) you
will have to select the day of the week first.
Now you must choose an action:
Finally you must enter the time of the day when the
action must be enabled.
Getting started
Programming the schedule timer is flexible (you can
add, remove or alter programmed actions whenever
required) and straightforward (programming steps are
limited to a minimum).
Below are some tips and tricks to ensure successful
programming of the schedule timer:
• familiarise yourself with the icons and the
buttons, you will need them when
programming,
• familiarise yourself with the browse function,
you will need it to start programming. Refer to
«Browsing the programmed actions in the
schedule timer» on page 8,
• fill out the form at the end of this manual; note
the time and the required action for each day
(keep in mind that the number of actions is
limited to 5 per day),
• take your time to enter all data accurately,
• try to program the actions for each day in
logical sequence (start with action 1 for the
first action and end with the highest number for
the last action). This is not a requirement but it
will make it much easier to interpret the
program later,
• keep in mind that you can always alter, add or
remove the programmed actions later.
1 switch on the installation at a scheduled time, in
combination with a setpoint (exact temperature
control)
2 switch off the installation (end of control)
3 switch on the installation at a scheduled time, in
limit operation
NOTE If you program 2 or more actions on the
same day and at the same time of the
day, only the action with the highest
action number (2 — 5) will be executed.
Page: 12
Operation manual
11
BRC1D528
Remote controller
4PW23717-1
Programming
1 THE SCHEDULE TIMER IS PROGRAMMED
FOR THE FIRST TIME
PROGRAMMING THE FIRST DAY OF THE WEEK
In this particular case, no actions have been program-
med before, all schedule timer actions are idle.
• Browse to Monday by pressing the button.
The icon appears, will blink and one of
the icons might be displayed
but all other fields remain blank, indicating that
no actions are programmed for Monday.
• Enter the program mode by holding down the
button for 5 seconds, the icon will now
blink too.
• Press the button to activate the first
programmed action.
• A blinking is displayed indicating that the first
programmed action for Monday is being
programmed; The set temperature and clock
display are blinking.
• Press the button to select either set
temperature, , or limit operation.
• Enter the desired temperature using the
& buttons.
• Press the button to toggle between
minimum set temperature and maximum set
temperature in limit operation, the selected
temperature will blink.
• Enter the time when the action must start
using the & buttons (min.
step = 10 minutes).
NOTE When changing day during programming
you will have to confirm «the last action».
Each day can have 5 programmed
actions (numbered 1 to 5) but for some
reason you might want to delete one,
several or all programmed actions.
To be able to delete programmed actions,
you must select the last action that you
want to keep, this can be 1 to 5 or no
action ( is displayed and no action
displayed).
All programmed actions with a number
HIGHER than the selected one, or all
programmed actions if no last action was
selected will be deleted.
NOTE In the guidelines below it is assumed that
you start programming the schedule
timer actions on Monday and end with the
schedule timer actions for Sunday.
If you prefer NOT to start on Monday, first
browse to the desired day and then enter
the PROGRAM mode.
NOTE If, by accident, you pressed the
button, you activated the next action;
is displayed ( steady and blinking).
Press the button repeatedly until a
blinking is displayed. You can now
continue adjusting the settings for the first
schedule timer action.
Page: 13
BRC1D528
Remote controller
4PW23717-1
Operation manual
12
If the action and the corresponding time are correct,
you can proceed to the second schedule timer action.
This is done by pressing the button, the data is
saved and the next schedule timer action can be
programmed.
Programming the remaining schedule timer actions
for the same day is similar.
You can browse the schedule timer actions by
pressing the button.
When all data for the schedule timer actions for
Monday are entered, you must confirm the
programmed actions.
Make sure the last schedule timer action you want to
keep is selected (schedule timer actions with a higher
number will be deleted).
Now you must choose between 2 options:
Program mode is quit and depending on the choice
made, the programmed actions are saved for Monday
(and possibly Tuesday).
PROGRAMMING THE OTHER DAYS OF THE WEEK
Programming the other days of the week is identical
to programming the first day of the week. is
blinking to indicate the selected day, and are
steady if actions were copied from Monday to
Tuesday, only is displayed if no actions were
copied from Monday to Tuesday.
2 I WANT TO EDIT PROGRAMMED ACTIONS
Editing programmed actions is easy.
Make sure you are not in program mode ( not
blinking); if required, press the button to quit
program mode.
Browse to the programmed actions using the
button, select the day and action you want to edit.
Press the button for 5 seconds; program mode is
enabled, the icon and selected action are blinking.
Edit the settings using the same buttons described
above.
Select the «last action» using the button and
decide if you do or do not want to copy the
programmed action(s) to the next day (pressing the
and buttons simultaneously or only the
button for 5 seconds).
NOTE Don’t worry if you add additional
schedule timer actions by pressing the
button repeatedly, they can be
deleted when finishing the current day.
1 CONFIRM AND COPY TO NEXT DAY
The schedule timer action programmed for the
current day are also valid for the next day: use
the «confirm last action and copy actions to next
day» function by pressing the and
buttons simultaneously for 5 seconds.
2 CONFIRM ONLY
The schedule timer action programmed for the
current day are only valid for the selected day:
use the «confirm last action and go to next day»
function by pressing the button for 5
seconds.
Page: 14
Operation manual
13
BRC1D528
Remote controller
4PW23717-1
3 I WANT TO DELETE ONE OR MORE
PROGRAMMED ACTIONS
Make sure you are not in program mode ( not
blinking); if required, press to quit program
mode.
Browse to the programmed actions using the
button, select the day you want to edit.
Press the button for 5 seconds; program mode is
enabled, the icon and selected action are blinking.
Select the «last action» you want to keep using the
button. All higher actions will be deleted.
Confirm the deletion by pressing the button for 5
seconds,
OR
confirm the deletion for the current and the next day
too by pressing the and buttons
simultaneously for 5 seconds.
4 I WANT TO DELETE ALL PROGRAMMED
ACTIONS AT ONCE
Quit programming or browsing.
Press the and buttons simultaneously for 5
seconds; the icon will invert and disappear to
confirm deletion.
7. Maintenance
The remote controller does not need maintenance.
Remove dirt with a soft damp cloth.
8. Troubleshooting
The guidelines below might help to solve your
problem. If you cannot remedy the problem, consult
your installer.
No readings on the remote controller (display
blank)
Check if the mains power is still applied to your
installation.
Only is displayed
This indicates that the installation has just been
powered, please wait until disappears.
The schedule timer does work but the
programmed actions are executed at the wrong
time (e.g. 1 hour too late or too early)
Check if the clock and the day of the week are set
correctly, correct if necessary (refer to «CLOCK
SETTING FUNCTION» on page 4).
I cannot enable the schedule timer (the icon
blinks for 2 seconds and disappears)
The schedule timer has not been programmed yet.
First program the schedule timer (refer to
«Programming the schedule timer» on page 10).
I cannot enable the schedule timer (the
icon is displayed)
The schedule timer can not be enabled when a
centralised control is connected.
Limit operation cannot be selected
Limit operation is not available for cooling only
installations.
NOTE In the case above, if for example the last
action was 3, the programmed actions 4
and 5 will also be deleted (if they were
present).
NOTE Only use clear tapid water to moisten the
cloth.