- Manuals
- Brands
- Toyota Manuals
- Automobile
- RAV4 1998
- Operating manual
-
Contents
-
Table of Contents
-
Bookmarks
Quick Links
Part 1
OPERATION OF
INSTRUMENTS AND
CONTROLS—
Chapter 1- 1
Overview of instruments
and controls
«
«
«
Indicator symbols on the
instrument panel
’98 Rav4.U
1
Related Manuals for Toyota RAV4 1998
Summary of Contents for Toyota RAV4 1998
-
Page 1: Instruments And Controls
’98 Rav4.U Part 1 OPERATION OF INSTRUMENTS AND CONTROLS— Chapter 1- 1 Overview of instruments and controls » Instrument panel overview » Instrument cluster overview » Indicator symbols on the instrument panel…
-
Page 2: Instrument Panel Overview
’98 Rav4U Instrument panel overview 1. Side vents 2. Instrument cluster 3. Center vents 4. Electric moon roof switch and personal lights 5. Glovebox 6. Power door lock switches 7. Power window switches 8. Parking brake lever 9. Automatic transmission selector lever or manual transmission gear shift lever 10.
-
Page 3
’98 Rav4.U 1. Instrument panel light control knob 2. Headlight and turn signal switch 3. Wiper and washer switches 4. Clock 5. Center differential lock button or driving pattern selector button 6. Air conditioning controls 7. Emergency flasher switch 8. Rear window defogger switch 9. -
Page 4
’98 Rav4U Instrument cluster overview 1. Speedometer 4. Engine coolant temperature gauge 7. Odometer and two trip meters 2. Fuel gauge 5. Tachometer 3. Service reminder indicators and 6. Trip meter reset knob indicator lights… -
Page 5
’98 Rav4.U Indicator symbols on the instrument panel (type A) (type A) Brake system warning light Anti-lock brake system warning light (type B) (type B) Open door warning light Seat belt reminder light SRS airbag warning light Discharge warning light Automatic transmission fluid temperature Low oil pressure warning light warning light… -
Page 6
’98 Rav4U Automatic transmission indicator light Overdrive- off indicator light Driving pattern indicator light Center differential lock indicator light Cruise control indicator light : For details, see ”Service reminder indicators and warning buzzers” in Chapter 1- 5. : If this light flashes, see ”Cruise control” in Chapter 1- 6. -
Page 7: Keys And Doors
If you should lose your keys or if you » Hood glovebox. need additional keys, duplicates can be » made by a Toyota dealer using the key Fuel tank cap To protect things locked in the glovebox number. when you have your vehicle parked, leave «…
-
Page 8
’98 Rav4U Side doors Driver’s side LOCKING AND UNLOCKING WITH KEY LOCKING AND UNLOCKING WITH IN- SIDE LOCK KNOB Insert the key into the keyhole and turn Move the lock knob. To lock: Turn the key forward. To lock: Push the knob forward. To unlock: Turn the key backward. -
Page 9
’98 Rav4.U LOCKING AND UNLOCKING WITH CAUTION POWER DOOR LOCK SWITCH Push the switch. Before driving, be sure that the doors To lock: Push the switch on the front side. closed locked, especially To unlock: Push the switch on the rear when small children are in the ve- side. -
Page 10
’98 Rav4U Power windows CAUTION » Never try jamming any part of your body to make the jam protection function work intentionally. » The jam protection function may work when something gets caught just before the window is fully closed. The windows can be operated with the Automatic operation: Push the switch switch on each side door. -
Page 11
’98 Rav4.U CAUTION Window lock To avoid serious personal injury, you button must do the following. » Always make sure the head, hands and other parts of the body of all occupants are kept completely in- side the vehicle before you close the power windows. -
Page 12
’98 Rav4U Quarter window Back door (hardtop) and (2- door hardtop) tail gate (soft- top) CAUTION » Keep the back door (hardtop) or tail gate (soft- top) closed while driving. This not only keeps the luggage from being thrown out but also pre- vents exhaust gases from entering the vehicle. -
Page 13
’98 Rav4.U Hood To open the hood, do the following. 2. In front of the vehicle, pull up on 3. Hold the hood open by inserting the the auxiliary catch lever and lift the support rod into the slot. 1. Pull the hood lock release lever. The hood. -
Page 14
The indicator lamp goes off after driving neck if the cap is suddenly re- several times. If the indicator lamp does moved. not go off, contact your Toyota dealer as soon as possible. -
Page 15
The sun shade can be opened or closed » by hand. Use only a genuine Toyota fuel tank cap for replacement. It has a built- Sliding operation— in check valve to reduce fuel tank To open: Push the switch on the ”SLIDE”… -
Page 16
’98 Rav4U Detachable sun roof— —Sun roof precautions —Tilting up and closing CAUTION CAUTION To avoid serious personal injury, you To avoid serious personal injury, you must do the following. must do the following. » While the vehicle is moving, always «… -
Page 17
’98 Rav4.U —Removing 1. Pull the handle down while pushing 2. Push in the retaining spring arms as 3. Push back the auxiliary catch to re- in one of the lock buttons. shown and push up the sun roof. lease it from the hook. Then lift the sun roof panel and pull it out. -
Page 18
’98 Rav4U —Stowing Install the removed sun roof panel on 1. Remove the holder from the tail gate 2. Set the front edge of the sun roof the tail gate as follows. by turning the bolts counterclock- panel into the holders. wise. -
Page 19
’98 Rav4.U —Installing 3. Place the removed holder over the 4. Secure the holder by turning the 1. Insert the flat hinges of the sun roof sun roof handle. bolts clockwise. panel into the hinge cases on the body. Then slowly lower it while NOTICE holding the roof with your hands. -
Page 20
’98 Rav4U Soft- top— —Soft- top precautions » Do not drive the vehicle only with CAUTION the rear window removed because To avoid serious personal injury, you serious injury or death can result. The removed rear window may let must do the following. «… -
Page 21
’98 Rav4.U —Lowering the soft- top NOTICE z Make sure there are no items or packages between the rear seatback and the soft- top storage area when raising or lowering the soft- top. Even small items may interfere with soft- top operation and can cause damage. -
Page 22
’98 Rav4U 3. Unfasten the zippers. 4. Remove the retainers on the bottom 5. Slide down the window along the of the quarter windows from the side groove. groove. NOTICE Do not bend the removed quarter win- dow or hit it on a hard object. It may damage the quarter window. -
Page 23
’98 Rav4.U REMOVING THE REAR WINDOW 2. Unfasten the zippers and slide down LOWERING THE SOFT- TOP the rear window. 1. Open the tail gate, and remove the Before lowering the soft- top, make sure Velcros on the rear window. the quarter windows and rear window NOTICE are already removed. -
Page 24
’98 Rav4U 2. Lock the latch handle and hook. 3. Fold soft- top. Make sure 4. Take the latch handle cover out of place the soft- top between the rear the glovebox, put it over the latch seat backs and tail gate. handle and fasten it securely with Velcros. -
Page 25
’98 Rav4.U —Raising the soft- top RAISING THE SOFT- TOP 2. Raise the soft- top. 3. Separate the latch handle and hook while pressing the lock release but- 1. Remove the latch handle cover. ton. CAUTION Store the removed cover in the glove- box. -
Page 26
’98 Rav4U 4. Set the hook, push up the latch han- INSTALLING THE REAR WINDOW 2. Align the retainer on the bottom of dle to securely lock it. the window with the groove. 1. Open the tail gate and engage the zipper approximately 25 mm (1.0 in.). -
Page 27
’98 Rav4.U 3. Fasten zippers securely INSTALLING THE QUARTER WINDOWS 2. Insert the retainer on the side of the align the Velcros to secure the rear window into the groove on the ve- 1. Engage the zipper approximately 25 window. hicle side. -
Page 28
’98 Rav4U 3. Insert the retainer on the bottom of 4. Fasten the zipper securely and align 5. Align the Velcros from the inside of the window into the groove. the Velcros to secure the quarter the vehicles. windows. CAUTION Make sure the retainers on the side and bottom of the quarter window are securely inserted into the grooves. -
Page 29
’98 Rav4.U Seats Part 1 » While the vehicle is being driven, all ve- Anti- glare inside rear view OPERATION OF hicle occupants should have the seatback mirror upright, sit well back in the seat and prop- INSTRUMENTS AND erly wear the seat belts provided. CONTROLS—… -
Page 30
’98 Rav4U Front seats— —Seat adjustment precautions —Adjusting front seats Adjust the driver’s seat so that the foot » While adjusting the seat, do not put pedals, steering wheel instrument your hands under the seat or near panel controls are within easy reach of the moving parts. -
Page 31
’98 Rav4.U —Moving passenger’s seat for rear seat entry (2- door hardtop and soft- top) 1. SEAT POSITION ADJUSTING LEVER CAUTION Pull the lever up. Then slide the seat to the desired position with slight body » After putting back the seat, pressure and release the lever. -
Page 32
’98 Rav4U Rear seats— —Folding up rear seats —Adjusting seatback angle (2- door hardtop and soft- top) CAUTION » Adjustments should not be made while the vehicle is moving. » To reduce the risk of sliding under belt during collision, avoid reclining the seatback any more than needed. -
Page 33
’98 Rav4.U 2. Unlock the seat cushion. Swing the 3. Lock the raised bottom cushion in When returning the rear seat to its whole seat up and forward. place by attaching the support rod original position, first remove the head onto the hook. -
Page 34
’98 Rav4U —Folding up rear seats (4- door hardtop) CAUTION When returning seats to their original position: » Make sure the seat belts are not twisted or caught under the seat and are arranged in their proper position for ready use. «… -
Page 35
’98 Rav4.U 2. Unlock the seat cushion. Swing the 3. Lock the raised bottom cushion in When returning the rear seat to its whole seat up and forward. place by clipping the strap to the original position, first remove the head hook. -
Page 36
’98 Rav4U Flattening seatbacks (2- door hardtop and soft- top) Rear seats: Remove the head restraint. CAUTION Then pull out the strap to unlock the seatback, and push down the seatback. When returning seats to their original Front seats: Remove the head restraint position: and slide the seat to the front- most «… -
Page 37
’98 Rav4.U Flattening seatbacks (4- door hardtop) NOTICE Rear seats: Pull out the strap to unlock Before closing the back door, make the seatback, and push down the seat- sure the rear headrests are removed back. from the flattened seats. Front seats: Remove the head restraint and slide the seat to the front- most position. -
Page 38
’98 Rav4U Seat belts— —Seat belt precautions Head restraints Toyota strongly urges that the driver and CAUTION passengers in the vehicle be properly re- strained at all times with the seat belts » Adjust the center of the head re- provided. -
Page 39
Pregnant woman. Toyota recommends the death in the event of sudden braking solution or lukewarm water. Never use of a seat belt. Ask your doctor for or a collision. -
Page 40
It also may normally, immediately contact your lock if you lean forward too quickly. A Toyota dealer. Do not use the seat until the seat belt is fixed. It cannot slow, easy motion will allow the belt to extend, and you can move around freely. -
Page 41
’98 Rav4.U CAUTION CAUTION » Always make sure the shoulder belt High- positioned belts Take up slack is positioned across the center of loose- fitting belts both could cause your shoulder. The belt should be serious injuries due to sliding un- kept away from your neck, but not der the lap belt during a collision Too high… -
Page 42
» If the seat belt does not function normally, immediately contact your Toyota dealer. Do not use the seat until the seat belt is fixed. It cannot To release the belt, press the buckle- re- Sit up straight and well back in the… -
Page 43
’98 Rav4.U —Stowing the rear seat belts (4- door hardtop) Too high Adjust to a snug fit Keep as low on hips as possible Remove excess length of the belt and To release the belt, press the buckle- re- The rear seat belts can be stowed when adjust the belt position. -
Page 44
Failure to fol- charge. low these instructions could result in Please contact your local Toyota dealer so less effectiveness of the seat belt re- that the dealer can order the proper re- straint system in case of vehicle acci- quired length for the extender. -
Page 45
» If the seat belt does not function normally, immediately contact your Toyota dealer. Do not use the seat The driver and front passenger’s seat This indicator comes on when the igni- until the seat belt is fixed. It cannot belt pretensioners are designed to be tion key is turned to the ”ACC”… -
Page 46
Do not perform any of the following may be released. This gas is harmless changes without consulting your and does not indicate that a fire is occur- Toyota dealer. Such changes ring. interfere with proper operation of the seat belt… -
Page 47
This front seat belt pretensioner system has a service reminder indicator to inform the driver of operating problems. If either of the following conditions occurs, this indicates a malfunction of the airbags or pretensioners. Contact your Toyota dealer soon possible service vehicle. -
Page 48
A driver or front passenger too close to the steering wheel or dashboard during airbag deployment killed seriously injured. Toyota strongly recommends that: » The driver sit as far back as pos- sible from the steering wheel while still maintaining control of the ve- hicle. «… -
Page 49
’98 Rav4.U If the severity of the impact is below the above threshold level, the SRS airbags may not deploy. However, this threshold velocity will be considerably higher if the vehicle strikes Collision from the rear an object, such as a parked vehicle or sign pole, which can move or deform on impact, or if it is involved in an underride collision (e.g. -
Page 50
When the airbags inflate, they produce a tems. The front seat occupants can restraint system. Toyota strongly fairly loud noise and release some smoke be killed or seriously injured by an recommends that all infants and along with non- toxic gas. -
Page 51
’98 Rav4.U Move seat fully back » » » Never put a rear- facing child re- A forward- facing child restraint sys- Do not sit on the edge of the seat straint system on the front seat be- tem should be allowed to put on or lean over the dashboard when cause the force of the rapid infla- the front seat only when it is un-… -
Page 52
’98 Rav4U » Do not modify or remove any wir- ing. Do not modify, remove, strike or open any components, such as the steering wheel column cover, front passenger airbag cover, front passenger airbag, airbag sensor as- sembly. Doing any of these may cause sudden SRS airbag inflation or disable the system, which could result in death or serious injury. -
Page 53
Modification of the suspension sys- z Modification of the front end struc- This SRS airbag system has a service In the following cases, contact your Toyota ture reminder indicator to inform the driver of dealer as soon as possible: z Attachment of a grille guard (bull operating problems. -
Page 54
’98 Rav4U Child restraint— —Child restraint precautions Toyota strongly urges the use of child » » Toyota strongly urges use of Make sure that you have complied restraint systems children small proper child restraint system which with all installation instructions pro- enough to use them. -
Page 55
If it is not restrained can purchase the following items from securely, it may cause death or se- your Toyota dealer. rious injury to the child in the * CRS installation kit event of a sudden stop or accident. -
Page 56
’98 Rav4U —Types of child restraint system * Bolt (Part No. 91511- 60830) Child restraint systems are classified into (A) Infant seat the following 3 types depending on the child’s age and size. (A) Infant seat (B) Convertible seat (C) Booster seat Install the child restraint system following the instructions provided by its manufac- turer. -
Page 57
’98 Rav4.U —Installation with 2- point type seat belt (C) Booster seat (A) INFANT SEAT INSTALLATION CAUTION An infant seat is used in rear- facing position only. Do not put a rear- facing child re- straint system on the rear seat if it interferes with the lock mechanism of the front seats. -
Page 58
Contact your Toyota dealer immediately. Do not 1. Run the center lap belt through or 2. While pressing the infant seat firmly use the seat until the seat belt is around the infant seat following the against the seat cushion and seatback, fixed. -
Page 59
’98 Rav4.U 3. To remove the infant seat, press the (B) CONVERTIBLE SEAT INSTALLATION CAUTION buckle- release button. A convertible seat is used in forward- facing and rear- facing position depend- Push and pull the child restraint sys- ing on the child’s age and size. When tem in different directions to be sure installing, follow… -
Page 60
Contact your Toyota dealer immediately. Do not 1. Run the center lap belt through or use the seat until the seat belt is CAUTION around the convertible seat following fixed. instructions provided Do not put a rear- facing child re-… -
Page 61
’98 Rav4.U 2. While pressing convertible seat 3. To remove the convertible seat, press CAUTION firmly against the seat cushion and the buckle- release button. seatback, tighten the lap belt by pulling Push and pull the child restraint sys- its free end to hold the convertible seat tem in different directions to be sure securely. -
Page 62
’98 Rav4U —Installation with 3- point type seat belt (A) INFANT SEAT INSTALLATION » Do not put a rear- facing child re- CAUTION An infant seat is used in rear- facing straint system on the rear seat if it position only. «… -
Page 63
1. Run the lap and shoulder belt through 2. Fully extend the shoulder belt to put it Toyota dealer immediately. Do not or around the infant seat following the in the lock mode. When the belt is use the seat until the seat belt is… -
Page 64
’98 Rav4U 3. While pressing the infant seat firmly 4. To remove the infant seat, press the CAUTION against the seat cushion and seatback, buckle- release button and allow the let the shoulder belt retract as far as belt to retract completely. The belt will Make sure the seat belt is securely it will go to hold the infant seat secure- move freely again and be ready to… -
Page 65
’98 Rav4.U Move seat fully back (B) CONVERTIBLE SEAT INSTALLATION » CAUTION A forward- facing child restraint sys- A convertible seat is used in forward- tem should be allowed to put on facing and rear- facing position depend- » Never put a rear- facing child re- the front seat only when it is un- ing on the child’s age and size. -
Page 66
Contact your 1. Run the lap and shoulder belt through » Toyota dealer immediately. Do not Do not put a rear- facing child re- or around the convertible seat following use the seat until the seat belt is straint system on the rear seat if it… -
Page 67
’98 Rav4.U 2. Fully extend the shoulder belt to put it 3. While pressing convertible seat CAUTION in the lock mode. When the belt is firmly against the seat cushion and then retracted slightly, it cannot be ex- seatback, let the shoulder belt retract Make sure the seat belt is securely tended. -
Page 68
’98 Rav4U Move seat fully back 4. To remove the convertible seat, press (C) BOOSTER SEAT INSTALLATION CAUTION the buckle- release button and allow the A booster seat is used in forward- fac- belt to retract completely. The belt will ing position only. -
Page 69
Always make sure the shoulder belt child from injury. Contact your Toyota dealer immediately. Do not is positioned across the center of child’s shoulder. The belt should be use the seat until the seat belt is kept away from child’s neck, but fixed. -
Page 70
’98 Rav4U —Top strap anchors and locations Bolt Anchor braket 52.8 mm Spaser (0.3 in.) 216.1 mm (0.9 in.) 216.1 mm (0.9 in.) 2- door hardtop and soft- top 2. To remove the child restraint system, If your child restraint system requires press the buckle- release button and al- the use of a top strap, latch the hook low the belt to retract. -
Page 71
2 anchor locations shown in the illustra- tion. If your child restraint system does not provide any of the necessary parts, ask your Toyota dealer. (See ”—Child restraint system”.) If you remove the anchor brackets when the child restraint system is necessary no… -
Page 72
’98 Rav4U —Power rear view mirror control Outside rear view mirrors— CAUTION Do not adjust the mirror while the ve- hicle is moving. It may cause the driver to mishandle the vehicle and an accident may occur resulting in personal injuries. Adjust the mirror so that you can just To adjust a mirror, use the switches. -
Page 73
’98 Rav4.U —Folding rear view mirrors Anti-glare inside rear view mirror NOTICE If ice should jam the mirror, do not operate the control or scrape the mir- ror face. Use a spray de- icer to free the mirror. To fold the rear view mirror, push back- Adjust the mirror so that you can just ward. -
Page 74
’98 Rav4U CAUTION Do not adjust the mirror while the ve- hicle is moving. It may cause the driver to mishandle the vehicle and an accident may occur resulting in personal injuries. -
Page 75: Operation Of Instruments And
’98 Rav4.U » » Headlights and turn signals Emergency flashers Part 1 OPERATION OF INSTRUMENTS AND CONTROLS— Chapter 1- 4 Lights, Wipers and Defogger…
-
Page 76
’98 Rav4U » » » Instrument panel light control Interior light Personal lights… -
Page 77
’98 Rav4.U » » » Windshield wipers and washer Rear window wiper and washer Rear window defogger… -
Page 78
’98 Rav4U Headlights and turn signals NOTICE To prevent the battery from being dis- charged, do not leave the lights on for a long period when the engine is not running. Daytime running light system (Canada only) The headlights turn on when the parking brake is released with the engine started, even with the light switch in the ”OFF”… -
Page 79
’98 Rav4.U Emergency flashers NOTICE To prevent the battery from being dis- charged, do not leave the switch on longer than necessary when the en- gine is not running. TURN SIGNALS To turn on the emergency flashers, push the switch. To signal a turn, push the headlight/ turn signal lever up or down to position All the turn signal lights will flash. -
Page 80
’98 Rav4U Instrument panel light control Interior light Personal light (with moon roof) To adjust the brightness of the instru- To turn on the interior light, slide the To turn on the personal light, push the ment panel lights, turn the knob. switch. -
Page 81
’98 Rav4.U Personal lights (without moon roof) Windshield wipers and washer For instructions on adding washer fluid, see ”Adding washer fluid” in Chapter 7- 3. In freezing weather, warm the windshield with the defroster before using the washer. This will help prevent the washer fluid from freezing on your windshield, which can block your vision. -
Page 82
’98 Rav4U Rear window wiper and washer Rear window defogger NOTICE Do not operate the rear wiper if the rear window is dry. It may scratch the glass. To turn on the rear window wiper, twist To defog or defrost the rear window, the lever knob upward. -
Page 83
’98 Rav4.U Make sure you turn the defogger off when the window is clear. Leaving the defogger on for a long time could cause the battery to discharge, especially during stop- and- go driving. The defogger is not designed for drying rain water or for melting snow. NOTICE z Without timer: To prevent the bat- tery from being discharged, turn the… -
Page 84
Gauges, Meters and The indicator lamp goes off after driving several times. If the indicator lamp does Service reminder not go off, contact your Toyota dealer as indicators soon as possible. » Fuel gauge The gauge works when the ignition switch is on and indicates the approxi- «… -
Page 85
’98 Rav4.U Engine coolant temperature gauge Tachometer Your vehicle may overheat during severe operating conditions, such as: » Driving up a long hill on a hot day. » Reducing speed or stopping after high speed driving. » Idling for a long period with the air conditioning on in stop- and- go traffic. -
Page 86
’98 Rav4U Service reminder indicators and warning buzzers Odometer and two trip meters 3. Trip meter reset knob—It can reset the If the indicator or Do this. two trip meters to zero, and also buzzer comes on… change the meter display. To change the meter display, quickly If parking brake push and release the knob. -
Page 87
Parking brake reminder Take vehicle to If this light is on, make sure the parking Close all side Toyota dealer. brake is fully released. The light should doors, back door (type A) go off. (hardtop) and tail gate (soft- top). -
Page 88
4 to 8 seconds. briefly after a hard stop. There is no paired by your Toyota dealer as soon as (c) Discharge Warning Light cause for concern if it then goes out when possible. -
Page 89
If the light does not go off, call a The light will come on when the ignition » Toyota dealer or qualified repair shop for The light does not come on when the key is turned to the ”ON” position. After assistance. -
Page 90
Have it 1. Apply the parking brake. checked by your Toyota dealer as soon as possible. 2. Open one of the doors or tail gate (soft- top). The open door warning light should come on. -
Page 91
’98 Rav4.U… -
Page 92
’98 Rav4U Ignition switch with steering lock Part 1 You must push in the key to turn the key OPERATION OF from ”ACC” to the ”LOCK” position. On vehicles with an automatic transmission, INSTRUMENTS AND the selector lever must be in the ”P” posi- CONTROLS–… -
Page 93
’98 Rav4.U Automatic transmission Lock release button To prevent misshifting Driving pattern selector button For selecting a driving pattern suited to existing driving conditions Parking, engine starting and key removal position Reverse position Neutral position ”NORMAL” (Normal) ”POWER” (Power) ”POWER” mode indicator Normal driving position mode for general mode for powerful… -
Page 94
’98 Rav4U » Your automatic transmission has a shift 3. Release the parking brake and brake Shift into the ”L” position. The trans- lock system to minimize the possibility of pedal. Depress the accelerator pedal mission will downshift to the first gear incorrect operation. -
Page 95
’98 Rav4.U With the selector lever in ”2”, the vehicle z Do not continue hill climbing or CAUTION will start in the first gear and automatical- hard towing for a long time in the ly shift to the second gear. ”2”… -
Page 96
(g) Rocking your vehicle if stuck or before the transmission is com- For ordinary driving, Toyota recommends pletely shifted to forward or reverse using the ”NORMAL” mode to improve fuel CAUTION gear. -
Page 97
’98 Rav4.U Manual transmission gear km/h (mph) Four- wheel drive models 1 to 2 or 2 to 1 24 (15) 215/60R16 tires 2 to 3 or 3 to 2 40 (25) gear km/h (mph) 3 to 4 or 4 to 3 64 (40) 44 ( 27) 4 to 5 or 5 to 4… -
Page 98
If the light either fails to come on or goes out, ask your Toyota dealer to check the electrical system and the NOTICE locking mechanism. -
Page 99
’98 Rav4.U If unlocking of the center differential is not completed, check the area around you for safety, then accelerate or decelerate, or move the vehicle backward. NOTICE While the indicator buzzer is sound- ing, do not make turns, and do not put the vehicle into a garage. -
Page 100
’98 Rav4U Parking brake Cruise control When parking, firmly apply the parking The cruise control allows you to cruise brake to avoid inadvertent creeping. the vehicle at a desired speed over 40 km/h (25 mph) even with your foot off To set: Pull up the lever. -
Page 101
’98 Rav4.U you need acceleration—for example, when passing—depress accelerator pedal enough for the vehicle to exceed the set speed. When you release it, the vehicle will return to the speed set prior to the acceleration. CAUTION For manual transmission: While driving with the cruise control on, do not shift to neutral without de- pressing the clutch pedal, as this may cause engine racing or overrev-… -
Page 102
In such cases, have your vehicle checked control is not cancelled. To decrease the » The indicator light flashes again. by your Toyota dealer at the earliest op- vehicle speed, reset to a slower speed » portunity. with the cruise control lever or depress The indicator light goes out after it the brake pedal. -
Page 103
’98 Rav4.U… -
Page 104
’98 Rav4U Car audio system— —Reference Part 1 Air conditioning system OPERATION OF Controls INSTRUMENTS AND Air flow selector settings CONTROLS— Operating tips Instrument panel vents Chapter 1- 7 Car audio system and Air conditioning system Type 1: AM F M ETR radio/cassette player/ Car audio system compact disc auto changer controller Reference… -
Page 105
This section describes some of the basic TONE AND BALANCE YOUR RADIO ANTENNA features on Toyota audio systems. Some For details about your system’s tone and To lower a manual antenna, carefully push information may not pertain to your sys- balance controls, see the description of it down. -
Page 106
’98 Rav4U YOUR COMPACT DISC PLAYER When you insert a disc, gently push it in with the label side up. (The player will automatically eject a disc if the label side is down.) The compact disc player will play from track 1 through the end of the disc. -
Page 107
’98 Rav4.U —Using your audio system: controls and features «Type 1 Details of specific buttons, controls, and features are described in the alphabetical listing that follows. -
Page 108
’98 Rav4U 1 2 3 4 5 6 (Preset buttons) (Reverse/Fast forward buttons) These buttons are used to preset and Push ”AM” to switch the AM band. ”AM” Cassette Player tune in radio stations. will appear on the display. Push the fast forward button to fast for- To preset a station to a button: Tune in If the audio system is off, you can turn ward a cassette tape. -
Page 109
If the malfunction is not recovered, take If the audio system is off, you can turn When the audio is set into compact disc your vehicle to your Toyota dealer. operation, the display shows the track or, on the radio by pushing ”FM”. Also, push… -
Page 110
’98 Rav4U PROG (Program) Random playing for all the tracks in the Repeating a disc: magazine: Push and hold ”RPT” until you hear a Push ”PROG” to select the other side of Push and hold ”RAND” until you hear a beep. -
Page 111
Your Toyota has an electronic tuning radio scan the first tracks of all the discs in the ceived. ”ST” appears on the display. If the (ETR). -
Page 112
’98 Rav4U «Type 2 Details of specific buttons, controls, and features are described in the alphabetical listing that follows. -
Page 113
’98 Rav4.U 1 2 3 4 5 6 (Preset buttons) high- pitch tone adjustment, push (Reverse/Fast forward buttons) ”AUDIO CONTROL / MODE” repeatedly These buttons are used to preset and If you want to fast forward or reverse until ”TRE” appears on the display. Then tune in radio stations. -
Page 114
If the malfunction is not recovered, take disc player and automatic changer. tracks in the magazine in random order. your vehicle to your Toyota dealer. To turn off the random feature, push the Your audio system shows six different dis- DISC ”RAND”… -
Page 115
’98 Rav4.U RPT (Repeat) SCAN Compact disc player There are two repeat features—you can Radio There are two scan features—you can ei- either replay a disc track or a whole com- ther scan the tracks on a specific disc or You can either scan all the frequencies on pact disc. -
Page 116
In addition, reception conditions Tuning change constantly as your vehicle moves. Your Toyota has an electronic tuning radio (ETR). Push and release the ” ” (up) or ” ” (down) side of ”TUNE” to step up or down the station band. (If you hear a beep, you held the button too long and the radio will go into the seek mode.) -
Page 117
’98 Rav4.U Here are some common reception prob- Use high- quality cassettes. lems that probably do not indicate a prob- Fading—AM broadcasts are reflected by Low- quality cassette tapes can cause lem with your radio: the upper atmosphere–especially at night. many problems, including poor sound, These reflected signals can interfere with inconsistent… -
Page 118
’98 Rav4U If moisture gets into your compact disc player, you may not hear any sound even though your compact disc player appears to be working. Remove the disc from the player and wait until it dries. Handle compact discs carefully, espe- cially when you are inserting them. -
Page 119
’98 Rav4.U CAUTION Compact disc players use invisible la- ser beam which could cause hazard- radiation exposure directed outside the unit. Be sure to operate the player correctly as instructed. -
Page 120
’98 Rav4U Air conditioning system— —Controls 1. Air Intake Selector 2. Air Flow Selector 3. Temperature Selector 4. Fan Speed Selector 5. ”A/C” Button (on some models) -
Page 121
’98 Rav4.U Fan speed selector For details about air flow selector settings, see the illustration after ”A/C” button. Move lever adjust speed—to the right to increase, to the left Vehicles with ”A/C” button— to decrease. Moving the air flow control lever to wind- Temperature selector shield position turns on the defroster- linked air conditioning. -
Page 122
If this happens, take your ve- hicle to a Toyota dealer for service. Air intake selector Move the lever to select the air source. 1. Recirculate—Recirculates the air inside the vehicle. -
Page 123
’98 Rav4.U —Air flow selector settings —Operating tips To cool off your Toyota after it has been parked in the hot sun, drive with the windows open for a few minutes. This vents the hot air, allowing the air conditioning to cool the interior more quickly. -
Page 124
’98 Rav4U Heating Air conditioning Defogging For best results, set controls to: For best results, set controls to: The inside of the windshield For best results, set controls to: Fan speed—Any setting except ”OFF” Fan speed—Any setting except ”OFF” Temperature—Towards WARM Temperature—Towards COLD Fan speed—Any setting except ”OFF”… -
Page 125
’98 Rav4.U —Instrument panel vents Defrosting If air flow control is not satisfactory, check the instrument panel vents. The instrument The outside of the windshield panel vents may be opened or closed as For best results, set controls to: shown. Fan speed—Any setting except ”OFF”… -
Page 126: Other Equipment
’98 Rav4U Clock Part 1 If the electrical power source has been OPERATION OF disconnected from the clock, the time dis- play will automatically be set to 1:00 (one INSTRUMENTS AND o’clock). CONTROLS— When instrument panel lights turned on, the brightness of the time in- dication will be reduced.
-
Page 127
If the engine is not running, the key must be in the ”ACC” position. Do not hold the cigarette lighter pressed Use a Toyota genuine cigarette lighter or equivalent for replacement. -
Page 128
’98 Rav4U Glovebox Auxiliary box NOTICE z To prevent the fuse from being blown, do not use the electricity over the total vehicle capacity of 12V/120W. z To prevent the battery from being discharged, do not use the power outlet longer than necessary when the engine is not running. -
Page 129
’98 Rav4.U Floor mat To open the box, turn the knob. You can hold the objects in the box Use a floor mat of the correct size. with the holding belt. If the floor carpet and floor mat have a 1. -
Page 130
’98 Rav4U CAUTION Make sure the floor mat is properly placed on the floor carpet. If the floor slips and interferes with movement of the pedals during driv- ing, it may cause an accident. -
Page 131
’98 Rav4.U… -
Page 132
It is not designed for cornering » at the same speeds as conventional Limited- slip differential two- wheel drive vehicles any more than » Your Toyota’s identification low- slung sports cars are designed to perform satisfactorily under off- road «… -
Page 133
’98 Rav4.U Break- in period Drive gently and avoid high speeds. » CAUTION Do not drive horizontally across Your vehicle does not need an elaborate steep slopes. Driving straight up or break- in. But following a few simple tips Always observe the following precau- straight down is preferred. -
Page 134
To help prevent gas station mixups, your lead to engine damage. AAMA specification offers optimal fuel Toyota has a new smaller fuel tank open- If your engine knocks… information for better vehicle perfor- ing. The special nozzle on pumps with… -
Page 135
’98 Rav4.U Operation in foreign countries GASOLINES CONTAINING MMT If you plan to drive your Toyota in NOTICE another country… Some gasolines contain an octane- en- z Do use gasohol other than hancing additive called MMT (methylcy- First, comply with the vehicle registration stated above. -
Page 136
Do not drive with an extremely low vehicle in for a check- up as soon fuel level; running out of fuel could as possible. Remember, your Toyota cause the engine to misfire, creat- dealer knows your vehicle and its… -
Page 137
’98 Rav4.U Facts about engine oil consumption Engine exhaust cautions FUNCTIONS OF ENGINE OIL » CAUTION To allow proper operation of your Engine oil has the primary functions of vehicle’s ventilation system, keep lubricating and cooling the inside of the «… -
Page 138
More oil is consumed by high- speed driv- regularly. Toyota recommends that the oil ing and frequent acceleration and decel- level be checked every time you refuel Your engine is fitted with twin ground eration. -
Page 139
’98 Rav4.U Brake system TANDEM MASTER CYLINDER BRAKE You may hear a sound in the engine CAUTION SYSTEM compartment for a few seconds when the engine is started or just after the vehicle The tandem master cylinder brake system » Do not pump the brake pedal if the is started. -
Page 140
Contact your Toyota dealer as of tire friction. soon as possible to service the vehicle. Always maintain a safe distance from the «… -
Page 141
Toyota possible. dealer as soon as possible. Expensive ro- NOTICE tor damage can result if the pads are not replaced when necessary. -
Page 142
This is the primary identification number Use only a spare tire of the same for your Toyota. It is used in registering size, construction and load capacity the ownership of your vehicle. as the original tires on your Toyota… -
Page 143
’98 Rav4.U Theft prevention labels (except for Canada) —Engine number The vehicle identification number (VIN) is Your new vehicle carries theft preven- also on the Certification Label. tion labels which are approximately 56 mm (2.20 in.) by 16 mm (0.63 in.). The purpose of these labels is to reduce the incidence of vehicle thefts by facilitat- ing the tracing and recovery of parts from… -
Page 144
’98 Rav4U Suspension and chassis Types of tires Determine what kind of tires your ve- CAUTION CAUTION hicle is originally equipped with. 1. Summer tires » Do not modify the suspension/chassis Do not mix summer and all season Summer tires are high- speed capability with lift kits, spacers, springs, etc. -
Page 145
’98 Rav4.U… -
Page 146
’98 Rav4U How to start the engine— (a) Before cranking Before starting the engine Part 3 1. Check the area around the vehicle be- 1. Apply the parking brake firmly. STARTING AND DRIV- fore entering it. 2. Turn off unnecessary lights and acces- 2. -
Page 147
See ”If your vehicle will not start” in Part ing brake pulled. If they still do not work safely, pull to the side of the road and call a Toyota dealer for assistance. -
Page 148
’98 Rav4U Off- road driving precautions » CAUTION Do not drive in excess of the speed CAUTION limit. Even if the legal speed limit » Before driving off, make sure that permits it, do not drive over 140 Always observe the following precau- km/h (85 mph) unless your vehicle the parking brake is fully released tions to minimize the risk of serious… -
Page 149
If you are not sure about premature failure, and may also en- which oil to use, call your Toyota dealer– the differentials, transmission he will be pleased to help. -
Page 150
Towing gency equipment. trailer will have an adverse effect on This product is available at your Toyota handling, performance, braking, durability dealer and most auto parts stores. Follow Some of the things you might put in the and driving economy (fuel consumption, manufacturer’s… -
Page 151
’98 Rav4.U » CAUTION The load on either the front or rear axle resulting from distribution of » total trailer weight (trailer the gross vehicle weight on both axles must not exceed the Gross weight plus its cargo load) must not exceed 680 kg (1500 lb.). -
Page 152
Toyota recommends trailers with brakes designed for the total trailer weight. that conform to any applicable federal Toyota does not recommend using a and state/provincial regulations. weight distribution (load equalizing) » A safety chain must always be used hitch. -
Page 153
Never tow a trailer without using a » form to any applicable federal, state/ Toyota recommends that you do not safety chain securely attached to provincial or local regulation. If not, tow a trailer with a new vehicle or a both the trailer and the vehicle. -
Page 154
’98 Rav4U » » TRAILER TOWING TIPS Avoid jerky starts or sudden accelera- Crosswinds and rough roads will ad- tion. If your vehicle has a manual versely affect handling of your vehicle When towing a trailer, your vehicle will transmission, prevent excessive clutch and trailer, causing sway. -
Page 155
’98 Rav4.U » Because of the added load of the trail- When restarting out after parking on a » Slow down and downshift before er, your vehicle’s engine may overheat slope: descending steep or long downhill on hot days temperatures over 1. -
Page 156
’98 Rav4U How to save fuel and make your vehicle last longer, too » » Getting more kilometers/mileage from a Avoid continuous speeding up and Keep the bottom of your vehicle free liter/gallon of fuel is easy—just take it slowing down. -
Page 157
’98 Rav4.U… -
Page 158
If the light is O.K., but the engine still will not start, it needs adjustment or repair. » If you lose your keys Call a Toyota dealer or qualified repair shop. NOTICE Do not pull- or push- start the ve- hicle. -
Page 159
» correct. Batteries contain sulfuric acid adjustment or repair. Call a Toyota dealer which is poisonous and corrosive. or qualified repair shop for assistance. Wear protective safety glasses when jump starting, and avoid spilling NOTICE acid on your skin, clothing, or ve- hicle. -
Page 160
’98 Rav4U JUMP STARTING PROCEDURE Jumper cable 1. If the booster battery is installed in another vehicle, make sure the vehicles are not touching. Turn off all unneces- sary lights and accessories. 2. If required, remove all the vent plugs Discharged Discharged battery… -
Page 161
’98 Rav4.U If your engine stalls while driving 6. Carefully disconnect the cables in the If your engine stalls while driving… Connecting point exact reverse order: the negative cable 1. Reduce your speed gradually, keeping and then the positive cable. a straight line. -
Page 162
You should have it checked as soon as possible at your Toyota dealer. CAUTION 1. Pull safely off the road, stop the ve- hicle and… -
Page 163
’98 Rav4.U If you have a flat tire— 1. Reduce your speed gradually, keeping » NOTICE Stop the vehicle on a level firm a straight line. Move cautiously off the ground, firmly set the parking brake road to a safe place well away from Do not continue driving with a de- and put the transmission in ”P”… -
Page 164: Required Tools And Spare Tire
’98 Rav4U —Required tools and spare tire 1. Get the required tools and spare To remove the jack, move the seat to the tire. front- most position and turn the jack joint by hand. Tool bag (in the right side miscellany box) To remove: Turn the joint in direction 1 Jack (under the right side front seat)
-
Page 165
’98 Rav4.U —Blocking the wheel —Removing wheel ornament Steel wheels To remove the spare tire: 2. Block the wheel diagonally opposite the flat tire to keep the vehicle from Turn the hold- down nuts counterclockwise rolling when it is jacked up. with the wheel nut wrench and remove them. -
Page 166
’98 Rav4U —Loosening wheel nuts —Positioning the jack 3. Remove the wheel ornament. Pry off the wheel ornament, using the beveled end of the wheel nut wrench as shown. CAUTION Do not try to pull the ornament by hand. Take due care in handling the ornament to avoid unexpected person- al injury. -
Page 167
’98 Rav4.U —Raising your vehicle —Changing wheels CAUTION Never get under the vehicle when the vehicle supported jack alone. 6. After making sure that no one is in 7. Remove the wheel nuts and change the vehicle, raise it high enough so tires. -
Page 168
’98 Rav4U —Reinstalling wheel nuts —Lowering your vehicle Before putting on wheels, remove any cor- 8. Reinstall all the wheel nuts finger 9. Lower the vehicle completely and rosion on the mounting surfaces with a tight. tighten the wheel nuts. wire brush or such. -
Page 169
’98 Rav4.U —Reinstalling wheel ornament —After changing wheels 11. Check the air pressure of the re- CAUTION placed tire. Adjust the air pressure to the specification When lowering the vehicle, make sure designated in Part 8. If the pressure is all portions of your body and all oth- lower, drive slowly to the nearest service er persons around will not be injured… -
Page 170
If towing is necessary, we recommend (a) Towing with wheel lift type truck (a) Towing with wheel lift type truck you to have it done by your Toyota —From front —From front dealer or a commercial tow truck ser- vice. -
Page 171
’98 Rav4.U TOWING PRECAUTIONS: (c) Towing with sling type truck NOTICE Use a safety chain system for all towing, Do not tow with the key removed or and abide by the state/provincial and local in the ”LOCK” position when towing laws. -
Page 172
’98 Rav4U —Emergency towing If towing is necessary, we recommend NOTICE you to have it done by your Toyota dealer or a commercial tow truck ser- Use only a cable or chain specifically vice. intended for use in towing vehicles. -
Page 173
» If the towing vehicle can hardly move, do not forcibly continue the towing. Contact your Toyota dealer or a commercial tow truck service for assistance. » Tow the vehicle as straight ahead as possible. -
Page 174
’98 Rav4U If you cannot shift automatic transmission selector lever If you lose your keys Many Toyota dealers can make a new key if you can give them the key num- ber. See the suggestion given in ”Keys” in Chapter 1- 2. -
Page 175
’98 Rav4.U… -
Page 176
Now, it is up to you. Proper » High temperatures will cause corrosion care of your Toyota can help ensure long- to those components of the vehicle » Protecting your Toyota from term corrosion prevention. which are prevented from quick- drying… -
Page 177
We recommend See ”Washing and waxing your Toyota” for » When driving in the areas where there that the fittings and the area where the more tips. -
Page 178
’98 Rav4U Soft- top models—For washing instruction 2. Wash with mild car- wash soap, for the soft- top, see ”Soft- top”. mixed according to the manufacturer’s instructions. Use a soft cotton mitt and 1. Rinse off loose dirt with a hose. Re- keep it wet by dipping it frequently into move any mud or road salt from the the wash water. -
Page 179
Be sure to polish and wax gets soapy. Use a cloth or sponge to driving your Toyota through an au- the chrome trim as well as the paint. remove dirt so it will not be ground into tomatic car wash. -
Page 180
’98 Rav4U Cleaning the interior NOTICE NOTICE CAUTION z Do not use dye or bleach on the Do not use solvent, thinner, gasoline Do not wash the vehicle floor with or window cleaner on the interior. belts — it may weaken them. water, or allow water to get onto the z Do not use the belts until they be- floor when cleaning the vehicle interi-… -
Page 181
It may con- tain ingredients mentioned above. Immediately clean any spill using the method mentioned above. If you have any questions about the cleaning of your Toyota, your local Toyota dealer will be pleased to answer them. -
Page 182: Maintenance And Care
Owner’s or if you prefer, your Toyota dealer will be Guide, Owner’s Manual Supplement or pleased to do them at a nominal cost. Warranty Booklet for complete warranty information.
-
Page 183
They learn to work on for the details. vehicle to your Toyota dealer or a quali- Toyotas before they work on your vehicle, fied service shop immediately. It is recom- rather than while they are working on it. -
Page 184
’98 Rav4U Tire surface and wheel nuts INSIDE THE VEHICLE Seat belts Check the tires carefully for cuts, damage Items listed below should be checked Check that the seat belt system such as or excessive wear. See Chapter 7- 2 for regularly, e.g. -
Page 185
’98 Rav4.U Does your vehicle need repair- ing? Automatic transmission ”Park” mecha- Brake fluid level nism Be on the alert for changes in perfor- Make sure the brake fluid level is correct. mance, sounds, and visual tip- offs that Check the lock release button of the se- See Chapter 7- 2 for additional information. -
Page 186
’98 Rav4U If you notice any of these clues, take your vehicle to your Toyota dealer as soon as possible. It probably needs adjustment or repair. CAUTION Do not continue driving with the ve- hicle unchecked. It could result in se- rious vehicle damage and possibly personal injury. -
Page 187
’98 Rav4.U… -
Page 188
’98 Rav4U Part 7 DO- IT- YOURSELF MAINTENANCE— Chapter 7- 1 Introduction » Engine compartment overview » Fuse locations » Do- it- yourself service precautions » Parts and tools… -
Page 189
’98 Rav4.U Engine compartment overview 1. Windshield washer, rear window washer fluid tank 2. Battery 3. Fuse blocks 4. Engine oil filler cap 5. Brake fluid reservoir 6. Engine coolant reservoir 7. Electric cooling fans 8. Engine oil level dipstick 9. -
Page 190
’98 Rav4U Fuse locations Spare fuses… -
Page 191
» Right after driving, engine warranty coverage. Read separate compartment—the engine, radiator, Toyota Warranty statement for details and exhaust manifold, power steering suggestions. fluid reservoir spark plug This part gives instructions only for those boots, etc.—will be hot. -
Page 192
’98 Rav4U » » z Do not reuse platinum- tipped spark Be sure that the ignition is off if Dispose of used oil and filter only plugs by cleaning or regapping. you work near the electric cooling in a safe and acceptable manner. fans or radiator grille. -
Page 193
» » Rag or paper towel Screwdriver (for driver’s side instru- nance. Remember all Toyota parts are de- ment lower panel nut) » Funnel (only for adding fluid) signed in metric sizes, so your tools must «… -
Page 194: Engine And Chassis
’98 Rav4U Checking the engine oil level Part 7 DO- IT- YOURSELF CAUTION Low level Full level MAINTENANCE— Be careful not to touch the hot ex- haust manifold. Chapter 7- 2 If the oil level is below or only slightly above the low level, add engine oil of Engine and Chassis the same type as already in the engine.
-
Page 195
’98 Rav4.U Engine oil selection Oil identification marks Use API grade SH, ”Energy- Conserving II” Either or both API registered marks are or SJ, ”Energy- Conserving” multigrade en- added to some oil containers to help gine oil or ILSAC multigrade engine oil. you select the oil you should use. -
Page 196
”MIN” lines on the reservoir. Do not use alcohol type antifreeze or If you can find no leak, have your Toyota It is normal for the brake fluid level to go plain water alone. dealer test the cap pressure and check for down slightly as the brake pads wear. -
Page 197
’98 Rav4.U Checking power steering fluid Use only newly opened brake fluid. Once Clean all dirt from outside of the reservoir opened, brake fluid absorbs moisture from tank and look at the fluid level. If the fluid the air, and excess moisture can cause a is cold, the level should be in the ”COLD”… -
Page 198
If a tire frequently needs refilling, have it vehicle is balanced. checked by your Toyota dealer. The following instructions for checking tire pressure should be observed: 4- door hardtop… -
Page 199
If the indicators show, re- place the tires. REPLACING YOUR TIRES The tires on your Toyota have built- in tread When replacing a tire, use only the wear indicators to help you know when the same size and construction as original- tires need replacement. -
Page 200
Toyota. Using tires whose previous history is un- known is a risk. Toyota recommends all four tires, or at least both of the front or rear tires be replaced at a time as a set. See ”If you have a flat tire” in Part 4 for tire change procedure. -
Page 201
When rotating tires, check for uneven wear replacing. capacity as the original tires on your and damage. Abnormal wear is usually Toyota. Make sure all the snow tires are caused by incorrect tire pressure, improper CAUTION the same brand. wheel alignment, out- of- balance wheels, or «… -
Page 202
Drive carefully avoiding bumps, Four- wheel drive models: your Toyota dealer. holes, and sharp turns, which may cause the vehicle to bounce. Install the chains on the rear tires as A wheel of a different brand, size and type «… -
Page 203
» When using tire chains, be careful not for a tubeless tire. to damage the aluminum wheels. » NOTICE Use only the Toyota wheel nuts and wrench designed for your aluminum wheels different wheels. brands, sizes and types. This may «… -
Page 204: Electrical Components
’98 Rav4U Checking battery condition— —Precautions Part 7 DO- IT- YOURSELF » CAUTION If electrolyte gets on your skin, thoroughly wash the contact area. If MAINTENANCE— BATTERY PRECAUTIONS you feel pain or burning, get medi- cal attention immediately. The battery produces flammable and «…
-
Page 205
DARK WHITE battery checked by your Toyota dealer. tighten. CLEAR or Tighten hold- down clamp only Have battery checked by LIGHT your Toyota dealer. enough to keep the battery firmly in place. YELLOW Overtightening may damage the battery case. -
Page 206
’98 Rav4U Battery recharging precautions Checking and replacing fuses During recharging, the battery is pro- Type A ducing hydrogen gas. Therefore, before recharging: 1. If recharging with the battery installed on the vehicle, be sure to disconnect the ground cable. 2. -
Page 207
Have your Toyota dealer correct it as soon as possible. If you are not sure whether the fuse has blown, try replacing the suspected fuse CAUTION with one that you know is good. -
Page 208
’98 Rav4U Replacing light bulbs— The following illustrations show how to Bulb CAUTION Light bulbs Type gain access to the bulbs. When replacing a bulb, make sure the ignition switch and Headlight To prevent burning yourself, do not light switch are off. Use bulbs with the inner check the washer fluid level when the wattage ratings given in the table. -
Page 209
3. Install a new bulb and the connector tor while depressing the lock re- into the mounting hole. lease. Aiming is not necessary after replacing If the connector is tight, wiggle it. the bulb. When aiming adjustment is nec- essary, contact your Toyota dealer. -
Page 210
’98 Rav4U —Parking, front turn signal and front side merker lights —Rear side marker lights Use a Phillips- head screwdriver. a: Front side marker light Use a Phillips- head screwdriver. b: Parking and front turn signal light… -
Page 211
’98 Rav4.U —Rear turn signal, stop and tail, and back- up lights Use a Phillips- head screwdriver. a: Back- up light b: Rear turn signal light c: Stop and tail light… -
Page 212
’98 Rav4U —High mounted stoplight (hardtop) Remove and install the cover clips as Removing cover clips shown in the following illustrations. Installing cover clips… -
Page 213
’98 Rav4.U —High mounted stoplight (soft- top) —License plate lights Use the Phillips- head screwdriver. -
Page 214
’98 Rav4U… -
Page 215
’98 Rav4.U… -
Page 216
’98 Rav4U Part 8 SPECIFICATIONS » Dimensions and weight » Engine » Fuel » Service specifications » Tires » Fuses… -
Page 217
’98 Rav4.U Dimensions and weight 2- door hardtop 4- door hardtop Soft- top 215/70R16 tires 235/60R16 tires 215/70R16 tires 235/60R16 tires 215/70R16 tires 235/60R16 tires Overall length mm (in.) 3750 (147.6) 3765 (148.2) 4160 (163.8) 4175 (164.4) 3750 (147.6) 3765 (148.2) Overall width mm (in.) 1695 (66.7) -
Page 218
’98 Rav4U Engine Fuel Service specifications Model: Fuel type: ENGINE 3S- FE Unleaded gasolene, Octane Rating 87 Valve clearance (engine cold), mm (in.): (Research Octane Number Type: Intake 0.19—0.29 (0.007—0.011) higher 4 cylinder in line, 4 cycle, gasoline Exhaust 0.28—0.38 (0.011—0.015) Fuel tank capacity, L (gal., lmp. -
Page 219
CLUTCH D- II or DEXRONrIII (DEXRONrII) Pedal freeplay, mm (in.): Four- wheel drive models 5—15 (0.2—0.6) Toyota automatic transaxle fluid COOLING SYSTEM Fluid type: Type T or equivalent Total capacity, L (qt., Imp. qt.): SAE J1703 or FMVSS No. 116 DOT 3… -
Page 220
’98 Rav4U TRANSFER BRAKES (four- wheel drive models with an auto- Minimum pedal clearance when depressed matic transaxle) with the pressure of 490 N (50 kgf, 110 Oil capacity, L (qt., Imp. qt.): lbf) with the engine running, mm (in.): 0.7 (0.7, 0.6) 75 (3.0) Oil type:… -
Page 221
’98 Rav4.U Tires Tire size and pressure: Tire pressure Model Tire size kpa (kgf/cm or bar, psi) Wheel size Front Rear 2- door hardtop 215/70R 16 99S 180 (1.8, 26) 180 (1.8, 26) and soft- top 6.5JJ 235/60R 16 100H 170 (1.7, 25) 170 (1.7, 25) 6.5JJ… -
Page 222
’98 Rav4U Fuses Engine compartment (U.S.A.) Engine compartment (Canada) Engine compartment Fuses (type A) 8. EFI 20 A (U.S.A.) or 15 A (Canada): 14. H- LP LH- L 10 A: Left- hand headlight Multiport fuel injection system/sequen- (low beam) 1. H- LP (RH) 15 A: Right- hand headlight tial multiport fuel injection system 15. -
Page 223
’98 Rav4.U Instrument panel Instrument panel Passenger’s side kick panel 20. ECU- IG 10 A: Electronically controlled 22. STOP 10 A: stoplights, high mounted 26. HORN 10 A: Horn automatic transmission system, rear stoplight, electronically controlled auto- 27. DEFOG 20 A: Rear window defogger window defogger, center… -
Page 224
’98 Rav4U 33. PWR 30 A: Power door lock system, electric moon roof, power windows Fuses (type C) 34. ABS 50 A: Anti- lock brake system 35. MAIN 80 A: ”IGN”, ”HAZ”, ”DOME”, ”ALT- S”, ”MAIN No.1”, ”AM2” and ”EFI” fuses 36. -
Page 225
’98 Rav4.U… -
Page 226: Uniform Tire Quality Grading
However, NHTSA cannot become involved in individual prob- lems between you, your dealer, or Toyota Motor Sales, U.S.A., Inc.
-
Page 227
C may have poor traction per- tire failure. quality grading. formance. Your Toyota dealer will help answer any Warning: The traction grade assigned to questions you may have as you read this this tire is based on braking (straight information.
Skip to content

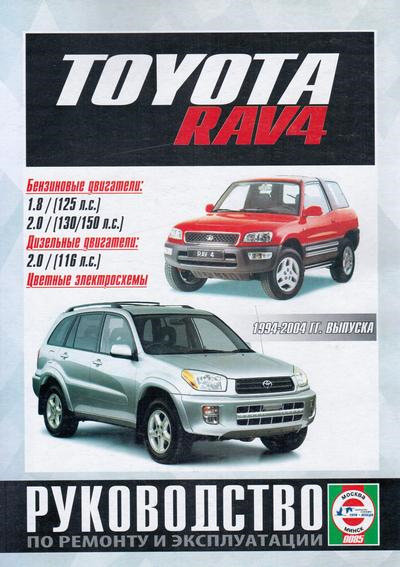
На всеобщее обозрение выкладываю руководство по эксплуатации для РАВ4 1 поколение, само руководство для авто 1998 г.в.
Небольшая вырезка из этой книжки.
Принадлежности, запасные части и модификации Вашего автомобиля Toyota
В настоящее время на рынке предлагается большое разнообразие запасных частей и принадлежностей к автомобилям Toyota от других производителей. Их использование может неблагоприятно отразится на безопасности Вашего автомобиля Toyota даже в том случае, если эти детали допущены контролирующими органами Вашей страны. Поэтому компания Тойота не несет ответственности и гарантийных обязательств по запасным частям других производителей и по узлам и деталям, в которые установлены такие запасные части.
Скачать руководство пользователя для RAV4 1994-2000
Пользуйтесь уважаемые посетители портала, если Вы можете поделиться другими книжками по Toyota RAV4, то добавляйте свои посты, давайте сделаем этот мир лучше с ТойотаРАВ4.ру
Технические данные автомобилей приведены в табл. 9.1, 9.2, 9.3.
Масляный радиатор коробки передач устанавливался только на полноприводных автомобилях выпуска до 2001 года. Снятие
Тросы управления коробкой передач не регулируются, поэтому в случае повреждения или растяжения замените их.
Внимание! Топливная система находится под постоянным давлением, поэтому перед отсоединением трубопроводов снимите давление в
Снятие В салоне автомобиля снимите центральную консоль. Освободите зажимы крепления тросов и отсоедините оба
Снятие Выключите зажигание и отсоедините провод «массы» от аккумуляторной батареи. Снимите корпус воздушного фильтра.
Предупреждение! При работе сцепления образуется пыль с содержанием асбеста, вредного для здоровья, поэтому при
Проверка Рис. 9.2. Расположение выключателя фонарей заднего хода наверху картера коробки передач Выключатель фонарей
Технические характеристики сцепления приведены в табл. 8.1, моменты затяжки основных соединений — в табл.
Коробка передач представляет собой сложный агрегат, и поэтому рекомендуется ремонтировать ее на специализированных предприятиях
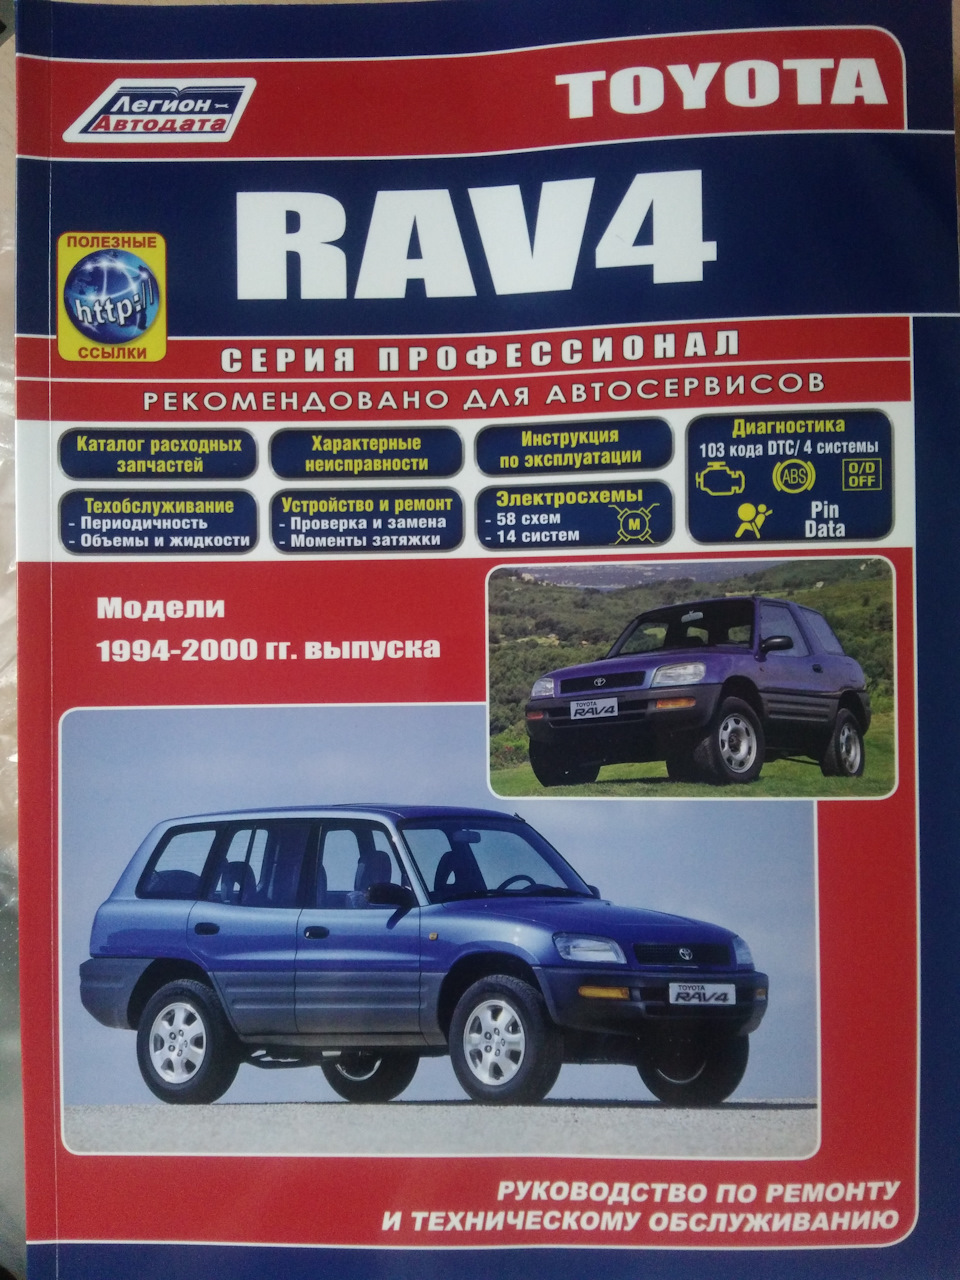
Руководство по ремонту и эксплуатации Toyota RAV4 1 (XA10)
Пошаговые инструкции по техобслуживанию, эксплуатации и ремонту японских кроссоверов «Тойота РАВ 4 ХА10» первого поколения, которые выпускались с 1994 года по 2000 год. Руководство охватывает автомобили, оснащавшиеся бензиновыми четырехцилиндровыми двигателями объемом 2.0 литра (1998 см3) — «S-FE» и «1AZ-FE». Описываются процедуры по разборке и сборке других узлов автомобилей, таких как коробки передач, сцепления, приводных валов, тормозов, рулевого управления, подвески, элементов кузова и салона, а также бортового электрооборудования.
Ссылка в разных форматах на эту статью
TEXTHTMLBB Code
- Руководства по ремонту
- Руководство по ремонту Тойота Рав4 1994-2000 г.в.
Руководство по ремонту Toyota Rav4 / Тойота РАВ4
Общая информация об автомобиле.

Автомобиль Toyota RAV 4 дебютировал в 1994 году как трехдверный универсал. Этот принципиально новый внедорожник вырывался за рамки существовавших тогда стереотипов. Сочетание полного привода, независимой подвески всех колес и несущей конструкции кузова обеспечило новому автомобилю отличные характеристики управляемости и высокий уровень комфорта езды. RAV 4 положил начало классу компактных внедорожников, совмещающих способность преодолевать бездорожье со спортивной динамикой на шоссе и комфортом легкового автомобиля. Название машины — это аббревиатура от Recreation Active Vehicle 4 Wheel Drive — полноприводный автомобиль для активного отдыха.
Короткобазная трехдверная машина предельно гармонична. Обладая броской, оригинальной внешностью, слегка тесноватым кокпитом водителя с a la спортивным рулем и утопленными циферблатами приборов, автомобиль создает образ «внедорожного спорткупе».
А вот появившаяся в 1995 году пятидверная версия RAV 4 претендует на роль семейного автомобиля. За счет удлиненной базы и заднего свеса в машине стало больше места для пассажиров на заднем сиденье, увеличился объем багажника.
Для RAV 4 первого поколения существует только один двигатель — двухлитровый бензиновый, мощностью 128 л.с. Этот мотор по-японски надежен, долговечен и обладает отличными характеристиками, обеспечивая достаточно легкому автомобилю прекрасную динамику. К тому же, он весьма экономичен — расход топлива на 100 км составляет 9-11 л.
Существует как полноприводная модификация автомобиля, так и переднеприводная версия RAV 4. Последняя распространена намного меньше, чем полноприводная и ее стоимость на 10% ниже. Трансмиссия машины практически безупречна. Полноприводная версия RAV 4 имеет схему постоянного полного привода с распределением момента поровну между передними и задними колесами.
Автомобиль комплектуется или абсолютно надежной механической коробкой переключения передач или «автоматом» с электронным управлением, который также зарекомендовал себя с лучшей стороны. Автоматическая коробка передач имеет два режима работы — экономичный («Norm») и спортивный («PWR»). Однако есть одно «но». Автомобиль не имеет главного атрибута внедорожника — понижающей передачи, без которой провернуть все четыре колеса в песке или вязкой грязи практически невозможно.
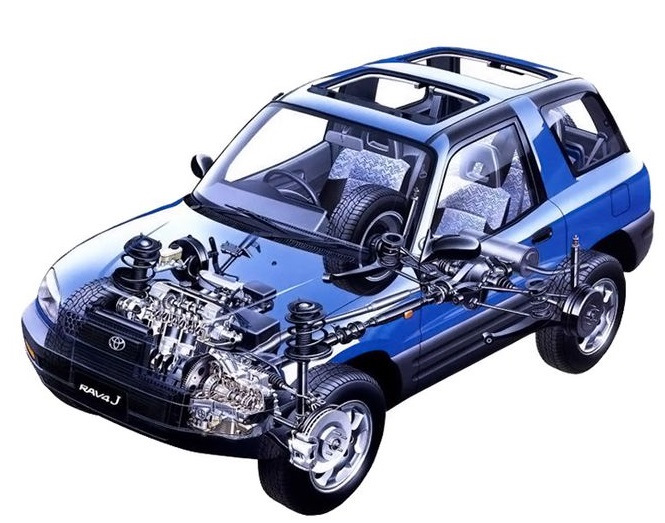
RAV 4 имеет великолепно настроенное шасси. Конструкторам Toyota удалось найти идеальный баланс между управляемостью, жесткостью и комфортом. В поворотах автомобиль ведт себя великолепно! В них он представляет собой практически идеальную модель поведения полноприводной машины. Но, в отличие от легковых полноприводников, позволяет почувствовать пределы возможностей до того, как ситуация станет критической. Прекрасные ездовые качества автомобиля во многом обеспечиваются несущим (безрамным) кузовом и полностью независимой подвеской.
Весной 2000 года стартовало второе поколение RAV 4. В ходе разработки нового автомобиля была сделана ставка на усиление продукт-имиджа новой концепции внедорожника, заложенной первоначальной моделью. В тоже время за счет радикальной доработки слабых мест предыдущей модели, машине удалось придать яркую индивидуальность как лидеру среди внедорожников малого класса, который опережал бы созданные после RAV 4 аналогичные модели других марок.
В первую очередь изменению подвергся внешний вид предыдущего RAV 4, оснащенного шинами большего размера и имеющий небольшие свесы — в ходе разработки нового дизайнерского решения автомобиль приобрел более стильный, более «мужественный» вид. При этом был существенно улучшен и интерьер, в первую очередь благодаря повышению качества отделки. Интересно смотрятся вставки «под метал» с декоративными хромированными головками «болтов».
Салон RAV 4 нового поколения стал просторнее практически без изменения наружных габаритов. Передние сиденья автомобиля имеют три механических регулировки и обладают широким диапазоном продольной регулировки. Задние сиденья многофункциональны и имеют раздельные регулировки (продольные и по углу наклона спинок). Однако, не смотря ни на что, человек ростом 190 см может сидеть на заднем сиденье за человеком такой же комплекции только отодвинув заднее сиденье до упора назад. Багажник автомобиля имеет сравнительно небольшую погрузочную высоту и несколько боковых карманов.
↓ Комментарии ↓
1. Введение
1.0 Введение
2. Эксплуатация автомобиля
2.0 Эксплуатация автомобиля
2.1. Органы управления, приборы и оборудование
2.2 Моторный отсек
2.3. Ключи и замок зажигания
2.4. Пуск двигателя
2.5 Механическая коробка передач
2.6. Автоматическая коробка передач (АКП)
2.7 Рекомендации по управлению автомобилем по пересеченной местности
2.8 Стояночный тормоз
2.9 Переключатель указателей поворота и света фар
2.22. Двери
2.25. Установка зеркал
2.27. Передние сиденья
2.28. Задние сиденья
2.29. Ремни безопасности
2.31. Подъем автомобиля домкратом
3. Техническое обслуживание
3.0 Техническое обслуживание
3.1 Общие сведения по эксплуатационным материалам и регулировочные данные
3.2. Объемы и периодичность технического обслуживания
3.3. Проверка уровней эксплуатационных жидкостей
3.4 Осмотр шин и проверка давления воздуха
3.5 Замена моторного масла и масляного фильтра
3.6 Проверка и замена резиновых лент щеток стеклоочистителя
3.7 Проверка и регулировка свободного хода педали сцепления
3.8. Проверка, обслуживание и зарядка аккумуляторной батареи
3.9. Проверка, регулировка натяжения и замена поликлинового ремня привода навесных агрегатов
3.13. Проверка состояния тормозов (каждые 24 000 км или 12 месяцев)
3.18. Проверка состояния подвески и рулевого управления
3.26. Замена охлаждающей жидкости и промывка системы охлаждения
3.34. Проверка и регулировка зазоров в приводе Клапанов
4. Двигатели
4.0 Двигатели
4.1. Ремонт двигателя 3S-FE без снятия его с автомобиля
4.2. Ремонт двигателя 1AZ-FE без снятия его с автомобиля
4.3. Диагностика и подготовка двигателя к капитальному ремонту
5. Системы охлаждения и кондиционирования
5.0 Системы охлаждения и кондиционирования
5.1. Общие сведения
5.2 Технические данные
5.3. Обслуживание и ремонт системы охлаждения
5.4. Проверка и обслуживание системы кондиционирования воздуха
6. Топливная система и система выпуска отработавших газов
6.0 Топливная система и система выпуска отработавших газов
6.1 Общие сведения
6.2 Технические характеристики системы впрыска топлива
6.3 Сбрасывание давления в топливной системе
6.4. Общая проверка топливной системы
6.5 Топливный насос
6.6 Регулятор давления топлива
6.7 Датчик уровня топлива
6.8 Топливный бак
6.9 Корпус воздушного фильтра
6.11. Электронная система впрыска топлива
6.14. Система выпуска отработавших газов
7. Система зажигания
7.0 Система зажигания
7.1. Общие сведения
7.2 Меры предосторожности при эксплуатации и ремонте системы зажигания
7.3 Технические характеристики системы зажигания
7.4. Проверка системы зажигания и ее элементов
8. Системы контроля и снижения токсичности отработавших газов
8.0 Системы контроля и снижения токсичности отработавших газов
8.1 Общие сведения
8.2 Технические характеристики
8.3 Система бортовой диагностики (OBD)
8.4. Информационные датчики и исполнительные стройства
8.5 Коды неисправностей системы OBD-II
8.6 Блок управления двигателем (PCM)
8.7. Датчики и клапаны системы впрыска топлива (EFI)
8.8 Система принудительной вентиляции Картера (PCV)
8.9 Система рециркуляции отработавших газов (EGR) на моделях с 2001 года
9. Сцепление
9.0 Сцепление
9.1 Общие сведения
9.2 Технические характеристики
9.3 Главный цилиндр цепления
9.4 Рабочий цилиндр сцепления
9.5 Удаление воздуха из гидравлического привода сцепления
9.6 Ведомый диск сцепления
9.7 Подшипник выключения сцепления
9.8 Выключатель сцепления
10. Коробка передач
10.0 Коробка передач
10.1 Общие сведения
10.2 Технические данные
10.3 Ремонт коробки передач
10.4. Ремонтные и регулировочные работы, выполняемые на автомобилях с механической коробкой передач
10.5. Ремонтные и регулировочные работы, выполняемые на автомобилях с автоматической коробкой передач
11. Карданный вал и валы привода ведущих колес
11.0 Карданный вал и валы привода ведущих колес
11.1 Общие сведения
11.3. Валы привода передних колес
11.4. Валы привода задних колес на полноприводных автомобилях
11.5. Замена защитных чехлов шарниров вала привода колеса
11.6. Карданный вал
11.7. Опорный подшипник карданного вала
11.8. Уплотнительные манжеты задней главной передачи
11.9. Дифференциал на полноприводных автомобилях
12. Тормозная система
12.0 Тормозная система
12.1 Общие сведения
12.2 Технические данные
12.3. Антиблокировочная система тормозов (ABS)
12.4 Замена передних тормозных колодок
12.5. Замена суппорта переднего тормоза
12.6. Проверка и замена тормозных дисков
12.7 Замена задних тормозных колодок
12.8. Замена рабочего тормозного цилиндра
12.9. Замена главного тормозного цилиндра
12.11. Замена тормозных трубок и шлангов
12.13. Проверка и замена вакуумного усилителя тормозов
12.15. Замена тросов стояночного тормоза
12.16. Регулировка положения педали тормоза
12.17. Проверка и замена выключателя стоп-сигнала
13. Подвеска
13.0 Подвеска
13.1 Общие сведения
13.2 Технические данные
13.3. Стойка передней подвески
13.4. Разборка и сборка амортизационной стойки
13.5. Передний стабилизатор поперечной устойчивости
13.6. Нижний рычаг передней подвески
13.7. Поворотный кулак и ступица переднего колеса
13.8. Задний стабилизатор поперечной устойчивости
13.9. Амортизатор задней подвески
13.10. Рычаги задней подвески
13.12. Ступица и подшипник заднего колеса
14. Рулевое управление и ходовая часть
14.0 Рулевое управление и ходовая часть
14.1 Общие сведения
14.2 Технические характеристики
14.3 Снятие и установка рулевого колеса с подушкой безопасности
14.4 Снятие и установка рулевой колонки
14.5 Снятие и установка наконечников рулевых тяг
14.6 Замена чехлов рулевого механизма
14.7 Снятие и установка рулевого механизма
14.8 Снятие и установка насоса усилителя рулевого управления
14.9 Прокачка гидравлической системы усилителя рулевого управления
14.11. Колеса и шины
15. Кузов
15.0 Кузов
15.1 Общие сведения
15.2. Уход за кузовом
15.3. Уход за обивкой и ковриками
15.4. Ремонт незначительных повреждений кузова
15.5 Ремонт значительных повреждений кузова
15.6 Обслуживание шарниров и замков
15.7 Рекомендации по замене ветрового стекла и неподвижных стекол
15.8 Снятие и установка капота
15.9 Замок и трос открытия замка капота
15.10. Снятие и установка бамперов
15.14. Снятие и установка обивки дверей
15.15. Двери
15.16. Снятие и установка стекол дверей
15.17. Снятие и установка стеклоподъемников
15.20. Дверь багажного отделения
15.22. Снятие и установка элементов отделки панели приборов
15.25. Снятие и установка сидений
16. Электрооборудование
16.0 Электрооборудование
16.1. Общие сведения
16.2 Технические характеристики
16.3. Электрические цепи
16.4. Проверка аккумуляторной батареи
16.5 Замена проводов аккумуляторной батареи
16.6. Предохранители и реле
16.7 Проверка и замена реле указателей поворота и аварийной световой сигнализации
16.8 Проверка системы зарядки
16.9. Генератор
16.10. Система пуска двигателя
16.13. Снятие и установка переключателей панели приборов
16.15. Проверка и замена двигателя стеклоочистителя
16.16. Радиоприемник и динамики
16.17. Замена антенны
16.27. Проверка системы центральной блокировки замков
16.29. Подушки безопасности
17. Схемы электрооборудования
17.0 Схемы электрооборудования
17.1 Схемы 1-10
17.2 Схемы 11-20
17.3 Схемы 21-32
Toyota Rav4 (1994+). Руководство — часть 1

6 Сокращения, условные обозначения, идентификация, точки установки домкрата
Сокращения
ECU электронный блок управления
EFI электронная система впрыска топлива
EGR система рециркуляции отработавших газов
EUR модели для Европы
Ех кроме
GEN модели для стран общего экспорта
LH левый (с левой стороны)
LHD модели с левосторонним рулевым управлением
PCV система принудительной вентиляции картера
RH правый (с правой стороны)
RHD…. модели с правосторонним рулевым управлением
TP манипулятор дроссельной заслонки
А/С кондиционер воздуха
АКБ аккумуляторная батарея
АКПП автоматическая коробка переключения передач
БЦК большое центральное колесо
BMT верхняя мертвая точка
ВП впускной
ВЫП выпускной
ГРМ газораспределительный механизм
KB коленчатый вал
КПП коробка переключения передач
кр кроме
МЗ момент затяжки
МКПП механическая коробка переключения передач
МЦК малое центральное колесо
НМТ нижняя мертвая точка
ОГ отработавших газов
ОЧИ октановое число топлива
по исследовательскому методу
ППР повышающий планетарный ряд
Т/В топливовоздушной смеси
ч/в х.х частота вращения холостого хода
ЭБУ электронный блок управления
Эл.М. Э/М электромагнитный клапан
Условные обозначения
• деталь, не подлежащая повторному
использованию
* нанесите анаэробный клей-герметик
THREE BOND 1344 (или эквивалентный)
на два или три витка резьбы на конце болта
•- нанесите консистентную смазку
Идентификация
1. Идентификационный номер автомобиля (VIN) «А» вы
штампован на наружной поверхности с правой стороны в
передней части рамы. Этот номер также выштампован на
пластинке с указанием завода-изготовителя «В».
2. Серийный номер двигателя выштампован на левой сто
роне блока цилиндров.
Точки установки домкрата

ВНИМАНИЕ: При проведении работ в салоне автомобиля, оборудованного системой подушек безопасности и
преднатяжителей ремней (система SRS), следует быть особенно внимательными, чтобы не повредить блок
управления системы SRS. Во избежание случайного срабатывания подушек безопасности или преднатяжителей
ремней, перед началом работ установите колеса в положение прямолинейного движения и замок зажигания в по
ложение «LOCK», отсоедините провод от отрицательной клеммы аккумулятора и подождите не менее 90 секунд
[время разряда резервного питания]. Не пытайтесь разбирать узел подушки безопасности или узел преднатяжите-
ля ремня, т.к. в данных узлах нет деталей, требующих обслуживания. Если подушки безопасности и/или преднатя-
жители ремней срабатывали (разворачивались), то их нельзя отремонтировать или использовать повторно.
Контрольно-измеритель
ные приборы и органы
управления
1. Индикатор состояния тормозной сис
темы.
а) Индикатор загорается, если
— стояночный тормоз включен;
— низкий уровень тормозной жидко
сти или нарушена герметичность ва
куумного усилителя привода тормо
зов;
— неисправна электрическая цепь
индикатора.
б) Если во время движения загорел
ся индикатор, то замедлите ско
рость, съедьте с дороги и осторожно
остановите автомобиль.
— Проверьте стояночный тормоз,
. возможно, он включен. Если стоя
ночный тормоз выключен или ин
дикатор горит после его выключе
ния, то возникла неисправность в
тормозной системе.
— Проверьте уровень тормозной
жидкости в бачке.
— Если уровень тормозной жидкости
низок, то в безопасном месте про
верьте эффективность торможения
автомобиля. Если вы считаете, что
тормоза все еще работают доста
точно эффективно, то осторожно
доведите автомобиль до ближай
шего места ремонта. Если тормоза
не работают, то автомобиль необ
ходимо отбуксировать или эвакуи
ровать для ремонта.
Внимание: движение на автомобиле с
низким уровнем тормозной жидкости
опасно.
— Если уровень тормозной жидкости
в норме, то, возможно, неэффектив
но работает вакуумный усилитель
привода тормозов или неисправна
электрическая цепь индикатора.
2. Индикатор ABS.
После включения зажигания индика
тор загорается на несколько секунд,
а затем гаснет. Если во время дви
жения загорается индикатор, то
возможно наличие неисправностей
в антиблокировочной системе.
Внимание:
— При заблокированном межосевом
дифференциале ABS не работает
и индикатор ABS горит постоянно.
— Многократное нажатие на тор
мозную педаль может привести к
включению индикатора на несколь
ко секунд.
3. Контрольная лампа зарядки аккуму
ляторной батареи.
а) Контрольная лампа загорается в
случае разряда аккумуляторной ба
тареи.
б) Если во время движения
загорелась контрольная лампа, то
неисправна система зарядки или
ослаблен ремень генератора. Од
нако двигатель будет продолжать
работать, пока аккумуляторная ба
тарея полностью не разрядится.
Выключите дополнительное обору
дование (кондиционер, вентилятор,
радиоприемник и др.) и двигайтесь
к месту ремонта.
4. Контрольная лампа низкого давле
ния масла.
а) Контрольная лампа загорается,
если давление масла в двигателе
слишком низкое.
б) Если во время движения кон
трольная лампа мигает или горит
постоянно, то съедьте с дороги в
безопасное место, немедленно ос
тановите двигатель.
— Контрольная лампа может мигать
после резкого торможения или ко
гда двигатель работает на холо
стом ходу. Неисправность отсутст
вует, если контрольная лампа гас
нет при небольшом увеличении
оборотов двигателя.
— Контрольная лампа может вклю
чаться, когда уровень масла в дви
гателе слишком низок. Но данная
контрольная лампа не предназна
чена для информирования о низ
ком уровне масла, поэтому перио
дически проверяйте уровень с по
мощью щупа.
5. Индикатор «проверь двигатель».
Индикатор загорается в случае нали
чия неисправностей в системе управ
ления двигателем.
Модели с левым рулем
1 2 3
Модели с правым рулем
6 5 4 3
13 15
Общий вид приборной панели. 1 — регулятор подсветки приборной панели, 2 — переключатель света фар и указате
лей поворота, 3 — выключатель стеклоочистителей и омывателей, 4 — часы, 5 — выключатель блокировки межосевого
дифференциала (МКПП) или выключатель выбора режима работы АКПП, 6 — панель улравления кондиционером и
отопителем, 7 — выключатель аварийной сигнализации, 8 — выключатель обогревателя стекла двери задка, 9 — ау
диосистема, 10 — выключатели обогревателей передних сидений, 11 — выключатель омывателей фар, 12 — выключа
тель блокировки центрального замка или выключатель обогревателей наружных зеркал, 13 — прикуриватель,
14 — замок зажигания, 15 — рычаг регулировки угла наклона рулевой колонки, 16 — переключатель регулировки поло
жения фар, 17 — выключатель задних противотуманных фонарей, 18 — переключатель регулировки положения на
ружных зеркал, 19 — выключатель блокировки центрального замка, 20 — выключатель обогревателей наружных зеркал.
7


9
13. Переключатель регулировки поло
жения фар.
Установите переключатель в необхо
димую позицию для регулировки по
ложения фар. Ниже приведены при
меры установки переключателя в за
висимости от загрузки автомобиля.
При увеличении номера позиции пе
реключателя, фары опускаются, из
меняя направление луча.
Загрузка автомобиля
Только водитель
Водитель + пассажир на .
переднем сиденье
Водитель + все пассажиры
Водитель + все пассажиры +
полная загрузка багажника
Водитель + полная загрузка
багажника
Позиция
0
0
1
2
3
Ключи (модели
с иммобилайзером)
1. В головке ключа установлена микро
схема с приемопередатчиком, которая
является важной для функционирова
ния системы, поэтому будьте осторож
ны, не потеряйте ключи. При помощи
ключа-дубликата, сделанного само
стоятельно, невозможно отменить бло
кировку и запустить двигатель.
2. При использовании ключа, содер
жащего микросхему с приемопередат
чиком, соблюдайте следующие меры
предосторожности:
а) При запуске двигателя не допус
кайте, чтобы кольцо было на пласти
ке, и не давите кольцом и другими
ключами на пластик ключа, так как
двигатель может не запуститься или
остановиться сразу после запуска.
б) При запуске двигателя не допус
кайте контакта ключа с другими клю
чами, в которых установлена микро
схема с приемопередатчиком (в том
числе с ключами от других автомо
билей), так как двигатель может не
запуститься или остановиться сразу
после запуска.
в) Не сгибайте ручку ключа и не сту
чите ключом по другим предметам.
г) Не покрывайте ручку ключа каким-
либо материалом, который может
мешать прохождению сигналов от
ключа к системе.
д) Не подвергайте ключ длительно
му воздействию высокой темпера
туры и прямых солнечных лучей.
е) Держите ключ сухим, не допус
кайте попадания воды или другой
жидкости внутрь ключа.
ж) Не размещайте ключ рядом с ис
точниками сильных магнитных полей,
т.к. они могут препятствовать нор
мальному функционированию ключа.
Люк с электроприводом
Внимание:
— При движении автомобиля следу
ет всегда держать голову, руки и
другие части тела подальше от
открытого люка. В противном
случае Вы можете получить серь
езную травму при внезапной оста
новке автомобиля или в результа
те дорожно-транспортного про
исшествия.
— Перед закрытием люка убеди
тесь, что в проеме открытого лю
ка никто не поместил своей голо
вы, рук и других частей тела.
— Никогда не оставляйте малень
ких детей одних в автомобиле,
особенно при вставленном ключе
зажигания. Они могут воспользо
ваться переключателями привода
люка, попасть в проем люка и по
лучить травмы.
1. Для открытия люка нажмите пере
ключатель «SLIDE» со стороны «OPEN»,
для закрытия нажмите со стороны
«CLOSE». Для подъема задней части
люка нажмите переключатель «TILT» со
стороны «UP», для опускания задней
части люка — со стороны «DOWN».
Примечание: ключ зажигания должен
быть в положении «ON».
местите запорный рычаг в положение
«LOCK», как показано на рисунке.
Открытие и закрытие люка
Наклон задней части люка
2. При нажатом переключателе люк
будет перемещаться. При отпускании
переключателя люк остановится.
3. При закрытии, в целях предосто
рожности, люк останавливается на три
четверти пути до полного закрытия.
Поэтому отпустите переключатель и
затем нажмите его снова для полного
закрытия люка.
Дополнительная
блокировка дверей
Данная функция позволяет запереть
дверь так, что она может быть откры
та только снаружи. Рекомендуется ис
пользовать эту функцию каждый раз,
когда в автомобиле находятся ма
ленькие дети. Для включения пере-
Складывание сидений
Примечание: складывание задних си
дений позволит увеличить объем ба
гажного отделения.
1. Для 5-ти дверных моделей: уложите
ремень безопасности и замок заднего
сиденья, как показано на рисунке.
2. Снимите подголовник. Потяните за
рычаг для снятия фиксации спинки си
денья и сложите спинку сиденья вниз.
3. Потяните за петлю (рычаг) для сня
тия фиксации подушки сиденья. Пе
реместите сиденье вверх и вперед (по
направлению к переднему сиденью),
как показано на рисунке.
3-х дверные модели
5-ти дверные модели
- Manuals
- Brands
- Toyota Manuals
- Automobile
- RAV4 1998
Manuals and User Guides for Toyota RAV4 1998. We have 2 Toyota RAV4 1998 manuals available for free PDF download: Operating Manual, Owner’s Manual
Toyota RAV4 1998 Operating Manual (228 pages)
Brand: Toyota
|
Category: Automobile
|
Size: 4.02 MB
Table of Contents
-
Overview of Instruments and Controls
1
-
Instrument Panel Overview
2
-
Instrument Cluster Overview
4
-
Indicator Symbols on the Instrument Panel
5
-
Operation of Instruments and Controls
7
-
Key Number Plate
7
-
Keys and Doors
7
-
Side Doors
8
-
Locking and Unlocking with Key
8
-
Locking and Unlocking with Inside Lock Knob
8
-
Locking and Unlocking with Power Door Lock Switch
9
-
Rear Door Child-Protectors
9
-
Power Windows
10
-
Operating the Driver’s Window
10
-
Operating the Passenger’s Window
11
-
Quarter Window
12
-
Back Door (Hardtop) and Tail Gate (Soft-Top) Locking and Unlocking with Key
12
-
Hood
13
-
Fuel Tank Cap
14
-
Electric Moon Roof
15
-
Detachable Sun Roof — Precautions
16
-
Detachable Sun Roof — Tilting up and Closing
16
-
Detachable Sun Roof — Removing
17
-
Detachable Sun Roof — Stowing
18
-
Detachable Sun Roof — Installing
19
-
Soft Top — Precautions
20
-
Lowering the Soft-Top
21
-
Removing the Quarter Windows
21
-
Raising the Soft-Top
25
-
Installing the Rear Window
26
-
Installing the Quarter Windows
27
-
Seats
29
-
Front Seat Adjustment Precautions
30
-
Adjusting Front Seats
30
-
Moving Passenger’s Seat for Rear Seat Entry
31
-
Seat Position Adjusting Lever
31
-
Seatback Angle Adjusting Lever
31
-
Rear Seats — Adjusting Seatback Angle
32
-
Folding up Rear Seats
32
-
Flattening Seatbacks (2-Door Hardtop and Soft-Top)
36
-
Flattening Seatbacks (4-Door Hardtop)
37
-
Head Restraints
38
-
Seat Belts Precautions
38
-
Front Seat Belts and Rear Outside Seat Belts
40
-
Rear Center Seat Belt (4-Door Hardtop)
42
-
Stowing the Rear Seat Belts (4-Door Hardtop)
43
-
Seat Belt Extender
44
-
Front Seat Belt Pretensioners
45
-
SRS Driver and Front Passenger Airbags
47
-
Child Restraint Precautions
54
-
Child Restraint System
55
-
Types of Child Restraint System
56
-
Child Restraint System — Installation with 2-Point Type Seat Belt
57
-
Infant Seal Installation
57
-
Convertible Seat Installation
59
-
Child Restraint System — Installation with 3-Point Type Seat Belt
62
-
Booster Seat Installation
68
-
Child Restraint — Top Strap Anchors and Locations
70
-
Tilt Steering Wheel
71
-
Outside Rear View Mirrors
72
-
Power Rear View Mirror Control
72
-
Folding Rear View Mirrors
73
-
Anti-Glare Inside Rear View Mirror
73
-
Lights, Wipers and Defogger
75
-
Operation of Instruments and
75
-
Headlights
78
-
Turn Signals
79
-
Emergency Flashers
79
-
Instrument Panel Light Control
80
-
Interior Light
80
-
Personal Light (with Moon Roof)
80
-
Personal Lights
81
-
Windshield Wipers and Washer
81
-
Rear Window Wiper and Washer
82
-
Rear Window Defogger
82
-
Fuel Gauge
84
-
Engine Coolant Temperature Gauge
85
-
Tachometer
85
-
Odometer and Two Trip Meters
86
-
Service Reminder Indicators and Warning Buzzers
86
-
Brake System Warning Light
87
-
Seat Belt Reminder Light and Buzzer
88
-
Discharge Warning Light
88
-
Low Oil Pressure Warning Light
88
-
Malfunction Indicator Lamp
88
-
Low Fuel Level Warning Light
89
-
«ABS» Warning Light
89
-
Open Door Warning Light
89
-
Automatic Transmission Fluid Temperature Warning Light
89
-
Checking Service Reminder Indicators
90
-
Light Reminder Buzzer
90
-
Key Reminder Buzzer
90
-
Ignition Switch with Steering Lock
92
-
Automatic Transmission
93
-
Normal Driving
94
-
Using Engine Braking
94
-
Using the «2» and «L» Positions
94
-
Backing up
95
-
Parking
95
-
Good Driving Practice
95
-
Rocking Your Vehicle if Stuck
96
-
Driving in «POWER» Mode
96
-
If You Cannot Shift the Selector Lever out of «P» Position
96
-
Manual Transmission
97
-
Center Differential Lock System (Four-Wheel Drive Models with Manual Transmission)
98
-
To Lock the Center Differential
99
-
To Unlock the Center Differential
99
-
Parking Brake
100
-
Cruise Control
100
-
Turning on the System
101
-
Setting at a Desired Speed
101
-
Cancelling the Preset Speed
101
-
Resetting at a Faster Speed
102
-
Resetting at a Slower Speed
102
-
Resuming the Preset Speed
102
-
Cruise Control Failure Warning
102
-
Car Audio System-Reference
104
-
Using Your Audio System: some Basics
105
-
Tone and Balance
105
-
Your Radio Antenna
105
-
Your Cassette Player
105
-
Your Compact Disc Player
106
-
Using Your Audio System: Control and Features
107
-
Car Audio System Operating — Hints
116
-
Radio Reception
116
-
Am
117
-
Caring for Your Compact Disc Player and Discs
118
-
Air Conditioning System — Controls
120
-
Air Conditioning System — Air Flow Selector Settings
123
-
Air Conditioning System — Operating Tips
123
-
Air Conditioning System — Instrument Panel Vents
125
-
Clock
126
-
Other Equipment
126
-
Cigarette Lighter
127
-
Ashtray
127
-
Power Outlet (4-Door Hardtop)
127
-
Glovebox
128
-
Auxiliary Box
128
-
Floor Mat
129
-
Off-Road Vehicle Precautions
132
-
Break-In Period
133
-
Fuel Type
134
-
Octane Rating
134
-
Gasolines Containing Detergent Additives
134
-
Improved Gasolines
134
-
Operation in Foreign Countries
135
-
Gasolines Containing MMT
135
-
Gasolines Containing Alcohol
135
-
Fuel Tank Capacity
135
-
Three-Way Catalytic Converter
136
-
Engine Exhaust Cautions
137
-
Facts about Engine Oil Consumption
137
-
Twin Ground Electrode Platinum-Tipped Spark Plugs
138
-
Important of Engine Oil Level Check
138
-
Tandem Master Cylinder Brake System
139
-
Brake Booster
139
-
Anti-Lock Brake System
139
-
Brake Pad Wear Limit Indicators
141
-
Luggage Stowage Precautions
141
-
Limited-Slip Differential (Four-Wheel Drive Models Only)
142
-
Your Toyota’s Identification — Vehicle Identification Number
142
-
Engine Number
143
-
Theft Prevention Labels (Except for Canada)
143
-
Suspension and Chassis
144
-
Types of Tires
144
-
Before Starting the Engine
146
-
How to Start the Engine
146
-
Before Cranking
146
-
Starting the Engine
147
-
Tips for Driving in Various Conditions
147
-
Off-Road Driving Precautions
148
-
Winter Driving Tips
149
-
Trailer Towing
150
-
Weight Limits
150
-
Hitches
152
-
Brakes and Safety Chains
152
-
Tires
153
-
Trailer Lights
153
-
Break-In Schedule
153
-
Maintenance
153
-
Trailer Towing Tips
154
-
How to Save Fuel and Make Your Vehicle Last Longer, too
156
-
In Case of an Emergency
158
-
If Your Vehicle will Not Start — Simple Checks
158
-
Starting a Flooded Engine
159
-
Jump Starting
159
-
If Your Engine Stalls While Driving
161
-
If Your Vehicle Overheats
162
-
If You Have a Flat Tire
163
-
If You Have a Flat Tire — Required Tools and Spare Tire
164
-
If You Have a Flat Tire — Blocking the Wheel
165
-
If You Have a Flat Tire — Removing Wheel Ornament
165
-
If You Have a Flat Tire — Loosening Wheel Nuts
166
-
If You Have a Flat Tire — Positioning the Jack
166
-
If You Have a Flat Tire — Raising Your Vehicle
167
-
If You Have a Flat Tire — Changing Wheels
167
-
If You Have a Flat Tire — Reinstalling Wheel Nuts
168
-
If You Have a Flat Tire — Lowering Your Vehicle
168
-
If You Have a Flat Tire — Reinstalling Wheel Ornament
169
-
If You Have a Flat Tire — after Changing Wheels
169
-
If Your Vehicle Needs to be Towed
170
-
Towing Precautions
171
-
Emergency Towing
172
-
Emergency Towing Eyelet Precautions
173
-
Tips for Towing a Stuck Vehicle
173
-
If You Cannot Shift Automatic Transmission Selector Lever
174
-
If You Lose Your Keys
174
-
Corrosion Prevention and Appearance Care
176
-
Protecting Your Toyota from Corrosion
176
-
Washing and Waxing Your Toyota
177
-
Cleaning the Interior
180
-
Vehicle Maintenance and Care
182
-
Scheduled Maintenance
182
-
Maintenance and Care
182
-
General Maintenance
183
-
Outside the Vehicle Maintenance
183
-
Tire Pressure
183
-
Maintenance Inside the Vehicle
184
-
Tire Surface and Wheel Nuts
184
-
Tire Rotation
184
-
Fluid Leaks
184
-
Does Your Vehicle Need Repaiting?
185
-
In the Engine Compartment Maintenance
185
-
Do-It-Yourself Maintenance
188
-
Engine Compartment Overview
189
-
Fuse Locations
190
-
Do-It-Yourself Service Precautions
191
-
Parts and Tools
193
-
Checking the Engine Oil Level
194
-
Engine and Chassis
194
-
Engine Oil Selection
195
-
Oil Identification Marks
195
-
Checking the Engine Coolant Level
196
-
Checking Brake Fluid
196
-
Coolant Type Selection
196
-
Checking Power Steering Fluid
197
-
Checking Tire Pressure
198
-
Checking and Replacing Tires
199
-
Rotating Tires
200
-
When to Use Snow Tires or Chains
201
-
Snow Tire Selection
201
-
Snoe Tire Installation
201
-
Tire Chain Selection
201
-
Chain Installation
202
-
When to Replace Your Wheels
202
-
Wheel Selection
202
-
Aluminum Wheel Precautions
203
-
Checking Battery Condition — Precautions
204
-
Electrical Components
204
-
Checking Battery Exterior
205
-
Checking Battery Fluid
205
-
Battery Recharging Precautions
206
-
Checking and Replacing Fuses
206
-
Adding Washer Fluid
207
-
Replacing Light Bulbs
208
-
Replacing Light Bulbs — Headlights
209
-
Replacing Light Bulbs — Parking, Front Turn Signal and Front Side Marker Lights
210
-
Replacing Light Bulbs — Rear Side Marker Lights
210
-
Replacing Light Bulbs — Rear Turn Signal, Stop and Tail, and Back-Up Lights
211
-
Replacing Light Bulbs — High Mounted Stoplight (Hardtop)
212
-
Replacing Light Bulbs — High Mounted Stoplight (Soft-Top)
213
-
Replacing Light Bulbs — License Plate Lights
213
-
Specifications
216
-
Dimensions and Weight
217
-
Service Specifications
218
-
Fuses
222
-
Reporting Safety Defects for U.S. Owners and Uniform Tire Quality Grading
226
Advertisement
Toyota RAV4 1998 Owner’s Manual (64 pages)
1998 Toyota
Brand: Toyota
|
Category: Automobile
|
Size: 0.34 MB
Table of Contents
-
Table of Contents
1
-
Warranty at a Glance
3
-
The Toyota Touch
4
-
How to Get Assistance
5
-
New Vehicle Limited Warranty
6
-
What Is Covered
6
-
What Is Not Covered
8
-
Owner’s Responsibilities
9
-
-
Federal Emission Warranty
11
-
California Emission Control Warranty
15
-
Emission Warranty
17
-
Tire Limited Warranty
19
-
Arbitration
20
-
Seat Belt/Audio Systems
23
-
Extended Protection for
24
-
Parts and Service
25
-
Toyota Parts Centers
26
-
Toyota Express Lube
27
-
Lifetime Guarantee Program
28
-
Genuine Toyota Fluids
29
-
Dealer Certificate
30
-
Scheduled Maintenance
31
-
Maintenance Log
36
-
Service Manuals
56
Advertisement
Related Products
-
Toyota RAV4 1999
-
Toyota RAV4 1997
-
Toyota RAV4 2005
-
Toyota RAV4 2003
-
Toyota RAV4 2001
-
Toyota RAV4 2010
-
Toyota RAV-4 2015 Series
-
Toyota RAV4 HYBRID 2017
-
Toyota RAV4 Hybrid 2016
-
Toyota RAV4 HYBRID 2022
Toyota Categories
Automobile
Automobile Accessories
Car Navigation system
Sewing Machine
Car Receiver
More Toyota Manuals
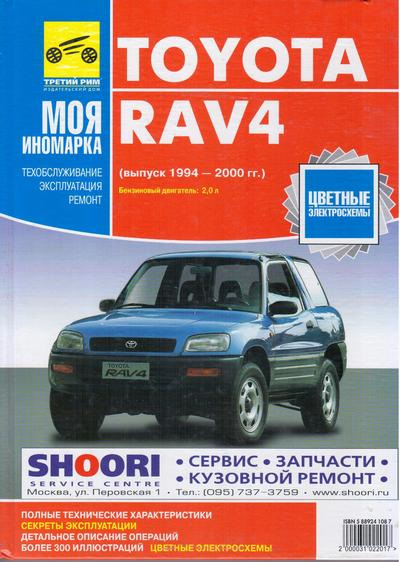
Руководства по ремонту Toyota RAV4-1 (1994-2000)
Вот нашел решил поделится с читателями
www.drive2.ru/l/609802893733664236/
Скачивать по ссылке из облака
drive.google.com/drive/fo…y3WPSj86AlsLXS3NePS8jQJBk
Но если вы решите самостоятельно разбирать двигатель, то рекомендую приобрести книгу этого же издательства по Toyote Celica 4WD&2WD 1993-1999 годов. В этой книге подробнее (чем о RAV4) описаны процедуры разборки и регулировки двигателей 3S-FE, а также двигателей 3S-GE и 3S-GТE (с турбонадувом). Учитывая, что есть желающие установить на первый RAV4-1 движки 3S-GE и 3S-GТE, то книга будет полезной.
Агрегатная база между Toyota RAV4-1 (1994-2000 годов) очень схожа с Toyota Celica (1994-1999 годов)