Quick Guide
Read this manual carefully before you use the product and keep it handy for future reference. For safe and correct use, please be
sure to read «Safety Information» before using the machine.
1
2
3
4
5
6
7
8
9
10
11
16
17
18
19
20
1. [Sort] key
12. [Reset] key
Press to assemble copies as sets in sequential order.
Press to clear the current settings.
2. [Combine] key
13. [Clear/Stop] key
Press to combine two one-sided originals or one
14. [User Tools/Counter] key
two-sided original to one side of a sheet.
Press to display the menu for configuring the
3. [Duplex] key
machine’s system settings. You can also check
Press to print on both sides of paper.
or print the counter value. If you press this key
while performing the various settings, the machine
4. [Scanner] key
returns to the initial screen.
Press to switch the machine to scanner mode.
15. [Energy Saver] key
5. [Folder Print] key
16. Data In Indicator
Press to enter Folder Print mode for the current job.
6. [Copy] key
17. Alert Indicator
Press to switch the machine to copier mode.
18. Selection keys
7. [ID Card Copy] key
19. [Escape] key
Press to enter ID card copy mode for the current job.
Press to cancel the last operation or to return to
8. Add Toner Indicator
the previous level of the menu tree.
9. Load Paper Indicator
20. [OK] key
Press to confirm settings and specified values, or
10. Screen
to move to the next menu level.
11. Scroll keys
21. Number keys
Press to move the cursor in the direction indicated
Press to enter numerical values when specifying
by the key.
settings such as copy quantities or to enter letters
Pressing the [][] keys while the machine is in
when specifying names.
standby mode will display the menu for configuring
22. [Start] key
the settings of the machine’s current operation
mode (copier or scanner).
Press to start copying or scanning.
Pressing the [▲][▼] keys allows you to scroll the
screen and select items on the menus.
Placing Originals
This section describes the procedure for placing
originals on the exposure glass and in the ADF.
Place the originals.
Exposure Glass (Face down)
If necessary, confi gure advanced
photocopy settings.
For details, see «Specifying Scan
Settings for Scanning», User Guide in the
provided CD-ROM or our website.
DZV419
12
13
14
15
Specifying the Paper Size
This section explains how to specify the paper
size and paper type using the control panel.
You can specify the size of the paper that is
loaded in the paper tray.
Basically, it is not necessary to specify the
paper size manually because the default value
of the paper size settings for each tray is [Auto
21
22
Detect]. If you load paper whose size is not
DZV102
detected automatically or load custom size
paper, specify the paper size manually using
the following procedures:
Press the [User Tools/Counter]
key.
Press the [] or [] key to
select [System Settings], and
then press the [OK] key.
Press the [] or [] key to
select [Tray Paper Settings], and
then press the [OK] key.
Press the [] or [] key to
select the paper size setting for
the desired tray, and then press
the [OK] key.
❖
Specifying the Standard Paper Size
Press the [], [], [], or
[] key to select the desired
paper size, and then press the
[OK] key.
Press the [User Tools/Counter]
key to return to the initial screen.
Auto Document Feeder (Face up)
❖
Specifying a Custom Paper Size
Press the [], [], [], or []
key to select [CustomSize],
and then press the [OK] key.
Press the [] or [] key to
select [mm] or [inch], and then
press the [OK] key.
DZV421
Enter the width using number
keys, and then press the [OK]
key.
To enter a decimal point, press the
[./ ] key.
Enter the length using number
keys, and then press the [OK]
key.
To enter a decimal point, press the
[./ ] key.
Press the [User Tools/Counter]
key to return to the initial screen.
Press the [Start] key.
Copying an ID Card
Place the original on the
You can copy the front and back sides of an ID
exposure glass with the back side
card or other small documents onto one side of
faced down and with the top to
a sheet of paper.
the rear of the machine, and then
press the [Start] key again.
This function is available only when the
original is set on the exposure glass, not
when it is set in the ADF.
To use this function, the paper size used for
printing copies must be set to A6, A5, A4,
Half Letter, or Letter.
You can scan both sides of an ID card and transmit
the scanned image to an e-mail address, a folder,
or a USB fl ash memory device.
This function is available only when the
CES165
original is set on the exposure glass, not
when it is set in the ADF.
Press the [ID Card Copy] key.
When using the ID Card Scan function, you
must fi rst register the destination in the
Address Book using Web Image Monitor.
To make multiple copies, enter
For details, see Web Image Monitor Help.
the number of copies using the
number keys.
Press the [Scanner] key.
Place the original with the front
side faced down in the upper-
Place the original front side
left area of the exposure glass.
down and top to the machine
rear on the exposure glass.
Press the selection key under
[ID Scan].
Press the [Start] key.
DZV423
Make sure the original faces down in the
scan area
specifi ed on the exposure
glass (as indicated by the scale).
Up to 3 documents can be stored on the machine.
The stored documents can be accessed and
printed with a single keystroke. This function
is called «Folder Print».
For details about deleting documents, see «Storing
Scanned Documents (Folder Print)», User Guide
in the provided CD-ROM or our website.
❖
Storing Documents
Press the [Folder Print] key.
1
Press the selection key under
[Store].
DZV424
Press the [] or [] key to
select an «Empty» document.
Press the [OK] key.
●
When using the ADF
Place the originals into the
ADF with their fronts facing
up.
Press the [Start] key.
Scanning an ID Card
Enter a Name.
Press the [OK] key.
●
When using the Exposure Glass
Place the original on the
exposure glass with the back
side faced down and with the
top to the rear of the machine.
Press the [Start] key.
Place the original on the
exposure glass with the back
side faced down and with the
top to the rear of the machine.
Press the [Start] key again.
When all originals have been scanned,
press the [ ] key.
Enter a Name.
Using Folder Print
Press the [OK] key.
- Overview
- Digital Workspace
- Business Process Management
- Cloud & Infrastructure
- Cybersecurity
- Digital Experience
- Graphic Communications
- Our Approach
- Financing Services
Overview
Leading Change at Work
Technology is changing the way we work. At Ricoh, we ensure that change is positive for your teams and your business. We guide you through every step of the journey to ensure a seamless transition to a fully digital workspace.
Discover more

Digital Workspace
Access everywhere
Hybrid and on-the-go set-ups are shaping our future. We take a holistic approach to designing, integrating and supporting your digital workspaces to nurture employee engagement and help you reach new levels of performance.
Discover more

- Managed Print Services
- Communication & Collaboration Services
- Managed Workplace Services
Business Process Management
Synched for success
Manual tasks no longer need to hold your staff back. We optimise your business processes to enable your staff to deliver more; providing the technology, expertise and support to streamline and simplify processes across your organisation.
Discover more

- Process Automation
- Business Process Services
Cloud & Infrastructure
Cloud & clear
Capturing the full value of cloud requires the right roadmap and team to execute it. We provide cloud solutions and expertise that make your business operations more agile, cost-effective and secure while pursuing next-generation innovation.
Discover more

- Cloud Infrastructure Services
- IT Infrastructure Solutions & Services
- Networking Solutions & Services
- Business Continuity & Disaster Recovery
Cybersecurity
No more risky business
Internet-enabled devices create new vulnerabilities to cyberattacks. We help you go on the offensive against cybercrime with intelligent cybersecurity services and solutions aligned to your core business processes.
Discover more

- Cybersecurity Services
- Cybersecurity Solutions
- Managed Cybersecurity Services
Digital Experience
A new level of experience
An excellent customer experience starts with a superior employee experience. Our highly-skilled team of data scientists and developers design, build, implement and service the solutions you need to exceed expectations at every touchpoint.
Discover more

- Data Analytics & AI
- Software Engineering
- Customer and Employee Engagement
Graphic Communications
Future proof your business
The possibilities with print are endless. At Ricoh, we help you evolve, digitalise and create a sustainable business advantage; providing solutions on hardware, software and services that enable new opportunities within professional printing.
Discover more

- Office Products & Software
- Production printers & software
- Direct to Garment Printers
- Audio-visual Equipment
- All Services
- Financing Options
- Supplies
- Digital Cameras
- PFU Scanners
- Counterfeit Toners
Office Products & Software
Best-in-class quality
Ricoh is well known for high-quality printers, digital duplicators and multifunction printers/scanners/copiers. With plenty of choices in speed, size and capabilities, you can select from the models and features that work best for your workgroup, office or classroom.
Discover all our office products & software
- All-in one printers
- Single Function Printers
- Digital Duplicators
- Office Software
- Overview
- Download Drivers
- Product FAQ
- Ricoh Security
- RICOH Intelligent Support
- Environmental, Health & Safety Information
- End User License Agreement
- Counterfeit Toners
- Register for eServices
- Register Warranty
- Recycle Toner Cartridges
- Ricoh Developer Site
Overview
A multi-faceted service and support platform
All the product and service support you need in one place. We provide support, advice and solutions to keep your business up and running.
Get support

- Overview
- News
- Press Room
- Events
Overview
Your one-stop resource
Find out everything about our business news, product innovations and people, along with the events we’re hosting and attending.
Keep informed

- The Company
- Our Brand
- Value, Vision & Mission
- Environmental, Social & Governance
- Sponsorships
- Our career opportunities
- Investor Relations
- Printed Memories
The Company
Who we are and what we do
At Ricoh, we endeavour to always listen to our customers and provide you with innovative solutions, products and services that align with your business goals. We strive to add value to your services and products. We adapt to changing business climates.
Learn more about Ricoh

- Our Business
- Our History
- Innovation
- Our Management Team
- Our Offices
- Overview
- General Enquiry
- Solutions & Product Enquiry
- Product & Services Support
- Account & Invoice Support
- Where to buy
- Investor Relations
Overview
We love to hear from you
Whether you have a pricing question about our solutions or products, need help managing your account or already using our products and have a support question, our team is there to help.
Get in touch

- Overview
- Modern Workplace
- Security & Cloud
- Process Optimisation
- Digital Printing
- Success Cases
Overview
Helping you to stay one step ahead
Explore and read our lastest insights from what matter the most in business solutions.
Discover the lastest insights

Modern Workplace
Modern Workplace
Explore the latest trends and ideas shaping the modern workplace, and discover how origanisations can thrive in today’s fast-paced business landscape.
Learn more

- FEATURED : Create spaces for employee engagement
Process Optimisation
Process Optimisation
Manual tasks no longer need to hold your staff back. Explore perspectives on how to streamline and simplify processes across your organisation so your staff can deliver more.
Learn more

- FEATURED : Enable growth with smart workflows
Quick Guide
Read this manual carefully before you use the product and keep it handy for future reference. For safe and correct use, please be
sure to read “Safety Information” before using the machine.
DZV424
1
Press the [Start] key.
Place the original on the
exposure glass with the back side
faced down and with the top to
the rear of the machine, and then
press the [Start] key again.
Scanning an ID Card
You can scan both sides of an ID card and transmit
the scanned image to an e-mail address, a folder,
or a USB fl ash memory device.
This function is available only when the
original is set on the exposure glass, not
when it is set in the ADF.
When using the ID Card Scan function, you
must fi rst register the destination in the
Address Book using Web Image Monitor.
For details, see Web Image Monitor Help.
Press the [Scanner] key.
Place the original front side
down and top to the machine
rear on the exposure glass.
Press the selection key under
[ID Scan].
Press the [Start] key.
Using Folder Print
Up to 3 documents can be stored on the machine.
The stored documents can be accessed and
printed with a single keystroke. This function
is called “Folder Print”.
Enter the length using number
keys, and then press the [OK]
key.
To enter a decimal point, press the
[./
] key.
Press the [User Tools/Counter]
key to return to the initial screen.
Copying an ID Card
You can copy the front and back sides of an ID
card or other small documents onto one side of
a sheet of paper.
This function is available only when the
original is set on the exposure glass, not
when it is set in the ADF.
To use this function, the paper size used for
printing copies must be set to A6, A5, A4,
Half Letter, or Letter.
CES165
Press the [ID Card Copy] key.
To make multiple copies, enter
the number of copies using the
number keys.
Place the original with the front
side faced down in the upper-
left area of the exposure glass.
DZV423
Make sure the original faces down in the
scan area
specifi ed on the exposure
glass (as indicated by the scale).
Specifying the Paper Size
This section explains how to specify the paper
size and paper type using the control panel.
You can specify the size of the paper that is
loaded in the paper tray.
Basically, it is not necessary to specify the
paper size manually because the default value
of the paper size settings for each tray is [Auto
Detect]. If you load paper whose size is not
detected automatically or load custom size
paper, specify the paper size manually using
the following procedures:
Press the [User Tools/Counter]
key.
Press the [] or [] key to
select [System Settings], and
then press the [OK] key.
Press the [] or [] key to
select [Tray Paper Settings], and
then press the [OK] key.
Press the [] or [] key to
select the paper size setting for
the desired tray, and then press
the [OK] key.
Specifying the Standard Paper Size
❖
Press the [], [], [], or
[] key to select the desired
paper size, and then press the
[OK] key.
Press the [User Tools/Counter]
key to return to the initial screen.
Specifying a Custom Paper Size
❖
Press the [], [], [], or []
key to select [CustomSize],
and then press the [OK] key.
Press the [] or [] key to
select [mm] or [inch], and then
press the [OK] key.
Enter the width using number
keys, and then press the [OK]
key.
To enter a decimal point, press the
[./
] key.
For details about deleting documents, see “Storing
Scanned Documents (Folder Print)”, User Guide
in the provided CD-ROM or our website.
Storing Documents
❖
Press the [Folder Print] key.
Press the selection key under
[Store].
Press the [] or [] key to
select an “Empty” document.
Press the [OK] key.
When using the ADF
●
Place the originals into the
ADF with their fronts facing
up.
Press the [Start] key.
Enter a Name.
Press the [OK] key.
When using the Exposure Glass
●
Place the original on the
exposure glass with the back
side faced down and with the
top to the rear of the machine.
Press the [Start] key.
Place the original on the
exposure glass with the back
side faced down and with the
top to the rear of the machine.
Press the [Start] key again.
When all originals have been scanned,
press the [
] key.
Enter a Name.
Press the [OK] key.
12. [Reset] key
Press to clear the current settings.
13. [Clear/Stop] key
14. [User Tools/Counter] key
Press to display the menu for configuring the
machine’s system settings. You can also check
or print the counter value. If you press this key
while performing the various settings, the machine
returns to the initial screen.
15. [Energy Saver] key
16. Data In Indicator
17. Alert Indicator
18. Selection keys
19. [Escape] key
Press to cancel the last operation or to return to
the previous level of the menu tree.
20. [OK] key
Press to confirm settings and specified values, or
to move to the next menu level.
21. Number keys
Press to enter numerical values when specifying
settings such as copy quantities or to enter letters
when specifying names.
22. [Start] key
Press to start copying or scanning.
1. [Sort] key
Press to assemble copies as sets in sequential order.
2. [Combine] key
Press to combine two one-sided originals or one
two-sided original to one side of a sheet.
3. [Duplex] key
Press to print on both sides of paper.
4. [Scanner] key
Press to switch the machine to scanner mode.
5. [Folder Print] key
Press to enter Folder Print mode for the current job.
6. [Copy] key
Press to switch the machine to copier mode.
7. [ID Card Copy] key
Press to enter ID card copy mode for the current job.
8. Add Toner Indicator
9. Load Paper Indicator
10. Screen
11. Scroll keys
Press to move the cursor in the direction indicated
by the key.
Pressing the [][] keys while the machine is in
standby mode will display the menu for configuring
the settings of the machine’s current operation
mode (copier or scanner).
Pressing the [▲][▼] keys allows you to scroll the
screen and select items on the menus.
Placing Originals
This section describes the procedure for placing
originals on the exposure glass and in the ADF.
Place the originals.
Exposure Glass (Face down)
DZV419
Auto Document Feeder (Face up)
DZV421
If necessary, confi gure advanced
photocopy settings.
For details, see “Specifying Scan
Settings for Scanning”, User Guide in the
provided CD-ROM or our website.
DZV102
2221
2019
181716
151413121110987654321
Quick Guide 2/2
Printing Documents
❖
Press the [Folder Print] key.
Press the selection key under
[Print].
Press the [] or [] key to
select a document to print.
Press the [OK] key.
Press the [Start] key.
Making Copies
This section describes the basic procedure for
making copies.
Use paper and originals that are the same size.
Specify a scaling ratio if the original is not the
same size as the paper. For details, see
“Specifying Reduce/Enlarge”.
Press the [Copy] key.
Place the original on the exposure
glass or in the ADF.
To place the original, see “Placing Originals”.
To make multiple copies, enter
the number of copies using the
number keys.
Press the [Start] key.
Specifying Reduce/Enlarge
There are two ways to set the scaling ratio.
Press the [Copy] key.
Press the selection key under [Scale].
Preset ratio
❖
DAC578
When using the Exposure Glass
●
Place the original on the
exposure glass front side
down and with the top to the
rear of the machine.
Press the [Start] key.
Place the next original on the
exposure glass.
When selecting [2 Sided->2 Sided] in
Step 2, place the original on the
exposure glass with the back side
faced down and with the top to the
rear of the machine.
Press the [Start] key again.
When all originals have been scanned,
press the [
] key.
Combined Copying
This section explains how to copy two original
pages to one sheet, or copy four original pages
to one sheet with two pages per side.
One-Sided Combine
❖
Press the [Combine] key.
Press the [] or [] key to
select [2 in 1] or [4 in 1]
according to how you want
the document to be output,
and then press the [OK] key.
Press the [] or [] key to
select paper orientation and
page order, and then press
the [OK] key.
When using the ADF
●
If you want to copy 2-sided originals onto
one side of a sheet, proceed to the next step.
If not, proceed to Step 7.
Press the [Duplex] key.
Press the [▲] or [▼] key to
select the desired copy mode,
and then press the [OK] key.
Press the [▲] or [▼] key to
select original orientation and
page order, and then press
the [OK] key.
Press the selection key under
[R/E] or [Auto R/E].
For [R/E], press the [] or [] key to
select the desired ratio.
Press the [OK] key.
Custom ratio
❖
CES106
Press the selection key under
[Custom].
Specify the desired ratio using the
number keys.
Press the [OK] key.
Duplex Copying
This section explains how to copy two 1-sided
pages or one 2-sided page onto a 2-sided page.
1 Sided->2 Sided
●
Copies two 1-sided pages on one 2-sided page.
2 Sided->2 Sided
●
Copies one 2-sided page on one 2-sided page.
Press the [Duplex] key.
Press the [▲] or [▼] key to
select [1 Sided->2 Sided] or [2
Sided->2 Sided] according to
how you want the document
to be output, and then press
the [OK] key.
Press the [▲] or [▼] key to
select the desired original
orientation, and then press
the [OK] key.
Press the [▲] or [▼] key to
select the desired duplex
orientation, and then press
the [OK] key.
When using the ADF
●
Place the originals into the ADF
with their fronts facing up.
Press the [Start] key.
Place the originals into the
ADF with their fronts facing
up.
Press the [Start] key.
When using the Exposure Glass
●
Place the original on the
exposure glass front side
down and with the top to the
rear of the machine.
Press the [Start] key.
Place the next original on the
exposure glass.
Press the [Start] key again.
When all originals have been scanned,
press the [
] key.
Two-Sided Combine
❖
To use this function, you have to use the duplex
function simultaneously. For details about the
duplex function, see “Duplex Copying”.
Press the [Combine] key.
Press the[] or [] key to
select [2 in 1] or [4 in 1]
according to how you want
the document to be output,
and then press the [OK] key.
Press the [] or [] key to
select paper orientation and
page order, and then press
the [OK] key.
Press the [Duplex] key.
Press the [▲] or [▼] key to
select the desired copy mode,
and then press the [OK] key.
Press the [] or [] key to
select original orientation and
page order, and then press
the [OK] key.
When using the ADF
●
Place the originals into the ADF
with their fronts facing up.
Press the [Start] key.
When using the Exposure Glass
●
Place the original on the
exposure glass front side
down and with the top to the
rear of the machine.
Press the [Start] key.
Place the next original on the
exposure glass.
When copying 2-sided originals, place
the original on the exposure glass with
the back side faced down and with the
top to the rear of the machine.
Press the [Start] key again.
When all originals have been scanned,
press the [
] key.
Using Scan to E-mail/Folder
This section describes the basic operation for
sending scanned fi les via e-mail or to a computer.
To send scanned fi les to an e-mail address (Scan
to E-mail) or a shared folder on a network
computer (Scan to Folder), you must fi rst register
the destination in the Address Book using Web
Image Monitor. See «Registering Scan
Destinations», User Guide in the provided
CD-ROM or our website.
Place the original on the
exposure glass or in the ADF.
To place the original, see “Placing Originals”
Press the [Scanner] key.
Press the selection key under
[Addr].
Press the [] or [] key to select
[Search By Name] or [Search By
ID], and then press the [OK] key.
If you want to search for a specifi c
entry by its name, enter the fi rst
letters of the name using the
number keys, and then press the
[OK] key. Each time you enter a
character, the display changes to
show the matching name.
Search for the desired destination
by pressing the [] or [] key to
scroll the Address Book, and
then press the [OK] key.
Press the [Start] key.
Depending on the machine’s settings, you
may see the following screen on the display
when scanning from the exposure glass.
If you see this screen, proceed to the next step.
If you have more originals to
scan, place the next original on
the exposure glass, and then
press the selection key under
[Yes]. Repeat this step until all
originals are scanned.
When all originals have been
scanned, press the selection key
under [No] to start sending the
scanned fi le.
Installing the Printer Driver
Using the CD-ROM supplied with this machine,
you can install the driver from your computer.
Turn on your computer.
Insert the provided CD-ROM
into the CD-ROM drive of the
computer.
If your computer does not have a CD-ROM
drive, download a setup fi le from our website.
Click [Quick Install].
The software license agreement appears
in the [Software License Agreement]
dialog box.
After reading the agreement,
click [Yes].
Follow the instructions in the
setup wizard.
Click [Finish] in the [Setup
Complete] dialog box. If the
installer prompt you to restart
Windows, reboot your computer.
Setup is completed.
© 2018
EN GB EN AU D0B3-7108
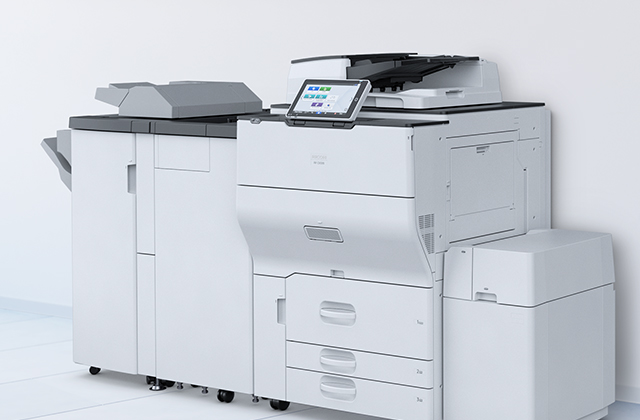
ОПИСАНИЕ МОДЕЛИ
Ricoh M 2701 — цифровое многофункциональное устройство формата А3 с возможностями сетевого GDI-принтера, цветного сканера и копира, автоподатчиком оригиналов и скоростью дуплексной печати 27 страниц А4 в минуту.
Высокая производительность по низкой цене
Устройство имеет скорость печати до 27 страниц в минуту и в стандартной комплектации поставляется с лотком для бумаги, который подает до 500 листов для обеспечения простой и плавной печати. Кроме того, RICOH M 2701 оснащен устройством автоматической подачи документов (ARDF) для удобного чтения и копирования документов. Мы сделали это сочетание высокой производительности и удобного использования доступным по разумной цене.
Простота установки и обслуживания
Ricoh M 2701 лёгко установить, как только машина прибудет с установленными по умолчанию устройствами для разработки и формирования изображений без проблем. Установка может быть выполнена на одном дыхании с помощью пошагового руководства по установке Ricoh. Дальнейшее обслуживание, такое как устранение замятий бумаги или замена тонера, также просто.
Лучшее подключение и удобство использования
МФУ поставляется со стандартной платой сетевого интерфейса, дополнительно можно установить беспроводную локальную сеть для обеспечения большего удобства печати. Печать можно выполнить даже прямо с вашего смартфона. Оно также оснащено различными функциями, такими как простая оцифровка и совместное использование печатной копии через «Сканирование в папку / электронная почта / USB», «Копирование и сканирование идентификационной карты» для поддержки повседневной работы и даже «Заблокированная печать». Установите пароли и обеспечьте сохранность личной информации. Ваша работа будет приятнее, чем когда-либо прежде.
Безопасность по DNA
Признавая современные проблемы безопасности бизнеса, Ricoh M 2701 гарантирует, что деловая информация остается защищенной с надежными уровнями безопасности на месте. Конфиденциальность документа может поддерживаться путем приостановки заданий на печать, и ее можно разблокировать только после выполнения аутентификации на устройстве. Сетевое шифрование гарантирует, что передача данных остается безопасной.
Ricoh M 2701 — экономически эффективное решение для функциональной офисной печати!
Стандартные интерфейсы Gigabit Ethernet и USB 2.0
Полноцветный скоростной сканер до 50 страниц в минуту
Традиционная экономичность в эксплуатации и низкая стоимость владения
Технология быстрого старта QSU для минимального времени прогрева
Широкие возможности работы с бумагой
Полное соответствие новой директиве ЕС RoHS, регламентирующей нормы использования вредных материалов при производстве оборудования
В комплекте базового блока: дуплекс, реверсивный автоподатчик оригиналов, предустановленный девелопер и стартовая туба тонера на 4000 отпечатков

ПАРАМЕТРЫ И ХАРАКТЕРИСТИКИ
| ФУНКЦИОНАЛЬНОСТЬ МОДЕЛИ | |
|---|---|
| M 2701 | • цифровое монохромное многофукциональное устройство максимального формата A3 (копировальный аппарат, сетевые GDI-принтер и цветной сканер) с автоматическим дуплексом и стартовым комплектом. Cкорость непрерывного копирования или печати 27 страниц A4 в минуту. Автоматический реверсивный податчик документов. |
| ОБЩИЕ ПАРАМЕТРЫ | |
| EDP | • 418118 |
| Конфигурация | • настольный (рекомендуется установка на специальную тумбу) |
| Скорость печати | • односторонняя А4: до 27 страниц в минуту • двусторонняя А4: до 16 страниц в минуту • односторонняя А3: до 15 страниц в минуту |
| Частота процессора | • 400 МГц |
| Панель управления | • 4х строчный LCD |
| Время прогрева | • менее 19 с |
| Объём общей памяти | • 512 Мб |
| Масса | • менее 39 кг |
| Габаритные размеры (Ш×Г×В) | • 587 × 581 × 639 мм |
| Напряжение питания | • 220 ÷ 240 В, 50/60 Гц |
| КОПИРОВАЛЬНЫЙ АППАРАТ | |
| Технология печати | • электрографическая печать с экспонированием лазерным лучом, двухкомпонентная система проявки методом сухого электростатического переноса |
| Разрешение | • 600 × 600 dpi |
| Множественное копирование | • до 999 копий |
| Коды пользователей | • 50 восьмизначных кодов |
| Время выхода первой копии | • менее 9 сек |
| Время выхода из «спящего режима» | • менее 5 с |
| Диапазон масштабирования | • 50 ÷ 200% с шагом 1% |
| ПРИНТЕР | |
| Разрешение | • 600 × 600 dpi |
| Язык описания страниц | • GDI |
| Драйвер | • стандартно: DDST |
| Интерфейс | • стандартно: Gigabit Ethernet, USB 2.0 тип B • опционально: Wi-Fi IEEE 802.11a/b/g/n/ac |
| Поддерживаемые сетевые протоколы | • TCP/IP (IP v4) |
| Поддерживаемые ОС | • Windows® 8.1/10/11 Server 2012/2016/2019/2022 • OpenSuse (en) • Ubuntu (en) • Red Hat Enterprise LinUX (en) |
| Печать с мобильных устройств | • Apple AirPrint™ • Mopria |
| Сортировка | • электронная |
| СКАНЕР | |
| Формат оригинала | • А6 ÷ А3 |
| Скорость сканирования | • полноцветное: до 6 оригиналов А4 в минуту • монохромное: до 18 оригиналов А4 в минуту |
| Разрешение | • максимальное: 600 × 600 dpi |
| Поддерживаемые форматы файлов | • TIFF/JPEG/PDF |
| Драйвер | • USB TWAIN/WIA, Network TWAIN |
| Адресаты | • email, папка, USB |
| РАБОТА С БУМАГОЙ | |
| Формат бумаги | • фронтальный лоток: А5 ÷ А3 • обходной лоток: А6 ÷ А3 (до 305 x 600 мм) |
| Двустороняя печать | • автоматический дуплекс |
| Плотность бумаги | • фронтальный лоток: 52 ÷ 105 г/м² • лоток прямой подачи: 52 ÷ 216 г/м² • дуплекс: 64 ÷ 105 г/м² • автоподатчик: 64 ÷ 128 г/м² |
| Запас бумаги | • стандартно: 500 листов • обходной лоток: 100 листов • максимально: 1600 листов |
| Ёмкость выходных лотков | • внутренний лоток на 250 листов |
| Автоматический податчик документов | • реверсивный на 50 листов |
| ПРОГРАММНОЕ ОБЕСПЕЧЕНИЕ | |
| Стандартно | • Device Manager NX® • Web Image Monitor • Printer Driver Packager NX |
| Опционально | • GlobalScan NX • Card Authentication Package Enterprise™ Server • Unicode Font Package для SAP • Remote Communication Gate S Pro • Streamline NX • @Remote |
| ОПЦИИ | |
| Внешние опции | • дополнительный лоток подачи бумаги на 500 листов тип PB2030 • дополнительные лотки подачи бумаги 2×500 листов тип PB2040 • пьедестал низкий тип 65 • пьедестал высокий тип 66 • крышка лотка ручной подачи тип P16 • ручка для удобства открывания автоподатчика людьми с ограниченными возможностями тип C |
| Внутренние опции | • интерфейс IEEE 802.11a/b/g/n/ac тип P16 |
| ЭКОЛОГИЯ | |
| Потребляемая мощность | • в «спящем» режиме: до 1 Вт • в режиме ожидания: до 94 Вт • в рабочем режиме: до 420 Вт • в режиме энергосбережения: до 1550 Вт |
| НАГРУЗКИ | |
| Рекомендуемая нагрузка | • 4k в месяц |
| Максимальная нагрузка | • 10k в месяц |
| Пиковая нагрузка | • 60k в месяц |
| Срок службы | • 600k или 5 лет |
| k = 1000 отпечатков А4 |
РАСХОДНЫЕ МАТЕРИАЛЫ
| Код EDP | Name | Наименование | Упаковка | Кол-во | Ресурс | Доступность |
| M 2700 2701 | IM 2702 | ||||||
|---|---|---|---|---|---|---|
| 842128 | Toner Type MP 2014 | Тонер тип MP 2014 | туба | 1 | 4k | В магазин |
| 842135 | Toner Type MP 2014H | Тонер тип MP 2014H | туба | 1 | 12k | В магазин |
| D2459640 | Developer Black | Девелопер | пакет | 1 | 60k | В магазин |
| B0399510 | OPC Drum | Фоторецепторный барабан | коробка | 1 | 60k | В магазин |
| 2700PM60 | Maintenance Kit MP 2700 | Комплект для технического обслуживания MP 2700 | набор | 1 | 60k | В магазин |
| 2700PM120 | Maintenance Kit MP 2700 | Комплект для технического обслуживания MP 2700 | набор | 1 | 120k | В магазин |
| k = 1000 |
ГАРАНТИЙНЫЕ ОБЯЗАТЕЛЬСТВА
СРОК ГАРАНТИИ
Гарантируется исправная работа печатного оборудования в течение 1 года или 48000 отпечатков A4 по пробегу общего счётчика в зависимости от того, что наступит ранее, при условии использования оригинальных расходных материалов, эксплуатации устройства в некоммерческих целях и регулярного технического обслуживания в соответствии с рекомендациями производителя.
Возможно опциональное расширение гарантийного срока:
до 2 лет или 96000 отпечатков — 7940 рублей
до 3 лет или 144000 отпечатков — 14290 рублей
до 4 лет или 192000 отпечатков — 22230 рублей
до 5 лет или 240000 отпечатков — 28580 рублей
ОТВЕТСТВЕННОСТЬ
Гарантийные обязательства несёт представительство компании Ricoh в России ООО «Рико Рус» через авторизованные сервисные центры. В случае выхода из строя оборудования, необходимо просто подать заявку в наш или ближайший авторизованный сервисный центр Ricoh.
Гарантия не распространяется на срок службы расходных материалов и ресурсных деталей, в том числе поставляемых вместе с оборудованием, на все типы программного обеспечения, на совместимость оборудования с аппаратными и программным обеспечением сторонних производителей и возможный ущерб, связанный с такой несовместимостью, на профилактические работы.
ГАРАНТИЙНОЕ ОБСЛУЖИВАНИЕ
Гарантийное обслуживание в течение гарантийного срока является комплексом услуг по сокращению времени простоя оборудования и обеспечения выполнения производителем гарантийных обязательств, включающий в себя:
оперативный выезд инженера на место установки оборудования для диагностики неисправности, ремонта и профилактической чистки;
восстановление работоспособности на месте или в максимально короткий срок.
Гарантийное обслуживание является платным для оборудования моделей класса LE и стандартными для моделей других классов, включено в любой Договор технического обслуживания
.
СЕРВИСНОЕ ОБСЛУЖИВАНИЕ И РЕМОНТ
РАЗОВЫЙ РЕМОНТ
3560 рублей — стоимость услуг сервисного специалиста по проведению разового технического обслуживания и ремонта одного устройства
в стоимость включены: диагностика и мелкий ремонт без замены деталей в пределах 60 минут
время реакции не превышает 12 рабочих часов с момента поступления предоплаты
выезд в пределах МКАД 950 рублей
дополнительные работы и выезд за пределы МКАД оплачиваются по текущему прейскуранту
ТАРИФ «ПРЕМИУМ»
14250 рублей — ежеквартальный платёж
включено: 1 обязательный и 8 дополнительных выездов в квартал сервисного специалиста в пределах МКАД каждый длительностью до 60 минут для проведения технического обслуживания, диагностики неисправности, любого вида ремонта
время реакции не превышает 6 рабочих часов с момента вызова
дополнительные вызовы, выезд за пределы МКАД оплачиваются по текущему прейскуранту со скидкой 20%
запасные части и расходные материалы оплачиваются по текущему прайсу со скидкой 6%
45600 рублей — фиксированный годовой единовременный платёж со скидкой 20%
ТАРИФ «ОПТИМУМ»
10690 рублей — ежеквартальный платёж
включено: 1 обязательный и 5 дополнительных выездов в квартал сервисного специалиста в пределах МКАД каждый длительностью до 60 минут для проведения технического обслуживания, диагностики неисправности, любого вида ремонта
время реакции не превышает 8 рабочих часов с момента вызова
дополнительные вызовы, выезд за пределы МКАД оплачиваются по текущему прейскуранту со скидкой 20%
запасные части и расходные материалы оплачиваются по текущему прайсу со скидкой 5%
34200 рублей — фиксированный годовой единовременный платёж со скидкой 20%
ТАРИФ «АТРИУМ»
7130 рублей — ежеквартальный платёж
включено: 1 обязательный и 2 дополнительных выезда в квартал сервисного специалиста в пределах МКАД, каждый длительностью до 30 минут для проведения технического обслуживания, диагностики неисправности, мелкого ремонта без замены деталей
время реакции не превышает 12 рабочих часов с момента вызова
дополнительные вызовы и ремонтные работы, выезд за пределы МКАД оплачиваются по текущему прейскуранту со скидкой 10%
запасные части и расходные материалы оплачиваются по текущему прайсу со скидкой 4%
25650 рублей — фиксированный годовой единовременный платёж со скидкой 10%
ТАРИФ «СТАДИУМ»
4750 рублей — ежеквартальный платёж
включено: 1 обязательный и 1 дополнительный выезд в квартал сервисного специалиста в пределах МКАД, каждый длительностью до 30 минут для проведения технического обслуживания, диагностики неисправности, мелкого ремонта без замены деталей
время реакции не превышает 12 рабочих часов с момента вызова
дополнительные вызовы и ремонтные работы, выезд за пределы МКАД оплачиваются по текущему прейскуранту со скидкой 5%
запасные части и расходные материалы оплачиваются по текущему прайсу со скидкой 3%
17100 рублей — фиксированный годовой единовременный платёж со скидкой 10%
ТАРИФ «МИНИМУМ»
2380 рублей — ежеквартальный платёж
включено: 1 обязательный выезд в квартал сервисного специалиста в пределах МКАД длительностью до 30 минут для проведения технического обслуживания, диагностики неисправности, мелкого ремонта без замены деталей
время реакции не превышает 12 рабочих часов с момента вызова
дополнительные вызовы и ремонтные работы, выезд за пределы МКАД оплачиваются по текущему прейскуранту
запасные части и расходные материалы оплачиваются по текущему прайсу со скидкой 2%
8550 рублей — фиксированный годовой единовременный платёж со скидкой 10%
указана стоимость за обслуживание единицы оборудования, совокупная минимальная стоимость ежеквартального контракта не может быть ниже 3800 рублей, а годового — 13680 рублей
для новой техники все тарифы обеспечивают выполнение гарантийных условий по регулярному техническому обслуживанию и предоставляет бесплатное гарантийного обслуживание для всех категорий
IT УСЛУГИ
3000 рублей
включает дистанционную работу IT-специалиста в пределах 1 нормочаса для диагностики неисправности, настройки или установки программного обеспечения
время реакции не превышает 8 рабочих часов с момента оплаты заявки
дополнительные работы оплачиваются по тарифу 1500 рублей за каждый полный и неполный нормочас
выезд в офис клиента в пределах МКАД 950 рублей
дополнительные работы и выезд за пределы МКАД оплачиваются по текущему прейскуранту
ДОКУМЕНТАЦИЯ ПОЛЬЗОВАТЕЛЯ И ИНСТРУКЦИИ
❖
Press the selection key under
Printing Documents
[R/E] or [Auto R/E].
Press the [Folder Print] key.
For [R/E], press the [] or [] key to
select the desired ratio.
Press the selection key under
Press the [OK] key.
[Print].
Press the [] or [] key to
❖
Custom ratio
select a document to print.
Press the [OK] key.
Press the [Start] key.
Press the selection key under
[Custom].
Making Copies
Specify the desired ratio using the
number keys.
Press the [OK] key.
This section describes the basic procedure for
making copies.
Use paper and originals that are the same size.
Specify a scaling ratio if the original is not the
same size as the paper. For details, see
«Specifying Reduce/Enlarge».
Press the [Copy] key.
This section explains how to copy two 1-sided
pages or one 2-sided page onto a 2-sided page.
Place the original on the exposure
●
1 Sided->2 Sided
glass or in the ADF.
Copies two 1-sided pages on one 2-sided page.
To place the original, see «Placing Originals».
●
2 Sided->2 Sided
To make multiple copies, enter
Copies one 2-sided page on one 2-sided page.
the number of copies using the
Press the [Duplex] key.
number keys.
Press the [Start] key.
Press the [▲] or [▼] key to
select [1 Sided->2 Sided] or [2
Sided->2 Sided] according to
how you want the document
to be output, and then press
Specifying Reduce/Enlarge
the [OK] key.
Press the [▲] or [▼] key to
There are two ways to set the scaling ratio.
select the desired original
Press the [Copy] key.
orientation, and then press
the [OK] key.
Press the selection key under [Scale].
Press the [▲] or [▼] key to
select the desired duplex
orientation, and then press
❖
Preset ratio
the [OK] key.
●
When using the ADF
Place the originals into the ADF
with their fronts facing up.
Press the [Start] key.
DAC578
●
When using the Exposure Glass
Place the original on the
exposure glass front side
down and with the top to the
rear of the machine.
Press the [Start] key.
Place the next original on the
exposure glass.
When selecting [2 Sided->2 Sided] in
Step 2, place the original on the
exposure glass with the back side
faced down and with the top to the
CES106
rear of the machine.
Press the [Start] key again.
When all originals have been scanned,
press the [ ] key.
Combined Copying
This section explains how to copy two original
Duplex Copying
pages to one sheet, or copy four original pages
to one sheet with two pages per side.
❖
One-Sided Combine
Press the [Combine] key.
Press the [] or [] key to
select [2 in 1] or [4 in 1]
according to how you want
the document to be output,
and then press the [OK] key.
Press the [] or [] key to
select paper orientation and
page order, and then press
the [OK] key.
●
When using the ADF
If you want to copy 2-sided originals onto
one side of a sheet, proceed to the next step.
If not, proceed to Step 7.
Press the [Duplex] key.
Press the [▲] or [▼] key to
select the desired copy mode,
and then press the [OK] key.
Press the [▲] or [▼] key to
select original orientation and
page order, and then press
the [OK] key.
Place the originals into the
●
When using the Exposure Glass
ADF with their fronts facing
Place the original on the
up.
exposure glass front side
down and with the top to the
Press the [Start] key.
rear of the machine.
●
When using the Exposure Glass
Press the [Start] key.
Place the original on the
exposure glass front side
Place the next original on the
down and with the top to the
exposure glass.
rear of the machine.
When copying 2-sided originals, place
Press the [Start] key.
the original on the exposure glass with
the back side faced down and with the
top to the rear of the machine.
Place the next original on the
Press the [Start] key again.
exposure glass.
When all originals have been scanned,
press the [ ] key.
Press the [Start] key again.
When all originals have been scanned,
press the [ ] key.
❖
Two-Sided Combine
To use this function, you have to use the duplex
function simultaneously. For details about the
This section describes the basic operation for
duplex function, see «Duplex Copying».
sending scanned fi les via e-mail or to a computer.
Press the [Combine] key.
To send scanned fi les to an e-mail address (Scan
to E-mail) or a shared folder on a network
computer (Scan to Folder), you must fi rst register
Press the[] or [] key to
the destination in the Address Book using Web
select [2 in 1] or [4 in 1]
Image Monitor. See «Registering Scan
Destinations», User Guide in the provided
according to how you want
CD-ROM or our website.
the document to be output,
and then press the [OK] key.
Place the original on the
exposure glass or in the ADF.
Press the [] or [] key to
To place the original, see «Placing Originals»
select paper orientation and
page order, and then press
Press the [Scanner] key.
the [OK] key.
Press the [Duplex] key.
Press the selection key under
[Addr].
Press the [▲] or [▼] key to
Press the [] or [] key to select
select the desired copy mode,
[Search By Name] or [Search By
and then press the [OK] key.
ID], and then press the [OK] key.
Press the [] or [] key to
If you want to search for a specifi c
select original orientation and
entry by its name, enter the fi rst
page order, and then press
letters of the name using the
the [OK] key.
number keys, and then press the
[OK] key. Each time you enter a
●
When using the ADF
character, the display changes to
Place the originals into the ADF
show the matching name.
with their fronts facing up.
Search for the desired destination
Press the [Start] key.
by pressing the [] or [] key to
scroll the Address Book, and
then press the [OK] key.
Press the [Start] key.
Depending on the machine’s settings, you
may see the following screen on the display
when scanning from the exposure glass.
If you see this screen, proceed to the next step.
If you have more originals to
scan, place the next original on
the exposure glass, and then
press the selection key under
[Yes]. Repeat this step until all
originals are scanned.
When all originals have been
scanned, press the selection key
under [No] to start sending the
scanned fi le.
Using Scan to E-mail/Folder
Installing the Printer Driver
Using the CD-ROM supplied with this machine,
you can install the driver from your computer.
Turn on your computer.
Insert the provided CD-ROM
into the CD-ROM drive of the
computer.
If your computer does not have a CD-ROM
drive, download a setup fi le from our website.
Click [Quick Install].
The software license agreement appears
in the [Software License Agreement]
dialog box.
After reading the agreement,
click [Yes].
Follow the instructions in the
setup wizard.
Click [Finish] in the [Setup
Complete] dialog box. If the
installer prompt you to restart
Windows, reboot your computer.
Setup is completed.
© 2018
EN GB
EN AU
D0B3-7108
Quick Guide 2/2