- Manuals
- Brands
- Ricoh Manuals
- Printer
- SP 220NW
- User manual
-
Contents
-
Table of Contents
-
Troubleshooting
-
Bookmarks
Quick Links
User’s Guide
Guide to the Machine
Paper Specifications and Adding Paper
Printing Documents
Configuring the Machine Using Utilities
Maintaining the Machine
Troubleshooting
Configuring Network Settings Using OS X
Appendix
For safe and correct use, be sure to read Safety Information before
using the machine.
Related Manuals for Ricoh SP 220NW
Summary of Contents for Ricoh SP 220NW
-
Page 1
User’s Guide Guide to the Machine Paper Specifications and Adding Paper Printing Documents Configuring the Machine Using Utilities Maintaining the Machine Troubleshooting Configuring Network Settings Using OS X Appendix For safe and correct use, be sure to read Safety Information before using the machine. -
Page 3: Table Of Contents
TABLE OF CONTENTS How to Find Information about Operations and Troubleshooting…………..5 Operating Manual (Printed)……………………..5 Operating Manual (Digital Format)………………….5 Help…………………………… 6 How to Read This Manual……………………..8 Introduction…………………………8 Symbols Used in This Manual……………………8 Model-Specific Information………………………8 Disclaimer…………………………..9 Notes…………………………..9 Note to Administrator……………………..
-
Page 4
Non-Recommended Paper Types………………….33 Paper Storage………………………… 34 Print Area…………………………34 3. Printing Documents What You Can Do with the Printer Function………………..37 Displaying the Printing Preferences Dialog Box…………………38 Displaying the Printing Preferences Dialog Box from the [Start] Menu……….. 38 Displaying the Printing Preferences Dialog Box in an Application…………38 Basic Operation of Printing…………………….. -
Page 5
Disposal………………………….. 66 Where to Inquire……………………….66 6. Troubleshooting Error and Status Indicate on the Control Panel………………..67 Error and Status Messages Appear on Smart Organizing Monitor…………69 Clearing Misfeeds……………………….71 Removing Jammed Paper from Tray 1………………….. 71 Removing Jammed Paper from the Bypass Tray………………73 Opening the Rear Cover to Remove Jammed Paper……………. -
Page 6
Specifying IPsec Settings on the Computer………………..96 Notes About the Toner………………………..99 Specifications of the Machine……………………100 General Function Specifications………………….100 Printer Function Specifications……………………102 Consumables…………………………103 Print Cartridge……………………….103 Information for This Machine……………………104 User Information on Electrical & Electronic Equipment (mainly Europe and Asia)..104 Note for the Battery and/or Accumulator Symbol (For EU countries only)……… -
Page 7: How To Find Information About Operations And Troubleshooting
This manual explains how to set up the machine. It also explains how to remove the machine from the packaging and how to connect it to a computer. Operating Manual (Digital Format) Operating manuals can be viewed from Ricoh’s website or from the provided CD-ROM. Viewing from a web browser Access the Internet from a web browser.
-
Page 8: Help
Click the manual you want to refer to. The PDF file manual opens. Help Use the following procedure to open the Help files learn about the printer driver, Web Image Monitor, and Smart Organizing Monitor functions. Depending on the model, Web Image Monitor may not be available. For details about model-specific differences, see «Differences in Performance/Functions between Different Models»…
-
Page 9
Web Image Monitor Click on the top right of the screen. DSH251 To display Help, install the help source file beforehand. For details about installing the file, see page 44 «Using Web Image Monitor». Smart Organizing Monitor Click [Help] on the [Printer Configuration] screen. DSH252… -
Page 10: How To Read This Manual
How to Read This Manual Introduction This manual contains detailed instructions and notes on the operation and use of this machine. For your safety and benefit, read this manual carefully before using the machine. Keep this manual in a handy place for quick reference.
-
Page 11: Disclaimer
The following information is region-specific. Read the information under the symbol that corresponds to the region of your machine. (mainly Europe and Asia) If the label contains the following, your machine is a region A model: • CODE XXXX -27, -29, -67 •…
-
Page 12: Note To Administrator
In this manual, «IP address» covers both IPv4 and IPv6 environments. Read the instructions that are relevant to the environment you are using. Differences in Performance/Functions between Different Models The differences in main performance/functions between different models are as follows: SP 220Nw SP 221 SP 221Nw Ethernet Port (Network)
-
Page 13: Guide To The Machine
1. Guide to the Machine This chapter describes preparations for using the machine and its operating instructions. Guide to Components This section introduces the names of the various parts on the front and rear side of the machine and outlines their functions. Exterior DSH105 •…
-
Page 14: Interior
For details about replacing the cartridge, see page 61 «Replacing the Print Cartridge». Control Panel This section introduces the names of the parts of the control panel and explains their functions. The illustration of the control panel is for SP 220Nw and SP 221Nw.
-
Page 15
[Wi-Fi Direct] key Pressing this key while Wi-Fi is disabled activates Wi-Fi and reboots the machine automatically. Press this key while Wi-Fi is (only SP 220Nw and enabled to activate or deactivate the Wi-Fi Direct function. This SP 221Nw) indicator lights blue when the Wi-Fi Direct function is active. After a long press of this key, configure the WPS using the PIN code or in PBC mode. -
Page 16
1. Guide to the Machine • For details about printing a list of the machine’s configurations or about doing a test print using Smart Organizing Monitor, see page 57 «Using Smart Organizing Monitor». -
Page 17: About Operation Tools
About Operation Tools About Operation Tools This section explains the operation tools of this machine. Depending on the model, Web Image Monitor may not be available. For details about model-specific differences, see «Differences in Performance/Functions between Different Models» in page 8 «How to Read This Manual».
-
Page 18
1. Guide to the Machine… -
Page 19: Paper Specifications And Adding Paper
2. Paper Specifications and Adding Paper This chapter describes how to load paper and originals and about their specifications. Workflow for Loading Paper and Configuring Paper Sizes and Types This section explains how to load paper and the operations required after loading paper. After following the procedures below, you can print on the paper that is loaded in the machine.
-
Page 20: Loading Paper
2. Paper Specifications and Adding Paper Loading Paper This section explains how to load paper into the paper tray and the bypass tray. • When loading paper, take care not to trap or injure your fingers. For information about supported paper, precautions for storing paper and print areas, see page 30 «Supported Paper».
-
Page 21
Loading Paper Slide the side and end paper guides outward. DSH112 Fan the paper before loading it in the tray. Load the new paper stack print side down. Make sure paper is not stacked higher than the upper limit marked inside the side paper guide. DSH115 Align the end paper guide to the paper size mark in the tray. -
Page 22
2. Paper Specifications and Adding Paper Check there are no gaps between the paper and the paper guides (both side and end paper guides). DSH116 Carefully push Tray 1 straight into the machine. DSH211 To avoid paper jams, make sure the tray is securely inserted. To deliver the sheets face up, open the rear cover. -
Page 23
Loading Paper Extending Tray 1 to load paper This section explains how to load paper larger than A4 (297 mm) into the machine. Remove the tray cover. DSH213 Pull Tray 1 out slowly, and then remove it using both hands. Release the extender locks on both sides of the tray, and then pull out the extender. -
Page 24
2. Paper Specifications and Adding Paper When using legal size paper, adjust the length to the position indicated by the mark » » in the tray. DSH180 Lock the extender. DSH122 Follow Steps 2 to 7 in «Loading Paper into Tray 1». Attach the tray cover. -
Page 25: Loading Paper Into The Bypass Tray
Loading Paper Loading Paper into the Bypass Tray • Do not load paper in the bypass tray unless the message «Ready» appears in Smart Organizing Monitor. Open the bypass tray. DSH215 Slide the side guides outward, load paper with the print side up, and then push in until it stops against the machine.
-
Page 26
2. Paper Specifications and Adding Paper To deliver the sheets face up, open the rear cover. DSH212 • Sheets can be delivered face down from the output tray without opening the rear cover. -
Page 27: Specifying Paper Type And Paper Size Using Smart Organizing Monitor
Specifying Paper Type and Paper Size Using Smart Organizing Monitor Specifying Paper Type and Paper Size Using Smart Organizing Monitor The procedure in this section is an example based on Windows 7. The actual procedure may vary depending on the operating system you are using. On the [Start] menu, click [All Programs].
-
Page 28
2. Paper Specifications and Adding Paper Click [SP 220 Series Software Utilities]. Click [Smart Organizing Monitor for SP 220 Series]. If the machine you are using is not selected, click [Connect Printer], and then do one of the following: • Select the machine’s model. •… -
Page 29: Specifying Paper Type And Paper Size Using Web Image Monitor
Specifying Paper Type and Paper Size Using Web Image Monitor Specifying Paper Type and Paper Size Using Web Image Monitor This section describes how to specify paper sizes and types using Web Image Monitor. Depending on the model, Web Image Monitor may not be available. For details about model-specific differences, see «Differences in Performance/Functions between Different Models»…
-
Page 30: Specifying Paper Type And Paper Size Using The Printer Driver
2. Paper Specifications and Adding Paper Specifying Paper Type and Paper Size Using the Printer Driver • Make sure that the paper type and size specified with the printer driver matches the type and size of the paper loaded in the tray. Since this machine does not detect paper sizes automatically, the type or size of the paper may be mismatched and the print job may not print correctly.
-
Page 31: When Using Os X
Specifying Paper Type and Paper Size Using the Printer Driver Click [OK]. When Using OS X The procedure in this section is an example based on OS X 10.11. The actual procedure may vary depending on the operating system you are using. Start System Preferences.
-
Page 32: Supported Paper
2. Paper Specifications and Adding Paper Supported Paper • After loading paper in the tray, specify the paper type and size using Smart Organizing Monitor and the printer driver. This machine does not detect the paper size automatically. • When loading custom size paper, specify the width and length using printer driver. Type Size Weight…
-
Page 33
Supported Paper • Depending on the paper type, the toner may take a while to dry. Before handling printed sheets, make sure that they have fully dried. Otherwise, the toner may smudge. • Print quality can be guaranteed only if recommended paper is used. For more information about the recommended paper, contact your sales or service representative. -
Page 34
2. Paper Specifications and Adding Paper Color Paper Item Description Paper thickness 75 to 90 g/m (20 to 24 lb.) Supported paper tray Tray 1 and bypass tray Notes If the paper thickness is outside the specified range, select [Thin Paper], [Plain Paper], or [Thick Paper 1]. -
Page 35: Non-Recommended Paper Types
Supported Paper Bond Paper Item Description Paper thickness 100 to 130 g/m (28 to 43 lb.) Supported paper tray Tray 1 and bypass tray Notes If the paper thickness is outside the specified range, select [Thin Paper], [Plain Paper], or [Thick Paper 1]. Cardstock Item Description…
-
Page 36: Paper Storage
2. Paper Specifications and Adding Paper • Paper with windows, holes, perforations, cutouts, or embossing • Adhesive label paper on which glue or base paper is exposed • Paper with clips or staples • When loading paper, take care not to touch the surface of the paper. •…
-
Page 37
Supported Paper 1. Print area 2. Feed direction 3. Approx. 4.2 mm (0.2 inches) 4. Approx. 4.2 mm (0.2 inches) • The print area may vary depending on the paper size, printer language and printer driver settings. -
Page 38
2. Paper Specifications and Adding Paper… -
Page 39: Printing Documents
3. Printing Documents This chapter describes how to configure settings on the printer driver and print documents. What You Can Do with the Printer Function Combined printing You can combine multiple pages and print them on a single sheet of paper. For details, see the printer driver Help.
-
Page 40: Displaying The Printing Preferences Dialog Box
3. Printing Documents Displaying the Printing Preferences Dialog Box To change the default settings of the printer driver, configure settings in the [Printing Preferences] dialog box. To change the default settings of all applications, open the [Printing Preferences] dialog box from the OS.
-
Page 41
Displaying the Printing Preferences Dialog Box In the [Select Printer] list, select the printer you want to use. Click [Preferences]. • Procedures for opening the [Printing Preferences] dialog box vary depending on the application. For details, see the printer driver Help or the manuals provided with the application. Displaying the Printing Preferences Dialog Box in an Application When Using OS X The following procedure is explained using OS X 10.11 as an example. -
Page 42: Basic Operation Of Printing
3. Printing Documents Basic Operation of Printing The following procedure explains how to perform basic printing. For details of printing options, see the printer driver Help. The procedure in this section is an example based on Windows 7. The actual procedure may vary depending on the operating system you are using.
-
Page 43
Basic Operation of Printing Canceling a print job before printing has started Double-click the printer icon on the task tray of your computer. Select the print job you want to cancel, click the [Document] menu, and then click [Cancel]. Click [Yes]. •… -
Page 44
3. Printing Documents… -
Page 45: Configuring The Machine Using Utilities
4. Configuring the Machine Using Utilities This chapter describes how to configure the machine using utilities. Available Setting Functions Using Web Image Monitor and Smart Organizing Monitor Use Web Image Monitor or Smart Organizing Monitor to change the configuration of the machine from a computer.
-
Page 46: Using Web Image Monitor
4. Configuring the Machine Using Utilities Using Web Image Monitor • Some items might not appear, depending on the model type you are using. Available operations The following operations can be remotely performed using Web Image Monitor on a computer: •…
-
Page 47: Changing The Interface Language
Using Web Image Monitor DSH134 1. Menu area If you select menu, its content will be shown on main area. 2. Tab area Contains tabs for switching between information and settings you want to see or configure. 3. Help If you click this icon, help index page opens. 4.
-
Page 48: Installing The Help Source File
4. Configuring the Machine Using Utilities Installing the Help Source File Follow the procedure below to install the help. Copy the [WIMHELP] folder on the CD-ROM to your computer’s hard drive. The example procedures explain how to copy the [WIMHELP] folder to the C:tmpWIMHELP directory.
-
Page 49: Home
Using Web Image Monitor Network Settings Configure network settings. IPsec Settings Configure IPsec settings. Print List/Report Print a list/report related to the printer. Administrator Tools Configure administrator settings. Home [Status] tab Click the [Status] tab on the main page to display system information, paper tray status and toner levels.
-
Page 50: Network Settings
• [General Status] You can check [Ethernet Speed], [IPP Printer Name], [Network Version], [Ethernet MAC Address], [Active Interface], and [Wi-Fi Direct IP Address] (only SP 220Nw and SP 221Nw). • [TCP/IP Status] You can specify [DHCP], [IP Address], [Subnet Mask], and [Gateway] for IPv4.
-
Page 51
[POP3] tab You can specify [POP3 Server], [User Account], [User Password], and [Authentication]. [Wireless] tab This function is available for only SP 220Nw and SP 221Nw. • [Wireless LAN Status] The status of the following items is displayed: [Wireless LAN Status], [MAC Address], [Communication Mode], [SSID], [Wireless Signal Status], and [Wireless]. -
Page 52
• [SSID] Enter the SSID name. Can contain 32 characters. [Google Cloud] tab This function is available for only SP 220Nw and SP 221Nw. • [Google Cloud Print] Select whether to enable [Google Cloud Print]. When disabled, [Local Discovery] and [Timeout (Seconds)] below cannot be configured. -
Page 53: Ipsec Settings
Using Web Image Monitor Displays the Account (email address) of Google Cloud Print registration. • [Local Discovery] Select whether to enable local discovery. • [Timeout (seconds)] Enter the number of seconds the machine waits before considering an XMPP operation to have timed out.
-
Page 54
4. Configuring the Machine Using Utilities Specify a number between 1 and 10 for the IPsec policy. The number you specify will determine the position of the policy in the IPsec Policy List. • [Activity] Select whether to enable or disable the policy. •… -
Page 55
Using Web Image Monitor Select this mode to secure every section of each IP packet. We recommend this type for communication between security gateways (such as VPN devices). • [Security Protocol] Select the security protocol from the following: • [AH] Establishes secure communication that supports authentication only. -
Page 56: Print List/Report
4. Configuring the Machine Using Utilities Specify the encryption algorithm from the following: [DES], [3DES], [AES-128], [AES-192], [AES-256] • [Authentication Algorithm] Specify the authentication algorithm from the following: [MD5], [SHA1] • [IKE Life Time] Specify the life time of the ISAKMP SA as a time period. Enter a number of seconds. •…
-
Page 57
Using Web Image Monitor Select to restore network settings to their defaults. • [Reset Menu Settings] Select to restore settings that are not related to the network. • [Reset IPsec Settings] Select to clear the IP security settings. • [Reset IPsec Settings] appears only when a password is specified in [Administrator]. Backup Setting Create backup files containing the printer’s configuration settings. -
Page 58
4. Configuring the Machine Using Utilities Enter the administrator password if required. Click [OK]. Help Source File Setting • [Help Source File] Enter the help source file path. -
Page 59: Using Smart Organizing Monitor
Using Smart Organizing Monitor Using Smart Organizing Monitor The state and status information of the machine can be checked using Smart Organizing Monitor. • Some items might not appear, depending on the model type you are using. Displaying the Smart Organizing Monitor Dialog On the [Start] menu, click [All Programs].
-
Page 60: Checking The Status Information
4. Configuring the Machine Using Utilities Checking the Status Information DSH160 1. Image area Displays the status of this machine with an icon. 2. Tab area • Status tab • Printer Name • Print Cartridge Displays the following messages to indicate remaining toner levels: Remaining Level 1 to 5, «Almost Empty»…
-
Page 61: Configuring The Machine Settings
Using Smart Organizing Monitor Displays the job log information. • User Tools tab Click to print test pages or maintenance pages, or to configure settings of the machine. 3. Message area Displays the status of this machine with a message. For details about error messages, see page 69 «Error and Status Messages Appear on Smart Organizing Monitor».
-
Page 62
• You can set configurations about wireless LAN network connection and communication. • The following operations are possible on the tab: • Checking the wireless LAN status • Connecting wireless LAN manually • Connecting with one touch using WPS (only SP 220Nw and SP 221Nw) -
Page 63: Maintaining The Machine
5. Maintaining the Machine This chapter describes how to replace supplies and how to clean the machine. Replacing the Print Cartridge • Replace the print cartridge if the printed image suddenly becomes pale or blurred. • Store print cartridges in a cool dark place. •…
-
Page 64
5. Maintaining the Machine Slide the print cartridge in horizontally, and then slowly push it in all the way. Finally, push the cartridge down until it clicks into place. DSH219 Carefully push up the front cover until it closes. -
Page 65: Cautions When Cleaning
Cautions When Cleaning Cautions When Cleaning Clean the machine periodically to maintain high print quality. Dry wipe the exterior with a soft cloth. If dry wiping is not sufficient, wipe with a soft, damp cloth that has been wrung out thoroughly. If you still cannot remove the stain or grime, use a neutral detergent, wipe over the area with a thoroughly-wrung damp cloth, and then dry wipe the area and allow it to dry.
-
Page 66: Cleaning The Inside Of The Machine
5. Maintaining the Machine Cleaning the Inside of the Machine Open the front cover, and then carefully lower it. Hold the center of the print cartridge and carefully raise it slightly and then pull it out horizontally. DSH218 Use a cloth to wipe the inside of the machine toward and away from yourself. DSH220 Wipe carefully so as not to touch any protrusions inside the machine.
-
Page 67: Moving And Transporting The Machine
Moving and Transporting the Machine Moving and Transporting the Machine This section provides cautions that you must follow when moving the machine both short and long distances. Repack the machine in its original packing materials when moving it over a long distance. •…
-
Page 68: Disposal
5. Maintaining the Machine • Toner might spill inside the machine if the machine is not kept level during transit. • For more information about moving the machine, contact your sales or service representative. Disposal Ask your sales or service representative for information about correct disposal of this machine. Where to Inquire Contact your sales or service representative for further information about the topics included in this manual or to inquire about other topics not included in this manual.
-
Page 69: Troubleshooting
6. Troubleshooting This chapter provides solutions for error messages and other problems. Error and Status Indicate on the Control Panel The LED on the operation panel indicates the machine status, including any errors. Power Alert Toner/ Status Solution Paper The power is on. The status is normal.
-
Page 70
6. Troubleshooting Power Alert Toner/ Status Solution Paper Another type of error has Use Web Image Monitor or occurred. Smart Organizing Monitor to check the error, and then take appropriate measures. See page 44 «Using Web Image Monitor» or page 57 «Using Smart Organizing Monitor». -
Page 71: Error And Status Messages Appear On Smart Organizing Monitor
Error and Status Messages Appear on Smart Organizing Monitor Error and Status Messages Appear on Smart Organizing Monitor «X» represents a displayed message that varies according to the situation. Message Causes Solutions No Response from • The power cable of the •…
-
Page 72
6. Troubleshooting Message Causes Solutions Printing has been The data is too large or Select [600 x 600 dpi] in [Resolution] to interrupted because complex to print. reduce the size of data. For details, see the of the memory printer driver Help. overflow. -
Page 73: Clearing Misfeeds
Clearing Misfeeds Clearing Misfeeds • Jammed paper may be covered in toner. Be careful not to get toner on your hands or clothes. • Toner on prints made immediately after clearing a paper jam may be insufficiently fused and can smudge.
-
Page 74
6. Troubleshooting Hold the center of the print cartridge and carefully raise it slightly and then pull it out horizontally. DSH161 • Do not shake the removed print cartridge. Doing so can cause remaining toner to leak. • Place the print cartridge on paper or similar material to avoid dirtying your workspace. Lifting the guide plate, remove the jammed paper carefully. -
Page 75: Removing Jammed Paper From The Bypass Tray
Clearing Misfeeds Carefully push up the front cover until it closes. DSH166 If the error display continues to appear, perform the procedure described in page 74 «Opening the Rear Cover to Remove Jammed Paper». Removing Jammed Paper from the Bypass Tray •…
-
Page 76: Opening The Rear Cover To Remove Jammed Paper
6. Troubleshooting Opening the Rear Cover to Remove Jammed Paper • Since the temperature around the guide is high, wait for it to cool before checking for jammed paper. Open the rear cover. DSH168 Open the fusing cover. DSH169 Push the levers on the sides down with your thumbs. DSH170…
-
Page 77
Clearing Misfeeds Remove the jammed paper carefully. DSH171 Push the levers on the sides up with your thumbs. Close the fusing cover. Close the rear cover. DSH172… -
Page 78: When You Cannot Print Test Page
6. Troubleshooting When You Cannot Print Test Page Possible cause Solution The power cord, a USB cable, or a Make sure that the power cord, USB cable, and network network cable is not connected cable are connected correctly. Also confirm that they are not correctly.
-
Page 79: Paper Feed Problems
Paper Feed Problems Paper Feed Problems If the machine is operating but paper will not feed or paper jams occur frequently, check the condition of the machine and paper. Problem Solution Paper does not feed smoothly. • Use supported types of paper. See page 30 «Supported Paper».
-
Page 80
6. Troubleshooting Problem Solution Paper gets wrinkles. • Paper is damp. Use paper that has been stored properly. See page 30 «Supported Paper». • Paper is too thin. See page 30 «Supported Paper». • If there are gaps between the paper and the paper guides, adjust the paper guides to remove the gaps. -
Page 81: Print Quality Problems
Print Quality Problems Print Quality Problems Checking the Condition of the Machine If there is a problem with the quality of printing, first check the condition of the machine. Possible Cause Solution There is a problem with the Make sure that the machine is on a level surface. Place the machine’s location.
-
Page 82
6. Troubleshooting Problem Solution Images smudge when rubbed. On the printer driver’s [Paper] tab, select a proper paper type (Toner is not fixed.) in the [Paper Type:] list. When printing graphics, the output To print accurately, specify the printer driver setting to print and the screen are different. -
Page 83: Printer Problems
Printer Problems Printer Problems This section describes printing problems and possible solutions. Problem Solution An error occurs. If an error occurs when printing, change the computer or printer driver settings. • Check the printer icon name does not exceed 32 alphanumeric characters.
-
Page 84: Print Positions Do Not Match Display Positions
6. Troubleshooting Print Positions Do Not Match Display Positions If the position of items on the printed page differs from the position displayed on the computer screen, the cause may be one of the following. Problem Solution Page layout settings are not Check that the page layout settings are properly configured in configured properly.
-
Page 85: Common Problems
Common Problems Common Problems This section describes how to troubleshoot common problems that may occur while operating the machine. Problem Possible cause Solution The machine does not turn on. The power cord is not • Make sure that the power connected properly.
-
Page 86
6. Troubleshooting… -
Page 87: Configuring Network Settings Using Os
Insert the provided CD-ROM into the CD-ROM drive of the computer. If your computer does not have a CD-ROM drive, download a setup file from our website (http:// www.ricoh.com/printers/sp200/support/gateway/). Double-click the CD-ROM drive icon. Double-click the [Mac OS X] folder.
-
Page 88: Using An Ethernet Cable
Insert the provided CD-ROM into the CD-ROM drive of the computer. If your computer does not have a CD-ROM drive, download a setup file from our website (http:// www.ricoh.com/printers/sp200/support/gateway/). Double-click the CD-ROM drive icon. Double-click the [Mac OS X] folder.
-
Page 89
Connecting the Machine to a Wired Network On the [Network 1] tab, select [On] for [DHCP] to automatically obtain the IP address or [Off] to specify the IP address manually. If you have selected [On], proceed to Step 25. Enter the machine’s IPv4 address in [IP Address]. Enter the subnet mask in [Subnet Mask]. -
Page 90: Connecting The Machine To A Wireless Network
7. Configuring Network Settings Using OS X Connecting the Machine to a Wireless Network You can use this function on SP 220Nw and SP 221Nw only. There are four methods for connecting the machine to a wireless network: • Using the WPS button See page 89 «Using the WPS Button».
-
Page 91: Using The Wps Button
Insert the provided CD-ROM into the CD-ROM drive of the computer. If your computer does not have a CD-ROM drive, download a setup file from our website (http:// www.ricoh.com/printers/sp200/support/gateway/). Double-click the CD-ROM drive icon. Double-click the [Mac OS X] folder.
-
Page 92: Using A Pin Code
7. Configuring Network Settings Using OS X Click [OK]. Wait until the machine restarts. Click [User Tools] tab. Click [Printer Configuration]. Enter the access code, and then click [OK]. The default access code is «Admin». On the [Wireless] tab, select [Setup with WPS] for [Configuration Method]. Click [Connect].
-
Page 93: Manual Setup
Connecting the Machine to a Wireless Network Enter the access code, and then click [OK]. The default access code is «Admin». On the [Wireless] tab, select [Setup with WPS] for [Configuration Method]. Select [Wi-Fi Protected Setup with PIN Code] for [One-Touch Connection Setting (WPS)]. Click [Get PIN Code] and check the PIN code.
-
Page 94
7. Configuring Network Settings Using OS X Enter the access code, and then click [OK]. The default access code is «Admin». On the [Wireless] tab, select [Manual Setup] for [Configuration Method]. Select the authentication method in [Authentication]. Configurations differ according to the authentication method. -
Page 95: Appendix
8. Appendix This chapter describes the machine specifications and consumables. Transmission Using IPsec For securer communications, this machine supports the IPsec protocol. When applied, IPsec encrypts data packets at the network layer using shared key encryption. The machine uses encryption key exchange to create a shared key for both sender and receiver.
-
Page 96: Security Association
8. Appendix • For successful authentication, the sender and receiver must specify the same authentication algorithm and authentication key. The authentication algorithm and authentication key are specified automatically. AH Protocol The AH protocol provides secure transmission through authentication of packets only, including headers.
-
Page 97: Encryption Key Exchange Settings Configuration Flow
Transmission Using IPsec Encryption Key Exchange Settings Configuration Flow This section explains the procedure for specifying encryption key exchange settings. Machine 1. Set the same IPsec settings as the machine on 1. Set the IPsec settings on Web Image Monitor. 2.
-
Page 98: Specifying Ipsec Settings On The Computer
8. Appendix • An administrator password can be specified in the [Administrator] tab. Specifying IPsec Settings on the Computer Specify exactly the same settings for IPsec SA settings on your computer as are specified for the IPsec Settings on the machine. Setting methods differ according to the computer’s operating system. The following procedure is based on Windows 7 in an IPv4 environment as an example.
-
Page 99
Transmission Using IPsec In [Description:], enter a name or a detailed explanation of the IP filter, and then click [Next]. You may click [Next] and proceed to the next step without entering any information in this field. Select «My IP Address» in «Source address», and then click [Next]. Select «A specific IP Address or Subnet»… -
Page 100
8. Appendix In the Session key settings, select «Generate a new key every», and enter the same validity period (in [Seconds] or [Kbytes]) as that specified for [Life Time] on the machine. Click [OK], and then click [Next]. Click [Finish]. If you are using IPv6, you must repeat this procedure from Step 12 and specify ICMPv6 as an exception. -
Page 101: Notes About The Toner
Notes About the Toner Notes About the Toner • Proper operation cannot be guaranteed if any third-party toner is used. • Depending on printing conditions, there are cases where the printer cannot print the number of sheets indicated in the specifications. •…
-
Page 102: Specifications Of The Machine
8. Appendix Specifications of the Machine This section lists the machine’s specifications. General Function Specifications Item Description Configuration Desktop Print process Laser electrostatic transfer Maximum paper size for printing 216 mm × 356 mm (8.5 × 14 inches) Warm-up time (23 °C, 71.6 °F) 25 seconds Paper sizes For details, see page 30 «Supported Paper».
-
Page 103
Specifications of the Machine Item Description Power consumption • Ready 50.2 W • During printing 358 W • Maximum 784 W The power level when the main switch is turned off and the power cord is plugged into an outlet: 1 W or less Power consumption •… -
Page 104: Printer Function Specifications
600 × 600 dpi (maximum: 1200 × 1200 dpi) First print speed 10 seconds or less Interface • Ethernet (10BASE-T, 100BASE-TX) (only SP 220Nw and SP 221Nw) • USB 2.0 • Wi-Fi (only SP 220Nw and SP 221Nw) Printer language…
-
Page 105: Consumables
ISO/IEC 19752 is an international standard on measurement of printable pages, set by the International Organization for Standardization. • For information about consumables, see our website (http://www.ricoh.com/printers/sp200/ support/gateway/). • If print cartridges are not changed when necessary, printing will become impossible. For easy replacement, we recommend you purchase and store extra print cartridges.
-
Page 106: Information For This Machine
8. Appendix Information for This Machine User Information on Electrical & Electronic Equipment (mainly Europe and Asia) Users in the countries where this symbol shown in this section has been specified in national law on collection and treatment of E-waste Our Products contain high quality components and are designed to facilitate recycling.
-
Page 107: Note For The Battery And/Or Accumulator Symbol (For Eu Countries Only)
Information for This Machine For Turkey only Üretici: Ricoh Company, Ltd. 8-13-1 Ginza, Chuo-ku, Tokyo 104-8222 Japan +81-36278-2111(English only/Sadece İngilizce) Note for the Battery and/or Accumulator Symbol (For EU countries only) In accordance with the Battery Directive 2006/66/EC Article 20 Information for end-users Annex II, the above symbol is printed on batteries and accumulators.
-
Page 108: Notice To Wireless Lan Interface Users (Mainly Europe)
Declaration of Conformity Notice to Users in EEA Countries This product complies with the essential requirements and provisions of Directive 2014/53/EU. The CE Declaration of Conformity is available by accessing the URL: http://www.ricoh.com/products/ ce_doc/ and selecting the product applicable. Operating frequency band: 2400 — 2483.5 MHz maximum radio-frequency power: less than 20.0 dBm…
-
Page 109: Notes To Users In The State Of California (Notes To Users In Usa)
Information for This Machine Notes to users in the state of California (Notes to Users in USA) Perchlorate Material — special handling may apply. See: www.dtsc.ca.gov/hazardouswaste/ perchlorate Notes to users in the United States of America Part 15 of the FCC Rules Note: This equipment has been tested and found to comply with the limits for a Class B digital device, pursuant to Part 15 of the FCC Rules.
-
Page 110: Notes To Canadian Users Of Wireless Devices
(1) This device may not cause harmful interference, and (2) this device must accept any interference received, including interference that may cause undesired operation. Model Number: SP 220Nw Notes to Canadian Users of Wireless Devices This device complies with Industry Canada’s licence-exempt RSSs.
-
Page 111: Energy Star Program
Information for This Machine ENERGY STAR Program ® ENERGY STAR Program Requirements for Imaging Equipment ® The ENERGY STAR Program Requirements for Imaging Equipment encourage energy conservation by promoting energy efficient computers and other office equipment. The program backs the development and dissemination of products that feature energy saving functions.
-
Page 112
8. Appendix Specifications Energy Saver mode 1 Power Consumption 28.7 W 29.3 W Recovery Time 10 seconds Energy Saver mode 2 Power Consumption 0.94 W 0.87 W Default Interval 30 seconds Recovery Time 18 seconds 19 seconds *1 Recovery time and power consumption may differ depending on the conditions and environment of the machine. -
Page 113: Copyright Information About Installed Applications
Copyright Information about Installed Applications Copyright Information about Installed Applications Apache License Apache License Version 2.0, January 2004 http://www.apache.org/licenses/ TERMS AND CONDITIONS FOR USE, REPRODUCTION, AND DISTRIBUTION 1. Definitions. «License» shall mean the terms and conditions for use, reproduction, and distribution as defined by Sections 1 through 9 of this document.
-
Page 114
8. Appendix form of electronic, verbal, or written communication sent to the Licensor or its representatives, including but not limited to communication on electronic mailing lists, source code control systems, and issue tracking systems that are managed by, or on behalf of, the Licensor for the purpose of discussing and improving the Work, but excluding communication that is conspicuously marked or otherwise designated in writing by the copyright owner as «Not a Contribution.»… -
Page 115: Dnsmasq
Copyright Information about Installed Applications You may add Your own copyright statement to Your modifications and may provide additional or different license terms and conditions for use, reproduction, or distribution of Your modifications, or for any such Derivative Works as a whole, provided Your use, reproduction, and distribution of the Work otherwise complies with the conditions stated in this License.
-
Page 116: Gpl Version 2
8. Appendix the Free Software Foundation; version 2 dated June, 1991. This program is distributed in the hope that it will be useful, but WITHOUT ANY WARRANTY; without even the implied warranty of MERCHANTABILITY or FITNESS FOR A PARTICULAR PURPOSE. See the GNU General Public License for more details.
-
Page 117
Copyright Information about Installed Applications distribute copies of the software, or if you modify it. For example, if you distribute copies of such a program, whether gratis or for a fee, you must give the recipients all the rights that you have. -
Page 118
8. Appendix Activities other than copying, distribution and modification are not covered by this License; they are outside its scope. The act of running the Program is not restricted, and the output from the Program is covered only if its contents constitute a work based on the Program (independent of having been made by running the Program). -
Page 119
Copyright Information about Installed Applications does not normally print such an announcement, your work based on the Program is not required to print an announcement.) These requirements apply to the modified work as a whole. If identifiable sections of that work are not derived from the Program, and can be reasonably considered independent and separate works in themselves, then this License, and its terms, do not apply to those sections when you distribute them as separate works. -
Page 120
8. Appendix allowed only for noncommercial distribution and only if you received the program in object code or executable form with such an offer, in accord with Subsection b above.) The source code for a work means the preferred form of the work for making modifications to it. -
Page 121
Copyright Information about Installed Applications 6. Each time you redistribute the Program (or any work based on the Program), the recipient automatically receives a license from the original licensor to copy, distribute or modify the Program subject to these terms and conditions. You may not impose any further restrictions on the recipients’ exercise of the rights granted herein. -
Page 122
8. Appendix This section is intended to make thoroughly clear what is believed to be a consequence of the rest of this License. 8. If the distribution and/or use of the Program is restricted in certain countries either by patents or by copyrighted interfaces, the original copyright holder who places the Program under this License may add an explicit geographical distribution limitation excluding those countries, so that distribution is permitted only in or among… -
Page 123
Copyright Information about Installed Applications MERCHANTABILITY AND FITNESS FOR A PARTICULAR PURPOSE. THE ENTIRE RISK AS TO THE QUALITY AND PERFORMANCE OF THE PROGRAM IS WITH YOU. SHOULD THE PROGRAM PROVE DEFECTIVE, YOU ASSUME THE COST OF ALL NECESSARY SERVICING, REPAIR OR CORRECTION. -
Page 124: Iperf
8. Appendix with this program; if not, write to the Free Software Foundation, Inc., 51 Franklin Street, Fifth Floor, Boston, MA 02110-1301 USA. Also add information on how to contact you by electronic and paper mail. If the program is interactive, make it output a short notice like this when it starts in an interactive mode: Gnomovision version 69, Copyright (C) year name of author Gnomovision comes with ABSOLUTELY NO WARRANTY;…
-
Page 125
Copyright Information about Installed Applications Ajay Tirumala Jim Ferguson Jon Dugan Feng Qin Kevin Gibbs John Estabrook National Laboratory for Applied Network Research National Center for Supercomputing Applications University of Illinois at Urbana-Champaign http://www.ncsa.uiuc.edu Permission is hereby granted, free of charge, to any person obtaining a copy of this software (Iperf) and associated documentation files (the «Software»), to deal in the Software without restriction, including without limitation the rights to use, copy, modify, merge, publish, distribute, sublicense, and/or sell copies of the Software, and to permit persons to whom the Software is furnished to do so, subject to the… -
Page 126: Libharu
8. Appendix Thanks to Mark Gates (NLANR), Alex Warshavsky (NLANR) and Justin Pietsch (University of Washington) who were responsible for the 1.1.x releases of Iperf. For this release, we would like to thank Bill Cerveny (Internet2), Micheal Lambert (PSC), Dale Finkelson (UNL) and Matthew Zekauskas (Internet2) for help in getting access to IPv6 networks / machines.
-
Page 127
Copyright Information about Installed Applications * notice, this list of conditions and the following disclaimer. * 2. Redistributions in binary form must reproduce the above copyright * notice, this list of conditions and the following disclaimer in * the documentation and/or other materials provided with the * distribution. -
Page 128: Mdnsresponser
8. Appendix mDNSResponser * Copyright (c) 2002-2006 Apple Computer, Inc. All rights reserved. * Licensed under the Apache License, Version 2.0 (the «License»); * you may not use this file except in compliance with the License. * You may obtain a copy of the License at * http://www.apache.org/licenses/LICENSE-2.0 * Unless required by applicable law or agreed to in writing, software * distributed under the License is distributed on an «AS IS»…
-
Page 129: Opencv
Copyright Information about Installed Applications * understand why variable y is not of type «char*» just proves the point that poor code * layout leads people to unfortunate misunderstandings about how the C language really works.) OpenCV By downloading, copying, installing or using the software you agree to this license. If you do not agree to this license, do not download, install, copy or use the software.
-
Page 130: Open Ssl
8. Appendix Open SSL LICENSE ISSUES ============== The OpenSSL toolkit stays under a dual license, i.e. both the conditions of the OpenSSL License and the original SSLeay license apply to the toolkit. See below for the actual license texts. Actually both licenses are BSD-style Open Source licenses.
-
Page 131
Copyright Information about Installed Applications * prior written permission. For written permission, please contact * openssl-core@openssl.org. * 5. Products derived from this software may not be called «OpenSSL» * nor may «OpenSSL» appear in their names without prior written * permission of the OpenSSL Project. * 6. -
Page 132
8. Appendix /* Copyright (C) 1995-1998 Eric Young (eay@cryptsoft.com) * All rights reserved. * This package is an SSL implementation written * by Eric Young (eay@cryptsoft.com). * The implementation was written so as to conform with Netscapes SSL. * This library is free for commercial and non-commercial use as long as * the following conditions are aheared to. -
Page 133: Wpa Supplicant
Copyright Information about Installed Applications * The word ‘cryptographic’ can be left out if the rouines from the library * being used are not cryptographic related :-). * 4. If you include any Windows specific code (or a derivative thereof) from * the apps directory (application code) you must include an acknowledgement: * «This product includes software written by Tim Hudson (tjh@cryptsoft.com)»…
-
Page 134
8. Appendix License ——- This software may be distributed, used, and modified under the terms of BSD license: Redistribution and use in source and binary forms, with or without modification, are permitted provided that the following conditions are met: 1. Redistributions of source code must retain the above copyright notice, this list of conditions and the following disclaimer. -
Page 135: Trademarks
Trademarks Trademarks Adobe and Acrobat are either registered trademarks or trademarks of Adobe Systems Incorporated in the United States and/or other countries. OS X, TrueType, and Safari are trademarks of Apple Inc., registered in the U.S. and other countries. ® Firefox is a registered trademark of the Mozilla Foundation.
-
Page 136
8. Appendix ® ® Microsoft Windows 8.1 Enterprise • The product names of Windows 10 are as follows: ® Microsoft® Windows 10 Home Premium ® Microsoft® Windows 10 Pro ® Microsoft® Windows 10 Enterprise ® Microsoft® Windows 10 Education • The product names of Windows Server 2003 are as follows: ®… -
Page 137
Trademarks ® ® Microsoft Windows Server 2012 Essentials ® ® Microsoft Windows Server 2012 Standard ® ® Microsoft Windows Server 2012 Datacenter • The product names of Windows Server 2012 R2 are as follows: ® ® Microsoft Windows Server 2012 R2 Foundation ®… -
Page 138
8. Appendix… -
Page 139: Index
INDEX 63, 64 Cleaning the machine……….Replacing the print cartridge……….Authentication…………Model-specific information……..Moving…………..Bypass tray…………. Non-recommended paper……..Notes…………..Configuring Network Settings Using OS X Ethernet…………….Installing Smart Organizing Monitor……. Operation tools…………. Installing the driver…………. USB………………Wireless LAN…………..Paper jam…………71, 73 Configuring the machine Paper Storage…………
-
Page 140
Supported paper……….. System information……….Trademarks…………Tray 1…………..Tray paper settings……….Troubleshooting Clearing misfeeds………….. Error and status indicate on the control panel….Error and status messages appear on Smart Organizing Monitor…………….76, 77, 79, 81, 83 Other problems……… Web Image Monitor……….What you can do with this machine Printer function………….. -
Page 141
MEMO… -
Page 142
MEMO M0A4-8604… -
Page 143
© 2016… -
Page 144
M0A4-8604…
 Loading…
![]()

|
СОДЕРЖАНИЕ |
|
|
Поиск информации об операциях и устранении неполадок………………………………………………………….. |
6 |
|
Руководство по эксплуатации (в печатном виде)………………………………………………………………………… |
6 |
|
Руководство по эксплуатации (в цифровом формате)………………………………………………………………… |
6 |
|
Справка………………………………………………………………………………………………………………………………………. |
7 |
|
Как пользоваться данным руководством………………………………………………………………………………………… |
9 |
|
Введение…………………………………………………………………………………………………………………………………….. |
9 |
|
Символы, используемые в этом руководстве……………………………………………………………………………… |
9 |
|
Информация по моделям……………………………………………………………………………………………………………. |
9 |
|
Отказ от ответственности…………………………………………………………………………………………………………. |
10 |
|
Примечания……………………………………………………………………………………………………………………………… |
10 |
|
Сообщение администратору……………………………………………………………………………………………………. |
11 |
|
Сведения об IP-адресах……………………………………………………………………………………………………………. |
11 |
|
Различия в производительности и функциональности моделей……………………………………………….. |
11 |
|
1. Руководство к аппарату |
|
|
Руководство по компонентам……………………………………………………………………………………………………….. |
13 |
|
Наружные компоненты……………………………………………………………………………………………………………… |
13 |
|
Внутренняя часть………………………………………………………………………………………………………………………. |
14 |
|
Панель управления…………………………………………………………………………………………………………………… |
14 |
|
Об инструментах управления………………………………………………………………………………………………………. |
17 |
|
2. Характеристики и добавление бумаги |
|
|
Процесс загрузки бумаги и настройки форматов и типов бумаги………………………………………………. |
19 |
|
Загрузка бумаги…………………………………………………………………………………………………………………………… |
21 |
|
Загрузка бумаги в лоток 1……………………………………………………………………………………………………….. |
21 |
|
Загрузка бумаги в обходной лоток………………………………………………………………………………………….. |
26 |
|
Настройка типа и размера бумаги с помощью Smart Organizing Monitor…………………………………… |
28 |
|
Настройка нестандартного формата бумаги…………………………………………………………………………… |
28 |
|
Настройка типа и размера бумаги с помощью Web Image Monitor……………………………………………. |
30 |
|
Настройка нестандартного формата бумаги…………………………………………………………………………… |
30 |
|
Настройка типа и размера бумаги с помощью драйвера принтера…………………………………………… |
32 |
|
Использование Windows………………………………………………………………………………………………………….. |
32 |
|
При использовании OS X…………………………………………………………………………………………………………. |
33 |
|
Пригодная для использования бумага………………………………………………………………………………………….. |
34 |
|
Спецификация типов бумаги…………………………………………………………………………………………………….. |
35 |
1

|
Нерекомендуемые типы бумаги……………………………………………………………………………………………….. |
38 |
|
Хранение бумаги………………………………………………………………………………………………………………………. |
39 |
|
Область печати………………………………………………………………………………………………………………………… |
39 |
|
3. Печать документов |
|
|
Операции с функцией принтера………………………………………………………………………………………………….. |
41 |
|
Отображение диалогового окна настроек печати………………………………………………………………………. |
42 |
|
Отображение диалогового окна настроек печати с помощью меню [Пуск]……………………………. |
42 |
|
Отображение диалогового окна настроек печати в приложении……………………………………………. |
42 |
|
Основные операции печати…………………………………………………………………………………………………………. |
44 |
|
Отмена задания печати……………………………………………………………………………………………………………. |
44 |
|
4. Настройка аппарата с использованием утилит |
|
|
Доступные функции настройки с помощью Web Image Monitor и Smart Organizing Monitor………. |
47 |
|
Использование Web Image Monitor…………………………………………………………………………………………….. |
48 |
|
Отображение начальной страницы………………………………………………………………………………………….. |
48 |
|
Изменение языка интерфейса………………………………………………………………………………………………….. |
49 |
|
Установка файла справки………………………………………………………………………………………………………… |
50 |
|
Отображение справки……………………………………………………………………………………………………………… |
50 |
|
Меню………………………………………………………………………………………………………………………………………… |
50 |
|
Главная……………………………………………………………………………………………………………………………………… |
51 |
|
Параметры системы…………………………………………………………………………………………………………………. |
51 |
|
Настройки сети…………………………………………………………………………………………………………………………. |
52 |
|
Настройки IPsec………………………………………………………………………………………………………………………… |
55 |
|
Печатать список/отчет…………………………………………………………………………………………………………….. |
59 |
|
Инструменты администратора…………………………………………………………………………………………………. |
59 |
|
Использование Smart Organizing Monitor……………………………………………………………………………………. |
61 |
|
Отображение Smart Organizing Monitor Dialog……………………………………………………………………….. |
61 |
|
Проверка информации о состоянии………………………………………………………………………………………… |
62 |
|
Настройка параметров аппарата……………………………………………………………………………………………. |
63 |
|
5. Техническое обслуживание аппарата |
|
|
Замена принт-картриджа…………………………………………………………………………………………………………….. |
65 |
|
Меры предосторожности при очистке…………………………………………………………………………………………. |
67 |
|
Очистка внутри аппарата…………………………………………………………………………………………………………….. |
68 |
|
Перемещение и транспортировка аппарата……………………………………………………………………………….. |
70 |
2

|
Утилизация……………………………………………………………………………………………………………………………….. |
71 |
|
Куда обращаться……………………………………………………………………………………………………………………… |
71 |
|
6. Устранение неполадок |
|
|
Индикатор ошибок и состояния на панели управления……………………………………………………………….. |
73 |
|
Сообщения об ошибках и состоянии в Smart Organizing Monitor……………………………………………….. |
75 |
|
Устранение замятий……………………………………………………………………………………………………………………… |
77 |
|
Удаление замятой бумаги из лотка 1……………………………………………………………………………………….. |
77 |
|
Удаление замятой бумаги из обходного лотка………………………………………………………………………… |
79 |
|
Открытие задней крышки для удаления замятой бумаги………………………………………………………….. |
80 |
|
Если невозможно распечатать тестовую страницу………………………………………………………………………. |
83 |
|
Проблемы с подачей бумаги………………………………………………………………………………………………………… |
84 |
|
Проблемы с качеством печати……………………………………………………………………………………………………… |
86 |
|
Проверка состояния устройства………………………………………………………………………………………………. |
86 |
|
Проверка настроек драйвера принтера………………………………………………………………………………….. |
87 |
|
Неполадки, связанные с печатью…………………………………………………………………………………………………. |
89 |
|
Расположение распечатываемого изображения на бумаге не соответствует его расположению |
|
|
на экране монитора…………………………………………………………………………………………………………………. |
90 |
|
Распространенные неполадки……………………………………………………………………………………………………… |
91 |
|
7. Настройка параметров сети с помощью OS X |
|
|
Подключение аппарата к проводной сети…………………………………………………………………………………… |
93 |
|
Использование USB-кабеля……………………………………………………………………………………………………… |
93 |
|
Использование кабеля Ethernet………………………………………………………………………………………………… |
94 |
|
Подключение аппарата к беспроводной сети……………………………………………………………………………… |
96 |
|
Установка драйвера принтера…………………………………………………………………………………………………. |
96 |
|
УстановкаSmart Organizing Monitor…………………………………………………………………………………………. |
96 |
|
Использование кнопки WPS…………………………………………………………………………………………………….. |
97 |
|
Использование PIN-кода………………………………………………………………………………………………………….. |
98 |
|
Настройка вручную………………………………………………………………………………………………………………….. |
99 |
|
8. Приложение |
|
|
Передача c использованием IPsec……………………………………………………………………………………………… |
101 |
|
Шифрование и аутентификация с помощью IPsec…………………………………………………………………. |
101 |
|
Security Association (Сопоставление безопасности)………………………………………………………………. |
102 |
|
Процедура настройки параметров обмена ключами шифрования………………………………………. |
103 |
3

|
Настройка параметров обмена ключами шифрования…………………………………………………………. |
103 |
|
Настройка параметров IPsec на компьютере………………………………………………………………………… |
104 |
|
Примечания о тонере…………………………………………………………………………………………………………………. |
107 |
|
Технические характеристики аппарата……………………………………………………………………………………… |
108 |
|
Технические характеристики основных функций…………………………………………………………………… |
108 |
|
Технические характеристики функции печати……………………………………………………………………….. |
110 |
|
Расходные материалы………………………………………………………………………………………………………………… |
112 |
|
Принт-картридж……………………………………………………………………………………………………………………… |
112 |
|
Информация по этому аппарату……………………………………………………………………………………………….. |
113 |
|
Информация для пользователей электрического и электронного оборудования |
|
|
(главным образом для Европы и Азии)…………………………………………………………………………………… |
113 |
|
Примечание к символу батареек и/или аккумулятора (только для стран ЕС)………………………. |
114 |
|
Рекомендации для пользователей по защите окружающей среды |
(главным образом |
|
страны Европы)………………………………………………………………………………………………………………………. |
114 |
|
Примечания для пользователей интерфейса беспроводной локальной сети |
(главным |
|
образом страны Европы)……………………………………………………………………………………………………….. |
115 |
|
Примечания для пользователей в штате Калифорния (Примечания для пользователей в США)…. |
|
|
……………………………………………………………………………………………………………………………………………….. |
116 |
|
Примечания для пользователей из США……………………………………………………………………………….. |
116 |
|
Примечания для пользователей беспроводных устройств в Канаде……………………………………… |
117 |
|
Программа ENERGY STAR……………………………………………………………………………………………………… |
118 |
|
Энергосбережение………………………………………………………………………………………………………………… |
118 |
|
Информация об авторском праве на установленные приложения……………………………………………. |
120 |
|
Apache License………………………………………………………………………………………………………………………… |
120 |
|
dnsmasq………………………………………………………………………………………………………………………………….. |
122 |
|
GPL Version 2………………………………………………………………………………………………………………………….. |
123 |
|
iperf…………………………………………………………………………………………………………………………………………. |
131 |
|
libHaru…………………………………………………………………………………………………………………………………….. |
133 |
|
Libsasl……………………………………………………………………………………………………………………………………… |
133 |
|
mDNSResponser……………………………………………………………………………………………………………………… |
135 |
|
OpenCV………………………………………………………………………………………………………………………………….. |
136 |
|
Open SSL………………………………………………………………………………………………………………………………… |
137 |
|
WPA Supplicant………………………………………………………………………………………………………………………. |
140 |
|
Товарные знаки………………………………………………………………………………………………………………………….. |
142 |
4

|
ИНДЕКС…………………………………………………………………………………………………………………………………… |
145 |
5

Поиск информации об операциях и устранении неполадок
Справочную информацию о работе с устройством и устранении неполадок можно найти в руководстве по эксплуатации (представлено в печатном виде и цифровом формате) и в разделе Справка (в Интернете).
Руководство по эксплуатации (в печатном виде)
Следующие руководства поставляются вместе с устройством.
Техника безопасности
В данном руководстве приведены инструкции по технике безопасности, которым необходимо следовать при использовании этого устройства. Обязательно прочтите его перед началом эксплуатации устройства.
Руководство по установке
В этом руководстве содержатся сведения об установке и настройке устройства, об извлечении устройства из упаковки и подключении его к компьютеру.
Руководство по эксплуатации (в цифровом формате)
Руководства по эксплуатации можно посмотреть на веб-сайте Ricoh или на предоставленном компакт-диске.
Просмотр через веб-браузер
Выйдите в Интернет через веб-браузер.
Убедитесь, что компьютер или устройство подключены к сети.
Загрузите руководства по эксплуатации с веб-сайта http://www.ricoh.com/.
Просмотр с предоставленного компакт-диска
Руководства по эксплуатации можно также изучить с предоставленного компакт-диска.
• При использовании Windows
1.Вставьте компакт-диск в дисковод компакт-дисков.
2.Нажмите [Открыть справку] и следуйте инструкциям на экране.
Откроется файл руководства в формате PDF.
• При использовании OS X
1. Вставьте компакт-диск в дисковод компакт-дисков.
6
2.Запустите файл [Manuals. htm], расположенный в корневом каталоге компактдиска.
3.Выберите язык.
4.Нажмите [Чтение руководств в формате PDF].
5.Нажмите на руководство, которое необходимо изучить.
Откроется файл руководства в формате PDF.
Справка
Чтобы открыть справочные файлы о функциях драйвера принтера Web Image Monitor и Smart Organizing Monitor , выполните описанные ниже действия.
В зависимости от модели режим Web Image Monitor может быть отключен. Для получения дополнительных сведений о различиях среди моделей см. стр. 9 «Как пользоваться данным руководством».
Для получения подробной информации об использовании приложения Web Image Monitor см. стр. 47 «Настройка аппарата с использованием утилит».
Для получения дополнительных сведений о Smart Organizing Monitor см. стр. 61 «Использование Smart Organizing Monitor».
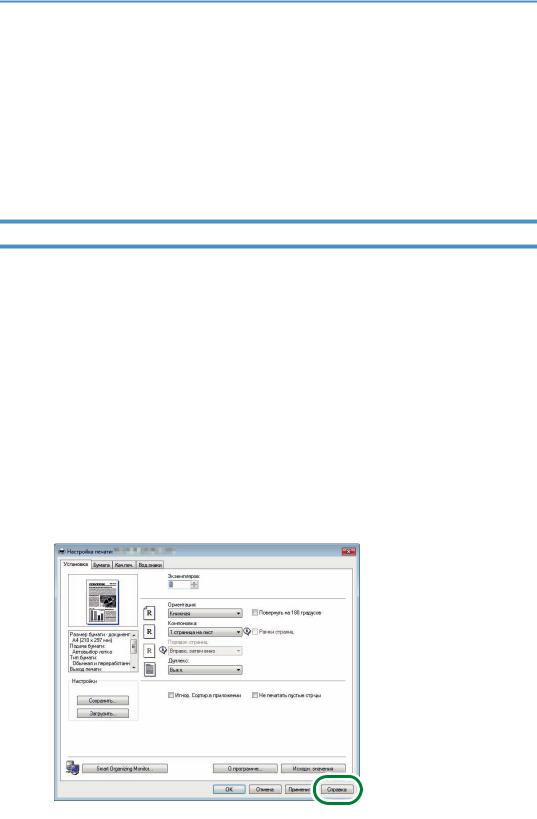
Драйвер принтера
1.Нажмите [Спр.] в диалоговом окне настроек печати.
Для получения сведений об открытии диалогового окна настроек печати см. стр. 42 «Отображение диалогового окна настроек печати».
DSH250
7
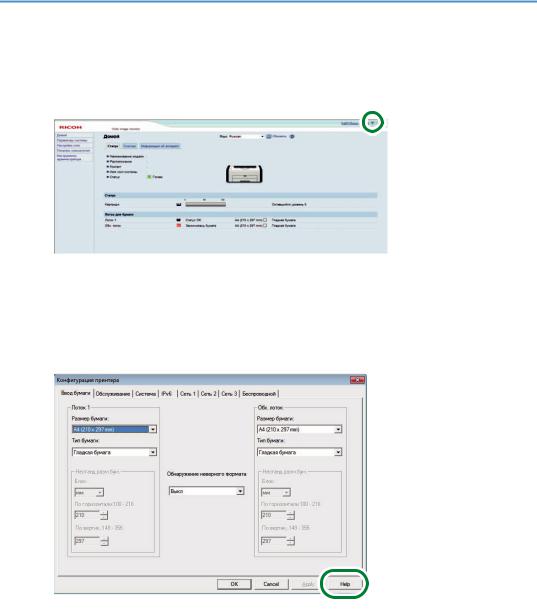
Web Image Monitor
1. Нажмите  в правом верхнем углу экрана.
DSH251
Для просмотра справки заранее установите файл источника справки. Для получения сведений об установке файла см. стр. 48 «Использование Web Image Monitor».
Smart Organizing Monitor
1. Нажмите [Спр.] на экране [Конфигурация принтера].
DSH252
8
![]()
Как пользоваться данным руководством
Введение
Это руководство содержит подробные инструкции и примечания по эксплуатации и использованию данного изделия. Для безопасности и удобства внимательно прочтите это руководство до начала эксплуатации данного изделия. Для быстрого получения справки храните данное руководство в доступном месте.
Символы, используемые в этом руководстве
В этом руководстве используются следующие обозначения:
Обозначает информацию, на которую следует обратить внимание при эксплуатации аппарата, а также сведения о наиболее вероятных причинах замятия бумаги, повреждения оригиналов или потери данных. Обязательно прочитайте эти пояснения.
Дается дополнительное описание функций изделия и инструкции по устранению ошибок пользователя.
Информация по моделям
В этой главе описано, как определить регион, к которому относится аппарат.
На задней стороне аппарата имеется наклейка, расположение которой указано ниже. На наклейке приведены данные, определяющие регион, к которому относится аппарат. Изучите данные на наклейке.
9

Следующая информация зависит от региона. Прочтите информацию под символом, который соответствует региону использования аппарата.


 (главным образом страны Европы и Азии)
Устройство относится к региону A, если на этикетке имеется следующая информация:
•CODE XXXX -27, -29, -67
•220-240 В


 (главным образом страны Северной Америки)
Аппарат относится к региону Б, если на наклейке имеется следующая информация:
•CODE XXXX -17
•120-127 В
•Размеры в этом руководстве даются в двух системах единиц измерения: метрической и дюймовой. Если аппарат относится к региону A, используется метрическая система. Если аппарат относится к региону Б, используется дюймовая система.
Отказ от ответственности
В рамках действующего законодательства компания-производитель ни при каких обстоятельствах не несет ответственность за ущерб, возникший в результате поломки изделия, потери зарегистрированных данных, использования или неиспользования данного продукта и руководств пользователя, поставляемых с ним.
Всегда выполняйте резервные копии данных, зарегистрированных на данном изделии. Документы и данные могут стереться при операционных ошибках и сбоях в работе аппарата.
Компания-производитель ни при каких обстоятельствах не несет ответственность за документы, созданные при использовании данного изделия, или за результаты данных, оформленных вами.
Для обеспечения высокого качества готовых отпечатков производитель настоятельно рекомендует использовать оригинальный тонер, поставляемый производителем.
Примечания
Информация, приведенная в данном руководстве, может быть изменена без предварительного уведомления.
Производитель не несет ответственность за любой ущерб или затраты, вызванные использованием в офисном оборудовании любых деталей или частей, кроме оригинальных, поставляемых производителем.
Некоторые иллюстрации в данном руководстве могут слегка отличаться от поставляемого
изделия.
10

Сообщение администратору
Пароль
При подключении к этому принтеру появится запрос на ввод пароля. Настоятельно рекомендуется немедленно изменить пароль, установленный на заводе по умолчанию, для предотвращения утечки информации и выполнения несанкционированных операций другими пользователями.
При попытке изменить параметры принтера, настроенные с помощью приложения Web Image Monitor, появится запрос на ввод пароля.
Для использования пароля, установленного на заводе по умолчанию, оставьте поле пароля пустым при использовании приложения Web Image Monitor.
Чтобы изменить пароль для приложения Web Image Monitor, войдите в качестве администратора и внесите необходимые изменения.
Для получения подробных сведений о настройке пароля см. стр. 48 «Использование Web Image Monitor».
Сведения об IP-адресах
В данном руководстве термин «IP-адрес» охватывает обе среды: IPv4 и IPv6. Прочтите инструкции по используемой среде.
Различия в производительности и функциональности моделей
Между характеристиками и функциями моделей существуют следующие различия:
|
SP 221 |
SP 220Nw |
|
|
SP 221Nw |
||
|
Порт Ethernet (сеть) |
Недоступно |
Доступно |
|
Беспроводная сеть |
Недоступно |
Доступно |
|
Web Image Monitor |
Недоступно |
Доступно |
11

12
1. Руководство к аппарату
В этой главе описываются приготовления для использования аппарата и приводятся инструкции по эксплуатации.
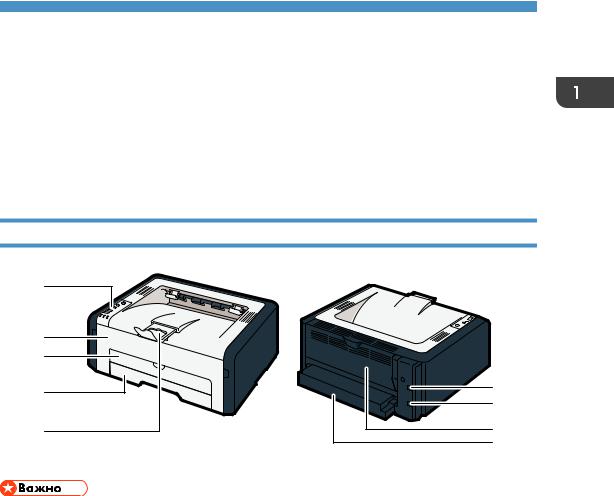
Руководство по компонентам
В данном разделе приводятся названия различных компонентов, находящихся с передней и задней стороны аппарата, а также описание их функций.
Наружные компоненты
• SP 221 не подходит к порту Ethernet.
|
№ |
Наименование |
Описание |
|
1 |
Панель управления |
Клавиши для управления аппаратом и индикаторы для |
|
проверки состояния аппарата находятся на данной панели |
||
|
управления. Для получения дополнительной информации см. |
||
|
стр. 14 «Панель управления». |
||
|
2 |
Лицевая обложка |
Поднимите эту крышку, чтобы заменить расходные материалы |
|
или устранить замятие бумаги. |
||
|
3 |
Обходной лоток |
В этот лоток можно поместить один лист обычной бумаги. |
|
4 |
Лоток 1 |
В этот лоток можно поместить до 150 листов обычной бумаги. |
13
1. Руководство к аппарату
|
№ |
Наименование |
Описание |
|
5 |
Ограничитель |
Поднимите этот ограничитель, чтобы предотвратить падение |
|
бумаги. |
||
|
6 |
Порт USB |
Используйте USB кабель для подключения принтера к |
|
главному компьютеру (хосту). |
||
|
7 |
Порт Ethernet |
Используйте кабель интерфейса локальной сети для |
|
подключения принтера к локальной сети. |
||
|
8 |
Задняя крышка |
Откройте эту крышку, чтобы загрузить листы лицевой |
|
стороной вверх или извлечь замятую бумагу. |
||
|
9 |
Крышка лотка |
Удлиняя лоток, присоедините эту крышку. |
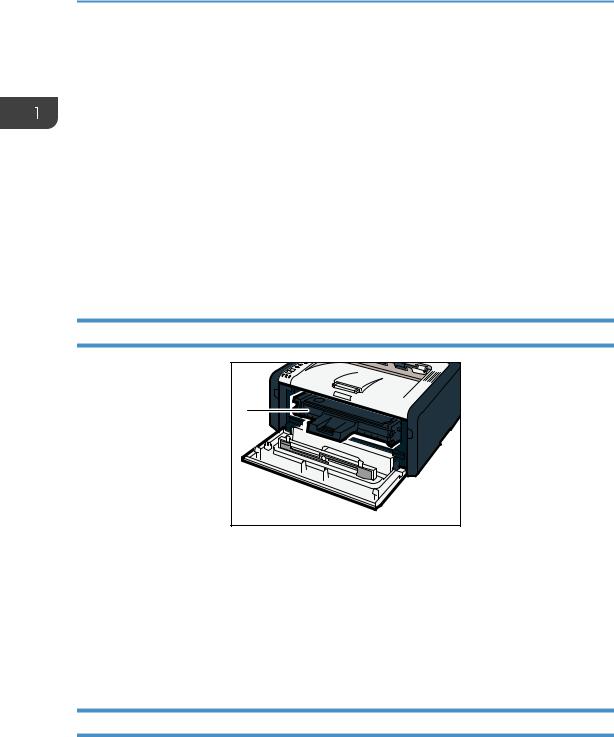
Внутренняя часть
|
№ |
Наименование |
Описание |
|
1 |
Принт-картридж |
Сменный расходный материал, который необходим для |
|
печати на бумаге. Когда загорится индикатор окончания |
||
|
тонера/бумаги, картридж необходимо заменить. Для |
||
|
получения подробных сведений о замене картриджа см. |
||
|
стр. 65 «Замена принт-картриджа». |
||
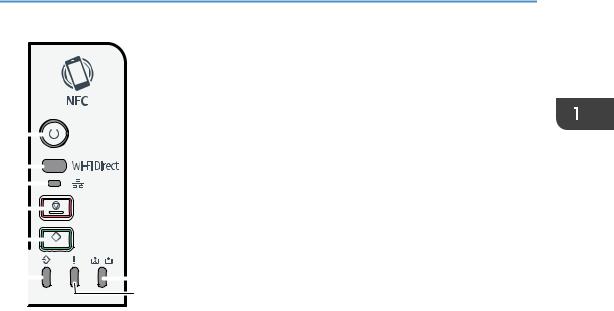
Панель управления
В этом разделе приводятся названия деталей панели управления и описываются их функции. Иллюстрация панели управления для SP 220Nw и SP 221Nw.
14
Руководство по компонентам
|
1 |
|||||||||||||
|
2 |
|||||||||||||
|
3 |
|||||||||||||
|
4 |
|||||||||||||
|
5 |
|||||||||||||
|
6 |
7 |
||||||||||||
|
8 |
|||||||||||||
|
DSH109 |
|||||||||||||
|
№ |
Наименование |
Описание |
|||||||||||
|
1 |
Клавиша [Питание] |
Этот индикатор загорается синим при включении питания |
|||||||||||
|
аппарата. |
|||||||||||||
|
2 |
Клавиша [Wi-Fi Direct] |
Нажимая эту клавишу пока Wi-Fi отключен, вы активируете |
|||||||||||
|
(только SP 220Nw и |
Wi-Fi и перезагружаете аппарат автоматически. Нажмите эту |
||||||||||||
|
клавишу, пока Wi-Fi включен, для активации или деактивации |
|||||||||||||
|
SP 221Nw) |
|||||||||||||
|
функции Wi-Fi Direct. Этот индикатор светится синим цветом, |
|||||||||||||
|
если функция Wi-Fi Direct активна. После долгого удержания |
|||||||||||||
|
этой клавиши настройте WPS с помощью PIN-кода или в |
|||||||||||||
|
режиме PBC. Для получения подробных сведений см. |
|||||||||||||
|
Руководство по установке. |
|||||||||||||
|
3 |
Индикатор сети |
Данный индикатор светится синим, если сеть подключена. |
|||||||||||
|
(только SP 220Nw и |
|||||||||||||
|
SP 221Nw) |
|||||||||||||
|
4 |
Клавиша [Стоп] |
Нажмите эту клавишу один раз для остановки текущей печати. |
|||||||||||
|
Чтобы отменить задание, нажмите ее снова. |
|||||||||||||
|
5 |
Клавиша [Пуск] |
Нажмите для перезапуска текущего задания. |
|||||||||||
|
6 |
Индикатор входа |
Этот индикатор светится синим цветом, если аппарат получает |
|||||||||||
|
данных |
данные на печать с главного устройства. |
||||||||||||
15

1. Руководство к аппарату
|
№ |
Наименование |
Описание |
||
|
7 |
Индикатор окончания |
Этот индикатор светится красным, если в аппарате |
||
|
тонера/бумаги |
заканчивается тонер или бумага. Загорается, если контейнер |
|||
|
для тонера почти пуст. |
||||
|
8 |
Индикатор |
Этот индикатор мигает красным при замятии бумаги и горит, |
||
|
предупреждения |
когда параметры бумаги не соответствуют параметрам, |
|||
|
заданным драйвером, а также при возникновении ошибок. |
||||
•Для получения дополнительных сведений о печати списка конфигураций аппарата или о выполнении тестовой печати с помощью Smart Organizing Monitor, см. стр. 61 «Использование Smart Organizing Monitor».
16
Об инструментах управления
Об инструментах управления
Вэтом разделе приведены инструменты управления этим аппаратом.
Взависимости от модели режим Web Image Monitor может быть отключен. Для получения дополнительных сведений о различиях среди моделей см. стр. 9 «Как пользоваться данным руководством».
Панель управления
На панели управления расположены клавиши для управления этим аппаратом.
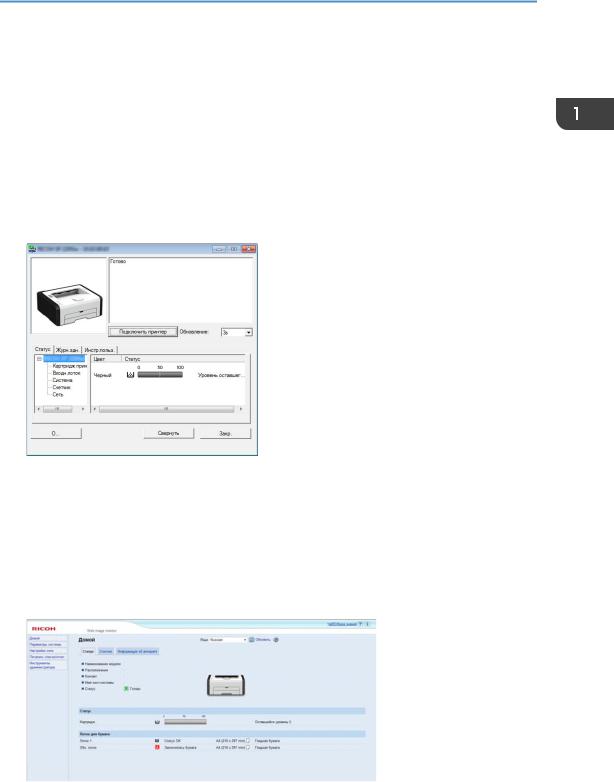
Smart Organizing Monitor
Прежде чем приступить к использованию этой утилиты, установите ее с компакт-диска, который входит в комплект поставки аппарата.
С помощью Smart Organizing Monitor можно проверять статус аппарата, настраивать его параметры и использовать другие функции.
Для получения подробных сведений об использовании Smart Organizing Monitor см. стр. 61 «Использование Smart Organizing Monitor».
Web Image Monitor
17

1. Руководство к аппарату
Можно проверить состояние аппарата или сконфигурировать его настройки непосредственно из приложения Web Image Monitor.
18
![]()
2. Характеристики и добавление бумаги
В этой главе описаны процессы загрузки бумаги и оригиналов, а также содержатся сведения об их характеристиках.
Процесс загрузки бумаги и настройки форматов и типов бумаги
В этом разделе описан процесс загрузки бумаги и приведены операции, выполняемые после загрузки бумаги.
После выполнения описанных ниже процедур можно печатать на бумаге, загруженной в устройство.
Загрузите бумагу в лоток.
Укажите тип и размер бумаги.
Укажите тип и размер бумаги в драйвере принтера.
DSG260
Подробные сведения о процедурах приведены на следующей странице.
•Загрузка бумаги в Лоток 1 См. стр. 21 «Загрузка бумаги в лоток 1».
•Загрузка бумаги в обходной лоток См. стр. 26 «Загрузка бумаги в обходной лоток».
Существует два способа настройки размера и типа бумаги.
• При использовании Web Image Monitor
См. стр. 30 «Настройка типа и размера бумаги с помощью Web Image Monitor».
•При использовании Smart Organizing Monitor
См. стр. 28 «Настройка типа и размера бумаги с помощью
Smart Organizing Monitor».
19

2. Характеристики и добавление бумаги
См. стр. 32 «Настройка типа и размера бумаги с помощью драйвера принтера».
Для получения сведений о поддерживаемой бумаге см. стр. 34 «Пригодная для использования бумага».
20
Загрузка бумаги
Загрузка бумаги
В этом разделе описаны процессы загрузки бумаги в стандартный и обходной лоток.
• При загрузке бумаги следите за тем, чтобы не прищемить и не травмировать пальцы.
Для получения сведений о поддерживаемой бумаге, мерах предосторожности при хранении бумаги и областях печати см. стр. 34 «Пригодная для использования бумага».
•Загружая бумагу, обязательно установите формат и тип бумаги для обходного лотка и лотка 1. Печатая документ, укажите формат и тип бумаги и выберите лоток для бумаги с помощью драйвера принтера – так, чтобы параметры, указанные при загрузке бумаги, можно было использовать для печати.
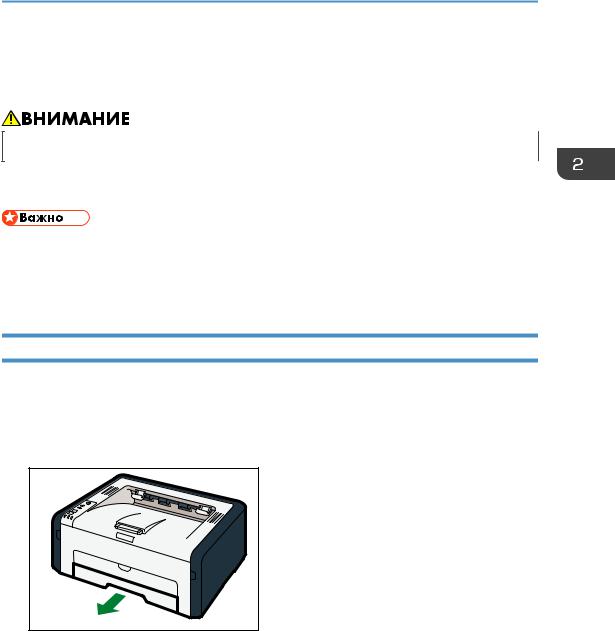
Загрузка бумаги в лоток 1
Расширьте этот лоток для загрузки бумаги A5 вертикально или для загрузки бумаги большего формата, чем A4 (297 мм). Для получения дополнительной информации см. стр. 24 «Удлинение лотка 1 для загрузки бумаги».
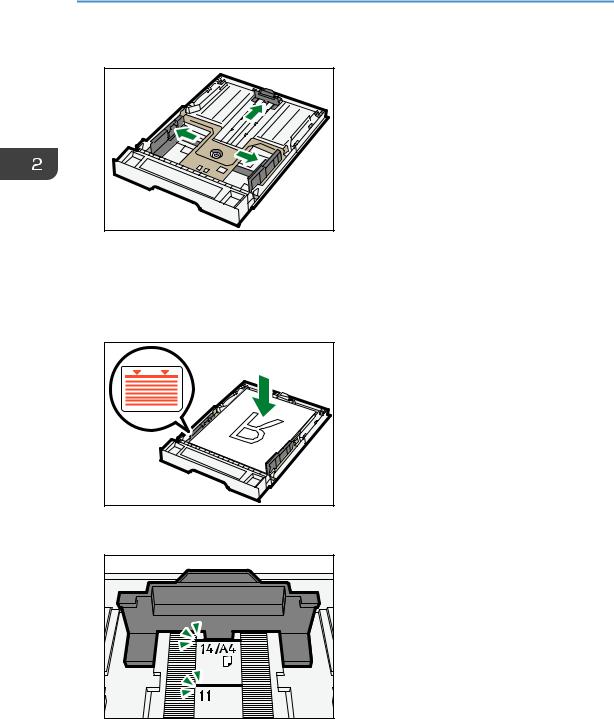
1. Осторожно вытяните лоток 1, затем снимите его обеими руками.
|
DSH210 |
|
Поместите его на ровную поверхность. |
21
|
2. Характеристики и добавление бумаги |
|
2. Раздвиньте боковые и заднюю направляющие. |
|
DSH112 |
3.Пролистайте листы бумаги перед их загрузкой в лоток.
4.Загружайте новую стопку бумаги стороной для печати вниз.
Убедитесь, что высота стопки бумаги не превышает ограничительную отметку на боковой направляющей.
Выровняйте конец бумаги с отметкой, соответствующей размеру бумаги в лотке.
22
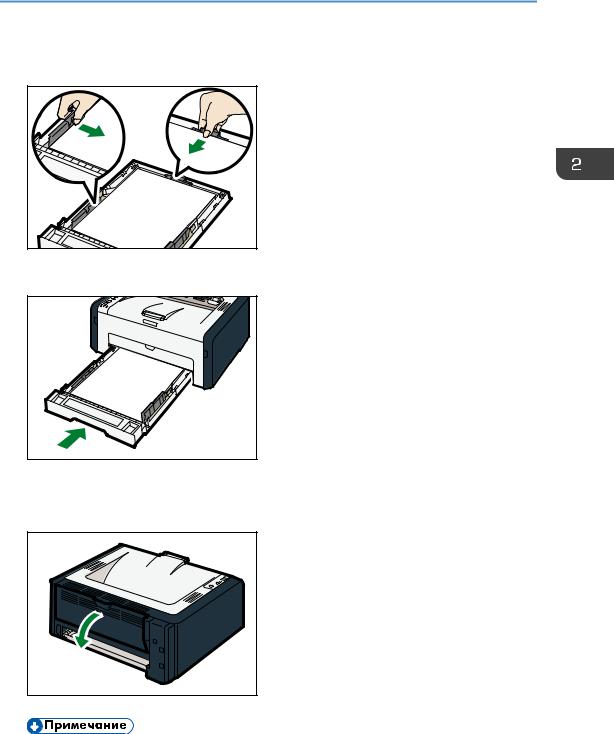
Загрузка бумаги
5.Убедитесь, что между направляющими и бумагой нет промежутков; это касается как боковых, так и задней направляющих.
|
DSH116 |
|
6. Осторожно вставьте лоток 1 в аппарат. |
Во избежание замятий убедитесь, что лоток вставлен плотно.
Чтобы листы выдавались лицевой стороной вверх, откройте заднюю крышку.
•Листы необходимо разместить лицом вниз от выходного лотка, не открывая заднюю крышку.
23

2. Характеристики и добавление бумаги
Удлинение лотка 1 для загрузки бумаги
В этом разделе описана загрузка бумаги больше формата A4 (297 мм)
|
1. |
Снимите крышку лотка. |
|
DSH213 |
2.Осторожно вытяните лоток 1, затем снимите его обеими руками.
3.Отпустите фиксаторы удлинителя на обеих сторонах лотка, затем вытяните удлинитель.
Убедитесь, что внутренняя поверхность удлинителя и шкала совпадают.
Отрегулировать длину удлинителя можно в три этапа. Используя бумагу формата A5 SEF, A4 или Letter, установите длину по положению, указанному меткой « » в лотке.
24
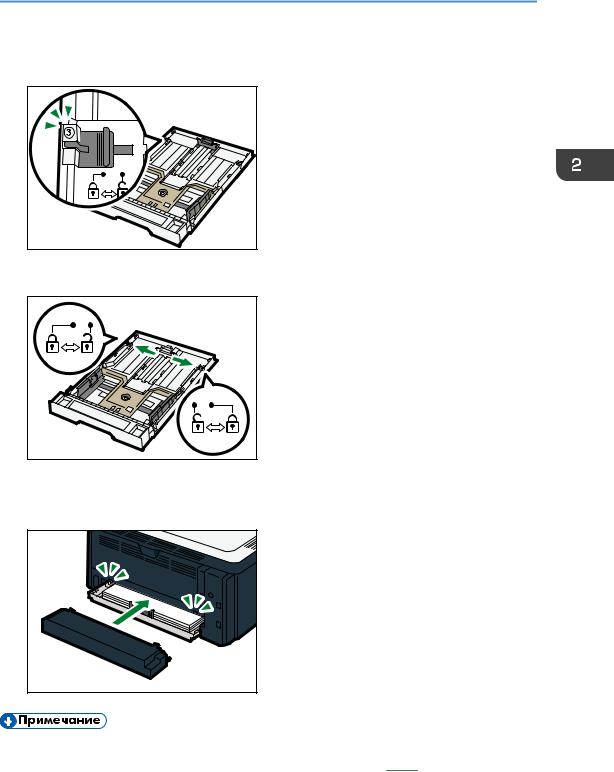
Загрузка бумаги
При использовании допустимого размера настройте длину в положение, обозначенное отметкой « » в лотке.
|
DSH180 |
|
|
4. |
Закройте удлинитель. |
5. Выполните операции 2 — 7 раздела «Загрузка бумаги в лоток 1».
|
6. |
Прикрепите крышку лотка. |
|
DSH214 |
•Не прикрепляйте крышку лотка при загрузке бумаги формата Legal или бумаги нестандартного размера, превышающего формат A4. ((только 


 )
)
25
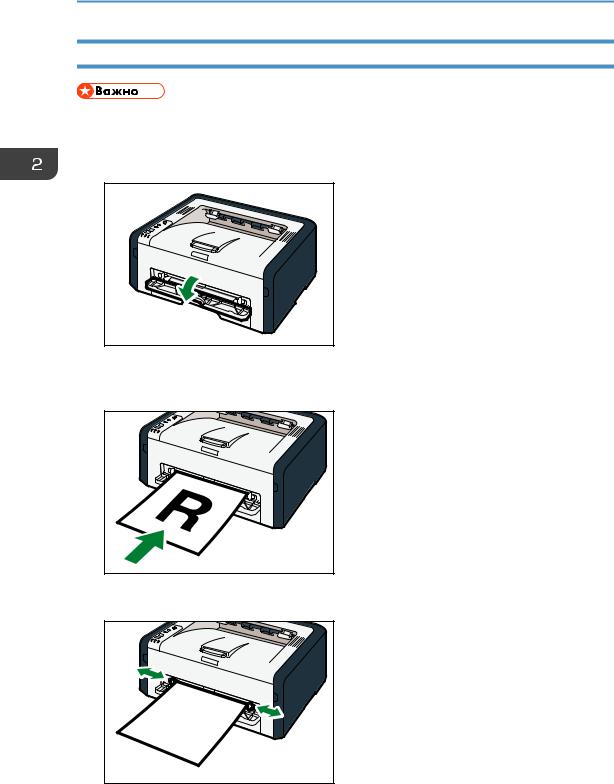
2. Характеристики и добавление бумаги
Загрузка бумаги в обходной лоток
•Не загружайте бумагу в обходной лоток, пока сообщение «Готово» не появится в Smart Organizing Monitor.
|
1. |
Откройте обходной лоток. |
|
DSH215 |
2.Раздвиньте боковые направляющие, переверните бумагу печатной стороной вверх и вставьте ее в аппарат до упора.
3. Отрегулируйте боковые направляющие по ширине бумаги.
26
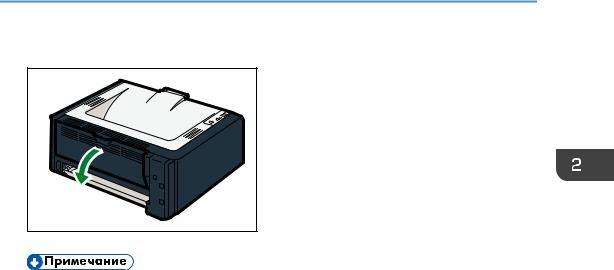
Загрузка бумаги
Чтобы листы выдавались лицевой стороной вверх, откройте заднюю крышку.
•Листы необходимо разместить лицом вниз от выходного лотка, не открывая заднюю крышку.
27
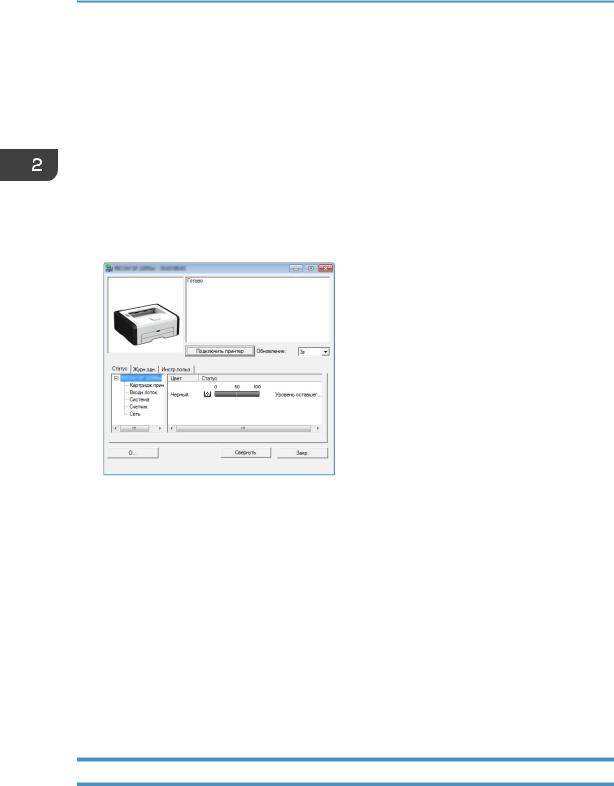
2. Характеристики и добавление бумаги
Настройка типа и размера бумаги с помощью Smart Organizing Monitor
В этом разделе в качестве примера приведена процедура для ОС Windows 7. Процедуры для других ОС могут отличаться от описываемой.
1.В меню [Пуск] выберите пункт [Все программы].
2.Выберите [SP 220 Series Software Utilities].
3.Выберите пункт [Smart Organizing Monitor for SP 220 Series].
Smart Organizing Monitor начинает работу.
4.Если используемый аппарат не выбран, нажмите [Подключить принтер] и выполните одно из следующих действий:
•Выберите модель устройства.
•Введите IP-адрес устройства вручную.
•Выберите [Поиск сет. принтера] для поиска устройства по сети.
5.Нажмите [OK].
6.Во вкладке [Инстр.польз.] нажмите [Конфигурация принтера].
Если необходимо ввести код доступа, введите его и нажмите [OK]. Код доступа по умолчанию “Admin”.
7.Во вкладке [Ввод бумаги] выберите тип и размер бумаги, а затем нажмите [ОК].
8.Нажмите [Закр.].
Настройка нестандартного формата бумаги
1. В меню [Пуск] выберите пункт [Все программы].
28
![]()
Настройка типа и размера бумаги с помощью Smart Organizing Monitor
2.Выберите [SP 220 Series Software Utilities].
3.Выберите пункт [Smart Organizing Monitor for SP 220 Series].
4.Если используемый аппарат не выбран, нажмите [Подключить принтер] и выполните одно из следующих действий:
•Выберите модель устройства.
•Введите IP-адрес устройства вручную.
•Выберите [Поиск сет. принтера] для поиска устройства по сети.
5.Нажмите [OK].
6.Во вкладке [Инстр.польз.] нажмите [Конфигурация принтера].
Если необходимо ввести код доступа, введите его и нажмите [OK]. Код доступа по умолчанию “Admin”.
7.Во вкладке [Ввод бумаги] выберите [Нестанд.разм.бум.] в списке [Размер бум.].
8.В списке [Блок] выберите [мм] или [дюйм].
9.В полях [По горизонтали] и [По вертик.] укажите ширину и длину.
10.Нажмите [OK].
11.Нажмите [Закр.].
29

2. Характеристики и добавление бумаги
Настройка типа и размера бумаги с помощью Web Image Monitor
Вэтом разделе описывается способ настройки размера и типа бумаги с помощью Web Image Monitor.
Взависимости от модели режим Web Image Monitor может быть отключен. Для получения дополнительных сведений о различиях среди моделей см. стр. 9 «Как пользоваться данным руководством».
1.Запустите веб-браузер и получите доступ к аппарату, указав его IP-адрес.
Откроется главная страница Web Image Monitor.
2.Нажмите [Парам.сист.].
3.Выберите [Парам.лотка для бумаги].
4.Выберите тип и размер бумаги для необходимого лотка.
5.При необходимости введите пароль администратора.
6.Нажмите [OK].
7.Закройте веб-браузер.
Настройка нестандартного формата бумаги
1.Запустите веб-браузер и получите доступ к аппарату, указав IP-адрес.
2.Нажмите [Парам.сист.].
3.Выберите [Парам.лотка для бумаги].
4.Выберите [Нест.разм.] в списке [Разм. бумаги].
5.Выберите [мм] или [дюйм], а затем укажите ширину и длину.
6.При необходимости введите пароль администратора.
7.Нажмите [OK].
30

Настройка типа и размера бумаги с помощью Web Image Monitor
8. Закройте веб-браузер.
31

2. Характеристики и добавление бумаги
Настройка типа и размера бумаги с помощью драйвера принтера
•Убедитесь, что тип и размер бумаги, указанный с помощью драйвера принтера, соответствует типу и размеру бумаги, загруженной в лоток. Поскольку этот аппарат не определяет размеры бумаги автоматически, тип и размер бумаги могут не соответствовать и задание на печать может быть выполнено некорректно.
Использование Windows
В этом разделе в качестве примера приведена процедура для ОС Windows 7. Процедуры для других ОС могут отличаться от описываемой.
1.Откройте диалоговое окно [Настройка печати] из драйвера принтера.
Для получения сведений об открытии свойств драйвера принтера из окна [Устройства и принтеры] см. стр. 42 «Отображение диалогового окна настроек печати».
Откроется диалоговое окно [Настройки печати].
2.Откройте вкладку [Бумага].
3.В списке [Входной лоток:] выберите необходимый лоток для бумаги.
4.В списке [Тип бумаги:] выберите тип бумаги, загружаемой в лоток.
5.Поставьте отметку в поле «[Печать вкл.]» и выберите размер бумаги, загруженной в лоток.
При необходимости уберите отметку в поле «[Масштаб: под размер печати]».
32

Настройка типа и размера бумаги с помощью драйвера принтера
6. Нажмите [OK].
При использовании OS X
В этом разделе в качестве примера приведена процедура для OS X 10.11. Для другой операционной системы процедура может быть иной.
1.Запустите системные настройки.
2.Нажмите [Printers & Scanners] (Принтеры и сканеры).
3.Выберите используемый принтер.
4.В списке [Формат бумаги:] (Paper Size:) выберите формат документа для печати.
5.Во всплывающем меню выберите [Printer Features] (Свойства принтера).
6.В списке [Тип носителя:] (Media Type:) выберите тип бумаги, загруженной в лоток.
33

2. Характеристики и добавление бумаги
Пригодная для использования бумага
•После загрузки бумаги в лоток укажите ее тип и размер с помощью Smart Organizing Monitor и драйвера принтера. Этот аппарат не определяет размер бумаги автоматически.
•При загрузке бумаги нестандартного размера настройте ширину и длину с помощью драйвера принтера.
|
Тип |
Размер |
Плотность |
Емкость |
||
|
Обычная бумага |
A4, 81/2 × 11, B5 JIS, B6 JIS, |
• Лоток 1 |
• |
Лоток 1 |
|
|
Переработ. бумага |
A5 LEF, A5 SEF, A6, 81/2 × |
60 — 105 |
150 листов |
||
|
Плотная бумага 1 |
14, 81/2 × 13, 8,5 × 13,4, 8,5 |
г/м2 (16 — |
• |
Обходной |
|
|
× 13,6, 16K, 8,11 × 13,3, |
28 фунтов.) |
||||
|
лоток |
|||||
|
Тонкая бумага |
51/2 × 81/2 |
||||
|
• Обходной |
1 лист |
||||
|
Бланки |
|||||
|
лоток |
|||||
|
(80 г/м2, 20 |
|||||
|
С напечат. изобр. |
52 — 128 |
||||
|
фунт.) |
|||||
|
Перфорированная |
г/м2 (14 — |
||||
|
бумага |
34 фунт.) |
||||
|
В/сортн.бумага |
|||||
|
Карточки |
|||||
|
Цветная бумага |
|||||
|
Обычная бумага |
Нестандартный размер: |
• Лоток 1 |
• Лоток 1 |
||
|
Переработ. бумага |
100 — 216 мм в ширину, |
60 — 105 |
150 листов |
||
|
Плотная бумага 1 |
148 — 356 мм в длину |
г/м2 (16 — |
• |
Обходной |
|
|
28 фунтов.) |
|||||
|
Тонкая бумага |
(3,94 — 8,50 дюйм. в ширину, |
лоток |
|||
|
• Обходной |
|||||
|
Бланки |
5,83 — 14,02 дюйм. в длину) |
1 лист |
|||
|
лоток |
|||||
|
(80 г/м2, 20 |
|||||
|
С напечат. изобр. |
52 — 128 |
||||
|
фунт.) |
|||||
|
Перфорированная |
г/м2 (14 — |
||||
|
бумага |
34 фунт.) |
||||
|
В/сортн.бумага |
|||||
|
Карточки |
|||||
|
Цветная бумага |
|||||
34

Пригодная для использования бумага
Спецификация типов бумаги
Втаблицах ниже описаны типы бумаги, которые можно использовать на этом аппарате.
•В зависимости от типа бумаги тонер может высохнуть не сразу. Перед использованием отпечатанных листов убедитесь, что они полностью высохли. В противном случае тонер может размазаться.
•Качество печати может гарантироваться только при использовании рекомендуемой бумаги. За дополнительной информацией о рекомендованной для использования бумаге обращайтесь к торговому представителю или в сервисный центр.
Обычная бумага
Плотность бумаги 65-99 г/м2 (17-27 фунт.)
Поддерживаемый Лоток 1 и обходной лоток лоток для бумаги
Плотная бумага 1
Плотность бумаги 100-130 г/м2 (27-35 фунт.)
Поддерживаемый Лоток 1 и обходной лоток лоток для бумаги
Тонкая бумага
Плотность бумаги 52-64 г/м2 (14-16 фунт.)
Поддерживаемый Лоток 1 и обходной лоток лоток для бумаги
35

2. Характеристики и добавление бумаги
Переработ. бумага
|
Элемент |
Описание |
|
Плотность бумаги |
75 — 90 г/м2 (20 — 24 фунт.) |
|
Поддерживаемый |
Лоток 1 и обходной лоток |
|
лоток для бумаги |
|
|
Примечания |
Если толщина бумаги не входит в указанный диапазон, выберите |
|
[Тонкая бумага], [Обычная бумага] или [Плотная бумага 1]. |
|
Цветная бумага
|
Элемент |
Описание |
|
Плотность бумаги |
75 — 90 г/м2 (20 — 24 фунт.) |
|
Поддерживаемый |
Лоток 1 и обходной лоток |
|
лоток для бумаги |
|
|
Примечания |
Если толщина бумаги не входит в указанный диапазон, выберите |
|
[Тонкая бумага], [Обычная бумага] или [Плотная бумага 1]. |
|
С напечат. изобр.
|
Элемент |
Описание |
|
Плотность бумаги |
75 — 90 г/м2 (20 — 24 фунт.) |
|
Поддерживаемый |
Лоток 1 и обходной лоток |
|
лоток для бумаги |
|
|
Примечания |
Если толщина бумаги не входит в указанный диапазон, выберите |
|
[Тонкая бумага], [Обычная бумага] или [Плотная бумага 1]. |
|
Перфорированная бумага
Плотность бумаги 75 — 90 г/м2 (20 — 24 фунт.)
36

|
Пригодная для использования бумага |
|
|
Элемент |
Описание |
|
Поддерживаемый |
Лоток 1 и обходной лоток |
|
лоток для бумаги |
|
|
Примечания |
Если толщина бумаги не входит в указанный диапазон, выберите |
|
[Тонкая бумага], [Обычная бумага] или [Плотная бумага 1]. |
|
|
Бланки |
|
|
Элемент |
Описание |
|
Плотность бумаги |
100-130 г/м2 (27-35 фунт.) |
|
Поддерживаемый |
Лоток 1 и обходной лоток |
|
лоток для бумаги |
|
|
Примечания |
Если толщина бумаги не входит в указанный вами диапазон, на ней не |
|
следует печатать. |
|
|
В/сортн.бумага |
|
|
Элемент |
Описание |
|
Плотность бумаги |
100 — 130 г/м2 (28 — 43 фунт.) |
|
Поддерживаемый |
Лоток 1 и обходной лоток |
|
лоток для бумаги |
|
|
Примечания |
Если толщина бумаги не входит в указанный диапазон, выберите |
|
[Тонкая бумага], [Обычная бумага] или [Плотная бумага 1]. |
|
|
Карточки |
|
|
Элемент |
Описание |
|
Плотность бумаги |
100-130 г/м2 (27-35 фунт.) |
|
Поддерживаемый |
Лоток 1 и обходной лоток |
|
лоток для бумаги |
|
37

2. Характеристики и добавление бумаги
|
Элемент |
Описание |
|
Примечания |
Если толщина бумаги не входит в указанный диапазон, выберите |
|
[Тонкая бумага], [Обычная бумага] или [Плотная бумага 1]. |
|
Нерекомендуемые типы бумаги
Не используйте бумагу следующих типов:
•Бумага, предназначенная для струйного принтера
•Имеющая перегибы, сложенная или мятая бумага
•Скрученная или изогнутая бумага
•Порванная бумага
•Бумага со складками
•Влажная бумага
•Грязная или поврежденная бумага
•Бумага настолько сухая, что может служить источником статического электричества
•Бумага, на которой уже печатали, за исключением бумаги с предварительной печатью бланка.
Сбои особенно вероятны при использовании бумаги, на которой уже печатали устройством, отличным от лазерного принтера (например, монохромным или цветным копиром, струйными принтерами и т.д.)
•Специальная бумага, например термобумага и копировальная бумага
•Бумага плотностью больше или меньше допустимого предела
•Бумага с окнами, отверстиями, перфорацией, вырезами и рельефными (выпуклыми) изображениями
•Этикеточная самоклеющаяся бумага, на которой выступает клей или видна бумага-основа
•Бумага со скрепками и скобками
•При загрузке бумаги не прикасайтесь к ее поверхности.
•Даже соответствующая требованиям, но хранившаяся в неподобающих условиях бумага может приводить к нарушению подачи, ухудшению качества печати или неисправностям.
38
![]()
Пригодная для использования бумага
Хранение бумаги
•Храните бумагу надлежащим образом. Ненадлежащее хранение бумаги может привести к замятиям, снижению качества печати или неисправностям.
Рекомендуется следующее:
•Не храните бумагу в местах с повышенной влажностью.
•При хранении бумаги избегайте воздействия прямого солнечного света.
•Не ставьте бумагу вертикально.
•Храните оставшуюся бумагу в пакете или коробке, в которой она поставлялась.
Область печати
На следующей схеме изображена область бумаги, на которой можно печатать с помощью описываемого аппарата.
С помощью драйвера принтера
3
1
3
2
CHZ904
1.Область печати
2.Направление подачи
3.Около 4,2 мм (0,2 дюйм.)
4.Около 4,2 мм (0,2 дюйм.)
•Область печати зависит от формата бумаги, языка принтера и настроек драйвера принтера.
39

2. Характеристики и добавление бумаги
40

3. Печать документов
В этой главе описаны процессы настройки параметров в драйвере принтера и печати документов.
Операции с функцией принтера
Комбинированная печать
Можно комбинировать несколько страниц и печатать их на одном листе бумаги. Для получения подробных сведений см. справку драйвера принтера.
Отчет 1
2  3
3 
DSG262
41

3. Печать документов
Отображение диалогового окна настроек печати
Чтобы изменить настройки драйвера принтера по умолчанию, установите настройки в диалоговом окне [Настройка печати].
Чтобы изменить настройки всех приложений по умолчанию, откройте диалоговое окно [Настройка печати] в ОС. Для получения сведений см. стр. 42 «Отображение диалогового окна настроек печати с помощью меню [Пуск]». Чтобы изменить настройки по умолчанию определенного приложения, откройте диалоговое окно [Настройка печати] из этого приложения. Для получения сведений см. стр. 42 «Отображение диалогового окна настроек печати в приложении».
Отображение диалогового окна настроек печати с помощью меню [Пуск]
В этом разделе описан порядок открытия диалогового окна [Настройка печати] из окна [Устройства и принтеры].
•Если драйвер принтера хранится на сервере печати, заданные сервером значения настроек отображаются по умолчанию в блоке [Настройки печати по умолчанию…].
•Установить разные настройки печати для каждого пользователя невозможно. Настройки, заданные в этом диалоговом окне, применяются по умолчанию.
1.В меню [Пуск] нажмите [Устройства и принтеры].
2.Правой кнопкой мыши нажмите на значок принтера, который необходимо использовать.
3.Нажмите [Настройка печати].
Отображение диалогового окна настроек печати в приложении
Можно выполнить настройки принтера для конкретного приложения. Для этого откройте диалоговое окно [Настройка печати] из этого приложения.
Настройки, заданные в диалоговом окне [Настройки печати], открытом из окна [Устройства и принтеры], являются настройками по умолчанию для диалогового окна [Настройки печати], открываемого в приложении. При печати из приложения измените настройки необходимым образом.
Фактически отображаемый экран зависит от приложения. Ниже описана процедура печати документов из приложения. В качестве примера использовано приложение WordPad в ОС
Windows 7.
42

Отображение диалогового окна настроек печати
Отображение диалогового окна настроек печати в приложении при использовании Windows
1.Нажмите кнопку меню WordPad в верхнем левом углу окна, затем выберите команду [Печать].
2.В списке [Выберите принтер] выберите принтер, который необходимо использовать.
3.Нажмите [Настройки].
•Способ доступа к окну [Настройка печати] различается в разных приложениях. Для получения подробных сведений см. справку драйвера принтера и руководства к приложениям.
Отображение диалогового окна настроек печати в приложении при использовании OS X
Описание следующей процедуры приведено на примере OS X 10.11.
1.Откройте документ, который необходимо напечатать.
2.В меню [File] (Файл) выберите [Print…] (Печать…).
3.Проверьте, выбрано ли имя и IP-адрес используемого устройства в раскрывающемся меню [Printer:] (Принтер:).
Если в списке [Printer:] (Принтер:) не выбрано имя или IP-адрес используемого аппарата, нажмите по списку и выберите нужный аппарат.
43

3. Печать документов
Основные операции печати
Ниже описан порядок выполнения основных операций печати.
Для получения подробных сведений об операциях печати см. справку драйвера принтера.
В этом разделе в качестве примера приведена процедура для ОС Windows 7. Процедуры для других ОС могут отличаться от описываемой.
1.Откройте диалоговое окно свойств принтера в том приложении, в котором открыт документ.
Для получения сведений о каждом параметре нажмите [Справка]. Для просмотра данных о конфигурации можно нажимать на информационные значки.
2.Выполните настройку необходимых параметров печати и нажмите [OK].
Диалоговое окно свойств принтера закроется.
3.Нажмите [Печать].
•Если происходит замятие бумаги, печать прекращается после печати текущей страницы. После удаления замятой бумаги печать автоматически возобновляется с замятой страницы. Для получения подробных сведений об удалении замятой бумаги см. стр. 77 «Устранение замятий».
Отмена задания печати
В зависимости от состояния задания печати его отмена осуществляется с панели управления аппарата или с компьютера.
44