На чтение 10 мин Просмотров 12.2к.

Максим aka WisH
Высшее образование по специальности «Информационные системы». Опыт работы системным администратором — 5 лет.
Сегодня рассмотрим инструкцию по настройке роутера Ростелеком Sagemcom fast 2804 v7 и других версий. Обычно этот маршрутизатор поставляется прошитым под Ростелеком, выдает их провайдер. С одной стороны, это облегчает работу под конкретным оператором, а с другой, сильно ограничивает людей в использовании устройства. Сама модель является универсальной, что позволяет использовать её почти в любых условиях.
Содержание
- Характеристики
- Индикаторы и порты
- Подключение и вход в админку
- Автонастройка
- Ручная настройка
- USB модем
- Ethernet
- ADSL
- Параметры Wi-Fi
- IPTV
- Прошивка
- Сброс
Характеристики
Пробежимся по характеристикам sagemcom f@st 2804. Главное, что здесь стоит отметить, – это возможность подключения разных линий связи. Сюда подходят и обычный ethernet кабель от провайдера, мобильные модемы, а также телефонная линия. Такой подход позволит обеспечить тройное резервирование, что пригодится в тех местах, где связь нужна постоянно.
Среди остальных характеристик следует выделить:
- Внешние разъемы: 1 x RJ11 DSL интерфейс; 1 x RJ45 WAN интерфейс (10/100BASE-TX Ethernet); 4 x RJ45 LAN интерфейса (10/100BASE-TX Ethernet); 2 x USB2.0 host.
- Размер в мм: 185 x 110 x 30.
- Имеет возможность для создания резервных каналов интернета.
- Роутер поддерживает создание на своей основе принт-сервера.
- Можно подключить флешку, что даст возможность использования дополнительной памяти. Если это сделать, то появляется возможность использовать маршрутизатор для обмена файлами, в качестве небольшого сервера.
В общем, если рассматривать роутер sagemcom f@st 2804 v5, то сразу видно, что он больше подходит для небольших офисных сетей или для домашней сети с высокими требованиями. Для обычной квартиры такой объем резервирования может оказаться избыточным. Если у вас есть такое устройство, то отказываться от него не стоит, хотя оно и не очень удобно в настройке. Придется потратить некоторое время, чтобы прошить его, а потом можно использовать его со всеми операторами.
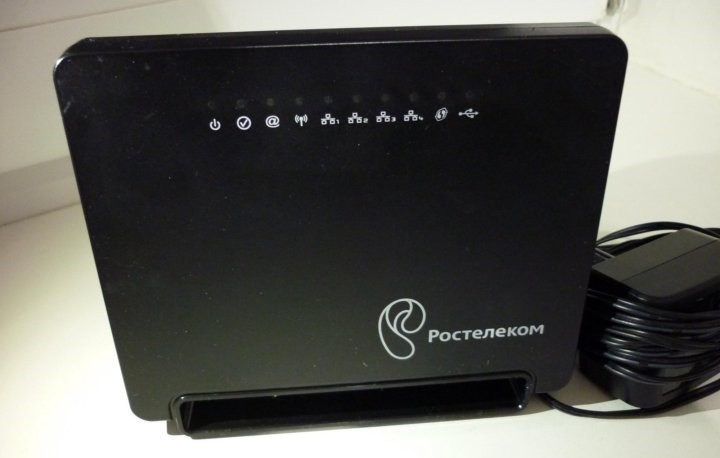
Индикаторы и порты
Сначала поговорим о внешнем виде и индикации. Посмотрите на индикаторы, расположенные на передней панели. Они расскажут вам о текущем состоянии устройства, а также о возможных проблемах.

- Питание. Должен гореть зеленым цветом. При любых других цветах лучше провести диагностику. Если окажется, что он мигает или горит красным, то маршрутизатор перешел в режим аварийного восстановления.
- Индикатор DSL. Если мигает часто, то это говорит о том, что он устанавливает соединение по телефонной линии. Постоянно зажженный индикатор говорит о стабильной работе adsl-соединения.
- Internet, горит при передаче данных.
- WLAN, загорается в случае использования беспроводной сети.
- Несколько индикаторов ETH, отвечают за порты для подключения других устройств.
- WPS, загорается в том случае, если установлено соединение через WPS.
- USB, говорит об успешном подключении через этот порт.

В задней части устройства находится порт для подключения телефонного кабеля, несколько портов для Ethernet кабелей, кнопки включения и сброса. С правой стороны располагаются порты для подключения usb-девайсов, включение беспроводной сети и кнопка wps.
Подключение и вход в админку
Теперь приступаем к подключению роутера и интернета. Сначала выберите место для самого устройства. Поставьте его так, чтобы он не стоял рядом с батареями или другими источниками тепла, также опасайтесь влажных мест. Выберите такое место, куда свободно дотягиваются кабеля от интернета и от розетки. Лучше избегать случаев, когда все провода идут в натяг, при любом неосторожном движении можно повредить их или порты на роутере.
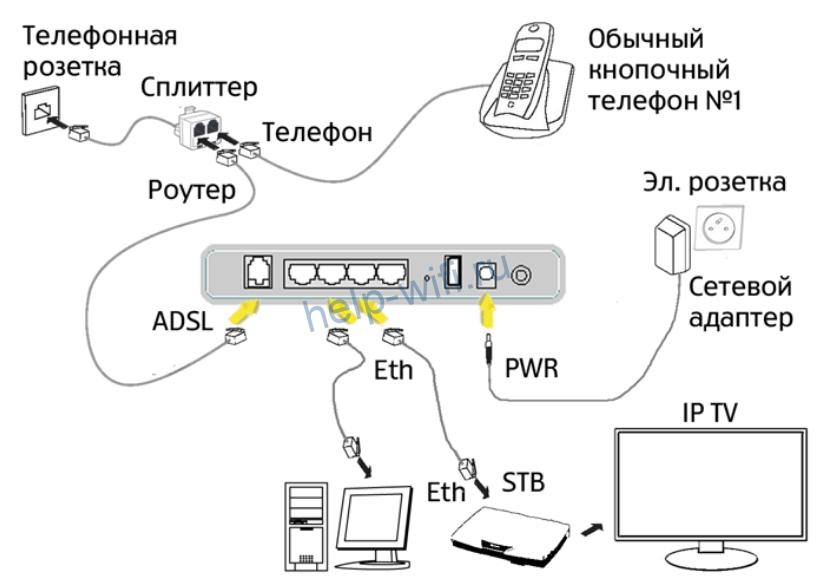
Дальше произведите подключение всех нужных устройств. Сначала подключите adsl-кабель в первый разъем, Ethernet кабель от провайдера воткните в lan-разъем под номером один, модем подключите в usb-порт. Не обязательно подключать все, это может быть один способ подключения из всех, и этого достаточно.

Теперь посмотрите на нижнюю часть маршрутизатора. Там написан адрес для входа, а также ssid и пароль для подключения к стандартной беспроводной сети. Подключение к вайфай поможет избежать необходимости искать устройство, к которому подключается Ethernet-кабель. Подключитесь к маршрутизатору через провод или беспроводную сеть, на подключенном устройстве откройте браузер и наберите в верхней строке адрес 192.168.1.1. Логин и пароль указаны на нижней части вашего устройство, обычно это admin/admin.
Автонастройка
Как таковой, автоматической настройки Wi-Fi роутера Sagemcom f@st 2804 не предусмотрено. Однако в комплекте с самим устройством идет диск, на котором есть программа «Мастер настройки». Так что, если вы подключаетесь к роутеру с компьютера, то можете установить данную программу на него. Запустите её сразу после установки и подключения маршрутизатора к компьютеру. После этого мастер задаст несколько вопросов, которые помогут ему определить тип соединения, а также запросит данные, необходимые для подключения.
Также с помощью этого мастера можно делать следующие вещи:
- Проводить обновление прошивки и программы самого маршрутизатора.
- Проводить настройку и конфигурирование самого устройства.
- Позволяет создавать резервные каналы, которые будут использоваться при сбоях в соединении.
- Можно проводить проверку работоспособности устройства.
Ручная настройка
Основная настройка модема Sagemcom проводится вручную. Способы и параметры настройки различаются в зависимости от того, какой тип подключения собираетесь использовать. Есть действия, которые придется проделать в любом случае. К ним относится удаление «стандартных» соединений, которые были созданы автоматически.
В левой части меню найдите раздел «Дополнительные настройки», а там щелкните по «wan сервис» и выделите все на странице справа. Потом кликните по «Удалить», чтобы убрать автоматические созданные подключения.
Теперь в разделе дополнительных настроек найдите «Интерфейс 2-го уровня», кликните по нему, выделите все в правой части экрана и удалите.
Дальнейшие действия зависят от того, какой тип подключения используется у вас в качестве основного. Разберем их все, а вы выберете тот, который подойдет вам. Обычно лучшая скорость обеспечивается провайдером по проводному Ethernet-соединению, а остальные способы подключения используются в качестве резервных.
USB модем
Один из самых простых способов, если судить по настройке. C самого началам производитель предполагал его использование в качестве запасного. Если других способов подключения нет, то ведите передачу данных через модем. Для настройки зайдите в «Конфигурацию 3G», поставьте галочку на включении функции резервирования, а в окне ниже введите данные для подключения. Обычно их можно посмотреть в инструкции или на сайте мобильного оператора.

Ethernet
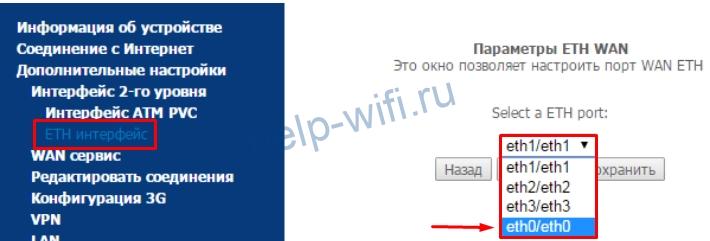
Это основной способ, который используют провайдеры для подключения своих абонентов. Такой тип соединения позволяет обеспечить быструю и стабильную связь, так что рассмотреть подобную настройку нужно обязательно. Перейдите в раздел «ETH-интерфейс», который находится в «Дополнительных настройках». В верхней части окна укажите тот порт, к которому подключен кабель от провайдера.
Теперь снова щелкните по «Wan сервису», в правой части окна нажмите по кнопке добавления соединения. Теперь зайдите в созданное соединение и перейдите к конфигурации. В верхней части окна выберите свой тип соединения, сейчас это PPPoE у большинства провайдеров. Остальные настройки поставьте такие же, как на картинке.

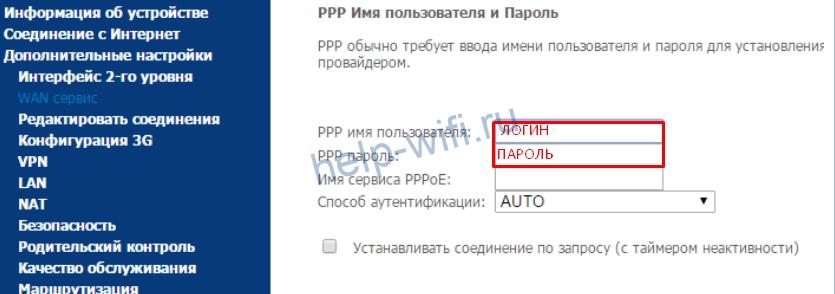
Дальше посмотрите в свой договор и введите здесь те данные, которые предоставил вам провайдер. На остальных этапах менять настройки не нужно, оставьте те, что стоят по умолчанию.
Также зайдите в раздел и включите там NAT (enable nat) и файрволл, если планируете использовать данные настройки.
ADSL
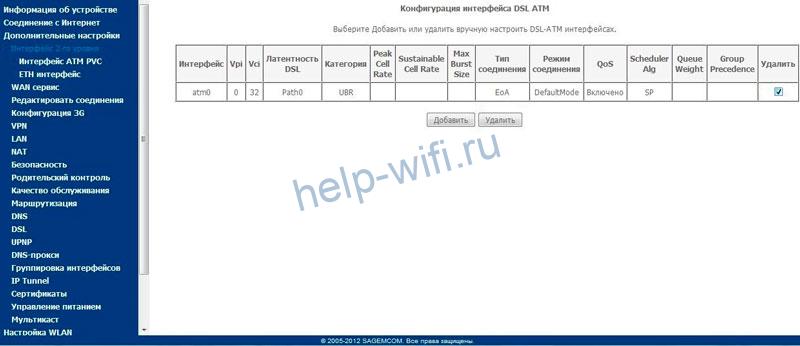
Перейдите в раздел «Интерфейс 2-го уровня» в «Дополнительных настройках», а там добавьте новое соединение DSL ATM. Здесь можно оставить все настройки по умолчанию, их хватает на то, чтобы интернет начал работать.

Теперь идите в раздел «WAN-сервис», кликните там на создание нового соединения, поставьте тип аутентификации «PPPoE». В новом окне выберите порт по умолчанию atm0. Далее, на новой вкладке, потребуется ввести логин и пароль, которые вам выдали у провайдера или которые написан в инструкции. Поставьте отметки у пунктов «повтор PPP при ошибке аутентификации» и «Включить IGMP Multicast Proxy».
Дальше остается только прощелкать до последней вкладки и нажать на «применить».
Параметры Wi-Fi
В левом меню перейдите в «Настройка WLAN», здесь и происходит настройка беспроводной сети. Поставьте галку на включении беспроводной сети, а также отметьте нижний пункт. Здесь же задайте имя беспроводного подключения в строке SSID.

Теперь перейдите в раздел безопасности. В строке аутентификации поставьте wpa2-psk. Здесь же задайте пароль, который будет использоваться для подключения к вайфай.
Теперь осталось только применить все настройки и на этом с беспроводной сетью можно закончить.
IPTV
Снова перейдите в «Дополнительные настройки», а потом в «Интерфейс 2-го уровня». Нажмите на кнопку «добавить», потому что прошлые соединения мы уже удаляли. Ставим здесь в настройках параметры VPI и VCI 1 и 36 соответственно. Это для Ростелекома, если используется другой провайдер, то значения посмотрите в инструкции. Теперь снова переходите в настройки Wan и добавьте там еще один интерфейс, в качестве порта укажите тот, в который воткнуто устройство. В окне конфигурации укажите Bridging.
Теперь зайдите в настройки LAN и отключите там dhcp сервер. Это необходимо для нормальной работы. Если вы настраиваете IPTV для подключения через Ethernet, то первый пункт можно пропустить. Просто добавьте нужное соединение в WAN.
Прошивка
Здесь все просто. В левом меню выберите Управление>>Обновление ПО, а дальше, в правой части окна щелкните по кнопке для указания пути до файла прошивки. Официальные прошивки не выходили уже давно, но есть пользовательские и кастомные. Некоторые из них позволят чуть улучшить функционал роутера, некоторые добавляют чуть более удобное меню.
Устанавливать что-то, кроме официальных прошивок, придется на свой страх и риск. Если решитесь на это, то внимательно читайте отзывы на них, потому что, если что-то пойдет не так, то придется сбрасывать устройство, а в некоторых случаях и это не поможет. Так что устанавливайте их тогда, когда нет другого выбора, кроме как перепрошить роутер под другого провайдера.
Сброс
Если прошивка роутера Ростелеком f@st 2804 v7 не удалась или еще что-то пошло не так, то можно сбросить роутер до первоначального состояния. Из меню это можно сделать следующим образом: «Управление» -> «Параметры настройки» -> «Сброс» -> «Восстановить настройки по умолчанию». Если меню недоступно, то найдите небольшую кнопку сброса на корпусе устройства. Надавите на неё тонким, но не острым предметом и подержите в течение 10 секунд. Устройство перезагрузится и все настройки сбросятся. Теперь, используя стандартные параметры для входа, зайдите в интерфейс и проведите настройку заново.
Руководство пользователя Wi-Fi роутера SaGeMCOM


1. Введение
Этот кабельный шлюз F @ ST 3686 представляет собой адаптер встроенного мультимедийного терминала (EMTA), совместимый с CableLabs DOCSIS 3.0 и PacketCable 1.5. Он обеспечивает высокоскоростной доступ в Интернет, а также экономичные, качественные телефонные услуги голосовой связи и факс / модема для бытовых, коммерческих и образовательных абонентов в общественных и частных сетях через существующую инфраструктуру кабельного телевидения. F @ ST 3686 предлагает высокоскоростное подключение к локальной сети с 4 портами Gigabit Ethernet и одной интегрированной точкой доступа беспроводной локальной сети, совместимой с IEEE 802.11a / b / g / n. Точка беспроводного доступа работает в диапазоне 2.4 ГГц.
Комплект поставки
Шлюз F @ S T3284u x1
Кабель Ethernet (RJ45) x1
Телефонный кабель (RJ11) x1
Краткое руководство x1
Блок питания x1
2 .Подключение оборудования


- RJ-11 Телефонный порт линии 1 и 2
- Разъем Ethernet 10/100/1000 BaseT RJ-45
- Кнопка «Восстановить заводские настройки по умолчанию»
- Коаксиальный радиочастотный разъем F Штекер питания
- Выключатель питания ВКЛ / ВЫКЛ
3 подключение шлюза F @ 3284 к компьютеру
Процедура установки интерфейса Ethernet
Для правильной установки выполните следующие действия:
- Убедитесь, что ваш компьютер соответствует системным требованиям.
- Подключите коаксиальный кабель к розетке.
- Подключите коаксиальный кабель к разъему CABLE на F @ ST3686 и прикрутите его снизу вручную (не прилагайте усилий).
Примечание: Чтобы ускорить процесс регистрации F @ ST3686, коаксиальный кабель должен быть подключен к шлюзу до разъема питания. 4. Подключите кабель Ethernet RJ45 к - Разъем ETHERNET на шлюзе, подключите другой конец к порту 10/100 / 1000BaseT Ethernet на вашем компьютере.
- Подключите телефонный шнур (и) RJ11 к разъему (ам) TEL 1 или TEL2 кабельного модема. (Подключите телефонный шнур (и) RJ11 к разъему PSTN на модеме, подключитесь к поставщику услуг PSTN. Этот шаг предназначен только для EMTA с моделью PSTN.)
- Подключите блок питания к разъему POWER модема.
- Другой конец блока питания вставьте в розетку.
- Включите F @ ST3686, нажав кнопку ON / OFF на задней панели F @ ST3686.
- Кабельный шлюз будет искать нужный сигнал кабельного модема в сети кабельного телевидения и обрабатывать начальную регистрацию. Кабельный шлюз готов к передаче данных после того, как светодиод «ИНТЕРНЕТ» загорится белым. Шлюз готов к телефонному звонку после того, как светодиод «Tell» или «Te12» загорится белым.
Примечание: Кнопка RESET на задней панели предназначена только для технического обслуживания.

Экран коаксиального кабеля предназначен для заземления при установке в здании.
4 Беспроводное соединение
Шаг 1

Под шлюзом, на этикетке, обратите внимание на ссылку SSID и пароль беспроводной сети WPA.
Шаг 2


• Нажмите «Пуск», затем выберите: Сетевое подключение Беспроводное сетевое подключение.
Шаг 3

В этом новом окне найдите значение SSID и выберите его, дважды щелкнув по нему.
Шаг 4
- Компьютер запрашивает пароль беспроводной сети WPA.
После того, как пароль введен дважды, нажмите кнопку «Подключение». Настройка Wi-Fi завершена

5 F @ ST3284u Персонализация


- Откройте сеанс Интернет и введите следующий адрес: http://192.168.1.1
Шаг 3


Шаг 3

Статус Чтобы узнать состояние подключения вашего F @ ST3284u
Базовый Чтобы выполнить базовую настройку вашего F @ ST3284u
Расширенный поиск Для выполнения расширенной настройки маршрутизации вашего F @ ST3284u
Межсетевые экраны Для защиты оборудования вашей локальной сети от злонамеренных атак
Родительский контроль Чтобы безопасно ограничить и контролировать использование Интернета членами вашей семьи
Беспроводной сети Чтобы настроить сеть Wi-Fi вашего F @ ST3284u
МТА Чтобы проверить статус телефонии вашего F @ ST3284u
6 Меры предосторожности и предупреждения
- Перед подключением и отключением кабелей прекратите использование F @ ST3686, а затем отключите его от источника питания. Следите за тем, чтобы руки во время работы были сухими.
- Держите F @ ST3686 вдали от источников тепла и огня, таких как обогреватель или
- Не закрывайте отверстия на F @ ST3686 какими-либо предметами. Оставьте минимум 10 см свободного пространства вокруг F @ ST3686 для отвода тепла.
- Поместите F @ ST3686 на устойчивую поверхность в прохладном и хорошо вентилируемом помещении. Не подвергайте F @ ST3686 воздействию прямых солнечных лучей. Используйте F @ ST3686 в зоне с температурой от 0 ° C до 40 ° C.
- Держите F @ ST3686 подальше от электронных приборов, которые генерируют сильные магнитные или электрические поля, например, микроволновых печей или
- Не ставьте на F @ ST3686 какие-либо предметы (например, свечи или емкости с водой). Если в устройство попадет какой-либо посторонний предмет или жидкость, немедленно прекратите использование устройства, выключите его, отсоедините все подключенные к нему кабели и затем обратитесь в авторизованный сервисный центр.
- Во время грозы выключите F @ ST3686, а затем отсоедините все подключенные к нему кабели, чтобы предотвратить его повреждение из-за ударов молнии.
- Не используйте F @ ST3686 или блок питания (PSU) после падения или сильного удара.
- Не используйте в условиях сильной запыленности или с dampчистота более 80%.
- Не открывайте и не обслуживайте F @ ST3686. В случае неисправности обратитесь в центр поддержки.
- Перед чисткой отключите блок питания.
- Этот F @ ST3686 вырабатывает радиочастотную энергию в диапазоне 2.4 и 5 ГГц. Он должен быть размещен на расстоянии не менее 23 см от ближайших
- F @ ST3686 должен работать на высоте от 0 до 2000 м.
Электрические предупреждения
- Подключение продукта к электрическому сектору имеет тип
- Блок питания предназначен для подключения к сети питания TT или TN.
- Его нельзя подключать к электроустановке по схеме типа IT (независимая от питания нейтраль).
- F @ ST3686 должен использоваться исключительно с блоком питания (PSU), поставляемым в том же
- Блок питания должен быть подключен к электрической сети с номинальным напряжением 110 В.tagи
- Защита от короткого замыкания и утечки между фазами, нейтралью и землей должна быть обеспечена электрической установкой здания. Силовая цепь этого оборудования должна быть оснащена защитой от перегрузки по току 16А и дифференциальной защиты.
- Убедитесь, что кабель и вход переменного тока не исправны. Не обрезайте, не ломайте и не сгибайте кабель постоянного тока.
- Входы TEL1 и TEL2 позволяют подключать телефон. Проводные соединения между входами TEL1 / TEL2 и телефоном не должны выходить за пределы здания.
7 Другие

Этот символ на устройстве (и любых прилагаемых батареях) указывает на то, что устройство (и любые прилагаемые батареи) не следует выбрасывать вместе с обычным бытовым мусором. Не выбрасывайте устройство или батареи вместе с несортированными бытовыми отходами. Устройство (и любые батареи) следует сдать в сертифицированный пункт сбора для вторичной переработки или надлежащей утилизации по окончании срока службы.
Для получения более подробной информации об утилизации устройства или аккумуляторов обратитесь в местную городскую администрацию, в службу утилизации бытовых отходов или в магазин розничной торговли, в котором вы приобрели это устройство. Утилизация этого устройства регулируется Директивой Европейского Союза об отходах электрического и электронного оборудования (WEEE). Целью отделения WEEE и аккумуляторов от других отходов является минимизация любого воздействия на окружающую среду и опасности для здоровья из-за присутствия опасных веществ.

Маркировка ЕС удостоверяет, что продукт соответствует основным требованиям директивы R & TTE Европейского парламента и Совета по радиооборудованию и телекоммуникационному оконечному оборудованию, а также взаимное признание их соответствия основным требованиям директивы ErP 2009/125 / CE по требованиям экодизайна. Эта маркировка удостоверяет, что оборудование соответствует требованиям в отношении здоровья и безопасности пользователей, электромагнитной совместимости оборудования и правильного использования радиочастотного спектра, а также снижения воздействия продукта на окружающую среду.
Маркировка ЕС удостоверяет, что продукт соответствует основным требованиям директивы R & TTE Европейского парламента и Совета по радиооборудованию и телекоммуникационному оконечному оборудованию, а также взаимное признание их соответствия основным требованиям директивы ErP 2009/125 / CE по требованиям экодизайна. Эта маркировка удостоверяет, что оборудование соответствует требованиям в отношении здоровья и безопасности пользователей, электромагнитной совместимости оборудования, а также правильного использования радиочастотного спектра и снижения
воздействие продукта на окружающую среду
Маркировка ЕС удостоверяет, что продукт соответствует основным требованиям директивы R & TTE Европейского парламента и Совета по радиооборудованию и телекоммуникационному оконечному оборудованию, а также взаимное признание их соответствия основным требованиям директивы ErP 2009/125 / CE по требованиям экодизайна. Эта маркировка удостоверяет, что оборудование соответствует требованиям в отношении здоровья и безопасности пользователей, электромагнитной совместимости оборудования и правильного использования радиочастотного спектра, а также снижения воздействия продукта на окружающую среду.
Заявления Федеральной комиссии связи (FCC)
Это устройство соответствует требованиям части 15 правил FCC. Эксплуатация возможна при соблюдении следующих двух условий:
- Это устройство не должно вызывать вредных помех, и
- Это устройство должно принимать любые помехи, включая помехи, которые могут вызвать нежелательные
Это оборудование было протестировано и признано соответствующим ограничениям для цифровых устройств класса B в соответствии с частью 15 правил FCC. Эти ограничения разработаны для обеспечения разумной защиты от вредных помех при установке в жилых помещениях.
Это оборудование генерирует, использует и может излучать радиочастотную энергию и, если оно установлено и используется не в соответствии с инструкциями, может создавать вредные помехи для радиосвязи. Однако нет гарантии, что помехи не возникнут при конкретной установке.
этикетка


Заявление о радиочастотных помехах
Примечание. Данное оборудование было протестировано и признано соответствующим ограничениям для цифровых устройств класса B в соответствии с частью 15 правил FCC. Эти ограничения разработаны для обеспечения разумной защиты от вредных помех при установке в жилых помещениях. Это оборудование генерирует, использует и может излучать радиочастотную энергию и, если оно установлено и используется не в соответствии с инструкциями, может создавать вредные помехи для радиосвязи. Однако нет гарантии, что помехи не возникнут при конкретной установке. Если это оборудование действительно создает недопустимые помехи для приема радио или телевидения, что можно определить путем включения и выключения оборудования, пользователю рекомендуется попытаться устранить помехи одним или несколькими из следующих способов:
- Переориентировать или переместить приемную
- Увеличьте расстояние между оборудованием и
- Подключить оборудование к розетке в цепи, отличной от той, к которой подключен приемник.
- Обратитесь за помощью к дилеру или опытному радио / телевизионному технику.
Заявление FCC о радиационном воздействии
Это оборудование соответствует ограничениям FCC на радиационное воздействие, установленным для неконтролируемой среды. Этот передатчик не должен располагаться рядом или работать вместе с какой-либо другой антенной или передатчиком. Это устройство вырабатывает радиочастотную энергию в диапазоне 2.4 ГГц. Антенна должна располагаться на расстоянии не менее 23 см (0.75 фута) от излучающего элемента до ближайшего человека.
Предупреждение FCC!
Любые изменения или модификации, явно не одобренные стороной, ответственной за соответствие, могут лишить пользователя права на эксплуатацию этого оборудования.
Этот передатчик не должен располагаться рядом или работать вместе с любой другой антенной или передатчиком.
Для работы в диапазоне частот 5.15 ~ 5.25 ГГц / 5.47 ~ 5.725 ГГц он ограничен внутренними условиями. Это устройство соответствует всем остальным требованиям, указанным в Части 15E, Раздел 15.407 Правил FCC.
Заявление о радиационном воздействии:
Это оборудование соответствует ограничениям FCC на радиационное воздействие, установленным для неконтролируемой среды. Это оборудование следует устанавливать и эксплуатировать на минимальном расстоянии 23 см между радиатором и вашим телом. Специалист по прокладке кабелей в Северной Америке: это напоминание предназначено для того, чтобы обратить ваше внимание на статью 820.93 Национального электротехнического кодекса (раздел 54 Канадского электротехнического кодекса, часть 1), в которой содержатся рекомендации по правильному заземлению и, в частности, указывается, что заземление кабеля должно быть подключенным к системе заземления здания как можно ближе к точке ввода кабеля.
Предупреждение FCC!
Любые изменения или модификации, явно не одобренные стороной, ответственной за соответствие, могут лишить пользователя права на эксплуатацию этого оборудования.
Этот передатчик не должен располагаться рядом или работать вместе с любой другой антенной или передатчиком.
Для работы в диапазоне частот 5.15 ~ 5.25 ГГц / 5.47 ~ 5.725 ГГц он ограничен внутренними условиями. Это устройство соответствует всем другим требованиям, указанным в Части 15E, Раздел 15.407 Правил FCC.
Узнать больше об этом руководстве и скачать PDF:
Документы / Ресурсы
Sagemcom F@st 2804, v7 и v7B может работать как по технологии xDSL, так и по utp кабелю. Т.е. WAN-порты есть на оба вида технологии подключения. Этот факт следует учесть при настройке подключения. Мы отразим это в пункте настройки подключения к Интернету. Также хотелось бы отметить, что Sagemcom F@st 2804, v7 можно настроить только под PPPoE подключение или в режим bridge.
Инструкция по настройке роутера Sagemcom F@st 2804 v7 и Sagemcom F@st 2804 v7B
- Особенности настройки модем + wi-fi роутер
- Настройка Wi-Fi на роутере
- Настройка подключения к Интернет
- Настройка интернета через xDSL
- Настройка интернета через ETTH
- Настройка IP-TV
- Настройка IP-TV через xDSL
- Настройка IP-TV через ETTH
- Переадресация/проброс портов
Авторизация
Для того, что бы попасть в веб-интерфейс роутера, необходимо открыть ваш Интернет браузер и в строке адреса набрать 192. 168.1.1, Имя пользователя — admin , Пароль — admin (при условии, что роутер имеет заводские настройки, и его IP не менялся).
Особенности настройки модем + wi-fi роутер
1. У данного модема ip-адрес 192.168.1.1. Поэтому, если Вы подключаете к Sagemcom 2804 роутер Asus, NetGear, Tp-Link или ZyXEL (у данных моделей роутеров такой же ip-адрес — 192.168.1.1) — не забудьте поменять адрес одного из устройств на какой-нибудь другой, например 192.168.0.1
2. Есть два варианта настройки:
- модем Sagemcom 2804 настраивает в режим router (PPPoE подключение к интернету создается на модеме), а на роутере выбираете режим Static IP (Статический IP) или Dinamic IP (DHCP или Динамический IP);
- модем Sagemcom 2804 настраиваете в режим bridge (моста), а подключение в интернету (PPPoE) создаете на роутере;
3. Если у абонента есть услуга IP-TV, то на модеме Sagemcom 2804 будет отключен DHCP. Поэтому на роутере Вы выбираете тип подключения Static IP (Статический IP) и прописываете ip-адреса вручную.
Настройка Wi-Fi на роутере
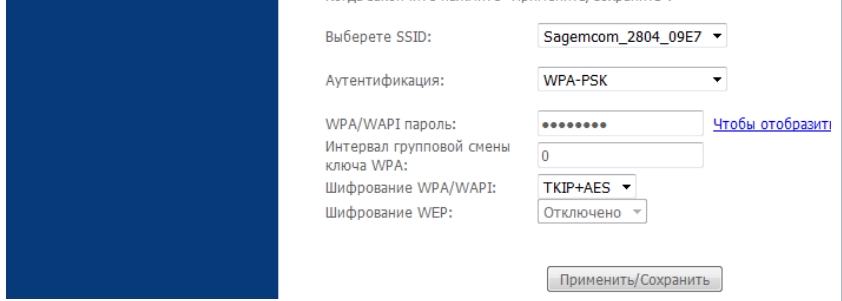
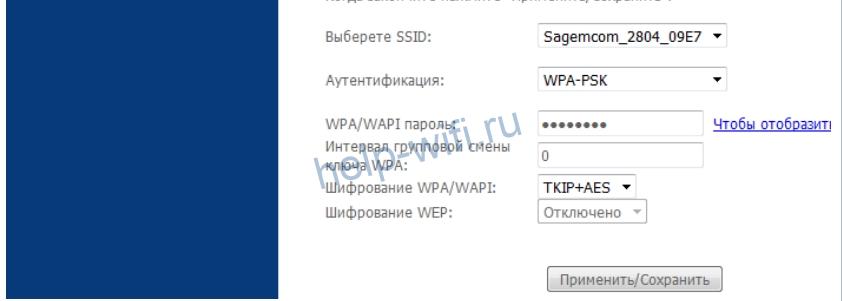
1. Находим пункт меню слева Настройка WLAN;, в открывшемся окне проверяем, что стоит галочка на параметре Включить беспроводную связь; и Включить передачу мультикаста через беспроводную сеть (WMF);. SSID — имя беспроводного соединения, оставляем по умолчанию или меняем на свое, нажимаем кнопку Применить/Сохранить;

2. Далее открываем подменю Безопасность, слева и в открывшейся вкладке отключаем параметр WPS, проверяем, что аутентификация выбрана WPA-PSK, шифрование WPA — TKIP+AES. Защиту сети ключом либо прописываем свою, либо нажимаем кнопку напротив WPA/WAP Чтобы отобразить, щелкните здесь; и в открывшемся окне переписываем пароль. Нажимаем Применить/Сохранить;

Настройка подключения к Интернет
Перед тем как устанавливать настройки роутеру, нужно сбросить его настройки до заводских. Для этого перейдите в Параметры настройки;→ Сброс;→ Восстановить настройки по умолчанию;.

Перед вами появится окно ниже. Ожидаем 2 минуты.
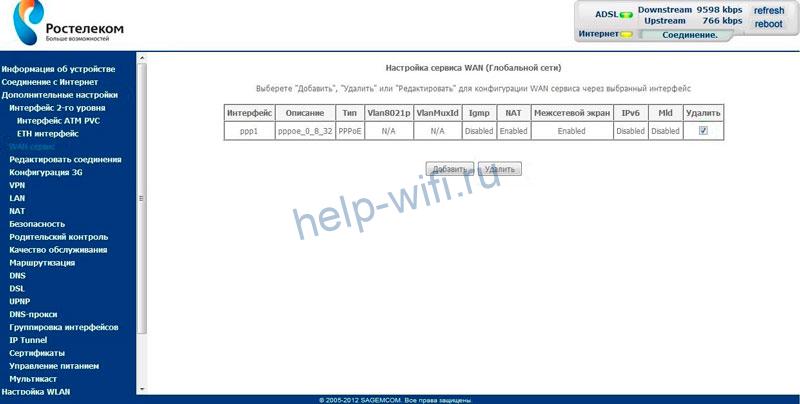
После сброса настроек по умолчанию необходимо удалить лишние надстройки у роутера. Перейдите во вкладку Дополнительные настройки;→ WAN сервис;. Далее поставьте 3 галочки как показано на скриншоте ниже и нажмите Удалить;.

Далее перейдите во вкладку Дополнительные настройки;→ Интерфейс 2-го уровня;. Далее поставьте единственную галочку как показано на скриншоте ниже и нажмите Удалить;. 
Настройка интернета через xDSL
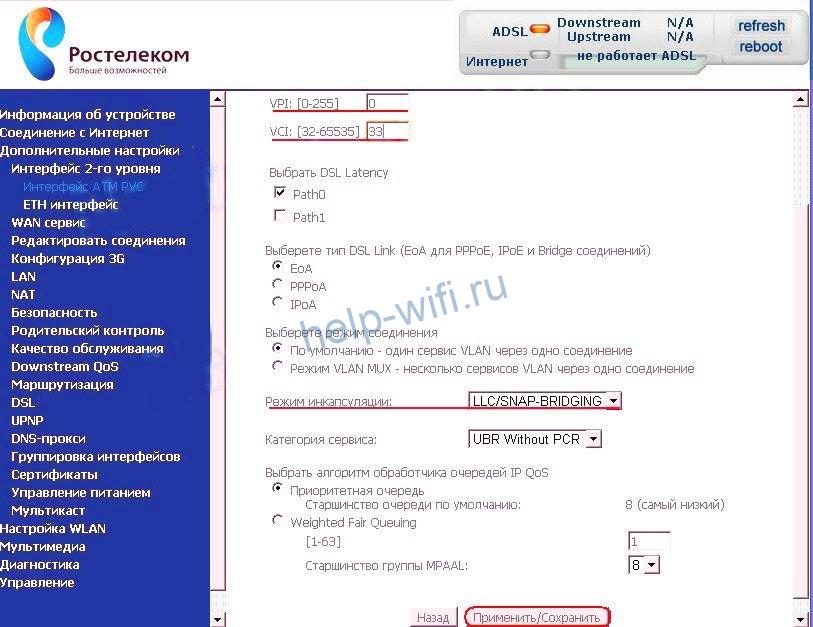
В главном окне нажимаем пункт меню слева Дополнительные настройки;, Интерфейс 2-го уровня;. Нажимаем кнопку Добавить; по середине окна.

Следуем по мастеру настройки;, исправляем только 2 пункта VPI и VCI на те параметры, которые использует Ростелеком. Нажимаем Применить/Сохранить; внизу окна (на картинке настройка Ростелеком Омск)

Далее, выбираем пункт меню WAN сервис; и нажимаем Добавить;

Проверяем, что выбран соответствующий интерфейс уровня 2 (в нашем примере это 0_0_35) и нажимаем Далее;

В конфигурации WAN сервиса решаем, как будет настроен модем (роутер, бридж) и нажимаем Далее; (см. пример настройки роутером)

В появившемся окне вводим PPP имя пользователя; — логин, PPP пароль; — пароль. Имя сервиса PPPoE; — любое. Ставим галочку в пункте повтор PPP при ошибке аутентификации; и Включить IGMP Multicast Proxy;, Далее;

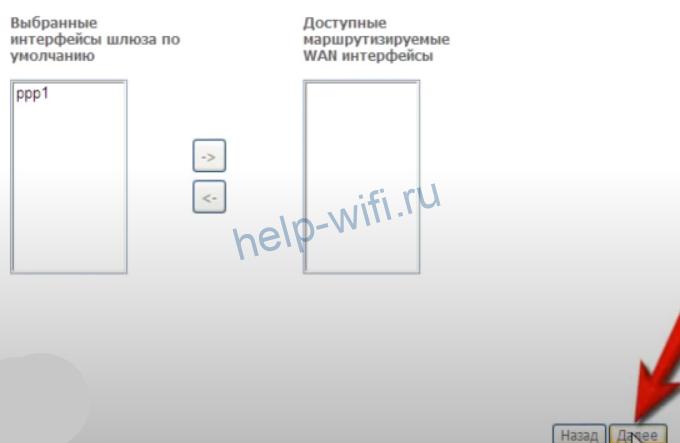
В следующих двух окнах мастера; проверяем, чтобы созданные интерфейсы были в левом столбце. Если они в правом — переносим в левый, нажимаем Далее;

Нажимаем Применить/Сохранить;, должно открыться окно с новой конфигурацией WAN сервиса

Настройка интернета через ETTH
Перейдите во вкладку Дополнительные настройки;→ ETH интерфейс;. Если здесь пусто, то добавьте запись. Если Уже имеется — то ничего не меняете (по умолчанию создан WAN-порт для eth0 — первый LAN-порт).
Перейдите во вкладку Дополнительные настройки;→ WAN сервис;. Нажмите Добавить;.

Выбираете eth0/et0 (или тот интерфейс, на который Вы создали выше) и нажмите Далее;.

Ставите точку на PPP over Ethernet (PPPoE), нажимаете Далее;.

Введите в разделе Имя пользователя; введите логин абонента, соответственно в Пароль; — пароль абонента, в Имя сервиса РРРоЕ; — int. Нажимаем Далее;.

Затем левом столбце Доступные маршрутизируемые WAN интерфейсы; выделяем пункт ppp1.1; и нажимаем на кнопку <-. Нажимаем Далее;. Аналогично затем в левом столбце Доступные WAN интерфейсы; выделяем пункт ppp1.1; и нажимаем на кнопку <-. Нажимаем Далее;.
Нажимаем Применить/Сохранить;.
Настройка IP-TV
Настройка IP-TV для разных технологий подключения отличается.
Настройка IP-TV через xDSL
В главном окне нажимаем пункт меню слева Дополнительные настройки;, Интерфейс 2-го уровня;. В появившейся таблице, если уже есть настроенные соединения для IP-TV, удаляем их (удаляем сначала в меню WAN сервис, затем в Интерфейсе 2-го уровня). Затем нажимаем кнопку Добавить; по середине окна.

Исправляем только 2 пункта VPI и VCI на те параметры, которые использует Ростелеком. Нажимаем Применить/Сохранить; внизу окна (на картинке настройка Ростелеком Омск)

Добавляем в конфигурацию WAN сервиса, еще один интерфейс, где проверяем, что выбран соответствующий интерфейс уровня 2 (в нашем примере это 0_1_36) и нажимаем Далее;


Выбираем Bridging;, нажимаем Далее;, затем Применить/Сохранить;. В результате откроется окно с новой конфигурацией WAN сервиса


Для корректной работы модема с STB приставками (IPTV), необходимо зайти в параметр LAN в левом меню и отключить в появившемся окне DHCP (Dynamic Host Configuration Protocol — протокол динамической конфигурации узла). Затем проверить, что включен IGMP Snooping и нажать внизу кнопку Применить/Сохранить;

Настройка IP-TV через ETTH
Перейдите во вкладку Дополнительные настройки;→ WAN сервис;. Нажмите Добавить;.

Выбираете eth0/et0 (или тот интерфейс, на который Вы создали выше) и нажмите Далее;.

Ставите точку на Bridging, нажимаете Далее;.

Нажимаете Применить/Сохранить;

Переадресация/проброс портов
Выбираем NAT —> Виртуальные серверы —> Добавить

Использовать интерфейс: выбираете интерфейс, который Вы создали для Интернета (в нашем примере это xDSL)
Имя сервиса: — либо выбираете из списка, либо создаете самостоятельно.
IP-адрес сервера: адрес устройства в сети, на которое будет перенаправляться запрос
Внешний портВнутренний порт: диапазон портов, которые требуется открыть


-
Contents
-
Table of Contents
-
Troubleshooting
-
Bookmarks
Quick Links
F@ST™ 2804v2
Reference Manual
Edition of may 2010
253 329 475-A
Related Manuals for SAGEMCOM F@ST 2804v2
Summary of Contents for SAGEMCOM F@ST 2804v2
-
Page 1
F@ST™ 2804v2 Reference Manual Edition of may 2010 253 329 475-A… -
Page 3: Guide To Symbols Used In This Manual
Sagemcom assiduously monitors technical developments and is constantly seeking to improve its products in order to let its clients take full advantage of them. It therefore reserves the right to modify its documentation accordingly without notice. All brands mentioned in this guide are registered by their respective owners: F@st™…
-
Page 4: How Should The Document Be Used
Annex A Troubleshooting CE compliance declaration Annex B Environment Annex C Technical Characteristics Annex D Default configuration Annex E Annex F Glossary Annex G Connection technology F@st™ 2804v2 Reference Manual — 253329475-A Page 0-2 Sagemcom document. Reproduction and disclosure prohibited…
-
Page 5: Table Of Contents
3. Installing and configuring the F@st 2804v2 router 4. Configuration of network parameters 5. Information / Configuration 5.1 Accessing the welcome screen 5.2 Recommendations 5.3 ADSL connection status 5.4 Display frame F@st™ 2804v2 Reference Manual — 253329475-A Sagemcom document. Reproduction and disclosure prohibited Page 0-3…
-
Page 6
5-121 5.10.2.1 LAN 5-121 5.10.2.2 WAN 5-122 5.10.2.3 ATM 5-123 5.10.2.4 ADSL 5-124 5.10.3 Route 5-126 5.10.4 ARP 5-127 5.10.5 DHCP 5-128 5.10.6 Station Info 5-129 F@st™ 2804v2 Reference Manual — 253329475-A Page 0-4 Sagemcom document. Reproduction and disclosure prohibited… -
Page 7
Returning to the factory configuration Offline mode B. Annex B — Warnings for safety Warnings for safety B.1.1 Safety levels in relation to the case EC compliance declaration F@st™ 2804v2 Reference Manual — 253329475-A Sagemcom document. Reproduction and disclosure prohibited Page 0-5… -
Page 8
G. Annex G — Connector Technology Pinouts of the » ADSL» connector Pinouts of the «PWR» connector Pinouts of the «ETH1», «ETH2», «ETH3» and «ETH4» connectors Pinouts of the «USB» connector F@st™ 2804v2 Reference Manual — 253329475-A Page 0-6 Sagemcom document. Reproduction and disclosure prohibited… -
Page 9: List Of Figures
Figure 2.1 — Overview of case……………………2-2 Figure 2.2 — Interconnection of ports of F@st 2804v2 …………….2-5 Figure 2.3 — ADSL line / Power Supply Connection ………………. 2-7 F@st™ 2804v2 Reference Manual — 253329475-A Sagemcom document. Reproduction and disclosure prohibited Page 0-7…
-
Page 10
F@st™ 2804v2 Reference Manual — 253329475-A Page 0-8 Sagemcom document. Reproduction and disclosure prohibited… -
Page 11: Introduction
1. Introduction This section covers presentation of the F@st™ 2804v2 range § 1.1 composition of the packaging § 1.2 required hardware and software § 1.3 F@st™ 2804v2 Reference Manual — 253329475-A Sagemcom document. Reproduction and disclosure prohibited Page 1-1…
-
Page 12: Presentation
It also lets you telephone over the Internet from an IP SIP telephone linked by Wi-Fi to your router. F@st™ 2804v2 products adapt the ADSL function for POTS (UIT G.992.1/3/5 — Annex A). Figure 1.1 — Supervising your router F@st™ 2804v2 Reference Manual — 253329475-A Page 1-2 Sagemcom document. Reproduction and disclosure prohibited…
-
Page 13
Multi-VC ATM and ATM Quality of service (CBR, UBR, VBR), UpnP, TR069, QoS, Upgrade Firmware (Local and Remote), Backup/Restore and Upgrade configuration file (Local and Remote). F@st™ 2804v2 Reference Manual — 253329475-A Sagemcom document. Reproduction and disclosure prohibited Page 1-3… -
Page 14: Composition Of Router Pack
1 Installation CD-ROM, 1 USB Wi-Fi key (optional), 1 USB Type A male/Type A female cable (length = 1.5 m) (optional), microfilter(s) (optional), 1 filter/splitter (optional). F@st™ 2804v2 Reference Manual — 253329475-A Page 1-4 Sagemcom document. Reproduction and disclosure prohibited…
-
Page 15: Minimum) Prerequisites
Standard pack (see annex G for use of Wi-Fi). Before installing the router, we advise you to uninstall any modem or other router (for example, an ADSL router). F@st™ 2804v2 Reference Manual — 253329475-A Sagemcom document. Reproduction and disclosure prohibited Page 1-5…
-
Page 16
1 — Introduction F@st™ 2804v2 Reference Manual — 253329475-A Page 1-6 Sagemcom document. Reproduction and disclosure prohibited… -
Page 17: Description And Connection Of Your Router
This section covers the description of your router § 2.1 connecting the ports of your router § 2.2 installing your router § 2.3 installation instructions § 2.4 F@st™ 2804v2 Reference Manual — 2533329475-A Sagemcom document. Reproduction and disclosure prohibited Page 2-1…
-
Page 18: Description
The base has the LED ideograms, manufacturer’s logo or the operator’s logo. Below the base is a label on which the product’s identification code, series number and barcode are shown. F@st™ 2804v2 Reference Manual — 2533329475-A Page 2-2 Sagemcom document. Reproduction and disclosure prohibited…
-
Page 19: Connectors
On/Off switch. Miniature jack fixed connector. This connector enables the router to be supplied with direct current from a mains adapter unit. F@st™ 2804v2 Reference Manual — 253329475-A Sagemcom document. Reproduction and disclosure prohibited Page 2-3…
-
Page 20: Leds
No link detected on the Ethernet port Green steady Ethernet port has detected a link with a device Green blinking Tx/Rx traffic detected on the Ethernet port F@st™ 2804v2 Reference Manual — 2533329475-A Page 2-4 Sagemcom document. Reproduction and disclosure prohibited…
-
Page 21: Connecting The Ports Of Your Router
2 — Description and connection of your router Connecting the ports of your router Figure 2.2 — Interconnection of ports of F@st 2804v2 F@st™ 2804v2 Reference Manual — 253329475-A Sagemcom document. Reproduction and disclosure prohibited Page 2-5…
-
Page 22: Installing Your F@St
Connect one end of the RJ11/RJ11 cable supplied with the equipment to the ADSL socket of your Residential Gateway. Connect the other end of this cable as shown in the Figure 2.3. F@st™ 2804v2 Reference Manual — 2533329475-A Page 2-6 Sagemcom document. Reproduction and disclosure prohibited…
-
Page 23: Figure 2.3 — Adsl Line / Power Supply Connection
2 — Description and connection of your router Figure 2.3 — ADSL line / Power Supply Connection F@st™ 2804v2 Reference Manual — 253329475-A Sagemcom document. Reproduction and disclosure prohibited Page 2-7…
-
Page 24: Connecting To Your Computer
Ethernet fixed connector (marked ETH1, ETH2, ETH3 ETH4 in the case of the F@st 2804v2) of your router, Connect the other end of the cable to your computer. F@st™ 2804v2 Reference Manual — 2533329475-A Page 2-8 Sagemcom document. Reproduction and disclosure prohibited…
-
Page 25: Connecting The Wi-Fi Interface Of Your Router To Your Computer
This key should only be connected to your computer during installation of the Wi-Fi drivers (standard 802.11b/g/n)(see Quick Installation Guide). You can also use the wifi adapter incorporated in your computer. F@st™ 2804v2 Reference Manual — 253329475-A Sagemcom document. Reproduction and disclosure prohibited Page 2-9…
-
Page 26: Connecting The Ethernet Interface Of Your Router To Your Tv Decoder
ETH4) of your router. Connect the other end of the cable to a TV decoder. Note: For connection to the decoder, refer to the manufacturer’s documentation. F@st™ 2804v2 Reference Manual — 2533329475-A Page 2-10 Sagemcom document. Reproduction and disclosure prohibited…
-
Page 27: Installation Instructions
16 A protection against power surges, and with a differential protection. Maintenance It is prohibited to open the case. Only qualified personnel approved by your supplier may do Do not use liquid or spray cleaning agents. F@st™ 2804v2 Reference Manual — 253329475-A Sagemcom document. Reproduction and disclosure prohibited Page 2-11…
-
Page 28
2 — Description and connection of your router F@st™ 2804v2 Reference Manual — 2533329475-A Page 2-12 Sagemcom document. Reproduction and disclosure prohibited… -
Page 29: Installing And Configuring The F@St
3. Installing and configuring the F@st™ 2804v2 router F@st™ 2804v2 Reference Manual — 253329475-A Sagemcom document. Reproduction and disclosure prohibited Page 3-1…
-
Page 30
3 — Installing and configuring the F@st™ 2804v2 router For the installation of the F@st™ 2804v2, please refer to the Quick Installation Guide of this product F@st™ 2804v2 Reference Manual — 253329475-A Page 3-2 Sagemcom document. Reproduction and disclosure prohibited… -
Page 31: Configuration Of Network Parameters
This section covers configuring as a DHCP client Page 4-3 reading status of the DHCP server Page 4-4 reading data of the DHCP client Page 4-5 F@st™ 2804v2 Reference Manual — 253329475-A Sagemcom document. Reproduction and disclosure prohibited Page 4-1…
-
Page 32
It is imperative that your computer is configured as a DHCP client or that it has a fixed IP address in the configuration range defined by the DHCP server. Configuration as a DHCP client is the more commonly used solution. F@st™ 2804v2 Reference Manual — 253329475-A Page 4-2 Sagemcom document. Reproduction and disclosure prohibited… -
Page 33
«Obtain an IP address automatically» and the case «Obtain the addresses of the DNS servers automatically». • click the OK button to confirm your choice. F@st™ 2804v2 Reference Manual — 253329475-A Sagemcom document. Reproduction and disclosure prohibited Page 4-3… -
Page 34
This IP address must belong to the same sub-network as that of the local network. Leased Time (hour) Displays the period for obtaining (in hours) an IP address for a terminal. F@st™ 2804v2 Reference Manual — 253329475-A Page 4-4 Sagemcom document. Reproduction and disclosure prohibited… -
Page 35
Click the Start button, select Execute, enter cmd and then click OK; the command prompt screen appears. Enter ipconfig /all (or ipconfig/all) then confirm by pressing Enter. F@st™ 2804v2 Reference Manual — 253329475-A Sagemcom document. Reproduction and disclosure prohibited Page 4-5… -
Page 36
4 — Configuration of network parameters F@st™ 2804v2 Reference Manual — 253329475-A Page 4-6 Sagemcom document. Reproduction and disclosure prohibited… -
Page 37: Information / Configuration
The «Wireless» section § 5.7 The «NAT» section § 5.8 The «Advanced Setup» section § 5.9 The «Advanced Status» section § 5.10 The «Management» section § 5.11 F@st™ 2804v2 Reference Manual — 253329475-A Sagemcom document. Reproduction and disclosure prohibited Page 5-1…
-
Page 38: Accessing The Welcome Screen
«Password» field. Then click on to confirm. Note: The equipment’s IP address (192.168.1.1) appears in the bar at the top of the screen. F@st™ 2804v2 Reference Manual — 253329475-A Page 5-2 Sagemcom document. Reproduction and disclosure prohibited…
-
Page 39
These let you view and configure your router’s parameters. You can modify the password to access your router’s configurer to optimise the safety of your network. F@st™ 2804v2 Reference Manual — 253329475-A Sagemcom document. Reproduction and disclosure prohibited Page 5-3… -
Page 40: Recommendations
3) All the fields in the different screens are explained in a table. F@st™ 2804v2 Reference Manual — 253329475-A Page 5-4 Sagemcom document. Reproduction and disclosure prohibited…
-
Page 41: Adsl Connection Status
Displays the nominal down line transmission rate Displays the nominal up line transmission rate Buttons Allows data displayed on the screen to be refreshed Allows your router to be started F@st™ 2804v2 Reference Manual — 253329475-A Sagemcom document. Reproduction and disclosure prohibited Page 5-5…
-
Page 42: Status
Default Gateway Default gateway address Primary DNS Server Primary DNS server address Secondary DNS Server Secondary DNS server address Date / Time Date and Time (see Note) F@st™ 2804v2 Reference Manual — 253329475-A Page 5-6 Sagemcom document. Reproduction and disclosure prohibited…
-
Page 43: Diagnostics
«Rerun Diagnostic Tests» at the bottom of the «Help» page, to check that the test has been conclusive. If the test still displays «FAIL», you must follow the troubleshooting procedure displayed on this page. F@st™ 2804v2 Reference Manual — 253329475-A Sagemcom document. Reproduction and disclosure prohibited Page 5-7…
-
Page 44
5 — Information / Configuration • Select the Diagnostics menu in the Status section; the following screen opens: F@st™ 2804v2 Reference Manual — 253329475-A Page 5-8 Sagemcom document. Reproduction and disclosure prohibited… -
Page 45: Internet Connection
In the supervision box, indicator “Internet” passes from the green to the yellow and the text “Connected” is replaced by “Waiting for ISP”. • On the front panel, the indicator @ goes out. F@st™ 2804v2 Reference Manual — 253329475-A Sagemcom document. Reproduction and disclosure prohibited Page 5-9…
-
Page 46: Wireless
These menus must only be accessed/modified by experienced users. 5.7.1 Basic • Select the Basic menu in the Wireless section to display the following wireless network configuration screen: F@st™ 2804v2 Reference Manual — 253329475-A Page 5-10 Sagemcom document. Reproduction and disclosure prohibited…
-
Page 47: Wireless — Basic
Conform to the CE Declaration of conformity / Radio rules list in appendix B to paragraph B.2. F@st™ 2804v2 Reference Manual — 253329475-A Sagemcom document. Reproduction and disclosure prohibited Page 5-11…
-
Page 48: Quick Wireless — Security — Configuration
The router may or may not be secured, at the request of the customer. This level of security is indicated on the label pasted to the box. This choice will modify the Wireless configuration screen. F@st™ 2804v2 Reference Manual — 253329475-A Page 5-12 Sagemcom document. Reproduction and disclosure prohibited…
-
Page 49
The characters are «0» to «9» and «A» to «F». Store the key phrase and the keys in a safe location. Do not write them in a file on your computer. F@st™ 2804v2 Reference Manual — 253329475-A Sagemcom document. Reproduction and disclosure prohibited Page 5-13… -
Page 50
«Guest SSID» fields appear. Check the appropriate box to activate the «Guest SSID». Box not Enable Guest SSID checked Guest SSID Enter a name for the «Guest SSID». Guest F@st™ 2804v2 Reference Manual — 253329475-A Page 5-14 Sagemcom document. Reproduction and disclosure prohibited… -
Page 51: Security
The WPA encryption mode is the most robust and the best adapted to correctly securing your wireless network. • Select the Security menu in the Wireless section to display the following screen: F@st™ 2804v2 Reference Manual — 253329475-A Sagemcom document. Reproduction and disclosure prohibited Page 5-15…
-
Page 52
WEP Encryption Select from the scroll down list: Disabled • Disabled to not use WEP encryption. • Enabled to use WE encryption (see subsection 5.7.1.2 — WEP). F@st™ 2804v2 Reference Manual — 253329475-A Page 5-16 Sagemcom document. Reproduction and disclosure prohibited… -
Page 53: Network Authentication
Object: The «Open System» authentication enables all users of the Wi-Fi network to authenticate themselves with the router. No restrictions concerning security are demanded. In this authentication mode, only the WEP key may be used to encrypt data. F@st™ 2804v2 Reference Manual — 253329475-A Sagemcom document. Reproduction and disclosure prohibited Page 5-17…
-
Page 54
Empty See subsection 5.7.1.2 — WEP. Current Network Key See subsection 5.7.1.2 — WEP. Network Key x (1 to 4) See subsection 5.7.1.2 — WEP. Empty F@st™ 2804v2 Reference Manual — 253329475-A Page 5-18 Sagemcom document. Reproduction and disclosure prohibited… -
Page 55
See subsection 5.7.1.2 — WEP. Key Phrase Empty See subsection 5.7.1.2 — WEP. Current Network Key Select key 2 or 3 (see subsection 5.7.1.2 — WEP). F@st™ 2804v2 Reference Manual — 253329475-A Sagemcom document. Reproduction and disclosure prohibited Page 5-19… -
Page 56
Enter the encryption on the key you selected in the «Current Key» (see subsection 5.7.1.2- WEP). This field is empty or displays the key Non modifiable value entered earlier (greyed out) F@st™ 2804v2 Reference Manual — 253329475-A Page 5-20 Sagemcom document. Reproduction and disclosure prohibited… -
Page 57
WPA encryption Select the WPA encryption required from the TKIP scroll down list: • TKIP (Temporal Key Integration Protocol), • AES (Advanced Encryption Standard), • TKIP+ AES. F@st™ 2804v2 Reference Manual — 253329475-A Sagemcom document. Reproduction and disclosure prohibited Page 5-21… -
Page 58
Select from the scroll down list: Disabled • Disabled to use WPA encryption only. • Enabled to use both WPA and WEP encryption (see subsection 5.7.1.2 — WEP). F@st™ 2804v2 Reference Manual — 253329475-A Page 5-22 Sagemcom document. Reproduction and disclosure prohibited… -
Page 59
(Renewing) broadcast multicast (LAN broadcast). WPA encryption Select the WPA encryption required from the TKIP scroll down list: • TKIP, • AES, • TKIP+ AES. F@st™ 2804v2 Reference Manual — 253329475-A Sagemcom document. Reproduction and disclosure prohibited Page 5-23… -
Page 60
Select from the scroll down list: Disabled • Disabled to use WPA encryption only. • Enabled to use both WPA and WEP encryption (see subsection 5.7.1.2 — WEP). F@st™ 2804v2 Reference Manual — 253329475-A Page 5-24 Sagemcom document. Reproduction and disclosure prohibited… -
Page 61
This encryption mode applies the functionalities of the WPA2 protocol and requires the use of a «RADIUS» authentication server. • Select «WPA2» security from scroll down list; following screen appears: F@st™ 2804v2 Reference Manual — 253329475-A Sagemcom document. Reproduction and disclosure prohibited Page 5-25… -
Page 62
Select from the scroll down list: Disabled • Disabled to use WPA encryption only. • Enabled to use both WPA and WEP encryption (see subsection 5.7.1.2 — WEP). F@st™ 2804v2 Reference Manual — 253329475-A Page 5-26 Sagemcom document. Reproduction and disclosure prohibited… -
Page 63
WPA key will be regenerated (Renewing) broadcast multicast (LAN broadcast). WPA encryption Select the WPA encryption required from the scroll down list: • TKIP, • AES, • TKIP+ AES. F@st™ 2804v2 Reference Manual — 253329475-A Sagemcom document. Reproduction and disclosure prohibited Page 5-27… -
Page 64
Select from the scroll down list: Disabled • Disabled to use WPA encryption only. • Enabled to use both WPA and WEP encryption (see subsection 5.7.1.2 — WEP). F@st™ 2804v2 Reference Manual — 253329475-A Page 5-28 Sagemcom document. Reproduction and disclosure prohibited… -
Page 65
RADIUS Port Enter the port used by the «RADIUS» 1812 authentication server. RADIUS Key Enter the secret key shared between the authentication server and its clients F@st™ 2804v2 Reference Manual — 253329475-A Sagemcom document. Reproduction and disclosure prohibited Page 5-29… -
Page 66
WEP Encryption Select from the scroll down list: Disabled • Disabled to not use WEP encryption. • Enabled to use WE encryption (see subsection 5.7.1.2 — WEP). F@st™ 2804v2 Reference Manual — 253329475-A Page 5-30 Sagemcom document. Reproduction and disclosure prohibited… -
Page 67
63 ASCII characters or 64 hexadecimal symbols (256 bits). Click on the «Save/Apply» button to validate the entry. Note: You may display your secret phrase by clicking on «Click here to display». F@st™ 2804v2 Reference Manual — 253329475-A Sagemcom document. Reproduction and disclosure prohibited Page 5-31… -
Page 68
WEP Encryption Select from the scroll down list: Disabled • Disabled to not use WEP encryption. • Enabled to use WE encryption (see subsection 5.7.1.2 — WEP). F@st™ 2804v2 Reference Manual — 253329475-A Page 5-32 Sagemcom document. Reproduction and disclosure prohibited… -
Page 69: Mac Filter
: Enables computers whose MAC address is in the list to use your wireless network, Denied : Refuses computers whose MAC address is in the list to use your wireless network. F@st™ 2804v2 Reference Manual — 253329475-A Sagemcom document. Reproduction and disclosure prohibited Page 5-33…
-
Page 70
(MAC Restrict Mode) “Allow” to authorize only the computers whose MAC address appears in the list to be connected to your router. F@st™ 2804v2 Reference Manual — 253329475-A Page 5-34 Sagemcom document. Reproduction and disclosure prohibited… -
Page 71: Advanced
Object: This menu is used to configure the essential parameters of your wireless network (WLAN) 802.11 and configure certain security parameters. • Select the Advanced menu in the Wireless section to display the following screen: F@st™ 2804v2 Reference Manual — 253329475-A Sagemcom document. Reproduction and disclosure prohibited Page 5-35…
-
Page 72
It is recommended not to reduce the packet size too much to avoid reducing the bandwidth. Enter a threshold value (in bytes) between 256 and 2347. F@st™ 2804v2 Reference Manual — 253329475-A Page 5-36 Sagemcom document. Reproduction and disclosure prohibited… -
Page 73
802.11 environments (g and b for example) or Off to improve the quality only on the 802.11g environments but degrade it on other environments (802.11b for example). F@st™ 2804v2 Reference Manual — 253329475-A Sagemcom document. Reproduction and disclosure prohibited Page 5-37… -
Page 74
(20%, 40 %, 60 %, 80 % or 100 %) at which you want to transmit. Note: The power rate will be selected according to your environment. F@st™ 2804v2 Reference Manual — 253329475-A Page 5-38 Sagemcom document. Reproduction and disclosure prohibited… -
Page 75: Quality Of Service
In the scroll down list, select Enabled or Disabled to permit or prohibit a more effective bit rate of the data flow with, on the other hand, a higher error rate. F@st™ 2804v2 Reference Manual — 253329475-A Sagemcom document. Reproduction and disclosure prohibited Page 5-39…
-
Page 76
The following screen appears as soon as you activate «WMM». • Click on the Add QoS Entry button to add a Wi-Fi Quality of Service (wifi QoS) rule; the following screen appears. F@st™ 2804v2 Reference Manual — 253329475-A Page 5-40 Sagemcom document. Reproduction and disclosure prohibited… -
Page 77
6 — WMM Voice priority These are higher priorities. They provide complete routing for voice 7 — WMM Voice priority Click on the button to save the parameters. F@st™ 2804v2 Reference Manual — 253329475-A Sagemcom document. Reproduction and disclosure prohibited Page 5-41… -
Page 78: Nat
(WAN) to computers on the local network (LAN) via the Internal Ports. • Select the Port forwarding menu in the section to display the following screen: F@st™ 2804v2 Reference Manual — 253329475-A Page 5-42 Sagemcom document. Reproduction and disclosure prohibited…
-
Page 79
This internal end port (LAN side) is associated with the external Internal Port End end port (WAN) side. Note: This cannot be modified. Server IP Address Computer address delivered by your router’s DHCP server. F@st™ 2804v2 Reference Manual — 253329475-A Sagemcom document. Reproduction and disclosure prohibited Page 5-43… -
Page 80
5 — Information / Configuration • Click on the Add button; the following screen appears: F@st™ 2804v2 Reference Manual — 253329475-A Page 5-44 Sagemcom document. Reproduction and disclosure prohibited… -
Page 81
You must always start entering with the «External Port Start» and «External Port End» ports, When you allocate a number to an «External Port Start», the same number is automatically allocated «Internal Port Start» identically «External Port End», F@st™ 2804v2 Reference Manual — 253329475-A Sagemcom document. Reproduction and disclosure prohibited Page 5-45… -
Page 82
The «Delta Force 2» service is available on your computer via the external ports 3568 and 3569 (WAN side) and via the internal ports 3568 and 3569 (LAN side). F@st™ 2804v2 Reference Manual — 253329475-A Page 5-46 Sagemcom document. Reproduction and disclosure prohibited… -
Page 83: Port Triggering
Port Range A port range contains a Start port and an End port. Note: A single port is characterised by an identical start port and end port. F@st™ 2804v2 Reference Manual — 253329475-A Sagemcom document. Reproduction and disclosure prohibited Page 5-47…
-
Page 84
Complete the ID Host of your computer’s IP address (this is attributed by your router’s DHCP server). • Fill in the «Trigger Port Start», «Trigger Port End», «Trigger Port Start», «Trigger Port End» and «Protocol» fields. F@st™ 2804v2 Reference Manual — 253329475-A Page 5-48 Sagemcom document. Reproduction and disclosure prohibited… -
Page 85
Using the «Trigger» 3568 port (WAN side), the «Delta Force» service server triggers the opening of port range 3100 to 3999 for your computer to access this service. F@st™ 2804v2 Reference Manual — 253329475-A Sagemcom document. Reproduction and disclosure prohibited Page 5-49… -
Page 86: Dmz Host
Note: Click on the Save/Apply button to take account of the address or its erasure. The «DMZ» zone is deactivated by default. F@st™ 2804v2 Reference Manual — 253329475-A Page 5-50 Sagemcom document. Reproduction and disclosure prohibited…
-
Page 87: Alg
Field Meaning Default SIP Enabled Check the box to permit telephoning in VoIP via the Checked Wi-Fi or Ethernet interfaces using the SIP protocol. F@st™ 2804v2 Reference Manual — 253329475-A Sagemcom document. Reproduction and disclosure prohibited Page 5-51…
-
Page 88: Advanced Setup
Object: This menu is associated with the remote network. It is used to display the list of all the configured PVCs, to add PVCs or remove them. • Select the menu in the Advanced Setup section to display the following screen: F@st™ 2804v2 Reference Manual — 253329475-A Page 5-52 Sagemcom document. Reproduction and disclosure prohibited…
-
Page 89
This function enables the distribution of Multicast datagrams over the local network (LAN) and interaction between the router and the local network hosts. • Click on the Add button to display the following screen: F@st™ 2804v2 Reference Manual — 253329475-A Sagemcom document. Reproduction and disclosure prohibited Page 5-53… -
Page 90
This field only appears when the «UBR with PCR», «CBR», «Non Realtime VBR» or «Realtime VBR» type of service is selected. This file only appears when the «Non Realtime VBR» or «Realtime VBR» type of service is selected. F@st™ 2804v2 Reference Manual — 253329475-A Page 5-54 Sagemcom document. Reproduction and disclosure prohibited… -
Page 91
PPP over ATM (PPPoA) Field Action Default Encapsulation Mode Select the encapsulation of your choice from the VC/MUX scroll down list. • VC/MUX, • LLC/ENCAPSULATION. F@st™ 2804v2 Reference Manual — 253329475-A Sagemcom document. Reproduction and disclosure prohibited Page 5-55… -
Page 92
Select the encapsulation of your choice from the LLC/SNAP- scroll down list. BRIDGING • LLC/SNAP-BRIDGING, • VC/MUX. PPPoE/PPPoA The encapsulation mode field will be selected automatically with PPPoE/PPPoA protocol type. F@st™ 2804v2 Reference Manual — 253329475-A Page 5-56 Sagemcom document. Reproduction and disclosure prohibited… -
Page 93
Enter a value (in minutes) between 1 and (minutes) [1-4320]: 4320 (i.e. 72 hours). This field only appears when the «Dial on demand (with idle timeout timer)» field is activated (box checked). F@st™ 2804v2 Reference Manual — 253329475-A Sagemcom document. Reproduction and disclosure prohibited Page 5-57… -
Page 94
Click on the Next button to continue configuring the remote network (WAN) in PPPoA mode. This field only appears when the «Use Static IP Address» field is activated (box checked). F@st™ 2804v2 Reference Manual — 253329475-A Page 5-58 Sagemcom document. Reproduction and disclosure prohibited… -
Page 95
«Advanced Status» section shows the «State is disable» if “Enable WAN Service” has not been selected. • Click on the Next button to continue configuring the remote network (WAN) in PPPoA mode. F@st™ 2804v2 Reference Manual — 253329475-A Sagemcom document. Reproduction and disclosure prohibited Page 5-59… -
Page 96
Service State Displays the status of the NAT: Enabled Firewall Displays the status of the firewall: Enabled IGMP Multicast Displays the status of the IGMP function: Disabled F@st™ 2804v2 Reference Manual — 253329475-A Page 5-60 Sagemcom document. Reproduction and disclosure prohibited… -
Page 97
1 and 4320 (minutes) [1-4320]: (i.e. 72 hours). If there is no traffic for a certain period of time, the PPPoE session is interrupted. F@st™ 2804v2 Reference Manual — 253329475-A Sagemcom document. Reproduction and disclosure prohibited Page 5-61… -
Page 98
The MTU specifies the maximum size of the data used (IP packets) expressed as a number of bytes. • Click on the Next button to continue configuring the remote network (WAN) in PPPoE mode. F@st™ 2804v2 Reference Manual — 253329475-A Page 5-62 Sagemcom document. Reproduction and disclosure prohibited… -
Page 99
Protocol_VPI_VCI_Index For example: pppoe_0_35_1. Note: You may enter another service name. Click on the Next button to continue configuring the remote network (WAN) in PPPoE mode. F@st™ 2804v2 Reference Manual — 253329475-A Sagemcom document. Reproduction and disclosure prohibited Page 5-63… -
Page 100
Service State Displays the status of the NAT: Enabled Firewall Displays the status of the firewall: Enabled IGMP Multicast Displays the status of the IGMP function: Disabled F@st™ 2804v2 Reference Manual — 253329475-A Page 5-64 Sagemcom document. Reproduction and disclosure prohibited… -
Page 101
This field only appears when the «Use the following IP address:» field is activated (box checked). This field only appears when the «Use the following default gateway:» field is activated (box checked). F@st™ 2804v2 Reference Manual — 253329475-A Sagemcom document. Reproduction and disclosure prohibited Page 5-65… -
Page 102
Secondary DNS server Enter a secondary DNS server address. This field only appears when the «Use the following DNS server addresses:» field is activated (box checked). F@st™ 2804v2 Reference Manual — 253329475-A Page 5-66 Sagemcom document. Reproduction and disclosure prohibited… -
Page 103
Displays the name of the service being mer_0_35_1 configured. This name, which is allocated automatically, is made up as follows: Protocol_VPI_VCI_Index For example: mer_0_35_1. Note: You may enter a different service name. F@st™ 2804v2 Reference Manual — 253329475-A Sagemcom document. Reproduction and disclosure prohibited Page 5-67… -
Page 104
Displays the status of the service: Enabled Displays the status of the NAT: Enabled Firewall Displays the status of the firewall: Enabled IGMP Multicast Displays the status of the IGMP function: Disabled F@st™ 2804v2 Reference Manual — 253329475-A Page 5-68 Sagemcom document. Reproduction and disclosure prohibited… -
Page 105
If you check this box, you must enter DNS server addresses: server addresses. Primary DNS server Enter a primary server DNS Address. Secondary DNS server Enter a secondary server DNS Address. F@st™ 2804v2 Reference Manual — 253329475-A Sagemcom document. Reproduction and disclosure prohibited Page 5-69… -
Page 106
For example: ipoa _0_35_1. Note: You may enter another service name. • Click on the Next button to continue configuring the remote network (WAN) in IPoA mode. F@st™ 2804v2 Reference Manual — 253329475-A Page 5-70 Sagemcom document. Reproduction and disclosure prohibited… -
Page 107
Displays the status of the service: Enabled Displays the status of the NAT: Enabled Firewall Displays the status of the firewall: Enabled IGMP Multicast Displays the status of the IGMP function: Disabled F@st™ 2804v2 Reference Manual — 253329475-A Sagemcom document. Reproduction and disclosure prohibited Page 5-71… -
Page 108
This field only appears if the Enable IPTV box in the previous field is checked. Enter the IP address of the external network of the «Set Top Box» connected virtually to this «PVC». F@st™ 2804v2 Reference Manual — 253329475-A Page 5-72 Sagemcom document. Reproduction and disclosure prohibited… -
Page 109
Displays the status of the NAT: Disabled Firewall Displays the status of the firewall: Disabled IGMP Multicast In the «Bridge» connection, this field is: Not Applicable F@st™ 2804v2 Reference Manual — 253329475-A Sagemcom document. Reproduction and disclosure prohibited Page 5-73… -
Page 110
1 and 4320 (minutes) [1-4320]: (i.e. 72 hours). If there is no traffic for a certain period of time, the PPPoE/PPPoA session is interrupted. F@st™ 2804v2 Reference Manual — 253329475-A Page 5-74 Sagemcom document. Reproduction and disclosure prohibited… -
Page 111
The MTU specifies the maximum size of the data used (IP packets) expressed as a number of bytes. • Click on the Next button to continue configuring the remote network (WAN) in PPPoE/PPPoA mode. F@st™ 2804v2 Reference Manual — 253329475-A Sagemcom document. Reproduction and disclosure prohibited Page 5-75… -
Page 112
The “Enable WAN Service” function makes it possible to disable connection types in a list to use only the selected connection type. Click on the Next button to continue configuring the remote network (WAN) in PPPoE/PPPoA mode. F@st™ 2804v2 Reference Manual — 253329475-A Page 5-76 Sagemcom document. Reproduction and disclosure prohibited… -
Page 113
Service State Displays the status of the NAT: Enabled Firewall Displays the status of the firewall: Enabled IGMP Multicast Displays the status of the IGMP function: Disabled F@st™ 2804v2 Reference Manual — 253329475-A Sagemcom document. Reproduction and disclosure prohibited Page 5-77… -
Page 114: Lan
Enable IGMP Snooping Box not Group Management Protocol) protocol. This checked lets you manage the declarations of belonging to one or more groups with Multicast routers. F@st™ 2804v2 Reference Manual — 253329475-A Page 5-78 Sagemcom document. Reproduction and disclosure prohibited…
-
Page 115
This field only appears when the «Enable DHCP» field is activated (box checked). This field only appears when the «Configure the second IP Address and Subnet Mask for LAN interface» field is activated (box checked). F@st™ 2804v2 Reference Manual — 253329475-A Sagemcom document. Reproduction and disclosure prohibited Page 5-79… -
Page 116: Advanced
This computer can be part of a LAN (Local Area Network). IP Address Displays the IP Address delivered by your 192.168.1.1 router’s DHCP server to your computer. F@st™ 2804v2 Reference Manual — 253329475-A Page 5-80 Sagemcom document. Reproduction and disclosure prohibited…
-
Page 117
To reserve the current address, check the «Select» box; both «MAC Address» and «IP Address» fields appear in the relevant fields of the «Reserved IP Addresses» area, then click on the button. F@st™ 2804v2 Reference Manual — 253329475-A Sagemcom document. Reproduction and disclosure prohibited Page 5-81… -
Page 118
Click in the box to delete MAC Address and IP Address of the table. All the reserved addresses belong to the range of addresses assigned by router’s DHCP server (192.168.1.2 to 192.168.1.254). F@st™ 2804v2 Reference Manual — 253329475-A Page 5-82 Sagemcom document. Reproduction and disclosure prohibited… -
Page 119: Security
Source Address / Mask Source IP address / Subnet mask. Source Port Source port Dest. Address / Mask Destination IP address / Subnet mask. Dest. Port Destination port. F@st™ 2804v2 Reference Manual — 253329475-A Sagemcom document. Reproduction and disclosure prohibited Page 5-83…
-
Page 120
Enter a «destination» port (WAN) or range of ports. (port or port:port) Note: For one port, for example, enter 80. For a range of ports, enter 80:90. F@st™ 2804v2 Reference Manual — 253329475-A Page 5-84 Sagemcom document. Reproduction and disclosure prohibited… -
Page 121
By default, all the incoming data is refused when the Firewall is activated. • Select the Incoming sub-menu in the Security menu in the Advanced Setup section to display the following screen: F@st™ 2804v2 Reference Manual — 253329475-A Sagemcom document. Reproduction and disclosure prohibited Page 5-85… -
Page 122
Enter a «destination» port (LAN) or range of ports. (port or port:port) Note: For one port, for example, enter 80. For a range of ports, enter 80:90. F@st™ 2804v2 Reference Manual — 253329475-A Page 5-86 Sagemcom document. Reproduction and disclosure prohibited… -
Page 123: Block Sites
Object: This menu is used to block the access of the Local Area Network to sites defined by a “keyword or a “Domain Name”. • Select the Block Sites sub-menu in the Security menu in the Advanced Setup section to display the following screen: F@st™ 2804v2 Reference Manual — 253329475-A Sagemcom document. Reproduction and disclosure prohibited Page 5-87…
-
Page 124
Blocked Sites Trusted IP Address Enter the IP address of the LAN computer to be authorized access to blocked sites. F@st™ 2804v2 Reference Manual — 253329475-A Page 5-88 Sagemcom document. Reproduction and disclosure prohibited… -
Page 125: Quality Of Service
The quality of service is only significant if all the traffic (data, video) is greater than the up rate of the ADSL line. • Select the Quality of Service menu in the Advanced Setup section to display the following screen: F@st™ 2804v2 Reference Manual — 253329475-A Sagemcom document. Reproduction and disclosure prohibited Page 5-89…
-
Page 126
CS6 (11000) : Routers mark Routing traffic to CS6, CS7 (111000) Note : This drop-down list is present only if the box “Enable Qos” is checked. F@st™ 2804v2 Reference Manual — 253329475-A Page 5-90 Sagemcom document. Reproduction and disclosure prohibited… -
Page 127: Queue Config
QoS Queue. Enable QoS enabled or disabled for this interface. Note: This status can be amended starting from this window. F@st™ 2804v2 Reference Manual — 253329475-A Sagemcom document. Reproduction and disclosure prohibited Page 5-91…
-
Page 128
: High priority for this queue, : Medium priority for this queue, : Low priority for this queue. Note : A high priority leads to low packet loss. F@st™ 2804v2 Reference Manual — 253329475-A Page 5-92 Sagemcom document. Reproduction and disclosure prohibited… -
Page 129: Qos Classification
Subject: Classification of packets into traffic classes. Enforcement of policies using queing. • Select the QoS Classification sub-menu in the Quality of Service menu to display the following screen: F@st™ 2804v2 Reference Manual — 253329475-A Sagemcom document. Reproduction and disclosure prohibited Page 5-93…
-
Page 130
802.1P Priority field 802.1P (value between 0 and 7). Order Sequence number. Enable/Disable QoS enabled or disabled for this traffic class. Note: This status can be amended starting from this window. F@st™ 2804v2 Reference Manual — 253329475-A Page 5-94 Sagemcom document. Reproduction and disclosure prohibited… -
Page 131
5 — Information / Configuration • Click on the Add button to display the following screen: F@st™ 2804v2 Reference Manual — 253329475-A Sagemcom document. Reproduction and disclosure prohibited Page 5-95… -
Page 132
WAN from the scroll down list. Note: The «Enable 802.1q» box is only present in «Bridging» mode. This condition is transparent for the other modes. F@st™ 2804v2 Reference Manual — 253329475-A Page 5-96 Sagemcom document. Reproduction and disclosure prohibited… -
Page 133
Select Blank or a priority value between 0 and 7 from the scroll down list. Note: 802.1p Priority cannot be selected together with IP traffic condition. F@st™ 2804v2 Reference Manual — 253329475-A Sagemcom document. Reproduction and disclosure prohibited Page 5-97… -
Page 134: Routing
(pppoe_8_35_1 for not checked example). Interface used this field only appears when the «Enable Automatic Assigned Default Gateway» field is deactivated (box not checked). F@st™ 2804v2 Reference Manual — 253329475-A Page 5-98 Sagemcom document. Reproduction and disclosure prohibited…
-
Page 135: Static Route
Field Meaning Destination Remote network IP address Subnet Mask Remote subnet mask Gateway Default gateway of the remote network Interface Remote network interface F@st™ 2804v2 Reference Manual — 253329475-A Sagemcom document. Reproduction and disclosure prohibited Page 5-99…
-
Page 136
IP address of the gateway. not checked Empty Use Interface Select the interface you want to use from Box checked the scroll down list (pppoa_8_35_1 for Interface example). used F@st™ 2804v2 Reference Manual — 253329475-A Page 5-100 Sagemcom document. Reproduction and disclosure prohibited… -
Page 137: Rip
VPI/VCI associated with the interface. (LAN) Version Select the RIP version of your choice from the scroll down list. • for RIP1, • for RIP2, • Both. F@st™ 2804v2 Reference Manual — 253329475-A Sagemcom document. Reproduction and disclosure prohibited Page 5-101…
-
Page 138
(silent mode). Enabled Check the box to activate the «RIP» function on Box not the interface you want (LAN or WAN for checked example). F@st™ 2804v2 Reference Manual — 253329475-A Page 5-102 Sagemcom document. Reproduction and disclosure prohibited… -
Page 139: Dns
Enter a primary DNS server address. Secondary DNS server Enter a secondary DNS server address. This field only appears when the «Enable Automatic Assigned DNS» field is deactivated (box not checked). F@st™ 2804v2 Reference Manual — 253329475-A Sagemcom document. Reproduction and disclosure prohibited Page 5-103…
-
Page 140: Dynamic Dns
On the screen above, The fields of the table are detailed in the next subsection (Add). The «Service» field is automatically filled by the system in «dyndns». F@st™ 2804v2 Reference Manual — 253329475-A Page 5-104 Sagemcom document. Reproduction and disclosure prohibited…
-
Page 141
5 — Information / Configuration F@st™ 2804v2 Reference Manual — 253329475-A Sagemcom document. Reproduction and disclosure prohibited Page 5-105… -
Page 142
User Name Enter the account name supplied to you by the dynamic DNS provider. Password Enter the account password provided to you by the dynamic DNS provider. F@st™ 2804v2 Reference Manual — 253329475-A Page 5-106 Sagemcom document. Reproduction and disclosure prohibited… -
Page 143: Dsl
ADSL2 Enabled Box checked AnnexL Enabled Box checked ADSL2+ Enabled Box checked AnnexM Enabled Box not checked Check the boxes according to the characteristics of your line. F@st™ 2804v2 Reference Manual — 253329475-A Sagemcom document. Reproduction and disclosure prohibited Page 5-107…
-
Page 144
Click on the Advanced Settings button to display the following screen: Field Default Normal Selected box Reverb Box not selected Medley Box not selected No retrain Box not selected Box not selected F@st™ 2804v2 Reference Manual — 253329475-A Page 5-108 Sagemcom document. Reproduction and disclosure prohibited… -
Page 145
All the tones are selected by default. To select a tone, simply check the associated box. To not select a tone, simply leave its associated box empty. F@st™ 2804v2 Reference Manual — 253329475-A Sagemcom document. Reproduction and disclosure prohibited Page 5-109… -
Page 146: Port Mapping
(ENET (1-4)) ports are gathered and seen like only one virtual port. When the box is checked, these ports are independently seen fall performances of the transfers between ports is noted. F@st™ 2804v2 Reference Manual — 253329475-A Page 5-110 Sagemcom document. Reproduction and disclosure prohibited…
-
Page 147
By default, all the interfaces are dedicated to data and are associated with the first VC (Virtual Channel) existing or created. • Click on the Add button to display the following screen: F@st™ 2804v2 Reference Manual — 253329475-A Sagemcom document. Reproduction and disclosure prohibited Page 5-111… -
Page 148
ATM «br_8_50» service («Bridge» protocol) created earlier using the Advanced Setup / WAN) menu. then click on the button to transfer this interface to the «Grouped Interfaces» area. F@st™ 2804v2 Reference Manual — 253329475-A Page 5-112 Sagemcom document. Reproduction and disclosure prohibited… -
Page 149
Default «Group Name» associates the «Data» service with the interfaces by default (Wireless, Wireless_Guest, ENET1, ENET2, ENET3). the dedicated ATM interface nas_8_50 and the Ethernet interface ENET4 are associated with the «Video» service. F@st™ 2804v2 Reference Manual — 253329475-A Sagemcom document. Reproduction and disclosure prohibited Page 5-113… -
Page 150
5 — Information / Configuration To enable you to understand better, the following diagram shows the path of the «Video» and «Data» flows. F@st™ 2804v2 Reference Manual — 253329475-A Page 5-114 Sagemcom document. Reproduction and disclosure prohibited… -
Page 151: Certificate
Summarises the main characteristics of the certificate. Type Indicates the status of the certificate (e.g.: request). Action Select the action from the list: view, load signed certificate, remove. F@st™ 2804v2 Reference Manual — 253329475-A Sagemcom document. Reproduction and disclosure prohibited Page 5-115…
-
Page 152
Enter the name of the organisation which owns the certificate State/Province Name Enter the name of the state of province Country/Region Name Select the country from the scroll down list F@st™ 2804v2 Reference Manual — 253329475-A Page 5-116 Sagemcom document. Reproduction and disclosure prohibited… -
Page 153
Click on the Import Certificate button to display the following screen: Field Action Default Certificate Name Enter the name of the certificate Certificate Insert the certificate here Private key Insert the private key here F@st™ 2804v2 Reference Manual — 253329475-A Sagemcom document. Reproduction and disclosure prohibited Page 5-117… -
Page 154: Trusted Ca
TR-69 (in SSL mode), enable the mutual authentication of the CPE and the ACS. • Select the Trusted sub-menu in the Certificate menu in the Advanced Setup section to display the following screen: F@st™ 2804v2 Reference Manual — 253329475-A Page 5-118 Sagemcom document. Reproduction and disclosure prohibited…
-
Page 155
Field Action Default Certificate Name Enter the name of the certificate to be imported. Certificate Insert the certificate here. Private Key Insert the private key here. F@st™ 2804v2 Reference Manual — 253329475-A Sagemcom document. Reproduction and disclosure prohibited Page 5-119… -
Page 156: Advanced Status
Object: This menu is used to display all the parameters which concern the remote network. • Select the menu in the Advanced Status section to display the following screen: F@st™ 2804v2 Reference Manual — 253329475-A Page 5-120 Sagemcom document. Reproduction and disclosure prohibited…
-
Page 157: Statistics
Select the sub menu in the Statistics menu in the Advanced Status section to display the following screen: • click on the button to reset statistics. F@st™ 2804v2 Reference Manual — 253329475-A Sagemcom document. Reproduction and disclosure prohibited Page 5-121…
-
Page 158: Wan
Select the sub menu in the Statistics menu in the Advanced Status section to display the following screen: • click on the button to reset statistics. F@st™ 2804v2 Reference Manual — 253329475-A Page 5-122 Sagemcom document. Reproduction and disclosure prohibited…
-
Page 159: Atm
Select the sub menu in the Statistics menu in the Advanced Status section to display the following screen: • click on the button to reset statistics. F@st™ 2804v2 Reference Manual — 253329475-A Sagemcom document. Reproduction and disclosure prohibited Page 5-123…
-
Page 160: Adsl
Select the ADSL sub menu in the Statistics menu in the Advanced Status section to display the following screen: • click on the button to reset statistics. F@st™ 2804v2 Reference Manual — 253329475-A Page 5-124 Sagemcom document. Reproduction and disclosure prohibited…
-
Page 161
«Test Time (sec)» field, select the test time from the scroll down list. • Click on the button to run test. • Click on the button to shut window and return to the previous screen. F@st™ 2804v2 Reference Manual — 253329475-A Sagemcom document. Reproduction and disclosure prohibited Page 5-125… -
Page 162: Route
Object: This menu is used to display all the information concerning your router’s routing. • Select the Route menu in the Advanced Status section to display the following screen: F@st™ 2804v2 Reference Manual — 253329475-A Page 5-126 Sagemcom document. Reproduction and disclosure prohibited…
-
Page 163: Arp
Address Resolution Protocol). This lets you find out the physical address of a computer’s network card, corresponding to an IP address. • Select the menu in the Advanced Status section to display the following screen: F@st™ 2804v2 Reference Manual — 253329475-A Sagemcom document. Reproduction and disclosure prohibited Page 5-127…
-
Page 164: Dhcp
Object: This menu is used to display all the computers which obtained an IP address from the router’s DHCP server. • Select the DHCP menu in the Advanced Status section to display the following screen: F@st™ 2804v2 Reference Manual — 253329475-A Page 5-128 Sagemcom document. Reproduction and disclosure prohibited…
-
Page 165: Station Info
Only appear the MAC addresses (BSSIDs) of the computers associated with the router and/or authorized by this one to use your wireless network (see subsection 5.7.3 — MAC Filter). F@st™ 2804v2 Reference Manual — 253329475-A Sagemcom document. Reproduction and disclosure prohibited Page 5-129…
-
Page 166: Management
5.11.1 Settings This menu contains the following three sub menus: • Backup (see subsection 5.11.1.1), • Update (see subsection 5.11.1.2), • Restore Default (see subsection 5.11.1.3). F@st™ 2804v2 Reference Manual — 253329475-A Page 5-130 Sagemcom document. Reproduction and disclosure prohibited…
-
Page 167: Backup
It is recommended to save the current configuration on your computer to a file • Select the Backup sub menu in the Settings menu of the Management section to display the following screen: F@st™ 2804v2 Reference Manual — 253329475-A Sagemcom document. Reproduction and disclosure prohibited Page 5-131…
-
Page 168
Click on the Save button to save the current configuration file, for example, on your computer. • Select the directory where you want to save the «backupsettings.conf» configuration file. The process takes a few seconds. F@st™ 2804v2 Reference Manual — 253329475-A Page 5-132 Sagemcom document. Reproduction and disclosure prohibited… -
Page 169: Update
Select the configuration file then click on the Update Settings button to recover a configuration which has already been saved. The process takes around 2 minutes. F@st™ 2804v2 Reference Manual — 253329475-A Sagemcom document. Reproduction and disclosure prohibited Page 5-133…
-
Page 170: Restore Default
» » LED (PWR) then all the LEDs and the process for returning to the factory configuration starts. It lasts for around 2 minutes. F@st™ 2804v2 Reference Manual — 253329475-A Page 5-134 Sagemcom document. Reproduction and disclosure prohibited…
-
Page 171: System Log
Object: This menu is used to view and/or configure the events which occur on your router. • Select the System Log menu in the Management section to display the following screen: F@st™ 2804v2 Reference Manual — 253329475-A Sagemcom document. Reproduction and disclosure prohibited Page 5-135…
-
Page 172: View System Log
(see table in the next paragraph — «Configure System Log»). • Click on the Save button to save all the events allocated to the severity you configured. F@st™ 2804v2 Reference Manual — 253329475-A Page 5-136 Sagemcom document. Reproduction and disclosure prohibited…
-
Page 173
5 — Information / Configuration Configure System Log • Click on the Configure System Log button to configure the events which occur on your router. F@st™ 2804v2 Reference Manual — 253329475-A Sagemcom document. Reproduction and disclosure prohibited Page 5-137… -
Page 174
«View System Log» button. The severities are classified in decreasing order of importance. • Emergency, • Alert, • Critical, • Error, • Notice, • Informational, • Debugging. F@st™ 2804v2 Reference Manual — 253329475-A Page 5-138 Sagemcom document. Reproduction and disclosure prohibited… -
Page 175
Server UDP Port Enter the number of the port associated with the «Syslog» server. This field only appears when the mode selected is «Remote or «Both». F@st™ 2804v2 Reference Manual — 253329475-A Sagemcom document. Reproduction and disclosure prohibited Page 5-139… -
Page 176: Snmp Agent
The rights are Read / Write (RW). System Name Enter the name of the SNMP server. Sagem System Location Enter the place where is your SNMP server. unknown F@st™ 2804v2 Reference Manual — 253329475-A Page 5-140 Sagemcom document. Reproduction and disclosure prohibited…
-
Page 177
Hereafter, an example of SNMP configuration: Field Action Read Community Iris (RO) Cyclamen (RW) Set Community System Name rose System Location France System Contact Myrouter@sagem/com Trap Manager IP 192.168.1.1 F@st™ 2804v2 Reference Manual — 253329475-A Sagemcom document. Reproduction and disclosure prohibited Page 5-141… -
Page 178: Client
Enter the URL or the IP address of the «ACS» Empty server. ACS User Name Enter the name of the user of the «ACS» admin server. ACS Password Enter the «ACS» server password. admin F@st™ 2804v2 Reference Manual — 253329475-A Page 5-142 Sagemcom document. Reproduction and disclosure prohibited…
-
Page 179
User Name Connection Request Enter your password for your router. admin Password • Click on the button to launch the auto-configuration procedure of your router. F@st™ 2804v2 Reference Manual — 253329475-A Sagemcom document. Reproduction and disclosure prohibited Page 5-143… -
Page 180: Internet Time
These servers display the date and time GMT (Greenwich Mean Time). Note: For these events to be displayed and/or saved at an effective date and time, you should check this box. F@st™ 2804v2 Reference Manual — 253329475-A Page 5-144 Sagemcom document. Reproduction and disclosure prohibited…
-
Page 181
GMT time to that Date Line West of the country where you live with the seasonal correction (Summer time or Winter time). F@st™ 2804v2 Reference Manual — 253329475-A Sagemcom document. Reproduction and disclosure prohibited Page 5-145… -
Page 182: Access Control
(WAN). Note: The ICMP service is always activated on the local network (LAN) and may be activated or deactivated on the remote network (WAN). F@st™ 2804v2 Reference Manual — 253329475-A Page 5-146 Sagemcom document. Reproduction and disclosure prohibited…
-
Page 183: Ip Address
Field Action Default Access Control Mode Select Enable to activate the access control Box not mode or Disable to not activate it. checked F@st™ 2804v2 Reference Manual — 253329475-A Sagemcom document. Reproduction and disclosure prohibited Page 5-147…
-
Page 184
Click on the Add button to add an IP address. Note: From this address you may access the local management services when the access control is active. F@st™ 2804v2 Reference Manual — 253329475-A Page 5-148 Sagemcom document. Reproduction and disclosure prohibited… -
Page 185: Passwords
Enter your old password New Password Enter your new password Confirm Password Confirm your new password Note: The password is a string of a maximum of 16 alphanumerical characters. F@st™ 2804v2 Reference Manual — 253329475-A Sagemcom document. Reproduction and disclosure prohibited Page 5-149…
-
Page 186: Update Software
Throughout the download procedure (up to five minutes), you must: • not power down the router, • not disconnect from the ADSL line. F@st™ 2804v2 Reference Manual — 253329475-A Page 5-150 Sagemcom document. Reproduction and disclosure prohibited…
-
Page 187: System Info
(sysinfo) with f24 type. • Select System Info menu in the Management section ; the following screen appears: F@st™ 2804v2 Reference Manual — 253329475-A Sagemcom document. Reproduction and disclosure prohibited Page 5-151…
-
Page 188
Note: This file can be opened with different apllications as spreadsheet program, word processing for example Microsoft Excel, Microsoft Word, Notepad and so on. F@st™ 2804v2 Reference Manual — 253329475-A Page 5-152 Sagemcom document. Reproduction and disclosure prohibited… -
Page 189: Save/Reboot
Click on the Save/Reboot button to restart the router. The process takes around 1 minute. A countdown is displayed to tell the user how long is left to wait. F@st™ 2804v2 Reference Manual — 253329475-A Sagemcom document. Reproduction and disclosure prohibited Page 5-153…
-
Page 190
5 — Information / Configuration F@st™ 2804v2 Reference Manual — 253329475-A Page 5-154 Sagemcom document. Reproduction and disclosure prohibited… -
Page 191: Internet Access Service
6. Internet access service This section covers of the introduction P6-2 F@st™ 2804v2 Reference Manual — 253329475-A Sagemcom document. Reproduction and disclosure prohibited Page 6-1…
-
Page 192
• the DNS addresses are correctly configured in each terminal. The router enables DNS queries to be relayed. F@st™ 2804v2 Reference Manual — 253329475-A Page 6-2 Sagemcom document. Reproduction and disclosure prohibited… -
Page 193: Tv Over Adsl Service
7. TV over ADSL service This section covers the introduction § 7.1 access to the optional TV over ADSL service § 7.2 F@st™ 2804v2 Reference Manual — 253329475-A Sagemcom document. Reproduction and disclosure prohibited Page 7-1…
-
Page 194: Introduction
Note: In the example above, the ATM interface «ppp_8_35_1» is dedicated to data and the ATM interface «nas_8_50_1» is dedicated to video. configure «Port Mapping» in accordance with section 6.9.8. F@st™ 2804v2 Reference Manual — 253329475-A Page 7-2 Sagemcom document. Reproduction and disclosure prohibited…
-
Page 195: Updating The Firmware
8. Updating the firmware This section covers setting up the download. P8-2 F@st™ 2804v2 Reference Manual — 253329475-A Sagemcom document. Reproduction and disclosure prohibited Page 8-1…
-
Page 196
You can download the new firmware to update your router as indicated in subsection 5.5.7 of the HTTP configurator. TR69 protocol Operators can use «TR69» protocol to upgrade the router’s firmware from an HTTP or FTP server. F@st™ 2804v2 Reference Manual — 253329475-A Page 8-2 Sagemcom document. Reproduction and disclosure prohibited… -
Page 197: A. Annex A — Troubleshooting
«Diagnostics» tool § A.4 interpreting the lights § A.5 reinitialising your router § A.6 resetting with the factory configuration § A.7 no-connection mode § A.8 F@st™ 2804v2 Reference Manual — 253329475-A Sagemcom document. Reproduction and disclosure prohibited Page A-1…
-
Page 198: Annex A — Troubleshooting
States of Front panel LEDs, Data accessible by the configurator by «DSL Router» onboard HTTP of your router: • supervision of the router, • «Diagnostics» tool. F@st™ 2804v2 Reference Manual — 253329475-A Page A-2 Sagemcom document. Reproduction and disclosure prohibited…
-
Page 199: Front Panel Leds
No link detected on the Ethernet port Green steady Ethernet port has detected a link with a device Green blinking Tx/Rx traffic detected on the Ethernet port F@st™ 2804v2 Reference Manual — 253329475-A Sagemcom document. Reproduction and disclosure prohibited Page A-3…
-
Page 200: Supervising Your Router
Displays the nominal down line transmission rate Displays the nominal up line transmission rate Buttons Allows data displayed on the screen to be refreshed. Allows your router to be started. F@st™ 2804v2 Reference Manual — 253329475-A Page A-4 Sagemcom document. Reproduction and disclosure prohibited…
-
Page 201: Diagnostics» Tool
A hypertext link (help) enables the user to access context-related help. This help gives an explanation concerning the state of the connection (PASS in green, DOWN in orange and FAIL in red) and supplies the appropriate troubleshooting procedures. F@st™ 2804v2 Reference Manual — 253329475-A Sagemcom document. Reproduction and disclosure prohibited Page A-5…
-
Page 202
IMPORTANT If you experience difficulties connecting to the Internet, we recommend that you restart your router (cf.A.6) or possibly re-establish the factory configuration (cf. § A.7). F@st™ 2804v2 Reference Manual — 253329475-A Page A-6 Sagemcom document. Reproduction and disclosure prohibited… -
Page 203: Interpreting The Leds
Check that the delivered power cord is properly connected at one end to the mains power network. Check that the power connector is inserted correctly in the corresponding connector (power) of the router. F@st™ 2804v2 Reference Manual — 253329475-A Sagemcom document. Reproduction and disclosure prohibited Page A-7…
-
Page 204: Restarting Your Router
CD-ROM, or to enter again the ADSL connection data supplied by your Internet Service Provider (ISP) (see Internet Connection section — § 5.6). F@st™ 2804v2 Reference Manual — 253329475-A Page A-8 Sagemcom document. Reproduction and disclosure prohibited…
-
Page 205: Offline Mode
In the menu bar, select the «File» menu then deselect the «Work Offline» command. Click OK in the browser’s «Address» field to display the home screen. When the router is installed, this box is checked. F@st™ 2804v2 Reference Manual — 253329475-A Sagemcom document. Reproduction and disclosure prohibited Page A-9…
-
Page 206
Annex A — Troubleshooting F@st™ 2804v2 Reference Manual — 253329475-A Page A-10 Sagemcom document. Reproduction and disclosure prohibited… -
Page 207: Annex B — Warnings For Safety
B. Annex B — Warnings for safety This section covers Warnings for safety § B.1 the EC compliance declaration § B.2 F@st™ 2804v2 Reference Manual — 253329475-A Sagemcom document. Reproduction and disclosure prohibited Page B-1…
-
Page 208: Warnings For Safety
This equipment can be operated in the EU without restrictions indoor, but cannot be operated outdoors in France in the whole of the band until further notice. Sagemcom Broadband SAS declares that the F@st™ 2804v2 product conforms to the requirements of European directives 1999/5/CE and the essential requirements of directives 2004/108/CE and 2006/95/CE.
-
Page 209: Annex C — Environment
C. Annex C — Environment This section covers directive E 2002/96/CE § C.1 F@st™ 2804v2 Reference Manual — 253329475-A Sagemcom document. Reproduction and disclosure prohibited Page C-1…
-
Page 210: Directive E 2002/96/Ce
Preservation of the environment as part of a sustainable development logic is an essential concern of Sagemcom. Sagemcom‘ aim is to operate systems safeguarding the environment and consequently it has decided to integrate environmental performance considerations in the life cycle of its products, from manufacturing to commissioning, use and disposal.
-
Page 211: D. Annex D — Technical Characteristics
This section covers mechanics and displays § D.1 the characteristics of the different interfaces § D.2 environmental characteristics § D.3 the application and the protocols § D.4 F@st™ 2804v2 Reference Manual — 253329475-A Sagemcom document. Reproduction and disclosure prohibited Page D-1…
-
Page 212: Annex D — Technical Characteristics
Abbreviation Meaning • Green Power LED • ADSL Green ADSL LED • WLAN Green WLAN LED • Internet Green/Red Internet LED • Ethernet Green Ethernet LED F@st™ 2804v2 Reference Manual — 253329475-A Page D-2 Sagemcom document. Reproduction and disclosure prohibited…
-
Page 213: Characteristics Of The Different Interfaces
Standard USB 2.0 • Data Asynchronous • Transmission Mode bidirectional • Power Supply 5 V — 500 mA maximum • Connection technology USB — Type A F@st™ 2804v2 Reference Manual — 253329475-A Sagemcom document. Reproduction and disclosure prohibited Page D-3…
-
Page 214
• Filtering by list of MAC addresses • WPA (encryption mode: TKIP or AES) • Range 200 m in free space • 30 m inside buildings F@st™ 2804v2 Reference Manual — 253329475-A Page D-4 Sagemcom document. Reproduction and disclosure prohibited… -
Page 215
DC Power Supply Input of router • Input Voltage 11 V — 13 V • Power absorbed < 7 W • Connection technology Miniature jack fixed connector diam. 3.5 mm F@st™ 2804v2 Reference Manual — 253329475-A Sagemcom document. Reproduction and disclosure prohibited Page D-5… -
Page 216: Environmental Characteristics
Flicker and fluctuations of EN 61000-3-3 voltage • Immunity EN 55024 Radio part for ISM band at 2.4 GHz • Transmission 802.11g/b ETR 300 328-2 Ed. Juillet 2000 F@st™ 2804v2 Reference Manual — 253329475-A Page D-6 Sagemcom document. Reproduction and disclosure prohibited…
-
Page 217: Application And Protocols
PPP over ATM RFC 2364 • PPP over ETH over ATM RFC 2516, RFC 1483/2684 • IP over ATM RFC 1483/2684 • ETH over ATM RFC 1483/2684 F@st™ 2804v2 Reference Manual — 253329475-A Sagemcom document. Reproduction and disclosure prohibited Page D-7…
-
Page 218
• Management From ETH, USB and WAN (with specific option) • Downloading of version Client by http mode • Telnet • TR69 Via a ACS server F@st™ 2804v2 Reference Manual — 253329475-A Page D-8 Sagemcom document. Reproduction and disclosure prohibited… -
Page 219: Annex E — Default Configuration
§ E.1 the default configuration for the local network (LAN) § E.2 the default configuration for the local wireless network § E.3 (WLAN) F@st™ 2804v2 Reference Manual — 253329475-A Sagemcom document. Reproduction and disclosure prohibited Page E-1…
-
Page 220: Default Username And Password
IP address ( IP address 192.168.1.1:631 Access to a LAN printer BROADCAST, ARP, MULTICAST Activated Router The LAN traffic is routed to your ISP NAT/PAT Activated F@st™ 2804v2 Reference Manual — 253329475-A Page E-2 Sagemcom document. Reproduction and disclosure prohibited…
-
Page 221: Default Configuration For The Local Wireless Network (Wlan
The following table supplies the principal default WLAN parameters of your F@st™ 2804v2. Wireless Characteristics (Wi-Fi) Value IP address 192.168.1.1/24 Enable Wireless Box checked SSID Sagem2804 Auto Channel Network Autentication F@st™ 2804v2 Reference Manual — 253329475-A Sagemcom document. Reproduction and disclosure prohibited Page E-3…
-
Page 222
Annexe E — Configuration par défaut F@st™ 2804v2 Reference Manual — 253329475-A Page E-4 Sagemcom document. Reproduction and disclosure prohibited… -
Page 223: Annex F — Glossary
F. Annex F — Glossary F@st™ 2804v2 Reference Manual — 253329475-A Sagemcom document. Reproduction and disclosure prohibited Page F-1…
-
Page 224
Integrated Service Digital Network Internet Service Provider L2TP Layer 2 Tunneling Protocol Local Area Network Link Control Protocol Logical Link Control Medium Access Control Media Dependent Interface F@st™ 2804v2 Reference Manual — 253329475-A Page F-2 Sagemcom document. Reproduction and disclosure prohibited… -
Page 225
Trivial File Transfer Protocol Unspecified Bit Rate User Datagram Protocol UPnP Universal Plug and Plug Uniformed Resource Locator Unshielded Twisted Pair VBR-nrt Variable Bit Rate — non real time F@st™ 2804v2 Reference Manual — 253329475-A Sagemcom document. Reproduction and disclosure prohibited Page F-3… -
Page 226
Wide Area Network Meshed network of information servers Wired Equivalent Privacy Weighted Fair Queuing Wi-Fi Wireless Fidelity (réseau sans fil) WLAN Wireless Local Area Network Wireless Protected Access F@st™ 2804v2 Reference Manual — 253329475-A Page F-4 Sagemcom document. Reproduction and disclosure prohibited… -
Page 227: Annex G — Connector Technology
§ G.1 pinouts of the «PWR» connector § G.2 pinouts of the «ETH1», «ETH2», «ETH3» and «ETH4» § G.3 connectors pinouts of the «USB» connector § G.4 F@st™ 2804v2 Reference Manual — 253329475-A Sagemcom document. Reproduction and disclosure prohibited Page G-1…
-
Page 228: Pinouts Of The » Adsl» Connector
The mains unit is connected to the equipment using the miniature fixed connector of the case. Contact No Signal Meaning Intérieur +12 V Connexion DC «+» Extérieur Masse Connexion DC «-» F@st™ 2804v2 Reference Manual — 253329475-A Page G-2 Sagemcom document. Reproduction and disclosure prohibited…
-
Page 229: Pinouts Of The «Eth1», «Eth2», «Eth3» And «Eth4» Connectors
(-) Reception of terminal Not connected Not connected The Ethernet port is self-detecting. You can use either straight or crossed cables. An emission or reception signal is detected automatically. F@st™ 2804v2 Reference Manual — 253329475-A Sagemcom document. Reproduction and disclosure prohibited Page G-3…
-
Page 230: Pinouts Of The «Usb» Connector
The «USB» interface is connected to the equipment using type A female USB fixed connector. Contact No Signal Meaning PC power (+) — Data Subscriber line signal + Data Subscriber line signal Ground Earth F@st™ 2804v2 Reference Manual — 253329475-A Page G-4 Sagemcom document. Reproduction and disclosure prohibited…
-
Page 232
Sagemcom Broadband Headquarters: 250, route de l’Empereur 92848 Rueil-Malmaison cedex — FRANCE Tel: +33 (0)1 57 61 10 00 — Fax: +33 (0)1 57 61 10 01 www.sagemcom.com…
Всем привет! Сегодня мы поговорим про простую настройку роутера Ростелеком Sagemcom 2804 v7 (rev. 1). Настройка Sagemcom Fast 2804 начнется со знакомства с портами и индикаторами. Это универсальный роутер, который можно использовать как aDSL модем, так и для прямого подключения по витой паре (тип Ethernet). Также можно использовать 3G/4G модем флешку. Я написал подробную инструкцию для каждого типа подключения, но если у вас будут возникать какие-то вопросы, то пишите в комментариях.
ВНИМАНИЕ! Для настройки вам понадобится договор от провайдера, где написан логин и пароль для аутентификации. Держите его под рукой во время настройки.
Содержание
- Индикаторы и порты
- Подключение роутера
- Настройка интернета
- Настройка Wi-Fi
- Задать вопрос автору статьи
Индикаторы и порты
Я вам настоятельно рекомендую ознакомиться с индикаторами роутера ST2804, так как они смогут помочь вам в случае каких-то ошибок или поломок. Смотрим на картинку (слева направо):

- Питание
- DSL подключение – если горит зеленым, то значит соединение от оператора есть. Если мигает, то соединение устанавливается.
- Интернет – аналогично, если горит, значит есть подключение к глобальной сети.
- Wi-Fi подключение – если горит, значит беспроводная сеть включена.
- 1-4 локальных подключения по кабелю.
- USB подключение.
- WPS подключение – если вы его не используете, но видите, что лампочка начала гореть, то стоит задуматься о том – что вас взломали.
Теперь давайте познакомимся с портами роутера и сразу его подключим. С самого права вы увидите вход для блока питания.
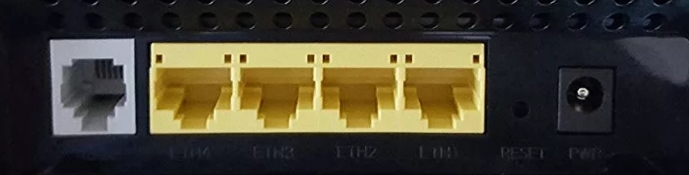
- DSL порт – вставляем сюда телефонный кабель.
- 1-4 LAN порта – в коробке должен быть сетевой кабель, подключите компьютер, ноутбук или другое сетевой аппарат к любому из 4-х портов. Если у вас от провайдера идет обычная витая пара со стандартным патч-кордом, то вставляем его в первый порт.
- Reset – это кнопка для сброса до заводских настроек. Если вы получили аппарат от знакомого, друга, то советую сбросить роутер, зажав эту кнопку на 10 секунд.
И сбоку находятся кнопки (сверху вниз):
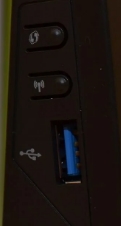
- WPS.
- Wi-Fi – для включения и отключения беспроводной сети.
- USB порт – сюда можно подключить флешку или жесткий диск.
Подключение роутера
Роутер поддерживает три вида подключения:
- Подключение к интернету с помощью aDSL технологии. Тут все просто, берем телефонный кабель от сплиттера и втыкаем в DSL порт.
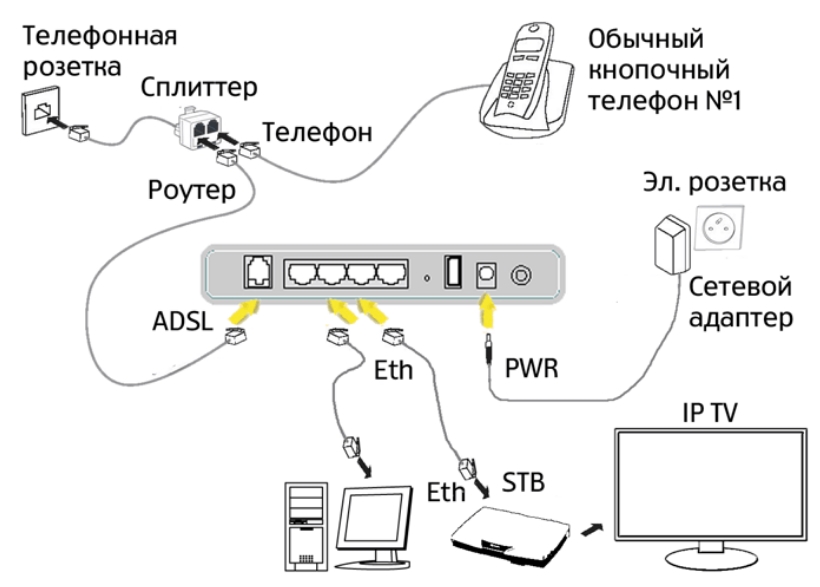
- Если же ваш провайдер прокидывает обычный кабель в дом, а не телефонный, то подключаем его к первому LAN порту
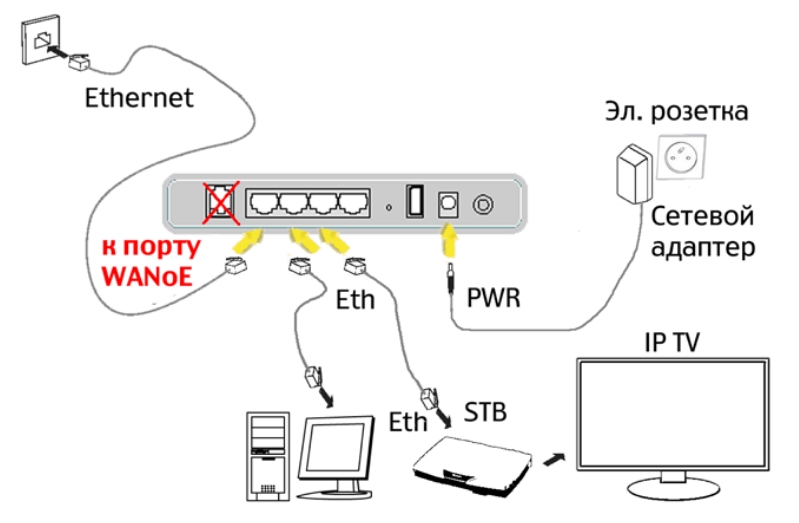
- Использование 3G/4G модема – просто подключаем его к USB.
Если вы уже подключили компьютер или ноутбук к LAN порту, то можете переходить на следующий шаг. Также вы можете подключиться по Wi-Fi – убедитесь, что индикатор беспроводной сети горит зеленым. Если он не горит, то нажмите на WiFi кнопку сбоку, и как только кнопка загорится – подключитесь к беспроводной сети! Имя сети (SSID) и пароль от неё (Pass) есть на бумажке, которая может находиться сбоку или на дне аппарата.
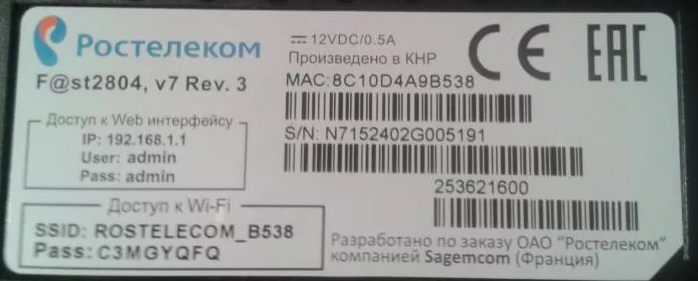
Как только вы подключитесь к сети маршрутизатора, откройте любой браузер и введите в адресную строку IP-адрес: 192.168.1.1. В качестве пароля и логина используйте слово «admin». Далее настройка будет отличаться в зависимости от подключения:
- aDSL
- Ethernet
- 3G/4G/Lte.
Не заходит по адресу
Если по адресу не заходит, то скорее всего у вас стоят статические настройки IP:
- Нажмите на клавиши и R.
- Вводим команду: ncpa.cpl.
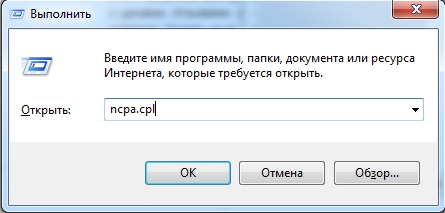
- Заходим в «Свойства» подключения, если вы используете беспроводное подключение, то выберите ваш Wi-Fi модуль.
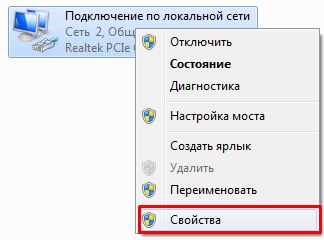
- Выделяем 4-ый протокол, нажимаем на кнопку «Свойства» и устанавливаем галочки, для автоматической настройки IP и DNS.

- Нажимаем «ОК» и вновь пытаемся зайти в настройки роутера.
Настройка интернета
- «Дополнительные настройки» – «WAN сервис» – выделите все галочки в столбце «Удалить» и далее нажмите на кнопку для удаления.
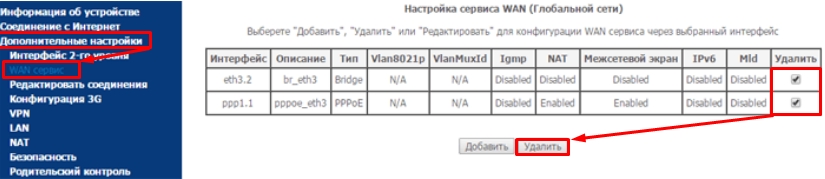
- Тоже самое нужно сделать в «Интерфейсе 2-го уровня» – «DSL ATM».

Далее настройки будут отличаться в зависимости от типа подключения.
Настройка aDSL
- В разделе «DSL ATM» нажимаем по кнопке «Добавить».
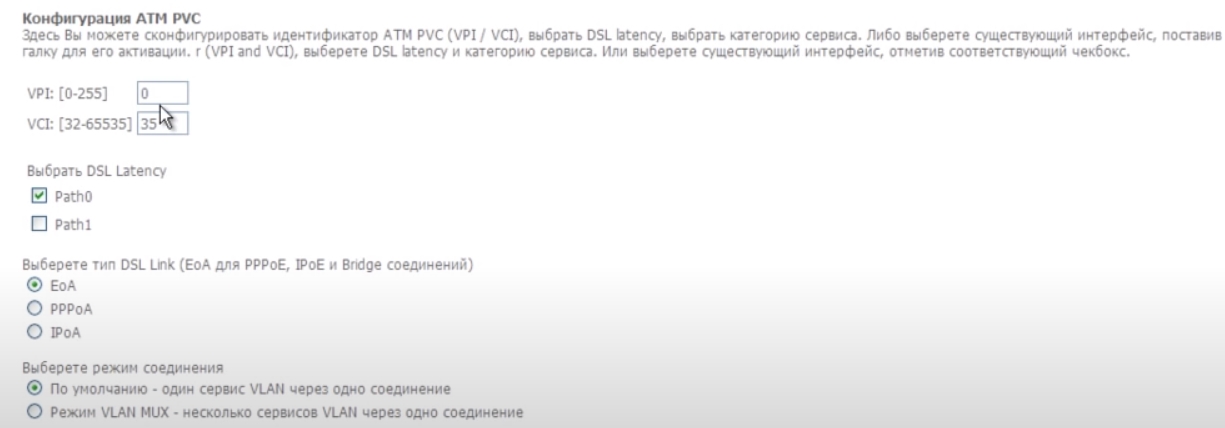
- Оставляем значение по умолчанию и нажимаем «Применить/Сохранить».
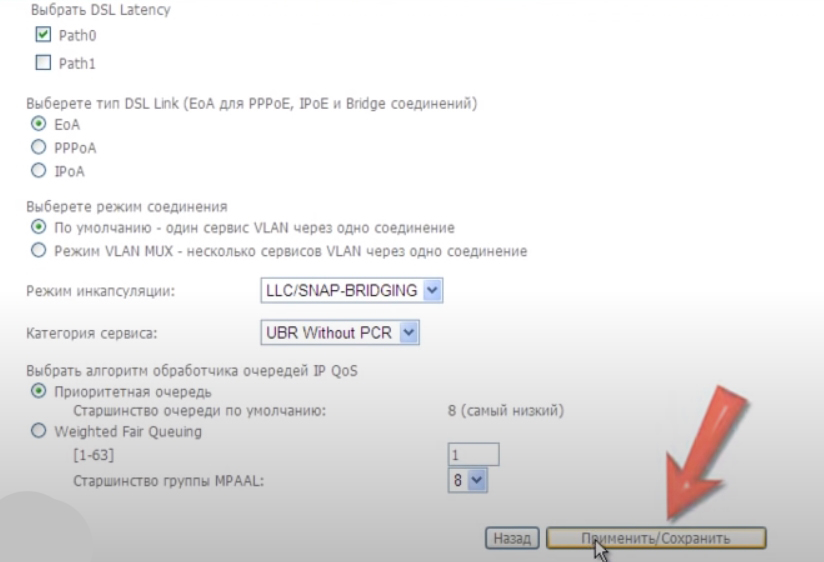
- В разделе «WAN-сервис», также нажимаем кнопку «Добавить». Указываем тип аутентификации как «PPPoE» – выделяем первую строку.
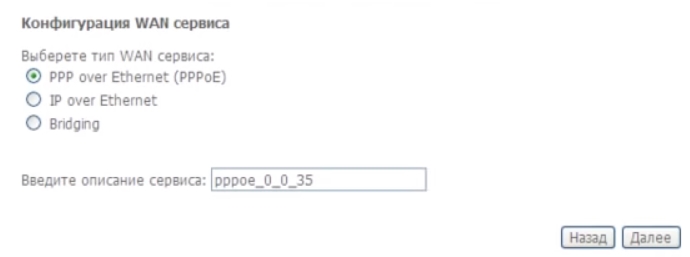
- Тут оставляем порт по умолчанию (atm0).
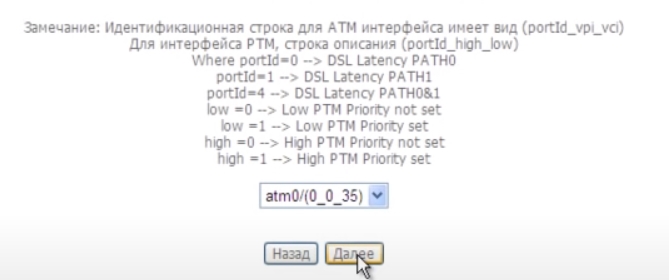
- Из договора вводим логин и пароль.

- Обязательно поставьте галочку «повтор PPP при ошибке аутентификации», чтобы если у вас отключился интернет, то интернет-центр снова пытался подключиться.

- Ставим также и галочку «Включить IGMP Multicast Proxy».
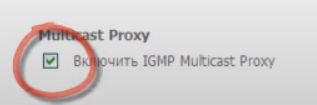
- Оставляем шлюз по умолчанию.
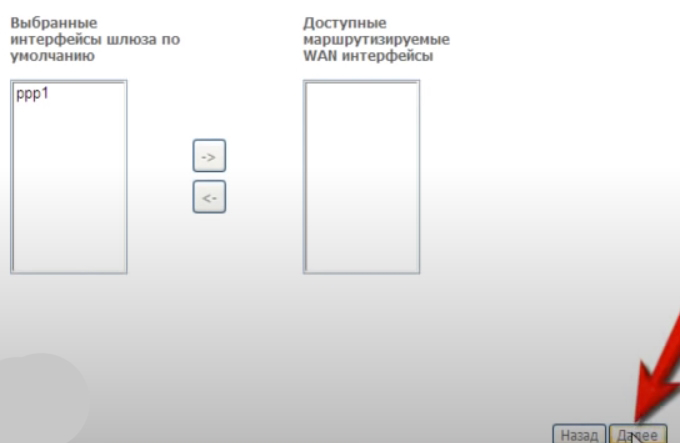
- Несколько раз нажимаем на «Далее» и в конце сохраняем и применяем параметр.
Настройка подключение по обычному кабелю
- В «ETH-интерфейсе» установите рабочий порт, как на картинке ниже (Eth0). Также установите рабочий режим как «Режим VLAN/MUX» и не забудьте сохранить измененные параметры.

- Идем опять в «Wan сервис», нажимаем на кнопку для добавления интернет соединения. Так как мы для этого выбрали именно нулевой порт (eth0), то его и выбираем для подключения.
- В «Конфигурации WAN-сервиса» устанавливаем значение как на картинке ниже.
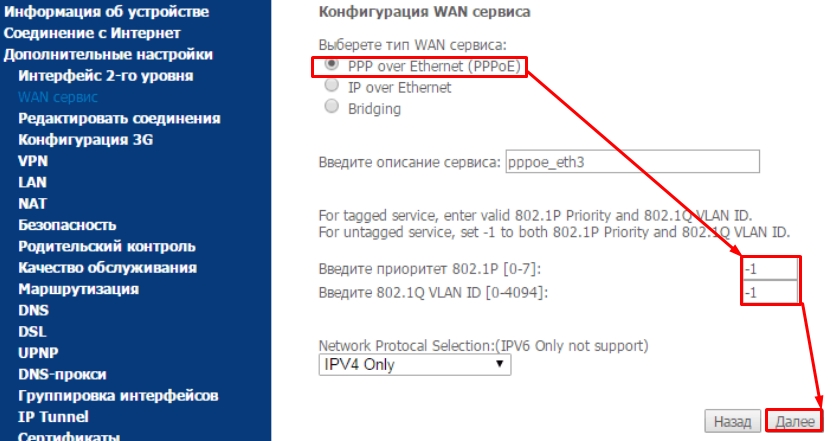
- Теперь возьмите договор от провайдера и введите оттуда имя пользователя и пароль. Больше тут ничего добавлять и изменять не нужно – идем далее.
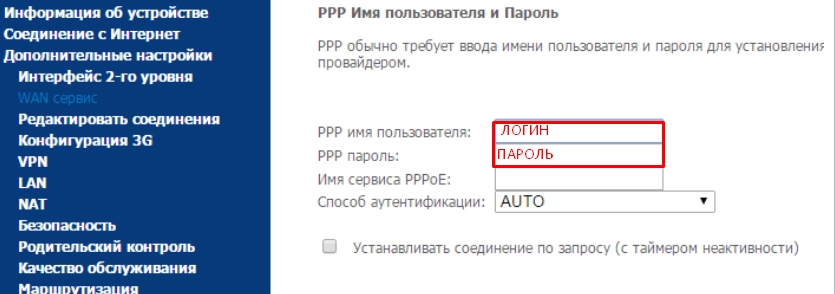
- На всех остальных шагах все оставляем по умолчанию и не меняем настройки.
Настройка 3G/4G интернета
Переходим в раздел «Конфигурации 3G» (4G) включаем функцию и вводим данные, которые можно посмотреть в договоре от мобильного оператора. Также эту информацию можно узнать в службе технической поддержке.
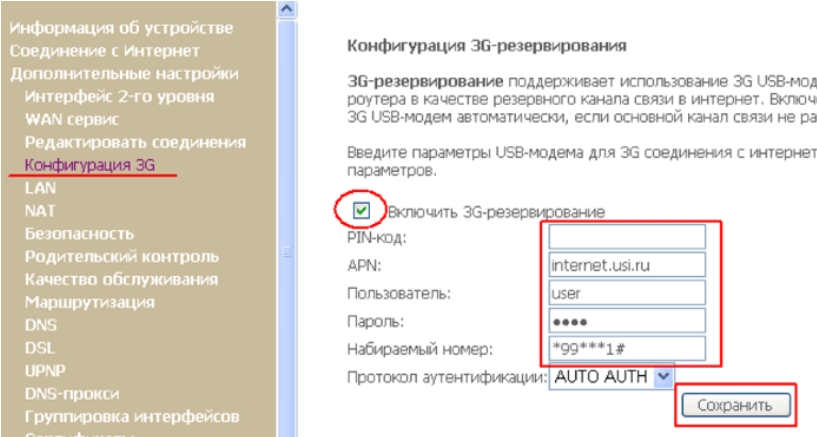
- Чтобы изменить имя беспроводной сети и пароль от неё – проходим в раздел «Настройка WLAN». Включаем галочки как на картинке ниже и вводим новое наименование сети в строке «SSID».
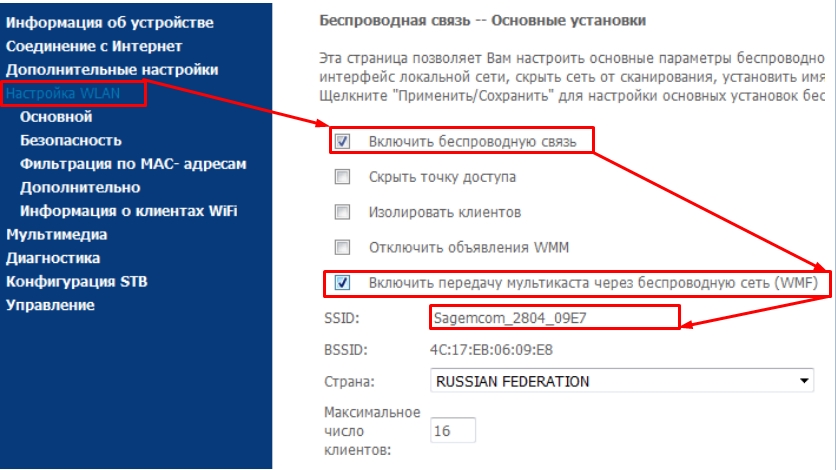
- Чтобы изменить другие настройки, перейдите в раздел «Безопасность». В строке «Включить WPS» поставьте «Выключено», если вы данной функцией не будете пользоваться. Если же вам она нужна, то вы можете придумать свой PIN и ввести его ниже в строке «PIN устройства».
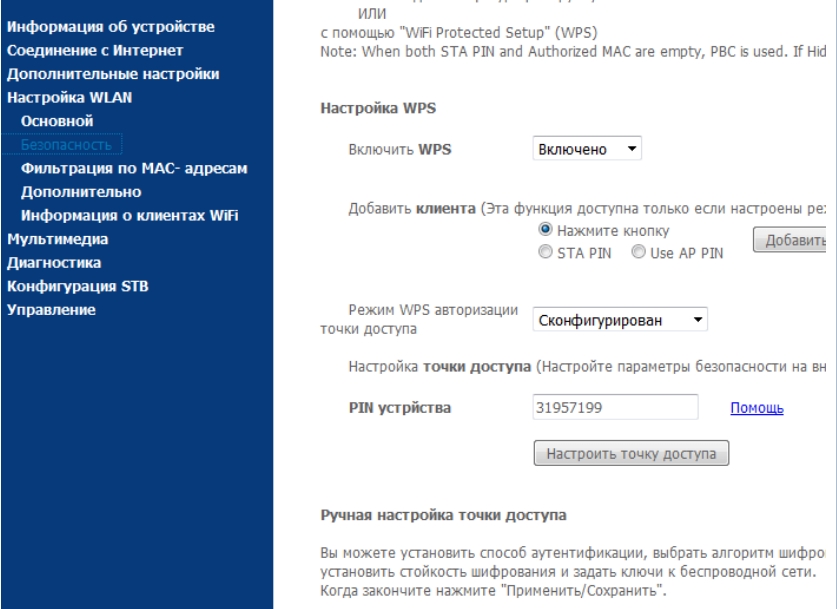
- Ниже в строке «Аутентификация» устанавливаем режим шифрования как «WPA-PSK» или, если есть, лучше установить «WPA2-PSK». Ниже вводим пароль. Также убедитесь, чтобы в строке «Выберите SSID» стояла ваша беспроводная сеть, которую вы только что создали.