Привет! Сегодня будем настраивать роутер TP-LINK TL-WR842ND. Как обычно, все подробно покажу и расскажу. Сам роутер у меня есть, фото по подключению TL-WR842ND я уже сделал, сейчас будем настраивать.
Интересный роутер. Если вы его уже купили, думаю останетесь довольны. Стоит он немного дороже чем популярный TP-LINK TL-WR841N (ND), но у TL-WR842ND есть несколько преимуществ. Главное преимущество, это наличие USB разъема. К TP-LINK TL-WR842ND можно подключить флешку, или жесткий диск, и организовать общий доступ к файлам. Так же, можно подключить принтер, и отправлять на печать документы со всех устройств в сети. А если у вас вторая аппаратная версия роутера (V2), то к TL-WR842ND можно подключить 3G/4G модем, и настроит раздачу интернета. А так же, можно запускать до 4 Wi-Fi сетей, с разными настройками. И белые антенны мне больше понравились, чем черные.

У меня обычный TP-LINK TL-WR842ND, аппаратная версия V1. Эту информацию можно посмотреть снизу роутера, на наклейке. Панель управления у меня на английском, и русской прошивки к сожалению нет. Но, если у вас версия TL-WR842ND(RU), то настройки у вас скорее всего будут на русском языке. Я буду делать скриншоты со своего устройства, но буду так же писать названия разделов настроек на русском. Если у вас вдруг русскоязычная прошивка.
Кстати, перед настройкой можете прошить свой роутер. Я уже подготовил отдельную инструкцию по этой модели: TP-LINK TL-WR842ND. Обновление прошивки.
Если вы купили TL-WR842ND (V2) для работы с 3G/4G модемом, то настроить его сможете по этой инструкции. Мы же рассмотрим настройку при подключении к обычному интернету по сетевому кабелю.
Как подключить TL-WR842ND и зайти в настройки
Первым делом достаем наш маршрутизатор из коробки. Подключаем к нему адаптер питания, и включаем его в розетку. Если вы будете настраивать с компьютера, или ноутбука, то возьмите сетевой кабель, который идет в комплекте с роутером, и с его помощью подключите компьютер к роутеру. На роутере кабель подключаем в один из 4 LAN разъемов. А на компьютере в сетевую карту. Если у вас дома есть компьютер, то рекомендую настраивать маршрутизатор именно по кабелю.

Дальше, в WAN разъем (он синий) нужно подключить интернет. Кабель от вашего провайдера, или от ADSL модема.

С подключением разобрались. Если вы хотите настраивать роутер TL-WR842ND по Wi-Fi, то подключитесь к его Wi-Fi сети. Если роутер новый, еще его не настраивали, то сеть будет иметь стандартное название, примерно такое: «TP-LINK_3CE9DA». Сеть будет без пароля, открытая. А если она закрыта паролем, то заводской пароль (PIN) указан снизу устройства на наклейке.
Вход в панель управления
Если вы уже подключены к роутеру, то откройте любой браузер, и перейдите по адресу tplinklogin.net, или 192.168.0.1. Адрес указан так же снизу роутера. Там же на наклейке указаны заводские имя пользователя и пароль: admin и admin.

Переходим в браузере по адресу, и указываем имя пользователя и пароль.

После этих действий должна открыться панель управления. Если не получается зайти в настройки роутера TP-LINK TL-WR842ND, то почитайте эту статью: что делать, если не заходит в настройки роутера на 192.168.0.1 или 192.168.1.1?
Если роутер не новый, или вы его уже настраивали сами, то лучше всего сделать сброс настроек к заводским. Так же, сброс нужно делать если не открываются настройки, или не подходит стандартный пароль admin.
Что бы сбросить настройки и пароль на TL-WR842ND, достаточно на секунд 10 нажать и подержать кнопку WPS/RESET. Смотрим на индикаторы на передней панели, они должны все загореться, и потухнуть. Роутер перезагрузится, и настройки будут восстановлены. Вот еще подробная инструкция по маршрутизаторам TP-LINK.
TP-LINK TL-WR842ND: настройка интернета (WAN)
Первым делом, нам нужно настроить интернет. Что бы роутер смог подключаться к провайдеру, и раздавать интернет на ваши устройства. Это очень важно. Если роутер не сможет подключится к провайдеру, то на ваших устройствах, которые вы подключите по кабелю, или по беспроводной сети, интернет работать не будет. Подключение будет со статусом «Без доступа к интернету». Получается, что Wi-Fi маршрутизатор раздавать будет, а доступа в интернет не будет.
Перед настройкой вы обязательно должны узнать, какой тип соединения использует ваш провайдер. И если это PPPoE, L2TP, или PPTP, то так же нужно узнать имя пользователя, пароль, и в некоторых случаях еще адрес сервера. Всю эту информацию можно узнать у интернет-провайдера, или в документах, которые вам выдали при подключении.
Настройка подключения Динамический IP
Если провайдер предоставляет вам интернет по технологии Динамический IP, то настраивать практически ничего не нужно. Интернет скорее всего заработает сразу после подключения. Но, давайте проверим.
На роутерах TP-LINK, настройки подключения к провайдеру можно изменить на вкладке Network (Сеть) – WAN. Тип подключения выбираем в выпадающем меню WAN Connection Type (Тип подключения WAN). Соответственно, если у нас подключение Динамический IP, то выбираем эту технологию, и сохраняем настройки.
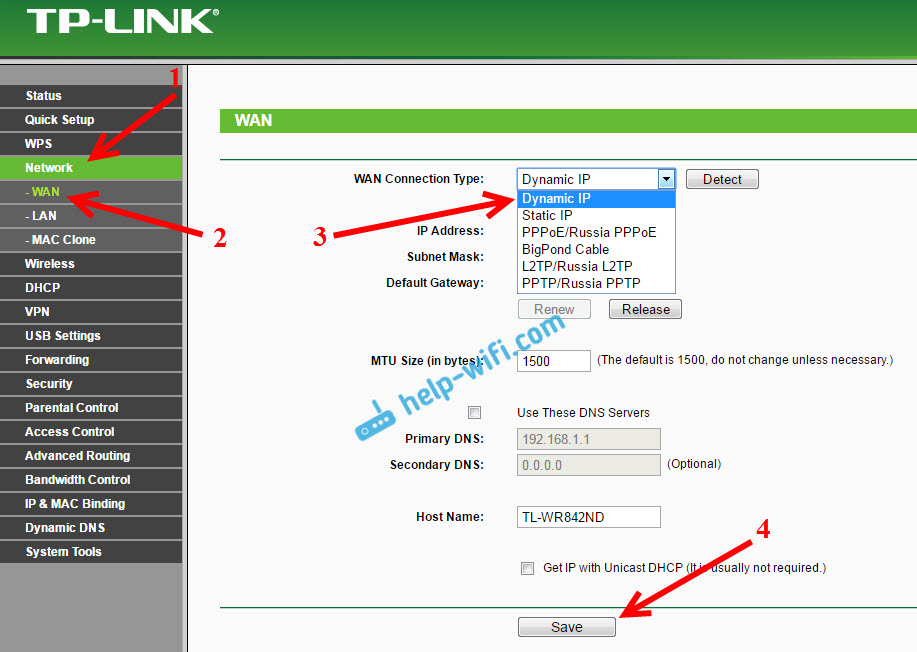
Если интернет не заработает, то может быть, что провайдер использует привязку по MAC-адресу. В таком случае, смотрите статью как клонировать (сменить) MAC-адрес роутера.
Настройка других подключений:
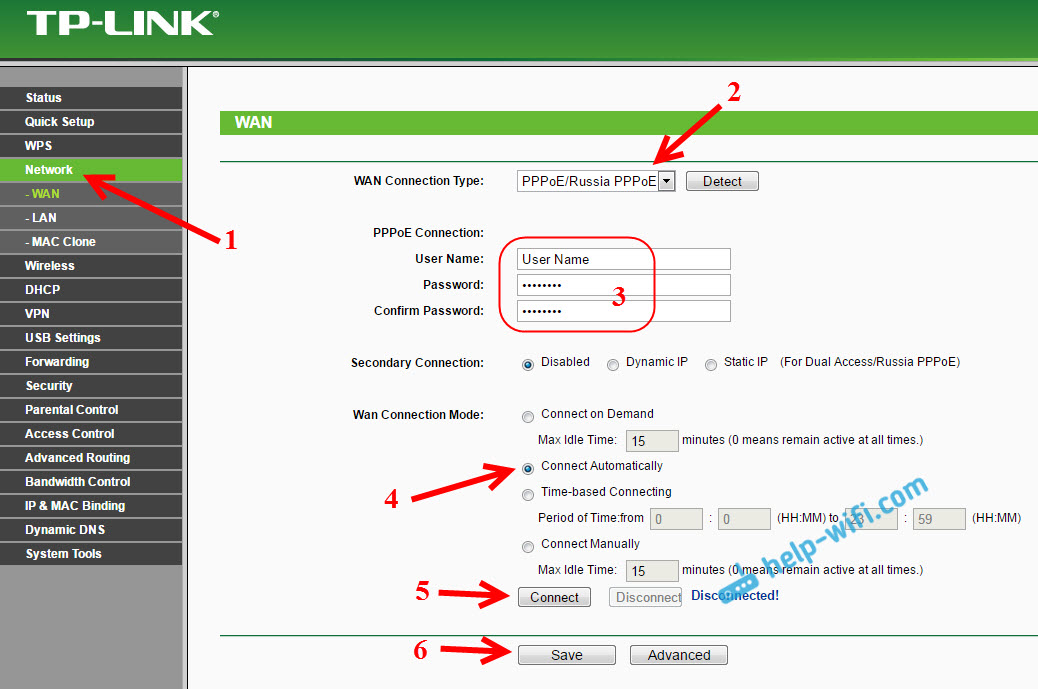
Настройка подключения PPPoE (Ростелеком, и другие провайдеры)
Если у вас провайдер использует тип соединения PPPoE, то выбираем соответствующие соединение, затем указываем имя пользователя и пароль, который выдает провайдер. Дальше, выбираем пункт «Connect Automatically» (Подключить автоматически).
Нажимаем на кнопку Connect (Подключить), роутер должен подключиться к интернету. И интернет уже должен работать на устройстве, с которого вы настраиваете. Для сохранения настроек нажимаем Save (Сохранить).
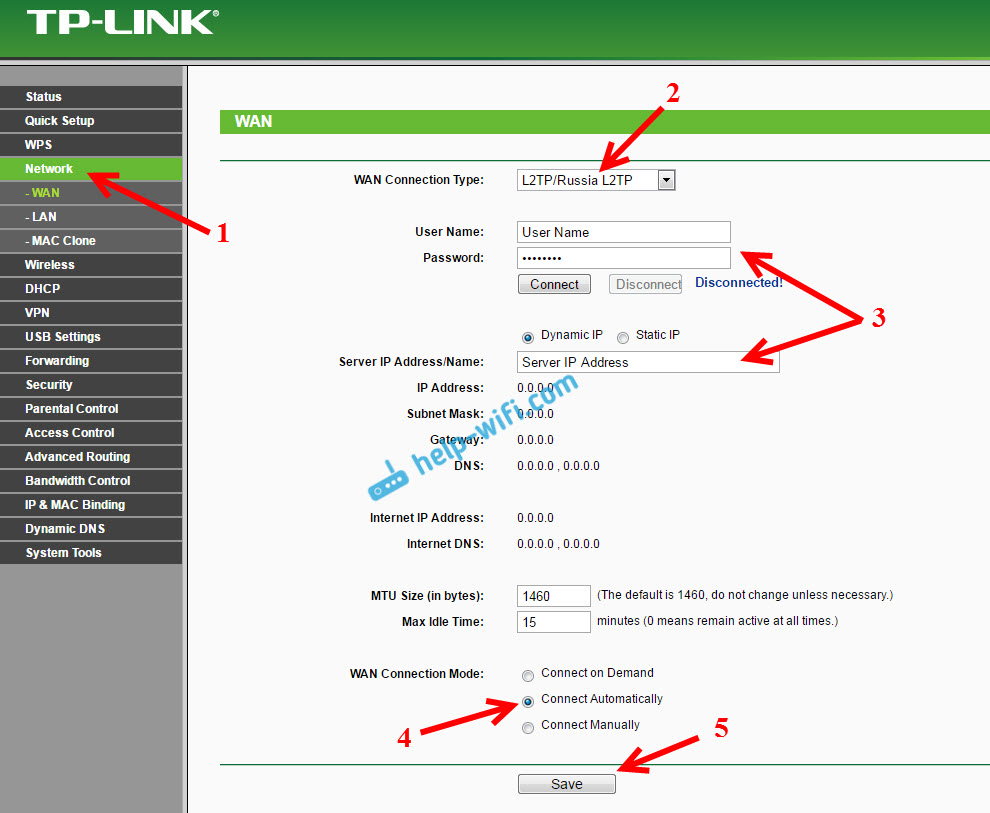
Настройка L2TP и PPTP (Билайн и т. д.)
Здесь все точно так же. Выбираем соответствующий тип соединения, задаем имя пользователя, пароль, и IP-адрес/имя сервера (эту информацию выдает провайдер). Затем, ставим переключатель возле пункта «Connect Automatically» (Подключить автоматически).
Нажимаем на кнопку Save, и перезагружаем роутер. Либо, нажимаем на кнопку Connect (Подключить), что бы проверить, подключится ли маршрутизатор к интернету.
Многие после установки маршрутизатора запускают на компьютере соединение с провайдером (высокоскоростное). И получается так, что интернет через роутер работает до той поры, пока подключение запущено на компьютере. Выключаем компьютер, интернет через роутер не работает.
После установки роутера, на компьютере не нужны никакие соединения. Роутер будет подключаться к провайдеру сам, его нужно только настроить. Если возникнут какие-то проблемы с настройкой на этом этапе, то вам поможет статья: при настройке роутера пишет «Без доступа к интернету», или «Ограничено».
Только после того, как интернет через роутер заработает, можно продолжать настройку нашего TP-LINK TL-WR842ND.
Настройка Wi-Fi и установка пароля на TP-LINK TL-WR842ND
Значит, интернет мы настроили. Нужно еще сменить название Wi-Fi сети, если вас не устраивает стандартное, и установить хороший пароль на Wi-Fi. Сделать это можно в настройках, на вкладке Wireless (Беспроводной режим).
Здесь, мы в поле SSID1 (Имя беспроводной сети) придумываем и записываем название для нашей беспроводный сети.
Я в начале статьи писал, что этот роутер может раздавать до 4 Wi-Fi сетей. И все эти сети будут с разными именами и паролями. Если вам нужно сделать более одной беспроводной сети, то установите галочку напротив SSID2, SSID3 и т. д. И если нужно, то смените их название.
Дальше, выберите свой регион, где вы живете, и нажмите на кнопку Save (Сохранить).

Для установки пароля на Wi-Fi перейдите на вкладку Wireless – Wireless Security (Беспроводной режим — Защита беспроводного режима).
На этой странице первым делом включаем тип защиты «WPA-PSK/WPA2-PSK». Напротив Version (Версия) выбираем WPA2-PSK. И в поле PSK Password (Пароль PSK) придумываем и записываем пароль, который будет использоваться для подключения к нашему Wi-Fi. Пароль должен быть минимум из 8-ми символов.
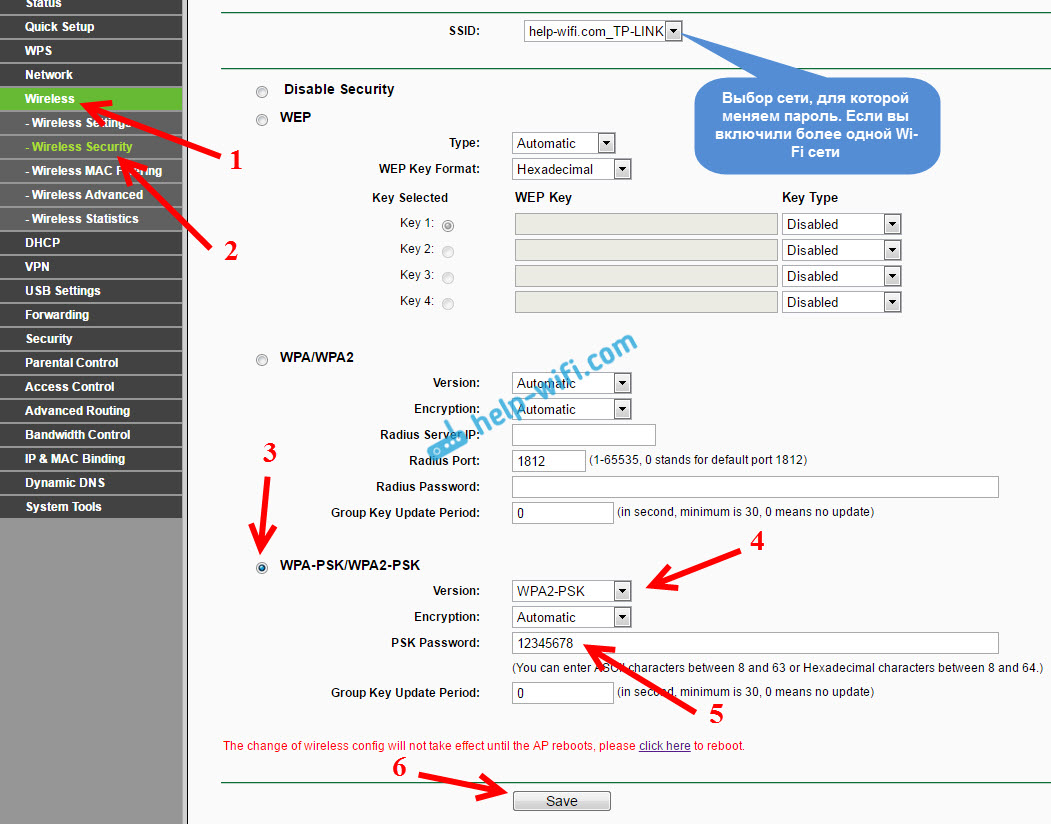
Не забудьте сохранить настройки нажав на кнопку Save.
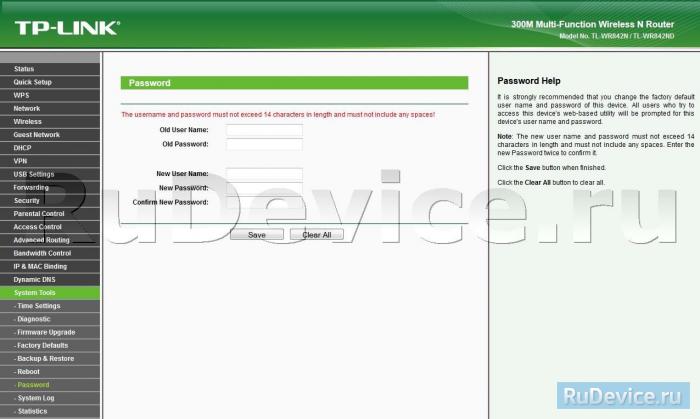
Смена пароля входа в настройки (admin)
Интернет и беспроводную сеть мы уже настроили. Я рекомендую еще сменить стандартный пароль admin, который нужно вводить при входе в настройки вашего роутера. Это нужно для того, что бы защитить настройки маршрутизатора. Ведь к ним будут иметь доступ все, кто подключится к роутеру по Wi-Fi.
Перейдите на вкладку System Tools – Password (Системные инструменты – Пароль). Укажите там старое имя пользователя и пароль (по умолчанию: admin и admin). И задайте новое имя пользователя и два раза укажите новый пароль.
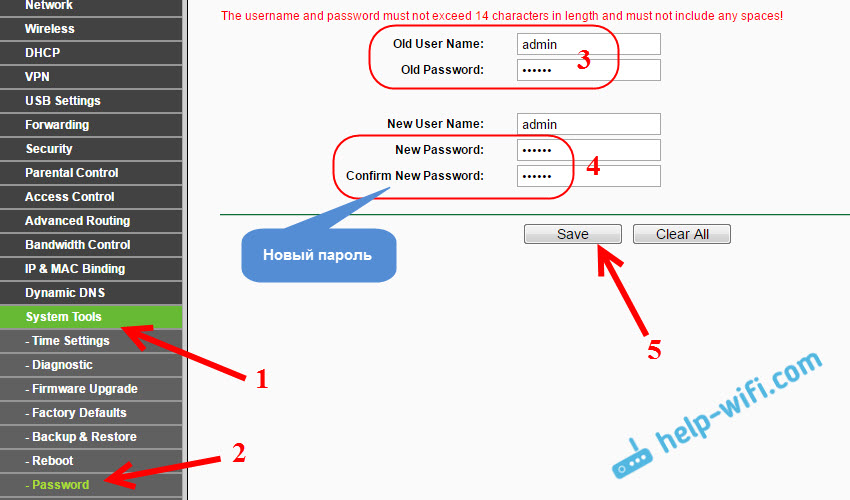
Сохраните изменения нажав на кнопку Save. Если вы после настройки еще не перезагружали роутер, то перезагрузите. Сделать это можно на вкладке «System Tools» – «Reboot» (Системные инструменты – Перезагрузка). Нажав на кнопку «Reboot». Можно просто отключить и включить питание.
На этом настройка маршрутизатора TL-WR842ND (TL-WR842ND(RU)) закончена. Мы задали только основные настройки, которых достаточно для работы роутера. Постарайтесь не забыть пароль от Wi-Fi сети, и от настроек маршрутизатора. Желательно, записать их где-то.
Можете задавать свои вопросы по теме статьи в комментариях. Только одна просьба, описывайте свою проблему подробно, пишите какая модель и аппаратная версия роутера. А так же, какой у вас провайдер.
-
Contents
-
Table of Contents
-
Bookmarks
Quick Links
TL-WR842ND
300Mbps Multi-Function Wireless N Router
Rev: 1.0.0
1910010537
Related Manuals for TP-Link TL-WR842ND
Summary of Contents for TP-Link TL-WR842ND
-
Page 1
TL-WR842ND 300Mbps Multi-Function Wireless N Router Rev: 1.0.0 1910010537… -
Page 2: Fcc Statement
Specifications are subject to change without notice. is a registered trademark of TP-LINK TECHNOLOGIES CO., LTD. Other brands and product names are trademarks or registered trademarks of their respective holders. No part of the specifications may be reproduced in any form or by any means or used to make any derivative such as translation, transformation, or adaptation without permission from TP-LINK TECHNOLOGIES CO., LTD.
-
Page 3: Ce Mark Warning
FCC RF Radiation Exposure Statement This equipment complies with FCC RF radiation exposure limits set forth for an uncontrolled environment. This device and its antenna must not be co-located or operating in conjunction with any other antenna or transmitter. “To comply with FCC RF exposure compliance requirements, this grant is applicable to only Mobile Configurations.
-
Page 4
This device has been designed to operate with the antennas listed below, and having a maximum gain of 5 dBi. Antennas not included in this list or having a gain greater than 5 dBi are strictly prohibited for use with this device. The required antenna impedance is 50 ohms. To reduce potential radio interference to other users, the antenna type and its gain should be so chosen that the equivalent isotropically radiated power (e.i.r.p.) is not more than that permitted for successful communication. -
Page 5: Declaration Of Conformity
TP-LINK TECHNOLOGIES CO., LTD DECLARATION OF CONFORMITY For the following equipment: Product Description: 300Mbps Multi-Function Wireless N Router Model No.: TL-WR842ND Trademark: TP-LINK We declare under our own responsibility that the above products satisfy all the technical regulations applicable to the product within the scope of Council Directives:…
-
Page 6: Table Of Contents
CONTENTS Package Contents…………………1 Chapter 1. Introduction………………2 1.1 Overview of the Router………………..2 1.2 Conventions ………………….. 3 1.3 Main Features ………………….3 1.4 Panel Layout ………………….4 1.4.1 The Front Panel………………..4 1.4.2 The Rear Panel ………………..5 Chapter 2. Connecting the Router ……………7 2.1 System Requirements ………………..
-
Page 7
4.7.2 DHCP Clients List ………………47 4.7.3 Address Reservation ………………48 4.8 VPN…………………….. 49 4.8.1 IKE…………………… 49 4.8.2 IPsec ………………….51 4.8.3 Security Alliance List………………53 4.9 USB Settings ………………….54 4.9.1 Storage Sharing……………….. 54 4.9.2 FTP Server ………………..56 4.9.3 Media Server ……………….. -
Page 8
4.16.2 ARP List………………….95 4.17 Dynamic DNS………………….95 4.17.1 Comexe.cn DDNS ………………96 4.17.2 Dyndns.org DDNS ………………97 4.17.3 No-ip.com DDNS ………………98 4.18 System Tools ………………….99 4.18.1 Time Setting………………..99 4.18.2 Diagnostic………………..101 4.18.3 Firmware Upgrade ………………102 4.18.4 Factory Defaults ……………… -
Page 9: Package Contents
Package Contents The following items should be found in your package: TL-WR842ND 300Mbps Multi-Function Wireless N Router DC Power Adapter for TL-WR842ND 300Mbps Multi-Function Wireless N Router Quick Installation Guide Resource CD for TL-WR842ND 300Mbps Multi-Function Wireless N Router, including: •…
-
Page 10: Chapter 1. Introduction
Additionally, the TL-WR842ND provides a USB port which supports storage/FTP/Media/Print Server. Incredible Speed The TL-WR842ND 300Mbps Multi-Function Wireless N Router provides up to 300Mbps wireless connection with other 802.11n wireless clients. The incredible speed makes it ideal for handling multiple data streams at the same time, which ensures your network stable and smooth. The performance of this 802.11n wireless Router will give you the unexpected networking experience at…
-
Page 11: Conventions
TL-WR842ND 300Mbps Multi-Function Wireless N Router Conventions The Router or TL-WR842ND mentioned in this guide stands for TL-WR842ND 300Mbps Multi-Function Wireless N Router without any explanation. Main Features Complies with IEEE 802.11n to provide a wireless data rate of up to 450Mbps.
-
Page 12: Panel Layout
TL-WR842ND 300Mbps Multi-Function Wireless N Router Panel Layout 1.4.1 The Front Panel Figure 1-1 Front Panel sketch The Router’s LEDs are located on the front panel (View from left to right). Name Status Indication The device has a system error.
-
Page 13: The Rear Panel
The following parts are located on the rear panel (View from left to right). POWER: The Power socket is where you will connect the power adapter. Please use the power adapter provided with this TL-WR842ND 300Mbps Multi-Function Wireless N Router. WAN: This port is where you will connect the DSL/cable Modem, or Ethernet.
-
Page 14
TL-WR842ND 300Mbps Multi-Function Wireless N Router 2) Use the Factory Default WPS/RESET button: With the Router powered on, use a pin to press and hold the WPS/RESET button (approximately 8 seconds) until the SYS LED becomes quick-flash from slow-flash. And then release the button and wait the Router to reboot to its factory default settings. -
Page 15: Chapter 2. Connecting The Router
TL-WR842ND 300Mbps Multi-Function Wireless N Router Chapter 2. Connecting the Router System Requirements Broadband Internet Access Service (DSL/Cable/Ethernet) One DSL/Cable Modem that has an RJ45 connector (which is not necessary if the Router is connected directly to the Ethernet.) PCs with a working Ethernet Adapter and an Ethernet cable with RJ45 connectors…
-
Page 16
TL-WR842ND 300Mbps Multi-Function Wireless N Router Note: If you want to use the Router to share files or printer, plug the USB storage device to the USB port or connect the printer to the Router with a matching cable. Connect the power adapter to the power socket on the Router, and the other end into an electrical outlet. -
Page 17: Chapter 3. Quick Installation Guide
TL-WR842ND 300Mbps Multi-Function Wireless N Router Chapter 3. Quick Installation Guide This chapter will show you how to configure the basic functions of your 300Mbps Multi-Function Wireless N Router using Quick Setup Wizard within minutes. TCP/IP Configuration The default domain name of the Router is http://tplinklogin.net…
-
Page 18: Quick Installation Guide
TL-WR842ND 300Mbps Multi-Function Wireless N Router If the result displayed is similar to Figure 3-2, it means the connection between your PC and the Router failed. Figure 3-2 Failure result of Ping command Please check the connection following these steps:…
-
Page 19
TL-WR842ND 300Mbps Multi-Function Wireless N Router Settings interface may not be opened with some web browsers, it is strongly recommended that you use Internet Explorer. To access the configuration utility, open a web-browser and type in the default domain name http://tplinklogin.net… -
Page 20
TL-WR842ND 300Mbps Multi-Function Wireless N Router Figure 3-5 Quick Setup Click Next, and then WAN Connection Type page will appear as shown in Figure 3-6. Figure 3-6 WAN Connection Type The Router provides Auto-Detect function and supports three popular ways PPPoE, Dynamic IP and Static IP to connect to the Internet. -
Page 21
TL-WR842ND 300Mbps Multi-Function Wireless N Router Figure 3-7 Quick Setup — PPPoE User Name/Password — Enter the User Name and Password provided by your ISP. These fields are case-sensitive. If you have difficulty with this process, please contact your ISP. -
Page 22
TL-WR842ND 300Mbps Multi-Function Wireless N Router Figure 3-9 Quick Setup – MAC Clone If you are visiting the Router from another computer, rather than the main computer, please select No, and then enter the main computer’s MAC in the field WAN MAC Address. -
Page 23
TL-WR842ND 300Mbps Multi-Function Wireless N Router Figure 3-11 Find MAC Address 3) If the connection type detected is Static IP, the next screen will appear as shown in Figure 3-12. Figure 3-12 Quick Setup — Static IP IP Address — This is the WAN IP address as seen by external users on the Internet (including your ISP). -
Page 24
TL-WR842ND 300Mbps Multi-Function Wireless N Router Secondary DNS — If your ISP provides another DNS server, enter it into this field. Click Next to continue, the Wireless settings page will appear as shown in Figure 3-13. Figure 3-13 Quick Setup – Wireless Wireless Radio — Choose from the drop-down list to enable or disable the wireless radio. -
Page 25
TL-WR842ND 300Mbps Multi-Function Wireless N Router Channel — This field determines which operating frequency will be used. It is not necessary to change the wireless channel unless you notice interference problems with another nearby access point. If you select auto, then the AP will select the best channel automatically. -
Page 26
TL-WR842ND 300Mbps Multi-Function Wireless N Router Figure 3-14 Quick Setup — Finish If there is anything changed on the Wireless page, you will see the Finish page as shown in Figure 3-15. Click the Reboot button to make your wireless configuration take effect and finish the Quick Setup. -
Page 27: Chapter 4. Configuring The Router
TL-WR842ND 300Mbps Multi-Function Wireless N Router Chapter 4. Configuring the Router This chapter will show each Web page’s key functions and the configuration way. Login After your successful login, you will see the sixteen main menus on the left of the Web-based utility.
-
Page 28: Quick Setup
TL-WR842ND 300Mbps Multi-Function Wireless N Router Figure 4-1 Router Status Quick Setup Please refer to 3.2 Quick Installation Guide. — 20 -…
-
Page 29: Wps
TL-WR842ND 300Mbps Multi-Function Wireless N Router This section will guide you to add a new wireless device to an existing network quickly by WPS (Wi-Fi Protected Setup) function. Choose menu “WPS”, and you will see the next screen (shown in Figure 4-2 ).
-
Page 30
TL-WR842ND 300Mbps Multi-Function Wireless N Router You can also keep the default WPS Status as Enabled and click the Add device button in Figure 4-2, then Choose “Press the button of the new device in two minutes” and click Connect. (Shown in the following figure) Figure 4-3 Add A New Device Step 2: Press and hold the WPS button of the client device directly. -
Page 31: Network
TL-WR842ND 300Mbps Multi-Function Wireless N Router III. Enter the Router’s PIN on your client device Use this method if your client device asks for the Router’s PIN number. Step 1: On the client device, enter the PIN number listed on the Router’s Wi-Fi Protected Setup screen.
-
Page 32
TL-WR842ND 300Mbps Multi-Function Wireless N Router Figure 4-6 WAN – Dynamic IP This page displays the WAN IP parameters assigned dynamically by your ISP, including IP address, Subnet Mask, Default Gateway, etc. Click the Renew button to renew the IP parameters from your ISP. -
Page 33
TL-WR842ND 300Mbps Multi-Function Wireless N Router Click the Save button to save your settings. If your ISP provides a static or fixed IP Address, Subnet Mask, Gateway and DNS setting, select Static IP. The Static IP settings page will appear, shown in Figure 4-7. -
Page 34
TL-WR842ND 300Mbps Multi-Function Wireless N Router Figure 4-8 WAN — PPPoE User Name/Password — Enter the User Name and Password provided by your ISP. These fields are case-sensitive. Secondary Connection — It’s available only for PPPoE Connection. If your ISP provides an extra Connection type such as Dynamic/Static IP to connect to a local area network, then you can check the radio button of Dynamic/Static IP to activate this secondary connection. -
Page 35
TL-WR842ND 300Mbps Multi-Function Wireless N Router down. Time-based Connecting — The connection will only be established in the period from the start time to the end time (both are in HH:MM format). Note: Only when you have configured the system time on “System Tools → Time” page, will the Time-based Connecting function take effect. -
Page 36
TL-WR842ND 300Mbps Multi-Function Wireless N Router these fields blank will work. ISP Specified IP Address — If your ISP does not automatically assign IP addresses to the Router during login, please click “Use IP address specified by ISP” check box and enter the IP address provided by your ISP in dotted-decimal notation. -
Page 37
TL-WR842ND 300Mbps Multi-Function Wireless N Router e.g. NSW / ACT — nsw.bigpond.net.au VIC / TAS / WA / SA / NT — vic.bigpond.net.au QLD — qld.bigpond.net.au MTU Size — The normal MTU (Maximum Transmission Unit) value for most Ethernet networks is 1500 Bytes. -
Page 38
TL-WR842ND 300Mbps Multi-Function Wireless N Router Figure 4-11 WAN — L2TP/Russia L2TP User Name/Password — Enter the User Name and Password provided by your ISP. These fields are case-sensitive. Dynamic IP/ Static IP — Choose either as you are given by your ISP. Click the Connect button to connect immediately. -
Page 39
TL-WR842ND 300Mbps Multi-Function Wireless N Router Connect Automatically — Connect automatically after the Router is disconnected. To use this option, check the radio button. Connect Manually — You can configure the Router to make it connect or disconnect manually. After a specified period of inactivity (Max Idle Time), the Router will disconnect from your Internet connection, and you will not be able to re-establish your connection automatically as soon as you attempt to access the Internet again. -
Page 40
TL-WR842ND 300Mbps Multi-Function Wireless N Router Figure 4-12 PPTP Settings User Name/Password — Enter the User Name and Password provided by your ISP. These fields are case-sensitive. Dynamic IP/ Static IP — Choose either as you are given by your ISP and enter the ISP’s IP address or the domain name. -
Page 41: Lan
TL-WR842ND 300Mbps Multi-Function Wireless N Router automatically re-establish your connection as soon as you attempt to access the Internet again. If you wish to activate Connect on Demand, check the radio button. If you want your Internet connection to remain active at all times, enter “0” in the Max Idle Time field.
-
Page 42: Mac Clone
TL-WR842ND 300Mbps Multi-Function Wireless N Router Figure 4-13 LAN MAC Address — The physical address of the Router, as seen from the LAN. The value can’t be changed. IP Address — Enter the IP address of your Router or reset it in dotted-decimal notation (factory default: 192.168.0.1).
-
Page 43: Wireless
TL-WR842ND 300Mbps Multi-Function Wireless N Router Your PC’s MAC Address — This field displays the MAC address of the PC that is managing the Router. If the MAC address is required, you can click the Clone MAC Address To button and this MAC address will fill in the WAN MAC Address field.
-
Page 44
TL-WR842ND 300Mbps Multi-Function Wireless N Router Figure 4-16 Wireless Settings SSID (1-4) — Up to four SSIDs for each BSS (Basic Service Set) can be entered in the filed SSID1 ~ SSID4. The name can be up to 32 characters. The same name (SSID) must be assigned to all wireless devices in your network. -
Page 45
TL-WR842ND 300Mbps Multi-Function Wireless N Router Note Dialog Note: Limited by local law regulations, version for North America does not have region selection option. Channel — This field determines which operating frequency will be used. The default channel is set to Auto, so the Router will choose the best channel automatically. It is not necessary to change the wireless channel unless you notice interference problems with another nearby access point. -
Page 46: Wireless Security
TL-WR842ND 300Mbps Multi-Function Wireless N Router or more Wlans. If this checkbox is selected, you will have to set the following parameters as shown in Figure 4-17. Make sure the following settings are correct. Figure 4-17 SSID(to be bridged) — The SSID of the AP your Router is going to connect to as a client.
-
Page 47
TL-WR842ND 300Mbps Multi-Function Wireless N Router Figure 4-18 Wireless Security SSID — Select the desired SSID from the drop-down list. Disable Security — If you do not want to use wireless security, check this radio button. But it’s strongly recommended to choose one of the following modes to enable security. -
Page 48
TL-WR842ND 300Mbps Multi-Function Wireless N Router Figure 4-19 WEP • Type — you can choose the type for the WEP security on the drop-down list. The default setting is Automatic, which can select Shared Key or Open System authentication type automatically based on the wireless station’s capability and request. -
Page 49
TL-WR842ND 300Mbps Multi-Function Wireless N Router notice in red as shown in Figure 4-20. Figure 4-20 WPA/WPA2 — Enterprise • Radius Server IP — Enter the IP address of the Radius server. • Radius Port — Enter the port number of the Radius server. -
Page 50: Wireless Mac Filtering
TL-WR842ND 300Mbps Multi-Function Wireless N Router Be sure to click the Save button to save your settings on this page. 4.6.3 Wireless MAC Filtering Choose menu “Wireless → MAC Filtering”, you can control the wireless access by configuring the Wireless MAC Filtering function, shown in Figure 4-22.
-
Page 51
TL-WR842ND 300Mbps Multi-Function Wireless N Router Give a simple description for the wireless station in the Description field. For example: Wireless station A. Select Enabled or Disabled for this entry on the Status drop-down list. Click the Save button to save this entry. -
Page 52: Wireless Advanced
TL-WR842ND 300Mbps Multi-Function Wireless N Router 4.6.4 Wireless Advanced Choose menu “Wireless → Wireless Advanced”, you can configure the advanced settings of your wireless network. Figure 4-24 Wireless Advanced Transmit Power — Here you can specify the transmit power of Router. You can select High, Middle or Low which you would like.
-
Page 53: Wireless Statistics
TL-WR842ND 300Mbps Multi-Function Wireless N Router DTIM Interval — This value determines the interval of the Delivery Traffic Indication Message (DTIM). A DTIM field is a countdown field informing clients of the next window for listening to broadcast and multicast messages. When the Router has buffered broadcast or multicast messages for associated clients, it sends the next DTIM with a DTIM Interval value.
-
Page 54: Dhcp
TL-WR842ND 300Mbps Multi-Function Wireless N Router If the numbers of connected wireless stations go beyond one page, click the Next button to go to the next page and click the Previous button to return the previous page. Note: This page will be refreshed automatically every 5 seconds.
-
Page 55: Dhcp Clients List
TL-WR842ND 300Mbps Multi-Function Wireless N Router End IP Address — Specify an IP address for the DHCP Server to end with when assigning IP addresses. 192.168.0.199 is the default end address. Address Lease Time — The Address Lease Time is the amount of time a network user will be allowed connection to the Router with their current dynamic IP Address.
-
Page 56: Address Reservation
TL-WR842ND 300Mbps Multi-Function Wireless N Router 4.7.3 Address Reservation Choose menu “DHCP → Address Reservation”, you can view and add a reserved address for clients via the next screen (shown in Figure 4-29).When you specify a reserved IP address for a PC on the LAN, that PC will always receive the same IP address each time when it accesses the DHCP server.
-
Page 57: Vpn
TL-WR842ND 300Mbps Multi-Function Wireless N Router Modify the information. Click the Save button. Click the Enable/Disabled All button to make all entries enabled/disabled. Click the Delete All button to delete all entries. Click the Next button to go to the next page and Click the Previous button to return the previous page.
-
Page 58
TL-WR842ND 300Mbps Multi-Function Wireless N Router Figure 4-33 IKE Policy Settings Policy Name — Specify a unique name to the IKE policy for identification and management purposes. Exchanged Mode — Select the IKE Exchange Mode in phase 1, and ensure the remote VPN peer uses the same mode. -
Page 59: Ipsec
TL-WR842ND 300Mbps Multi-Function Wireless N Router DPD — Enable or disable DPD (Dead Peer Detect) function. If enabled, a Dead Peer Detection (DPD) packet is sent from the VPN Concentrator to the VPN Client to ensure its peer is still there.
-
Page 60
TL-WR842ND 300Mbps Multi-Function Wireless N Router Figure 4-35 IPsec Policy Settings Policy Name — Enter the name for the IPsec Policy. Local Subnet — Enter the local (LAN) subnet and mask.(ex. 192.168.0.0/24) Peer Subnet — Enter the Peer subnet and mask. -
Page 61: Security Alliance List
TL-WR842ND 300Mbps Multi-Function Wireless N Router Out Authentication Key — It is for direction out authentication key set in manual mode, and the key must be same as peer In Authentication Key. PFS Group — Select the PFS property from the drop-down list that should be the same for the local and remote endpoints.
-
Page 62: Usb Settings
TL-WR842ND 300Mbps Multi-Function Wireless N Router 10.0.0.10 and 10.0.0.1 respectively. Security protocol and other parameters for IPsec tunnel and the remote router should be configured the same. As Security Association is unidirectional, an ingoing SA and an outgoing SA are created to protect data flows for each tunnel after IPsec tunnel is successfully established.
-
Page 63
TL-WR842ND 300Mbps Multi-Function Wireless N Router Used — The used space of the USB driver. Free — The available space of the USB driver. Use% — The percentage of the used space. Shared — Indicates the shared or non-shared status of the volume. When the volume is shared, you can click the Disable to stop sharing the volume;… -
Page 64: Ftp Server
TL-WR842ND 300Mbps Multi-Function Wireless N Router 4.9.2 FTP Server Choose menu “USB Settings→FTP Server”, you can create an FTP server that can be accessed from the Internet or your local network. Figure 4-40 FTP Server Configuration Server Status — Indicates the FTP Server’s current status.
-
Page 65: Media Server
TL-WR842ND 300Mbps Multi-Function Wireless N Router To add a new folder, follow the instructions below. Click Add New Folder in Figure 4-40. Figure 4-41 Add or Modify Share Folder Select the Share entire partition or a specific folder option. Enter display name of the share folder in Display Name filed.
-
Page 66
TL-WR842ND 300Mbps Multi-Function Wireless N Router Figure 4-42 Media Server Setting Server Name – The name of this Media Server. Server Status — Indicates the Media Server’s current status, started or stopped. You can click the Start button to start the Media Server and click the Stop button to stop it. -
Page 67
TL-WR842ND 300Mbps Multi-Function Wireless N Router Figure 4-44 Media Server Setting 3. Click the Add share folder button to specify a folder as the search path of media server. The screen will then appear as shown in Figure 4-45. Figure 4-45 Add New Folder Display Name — You can enter a display name for the share folder. -
Page 68: Print Server
TL-WR842ND 300Mbps Multi-Function Wireless N Router Select the Share entire partition or a specified folder option. Enter the display name of the share folder in Display Name edit box. Click the Save button to save the configuration and the page will be redirected to the media server configuration page as shown in Figure 4-46.
-
Page 69: User Accounts
TL-WR842ND 300Mbps Multi-Function Wireless N Router print service. Busy — Indicates the print service has been turned on, but at this moment other users are using print services. 4.9.5 User Accounts You can specify the user name and password for Storage Sharing and FTP Server users on this page.
-
Page 70
TL-WR842ND 300Mbps Multi-Function Wireless N Router Figure 4-49 Add or Modify User Account User Name — Type the user name that you want to give access to the USB drive. The user name must be composed of alphanumeric symbols not exceeding 15 characters in length. -
Page 71: Forwarding
TL-WR842ND 300Mbps Multi-Function Wireless N Router 4.10 Forwarding Figure 4-50 The Forwarding menu There are four submenus under the Forwarding menu (shown in Figure 4-50): Virtual Servers, Port Triggering, DMZ and UPnP. Click any of them, and you will be able to configure the corresponding function.
-
Page 72
TL-WR842ND 300Mbps Multi-Function Wireless N Router supported by the Router). Status — The status of this entry, «Enabled» means the virtual server entry is enabled. Common Service Port — Some common services already exist in the drop-down list. Modify — To modify or delete an existing entry. -
Page 73: Port Triggering
TL-WR842ND 300Mbps Multi-Function Wireless N Router Click the Next button to go to the next page and click the Previous button to return to the previous page. Note: If you set the service port of the virtual server as 80, you must set the Web management port on System Tools –>…
-
Page 74
TL-WR842ND 300Mbps Multi-Function Wireless N Router Figure 4-54 Add or Modify a Triggering Entry Trigger Port — The port for outgoing traffic. An outgoing connection using this port will trigger this rule. Trigger Protocol — The protocol used for Trigger Ports, either TCP, UDP, or All (all protocols supported by the Router). -
Page 75: Dmz
TL-WR842ND 300Mbps Multi-Function Wireless N Router Once the Router is configured, the operation is as follows: A local host makes an outgoing connection to an external host using a destination port number defined in the Trigger Port field. The Router records this connection, opens the incoming port or ports associated with this entry in the Port Triggering table, and associates them with the local host.
-
Page 76
TL-WR842ND 300Mbps Multi-Function Wireless N Router such as Internet computers, to access the local host resources or devices as needed. UPnP devices can be automatically discovered by the UPnP service application on the LAN. Figure 4-56 UPnP Setting Current UPnP Status — UPnP can be enabled or disabled by clicking the Enable or Disable button. -
Page 77: Security
TL-WR842ND 300Mbps Multi-Function Wireless N Router 4.11 Security Figure 4-57 The Security menu There are four submenus under the Security menu as shown in Figure 4-57: Basic Security, Advanced Security, Local Management and Remote Management. Click any of them, and you will be able to configure the corresponding function.
-
Page 78: Advanced Security
TL-WR842ND 300Mbps Multi-Function Wireless N Router VPN — VPN Passthrough must be enabled if you want to allow VPN tunnels using VPN protocols to pass through the Router. PPTP Passthrough — Point-to-Point Tunneling Protocol (PPTP) allows the • Point-to-Point Protocol (PPP) to be tunneled through an IP network. To allow PPTP tunnels to pass through the Router, click Enable.
-
Page 79
TL-WR842ND 300Mbps Multi-Function Wireless N Router Figure 4-59 Advanced Security Packets Statistics Interval (5~60) — The default value is 10. Select a value between 5 and 60 seconds from the drop-down list. The Packets Statistics Interval value indicates the time section of the packets statistics. -
Page 80: Local Management
TL-WR842ND 300Mbps Multi-Function Wireless N Router Enable TCP-SYN-FLOOD Attack Filtering — Enable or Disable the TCP-SYN-FLOOD Attack Filtering. TCP-SYN-FLOOD Packets Threshold (5~3600) — The default value is 50. Enter a value between 5 ~ 3600. When the current TCP-SYN-FLOOD Packets numbers is beyond the set value, the Router will startup the blocking function immediately.
-
Page 81: Remote Management
TL-WR842ND 300Mbps Multi-Function Wireless N Router use the password to browse the built-in web pages to perform Administrator tasks while all the others will be blocked. After click the Add button, your PC’s MAC Address will be placed in the list above.
-
Page 82: Parental Control
TL-WR842ND 300Mbps Multi-Function Wireless N Router Be sure to change the Router’s default password to a very secure password. 4.12 Parental Control Choose menu “Parental Control”, and then you can configure the parental control in the screen as shown in Figure 4-62. The Parental Control function can be used to control the internet activities of the child, limit the child to access certain websites and restrict the time of surfing.
-
Page 83
TL-WR842ND 300Mbps Multi-Function Wireless N Router Figure 4-63 Add or Modify Parental Control Entry Parental Control — Check Enable if you want this function to take effect; otherwise, check Disable. MAC Address of Parental PC — In this field, enter the MAC address of the controlling PC, or you can make use of the Copy To Above button below. -
Page 84
TL-WR842ND 300Mbps Multi-Function Wireless N Router Give a description (e.g. Allow Google) for the website allowed to be accessed in the Website Description field. Enter the allowed domain name of the website, either the full name or the keywords (e.g. -
Page 85: Access Control
TL-WR842ND 300Mbps Multi-Function Wireless N Router Figure 4-64 Parental Control Settings 4.13 Access Control Figure 4-65 Access Control There are four submenus under the Access Control menu as shown in Figure 4-59: Rule, Host, Target and Schedule. Click any of them, and you will be able to configure the corresponding function.
-
Page 86
TL-WR842ND 300Mbps Multi-Function Wireless N Router Enable Internet Access Control — Select the check box to enable the Internet Access Control function, so the Default Filter Policy can take effect. Rule Name — Here displays the name of the rule and this name is unique. -
Page 87
TL-WR842ND 300Mbps Multi-Function Wireless N Router Mode — Here are two options, IP Address and MAC Address. You can select either of them from the drop-down list. If the IP Address is selected, you can see the following item: LAN IP Address — Enter the IP address or address range of the host in dotted-decimal format (e.g. -
Page 88
TL-WR842ND 300Mbps Multi-Function Wireless N Router Protocol — Here are four options, All, TCP, UDP, and ICMP. Select one of them from the drop-down list for the target. Common Service Port — Here lists some common service ports. Select one from the drop-down list, and the corresponding port number will be filled in the Target Port field automatically. -
Page 89
TL-WR842ND 300Mbps Multi-Function Wireless N Router Click Next when finishing creating the advanced schedule entry, and the next screen will appear as shown in Figure 4-70. Figure 4-70 Quick Setup – Create an Internet Access Control Entry Rule — In this field, create a name for the rule. Note that this name should be unique (e.g. -
Page 90
TL-WR842ND 300Mbps Multi-Function Wireless N Router Click the Save button. Figure 4-71 Add Internet Access Control Entry For example: If you desire to allow the host with MAC address 00-11-22-33-44-AA to access www.google.com only from 18:00 to 20:00 on Saturday and Sunday, and forbid other hosts in the LAN to access the Internet, you should follow the settings below: Click the submenu Rule of Access Control in the left to return to the Rule List page. -
Page 91: Host
TL-WR842ND 300Mbps Multi-Function Wireless N Router 4.13.2 Host Choose menu “Access Control → Host”, and then you can view and set a Host list in the screen as shown in Figure 4-72. The host list is necessary for the Access Control Rule.
-
Page 92: Target
TL-WR842ND 300Mbps Multi-Function Wireless N Router Figure 4-73 Add or Modify a Host Entry Figure 4-74 Add or Modify a Host Entry For example: If you desire to restrict the internet activities of host with MAC address 00-11-22-33-44-AA, you should first follow the settings below: 1.
-
Page 93
TL-WR842ND 300Mbps Multi-Function Wireless N Router Figure 4-75 Target Settings Target Description — Here displays the description about the target and this description is unique. Information — The target can be IP address, port, or domain name. Modify — To modify or delete an existing entry. -
Page 94
TL-WR842ND 300Mbps Multi-Function Wireless N Router Figure 4-77 Add or Modify an Access Target Entry 1) In Target Description field, create a unique description for the target (e.g. Target_1). 2) In Domain Name field, enter the domain name, either the full name or the keywords (for example, google) in the blank. -
Page 95: Schedule
TL-WR842ND 300Mbps Multi-Function Wireless N Router 4.13.4 Schedule Choose menu “Access Control → Schedule”, and then you can view and set a Schedule list in the next screen as shown in Figure 4-78. The Schedule list is necessary for the Access Control Rule.
-
Page 96: Advanced Routing
TL-WR842ND 300Mbps Multi-Function Wireless N Router Figure 4-79 Advanced Schedule Settings For example: If you desire to restrict the internet activities of host with MAC address 00-11-22-33-44-AA to access www.google.com only from 18:00 to 20:00 on Saturday and Sunday, you should first follow the settings below: 1) Click Add New…
-
Page 97: Static Routing List
TL-WR842ND 300Mbps Multi-Function Wireless N Router corresponding function. 4.14.1 Static Routing List Choose menu “Advanced Routing → Static Routing List”, and then you can configure the static route in the next screen (shown in Figure 4-81). A static route is a pre-determined path that network information must travel to reach a specific host or network.
-
Page 98: System Routing Table
TL-WR842ND 300Mbps Multi-Function Wireless N Router Click the Save button to make the entry take effect. Other configurations for the entries: Click the Delete button to delete the entry. Click the Enable All button to enable all the entries. Click the Disable All button to disable all the entries.
-
Page 99: Bandwidth Control
TL-WR842ND 300Mbps Multi-Function Wireless N Router 4.15 Bandwidth Control Figure 4-84 Bandwidth Control There are two submenus under the Bandwidth Control menu as shown in Figure 4-84: Control Settings and Rules List. Click any of them, and you will be able to configure the corresponding function.
-
Page 100
TL-WR842ND 300Mbps Multi-Function Wireless N Router Figure 4-86 Bandwidth Control Rules List Description — This is the information about the rules such as address range. Egress bandwidth — This field displays the max and mix upload bandwidth through the WAN port, the default is 0. -
Page 101: Ip & Mac Binding Setting
TL-WR842ND 300Mbps Multi-Function Wireless N Router 4.16 IP & MAC Binding Setting Figure 4-88 the IP & MAC Binding menu There are two submenus under the IP &MAC Binding menu (shown in Figure 4-88): Binding Settings and ARP List. Click any of them, and you will be able to scan or configure the corresponding function.
-
Page 102
TL-WR842ND 300Mbps Multi-Function Wireless N Router Figure 4-90 IP & MAC Binding Setting (Add & Modify) To add IP & MAC Binding entries, follow the steps below. Click the Add New… button as shown in Figure 4-89. Enter the MAC Address and IP Address. -
Page 103: Arp List
TL-WR842ND 300Mbps Multi-Function Wireless N Router 4.16.2 ARP List To manage the computer, you could observe the computers in the LAN by checking the relationship of MAC address and IP address on the ARP list, and you could also configure the items on the ARP list.
-
Page 104: Comexe.cn Ddns
TL-WR842ND 300Mbps Multi-Function Wireless N Router service providers such as www.comexe.cn, www.dyndns.org, or www.no-ip.com. The Dynamic DNS client service provider will give you a password or key. 4.17.1 Comexe.cn DDNS If the dynamic DNS Service Provider you select is www.comexe.cn, the page will appear as shown in Figure 4-93 .
-
Page 105: Dyndns.org Ddns
TL-WR842ND 300Mbps Multi-Function Wireless N Router Note: If you want to login again with another account after a successful login, please click the Logout button, then input your new username and password and click the Login button. 4.17.2 Dyndns.org DDNS If the dynamic DNS Service Provider you select is www.dyndns.org, the page will appear as…
-
Page 106: No-Ip.com Ddns
TL-WR842ND 300Mbps Multi-Function Wireless N Router 4.17.3 No-ip.com DDNS If the dynamic DNS Service Provider you select is www.no-ip.com, the page will appear as shown in Figure 4-95. Figure 4-95 No-ip.com DDNS Settings To set up for DDNS, follow these instructions: Enter the User Name for your DDNS account.
-
Page 107: System Tools
TL-WR842ND 300Mbps Multi-Function Wireless N Router 4.18 System Tools Figure 4-96 The System Tools menu Choose menu “System Tools”, and you can see the submenus under the main menu: Time Settings, Diagnostic, Firmware Upgrade, Factory Defaults, Backup & Restore, Reboot, Password, System Log and Statistics.
-
Page 108
TL-WR842ND 300Mbps Multi-Function Wireless N Router Time Zone — Select your local time zone from this pull down list. Date — Enter your local date in MM/DD/YY into the right blanks. Time — Enter your local time in HH/MM/SS into the right blanks. -
Page 109: Diagnostic
TL-WR842ND 300Mbps Multi-Function Wireless N Router Note: This setting will be used for some time-based functions such as firewall. You must specify your time zone once you login to the router successfully, otherwise, these functions will not take effect. The time will be lost if the router is turned off.
-
Page 110: Firmware Upgrade
TL-WR842ND 300Mbps Multi-Function Wireless N Router pinging/tracerouting the IP address is successful, but pinging/tracerouting the domain name is not, you might have a name resolution problem. In this case, ensure that the domain name you are specifying can be resolved by using Domain Name System (DNS) queries.
-
Page 111
Router with an Ethernet cable; otherwise, the following screen will appear to remind you. New firmware versions are posted at http://www.tp-link.com and can be downloaded for free. There is no need to upgrade the firmware unless the new firmware has a new feature you want to use. -
Page 112: Factory Defaults
TL-WR842ND 300Mbps Multi-Function Wireless N Router The upgrade process takes a few moments and the Router restarts automatically when the upgrade is complete. 4.18.4 Factory Defaults Choose menu “System Tools → Factory Defaults”, and then and you can restore the…
-
Page 113: Reboot
TL-WR842ND 300Mbps Multi-Function Wireless N Router • Click the Restore button to update the configuration with the file whose path is the one you have input or selected in the blank. Note: The current configuration will be covered with the uploading configuration file. Wrong process will lead the device unmanaged.
-
Page 114: System Log
TL-WR842ND 300Mbps Multi-Function Wireless N Router Figure 4-105 Password It is strongly recommended that you should change the factory default user name and password of the Router, because all users who try to access the Router’s Web-based utility or Quick Setup will be prompted for the Router’s default user name and password.
-
Page 115
TL-WR842ND 300Mbps Multi-Function Wireless N Router Figure 4-106 System Log Auto Mail Feature — Indicates whether auto mail feature is enabled or not. Mail Settings — Set the receiving and sending mailbox address, server address, validation information as well as the timetable for Auto Mail Feature, as shown in Figure 4-107. -
Page 116: Statistics
TL-WR842ND 300Mbps Multi-Function Wireless N Router • Authentication — Most SMTP Server requires Authentication. It is required by most mailboxes that need User Name and Password to log in. Note: Only when you select Authentication, do you have to enter the User Name and Password in the following fields.
-
Page 117
TL-WR842ND 300Mbps Multi-Function Wireless N Router Figure 4-108 Statistics Current Statistics Status — Enable or Disable. The default value is disabled. To enable it, click the Enable button. If it is disabled, the function of DoS protection in Security settings will be disabled. -
Page 118
TL-WR842ND 300Mbps Multi-Function Wireless N Router Statistics Table: IP/MAC Address The IP and MAC address are displayed with related statistics. Packets The total number of packets received and transmitted by the Router. Total Bytes The total number of bytes received and transmitted by the Router. -
Page 119: Appendix A: Faq
TL-WR842ND 300Mbps Multi-Function Wireless N Router Appendix A: FAQ How do I configure the Router to access Internet by ADSL users? First, configure the ADSL Modem configured in RFC1483 bridge model. Connect the Ethernet cable from your ADSL Modem to the WAN port on the Router. The telephone cord plugs into the Line port of the ADSL Modem.
-
Page 120
TL-WR842ND 300Mbps Multi-Function Wireless N Router Note: 1) Sometimes the connection cannot be disconnected although you specify a time to Max Idle Time, since some applications is visiting the Internet continually in the background. 2) If you are a Cable user, please configure the Router following the above steps. -
Page 121
TL-WR842ND 300Mbps Multi-Function Wireless N Router Figure A-4 Virtual Servers Figure A-5 Add or Modify a Virtual server Entry Note: Your opposite side should call your WAN IP, which is displayed on the “Status” page. How to enable DMZ Host: Log in to the Router, click the “Forwarding” menu on the left of your browser, and click «DMZ»… -
Page 122
TL-WR842ND 300Mbps Multi-Function Wireless N Router check the Enable radio button next to H323 ALG. Remember to click the Save button. Figure A-7 Basic Security I want to build a WEB Server on the LAN, what should I do? Because the WEB Server port 80 will interfere with the WEB management port 80 on the Router, you must change the WEB management port number to avoid interference. -
Page 123
TL-WR842ND 300Mbps Multi-Function Wireless N Router F igure A-8 Remote Management Note: If the above configuration takes effect, you can visit and configure the Router by typing http://192.168.0.1:88 (the Router’s LAN IP address: Web Management Port) in the address field of the Web browser. If the LAN IP of the modem connected with your router is 192.168.0.x, the default LAN IP of the Router will automatically switch from 192.168.0.1 to… -
Page 124
TL-WR842ND 300Mbps Multi-Function Wireless N Router Figure A-10 Add or Modify a Virtual server Entry The wireless stations cannot connect to the Router. Make sure the «Wireless Router Radio» is enabled. Make sure that the wireless stations’ SSID accord with the Router’s SSID. -
Page 125: Appendix B: Configuring The Pcs
TL-WR842ND 300Mbps Multi-Function Wireless N Router Appendix B: Configuring the PCs In this section, we’ll introduce how to install and configure the TCP/IP correctly in Windows XP. First make sure your Ethernet Adapter is working, refer to the adapter’s manual if needed.
-
Page 126
TL-WR842ND 300Mbps Multi-Function Wireless N Router In the prompt page that showed below, double click on the Internet Protocol (TCP/IP). Figure B-2 The following TCP/IP Properties window will display and the IP Address tab is open on this window by default. -
Page 127
TL-WR842ND 300Mbps Multi-Function Wireless N Router Select Obtain an IP address automatically and Obtain DNS server automatically, as shown in the Figure below: Figure B-3 — 119 -… -
Page 128: Appendix C: Specifications
TL-WR842ND 300Mbps Multi-Function Wireless N Router Appendix C: Specifications General IEEE 802.11n, IEEE 802.11g, IEEE 802.11b, IEEE 802.11a, IEEE Standards 802.11e, IEEE 802.11i, IEEE 802.1X, IEEE 802.3X, IEEE 802.3, IEEE 802.3u, IEEE 802.3ab Protocols TCP/IP, PPPoE, DHCP, ICMP, NAT, SNTP…
-
Page 129: Appendix D: Glossary
TL-WR842ND 300Mbps Multi-Function Wireless N Router Appendix D: Glossary 802.11n — 802.11n builds upon previous 802.11 standards by adding MIMO (multiple-input multiple-output). MIMO uses multiple transmitter and receiver antennas to allow for increased data throughput via spatial multiplexing and increased range by exploiting the spatial diversity, perhaps through coding schemes like Alamouti coding.
-
Page 130
TL-WR842ND 300Mbps Multi-Function Wireless N Router hosts to the Internet over an always-on connection by simulating a dial-up connection. SSID — A Service Set Identification is a thirty-two character (maximum) alphanumeric key identifying a wireless local area network. For the wireless devices in a network to communicate with each other, all devices must be configured with the same SSID.
инструкцияTP-Link TL-WR842ND

Quick Installation Guide
Wireless Router
www.tp-link.com
7106508531 REV2.3.0
Specications are subject to change without notice. is a registered trademark of TP-Link
Technologies Co., Ltd. Other brands and product names are trademarks or registered trademarks of
their respective holders.
No part of the specications may be reproduced in any form or by any means or used to make any
derivative such as translation, transformation, or adaptation without permission from TP-Link
Technologies Co., Ltd. Copyright © 2019 TP-Link Technologies Co., Ltd. All rights reserved.
*Image may dier from your actual product.
For technical support, the user guide and more information, please visit
https://www.tp-link.com/support.
Посмотреть инструкция для TP-Link TL-WR842ND бесплатно. Руководство относится к категории Маршрутизаторы (роутеры), 1 человек(а) дали ему среднюю оценку 7.8. Руководство доступно на следующих языках: русский, английский. У вас есть вопрос о TP-Link TL-WR842ND или вам нужна помощь? Задайте свой вопрос здесь
- 7106508531_封面
- SOHO无线路由(欧二16国)_QIG_V1
Главная
| TP-Link | |
| TL-WR842ND | TL-WR842ND | |
| Маршрутизатор (роутер) | |
| 1407832804810, 163121182281, 6935364051617, 6935364051624, 745449845330, 845973051617, 8459730516176, 0845973051617, 0745449845330, 0163121182281, 0071040165158, 0191120100746, 0172302833805, 0168141564390, 0809385676424, 0898029647593, 0132018352526, 0807030505877, 0809185824957, 0168141654220, 0809186281575, 0132018165102, 0778890699528, 0803982840820, 0796793910564, 0115971150538 | |
| русский, английский | |
| Руководство пользователя (PDF), Техническая спецификация (PDF) |
Сеть
| Подключение Ethernet | Да |
| Скорость передачи данных Ethernet LAN | 10, 100 Мбит/с |
| Стандарты сети | IEEE 802.11b, IEEE 802.11n |
| Количество туннелей VPN | 5 |
| Свивка кабеля | 10/100Base-T(X) |
| Тип LAN Ethernet интерфейса | Быстрый Ethernet |
Характеристики беспроводной LAN
| Wi-Fi стандартов | 802.11b, 802.11g, Wi-Fi 4 (802.11n) |
| Основной стандарт Wi-Fi | Wi-Fi 4 (802.11n) |
| Скорость передачи данных WLAN (макс) | 300 Мбит/с |
Прочие свойства
| Поддерживаемые скорости передачи данных беспроводной LAN | 300 Мбит/с |
| Количество портов USB | 1 |
| Диапазон частот | 2.4 — 2.4835 GHz |
| Монтаж в стойку | Нет |
| xDSL подключение | Нет |
| Подключение к мобильной сети | Нет |
Протоколы
| Поддерживаемые сетевые протоколы | PPTP, L2TP, PPPoE, FTP |
| DHCP клиент | Да |
| DHCP сервер | Да |
| Universal Plug and Play (UPnP) | Да |
Безопасность
| Поддержка DMZ | Да |
| Алгоритмы шифрования данных | 128-bit WEP, 152-bit WEP, 64-bit WEP, WEP, WPA, WPA-PSK, WPA2, WPA2-PSK |
| Фильтрация MAC-адресов | Да |
| Защита от DoS атаки | Да |
| Фильтрация | Да |
| Инспекция пакетов с хранением состояния (SPI) | Да |
Антена
| Тип разъема антенны | RP-SMA |
| Коэффициент усиления антенны (макс) | 5 dBi |
| Количество антенн | 2 |
Характеристики управления
| Управление через веб-интерфейс | Нет |
| Кнопка сброса установок | Да |
| Поддержка Quality of Service (QoS) | Да |
Порты и интерфейсы
| Количество портов Ethernet LAN ( RJ-45) | 4 |
| Гнездо входа постоянного тока (DC) | Да |
Свойства
| Сертификация | CE, FCC, RoHS |
Условия эксплуатации
| Диапазон температур при эксплуатации | 0 — 40 °C |
| Диапазон температур при хранении | -40 — 70 °C |
| Диапазон относительной влажности при эксплуатации | 10 — 90 % |
| Диапазон относительной влажности при хранении | 5 — 95 % |
Вес и размеры
| Вес | — g |
| Ширина | 192 mm |
| Глубина | 130 mm |
| Высота | 33 mm |
Содержимое упаковки
| Сетевой адаптер в комплекте | Да |
| Поставляемые кабели | LAN (RJ-45) |
| Краткая инструкция пользователя | Да |
Дизайн
| Цвет товара | Белый |
| Светодиодные индикаторы | LAN, Link, Power, WAN |
Мобильная сеть
| 3G | Нет |
| 4G | Нет |
| Поколение сети мобильной связи | 4G |
WAN подключение
показать больше
Не можете найти ответ на свой вопрос в руководстве? Вы можете найти ответ на свой вопрос ниже, в разделе часто задаваемых вопросов о TP-Link TL-WR842ND.
Не нашли свой вопрос? Задайте свой вопрос здесь
Инструкция по настройке роутера TP-Link TL-WR842ND
- Авторизация
- Смена заводского пароля
- Настройка подключения к Интернет
- Настройка PPPoE подключения (Ростелеком, Dom.ru)
- Настройка L2TP подключения (Билайн)
- Настройка PPtP (VPN) при автоматическом получении локального IP адреса (DHCP)
- Настройка PPtP (VPN) при статическом локальном IP адресе
- NAT при автоматическом получении IP адреса (DHCP)
- Настройка Wi-Fi на роутере
- Настройка IP-TV
- Переадресация/проброс портов
- Сохранение/восстановление настроек роутера
Авторизация
Для того, что бы попасть в веб-интерфейс роутера, необходимо открыть ваш Интернет браузер и в строке адреса набрать 192. 168.0.1, Имя пользователя — admin , Пароль — admin (при условии, что роутер имеет заводские настройки, и его IP не менялся).
Смена заводского пароля
Чтобы никто, кроме Вас не смог войти в настройки роутера, необходимо сменить пароль для входа в настройки.
Для этого выбираем слева в меню System Tools(Системные инструменты) — Password(Пароль) и вводим настройки:
Old User Name: старое имя пользователя, вводим admin Old Password: старый пароль, вводим admin New User Name: вводим новое имя пользователя, можно оставить admin New Password: вводим новый пароль Confirm New Password: подтверждаем новый пароль

Настройка подключения к Интернет
В интерфейсе роутера необходимо зайти во вкладку Network(Сеть), меню WAN (Здесь Вы можете добавлять, редактировать и удалять соединения).
Настройка PPPoE подключения
- Слева выбираем меню Network, далее MAC Clone
- Нажимаем Clone MAC address, далее Save
- В поле Тип WAN подключения (WAN Connection Type): PPPoE
- User Name (Имя пользователя): ваш логин по договору
- Password (Пароль) и Confirm Password (Подтверждение пароля): ваш пароль по договору.
- WAN Connection Mode (Режим WAN-подключение): Connect Automatically (Автоматическое подключение )
- После введения вышеперечисленных настроек нажимаем Save (Сохранить). Интернет настроен.

Настройка L2TP подключения
- WAN Connection Type ( Тип WAN подключения): выберите L2TP/Russia L2TP
- User Name (Имя пользователя): ваш логин по договору
- Password (Пароль) и Confirm Password (Подтверждение пароля): ваш пароль по договору
- Ставим точку на Dinamic IP
- Server IP Address/Name — адрес или имя сервера (указано в договоре)
- MTU size — поменяйте значение на 1450 или меньше
- WAN connection mode — Connect Automatically (подключаться автоматически)
- После введения вышеперечисленных настроек нажимаем Save (Сохранить). Интернет настроен.

Настройка PPtP (VPN) при автоматическом получении локального IP адреса (DHCP)
- Слева выбираем меню Network, далее MAC Clone
- Нажимаем Clone MAC address, далее Save
- В поле Тип WAN подключения (WAN Connection Type): PPTP
- User Name (Имя пользователя): ваш логин по договору
- Password (Пароль) и Confirm Password (Подтверждение пароля): ваш пароль по договору
- Выбираем Dinamic IP address (Динамический IP адрес).
- В поле Server IP Address/Name ставим адрес или имя сервера (указано в договоре)
- WAN Connection Mode (Режим WAN-подключение): Connect Automatically (Автоматическое подключение).
- После введения вышеперечисленных настроек нажимаем Save (Сохранить). Интернет настроен.
 при автоматическом получении локального IP адреса (DHCP) на роутере TP-Link TL-WR842ND")
Настройка PPtP (VPN) при статическом локальном IP адресе
- В поле Тип WAN подключения (WAN Connection Type): PPTP
- User Name (Имя пользователя): ваш логин по договору
- Password (Пароль) и Confirm Password (Подтверждение пароля): ваш пароль по договору
- Выбираем Static IP address (Статический IP адрес).
- В полях Server IP Address/Name, IP Address, Subnet Mask, Gateway вводим данные из договора. В поле DNS можно ввести DNS адрес Вашего провайдера.
- WAN Connection Mode (Режим WAN-подключение): Connect Automatically (Автоматическое подключение).
- После введения вышеперечисленных настроек нажимаем Save (Сохранить). Интернет настроен.
 при статическом локальном IP адресе на роутере TP-Link TL-WR842ND")
NAT при автоматическом получении IP адреса (DHCP)
- Слева выбираем меню Network, далее MAC Clone
- Нажимаем Clone MAC address, далее Save (подробнее см. в разделе Клонирование МАК адреса;)
- В поле Тип WAN подключения (WAN Connection Type): выберите Dinamic IP (Динамический IP)
- Нажимаем Save (Сохранить). Интернет настроен.
 на роутере TP-Link TL-WR842ND")
Настройка Wi-Fi на роутере
Настраиваем Wi-Fi соединение. В боковом меню перейдите в Wireless (Беспроводной режим). В открывшемся окошке вводите следующие настройки:
Выставляем параметры следующим образом:
- Поле SSID;: вводим название беспроводной сети.
- Region: Russia
- Chanel: Auto
- Mode: 11bgn mixed
- Channel Width: Automatic
- Нажимаем ниже кнопку Save;

Настраиваем шифрование Wi-Fi для каждой сети. Пароли могут быть одинаковые. В боковом меню переходим в Wireless Security (Защита Беспроводного режима):
- Выбираем тип шифрования WPA/WPA2 — Personal(Recommended).
- Wireless Password: вводим пароль на Wi-Fi сеть. Пароль не должен быть менее 8 символов
- Нажмите внизу кнопку Save (Сохранить). После сохранения настроек будет предложено перегрузить роутер, игнорируйте это требование (красная надпись внизу).

Сохранение/восстановление настроек роутера
После проведения настройки, рекомендуется сохранить их, чтобы в случае возникновения проблем, можно было их восстановить. Для этого необходимо зайти во вкладку System Tools, меню Backup & Restore.
- Для сохранения текущих настроек роутера необходимо нажать кнопку Backup. Файл с настройками будет сохранен в указанное место на жёстком диске.
- Для восстановления настроек настроек из файла, необходимо нажать кнопку выбора файла, указать путь к файлу с настройками, затем нажать кнопку Restore.

Переадресация/проброс портов
Данная функция автоматически перенаправляет запросы определенных сервисов из Интернета на соответствующий хост Вашей локальной сети, находящийся за межсетевым экраном роутера. Использовать данную функцию следует в том случае, если Вы хотите создать в локальной сети за межсетевым экраном роутера какой-либо сервер (например, Web-сервер или почтовый сервер). Заходим в Forwarding, нажимаем Add New.

IP-адрес — сетевой адрес устройства, на который будет перенаправляться запрос Servise Port — номер порта, который требуется открыть Protocol — Выбираете требуемый протокол Status — Enable Нажимаем Save.

Содержание
- 1 Роутер tl wr842nd: возможности и характеристики
- 2 Маршрутизатор tl wr842nd: обзор и подключение к сети
- 2.1 Порты/разъёмы на задней панели устройства:
- 3 Роутер tp link tl wr842nd: настройка подключения к интернету
- 4 Как настроить WiFi на роутере tp link tl wr842nd?
- 5 Роутер tp link tl wr842nd: инструкция по настройке IpTV
- 6 Роутер tp link tl wr842nd: дополнительные возможности
Роутер tp link tl wr842nd – это многофункциональный беспроводной маршрутизатор с высокой скоростью передачи данных, обеспечивающий стабильную работу домашней или офисной сети и вполне удовлетворяющий основным требованиям рядовых пользователей.
Роутер tl wr842nd: возможности и характеристики
К основным техническим особенностям роутера tl wr842nd относится:
- – использование технологии «IEEE 802.11n», которая обеспечивает скорость передачи данных до 300 Мбит/с;
- – оснащённость поддержкой до 5 «VPN туннелей»;
- – поддержка технологии «2×2 MIMO», что позволяет покрывать большую площадь;
- – наличие «USB порта» для подключения 3G/4G модемов;
- – поддержка авто-MDI/MDIX;
- – гостевая сеть;
- – список контроля доступа для беспроводной сети;
- – предоставление статистики по потокам.
Маршрутизатор tl wr842nd: обзор и подключение к сети
Прежде всего, стоит ознакомиться с индикаторами и наличием портов маршрутизатора.
Итак, на корпусе роутера tl wr842nd присутствуют следующие индикаторы:

- – «Питание».
- – «Система». Если индикатор горит непрерывно — устройство загружается и готовится к работе, если мигает – исправно работает, если индикатор «не горит» – вероятно, возникла системная ошибка;
- – «Беспроводное вещание». Мигающий индикатор показывает, что беспроводная сеть исправно работает.
- – «WAN» и «LAN 1/2/3/4». При подключении устройств к маршрутизатору в порты «LAN» соответствующим кабелем индикатор будет постоянно «мигать».
- – «USB». Индикатор загорается при подключении к роутеру tl wr842nd USB устройств.
- – «WPS». Медленное мигание означает, что в настоящий момент к беспроводной сети подключается устройство, непрерывное «горение» – устройство успешно подключено, а при быстром мигании – подключение не удалось.
Порты/разъёмы на задней панели устройства:

- – разъём «Power». Предназначен для подключения элемента питания роутера tl wr842nd.
- – «LAN» порты 4/3/2/1. Для подключения компьютеров к локальной сети.
- – «WAN». Для подключения к сети провайдера.
- – «USB». Порт предназначен для подключения 3G/4G модемов, принтеров и устройств хранения данных.
- – «WPS/Reset». «WPS» предназначен для быстрого подключения устройств к беспроводной сети, а кнопка «Reset» – для сброса настроек до значения «по умолчанию».
- – «WiFi ON/OFF». Служит для включения или выключения беспроводной сети.
Кроме того, роутер tl wr842nd также оснащён двумя антеннами для усиления передаваемого сигнала.
Роутер tp link tl wr842nd: настройка подключения к интернету
Переходим непосредственно к установке и настройке роутера tp link tl wr842nd.
Перед подключением роутера к сети отключите адаптер электропитания. Соедините роутер и компьютер/ы соответствующим кабелем в «LAN» порты. Кабель от провайдера подключите в порт «WAN». Останется подключить адаптер питания и с помощью кнопки «ON/OFF» включить маршрутизатор.

Теперь можно перейти к настройке интернет соединения. Для этого потребуется сделать следующее:
- – в адресной строке браузера введите ip адрес роутера — 192.168.0.1, подтвердите вход вводом логина и пароля (по умолчанию установлено admin/admin);
- – в открывшимся меню настроек роутера tp link tl wr842nd перейдите в раздел «Сеть» – далее «WAN»;

– в первой строке выберите «Тип подключения» – он указан в договоре с провайдером:
а). «Динамический ip».

Нажмите кнопку «Обновить» – чтобы получить параметры от провайдера. «Размер MTU» (это максимальный размер пакета) установите 1500. «DNS сервера» заполняются по желанию: для активации поля для ввода адреса установите галочку «Использовать следующие dns сервера» и укажите любой публичный «dns сервер» (это может быть dns сервер google 8.8.8.8 или 8.8.8.4 или вашего провайдера). Остальные строки оставьте как есть.
б). «Статистический ip».

Заполняется по тому же принципу, что и выше, за исключением полей «ip адреса», «маска подсети» и «основной шлюз» – эти параметры будут указаны всё в том же договоре с провайдером.
в). «PPPoE/PPPoE Россия».

В строки «имя пользователя» и «пароль» введите авторизационные данные, которые вам указал поставщик интернет-услуг. «Вторичное подключение» заполните по желанию. Остальные параметры заполняются по аналогии с вышеописанным руководством.
г). «Кабель BigPond».

Настройка осуществляется аналогично, только здесь необходимо прописать «сервер аутентификации» и «домен аутентификации».
д). «L2TP/L2TP Россия»

и «PPTP/PPTP Россия ».

Данные варианты характерны при использовании «VPN», все параметры необходимо уточнить у поставщика услуг «VPN сервера».
Для завершения настройки роутера tp link tl wr842nd нажмите кнопку «Сохранить».
Как настроить WiFi на роутере tp link tl wr842nd?
Теперь необходимо рассмотреть настройку беспроводной сети, которая также не отличается особой сложностью:
– откройте раздел «Беспроводной режим» – далее «Настройки беспроводного режима»;

- – в открывшемся окне введите в строку «Имя беспроводной сети» название, которое вы придумали для своей создаваемой сети (или оставьте название маршрутизатора);
- – остальные параметры оставьте по умолчанию: «Режим» – 11bgn смешанный, «Ширина канала» и «Канал» – Авто, или – если известен наименее занятый канал – укажите его (в России используются каналы от 1 до 13). Оставьте галочки на «Включить беспроводное вещание» и «Включить широковещание SSID» и нажмите «Сохранить.
- – откройте раздел «Защита беспроводного режима» и выберите один из трёх типов аутентификации: «WPA/WPA2 – Personal», «WPA/WPA2 – Enterprise» или «WEP». Параметры «Версия» и «Шифрования» оставьте в значении – «Автоматически».

В строке «Пароль» введите придуманный вами пароль, который в дальнейшем потребуется для подключения к создаваемой беспроводной сети и нажмите «Сохранить».
Роутер tp link tl wr842nd: инструкция по настройке IpTV
Для настройки IpTV перейдите в одноимённый раздел и укажите следующие параметры:
– «IGMP Proxy » – «Включить»;

– «Режим». При выборе:
а). «Автоматически» – «LAN» порты, использующие «IGMP Proxy», будут работать без изменений, что открывает возможность для использования «IPTV» как в проводном, так и в без проводном подключении.
б). «Мост».

Потребуется указать номер «LAN» порта, к которому физически подключена ТВ приставка, которая получит свой «ip адрес».
в). «802.1Q Tag VLAN ».

В этом случае необходимо уточнить идентификаторы виртуальной сети (VLAN Tag ID) у провайдера.
Для завершения настройки IpTV сохраните конфигурацию и дождитесь перезагрузки роутера.
Роутер tp link tl wr842nd: дополнительные возможности
В качестве дополнительных возможностей маршрутизатора TP-link tl wr842nd стоит рассмотреть настройку функции «WDS».
Данный раздел настраивается при использовании роутера в качестве клиента и усилителя уже существующего беспроводного сигнала. А выглядят настройки так:

- – в разделе «Настройки беспроводного режима» установите флажок в строке «Включить WDS»;
- – ниже укажите «SSID», т.е. название сети, сигнал которой будет усиливаться;
- – далее, введите «mac-адрес» устройства, которое осуществляет раздачу беспроводной сети (или можно воспользоваться поиском);
- – «Режим WDS» – «Авто»;
- – «Тип ключа», «Тип аутентификации» и «Пароль» заполняются также, как и на основной точке доступа;
- – строка «Индекс WEP» заполняется только если данный тип аутентификации используется на основном (раздающем) маршрутизаторе.
Как и большинство маршрутизаторов фирмы «TP-Link», роутер tl wr842nd отличается стабильной работой, удобным, понятным и русифицированным интерфейсом, и всё это за относительно невысокую цену. Отличный вариант для создания домашней или небольшой корпоративной сети.
- Распечатать
Оцените статью:
- 5
- 4
- 3
- 2
- 1
(2 голоса, среднее: 4.5 из 5)
Поделитесь с друзьями!