Mitsubishi Mirage: Руководства по эксплуатации
Материал из MMC Manuals
Перейти к навигации
Перейти к поиску
Руководства по эксплуатации Mitsubishi Mirage. Брошюры, каталоги, спецификации, карты технического обслуживания.
↑ Mitsubishi Mirage
![]()
| Язык/Language: | Русский • English |
|---|
Брошюры, каталоги, спецификации
Руководства по эксплуатации
- Краткое руководство Mitsubishi Mirage MY 2014 (North America), pdf, eng., 1,40 МБ
- Краткое руководство Mitsubishi Mirage MY 2015 (North America), pdf, eng., 920 кБ
- Краткое руководство Mitsubishi Mirage MY 2017 (North America), pdf, eng., 1,31 МБ
- Краткое руководство Mitsubishi Mirage MY 2018 (North America), pdf, eng., 852 кБ
- Краткое руководство Mitsubishi Mirage MY 2019 (North America), pdf, eng., 935 кБ
- Руководство по эксплуатации Mitsubishi Mirage MY 2013 (Europe), pdf, eng., 9,51 МБ
- Руководство по эксплуатации Mitsubishi Mirage MY 2016 (Europe), pdf, eng., 17,0 МБ
- Руководство по эксплуатации Mitsubishi Mirage MY 2019 (Europe), pdf, eng., 36,1 МБ
- Руководство по эксплуатации Mitsubishi Mirage MY 2014 (North America), pdf, eng., 20,8 МБ
- Руководство по эксплуатации Mitsubishi Mirage MY 2015 (North America), pdf, eng., 43,4 МБ
- Руководство по эксплуатации Mitsubishi Mirage MY 2017 (North America), pdf, eng., 8,67 МБ
- Руководство по эксплуатации Mitsubishi Mirage MY 2018 (North America), pdf, eng., 27,4 МБ
- Руководство по эксплуатации Mitsubishi Mirage MY 2019 (North America), pdf, eng., 28,0 МБ
- Руководство по эксплуатации Mitsubishi Mirage MY 2021 (North America), pdf, eng., 30,5 МБ
- Руководство по эксплуатации Mitsubishi Mirage MY 2022 (North America), pdf, eng., 35,2 МБ
- Руководство по эксплуатации Mitsubishi Mirage G4 MY 2017 (North America), pdf, eng., 9,01 МБ
- Руководство по эксплуатации Mitsubishi Mirage G4 MY 2018 (North America), pdf, eng., 37,9 МБ
- Руководство по эксплуатации Mitsubishi Mirage G4 MY 2019 (North America), pdf, eng., 38,3 МБ
- Руководство по эксплуатации Mitsubishi Mirage G4 MY 2020 (North America), pdf, eng., 36,3 МБ
- Руководство по эксплуатации Mitsubishi Mirage G4 MY 2021 (North America), pdf, eng., 30,0 МБ
- Руководство по эксплуатации Mitsubishi Mirage G4 MY 2022 (North America), pdf, eng., 34,4 МБ
Руководства по эксплуатации аудио-системы
- См. раздел Аудиооборудование: Руководства по эксплуатации
Карты технического обслуживания
- Периодическое техническое обслуживание (карта ТО), pdf, 301 кБ
- Периодическое техническое обслуживание при тяжелых условиях эксплуатации, pdf, 392 кБ
Руководство на английском языке по ремонту автомобилей Mitsubishi Galant/Mirage/Diamante 1990-2000 годов выпуска.
- Автор: —
- Издательство: Chilton
- Год издания: —
- Страниц: —
- Формат: PDF
- Размер: 66,3 Mb
Руководство на английском языке по техническому обслуживанию и ремонту автомобиля Mitsubishi Mirage 1999 года выпуска.
- Автор: —
- Издательство: Mitsubishi Motors Corp.
- Год издания: 1998
- Страниц: —
- Формат: PDF
- Размер: 76,3 Mb
Мультимедийное руководство по эксплуатации и ремонту автомобилей Mitsubishi Colt/Lancer/Mirage/Cordia/Tredia/Precis 1983-1993 годов выпуска.
- Автор: —
- Издательство: —
- Год издания: —
- Страниц: —
- Формат: ISO
- Размер: 196,8 Mb
Руководства на английском языке по техническому обслуживанию и ремонту (Service Manual) и кузовному ремонту (Body Repair Manual) автомобиля Mitsubishi Mirage 2014-2015 годов выпуска.
- Автор: —
- Издательство: Mitsubishi Motors Corp.
- Год издания: —
- Страниц: —
- Формат: ISO
- Размер: 61,2 Mb
Руководство по эксплуатации, техническому обслуживанию и ремонту автомобилей Mitsubishi Colt/Lancer/Mirage 1991-1996 и Mitsubishi Libero 1992-2002 годов выпуска с бензиновыми и дизельными двигателями.
- Автор: —
- Издательство: Легион-Автодата
- Год издания: —
- Страниц: 448
- Формат: —
- Размер: —
Руководство по эксплуатации, техническому обслуживанию и ремонту автомобилей Mitsubishi Colt/Lancer/Mirage/Cordia/Tredia/Precis/Galant/Sigma/Eterna/Magna/Sapporo 1983-1993 годов выпуска с бензиновыми и дизельными двигателями.
- Автор: —
- Издательство: Техно-BOOK
- Год издания: 2005
- Страниц: 273
- Формат: PDF
- Размер: 34,7 Mb
Руководство по техническому обслуживанию и ремонту автомобилей Mitsubishi Mirage/Lancer/Colt/Galant/Eterna/Sapporo/Sigma/Cordia/Tredia/Precis 1983-1993 годов выпуска.
- Автор: —
- Издательство: MoToR
- Год издания: 1996
- Страниц: 183
- Формат: —
- Размер: —
Руководство по техническому обслуживанию и ремонту автомобилей Mitsubishi Diamante/Galant/Mirage 1990-2000 годов выпуска с бензиновыми двигателями.
- Автор: —
- Издательство: Автонавигатор
- Год издания: —
- Страниц: 384
- Формат: —
- Размер: —

- Manuals
- Brands
- Mitsubishi MOTORS Manuals
- Automobile
- Mirage 2012
- Owner’s manual
-
Contents
-
Table of Contents
-
Bookmarks
Related Manuals for Mitsubishi MOTORS Mirage 2012
Summary of Contents for Mitsubishi MOTORS Mirage 2012
-
Page 1
MIRAGE OWNER’S MANUAL MIRAGE — EN-UK — OA0X13E4… -
Page 2
Repairs to your vehicle: RHD: Right-Hand Drive Vehicles in the warranty period: M/T: Manual Transmission All warranty repairs must be carried out by a MITSUBISHI MOTORS Au- CVT: Continuously Variable Transmission thorized Service Point. Vehicles outside the warranty period: Where the vehicle is repaired is at the discretion of the owner. -
Page 3
Table of contents Overview/Quick guide General information Locking and unlocking Seat and seat belts Instruments and controls Starting and driving For pleasant driving For emergencies Vehicle care Maintenance Specifications OA0X13E4… -
Page 4
Overview/Quick guide Instruments and controls E08500100074 1. Instruments p. 3-02 2. Hazard warning flasher switch p. 3-18 3. Windscreen wiper and washer switch p. 3-19 Rear window wiper and washer switch p. 3-22 4. Ignition switch* p. 4-08 5. Supplemental restraint system (SRS) -airbag (for driver) p. 2-17 Horn switch p. -
Page 5
Overview/Quick guide 1. Instruments p. 3-02 2. Windscreen wiper and washer switch p. 3-19 Rear window wiper and washer switch p. 3-22 3. Engine switch* p. 4-09 4. Headlamp levelling switch p. 3-16 5. Electric remote-controlled outside rear-view mirror switch* p. 4-07 6. -
Page 6
Overview/Quick guide 1. Supplemental restraint system (SRS)-airbag (for front passen- ger) p. 2-17 2. Heater* p. 5-03 3. Manual air conditioning* p. 5-03 4. Rear window demister switch p. 3-23 5. Automatic air conditioning* p. 5-06 6. Rear window demister switch p. 3-23 7. -
Page 7
Overview/Quick guide 1. Centre ventilators p. 5-02 2. Manual air conditioning* p. 5-03 3. Heater* p. 5-03 4. Rear window demister switch p. 3-23 5. Automatic air conditioning* p. 5-06 6. Rear window demister switch p. 3-23 7. Bonnet release lever p. 8-04 8. -
Page 8
Overview/Quick guide Interior E08500200075 1. Sun visors p. 5-34 Vanity mirror p. 5-34 Card holder p. 5-34 2. Bottle holder p. 5-38 3. Room lamp p. 5-35, 8-21 4. Inside rear-view mirror p. 4-06 5. Head restraints p. 2-04 6. USB input terminal* p. 5-31 7. -
Page 9
Overview/Quick guide 1. Inside rear-view mirror p. 4-06 2. Room lamp p. 5-35, 8-21 3. Sun visors p. 5-34 Vanity mirror p. 5-34 Card holder p. 5-34 4. Bottle holder p. 5-38 5. Electric window lock switch* p. 1-16 6. Electric window control switch* p. 1-15 7. -
Page 10
Overview/Quick guide Luggage area E08500300047 1. Tether anchorages for child restraint system p. 2-15 2. Spare wheel p. 6-12 Type 1 Type 2 3. Tools p. 6-05 4. Tether anchorages for child restraint system p. 2-15 5. Tools p. 6-05 Tyre repair kit p. -
Page 11
Overview/Quick guide Outside (Front) E08500400107 1. Electric window control* p. 1-15 2. Outside rear-view mirror p. 4-07 3. Fuel tank filler p. 02 4. Locking and unlocking the doors p. 1-12 Keyless entry system* p. 1-03 Keyless operation system* p. 1-04 5. -
Page 12
Overview/Quick guide Outside (Rear) E08500400123 1. Tyre p. 8-09 Tyre inflation pressures p. 8-10 Wheel condition p. 8-11 Tyre rotation p. 8-11 Snow traction device (Tyre chains) p. 8-12 Size of tyres and wheels p. 9-10 2. Stop and tail lamps p. 8-20, 8-23 3. -
Page 13
Overview/Quick guide Quick guide The operating range is approximately 70 cm from Around the driver’s seat the driver’s door switch and the tailgate switch. E08500800068 E08500500010 Lock and unlock the doors and tailgate E08500600040 Keyless entry system* Press the remote control switch, and all doors and the tailgate will be locked or unlocked as desired. -
Page 14
Overview/Quick guide 1-Wiper and washer switch MIST- Misting function The wipers will operate once. Except for vehicles equipped with rain sensor OFF- Off AUTO- Auto-wiper control Rain sensor The wipers will automatically oper- ate depending on the degree of wet- ness on the windscreen. -
Page 15
Overview/Quick guide If you are carrying the keyless operation key, you 4-Combination headlamps can start the engine. If you press the engine switch Type 1 without depressing the brake pedal (CVT) or the Rotate the switch to turn on the lamps. clutch pedal (M/T), you can change the operation mode in the order of OFF, ACC, ON, OFF. -
Page 16
Overview/Quick guide 5-Electric remote-controlled outside rear-view mir- 6-Electric window control* OFF All lamps off rors* Press the switch down for opening the window, AUTO With the ignition switch or the oper- and pull the switch for closing. To adjust the mirror position ation mode is in ON, head-lamps, po- sition, tail, licence plate, and instru- Driver’s switch (Type 1) -
Page 17
Overview/Quick guide The fuel tank filler is located on the rear left side of Automatic transmission INVECS-III Selector lever positions your vehicle. CVT (Intelligent & Innovative Vehicle “P” PARK Electronic Control System III)* This position locks the transmission to prevent the E08501000054 vehicle from moving. -
Page 18
Overview/Quick guide Instruments The following information is included on the multi- information display: odometer, tripmeter, meter il- E08501100039 lumination control, service reminder, fuel remain- ing, driving range and average fuel consumption, etc. 1- Tachometer* The tachometer indicates the engine speed 1- Information display (r/min). -
Page 19
Overview/Quick guide Indication and warning lamps E08501300044 1- High-beam indication lamp ® p. 3-11 14- Anti-lock brake system (ABS) warning lamp ® p. 4-28 2- Electric power steering system (EPS) warning lamp ® p. 4-30 15- Multi-information display ® p. 3-02 3- Turn-signal indication lamps/Hazard warning indication lamps ®… -
Page 20
OA0X13E4… -
Page 21: Table Of Contents
General information Fuel selection……………….02 Filling the fuel tank…………….02 Installation of accessories…………..04 Modification/alterations to the electrical or fuel systems….04 Genuine parts……………….05 Safety and disposal information for used engine oil……05 Disposal information for used batteries………..05 OA0X13E4…
-
Page 22: Fuel Selection
Any static electricity on your have the system checked as soon as possible ney, etc. body could create a spark that ignites at a MITSUBISHI MOTORS Authorized In such a case, you don’t need to adjust the fuel vapour. Service Point.
-
Page 23
General information Fuel tank capacity 3. Open the fuel tank filler tube by slowly turn- 4. While filling with fuel, hang the fuel cap ing the cap anticlockwise. cord on the hook located on the inside of the 35 litres fuel tank filler door. -
Page 24: Installation Of Accessories
MITSUBISHI MOTORS, but also for a MITSUBISHI MOTORS Authorized Service Point, to check whether the at- tachment or installation of such parts affects the overall safety of your MITSUBISHI-vehicle.
-
Page 25: Genuine Parts
Safety and disposal information Disposal information for used E00200500499 for used engine oil batteries MITSUBISHI MOTORS has gone to great lengths E00200600155 E00201300032 to bring you a superbly crafted automobile offering the highest quality and dependability. Your vehicle contains batteries…
-
Page 26
OA0X13E4… -
Page 27
Locking and unlocking Keys………………..1-02 Key number tag…………….1-02 Electronic immobilizer (Anti-theft starting system)…..1-03 Keyless entry system*…………..1-03 Keyless operation system*…………1-04 Doors………………..1-12 Central door locks*……………1-13 “Child-protection” rear doors…………1-14 Tailgate………………1-14 Manual window control*…………..1-15 Electric window control*…………..1-15 OA0X13E4… -
Page 28: Keys
Locking and unlocking Keys Key number tag NOTE The key is a precision electronic device with E00300102575 E00312700024 The key number is stamped on the tag as indicated a built-in signal transmitter. Please observe in the illustration. the following in order to prevent a malfunc- Keyless entry key Make a record of the key number and store the key tion.
-
Page 29: Electronic Immobilizer (Anti-Theft Starting System)
Keyless entry key Keyless operation key maining keys to a MITSUBISHI MOTORS if an invalid start is attempted. A valid start attempt Authorized Service Point. can only be achieved by using a key “registered” to If you need an extra spare key, take your ve- the immobilizer system.
-
Page 30: Keyless Operation System
If you wish to add a remote control switch, ters (B). The radio waves used by the key- gate with the flash of the turn-signal please contact a MITSUBISHI MOTORS Au- less operation system could adversely af- lamps) can be deactivated.
-
Page 31
When the bat- tery wears out, have replaced MITSUBISHI MOTORS Authorized Service You can limit the possible operations of the keyless operation system. Please consult a MITSUBISHI Point. MOTORS Authorized Service Point for details. Because the keyless operation key continual- ly receives signals, strong radio wave recep- tion could affect battery wear. -
Page 32
Locking and unlocking If the keyless operation key is within the op- To operate using the keyless operation Operating range for locking and unlocking the erating range, even someone not carrying the doors and tailgate function key can lock and unlock the doors and tail- E00306200529 E00305800977 The operating range is approximately 70 cm from… -
Page 33
If the driver’s door switch is pressed and any of the For further information, please contact a doors or tailgate is not opened within approximate- MITSUBISHI MOTORS Authorized Service ly 30 seconds, relocking will automatically occur. Point. Refer to “Locking and unlocking: Doors, Central •… -
Page 34
Locking and unlocking Locking and unlocking the front passenger’s door Turning the emergency key in the forward direc- tion locks the door, and turning it in the rear direc- tion unlocks the door. Also refer to “Locking and unlocking: Doors” on page 1-12. 1- Lock 2- Unlock 1-08… -
Page 35
Locking and unlocking Warning activator E00305900691 In order to prevent vehicle theft or the accidental operation of the keyless operation system, the lamp and buzzer are used to alert the driver. Lamp Buzzer Item Cause Note (Solution) Blinks Outer buzzer sounds Keyless operation When the vehicle is parked with the opera-… -
Page 36
Inner buzzer sounds There is a fault in the electrical system. (intermittent sounds) Inner buzzer sounds Immediately stop the vehicle in a safe place (continuous sounds) and contact a MITSUBISHI MOTORS Au- thorized Service Point. Blinks Outer buzzer sounds Keyless operation… -
Page 37
Locking and unlocking Lamp Buzzer Item Cause Note (Solution) Blinks Inner buzzer sounds Steering wheel lock Steering wheel does not unlock. Unlock the steering wheel lock following the procedure of reference page. Refer to “Steering wheel lock” on page 4-11. Illuminates No sounds Steering wheel lock is abnormal. -
Page 38: Doors
Locking and unlocking Doors To lock or unlock from inside the vehi- Set the inside lock knob (1) to the locked position, and close the door (2). E00300402334 NOTE CAUTION The driver’s door cannot be locked using the inside lock knob while the driver’s door is Make sure the doors are closed: driving opened.
-
Page 39: Central Door Locks
“P” (PARK) posi- tion with the ignition switch in the “ON” po- sition. If you wish to change the setting such that the doors are unlocked, please contact a MITSUBISHI MOTORS Authorized Service Point. 1- Lock 2- Unlock…
-
Page 40: Child-Protection» Rear Doors
Locking and unlocking “Child-protection” rear doors Tailgate CAUTION E00300901039 E00301401275 Make sure there is no one standing near- by when opening the tailgate. WARNING To close It is dangerous to drive with the tailgate open, since carbon monoxide (CO) gas Pull the tailgate grip (A) downward as illustrated.
-
Page 41: Manual Window Control
Locking and unlocking NOTE Manual window control* Electric window control* Gas struts (B) are installed to support the tail- E00302100096 E00302200576 gate. To prevent damage or faulty operation, The electric windows can only be operated with the • Do not hold the gas struts when closing ignition switch or the operation mode in ON.
-
Page 42
Locking and unlocking NOTE If the switch for the driver’s window is fully press- Driver’s switch (Type 3) ed down/pulled up, the door window automatically Repeated operation with the engine stopped opens/closes completely. will run down the battery. Operate the win- If you want to stop the window movement, operate dow switches only while the engine is running. -
Page 43
Locking and unlocking WARNING CAUTION A child may tamper with the switch at The safety mechanism is cancelled just be- the risk of its hands or head being trap- fore the window is fully closed. This al- ped in the window. When driving with a lows the window to close completely. -
Page 44
OA0X13E4… -
Page 45
Seat and seat belts Seat adjustment…………….2-02 Front seat………………2-02 Rear seat………………2-03 Head restraints…………….2-04 Seat belts………………2-05 Pregnant women restraint………….2-08 Seat belt pretensioner system and force limiter system….2-08 Child restraint…………….2-09 Seat belt inspection……………2-17 Supplemental restraint system (SRS) — airbag……2-17 OA0X13E4… -
Page 46: Seat Adjustment
Seat and seat belts Seat adjustment Front seat CAUTION E00400300558 E00400400230 Adjust the driver’s seat so that you are comfortable Make sure the seat is adjusted by an and that you can reach the pedals, steering wheel, adult or with adult supervision for cor- switches etc.
-
Page 47: Rear Seat
Seat and seat belts Heated seats* Rear seat CAUTION E00401101130 E00401300018 The heated seats can be operated with the ignition Folding the seatbacks forward or receive minor burns (red skin, heat blis- switch or the operation mode is in ON. Operate the E00401600428 ters, etc.): switch as indicated by arrows.
-
Page 48: Head Restraints
Seat and seat belts 2. Raise the seatbacks until it locks securely in- Head restraints To adjust height to place. Adjust the head restraint height so that the centre E00403301644 Push lightly on the seatbacks to confirm that of the restraint is as close as possible to ear level to it has actually been secured.
-
Page 49: Seat Belts
Seat and seat belts The head restraint stalk with the adjustment notch- Seat belts CAUTION es (B) must be installed in the hole with the adjust- E00404800883 ing knob (A). To protect you and your passengers in the event of The shape and size of the head restraint an accident, it is most important that the seat belts differs according to the seat.
-
Page 50
Seat and seat belts NOTE To unfasten WARNING When the seat belts cannot be pulled out in a Hold the latch plate and push the button on the buck- locked condition, pull the belts once forceful- No modifications or additions should be ly and then return them. -
Page 51
Seat and seat belts If the ignition switch is turned to the “ON” position To move the anchor, pull the lock knob (A) and Rear seat belt storage or the operation mode is put in ON while a seat slide the anchor to the desired position. Release the E00405400059 When folded the rear seatbacks forward, store the belt is not fastened, the warning lamp comes on… -
Page 52: Pregnant Women Restraint
E00405600064 force limiter system If you need to scrap the vehicle, please con- E00405700166 sult a MITSUBISHI MOTORS Author- The driver’s seat and front passenger’s seat each WARNING ized Service Point. It is important to do have a seat belt equipped with a pretensioner system.
-
Page 53: Child Restraint
Seat and seat belts Child restraint Caution for installing the child re- Use rearward facing child restraints in the rear seat or turn off the front passenger’s airbag ON-OFF straint on vehicles with a front passen- E00406401835 switch. (Refer to “To turn an airbag off” on page When transporting children in your vehicle, some ger airbag 2-19)
-
Page 54
Seat and seat belts Infants and small children Before purchasing a child restraint system, have, the child restraint can be attached us- try installing it in the rear seat to make sure ing one of the following two locations: E00406600872 When transporting infants and small children in there is a good fit. -
Page 55
II — 15 to 25 kg — — III — 22 to 36 kg — — : MITSUBISHI MOTORS Europe B.V. reserves the right to changes without prior announcement. For further information, please contact a MITSUBISHI MOTORS Authorized Service Point. 2-11 OA0X13E4… -
Page 56
Seat and seat belts CAUTION When installing a child restraint system, remove the head restraint from the seat. Definition of characters the above table: IUF- Suitable for ISOFIX forward child restraint systems of universal category approved for use in the mass group. IL- Suitable for particular ISOFIX child restraint systems of the categories for “specific vehicles”, “restricted”, or “semi-universal”, approved for this type of vehicle. -
Page 57
III — 22 to 36 kg : With front passenger’s airbag deactivated by means of front passenger’s airbag ON-OFF switch : MITSUBISHI MOTORS Europe B.V. reserves the right to changes without prior announcement. For further information, please contact a MITSUBISHI MOTORS Authorized Service Point. -
Page 58
Seat and seat belts Key of characters to be inserted in the table above: U- Suitable for “universal” category restraints approved for use in this mass group. L- Suitable for particular child restraint systems. See the above table of “Recommended Child Restraint Systems”. X- Seat position not suitable for children in this mass group. -
Page 59
Seat and seat belts Installing a child restraint system to Tether anchorage locations It is not necessary to retain the child restraint sys- There are 2 attachment points located on the back tem using the vehicle’s seat belts. the lower anchorage (ISOFIX child re- of the rear seatbacks. -
Page 60
Seat and seat belts 6. Push and pull the child restraint system in all WARNING directions to be sure it is firmly secured. For some types of child restraint, the lock- Installing a child restraint system to a ing clip (C) should be used to help avoid personal injury during a collision or sud- 3-point type seat belt (with emergency den manoeuvre. -
Page 61: Seat Belt Inspection
Seat and seat belts Seat belt inspection Supplemental restraint system How the Supplemental Restraint Sys- tem works E00406300576 (SRS) — airbag Check the belts for cuts, worn or frayed web- E00407301785 E00407202244 bing and for cracked or deformed metallic The SRS includes the following components: The information written in this Supplemental Re- parts.
-
Page 62
Seat and seat belts The airbags deployment produces a sudden, loud WARNING noise, and releases some smoke and powder, but these conditions are not injurious, and do not indi- Place all infants and small children in the cate a fire in the vehicle. People with respiratory rear seat and properly restrained using problems may feel some temporary irritation from an appropriate child restraint system. -
Page 63
Seat and seat belts Front passenger’s airbag OFF indication lamp To turn an airbag off WARNING E00411500198 E00410600495 The front passenger’s airbag OFF indication lamp Extreme Hazard! is located at shown in the illustration. WARNING NEVER use a rearward facing child re- straint on a seat protected by an AC- To reduce risk of serious or fatal injury: TIVE AIRBAG in front of it, DEATH or… -
Page 64
ON-OFF switch is turned OFF, do not fit a child restraint system to the front passenger seat. We recommend you to have the system inspected by a MITSUBISHI MOTORS Authorized Service Point. • If the indication lamp remains on when the front passenger’s airbag ON-… -
Page 65
Seat and seat belts Deployment of front airbags Because frontal collisions can easily move you out Examples of some typical conditions are shown in of position, it is important to always properly wear the illustration. E00412500313 your seat belts. Your seat belts will help keep you The front airbags ARE DESIGNED TO DEPLOY in a safe distance from the steering wheel and in- when…… -
Page 66
Seat and seat belts The front airbags ARE NOT DESIGNED TO DE- Examples of some typical conditions are shown in WARNING PLOY when… the illustration. The front airbags are not designed to deploy in con- Do not set anything on, or attach any- ditions where they cannot typically provide protec- thing to, the instrument panel above the tion to the occupant. -
Page 67
Seat and seat belts The label shown here is attached to the seatbacks Deployment of side airbags and cur- WARNING with a side airbag. tain airbags The airbag system is designed to work on- E00407701503 ly once. Once the airbags have deployed, The side airbags and curtain airbags ARE DE- they will not work again. -
Page 68
Seat and seat belts The side airbags and curtain airbags MAY NOT 3- Collision with a utility pole, tree or other nar- The side airbags and curtain airbags ARE NOT DEPLOY when… row object DESIGNED TO DEPLOY when… With certain types of side collisions, the vehicle’s The side airbags and curtain airbags are not de- body structure is designed to absorb the shock to signed to deploy in conditions where they cannot… -
Page 69
We recommend work around and on the side airbags and curtain airbags system WARNING to be done by a MITSUBISHI MOTORS Authorized Service Point. Do not allow any rear seat occupant to hold onto the seatback of either front… -
Page 70
If you found any tear scratch, crack or out after several seconds. damage to the portion where the airbag is • The SRS warning lamp illuminates stored, you should have the SRS inspec- while driving. ted by a MITSUBISHI MOTORS Author- ized Service Point. 2-26 OA0X13E4… -
Page 71
Instruments and controls Instruments……………….3-02 Multi-information display………….3-02 Indication and warning lamps…………3-10 Indication lamps…………….3-11 Warning lamps…………….3-12 Combination headlamps and dipper switch……..3-14 Headlamp levelling switch…………3-16 Turn-signal lever…………….3-17 Hazard warning flasher switch………….3-18 Fog lamp switch…………….3-18 Wiper and washer switch…………..3-19 Rear window demister switch…………3-23 Horn switch……………….3-24 OA0X13E4… -
Page 72: Instruments
Instruments and controls Instruments Multi-information display E00500101453 E00519901109 Always stop the vehicle in a safe place before oper- ating. The following information is included on the multi- information display: odometer, tripmeter, meter il- lumination control, service reminder, fuel remain- ing, driving range and average fuel consumption, etc. 1- Tachometer* The tachometer indicates the engine speed (r/min).
-
Page 73
Instruments and controls Information display E00528200084 Each time you lightly press the multi-information display switch (A), the display switches in the following order. 1- Odometer ® p. 3-04 6- Average fuel consumption display ® p. 3-05 2- Tripmeter 7- AS&G monitor* ® p. 3-05 ®… -
Page 74
Instruments and controls Odometer Meter illumination control If the vehicle is equipped with the automatic lamp control, when the lamp switch is in a po- E00527800067 E00537900045 The odometer indicates the distance travelled. Each time you press the multi-information display sition other than the “OFF”… -
Page 75
Instruments and controls Average fuel consumption display Refer to “Auto Stop & Go (AS&G) system” on Frozen road warning* page 4-15. E00531200017 E00533400026 This displays the average fuel consumption from If the outside air temperature drops below approx. the last reset to the present time. 3°C (37 °F), the alarm sounds and the outside air NOTE The reset mode conditions for the average fuel con-… -
Page 76
Displays the approximate time until the next period- or less (one segment displayed) when the ignition in the fuel tank when the ignition switch or the op- ic inspection that MITSUBISHI MOTORS recom- switch is turned to the “ON” position or the opera- eration mode is ON. -
Page 77
2. This informs you that a periodic inspection is 3. Lightly press the multi-information display ice Point. due. Consult a MITSUBISHI MOTORS Au- switch while the icon is flashing to change thorized Service Point. the display from “—” to “cLEAr”. After this, 3. -
Page 78
Instruments and controls 2. Each time you press the multi-information dis- Auto reset mode 2. Press and hold the multi-information display play switch for 1 second or more on driving When the average fuel consumption is being switch for about 5 seconds or more until buz- range display, you can switch reset mode for displayed, if you hold down the multi-infor- zer sound is heard twice. -
Page 79
Instruments and controls Fuel consumption Distance (driving range) mile(s) Changing the temperature unit* E00523100730 The display unit for outside temperature can be switched. 1. When you lightly press the multi-informa- tion display switch a few times, the informa- tion display switches to the outside tempera- ture display. -
Page 80: Indication And Warning Lamps
Instruments and controls Indication and warning lamps E00501502448 1- High-beam indication lamp ® p. 3-11 14- Anti-lock brake system (ABS) warning lamp ® p. 4-28 2- Electric power steering system (EPS) warning lamp ® p. 4-30 15- Multi-information display ® p. 3-02 3- Turn-signal indication lamps/Hazard…
-
Page 81: Indication Lamps
Instruments and controls Indication lamps Rear fog lamp indication lamp The ECO drive assist display will change as fol- lows if you do fuel-efficient driving using the accel- E00502000215 E00501600139 This indication lamp illuminates while erator in a way well matched with the vehicle speed. Turn-signal indication lamps/ the rear fog lamp is on.
-
Page 82: Warning Lamps
Instruments and controls Warning lamps CAUTION CAUTION E00502400479 Furthermore, vehicle • Should the brakes fail, use Brake warning lamp should be brought to a stop in a engine braking to reduce E00502502676 safe location and to have it your speed and pull the park- This lamp illuminates when the ignition checked.
-
Page 83
This lamp illuminates in red if the cool- ant temperature becomes excessively the system inspected by a high. MITSUBISHI MOTORS Au- thorized Service Point as soon Oil pressure warning lamp as possible. E00502800718 CAUTION… -
Page 84: Combination Headlamps And Dipper Switch
Instruments and controls Combination headlamps and Type 1 NOTE Rotate the switch to turn on the lamps. The high coolant temperature dipper switch warning lamp may illuminate E00506002392 when the vehicle has been driven at high speeds or on hilly roads. Headlamps This illuminating does not necessa- rily indicate a problem.
-
Page 85
For further information, we recommend you If the following operation is performed while When the headlamps are turned off by the au- to consult a MITSUBISHI MOTORS Author- tomatic on/off control with the ignition the lamp switch is in the “… -
Page 86: Headlamp Levelling Switch
Instruments and controls Lamp monitor buzzer Dipper (High/Low beam change) Headlamp levelling switch E00506100621 E00506200329 E00506400871 If the following operation is performed, a buzzer When the lamp switch is in the “ ” position, the The angle of the headlamp beam varies depending will sound to remind the driver to turn off the lamps.
-
Page 87: Turn-Signal Lever
• Changing of the tone of a sounding buz- •: 1 person zer as the turn-signal lamps flash. :Full luggage loading For further information, we recommend you to consult a MITSUBISHI MOTORS Author- ized Service Point. Switch posi- Driver only/Driver + 1 front passen- tion 0-…
-
Page 88: Hazard Warning Flasher Switch
Instruments and controls Hazard warning flasher switch Fog lamp switch Rear fog lamp switch E00508400569 E00506601027 E00506700034 The rear fog lamp can be operated when the head- Use the hazard warning flasher switch when the ve- Front fog lamp switch* lamps or front fog lamps (if so equipped) turn on.
-
Page 89: Wiper And Washer Switch
Instruments and controls Wiper and washer switch NOTE OFF- The rear fog lamp is automatically turned off E00507101739 INT- Intermittent (Speed sensitive) The windscreen wipers, rear window wiper and when the headlamps or front fog lamps (if so washer can be operated with the ignition switch or Slow equipped) are turned off.
-
Page 90
E00517000402 windscreen wipers can be deactivated. For further information, we recommend you to consult a MITSUBISHI MOTORS Author- ized Service Point. Misting function Move the lever in the direction of the arrow and re- lease, to operate the wipers once. -
Page 91
In the following cases, the rain sensor may be malfunctioning. For further information, we recommend you to consult a MITSUBISHI MOTORS Author- ized Service Point. • When the wipers operate at a constant in- “+”- Higher sensitivity to rain terval despite changes in the extent of rain. -
Page 92
• Adjustment of the interval for intermit- tent operation. E00507301379 • Changing intermittent wiper operation to continuous wiper operation. For further information, we recommend you to consult a MITSUBISHI MOTORS Author- ized Service Point. Precautions to observe when using wip- Windscreen washer ers and washers E00507201310… -
Page 93: Rear Window Demister Switch
Instruments and controls Periodically check the level of washer fluid Rear window demister switch NOTE in the reservoir and refill if required. On vehicles equipped with heated mirrors, E00507901287 During cold weather, add a recommended The rear window demister switch can be operated when the rear window demister switch is washer solution that will not freeze in the when the engine is running.
-
Page 94: Horn Switch
Instruments and controls Horn switch E00508000640 Press the steering wheel on or around the “ ” mark. 3-24 OA0X13E4…
-
Page 95
Starting and driving Economical driving……………4-02 Driving, alcohol and drugs…………4-02 Safe driving techniques…………..4-03 Running-in recommendations…………4-03 Parking brake…………….4-04 Parking………………4-05 Steering wheel height adjustment……….4-06 Inside rear-view mirror…………..4-06 Outside rear-view mirrors………….4-07 Ignition switch*…………….4-08 Engine switch*…………….4-09 Steering wheel lock…………..4-11 Starting………………4-12 Auto Stop & Go (AS&G) system*……….4-15 Manual transmission*…………..4-19 Automatic transmission INVECS-III CVT (Intelligent &… -
Page 96: Economical Driving
Starting and driving Economical driving Speed Driving, alcohol and drugs At higher vehicle speed, more fuel is consumed. E00600101223 E00600200096 For economical driving, there are some technical re- Driving after drinking alcohol is one of the most fre- Avoid driving at full speed. Even a slight release of quirements that have to be met.
-
Page 97: Safe Driving Techniques
Starting and driving Safe driving techniques Carrying children in the vehicle Running-in recommendations Never leave your vehicle unattended with the E00600300619 E00600402597 Driving safety and protection against injury cannot During the running-in period for the first 1,000 km key and children inside the vehicle. Children be fully ensured.
-
Page 98: Parking Brake
Starting and driving NOTE Parking brake CAUTION Apply sufficient force to the parking brake E00600501751 lever to hold the vehicle stationary after the To park the vehicle, first bring it to a complete Before driving, be sure that the parking foot brake is released.
-
Page 99: Parking
Starting and driving NOTE Parking Do not keep the steering wheel fully If your vehicle is equipped with CVT, be turned for a long time E00600601589 sure to apply the parking brake before mov- To park the vehicle, fully engage the parking More effort could be required to turn the steering ing the selector lever to the “P”…
-
Page 100: Steering Wheel Height Adjustment
Starting and driving Steering wheel height adjustment Inside rear-view mirror To adjust the mirror position It is possible to move the mirror up/down and left/ E00600700554 E00600800816 1. Release the lever while holding the steering Adjust the rear-view mirror only after making any right to adjust its position.
-
Page 101: Outside Rear-View Mirrors
Starting and driving Outside rear-view mirrors Electric remote-controlled outside rear-view mir- CAUTION rors* E00600900761 E00610900067 Do not drive the vehicle with the mirror The outside rear-view mirrors can be adjusted folded in. WARNING when the ignition switch or the operation mode is The lack of rearward visibility normally in ON or ACC.
-
Page 102: Ignition Switch
Starting and driving NOTE The heater will be turned off automatically in about Ignition switch* 20 minutes. If your vehicle is equipped with an electronic E00601401975 immobilizer. To start the engine, the ID code which the transponder inside the key sends Type 1 must match the one registered in the immobil- izer computer.
-
Page 103: Engine Switch
Immediately The indication lamp on the engine switch turns off. contact a MITSUBISHI MOTORS Au- The operation mode cannot be put in OFF when thorized Service Point. the selector lever is in any position other than the If the engine switch operation is not “P”…
-
Page 104
Starting and driving Operation mode OFF reminder system CAUTION All vehicle’s electrical devices can be operated. E00632200015 The indication lamp on the engine switch illumi- When the engine is not running, put the nates green. The indication lamp turns off when the operation mode in OFF. -
Page 105: Steering Wheel Lock
Starting and driving Steering wheel lock [For vehicles equipped with keyless op- CAUTION eration system] E00601500751 If the engine is stopped while driving, do [Except for vehicles equipped with key- To lock not open a door or press the LOCK less operation system] After pressing the engine switch and operation switch on the remote control switch until…
-
Page 106: Starting
Starting and driving MITSUBISHI MOTORS Authorized Service Starting [For vehicles equipped with keyless operation sys- Point. tem] E00601601052 The operation mode can be in any mode to Tips for starting start the engine. E00632400020 The starter motor will be turning for up to ap-…
-
Page 107
Starting and driving Starting the engine When it is difficult to start the engine 1. Fasten the seat belt. After several attempts, you may experience that the 2. Make sure the parking brake is applied. E00601702409 engine still does not start. 3. -
Page 108
Starting and driving 2. While depressing the brake pedal on vehicles Stopping the engine 3. On vehicles with M/T, press the engine equipped with CVT or the clutch pedal on switch to stop the engine, move the gearshift E00632700010 the vehicles equipped with manual transmis- lever to the 1 (on a uphill) or “R”… -
Page 109: Auto Stop & Go (As&G) System
Starting and driving Remove the object or additional key from the Auto Stop & Go (AS&G) system* Indication lamp the keyless operation key before inserting the E00627400080 key into the key slot. The vehicle may not be The Auto Stop & Go (AS&G) system automatical- able to receive the registered ID code from ly stops and restarts the engine without operating the registered key.
-
Page 110
Starting and driving [For vehicles with CVT] CAUTION CAUTION 1. Stop the vehicle. 2. Depressing the brake pedal. The engine will • Do not depress the accelerator pedal • On vehicles with M/T, do not move stop automatically. to race the engine while the vehicle is the gearshift lever to a position other stopped (regardless of whether the en- than the “N”… -
Page 111
Starting and driving • Ambient temperature is lower than ap- • Brake pedal is not sufficiently depressed NOTE proximately 3 °C (CVT) If the engine does not restart automatically or • When the heater is operated, vehicle indi- • Parking on steep hill (CVT) if the engine stalls, the charge warning lamp cator temperature is not still hot enough. -
Page 112
Starting and driving • While the engine is stopped automatical- To reactivate the Auto Stop & Go (AS&G) system, CAUTION ly, the “Auto Stop & Go (AS&G) OFF” press the “Auto Stop & Go (AS&G) OFF” switch; switch is pressed to deactivate the “Auto the indicator will turn off. -
Page 113: Manual Transmission
Starting and driving Manual transmission* Changing gears E00610600295 E00602000708 Always take care to change the gear with the vehi- The shift pattern is shown on the gearshift lever cle speed matched to the engine speed. Proper shift- knob. To start off, depress the clutch pedal all the ing will improve fuel economy and prolong engine way down and shift into 1 or “R”…
-
Page 114
Starting and driving Possible driving speed E00610801555 Avoid shifting down at high speed, as this may cause excessive engine speed and damage the engine. Shift point Speed limit 50 km/h (30 mph) gear 95 km/h (59 mph) gear 145 km/h (90 mph) gear 180 km/h (112 mph) gear… -
Page 115: Automatic Transmission Invecs-Iii Cvt (Intelligent & Innovative Vehicle Electronic Control System Iii)
Immediately have your vehicle checked by a Move the selector lever through the gate. MITSUBISHI MOTORS Authorized Service Point. If you need to move the vehicle, shift the selector lever as follows. For LHD vehicles WARNING 1.
-
Page 116
Starting and driving 3. Insert a straight blade (or minus) screwdriver 2. Stop the engine if it is running. Selector lever positions with a cloth over its tip into notch (A) or the 3. Depress the brake pedal with the right foot. E00602400382 cover. -
Page 117
Starting and driving NOTE WARNING WARNING “A” indicator does brink only the condition that the CVT positional switch is broken. To prevent rolling, always keep your foot This position can be used for maximum It does not indicate in normal driving condi- on the brake pedal when the vehicle is in engine braking. -
Page 118
Starting and driving Operation of the CVT DRIVING DOWNHILL CAUTION According to the conditions, the transmission will E00602600401 automatically shift to a lower gear ratio to achieve Use the selector lever in the correct shift stronger engine braking. This may help reduce CAUTION position in accordance with driving condi- your need to use the service brake. -
Page 119: Braking
Starting and driving Braking NOTE WARNING On a slope, be sure to apply the parking E00607001957 All the parts of the brake system are critical to safe- brake before moving the selector lever to the If the power assist is lost or if either ty.
-
Page 120: Hill Start Assist
Starting and driving Hill start assist* To operate WARNING E00628100358 E00628000142 1. Stop the vehicle completely using the brake The hill start assist makes it easy to start off on a Do not leave any objects near the brake pedal. steep uphill slope by preventing the vehicle from pedal or let a floor mat slide under it;…
-
Page 121: Brake Assist System
Starting and driving When the hill start assist activated, you may Brake assist system When the anti-lock brake system lamp is illu- feel the operation sound or vibration from un- minated, the brake assist system is not func- E00627000549 der the body. tioning.
-
Page 122: Emergency Stop Signal System
Starting and driving Emergency stop signal system • The brake pedal is released. Anti-lock brake system (ABS) • The hazard warning flasher switch is E00626000050 E00607101479 pressed. This is a device that reduces the possibility of rear The anti-lock brake system (ABS) helps prevent •…
-
Page 123
Starting and driving The ABS can be used after the vehicle has Under normal conditions, the ABS warning lamp If the ABS warning lamp and brake warning reached a speed over approximately 10 km/h comes on when the ignition switch is turned to the lamp illuminate at the same time (6 mph). -
Page 124: Electric Power Steering System (Eps)
In this event, ted by a MITSUBISHI MOTORS Author- Be sure to use the same specified type and limit your turning of the steering wheel for a size of tyre on all 4 wheels.
-
Page 125
Starting and driving Stability control function When a compact spare tyre has been put on NOTE your vehicle, the gripping ability of the tyre An operation noise may be emitted from the E00619100017 The stability control function is designed to help will be lower, making it more likely that the engine compartment in the following situa- the driver maintain control of the vehicle on slip-… -
Page 126: Rear-View Camera
Starting and driving Towing Rear-view camera* Location of rear-view camera The rear-view camera (A) is in the tailgate. E00624400076 E00618400576 The rear-view camera is a system that shows the view behind the vehicle on a screen of the CAUTION MITSUBISHI Multi Entertainment System. When towing the vehicle with only the front wheels or only the rear wheels CAUTION…
-
Page 127
Starting and driving • Low light (nighttime) • When the light of the sun or the light from a vehicle’s headlamps shines direct- ly into the lens If the camera is hot and is then cooled by rain or a car wash, the lens can mist up. This phenomenon does not indicate a malfunction. -
Page 128: Cargo Loads
Starting and driving • When the rear of the vehicle is weighed a flat object such as a level, flat road surface. Cargo loads down with the weight of passengers and This may make the distance to a projecting E00609901484 luggage in the vehicle.
-
Page 129: Trailer Towing (1200 Models)
Make sure that the weight of the luggage the roof carrier. MITSUBISHI MOTORS Authorized Service Point. does not exceed the allowable roof load. Be sure that adequate clearance is main- The regulations concerning the towing of a trailer…
-
Page 130
Starting and driving Towing bar mounting specifications To make full use of engine braking, change 606.5 mm to a lower shift point before descending a See the following table for fixing points (A) for the 140.5 mm slope. towing bar. 154.5 mm Additional precautions for vehicles equipped with 76 mm… -
Page 131
For pleasant driving Ventilators………………5-02 Heater/Manual air conditioning*……….5-03 Automatic air conditioning*…………5-06 Important operation tips for the air conditioning……5-12 Air purifier*………………5-13 LW/MW/FM electronic tuning radio with CD player*….5-13 To play tracks from USB device*……….5-23 Error codes………………5-27 Handling of compact discs…………5-29 Antenna………………5-30 Link System*…………….5-31 USB input terminal*…………..5-31 Sun visors………………5-34 Accessory socket…………….5-35… -
Page 132: Ventilators
For pleasant driving NOTE Ventilators Air flow and direction adjustments On vehicles with air conditioning, the cool E00700201010 E00700101006 air from the ventilators may appear as a mist. Centre ventilators This is due to moist air being suddenly Move the knob (A) to make adjustments. cooled by the air conditioning.
-
Page 133: Heater/Manual Air Conditioning
For pleasant driving Heater/Manual air conditioning* The blower speed will gradually increase as the di- al is turned to the right. Foot/Demister position E00700500537 Air flows to the leg area, the windscreen and the The air conditioning can only be used while the en- door windows.
-
Page 134
For pleasant driving NOTE NOTE CAUTION While the engine coolant temperature is low, Normally, use the outside position to keep the temperature of the air from the heater the windscreen and side windows clear and When using the air conditioning, the will be cool/cold until the engine warms up, quickly remove fog or frost from the wind- idling speed may slightly increase as the… -
Page 135
For pleasant driving NOTE For ordinary demisting Combination of unheated air and heated air For maximum heat, set the blower speed at E00702000552 the 3 position. Cooling (manual air conditioning) E00701900785 *: Optional equipment Demisting of the windscreen and door windows E00702100931 CAUTION CAUTION… -
Page 136: Automatic Air Conditioning
For pleasant driving For quick demisting Automatic air conditioning* Introduction of outside air E00702200479 E00702400413 The air conditioning can only be used while the en- gine is running. *: Optional equipment NOTE To demist effectively, direct the air flow from the side ventilators towards the door win- dows.
-
Page 137
For pleasant driving Control panel E00702501466 1- Temperature control switch NOTE Never place anything on top of the sensor, 2- Air conditioning switch since doing so will prevent it from function- There is an interior air temperature sensor 3- MODE switch ing properly. -
Page 138
NOTE For further information, we recommend you to con- The temperature value of air conditioning is sult a MITSUBISHI MOTORS Authorized Service switched in conjunction with outside temper- Point. ature display unit of the multi information dis- Refer to “Customizing the air conditioning switch”… -
Page 139
For pleasant driving Air is recirculated inside the passenger com- Customizing the air selection The “AUTO” indicator will be shown in the dis- partment. Functions can be changed as desired, as stated below. play (A). Enable automatic air control When the AUTO switch pressed, the air se- lection switch is also controlled automatically. -
Page 140
For pleasant driving When the demister switch is pressed, in or- MODE switch CAUTION der to prevent misting of the windows the air E00703300044 Each time the MODE switch is pressed, the mode conditioning operates automatically even if When using the air conditioning, the changes to the next one in the following sequence: “Disable automatic air conditioning control”… -
Page 141
For pleasant driving For ordinary demisting NOTE CAUTION When the demister switch is pressed, the air conditioning system automatically operates When using the air conditioning, the and outside air (as opposed to recirculated idling speed may slightly increase as the air) is selected. -
Page 142: Important Operation Tips For The Air Conditioning
For pleasant driving For quick demisting Important operation tips for the We recommend you to recover and recycle the re- frigerant for reuse. air conditioning E00708301091 During a long period of disuse Park the vehicle in the shade. The air conditioning should be operated for at least Parking in the hot sun will make the vehicle five minutes each week, even in cold weather.
-
Page 143: Air Purifier
For pleasant driving Air purifier* LW/MW/FM electronic tuning Volume and tone control panel E00708601195 E00708400675 radio with CD player* An air filter has been incorporated into this air con- E00708502377 ditioning so that dirt and dust are cleaned from the The audio system can only be used when the igni- air.
-
Page 144
For pleasant driving TREBLE (Treble tone control) Radio control panel and display Automatic tuning After keeping the seek button depressed until it Press the sound control button either E00708901273 beeps, release the button, and the selected station re- select the desired treble level. ception will start. -
Page 145
For pleasant driving 1. With the radio mode selected, hold down the 6- PTY (Program type) indicator CT (Clock Time) function RADIO button for 2 seconds or longer. The 7- CT (Clock time) indicator E00721000173 The clock can be set automatically by using the sig- 6 stations with the best signal strength will au- 8- REG (Regional program) indicator nal from the local RDS stations. -
Page 146
For pleasant driving To search for a broadcast of desired program type: NOTE To change the language of PTY display 1. Press the PTY button. E00721500253 While searching, the audio system is muted. You can select your favourite language among ENG- 2. -
Page 147
For pleasant driving 2. If the radio detects traffic information on ei- The setting will be shown on the display. Emergency broadcasts ther the station currently selected or another E00721700268 If an emergency broadcast is caught while receiv- station, the display will show “TRAF INF” Example ing a FM broadcast or playing back a compact disc for 5 seconds followed by a 2-second indica-… -
Page 148
For pleasant driving NOTE 1- CD (CD mode changeover) button 2. Press the CD button if a disc is already in the 2- RADIO button For information on adjusting the volume and CD player. tone, refer to “To adjust the volume” on page The display shows “READING”, then play- (Return) button 5-13 and “To adjust the tone”… -
Page 149
For pleasant driving For information on CD-Rs/RWs, refer to File selection Turn the SEL : To show the folder or file “Notes on CD-Rs/RWs” on page 5-29. switch In the order CAUTION NOTE To fast-forward/reverse the disc To cancel the selection, press the button Attempting to play a file not in the MP3 to return to the previous step. -
Page 150
For pleasant driving NOTE NOTE CD text and MP3 title display With a disc that contains both CD-DA and To return from ID3 tag information to the E00725000706 This CD player can display CD text and MP3 titles MP3 files, the repeat mode causes only files folder name, press the DISP button again for including ID3 tag information. -
Page 151
For pleasant driving 3. Select the desired setting for each mode to be Manual mode NOTE turned ON and OFF. The manual mode is also available in case the auto- While the clock mode is selected, the display matic mode shows the incorrect time when the ad- will switch to the applicable operation dis- jacent local RDS stations are located in a different play whenever the CD player, external audio… -
Page 152
For pleasant driving NOTE Use the connected audio equipment’s own NOTE When using the manual mode to adjust the power source, such as its battery. Use a stereo mini-jack connector to connect clock, set the “CT” function to “OFF”. If the Noise may be produced from the speakers if the audio equipment to the auxiliary audio “CT”… -
Page 153: To Play Tracks From Usb Device
For pleasant driving NOTE To play tracks from USB device* 2- RADIO button Depending on the condition of your iPod, it (Return) button E00756100240 may take a longer time before the playback If your vehicle is equipped with the USB input ter- (USB device active) indicator starts.
-
Page 154
For pleasant driving NOTE USB control panel and display To play the same track repeatedly Pressing the button once during the song E00756700044 E00758100299 Press the RPT button during playback to show will cause the audio system to restart play- “RPT”… -
Page 155
For pleasant driving To play from a USB memory device Folder selection order/file playback order (exam- To fast-forward/reverse the track ple) E00758400117 E00762500382 To fast-forward/reverse the current track, press the 1. Press the PWR button to turn on the audio sys- The folder and file hierarchy in the USB memory button or button. -
Page 156
For pleasant driving To play all folders in random order Turn the SEL : To show the folder or file. E00759000107 switch Press and hold the RDM button until you hear a beep to show “RDM” in the display. NOTE The audio randomly selects tracks from all folders and plays the selected tracks. -
Page 157: Error Codes
Loading or eject error. Pick-up is out of position. spected. HEAT ERROR Internal protection against high temperatures. Allow radio to cool by waiting about 30 minutes. Bring your vehicle to a MITSUBISHI MOTORS Authorized Serv- ERROR DC Foreign material is inside the radio or amplifier. ice Point. iPod*…
-
Page 158
For pleasant driving Error display Item Repair Have the vehicle inspected at a MITSUBISHI MOTORS Author- LSI ERROR Internal device errors ized Service Point. 5-28 OA0X13E4… -
Page 159: Handling Of Compact Discs
For pleasant driving Handling of compact discs When storing compact discs, always store them in their separate cases. Never place com- E00723000454 pact discs in direct sunlight, or in any place Use only the type of compact discs that have where the temperature or humidity is high.
-
Page 160: Antenna
For pleasant driving NOTE Depending on the combination of the writing Antenna software, the CD recorder (CD-R/RW drive), Be sure to remove the roof antenna in the fol- E00710500022 and the disc used to create a CD-R/RW, the lowing cases: Roof antenna disc might not play successfully.
-
Page 161: Link System
For pleasant driving Link System* USB input terminal* 3. Connect a commercially available USB con- nector cable (D) to the USB memory device E00764500155 E00761900015 (E). The Link System takes overall control of the devi- You can connect your USB memory device or ces connected via the USB input terminal allowing iPod* to play music files stored in the USB memo- the connected devices to be operated by using the…
-
Page 162
For pleasant driving NOTE How to connect an iPod CAUTION Use a genuine Dock connector from Apple E00762100304 Inc. Keep the lid of the glove box closed while To connect On vehicles equipped with MITSUBISHI driving the vehicle. A lid or the contents 1. -
Page 163
For pleasant driving NOTE Model name Condition Model name Condition When closing the glove box, be careful not Storage capacity of iPhone F/W Ver.3.1.3 or later iPhone to trap the connector cable and iPod. USB memory device 256 Mbytes or more iPhone 3G F/W Ver.4.2.1 or later To remove… -
Page 164: Sun Visors
For pleasant driving Do not connect to the USB input terminal Sun visors Card holder any device (hard disk, card reader, memory Cards can be slipped into the holder (A) on the E00711201270 reader, etc.) other than the connectable devi- back of the sun visor on the driver side.
-
Page 165: Accessory Socket
For pleasant driving Accessory socket Interior lamps 1- ( ) The lamp illuminates regardless of whether a door E00711601519 E00712001318 The accessory socket can be used while the igni- or the tailgate is open or closed. tion switch or the operation mode is in ON or ACC. 2- (•) To use a plug-in type accessory, open the cap, and Delayed off function…
-
Page 166: Storage Spaces
The time until the lamp goes off (delayed Glove box off) can be adjusted. For details, please con- sult a MITSUBISHI MOTORS Authorized E00717601595 To open, pull the lever (A). Service Point The auto cut-out function cannot be operated when the room lamp switch is in the “…
-
Page 167: Cup Holder
For pleasant driving Cup holder For the rear seat NOTE The USB input terminal (if so equipped) is lo- E00718900152 E00714501027 The cup holder is located behind the parking brake cated in the glove box. lever. For details, refer to “USB input terminal” on CAUTION page 5-31.
-
Page 168: Bottle Holder
For pleasant driving Bottle holder Rear shelf panel* CAUTION E00718200357 E00715400156 Lightly push the rear shelf panel to make sure that the concave portion (A) is set CAUTION CAUTION firmly in the protruding portion (B) of the tailgate. If the rear shelf panel is not Do not drink beverages while driving.
-
Page 169: Convenient Hook
For pleasant driving Convenient hook Assist grip E00732900169 E00732800302 Light items of luggage can be hung from the hook. The grip is to support the body by hand while seat- ed in the vehicle. NOTE Do not hang heavy luggage (more than about CAUTION 4 kg) on the hook.
-
Page 170
OA0X13E4… -
Page 171
For emergencies If the vehicle breaks down…………6-02 Emergency starting……………6-02 Engine overheating……………6-04 Tool and jack…………….6-05 Tyre repair kit*…………….6-06 How to change a tyre (Vehicles equipped with spare tyre)..6-11 Wheel covers*…………….6-16 Towing………………6-17 Operation under adverse driving conditions………6-20 OA0X13E4… -
Page 172: If The Vehicle Breaks Down
For emergencies If the vehicle breaks down Emergency starting 1. Get the vehicles close enough so the jumper cables can reach, but be sure the vehicles E00800101137 E00800502910 aren’t touching each other. If the vehicle breaks down on the road, move it to If the engine cannot be started because the battery 2.
-
Page 173
For emergencies NOTE WARNING WARNING For vehicles equipped with the Auto Stop & Go (AS&G) system, press the “Auto Stop & Electrolyte is corrosive diluted sulphuric Make sure that the connection is made Go (AS&G) OFF” switch to deactivate the acid. -
Page 174: Engine Overheating
Stop the engine immediately and contact a Auto Stop & Go (AS&G) system before stop- 5. Add coolant to the radiator and/or reserve MITSUBISHI MOTORS Authorized Service ping the vehicle. tank if necessary. (Refer to the “Mainte- Point for assistance.
-
Page 175: Tool And Jack
For emergencies Tool and jack Tools CAUTION E00801900627 E00800901496 Do not add coolant while the engine is Storage hot. Suddenly adding cold coolant could The tools are stored beneath the luggage floor damage the engine. Wait for the engine to board of the luggage compartment.
-
Page 176: Tyre Repair Kit
After storing the jack in place, make sure ant. the jack is securely fixed in the holder. If Be sure to use a MITSUBISHI MOTORS the jack is not fixed securely, it may move GENUINE tyre sealant. and hit an occupant in an accident result- ing in serious injury or death.
-
Page 177
For emergencies Use the tyre sealant only at ambient tempera- tures of -30 °C to + 60 °C. Effect an emergency repair without pulling out the object (nail, screw, etc.) that is stuck in the tyre. Do not use the tyre sealant if the tyre has been damaged by being driven when insuffi- ciently inflated (e.g. -
Page 178
For emergencies 11. Holding the sealant bottle upside-down, CAUTION squeeze it again and again to inject all of the sealant into the tyre. If you shake the bottle after screwing on the hose, sealant may spray out of the hose. 8. -
Page 179
For emergencies Fit the valve insert (J) into the valve (H), and 14. Place the compressor (N) with its air pres- CAUTION screw the valve insert securely into place us- sure gauge (O) on top. ing the valve remover (I). Pull out the compressor’s power cord (P), in- The compressor is not waterproof. -
Page 180
CAUTION not be used to effect an emergency repair. make the vehicle vibrate. Please contact a MITSUBISHI MOTORS Au- thorized Service Point or another specialist Do not affix the sticker anywhere except 19. After driving for 10 minutes or 5 km, check in this event. -
Page 181: How To Change A Tyre (Vehicles Equipped With Spare Tyre)
Please give the empty sealant bottle to your specified level when you check it at the end 3. On vehicles with M/T, stop the engine and MITSUBISHI MOTORS Authorized Service of the repair procedure, do not drive the vehi- move the gearshift lever to the “R” (Reverse) Point when you purchase new sealant or dis- cle any further.
-
Page 182
For emergencies WARNING CAUTION CAUTION Be sure to apply chocks or blocks to the The tyre pressure should be periodically Do not use snow traction device (tyre correct tyre when jacking up the vehicle. checked and maintained at the specified chains) with your compact spare wheel. -
Page 183
For emergencies CAUTION Do not install more than one compact spare wheel at the same time. To remove the spare tyre E00803500467 1. Lift up the luggage floor board. 2. To remove the spare tyre, remove the instal- lation clamp (A) by turning it anticlockwise. To change a tyre WARNING E00803200914… -
Page 184
For emergencies 3. Rotate the jack by hand until the flange por- WARNING tion (B) fits in the groove (C) at the top of the jack. Stop jacking up the vehicle as soon as the tyre is raised off the ground. It is danger- ous to raise the vehicle any higher. -
Page 185
For emergencies make light contact with the seats of the 9. Tighten the nuts in the order shown in the il- wheel holes and the wheel is not loose. lustration until each nut has been tightened to the torque listed here. Tightening torque Steel wheel 88 to 108 Nm… -
Page 186: Wheel Covers
(B). If in doubt, do not in- stall the wheel cover and consult a 1. Wrap the tip of the jack bar with a cloth, in- MITSUBISHI MOTORS Authorized Service sert it into the notch provided in the wheel Point.
-
Page 187: Towing
If towing is necessary, we recommend you to have wheel, make sure that the opening with the it done by your MITSUBISHI MOTORS Author- symbol mark is correctly aligned with the air ized Service Point or a commercial tow truck service.
-
Page 188
For emergencies Towing the vehicle by a tow truck Emergency towing CAUTION If towing service is not available in an emergency, your vehicle may be temporarily towed by a rope If the vehicle is towed with the ignition CAUTION secured to the towing hook. switch in the “ON”… -
Page 189
For emergencies 3. Use the wheel nut wrench (B) to securely [Except for vehicles equipped with keyless 6. Place the gearshift lever in the “Neutral” po- mount the towing hook (C). operation system] sition (M/T) or the selector lever in the “N” On vehicles with M/T, turn the ignition key (NEUTRAL) position (CVT). -
Page 190: Operation Under Adverse Driving Conditions
For emergencies Secure the tow rope to the rear towing hook. Operation under adverse driving CAUTION conditions When the vehicle with CVT is to be tow- E00801702818 ed by another vehicle with the all wheels on the ground, make sure that the towing On a flooded road speed and distance given below are never Avoid flooded roads.
-
Page 191
For emergencies Depressing the brake pedal during travel on CAUTION snowy or icy roads may cause tyre slippage and skidding. When traction between the The vehicle’s body, bumper, muffler and tyres and the road is reduced the wheels may other parts may be damaged if the vehi- skid and the vehicle cannot readily be cle is: brought to a stop by conventional braking… -
Page 192
OA0X13E4… -
Page 193
Vehicle care Vehicle care precautions……………7-02 Cleaning the interior of your vehicle……….7-02 Cleaning the exterior of your vehicle………..7-03 OA0X13E4… -
Page 194
Vehicle care Vehicle care precautions Cleaning the interior of your NOTE Do not use cleaners, conditioners, and protec- E00900100984 vehicle In order to maintain the value of your vehicle, it is tants containing silicons or wax. E00900200611 necessary to perform regular maintenance using the Such products, when applied to the instru- After cleaning the interior of your vehicle with wa- proper procedures. -
Page 195
Vehicle care Cleaning the exterior of your NOTE CAUTION If genuine leather is wet with water or is wash- vehicle ed in water, wipe off water as quickly as pos- When washing the under side of your ve- E00900700137 sible with a dry, soft cloth. If left damp, mil- hicle or wheel, be careful not to injure If the following is left on your vehicle, it may dew may grow. -
Page 196
Vehicle care NOTE CAUTION CAUTION To prevent freezing of the weatherstripping on the doors, bonnet, etc., they should be trea- After washing the vehicle, drive the vehi- Do not use a scrubbing brush or other ted with silicone spray. cle slowly while lightly depressing the hard tools as they may damage the plastic brake pedal several times in order to dry part surface. -
Page 197
Vehicle care Wiper blades CAUTION E00901700088 Use a soft cloth and glass cleaner to remove grease, Do not use a brush or other hard imple- dead insects, etc., from the wiper blades. Replace ment on the wheels. the wiper blades when they no longer wipe proper- Doing so could scratch the wheels. -
Page 198
OA0X13E4… -
Page 199
Maintenance Service precautions……………8-02 Catalytic converter…………….8-03 Bonnet……………….8-04 Engine oil………………8-05 Engine coolant…………….8-06 Washer fluid……………..8-07 Brake fluid………………8-07 Battery………………8-08 Tyres…………………8-09 Wiper blade rubber replacement………..8-13 General maintenance…………..8-14 Fusible links………………8-15 Fuses…………………8-15 Replacement of lamp bulbs…………8-19 Masking the headlamps…………..8-25 OA0X13E4… -
Page 200: Service Precautions
Maintenance Service precautions Check items of engine compartment are located as WARNING shown in the figure below. E01000101035 Adequate care of your vehicle at regular intervals Do not smoke, cause sparks or allow open serves to preserve the value and appearance as long flames around fuel or battery.
-
Page 201: Catalytic Converter
Maintenance If your vehicle is raised with a garage Catalytic converter WARNING jack E01000200765 The exhaust gas scavenging devices used with the Do not use the jack on a tilted or soft sur- E01011500032 Only use the appointed position as shown in the il- catalytic converter are extremely efficient for the re- face.
-
Page 202: Bonnet
Maintenance NOTE Bonnet 3. Make sure the bonnet is securely locked by Only open the bonnet when the wipers are in softly lifting the centre of the bonnet. E01000302858 the parked position. Failure to do so may cause damage to the bonnet, wiper arms or To open windscreen.
-
Page 203: Engine Oil
Maintenance Engine oil 7. If the oil level is below the specified limit, re- Select engine oil of the proper SAE viscosity move the cap located on the cylinder head number according to the atmospheric temper- E01000403058 cover and add enough oil to raise the level to ature.
-
Page 204: Engine Coolant
Do not top up with water only. Use “MITSUBISHI MOTORS GENUINE SUPER FULL LONG LIFE COOLANT PREMIUM” or equiva- During cold weather lent*.
-
Page 205: Washer Fluid
Maintenance Washer fluid Brake fluid If the fluid level falls markedly in a short length of time, it indicates leaks from the brake system. E01000700920 E01000900922 If this occurs, we recommend you to have the vehi- Open the washer fluid reservoir cap and check the cle checked.
-
Page 206: Battery
Maintenance Battery During cold weather E01010900084 E01001202274 The capacity of the battery is reduced at low tem- The condition of the battery is very important for peratures. This is an inevitable result of its chemi- quick starting of the engine and proper functioning cal and physical properties.
-
Page 207: Tyres
Maintenance Tyres CAUTION E01001300301 Never short-circuit the battery. This could cause it to overheat and be damaged. WARNING If the battery is to be quick-charged, first disconnect the battery cables. Driving with tyres that are worn, dam- In order to prevent a short circuit, be aged or improperly inflated can lead to a sure to disconnect the negative (-) termi- loss of control or blow out of the tyres…
-
Page 208
Maintenance Tyre inflation pressures E01001402843 Item Tyre size Front Rear Normal tyre 165/65R14 79S 2.7 bar (39 psi) [270 kPa] 175/55R15 77V 2.2 bar (32 psi) [220 kPa], 2.4 bar (35 psi) [240 kPa] Compact spare tyre T115/70D14 88M 4.2 bar (60 psi) [420 kPa] : Above 160 km/h (99 mph) Check the tyre inflation pressure of all the tyres while they are cold: if insufficient or excessive, adjust to the specified value. -
Page 209
Maintenance Wheel condition Replacing tyres and wheels When rotating tyres, check for uneven wear and damage. Abnormal wear is usually caused by incor- E01001800957 E01007200490 rect tyre pressure, improper wheel alignment, out of balance wheel, or severe braking. We recom- CAUTION mend you to have it checked to determine the cause of irregular tread wear. -
Page 210
Maintenance Snow tyres Contact a MITSUBISHI MOTORS Authorized CAUTION Service Point before putting on snow traction de- E01002000839 The use of snow tyres is recommended for driving vice (tyre chains). The max. snow traction device If the tyres have arrows (A) indicating on snow and ice. -
Page 211: Wiper Blade Rubber Replacement
Maintenance Wiper blade rubber replacement Refer to the illustration to ensure that the re- CAUTION tainers are correctly aligned as you attach E01008200338 them. When snow traction device (tyre chains) Windscreen wiper blades (Driver’s are installed, take care that they do not side) damage the disc wheel or body.
-
Page 212: General Maintenance
WARNING If you see a suspicious fuel leak or if you smell fuel, do not operate the vehicle; call your MITSUBISHI MOTORS Author- ized Service Point for assistance. Windscreen wiper blades (Passenger’s Exterior and interior lamp operation…
-
Page 213: Fusible Links
Maintenance Hinges and latches lubrication Fusible links Fuses Check all latches and hinges, and, if necessary, E01002900636 E01003002335 The fusible links will melt to prevent a fire if a have them lubricated. Fuse block location large current attempts to flow through certain elec- trical systems.
-
Page 214
Maintenance Passenger compartment (RHD vehicles) 3. Remove the glove box fastener (B), and then Fuse load capacity The fuse boxes in the passenger compartment are remove the glove box. E01007700727 The fuse capacity and the names of electrical sys- located behind the glove box at the position shown tems protected by the fuses are indicated on the in- in the illustration. -
Page 215
Maintenance Symbol Electrical system Capacity Symbol Electrical system Capacity Sym- Electrical system pacity — — — Radio 10 A SBF1 Radiator fan motor 40 A — — — Electronic control- 15 A led unit Tail lamp (right) 7.5 A SBF2 Anti-lock brake system 30 A Some fuses may not be installed on your ve-… -
Page 216
Maintenance The table above shows the main equipment Identification of fuse Sym- Electrical system corresponding to each fuse. E01008100366 pacity Capacity Colour Ignition coil 7.5 A Type B 7.5 A Brown Engine control 7.5 A 10 A Alternator 7.5 A 15 A Blue Hazard warning flasher… -
Page 217: Replacement Of Lamp Bulbs
Maintenance Replacement of lamp bulbs CAUTION E01003100794 Before replacing a bulb, ensure the lamp is off. Do If the newly inserted fuse blows again af- not touch the glass part of the new bulb with your ter a short time, we recommend you to bare fingers;…
-
Page 218
LEDs rather than ers inside the lamp, we recommend you to bulbs. For repair and replacement, contact a have the lamp checked. MITSUBISHI MOTORS Authorized Service NOTE Point. For the side turn-signal lamp, it is not possi- Bulb location and capacity ble to repair or replace just the bulb. -
Page 219
Maintenance 2. Unhook the spring (C), which secures the 2. Pull the bulb out of the socket. Inside bulb, and then remove the bulb (D). E01003402049 1- Luggage room lamp: 5 W 3. To install the bulb, perform the removal 2- Room lamp: 8 W 3. -
Page 220
Maintenance 2. Remove the bulb from the socket by turning 2. Remove the clips/bolts (A) to turn up the cov- 4. Turn the bulb anticlockwise to remove it. it anticlockwise while pressing in. er (B). Type 1 Type 2 3. To install the bulb, perform the removal 3. -
Page 221
Maintenance 3. Move the lamp unit towards the rear of the ve- 5. Remove the bulb from the socket by turning hicle to unfix the notch (B) and pin (C). it anticlockwise while pressing in. Rear combination lamps E01004201539 1. Open the tailgate (Refer to “Tailgate”… -
Page 222
Maintenance High-mounted stop lamp (bulb type)* 4. Gently close the tailgate, remove the lamp Licence plate lamps unit, and turn the socket anticlockwise to re- E01004500665 E01004601012 1. Open the tailgate. 1. Push the lens (A) towards the rear of the ve- move it. -
Page 223: Masking The Headlamps
Maintenance Masking the headlamps Left lens Left lens E01011600059 When entering a country in which vehicles are driv- en on the opposite side of the road to the country in which your vehicles is supplied, necessary meas- ures have to be taken to avoid dazzling oncoming traffic.
-
Page 224
OA0X13E4… -
Page 225
Specifications Vehicle labeling…………….9-02 Vehicle dimensions……………9-03 Vehicle performance…………..9-05 Vehicle weight…………….9-06 Engine specifications…………..9-08 Electrical system…………….9-09 Tyres and wheels…………….9-10 Clutch pedal………………9-11 Fuel consumption……………..9-12 Refill capacities…………….9-13 OA0X13E4… -
Page 226: Vehicle Labeling
Specifications Vehicle labeling Please use this number when ordering replacement Vehicle identification number plate parts. (RHD vehicles only) E01100103375 The vehicle identification number is stamped on Vehicle identification number the plate riveted to the left front corner of the vehi- The vehicle identification number is stamped on cle body.
-
Page 227: Vehicle Dimensions
Specifications Vehicle dimensions E01100202920 Front track 1,430 mm Overall width 1,665 mm Front overhang 730 mm Wheel base 2,450 mm Rear overhang 530 mm Overall length 3,710 mm Ground clearance (unladen) 150 mm Overall height (unladen) 1,490 mm Rear track 1,415 mm Minimum turning radius Body…
-
Page 228
Specifications Wheel 4.6 m 9-04 OA0X13E4… -
Page 229: Vehicle Performance
Specifications Vehicle performance E01100302572 Maximum speed 1000 models 172 km/h 1200 models 180 km/h 173 km/h 9-05 OA0X13E4…
-
Page 230: Vehicle Weight
Specifications Vehicle weight E01100405721 1000 models Kerb weight Without optional parts 845 kg With full optional parts 897 kg Maximum gross vehicle weight 1,290 kg Maximum axle weight Front 730 kg Rear 670 kg Maximum roof load 50 kg Seating capacity 5 persons 1200 models Item…
-
Page 231
Specifications NOTE Trailer specifications indicate the manufacturer’s recommendation. 9-07 OA0X13E4… -
Page 232: Engine Specifications
Specifications Engine specifications E01100602937 Item 1000 models 1200 models Engine model 3A90 3A92 No. of cylinders 3 in line 3 in line Total displacement 999 cc 1,193 cc Bore 75.0 mm 75.0 mm Stroke 75.4 mm 90.0 mm Camshaft Double overhead Double overhead Mixture preparation Electronic injection…
-
Page 233: Electrical System
95 A Spark plug type DILFR6A11 : Vehicles equipped with Auto Stop & Go (AS&G) system NOTE For vehicles equipped with the Auto Stop & Go (AS&G) system, contact a MITSUBISHI MOTORS Authorized Service Point when replacing the battery. 9-09 OA0X13E4…
-
Page 234: Tyres And Wheels
Specifications Tyres and wheels E01100903201 Tyre 165/65R14 79S 175/55R15 77V Wheel Size 14×4 1/2J 15×5 J Offset 46 mm NOTE Contact your MITSUBISHI MOTORS Authorized Service Point for details on the combination used on your vehicle. 9-10 OA0X13E4…
-
Page 235: Clutch Pedal
Specifications Clutch pedal E01102000029 Free play 11 to 16 mm NOTE Have the clutch pedal adjusted at a MITSUBISHI MOTORS Authorized Service Point. 9-11 OA0X13E4…
-
Page 236: Fuel Consumption
Specifications Fuel consumption E01101100788 Combined Urban conditions Extra-urban conditions Item Fuel consumption Fuel consumption Fuel consumption (g/km) (L/100 km) (L/100 km) (L/100 km) 1000 models 96, 92 4.2, 4.0 5.0, 4.6 3.6, 3.6 Vehicle with 14 inch 100, 96 4.3, 4.1 5.2, 4.8 3.8, 3.7 tyres…
-
Page 237: Refill Capacities
E01101304632 Item Quantity Lubricants Brake fluid As required Brake fluid DOT 3 or DOT 4 Engine coolant MITSUBISHI MOTORS GENUINE SUPER LONG LIFE COOL- 4.0 litres ANT PREMIUM or equivalent 4.6 litres Washer fluid 2.5 litres — Engine oil Oil pan 2.8 litres…
-
Page 238
Specifications Item Quantity Lubricants Manual transmission oil 1.6 litres MITSUBISHI MOTORS GENUINE NEW MULTI GEAR OIL ECO API classification GL-4, SAE 75W-80 250-290 g HFO-1234yf Refrigerant (air conditioning : Includes 0.5 litre in the reservoir : Similar high quality ethylene glycol based non-silicate, non-amine, non-nitrate and non-borate coolant with long life hybrid organic acid technology… -
Page 239
Alphabetical index Disposal information for used batteries 05 Bulb capacity 8-20 Specification 9-09 Replacement 8-22 Bonnet 8-04 Demister (rear window) 3-23 Bottle holder 5-38 Dimensions 9-03 Accessory (Installation) 04 Brake assist system 4-27 Dipper (High/Low beam change) 3-16 Accessory socket 5-35 Brake Door ajar warning lamp 3-14 Active stability control (ASC) 4-30… -
Page 240
Alphabetical index Fluid Jump starting (Emergency starting) 6-02 Automatic transmission fluid 9-13 Brake fluid 8-07,9-13 Engine coolant 8-06 Hazard warning flasher switch 3-18 Washer fluid 8-07,9-13 Hazard warning indication lamps 3-11 Keyless entry system 1-03 Front fog lamps Head restraints 2-04 Keyless operation system 1-04 Bulb capacity 8-20 Headlamp levelling switch 3-16… -
Page 241
Alphabetical index Rear window demister switch 3-23 Starting 4-12 Rear-view camera 4-32 Steering Rear-view mirror Steering wheel height adjustment 4-06 Inside 4-06 Steering wheel lock 4-11 Oil pressure warning lamp 3-13 Outside 4-07 Stop and tail lamps Replacement of lamp bulbs 8-19 Bulb capacity 8-20 Engine oil 8-05 Reversing lamps… -
Page 242
Alphabetical index Tyre repair kit 6-06 Tyre rotation 8-11 Wheel condition 8-11 USB input terminal 5-31 Used engine oils safety instructions and disposal information 05 Vanity mirror 5-34 Vehicle care precautions 7-02 Vehicle dimensions 9-03 Vehicle identification number 9-02 Vehicle information code plate 9-02 Vehicle labeling 9-02 Vehicle performance 9-05 Vehicle weight 9-06… -
Page 243
Declaration of Conformity OA0X13E4… -
Page 244
Declaration of Conformity OA0X13E4… -
Page 245
Declaration of Conformity OA0X13E4… -
Page 246
OA0X13E4… -
Page 247
OA0X13E4… -
Page 248
OA0X13E4… -
Page 249
OA0X13E4… -
Page 250
OA0X13E4…

Руководство на английском языке по ремонту автомобилей Mitsubishi Galant/Mirage/Diamante 1990-2000 годов выпуска.
- Автор: —
- Издательство: Chilton
- Год издания: —
- Страниц: —
- Формат: PDF
- Размер: 66,3 Mb
Руководство на английском языке по техническому обслуживанию и ремонту автомобиля Mitsubishi Mirage 1999 года выпуска.
- Автор: —
- Издательство: Mitsubishi Motors Corp.
- Год издания: 1998
- Страниц: —
- Формат: PDF
- Размер: 76,3 Mb
Мультимедийное руководство по эксплуатации и ремонту автомобилей Mitsubishi Colt/Lancer/Mirage/Cordia/Tredia/Precis 1983-1993 годов выпуска.
- Автор: —
- Издательство: —
- Год издания: —
- Страниц: —
- Формат: ISO
- Размер: 196,8 Mb
Руководства на английском языке по техническому обслуживанию и ремонту (Service Manual) и кузовному ремонту (Body Repair Manual) автомобиля Mitsubishi Mirage 2014-2015 годов выпуска.
- Автор: —
- Издательство: Mitsubishi Motors Corp.
- Год издания: —
- Страниц: —
- Формат: ISO
- Размер: 61,2 Mb
Руководство по эксплуатации, техническому обслуживанию и ремонту автомобилей Mitsubishi Colt/Lancer/Mirage 1991-1996 и Mitsubishi Libero 1992-2002 годов выпуска с бензиновыми и дизельными двигателями.
- Автор: —
- Издательство: Легион-Автодата
- Год издания: —
- Страниц: 448
- Формат: —
- Размер: —
Руководство по эксплуатации, техническому обслуживанию и ремонту автомобилей Mitsubishi Colt/Lancer/Mirage/Cordia/Tredia/Precis/Galant/Sigma/Eterna/Magna/Sapporo 1983-1993 годов выпуска с бензиновыми и дизельными двигателями.
- Автор: —
- Издательство: Техно-BOOK
- Год издания: 2005
- Страниц: 273
- Формат: PDF
- Размер: 34,7 Mb
Руководство по техническому обслуживанию и ремонту автомобилей Mitsubishi Mirage/Lancer/Colt/Galant/Eterna/Sapporo/Sigma/Cordia/Tredia/Precis 1983-1993 годов выпуска.
- Автор: —
- Издательство: MoToR
- Год издания: 1996
- Страниц: 183
- Формат: —
- Размер: —
Руководство по техническому обслуживанию и ремонту автомобилей Mitsubishi Diamante/Galant/Mirage 1990-2000 годов выпуска с бензиновыми двигателями.
- Автор: —
- Издательство: Автонавигатор
- Год издания: —
- Страниц: 384
- Формат: —
- Размер: —
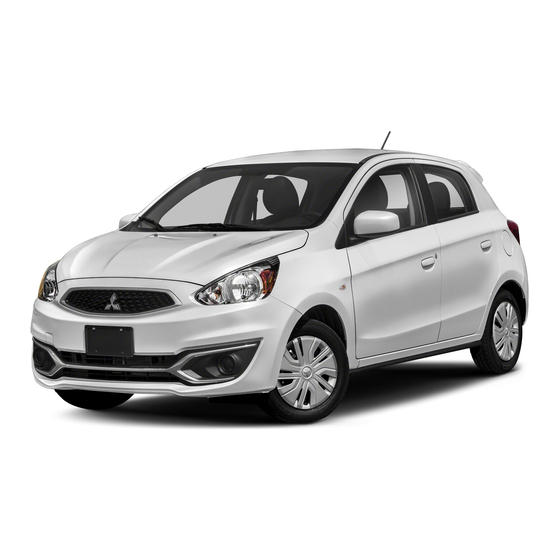
- Manuals
- Brands
- Mitsubishi Manuals
- Automobile
- MIrage 2019
- Owner’s handbook manual
-
Contents
-
Table of Contents
-
Bookmarks
Quick Links
Related Manuals for Mitsubishi MIrage 2019
Summary of Contents for Mitsubishi MIrage 2019
-
Page 1
2019 Owner’s Handbook… -
Page 2
PLEASE PLACE COPIES OF THE FOLLOWING ITEMS IN THIS BOOKLET: 1. Pre-Delivery Inspection Form (Customer Copy) 2. Triple Diamond Delivery Checklist (Customer Copy) 3. Salesperson or Key Dealership Contact’s Business Card… -
Page 3: Table Of Contents
Some of the information contained in this booklet may not be correct due to product changes which may have occurred after the time it was published. Mitsubishi Motors North America, Inc. reserves the right to make changes at any time, without notice, to prices, color, materials, specification and models.
-
Page 4: Driver’s View
DRIVER’S VIEW Side Mirror Adjustment . . . . . . . . . . . Page 5 Headlights . . . . . . . . . . . . . . . . . . . . . Page 5 Windshield Wiper Lever .
-
Page 5: Controls
CONTROLS WINDSHIELD WIPERS (MIRAGE) SIDE MIRROR ADJUSTMENT The side mirrors can be adjusted when MIST The wipers will operate once. the ignition switch is in the “ON” or “ACC” position or the operation mode is put in ON or ACC. Intermittent (speed sensitive) Move the lever to the same side as the…
-
Page 6
CONTROLS REGULAR HEADLIGHTS TEMPERATURE INDICATOR LAMP OPERATION Headlights and other lights on. Parking, tail, front and rear sidemarker lights, license plate and instrument panel lights on. All lights off. 1. TEMPERATURE INDICATOR LAMP ILLUMINATED GREEN When the temperature indicator lamp is illuminated CRUISE CONTROL (IF EQUIPPED) Green this indicates the engine has not reached normal — CANCEL: Used to deactivate the set… -
Page 7: Technology
TECHNOLOGY KEYLESS ENTRY SYSTEM REARVIEW CAMERA OPERATION INDICATOR LIGHT LOCK ( ) BUTTON UNLOCK ( ) BUTTON POWER LIFTGATE BUTTON (IF EQUIPPED) PANIC BUTTON F.A.S.T.-KEY NORMAL KEY When the vehicle is placed in Reverse, the rearview camera system automatically activates. A wide- F.A.S.T.-KEY (IF EQUIPPED) angle view behind the vehicle is shown.
-
Page 8
TECHNOLOGY START/STOP ENGINE SWITCH (IF EQUIPPED WITH F.A.S.T.-KEY) TIRE PRESSURE MONITORING SYSTEM (TPMS) While carrying the F.A.S.T.-KEY within the The Tire Pressure Monitoring System operating range, the Start/Stop Engine light illuminates when one or more of Switch can be used to start the engine. your tires is significantly under inflated. -
Page 9: Air Conditioning And Usb Connection
AIR CONDITIONING AND USB CONNECTION MANUAL AIR CONDITIONING AUTOMATIC AIR CONDITIONING (IF EQUIPPED) — Temperature Control Dial/Switch — Defogger switch — Air conditioning switch — AUTO switch — Mode Selection Dial/Switch — Electric rear window defogger switch — Air Selection Lever/Switch — OFF switch — Blower Speed Selection Dial/Switch CONNECTING A USB OR SMARTPHONE DEVICE (IF EQUIPPED)
-
Page 10: Audio/Bluetooth
AUDIO / BLUETOOTH® LISTENING TO THE RADIO BLUETOOTH INFORMATION ® To Register a Bluetooth Device: ® 1. Press the HOME key 2. Touch SETTING, then BLUETOOTH 3. Touch the NEW DEVICES (IF NO BLUETOOTH DEVICES ARE REGISTERED, STEP 3 IS ®…
-
Page 11
AUDIO / BLUETOOTH® SMARTPHONE LINK DISPLAY AUDIO (SDA) (IF EQUIPPED) SETTING THE CLOCK The clock adjustment procedure is as follows: 1. Press the HOME key 2. Touch SETTING, then CLOCK The display changes to the clock setting where time and format can be adjusted. -
Page 12
AUDIO / BLUETOOTH® BLUETOOTH CONTROLS AUDIO REMOTE CONTROL SWITCH ® For a list of compatible Bluetooth devices, please go to ® http://www.mitsubishicars.com/owners SEEK VOLUME UP — SPEECH BUTTON Change station (IF EQUIPPED) or track Change to voice recognition — PICK-UP BUTTON Answer an incoming call VOLUME DOWN — HANG-UP BUTTON… -
Page 13: Smartphone Link Display Audio (Sda) (If Equipped)
SMARTPHONE LINK DISPLAY AUDIO (SDA) (IF EQUIPPED) ACCESSING APPLE CARPLAY ™ 1. Make sure your iPhone has iOS8.0 or later and that you are ® using a genuine Apple Lightning to USB cable. ® 2. Connect the Apple Lightning to USB cable to your phone and to ®…
-
Page 14: Mitsubishi Connect
• Access discounts and earn a Mitsubishi reward for safe driving. With the Mitsubishi Road Assist+ app you are given journey feedback and a score based on your driving habits using your smartphone sensors. With Mitsubishi rewards, complete levels and earn badges by achieving each level requirement in: •…
-
Page 15: Faq’s
Q: Why does the Audio System take so long to upload my music from my audio music device? A: The Mitsubishi system can read multiple device structures in order to catalog the music files for easy playing and listening. Depending on the amount of music you have on your device, this may take a few minutes.
-
Page 16
NOTES… -
Page 17
NOTES… -
Page 18
A CENTURY OF BIG IDEAS IN TWO SUBCOMPACT VEHICLES For 100 years, Mitsubishi has been a pioneer in the automotive industry, incorporating visionary design with technology ahead of its time. Our drivers are more than just car enthusiasts––they share our conspicuously bold imagination and have the confidence to adhere to their convictions and follow their own paths in life. -
Page 19
MITSUBISHICARS.COM REV. 10/2018…
We have 37 Mitsubishi
Mirage manuals
covering a total of 28 years of production.
In the table below you can see 0
Mirage Workshop Manuals,0
Mirage Owners Manuals and 20 Miscellaneous
Mitsubishi Mirage downloads.
Our most popular manual is the
1999-05—Mitsubishi—Mirage—4 Cylinders A 1.5L MFI SOHC—32635101
.
This (like all of our manuals) is available to download for free in PDF format.
How to download a Mitsubishi Mirage
Repair Manual (for any year)
These Mirage manuals have been provided by our users,
so we can’t guarantee completeness. We’ve checked the years that the manuals cover
and we have Mitsubishi Mirage repair manuals
for the following years; 1990, 1990, 1990, 1990, 1990, 1990, 1990, 1990, 1990, 1993, 1999, 1999, 2012, 2013, 2014, 2015, 2016, 2017 and 2018.
Go through the 37 different PDF’s that are displayed below,
for example this one. You’ll then be shown the first 10 pages of this specific
document, you can then scroll down and click ‘show full PDF’. Then you can click
download you’ve got a totally free car manual, forever!
What topics does the Mitsubishi Mirage
Service/Repair Manual cover?
In total, that’s over 4069 pages of content dedicated to your
Mitsubishi Mirage. Here’s a non exhaustive list
of what’s covered;
- Mitsubishi Mirage service manual for roadside repairs
- Mitsubishi Mirage owners manual covering weekly checks
- Mitsubishi Mirage workshop manual covering Lubricants, fluids and tyre pressures
- Mitsubishi Mirage service PDF’s covering routine maintenance and servicing
- Detailed Mitsubishi Mirage Engine and Associated Service Systems (for Repairs and Overhaul) (PDF)
- Mitsubishi Mirage Transmission data Service Manual PDF
- Mitsubishi Mirage Brakes and suspension PDF
- Mitsubishi Mirage Wiring Diagrams
Looking for a Free Mitsubishi Mirage Haynes /
Mitsubishi Mirage Chilton Manuals?
We get a lot of people coming to the site looking to get themselves a free
Mitsubishi Mirage Haynes
manual. There are two things you need to know; firstly it’s illegal, and secondly —
there are much better ways of servicing and understanding your
Mitsubishi Mirage engine than
the Haynes manual. That’s essentially what we’re here for — to give you an
alternative to the Haynes and Chilton, online and totally for free.
Комментарии
7
Войдите или зарегистрируйтесь, чтобы писать комментарии, задавать вопросы и участвовать в обсуждении.
Войти
Зарегистрироваться

SalomonBlack
Я езжу на Toyota Corona EXiV (1G)
Ребята здравствуйте. Есть ссылка на мануал митсубиси мираж 5 поколения?
1 месяц

Dja31region
Я езжу на Citroen C-Elysee
Народ скиньте пожалуйста руководство
2 года

12527
Я езжу на Mitsubishi Mirage (5G)
Привет, книгу по ремонту не могу найти на мираж CK 1a, 4g13 двигатель,
2 года

EvgeniyD31
Я езжу на KIA Cerato (2G)
2 года

Serge1912
Я езжу на BAC Mono
2 года

ищу и не могу найти руководство на Mirage V, везде на IV поколение
наткнулся на это руководство, оно тоже для IV Миража
7 лет

abver-78
Я езжу на Mitsubishi Mirage V
7 лет
Руководство на английском языке по ремонту автомобилей Mitsubishi Galant/Mirage/Diamante 1990-2000 годов выпуска.
Рекомендуем перед началом ремонта или обслуживания изучить руководство, это позволит избежать проблем при эксплуатации и узнать о всех функциях и особенностях автомобиля.
◀Скачать Руководство по ремонту, эксплуатации и ТО Mitsubishi Tredia 1983-1993 г
Скачать Руководство по ремонту Mitsubishi Pajero 1991-1998 г▶
Посмотреть инструкция для Mitsubishi Mirage (2021) бесплатно. Руководство относится к категории Автомобили, 1 человек(а) дали ему среднюю оценку 9.3. Руководство доступно на следующих языках: английский. У вас есть вопрос о Mitsubishi Mirage (2021) или вам нужна помощь? Задайте свой вопрос здесь
Главная
Не можете найти ответ на свой вопрос в руководстве? Вы можете найти ответ на свой вопрос ниже, в разделе часто задаваемых вопросов о Mitsubishi Mirage (2021).
Как перевести мили в километры?
Где я могу узнать идентификационный номер транспортного средства Mitsubishi?
Что такое идентификационный номер транспортного средства (VIN)?
Когда транспортному средству Mitsubishi требуется техническое обслуживание?
Когда следует заменять тормозную жидкость на Mitsubishi?
В чем разница между топливом E10 и E5?
Одна или несколько дверей не открываются изнутри. Что мне делать?
Автомобильный радиоприемник не включается, что делать?
Инструкция Mitsubishi Mirage (2021) доступно в русский?
Не нашли свой вопрос? Задайте свой вопрос здесь
Техническая документация по ремонту автомобилей Mitsubishi Mirage ( все годы выпуска) Бесплатно, без регистрации и СМС


Руководство по ремонту, эксплуатации и техническому обслуживанию Mitsubishi Mirage
— полные технические характеристик
-особенности эксплуатации
— устранение неисправностей Mitsubishi Mirage
— цветные электросхемы Mitsubishi Mirage
СКАЧАТЬ / СКАЧАТЬ С ЗЕРКАЛА 
Руководство по эксплуатации Mitsubishi Mirage
— полные технические характеристики Mitsubishi Mirage
— особенности эксплуатации
— устранение неисправностей
— цветные электросхемы
СКАЧАТЬ / СКАЧАТЬ С ЗЕРКАЛА 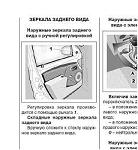
Руководство по ремонту Mitsubishi Mirage в фотографиях
— полные технические характеристики
— особенности эксплуатации Mitsubishi Mirage
— устранение неисправностей
в фотографиях своими руками
— более 1980 фотографий процесса ремонта
СКАЧАТЬ / СКАЧАТЬ С ЗЕРКАЛА 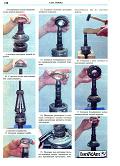
Каталог деталей и сборочных единиц Mitsubishi Mirage
— таблица взаимозаменяемости деталей автомобилей
— предназначен для работников СТО и владельцев автомобилей Mitsubishi Mirage
— каталог деталей Mitsubishi Mirage
СКАЧАТЬ / СКАЧАТЬ С ЗЕРКАЛА 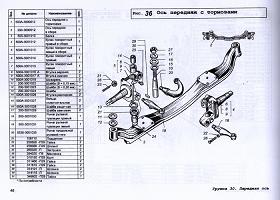
Подробная электросхема Mitsubishi Mirage
— полное описание электрооборудования Mitsubishi Mirage , подробная интерактивная электрическая схема Mitsubishi Mirage
— подробно описан алгоритм поиска неисправностей электрооборудования (стартер, генератор, система зажигания, впрыск, инжектор)
— подробная схема электрооборудования ( электро схема ) Mitsubishi Mirage
— распиновка разъемов электрических, распиновка электро проводки Mitsubishi Mirage
СКАЧАТЬ / СКАЧАТЬ С ЗЕРКАЛА 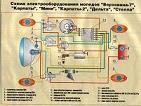
Руководство по ремонту двигателя Mitsubishi Mirage
— полные технические характеристики двигателя Mitsubishi Mirage
— особенности конструкции и ремонта двигателя Mitsubishi Mirage
— подробное описание процессов разборки, дефектовки и сборки двигателя с фотографиями, ГРМ
СКАЧАТЬ / СКАЧАТЬ С ЗЕРКАЛА 
Руководство по ремонту коробок передач Mitsubishi Mirage
— полные технические характеристики КПП
— особенности конструкции и ремонта КПП Mitsubishi Mirage
— устранение неисправностей КПП трансмиссия, валы, шестерни, ШРУС
— подробное описание процессов разборки, дефектовки и сборки КПП с фотографиями
СКАЧАТЬ / СКАЧАТЬ С ЗЕРКАЛА 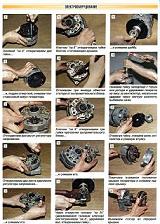
а вот здесь можно заработать на новую машину, и тогда старую не придется ремонтировать!!!
Mitsubishi Mirage
Посмотреть инструкция для Mitsubishi Mirage (2022) бесплатно. Руководство относится к категории Автомобили, 1 человек(а) дали ему среднюю оценку 7.6. Руководство доступно на следующих языках: английский. У вас есть вопрос о Mitsubishi Mirage (2022) или вам нужна помощь? Задайте свой вопрос здесь
Главная
Не можете найти ответ на свой вопрос в руководстве? Вы можете найти ответ на свой вопрос ниже, в разделе часто задаваемых вопросов о Mitsubishi Mirage (2022).
Как перевести мили в километры?
Где я могу узнать идентификационный номер транспортного средства Mitsubishi?
Что такое идентификационный номер транспортного средства (VIN)?
Когда транспортному средству Mitsubishi требуется техническое обслуживание?
Когда следует заменять тормозную жидкость на Mitsubishi?
В чем разница между топливом E10 и E5?
Одна или несколько дверей не открываются изнутри. Что мне делать?
Автомобильный радиоприемник не включается, что делать?
Инструкция Mitsubishi Mirage (2022) доступно в русский?
Не нашли свой вопрос? Задайте свой вопрос здесь