 Loading…

Corel® VideoStudio® X10
User Guide
Including VideoStudio Pro and
VideoStudio Ultimate

Contents
Quick start. . . . . . . . . . . . . . . . . . . . . . . . . . . . . . . . . . . . . . 1 Welcome . . . . . . . . . . . . . . . . . . . . . . . . . . . . . . . . . . . . . . . 9
What’s new in Corel VideoStudio X10? . . . . . . . . . . . . . . . . . . . . . 9 System requirements . . . . . . . . . . . . . . . . . . . . . . . . . . . . . . . . . . 12 Supported file formats . . . . . . . . . . . . . . . . . . . . . . . . . . . . . . . . 14 Hardware acceleration. . . . . . . . . . . . . . . . . . . . . . . . . . . . . . . . . 15 Preparing for video editing . . . . . . . . . . . . . . . . . . . . . . . . . . . . . 16 Installing and uninstalling the application . . . . . . . . . . . . . . . . . . 17 Starting and quitting the application . . . . . . . . . . . . . . . . . . . . . . 17 Updating the application. . . . . . . . . . . . . . . . . . . . . . . . . . . . . . . 18 Corel Support Services. . . . . . . . . . . . . . . . . . . . . . . . . . . . . . . . . 18 About Corel . . . . . . . . . . . . . . . . . . . . . . . . . . . . . . . . . . . . . . . . 18
Learning resources . . . . . . . . . . . . . . . . . . . . . . . . . . . . . . 21
Documentation conventions . . . . . . . . . . . . . . . . . . . . . . . . . . . . 21 Using the Help system. . . . . . . . . . . . . . . . . . . . . . . . . . . . . . . . . 22 Corel VideoStudio X10 User Guide PDF . . . . . . . . . . . . . . . . . . . . 23 Understanding VideoStudio terminology . . . . . . . . . . . . . . . . . . . 23 Learning with video tutorials . . . . . . . . . . . . . . . . . . . . . . . . . . . . 23 Using Web-based resources. . . . . . . . . . . . . . . . . . . . . . . . . . . . . 24
Workspace tour. . . . . . . . . . . . . . . . . . . . . . . . . . . . . . . . . 25
Exploring the workspaces . . . . . . . . . . . . . . . . . . . . . . . . . . . . . . 25 Switching between workspaces . . . . . . . . . . . . . . . . . . . . . . . . . . 30

The Welcome book . . . . . . . . . . . . . . . . . . . . . . . . . . . . . . . . . . . 31 Using the Player panel. . . . . . . . . . . . . . . . . . . . . . . . . . . . . . . . . 31 Using the toolbar . . . . . . . . . . . . . . . . . . . . . . . . . . . . . . . . . . . . 34 Customizing the workspace . . . . . . . . . . . . . . . . . . . . . . . . . . . . 36
Capture and import . . . . . . . . . . . . . . . . . . . . . . . . . . . . . . 41
Using the Options panel in the Capture workspace . . . . . . . . . . . 41 Capturing videos and photos . . . . . . . . . . . . . . . . . . . . . . . . . . . 42 Capturing digital video (DV) . . . . . . . . . . . . . . . . . . . . . . . . . . . . 46 Using DV Quick Scan. . . . . . . . . . . . . . . . . . . . . . . . . . . . . . . . . . 46 Capturing analog video. . . . . . . . . . . . . . . . . . . . . . . . . . . . . . . . 46 Importing from digital media . . . . . . . . . . . . . . . . . . . . . . . . . . . 47 Scanning and splitting scenes . . . . . . . . . . . . . . . . . . . . . . . . . . . 49
Project basics . . . . . . . . . . . . . . . . . . . . . . . . . . . . . . . . . . . 51
Creating new projects and opening projects . . . . . . . . . . . . . . . . 51 Using Instant Project templates . . . . . . . . . . . . . . . . . . . . . . . . . . 53 Setting project properties . . . . . . . . . . . . . . . . . . . . . . . . . . . . . . 55 Creating custom profiles . . . . . . . . . . . . . . . . . . . . . . . . . . . . . . . 55 Using Smart Proxy for a faster, smoother editing experience . . . . 57 Previewing your project or clips . . . . . . . . . . . . . . . . . . . . . . . . . . 58 Undoing and redoing actions . . . . . . . . . . . . . . . . . . . . . . . . . . . 59 Showing and hiding grid lines. . . . . . . . . . . . . . . . . . . . . . . . . . . 60 Saving projects . . . . . . . . . . . . . . . . . . . . . . . . . . . . . . . . . . . . . . 61 Saving projects by using Smart Package. . . . . . . . . . . . . . . . . . . . 61 Adding cues and chapters. . . . . . . . . . . . . . . . . . . . . . . . . . . . . . 62
Organize and find media . . . . . . . . . . . . . . . . . . . . . . . . . . 65
Using the Library. . . . . . . . . . . . . . . . . . . . . . . . . . . . . . . . . . . . . 65
|
ii |
Corel VideoStudio Pro User Guide |

Sorting, viewing, and filtering clips in the Library . . . . . . . . . . . . . 68 Resizing thumbnails . . . . . . . . . . . . . . . . . . . . . . . . . . . . . . . . . . 70 Tagging files as 3D . . . . . . . . . . . . . . . . . . . . . . . . . . . . . . . . . . . 71
Timeline. . . . . . . . . . . . . . . . . . . . . . . . . . . . . . . . . . . . . . . 75
Switching between Timeline views. . . . . . . . . . . . . . . . . . . . . . . . 75 Showing and hiding tracks . . . . . . . . . . . . . . . . . . . . . . . . . . . . . 78 Adding and swapping tracks . . . . . . . . . . . . . . . . . . . . . . . . . . . . 78 Grouping and ungrouping . . . . . . . . . . . . . . . . . . . . . . . . . . . . . 80 Using Ripple Editing . . . . . . . . . . . . . . . . . . . . . . . . . . . . . . . . . . 81
Edit media. . . . . . . . . . . . . . . . . . . . . . . . . . . . . . . . . . . . . 85
Using the Options panel in the Edit workspace . . . . . . . . . . . . . . 86 Converting multiple files . . . . . . . . . . . . . . . . . . . . . . . . . . . . . . . 89 Adding video clips. . . . . . . . . . . . . . . . . . . . . . . . . . . . . . . . . . . . 90 Adding photos . . . . . . . . . . . . . . . . . . . . . . . . . . . . . . . . . . . . . . 91 Time remapping . . . . . . . . . . . . . . . . . . . . . . . . . . . . . . . . . . . . . 92 Modifying video playback speed . . . . . . . . . . . . . . . . . . . . . . . . . 94 Using Freeze Frame . . . . . . . . . . . . . . . . . . . . . . . . . . . . . . . . . . . 99 Replacing media clips . . . . . . . . . . . . . . . . . . . . . . . . . . . . . . . . 100 Trimming a clip . . . . . . . . . . . . . . . . . . . . . . . . . . . . . . . . . . . . . 101 Using Split by Scene . . . . . . . . . . . . . . . . . . . . . . . . . . . . . . . . . 104 Trimming video into multiple clips . . . . . . . . . . . . . . . . . . . . . . . 105 Saving trimmed clips . . . . . . . . . . . . . . . . . . . . . . . . . . . . . . . . . 107 Taking a snapshot from a video clip. . . . . . . . . . . . . . . . . . . . . . 108 Enhancing clips . . . . . . . . . . . . . . . . . . . . . . . . . . . . . . . . . . . . . 108 Adjusting white balance . . . . . . . . . . . . . . . . . . . . . . . . . . . . . . 110 Applying pan and zoom effect . . . . . . . . . . . . . . . . . . . . . . . . . 111 Working with the Mask Creator. . . . . . . . . . . . . . . . . . . . . . . . . 115

Track transparency . . . . . . . . . . . . . . . . . . . . . . . . . . . . . . . . . . 120 360 video . . . . . . . . . . . . . . . . . . . . . . . . . . . . . . . . . . . . . . . . . 122
Titles and subtitles . . . . . . . . . . . . . . . . . . . . . . . . . . . . . . 127
Using the Title Safe area . . . . . . . . . . . . . . . . . . . . . . . . . . . . . . 127 Adding titles using the Library . . . . . . . . . . . . . . . . . . . . . . . . . . 128 Adding titles with the Subtitle Editor. . . . . . . . . . . . . . . . . . . . . 129 Formatting text . . . . . . . . . . . . . . . . . . . . . . . . . . . . . . . . . . . . . 133 Applying text effects and animation . . . . . . . . . . . . . . . . . . . . . 137 Converting titles to image and animation files . . . . . . . . . . . . . . 138
Transitions . . . . . . . . . . . . . . . . . . . . . . . . . . . . . . . . . . . . 141
Adding transitions. . . . . . . . . . . . . . . . . . . . . . . . . . . . . . . . . . . 141 Saving and deleting transitions . . . . . . . . . . . . . . . . . . . . . . . . . 144
Graphics . . . . . . . . . . . . . . . . . . . . . . . . . . . . . . . . . . . . . . 145
Adding color clips . . . . . . . . . . . . . . . . . . . . . . . . . . . . . . . . . . . 145 Adding color patterns . . . . . . . . . . . . . . . . . . . . . . . . . . . . . . . . 146 Adding backgrounds. . . . . . . . . . . . . . . . . . . . . . . . . . . . . . . . . 146 Adding objects or frames . . . . . . . . . . . . . . . . . . . . . . . . . . . . . 147 Adding Flash animations . . . . . . . . . . . . . . . . . . . . . . . . . . . . . . 148 Customizing objects, frames, and animations . . . . . . . . . . . . . . 148
Video filters . . . . . . . . . . . . . . . . . . . . . . . . . . . . . . . . . . . 149
Applying filters . . . . . . . . . . . . . . . . . . . . . . . . . . . . . . . . . . . . . 149 Marking filters as favorites. . . . . . . . . . . . . . . . . . . . . . . . . . . . . 150 Applying multiple filters . . . . . . . . . . . . . . . . . . . . . . . . . . . . . . 151 Customizing filters . . . . . . . . . . . . . . . . . . . . . . . . . . . . . . . . . . 152
Overlay clips . . . . . . . . . . . . . . . . . . . . . . . . . . . . . . . . . . . 155
Adding clips to overlay tracks . . . . . . . . . . . . . . . . . . . . . . . . . . 155
|
iv |
Corel VideoStudio Pro User Guide |

Adjusting overlay clips. . . . . . . . . . . . . . . . . . . . . . . . . . . . . . . . 156 Combining Overlay clips to create an Ultra HD (4K) video. . . . . . 158 Applying motion to an overlay clip . . . . . . . . . . . . . . . . . . . . . . 159 Adjusting the overall transparency of overlay clips . . . . . . . . . . . 160 Adding borders to overlay clips . . . . . . . . . . . . . . . . . . . . . . . . . 161 Blending overlay clips with the background . . . . . . . . . . . . . . . . 161 Adding a mask frame . . . . . . . . . . . . . . . . . . . . . . . . . . . . . . . . 164 Using video masks with overlay clips . . . . . . . . . . . . . . . . . . . . . 165
|
Motion tracking . . . . . . . . . . . . . . . . . . . . . . . . . . . . . . . |
167 |
Tracking motion of video objects. . . . . . . . . . . . . . . . . . . . . . . . 167 Matching motion to a tracking path . . . . . . . . . . . . . . . . . . . . . 173 Customizing motion . . . . . . . . . . . . . . . . . . . . . . . . . . . . . . . . . 179
Tracking paths. . . . . . . . . . . . . . . . . . . . . . . . . . . . . . . . . 185
Adjusting tracking paths . . . . . . . . . . . . . . . . . . . . . . . . . . . . . . 185 Using objects on tracking paths. . . . . . . . . . . . . . . . . . . . . . . . . 189 Using the Path Library . . . . . . . . . . . . . . . . . . . . . . . . . . . . . . . . 192
Audio . . . . . . . . . . . . . . . . . . . . . . . . . . . . . . . . . . . . . . . 195
Adding audio files . . . . . . . . . . . . . . . . . . . . . . . . . . . . . . . . . . . 196 Using Audio Ducking to automatically adjust volume. . . . . . . . . 197 Splitting an audio track from a video clip. . . . . . . . . . . . . . . . . . 199 Using Auto Music . . . . . . . . . . . . . . . . . . . . . . . . . . . . . . . . . . . 200 Balancing the volume of multiple clips with Normalize Audio. . . 201 Using the Clip Volume Control . . . . . . . . . . . . . . . . . . . . . . . . . 202 Trimming and cutting audio clips . . . . . . . . . . . . . . . . . . . . . . . 202 Stretching audio duration . . . . . . . . . . . . . . . . . . . . . . . . . . . . . 203 Applying fade-in/out . . . . . . . . . . . . . . . . . . . . . . . . . . . . . . . . . 204

Using the Sound Mixer . . . . . . . . . . . . . . . . . . . . . . . . . . . . . . . 204 Adjusting stereo channels . . . . . . . . . . . . . . . . . . . . . . . . . . . . . 205 Using the Surround Sound Mixer. . . . . . . . . . . . . . . . . . . . . . . . 205 Mixing Surround Sound . . . . . . . . . . . . . . . . . . . . . . . . . . . . . . 206 Duplicating an audio channel . . . . . . . . . . . . . . . . . . . . . . . . . . 207 Applying audio filters . . . . . . . . . . . . . . . . . . . . . . . . . . . . . . . . 208
Painting Creator . . . . . . . . . . . . . . . . . . . . . . . . . . . . . . . . 209
Working with Painter Creator . . . . . . . . . . . . . . . . . . . . . . . . . . 210 Switching between Painting Creator modes. . . . . . . . . . . . . . . . 213 Creating images and animations . . . . . . . . . . . . . . . . . . . . . . . . 213
Live screen capture. . . . . . . . . . . . . . . . . . . . . . . . . . . . . . 217
Starting a screen capture project . . . . . . . . . . . . . . . . . . . . . . . . 217 Recording your screen. . . . . . . . . . . . . . . . . . . . . . . . . . . . . . . . 218
FastFlick . . . . . . . . . . . . . . . . . . . . . . . . . . . . . . . . . . . . . . 223
Creating a FastFlick project . . . . . . . . . . . . . . . . . . . . . . . . . . . . 223 Selecting a template (FastFlick) . . . . . . . . . . . . . . . . . . . . . . . . . 224 Adding media clips (FastFlick) . . . . . . . . . . . . . . . . . . . . . . . . . . 224 Editing titles (FastFlick) . . . . . . . . . . . . . . . . . . . . . . . . . . . . . . . 225 Adding music (FastFlick) . . . . . . . . . . . . . . . . . . . . . . . . . . . . . . 227 Applying Pan & Zoom effects (FastFlick). . . . . . . . . . . . . . . . . . . 228 Setting movie duration (FastFlick) . . . . . . . . . . . . . . . . . . . . . . . 228 Saving to video files for computer playback (FastFlick) . . . . . . . . 229 Uploading to the Web (FastFlick). . . . . . . . . . . . . . . . . . . . . . . . 229 Editing your movie in VideoStudio (FastFlick) . . . . . . . . . . . . . . . 231
Making FastFlick templates . . . . . . . . . . . . . . . . . . . . . . . 233
Terminology for FastFlick templates . . . . . . . . . . . . . . . . . . . . . . 233
|
vi |
Corel VideoStudio Pro User Guide |

Rules for creating FastFlick templates. . . . . . . . . . . . . . . . . . . . . 236 Creating FastFlick templates. . . . . . . . . . . . . . . . . . . . . . . . . . . . 238
Stop motion animation . . . . . . . . . . . . . . . . . . . . . . . . . . 241
Creating a Stop Motion project . . . . . . . . . . . . . . . . . . . . . . . . . 241 Capturing stop motion images in Corel VideoStudio . . . . . . . . . 243 Using the DSLR Enlarged Mode . . . . . . . . . . . . . . . . . . . . . . . . . 244
Multi-Camera Editing . . . . . . . . . . . . . . . . . . . . . . . . . . . 247
The Multi-Camera Editor workspace . . . . . . . . . . . . . . . . . . . . . 248 Basic steps in multi-camera editing . . . . . . . . . . . . . . . . . . . . . . 250 Importing video and audio clips into the Multi-Camera Editor . . 251 Synchronizing video and audio clips in multi-camera projects . . 252 Choosing an audio source for your multi-camera project . . . . . . 254 Editing multiple clips to create a multi-camera compilation . . . . 255 Adding picture-in-picture (PIP) in the Multi-Camera Editor . . . . . 258 Managing multi-camera source files . . . . . . . . . . . . . . . . . . . . . 259 Saving and exporting your multi-camera project . . . . . . . . . . . . 260 Using Smart Proxy with the Multi-Camera Editor . . . . . . . . . . . . 261
Save and share . . . . . . . . . . . . . . . . . . . . . . . . . . . . . . . . 263
Choosing a sharing option . . . . . . . . . . . . . . . . . . . . . . . . . . . . 263 Saving to video files for computer playback . . . . . . . . . . . . . . . . 264 Saving to video files for mobile devices . . . . . . . . . . . . . . . . . . . 266 Saving HTML5 video files. . . . . . . . . . . . . . . . . . . . . . . . . . . . . . 268 Uploading to the Web. . . . . . . . . . . . . . . . . . . . . . . . . . . . . . . . 270 Creating 3D video files. . . . . . . . . . . . . . . . . . . . . . . . . . . . . . . . 272 Creating video files from part of a project (trimmed) . . . . . . . . . 274 Creating sound files. . . . . . . . . . . . . . . . . . . . . . . . . . . . . . . . . . 274

Working with custom profiles in the Share workspace . . . . . . . . 275
Burn discs. . . . . . . . . . . . . . . . . . . . . . . . . . . . . . . . . . . . . 277
Saving a project to disc . . . . . . . . . . . . . . . . . . . . . . . . . . . . . . . 277 Assembling files . . . . . . . . . . . . . . . . . . . . . . . . . . . . . . . . . . . . 280 Adding and editing chapters . . . . . . . . . . . . . . . . . . . . . . . . . . . 281 Editing a menu template. . . . . . . . . . . . . . . . . . . . . . . . . . . . . . 284 Creating advanced menus . . . . . . . . . . . . . . . . . . . . . . . . . . . . . 287 Previewing your movie and menu before burning . . . . . . . . . . . 289 Burning your project onto a disc . . . . . . . . . . . . . . . . . . . . . . . . 290 Copying a disc image file. . . . . . . . . . . . . . . . . . . . . . . . . . . . . . 293 Creating disc labels . . . . . . . . . . . . . . . . . . . . . . . . . . . . . . . . . . 294
Glossary . . . . . . . . . . . . . . . . . . . . . . . . . . . . . . . . . . . . . . 297 Shortcuts . . . . . . . . . . . . . . . . . . . . . . . . . . . . . . . . . . . . . 307
Menu command shortcuts . . . . . . . . . . . . . . . . . . . . . . . . . . . . 307 Workspace shortcuts. . . . . . . . . . . . . . . . . . . . . . . . . . . . . . . . . 308 Navigation area shortcuts . . . . . . . . . . . . . . . . . . . . . . . . . . . . . 308 Timeline shortcuts. . . . . . . . . . . . . . . . . . . . . . . . . . . . . . . . . . . 309 Multi-trim Video shortcuts . . . . . . . . . . . . . . . . . . . . . . . . . . . . 310 Layout settings shortcuts. . . . . . . . . . . . . . . . . . . . . . . . . . . . . . 310 Screen capture shortcuts . . . . . . . . . . . . . . . . . . . . . . . . . . . . . . 311 Other Shortcuts . . . . . . . . . . . . . . . . . . . . . . . . . . . . . . . . . . . . 311
DV-to-DVD Wizard . . . . . . . . . . . . . . . . . . . . . . . . . . . . . . 313
Scanning for scenes . . . . . . . . . . . . . . . . . . . . . . . . . . . . . . . . . 313 Applying templates and burning to DVDs . . . . . . . . . . . . . . . . . 315
|
viii |
Corel VideoStudio Pro User Guide |
![]()
Quick start
If you want to dive into Corel VideoStudio right away, this tutorial will walk you through the key tasks. In this tutorial, you’ll learn how to:
•Import video clips to the Library
•Add your clips and photos
•Review and trim your video clips
•Add titles
•Apply transitions
•Add music
•Save and share
The same basic steps can be applied to create a photo slideshow or any multimedia presentation that includes photos, video clips, and music.
For a quick movie, try the FastFlick. For more information, see “FastFlick” on page 223.
For more details about starting movie projects, see “Project basics” on page 51.
Import video clips to the Library
Let’s start with the most common situation—the shoot is done and you’ve transferred your video clips and photos from your camera to your computer. We can open Corel VideoStudio, and jump directly to the Edit workspace and the Library.
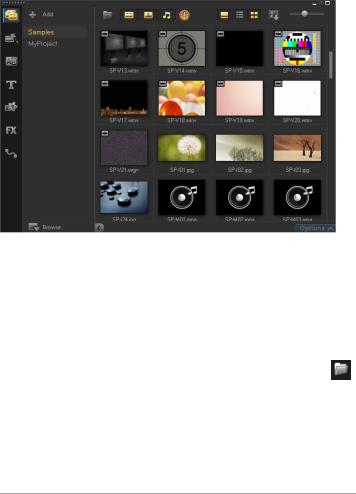
The Library is the source for all your media, including video clips, photos, and music. It also houses templates, transitions, effects, and a variety of other media assets that you can use in your projects.
1Click the Edit tab  at the top of the application window to open the Edit workspace. The Library panel appears in the upper right corner of the application.
2Create a folder for your project to keep all your videos together by clicking the Add a new folder button  .
.
3Type a name for the folder.
|
4 At the top of the Library, click the Import Media Files button |
, |
|
select the video clips and photos that you want to use, and click |
|
|
Open. |
Note that the buttons at the top of the Library can be enabled and disabled to filter the thumbnails by video, photos, and music. If you don’t see the media you expect to see, check the state of these media buttons.

Add your clips and photos
Adding clips and photos to a video project is as easy as dragging thumbnails for the video clips and photos that you want to use from the Library to the Timeline.
If you’re looking for a way to get polished results quickly, you can use an Instant Project template. For more information, see “Using Instant Project templates” on page 53.
Review and trim your video clips
The key to a successful video is to keep it short enough to hold your viewer’s interest. Let’s review and trim the video clips.
1 In the Edit workspace, click a video clip in the Timeline.
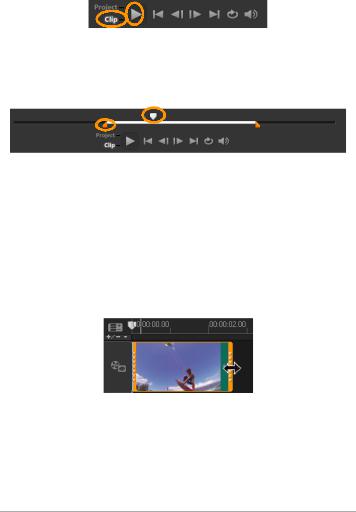
2In the Navigation area of the Player panel, click Clip, and click the Play button.
3After you review the clip, drag the orange Trim Marker from the original starting position to the new starting position. The Scrubber moves to the selected frame and this frame displays in the Preview Window.
1. Trim Marker (one on each end). 2. Scrubber.
4Now drag the second Trim Marker from the original end position to the new end position.
5Click Play.
Note: Changes made to files imported into the Library do not affect the original files.
You can also trim video clips in the Timeline itself by dragging the end handles of a clip.
Want to edit a section in the middle? Try Multi-Trim Video. For more information, see “Trimming video into multiple clips” on page 105.
Add titles
Now let’s add a title.

1Drag the Scrubber to the position you want.
2Click the Title button  to the left of the Library thumbnails.
3You can type directly in the Preview Window, but the easiest way to get a professional-looking title, is to drag one of the title thumbnails from the Library to the Title track in the Timeline.
4You can drag the title to any position in the Title track and adjust the duration of the title by dragging the end handles of the clip.
5To edit the title text, double-click the title clip in the Timeline, in the Preview Window, select the text and type new text. Keep the text inside the box that displays near the edges of the Preview Window (called the Title Safe area).
6The Options panel for titles displays below the thumbnails in the Library. Use any of the controls to format your title text. For example, you can align the text and change the font, size, and color.

Apply transitions
You can add transitions between clips or between photos. Transitions can be used to fade in or fade out or to dissolve one photo into the next. There are many transition options to choose from.
1In the Library, click the Transition button  .
.
2Click the Gallery drop-list at the top of the Library, and choose All if you want to see what is available.
3Drag the thumbnail for the transition you want to the Timeline and place it between two clips or photos.
If you want to apply the same transition between all clips and photos in the track, in the Library, right-click the transition thumbnail, and choose Apply current effect to video track. You will be warned about replacing any existing transitions.
Add music
You can add songs from your computer by dragging a music file from the Library to the Music track. You can also use Auto Music to choose royalty-free music to your project.
1 On the Timeline toolbar, click the Auto Music button  .
.
1In the Auto Music area that displays below the Library thumbnails, experiment with different choices in the drop-lists and click Play selected Music to listen to the selection.
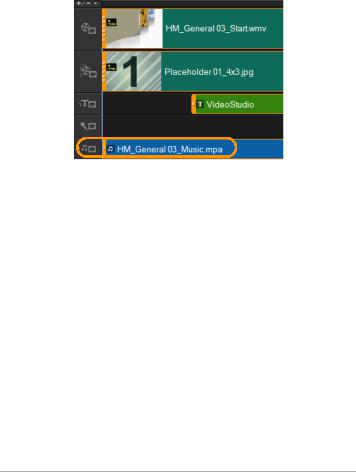
2To add your selection to the Timeline, click Add to Timeline.
3The music is added to the Music track, and as with other clips, you can drag it to a new position in the Timeline and trim it by dragging the end handles.
4To fade the music at the end of your project, click the Fade-out
button  in the Auto Music area.
Note that with any audio clips, or video clips that include sound, you can control the volume of the clips. For more information about adjusting audio, see “Audio” on page 195.

Save and share
When you’re finished with your project, you can save it and share it in a variety of ways. For this tutorial, we’ll upload it directly to the Web.
Before sharing, it’s important to save a version of your project to the native *.vsp format. This will give you maximum flexibility if you choose to edit your project later or if you want to output it to a different format.
1Click the Share tab  to view the Share workspace.
2Click File > Save, choose a location from the Save in box, and type a name in the File name box.
3 To share your video on the Web, click the Web button , then click YouTube, Facebook, Flickr, or Vimeo, and click Log In to sign in to your account or to create an account. After you sign in and approve the link between Corel VideoStudio and the account, choose the settings you want for your video upload and click
Start.

Welcome
Welcome to Corel® VideoStudio®, the surprisingly creative videoediting software that lets you produce impressive video projects, regardless of your skill level. Corel VideoStudio provides a complete set of tools for capturing, editing, and sharing your video, slideshow, and multimedia projects.
The availability of features depends on the version of the software you have. For more information, see http:// videostudiopro.com/compare.
This section contains the following topics:
•What’s new in Corel VideoStudio X10?
•System requirements
•Hardware acceleration
•Preparing for video editing
•Installing and uninstalling the application
•Starting and quitting the application
•Updating the application
•Corel Support Services
•About Corel
What’s new in Corel VideoStudio X10?
New creative features as well as enhancements to favorite features means that you can create stunning videos faster in
Corel VideoStudio. The key updates are listed below.

New! Mask Creator (in Ultimate)
Put the focus on key elements in your video with the new Mask Creator. Define the area to highlight with brush and shape tools and the powerful VideoStudio Ultimate X10 engine will detect the movement of the object. You can fine-tune your mask to get perfection. When you are happy with the results, the mask gets added to the timeline. Apply popular effects to accent or cover the object or the background, for example add blurring, a grayscale effect, boost color and more, for a truly unique effect. For more information, see “Working with the Mask Creator” on page 115.
New! Time Remapping
Evoke drama by playing with speed. The new Time Remapping controls in VideoStudio make it easy to add impact with slow motion, speed things up, temporarily freeze the action, or even reverse and replay scenes. New Time Remapping controls puts all these controls in one place, so you can adjust speed without having to edit multiple movie clips and jump between windows. For more information, see “Time remapping” on page 92.
New! Track Transparency
Track Transparency is available in the Timeline, making it easier than ever to precisely adjust the opacity of your track to show multiple layered clips at once. You can create a custom fade in, fade out, or superimposed effect. For more information, see “Track transparency” on page 120.
New! 360 Video support
Show your best angle with 360° video. VideoStudio introduces controls to convert your 360° video to standard video for playback on TVs and standard video players. Add your video to the Timeline and show your audience the exact point of view you want them to see.
![]()
Then export it and playback as any standard movie. For more information, see “360 video” on page 122.
New Effects! Exclusive Ultimate effects collection
With over 2,000 filters, effects, animated titles and transitions, VideoStudio unleashes your creativity. Plus, only VideoStudio Ultimate includes a bonus collection of premium effects loaded with 14 effects packs, including 3 new to this release. Create beautiful titles with ease using drag-and-drop visual effects and exciting 2D/3D elements in NewBlue Titler Pro 1. Choose from more than 300 new amazing particle and object effects in proDAD Adorage Effects Package Volume 9 — Particle & Object Effects. Try Boris Title Studio to create stylized 2D or 3D titles with custom bevels, fills and styles and high-quality motion graphics.
New! 100+ MyDVD templates
After your video is complete, give it the packaging it deserves. Burn your projects to disc with VideoStudio MyDVD and quickly create high-quality, personalized DVDs with menus, chapters and music. Now with 100+ themed templates to choose from, MyDVD makes it easy to find the style that best fits your project. Tailor templates with custom background images, music and titles. Then quickly burn to DVD and AVCHD disc to share with family and friends. For more information, see the Help in MyDVD.
New! Group and ungroup clips
Timeline editing is more powerful and efficient than ever with new grouping capabilities. Select your clips, then group or ungroup them by simply right-clicking. After clips are grouped, it’s easier than ever to move them along the Timeline, or apply filters and effects by dragging and dropping them on the group. For more information, see “Grouping and ungrouping” on page 80.

Enhanced! Music Library
Now it’s a breeze to add ScoreFitter music tracks to your projects. ScoreFitter tracks are now integrated into the Library, making it easy to choose the track that best suits the mood of your video. Track length now adjusts to the length of your video automatically. For more information, see “Using Auto Music” on page 200.
New! Performance and file support
VideoStudio continues to keep pace with the latest formats with expanded support for HEVC (H.265) encode for nVidia and AMD, offering a higher compression rate, better quality and a smaller file size. VideoStudio X10 is optimized for Intel’s 7th generation processor.
New! Integrated learning and tutorials
Get help when you need it with the new Welcome book that offers instant access to helpful tutorials. It includes Corel Discovery Center videos to help you explore a wide range of tutorials for new and advanced users. For more information, see “The Welcome book” on page 31. You can also view the User Guide online and access the Corel Knowledgebase to find answers to frequently asked questions.
System requirements
For optimal performance of Corel VideoStudio, make sure that your system meets the recommended specifications. Note that some formats and features require specific hardware or software (as indicated).
•Internet connection required for installation, registration and updates. Registration required for product use.
•Windows 10, Windows 8, Windows 7, 64-bit OS highly recommended
•Intel Core i3 or AMD A4 3.0 GHz or higher

•Intel Core i5 or i7 1.06 GHz or higher required for AVCHD & Intel Quick Sync Video support
•Intel Core i7 or AMD Athlon A10 or higher for UHD, Multi-Camera or 360° video
•4 GB of RAM or higher, 8+GB highly recommended for UHD, Multi-Camera, or 360° video
•Minimum 256 MB VRAM, 512 MB or higher recommended for hardware decoding acceleration
•HEVC (H.265) support requires Windows 10 and supporting PC hardware or graphics card
•Minimum display resolution: 1024 x 768
•Windows-compatible sound card
•Minimum 8 GB HDD space for full installation
•Digital download option available if DVD-ROM drive not available for installation
Accessories
•DVD burner for creating DVD and AVCHD discs
Input Options
•Capture from DV, HDV and Digital8 camcorders or VCRs (requires a FireWire port)
•Capture from analog camcorders with compatible analog capture card
•Capture from USB capture devices, PC cameras, webcams
•Import from AVCHD and other file-based camcorders, digital still cameras, mobile devices and discs
Product specifications are subject to change without notice or obligation.
For more details, visit: www.videostudiopro.com

Supported file formats
The supported file formats are listed below. Please review release notes for any updates to supported files or visit www.videostudiopro.com for the latest list in the system requirements section.
Import Formats
•Video: AVCHD, DV, HDV, AVI, MPEG-1/-2/-4, DVR-MS, DivX*, SWF*, UIS, UISX, M2T, M2TS, TOD, MOD, M4V, WebM, 3GP, WMV, Non-encrypted DVD titles, MOV (H.264), MKV, XAVC, MXF**, HEVC (H.265)
•360° Video: Equirectangular format
•Audio: AC3, MP3, MPA, MOV, WAV, WMA, MP4, M4A, Aiff, AU, CDA, AMR, AAC, OGG
•Image: BMP, CLP, CUR, EPS, FAX, FPX, GIF87a, IFF, IMG, JP2, JPC, JPG, MAC, MPO, PCT, PIC, PNG, PSD, PXR, RAS, SCT, SHG, TGA, TIF/TIFF, UFO, UFP, WMF, PSPImage, Camera RAW, 001, DCS, DCX, ICO, MSP, PBM, PCX, PGM, PPM, SCI, WBM, WBMP
Export Formats
•Video: AVCHD, DV, HDV, AVI, MPEG-1/-2/-4, UIS, UISX, M2T, WebM, 3GP, HEVC (H.265), WMV
•Device: Apple iPod/iPhone/iPad/TV, Sony PSP/PS3/PS4, Nintendo Wii, Microsoft Xbox compatible formats
•Audio: AC3, M4A, OGG, WAV, WMA
•Image: BMP, JPG
Blu-ray Support
•Requires purchase of a separate plug-in from within the product
•Requires Blu-ray Disc reader and/or burner

*MOV, DivX & SWF: QuickTime driver for MOV, DivX codec for DivX and Flash player for SWF are required to enable these formats.
**VideoStudio Ultimate only
Hardware acceleration
Depending on your hardware specifications, Corel VideoStudio lets you optimize the performance of your system by optimizing hardware acceleration.
Hardware decoder and encoder acceleration is supported only by Windows Vista and later versions of the Windows operating system software and requires at least 512 MB of VRAM.
To change hardware acceleration settings
1Select Settings > Preferences [F6].
2Click the Performance tab and select the following options under
Editing Process and File Creation:
•Enable Hardware Decoder acceleration — enhances editing performance and improves clip and project playback by using video graphics acceleration technologies of the computer’s available hardware
•Enable Hardware Encoder acceleration — improves the rendering time required for producing your movies
Note: For optimum performance, VGA cards must support DXVA2 VLD mode with Vertex and Pixel Shader 2.0 or later.
If you want the program to automatically detect the hardware acceleration capabilities of your system and determine the
optimum settings, select all hardware acceleration options in
Performance Optimization, including Enable hardware acceleration optimization.

If the feature is not supported by your system, some hardware acceleration options will be grayed out.
Preparing for video editing
Video editing tasks require a lot of computer resources. Your computer must be properly set up to ensure successful capturing and smooth video editing. Below are some tips on how to prepare and optimize your computer before you launch Corel VideoStudio.
•It is recommended that you close other applications when working with Corel VideoStudio. To avoid interruptions while capturing, it is best to turn off any automatically launched software.
•If you have two hard drives in your system, it is recommended that you install Corel VideoStudio to your system drive (usually C:) and store captured videos on your other drive.
•It is recommended that you store video files on a dedicated hard drive.
•Increase the Paging File (Swap File) size to twice your amount of RAM.
When you are in Corel VideoStudio, you can choose settings that let you balance the quality of the playback and the speed of the application. For example, is your playback fast but fuzzy? Or is your playback too slow? The tips below can help you find the right settings in Corel VideoStudio.
•Clearer, higher quality playback is available if your computer system meets or exceeds the recommended system requirements. You can work with HD projects and you can preview your project in HD. For more information, see “Setting project properties” on page 55 and “Previewing your project or clips” on page 58.
•To speed up less powerful systems, consider using Smart Proxy and review the hardware acceleration options. For more

information, see “Using Smart Proxy for a faster, smoother editing experience” on page 57 and “Hardware acceleration” on page 15.
Installing and uninstalling the application
You can install Corel VideoStudio from a disc or from installation files that you download.
To install Corel VideoStudio
1Close any open applications.
2Insert the DVD in the DVD drive or double-click the associated
.exe file that you downloaded.
If the disc-initiated setup does not start automatically, navigate to the DVD drive on your computer, and double-click Setup.exe.
3Follow the instructions on your screen.
Note: In addition to Corel VideoStudio, you might be prompted to install supporting Windows extensions and third-party programs and drivers.
To uninstall Corel VideoStudio
1Open the Windows Control Panel.
2In the Programs category, click the Uninstall a program link.
3In the Programs and Features window, click Corel VideoStudio X10 in the list of applications.
4Click Uninstall/Change.
5Follow the instructions on your screen.
Starting and quitting the application
You can start Corel VideoStudio from the Windows desktop or Start menu, and quit the program from the application window.

To start the application
•From the Windows Start menu or Start screen, choose Corel VideoStudio X10.
To quit the application
•Click the Close button  in the upper-right corner of the application window.
Updating the application
You can check for and install product updates. Updates provide important new information about your application.
To update the application
•Choose Help > Check for Updates.
Corel Support Services
Corel Support Services can provide you with prompt and accurate information about product features, specifications, pricing, availability, services, and technical support options. For the most current information on available support and professional services for your Corel product, please visit www.corel.com/support.
About Corel
Corel is one of the world’s top software companies, boasting some of the industry’s best-known graphics, productivity and digital media products. We’ve built a reputation for giving customers more choice, and delivering solutions that are easy to learn and use. Our mission is simple: help people achieve new levels of creativity and productivity.
Corel’s product lines include CorelDRAW® Graphics Suite, Corel® Painter®, Corel®PaintShop® Pro, Corel® VideoStudio®, MindManager®, Pinnacle Studio™, ReviverSoft®, Roxio Creator®,

Roxio® Toast™ and WinZip®. For more information on Corel, please visit www.corel.com.

![]()
Learning resources
You can learn how to use Corel VideoStudio in various ways: by searching the Help or the user guide, by accessing video tutorials in the Welcome tab, or by exploring the Corel website (www.corel.com).
This section contains the following topics:
•Documentation conventions
•Using the Help system
•Corel VideoStudio X10 User Guide PDF
•Understanding VideoStudio terminology
•Learning with video tutorials
•Using Web-based resources
Documentation conventions
The following table describes important conventions used in the Help.
|
Convention |
Description |
Example |
|
Menu |
A menu item followed by a |
Click Settings > |
|
>Menu |
menu command |
Preferences > Edit. |
|
command |
||
|
drop-list |
A list of options that drops |
Select a profile from the |
|
down when a user clicks a |
Profile drop-list. |
|
|
down arrow button |
||

|
Convention Description |
Example |
A note containing information that is important to the preceding steps. It may describe conditions under which the procedure can be performed.
Enable Flatten audio and background video if your browser can only support a single track for audio and video.
A tip containing suggestions for performing the preceding steps. It may present alternatives to the steps, or other benefits and uses of the procedure.
For best results, use a tripod when you shoot photos and videos that you want to use in your stop motion animation project.
Using the Help system
The Help that is available from within the program is the most comprehensive source of information for Corel VideoStudio. The Help system provides two ways to find information. You can choose a topic from the Contents page, or use the Search page to search for specific words and phrases. You can also print topics from the Help.
An Internet connection is required to view the Help. If you work offline on a regular basis, you can download a PDF copy of the information (Help > User Guide (PDF)).
To use the Help system
1Do one of the following:
•Click Help > Help topics.
•Press F1.
2In the Help window, click one of the following tabs:
•Contents — lets you browse through topics in the Help

•Search — lets you search the full text of the Help for a particular word or phrase (enclosed in quotation marks). For example, if you are looking for information about a specific tool or command, you can type the name of the tool or command, such as Trimming, to display a list of relevant topics.
Corel VideoStudio X10 User Guide PDF
You can view the Corel VideoStudio X10 User Guide PDF online or you can download it to your computer or tablet. At any time, you can print the pages you want. You can find the PDF in Help menu (Help > User Guide (PDF)).
Understanding VideoStudio terminology
Learn more about the language of video editing. We created a list of the most common video editing terms used in Corel VideoStudio to help you out. What is a scrubber and what does rendering mean? Find out by reading the “Glossary” on page 297.
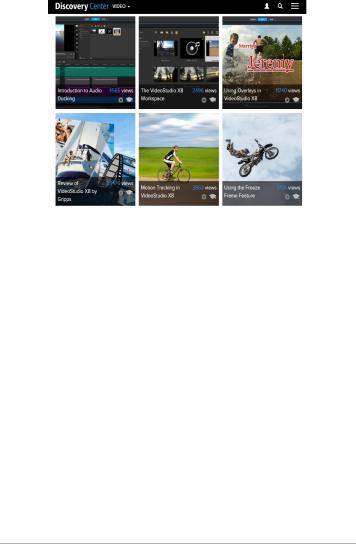
Learning with video tutorials
The Welcome tab includes access to learning material, such as video tutorials (English only for some video content), as well as free and paid content to help you expand your project options in VideoStudio.
You can also visit www.youtube.com/VideoStudioPro for more tutorials.
To open the Discovery Center window
•Choose Help Video Tutorials.
Using Web-based resources
From the Corel VideoStudio Help menu and the Corel website, you can access a number of Web pages dedicated to customer support and communities. You can find resources such as tutorials, tips, newsgroups, downloads, and other online resources.
To access Corel VideoStudio Web resources
•Use your Internet browser to go to www.videostudiopro.com/ learn for tutorials, community forums, and other resources
•Visit VideoStudio Facebook postings: https:// www.facebook.com/corelvideostudio

Workspace tour
Corel VideoStudio has three workspaces: Capture, Edit, and Share. These workspaces are based on the key steps in the video-editing process. The customizable workspaces let you rearrange the panels to suit your preferences and ensure that you have everything you need at a glance.
This section presents the following topics:
•Exploring the workspaces
•Switching between workspaces
•The Welcome book
•Using the Player panel
•Using the toolbar
•Customizing the workspace
Exploring the workspaces
Corel VideoStudio Pro consists of three main workspaces, and a
Welcome tab.
•Capture
•Edit
•Share
Each workspace contains specific tools and controls to help you accomplish the task at hand quickly and efficiently.
For more information about the Welcome tab, see “The Welcome book” on page 31.
You can customize the size and position of the elements on your screen for full control of your editing environment. For information about using a custom workspace layout, see “Customizing the workspace” on page 36.
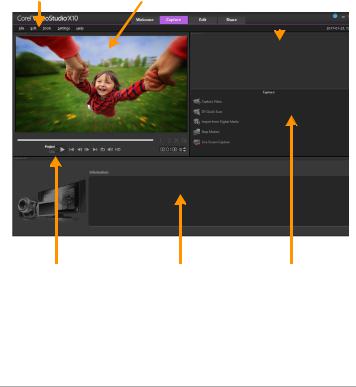
The Capture workspace
Media clips can be recorded or imported directly to your computer’s hard drive. This step allows you to capture and import video, photo, and audio clips.
|
1 |
2 |
3 |
|||||
The Capture workspace consists of the following components:
1. Menu bar — provides various commands for customizing
Corel VideoStudio, opening and saving movie projects, working with individual clips, and more.

2.Preview Window — shows the current video being played in the Player panel.
3.Library panel — a storage depot for captured media clips.
4.Navigation area — provides buttons for playback and for precision trimming in the Player panel.
5.Information panel — lets you view information about the files you are working with.
6.Capture Options — displays different media capture and import methods.
The Edit workspace
When you open Corel VideoStudio Pro, the Edit workspace appears as your default workspace. The Edit workspace and the Timeline are the heart of Corel VideoStudio Pro, where you can arrange, edit, trim, and add effects to your video clips.

|
1 |
2 |
3 |
||||
The Edit workspace consists of the following components:
1. Menu bar — provides various commands for customizing
Corel VideoStudio, opening and saving movie projects, working with individual clips, and more.
2.Preview Window — shows the current video being played in the Player panel.
3.Library panel — a storage depot for everything you need to create a movie, including sample video, photo, and music clips, and your imported clips. It also includes templates, transitions, titles, graphics, filters, and paths. The Options area opens in the Library panel.
4.Navigation area — provides buttons for playback and for precision trimming in the Player panel.
5.Toolbar — lets you choose from a variety of functions related to content in the Timeline.
6.Timeline panel — The Timeline is where you assemble the media clips for your video project. For more information, see “Timeline” on page 75.
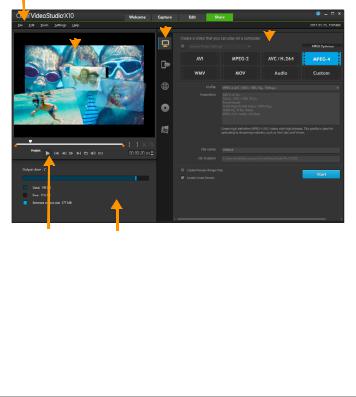
The Share workspace
The Share workspace lets you save and share your finished movie.
|
1 |
2 |
3 |
4 |
|||||||
5 6
The Share workspace consists of the following components:
1. Menu bar — provides various commands for customizing
Corel VideoStudio, opening and saving movie projects, working with individual clips, and more.
2. Preview Window — shows the current video being played in the Player panel.

3.Category selection area — lets you choose between Computer, Device, Web, Disc, and 3D movies output categories. For HTML5 projects, you can choose HTML5 and Corel VideoStudio project.
4.Format area — provides a selection of file formats, profiles, and descriptions. For Web sharing, it displays the settings for your account.
5.Navigation area — provides buttons for playback and for precision trimming in the Player panel.
6.Information area — lets you view the information about the output location and provides an estimate of the file size.
Switching between workspaces
Corel VideoStudio simplifies the process of creating movies by organizing the controls you need into three workspaces that correspond to the different steps in the video-editing process.
Media clips can be recorded or imported directly to your computer’s hard drive in the Capture workspace. This workspace allows you to capture and import video, photo, and audio clips.
The Edit workspace includes the Timeline. This is the heart of Corel VideoStudio, where you can arrange, edit, trim and add effects to your video clips.
The Share workspace lets you save and share your movie. You can save your video file, burn it to a disc, or upload it to the Web.
To switch between workspaces
•At the top of the application window, click one of the following tabs:
• Capture
![]()
•Edit
•Share
The Welcome book
The Welcome book is accessed from the Welcome tab.
In the Welcome book, you’ll find
•Video tutorials
•Content offerings (free and paid)
•Update information
•Information about other resources
Review the Welcome book regularly to see what’s new.
The Welcome book is set as the default tab when you open the application. You can adjust your default startup page in Settings >
Preferences, and on the General tab, choose a Default startup page. Note that the Welcome book page might still display on startup if important updates are available.
Using the Player panel
The Player panel consists of the Preview window and the Navigation area, which provides buttons for playback and for precision trimming of clips. Use the controls in the Navigation area to move around a selected clip or your project. Use the Trim Markers and Scrubber to edit your clips. In the Capture workspace, this panel also acts as the device control for a DV or HDV camcorder.

1
2
The Player panel consists of the 1. Preview Window and the 2. Navigation area
The Navigation area
The table below describes the controls available in the Navigation area.
|
Part |
Description |
|
Scrubber |
Lets you scrub through the |
|
project or clip. |
|
|
Trim Markers |
Lets you drag the scrubbers to set |
|
a preview range in the project or |
|
|
to trim a clip. |
|
|
Project/Clip |
Specifies a preview of the entire |
|
mode |
project or of a selected clip. |
|
Play |
Plays, pauses, or resumes the |
|
current project or a selected clip. |
|
|
Home |
Returns to the starting segment or |
|
cue. |
|
|
Previous |
Moves to the previous frame. |

|
Part |
Description |
|
Next |
Moves to the next frame. |
|
End |
Moves to the end segment or cue. |
|
Repeat |
Loops playback. |
|
System |
Lets you adjust the volume of |
|
Volume |
your computer’s speakers by |
|
dragging a slider. |
|
|
HD Preview |
Lets you preview high definition |
|
clips and projects. |
|
|
Timecode |
Lets you jump directly to a part of |
|
your project or selected clip by |
|
|
specifying the exact timecode. |
|
|
Enlarge |
Increases the size of the Preview |
|
Preview |
Window. |
|
Window |
|
|
Split Clip |
Splits the selected clip. Position |
|
the Scrubber to where you want |
|
|
the clip to be split, and then click |
|
|
this button. |
|
|
Mark-in and |
Sets a preview range in the |
|
Mark-out |
project, or sets the start and end |
|
points for trimming a clip. |
The Play button in the Navigation area serves two purposes: for playback of your entire project or a selected clip.
To preview projects or clips
•Click Project or Clip, then click Play.

While working on your project, you will want to preview your work frequently to see how your project is progressing. Instant Playback allows you to quickly preview changes in your project. Playback quality will be dependent on your computer’s resources.
You may choose to play only a part of your project. The selected range of frames to preview is referred to as the preview range, and it is marked as a colored bar in the Ruler Panel.
To play the trimmed range only
1Use the Trim Markers or the Mark-in/out buttons to select the preview range.
2To preview the selected range, select what you want to preview (Project or Clip), then click Play. To preview the entire clip, hold [Shift], then click Play.
Using the toolbar
The toolbar provides easy access to many editing commands. You can change your project view, zoom in and out on the Timeline, and launch different tools that can help you edit efficiently.
|
Part |
Description |
|
Storyboard |
Displays your media |
|
View |
thumbnails in chronological |
|
order. |
|

|
Part |
Description |
|
Timeline View |
Lets you perform frame- |
|
accurate editing of your clips |
|
|
on separate tracks, add and |
|
|
position other elements such as |
|
|
titles, overlays, voice-over and |
|
|
music. |
|
|
Undo |
Undoes the last action. |
|
Redo |
Repeats the last action that was |
|
undone. |
|
|
Record/ |
Shows the Record/Capture |
|
Capture |
Option panel, where you can |
|
Option |
capture videos, import files, |
|
record voice-overs and take |
|
|
snapshots. |
|
|
Sound Mixer |
Launches the Surround Sound |
|
Mixer and the multitrack Audio |
|
|
Timeline, which lets you |
|
|
customize your audio settings. |
|
|
Auto Music |
Launches the Auto Music |
|
Options Panel for adding |
|
|
background music to your |
|
|
project in a variety of styles and |
|
|
moods. You can set the music |
|
|
to match the duration of your |
|
|
project. |
|
|
Track Motion |
Launches the Track Motion |
|
dialog box, which lets you |
|
|
create tracking paths of |
|
|
particular elements in selected |
|
|
video clips. |
|

|
Part |
Description |
|
Subtitle Editor |
Launches the Subtitle Editor |
|
dialog box, which lets you |
|
|
detect and organize segments |
|
|
to easily add titles in selected |
|
|
video clips. |
|
|
Multi-Camera |
Launches the Multi-Camera |
|
Editor |
Editor and imports any of the |
|
selected media. |
|
|
Time |
Launches the Time Remapping |
|
Remapping |
dialog box, which lets you use |
|
speed controls to slow down, |
|
|
speed up, reverse, or freeze |
|
|
frames in a video clip. |
|
|
Mask Creator |
Launches the Mask Creator |
|
dialog box, which lets you |
|
|
create video and still masks. |
|
|
Zoom in and |
Lets you adjust your view of the |
|
Zoom out |
Timeline by using the zoom |
|
slider and buttons. |
|
|
Fit Project in |
Adjusts your project view to fit |
|
Timeline |
the entire span of your |
|
Window |
Timeline. |
|
Project |
Shows the total duration of the |
|
Duration |
project. |
Customizing the workspace
The new workspace is designed to provide you with a better editing experience. You can now customize the size of the program window and change the size and position of the elements on your screen for full control of your editing environment.

Each panel behaves like an independent window that can be modified according to your editing preferences. This is very useful when you are using large displays or dual monitors.
1
3
2
The main panels are:
1.Player panel — Contains the Preview Window and Navigation area.
2.Timeline panel — Contains the Toolbar and Timeline.
3.Library panel — Contains the media library and the Options area.
To move a panel
•Double-click the top-left corner of the Player Panel, Timeline Panel or Library Panel.
When the panel is active, you can minimize, maximize, or resize each panel.
You can also drag the panel outside the main application window into the second display area for dual-monitor setups.

To customize the size of the program window
•You can do one of the following:
•Click the  Restore button and drag the ends of the program window to the desired size.
•Click the  Maximize button for full screen editing.
To dock a panel
1Click and hold an active panel. The docking guide appears.
2Drag your mouse over the docking guide and choose a docking position to snap the panel in place.
To save a custom workspace layout
•Click Settings > Layout Settings > Save to and click a Custom option.
To load a custom workspace layout
•Click Settings > Layout Settings > Switch to and choose Default or one of the custom settings you have saved.
To know more about hotkey combinations assigned for each preset, see “Layout settings shortcuts” on page 310.

You can also change the layout settings from the UI Layout tab in Settings > Preferences.
To set program preferences
•Click Settings > Preferences or press F6 to launch the Preferences dialog box.

Временами бывает очень полезно иметь под рукой серьезный инструмент по редактированию видеофайлов. Хорошо, что в эпоху развития технологий, появилось великое множество специальных программ, способных легко и непринужденно справиться с подобной задачей. Одной из таких серьезных программ, мы и научимся пользоваться в следующем видеокурсе.
Представляем Вашему вниманию мощный редактор Corel VideoStudio. Данный пакет инструментов, способен играючи справиться с самыми разнообразными задачами: начиная от объединения фото и видео с семейного отдыха в красивый видеоряд, и заканчивая созданием эпичного фильма со сложной архитектурой. Функционал этого удивительного инструмента, способен справиться с практически любой задачей по обработке и монтажу видеофайлов. Всё, что Вам потребуется для успешной творческой деятельности в этой продвинутой программе – это умение полностью использовать её потенциал.
Уроки Corel VideoStudio PRO
Наглядное, пошаговое руководство, нацеленное начинающих пользователей. Состоит из 22 качественных видеоуроков, общей продолжительностью 38 минут. За это время, автор доходчиво расскажет о всех элементах программы и покажет, как пользоваться Corel VideoStudio на уровне уверенного пользователя. Курс затрагивает множество аспектов программы поверхностно, создавая твердую почву для дальнейшего, самостоятельного изучения.
{banner_lesson}
Как видно из названия страницы, речь пойдет о современной версии монтажной программы Corel VideoStudio X10. Компания-производитель позиционирует этот продукт как универсальный и высокотехнологичный, подходящий и для начинающих, и для профессионалов. При изучении возможностей данной программы, и их реализации, я сильно засомневался в этом утверждении, программа не совсем подходит ни тем, ни другим. Новичков может испугать большим количеством инструментов и эффектов, а для профессионала все эти, на первый взгляд, передовых технологий штуковины, реализованы на любительском уровне.
Когда выходит новая версия любой программы, там обязательно имеются изменения, доработки, свежие добавления. По сути, в этом и есть смысл выпуска новой версии. Но в программе Corel VideoStudio X10 этого нет. При тестировании трех последних версий я не нашел практически никаких значимых изменений, ради которых можно выпускать новую версию. Те новшества, о которых заявляет производитель, на самом деле уже присутствовали в предыдущих версиях.
Кстати, этим грешит не только компания Corel, но и другие производители программ для видеомонтажа. Я объясняю это так: чего-то действительно революционно нового придумать не могут, но очень хотят поднять продажи, и потому стараются завернуть старую конфетку в новую бумажку. Поэтому если Вы имеете интерес к приобретению программы Corel VideoStudio X10, можете покупать любую из последних версий, разницы не почувствуете.
Я уже писал обзоры о предыдущих версиях этой программы, и потому рекомендую Вам сначала ознакомиться с тем материалом (Corel VideoStudio Pro X8 и Corel VideoStudio Pro X9), а на этой странице, чтобы не повторяться, я постараюсь описать только те «как бы новинки», о которых заявляет разработчик, и свое к ним отношение. Сразу предупреждаю, все мои замечания носят критический характер, так как цель моей статьи не похвалить программу, а найти в ней существенные недочеты. Так что читайте, и понимайте правильно. В принципе, эта программа ничем не хуже аналогичных, и при должном умении в ней тоже можно прекрасно работать и создавать качественную видеопродукцию.
О других программах для редактирования видео читайте на странице «Программы для видеомонтажа»
Описание новинок программы Corel VideoStudio Ultimate X10
Средство создания масок
Этот инструмент позволяет выделить путем закрашивания какой-либо объект или область в кадре, и изменить именно эту область, либо наоборот, оставить это выделение неизменным, а ко всему остальному кадру применить какой-либо эффект. То есть инструмент создания масок дублирует такие инструменты как перо или выделение, кто знаком с фотошопом — поймет. Ну, в принципе инструмент хороший, конечно, выделение придется дорабатывать вручную, но если его освоить, можно использовать.

Настройка прозрачности дорожек
Позволяет сделать часть картинки прозрачной, чтобы проявилось видео, лежащее на нижней дорожке. Можно менять степень размытия краев, прозрачность, и способ наложения одной дорожки на другую. Опять же, то, что представлено на картинке — слишком примитивно, и таким образом получить что-либо вразумительное, скорее всего не удастся. Люди поопытнее применяют этот эффект совсем в других случаях.

Отслеживание движения
То же самое, что трекинг. Привязка объекта к определенной точке в кадре. Привязанный объект перемещается вместе с этой точкой. Объектом является текст либо картинка. Чаще всего эффект применяют для размытия лица, номера машины, логотипа, и так далее. Инструмент имеется во всех программах для монтажа, но даже в более продвинутых, этот трекинг часто ошибается, и приходится доделывать вручную. Corel VideoStudio X10 — не исключение.

Инструмент покадровой анимации
Работает так: раскладываете предметы, делаете кадр, немного меняете положение предметов, делаете следующий кадр, и так далее. В общем, мультипликация. И тут, чтобы с помощью этого эффекта получить нечто оригинальное, нужна идея.

Мультикамерный видеоредактор
Позволяет монтировать видео, снятое одновременно несколькими камера с разных точек. Ерунда. Те, кто монтирует в этой программе — не снимает несколькими камерами, а те, кто снимает, монтирует в других программах. Поэтому для пользователей Corel VideoStudio Ultimate X10 эта функция бесполезна.

Разделение по цветовому тону (съемка на зеленом фоне)
В разных программах это называют по-разному, но суть от этого не меняется. Наиболее частый пример использования: съемка человека на зеленом фоне, затем фон удаляется, и за человеком появляется новый фон. Может быть полезна продвинутым блогерам.

Улучшение цвета видео
Можно назвать этот инструмент цветокоррекция. Но этим инструментом большинство пользователей программ, типа Корела, цвета не исправляют, а искажают. Дело в том, что многие не понимают, как им пользоваться, и красят картинку в кислотно-ядовитые цвета, тем самым окончательно убивая свое видео.

Фильтры и эффекты
Ну конечно, куда же без них. Разработчик программы внедрил в программу более 1500 эффектов, анимированных заголовков и переходов. Эффекты и переходы, конечно могут придать видео некую оригинальность, но только в том случае, когда монтирует грамотный человек, который понимает, что и куда сунуть. Большинство применяет эффекты по принципу «чем больше — тем лучше».

ProDad Adorage, Volume 9
В этом сборнике еще 300 «изумительных эффектов на основе частиц и объектов для использования в видео-проектах при работе с переходами». Создатели программы Corel VideoStudio Ultimate X10 как бы провоцируют пользователей, подкидывая им все больше и больше игрушек.

NewBlue Titler Pro 1
Плагин для создания эффектных титров. Это действительно полезный инструмент, можно создать эффектные титры.

Boris Title Studio
Еще один титровальщик с уклоном на 3-D эффекты. Аналогичен предыдущему плагину. На мой взгляд, в такой программе два титровальщика — это уже перебор.

Видео-шаблоны и слайд-шоу
Добавляете видео в окошки с цифрами, и получаете нечто. Можно сохранить свою заготовку в виде шаблона для монтажа другого видео. Сколько ни смотрел программ, ни разу не видел оригинальных и стильных шаблонов, один примитив. Все по-настоящему стоящее делается только руками. Так что эта чепуха только засоряет программу и портит видео.

Полный набор инструментов для редактирования видео 360°
Вот выдержки из рекламных текстов разработчика программы: «В программе представлен полный набор средств редактирования видео 360°…», «Средства экспорта видео для просмотра на гарнитурах VR или 360° плеерах…», «В программе представлена поддержка популярнейших форматов сферического 360° видео, включая равноугольный формат, а также одинарный и двойной рыбий глаз…», «Установите угол просмотра и преобразуйте видео 360° в стандартный формат для воспроизведения на телевизорах и обычных видео-плеерах…». Конец всех цитат.
Вы что-нибудь поняли? Я тоже. Что за «равноугольный формат»? Какой «одинарный и двойной рыбий глаз»? Зачем это извращение, если его нужно «преобразовать в стандартный формат»? В общем, голимая муть…

Поддержка портретного видео
Ну а этот бред я поставил в самый конец. Вместо того чтобы учить снимать правильными, специально для этого предназначенными изделиями, разработчики как бы поощряют видеосъемку чем попало. Так глядишь, скоро появится кнопочка «монтаж видео, снятого пылесосом». Я надеюсь, Вы меня поняли…

Ну а эта картинка полностью противоречит заявлению разработчиков о принадлежности их программы к профессиональному кругу. Снимай видео чем попало, заливай свою ерунду на ютубы, и другие вимео… Хотя, что греха таить, многие более серьезные программы пошли по такому же пути. Чего не сделаешь ради денег…

Описание инструментов для работы со звуком в программе Corel VideoStudio Ultimate X10
Нормализация аудио
Если Ваше видео записано с разным уровнем звука, то с помощью этого инструмента можно привести весь звук к одинаковой громкости, то есть тихие звуки сделать громче, а громкие — приглушить. Ну что сказать, преимущество только одно, то что быстро. Работает по принципу все под одну гребенку.

Audio Ducking
Эффект довольно усиленно рекламируется разработчиками программы Corel VideoStudio, да и другими программами для монтажа аналогичного уровня. Суть в том, что если звучит музыка и появляется речь, то фоновая музыка автоматически приглушается. Эффект работает слишком грубо, хотя, если у Вас звуковая картина совсем ужасная, то может и поможет. Автоматика не может сделать что-либо хорошее, только вручную.

Библиотека безгонорарных музыкальных композиций
По большей части электронная музыка разных стилей, для добавления к видеоряду. Удобство в том, что можно подогнать под любую длительность. Но ничего хорошего там нет. Сделано, опять же с намеком на ютуб.

Ну и еще несколько слов о функциях, которые рекламирует производитель, хотя и более скромно:
Эффекты замедления или ускорения видео, также присутствует реверс. Ну, это стандартно.
Стабилизация видео с помощью плагина ProDAD Mercalli. Это как раз очень хорошая штука для любительской видеосъемки, которая постоянно трясется.
Подавление искажений, которые появляются при съемке камерами типа гоупро, называется «рыбий глаз». А я скажу так — снимайте нормальными камерами, и никаких искажений не будет.
В программе Corel VideoStudio Ultimate X10 присутствует модуль Live Screen Capture, с помощью которого можно осуществить запись экрана. Иногда может пригодиться.
Создание абсолютно бессмысленных роликов с помощью инструмента FastFlick. Логики никакой, зато быстро. …И этим еще хвастают.
Экспорт видео с помощью кодека HEVC (H.265). Даже профессионалы далеко не все пользуются этим кодеком, они просто знают, почему. Ну а для любителей он вообще не представляет никакой ценности.
Остальное — это обычная ерунда, о которой даже писать не имеет смысла…
P.S. Не могу промолчать, посмотрите на изображение внизу, это рекламная картинка программы Corel VideoStudio. Для работы с видео предлагают использовать что угодно, кроме видеокамеры. Производитель, а-у-у, что происходит…

Привет друг Что с компом=). Сегодня научимся создавать профессиональные видео. Внизу можно видеоредактор торрентом скачать абсолютно без вирусов и быстро.
VideoStudio Pro X3 — современный вариант мощного обеспечения для возможности редактирования, обработки записи видео-файлов на различные носители. Предоставляет возможность создавать действительно профессиональные видеоролики, при этом обеспечивая удобную в применении возможности данной программы. С наивысшей скоростью и минимальным временем получения изображения, новейшее издание программы осуществляет много встречающихся задач для видеомонтажа и поддерживает новейшие процессоры, к которым также относится Intel Core i7. Проект в свою очередь осуществляет работу с HD-видео и обеспечивает обработку видео-данных благодаря многоядерным процессорам и современным графическим картам. Устанавливает контакт в работе с современными технологиями такими, как NVIDIA CUDA для оснащения производительностью и отличным качеством работы. (Вам нужен хороший Photoshop CS5?)
Функции программы:
- Перенос из различных носителей (таких как HDV, AVCHD, Blu-ray JVC HD видеокамеры).
- Возможность сохранить видео-ролик в форме HD MPEG-4 для браузеров со стандартом сжатия H.264.
- Перенос HD файлов на DVD или Blu-Ray носители с подключением BD-J.
- Высокопрофессиональные образцы для HD видео от RevoStock.
- Музыкальное звучание, как в звукозаписывающей студии, заголовки и спецэффекты в режиме настоящего времени.
- Регулировавшиеся аудио дорожки с осуществлением озвучки SmartSound и Dolby Digital 5.1.
- Набор процедур NewBlue, в составе которого 3D-перемещения.
- Поддержка производства NVIDIA CUDA и самых производительных процессоров Intel Core i7.
- Структура Экспресс-Редактирования для образования видео-роликов в короткий промежуток времени.
- Свежий улучшенный интерфейс пользователя.
- Загрузка роликов непосредственно на YouTube, Vimeo, Facebook и Flickr.
- Осуществление записи видео в качестве HD, на соответствующие стандарту DVD накопители, для показа на соответствующем DVD и Blu-Ray видеопроигрывателях.
- Возможность сохранить ваши видео для iPod, iPhone, PSP и прочих сотовых аппаратов.
На самом деле, активация совсем не сложная. Расписано все досконально, для того чтобы не возникло проблем в установке данной программы.
Руководство по установке и активации
- Отключите антивирус.
- Заходим в папку VideoStudioX10Ultimate 64 Bit, запускаем Setup.exe.

3. Принимаем лицензионное соглашение.


4. Вводим серийный номер VU20U22-QAYND7R-NLSMU2C-HJU9THW. Его можно найти в текстовом файле, в папке Crack.

5. Жмем Install Now.

6. Ожидаем ход установки Corel VideoStudio.


7. Копируем содержимое папки Update v20.5.0.60 и закидываем его с заменой в только, что установленную программу.

У меня по адресу: C:Program FilesCorelCorel VideoStudio X10.

8. Теперь, переходим в папку Crack и запускаем файл реестра Reg Patch двойным нажатием => да.


9. Нам нужна русская версия? Заходим в папку Rus, копируем файл herrc.dll.

10. Закидываем его с заменой в знакомую уже нам папку по адресу: C:Program FilesCorelCorel VideoStudio X10.

11. Запускам ярлык на рабочем столе Corel VideoStudio X10. При первом запуске нужно будет ввести любую не существующую почту.


Большое спасибо, что посетили статью: «Скачать бесплатно видеоредактор торрент Corel VideoStudio». Надеюсь у вас все получилось. Хочу порекомендовать вам, еще одну хорошую программу для работы с видео Pinnacle Studio 15.
Видео с ютуб
Corel VideoStudio Pro x10 скачать бесплатно русская версия торрент

Corel VideoStudio Pro — это комплексный редактор видео, в котором сочетается художественное редактирование, усовершенствованные эффекты, запись с экрана, интерактивное видео для Интернета и решение для создания дисков. Обладающий исключительным быстродействием пакет интуитивно понятных средств позволяет создавать семейные фильмы и слайд-шоу, увлекательную покадровую анимацию, осуществлять запись с экрана для презентаций, учебных пособий или других целей. Безграничные возможности благодаря усовершенствованным средствам создания композиций и блестящим художественным эффектам. Воспользуйтесь всей мощью многоядерного процессора с невиданной производительностью.
Страницы
- 1
- 2
- 3
- 4
- 5
- 6
- 7
- 8
- 9
- …
- ›
- »
VideoStudio