The Ableton Team Says: Thank You
Live is the result of musicians wanting a better way to create, produce and perform music using a computer. A great deal of effort has been put into making Live easy and fun to use, yet at the same time capable of helping you create music with unlimited depth and sophistication. This effort continues even as you read these lines… in fact, a new, improved Live version might already be available for download! Please check your ableton.com account now (see https://www.ableton.com/account), or choose the Check for Updates command from the Help menu.
We hope you enjoy using Live and that it enhances your creative process.
Your Ableton Team.
What’s New in Live 11
Ableton Cloud
Introduced Ableton Cloud (see ‘Using Ableton Cloud’), a service that sends Note Sets directly to Live’s browser, and across iOS devices.
In the Cloud tab of Live’s browser, the Date Modified column now appears as Cloud Modified.
Arrangement View Improvements
A new Create Crossfades On Clip Edges command creates four-millisecond crossfades on clip edges. The command is available in the Create menu, and the context menu of Arrangement clips, or via the CTRL—ALT—F(Win) / CMD—ALT—F(Mac) keyboard shortcut.
It is possible to change the selection of automation and take lane headers using the up and down arrow keys. The lane header selection can also be extended using Shift and the up and down arrow keys.
You can move automation lanes and take lanes using CTRL(Win) / CMD(Mac) and the up and down arrow keys.
Selected automation lanes or take lanes can be resized vertically by pressing ALT—+ or ALT—-, or by pressing ALT while using the mousewheel/pinch gesture.
When using the Zoom to Time Selection command in the Arrangement, Live now only zooms horizontally at first. When using the command a second time (without changing the time selection), Live then zooms vertically as well. Upon using the command a third time, the Arrangement returns to the first vertical zoom state.
You can use the left arrow key to navigate from an automation lane or take lane to the main track, this will fold the lanes as well. You can also use the left arrow key to navigate from tracks in a group to the main Group Track.
Selected tracks and automation lanes can be folded/unfolded using the left and right arrow keys.
You can solo tracks with the S key and arm tracks with the C key when take lane headers or automation lane headers are selected.
Pressing Tab/Shift—Tab while renaming an Arrangement clip selects the next/previous clip on the same track or take lane.
Browser Improvements
A Templates label (see ‘Template Sets’) has been added to the browser’s Categories. It shows template Live Sets from factory packs (including the Core Library), the User Library, and other Project folders.
A Grooves label (see ‘Using Grooves’) has also been added. It shows a flat list of all Grooves from the Core Library as well as the User Library.
Devices in the Audio Effects label are now grouped into folders. You can unfold more than one folder at once by holding CTRL(Win) / CMD(Mac).
Ableton’s official Max for Live devices are now listed within the Audio Effects, MIDI Effects, and Instruments labels.
The browser receives focus when opened via the CTRL—ALT—B(Win) / CMD—ALT—B (Mac) keyboard shortcut.
When viewing and expanding Live Sets in the browser, you will see a new Devices icon for device chains on a track that contain at least one device.
Capture MIDI Updates
Added MPE to Capture MIDI.
In the first captured MIDI clip (in an empty set with the transport stopped), if the detected loop is eight bars or less, the first played note is considered the start of the loop.
When only one note is played in the first captured MIDI clip (in an empty set with the transport stopped), the loop boundaries are set to the note start and end, and the tempo is accordingly calculated, resulting in a one, two, four, or eight bar loop. This is particularly useful when playing a rhythmical sample with a single MIDI note.
In Session View, new captured clips now use the Adaptive Grid: Narrow setting instead of Fixed Grid: 1/16.
Capture MIDI results are no longer influenced by the song tempo set by the target track’s previous Capture attempts.
When Live’s transport is running, Capture MIDI will keep longer phrases in captured clips.
Clip View Updates
Live now makes better use of screen space when editing clips.
Clip View properties (see ‘The Clip Tabs/Panels’) can be arranged vertically by moving the mouse cursor to the left from the Clip View panel edge next to the Sample Editor/MIDI Note Editor.
Clip View properties can also be arranged automatically, which switches between the horizontal and vertical views depending on the height of the Clip View area. Select “Arrange Clip View Panels Automatically” from the View menu to enable this option.
Pressing ALT—1 switches to the Audio/Notes tab, pressing ALT—2 switches to the Envelopes tab, and, when a MIDI clip is selected, pressing ALT3 switches to the Note Expression tab.
The Pitch control now has a dial control for transposing in semitones, and a text slider control for fine-tune in cents (previously named Transpose/Detune).
Clip Volume is now called Clip Gain in the Envelope tab’s Device/Control choosers, and in the undo history.
The Audio tab’s Clip Gain control has been changed back to a vertical slider, and it has been repositioned above the Transpose controls.
The Audio tab’s Reverse button now shows an icon instead of text. The Reverse and Edit buttons are now positioned next to each other.
When multiple audio clips with different Clip Gain values are selected, the value range is shown with split triangle handles on the Clip Gain slider.
Comping
Introduced comping (see ‘Comping’) in the Arrangement View.
Comping makes it possible to pick the best moments of each recorded performance, and combine them into a composite track.
You can record multiple takes of a musical performance without stopping recording. Live will then create and organize individual takes from this recorded material, allowing you to piece your favorite parts together.
You can also drag samples from your library and use comping as a creative sample-chopping tool.
CPU Meter Updates
The CPU meter (see ‘The CPU Load Meter’) drop-down menu now can be customized to display both the Average or Current CPU usage levels, only the Average level or only the Current level. Alternatively, the CPU meter can also be switched off entirely.
By default, Live will not display the Current level; it must be enabled from the drop-down menu of the meter.
The Overload Indicator (previously named the “Disk Overload” indicator) in the Control Bar has been redesigned, and will light up if a CPU overload has occurred.
The Overload Indicator is disabled by default for new Live 11 installations.
CPU overload notifications can be disabled in the Control Bar via the CPU Overload Indication entry in the Overload indicator’s context menu.
Clicking on the new Show/Hide CPU Meter Section selector in the Session View’s Mixer Section will open a per-track CPU metering section. Each track shows a CPU meter with six rectangles that light up to indicate the relative impact of that track on the CPU level of the current Live Set.
Device Additions and Improvements
Hybrid Reverb (see ‘Hybrid Reverb’) is a new audio effect which allows blending a convolution reverb with a number of reverb algorithms.
Spectral Time (see ‘Spectral Time’) is a new audio effect that combines time freezing and spectral delay effects in a single inspiring device.
Spectral Resonator (see ‘Spectral Resonator’) is a new audio effect based on spectral processing that uses spectral resonances and pitched overtones to add tonal character to any audio source.
Chorus-Ensemble (see ‘Chorus-Ensemble’) is a new audio effect featuring two different chorus modes and a vibrato mode for creating pitch variation.
Phaser-Flanger (see ‘Phaser-Flanger’) is a new audio effect that combines the functionalities of the Phaser and Flanger devices into one, as separate effect modes.
Shifter (see ‘Shifter’) is a new audio effect designed for pitch shifting, frequency shifting, and ring modulation.
Redux (see ‘Redux’) now has new parameters that can be used to create a wider range of sounds, from harsh distortion to digital and aliasing artifacts, through to warm and fat 8-bit sounds.
A Hi-Quality option has been added to the right-click(Win) / CTRL—click(Mac) context menu of the Redux device. Using Redux with Hi-Quality switched off saves some extra CPU.
Wavetable has a new Hi-Quality right-click(Win) / CTRL—click(Mac) context menu option (see ‘Hi-Quality Mode’). Using Wavetable with Hi-Quality mode off can save up to 25% CPU compared to having it enabled.
Wavetable can now be fully controlled using MPE controllers.
MPE Control is a new Max for Live MIDI effect that can be used to shape and transform incoming MPE modulation for Pressure (polyphonic aftertouch, Slide (per-note Y-Axis) and Pitch (per-note pitch bend).
Align Delay (see ‘Align Delay’) is a new Max for Live audio effect that delays incoming signals by samples, milliseconds, or meters/feet.
Shaper MIDI (see ‘Shaper MIDI’) is a new Max for Live MIDI effect that uses multi-breakpoint envelopes to generate mappable modulation data.
Updated the appearance of the UI in the Tension (see ‘Tension’), Electric (see ‘Electric’), Corpus (see ‘Corpus’), and Collision (see ‘Collision’) devices.
Sampler and Simpler now support MPE. It is now also possible to use MPE/Push 2’s Pressure mode to modulate individual notes in Sampler and Simpler.
The number of visible Macro Controls in Instrument Racks can now be controlled from a Max for Live device or a control surface.
The Cytomic Filters, which are used in the Wavetable, Echo, Simpler, Sampler, Operator, and Auto Filter devices, have been updated and improved in stability, sound and performance. As of 11.1, the Cytomic filters (particularly the MS2 and SMP options) might deviate in sound compared to previous Live versions, especially when driven hard.
An update to the Softtube libraries may cause subtle sound changes in the Amp and Cabinet audio effects.
The Tuner device now includes three new options for note spellings: Sharps (C#), Flats (D♭), or Sharps and Flats (C#/D♭). You can access a menu with these options when you right-click anywhere within Tuner’s UI.
It is now possible to zoom out to a full octave in Tuner’s Histogram View by clicking the interface and dragging the cursor horizontally.
A context menu option for a Hi-Quality mode has been added to the Delay device. Switching off Hi-Quality uses less CPU resources.
The Channel EQ device now uses less CPU resources.
The Pitch MIDI effect UI has been slightly updated.
In Audio and MIDI Effect Racks, chains are now automatically named based on whichever devices are added.
Follow Actions
Follow Actions can now be assigned to scenes via the new Scene View. Clip Follow Actions will continue to run when a scene Follow Action is created or scheduled, however scene Follow Actions take precedence when triggered.
Follow Actions can be activated or deactivated using the selected clip/scene’s Follow Action button. This button is disabled by default, and can be toggled using the Shift—Enter keyboard shortcut.
An Enable Follow Actions Globally button has been added next to the Back to Arrangement button in the Session View. When disabled, no Follow Actions will occur in the Live Set.
Follow Action Chance A and Chance B values are now represented as percentages that sum to 100%. These values can be modified using a new slider control.
The Follow Action Chance slider now displays a split triangle instead of just a black bar when it is showing multiple different values.
Interface Improvements
Live’s Themes have been redesigned to provide much greater contrast.
Added a Reduced Automatic Colors toggle to the Look/Feel Preferences, which uses a reduced color palette when assigning colors to clips and tracks. This palette makes clips and tracks easier to tell apart with a deuteranopia, protanopia or tritanopia color vision deficiency.
Added a Grid Line Intensity slider to the Look/Feel Preferences, allowing for more pronounced or dimmed appearance of grid lines in the Arrangement and Detail Views.
Added an Arm Track command to the Edit menu. If multiple tracks are selected, the command appears as Arm Tracks. If the selected track is armed, the command is replaced with Disarm Track. It is now possible to arm selected tracks using the C shortcut key.
Reorganized the Edit menu for improved usability and accessibility, and added a new Solo/Unsolo Track entry.
The Groove Pool now opens automatically when loading a groove file from the browser by double-clicking or pressing the Enter key, adding a groove to the Groove Pool, or extracting grooves.
You can use the left and right arrow keys to navigate radio buttons anywhere in Live. If you are navigating radio buttons on a device that is inside of a Rack with the left and right arrow keys, you can get back to moving between devices in the Rack using the left and right arrow keys by hitting the ESC key.
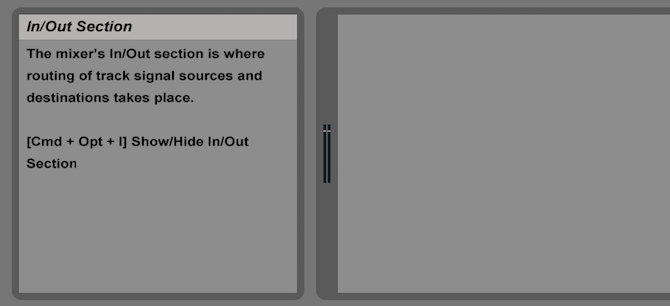
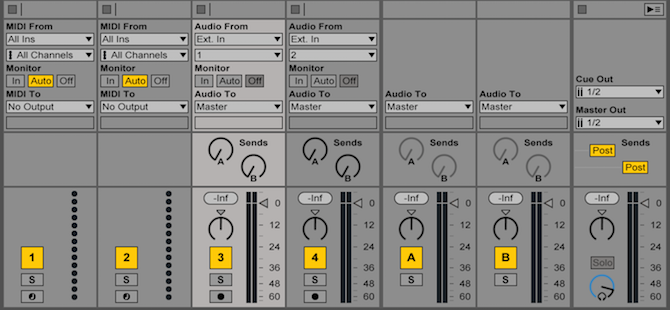
In Session and Arrangement View, the Monitor radio buttons now have a default state that can be restored. When the In/Out section is expanded, you can press the Delete key to reset the Monitor radio buttons to the default (Off for audio tracks and Auto for MIDI tracks). This option is also accessible via the Edit menu option Return to Default.
An error message will be displayed in the status bar if an auto-update cannot be downloaded.
Added a new MIDI Envelope Auto-Reset entry to the Options menu. When enabled, certain MIDI control message types that are not automated for a given clip will automatically reset at the start of a new clip.
Added support for keyboard shortcuts on French keyboard layouts for macOS versions 10.14 and older. Keyboard shortcuts that have numbers can be accessed without having to press Shift to access the number keys.
The audio engine can now be turned on or off via a new Audio Engine On entry in the Options menu, or using the CTRL—ALT—Shift—E(Win) / {CMD]ALT—Shift—E(Mac) keyboard shortcut.
When Sets are saved with the File menu’s Save Live Set as Template… or Save Live Set as Default Set… command, they are automatically self-contained in the same way as Sets that use the File Manager’s Collect and Save function.
The icons in Live’s Preferences and dialogs have been improved.
Live now shows different icons for Live Clip (.alc) files that distinguish between Audio and MIDI content in the browser.
Improved drag and drop behavior within list views (such as the Groove Pool and device chains). Instead of always being inserted before the target item, dropped items will now be placed dynamically, depending on which half of the target item the cursor hovers over. In addition, the copy modifier ALT now works more consistently.
Linked Track Editing
Introduced linked-track editing (see ‘Linked-Track Editing’) in the Arrangement View.
Linked-track editing makes it possible to use comping workflows and other phase-locked editing operations on multiple tracks at once.
Any tracks in the Arrangement View can now be linked so that their content can be edited simultaneously. There can be multiple instances of linked tracks in a Set, however each track can only belong to one of these instances.
Max for Live Updates
Updated the bundled Max build to the latest available version.
Added support for MPE input to/output from Max for Live devices.
The Expression Control device now allows assigning an additional parameter as a mapping target.
All Max for Live devices have been moved inside the application bundle (previously, they lived in the Core Library), to ensure that using Collect All and Save will not create redundant copies of the devices.
Link functions have been added to the Max for Live API.
When Max fails to load, an error message will be displayed that contains a link to a Knowledge Base article that explains potential causes for the issue and steps to take to resolve it.
Error reporting in the Max Window is more consistent.
Four new theme colors are available in Max for Live.
Audio driver input and output latencies are now taken into account for Max for Live devices that contain audio routings to external targets. If needed, users can revert to the previous behavior by using the -DisableM4LRoutingCompensation debug option in an Options.txt file.
The time_signature_numerator, time_signature_denominator, time_signature_enabled and tempo_enabled properties are now available in the Max for Live API.
MIDI Clip Scales
A new Scale Mode (see ‘MIDI Clip Scales’) can be enabled/disabled via the Scale button in the Clip tab of MIDI clips.
By default, key tracks belonging to the selected scale are highlighted in the MIDI Note Editor, and the root note is indicated by a prominent highlight in the piano roll.
Newly-created MIDI clips inherit the previously edited or viewed clip scale, even if they have Scale Mode disabled. When editing multiple clips with different key and scale settings, any foreground clip with Scale Mode enabled now updates the global settings that are used to initialize the next created clips, as well as Push’s key and scale.
MIDI Note Editing
A new Chance Editor (see ‘Editing Probabilities’) allows setting the probability of a MIDI note occurring in a playing clip. Dragging a note’s probability marker up and down changes the probability value between 0-100%.
It is now possible to see and edit a velocity range, from which a velocity value is randomly selected when a note is played. In the Notes tab, a Velocity Range slider (see ‘The Velocity Range Slider.’) lets you assign a velocity range to selected notes (or the entire clip, if no notes are selected).
The Randomize button allows randomizing velocity/probability values for selected notes (or notes with selected markers), depending on the focused lane. If no markers are selected, values for all notes will be randomized.
The Velocity and Chance Editor lanes can be shown or hidden via the lane selector toggle buttons at the left. Underneath the lane selector toggle buttons, a triangular toggle button allows showing/hiding all enabled lanes at once.
The Velocity and Chance Editor lanes can be resized at once by dragging the split line between the lanes and the MIDI Note Editor.
In the Record/Warp/Launch tab of Live’s Preferences, a new MIDI Note Drawing section contains a Draw Mode with Pitch Lock option. When enabled, drawing MIDI notes is constrained to one single key track (or pitch) at a time, while holding the ALT key allows freehand melodic drawing.
It is now possible to change the note selection in the MIDI Note Editor using CTRL(Win) or ALT(Mac) and the up and down arrow keys.
MPE Support and Editing
Added support for MIDI Polyphonic Expression, also known as MPE (see ‘Editing MPE’).
The Slide, Pressure, Velocity, and Release Velocity dimensions are displayed inside new expression lanes below the MIDI Note Editor.
When a note is moved, its expression envelopes will move along with it.
MIDI track meters now indicate MPE per-note controller changes. The lowest dot in a meter lights up in a blue color if per-note controller changes pass that meter.
Plug-in devices that have MIDI outs and that have MPE enabled can now output MPE.
Added an MPE Settings dialog box to the I/O section of Live’s mixer (see ‘MPE/Multi-channel Settings’).
Multi-clip Editing
The new Focus button enables Focus Mode (see ‘Focus Mode’), which allows editing the current foreground clip only. Focus Mode can be toggled via the N keyboard shortcut.
Loops are now visible and editable via mouse interactions.
The Invert button is now enabled in the Notes tab when at least one note is selected, and it is possible to invert selected notes from multiple clips at the same time.
Time selection interactions, note selection interactions, and new note editing options have been added to multi-clip editing.
Plug-ins
Audio Unit v3 plug-ins (AUv3) are now supported on macOS 10.15 or higher. To access AUv3 plug-ins in the Plug-Ins category of the browser, enable the “Use Audio Units v3” toggle in Live’s Plug-Ins Preferences.
Push Device Visualizations
On Push 2, the Hybrid Reverb parameter banks Algorithm 1 and Algorithm 2 have been renamed. Also some parameters for Hybrid Reverb have been rearranged for easier navigation.
Updated some parameter names for the Chorus-Ensemble device on Push 2.
The Saw Up and Saw Down icons for Sampler’s LFO waveforms on Push 2 now appear as expected.
Push 2 mappings for the Reverb device have been redesigned to include parameters for new features.
On Push 2, the parameter names of the AAS devices (Analog, Collision, Tension and Electric) have been improved and aligned with the UI parameter names for readability.
Push MIDI Clip Mode
When Push’s In Key/Chromatic is set to In Key Mode, and the selected MIDI clip has Scale Mode enabled, selecting a scale on Push will update that clip’s scale in Live.
If Focus Mode is enabled in multi-clip editing, only the foreground clip’s key and scale will be updated in Live.
When Push’s In Key/Chromatic is set to In Key Mode, and the selected MIDI clip has Scale Mode enabled, selecting a scale in Live will change the pad layout on Push.
Additional Push Improvements
Added a Pressure switch to Push 2’s Setup Menu that allows toggling between monophonic and polyphonic aftertouch when playing melodic instruments.
Push 2 and MIDI controllers sending polyphonic aftertouch can be used with plug-in devices that support polyphonic aftertouch.
When Push 2’s Pressure mode is set to Poly, the Repeat button now produces notes at full velocity when Accent is enabled.
When a Rack contains a parameter mapped to one of the new Macro Controls (e.g., Macro 9-16), the additional Macro Control parameters will appear in a new device within the Rack. Degree symbol icons (Push 1) or bullet point icons (Push 2) are used to differentiate the Rack from the device.
When editing multiple MIDI clips at once, a connected Push device now follows all highlight changes of tracks/scenes, and the focus on the corresponding track.
Updated the notification style for scenes, and updated the scene name visualization to include the absolute position, tempo and time signature on Push.
Rack and Macro Control Improvements
The maximum number of available Macro Controls (see ‘Macro Controls’) in Live has been doubled to 16. New + and — view selector buttons in Racks allow setting how many Macro Controls are shown or hidden.
A new Show/Hide Macro Variations view selector button in Racks opens a view that allows storing the state of the Macro Controls as a variation preset via the “New” button.
Pressing the Rand button in the title bar of a Rack randomizes the values of mapped Macro Controls.
Session View Improvements
Selecting a scene (or multiple scenes) opens the new Scene View (see ‘Scene View’), which allows editing the selected scene’s tempo, time signature and Follow Actions.
Scene numbers are now displayed in a new column in the Master track.
Dragging the left edge of the Master track’s title header reveals two new controls, which allow assigning a tempo or time signature to a scene.
It is now possible to rename multiple selected clips at once, via the Rename command in the right-click(Win) / CTRL—click(Mac) context menu, Edit menu, or by using the CTRL—R (Win) / CMD—R (Mac) keyboard shortcut.
Added a Cancel Scene Launch entry to the Master track’s right-click(Win) / CTRL—click(Mac) context menu. Clicking this entry cancels the launch of any previously triggered scene.
It is now possible to simultaneously rename multiple rack chains in Session View.
Setup Improvements
Live supports MIDI files with the .midi extension.
As of version 11.2.10, Live has a Use System Device Option in the audio input/output choosers in Live’s Audio Preferences on macOS. Selecting Use System Device will set the input/output device in Live to match what is set in the macOS Sound System Preferences.
As of version 11.1, Live is natively supported on Apple silicon computers.
Live’s Status Bar will now indicate when an update for Live is being downloaded. Once it is downloaded, the Status Bar will state that Live must be restarted in order to apply the update.
ReWire support has been removed.
To avoid incompatibilities, you will be asked to save Live Sets created with an older version of Live as a new file in Live 11.2.
Renamed the Customization section of Live’s Preferences to Display Customization, which now also includes the Zoom Display setting.
Tempo Follower
Introduced Tempo Follower (see ‘Synchronizing via Tempo Follower’), which adapts Live’s tempo to stay in time with a drummer or another rhythmic audio source.
A Tempo Follower section has been added to Live’s Preferences in the Link, Tempo, MIDI tab. The Show Tempo Follower Toggle switch shows/hides the Follow button in the Control Bar.
An Input Channel (Ext. In) chooser allows choosing the channel from which the tempo will be tracked, and displays a level meter for each channel.
Ableton Live – многофункциональная DAW программа. Она будет полезна и диджеям для сведения студийных миксов, и музыкантам для написания музыки и лайв-игры). Я постарался изложить свои знания таким образом, чтобы и вы, читатели, почерпнули нужную информацию, не забивая голову бесполезными материалами, диджей вы или музыкант.
Ableton Live – это VST-совместимый секвенсор, который всецело поддерживает стандарт виртуальных инструментов VST 2.0. Программа выполнена как в версиях для Windows, так и для MacOS и вмещает в себе широкий спектр внутренних инструментов и обработки.
В комплект входит несколько синтезаторов и солидный набор многократно применяемой обработки: эквалайзеры, фильтры, ревербераторы, дилеи, компрессор, лимитер, дисторшен, Chorus, Phaser, Flanger, а также набор других специальных эффектов для диджейской и лайв-игры.
Повторюсь, что существенный плюс Ableton Live заключается в том, что он позволит и создать обычные студийные DJ-миксы, собранные из чужих треков, и написать собственную музыку, а затем играть ее в виде лайв-сетов, собираемых из отдельных партий и разыгрываемых в живую. Существует множество программ (например, ACID и MixMeister) для создания миксов и массу различных секвенсоров для написания музыки, будь то Cubase или Logic. В Ableton Live можно записать авторские лайв-сеты. Этот инструментарий Live дает неограниченные возможности для импровизации и игры в реальном времени.
В других своих проявлениях Live является современным секвенсором со всеми соответствующими данному классу программ возможностями: работа с аудио и MIDI дорожками, VST-инструментами, обработкой, подключение внешних инструментов и полное управление по MIDI. Последняя функция в Live реализована основательно: она дает возможность назначить необходимую ручку любого инструмента на MIDI контроллер. Не смотря на то, что инструмент может не иметь встроенную возможность назначать контроллер для параметра (Latch to MIDI). Назначение реализуется встроенными средствами Ableton и не зависит от используемого инструмента.
Чтобы лайв-музыкантам и диджеям было комфортнее работать, в Ableton существенно автоматизирована и упрощена схема определения темпа (BPM) добавляемых аудиофайлов и дальнейшей их подгонки как по скорости так и тональности.
Ableton способен определять скорость самостоятельно и достаточно точно, а изменить тональность добавленного фрагмента без изменения скорости («подтьюнить») можно одной ручкой.
По мимо этого схема Drag&Drop устроена очень элементарно. Чтобы добавить в Ableton файл, VST-инструмент или эффект обработки, его можно просто «перетащить» в нужную область программы.
Удобство работы в Ableton – серьезное преимущество. Основная часть рутинных технических моментов в Ableton автоматизирована. Качество же звучания на высоте и отвечает всем необходимым требованиям к профессиональному продукту.
В общем, плюсов у этого продукта много – он очень функционален. Отсюда и такое внимание к Ableton’у со стороны многих музыкантов и диджеев мира.
Из этой статьи вы почерпнете для себя базовые знания. Их будет вполне достаточно, чтобы немедленно приступить к работе. Как настроить Ableton, смотрите в этой статье.
Браузер
Главное окно Ableton Live состоит из нескольких частей. Основная часть включает в себя микшер или мультитрек (в зависимости от режима отображения: Session View или Arrangement View), слева расположен браузер, а внизу – окна Info View, а также Clip View либо Track View , которые можно вызывать и скрывать. Браузер — это небольшое окно в верхнем левом углу экрана. Браузер необходим для быстрого доступа к исходному аудио и MIDI-материалу, подключения плагинов и виртуальных инструментов.

Браузер управляется с помощью семи кнопок быстрого доступа к страницам. вертикально расположенных в левом верхнем углу:

- Show/Hide Browser — показать/скрыть окно браузера;
- Live Device Browser — отобразить страницу Live-инструментов, MIDI-плагинов и аудио-плагинов Ableton Live;
- Plug–in Device Browser — отобразить страницу плагинов сторонних производителей. Ableton Live поддерживает плагины формата VST, Audio Units (только для Mac).
- Оставшиеся три кнопки File Browser 1, File Browser 2 и File Browser 3 предназначены для организации быстрого доступа к исходным аудио и MIDI-файлам.


Пользователь сам распределяет исходный материал по трем папкам.
Исходные сэмплы в окне браузера вы сможете прослушивать. Чтобы это сделать, активируйте кнопку Preview. При каждом выделении сэмпла он будет воспроизведен один раз. Как только сэмпл воспроизведен, его пиктограмма изменяется, появляется пометка, означающая, что сэмпл уже прослушали. Внизу на панели Status Bar отображается процесс воспроизведения и параметры сэмпла, а именно частота дискретизации и разрядность. Конечно, на концерте рабочее прослушивание сэмплов не может звучать в финальном миксе. В рамках Ableton Live этот момент решен путем маршрутизации сигнала Preview на выход Cue Out мастер-трека. Далее назначается Cue Out на любой свободный выход звуковой платы, музыкант или диджей пользуется наушниками – и готово! Начинка окна браузера (плагины, сэмплы или инструменты) перетаскивается на треки проекта. Один аудиоклип занимает один слот. Перетаскивание другого сэмпла в занятый слот заменяет клип в слоте.
РЕЖИМЫ РАБОТЫ
Ableton Live работает в режимах сессии (Session View) и аранжировки (Arrangement View), дополняющих друг друга. Режим аранжировки по интерфейсу и функциональному назначению похож на привычные аудио- и MIDI-секвенсоры. Режим сессии в свою очередь требуется для творческого манипулирования клипами в реальном времени. В нем вы можете экспериментировать, так как он облегчает процесс конструиро- вания музыки “на лету”. Рекомендую вам режим сессии выбрать как первую ступень работы над проектом в Ableton Live. К примеру, начните
с исходной аранжировки, запустите клипы в режиме сессии, а затем возвратитесь к исходной аранжировке. Помните, что все манипуляции, которые производятся над лупами в программе, могут быть записаны в режиме глобальной записи и затем представлены для дальнейшего редактирования в режиме аранжировки.
РЕЖИМ СЕССИИ
Есть среда, где в реальном времени возможны манипуляции с клипами и управление звуком. Теперь вы можете реализовать вашу музыкальную идею. В Ableton Live встроены интеллектуальные алгоритмы “эластичного” аудио. Благодаря им вы можете подогнать “непослушный” в темповом и метрическом отношении луп под темп и размер проекта. В режиме сессии треки — это обычные вертикальные линейки виртуального микшера, совмещенные с интерфейсом управления клипами. Каждый клип занимает один слот. Это несложное интерфейсное решение разгружает музыканта – избавляет его от лишних действий по управлению программой. Клипы располагаются на треках в слотах друг над другом и могут запускаться в произвольном порядке с помощью кнопок Clip Launch.
Запущенный клип отмечается подсвеченной кнопкой Clip Launch. Если клип поставлен на запуск, но еще ждет старта по сетке общего квантайза, то кнопка Clip Launch мигает. В соответствии с типом трека на MIDI-треках расположены MIDI-клипы, а на аудио треках — аудио клипы.
Запускайте клипы поодиночке с помощью кнопки Clip Launch или группами – как вам потребуется. Такие группы из клипов, звучащих одновременно, в терминологии программы называются “сцены” (Scene). Клипы одной сцены размещены на горизонтальной линии, пересекающей все треки до мастер-трека. Управление сценами осуществляется на мастер-треке с помощью кнопок Scene, что совершенно логично: общее управление звуком и музыкой сосредоточено в одном месте.
Итак, музыкальная вертикаль — звуки, воспроизводимые одновременно, – распределена в Ableton Live по горизонтали. Термин “сцена” выбран разработчиками не случайно. Ведь каждая сцена может состоять из клипов, которые звучанием сильно отличаются от предыдущих, например, вследствие применения мощных средств звуковой обработки Ableton Live. В такой ситуации смена сцены сопровождается сменой звучания. Поэтому “сцена” — это обобщенный термин, включающий в себя как музыкальную вертикаль, так и собственно звучание. Циклическое воспроизведение клипа или сцены можно остановить, соответственно, с помощью кнопок Clip Stop и Slop All Clips. Можно запускать клипы, расположенные в разных сценах (на разных горизонтальных линиях). Допустим, что вы нашли удачное сочетание клипов из разных сцен (на разных горизонтальных линиях) и хотите зафиксировать это сочетание в виде новой сцены. Такое конструирование произведения из клипов разных сцен — один из способов быстрого построения музыкальной формы в Ableton Live. Новая сцена создается с помощью команды меню Insert — Capture and Insert Scene.
Окно Clip View
Clip View открывается двойным кликом на аудио/миди-клипе в режиме Сессии или режиме Аранжировки.
Окно Clip View включает в себя основные настройки для управления звучанием и запуском клипов. Размеры этого окна при необходимости можно увеличить. Для этого перетащите границу, разделяющую микшер и окно Clip View вверх до полного исчезновения микшера или вниз до полного исчезновения окна Clip View. Для каждого клипа, выделенного в слоте (режим сессии) или на треке (режим аранжировки), вызывается соответствующее окно Clip View. Окна Clip View для MIDI-клипов и аудиоклипов имеют различия.

Давайте рассмотрим окно Clip View для аудио клипов, в минимальном виде окно Clip View состоит из панели Clip Box и секции Clip Display.
В секции Clip Display отображается форма звуковой волны сэмпла. В этой секции реализуются функции “эластичного” аудио, устанавливаются границы цикла Clip/Loop Region. Здесь же рисуются огибающие клипов. Забегая вперед, отмечу, что автоматизация в Ableton Live реализуется на двух независимых уровнях: треков и клипов. Для MIDI-клипов огибающими могут быть MIDI-контроллеры или параметры автоматизации виртуальных инструментов.
ВИРТУАЛЬНЫЙ МИКШЕР
В Ableton Live есть микшер, который в режиме аранжировки отображается в виде горизонтальных линеек в области микшера. В режиме сессии микшер выглядит традиционно, в виде верти кальных линеек. Каждый трек представлен в виде линейки виртуального микшера.

Рис. Микшер в режиме аранжировки.

Рис. Микшер в режиме Сессии.
В режиме аранжировки можно создать новый трек перетаскиванием плагина или инструмента в область Mixer Drop Area. Каждый трек (линейка микшера) имеет традиционные регуляторы громкости и панорамы. Вместо стандартной кнопки Mute в Live используется Track Activator — кнопка с обратной функцией.
В режиме Solo все кнопки Solo/Cue треков обеспечивают функцию Solo. В режиме Сuе — все кнопки Solo становятся Сuе что и отображается синим цветом. Режим Сue предназначен для концертных выступлений, когда для музыканта, управляющего программой Ableton Live, требуется отдельный мониторный контроль каждого трека. Уровень сигнала контроля изменяется регулятором Preview/Cue на мастер-треке. Напомним, что предварительное прослушивание сэмплов в браузере (Preview) тоже осуществляется через Cue-выход.
Дополнительные возможности маршрутизации предоставляют треки возврата (Return–треки). Каждый трек имеет количество регуляторов уровня посыла равное числу Return-треков. Треки возврата тоже оснащены регуляторами посыла, причем есть возможность создания обратной связи с помощью посыла с Return-трека на самого себя. Глобальные переключатели Pre/Post Toggle мастер-трека изменяют маршрут посыла с постфейдерного (по умолчанию) на префейдерный. Обратим внимание еще на одну полезную функцию — Live’s Crossfader, которая реализована как регулятор-кроссфейдер на мастер-треке, и радиокнопки А и В на остальных треках. Live’s Crossfader — это виртуальный аналог кроссфейдера типичного диджейского микшера. Каждый трек, включая треки возврата, может быть назначен в группу А или В с помощью радиокнопок. При движении кроссфейдера слева направо громкость треков группы А уменьшается до полного заглушения, а треков группы В — увеличивается, и наоборот. На громкость треков, не имеющих назначения А или B кроссфейдер не действует.

- Громкость – показывает RMS (среднеквадратический уровень громкости), а также пиковое значение выходного сигнала.
- Контролер уровня громкости.
- Контролер панорамы в стерео пространстве.
- Включить/выключить трек – mute.
- Переключатель solo – выключает все треки, кроме солируемого.
- Запись канала.
CLIP BOX

В поле Name изменяется название клипа. В поле Color можно выбрать другой цвет вместо предложенного по умолчанию. В поле Signature устанавливается музыкальный размер. Этот параметр не влияет на воспроизведение клипа и может рассматриваться как способ изменить сетку в секции Clip Display. Список Groove предназначен для выбора длительности нот грув-квантайза (в данном случае аудио). Степень квантайза за висит от настройки общего грува Global Groove Amount. Более подробнее смотрите в этой статье.
Режим Warp должен быть оптимизирован для барабанных лупов (Beats). Для естественного звучания аудиогрува нужно точное равенство между разрешением переходов (параметр Transients Resolution в режиме Beats, об этом дальше) и длительностью ноты грув-квантайза. Например, можно установить параметры Transients Resolution и Clip Groove равными 1/16. В самом низу расположены три кнопки для вызова/раскрывания трех дополнительных панелей: Launch Box, Sample Box и Envelopes Box. Более подробнее по варпингу тут.
Контролер транспонирования, Transpose изменяет питч клипа на указанное количество полутонов.
Реверсирование сэмплов. Эта функция создает новый сэмпл который проигрывается наоборот, относительно оригинального сэмпла.
LAUNCH BOX

Рис. Нажмите иконку L, чтобы получить доступ к Launch Box.
Launch Box – панель режимов запуска клипов. Чтоб вызвать панель Launch Box нужно совершить двойной шелчок по клипу.
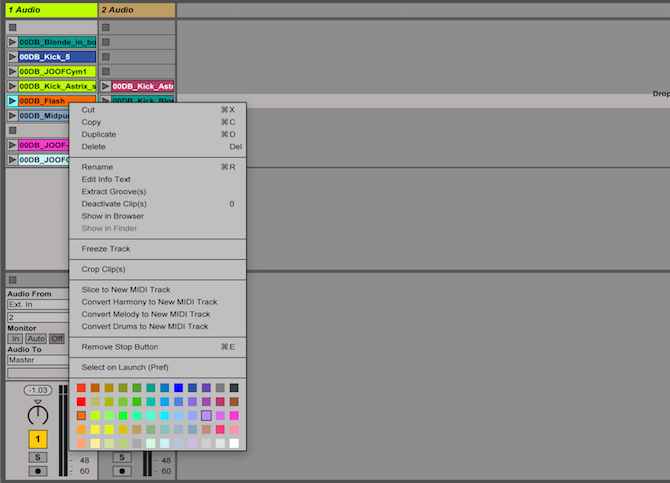
Самый верхний элемент интерфейса — это список режимов запуска Launch Mode. Режим Trigger — нажатие кнопки Clip Launch вызывает запуск клипа. Отпускание левой кнопки мыши игнорируется. Воспроизведение клипа останавливается нажатием любой свободной кнопки Clip Stop того же трека, запуском другого клипа этого трека или кнопкой Stop All Clips мастер-трека. Трековая кнопка Clip Stop находится в секции Track Status Display. По умолчанию каждый пустой слот содержит кнопку Clip Stop. При необходимости ее можно удалить командой Edit/ Remove Stop Button. Новая запущенная сцена с удаленными на треках кнопками Clip Stop не сможет остановить соответствующие клипы.
Режим Gate — клип воспроизводится только во время удержания кнопки Clip Launch нажатой. Отпускание левой кнопки мыши вызывает остановку клипа в соответствии с настройками квантизации.
Режим Toggle (переключатель) — каждое нажатие кнопки Clip Launch запускает/ останавливает клип. Режим Repeat (повтор запуска) — до тех пор, пока кнопка Clip Launch нажата, происходит постоянный перезапуск клипа в соответствии с установками квантизации. Эффект хорошо заметен при квантизации запуска по длительностям меньшим, чем длительность самого клипа.
Кнопкой Legato включается одноименный режим сохранения синхронизации при отключенной квантизации запуска клипов. Если в списке глобальной или клиповой квантизации выбрать None, то квантизация будет отключена. Теперь запуск клипа будет происходить точно в момент нажатия кнопки Clip Launch. В режиме Legato переключение на другой клип произойдет плавно внутри цикла по текущей позиции воспроизведения. Список Clip Quantization содержит параметры сетки клиповой квантизации. Выбор в списке пункта Global отменяет режим индивидуальной квантизации.
Запуск такого клипа подчиняется общим установкам — глобальному квантайзу. Velocity Amount — степень зависимости громкости клипа от значения динамики запускающей ноты (при MIDI-управлении запуском, об этом далее). 100% —полная зависимость, 0,0% — зависимость отсутствует.
Follow Action — интеллектуальный блок, позволяющий автоматизировать процесс запуска цепочки клипов, начиная с простых логических условий для списка действий и заканчивая полной случайностью.
SAMPLE BOX
Sample Box содержит мощные инструменты виртуального редактирования клипа. Рассмотрим их по порядку.
Warp Controls — “эластичное аудио”. Если кнопка Warp не активна, то режим Warping выключен. Тогда Ableton Live воспроизводит сэмпл “в оригинале”, в собственном темпе сэмпла, который не зависит от установленного темпа проекта Live. В каких случаях это может понадобиться? Отключенный режим Warping уместен для сэмплов, не имеющих конкретной ритмической структуры. Например: отдельные звуки ударных, атмосферы, звуковые эффекты, слова, фразы и т. п. Напротив, для сэмплов с четкой ритмической структурой, а также законченных музыкальных фрагментов режим Warping должен быть включен. Режим Warping обеспечит синхронизацию материала с текущим темпом проекта. Чтобы в этом убедиться, измените темп на панели управления Control Bars. Все Warping-сэмплы (эластичные сэмплы) следуют за темпом проекта. Диапазон изменения темпа в Ableton Live : от 20 до 999 долей в минуту (bpm). Чтобы понять, как работает алгоритм “эластичного” аудио, нужно представить себе сэмпл в виде резины. Другими словами, сэмпл можно растягивать или сжимать. Причем растягивать/сжимать можно как любую часть сэмпла, так и несколько частей одного сэмпла. При этом автоматически сохранится синхронизация. “Эластичный” сэмпл легко привести в соответствие музыкальной сетке буквально “по нотам”. В поле Orig. BPM отображается темп сэмпла, который вычислила программа, Этот вычисленный темп (резуль тат интеллектуального алгоритма) — так называемое предположение Ableton Live. Чаще всего предположения программы верны и не требуют корректировки. Темп можно вводить вручную в это же поле.

Рис. Выставление “маячков” Warping.
Так как же подогнать “эластичный” сэмпл к музыкальной сетке? Для этого в Ableton Live предусмотрены два типа маркеров Grid Marker (маркер сетки), отображающий метр (метрономное время), и Warp Marker (маркер деформации), предназначенный для сжатия/растяжения сэмплов. По умолчанию сэмпл автоматически получает два Warp- маркера: в начале и в конце (маркеры 1 и 2 помечены в программе зеленым цветом). Если луп требует простой подгонки по темпу, то достаточно подвинуть финальный Warp- маркер (при этом вместе с ним сместится маркер Clip/Loop Region, отвечающий за область цикла). Анализ темпа программа выполняет на основе этих двух Warp-маркер- ов. Любой Grid-маркер преобразуется в Warp-маркер и обратно двойным щелчком мыши. Смещая Warp-маркеры, можно растягивать/ сжимать сэмплы. Если между Warp-маркерами относительно небольшое расстояние, то сэмпл растянут во времени, и наоборот. Чтобы в этом убедиться, достаточно проследить за скоростью движения курсора при воспроизведении сэмпла. В секции Track Status Display отображаются параметры лупа: слева от вращающегося круга находится число повторов (начиная с момента запуска), а справа — длина лупа в долях (beats). Если клип запускается однократно (не в цикле), то вместо круга отображается прямоугольник.
Для точной установки маркеров может потребоваться изменить масштаб отображения звуковой волны. В Ableton Live это делается просто. Курсор мыши в секции Clip Display на уровне звуковой волны приобретает форму руки с лупой. Для изменения масштаба нужно нажать и удерживая левую кнопку мыши, а затем сдвинув курсор вверх или вниз. Кроме этого, в Ableton Live предусмотрен другой вариант изменения масштаба и навигации, через Zooming Hot Spot. Размер рамки изменяется так же как и масштаб в окне Clip Display. Для быстрой навигации рамка просто перетаскивается. Чтобы полностью заполнить рамкой область Hot Spot, достаточно дважды щелкнуть внутри рамки. В том случае, если Ableton Live неверно вычислит темп лупа, можно воспользоваться кнопками “’2” (Double Original Tempo) и “:2” (Half Origi- nal Tempo).
Список Warp Mode содержит режимы функции деформации сэмпла во времени. Режим Beats предпочтителен для барабанных лупов или другого материала с четко выраженной ритмической структурой. Форма звуковой волны таких сэмплов отличается более-менее выраженными моментами атаки.

Режим Beats имеет всего один параметр настройки — Transient Resolution (разрешение переходного процесса). Под переходным процессом понимается фрагмент ритмической структуры сэмпла с относительно резким изменением амплитуды.
Режим Tones оптимизирован для звуков с выраженной высотой тона. Например, для вокала, одноголосных инструментов или басовых партий. Параметр Grain Size нужно настраивать экспериментально. Больший размер Grain Size позволяет избежать артефактов для более сложных звуков, например, партий состоящих из двух и более голосов.
Режим Texture оптимизирован для звуковых текстур: сложных полифонических партий, шумов, атмосфер. Помимо параметра Grain Size появился параметр Flux, который вносит случайность в процесс. Большие значения Flux соответствуют большему внесению случайности.
В режиме Re–Pitch сэмпл как бы воспроизводится с измененной скоростью (меняется высота тона). Ускорение в два раза вызывает транспонирование на октаву вверх. В режиме Re-Pitch регуляторы Detune и Transpose не оказывают никакого влияния на звук.
Совет: если требуется заменить сэмпл в слоте с сохранением позиций Warp–маркеров, нужно просто перетащить выбранный сэмпл из окна Browser в окно Clip View. При этом сэмплы должны быть одинаковой длины.
НАСТРОЙКИ SAMPLE LOOP/REGION
Чтобы запустить режим цикла, кнопка Loop должна быть активна. Зацикливать можно только Warped-клипы. Поэтому если кнопка Warp не подсвечена, кнопка Loop заблокирована. В панели Loop, кроме кнопки Loop, предусмотрен еще и ввод параметров региона в формате такт: четверть: шестнадцатые. В одноименные поля вводятся четыре параметра: Start, End, Length (длина) и Offset (смещение). При вводе числовых данных маркер Clip/Loop Region ограничивает регион в соответствии с числами, также позиционируется и маркер Loop Offset — точка смещения старта.

Рис. Зона скрола и зума аудио клипа.
Смещение маркера Loop Offset вызывает автоматический перезапуск клипа. Для перемещения маркера Loop Offset нужно либо ухватиться за него мышью, либо щелкнуть в точке новой позиции маркера с нажатой клавишей Shift. Переключатель Start/Pos обеспечивает два режима управления маркером Clip/ Loop Region. В положении Start смещается только стартовая граница маркера при изменении значений в поле Start. В положении pgs смещается весь маркер Clip/ Loop Region. Кнопки со стрелками Show Loop Start. Show Loop End, Show Loop и Show Loop Offset предназначены, соответственно, для быстрого перехода к стартовой и конечной точкам лупа, быстрому изменения масштаба под размер лупа, а так же переходу к маркеру смещения Loop Offset.
Управление высотой тона и уровнем клипа (Pitch and Gain). Высотой тона клипа можно управлять с помощью регулятора Transpose. Дискретность шага — один полутон. Дополнительный регулятор Detune обеспечивает тонкую подстройку в центах (сотых долях полутона). Движок Dip Gain предназначен для виртуального изменения громкости клипа в дБ. Деструктивное редактирование сэмплов.
К Ableton Live можно подключить внешний звуковой редактор (Sample Editor). Если такая настройка произведена, то клип автоматически загружается в звуковой редактор после нажатия кнопки Edit, Эта операция требует остановки воспроизведения. Если длина сэмпла после редактирования не изменилась, то набор Warp-маркеров сохранится без изменений.
Функция реверсирования вызывается кнопкой Reverse. В первый раз эта операция выполняется в оффлайновом режиме с созданием реверсивной копии исходного сэмпла. В дальнейшем кнопка Reverse просто переназначает ссылку содержимого слота на оригинал или копию без деструктивного пересчета.
Функция Save. Кнопка Save позволяет переназначить ссылку на другой сэмпл. При этом все клипы, ссылавшиеся на тот же сэмпл, получат новую ссылку. Другими словами, функция Replace позволяет заменить сэмпл во всем наборе клипов с одинаковой ссылкой. Функция сохранения настроек клипа. Предположим, мы выполнили оригинальные настройки воспроизведения клипа в данном проекте. Как их сохранить и перенести, например, в другой проект. Для этого в Ableton Live используются служебные файлы с расширением .asd (Analysis Files). Кнопка Save сохраняет текущие настройки клипа (те же позиции Warp-маркеров, режим деформации и т. д.) в файл .asd как настройки по умолчанию для данного сэмпла. При последующей загрузке этого же сэмпла автоматически восстановятся текущие настройки. Можно сказать, что функция Save Default Clip позволяет сохранить виртуальный объект Live, сэмпл + виртуальные настройки.
Режим High Quality Interpolation. Если кнопка High Quality Interpolation (Hi-Q) нажата (подсвечена зеленым цветом), то Ableton Live использует более качественный режим преобразования частоты дискретизации. Этот режим дополнительно загружает процессор, но при этом существенно снижаются искажения, особенно на высоких частотах. Нужно отметить, что режим High Quality Interpolation не влияет на качество алгоритма растяжения/сжатия сэмплов. Он используется только при импорте сэмплов и изменении высоты тона.
Режим Clip Start/End Fades. За этот режим отвечает кнопка Fade. Если она нажата, то программа автоматически добавляет в начале и конце клипа короткие фейды не более 20 миллисекунд. При переключении на другой клип выполняется короткий кроссфейд. Алгоритм построен таким образом, чтобы исключить “размазывание” атаки в начале клипа и заметный на слух фейд в конце. Режим Clip Start/ End Fades избавляет от щелчков на стыках клипов, поэтому отключать его без особой необходимости не следует.
Режим загрузки клипа в оперативную память. Чтобы загрузить клип в оперативную память, достаточно нажать кнопку RAM. Такое действие может потребоваться в двух случаях: из-за перегрузки дисковой подсистемы возникли сбои в воспроизведении или возникли сбои при воспроизведении клипа в режиме Legato. Чтобы воспользоваться режимом Clip RAM, нужно иметь достаточно большой объем оперативной памяти. Если ресурсы компьютера исчерпаны, лучше осуществить перезапись треков в реальном времени на один трек.
ОКНО CLIP VIEW ДЛЯ MIDI | ПАНЕЛЬ NOTES BOX
 Интерфейс этого окна изменился по сравнению с окном Clip View аудиоклипов. Панель Sample Box заменена на панель Notes Box. Вместо окна Clip Display появился MIDI Note Editor, Остальные панели, Launch Box и Envelopes Box, не изменились.
Для пустых и импортированных MIDI-клипов в поле Orig. BPM устанавливается темп, равный темпу проекта, заданному в поле Tempo панели управления. Ableton Live разрешает каждому MIDI-клипу иметь свой темп. Списки MIDI Bank Select, MIDI Sub Bank Select и Program Change Select предназначены для посыла MIDI-сообщений Bank.
Program Change на внешнее MIDI-устройство. Если выбрано значение None, то со ответствующее MIDI-сообщение не посылается. Каждый MIDI -клип из набора Live может воспроизводиться своим тембром внешнего синтезатора. Управление маркерами Clip/Loop Region и Loop Offset MIDI-клипа не отличается от управления маркерами аудиоклипа.
Редактор MIDI Note Editor MIDI-редактор Ableton, на наш взгляд, не отличается особой оригинальностью интерфейса. Однако разработчики учли особенности концертной эксплуатации MIDI-редактора в некоторых деталях его интерфейса. Большинство операций выполняет- ся с помощью карандаша в режиме Draw.
ОГИБАЮЩИЕ MIDI–КЛИПА

Для редактирования огибающих MIDI-клипа предусмотрен редактор Envelope Editor, доступ к которому осуществляется кнопкой Show/Hide Envelopes Box. Если выход MIDI-трека назначен на внешнее MlDI-устройство, то огибающие — это MIDI-контроллеры. Поэтому в списке Device Chooser доступен только один пункт: MIDI Ctrl. А в списке Control Chooser осуществляется выбор MIDI-контроллера.
Теперь рассмотрим типичный пример и последовательно загрузим из окна Browser в MIDI-трек виртуальный инструмент Impulse, MIDI-плагин Velocity и аудиоплагин Compressor. Более подробно я рассмотрел эти инструменты в этой статье. Список автоматизируемых устройств Device Chooser существенно расширился. Кроме MIDI- контроллеров появились пункты Velocity (по названию MIDI-плагина), Impulse, Compressor и Mixer (так как мы загрузили виртуальный инструмент, то его аудио выход регулируется фейдерами MIDI-линейки виртуального микшера). У каждого из автоматизируемых устройств в списке Control Chooser появился свой набор параметров автоматизации. Окно Envelope Editor отображает ноты, поэтому огибающие могут быть легко привязаны к материалу.
Не волнуйтесь, если это выглядит ошеломляющим — мы разберемся со временем.
Теперь вам нужно настроить несколько параметров. Откройте панель настроек. На Mac посмотрите в верхний левый угол и выберите Live > Preferences (или Command + , ). В Windows это Параметры > Настройки (или Ctrl + , ).
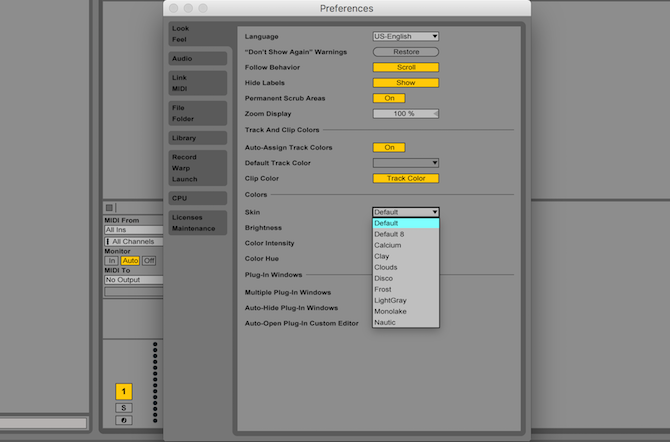
Выберите вкладку Look Feel слева. Здесь вы можете изменить язык, общие цвета и темы. Под заголовком « Цвета» вы можете изменить скин или тему Ableton. Я предпочитаю тему Диско , но по умолчанию темно-серый является наиболее распространенным.
Выберите вкладку Аудио . Здесь вы можете настроить свои входы и выходы. Для устройства ввода звука и устройства вывода звука выберите соответствующие настройки.
Если вы используете внешний аудиоинтерфейс, он будет указан здесь (при условии, что установлены ваши драйверы). В противном случае он будет предварительно заполнен «Встроенным выходом». Вы можете нажать Input Config и Output Config для точной настройки этих параметров, а также установить количество входов / выходов ( I / O ), доступных для Ableton.
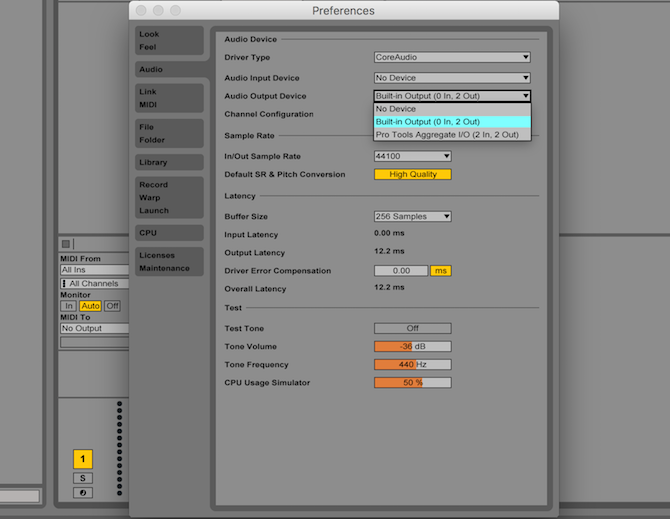
Наконец, под подзаголовком Latency выберите подходящий размер буфера . Размер буфера измеряется в сэмплах, и это используется для управления скоростью, с которой Ableton может записывать и воспроизводить звуки.
Если это значение слишком велико, между воспроизведением звука и прослушиванием его через динамики может быть большая задержка. Если вы установите слишком низкое значение, ваш компьютер будет работать намного тяжелее. Хорошее место для начала — 256 образцов . Если у вас странные глюки звука, возможно, вам придется увеличить это.

Теперь, когда вы все настроили, пришло время написать музыку — закройте панель настроек.
Заседание против Представления договоренности
«Традиционный» подход в музыкальном программном обеспечении заключается в записи треков слева направо. У Ableton есть эта способность, но то, что действительно отличает ее от других DAW, это представление Session . Это упорядочивает клипы по вертикали и позволяет запускать любой клип в любом порядке. Это действительно открывает творческие возможности для создания музыки, и вы можете обнаружить новую аранжировку вашей песни!
Session view чаще всего используется для ремикширования песен вживую. Он также может запускать клипы или песни в ответ на различные события. Если вы хотите записывать музыку «традиционным» способом, Ableton имеет встроенное представление Arrangement, к которому можно получить доступ с помощью клавиши Tab . Находясь в режиме компоновки, повторное нажатие клавиши Tab вернет вас в режим просмотра сеанса.
Вы можете использовать представление аранжировки для записи результатов сеанса или записи себя или группы, а также представление сеанса для ремикса вашего последнего хита или эксперимента с новым аранжировкой.
Интерфейс
Вернитесь в режим просмотра сеанса. Есть четыре основных компонента (рядом с элементами управления в самом верху). Крайний левый раздел предназначен для навигации и выбора файлов проекта, инструментов и эффектов. Это называется браузером , и его можно показать или скрыть с помощью маленькой стрелки в верхнем левом углу.
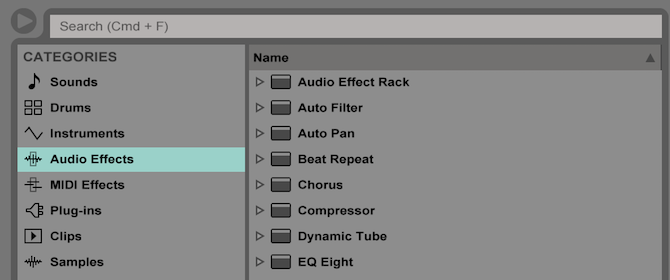
Браузер разделен на две половины. На левой стороне перечислены папки на вашем компьютере и встроенные папки Ableton:
- Звуки
- Барабаны
- инструменты
- Аудио эффекты
- MIDI-эффекты
- Плагины
- клипсы
- образцы
В этих категориях можно искать эффекты и инструменты, встроенные в Ableton. Под это место, где вы можете искать свой компьютер файлы.
В правой части Браузера вы можете перемещаться к определенным файлам или папкам в выбранной вами категории или месте. Верхняя часть браузера содержит функцию поиска, которая позволяет вам искать в выбранной папке определенный звук, инструмент или эффект.
В левом нижнем углу окна Ableton находится средство просмотра информации. Наведите курсор на что-нибудь в Ableton, и это скажет вам, что он делает. Это очень полезно и может помочь вам научиться.
Нижняя панель — это раздел « Элементы управления эффектами ». Здесь вы можете настроить любые инструменты или эффекты, которые вы назначили для трека — о чем мы поговорим позже.
Наконец, оставшаяся панель справа — это вид сеанса или расположения. Это где вы будете создавать и манипулировать аудио.
Создание музыки
Теперь, когда вы знаете об интерфейсе, давайте сделаем немного музыки! Ableton поставляется с несколькими инструментами, которые вы можете использовать для создания звуков, или вы можете использовать включенные сэмплы , которые являются предварительно записанными фрагментами звука или песен.
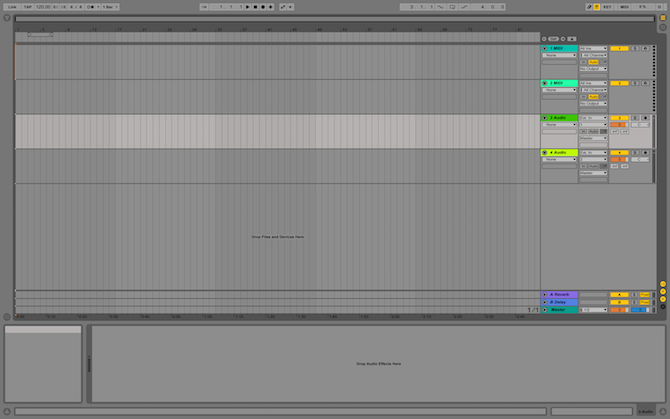
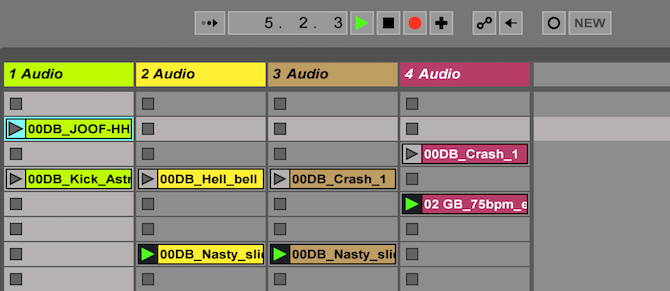
В режиме просмотра сеанса по умолчанию вы увидите семь вертикальных панелей. Они, вероятно, будут называться как «1 Midi», «2 Audio» и так далее. Последний из них называется «Мастер» и является всеобъемлющим главным каналом.
Эти дорожки по умолчанию определены в проекте Ableton по умолчанию. Можно сохранить свой собственный проект по умолчанию, поэтому, когда вы открываете Ableton, у вас есть базовая структура, готовая к работе. Но прямо из коробки, вы получаете проект Ableton по умолчанию.
Прежде чем вы сможете писать музыку, вам нужно понять разницу между треками.
MIDI- треки могут принимать только MIDI-инструменты и не могут воспроизводить сами сэмплы. MIDI-устройства и треки будут подробно рассмотрены позже, но пока, думайте о них как о способе генерирования звука, такого как клавиатура или гитара.
Аудио дорожки являются противоположностью дорожек MIDI. Они могут воспроизводить и записывать звуки с других устройств (таких как микрофон или другое устройство), но не могут генерировать звуки самостоятельно.
Наконец, есть треки возврата . Они обеспечивают маршрут для обработки аудио и возврата его обратно. Не беспокойтесь об этом сейчас.
Каждый трек имеет одинаковую базовую структуру. Верх трека известен как строка заголовка трека . Вы можете щелкнуть правой кнопкой мыши здесь, чтобы изменить название и цвет трека. Под этим — Слоты Скрепки . Каждый слот клипа может содержать один клип (фрагмент или целую песню / звук).
Под слотом клипа находится мини-панель управления для каждой дорожки. Здесь вы можете включить или отключить трек, настроить параметры, такие как панорамирование или усиление, и направить звук из или почти в любое другое место. Значения по умолчанию на данный момент достаточно.
Идите вперед и удалите две дорожки MIDI и одну звуковую дорожку, чтобы у вас осталась одна дорожка. Вы можете удалить дорожки, щелкнув правой кнопкой мыши по строке заголовка дорожки и выбрав « Удалить» , или щелкнув левой кнопкой мыши по строке заголовка и нажав клавишу «Удалить» или «Backspace». Если у вас есть только одна дорожка, вы не сможете ее удалить.
Откройте браузер с левой стороны — это время , чтобы найти какие — то звуки! Под категориями выберите Образцы . Используйте правую часть браузера для поиска некоторых звуков, которые вам нравятся — Ableton поставляется с большим количеством сэмплов, и каждая версия (Intro, Standard и Suite) имеет свой выбор.
Вы можете использовать курсор или клавиши со стрелками, чтобы выбрать образец, и при этом будет воспроизведен его предварительный просмотр. Большинство из них будут короткие звуки людей или инструментов. Если вы хотите что-то более сложное, выберите Clips в подменю Categories . Клипы, как правило, являются более длинными образцами, но большинство из них не будут просматриваться при нажатии на них. Чтобы прослушать предварительный просмотр, выберите « Нажмите для предварительного просмотра» в нижней части браузера.
Найдя понравившийся образец, перетащите его в пустую ячейку клипа, нажав и удерживая левую кнопку мыши. Это теперь будет отображаться как клип.
Вы можете перетащить несколько клипов в пустые слоты клипов или перетащить их поверх существующих клипов, чтобы заменить старые клипы новыми.
При просмотре сеанса клипам назначается случайный цвет. Вы можете изменить это, щелкнув правой кнопкой мыши и выбрав новый цвет.
Нажмите маленький треугольник рядом с клипом, чтобы воспроизвести его. Обратите внимание, как меняется интерфейс. Треугольник становится зеленым, и вы получаете звуковые метры на этой дорожке и на мастере.
Внизу в секции микшера попробуйте поиграть с различными элементами управления. Track Activator включит или отключит трек. Если этот параметр отключен, звук не будет выходить из дорожки, но он будет продолжать играть — думайте об этом как о кнопке отключения звука.
Используйте ручку панорамирования, чтобы отрегулировать панораму дорожки, или отрегулируйте громкость с помощью ползунка громкости дорожки справа от выходных уровней.
Если вы хотите остановить или запустить звук, нажмите пробел .
Идите вперед и перетащите еще несколько клипов на дорожку. Если у вас есть более одного клипа, попробуйте воспроизвести другой — что вы заметили? Есть несколько вещей, которые происходят, когда вы запускаете новый клип в той же дорожке.
Текущий воспроизводимый клип останавливается, и начинается новый клип. Однако новый клип начнется не сразу, а через некоторое время (обычно один такт ). Вот где знание основ теории музыки будет полезно для вас.
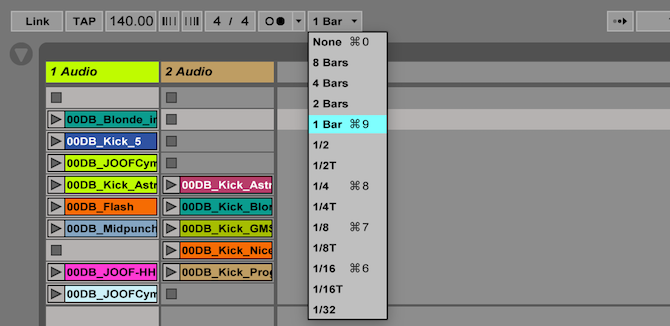
Если вы запускаете клип в середине полосы, Ableton будет ждать до начала полосы, прежде чем воспроизводить этот клип. Это улучшает звучание музыки и поддерживает ее во времени. Вы можете изменить это в меню квантования на верхней левую настройке бара. Это меню также позволяет изменить время подписи и темп.
Если вы хотите воспроизвести более одного клипа одновременно, вам понадобится другой трек. Вы можете создать новую дорожку, щелкнув правой кнопкой мыши в пустом месте и выбрав Вставить звуковую дорожку или Вставить дорожку миди .
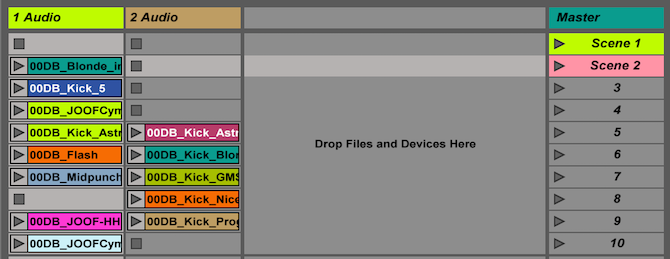
Если у вас есть более одной дорожки, вы можете запустить все горизонтальные клипы на нескольких дорожках, используя сцену . Сцена — это один ряд клипов (тогда как трек — это столбец). Сцены можно найти с правой стороны под мастер- дорожкой, их можно раскрашивать, переименовывать и корректировать, как клипы.
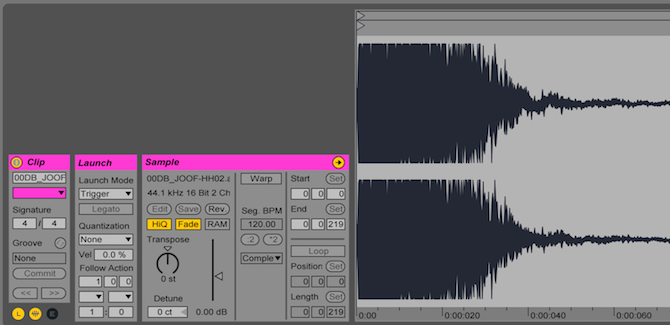
Двойной щелчок на клипе откроет его в разделе «Элементы управления эффектами» в нижней части экрана. Здесь вы можете манипулировать сэмплом, а также настраивать звук. Вы можете настроить место начала или окончания семпла, а также высоту звука, время, громкость и многое другое.
На данный момент есть только несколько основных моментов, на которые стоит обратить внимание.
Под Sample Control есть кнопка Loop , которая включена по умолчанию. Это означает, что после завершения воспроизведения клипа он начнется снова. Он никогда не остановится, если вы не нажмете Стоп . Если вы хотите, чтобы определенный клип воспроизводился только один раз, просто отключите зацикливание с помощью кнопки цикла. Зацикливание может быть настроено для каждого клипа отдельно, поэтому некоторые клипы можно зацикливать, а другие воспроизводить только один раз.
Кнопка « Деформация» регулирует время клипа в соответствии с текущим временем вашего проекта. Иногда это может быть запутано и запутано, но есть вещи, которые вы можете сделать, чтобы сделать его более точным. У Ableton есть подробное руководство по деформации, если вы хотите узнать больше.
Наконец, одним из наиболее полезных действий является режим запуска . Это определяет, как воспроизводятся клипы после начала. Если вы не видите панель запуска, вы можете показать ее, используя маленькую кнопку «L» под элементами управления клипами.

Есть четыре режима запуска:
Триггер : режим по умолчанию. Нажав на клип, вы начнете играть.
Gate: Клип будет играть до тех пор , как она проходит вниз. Как только вы отпустите кнопку мыши, клип перестанет воспроизводиться.
Переключить : Нажмите, чтобы начать. Нажмите, чтобы остановить.
Повторить : Это повторяет клип каждые x баров — как определено в меню квантования ранее.
Режимы запуска — это то, где ваше творчество действительно может ожить. При использовании с MIDI-контроллером или сочетаниями клавиш вы можете получить действительно креативные звуки из Ableton.
Назначение ярлыков
Теперь, когда вы знаете, как использовать сеанс, вам нужно знать еще один трюк. Нажмите кнопку ключа в правом верхнем углу. Это включит или выключит режим Key Map Mode . Именно здесь вы можете назначить клавиши клавиатуры практически любой функции в Ableton — наиболее важным из которых является запуск клипов.

Находясь в режиме карты ключей, просто щелкните действие (например, начало клипа), а затем нажмите клавишу. Ваша новая клавиша появится рядом с функцией, которую вы нажали. Когда закончите, выйдите из режима карты ключей.
Если после назначения клавиш ничего не происходит, вам может потребоваться отключить компьютерную MIDI-клавиатуру . Это позволяет играть на виртуальной (музыкальной) клавиатуре с клавиатуры компьютера. Отключите его, нажав маленькую кнопку клавиатуры в правом верхнем углу рядом с кнопкой режима карты клавиш (убедившись, что вы не находитесь в режиме карты клавиш).
MIDI-треки
До сих пор вы работали с сэмплами — настоящими, «подлинными» аудиозаписями. Теперь перейдем к MIDI . MIDI расшифровывается как цифровой интерфейс музыкальных инструментов и представляет собой способ иметь виртуальный инструмент, например клавиатуру или ударные. MIDI-устройства воспроизводят звук при наличии команды.
Чтобы начать работу с MIDI, создайте новый MIDI-трек, щелкнув правой кнопкой мыши > Insert Midi Track . Дважды щелкните пустой слот клипа, чтобы создать новый клип. Вы можете воспроизвести этот клип, но звук не выйдет — это пустой клип.
Дважды щелкните на своем MIDI-клипе, чтобы просмотреть редактор MIDI-нот . Это «виртуальная» клавиатура, которую вы можете играть или программировать. Однако нажатие на клавиши не произведет никакого звука — вам нужно нажать кнопку предварительного просмотра MIDI-редактора в верхней части виртуальной клавиатуры — это похоже на пару наушников.
Даже если вы включили предварительный просмотр MIDI-редактора, вы все равно ничего не услышите. Вам нужно назначить инструмент на трек, прежде чем прозвучит какой-либо звук.
Начните с добавления некоторых заметок — мажорная мажорная шкала, состоящая из нот C, D, E, F, G, A, B, является самой простой, которую вы можете получить. Нажмите клавишу B, чтобы войти в режим рисования — это позволит вам вводить заметки.
Если вы нажмете кнопку Fold над виртуальной клавиатурой, Ableton скроет все клавиши, которые вы еще не использовали.
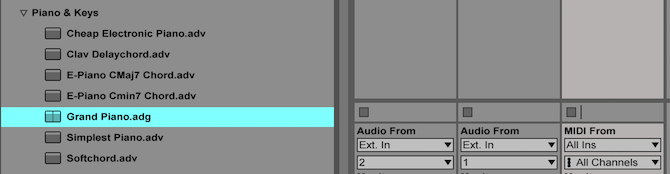
Теперь, когда у вас есть некоторые заметки, дважды щелкните по строке заголовка дорожки для вашей дорожки MIDI. Откройте браузер и выберите Инструменты под заголовком категории. Разверните категорию Simpler и выберите подходящий инструмент — я использую Grand Piano из раздела Piano & Keys .
Перетащите этот инструмент поверх названия дорожки — это назначит его на дорожку. Теперь, когда вы нажимаете кнопку воспроизведения, у вас должен быть приятный звук пианино!
Этот инструмент содержит различные эффекты и настройки. Вам не нужно понимать их все прямо сейчас, но Ableton упростил для вас задачу, «сложив» все элементы управления в простую панель управления рояля, расположенную в разделе элементов управления эффектами в нижней части экрана.
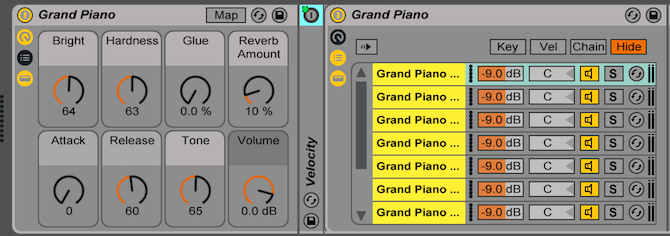
Попробуйте поиграть с такими настройками, как Reverb и Bright и посмотреть, что происходит с вашим звуком.
Барабанные стойки
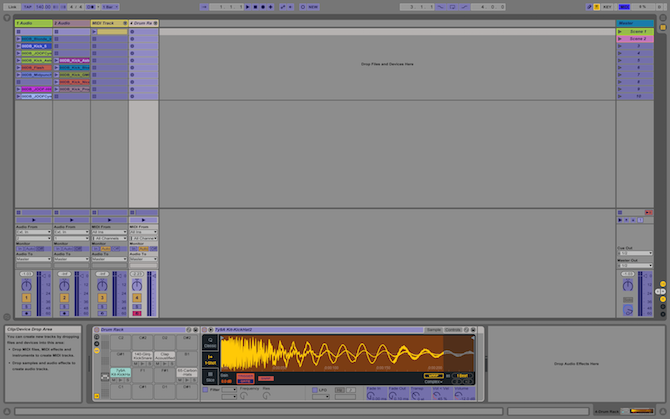
Барабанного типа Rack представляет собой особый вид MIDI инструмента — и это не ограничивается только барабаны. Это позволяет назначать сэмплы клавишам на клавиатуре и представляет собой удобный способ запуска нескольких сэмплов.
В разделе « Инструменты» браузера перетащите стойку барабана на свой собственный канал. Панель эффектов теперь отображает элементы управления стойкой барабана. В основном это 16 слотов (больше доступно на отдельных «страницах»). Каждый слот запускается запиской с (музыкальной) клавиатуры.

Вы можете перетащить сэмплы из браузера в слот в стойке барабана. У вас есть различные элементы управления для изменения сэмпла, и если вы создаете новый клип на канале барабанной стойки, любая нота, которую вы играете в этом клипе, вызовет сэмпл, который вы настроили на барабанной стойке — довольно аккуратно!
MIDI контроллеры
Одна особенность Ableton заключается в том, что он может работать с бесконечным количеством MIDI-контроллеров или клавиатур. Ранее я показал вам, как создать свой собственный MIDI-контроллер. используя Arduino — который работает довольно хорошо.
MIDI-клавиатура позволяет создавать музыку и записывать клипы с использованием настоящей клавиатуры, но той, которая проходит через ваш трек. Хотите сменить инструмент? Нет проблем: просто выберите новый в Ableton.
При использовании MIDI-клавиатуры вам необходимо настроить Ableton для «прослушивания» внешнего устройства. В разделе управления вашего MIDI-трека под MIDI From выберите ваше MIDI-устройство (как только оно подключено).
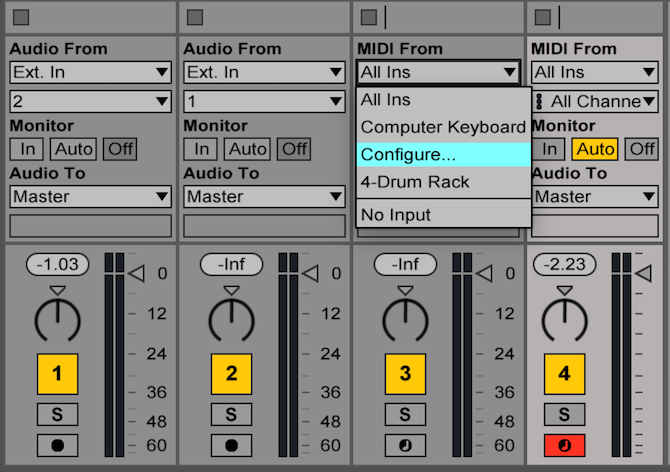
Ваша MIDI-дорожка автоматически преобразует воспроизводимые ноты в соответствующий звук, в зависимости от выбранного вами инструмента.
Контроллер MIDI отличается от клавиатуры MIDI тем, что они часто имеют кнопки и кнопки вместо клавиш. После подключения вы можете сопоставить свой контроллер с Ableton так же, как сочетания клавиш выше.
В правом верхнем углу Ableton нажмите кнопку переключения режима MIDI Map . В этом режиме запустите клип или переместите параметр, а затем нажмите или переместите соответствующий физический элемент управления на своем MIDI-устройстве. После этого просто нажмите кнопку переключения режима карты MIDI еще раз, чтобы выйти из режима карты MIDI.
Многие MIDI-контроллеры предлагают комбинацию клавиш клавиатуры и кнопок, и вы даже можете настроить клавиши клавиатуры для запуска клипов вместо воспроизведения нот — возможности действительно безграничны!
Последствия
Эффекты — отличный способ оживить ваши треки, и они просты в использовании!
Существует два типа эффектов — MIDI-эффекты и аудиоэффекты . MIDI-эффекты можно применять только к MIDI-трекам, тогда как аудиоэффекты можно применять к аудио или MIDI-трекам.
Выбрав эффект из браузера, просто перетащите его на свой канал. Ваш эффект появится в разделе управления эффектами. Вы можете добавить несколько эффектов и настроить их порядок и расположение, а также их настройки.
Вы можете использовать практически неограниченное количество эффектов — единственным реальным ограничением является ваша вычислительная мощность.
Запись сессии
Итак, у вас продолжается сессия, и теперь пришло время ее записать. Ableton может записывать вывод из сеансового представления прямо в представление компоновки.
Все, что вам нужно сделать, это нажать кнопку записи на верхней панели управления. После записи вы можете микшировать и подбирать клипы по своему усмотрению, зная, что идеальная комбинация клипов всегда будет доступна при записи.
Когда вы закончите, нажмите кнопку Стоп на верхней панели управления. Нажмите Tab, чтобы переключиться в режим аранжировки, и ваша запись будет там — все разделены на несколько дорожек, готовых для редактирования или экспорта.
Экспорт готовых мелодий
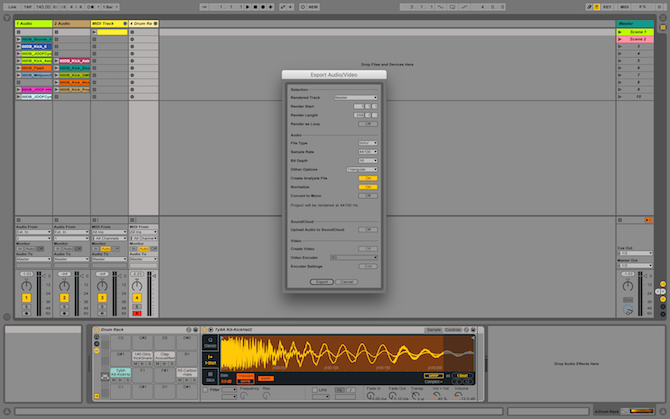
После того как вы написали классную песню, пришло время ее экспортировать.
Перейдите в Файл > Экспорт аудио / видео . Отсюда вам представлены различные варианты настройки. Вы можете экспортировать каждую дорожку как отдельный файл, но пока оставьте настройки как есть и нажмите « Экспорт» .
Начните делать и записывать с Ableton Live
Вот и все — вы сделали! Сегодня мы только начали царапать поверхность, и мы едва охватили представление компоновки — к счастью, большинство приемов сессионного просмотра также работают в режиме компоновки.
Конечно, если вы хотите узнать больше, руководство Ableton Live очень всеобъемлющее и подробно рассказывает о каждом предмете.
Если вы ищете песни для ремиксов или сэмплы для манипулирования, убедитесь, что вы заказали эти три места, чтобы найти бесплатную музыку музыку без роялти музыку без роялти
В качестве альтернативы, если вы ищете что-то немного более простое, возможно, что-то просто для микширования песен, таких как DJ, то почему бы не проверить наш путеводитель по лучшему программному обеспечению для DJ на любой бюджет? обеспечение для DJ на любой бюджет обеспечение для DJ на любой
Вы узнали, как использовать Ableton Live сегодня? Почему бы не поделиться своими любимыми советами и рекомендациями со всеми в комментариях ниже?
Время на прочтение
12 мин
Количество просмотров 54K
Доброго времени суток уважаемые хабрапользователи! Спешу поделиться с вами отличной статьей, которую написал товарищ Jackarus (TriminghamDJ Trimingham). Сам он к сожалению запостить не смог, поэтому пришлось это сделать мне. Так что если кто-то захочет поблагодарить автора статьи, помните что автор — Jackarus (надеюсь он объявиться в комментариях), а не я, помните кого плюсовать 
P.S. Заодно, пользуясь случаем, хочу извиниться перед автором статьи за огромную задержку в публикации.
Первоначально этот текст предназначался для участников музыкального форума www.beatsfactory.net, где я тружусь администратором, но потом я решил, что надо поделиться и с хабралюдьми
Сразу хочу оговориться, что данный мануал ни в коей мере не претендует на то, чтобы являться исчерпывающим справочником и уж тем более истиной в последней инстанции. Я всего лишь сделал попытку обобщить собственный опыт, советы и рекомендации, которыми со мной любезно поделились коллеги-диджеи, а также информацию, почерпнутую из различных сетевых и печатных источников. Любая конструктивная критика будет принята с благодарностью.
Так как это руководство могут читать люди с самым разным уровнем подготовки, я постараюсь построить его по принципу «от простого к сложному», однако исхожу при этом из предположения, что все читатели уже хотя бы немного знакомы с Ableton Live. Если это не так, я рекомендую сначала ознакомиться с учебным видео от GrooveBoxMusic или от AskVideo.
DJ Trimingham
jackarus (гав-гав) gmail dot com
Часть 1. Быстрый старт.
Куда сувать, когда в первый раз?
(Из запросов к Яндексу)
Общие настройки.
Каких-то особых настроек для диджеинга Ableton Live практически не требует, можно выделить лишь три момента:
- Идем в Options – Preferences – Record Warp Launch и отключаем Auto-warp Long Samples. Beatwarping – это операция, проведение которой, по моему мнению, доверять нельзя никому.
- Там же ставим Default warp mode в режим Complex – хотя этот режим является приблизительно в 10 раз более ресурсоемким, чем все прочие, именно он дает наилучший результат в случае сложного музыкального материала. Напомню, что при необходимости изменить режим Beatwarping’а для любого клипа можно в Sample Box.
- В Options – Preferences – Look Feel – Colors меняем дефолтный скин на какой-нибудь более контрастный. Дело в том, что в Session view существует 3 основные зоны фокуса – Browser, Clip view/Track view и Mixer drop area. Одна и та же клавиатурная команда в зависимости от текущего фокуса может вызывать разные действия, или не вызывать никаких; поэтому дефолтный скин, который, на мой взгляд, является недостаточно информативным, лучше заменить. Лично я предпочитаю скин Nautic, но это, естественно, дело вкуса.
Session View и Arrangement view.
Как вам без сомнения известно, в Ableton Live есть 2 режима: Session View и Arrangement view. Обычно для работы «вживую» используется Session View, а в Arrangement view осуществляется пошаговая, «оффлайновая» запись миксов. Хотя и существуют диджеи, работающие «вживую» в Arrangement view, это, на мой взгляд, удовольствие на любителя.
Global Quantization.
Применительно к диджеингу параметр Global Quantization отвечает за то, когда начнется воспроизведение запущенного клипа. Если установить его равным 1 такту, то воспроизведение начнется с началом следующего такта. Если установить его равным 2 тактам, то воспроизведение начнется с началом следующего нечетного такта. Если установить его равным 4 тактам, то воспроизведение клипа начнется на такте из ряда 5, 9, 13 … и так далее.
Чем больше параметр GQ, тем больше времени есть у диджея на принятие решения, зато небольшое значение GQ оставляет больший простор для творчества. Как правило, GQ ставится равным одному или двум тактам, хотя, разумеется, никаких жестких правил здесь нет и быть не может.
1. Подготовка Материала.
Принципиальным отличием Ableton Live от «традиционных» диджейских программ (Тraktor/Virtual DJ/Dekadance и т.д.) является то, что все используемые треки должны быть специальным образом подготовлены; другими словами, Вы не можете взять первый попавшийся аудиофайл и тут же использовать его в миксе (исключение составляют разве что «атмосферные» сэмплы, не имеющие определенного темпа). Необходимость предварительной подготовки материала многих отпугивает, однако поверьте — данный процесс окупается сторицей.
1.1 Beatwarping.
Ableton live был первой DAW, в которой была реализована концепция эластичного аудио (Elastic audio). Суть ее заключается в том, что аудиофайл разбивается на произвольное количество фрагментов, каждый из которых можно растягивать или сжимать во времени, не меняя при этом частоты (т.е. высоты) звука. Другими словами, мы как бы принудительно указываем: «Такое-то музыкальное событие должно произойти тогда-то». Практически это означает, что мы можем идеально синхронизовать по темпу любой музыкальный материал – танцевальные треки, записи живых выступлений, барабанные лупы и так далее ни секунды не тратя при этом на beatmatching – основу основ традиционного диджеинга и главного камня преткновения для начинающих. Для этого используется процесс, который называется Beatwarping.
1.1.1 Beatwarping – «классический» способ.
- Загружаем нужный трек в любой слот и устанавливаем темп сета приблизительно равным темпу трека, который мы хотим обработать.

- Ставим параметр Global Quantization равным двум тактам – это поможет нам быстро перемещаться по треку, используя кнопки Nudge. На эти кнопки удобно назначить горячие клавиши; о том, как это сделать, рассказано в разделе «Управление».
- Нажимаем в окошке Sample Box кнопку Warp, при этом на волновой форме появляется желтый Warp-маркер с цифрой 1.
- От точности позиционирования первого Warp-маркера в значительной степени зависит успешность всего beatwarping’a, поэтому этот маркер необходимо поставить как можно точнее на нужный бит, для чего используется зум. Горячие клавиши – серый «+» (zoom in) и серый «-» (zoom out).
Вопрос: Куда лучше ставить первый Warp-маркер?
Ответ: Пытаться найти нужное место на «атмосферном» вступлении — занятие практически безнадежное; ставьте Warp-маркер на первый перкуссионный даунбит (в идеале — на первую бочку) — не ошибетесь. Если Вы хотите использовать такое вступление в миксе, то после проведения beatwarping’а всего трека Start-маркер следует поставить на «отрицательный» Grid-маркер, соответствующий даунбиту. - В окошке Sample Box нажимаем кнопку Loop и совмещаем начало петли с первым Warp-маркером. Туда же ставим Start-маркер. При необходимости используем зум.
- Устанавливаем длину петли равной 4 тактам.
- Включаем метроном и запускаем воспроизведение. Скорее всего, к концу петли Вы услышите небольшую «перебитовку» — петля будет расходиться по темпу с метрономом. Кстати многие диджеи предпочитают использовать не метроном, а барабанный луп (обычно просто бочку), запущенный на соседней аудиодорожке.
- «Ухватываем» мышью Grid-маркер, соответствующий началу 5-го такта и, двигая его влево или вправо, добиваемся идеальной синхронизации петли и метронома. При необходимости используем зум и контролируем синхронизацию визуально.
- Щелчком по Loop brace (полоска над волновой формой) выделяем петлю и нажимаем Ctrl-Up. При этом длина петли удваивается (Ctrl-Down производит обратное действие).
- Повторяем пункт 8 для Grid-маркера, соответствующего началу 9-го такта (для быстрой навигации в пределах петли используем кнопки Nudge). Если петлю не удается синхронизовать с метрономом, значит, темп на треке очень сильно «плавает» и длину петли нужно уменьшить до 4 тактов, а затем перейти к пункту 12.
- Повторяем пункты 9-10, пока длина петли не будет соответствовать 32 тактам.
- Двойным щелчком превращаем Grid-маркер, соответствующий началу 33 такта (или 5/9/17 – в зависимости от колебаний темпа на треке), в желтый Warp-маркер. Теперь он останется на месте, даже если мы будем передвигать другие маркеры.
- Щелкаем по Loop brace и нажимаем Up. При этом петля сдвигается с позиции 1-33 на позицию 33-65.
- Корректируя позицию Grid-маркера 65-го такта, добиваемся синхронизации петли и метронома (используем зум). Если этого сделать не удается, значит, длину петли нужно уменьшить до 16 или менее тактов.
- Двойным щелчком превращаем Grid-маркер 65-го такта в Warp-маркер.
- Повторяем пункты 13-15, пока не достигнем конца трека (последняя петля может быть меньше 32 тактов и ее длину потребуется уменьшить).
- Ставим Global quantization равным 8 тактам и, используя кнопки Nudge, «пролистываем» трек под метроном от начала до конца для окончательной проверки.
- Если все в порядке – нажимаем Save.
1.1.2 Beatwarping – практический способ.
Описанный выше метод Beatwarping’а с небольшими вариациями кочует из статьи в статью и из учебника в учебник. Но давайте подумаем – а что мы, собственно говоря, делаем? А делаем мы следующее: разбиваем трек на дюжину фрагментов и каждому из них присваиваем независимый темп, чтобы Ableton знал, с какой скоростью какой фрагмент проигрывать. Это безусловно необходимо для композиций с плавающим темпом – например, записей живых выступлений или виниловых рипов (как в примере выше). Но зачем c потрясающим упорством некоторые диджеи это делают на треках со стабильным темпом — сграбленных с CD или купленных на Beatport’e mp3-шках? Не знаете? Вот и я не знаю.
На самом деле все, что нужно сделать в таких случаях – это указать первый бит и точно определить темп всего трека. Делается это очень легко, вся процедура занимает 30-40 секунд.
- Загружаем нужный трек в любой слот и устанавливаем темп сета приблизительно равным темпу трека.
- Нажимаем в Sample Box кнопку Warp, при этом на треке появляется Warp-маркер.
- Находим подходящий даунбит и совмещаем с ним Warp-маркер. Это единственный Warp-маркер, который необходимо поставить! Напоминаю, что от точности позиционирования первого Warp-маркера зависит успешность всего beatwarping’а. На это же место ставим Start-маркер.
- Включаем метроном, запускаем воспроизведение и, ухватив Grid-маркер, скажем, девятого такта синхронизуем трек с метрономом. Еще раз подчеркиваю — не нужно превращать этот Grid-маркер в Warp-маркер! Другими словами — не делайте его желтым!
- Используя Scrub area, переходим куда-нибудь ближе к последней трети трека (например, первый даунбит после зависалова), ухватываем любой из Grid-маркеров (не делая его желтым!) и снова выравниваем темп относительно метронома.
- Переходим в конец трека и повторяем при необходимости предыдущую операцию, окончательно определяя темп. Понятно, что чем ближе к концу трека мы находимся, тем более прецизионные изменения темпа мы делаем, для чего используется зум.
- Не забываем нажать кнопку Save.
Вопрос: Я все сделал, как написано, но трек расходится с метрономом!
Ответ: Еще раз обратите внимание на точность позиционирования первого Warp-маркера, как правило, причина кроется в этом. Другая распространенная ошибка – сдвинутые относительно даунбита Start-маркер и/или петля.
1.2. Расстановка меток
На мой взгляд, у Ableton, как у диджейской программы, всего два существенных недостатка – невозможность сохранения множественных Start-маркеров (соответствующим cue -меткам на CD-деке) и отображение лишь одной волновой формы в режиме Session View.
Второй недостаток на сегодняшний день является, насколько мне известно, неустранимым (разве что написать какой-нибудь хитрый VST-плагин, может кто-нибудь из хабралюдей возьмется?), а вот с первым можно и нужно бороться. Делается это так:
- В режиме Session View создаем аудиодорожку и перетаскиваем из браузера в первый слот нужный трек (предполагается, что beatwarping на нем мы уже сделали).
- Нажимаем несколько раз Ctrl-D (по количеству меток, которое Вам необходимо). При этом созданный клип дублируется соответствующее количество раз.
- Последовательно переходя от первого клипа к последнему, устанавливаем Start-маркеры в нужных нам местах.
- Даем созданным клипам понятные Вам названия. Первый клип, соответствующий началу трека, я обычно не переименовываю, чтобы было понятно, что сейчас играет.
- А теперь самое главное: выделяем все созданные клипы и перетаскиваем их обратно в браузер, в специально подготовленную для этого папку:
При этом происходит сразу несколько событий:
— Создается папка Название_аудиодорожки_Project с фирменной иконкой AL.
— В папке Название_аудиодорожки_Project создается папка Samples.
— В папке Samples создается папка Imported, куда копируется исходный трек.
— В папке Название_аудиодорожки_Project создается файл Название_аудиодорожки.als (Ableton Live set).
Это то, что видно из браузера Ableton. Если мы перейдем в проводник Windows, то увидим еще три созданных объекта – папку Ableton Project Info, а в ней файлы Project.cfg и AProject.ico.
Файл Название_аудиодорожки.als переименовываем в Название_трека.als; папку Название_аудиодорожки_Project тоже переименовываем – можете дать ей любое понятное название, например, наименование музыкального стиля или имя исполнителя.
В эту переименованную папку можно скидывать неограниченное количество подготовленных подобным образом треков, при этом исходные треки будут копироваться в папку Imported, а в корне папки будут появляться новые файлы *.als.
Теперь мы можем в любой момент перетащить любой файл *.als обратно на аудиодорожку (не пугайтесь, что Ableton при этом заново отрисует волновые формы клипов – это произойдет лишь в первый раз) и вуаля – наши клипы с заранее расставленными Start-маркерами снова в строю. Используя несколько клипов со Start-маркерами в разных местах можно «на лету» делать recut-версии треков.
Кроме Start-маркеров таким образом можно сохранять петли, follow action и так далее.
Часть 2. Создание диджейского темплейта.
Темплейты для диджеинга в AL могут быть чрезвычайно навороченными – содержать несколько аудиодорожек для треков, MIDI-дорожки с VST-инструментами и клипами автоматизации, аудиодорожки с лупами, сэмплами, клипами-«болванчиками» (dummy clips), всевозможные аудио — и MIDI-эффекты и так далее и тому подобное.
Однако речь обо всем этом пойдет впереди, а для начала давайте попробуем воспроизвести классический диджейский сетап – две вертушки и микшер с кроссфейдером и трехполосными эквалайзерами.
Вариант первый. Использование внешнего (железного) микшера.
Данный вариант имеет свои преимущества – он прост, как валенок и надежен, как АК-47. Ableton Live в этом случае используется только для запуска треков, а cueing (предварительное прослушивание) и собственно микширование производится с помощью обычного диджейского микшера.
- Создадим две аудиодорожки, для аутентичности назовем одну Deck 1, а другую – Deck 2.
- Для того чтобы аудиодорожки не переименовывались всякий раз, когда мы перетаскиваем на них файл *.als, в Track view каждой дорожки загружаем, а затем отключаем любой аудиоплагин (их можно найти в разделе браузера Live Devices). Вместо аудиоплагина можно загрузить Audio Effects rack, его, естественно, можно не отключать.
- Направляем Deck 1 в один выход аудиокарты, а Deck 2 — в другой (для этого может потребоваться активировать пункт In/Out в меню View).
- Сохраняем темплейт под каким-нибудь подходящим названием и производим соответствующую физическую коммутацию микшера и аудиокарты.
Вариант второй: Использование внутреннего (программного) микшера.
Этот вариант не требует наличия внешнего микшера, а вот без MIDI-контроллера с поворотными и ползунковыми регуляторами обойтись будет сложно.
- Начинаем так же – с создания двух аудиодорожек, обе оставляем направленными в Master.
- В браузере в разделе Live Devices выбираем EQ Three и перетаскиваем его в Track view обеих аудиодорожек. Оба эквалайзера переименовываем (используем для этого контекстное меню на заголовке девайса) – один, скажем, в Deck 1 EQ Three, другой, соответственно – в Deck 2 EQ Three; это помогает быстро понимать, на каком канале микшера сейчас стоит фокус.
- В меню View включаем Crossfader (или нажимаем Ctrl-Alt-F), при этом в мастер-секции появляется соответствующий элемент управления.
- В нижней части микшера находим секцию Crossfader assign. Нажимаем на дорожке Deck 1 кнопку А, а на Deck 2 – B.
- В мастер-секции переключаем кнопку Solo/Cue в режим Cue.
- Там же, в мастер-секции, направляем Cue Out в один выход аудиокарты, а Master Out – в другой.
- Сохраняем темплейт. Выход ½ используется для предварительного прослушивания через наушники (при убранном фейдере громкости и нажатой кнопке Cue на соответствующем канале), а выход ¾ — для вывода звука в эфир.
Часть 3. Управление.
Нет ничего скучнее, чем наблюдать за диджеем, который сидит за ноутбуком и возит туда-сюда мышку по коврику. Как написал один журналист — «Осталось непонятным, что именно делал диджей: то ли проверял свою почту, то ли играл в «Сапера».
Создание полностью «безмышевого» темплейта AL – задача вполне выполнимая, но требующая отдельного разговора; я планирую посвятить этой животрепещущей теме вторую часть руководства. На текущий момент давайте условимся, что загрузку треков мы будем осуществлять мышью, а их запуск и прочее управление – с помощью клавиатуры или MIDI-контроллера.
1. Запуск клипов. Вариант 1 — Использование клавиатуры.
В принципе, переходить на нужный клип можно с помощью курсорных клавиш, а запуск производить клавишей Enter, но это, на мой взгляд, не слишком удобно. Лучше назначить каждому из слотов нашего темплейта отдельную клавишу для запуска. Практику показывает, что редко на каком-то треке используется более пяти Start-маркеров, поэтому для простоты давайте назначим слотам на дорожке Deck 1 клавиши 1- 5, а на дорожке Deck 2 – 6-0. Делается это так:
- Нажатием на кнопку “KEY” в правом верхнем углу (клавиатурная команда – Ctrl-K) включаем режим Key map, при этом элементы управления, на которые можно назначить горячие клавиши, подсвечиваются красным цветом.
- Кликом выделяем нужный слот:
- Нажимаем на клавиатуре нужную клавишу, при этом ее обозначение появляется на выделенном слоте:
- Повторяем пункты 2 и 3 до полного удовлетворения:
- Отключаем режим Key map повторным нажатием на кнопку KEY и сохраняем темплейт.
Между прочим, отличный вариант контроллера из категории «дешево и сердито» — купить дополнительную клавиатуру за 10 долларов, выломать из нее все ненужные кнопки, а нужные, для большей информативности, покрасить в разные цвета.
Вопрос: Клавиша Space останавливает воспроизведение всех запущенных клипов, но при повторном ее нажатии воспроизведение начинается не с момента остановки, а снова со Start-маркеров. Как этого избежать?
Ответ: Для того чтобы воспроизведение началось с того же момента, где была сделана остановка, используется команда Shift-Space.
Вариант 2. Использование MIDI-контроллера.
Запуск клипов с помощью MIDI-контроллера реализуется абсолютно аналогично:
- Включаем режим MIDI Map нажатием на кнопку MIDI в правом верхнем углу (клавиатурная команда – Ctrl-M), при этом элементы управления, на которые можно назначить MIDI-команды, подсвечиваются синим цветом.
- Кликом выделяем нужный слот:
- Нажимаем нужную кнопку (клавишу) на MIDI-контроллере, при этом обозначение MIDI-команды появляется на выделенном слоте:
- Повторяем пункты 2 и 3 до победного конца:
- Отключаем режим MIDI Map повторным нажатием на кнопку MIDI и сохраняем темплейт.
Не так давно был анонсирован MIDI-контроллер AKAI APC 40, который поддерживает AL «из коробки». Девайс выглядит очень привлекательно, ну а как он покажет себя в реальной работе – узнаем чуть позже, когда контроллер поступит в продажу.
3.2 Кроссфейдер, канальные фейдеры и эквалайзер.
Здесь, естественно, речь идет только о MIDI-контроллере. На клавиатуру компьютера можно повесить разве что kill buttons эквалайзера.
Установка соответствия этих элементов управления регуляторам на MIDI-контроллере осуществляется так же, как и в предыдущем случае: включаем режим MIDI map, кликом мыши выделяем элемент управления и шевелим нужную ручку на MIDI-контроллере:
В использовании EQ3 есть одна тонкость: дело в том, что, как видно из рисунка выше, точки 0 dB в нем сделаны не на 12 часов, как обычно, а где-то на 15.30. На известных мне MIDI-контроллерах эти точки никак не обозначены и ручки на них не фиксируются. Ловить 0 dB «на глаз», особенно в условиях реальной работы – удовольствие небольшое. Выйти из положения можно двумя способами:
- При работе выворачиваем ручки эквалайзера до упора вправо (что соответствует 6 dB), а у канального фейдера устанавливаем лимит -6 dB (в режиме MIDI map в открывшейся таблице в колонке «Max» в соответствующей строке введите «-6»), что в итоге дает 0 dB.
- Опять-таки выворачиваем при работе ручки эквалайзера до упора вправо, но нулевой лимит устанавливаем для самих полос эквалайзера, т.е. крайне правое положение будет соответствовать 0 dB.
Ну вот, в общем, и все. Have a nice mix! 
-
Contents
-
Table of Contents
-
Bookmarks
Quick Links
Ableton Reference Manual Version 8
Summary of Contents for Ableton Live
-
Page 1
Ableton Reference Manual Version 8… -
Page 2
The content of this manual is furnished for informational use only, is subject to change without notice, and should not be construed as a commitment by Ableton. Every effort has been made to ensure that the information in this manual is accurate. -
Page 3
Chapter 1 Welcome to Live 1.1 The Ableton Team Says: Thank You Live is the result of musicians wanting a better way to create, produce and perform music using a computer. A great deal of effort has been put into making Live easy and fun to use, yet at the same time capable of helping you create music with unlimited depth and sophistication. -
Page 4
CHAPTER 1. WELCOME TO LIVE 1.2 What’s New in Live 8? 1.2.1 New Warping Engine ˆ Live’s warping engine has been dramatically overhauled, with more accurate transient detection and a redesigned interface that allows you to drag the waveform along a xed timeline. -
Page 5
MIDI display. ˆ When multiple tracks are selected, adjusting one of their mixer or routing parameters will adjust the same parameter in the other selected tracks. 1.2.4 Ableton Effects and Instruments ˆ Operator… -
Page 6
CHAPTER 1. WELCOME TO LIVE 1.2.6 Online Collaboration Tools ˆ Share Live Sets with other users via a shared web area at ableton.com. 1.2.7 Controllers ˆ Support for the APC40 (Ableton Performance Controller), a dedicated controller for Ableton Live. 1.2.8 More Improvements ˆ… -
Page 7: First Steps
Chapter 2 First Steps When you install Live and run it for the rst time, you will be presented with an authorization dialog. Please see the chapter on authorizing Live should you have questions or concerns during the authorization process. If you do not (yet) own Live, you can still try out all of Live’s features, but you will not be able to save or export your work.
-
Page 8
CHAPTER 2. FIRST STEPS 2.1.1 Using the Info View and Index Live’s Info View tells you the name and function of whatever you place the mouse over. For certain items, you can create your own text and it will appear in this window. The Info View and its Show/Hide Button. -
Page 9
CHAPTER 2. FIRST STEPS text display and the color scheme, or skin, for the Live user interface. This is also where you can adjust the size of objects displayed on the screen: the Zoom Display slider allows you to zoom Live’s screen to any percentage between 50% and 200% of the standard interface size. -
Page 10
CHAPTER 2. FIRST STEPS 2.3 The Main Live Screen Most of your work in Live happens in the main Live screen. This screen consists of a number of views, and each view manages a speci c aspect of your Live Set, which is the type of document that you create and work on in Live. -
Page 11
CHAPTER 2. FIRST STEPS Adjusting the Main Window Split. -
Page 12
If you nd this procedure to be an inconvenience, please understand that the copy protection secures your investment: It allows Ableton to provide you with support and to continue developing Live. -
Page 13
The standard Live license allows you to use Live on only one computer at a time. However, the Ableton server will provide you with two authorizations in good faith that you will use Live on only one machine at a time. -
Page 14
To use Live on more than one computer at a time, you may require a secondary license or a site license. Ableton offers these licenses at special rates. 3.1.4 Can I Play my Set from a Computer That Is Not Authorized? Even if Live is not authorized, you can still load and perform a Live Set with no time limitation. -
Page 15
Chapter 4 Live Concepts This chapter introduces the essential concepts of Live. We advise you to read this chapter early in your Live career, as a solid understanding of the program’s basic principles will help you fully exploit Live’s potential for your music-making. 4.1 Live Sets The type of document that you create and work on in Live is called a Live… -
Page 16
Sets here, and double-clicking a Live Set’s name in the Browser will open that Live Set. You can also nd Live Sets made by others at the Ableton website, as well as upload your own. This makes it easy to collaborate with other Live users. -
Page 17
CHAPTER 4. LIVE CONCEPTS The Arrangement and Session View Selectors. The Arrangement View and the Session View interact in useful ways. One can, for instance, improvise with Session clips and record a log of the improvisation into the Arrangement for further re nement. -
Page 18
CHAPTER 4. LIVE CONCEPTS A Scene in the Session View. The exclusivity of clips in a track also implies that, at any one time, a track will either play a Session clip or an Arrangement clip, but never both. So, who wins? When a Session clip is launched, the respective track stops whatever it is doing to play that clip. -
Page 19
CHAPTER 4. LIVE CONCEPTS signals are generated by input devices such as MIDI or USB keyboards It takes an instrument to convert MIDI signals into audio signals that can actually be heard. Some instruments, such as Live’s Simpler, are for chromatic playing of one sound via the keyboard. -
Page 20
CHAPTER 4. LIVE CONCEPTS Samples Are Dragged in from Live’s File Browsers. Live offers many options for playing samples in exciting new ways, allowing you to create an abundance of new sounds without actually changing the original sample all the changes are computed in real time, while the sample is played. -
Page 21
CHAPTER 4. LIVE CONCEPTS sound using extreme warp settings. 4.6 MIDI Clips and MIDI Files A MIDI clip contains musical material in the form of MIDI notes and controller envelopes. When MIDI is imported from a MIDI le, the data gets incorporated into the Live Set, and the original le is not referenced thereafter. -
Page 22
CHAPTER 4. LIVE CONCEPTS 4.7 Devices and the Mixer A track can have not only clips but also a chain of devices for processing signals. Double- clicking a track’s title bar brings up the Track View, which shows the track’s device chain. The Track View Displaying a MIDI Track’s Device Chain. -
Page 23
CHAPTER 4. LIVE CONCEPTS Live’s Built-in Devices Are Available from the Device Browser. You can also use plug-in devices in Live. VST and Audio Units (Mac OS X only) Plug-ins are available from the Plug-In Device Browser. Plug-In Devices Are Available from the Plug-In Device Browser. -
Page 24
CHAPTER 4. LIVE CONCEPTS you can use at the same time, a topic that deserves separate discussion. Note that the signal connections between audio devices are always stereo, but the software’s inputs and outputs can be con gured to be mono in the Audio Preferences. When the signal has passed through the device chain, it ends up in Live’s mixer. -
Page 25
CHAPTER 4. LIVE CONCEPTS Consider a MIDI track playing a clip. The MIDI signal from the clip is fed into the track’s device chain. There, it is rst processed by any number of MIDI effects. A MIDI effect receives and delivers MIDI signals. One example is the Scale effect, which maps the incoming notes onto a user-de ned musical scale. -
Page 26
CHAPTER 4. LIVE CONCEPTS settings as a single preset. This feature allows for the creation of powerful multi-device creations and effectively adds all the capabilities of Live’s MIDI and audio effects to the built-in instruments. 4.9 Routing As we have seen, all tracks deliver signals, either audio or MIDI. Where do these signals go? This is set up in the mixer’s In/Out section, which offers, for every track, choosers to select a signal source and destination. -
Page 27
CHAPTER 4. LIVE CONCEPTS 4.10 Recording New Clips Audio tracks and MIDI tracks can record their input signal and thereby create new clips. Recording is enabled on a track by pressing its Arm button. With multiple tracks selected, pressing any of their Arm buttons will arm all of them. You can also hold down the Ctrl (PC) / (Mac) modi er when clicking the Arm buttons to arm several tracks at once. -
Page 28
CHAPTER 4. LIVE CONCEPTS 4.11 Automation Envelopes Often, when working with Live’s mixer and effects, you will want the controls’ movements to become part of the Arrangement. The movement of a control across the Arrangement timeline is called automation; a control whose value changes in the course of this timeline is automated. -
Page 29
CHAPTER 4. LIVE CONCEPTS An Envelope for Clip Transposition. 4.13 MIDI and Key Remote To liberate the musician from the mouse, most of Live’s controls can be remote-controlled via an external MIDI controller. Remote mappings are established in MIDI Map Mode, which is engaged by pressing the MIDI switch in the Control Bar. -
Page 30: Saving And Exporting
CHAPTER 4. LIVE CONCEPTS 4.14 Saving and Exporting Saving a Live Set saves everything it contains, including all clips, their positions and settings, and settings for devices and controls. An audio clip can, however, lose the reference to its corresponding sample if it is moved or deleted from disk. The links between samples and their clips can be preserved with a special command, Collect and Save, which makes a copy…
-
Page 31: The Library
After installation the Library will already contain a few sound ideas, courtesy of Ableton. We encourage you to experiment with this material to get a sense of what the program can do, but we do not recommend removing or changing the contents of the factory Library.
-
Page 32
CHAPTER 4. LIVE CONCEPTS enjoy the Essential Instrument Collection, a multi-gigabyte library of meticulously sampled and selected instruments. -
Page 33
Chapter 5 Managing Files and Sets Various types of les are used in making music with Live, from those containing MIDI audio, to more program-speci c les such as Live Clips Live Sets. This chapter will explain everything you need to know about working with each of these le types in Live. However, we should rst take a look at Live’s File Browsers, through which most les arrive in the program. -
Page 34
CHAPTER 5. MANAGING FILES AND SETS The File Browser Selector Buttons. Each Browser can point to a different disk location, which Live will remember across sessions. The Browser display is divided into columns corresponding to Name , Date, Live Pack, etc., which you can show and hide using the (PC) / (Mac) context menu options. -
Page 35
CHAPTER 5. MANAGING FILES AND SETS Library Is this Browser’s Root. The Browser root can easily be changed: The topmost Browser item, called Parent Folder, will move the Browser root up one step up in the disk hierarchy when double-clicked. The File Browser’s Parent Folder Item. -
Page 36
CHAPTER 5. MANAGING FILES AND SETS File Browser’s selector button will do the same. 5.1.2 Browser Bookmarks Using bookmarks, you can quickly save and recall frequently used folder locations in the Browser. Clicking in the Browser’s title bar will open the Bookmark menu. The Bookmark Menu. -
Page 37
CHAPTER 5. MANAGING FILES AND SETS Activating Browser Search Mode. After entering your search terms, begin the search by clicking the Go button or pressing on your computer keyboard. Return The Search Field and Go Button. Live will search the entire Browser root for your search terms. The results will include les that match all search terms, as opposed to any. -
Page 38
CHAPTER 5. MANAGING FILES AND SETS Automatic rescanning for new searches can be activated and deactivated in the File/Folder Preferences. While a search/rescan is going on, the adjacent search button is labeled Stop. Rescanning happens in the background, and you can keep making music while Live does its work, but you can also abort the search with this button if the disk traf c is bothering you. -
Page 39
CHAPTER 5. MANAGING FILES AND SETS The Rotating Ring Means That a Search is in Progress. For mouse-free searching, we suggest the following sequence of shortcuts: (PC) / (Mac) to open the search eld; Ctrl 2) Type your search terms; to Go ;… -
Page 40
CHAPTER 5. MANAGING FILES AND SETS The Preview Switch. Hint: You can preview les even when the Preview switch is not activated by pressing Return Click on a sample le (or use ) to select it. Click in the Tab’s scrub area to make playback jump to that point. -
Page 41
CHAPTER 5. MANAGING FILES AND SETS To learn how to set up Live for cueing, please refer to the relevant section of the Mixing chapter. 5.1.5 Adding Clips from the Browser There are several ways to add clips to a Live Set: ˆ… -
Page 42
CHAPTER 5. MANAGING FILES AND SETS ˆ Rename les and folders using the Edit menu’s Rename command or the Ctrl (PC) / (Mac) shortcut. Cancel renaming with the key. ˆ Create folders by opening the context menu with (PC) / (Mac), and then Ctrl selecting the Create Folder command. -
Page 43
CHAPTER 5. MANAGING FILES AND SETS The Hot-Swap Browser. While in Hot-Swap Mode, pressing the key loads that le into the Impulse slot Return (presumably while Impulse is playing incoming MIDI notes); pressing , then loads Return the next sample, and so on. Instead of using the keys, we can also click on the le’s Hot- Swap icon to load it. -
Page 44
CHAPTER 5. MANAGING FILES AND SETS 5.2 Sample Files A sample is a le that contains audio data. Live can play both uncompressed le formats (WAV, AIF, REX and Sound Designer II for Mac) and compressed le formats (MP3, AAC, Ogg Vorbis, Ogg FLAC and FLAC). -
Page 45
CHAPTER 5. MANAGING FILES AND SETS Preferences for the Decoding and Web Cache. 5.2.2 Analysis Files (.asd) An analysis le is a little le that Live creates when a sample le is brought into the program for the rst time. The analysis le contains data gathered by Live to help optimize the stretching quality, speed up the waveform display and automatically detect the tempo of long… -
Page 46
CHAPTER 5. MANAGING FILES AND SETS The analysis le’s name is the same as that of the associated sample, with an added .asd extension. Live puts this analysis le in the same folder as the sample. Samples that have an .asd le are displayed like this in the Browser. Samples without an .asd le look like this. -
Page 47
CHAPTER 5. MANAGING FILES AND SETS Which Signal Will Be Rendered? The Rendered Track Chooser. The Export dialog’s Rendered Track chooser offers several options for which audio signal to render: ˆ Master the post-fader signal at Live’s Master output. If you are monitoring the Master output, you can be sure that the rendered le will contain exactly what you hear. -
Page 48
CHAPTER 5. MANAGING FILES AND SETS Audio Rendering Options Audio Rendering Options. The Export dialog offers several audio rendering options: ˆ Normalize If this is activated, the sample resulting from the render process will be normalized (i.e., the le will be ampli ed so that the highest peak attains the maximum available headroom). -
Page 49
CHAPTER 5. MANAGING FILES AND SETS created. ˆ Convert to Mono If this is activated, Live will create a mono le instead of a stereo ˆ Dither Options If you are rendering at a bit depth lower than 32-bit, choose one of the dither modes. -
Page 50
CHAPTER 5. MANAGING FILES AND SETS Waiting for External Devices to Become Silent. ˆ Skip By default, Live will wait for ten seconds before starting a real-time render. This should allow any sound from external devices to fade out, but if you need more time (for example, if you’re waiting for a long reverb tail), you can increase the wait time by typing a new number in the number box. -
Page 51
CHAPTER 5. MANAGING FILES AND SETS Rendering Video Video Rendering Options. In addition to settings for audio rendering, the Export dialog provides additional options for rendering video: ˆ Create Video File If this is activated, a video le will be created in the same directory as your rendered audio. -
Page 52: Midi Files
CHAPTER 5. MANAGING FILES AND SETS For more information about working with video in Live, see the chapter on video. 5.3 MIDI Files A MIDI le contains commands that prompt MIDI compatible synthesizers or instruments, such as Live’s Simpler, to create speci c musical output. MIDI les are exported by hardware and software MIDI sequencers.
-
Page 53
CHAPTER 5. MANAGING FILES AND SETS 5.4 Live Clips Individual clips can be exported to disk in the Live Clip format for easy retrieval and reuse in any project. Because they only contain references to samples on disk (rather than the audio data itself), Live Clips are very small, which makes it easy to develop and maintain your own collection. -
Page 54
Save a Copy command to create a copy of the current Live Set with a new name and/or new directory location. Live Sets can also be saved to the Ableton server via the Share Live Set command. Uploaded Sets can then be shared with other Live users. -
Page 55
CHAPTER 5. MANAGING FILES AND SETS Set will be completely reconstructed, including their clips in the Session and Arrangement View, their devices, and their automation. Session View Drop Area for Importing Live Sets. Arrangement View Drop Area for Importing Live Sets. -
Page 56
CHAPTER 5. MANAGING FILES AND SETS unfolded Set. Of the three tracks contained in the Set shown in the following gure, two contain Session View clips. These can be accessed by unfolding the tracks: Revealing the Session View Clips Contained in a Set. -
Page 57
CHAPTER 5. MANAGING FILES AND SETS ˆ MIDI mappings. The template Live Set, Template.als, is located in Live’s Preferences folder and can be copied or deleted from there. The easiest way to locate this folder is to search your disk for Template.als. -
Page 58
CHAPTER 5. MANAGING FILES AND SETS The Sample Reference List’s Hot-Swap Button. ˆ Edit a referenced sample using an external application (which can be chosen in the Preferences’ File/Folder tab). Clicking the Edit button will open the referenced sample in the external application. The sample will remain of ine as long as the Edit switch is engaged. -
Page 59
CHAPTER 5. MANAGING FILES AND SETS 5.6.1 Projects and Live Sets You can manually create a Project by clicking (PC) / (Mac) in the Browser and Ctrl selecting Create Project from the context menu. Usually, Live takes care of this automatically. When you save a Live Set under a new name or in a new folder location, Live will create a new project folder and store the Live Set there unless you are saving the Live Set into an… -
Page 60
CHAPTER 5. MANAGING FILES AND SETS A Second Version of the Live Set Has Been Added to the Project. The Tango Project now contains two Live Sets, and its Samples/Recorded folder contains the samples used by both of them. And now for something completely different: We choose the File menu’s New command and record a samba tune. -
Page 61
CHAPTER 5. MANAGING FILES AND SETS The piece evolves towards something entirely different, and we feel that it should live in a Project of its own. So, we Save As… under a new name and in some location outside the current Project, say the Desktop: A New Project Was Added by Saving a Live… -
Page 62
CHAPTER 5. MANAGING FILES AND SETS 5.6.2 Projects and Presets By default, new instrument and effect presets are stored in the Live Library, making them available to any project. At times however, it may make more sense to save a preset with the current Project. -
Page 63
Library by default (but you can also save them with a Project). Ableton delivers Library content that can serve as a starting point for creative exploration. Content is shipped in the form of Factory Live Packs. Factory Live Packs are available from installation CDs, DVDs or the Ableton website . -
Page 64
By default, the Live 8 Library contains the following sub-folders: ˆ Ableton Project Info contains les that Live uses to identify the Library and keep track of what Live Packs have been installed. You should not use or modify this folder or its contents. -
Page 65
CHAPTER 5. MANAGING FILES AND SETS 5.7.1 Changing the Library Location, Upgrading an Old Library The Library can reside in the hard drive location of your choice. In the Preferences’ Library tab, you will nd the Library Location chooser, which contains a list of Library locations that you’ve used in the past: The Library Location Chooser. -
Page 66
CHAPTER 5. MANAGING FILES AND SETS or moving any content from the previous location. Live will then offer to install any default packages to the new location. ˆ If the target location is a Library that was made with an older version of Live, you will be warned about possible compatibility issues. -
Page 67
CHAPTER 5. MANAGING FILES AND SETS The File Manager’s List of Missing Samples. 5.8.1 Manual Repair To manually x a broken sample reference, locate the missing sample in the File Browser, drag it over to the File Manager and drop it on the respective line in the list of missing les. Note that Live will not care if the sample you offer is really the sample that was missing. -
Page 68
CHAPTER 5. MANAGING FILES AND SETS Automatic Repair Options in the File Manager. ˆ Search Folder includes a user-de ned folder, as well as any sub-folders, in the search. To select the folder, click the associated Set Folder button. ˆ Search Project includes this Set’s project folder in the search. -
Page 69
CHAPTER 5. MANAGING FILES AND SETS 5.9 Collecting External Samples To prevent a Live Set from containing broken sample references, Live provides the option of collecting (i.e., copying) them into the Set’s project folder. This is accomplished via the File Manager: ˆ… -
Page 70
CHAPTER 5. MANAGING FILES AND SETS Separated by location (the Library, installed by factory Live Packs, other Projects and else- where sample collections from external drives, for example), the File Manager provides: ˆ A sample count and the associated disk space used; ˆ… -
Page 71
CHAPTER 5. MANAGING FILES AND SETS Live’s File Manager, you can nd missing samples collect external samples not only for the current Live Set but also for: ˆ The Library choose the Manage Files command from the File menu; then click the Manage Library button. -
Page 72
(.alp), drag it into the Live main window, or locate it via the File menu’s Install Live Pack command. Live will then request that you choose a location for the new Project. Note: Factory Live Packs (those provided by Ableton) will automatically be installed in the Live Library. -
Page 73
CHAPTER 5. MANAGING FILES AND SETS 5.13.2 How Can I Save Presets Into My Current Project? As long as you’re working in a Project (meaning that you’ve saved your current Live Set), every device in the Device Browser will show a Current Project sub-folder. You can copy presets from other Browser locations to the current project by (PC) / (Mac)-… -
Page 74
CHAPTER 5. MANAGING FILES AND SETS 5.13.6 Can I Use My Own Folder Structure Within a Project Folder? You can organize your les any way you want within a Project, but you’ll need to use the File Manager to relink the les that you’ve moved around: 1) In Live’s Browser or via your operating system, reorganize the les and folders within your Project folder. -
Page 75
Chapter 6 Arrangement View The Arrangement View displays the Arrangement, which contains music laid out along a song timeline, like a multitrack tape. A Piece of Music in the Arrangement View. The Arrangement View is a powerful editing tool that easily lets you combine and arrange MIDI, loops, sound effects, video and complete pieces of music. -
Page 76
CHAPTER 6. ARRANGEMENT VIEW 6.1 Navigation Live offers several fast methods for zooming and scrolling the Arrangement display: Navigating the Arrangement View. 1. To smoothly change the zoom level, click and drag vertically in the beat-time ruler at the top of the Arrangement View (you can also drag horizontally to scroll the display). -
Page 77
CHAPTER 6. ARRANGEMENT VIEW and drag downwards to zoom in around that part. Note that you can also drag horizontally to scroll the display. Using this method, you can zoom and scroll to focus around any part of the Arrangement with just one mouse motion. 6. -
Page 78
CHAPTER 6. ARRANGEMENT VIEW menu setting. While the mouse is held down over the scrub area, a portion of the Arrangement the size of the chosen quantization setting will be repeatedly played. With small quantization settings, or a setting of None, this allows you to scrub through the music. -
Page 79
CHAPTER 6. ARRANGEMENT VIEW 6.3 Launching the Arrangement with Locators Using Locators to Launch Play in the Arrangement. Locators can be set at any point in the Arrangement. This can be done in real time during playback or recording with the Set Locator button, and will be quantized according to the global quantization value set in the Control Bar. -
Page 80
CHAPTER 6. ARRANGEMENT VIEW menu command (or use the (PC) / (Mac) shortcut). You can also enter Ctrl your own info text for a locator via the Edit Info Text command in the Edit menu or in the locator’s (PC) / (Mac) context menu. -
Page 81
CHAPTER 6. ARRANGEMENT VIEW Any time signature with a one- or two-digit numerator and a denominator of 1, 2, 4, 8 or 16 can be used as a time signature marker value. The numbers must be separated by a delimiter such as a slash, comma, period, or any number of spaces. These marker values can also be set by adjusting the time signature elds in the Control Bar, either by typing in values or dragging the numerator and denominator sliders. -
Page 82
CHAPTER 6. ARRANGEMENT VIEW changes the length of the entire Arrangement. If you import a MIDI le into the Arrangement, you’ll be given an option to import any time signature information that was saved with the le. If you choose to do this, Live will automatically create time signature markers in the correct places. -
Page 83
CHAPTER 6. ARRANGEMENT VIEW ˆ shift the loop brace left/right in steps the size of its length. ˆ The (PC) / (Mac) modi er used with the arrow left and right keys shortens Ctrl or lengthens the loop by the current grid setting. -
Page 84
CHAPTER 6. ARRANGEMENT VIEW 6.7 Audio Clip Fades and Crossfades The beginning and end of audio clips in the Arrangement View have adjustable volume fades. Additionally, adjacent clips on the same audio track can be crossfaded. To access the fades for an audio track’s clips: 1. -
Page 85
CHAPTER 6. ARRANGEMENT VIEW menu. Crossfaded Clips. Selecting a fade handle and pressing the key deletes the fade, unless the Create Delete Fades on Clip Edges option is enabled in the Record/Warp/Launch Preferences. In this case, pressing returns the fade handle to a default length of 4 ms. With this option Delete enabled, new clips in the Arrangement View will have these short declicking fades by default. -
Page 86
CHAPTER 6. ARRANGEMENT VIEW 6.8 Selecting Clips and Time With the exception of moving and resizing clips, Arrangement editing in Live is selection- based: You select something using the mouse, then execute a menu command (e.g., Cut, Copy, Paste, Duplicate) on the selection. This editing method lends itself to an ef cient division of labor between the two hands: One hand operates the mouse or trackpad, while the other hand issues the keyboard shortcuts for the menu commands. -
Page 87
CHAPTER 6. ARRANGEMENT VIEW ˆ Holding while clicking extends an existing selection in the same track or across tracks. You can also hold and use the arrow keys to manipulate the selection. Clicking the Loop Brace to Select the Loop for Editing. -
Page 88
CHAPTER 6. ARRANGEMENT VIEW The current spacing between adjacent grid lines is displayed in the lower right corner of the Arrangement View or Clip View. You can hold down the (PC) / (Mac) modi er while performing an action to bypass grid snapping. -
Page 89
CHAPTER 6. ARRANGEMENT VIEW ˆ Insert Silence inserts as much empty time as is currently selected into the Arrangement, before the selection. 6.11 Splitting Clips The Split command can divide a clip or isolate part of it. To split a clip in two halves, do the following: 1. -
Page 90
CHAPTER 6. ARRANGEMENT VIEW Consolidating Several Clips Into a New Clip. Suppose you have, by editing or improvising, come up with a layout of clips that sound good in Arrangement Loop mode. Selecting that part of the Arrangement, for instance by using the Edit menu’s Select Loop command, and then executing the Consolidate command creates a new clip that can be treated as a loop. -
Page 91
Chapter 7 Session View In Live’s Arrangement View, as in all traditional sequencing programs, everything happens along a xed song timeline. For a number of applications, this is a limiting paradigm: ˆ When playing live, or when DJing, the order of pieces, the length of each piece and the order of parts within each piece is generally not known in advance. -
Page 92
CHAPTER 7. SESSION VIEW 7.1 Session View Clips The Controls for a Session View Clip. 1. Each clip in the Session View has a triangular button at the left edge. Click the button with the mouse to launch clip playback at any time, or pre-select a clip by clicking on its name, and launch it using the computer’s key. -
Page 93
CHAPTER 7. SESSION VIEW The Arrangement Position Fields and the Stop Button. Slots in Group Tracks show a shaded area to indicate that at least one of the contained tracks contains a clip at that location. The color of the shading is the color of the left-most clip in the group. -
Page 94
CHAPTER 7. SESSION VIEW A Scene in the Session View. The horizontal rows are called scenes. The Scene Launch buttons are located in the rightmost column, which represents the Master track. To launch every clip in a row simultaneously, click on the associated Scene Launch button. This can be very useful in organizing the live performance of a song with multiple parts. -
Page 95
CHAPTER 7. SESSION VIEW Tempo and time signature changes can coexist within a single scene name, and can appear in any position as long as they are separated from each other by at least one character. For example, 2/4+108 BPM , 72 BPM;7/8 and 60 BPM Chorus 3/4 are all scene names that will cause simultaneous meter and tempo changes. -
Page 96
CHAPTER 7. SESSION VIEW … Monitoring the Input… A microphone icon appears in an audio track that is set to monitor its input. A keyboard icon appears in a MIDI track under these same circumstances..Playing the Arrangement. If the track is playing clips from the Arrangement, a miniature display representing the Arrangement clips being played appears. -
Page 97: Editing Scenes
CHAPTER 7. SESSION VIEW 7.4.1 Select on Launch By default, clicking a Session View clip’s Launch button also selects the clip, since you will typically want the Clip View to show the newly launched clip. However, some power-users don’t want the current focus (e.g., a return track’s devices) to disappear just because a clip has been launched, especially when starting a clip in order to try it with the return track device settings.
-
Page 98
CHAPTER 7. SESSION VIEW 7.5 Recording Sessions into the Arrangement Your Session View playing can be recorded into the Arrangement, allowing for an improvi- sational approach to composing songs and scores. The Control Bar’s Record Button. When the Record button is on, Live logs all of your actions into the Arrangement: ˆ… -
Page 99
CHAPTER 7. SESSION VIEW Arrangement playback does not resume until you explicitly tell Live to resume by clicking the Back to Arrangement button, which lights up to remind you that what you hear differs from the Arrangement. The Stop All Clips Button. -
Page 100
Chapter 8 Clip View The Clip View is where clip properties can be set and adjusted. The Clip View. The Clip View is opened by clicking on the Clip Overview or double-clicking a clip in the Session or Arrangement View. -
Page 101
CHAPTER 8. CLIP VIEW Clicking the Clip Overview Opens the Clip View. In the Session View, clicking on a Track Status Field opens the Clip View for editing the clip that is currently running in the track. Clicking a Session View Track Status Field Opens the Clip View. -
Page 102
CHAPTER 8. CLIP VIEW in common: ˆ The Clip box contains basic clip settings. ˆ The Envelopes box and the Envelope Editor manage the clip’s envelopes, which are used to modulate the effects, mixer, and clip or MIDI controls. Clip envelopes and their associated Clip View components are covered in detail in a separate manual chapter. -
Page 103
CHAPTER 8. CLIP VIEW The Clip View for a MIDI Clip. To make best use of the screen real estate, you can show or hide the Launch, Envelopes, and Sample or MIDI boxes using the Clip View Box selector in the Clips box. You can also toggle between the Sample Display/MIDI Editor and the Envelope Editor by clicking in the title bars of the Sample/Notes box and the Envelopes box, respectively. -
Page 104
CHAPTER 8. CLIP VIEW 8.1 The Clip Box The Clip Box. 8.1.1 Clip Activator Switch Using this switch, you can deactivate a clip so that it does not play when launched in the Session View or during Arrangement playback. Clips can also be activated/deactivated directly from the Session or Arrangement View with their (PC) / (Mac) context… -
Page 105
CHAPTER 8. CLIP VIEW 8.1.3 Clip Signature Using the Clip Signature elds, you can specify the time signature of a MIDI or audio clip. This setting is relevant only for display; it does not affect playback. Please note that Clip Signature is completely separate from the project’s time signature, and can be set independently for each clip. -
Page 106
CHAPTER 8. CLIP VIEW 8.1.5 Clip Offset and Nudging To jump within a playing clip in increments the size of the global quantization period, you can use the Nudge buttons in the Clip box. Using the Nudge Buttons to Jump Through a Clip. -
Page 107
CHAPTER 8. CLIP VIEW 8.2 The Sample Box 8.2.1 Warp Controls The Sample Box Warp Controls. When the Warp switch is off, Live plays the sample at its original, normal tempo, irrespec- tive of the current Live Set tempo. This is useful for samples that have no inherent rhythmic structure: percussion hits, atmospheres, sound effects, spoken word and the like. -
Page 108
CHAPTER 8. CLIP VIEW 8.2.2 Sample Loop/Region and Display Zooming and Scrolling The Clip Zoom/Scroll Area. Zooming and scrolling in the Sample Display work much like they do in the Arrangement View. When Warp is disabled, zooming and scrolling can be done anywhere in the Sample Display. -
Page 109
CHAPTER 8. CLIP VIEW To have the Sample Display follow the play position and scroll automatically, turn on the Follow switch, or use the Follow command from the Options menu. The Follow Switch. Playing and Scrubbing Clips The section of the sample that plays when a clip is launched is set with the clip’s region and loop controls. -
Page 110
CHAPTER 8. CLIP VIEW You can also adjust the clip start and end numerically using the respective value elds to the left of the Sample Display. For warped clips, these elds display values as bars-beats- sixteenths; for unwarped clips, the display is in minutes-seconds-milliseconds. Notice that you can use the Set buttons here to place the markers during playback. -
Page 111
CHAPTER 8. CLIP VIEW cannot be looped. You can click and drag to change the position and length of the loop brace in the Sample Display, or you can type exact values into the Loop Length and Position elds to the left of the display. -
Page 112
CHAPTER 8. CLIP VIEW Setting the Clip to Run Into a Loop. The Loop Length and Position elds are equipped with Set buttons, which can be used to create loops spontaneously during playback: ˆ Playing the clip and then clicking the Set Loop Position button moves the beginning of loop to the current playback position (rounded to the global quantization setting) and engages the loop. -
Page 113
CHAPTER 8. CLIP VIEW 8.2.3 Clip Pitch and Gain The Clip Pitch and Gain Controls. The Transpose control shifts the clip pitch in semitones. The Detune eld ne-tunes the clip in cents (100 cents = one semitone). The Clip Gain slider, calibrated in dB, changes the clip gain. 8.2.4 Destructive Sample Editing The Launch Sample Editor Button. -
Page 114
CHAPTER 8. CLIP VIEW 8.2.5 Saving Default Clip Settings with the Sample The Save Default Clip Button. The Save Default Clip button saves the current clip’s settings with the sample. With multiple clips selected, this button will save them all simultaneously. Once saved, Live will restore the current clip settings whenever you drop the sample into a Live Set. -
Page 115
CHAPTER 8. CLIP VIEW this reason, we have provided a Legacy Hi-Q Mode option, which is enabled by default in the Options menu whenever you load an old Set that has Hi-Q enabled for any clips. Simply disable this option if you wish to use the new mode. 8.2.7 Clip Start and End Fades The Clip Fade Switch. -
Page 116
CHAPTER 8. CLIP VIEW 8.2.8 Clip RAM Mode The RAM Mode Switch. If the RAM Mode switch is on, Live is loading the audio referenced by the clip into the computer’s memory rather than reading it from disk in real time. RAM Mode can help with these problems: ˆ… -
Page 117
CHAPTER 8. CLIP VIEW Processed/Reverse. Until the Set is saved, new samples remain at the location speci ed by Temporary Folder. There are a few rules for the reversing process. First, any Warp Markers will remain xed to their positions in the sample. This means that a Warp Marker on the downbeat of the second bar of a clip will end up on the downbeat of the second-to-last bar after reversal. -
Page 118
CHAPTER 8. CLIP VIEW be retained. The Warp Markers will be retained only if the new sample has the exact same length as the old sample. The Sample Display’s (PC) / (Mac) context menu includes the Manage Sample Ctrl File command. This opens the File Manager for the current Set with the sample referenced by the clip selected. -
Page 119
CHAPTER 8. CLIP VIEW 8.3.2 Bank and Program Change Live can send MIDI bank/program change messages to external devices and plug-ins that support MIDI program change messages. According to the settings in these controls, launching a clip also sends its bank/program change message. If you are using Live to send MIDI to your synth, this means that each MIDI clip in your Live Set can play a different sound on your synth. -
Page 120: Setting The Tempo
Chapter 9 Tempo Control and Warping Unlike music stored on tape or in a traditional digital audio workstation, the music in Live remains elastic at all times. Live is capable of time-warping samples while streaming them from disk so as to synchronize them to the current Live Set’s tempo. This happens without affecting the pitch, which can be changed independently.
-
Page 121
CHAPTER 9. TEMPO CONTROL AND WARPING in hundredths of a BPM allows for enough precision to adjust to live performers or other unsynchronized sources. You can have an external sequencer (or drum machine) play along with Live or have Live play along with the sequencer. -
Page 122
CHAPTER 9. TEMPO CONTROL AND WARPING Although Live can be easily synchronized to external MIDI devices, you may nd yourself in situations in which you need to adjust to sources that aren’t locked to one tempo, such as live musicians or turntables. As long as your Set’s tempo is basically the same as that of the unsynchronized material, you can use the Nudge buttons to temporarily speed up or slow down Live’s playback to match what you hear. -
Page 123
CHAPTER 9. TEMPO CONTROL AND WARPING Preferences. If the Auto-Warp Long Samples preference is on, Live assumes that long samples contain music that should be played in sync with the Live Set’s tempo. If you would rather have Live default to playing long samples as they are, disengage this preference. 9.2.1 Tempo Master/Slave All warped clips in the Arrangement View have one further option: They can be de ned as tempo masters by toggling their Master/Slave switches. -
Page 124
CHAPTER 9. TEMPO CONTROL AND WARPING Warp Markers are set in the Clip View’s Sample Display by double-clicking within the sam- ple. They can then be dragged or moved with the arrow keys to different points in time. Warp Markers can also be deleted by double-clicking them, or by pressing the computer keyboard’s key after selecting them. -
Page 125
CHAPTER 9. TEMPO CONTROL AND WARPING Transient Markers. As you mouse over transients, temporary pseudo Warp Markers appear. These have the same shape as regular Warp Markers, but they’re grey. Double-clicking or dragging a pseudo Warp Marker creates an actual Warp Marker or, if there are no Warp Markers later in the clip, changes the tempo for the clip segment. -
Page 126
CHAPTER 9. TEMPO CONTROL AND WARPING 9.2.3 Using Warp Markers In the following sections, we will look at a couple of applications for time-warping samples. Warping is, of course, an optional property of clips. Syncing Straight Loops When you import a sample that represents a well-cut musical loop of 1,2,4 or 8 bars in length, Live usually makes the correct assumptions to play the loop in sync with the chosen tempo. -
Page 127
CHAPTER 9. TEMPO CONTROL AND WARPING you can eliminate silence after the actual loop end by placing a Warp Marker at the sample’s right edge. Setting the Warp Markers for a Poorly Cut Loop. Syncing Odd-Length Loops If you import a sample that contains a seven-bar loop, Live initially assumes the loop is eight bars long (or four, depending on its length) and plays it out of sync. -
Page 128
CHAPTER 9. TEMPO CONTROL AND WARPING If a single event in a percussion loop comes late, just pin a Warp Marker to it and drag the marker to the correct beat position. You may want to pin the adjacent events as well, to avoid affecting neighboring regions in the sample. -
Page 129
CHAPTER 9. TEMPO CONTROL AND WARPING Auto-Warp’s Results in the Clip View. As long as Auto-Warp made the correct set of informed guesses, the clip will be ready to play in perfect sync with the Live Set’s tempo. However, if Auto-Warp does not quite do what you want, you can control its results. -
Page 130
CHAPTER 9. TEMPO CONTROL AND WARPING Using the Context Menu to Direct Auto-Warp. Directing Auto-Warp is also relatively simple when you have imported a perfectly cut loop. You can tell Auto-Warp to work accordingly using the Warp As …-Bar Loop command. Live will propose a loop length that makes the most sense given the current Live Set’s tempo. -
Page 131
CHAPTER 9. TEMPO CONTROL AND WARPING The four Warp From Here commands provide various ways of resetting Warp Markers to the right of the selected grid marker or Warp Marker, leaving Warp Markers to the left untouched. These commands are also available from the start marker. ˆ… -
Page 132
CHAPTER 9. TEMPO CONTROL AND WARPING 9.2.4 Quantizing Audio In the previous section, you learned how to adjust the timing of events in audio les by manually dragging Warp Markers along the timeline. But it is also possible to automatically snap the entire sample to the grid at once by using the Quantize command. -
Page 133
CHAPTER 9. TEMPO CONTROL AND WARPING The warp modes are different varieties of granular resynthesis techniques. Granular resyn- thesis achieves time compression and expansion by repeating and skipping over parts of the sample (the grains ). The warp modes differ in the selection of grains, as well as in the details of overlapping and crossfading between grains. -
Page 134
CHAPTER 9. TEMPO CONTROL AND WARPING The Transient Envelope slider applies a volume fade to each segment of audio. At 100, there is no fade. At 0, each segment decays very quickly. Long envelope times can help to smooth clicks at the end of segments, while short times can be used to apply rhythmic gating effects. -
Page 135
CHAPTER 9. TEMPO CONTROL AND WARPING 9.3.5 Complex Mode Complex Mode is a warping method speci cally designed to accommodate composite signals that combine the characteristics covered by other Warp Modes; it works well for warping entire songs, which usually contain beats, tones and textures. Complex Mode is a rather CPU-intensive function, using approximately ten times the CPU resources required by the other Warp Modes. -
Page 136
CHAPTER 9. TEMPO CONTROL AND WARPING Although REX les are audio les, they can quickly be transformed into playable instruments via the Slice to New MIDI Track command, which is available in the Create Menu or the (PC) / (Mac) context menu for the Clip. Ctrl Warp Markers/parameters, Clip Envelopes… -
Page 137
Chapter 10 Editing MIDI Notes and Velocities A MIDI clip in Live contains notes and controller data for playing a MIDI instrument. This instrument can be a virtual instrument in a MIDI track’s device chain or an external synth fed via the track’s output routing. -
Page 138
CHAPTER 10. EDITING MIDI NOTES AND VELOCITIES 10.2 The MIDI Editor To bring up the MIDI Editor, double-click a MIDI clip to open the Clip View. You can use the Clip View Box selector to make sure the Notes box is showing, then click in the title bar of the Notes box to bring up the MIDI Editor on the right-hand side of the screen. -
Page 139
CHAPTER 10. EDITING MIDI NOTES AND VELOCITIES Previewing MIDI Notes. Provided your MIDI track’s device chain contains an instrument, activating the Preview switch in the MIDI Editor allows you to hear notes as you select and move them. If the MIDI track is armed, activating Preview also allows you to step record new notes into the clip. -
Page 140
CHAPTER 10. EDITING MIDI NOTES AND VELOCITIES The MIDI Editor has both vertical and horizontal navigation. Along the horizontal axis lies a time ruler, which shows note position along a musical timeline. The vertical axis contains the note ruler, displaying octaves C0 C10, and a representation of a piano keyboard (the piano roll). -
Page 141
CHAPTER 10. EDITING MIDI NOTES AND VELOCITIES It always shows the complete contents of the selected MIDI clip. The black rectangular outline represents the part of the clip that is currently displayed in the Editor above. To scroll, click within the outline and drag left or right; to zoom in and out, drag up and down. -
Page 142
CHAPTER 10. EDITING MIDI NOTES AND VELOCITIES 10.4 Editing MIDI 10.4.1 Non-Destructive Editing You can always return your MIDI clip to its previous state by using the Edit menu’s Undo command. Furthermore, if the MIDI clip being edited originated in a MIDI le on your hard drive, none of your editing will alter the original MIDI le, as Live incorporates its contents into your Live Set when importing. -
Page 143: Editing Notes
CHAPTER 10. EDITING MIDI NOTES AND VELOCITIES Use the Loop/Region Markers to Select a Speci c Region of the Clip to Play. 10.4.3 Grid Snapping Most functions in the MIDI Editor are subject to grid snapping. You can hold down the (PC) / (Mac) modi er while performing an action to bypass grid snapping.
-
Page 144
CHAPTER 10. EDITING MIDI NOTES AND VELOCITIES ˆ Clicking and dragging in the background selects a timespan. To select all of the notes that begin during the timespan, press Return After placing the insert mark, you can manipulate it using your computer keyboard. ˆ… -
Page 145
CHAPTER 10. EDITING MIDI NOTES AND VELOCITIES You can also use the (PC) / (Mac) modi er to click and drag copies of notes Ctrl to a new location. If you click and drag to move notes but then decide that you would like to copy them instead, you can press the (PC) / (Mac) modi er even after… -
Page 146
CHAPTER 10. EDITING MIDI NOTES AND VELOCITIES ˆ Cut Time cuts a selection of time from the MIDI clip, thereby moving any notes on either side of the cut area closer together in the timeline. A Gap Between MIDI Notes Has Been Cut by First Selecting It, Then Executing the Cut Time Command. -
Page 147
CHAPTER 10. EDITING MIDI NOTES AND VELOCITIES Quantizing MIDI Notes. Using the options presented here, you can select either the current grid size or a speci c meter value for quantization and set either the note start or end (or both) to be quantized. Quantizing the note end will stretch the note so that it ends at the chosen meter subdivision. -
Page 148
CHAPTER 10. EDITING MIDI NOTES AND VELOCITIES As in the Note Editor, you can select multiple velocity markers to change by clicking with modi er held down. Tip: To set a group of notes so that they all have the same velocity, select their markers in the Velocity Editor, drag them up or down to either maximum or minimum velocity, and then adjust velocity to the desired value. -
Page 149
The Velocity Editor Showing Note-Off Velocities. Please note that note-off (or release ) velocity is a somewhat esoteric parameter, and is only supported by certain devices. Ableton’s Sampler instrument, for example, provides note-off velocity as a controller for a variety of parameters. -
Page 150
CHAPTER 10. EDITING MIDI NOTES AND VELOCITIES When multiple notes are selected in the Note Editor, the Stretch Notes command becomes available from the context menu, if you invoke it with (PC) / (Mac). Note Stretch Ctrl markers will then appear in the Note Editor, allowing notes to be scaled proportionally in time. -
Page 151
Chapter 11 Using Grooves The timing and feel of each clip in your Set can be modi ed through the use of grooves. Live’s Library includes a large selection of grooves, which appear as .agr les in the Browser. Groove Files in the Browser. -
Page 152
CHAPTER 11. USING GROOVES the Browser while the clip plays. The Hot-Swap Groove Button. Grooves can be applied to both audio and MIDI clips. In audio clips, grooves work by adjusting the clip’s warping behavior, and thus only works on clips with Warp enabled. 11.1 Groove Pool Once you’ve applied a groove le, you can modify its behavior by adjusting its parameters in the Groove Pool, which can be opened or closed via its selector button at the bottom of… -
Page 153
CHAPTER 11. USING GROOVES The Groove Pool. 11.1.1 Adjusting Groove Parameters Grooves in the Groove Pool appear in a list, and offer a variety of parameters that can be modi ed in real time to adjust the behavior of any clips that are using them. You can also save and hot-swap grooves via the buttons next to the Groove’s name. -
Page 154
CHAPTER 11. USING GROOVES to every voice in your clip, so notes that originally occurred together will now be randomly offset both from the grid and from each other. ˆ Velocity adjusts how much the velocity of the notes in clips will be affected by the velocity information stored in the groove le. -
Page 155
CHAPTER 11. USING GROOVES or Groove Pool into a MIDI track. This will create a new MIDI clip, which you can then edit, as you would with any other MIDI clip. You can then convert the edited clip back into a groove, via the process below. -
Page 156
CHAPTER 11. USING GROOVES the voice that you want to independently groove. In this example, we’d extract the snare chain, creating a new clip and track that contained only the snare notes. Then we could apply a different groove to this new clip. 11.3.2 Non-Destructive Quantization Grooves can be used to apply real-time, non-destructive quantization to clips. -
Page 157
Chapter 12 Launching Clips The Live Session View is set apart by the fact that it gives you, the musician, a spontaneous environment that encourages performance and improvisation. An important part of how you take advantage of the Session View lies within how you con gure your various Session View clips. -
Page 158
CHAPTER 12. LAUNCHING CLIPS Use the Clip View Box Selector to Bring up the Launch Box. Note that you can edit the launch settings of more than one clip at the same time by rst selecting the clips and then opening the Clip View. 12.2 Launch Modes The Clip Launch Mode Chooser. -
Page 159
CHAPTER 12. LAUNCHING CLIPS 12.3 Clip-Level Quantization The Clip Quantization Chooser. The Clip Quantization chooser lets you adjust an onset timing correction for clip triggering. To disable clip quantization, choose None. To use the Control Bar’s Global Quantization setting, choose Global. Global quantization can be quickly changed using the (PC) / (Mac),… -
Page 160
CHAPTER 12. LAUNCHING CLIPS The Velocity Amount control allows you to adjust the effect of MIDI note velocity on the clip’s volume: If set to zero, there is no in uence; at 100 percent, the softest notes play the clip silently. For more on playing clips via MIDI, see the respective section. -
Page 161
CHAPTER 12. LAUNCHING CLIPS same group after the clip plays. A group is de ned by clips arranged in successive slots of the same track. Tracks can have an unlimited number of groups, separated by empty slots. The Follow Action Controls. -
Page 162
CHAPTER 12. LAUNCHING CLIPS Play First Clip launches the rst (top) clip in a group. Play Last Clip launches the last (bottom) clip in a group. Play Any Clip plays any clip in the group. Play Other Clip is similar to Play Any Clip, but as long as the current clip is not alone in the group, no clip will play consecutively. -
Page 163
CHAPTER 12. LAUNCHING CLIPS Creating a Group With the Two Clips. 3. Set up Follow Actions for the rst clip. You will want to make Follow Action Time equal to the clip’s length. Set the Follow Action A chooser to Play Next Clip, with a Chance setting of 1, leaving Follow Action B alone. -
Page 164
CHAPTER 12. LAUNCHING CLIPS The default setting for Follow Action is actually a 1:0 chance that Nothing happens after the Follow Action Time, which means that there is effectively no Follow Action. But now, imagine a group consisting of one single clip. Follow Action A is set to Play Clip Again, with a Chance of 8. -
Page 165
CHAPTER 12. LAUNCHING CLIPS 12.6.5 Mixing up Melodies and Beats You can let Follow Actions perform unpredictable remixes and solos for you: Use a clip containing a beat or melody, and copy it so that there are several instances of it forming a group. -
Page 166
Chapter 13 Routing and I/O In the context of Live, routing is the setup of the tracks’ signal sources and destinations (i.e., their inputs and outputs). Most routing happens in the mixer’s track In/Out section, which offers, for every track, choosers to select a signal source and destination. The mixer’s In/Out section is Live’s patchbay. -
Page 167
CHAPTER 13. ROUTING AND I/O For every track that can play clips, the In/Out section has the same layout: ˆ The upper chooser pair ( Audio/MIDI From ) selects the track’s input. Audio tracks have an audio input, and MIDI tracks have a MIDI input. Return tracks receive their input from the respective sends. -
Page 168
CHAPTER 13. ROUTING AND I/O Audio and MIDI Track Arm Buttons. ˆ To permanently monitor the track’s input, regardless of whether the track is armed or clips are playing, choose In. This setting effectively turns the track into what is called an Aux on some systems: the track is not used for recording but for bringing in a signal from elsewhere (for instance, a ReWire slave program). -
Page 169
CHAPTER 13. ROUTING AND I/O reached via the Input and Output Channel choosers’ Con gure… option. Note that the Audio Preferences also provide access to the Channel Con guration dialogs, which determine which inputs and outputs are used, and whether they are available to Live as mono or stereo pairs. -
Page 170
CHAPTER 13. ROUTING AND I/O You can con gure which MIDI ports are made available to Live using the MIDI Ports section of the MIDI/Sync Preferences. All available input and output ports are listed here. For Live’s tracks to receive/send MIDI from/to a speci c MIDI port, the corresponding switch in the Track column must be set to On. -
Page 171
CHAPTER 13. ROUTING AND I/O otherwise been assigned to remote-control elements of the Live interface. To prevent this, you can turn the computer MIDI keyboard off when it is not needed. 13.3.3 Connecting External Synthesizers Routing MIDI to an external synthesizer is straightforward: The Output Type chooser is set to whatever MIDI port the synthesizer is connected to;… -
Page 172
CHAPTER 13. ROUTING AND I/O 2. MIDI messages that are used for remote-controlling Live’s user-interface ele- ments; 3. MIDI messages coming from and going to Live’s MIDI tracks. MIDI messages that are mapped to remote-control Live’s user-interface elements are eaten up by the remote control assignment and will not be passed on to the MIDI tracks. -
Page 173
CHAPTER 13. ROUTING AND I/O 4. The Output Channel chooser presents you with a list of the instruments that you currently have in your Reason rack; select the instrument you want to address. 5. Select Reason from the audio track’s Input Type chooser. 6. -
Page 174
CHAPTER 13. ROUTING AND I/O 13.5 Resampling Live’s Master output can be routed into an individual audio track and recorded, or resampled. Resampling can be a fun and useful tool, as it lets you create samples from what is currently happening in a Live Set that can then be immediately integrated. -
Page 175
CHAPTER 13. ROUTING AND I/O Two Ways to Route Track A into Track B. Both approaches result in Track A’s output being fed into Track B. Approach 1 leaves Track B’s in/out settings alone, and we can, at any time, add more tracks that feed their output into Track B. -
Page 176
CHAPTER 13. ROUTING AND I/O Tap Points for Track Routing. ˆ Pre FX taps the signal that is coming directly from a track, before it has been passed on to the track’s device chains (FX) or mixer. Therefore, changes that are made to the tapped track’s devices or mixer have no effect on the tapped signal. -
Page 177
CHAPTER 13. ROUTING AND I/O Routing Points in Racks Tap Points for Every Chain in a Track. If a track has one or more Instrument or Effect Racks in its device chain, internal routing points (Pre FX, Post FX and Post Mixer) will also be available for every chain within the Rack. If a track contains one or more Drum Racks, internal routing points will be available for any… -
Page 178
CHAPTER 13. ROUTING AND I/O 13.6.2 Making Use of Internal Routing This section presents several internal routing examples in more detail. Post-Effects Recording Let’s say that you are feeding a guitar into Live, building up a song track by track, overlaying take onto take. -
Page 179
CHAPTER 13. ROUTING AND I/O Recording MIDI as Audio When working with MIDI and complex software instruments, it is sometimes more useful to record the resulting audio than the incoming MIDI. A single MIDI note can prompt, for example, Native Instruments’ Absynth to produce something that sounds more like a piece of music than a single tone. -
Page 180
CHAPTER 13. ROUTING AND I/O Creating Submixes Submixing the Individual Drums of a Drum Kit. Suppose we have the individual drums of a drum kit coming in on separate tracks for multitrack recording. In the mix, we can easily change the volumes of the individual drums, but adjusting the volume of the entire drum kit against the rest of the music is less convenient. -
Page 181
CHAPTER 13. ROUTING AND I/O Feeding an Additional MIDI Track Into an Existing MIDI Track to Reuse its Instrument. This is accomplished by setting the new MIDI track’s Output Type chooser to Pad. Note that the Output Channel chooser now offers a selection of destinations: We can either feed the new track’s output into the input of the pad track, or we can directly address the Simpler. -
Page 182
CHAPTER 13. ROUTING AND I/O MIDI is played by an instrument that is out of the mix. This can be easily remedied by cutting the clips from the pad track and pasting them into a third track that can be independently muted (and that can hold its own MIDI effects). -
Page 183
CHAPTER 13. ROUTING AND I/O most plug-in instruments, however. Soloing a track that taps one of Impulse’s sample slots will still allow you to hear the output of that slot. Using Multi-Timbral Plug-In Instruments Many plug-in instruments support multi-timbral operation. A multi-timbral instrument is like several instruments in one, with each component part (or whatever term the manufacturer uses) receiving MIDI on a separate MIDI channel. -
Page 184
CHAPTER 13. ROUTING AND I/O 2. Insert an External Instrument device on another MIDI track. 3. Select the track that contains the instrument in the rst MIDI To chooser on the External Instrument device. 4. Select the MIDI channel to route to in the second chooser on the External Instrument device. -
Page 185
Some vocoder plug-ins include a built-in synthesizer to generate the carrier signal. In this case, the only difference from the above procedure is that the vocoder instrument is dragged into a MIDI track. Feeding the side-chain audio input works as described above. Please note that Ableton’s Auto Filter, Compressor,… -
Page 186
CHAPTER 13. ROUTING AND I/O Using an Auxiliary MIDI Track to Layer Instruments. Perhaps you wonder why this works, given that the string track’s output is audio and not MIDI. When routing MIDI in from another track, we are tapping the MIDI at the latest possible stage, which is after any MIDI Effects, and just before the instrument. -
Page 187
Chapter 14 Mixing 14.1 The Live Mixer Live includes a mixer section that is accessible from two views: The Arrangement View Mixer. In the Arrangement View, the mixer appears as a horizontal strip to the right of the track area. To display all mixer controls for a track, unfold the track using the button next to its name, and adjust its height accordingly. -
Page 188
CHAPTER 14. MIXING The Session View Mixer. The Session View is a standard vertical mixer layout. You’ll likely nd the Session View mixer more intuitive than the Arrangement mixer, which comes in handy when you work with automation. Note that the Tab key toggles between the Arrangement and Session Views. The View menu options listed below show or hide mixer components. -
Page 189
CHAPTER 14. MIXING Let’s look at the mixer controls: The Mixer Controls. 1. The Meter shows the track’s RMS (average) and peak output level. While moni- toring, however, it shows the input level. 2. The Volume control adjusts the track’s output level. With multiple tracks selected, adjusting the volume of one of them will adjust the others as well. -
Page 190
CHAPTER 14. MIXING 14.1.1 Session Mixer Features The Session Mixer’s Possibilities. The Mixer section of the Session Mixer has several additional features that are not visible by default. The mixer is resizable, and dragging upwards on the top of the mixer will extend the height of the track meters, adding tick marks, a numeric volume eld and resettable peak level indicators. -
Page 191
CHAPTER 14. MIXING 14.2 Audio and MIDI Tracks Audio and MIDI tracks in Live are for hosting and playing clips, as explained earlier. You can add new audio and MIDI tracks to your Live Set’s mixer at any time using the appropriate Create menu commands. -
Page 192
CHAPTER 14. MIXING particular knob or slider parameter (volume, for example), this difference will be maintained as you adjust the parameter. If you drag a track’s title bar to the Browser it will be saved as a new Set. If a track contains audio clips, Live will manage the copying of the referenced sampled into this new location based on the selection in the Collect Samples on Export… -
Page 193
CHAPTER 14. MIXING than Master. ) You can also use a Group Track purely as a folder track by rerouting the outputs of the contained tracks to some other destination..and in Arrangement View. Once a Group Track has been created, tracks can be dragged into or out of the group. Deleting a Group Track deletes all of its contents, but a group can be dissolved back into individual tracks by executing the Edit Menu’s Ungroup Tracks command. -
Page 194
CHAPTER 14. MIXING in a return track lets it receive audio from any number of tracks and add echoes to them. The Send Controls and Pre/Post Toggle. A clip or group track’s Send control regulates how much of the track’s output feeds the associated return track’s input. -
Page 195
CHAPTER 14. MIXING The Crossfader and Selector. The crossfader is accessed via the Session View’s mixer selectors. It features seven different crossfade curves so that you can choose the one that ts your style the best. To change the curve, (PC) / (Mac) on the crossfader, then select an entry from the context Ctrl… -
Page 196
CHAPTER 14. MIXING A+B Power Level Crossfader Response Transition Dipped Intermediate Constant Power Slow Fade Slow Cut Crossfader Curve Fast Cut Properties. The crossfader can be mapped to any continuous MIDI controller (absolute or incremental). In addition to the crossfader’s central slider, its absolute left and right positions are separately available for MIDI or keyboard mapping. -
Page 197
CHAPTER 14. MIXING Each track has two Crossfade Assign buttons, A and B. The track can have three states with respect to the crossfader: ˆ If neither Assign button is on, the crossfader does not affect the track at all. ˆ… -
Page 198
CHAPTER 14. MIXING In order to set Live up for cueing, you must be using an audio interface with at least four dedicated outputs (or two dedicated stereo outputs). The respective settings are accessible in the Session View mixer. Make sure you have the Mixer and In/Out options checked in the View menu. -
Page 199
CHAPTER 14. MIXING 14.7 Track Delays A Track Delay control is available for every track in Live. The control allows delaying or pre- delaying the output of tracks in milliseconds in order to compensate for human, acoustic, hardware and other real-world delays. This section of the interface can be shown or hidden using its respective Mixer Section selector. -
Page 200
Chapter 15 Recording New Clips This chapter is about recording new clips from audio and MIDI input signals. Note that this is a different kind of recording than the capturing of Session clips into the Arrangement. For successful audio recording, please make sure the audio preferences are set up properly. For more on this, please see the built-in program lesson on setting up Audio Preferences. -
Page 201
CHAPTER 15. RECORDING NEW CLIPS The Track In/Out Section in the Arrangement (Left) and Session View (Right). Audio tracks default to recording a stereo signal from the external input pair 1/2. MIDI tracks default to recording all MIDI that is coming in through the active external input devices. -
Page 202
CHAPTER 15. RECORDING NEW CLIPS If you are using a natively supported control surface, arming a MIDI track will automatically lock this control surface to the instrument in the track. Clicking one track’s Arm button unarms all other tracks unless the (PC) / (Mac) Ctrl… -
Page 203
CHAPTER 15. RECORDING NEW CLIPS 1. Recording commences when the Control Bar’s Record button is activated and the Play button is pressed. 2. Recording creates new clips in all tracks that have their Arm button on. 3. When the Overdub switch is on, the new clips contain a mix of the signal already in the track and the new input signal. -
Page 204
CHAPTER 15. RECORDING NEW CLIPS Recording a New Clip Into the Session View. 1. Set the Global Quantization chooser to any value other than None to obtain correctly cut clips. 2. Activate the Arm button for the tracks onto which you want to record. Clip Record buttons will appear in the empty slots of the armed tracks. -
Page 205
CHAPTER 15. RECORDING NEW CLIPS 15.3.3 Overdub Recording MIDI Patterns Live makes pattern-oriented recording of drums and the like quite easy. Using Live’s Impulse instrument and the following technique, you can successively build up drum patterns while listening to the result. Or, using an instrument such as Simpler, which allows for chromatic playing, you can build up melodies or harmonies, note by note. -
Page 206
CHAPTER 15. RECORDING NEW CLIPS 15.3.4 MIDI Step Recording The MIDI Editor allows you to record notes with the transport stopped by holding down keys on your controller or computer MIDI keyboard and advancing the insert mark according to the grid settings. This process, known as step recording, allows you to enter notes at your own pace, without needing to listen to a metronome or guide track. -
Page 207
CHAPTER 15. RECORDING NEW CLIPS 15.4 Recording in Sync Live keeps the audio and MIDI you have recorded in sync, even when you later decide on a different song tempo. In fact, Live allows you to change the tempo at any time before, after and even during recording. -
Page 208
CHAPTER 15. RECORDING NEW CLIPS 15.5 Recording Quantized MIDI Notes If you will be recording MIDI, you have the option of automatically quantizing MIDI notes while recording. The Record Quantization chooser in the Edit menu allows selecting the meter subdivisions with which your recorded notes will align. When recording into Session slots into the… -
Page 209
CHAPTER 15. RECORDING NEW CLIPS 15.7 Setting up File Types The following Preferences from the Record/Warp/Launch tab are relevant to the sample les that are created by recording: ˆ The sample le type you would like Live to create can be chosen from the File Type chooser in the Record/Warp/Launch Preferences. -
Page 210
CHAPTER 15. RECORDING NEW CLIPS The Scene Up/Down Buttons. One key is used to jump to the next scene… A Track Launch Button..and another key to start and end recording in the respective track. You can also map the step recording navigators. -
Page 211: Working With Instruments And Effects
Chapter 16 Working with Instruments and Effects Every track in Live can host a number of devices. These devices can be of three different sorts: ˆ MIDI effects act upon MIDI signals and can only be placed in MIDI tracks. ˆ…
-
Page 212
CHAPTER 16. WORKING WITH INSTRUMENTS AND EFFECTS Devices in the Track View. To save space in the Track View, a device can be collapsed by double-clicking on its title bar or by choosing Fold from its (PC) / (Mac) context menu. Ctrl Devices Can Be Folded. -
Page 213
CHAPTER 16. WORKING WITH INSTRUMENTS AND EFFECTS 16.1 Using the Live Devices The Live Device Browser. Click on the Device Browser selector to access the palette of Live’s built-in devices. You will notice that MIDI effects, audio effects and instruments each have their own folders in the Browser. -
Page 214
CHAPTER 16. WORKING WITH INSTRUMENTS AND EFFECTS MIDI and Audio Track Arm Buttons This is how you would play live instruments through effects on a track, for example, or use a MIDI keyboard’s input to play a track’s instrument. Note that you can easily move from this setup into recording new clips for further use in Live. -
Page 215
CHAPTER 16. WORKING WITH INSTRUMENTS AND EFFECTS A MIDI Track’s Device Chain Can Contain All Three Device Types. To remove a device from the chain, click on its title bar and press your computer’s key, or select Delete from the Edit menu. To change the order of devices, drag a Delete device by its title bar and drop it next to any of the other devices in the Track View. -
Page 216
CHAPTER 16. WORKING WITH INSTRUMENTS AND EFFECTS Devices in Live’s tracks have input and output level meters. These meters are helpful in nding problematic devices in the device chain: Low or absent signals will be revealed by the level meters, and relevant device settings can then be adjusted, or the device can be turned off or removed. -
Page 217
CHAPTER 16. WORKING WITH INSTRUMENTS AND EFFECTS Presets in the Device Browser. You can browse and load presets quickly with the computer keyboard: ˆ Scroll up and down using the keys. ˆ Close and open device folders using the keys. ˆ… -
Page 218
CHAPTER 16. WORKING WITH INSTRUMENTS AND EFFECTS Saving Presets You can create and save any number of your own presets in the Device Browser. The Save Preset Button. Click the Save Preset button to save a device’s current settings (including any custom info text) as a new preset. -
Page 219
CHAPTER 16. WORKING WITH INSTRUMENTS AND EFFECTS for all of Live’s instruments, MIDI effects and audio effects (including the various types of Racks). If you have already saved a default preset for a particular device, Live will ask you before overwriting it. To specify how Live behaves when dragging a sample to a Drum Rack or the Track View of a MIDI track: ˆ… -
Page 220
CHAPTER 16. WORKING WITH INSTRUMENTS AND EFFECTS tracks or following instruments. Please see the previous section, Using the Live Devices, for details. The Plug-In Device Browser. Audio Units and VST Plug-ins are browsed and imported using the Plug-In Device Browser, which is accessed via its selector. -
Page 221
CHAPTER 16. WORKING WITH INSTRUMENTS AND EFFECTS Live is running, so that newly installed devices become immediately available in the Plug-In Device Browser. You can also rescan if you believe that your plug-in database has somehow become cor- rupted. Holding down the (PC) / (Mac) modi er while pressing Rescan will delete your plug-in database altogether and run a clean scan of your plug-ins. -
Page 222
CHAPTER 16. WORKING WITH INSTRUMENTS AND EFFECTS The X-Y control eld can be used to control two plug-in parameters at once and is therefore especially well-suited for live control. To assign any two plug-in parameters to the Live panel X-Y eld, use the drop-down menus directly beneath it. Showing Plug-In Panels in Separate Windows The Plug-In Edit Button. -
Page 223
CHAPTER 16. WORKING WITH INSTRUMENTS AND EFFECTS Plug-In Con gure Mode The Con gure Button. Con gure Mode allows you to customize Live’s panel to show only the plug-in parameters that you need to access. To do this: ˆ Enter Con gure Mode by pressing the Con gure button in the device’s header. ˆ… -
Page 224
CHAPTER 16. WORKING WITH INSTRUMENTS AND EFFECTS ˆ Adjusting a parameter in the plug-in’s oating window creates temporary entries for that parameter in the clip envelope and automation choosers, as well as the choosers in the panel’s X-Y eld. These entries are removed when you adjust another param- eter. -
Page 225
CHAPTER 16. WORKING WITH INSTRUMENTS AND EFFECTS 16.2.2 Plug-In Performance Options The CPU Preferences contain a Plug-In Buffer Size setting for balancing plug-in latency and performance. Here you can set the number of samples processed at any one time by the plug-in. -
Page 226
CHAPTER 16. WORKING WITH INSTRUMENTS AND EFFECTS 2. Once you have selected a VST Custom Folder and Live has scanned it, the path will be displayed. Note that, on Windows, Live may have found a path in the registry without the need for browsing. 3. -
Page 227
CHAPTER 16. WORKING WITH INSTRUMENTS AND EFFECTS System folder on Mac OS X) selected in Live’s File/Folder Preferences. The alias can point to a different partition or hard drive on your computer. Live will scan the set VST Plug-in folder as well as any alias folders contained therein. Some VST Plug-ins contain errors or are incompatible with Live. -
Page 228
CHAPTER 16. WORKING WITH INSTRUMENTS AND EFFECTS The VST Program/Bank Load Button (Left) and Save Button (Right). VST programs and banks can be imported from les. Clicking the VST Program Load button brings up a standard le-open dialog for locating the desired le. Windows only: Please select from the File Type menu whether you want to locate VST Device Program les or VST Device Bank les. -
Page 229
CHAPTER 16. WORKING WITH INSTRUMENTS AND EFFECTS on the Use Audio Units option activates Audio Units Plug-ins so that they appear in Live’s Plug-In Device Browser. Note that you can always turn this option off later if you decide not to use Audio Units. Activating Audio Units Plug-Ins. -
Page 230
CHAPTER 16. WORKING WITH INSTRUMENTS AND EFFECTS Device delay compensation is on by default and does not normally have to be adjusted in any way. However, Live Sets that were created with Live 4 or earlier will open without device delay compensation. To manually turn latency compensation on (or off), use the Delay Compensation option in the Options menu. -
Page 231
Chapter 17 Instrument, Drum and Effect Racks An Audio Effect Rack. A Rack is a exible tool for working with effects, plug-ins and instruments in a track’s device chain. Racks can be used to build complex signal processors, dynamic performance instruments, stacked synthesizers and more. -
Page 232
CHAPTER 17. INSTRUMENT, DRUM AND EFFECT RACKS 17.1 An Overview of Racks 17.1.1 Signal Flow and Parallel Device Chains In any of Live’s tracks, devices are connected serially in a device chain, passing their signals from one device to the next, left to right. By default, the Track View displays only a single chain, but there is actually no limit to the number of chains contained within a track. -
Page 233
CHAPTER 17. INSTRUMENT, DRUM AND EFFECT RACKS The Macro Controls are a bank of eight knobs, each capable of addressing any number of parameters from any devices in a Rack. How you use them is up to you whether it be for convenience, by making an important device parameter more accessible;… -
Page 234
CHAPTER 17. INSTRUMENT, DRUM AND EFFECT RACKS on one of the title bars to reveal the Group and Group to Drum Rack commands in the context menu. Note that if you repeat one of these commands again on the same device, you will create a Rack within a Rack. -
Page 235
CHAPTER 17. INSTRUMENT, DRUM AND EFFECT RACKS an Instrument, Drum or Effect Rack is being used. 2. Macro Controls 3. Chain List. In Drum Racks, this view can include both drum chains and return chains. 4. Devices 5. Racks are also identi able by their round corners, which bracket and enclose their content. -
Page 236
CHAPTER 17. INSTRUMENT, DRUM AND EFFECT RACKS Navigate Racks Quickly Via a Context Menu. 17.4 Chain List The Chain List in an Audio Effect Rack. As signals enter a Rack, they are rst greeted by the Chain List. We will therefore also choose this point for our own introduction. -
Page 237: Auto Select
CHAPTER 17. INSTRUMENT, DRUM AND EFFECT RACKS or Arrangement View track will give that track focus; its Track View will open, allowing you to drop your chain into place. Since the Track View can show only one device chain at a time, the Chain List also serves as a navigational aid: The list selection determines what will be shown in the adjacent Devices view (when enabled).
-
Page 238
CHAPTER 17. INSTRUMENT, DRUM AND EFFECT RACKS Auto Select in a Drum Rack. When the Auto Select switch is activated, every chain that is currently processing signals becomes selected in the Chain List. In Drum Racks, this feature will select a chain if it receives its assigned MIDI input note. -
Page 239
CHAPTER 17. INSTRUMENT, DRUM AND EFFECT RACKS 17.5.1 Signal Flow through Zones To understand how zones work, let’s examine the signal ow in a MIDI Effect Rack. Our MIDI Effect Rack resides in the device chain of a MIDI track, and therefore processes MIDI signals. -
Page 240
CHAPTER 17. INSTRUMENT, DRUM AND EFFECT RACKS 17.5.2 Key Zones The Key Zone Editor. When the Key button is selected, the Key Zone Editor appears to the right of the Chain List, illustrating how each chain maps to the full MIDI note range (nearly 11 octaves). Chains will only respond to MIDI notes that lie within their key zone. -
Page 241
CHAPTER 17. INSTRUMENT, DRUM AND EFFECT RACKS spans the top of the editor. Otherwise, the functionality here is identical to that of the Key Zone Editor. Velocity zone fade ranges attenuate the velocities of notes entering a chain. 17.5.4 Chain Select Zones The Chain Select Editor. -
Page 242
CHAPTER 17. INSTRUMENT, DRUM AND EFFECT RACKS is not attenuated, allowing the chain’s effects (like long reverb tails or delays) to fade out according to their own settings. Let’s consider how we can make use of chain select zones in a performance situation: Making Preset Banks Using Chain Select Using Chain Select Zones to Create Effects… -
Page 243
CHAPTER 17. INSTRUMENT, DRUM AND EFFECT RACKS Crossfading Preset Banks Using Fade Ranges Crossfading Between Effects Presets Using Chain Select Zones. Taking the previous example one step further, we can tweak our chain select zones to produce a smooth transition between our presets. To accomplish this, we will make use of our zones’ fade ranges. -
Page 244
CHAPTER 17. INSTRUMENT, DRUM AND EFFECT RACKS The Chain List in a Drum Rack. 1. In addition to the standard selectors found on all Racks, Drum Racks have four additional controls in the view column. From top to bottom, these are the Auto Select button and toggles for the Input/Output, Send, and Return sections. -
Page 245
CHAPTER 17. INSTRUMENT, DRUM AND EFFECT RACKS Drum Racks that are nested within other Drum Racks, both drum chains and return chains can route upwards to the returns of any of the Drum Racks that contain them. 17.6.1 Pad View Pad View. -
Page 246
Although Pad View is designed for easy editing and sound design, it also excels as a performance interface, particularly when triggered by a hardware control surface with pads. If your pad controller is one of Ableton’s natively supported control surfaces, simply select it as a control surface in the MIDI/Sync tab of Live’s Preferences. -
Page 247
The Slicing Preset chooser contains a few Ableton-supplied slicing templates, as well as any of your own that you may have placed in your Library’s default presets folder. -
Page 248
CHAPTER 17. INSTRUMENT, DRUM AND EFFECT RACKS 3. The Drum Rack’s Macro Controls will be pre-assigned to useful parameters for the Simplers, as determined by the settings in the selected slicing preset. In the factory Slicing presets, these include basic envelope controls and parameters to adjust the loop and crossfade properties of each slice. -
Page 249
CHAPTER 17. INSTRUMENT, DRUM AND EFFECT RACKS Using Effects on Slices Because each slice lives in its own chain in the Drum Rack, you can easily process individual slices with their own audio effects. To process several slices with the same set of effects, multi-select their chains in the Drum Rack’s chain list and press -G to group them to Ctrl… -
Page 250
CHAPTER 17. INSTRUMENT, DRUM AND EFFECT RACKS ˆ Map buttons will appear beneath each Macro Control dial; ˆ The Mapping Browser will open. The following steps will get you started mapping: 1. Enable Macro Map Mode by clicking the Map Mode button; 2. -
Page 251
CHAPTER 17. INSTRUMENT, DRUM AND EFFECT RACKS button in its title bar, which will fold the Rack’s mixer in or out. Likewise, any nested chains within the Rack will also have this button. This makes it easy to get an overview of your Rack’s hierarchy or hide it when you just want to work on your mix. -
Page 252
CHAPTER 17. INSTRUMENT, DRUM AND EFFECT RACKS 17.8.1 Extracting Chains All chains can be dragged from their parent Racks and placed into other tracks or Racks, either from the chain list or from the Session View mixer. A Drum Rack’s return chains can also be extracted, and will create new return tracks if dragged to the mixer. -
Page 253
Chapter 18 Automation and Editing Envelopes Often, when working with Live’s mixer and devices, you will want the controls’ movements to become part of the music. The movement of a control across the song timeline is called automation; a control whose value changes in the course of this timeline is automated. Practically all mixer and device controls in Live can be automated, including the song tempo. -
Page 254: Deleting Automation
CHAPTER 18. AUTOMATION AND EDITING ENVELOPES Volume, Pan and the Track Activator Switch Have Been Automated. 18.2 Deleting Automation To delete automation data, (PC) / (Mac) on an automated control to open Ctrl its context menu and select Delete Automation. The automation LED disappears, and the control’s value stays constant across the entire song.
-
Page 255
CHAPTER 18. AUTOMATION AND EDITING ENVELOPES 2. You can click on it to reactivate all automation and thereby return to the automa- tion state as it is written on tape. 18.4 Drawing and Editing Automation In the Arrangement View, automation curves can be viewed and edited as breakpoint envelopes. -
Page 256
CHAPTER 18. AUTOMATION AND EDITING ENVELOPES of the track’s devices or None to hide the envelope. It also provides you with an overview of which devices actually have automation by showing an LED next to their labels. You can make things clearer still by selecting Show Automated Parameters Only from the bottom of the chooser. -
Page 257: Editing Breakpoints
CHAPTER 18. AUTOMATION AND EDITING ENVELOPES Drawing an Envelope. Drawing creates steps as wide as the visible grid, which you can modify using a number of handy shortcuts. For freehand drawing, you can hide the grid using the Snap to Grid Options menu entry or the (PC) / (Mac) shortcut.
-
Page 258: Edit Menu Commands
CHAPTER 18. AUTOMATION AND EDITING ENVELOPES them. Holding down the (PC) / (Mac) modi er while dragging switches Ctrl to a ner resolution. ˆ Click and drag a line segment between two breakpoints to move it vertically, without affecting the breakpoint’s horizontal position. If the line segment is in the current selection, the envelope is moved vertically across the selected timespan.
-
Page 259
CHAPTER 18. AUTOMATION AND EDITING ENVELOPES To copy, cut, delete or duplicate automation from a track, independent of the associated clip, make sure the parameter you want to work with is in its own lane. Any edit commands applied to an envelope selection within a single lane will only apply to this envelope. The clip itself will be unaffected. -
Page 260
Chapter 19 Clip Envelopes Every clip in Live can have its own clip envelopes. The aspects of a clip that are in uenced by clip envelopes change depending upon clip type and setup; clip envelopes can do anything from representing MIDI controller data to modulating device parameters. In this chapter, we will rst look at how all clip envelopes are drawn and edited, and then get into the details of their various applications. -
Page 261
CHAPTER 19. CLIP ENVELOPES To work with clip envelopes, bring up the Clip View’s Envelopes box by activating the rightmost Clip View Box selector panel. The Envelopes box contains two choosers for selecting an envelope to view and edit. The Clip View’s Envelopes Box. -
Page 262
CHAPTER 19. CLIP ENVELOPES 1. Enclose the desired selection in the loop brace, and click the brace so that it is selected. This will execute the Edit menu’s Select Loop command, which selects all material in the loop. 2. Copy the envelope with (PC) / (Mac). -
Page 263
CHAPTER 19. CLIP ENVELOPES 19.2.2 Changing Pitch and Tuning per Note Drop a sample loop from the Browser into Live and play it. Click on the Transpose quick- chooser button. You can now alter the pitch transposition of individual notes in the sample as you listen to it. -
Page 264
CHAPTER 19. CLIP ENVELOPES To scroll the display, hold down the (PC) / (Mac) modi er while Ctrl dragging. Pitch is modulated in an additive way. The output of the transposition envelope is simply added to the Transpose control’s value. The result of the modulation is clipped to stay in the available range (-48..48 semitones in this case). -
Page 265
CHAPTER 19. CLIP ENVELOPES the Control chooser. The Envelope Editor appears with a vertical grid overlay. In envelope Draw Mode, set steps to non-zero values to hear the loop scrambled. What is going on? Imagine the audio is read out by a tape head, the position of which is modulated by the envelope. -
Page 266
CHAPTER 19. CLIP ENVELOPES File Browsers, or the Session or Arrangement View, onto the Clip View. All clip settings, including the envelopes, will remain unaltered; only the sample will be replaced. 19.3 Mixer and Device Clip Envelopes Clip envelopes can be used to modulate mixer and device controls. Since mixer and device controls can also be controlled by the Arrangement’s automation envelopes, this is… -
Page 267
CHAPTER 19. CLIP ENVELOPES As you raise and lower the Volume slider, you can observe the dot following your movement in a relative fashion. Modulating the track’s Send controls is just as easy. Again, the modulation is a relative percentage: The clip envelope cannot open the send further than the Send knob, but it can Modulating a Send. -
Page 268
CHAPTER 19. CLIP ENVELOPES Choose MIDI Ctrl from a MIDI clip’s Device chooser and use the Control chooser below it to select a speci c MIDI controller. You can create new clip envelopes for any of the listed controllers by drawing steps or using breakpoints. You can also edit clip envelope representations of controller data that is imported as part of your MIDI les or is created while recording new clips: Names of controllers that already have clip envelopes appear with an adjacent LED in the Control chooser. -
Page 269
CHAPTER 19. CLIP ENVELOPES 19.5.1 Programming a Fade-Out for a Live Set Let us start with a straightforward example. Suppose you are setting up a Live Set and wish to program a fade-out over eight bars to occur when a speci c clip is launched but all you have is a one-bar loop. -
Page 270
CHAPTER 19. CLIP ENVELOPES effectively deletes the envelope data. To return to the previous state, please use the Edit menu’s Undo command. 19.5.2 Creating Long Loops from Short Loops Let us take this a step further. For a different part of your set, you would like to use the same one-bar loop because it sounds great but its repetition bores you. -
Page 271
CHAPTER 19. CLIP ENVELOPES Note that the start/end markers and loop brace are subject to quantization by the zoom- adaptive grid, as is envelope drawing. 19.5.3 Imposing Rhythm Patterns onto Samples So far, we have been talking about imposing long envelopes onto small loops. You can also think of interesting applications that work the other way around. -
Page 272: Working With Video
Chapter 20 Working with Video Live’s exible architecture makes it the perfect choice for scoring to video. You can trim video clips to select parts of them and use Warp Markers to visually align music in the Arrangement View with the video. You can then render your edited video le along with your audio.
-
Page 273
CHAPTER 20. WORKING WITH VIDEO 20.2 The Appearance of Video in Live 20.2.1 Video Clips in the Arrangement View A video clip in the Arrangement View looks just like an audio clip, except for the sprocket holes in its title bar. A Video Clip with a QuickTime Marker. -
Page 274
CHAPTER 20. WORKING WITH VIDEO 20.2.2 The Video Window The Video Window is a separate, oating window that always remains above Live’s main window. It can be dragged to any location you like, and it will never get covered up by Live. -
Page 275
CHAPTER 20. WORKING WITH VIDEO 20.2.3 Clip View Soundtrack composers will want to note the Tempo Master option in Live’s Clip View. When scoring to video, video clips are usually set as tempo masters, while audio clips are left as tempo slaves. -
Page 276
CHAPTER 20. WORKING WITH VIDEO 20.3 Matching Sound to Video In Live, it takes just a few steps to get started with video. Let’s look at a common scenario matching a piece of music to edits or hit points in a video: 1. -
Page 277
CHAPTER 20. WORKING WITH VIDEO 20.4 Video Trimming Tricks Commonly, composers receive movie les with a few seconds of blank space before the real beginning of the action. This pre-roll ( two-beep ) serves as a sync reference for the mixing engineer, who expects that the composer’s audio les will also include the same pre-roll. -
Page 278
CHAPTER 20. WORKING WITH VIDEO In the Arrangement View, we select all materials (Edit menu/Select All), then drag the entire composition a few seconds to the right: The Video Clip and the Final Clip of Music. Now, we click on the video clip’s title bar (to deselect everything else), then drag the video clip’s left edge to the left as far as possible to reveal the pre-roll again. -
Page 279
Chapter 21 Live Audio Effect Reference Live comes with a selection of custom-designed, built-in audio effects. The Working with Instruments and Effects chapter explains the basics of using effects in Live. 21.1 Auto Filter The Auto Filter Effect. The Auto Filter effect provides classic analog lter emulation. It can be modulated by an envelope follower and/or an LFO to create moving lter effects. -
Page 280
CHAPTER 21. LIVE AUDIO EFFECT REFERENCE There are four different lter types: lowpass, highpass, bandpass and notch. For each type, the X-Y controller adjusts frequency (to adjust, click and drag on the X-axis) and Q (also called resonance; to adjust, click and drag on the Y-axis). You can also click on the Freq and Q numeric displays and type in exact values. -
Page 281: Auto Pan
CHAPTER 21. LIVE AUDIO EFFECT REFERENCE periodic fashion. The respective Amount control sets how much the LFO affects the lter. This can be used in conjunction with or instead of the envelope follower. The Rate control speci es the LFO speed. It can be set in terms of hertz, or synced to the song tempo, allowing for controlled rhythmic ltering.
-
Page 282
CHAPTER 21. LIVE AUDIO EFFECT REFERENCE Auto Pan offers LFO-driven manipulation of amplitude and panning for creating automatic panning, tremolo and amplitude modulation, and beat-synchronized chopping effects. Auto Pan’s LFOs modulate the amplitude of the left and right stereo channels with sine, triangle, sawtooth down or random waveforms. -
Page 283
CHAPTER 21. LIVE AUDIO EFFECT REFERENCE The Interval control de nes how often Beat Repeat captures new material and begins re- peating it. Interval is synced to and set in terms of the song tempo, with values ranging from 1/32 to 4 Bars. The Offset control shifts the point de ned by Interval forward in time. -
Page 284
CHAPTER 21. LIVE AUDIO EFFECT REFERENCE Beat Repeat includes a combined lowpass and highpass lter for de ning the passed fre- quency range of the device. You can turn the lter on and off, and set the center frequency and width of the passed frequency band, using the respective controls. The original signal (which was received at Beat Repeat’s input) is mixed with Beat Repeat’s repetitions according to one of three mix modes: Mix allows the original signal to pass through the device and have repetitions added to it;… -
Page 285
CHAPTER 21. LIVE AUDIO EFFECT REFERENCE To set both delay lines to Delay 1’s delay time, turn on the link button ( = ). This is especially useful if you want to change both delays with a single gesture. The Modulation X-Y controller can impart motion to the sounds. To change the modula- tion rate for the delay times, click and drag along the horizontal axis. -
Page 286
CHAPTER 21. LIVE AUDIO EFFECT REFERENCE A compressor reduces gain for signals above a user-settable threshold. Compression re- duces the levels of peaks, opening up more headroom and allowing the overall signal level to be turned up. This gives the signal a higher average level, resulting in a sound that is subjectively louder and punchier than an uncompressed signal. -
Page 287
CHAPTER 21. LIVE AUDIO EFFECT REFERENCE maximizing tool in the master channel. Less is often more here. Because compression reduces the volume of loud signals and opens up headroom, you can use the Output slider so that the peaks once again hit the maximum available headroom. The Output meter shows the output signal’s level. -
Page 288
Note that, for reasons of quantum physics, Lookahead and external sidechaining are disabled when using the FB model; Ableton’s engineers are hard at work developing code that will allow our software to predict the future, but we don’t anticipate having this available until at least the next major release. -
Page 289
CHAPTER 21. LIVE AUDIO EFFECT REFERENCE are the same signal. But by using sidechaining, it is possible to compress a signal based on the level of another signal or a speci c frequency component. To access the Sidechain parameters, unfold the Compressor window by toggling the button in its title bar. -
Page 290
CHAPTER 21. LIVE AUDIO EFFECT REFERENCE Mixing a Voiceover Sidechaining is commonly used for so-called ducking effects. For example, imagine that you have one track containing a voiceover and another track containing background music. Since you want the voiceover to always be the loudest source in the mix, the background music must get out of the way every time the narrator is speaking. -
Page 291
CHAPTER 21. LIVE AUDIO EFFECT REFERENCE 21.6 Corpus The Corpus Effect. Corpus is an effect that simulates the acoustic characteristics of seven types of resonant objects. Developed in collaboration with Applied Acoustics Systems, Corpus uses physical modelling technology to provide a wide range of parameters and modulation options. The full version of Corpus is not included with the standard version of Live, but is bundled with the Collision… -
Page 292
CHAPTER 21. LIVE AUDIO EFFECT REFERENCE real-world mallet instruments such as a marimbas and glockenspiels behave. At 100%, the resonance is muted immediately at note off, regardless of the Decay time. You can hide or show the Sidechain parameters by toggling the button in Corpus’s title bar. -
Page 293
CHAPTER 21. LIVE AUDIO EFFECT REFERENCE ˆ Marimba, a specialized variant of the Beam model, reproduces the characteristic tuning of marimba bar overtones which are produced as a result of the deep arch-cut of the bars. ˆ String simulates the sound produced by strings of different materials and sizes. ˆ… -
Page 294
CHAPTER 21. LIVE AUDIO EFFECT REFERENCE Inharm. (Inharmonics) adjusts the pitch of the resonator’s harmonics. At negative values, frequencies are compressed, increasing the amount of lower partials. At positive values, frequencies are stretched, increasing the amount of upper partials. This parameter is not used with the Pipe or Tube resonators. -
Page 295
CHAPTER 21. LIVE AUDIO EFFECT REFERENCE 21.7 Dynamic Tube The Dynamic Tube Effect. The Dynamic Tube effect infuses sounds with the peculiarities of tube saturation. An in- tegrated envelope follower generates dynamic tonal variations related to the level of the input signal. -
Page 296
CHAPTER 21. LIVE AUDIO EFFECT REFERENCE to volume changes in the input signal. Together, they shape the dynamic nature of the distortions. Note that if Envelope is set to zero, they will have no effect. Cut or boost the device’s nal signal level with the Output dial. Aliasing can be reduced by enabling Hi-Quality mode, which can be accessed via the (PC) / (Mac) context menu. -
Page 297
CHAPTER 21. LIVE AUDIO EFFECT REFERENCE ˆ Low cut (cuts frequencies below the speci ed frequency); ˆ Low shelf (boosts or cuts frequencies lower than the speci ed frequency); ˆ Bell curve (boosts or cuts over a range of frequencies); ˆ… -
Page 298
CHAPTER 21. LIVE AUDIO EFFECT REFERENCE 21.9 EQ Three The EQ Three Effect. If you have ever used a good DJ mixer you will know what this is: An EQ that allows you to adjust the level of low, mid and high frequencies independently. Each band can be adjusted from -in nite dB to +6 dB using the gain controls. -
Page 299
CHAPTER 21. LIVE AUDIO EFFECT REFERENCE controls are set to 0.00 dB. This is typical behavior for this kind of lter, and is part of EQ Three’s unique sound. If you need a more linear behavior choose 24 dB Mode or use the EQ Eight. -
Page 300
CHAPTER 21. LIVE AUDIO EFFECT REFERENCE 21.11 External Audio Effect The External Audio Effect. The External Audio Effect is a bit different than Live’s other effects devices. Instead of processing audio itself, it allows you to use external (hardware) effects processors within a track’s device chain. -
Page 301
CHAPTER 21. LIVE AUDIO EFFECT REFERENCE latency settings in samples, which ensures that the number of samples you specify will be retained even when changing the sample rate. If your external device connects to Live via an analog connection, you will want to adjust your latency settings in milliseconds, which ensures that the amount of time you specify will be retained when changing the sample rate. -
Page 302
CHAPTER 21. LIVE AUDIO EFFECT REFERENCE delay 3 to the right channel. The Pan controls at the right can override the delay channels’ outputs; otherwise each delay outputs on the channel from which it derives its input. Each delay channel’s lter has an associated On switch, located to the left of each X-Y controller. -
Page 303
CHAPTER 21. LIVE AUDIO EFFECT REFERENCE 21.13 Flanger The Flanger Effect. Flanger uses two parallel time-modulated delays to create anging effects. Flanger’s delays can be adjusted with the Delay Time control. The Feedback control sends part of the output signal back through the device input, while the Polarity switch ( + or — ) sets the polarity. -
Page 304: Frequency Shifter
CHAPTER 21. LIVE AUDIO EFFECT REFERENCE Adjusting the HiPass control will cut low frequencies from the delayed signal. The Dry/Wet control adjusts the balance between the processed and dry signals. Set it to 100 percent if using Flanger in a return track. Hi-Quality mode can be toggled on or off via a (PC) / (Mac) context menu…
-
Page 305
CHAPTER 21. LIVE AUDIO EFFECT REFERENCE The Drive button enables a distortion effect, while the slider below it controls the level of the distortion. Drive is only available in Ring mode. Enabling the Wide button creates a stereo effect by inverting the polarity of the Spread value for the right channel. -
Page 306
CHAPTER 21. LIVE AUDIO EFFECT REFERENCE 21.14.1 Frequency Shifter Tips Frequency shifting and ring modulation can produce some very interesting sounds. Here are some tips for using the Frequency Shifter device. Drum tuning Tuning sampled acoustic drums can be tricky. Using a sampler’s transposition controls often changes the character of the sounds in unrealistic ways, resulting in pinched or tubby samples. -
Page 307
CHAPTER 21. LIVE AUDIO EFFECT REFERENCE 21.15 Gate The Gate Effect. The Gate effect passes only signals whose level exceeds a user-speci ed threshold. A gate can eliminate low-level noise that occurs between sounds (e.g., hiss or hum), or shape a sound by turning up the threshold to where it cuts off reverb or delay tails or truncates an instrument’s natural decay. -
Page 308
CHAPTER 21. LIVE AUDIO EFFECT REFERENCE Normally, the signal being gated and the input source that triggers the gate are the same signal. But by using sidechaining, it is possible to gate a signal based on the level of another signal. -
Page 309
CHAPTER 21. LIVE AUDIO EFFECT REFERENCE source. Randomizing pitch and delay time can create complex masses of sound and rhythm that seem to bear little relationship to the source. This can be very useful in creating new sounds and textures, as well as getting rid of unwelcome house guests, or terrifying small pets (just kidding!). -
Page 310
CHAPTER 21. LIVE AUDIO EFFECT REFERENCE Grain Delay now also has a dry/wet control; it can be routed to the vertical axis of the X-Y controller. 21.17 Limiter The Limiter Effect. The Limiter effect is a mastering-quality dynamic range processor that ensures that the output does not exceed a speci ed level. -
Page 311
CHAPTER 21. LIVE AUDIO EFFECT REFERENCE and sets an appropriate release time automatically. The meter gives a visual indication of how much gain reduction is being applied to the signal. Note that any devices or channel faders that appear after Limiter may add gain. To ensure that your nal output will never clip, place Limiter as the last device in the Master track’s device chain and keep your Master fader below 0 dB. -
Page 312
CHAPTER 21. LIVE AUDIO EFFECT REFERENCE audio that are the length of the originally recorded material. The Play button plays back the current state of Looper’s buffer without recording any new material. The Stop button stops playback. The behavior of the transport controls changes depending on whether or not Live’s playback is running. -
Page 313
CHAPTER 21. LIVE AUDIO EFFECT REFERENCE Stopped Clear Overdub Record Play Empty Undo/Redo Diagram of Looper’s Click Doubleclick Multi-Purpose Transport Hold Button Behavior Looper’s Multi-Purpose Transport Button is optimized for use with a MIDI footswitch. To assign a footswitch, enter MIDI Map Mode, click the button and then press your attached footswitch. -
Page 314
CHAPTER 21. LIVE AUDIO EFFECT REFERENCE speci ed time and then switch to Play or Overdub, as determined by the button next to this chooser. ˆ Song not running: If Looper’s Record Length chooser is set to the default x bars, Looper will make a guess about the tempo of the material you’ve recorded as soon as you press Overdub, Play or Stop. -
Page 315
CHAPTER 21. LIVE AUDIO EFFECT REFERENCE will then swap this behavior; the original material will play forward again, while the material that was overdubbed while Reverse was enabled will play backwards. Engaging the Reverse button is subject to the Quantization chooser setting. Feedback sets the amount of previously recorded signal that is fed back into Looper when overdubbing. -
Page 316
CHAPTER 21. LIVE AUDIO EFFECT REFERENCE 2. Record at least one pass of material into Looper. 3. Create another audio track. 4. In the new track’s top Audio From and Audio To choosers, select the track containing the Looper. 5. In the new track’s bottom Audio From and Audio To choosers, select Insert-Looper. -
Page 317
CHAPTER 21. LIVE AUDIO EFFECT REFERENCE 21.19.1 Dynamics Processing Theory To understand how to use the Multiband Dynamics device, it helps to understand the four different methods of manipulating dynamics. When we use the term compression, we’re typically talking about lowering the level of signals that exceed a threshold. -
Page 318
CHAPTER 21. LIVE AUDIO EFFECT REFERENCE upward expansion (uncommon) larger larger original original dynamic dynamic dynamic dynamic range range range range Downward and Upward downward expansion Expansion. (common) To summarize: ˆ Downward compression (common): make loud signals quieter ˆ Upward compression (uncommon): make quiet signals louder ˆ… -
Page 319
CHAPTER 21. LIVE AUDIO EFFECT REFERENCE Hz, the mid band from 500 Hz to 2000 Hz and the high band from 2000 Hz up to whatever your soundcard or sample rate supports. Each band has activator and solo buttons. With the activator button disabled for a given band, its compression/expansion and gain controls are bypassed. -
Page 320
CHAPTER 21. LIVE AUDIO EFFECT REFERENCE between displaying the Time (attack and release), Below (threshold and ratio) and Above (threshold and ratio) for each band. For the Above thresholds, Attack de nes how long it takes to reach maximum compression or expansion once a signal exceeds the threshold, while Release sets how long it takes for the device to return to normal operation after the signal falls below the threshold. -
Page 321
CHAPTER 21. LIVE AUDIO EFFECT REFERENCE Basic Multiband Compression By using only the upper thresholds, Multiband Dynamics can be used as a traditional down- ward compressor. Adjust the crossover points to suit your audio material, then apply down- ward compression (by dragging down in the upper blocks in the display or by setting the numerical ratios to values greater than 1.) De-essing To remove harshness caused by overly loud high frequency content, try enabling only the… -
Page 322
CHAPTER 21. LIVE AUDIO EFFECT REFERENCE 21.20 Overdrive The Overdrive Effect. Overdrive is a distortion effect that pays homage to some classic pedal devices commonly used by guitarists. Unlike many distortion units, it can be driven extremely hard without sacri cing dynamic range. The distortion stage is preceded by a bandpass lter that can be controlled with an X-Y controller. -
Page 323
CHAPTER 21. LIVE AUDIO EFFECT REFERENCE 21.21 Phaser The Phaser Effect. Phaser uses a series of all-pass lters to create a phase shift in the frequency spectrum of a sound. The Poles control creates notches in the frequency spectrum. The Feedback control can then be used to invert the waveform and convert these notches into peaks (or poles). -
Page 324: Ping Pong Delay
CHAPTER 21. LIVE AUDIO EFFECT REFERENCE LFOs will be perfectly out of phase (180 degrees apart), so that when one reaches its peak, the other is at its minimum. Spin detunes the two LFO speeds relative to each other. Each lter frequency is then modulated using a different LFO frequency, as determined by the Spin amount.
-
Page 325
CHAPTER 21. LIVE AUDIO EFFECT REFERENCE time, click and drag up or down in the Delay Time eld, or click in the eld and type in a value. The Feedback parameter controls how much of the right channel output signal returns to the delay line input. -
Page 326
CHAPTER 21. LIVE AUDIO EFFECT REFERENCE 21.23 Redux The Redux Effect. Nostalgic for the famed low-resolution sound quality of the Ensoniq Mirage, Fairlight CMI or Commodore-64 computer? Redux returns us to the Dark Ages of digital by reducing a signal’s sample rate and bit resolution. The Downsample section has two parameters: Downsample and a downsample Mode switch. -
Page 327
CHAPTER 21. LIVE AUDIO EFFECT REFERENCE Turning off Bit Reduction results in modest CPU savings. 21.24 Resonators The Resonators Effect. This device consists of ve parallel resonators that superimpose a tonal character on the input source. It can produce sounds resembling anything from plucked strings to vocoder- like effects. -
Page 328
CHAPTER 21. LIVE AUDIO EFFECT REFERENCE Resonators provides two different resonation modes. Mode A provides a more realistic sounding resonation, while Mode B offers an effect that is especially interesting when Resonator I’s Note parameter is set to lower pitches. The brightness of the resulting sound can be adjusted using the Color control. -
Page 329: Global Settings
CHAPTER 21. LIVE AUDIO EFFECT REFERENCE Predelay controls the delay time, in milliseconds, before the onset of the rst early re ection. This delays the reverberation relative to the input signal. One’s impression of the size of a real room depends partly on this delay. Typical values for natural sounds range from 1ms to 25ms.
-
Page 330
CHAPTER 21. LIVE AUDIO EFFECT REFERENCE other (this is also a property of the diffusion in real rooms). The lowest setting mixes the output signal to mono. 21.25.4 Diffusion Network The Diffusion network creates the reverberant tail that follows the early re ections. The decay time control adjusts the time required for this tail to drop to 1/1000th (-60 dB) of its initial amplitude. -
Page 331
CHAPTER 21. LIVE AUDIO EFFECT REFERENCE 21.26 Saturator The Saturator Effect. Saturator is a waveshaping effect that can add that missing dirt, punch or warmth to your sound. It can coat input signals with a soft saturation or drive them into many different avors of distortion. -
Page 332
CHAPTER 21. LIVE AUDIO EFFECT REFERENCE Period. ˆ Drive determines how much the input signal will be in uenced by the Waveshaper parameters. Setting Drive to zero will negate the effect entirely. ˆ Lin works together with the Curve and Depth parameters to alter the linear portion of the shaping curve. -
Page 333
CHAPTER 21. LIVE AUDIO EFFECT REFERENCE 21.27 Simple Delay The Simple Delay Effect. The Simple Delay provides two independent delay lines, one for each channel (left and right). To refer delay time to the song tempo, activate the Sync switch, which allows using the Delay Time beat division chooser. -
Page 334
CHAPTER 21. LIVE AUDIO EFFECT REFERENCE ˆ Fade creates a crossfade between the old and new delay times. This sounds similar to time stretching if the delay time is gradually changed. Fade mode is the default option. ˆ Jump immediately jumps to the new delay time. Note that this will cause an audible click if the delay time is changed while delays are sounding. -
Page 335
CHAPTER 21. LIVE AUDIO EFFECT REFERENCE The Avg slider allows you to specify how many blocks of samples will be averaged for each update of the display. With a setting of one, each block is shown. This results in much more activity in the display, which can be useful for nding the spectrum of short peaks. -
Page 336
CHAPTER 21. LIVE AUDIO EFFECT REFERENCE 21.29 Utility The Utility Effect. Utility can perform some very useful tasks, especially in combination with other devices. The Mute button simply silences the incoming signal when enabled. Note: The active/mute controls of a track are always placed at the very end of the signal chain. However, since you can place Utility anywhere in a signal chain, you can use its mute function to cut the input of a delay line or reverb without turning off the output of these devices. -
Page 337
CHAPTER 21. LIVE AUDIO EFFECT REFERENCE 21.30 Vinyl Distortion The Vinyl Distortion Effect. The Vinyl Distortion effect emulates some of the typical distortions that occur on vinyl records during playback. These distortions are caused by the geometric relationships between the needle and the recorded groove. -
Page 338
CHAPTER 21. LIVE AUDIO EFFECT REFERENCE The Volume control adjusts the amount of gain applied to the noise. 21.31 Vocoder The Vocoder Effect. A vocoder is an effect that combines the frequency information of one audio signal (called the carrier) with the amplitude contour of another audio signal (called the modulator). The modulator source is generally something with a clear rhythmic character such as speech or drums, while the carrier is typically a harmonically-rich synthesizer sound such as a string or pad. -
Page 339
CHAPTER 21. LIVE AUDIO EFFECT REFERENCE ˆ External allows you to select any available internal routing points from the choosers below. This is the option you’ll want for classic robot voice applications. ˆ Modulator uses the modulator itself as the carrier. This essentially outputs a resynthe- sized version of the modulator signal, but allows you to use Vocoder’s sound-shaping controls to adjust the sound. -
Page 340
CHAPTER 21. LIVE AUDIO EFFECT REFERENCE bandwidth, you increase the overlap of the lter bands. A bandwidth of 100% is the most accurate, but higher or lower settings can create interesting effects. The Precise/Retro switch toggles between two types of lter behavior. In Precise mode, all lters have the same gain and bandwidth. -
Page 341
CHAPTER 21. LIVE AUDIO EFFECT REFERENCE 1. Insert Vocoder in the track that contains your vocal material. You can either use a clip that contains a prerecorded voice clip or, to process a live vocal signal, connect a microphone to a channel on your audio hardware and choose this as input source for the track. -
Page 342
Chapter 22 Live MIDI Effect Reference Live comes with a selection of custom-designed, built-in MIDI effects. The Working with Instruments and Effects chapter explains the basics of using effects in Live. 22.1 Arpeggiator The Arpeggiator Effect. Live’s Arpeggiator effect takes the individual MIDI notes from a held chord (or single note), and plays them as a rhythmical pattern. -
Page 343
CHAPTER 22. LIVE MIDI EFFECT REFERENCE controlled by the device, which also provides a full complement of both classic and original arpeggiator features. Arpeggiators are a classic element in Eighties synth music. The name originates with the musical concept of the arpeggio, in which the notes comprising a chord are played as a series rather than in unison. -
Page 344
CHAPTER 22. LIVE MIDI EFFECT REFERENCE Pinky Up and Pinky UpDown . Thumb Up and Thumb UpDown . Play Order places notes in the pattern according to the order in which they are played. This is therefore only recognizable when more than one chord or note has been played. In addition to the Arpeggiator styles above, there is a Chord Trigger mode which repeats the incoming notes as a block chord, as well as three settings for creating random arpeggios: ˆ… -
Page 345
CHAPTER 22. LIVE MIDI EFFECT REFERENCE can be added to the pattern simply by playing them. Notes can also be removed from the pattern in this scenario by playing them a second time, allowing the gradual buildup and rearrangement of the pattern over time. Tip: If you want the pattern to stop playing, momentarily deactivate Hold. -
Page 346
CHAPTER 22. LIVE MIDI EFFECT REFERENCE The dynamics of Arpeggiator are controlled using the velocity section. With Velocity set to On and Target set to 0, for example, the sequence will gradually fade out, eventually reaching 0 velocity. The Decay control sets the amount of time Arpeggiator takes to reach the Target velocity. -
Page 347
CHAPTER 22. LIVE MIDI EFFECT REFERENCE Note that no two notes of the same pitch can contribute to the chord, and that selecting the same shift value twice (e.g., +8 semitones on both Shift 2 and Shift 3) will result in the latter control appearing disabled, indicating that it is a duplicate and therefore not in use. -
Page 348
CHAPTER 22. LIVE MIDI EFFECT REFERENCE Decay Time This is the time needed for an incoming note’s velocity to decay to zero. The decay begins immediately from the moment the device receives a MIDI Note On message. The value at the time of Note Off will become the velocity of the output MIDI note. Key Scale The pitch of incoming notes can be used to alter the length of the output notes. -
Page 349
CHAPTER 22. LIVE MIDI EFFECT REFERENCE 22.5 Random The Random Effect. Random adds an element of the unknown to the otherwise commonplace pitch parameter. The Chance control de nes the likelihood that an incoming note’s pitch will be changed by a random value. -
Page 350
CHAPTER 22. LIVE MIDI EFFECT REFERENCE C3 once will trigger C3, and each successive C3 will trigger the next semitone higher until the device reaches C4, at which point it will start over at C3. But with Chance set to 100 percent, Choices set to 2 and Scale set to 2, incoming C3s will alternate between C3 and D3. -
Page 351
CHAPTER 22. LIVE MIDI EFFECT REFERENCE mapping will take effect. Outside of the range de ned by these controls, the Scale effect will be inapplicable, and the LED light will ash to indicate that some notes are not being processed by the effect, but are playing at their unaltered pitch. 22.7 Velocity The Velocity Effect. -
Page 352
CHAPTER 22. LIVE MIDI EFFECT REFERENCE ˆ Gate Mode removes incoming notes altogether if their velocities are outside of the range. You will see the little LED below the X-Y display ash when a note is blocked by gating. ˆ In Fixed Mode, the Out Hi velocity de nes all outgoing note velocities, regardless of incoming note velocity. -
Page 353
Chapter 23 Live Instrument Reference Live comes with a selection of custom-designed, built-in instruments. The Working with Instruments and Effects chapter explains the basics of using instruments in Live. The boxed version of Live 8 ships with the Essential Instrument Collection, a multi-gigabyte library of meticulously sampled and selected instruments ready for use in either Simpler or Sampler. -
Page 354
CHAPTER 23. LIVE INSTRUMENT REFERENCE Analog is a virtual analog synthesizer, created in collaboration with Applied Acoustics Sys- tems. With this instrument, we have not attempted to emulate a speci c vintage analog synthesizer but rather to combine different features of legendary vintage synthesizers into a modern instrument. -
Page 355
CHAPTER 23. LIVE INSTRUMENT REFERENCE These sources can be independently routed to two different multi-mode lters, which are each connected to an ampli er. Furthermore, the signal ow can be run through the lters in series or in parallel. Analog also features two low-frequency oscillators (LFOs) which can modulate the oscillators, lters and ampli ers. -
Page 356
CHAPTER 23. LIVE INSTRUMENT REFERENCE The Shape chooser selects the oscillator’s waveform. The choices are sine, sawtooth, rectan- gular and white noise. When rectangular is selected, the Pulse Width parameter is enabled in the display, which allows you to change the pulse width of the waveform. Low Width values result in a very narrow waveform, which tends to sound tinny or pinched. -
Page 357: Noise Generator
CHAPTER 23. LIVE INSTRUMENT REFERENCE oscillator whose frequency is set by the Ratio slider. At 0%, the frequency of the internal oscillator and the audible oscillator match, so sync has no effect. As you increase the Ratio, the internal oscillator’s rate increases, which changes the harmonic content of the audible oscillator.
-
Page 358
CHAPTER 23. LIVE INSTRUMENT REFERENCE 23.1.4 Filters Display and Shell Parameters for the two Filters. Analog’s two multi-mode lters come equipped with a exible routing architecture, multiple saturation options and a variety of modulation possibilities. As with the oscillators, all parameters can be set independently for each lter. -
Page 359
CHAPTER 23. LIVE INSTRUMENT REFERENCE The three Sym options apply symmetrical distortion, which means that the saturation be- havior is the same for positive and negative values. The Asym modes result in asymmetrical saturation. For both mode types, higher numbers result in more distortion. Drive can be switched off entirely by selecting Off in the chooser. -
Page 360
CHAPTER 23. LIVE INSTRUMENT REFERENCE 23.1.6 Envelopes Analog’s Envelope Parameters. In addition to the pitch envelopes in the oscillator sections, Analog is equipped with inde- pendent envelopes for each lter and ampli er. All four of these envelopes have identical controls, which are housed entirely within the display. -
Page 361
CHAPTER 23. LIVE INSTRUMENT REFERENCE Normally, each new note triggers its own envelope from the beginning of the attack phase. With Legato enabled, a new note that is played while another note is already depressed will use the rst note’s envelope, at its current position. Enabling the Free switch causes the envelope to bypass its sustain phase and move directly from the decay phase to the release phase. -
Page 362: Global Parameters
CHAPTER 23. LIVE INSTRUMENT REFERENCE Analog’s two LFOs can be used as modulation sources for the oscillators, lters and ampli- ers. As with the other sections, each LFO has independent parameters. The LFO 1 and LFO 2 switches in the shell toggle the respective LFO on and off, while the Rate knob sets the LFO’s speed.
-
Page 363
CHAPTER 23. LIVE INSTRUMENT REFERENCE The Volume control in the shell adjusts the overall output of the instrument. This is the instrument’s master level, and can boost or attenuate the output of the ampli er sections. The Vib switch turns the vibrato effect on or off, while the percentage slider next to it adjusts the amplitude of the vibrato. -
Page 364
CHAPTER 23. LIVE INSTRUMENT REFERENCE priority to the most recently played notes, cutting off the oldest notes as necessary. The Octave, Semi and Tuning controls function as coarse and ne tuners. Octave transposes the entire instrument by octaves, while Semi transposes up or down in semitone increments. The Tuning slider adjusts in increments of one cent (up to a maximum of 50 cents up or down). -
Page 365
CHAPTER 23. LIVE INSTRUMENT REFERENCE 23.2 Collision The Collision Instrument. Collision is a synthesizer that simulates the characteristics of mallet percussion instruments. Created in collaboration with Applied Acoustics Systems, Collision uses physical modeling technology to model the various sound generating and resonant components of real (or imagined) objects. -
Page 366
CHAPTER 23. LIVE INSTRUMENT REFERENCE In addition to serving as organizational aids, Collision’s tabs contain LEDs that light up to indicate that their contained sections are active. Disabling unused sections can save CPU. 23.2.2 Excitator Tab The Excitator tab contains parameters for the Mallet and Noise sections. These model the behavior of a mallet striking a surface, and provide Collision’s fundamental sound. -
Page 367
CHAPTER 23. LIVE INSTRUMENT REFERENCE The Color knob sets the frequency of the noise component. At higher values, there are less low frequencies in the noise. This parameter has no effect if Noise is set to 0. The Mallet section can be toggled on or off via the switch next to its name. The Noise Section Collision’s Noise Section. -
Page 368
CHAPTER 23. LIVE INSTRUMENT REFERENCE decay phase to the release of the key. When this slider is set to 0, there is no sustain phase. With it set to 100, there is no decay phase. Finally, the release time is set with the R (Release) slider. This is the time it takes for the envelope to reach zero after the key is released. -
Page 369
CHAPTER 23. LIVE INSTRUMENT REFERENCE Tuning Section Resonator Tuning Parameters. The Tune and Fine knobs function as coarse and ne tuning controls. Tune moves up or down in semitone increments, while Fine adjusts in increments of one cent (up to a maximum of one quarter tone (50 cents) up or down). -
Page 370
CHAPTER 23. LIVE INSTRUMENT REFERENCE The type chooser allows you to select from seven types of physically modeled resonant objects: ˆ Beam simulates the resonance properties of beams of different materials and sizes. ˆ Marimba, a specialized variant of the Beam model, reproduces the characteristic tuning of marimba bar overtones which are produced as a result of the deep arch-cut of the bars. -
Page 371
CHAPTER 23. LIVE INSTRUMENT REFERENCE the radius of the pipe or tube. As the radius increases, the decay time and high frequency sustain both increase. At very large sizes, the fundamental pitch of the resonator also changes. The Decay and Material/Radius parameters can also be controlled with the X-Y controller, and modulated by note pitch and velocity via the sliders below the X-Y panel. -
Page 372
CHAPTER 23. LIVE INSTRUMENT REFERENCE Mixer Section Resonator Mixer. Each resonator has its own Volume and Pan controls. Pan can also be modulated by note pitch via the K (Key) slider below the knob. The Bleed control mixes a portion of the original oscillator signal with the resonated signal. At higher values, more of the original signal is applied. -
Page 373: Midi Tab
CHAPTER 23. LIVE INSTRUMENT REFERENCE sawtooth down and two types of noise. The rst noise type steps between random values while the second uses smooth ramps. The switch next to the waveform chooser toggles the LFO’s rate between frequency in Hertz and tempo-synced beat divisions.
-
Page 374
CHAPTER 23. LIVE INSTRUMENT REFERENCE The Global Section Collision’s Global Section. The global section contains the parameters that relate to the overall behavior and perfor- mance of Collision. The Volume knob acts as Collision’s master output control. Collision contains a built-in limiter that automatically activates when the audio level is too high. -
Page 375
CHAPTER 23. LIVE INSTRUMENT REFERENCE Mallet Resonator 1 Resonator 2 Noise Resonators in 1 + 2 (Parallel) Con guration. The Voices chooser sets the available polyphony. Since each voice that’s used requires additional CPU, you may need to experiment with this chooser to nd a good balance between playability and performance, particularly on older machines. -
Page 376
Drum Machines Live Pack into the Live application window, either from your operating system or from Live’s Browser. After you have installed the Drum Machines Live Pack, you will need to authorize it. Further details can be found at the Ableton website http://www.ableton.com/authorize… -
Page 377
CHAPTER 23. LIVE INSTRUMENT REFERENCE 23.3.2 Accessing the Drum Machines After installation, the Drum Machines presets are accessed through Live’s Device Browser, in exactly the same way as Live’s other built-in instruments. You will nd them as categorized presets within the Drum Rack folder. Drum Machines presets are therefore loaded just like any other device, by dragging a preset from the Browser into an empty MIDI track. -
Page 378
CHAPTER 23. LIVE INSTRUMENT REFERENCE parameters can be tweaked to values not possible with the real instruments to get some truly amazing new sounds that still retain a warm acoustic quality. The full version of Electric is not included with the standard version of Live, but is a special feature available for purchase separately. -
Page 379
CHAPTER 23. LIVE INSTRUMENT REFERENCE The Noise subsection simulates the impact noise caused by the mallet striking the fork. The Decay knob adjusts how long it takes for this noise to fade to silence, while the Pitch control sets the center frequency. Level adjusts the overall volume of the noise component. An additional Key scaling control adjusts how much the noise volume is determined by note pitch. -
Page 380: Global Section
CHAPTER 23. LIVE INSTRUMENT REFERENCE hardness of the dampers, producing a brighter sound. The overall amount of damper noise is adjusted with the Level control. The Att/Rel knob adjusts whether or not damper noise is present when the dampers are applied to the fork or when they are released.
-
Page 381: External Instrument
CHAPTER 23. LIVE INSTRUMENT REFERENCE The Volume knob sets Electric’s overall output level. The Voices chooser sets the available polyphony. Since each voice that’s used requires additional CPU, you may need to experiment with this chooser to nd a good balance between playability and performance, particularly on older machines.
-
Page 382
CHAPTER 23. LIVE INSTRUMENT REFERENCE allows you to easily integrate external (hardware) synthesizers, ReWire devices and multi- timbral plug-ins into your projects. It sends MIDI out and returns audio. The two MIDI To choosers select the output to which the device will send MIDI data. The top chooser selects either a physical MIDI port, a… -
Page 383
CHAPTER 23. LIVE INSTRUMENT REFERENCE slider allows you to set your latency compensation amount in either milliseconds or samples. If your external device connects to Live via a digital connection, you will want to adjust your latency settings in samples, which ensures that the number of samples you specify will be retained even when changing the sample rate. -
Page 384
CHAPTER 23. LIVE INSTRUMENT REFERENCE loaded into Impulse’s sample slots can be time-stretched, ltered and processed by enve- lope, saturation, pan and volume components, nearly all of which are subject to random and velocity-based modulation. 23.6.1 Sample Slots Drag and drop samples into any of Impulse’s sample slots from the Browser or the Session and Arrangement Views. -
Page 385
CHAPTER 23. LIVE INSTRUMENT REFERENCE 23.6.2 Start, Tune and Stretch The Start control de nes where Impulse begins playing a sample, and can be set up to 100 ms later than the actual sample beginning. The Transposition control adjusts the transposition of the sample by +/- 48 semitones, and can be modulated by incoming note velocity or a random value, as set in the appropriate elds. -
Page 386: Global Controls
CHAPTER 23. LIVE INSTRUMENT REFERENCE 23.6.5 Pan and Volume Each sample has Volume and Pan controls that adjust amplitude and stereo positioning, respectively. Both controls can be modulated: Pan by velocity and a random value, and Volume by velocity only. 23.6.6 Global Controls The parameters located to the right of the sample slots are global controls that apply to all samples within Impulse’s domain.
-
Page 387
Live’s Browser. After you have installed Latin Percussion, you will need to authorize it. Further details can be found at the Ableton website 23.7.2 Accessing the Latin Percussion Presets After installation, the Latin Percussion presets are accessed through Live’s Device Browser, in exactly the same way as Live’s other built-in instruments. -
Page 388
CHAPTER 23. LIVE INSTRUMENT REFERENCE to navigate to the selected conga preset folder. Then drag the entire folder to the Drum Rack’s pad view. This will replace all of the currently loaded conga components, leaving all other pads alone. You can also unfold these preset folders to access individual instruments within. -
Page 389: General Overview
CHAPTER 23. LIVE INSTRUMENT REFERENCE 23.8.1 General Overview The interface of Operator consists of two parts: the display surrounded on either side by the shell. The shell offers the most important parameters in a single view and is divided into eight sections.
-
Page 390
CHAPTER 23. LIVE INSTRUMENT REFERENCE Operator’s Global Display. Typically, FM synthesis makes use of pure sine waves, creating more complex waveforms via modulation. However, in order to simplify sound design and to create a wider range of possible sounds, we designed Operator to produce a variety of other waveforms, including two types of noise. -
Page 391
CHAPTER 23. LIVE INSTRUMENT REFERENCE Built-in Waveforms The oscillators come with a built-in collection of basic waveform types sine, sawtooth, square, triangle and noise which are selected from the Wave chooser in the individual oscillator displays. The rst of these waveforms is a pure, mathematical sine wave, which is usually the rst choice for many FM timbres. -
Page 392
CHAPTER 23. LIVE INSTRUMENT REFERENCE offers an option to toggle Normalize on or off. When enabled, the oscillator’s overall output level is maintained as you draw additional harmonics. When disabled, additional harmonics add additional level. Note that the volume can become extremely loud if Normalize is off. You can export your waveform in .ams format to the Library/Samples/Waveforms folder via an option in the (PC) /… -
Page 393
CHAPTER 23. LIVE INSTRUMENT REFERENCE The phase of each oscillator can be adjusted using the Phase control in its display. With the R (Retrigger) button enabled, the waveform restarts at the same position in its phase each time a note is triggered. With R disabled, the oscillator is free-running. As explained earlier oscillators can modulate each other when set up to do so with the… -
Page 394: Lfo Section
CHAPTER 23. LIVE INSTRUMENT REFERENCE 23.8.3 LFO Section Operator’s LFO Parameters. The LFO in Operator can practically be thought of as a fth oscillator. It runs at audio rates, and it modulates the frequency of the other oscillators. It is possible to switch LFO modulation on or off for each individual oscillator (and the lter) using the Dest.
-
Page 395
CHAPTER 23. LIVE INSTRUMENT REFERENCE display’s Amt<Vel control. The LFO’s intensity is also affected by its envelope. 23.8.4 Envelopes Operator has seven envelopes: one for each oscillator, a lter envelope, a pitch envelope and an envelope for the LFO. All envelopes feature some special looping modes. Addition- ally, the lter and pitch envelopes have adjustable slopes. -
Page 396
CHAPTER 23. LIVE INSTRUMENT REFERENCE Mode, an envelope will restart after the beat time selected from the Repeat chooser. In Beat Mode, the repeat time is de ned in fractions of song time, but notes are not quantized. If you play a note a bit out of sync, it will repeat perfectly but stay out of sync. In Sync Mode however, the rst repetition is quantized to the nearest 16th note and, as a result, all following repetitions are synced to the song tempo. -
Page 397: Filter Section
CHAPTER 23. LIVE INSTRUMENT REFERENCE 23.8.5 Filter Section Operator’s Filter Section. Operator’s lters can be very useful for modifying the sonically rich timbres created by the oscillators. And, since the oscillators also provide you with the classic waveforms of analog synthesizers, you can very easily build a subtractive synthesizer with them.
-
Page 398
CHAPTER 23. LIVE INSTRUMENT REFERENCE adjusted with the Dry/Wet control. With this set to 0%, the shaper and drive parameters are bypassed. 23.8.6 Global Controls The global section contains parameters that affect Operator’s overall behavior. Additionally, the global display area provides a comprehensive set of modulation routing controls. The maximum number of Operator voices (notes) playing simultaneously can be adjusted with the Voices parameter in the global display. -
Page 399
CHAPTER 23. LIVE INSTRUMENT REFERENCE 23.8.7 Glide and Spread Operator’s Pitch Section. Operator includes a polyphonic glide function. When this function is activated, new notes will start with the pitch of the last note played and then slide gradually to their own played pitch. -
Page 400
CHAPTER 23. LIVE INSTRUMENT REFERENCE Interpolation and Antialias modes in the global display can also be turned off to conserve CPU resources. Note that turning off the oscillators will not save CPU power. 23.8.9 Finally… Operator is the result of an intense preoccupation with FM synthesis and a love and dedi- cation to the old hardware FM synthesizers, such as the Yamaha SY77, the Yamaha TX81Z and the NED Synclavier II. -
Page 401
CHAPTER 23. LIVE INSTRUMENT REFERENCE Algorithm An oscillator can modulate other oscillators, be modulated by other oscillators, or both. The algorithm de nes the connections between the oscillators and therefore has a signi cant impact on the sound that is created. Voices This sets the maximum number of notes that can sound simultaneously. -
Page 402
CHAPTER 23. LIVE INSTRUMENT REFERENCE OSC Crossfade A/C Crossfades the volumes of the A and C oscillators based on the value of the modulation source. OSC Crossfade B/D Crossfades the volumes of the B and D oscillators based on the value of the modulation source. -
Page 403
CHAPTER 23. LIVE INSTRUMENT REFERENCE Spread If Spread is turned up, the synthesizer uses two detuned voices per note, one each on the left and right stereo channels, to create chorusing sounds. Spread is a very CPU-intensive effect. Transpose This is the global transposition setting for the instrument. Changing this pa- rameter will affect notes that are already playing. -
Page 404
CHAPTER 23. LIVE INSTRUMENT REFERENCE with low resonance settings. The 24 dB lter modes attenuate the ltered frequencies to a much greater degree than the 12 dB modes. The Ladder and SVF lters provide additional lter architectures. Filter Frequency (Freq) This de nes the center or cutoff frequency of the lter. -
Page 405
CHAPTER 23. LIVE INSTRUMENT REFERENCE LFO Waveform Select from among several typical LFO waveforms. Sample and Hold creates random steps, and Noise supplies bandpass- ltered noise. All waveforms are band- limited to avoid unwanted clicks. LFO Range The LFO covers an extreme frequency range. Choose Low for a range from 50 seconds to 30 Hz, or Hi for 8 Hz to 12 kHz. -
Page 406
CHAPTER 23. LIVE INSTRUMENT REFERENCE Osc Coarse Frequency (Coarse) The relationship between oscillator frequency and note pitch is de ned by the Coarse and Fine parameters. Coarse sets the ratio in whole numbers, creating a harmonic relationship. Osc Fine Frequency (Fine) The relationship between oscillator frequency and note pitch is de ned by the Coarse and Fine parameters. -
Page 407
CHAPTER 23. LIVE INSTRUMENT REFERENCE brighter sound, while higher values result in more high-end roll-off and a more prominent fundamental. With Repeat off, partials above the 16th, 32nd or 64th harmonic are truncated. Osc Frequency<Velocity (Osc<Vel) The frequency of an oscillator can be modulated by note velocity. -
Page 408
CHAPTER 23. LIVE INSTRUMENT REFERENCE Envelope Initial Level (Initial) This sets the initial value of the envelope. Envelope Peak Level (Peak) This is the peak level at the end of the note attack. Envelope Sustain Level (Sustain) This is the sustain level at the end of the note decay. The envelope will stay at this level until note release unless it is in Loop, Sync or Beat Mode. -
Page 409
CHAPTER 23. LIVE INSTRUMENT REFERENCE Context Menu Parameters Certain operations and parameters in Operator are only available via the (PC) / Ctrl (Mac) context menu. These include: Copy commands for Oscillators (PC) / (Mac) context menu of the Ctrl oscillator’s shell and envelope display provide options for copying parameters between oscillators. -
Page 410
After you have installed the libraries of your choice, you will need to authorize them. Further details can be found at the Ableton website 23.9.2 Using the Orchestral Presets After installation, the orchestral instruments are accessed through Live’s Device Browser, in exactly the same way as Live’s other built-in instruments. -
Page 411
CHAPTER 23. LIVE INSTRUMENT REFERENCE 23.10 Sampler The Sampler Instrument. Sampler is a sleek yet formidable multisampling instrument that takes full advantage of Live’s agile audio engine. It has been designed from the start to handle multi-gigabyte instrument libraries with ease, and it imports most common library formats. But with Sampler, playback is only the beginning;… -
Page 412
Sampler is designed to let you approach multisampling on whatever level you like: You can load and play multisample presets, like those from Ableton’s Essential Instrument Collection, import multisamples from third-party vendors, or create your own multisamples from scratch. -
Page 413
CHAPTER 23. LIVE INSTRUMENT REFERENCE which are mounted automatically upon inserting and can be browsed as usual with Live’s File Browser. Here are the steps: 1. Insert the AKAI-formatted sample CD. 2. On a Mac, click on the title bar of Live’s File Browser and select All Volumes. On a PC, navigate Live’s File Browser to the Workspace by clicking on the Browser’s title bar and selecting Workspace. -
Page 414
CHAPTER 23. LIVE INSTRUMENT REFERENCE 23.10.3 The Zone Tab The Key Zone Editor. Clicking on the Zone tab toggles the display of Sampler’s Zone Editor, which offers a hands- on interface for mapping any number of samples across three types of ranges. The Zone Editor opens in its own dedicated view, directly above the Track View. -
Page 415
CHAPTER 23. LIVE INSTRUMENT REFERENCE Zone Editor View (Key/Vel/Sel) These buttons toggle the display of the Key Zone, Velocity Zone and Sample Select Editors. The Sample Layer List All samples contained in the currently loaded multisample are listed here, with each sample given its own layer. -
Page 416
CHAPTER 23. LIVE INSTRUMENT REFERENCE Velocity Zones The Velocity Zone Editor. Velocity zones determine the range of MIDI Note On velocities that each sample will respond to. The timbre of most musical instruments changes greatly with playing intensity. Therefore, the best multisamples capture not only individual notes, but also each of those notes at different velocities. -
Page 417
CHAPTER 23. LIVE INSTRUMENT REFERENCE found in Racks, in that only samples with sample select values that overlap the current value of the sample selector will be triggered. The Sample Select Editor, when toggled, appears alongside the sample layer list. The editor has a scale of 0-127, similar to the Velocity Zone Editor. -
Page 418
CHAPTER 23. LIVE INSTRUMENT REFERENCE Snap Snaps all start and end points to the waveform zero-crossings (points where the amplitude is zero) to avoid clicks. As with Simpler, this snap is based on the left channel of stereo samples, so a small Crossfade value may be necessary in some cases to completely eliminate clicks. -
Page 419
CHAPTER 23. LIVE INSTRUMENT REFERENCE No Sustain Loop Playback proceeds linearly until either the Sample End is reached or the volume envelope completes its release stage. Sustain Loop Enabled Playback proceeds linearly until Loop End is reached, when it jumps immediately to Loop Start and continues looping. If Release Mode is OFF, looping will continue inside the Sustain Loop until the volume envelope has completed its release stage. -
Page 420
CHAPTER 23. LIVE INSTRUMENT REFERENCE the pitch of samples may shift within a loop, relative to the loop’s duration. With Detune, the pitch of these regions can be matched to the rest of the sample. Interpolation (Interpol) This is a global setting that determines the accuracy of transposed samples. -
Page 421
CHAPTER 23. LIVE INSTRUMENT REFERENCE The Pitch Envelope The pitch envelope modulates the pitch of the sample over time, as well as of the Modulation Oscillator, if it is enabled. This is a multi-stage envelope with Initial, Peak, Sustain and End levels. -
Page 422
CHAPTER 23. LIVE INSTRUMENT REFERENCE Four different curves can be chosen for the waveshaper, and its overall intensity can be controlled with the Amount slider. In addition, the signal ow direction can be adjusted with the button above the waveshaper area. With the triangle pointing up, the signal passes from the shaper to the lter. -
Page 423
CHAPTER 23. LIVE INSTRUMENT REFERENCE The Modulation tab offers an additional loopable envelope, plus three LFOs, all capable of modulating multiple parameters, including themselves. Each LFO can be free running, or synced to the Live Set’s tempo, and LFOs 2 and 3 can produce stereo modulation effects. LFO Attack (Attack) This is the time needed for the LFO to reach maximum intensity. -
Page 424
Session Drums Live Packs into the Live application window, either from your operating system or from Live’s Browser. After you have installed Session Drums, you will need to authorize it. Further details can be found at the Ableton website http://www.ableton.com/authorize… -
Page 425
CHAPTER 23. LIVE INSTRUMENT REFERENCE 23.11.2 Accessing the Session Drums Presets After installation, the Session Drums presets are accessed through Live’s Device Browser, in exactly the same way as Live’s other built-in instruments. You will nd them as categorized presets within the Drum Rack folder. Session Drums presets are therefore loaded just like any other device, by dragging a preset from the Browser into an empty MIDI track. -
Page 426
Then drag the entire folder to the Drum Rack’s pad view. This will replace all of the currently loaded snare components, leaving all other pads alone. Because Ableton’s drum collections share common note mappings, this works when swapping between any instruments in the Session Drums or Drum Machines libraries. -
Page 427
Samples can be replaced by dragging in a new sample, or by activating the integrated Hot-Swap button. Note: When playing instruments from Ableton’s Essential Instrument Collection, Simpler runs in Multisample Mode. The Sample View has no function in this mode. -
Page 428
CHAPTER 23. LIVE INSTRUMENT REFERENCE 23.12.2 Sample Controls Simpler plays a speci c region or loop of the sample, as determined by a group of sample controls. The Start and Length controls work together to specify where Simpler begins and ends its sweep of the sample. -
Page 429
CHAPTER 23. LIVE INSTRUMENT REFERENCE vertically to zoom, and drag horizontally to pan different areas of the sample into view. 23.12.4 Envelope Simpler contains three classic ADSR envelopes, as seen in most synthesizers, for shaping the dynamic response of the sample. Volume-, lter frequency-, and pitch modulation are all modi able by toggling their respective buttons in the envelope section. -
Page 430
CHAPTER 23. LIVE INSTRUMENT REFERENCE 30 Hz, or sync to divisions of the Set’s tempo. LFOs are applied individually to each voice, or played note, in Simpler. The Key parameter scales each LFO’s Rate in proportion to the pitch of incoming notes. A high Key setting assigns higher notes a higher LFO rate. -
Page 431
CHAPTER 23. LIVE INSTRUMENT REFERENCE The Voices parameter sets the maximum number of voices that Simpler can play simultane- ously. If more voices are needed than have been allocated by the Voices chooser, voice stealing will take place, in which the oldest voice(s) will be dropped in favor of those that are new. -
Page 432
CHAPTER 23. LIVE INSTRUMENT REFERENCE 23.13 Tension The Tension Instrument. Tension is a synthesizer dedicated to the emulation of string instruments, and developed in collaboration with Applied Acoustics Systems. The synthesizer is entirely based on physical modeling technology and uses no sampling or wavetables. Instead, it produces sound by solving mathematical equations that model the different components in string instruments and how they interact. -
Page 433
CHAPTER 23. LIVE INSTRUMENT REFERENCE a hammer, a pick or a bow. The frequency of the oscillation is determined by the effective length of the string, which is controlled by the nger/fret interaction or termination. A damper can be applied to the strings in order to reduce the decay time of the oscillation. This is the case on a piano, for example, when felt is applied to the strings by releasing the keys and sustain pedal. -
Page 434
CHAPTER 23. LIVE INSTRUMENT REFERENCE The modelled string can be played using different types of excitators in order to reproduce different types of instruments and playing techniques. The excitator is selected using the Type chooser, and the choices available are Bow, Hammer, Hammer (bouncing) and Plectrum. -
Page 435
CHAPTER 23. LIVE INSTRUMENT REFERENCE string into motion. The Prot knob (for protrusion ) adjusts how much of the plectrum’s surface area is placed under the string. Lower values results in a thinner, smaller sound, as there is less mass setting the string into motion. -
Page 436
CHAPTER 23. LIVE INSTRUMENT REFERENCE The String Section Tension’s String Section. The vibration of the string is the main component of a stringed instrument’s sound. The effective length of the string is also responsible for the pitch of the sound we hear. The theoretical model of a resonating string is harmonic, meaning that the string’s partials are all exact multiples of the fundamental frequency. -
Page 437
CHAPTER 23. LIVE INSTRUMENT REFERENCE The Vibrato Section Tension’s Vibrato Section. The Vibrato section uses an LFO to modulate the string’s pitch. As with all of Tension’s parameters, the controls in this section can be used to enhance the realism of a stringed instrument model or to create something never heard before. -
Page 438
CHAPTER 23. LIVE INSTRUMENT REFERENCE The Damper Section Tension’s Damper Section. All string instruments employ some type of damping mechanism that mutes the resonating string. In pianos, this is a felt pad that is applied to the string when the key is released. In instruments such as guitars and violins, the player damps by stopping the string’s vibration with the ngers. -
Page 439
CHAPTER 23. LIVE INSTRUMENT REFERENCE The Mass, Stiffness and Velocity parameters can be further modulated by note pitch, via the sliders below. The stiffness of the damper mechanism is adjusted with the Damping knob, which affects the overall amount of vibration absorbed by the damper. Lower values result in less damping (longer decay times.) But this becomes a bit less predictable as the Damping value goes over 50%. -
Page 440
CHAPTER 23. LIVE INSTRUMENT REFERENCE adjusted with the Fing Mass and Fing Stiff knobs, which set the force the nger applies to the string and the nger’s stiffness, respectively. The Mass amount can be additionally modulated by velocity or note pitch via the sliders. The stiffness of the fret is modelled with the Fret Stiff parameter. -
Page 441
CHAPTER 23. LIVE INSTRUMENT REFERENCE The Body Section Tension’s Body Section. The role of the body or soundboard of a string instrument is to radiate the vibration energy from the strings. The body also lters these vibrations, based on its size and shape. In some instruments, such as guitars, the body also includes an air cavity which boosts low frequencies. -
Page 442
CHAPTER 23. LIVE INSTRUMENT REFERENCE 23.13.3 Filter/Global Tab The Filter/Global tab contains the lter parameters for the instrument, as well as global controls. The Filter Section Tension’s Filter Section. Tension’s Filter section features a highly con gurable multi-mode lter that sits between the String and Body sections. -
Page 443
CHAPTER 23. LIVE INSTRUMENT REFERENCE The time it takes for the envelope to reach the sustain level after the attack phase is set by the Decay knob. The Sustain knob sets the level at which the envelope will remain from the end of the decay phase to the release of the key. -
Page 444
CHAPTER 23. LIVE INSTRUMENT REFERENCE Global and Keyboard Parameters Tension’s Global and Keyboard Parameters. The remaining section contain all of the parameters that adjust how Tension responds to MIDI data, as well as controls for performance parameters such as tuning and portamento. The Keyboard section contains all of Tension’s polyphony and tuning parameters. -
Page 445
CHAPTER 23. LIVE INSTRUMENT REFERENCE The Error slider increases the amount of random tuning error applied to each note. Try very high values if you would like to relive your experiences from junior high school orchestra. The Unison section allows you to stack multiple voices for each note played. The switch next to the name toggles the section on or off. -
Page 446
After you have installed the EIC Live Packs, you will need to authorize them. Further details can be found at the Ableton website 23.14.2 Accessing The EIC Instruments After installation, the EIC instruments are accessed through Live’s Device Browser, in exactly the same way as Live’s other built-in instruments. -
Page 447
CHAPTER 23. LIVE INSTRUMENT REFERENCE The EIC presets are available in Full and Lite versions, allowing you to choose the right balance of delity and polyphony for your needs. The Lite version reduces CPU, RAM and disk requirements by reducing the number of zones and sample layers used. Both the normal and Lite presets use 24-bit multisamples. -
Page 448
CHAPTER 23. LIVE INSTRUMENT REFERENCE Special Features of the Guitar and Bass Banks The EIC’s guitar instruments have additional banks for single-key chords with strumming, and the PBass instrument has a similar bank for down- and up- strokes played with a pick. In all cases, lower octaves play down strums, while upper octaves play up strums. -
Page 449
Chapter 24 Max For Live A Generic Max Audio Effect. Max for Live, an add-on product co-developed with Cycling ’74 , allows users to extend and customize Live by creating instruments, controllers, audio effects, and MIDI processors. After installing Max for Live, you will need to point to it in Live’s File/Folder Preferences: http://www.cycling74.com… -
Page 450
CHAPTER 24. MAX FOR LIVE The Max Editor Chooser. Like all other Live devices, Max devices can have their own presets, which can be viewed and loaded by unfolding the device in the Browser. What a Max device actually does is dependent on its patch, which can be accessed by pressing the Edit button in the Max device’s title bar. -
Page 451
Live provides tools to collaborate with other Live users by uploading and downloading Live Sets from Ableton’s web server. Any media les which are needed by your Live Sets are uploaded automatically, unless they are already on Ableton’s server. Likewise, any media les which are needed by Sets that you download are only downloaded if you do not already have them. -
Page 452
CHAPTER 25. SHARING LIVE SETS Enter the Set’s Name in the Upload Details Window. If you are not already logged in to your ableton.com account, you will then be prompted to enter your username and password. Log In to Upload Your Set. -
Page 453
Tracks, return tracks and the Master track, for example, cannot be frozen. 25.2 Downloading Sets You can download Live Sets that other users have uploaded to ableton.com. You can get more information and nd Sets at the Ableton website http://www.ableton.com/share… -
Page 454
CHAPTER 25. SHARING LIVE SETS 25.3 The Upload/Download Browser All les that you download from Ableton’s server are stored locally on your machine, in your cache. You can view any nished downloads or in-progress transfers via the Upload/ Download Browser, which can be accessed via its selector. Note that this selector is not visible until your cache actually contains something. -
Page 455
Chapter 26 MIDI and Key Remote Control To liberate the musician from the mouse, most of Live’s controls can be remote-controlled with an external MIDI controller and the computer keyboard. This chapter describes the details of mapping to the following speci c types of controls in Live’s user interface: 1. -
Page 456
CHAPTER 26. MIDI AND KEY REMOTE CONTROL 26.1 MIDI Remote Control Live can be controlled remotely by external MIDI control surfaces, such as MIDI keyboards or controller boxes. Live also supports the Akai APC40 , a topic that is covered in its own chapter, for completely mouse-free program operation. -
Page 457
CHAPTER 26. MIDI AND KEY REMOTE CONTROL listed here, don’t fret it can still be enabled manually in the next section, Manual Control Surface Support. Depending on the controller, Live may need to perform a preset dump to complete the setup. -
Page 458
CHAPTER 26. MIDI AND KEY REMOTE CONTROL Control Surfaces Can Follow Device Selection. In addition to following device selection, natively supported control surfaces can be locked to speci c devices, guaranteeing hands-on access no matter where the current focus is in your Live Set. -
Page 459
CHAPTER 26. MIDI AND KEY REMOTE CONTROL Note: Some control surfaces do not support locking to devices. This capability is indicated for individual controllers in the Control Surface Reference lesson. Select the Lessons option from the View menu to access Live’s built-in lessons. 26.1.2 Manual Control Surface Setup If your MIDI control surface is not listed in the MIDI/Sync Preferences’ Control Surface chooser, it can still be enabled for manual mapping in the MIDI Ports section of this tab. -
Page 460
CHAPTER 26. MIDI AND KEY REMOTE CONTROL 26.1.3 Takeover Mode MIDI Controller Takeover Mode. When MIDI controls that send absolute values (such as faders) are used in a bank-switching setup, where they address a different destination parameter with each controller bank, you will need to decide how Live should handle the sudden jumps in values that will occur when moving a control for the rst time after switching the bank. -
Page 461
CHAPTER 26. MIDI AND KEY REMOTE CONTROL 26.2 The Mapping Browser The Mapping Browser and Selector. All manual MIDI, computer keyboard Macro Control mappings are managed by the Mapping Browser. The Mapping Browser is hidden until one of the three mapping modes is enabled. -
Page 462
CHAPTER 26. MIDI AND KEY REMOTE CONTROL Once your remote control setup has been de ned in the MIDI/Sync Preferences, giving MIDI controllers and notes remote control assignments is simple: 1. Enter MIDI Map Mode by pressing the MIDI switch in Live’s upper right-hand corner. -
Page 463
CHAPTER 26. MIDI AND KEY REMOTE CONTROL 26.2.3 Mapping to Absolute MIDI Controllers Absolute MIDI controllers send messages to Live in the form of absolute values ranging from 0 to 127. These values lead to different results depending on the type of Live control to which they are assigned. -
Page 464
CHAPTER 26. MIDI AND KEY REMOTE CONTROL Live to pan right, causing an abrupt jump in the track’s panning. A pan knob sending relative messages would prevent this, since its incremental message to Live would simply say, Pan slightly to the left of your current position. There are four types of relative controllers: Signed Bit, Signed Bit 2, Bin Offset and Twos Complement. -
Page 465
CHAPTER 26. MIDI AND KEY REMOTE CONTROL Relative Session View Navigation Notice that you can make not only absolute mappings to individual slots and scenes, but also relative mappings to move the highlighted scene and operate on the highlighted clips. In both MIDI Map Mode and Key Map Mode, a strip of assignable controls appears below… -
Page 466
CHAPTER 26. MIDI AND KEY REMOTE CONTROL Clip View interface could potentially affect any clip in the Live Set. For this reason, we recommend mapping Clip View controls to relative MIDI controllers to prevent undesirable jumps in parameter values. 26.2.5 Computer Keyboard Remote Control The Key Map Mode Switch. -
Page 467
CHAPTER 26. MIDI AND KEY REMOTE CONTROL computer keystrokes for use with instruments. -
Page 468
Chapter 27 Using the APC40 The APC40 (Ableton Performance Controller) is a dedicated controller for Ableton Live, co- designed by Ableton and Akai Professional . This chapter will help you set up your APC40, and introduce its capabilities. 27.1 Setup Once the APC40 has been powered on and connected to your computer’s USB port, you will need to select the APC40 in Live’s Preferences. -
Page 469
CHAPTER 27. USING THE APC40 Setting Up The APC40. 27.2 Clip Launch Matrix The APC40’s matrix of buttons gives you physical access to the clips in your Session View. The matrix has 40 three-color buttons arranged in a ve-scene-deep-by-eight-track-wide grid. The color-coding system lets you know exactly what is happening in each clip, and directional controls let you move around inside your Session View. -
Page 470
CHAPTER 27. USING THE APC40 Session View Clip and Navigation Controls. Pressing a Clip Launch button triggers the clip in the corresponding clip slot in Live. If the track is armed to record, pressing the button records a new clip. The buttons in the matrix light up in different colors so you know what’s going on: ˆ… -
Page 471
CHAPTER 27. USING THE APC40 APC’s button matrix are shown in Live with a red border. The directional arrows and Shift button increase the scope of the eight-by- ve grid: ˆ Pressing Up or Down moves you up or down one scene at a time. Hold the Shift button while hitting Up or Down to move ve scenes up or down. -
Page 472: Mixer Section
CHAPTER 27. USING THE APC40 27.4 Mixer Section The APC40 features eight tracks, each with its own fader, solo/pre-cue, mute and record arm buttons. A Master fader controls the master volume and a Cue Level knob controls volume, so you can pre-listen to a clip or the metronome without your audience hearing it. Mixer Controls.
-
Page 473: Device Control
CHAPTER 27. USING THE APC40 27.5 Device Control The APC40 features eight endless dials and four control buttons that map to your devices automatically for exibility and speed on stage or in the studio. Device Controls. The Track Selection buttons route the eight endless encoders to the rst device or Rack on that track, with LED rings to automatically show you the levels on the selected parameter.
-
Page 474
CHAPTER 27. USING THE APC40 controls. For more information, see the Control Surface Reference Lesson. 27.6 Transport and Global Buttons Live’s Play, Stop and Global Record buttons are all easily accessible, and four global buttons access Live’s functions, cleaning up your screen view onstage and freeing you from the mouse in the studio: Transport and Global Controls. -
Page 475
CHAPTER 27. USING THE APC40 ˆ Metronome turns the metronome on and off. 27.7 Track Control The Track Control section covers pan settings or send levels for whichever eight tracks are currently selected. It consists of eight endless dials with LED rings and four buttons: Pan, Send A, Send B and Send C. -
Page 476
CHAPTER 27. USING THE APC40 27.8 Tempo Control Tap Tempo and Nudge Left/Right buttons are essential for live performance, helping you to stay in sync with turntables, other musicians or a live band, and correct timing issues quickly. Tempo Control. As you hit the Tap Tempo button once every beat, the tempo of the Live Set will follow your… -
Page 477
CHAPTER 27. USING THE APC40 27.9 Crossfader The APC40’s replaceable crossfader is an essential DJ control, and is also handy for control- ling effect, volume and modulation curves. Crossfader. In Live, you can set any track as an A or B destination, and then crossfade between the A and B selections. -
Page 478
CHAPTER 27. USING THE APC40 27.10 Customizing the APC40 Controls You can change the assignment of all of the knobs, faders and buttons on the APC40 by enabling the Remote switches in the MIDI/Sync Preferences, as described in the section on manual control surface setup. -
Page 479
Chapter 28 Synchronization and ReWire 28.1 Synchronizing via MIDI The MIDI protocol de nes two ways to synchronize sequencers, both of which are supported by Live. Both protocols work with the notion of a sync master, which delivers a sync signal that is tracked by the sync slave(s). -
Page 480
CHAPTER 28. SYNCHRONIZATION AND REWIRE are explained later in this chapter. With respect to MIDI Timecode, Live can only act as a MIDI sync slave, not a master. 28.1.1 Synchronizing External MIDI Devices to Live Live can send MIDI Clock messages to an external MIDI sequencer (or drum machine). After connecting the sequencer to Live and setting it up to receive MIDI sync, turn the device on as a sync destination in Live’s MIDI/Sync Preferences. -
Page 481: Sync Delay
CHAPTER 28. SYNCHRONIZATION AND REWIRE The External Sync Switch. When Live is synced to an external MIDI device, it can accept song position pointers from this device, syncing it not only in terms of tempo but in terms of its position in the song. If the master jumps to a new position within the song, Live will do the same.
-
Page 482
CHAPTER 28. SYNCHRONIZATION AND REWIRE pronounced percussive sounds. While listening to the output from both, adjust the Sync Delay control until both sounds are in perfect sync. Adjusting Sync Delay. 28.2 Connecting via ReWire Live supports the ReWire interface for connecting with another ReWire-compatible audio program running on the same computer. -
Page 483
CHAPTER 28. SYNCHRONIZATION AND REWIRE resources than running a single program. 28.2.1 Running Live in ReWire Master Mode The step-by-step procedure for sending MIDI to and receiving audio from a ReWire slave program is presented in the routing chapter. 28.2.2 Running Live in ReWire Slave Mode In ReWire slave mode, Live can both receive MIDI from, but also send audio to the master application. -
Page 484
You can nd tutorials on connecting Live to speci c ReWire master programs at the Ableton tutorial website Ableton FAQ website is the rst place to go if you encounter ReWire-related problems. If you cannot seem to nd an answer there, please contact the Ableton support team http://www.ableton.com/tutorials… -
Page 485
Chapter 29 Computer Audio Resources and Strategies Real-time audio processing is a demanding task for general-purpose computers, which are usually designed to run spreadsheets and surf the Internet. An application like Live requires a powerful CPU and a fast hard disk. This section will provide some insight on these issues, and should help you avoid and solve problems with running audio on a computer. -
Page 486
CHAPTER 29. COMPUTER AUDIO RESOURCES AND STRATEGIES Fortunately, Live supports multicore and multiprocessor systems, allowing the processing load from things like instruments, effects and I/O to be distributed among the available resources. Depending on the machine and the Live Set, the available processing power can be several times that of older systems. -
Page 487
CHAPTER 29. COMPUTER AUDIO RESOURCES AND STRATEGIES 29.1.2 CPU Load from Tracks and Devices Generally, every track and device being used in Live incurs some amount of CPU load. However, Live is smart and avoids wasting CPU cycles on tracks and devices that do not contribute anything useful. -
Page 488
CHAPTER 29. COMPUTER AUDIO RESOURCES AND STRATEGIES device or clip settings. On slower machines, you can unfreeze processor-intensive tracks one at a time to make edits, freezing them again when you are done. Many editing functions remain available to tracks that are frozen. Launching clips can still be done freely, and mixer controls such as volume, pan and the sends are still available. -
Page 489
CHAPTER 29. COMPUTER AUDIO RESOURCES AND STRATEGIES For frozen Session clips, only two loop cycles are included in the frozen clip, which means that clips with unlinked clip envelopes may play back differently after two loop cycles when frozen. The samples generated by the Freeze Track command are stored in your temporary recording folder until you save your Live Set, at which point they are moved to the following project folder… -
Page 490
CHAPTER 29. COMPUTER AUDIO RESOURCES AND STRATEGIES Do the following to avoid disk overload: ˆ Reduce the amount of audio channels being written by choosing mono inputs instead of stereo inputs in the Audio Preferences’ Channel Con guration dialog. ˆ Use RAM Mode for selected clips. -
Page 491
Chapter 30 Audio Fact Sheet Prior to the release of Live 7, much of Ableton’s development effort was focused on carefully and objectively testing Live’s fundamental audio performance. As a result of this testing, we have implemented a number of low-level improvements to the audio engine. We have also… -
Page 492
CHAPTER 30. AUDIO FACT SHEET we will never release an update unless it passes every test. 30.2 Neutral Operations Procedures in Live that will cause absolutely no change in audio quality are referred to as neutral operations. You can be sure that using these functions will never cause any signal degradation. -
Page 493
CHAPTER 30. AUDIO FACT SHEET ˆ rendering to a le with the same bit depth as the original results in complete phase cancellation. ˆ rendering to a le with a higher bit depth than the original results in complete phase cancellation. -
Page 494
CHAPTER 30. AUDIO FACT SHEET 30.2.4 Summing at Single Mix Points Since version 7, Live uses double precision (64-bit) summing at all points where signals are mixed, including Clip and return track inputs, the Master track and Racks. Mixing in Live is thus a neutral operation for signals mixed at any single summing point. -
Page 495
CHAPTER 30. AUDIO FACT SHEET 30.2.7 Freeze, Flatten When tracks are frozen, the audio les that are created are 32 bit, which ensures that they will not be lower quality than the audio heard prior to freezing. But there are some special cases involving Freeze that result in non-neutral behavior and should be noted: ˆ… -
Page 496
CHAPTER 30. AUDIO FACT SHEET 30.2.8 Bypassed Effects Bypassed effects in Live are removed from the signal ow. This is true for both Live’s built-in effects devices and third-party VST and AU plug-ins. Consequently, audio at the output of a bypassed effect is identical to the audio at the input. Please note, however, that effects devices with parameters that inherently require delay (e.g., the Look Ahead settings in Compressor) will still introduce this delay when bypassed, in order to maintain automatic delay compensation with the rest of the project. -
Page 497
CHAPTER 30. AUDIO FACT SHEET In all cases, output is rendered and compared with the output of an unsplit version of the same source. Phase cancellation testing of the two les con rms that they are identical. 30.3 Non-Neutral Operations Procedures in Live that will cause a change in audio quality are referred to as non-neutral operations. -
Page 498
CHAPTER 30. AUDIO FACT SHEET sample rate that you plan to use in Live, the les can be imported without any loss of quality. Rendering audio from Live with a sampling rate other than the one that was used while working on the project is also a non-neutral operation, and may result in a loss of sound quality. -
Page 499
CHAPTER 30. AUDIO FACT SHEET 30.3.5 Recording external signals (bit depth < A/D converter) Recording audio signals into Live is a non-neutral operation if the bit depth set in Live’s Preferences window is lower than that of the A/D converters used for the recording. This is not recommended. -
Page 500
CHAPTER 30. AUDIO FACT SHEET 30.3.9 Panning Live uses constant power panning with sinusoidal gain curves. Output is 0 dB at the center position and signals panned fully left or right will be increased by +3 dB. In order to minimize this volume change, it may be helpful to narrow the overall stereo width before doing extreme panning. -
Page 501
30.5 Summary and Conclusions Ableton wrote this paper in order to help users understand exactly how audio is affected when performing various procedures in Live. Our focus has been on functions that have proven over the years to cause confusion or uncertainty, and the list of both neutral and non-neutral operations presented here is necessarily incomplete. -
Page 502
Chapter 31 MIDI Fact Sheet In conjunction with our work on the audio engine, Ableton has spent additional effort an- alyzing Live’s MIDI timing and making improvements where necessary. We wrote this fact sheet to help users understand the problems involved in creating a reliable and accurate computer-based MIDI environment, and to explain Live’s approach to solving these prob- lems. -
Page 503
CHAPTER 31. MIDI FACT SHEET environment would capture this incoming information with perfect timing accu- racy in relation to the timeline of the song as accurately as an audio recording. 2) Playback refers to two related scenarios when dealing with DAWs. The rst in- volves sending MIDI note and controller information from the DAW to a hardware device such as a synthesizer. -
Page 504
(which can result in jitter if that moment happens to occur when the system is busy) or should they be delayed (which adds latency)? Ableton’s choice is to add latency, as we believe that it is easier for users to adjust to consistent latency than to random jitter. -
Page 505
CHAPTER 31. MIDI FACT SHEET For playback of hardware devices, Live also generates timestamps that it attempts to com- municate to the MIDI interface drivers for scheduling of outgoing MIDI events. Windows MME drivers cannot process timestamps, however, and for devices that use these drivers, Live schedules outgoing events internally. -
Page 506
CHAPTER 31. MIDI FACT SHEET 31.5 Tests and Results Our procedure for testing the timing of incoming MIDI events is represented in the following diagram: Live MIDI Clip MIDI MIDI Source Splitter MIDI-to-Audio Audio Clip Converter MIDI Input Test Con guration. The output of a MIDI Source (a keyboard or other DAW playing long sequences of random MIDI events) is fed to a zero-latency hardware MIDI Splitter. -
Page 507
CHAPTER 31. MIDI FACT SHEET At 44.1 kHz and 512 sample buffer, occasional events with +/- 6 ms occurred. In all cases, the majority of the jitter occurred at +/- 1 ms. ˆ Interface C: For most of the tests, the maximum jitter was +/- 5 ms. At 96 kHz and 512 sample buffer, there were a small number of events with between +/- 6 and 8 ms of jitter. -
Page 508
CHAPTER 31. MIDI FACT SHEET 31.6 Tips for Achieving Optimal MIDI Performance In order to help users achieve optimal MIDI performance with Live, we have provided a list of recommended practices and program settings. ˆ Use the lowest possible buffer sizes available on your audio hardware, thereby keeping latency to a minimum. -
Page 509
CHAPTER 31. MIDI FACT SHEET 31.7 Summary and Conclusions Ableton wrote this paper in order to help users understand a variety of related topics: ˆ the inherent problems in computer-based MIDI systems; ˆ our approach to solving these problems in Live;… -
Page 510
Chapter 32 Live Keyboard Shortcuts 32.1 Showing and Hiding Views Windows Macintosh Toggle Full Screen Mode Ctrl Toggle Session/Arrangement View Toggle Track/Clip View Ctrl Hide/Show Detail View Ctrl Ctrl Hide/Show Info View Hide/Show Browser Ctrl Hide/Show Overview Ctrl Hide/Show In/Out Ctrl Hide/Show Sends Ctrl… -
Page 511
CHAPTER 32. LIVE KEYBOARD SHORTCUTS Windows Macintosh Close Window/Dialog 32.2 Accessing Menus Under Windows, you can access each menu by pressing and the rst letter of the menu ( for File, for instance). While a menu is open, you can use: ˆ… -
Page 512
CHAPTER 32. LIVE KEYBOARD SHORTCUTS 32.4 Browsing In addition to the shortcuts shown here, editing shortcuts can also be used in the Browser. Windows Macintosh Scroll Up/Down Open/Close Folders Set Selected Folder as Browser Root Return Return Load Selected Item from Browser or Double- or Double- Return… -
Page 513
CHAPTER 32. LIVE KEYBOARD SHORTCUTS 32.6 Editing Windows Macintosh Ctrl Copy Ctrl Paste Ctrl Duplicate Ctrl Delete Delete Undo Ctrl Redo Ctrl Rename Ctrl Select All Ctrl By holding down an additional modi er key, some of the above commands can also be applied to: Windows Macintosh… -
Page 514
CHAPTER 32. LIVE KEYBOARD SHORTCUTS 32.7 Loop Brace and Start/End Markers The loop brace and start/end markers must rst be selected before any of the following commands will apply to them. Windows Macintosh Move Start Marker to Position Click Click Nudge Loop Left/Right Move Loop By Loop Length Double/Halve Loop Length… -
Page 515
CHAPTER 32. LIVE KEYBOARD SHORTCUTS 32.9 Arrangement View Commands The shortcuts for zooming, snapping/drawing loop/region settings also work in the Arrangement View. See also the editing commands. Windows Macintosh Split Clip at Selection Ctrl Consolidate Selection into Clip Ctrl Create Fade/Crossfade Ctrl Loop Selection Ctrl… -
Page 516
CHAPTER 32. LIVE KEYBOARD SHORTCUTS 32.10 Commands for Tracks See also the editing commands. Windows Macintosh Insert Audio Track Ctrl Insert MIDI Track Ctrl Insert Return Track Ctrl Rename Selected Track Ctrl While Renaming, Go to next Track Group Selected Tracks Ctrl Ungroup Tracks Ctrl… -
Page 517
CHAPTER 32. LIVE KEYBOARD SHORTCUTS 32.12 Key/MIDI Map Mode and the Computer MIDI Keyboard Windows Macintosh Toggle MIDI Map Mode Ctrl Toggle Key Map Mode Ctrl Computer MIDI Keyboard Ctrl 32.13 Zooming, Display and Selections Windows Macintosh Zoom In Zoom Out Drag/Click to Append to a Selection Click to Add Adjacent Clips/Tracks/Scenes to Multi-Selection… -
Page 518
CHAPTER 32. LIVE KEYBOARD SHORTCUTS 32.14 Clip View Sample Display The shortcuts for zooming loop/region settings also work in the Sample Display. Windows Macintosh Quantize Ctrl Quantize Settings… Ctrl Move Selected Warp Marker Select Warp Marker Ctrl Scroll Display to Follow Playback Ctrl Move Clip Region with Start Marker 32.15 Clip View MIDI Editor… -
Page 519
CHAPTER 32. LIVE KEYBOARD SHORTCUTS 32.16 Grid Snapping and Drawing Windows Macintosh Toggle Draw Mode Ctrl Narrow Grid Ctrl Widen Grid Ctrl Triplet Grid Ctrl Snap to Grid Ctrl Fixed/Zoom-Adaptive Grid Ctrl Bypass Snapping While Dragging 32.17 Global Quantization Windows Macintosh Sixteenth-Note Quantization Ctrl… -
Page 520
CHAPTER 32. LIVE KEYBOARD SHORTCUTS 32.18 Working with Sets and the Program Windows Macintosh New Live Set Ctrl Open Live Set Ctrl Close Live Set Ctrl Save Live Set Ctrl Save Live Set As… Ctrl Quit Live Ctrl Hide Live Export Audio/Video Ctrl Export MIDI le… -
Page 521
CHAPTER 32. LIVE KEYBOARD SHORTCUTS 32.20 Using the Context Menu A context menu is available in Live for quick access to many commonly used menu items. To access the context menu, (PC) / (Mac) on the part of the interface where Ctrl you would like to execute a particular command. -
Page 522
Analyze Audio command ….Ableton APC40 ……. . . -
Page 523
INDEX testing and methodology ..Beats Mode ……tips . -
Page 524
INDEX Clip Gain slider ……saving settings for ….Clip Groove chooser . -
Page 525
INDEX count-in for recording ….in the Arrangement ….Count-In preference . -
Page 526
……FAQs ……see Ableton Edit switch . -
Page 527
INDEX Full Screen Mode ……importing les ……importing projects . -
Page 528
INDEX Loop Selection command ….Loop Start/Punch-In Position elds ..Language preference ….. Loop switch latency Clip View . -
Page 529
INDEX MIDI modulation … . . see clip envelopes exporting ……monitor mix . -
Page 530
INDEX envelopes ……plug-ins, using ….see devices lter . -
Page 531
.170 registration ….see Ableton and sidechain inputs …. -
Page 532
Save Live Set to Web command ..52, sales ……see Ableton Scale effect . -
Page 533
INDEX Set Locator command ….Stop All Clips button ….Set Song Start Time Here command . -
Page 534
Tones Mode ……tutorials …see Ableton, see lessons Track Activator switch . -
Page 535
….. webshop ….. . see Ableton views, working with .