 04:37
04:37
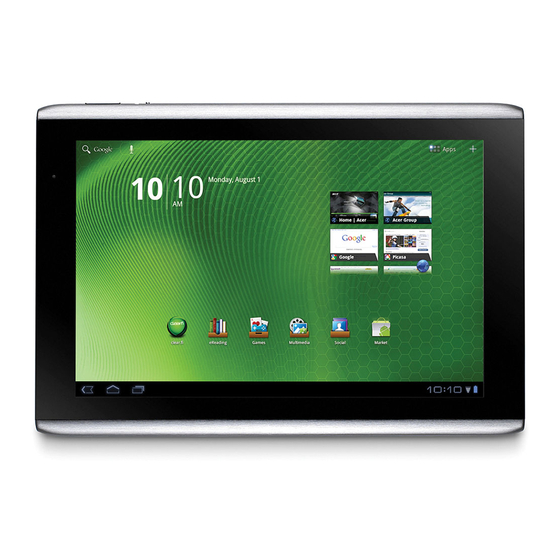
Обзор Acer Iconia Tab A500/A501
 25:18
25:18
Acer Iconia Tab A500. Тише едешь- дальше будешь
 10:52
10:52
Восстановление планшета Acer Icona Tab A501 A500
 03:49
03:49
Простой способ прошить acer iconia tab a500
 33:06
33:06
Обзор Acer Iconia W510 (W5): доступный планшет с док-станцией
 04:59
04:59
Acer Iconia Tab A500 — как разобрать планшет и из чего состоит
 08:18
08:18
Обзор и тестирование Acer Iconia Tab A500
 04:06
04:06
Не включается Acer Iconia Tab A500 как разобрать планшет и отремонтировать
1
Руководство
Пользователя

Все права защищены Руководство пользователя Acer ICONIA TAB…
Страница 2
- Изображение
- Текст
© 2011 Все права защищены
Руководство пользователя Acer ICONIA TAB
Модель: A500 (модели только с Wi-Fi) и A501 (модели с Wi-Fi+3G)
Первое издание: 03/2011
Acer ICONIA TAB
Номер модели: ____________________________
Серийный номер: __________________________
Дата покупки: ______________________________
Место покупки: _____________________________

Содержание Лицензионное соглашение Acer с конечным пользова…
Страница 3
- Изображение
- Текст

Папки содержимого Acer Использование папок содержимого…
Страница 4
- Изображение
- Текст

Лицензионное соглашение Acer с конечным пользователем ПРОСЬ…
Страница 5
- Изображение
- Текст
3
Лицензионное соглашение Acer
с конечным пользователем
ПРОСЬБА ВНИМАТЕЛЬНО ОЗНАКОМИТЬСЯ С НИЖЕСЛЕДУЮЩИМ: ДАННОЕ ЛИЦЕНЗИОННОЕ СОГЛАШЕНИЕ ACER
С КОНЕЧНЫМ ПОЛЬЗОВАТЕЛЕМ («СОГЛАШЕНИЕ») ПРЕДСТАВЛЯЕТ СОБОЙ ЮРИДИЧЕСКИ ДЕЙСТВИТЕЛЬНОЕ
СОГЛАШЕНИЕ МЕЖДУ ВАМИ (ФИЗИЧЕСКИМ ИЛИ САМОСТОЯТЕЛЬНЫМ ЮРИДИЧЕСКИМ ЛИЦОМ) И КОРПОРАЦИЕЙ
ACER INC., ВКЛЮЧАЯ ЕЕ ДОЧЕРНИЕ ОБЩЕСТВА («ACER»), НА ПРОГРАММУ (ПРЕДОСТАВЛЕННУЮ ACER ИЛИ ЖЕ
ЕЕ ЛИЦЕНЗИАРАМИ ИЛИ ПОСТАВЩИКАМИ), СОПРОВОЖДАЮЩУЮ НАСТОЯЩЕЕ СОГЛАШЕНИЕ, ВКЛЮЧАЯ ЛЮБЫЕ
СОПУТСТВУЮЩИЕ НОСИТЕЛИ, ПЕЧАТНЫЕ МАТЕРИАЛЫ И СОПУТСТВУЮЩУЮ ПОЛЬЗОВАТЕЛЬСКУЮ
ДОКУМЕНТАЦИЮ В ЭЛЕКТРОННОМ ФОРМАТЕ, НА КОТОРЫХ МОГУТ БЫТЬ РАЗМЕЩЕНЫ ЗНАКИ «ACER»
(«ПРОГРАММА»). НАСТОЯЩИМ СОГЛАШЕНИЕМ НЕ ЗАКЛЮЧАЮТСЯ И НЕ ДОЛЖНЫ ПОДРАЗУМЕВАТЬСЯ
СОГЛАШЕНИЯ НА КАКИЕ-ЛИБО ДРУГИЕ ТОВАРЫ ИЛИ ПО КАКИМ-ЛИБО ДРУГИМ ВОПРОСАМ. УСТАНОВИВ У СЕБЯ
ПРОГРАММУ, СОПРОВОЖДАЮЩУЮ НАСТОЯЩЕЕ СОГЛАШЕНИЕ, ИЛИ ЛЮБУЮ ЕЕ ЧАСТЬ, ВЫ СОГЛАШАЕТЕСЬ
СОБЛЮДАТЬ УСЛОВИЯ НАСТОЯЩЕГО СОГЛАШЕНИЯ. ЕСЛИ ВЫ НЕ СОГЛАСНЫ СО ВСЕМИ УСЛОВИЯМИ
НАСТОЯЩЕГО СОГЛАШЕНИЯ, ПРЕРВИТЕ ПРОЦЕСС УСТАНОВКИ ПРОГРАММЫ И НЕЗАМЕДЛИТЕЛЬНО УДАЛИТЕ
ВСЕ УСТАНОВЛЕННЫЕ ФАЙЛЫ ПРОГРАММЫ, ЕСЛИ ТАКОВЫЕ ИМЕЮТСЯ, ИЗ СВОЕЙ КОМПЬЮТЕРНОЙ СИСТЕМЫ.
ЕСЛИ У ВАС НЕТ ДЕЙСТВУЮЩЕЙ ЛИЦЕНЗИИ НА СООТВЕТСТВУЮЩУЮ ПРОГРАММУ, ВАМ НЕ РАЗРЕШЕНО
УСТАНАВЛИВАТЬ, КОПИРОВАТЬ ИЛИ ИНЫМ ОБРАЗОМ ИСПОЛЬЗОВАТЬ ЭТУ ПРОГРАММУ, И ВЫ НЕ ИМЕЕТЕ
НИКАКИХ ПРАВ ПО НАСТОЯЩЕМУ СОГЛАШЕНИЮ.
Данная Программа охраняется законодательством США и международными конвенциями об охране авторских прав, а
также иными законами и международными соглашениями о правах интеллектуальной собственности. Программа вам не
продается – на нее предоставляется лицензия.
ПРЕДОСТАВЛЕНИЕ ЛИЦЕНЗИИ
Acer предоставляет вам следующие неисключительные и не подлежащие передаче права на Программу. По настоящему
Соглашению вы вправе:
1. установить и использовать Программу только на одном компьютере. Для каждого компьютера, на котором будет
использоваться Программа, необходимо получить отдельную лицензию;
2. изготовить одну копию Программы исключительно для резервирования и архивирования;
3. изготовить одну бумажную копию любых электронных документов, включенных в состав Программы, если
соответствующие документы предоставлены вам в электронной форме.
ОГРАНИЧЕНИЯ
Вы НЕ ИМЕЕТЕ ПРАВА:
1. использовать или копировать Программу в порядке, отличающемся от установленного настоящим Соглашением;
2. сдавать Программу в аренду или временное пользование третьим сторонам;
3. изменять, адаптировать или переводить на другой язык Программу или какую-либо ее часть;
4. восстанавливать исходный текст Программы, декомпилировать или деассемблировать ее или создавать на ее
основе производные произведения;
5. объединять Программу с любой другой программой или модифицировать Программу за исключением случаев,
когда это делается для вашего личного пользования; и
6. предоставлять Программу в пользование третьим лицам на условиях сублицензии или на иных условиях с тем
исключением, что вы можете, направив предварительное письменное уведомление Acer, передать всю Программу
третьей стороне при условии, что вы не оставите у себя никаких копий Программы, а третья сторона примет на
себя обязательства по настоящему Соглашению;
7. передавать свои права по настоящему Соглашению каким-либо третьим сторонам;
8. экспортировать Программу в нарушение действующих экспортных законодательных и нормативных актов, либо (i)
осуществлять продажу, экспорт, реэкспорт, передачу, перенаправление, раскрытие технических данных или
реализацию какой-либо Программы любому запрещенному лицу, организации или в запрещенное место
назначения, включая, в частности, Кубу, Иран, КНДР, Судан и Сирию; либо (ii) использовать какую-либо Программу
для какой-либо цели, запрещенной законами или нормативными актами США.
УСЛУГИ СОПРОВОЖДЕНИЯ
Acer не обязана оказывать услуги технического и иного сопровождения Программы.
ACER LIVE UPDATE
Часть программы содержает составные части, которые дают возможность пользования обслуживанием Acer Live Update,
которое позволяет автоматическое скачивание и инсталляцию апдейтов этой программы на Ваш компютер. Инсталлируя
программу, Вы соглашаетесь на то, что Acer (либо ее лицензиары) вправе автоматически проверять версию этой
программы, которой Вы пользуютесь на Вашем компютере, и поставить апгрейды для этой программы, скачивание
которых на Ваш компютер может быть проведено автоматически.
ПРАВО СОБСТВЕННОСТИ И АВТОРСКИЕ ПРАВА
Право собственности и права интеллектуальной собственности на Программу и на все ее копии остаются за Acer или же
лицензиарами (поставщиками) Acer (по применимости). Вы не имеете и не приобретаете никаких имущественных прав
на Программу (в том числе на любые ее модификации или копии, изготовленные вами) и никаких сопутствующих прав
интеллектуальной собственности. Права собственности и сопутствующие права на любую информацию, доступ к
которой может быть получен с помощью Программы, принадлежат соответствующему владельцу такой информации и
могут охраняться действующим законодательством. Данная лицензия не предоставляет вам никаких прав на такую
информацию. Настоящим вы соглашаетесь:

не удалять из Программы никаких отметок об авторских права…
Страница 6
- Изображение
- Текст
4
1. не удалять из Программы никаких отметок об авторских правах или иных правах;
2. воспроизводить все такие отметки на любых изготавливаемых вами санкционированных копиях; и
3. прилагать все усилия к пресечению несанкционированного копирования Программы.
ТОВАРНЫЕ ЗНАКИ
Настоящее Соглашение не предоставляет вам никаких прав на товарные знаки или знаки обслуживания Acer или же
лицензиаров (поставщиков) Acer.
ОТКАЗ ОТ ГАРАНТИЙ
В МАКСИМАЛЬНОЙ СТЕПЕНИ, РАЗРЕШЕННОЙ ДЕЙСТВУЮЩИМ ЗАКОНОДАТЕЛЬСТВОМ, ACER, ЕЕ ПОСТАВЩИКИ И
ЕЕ ЛИЦЕНЗИАРЫ ПРЕДОСТАВЛЯЮТ ПРОГРАММУ НА УСЛОВИЯХ «КАК ЕСТЬ» И СО ВСЕМИ ОШИБКАМИ И
НАСТОЯЩИМ ОТКАЗЫВАЮТСЯ ОТ ЛЮБЫХ ДРУГИХ ПРЯМО ВЫРАЖЕННЫХ, ПОДРАЗУМЕВАЕМЫХ ИЛИ
ВМЕНЯЕМЫХ ПО ЗАКОНУ ГАРАНТИЙ И УСЛОВИЙ, В ТОМ ЧИСЛЕ, НО НЕ ОГРАНИЧИВАЯСЬ
НИЖЕПЕРЕЧИСЛЕННЫМ, ОТ ЛЮБЫХ ПОДРАЗУМЕВАЕМЫХ ГАРАНТИЙ, ОБЯЗАННОСТЕЙ И УСЛОВИЙ
ТОВАРНОСТИ, СООТВЕТСТВИЯ КОНКРЕТНОМУ НАЗНАЧЕНИЮ, ТОЧНОСТИ И ПОЛНОТЫ ОТВЕТОВ, РЕЗУЛЬТАТОВ,
КВАЛИФИЦИРОВАННОСТИ, ОТСУТСТВИЯ ВИРУСОВ И ОТСУТСТВИЯ НЕБРЕЖНОСТИ КАК В ОТНОШЕНИИ
ПРОГРАММЫ, ТАК И В ОТНОШЕНИИ ОКАЗАНИЯ ИЛИ НЕОКАЗАНИЯ УСЛУГ СОПРОВОЖДЕНИЯ. КРОМЕ ТОГО, В
ОТНОШЕНИИ ПРОГРАММЫ НЕ ПРЕДУСМАТРИВАЕТСЯ НИКАКИХ ГАРАНТИЙ И УСЛОВИЙ ПРАВ СОБСТВЕННОСТИ,
БЕСПРЕПЯТСТВЕННОГО ИСПОЛЬЗОВАНИЯ, БЕСПРЕПЯТСТВЕННОГО ВЛАДЕНИЯ, СООТВЕТСТВИЯ ОПИСАНИЮ И
ОТСУТСТВИЯ НАРУШЕНИЯ ПРАВ ИНТЕЛЛЕКТУАЛЬНОЙ СОБСТВЕННОСТИ.
ИСКЛЮЧЕНИЕ ОТВЕТСТВЕННОСТИ ЗА КОСВЕННЫЕ, ВЫТЕКАЮЩИЕ И НЕКОТОРЫЕ ДРУГИЕ УБЫТКИ
В МАКСИМАЛЬНОЙ СТЕПЕНИ, РАЗРЕШЕННОЙ ДЕЙСТВУЮЩИМ ЗАКОНОДАТЕЛЬСТВОМ, НИ ПРИ КАКИХ
ОБСТОЯТЕЛЬСТВАХ ACER, ПОСТАВЩИКИ ACER ИЛИ ЛИЦЕНЗИАРЫ ACER НЕ НЕСУТ ОТВЕТСТВЕННОСТИ ЗА
КАКИЕ-ЛИБО ОСОБЫЕ, СОПУТСТВУЮЩИЕ, КОСВЕННЫЕ, ШТРАФНЫЕ ИЛИ ВЫТЕКАЮЩИЕ УБЫТКИ ЛЮБОГО РОДА
(ВКЛЮЧАЯ, НО НЕ ОГРАНИЧИВАЯСЬ НИЖЕПЕРЕЧИСЛЕННЫМ, УБЫТКИ ОТ УПУЩЕНИЯ ВЫГОДЫ ИЛИ УТРАТЫ
КОНФИДЕНЦИАЛЬНОЙ ИЛИ ИНОЙ ИНФОРМАЦИИ, ОТ ВЫНУЖДЕННОГО ПРОСТОЯ, ОТ ЛИЧНОГО ВРЕДА, ОТ
НАРУШЕНИЯ ТАЙНЫ ЛИЧНОЙ ЖИЗНИ, ОТ НЕСОБЛЮДЕНИЯ ЛЮБЫХ ОБЯЗАННОСТЕЙ, ВКЛЮЧАЯ ОБЯЗАННОСТЬ
ДОБРОСОВЕСТНОСТИ И ДОЛЖНОЙ ЗАБОТЛИВОСТИ, ОТ ХАЛАТНОСТИ, РАВНО КАК И ЛЮБЫЕ ДРУГИЕ
МАТЕРИАЛЬНЫЕ ИЛИ ИНЫЕ УБЫТКИ ЛЮБОГО РОДА), ВОЗНИКАЮЩИЕ ВСЛЕДСТВИЕ НЕСПОСОБНОСТИ
ИСПОЛЬЗОВАТЬ ПРОГРАММУ, ОКАЗАНИЯ ИЛИ НЕОКАЗАНИЯ УСЛУГ СОПРОВОЖДЕНИЯ ИЛИ В КАКОЙ-ЛИБО СВЯЗИ
С ВЫШЕПЕРЕЧИСЛЕННЫМ ЛИБО ИНЫМ ОБРАЗОМ ПО НАСТОЯЩЕМУ СОГЛАШЕНИЮ ИЛИ В СВЯЗИ С ЛЮБЫМ ЕГО
ПОЛОЖЕНИЕМ, ДАЖЕ В СЛУЧАЕ ВИНЫ, ГРАЖДАНСКОГО ПРАВОНАРУШЕНИЯ (В ТОМ ЧИСЛЕ ХАЛАТНОСТИ),
СТРОГОЙ ОТВЕТСТВЕННОСТИ, НАРУШЕНИЯ ДОГОВОРА ИЛИ НАРУШЕНИЯ ГАРАНТИЙ СО СТОРОНЫ ACER, ЕЕ
ПОСТАВЩИКОВ ИЛИ ЛИЦЕНЗИАРОВ, И ДАЖЕ ЕСЛИ ACER, ЕЕ ПОСТАВЩИКАМ И ЛИЦЕНЗИАРАМ БЫЛО ИЗВЕСТНО
О ВЕРОЯТНОСТИ ВОЗНИКНОВЕНИЯ ТАКИХ УБЫТКОВ.
ОГРАНИЧЕНИЕ ОТВЕТСТВЕННОСТИ И СРЕДСТВ ЗАЩИТЫ
НЕВЗИРАЯ НИ НА КАКИЕ УБЫТКИ, КОТОРЫЕ ВЫ МОЖЕТЕ ПОНЕСТИ ПО КАКОЙ-ЛИБО ПРИЧИНЕ (ВКЛЮЧАЯ, НО НЕ
ОГРАНИЧИВАЯСЬ НИЖЕПЕРЕЧИСЛЕННЫМ, ВСЕ УБЫТКИ, УПОМЯНУТЫЕ ВЫШЕ, А ТАКЖЕ ВСЕ ПРЯМЫЕ И ОБЩИЕ
УБЫТКИ), ОТВЕТСТВЕННОСТЬ ACER, ЕЕ ПОСТАВЩИКОВ И ЕЕ ЛИЦЕНЗИАРОВ ПО ЛЮБОМУ ИЗ ПОЛОЖЕНИЙ
НАСТОЯЩЕГО СОГЛАШЕНИЯ И ВАШЕ ИСКЛЮЧИТЕЛЬНОЕ СРЕДСТВО ЗАЩИТЫ В СВЯЗИ СО ВСЕМ
ВЫШЕПЕРЕЧИСЛЕННЫМ ОГРАНИЧИВАЮТСЯ СОВОКУПНЫМ РАЗМЕРОМ СУММЫ, ВЫПЛАЧЕННОЙ ВАМИ ЗА
ПРОГРАММУ. ИЗЛОЖЕННЫЕ ВЫШЕ ОГРАНИЧЕНИЯ, ИСКЛЮЧЕНИЯ И ОГОВОРКИ (В ТОМ ЧИСЛЕ ОТКАЗ ОТ
ГАРАНТИЙ И ИСКЛЮЧЕНИЕ ОТВЕТСТВЕННОСТИ ЗА СОПУТСТВУЮЩИЕ, ВЫТЕКАЮЩИЕ И НЕКОТОРЫЕ ДРУГИЕ
УБЫТКИ, УПОМЯНУТЫЕ ВЫШЕ) ДЕЙСТВУЮТ В МАКСИМАЛЬНОЙ СТЕПЕНИ, РАЗРЕШЕННОЙ ДЕЙСТВУЮЩИМ
ЗАКОНОДАТЕЛЬСТВОМ, ДАЖЕ ЕСЛИ КАКОЕ-ЛИБО СРЕДСТВО ЗАЩИТЫ НЕ ДОСТИГАЕТ СВОЕЙ СУЩЕСТВЕННОЙ
ЦЕЛИ. ПРИ ЭТОМ, ОДНАКО, ПОСКОЛЬКУ В НЕКОТОРЫХ ЮРИСДИКЦИЯХ НЕ ДОПУСКАЕТСЯ ИСКЛЮЧЕНИЕ ИЛИ
ОГРАНИЧЕНИЕ ОТВЕТСТВЕННОСТИ ЗА КОСВЕННЫЕ ИЛИ ПОБОЧНЫЕ УБЫТКИ, ПРИВЕДЕННОЕ ВЫШЕ
ОГРАНИЧЕНИЕ, ВОЗМОЖНО, НЕ ПРИМЕНЯЕТСЯ К ВАМ.
ПРЕКРАЩЕНИЕ СОГЛАШЕНИЯ
Без ущерба для каких-либо других своих прав Acer вправе незамедлительно расторгнуть настоящее Соглашение без
уведомления в случае несоблюдения вами каких-либо условий настоящего Соглашения.
В этом случае вы обязаны:
1. прекратить всякое использование Программы;
2. уничтожить или вернуть Acer оригинал Программы и все ее копии; и
3. удалить Программу со всех компьютеров, на которых она была установлена.
Все отказы от гарантий и ограничения ответственности, изложенные в настоящем Соглашении, остаются в силе после
прекращения настоящего Соглашения.
ОБЩИЕ ПОЛОЖЕНИЯ
Настоящее Соглашение представляет собой полный договор между вами и Acer в связи с данной лицензией на
Программу, заменяет собой все предшествующие договоры, соглашения, сообщения, предложения и заверения между
сторонами и имеет преимущественную силу над любыми противоречащими и дополнительными условиями любого
предложения, заказа, подтверждения или другого аналогичного сообщения. Изменения в настоящее Соглашение могут
вноситься только письменным документом, подписанным обеими сторонами. Если какое-то положение настоящего
Соглашения будет признано компетентным судом противоречащим закону, такое положение применяется в максимально
разрешенной степени, а остальные положения продолжают действовать в полную силу.

5
ДОПОЛНИТЕЛЬНЫЕ ПОЛОЖЕНИЯ, ПРИМЕНЯЕМЫЕ К ПРОГРАММНОМУ ОБЕСПЕЧЕНИЮ И УСЛУГАМ ТРЕТЬИХ
СТОРОН
Программное обеспечение, поставляемое в соответствии с настоящим Соглашением лицензиарами или поставщиками
Acer («Программное обеспечение третьих сторон»), предоставляется вам исключительно для вашего персонального
некоммерческого пользования. Вы не вправе использовать Программное обеспечение третьих сторон каким-либо
способом, который мог бы причинить вред услугам, предоставляемым лицензиарами или поставщиками Acer в
соответствии с настоящим Соглашением («Услуги третьих сторон»), вывести их из строя, вызвать их перегрузку или
ограничить их предоставление. Вы также не вправе использовать Программное обеспечение третьих сторон каким-либо
способом, который мог бы помешать другим лицам пользоваться Услугами третьих сторон либо услугами и продуктами
сторонних лицензиаров лицензиаров или поставщиков Acer. Использование вами Программного обеспечения третьих
сторон и Услуг третьих сторон также подчинено дополнительным условиям и правилам, с которыми можно ознакомиться
на нашем всемирном веб-сайте по адресу.
Замечание: Исходная версия настоящего лицензионного соглашения с конечным пользователем написана на
английском языке. В случае расхождений между исходной версией и ее переводом на другой язык
преобладающую силу будут иметь англоязычные положения и условия. Авторские права 2002-2011
Правила в отношении персональных данных
В ходе регистрации вас попросят сообщить компании Acer некоторые сведения о себе. Ознакомьтесь с Правилами
Acer в отношении персональных данных на международном веб-сайте http://www.acer.com или на веб-сайте Acer вашей
страны.
Технология распознавания музыки и соответствующие данные предоставлены компанией
Gracenote
®
. Gracenote
®
, фирменный знак и логотип Gracenote, а также фирменный знак
«Powered by Gracenote» являются либо зарегистрированным товарным знаком, либо
товарным знаком компании Gracenote, Inc. в США и/или других странах.
Логотипы XT9 и XT9 являются зарегистрированными товарными знаками компании
Nuance Communications, Inc. или ее дочерних компаний в США и других странах.

Знакомство с вашим планшетным пк, Отличительные особенности и функции, Регистрация устройства
Порядок регистрации
- Изображение
- Текст
6
Русский
Знакомство с вашим
планшетным ПК
Отличительные особенности и функции
Ваш новый планшетный ПК обеспечивает передовые и вместе с тем легкие в
использовании функции для работы с мультимединыйми файлами и широкие
возможности для развлечений. Вы можете:
• Подключаться к Интернету по сети Wi-Fi или, если в вашем планшетном
ПК есть функции 3G, по сети HSDPA+.
• Получать и отправлять эл. почту, находясь в дороге.
• Поддерживать связь с друзьями, используя программу Контакты и
программы общения в социальных сетях.
• Слушать музыку с отличной передачей всех звуковых красок в режиме
Dolby Mobile.
Регистрация устройства
При первом использовании устройства советуем сразу его зарегистрировать.
Тогда вы сможете воспользоваться различными преимуществами, такими как:
• Более быстрая помощь от наших квалифицированных специалистов.
• Членство в сообществе Acer: получение уведомлений о специальных
предложениях и участие в опросах клиентов.
• Получение новостных рассылок от компании Acer.
Спешите зарегистрироваться, так как вас ждет много других льготных
предложений!
Порядок регистрации
Для регистрации своего устройства Acer зайдите на веб-сайт mobile.acer.com.
Нажмите Регистрация продукта и выполните несложные указания.
Зарегистрироваться можно также прямо с планшетного ПК, нажав значок
Регистрация в Acer.
После того, как мы зарегистрируем ваше устройство, вы получите
подтверждение по эл. почте с важной информацией, которую нужно будет
сохранить для использования в будущем.

Настройка, Распаковка планшетного пк, Знакомство с вашим планшетным пк
Вид спереди вид
- Изображение
- Текст
7
Распаковка планшетного ПК
Русский
Настройка
Распаковка планшетного ПК
Новый планшетный ПК поставляется в защитной коробке. Аккуратно вскройте
коробку и извлеките содержимое. Если отсутствует или поврежден хотя бы
один из перечисленных ниже компонентов, то немедленно обратитесь к
продавцу:
• Acer ICONIA TAB
• Краткое руководство
• USB-кабель
• Адаптер перем. тока
• Гарантийный формуляр
Знакомство с вашим планшетным ПК
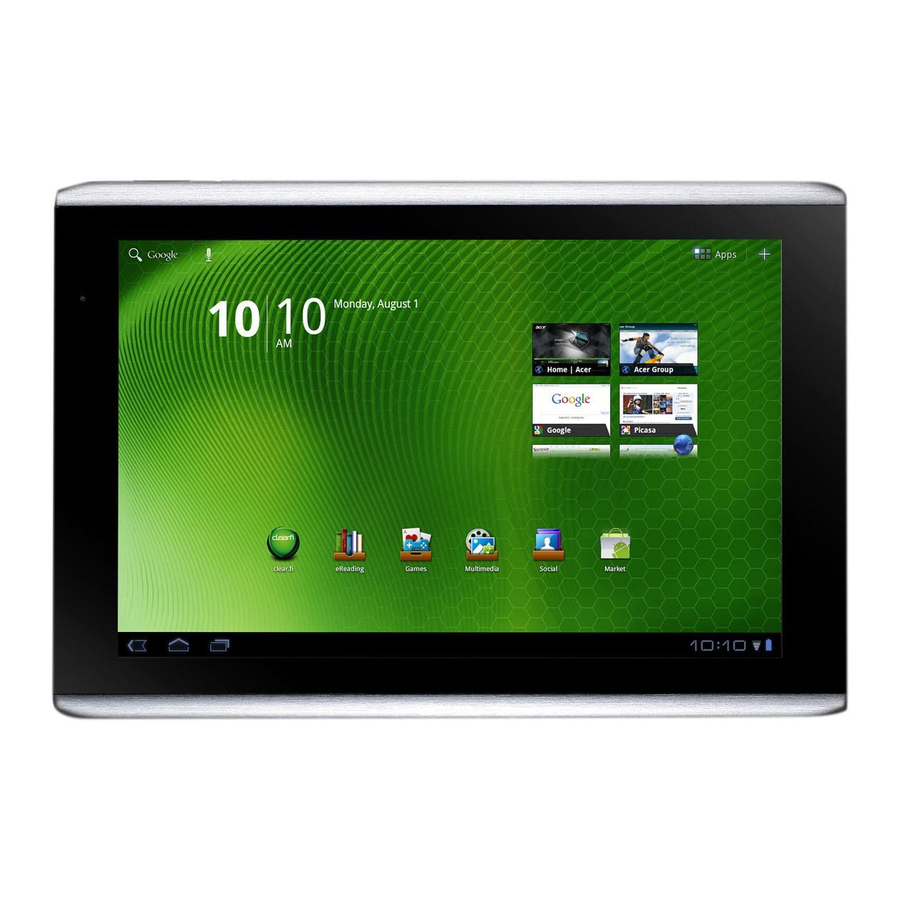
Вид спереди вид
Поз. Элемент
Описание
1
Сенсорный экран
10,1-дюймовый емкостной сенсорный экран с
разрешением 1280 x 800 пикселей.
2
Передняя камера
2-мегапиксельная камера для видеосвязи и
съемки автопортретов.
3
Светочувствительный
датчик
Определяет условия освещения и
автоматически регулирует яркость экрана.
1
2
3

8
Русский
Вид сзади вид
Вид сверху вид
Поз. Элемент
Описание
1
Светодиодная вспышка
Загорается для подсветки объектов съемки.
2
5-Мп камера
5-мегапиксельная камера для фотосъемки с
высоким разрешением.
3
Динамики
Вывод стереозвука.
Поз. Элемент
Описание
1
Разъем Micro HDMI
(Тип D)
Служит для подключения кабеля HDMI с
разъемом Типа D.
2
3,5-мм гнездо наушников Служит для подключения стереонаушников.
3
Кнопка питания
Нажмите на несколько секунд, чтобы включить
планшетный ПК; нажмите кратковременно,
чтобы включить/выключить экран или
перевести планшетный ПК в режим сна;
нажмите и удерживайте, чтобы выключить
планшетный ПК.
1
2
3
3
1
2 3

Комментарии
-
Инструкции по эксплуатации
1

Acer ICONIA TAB A500 инструкция по эксплуатации
(90 страниц)
- Языки:Русский
-
Тип:
PDF -
Размер:
9.43 MB -
Описание:
Планшетный компьютер
Просмотр
На NoDevice можно скачать инструкцию по эксплуатации для Acer ICONIA TAB A500. Руководство пользователя необходимо для ознакомления с правилами установки и эксплуатации Acer ICONIA TAB A500. Инструкции по использованию помогут правильно настроить Acer ICONIA TAB A500, исправить ошибки и выявить неполадки.
-
Contents
-
Table of Contents
-
Troubleshooting
-
Bookmarks
Quick Links
Related Manuals for Acer A500
Summary of Contents for Acer A500
-
Page 1: User Guide
User Guide…
-
Page 2
© 2011 All Rights Reserved Acer ICONIA TAB User Guide Model: A500 (Wi-Fi only models) and A501 (Wi-Fi+3G models) First issue: 03/2011 Acer ICONIA TAB Model number: __________________________________ Serial number: ___________________________________ Date of purchase: ________________________________ Place of purchase: ________________________________… -
Page 3: Table Of Contents
Online applications ……….29 Acer content folders…
-
Page 4
Playing music and video Multimedia playback ……… . . 35 Media server . -
Page 5: End User License Agreement
Sublicense or otherwise make the Software available to third parties, except that you may, after prior written notification to Acer, transfer the Software as a whole to a third party so long as you do not retain any copies of the Software and such third party accepts the terms of this Agreement.
-
Page 6
Furthermore, you may not use the Third Party Software in any manner that could interfere with any other party’s use and enjoyment of the Third Party Services, or the services and products of Acer’s licensors’ or suppliers’ third party licensors. -
Page 7: Features And Functions
To register your Acer product, please visit mobile.acer.com. Click Product Registration and follow the simple instructions. You can also register directly from your tablet by tapping the Acer Registration icon. After we receive your product registration, you will be sent a confirmation email with important data that you should keep in a safe place.
-
Page 8: Unpacking Your Tablet
Your new tablet comes packed in a protective box. Carefully unpack the box and remove the contents. If any of the following items is missing or damaged, contact your dealer immediately: • Acer ICONIA TAB • Quick Guide • USB cable •…
-
Page 9: Back View
Back view Item Description LED flash Lights to illuminate images. 5 MP camera A 5-megapixel camera for taking high- resolution images. Speakers Emits stereo audio Left and right views Item Description Power button Long press to turn the tablet on, press briefly to turn the screen on/off or enter sleep mode;…
-
Page 10: Using The Sim Card Slot (Only For Wi-Fi+3G Models)
Item Description Micro HDMI (Type D) Connects to an HDMI cable with a Type D connector connector. DC-in jack Connects to the DC power supply. Micro USB connector Connects to a computer with a USB cable. (Slave) USB connector (Host) Connects USB devices to your tablet.
-
Page 11: Using Your Tablet
Using your tablet Using the SIM card slot (only for Wi-Fi+3G models) Certain tablets include a SIM slot for internet access. To take full advantage of your tablet’s Internet capabilities, you should install a SIM card with data before subscription turning on your tablet.
-
Page 12: Turning On For The First Time
Turning on for the first time To turn on your tablet, press and hold the power button for two seconds. You will then be asked some questions before you can use your tablet. To start, tap to select your language, then tap Start. Follow the rest of the instructions as they are displayed.
-
Page 13: Using The Touchscreen
any services. Your tablet will lock automatically if it is not used after a while. To change the delay, tap Apps > Settings > Screen > Timeout. Waking your tablet If the screen is off and the tablet does not react to any taps on the screen, then it has been locked and is in sleep mode.
-
Page 14: The Home Screen
The Home screen When you start your tablet, or wake it from power saving, it will display the Home screen. This screen gives you quick access to information and simple controls with widgets or shortcuts. These display information such as the time and favorite bookmarks, or provide additional controls and direct access to applications.
-
Page 15
Home Tap this icon to go directly to the Home screen. Recent Tap this icon to see recently opened applications. Tap an application to open it, or tap anywhere on the screen to return to the Home screen. Settings This icon is displayed in some applications. Tap this icon to open a list of options. -
Page 16: Status And Notification Area
The application menu The application menu displays applications installed on your tablet. Two categories are available All and My apps. All displays all applications that are installed on your tablet; My apps displays applications that you have installed from the Android Market. Note: All images are for reference only.
-
Page 17: Status And Notification Icons
Tap the status icons to view more status information and a summary of events. Tap the status area again to view more controls. While viewing a notification, tap the summary to see more information, if available. Some event summaries include controls, such as media controls if music is playing. Status and notification icons Connection and batterystatus icons Note: Network connection icons are blue if you have an active Google…
-
Page 18
Notification icons Icon Description Icon Description Alarm is set Speaker is silenced New Gmail message Tablet microphone is off New Google Talk message GPS is on Upcoming event Receiving location data from Song is playing More status notifications SD card or USB storage is full Syncing data Tablet is connected to PC via Sync is on… -
Page 19: Personalizing The Home Screen
Personalizing the Home screen You may personalize your Home screen by adding or removing application shortcuts or widgets, and by changing the wallpaper. Adding or removing shortcuts or widgets To add shortcuts or widgets open the Add to Home screen: tap the plus sign next to Apps in the top-right corner of the Home screen.
-
Page 20: The Onscreen Keyboard
Adding shortcuts from the Application menu You can add shortcuts to the Home screen directly from the application menu. Open the Application menu then tap and hold an icon until an image of the Home screens appears. Drag the icon to a Home screen to create a shortcut. The onscreen keyboard When you tap a text box to enter text, an onscreen keyboard will appear.
-
Page 21: Xt9 Text Input
settings. These settings include Auto-correction and keyboard sounds and vibration. Predictive text or auto correction The Android keyboard can provide predictive text input. As you tap the letters of a word, a selection of words are displayed that continue the sequence of letters tapped, or are a close match allowing for errors.
-
Page 22: Editing Text
listing the text input methods available on your tablet. Tap the settings icon next to the XT9 Text Input entry. Function Description Languages and Set the languages that will be available. settings If you have selected more than one language, tap the globe in the text prediction bar to cycle through the languages.
-
Page 23
The selected text is highlighted, with a tab at each end of the selection. 2. Drag either tab to expand or reduce the amount of selected text, or tap Select all. 3. To cut or copy the text, tap the Cut or Copy button. Editing text… -
Page 24: Connecting Devices To Your Tablet
Take care when removing the card, the slot is spring-loaded. Connecting to a PC as a USB storage device Download and install the latest USB driver on your computer before connecting your tablet to the computer. Visit www.acer.com/worldwide/support/ download.htm for the latest driver.
-
Page 25: Connecting A Usb Device To Your Tablet
This allows you to transfer your personal data to, or from, your PC, using your PC’s file explorer. Plug the micro USB connector to your tablet, and plug the other end of the USB cable into a USB port on your PC. After a short delay, your tablet’s internal memory will be visible as an external drive in your PC’s file explorer.
-
Page 26: Connecting To A Television With Hdmi
Tap Find nearby devices to scan for available devices. Note: Please check for updates to the tablet’s software that may add support for additional Bluetooth devices. Visit www.acer.com/support. Connecting to a television with HDMI Connect a micro HDMI (Type D) cable to your tablet then plug the other end of the HDMI cable into a TV or monitor with an HDMI port.
-
Page 27: Going Online
Going online Managing Wi-Fi connections If you did not connect to a Wi-Fi network when you first started your tablet, or want to connect to a new network, tap Apps > Settings > Wireless & networks > Wi-Fi settings to manage your connection settings. Alternatively, tap the Wi-Fi status icon in the bottom-right corner of the screen.
-
Page 28: Setting Up Gmail (Google Mail)
You may open multiple tabs. When a page is open, press the small tab with a plus sign. Simply tap one of the tabs across the top of the screen to switch pages. New tab Pinch to zoom in or out of pages. Tap and hold an item on a page to open a contextual menu.
-
Page 29: Setting Up The Email Application
Your tablet provides a variety of preinstalled applications. Many of these require some form of Internet access. These applications may include: • Acer Sync: Sync your data between your tablet, your computer and the Google servers. • SocialJogger: View updates to your social networks in one location.
-
Page 30: Acer Socialjogger
From the application menu, tap Acer SocialJogger to launch the program. Select Sign in to enter your account information. When you are finished press Start.
-
Page 31
You can browse the market by category or tap the search icon to search for a specific application. Once you have selected an application, tap the DOWNLOAD button to download and install the application. You will be told which services (contact information, wireless access, GPS, etc.) the application requires access in order to function correctly. -
Page 32: Google Talk
Using downloaded applications Once you’ve downloaded and installed an application, you may find it in the My apps or All sections of the Application menu. Certain applications also provide widgets, or only provide a widget (with no application icon). Widgets can be found in the Widget section when personalizing your Home screen.
-
Page 33: Acer Content Folders
Acer content folders Your tablet includes content folders that allow you to easily organize and access your favorite applications. Choose one of the four categories on the Home screen or application menu: eReading, Games, Multimedia or Social. Tap the shortcut to open a screen containing applications from that category.
-
Page 34
Selecting a content folder The folder shortcuts on the home screen or Application menu give you direct access to any of the four categories. If you have opened a category, you can easily change category by swiping the screen to the left or right. Adding You can add applications to any content folder. -
Page 35: Playing Music And Video
Acer clear.fi will automatically detect devices that are connected to the network and are also running Acer clear.fi. These devices are displayed at the bottom of the screen, with your tablet as the default device on the leftmost corner. Tap any of the connected devices and then tap Photo, Video, or Music to browse media files on that connected device.
-
Page 36
Tap and hold a photo thumbnail, then tap and hold any of the connected device showing an arrow. Select Play or Save. To upload a photo to Facebook, or Flickr via Acer Photo Uploader, or to paired devices using Bluetooth, tap and hold a photo thumbnail, then tap Share. -
Page 37
Note: The Acer clear.fi video player only plays MP4 files. Please check for updates to the tablet’s software which may add support for other types of video. See “Updating your tablet’s operating system” on page 59. To send video files, for example, to paired devices using Bluetooth or to YouTube, tap and hold a photo thumbnail, then tap Share. -
Page 38: Media Server
nemoPlayer Open nemoPlayer from the application menu to play media you have stored on your tablet. nemoPlayer enables you to listen to music, view video clips and pictures in all the formats supported by your tablet. See “Multimedia” on page 63. Media server Your tablet can act as a digital media server using UPnP technology.
-
Page 39: Managing Contacts
Managing contacts Your tablet features an address book that allows you to save contacts to the internal memory, SIM card or your Google account. Tap Contacts from the application menu to view your contacts. If you don’t have any contacts stored on your tablet, you can sync with your Google account contacts, import contacts from a contact data file (vCard or csv) or add a new contact.
-
Page 40: Editing A Contact
You may now edit the new contact entry. Editing a contact If you have opened an new or existing contact you can enter information about the contact: Simply tap on a box and type the appropriate information. Click on the arrow next to the name entry to see options, such as adding a name prefix or phonetic name.
-
Page 41: Starred Contacts
Tap on an entry (such as an email address) to open the application linked to that type of entry. For example, tap an email address to open the Gmail application. To add or change information, tap the pencil icon. Tap Done to save changes, or Cancel to discard them. Starred contacts star You may quickly access your favorite contacts by adding a…
-
Page 42: Using The Camera
Using the camera Your tablet features two cameras: a 5-megapixel digital camera and flash mounted on the rear and a 2-megapixel digital camera mounted on the front. This section will take you through all the steps in taking photos and videos with your tablet.
-
Page 43: Taking A Photo
Icon Description Zoom out You may only zoom out after you have zoomed in. Zoom in Crop and enlarge the center of the screen. When using zoom, the image on the screen does not represent the quality of the final image. Take photo After taking a photo, tap the thumbnail in the bottom-left corner to view the photo in the Gallery.
-
Page 44: Shooting A Video
3. Zoom in or out as needed. Note: When using zoom, the image on the screen does not represent the quality of the final image. 4. Tap the camera icon to take the photo. After taking a photo, tap the thumbnail in the bottom-left corner to view the photo in the Gallery.
-
Page 45: Supported Formats
Note: Zoom is only available in certain resolutions. Supported formats Type Formats Image JPEG Video H.264BP Audio AAC-LC Viewing photos and videos After you have taken your photo or video, it is automatically saved; normally to internal memory. After taking a photo or video, you can view it in the Gallery by tapping the thumbnail in the bottom-left corner of the screen.
-
Page 46: Reading An Ebook Or Pdf
Reading an eBook or pdf LumiRead The LumiRead application allows you to purchase, store and read books on your tablet. Tap the LumiRead shortcut in the Application menu, or the eReading content folder, to open the LumiRead application. The bookshelves The contents of your tablet are shown on the screen as a series of bookshelves.
-
Page 47
Icon Item Description Sort by Change how books are organized on the bookshelves. Display Change how the books are shown. Settings Open settings to Register an Adobe ID, change the theme or edit tags. Recently read The first shelf (at the top) displays books you have recently read. This list will change to reflect your activity. -
Page 48: Opening A Book
Warning: Certain vendors may use copyright protection systems that cannot be opened by your tablet. Please check which DRM (Digital Rights Management) system is used. LumiRead supports books protected with Adobe ID. In order to read certain books, you must activate your tablet with an Adobe ID. See “Your Adobe ID”…
-
Page 49
To add books to your tablet’s internal memory or to a micro SD card, copy the books to the LumiBooks folder, see “Transferring files between a microSD card and your PC“ on page 24 or “Connecting to a PC as a USB storage device“ on page 24. -
Page 50
Your Adobe ID Some books available for purchase are protected with Adobe DRM (Digital Rights Management). Before you can read them, you must enter an Adobe ID to activate your tablet. Only one activation is required, as it covers all purchases. If you already have an Adobe ID, you may use this to activate your tablet. -
Page 51: Using A Cellular Data Network (Only For Wi-Fi+3G Models)
Using a cellular data network (only for Wi-Fi+3G models) ‘3G’, or data over a cellular network, is only available on models equiped with a SIM card slot, or through a separate 3G modem (not supplied — available from your mobile Internet provider, check for compatibility). Important: Please check the information provided by your mobile internet provider.
-
Page 52: Adjusting Connection Settings
Important: Depending on your settings, you may be required to enter your PIN each time you switch on the cellular data function. SIM card lock Your tablet may come with a SIM card lock, i.e., you will only be able to use the SIM card provided by your network operator.
-
Page 53: Internet Sharing
Disable data when roaming You can prevent your tablet from transmitting data over other carriers’ mobile networks when you are traveling and leave an area that is covered by your carrier’s networks. This is useful for controlling expenses if your mobile data contract doesn’t include data roaming.
-
Page 54
Wi-Fi hotspot You can turn your tablet into a portable Wi-Fi hotspot to share your mobile Internet connection with up to eight clients. 1. Tap Apps > Settings > Wireless & networks > Tethering & portable hotspot. 2. Tap Portable Wi-fi hotspot and Portable Wi-Fi hotspot settings. 3. -
Page 55: Advanced Settings
Advanced settings Access Settings from the Application menu. Tap Apps, then Settings. Sound Adjust the volume of your tablet using the volume buttons on the side of the tablet. Alternatively, you can adjust your tablet sound settings by tapping Apps >…
-
Page 56: Putting Your Tablet In Airplane Mode
Putting your tablet in Airplane mode You can enter Airplane mode (also known as flight mode) to turn off network and Bluetooth functions and use your tablet during a flight. Check with your airline to make sure this is permitted onboard. Switch your tablet off during takeoff and landing as it may interfere with aircraft electronic systems.
-
Page 57: Adjusting Bluetooth Settings
Adjusting Bluetooth settings You can use Bluetooth to exchange information between your tablet and other mobile devices. Bluetooth connections For all Bluetooth settings, tap Apps > Settings > Wireless & networks > Bluetooth settings. Here you can switch Bluetooth on or off, set a device name and discoverability.
-
Page 58: Setting The Date And Time
Internet accounts. Acer Sync Acer Sync allows you to easily synchronize your contacts, calendar, photos and videos between your tablet, PC and corresponding Google services. You must install the Acer Sync program on your computer; download and install Acer Sync and Acer PIM for the PC from the mobile.acer.com website.
-
Page 59: Changing Language And Text Options
Changing language and text options Set your location and language input preferences by opening the application menu and going to Apps > Settings > Language & input. Managing applications You can allow programs from Unknown sources to be installed and Manage applications.
-
Page 60: Clean Boot
Clean boot A clean boot will restore your tablet to the factory settings. Warning! This will erase all your personal information, any contacts stored on your tablet and any programs you installed. Open Settings from the application menu, then tap Privacy > Factory data reset; click Reset tablet and then Erase everything to format your tablet.
-
Page 61: Faq And Troubleshooting
FAQ and troubleshooting This section lists frequently asked questions that may arise during the use of your tablet, and gives easy answers and solutions to these questions. Aspect Question Answer Audio Why is there no If the headset is plugged into the sound coming from device, the speaker is automatically the device?
-
Page 62: Other Sources Of Help
It is also normal for the tablet to heat up during long periods of use, such as watching a video or playing a game. All Acer tablets are factory tested before release. Other sources of help For information on:…
-
Page 63: Specifications
Specifications Performance ® ™ • NVIDIA Tegra 2 mobile processor ® ™ • Dual Core ARM Cortex • System memory: • 1 GB of RAM • 16 or 32 GB of flash memory ™ • Google Android operating system Display •…
-
Page 64
3G support (only available on Wi-Fi+3G models) • aGPS • GSM 850 / 900 / 1800 / 1900 • UMTS 850 / 900 / 1900 / 2100 • HSDPA 7.2 Mbps / HSUPA 5.76 Mbps / EDGE / GPRS • Optional HSDPA 21 Mbps Camera •…
-
Contents
-
Table of Contents
-
Troubleshooting
-
Bookmarks
Quick Links
Related Manuals for Acer ICONIA Tab A500 16GB
Summary of Contents for Acer ICONIA Tab A500 16GB
-
Page 1: User Guide
User Guide…
-
Page 2
© 2011 All Rights Reserved Acer ICONIA TAB User Guide Model: A500 First issue: 03/2011 Acer ICONIA TAB Model number: __________________________________ Serial number: ___________________________________ Date of purchase: ________________________________ Place of purchase: ________________________________… -
Page 3: Table Of Contents
Connecting a Bluetooth device ……..25…
-
Page 4
Adjusting Bluetooth settings …….. -
Page 5: End User License Agreement
Sublicense or otherwise make the Software available to third parties, except that you may, after prior written notification to Acer, transfer the Software as a whole to a third party so long as you do not retain any copies of the Software and such third party accepts the terms of this Agreement.
-
Page 6
This Agreement may only be modified by a written document signed by both parties. If any provision of this Agreement is held by a court of competent jurisdiction to be contrary to law that provision will be enforced to the maximum extent permissible and the remaining provisions of this Agreement will remain in full force and effect. -
Page 7: Features And Functions
You can: • Connect to the Internet. • Access your email while on the move. • Keep in touch with your friends via your Contacts and social networking applications. • Listen to rich, full-impact audio via Dolby Mobile. Product registration When using your product for the first time, it is recommended that you immediately register it.
-
Page 8: Unpacking Your Tablet
Setting Up Unpacking your tablet Your new tablet comes packed in a protective box. Carefully unpack the box and remove the contents. If any of the following items is missing or damaged, contact your dealer immediately: • Acer ICONIA TAB •…
-
Page 9: Back View
3.5 mm headphone jack Connect to stereo headphones. Power button Long press to turn the tablet on, press briefly to turn the screen on/off or enter sleep mode; press and hold to turn the tablet off. Getting to know your tablet…
-
Page 10: Bottom View
1 2 3 Item Description Reset button Insert a small thin object (such as a paperclip) to reset power to the tablet. USB connector (Host) Connects USB devices to your tablet. Micro USB connector Connects to a computer with a USB cable.
-
Page 11: Charging Your Tablet
24. Charging your tablet For first-time use, you need to charge your tablet for four hours. After that you can recharge the battery as needed. Connect the DC-in jack to your tablet and plug the AC adapter into any AC outlet.
-
Page 12: Using Your Tablet
During the start-up process, you may create or sign in to an account, which will be used to synchronize your contact list, email, calendar and other information. If you do not yet have Internet access, or do not want to use this feature, then tap Skip.
-
Page 13: Locking Your Tablet
Apps > Settings > Screen > Timeout. Waking your tablet If the screen is off and the tablet does not react to any taps on the screen, then it has been locked and is in sleep mode.
-
Page 14: The Home Screen
Tap and hold: Tap and hold an item to see a list of actions available for that item. On the pop-up menu that appears, tap the action you want to perform. Scroll: To scroll up or down the screen, simply drag your finger up or down the screen in the direction that you want to scroll.
-
Page 15
Back Tap this icon to go to the previous page, or to go up one level in a hide menu. This icon may be replaced with the icon in certain cases (such as if the keyboard or list of recent applications is shown). -
Page 16: Status And Notification Area
Swipe the outline towards the center of the screen to switch pages. Tap and hold an icon to add a shortcut to one of your Home screens. While a shortcut is selected, thumbnails of the Home screens are shown below the list of applications, simply drag the shortcut to a screen.
-
Page 17: Status And Notification Icons
Tap the status icons to view more status information and a summary of events. Tap the status area again to view more controls. While viewing a notification, tap the summary to see more information, if available. Some event summaries include controls, such as media controls if music is playing.
-
Page 18
GPS is on Upcoming event Receiving location data from Song is playing More status notifications SD card or USB storage is full Syncing data Tablet is connected to PC via Sync is on Application update available Problem with sign-in or sync… -
Page 19: Personalizing The Home Screen
To move any item on the Home screen, tap and hold the item until it is selected. You may drag the item to any free area on the screen. To move the item to a different home screen, drag it to the side of the screen, the Home screen will switch to the screen in that direction.
-
Page 20: The Onscreen Keyboard
You can add shortcuts to the Home screen directly from the application menu. Open the Application menu then tap and hold an icon until an image of the Home screens appears. Drag the icon to a Home screen to create a shortcut.
-
Page 21: Xt9 Text Input
The word list changes after every key press. If the word you need is displayed, you can tap on it to insert it into your text.
-
Page 22: Editing Text
Inserting text 1. Tap the text you want to select. If you can select this text, a cursor is inserted below the text. Note: The cursor indicates where text you type or paste will be inserted.
-
Page 23
The selected text is highlighted, with a tab at each end of the selection. 2. Drag either tab to expand or reduce the amount of selected text, or tap Select all. 3. To cut or copy the text, tap the Cut or Copy button. -
Page 24: Connecting Devices To Your Tablet
Check card capacity in the External SD card section of Apps > Settings > Storage. Note: Ensure that the micro SD card is inserted all the way into the card slot. Transferring files from a microSD card to your PC Remove the card from the tablet and use a card reader or USB adapter to access the card as an external storage device.
-
Page 25: Connecting A Usb Device To Your Tablet
You can access media files (photos, music and video) on USB storage devices with your tablet’s multimedia apps. Caution: Before removing USB storage, make sure your device is not using data on the USB storage device. Note: Please check for updates to the tablet’s software that may add support for additional USB devices.
-
Page 26: Connecting To A Television With Hdmi
Bluetooth devices. Visit www.acer.com/support. Connecting to a television with HDMI Connect a micro HDMI (Type D) cable to your tablet then plug the other end of the HDMI cable into a TV or monitor with an HDMI port.
-
Page 27: Going Online
Alternatively, tap the Wi-Fi status icon in the bottom-right corner of the screen. If Wi-Fi is not on, tap Turn on Wi-Fi, and wait for your tablet to detect nearby networks. Tap the name of your network and enter a security password, if needed.
-
Page 28: Setting Up Gmail (Google Mail)
Simply tap one of the tabs across the top of the screen to switch pages. New tab Pinch to zoom in or out of pages. Tap and hold an item on a page to open a contextual menu. Voice Search With voice actions, you can send emails, find directions to locations, search the Internet and even send a note to yourself using your voice.
-
Page 29: Setting Up The Email Application
Setting up the Email application The Email application enables you to access email from most popular email providers. Most accounts can be set up in two steps. Open the application menu and then tap Email to start setting up your email access.
-
Page 30: Acer Socialjogger
Select Sign in to enter your account information. When you are finished press Start. Slide the disc, located on the right, up and down to cycle through the status updates. Tap on a status to view more details and make a comment.
-
Page 31
You can browse the market by category or tap the search icon to search for a specific application. Once you have selected an application, tap the DOWNLOAD button to download and install the application. You will be told which services (contact information, wireless access, GPS, etc.) the application requires access in order… -
Page 32: Google Talk
Note: You need to activate a Google account before you can use Google Talk. Tap Talk from application menu to open Google Talk. Here you can see a list of your contacts connected to Google Talk services. Tap on a contact to open a chat session.
-
Page 33: Acer Content Folders
Your tablet includes content folders that allow you to easily organize and access your favorite applications. Choose one of the four categories on the Home screen or application menu: eReading, Games, Multimedia or Social. Tap the shortcut to open a screen containing applications from that category.
-
Page 34
Moving or removing Tap and hold an item to select it. Drag it to an new position to change the order, or to the trash can in the top right corner to remove the shortcut from the screen. -
Page 35: Playing Music And Video
Acer clear.fi will automatically detect devices that are connected to a wireless network and display them at the bottom of the screen, with your tablet as the default device on the leftmost corner. Tap any of the connected devices and then tap Photo, Video, or Music to browse media files on that connected device.
-
Page 36
Drag the bar on left side for more viewing options. clear.fi photos Tap the photo album to view the thumbnails. Tap and hold an album or photo thumbnail to view the menu panel. You can view photos found on any of the connected devices and save them. -
Page 37
YouTube, tap and hold a photo thumbnail, then tap Share. clear.fi music Tap a folder to list the audio files. Tap and hold a folder or audio file to view the menu panel. You can listen to any audio file found on any of the connected devices and save them. -
Page 38: Media Server
To set up the media server, open the application menu and tap Media server. You will need to enable Share contents before you can start using the service. You may select to share Video, Photo or Music. Tap a category to control which files are shared.
-
Page 39: Managing Contacts
Google account. Tap Contacts from the application menu to view your contacts. If you don’t have any contacts stored on your tablet, you can sync with your Google account contacts, import contacts from a contact data file (vCard or csv) or add a new contact.
-
Page 40: Editing A Contact
Simply tap on a box and type the appropriate information. Click on the arrow next to the name entry to see options, such as adding a name prefix or phonetic name. To enter multiple entries, such as separate entries for mobile and home phone numbers, tap the plus sign to create a second entry.
-
Page 41: Starred Contacts
Tap on an entry (such as an email address) to open the application linked to that type of entry. For example, tap an email address to open the Gmail application. To add or change information, tap the pencil icon. Tap Done to save changes, or Cancel to discard them.
-
Page 42: Using The Camera
Tip: The recommended use for the front-facing camera is for video chat. Use the camera so the person you call can see you while you can see them on the screen. Normally, the video chat software you are using will provide controls for switching between the front and rear facing cameras.
-
Page 43: Taking A Photo
Internal memory Saves photos to the tablet’s internal memory (this is the default). Memory card Saves photos to the memory card in the micro SD card slot (only available if a micro SD card has been inserted). Taking a photo 1.
-
Page 44: Shooting A Video
1. Ensure you the options described above are set to your preferences. 2. Frame your subject and steady your tablet and zoom in or out as needed. 3. Press the camera button down fully to begin recording.
-
Page 45: Supported Formats
After you have taken your photo or video, it is automatically saved; normally to internal memory. After taking a photo or video, you can view it in the Gallery by tapping the thumbnail in the bottom-left corner of the screen. Alternatively, open the application menu and tap Gallery, then Camera.
-
Page 46: Reading An Ebook
Favorites / tags As you add books to your tablet, you may find it difficult to find the book you need. You may either search for a specific title or author, add books to your Favorites, or choose only to display books with a certain tag, to reduce the number of books displayed at one time.
-
Page 47: Opening A Book
Normally All books are displayed, but you can select a tag. If a tag has been selected, only books with that tag will be displayed. Available tags are: All, Favorites, Fiction, Romance, Fantasy, Crime, Historical, Horror, Business, Life, Outdoor, Science. Tap the Settings icon and select Tags to edit or create new tags.
-
Page 48
Rights Management). Before you can read them, you must enter an Adobe ID to activate your tablet. Only one activation is required, as it covers all purchases. If you already have an Adobe ID, you may use this to activate your tablet. To create an Adobe ID:… -
Page 49
4. Tap Create an Adobe Account. 5. Enter the information requested to create login information for your account. Note: The email adress you enter will be your Adobe ID. Make sure you remember your password. 6. Select Continue. Your Adobe ID is now registered. -
Page 50: Advanced Settings
Access Settings from the Application menu. Tap Apps, then Settings. Sound Adjust the volume of your tablet using the volume buttons on the side of the tablet. Alternatively, you can adjust your tablet sound settings by tapping Apps > Settings > Sound.
-
Page 51: Putting Your Tablet In Airplane Mode
Putting your tablet in Airplane mode You can enter Airplane mode (also known as flight mode) to turn off network and Bluetooth functions and use your tablet during a flight. Check with your airline to make sure this is permitted onboard.
-
Page 52: Connecting To A Pc
To connect to a device, tap the device in the list of available devices. You may be asked to enter a PIN on both devices to establish the connection. Note: Only A2DP stereo headsets (without microphone) are supported. Please check for updates to the tablet’s software which may add support for additional Bluetooth devices.
-
Page 53: Setting The Date And Time
To set the date and time, tap Apps > Settings > Date & time. Tip: If you travel frequently or live in an area that uses daylight saving time, and have mobile network access, activate Automatic date & time from this menu. Your tablet will set the date and time based on information it receives from the network.
-
Page 54: Updating Your Tablet’s Operating System
You may have to perform a reset if your tablet fails to respond when buttons are pressed or the screen is tapped. To reset your tablet use a small thin object (such as a paperclip) to press the recessed reset button. See “Bottom view” on page 10.
-
Page 55
Open Settings from the application menu, then tap Privacy > Factory data reset; click Reset tablet and then Erase everything to format your tablet. If your tablet still does not respond, refer to “FAQ and troubleshooting” on page 56. Resetting your tablet… -
Page 56: Appendix
Appendix FAQ and troubleshooting This section lists frequently asked questions that may arise during the use of your tablet, and gives easy answers and solutions to these questions. Aspect Question Answer Audio Why is there no If the headset is plugged into the…
-
Page 57: Other Sources Of Help
See “Clean boot“ on page 54. Heat The tablet heats up It is normal for the device to heat up when charging or when charging. When charging is operating for a long complete, it will return to its normal period.
-
Page 58: Specifications
Formats supported: Type Formats Audio recording AAC-LC, AMR-WB Audio playback AAC-LC, AAC, AAC+ (Not raw AAC), AMR-NB, AMR-WB, MP3, OGG Vorbis, WAV Video recording H.264 BP, MPEG-4 SP, H.263 Video playback H.264 BP, H.264 MP, H.264 HP, MPEG-4 SP, H.263 USB connectors •…
-
Page 59
• microSD memory card slot (up to 32 GB) Battery • Rechargeable high density Li-polymer batteries: 3260 mAh x 2 (24.1 Wh) Note: Length of battery operation will depend on power consumption which is based on system resource use. For example, constantly using the backlight or using power-demanding applications will shorten battery life between charges. -
Page 60: Safety
Parts of the device are magnetic. Metallic materials may be attracted to the device, and persons with hearing aids should not hold the device to the ear with the hearing aid. Do not place credit cards or other magnetic storage media near the device, because information stored on them…
-
Page 61: Medical Devices
For vehicles equipped with an air bag, remember that air bags inflate with great force. Do not place objects, including installed or portable wireless equipment in the area over the air bag or in the air bag deployment area. If in-vehicle wireless equipment is improperly installed, and the air bag inflates, serious injury could result.
-
Page 62: Emergency Calls
• Is kept at least 30 centimetres (one foot) away from a mobile phone. • Is not in a dusty or damp environment. • Is not used near water. Never spill liquids of any kind on or into your device.
-
Page 63: Battery Information
For safety reasons, and to prolong the lifetime of the battery, charging will not occur at low (below 0 °C/32 °F) or high (over 40 °C/104 °F) temperatures.
-
Page 64
°C and 25 °C (59 °F and 77 °F). A device with a hot or cold battery may not work temporarily, even when the battery is fully charged. Battery performance is particularly limited in temperatures well below freezing. Do not dispose of battery or devices with embedded batteries in a fire as they may explode. -
Page 65
Glass parts Some of parts of your device may be made of glass. This glass could break if the product is dropped on a hard surface or receives a substantial impact. If glass breaks, do not touch or attempt to remove. Stop using your device until the glass is replaced by a qualified service center. -
Page 66: Disposal And Recycling Information
Use of connectors and ports Never force a connector into a port. Check for obstructions on the port. If the connector and port don’t join with reasonable ease, they probably don’t match. Make sure that the connector matches the port and that you have positioned the connector correctly in relation to the port.
-
Page 67: Rohs Compliance
RoHS compliance This product is in compliance with Directive 2002/95/EC of the European Parliament and of the Council of 27 January 2003, on the restriction of the use of certain hazardous substances in electrical and electronic equipment (RoHS) and its amendments.
-
Page 68
Ministry of Defense, with maximum authorized power of 100 mW in the 2446.5 — 2483.5 MHz band. Use outdoors on public property is not permitted. -
Page 69: Fcc Regulations
If this equipment does cause harmful interference to radio or television reception, which can be determined by turning the equipment off and on, the user is encouraged to try to correct the interference by one or more of the following measures: •…
-
Page 70
Hävitä käytetty paristo valmistagan ohjeiden mukaisesti. ATTENTION ! Il y a danger d’explosion s’il y a remplacement incorrect de la batterie. Remplacer uniquement avec une batterie du mêre type ou d’ un type équivalent recommandé par le constructeur. Mettre au rebut les batter- ies usagées conformément aux instructions du fabricant. -
Page 71
Commission of the U.S. Government. The exposure standard for wireless devices employs a unit of measurement known as the Specific Absorption Rate, or SAR. The SAR limit set by the FCC is 1.6 W/kg. Tests for SAR are conducted using standard operating positions accepted by the FCC with the device transmitting at its highest certified power level in all tested frequency bands. -
Page 72
EN 62209-2 for use with accessories that contain no metal and that position the handset a minimum of 1.5 cm from the body. Use of other accessories may not ensure compliance with ICNIRP exposure guidelines. If you do not use a body- worn accessory and are not holding the device at the ear, position the handset a minimum of 1.5 cm from your body when the device is switched on. -
Page 73: Declaration Of Conformity
Acer Incorporated Date: March 2, 2011 Declaration of Conformity We, Acer Incorporated, of 8F., No. 88, Sec. 1, Xintai 5th Rd., Xizhi Dist, New Taipei City, 22181, Taiwan Declare under sole responsibility that the product: Model: A500 Description: Tablet Computer…