Оглавление
- 0.Часть Нулевая.
Предисловие - 1.Часть Первая.
А где его взять, этот Бейсик? - 2. Часть Вторая.
Как запустить этот Бейсик? - 3. Часть Третья.
Интерфейс или куда тыкать - 4. Часть Четвертая.
Начинаем программировать - 5. Часть Пятая.
Переменные — или САМОЕ ВАЖНОЕ - 6. Часть Шестая.
Все об операторе
PRINT и математика в Бейсике - 7. Часть Седьмая.
Первая игра - 8. Часть Восьмая.
Сохранение, Загрузка, Компилирование - 9. Часть Девятая.
Немного об экранных режимах - 10. Часть Десятая.
Циклы. FOR и NEXT - 11. Часть Одиннадцатая. Введение в
Графику — Кружочки, точки и прочая хрень - 12. Часть Двенадцатая. DRAW — красиво
и быстро - 14. Часть Четырнадцатая. Эффект движения
- 15. Часть Пятнадцатая.
Опрос клавиатуры - 16. Часть Шестнадцатая.
Генератор случайных чисел - 17. Часть Семнадцатая. Вторая
игра. - 18. Часть Восемнадцатая. Музыка и Звуки.
- 19. Часть Девятнадцатая. Продвинутая
графика: GET и PUT - 20. Часть Двадцатая.
Проблемы и Дополнения.
0. Часть
Нулевая. Предисловие
День Добрый. Данная писанина предназначена для тех, кто
хочет начать заниматься программированием, но не знает на чем и не
знает как. Поэтому я постараюсь все объяснять доступно, по
рабоче-крестьянски. И, в отличие от всяких там книжек, если у вас в
голове возникли каке-либо мысли вроде: «Ни чего не понял, чего этот тип
написал» вы можете без проблем написать мне о своей проблеме на мыло: m_rechkov@yourline.ru, или,
как вариант, набрать в поле ввода адреса своего браузера (или броузера) http://quitbasic.narod.ru (если
кто не знает — один из лучших сайтов в Рунете по QBasic’у) и зайти на
форум. Там я или оные лица попробуют ответить и помочь (но не деньгами).
Итак, здесь будут объясняться ОСНОВЫ и некоторые ПРОСТЫЕ РЕШЕНИЯ
сложных проблем без вникания в их суть. После изучения энного
количества килобайт текста вы сможете более-менее ориентироваться в
QBasic’e. Если этого не случится, значит либо я плохо поработал (чего не
может быть! Однозначно!), либо ваш отец Папа Карло. Начнем…
1. Часть Первая —
А где его взять, этот Бейсик?
Здесь и далее будет идти речь о QuickBasic’e 4.5 А где ж его взять-то?
Вариант первый — зайти на вышеупомянутый сайт, кликнуть на [Архив] ->
[Компиляторы] и скачать себе нужную версию. Весит она около мегабайта.
Вариант второй — берите где хотите.
2. Часть Вторая —
Как запустить этот Бейсик?
Ну, допустим, скачали вы себе архив, разархивировали куда-нибудь
в c:qb. «А че дальше-то?» — хотите вы сказать. А мы заходим в папку с
Бейсиком и запускаем файл QB.EXE. Видим примерно такой пейзаж:

На этой картинке я накалякал немного пояснений. Большинство из пунктов
меню нам нахрен не нужно, а вот некоторые из пунктов мы сейчас рассмотрим
3. Часть Третья —
Интерфейс или че-куда тыкать
Начнем с меню File (для того чтобы открыть это меню нужно щелкнуть на
нем мышкой или, по-пацански, нажать ALT а потом на F). В нем есть пункты
New Program — создать новую программу; Open Program… — открыть
программу; Save и Save As… — сохранить и сохранить как, и Exit —
остальные нам не понадобятся. В меню Edit: Undo — отменить
последний ввод; Cut — вырезать в буфер; Copy — копировать туда же;
Paste — вставить оттуда; Clear — удалить все нахрен. А теперь слушайте
внимательно: посмотрите на клавиатурные комбинации рядом с командами —
быстро выучите их и не вздумайте лазить в это меню для редактирования!
Все делайте только с клавиатуры! Этим вы продлите себе жизнь лет на
10-15. Меню Search: Find — найти какие-нибудь символы, а Change —
найти что-нибудь, а потом заменить (иногда довольно полезная
вещь). Run: Start- запуск написанного вами кода с начала;
Continue — продолжение выполнения программы после прерывания ее.
Make EXE File… — позволяет сделать из *.bas файла настоящую
EXE-версию вашего кода, чтобы ее можно было запускать на машине без
Бейсика. Подробнее мы рассмотрим ее позднее. Ну и хватит — остальное
посмотрите сами, если понадобится. Внимание! Запомните это: чтобы
переключиться на рус. язык надо зажать правый контрл и правый альт, а
чтобы на англ. язык, то на те же клавиши, только слева. И еще — если вы
запустили программу, а выхода из нее не предусмотрели, то зажмите
Ctrl+Break и все будет хорошо. И еще, чтобы при наборе кода
перейти на новую строку нажмите на [ENTER]. А теперь постарайтесь
выучить самое важное, покурите (но не шмаль! Шмаль будете курить, когда
дело дойдет до программирования. Иногда, чтобы найти решение, бывает
нужно погрузиться в Нирвану)
4. Часть Четвертая
— Начинаем программировать
Тушим папиросу, запускаем Бейсик и вводим
следующий код
CLS
PRINT «Hello World!»
END
И запускаем полученную программу («А как это
сделать?» — скажете вы. Или не скажите? А если скажите, то — ЧИТАЙТЕ
Часть №3) SHIFT+F5
И чего мы видим? А видим мы на пустом и черном фоне
надпись белыми буквами : Hello World! Ага, а теперь можете налить себе
стакан красного — вы написали свою первую прогу! Только вы сами ни хрена
не поняли, чего написали. Так? Но сейчас мы все разберем. Вверху у нас
стоит команда CLS. Это команда
очистки экрана, т.е. после этой команды экран напрочь очищается и
предстает перед нами в девственном виде. А дальше идет оператор PRINT. Он позволяет выводить
символы на экран. В нашем случае мы выводим ТЕКСТ, поэтому текст мы
заключаем в кавычки, а если бы мы захотели вывести на экран число, то
кавычки бы мы не ставили, а писали просто PRINT 999 или PRINT 7.5 (заметьте, в Бейсике
дробную часть отделяет точка, а не запятая). Попробуете теперь вывести
на экран надписи: Rock — лучшая музыка в мире! и Аквариум, Калинов
Мост, The Doors, а также числа: 75, 0.55, 1234567890.
Получается? Хорошо. А сейчас попробуйте убрать CLS и несколько раз подряд
запустить программу — вы наглядно убедитесь для чего это самое CLS
нужно. А теперь сделайте так, чтобы под надписью Hello World! шла цифра
777. Надеюсь, ума у вас хватит…
5. Часть Пятая.
Переменные — или САМОЕ ВАЖНОЕ
Теперь о самом важном. Вам необходимо уяснить понятия о
переменных и операторе присваивания. Итак, переменная, это — область
данных, имеющая имя. По простому, мы можем присваивать разное значение
одинаковым именам. Исполните эту программу:
CLS
a=100
text$=»РОК»
PRINT a
PRINT text$
END
Ага, что у нас получилось. Получилось то, что на
экране вывелось число 100, а под ним надпись РОК. Почему так получилось?
Разберем все по проядку. Что означает строка a=100. Она означает то, что
переменной под именем [a] присвоили значение [100], а знак [=] и есть
оператор присваивания, т.е. он присваивает переменной определенное
значение. Строка text$=»РОК» означает то же самое,
что и предыдущая,только тут не число, а текст и на конце переменной
стоит символ $, и значение переменной будет текстовое, а раз текстовое,
то мы его заключаем в кавычки. Такая переменная называется строковой. А
после команд PRINT мы просто
подставляем имя нужной нам переменной и эта самая переменная выводится
на экран. Теперь о том, какие имена могут быть у переменных. Запомним,
имена должны состоять только из латинских букв и они не должны
начинаться с цифры, большие и маленькие буквы Бейсиком не различаются.
Т.е. возможны такие имена файлов: a, abc$, nom1, LaLa, а нельзя вводить
так: Ш, 1a, abГ. Переменную можно приравнять к другой
переменной. К примеру, введем такой код:
N1=200
N2=N1
PRINT N2
Все, с этим разобрались. Вся эта часть очень важна. Если не
поняли ее содержания, то купите себе веревку, мыло и табуретку…
6. Часть Шестая.
Все об операторе PRINT и математика в Бейсике
Переменной можно присвоить не только какое-либо
значение, но также и математическую формулу, например a=100*2-10, или b=(a+150)*2.75 А теперь о
том ,как в Бейсике записывать эти самые формулы правильно. Ну,
во-первых, как и в математике сначала выполняются действия в скобках,
потом умножения и т.д. Знак умножения выглядит так: [*], деления: [/],
ну [+] и [-] это понятно, степени: ^ n(зажми шестерку при нажатом
шифте), где n — сама степень, SQR(n) — квадратный корень (т.е.
вместо n в скобки подставляем нужное), SIN(n)- это синус, такого же вида
и COS, TAN и т.д. INT(n) — что-то вроде округления. Остальные
математические штуки можно всегда посмотреть во встроенное справке
Бейсика. И еще, запомните одну вещь: нельзя, как в математике, писать
слитно цифру и переменную, т.е. забудте про 2a, писать надо 2*a. Все, с
математикой покончено.
Теперь разберемся с PRINT’oм. В передыдущих примерах
мы писали подряд два оператора PRINT и притом
, что должен был вывести второй оператор он выводил на другой строке. А
что делать, если надо на той же? Смотрим:
CLS
a=5^2
PRINT «5 во второй степени будет
равно «;a; » и это правда»
Посмотрим, что у нас получилось. В одну строку все вместилось,
правда ведь? Разберем все последовательно: сначала идет текст, послне
него идет [;], после этой точки с запятой можно писать еще что-нибудь в
том же операторе и это что-нибудь будет выводится на той же строке; а у
нас здесь стоит переменная a, которой мы присвоили нужное нам значение,
после переменной опять [;] и завершающая фраза. Вместо [;] можно
поставить [,], тогда текст будет выводится через определенное кол-во
символов. Это бывает полезно для создания вякого рода таблиц. Еще одно
примечание: в PRINT можно подставлять не
переменные а сразу формулы, например можно записать и так: PRINT «5 во второй степени
будет равно «;5^2; » и это правда».
7. Часть Седьмая. Первая игра
Готовтесь, дети мои. Сейчас мы создадим первое подобие игры. Пишем код:
CLS
PRINT «Игра: Крутой Математик»
PRINT «Решите пример: (500-100)*2»
Nach:
INPUT a
IF colO = 5 THEN PRINT «Тебе ничто
уже не поможет»: END
IF a = (500 — 100) * 2 THEN PRINT «Ты
умный тип, однако!»: END
IF a <> (500 — 100) * 2 THEN
PRINT «Учи математику, идиот. Попробуй снова:»: colO = colO + 1: GOTO
Nach
Итак, запустите эту писанину и посмотрите, что она
делает. А она делает вот что: сначала выводится название игры и задание
— вычислить то-то то-то. А затем идет знак вопроса, после которого вы
вводите нужное число и жмете на [ENTER]. Если число равно (500-100)*2,
т.е. 800, то выводится надпись [Ты умный тип, однако!] и прогамма
завершает работу, а если ответ неправильный, то пишется [Учи математику,
идиот. Попробуй снова:] и все повторяется заново, но если вы настолько
умалишенны, что за пять попыток не подсчитаете нужное число, то
программа выводит [Тебе ничто уже не поможет] и завершает свою
работу.
Сейчас разберем новые команды. Ну, сначала определим,
что означает знак [:], а он просто-напросто позваляет выполнить другую
команду в той же строке, для экономии, так сказать, экранного места.
Оператор INPUT позволяет вам вводить нужные данные с клавиатуры. В нашем
случае с помощью него мы вводим значение числовой переменной a. То что
мы введем, то и будет новым значением переменной. А теперь о операторе
IF THEN, дословно он означает [ЕСЛИ] … [ТО] … Т.е. в строке IF a = (500 — 100) * 2 THEN PRINT «Ты
умный тип, однако!»: END происходит следующее: ЕСЛИ a=столько-то,
TO пишем такой-то текст и завершаем программу. Понятно, да? А теперь о
том, что мы делаем, для того чтобы после пяти неправильных попыток
программа писала о вас, то что она думает. За счетчик попыток мы взяли
переменную colO, по умолчанию все переменные равны нулю. Теперь разберем
строку IF a <> (500 — 100) * 2
THEN PRINT «Учи математику, идиот. Попробуй снова:»: colO = colO + 1:
GOTO Nach Получается: ЕСЛИ a не равно (знак <> означает
не равно) нужному числу ТО пишем текст и добавляем к переменной colO
единицу, т.е. она будет равна своему предыдущему значению плюс единица
(очень важно это понять!). И когда у нас эта переменная будет равна
пяти, то мы с помощью стоки IF colO
= 5 THEN PRINT «Тебе ничто уже не поможет»: END напишем нужное
нам и завершим программу. А как нам сделать так, чтобы программа
возвращалась к вводу переменной a, если ответ неправилен. Смотрим на
предыдущую строку и видим: GOTO Nach.
Оператор GOTO — это безусловный переход. Т.е. при обращении к этому
оператору программа переходит к указанной в операторе метке, в нашем
случае метка носит название Nach.
Теперь посмотрите на 4-ю строчку кода: Nach: После метки в программе
всегда ставится двоеточие, чтобы Бейсик понял, что это метка.
Следовательно, после нашей команды GOTO программа переходит к
этой метке и снова начинает выполнять строку INPUT a. Теперь вам все должно
быть понятно. Главное во всем разобраться. Попробуйте видоизменить
программу, добавить в нее что-нибудь. Изменить формулу. Добавить
всякие надписи или усложнить условие. Главное, чтобы у вас было 15-20
грамм мозгов и до хрена терпения. А, кстати, попробуйте убрать строку
где написано «Решите..», а строку с инпутом измените так: INPUT «Решите пример: (500-100)*2»; a. Так будет лучше…
8. Часть Восьмая.
Сохранение, Загрузка, Компилирование
Что же делать, если вы хотите сохранить ваше первое жалкое подобие
игры? Воспользуемся меню File -> Save. Нам откроется следующее
окно:

Рассмотрите надписи на рисунке и вы все поймете. Немного про имена
файла: В DOS’e, под которым Бейсик и работает, имя файла должно
состоять не более чем из 8-ми символов. Расширение после сохранения
Бейсик ставит такое — bas. Запомним это, так нам будет легче искать
нужные файлы. Про форматы — верхний формат стоит по умолчанию. Убыстряет
работу с Бейсиком, может и размер файла будет немного меньше. Но зато
файлы, сохраненные таким образом, нельзя открыть ничем, кроме Бейсика, а
во-втором формате в файле просто будет текст написанного вами кода.
Такой файл можно открывать через любой редактор. Сохраните свою игру под
каким-нибудь именем. Теперь откроем меню загрузки: File ->
Open Program… Тут все почти тоже самое. Просто в большом окошке
выбираем нужный файл. Можно ввести название файла в верхнем окне и
Бейсик откроет его. А теперь о компилировании. Компилирование это,
по-простому, переделывание кода программы в простой EXE-файл. После
этого вы можете запускать свое детище отдельно от Бейсика и
где-угодно. Откроем меню компилирования Run -> Make EXE File…
В строке для ввода имени вводим нужное нам имя и переставляем
галочку на [ Stand-Alone EXE File] и жмем на [Make]. Откомпилируйте свою
игру под именем otstoy . При этом создадутся два файла. Один,
собственно, EXE-ник и файл с расширением OBJ. Он вам точно не нужен.
Можете его удалить.
9. Часть Девятая.
Немного об экранных режимах
Экранные режимы — это такие штуки, которые
определяют разрешение экрана (кол-во пикселов по гор-ли в вер-ли), а
также сколько символов (т.е. букв и цифр) вмещается в строку и
сколько будет столбцов. Ну еще и кол-во цветов. Режим определяется
оператором SCREEN n, где n — номер экранного режима. По умолчанию в
Бейсике стоит режим SCREEN 0. Этот режим единствнный из все только
текстовой. Т.е. в нам нельзя выводить графику. Кол-во символов,
вмещающихся в строке — 80, кол-во столбцов 25. Цветов шестнадцать.
Остальные режимы поддерживают графику. Например, режим SCREEN 12
поддерживает разрешение 640х480 и столько же цветов, а SCREEN 13
320х200, символов вмещается 40х25, но зато цветов — 256. Остальные
разрешения мы трогать не будем. Нам хватит и этих.
Сейчас мы научимся писать текст в нужном нам месте и
выбирать его цвет. Напишем следующий код. Знак [‘] означает комментарий,
т.е. после него вы можете писать какие-либо заметки. Бейсик при
исполнениии программы их не видит. Прочитайте комметарии в коде и
попробуйте сами все понять. Действуйте
‘Ставим 13-й экранный режим
SCREEN 13
‘Устанавливаем цвет №4, т.е. красный
COLOR 4
‘В 3 столбце с 17-го места в строке
пишем нужный текст
LOCATE 3,15: PRINT «Пишем вверху
посередине красным цветом»
‘Меняем цвет на зеленый и пишем внизу
экрана текст
COLOR 2: LOCATE 20, 1: PRINT
«Внизу слева зеленым цветом»
‘Завершение программы
END
Теперь все должно быть понятно. Сейчас посмотрите
картинку, где показано какому цвету соответствуют цифры в операторе COLOR (только 16-ть цветов)

Прошу заметить, что цифра [0] соответствует черному цвету. И еще про LOCATE — все значения в операторе
начинаются с [1] а не с нуля, и если вы в нем напишите значения не
подходящие к заданному экранному режиму, то вылезет сообщение об ошибке.
Будте внимательней!
10. Часть Десятая.
Циклы. FOR и NEXT
А сейчас мы напишем программу, которая на
SCREEN 13 будет выводить по порядку 212 цветов и их цифровой код —
как это сделано на предыдущей картинке. Для этого нам понадобятся циклы.
Пишем код
SCREEN 13
FOR c=0 to 212
COLOR c: PRINT c;
NEXT c
END
Что же делает строка FOR c=0 to 212. Дословно она
означает то, что Бейсик прокручивает значение переменной c. Т.е. сначала
значение этой переменной равно 0, а когда Бейсик доходит до строки NEXT
c, то программа возвращается на вторую строку, но значение переменной
будет уже равно единице. И так будет продолжаться до тех пор, пока [c]
не будет равна 212. Третья строка текста: COLOR c — здесь просто вместо
цифры, мы подставляем значение переменной. Значит, цвет будет таким,
какое значение у переменной. PRINT c; — просто выводит подряд значения
переменной [c]. А почему же 212, если цветов 256? Все просто — потому
что только 212 вмещается на экране одновременно, если цифр будет больше
экран станет прокручиваться вниз и мы не увидим верхних строк. Что же
еще можно сделать с фором и некстом. А можно сделать так, чтобы значение
прибавлялось не на единицу а на большее число. Мы будем задавать шаг
цикла. Измените вторую строку на FOR
c=0 to 212 STEP 2 . STEP 2 означает то, что цикл будет повышать
значение переменной на 2 единицы сразу. Т.е. не 0,1,2,3, а 0,2,4,6,8. А
вот пример использования сразу двух циклов:
SCREEN 13
FOR y = 1 TO 25
FOR x = 1 TO 40 STEP 2
LOCATE y, x: COLOR x: PRINT «*»;
NEXT x, y
Красиво? То-то же. Разберитесь сами, зачем нам два цикла. Теперь о
правилах использовании нескольких циклов. В операторе NEXT на первом
месте должна стоять переменноа, которая указывается в самом последнем
операторе FOR. В нашем случае это переменная [x]. Сперва Бейсик
выполняет все условия цикла с [x], а потом переходит в цикл с [y] а
затем опять в цикл с [x]. Если разобраться и немного подумать, то все
это довольно просто.
11. Часть
Одиннадцатая. Введение в Графику — Кружочки, точки и прочая хрень
Сейчас самое время поработать с графикой. Вспомним такое понятие как
разрешение. Напомним, это кол-во пикселей на экране. Как уже было
сказано, разрешение для режима SCREEN 12 составляет 640х480. Запомним
это. Теперь рассмотрим оператор PSET, он имеет следующую структуру: PSET
(x,y),c
Этот оператор рисует точку (т.е. меняет цвет одного пиксела) с
координатами [x] и [y] цветом [c]. Следовательно, если мы введем
PSET(320,240),2 то получим зеленую точку в центре экрана. А
теперь, вспомнив материал о циклах, попробуйте наклепать программу,
которая будет рисовать в середине экрана точки с интервалом в 2 пикселя.
Надеюсь, на это у вас ума хватило. Теперь оператор LINE. Он может
нарисовать линию, если будет иметь следующий вид LINE (x1,y1)-(x2,y2),c
Первая пара координат с индексом [1] будет означать начало линии, а
вторая пара с индексом [2] конец ее. Т.е., если мы введем этот код:
LINE (0,0)-(50,50),4: LINE
(50,0)-(0,50),4
то Бейсик выведет на экран букву «Хэ». Если мы изобразим оператор так
LINE (x1,y1)-(x2,y2),c,b (b — это не переменная. Ее так и надо писать.
Она означает BOX ) то Бейсик будет выводить на экран незакрашенный
четырехугольник. Т.е. если мы подставим какие-либо координаты в оператор
с параметром b, а потом это b уберем, то получится диагональ этого
четырехугольника. А если мы изменим [b] на [bf], т.е. BOX FULL, то 4-х
угольник наш будет закрашенным. Теперь об окружностях. За это тут
отвечает оператор CIRCLE (x,y),r,c где x и y будут координатами центра
окружности, r — радиус и c — надо полагать, — цвет. Теперь немного про
эллипсы. Вид эллипса будет определяться следующим соотношением : Ry/Rx,
т.е. радиус по [y] на радиус по [x] И для того, чтобы нарисовать
эллипсы, вытянутые по вертикали, это соотношение должно быть от 0 до 1,
а для эллипсов, вытянутых по горизонтали, оно должно быть больше 1. Сам
оператор будет выглядеть так: CIRCLE(x,y),r,c, , , k, где [k] — это и
есть значение нашего соотношения. Теперь вам надо просто научиться
ориентироваться в системе координат. Побольше тренируйтесь — это вам
поможет, потому что больше вам уже ничего не поможет. А сейчас оператор
закраски. Нарисуем в середине экрана окружность с координатами 320,240 ,
радиусом 50 и цветом 2. А затем добавим такую строку PAINT(x,y),c1,c2
Она означает: в точке с заданными координатами цветом c1 закрасить всю
область, имеющую контур с цветом c2. Надо помнить, что оператор PAINT
закрашивает только замкнутые контуры цвет которых совпадает с
показателем c2. Т.е. мы в нашей строке меняем координаты на те, в которые
входит наша окружность, например 310 и 245, а c1 на, допустим 4, а c2 —
на 2. И смотрим, что получается. С этим оператором могут быть большие
проблемы из-за невнимательности к замкнутости контура и его цвета.
Повнимательней, люди!
12. Часть
Двенадцатая. DRAW — красиво и быстро
Сейчас мы разберем очень хороший оператор DRAW, с
его помощью можно рисовать довольно сложные изображения — было бы
желание. А теперь прочитайте внимательно эту таблицу:
| Ux | Переместиться на x точек вверх |
| Dx | Переместиться на х точек вниз |
| Lx | Переместиться на х точек влево |
| Hx | Переместиться на х точек вправо |
| Hx | Переместиться на х точек вверх и влево |
| Ex | Переместиться на х точек вверх и вправо |
| Gx | Переместиться на х точек вниз и влево |
| Fx | Переместиться на х точек вниз вправо |
| M+-x,+-y | Переместиться на + или — x точек по горизонтали и на + или — y точек по вертикали. Не забудьте проставлять [+] и [-] ! |
| M x,y | Переместиться в точку с координатами x и y |
| Cx | Задание цвета. Это цвет будет сохраняться до введения новой команды |
| Pc1,c2 | Команда закраски. c1 и c2 имеют то же значение, что и в операторе PAINT |
| B | Переместиться на новое место, указанное в следующем за B параметре, но РИСОВАНИЕ не производить |
| N | Выполнить следующую за N команду по перемещению в новое место, а затем вернуться на предыдущую позицию |
Это почти все параметры оператора DRAW. Сам оператор имеет следующую
структуру: DRAW «—праметры—» Т.е. для того, чтобы нарисовать куб со
строной в 50 и закрасить его в красный цвет, мы введем следующий код:
DRAW «C2 R50 D50 L50 U50 B F25 P4,2». Разберем это поэтапно: назначаем
цвет №2, перемещаем курсор на 50 точек вправо, затем вниз, потом влево и
затем вверх. Теперь после команды B курсор переходит без рисования на 25
точек вниз и вправо, а затем закрашивает наш квадрат с контуром цвета №2
цветом №4. По умолчанию DRAW выводит изображение на середине экрана.
Чтобы нарисовать изображение в нужной позиции добавим в начало строки
команду Mx,y, где и выбираем нужные координаты. После драв можно ставить
не само выражение, а строковую переменную, т.е. :
a$= «C2 R50 D50 L50 U50 B F25 P4,2»:
DRAW a$
Оператору все-равно большими или маленкими буквами стоят параметры, а
также есть ли между ними промежутки. Можно комбинировать переменные или
выражения в строке DRAW при помощи знака [+]:
a$= «C2 R50 D50 L50»
b$=»U50 B F25 P4,2″
DRAW «m1,1″+a$+b$
С помощью DRAW можно рисовать довольно сложные
изображения. Они будут быстро выводиться на экран и занимать мало места.
Только надо тренироваться, чтобы запомнить и приноровиться к командам
этого оператора.
14. Часть
Четырнадцатая. Эффект движения
Как же нам иммитировать движение на Бейсике. Самый
простой и распространненный способ состоит в следующем: рисуем
изображение, стираем его, потом рисуем изображение, но уже на новом
месте. Стирать и рисовать надо черех определенный промежуток времени,
т.е. от этого будет зависить скорость движения. За время в Бейсике
отвечает оператор SLEEP n, где n — время в секундах. Этот оператор плох
тем, что не может отсчитывать время меньшее чем 1 сек. А если нам не
ставить после SLEEP число, то Бейсик будет ждать все жизнь, пока
вы не нажмете какую-либо клавишу. Сейчас мы сделаем программу, которая
рисует движущуюся точку со скоростью пиксел в секунду:
SCREEN 13
FOR x=0 to 310
‘Рисуем точку с цветом 4
PSET(x,120),4
‘Ждем одну секунду
SLEEP 1
‘В точке с теми же координатами
рисуем точку черным цветом, т.е. стираем ее
PSET(x,120),0
‘Цикл каждый раз добавляет к
переменной x единицу
NEXT x
Усе. Надеюсь все понятно. Попробуйте заменить точку на окружность.А
потом на закрашенную окружность.
15. Часть
Пятнадцатая. Опрос клавиатуры
Выполним следующий код:
‘Задаем начальные значения для
переменных
x = 159: y = 100: c = 1
‘Задаем экранный режим
SCREEN 13
‘Рисуем окружность с заданными
координатами и цветом
CIRCLE (x, y), 4, c
‘Начала безусловного цикла
DO
‘Задание строковой переменной k$
значения системной переменной INKEY$
k$ = INKEY$
‘Действия при нажатых клавишах
IF k$ = «w» AND y > 5 THEN CIRCLE
(x, y), 4, 0: y = y — 2: GOSUB ReDraw
IF k$ = «s» AND y < 190 THEN
CIRCLE (x, y), 4, 0: y = y + 2: GOSUB ReDraw
IF k$ = «a» AND x > 5 THEN CIRCLE
(x, y), 4, 0: x = x — 2: GOSUB ReDraw
IF k$ = «d» AND x < 310 THEN
CIRCLE (x, y), 4, 0: x = x + 2: GOSUB ReDraw
IF k$ = «c» AND 0 < x <
256 THEN c = c + 1: GOSUB ReDraw
‘Конец безусловного цикла
LOOP
‘Начало подпрограммы ReDraw
ReDraw:
CIRCLE (x, y), 4, c
‘И ее же конец
RETURN
Во-первых, переключитесь на английский язык и
выключите Caps Lock. Ну, как всегда, здесь много всего непонятного и
загадочного. По порядку: задаем переменным x и y значения (можно
догадаться, за что они отвечают), а также задаем его и переменной с,
которая у нас будет отвечать за цвет нашего объекта. Далее экранный
режим, рисование окружности… ну это нам уже известно. А теперь новое:
оператор DO … LOOP. Все просто — все команды, которые стоят между
этими словами, будут выполняться в цикле бесконечно. Что нам и нужно.
Идем дальше. Строка k$ = INKEY$ делает вот что: теперь переменная
k$ у нас будет отвечать за нажатые клавишы. Сейчас все поймете.
Следующая строчка это иллюстрирует: ЕСЛИ k$=»w» ТО … Одним словом,
если k$=»какой-то клавише», то выполнится все, все…эээ, что
написано после. Сейчас разберем смысл всей строки: IF k$ = «w» AND y
> 5 THEN CIRCLE (x, y), 4, 0: y = y — 2: GOSUB ReDraw. Сначала
проверяем, если нажата клавиша [w] и пременная y больше пяти (AND
обозначает [И], т.е. если не будет выполнено условие, стоящее после AND,
то оператор не выполнит указанные действия), то рисуем в точке с
заданными координатами тот же круг, но черного цвета, т.е. как бы
«стираем» предыдущий, «цветной» круг. Затем изменяем координату, а потом
новая для вас команда GOSUB. Это что-то вроде GOTO, только лучше
(вообще, использование GOTO считают неким дурным тоном в
программировании, поэтому его лучше не использовать, да и новый оператор
гораздо удобнее во многих случаях). Он вызывает подпрограмму, в данном
случае, ReDraw. Посмотрите в конец программы. Там есть строчка ReDraw:
(не забудьте про двоеточие). Т.е. подпрограмма назначается так же как и
метка в операторе GOTO. После команды Gosub ReDraw Бейсик ищет начало
подпрограммы, выполняет все команды в ее теле, а после ее конца (а она
всегда закачивается словом RETURN) ВОЗВРАЩАЕТСЯ (это важно!), опять к
тому месту, где стоит вызвавший ее GOSUB. Т.е получается то, что после
GOSUB программа переходит в подпрограмму (вынужденная тавталогия,
однако:) ), которая рисует круг с новыми координатами и цветом, а затем
возвращается в начало. Все. Строчка отвечающая за обработку нажатия
клавиши [c], как вы уже догадались, отвечает за изменение цвета, причем
ограничение AND 0 < x < 256 сделано для того, чтобы вы не могли
назначить цвет за пределами возможных в этом экранном режиме. И сразу
после этого опять идет вызов подпрограммы, чтобы эффект от перемены
цвета был виден сразу после нажатия на [c], а не после нажатия на
клавиши, отвечающие за движение. Еще одно важное замечание: IF k$ = «w»
отвечает только за нажатие клавиши [w], а не за [W] или [ц]. Если вы
хотите избежать этого, то просто напишите IF k$ = «w» OR k$ = «W» OR k$
= «ц» OR k$ = «Ц» OR … и так далее. OR означает [ИЛИ], т.е. если один
из этих вариантов имеет смысл, то оператор пойдет выполнять свои
инструкции дальше. Так, что еще… ах да! Стоит отметить, что
ограничения вроде x < 310 или y > 5 сделаны для того, чтобы
окружность не выходила за пределы экрана. Вникните, разберитесь что к
чему. Попробуйте изменить что-нибудь или добавить нового. Сейчас
вы уже вполне можете сделать какую-нибудь простенькую игру, вроде Quake
или WarCraft. Но не будем же мы забивать себе голову этими попсовыми
делами!
P.S. Нет, все-таки забыл кое-что. А как же нам
использовать клавиши движения курсора или ESC с Enter’ом? Давайте
воспользуемся следующим кодом, мы не будем вдаваться в подробности,
просто примите это как данное:
DO
k$ = INKEY$
IF LEN(k$) = 2 THEN
code = ASC(MID$(k$, 2, 1))
IF code = 72 THEN PRINT «Вверх»
IF code = 80 THEN PRINT «Вниз»
IF code = 75 THEN PRINT «Влево»
IF code = 77 THEN PRINT «Вправо»
ELSE
IF k$ = CHR$(27) THEN PRINT «[ESC]»
IF k$ = CHR$(13) THEN PRINT «[ENTER]»
END IF
LOOP
16. Часть
Шестнадцатая. Генератор случайных чисел
Вводим код:
SCREEN 13
‘Цикл, повторяющийся тысячу раз
FOR i = 1 TO 1000
‘Задаем переменным значения с помощью
генератора случайных чисел
x = INT(RND(1) * 320): y = INT(RND(1)
* 200): c = INT(RND(1) * 256)
‘Рисуем точку с заданными
координатами и цветом
PSET (x, y), c
NEXT i
Что такое генератор случайных чисел (ГСЧ) и зачем он
нужен? Это специальный оператор, который выдает какое-либо случайное
число из заданного диапазона. Он имеет следующий синтаксис (он может
иметь и другой, но мы рассматриваем только этот, т.к. он самый
практичный): RND(1)*n. Рассмортрим пример. Если мы введем
a=RND(1)*5, то компьютер будет выдавать числа в районе от 0 до 4.[9]
(вдумайтесь: от 0 до 4.[9], а не до 5!). Только будет он их выдавать в
несколько неподходящем формате, а именно с многими цифрами после
запятой, вроде 3.1748583890 и т.п. Чтобы избежать этого мы воспользуемся
командой INT, которая округляет полученное выражение (заметьте, что все
выражение стоит в скобках. Т.е. INT округляет выражение, стоящее в
скобках), и на выходе буду получаться только цифры: 0,1,2,3 и 4.
Надеюсь, вы уже поняли принцип вышеописанной программы. Она, с помощью
RND, рисует 1000 точек в случайном месте и случайным цветом. А что если
надо получить числа в промежутке от 1 до 5. Просто пишем так:
a=INT(RND(1)*5)+1. Все просто, однако. Только тут надо запомнить еще
одну вещь. Сейчас числа выдаются не совсем случайным образом, чтобы уж
точно сделать их случайными вы должны в начале программы написать
строчку RANDOMIZE TIMER. После этого Бейсик будет генерировать
случайные числа, основываясь на показаниях таймера компьютера.
17. Часть
Семнадцатая. Вторая игра.
Подошло время написать вторую игру. Но она уже будет
действительно на нее похожа. В этой игре нужно ловить «ракеткой» подобие
шарика (точки, которая быстро падает вниз). Причем коодринаты шарика
всегда выдаются случайными и надо приловчиться, чтобы ловить их. Причем,
если шарик подвести к краю экрана, то он окажется на другой его стороне.
Это нужно, чтобы ловить «далекие» шарики. Все команды, кроме одной, вам
известны, просто надо обдумывать каждую строчку и прикидывать зачем она
тут нужна. Давайте разберемся с новой командой POINT. Она имеет
следующий синтаксис POINT(x,y). Рассмотрим фрагмент кода: IF POINT(xB,
yB + 1) = 0… Этот оператор возвращает значение цвета в точке с
заданными координатами. Т.е., в нашем случае получается, что ЕСЛИ в
точке с координатами xB,yB+1 экран будет черного цвета, то дальше пойдет
выполняться условие. Это очень нужный оператор. С помощью него вы
можете легко реализовать проверку на столкновения. Вводим код:
SCREEN 13
‘Задание значений таймера для
генерации случайных чисел
RANDOMIZE TIMER
‘Задание переменным значений
x = 110: yB = 10: xB = 100: Live = 5
‘Первичная прорисовка ракетки и
интерфейса, чтобы все эти элементы были видны сразу
LINE (x, 170)-(x + 10, 175), 2, BF
LOCATE 23, 1: PRINT «Жизни:»; Live;
«Очки:»; Score; «[ESC]-В
‘Начало безусловного цикла
DO
‘Стираем шарик, перемещаем его и
опять рисуем
PSET (xB, yB), 0: yB = yB + .0005:
PSET (xB, yB), 4
‘Если шарик уже на уровне ракетки, то
проверяем его на столкновение с ракеткой, а затем создаем новый шарик
IF yB >= 169 THEN GOSUB Coll:
GOSUB NewBall
‘Уже знакомые нам команды
k$ = INKEY$
IF LEN(k$) = 2 THEN
code = ASC(MID$(k$, 2, 1))
IF x > 320 THEN GOSUB Del: x = 0
IF x < -4 THEN GOSUB Del: x = 320
IF code = 75 THEN GOSUB Del: x = x —
3: GOSUB ReDraw
IF code = 77 THEN GOSUB Del: x = x +
3: GOSUB ReDraw
ELSE
‘При нажатии [ESC] переходим на метку
GameOver
IF k$ = CHR$(27) THEN GOTO GameOver
END IF
‘Конец цикла
LOOP
‘Подпрограмма рисования ракетки
ReDraw:
LINE (x, 170)-(x + 10, 175), 2, BF
RETURN
‘Подпрограмма стирания ракетки
Del:
LINE (x, 170)-(x + 10, 175), 0, BF
RETURN
‘Подпрограмма проверки на
столкновение шарика с ракеткой
Coll:
‘Если в нужной точке цвет равен 0,
т.е. он черный, значит там нет ракетки и кол-во жизней уменшается на одну
‘А если он не равен 0, то,
следовательно, он столкнулся с рокеткой и игрок получает 50 очков
IF POINT(xB, yB + 1) = 0 THEN Live =
Live — 1 ELSE Score = Score + 50
‘А это строка нужна для стирания с
поля «мертвых» шариков, т.е. уже упавших
PSET (xB, yB), 0
‘Если кол-во жизней меньше нуля, то
переход к метке GameOver
IF Live < 0 THEN GOTO GameOver
‘Обновление интерфейса
LOCATE 23, 1: PRINT «Жизни:»; Live;
«Очки:»; Score; «[ESC]-Выход»
RETURN
‘Подпрограмма создания нового шарика
NewBall:
xB = INT(RND(1) * 315) + 1: yB =
INT(RND(1) * 50) + 1
RETURN
‘Метка, после которой идет вывод
результата игры и завершения программы
GameOver:
CLS
COLOR 2: LOCATE 3, 15: PRINT «Конец
Игры»
LOCATE 8, 15: PRINT «Очки:»; Score
END
Еще одно. У вас шарик может двигаться недостаточно
быстро, или наборот, предостаточно быстро. Для корректировки скорости
меняйте число в этом коде: yB= yB + .0005. При увеличении числа,
шарик станет медленнее, при уменьшении… ну вы уже поняли.
18. Часть
Восемнадцатая. Музыка и Звуки.
Все, что мы делали прежде, происходило в полной
тишине. Сейчас мы научимся «озвучивать» наши программы. Бейсик
использует для выода звука не какой-нибудь там Sound Blaster, а
встроенный динамик — бипер (тот, который пищит при загрузке). Для звука
есть два оператора: SOUND и PLAY. Первый используется для подачи звука
определенной частоты и длительности, а второй использует макроязык,
похожий на DRAW, и позволяет работать непосредственно с нотами. Разберем
SOUND. Синтаксис следующий: SOUND f, t, где f -частота в Гц (от 37 до
32.767), а t — длительность в тиках (18.2 тика — 1 сек. Диапазон: от 0
до
65.535). Введите этот код; звук будет напоминать нарастающий рев мотора:
FOR x = 100 TO 200
SOUND x, .5
NEXT x
А теперь про PLAY. Синтаксис как у DRAW: PLAY
«Набор-Команд». Введите следующий код: PLAY «T180 o2 P2 P8 L8 GGG L2 E-
P24 P8 L8 FFF L2 D». Прозвучат первые несколько секунд из Бетховена.
Кстати, на моем сайте вы можете найти немного PLAY’евской музыки.
Конечно, можно присвоить значение этой мелодии строковой переменной.
Вроде: a$= «T180 o2 P2 P8 L8 GGG»: PLAY a$. Ниже перечислены команды
оператора PLAY:
Ноты задаются буквами A,B,C,D,E,F,G, # означает
диез, а — бемоль, т.е B# ре-диез, а B- ре-бемоль
| On | Выбор октавы, где n -ее номер. |
| Tn | Задание темпа или четвертных нот, которые исполняются в минуту. n от 32 до 255. По умолчанию 120 |
| Pn | Задание паузы длительностью 1/n. n от до 64 |
| Nn | Исполнение ноты n, которая может меняться от 0 до 84. Каждая октава имеет 12 нот, включая диезы и бемоли. 0 — пауза |
| Ln | Исполнение последующих нот с интервалом 1/n. n от 1 до 64 |
| MN | Нормаль. Каждая нота звучит 7/8 времени, заданного в команде L |
| ML | Легато. Каждая нота звучит полный интервал времени, заданного в команде L |
| MF | Стаккато. Каждая нота звучит 3/4 времени, заданного в команде L |
| MS | Режим непосредственного исполнения. Т.е. на время проигрывания ноты программа приостанавливается. Используется по умолчанию |
| MB | Режим фонового исполнения. Т.е. проигрывание нот не приостанавливает действие программы |
| . (точка) | Увеличение продолжительности звучания на 50% |
19. Часть
Девятнадцатая. Продвинутая графика: GET и PUT
Вы, конечно, наивно думаете, что с помощью всяких LINE, PSET и даже
DRAW сможете нарисовать какие-либо серьезные и красивые изображения. Но
когда надо сделать действительно хорошую графику (например, в играх:
изображение игрока или врагов), то надобно использовать ооманды GET и
PUT. Только для их применения надо разобрать еще несколько команд.
Вводим код:
SCREEN 12
‘Создаем массив с именем Tank,
длинной в 100
DIM Tank(100)
‘Вводим данные нашего танка
DATA 8,8,8,0,8,8,0,8,8,8
DATA 8,7,8,0,8,8,0,8,7,8
DATA 8,7,8,0,8,8,0,8,7,8
DATA 8,7,8,8,8,8,8,8,7,8
DATA 8,7,8,7,7,7,7,8,7,8
DATA 8,7,8,7,8,8,7,8,7,8
DATA 8,7,8,7,8,8,7,8,7,8
DATA 8,7,8,7,7,7,7,8,7,8
DATA 8,7,8,8,8,8,8,8,7,8
DATA 8,8,8,0,0,0,0,8,8,8
‘Два цикла, отвечающие за считывание
данных и отображения их на экран
FOR y = 0 TO 9: FOR x = 0 TO 9
‘Считываем данные из операторов DATA;
выводим точки с заданными координатами и цветом (который взят из данных
DATA)
READ c: PSET (x, y), c: NEXT x, y
‘Заносим в массив Tank изображение
нашего танка
GET (0, 0)-(9, 9), Tank
‘Стираем экран, выводим с помощью PUT
изображение танка в указанном координатами месте
CLS: y = 470: PUT (320, y), Tank
‘Начало цикла
DO
k$ = INKEY$
‘При нажатии [w] стирание
изображения, с помощью наложения такого же в те же координаты, изменение
координаты y,
‘И перерисовка изображения на новом
месте
IF k$ = «w» THEN PUT (320, y), Tank:
y = y — 3: PUT (320, y), Tank
‘Конец цикла
LOOP
Что такое DATA и что за цифры после него? Все
просто. Это, так сказать, цифровое отображение нашего танка. Т.е. цифры
соответствуют номеру определенного цвета. Но «рисовать» таким образом в
Бейсике — изврат чистой воды. Поэтому делаем вот что. Запускаем
стандартный Windows’ский Paint, создаем небольшое изображение (в нашем
случае 10×10 пикселей), потом сохраняем файл как 16-цветный рисунок,
далее увеличиваем масштаб до максимума, и в меню [Вид]->[Масштаб]
выбераем [Показать Сетку]. Теперь рисуем. Какой номер соответствует
какому цвету было уже описано и показано вверху. Наш танк выглядит вот
так:

Теперь переводим это в форму, понятную Бейсику, т.е. в оператор DATA.
Считать данные можно оператором READ n, где n — переменная, которая
принимает значение данных в операторе DATA. Но у нас 100 значений,
поэтому мы прокручиваем их с помощью двух циклов (заметьте, циклы
начинаются от 0 до 9, но у нас изображение 10×10. Это связано с тем, что
0 тоже входит в эти числа. Просто мы начинаем с 0 для того, чтобы
изображение наше начало выводиться с самого начала координат). При
прохождении этих циклов оператор READ поэтапно считывает все данные с
DATA, а при считывании каждый раз, с помощью PUT, мы каждый раз рисуем
точку с координатами x и y и цветом c. Переменная c, как вы поняли, и
принимает значения данных с оператора DATA.
Теперь непосредственно об самих операторах GET и
PUT. Оператор GET заносит в массив выбранную часть экрана. Сейчас мы
немного коснемся массивов. В начале программы мы создаем массив с именем
Tank и размером в 100 ячеек, т.е. это вроде переменной, но которая может
хранить очень много значений, в нашем случает это 100. Т..е 100 хватит,
чтобы считать область экрана размером 10×10 (10*10=100). Задается
массив так: DIM Name(n), где Name — имя массива, а n- количество ячеек
в нем. Если надо задать, например больше одного массива, то можно в
одном операторе DIM перечислить их через запятую: DIM one(100),
two(200), free(300) и т.д. Вернемся к GET. Оператор имеет следующий
синтаксис: GET (x1,y1)-(x2,y2),Name. С координатами тут как в LINE,
т.е. две пары координат и создают область экрана, которую надо считать.
GET считывает изображение с экрана и записывает его в массив Name.
Только надо следить за тем, чтобы размера массива хватило на тот
участок экрана, который считывается. Например, если бы мы в нашей
программе сделали бы массив Tank размером, например, 90, то вылезло бы
сообщение об ошибке. Будте Бдительны!. Теперь о PUT. Он выводит
изображение на экран, сохраненное в массиве. Его синтаксис: PUT
(x,y),Name. x,y — координаты левого верхнего угла, с которого и будет
начинаться строиться изображение, Name — имя массива, содержащего нужное
изображение. Но, стоит отметить, в отличие, например, от оператора LINE,
где мы стирали изображение черным прямоугольником, здесь изображение
стирается простым наложением того же изображения. Т.е. две команды PUT,
идущие вместе: PUT (320, y), Tank: PUT (320, y), Tank, сотрут
изображение.
20. Часть Двадцатая.
Проблемы и Дополнения.
Все. Практическая часть этой книги закончена. Она не раскрывает и 1/10
всех возможностей QBasic’a, но она позволит с чего-то начать. Если вы
хотите и дальше развиваться в этом направлении, то я бы посоветовал вам
приобрести книги по QBasic’y. Выбрать себе книги можно здесь http://quitbasic.narod.ru/book.html
Лично я посоветовал бы вам книгу, с которой я
сам начинал. Это книга И. Сафронова «Бейсик В Задачах И Примерах’. На
вышеприведенной ссылке эта книга тоже есть. Также на моем сайте http://quitbasic.narod.ru можно
найти различную справочную информацию и скачать множество игр,
программ, утилит для QBasic’a.
Теперь о проблемах. Часто программы под Бейсиком
используют мышь, но чтобы вы могли нормально запустить эту программу,
вам надо использовать стандартную библиотеку, поставляемую с
Бейсиком . Делается это так: создаем в папке с Бейском файл с
расширением BAT (Если у вас не отображаются расширения, то зайдите в
меню [Свойства Папки] и уберите галочку с пункта [Скрывать расширения
для зарегистрированных типов файлов]). Просто создайте новый файл,
откройте этот файл с помощью Блокнота и напишите Name.exe/q, где Name
-имя файла, который у вас запускает Бейсик. Просто иногда они бывают
разными, вроде QB.exe или QBasic.exe. Сохраните файл и запускайтесь
через него. Все должно заработать. Другая проблема, более серьезная,
это корректное отображение русского языка в Бейсике. При использовании
MS-DOS и WIN95-98 никаких проблем не возникнет. А вот, например, в WIN
Me, при SCREEN 13 или SCREEN 9, русский язык отображаться не будет. Про
системы типа WIN2000 или XP я вообще молчу. Чтобы избавиться от этой
проблемы, надо использовать программу-русификатор KeyRus. Взять ее
можно, например здесь
http://quitbasic.narod.ru/file/keyrus.zip . Весит она в архиве всего
12 кб. Для использования этой программы воспользуйтесь тем же BAT
файлом, просто первой строчкой пропишите в нем вот это: keyrus Но,
естественно, сам файл с программой KeyRus должен быть в одной
папке с Бейсиком. Но есть еще одна проблема, более фатальная. Она
характерна для ОС вроде WIN2002 или XP. На этих системах Бейсик имеет
обыкновение жутко глючить и подвисать. Также открытое окно Бейсика,
впрочем, как и любой другой DOS-программы, очень тормозит систему. И
еще: если вы запустите Бейсик, то окно его, развернется на полный экран,
причем все будет маленькое и неудобное. Про русские буквы можно и не
упоминать… Чтобы хоть этого не было, надо выбрать в свойствах
исполняемого файла Бейсика пункт, который будет называться вроде
[Запускать в окне]. Если вы после этого запустите Бейсик, то он будет в
окне. Теперь просто разверните его на всеь экран (Alt+Enter) и все
должно быть нормально. Но запуск QBasic’a под этими системами — это
большая проблема. Имейте это в виду.
На этом все. Все замечания и предложения прошу доставлять на maxim1441@yandex.ru
10.07.04 Максим Речков.
Basic Input[edit | edit source]
The INPUT command is used to gather input from the user. This section will attempt to teach you how to gather input upon request from the user. For real-time input, see QBasic/Advanced Input.
Here is the syntax of the input command:
INPUT "[text to user]"; [variable] ' Question mark added
or
INPUT "[text to user]", [variable] ' No question mark added
Example:
INPUT "What is your name"; name$
or
INPUT "What is your age", age
When a semicolon (;) is used after the text output to the user, a question mark (?) and space ( ) are added to the output. When a comma (,) is used, no question mark is added.
If a string is specified (e.g., ‘name$’), anything the user enters before pressing the ‘return’ key will be accepted.
If a numeric variable (e.g., ‘age’) is specified, the user must enter a number. If any non-numeric key is entered, the error message «Redo from start» will be output and the INPUT command rerun.
6INPUT.BAS[edit | edit source]
CLS
INPUT "What is your name"; name$
PRINT "Hello, "; name$;
INPUT "How old are you"; age
INPUT "What is your best computer game?", game$
PRINT "     name:"; name$
PRINT "      age:"; age; " years old"
PRINT "best game:"; game$
Please note: In the PRINT command, the (;) function concatenates (joins) the contents of the string variables with the text between the quotes (» «). Note the use of spaces so that the final printed text reads properly.
If a numerical variable is specified within the PRINT command, additional space is automatically added both before and after the number.
See also: LINE INPUT command to read a line of text from a file (and place the result in a string variable) or to input a series of variables (in which case any comma found will be treated as a delimiter between fields).
INPUT # and LINE INPUT[edit | edit source]
INPUT # uses an open file stream to collect data from the file itself. The file may be a data file, a bitmap, or a text file. The syntax is:
INPUT #file_stream, variable1 ; variable2$ ' more variables can be taken.
LINE INPUT is used to collect an entire line of a text file. Syntax:
LINE INPUT 1,file_line '1 is the file stream number. Can be any other number too.
WARNING:
If input is taken beyond the file end, the error : «Input past end of file » is issued.
You can use LOF and EOF functions to prevent errors.
(LOF stands for LENGTH OF FILE while EOF stands for END OF FILE)
Text Output[edit | edit source]
Your first QBasic program: 1HELLO.BAS[edit | edit source]
The following paragraph requires a computer with QBasic installed
To begin, write down everything from the program below («PRINT «Hello World») into a text editor or into the QBasic IDE (Integrated Development Interface) itself and save it as «1HELLO.BAS». Next open the file in QBasic (unless you used QBasic IDE in which case it is already open) and press F5. Optionally you can use the «RUN» menu located on the menu bar at the top of the IDE window. This will execute (run) the program. The words «Hello World» should appear on the upper left hand side of the screen. You have just executed your first QBasic program. If you press F5 again, another line of text saying «Hello World» will appear on the upper left hand side of the screen pushing the first one down to the second row of the screen. You can follow the same procedure for the rest of the example programs in this wikibook.
1HELLO.BAS[edit | edit source]
PRINT[edit | edit source]
PRINT is QBasic’s text output function. It is the command that we will be exploring through this section. PRINT is a QBasic function that requires arguments. The argument in the «Hello, World!» program we just ran were the words «Hello, World!». So, PRINT is the function and «Hello, World!» is the argument we pass to the function.
PRINT [Text to screen]
Note: For a short cut, just use a question mark «?» in place of the command «PRINT». Likewise you can use a single quote «‘» in place of the key word REM to insert comments in your code
2HELLO.BAS[edit | edit source]
 PRINT "This line will be erased"
 CLS
 PRINT "Hello";
 PRINT " World",
 PRINT "Hello Jupiter"
 PRINT "Good Bye",,"For";" Now"
 PRINT 1,2,3,4,5
PRINT, Commas, Semicolons, tab (n) and CLS[edit | edit source]
This is what the program output should look like:
Hello World   Hello Jupiter
Good Bye                    For Now
 1             2             3              4              5
The first line of 2HELLO.BAS outputs «This line will be erased.» to the screen. However, in the second line, the CLS command clears the screen immediately after. So, it will only flash momentarily. The text «Hello Jupiter» should line up with ‘2’ under it. More than one comma can be used consecutively. In this example, after «Good Bye» two commas are used to move «For Now» over two tab columns. «For Now» should line up with ‘3’.
My final statement on this topic is to play around with it. Try using commas and semicolons in a program.
3HELLO.BAS[edit | edit source]
 CLS
 hello$ = "Hello World"
 number = 12
 PRINT hello$, number
Variables[edit | edit source]
Variables are used to store information. They are like containers. You can put information in them and later change the information to something else. In this first example they may not seem very useful but in the next section (Input) they will become very useful.
In this example we use two types of variables: string variables and numeric variables. A string variable holds a string of characters, such as words. (A character is a letter, digit or symbol.) In this case, the characters are letters. A string variable is denoted by ending the name of the variable with a dollar sign. The string variable in this program is hello$. Whatever value you assign to hello$ will be displayed in the PRINT statement. The numeric variable is number. Numeric variables do not have a special ending like string variables.
4FACE.BAS[edit | edit source]
CLS
LOCATE 14, 34     'position the left eye
PRINT "<=>"       'draw the left eye
LOCATE 14, 43     'position the right eye
PRINT "<=>"       'draw the right eye
LOCATE 16, 39     'position the nose
PRINT "o|o"       'draw the nose
LOCATE 18, 36     'position the mouth
PRINT "_______/" 'draw the mouth
LOCATE 19, 42     'the bottom
PRINT "The Face by QBasic"
LOCATE statement[edit | edit source]
LOCATE allows you to position the cursor for the next piece of text output. Contrary to Cartesian coordinates which read (X,Y), the locate statement is LOCATE Y,X. In this case Y is the distance down from the top of the screen and X is the distance from the left side of the screen. The reason that LOCATE does not follow the standard coordinate system is that it is not necessary to include the X portion; you can use the format LOCATE Y which just specifies the line to start on.
LOCATE[row, column]
LOCATE[row]
5FACE.BAS[edit | edit source]
 CLS

 LOCATE 14, 34
 COLOR 9
 PRINT "<=>"

 LOCATE 14, 43
 PRINT "<=>"

 COLOR 11
 LOCATE 16, 39
 PRINT "o|o"

 COLOR 4
 LOCATE 18, 36
 PRINT "_______/"

 COLOR 20
 LOCATE 19, 42
 PRINT "U"

 LOCATE 1, 1
 COLOR 16, 1
 PRINT "Hello World"
COLOR statement[edit | edit source]
The program 5FACE.BAS is broken into many sections to make it easier to read. This is an example of a good programming habit. Each three-line piece of code specifies what the color, location and form of its part of the face. The order of the position and the color is unimportant. The new statement COLOR allows you to change the color of the text. Once changed, all output will be in the new color until COLOR or CLS is used.
COLOR [foreground]
COLOR [foreground], [background]
The colors are designated by numbers which will be discussed in the next section.
Color by Number[edit | edit source]
There are 16 colors (in screen mode 0), numbered from 0 to 15.
| 0 | Black | 8 | Gray |
| 1 | Blue | 9 | Light Blue |
| 2 | Green | 10 | Light Green |
| 3 | Cyan | 11 | Light Cyan |
| 4 | Red | 12 | Light Red |
| 5 | Purple | 13 | Light Purple |
| 6 | Brown/Orange | 14 | Yellow (Light Orange) |
| 7 | Light Grey (White) | 15 | White (Light White) |
If you look carefully at this chart you can see that there are 8 main colors (0 through 7) and then those colors repeat, each in a lighter shade. You may also notice that the colors act as a combination of binary values (where blue=1, green=2, red=4, etc.) This makes it much easier to memorize the color scheme. Blinking colors are also available: at 16, the colors start over again with blinking black and extend through 31 (blinking white). However, the blinking option is not available for the background, only for the text (foreground). Add 16 to the color you wish to blink. e.g.: 2+16=18 — Blinking Green, 4+16=20 — Blinking Red.
It is possible to switch the blinking foreground text with an intense background, but this task is beyond the scope of this QBasic textbook, and may not work when MS Windows displays the console in a windowed mode.
Font[edit | edit source]
On a VGA compatible video card, you can inspect and change the font used in screen mode 0.
OUT &H3CE, 5: OUT &H3CF, 0 'Clear even/odd mode
OUT &H3CE, 6: OUT &H3CF, 4 'Map VGA mem A0000-BFFFF
OUT &H3C4, 2: OUT &H3C5, 4 'Set bit plane 2
OUT &H3C4, 4: OUT &H3C5, 6 'Clear even/odd mode again
You can now use PEEK and POKE to access the character data. It starts at absolute address &HA0000 and every character is 32 bytes, each of which is a row of eight bits. The highest bit of each byte corresponds to the leftmost pixel of each row. Usually only the first 16 or 8 rows are used, depending on the WIDTH setting.
When you’re done, it’s important to put the memory mapping back to what QBasic expects:
OUT &H3CE, 6: OUT &H3CF, 14 'Map VGA mem B8000-BFFFF
Summary[edit | edit source]
In this section we looked at several methods to manipulate text output. All centered around the PRINT statement. LOCATE and COLOR modified where the text was displayed and how it looked. We used CLS to clear the screen and gave a brief introduction to variables which will be expanded upon in later sections.
Basic Math[edit | edit source]
There are six numerical variables within QBasic:
| Type | Minimum | Maximum |
|---|---|---|
| Integer | -32,768 | 32,767 |
| Long Integer | -2,147,483,648 | 2,147,483,647 |
| Float | -3.37×10^38 | 3.37×10^38 |
| Double | -1.67×10^308 | 1.67×10^308 |
| 64-bit Integer | -9,223,372,036,854,775,808 | 9,223,372,036,854,775,807 |
| 64-bit Float | ±1.18E−4932 | ±1.18E+4932 |
Please note that Integer and Float type variables for 64-bit are available only in QB64.
A lot of programming is math. Don’t let this scare you: a lot of the math is simple, but it’s still math. In this section, we will look at doing some basic math (the same stuff you learned in the 3rd grade) and manipulating numbers.
Equation Setup[edit | edit source]
In QBasic an equation has a basic setup a right side and a left side. For instance X=5, as you can probably figure out, this sets the variable X to 5. But we can use variables on the right side too. Y=X*10 would set Y equal to 10 times X, in this situation, 50. In this next program I will show several equations to give you a feel for math.
7MATH.BAS[edit | edit source]
 CLS

 'Set a-d to initial values
 a = 10
 b = 6
 c = 3.1415
 d = 3.333333

 e = a + b
 PRINT a; "+"; b; "="; e

 f = c * d
 PRINT c; "x"; d; "="; f

 g = b - c
 PRINT b; "-"; c; "="; g

 h = b / d
 PRINT b; "/"; d; "="; h

 i = INT(d)
 PRINT "Remove the decimal from "; d; "="; i
Understanding 7MATH.BAS[edit | edit source]
The most important thing you can take away from this is the setup for math equations. I think you can figure out what all the symbols are and what they do, but QBasic is picky about equations. For ‘e=a+b’, if you try ‘a+b=e’ it will not work.
The final thing I would like to address in 7MATH.BAS is the INT() function. As far as vocabulary, a function is something that takes in a piece of information and gives you another piece of information back. So PRINT, was a statement, and INT() is a function. The INT() function takes a number and truncates its decimal, it does not round. So INT(5.1) is 5 and INT(5.999) is still 5. If you want to round a number use CINT().
8MATH.BAS[edit | edit source]
 CLS
 INPUT "Enter a number: ", x
 PRINT

 x = x + 5
 PRINT "X is now: "; x

 x = x * x
 PRINT "X is now: "; x

 x = x / 5
 PRINT "X is now: "; x

 x = x - 4
 PRINT "X is now: "; x

 x = x / x
 PRINT "X should be 1: "; x
Understanding 8MATH.BAS[edit | edit source]
8MATH.BAS shows one simple concept that is very important in programming, but impossible in math. The way that the computer calculates the equation is it does all the math on the right side of the equation and then sticks it in the variable on the left side. So the equation x=x+5 makes perfect sense, unlike math where it is a contradiction. Reassigning a value to a variable based on its current value is common and a good way to keep the number of variables down.
9TIP.BAS[edit | edit source]
 CLS
 INPUT "How much is your bill: ", bill
 INPUT "What percent tip do you want to give: ", tip

 tip = tip / 100   'change percent to decimal
 tip = tip * bill  'change decimal to money

 PRINT
 PRINT "The tip is"; tip; "$."
 PRINT "Pay"; tip + bill; "$ total."
Tip Calculator[edit | edit source]
9TIP.BAS calculates your tip and total bill from the bill and percent tip you wish to give. The first three lines clear the screen and get the information from the user. The fifth line changes the tip from a percent to the correct decimal by dividing by 100 (ex. 20%=.2 because 20/100=.2) the next line takes that percent and turns it into a dollar value by multiplying the decimal value by the bill. So if your bill is $20.00 and you leave a 20% tip, it multiplies 20*.2 which is 4 or $4.00. The last three lines format the output.
This is a good example of a complete program. It collects information from the user, it processes the information and it gives the user feedback. Also, the middle section of the program is a good example of variable conservation. This is subject that will take some practice to get used to. In writing a program, if you use too many variables, it will become difficult to keep track of all of them. If you try and conserve too much, you code may become difficult to understand.
You may notice that the program may print more than two decimal places if you enter a bill that is not an exact dollar value. As an exercise, try modifying the program so that it only displays two decimal places — you can use the CINT() function or any other rounding method you intend to use.
10OROP.BAS[edit | edit source]
 'ORder of OPerations
 CLS
 a = 15
 b = 10
 c = 12.2
 d = 1.618

 PRINT a * b + c   'these two are different
 PRINT a * (b + c)

 PRINT

 PRINT b - c / d   'these two are different
 PRINT (b - c) / d

 PRINT

 PRINT a * b - c * d / a + d   'these two are the same
 PRINT (a * b) - ((c * d) / a) + d
Parentheses and Order of Operations[edit | edit source]
10OROP.BAS is an example of order of operations and how parentheses can be used to manipulate it. I do not want to go into an indepth explanation of the order of operations here. The best advice I can give is unless you are sure of the order of operations, use parentheses to make sure the equation works how you want. All you need to know about parentheses is that the deepest nested parentheses calculate first. If you wish to know more, there are plenty of algebra resources available. On that note, you may wish to brush up on algebra. While it is not necessary for programming, it can help make programming easier and it can allow you to create more advanced programs.
Random Numbers[edit | edit source]
Though we will not go into their use until the next section, I would like to discuss the generation of random numbers. QBasic has a random number statement, RND, that generates a random decimal between 0 and 1. You can think of it as a random percent. At first, this may seem like an odd way to generate random numbers. However, with a little math it is very easy to manipulate this to provide numbers in whatever range you want.
The first step is to multiply RND by a number (the range you want). For instance ‘RND*10’. This will return random numbers (decimal numbers) between 0 and 10(both included). So, to pick a random number between zero and ten we would say ‘(RND*10)’
11RND.BAS[edit | edit source]
 CLS
 RANDOMIZE TIMER

 PRINT "Random number from 0-9:"; RND * 10
 PRINT

 PRINT "Random number from 1-10:"; (RND * 10) + 1
 PRINT

 PRINT "Random integer from 1-10:"; INT(RND * 10) + 1
 PRINT

 PRINT "Random even integer from 50-100:"; INT(RND * 25) * 2 + 50
More on RND[edit | edit source]
A few notes on 11RND.BAS, the second line, RANDOMIZE TIMER, sets it so that the computer uses the current time to pick random number. If you don’t do this, it picks the same random number every time (try it, write a one line program, PRINT RND, and run it over and over, your screen will fill up with the same number) this can prove useful for some applications, but not most. Stick RANDOMIZE TIMER in at the top of all your programs that use the RND statement and they will be far less predictable. This program just show some ways to choose what you want from your random number generator. The last line shows that you can be very specific in what you get. Make sure to run this program several times to see the different results.
Flow Control[edit | edit source]
Conditional execution[edit | edit source]
To choose between two or more sections of the program to execute, the IF statement can be used. It is also possible to use the WHILE, DO UNTIL and CASE statements. All of these control conditional execution by using a Boolean logic ‘test’, the result of which is either TRUE or FALSE. To repeat a section of code for a set number of times, the FOR statement is used.
The IF test can be executed in a single line, however it can also be used like the others to control a block of code.
True or False[edit | edit source]
Boolean logic is a test that yields one of only two possible results, true or false. The tests are always mathematical in nature .. when two characters (or strings) are ‘compared’ it is their ASCII codes that are used (thus a < b and b < A).
The comparison operators used in qbasic are:
= true if two variables are equal
< true if the first is less than the second
=< true if the first is less than or equal to the second
> true if the first is greater than the second
>= true if the first is greater than or equal to the second
<> true if the two are unequal
Multiple tests can be linked together in the comparison, using the ‘AND’, ‘OR’ and ‘NOT’ operators. We will cover exactly what these mean later on, but you probably understand the first two already.
IF[edit | edit source]
One of the most useful statements in QBasic is the IF statement. It allows you to choose what your program will do depending on the conditions you give it. The next few programs will be taking a look at ways to use the IF statement.
IF [conditional] THEN [do this]
The single line IF is the simplest example. To execute a block of code, the END IF is used
 IF [conditional] THEN
   [do this]
   [and do this]
    ...
   [and also do this]
 END IF
IF…THEN…ELSE[edit | edit source]
IF [conditional] THEN [do this] ELSE [do that]
To choose between two different code blocks, the ELSE statement is used.
IF [conditional] THEN
  [do this]
  ..
  [and do this]
ELSE
  [do that]
  ..
  [and also that]
END IF
13 ELSEIF[edit | edit source]
As an alternative to starting an entirely new IF THEN ELSE statement sequence.
You can follow the THEN statement(s) with ELSEIF [conditional] THEN.
This does not create a new level of nesting.
IF [conditional] THEN
 [do this]
 ..
 [and do this]
ELSEIF [conditional] THEN
 [do that]
 ..
 [and also that]
ELSEIF [conditional] THEN
 [do the other]
 ..
 [and also ...]
ELSE
[do this final thing]
END IF
FOR…NEXT[edit | edit source]
FOR <variable name> = <start value> TO <end value> [STEP <increment>]
 [do this]
 ...
 [and do this]
NEXT
<increment> may be + or — and is optional. If omitted the default is +1. The code contained within the FOR loop will always be executed at least once because it is only at the ‘NEXT’ statement that the value of the variable is checked against the end value.
When the NEXT statement executes, the variable is modified by STEP value and compared against the end value. If the variable has not yet exceeded the end value, control is returned to the line following the FOR.
You can exit a FOR loop early with the EXIT FOR command.
14FOR.BAS[edit | edit source]
 CLS
 RANDOMIZE TIMER

 num = INT(RND * 20) + 1

 FOR count = 1 TO 5
  INPUT "Pick a number between 1 and 20: ", answer
  IF answer = num THEN PRINT "You win after";count;"guesses!": END
 NEXT
 PRINT "You lose"
WHILE…WEND[edit | edit source]
 WHILE <condition is true>
   [do this]
   ..
   [and this]
 WEND
If the condition is true, the code following the WHILE is executed. When the WEND command is executed, it returns control to the WHILE statement (where the condition is tested again). When the condition evaluates to FALSE, control is passed to the statement following the WEND.
15WHILE.BAS[edit | edit source]
PRINT "Press any key to continue"
WHILE INKEY$=""
WEND
In the example above, you see a press any key prompt that waits until the user presses a key. (The INKEY$ feature will be described under Advanced Input.)
DO…LOOP[edit | edit source]
 DO
   [this]
   ..
   [and this]
 LOOP WHILE <condition is true> / LOOP UNTIL <condition is true>
The DO…LOOP construct is a more advanced of the WHILE loop — as with other flow control blocks, it is marked by DO and LOOP to denote the boundaries.
It relies on a conditional statement placed after either DO or LOOP:
DO
  a$ = inkey$
LOOP WHILE a$=""
As an alternative, you can instead replace WHILE with UNTIL have the loop continue until a specific condition is met:
DO
  x=x+1
LOOP UNTIL x >= 10
In some versions of BASIC the UNTIL or WHILE condition can follow the DO statement rather than the LOOP statement (pre-test) as apposed to the above shown (post-test).
12IF.BAS[edit | edit source]
 CLS
 RANDOMIZE TIMER

 num = INT(RND * 100) + 1
 DO
      INPUT "Pick a number between 1 and 100: ", answer

      IF num = answer THEN PRINT "You Got It!"
      IF num > answer THEN PRINT "Too Small"
      IF num < answer THEN PRINT "Too big"
LOOP UNTIL num = answer
PRINT "Game Over."
SELECT CASE[edit | edit source]
 SELECT CASE <variable expression>
   CASE <value>
     [do this]
   CASE <value 2>
     [do instead]
   ...
   CASE ELSE
   ...
 END SELECT
The select statement is a substitute for repeated use of IF statements. The <variable expression> is evaluated and compared against each CASE <value> in turn. When a CASE <value> is found to match, the [do this] code following is executed. If an EXIT CASE is executed, control passes to the line following the END SELECT, otherwise the next CASE <value> is checked. If no matches are found, the CASE ELSE is executed. Note that <value> may be a number, character or string or logical expression (eg ‘>0’, ‘<>1’). Note also that multiple CASE matches may be found and executed (so, for example, if two CASE <values> are ‘CASE >1’ and ‘CASE >10’, a <variable expression> that evaluates to 11 (or more) will result in both CASE >1 and CASE >10 being executed)
CLS
PRINT "WELCOME"
PRINT "I HAVE AN ANSWER FOR ANY OF YOUR QUESTIONS"
10 INPUT "WRITE YOUR QUESTION AND I'LL GIVE YOU AN ANSWER ", question$
RANDOMIZE TIMER
PRINT
answer = INT(RND * 4 + 1)
SELECT CASE answer
    CASE 1
        PRINT "PLEASE REPHRASE YOUR QUESTION."
    CASE 2
        PRINT "YOUR QUESTION IS MEANINGLESS."
    CASE 3
        PRINT "DO YOU THINK I CAN ANSWER THIS?"
    CASE 4
        PRINT "THIS QUESTION LOOKS FUNNY."
END SELECT
PRINT
PRINT "ENTER ANOTHER QUESTION", K$
GOTO 10
If a parameter would be covered by more than one case statement, the first option will take priority.
Advanced Input[edit | edit source]
INKEY$[edit | edit source]
Getting real time information from the user is a little more difficult. To do so, we will use the INKEY$ command, which checks to see whether a user typed a key and provides the keypress to the program.
Look at this code and then we will look at it in depth:
DO
	LET k$ = INKEY$
LOOP UNTIL k$ <> ""
SELECT CASE k$
	CASE "q"
		QuitProgram
	CASE "c"
		MakeCircle
	CASE "s"
		MakeSquare
END SELECT
The first part is the DO-LOOP which constantly polls INKEY$ for a return value. In the basic use, INKEY$ returns an empty string if no keys are being pressed and continues with the program. Once a key is pressed, INKEY$ will return that key immediately.
The keyboard buffer[edit | edit source]
What is INKEY$ doing and how does it work?
While the INKEY$ command looks like it returns the key currently being pressed, this is not the case. It is used by the program to answer the question, «What is IN the KEYboard buffer?» To understand this you will need to understand what a basic buffer is and why it is used.
In older systems (not necessarily the IBM PC) a single chip processed keyboard input, and controlled the LED lights for caps lock and number lock. Because a computer does many things at once (e.g., take input from the mouse, crunch numbers, call subroutines, display new information on the screen), it needs to be able to remember what was pressed on the keyboard while it is busy. This chip contained some memory (called a buffer) that allow keeping track of a limited number of keypresses.
Within the Dos platform under IBM PCs, the hardware has changed slightly. Instead of a hardware buffer, pressing or releasing a key will interrupt the running program to add a keystroke to a software buffer located in the BIOS. This procedure is usually unnoticed by the user and has minimal impact on system performance. However, this buffer allows for 15 characters: attempting to overflow it when the computer is busy will cause a short beep and drop any further characters.
The INKEY$ command uses this buffer as a FIFO (First In First Out) buffer. As an example let’s say you have a game that has a bouncing ball on the screen and a paddle at the bottom. The computer program constantly has to update the screen to show the movement of the ball. While it does this the program passes by an INKEY$ command to see what value is returned. If the user has pressed a key since the last time the command was invoked it will return that key. Let’s say the ball is moving over to the right and the user needs to press the «R» key to tell the program to move the paddle right. Since the program is busy moving the ball and updating the screen, it does not instantaneously notice that the user has pressed the key. Instead, the key press is stored in the keyboard buffer, and retrieved a few milliseconds (or microseconds) later when the INKEY$ command is used.
In many programs (as above), INKEY$ will appear nested in a loop. It is requested over and over again. This allows the program to get user input one character at a time. Using our example above, the user may need to press R over and over again until the paddle is under the ball. On the other hand, the user may press R too many times and need to press L to move it left. Because the INKEY$ command is using a FIFO buffer it will always retrieve the keys pressed in the same order as they were typed.
In summary, the INKEY$ command will always return and remove the first character in the keyboard buffer. Generally speaking, it is used over and over to retrieve every key that has been pressed, and to allow a user to interact with a program in a close approximation to «real time.» If there is no key in the keyboard buffer, INKEY$ returns an empty string (no character).
Scancodes[edit | edit source]
Some keypresses are not associated with an ASCII character. When one of these keys is pressed, INKEY$ returns a string with two characters: the first character is a null (ASCII code 0), and the second is the raw scan code for the keyboard. A full listing of the scancodes can be found within the QBASIC help file. You can also determine the scan codes by examining the results of INKEY$ as you press those keys in question.
Note:
Some keys cannot be directly detected by INKEY$.
  Ctrl+            Extended; prefixed with CHR$(0)
 1  A               3   Ctrl+2
 2  B              15   Shift+Tab
 3  C
 4  D                Alt+    Alt+    Alt+     Alt+
 5  E              16  Q   30  A   44  Z   120  1
 6  F              17  W   31  S   45  X   121  2
 7  G              18  E   32  D   46  C   122  3
 8  H  Backspace   19  R   33  F   47  V   123  4
 9  I  Tab         20  T   34  G   48  B   124  5
10  J  Ctrl+Enter  21  Y   35  H   49  N   125  6
11  K              22  U   36  J   50  M   126  7
12  L              23  I   37  K           127  8
13  M  Enter       24  O   38  L           128  9
14  N              25  P                   129  0
15  O                                      130  -
16  P                 Shift Ctrl Alt       131  =
17  Q              59   84   94  104  F1
18  R              60   85   95  105  F2
19  S              61   86   96  106  F3
20  T              62   87   97  107  F4
21  U              63   88   98  108  F5
22  V              64   89   99  109  F6
23  W              65   90  100  110  F7
24  X              66   91  101  111  F8
25  Y              67   92  102  112  F9
26  Z              68   93  103  113  F10
27  [  Escape     133  135  137  139  F11
28               134  136  138  140  F12
29  ]
30  6              71  Home   72  Up    73  PgUp
31  -              75  Left             77  Right
                   79  End    80  Down  81  PgDn
   Ctrl+           82  Insert           83  Del
127 Backspace
                  119  Ctrl+Home   132  Ctrl+PgUp
                  115  Ctrl+Left   116  Ctrl+Right
                  117  Ctrl+End    118  Ctrl+PgDn
Subroutines and Functions[edit | edit source]
Purpose[edit | edit source]
Subroutines and functions are ways to break up your code into reusable ‘lumps’. They allow the programmer reuse a large set of common instructions just by calling the appropriate procedure or function.
For example, lets say you need to PRINT multiple Tables of values. One way to do this is to just enter all the Table PRINT commands directly into where you need them. However this not only makes the program very large but also makes it harder to debug or change the ‘style’ of the table. A simpler way is to create a single ‘Print Table’ procedure and enter all of the PRINT commands there. Then, each time you need to print a Table, you would simply ‘call’ the ‘Print Table’ procedure with a list of the values to be printed.
Procedure vs. Function[edit | edit source]
A procedure does something and does not return anything for the programmer. For example, a procedure might be used to set the screen mode and palette.
A function does something and RETURNS a value. For example, if you need to find the average of two values, you might write a function that takes in two numbers and returns the average.
GOTO and GOSUB[edit | edit source]
The GOTO and GOSUB statements were the original methods by which functions were created. They were the most common on older basic implementations and are kept around for compatibility reasons; however, their use is not recommended in other programming languages or in large scale projects, both because GOTO’s make it harder to ‘follow’ the program flow and because GOSUB’s do not ‘isolate’ the changes made to any variables.
These two commands depend on Labels, which come in one of two forms. The first and older form involves writing line numbers at the beginning of each line (usually in increments of 10). The newer method looks similar to other programming languages, which is a single word followed by a colon.
The GOTO statement is simple; it just moves the execution point to a given Label:
The GOSUB statement transfers control to a given Label, however whan a RETURN statement is encountered, execution returns to the line following the GOSUB statement. Any changes made within the GOSUB will be to actual variables used within the ‘main’ code.
ON ERROR[edit | edit source]
The ON ERROR allows you to define an error handler for your program; when an error occurs, it immediately jumps to the given label. The control returns once the program reaches a RESUME statement, which can either return control to the same point, the next statement, or any other desired label.
Within Qbasic, the error handler cannot be located within any subroutines. As such, any error checking or flags will have to be handled through the use of variables that are shared with the main module.
Note:
While the QBasic documentation states ON ERROR RESUME NEXT is a valid statement, this is incorrect.
NOTE: If your error handling routine does not have a «resume» statement in it (IOW you try to do it all with gotos) error handling will only work once — the next «on error» will be ignored and the program ends as if you had no «on error» statement at all. This problem does not seem to be mentioned in any of the documentation. It took me three hours to figure out why two nearly identical program portions acted so differently.
Declaring a subroutine[edit | edit source]
A superior method of declaring a subroutine is using the SUB statement block, because (by default) any new variables used within the subroutine are discarded on exit.
Under the QBasic IDE, doing so moves the SUB block to its own section in the window to prevent accidental deletion of the module, and allows the easier organization of the program code.
Calling a subroutine is as simple as writing the name of the subroutine (passing any required parameters). If you want, you can use the CALL statement to indicate to other programmers that it is a subroutine.
SUB name (params)
{SHARED variables 'if any}
'{code to execute}
'  ...
'  ...
{STATIC variables 'if any, to be saved for use next time}
END SUB
Whilst the Parameters passed into subroutines are passed by ‘reference’ (i.e. they take on a new name within the SUB), any changes that are made to the values are ‘reflected back’ into the originals. By default, all other variables used within the SUB are discarded when the END SUB is reached (or an EXIT SUB is executed), except as below :-
To ‘preserve’ the values of variables used within the SUB for re-use on the next CALL, use the STATIC keyword at the end.
If you need access to a variable (that has not been passed as a parameter), use the SHARED keyword to define each at the start of the subroutine (a SHARED variable retains its name).
Declaring a function[edit | edit source]
A function is a form of subroutine that returns a value. Everything that applies in defining a subroutine also applies to a function. Within the function, the return value is created by using the function name as a variable — the return value is then passed to the calling expression when a valid exit or end call is reached. There are two ways to return from a function, one way is to reach the END FUNCTION statement, the other is to make a call to EXIT FUNCTION. The difference between END FUNCTION and EXIT FUNCTION is that there can only be a single END FUNCTION and it must appear after all other code for the function as it denotes the end of a code block. EXIT FUNCTION can occur multiple times and can be placed anywhere deemed appropriate.
FUNCTION name (params)
  ' Shared variable declarations
  name = result
  ' ...
END FUNCTION
Functions are declared in the same way as variables — it returns the variable type it’s defined to return, in the same way variables are defined to contain their specified type. By default, it is a number, but appending a dollar sign indicates that it is returning a string.
Functions can only be called within an expression; unlike subroutines, they are not a standalone statement.
Arrays and Types[edit | edit source]
Q basic is an IDE(integrated development environment) developed by Microsoft to create, edit, debug and execute basic program.
Built-in Types[edit | edit source]
QBasic has five built-in types: INTEGER (%), LONG(&) integer, SINGLE(!) float, DOUBLE(#) float and STRING($). QB64 has two more built-in types: _INTEGER64 (&&) and _FLOAT (##)
Implicit declaration is by adding the type character to the end of the variable name (%, &, !, #, $, &&, ##). See QBasic/Basic math for more.
Explict declaration is by using the DIM statement before first use:
DIM a AS STRING
DIM b AS INTEGER
DIM c AS LONG
DIM d AS SINGLE
DIM e AS DOUBLE
DIM f AS _INTEGER64 'QB64 only
DIM g AS _FLOAT 'QB64 only
If you do not use either implicit or explicit declaration, QBASIC interpreter assumes SINGLE type.
User-defined type[edit | edit source]
A user defined type allows you to create your own data structures. Please note that custom types are similar to arrays.
 TYPE playertype
  name AS STRING
  score AS INTEGER
 END TYPE
You can then declare variables under this type, and access them:
DIM playername AS playertype
playername.name = "Bob"
playername.score = 92
This above example shows how a custom type can be used for maintaining data, say on a player who plays a game.
Array[edit | edit source]
An array is a collection of values stored in a single variable. A STRING is an array of characters (so, for example, char$(1) means 1st character in string char$). Arrays of numbers should be defined using the DIM instruction (unless you DIM them, they are limited to 10 elements on each dimension).
By default, arrays in QBasic are static in size and cannot be changed later in the program. Code that will set up this type of array is as follows:
DIM myArray(10) as TYPE 'this is explaining the datatype to be used during program execution in array'
TYPE can be any of the built in QBasic (INTEGER, LONG, SINGLE, DOUBLE, STRING) or user-defined type. If this is not specified, the array takes the Type defined by the variable name suffix — INTEGER (%), LONG(&) integer, SINGLE(!) float, DOUBLE(#), STRING($) — or INTEGER if none.
WARNING: If your data Type is string, DIM string(10) defines a SINGLE string of 10 characters, NOT 10 strings of arbitary length !
(10 strings of up to 128 chars each would be defined as DIM string(10,128)
By issuing the Meta Command ‘$DYNAMIC at the beginning of your program you can cause your arrays to be dynamic:
 ' $DYNAMIC
 DIM myDynamicArray(5) as INTEGER
 REDIM myDynamicArray(10) as INTEGER
This is now perfectly legal code.
To free up space occupied by an array, use the ERASE statement.
Multidimensional array[edit | edit source]
An array isn’t restricted to one dimension — it’s possible to declare an array to accept two parameters in order to represent a grid of values.
DIM housenames(25,25) as STRING
You cannot use the REDIM statement to change the number of dimensions on the array, even with dynamic allocation.
Non-zero base[edit | edit source]
In most languages, arrays start at the value 0, and count up. In basic, it’s possible to index arrays so that they start at any value, and finish at any other value.
You can change the default lower bound with the OPTION BASE statement.
Files[edit | edit source]
In this lesson, we will learn how to create and modify files. In doing so, we will create a portion of a text editor to handle reading and writing files to and from disk — the program won’t be complete by the end of this chapter, but will be finished within Advanced Text Output.
Let’s start by setting up out main procedure:
'$DYNAMIC
ON ERROR GOTO handler ' Prepares the error handler
DIM text(50) AS STRING ' Used to contain the text file.
maxlines = 50 ' Contains the current size of the buffer.

DO
  CLS 'clears the screen
  INPUT "Would you like to create a (N)ew file, (L)oad an existing one, or (E)xit the program"; choice$

  SELECT CASE UCASE$(choice$) 'UCASE$ converts strings to UPPER CASE
    CASE "N" 'New file
    CASE "L" 'Load a file
    CASE "E" 'Exit
      CLS
      END
  END SELECT
LOOP 'returns to the top of the program.

handler:
errorflag = ERR  ' Keep track of the error that occurred.
RESUME NEXT ' Proceeds with the next statement.
As you can see, we are using CASE rather than IF. IF statements can sometimes work better than case statements, but for now, we want to avoid spaghetti code (where there are too many GOTO’s).
So far, we don’t really have much, but it’s a start. We’ve asked the user what they want to do, and finished 1/3 options. Not so shabby when you put it that way!
The OPEN statement[edit | edit source]
The open statement allows either reading or writing information from the disk. In general, the open statement follows this pattern:
OPEN file$ FOR INPUT AS 1
OPEN file$ FOR OUTPUT AS 2
The file$ determines the filename to use. The FOR portion indicates how the file will be accessed or operated — it may be APPEND, BINARY, INPUT, OUTPUT, and RANDOM. The AS # is the identifier used for the file handle in question — this may be a variable if desired.
Note:
If you allow the user to enter a filename that does not exist on disk, you need to implement error handling using ON ERROR to react to this situation.
Input and output[edit | edit source]
When you need to access or write content to a file handle, the PRINT and INPUT statements expect a file handle to appear as the first parameter:
 INPUT #1, a$
 PRINT #2, a$
In some cases, you need to detect if you are going to reach the end of file — this is performed by the EOF function, which accepts a filehandle that takes input.
Reading the file from disk[edit | edit source]
We will now add a subroutine to read the complete file from disk, as lines of text, into an string array called text(). It is also possible to read a data file full of numerical values (and input these into a number array), however that is a different topic.
Note the code that finds the file ‘size’, by reading lines one at a time until the End Of File is reached, and the use of ‘SEEK’ to ‘rewind’ to the beginning again.
SUB LoadFile
  SHARED filename$
  SHARED lines, maxlines
  SHARED text() AS STRING
  SHARED errorflag

  INPUT "Enter filename: "; filename$

  OPEN filename$ FOR INPUT AS 1
  IF errorflag <> 0 THEN
    errorflag = 0
    CLOSE
    PRINT "File not found - press return to continue."
    INPUT "", a$
    EXIT SUB
  END IF

  ' Count the number of lines.
  lines = 0
  DO WHILE NOT EOF(1)
    LINE INPUT #1, l$
    lines = lines + 1
  LOOP

  'Allocate enough space for input.
  IF maxlines > lines THEN
    REDIM text(lines + 25) AS STRING
    maxlines = lines + 25
  END IF
  SEEK #1, 1 ' Rewind to the beginning of the file.

  ' Read the lines into the buffer
  FOR cline = 1 TO lines
    LINE INPUT #1, text(cline)
  NEXT
  CLOSE 1
  errorflag = 0

END SUB
The example above treats the file as type=text. If the file contains numbers (for example, a data array of N integers per line x M lines) these can be read (input #) one at a time, directly into a numeric array. Input will read the numbers one at a time, ‘stopping’ after each is input. Numbers can be separated by ‘anything’ (so lines of text will be skipped).
Writing a file to the disk[edit | edit source]
The function for writing a file to disk is easier:
SUB SaveFile (outfile$)
  SHARED filename$
  SHARED lines, maxlines
  SHARED text() AS STRING
  SHARED errorflag

  IF outfile$ = "" THEN
    LOCATE 1, 1
    INPUT "Enter filename: "; outfile$
  END IF

  OPEN outfile$ FOR OUTPUT AS 1
  IF errorflag <> 0 THEN
    errorflag = 0
    CLOSE
    PRINT "Couldn't save file - press return to continue."
    INPUT "", a$
    EXIT SUB
  END IF

  ' Write each line to the file
  FOR cline = 1 TO lines
    PRINT #1, text(cline)
  NEXT

  CLOSE 1
  errorflag = 0
  filename$ = outfile$

END SUB
Part 2: New file[edit | edit source]
In order to create a new file, you have to open it for OUTPUT, then close it.
Example:
OPEN NEWFILE FOR OUTPUT AS #1
CLOSE #1
NOTE: If you accidently open an existing file, all of its contents will be overwritten!
Advanced Text Output[edit | edit source]
Cursor manipulation[edit | edit source]
As you try to write your text editor, you may realize that you will need to place the cursor in a given location on the screen. This is performed using the LOCATE statement.
Note:
Printing any character in the bottom-right corner of the screen will cause the display to scroll.
Color[edit | edit source]
To change the current printing color, use the COLOR statement.
  COLOR 7,0  'Uses the default white on black.
  COLOR 15,0 'Bright white on black.
  COLOR 0,1  'Black on blue
  COLOR 14,0 'Bright yellow.
This can be used for title or status bars at the bottom.
Formatted printing[edit | edit source]
The PRINT USING statement allows you to output strings or numbers in a specified format. With this statement, you can write numbers out to specified decimal places or perform advanced output.
The most common format specifiers would be # and ., which reserve space for digits and decimal points respectively. You may also use the underscore to ensure that a given character is printed literally.
Note: PRINT USING is unable to add leading zeros to a number. E.g., if you specify 3 digits (###), a two digit number will be output with leading spaces.
Text animation[edit | edit source]
You require some time before doing a certain procedure. It is generally better to make an animation during the process which shows that the program has not hanged, but is going on. Why make that out of very complicated graphics? Use this:
<syntaxhighlight lang = QBasic>
SUB TEXT_ANIM
   X = 15 ' CAN BE ANY OTHER VALUE TOO
   Y = 15 ' CAN BE ANY OTHER VALUE
   LOCATE Y,X
   DO
       PRINT ">     "
       SLEEP 1
       CLS
       PRINT " >    "
       SLEEP 1
       CLS
       PRINT "  >   "
       SLEEP 1
       CLS
       PRINT "   >  "
       SLEEP 1
       CLS
       PRINT "    > "
       SLEEP 1
       CLS
       PRINT "     >"
       SLEEP 1
       CLS
    LOOP UNTIL INKEY$ <> ""
END SUB
</SOURCE>
The program uses INKEY$, which you have not learnt yet, and SLEEP and DO…LOOP, which also you have not learnt. For more information, refer to Flow Control and Appendix.
Sound[edit | edit source]
QBasic has three ways of making sounds.
- BEEP command
- SOUND command
- PLAY command
BEEP[edit | edit source]
Earlier used as PRINT CHR$(07) the now available BEEP command makes a beep noise. It is commonly used to attract attention, when some important message is being displayed.
'Syntax example
BEEP
PRINT CHR$(07)
The two commands , as can be seen by running this program on a computer, are exactly the same.
SOUND[edit | edit source]
The SOUND command produces sound of a specific frequency for a specific duration from the PC Speaker. Only one sound can be played at a time. If multiple SOUND statements are issued sequentially, every statement after the first will not execute until after the previous one finishes.
Syntax[edit | edit source]
SOUND f, d
- f — Frequency in Hertz, ranges from 37 to 32767
- d — Duration in ticks, ranges from 0 to 65535, there are 18.2 ticks per second
Example[edit | edit source]
SOUND 100, 18.2
Plays a 100 hertz wave for 18.2 ticks, about 1 seconds.
The lowest frequency allowed by QBasic is 37 Hz, which is roughly a D in the 2nd octave.
The highest frequency is 32 767 Hz, but this tone can not be heard, because the normal human hearing range ends at 20 000 Hz.
A secondary function of the SOUND command is to use it to control time in a program.
   For x% = 1 TO 10
    Print x%
    Sound 3200,18.2
   NEXT
This program will print the numbers 1 to 10, with a 1 second delay between each number,and play a sound of 3200hz having interval of 1 second.(edited by FalcoN)
PLAY[edit | edit source]
The PLAY command is for playing musical notes,octave. It can only play one note at a time.
More than that the play command can play a complex stored «song» This is accomplished through the use of a song string. For string command detail, see QBasic/Appendix#PLAY.
Simple Musical Keyboard In Qbasic[edit | edit source]
rem Music keyboard
do
note$ = inkey$
select case ucase$(note$)
case "A"
Play "A"

case "B"
Play "B"

case "C"
Play "C"

case "D"
Play "D"

case "E"
Play "E"

case "F"
Play "F"

case "G"
Play "G"

end select

loop until ucase$(note$) = "Q"

end
This code uses a select case command to check values of note$ . Ucase$ is used to maintain that there be no difference if Caps Lock is applied.
The play command is used to play different notes. The other features of play have not been used here.
Graphics[edit | edit source]
What QBasic can do with Graphics[edit | edit source]
QBasic is not graphically very capable but many good programs can be created with it. Commands like PSET, CIRCLE, LINE, etc., are used to draw graphics in QBasic.
Good examples of graphical programs created using QBasic are SYMMETRIC ICON and SYMMETRIC FRACTALS.
Functions[edit | edit source]
Screen will let you set how it will be used. Text Graphics, both, and the Size of the surface you are working with. Screen 0 .. means Text Only. Screen 12 .. means 64 X 480 X 16 Colors & Text.
PSET[edit | edit source]
The PSET command lets the programmer display pixels on the screen. Before you type the command in, you must make sure that a SCREEN command is in. Look at this example:
SCREEN 13
PSET (1,1), 43
This command will display one yellow pixel at the coordinates 1, 1. The coordinates are X and Y coordinates, like any other mathematical situation. So the PSET command has to have this layout to function properly:
PSET ([X coordinate], [Y coordinate]), [Colour of Pixel]
Remember that X coordinates are those that go left to right on the screen and Y coordinates are those that go Up to Down on the screen.
LINE[edit | edit source]
   LINE [[STEP](x1!,y1!)]-[STEP](x2!,y2!) [,[color%] [,[B | BF] [,style%]]]
   STEP          Specifies that coordinates are relative to the current
                   graphics cursor position.
   (x1!,y1!),    The screen coordinates of the start of the line and of
   (x2!,y2!)     the end of the line.
   color%        A color attribute that sets the color of the line or
                   rectangle. The available color attributes depend on your
                   graphics adapter and the screen mode set by the most
                   recent SCREEN statement.
   B             Draws a rectangle instead of a line.
   BF            Draws a filled box.
   style%        A 16-bit value whose bits set whether or not pixels are
                   drawn. Use to draw dashed or dotted lines.
This simple program displays a line:
  Screen 13
  LINE (160,10)-(100,50),13

CIRCLE[edit | edit source]
CIRCLE (100, 100), 25, 4,0,3.14
This displays a circle at the coordinates. The layout of the function is as follows:
CIRCLE ([X Coordinate], [Y Coordinate]), [Radius], [Colour Number],[Start Angle],[Finish Angle]
Remember to put a SCREEN command at the front.
PAINT[edit | edit source]
To use PAINT, there must be a SCREEN command declared. The command has coordinates that tells QBasic where to start. The color number specifies the color to paint with, and the bordercolor tells the PAINT command that it should not paint further when it encounters a pixel of that color. In almost all cases, you will need to use the bordercolor parameter, simply because without it, PAINT will cover the entire screen.
PAINT ([X Coordinate],[Y Coordinate]), [Color Number], [Border Color]1,2,3,4,5,5
DRAW[edit | edit source]
ToDo
Making An Image Using the DATA command[edit | edit source]
Graphics using this command can either be made by using a Graphics Editor or by using the DATA command Manually. The DATA command is a way of inputting information into QBasic and being read by the READ command. Remember that the DATA command cannot be used in subroutines or functions. Look at this example:
SCREEN 7
FOR y = 1 TO 10
FOR x = 1 TO 10
READ z
PSET (x, y), z
NEXT
NEXT
DATA 04, 04, 04, 04, 04, 04, 04, 04, 04, 04
DATA 04, 00, 00, 00, 00, 00, 00, 00, 00, 04
DATA 04, 00, 00, 00, 00, 00, 00, 00, 00, 04
DATA 04, 00, 00, 00, 00, 00, 00, 00, 00, 04
DATA 04, 00, 00, 00, 00, 00, 00, 00, 00, 04
DATA 04, 00, 00, 00, 00, 00, 00, 00, 00, 04
DATA 04, 00, 00, 00, 00, 00, 00, 00, 00, 04
DATA 04, 00, 00, 00, 00, 00, 00, 00, 00, 04
DATA 04, 00, 00, 00, 00, 00, 00, 00, 00, 04
DATA 04, 04, 04, 04, 04, 04, 04, 04, 04, 04
The FOR commands declare the amount of pixels there are to be read. On this particular program, there are pixels of 10 by 10 (100) so we put:
FOR x = 1 TO 10
FOR y = 1 TO 10
We have now declared the x and y planes. You can change these values if you want a smaller or bigger picture Bitmap.
The READ command reads the DATA commands and declares the information gathered as z.
READ z
The PSET reads the planes and the DATA read and a bitmap.
PSET (x, y), z
It works like the first example on this page, except it is reading more than one pixels
Advanced Graphics[edit | edit source]
Animation[edit | edit source]
Basic Movement[edit | edit source]
Animation is basically graphics that changes over a fixed period of time. In this we will be using a do-loop .
SCREEN 7  ' we need to use a graphics enabled screen mode
animation   'calling the sub


SUB animation
    SCREEN 7
    x = 10 'set first x- coordinate
    y = 10 'set first y-coordinate
    DO
        CLS ' going back to a blank screen so that the previous rectangle is erased
        x = x + 3  ' setting increment of coordinate x
        y = y + 3   ' setting increment of coordinate y

        LINE (x, y)-(x + 5, y) 'drawing lines
        LINE (x, y + 5)-(x + 5, y + 5)
        LINE (x, y)-(x, y + 5)
        LINE (x + 5, y)-(x + 5, y + 5)

        SLEEP 2

    LOOP UNTIL INKEY$ <> ""


END SUB
Explanation:
- We have switched from the default qbasic text-only screen to one which enables graphics.
- We have called the sub which creates the animation.
- We have begun the do-loop until. This enables the animation to run until the user ends it by pressing a key.
- We have set an increment of the coordinates. This allows the box to be drawn on a new position rather than the same one. If it movement in only one direction was wished, we had to set the increment only in one variable.
- We have drawn lines from each coordinate to another. Note that each time one coordinate remains fixed while the others change.(In this I refer to the two coordinate sets, the first starting and the ending one)
- We have issued a sleep command . This stops execution for 2 seconds . Without this the do-loop will execute more quickly than we want , and the animation will be very short-lived.
- By using RND for the variables, you can create a randomized ,unpredictable animation.
Mouse-Control[edit | edit source]
In this step, we will use the QB64 inbuilt _mousehide,_mousex,_mousey,_mouseinput and _mousebutton commands to control the mouse input.
WARNING[edit | edit source]
These Functions only work in QB64!
[edit | edit source]
_mousehide
screen 7

mousetrack

sub mousetrack
do while _mouseinput
cls

X = _mousex
Y = _mousey

LINE (X - 10, Y)-(X + 10, Y), 15
LINE (X, Y - 10)-(X, Y + 10), 15

        IF _MOUSEBUTTON(1) THEN
            IF X > A AND X < A + 25 AND Y > B AND Y < B + 25 THEN
                message$ = "yes"
                goto action
            END IF
        END IF

loop until inkey$ <> ""
- Here the first function «_mousehide» prevents the default pointer mouse format to be displayed on the screen
- Mouseinput function retrieves mouse information.
- The next functions «_mousex» and «_mousey» hold the current x and y coordinates of the mouse.
- The lines draw a basic trigger .
- The «_mousebutton» function returns the value of the mouse button pressed, «1» signifies the left button being pressed.
- If the mouse button event has taken place within a certain enclosed area, a message in the form of «message$» is issued. This can be used later on.
- The procedure, if the previous condition has been fulfilled , goes to line label «action» where any commands to be executed may lie.
- Else , the process loops , until a «loop until» condition has been met. It can also be something other than the one given above.
Usage[edit | edit source]
These graphics and animations can be used to create a complete game. Instead of the «Mouse» functions, you could use the «Inkey$» command to issue various scenarios and cases, each with a complete code to decide what happens next.
Tip[edit | edit source]
Instead of making games which do not contain any user information, you could use «.txt» files to store information. This information can be later retrieved to make a game with a complete «Career» option.
3d Graphics[edit | edit source]
Simple 3D Box[edit | edit source]
3 Dimension or 3D graphics in Qbasic is nothing , but including an additional ‘z’ axis and to extend the 2 dimensional structure along that axis.
This can be achieved by drawing a box, or the structure you want , each time at a new x and y position. It is quite like animation, except, we do not erase the structure after it being drawn , and there is no need of any intermediate pause. You can better understand by looking at the 3d box program given below.
Redo:
cls
screen 1
Input "Enter the X-position?";k  'entering coordinates of the screen from where to start.
Input "Enter the Y-position?";l   ' this also determines the size of the box.
color 1
for i = 1 to 50 step 2   rem box ' step to ensure space between the boxes, make it one to eliminate the space. The 50 number sets the extension of the box along the z axis
    a = k+i:b = l+i          ' this "for-next" loop draws the box over and over again, each with incremented values of k and l.
    line (a,a)-(b,a)
    line (a,b)-(b,b)
    line (a,a)-(a,b)
    line (b,a)-(b,b)
next                            rem diagonals
line (k,k)-(a,a)              ' the four diagonals to the structure , which make it more realistic
line (l,l)-(b,b)
line (l,k)-(b,a)
line (k,l)-(a,b)
Input"Do you want to redo? (Y/N)";ans$
if ucase$(ans$)="Y" then goto Redo
end
Images[edit | edit source]
WARNING[edit | edit source]
NONE of these functions work in IDEs other than QB64.
Simple image[edit | edit source]
rem image_display
cls
Dim Image as long
x = 1000  'resolution
y = 1000
Image = _loadimage("TEST.jpg") 'loading the image
screen _newimage(x,y,32) 'putting screen sizes
_putimage (0,0),Image 'putting image
So, you were most probably expecting miles of code. And there you have it, all you need to display an image in QB64!
So, what does this astoundingly simple piece of code even do?
A step by step explanation:
- We have DIMed our variable Image as a long value. This is because the image handle returned by the _loadimage function is a long value.
- x and y are our variables. They hold the values we need to put as the resolution. Thus , for a 800 x 900 image, x = 800 , y = 900.
- The image variable Image is next being put the handle values of the image «TEST.jpg». A healthy warning: Keep the image in the folder of the QB64 IDE. Or else , the function wont work!
- Next, we have resized the screen to fit the image. The newimage function requires three parameters, the resolution parameters and the color mode parameters. Here we have used 32 bit color modes, you can also use 256 bit pallete color modes.
- Lastly, we put the image using _putimage, which takes the Image variable(our image handle) as its parameter.

Secondary use of _newimage for setting screen details[edit | edit source]
Well, you must be thinking , all these commands must be used in this exact same order. Nah, that isnt the case. You can use _newimage solo, to set the screen details, like shown below:
screen _Newimage(1000,1000,256)
This code sets the screen to a massive 1000 x 1000 resolution , with 256 bit palette color modes!

What Next[edit | edit source]
Websites[edit | edit source]
There are many good websites out there on the topic of QBasic. This is a list of the best sites:
Petes QBasic Site: This site is mostly aimed at people thinking about programming video games in QBasic.
The QBasic Page: This is a good site for getting source codes and programs for QBasic.
QBasic News: The most recent and up to date news on the QBasic community.
QBasic Programming for Kids: A good site for young people to start programming.
Qb64 : All you need to know about QB64.
Also, the QB64 IDE has an inbuilt help page, giving essential help when you don’t know how to use a command. The only drawback is , it does not show any help unless you select the command and right click on it, and click on «HELP ON ….» which means, you atleast have to know the name of the command before you seek help on it.
Further in programming[edit | edit source]
If you are learning QBasic, chances are that you are still new to programming. It is a diverse world, explore it!
A list of extremely good programming languages to continue further:
- C++
- HTML
- Java
- Javascript
- CSS
Sample Programs [edit | edit source]
Calculator[edit | edit source]
This program can be used to make a simple, functioning calculator, very simply.
Rem calculator
cls
10
print "input first operand"
input a
print "select operation"
input b
print "addition(a)"
print "subtraction(s)"
print "multiplication(m)"
print "division(d)"
print "exponentification(e)"
print "rooting(r)"
print "Quit(q)"
do
next$ = inkey$
loop until next$ <> ""
gosub input_var2

select case next$
case "a"
c = a + b
print "sum is:";c
case "s"
c = a - b
print "Difference is:";c
case "m"
c= a*b
print "Product is :";c
case "d"
c = a/b
print "Quotient is:";c
case "e"
c = a^b
print "Exponentification is:"c
case "r"
c = a^ 1/b
print "Root is:";c
case "q"
end

end select
sleep 3
goto 10


sub input_var
input "enter second operand";b
end sub
For reference goto Basic Math
Basic Game[edit | edit source]
Uses animation to make a simple game.
SCREEN 7
COLOR 15, 1


_MOUSEHIDE
CLS
LOCATE 5, 1
PRINT "GUNSHOTS"

DO
    NEXT$ = INKEY$
LOOP UNTIL NEXT$ <> ""

CLS
LOCATE 5, 1
PRINT "In this game, you require to bring"
PRINT ""
PRINT "the crosshairs to the box"
PRINT ""
PRINT " , which is the target ,"
PRINT ""
PRINT " and click to shoot it."
PRINT ""
PRINT " In this game , you control"
PRINT ""
PRINT "the crosshairs with your mouse."
PRINT ""
PRINT " You will be given a"
PRINT ""
PRINT " fixed number of tries."
PRINT ""
PRINT " The number of times you hit the target,"
PRINT ""
PRINT " you will be given a point "

DO
    NEXT$ = INKEY$
LOOP UNTIL NEXT$ <> ""


CLS
LOCATE 5, 1
PRINT "Get Ready!"

DO
    NEXT$ = INKEY$
LOOP UNTIL NEXT$ <> ""


10
A = INT(RND * 100)
B = INT(RND * 100)

DO: K$ = INKEY$
    20

    DO WHILE _MOUSEINPUT
        CLS

        IF TRY_COUNT > 30 THEN
            CLS
            LOCATE 10, 1
            PRINT "Remarks:"
            IF POINT_COUNT < 10 THEN PRINT "OH NO! NICE TRY!"
            IF POINT_COUNT > 10 AND POINT_COUNT < 16 THEN PRINT "GOOD WORK!"
            IF POINT_COUNT > 15 AND POINT_COUNT < 21 THEN PRINT "GREAT!"
            IF POINT_COUNT > 20 AND POINT_COUNT < 26 THEN PRINT "AMAZING!"
            END
        END IF


        SECOND = VAL(RIGHT$(TIME$, 2))
        IF PREVSEC <> SECOND THEN
            COUNT = COUNT + 1
        END IF

        LOCATE 25, 25
        PRINT POINT_COUNT


        X = _MOUSEX: Y = _MOUSEY
        LINE (X - 10, Y)-(X + 10, Y), 15
        LINE (X, Y - 10)-(X, Y + 10), 15

        LINE (A, B)-(A + 25, B), 15
        LINE (A, B + 25)-(A + 25, B + 25), 15
        LINE (A, B)-(A, B + 25), 15
        LINE (A + 25, B)-(A + 25, B + 25), 15
        PAINT (A, B), (1), 15

        IF _MOUSEBUTTON(1) THEN
            IF X > A AND X < A + 25 AND Y > B AND Y < B + 25 THEN
                POINT_COUNT = POINT_COUNT + 1
                TRY_COUNT = TRY_COUNT + 1
                GOTO 10
            END IF


        END IF

        IF COUNT > 1 THEN
            COUNT = 0
            TRY_COUNT = TRY_COUNT + 1
            GOTO 10

        END IF


        PREVSEC = SECOND
        GOTO 20


    LOOP
LOOP
For reference , goto Advanced Graphics
Clock[edit | edit source]
A clock which is quite like a digital clock,with no hands.Use draw to make them if you want.
REM  Clock
SCREEN 7

CLS
start:
SCREEN 7
_FONT 16
LOCATE 1, 5
PRINT "CLOCK"
PRINT "________________________________________"

LINE (50, 50)-(100, 100), 1, BF
LOCATE 9, 5
PRINT "TIME"
LOCATE 10, 5
PRINT "CONTROL"
LINE (150, 50)-(200, 100), 2, BF
LOCATE 9, 18.5
PRINT "STOP WATCH"


DO

    exit$ = INKEY$
    IF exit$ = "e" OR exit$ = "E" THEN
        CLS
        SCREEN 7
        COLOR 2, 1
        LOCATE 5, 5
        PRINT "YOU HAVE ABORTED THE CLOCK"


        WHILE close_count <> 10
            close_count = close_count + 1
            LOCATE 7, 5
            PRINT "APPLICATION  ";
            IF close_count MOD 2 = 1 THEN
                PRINT "CLOSING >>>   "
            ELSE
                PRINT "CLOSING   >>> "
            END IF


            SLEEP 1
        WEND

        CLS
        SCREEN 7
        COLOR 10, 0
        END
    END IF


    Mouser mx, my, mb
    IF mb THEN
        IF mx >= 50 AND my >= 50 AND mx <= 100 AND my <= 100 THEN 'button down
            DO WHILE mb 'wait for button release
                Mouser mx, my, mb
            LOOP
            'verify mouse still in box area
            IF mx >= 50 AND my >= 50 AND mx <= 100 AND my <= 100 THEN
                GOTO proccess
            END IF
        END IF
    END IF


    Mouser mx, my, mb
    IF mb THEN
        IF mx >= 150 AND my >= 50 AND mx <= 200 AND my <= 100 THEN 'button down
            DO WHILE mb 'wait for button release
                Mouser mx, my, mb
            LOOP
            'verify mouse still in box area
            IF mx >= 150 AND my >= 50 AND mx <= 200 AND my <= 100 THEN
                time_control = 1
                GOTO proccess
            END IF
        END IF
    END IF
LOOP


proccess:

IF time_control = 0 THEN
    time_enter:
    LOCATE 12, 6
    INPUT "enter time"; t
    IF t > 1800 THEN
        mistake = mistake + 1
        IF mistake > 3 THEN
            PRINT "BLOCKED"
            END
        END IF

        GOTO time_enter
    END IF
END IF

Mouser mx, my, mb
IF mb THEN
    IF mx >= 150 AND my >= 50 AND mx <= 200 AND my <= 100 THEN 'button down
        DO WHILE mb 'wait for button release
            Mouser mx, my, mb
        LOOP
        'verify mouse still in box area
        IF mx >= 150 AND my >= 50 AND mx <= 200 AND my <= 100 THEN
            time_control = 1
            GOTO proccess
        END IF
    END IF
END IF


WHILE INKEY$ <> " "
    SLEEP 1
    count = count + 1
    tc = tc + 1
    BEEP
    CLS
    LOCATE 1, 5
    PRINT "CLOCK"
    PRINT "________________________________________"

    IF time_control = 1 THEN
        LINE (150, 50)-(200, 100), 2, BF
    END IF
    LOCATE 3, 5
    PRINT "CURRENT TIME:"; TIME$
    LOCATE 5, 5
    PRINT "MINUTES:"; minute
    LOCATE 6, 5
    PRINT "SECONDS:"; count
    IF count = 60 THEN
        count = 0
        minute = minute + 1
    END IF

    IF time_control = 0 THEN
        LOCATE 8, 5
        PRINT "TIME LEFT:"; (t - tc)  60; ":"; (t - tc) MOD 60
        IF tc = t THEN
            BEEP
            BEEP
            BEEP
            BEEP
            END
        END IF
    END IF
    IF time_control = 1 THEN
        Mouser mx, my, mb
        IF mb THEN
            IF mx >= 150 AND my >= 50 AND mx <= 200 AND my <= 100 THEN 'button down
                DO WHILE mb 'wait for button release
                    Mouser mx, my, mb
                LOOP
                'verify mouse still in box area
                IF mx >= 150 AND my >= 50 AND mx <= 200 AND my <= 100 THEN
                    END
                END IF
            END IF
        END IF
        LOCATE 10, 10
        PRINT "PRESS BUTTON TO END"
    END IF

WEND
GOTO start


SUB Mouser (x, y, b)
    mi = _MOUSEINPUT
    b = _MOUSEBUTTON(1)
    x = _MOUSEX
    y = _MOUSEY
END SUB
This is a little logical combination of all the chapters you have read so far.
Binary Coder[edit | edit source]
No, this is NOT a binary decoder, but a binary Coder. This takes any decimal system number and converts it to binary. Run this program to see for yourself.
REM binary
SCREEN 7
COLOR 1, 2

_FONT 16
LOCATE 7, 10
PRINT "Binary Coder"

SLEEP 5

start:

CLS
LOCATE 1, 1
PRINT "Binary coder"
PRINT "_____________"
PRINT ""
PRINT ""
PRINT ""
PRINT ""


INPUT "Enter Decimal number"; a
CLS
LOCATE 1, 1
PRINT "Binary coder"
PRINT "_____________"
PRINT ""
PRINT ""
WHILE a <> 0
    PRINT a MOD 2;
    IF a MOD 2 = 1 THEN
        a = a  2
    ELSE a = a / 2
    END IF

WEND
PRINT ""
PRINT ""
PRINT "Binary code is reversed"
WHILE INKEY$ <> " "
WEND
GOTO start
Just the trouble is: the binary code is reversed. You might have guessed it by looking at the last PRINT statement. I still haven’t figured out how to reverse it, so I guess you have to do it yourself.
And , the WHILE loop has a print statement with the semicolon at the end. That is used to ensure that the next number comes after it, not on the next line.
Projectile Game[edit | edit source]
Remember Gorillas? Well, take out the graphics and what you get is this:
10
RANDOMIZE TIMER
cor = RND * 150
cor2 = CINT(cor)
IF cor2 < 30 AND cor2 > -30 THEN GOTO 10

PRINT "The object to hit is at coordinates"; cor2

INPUT "enter velocity"; v
INPUT "enter angle"; a
d = ((v ^ 2) * SIN(2 * a)) / 10
PRINT "Hit on:"
PRINT CINT(-d)

IF CINT(-d) < cor2 + 30 AND CINT(-d) > cor2 - 30 THEN
    PRINT "Well Done!"
ELSEIF CINT(-d) < 30 AND CINT(-d) > -30 THEN PRINT "Hey , you hit us!"
ELSE PRINT "Ugh, not on target"
END IF
Huh? Ok, now the maths is complicated , but the formula is basically the same. Here, the projectile has to land between 30 coordinates out of the hit object, or else you lose. See Wikipedia:Projectile motion for more information on the maths part.
Tip: Add graphics. It will be a big , fat piece of code, but the final product will be AMAZING!
Check hearing[edit | edit source]
Ok, now , how high a frequency sound can you hear? Test your hearing with this program:
REM ultrasonic_test
CLS
freq = 20000
DO
    PRINT "Frequency is:"; freq

    SOUND freq, 18.2
    INPUT "Can you hear?"; ans$
    IF ans$ = "no" THEN
        freqrange = freq
        GOTO 10
    END IF
    freq = freq + 100
LOOP
10
freq = freqrange
DO
    PRINT "frequency is:"; freq

    SOUND freq, 18.2
    INPUT "can you hear?"; ans$
    IF ans$ = "no" THEN
        PRINT "your max frequency is:"; freq
        END
    END IF
    freq = freq + 2
LOOP
Check this out!
Appendix[edit | edit source]
Commands[edit | edit source]
ABS()[edit | edit source]
N = ABS(expression returning a numerical value)
Returns the ‘absolute’ value of the expression, turning a negative to a positive (e.g. -4 to 4)
PRINT ABS(54.345) 'This will print the value ABS now as it is (54.345)
PRINT ABS(-43) 'This will print the value as (43)
.
ACCESS[edit | edit source]
OPEN "file.txt" FOR APPEND ACCESS WRITE
This sets the access of a file that has been declared into the program. There are three settings that the programmer can set. These are:
READ - Sets up the file to be read only, no writing.
WRITE - Writes only to the file. Cannot be read.
READ WRITE - Sets the file to both of the settings above.
FOR APPEND opens the file as a text file and sets the file pointer to the end of the file, thereby appending new output to the file. If omitted, FOR RANDOM is the default, which would open the file as a sequence of fixed-length records and set the file pointer to the start of the file. New data would overwrite existing data in the file without warning.
ASC(«C»)[edit | edit source]
PRINT ASC("t") 'Will print 116
Prints the ASCII code number of the character found within the brackets. If the programmer put in a string into brackets, only the first character of the string will be shown.
ATN()[edit | edit source]
ATN(expression)
Part of the inbuilt trigonometry functions. An expression that evaluates to a numeric vale is converted to it’s Arc-Tangent.
angle = ATN( B )
angle2 = ATN( 23 / 34 )
BEEP[edit | edit source]
BEEP
The BIOS on the motherboard is instructed to emit a «Beep» sound from the PC ‘speaker’. See also SOUND and PLAY.
An older, outdated alternative is to use :
PRINT CHR$(07)
This was replaced later by the BEEP command.
BLOAD[edit | edit source]
BLOAD file_path$, memory_offset%
Loads a file saved with BSAVE into memory.
- file_path$ is the file location
- memory_offset is an integer specifying the offset in memory to load the file to
The starting memory address is determined by the offset and the most recent call to the DEF SEG statement
BSAVE[edit | edit source]
BSAVE file_path$, memory_offset%, length&
Saves the contents of an area in memory to a file that can be loaded with BLOAD
- file_path$ is the file location
- memory_offset is an integer specifying the offset in memory to save
- length the number of bytes to copy
The starting memory address is determined by the offset and the most recent call to the DEF SEG statement
CALL ABSOLUTE[edit | edit source]
CALL ABSOLUTE([argument%, ...,] address%)
Pushes the provided arguments, which must be INTEGER, from left to right on the stack and then does a far call to the assembly language routine located at address. The code segment to use is set using DEF SEG. Normally QBasic will push the address of arguments, but if an argument is preceded by BYVAL the value of the argument will be pushed.
Note that because QBasic pushes the arguments from left to right, if you provide three arguments for example the stack will look like this:
SS:SP Return IP
+0002 Return CS
+0004 Argument 3
+0006 Argument 2
+0008 Argument 1
Example:
'POP CX
'POP DX
'POP BX
'POP AX
'MOV [BX], AX
'PUSH DX
'PUSH CX
'RETF
A$ = "YZ[Xë•RQ╦" 'Codepage: 437
I% = 42: J% = 0
IF VARSEG(A$) <> VARSEG(J%) THEN STOP 'Both A$ and J% are stored in DGROUP.
DEF SEG = VARSEG(A$)
CALL ABSOLUTE(BYVAL I%, J%, PEEK(VARPTR(A$) + 3) * 256& OR PEEK(VARPTR(A$) + 2))
PRINT J%
QBasic doesn’t set BP to the stack frame of your machine language routine, but leaves it pointing to the stack frame of the calling QBasic procedure, which looks like this:
-???? Variable 3
-???? Variable 2
-???? Variable 1
-???? Return value (only if the procedure is a FUNCTION, absent if a SUB)
-0002 BP of calling procedure
SS:BP BP of calling procedure (yes, again)
+0002 Six bytes referring back to the calling procedure to use when executing END/EXIT SUB/FUNCTION
+0008 Argument 3
+000A Argument 2
+000C Argument 1
The offsets indicated with -/+???? will depend on the sizes and presence of variables, return value and arguments. For example, an INTEGER variable will take two bytes, but a LONG variable four. As one might expect considering how QBasic passes arguments, variables are stored in reverse order of declaration. Contrary to when calling a machine language routine, the arguments here will always be addresses. For arguments passed by value, space is allocated on the stack and the address of that space is passed to the procedure.
CASE[edit | edit source]
SELECT CASE expression
CASE test1[, test2, ...]: statements
[CASE test4[, test5, ...]: statements]
[CASE ELSE: statements]
END SELECT
Executes the statements after the first CASE statement where a test matches expression. The tests can be of the following forms:
expression
expression1 TO expression2
IS {<|<=|=|<>|>=|>} expression
This is an example of a program with no CASE commands that assigns different paths to values:
PRINT "1. Print 'path'"
PRINT "2. Print 'hello'"
PRINT "3. Quit"
INPUT "Enter a choice: "; a$
IF a$ = "1" THEN PRINT "path": RUN
IF a$ = "2" THEN PRINT "hello": RUN
IF a$ <> "3" THEN PRINT "That is not a valid choice.": RUN
This is what a program looks like with the CASE command:
PRINT "1. Print 'path'"
PRINT "2. Print 'hello'"
PRINT "3. Quit"
INPUT "Enter a choice: "; a$
SELECT CASE a$
CASE "1": PRINT "path": RUN
CASE "2": PRINT "hello": RUN
CASE IS <> "3": PRINT "That is not a valid choice.": RUN
END SELECT
CHAIN[edit | edit source]
CHAIN filename
This chains execution to another QBasic program. Values may be passed to the other program by using the COMMON statement before the CHAIN statement. Note that execution doesn’t return to the first program unless the second program uses CHAIN to transfer execution back to the first.
CHDIR[edit | edit source]
CHDIR directoryname
This is used for setting the working directory, also known as the current directory. The directory name is declared exactly like in DOS and long file names aren’t supported. For example:
CHDIR "C:DOS"
Note that this doesn’t change the current drive and every drive has its own working directory. You can set the current drive like this:
SHELL "C:"
CHR$()[edit | edit source]
This returns the string character symbol of an ASCII code value.
name$ = CHR$([ascii character code])
Often used to ‘load’ characters into string variables when that character cannot be typed (e.g. the Esc key or the F{n} (Function Keys) or characters that would be ‘recognised’ and acted upon by the QBASIC interpreter. The following four characters cannot occur in a QBasic string literal:
- 0 Null: all characters up to the end of the line will get deleted, including this one.
- 10 Line Feed: signals the end of the line.
- 13 Carriage Return: this character will get deleted.
- 34 Quotation Mark: signals the end of the string literal.
Here is a list of some character codes :-
07 Beep (same as BEEP)
08 Backspace
09 Tab
27 Esc
72 Up Arrow
75 Left Arrow
77 Right Arrow
80 Down Arrow
CINT()[edit | edit source]
This rounds the contents of the brackets to the nearest integer.
PRINT CINT(4573.73994596)
4574
CIRCLE[edit | edit source]
CIRCLE ([X Coordinate], [Y Coordinate]), [Radius], [Colour],[Start],[End],[Aspect]
Lets the programmer display a circle. Like all graphics commands, it must be used with the SCREEN command.
CLEAR[edit | edit source]
CLEAR
Resets all variables, strings, arrays and closes all files. The reset command on QBasic.
CLOSE[edit | edit source]
CLOSE
Closes all open files
CLOSE #2
Closes only the file opened as data stream 2. Other files remain open
CLS[edit | edit source]
CLS
Clears the active screen. Erases all text, graphics, resets the cursor to the upper left (1,1), and also applies the current background color (this has to be set using the COLOR command) to the whole screen.
COLOR[edit | edit source]
COLOR [Text Colour], [Background Colour]
This lets you change the colour of the text and background used when next ‘printing’ to the current output window. It can be done like this:
COLOR 14, 01
PRINT "Yellow on Blue"
You have a choice of sixteen colours:
00: Black            08: Dark Grey
01: Dark Blue        09: Light Blue
02: Dark Green       10: Light Green
03: Dark Cyan        11: Light Cyan
04: Dark Red         12: Light Red
05: Dark Purple      13: Magenta
06: Orange Brown     14: Yellow
07: Grey             15: White
These values are the numbers that you put in the COLOR command.
Note Only screen modes 0, 7, 8, 9, 10 support a background color. To ‘re-paint’ the whole screen in a background colour, use the CLS command.
COMMON[edit | edit source]
Declares a variable as ‘global’, which allows its value to be accessed across multiple QBasic programs / scripts (see also the CHAIN command)
COMMON SHARED [variablename]
Each program that declares ‘variablename’ as COMMON will share the same value.
NOTE. All COMMON statements must appear at the start of the program (i.e. before any executable statements).
CONST[edit | edit source]
Fixes a variable so it can not be changed within the program.
CONST (name) {AS (type = INTEGER / STRING)} = (expression or value)
For example :-
CONST PI = 3.14159265
Assigns the value 3.14159265 to PI.
CONST PI2 = 2 * PI
PI must be assigned a value before it is used to calculate PI2. Typically all CONST are declared at the beginning of a program.
DATA[edit | edit source]
DATA [constant]
Use in conjunction with the READ and RESTORE command. Mostly used in programs dealing with graphics, this command lets QBasic read a large number of constants. The READ command accesses the data while the RESTORE command «refreshes» the data, allowing it to be used again.
DATE$[edit | edit source]
A system variable that always contains the current date as a string in mm-dd-yyyy format. Use it like this:
a$ = DATE$
DEF SEG[edit | edit source]
Sets the current segment address.
DEG SEG [=address]
- address is a segment address that can contain a value of 0 through 65535.
If address is omitted, DEF SEG resets the current segment address to the default data segment. DEF SEG is used by BLOAD, BSAVE, CALL ABSOLUTE, PEEK, and POKE
DEST(Only QB64!)[edit | edit source]
_DEST sets the current write-to page or image.
_DEST image_handle sends the destination image to an image of handle stored in long variable image_handle.
_DESt 0 sends the destination image to the current screen being used.
DIM[edit | edit source]
This is used to declare an array (early versions of QBasic required all variables to be defined, not just arrays greater than 10)
DIM [Array Name] ([count],[count], ..)
The Array name can be of any type (Integer, Double, String etc). If not declared, single precision floating point is assumed. Strings can be ‘declared’ using $ sign (Integers with the ‘%’ sign). The QBASIC interpreter tolerates numeric arrays of up to 10 count without these needing to be declared.
NOTE Early versions of QBasic did not explicitly set the contents of an array to zero (see CLEAR command)
DIM table%(100,2)
Create an integer array called table% containing 100×2 = 200 entries
DIM form$(5)
Create a string array called form$ containing 5 strings
DIM quotient(20) AS DOUBLE
Create an array called quotient that contains 20 double precision numbers
DO .. LOOP[edit | edit source]
DO
[program]
LOOP UNTIL [test condition becomes TRUE]
Used to create a loop in the program. The [condition] is tested only after the [program] code is executed for the first time (see also WHILE). For example:
num$ = 1
sum$ = 0
DO
sum$ = 2 * num$
PRINT sum$
num$ = num$ + 1
LOOP UNTIL num$ = 13
This does not work
But the following does
num = 1
sum = 0
DO
sum = 2 * num
PRINT sum
num = num + 1
LOOP UNTIL num = 13
DRAW[edit | edit source]
DRAW "[string expression]"
Used to draw a straight line from the current ‘cursor’ position in the current colour. DRAW defines the direction (up, down etc.) and the length of the line (in pixels). For example:-
SCREEN 7
PSET (50, 50), 4
DRAW "u50 r50 d50 l50"
The letter in front of each number is the direction:
U = Up    E = Upper-right
D = Down  F = Lower-right
L = Left  G = Lower-left
R = Right H = Upper-left
The drawing ‘cursor’ is left at the position where the line ends.
u50 draws from 50,50 upwards ending at 50,0
r50 draws from 50,0 to the right, ending at 100,0
d50 draws from 100,0 downwards, ending at 100,50
l50 draws from 100,50 to the left, ending at 50,50
The example shown will thus draw a red ‘wire frame’ square.
See also LINE and CIRCLE commands.
Note: The diagonal from 0,0 to 100,100 will be 100 * root(2) pixels long (i.e. 141)
END[edit | edit source]
END
Signifies the end of the program. When QBasic sees this command it usually comes up with a statement saying: «Press Any Key to Continue».
END TYPE / END DEF / END SUB / END FUNCTION / END IF / END SELECT[edit | edit source]
END TYPEends a TYPE definition.END DEFends a DEF FN function definition.END SUBends a SUB procedure definition.END FUNCTIONends a FUNCTION procedure definition.END IFends a multiline IF block.END SELECTends a SELECT CASE block.
ENVIRON[edit | edit source]
ENVIRON [string expression]
NOTE: If you are running QBasic on a Windows system, you will not be able to use this command.
This command helps you set an environment variable for the duration of the session. On exit from the QBasic.exe interpreter, the variables revert to their original values.
EOF()[edit | edit source]
This checks if there are still more data values to be read from the file specified in (). EOF() returns a boolean / binary value, a one or zero. 0 if the end of file has not been reached, 1 if the last value in the file has been read (see also LINE INPUT)
OPEN File.txt FOR INPUT AS #1
DO
INPUT #1, text$
PRINT text$
LOOP UNTIL EOF(1)
END
Note that, since the INPUT is executed before UNTIL is reached, File.txt must contain at least one line of text — if the file is empty, you will receive an ‘ERROR (62) Input past end of file’.
ERASE[edit | edit source]
ERASE [arrayname] [,]
Used to erase all dimensioned arrays.
ERROR[edit | edit source]
System variable holding a numeric value relating to the processing of the previous line of code. If the line completed without error, ERROR is set to 0. If the line failed, ERROR is set to one of the values shown below. Most commonly used to redirect program flow to error handling code as in :-
ON ERROR GOTO [line number / label]
If ERROR is non=zero, program flow jumps to the line number or label specified. If ERROR is zero, program flow continues with the next line below.
To manually test your program and check to see if the error handling routine runs OK, ERROR can be set manually :-
ERROR [number]
Set ERROR = number
The error numbers are as follows:
1 NEXT without FOR                 39 CASE ELSE expected
2 Syntax Error                     40 Variable required
3 RETURN without GOSUB             50 FIELD overflow
4 Out of DATA                      51 Internal error
5 Illegal function call            52 Bad file name or number
6 Overflow                         53 File not found
7 Out of memory                    54 Bad file mode
8 Label not defined                55 File already open
9 Subscript out of range           56 FIELD statement active
10 Duplicate definition            57 Device I/O error
11 Division by zero                58 File already exists
12 Illegal in direct mode          59 Bad record length
13 Type mismatch                   61 Disk full
14 Out of string space             62 Input past end of file
16 String formula too complex      63 Bad record number
17 Cannot continue                 64 Bad file name
18 Function not defined            67 Too many files
19 Yes RESUME                       68 Device unavailable
20 RESUME without error            69 Communication-buffer overflow
24 Device timeout                  70 Permission denied
25 Device Fault                    71 Disk not ready
26 FOR without NEXT                72 Disk-media error
27 Out of paper                    73 Advanced feature unavailable
29 WHILE without WEND              74 Rename across disks
30 WEND without WHILE              75 Path/File access error
33 Duplicate label                 76 Path not found
35 Subprogram not defined
37 Argument-count mismatch
38 Array not defined
Note that ERROR is set when execution fails, not when the code is ‘read’ — so, for example, a ‘divide by 0’ will be found before the result is assigned to a non-existent array variable or written to a non-existent file.
EXIT[edit | edit source]
Allows the immediate exit from a subroutine or a loop, without processing the rest of that subroutine or loop code
EXIT DEF
Exits from a DEF FN function.
EXIT DO
Exits from a DO loop, execution continues with the command directly after the LOOP command
EXIT FOR
Exits from a FOR loop, execution continues with the command directly after the NEXT command
EXIT FUNCTION
Exits a FUNCTION procedure, execution continues with the command directly after the function call
EXIT SUB
Exits a SUB procedure.
FOR .. NEXT[edit | edit source]
FOR [variable name] = [start value] TO [end value] {STEP n}
[program  code]
NEXT [variable name]
The variable is set to the [start value], then program code is executed and at the Next statement the variable is incremented by 1 (or by the STEP value, if any is specified). The resulting value is compared to the [end value] and if not equal program flow returns to the line following the FOR statement.
For example:
FOR a = 200 TO 197 STEP-1
PRINT a
NEXT a
200
199
198
Care must be taken when using STEP, since it is quite possible to step past the (end value) with the result that the FOR loop will run ‘for ever’ (i.e. until the user aborts the interpreter or an error occurs), for example :-
FOR a = 200 TO 197 STEP-2
PRINT a
NEXT a
200
198
196
194
192
…
0
-2
-4
…
-32768
ERROR overflow
GOSUB[edit | edit source]
GOSUB [subroutine line number / label]
Command processing jumps to the subroutine specified. When the RETURN command is encountered, processing returns to this point and continues with the line below the GOSUB.
IF[edit | edit source]
IF [variable or string] [operator] [variable or string] THEN [command] {ELSE [command]}
Compares variables or strings. For example, if you wanted to examine whether or not a user-entered password was the correct password, you might enter:
IF a$ = «password» THEN PRINT «Password Correct»
Where a$ is the user entered password. Some operators include:
«=»- equal to
«<«- less than (only used when variable or string is a number value)
«>»- greater than (only used when variable or string is a number value)
«<>»- does not equal
«<=»- less than or equal to (only used when variable or string is a number value)
«>=»- greater than or equal to (only used when variable or string is a number value)
One can also preform actions to number values then compare them to other strings or variables using the if command, such as in the below examples:
IF a+5 = 15 THEN PRINT «Correct»
IF a*6 = b*8 THEN PRINT «Correct»
INCLUDE (QUICKbasic Only)[edit | edit source]
QUICKBasic supports the use of include files via the $INCLUDE directive:
(Note that the Qbasic interpreter does NOT support this command.)
'$INCLUDE: 'foobar.bi'
Note that the include directive is prefixed with an apostrophe, dollar, and that the name of the file for inclusion is enclosed in single quotation mark symbols.
INKEY$[edit | edit source]
[variable] = INKEY$
This is used when you want a program to function with key input from the keyboard. Look at this example on how this works:
a$ = INKEY$
PRINT "Press Esc to Exit"
END IF a$ = CHR$(27)
You can use this in conjunction with the CHR$ command or type the letter (e.g. A).
INPUT[edit | edit source]
INPUT [String Literal] [,or;] [Variable]
Displays the String Literal, if a semi colon follows the string literal, a question mark is displayed, and the users input until they hit return is entered into the variable. The variable can be a string or numeric. If a user attempts to enter a string for a numeric variable, the program will ask for the input again. The String Literal is option. If the string literal is used, a comma (,) or semicolon (;) is necessary.
INPUT #[edit | edit source]
INPUT #n [String Literal] [,or;] [Variable]
Reads a string / value from the specified file stream (see also LINE INPUT #)
INPUT #1, a$, b$, n, m
Reads 4 values from the file that is OPEN as #1. a$ is assigned all text until a ‘,’ (comma) or end of line is reached, b$ the next segment of text, then two numeric values are interpreted and assigned to n and m.
Note that, within the file, numbers can be separated by ‘anything’ — so, if a number is not found (for ‘n’ or ‘m’) on the current ‘line’ of the file, the rest of the file will be searched until a number is found. Input is then left ‘pointing’ at the position in the file after the last number required to satisfy the input statement (see also ‘seek #’ command)
INSTR[edit | edit source]
INSTR (start%, Search$, Find$)
Returns the character position of the start of the first occurrence of Find$ within Search$, starting at character position ‘start%’ in Search$. If Find$ is not found, 0 is returned. start% is optional (default = 1, the first character of Search$)
Pos = INSTR ("abcdefghi", "de")
returns 4
LEFT$()[edit | edit source]
A$ = LEFT$(B$,N)
A$ is set to the N left most characters of B$.
A$ = LEFT$("Get the start only",6)
returns «Get th»
See also RIGHT$(), MID$().
LET[edit | edit source]
LET [variable] = [value]
Early versions of the QBasic.exe command interpreter required use of the ‘LET’ command to assign values to variables. Later versions did not.
LET N = 227 / 99
LET A$="a line of simple text"
is equliavent to :-
N = 227 / 99
A$="a line of simple text"
LINE[edit | edit source]
LINE ([X], [Y]) - ([X], [Y]), [Colour Number]
Used for drawing lines in QBasic. The first X and Y are used as coordinates for the beginning of the line and the second set are used for coordinating where the end of the line is. You must put a SCREEN command at the beginning of the program to make it work.
Note. When in SCREEN 13, the Colour Number == the Palette number
LINE INPUT #[edit | edit source]
LINE INPUT #1, a$
Reads a complete line as text characters from the file OPEN as stream #1 and places it in a$.
To find the ‘end of line’, the QBasic interpreter seaches for the ‘Carriage Return’ + ‘Line Feed’ (0x0D, 0x0A) characters. When reading text files created on UNIX/LINUX systems (where the ‘Line feed’ 0x0A is used on it’s own to signify ‘end of line’), LINE INPUT will not recognise the ‘end of line’ and will continue to input until the end of file is reached. For files exceeding 2k characters, the result is an «Out of String Space» Error as a$ ‘overflows’. One solution is to use a text editor able to handle UNIX files to open and ‘save as’ before attempting to process the file using QBasic.
LOADIMAGE (QB64 Only)[edit | edit source]
(NOTE! The commands in this section refer to a third-party program called «QB64». Neither QUICKbasic nor Qbasic support _LOADIMAGE, _NEWIMAGE, OR _PUTIMAGE commands. Both QUICKbasic and Qbasic have a «SCREEN» command, but it works diffently in those languages than in QB64.)
_LOADIMAGE(«image.jpg»)
Shows an image. Must be used with the commands SCREEN, _NEWIMAGE and _PUTIMAGE.
Example:
DIM rabbit AS LONG
SCREEN _NEWIMAGE(800, 600, 32)
rabbit = _LOADIMAGE(«rabbit.jpg»)
_PUTIMAGE (100,100), rabbit
LOOP[edit | edit source]
DO
[Program]
LOOP UNTIL [condition]
Used to create a loop in the program. This command checks the condition after the loop has started. This is used in conjunction with the DO command.
LPRINT[edit | edit source]
LPRINT [statement or variable]
Prints out text to a printer.
The LPRINT command expects a printer to be connected to the LPT1(PRN) port. If a printer is not connected to LPT1, QBasic displays a «Device fault» error message.
If your printer is connected to a COM port instead, use the MS-DOS MODE command to redirect printing from LPT1 to COMx (for example, to redirect to COM1, use the following command:
MODE LPT1=COM1
If you need to cancel the redirection when finished, use the following command:
MODE LPT1
MID$[edit | edit source]
 a$=MID$(string$,start%[,length%])
 MID$(string$,start%[,length%])=b$
In the first use, a$ is set to the substring taken from string$ strating with character start% taking Length% characters. If length% is omitted, the rest of the line (i.e. start% and all the characters to the right) are taken.
In the second use, length% characters of string$ are replaced by b$ starting at start%. If length% is omitted, the rest of the line is replaced (i.e. start% and all the characters to the right)
See also LEFT$ RIGHT$ LEN
MOD[edit | edit source]
a MOD b
Returns the remainder of an integer divide of a by b
For example, 10 MOD 3 returns 1
NEWIMAGE(Only QB64!)[edit | edit source]
_NEWIMAGE is used to set a long variable as the screen dimensions, or can be used with the SCREEN command (See later in Appendix) to directly set the screen details. It is very useful as you can enlarge the SCREEN mode ’13’ which has RGB color settings if you find the default size too small.
Syntax:
_NEWIMAGE(width,length,screen_mode)
- width and length are long variables, while screen_mode is the screen mode format you wish to change.
Like,
_NEWIMAGE(1000,1000,24),256
where, 256 is the amount of colours
It is also used to prepare the window screen surface for the image you want to put (first load it using LOADIMAGE).
OPEN[edit | edit source]
OPEN "[(path)8.3 file name.ext]" (FOR {INPUT/OUTPUT} AS #{n})
This opens a file. You have to give the DOS file name, for example:
OPEN "data.txt" FOR INPUT AS #1
Opens the existing file data.txt for reading as data stream #1. Since no path is specified, the file must be in the same folder as the QBasic.exe — if not, processing halts with a ‘file not found’ error
OPEN "C:TEMPRUN.LOG" FOR OUTPUT AS #2
Opens an empty file named RUN.LOG in the C:TEMP folder for writing data stream #2. Any existing file of the same name is replaced.
PALETTE[edit | edit source]
PALETTE[palette number, required colour]
For VGA (SCREEN mode 13) only, sets the Palette entry to a new RGB color. The palette number must be in the range 1-256. The required colour is a LONG integer created from the sum of (required Blue * 65536) + (required Green * 256) + required Red.
RANDOMIZE[edit | edit source]
RANDOMIZE TIMER
A = INT((RND * 100)) + 1
RANDOMIZE will set the seed for QBasic’s random number generator. With QBasic, it’s standard to simply use RANDOMIZE TIMER to ensure that the sequence remains the same for each run.
The example is a mathematical operation to get a random number from 1 to 100.
INT stands for Integer, RND for Random and «*» stands for the limit upto which the random number is to be chosen. The «+ 1» is just there to ensure that the number chose is from 1 to 100 and not 0 to 99.
Note: Subsequent calls of this function do not guarantee the same sequence of random numbers.
READ[edit | edit source]
READ AIM(I)
Used in conjunction with the DATA command, this command lets QBasic read data. This is mostly used when dealing with large quantities of data like bitmaps.
REM or ‘[edit | edit source]
REM {comments}
' {comments}
When the interpreter encounters REM or » ‘ » (a single quote) at the start of a line, the rest of the line is ignored
RETURN[edit | edit source]
RETURN
Signifies that it is the end of a subroutines
RND[edit | edit source]
RANDOMIZE TIMER
A = INT((RND * 100)) + 1
RND will provide a random number between 0 and 1.
The example is a mathematical operation to get a random number from 1 to 100. RANDOMIZE TIMER will set the initial seed to a unique sequence. INT stands for Integer, RND for Random and «*» stands for the limit upto which the random number is to be chosen. The «+ 1» is just there to ensure that the number chose is from 1 to 100 and not 0 to 99.
Internally, the seed a 24-bit number, iterated in the following method: rnd_seed = (rnd_seed*16598013+12820163) MOD 2^24
PLAY[edit | edit source]
PLAY "[string expression]"
Used to play notes and a score in QBasic on the PC speaker. The tones are indicated by letters A through G. Accidentals are indicated with a «+» or «#» (for sharp) or «-» (for flat) immediately after the note letter. See this example:
PLAY "C C# C C#"
Whitespaces are ignored inside the string expression. There are also codes that set the duration, octave and tempo. They are all case-insensitive. PLAY executes the commands or notes the order in which they appear in the string. Any indicators that change the properties are effective for the notes following that indicator.
Ln     Sets the duration (length) of the notes. The variable n does not indicate an actual duration
       amount but rather a note type; L1 - whole note, L2 - half note, L4 - quarter note, etc.
       (L8, L16, L32, L64, ...). By default, n = 4.
       For triplets and quintets, use L3, L6, L12, ... and L5, L10, L20, ... series respectively.
       The shorthand notation of length is also provided for a note. For example, "L4 CDE L8 FG L4 AB"
       can be shortened to "L4 CDE F8G8 AB". F and G play as eighth notes while others play as quarter notes.
On     Sets the current octave. Valid values for n are 0 through 6. An octave begins with C and ends with B.
       Remember that C- is equivalent to B.
< >    Changes the current octave respectively down or up one level.
Nn     Plays a specified note in the seven-octave range. Valid values are from 0 to 84. (0 is a pause.)
       Cannot use with sharp and flat. Cannot use with the shorthand notation neither.
MN     Stand for Music Normal. Note duration is 7/8ths of the length indicated by Ln. It is the default mode.
ML     Stand for Music Legato. Note duration is full length of that indicated by Ln.
MS     Stand for Music Staccato. Note duration is 3/4ths of the length indicated by Ln.
Pn     Causes a silence (pause) for the length of note indicated (same as Ln).
Tn     Sets the number of "L4"s per minute (tempo). Valid values are from 32 to 255. The default value is T120.
.      When placed after a note, it causes the duration of the note to be 3/2 of the set duration.
       This is how to get "dotted" notes. "L4 C#." would play C sharp as a dotted quarter note.
       It can be used for a pause as well.
MB MF  Stand for Music Background and Music Foreground. MB places a maximum of 32 notes in the music buffer
       and plays them while executing other statements. Works very well for games.
       MF switches the PLAY mode back to normal. Default is MF.
PRINT[edit | edit source]
PRINT [Argument] [,or;] [Argument]...
Displays text to the screen. The Argument can be a string literal, a string variable, a numeric literal or a numeric variable. All arguments are optional.
PRINT #[n] [,or;] [Argument]...
Saves data to the file that is ‘OPEN FOR OUTPUT AS #[n]’
or we can use ? symbol for print command
PSET[edit | edit source]
PSET ([X coordinate],[Y coordinate]), [Pixel Colour]
This command displays pixels, either one at a time or a group of them at once. For the command to work, the program must have a SCREEN command in it.
SCREEN[edit | edit source]
SCREEN [Screen Mode Number]
This command is used for displaying graphics on the screen. There are ten main types of screen modes that can be used in QBasic depending on the resolution that you want. Here is a list of what screen modes you can choose from:
SCREEN 0: Textmode, cannot be used for graphics. This the screen mode that text based programs run on.
SCREEN 1: 320 x 200 Resolution. Four Colours
SCREEN 2: 640 x 200 Resolution. Two Colours (Black and White)
SCREEN 7: 320 x 200 Resolution. Sixteen Colours
SCREEN 8: 640 x 200 Resolution. Sixteen Colours
SCREEN 9: 640 x 350 Resolution. Sixteen Colours
SCREEN 10: 640 x 350 Resolution. Two Colours (Black and White)
SCREEN 11: 640 x 480 Resolution. Two Colours
SCREEN 12: 640 x 480 Resolution. Sixteen Colours
SCREEN 13: 320 x 200 Resolution. 256 Colours. (Recommended)
Note. In SCREEN 13 you have a colour Palette of 256 colours. The PALETTE is pre-set by Windows however you can change the RGB values using the PALETTE command.
SEEK[edit | edit source]
SEEK #[file number], 1
Repositions the ‘input #’ pointer to the beginning of the file.
SGN[edit | edit source]
SGN(expression yielding a numeric value)
Yields the ‘sign’ of a value, -1 if < 0, 0 if 0, 1 if > 0
SHELL[edit | edit source]
The ‘SHELL’ command is used in Qbasic to issue a command to Command Prompt/Windows Shell .
The ‘Shell’ command is used along with a string that contains commands that would be understood by any of the above software. The string enclosed commands are much like that of MS-DOS
Example:
SHELL can be used with a ‘DIR’ command to make a directory of files in a certain folder or path.
SLEEP[edit | edit source]
SLEEP [n]
Execution is suspended for n seconds
SOUND[edit | edit source]
SOUND [frequency], [duration]
Unlike the BEEP command, this produces a sound from the PC speakers that is of a variable frequency and duration. The frequency is measured in Hertz and has a range from 37 to 32767. Put in one of these numbers in the frequency section. The duration is clock ticks that is defaulted at 18.2 ticks per second.
STR$[edit | edit source]
Converts a numeric value into a text (string) character
A$ = STR$(expression yielding a numeric value)
The numeric value is converted into text characters and placed into A$. Use to convert numbers into a text string.
WARNINGS.
1) If the result is positive, a leading ‘space’ is added (STR$(123) = » 123″ and not «123» as might be expected). If the result is negative, instead of a space you get a ‘-‘ (minus sign), i.e. STR$(-123) = «-123″ and not » -123″ as might be expected from the positive behaviour.
2) When converting a float (mumb!, numb#) less than 0.1, the string value may be rendered in ‘scientific notation’, with ‘D’ used rather than ‘*10^’ (for example «5.nnnnnnD-02″ rather than » .05nnnnnn» or «5.nnnnnn*10^-02″). This only occurs when the number of significant digits needs to be preserved (so .03000000 is rendered as » .03″, whilst .030000001 becomes » 3.0000001D-02″), again perhaps not what you might expect.
See also CHR$ for converting an ascii value into a string character.
See also LEFT$, MID$, RIGHT$ for extracting sub-strings from a line of text.
SYSTEM[edit | edit source]
SYSTEM
The .bas exits, the QBasic.exe interpreter is closed and ‘control’ passes to the Command Window c: prompt (or next line of a calling .cmd script etc.)
NOTE!: This only works when you start your program at the command prompt using the «/run» parameter! (EX: «Qbasic /run MyProg.bas») Otherwise, Qbasic assumes you opened your program to make changes, and thus «SYSTEM» drops you back at the editor screen.
THEN[edit | edit source]
[Command] [variable] = [value] THEN GOTO [line command value]
Used in conjunction with the GOTO or IF condition commands. It tells the computer what to do if a certain condition has been met.
TO[edit | edit source]
[Command] [Variable] = [Value] TO [Value]
Usually used to input a number of variables.
FOR a = 400 TO 500
PRINT a
NEXT a
This example will print all numbers from 400 to 500. Instead of declaring all values separately, we can get them all declared in one go.
USING[edit | edit source]
USING "format";
Used to format the output of data from PRINT commands. Normally, the QBasic interpreter will print a number as 8 characters with as many leading spaces as necessary. To change this behavour, the USING command can be used to format the output. For example ..
IF n > 99 THEN PRINT #1, USING "###"; n; ELSE IF n > 9 AND n<=99
THEN PRINT #1, USING «0##»; n; ELSE PRINT #1, USING «00#»; n;
.. will output n from 0 to 999 with leading zeros. Note the ‘;’ after the n. This means ‘don’t start a new line’ and results in the next PRINT #1 adding data directly after the comma (‘,’) Qbasic automatically inserts instead of a line.
VAL()[edit | edit source]
name=VAL([variable$])
Converts the [variable string] contents into a numeric value so it can be used in calculations. If (name) is an INTEGER type, the VAL is rounded down. See also STR$.
A$ = «2»
B$ = «3»
X = VAL(A$) + VAL(B$)
PRINT A$; » + «; B$; » =»; X
WHILE … WEND[edit | edit source]
WHILE {NOT} [test condition is true]
[program code to execute]
WEND
The condition is tested and if true (or NOT true) the [program] code is executed until WEND is reached, at which point control passes back to the WHILE line.
WHILE NOT (EOF(1))
LINE INPUT #1, A$
PRINT #2, A$
WEND
While the end of file #1 has not been reached, read each complete line and write it to file #2.
Unlike FOR and DO, it is not possible to EXIT from a WHILE loop
ASCII Chart[edit | edit source]

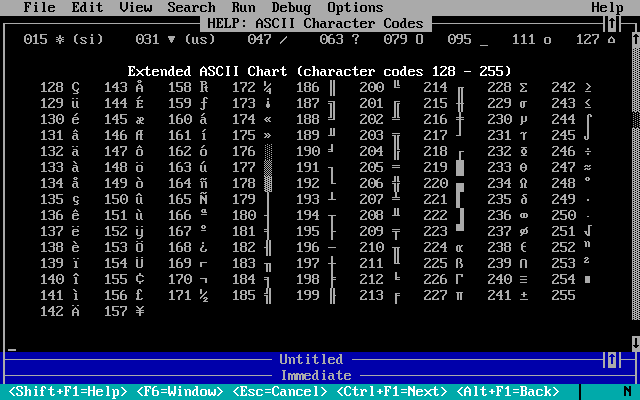
[edit | edit source]
The authors of this work are:
Faraaz Damji (Frazzydee)
Adam Colton
Gareth Richardson (Grich)
Debanshu Das
Среда программирования QBasic.
Бейсик (Basic) — диалоговый учебный
язык программирования для персональных компьютеров. На современных
компьютерах используется следующие версии Basic: GWBasic, QBasic 4.5,
Turbo Basic для DOS, Visual Basic 3.0-6.0 для Windows. Здесь мы
рассмотрим QBasic 4.5.

QBasic входит в состав операционной системы MS-DOS 6.0-6.22. Есть русифицированная версия QBasic.
Для запуска QBasic надо или найти файл qbasic.exe и Enter, или ввести в командную строку qbasic и Enter. Меню — Alt.
Запуск программы Shift-F5.
Получение помощи Shift-F1.
Создать файл: Меню Файл, Сохранить Как, выбрать каталог, задать имя файла, ОК. Файл получит расширение bas.
Сохранить файл: Меню Файл, Сохранить.
Открыть файл, то есть считать его с диска: Меню Файл, Открыть.
Выход из QBasic: Меню Файл, Выход.
Копирование выделенного фрагмента программы в буфер (Edit,Copy) — Ctrl-Insert,
Вставка фрагмента из буфера (Edit,Paste) — Shift-Insert,
Вырезать (Edit,Cut) — Shift-Delete.
Удобно выделять и делать все
указанные операции с помощью мыши. Можно выделенный фрагмент программы
вставить в другой файл, если после выделения открыть его.
В QBasic 4.5 можно
откомпилировать текстовый bas-файл, превратив его в двоичный exe-файл,
который можно использовать отдельно, то есть без среды программирования
QBasic.
Переменная в программе
Переменная — это область в памяти компьютера, где хранится некоторое значение. Каждая переменная имеет имя, значение и тип.
Имя переменной обозначается
английской буквой, после которой может быть цифра, причем первой стоит
буква, например: x, y, z, A1, B2. Имя переменной служит для обозначения
некоторой величины в программе, которая при выполнении программы может
иметь какое-либо значение, но может быть и не определена. Пример
задания часто употребляемой константы: pi=3.14159.
Типы переменых:
целая, вещественная, логическая, символьная, строковая и др. Если в
переменной хранится число, то это числовая переменная, если в
переменной хранится слово или фраза, то это строковая (символьная)
переменная. В QBasic строковая переменная обозначается a$, b$ (в конце
имени стоит знак доллара $). Содержимое хранится в переменной, до тех
пор, пока оно не будет специально изменено.
Операция предачи новых данных в переменную называется присваиванием и обозначается в QBasic знаком «=», например, x=10.
Некоторые основные директивы QBasic
Директива REM или апостроф ‘ —
обозначает комментарий к программе или команде. Вся строка (как
правило, это поясняющий текст), что идёт после знака комментария, не
исполняется. Этот знак используется при отладке программ.
Оператор CLS-оператор очистки экрана. С него часто начинаются программы, работающие в текстовом режиме.
Директива END означает конец программы. Применение этой команды в конце программы не является обязательным.
Все формулы в QBasic записываются в строку, при этом используются следующие математические знаки:
«+» и «-» — сложение и вычитание;
«*» и «/» — умножение и деление;
«^» — возведение в любую степень;
(x+3.14)/(a+b) — используются только круглые скобки и десятичная точка вместо запятой.
Пример: S=Vo*t+g*t^2/2
В QBasic применяются следующие встроенные функции:
SQR(X) — извлечение квадратного корня;
ABS(X) — модуль (абсолютная величина) числа;
SIN(X); COS(X); TAN(X) — тригонометрические функции синус, косинус и тангенс угла в радианах;
ATN(X) — арктангенс числа в радианах;
INT(X) — округление числа (дробная часть числа отбрасывается);
RND(X) — случайное число;
z = y MOD x — целый остаток от деления y на x.
LOG(X) — логарифмическая функция (натуральный логарифм по основанию e=2.71828);
EXP(X) — показательная (экспоненциальная) функция.
Операции ввода-вывода информации
Для вывода (печати) информации на экран применяется оператор PRINT. Пример:
PRINT X — вывод на экран значения числа X.
PRINT «Скорость тела равна:
V=»; V; «м/с» — выводимый на экран текст указывается в кавычках. Вместо
знака «;» можно ставить знак «,».
Просто оператор PRINT без текста и знаков даёт пустую строку на экране.
Если при работе в среде
QBasic 4.5 вместо слова PRINT ставить знак вопроса «?», а затем нажать
Enter, то слово PRINT само появится на экране. Это упрощает работу
программиста.
Ввод данных с клавиатуры осуществляется с помощью оператора INPUT
Пример: INPUT X — ввод числа X. На экране появится знак «?» и компьютер ждёт ввода переменной Х (это приглашение ввести число).
INPUT «Введите число Х=»; X —
можно вводить в кавычках подсказку, она будет выводиться на экран.
После подсказки можно ставить знак «,» вместо знака «;», но тогда знака
вопроса «?» на экране не будет, а вместо него в качестве приглашения
будет мигать курсор.
Пример 1: Вычислить площадь треугольника по формуле Герона.
CLS
‘Определите площадь треугольника по формуле Герона.
INPUT «Введите величину стороны a: a=», a
INPUT «Введите величину стороны b: b=», b
INPUT «Введите величину стороны c: c=», c
p = (a + b + c) / 2
S = SQR(p * (p — a) * (p — b) * (p — c))
PRINT «Ответ: площадь треугольника равна: S=»; S
Пример 2 (с использованием строковых переменных). Напечатайте на экране введённые с клавиатуры фамилию, имя и класс ученика.
CLS
INPUT «Введите свою фамилию: «, f$
INPUT «Введите своё имя: «, i$
INPUT «Введите свой класс: «, k$
PRINT f$; » «; i$; «, «; k$
END
Управляющие конструкции QBasic
1. Оператор безусловного перехода
GOTO N, где N-метка. В качестве N можно взять любое число, не
обязательно совпадающее с номером строки, так как в QBasic 4.5 строки
можно не нумеровать. Но двух одинаковых меток в одной программе не
должно быть. Исполнение программы будет продолжено с той её части,
которая начинается с указанной метки.
Пример:
…….
GOTO 10
…….
10 PRINT «Текст»
…….
2. Условный оператор IF…THEN…ELSE (Если…Тогда…Иначе):
IF <условие> THEN <список операторов> ELSE <список операторов>
Если заданное условие
истинно, выполняется список операторов, стоящий после THEN, в противном
случае выполняется список операторов, стоящий после ELSE.
Слово ELSE может и отсутствовать. Тогда происходит переход к строке, следующей за оператором IF…THEN.
Условия представляют собой
логические соотношения: равенства или неравенства = равно, <>
неравно, > больше, < меньше, >= больше или равно, <= меньше
или равно.
При использовании сложных
условий (объединении двух и более условий) применяют слова AND (И) и OR
(ИЛИ): Условие1 AND (или OR) Условие2…
Условный оператор позволяет реализовать алгоритм с ветвлением.
Пример 1:
CLS
INPUT «Введите год основания Москвы: M=»; M
IF M = 1147 THEN PRINT «Вы правы!» ELSE PRINT «Вы ошиблись!»
Пример 2:
CLS
PRINT «Вычислите y=1/(x-2) для всех x»
INPUT «Введите x=», x
IF x = 2 THEN PRINT «При x=2 функция не определена!»: END
y = 1 / (x — 2)
PRINT «y=»; y
Применяется также частный
случай условного оператора — оператор условного перехода: IF
<условие> GOTO N ELSE <список операторов> Число N — метка.
Если условие выполняется, то происходит переход по метке N, а иначе
выполняется список операторов, стоящих после ELSE. Слово ELSE может и
отсутствовать. Тогда происходит переход к строке, следующей за
оператором IF…GOTO.
Пример 3:
CLS
INPUT «Если хочешь каникулы, вводи 1. Если нет, любое число. n=», n
IF n = 1 THEN GOTO 10 ELSE GOTO 20
10 PRINT «Хочу каникулы!»: END
20 PRINT «Хочу учиться!»
3. Оператор цикла
FOR…TO…NEXT… позволяет реализовать циклический алгоритм, когда
часть программы может быть выполнена много раз подряд. FOR…TO… —
начало цикла, NEXT… — конец цикла.
То, что стоит между началом и
концом цикла, называется телом цикла. Иногда также применяются
вложенные циклы, то есть циклы могут быть вложенными один в другой.
FOR X=A TO B STEP H
……………….
NEXT X
Здесь X — переменная, A —
начальное значение переменной, B — конечное значение переменной, H —
шаг, с которым меняется переменная. Если шаг STEP H отсутствует, то по
умолчанию шаг H=1. При этом переменная X называется счётчиком цикла.
Повторение участка программы с шагом H происходит до тех пор, пока
X<B. Число повторений цикла равно (B-A)/H. При X=B цикл
заканчивается и выполняется оператор, следующий за оператором конца
цикла NEXT. Возможно, что шаг H<0, но тогда A>B.
Пример 1: Напечатать на экране текст 20 раз.
CLS
FOR X=1 TO 20
PRINT «С Новым Годом!»
NEXT X
Пример 2: Вычислить сумму n первых членов ряда S=1+1/4+1/9+…+1/n^2
CLS
INPUT «Введите число членов ряда: n=», n
FOR i = 1 TO n
S = S + 1 / i ^ 2
NEXT i
PRINT «Сумма n первых членов ряда равна: S=», S
Пример 3: Нарисуйте 15 разноцветных концентрических окружностей.
SCREEN 7
FOR i = 1 TO 15
CIRCLE (160, 100), i * 6, i
NEXT i
Пример 4: Разлинуйте экран в клеточку.
SCREEN 7
FOR i = 1 TO 32
LINE (0, 10 * i)-(320, 10 * i), 15
LINE (10 * i, 0)-(10 * i, 200), 15
NEXT i
Примеры 5,6 : Одновременное
использование циклического и условного операторов. Вычисление функций,
имеющих ограничения в области определения.
Примечание: Оператор IF…THEN…ELSE в QBasic должен быть записан в одну строку!
Пример 5.
CLS
REM Вычислить функцию y=1/(x^2-5*x-6)
FOR x = -10 TO 10
IF x ^ 2 — 5 * x — 6 = 0 THEN PRINT «При x=-1, x=6 функция не определена!»
ELSE y = 1 / (x ^ 2 — 5 * x — 6)
PRINT «x=»; x, » y=»; y
NEXT x
Пример 6.
CLS
REM Вычислить функцию y=1/SQR(x^2-3*x+2)
FOR x = -5 TO 5
IF x >= 1 AND x <= 2 THEN PRINT «При 1<=x=<2 функция не определена!»
ELSE y = 1 / SQR(x ^ 2 — 3 * x + 2)
PRINT «x=»; x, » y=»; y
NEXT x
Некоторые полезные команды QBasic.
Оператор LOCATE a, b — указывает
позицию экрана (a-строка, b-столбец), начиная с которой будет
печататься текст или число. Обычно используется перед оператором PRINT.
Пример: LOCATE 4, 10: PRINT «Здравствуй, мир!»
Оператор SWAP X1, X2 — заставляет переменные X1 и X2 обменяться своими значениями. Пример:
X = 3
Y = 5
SWAP X, Y
Директива FILES выдает список подкаталогов и файлов в текущем каталоге. Кроме того, выдается свободная память на жестком диске.
Директива SHELL осуществляет сеанс связи с MS-DOS. Возвращение обратно из DOS в QBasic — команда EXIT.
Кроме того, директива SHELL
«name» позволяет запускать программу name.exe или name.com, указанную в
кавычках. Эта программа должна находиться в текущем каталоге, там же,
где и *.bas файл. Расширение exe или com можно не указывать.
Графические операторы в QBasic.
1. SCREEN N — этот оператор очищает экран и задает графический режим, где N определяет тип графического режима: N=1,7,8,9,12.
При N=12 в операторе COLOR цвет
фона не задается. При N=7 режим экрана 320×200 пикселей и 16 цветов.
Режим SCREEN 7 используется весьма часто.
Если задан оператор SCREEN N, то оператор CLS можно не использовать.
2. COLOR C1, C2. COLOR — оператор, задающий цвет текста и фона, где C1 задаёт цвет текста, а C2 — цвет фона. C1, C2=0-15.
Пример использования этого оператора — COLOR 14, 1
3. Рисование точки: PSET (X,
Y), C, где X,Y — координаты точки, C — цвет точки. C=0-15. X=160, Y=100
— координаты центра экрана для режима SCREEN 7.
Пример: PSET (160, 100), 10
4. Оператор стирания точки: PRESET (X, Y)
5. Рисование линии: LINE
(X1,Y1)-(X2,Y2), C. Здесь X1,Y1 и X2, Y2 — координаты концов линии,
C-цвет. Пример: LINE (30, 100)-(120, 150), 10
6. Рисование прямоугольной рамки:
LINE (X1,Y1)-(X2,Y2), C, B.
Здесь X1,Y1 и X2,Y2-кординаты концов левой диагонали, C-цвет. Пример:
LINE (90, 110)-(140, 170), 10, B
7. Рисование закрашенного прямоугольника:
LINE (X1,Y1)-(X2,Y2), C, BF.
Здесь X1,Y1 и X2,Y2-кординаты концов левой диагонали, C-цвет. Пример:
LINE (90, 110)-(140, 170), 12, BF
8. Рисование окружности: CIRCLE (X, Y), R, C
Здесь X,Y — координаты центра, R — радиус, C — цвет.
Пример: CIRCLE (160, 110), 60, 13
9. Рисование закрашенной окружности:
CIRCLE (X, Y), R, C
PAINT (X, Y), C1, C2. Здесь
PAINT — оператор закрашивания. X,Y — координаты точки внутри
закрашиваемой области, C1 — цвет закрашивания, C2 — цвет линии границы.
Пример:
CIRCLE (160, 130), 50, 13
PAINT (160, 110), 11, 13
10. Рисование дуги и сектора: CIRCLE (X, Y), R, C, Ф1, Ф2
Здесь Ф1, Ф2 начальный и конечный углы дуги в радианах. У сектора перед Ф1 и Ф2 стоит знак минус:
CIRCLE (X, Y), R, C, -Ф1, -Ф2. Пример (pi=3.14159):
CIRCLE (160, 140), 70, 11, pi / 4, 3 * pi / 4
CIRCLE (160, 140), 60, 10, -pi / 4, -3 * pi / 4
11. Рисование эллипса: CIRCLE (X, Y), R, C, , , K
Здесь K — эксцентриситет эллипса. K<1-эллипс вытянут вдоль большой оси. K>1-эллипс вытянут вдоль малой оси.
Пример: CIRCLE (160, 100), 70, 15, , , 0.5
Пример графики на QBasic: Квадрат, три концентрические окружности и точка. Программа имеет вид:
SCREEN 7
COLOR 14, 8
PRINT «Пример графики на QBasic:»
LINE (100, 50)-(220, 150), 13, B
CIRCLE (160, 100), 20, 11
CIRCLE (160, 100), 30, 12
CIRCLE (160, 100), 40, 14
PSET (160, 100), 15
END
Установка цветов в операторе COLOR QBasic:
Число Цвет
0 Черный
1 Синий
2 Зеленый
3 Голубой
4 Красный
5 Фиолетовый
6 Коричневый
7 Серый
8 Темно-серый
9 Светло-синий
10 Светло-зеленый
11 Светло-голубой
12 Светло-красный
13 Светло-фиолетовый
14 Желтый
15 Белый
Некоторые сочетания цветов в операторе COLOR QBasic:
1) 14, 8 — желтый на темно-сером фоне;
2) 1, 7 — синий на светло-сером фоне;
3) 5, 14 — фиолетовый на желтом фоне;
4) 4, 11 — красный на голубом фоне;
5) 5, 10 — фиолетовый на светло-зеленом фоне;
6) 15, 5 — белый на фиолетовом фоне;
7) 14, 1 — желтый на синем фоне;
15, 1 — белый на синем фоне;
9) 8, 11 — темно-серый на голубом фоне;
10) 1, 15 — синий на белом фоне
© Евгений Матвеев, 2016
Создано в интеллектуальной издательской системе Ridero
Введение
О чЁм эта книга?
Книга представляет собой пошаговый самоучитель по программированию на языке Microsoft Visual Basic версии 6.0, с последовательным изучением всех основных компонентов языка Visual Basic и элементов управления Windows, которые в нём используются.
Она будет также очень полезна и при рассмотрении других версий языка Visual Basic, так как отличия между ними на начальном уровне изучения не приниципиальны.
Доступный стиль изложения, большое количество иллюстраций, реальных примеров исходных текстов программ, полезных советов и обилие справочной информации помогут вам хорошо изучить данный язык программирования «с нуля» в кратчайшие сроки.
Прочитав эту книгу, вы научитесь:
• устанавливать Microsoft Visual Basic 6.0 на свой компьютер,
• пользоваться всеми основными возможностями среды программирования,
• находить нужную информацию в справочной системе,
• оперировать свойствами и методами объектов Windows,
• программировать различные внешние устройства,
• писать сетевые приложения для работы в Интернете,
• проектировать свое собственное приложение,
• разрабатывать его интерфейс,
• создавать исходный текст программы,
• отлаживать программу и находить в ней ошибки,
• компилировать код программы в исполнимый файл,
• создавать инсталляцию готового приложения,
• распространять свои программы через Интернет,
•…и многому другому!
Простой и доступный стиль изложения материала рассчитан на студентов, преподавателей и других лиц, желающих самостоятельно освоить принципы современного визуального проектирования приложений на языке Visual Basic.
Большая часть информации, содержащейся в этой книге, пригодится вам также и в других целях, не связанных напрямую с изучением Visual Basic:
• для лучшего понимания принципов работы операционной системы Microsoft Windows,
• изучения основ программирования вообще,
• написания программ на других диалектах языка Basic.

История появления языка Visual Basic
Почти сразу же после появления электронных вычислительных машин (ЭВМ), в 50-х годах ХХ века были разработаны первые языки программирования для управления вычислительным процессом.
Они были крайне сложны, специализированы для конкретных моделей ЭВМ и предназначались для создания управляющих программ, решающих сложные математические задачи.
По мере распространения ЭВМ возникла необходимость упрощения языка взаимодействия человека с машиной, в результате чего в Dartmouth College был создан язык программирования BASIC. Это название являлось аббревиатурой, а полное наименование этого языка звучало как Beginner’s All-purpose Symbolic Instruction Code (универсальный символьный программный код для начинающих). В то же время слово Basic переводится с английского как «базовый», «основной». Как бы то ни было, прижился именно короткий вариант названия.
Поначалу Basic был очень простым языком программирования, так как предназначался для обучения. Именно из-за своей простоты и компактности он был выбран в качестве языка для первых микрокомпьютеров серии Альтаир (Altair), выпущенных в 1975 году и имеющих всего 4 кб оперативной памяти. Разрабатывали интерпретатор языка основатели корпорации Microsoft — Билл Гейтс (Bill Gates) и Пол Аллен (Paul Allen).
Когда появились персональные компьютеры фирмы IBM, был создан интерпретатор Microsoft GW-Basic, работающий под управлением операционной системы DOS. У интерпретатора GW-Basic имелся интерфейс командной строки и занимал он менее 100 кб оперативной памяти компьютера.
Следующим шагом в развитии языка Basic для DOS было появление двух компиляторов: Microsoft QuickBasic и Borland TurboBasic. Они оба отличались более удобным оконным интерфейсом, наличием текстового редактора для написания программ, системы отладки и возможностью генерации выполнимых exe-файлов.
Через несколько лет после появления операционной системы Microsoft Windows, в 1991 году был создан Microsoft Visual Basic for Windows версии 1.0. Это был революционный шаг в развитии языка, так как теперь отпала необходимость в скурпулезном программировании интерфейса приложений — достаточно было нарисовать его.

В дальнейшем развитие языка шло в направлении совершенствования Microsoft Visual Basic for Windows, которое было связано, в основном, с добавлением новых инструментальных средств и расширением поддержки работы с объектами операционной системы Windows, а также прикладными программами, прежде всего — с пакетом Microsoft Office.
Отличительные особенности Visual Basic
Читатели, которые даже немного знакомы хотя бы с одним классическим языком программирования, в котором не предусмотрены визуальные средства проектирования приложений, особенно сильно почувствуют разницу между обычными системами программирования, включая другие диалекты языка Basic, и современным Visual Basic.
Визуальное проектирование в значительной степени ускоряет разработку приложений за счет уменьшения количества кода, который должен написать программист.
Создание объектов интерфейса: окон, кнопок, полей ввода, флажков и т. п., с помощью Visual Basic не представляет большого труда и напоминает рисование в графическом редакторе. После этого остается лишь написать подпрограммы, связанные с этими объектами.
Существенное отличие Visual Basic от QuickBasic, TurboBasic и других диалектов языка Basic для DOS, заключается в том, что в него встроена поддержка работы с объектами Windows, а также предоставлена возможность использования любых функций операционной системы.
Исходный текст программы Visual Basic может считывать и обрабатывать построчно, сразу же выполняя операторы языка, то есть, функционировать как интерпретатор.
Но он же может быть и компилятором, создающим исполняемые файлы, которые работают независимо от самой среды программирования.
Работа в среде Visual Basic очень комфортна, чему способствует наличие большого количества мастеров, многоуровневой справочной системы и удобных средств отладки приложений.
Все это говорит в пользу того, что Visual Basic является мощной средой программирования, с помощью которой можно разрабатывать широкий круг профессиональных приложений для Windows.
Редакции Visual Basic
Фирма Microsoft выпускает Visual Basic 6.0 в нескольких редакциях, которые различаются своими возможностями, поставляемой документацией и, конечно же, своей стоимостью:
Learning Edition (Учебная редакция) — включает основные возможности по созданию приложений и базовый набор элементов управления,
Professional Edition (Профессиональная редакция) — содержит больше инструментов и вспомогательных средств разработки, а также ряд дополнительных элементов управления,
Enterprise Edition (Промышленная редакция) — предназначено для разработчиков корпоративных систем и клиент-серверных приложений, поэтому охватывает все аспекты создания и поддержки больших баз данных, базирующихся на различных технологиях.
Несмотря на имеющиеся отличия, все редакции языка программирования Visual Basic, имеют много общего в среде разработки и совсем не отличаются по своему синтаксису, поэтому практически идентичны между собой для начинающего программиста.
Visual Basic 6.0 Enterprise Edition, какой мы будем рассматривать в этой книге, поставляется не отдельно, как это было в предыдущих версиях, а в составе интегрированного пакета Microsoft Visual Studio 6.0, предназначенного для разработчиков программного обеспечения.
В этот пакет входит, кроме Microsoft Visual Basic еще и Microsoft Visual C++, Microsoft Visual FoxPro, а также ряд других вспомогательных программ и компонентов.
Основные обозначения
Теперь рассмотрим основные обозначения, принятые в данной книге, которые помогут вам свободно в ней ориентироваться.
Списки, в которых перечисляются какие-либо понятия, выглядят так:
• элемент списка 1,
• элемент списка 2,
•…и т. д.
Если вам нужно выполнить практическое действие для получения определенного результата, то это будет выглядеть примерно так:
Сделайте это… На экране появится следующее…
Названия клавиш, которые придется нажимать на клавиатуре, заключены в квадратные скобки и выделены жирным шрифтом, например: [F1]. Комбинации клавиш, нажимаемые одновременно, содержат между собой знак «плюс», например: [Ctrl] + [Break].
Последовательно выбираемые мышью пункты меню разделены знаком «дефис», а в скобках приводится их перевод на русский язык: File — Open… (Файл — Открыть…).
Названия программ в тексте выглядят таким образом: Microsoft Visual Basic.
Исходные тексты программ, которые придется набирать на клавиатуре вручную, отделены от остального текста пустыми строками и выделены жирным шрифтом, например:
If Check1.Value = Checked Then
Frame1.Enabled = False
Else
Frame1.Enabled = True
End If


Книга
Издательство:
Москва, VA Print
Cтраниц:
86
Язык:
русский
Формат:
Размер файла:
17 Мб


Книга легендарного издательства ВА Принт представляет собой перевод на русский язык оригинальной книги Стивена Викерса под редакцией Робина Бредбира «Программирование на языке Бейсик», специально написанная как руководство к домашнему персональному компьютеру ZX Spectrum. В ней рассказывается об устройстве компьютера, режимах его работы. Перечислены операторы языка Spectrum Basic, рассказано об азах программирования на этом языке.
Кроме того в книге приведена схема работы микропроцессора Z80, приведена система его команд. Рассмотрена карта памяти микрокомпьютера, а также управляющие системные переменные. В завершении книги приведены примеры программирования на ассемблере Z80
Содержание:
1. Введение
2. Основы программирования на языке бейсик
3. Условия
4. Циклы
5. Подпрограммы
6. Операторы READ, DATA и RESTORE
7. Арифметические операции
8. Строки символов
9. Функции
10. Математические функции
11. Случайные числа
12. Массивы
13. Логические операции
14. Набор символов
15. Дополнительные сведения об операторах «PRINT» и «INPUT»
16. Цвета
17. Графика
18. Указания
19. Программирование звуков
20. Внешняя память на магнитной ленте
21. Устройство печати
22. Другое периферийное оборудование
23. Ввод и вывод
24. Память
25. Системные переменные
26. Использование машинных кодов
Приложение A. Полный набор символов
Приложение B. Сообщения
Приложение C. (часть 1). Описание микрокомпьютера ZX Spectrum
Приложение C. (часть 2). Язык программирования бейсик
Приложение D. Примеры программ
Приложение E. Шестнадцатеричная и двоичная системы счисления
Приложение F. Использование кириллицы
![]() Загрузка…
Загрузка…