-
Contents
-
Table of Contents
-
Bookmarks
Quick Links
T E C H N O L O G Y
R E F E R E N C E
G U I D E
o w n e r s . h o n d a . c o m
2014 Accord Hybrid
2014 Honda Accord Hybrid
3 1 T 3 W A 0 0
Technology Reference Guide
0 0 X 3 1 — T 3 W — A 0 0 0
©2013 American Honda Motor Co., Inc. — All Rights Reserved
P r i n t e d i n U . S . A .
Related Manuals for Honda 2014 Accord Hybrid
Summary of Contents for Honda 2014 Accord Hybrid
-
Page 1
Technology Reference Guide 0 0 X 3 1 — T 3 W — A 0 0 0 ©2013 American Honda Motor Co., Inc. — All Rights Reserved P r i n t e d i n U . S . A . -
Page 2: Table Of Contents
18 HANDSFREELINK p. 19 ® This Technology Reference Guide is designed to help you INSTRUMENT get acquainted with your 2014 Honda Accord Hybrid and AUDIO p. 24 ASSIST p. 10 PANEL p. 4 provide basic instructions on some of its technology and convenience features.
-
Page 3: Smart Entry With Push Button Start
SMART ENTRY WITH PUSH BUTTON START Operate certain functions of your vehicle by simply having the remote transmitter within operating range. Unlocking the Doors Power Button Grab either one of the front door handles when the vehicle is off. Wait until the doors unlock, then pull the handle to open.
-
Page 4: Instrument Panel Indicators
INSTRUMENT PANEL INDICATORS Briefly appear with each engine start. Red and orange indicators are most critical. Blue and green indicators are used for general information. See your Owner’s Manual for more information. Battery Charge Level Gauge POWER Gauge Fuel Gauge READY CHARGE Gauge Malfunction Indicators…
-
Page 5: Multi-Information Display (Mid)
MULTI-INFORMATION DISPLAY (MID) Consists of several displays that provide you with useful information. Main Displays Accessing the Information Display Eco Drive Main screen Display Average fuel Vehicle economy settings* records Average and Main Oil life instant fuel Displays economy To toggle between the different displays: •…
-
Page 6: Sport Hybrid I-Mmd
SPORT HYBRID i-MMD Learn how the Sport Hybrid i-MMD (intelligent Multi-Mode Drive) system operates. Your vehicle is able to operate in electric, hybrid, charge, or full engine mode. How Your Vehicle Operates Driving Modes Operating Electric Hybrid Engine Regeneration mode Vehicle (EV) Vehicle (HV) Press the EV button…
-
Page 7: Eco Assist Tm
ECO ASSIST Provides various ways to monitor your fuel efficiency and driving style. Driver Feedback ECON Button Indicates real-time fuel efficiency. Results are displayed on the MID, where the Helps maximize fuel efficiency. vehicle icon and its surrounding color change based on your driving style. Press either Info ( /q) button to 1.
-
Page 8: Tire Pressure Monitoring System (Tpms)
TIRE PRESSURE MONITORING SYSTEM (TPMS) SETTINGS FOR YOUR VEHICLE Monitors the vehicle’s tire pressures. Change different settings for many features in your vehicle. See your Owner’s Manual for detailed information on settings and options. How It Works Adjusting Vehicle Settings When the tire pressure drops significantly below recommended levels, the low tire pressure…
-
Page 9: Auto Door Locks
AUTO DOOR LOCKS ONE-TOUCH TURN SIGNAL Program how and when the vehicle doors automatically lock and unlock. Use this quick and convenient method to signal a lane change. How It Works Door Locks • Lightly push the turn signal lever up or down for a three- blink sequence.
-
Page 10: Rearview Camera
REARVIEW CAMERA LANEWATCH Helps you check your right blind spot when you make a lane change to the right. For added convenience, the area behind your vehicle is displayed to help you navigate while backing up. How It Works How It Works When the right turn signal is activated, a camera located in the passenger side •…
-
Page 11: Intelligent Multi-Information Display (I-Mid)
Choose what to display in the upper screen. Make and receive phone calls through your vehicle’s audio system. Visit handsfreelink.honda.com to check if this feature is compatible with your phone. To reduce the potential for driver distraction, certain functions may be Changing the Display inoperable or grayed out while the vehicle is moving.
-
Page 12
Pairing Your Phone Dialing a Number Pair your phone when the vehicle is stopped to begin using hands-free phone and Enter a 10-digit phone number to call. related audio functions. Using the Menu* Use the selector knob to make and enter selections. Use the selector knob to make and enter selections. -
Page 13: Sms Text Messaging
Receive and send text messages from your paired and linked phone using Bluetooth ® Using the Menu* HandsFreeLink . Visit handsfreelink.honda.com to see if this feature is compatible with ® your phone. Standard message rates apply. This feature is limited while the vehicle is moving.
-
Page 14: Basic Audio Operation
BASIC AUDIO OPERATION iPod OR USB FLASH DRIVE ® Operate basic controls of your audio system using various convenient methods. Play audio files from your compatible iPod or USB flash drive through your vehicle’s audio system. Playing Audio Files 1. Connect the iPod cable or USB flash drive to the USB port in the front console (see opposite page).
-
Page 15: Bluetooth Audio
Play stored or streaming audio from your compatible phone through your vehicle’s audio Play and operate Pandora from your compatible phone through your vehicle’s audio system. Visit handsfreelink.honda.com to check if this feature is compatible with your phone. system. Visit handsfreelink.honda.com to check if this feature is compatible with your phone.
-
Page 16: Honda Owners
HONDA OWNERS FUEL RECOMMENDATION Visit owners.honda.com and register to explore features and technologies specific to Use of unleaded gasoline of 87 octane or higher is recommended. your vehicle, obtain and update maintenance and service records, manage your • Honda recommends TOP TIER Detergent Gasoline where available.
Посмотреть инструкция для Honda Accord Hybrid (2017) бесплатно. Руководство относится к категории Автомобили, 1 человек(а) дали ему среднюю оценку 6.9. Руководство доступно на следующих языках: английский. У вас есть вопрос о Honda Accord Hybrid (2017) или вам нужна помощь? Задайте свой вопрос здесь
Не можете найти ответ на свой вопрос в руководстве? Вы можете найти ответ на свой вопрос ниже, в разделе часто задаваемых вопросов о Honda Accord Hybrid (2017).
Как перевести мили в километры?
Где я могу узнать идентификационный номер транспортного средства Honda?
Что такое идентификационный номер транспортного средства (VIN)?
Когда транспортному средству Honda требуется техническое обслуживание?
Когда следует заменять тормозную жидкость на Honda?
В чем разница между топливом E10 и E5?
Одна или несколько дверей не открываются изнутри. Что мне делать?
Автомобильный радиоприемник не включается, что делать?
Инструкция Honda Accord Hybrid (2017) доступно в русский?
Не нашли свой вопрос? Задайте свой вопрос здесь
Привет, гость моего БЖ 
Пока авто пытается на «шлюпке» тронуться с Японии, Я ищу много информации по обслуживанию и закупаю расходники для первого ТО.
Нашёл на просторах интернета нужный весЧь. А именно — мануал от официалов, даже целых 2: Английский и Японский… К сожалению не нашёл на Русском (надеюсь появиться).
Ссылки для скачивания (google):
Мануал Honda Accord Hybrid CR6 (Английский)
Мануал Honda Accord Hybrid CR6 (Японский)
В них есть всё, кроме, информация о мощах. Зато есть интересные факты, что лить можно в трансмиссию DW-1 (объём 2,36 л), в ДВС (3.5 л) при замене, заправка кондиционера и много другое.
P.s. информация и жидкостях, свечах и прочих расходниках (в Английской версии) начинается с страницы 540 (538).
Расходники:
Фильтр масляный:
ОЕМ: 15400-RTA-003 / 15400-RTA-004
С-809
Воздушный фильтр:
ОЕМ: 17220-5K0-A00
VIC: A-8011V
A2817 JS_Asakashi
WA10124 WIX
VR/C2008U (204-157-666) SKSONO запись в моём БЖ
95124 AF5229 AF5229 WAF5229
Фильтр салонный:
ОЕМ: 80292-SLJ-003
AC-806
Топливный фильтр:
ОЕМ: 17048-T2A-A00
MFF-H522 Masuma
Свечи:
ОЕМ: 12290-5K0-A01
ILZKAR7E11S (NGK)
VFXEHC22G (DENSO)
Колодки:
Передние:
ОЕМ: 45022-T3V-A00 (аналог с левого руля, обычный Accord CR2, ОЕМ: 45022-T2M-T00)
GP05007 (G-Brake)
Задние:
ОЕМ: 4302-2S9-A010 (кросс ОЕМ: 43022-TP6-A00, 43022-S3N-000, 43022-SP0-010 и многие другие…)
GP05004 (G-Brake)
MS-8255 Masuma
Лампы:
ПТФ: H8 (35W)
Дальний свет: HB3 (65W)
Дополнительное освещение при повороте: H8 (35W)
Задний ход: T16 (W16W)
Задние указатели поворота: 21W (янтарныежёлтые)
Подсветка номера: T10 (5W)
Подсветка багажника: T10 (5W)
Потолочный светильник: 8W
Сам заказал на Али фильтр воздушный, ждать осталось не много. Как придёт, отпишусь про качество. Сразу скажу, что фильтр на много дешевле, но если он Китай китайский, то ставить не буду, есть варианты в наличии.
P.s.s. Если располагаете информацией мануала на Русском языке (именно гибридного), прошу поделиться, добавлю в эту запись.
Спасибо за внимание.
Всем ни гвоздя, ни жезла! 
Смотреть руководство для Honda Accord Hybrid (2018) ниже. Все руководства на ManualsCat.com могут просматриваться абсолютно бесплатно. Нажав кнопку «Выбор языка» вы можете изменить язык руководства, которое хотите просмотреть.
MANUALSCAT | RU
Вопросы и ответы
У вас есть вопрос о Honda Accord Hybrid (2018), но вы не можете найти ответ в пользовательском руководстве? Возможно, пользователи ManualsCat.com смогут помочь вам и ответят на ваш вопрос. Заполните форму ниже — и ваш вопрос будет отображаться под руководством для Honda Accord Hybrid (2018). Пожалуйста, убедитесь, что вы опишите свои трудности с Honda Accord Hybrid (2018) как можно более детально. Чем более детальным является ваш вопрос, тем более высоки шансы, что другой пользователь быстро ответит на него. Вам будет автоматически отправлено электронное письмо, чтобы проинформировать вас, когда кто-то из пользователей ответит на ваш вопрос.
Задать вопрос о Honda Accord Hybrid (2018)
- Бренд:
- Honda
- Продукт:
- Автомобили
- Модель/название:
- Accord Hybrid (2018)
- Тип файла:
- Доступные языки:
- английский
Сопутствующие товары Honda Accord Hybrid (2018)


2018 HYBRID
OWNER’S MANUAL

3WARNING
California Proposition 65 Warning
Operating, servicing and maintaining a passenger vehicle or off-highway motor vehicle can expose you to chemicals including engine exhaust, carbon monoxide, phthalates, and lead, which are known to the State of California to cause cancer and birth defects or other reproductive harm. To minimize exposure, avoid breathing exhaust, do not idle the engine except as necessary, service your vehicle in a well-ventilated area and wear gloves or wash your hands frequently when servicing your vehicle. For more information go to www.P65Warnings.ca.gov/passenger-vehicle.
Event Data Recorders
This vehicle is equipped with an event data recorder (EDR).
The main purpose of an EDR is to record, in certain crash or near crash-like situations, such as an air bag deployment or hitting a road obstacle, data that will assist in understanding how a vehicle’s systems performed. The EDR is designed to record data related to vehicle dynamics and safety systems for a short period of time, typically 30 seconds or less. The EDR in this vehicle is designed to record such data as:
•How various systems in your vehicle were operating;
•Whether or not the driver and passenger safety buckled/fastened;
•How far (if at all) the driver was depressing the accelerator and/or brake pedal; and,
•How fast the vehicle was traveling.
These data can help provide a better understanding of the circumstances in which crashes and injuries occur. NOTE: EDR data are recorded by your vehicle only if a non-trivial crash situation occurs; no data are recorded by the EDR under normal driving conditions and no personal data (e.g., name, gender, age, and crash location) are recorded. However, other parties, such as law enforcement, could combine the EDR data with the type of personally identifying data routinely acquired during a crash investigation.
To read data recorded by an EDR, special equipment is required, and access to the vehicle or the EDR is needed. In addition to the vehicle manufacturer, other parties, such as law enforcement, that have the special equipment, can read the information if they have access to the vehicle or the EDR.
The data belongs to the vehicle owner and may not be accessed by anyone else except as legally required or with the permission of the vehicle owner.
Service Diagnostic Recorders
This vehicle is equipped with service-related devices that record information about powertrain performance. The data can be used to verify emissions law requirements and/or help technicians diagnose and solve service problems. It may also be combined with
other sources for research purposes, but it remains
. Some diagnostic and maintenance information is to Honda upon vehicle start up.

California Perchlorate Contamination Prevention Act
The airbags, seat belt tensioners, and CR type batteries in this vehicle may contain perchlorate materials — special handling may apply. See www.dtsc.ca.gov/hazardouswaste/perchlorate/
As you read this manual, you will find information that is preceded by a NOTICE symbol. This information is intended to help you avoid
damage to your vehicle, other property, or the environment.
Software End User License Agreement
Your vehicle comes equipped with software, which is governed by the End User License Agreement in Owner’s Manual, and which contains a binding arbitration clause. Please refer to the End User License Agreement for the terms and conditions governing your use of the installed software, as well as the applications, services, functions, and content provided through the software. Your use of the installed software will serve as your consent to the terms and conditions of the End User License Agreement.
You may opt out within 30 days of your initial use of the Software by sending a signed, written notice to HONDA at American Honda Motor Co., Inc. Honda Automobile Customer Services Mail Stop 100-5E-8A, 1919 Torrance Blvd. Torrance, CA 90501-2746.
Privacy Notice
This vehicle may share location and usage information. To manage this setting, visit www.hondalink.com/vehicle-data-choices.
A Few Words About Safety
Your safety, and the safety of others, is very important. operating this vehicle safely is an important responsibility.
To help you make informed decisions about safety, we have provided operating procedures and other information on labels and in this manual. This information alerts you to potential hazards that could hurt you or others.
Of course, it is not practical or possible to warn you about all the hazards associated with operating or maintaining your vehicle. You must use your own good judgment.
You will find this important safety information in a variety of forms, including:
●Safety Labels — on the vehicle.
●Safety Messages — preceded by a safety alert symbol 3 and one of three signal words: DANGER, WARNING, or CAUTION. These signal words mean:
3DANGER
3WARNING
3CAUTION
You WILL be KILLED or SERIOUSLY HURT if you don’t follow instructions.
You CAN be KILLED or SERIOUSLY HURT if you don’t follow instructions.
You CAN be HURT if you don’t follow instructions.
●Safety Headings — such as Important Safety Precautions.
●Safety Section — such as Safe Driving.
●Instructions — how to use this vehicle correctly and safely.
book is filled with important safety information — please carefully.

This owner’s manual should be considered a permanent part of the vehicle and should remain with the vehicle when it is sold.
This owner’s manual covers all models of your vehicle. You may find descriptions of equipment and features that are not on your particular model.
Images throughout this owner’s manual (including the front cover) represent features and equipment that are available on some, but not all, models. Your particular model may not have some of these features.
This owner’s manual is for vehicles sold in the United States and Canada.
The information and specifications included in this publication were in effect at the time of approval for printing. Honda Motor Co., Ltd. reserves the right, however, to discontinue or change specifications or design at any time without notice and without incurring any obligation.
|
2 |
Safe Driving P. 37 |
|||
|
For Safe Driving P. 38 |
Seat Belts P. 42 |
Airbags P. 49 |
||
|
2 |
Instrument Panel P. 81 |
|||
|
Indicators P. 82 |
Gauges and Displays P. 133 |
|||
|
2 |
Controls P. 163 |
|||
|
Clock P. 164 |
Locking and Unlocking the Doors P. 166 |
|||
|
Opening and Closing the Moonroof* P. 187 |
||||
|
Adjusting the Seats P. 208 |
||||
|
2 |
Features P. 237 |
|||
|
Audio System P. 238 |
Audio System Basic Operation P. 246, 267 |
|||
|
Customized Features P. 367, 378 |
HomeLink® Universal Transceiver* P. 397 |
|||
|
2 |
Driving P. 451 |
|||
|
Before Driving P. 452 |
Towing a Trailer P. 457 |
|||
|
Parking Your Vehicle P. 548 |
Multi-View Rear Camera P. 558 |
|||
|
2 |
Maintenance P. 565 |
|||
|
Before Performing Maintenance P. 566 |
Maintenance MinderTM P. 569 |
|||
|
Checking and Maintaining Wiper Blades P. 597 |
||||
|
Climate Control System Maintenance P. 612 |
||||
|
2 |
Handling the Unexpected P. 621 |
|||
|
Tools P. 622 |
If a Tire Goes Flat P. 623 |
|||
|
Jump Starting P. 639 |
Overheating P. 641 |
|||
|
When You Cannot Unlock the Fuel Fill Door P. 656 |
||||
|
2 |
Information P. 659 |
|
P. 660 |
Identification Numbers P. 662 |
|
Testing P. 665 |
Warranty Coverages P. 667 |

|
Child Safety P. 65 |
Exhaust Gas Hazard P. 78 |
Safety Labels P. 79 |
|
Opening and Closing the Trunk P. 178 |
Security System P. 181 |
Opening and Closing the Windows P. 184 |
|
Operating the Switches Around the Steering Wheel P. 188 |
Adjusting the Mirrors P. 206 |
|
|
Interior Lights/Interior Convenience Items P. 217 |
Climate Control System P. 232 |
|
|
Audio Error Messages P. 340 |
General Information on the Audio System P. 345 |
|
|
Bluetooth® HandsFreeLink® P. 400, 424 |
Refuel Recommend P. 449 |
|
|
When Driving P. 458 |
Honda SensingTM P. 492 |
Braking P. 539 |
|
Refueling P. 561 |
Fuel Economy and CO2 Emissions P. 564 |
|
|
Maintenance Under the Hood P. 576 |
Replacing Light Bulbs P. 589 |
|
|
Checking and Maintaining Tires P. 600 |
12-Volt Battery P. 609 |
Remote Transmitter Care P. 611 |
|
Cleaning P. 613 |
Accessories and Modifications P. 618 |
|
|
Handling of the Jack P. 635 |
Power System Won’t Start P. 636 |
|
|
Indicator, Coming On/Blinking P. 644 |
Fuses P. 651 |
Emergency Towing P. 655 |
|
When You Cannot Open the Trunk P. 657 Refueling P. 658 |
||
|
Devices that Emit Radio Waves P. 663 |
Reporting Safety Defects P. 664 |
|
|
Authorized Manuals P. 669 |
Customer Service Information |
Contents
Quick Reference Guide P. 4
Safe Driving P. 37
Instrument Panel P. 81
Controls P. 163
Features P. 237
Driving P. 451
Maintenance P. 565
Handling the Unexpected P. 621
Information P. 659
Index P. 671
Guide Reference Quick
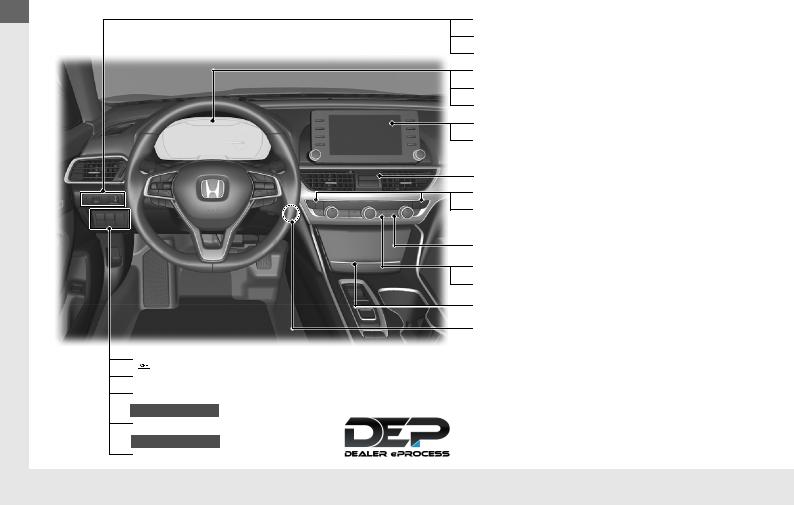
Visual Index
Brightness Control (P 201)
TRIP Button (P 137)
Head-Up Display (HUD) Buttons* (P 157)
System Indicators (P 82)
Gauges (P 133)
Driver Information Interface (P 135)
Audio System (P 246, 267)
Navigation System*
() See Navigation System Manual
|
Hazard Warning Button |
|
Front Seat Heater Buttons* (P 229) |
|
Front Seat Heaters and Seat Ventilation |
|
Buttons* (P 230) |
|
Climate Control System (P 232) |
|
Rear Window Defogger (P 200) |
|
Heated Door Mirror Button (P 200) |
|
Center Pocket (P 219) |
POWER Button (P 188)

Safety Support Switch (P 496, 528)
Parking Sensor System Button* (P 549)
Canadian models
Heated Windshield Button (P
|
Canadian models |
|
|
Acoustic Vehicle Alerting System |
476) |
4
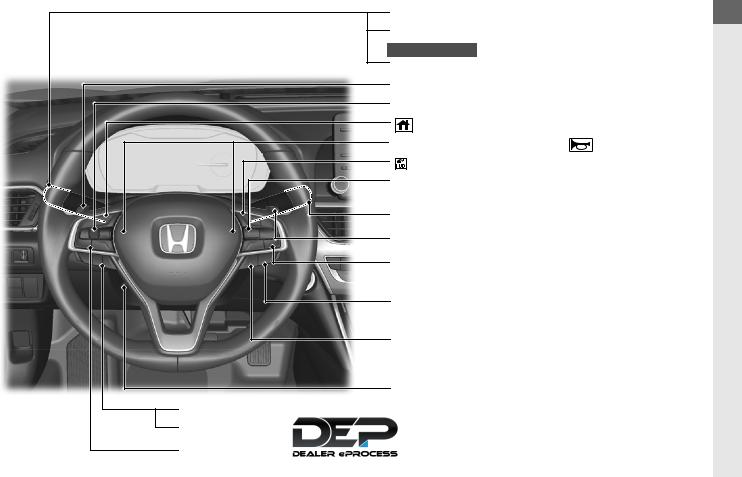
Headlights/Turn Signals (P 191)
Fog Lights* (P 193)
Canadian models
|
LaneWatchTM*(P 490) |
|
|
Selector ( — ) (P 472) |
|
|
Left Selector Wheel (P 136) |
|
|
(Home) Button (P 136) |
|
|
Horn (Press an area around |
.) |
|
(HUD) Button* (P159) |
|
|
MAIN Button (P 503) |
|
Wipers/Washers (P 198) |
|
|
Selector ( + ) (P 472) |
|
|
Adaptive Cruise Control (ACC) with Low |
|
|
Speed Follow (LSF) Buttons (P 502) |
|
|
Lane Keeping Assist System (LKAS) Button |
|
|
(P 520) |
|
|
Interval Button (P 512) |
|
|
Steering Wheel Adjustments (P 205) |
|
|
Voice Control Buttons* (P 292) |
|
|
Bluetooth® |
Buttons (P 400, 424) |
|
Audio Remote |
Guide Reference Quick
|
* Not available on all models |
5 |
Guide Reference Quick
Visual Index
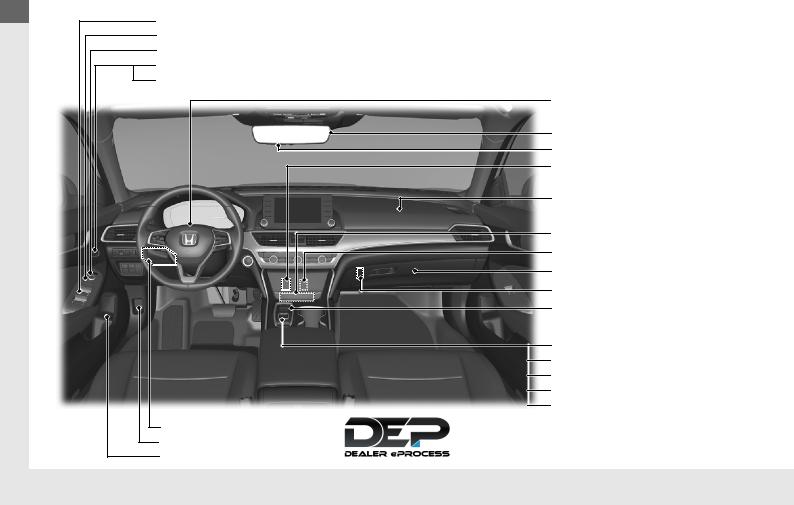
Power Window Switches (P 184)
Master Door Lock Switch (P 176)
Door Mirror Controls (P 207)
Memory Buttons* (P 204)
SET Button* (P 204)
|
Driver’s Front Airbag |
|
(P 52) |
|
Rearview Mirror (P 206) |
|
HomeLink® Buttons* (P 397) |
|
Accessory Power Socket |
|
(P 223) |
|
Passenger’s Front Airbag |
|
(P 52) |
|
Wireless Charger* (P 224) |
|
USB Port (P 239) |
|
Glove Box (P 219) |
|
Trunk Main Switch (P 180) |
|
Shift Button |
||||
|
Transmission (P 465) |
||||
|
Parking Brake (P 539) |
||||
|
ECON Button (P 475) |
||||
|
SPORT Button (P 471) |
||||
|
EV Button (P 13) |
||||
|
Automatic Brake Hold Button |
||||
|
Interior Fuse Box (P 652) |
(P 544) |
|||
|
Electric Parking Brake Switch |
||||
|
Hood Release Handle (P |
||||
|
(P 458) |
||||
|
Trunk Opener (P 178) |
6
|
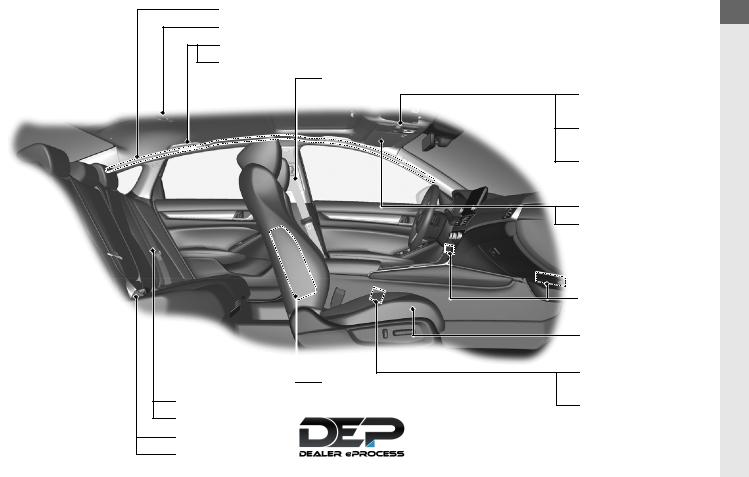
Side Curtain Airbags (P 61) |
|
Ceiling Light (P 217) |
|
Grab Handle |
|
Coat Hook (P 227) |
|
Seat Belts (P 42) |
|
Side Airbags (P 59) |
||
|
Seat Belt (Installing a Child Seat) (P 72) |
||
|
Seat Belt to Secure |
74) |
Rear Seat (P 212)
LATCH to Secure a
Map Lights
(P 218)
Moonroof Switch* (P 187)
Sunglasses Holder (P 228)
Sun Visors
Vanity Mirrors
Knee Airbags
(P 56)
Front Seat
(P 208)
Accessory Power Socket (P 223)
USB Port*
(P 239)
Guide Reference Quick
|
* Not available on all models |
7 |

|
Visual Index |
|
|
Quick |
|
|
Reference |
Maintenance Under the Hood (P 576) |
|
Guide |
Windshield Wipers (P 198, 597) |
|
Power Door Mirrors (P 207) |
|
|
Door Lock/Unlock Control (P 168) |
Headlights (P 191, 589)
Front Turn Signal/Side Marker Lights (P 191, 591)
Parking/Daytime Running Lights (P 194, 591)
Fog Lights* (P 193, 591)
Tires (P 600, 623)
8
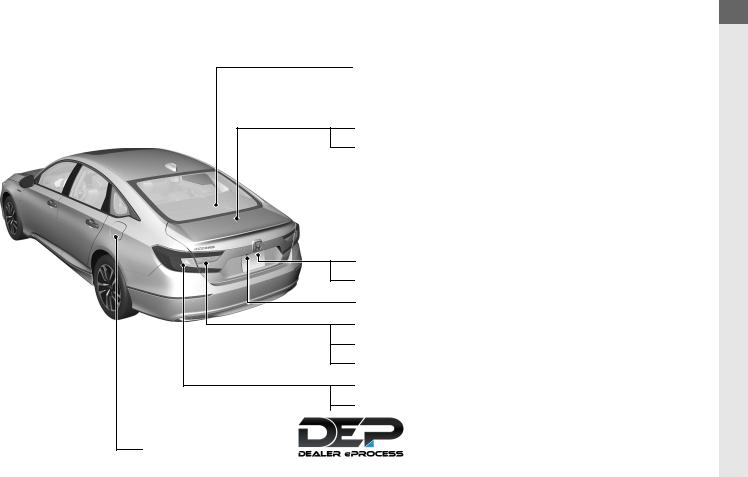
|
Quick |
|
|
High-Mount Brake Light (P 596) |
Reference |
|
Opening/Closing the Trunk (P 178) |
Guide |
|
Emergency Trunk Release Lever (P 180) |
|
Trunk Release Button (P 179) |
|
Rear License Plate Light (P 596) |
|
Multi-View Rear Camera (P 558) |
|
Back-Up Lights (P 594) |
|
Taillights (P 594) |
|
Brake Lights* (P 594) |
|
Brake Lights (P 592) |
|
Rear Turn Signal Lights (P 592) |
|
Marker/Taillights (P 592) |
How to Refuel (P 562)
|
* Not available on all models |
9 |

Guide Reference Quick
SPORT HYBRID i-MMD (intelligent Multi Mode
Drive)
Your SPORT HYBRID i-MMD vehicle uses both an electric motor and a gasoline engine as propulsion sources, with the electric motor receiving electricity from an internal High Voltage battery or internal generator. The High Voltage battery can be charged from the generator driven by the engine or regenerative braking.
When driving, your vehicle is propelled exclusively by the electric motor, exclusively by the gasoline engine, or by a combination of the two. The system selects which propulsion source is most appropriate and automatically switches to it. Under certain circumstances, pressing the EV button can manually enable EV (driven only on electricity) mode.
● Energy efficiency
As with a gasoline-powered vehicle, hybrid vehicle fuel efficiency and driving range is most impacted by your driving style. Aggressive acceleration and high-speed driving can easily trigger the system to switch the propulsion source to the gasoline-powered engine.
In addition, heavy climate control system use negatively affects vehicle range and efficiency. Either of these use patterns will more quickly reduce the High Voltage battery’s state of charge.
● Battery types
There are two types of batteries used in this vehicle; a standard 12-volt battery that powers the airbags, the interior and exterior lights, and other standard 12-volt systems; and a high voltage battery that is used to power the propulsion motor and recharge the 12-volt battery.
10
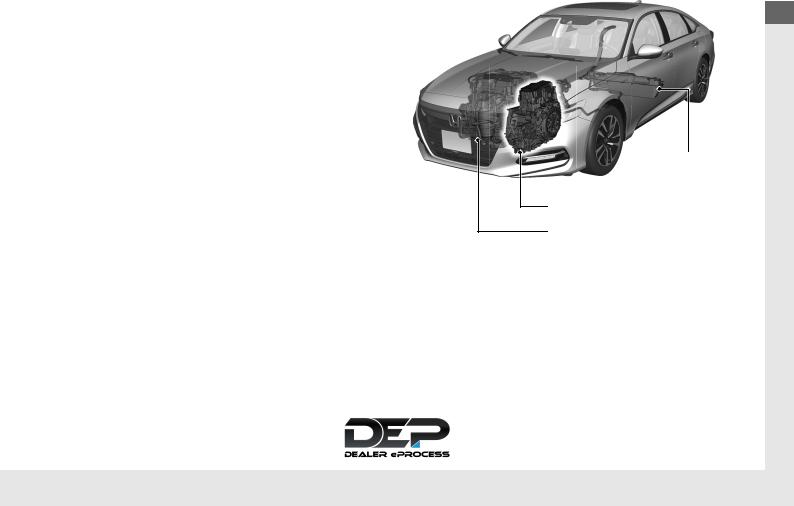
SPORT HYBRID i-MMD SYSTEM MAIN COMPONENTS
Gasoline Engine– Provides propulsion to drive the wheels under certain driving conditions, and turns the generator.
Generator– Starts the engine and generates electric power when driven by the gasoline engine to supply electricity to power the electric motor and/or to charge the High Voltage battery.
Electric Motor– Provides propulsion to drive the wheels in conjunction with the gasoline engine in certain conditions, and provides electricity to the High Voltage battery through regenerative braking.
High Voltage Battery– Provides electrical storage and serves as a power source for the electric motor.
Learning about the High Voltage battery’s characteristics will help you get the best handling and maximize the range of your electric vehicle. (P489)
High Voltage Battery Charge Level Indicator– Displays battery state of charge.
When the indicator:
•Displays two or less segments, EV mode is no longer available.
•Displays ten segments, battery charge level is full.
Guide Reference Quick
High Voltage
Battery
Generator & Electric Motor
Gasoline Engine
11

Guide Reference Quick
Vehicle
Speed
|
Time |
|||||
|
Operating |
Electric Vehicle (EV) |
Hybrid (HV) |
Engine (Direct Drive) |
Regeneration |
|
|
mode |
|||||
|
Stopped or driven at low speeds: |
Driven in high-load conditions |
Driven in high-speed, low-load |
The accelerator pedal is released |
||
|
• Only the electric motor |
(e.g., when accelerating, going |
conditions: |
and the vehicle is decelerating. |
||
|
provides propulsion to the |
uphill): |
• The gasoline engine provides |
• The electric motor provides |
||
|
wheels. |
• The Electric Motor provides |
propulsion to the wheels. |
electricity to the High Voltage |
||
|
propulsion to the wheels. |
• The High Voltage battery |
battery through regenerative |
|||
|
Driving state |
• The gasoline engine drives |
supplies electricity to the |
braking. |
||
|
the generator, supplying |
electric motor for added |
||||
|
electricity to the electric |
propulsion. |
||||
|
motor for added propulsion |
• The electric motor provides |
||||
|
or to the High Voltage battery |
electricity to the High Voltage |
||||
|
for charging. |
battery through regenerative |
||||
|
braking. |
|||||
|
Power Flow |
|||||
|
Monitor |
|||||
|
Electric motor |
Stopped/Running |
Running |
Generating/Running |
Regenerating |
|
|
Generator |
Stopped |
Generating |
No Output |
Stopped/No Output |
|
|
Engine |
Stopped |
Running |
Stopped/No Output |
||
|
High Voltage |
Discharge |
Charging/Discharge |
Charging |
||
|
battery |
|||||
12

EV Button
EV mode is enabled by pressing the EV button near the shift button.
The EV mode indicator comes on in the instrument panel when EV mode is enabled.
Press
Press the EV button again to switch back to HV mode.
Some conditions, such as a low High Voltage battery level and a high vehicle speed, may keep the system from manually switching into EV mode. The beeper sounds and a message appears on the driver information interface with the button pressed when EV mode is disabled.
Shifts in vehicle, driving or road conditions may automatically cancel EV mode and switch back to HV mode.
A message will appear on the driver information interface and EV mode may be canceled automatically when:
●The High Voltage battery charge level is low.
●Your vehicle speed is too high.
●Your vehicle speed is above 25 mph (40 km/h) while the engine is in warming-up operation.
●You fully depress the accelerator pedal.
●You are driving on hilly road.
2 Driver Information Interface Warning and Information Messages (P108)
Canadian models
In EV mode, the acoustic vehicle alerting system is on.
2 Acoustic Vehicle Alerting System (P476)
Guide Reference Quick
13

Guide Reference Quick
● Regenerative Energy and Regenerative Braking
When regenerative braking is in operation
Motor
When decelerating without the accelerator being depressed or the brake pedal being applied, or while driving downhill, the electric motor acts as a generator that recovers a portion of the electrical energy that was used to accelerate the vehicle. This regenerative braking slows the vehicle in a manner similar to engine braking in a gasoline-powered vehicle. You can control the rate of deceleration by using the deceleration paddle selector.
High
Voltage
Battery
● Auto Engine Stop/Start
Your vehicle’s gasoline engine automatically stops running during vehicle operation or restarts while the vehicle is stationary when it is appropriate.
In the following cases, however, auto engine stop may not activate.
•The vehicle momentarily needs additional power for aggressive acceleration, or driving uphill or at high speed.
•The climate control system is in heavy use.
•The High Voltage battery temperature is high or low.
● Sounds Unique to the SPORT HYBRID i-MMD System
When you first start driving this vehicle, you will likely hear some unfamiliar sounds, particularly when you turn on the power system, or while you are driving or accelerating from a stop. Some of these sounds are unique to this vehicle‘s powertrain, fuel, and climate control systems; others are similar to sounds generated by conventional automobiles that typically are masked by louder noises absent from a vehicle of this design. These sounds are not a cause for concern, and you will soon recognize them as normal and thus be able to detect any new or unusual noise should one develop.
14

Safety Precautions
Do not cover the air intake.
Air Intake
If the air intake is obstructed during vehicle operation, the High Voltage battery can become too hot. To protect the battery, the system may limit the battery’s output and cause the power system and 12-volt battery charging system indicators to come on.
Do not touch the High Voltage system
Attempting to take a High Voltage system component apart or disconnect one of its wires can cause severe electrical shock. Make sure that any maintenance or repairs to the High Voltage system is performed by a Honda dealer.
If a crash occurs
●Be careful of electric shock hazard.
uIf a severe crash damages your vehicle’s High Voltage system, there is a possibility of electrical shock due to exposed High Voltage components or wires. If this happens, do not touch any of the High Voltage system components or any of its orange wires.
●Avoid contact with High Voltage battery fluid.
uThe High Voltage battery contains a flammable electrolyte that could leak as a result of a severe crash. Avoid skin or eye contact with the electrolyte as it is corrosive. If you accidentally come into contact with the electrolyte, rinse the exposed skin or flush your eyes with copious amounts of water for at least five minutes, and seek medical attention immediately.
●Use a fire extinguisher for an electrical fire.
uAttempting to extinguish an electrical fire with a small quantity of water, from a garden hose for instance, can be dangerous.
●Anytime the vehicle is damaged in an accident, have it repaired by a dealer.
Emergency Shutdown System for the High Voltage System
If the vehicle is involved in a crash, the emergency shutdown system will activate depending on the severity of the impact. When the system activates, the High Voltage system automatically shuts down, and the vehicle can no longer move under its own power. To return the High Voltage system back to normal operation, consult a dealer.
Honda collects and recycles High Voltage batteries used in its vehicles – consult a dealer for more information.
Guide Reference Quick
15
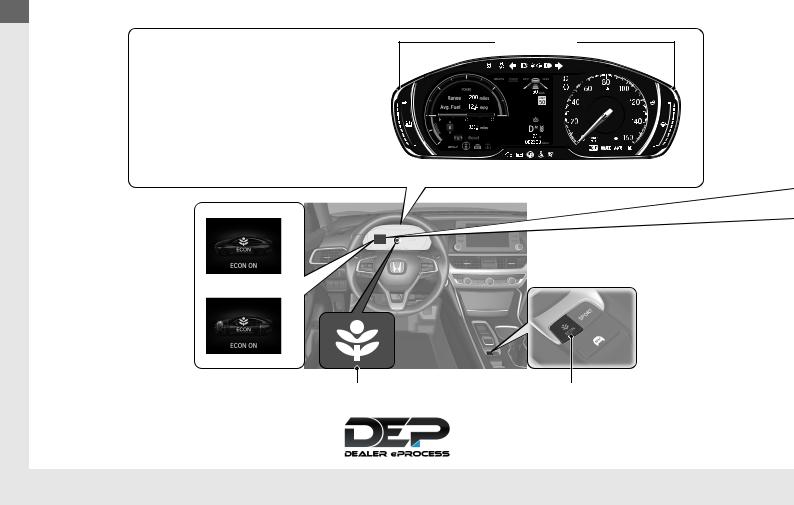
Guide Reference Quick
Eco Assist® System (P 475)
Ambient Meter
Ambient Meter
With SPORT mode off, the color of the ambient meter changes to green to indicate that the vehicle is being driven in a fuel efficient manner.
*1
*2
The message is displayed for a few seconds when the ECON button is pressed.
*1: Models without adaptive damper system *2: Models with adaptive damper system
|
ECON Mode Indicator (P 100) |
ECON Button (P 475) |
|
Comes on when the ECON button is |
Helps maximize fuel economy. |
16
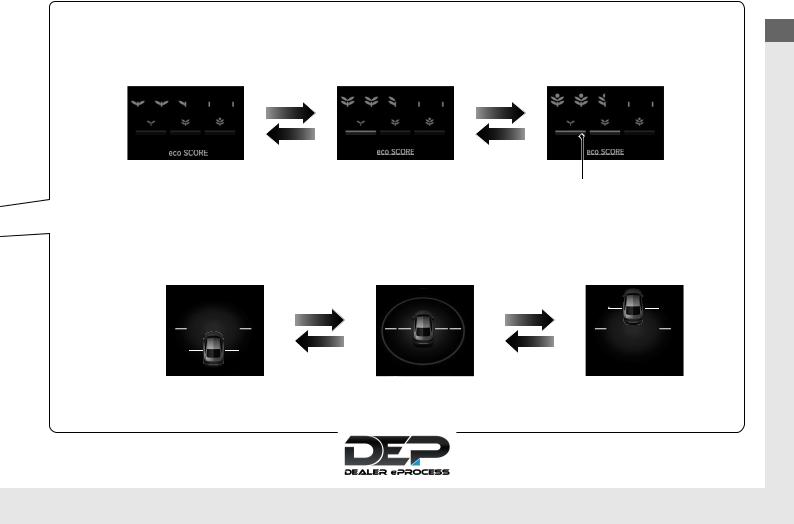
Drive Cycle Score/Lifetime Points
● Comes on when the power mode is in VEHICLE OFF.

Score
Lifetime Points
Eco Drive Display (P154)
● Keep the vehicle icon near the center of the circle.
|
Fuel economy is: |
Worse |
Better |
Best |
Better |
Worse |
|
Aggressive |
Moderate |
Slow Acceleration/ |
Moderate |
Aggressive |
|
Deceleration |
Deceleration |
Deceleration |
Acceleration |
Acceleration |
Guide Reference Quick
17

Guide Reference Quick
Safe Driving (P 37)
Airbags (P 49)
●Your vehicle is fitted with airbags to help protect you and your passengers during a moderate-to-severe collision.
Child Safety (P 65)
●All children 12 and younger should be seated in the rear seat.
●Smaller children should be properly restrained in a forward-facing child seat.
●Infants must be properly restrained in a rear-facing child seat.
Before Driving Checklist (P 41)
●Before driving, check that the front seats, head restraints, steering wheel, and mirrors have been properly adjusted.

●Your vehicle emits dangerous exhaust gases that contain carbon monoxide. Do not run the engine in confined spaces where carbon monoxide gas can accumulate.
Seat Belts (P 42)
● Fasten your seat belt and sit upright well back in the seat.
● Check that your passengers are wearing their seat belts correctly.
Fasten your lap belt as low as possible.
18
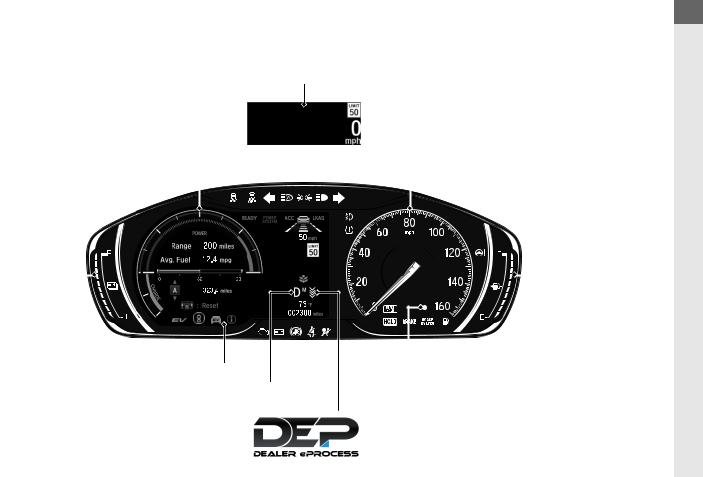
Instrument Panel (P 81)
Indicators (P 82)/Driver Information Interface (P 135)/Gauges (P 133)/ Head-Up Display* (P 157)
Head-Up Display*
|
POWER/CHARGE Gauge |
Speedometer |
|||||
|
High Voltage Battery |
Fuel Gauge |
|||||
|
Charge Level Gauge |
||||||
|
Driver Information Interface |
Immobilizer System Indicator/ |
||
|
Security System Alarm Indicator |
|||
|
Shift Position Indicator/ |
|||
|
Transmission System Indicator |
|||
|
Paddle Selector |
Guide Reference Quick
|
* Not available on all models |
19 |

Guide Reference Quick
Controls (P 163)
Clock (P 164)
Models with color audio
a Press and hold the MENU/CLOCK button.
b Rotate 

c Rotate 

d Select Set, then press 
These indications are used to show how to operate the selector knob.
•Rotate 
•Press 
Models with Display Audio
To adjust time
To adjust date
|
a Select the |
(HOME) icon, then select |
|
Settings. |
b Select System, then Day & Time. c Select Set Date & Time.
d Select Automatic Date & Time, then
|
select OFF. |
|
|
e Select Set Date or Set Time. |
|
|
f Adjust |
minutes by |
|
selecting |
|
|
g Select |
time. |
Models with navigation system
The navigation system receives signals from GPS satellites, updating the clock automatically.
POWER Button (P 188)
Press the button to change the vehicle’s power mode.
20

Turn Signals (P 191)
Turn Signal Control Lever
Right
Left
Lights (P 191)
Light Control Switches
High Beam
Low Beam
Flashing
Wipers and Washers
(P 198)
Wiper/Washer Control Lever
Adjustment Ring (—: Low Sensitivity*1
(— 
(+ 
Pull toward you to spray washer fluid.
MIST
OFF
AUTO*1: Wiper speed varies automatically INT*2: Low speed with intermittent
LO: Low speed wipe HI: High speed wipe
*1:Models with automatic intermittent wipers
*2:Models without automatic intermittent wipers
Models with automatic intermittent wipers
AUTO should always be turned OFF before the following situations in order to prevent severe damage to the wiper system:
●Cleaning the windshield
●Driving through a car wash
●No rain
Steering Wheel (P 205)
●To adjust, push the adjustment lever down, adjust to the desired position, then lock the lever back in place.
To lock
To adjust
Guide Reference Quick
21
Guide Reference Quick
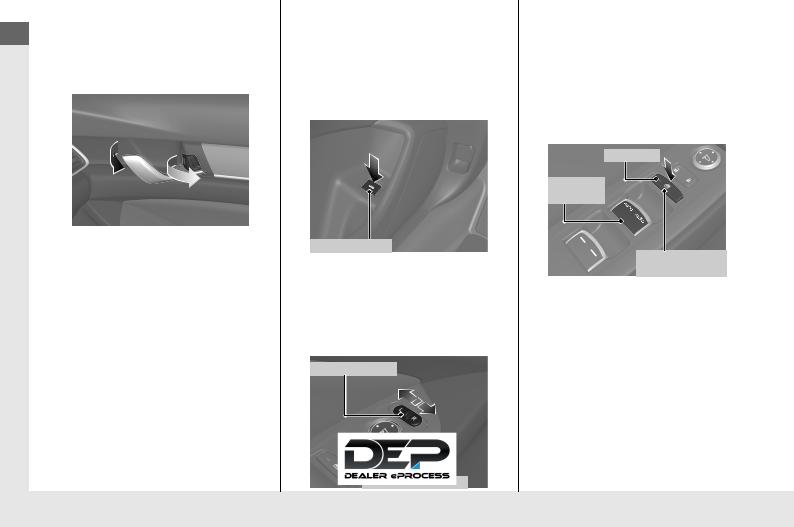
Unlocking the Front Doors from the Inside
(P 174)
●Pull either front door inner handle to unlock and open it at the same time.
●Unlocking and opening the driver’s door from the inner handle unlocks all the other doors and fuel fill door.
Trunk (P 178)
●Press and hold the trunk opener on the driver’s door unlocks and opens the trunk.
●Press the trunk release button on the smart entry remote to unlock and open the trunk.
●Press the trunk release button on the trunk lid to unlock and open the trunk.
Trunk Opener
Power Door Mirrors
(P 207)
●With the power mode in ON, move the selector switch to L or R.
●Push the appropriate edge of the adjustment switch to adjust the mirror.
Selector Switch
Power Windows (P 184)
●With the power mode in ON, open and close the power windows.
●If the power window lock button is in the off position, each passenger’s window can be opened and closed with its own switch.
●If the power window lock button is in the on position (indicator on), each passenger’s window switch is disabled.
Indicator
Window
Switch
Power Window
Lock Button
22
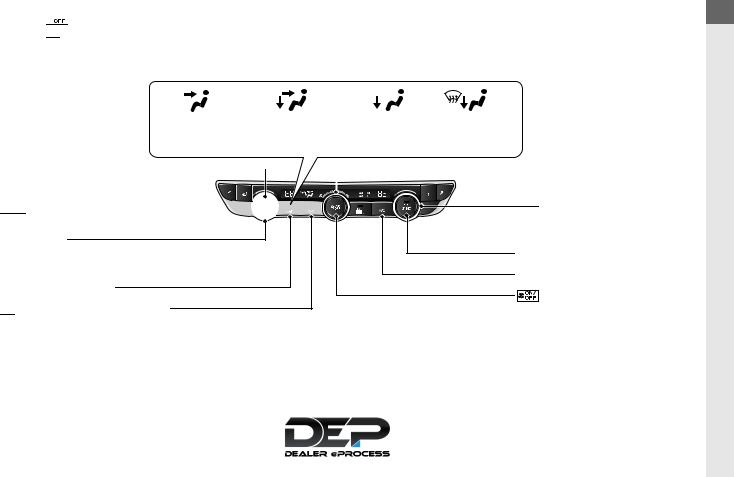
Climate Control System (P 232)
●Press the AUTO button to activate the climate control system.
●Press the 
●Press the 
|
Dashboard vents |
Dashboard and floor Floor vents |
Floor and |
||||
|
and back of the |
vents, and back of |
defroster |
||||
|
center console* |
the center console* |
vents |
||||
|
AUTO Button |
Fan Control Dial |
|||||
|
Passenger’s Side |
|
Temperature Control |
|
Dial |
|
SYNC (Synchronization) Button |
|
A/C (Air Conditioning) Button |
|
(On/Off) Button |
Guide Reference Quick
|
* Not available on all models |
23 |
Guide Reference Quick
Features (P 237)
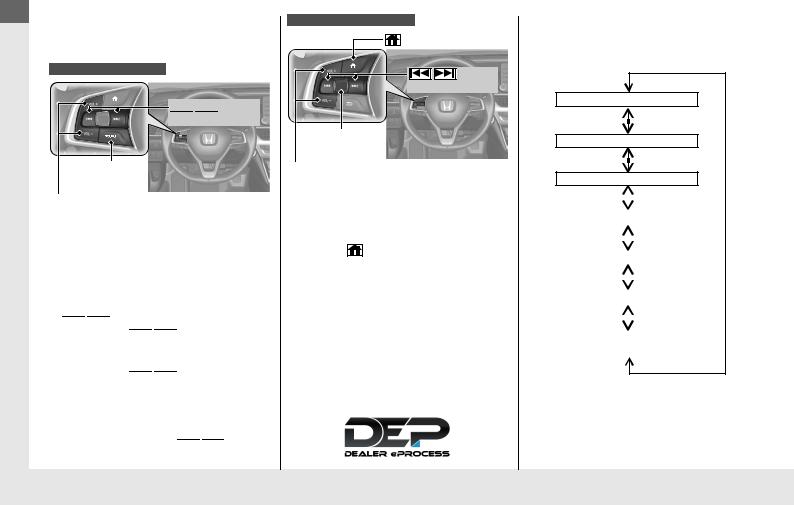
Audio Remote Controls
(P 242)
Models with color audio


Skip) Buttons
SOURCE
Button
VOL(+/VOL(— (Volume) Buttons
●VOL +/VOL — (Volume) Buttons Press to adjust the volume up/down.
●SOURCE Button
Press to change the audio mode: FM1FM2AMUSB/iPodPandora®
Bluetooth® Audio.
●

Radio: Press 

iPod, USB device, or Bluetooth® Audio:
Press 

USB device or Bluetooth® Audio:
Press and hold 

|
Models with Display Audio |
Roll up or down: To cycle through the |
||
|
(home) Button |
|||
|
audio modes, roll up or down and then |
|||
|
press the left selector wheel: |
|||
|
/ |
(Seek/ |
||
|
Skip) Buttons |
|||
|
FM |
|||
|
Left Selector |
AM |
||
|
Wheel |
|||
|
VOL(+/VOL(— (Volume) Buttons |
SiriusXM®* |
||
|
● VOL +/VOL — (Volume) Buttons |
|||||
|
Press to adjust the volume up/down. |
|||||
|
● Left Selector Wheel |
USB1 |
||||
|
When selecting the audio mode |
|||||
|
Press the |
(home) button, then roll up |
||||
|
or down to select Audio on the driver |
USB2 |
||||
|
information interface, and then press the |
|||||
|
left selector wheel. |
|||||
|
Bluetooth® |
Audio |
||||
|
Smartphone Connection |
|||||
|
(Apple CarPlay/Android Auto) |
|||||
24
|
* Not available on all models |
25 |

Guide Reference Quick
Audio System (P 246, 267)
Models with color audio (P 246)
Audio/Information Screen
|
(Day/Night) Button |
|
|
RADIO Button |
(Phone) Button |
|
MEDIA Button |
(Sound) Button |
|
(Seek/Skip) Button |
MENU/CLOCK Button |
|
(Seek/Skip) Button |
(Back) Button |
|
VOL/ (Volume/Power) Knob |
Selector Knob |
||||||||||
Preset Buttons (1—6)
26

Models with Display Audio (P267)
For navigation system operation () See the Navigation System Manual
|
Audio/Information Screen |
|||||||||||||||||||
|
(Home) Button |
(Clock) Button*/ (Map) Button* |
||||||||||||||||||
|
(Back) Button |
(Phone) Button |
||||||||||||||||||
|
(Day/Night) Button |
(Audio) Button |
||||||||||||||||||
|
(Seek/Skip) Button |
SOURCE Button |
||||||||||||||||||
|
(Seek/Skip) Button |
|||||||||||||||||||
|
VOL/ (Volume/Power) |
Selector Knob |
||||||||||||||||||
|
Knob |
Guide Reference Quick
|
* Not available on all models |
27 |

Guide Reference Quick
Driving (P 451)
Transmission (P 464)
●Select (P and depress the brake pedal when turning on the power.
●Shift selection
READY Indicator
On: You can start to drive.
|
Shift Position Indicator |
Shift Button |
||||||||||
|
The shift position indicator |
|||||||||||
|
Indicator |
|||||||||||
|
and the shift button indicator |
|||||||||||
|
indicate the current shift |
|||||||||||
|
selection. |
Shift Position |
Indicator |
|||||||||
|
Park |
|||||||||||
|
Press the (P button. |
|||||||||||
|
Used when parking or before turning the power on or off. |
|||||||||||
|
Transmission is locked. |
|||||||||||
|
Reverse |
|||||||||||
|
Press back the (R button. |
|||||||||||
|
Used when reversing. |
|||||||||||
|
Neutral |
|||||||||||
|
Press the (N button. |
|||||||||||
|
Transmission is not locked. |
|||||||||||
|
Drive |
|||||||||||
|
Press |
|||||||||||
|
Used |
|||||||||||
|
The |
selector can be used temporarily. |
||||||||||
|
The |
selector can be used when SPORT mode is on. |
28

Deceleration Paddle Selector (P472)
When you release the accelerator pedal, you can control the rate of deceleration without removing your hands from the steering wheel. Using the deceleration paddle selector situated on the steering wheel, you can sequentially shift through four stages of deceleration.
Pull the (+ selector for a few seconds when you want to cancel the deceleration paddle selector.
●When SPORT mode is OFF
If you pull back the paddle selector, the rate of deceleration will change temporarily, and the stage will appear in the instrument panel.
●When SPORT mode is ON
If you pull back the paddle selector, the rate of deceleration will change and the stage along with M will appear in the instrument panel.
|
When SPORT |
When SPORT |
|||||||
|
mode is OFF, |
mode is ON, the |
|||||||
|
the |
deceleration |
|||||||
|
deceleration |
stage and M |
|||||||
|
stage appears. |
appear. |
|||||||
|
(— Paddle |
(+ Paddle |
|||||||
|
Deceleration |
||||||||
|
Selector |
Selector |
stage |
Guide Reference Quick
29

Guide Reference Quick
VSA® On and Off (P 479)
●The Vehicle Stability Assist® (VSA®) system helps stabilize the vehicle during cornering, and helps maintain traction while accelerating on loose or slippery road surfaces.
●VSA® comes on automatically every time you turn on the power system.
●To partially disable or fully restore VSA® function, press and hold the button until you hear a beep.
CMBSTM On and Off
(P 493)
●When a possible collision is likely unavoidable, the CMBSTM can help you to reduce the vehicle speed and the severity of the collision.
●CMBSTM comes on automatically every time you turn on the power system.
●To turn the CMBSTM on or off, use the safety support switch.
Tire Pressure Monitoring
System (TPMS) (P 481)
●Detects a change in tire conditions and overall dimensions due to decrease in tire pressures.
●The TPMS is turned on automatically every time you turn on the power system.
●A calibration procedure must be performed when certain conditions arise.
Refueling (P 561)
Fuel recommendation: Unleaded gasoline, pump octane number 87 or higher Fuel tank capacity: 12.81 US gal (48.5 L)
a Unlock the driver’s door using the master door lock switch.
2Using the Master Door Lock Switch
(P176)
b Press on the edge of the fuel fill door to make it pop up slightly.
c After refueling, wait for about five seconds before removing the filler nozzle.
30

(P 502)
Honda SensingTM (P 492)
Honda SensingTM is a driver support system which employs the use of two distinctly different kinds of sensors, a radar sensor located at the lower part of the front bumper and a front sensor camera mounted to the interior side of the windshield, behind the rearview mirror.
The camera is located behind the rearview mirror.
Front Sensor
Camera
Radar Sensor
The radar sensor is at the lower part of the front bumper.
Collision Mitigation
Braking SystemTM
(CMBSTM) (P 493)
Can assist you when there is a possibility of your vehicle colliding with a vehicle or a pedestrian detected in front of yours. The CMBSTM is designed to alert you when a potential collision is determined, as well as to reduce your vehicle speed to help minimize collision severity when a collision is deemed unavoidable.
Adaptive Cruise Control (ACC) with Low Speed Follow (LSF)
Helps maintain a constant vehicle speed and a set following interval behind a vehicle detected ahead of yours and, if the detected vehicle comes to a stop, can decelerate and stop your vehicle, without you having to keep your foot on the brake or the accelerator.
Lane Keeping Assist
System (LKAS) (P 518)
Provides steering input to help keep the vehicle in the middle of a detected lane and provides tactile and visual alerts if the vehicle is detected drifting out of its lane.
Road Departure
Mitigation (RDM) System
(P 526)
Alerts and helps to assist you when the system detects a possibility of your vehicle unintentionally crossing over detected lane markings and/or leaving the roadway altogether.
Traffic Sign Recognition
System (P530)
Reminds you of road sign information, such as the current speed limit and that overtaking is prohibited, your vehicle has just passed through, showing it on the driver information interface and the headup display*.
Guide Reference Quick
|
* Not available on all models |
31 |

Guide Reference Quick
Maintenance (P 565)
Under the Hood (P 576)
|
● Check engine oil, engine coolant, inverter coolant, and windshield |
|||
|
washer fluid. Add when necessary. |
Wiper Blades (P 597) |
||
|
● Check brake fluid. |
|||
|
● Check the 12-volt battery condition monthly. |
● Replace blades if they leave streaks |
||
|
a Pull the hood release handle under the corner of the |
|||
|
across the windshield. |
|||
|
dashboard. |
|||
b Locate the hood latch lever, push it to the side, and then raise the hood. Once you have raised the hood slightly, you can release the lever.
|
Tires (P 600) |
Lights (P 589) |
||
|
● Inspect tires and wheels |
● Inspect all lights regularly. |
||
|
regularly. |
|||
|
● Check tire pressures regularly. |
|||
|
● Install snow tires for winter |
|||
|
driving. |
c When finished, close the hood and make sure it is in place.
32

Handling the Unexpected (P 621)
Flat Tire (P 623)
●Park in a safe location and repair the flat tire using the tire repair kit in the trunk.
Power System Won’t
Start (P 636)
●If the 12-volt battery is dead, jump start using a booster battery.
Overheating (P 641)
●Park in a safe location. If you do not see steam under the hood, open the hood, and let the power system cool down.
Indicators Come On
(P 644)
●Identify the indicator and consult the owner’s manual.
Blown Fuse (P 651)
●Check for a blown fuse if an electrical device does not operate.
Emergency Towing
(P 655)
●Call a professional towing service if you need to tow your vehicle.
Guide Reference Quick
33

Guide Reference Quick
What to Do If
|
Why does the brake pedal |
This can occur when the ABS activates and does not indicate a |
|
pulsate slightly when |
problem. Apply firm, steady pressure on the brake pedal. Never |
|
applying the brakes? |
pump the brake pedal. |
|
2 Anti-lock Brake System (ABS) (P 546) |
The rear door cannot be opened from inside the vehicle. Why?
Check if the childproof lock is in the lock position. If so, open the rear door with the outside door handle.
To cancel this function, slide the lever up to the unlock position.
|
Why do the doors lock |
If you do not open the doors within 30 seconds, the doors are |
|
|
after I unlocked the doors? |
relocked automatically for security. |
|
|
Why does the beeper |
The beeper sounds when: |
|
|
sound when I open the |
• |
The power mode is in ACCESSORY. |
|
driver’s door? |
• |
The exterior lights are left on. |
34

|
Why does a buzzer sound |
The buzzer sounds if you move outside the walk away auto |
|
when I walk away from the |
door lock operating range before the door completely closes. |
|
vehicle after I close the |
2 Locking the doors and trunk (Walk away auto lock) (P170) |
|
door? |
|
|
Why does the beeper |
The beeper sounds when the driver and/or front passenger are |
|
sound when I start driving? |
not wearing their seat belts. |
|
Why do I hear a screeching |
The brake pads may need to be replaced. Have your vehicle |
|
sound when I apply the |
inspected by a dealer. |
|
brake pedal? |
I’m seeing an amber indicator of a tire with an exclamation point. What is that?
The Tire Pressure Monitoring System (TPMS) needs attention. If you recently inflated or changed a tire, you have to recalibrate the system.
2 Tire Pressure Monitoring System (TPMS) (P 481)
|
Pressing the electric |
Press the electric parking brake switch with the brake pedal |
|
parking brake switch does |
depressed. |
|
not release the parking |
|
|
brake. Why? |
|
Guide Reference Quick
35

Guide Reference Quick
|
Depressing the accelerator |
• |
Fasten the driver’s seat belt. |
|
pedal does not release the |
• |
Check if the transmission is in P or N. If so, select any other |
|
parking brake |
position. |
|
|
automatically. Why? |
Why does the shift position automatically change to P when I open the driver’s door to check for parking space lines when reversing?
•Fasten the driver’s seat belt.
•Close the driver’s door and manually change the shift
position.
2 When opening the driver’s door (P468)
36

Safe Driving
You can find many safety recommendations throughout this chapter, and throughout this manual.
|
For Safe Driving |
……………………………….Knee Airbags |
56 |
Safety Labels |
||
|
Important Safety Precautions………….. |
38 |
Side Airbags………………………………… |
59 |
Label Locations ……………………………. |
79 |
|
Your Vehicle’s Safety Features………… |
40 |
Side Curtain Airbags …………………….. |
61 |
||
|
Safety Checklist …………………………… |
41 |
Airbag System Indicators……………….. |
62 |
||
|
Seat Belts |
Airbag Care ………………………………… |
64 |
|||
|
About Your Seat Belts …………………… |
42 |
Child Safety |
|||
|
Fastening a Seat Belt…………………….. |
45 |
Protecting Child Passengers …………… |
65 |
||
|
Seat Belt Inspection………………………. |
48 |
Safety of Infants and Small Children… |
67 |
||
|
Airbags |
Safety of Larger Children ………………. |
76 |
|||
|
Airbag System Components…………… |
49 |
Exhaust |
|||
|
Types of Airbags ………………………….. |
52 |
Carbon |
78 |
||
|
Front Airbags (SRS) ………………………. |
52 |
37

For Safe Driving
Driving Safe
The following pages explain your vehicle’s safety features and how to use them properly. The safety precautions below are ones that we consider to be among the most important.
Important Safety Precautions
■ Always wear your seat belt
A seat belt is your best protection in all types of collisions. Airbags are designed to supplement seat belts, not replace them. So even though your vehicle is equipped with airbags, make sure you and your passengers always wear your seat belts, and wear them properly.
■ Restrain all children
Children ages 12 and under should ride properly restrained in a back seat, not the front seat. Infants and small children should be restrained in a child seat. Larger children should use a booster seat and a lap/shoulder seat belt until they can use the belt properly without a booster seat.
■ Be aware of airbag hazards
While airbags can save lives, they can cause serious or fatal injuries to occupants who sit too close to them, or are not properly restrained. Infants, young children, and short adults are at the greatest risk. Be sure to follow all instructions and warnings in this manual.
|
■ Don’t drink and drive |
|
|
Alcohol and driving don’t mix. Even one drink can reduce |
to |
|
changing conditions, and your reaction time gets worse |
. |
|
So don’t drink and drive, and don’t let your friends drink |
1Important Safety Precautions
Some states, provinces and territories prohibit the use of cell phones other than hands-free devices by the driver while driving.
38

■ Pay appropriate attention to the task of driving safely
Engaging in cell phone conversation or other activities that keep you from paying close attention to the road, other vehicles, and pedestrians could lead to a crash. Remember, situations can change quickly, and only you can decide when it is safe to divert some attention away from driving.
■ Control your speed
Excessive speed is a major factor in crash injuries and deaths. Generally, the higher the speed, the greater the risk, but serious injuries can also occur at lower speeds. Never drive faster than is safe for current conditions, regardless of the maximum speed posted.
■ Keep your vehicle in safe condition
Having a tire blowout or a mechanical failure can be extremely hazardous.
To reduce the possibility of such problems, check your tire pressures and condition frequently, and perform all regularly scheduled maintenance.
■ Do not leave children unattended in the vehicle
Children left unattended in the vehicle may be injured if they activate one or more of the vehicle controls. They may also cause the vehicle to move, resulting in a crash in which the children and/or another person(s) can be injured or killed. Also, depending on the ambient temperature, the temperature of the interior may reach extreme levels, which can result in injury or death. Even if the climate control system is on, never leave children in the vehicle unattended as the climate control system can shut off at any time.
uuFor Safe DrivinguImportant Safety Precautions
Driving Safe
39

Driving Safe
uuFor Safe DrivinguYour Vehicle’s Safety Features
Your Vehicle’s Safety Features
6
11
7
9
11
8
12
|
Safety Cage |
||||
|
8 |
7 |
Crush Zones |
||
|
Seats and Seat-Backs |
||||
|
Head Restraints |
||||
|
Collapsible Steering Column |
||||
|
6 |
Seat Belts |
|||
|
7 |
Front Airbags |
|||
|
8 |
Knee Airbags |
|||
|
9 |
Side Airbags |
|||
|
10 |
Side Curtain Airbags |
|||
|
11 |
Door Locks |
|||
|
12 |
Seat Belt Tensioners |
The following checklist will help you take an active role your passengers.
1Your Vehicle’s Safety Features
Your vehicle is equipped with many features that work together to help protect you and your passengers during a crash.
Some features do not require any action on your part. These include a strong steel framework that forms a safety cage around the passenger compartment, front and rear crush zones, a collapsible steering column, and tensioners that tighten the front seat belts in a sufficient crash.
However, you and your passengers cannot take full advantage of these features unless you remain seated in the correct position and always wear your seat belts. In fact, some safety features can contribute to injuries if they are not used properly.
40

uuFor Safe DrivinguSafety Checklist
Safety Checklist
For the safety of you and your passengers, make a habit of checking these items each time before you drive.
•After everyone has entered the vehicle, be sure all doors are closed and locked. Locking the doors helps prevent an occupant from being ejected and an outsider from unexpectedly opening a door.
2 Locking/Unlocking the Doors from the Inside P. 174
•Adjust your seat to a position suitable for driving. Be sure the front seats are adjusted as far to the rear as possible while allowing the driver to control the vehicle. Sitting too close to a front airbag can result in serious or fatal injury in a crash.
2 Adjusting the Seats P. 208
•Adjust head restraints to the proper position. Head restraints are most effective when the center of the head restraint aligns with the center of your head. Taller persons should adjust their head restraint to the highest position.
2 Adjusting the Front and Rear Outer Head Restraint Positions P. 214
•Always wear your seat belt, and make sure you wear it properly. Confirm that any passengers are properly belted as well.
2 Fastening a Seat Belt P. 45
•Protect children by using seat belts or child seats according to a child’s age, height and weight.
2 Child Safety P. 65
1Safety Checklist
If the door and/or trunk open message appears on the driver information interface, a door and/or the trunk is not completely closed. Close all doors and the trunk tightly until the message disappears.
2Driver Information Interface Warning and Information Messages P. 108
Driving Safe
41

Driving Safe
Seat Belts
About Your Seat Belts
Seat belts are the single most effective safety device because they keep you connected to the vehicle so that you can take advantage of many built-in safety features. They also help keep you from being thrown against the inside of the vehicle, against any passengers, or out of the vehicle. When worn properly, seat belts also keep your body properly positioned in a crash so that you can take full advantage of the additional protection provided by the airbags.
In addition, seat belts help protect you in almost every type of crash, including:
—frontal impacts
—side impacts
—rear impacts
—rollovers
■ Lap/shoulder seat belts
All five seating positions are equipped with lap/shoulder seat belts with emergency locking retractors. In normal driving the retractor lets you move freely while keeping some tension on the belt. During a collision or sudden stop the retractor locks to restrain your body. The front passenger’s and rear seat belts also have a lockable retractor for use with child seats.
2 Installing a Child Seat with a Lap/Shoulder Seat Belt P. 72
1About Your Seat Belts
3WARNING
Not wearing a seat belt properly increases the chance of serious injury or death in a crash, even though your vehicle has airbags.
Be sure you and your passengers always wear seat belts and wear them properly.
Seat belts cannot completely protect you in every crash. But in most cases, seat belts can reduce your risk of serious injury.
Most states and all Canadian provinces and territories require you to wear seat belts.
If you extend the seat belt too quickly, it will lock in place. If this happens, slightly retract the seat belt, then extend it slowly.
42

uuSeat BeltsuAbout Your Seat Belts
■ Proper use of seat belts
Follow these guidelines for proper use:
•All occupants should sit upright, well back in the seat, and remain in that position for the duration of the trip. Slouching and leaning reduce the effectiveness of the belt and can increase the chance of serious injury in a crash.
•Never place the shoulder part of a lap/shoulder seat belt under your arm or behind your back. This could cause very serious injuries in a crash.
•Two people should never use the same seat belt. If they do, they could be very seriously injured in a crash.
•Do not put any accessories on the seat belts. Devices intended to improve comfort or reposition the shoulder part of a seat belt can reduce the protective capability and increase the chance of serious injury in a crash.
■ Seat Belt Reminder
The seat belt system includes an indicator on the instrument panel to remind the driver or a front passenger or both to fasten their seat belts.
If you set the power mode to ON and a seat belt is not fastened, a beeper will sound and the indicator will blink. After a few seconds, the beeper will stop and the indicator will come on and remain illuminated until the seat belt is fastened.
The beeper will also the indicator will blin moving until the seat
1About Your Seat Belts
If a rear seat passenger moves around and extends the seat belt, the lockable retractor may activate. If this happens, release the retractor by unfastening the seat belt and allow the belt to retract completely. Then refasten the belt.
1Seat Belt Reminder
The indicator will also come on if a front passenger does not fasten their seat belt within six seconds after the power mode is set to ON.
When no one is sitting in the front passenger’s seat, the indicator will not come on and the beeper will not sound. The indicator also may not come on and the beeper may not sound when the occupant is not heavy enough to trigger the weight sensor. Such occupants (e.g., infants and smaller children) should be moved to the rear seat as a deploying front airbag likely will injure or kill them.
2 Protecting Child Passengers P. 65
Driving Safe

Driving Safe
uuSeat BeltsuAbout Your Seat Belts
■ Automatic Seat Belt Tensioners
The front seats are equipped with automatic seat belt tensioners to enhance safety.
The tensioners automatically tighten the front seat belts during a moderate-to- severe frontal collision, sometimes even if the collision is not severe enough to inflate the front airbags or the knee airbags.
1Automatic Seat Belt Tensioners
The seat belt tensioners can only operate once.
If a tensioner is activated, the SRS indicator will come on. Have a dealer replace the tensioner and thoroughly inspect the seat belt system as it may not offer protection in a subsequent crash.
During a moderate-to-severe side impact, the tensioner on that side of the vehicle also activates.
44

uuSeat BeltsuFastening a Seat Belt
Fastening a Seat Belt
After adjusting a front seat to the proper position, and while sitting upright and well back in the seat:
2 Adjusting the Seats P. 208
Pull out slowly.
Correct
Seated
Posture.
Latch
Plate
Buckle
1. Pull the seat belt out slowly.
2.Insert the latch plate into the buckle, then tug on the belt to make sure the buckle is
secure.
u Make sure that the belt is not twisted or caught on anything.
1Fastening a Seat Belt
No one should sit in a seat with an inoperative seat belt or one that does not appear to be working correctly. Using a seat belt that is not working properly may not protect the occupant in a crash. Have a dealer check the belt as soon as possible.
Never insert any foreign objects into the buckle or retractor mechanism.
Driving Safe

Driving Safe
uuSeat BeltsuFastening a Seat Belt
Lap belt as low as possible
3.Position the lap part of the belt as low as possible across your hips, then pull up on the shoulder part of the belt so the lap part fits snugly. This lets your strong pelvic bones take the force of a crash and reduces the chance of internal injuries.
4.If necessary, pull up on the belt again to remove any slack, then check that the belt rests across the center of your chest and over your shoulder. This spreads the forces of a crash over the strongest bones in your upper body.
■ Adjusting the Shoulder Anchor
The front seats have adjustable shoulder anchors to accommodate taller and shorter occupants.
1.Move the anchor up and down while holding the release button.
2. Position the anchor so that the belt rests
Push across the center of your chest and over your shoulder.
1Fastening a Seat Belt
3WARNING
Improperly positioning the seat belts can cause serious injury or death in a crash.
Make sure all seat belts are properly positioned before driving.
To release the belt, push the red PRESS button and then guide the belt by hand until it has retracted completely.
When exiting the vehicle, be sure the belt is properly stowed so that it will not get caught in the closing door.
1Adjusting the Shoulder Anchor
The shoulder anchor height can be adjusted to four levels. If the belt contacts your neck, lower the height one level at a time.
After an adjustment, make sure that the shoulder anchor position is secure.
46

uuSeat BeltsuFastening a Seat Belt
■ Advice for Pregnant Women
If you are pregnant, the best way to protect yourself and your unborn child when driving or riding in a vehicle is to always wear a seat belt and keep the lap part of the belt as low as possible across the hips.
Wear the shoulder belt across the chest avoiding the abdomen.
Wear
1Advice for Pregnant Women
Each time you have a checkup, ask your doctor if it is okay for you to drive.
To reduce the risk of injuries to both you and your unborn child that can be caused by an inflating front airbag:
•When driving, sit upright and adjust the seat as far back as possible while allowing full control of the vehicle.
•When sitting in the front passenger’s seat, adjust the seat as far back as possible.
Driving Safe
47

Driving Safe
uuSeat BeltsuSeat Belt Inspection
Seat Belt Inspection
Regularly check the condition of your seat belts as follows:
•Pull each belt out fully, and look for frays, cuts, burns, and wear.
•Check that the latch plates and buckles work smoothly and the belts retract easily.
u If a belt does not retract easily, cleaning the belt may correct the problem. Only use a mild soap and warm water. Do not use bleach or cleaning solvents. Make sure the belt is completely dry before allowing it to retract.
Any belt that is not in good condition or working properly will not provide proper protection and should be replaced as soon as possible.
A belt that has been worn during a crash may not provide the same level of protection in a subsequent crash. Have your seat belts inspected by a dealer after any collision.
1Seat Belt Inspection
3WARNING
Not checking or maintaining seat belts can result in serious injury or death if the seat belts do not work properly when needed.
Check your seat belts regularly and have any problem corrected as soon as possible.
48


