- Manuals
- Brands
- Opel Manuals
- Automobile
- OPEL
- Infotainment manual
-
Contents
-
Table of Contents
-
Bookmarks
Quick Links
OPEL ASTRA
Infotainment Manual
Related Manuals for Opel OPEL
Summary of Contents for Opel OPEL
-
Page 1
OPEL ASTRA Infotainment Manual… -
Page 3
Contents Navi 900 IntelliLink ……5 R 4.0 IntelliLink ……85 R300 BT ……..125 Phone holder ……155… -
Page 5: Table Of Contents
Navi 900 IntelliLink Introduction ……..6 Basic operation ……13 Radio ……….. 30 CD Player ……..35 External devices ……38 Navigation ……..43 Speech recognition …… 61 Phone ………. 66 Frequently asked questions ..77 Index ……….80…
-
Page 6: Introduction
Introduction Introduction General information In addition, the Infotainment system is equipped with a Phone portal that The Infotainment system provides allows comfortable and safe use of you with state-of-the-art in-car your mobile phone in the vehicle. infotainment. General information ……. 6 Using the phone projection function, Using the FM, AM or DAB radio you can operate specific applications…
-
Page 7
Introduction Important information on Theft-deterrent feature 9 Warning operation and traffic safety The Infotainment system is equipped with an electronic security system for In some areas one-way streets 9 Warning and other roads and entrances the purpose of theft deterrence. (e.g. -
Page 8
Introduction Control elements overview Centre display with controls… -
Page 9
Introduction X ……….. 11 MENU 10 RADIO ……..30 Turn: mark screen buttons Press: activate radio or If switched off: short press: or menu items; scroll change waveband switch power on through a list of menu If switched on: short press: items;… -
Page 10
Introduction Steering wheel controls Press: confirm selection on the Driver Information Centre Press: display application- specific main menu on the Driver Information Centre ! / # ……..11 Press upwards: increase volume Press downwards: decrease volume In the Driver Information Centre, k / l Press: display menu for Infotainment related information and… -
Page 11
Introduction or deactivate speech For a description of all other controls, recognition ……61 see Owner’s Manual. or activate/deactivate Usage mute function ……11 Switching Infotainment system on/off Press X briefly. After switching on, the last selected Infotainment source becomes active. Automatic switch-off If the Infotainment system is switched on pressing X while the ignition is… -
Page 12
Introduction Auto volume External devices If the mobile phone is connected, press HOME and then select When Auto volume is activated Repeatedly press MEDIA to activate PHONE to display the main menu of 3 26, the volume is adapted the playback mode for a connected the phone portal. -
Page 13: Basic Operation
Basic operation Basic operation Basic operation Touch a screen button or menu item. The corresponding system function is activated, a message is shown, or a The centre display has a touch- submenu with further options is sensitive surface that allows direct Basic operation ……
-
Page 14
Basic operation Touch and hold the element you wish Scrolling lists ● Move the slider of the scroll bar to move until frame marks appear up and down with your finger. around the icons. Move your finger to ● In alphabetically ordered lists, the desired location and release the touch the respective letter in the element. -
Page 15
Basic operation Menu operation Application tray Interaction selector bar The interaction selector bar is located Home screen at the bottom of the screen and accessible from all main menus. The application tray is located in the top centre of the screen and accessible from all main menus. -
Page 16
Basic operation Messages Depending on the application or function currently active, the In the case of a system event, before keyboard menu is displayed the execution of a system function, or differently. due to an outside trigger, e.g. To switch to the symbol keyboard, incoming phone call, you may be select Sym. -
Page 17
Basic operation To confirm your input, select the Editing text Keypad respective confirmation screen To place the cursor, touch the If only a number or PIN code have to button. respective position within the text. be entered, a keypad is displayed. Enter your changes. -
Page 18
Basic operation ● albums or artists If a favourite location is occupied, the To display one row of favourites when favourite screen button displays the an interaction selector bar is shown ● telephone numbers label text of the respective favourite. on the screen: ●… -
Page 19
Basic operation Scrolling through favourites Storing favourites Seek for the station you wish to store as a favourite 3 30. pages Favourites may be stored from the To store this station as a favourite, Home screen, the audio application, The favourites page is visible in the reveal the favourites list and scroll to the navigation application or the one row or the three row view. -
Page 20
Basic operation Example: Destination Retrieving favourites Editing favourites Press HOME to display the Home Display a favourites page (see above) Select SETTINGS on the Home screen and then select NAV. and scroll to the desired favourites screen, Radio and then Manage Select DESTINATION, select page (if necessary). -
Page 21
Basic operation A keyboard opens up with the current To store a favourite in a location Activate the desired number of favourite label text displayed in the beyond the favourites page currently favourites to be displayed. entry field as well as in the label visible, drag it to the p or q symbols Note preview area. -
Page 22
Basic operation The contacts list displayed upon first Select the desired contacts list. The Phone application: access differs depending on the respective list is displayed. application active and the devices Note connected. The system remembers a list chosen within an application. When re- Changing the source entering the contacts list from this To display a contacts list, press… -
Page 23
Basic operation ● in the vehicle contacts list: notes Complete the entry and select Save field to save the contact. ● for POI entries: information on Add to Existing Contact business hours, menu (e.g. The vehicle contacts list is displayed. restaurant), prices etc. -
Page 24
Basic operation Note Delete the whole vehicle contacts list The w screen button is only To delete the whole vehicle contacts displayed if it is possible to add more list, open the vehicle contacts list. information for that data category. Select Change Contacts List on the right side of the screen. -
Page 25: Tone Settings
Basic operation Tone settings Treble Balance and fader In the tone settings menu, the tone Use this setting to enhance or In the illustration at the right side of characteristics can be set. The menu attenuate the high frequencies of the the menu, define the point within the may be accessed from each audio audio sources.
-
Page 26: Volume Settings
Basic operation Surround modes To adjust the degree of volume adaptation, set Auto Volume to one of (if Surround system equipped) the available options. Select one of the screen buttons in Off: no enhancement of volume with the interaction selector bar of the increasing vehicle speed.
-
Page 27
Basic operation Note Valet mode If date information is automatically If valet mode is activated, all vehicle provided, this menu item is not displays are locked and no changes available. may be performed within the system. Select Auto Set at the bottom of the Note screen. -
Page 28
Basic operation To confirm the first input, re-enter the Display Calibrate Touchscreen four-digit code and select Lock. The Select Calibrate Touchscreen to Press HOME and then select system is locked. enter the respective submenu. SETTINGS. Unlocking the system Scroll through the list and select Turn the Infotainment system on. -
Page 29
Basic operation Return to Factory Settings Restore Radio Settings Select Restore Radio Settings to Press HOME and then select reset the following data: SETTINGS. ● tone settings Scroll through the list and select ● volume settings Return to Factory Settings. ●… -
Page 30: Radio
Radio Radio Usage Station search The radio function is part of the Automatic station search AUDIO application. Press Y or Z to play the previous or Usage ………. 30 next station. Station search ……30 Manual station search Radio data system (RDS) …. 31 Press and hold Y or Z.
-
Page 31
Radio Touch the Direct Tune field and then Note Select the desired category. A list of enter the desired frequency. Confirm The currently received station is stations is displayed transmitting a your input. highlighted. programme of the selected type. Select the desired station. Scroll through the list and select the Station lists desired list item. -
Page 32
Radio Advantages of RDS As soon as a radio traffic service station is found, [TP] is highlighted. If ● On the display, the programme no radio traffic service station is name of the station appears found, [ ] remains on the screen. instead of its frequency. -
Page 33: Digital Audio Broadcasting
Radio Digital audio broadcasting If the DAB signal is too weak to not wish DAB reception to be be picked up by the receiver, interrupted by FM traffic Digital audio broadcasting (DAB) is reception is interrupted announcements. an innovative and universal completely.
-
Page 34
Radio received is interrupted when an Set DAB to FM Linking — On or DAB announcement of these categories is to FM Linking — Off. made. L Band Select DAB Announcements to If L Band is activated, the display the DAB categories list. Infotainment system receives an Select the desired categories. -
Page 35: Cd Player
CD Player CD Player General information MP3 and WMA files written in any format other than listed above A CD player for the replay of audio may not play correctly, and their CDs and MP3/WMA CDs is located in file names and folder names may the glovebox.
-
Page 36
CD Player ● Put CDs back in their sleeves Playlist entries must be in the immediately after removing them form of relative paths. from the audio player in order to Note protect them from damage and This chapter only deals with playing dirt. -
Page 37
CD Player Skipping to previous or next track Note For a detailed description of Select t or v to play the previous browsing MP3 CDs 3 39. or next track. Alternatively, turn MENU to skip to Playback order previous or next tracks. Select MENU in the interaction selector bar to display the CD menu. -
Page 38: External Devices
External devices External devices General information Connecting/disconnecting a device To connect the auxiliary device to the An AUX and USB socket for the AUX input socket of the Infotainment connection of external devices is system, use the following cable: located in the centre console. General information …..
-
Page 39: Playing Audio
External devices Connecting/disconnecting a device profiles A2DP and AVRCP can be Files from online shops to which connected wirelessly to the Digital Rights Management (DRM) Connect the USB device or iPod to Infotainment system. has been applied cannot be played. the USB port.
-
Page 40
External devices Repeatedly select MEDIA in the Skipping to previous or next track interaction selector bar or press Select t or v to play the previous MEDIA on the control panel to or next track. activate the desired media source. Alternatively, turn MENU to skip to Example: USB main menu. -
Page 41
External devices Note Alternatively, move the slider on the In USB or iPod playback, the shuffle time bar. function is dependent on the filter Video menu mode selected for song playback, e.g. album, artist, genre. To display the video menu, select MENU in the interaction selector bar. -
Page 42
External devices iPhone: There is no additional app Note required to use Apple CarPlay. Check The application may be launched on the manufacturer’s website automatically upon connection. whether Apple CarPlay is available Starting phone projection with your smartphone. To start the phone projection function, Activating phone projection in the press ;… -
Page 43: Navigation
Navigation Navigation General information Functioning of the navigation system The navigation system will reliably guide you to your destination. The position and movement of the vehicle are detected by the navigation The current traffic situation is taken General information ….. 43 system using sensors.
-
Page 44
Navigation Important information Map data After a timeout of approx. 15 seconds, the application tray and All required map data is stored within TMC traffic information system and the interaction selector bar disappear the Infotainment system. To update dynamic route guidance to show a full screen view of the map. -
Page 45
Navigation Route guidance active ● The arrival time is shown above the arrow symbol. ● The distance to the next turning manoeuvre is shown below the arrow symbol. Map manipulation Scrolling To scroll the map, place your finger anywhere on the screen and move it up, down, left or right depending on the direction in which you want to To return to the current location,… -
Page 46
Navigation To display an overview of the route Audio information Buildings can be displayed in 3D or currently active on the map, select normal view. If Audio Information — On is set, OVERVIEW. information on the station, album or Set 3D Buildings — On or 3D Buildings song currently playing is displayed on The screen button changes to — Off. -
Page 47
Navigation Select Clear All to unselect all Select the desired point of interest. categories. The destination details view is displayed. Information on the current Select Go. location For a detailed description on how to Select MENU in the interaction enter a destination 3 50. selector bar to display the navigation Navigation data management menu. -
Page 48
Navigation Recent destinations list To delete only individual categories, Downloading contacts data select Delete Individual Categories to Select Recent Destinations to display You can exchange your vehicle display a list of POI categories. Select the respective submenu. contacts list data with Infotainment ─… -
Page 49
Navigation user defined POIs can be The additional information and phone downloaded to the Infotainment number strings are optional. If, e.g., system. no additional information is required, «» needs to be entered at the For each POI, you need to define the respective position. -
Page 50: Destination Input
Navigation Organising the POI data in several Downloading the POI data to the Infotainment system subfolders Optionally you can organise the text Connect the USB device with your files in several randomly named user defined POI data to the USB port subfolders (max.
-
Page 51
Navigation Select one of the destinations. The destination details view is displayed. POI list: Touch one of the entry fields next to the address part specifications. A keyboard is displayed. To start route guidance, select Go. For a detailed description on the Address entry mask keyboards 3 16. -
Page 52
Navigation If there is more than one destination For a detailed description on the chapter «Usage» 3 44. Those POIs possible according to the information keyboards 3 16. are selectable as destinations via the entered, a list of all matching POI main category My POIs. -
Page 53
Navigation If POIs at Another Location is Searching POIs via name input selected, a keyboard is displayed. To search for a particular POI, a category or a specific location, select For a detailed description on the Spell Name in the POI main keyboards 3 16. -
Page 54
Navigation Select one of the addresses stored for While under active route guidance, the contact. The destination details select DESTINATION in the view is displayed. interaction selector bar of the map view. To start route guidance, select Go. Alternatively, touch the arrow symbol Waypoint trips indicating your next turning manoeuvre on the right side of the… -
Page 55
Navigation New destination To set a new destination, you may either cancel route guidance to the current destination and then enter a new destination. Or you may directly enter a new destination. While under active route guidance, select DESTINATION in the interaction selector bar of the map view. -
Page 56
Navigation To initiate a phone call to the selected Guidance Starting and cancelling route location, select Call. guidance Route guidance is provided by the Note navigation system through visual Starting route guidance The Call screen button is only instructions and voice prompts (voice To start route guidance to a new available if a phone number is stored guidance). -
Page 57
Navigation Select END in the interaction Voice prompts during phone calls Alternatively, select MENU in the selector bar. interaction selector bar and then Select MENU in the interaction select Traffic to display the respective selector bar and then select Navigation voice settings submenu. -
Page 58
Navigation By default, the list is sorted by If you wish slow traffic to be generally Route settings distance from the vehicle location. To avoided, set Avoid Slow Traffic to On. Select MENU in the interaction sort the list alphabetically, select Select Automatically Avoid Traffic or selector bar and then select Routing Sort in the top line of the screen. -
Page 59
Navigation Route modification Excluding streets from route guidance To modify the route during active After route guidance has been route guidance, touch the arrow started, you may exclude streets from symbol indicating your next turning the previously calculated route. The manoeuvre on the right side of the route is then recalculated bypassing screen. -
Page 60
Navigation Displaying the waypoint list Each list entry may show the following Select OPTIMISE in the interaction information: selector bar of the route guidance If you are in a waypoint trip, the route menu. guidance menu comprises additional ● name or address of the waypoint menu functions for waypoint trip Wait until the waypoints list has been ●… -
Page 61: Speech Recognition
Speech recognition Speech recognition General information system functions, the speech recognition does not start until it has Embedded speech recognition been activated. Important information The embedded speech recognition of General information ….. 61 Language support the Infotainment system enables you ●…
-
Page 62
Speech recognition E.g., if the display is currently set to <house number> <street> <city> Confidence Threshold English and you want to enter the Depending on the option selected in ● Denmark, Italy, Netherlands, name of a city located in France, you the corresponding submenu, the Poland, Portugal, Russia, Spain, need to change the display language… -
Page 63
Speech recognition Prompt Length The availability of this function You can now say a voice command to The length and the level of detail of depends on your smartphone. For initiate a system function (e.g. playing the questions and statements the more information on compatibility, a preset radio station). -
Page 64
Speech recognition Interrupting a voice prompt In the following situations, a dialogue ● The voice prompt can be sequence is automatically cancelled: interrupted by pressing w again. As an experienced user, you can interrupt a voice prompt by briefly ● If you do not say any command ●… -
Page 65
Speech recognition until enough details are gathered. If The «Back» command In addition, a message in the Driver the phone number has been saved To return to the previous menu, Information Centre informs you when with a name and a place, the direct optionally: say «Back», press k the voice pass-thru application is command should include both, for… -
Page 66: Phone
Phone Phone General information Important information for operation and traffic safety The Phone portal provides you with the possibility of having mobile phone 9 Warning conversations via a vehicle General information ….. 66 microphone and the vehicle Mobile phones have effects on Bluetooth connection ….
-
Page 67: Bluetooth Connection
Phone system) and connecting of the Infotainment system interference is caused by the Bluetooth devices to the Infotainment automatically establishes a mobile phone or if dangerous system are carried out. connection. situations can occur. ● Bluetooth operation considerably Bluetooth settings menu drains the device’s battery.
-
Page 68
Phone Compare the PIN code (if confirm the respective message Connecting a paired device demanded) and confirm the on your smartphone. 1. Press HOME and then select the messages on the Note SETTINGS icon. Infotainment system and the For the contacts to be read by the Select Bluetooth to display the Bluetooth device. -
Page 69: Emergency Call
Phone Deleting a device 9 Warning 9 Warning 1. Press HOME and then select the SETTINGS icon. Bear in mind that you can make Do not end the call until you are and receive calls with the mobile requested to do so by the Select Bluetooth to display the phone, if it is in a service area with emergency call centre.
-
Page 70
Phone Note Enter the desired number and select Quick function icon The phone main menu is only Call. The number is dialled. If there is only one number stored for available, if a mobile phone is a contact, a quick dial icon is To dial a speed dial number, enter the connected to the Infotainment displayed next to the respective entry… -
Page 71
Phone Incoming phone call Changing the ringtone Press HOME and then select the Taking a phone call SETTINGS icon. If a radio or media source is active Select Bluetooth to display the when a call comes in, the audio respective submenu and then select source is muted and remains muted Ringtones. -
Page 72
Phone Ending a phone call To cancel the initiation of the second To end just one of the calls, select call and return to the in-call view, A next to the respective call. Select End to end the call. select Current Call. Deactivating the microphone Conference call Both calls are displayed in the in-call… -
Page 73: Text Messages
Phone Prerequisites The following prerequisites must be met in order to use the TEXT application: ● The Bluetooth function of the respective phone must be activated (see user guide of the device). ● Dependent on the phone, it may be required to set the device to «visible»…
-
Page 74
Phone Note Select INBOX in the interaction Depending on the phone, not all text selector bar. The text messages messages stored on the phone are stored on the respective phone are displayed in the inbox. displayed in a list. Select the desired message to To listen to a message, select 3 display the message view. -
Page 75: Mobile Phones And Cb Radio
Phone Device list Mobile phones and CB radio equipment Select PHONES to display the device list. Installation instructions and For a detailed description 3 67. operating guidelines Text settings The vehicle specific installation instructions and the operating Select Settings to enter the settings guidelines of the mobile phone and menu.
-
Page 76
Phone Seek advice on predetermined Caution installation points for the external antenna or equipment holder and Mobile telephones and radio ways of using devices with a equipment may lead to transmission power exceeding malfunctions in the vehicle 10 watts. electronics when operated inside Use of a handsfree attachment the vehicle with no exterior without external antenna with mobile… -
Page 77: Frequently Asked Questions
Frequently asked questions Frequently asked Frequently asked Favourites questions questions What can be stored as a favourite? Up to 60 favourites of almost all elements can be stored, e.g. Phone destinations, phone contacts, Frequently asked questions ..77 How can I pair my phone with the playlists, radio stations, etc.
-
Page 78
Frequently asked questions Where are the favourites stored How can I cancel active route Other and how can I recall them? guidance? How can I improve the The favourites are stored in the To cancel route guidance, select performance of the voice favourites list. -
Page 79
Frequently asked questions… -
Page 80: Index
Index Bass……….25 Bluetooth connection….67 Activating AUX……39 Bluetooth music……38 Activating Bluetooth music… 39 Activating CD player….. 36 Activating phone projection..41 Category list……..30 Activating radio……30 CD player……..35 Activating the Infotainment system 11 Character modifiers…… 16 Activating the navigation system.
-
Page 81
Radio……… 30 Mobile phones and CB radio USB……….. 38 equipment …….. 75 Emergency call……69 Guidance ……..56 Movie files……..38 EQ……….25 Movies………. 41 Equaliser……..25 Mute……….11 Home button……… 15 Home screen…….. 15 Fader……….25 Navigation……..56 Favourites……..17 Contacts…… -
Page 82
CD……….36 Phone projection……41 Retrieving favourites….. 17 Contacts……..21 Playing audio…….. 39 Return to factory settings….26 Favourites……… 17 Playing movies……41 Ringtone……..69 Infotainment system….11 POIs……….50 Route guidance……56 Keyboards……… 16 Route style……..56 Navigation system….. 44 Radio Phone…….. -
Page 83
Touch screen…….. 13 Mute function……11 Touch screen calibration….26 Setting the volume….11 Touch screen operation….13 Volume settings……26 TP……….31 Traffic incidents……56 Waveband selection….. 30 Traffic Programme……31 Waypoint list……… 56 Treble……….. 25 Waypoint trip……… 50 Turn list……… -
Page 85: R 4.0 Intellilink
R 4.0 IntelliLink Introduction ……..86 Radio ……….. 99 External devices ……105 Speech recognition ….112 Phone ……..113 Index ………. 122…
-
Page 86: General Information
Introduction Introduction General information The well-thought-out design of the control elements, the touch screen The Infotainment system provides and the clear displays enable you to you with state-of-the-art in-car control the system easily and infotainment. intuitively. General information ….. 86 Using radio tuner functions, you may Note Theft-deterrent feature ….
-
Page 87
Introduction Radio reception Radio reception may be disrupted by static, noise, distortion or loss of reception due to: ● changes in distance from the transmitter ● multipath reception due to reflection ● shadowing Theft-deterrent feature The Infotainment system is equipped with an electronic security system for the purpose of theft deterrence. -
Page 88
Introduction Control elements overview Control panel… -
Page 89
Introduction Display / Touch screen ..93 Home menu ……93 Radio: short press: skip to Short press: open Home next station; long press: menu ……..91 Screen buttons for access to: seek up ……… 99 Long press: open phone AUDIO: audio functions External devices: short projection function (if… -
Page 90
Introduction Steering wheel audio controls With radio active: turn or deactivate speech upwards/downwards to recognition ……112 select next/previous or activate/deactivate preset radio station ….99 mute function ……91 With external device active: turn upwards/ downwards to select next/ previous track/chapter/ picture ……… -
Page 91
Introduction Usage Setting the volume Volume limitation at high temperatures Turn X. The current setting is shown Control elements At very high temperatures inside the on the display. vehicle, the Infotainment system The Infotainment system is operated When the Infotainment system is limits the maximum adjustable via function buttons, a touch screen switched on, the last selected volume… -
Page 92
Introduction Select Source on the screen to GALLERY PHONE display the interaction selector bar. Select GALLERY to open the picture Before the phone portal can be used, and movie menu for files stored on an a connection has to be established external device as USB stick or between the Infotainment system and smartphone. -
Page 93
Introduction PROJECTION OnStar 9 screen button To show specific apps of your To display a menu with the OnStar smartphone display on the Wi-Fi settings, select OnStar. Infotainment system, connect your For a detailed description, see smartphone. Owner’s Manual. Select PROJECTION to start the projection function. -
Page 94
Introduction Selecting or activating a screen Note Note In subsequent chapters the Constant pressure must be applied button or menu item operating steps for selecting and and the finger must be moved at activating a screen button or menu constant speed. item via the touchscreen will be All other items are rearranged. -
Page 95
Introduction To scroll through a list of menu items, Scrolling pages Note you may optionally: In subsequent chapters the operating steps for scrolling pages ● Place your finger anywhere on via the touch screen will be the screen and move it upwards described as «…scroll to…page…». -
Page 96
Introduction Midrange Volume settings Use this setting to enhance or Adjusting the maximum startup attenuate the midrange frequencies of the audio source. volume Touch + or — to adjust the setting. Press ; and then select Settings. Select Radio, scroll through the list Treble and then select Max Startup Volume. -
Page 97
Introduction Activating or deactivating the Volume of traffic announcements audible touch feedback function To adjust the volume of traffic announcements, set the desired If the audible touch feedback function volume while a traffic announcement is activated, each touch of a screen is given out by the system. -
Page 98
Introduction For time and date to be set manually, To reset tone and volume settings, select Off — Manual. If Auto Set is set delete all favourites, and erase the to Off — Manual, the submenu items ringtone selection, select Restore Set Time and Set Date become Radio Settings. -
Page 99: Station Search
Radio Radio Usage Station search Activating radio Automatic station search Press ; and then select AUDIO. The Usage ………. 99 audio main menu last selected is Station search ……99 displayed. Favourite lists ……101 Select Source in the bottom line of the active radio main menu to open the Radio data system (RDS) ..
-
Page 100
Radio Note Station lists Category lists FM waveband: when the RDS Select Menu in the bottom line of the Numerous radio stations broadcast a function is activated, only RDS active radio main menu to open the PTY code, which specifies the type of stations 3 102 are searched for, and corresponding waveband-specific programme transmitted (e.g. -
Page 101: Favourite Lists
Radio Note Favourite lists To store the currently active radio The currently received radio station station to a preset screen button: Stations of all wavebands can be is indicated by the l symbol next to touch and hold the desired screen stored manually in the favourite lists.
-
Page 102
Radio Radio data system (RDS) RDS configuration Note In the station list, TP is displayed RDS is a service of FM stations that Touch Menu in the bottom line of the next to the stations providing a traffic considerably facilitates the finding of FM radio main menu to open the programme. -
Page 103
Radio Select Menu in the bottom line of the ● Besides high-quality digital audio ● If the DAB signal is reflected by FM radio main menu to open the services, DAB is also able to natural obstacles or buildings, corresponding waveband-specific transmit programme-associated the reception quality of DAB is submenu and scroll to Region… -
Page 104
Radio Select Menu in the bottom line of the DAB-FM Linking Note DAB radio main menu to open the The content available depends on If this function is activated, the device corresponding waveband-specific the station and region. switches over to a corresponding FM submenu. -
Page 105
External devices External devices General information Connecting a device To connect the auxiliary device to the An AUX and USB socket for the AUX input socket of the Infotainment connection of external devices is system, use a 3-pole connector for located in the centre console. -
Page 106
External devices Note USB Auto Launch Connecting a device Not all MP3 players, USB drives, By default, the USB audio menu is For a detailed description on how to iPod models or smartphones are displayed automatically as soon as a establish a Bluetooth connection supported by the Infotainment USB device is connected. -
Page 107
External devices Audio files The playable audio formats are .mp3, .ac3, .aac and .wma. The playable audio file formats are .mp3, .wma, .ogg and .wav. The displayable subtitle format is .smi. When playing a file with ID3 tag information, the Infotainment system can display information, e.g. -
Page 108: Displaying Pictures
External devices Returning to the beginning of the main screen to display the respective Note current track audio menu and then select Browse For your safety, some features are Music. disabled while your vehicle is in Touch t after 2 seconds of the track motion.
-
Page 109
External devices Function buttons Picture menu Display settings Select Display Settings to open a Select Menu in the bottom line of the Full screen mode submenu for the adjustment of screen to display the Picture Menu. Select x to display the picture in full brightness and contrast. -
Page 110
External devices Returning to the beginning of the Display settings current movie Select Display Settings to open a Touch d after 5 seconds of the movie submenu for adjustment of brightness and contrast. playing. Touch + and — to adjust the settings. Fast forwarding and rewinding Touch and hold d or c. -
Page 111
External devices iPhone: There is no additional app Starting phone projection required to use Apple CarPlay. Check To start the phone projection function, on the manufacturer’s website press ; and then select whether Apple CarPlay is available PROJECTION. with your smartphone. Note Activating phone projection in the If the application is recognised by… -
Page 112
Speech recognition Speech recognition General information Adjusting the volume of voice prompts The voice pass-thru application of the Turn m on the control panel or press Infotainment system allows access to + / — on the right side of the steering the speech recognition commands on wheel to increase or decrease the General information …. -
Page 113
Phone Phone General information Important information for operation and traffic safety The Phone portal provides you with the possibility of having mobile phone 9 Warning conversations via a vehicle General information ….113 microphone and the vehicle Mobile phones have effects on Bluetooth connection …. -
Page 114
Phone Select Bluetooth to display the been connected previously, the interference is caused by the Bluetooth menu. Infotainment system establishes mobile phone or if dangerous the connection automatically. situations can occur. ● Bluetooth operation considerably drains the device’s battery. Bluetooth Therefore, connect the device to The Phone portal is certified by the the USB port for charging. -
Page 115
Phone Confirm the messages on the messages displayed on the Infotainment system and the Bluetooth device. Bluetooth device. If this function is not supported by ● If SSP (secure simple the Bluetooth device, a pairing) is not supported: corresponding message is displayed. -
Page 116
Phone Disconnecting a device The information displayed includes phone networks; it is possible that Device Name, Address, and PIN they cannot be made when certain Press ; and then select SETTINGS. Code. network services and/or telephone Select Bluetooth and then Device functions are active. -
Page 117
Phone Operation Note Many functions of the mobile phone Not every mobile phone supports all can now be controlled via the phone As soon as a connection via functions of the Phone portal. main menu (and associated Bluetooth has been set up between Therefore deviations from the range submenus), and via the phone- your mobile phone and the… -
Page 118
Phone Select Contacts in the phone main Search menu For example: If the contact you menu. If the phone book contains a great wish to search for starts with ‘g’ number of entries, you can search for select the ghi screen button. the desired contact via the search All contacts containing one of the menu. -
Page 119
Phone Using speed dial numbers Speed dial numbers that are stored on the mobile phone can also be dialled using the keypad of the phone main menu. Press ; and then select PHONE. Touch and hold the respective digit on the keypad to initiate the call. -
Page 120
Phone Select one of the ringtones. To reactivate the microphone, deactivate n. Functions during a call Ending a phone call During an ongoing phone call the Select J to end the call. phone main menu is displayed. Voice mail box You may operate your voice mail box via the Infotainment system. -
Page 121
Phone Mobile phones and CB radio ways of using devices with a Caution transmission power exceeding equipment 10 watts. Mobile telephones and radio Installation instructions and Use of a handsfree attachment equipment may lead to without external antenna with mobile operating guidelines malfunctions in the vehicle telephone standards GSM… -
Page 122
Index Activating AUX audio….107 Call Activating Bluetooth music..107 Functions during a call…. 117 Activating iPod audio….107 Incoming call……117 Activating phone……117 Initiating a phone call….117 Activating phone projection..110 Ring tone……… 117 Activating radio……99 Call history…….. -
Page 123
Menu……… 93 Digital audio broadcasting Phone……..117 (DAB)……..103 General information..105, 112, 113 Radio……… 99 Favourite lists……101 AUX……… 105 Intellitext……..103 Bluetooth……… 105 Radio data system (RDS)..102 DAB……… 103 Pairing……..114 Regional……..102 Infotainment system….86 Phone Regionalisation……. -
Page 124
Switching the Infotainment system on……..91 Voice recognition……112 System settings……97 Volume Auto volume……96 Maximum startup volume..96 Theft-deterrent feature ….87 Mute function……91 Tone settings…….. 95 Ring tone volume…… 96 Touch beep volume…… 96 Setting the volume….91 TP volume…….. -
Page 125
R300 BT Introduction …….. 126 Basic operation ……132 Radio ……… 136 External devices ……141 Speech recognition ….144 Phone ……..145 Index ………. 152… -
Page 126
Introduction Introduction General information Note This manual describes all options The Infotainment system provides and features available for the you with state-of-the-art in-car various Infotainment systems. infotainment. Certain descriptions, including those General information ….126 Using the FM, AM or DAB radio for display and menu functions, may Theft-deterrent feature …. -
Page 127
Introduction Radio reception Radio reception may be disrupted by static, noise, distortion or loss of reception due to: ● changes in distance from the transmitter ● multi-path reception due to reflection ● shadowing Theft-deterrent feature The Infotainment system is equipped with an electronic security system for the purpose of theft deterrence. -
Page 128
Introduction Control elements overview Control panel… -
Page 129
Introduction X ……… 130 PHONE Softkeys Short press: open phone Favourites: press: select If switched off: short press: menu ……..145 favourites; press and hold: switch power on save radio stations as If switched on: short press: Long press: activate favourites …… -
Page 130
Introduction Steering wheel audio controls With radio active: turn Usage upwards/downwards to select next/previous Control elements preset radio station ….. 136 The Infotainment system is operated With Phone portal active via function buttons, a MENU knob and call list open: turn and menus that are shown on the upwards/downwards to display. -
Page 131
Introduction Setting the volume External devices Press MEDIA repeatedly to activate Turn m; the current setting is shown the playback mode for a connected on the display. external device (e.g. USB device, When the Infotainment system is Bluetooth device). switched on, the last selected volume For a detailed description on is set, provided that the volume is connecting and operating external… -
Page 132
Basic operation Basic operation Basic operation Note In subsequent chapters, the operating steps for selecting and Control panel activating a screen button or menu item will be described as «…select Basic operation ……132 MENU knob <button name>/<item name>». Tone settings ……132 The MENU knob is one of the central BACK button Volume settings …… -
Page 133
Basic operation Press MENU and select Tone The EQ options offer optimised bass, Scroll through the list and select Settings to open the tone settings middle, and treble presettings for the Settings. menu. relevant style of music. Select Maximum Startup Volume. Turn MENU to toggle through the Set the desired value. -
Page 134
Basic operation Select Time and Date. Language Valet mode Press MENU to open the respective If valet mode is activated, all vehicle Set Time audio menu. displays are locked and no changes Select Set Time to enter the may be performed within the system. respective submenu. -
Page 135
Basic operation Forgotten PIN code To reset the PIN code to the default setting, contact your workshop. -
Page 136
Radio Radio Usage Manual tuning Press MENU to open the waveband menu and then select Manual Tuning. Depending on the waveband Usage ……..136 selected, a list of all frequencies is Station search ……136 displayed. Favourite lists ……137 Select the desired frequency. -
Page 137
Radio Note Note The Categories list item is only The active favourite is highlighted. available for the FM and the DAB Defining the number of favourites wavebands. shown Press MENU to display the respective Press MENU, scroll through the list waveband menu and select and select Set Number of Favourite Categories. -
Page 138
Radio Advantages of RDS Note Region If RDS is set to Off, RDS functions Sometimes RDS stations broadcast ● On the display, the programme are not available. regionally different programmes on name of the station appears different frequencies. Traffic Programme (TP) instead of its frequency. -
Page 139
Radio ● Besides high-quality digital audio ● If the DAB signal is reflected by categories. If you activate some or all services, DAB is also able to natural obstacles or buildings, categories, the currently received transmit programme-associated the reception quality of DAB is DAB service is interrupted when an data and a multitude of other data improved, whereas AM or FM… -
Page 140
Radio DAB to FM Linking If this function is activated, the device switches over to a corresponding FM station of the active DAB service (if available) when the DAB signal is too weak to be picked up by the receiver. Set DAB to FM Linking to On or Off. -
Page 141
External devices External devices General information Connecting/disconnecting a device To connect the auxiliary device to the An AUX and USB socket for the AUX input socket of the Infotainment connection of external devices is system, use the following cable: located in the centre console. General information …. -
Page 142
External devices Note Bluetooth Caution Not all MP3 players, USB drives, Bluetooth enabled audio sources iPod models or smartphones are Avoid disconnecting the device (e.g. music mobile phones, MP3 supported by the Infotainment during playback. This may players featuring Bluetooth, etc.), system. -
Page 143
External devices Note To play the songs on the device in Some files may not be played random order, set Shuffle Songs to properly. This might be due to a different recording format or the To play the songs in normal order, set condition of the file. -
Page 144
Speech recognition Speech recognition General information Adjusting the volume of voice prompts The voice pass-thru application of the Turn m on the control panel or press Infotainment system allows access to + / — on the right side of the steering the speech recognition commands on wheel to increase or decrease the General information …. -
Page 145
Phone Phone General information Important information for operation and traffic safety The Phone portal provides you with the possibility of having mobile phone 9 Warning conversations via a vehicle General information ….145 microphone and the vehicle Mobile phones have effects on Bluetooth connection …. -
Page 146
Phone connecting of the Bluetooth devices the name and PIN code of the interference is caused by the with the Infotainment system are Infotainment system. mobile phone or if dangerous carried out. 2. Start Bluetooth searching on the situations can occur. Bluetooth device to be paired. -
Page 147
Phone Note The device is disconnected. 9 Warning For the contacts to be read by the Deleting a device Infotainment system, they must be Bear in mind that you can make stored in the phone memory of the Press PHONE, scroll through the list and receive calls with the mobile mobile phone. -
Page 148
Phone Scroll through the list and select the 9 Warning desired contacts entry. The contact is displayed. Do not end the call until you are Select one of the phone numbers requested to do so by the stored under that contact. The emergency call centre. -
Page 149
Phone The screen button changes to Ending the phone calls Unmute. The calls can be ended one at a time. To reactivate the microphone, select Select End. The call currently active Unmute. is ended. Deactivating the handsfree function Text messages To continue the conversation on your To answer the call, select Answer. -
Page 150
Phone ● The respective phone must be Mobile phones and CB radio Seek advice on predetermined paired and connected to the installation points for the external equipment Infotainment system. For a antenna or equipment holder and detailed description 3 146. ways of using devices with a Installation instructions and transmission power exceeding… -
Page 151
Phone Caution Mobile telephones and radio equipment may lead to malfunctions in the vehicle electronics when operated inside the vehicle with no exterior antenna, unless the above mentioned regulations are observed. -
Page 152
Index Activating AUX……143 Emergency call……147 Activating Bluetooth music..143 Activating radio……136 Favourite lists……137 Activating the Infotainment Retrieving stations….137 system……..130 Storing stations……. 137 Activating the phone portal..148 File formats Activating USB……143 Audio files…….. 141 Audio files…….. -
Page 153
Mobile phones and CB radio Phone call Region……..137 equipment ……150 Initiating……..148 Regionalisation……137 Mute……….130 Rejecting……… 148 Restore factory settings….133 Taking……..148 Retrieving stations…… 137 Playing audio……143 Ringtone……..148 Operation……..148 AUX……… 143 Bluetooth music……. 143 Radio Speech recognition….. -
Page 154
Infotainment system….130 Menu……..132 Phone……..148 USB……… 143 USB……….141 Valet mode Locking……..133 Unlocking…….. 133 Voice recognition……144 Volume Auto volume control….133 Maximum startup volume..133 Mute function……130 Setting the volume….130 Speed compensated volume. . 133 Volume limitation at high temperatures…… -
Page 155: Phone Holder
Phone holder Phone holder ……156 Index ………. 160…
-
Page 156
Phone holder Phone holder Phone holder 9 Warning Devices attached to the phone General information holder must be used in a way that Phone holder ……156 driver distraction is avoided and the vehicle can be driven safely at all times. You must always comply with the respective laws and regulations of the country where you are driving. -
Page 157
Phone holder Usage 4. Adjust the width of the phone holder to the width of the phone by Adapting the phone holder to the size pushing together the shifters. of the smartphone Attaching the phone holder to the power connector 2. -
Page 158
Phone holder 1. Press button (2) to disengage Connecting the smartphone with the power supply shifter. 2. Insert the smartphone in a way that the power supply of the smartphone is accessible and no buttons are pressed. 2. Attach the phone holder to the power connector and press both locking shifters (4) to lock. -
Page 159
Phone holder Removing the phone from the phone holder 1. Disconnect the power supply from the phone. 2. Press the release button (3) and remove the phone holder. 2. Press button (2) on left upper side to disengage shifter for height adjustment. -
Page 160
Index Phone holder……156… -
Page 161
Copyright by ADAM OPEL AG, Rüsselsheim, Germany. The information contained in this publication is effective as of the date indicated below. Adam Opel AG reserves the right to make changes to the technical specifications, features and design of the vehicles relative to the information in this publication as well as changes to the publication itself.

130
Информационно-развлекательная система
Информационно-
развлекательная
система
Введение ……………………………. 130
Радиоприемник …………………… 130
Система воспроизведения
звука …………………………………… 131
Информационно-
развлекательная система на
задних сиденьях ………………….. 131
Телефон ……………………………… 132
Введение
Порядок работы
Порядок работы информационно-
развлекательной системы описан
в ее руководстве.
Радиоприемник
Прием радиосигналов
При радиоприеме возможны шипе‐
ние, свист, искажения или пере‐
рывы в вещании из-за
■ изменения расстояния до пере‐
датчика,
■ многократного приема отражен‐
ных сигналов,
■ экранирования.
Назад
к
обзору
Manufacturer: OPEL, Model Year: 2017,
Model line: ASTRA J,
Model: OPEL ASTRA J 2017
Pages: 185, PDF Size: 2.62 MB
Page 1 of 185
 ASTRAРуководство по информационно-развлекательной системе")
Page 2 of 185
")
Page 3 of 185
 Navi 950/650 / CD 600..................5
CD 400/300 .................................. 91
CD 400plus ................................ 131
FlexDock .................................... 181Содерж�")
Page 4 of 185
")
Page 5 of 185
 Введение...................................... 6
Основные операции
управления ................................. 17
Радиоприемник ........................")
Page 6 of 185
 6ВведениеВведениеОбщие сведения..........................6
Функция защиты от кражи ...........7
Общий обзор органов
управлени")
Page 7 of 185
 Введение7данной страны, наличия
специального оборудования или
аксессуаров.
Важная информация о работе
систе")
Page 8 of 185
 8ВведениеОбщий обзор органов управления
Navi 950 / 650")
Page 9 of 185
 Введение91;
Доступ к начальной
странице .............................. 17
2 SRCE (Источник)
Нажмите для
переключения между
разл�")
Page 10 of 185
 10Введение11 CONFIGОткрывает меню
настроек ............................... 22
12 r
CD/MP3/WMA:
запустить/
приостановить
воспроизведени�")
- Load next 10 pages
View, print and download for free: OPEL ASTRA J 2017 Руководство по информационно-развлекательной системе (in Russian), 185 Pages, PDF Size: 2.62 MB. Search in OPEL ASTRA J 2017 Руководство по информационно-развлекательной системе (in Russian) online. CarManualsOnline.info is the largest online database of car user manuals. OPEL ASTRA J 2017 Руководство по информационно-развлекательной системе (in Russian) PDF Download.
All product names, logos, and brands are property of their respective owners.
Privacy Policy | About Us & Contact
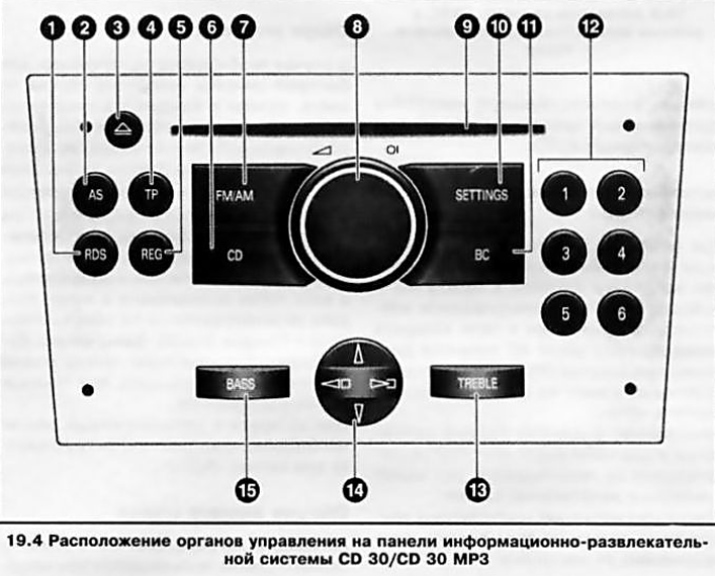
Расположение органов управления на панели информационно-развлекательной системы приведено на иллюстрации 19.4, к которой относятся все встречающиеся в тексте ссылки.
Активация/деактивация аудиосистемы
Активация информационно-развлекательной системы производится нажатием на центральную кнопку поворотного регулятора громкости (8). Система будет активирована в режиме воспроизведения, который был установлен перед деактивацией системы.
Для выключения системы повторно нажмите кнопку (8).
Замечание: Если активировать информационно-развлекательную систему при выключенном зажигании, то система автоматически отключится спустя 1 час.
Кроме того, предусмотрена возможность активации/деактивации системы при включении/выключении зажигания (функция автоматического включения) — для управления в этом режиме необходимо не отключая аудиосистему выключить зажигание — система деактивируется. При последующем включении зажигания аудиосистема будет активирована в том режиме, который был настроен до выключения зажигания.
Эта функция устанавливается при заводских настройках системы и активируется по умолчанию. В случае необходимости ее можно отключить — аудиосистема будет активироваться/деактивироваться только нажатием кнопки (8).
Для деактивации функции автоматического включения:
- Нажмите кнопку SETTINGS (10) — на дисплее появится надпись -Audio»;
- Нажмите нижний сектор 4-позицион-ного переключателя (14) — на дисплее появится надпись «System»;
- Последовательно нажимая на правый сектор 4-позиционного переключателя (14) выберите в меню пункт «Ign.Logic ON/OFF»;
- Нажимая на верхний или нижний сектор 4-позиционного переключателя (14) выберите необходимую настройку:
- при выборе «Ign.Logic ON» функция автоматического включения активирована;
- при выборе «Ign.Logic OFF» функция автоматического включения деактивирована.
Спустя примерно 6 секунд после последнего нажатия на кнопки дисплей вернется в режим индикации основного меню.
Замечание: При отключении аккумуляторной батареи и ее повторном подключении функция автоматического включения будет вновь активирована.
Регулировка громкости звучания
Регулировка громкости звука производится вращением рукоятки регулятора громкости (8).
Замечание: На моделях, оборудованных системой контроля уровня звука SSV (Speed Sensitive control Volume), громкость воспроизведения аудиосистемы будет регулироваться в автоматическом режиме в зависимости от скорости движения автомобиля.
При активации информационно-развлекательная система начинает воспроизводить звук с последней настроенной громкостью. При помощи соответствующего меню (см. ниже) можно заранее настроить уровень максимальной громкости при включении. Выбранный уровень максимальной громкости при активации информационно-развлекательной системы будет установлен только в том случае, если громкость звука перед выключением системы была выше этого показателя, при этом информационно-развлекательная система должна находиться в выключенном состоянии в течение не менее 5 минут при выключенном зажигании.
В случае необходимости звук можно отключить, не отключая систему в целом (блокировка звука). Для этого необходимо удерживать в нажатом положении более 2 секунд кнопку регулятора громкости (8) — на дисплее появится надпись -Mute» и источники звука отключаются.
Замечание: При приеме аудиосистемой сигнала службы дорожных сообщений (см. ниже) блокировка звука автоматически снимается.
Для снятия блокировки звука необходимо нажать на кнопку или повернуть рукоятку регулятора громкости (8) — на дисплей будет выведена индикация текущего режима воспроизведения.
Настройка параметров звучания
Настройка параметров звучания производится через соответствующее меню и кнопками «BASS» (15) «TREBLE» (13) на панели управления информационно-развлекательной системы.
Для входа в меню настроек параметром звучания необходимо нажать кнопку «SETTINGS» (10) — на дисплее появится надпись «Audio». Если на дисплее появится надпись «Settings», нажмите на нижний сектор 4-позиционного переключателя (14) чтобы перейти к пункту меню «Audio».
Выбор подлежащих регулировке параметров звучания производится последовательным нажатием на правый/левый сектор 4-позиционного переключателя (14) — в поле окна дисплея будут воспроизводиться названия выбранного параметра в следующей последовательности:
FADER (баланс громкости передних и задних громкоговорителей) (при соответствующей комплектации) <-> BALANCE (баланс громкости левых и правых громкоговорителей) <-> SOUND (выбор режима эквалайзера) <-> ТА VOLUME (громкость приёма дорожных сообщений) <-> SDVC (система автоматической регулировки громкости в зависимости от скорости движения) <-> EXT.IN.VOL. (громкость воспроизведения сигнала от внешнего источника, например, мобильного телефона) <-> ON VOLUME (громкость звука при активации аудиосистемы) <-> FADER <-> РТУ <-> и т.д.
После выбора нужного параметра его регулировка осуществляется нажатием на верхний/нижний сектор 4-позиционного переключателя (14). Настройка параметров FADER, BALANCE, , EXT.IN.VOL., ON VOLUME осуществляется при помощи условных единиц от -12 до +12. При выборе нужного значения оно автоматически вносится в память системы.
Замечание: Новая минимальная громкость трансляции дорожных сообщений (при настройке параметра ТА VOLUME) будет установлена только в том случае, если она ниже ранее установленной минимальной громкости трансляции дорожных сообщений.
При выборе параметра SOUND настройки эквалайзера после каждого нажатия кнопки переключаются между 5 предварительно настроенными режимами — в поле окна дисплея высвечивается соответствующая надпись, например «Rock» или «Jazz».
При помощи параметра SDVC можно отрегулировать уровень компенсации дорожного шума, выбрав одно из значений от 0 до 5.
Выход из режима настройки производится нажатием кнопки «SETTINGS» (10) — на дисплее высветится индикация выбранного режима воспроизведения. Выход из меню настройки может произойти автоматически по сигналу таймера при не использовании настроек более 3 секунд.
Замечание: При выходе из меню по сигналу таймера на дисплеях ТЮ и BID высветится надпись «Audio», а затем название текущего источника аудиосигнала — на дисплее GID появится индикация общего меню настроек «Settings».
Тембр высоких и низких частот может быть отрегулирован при помощи заранее настроенных режимов эквалайзера (см. выше) или в ручном режиме настройки.
Замечание: При настройке в ручном режиме ранее установленный режим эквалайзера отменяется.
Для ручной настройки тембра низких частот необходимо нажать кнопку «BASS» (15) — в окне дисплея высветиться соответствующая надпись и ранее выбранный уровень тембра низких частот. Регулировка осуществляется нажатием на верхний/нижний сектор 4-позиционно-го переключателя (14). Настройка осуществляется при помощи условных единиц от -12 до +12. При выборе нужного значения оно автоматически вносится в память системы.
Замечание: Регулировка тембра низких частот распространяется на выбранный в данный момент источник аудиосигнала и запоминается отдельно для радиоприёмника и для проигрывателя компакт-дисков.
Выход из режима настройки производится повторным нажатием на кнопку «BASS» или автоматически по сигналу таймера при не использовании настроек более 3 секунд.
Ручная настройка высоких частот производится аналогично настройке низких частот при нажатии кнопки «TREBLE» (13).
228 страниц подробных инструкций и пользовательских руководств по эксплуатации
 07:36
07:36
Opel Zafira — самый популярный минивэн
 10:41
10:41
Опель Зафира ВЕРНУЛСЯ! Теперь это конкурент Фольксваген Мультивен. Лиса рулит
 12:42
12:42
Opel Zafira Family / Подержанные автомобили
 19:34
19:34
OPEL ZAFIRA LIFE / Большой тест-драйв
 17:50
17:50
Opel Zafira B. Место много а как едет? (Опель Зафира Б)
 16:09
16:09
Тест-драйв Chevrolet Orlando против Opel Zafira Tourer
 05:01
05:01
¨Главная дорога или Секонд тест¨ — «OPEL ZAFIRA 201214
 11:59
11:59
Тест-драйв Opel Zafira Tourer. Что мы от неё ожидаем?
Информационно-развлекательная система
131
Система
воспроизведения звука
Дополнительные устройства
Ко входу AUX с помощью штыре‐
вого концентрического штекера
диаметром 3,5 мм можно подклю‐
чить внешний источник аудиосиг‐
нала, например, переносной про‐
игрыватель компакт-дисков.
Следите, чтобы вход AUX был чис‐
тым и сухим.
Информационно-
развлекательная
система на задних
сиденьях
Аудиосистема на задних
сиденьях
Twin Audio позволяет выбирать
между источником звукового сиг‐
нала информационно-развлека‐
тельной системы и другим источ‐
ником звукового сигнала. Управ‐
лять можно только таким источни‐
ком звукового сигнала, который не
включен в информационно-
развлекательной системе.
Предусмотрено два гнезда для
подключения наушников с раз‐
дельной регулировкой громкости.
Назад
к
обзору

Телефон, Мобильные телефоны и cb-радиоаппаратура, 132 информационно-развлекательная система
Мобильные телефоны и cb- радиоаппаратура
- Изображение
- Текст
132
Информационно-развлекательная система
Телефон
Мобильные телефоны и CB-
радиоаппаратура
Инструкции по установке
и рекомендации по
эксплуатации
При установке и работе с мобиль‐
ным телефоном следует руковод‐
ствоваться специальными инструк‐
циями изготовителей мобильного
телефона и системы громкой связи
по их установке и эксплуатации на
автомобиле. Несоблюдение этих
указаний может привести к аннули‐
рованию разрешения на эксплуа‐
тацию данного типа транспортного
средства (директива Европейского
Союза 95/54/EC).
Как обеспечить безотказную ра‐
боту:
■ используйте профессионально
смонтированную внешнюю ан‐
тенну, обеспечивающую макси‐
мальную дальность действия;
■ максимальная мощность пере‐
дачи не должна превышать10 Вт;
■ устанавливайте телефон в под‐
ходящем месте, см. соответ‐
ствующее Примечание 3 66.
Для получения сведений по реко‐
мендуемым местам установки на‐
ружной антенны или держателей
оборудования, а также о возмож‐
ности использования передатчи‐
ков мощностью более 10 Вт необ‐
ходима отдельная консультация.
Использования устройства гром‐
кой связи с телефонами стандар‐
тов GSM 900/1800/1900 и UMTS
без наружной антенны допускается
только в том случае, если макси‐
мальная излучаемая мощность мо‐
бильного телефона не превышает
2 Вт для GSM 900, а в остальных
случаях — 1 Вт.
Из соображений безопасности не
пользуйтесь телефоном во время
движения. Даже разговор через
устройство громкой связи может
отвлекать водителя во время дви‐
жения.
9 Предупреждение
Не соответствующие вышеука‐
занным стандартам мобильные
телефоны и радиоаппаратура
могут использоваться только
с антенной, установленной сна‐
ружи автомобиля.
Внимание
Если не соблюдать упомянутых
выше предписаний, включение
мобильных телефонов и радио‐
аппаратуры в салоне при отсут‐
ствии внешней антенны может
привести к нарушению работо‐
способности электронной сис‐
темы автомобиля.
Назад
к
обзору

Система управления климатом, Системы управления климатом, Обогреватель и вентиляционная система
Распределением воздуха, Температурой, Скоростью вращения вентилятора, Система управления, Климатом
- Изображение
- Текст
Система управления климатом
133
Система
управления
климатом
Системы управления
климатом …………………………….. 133
Сопла обдува ……………………… 141
Техническое обслуживание …. 142
Системы управления
климатом
Обогреватель
и вентиляционная система
Органы управления:
■ Распределением воздуха
■ Температурой
■ Скоростью вращения вентиля‐
тора
Обогреваемое заднее стекло Ü
3
48.
Распределением воздуха
L
= к области головы и нише для
ног
M
= к области головы
l
= к ветровому стеклу и стек‐
лам передних дверей
J
= к ветровому стеклу, стеклам
передних дверей и нише для
ног
K
= к нише для ног
Возможны промежуточные поло‐
жения.
Температурой
красный = теплее
синий
= холоднее
Эффективный обогрев не возмо‐
жен, пока двигатель не достигнет
своей нормальной рабочей темпе‐
ратуры.
Скоростью вращения
вентилятора
Регулирует воздушный поток, пе‐
реключая вентилятор на соответ‐
ствующую скорость.
Назад
к
обзору

Удаление влаги и инея со стекол, Система кондиционирования воздуха, Охлаждение n
Система рециркуляции воздуха 4, 134 система управления климатом
- Изображение
- Текст
134
Система управления климатом
Удаление влаги и инея со
стекол
■ Установите регулятор распреде‐
ления воздуха в положение l.
■ Установите регулятор на самую
высокую температуру.
■ Установите наибольшую ско‐
рость вентилятора.
■ Включите обогрев заднего
стекла Ü.
■ При необходимости, откройте
боковые вентиляционные отвер‐
стия и направьте их рефлекторы
на боковые стекла.
■ Для одновременного обогрева
ниши для ног установите распре‐
делитель воздуха в положе‐
ние J.
Система
кондиционирования воздуха
Дополнительно к системе обогрева
и вентиляции, система кондицио‐
нирования воздуха позволяет
обеспечить:
n
= охлаждение
4
= рециркуляцию воздуха
Охлаждение n
Управляется кнопкой n и работает
только тогда, когда работают дви‐
гатель и вентилятор.
Кондиционер охлаждает воздух
и удаляет из него влагу (осушает),
когда наружная температура пре‐
вышает заданный уровень. Обра‐
зовавшийся конденсат может ка‐
пать из-под автомобиля.
Если охлаждение или осушение не
требуется, для экономии топлива
систему рекомендуется выклю‐
чить.
Система рециркуляции
воздуха 4
Включается с помощью
кнопки 4.
Назад
к
обзору

Максимальное охлаждение, Удаление влаги и инея со стекол, Автоматическая система управления климатом
Система управления климатом 135
- Изображение
- Текст
Система управления климатом
135
9 Предупреждение
В режиме рециркуляции умень‐
шается объем поступающего
в салон с улицы воздуха. Если
рециркуляция включена без ох‐
лаждения, влажность воздуха
повышается, и возможно запо‐
тевание стекол. Качество воз‐
духа в салоне со временем
ухудшается, что может вызы‐
вать у пассажиров чувство сон‐
ливости.
Подача воздуха к l: Рециркуляция
воздуха отключена.
Максимальное охлаждение
Откройте ненадолго окна, чтобы
быстро вытянуть горячий воздух.
■ Включите охлаждение n.
■ Включите режим циркуляции воз‐
духа 4.
■ Установите регулятор распреде‐
ления воздуха в положение M.
■ Установите регулятор темпера‐
туры на самый холодный уро‐
вень.
■ Установите наибольшую ско‐
рость вентилятора.
■ Откройте все вентиляционные
отверстия.
Удаление влаги и инея со
стекол
■ Включите охлаждение n.
■ Установите регулятор распреде‐
ления воздуха в положение l.
■ Установите регулятор на самую
высокую температуру.
■ Установите наибольшую ско‐
рость вентилятора.
■ Включите обогрев заднего
стекла Ü.
■ При необходимости, откройте
боковые вентиляционные отвер‐
стия и направьте их рефлекторы
на боковые стекла.
■ Для одновременного обогрева
ниши для ног установите распре‐
делитель воздуха в положе‐
ние J.
Автоматическая система
управления климатом
Органы управления:
■ Распределением воздуха
■ Температурой
■ Скоростью вращения вентиля‐
тора
n
= охлаждение
4
= рециркуляцию воздуха
V
= удаление влаги и инея
Обогреваемое заднее стекло Ü
3
48.
Назад
к
обзору

Автоматический режим, Распределением воздуха, Предварительная установка температуры
Скоростью вращения вентилятора, Охлаждение n, Система рециркуляции воздуха 4, 136 система управления климатом
- Изображение
- Текст
136
Система управления климатом
Предустановленная температура
поддерживается автоматически.
В автоматическом режиме ско‐
рость вентилятора автоматически
регулирует поток воздуха.
Автоматический режим
Базовая установка, обеспечиваю‐
щая максимальный комфорт:
■ Установите регулятор вентиля‐
тора на A.
■ Установите регулятор распреде‐
ления воздуха в желаемое поло‐
жение.
■ Установите температуру на же‐
лаемый уровень.
■ Включите охлаждение n.
■ Откройте все вентиляционные
отверстия.
Распределением воздуха
L
= к области головы и нише для
ног
M
= к области головы
l
= к ветровому стеклу и стек‐
лам передних дверей
J
= к ветровому стеклу, стеклам
передних дверей и нише для
ног
K
= к нише для ног
Возможны промежуточные поло‐
жения.
Предварительная установка
температуры
Установите регулятор темпера‐
туры в желаемое положение. Воз‐
можны промежуточные положе‐
ния.
Для обеспечения комфортных ус‐
ловий изменяйте температуру
только малыми шагами.
В крайних положениях темпера‐
тура не регулируется. Кондицио‐
нер работает на максимальной
мощности охлаждения или обо‐
грева.
Эффективный обогрев не возмо‐
жен, пока двигатель не достигнет
своей нормальной рабочей темпе‐
ратуры.
Скоростью вращения
вентилятора
В автоматическом режиме A за
счет изменения скорости вентиля‐
тора автоматически регулируется
воздушный поток. При необходи‐
мости, поток воздуха можно на‐
строить вручную.
Охлаждение n
Управляется кнопкой n и работает
только тогда, когда работают дви‐
гатель и вентилятор.
Кондиционер охлаждает воздух
и удаляет из него влагу (осушает),
когда наружная температура пре‐
вышает заданный уровень. Обра‐
зовавшийся конденсат может ка‐
пать из-под автомобиля.
Если охлаждение или осушение не
требуется, для экономии топлива
систему рекомендуется выклю‐
чить.
Система рециркуляции
воздуха 4
Режим рециркуляции воздуха
включается и выключается кноп‐
кой 4.
Назад
к
обзору

Максимальное охлаждение, Удаление влаги и инея со стекол, Электронная система управления климатом
Система управления климатом 137
- Изображение
- Текст
Система управления климатом
137
9 Предупреждение
В режиме рециркуляции умень‐
шается объем поступающего
в салон с улицы воздуха. Если
рециркуляция включена без ох‐
лаждения, влажность воздуха
повышается, и возможно запо‐
тевание стекол. Качество воз‐
духа в салоне со временем
ухудшается, что может вызы‐
вать у пассажиров чувство сон‐
ливости.
Максимальное охлаждение
На короткий промежуток времени
откройте окна, чтобы нагретый воз‐
дух мог быстро выйти наружу.
■ Включите охлаждение n.
■ Установите регулятор распреде‐
ления воздуха в положение M.
■ Установите регулятор темпера‐
туры на необходимое значение.
■ Установите регулятор вентиля‐
тора на A.
■ Откройте все вентиляционные
отверстия.
Автоматический климат-контроль
наиболее эффективно охлаждает
воздух до заданной температуры.
Если регулятор температуры уста‐
новлен на минимум, система не‐
прерывно работает при макси‐
мальном охлаждении. При вклю‐
ченном кондиционировании воз‐
духа система автоматически вклю‐
чает его рециркуляцию.
Удаление влаги и инея со
стекол
■ Включите охлаждение n.
■ Нажмите кнопку V: в положении
A вентилятор автоматически пе‐
реключается на наибольшую
частоту вращения, воздух на‐
правляется на ветровое стекло.
■ Установите регулятор на самую
высокую температуру.
■ Включите обогрев заднего
стекла Ü.
Электронная система
управления климатом
Органы управления:
■ температурой
■ распределением воздуха и выбо‐
ром меню
■ скоростью вращения вентиля‐
тора
AUTO = Автоматический режим
4
= Рециркуляция воздуха
V
= Удаление влаги и инея
Обогреваемое заднее стекло Ü
3
48.
Назад
к
обзору

Автоматический режим, Предварительная установка температуры, Скоростью вращения вентилятора
Удаление влаги и инея со стекол, 138 система управления климатом
- Изображение
- Текст
138
Система управления климатом
Предустановленная температура
поддерживается автоматически.
В автоматическом режиме ско‐
рость вентилятора и распределе‐
ние воздуха автоматически регули‐
руют поток воздуха.
Система может быть настроена
вручную с помощью регуляторов
распределения и потока воздуха.
Данные выводятся на Info-Display.
Изменения установок на короткое
время выводятся на Info-Display
поверх выводимого на дисплей
меню.
Электронная система климат-конт‐
роля полностью работает только
при работающем двигателе.
Для сохранения эффективности
работы системы не закрывайте
датчик на приборной панели.
Автоматический режим
Базовая установка, обеспечиваю‐
щая максимальный комфорт:
■ Нажмите кнопку AUTO.
■ Откройте все вентиляционные
отверстия.
■ Включите Air conditioning
(кондиционирование воздуха).
■ Установите желаемую темпера‐
туру.
Предварительная установка
температуры
Можно установить нужное значе‐
ние температуры.
Для обеспечения комфортных ус‐
ловий изменяйте температуру
только малыми шагами.
Если установлена минимальная
температура, на дисплее появля‐
ется Lo, и электронная система
климат-контроля работает при мак‐
симальном охлаждении.
Если установлена максимальная
температура, на дисплее появля‐
ется Hi, и электронная система кли‐
мат-контроля работает на режиме
максимального обогрева.
скоростью вращения
вентилятора
Выбранная скорость вентилятора
выводится в виде x и числа на дис‐
плее.
Если вентилятор выключен, конди‐
ционирование воздуха отклю‐
чается.
Для возврата к автоматическому
режиму: Нажмите кнопку AUTO.
Удаление влаги и инея со
стекол
Нажмите кнопку V, на дисплее по‐
явится V.
Назад
к
обзору

Ручные настройки в меню climate, Распределением воздуха, Охлаждение
Система управления климатом 139
- Изображение
- Текст
Система управления климатом
139
Температура и распределение воз‐
духа устанавливаются автомати‐
чески, вентилятор работает на вы‐
сокой скорости.
Возврат в автоматический режим:
нажмите кнопку V или AUTO.
Включите обогрев заднего
стекла Ü.
Ручные настройки в меню
Climate
Параметры системы климат-конт‐
роля можно изменять с помощью
среднего регулятора, кнопок и ото‐
бражаемых на дисплее меню.
Для просмотра меню нажмите на
центральный регулятор. На дис‐
плее появится меню Climate
(климат).
Вращая центральный регулятор,
отметьте отдельные пункты меню,
их можно выбрать, нажав на регу‐
лятор.
Для выхода из меню поворачи‐
вайте центральный регулятор,
пока не появится Return (назад)
или Main (главн.), и сделайте вы‐
бор.
Распределением воздуха
Поверните центральный регуля‐
тор. Включится меню Air distribut.
(распределение воздуха), в кото‐
ром выведены возможные на‐
стройки распределения воздуха:
Верх
= к ветровому стеклу
и стеклам передних
дверей
Середина = к пассажирам авто‐
мобиля.
Низ
= к нише для ног
Меню Air distribut. (распределение
воздуха) может быть вызвать и че‐
рез меню Climate (климат).
Возврат к автоматическому рас‐
пределению воздуха: Отключите
соответствующую установку или
нажмите кнопку AUTO.
охлаждение
В меню Climate (климат) выберите
пункт меню AC (система
кондиционирования) и включите
или отключите охлаждение.
Кондиционер охлаждает воздух
и удаляет из него влагу (осушает),
когда наружная температура пре‐
вышает заданный уровень. Обра‐
зовавшийся конденсат может ка‐
пать из-под автомобиля.
Если нет необходимости в охлаж‐
дении и осушении, для экономии
топлива выключите охлаждение,
на дисплее появится Eco.
Назад
к
обзору

Ручной режим управления рециркуляцией воздуха, Вспомогательный отопитель, Отопитель
Подогреватель охлаждающей жидкости, 140 система управления климатом
- Изображение
- Текст
140
Система управления климатом
Регулировка скорости
вентилятора в автоматическом
режиме
Параметры регулировки обдува
в автоматическом режиме можно
настроить.
Из меню Climate (климат) выберите
пункт Automatic blower (автом.
вентилятор) и желаемую настройку
вентилятора.
Ручной режим управления
рециркуляцией воздуха
Ручной режим рециркуляции воз‐
духа включается и выключается
кнопкой 4.
9 Предупреждение
В режиме рециркуляции умень‐
шается объем поступающего
в салон с улицы воздуха. Если
рециркуляция включена без ох‐
лаждения, влажность воздуха
повышается, и возможно запо‐
тевание стекол. Качество воз‐
духа в салоне со временем
ухудшается, что может вызы‐
вать у пассажиров чувство
сонливости.
Кондиционирование воздуха
при неработающем двигателе
Когда зажигание выключено, для
управления климатом в салоне мо‐
гут использоваться сохранившиеся
в системе тепло или холод.
Нажмите кнопку AUTO при выклю‐
ченном зажигании. На дисплее на
короткое время появится надпись
Residual air conditioning on
(включено кондиционирование
остаточного воздуха).
Управление климатом на остаточ‐
ном тепле или холоде возможно
только ограниченное время. Для
выхода нажмите кнопку AUTO.
Вспомогательный отопитель
Отопитель
Нагреватель ускоренного обогрева
— это электрический вспомогатель‐
ный нагреватель воздуха, который
ускоренно автоматически прогре‐
вает пассажирский салон.
Подогреватель охлаждающей
жидкости
Дизельные автомобили оснащены
работающим на том же топливе,
что и двигатель, вспомогательным
подогревателем охлаждающей
жидкости, нагревающим охлаж‐
дающую жидкость во время работы
двигателя.
Назад
к
обзору

Комментарии
Обновлено: 22.04.2023

Руководство по эксплуатации и техническому обслуживанию Opel Zafira B, оборудованных бензиновыми двигателями: 1.6 — Z16XEP (1598см3, мощность двигателя 77 кВт), 1.6 — Z16XER (1598см3, мощность двигателя 88 кВт), 1.6 — Z16XE1 (1598см3, мощность двигателя 77 кВт), 1.6 CNG — Z16YNG(1598см3, природный газ/бензин, мощность двигателя 69 кВт), 1.8 — Z18XER (1796см3, мощность двигателя 103 кВт), 2.0 Turbo — Z20LER (1998см3, мощность двигателя 147 кВт), 2.0 Turbo — Z20LEH (1998см3, мощность двигателя 177 кВт), 2.2 — Z22YH (2198см3, мощность двигателя 110 кВт) и дизельными двигателями: 1.7 — A17DTJ (1686см3, мощность двигателя 81 кВт), 1.7 — A17DTR (1686см3, мощность двигателя 92 кВт), 1.9 CDTI — Z19DTL (1910см3, мощность двигателя 74 кВт), 1.9 CDTI — Z19DT (1910см3, мощность двигателя 88 кВт), 1.9 CDTI — Z19DTH (1910см3, мощность двигателя 110 кВт).
Если Вы оформили заявку с 9:00 до 18:00, мы перезвоним Вам в течение 30 минут.
Если Вы оформили заявку после 18:00, мы перезвоним на следующий день до 11:00.
Если Вы оформили заявку с 9:00 до 18:00, мы перезвоним Вам в течение 30 минут.
Если Вы оформили заявку после 18:00, мы перезвоним на следующий день до 11:00.
предварительно сделав заказ
Современное головное устройство для автомобиля Opel Zafira B (2005-2014), с которым вы можете ощутить высочайшее качество звука, многофункциональность магнитолы, поражающее скоростью работы системы Android.

Поддержка SIM карт всех мобильных операторов. Модем с технологией 4G обеспечивает быструю работу с веб страницами.

Главный экран: Движение + Навигатор + Проигрыватель. Разделение экран на 2 части в приложениях позволяет не отвлекаться от просмотра видео и одновременно использовать навигатор.

Быстрые и современные процессоры с частотой 1.8Гц и объемом оперативной и внутренней памяти 2+32Гб / 3+32Гб / 4+64Гб / 6+128Гб

ADAU1701 или двойной (CC3) + ROHM32107, а так же 32 полосный эквалайзер + временные задержки + усиленные басы

Повышает безопасность и комфорт вождения. Изображение с камеры TEYES (заднего или переднего вида) может быть достуно в любое время движения автомобиля

Операционная система Android 10.0 (CC3/CC2 Plus/sPRO Plus) обеспечивает быструю работу устройства и позволяет пользоваться современными программами.


Возможность дополнительной установки и подключения датчиков давления в шинах для удобства и безопастности пользования

Наилучшее соотношение цены и качества, данная автомагнитола удовлетворит в себе высокие требования к звуку и скорости работы устройства.
- Доступная цена является отличительной особенностью головного устройства Teyes.
- Универсальная архитектура позволяет подключать к магнитоле дополнительные устройства, такие как видеорегистратор, фронтальную камеру, датчики давления в шинах, OBD диагностику.
- Головное устройство
- Модельная переходная рамка
- Антенна GPS
- Антенна 4G (в модификациях с 4G)
- Кабель питания (модельный)
- Провода аудио/видео
- USB провод
- Тройной информационный дисплей. На экране вам будет доступно время, температура наружного воздуха и панель настройки аудиосистемы;
- Бортовой информационный дисплей. Вам будет доступна информация о времени, температуре воздуха, день недели, а также данные с бортового компьютера. На экране вы можете изменить настройки информационно-развлекательной системы;
- Графический информационный дисплей. Здесь вам будут доступны различные настройки системы, температура воздуха, а также информация о работе системы климат-контроля.
- сведения с бортового компьютера;
- с контрольной системы;
- опции и настройки радиоприемника;
- состояние системы климат-контроля;
- дата, время и температура воздуха.
- Опель вектра а замена личинки замка зажигания
- Что лучше бмв х4 или ауди q5
- Установка кнопок на руль bmw x3 f25
- Ремонт заднего суппорта ауди а4 б6
- Замена радиатора кондиционера ауди а4 б6
| CC2 Plus | sPRO Plus | CC3 | |
|---|---|---|---|
| Версия Android | Android 10 | Android 10 | Android 10 |
| Процессор CPU | 8 ядер / 1.8Ghz 64bit Unisoc UMS512 2*A75+6*A55 ARM 12NM | 8 ядер / 1.8Ghz 64bit Unisoc UMS512 2*A75+6*A55 ARM 12NM | 8 ядер / 1.8Ghz 64bit Unisoc UMS512 2*A75+6*A55 ARM 12NM |
| Внутренняя и оперативная память | 3+32Gb 4+64Gb |
3+32Gb 4+64Gb |
3+32Gb 4+64Gb 6+128Gb |
| Интернет | 4G+Wi-Fi(2.4G+5G) | 4G+Wi-Fi(2.4G+5G) | 4G+Wi-Fi(2.4G+5G) |
| Экран | QLED+2.5D | IPS+2.5D | QLED+2.5D |
| Разрешение экрана | 1280×720 | 1280×720 | 1280×720 |
| Усилитель звука | TDA7851 | TDA7851 | TDA7851 |
| DSP | ROHM32107 независимый модуль | ROHM32107 независимый модуль | Двойной DSP ADAU1701 + ROHM32107 |
| Carplay / Android Auto | опционально | опционально | Поддерживает беспроводной Carplay / проводной Android Auto |
| Временные задержки | Есть | Есть | Есть |
| Эквалайзер | 16*2 полосы | 16*2 полосы | 27 полос |
| Линейный выход, RCA | 4+1 (опционально) | 4+1 (опционально) | 4+1 (в комплекте) |
| Выносной слот SIM | опционально | опционально | в комплекте |
| Внешний микрофон | Поддерживает | Поддерживает | Поддерживает |
| Многофункциональный главный экран | Есть | Нет | Есть |
| Разделение экрана | Поддерживает | Поддерживает | Поддерживает |
| Кулер охлаждения | Есть | Нет | Есть |
| Поддерживаемые аксессуары | USB видеорегистратор Teyes X5 CarPlay OBD |
USB видеорегистратор Teyes X5 CarPlay OBD |
USB видеорегистратор Teyes X5 CarPlay OBD |
Отзывы Штатная магнитола Opel Zafira B (2005-2014)
Мы готовы привести веские доводы преимущества покупки у нас. Тезисы ориентированы на каждого клиента, который сомневается. Читать полностью
Сравнение головных устройств Teyes CC2L, sPRO, CC2 и CC3. Ответим на вопросы: В чем разница? Что выбрать? Cравнение характеристик Читать полностью
Система CD30 является аудиосистемой новейшего поколения. Панель управления устройства не вызывает у пользователя сложностей, поскольку в инструкции четко обозначены клавиши и их опции. Штатная магнитола CD30 рассчитана для линейки автомобилей Опель.
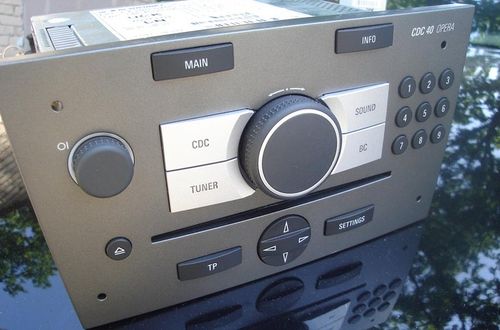
Штатная магнитола
Общие сведения
Магнитола CD30 MP3 признана революционным устройством для пользователей. В ней удачно сочетаются характеристики цены и качества. Магнитола имеет встроенный радиоприемник, который фиксирует 9 частот настроенных вручную и автоматически. Рабочий диапазон – FM, AM. Устройство обладает функцией RDS, облегчающей поиск радиосигнала и гарантирующей качественный прием.
На фото представлены все функциональные клавиши устройства. С помощью имеющегося CD проигрывателя вы можете прослушать любимые композиции в MP3 и CD формате. Смарт система сама регулирует уровень звука в зависимости от скорости движения машины. Также вы можете изменить степень компенсации городского шума.
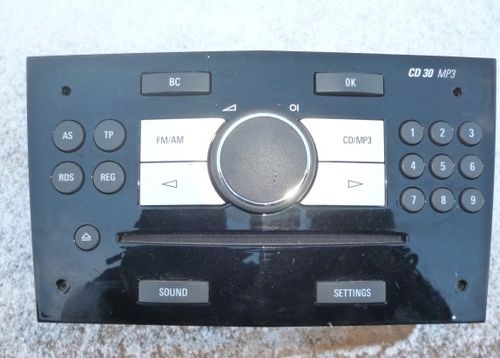
Автомагнитола CD30 MP3
С помощью магнитолы CD30 осуществляется доступ к бортовому компьютеру. Более подробную информацию по этой опции вы можете узнать из Руководства пользователя.
Система обладает возможностью подключения внешнего источника звука, к примеру ваш MP3. Также система обладает функцией дистанционного управления или системой Twin Audio. Комплектация устройства может включать оборудование Mobile Phone Portal.
Штатная магнитола CD30 на Opel имеет легкий продуманный дизайн, удобную ручку включения/выключения, а также удобство при регулировке громкости. Все это значительно упрощает эксплуатацию. Кроме этого, система оснащена защитой от хищения. Если даже произошла кража, то ваша магнитола CD30 не будет работать в автомобиле похитителя.
В инструкции по эксплуатации производитель делает акцент на том, что пользование магнитолой не должно мешать управлению автомобилем. Если по дороге возникли неполадки, остановитесь и настройте информационную систему.
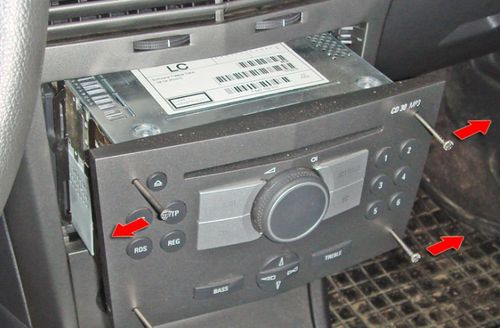
Съём магнитолы
Формат дисплея
Магнитола CD30 MP3 имеет опцию для самостоятельной настройки формата дисплея. В зависимости от выбранных параметров, экран может быть:
На всех трех видах дисплея вы можете посмотреть текущее время, температуру, а также настроить интерфейс по своему желанию.
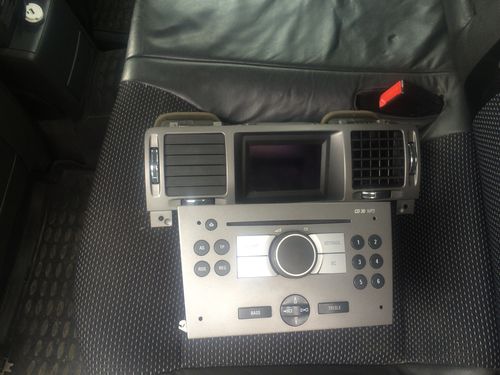
Последняя модификация CD MP3
Как пользоваться системой
Чтобы начать эксплуатацию магнитолы CD30 MP3, вам нужно освоить его основную функцию включение/выключение. Для включения системы нажмите на ручке кнопку включения и ожидайте несколько секунд. Для облегченного пользования вы можете настроить функцию автоматического включения. В этом случае система активируется вместе с зажиганием.
Вообще, автоматическое включение относится к заводской настройке, но ее можно сделать неактивной. Если вы все же решили деактивировать такую функцию, то сделать ее снова активной вам поможет загрузка компакт-диска или простая активация на ручке включения. Также деактивация функции может произойти из-за прерванного питания магнитолы.
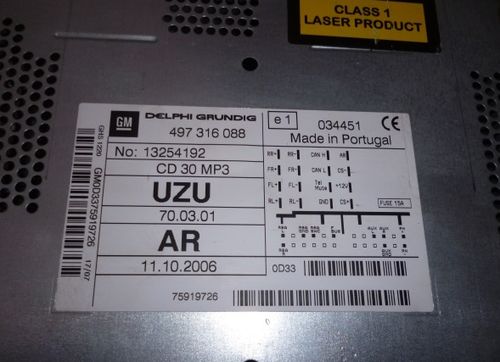
Система штатной магнитолы CD30 имеет функцию автоматического отключения. К примеру, если вы активировали систему при выключенном питании, то магнитола сама выключится через час.
Что отображается на экране
Дисплей магнитолы CD30 имеет мягкую для глаз подсветку. На экране устройства отображается такая информация:
Более подробную информацию вы можете получить из руководства пользователя системой.

Экран штатной магнитолы CD30
Когда вы включаете магнитолу CD30, вас приветствует звук находящегося в памяти последнего аудиосигнала.
Органы управления системой
Если к системе подключена функция Mobile Phone Portal, то органы управления немного изменяют свои функции. Подробнее об этом вы можете прочесть в инструкции по эксплуатации. Органы управления системой штатной магнитолы для вашего комфорта расположены на рулевом колесе.
Одной из главной опции считается вращающийся переключатель. Им легко можно настроить радиостанции. Для этого достаточно просто вращать его ручку вверх и вниз, чтобы найти подходящую волну. Если вы используете переключатель для настройки бортового компьютера, то функция радиоприемника становится недоступной.
Кроме этого, на кнопках поиска можно настроить радиоприемник и воспроизведение CD/MP3. Выполнить эту опцию можно с помощью стрелок вверх/вниз. Вращающийся переключатель регулирует громкость устройства.
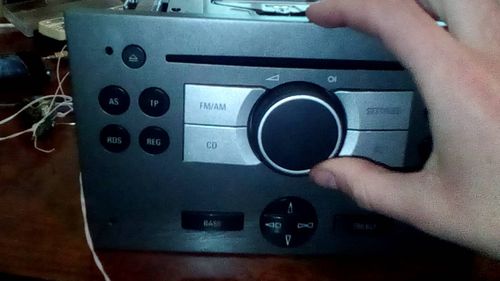
Функция Twin Audio
Магнитола CD30 для Опеля оснащена системой Twin Audio, которая предназначена для пользования пассажирами. Производитель предупреждает, что слишком высокий уровень звука вредит вашему слуху. В аудиосистему встроены 2 гнезда, которые подходят для подключения наушников стандартного разъема. Система оснащена регулировкой звука для каждой пары наушников отдельно.
Twin Audio позволяет управлять только тем источником, который используется в качестве основного. Также при включенной функции TP смарт система позволяет выбрать другую программу. Кроме этого, вы не можете поменять порядок воспроизводимых файлов.
Главное меню
Основное меню становится доступным при включенной информационно-развлекательной системе. На экране у вас отобразится информация:
Читайте также: