
FS-1020MFP/FS-1220MFP
Руководство по эксплуатации
Данное руководство по эксплуатации предназначено для моделей FS-1020MFP и FS-1220MFP.
Настоящее руководство по эксплуатации содержит сведения по правильной эксплуатации аппарата, выполнению
планового обслуживания, а также описание несложных действий по поиску и устранению неполадок с целью
поддержания аппарата в исправном состоянии.
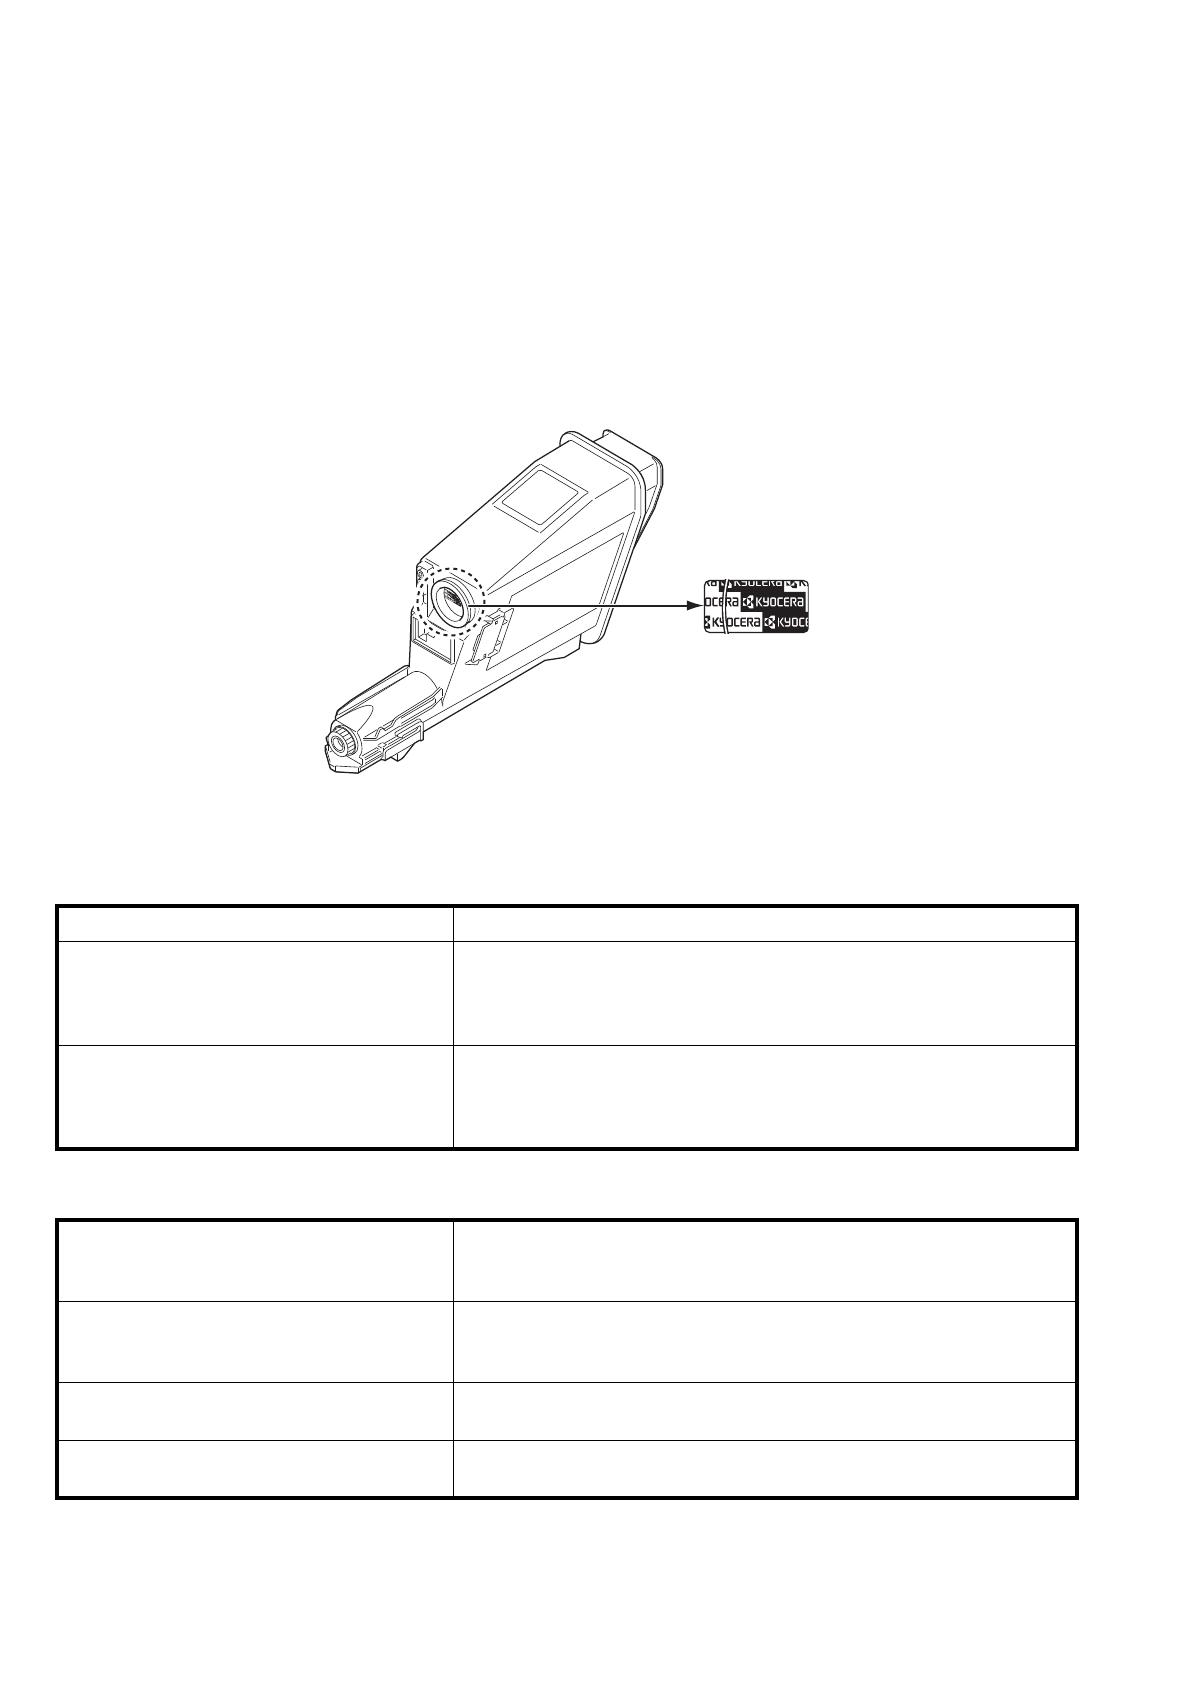
Рекомендуется использовать только расходные материалы нашей торговой марки. Мы не несем ответственности
за
какие—либо повреждения данного аппарата, вызванные использованием расходных материалов сторонних
производителей.
Наличие этикетки, изображенной на рисунке, означает, что расходные материалы принадлежат нашей торговой
марке.
Руководства, входящие в комплект поставки
В комплект поставки данного аппарата входят следующие руководства. Обращайтесь к ним по мере необходимости.
Диск Product Library
Quick Installation Guide Описывает процедуры установки аппарата.
Safety Guide Предоставляет информацию по безопасности и предостережения
относительно установки и эксплуатации аппарата. Обязательно
прочитайте это руководство перед использованием данного
аппарата.
Safety Guide
(FS-1020MFP/FS-1025MFP/FS-1120MFP/
FS-1125MFP/FS-1220MFP/FS-1320MFP/
FS-1325MFP)
Описывает место для установки аппарата, участки ограниченного
доступа и другую информацию. Обязательно прочитайте это
руководство перед использованием данного аппарата.
Руководство по эксплуатации (данный
документ)
Описывает метод загрузки бумаги, основные процедуры
копирования, печати и сканирования, а также поиск и устранение
неисправностей.
KYOCERA Client Tool User Guide
(Руководство пользователя)
Описывает использование KYOCERA Client Tool. KYOCERA Client
Tool — программное обеспечение, устанавливаемое на компьютере,
которое позволяет выполнять настройку параметров аппарата.
Printer Driver User Guide (Руководство
пользователя)
Описывает процедуру установки драйвера принтера и
использование функций принтера.
KYOCERA Net Viewer User Guide
(Руководство пользователя)
Описывает мониторинг системы сетевой
печати с помощью
KYOCERA Net Viewer.

i
Cодержание
1 Компоненты аппарата ………………………………….…………….…………….…………….……………..…………….….....1-1
Компоненты передней части аппарата …………..…………….………….…………….……………..…………….……..1-2
Компоненты задней части аппарата …………………………….……………..………………………..…………….……..1-3
Панель управления ………………………….…………….…………….……………..…………….…………….…………..…….1-4
2 Подготовка ………..…………….…………….…………….…………….…………….…………….……………....………………….2-1
Подключения ……………….……………..…………….…………….…………….………….…………….………….………….…..2-2
Загрузка бумаги …..………….…………….…………….…………….…………….…………….……………..………..………….2-4
Загрузка оригиналов ………….…………….…………….…………….……………..…………….…………….…………….…2-16
Установка и удаление драйверов и служебных программ ……………………………….…………….……….2-17
Настройки аппарата ………………..……………..…………….…………….…………….…………….…………….………….2-23
Конфигурация ……..…………….…………….…………….…………….……………..…………….…………….…..…………..2-39
Печать страницы состояния …………………..………………………..…………….…………….…………….…………….2-45
3 Копирование ………………………………….…………….…………….…………….………….…………….……………………….3-1
Основные операции ……………..…………….…………….……………..…………….…………….…………….………………3-2
Ручная двусторонняя печать .…………….…………….……………..…………….………….…………….…………….…..3-3
Использование программ …………………………………….………….…………….…………….…………….……………...3-5
Функции копирования ………………..…………….…………….…………….…………….…………….…………….………...3-6
Копирование ID карт ……………………..…………….…………….…………….………….…………….…………….…….…..3-6
4 Печать ………………….………….…………….…………….…………….…………….…………….………..…………………………4-1
Печать из прикладной программы …………………………….…………….…………….………….…………….…………4-2
Информация о GX Driver …………….…………….…………….…………….…………….…………….…………….….……..4-2
Ручная двусторонняя печать .…………….…………….……………..…………….………….…………….…………….…..4-3
Ящик печати ……………………….…………….…………….…………….……………..…………….……………..………………..4-5
Изменение настроек по умолчанию драйвера принтера (Windows 7) …………….…………….……………4-6
5 Сканирование ……………………….…………….…………….……………..…………….………….…………….….……………..5-1
Сканирование ……………………….…………….…………….……………..…………….………….…………….….……………..5-2
Использование программ …………………………………….………….…………….…………….…………….……………...5-3
Быстрое сканирование (Сканирование в PDF/Сканирование с отправкой по электронной
почте/Сканирование в папку) ………………………………….…………….…………….…………….…………….…………5-4
Сканирование с использованием TWAIN/WIA ..…………….………………..…………….…………….……………...5-5
6 Обслуживание ………………………………….…………….…………….……………..…………….…………….…..…………….6-1
Общая информация …….……………..…………….…………….…………….…………….…………….…………….…………6-2
Замена картриджа с тонером ……………..…………….……………..…………….…………….…………….……………...6-2
Замена
комплекта для обслуживания ………………….…………….…………….…………….…………….……………6-5
Очистка аппарата …………………….……………..………………………..…………….…………….…………….…….………..6-5
Меню обслуживания …………….…………….…………….………….……………..…………….…………….…………….…..6-7
Длительное неиспользование и перемещение аппарата …..…………….…………….…………….……………6-8
7 Устранение неисправностей …………………….………….…………….…………….…………….…………….……………7-1
Устранение сбоев в работе …..…………….…………….……………..…………….…………….…………….……………...7-2
Сообщения об ошибках …………..……………..…………….…………….…………….…………….…………….……………7-8
Извлечение застрявшей бумаги ……………….…………….…………….…………….………….…………….………….7-11
8 Приложение ……………………….…………….…………….………….…………….…………….……………..….………………..8-1
Технические характеристики …………………………….……………..…………….…………….…………….……………...8-2
Алфавитный указатель ………………………….…………….………….…………….……………. Алфавитный указатель-1

ii

iii
Правовая информация и правила техники
безопасности
Примечание
Информация в данном руководстве может быть изменена без предварительного уведомления. В последующие
редакции руководства могут быть добавлены дополнительные страницы. Заранее приносим извинения за
возможные технические неточности или типографские ошибки в настоящей редакции руководства.
Корпорация не несет ответственности ни за какие несчастные случаи, произошедшие в то время, когда
пользователь следовал инструкциям, изложенным
в данном руководстве. Мы не несем ответственности ни за
какие дефекты в микропрограммном обеспечении аппарата (содержании его постоянной памяти).
Настоящее руководство и все материалы, приобретаемые или поставляемые с данным аппаратом или связанные
с его продажей, защищены авторскими правами. Все права защищены. Копирование или какое—либо иное
воспроизведение настоящего руководства полностью
или частично, а также любых материалов, являющихся
предметом авторского права, без предварительного разрешения корпорации KYOCERA Document Solutions Inc.
запрещено. Во всех копиях всего настоящего руководства или какой—либо его части и во всех сопутствующих
материалах должны содержаться примечания о защите авторских прав, имеющиеся в оригинальном руководстве.
Торговые марки
Adobe, Acrobat и Flash являются зарегистрированными торговыми знаками Adobe Systems Incorporated.
Macintosh и Mac OS являются торговыми марками Apple Inc., зарегистрированными в США и других странах.
Microsoft, MS-DOS и Windows являются зарегистрированными торговыми марками корпорации Microsoft в США
и/или других странах.
ENERGY STAR является зарегистрированной торговой маркой США.
Все остальные наименования торговых марок и продуктов, упомянутые в настоящем руководстве, являются
зарегистрированными торговыми марками или торговыми
марками соответствующих компаний.
ВНИМАНИЕ КОРПОРАЦИЯ KYOCERA НЕ НЕСЕТ ОТВЕТСТВЕННОСТИ НИ ЗА КАКИЕ
ПОВРЕЖДЕНИЯ, ПРИЧИНОЙ КОТОРЫХ СТАЛА НЕПРАВИЛЬНАЯ УСТАНОВКА АППАРАТА.

iv
Compliance and Conformity
This equipment has been tested and found to comply with the limits for a Class B digital device, pursuant to Part 15 of the
FCC Rules. These limits are designed to provide reasonable protection against harmful interference in a residential
installation. This equipment generates, uses and can radiate radio frequency energy and, if not installed and used in
accordance with the instructions, may cause harmful interference to radio communications. However, there is no
guarantee that interference will not occur in a particular installation. If this equipment does cause harmful interference to
radio or television reception, which can be determined by turning the equipment off and on, the user is encouraged to try to
correct the interference by one or more of the following measures:
• Reorient or relocate the receiving antenna.
• Increase the separation between the equipment and receiver.
• Connect the equipment into an outlet on a circuit different from that to which the receiver is connected.
• Consult the dealer or an experienced radio/TV technician for help.
• The use of a non-shielded interface cable with the referenced device is prohibited.
CAUTION
— The changes or modifications not expressly approved by the party responsible for compliance could void the
user’s authority to operate the equipment.
This device complies with Part 15 of FCC Rules.
Operation is subject to the following two conditions; (1) this device may not cause interference, and (2) this device must
accept any interference, including interference that may cause undesired operation of the device.
* The above warning is valid only in the United States of America.
Интерфейсные разъемы
ВАЖНО Перед подсоединением или отсоединением интерфейсного кабеля убедитесь, что питание
аппарата отключено. Для защиты внутренних электронных частей аппарата от статического электричества,
которое может поступать от интерфейсных разъемов, закройте каждый разъем защитным колпачком,
входящим в комплект поставки.
CDRH Regulations
The Center for Devices and Radiological Health (CDRH) of the U.S. Food and Drug Administration implemented
regulations for laser products on August 2, 1976. These regulations apply to laser products manufactured after August 1,
1976. Compliance is mandatory for products marketed in the United States. A label indicating compliance with the CDRH
regulations must be attached to laser products marketed in the United States.
Canadian Department of Communications Compliance Statement
This Class B digital apparatus complies with Canadian ICES-003.
Avis de conformité aux normes du ministère des Communications du Canada
Cet appareil numérique de la classe B est conforme à la norme NMB-003 du Canada.
Примечание Используйте экранированные интерфейсные кабели.
v
Safety Instructions Regarding the Disconnection of Power
Caution: The power plug is the main isolation device! Other switches on the equipment are only functional switches and
are not suitable for isolating the equipment from the power source.
VORSICHT: Der Netzstecker ist die Hauptisoliervorrichtung! Die anderen Schalter auf dem Gerät sind nur
Funktionsschalter und können nicht verwendet werden, um den Stromfluß im Gerät zu unterbrechen.
Функция управления энергосбережением
Для снижения энергопотребления в режиме ожидания устройство оснащено функцией управления
энергосбережением для переключения в Режим ожидания и Режим выключения питания, при этом
энергопотребление автоматически снижается до минимума по прошествии определенного времени с момента
последнего использования устройства.
Режим ожидания
Устройство автоматически переходит в режим ожидания по истечении приблизительно 1 минуты с момента
последнего его использования. Период бездействия до перехода в режим ожидания может быть увеличен, для
этого необходимо изменить параметр «Автоматический переход в режим ожидания». См. инструкции в разделе
Вкладка «Параметры устройства по умолчанию» на стр. 2-41.
Режим выключения питания
Устройство автоматически выключается по истечении приблизительно 1 часа с момента последнего его
использования. Период бездействия до перехода в режим выключения питания может быть увеличен, для этого
необходимо изменить параметр «Таймер выключения питания». См. инструкции в разделе Вкладка «Параметры
устройства по умолчанию» на стр. 2-41.
Если аппарат не будет использоваться в течение
длительного времени
ВНИМАНИЕ Извлеките бумагу из кассет и герметично упакуйте в пакет для хранения, чтобы защитить ее от
влаги.
Двусторонняя печать
Для этого аппарата двусторонняя печать является стандартной функцией. Например, печать двух односторонних
оригиналов на один лист бумаги с обеих сторон позволяет сократить расход бумаги.
Печать в двустороннем режиме снижает расход бумаги и позволяет внести вклад в сохранение лесных ресурсов.
Использование режима двусторонней печати также приводит к сокращению закупок бумаги и, следовательно
, к
снижению расходов. Рекомендуется в аппаратах, поддерживающих функцию двусторонней печати, использовать
этот режим по умолчанию.
Сбережение ресурсов — бумага
В целях сохранения и рационального использования лесных ресурсов рекомендуется использовать
переработанную, а также первичную бумагу, сертифицированную в соответствии с программами рационального
использования природных ресурсов или снабженную общепризнанной экологической маркировкой,
соответствующей стандарту EN 12281:2002*
1
или эквивалентному стандарту качества.
Данный аппарат также поддерживает печать на бумаге плотностью 64 г/м². Использование такой бумаги, на
изготовление которой расходуется меньше сырья, вносит дополнительный вклад в сохранение лесных ресурсов.
*1: EN12281:2002 «Бумага для печати и офиса — Требования к бумаге для способов получения изображений
с помощью сухого тонера«
ВНИМАНИЕ Если данный аппарат не будет использоваться длительное время (например, в
течение ночи), выключите его с помощью выключателя питания. Если аппарат не будет
использоваться в течение более длительного времени (например, во время отпуска), в целях
безопасности выньте вилку шнура питания из розетки.

vi
Более подробную информацию по рекомендуемым типам бумаги можно получить у сервисного персонала или у
торгового представителя.
Экологическая польза от функции «управления режимом питания«
Чтобы снизить энергопотребление в случае простоя, аппарат оснащен функцией управления режимом питания,
которая автоматически активирует энергосберегающий режим, если аппарат не используется в течение
определенного времени. Хотя для возврата аппарата из энергосберегающего режима в режим ГОТОВНОСТИ
потребуется незначительное время, это может существенно снизить энергопотребление.
Рекомендуется для работы с аппаратом задать время активации
энергосберегающего режима в качестве
настройки по умолчанию.
Программа Energy Star (ENERGY STAR
®
)
Наша компания, будучи участником программы ENERGY STAR
®
, определила, что данный продукт
соответствует требованиям этой программы.
ENERGY STAR
®
— добровольная программа энергосбережения, целью которой является
разработка и распространение изделий с высокими показателями энергосбережения, что
способствует предотвращению глобального потепления. Приобретая изделия, отвечающие
критериям ENERGY STAR
®
, пользователи могут внести вклад в уменьшение выбросов
парниковых газов при использовании изделия и сократить расходы на энергоресурсы.
Законодательные ограничения на копирование и сканирование
Может быть запрещено копирование материала, защищенного авторскими правами, без разрешения
владельца тех прав.
Копирование/сканирование следующих изображений запрещено и может быть уголовно наказуемым. Это
может ограничиваться не только данными изображениями. Не копируйте/сканируйте умышленно
изображения, которые не предназначены для копирования/сканирования.
• Бумажные деньги
• банкноты;
• ценные бумаги;
• печати;
• паспорта;
•
сертификаты.
Местные законы и предписания могут запрещать или ограничивать копирование и сканирование иного, не
упомянутого выше.
vii
Условные обозначения по технике безопасности
Разделы настоящего руководства и компоненты аппарата, отмеченные специальными предупреждающими
символами, призваны обратить внимание пользователя на возможную опасность как для него самого, так и для
других людей и окружающих объектов, связанную с эксплуатацией данного аппарата, а также обеспечить
правильную и безопасную его эксплуатацию. Символы и их описания приведены ниже.
Следующие символы обозначают
, что в соответствующем разделе содержатся предупреждения по технике
безопасности. Знаки внутри символа призваны привлечь внимание пользователя.
Следующие символы обозначают, что в соответствующие разделы включена информация о запрещенных
действиях. Внутри символа приводится условное обозначение запрещенного действия.
Следующие символы обозначают, что в соответствующие разделы включена информация о действиях,
подлежащих обязательному выполнению. Внутри
символа приводится условное обозначение обязательного
действия.
В случае, если предупреждения по технике безопасности в данном руководстве напечатаны неразборчиво, или в
случае утраты самого руководства, обратитесь к представителю сервисной службы и закажите новое руководство
(платная услуга).
ПРЕДУПРЕЖДЕНИЕ: Предупреждает о возможности получения тяжелой травмы или даже гибели при
недостаточном внимании или несоблюдении
соответствующих правил.
ВНИМАНИЕ: Предупреждает о возможности получения травмы или механического повреждения
аппарата при недостаточном внимании или несоблюдении соответствующих правил.
…. [Общее предупреждение]
…. [Предупреждение о высокой температуре]
…. [Предупреждение о запрещенном действии]
…. [Разборка запрещена]
…. [Уведомление об обязательном действии]
…. [Извлеките вилку шнура питания из сетевой розетки]
…. [Подключайте аппарат только к заземленной
розетке]
Примечание Оригинал, имеющий близкое сходство с банковским билетом, может в некоторых редких
случаях не копироваться правильно, так как данный аппарат имеет специальную функцию предотвращения
изготовления подделок.

viii
Окружающая среда
Аппарат предназначен для эксплуатации в следующих условиях окружающей среды:
• Температура: от 10 до 32,5 °C
• Влажность: от 15 до 80 %
Неблагоприятные условия окружающей среды могут отрицательно сказаться на качестве изображения. При
размещении аппарата избегайте его установки в следующих местах.
• Избегайте размещения аппарата вблизи окна или в местах, где на него будет попадать прямой солнечный
свет.
• Избегайте мест, подверженных вибрации.
• Избегайте мест с резкими перепадами температуры.
• Избегайте мест под направленными потоками горячего или холодного воздуха.
• Избегайте мест с плохой вентиляцией.
Непрочный материал пола при перемещении аппарата после установки может быть поврежден роликами.
Во время печати происходит выделение небольшого количества озона, но это не может
отрицательно сказаться на
здоровье человека. Однако, если аппарат используется в течение длительного времени в помещении с плохой
вентиляцией или печатается большое количество копий, по помещению может распространиться неприятный
запах. Для обеспечения оптимальных условий при печати рекомендуется хорошо проветривать помещение.
Меры предосторожности при обращении с горючими материалами
Не пытайтесь поджечь детали, содержащие тонер. Искры от пламени могут стать причиной ожогов.
Храните детали, содержащие тонер, в недоступном для детей месте.
Если тонер просыплется из деталей, его содержащих, не вдыхайте его и не проглатывайте, а также
избегайте попадания в глаза и на кожу.
• При случайном вдыхании выйдите на свежий
воздух и тщательно прополощите горло большим
количеством воды. При появлении кашля обратитесь к врачу.
• Если вы проглотили тонер, прополощите рот водой и выпейте 1–2 чашки воды, чтобы разбавить содержимое
желудка. При необходимости обратитесь к врачу.
• При попадании тонера в глаза тщательно промойте их водой. При продолжительном дискомфорте в глазах
обратитесь к
врачу.
• При попадании тонера на кожу помойте ее водой с мылом.
Не пытайтесь силой открыть или разрушить детали, содержащие тонер.
Другие меры предосторожности
Утилизация использованного картриджа с тонером должна выполняться в соответствии с федеральными,
государственными и местными правилами и нормами.
Все расходные материалы должны храниться в прохладном темном месте.
Если аппарат не будет использоваться в течение длительного периода, извлеките бумагу из кассеты, положите ее
обратно в упаковку и запечатайте.

ix
О руководстве по эксплуатации
Настоящее руководство по эксплуатации включает в себя следующие главы:
1 Компоненты аппарата
В этой главе приведены названия компонентов аппарата.
2 Подготовка
В этой главе содержатся инструкции по запуску аппарата, загрузке бумаги и оригиналов и использованию
прикладного программного обеспечения, включенного в диск Product Library.
3 Копирование
В этой главе описываются функции, используемые при копировании.
4 Печать
В
этой главе описывается процедура печати из прикладной программы.
5 Сканирование
В этой главе описываются функции, используемые при сканировании оригиналов.
6 Обслуживание
В главе описаны процедуры замены картриджа с тонером и ухода за аппаратом.
7 Устранение неисправностей
Эта глава посвящена устранению возможных неисправностей, таких как застревание бумаги.
8 Приложение
В этой главе приведены технические характеристики
аппарата.
x
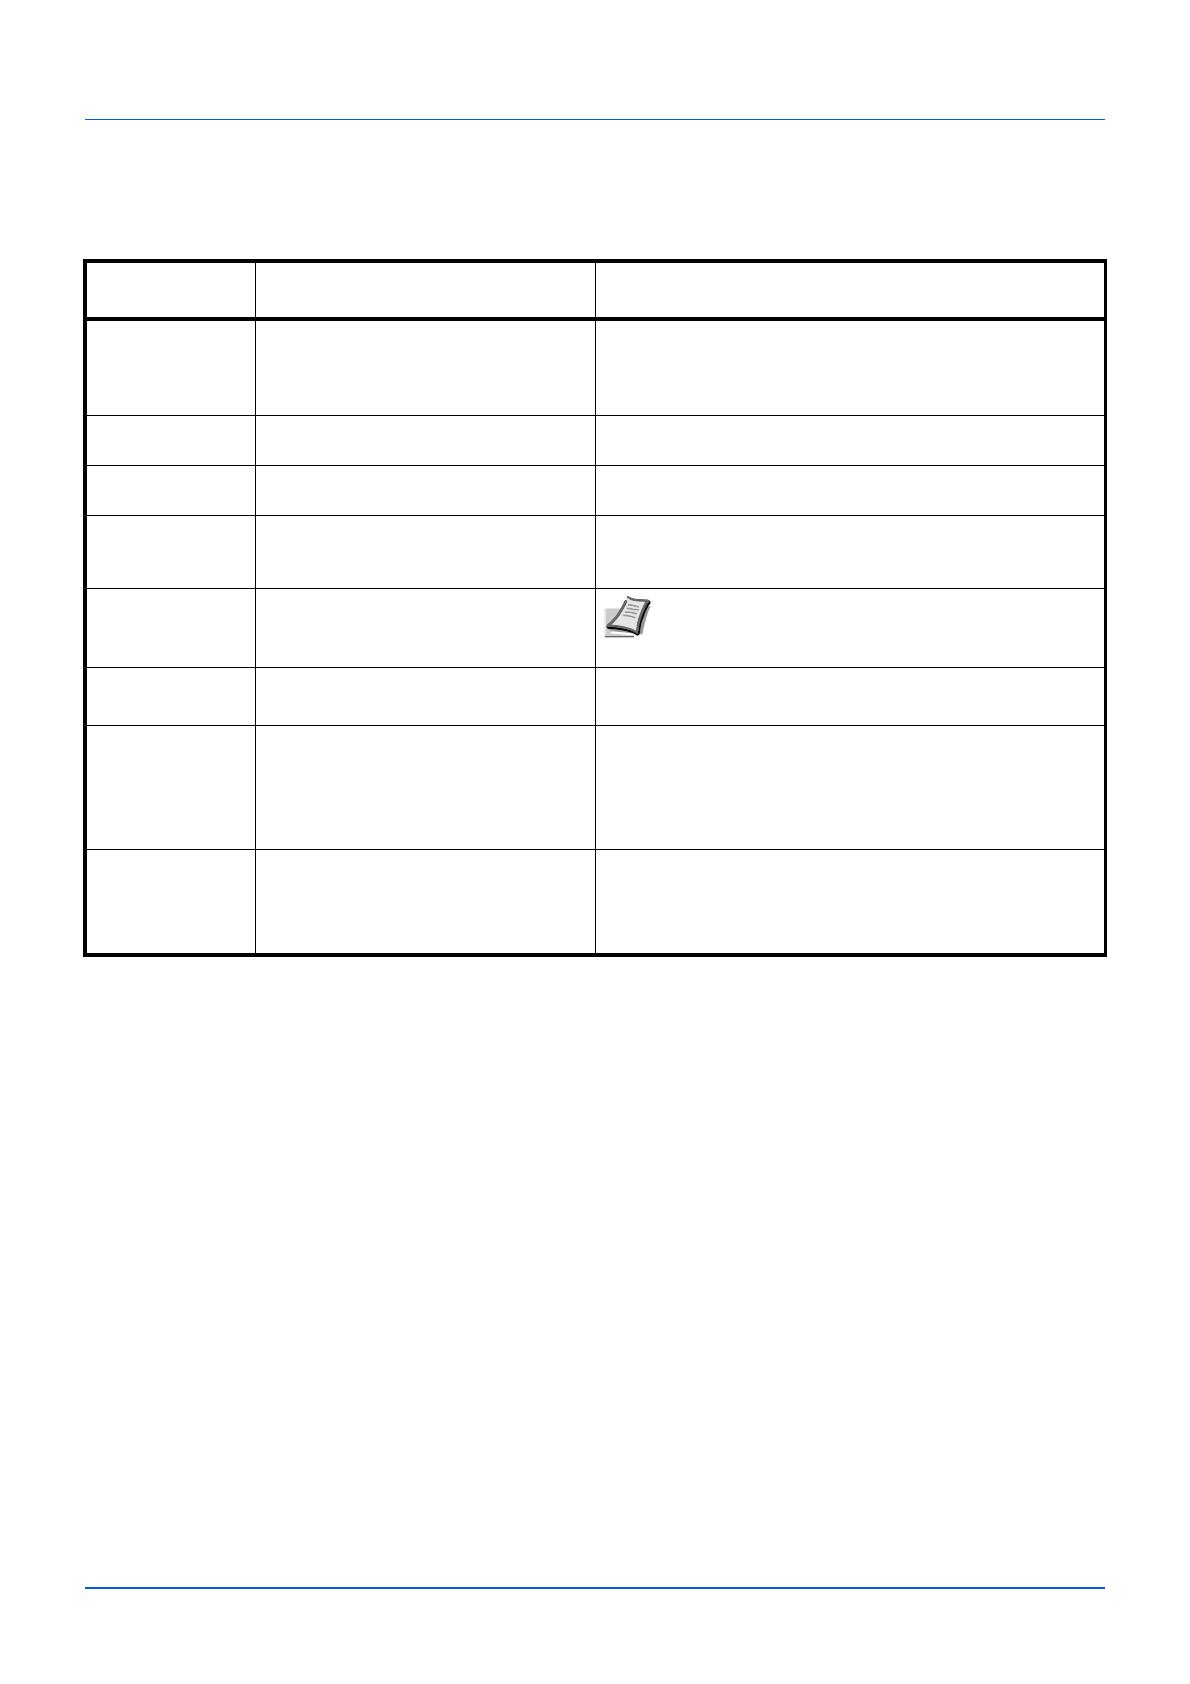
Условные обозначения в данном руководстве
В руководстве использованы следующие условные обозначения
Условное
обозначение
Описание Пример
Курсив Используется для выделения
ключевого слова, фразы или
источника дополнительной
информации.
Смотрите Подключения на стр. 2-2.
Жирный шрифт Используется для обозначения
кнопок в программном обеспечении.
Для начала печати нажмите OK.
Жирный со
скобками
Используется для обозначения
кнопок панели управления.
Нажмите [Старт], чтобы начать копирование.
Шрифт Courier Используется для обозначения
символов, отображаемых на
дисплее панели управления.
На дисплее панели управления отображается 1-.
Примечание Предоставляет дополнительную
полезную информацию о функции
или режиме.
Примечание Не вынимайте картридж с тонером
из коробки до тех пор, пока не будете готовы
установить его в аппарат.
Важно Используется для предоставления
важной информации.
ВАЖНО При очистке следите за тем, чтобы не
коснуться валика переноса (черного).
Внимание Призвано обратить внимание
пользователя на опасность
механического повреждения
аппарата в результате совершения
какого—либо действия.
ВНИМАНИЕ Вытягивайте застрявшую бумагу
аккуратно, старайтесь не порвать ее. Порванные
кусочки бумаги трудно вынуть, и их можно не
заметить, поэтому устранить застревание бумаги
будет еще сложнее.
Предупреж—
дение
Призвано обратить внимание
пользователя на опасность
получения травмы.
ПРЕДУПРЕЖДЕНИЕ При транспортировке аппарата
необходимо извлечь и упаковать узел проявки и
барабанный блок в пластиковый пакет и
транспортировать их отдельно от аппарата.

1-1
1 Компоненты аппарата
В этой главе рассматриваются следующие темы.
Компоненты передней части аппарата …..…………….…………….……………..…………….…………….…………….…… 1-2
Компоненты задней части аппарата………….…………….……………..…………….…………….…………….…………….… 1-3
Панель управления….…………….…………….…………….…………….…………….…………….……………..……….…………… 1-4
1-2
Компоненты аппарата
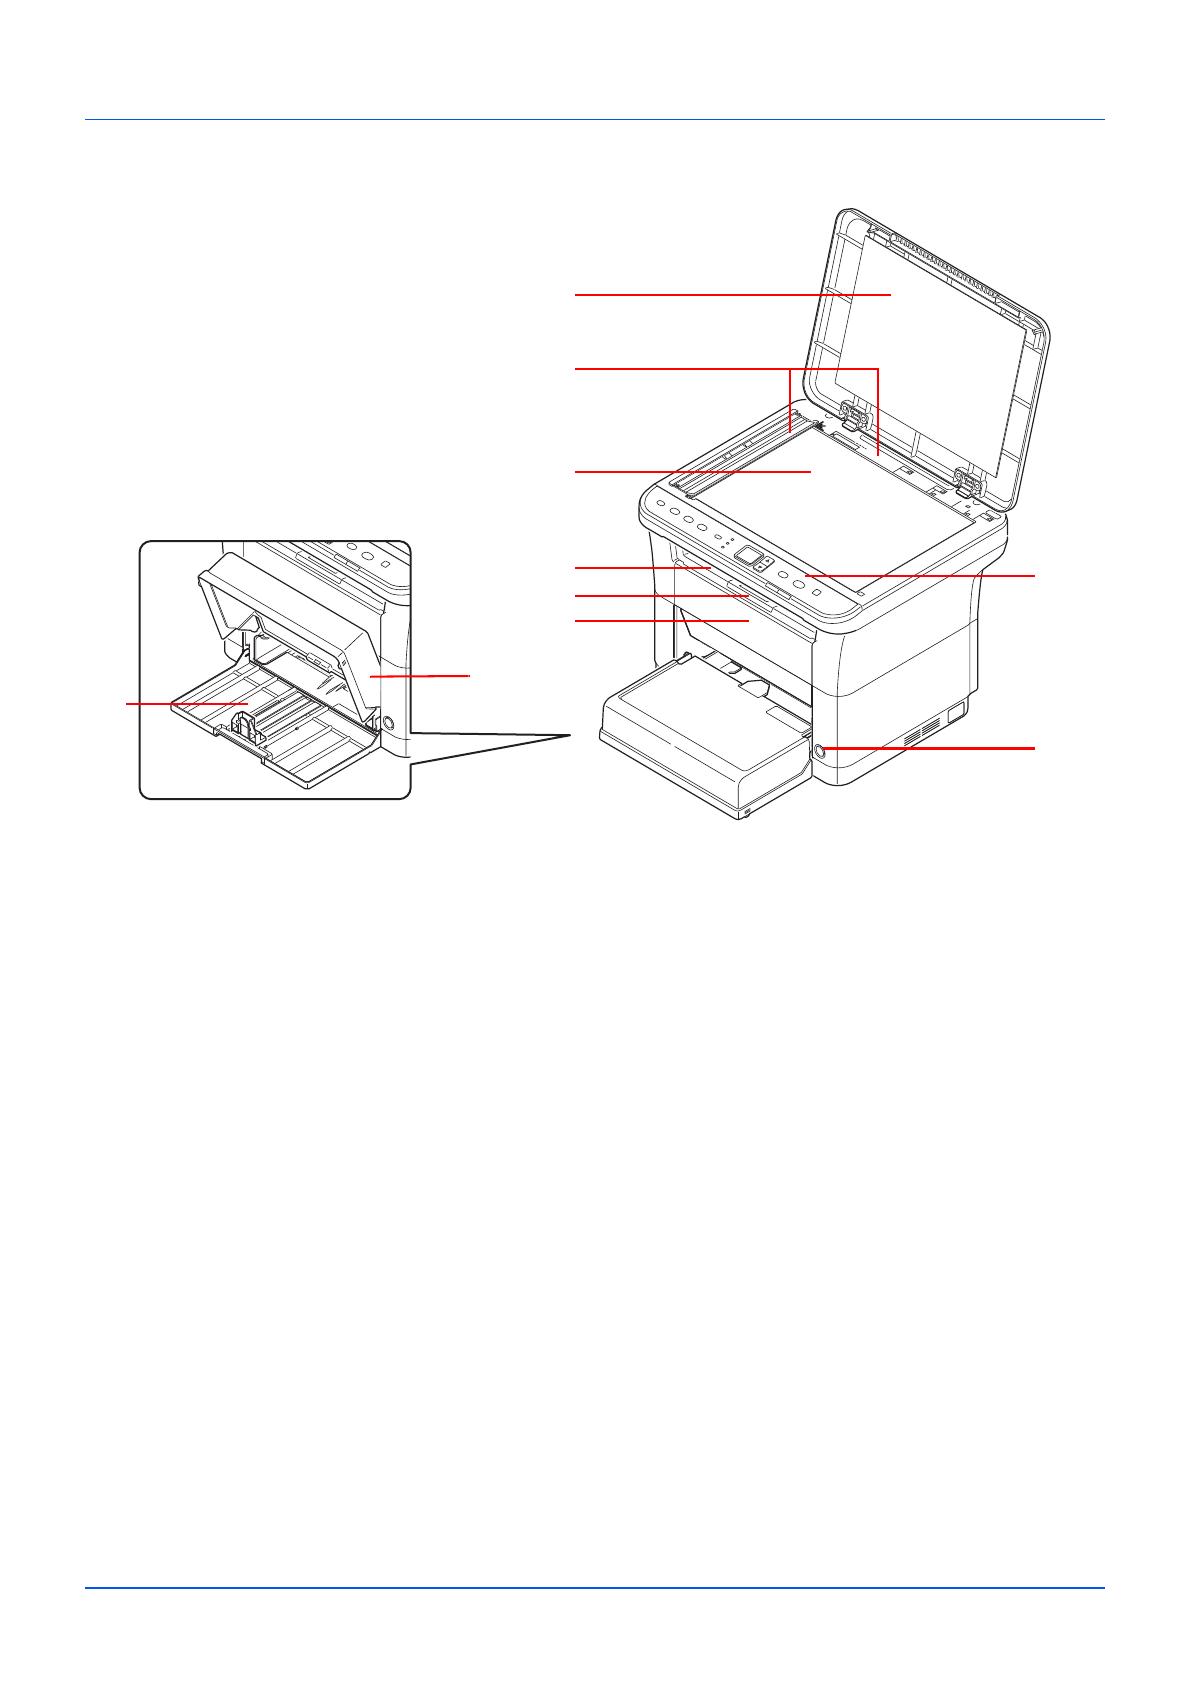
Компоненты передней части аппарата
1 Крышка оригинала
2 Метки размера оригинала
3 Стекло оригинала
4 Внутренний лоток
5 Ограничитель бумаги
6 Передняя крышка
7 Крышка кассеты
8 Кассета
9 Панель управления
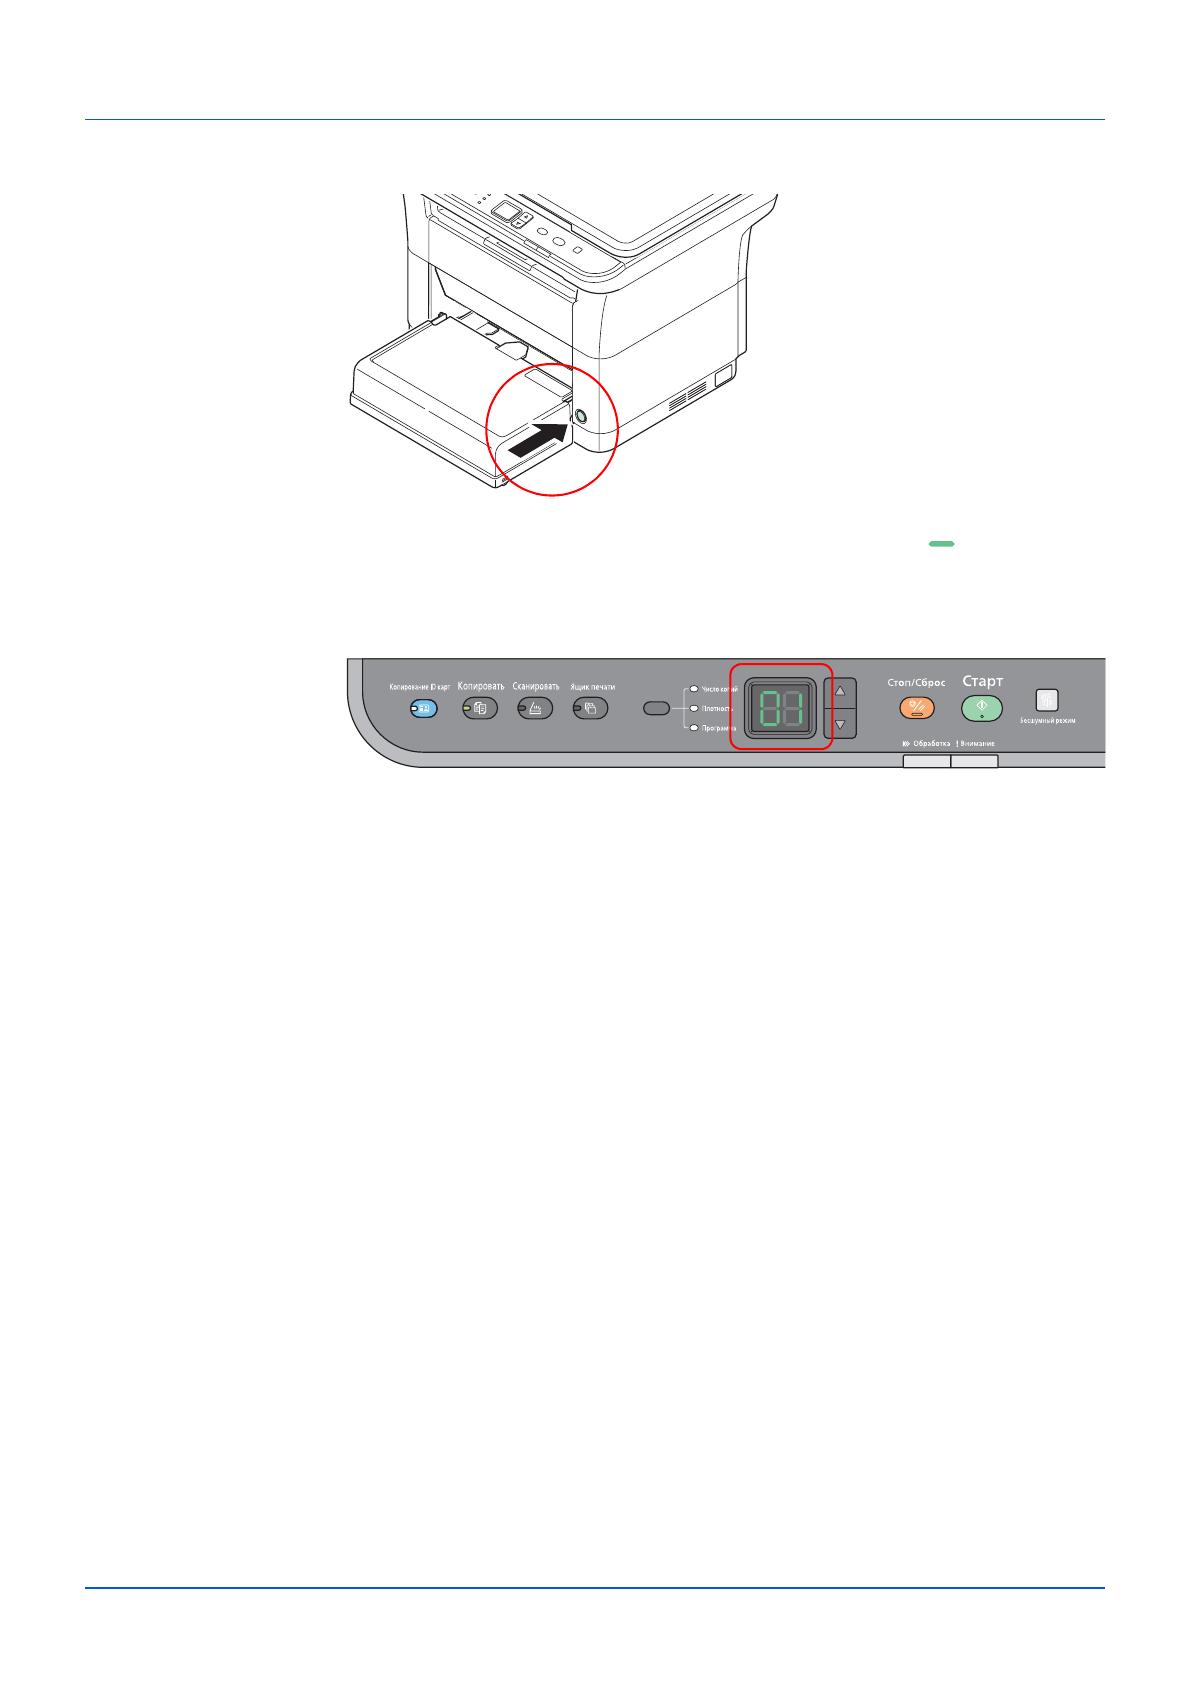
10 Выключатель питания
1-3
Компоненты аппарата
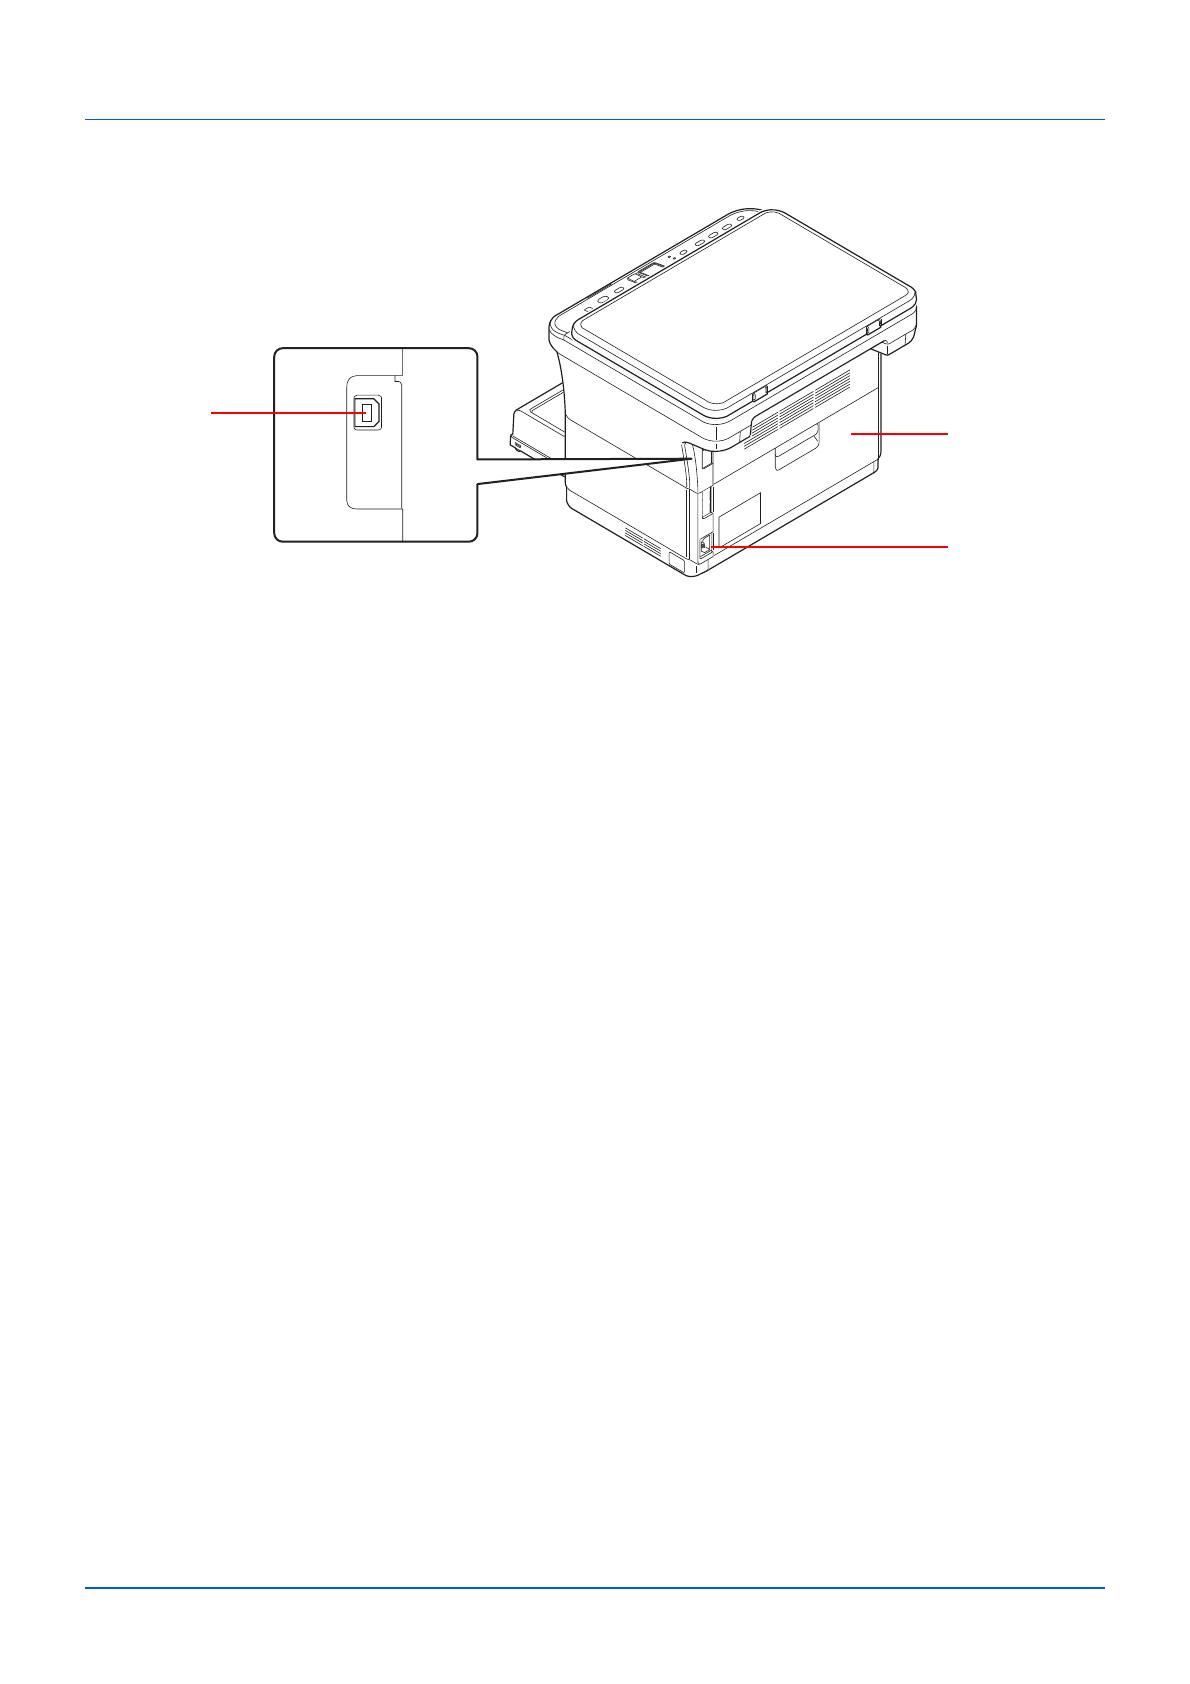
Компоненты задней части аппарата
11 Задняя крышка
12 Разъем для шнура питания
13 Разъем интерфейса USB
1-4
Компоненты аппарата
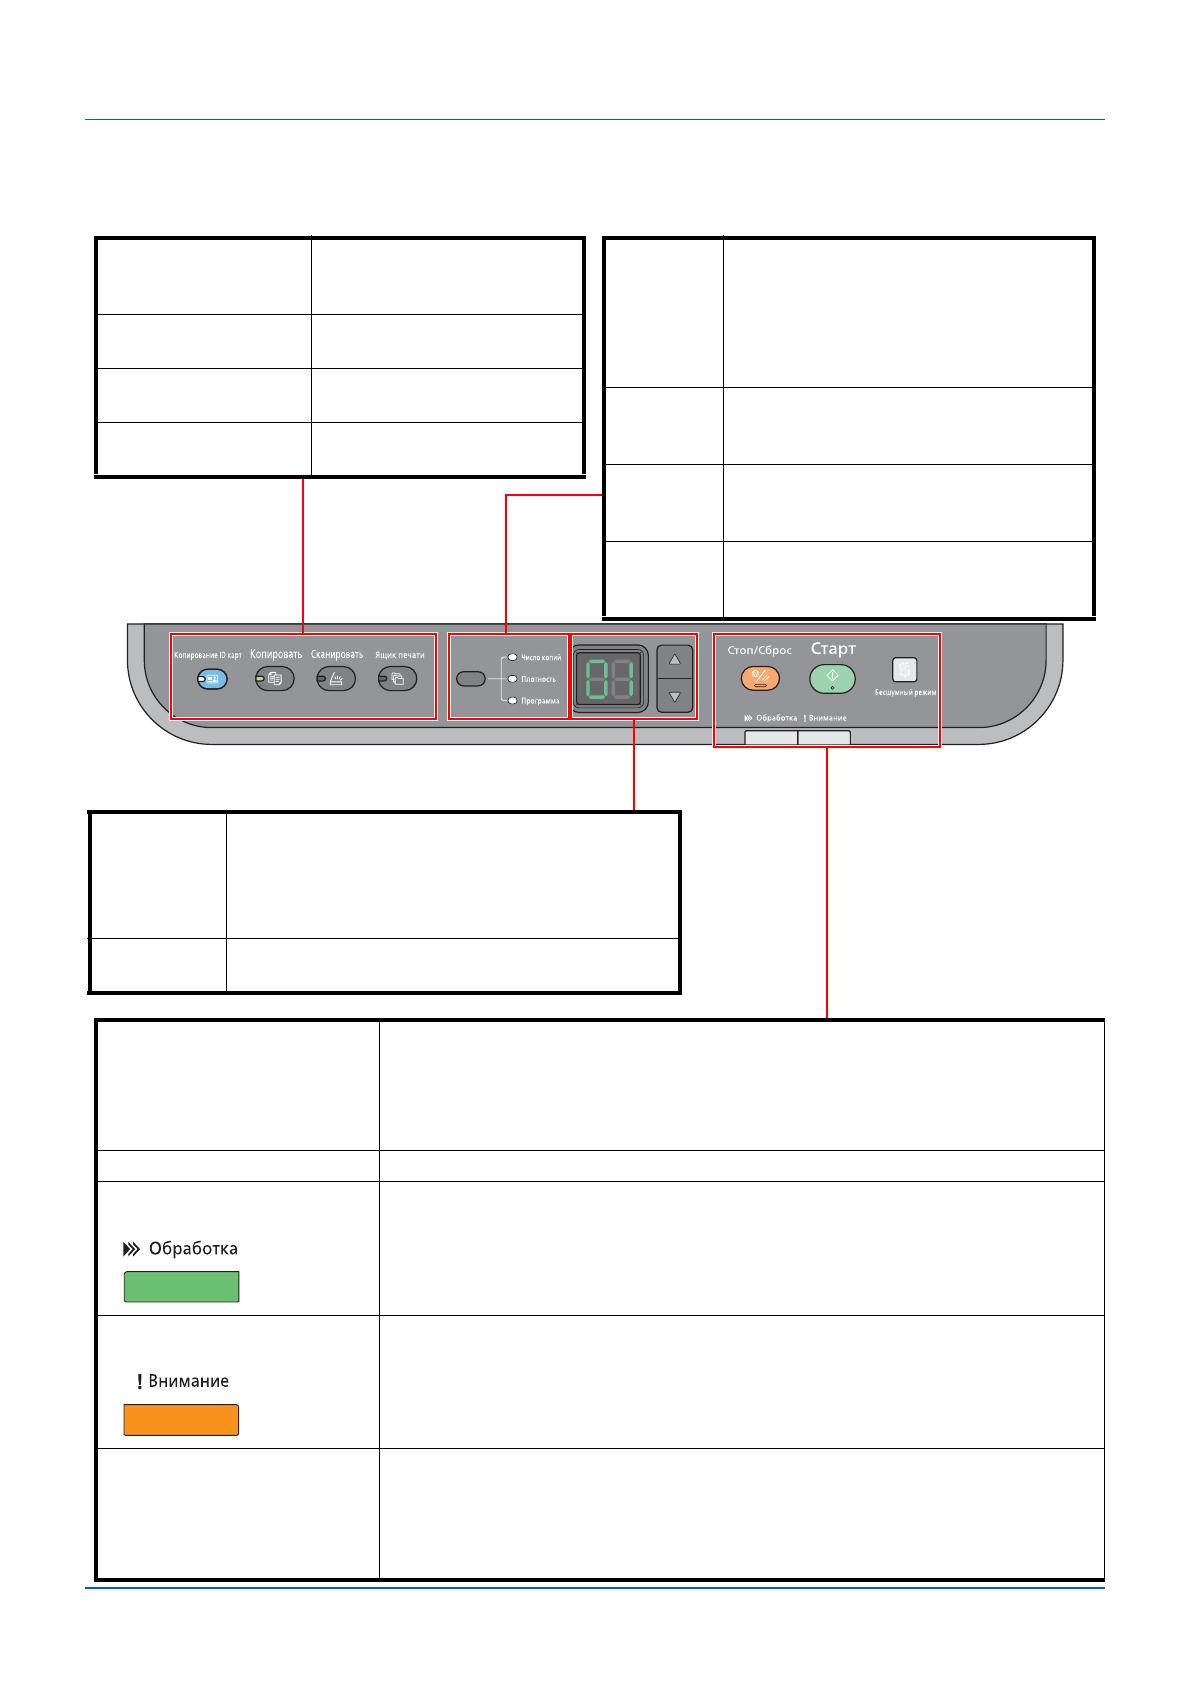
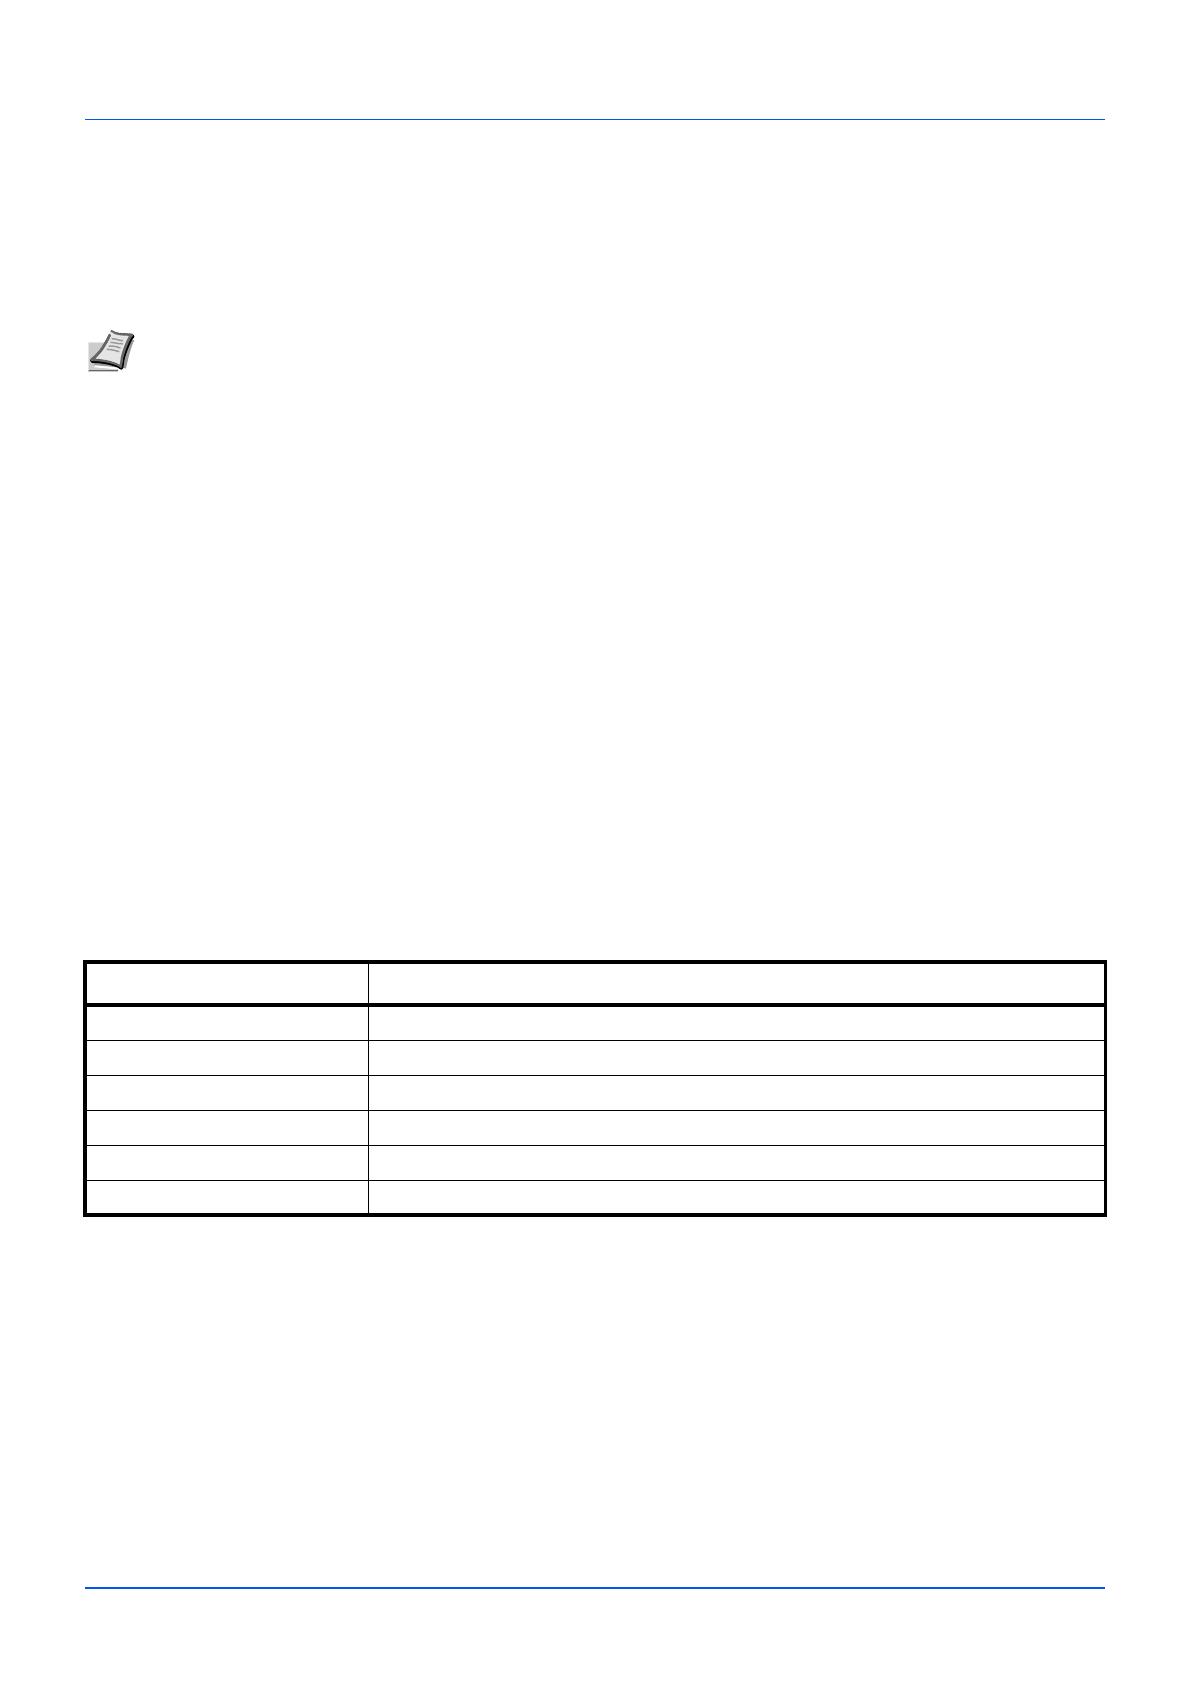
Панель управления
Клавиша
выбора
режима
• Установите режим — «Число копий«,
«Плотность» или «Программа«.
• Нажмите и удерживайте в течение 5
секунд, чтобы распечатать страницу
состояния. Смотрите Печать
страницы состояния на стр. 2-45.
Индикатор
Число
копий
Светится, если выбран режим Число
копий. Введите число копий.
Индикатор
Плотность
Светится, если выбран режим
Плотность. Отрегулируйте плотность
копирования.
Индикатор
Программа
Светится, если выбран режим
Программа. Выберите номер
программы.
Клавиша [Стоп/Сброс]•Отменяет текущее задание печати.
• Восстанавливает настройки параметров по умолчанию.
• Удерживайте нажатой в течение двух секунд, чтобы приостановить печать.
Удерживайте нажатой в течение двух секунд повторно, чтобы возобновить
печать.
Клавиша [Старт] Запуск операций копирования и сканирования.
Индикатор Обработка
(зеленый)
Мигает во время обработки данных аппаратом.
Индикатор
Внимание
(желтый)
Светится или мигает, если произошла ошибка.
Клавиша [Бесшумный
режим]
Включает бесшумный режим.
Бесшумный режим
Если вы предпочитаете, чтобы аппарат работал тихо, нажмите клавишу
[Бесшумный режим], чтобы включить бесшумный режим. В бесшумном
режиме скорость печати снижается.
Дисплей • Отображает численные значения и
настройки, такие как число копий, а также
коды ошибок.
• Если аппарат находится в режиме ожидания,
отображается символ —.
Клавиши [] /
[]
Увеличение/уменьшение численных значений на
дисплее.
Клавиша
[Копирование ID
карт]
Отображает экран
копирования ID-карт.
Клавиша
[Копировать]
Отображает экран
копирования.
Клавиша
[Сканировать]
Отображает экран
сканирования.
Клавиша [Ящик
печати]
Отображает экран ящика
печати.

2-1
2 Подготовка
В этой главе рассматриваются следующие темы.
Подключения…..…………….…………….…………….…………….……………..…………….…………….…………………………..… 2-2
Загрузка бумаги ………….…………….…………….…………….………….…………….…………….……………..….………………… 2-4
Загрузка оригиналов……..………….…………….…………….…………….……………..…………….…………….……………….. 2-16
Установка и удаление драйверов и служебных программ….……………..…………….…………….…………….…. 2-17
Настройки аппарата …………………………..…………….………….…………….…………….…………….……………...………… 2-23
Конфигурация …………….…………….…………….………….…………….…………….…………….……………...………..……….. 2-39
Печать страницы состояния ……………..…………….…………….………….…………….…………….…………….………….. 2-45
2-2
Подготовка
Подключения
В этом разделе объясняется процедура запуска аппарата.
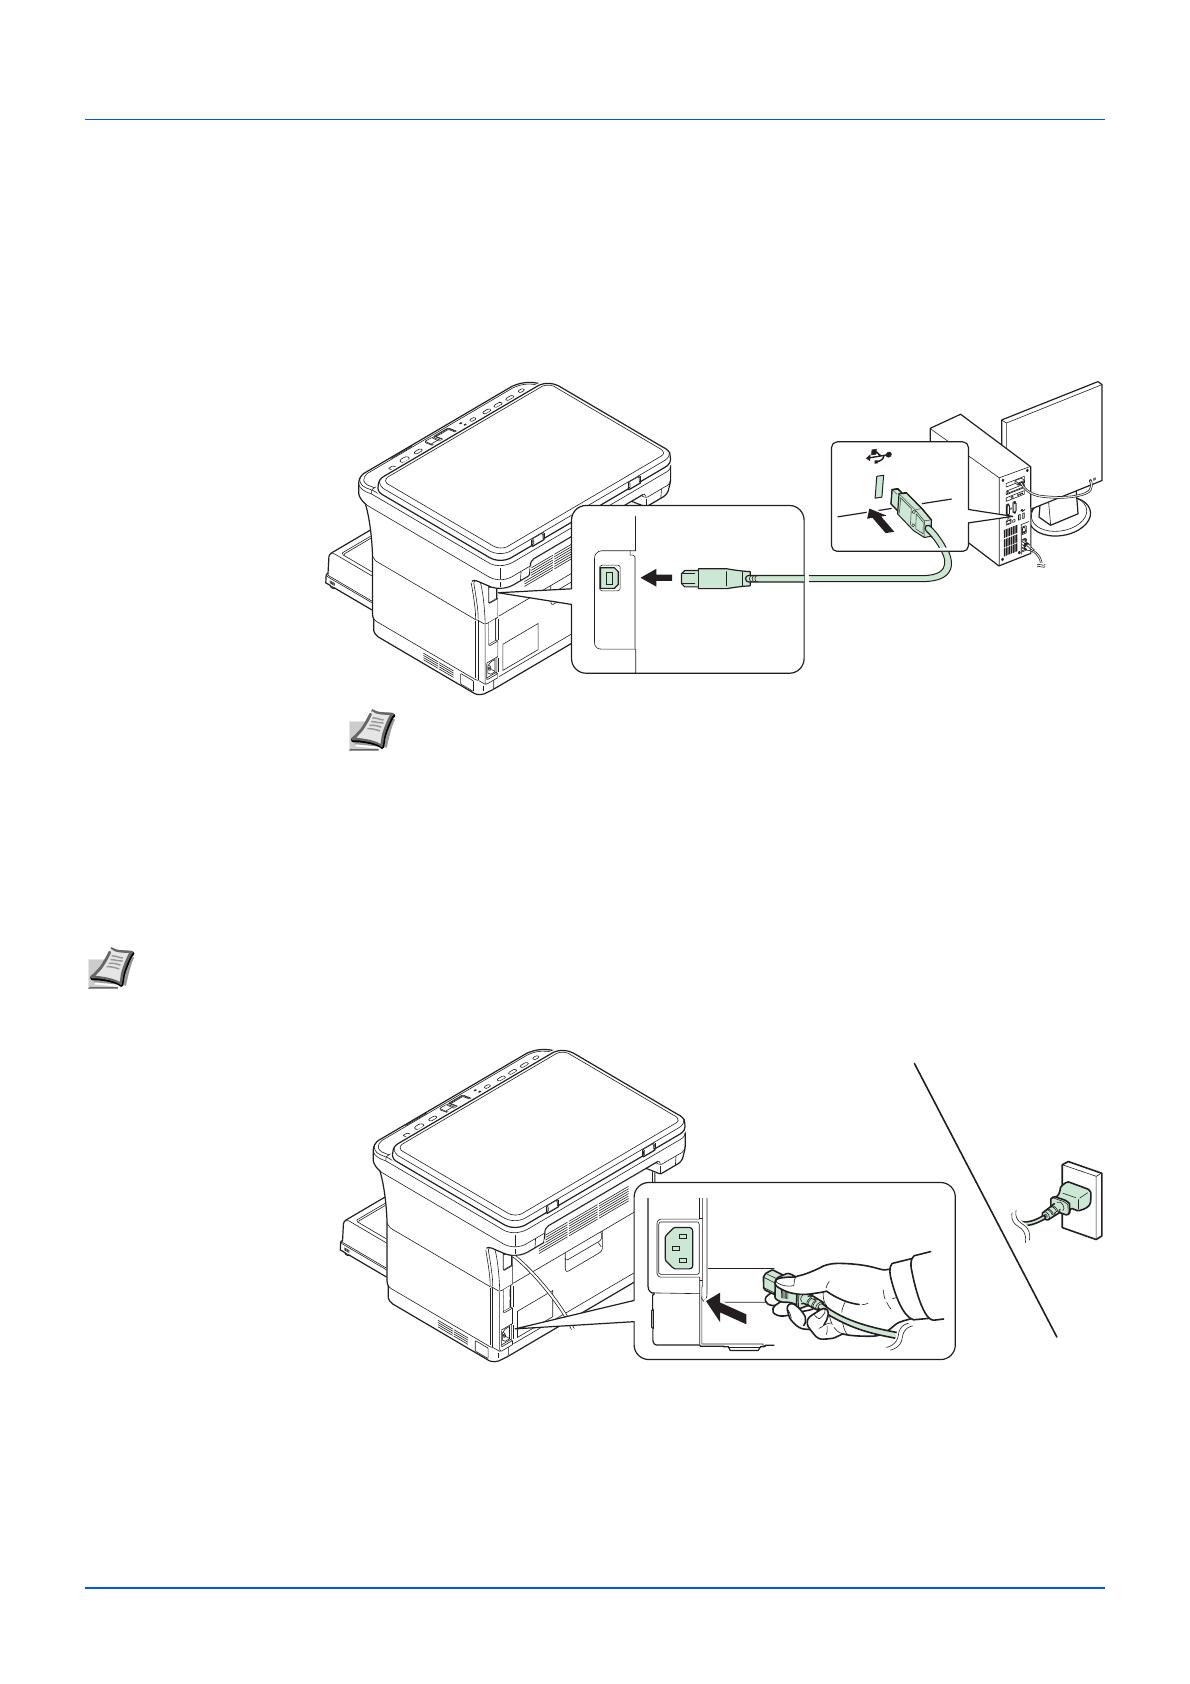
Подключение кабеля USB
Для подсоединения кабеля USB выполните следующие действия.
1 Подключите кабель USB к разъему интерфейса USB аппарата.
2 Подсоедините другой конец кабеля USB к разъему интерфейса USB компьютера.
Подключение шнура питания
Установите аппарат поближе к настенной розетке переменного тока. Если используется удлинитель, полная длина
шнура питания с удлинителем должна быть не более 5 метров.
1 Подключите шнур питания к разъему для шнура питания в задней части аппарата.
2 Подключите другой конец шнура питания к сетевой розетке.
Примечание Используйте кабель USB с прямоугольным разъемом типа A и
квадратным типа B. Кабель USB должен быть экранирован и иметь длину не
более 5 метров.
Примечание Используйте только тот шнур питания, который поставляется с аппаратом.
2-3
Подготовка
3 Нажмите выключатель питания, чтобы включить аппарат. Начнется прогрев аппарата.
Исходный картридж с тонером
Исходным называется картридж с тонером, включенный в комплект поставки нового аппарата. Исходного
картриджа с тонером хватает в среднем на 700 страниц.
ВАЖНО Если установить картридж с тонером и включить питание, на дисплее
панели управления отобразятся две вращающиеся черточки (). Если аппарат
включается в первый раз после установки тонера, перед тем, как он будет готов
к работе, произойдет задержка приблизительно на 7 минут. Как только на
дисплее панели управления отобразятся цифры 01, установка аппарата будет
завершена.
2-4
Подготовка
Загрузка бумаги
Общие инструкции
Аппарат предназначен для печати на стандартной бумаге для копировальных аппаратов, но может также
принимать множество других типов бумаги в соответствии с ограничениями, указанными ниже.
Выбор правильной бумаги очень важен. Использование неправильной бумаги может привести к ее застреванию,
скручиванию, плохому качеству печати, отходам бумаги и в крайних случаях может повредить аппарат.
Соблюдение
указаний, приведенных ниже, увеличит производительность вашего офиса, путем обеспечения
эффективной бесперебойной печати и снижению износа аппарата.
Пригодность бумаги
Большинство типов бумаги совместимы с различными аппаратами. Бумагу, предназначенную для
ксерографических копировальных аппаратов, также можно использовать в этом аппарате.
Существует три основных сорта бумаги: экономичный, обычный и премиум. Наиболее значительна разница между
сортами в легкости, с которой они проходят через машину. На это влияет гладкость, формат бумаги, содержание в
ней влаги
и способ ее нарезки. Чем выше сорт используемой бумаги, тем меньше риск застревания бумаги и
других проблем, и тем выше уровень качества печати.
Различия между бумагой от различных поставщиков также могут влиять на работу аппарата. Высококачественный
аппарат не может обеспечивать высокое качество печати при использовании неподходящей бумаги.
Продолжительное использование дешевой
бумаги невыгодно, если при этом возникают проблемы с печатью.
Бумага каждого сорта доступна в диапазоне основных плотностей (определяется далее). Обычная стандартная
плотность составляет от 60 до 120 г/м².
Характеристики бумаги
В следующей таблице приведены основные характеристики бумаги. Подробные сведения приведены на
следующих страницах.
Примечание Производитель не несет никакой ответственности за проблемы, возникающие при
использовании бумаги, не удовлетворяющей этим требованиям.
Параметр Характеристики
Плотность от 60 до 220 г/м²
Толщина от 0,086 мм до 0,110 мм
Погрешность размеров ±0,7 мм
Прямоугольность 90 ±0,2°
Содержание влаги от 4 до 6%
Содержание целлюлозы более 80%
/
Похожие инструкции
-
Драйверы
2
-
Руководства по ремонту
6
-
Инструкции по эксплуатации
5


Kyocera ECOSYS FS-1020MFP инструкция по эксплуатации
(96 страниц)
- Языки:Английский
-
Тип:
PDF -
Размер:
548.12 KB -
Описание:
Kyocera Net Viewer User Guide
The KYOCERA Net Viewer application lets you organize and monitor network device information. This guide provides instructions on how to use the features and settings of the application.

Kyocera ECOSYS FS-1020MFP инструкция по эксплуатации
(119 страниц)
- Языки:Английский
-
Тип:
PDF -
Размер:
816.87 KB -
Описание:
Command Center RX User Guide
Command Center RX (Remote eXtension), is the web server that is built into the printing device. It allows you to verify the operating status of the device and make settings related to security, network printing, E-mail transmission and advanced networking.


На NoDevice можно скачать инструкцию по эксплуатации для Kyocera ECOSYS FS-1020MFP. Руководство пользователя необходимо для ознакомления с правилами установки и эксплуатации Kyocera ECOSYS FS-1020MFP. Инструкции по использованию помогут правильно настроить Kyocera ECOSYS FS-1020MFP, исправить ошибки и выявить неполадки.
- Manuals
- Brands
- Kyocera Manuals
- All in One Printer
- FS-1020MFP
- Operation manual
-
Contents
-
Table of Contents
-
Troubleshooting
-
Bookmarks
Quick Links
oPeratioN guide
FS-1020MFP/FS-1220MFP
Related Manuals for Kyocera FS-1020MFP
Summary of Contents for Kyocera FS-1020MFP
-
Page 1
FS-1020MFP/FS-1220MFP… -
Page 2
Describes how to load paper, basic copy, print and scan operations, and troubleshooting. KYOCERA Client Tool User Guide Describes how to use KYOCERA Client Tool. KYOCERA Client Tool is a software program that is installed on your computer to enable you to configure machine settings. -
Page 3: Table Of Contents
Contents Machine Parts …………………………1-1 Front Machine Components …………………….1-2 Rear Machine Components ……………………..1-3 Operation Panel ………………………..1-4 Preparation …………………………2-1 Connections …………………………2-2 Loading Paper …………………………2-4 Loading Originals ……………………….2-16 Installing and Uninstalling Drivers and Utilities ………………2-17 Machine Settings ……………………….2-22 Configuration ………………………….2-36 Printing the Status Page ……………………..2-42 Copying …………………………..3-1 Basic Operation ………………………..3-2 Manual Duplex ………………………….3-3…
-
Page 5: Legal And Safety Information
All rights are reserved. Copying or other reproduction of all or part of this guide, or any copyrightable subject matter without the prior written consent of KYOCERA Document Solutions Inc. is prohibited. Any copies made of all or part of this guide, or any copyrightable subject must contain the same copyright notice as the material from which the copying is done.
-
Page 6
Compliance and Conformity This equipment has been tested and found to comply with the limits for a Class B digital device, pursuant to Part 15 of the FCC Rules. These limits are designed to provide reasonable protection against harmful interference in a residential installation. -
Page 7: Safety Instructions Regarding The Disconnection Of Power
Safety Instructions Regarding the Disconnection of Power Caution: The power plug is the main isolation device! Other switches on the equipment are only functional switches and are not suitable for isolating the equipment from the power source. VORSICHT: Der Netzstecker ist die Hauptisoliervorrichtung! Die anderen Schalter auf dem Gerät sind nur Funktionsschalter und können nicht verwendet werden, um den Stromfluß…
-
Page 8
Environmental benefits of «Power Management» To reduce power consumption when idle, this machine is equipped with a power management function that automatically activates energy-saving mode when the machine is idle for a certain period of time. Although it takes the machine a slight amount of time to return to READY mode when in energy-saving mode, a significant reduction in energy consumption is possible. -
Page 9: Safety Conventions In This Guide
Safety Conventions in This Guide The sections of this guide and parts of the machine marked with symbols are safety warnings meant to protect the user, other individuals and surrounding objects, and ensure correct and safe usage of the machine. The symbols and their meanings are indicated below.
-
Page 10: Cautions When Handling Consumables
Environment The service environmental conditions are as follows: • Temperature: 50 to 90.5 °F (10 to 32.5 °C) • Humidity: 15 to 80 % However, adverse environmental conditions may affect the image quality. Avoid the following locations when selecting a site for the machine.
-
Page 11
About the Operation Guide This Operation Guide contains the following chapters: 1 Machine Parts This chapter lists the names of different machine parts. 2 Preparation This chapter explains how to start up the machine, load paper and originals, and use the application software included in the Product Library disc. -
Page 13: Machine Parts
Machine Parts This chapter explains the following topics: Front Machine Components……………………..1-2 Rear Machine Components ……………………… 1-3 Operation Panel…………………………1-4…
-
Page 14: Front Machine Components
Machine Parts Front Machine Components Original Cover Original Size Indicator Plates Platen Inner Tray Paper Stopper Front Cover Cassette Cover Cassette Operation Panel 10 Power Switch…
-
Page 15: Rear Machine Components
Machine Parts Rear Machine Components 11 Rear Cover 12 Power Cord Connector 13 USB Interface Connector…
-
Page 16: Operation Panel
Machine Parts Operation Panel [ID Card Copy] key Displays the ID Card Copy Mode Select key • Set the mode to Copies, screen. Density, or Program. • Press and hold for 5 seconds to [Copy] key Displays the Copy screen. print the status page.
-
Page 17: Preparation
Preparation This chapter explains the following topics: Connections …………………………..2-2 Loading Paper ………………………….. 2-4 Loading Originals…………………………2-16 Installing and Uninstalling Drivers and Utilities………………..2-17 Machine Settings…………………………2-22 Configuration………………………….. 2-36 Printing the Status Page……………………….2-42…
-
Page 18: Connections
Preparation Connections This section explains how to start up the machine. Connecting the USB Cable Follow the steps as below for connecting the USB cable. Connect the USB cable to the machine’s USB interface connector. Note Use a USB cable with a rectangular Type A plug and a square Type B plug. The USB cable should be shielded and no longer than 5 meters (16 feet) long.
-
Page 19
Preparation Press the power switch to On. The machine begins to warm up. IMPORTANT If you install the toner container and switch on the power, a screen with two bars ( ) rotating is shown on the display on the operation panel. When the machine is first switched on after toner installation, there will be a delay of approximately 7 minutes before the machine gets ready to use. -
Page 20: Loading Paper
Preparation Loading Paper General Guidelines The machine is designed to print on standard copier paper, but it can also accept a variety of other types of paper within the limits specified below. Note The manufacturer assumes no liability for problems that occur when paper not satisfying these requirements is used.
-
Page 21: Selecting The Right Paper
Preparation Minimum and Maximum Paper Sizes The minimum and maximum paper sizes are as follows. Minimum Paper Size 70 mm (2-3/4 inches) Maximum Paper Size 216 mm (8-1/2 inches) Selecting the Right Paper This section describes the guidelines for selecting paper. Condition Avoid using paper that is bent at the edges, curled, dirty, torn, embossed, or contaminated with lint, clay, or paper shreds.
-
Page 22
Preparation • Envelope Monarch (3-7/8 × 7-1/2 inches) • Envelope #10 (4-1/8 × 9-1/2 inches) • Envelope #9 (3-7/8 × 8-7/8 inches) • Envelope #6-3/4 (3-5/8 × 6-1/2 inches) • Envelope C5 (162 × 229 mm) • Envelope DL (110 × 220 mm) •… -
Page 23
Preparation The moisture content of the paper varies with the relative humidity in the room. When the relative humidity is high and the paper absorbs moisture, the paper edges expand, becoming wavy in appearance. When the relative humidity is low and the paper loses moisture, the edges shrink and tighten, and print contrast may suffer. -
Page 24: Special Paper
Preparation Special Paper The following types of special paper can be used: • Preprinted paper • Labels* • Bond paper • Recycled paper • Thin paper* (60 to 64 g/m²) • Rough paper • Letterhead • Colored paper • Prepunched paper •…
-
Page 25
Preparation Some label paper is manufactured with an extra margin of top sheet around the edge. Do not remove the extra top sheet from the carrier sheet until after printing is finished. Acceptable Unacceptable Top sheet Carrier sheet The table below lists the specifications for adhesive label paper. Item Specification Weight of top sheet… -
Page 26
Preparation Thick Paper If an excessive amount of thick paper is loaded in the cassette, it may not be fed. In that case, reduce the number of sheets to be loaded. Fan the stack of paper and align the edges before loading them in the paper source. Some types of paper have rough edges on the back (those are created when the paper is cut). -
Page 27: Paper Type
Not only can preset paper types be selected, but it is also possible for you to define and select customized paper types. Paper type can be changed using the printer driver and KYOCERA Client Tool. The following types of paper can be used.
-
Page 28
Preparation Loading Paper into Cassette 250 sheets of A4 or Letter paper (80 g/m²) may be loaded into the cassette. Open the cassette cover. Note When using paper that is larger than A4/Letter, remove the cassette cover. Gently press on both the left and right sides of the cassette cover and pull. If necessary, open the paper stopper shown in the figure. -
Page 29
Preparation Adjust the paper length guide to the paper size required. Note When using paper larger than A4/Letter, pull out the paper length guide. When using A6 paper, attach the stopper. Move the stopper to the A6 position. 2-13… -
Page 30
Preparation Load the paper all the way in the cassette until the paper touches the far inner side. Ensure the side to be printed is facing up and the paper is not folded, curled, or damaged. IMPORTANT Adjust so that there is no gap between the paper length guide and the paper. -
Page 31
Note When storing the cassette, or when using paper larger than A4/Letter, remove the cassette cover. Specify the paper size and type for the cassette using KYOCERA Client Tool. For more information, refer to Configuration on page 2-36. Note Set the same paper size to the paper size that is set on the machine. -
Page 32: Loading Originals
Preparation Loading Originals You may place books or magazines on the platen in addition to ordinary sheet originals. Note Shadows may be produced around the edges and in the middle of open-faced originals. Align it flush against the original size indicator plates with the back left corner as the reference point.
-
Page 33: Installing And Uninstalling Drivers And Utilities
KYOCERA Client Utility that enables current and all supported 2-22 Tool devices status, features and settings to be accessed. When KYOCERA Client Tool is installed, the following utilities are installed. • Status Monitor (page 2-27) • Preset Tool (page 2-28) •…
-
Page 34: Installing The Software In Windows
Preparation Installing the Software in Windows If you are connecting this machine to a Windows PC, follow the next steps to install the software. The example shows you how to connect your machine to a Windows 7. Note In Windows operating systems, you must be logged in with administrator privileges to install the software. You can use either Express Install or Custom Install to install the software.
-
Page 35
Preparation Select the machine you want to install, select the Driver Package, and click Install. Note If the Found New Hardware Wizard appears, click Cancel. If a hardware installation warning message appears, click Continue. If the Windows security window appears, click Install this driver software anyway. A message appears saying that your software is ready to use. -
Page 36
Preparation Double-click OS X 10.5 or higher. Double-click Kyocera OS X 10.5+ xxxxx. The printer driver installation program starts up. Install the printer driver as directed by the instructions in the installation software. IMPORTANT In the Authentication screen, enter the name and password used to log in to the operating system. -
Page 37
Description) file, the software cannot be uninstalled using the Product Library disc. Note When KYOCERA Net Viewer is installed, separate uninstallers are launched for this application. Proceed with the uninstallation steps for this application as directed by the on-screen instructions. -
Page 38: Machine Settings
Preparation Machine Settings Various machine settings can be configured from a computer using KYOCERA Client Tool. Install KYOCERA Client Tool from the provided Product Library disc. Note For the detailed functions of KYOCERA Client Tool, refer to KYOCERA Client Tool User Guide.
-
Page 39
Item Description Page Machine list The list at the top of KYOCERA Client Tool screen — includes all of the supported machines installed on your computer. You can select a machine from this list to view its properties and select available options, such as configuration, maintenance, and driver download. -
Page 40
Device Overview The Device Overview tab shows the machine — settings. Close Clicking Close exits KYOCERA Client Tool. — To display KYOCERA Net Viewer, KYOCERA Net Viewer must be installed. Print Tab Item Description Preferences Opens the Printing Preferences screen for the selected machine. -
Page 41
Preparation Device Tab Reference Item Description Page Configuration Opens the Configuration screen for the selected 2-36 machine. Preset Opens the Preset Tool screen for the selected 2-28 machine. Documentation Opens the folder where manuals are contained. — Device restart Click the Device restart icon to restart the machine. —… -
Page 42
Kyocera Online Opens our website. — Driver Download Click to open the download page of our — website. You can download software and find an authorized dealer. To display KYOCERA Net Viewer, KYOCERA Net Viewer must be installed. 2-26… -
Page 43: Status Monitor
Preparation Status Monitor When KYOCERA Client Tool is installed, you can check the machine status in the Status Monitor icon. The Status Monitor icon displays machine status messages in the lower right corner of the screen. Screen Overview The screen overview of the Status Monitor icon is as follows.
-
Page 44
If you have settings that are frequently changed from the default settings, register the settings in a program. You can simply select the program number as needed to recall those functions. Programs can be registered from a computer using Preset Tool. The Preset Tool is a function of KYOCERA Client Tool. Three programs can be registered per function. -
Page 45
Preparation General Reference Item Description Page Program number Select the program number (1 to 3) to be registered. When a program number is — selected, the settings registered in that number appear in the right-hand screen. Summary Shows a list of the settings of the selected program. —… -
Page 46
Preparation Copy Tab Item Description Original size Specify the size of originals being scanned. Value: Executive, Letter, A4, A5, A6, B5 (JIS), B5 (ISO), Custom, 16K, Statement Note Refer to Configuration on page 2-36 for selecting Custom. Original image Select image quality suited to the type of original. Value: Text + Photo Photo… -
Page 47
Preparation Item Description Zoom Adjust the magnification to reduce or enlarge the original image. Value: 100%, Auto, Custom, Fixed When Custom or Fixed is selected, the Zoom screen is displayed. Zoom level (Fixed) Custom* Adjusts the image to match present Specify the image size in 1% increment sizes. -
Page 48
Preparation Scan Tab Item Description Name Set a name for the Program. Up to 18 characters can be entered. Original size Specify the size of originals being scanned. Value: Executive, Letter, A4, A5, A6, B5 (JIS), B5 (ISO), Custom, 16K, Statement Note Refer to Configuration on page 2-36 for selecting Custom. -
Page 49
Preparation Item Description Quality Set the quality if file format is JPEG. This is disabled for non-JPEG format. Value: 1 to 100 Note Non-numeric characters cannot be entered. If entered number is beyond range, the max/min value will be restored. Destination folder Enter the path of the folder where the scanned image will be saved. -
Page 50
Quick Scan Settings Change the settings for Scan to PDF, Scan to Email and Scan to Folder. Start KYOCERA Client Tool as explained in Accessing KYOCERA Client Tool on page 2-22. Click Preferences or Quick Scan Settings on the Scan tab. -
Page 51
Preparation Item Description Original image Select original image type for best results. Value: Text, Photo, Text+Photo Destiny Select the density. Value: -3 (Lighter) to 3 (Darker) Reverse image When this is selected, the image color reverses. Reset Reset the settings to the previous settings. Help Displays the Help screen. -
Page 52: Configuration
Preparation Configuration The Configuration is a function of KYOCERA Client Tool. The default settings of the machine can be changed and the messages that appear in the Status Monitor can be set. Note For the detailed functions of the Configuration, refer to KYOCERA Client Tool User Guide.
-
Page 53: Configuration Screen
Preparation Configuration Screen General Reference Item Description Page Device Defaults Configure overall machine operation. 2-38 Copy Configure settings for copying functions. 2-40 Status Monitor Configure settings for the Status Monitor. 2-41 OK/Cancel/Apply Clicking OK exits the Configuration after applying the modified machine —…
-
Page 54
Value: 1 to 6 hours, 9 hours, 12 hours, 1 day to 1 week Also, selects whether or not to turn the power off automatically when a USB is connected. Note Power off when does not appear on the FS-1020MFP for Europe, Russia, Africa and Middle East, and FS-1220MFP for Europe. Auto sleep Set the sleep timer for the machine to go into sleep mode when not in use. -
Page 55
Preparation Item Description Auto error clear Enable auto error clear. If an error occurs during processing, processing stops to wait for the next step to be taken by the user. In the auto error clear mode, automatically clear the error after a set amount of time elapses. If you select On for auto error clear, set the amount of time to wait before automatically clearing errors. -
Page 56
Preparation Copy Tab Item Description Collate Select the defaults for Collate. Orientation Set the original orientation defaults. Value: Top edge top, Top edge left EcoPrint Select the EcoPrint default. Zoom Select the default zoom setting. Value: Auto, 100% Density Set the default value for the copy density. Value: Lighter (-3), Lighter (-2), Lighter (-1), Normal, Darker (+1), Darker (+2), Darker (+3) 2-40… -
Page 57
Select to create an alert when the toner starts running low, and then select a percentage between 0 and 100. If the toner level goes below this percentage, an alert icon is displayed on the Supplies tab at the bottom of KYOCERA Client Tool screen. Enable event Select to activate the notification feature for selected machine events. -
Page 58: Printing The Status Page
Preparation Printing the Status Page You can print the Status Page to check the current settings. To print the status page, hold down the Mode Select key for 5 seconds. 2-42…
-
Page 59: Copying
Copying This chapter explains the following topics: Basic Operation…………………………3-2 Manual Duplex………………………….. 3-3 Using Programs …………………………3-5 Copying Functions…………………………3-5 ID Card Copy …………………………..3-6…
-
Page 60: Basic Operation
Copying Basic Operation Follow the steps as below for basic copying. Configure necessary settings in KYOCERA Client Tool in advance. Refer to Machine Settings on page 2-22. Press [Copy]. Place the originals. For details, refer to Loading Originals on page 2-16.
-
Page 61: Manual Duplex
Copying Manual Duplex To copy on both sides of the paper, use Manual Duplex. Select copy functions and place the front-side original (or odd numbered page) as explained in Basic Operation on page 3-2. Press [Start] to start copying. The front side is copied. Retrieve the paper from the inner tray.
-
Page 62
Copying Copy the back side (or even numbered page). Load the paper as shown. Long Edge Binding Short Edge Binding (Finished) (Finished) Place the back-side original (or even numbered page). For details, refer to Loading Originals on page 2-16. Press [Start]. The back side is copied, and duplex copying is completed. -
Page 63: Using Programs
[Start]. When you have finished scanning all pages, press [] or [] to select — and press [Start] again to start printing. Note To set a function from KYOCERA Client Tool, refer to Default and Program Settings on page 2-28.
-
Page 64: Id Card Copy
Copying ID Card Copy Use to copy the front and back sides of a license or other ID card on one sheet of paper. Press [ID Card Copy]. Place the original. Align with the ID Card marks on the Original Size Indicator Plates. ID Card For details, refer to Loading Originals on page 2-16.
-
Page 65: Printing
Printing This chapter explains the following topics: Printing from Application Software ……………………4-2 About GX Driver …………………………4-2 Manual Duplex………………………….. 4-3 Print Box …………………………… 4-5 Changing the Default Printer Driver Settings (Windows 7 for example)…………4-6…
-
Page 66: Printing From Application Software
Printing Printing from Application Software The steps required to print a document created with an application are explained below. You can select the printing paper size. Note You can also select the various settings by clicking Properties to open the Properties screen. Refer to About GX Driver.
-
Page 67: Manual Duplex
Printing Manual Duplex To print on both sides of the paper, use Manual Duplex. The even pages are printed first and then reloaded to print the odd pages. An instruction sheet is available to assist with loading the sheets in the correct orientation and order. Note Ensure Print manual duplex instructions is selected to receive the instruction sheet.
-
Page 68
Printing Load the even pages printed into the cassette with the instruction sheet facing down and the arrows pointing toward the machine. Long Edge Binding Short Edge Binding (Finished) (Finished) Manual Duplex Instructions Manual Duplex Instructions Long Edge Binding Short Edge Binding Note If the paper is considerably curled in one direction, roll the paper in the opposite direction to counteract the curl. -
Page 69: Print Box
Printing Print Box A print job can be saved in Print Box in the computer and printed from the machine when needed. Use the machine’s operation panel to print the print job stored in a Print Box. The four possible selections for the Print Box are the Default box and Boxes 1 — 3. Note The folder to be used for Boxes 1 — 3 can be set in the Preset Tool.
-
Page 70: Changing The Default Printer Driver Settings (Windows 7 For Example)
Print a print job saved in a Print Box. Note All print jobs saved in the selected Print Box are printed. KYOCERA Client Tool must be running on the computer from which printing from Print Box is executed. Refer to Machine Settings on page 2-22.
-
Page 71: Scanning
Scanning This chapter explains the following topics: Push Scan…………………………..5-2 Using Programs …………………………5-3 Quick Scan (Scan to PDF/Scan to Email/Scan to Folder) ……………… 5-4 Scanning using TWAIN/WIA……………………..5-5…
-
Page 72: Push Scan
For Windows XP: C:Documents and Settings<user>My Documents Note The Program is used to change the settings. Refer to Using Programs on page 5-3. When using Push Scan, KYOCERA Client Tool must be running on the computer. Refer to Accessing KYOCERA Client Tool on page 2-22.
-
Page 73: Using Programs
Scanning Press [Start] to start scanning. Using Programs If there are settings that you frequently change from the default state, register the settings in a program. You can simply select the program number as needed to recall those functions. Scan functions can be registered in three programs. The programs below have been preregistered.
-
Page 74: Quick Scan (Scan To Pdf/Scan To Email/Scan To Folder)
Scan to Folder: Saves the scanned image to a specified folder. Note The folder in which the scanned image is saved and the file format can be set in advance in KYOCERA Client Tool. Refer to Quick Scan/TWAIN Settings on page 2-34.
-
Page 75: Scanning Using Twain/Wia
Scanning Scanning using TWAIN/WIA This section explains how to scan an original using TWAIN/WIA. The procedure for scanning using the TWAIN driver is explained as an example. The WIA driver is used in the same way. Place the originals. For details, refer to Loading Originals on page 2-16. Activate the TWAIN compatible application.
-
Page 76
Scanning Item Description Sharpen Adjust the sharpness of the image. Value: None, Low, Medium, High, Descreen (Blurs the outlines and reduces the sharpness.) Original image Select original image type for best results. Value: Text, Photo, Text+Photo Density Select the density. Value: -3 (Lighter) to 3 (Darker) Reverse image When this is selected, the image color reverses. -
Page 77: Maintenance
Maintenance This chapter explains the following topics: General Information …………………………. 6-2 Toner Container Replacement ……………………..6-2 Maintenance Kit Replacement ……………………..6-5 Cleaning the Machine ……………………….6-5 Maintenance Menu …………………………6-7 Prolonged Non-Use and Moving of the Machine ………………..6-8…
-
Page 78: General Information
Toner Kits For best results, we recommend that you only use genuine Kyocera Parts and Supplies. Should any damage be caused by the application of a toner other than the original toner, then this damage is excluded from the guarantee.
-
Page 79: Replacing The Toner Container
This is to avoid damaging media by the magnetism of toner. KYOCERA Document Solutions Inc. is not liable against any damages or problems arising from the use of toner containers other than those designated as original Kyocera toner containers. For optimum performance, it is also recommended to use only the Kyocera toner containers which are specifically intended for use in your country or region.
-
Page 80
Maintenance Install the new toner container in the machine. Push in firmly until you hear a «click» sound. Close the front cover. Toner is replenished for about 4 seconds. Note If the front cover does not close, check that the new toner container is installed correctly (in step 4). -
Page 81: Maintenance Kit Replacement
Maintenance Maintenance Kit Replacement When the machine prints 100,000 pages, a message is printed indicating that the maintenance kit should be replaced. The maintenance kit must then be replaced immediately. To replace the maintenance kit, contact your service representative. Contents: •…
-
Page 82
Maintenance Use a clean, lint-free cloth to wipe dust and dirt off the metal and rubber rollers, conveying unit, and paper feed unit. Rubber Roller Metal Roller Conveying Unit Paper Feed Unit Transfer Roller Drum IMPORTANT Take care not to touch the drum and transfer roller (black) during cleaning. -
Page 83: Maintenance Menu
Maintenance Maintenance Menu The Maintenance Menu that the user can adjust from KYOCERA Client Tool is described below. In addition, also refer to KYOCERA Client Tool User Guide. Maintenance Menu Description Adjust print Drum charge When print quality has deteriorated, the output of the main charger can be…
-
Page 84: Prolonged Non-Use And Moving Of The Machine
Maintenance Maintenance Menu Description Adjust scan Scanning start Adjust the position of the scanned position position image. Platen: -10 Scan margins Adjust the width of the top edge, bottom edge, left edge and right edge margins. A: Left edge Top edge: +10 B: Top edge C: Right edge D: Bottom edge…
-
Page 85: Troubleshooting
Troubleshooting This chapter explains the following topics: Solving Malfunctions ……………………….. 7-2 Error Messages …………………………7-7 Clearing Paper Jams………………………… 7-9…
-
Page 86: Solving Malfunctions
Pressing [Start] does not Is there a message on the machine Determine the appropriate response to produce copies. screen, KYOCERA Client Tool, or the the message and respond accordingly. Status Monitor? Is the machine in Sleep mode? Press any key on the operation panel —…
-
Page 87
Troubleshooting Reference Symptom Checkpoints Corrective Actions Page Vapor is emitted near the Check if the temperature is low near Depending on the operating — inner tray. the location of the machine, or if the environment of the machine and the paper that is being used has been condition of the paper, heat generated exposed to humidity. -
Page 88
Check the Print density setting in Increase the adjustment value for the 2-38 KYOCERA Client Tool. Print density setting in KYOCERA Client Tool. Check the Drum charge setting in the Decrease the adjustment value for the Maintenance Menu. Drum charge setting in the… -
Page 89
Check the Print density setting in Decrease the adjustment value for 2-38 KYOCERA Client Tool. Print density in KYOCERA Client Tool. Dirt on the top edge or Check the Drum charge setting in the Increase the adjustment value for the back of the paper. -
Page 90
Troubleshooting Reference Symptom Checkpoints Corrective Actions Page Copies have a moire Is the original a printed photograph? Set the image quality to Photo. 2-30 pattern (dots grouped together in patterns and not aligned uniformly). Texts are not clearly Did you choose appropriate image Select appropriate image quality. -
Page 91: Error Messages
An error code appears in the display on the operation panel. • KYOCERA Client Tool and Status Monitor will show the status of the machine. If the Attention indicator is lit or flashing and an error code appears in the display on the operation panel, check the KYOCERA Client Tool or Status Monitor.
-
Page 92
E-0015 USB cable. The PC is powered off. Press [Stop/Reset] and turn the PC power on. Cannot find KYOCERA Client Tool. Press [Stop/Reset] and open KYOCERA Client Tool. — Not connected. The USB cable is not connected. Connect the USB cable. -
Page 93: Clearing Paper Jams
If paper jams in the paper transport system, or no paper sheets are fed at all, the machine automatically goes offline, and the Attention indicator will flash. KYOCERA Client Tool can indicate the location of the paper jam (the component where the paper jam has occurred).
-
Page 94: Rear Cover
Troubleshooting Rear Cover Follow the steps below to clear paper jams inside the rear cover. Note When the front cover is opened or closed, the paper inside the machine may be discharged. Drum Transfer Roller IMPORTANT Take care not to touch the drum and transfer roller (black).
-
Page 95
Troubleshooting 7-11 CAUTION The fuser unit inside the machine is hot. Do not touch it, as it may result in burn injury. Note Close the top cover first and then close Close the rear cover to clear the error. The the rear cover. -
Page 96
Troubleshooting Cassette Follow the steps below to clear paper jams in the cassette. IMPORTANT Do not try to remove paper that has already been partially fed. Refer to Rear Cover on page 7-10. Note Do not open or close the front cover or rear cover before removing the jammed paper. Remove any partially fed paper. -
Page 97
Troubleshooting If paper feed failure occurs Check on and reduction of number of paper sheets loaded If an excessive amount of thick paper is loaded in the cassette, it may not be fed. In that case, reduce the number of sheets to be loaded. Edge fanning and curl straightening Remove all the even pages (including the instruction sheet) from the inner tray, fan through the sheets to separate them prior to loading. -
Page 98
Troubleshooting 7-14… -
Page 99: Appendix
Appendix This chapter explains the following topics: Specifications …………………………… 8-2…
-
Page 100: Specifications
Appendix Specifications Note These specifications are subject to change without notice. Common Functions Item Description Type Desktop Printing Method Electrophotography by semiconductor laser Paper Weight 60 to 220 g/m² Paper Type Plain, Preprinted, Labels, Bond, Recycled, Vellum, Rough, Letterhead, Color, Prepunched, Envelope, Cardstock, Thick paper, High Quality, Custom 1 to 8 Warm-up Time Power on…
-
Page 101: Copy Functions
Appendix Copy Functions Item Description Paper Size A4, A5, A6, Folio, JIS B5, ISO B5, Letter, Legal, Statement, Executive, Oficio II (216 × 340 mm, 8-1/2 × 13 inches), 216 × 340 mm, 16 K, Custom (70 × 148 to 216 × 356 mm, 2-3/4 × 5-13/16 to 8-1/2 ×…
-
Page 102: Printer Functions
Appendix Printer Functions Item Description Paper Size A4, A5, A6, Folio, JIS B5, ISO B5, Letter, Legal, Statement, Executive, Envelope Monarch, Envelope #10, Envelope #9, Envelope #6-3/4, Envelope C5, Envelope DL, Oficio II (216 × 340 mm, 8-1/2 × 13 inches), 216 ×…
-
Page 103: Scanner Functions
Appendix Scanner Functions Item Description System Requirements CPU: 20 MHz RAM: 64 MB Resolution 200 × 200 dpi, 300 × 300 dpi, 400 × 400 dpi, 600 × 600 dpi File Format BMP, JPEG, PNG, TIFF, PDF Transmission System PC transmission: Scan to Folder TWAIN scan* WIA scan** Available Operating System: Windows XP, Windows Server 2003/R2, Windows Vista, Windows 7, Windows…
-
Page 104
Appendix… -
Page 105: Index
……………. 1-4 power cord ………….. 2-2 Start …………….. 1-4 USB cable …………… 2-2 Stop/Reset …………… 1-4 Copies indicator KYOCERA Client Tool ……….2-22 operation panel …………1-4 Copying …………….3-1 basic operation …………3-2 functions …………..3-5 ID Card Copy …………
-
Page 106
printing …………..4-3 Mode Select key operation panel …………1-4 Quick Scan Moving machine …………. 6-8 settings …………..2-34 using ……………. 5-4 Quiet Mode …………..1-4 Quiet Mode key Operation panel operation panel …………1-4 components …………. 1-2 indicators, keys, overview …….. -
Page 107
Uninstalling drivers and utilities ……..2-21 USB cable connection …………… 2-2 USB interface connector components …………. 1-3 Index-3… -
Page 108
Index-4… -
Page 110
Phone: +33-1-69852600 Fax: +27-11-466-3050 Fax: +33-1-69853409 KYOCERA Document Solutions Russia LLC KYOCERA Document Solutions Espana, S.A. Botanichesky pereulok 5, Moscow, 129090, Edificio Kyocera, Avda. de Manacor No.2, Russia 28290 Las Matas (Madrid), Spain Phone: +7(495)741-0004 Phone: +34-91-6318392 Fax: +7(495)741-0018 Fax: +34-91-6318219… -
Page 111
First Edition 2012.09 2M4KMEN000…
Страницы и текст этой инструкции
 Kyocera FS-1020MFP. Страница №1") Руководство пользователя МФУ (многофункционального устройства) Kyocera FS-1020MFP
Руководство пользователя МФУ (многофункционального устройства) Kyocera FS-1020MFP
 Kyocera FS-1020MFP. Страница №2") Информация отображена на картинке
Информация отображена на картинке
 Kyocera FS-1020MFP. Страница №3") Информация отображена на картинке
Информация отображена на картинке
 Kyocera FS-1020MFP. Страница №4") Информация отображена на картинке
Информация отображена на картинке
 Kyocera FS-1020MFP. Страница №5") Информация отображена на картинке
Информация отображена на картинке
Как использовать наш сайт инструкций OnlineManuals.ru
Наша цель состоит в том, чтобы предоставить вам быстрый доступ к содержанию инструкции для МФУ (многофункционального устройства) Kyocera FS-1020MFP.
С помощью онлайн просмотра, Вы можете быстро просмотреть содержимое инструкции и найти решение проблемы с МФУ (многофункционального устройства) Kyocera FS-1020MFP.
Для Вашего удобства
Если листать руководство пользователя МФУ (многофункционального устройства) Kyocera FS-1020MFP прямо на сайте, не очень удобно для Вас, есть два возможных решения:
• Просмотр в полноэкранном режиме — легко просмотреть руководство пользователя (без загрузки его на свой компьютер), Вы можете использовать режим полноэкранного просмотра.
Для просмотра инструкции пользователя МФУ (многофункционального устройства) Kyocera FS-1020MFP на полном экране, используйте кнопку «Открыть в Pdf-viewer».
• Загрузка на компьютер — Вы можете также скачать Руководство пользователя МФУ (многофункционального устройства) Kyocera FS-1020MFP на свой компьютер и сохранить его в файлах.
Многие люди предпочитают читать документы не на экране, а в печатной версии.
Возможность печати руководства пользователя также была предусмотрена на нашем сайте,
и вы можете использовать ее, нажав на иконку «печать» в Pdf-viewer.
Нет необходимости печатать все руководство МФУ (многофункционального устройства) Kyocera FS-1020MFP, можно выбрать только нужные страницы инструкции.