Increase more than 700% of Email Subscribers!
Dolor aliquet augue augue sit magnis, magna aenean aenean et! Et tempor, facilisis cursus turpis tempor odio. Diam lorem auctor sit, a a? Lundium placerat mus massa nunc habitasse, arcu, etiam pulvinar.
- Goblinus globalus fantumo tubus dia
- Scelerisque cursus dignissim lopatico
- Montes vutario lacus quis preambul den
- Leftomato denitro oculus softam lorum
- Spiratio dodenus christmas gulleria tix
- Dualo fitemus lacus quis preambul pat
- Montes vutario lacus quis digit turtulis

We hate spam and never share your details.
Руководство по эксплуатации и техническому обслуживанию подвесных лодочных моторов Hidea HD-2.5F и HD-3.5F.
- Год издания: —
- Страниц: 10
- Формат: PDF
- Размер: 1,0 Mb

Руководство по эксплуатации и техническому обслуживанию четырехтактного подвесного лодочного мотора Hidea HDF2.5.
- Год издания: —
- Страниц: 22
- Формат: PDF
- Размер: 2,8 Mb

Руководство по эксплуатации и техническому обслуживанию четырехтактных подвесных лодочных моторов Hidea HDF4 и HDF5.
- Год издания: —
- Страниц: 22
- Формат: PDF
- Размер: 3,1 Mb
Руководство по эксплуатации и техническому обслуживанию подвесного лодочного мотора Hidea HD5F.
- Год издания: —
- Страниц: 16
- Формат: PDF
- Размер: 1,9 Mb

Руководство по эксплуатации и техническому обслуживанию двухтактных подвесных лодочных моторов Hidea HD8F/HD9.8F/HD9.9FLT.
- Год издания: —
- Страниц: 19
- Формат: PDF
- Размер: 1,9 Mb

Руководство по эксплуатации и техническому обслуживанию подвесных лодочных моторов Hidea HD9.9F и HD15F.
- Год издания: —
- Страниц: 9
- Формат: DOC
- Размер: 3,2 Mb

Руководство по эксплуатации и техническому обслуживанию четырехтактных подвесных лодочных моторов Hidea HDF9.9H и HDF15H.
- Год издания: —
- Страниц: 22
- Формат: PDF
- Размер: 6,0 Mb

Руководство по эксплуатации и техническому обслуживанию подвесного лодочного мотора Hidea HDF-15.
- Год издания: —
- Страниц: 21
- Формат: PDF
- Размер: 1,0 Mb

Руководство по эксплуатации и техническому обслуживанию двухтактных подвесных лодочных моторов Hidea HD25F и HD30F.
- Год издания: —
- Страниц: 20
- Формат: PDF
- Размер: 3,4 Mb

Руководство по эксплуатации и техническому обслуживанию двухтактного подвесного лодочного мотора Hidea HD40F.
- Год издания: —
- Страниц: 84
- Формат: PDF
- Размер: 3,7 Mb
- Manuals
- Brands
- Hidea Manuals
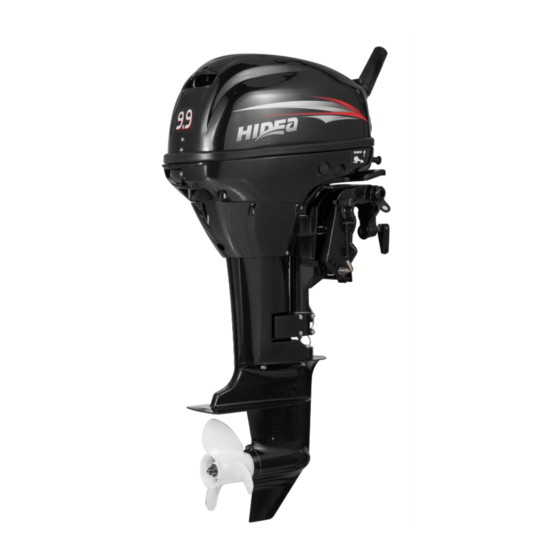
- Outboard Motor
- HDF9.9
- Owner’s manual
-
Contents
-
Table of Contents
-
Troubleshooting
-
Bookmarks
Quick Links
HangZhou Hidea Power Machinery Co. , Ltd.
Nautimarket Srl — ITALY
www.hidea.ws
www.nautimarket.com
Related Manuals for Hidea HDF9.9
Summary of Contents for Hidea HDF9.9
-
Page 1
HangZhou Hidea Power Machinery Co. , Ltd. Nautimarket Srl — ITALY www.hidea.ws www.nautimarket.com… -
Page 2
NOTE A NOTE provides key information to make procedures easier or clearer. To ensure long product life, HIDEA recommends that you use the product and perform the specified periodic inspections and maintenance by correctly following the instructions in the owner’s manual. Note that if you do not follow these instructions, not only may the product break down, but the warranty will also be voided. -
Page 3: Table Of Contents
Table of contents General information Safety information Important labels Warning labels Caution labels Fueling instructions Gasoline Engine oil Propeller selection Basic components Main components Fuel tank cap Air vent screw Gear shift lever Throttle grip Throttle friction adjuster Engine stop lanyard switch Engine stop button Choke knob for pull type Manual starter handle…
-
Page 4
Table of contents Stopping engine Procedure Trimming outboard motor Adjusting trim angle Adjusting boat trim Tilting up and down Procedure for tilting up Procedure for tilting down Maintenance Specifications Transporting and storing outboard motor Clamp screw mounting models Storing outboard motor Procedure Lubrication Cleaning the outboard motor… -
Page 5: General Information
The outboard motor serial number is stamped on the label attached to the port side of the clamp bracket. Record you outboard motor serial number in the spaces provided to assist you in ordering spare parts from your HIDEA dealer or for reference in case your outboard motor is stolen. 1 Outboard motor serial number location Safety information •…
-
Page 6: Read Manuals And Labels
Read any manuals supplied with the boat. Read all label on the outboard motor and the boat. If you need any additional information, contact your HIDEA dealer. WARNING LABELS If these labels are damaged or missing, contact your HIDEA dealer for replacements. HDF15 HDF3.5…
-
Page 7: Important Labels
General information Warning: Do not smoke when refueling or connecting fuel supply, and keep away from sparks, flames, or other sources of ignition. Warning Make sure people are clear of the outboard motor when tilting up and down, also be careful not to pinch any body parts between the drive unit and engine bracket.
-
Page 8: Caution Labels
General information WARNING Be sure shift control is in neutral before starting engine.(except 2.5hp) Do not touch or remove electrical parts when starting or during operation. Keep hands, hair, and clothes away from flywheel and other rotating parts while engine is running.
-
Page 9: Fueling Instructions
General information Label CAUTION Notice This side up. Fueling instructions GASOLINE AND ITS VAPORS ARE HIGHLY FLAMMABLE AND EXPLOSIVE! • Do not smoke when refueling, and keep away from sparks, flames, or other sources of ignition. • Stop engine before refueling. •…
-
Page 10: Propeller Selection
General information NOTE If the recommended engine oil grades are not available, select an alternative from the following chart according to the average temperatures in your area. CAUTION All 4-stroke engines are shipped from the factory without engine oil. Propeller selection The performance of your outboard motor will be critically affected by your choice of propeller, as an incorrect choice could adversely affect performance and could also seriously damage the motor.
-
Page 11: Basic Components
Basic components Main components NOTE • May not be exactly as shown; also may not be included as standard equipment on all models. 1. Propeller 13. Warning indicator 2. Inlet cover 14. Gear shift lever 3. Trim rod 15. Tiller handle 4.
-
Page 12: Fuel Tank Cap
Basic components Fuel tank cap This cap seals the fuel tank. When removed, the tank can be filled with fuel. To remove the cap, turn it counterclockwise. Air vent screw This screw is on the fuel tank cap. To loosen the screw, turn it counterclockwise. Tiller handle To change direction, move the tiller handle to the left or right as necessary.
-
Page 13: Throttle Friction Adjuster
Basic components Throttle friction adjuster A friction device provides adjustable resistance to movement of the throttle grip or the remote control lever, and can be set according to operator preference. To increase resistance, turn the adjuster clockwise. To decrease resistance, turn the adjuster counterclockwise.
-
Page 14: Choke Knob For Pull Type
Basic components Choke knob for pull type To supply the engine with the rich fuel mixture required start, pull out this knob. Manual starter handle To start the engine, first gently pull the handle out until resistance is felt. From that position, then pull the handle straight out quickly to crank the engine.
-
Page 15: Tilt Support Lever
Basic components WARNING Do not over tighten the friction adjuster. If there is too much resistance, it could be difficult to steer, which could result in an accident. Thrust rod The position of the thrust rod determines the minimum trim angle of the outboard motor in relation to the transom.
-
Page 16: Engine Oil Warning Lamp
Basic components Engine oil warning lamp Oil pressure is required to lubricate internal engine parts. When the warning lamp (Red) is off, it indicates that oil pressure is present. WARNING Never run the engine if the warning lamp is on or blinking on and off When the warning lamp is on or blinking on and off, stop the engine immediately and check the engine oil level.
-
Page 17: Operation
Operations Installation Incorrect engine height or obstructions to smooth water flow (such as the design or condition of the boat, or accessories such as transom ladders or depth finder transducers) can create airborne water spray while the boat is cruising. Severe engine damage may result if the motor is operated continuously in the presence of airborne water spray.
-
Page 18: Clamping The Outboard Motor
Operations Mounting height To run your boat at optimum efficiency, the water resistance (drag) of the boat and outboard motor must be made as little as possible. The mounting height of the outboard motor greatly affects the water resistance. If the mounting height is too high, cavitation tends to occur, thus reducing the propulsion;…
-
Page 19: Breaking In Engine
Operations 2. If the engine restraint cable attachment is equipped on your engine, an engine restraint cable or chain should be used. Attach one end to the engine restraint cable attachment and the other to a secure mounting point on the boat. Otherwise the engine could be completely lost if it accidentally falls off the transom.
-
Page 20: Controls
Operations Controls • Check throttle, shift, and steering for proper operation before starting the engine. • The controls should work smoothly, without binding or unusual free play. • Look for loose or damaged connections. • Check operation of the starter and stop switches when the outboard motor is in the water. Engine •…
-
Page 21: Operation Engine
Operations Operation engine WARNING • Before starting the engine, make sure that the boat is tightly moored and that you can steer clear of any obstructions. Be sure there are no swimmers in the water near you. • When the air vent screw is loosened, gasoline vapor will be released. Gasoline is highly flammable, and its vapors are flammable and explosive.
-
Page 22: Starting Engine
Operations Starting engine Manual start models 1.Place the gear shift lever in neutral. WARNING Always start the engine in neutral to avoid accidentally moving the boat. 2.If the engine stop switch lanyard is equipped, attach it to a secure place on your clothing, or your arm or leg.
-
Page 23
Operations 3. Place the throttle grip in the “START” (start) position 4.Place the choke knob in the “START” (start) position. After the engine starts, return the knob to the “RUN” (run) position. NOTE: • When restarting a warm engine, place the choke knob in the ‘RUN” (run) position. •… -
Page 24: Shifting
Warming up engine Manual start models 1. After starting the engine, return the choke knob to the halfway position. For approximately the first 5 minutes after starting, warm up the engine by operating at one fifth throttle or less. After the engine has warmed up, push the choke knob in fully.
-
Page 25: Forward Or Reverse
Operations Forward or reverse 1. Place the throttle grip in the fully closed position. 2. Move the gear shift lever quickly and firmly from neutral to forward or reverse. WARNING When operating in reverse, go slowly. Do not open the throttle more than half. Otherwise the boat could become unstable, which could result in loss of control and an accident.
-
Page 26: Trimming Outboard Motor
Operations Trimming outboard motor The trim angle of the outboard motor helps determine the position of the bow of the boat in the water. Correct trim angle will help improve performance and fuel economy while reducing strain on the engine. Correct trim angle depends upon the combination of boat, engine, and propeller. Correct trim is also affected by variables such as the lead in the boat, sea conditions, and running speed.
-
Page 27
Operations Bow Up Too much trim-out puts the bow of the boat too high in the water. Performance and economy are decreased because the hull of the boat is pushing the water and there is more air drag . Excessive trim-out can also cause the propeller to ventilate, which reduces performance further, and the boat may “porpoise”… -
Page 28: Tilting Up And Down
Operations NOTE: Depending on the type of boat, the outboard motor trim angle may have little effect on the trim of the boat when operating. Tilting up and down If the engine will be stopped for some time or if the boat is moored in shallows , the outboard motor should be tilted up to protect the propeller and casing from damage by collision with obstructions , and also to reduce salt corrosion.
-
Page 29: Procedure For Tilting Down
Operations 2. Tighten the air vent screw. On models equipped with a fuel joint, disconnect the fuel line from the outboard motor. 3. Take hold of the top cowl grip and raise outboard to the full up position. 4. The spring loaded tilt lock lever will engage automatically and look the outboard in full up position.
-
Page 30: Maintenance
Maintanance Specifications Dimension: Overall length: 869 mm (34.2 in) Overall width: 372 mm (14.6 in) Overall height: 1031 mm (40.6 in) Transom height : 557 mm (21.9 in) Weight (AL) : 40 Kg (87.7 lb) Performance: Full throttle operating range: F9.9-F8-F6.8 5000 -6000 r/min Maximum output F9.9 7.3 kW@6000 r/min (9.9 HP@6000 r/min)
-
Page 31
Maintanance Fuel and oil: Recommended fuel: Regular unleaded gasoline Integral fuel tank capacity: 1.1 L (0.29 US gal) Separate fuel tank capacity: 12 L (3.17 US gal) Recommended engine oil: 4-stroke outboard motor oil Engine oil grade APl: APl SE, SF, SG, SH, SJ, SL Engine oil type SAE: SAE10W30 or SAE25W40 Lubrication:… -
Page 32: Transporting And Storing Outboard Motor
Maintanance Transporting and storing outboard motor WARNING • Leaking fuel is a fire hazard. When transporting and storing the outboard motor, close the air vent screw and fuel cock to prevent fuel from leaking. • USE CARE when transporting fuel tank, whether in a boat or car. •…
-
Page 33: Procedure
Maintanance Procedure Flushing in a test tank CAUTION Do not run the engine without supplying it with cooling water. Either the engine water pump will be damaged or the engine will be damaged from overheating. Befor starting the engine, be sure to supply water to the cooling water passages.
-
Page 34: Lubrication
Replacement parts If replacement parts are necessary, use only genuine HIDEA parts or parts of the same type and of equivalent strength and materials. Any part of inferior quality may malfunction, and the resulting loss of control could endanger the operator and passengers. HIDEA genuine parts and accessories…
-
Page 35: Maintenance Chart
When operating in salt water, turbid or muddy water, the engine should be flushed with clean water after each use. The “ ” symbol indicates the check-ups which you may carry out yourself. The “ ” symbol indicates work to be carded out by your HIDEA dealer.
-
Page 36: Greasing
Maintanance Greasing Water resistant grease…
-
Page 37: Cleaning And Adjusting Spark Plug
Do not attempt to diagnose any problems yourself. Instead, take the outboard motor to a HIDEA dealer. You should periodically remove and inspect the spark plug because heat and deposits will cause the spark plug to slowly break down and erode. If electrode erosion becomes excessive, or if carbon and other deposits are excessive, you should replace the spark plug with another of the correct type.
-
Page 38: Checking Fuel System
• If any fuel leakage is found, the fuel system must be repaired by a qualified mechanic. Improper repairs can make the outboard unsafe to operate. Check the fuel lines for leaks, crack, or maifunction. If a problem is found, your HIDEA dealer or other qualified mechanic should repair it immediately.
-
Page 39: Changing Engine Oil
If you have difficulty verifying the idle speed, or the idle speed requires adjustment, consult a HIDEA dealer or other qualified mechanic. 2. Verify whether the idle speed is set to specification. For idle speed specifications, see page 23…
-
Page 40: Recommended Engine Oil
Maintanance 3. Put a new gasket on the oil drain screw. Apply a light coat of oil to the gasket and install the drain screw. Drain screw tightening torque: 18.0Nm (13.3 ft-lb)(1.84Kgf-m) NOTE If a torque wrench is not available when you are installing the drain screw, finger tighten the screw just until the gasket comes into contact with the surface of the drain hole.
-
Page 41: Checking Wiring And Connectors
Maintanance 5.Start the engine and watch to make sure the iow oil pressure warning indicator turns off. Make sure that there are no oil leaks. CAUTION If the low oil pressure warning indicator does not turn off or if there are oil leaks, stop the engine and find the cause.
-
Page 42: Removing The Propeller
Maintanance Checkpoints • Check each of the propeller blades for wear, erosion from cavitation or ventilation, or other damage. • Check the propeller shaft for damage. • Check the splines pin for wear or damage. • Check for fish line tangled around the propeller shaft. •…
-
Page 43: Changing Gear Oil
Maintanance 1. Apply corrosion resistant grease to the propeller shaft. 2. Install the thrust holder, and propeller on the propeller shaft. 3. Install the washer. Tighten the propeller nut until there is no forward-and-backward movement. 4. Align the propeller nut with the propeller shaft hole. Insert a new cotter pin in the hole and bend the cotter pin ends.
-
Page 44: Inspecting And Replacing Anode(S)
6. When the oil begins to flow out of the oil level plug hole, insert and tighten the oil level plug. 7. Insert and tighten the gear oil drain screw. Inspecting and replacing anode(s) HIDEA outboard motors are protected from corrosion by sacrificial anodes. Inspect the external anodes periodically. Remove scales from the surfaces of the anodes. CAUTION Do not paint anodes, as this would render them ineffective.
-
Page 45: Trouble Recovery
Q. Is starting procedure incorrect? A. See page 21. Q. Has fuel pump malfunctioned? A. Have serviced by a HIDEA dealer. Q. Are spark plug(s) fouled or of incorrect type? A. Inspect spark plug(s). Clean or replace with recommended type.
-
Page 46
Trouble Recovery Q. Is fuel contaminated or stale? A. Fill tank with clean, fresh fuel. Q. Is fuel filter clogged? A. Clean or replace filter. Q. Have ignition parts failed? A. Have serviced by a yours dealer. Q. Has warning system activated? A. -
Page 47
Trouble Recovery Indicator lights Q. Is engine oil level low?. A. Fill oil tank with specified engine oil. Q. !s specified engine oil not being used? A. Check and replace oil with specified type. O. Is engine oil contaminated or deteriorated? A. -
Page 48
Trouble Recovery Q. Is ignition wiring damaged or poorly connected? A. Check wires for wear or breaks. Tighten all loose connections. Replace worn or broken wires. Q. Have electrical parts failed? A. Have serviced by a yours dealer. Q. is specified fuel not being used? A. -
Page 49: Temporary Action In Emergency
2. Inspect the control system and all components for damage. Also inspect the boat for damage. 3. Whether damage is found or not, return to the nearest harbor slowly and carefully. 4. Have a HIDEA dealer inspect the outboard motor before operating it again. Starter will not operate If the starter mechanism does not operate (the engine cannot be cranked with the starter), the engine can be started with an emergency starter rope.
-
Page 50: Emergency Starting Engine
Trouble Recovery Emergency Starting Engine 1. Remove the top cowling. 2. Shift outboard to neutral position. 3. Disconnect linkage from rewind starter assembly.
-
Page 51: Treatment Of Submerged
Trouble Recovery 4. Remove three bolts and rewind starter assembly. 5. Place the starter rope knot into the starter cup notch and wind the rope clockwise around the cup. 6. Pull the rope slowly until resistance is felt. 7. Give a strong pull straight out to crank and start the engine. Repeat it necessary. Treatment of submerged motor If the outboard motor is submerged, immediately take it to a yours dealer.
-
Page 52
HangZhou Hidea Power Machinery Co. , Ltd. Nautimarket Srl — ITALY www.hidea.ws www.nautimarket.com…