
-
Contents
-
Table of Contents
-
Bookmarks
Quick Links
Plug-in Hybrid
2010 Model
Revised (includes 2012 Model)
© 2012 Toyota Motor Corporation
All rights reserved. This document may not be
altered without the written permission of Toyota Motor Corporation.
Prius Plug-in hybrid ERG REV A – (02/22/12)
Related Manuals for Toyota Prius
Summary of Contents for Toyota Prius
-
Page 1
Plug-in Hybrid 2010 Model Revised (includes 2012 Model) © 2012 Toyota Motor Corporation All rights reserved. This document may not be altered without the written permission of Toyota Motor Corporation. Prius Plug-in hybrid ERG REV A – (02/22/12) -
Page 2
This Prius Plug-in hybrid Emergency Response Guide has been revised • An electric vehicle charge cable rated at 120 Volts. to include the changes of the 2012 model year Prius Plug-in hybrid. • An onboard battery charger with a 120 Volt /240 Volt AC input and These changes include minor updates to the vehicle exterior, interior 346 Volt DC output. -
Page 3
2012 Model Year Prius Plug-in Hybrid 2010 Model Year Prius Plug-in Hybrid This guide is intended to assist emergency responders in the safe handling of a Prius Plug-in hybrid vehicle during an incident. NOTE: Charge Inlet Door Emergency Response Guides for Toyota hybrid and alternative fuel 2012 Model vehicles may be viewed at http://techinfo.toyota.com. -
Page 4: Table Of Contents
Table of Contents (2010 Model) Page Table of Contents (2010 Model) Page About the Prius Plug-in Hybrid Roadside Assistance Prius Plug-in Hybrid Identification Hybrid Synergy Drive Component Locations & Descriptions Plug-in Charging System Component Locations & Descriptions Smart Key System…
-
Page 5
Table of Contents (2012 Model) Page Table of Contents (2012 Model) Page About the Prius Plug-in Hybrid Roadside Assistance Prius Plug-in Hybrid Identification Hybrid Synergy Drive Component Locations & Descriptions Plug-in Charging System Component Locations & Descriptions Smart Key System… -
Page 6
About the Prius Plug-in Hybrid (2010 Model) The Prius Plug-in hybrid contains a gasoline engine, an electric motor, and a newly developed large capacity Li-ion battery. It is the first Toyota hybrid that allows the HV battery to be plugged-in and charged by an external power source. -
Page 7
Prius Plug-in Hybrid Identification (2010 Model) Prius Plug-in Hybrid Identification (2010 Model) Exterior In appearance, the 2010 model year Prius Plug-in hybrid is a 5-door In appearance, the 2010 model year Prius Plug-in hybrid is a 5-door hatchback. Exterior, interior, and engine compartment illustrations are hatchback. -
Page 8
Prius Plug-in Hybrid Identification (2010 Model — Continued) Interior An instrument cluster (speedometer, READY light, shift position indicators, warning lights) located in center of the dash and near the base of the windshield. A plug-in charge indicator light located on the upper dash near the driver side windshield. -
Page 9: Prius Plug-In Hybrid Identification
Prius Plug-in Hybrid Identification (2010 Model — Prius Plug-in Hybrid Identification (2010 Model — Continued) Continued) Engine Compartment Engine Compartment 1.8-liter aluminum alloy gasoline engine. Logo on the plastic engine cover. Engine Compartment View…
-
Page 10: Hybrid Synergy Drive Component Locations & Descriptions
Hybrid Synergy Drive Component Locations & Hybrid Synergy Drive Component Locations & Descriptions (2010 Model) Descriptions (2010 Model) Component Location Description 12 Volt Passenger Side A lead-acid battery that supplies power to the Auxiliary Battery of Cargo Area low voltage devices. Hybrid Vehicle Cargo Area…
-
Page 11
Hybrid Synergy Drive Component Locations & Hybrid Synergy Drive Component Locations & Descriptions (2010 Model — Continued) Descriptions (2010 Model — Continued) Component Location Description Fuel Tank Undercarriage The fuel tank provides gasoline via a fuel and Fuel Line and Center line to the engine. -
Page 12
Hybrid Synergy Drive Component Locations & Hybrid Synergy Drive Component Locations & Descriptions (2010 Model — Continued) Descriptions (2010 Model — Continued) Key Specifications: Key Specifications: Aluminum Hood Aluminum Hatch Gasoline Engine: 98 hp (73 kW), 1.8-liter Aluminum Alloy Engine Electric Motor: 80 hp (60 kW), AC Motor Transmission: Automatic Only (electrically controlled continuously variable transaxle) -
Page 13: Plug-In Charging System Component Locations & Descriptions
lug-in Charging System Component Locations & Descriptions (2010 Model) Component Location Description Charge Inlet Driver Side Front Connects to the charge cable assembly Fender charge connector. Supplies the electrical power from an external power source to the vehicle. Power Cable Driver Side Power cable connecting the charge inlet and for Charging…
-
Page 14: Smart Key System
Key System (2010 Model) The Prius Plug-in hybrid smart key system consists of a smart key transceiver that communicates bi-directionally, enabling the vehicle to recognize the smart key in proximity to the vehicle. Once recognized, the smart key will allow the user to lock and unlock the doors without pushing smart key buttons, and start the vehicle without inserting it into an ignition switch.
-
Page 15
If the internal smart key battery is dead, use the following method to start the vehicle. Touch the Toyota emblem side of the smart key to the power button. Within the 5 seconds after the buzzer sounds, push the power button with the brake pedal depressed (the READY light will illuminate). -
Page 16: Electronic Gearshift Selector
Electronic Shift Selector (2010 Model) The Prius Plug-in hybrid electronic shift selector is a momentary select shift-by-wire system that can be used to select reverse (R), neutral (N), drive (D), or engine brake (B) states. • These states may only be selected while the vehicle is on and operational (READY-on), except for neutral (N) which may also be selected while in the ignition-on mode.
-
Page 17: Hybrid Synergy Drive Operation
Vehicle Operation • With the Prius Plug-in hybrid, the gasoline engine may stop and start at any time while the READY indicator is on. Instrument Cluster READY Indicator •…
-
Page 18: Hybrid Vehicle (Hv) Battery Assembly
Vehicle (HV) Battery Assembly (2010 Model) Components Powered by the HV Battery Assembly The Prius Plug-in hybrid features a large capacity high voltage Hybrid • • Vehicle (HV) battery assembly that contains newly developed sealed Electric Motor Inverter/Converter •…
-
Page 19
346 Volts DC used to charge the HV battery assembly. Prius Plug-in hybrid vehicles for North America are supplied with a charge cable assembly designed to allow charging from a 120 Volt AC NEMA 5-15R receptacle. -
Page 20: Plug-In Charging System
Plug-in Charging System (2010 Model — Continued) System Deactivation: The following steps explain how to stop charging. Disconnect the charge cable assembly connector from the vehicle. To disconnect it, push the orange lock release button on the top of the connector and pull it away from the vehicle. Close the charge inlet cap and charge inlet door.
-
Page 21: Remote Air Conditioning System
• while the vehicle is parked. Unlike a conventional gasoline vehicle, the Prius The instrument cluster lights are on, the READY indicator is off, and Plug-in hybrid does not start the gasoline engine. Instead, to heat or cool the all of the conditions in the preceding list are met.
-
Page 22
Remote Air Conditioning System (2010 Model -Continued) System Deactivation: When the system is deactivated, the A/C system stops. The system is deactivated when any one of the following conditions occurs: • When the system has operated for more than about 30 minutes. •… -
Page 23: Low Voltage Battery
Low Voltage Battery (2010 Model) Auxiliary Battery • The Prius Plug-in hybrid contains a sealed lead-acid 12 Volt battery. The 12 Volt auxiliary battery powers the vehicle’s electrical system similar to a conventional vehicle. As with conventional vehicles, the negative terminal of the auxiliary battery is grounded to the metal chassis of the vehicle.
-
Page 24: High Voltage Safety
igh Voltage Safety (2010 Model) The HV battery assembly powers the high voltage electrical system with DC Hybrid Vehicle Computer electricity. Positive and negative orange colored high voltage power cables are routed from the HV battery assembly, under the vehicle floor pan, to the Volt DC inverter/converter.
-
Page 25: Plug-In Charging Safety
Plug-in Charging Safety (2010 Model) The HV battery assembly can be charged using power from an external power outlet. AC power is supplied to the charge inlet by the charge cable assembly and sent to the charger assembly. There are basically 2 circuits in the charger assembly: One is an AC/DC converter circuit and the other is a booster circuit used to boost the charger input voltage to 346 Volts.
-
Page 26
lug-in Charging Safety (2010 Model — Continued) • Hybrid Vehicle Computer The AC cables are connected to the charger assembly. The high voltage DC power cables from the charger assembly are connected to the HV Volt DC battery assembly and are controlled by 12 Volt normally open charge relays 12V Auxiliary Battery , HV system main relays… -
Page 27
RS Airbags & Seat Belt Pretensioners (2010 Model) Standard Equipment • Electronic frontal impact sensors (2) are mounted in the engine compartment as illustrated. • Front seat belt pretensioners are mounted near the base of the B-pillars • A frontal dual stage driver airbag is mounted in the steering wheel hub. -
Page 28: Srs Airbags & Seat Belt Pretensioners
The knee airbag deploy simultaneously with the frontal airbags. The Prius Plug-in hybrid is equipped with a standard front passenger occupant classification system that may prohibit the deployment of the front passenger frontal airbag and seat belt pretensioners. If the passenger occupant classification system prohibits deployment during an SRS event, the passenger SRS will not re-arm nor deploy.
-
Page 29: Emergency Response
Extrication, Fire, Overhaul, Recovery, Spills, First Aid, and Submersion. WARNING: • Never assume the Prius Plug-in hybrid is shut off simply because it is silent. • Always observe the instrument cluster for the READY indicator status to verify whether the vehicle is on or shut off.
-
Page 30
Emergency Response (2010 Model — Continued) Extrication (Continued) • Disable Vehicle Perform these steps first if the charge cable assembly is connected to the vehicle. Disconnect the charge cable assembly connector from the vehicle. To disconnect it, push the orange lock release button on the top of the connector and pull it away from the vehicle. -
Page 31
Emergency Response (2010 Model — Continued) Extrication (Continued) Procedure #2 (Alternate if power button is inaccessible) Open the hood. Remove the fuse box cover. Remove the IGCT fuse (30A green colored) and AM2 fuse (7.5A brown colored) in the engine compartment fuse box (refer to illustration). -
Page 32
Do not place cribbing under the high voltage power cables, exhaust system, or fuel system. NOTE: The Prius Plug-in hybrid is equipped with a tire pressure warning system that by design prevents pulling the metal valve stem with integral transmitter from the wheel. Snapping the valve stem with pliers or removing the valve cap and Schrader valve will release the air in the tire. -
Page 33
AIRBAG AIRBAG Roof Removal The Prius Plug-in hybrid is equipped with side curtain airbags. When undeployed, total roof removal is not recommended. Patient access through the roof can be performed by cutting the roof center section inboard of the roof rails as illustrated. This would avoid breaching the side curtain airbags, inflators, and wiring harness. -
Page 34
Emergency Response (2010 Model — Continued) Extrication (Continued) NOTE: The Prius Plug-in hybrid has an orange power cable that is energized during charging. The charge power cable is routed along the driver side front fender apron member (top rail) that is concealed by the front fender panel. -
Page 35
Extrication (Continued) Headrest Active Headrest Removal Upper Unit The Prius Plug-in hybrid is equipped with active headrests, located in both front seatbacks. The active headrests are Cable mechanical non-pyrotechnic head supports that are designed to reduce neck injuries in the event of a rear collision. -
Page 36: Fire
Divert the runoff from entering watershed areas. protect exposures or to control the path of smoke. Attack teams may not be able to identify a Prius Plug-in hybrid until the fire has been knocked down and overhaul operations have commenced.
-
Page 37: Overhaul
The vehicle is already shut off if the instrument cluster lights are United States: (800) 331-4331 not illuminated. Do not push the power button because the Canada: (888) TOYOTA 8 [(888) 869-6828] vehicle may start. If the smart key is easily accessible, keep it at least 16 feet (5 meters) away from the vehicle.
-
Page 38: Spills
Response (2010 Model — Continued) Spills First Aid The Prius Plug-in hybrid contains the same common automotive fluids used in Emergency responders may not be familiar with Li-ion electrolyte exposure other non-hybrid Toyota vehicles, with the exception of the Li-ion electrolyte when rendering aid to a patient.
-
Page 39: Submersion
If a hybrid vehicle is fully or partially submerged in water, emergency responders may not be able to determine if the vehicle has been automatically disabled. The Prius Plug-in hybrid may be handled by following these recommendations: Perform these steps first if the charge cable assembly is connected to the vehicle (see illustrations on page 25).
-
Page 40
Roadside assistance is available in the United States by contacting (800) 771-1841 Towing The Prius Plug-in hybrid is a front wheel drive vehicle and it must be towed with the front wheels off the ground. Failure to do so may cause serious Starting Vehicle Move Shift Selector to N Position damage to Hybrid Synergy Drive components. -
Page 41
Manual Hatch Release Electric Fuel Door Opener The Prius Plug-in hybrid is equipped with an electric fuel door opener. In the event of 12 Volt power loss, the fuel door can only be opened using the manual release located inside the cargo area. -
Page 42
Roadside Assistance (2010 Model — Continued) Emergency Tire Puncture Repair Kit The Prius Plug-in hybrid does not contain a spare tire. Instead, an emergency tire puncture repair kit is provided along with the jack, tools, and towing eyelet. These items are located as shown in the illustration. -
Page 43
Positive Terminal Ground If the smart key internal battery is dead, touch the Toyota emblem side of the smart key to the power button during the start sequence. See the instructions and illustrations on page 10 for more details. -
Page 44
About the Prius Plug-in Hybrid (2012 Model) The Prius Plug-in hybrid contains a gasoline engine, an electric motor, and a newly developed large capacity Li-ion battery. It is the first Toyota hybrid that allows the HV battery to be plugged-in and charged by an external power source. -
Page 45: Prius Plug-In Hybrid Identification
Prius Plug-in Hybrid Identification (2012 Model) Prius Plug-in Hybrid Identification (2012 Model) Exterior In appearance, the 2012 model year Prius Plug-in hybrid is a 5-door In appearance, the 2012 model year Prius Plug-in hybrid is a 5-door hatchback. Exterior, interior, and engine compartment illustrations are hatchback.
-
Page 46
Prius Plug-in Hybrid Identification (2012 Model — Prius Plug-in Hybrid Identification (2012 Model — Continued) Continued) Interior Interior An instrument cluster (speedometer, READY light, shift position indicators, warning lights) located in center of the dash and near the base of the windshield. -
Page 47
Prius Plug-in Hybrid Identification (2012 Model) Prius Plug-in Hybrid Identification (2012 Model) (Continued) (Continued) Engine Compartment Engine Compartment 1.8-liter aluminum alloy gasoline engine. Logo on the plastic engine cover. Engine Compartment View… -
Page 48: Hybrid Synergy Drive Component Locations & Descriptions
Hybrid Synergy Drive Component Locations & Hybrid Synergy Drive Component Locations & Descriptions (2012 Model) Descriptions (2012 Model) Component Location Description 12 Volt Passenger Side A lead-acid battery that supplies power to the Auxiliary Battery of Cargo Area low voltage devices. Hybrid Vehicle Cargo Area…
-
Page 49
Hybrid Synergy Drive Component Locations & Hybrid Synergy Drive Component Locations & Descriptions (2012 Model — Continued) Descriptions (2012 Model — Continued) Component Location Description Fuel Tank Undercarriage The fuel tank provides gasoline via a fuel and Fuel Line and Center line to the engine. -
Page 50
Hybrid Synergy Drive Component Locations & Hybrid Synergy Drive Component Locations & Descriptions (2012 Model — Continued) Descriptions (2012 Model — Continued) Key Specifications: Key Specifications: Aluminum Hood Aluminum Hatch Gasoline Engine: 98 hp (73 kW), 1.8-liter Aluminum Alloy Engine Electric Motor: 80 hp (60 kW), AC Motor Transmission: Automatic Only (electrically controlled continuously variable transaxle) -
Page 51: Plug-In Charging System Component Locations & Descriptions
lug-in Charging System Component Locations & Descriptions (2012 Model) Component Location Description Charge Inlet Passenger Side Connects to the charge cable assembly Rear Quarter charge connector. Supplies the electrical Panel power from an external power source to the vehicle. Power Cable Passenger Side Power cable connecting the charge inlet and for Charging…
-
Page 52
Key System (2012 Model) The Prius Plug-in hybrid smart key system consists of a smart key transceiver that communicates bi-directionally, enabling the vehicle to recognize the smart key in proximity to the vehicle. Once recognized, the smart key will allow the user to lock and unlock the doors without pushing smart key buttons, and start the vehicle without inserting it into an ignition switch. -
Page 53: Smart Key System
If the internal smart key battery is dead, use the following method to start the vehicle. Touch the Toyota emblem side of the smart key to the power button. Within the 5 seconds after the buzzer sounds, push the power button with the brake pedal depressed (the READY light will illuminate).
-
Page 54: Electronic Gearshift Selector
Electronic Shift Selector (2012 Model) The Prius Plug-in hybrid electronic shift selector is a momentary select shift-by-wire system that can be used to select reverse (R), neutral (N), drive (D), or engine brake (B) states. • These states may only be selected while the vehicle is on and operational (READY-on), except for neutral (N) which may also be selected while in the ignition-on mode.
-
Page 55: Hybrid Synergy Drive Operation
Vehicle Operation • With the Prius Plug-in hybrid, the gasoline engine may stop and start at any time while the READY indicator is on. Instrument Cluster READY Indicator •…
-
Page 56: Hybrid Vehicle (Hv) Battery Assembly
Vehicle (HV) Battery Assembly (2012 Model) Components Powered by the HV Battery Assembly The Prius Plug-in hybrid features a large capacity high voltage Hybrid • • Vehicle (HV) battery assembly that contains newly developed sealed Electric Motor Inverter/Converter •…
-
Page 57
HV battery assembly. Charge Indicator Prius Plug-in hybrid vehicles for North America are supplied with a charge cable assembly designed to allow charging from a 120 Volt AC NEMA 5-15R receptacle. The maximum current flow during charging is 12 A. -
Page 58: Plug-In Charging System
Plug-in Charging System (2012 Model — Continued) System Deactivation: The following steps explain how to stop charging. Disconnect the charge cable assembly connector from the vehicle. Push To disconnect it, push the lock release button on the top of the connector and pull it away from the vehicle.
-
Page 59: Remote Air Conditioning System
Second, disconnect the 12 Volt auxiliary while the vehicle is parked. Unlike a conventional gasoline vehicle, the Prius battery. After performing these two steps, the remote air conditioning system Plug-in hybrid does not start the gasoline engine.
-
Page 60: Low Voltage Battery
Low Voltage Battery (2012 Model) Auxiliary Battery • The Prius Plug-in hybrid contains a sealed lead-acid 12 Volt battery. The 12 Volt auxiliary battery powers the vehicle’s electrical system similar to a conventional vehicle. As with conventional vehicles, the negative terminal of the auxiliary battery is grounded to the metal chassis of the vehicle.
-
Page 61: High Voltage Safety
igh Voltage Safety (2012 Model) The HV battery assembly powers the high voltage electrical system with DC electricity. Positive and negative orange colored high voltage power cables are 12 Volt Auxiliary Hybrid Vehicle Battery Computer routed from the HV battery assembly, under the vehicle floor pan, to the Volt DC inverter/converter.
-
Page 62: Plug-In Charging Safety
Plug-in Charging Safety (2012 Model) The HV battery assembly can be charged using power from an external power outlet. AC power is supplied to the charge inlet by the charge cable assembly and sent to the charger assembly. There are basically 2 circuits in the charger assembly: One is an AC/DC converter circuit and the other is a booster circuit used to boost the charger input voltage to 207.2 Volts.
-
Page 63
lug-in Charging Safety (2012 Model — Continued) • The AC cables are connected to the charger assembly. The high voltage Charging Circuit Interrupter Device (CCID) DC power cables from the charger assembly are connected to the HV battery assembly and are controlled by 12 Volt normally open charge relays , HV system main relays and AC leakage cut relays . -
Page 64
RS Airbags & Seat Belt Pretensioners (2012 Model) Standard Equipment • Electronic frontal impact sensors (2) are mounted in the engine compartment as illustrated. • Front seat belt pretensioners are mounted near the base of the B-pillars • A frontal dual stage driver airbag is mounted in the steering wheel hub. -
Page 65: Srs Airbags & Seat Belt Pretensioners
The knee airbag deploy simultaneously with the frontal airbags. The Prius Plug-in hybrid is equipped with a standard front passenger occupant classification system that may prohibit the deployment of the front passenger frontal airbag and seat belt pretensioners. If the passenger occupant classification system prohibits deployment during an SRS event, the passenger SRS will not re-arm nor deploy.
-
Page 66
Extrication, Fire, Overhaul, Recovery, Spills, First Aid, and Submersion. WARNING: • Never assume the Prius Plug-in hybrid is shut off simply because it is silent. • Always observe the instrument cluster for the READY indicator status to verify whether the vehicle is on or shut off. -
Page 67: Emergency Response
Emergency Response (2012 Model — Continued) Extrication (Continued) • Disable Vehicle Perform these steps first if the charge cable assembly is connected to the vehicle. Disconnect the charge cable assembly connector from the vehicle. To disconnect it, push the lock release button on the top of the connector and pull it away from the vehicle.
-
Page 68
Emergency Response (2012 Model — Continued) Extrication (Continued) Procedure #2 (Alternate if power button is inaccessible) Open the hood. Remove the fuse box cover. Remove the IG2 fuse (20A yellow colored) in the engine compartment fuse box (refer to illustration). If the correct fuse cannot be recognized, pull all fuses in the fuse box. -
Page 69
Do not place cribbing under the high voltage power cables, exhaust system, or fuel system. NOTE: The Prius Plug-in hybrid is equipped with a tire pressure warning system that by design prevents pulling the metal valve stem with integral transmitter from the wheel. Snapping the valve stem with pliers or removing the valve cap and Schrader valve will release the air in the tire. -
Page 70
AIRBAG AIRBAG Roof Removal The Prius Plug-in hybrid is equipped with side curtain airbags. When undeployed, total roof removal is not recommended. Patient access through the roof can be performed by cutting the roof center section inboard of the roof rails as illustrated. This would avoid breaching the side curtain airbags, inflators, and wiring harness. -
Page 71
Emergency Response (2012 Model — Continued) Extrication (Continued) NOTE: The Prius Plug-in hybrid has an orange power cable that is energized during charging. The charge power cable is routed along the passenger side rear quarter panel. Rescue Lift Air Bags Responders should not place cribbing or rescue lift air bags under the high voltage power cables, exhaust system, or fuel system. -
Page 72
Extrication (Continued) Headrest Active Headrest Removal Upper Unit The Prius Plug-in hybrid is equipped with active headrests, located in both front seatbacks. The active headrests are Cable mechanical non-pyrotechnic head supports that are designed to reduce neck injuries in the event of a rear collision. -
Page 73: Fire
Divert the runoff from entering watershed areas. protect exposures or to control the path of smoke. Attack teams may not be able to identify a Prius Plug-in hybrid until the fire has been knocked down and overhaul operations have commenced.
-
Page 74: Overhaul
The vehicle is already shut off if the instrument cluster lights are United States: (800) 331-4331 not illuminated. Do not push the power button because the Canada: (888) TOYOTA 8 [(888) 869-6828] vehicle may start. If the smart key is easily accessible, keep it at least 16 feet (5 meters) away from the vehicle.
-
Page 75: Spills
Response (2012 Model — Continued) Spills First Aid The Prius Plug-in hybrid contains the same common automotive fluids used in Emergency responders may not be familiar with Li-ion electrolyte exposure other non-hybrid Toyota vehicles, with the exception of the Li-ion electrolyte when rendering aid to a patient.
-
Page 76: Submersion
If a hybrid vehicle is fully or partially submerged in water, emergency responders may not be able to determine if the vehicle has been automatically disabled. The Prius Plug-in hybrid may be handled by following these recommendations: Perform these steps first if the charge cable assembly is connected to the vehicle (see illustrations on page 62).
-
Page 77: About The Prius Plug-In Hybrid 39 Roadside Assistance
Starting Vehicle Move Shift Selector to N Position The Prius Plug-in hybrid is a front wheel drive vehicle and it must be towed with the front wheels off the ground. Failure to do so may cause serious damage to Hybrid Synergy Drive components.
-
Page 78
Inside Vehicle Manual Hatch Release Electric Fuel Door Opener The Prius Plug-in hybrid is equipped with an electric fuel door opener. In the Pull event of 12 Volt power loss, the fuel door can only be opened using the manual release located inside the cargo area. -
Page 79
Roadside Assistance (2012 Model — Continued) Emergency Tire Puncture Repair Kit The Prius Plug-in hybrid does not contain a spare tire. Instead, an emergency tire puncture repair kit is provided in the driver side rear panel well shown in the illustration. The jack, tools, and towing eyelet are located under the driver seat shown in the illustration. -
Page 80
If the smart key internal battery is dead, touch the Toyota emblem side of the smart key to the power button during the start sequence. See the instructions and illustrations on page 48 for more details.
Надоело рыться в разных местах при обслуживании гибрида? Представляю библиотеку официальных документов для образовательных целей. Источники: сайты Тойоты, NHTSA, priuschat.com, prius-club.su и др.
_______________________________________
Брошюры для покупателя с комплектациями для разных стран и модельных годов вы можете найти здесь.
_______________________________________
Инструкции для владельца:
Owner’s Manual (Руководство для Владельца),
Quick Reference Guide (Краткое руководство),
Emergency Response Guide (Инструкция, как действовать в аварийных ситуациях),
Dismantling Manual (Руководство по безопасной разборке),
руководства к навигационной и мультимедийной системе,
инструкции по установке дополнительного оборудования:
— Европа (включая Россию и Великобританию) (выбрать общий поиск по критериям) и тут,
— ZVW30 EU 04/2009—>12/2011 OM RU скан,
— ZVW30 EU 12/2011—>10/2015 OM RU (ищу),
— ZVW30 EU 12/2011—>10/2015 OM UA,
— CT200h ZWA10 EU 12/2010—> OM UA,
— Австралия,
— Япония,
— США или тут,
— Канада.
_______________________________________
График ТО для Prius 3#.
_______________________________________
Информацию для ремонта и обслуживания можно получить из 3 источников. Эти документы делятся на несколько категорий:
1) RM Repair Manual (Руководство по ремонту),
2) NCF New Car Features (Новые возможности автомобиля),
3) EWD Electrical Wiring Diagram (Электросхемы),
4) BRM Body Repair Manual (Руководство по ремонту кузова, поврежденного в результате столкновения),
5) SDS Service Data Sheet (Сервисная карта).
Буква в конце версии документа — язык или регион: E или CA — английский, RU или CS — русский, U — Сев. Америка на англ. Мои сокращения: EU — Europe, NA — North America.
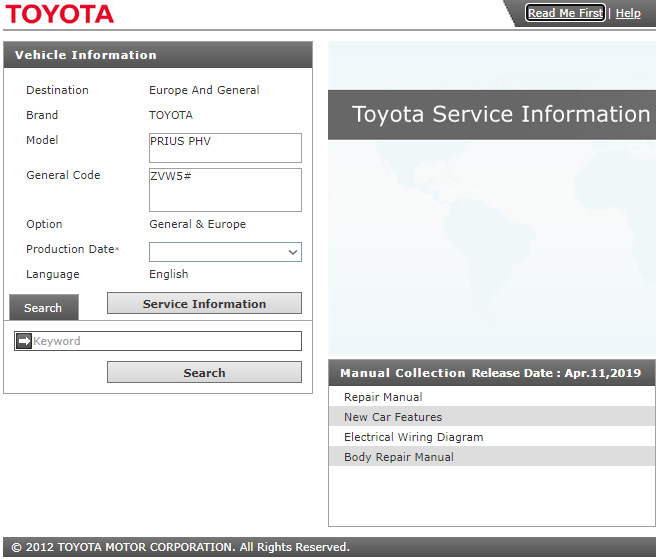
1️⃣ Toyota Service Information — платные разделы европейского портала:
— ZVW50 EU 11/2015—> Service Information 3210E 03.08.2016,
— ZVW50 EU 11/2015—> EWD EM3212E.V.1,
— ZVW52 EU 01/2017—> Service Information 32E3E 11.04.2019.
— Service Information без SDS к большинству европейских моделей Тойоты-Лексус на рус. и англ. языках на сайте Андрея Федорковского.
2️⃣ SIL Service Information Library (Сборник руководств по техническому обслуживанию и ремонту) — копия документов с портала GSIC Global Service Information Center или Techdoc, записанная на компакт-диск. Для последних TNGA-моделей диски уже не выпускаются. По мере появления новой информации появляются CB Correction Bulletins (Бюллетени с исправлениями), дабы не покупать новый диск:
— NHW20 NA SIL
2006MY — RM01R0U,
2008MY — RM07X0U.
— ZVW30 NA SIL
2010MY — RM1290U,
2011MY — RM16P0U,
2012MY — RM1990U,
2013MY — RM23E0U,
2014MY — RM25A0U,
2015MY — RM25M0U.
— ZVW30 EU 04/2009—>10/2015 SIL копия CD со всеми главами есть на англ. PZ471-Z12A0-CA и датском PZ471-Z12A0-CJ, диск на русском PZ471-Z12A0-CS можно купить, например, в Emex. Отдельные документы:
1) RM12A6E-1 2015-03-17, RM12A6RU-1 2015-05-06;
2) NM12A6E-2 2015-03-10, NM12A6RU-2 2015-03-26;
3) EM12A6E.V.1 2014-05-13, EM12A4RU 2013-01-08;
4) BM1290E 2012-08-02, BM1290RU 2012-09-27;
5) SM12A6E 2014-05-23, SM12A6RU 2014-05-23. .
— ZVW35 EU 05/2012—>12/2016 SIL CD существует только на английском PZ471-Z2220-CA (его также можно купить), на русском нет — в ЕАЭС PHV не поставлялись. Отдельные документы:
1) RM2223E-1 2017-02-02,
2) NM2223E 2015-06-03,
3) EM2222E 2014-04-22,
4) BM2220E 2012-05-04,
5) SM2223E 2015-06-30.
— ZVW35 EU 12/2009—>04/2012 SIL образ CD PZ471-Z14D0-CA 2011-01-22 (нужно еще скачать CB позже 2012-05-03).
— CT200h ZWA10 EU SIL копия CD 25K0E.
CB к европейским SIL:
G-01121T-TME Бюллетени поправок TOYOTA (дек. 2021)
G-00819T-TME Бюллетени поправок TOYOTA (сен 2019)
G-0011T-0518 Бюллетени поправок Toyota (март 2018 г.)
G-0008T-0318 Бюллетени поправок Toyota (январь 2018 г.)
G-0094T-1017 Бюллетени поправок Toyota (сентябрь 2017 г.)
G-0049T-0417 Бюллетени поправок Toyota (март 2017 г.)
G-0054T-0515 Бюллетени поправок Toyota (апрель 2015 г.)
G-0051T-0415 Бюллетени поправок Toyota (март 2015 г.)
G-0102T-0714 Бюллетени поправок
G-0084T-0614 Бюллетени поправок
G-0072T-0514 Бюллетени поправок
G-0058T-0414 Бюллетени поправок
G-0057T-0414 Бюллетени поправок
G-0050T-0314 Бюллетени поправок
3️⃣ TIS Technical Information System — платные разделы североамериканского портала.
_______________________________________
TSB Technical Service Bulletin (Бюллетени технического обслуживания):
EU,
USA, Canada.
_______________________________________
Европейские SSC Special Service Campaign (специальные сервисные кампании) для 30:
— ZKBA-011 ЭБУ привода АБС
— 3KB2-012 Насос усилителя тормозной системы (гидроаккумулятор) на модели Prius
— 4KET-024 Перепрограммирование ЭБУ мотора-генератора и ЭБУ распределения питания на модели Toyota Prius
— 16OSD-052 Подушка безопасности занавесочного типа
— 16OSD-054 Угольный адсорбер
— 18SMD-088 Перепрограммирование ЭБУ распределения питания
— 20SMD-058 ЭБУ распределения питания/интеллектуальный силовой модуль на некоторых автомобилях Prius, Prius+ и Auris HV
_______________________________________
Американские Safety Recalls (отзывы безопасности), Safety (Noncompliance) Recalls, SSCs Special Service Campaign, LSCs Limited Service Campaigns, WEPs Warranty Enhancement Programs для 30:
— Safety Recall A0B Certain 2010 Prius ABS Actuator ECU Update,
— Safety Recall D0H 2010 Prius Brake Booster Pump Assembly (Accumulator),
— Safety Recall E0E 2010-2014 Prius Software Update for Motor Generator ECU & Power Management ECU,
— Safety Recall G0U 2010 — 2012 Prius & Prius Plug-In Curtain Shield Airbag,
— Safety Recall J0V Certain 2010-2014 Prius, 2012-2014 Prius V Hybrid System Software Update,
— WEP ZE3 Certain 2010 – 2014 Prius Extension of Warranty Coverage to the IPM,
— WEP ZF3 Certain 2010-2012 Prius, 2012 Prius V, 2010-2012 Prius Plug-In Sticking EGR Valve,
— LSC K0P / CSP 19TE12 Certain 2013-2019 4Runner, 2011-2017 Land Cruiser, 2013-2017 Prius, 2012-2017 Prius V, 2016-2017 Mirai Safety Connect System — Vehicle Location Inaccurate,
— Safety Recall 20TA10 Certain 2013‐2015 Prius, 2014‐2017 Prius V Hybrid System Software Update.
Список по всем моделям, актуально на 17.03.2021.
В США есть еще CSPs Customer Support Programs (программы поддержки клиентов), Non-Compliance (Voluntary) Safety Recalls by Southeast Toyota, и Non-Compliance Recalls by Gulf States Toyota для 30:
— CSP ZJB Coverage for Brake Booster and Brake Booster Pump Assemblies,
— CSP 20TE10 Certain 2013‐2015 Prius, 2014‐2017 Prius V Hybrid System Software Update Extension of Coverage to the IPM,
— Non-Compliance (Voluntary) Safety Recalls by Southeast Toyota 14V-743 Seat Heater Electrical Wiring,
— Non-Compliance (Voluntary) Safety Recalls by Southeast Toyota 13V-014 Airbag Sensor Calibration.
Если интересно, то документы по всем кампаниям можно найти тут: 2010MY Prius (можно поменять на другую модель).
_______________________________________
Каталоги деталей:
1. EPC Electronic Parts Catalog (официальный оффлайн каталог) — последнюю сборку от Autokent можно найти на торрентах. Это программа с устаревшим интерфейсом, занимающая 25GB на диске, поэтому иногда удобнее искать в онлайн-каталогах на базе EPC:
🆕ToyoDIY (шустрый, есть поиск применимости одной и той же детали во всех моделях всех регионов),
Официальный каталог моделей Сев. Америки,
JapanCars.ru (поиск применимости по всем регионам (но не показывает весь список), корректно отображает замены (Substitution),
www.megazip.net/ (попроще применимость, замены),
www.catcar.info/ (свежий каталог, но без поиска по PN)
www.artemid-gr.ru/ (использует CatCar, есть применимость),
partsouq.com/ (глючащая применимость, есть Substitution, реальные фото),
afyal.com/
2. Официальный европейский каталог, использующий технологии Microcat (платный).
_______________________________________
Прочие схемы, фото, PDF и др. файлы, которые я собираю.
За помощь в предоставлении информации спасибо AndrewHrenov, Igor-PV, 3est, щедрым дилерам из Коста Рики и Индонезии.
© Max Kaminsky. При копировании указывайте ссылку на автора.

Данная инструкция на русском языке предназначена для автомобиля
Toyota Prius IV XW50 (2015 — нв), описывает принцип работы и основные моменты эксплуатации устройства.
Производитель настойчиво рекомендует перед включением автомобиля
внимательно изучить настоящую инструкцию.
Инструкция для автомобиля
представлена в формате PDF. Все современные браузеры уже поддерживают данный формат и сложностей с открытием файла возникнуть не должно.
Но если открыть инструкцию все же не удается, то необходимо установить на компьютер программу для чтения PDF файлов, например, Acrobat Reader. Если у вас возникли сложности с открытием инструкции на смартфоне под управлением Android, нужно установить, например, Adobe Acrobat Reader.
Комментарии (0)
Комментарии про другие Автомобили
Другие Автомобили Toyota
18
Руководство по эксплуатации
ВНИМАНИЕ: при проведении работ в салоне автомобиля, оборудованного системой подушек безопасности и
преднатяжителей ремней (система «SRS»), следует быть особенно внимательными, чтобы не повредить блок
управления системы «SRS». Во избежание случайного срабатывания подушек безопасности или преднатяжи-
телей ремней, перед началом работ установите колеса в положение прямолинейного движения и замок зажи-
гания в положение «LOCK», отсоедините провод от отрицательной клеммы вспомогательной аккумуляторной
батареи и подождите не менее 90 секунд (время разряда резервного питания). Не пытайтесь разбирать узел
подушки безопасности или узел преднатяжителя ремня, т.к. в данных узлах нет деталей, требующих обслужи-
вания. Если подушки безопасности и/или преднатяжители ремней срабатывали (разворачивались), то их
нельзя отремонтировать или использовать повторно.
Общие сведения
и советы по эксплуатации
гибридного автомобиля
Ваш автомобиль является гибридным
и при движении использует энергию,
получаемую как от двигателя внут-
реннего сгорания (ДВС), так и от элек-
тродвигателя, работающего на высо-
ковольтной батарее (ВВБ), обеспечи-
вая оптимальный расход топлива и
экологичность автомобиля.
Зарядка высоковольтной батареи
осуществляется во время движения
автомобиля или при работе двигателя
на холостом ходу.
Внимание: максимальный заряд высо-
ковольтной батареи является по-
стоянным значением. Зарядка ВВБ
свыше этого значения невозможна.
Примечание:
— Поскольку высоковольтная бата-
рея заряжается по мере необходи-
мости во время движения или при
работающем двигателе, ее не
требуется заряжать от внешней
сети.
— Если не запускать двигатель ав-
томобиля более двух недель, это
может привести к разрядке высо-
ковольтной батареи и уменьшению
ее емкости. Поэтому, каждые две
недели рекомендуется хотя бы раз
запускать двигатель и оставлять
его запущенным при выключенных
потребителях электроэнергии
(осветительные приборы, магни-
тола, кондиционер и т.д.) не менее
чем на 30 минут.
Используемая энергия в
зависимости от условий движения
Примечание: в зависимости от усло-
вий движения автомобиля на много-
функциональном дисплее в режиме
«Energy Monitor» отображается схема
распределения энергии от ДВС и
электродвигателя.
1. При запуске двигателя и движении
задним ходом автомобиль работает на
электродвигателе и использует энер-
гию от высоковольтной батареи.
2. При равномерном ускорении или
движении с постоянной скоростью ав-
томобиль работает на ДВС, однако в
зависимости от условий движения к
работе ДВС может подключаться и
электродвигатель, использующий в
данный момент энергию от генератора
автомобиля. Система управления гиб-
ридной установкой обеспечивает оп-
тимальное соотношение используе-
мой энергии от ДВС и электродвига-
теля для снижения расхода топлива и
токсичности автомобиля, не влияя при
этом на динамические характеристики
автомобиля.
3. При движении на максимальных обо-
ротах коленчатого вала автомобиль ра-
ботает одновременно как на ДВС, так и
на электродвигателе, работающем на
высоковольтной батарее, обеспечивая
максимальную динамику автомобиля.
4. При нажатии на педаль тормоза или
замедлении автомобиля, электродви-
гатель работает как генератор и про-
исходит зарядка высоковольтной ба-
тареи (эффект «рекуперативных» тор-
мозов).
«, £
5. При остановке автомобиля ДВС ав-
томатически выключается и автомо-
биль работает на энергии от электро-
двигателя, работающего на высоко-
вольтной батарее.
Советы по повышению
эффективности использования
гибридного автомобиля
1. Плавно нажимайте на педаль аксе-
лератора, а также плавно отпускайте
педаль.
Примечание:
— Избегайте резкого увеличения или
уменьшения скорости автомобиля.
— Помните, что при спокойной ма-
нере движения (при плавном уско-
рении или снижении скорости) ав-
томобиль может работать без
использования ДВС только на
электродвигателе.
Руководство по эксплуатации
19
2. Во время движения убедитесь, что
селектор трансмиссии установлен в
положение «D». При парковке автомо-
биля всегда нажимайте на выключа-
тель режима «Р» трансмиссии.
Примечание: если селектор транс-
миссии установлен в положение «N»,
зарядка ВВБ не осуществляется.
Более того, продолжительная рабо-
та двигателя при положении «N» се-
лектора трансмиссии может при-
вести к разрядке высоковольтной
батареи.
Режим «EV» движения автомобиля
Внимание: при полном уровне заряда
высоковольтной батареи и обычных
условиях движения, в режиме «EV» ав-
томобиль может проехать около двух
километров. Движение на большее
расстояние при работе автомобиля в
режиме «EV» приведет к критическому
разряду ВВБ, что, в свою очередь,
приведет к безвозвратному уменьше-
нию емкости батареи и невозможно-
сти ее дальнейшей эксплуатации.
Движение автомобиля в режиме «EV»
осуществляется только за счет элек-
троэнергии от высоковольтной бата-
реи, при этом ДВС отключен. Поэтому
данный режим рекомендуется исполь-
зовать при постановке автомобиля в
гараж или движения в недостаточно
вентилируемых помещениях, где не
желательно присутствие выхлопных
газов. Также, в данном режиме значи-
тельно уменьшается шум от автомо-
биля, что актуально при движении по
парковой или дворовой территории.
Внимание: во время движения в дан-
ном режиме ДВС отключен полно-
стью и не участвует ни в движении
автомобиля, ни в подзарядке высоко-
вольтной батареи.
Для включения режима нажмите на
выключатель, расположение которого
показано на рисунке. При этом на
комбинации приборов загорится соот-
ветствующий индикатор.
Выключатель “EV”
I___’)
Примечание:
— В следующих случаях включение
режима «EV» будет невозможно:
— При высокой температуре ком-
понентов гибридной установки.
— При низкой температуре компо-
нентов гибридной установки.
— При температуре охлаждающей
жидкости, близкой к перегреву.
— При уровне заряда высоковольт-
ной батареи, равном трем пунк-
там или меньше.
— При скорости автомобиля более
55 км/ч.
— При сильном нажатии на педаль
акселератора.
— При использовании обогревате-
ля стекла задней двери и т.д.
— Поскольку включение режима «EV»
возможно только на прогретом
автомобиле, включение режима в
холодную погоду осуществляется
либо после того, как перестанет
мигать индикатор «READY”
(свидетельствует о готовности
автомобиля к движению), либо до
запуска двигателя. При этом вы-
ключите все ненужные электро-
приборы и убедитесь, что ВВБ за-
ряжена полностью.
При повторном нажатии на выключа-
тель, режим «EV» отключается и авто-
мобиль продолжает движение, работая
как на ДВС так и на электродвигателе.
Переход автомобиля в режим обычного
движения сопровождается отображе-
нием информационного сообщения на
многофункциональном дисплее и зву-
чанием «зуммера».
Если во время движения автомобиля
в данном режиме звучит звуковой сиг-
нал и индикатор режима «EV» мигает
три раза, а затем гаснет, это свиде-
тельствует о том, что система управ-
ления гибридной установкой автома-
тически отключала режим «EV» для
избежания полной разрядки высоко-
вольтной батареи. Автоматическое
отключение режима происходит в
следующих случаях:
— Если уровень заряда высоковольт-
ной батареи снизился до двух пунк-
тов.
— Если скорость автомобиля более
55 км/ч.
— При сильном нажатии на педаль
акселератора.
Обратите особое внимание
1. Во время движения ДВС включает-
ся и выключается автоматически в за-
висимости от условий движения. В
следующих случаях ДВС может не вы-
ключиться автоматически:
— При перегреве двигателя.
— Во время зарядки высоковольтной
батареи.
— При высокой или низкой темпера-
туре высоковольтной батареи.
2. Поскольку Ваш автомобиль осна-
щен как ДВС, так и электродвигателем
с высоковольтной батареей, некото-
рые узлы автомобиля представляют
собой особую опасность и при недос-
таточном внимании и неправильном
обслуживании могут причинить серь-
езные травмы, ожоги и даже стать
причиной смерти.
Внимание: узлы и агрегаты, а также
соединительные кабели гибридной
установки, приведенные на рисунке
«Компоненты автомобиля, находя-
щиеся под высоким напряжением»,
представляют собой наибольшую
опасность для жизни человека.
— Не прикасайтесь и не пытайтесь
произвести какие-либо подключения
к кабелям высокого напряжения или
клеммам высоковольтной батареи.
Клеммы ВВБ и кабели высокого на-
пряжения (более 200 В), окрашен-
ные в оранжевый цвет, представля-
ют собой наибольшую опасность
для жизни.
— На электродвигателе автомобиля,
электровентиляторе радиатора и на
некоторых других компонентах авто-
мобиля имеются информационные
таблички и этикетки, предупреждаю-
щие о возможной опасности при об-
служивании или проверке данного
компонента, поскольку во время дви-
жения автомобиля они нагреваются
до очень высоких температур.
— Не разбирайте, не демонтируйте,
не усовершенствуйте высоковольт-
ную батарею, кабели высокого на-
пряжения и другие компоненты, на-
ходящиеся под напряжением.
— Не прикасайтесь к аварийному вы-
ключателю ВВБ, расположенному в
левой боковой отделке багажного
отделения. Данный выключатель
предназначен для отключения по-
дачи напряжения от высоковольтной
батареи при ремонте и обслужива-
нии автомобиля.
3. Помните, что когда автомобиль ра-
ботает на электродвигателе, он почти
не производит шума работы двигателя,
тем более характерного для автомоби-
лей с ДВС. Ошибочное суждение лю-
дей, находящихся в непосредственной
близости от Вашего автомобиля, о том,
что автомобиль не работает, может
стать причиной аварии или причинения
вреда окружающим людям.
4. Всегда покидайте автомобиль толь-
ко после того, как убедитесь, что на-
жат выключатель режима «Р» транс-
миссии или селектор установлен в по-
ложение «N».
5. С правой стороны заднего сиденья
установлены воздуховоды, через ко-
торые осуществляется забор воздуха
для охлаждения высоковольтной ба-
тареи. Перед началом движения убе-
дитесь, что дефлекторы воздуховодов
не заслонены багажом или иным гру-
зом, пассажиры заднего сиденья не
ограничивают доступ воздуха к возду-
ховодам, ремни безопасности заднего
сиденья убраны в предназначенные
для них крепления. Ограничение за-
бора воздуха может привести к пере-
греву высоковольтной батареи и стать
причиной серьезных неисправностей.
6. В случае, если Вы попали в аварию,
для уменьшения риска удара током от
компонентов автомобиля, выполните
следующие действия:
а) Нажмите на педаль стояночного
тормоза.
Toyota Prius (XW20/NHW20, Mark II, MC Platform) с гибридной установкой: бензиновыми двигателями 1NZ-FXE 1.5 л (1496/1497 см³) 76-77 л.с./56-57 кВт и электрическими мотор-генераторами MG1 25 л.с./18 кВт, 3CM MG2 68 л.с./50 кВт; Руководство по эксплуатации, техническому обслуживанию и ремонту, технические характеристики, электросхемы, устройство, диагностика, особенности конструкции. Иллюстрированное практическое пособие гибридный легковой автомобиль компактного «Ц» класса Тойота Приус с цельнометаллическими несущими кузовами пятидверный хэтчбек (лифтбек) переднеприводные модели второго поколения выпуска с августа 2003 по 2009 год
ЕСЛИ ВЫ ВИДИТЕ ОШИБКУ 406 Not Acceptable и не видите документ, то скорей всего у Вас IP РФ и его надо сменить, на любой другой страны, с помощью VPN ( Scribd и SlideShare блокируют посетителей с Российским IP).
Видео Toyota Prius XW20 замена подшипника передней ступицы и высоковольтной батареи (Тойота Приус 03-09)
Toyota Prius Mark II общая информация (Тойота Приус 2003-2009)
Высоковольтная батарея
Проверка
Проверка ответной части сервисной перемычки
1. Снимите ответную часть сервисной перемычки и убедитесь в отсутствии проводимости между выводами.
2. Подсоедините к ответной части сервисную перемычку и убедитесь в наличии проводимости между выводами.
Проверка датчика тока высоковольтной батареи
1. Используя диагностический тестер, измерьте сопротивление между выводами «1» и «2».
Номинальное сопротивление:
Щуп «+» тестера к выводу «1» …………. 3,5-4,5 кОм
Щуп тестера к выводу «2» …………. 5,0-7,0 кОм
2. Используя диагностический тестер, измерьте сопротивление между выводами «1» и «3»
Номинальное сопротивление:
Щуп «+» тестера к выводу «1» …………. 3,5-4,5 кОм
Щуп «+» тестера к выводу «3» …………. 5,0-7,0 кОм
3. Измерьте сопротивление между выводами «2» и «3».
Номинальное сопротивление …………. менее 0,2 кОм
Снятие и установка
Примечание: установка производится в порядке, обратном снятию.
Моменты затяжки указаны в тексте.
1. Ознакомьтесь с мерами предосторожности перед проведением работ.
2. Снимите крышку пола №2 багажного отделения.
3. Снимите поддон для хранения инструментов.
4. Снимите боковую крышку пола багажного отделения.
5. Отсоедините провод от отрицательной клеммы аккумуляторной батареи.
Момент затяжки …………. 6,0 Нм
6. Снимите сервисную перемычку.
7. Отсоедините четыре пистона и снимите отделку порога багажного отделения.
8. Снимите шторку багажного отделения.
9. Снимите подушку заднего сиденья.
10. Снимите крышку пола №1 багажного отделения.
11. Снимите боковую отделку заднего сиденья с левой и правой стороны.
12. Снимите боковую крышку пола багажного отделения.
13. Снимите боковой поддон для хранения инструментов.
14. Снимите боковые отделки багажного отделения.
15. Отверните семь болтов и снимите кронштейн высоковольтной батареи.
Момент затяжки …………. 28 Нм
16. Снимите воздуховод №2.
а) Отсоедините фиксатор и реле №1 вентилятора батареи.
б) Отсоедините два держателя.
в) Снимите воздуховод №2.
17. Отверните семь болтов и снимите боковой кронштейн.
Момент затяжки …………. 28 Нм
18. Снимите воздуховод №3.
а) Отсоедините разъем.
б) Снимите фиксатор и отсоедините жгут проводов.
в) Отверните болт, отсоедините пистон и снимите воздуховод №3.
Момент затяжки …………. 4,0 Нм
19. Отверните три болта, две гайки и снимите крышку высоковольтной батареи.
Момент затяжки …………. 7,5 Нм
22. Снимите соединитель.
21. Отсоедините высоковольтные провода от батареи.
Момент затяжки …………. 5,6 Нм
22. Снимите высоковольтную батарею.
Примечание: используйте изоляционные перчатки.
а) Отверните четыре болта и отсоедините провод массы от высоковольтной батареи.
Момент затяжки …………. 19 Нм
б) Отсоедините разъем главного реле.
в) Отсоедините разъем выключателя блокировки.
г) Отсоедините фиксатор и разъем блока управления вентилятором батареи.
д) Отсоедините шланг высоковольтной батареи от панели пола.
е) Снимите высоковольтную батарею.
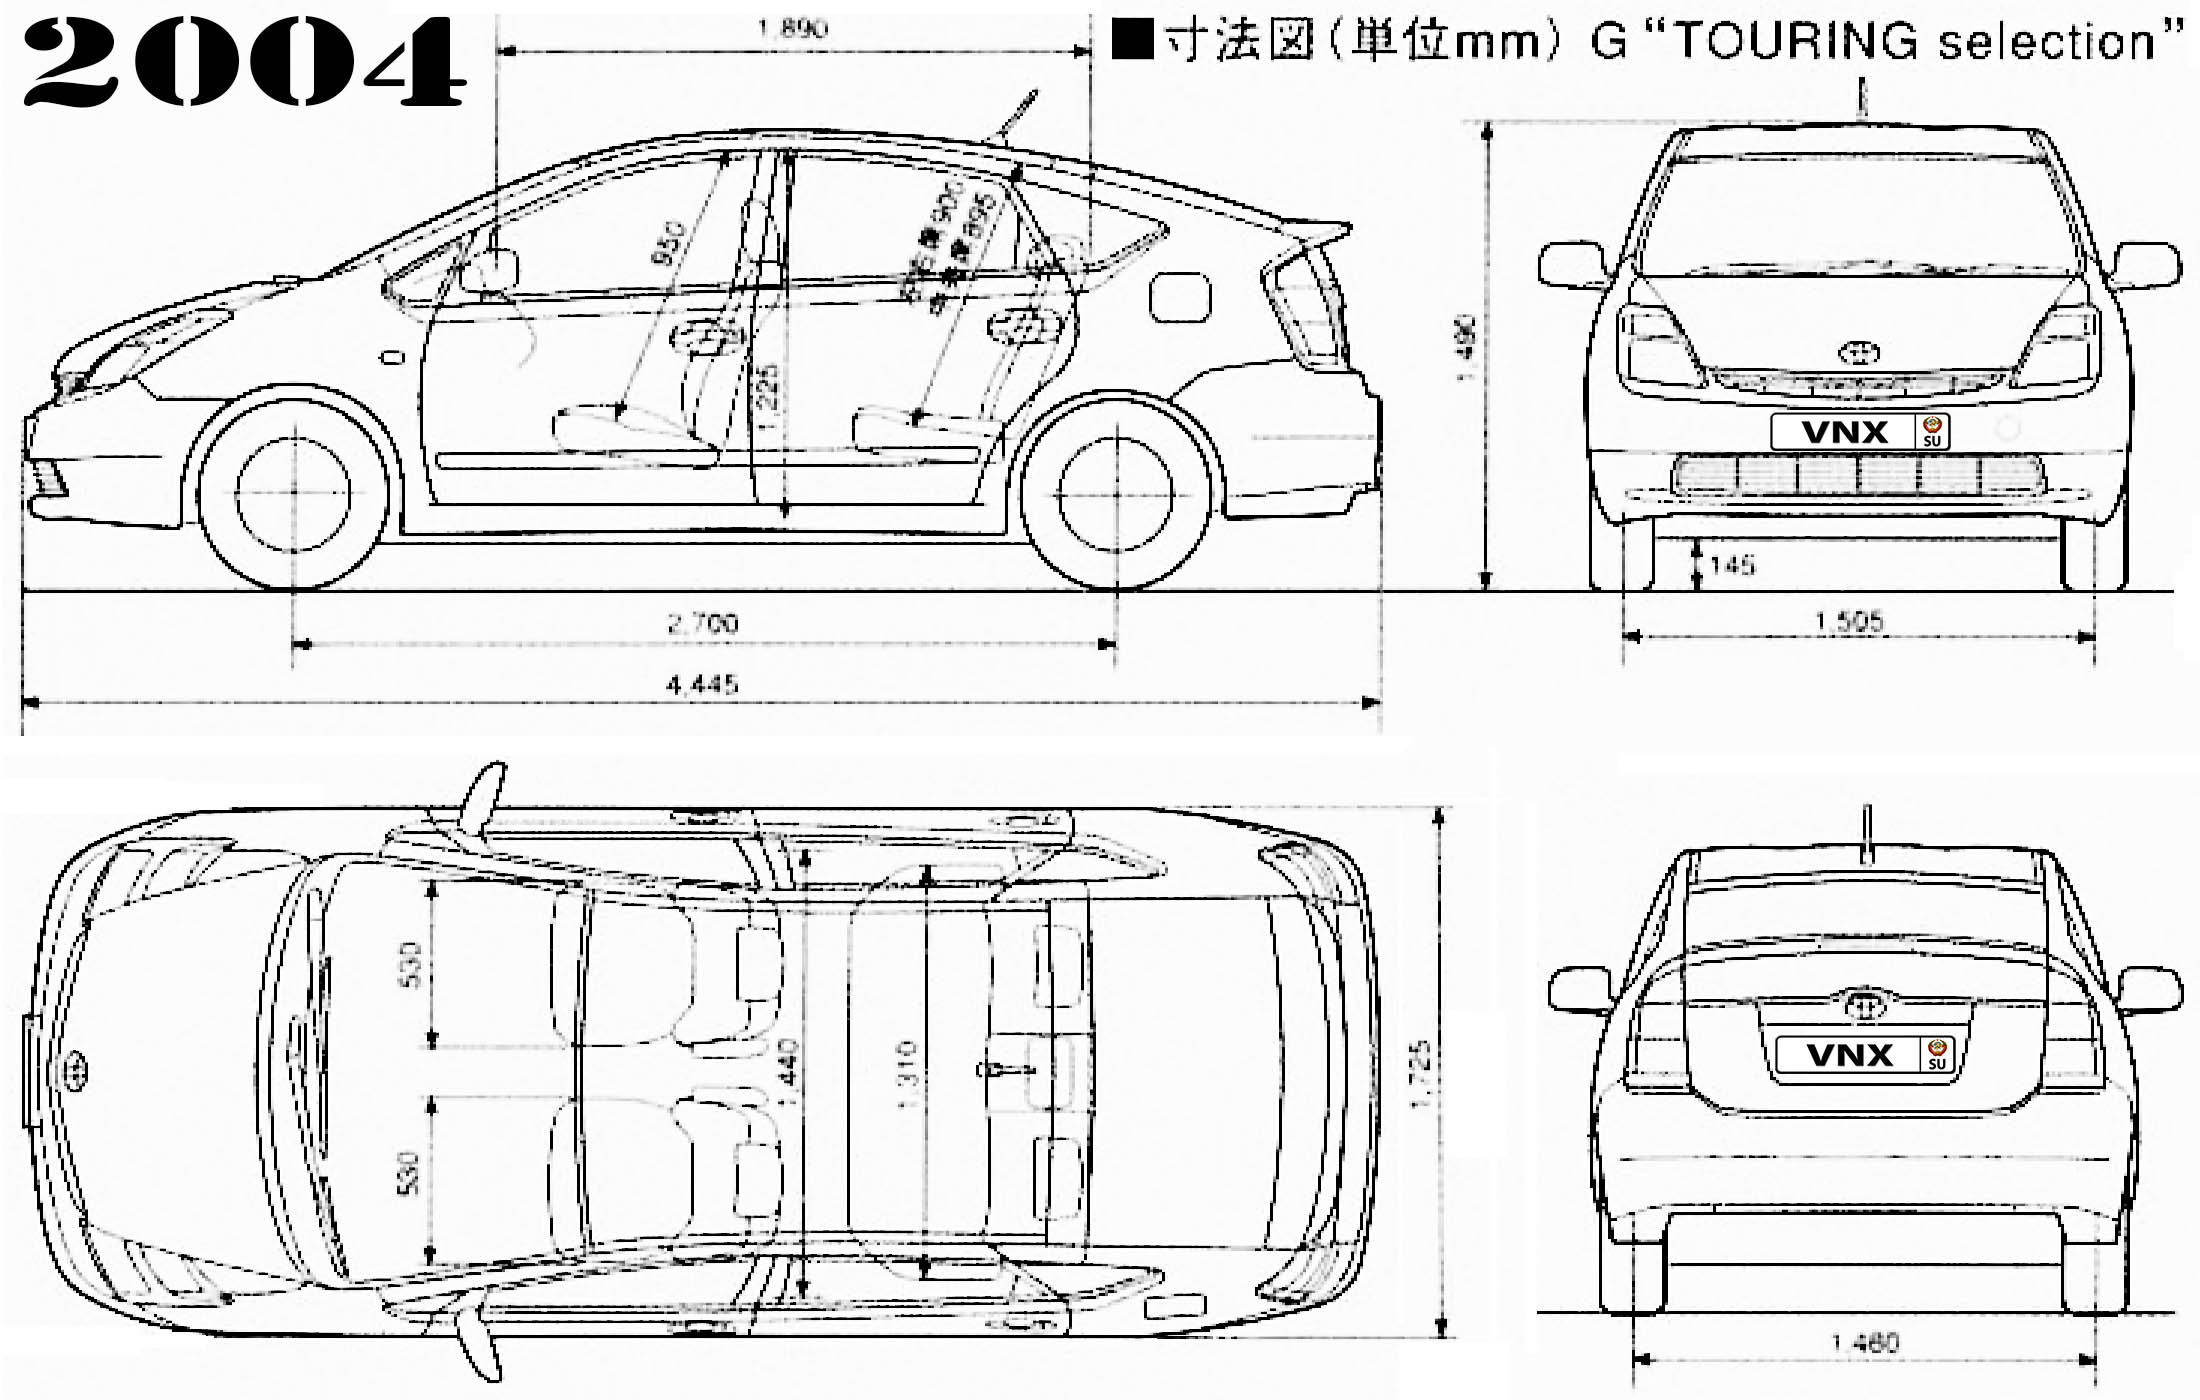
| № | Спецификация / Specs | Данные |
| Габариты (мм/mm) и масса (кг/kg) / Dimensions and Weight | ||
| 1 | Длина / Length | 4445 |
| 2 | Ширина (без/с зеркалами) / Width | 1725 |
| 3 | Высота (загружен/пустой) / Height | 1490 |
| 4 | Колёсная база / Wheelbase | 2700 |
| 5 | Дорожный просвет (клиренс) / Ground clearance | 145 |
| 6 | Снаряжённая масса / Total (curb) weight | 1270 |
| Полная масса / Gross (max.) weight | 1545 | |
|
Двигатель / Engine |
||
| 7 | Тип / Engine Type, Code | Гибридный, бензиновый, жидкостного охлаждения, четырехтактный, 1NZ-FXE и электрический 3CM MG2 |
| 8 | Количество цилиндров / Cylinder arrangement: Total number of cylinders, of valves | 4-цилиндровый, рядный, 16V, DOHC с верхним расположением двух распределительных валов |
| 9 | Диаметр цилиндра / Bore | 75.0 мм |
| 10 | Ход поршня / Stroke | 84.7 мм |
| 11 | Объём / Engine displacement | 1496 см³ |
| 12 | Система питания / Fuel supply, Aspiration | Распределенный впрыск топлива EFI |
| Атмосферный | ||
| 13 | Степень сжатия / Compression ratio | 13.0:1 |
| 14 | Максимальная мощность / Max. output power kW (HP) at rpm | 57 кВт (77 л.с.) при 5000 об/мин, электрический 68 л.с./50 кВт при 1200-1540 об/мин, Синергетический режим: 111.5 л.с./82 кВт |
| 15 | Максимальный крутящий момент / Max. torque N·m at rpm | 115 Нм при 4200 об/мин, электрический 400 Нм при 0-1200 об/мин |
|
Трансмиссия / Transmission |
||
| 16 | Сцепление / Clutch type | Устройство распределения мощности PSD (Power Split Device) |
| 17 | КПП / Transmission type | P112 Планетарная передача (Continuously Variable Transmission CVT — Бесступенчатый Вариатор) |
О Книге
- Название: Toyota Prius Устройство, техническое обслуживание и ремонт
- Бензиновые двигатели: 1NZ-FXE 1.5 л (1496/1497 см³) 76-77 л.с./56-57 кВт и электрическими мотор-генераторами MG1 25 л.с./18 кВт, 3CM MG2 68 л.с./50 кВт
- Выпуск с 2003 года
- Серия: «Ремонт Автомобилей»
- Год издания: 2009
- Автор: Коллектив авторов
- Издательство: «Ассоциация независимых издателей»
- Формат: PDF
- Страниц в книге: 572
- Размер: 423.66 МБ
- Язык: Русский
- Количество электросхем: более 50