Панель управления автомобилем
1 — внутренняя ручке водительской двери 2 — клавиша центрального замка 3 — переключатель наружного освещения 4 — боковые дефлекторы 5 — регуля…

Щиток приборов
1 — кнопки настройки часов 2 — тахометр 3 — указатель температуры охлаждающей жидкости 4 — дисплей 5- указатель запаса топлива 6 — спидомет…

Дисплей в приборном щитке
1 — сигнальные лампочки 2 — часы. У некоторых моделей справа от часов находится указатель температуры наружного воздуха 3 — счетчики пробега или инд…

Бортовой компьютер (MFA)
Бортовой компьютер выдает различные данные по поездке, которые выводятся на дисплей приборного щитка. Подрулевой рычаг очистителя и омывателей стекла В с к…


Ключи для автомобиля
Ключи А с встроенным пультом дистанционного управления и пластиковый брелок В с номером ключей представлены на иллюстрации. На основании номера ключе…

Центральный замок
Центральный замок обеспечивает централизованное отпирание и запирание всех дверей, включая заднюю дверь. Управление центральным замком осуществляется…


Дистанционное управление замками
Запирание и отпирание автомобиля При помощи пульта дистанционного управления замками можно запирать и отпирать автомобиль на расстоянии. Кнопкой на пу…


Управление отопителем
Выключатели отопителя Переключателями 1, 5 и клавишей 6 выберите температуру, направление обдува салона и объем подаваемого в салон воздуха. Для…

Управление кондиционером
Выключатели кондиционера Кондиционер работает только при запущенном двигателе и включенном вентиляторе. Переключателями 1, 6 и клавишей 7 выбери…

Управление климат-контролем
1 — температура на левой стороне салона. 2 — режим рециркуляции воздуха в салоне . 3 — обдув середины салона . 4 — обдув пола . 5 — об…

Замок зажигания
0 — зажигание выключено, рулевое управление заблокировано Для блокировки рулевого управления при вынутом из замка ключе зажигания несколько поверните…

Механическая коробка передач
Схема переключения 5-ступенчатой механической коробки передач: Схема переключения 6-ступенчатой механической коробки передач: …

Автоматическая коробка передач
Автоматическая коробка передач имеет две программы — D и S. При установке рычага управления в положение D коробка передач работает в экономичном режи…

Включение круиз-контроля
Круиз-контроль поддерживает постоянной заданную скорость движения в диапазоне примерно от 30 до 180 км/час. Управление круиз-контролем выполняется с помощь…
- Manuals
- Brands
- Volkswagen Manuals
- Automobile
- Golf Variant 2007
Manuals and User Guides for Volkswagen Golf Variant 2007. We have 12 Volkswagen Golf Variant 2007 manuals available for free PDF download: Workshop Manual, Repair Manual, Maintenance Manual, Service Manual

Volkswagen Golf Variant 2007 Workshop Manual (515 pages)
Electrical system
Brand: Volkswagen
|
Category: Automobile
|
Size: 13.1 MB
Table of Contents
-
Table of Contents
3
-
Starter, Current Supply, CCS
9
-
Battery a
9
-
Types of Battery
9
-
Warning Notices and Safety Regulations
9
-
Battery Terminal Connection
9
-
Checking Battery a
10
-
Charging Battery a
11
-
Disconnecting and Connecting Battery a
12
-
Disconnecting and Connecting Battery a ( Battery a in Engine Compartment)
12
-
Removing and Installing Battery a
15
-
Removing and Installing Battery a ( Battery a in Engine Compartment)
15
-
Starter B
21
-
Checking Starter B
21
-
Removing and Installing Starter B (Automatic Gearbox)
22
-
Removing and Installing Starter B (DSG)
43
-
Removing and Installing Starter B (Manual Gearbox)
68
-
Alternator C
96
-
Securing Battery Positive Wire on Alternator C
96
-
Checking Poly V-Belt
96
-
Checking Alternator C
97
-
Alternator C 1.4L Petrol Engine
98
-
Alternator C 1.4L FSI Engine
103
-
Alternator C 1.4L, TSI Engine
108
-
Alternator C 1.6L Petrol Engine
114
-
Alternator C 1.6L FSI Engine
118
-
Alternator C 2.0L FSI Engine
122
-
Alternator C 2.0L TFSI Engine
129
-
Alternator C 2.5L Petrol Engine
136
-
Alternator C 1.9L Diesel Engine
139
-
Alternator C 1.9L Diesel Engine with Diesel Particle Filter
146
-
Alternator C 2.0L SDI Engine
152
-
Alternator C 2.0L Diesel Engine
156
-
Alternator C 2.0L CR Diesel Engine
161
-
Alternator C 2.0L TSI Engine
166
-
Removing and Installing Poly-V Belt Pulley on Alternator C
171
-
Voltage Regulator C1 for Alternator C
176
-
Cruise Control System (CCS)
180
-
Gauges, Instruments
181
-
Dash Panel Insert
181
-
Renewing Dash Panel Insert
181
-
Removing and Installing Dash Panel Insert (up to MY2009)
182
-
Removing and Installing Dash Panel Insert (from MY2010)
183
-
Back of Dash Panel Insert (up to MY2009)
184
-
Back of Dash Panel Insert (from MY2010)
184
-
Pin Assignment of Connectors at Dash Panel Insert
184
-
Warning Lamp Symbols on Dash Panel Insert (up to MY2009)
184
-
Warning Lamp Symbols on Dash Panel Insert (from MY2010)
186
-
Service Interval Display
188
-
Resetting Service Interval Display
188
-
Windscreen Wash/Wipe System
189
-
Windscreen Wiper System
189
-
Deactivating Wiper Motor Control Unit J400 APP Function
189
-
Assembly Overview — Windscreen Wiper System
191
-
Removing and Installing Windscreen Wiper System
191
-
Removing and Installing Wiper Arms
196
-
Adjusting Wiper Blade Park Position
196
-
Removing and Installing Joint-Free Wiper Blades
198
-
Removing and Installing Rain and Light Sensor G397
198
-
Coding Rain and Light Sensor G397
200
-
Windscreen Washer System
202
-
Assembly Overview — Windscreen Washer System
202
-
Removing and Installing Washer Fluid Reservoir
203
-
Removing and Installing Windscreen and Rear Window Washer Pump V59
205
-
Removing and Installing Windscreen Washer Fluid Level Sender G33
206
-
Removing and Installing Windscreen Washer System Spray Jets
207
-
Adjusting Windscreen Washer System Spray Jets
207
-
Rear Window Wiper System
208
-
Assembly Overview — Rear Window Wiper System
208
-
Removing Rear Window Wiper
208
-
Adjusting Rear Window Wiper Park Position
210
-
Removing and Installing Joint-Free Wiper Blades
211
-
Rear Window Washer System
213
-
Assembly Overview — Rear Window Washer System
213
-
Removing and Installing Washer Jet
214
-
Adjusting Spray Jet
214
-
Headlight Washer System
215
-
Assembly Overview — Headlight Washer System
215
-
Removing and Installing Headlight Washer System Pump V11
216
-
Removing and Installing Spray Jet Pop-Up Cylinders
217
-
Removing and Installing Spray Jet Assembly
217
-
Adjusting Headlight Washer System Spray Jets
218
-
Bleeding Headlight Washer System
218
-
Washer Fluid Line Hose Couplings
220
-
Hose Repair
221
-
Lights, Bulbs, Switches — Exterior
222
-
Headlights with Halogen Bulbs (up to MY2009)
222
-
Assembly Overview
222
-
Removing and Installing Headlight
223
-
Adjusting Headlight Installation Position
225
-
Renewing Bulbs
226
-
Removing and Installing Headlight Range Control Motor
232
-
Repairing Headlight Retaining Tabs
239
-
Converting Headlights for Use When Driving on the Left or Right
241
-
Adjusting Headlights
243
-
Headlights with Halogen Bulbs (from MY2009)
244
-
General Description
244
-
Assembly Overview
244
-
Removing and Installing Headlight
246
-
Adjusting Headlight Installation Position
248
-
Renewing Bulbs
249
-
Removing and Installing Headlight Range Control Motor
255
-
Repairing Headlight Securing Tabs
259
-
Converting Headlights for Use When Driving on the Left or Right
262
-
Adjusting Headlights
265
-
Headlights with Gas Discharge Bulbs (up to MY2009)
266
-
Operation and Safety Notes for Gas Discharge Bulbs
266
-
Assembly Overview
269
-
Removing and Installing Headlight
270
-
Adjusting Headlight Installation Position
270
-
Renewing Bulbs
270
-
Removing and Installing Headlight Range Control Motor
276
-
Removing and Installing Gas Discharge Light Control Unit
279
-
Control Unit for Headlight Range Control J431
280
-
Vehicle Level Sender
283
-
Repairing Headlight Securing Tabs
284
-
Converting Headlights for Use When Driving on the Left or Right
285
-
Adjusting Headlights
285
-
Headlights with Gas Discharge Bulbs and Cornering Lights (from MY2010)
286
-
General Description
286
-
Assembly Overview
287
-
Removing and Installing Headlight
288
-
Adjusting Headlight Installation Position
290
-
Renewing Bulbs
290
-
Headlight Starter for Gas Discharge Bulb
295
-
Power Output Module for Headlight
296
-
Headlight Range Control Unit J431
298
-
Headlight Range Control Motor
300
-
Swivel Module Position Sensor
300
-
Headlight Screen Adjustment Solenoid
301
-
Vehicle Level Sender
302
-
LED Module for Daytime Running Light and Side Light
302
-
Converting Headlights for Use When Driving on the Left or Right
302
-
Repairing Headlight Securing Tabs
304
-
Adjusting Headlights
304
-
Fog Lights
305
-
Assembly Overview — Fog Lights (up to MY2009)
305
-
Assembly Overview — Fog Lights (from MY2010)
306
-
Removing and Installing Fog Lights (up to MY2009)
306
-
Removing and Installing Fog Lights (from MY2010)
307
-
Removing and Installing Fog Light/Cornering Light Bulb
308
-
Adjusting Fog Lights
309
-
Bulb for Turn Signal Repeater Light and Entry Light in Exterior Mirror
310
-
Removing and Installing Turn Signal Bulb
310
-
Removing and Installing Entry Light in Exterior Mirror
310
-
Removing and Installing Front Side Marker Light in Front Bumper
313
-
Rear Side Marker Bulb (Usa/Canada Only)
314
-
Tail Lights
315
-
Assembly Overview — Tail Light in Side Panel (Bulbs) — Saloon
315
-
Removing and Installing Tail Light in Side Panel (Bulbs) — Saloon
315
-
Removing and Installing Tail Light Bulb Carrier in Side Panel — Saloon
316
-
Tail Light in Side Panel (LED) — Saloon
317
-
Removing and Installing Tail Light in Side Panel (LED) — Saloon
317
-
Assembly Overview — Tail Light in Rear Lid — Saloon
318
-
Removing and Installing Tail Light in Rear Lid — Saloon
319
-
Removing and Installing Tail Light Bulb Holder in Rear Lid — Saloon
319
-
Assembly Overview — Tail Light — Variant
321
-
Removing and Installing Tail Light — Variant
321
-
Removing and Installing Tail Light Bulb Holder — Variant
322
-
Removing and Installing Number Plate Lights
323
-
Additional Brake Lights
324
-
Removing and Installing Additional Brake Light Bulb M25 — Saloon
324
Advertisement

Volkswagen Golf Variant 2007 Workshop Manual (372 pages)
Brand: Volkswagen
|
Category: Automobile
|
Size: 12.72 MB
Table of Contents
-
Table of Contents
3
-
Golf Variant 2007 ➤ , Jetta
10
-
Body — Front
11
-
Lock Carrier
11
-
Tools
11
-
Assembly Overview — Lock Carrier, Service Position
12
-
Service Position
12
-
Removing and Installing Lock Carrier with Add-On Parts
14
-
Wing
16
-
Tools
16
-
Assembly Overview — Front Wing
17
-
Removing and Installing Wing
17
-
Removing and Installing Wing Bracket
18
-
Noise Insulation
20
-
Tools
20
-
Assembly Overview — Noise Insulation
21
-
Underbody Cladding
22
-
Tools
22
-
Assembly Overview — Underbody Cladding
23
-
Assembly Overview — Rear Underbody Cladding
24
-
Plenum Chamber Bulkhead
25
-
Tools
25
-
Assembly Overview — Plenum Chamber Bulkhead
25
-
-
Bonnet, Rear Lid
26
-
Bonnet
26
-
Tools
26
-
Assembly Overview — Bonnet
27
-
Removing and Installing Bonnet
27
-
Removing Gas Strut
29
-
Releasing Gas from Gas Strut
29
-
Removing and Installing Lid Hinge
29
-
Removing and Installing Insulation
30
-
Assembly Overview — Bonnet Latch and Release Components
33
-
Removing and Installing Bonnet Lock
33
-
Disconnecting Bowden Cable
34
-
Adjusting Bonnet
35
-
Removing and Installing Release Lever
37
-
Rear Lid (Saloon)
39
-
Tools
39
-
Assembly Overview — Rear Lid
39
-
Removing and Installing Rear Lid
40
-
Removing Gas Strut
40
-
Releasing Gas from Gas Strut
41
-
Removing and Installing Lid Hinge
41
-
Removing and Installing Striker Pin
42
-
Adjusting Rear Lid
43
-
Assembly Overview — Lid Lock and Lock Cylinder Carrier
45
-
Removing and Installing Lock Cylinder
45
-
Removing and Installing Handle Trim
46
-
Removing and Installing Lid Lock
46
-
Rear Lid Seal
47
-
Removing and Installing Rear Lid Seal
48
-
Rear Lid (Variant)
49
-
Tools
49
-
Assembly Overview — Rear Lid
49
-
Removing and Installing Rear Lid
50
-
Removing and Installing Gas Strut
51
-
Releasing Gas from Gas Strut
52
-
Removing and Installing Rear Lid Hinge
52
-
Adjusting Rear Lid
54
-
Removing and Installing Release Button
57
-
Removing and Installing Lid Lock
58
-
Rear Lid Seal
60
-
Removing and Installing Rear Lid Seal
61
-
Registration Plate Carrier
63
-
Fuel Tank Flap Unit (Saloon)
64
-
Assembly Overview — Tank Flap Unit
64
-
Removing and Installing Tank Flap Unit
64
-
Removing and Installing Tank Filler Flap Locking Motor V155
66
-
Fuel Tank Flap Unit (Variant)
68
-
Assembly Overview — Tank Flap Unit
68
-
Removing and Installing Tank Flap Unit
68
-
Removing and Installing Tank Filler Flap Locking Motor V155
70
-
-
Front Doors, Door Components, Central Locking
73
-
Front Door
73
-
Tools
73
-
Materials
74
-
Assembly Overview — Door Assembly
74
-
Assembly Overview — Door Hinges
76
-
Removing and Installing Door
78
-
Adjusting Door
80
-
Removing and Installing Outer Panel on Door
83
-
Installing New Outer Panel on Door
86
-
Removing and Installing Retaining Rail on Door Outer Panel
90
-
Installation Notes for Bonding a New Outer Panel on Door
92
-
Minimum Curing Period
92
-
Cleaning off Excess Adhesive Sealing Material
93
-
Assembly Overview — Door Inner Part
94
-
Assembly Overview — Door Handle and Door Lock
95
-
Removing and Installing Housing
96
-
Removing and Installing Door Handle
96
-
Removing and Installing Bearing Bracket
99
-
Removing and Installing Door Lock
100
-
Assembly Overview — Side Impact Protection
102
-
Door Inner Seal
102
-
Removing and Installing Door Inner Seal
103
-
Removing and Installing Door Outer Seal
104
-
Central Locking
108
-
Fitting Location Overview — Central Locking Components
108
-
Adapting Keys with Remote Control
110
-
Assembly Overview — Battery for Folding Key with Remote Control
110
-
Removing and Installing Battery for Folding Key with Remote Control
111
-
-
Rear Doors, Door Components
112
-
Rear Door (Saloon)
112
-
Tools
112
-
Materials
113
-
Assembly Overview — Door Assembly
113
-
Assembly Overview — Door Hinges
115
-
Removing and Installing Door
117
-
Adjusting Door
119
-
Removing and Installing Outer Panel on Door
122
-
Installing New Outer Panel on Door
125
-
Removing and Installing Retaining Rail on Door Outer Panel
129
-
Installation Notes for Bonding a New Outer Panel on Door
131
-
Minimum Curing Period
131
-
Cleaning off Excess Adhesive Sealing Material
132
-
Assembly Overview — Door Inner Part
133
-
Assembly Overview — Door Handle and Door Lock
134
-
Removing and Installing Housing
134
-
Removing and Installing Door Handle
135
-
Removing Bearing Bracket
137
-
Removing and Installing Door Lock
139
-
Assembly Overview — Side Impact Protection
141
-
Door Inner Seals
141
-
Removing and Installing Door Inner Seal
142
-
Removing and Installing Door Outer Seal
143
-
Rear Door (Variant)
147
-
Tools
147
-
Assembly Overview — Rear Door
148
-
Assembly Overview — Door Hinges
148
-
Removing and Installing Door
150
-
Adjusting Door
152
-
Assembly Overview — Assembly Carrier
154
-
Removing and Installing Assembly Carrier
155
-
Assembly Overview — Door Handle and Door Lock
160
-
Removing and Installing Housing
161
-
Removing and Installing Door Handle
161
-
Removing and Installing Bearing Bracket
164
-
Removing and Installing Door Lock
165
-
Door Inner Seals
165
-
Removing and Installing Door Inner Seal
166
-
Removing and Installing Door Outer Seal
167
-
-
-
Sunroof
171
-
Sliding/Tilting Sunroof with Glass Panel (Meritor)
171
-
Tools
171
-
Function
171
-
Assembly Overview — Sliding/Tilting Sunroof with Glass Panel
173
-
Removing and Installing Bellows
174
-
Removing and Installing Sliding/Tilting Sunroof Glass Panel
176
-
Adjusting Height of Sliding/Tilting Sunroof Glass Panel
177
-
Adjusting Panel Seal
178
-
Renewing Panel Seal
179
-
Removing and Installing Wind Deflector
179
-
Removing and Installing Sliding Headliner
180
-
-
Removing and Installing Sliding/Tilting Sunroof Glass Panel Drive
181
-
Adjusting Drive for Sliding/Tilting Sunroof Glass Panel (0 Position)
182
-
Removing and Installing Sliding/Tilting Sunroof Glass Panel Automatic Preselection Switch
182
-
Checking Parallel Running
182
-
Adjusting Parallel Running
183
-
Assembly Overview — Carrier Unit
184
-
-
Removing and Installing Carrier Unit
184
-
Operating Without Current
187
-
Removing and Installing Guide Plate
187
-
Removing and Installing Guide Plate
188
-
Cleaning Water Drain Hoses
189
-
Panorama Sliding Sunroof (Arvin-Meritor)
192
-
Tools
192
-
Function
192
-
Establishing Reference Points of Panorama Sliding Roof
193
-
Assembly Overview — Panorama Sliding Roof
194
-
Removing and Installing Front Glass Panel
195
-
Removing and Installing Rear Glass Panel
197
-
Adjusting Height of Front and Rear Glass Panel
198
-
Renewing Seals for Rear Glass Panel
200
-
Renewing Outer Seal
201
-
Renewing Inner Seal
203
-
Removing and Installing Wind Deflector
203
-
Removing and Installing Wind Deflector Bracket
205
-
Removing and Installing Preselector for Glass Panel and Sun Blind
206
-
Removing and Installing Sliding Sunroof Motor
206
-
Removing and Installing Sun Blind Motor
208
-
Removing and Installing Sun Blind
209
-
Assembly Overview — Assembly Frame
213
-
Installing and Removing Motor Plate and Sun Blind Cable
214
-
Removing and Installing Assembly Frame
217
-
Removing and Installing Rear Part
219
-
Removing and Installing Front Motor Plate
222
-
Removing and Installing Tilting Mechanism and Front Glass Panel Cable
225
-
Maintenance and Care
227
-
Operating Without Current
227
-
Sun Blind
228
-
Cleaning Water Drain Hoses
229
-

Volkswagen Golf Variant 2007 Workshop Manual (374 pages)
Running gear, axles, steering
Brand: Volkswagen
|
Category: Automobile
|
Size: 12.43 MB
Table of Contents
-
Golf Variant 2007 ➤ , Jetta
8
-
Technical Data
9
-
General Information
11
-
Front Suspension
12
-
Repairing Front Suspension
13
-
Raising Wheel Suspension to Unladen Position
14
-
Subframe, Anti-Roll Bar, Suspension Links
17
-
Assembly Overview: Front Left Vehicle Level Sender G78
22
-
Repairing Thread in Longitudinal Member
23
-
Fixing Position of Subframe and Brackets
24
-
Lowering Subframe
25
-
Removing and Installing Subframe Without Steering Box
29
-
Removing and Installing Subframe with Steering Box
31
-
Repairing Subframe (Front-Wheel Drive)
36
-
Repairing Subframe (Four-Wheel Drive)
39
-
Checking Swivel Joint
43
-
Removing and Installing Swivel Joint
44
-
Removing and Installing Suspension Link with Mounting Bracket
46
-
Renewing Bonded Rubber Bush for Suspension Link
54
-
Renewing Mounting Bracket with Suspension Link Bush
56
-
Removing and Installing Anti-Roll Bar
58
-
Assembly Overview: Wheel Bearing
63
-
Removing and Installing Wheel Bearing Unit
64
-
Removing and Installing Wheel Bearing Housing
66
-
Assembly Overview: Suspension Strut
70
-
Removing and Installing Suspension Strut
71
-
Repairing Suspension Strut
76
-
Removing and Installing Drive Shafts
78
-
Loosening and Tightening 12-Point Flange Bolt Securing Drive Shaft
79
-
Removing and Installing Drive Shaft with Constant Velocity Joint
80
-
Removing and Installing Left Drive Shaft with (Push-On) Constant Velocity Slip Joint
82
-
Removing and Installing Right Drive Shaft with (Push-On) Constant Velocity Slip Joint
86
-
Removing and Installing Drive Shafts with Triple Roller Joint Aar2600I
89
-
Removing and Installing Drive Shafts with Triple Roller Joint Aar3300I
91
-
Removing and Installing Intermediate Shaft
93
-
Repairing Drive Shaft — Overview of Drive Shafts
95
-
Heat Shields for Drive Shafts
97
-
Assembly Overview: Drive Shaft with VL90 or VL100 Constant Velocity Joint
98
-
Dismantling and Assembling Drive Shaft with VL90 or VL100 Constant Velocity Joint
100
-
Checking Outer Constant Velocity Joint
104
-
Checking Inner Constant Velocity Joint
105
-
Assembly Overview: Drive Shaft with VL107 Constant Velocity Joint (Bolt-On)
108
-
Dismantling and Assembling Drive Shaft with VL107 Constant Velocity Joint
110
-
Golf Variant 2007 ➤ , Jetta
111
-
Repairing Intermediate Shaft
115
-
Assembly Overview: Drive Shaft with VL107 Constant Velocity Slip Joint (Push-On)
117
-
10.1 Dismantling and Assembling Drive Shaft with VL107 (Push-On) Constant Velocity Slip Joint
118
-
Checking Outer Constant Velocity Joint
120
-
Assembly Overview: Drive Shaft with Triple Roller Joint Aar2600I
122
-
Dismantling and Assembling Drive Shaft with Triple Roller Joint Aar2600I
123
-
Assembly Overview: Drive Shaft with Triple Roller Joint Aar3300I
128
-
Dismantling and Assembling Drive Shaft with Triple Roller Joint Aar3300I
130
-
Appraisal of Accident Vehicles
135
-
Repairing Rear Suspension (Front-Wheel Drive)
136
-
Rear Axle in Unladen Position
137
-
Assembly Overview: Subframe, Transverse Link, Track Rod (Front-Wheel Drive)
140
-
Removing and Installing Rear Axle
142
-
Vehicle Level Sender for Vehicles with Automatic Headlight Range Control
147
-
Removing and Installing Upper Transverse Link
148
-
Removing and Installing Lower Transverse Link
150
-
Removing and Installing Track Rod
151
-
Assembly Overview: Wheel Bearing Housing, Trailing Arm (Front-Wheel Drive)
155
-
Removing and Installing Wheel Bearing Housing
156
-
Renewing Bonded Rubber Bush for Wheel Bearing Housing
160
-
Removing and Installing Wheel Bearing/Wheel Hub Unit
163
-
Removing and Installing Trailing Arm with Mounting Bracket
165
-
Repairing Trailing Arm
169
-
Assembly Overview: Shock Absorber, Coil Spring
172
-
Removing and Installing Shock Absorbers
174
-
Repairing Shock Absorber
176
-
Assembly Overview: Anti-Roll Bar
178
-
Bluemotion (Front-Wheel Drive)
181
-
Removing and Installing Shield
182
-
Repairing Rear Suspension (Four-Wheel Drive)
184
-
Rear Axle in Unladen Position
186
-
Assembly Overview: Subframe, Final Drive (Four-Wheel Drive)
188
-
Repairing Subframe
194
-
Assembly Overview: Transverse Link, Track Rod (Four-Wheel Drive)
201
-
Overview — Rear Left Vehicle Level Sender G76
204
-
Removing and Installing Upper Transverse Link
205
-
Removing and Installing Lower Transverse Link
207
-
Removing and Installing Track Rod
209
-
Assembly Overview: Wheel Bearing Housing, Trailing Arm (Four-Wheel Drive)
212
Advertisement
Volkswagen Golf Variant 2007 Workshop Manual (319 pages)
Brand: Volkswagen
|
Category: Automobile
|
Size: 12.2 MB
Table of Contents
-
Table of Contents
3
-
Golf Variant 2007 ➤ , Golf Variant 2010 ➤ , Jetta
8
-
Interior Equipment
9
-
Interior Mirror
9
-
Tools
9
-
Automatic Anti-Dazzle Interior Mirror
9
-
Removing and Installing Interior Mirror with Rain Sensor
9
-
Bonding on Retaining Plate for Interior Mirror with Rain Sensor
10
-
Removing and Installing Interior Mirror in Vehicles with Adaptive Cruise Control
11
-
Removing and Installing Interior Mirror
13
-
Bonding on Retaining Plate for Interior Mirror Without Rain Sensor
13
-
Compartments, Covers and Trims
15
-
Tools
15
-
Removing and Installing Basic Version Centre Console (Jetta 2010 ▸, Golf Variant 2010 ▸)
19
-
Removing and Installing Highline Centre Console (Jetta 2005 ▸, Golf Variant 2007 ▸)
24
-
Removing and Installing Highline Centre Console (Jetta 2010 ▸, Golf Variant 2010 ▸)
33
-
Removing and Installing Mounting Bracket for Centre Console (Jetta 2005 ▸, Golf Variant 2007 ▸)
43
-
Removing and Installing Mounting Bracket for Centre Console and Mounting Bracket for Footwell Trim (Jetta 2010 ▸, Golf Variant 2010 ▸)
44
-
Removing and Installing Cup Holder in Highline Centre Console
45
-
Repairing Cup Holder in Centre Console, Highline
46
-
Removing and Installing Dash Panel Centre Vents (Vehicles with no Climatronic) (Jetta 2005 ▸, Golf Variant 2007 ▸)
51
-
Removing and Installing Dash Panel Centre Vents (Vehicles with Climatronic) (Jetta 2005 ▸, Golf Variant 2007 ▸)
53
-
Removing and Installing Centre Storage Compartment in Dash Panel (Jetta 2010 ▸, Golf Variant 2010 ▸)
56
-
Removing and Installing Dash Panel Centre Vents (Jetta 2010 ▸, Golf Variant 2010 ▸)
57
-
Removing and Installing Dash Panel Middle Trim (Jetta 2005 ▸, Golf Variant 2007 ▸)
59
-
Removing and Installing Dash Panel Middle Trim (Jetta 2010 ▸, Golf Variant 2010 ▸)
60
-
Removing and Installing Air Conditioner Controls Unit / Heater Controls Unit Trim (Jetta 2010 ▸, Golf Variant 2010 ▸)
61
-
Removing and Installing Dash Panel End Trims
62
-
Removing and Installing Steering Column Trim
63
-
Removing and Installing Left Trim Panel on Driver Side with no Storage Compartment
64
-
Removing and Installing Left Trim Panel on Driver Side with Storage Compartment
66
-
Removing and Installing Right Trim Panel on Driver Side
68
-
Removing and Installing Glove Compartment
70
-
Removing and Installing Glove Compartment Lock Cylinder
74
-
Removing and Installing Footwell Cover on Driver Side
75
-
Removing and Installing Centre Cover (Jetta 2005 ▸, Golf Variant 2007 ▸)
80
-
Removing and Installing Centre Cover (Jetta 2010 ▸, Golf Variant 2010 ▸)
80
-
Removing and Installing Sun Visor
81
-
Sill Panel Mouldings
85
-
Removing and Installing Sill Panel Mouldings
85
-
Removing and Installing Wheel Housing Liner (Saloon)
86
-
Removing and Installing Wheel Housing Liner (Variant)
87
-
Grab Handles
89
-
Removing and Installing Roof Grab Handles
89
-
Removing and Installing Roof Grab Handle Bracket
90
-
Net Partition
92
-
Removing and Installing Net Partition
92
-
Removing and Installing Net Partition Mountings
93
-
Removing and Installing Net Partition Bracket on Vehicles with no Panorama Sliding Roof
94
-
Removing and Installing Net Partition Bracket on Vehicles with Panorama Sliding Roof
95
-
-
Passenger Protection
96
-
Seat Belts
96
-
General Safety Regulations When Working on Airbag, Belt Tensioner and Battery Isolator Units (Pyrotechnic Components)
97
-
Special Instructions for Belt Tensioners
98
-
Storage, Transportation and Disposal of Airbag, Belt Tensioner and Battery Isolator Units (Pyrotechnic Components)
98
-
Assembly Overview — Front Seat Belts
99
-
Removing and Installing Front Seat Belts
99
-
Removing and Installing Front Belt Height Adjuster
101
-
Removing and Installing Front Belt Buckle
102
-
Assembly Overview — Rear Outer Seat Belts (Saloon)
104
-
Removing and Installing Rear Outer Seat Belts (Saloon)
104
-
Assembly Overview — Rear Outer Seat Belts (Variant)
106
-
Removing and Installing Rear Outer Seat Belts (Variant)
106
-
Assembly Overview — Rear Centre 3-Point Seat Belt
108
-
Removing and Installing Rear Centre 3-Point Seat Belt
108
-
Removing and Installing Middle Rear Seat Lap Belt
109
-
Removing and Installing Rear Double Belt Buckle
110
-
Inspecting Seat Belts
112
-
Points to Check
112
-
Checking Child Seat Anchors (ISOFIX) after an Accident
116
-
Points to Check
116
-
Removing and Installing Child Seat Anchorages in Rear Shelf
116
-
Airbag
117
-
Overview of Locations — Airbag Systems
117
-
General Safety Regulations When Working on Airbag, Belt Tensioner and Battery Isolator Units (Pyrotechnic Components)
119
-
Special Instructions for Driver and Front Passenger Airbag
120
-
Special Instructions for Curtain Airbag Modules
120
-
Storage, Transportation and Disposal of Airbag, Belt Tensioner and Battery Isolator Units (Pyrotechnic Components)
120
-
Deactivating the Airbag
120
-
Renewing Airbag Units Following an Accident
121
-
Removing and Installing Airbag Control Unit J234
122
-
Removing and Installing Airbag Unit on Driver Side (Jetta 2005 ▸, Golf Variant 2007 ▸)
124
-
Removing and Installing Airbag Unit on Driver Side (Jetta 2010 ▸, Golf Variant 2010 ▸)
128
-
Removing and Installing Airbag Coil Connector and Return Spring with Slip Ring F138
131
-
Removing and Installing Key Operated Switch to Deactivate Front Passenger Airbag E224
131
-
Removing and Installing Knee Airbag (Jetta 2010 ▸, Golf Variant 2010 ▸)
132
-
Drive Vehicles
134
-
Drive Vehicles
136
-
-
Removing and Installing Return Spring with Slip Ring
138
-
Removing and Installing Front Passenger Airbag Unit
138
-
Removing and Installing Side Airbags on Driver and Front Passenger Sides
143
-
Removing and Installing Rear Side-Airbag
144
-
Removing and Installing Curtain Airbag on Driver and Passenger Side (Saloon)
146
-
Removing and Installing Curtain Airbag on Driver and Passenger Side (Variant)
148
-
Removing and Installing Seat Occupied Sensor, Front Passenger Side G128
150
-
Adapting Components
155
-
Seat Occupied Recognition (USA)
156
-
Safety Precautions for When Working on Seat Occupied Recognition
156
-
Procedure for Seat Belt Tensioner after an Accident and /Or Triggering of Airbag
156
-
Assembly Overview — Seat Occupied Recognition (USA)
157
-
Parts Repair Kit for Seat Occupied Recognition
157
-
Removing and Installing Repair Kit for Seat Occupied Recognition on Vehicles with Manually Adjusted Seats
158
-
Removing and Installing Repair Kit for Seat Occupied Recognition on Vehicles with Electrically Adjusted Seats
167
-
Importers Reporting Obligation
176
-
Crash Sensors
178
-
Tools
178
-
Removing and Installing Side Airbag Crash Sensor on Driver Side G179
181
-
Variant 2010 ▸)
181
-
Removing and Installing Side Airbag Crash Sensor on Front Passenger Side G180 (Jetta 2010 ▸, Golf Variant 2010 ▸)
183
-
Removing and Installing Crash Sensors in Rear Wheel Housing (Saloon)
183
-
Removing and Installing Crash Sensors in Rear Wheel Housing (Variant)
185
-

Volkswagen Golf Variant 2007 Workshop Manual (246 pages)
Brand: Volkswagen
|
Category: Automobile
|
Size: 9.73 MB
Table of Contents
-
Table of Contents
3
-
Technical Data
5
-
Gearbox Identification
5
-
Location on Gearbox
5
-
Identification Code, Assembly Allocation and Capacities
5
-
Golf Variant 2007 ➤ , Golf Variant 2010 ➤ , Jetta 2005 ➤ , Jetta
5
-
Overview — Power Transmission
9
-
Calculating Overall Gear Ratio „I
11
-
General Repair Notes
12
-
Contact Corrosion
12
-
Special Tools
12
-
Components
12
-
-
Clutch
16
-
Fault Finding, Power Transmission
16
-
Repairing Clutch Mechanism
17
-
Overview
17
-
Assembly Overview — Pedal Cluster
18
-
Removing and Installing Over-Centre Spring
19
-
Removing and Installing Clutch Pedal
23
-
Removing and Installing Mounting Bracket
27
-
Removing and Installing Master Cylinder
33
-
Removing and Installing Clutch Position Sender G476
34
-
Assembly Overview — Hydraulics (LHD)
38
-
Assembly Overview — Hydraulics (RHD)
40
-
Bleeding Clutch System
41
-
Repairing Clutch Release Mechanism
43
-
Removing Pipe/Hose Line and Bleeder from and Installing on Slave Cylinder
44
-
Removing and Installing Slave Cylinder with Release Bearing
44
-
Removing and Installing Pipe/Hose Line or Plastic Line
45
-
Renewing Input Shaft Seal
47
-
Repairing Clutch — Vehicles with Turbo Diesel Engine
49
-
Determining Clutch Manufacturer
49
-
Removing and Installing „Sachs» Clutch
51
-
Repairing „Sachs» Clutch
54
-
Removing and Installing „Luk» Clutch
54
-
Repairing „Luk» Clutch
57
-
Repairing Clutch — Vehicles with Petrol Engine
58
-
Repairing Clutch
59
-
Removing and Installing Clutch
59
-
-
Controls, Housing
63
-
Repairing Selector Mechanism
63
-
Installation Position of Selector Mechanism
63
-
Overview of Selector Mechanism
64
-
Removing and Installing Gear Knob and Frame
66
-
Removing and Installing Gaiter with Gear Knob and Noise Insulation
66
-
Repairing Gear Lever and Selector Housing (through 10.06)
68
-
Repairing Gear Lever and Selector Housing (from 11.06)
70
-
Assembly Overview — Removing and Installing Selector Cables
75
-
Plastic Relay Lever
79
-
Removing and Installing Selector Mechanism
82
-
Removing and Installing Gear Selector Cable and Gate Selector Cable
84
-
Adjusting Selector Mechanism
86
-
Functional Check
88
-
Removing and Installing Gearbox in Vehicles with Turbo Diesel Engine
89
-
Removing Gearbox
89
-
Transporting Gearbox
100
-
Installing Gearbox
101
-
Specified Torques
108
-
Removing and Installing Gearbox, Vehicles with Petrol Engine
110
-
Removing Gearbox
110
-
Transporting Gearbox
120
-
Installing Gearbox
121
-
Specified Torques
128
-
Checking Gearbox Oil
130
-
Dismantling and Assembling Gearbox
132
-
Overview — Rear Final Drive
132
-
Assembly Overview
133
-
Removing and Installing Gearbox Housing and Selector Mechanism
134
-
Removing and Installing Input Shaft, Output Shafts, Differential and Selector Rods
136
-
Assembly Order, Gearbox »Without« Retaining Ring a for Input Shaft Sealing Cover
138
-
Assembly Order, Gearbox »With« Retaining Ring a for Input Shaft Sealing Cover
149
-
Repairing Gearbox Housing
161
-
Repairing Clutch Housing
171
-
Repairing Selector Unit
176
-
Renewing Oil Seal for Selector Shaft
177
-
Repairing Selector Forks
179
-
Volkswagen Golf Variant 2007 Maintenance Manual (214 pages)
Brand: Volkswagen
|
Category: Automobile
|
Size: 5.89 MB
Table of Contents
-
Table of Contents
3
-
1 Engine List
5
-
In Litres Number of Cylinders 4
8
-
Engine List
9
-
-
2 Service Work
10
-
Service Tables for «Rest of World» Markets
10
-
Spark Plugs
13
-
Service Scope for North American and Canadian Markets
15
-
Service Scope for «Rest of World» Markets up to Model Year 2007
21
-
Page
21
-
Service Scope for «Rest of World» Markets from Model Year 2008
29
-
Oil Change Service
29
-
Interval Service
31
-
Inspection Service
32
-
-
Service Intervals for «Rest of World» Markets
39
-
Service Intervals for North American and Canadian Markets
39
-
Information on Longlife Service or Time or Distance Dependent Service
40
-
-
3 General
41
-
Tow Starting/Towing for North American and Canadian Markets
41
-
Raising Vehicle with Lifting Platform and Trolley Jack
45
-
Sticker
45
-
Delivery Inspection
46
-
Connecting Vehicle Diagnostic Tester
47
-
Vehicle Identification Number
50
-
Vehicle Data Sticker
50
-
Countries with Elevated Sulphur Content in Diesel Fuel
51
-
Severe Operating Conditions
51
-
Engine Code and Engine Number
52
-
Engine Oils for North American and Canadian Markets
52
-
Engine Oils for «Rest of World» Markets
52
-
RME Fuel -Biodiesel- for Vehicles up to 05.2006
53
-
Type Plate
53
-
-
4 Descriptions of Work
55
-
Removable Towing Bracket: Check
57
-
Swivel Joints: Visual Check
59
-
Driving Light Assist and Cornering Light: Check Function
59
-
Automatic Gearbox: Check ATF Level, 09G Gearbox
60
-
Battery: Check Battery Terminal Clamps for Secure Seating
60
-
Battery: Check Using Battery Tester with Printer VAS 5097A
62
-
Front Passenger Front Airbag: Check Activation / Deactivation for Vehicles Without Seat
62
-
Occupied Recognition
62
-
Checking Tyres: Condition, Wear Pattern, Inflation Pressure, Tread Depth
63
-
General Notes
65
-
Brake and Clutch System: Change Brake Fluid
71
-
Brake Fluid Level: Check
75
-
Brake System: Perform Visual Check for Leaks and Damage
76
-
Front and Rear Brake Pads/Linings: Check Thickness
76
-
Front Brake Pads
77
-
Checking Diesel Particulate Filter
78
-
6-Speed Dual Clutch Gearbox (DSG) 02E: Change Oil and Filter
78
-
Electric Windows: Check Positioning (Open and Close Functions)
79
-
Vehicle System Test: Perform Test
79
-
Protective Bellows: Visual Check
80
-
Renewing Rubber Buffers for Engine Cover
81
-
Haldex Coupling (Jetta 4Motion): Change Oil
82
-
Poly V-Belt: Adjust Tension on Engines Without Automatic Tensioning Roller
85
-
Poly V-Belt: Check Condition
86
-
Dash Panel Insert: Adapt Menu Language Versions
87
-
Compass: Set Compass Zone and Calibrate Compass (for North American, Canadian and Mexican Markets)
88
-
Multifunction Steering Wheel
88
-
Cooling System: Check Frost Protection and Coolant Level
92
-
Fuel Filter: Renew
95
-
Air Filter: Clean Housing and Renew Filter Element
99
-
Memory Seat: Perform Initialisation
108
-
Engine and Components in Engine Compartment (from above and Below): Perform Visual Check for Leaks and Damage
109
-
Engine Cover -Top-: Removing and Installing
109
-
Removing and Installing Engine Compartment Cover -Bottom- (Noise Insulation)
120
-
Engine Oil Level: Check
121
-
Engine Oil: Drain or Extract; Renew Oil Filter and Replenish Engine Oil
121
-
Checking Breakdown Set
137
-
Panorama Sliding Roof: Check Function, Clean Guide Rails if Necessary and Grease with Special Grease, Clean Wind Deflector
138
-
Performing Road Test (Driving Behaviour, Noises, Air Conditioner Etc.)
139
-
Wheel Securing Bolts: Tighten to Prescribed Torque Setting
140
-
Reading Radio Code with Fault Reader
143
-
Radio/Navigation System: Activate Anti-Theft Coding
144
-
Tyre Pressure Monitoring: Perform Basic Setting
148
-
Renewing Tyre Pressure Sensors
150
-
Dust and Pollen Filter: Clean Housing and Renew Filter Element
150
-
Headlight Adjustment: Check
151
-
Adjusting Headlights
155
-
Service Interval Display: Reset
157
-
Service Interval Display: Recode (for «Rest of World» Markets)
158
-
Service Interval Display: Recode at Delivery Inspection
160
-
Markets)
160
-
Service Interval Display: Recode at First Oil Change Service (for North American and Canadian Markets)
162
-
Sunroof: Check Function, Clean and Grease Guide Rails
164
-
Window Wash/Wipe System and Headlight Washer System: Check Function
164
-
Wiper Blades: Check Park Position
169
-
Wiper Blade Protection: Remove
170
-
Track Rod Ends: Check Play, Security and Boots
173
-
Auxiliary Heater: Set Weekday in Menu of Combi-Instrument
173
-
Door Arrester: Grease
174
-
Transportation Mode: Switch off
174
-
Transportation Devices: Remove Blocking Pieces from Front Axle Springs
176
-
Underbody Sealant: Perform Visual Check for Damage to Underbody Sealant, Underbody Panels, Routing of Lines and Plugs
176
-
Clock and Date: Set to Correct Time
177
-
Camshaft Drive Toothed Belt: Check (TDI Unit Injector Engines)
178
-
Toothed Belt and Toothed Belt Tensioning Roller: Renew (TDI Engines)
178
-
Camshaft Drive Toothed Belt: Renew (2.0 L FSI and TFSI)
179
-
Camshaft Drive Toothed Belt: Check (4-Cylinder Petrol Engines 1.4 L and 1.6 L)
179
-
Spark Plugs: Renew
179
-

Volkswagen Golf Variant 2007 Repair Manual (224 pages)
Brand: Volkswagen
|
Category: Automobile
|
Size: 15.42 MB
Table of Contents
-
Table of Contents
3
-
General, Technical Data
5
-
Transmission Identification
5
-
Overview — Transmission
6
-
Engine Codes, Engine Allocation
7
-
Capacities
8
-
Safety Precautions
9
-
General Safety Precautions
9
-
Safety Precautions When Working on Vehicles with Start/Stop System
9
-
Safety Precautions During Road Test with Testing Equipment
10
-
Tow Starting and Towing Notes
11
-
General Repair Information
12
-
Tools
12
-
Transmission
12
-
Working with Vehicle Diagnostic Testers
17
-
-
Clutch
19
-
Dual Clutch, Removing and Installing, through Transmission Production Date 05/2011
19
-
Overview — Dual Clutch, through Transmission Production Date 05/2011
19
-
Dual Clutch, Removing, through Transmission Production Date 05/2011
21
-
K 1″ and «K 2» Clutch Engaging Bearing Position, Adjusting, Transmission Production Date through 05/2011
24
-
Dual Clutch, Installing, Transmission Production Date through 05/2011
37
-
Dual Clutch, Removing and Installing, from Transmission Production Date 06/2011
44
-
Overview — Dual Clutch, Transmission Production Date from 06/2011
44
-
Dual Clutch, Removing, Transmission Production Date from 06/2011
46
-
K 1″ and «K 2» Clutch Engaging Bearing Position, Adjusting, Transmission Production Date from 06/2011
49
-
Dual Clutch, Installing, Transmission Production Date from 06/2011
62
-
Clutch-Side Seals, Removing and Installing
67
-
Special Tools
70
-
-
Controls, Housing
74
-
Transmission Fluid, Replacing
74
-
Selector Mechanism
78
-
Selector Mechanism Overview, through 02/2009
78
-
Selector Lever Cable, Removing and Installing, through 02/2009
80
-
Selector Mechanism Overview, from 03/2009
88
-
Selector Mechanism, Removing and Installing, Vehicles from 03/2009
89
-
Selector Lever Cable, Checking
97
-
Selector Lever Cable, Adjusting
98
-
Selector Lever, Emergency Release
100
-
Selector Lever Handle, Removing and Installing
100
-
Button in Handle, Moving into Installation Position
103
-
Selector Mechanism, Checking
105
-
DSG Transmission Mechatronic J743
107
-
DSG Transmission Mechatronic J743 Safety Precautions
107
-
Overview — Mechatronic
108
-
DSG Transmission Mechatronic J743 , Removing with Transmission Installed
109
-
DSG Transmission Mechatronic J743 , Moving into «Removal Position» by Hand
119
-
DSG Transmission Mechatronic J743 , Moving into Re- Moval Position by Hand
119
-
DSG Transmission Mechatronic J743 , Installing
123
-
Overview — Shift Forks with Mechatronic Removed
129
-
Transmission, Removing and Installing, Jetta from MY 2005, Golf Wagon from MY 2007 and Golf Wagon from MY 2010
131
-
Transmissions with Different Output Shafts
131
-
Transmission, Removing, Vehicles with 1.4L/90 Kw TFSI Engine and 1.4L/118 Kw TSI Engine
131
-
Transmission, Removing, Vehicles with 1.6L/75 Kw MPI Engine
139
-
Transmission, Removing, Vehicles with 1.9L 77 Kw TDI PD Engine
147
-
Transmission, Removing, Vehicles with 1.6L/77 Kw TDI CR Engine
154
-
Transmission, Installing, Jetta from MY 2005, Golf Wagon from MY 2007, Golf Wagon from
161
-
Transmission to Engine» Tightening Specifications and Subframe Mount Information
165
-
Transmission, Removing and Installing, Jetta from MY 2011
170
-
Transmission, Removing, Jetta 2011 with 1.4L/90 Kw TFSI Engine and 1.4L/118 Kw TSI Engine
170
-
Transmission, Removing, Jetta 2011 with 1.6L/77 Kw TDI CR Engine
179
-
Transmission, Installing, Jetta MY 2011
187
-
Tightening Specifications
192
-
Transmission, Transporting and Securing to Assembly Stand
195
-
Special Tools
198
-

Volkswagen Golf Variant 2007 Service Manual (206 pages)
6-speed manual gearbox 02S
Brand: Volkswagen
|
Category: Automobile
|
Size: 11.23 MB
Table of Contents
-
Table of Contents
3
-
Technical Data
5
-
Gearbox Identification
5
-
Location on Gearbox
5
-
Identification Code, Assembly Allocation and Capacities
5
-
Overview — Power Transmission
9
-
Calculating Overall Gear Ratio «I
11
-
General Repair Notes
12
-
Components
12
-
-
Clutch
16
-
Fault Finding, Power Transmission
16
-
Repairing Clutch Mechanism
17
-
Overview
17
-
Assembly Overview — Pedal Cluster
18
-
Removing and Installing Over-Centre Spring
19
-
Removing and Installing Clutch Pedal
24
-
Removing and Installing Mounting Bracket
29
-
Removing and Installing Master Cylinder
35
-
Removing and Installing Clutch Position Sender G476
37
-
Assembly Overview — Hydraulics (LHD Vehicles)
41
-
Assembly Overview — Hydraulics (RHD Vehicles)
43
-
Removing and Installing Slave Cylinder
44
-
Bleeding Clutch System
46
-
Repairing Clutch Release Mechanism
48
-
Repairing Clutch, in Conjunction with Dual-Mass Flywheel
50
-
Determining Clutch Manufacturer
50
-
Removing and Installing Sachs Clutch
52
-
Repairing Sachs Clutch
54
-
Removing and Installing Luk Clutch
54
-
Repairing Luk Clutch
57
-
Repairing Clutch, in Conjunction with One-Piece Flywheel
58
-
-
Controls, Housing
61
-
Fault Finding, Power Transmission
61
-
Repairing Selector Mechanism
62
-
Installation Position of Selector Mechanism
62
-
Overview of Selector Mechanism
63
-
Removing and Installing Gear Knob and Frame
65
-
Removing and Installing Gaiter with Gear Knob and Noise Insulation
65
-
Repairing Gear Lever and Selector Housing (through 10.06)
67
-
Repairing Gear Lever and Selector Housing (from 11.06)
69
-
Assembly Overview — Removing and Installing Selector Cables
74
-
Plastic Relay Lever
77
-
Removing and Installing Selector Mechanism
79
-
Removing and Installing Gear Selector Cable and Gate Selector Cable
82
-
Adjusting Selector Mechanism
84
-
Functional Check
86
-
Removing and Installing Gearbox
88
-
Removing Gearbox
89
-
Transporting Gearbox
95
-
Installing Gearbox
96
-
Specified Torques
100
-
Checking and Topping up Gear Oil
103
-
Preparation
103
-
Draining Gear Oil
104
-
Filling with Gear Oil
105
-
Dismantling and Assembling Gearbox
106
-
Overview — Gearbox
106
-
Assembly Overview
107
-
Removing and Installing Cover for Gearbox Housing and 5Th and 6Th Gear
108
-
Removing and Installing Gearbox Housing and Shift Mechanism
111
-
Removing and Installing Input Shaft, Output Shaft, Differential and Selector Forks
112
-
Gear
113
-
Assembly Sequence — Dismantling and Assembling Gearbox Completely
119
-
Repairing Gearbox Housing and Clutch Housing
136
-
Repairing Gearbox Housing Cover
142
-
Repairing Selector Unit
146
-
Dismantling and Assembling Selector Forks
149
-
Volkswagen Golf Variant 2007 Workshop Manual (180 pages)
Brand: Volkswagen
|
Category: Automobile
|
Size: 1.72 MB
Table of Contents
-
Table of Contents
5
-
Technical Data
7
-
1 General Notes on Air Conditioning Systems
7
-
Introduction
7
-
Additional Information
7
-
Basics of Air Conditioning
8
-
Vapour Pressure Table for Refrigerant R134A
9
-
Refrigerant R134A
10
-
Characteristics of Refrigerant R134A
11
-
Refrigerant Machine Oil
13
-
Comfort
15
-
How Air Conditioning Works
15
-
General Safety
16
-
Safety Precautions for When Working on Vehicles with Air Conditioning and When Handling
19
-
Refrigerant R134A
19
-
-
Basics for Working on Refrigerant Circuit
20
-
-
2 General Information on Refrigerant Circuit
23
-
Refrigerant Circuit Components
23
-
Design of Refrigerant Circuit
31
-
Evacuation and Charging Valves for Quick-Release Couplings of Air Conditioner Service Station
31
-
On Refrigerant Circuit
31
-
-
Switch and Sender in Refrigerant Circuit and Related Connections
33
-
Electrical Components Not Installed in Refrigerant Circuit
36
-
Pressures and Temperatures in the Refrigerant Circuit
38
-
Refrigerant Circuit with Expansion Valve
38
-
Refrigerant Circuit with Restrictor and Reservoir
40
-
Test and Measurement Work that Can be Performed Using a Pressure Gauge
42
-
Air Conditioner Service and Recycling Equipment
43
-
Notes to Repairs on Refrigerant Circuit
44
-
-
3 Statutory Texts and Instructions
45
-
Statutes and Regulations
45
-
Recycling and Refuse Law
50
-
Converting R12 Refrigerant Circuits to R134A Refrigerant Circuits and Repairing Them (Retrofitting)
51
-
Maintaining Records on Refrigerant
51
-
-
4 Refrigerant Circuit
52
-
Important Repair Notes on Air Conditioning
52
-
Retrofitting Refrigerant Circuit from R12 Refrigerant to R134A Refrigerant
52
-
-
5 Working with the Air Conditioner Service Station
53
-
Important Notes for Working with the Air Conditioner Service Station
54
-
Connecting Air Conditioner Service Station for Measuring and Checking
54
-
Draining Refrigerant Circuit Using Air Conditioner Service Station
55
-
Evacuating Refrigerant Circuit Using Air Conditioner Service Station
56
-
Charging Refrigerant Circuit Using Air Conditioner Service Station
57
-
Bringing Air Conditioning System into Service after Charging
58
-
Charging Container in Air Conditioner Service Station with Refrigerant
59
-
Draining Air Conditioner Service Station
59
-
-
6 Detecting Leaks in Refrigerant Circuit
61
-
Leak Detection in Refrigerant Circuit Using Compressed Air or Nitrogen
62
-
Searching for Leaks in Refrigerant Circuits Using Leak Detector V.A.G 1796
64
-
Detecting Leaks in Refrigerant Circuit Using Leak Detecting System VAS 6196 or Leak Detecting
65
-
System VAS 6201 or a Later Model
65
-
-

Volkswagen Golf Variant 2007 Workshop Manual (116 pages)
Brand: Volkswagen
|
Category: Automobile
|
Size: 4.24 MB
Table of Contents
-
Table of Contents
3
-
Technical Data
5
-
Suggestions and Criticism, General Repair Notes
5
-
Suggestions and Criticism of this Workshop Manual
5
-
Golf Variant 2007 ➤ , Golf Variant 2010 ➤ , Jetta 2005 ➤ , Jetta
5
-
General Repair Notes
6
-
Gearbox
6
-
Torque Converter
6
-
Atf
6
-
Automatic Gearbox Control Unit J217 with Fuzzy Logic
6
-
Control Units in Vehicle
6
-
Information on «09G Gearbox
6
-
Tools
6
-
Gearbox
7
-
Gaskets, Seals and Oil
8
-
Nuts and Bolts
8
-
Electrical Components
8
-
Guided Fault Finding, Vehicle Self-Diagnosis and Testing
9
-
Gearbox Identification
10
-
Gearbox Codes
10
-
Capacities
11
-
Planetary Gearbox and Final Drive
11
-
Codes, Gearbox Allocation, Ratios
12
-
-
Torque Converter
13
-
Identification of Torque Converter
13
-
Draining Torque Converter
13
-
Removing and Installing Torque Converter Oil Seal
13
-
Installing Torque Converter
14
-
-
Controls, Housing
15
-
Connecting «Tester
15
-
Connecting Vehicle Diagnosis, Testing and Information System VAS 5051
15
-
Electrical and Electronic Components and Their Locations
17
-
Multifunction Switch F125
22
-
Removing Multifunction Switch F125
22
-
Installing Multifunction Switch F125
23
-
Adjusting Multifunction Switch F125
24
-
Selector Mechanism up to 02.2009
26
-
Overview of Selector Mechanism up to 02.2009
26
-
Removing and Installing Selector Mechanism with Selector Lever up to 02.2009
27
-
Removing and Installing Selector Lever Cable up to 02.2009
27
-
Checking Selector Lever Cable
34
-
Adjusting Selector Lever Cable
34
-
Emergency Release of Selector Lever
35
-
Removing and Installing Knob
36
-
Checking Selector Mechanism
37
-
Selector Mechanism from 03.2009 Onwards
39
-
Overview of Selector Mechanism in Vehicles from 03.2009 Onwards
39
-
Onwards
39
-
Emergency Release of Selector Lever
41
-
Removing and Installing Gearbox, Jetta 2005 ▸, Bora 2006 ▸, Golf Variant 2007 ▸, Jetta Wagon 2008
42
-
Removing Gearbox, Vehicles with 1.6 L — 75 Kw and 2.0 L — 110 Kw (FSI) Engines
42
-
Installing Gearbox, Vehicles with 1.6 L — 75 Kw and 2.0 L — 110 Kw (FSI) Engines
49
-
Removing Gearbox, Vehicles with 2.5 L, 110 Kw Engine
49
-
Installing Gearbox, Vehicles with 2.5 L, 110 Kw Engine
57
-
Torque Settings, Gearbox to Engine
58
-
Removing and Installing Gearbox, Jetta 2011
61
-
Removing Gearbox, Jetta 2011 with 2.0 L — 85 Kw Engine
61
-
Installing Gearbox, Jetta 2011 with 2.0 L — 85 Kw Engine
67
-
Removing Gearbox, Jetta 2011 with 2.5 L — 125 Kw Engine
67
-
Installing Gearbox, Jetta 2011 with 2.5 L — 125 Kw Engine
76
-
Torque Settings, Gearbox to Engine
76
-
Transporting Gearbox
79
-
ATF Cooler
80
-
Assembly Overview — ATF Cooler
80
-
Checking ATF Level and Topping up
81
-
Checking ATF Level
82
-
Topping up ATF
83
-
Draining and Filling ATF
84
-

Volkswagen Golf Variant 2007 Workshop Manual (123 pages)
Electrical System, General Information
Brand: Volkswagen
|
Category: Automobile
|
Size: 1.6 MB
Table of Contents
-
Table of Contents
3
-
Starter, Current Supply, CCS
5
-
Battery a
5
-
Fundamentals for Batteries a
5
-
Types of Battery
5
-
Warning Notices and Safety Regulations
6
-
Battery Terminal Connection
8
-
Checking Battery a
9
-
Testing Different Battery Types
9
-
Visual Check
10
-
Test of Colour Display of Magic Eye
11
-
Battery Tester with Printer VAS 5097 a
12
-
Battery Tester with Printer VAS 6161
17
-
Midtronics MCR340V Battery Tester (Only for Usa/Canada)
23
-
Current Draw Test
27
-
Checking No-Load Voltage of Battery a (Stock and Stored Vehicles)
28
-
Charging Battery a
30
-
Battery Charger VAS 5095 a
30
-
Battery Charger VAS 5900
35
-
Trickle Charging
46
-
Battery Charger VAS 5903
47
-
Battery Charger VAS 5906
59
-
Midtronics INC 940 Battery Charger (Only for Usa/Canada)
61
-
Solar Panel VAS 6102 a
66
-
Totally Discharged Batteries a
67
-
Cruise Control System (CCS)
69
-
Activating and Deactivating Cruise Control System (CCS)
69
-
-
Gauges, Instruments
70
-
Windscreen Wash/Wipe System
71
-
Washer Fluid Line Hose Couplings
71
-
Windscreen and Rear Window Washer System
71
-
Headlight Washer System
72
-
Hose Repair
73
-
General Description
73
-
Repairing Smooth Pipe
73
-
Repairing Corrugated Pipe
73
-
Distinguishing Features of Jointless Wiper Blades
75
-
-
Lights, Bulbs, Switches — Exterior
76
-
Operation and Safety Notes for Gas Discharge Bulbs
76
-
-
Lights, Bulbs, Switches — Interior
79
-
Socket U5
79
-
Removing and Installing 12 V Socket U5
79
-
Removing and Installing Socket Illumination Bulb L42
79
-
Cigarette Lighter U1
80
-
General Description
80
-
Assembly Overview
81
-
Removing and Installing Cigarette Lighter Socket
82
-
Removing and Installing Cigarette Lighter Illumination Bulb L28
84
-
-
Wiring
86
-
Vehicle Diagnosis, Testing and Information System VAS 5051B
86
-
Connecting Vehicle Diagnosis, Testing and Information System VAS 5051B
86
-
Connecting Vehicle Diagnostic Tester Bora Model Year 1998 to 2003
87
-
Repairs to Wiring Harnesses and Connectors
89
-
Wiring Harness Repair Set
89
-
Tool Descriptions
90
-
General Notes Concerning Repairs to Vehicle Electrical System
94
-
Repairs to Wiring Harnesses
95
-
Repairs to Contact Housings and Connectors
105
-
Releasing and Dismantling Contact Housings
109
-
Contact Surface Cleaning Set VAS 6410
115
-
Using the Contact Surface Cleaning Set VAS 6410
115
-
Cleaning Battery Terminals
118
-
Renewing Lambda Probe
121
-
Renewing LSF Lambda Probe (4-Pin)
121
-
Renewing LSU Lambda Probe (6-Pin)
122
-
Types of Protective Tube on Uniform Lambda Probes
123
-

Volkswagen Golf Variant 2007 Workshop Manual (127 pages)
7-speed dual clutch gearbox 0AM
Brand: Volkswagen
|
Category: Automobile
|
Size: 10.89 MB
Table of Contents
-
Table of Contents
3
-
Technical Data
5
-
Gearbox Identification
5
-
Code, Engine Allocation
6
-
Capacities
7
-
General Repair Notes
8
-
Tools
8
-
Gearbox
8
-
Oil
10
-
Working with Vehicle Diagnostic Testers
10
-
-
Clutch
12
-
Removing and Installing the Dual Clutch
12
-
Removing Dual Clutch
12
-
Adjusting Position of Engagement Bearings «K 1 and K 2
16
-
Installing Dual Clutch
26
-
-
Controls, Housing
34
-
Renewing Gear Oil
34
-
Selector Mechanism
37
-
Overview — Selector Mechanism in Vehicles up to 02.2009
37
-
Removing and Installing Selector Lever Cable — Vehicles up to 02.2009
38
-
Overview of Selector Mechanism — Vehicles from 03.2009 Onwards
45
-
Removing and Installing Selector Mechanism with Selector Lever and Selector Lever Cable
46
-
Vehicles from 03.2009 Onwards
46
-
Checking Selector Lever Cable
47
-
Adjusting Selector Lever Cable
47
-
Emergency Release of Selector Lever
50
-
Removing and Installing Selector Lever Handle
50
-
Checking Selector Mechanism
52
-
Mechatronic Unit for Dual Clutch Gearbox J743
54
-
Safety Note on Mechatronic Unit for Dual Clutch Gearbox J743
54
-
Overview — Mechatronic Unit
55
-
Removing Mechatronic Unit for Dual Clutch Gearbox J743 with Gearbox Installed
56
-
Moving Mechatronic Unit for Dual Clutch Gearbox J743 into «Removal Position» by Hand
66
-
Installing Mechatronic Unit for Dual Clutch Gearbox J743
69
-
View of Selector Forks with Mechatronic Unit Removed
76
-
Removing and Installing Gearbox
77
-
Information about Gearboxes with Different Output Shafts
77
-
Removing Gearbox, Vehicles with 1.4 L/90 Kw TFSI Engine and 1.4 L/118 Kw TSI Engine
78
-
Removing Gearbox, Vehicles with 1.6 L/75 Kw MPI Engine
85
-
Removing Gearbox — Vehicles with 1.9 L/77 Kw TDI PD Engine
94
-
Removing Gearbox — Vehicles with 1.6 L/77 Kw TDI CR Engine
101
-
Installing Gearbox
108
-
Torque Settings «Gearbox to Engine» and Notes on Assembly Mounting
111
-
Transporting Gearbox and Securing to Assembly Stand
115
-
-
Gears, Shafts
117
-
Currently, no Repairs Can be Made to Gears and Shafts
117
-
-
Renewing Oil Seal for Right Stub Shaft
118
-
Final Drive — Front Differential
118
-
Oil Seals
118
-
-
Renewing Oil Seal for Left Stub Shaft
120
-
Renewing Seal for Right Flange Shaft
122
-
Renewing Oil Seal for Left Flange Shaft
124
Advertisement
Related Products
-
Volkswagen Golf Variant 2010
-
Volkswagen Golf Variant 2015
-
Volkswagen Golf Variant 1998
-
Volkswagen Golf Variant 2014
-
VOLKSWAGEN GOLF ESTATE —
-
Volkswagen Golf 2013
-
Volkswagen Golf 2005
-
Volkswagen Golf Estate BlueMotion Sportline
-
Volkswagen Golf 2002
-
Volkswagen Golf BlueMotion SE
Volkswagen Categories
Automobile
Automobile Accessories
Car Receiver
Adapter
Engine
More Volkswagen Manuals

P
r
o
t
e
c
t
e
d
b
y
c
o
p
y
r
i
g
h
t
.
C
o
p
y
i
n
g
f
o
r
p
r
i
v
a
t
e
o
r
c
o
m
m
e
r
c
i
a
l
p
u
r
p
o
s
e
s
,
i
n
p
a
r
t
o
r
i
n
w
h
o
l
e
,
i
s
n
o
t
p
e
r
m
i
t
t
e
d
u
n
l
e
s
s
a
u
t
h
o
r
i
s
e
d
b
y
V
o
l
k
s
w
a
g
e
n
A
G
.
V
o
l
k
s
w
a
g
e
n
A
G
d
o
e
s
n
o
t
g
u
a
r
a
n
t
e
e
o
r
a
c
c
e
p
t
a
n
y
l
i
a
b
i
l
i
t
y
w
i
t
h
r
e
s
p
e
c
t
t
o
t
h
e
c
o
r
r
e
c
t
n
e
s
s
o
f
i
n
f
o
r
m
a
t
i
o
n
i
n
t
h
i
s
d
o
c
u
m
e
n
t
.
C
o
p
y
r
i
g
h
t
b
y
V
o
l
k
s
w
a
g
e
n
A
G
.
Workshop Manual
Bora 1999 ➤ , Bora Variant 1999 ➤ ,
Golf 1992 ➤ , Golf 1998 ➤ ,
Golf 2004 ➤ , Golf Cabrio 1994 ➤ ,
Golf Cabrio 1998 ➤ , Golf GTI 2005 ➤ ,
Golf Plus 2005 ➤ , Golf Variant 1992 ➤ ,
Golf Variant 1998 ➤ ,
Golf Variant 2007 ➤ , Lupo 1999 ➤ ,
Lupo 3L 1999 ➤ ,
New Beetle RSI 2001 ➤ , Passat 1994 ➤ ,
Passat 1997 ➤ , Polo 1995 ➤ ,
Polo 2002 ➤ , Polo Classic 1996 ➤ ,
Polo Variant 1998 ➤ , Sharan 1996 ➤ ,
Touareg 2003 ➤ , Vento 1992 ➤
Wheels and Tyres Guide — Archive
Edition 06.2010
Service
Service Department. Technical Information
Внимание! Ввиду сложности конструкции коробки передач, а также необходимости наличия специальных инструментов и приспособлений,
1. Отсоедините от аккумулятора клеммы обоих проводов. Сначала отсоединяется клемма провода «массы» (-). 2.
2.0. Тросы выбора передач 1, 2 – тросы выбора передач 3 – стопорная шайба.
Крутящий момент от коленчатого вала двигателя передаётся через сцепление на первичный вал коробки передач.
Сцепление при переключении передач разъединяет силовое замыкание между двигателем и коробкой передач, а при
1. Снимите кронштейн вместе с педалью и зажмите его в тисках с накладками из
1. Снимите кронштейн вместе с педалью и зажмите его в тисках с накладками из
При проведении динамических проверок, выполняемых на работающем двигателе, а также при выявлении причин периодических
4. Переведите рычаг управления коробкой передач в положение «S». 5. Отсоедините трос 1 от
1. Снимите брызговик двигателя. 2. Закрепите на капоте масленку V.A.G 1306 с трансмиссионным маслом

Руководство на английском языке по техническому обслуживанию и ремонту автомобилей Volkswagen Golf и Volkswagen Jetta 1984-1992 годов выпуска с бензиновыми двигателями.
- Автор: —
- Издательство: Haynes Publishing
- Год издания: 1997
- Страниц: 310
- Формат: PDF
- Размер: 7,2 Mb

Руководство на английском языке по техническому обслуживанию и ремонту автомобилей Volkswagen Golf и Volkswagen Vento 1992-1998 годов выпуска с бензиновыми и дизельными двигателями.
- Автор: —
- Издательство: Haynes Publishing
- Год издания: 2002
- Страниц: 295
- Формат: PDF
- Размер: 221,5 Mb

Руководство на английском языке по техническому обслуживанию и ремонту автомобилей Volkswagen Bora и Volkswagen Golf 1998-2000 годов выпуска с бензиновыми и дизельными двигателями.
- Автор: —
- Издательство: Haynes Publishing
- Год издания: 2001
- Страниц: 383
- Формат: PDF
- Размер: 35,8 Mb
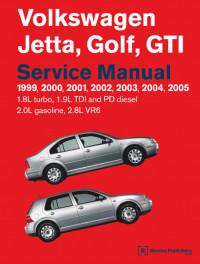
Руководство на английском языке по техническому обслуживанию и ремонту автомобилей Volkswagen Golf/Golf GTI/Jetta 1999-2005 годов выпуска с бензиновыми и дизельными двигателями.
- Автор: —
- Издательство: Bentley Publishers
- Год издания: 2005
- Страниц: 4954
- Формат: PDF
- Размер: 60,9 Mb

Сборник программ самообучения по устройству автомобиля Volkswagen Golf 2009 года выпуска.
- Автор: —
- Издательство: Volkswagen AG
- Год издания: —
- Страниц: —
- Формат: PDF, PPT
- Размер: 42,4 Mb

Сборник программ самообучения по устройству автомобиля Volkswagen Golf 2013 года выпуска.
- Автор: —
- Издательство: Volkswagen AG
- Год издания: —
- Страниц: —
- Формат: PDF
- Размер: 37,5 Mb

Сборник руководств на английском языке по техническому обслуживанию и ремонту автомобиля Volkswagen Golf Variant с 2007 года выпуска.
- Автор: —
- Издательство: Volkswagen AG
- Год издания: 2009-2015
- Страниц: —
- Формат: PDF
- Размер: 154,8 Mb
Сборник руководств на английском языке по техническому обслуживанию и ремонту автомобилей Volkswagen Golf/Golf GTI/Golf Variant с 2013 года выпуска.
- Автор: —
- Издательство: Volkswagen AG
- Год издания: 2012-2016
- Страниц: —
- Формат: PDF
- Размер: 287,4 Mb
Сборник руководств на английском языке по техническому обслуживанию и ремонту автомобилей Volkswagen Golf с 2004 и Volkswagen Golf Plus с 2005 года выпуска.
- Автор: —
- Издательство: Volkswagen AG
- Год издания: 2008-2010
- Страниц: —
- Формат: PDF
- Размер: 47,2 Mb
Руководство по техническому обслуживанию и ремонту автомобилей Volkswagen Golf и Volkswagen Jetta 1984-1992 годов выпуска с бензиновыми двигателями.
- Автор: —
- Издательство: Алфамер
- Год издания: —
- Страниц: 278
- Формат: PDF
- Размер: 17,0 Mb
Руководство по техническому обслуживанию и ремонту автомобилей Volkswagen Golf и Volkswagen Vento 1992-1998 годов выпуска с бензиновыми и дизельными двигателями.
- Автор: М. Кумбс, С. Дрейтон
- Издательство: Алфамер
- Год издания: 2006
- Страниц: 323
- Формат: PDF
- Размер: 375,8 Mb

Руководство по эксплуатации, техническому обслуживанию и ремонту автомобилей Volkswagen Bora и Volkswagen Golf 1998-2000 годов выпуска с бензиновыми и дизельными двигателями.
- Автор: —
- Издательство: Алфамер
- Год издания: —
- Страниц: 400
- Формат: —
- Размер: —
Руководство по техническому обслуживанию и ремонту автомобилей Volkswagen Bora и Volkswagen Golf 1998-2000 годов выпуска с бензиновыми и дизельными двигателями.
- Автор: —
- Издательство: Алфамер Паблишинг
- Год издания: 2004
- Страниц: 372
- Формат: PDF
- Размер: 107,7 Mb
Руководство по эксплуатации, техническому обслуживанию и ремонту автомобилей Volkswagen Bora и Volkswagen Golf 2001-2003 годов выпуска с бензиновыми и дизельными двигателями.
- Автор: А. Легг, П. Гилл
- Издательство: Алфамер
- Год издания: —
- Страниц: 396
- Формат: —
- Размер: —

Руководство по техническому обслуживанию и ремонту автомобиля Volkswagen Golf VI с 2008 года выпуска.
- Автор: —
- Издательство: Алфамер
- Год издания: —
- Страниц: 312
- Формат: —
- Размер: —

Руководство по эксплуатации, техническому обслуживанию и ремонту автомобилей Volkswagen Golf и Volkswagen Jetta с 2004 года выпуска с бензиновыми и дизельными двигателями.
- Автор: —
- Издательство: Алфамер
- Год издания: —
- Страниц: 408
- Формат: —
- Размер: —
Мультимедийное руководство по эксплуатации и ремонту автомобилей Volkswagen Golf II и Volkswagen Jetta 1983-1992 годов выпуска.
- Автор: —
- Издательство: —
- Год издания: —
- Страниц: —
- Формат: —
- Размер: 102,4 Mb
Мультимедийное руководство по эксплуатации и ремонту автомобиля Volkswagen Golf IV с 1997 годов выпуска.
- Автор: —
- Издательство: —
- Год издания: —
- Страниц: —
- Формат: ISO
- Размер: 146,7 Mb

Руководство на немецком языке по техническому обслуживанию и ремонту автомобилей Volkswagen Golf V/Golf Plus/Jetta/Touran с 2003 года выпуска.
- Автор: —
- Издательство: Delis Klasing
- Год издания: —
- Страниц: 332
- Формат: PDF
- Размер: 133,2 Mb

Руководство по техническому обслуживанию и ремонту автомобилей Volkswagen Golf до 1983 и Volkswagen Jetta до 1984 года выпуска с дизельными двигателями.
- Автор: —
- Издательство: Автостиль
- Год издания: 1996
- Страниц: 271
- Формат: PDF
- Размер: 46,0 Mb

Руководство по техническому обслуживанию и ремонту автомобилей Volkswagen Golf/Jetta/Scirocco 1974-1984 годов выпуска.
- Автор: —
- Издательство: ПетерГранд
- Год издания: 1998
- Страниц: 217
- Формат: DjVu
- Размер: 12,9 Mb
Руководство по техническому обслуживанию и ремонту автомобилей Volkswagen Golf и Volkswagen Jetta 1984-1992 годов выпуска с бензиновыми двигателями объемом 1,1/1,3/1,6/1,8 л.
- Автор: —
- Издательство: Легион-Автодата
- Год издания: —
- Страниц: 336
- Формат: —
- Размер: —

Руководство по техническому обслуживанию и ремонту автомобилей Volkswagen Golf и Volkswagen Wento 1992-1998 годов выпуска с бензиновыми и дизельными двигателями.
- Автор: —
- Издательство: Легион-Автодата
- Год издания: —
- Страниц: 328
- Формат: —
- Размер: —
Руководство по эксплуатации, техническому обслуживанию и ремонту автомобилей Volkswagen Golf II и Volkswagen Jetta II 1984-1993 годов выпуска с бензиновыми двигателями.
- Автор: —
- Издательство: Экоинвест
- Год издания: 1997
- Страниц: 331
- Формат: DjVu
- Размер: 31,9 Mb

Руководство по техническому обслуживанию и ремонту автомобилей Volkswagen Golf III и Volkswagen Vento.
- Автор: —
- Издательство: —
- Год издания: —
- Страниц: 212
- Формат: PDF
- Размер: 43,3 Mb

Руководство по эксплуатации и ремонту автомобилей Volkswagen Golf III и Volkswagen Vento с 1991 года выпуска с бензиновыми и дизельными двигателями.
- Автор: —
- Издательство: Монолит
- Год издания: —
- Страниц: 316
- Формат: —
- Размер: —

Руководство по эксплуатации и ремонту автомобилей Volkswagen Bora и Volkswagen Golf IV 2001-2003 годов выпуска с бензиновыми и дизельными двигателями.
- Автор: —
- Издательство: Монолит
- Год издания: —
- Страниц: 448
- Формат: —
- Размер: —

Руководство по эксплуатации и ремонту автомобилей Volkswagen Golf V и Volkswagen Jetta с 2003 года выпуска с бензиновыми и дизельными двигателями.
- Автор: —
- Издательство: Монолит
- Год издания: —
- Страниц: 494
- Формат: —
- Размер: —

Руководство по эксплуатации и ремонту автомобилей Volkswagen Golf V/Golf Plus/Jetta/Touran с 2003 года выпуска с бензиновыми и дизельными двигателями.
- Автор: —
- Издательство: Гуси-лебеди
- Год издания: 2007
- Страниц: 265
- Формат: PDF
- Размер: 55,7 Mb
Руководство по эксплуатации и ремонту автомобиля Volkswagen Golf VII с 2012 года выпуска с бензиновыми и дизельными двигателями.
- Автор: —
- Издательство: Монолит
- Год издания: —
- Страниц: 462
- Формат: —
- Размер: —

Руководство по эксплуатации и ремонту автомобиля Volkswagen Golf VII с 2012 года выпуска с бензиновыми и дизельными двигателями.
- Автор: —
- Издательство: Монолит
- Год издания: —
- Страниц: 469
- Формат: —
- Размер: —

Руководство по эксплуатации и техническому обслуживанию автомобиля Volkswagen Golf VI с 2006 года выпуска.
- Автор: —
- Издательство: Volkswagen AG
- Год издания: 2009
- Страниц: 360
- Формат: PDF
- Размер: 31,3 Mb

Руководство по эксплуатации и техническому обслуживанию автомобиля Volkswagen Golf VII с 2013 года выпуска.
- Автор: —
- Издательство: Volkswagen AG
- Год издания: 2012
- Страниц: 450
- Формат: PDF
- Размер: 104,4 Mb
Руководство по техническому обслуживанию и ремонту автомобилей Volkswagen Golf и Volkswagen Vento 1991-1997 годов выпуска с бензиновыми дизельными двигателями.
- Автор: —
- Издательство: Арго-Авто
- Год издания: —
- Страниц: 240
- Формат: —
- Размер: —

Руководство по эксплуатации, техническому обслуживанию и ремонту автомобилей Volkswagen Golf II и Volkswagen Jetta II 1983-1992 годов выпуска с бензиновыми и дизельными двигателями.
- Автор: —
- Издательство: Атласы автомобилей
- Год издания: 2002
- Страниц: 248
- Формат: —
- Размер: —
Руководство по техническому обслуживанию и ремонту автомобилей Volkswagen Golf IV 1997-2004 и Volkswagen Golf Variant 1999-2006 годов выпуска с бензиновыми и дизельными двигателями.
- Автор: —
- Издательство: АНТА-ЭКО
- Год издания: 2010
- Страниц: 592
- Формат: —
- Размер: —
Руководство по техническому обслуживанию и ремонту автомобиля Volkswagen Golf V с 2003 года выпуска с бензиновыми и дизельными двигателями.
- Автор: —
- Издательство: Атласы автомобилей
- Год издания: —
- Страниц: 524
- Формат: —
- Размер: —

Руководство по техническому обслуживанию и ремонту автомобиля Volkswagen Golf VI с 2008 года выпуска с бензиновыми двигателями.
- Автор: —
- Издательство: Атласы автомобилей
- Год издания: —
- Страниц: 800
- Формат: —
- Размер: —

Руководство по техническому обслуживанию и ремонту автомобилей Volkswagen Golf и Volkswagen Golf Plus с 2005 года выпуска с бензиновыми и дизельными двигателями.
- Автор: —
- Издательство: Арго-Авто
- Год издания: —
- Страниц: 840
- Формат: —
- Размер: —

Руководство по техническому обслуживанию и ремонту автомобиля Volkswagen Golf 1984-1991 годов выпуска.
- Автор: М.Л. Зинченко
- Издательство: Арус
- Год издания: —
- Страниц: 125
- Формат: PDF
- Размер: 30,2 Mb

Руководство по эксплуатации, техническому обслуживанию и ремонту автомобиля Volkswagen Golf VI с 2008 года выпуска с бензиновыми двигателями.
- Автор: —
- Издательство: Автонавигатор
- Год издания: —
- Страниц: 312
- Формат: —
- Размер: —

Руководство по эксплуатации, техническому обслуживанию и ремонту автомобилей Volkswagen Bora, Volkswagen Jetta и Volkswagen Golf 1997-2005 годов выпуска.
- Автор: —
- Издательство: Мир Автокниг
- Год издания: 2008
- Страниц: 513
- Формат: PDF
- Размер: 464,8 Mb

Инструкция по ремонту и эксплуатации

Войдите или зарегистрируйтесь, чтобы писать комментарии, задавать вопросы и участвовать в обсуждении.

-
Contents
-
Table of Contents
-
Bookmarks
Quick Links
Service
Workshop Manual
Golf Variant 2007 ➤
Golf Variant 2010 ➤
Jetta 2005 ➤
6-speed manual gearbox 02S
Edition 07.2009
Service Department. Technical Information
Related Manuals for Volkswagen Golf Variant 2007
Summary of Contents for Volkswagen Golf Variant 2007
-
Page 1
Service Workshop Manual Golf Variant 2007 ➤ Golf Variant 2010 ➤ Jetta 2005 ➤ 6-speed manual gearbox 02S Edition 07.2009 Service Department. Technical Information… -
Page 2
In addition, the normal basic safety precautions for working on motor vehicles must, as a matter of course, be observed. All rights reserved. No reproduction without prior agreement from publisher. Copyright © 2010 Volkswagen AG, Wolfsburg MEX5R007520… -
Page 3: Table Of Contents
Golf Variant 2007 ➤ , Golf Variant 2010 ➤ , Jetta 2005 ➤ 6-speed manual gearbox 02S — Edition 07.2009 Contents 00 — Technical data ……….. .
-
Page 4
Golf Variant 2007 ➤ , Golf Variant 2010 ➤ , Jetta 2005 ➤ 6-speed manual gearbox 02S — Edition 07.2009 Draining gear oil …………100 Filling with gear oil . -
Page 5: Technical Data
Technical data Gearbox identification The 6-speed manual gearbox 02S is installed in the Jetta 2005 ▸, in the Golf Variant 2007 ▸ and in the Golf Variant 2010 ▸ in con‐ junction with a 4-cylinder engine. Allocation ⇒ page 1…
-
Page 6
Golf Variant 2007 ➤ , Golf Variant 2010 ➤ , Jetta 2005 ➤ 6-speed manual gearbox 02S — Edition 07.2009 Manual gearbox 6-speed 02S Identification code Engine 1.9 l — 74 kW 1.4 l — 103 kW 1.9 l — 74 kW… -
Page 7
Golf Variant 2007 ➤ , Golf Variant 2010 ➤ , Jetta 2005 ➤ 6-speed manual gearbox 02S — Edition 07.2009 Manual gearbox 6-speed 02S Identification code Capacity of manual gearbox (gear‐ 2.1 l 2.1 l 2.1 l box completely dismantled) Capacity of manual gearbox 1.9 l… -
Page 8
Golf Variant 2007 ➤ , Golf Variant 2010 ➤ , Jetta 2005 ➤ 6-speed manual gearbox 02S — Edition 07.2009 Manual gearbox 6-speed 02S Identification code • The following data can be found in the ⇒ Electronic parts catalogue “ETKA” . -
Page 9: Overview — Power Transmission
Golf Variant 2007 ➤ , Golf Variant 2010 ➤ , Jetta 2005 ➤ 6-speed manual gearbox 02S — Edition 07.2009 Overview — power transmission Designation -Arrows- indicate direction of travel. 1 — Engine 2 — Clutch 3 — Manual gearbox…
-
Page 10
Golf Variant 2007 ➤ , Golf Variant 2010 ➤ , Jetta 2005 ➤ 6-speed manual gearbox 02S — Edition 07.2009 I — 1st gear II — 2nd gear III — 3rd gear IV — 4th gear V — 5th gear… -
Page 11: Calculating Overall Gear Ratio «I
Golf Variant 2007 ➤ , Golf Variant 2010 ➤ , Jetta 2005 ➤ 6-speed manual gearbox 02S — Edition 07.2009 Calculating overall gear ratio “i” Example: 6th gear Final drive Drive gear ZG 1 = 45 ZA 1 = 18…
-
Page 12: General Repair Notes
Golf Variant 2007 ➤ , Golf Variant 2010 ➤ , Jetta 2005 ➤ 6-speed manual gearbox 02S — Edition 07.2009 General repair notes To ensure flawless and successful gearbox repairs, the greatest care and cleanliness as well as the use of good and proper tools are essential.
-
Page 13
Golf Variant 2007 ➤ , Golf Variant 2010 ➤ , Jetta 2005 ➤ 6-speed manual gearbox 02S — Edition 07.2009 4.1.3 Locking devices ♦ Do not overstretch retaining rings. ♦ Always renew retaining rings which have been damaged or overstretched. -
Page 14
Golf Variant 2007 ➤ , Golf Variant 2010 ➤ , Jetta 2005 ➤ 6-speed manual gearbox 02S — Edition 07.2009 4.1.6 Shims ♦ Measure shims at several points with a micrometer. The var‐ ious thicknesses make it possible to achieve the exact shim thickness required. -
Page 15
Golf Variant 2007 ➤ , Golf Variant 2010 ➤ , Jetta 2005 ➤ 6-speed manual gearbox 02S — Edition 07.2009 ♦ Ensure that the pressure plate does not cant: loosen and tight‐ en bolts diagonally and in several gradual stages. -
Page 16: Clutch
Golf Variant 2007 ➤ , Golf Variant 2010 ➤ , Jetta 2005 ➤ 6-speed manual gearbox 02S — Edition 07.2009 30 – Clutch Fault finding, power transmission – Refer to ⇒ Fault finding, power transmission; Rep. Gr. 30 ; Complaints about clutch and clutch mechanism and ⇒ Fault finding, power transmission;…
-
Page 17: Repairing Clutch Mechanism
Golf Variant 2007 ➤ , Golf Variant 2010 ➤ , Jetta 2005 ➤ 6-speed manual gearbox 02S — Edition 07.2009 Repairing clutch mechanism Overview Note Before disconnecting battery, obtain code for radio units having anti-theft coding. ♦ With ignition switched off, disconnect battery earth strap ⇒ Electrical system; Rep. Gr. 27 ; Disconnecting ♦…
-
Page 18: Assembly Overview — Pedal Cluster
Golf Variant 2007 ➤ , Golf Variant 2010 ➤ , Jetta 2005 ➤ 6-speed manual gearbox 02S — Edition 07.2009 Assembly overview — pedal cluster 1 — Bulkhead ❑ With support for mount‐ ing bracket 2 — Seal ❑ Always renew ❑…
-
Page 19: Removing And Installing Over-Centre Spring
Golf Variant 2007 ➤ , Golf Variant 2010 ➤ , Jetta 2005 ➤ 6-speed manual gearbox 02S — Edition 07.2009 ❑ Qty. 3 ❑ For mounting bracket on bulkhead ❑ Always renew 16 — Hexagon nut, 25 Nm ❑ Always renew 17 — Stop ❑…
-
Page 20
Golf Variant 2007 ➤ , Golf Variant 2010 ➤ , Jetta 2005 ➤ 6-speed manual gearbox 02S — Edition 07.2009 – With ignition switched off, disconnect battery earth strap ⇒ Electrical system; Rep. Gr. 27 ; Disconnecting and connecting battery . -
Page 21
Golf Variant 2007 ➤ , Golf Variant 2010 ➤ , Jetta 2005 ➤ 6-speed manual gearbox 02S — Edition 07.2009 – If fitted, remove damping -arrow- from lower area of clutch pedal mounting bracket. – To do this, remove lock washers -A- for damping. -
Page 22
Golf Variant 2007 ➤ , Golf Variant 2010 ➤ , Jetta 2005 ➤ 6-speed manual gearbox 02S — Edition 07.2009 – Unbolt clutch pedal -1- from mounting bracket -3- by removing nut -2- and pulling out bolt -5-. Note The clutch pedal remains hooked to operating rod of master cyl‐… -
Page 23
Golf Variant 2007 ➤ , Golf Variant 2010 ➤ , Jetta 2005 ➤ 6-speed manual gearbox 02S — Edition 07.2009 Some cars have damping -arrow- on the clutch pedal mounting bracket. – Return it to installation position. Vehicles without knee airbag The crash bar -1- in front of clutch pedal -2- may be secured in different ways. -
Page 24: Removing And Installing Clutch Pedal
Golf Variant 2007 ➤ , Golf Variant 2010 ➤ , Jetta 2005 ➤ 6-speed manual gearbox 02S — Edition 07.2009 2.3.3 Specified torques Component Clutch pedal to mounting bracket ♦ Renew self-locking nuts Crash bar to steering column mounting bracket (attachment with 2 bolts)
-
Page 25
Golf Variant 2007 ➤ , Golf Variant 2010 ➤ , Jetta 2005 ➤ 6-speed manual gearbox 02S — Edition 07.2009 Continuation for all – Push driver seat as far back as possible and put steering wheel in highest position. – Remove trim and cover below trim on drive side ⇒ General body repairs, interior;… -
Page 26
Golf Variant 2007 ➤ , Golf Variant 2010 ➤ , Jetta 2005 ➤ 6-speed manual gearbox 02S — Edition 07.2009 – If fitted, remove damping -arrow- from lower area of clutch pedal mounting bracket. – To do this, remove lock washers -A- for damping. -
Page 27
Golf Variant 2007 ➤ , Golf Variant 2010 ➤ , Jetta 2005 ➤ 6-speed manual gearbox 02S — Edition 07.2009 – Unbolt clutch pedal -1- from mounting bracket -3- by removing nut -2- and pulling out bolt -5-. – Swing clutch pedal down slightly and remove over-centre spring -4- from mounting bracket. -
Page 28
Golf Variant 2007 ➤ , Golf Variant 2010 ➤ , Jetta 2005 ➤ 6-speed manual gearbox 02S — Edition 07.2009 – Insert over-centre spring -2- in mounting bracket from above while holding end of spring with assembly tool -T10178- in in‐… -
Page 29: Removing And Installing Mounting Bracket
Golf Variant 2007 ➤ , Golf Variant 2010 ➤ , Jetta 2005 ➤ 6-speed manual gearbox 02S — Edition 07.2009 The crash bar -1- in front of clutch pedal -2- may be secured in different ways. Attachment with 2 bolts –…
-
Page 30
Golf Variant 2007 ➤ , Golf Variant 2010 ➤ , Jetta 2005 ➤ 6-speed manual gearbox 02S — Edition 07.2009 ♦ Hose clamps to 25 mm Ø -3094- ♦ Hose clip pliers -VAS 6362- ♦ Sealing tool -T10249- 2.5.1 Removing –… -
Page 31
Golf Variant 2007 ➤ , Golf Variant 2010 ➤ , Jetta 2005 ➤ 6-speed manual gearbox 02S — Edition 07.2009 Continuation for all Note During the following work, ensure that no brake fluid lands on ♦ longitudinal member or gearbox. If this does happen, clean the affected areas thoroughly. -
Page 32
Golf Variant 2007 ➤ , Golf Variant 2010 ➤ , Jetta 2005 ➤ 6-speed manual gearbox 02S — Edition 07.2009 – Remove bracket for knee airbag together with crash bar ⇒ Interior equipment; Rep. Gr. 69 ; Airbag; Removing and in‐… -
Page 33
Golf Variant 2007 ➤ , Golf Variant 2010 ➤ , Jetta 2005 ➤ 6-speed manual gearbox 02S — Edition 07.2009 – To do this, remove lock washers -A- for damping. – Pull off damping. – Push damping upwards in area of upper securing nut -1- above clutch pedal -A- in -direction of arrow-. -
Page 34
Golf Variant 2007 ➤ , Golf Variant 2010 ➤ , Jetta 2005 ➤ 6-speed manual gearbox 02S — Edition 07.2009 Some cars have damping -arrow- on the clutch pedal mounting bracket. Note Renew self-locking nuts. ♦ Renew hose clips. ♦… -
Page 35: Removing And Installing Master Cylinder
Golf Variant 2007 ➤ , Golf Variant 2010 ➤ , Jetta 2005 ➤ 6-speed manual gearbox 02S — Edition 07.2009 – Push pipe/hose line or plastic line -1- with seal -2- onto con‐ nection of master cylinder -4- until securing clip -3- engages audibly.
-
Page 36
Golf Variant 2007 ➤ , Golf Variant 2010 ➤ , Jetta 2005 ➤ 6-speed manual gearbox 02S — Edition 07.2009 – Release retainer for master cylinder operating rod using pliers -T10005- . – Insert spacer -A- between clutch pedal and stop and press clutch pedal to spacer. -
Page 37: Removing And Installing Clutch Position Sender G476
Golf Variant 2007 ➤ , Golf Variant 2010 ➤ , Jetta 2005 ➤ 6-speed manual gearbox 02S — Edition 07.2009 – Insert spacer -A- between clutch pedal and stop and press clutch pedal to spacer. ♦ Length of spacer = about 40 mm (e.g.
-
Page 38
Golf Variant 2007 ➤ , Golf Variant 2010 ➤ , Jetta 2005 ➤ 6-speed manual gearbox 02S — Edition 07.2009 – Remove complete air filter housing if it is near battery ⇒ Rep. Gr. 23 ; Repairing diesel direct injection system or ⇒ Rep. -
Page 39
Golf Variant 2007 ➤ , Golf Variant 2010 ➤ , Jetta 2005 ➤ 6-speed manual gearbox 02S — Edition 07.2009 – Clamp off supply hose to master cylinder using hose clamp to 25 mm ∅ -3094- . – Release securing clip -2- with a screwdriver or a pointed object and pull out of master cylinder to stop. -
Page 40
Golf Variant 2007 ➤ , Golf Variant 2010 ➤ , Jetta 2005 ➤ 6-speed manual gearbox 02S — Edition 07.2009 If the pipe/hose line was removed – Push pipe/hose line -1- or plastic line with seal -2- onto con‐ nection of master cylinder -4- until securing clip -3- engages audibly. -
Page 41: Assembly Overview — Hydraulics (Lhd Vehicles)
Golf Variant 2007 ➤ , Golf Variant 2010 ➤ , Jetta 2005 ➤ 6-speed manual gearbox 02S — Edition 07.2009 Assembly overview — hydraulics (LHD vehicles) 1 — Brake fluid reservoir 2 — Spring-type clip 3 — Supply hose ❑ Rubber ❑…
-
Page 42
Golf Variant 2007 ➤ , Golf Variant 2010 ➤ , Jetta 2005 ➤ 6-speed manual gearbox 02S — Edition 07.2009 15 — Hexagon bolt, 20 Nm 16 — Bleeder valve ❑ Bleeding clutch system ⇒ page 42 17 — Dust cap… -
Page 43: Assembly Overview — Hydraulics (Rhd Vehicles)
Golf Variant 2007 ➤ , Golf Variant 2010 ➤ , Jetta 2005 ➤ 6-speed manual gearbox 02S — Edition 07.2009 Assembly overview — hydraulics (RHD vehicles) 1 — Brake fluid reservoir 2 — Seal ❑ For plastic supply hose ❑ The seals must be loca‐…
-
Page 44: Removing And Installing Slave Cylinder
Golf Variant 2007 ➤ , Golf Variant 2010 ➤ , Jetta 2005 ➤ 6-speed manual gearbox 02S — Edition 07.2009 ❑ Insert with brake fluid ❑ Seals/O-rings are adapted to configuration of line connection ⇒ page 38 ❑ Allocation ⇒ Electronic parts catalogue “ETKA”…
-
Page 45
Golf Variant 2007 ➤ , Golf Variant 2010 ➤ , Jetta 2005 ➤ 6-speed manual gearbox 02S — Edition 07.2009 – With ignition switched off, disconnect battery earth strap ⇒ Electrical system; Rep. Gr. 27 ; Disconnecting and connecting battery . -
Page 46: Bleeding Clutch System
Golf Variant 2007 ➤ , Golf Variant 2010 ➤ , Jetta 2005 ➤ 6-speed manual gearbox 02S — Edition 07.2009 2.10.2 Installing Install in the reverse order of removal, observing the following: – Install slave cylinder and tighten bolts -arrows B- to specified torque.
-
Page 47
Golf Variant 2007 ➤ , Golf Variant 2010 ➤ , Jetta 2005 ➤ 6-speed manual gearbox 02S — Edition 07.2009 ♦ Brake filling and bleeding equipment -V.A.G 1869- Note Prefilling system is not necessary! Specifications for brake fluid ⇒ Brake systems; Rep. Gr. 47 ;… -
Page 48: Repairing Clutch Release Mechanism
Golf Variant 2007 ➤ , Golf Variant 2010 ➤ , Jetta 2005 ➤ 6-speed manual gearbox 02S — Edition 07.2009 Repairing clutch release mechanism Special tools and workshop equipment required ♦ Torque wrench -V.A.G 1331- 1 — Gearbox 2 — Ball stud, 25 Nm ❑…
-
Page 49
Golf Variant 2007 ➤ , Golf Variant 2010 ➤ , Jetta 2005 ➤ 6-speed manual gearbox 02S — Edition 07.2009 ❑ Renew noisy bearings ❑ Removing from and inserting in clutch release lever ⇒ page 45 ❑ Lubricate contact surfaces of release lever with MoS 2 grease. -
Page 50: Repairing Clutch, In Conjunction With Dual-Mass Flywheel
Golf Variant 2007 ➤ , Golf Variant 2010 ➤ , Jetta 2005 ➤ 6-speed manual gearbox 02S — Edition 07.2009 Repairing clutch, in conjunction with dual-mass flywheel Special tools and workshop equipment required ♦ Counterhold -3067- ♦ Centring mandrel -3190 A- ♦…
-
Page 51
Golf Variant 2007 ➤ , Golf Variant 2010 ➤ , Jetta 2005 ➤ 6-speed manual gearbox 02S — Edition 07.2009 Some notches -arrows- are located in lower region of sump be‐ tween engine -A- and gearbox -B-. – Check outer contour of flywheel through these notches. -
Page 52: Removing And Installing Sachs Clutch
Golf Variant 2007 ➤ , Golf Variant 2010 ➤ , Jetta 2005 ➤ 6-speed manual gearbox 02S — Edition 07.2009 Rounded outer contour -arrows 1- and a circumferential crease -arrow 2- = LuK clutch = -B- – Removing and installing LuK clutch ⇒…
-
Page 53
Golf Variant 2007 ➤ , Golf Variant 2010 ➤ , Jetta 2005 ➤ 6-speed manual gearbox 02S — Edition 07.2009 Checking ends of diaphragm spring • Wear to half the thickness of the diaphragm spring -arrows- is permitted. Checking spring connections and riveted connections –… -
Page 54: Repairing Sachs Clutch
Golf Variant 2007 ➤ , Golf Variant 2010 ➤ , Jetta 2005 ➤ 6-speed manual gearbox 02S — Edition 07.2009 Repairing Sachs clutch 1 — Dual-mass flywheel ❑ Removing and installing ⇒ Rep. Gr. 13 ❑ Ensure that centring pins fit tightly ❑…
-
Page 55
Golf Variant 2007 ➤ , Golf Variant 2010 ➤ , Jetta 2005 ➤ 6-speed manual gearbox 02S — Edition 07.2009 Note Renew pressure plate and clutch plate together only. Select ♦ clutch plate and pressure plate according to engine code and ⇒… -
Page 56
Golf Variant 2007 ➤ , Golf Variant 2010 ➤ , Jetta 2005 ➤ 6-speed manual gearbox 02S — Edition 07.2009 Checking position of adjusting mechanism with new pressure plates only • Both edges -A- of the adjuster ring must be located between the two notches -arrows B-. -
Page 57: Repairing Luk Clutch
Golf Variant 2007 ➤ , Golf Variant 2010 ➤ , Jetta 2005 ➤ 6-speed manual gearbox 02S — Edition 07.2009 Repairing LuK clutch 1 — Dual-mass flywheel ❑ Removing and installing ⇒ Rep. Gr. 13 ❑ Ensure that centring pins fit tightly ❑…
-
Page 58: Repairing Clutch, In Conjunction With One-Piece Flywheel
Golf Variant 2007 ➤ , Golf Variant 2010 ➤ , Jetta 2005 ➤ 6-speed manual gearbox 02S — Edition 07.2009 Repairing clutch, in conjunction with one-piece flywheel Special tools and workshop equipment required ♦ Counterhold -3067- ♦ Centring mandrel -3190 A- ♦…
-
Page 59
Golf Variant 2007 ➤ , Golf Variant 2010 ➤ , Jetta 2005 ➤ 6-speed manual gearbox 02S — Edition 07.2009 1 — Flywheel ❑ Removing and installing ⇒ Rep. Gr. 13 ❑ Ensure that centring pins fit tightly ❑ Keep contact surface for clutch lining free of grooves, oil and grease. -
Page 60
Golf Variant 2007 ➤ , Golf Variant 2010 ➤ , Jetta 2005 ➤ 6-speed manual gearbox 02S — Edition 07.2009 Checking ends of diaphragm spring • Wear up to half the thickness of the diaphragm spring is per‐ mitted. Checking spring connections and riveted connections –… -
Page 61: Controls, Housing
Golf Variant 2007 ➤ , Golf Variant 2010 ➤ , Jetta 2005 ➤ 6-speed manual gearbox 02S — Edition 07.2009 34 – Controls, housing Fault finding, power transmission – Refer to ⇒ Fault finding, power transmission; Rep. Gr. 30 ;…
-
Page 62: Repairing Selector Mechanism
Golf Variant 2007 ➤ , Golf Variant 2010 ➤ , Jetta 2005 ➤ 6-speed manual gearbox 02S — Edition 07.2009 Repairing selector mechanism Installation position of selector mechanism Arrow -A- Gear selection movement Arrow -B- Gate selection movement A — Gear selector cable…
-
Page 63: Overview Of Selector Mechanism
Golf Variant 2007 ➤ , Golf Variant 2010 ➤ , Jetta 2005 ➤ 6-speed manual gearbox 02S — Edition 07.2009 Overview of selector mechanism Note Note radio code for vehicles with coded radio. ♦ Before working on selector mechanism in engine compartment, disconnect earth strap from battery ⇒ Elec‐…
-
Page 64
Golf Variant 2007 ➤ , Golf Variant 2010 ➤ , Jetta 2005 ➤ 6-speed manual gearbox 02S — Edition 07.2009 ♦ Hose clip pliers -V.A.G 1275- ♦ Torque wrench -V.A.G 1331- Rep. Gr.34 — Controls, housing… -
Page 65: Removing And Installing Gear Knob And Frame
Golf Variant 2007 ➤ , Golf Variant 2010 ➤ , Jetta 2005 ➤ 6-speed manual gearbox 02S — Edition 07.2009 Removing and installing gear knob and frame 1 — Emblem ❑ Can be carefully levered off gear knob of plastic…
-
Page 66
Golf Variant 2007 ➤ , Golf Variant 2010 ➤ , Jetta 2005 ➤ 6-speed manual gearbox 02S — Edition 07.2009 – Pull gaiter with frame for centre console upwards, inside out over gear knob. – Open clamp -arrow- and pull off gear knob together with gaiter. -
Page 67: Repairing Gear Lever And Selector Housing (Through 10.06)
Golf Variant 2007 ➤ , Golf Variant 2010 ➤ , Jetta 2005 ➤ 6-speed manual gearbox 02S — Edition 07.2009 Repairing gear lever and selector housing (through 10.06) Note Lubricate bearing points and sliding surfaces with grease -G 000 450 02- .
-
Page 68
Golf Variant 2007 ➤ , Golf Variant 2010 ➤ , Jetta 2005 ➤ 6-speed manual gearbox 02S — Edition 07.2009 25 — Securing clip ❑ Always renew 26 — Hexagon nut ❑ M8: 25 Nm ❑ M6: 8 Nm ❑ Qty. 4 27 — Bearing bush ❑… -
Page 69: Repairing Gear Lever And Selector Housing (From 11.06)
Golf Variant 2007 ➤ , Golf Variant 2010 ➤ , Jetta 2005 ➤ 6-speed manual gearbox 02S — Edition 07.2009 Repairing gear lever and selector housing (from 11.06) Note Lubricate bearing points and sliding surfaces with grease -G 000 450 02- .
-
Page 70
Golf Variant 2007 ➤ , Golf Variant 2010 ➤ , Jetta 2005 ➤ 6-speed manual gearbox 02S — Edition 07.2009 14 — Bush 15 — Gear lever guide 16 — Hexagon nut ❑ M8: 25 Nm ❑ M6: 8 Nm ❑… -
Page 71
Golf Variant 2007 ➤ , Golf Variant 2010 ➤ , Jetta 2005 ➤ 6-speed manual gearbox 02S — Edition 07.2009 – Lift upper end -A- of compression spring over tab of gate se‐ lector lever. – Use screwdriver to press catches -arrows- of ball socket to‐… -
Page 72
Golf Variant 2007 ➤ , Golf Variant 2010 ➤ , Jetta 2005 ➤ 6-speed manual gearbox 02S — Edition 07.2009 – Slacken ends -A- and -B- by turning both round to right. • Ends -A- and -B- must point in opposite directions. -
Page 73
Golf Variant 2007 ➤ , Golf Variant 2010 ➤ , Jetta 2005 ➤ 6-speed manual gearbox 02S — Edition 07.2009 – Move gate selector lever back to stop (opposite from mounting holes for gear and gate selector cable) -arrow 1-. -
Page 74: Assembly Overview — Removing And Installing Selector Cables
Golf Variant 2007 ➤ , Golf Variant 2010 ➤ , Jetta 2005 ➤ 6-speed manual gearbox 02S — Edition 07.2009 Assembly overview — removing and installing selector cables Note Lubricate bearing points and sliding surfaces with grease -G 000 450 02- .
-
Page 75
Golf Variant 2007 ➤ , Golf Variant 2010 ➤ , Jetta 2005 ➤ 6-speed manual gearbox 02S — Edition 07.2009 9 — Spacer 10 — Cable end-piece ❑ For gate selector cable to relay lever ❑ After installing, adjust selector mechanism ⇒… -
Page 76
Golf Variant 2007 ➤ , Golf Variant 2010 ➤ , Jetta 2005 ➤ 6-speed manual gearbox 02S — Edition 07.2009 Allocation of cable end-pieces The holes in the cable end-pieces have different diameters. Cable end-piece for Dimension “a” 1 — Gear selector cable to gearbox selector lever 8.5 mm… -
Page 77: Plastic Relay Lever
Golf Variant 2007 ➤ , Golf Variant 2010 ➤ , Jetta 2005 ➤ 6-speed manual gearbox 02S — Edition 07.2009 Fitting position of cable tie for cables – Wind cable tie -arrow- around the selector cables in a figure eight and secure them as shown in figure.
-
Page 78
Golf Variant 2007 ➤ , Golf Variant 2010 ➤ , Jetta 2005 ➤ 6-speed manual gearbox 02S — Edition 07.2009 Relay lever with clip -arrow 1- – Pull clip -arrow 1- off and remove relay lever together with ca‐ ble end-piece. -
Page 79: Removing And Installing Selector Mechanism
Golf Variant 2007 ➤ , Golf Variant 2010 ➤ , Jetta 2005 ➤ 6-speed manual gearbox 02S — Edition 07.2009 Levering gate selector cable end-piece off plastic relay lever • Relay lever has been removed. – Insert a flat-blade screwdriver -A- between bush -B- and relay lever.
-
Page 80
Golf Variant 2007 ➤ , Golf Variant 2010 ➤ , Jetta 2005 ➤ 6-speed manual gearbox 02S — Edition 07.2009 ♦ Torque wrench -V.A.G 1331- ♦ Grease -G 000 450 02- – First check whether a coded radio is fitted. If so, obtain anti- theft code. -
Page 81
Golf Variant 2007 ➤ , Golf Variant 2010 ➤ , Jetta 2005 ➤ 6-speed manual gearbox 02S — Edition 07.2009 Releasing cable end-piece from gate selector cable – Pull locking mechanism forward to stop in -direction of arrow 1- and then lock by turning to left in -direction of arrow 2-. -
Page 82: Removing And Installing Gear Selector Cable And Gate Selector Cable
Golf Variant 2007 ➤ , Golf Variant 2010 ➤ , Jetta 2005 ➤ 6-speed manual gearbox 02S — Edition 07.2009 Clip -A- holds cables and heat shield together in position. – Install cable support bracket on gearbox and tighten bolts to specified torques ⇒…
-
Page 83
Golf Variant 2007 ➤ , Golf Variant 2010 ➤ , Jetta 2005 ➤ 6-speed manual gearbox 02S — Edition 07.2009 – Bend open tabs -arrows- of selector mechanism cover using a screwdriver and remove cover. – Remove gasket. – Pull off securing clips -2 and 3-. (Securing clips -1 and 4- have been discontinued.) Lever gear selector cable off gear lever… -
Page 84: Adjusting Selector Mechanism
Golf Variant 2007 ➤ , Golf Variant 2010 ➤ , Jetta 2005 ➤ 6-speed manual gearbox 02S — Edition 07.2009 – Secure gear selector cable and gate selector cable to selector housing using securing clips -2 and 3-. – Press gear selector cable onto gear lever and gate selector cable onto gate selector lever in selector housing.
-
Page 85
Golf Variant 2007 ➤ , Golf Variant 2010 ➤ , Jetta 2005 ➤ 6-speed manual gearbox 02S — Edition 07.2009 – Remove complete air filter housing if bracket -A- to secure gear selector cable and gate selector cable are not accessible ⇒… -
Page 86: Functional Check
Golf Variant 2007 ➤ , Golf Variant 2010 ➤ , Jetta 2005 ➤ 6-speed manual gearbox 02S — Edition 07.2009 – Check that gate and selector cables -B- are inserted, free of tension, into locking devices -A-. – Now turn locking mechanisms on gear selector cable and gate selector cable end pieces clockwise to stop -direction of arrow 1-.
-
Page 87
Golf Variant 2007 ➤ , Golf Variant 2010 ➤ , Jetta 2005 ➤ 6-speed manual gearbox 02S — Edition 07.2009 – If it continues to be difficult to engage a gear after repeated attempts, repeat adjustment procedure of selector mechanism ⇒… -
Page 88: Removing And Installing Gearbox
Golf Variant 2007 ➤ , Golf Variant 2010 ➤ , Jetta 2005 ➤ 6-speed manual gearbox 02S — Edition 07.2009 Removing and installing gearbox Special tools and workshop equipment required ♦ Vehicles with turbo diesel engines and vehicles with 2.0l — 110 kW petrol engines ♦…
-
Page 89: Removing Gearbox
Golf Variant 2007 ➤ , Golf Variant 2010 ➤ , Jetta 2005 ➤ 6-speed manual gearbox 02S — Edition 07.2009 ♦ Adjustment plate -3282/39- ♦ Engine and gearbox jack — V.A.G 1383A- ♦ Torque wrench -V.A.G 1331- ♦ Torque wrench -V.A.G 1332- ♦…
-
Page 90
Golf Variant 2007 ➤ , Golf Variant 2010 ➤ , Jetta 2005 ➤ 6-speed manual gearbox 02S — Edition 07.2009 – Pull gear selector cable from pin. Metal relay lever – Remove securing clip -arrow 2- for gate selector cable from relay lever -B-. -
Page 91
Golf Variant 2007 ➤ , Golf Variant 2010 ➤ , Jetta 2005 ➤ 6-speed manual gearbox 02S — Edition 07.2009 – Pull connector -arrow 1- off reversing light switch -F4- . – Now remove connector -arrow 2- and wire -arrow 3- from starter. -
Page 92
Golf Variant 2007 ➤ , Golf Variant 2010 ➤ , Jetta 2005 ➤ 6-speed manual gearbox 02S — Edition 07.2009 – Now attach hook -10 — 222 A /2- at rear left of engine -arrow-. – Then connect hook -10 — 222 A /2- using adapter -10 — 222 A / 16- . -
Page 93
Golf Variant 2007 ➤ , Golf Variant 2010 ➤ , Jetta 2005 ➤ 6-speed manual gearbox 02S — Edition 07.2009 – Remove pendulum support. First remove bolt -arrow A- and then bolts -B- and -C-. – Remove hexagon bolts -arrows- for left assembly mounting from gearbox mounting. -
Page 94
Golf Variant 2007 ➤ , Golf Variant 2010 ➤ , Jetta 2005 ➤ 6-speed manual gearbox 02S — Edition 07.2009 – If small cover plate -A- for flywheel behind the right flange shaft -arrows- is installed, remove it. – Remove exhaust system strut -1-, if present, from gearbox -arrow-. -
Page 95: Transporting Gearbox
Golf Variant 2007 ➤ , Golf Variant 2010 ➤ , Jetta 2005 ➤ 6-speed manual gearbox 02S — Edition 07.2009 – Press gearbox off dowel sleeves and carefully swing towards subframe. – Turn gearbox downwards in vicinity of differential. – Have a second mechanic push engine forwards slightly.
-
Page 96: Installing Gearbox
Golf Variant 2007 ➤ , Golf Variant 2010 ➤ , Jetta 2005 ➤ 6-speed manual gearbox 02S — Edition 07.2009 – Adjust support beam on sliding piece using locking pin -arrow-. Number of holes visible = 5. – Lift gearbox using workshop crane and gearbox lifting tackle -3336- .
-
Page 97
Golf Variant 2007 ➤ , Golf Variant 2010 ➤ , Jetta 2005 ➤ 6-speed manual gearbox 02S — Edition 07.2009 The clutch plate must slide easily to and fro on the input shaft. To install gearbox “02S”, set up gearbox support -3282- with ad‐… -
Page 98
Golf Variant 2007 ➤ , Golf Variant 2010 ➤ , Jetta 2005 ➤ 6-speed manual gearbox 02S — Edition 07.2009 – Install bracket -A- on gearbox using new hexagonal bolts -arrows- and tighten to specified torque ⇒ page 96 – Align engine and gearbox in installation position using both spindles of support bracket -10-222A- . -
Page 99
Golf Variant 2007 ➤ , Golf Variant 2010 ➤ , Jetta 2005 ➤ 6-speed manual gearbox 02S — Edition 07.2009 – Install pendulum support with new bolts -arrows A-, -B- and -C- ⇒ Running gear, axles, steering ; Rep. Gr. 40 ; Repairing front suspension . -
Page 100: Specified Torques
Golf Variant 2007 ➤ , Golf Variant 2010 ➤ , Jetta 2005 ➤ 6-speed manual gearbox 02S — Edition 07.2009 – Install gearbox selector lever -A-. – Tighten hexagon nut -arrow 4- to specified torque ⇒ Item 18 (page 71) –…
-
Page 101
Golf Variant 2007 ➤ , Golf Variant 2010 ➤ , Jetta 2005 ➤ 6-speed manual gearbox 02S — Edition 07.2009 Gearbox to 2.0 l/100 kW petrol engine Item Bolt Quantity M12 x 65 M12 x 150 ♦ Additionally, start‐ er to gearbox M12 x 165 ♦… -
Page 102
Golf Variant 2007 ➤ , Golf Variant 2010 ➤ , Jetta 2005 ➤ 6-speed manual gearbox 02S — Edition 07.2009 Gearbox mounting to body – Renew bolts. – Screw in all bolts hand-tight. – Tighten bolts to specified torque. Bolts -arrows- 60 Nm + 90°… -
Page 103: Checking And Topping Up Gear Oil
Golf Variant 2007 ➤ , Golf Variant 2010 ➤ , Jetta 2005 ➤ 6-speed manual gearbox 02S — Edition 07.2009 Checking and topping up gear oil It is not possible to check the gear oil level by unscrewing the oil filler plug.
-
Page 104: Draining Gear Oil
Golf Variant 2007 ➤ , Golf Variant 2010 ➤ , Jetta 2005 ➤ 6-speed manual gearbox 02S — Edition 07.2009 Clean gearbox. Caution To drain gear oil, a pivot pin for the selector forks in the gearbox must be removed.
-
Page 105: Filling With Gear Oil
Golf Variant 2007 ➤ , Golf Variant 2010 ➤ , Jetta 2005 ➤ 6-speed manual gearbox 02S — Edition 07.2009 Filling with gear oil Top up oil in container to 1.9 litres. Gearbox oil specification ⇒ Electronic parts catalogue “ETKA” .
-
Page 106: Dismantling And Assembling Gearbox
Golf Variant 2007 ➤ , Golf Variant 2010 ➤ , Jetta 2005 ➤ 6-speed manual gearbox 02S — Edition 07.2009 Dismantling and assembling gearbox Overview — gearbox 1 — 1st gear 2 — 2nd gear 3 — 3rd gear 4 — 4th gear…
-
Page 107: Assembly Overview
Golf Variant 2007 ➤ , Golf Variant 2010 ➤ , Jetta 2005 ➤ 6-speed manual gearbox 02S — Edition 07.2009 Assembly overview Assembly sequence — Removing and installing cover for gearbox housing and 5th and 6th gear ⇒ page 109 Assembly sequence — Dismantling and assembling gearbox com‐…
-
Page 108: Removing And Installing Cover For Gearbox Housing And 5Th And 6Th Gear
Golf Variant 2007 ➤ , Golf Variant 2010 ➤ , Jetta 2005 ➤ 6-speed manual gearbox 02S — Edition 07.2009 Removing and installing cover for gearbox housing and 5th and 6th gear 1 — Gearbox housing ❑ Pull off together with 5th and 6th gears ⇒…
-
Page 109
Golf Variant 2007 ➤ , Golf Variant 2010 ➤ , Jetta 2005 ➤ 6-speed manual gearbox 02S — Edition 07.2009 ❑ Allocation of bolts ⇒ page 106 ❑ To gearbox date 20 08 6: 40 Nm and 180° further ❑ From gearbox date 21 08 6: 80 Nm and then turn 90° further ❑… -
Page 110
Golf Variant 2007 ➤ , Golf Variant 2010 ➤ , Jetta 2005 ➤ 6-speed manual gearbox 02S — Edition 07.2009 20 — Wave spring washer ❑ From gearbox date 26 05 8 ❑ Allocate according to ⇒ Electronic parts catalogue “ETKA”… -
Page 111: Removing And Installing Gearbox Housing And Shift Mechanism
Golf Variant 2007 ➤ , Golf Variant 2010 ➤ , Jetta 2005 ➤ 6-speed manual gearbox 02S — Edition 07.2009 Removing and installing gearbox housing and shift mechanism 1 — Countersunk bolt, 25 Nm 2 — Flange shaft with compres‐…
-
Page 112: Removing And Installing Input Shaft, Output Shaft, Differential And Selector Forks
Golf Variant 2007 ➤ , Golf Variant 2010 ➤ , Jetta 2005 ➤ 6-speed manual gearbox 02S — Edition 07.2009 Removing and installing input shaft, output shaft, differential and selector forks 1 — Differential ❑ Dismantling and assem‐ bling ⇒ page 193 2 — Seal ❑…
-
Page 113: Gear
Golf Variant 2007 ➤ , Golf Variant 2010 ➤ , Jetta 2005 ➤ 6-speed manual gearbox 02S — Edition 07.2009 Assembly sequence — Removing and in‐ stalling cover for gearbox housing and 5th and 6th gear Note Follow the working procedure described below if only the 5th ♦…
-
Page 114
Golf Variant 2007 ➤ , Golf Variant 2010 ➤ , Jetta 2005 ➤ 6-speed manual gearbox 02S — Edition 07.2009 ♦ Support bridge -30-211A- ♦ Thrust piece -32 — 111- ♦ Thrust piece from assembly tool -T10030/4- ♦ Tube -VW 416 B- ♦… -
Page 115
Golf Variant 2007 ➤ , Golf Variant 2010 ➤ , Jetta 2005 ➤ 6-speed manual gearbox 02S — Edition 07.2009 ♦ Support device -T10323- ♦ Assembly tool -3253/7- ♦ Thrust piece -VW 433- ♦ Thrust plate -40 — 105- ♦ Torque wrench -V.A.G 1332- 5.6.1… -
Page 116
Golf Variant 2007 ➤ , Golf Variant 2010 ➤ , Jetta 2005 ➤ 6-speed manual gearbox 02S — Edition 07.2009 • Bearings of input shaft and output shaft must not be damaged when 5th and 6th gears are removed and installed. -
Page 117
Golf Variant 2007 ➤ , Golf Variant 2010 ➤ , Jetta 2005 ➤ 6-speed manual gearbox 02S — Edition 07.2009 – Check whether puller hooks -T10040/2A- can be inserted cor‐ rectly under 5th gear wheel. Puller hooks -T10040/2A- cannot be inserted correctly. -
Page 118
Golf Variant 2007 ➤ , Golf Variant 2010 ➤ , Jetta 2005 ➤ 6-speed manual gearbox 02S — Edition 07.2009 – Pull off gear wheel for 6th gear with inner race of cylindrical roller bearing for output shaft. A — Two arm puller , e.g. -Kukko 20/10-… -
Page 119: Assembly Sequence — Dismantling And Assembling Gearbox Completely
Golf Variant 2007 ➤ , Golf Variant 2010 ➤ , Jetta 2005 ➤ 6-speed manual gearbox 02S — Edition 07.2009 – Set threaded insert -T10309/3- in half shell . – Now fit second half shell -T10309/1- and set tube -T10309/2- over assembly.
-
Page 120
Golf Variant 2007 ➤ , Golf Variant 2010 ➤ , Jetta 2005 ➤ 6-speed manual gearbox 02S — Edition 07.2009 Special tools and workshop equipment required ♦ Support plate -VW 309- ♦ Gearbox support -VW 353- ♦ Drift -VW 295- ♦… -
Page 121
Golf Variant 2007 ➤ , Golf Variant 2010 ➤ , Jetta 2005 ➤ 6-speed manual gearbox 02S — Edition 07.2009 ♦ Support bridge -30-211A- ♦ Thrust piece -32 — 111- ♦ Thrust piece from assembly tool -T10030/4- ♦ Tube -VW 416 B- ♦… -
Page 122
Golf Variant 2007 ➤ , Golf Variant 2010 ➤ , Jetta 2005 ➤ 6-speed manual gearbox 02S — Edition 07.2009 ♦ Support device -T10323- ♦ Assembly tool -3253/7- ♦ Thrust piece -VW 433- ♦ Torque wrench -V.A.G 1332- ♦ Mounting -2 Kukko 18/1- (Qty. 2) ♦… -
Page 123
Golf Variant 2007 ➤ , Golf Variant 2010 ➤ , Jetta 2005 ➤ 6-speed manual gearbox 02S — Edition 07.2009 • Bearings of input shaft and output shaft must not be damaged when 5th and 6th gears are removed and installed. -
Page 124
Golf Variant 2007 ➤ , Golf Variant 2010 ➤ , Jetta 2005 ➤ 6-speed manual gearbox 02S — Edition 07.2009 – Remove selector fork for 5th and 6th gears as follows: – Cover openings with a cloth. – Engage 5th gear -arrows 1- and -2-. -
Page 125
Golf Variant 2007 ➤ , Golf Variant 2010 ➤ , Jetta 2005 ➤ 6-speed manual gearbox 02S — Edition 07.2009 – Now remove 3rd bolt -arrow- for reverse shaft support bracket. – Remove selector shaft with selector mechanism cover, placing selector shaft in neutral position. -
Page 126
Golf Variant 2007 ➤ , Golf Variant 2010 ➤ , Jetta 2005 ➤ 6-speed manual gearbox 02S — Edition 07.2009 – Remove bolts -A- from clutch housing side for securing clutch housing to gearbox housing. Note Do not remove nuts -B- for output shaft bearing support. -
Page 127
Golf Variant 2007 ➤ , Golf Variant 2010 ➤ , Jetta 2005 ➤ 6-speed manual gearbox 02S — Edition 07.2009 – Remove selector forks -A- together with selector plates. – Unbolt reverse gear selector mechanism -B-. – Remove nuts -B- for output shaft bearing support. -
Page 128
Golf Variant 2007 ➤ , Golf Variant 2010 ➤ , Jetta 2005 ➤ 6-speed manual gearbox 02S — Edition 07.2009 – Insert input shaft -1- and output shaft -2- together. – Tighten nuts for output shaft bearing support to specified tor‐… -
Page 129
Golf Variant 2007 ➤ , Golf Variant 2010 ➤ , Jetta 2005 ➤ 6-speed manual gearbox 02S — Edition 07.2009 – Screw M8 x 100 mm studs -A- into reverse shaft support so that shaft is aligned after gearbox housing is fitted. -
Page 130
Golf Variant 2007 ➤ , Golf Variant 2010 ➤ , Jetta 2005 ➤ 6-speed manual gearbox 02S — Edition 07.2009 Install selector shaft with selector shaft cover plate as follows: – Place selector plates in neutral. – Apply sealant -AMV 188 200 03- evenly to sealing surface of selector mechanism cover. -
Page 131
Golf Variant 2007 ➤ , Golf Variant 2010 ➤ , Jetta 2005 ➤ 6-speed manual gearbox 02S — Edition 07.2009 Checking 5th gear synchro-ring and 6th gear synchro-ring – Before installing synchromeshed gears and synchro-rings for 5th and 6th gear, press synchro-rings onto cones of synchro‐… -
Page 132
Golf Variant 2007 ➤ , Golf Variant 2010 ➤ , Jetta 2005 ➤ 6-speed manual gearbox 02S — Edition 07.2009 – Drive on synchro-hub for 5th and 6th gear. Note When driving on, ensure that synchro-ring moves freely. – Heat inner race of cylindrical roller bearing for 6th gear syn‐… -
Page 133
Golf Variant 2007 ➤ , Golf Variant 2010 ➤ , Jetta 2005 ➤ 6-speed manual gearbox 02S — Edition 07.2009 Installation position of gear wheel for 6th gear: Groove -B- faces away from sleeve -A-. “Or” groove -arrow 1- near shoulder -arrow 2- faces away from sleeve -A- see previous figure). -
Page 134
Golf Variant 2007 ➤ , Golf Variant 2010 ➤ , Jetta 2005 ➤ 6-speed manual gearbox 02S — Edition 07.2009 – To tighten securing bolts -A-, engage 2 gears -arrows 1- through -3-. – Install selector forks for 5th and 6th gears. -
Page 135
Golf Variant 2007 ➤ , Golf Variant 2010 ➤ , Jetta 2005 ➤ 6-speed manual gearbox 02S — Edition 07.2009 Adjusting 5th and 6th gear from gearbox manufacture date 12 06 6 – Engage 5th gear. – Loosen bolt -1-. -
Page 136: Repairing Gearbox Housing And Clutch Housing
Golf Variant 2007 ➤ , Golf Variant 2010 ➤ , Jetta 2005 ➤ 6-speed manual gearbox 02S — Edition 07.2009 Repairing gearbox housing and clutch housing Special tools and workshop equipment required ♦ Drift -VW 295- ♦ Adapter -VW 295 A- ♦…
-
Page 137
Golf Variant 2007 ➤ , Golf Variant 2010 ➤ , Jetta 2005 ➤ 6-speed manual gearbox 02S — Edition 07.2009 ♦ Puller -VW 228 B- (is not required for this gearbox) ♦ Drift -VW 222 A- (not re‐ quired with this gearbox) ♦… -
Page 138
Golf Variant 2007 ➤ , Golf Variant 2010 ➤ , Jetta 2005 ➤ 6-speed manual gearbox 02S — Edition 07.2009 1 — Gearbox housing ❑ If renewed: adjust input shaft and differential ⇒ page 192 2 — Needle bearing ❑ For output shaft ❑… -
Page 139
Golf Variant 2007 ➤ , Golf Variant 2010 ➤ , Jetta 2005 ➤ 6-speed manual gearbox 02S — Edition 07.2009 ❑ Remove guide sleeve to change oil seal ❑ If O-ring is damaged, renew guide sleeve and O-ring together 13 — Socket head bolt, 20 Nm ❑… -
Page 140
Golf Variant 2007 ➤ , Golf Variant 2010 ➤ , Jetta 2005 ➤ 6-speed manual gearbox 02S — Edition 07.2009 Driving needle bearing in to stop – Secure needle bearing in gearbox housing at three points (120° offset) using a punch. -
Page 141
Golf Variant 2007 ➤ , Golf Variant 2010 ➤ , Jetta 2005 ➤ 6-speed manual gearbox 02S — Edition 07.2009 Pulling in sleeve – Clean sleeve seat in gearbox. – Screw spindle -A- of assembly device -3066- into threaded piece of differential. -
Page 142: Repairing Gearbox Housing Cover
Golf Variant 2007 ➤ , Golf Variant 2010 ➤ , Jetta 2005 ➤ 6-speed manual gearbox 02S — Edition 07.2009 Repairing gearbox housing cover Special tools and workshop equipment required ♦ Pressure plate -VW 401- ♦ Pressure plate -VW 402- ♦…
-
Page 143
Golf Variant 2007 ➤ , Golf Variant 2010 ➤ , Jetta 2005 ➤ 6-speed manual gearbox 02S — Edition 07.2009 1 — Cylindrical roller bearing ❑ For output shaft ❑ Do not interchange with cylindrical roller bearing for input shaft ❑… -
Page 144
Golf Variant 2007 ➤ , Golf Variant 2010 ➤ , Jetta 2005 ➤ 6-speed manual gearbox 02S — Edition 07.2009 Pulling cylindrical roller bearing out of gearbox housing cover A — Internal puller, 30 … 37 mm , e.g. -Kukko 21/5- B — Counter support , e.g. -
Page 145
Golf Variant 2007 ➤ , Golf Variant 2010 ➤ , Jetta 2005 ➤ 6-speed manual gearbox 02S — Edition 07.2009 Secure cylindrical roller bearing in gearbox housing cover by pe‐ ening -arrows-. 7. Repairing gearbox housing cover… -
Page 146: Repairing Selector Unit
Golf Variant 2007 ➤ , Golf Variant 2010 ➤ , Jetta 2005 ➤ 6-speed manual gearbox 02S — Edition 07.2009 Repairing selector unit Special tools and workshop equipment required ♦ Tube -T10203- ♦ Tube -VW 423- ♦ Torque wrench -V.A.G 1331-…
-
Page 147
Golf Variant 2007 ➤ , Golf Variant 2010 ➤ , Jetta 2005 ➤ 6-speed manual gearbox 02S — Edition 07.2009 1 — Selector unit ❑ Consists of selector shaft and selector shaft cover ❑ Components cannot be separated from each other 2 — -Schalter für Rückfahr‐… -
Page 148
Golf Variant 2007 ➤ , Golf Variant 2010 ➤ , Jetta 2005 ➤ 6-speed manual gearbox 02S — Edition 07.2009 Removing angled rod -A- from selector shaft cover – Remove outer part of angled rod. – Then carefully lever out angled rod using a screwdriver. -
Page 149: Dismantling And Assembling Selector Forks
Golf Variant 2007 ➤ , Golf Variant 2010 ➤ , Jetta 2005 ➤ 6-speed manual gearbox 02S — Edition 07.2009 Dismantling and assembling selector forks Special tools and workshop equipment required ♦ Pressure plate -VW 402- ♦ Thrust piece -3290/1- ♦…
-
Page 150
Golf Variant 2007 ➤ , Golf Variant 2010 ➤ , Jetta 2005 ➤ 6-speed manual gearbox 02S — Edition 07.2009 ♦ Drift -10 — 508- ♦ Clamp -2070- Note It is not necessary to dismantle the selector fork group ( ⇒… -
Page 151
Golf Variant 2007 ➤ , Golf Variant 2010 ➤ , Jetta 2005 ➤ 6-speed manual gearbox 02S — Edition 07.2009 1 — Selector segment for 5th and 6th gears ❑ Identification ⇒ page 148 ❑ After lock washer is in‐… -
Page 152
Golf Variant 2007 ➤ , Golf Variant 2010 ➤ , Jetta 2005 ➤ 6-speed manual gearbox 02S — Edition 07.2009 Identifying selector segments Dimension -a- 1 — 1st and 2nd gear selector segments = 11.4 mm 2 — 3rd and 4th gear selector segments = 7.7 mm 3 — 5th and 6th gear selector segments = 12.1 mm… -
Page 153
Golf Variant 2007 ➤ , Golf Variant 2010 ➤ , Jetta 2005 ➤ 6-speed manual gearbox 02S — Edition 07.2009 Pressing inner race -A- of angular contact ball bearing into outer race Inner race must engage in outer race. Pulling angular contact ball bearing into selector fork to stop Depression in thrust piece -3290/1- faces ball bearing. -
Page 154: Gears, Shafts
Golf Variant 2007 ➤ , Golf Variant 2010 ➤ , Jetta 2005 ➤ 6-speed manual gearbox 02S — Edition 07.2009 35 – Gears, shafts Input shaft Dismantling and assembling input shaft Special tools and workshop equipment required ♦ Press tool -VW 407- ♦…
-
Page 155
Golf Variant 2007 ➤ , Golf Variant 2010 ➤ , Jetta 2005 ➤ 6-speed manual gearbox 02S — Edition 07.2009 ♦ Drift sleeve -41 — 501- ♦ Thrust pad -VW 447 i- ♦ Drift sleeve -30 — 100- ♦ Thrust pad -VW 510- ♦… -
Page 156
Golf Variant 2007 ➤ , Golf Variant 2010 ➤ , Jetta 2005 ➤ 6-speed manual gearbox 02S — Edition 07.2009 1 — Clutch housing 2 — Tapered roller bearing outer race ❑ Pressing out ⇒ page 154 ❑ Pressing in ⇒… -
Page 157
Golf Variant 2007 ➤ , Golf Variant 2010 ➤ , Jetta 2005 ➤ 6-speed manual gearbox 02S — Edition 07.2009 16 — Wave spring washer ❑ From gearbox date 26 05 8 ❑ Allocate according to ⇒ Electronic parts catalogue “ETKA”… -
Page 158
Golf Variant 2007 ➤ , Golf Variant 2010 ➤ , Jetta 2005 ➤ 6-speed manual gearbox 02S — Edition 07.2009 Pressing out tapered roller bearing outer race Pressing in tapered roller bearing outer race Pressing off tapered roller bearing inner race… -
Page 159
Golf Variant 2007 ➤ , Golf Variant 2010 ➤ , Jetta 2005 ➤ 6-speed manual gearbox 02S — Edition 07.2009 Pressing off gear wheel for 4th gear with tapered roller bearing and sleeve Pressing off gear wheel for 3rd gear… -
Page 160
Golf Variant 2007 ➤ , Golf Variant 2010 ➤ , Jetta 2005 ➤ 6-speed manual gearbox 02S — Edition 07.2009 Pressing on tapered roller bearing inner race Pressing on sleeve for needle bearing Pressing out tapered roller bearing outer race Pressing in tapered roller bearing outer race –… -
Page 161
Golf Variant 2007 ➤ , Golf Variant 2010 ➤ , Jetta 2005 ➤ 6-speed manual gearbox 02S — Edition 07.2009 Deeper notches in both sides of locking collar for 5th and 6th gears -arrows- from gearbox date 12 06 6… -
Page 162: Adjusting Input Shaft
Golf Variant 2007 ➤ , Golf Variant 2010 ➤ , Jetta 2005 ➤ 6-speed manual gearbox 02S — Edition 07.2009 Installing springs with bent ends -A- The modified springs are installed on both sides. – Spring are installed only in conjunction with locking pieces which are hollow on the inner side.
-
Page 163
Golf Variant 2007 ➤ , Golf Variant 2010 ➤ , Jetta 2005 ➤ 6-speed manual gearbox 02S — Edition 07.2009 Special tools and workshop equipment required ♦ Universal dial gauge brack‐ et -VW 387- ♦ End dimension plate — VW 385/17- ♦… -
Page 164
Golf Variant 2007 ➤ , Golf Variant 2010 ➤ , Jetta 2005 ➤ 6-speed manual gearbox 02S — Edition 07.2009 – Press tapered roller bearing outer race into gearbox housing to stop. – Press tapered roller bearing outer race without shim into gear‐… -
Page 165
Golf Variant 2007 ➤ , Golf Variant 2010 ➤ , Jetta 2005 ➤ 6-speed manual gearbox 02S — Edition 07.2009 Table of shims Bearing play Shim Measured value (mm) Thickness (mm) 0.671…0.699 0.650 0.700…0.724 0.675 0.725…0.749 0.700 0.750…0.774 0.725 0.775…0.799 0.750… -
Page 166
Golf Variant 2007 ➤ , Golf Variant 2010 ➤ , Jetta 2005 ➤ 6-speed manual gearbox 02S — Edition 07.2009 – Set gearbox housing in place and tighten hexagon head bolts to 25 Nm and then turn 90° further. 1.2.2 Carrying out check measurement –… -
Page 167: Output Shaft
Golf Variant 2007 ➤ , Golf Variant 2010 ➤ , Jetta 2005 ➤ 6-speed manual gearbox 02S — Edition 07.2009 Output shaft Dismantling and assembling output shaft Special tools and workshop equipment required ♦ Press tool -VW 407- ♦ Press tool -VW 412- ♦…
-
Page 168
Golf Variant 2007 ➤ , Golf Variant 2010 ➤ , Jetta 2005 ➤ 6-speed manual gearbox 02S — Edition 07.2009 ♦ Pressure plate -VW 402- ♦ Thrust piece -32 — 111- ♦ Press tool -VW 408 A- ♦ Press tool -VW 409- ♦… -
Page 169
Golf Variant 2007 ➤ , Golf Variant 2010 ➤ , Jetta 2005 ➤ 6-speed manual gearbox 02S — Edition 07.2009 ♦ Drift sleeve -30 — 100- ♦ Tube -VW 415 A- ♦ Thrust pad -VW 447 H- ♦ Thrust piece -VW 454- ♦… -
Page 170
Golf Variant 2007 ➤ , Golf Variant 2010 ➤ , Jetta 2005 ➤ 6-speed manual gearbox 02S — Edition 07.2009 ♦ Internal puller -1- Kukko 21/6- ♦ Counter support -4- Kukko 22/2- ♦ Splitter -3- Kukko 17/2- Note The output shaft is dismantled as follows: position separating device under 2nd gear synchromeshed gear ♦… -
Page 171
Golf Variant 2007 ➤ , Golf Variant 2010 ➤ , Jetta 2005 ➤ 6-speed manual gearbox 02S — Edition 07.2009 1 — Hexagon nut, 25 Nm and then turn 90° further ❑ 4 nuts for bearing sup‐ port ❑ Always renew… -
Page 172
Golf Variant 2007 ➤ , Golf Variant 2010 ➤ , Jetta 2005 ➤ 6-speed manual gearbox 02S — Edition 07.2009 ❑ Check for wear ⇒ page 172 16 — Locking collar with synchro-hub for 1st and 2nd gears ❑ After removing retaining ring ⇒… -
Page 173
Golf Variant 2007 ➤ , Golf Variant 2010 ➤ , Jetta 2005 ➤ 6-speed manual gearbox 02S — Edition 07.2009 31 — Synchro-ring for 4th gear ❑ Check for wear ⇒ page 175 32 — Synchromeshed gear for 4th gear… -
Page 174
Golf Variant 2007 ➤ , Golf Variant 2010 ➤ , Jetta 2005 ➤ 6-speed manual gearbox 02S — Edition 07.2009 Pressing in small tapered roller bearing outer race Pulling off small tapered roller bearing inner race A — Vice with protective jaws –… -
Page 175
Golf Variant 2007 ➤ , Golf Variant 2010 ➤ , Jetta 2005 ➤ 6-speed manual gearbox 02S — Edition 07.2009 Pressing off locking collar with synchro-hub and bearing support – First remove retaining ring -arrow-. Pulling off large tapered roller bearing inner race A — Protective jaws –… -
Page 176
Golf Variant 2007 ➤ , Golf Variant 2010 ➤ , Jetta 2005 ➤ 6-speed manual gearbox 02S — Edition 07.2009 Checking 1st and 2nd gear inner ring for wear – Press inner ring onto cone of synchromeshed gear and meas‐… -
Page 177
Golf Variant 2007 ➤ , Golf Variant 2010 ➤ , Jetta 2005 ➤ 6-speed manual gearbox 02S — Edition 07.2009 Assembly of 1st and 2nd gear locking collar and synchro-hub with hollow locking pieces • Locking collar has been pushed over synchro-hub. -
Page 178
Golf Variant 2007 ➤ , Golf Variant 2010 ➤ , Jetta 2005 ➤ 6-speed manual gearbox 02S — Edition 07.2009 Installation position of 2nd gear outer ring Lugs -arrows- face 1st gear -A-. Installation position of synchro-ring (2nd gear inner ring) -A- Lugs -arrow 1- engage in notches -arrow 2- in synchro-ring -B-. -
Page 179
Golf Variant 2007 ➤ , Golf Variant 2010 ➤ , Jetta 2005 ➤ 6-speed manual gearbox 02S — Edition 07.2009 Checking synchro-rings for 3rd and 4th gear for wear – Press synchro-ring onto cone of synchromeshed gear and measure gap -a- using feeler gauge. -
Page 180: Adjusting Output Shaft
Golf Variant 2007 ➤ , Golf Variant 2010 ➤ , Jetta 2005 ➤ 6-speed manual gearbox 02S — Edition 07.2009 Installation position of locking collar with synchro-hub for 3rd and 4th gears Chamfer -arrow- faces 4th gear. Pressing on synchro-hub with locking collar for 3rd and 4th gears…
-
Page 181
Golf Variant 2007 ➤ , Golf Variant 2010 ➤ , Jetta 2005 ➤ 6-speed manual gearbox 02S — Edition 07.2009 Special tools and workshop equipment required ♦ Universal dial gauge brack‐ et -VW 387- ♦ End dimension plate — VW 385/17- ♦… -
Page 182
Golf Variant 2007 ➤ , Golf Variant 2010 ➤ , Jetta 2005 ➤ 6-speed manual gearbox 02S — Edition 07.2009 ♦ Adapter -VW 771/15- It is necessary to readjust the output shaft when the following components are renewed: ♦ Output shaft ♦… -
Page 183
Golf Variant 2007 ➤ , Golf Variant 2010 ➤ , Jetta 2005 ➤ 6-speed manual gearbox 02S — Edition 07.2009 – Set up dial gauge (3 mm measuring range) and set to “0”with 1 mm preload. -A- = threaded spindle from puller —Kukko 18/0- . -
Page 184
Golf Variant 2007 ➤ , Golf Variant 2010 ➤ , Jetta 2005 ➤ 6-speed manual gearbox 02S — Edition 07.2009 Bearing play = Shim (0.65 mm shim thickness (mm) plus determined measured val‐ 1.290 … 1.339 1.450 1.340 … 1.389 1.500… -
Page 185: Reverse Shaft
Golf Variant 2007 ➤ , Golf Variant 2010 ➤ , Jetta 2005 ➤ 6-speed manual gearbox 02S — Edition 07.2009 Reverse shaft Dismantling and assembling reverse shaft Special tools and workshop equipment required ♦ Thrust piece -VW 454- ♦ Thrust pad -VW 447 H- ♦…
-
Page 186
Golf Variant 2007 ➤ , Golf Variant 2010 ➤ , Jetta 2005 ➤ 6-speed manual gearbox 02S — Edition 07.2009 Note After dismantling, always renew needle bearing in clutch housing and reverse shaft support. 1 — Clutch housing 2 — Needle bearing ❑… -
Page 187
Golf Variant 2007 ➤ , Golf Variant 2010 ➤ , Jetta 2005 ➤ 6-speed manual gearbox 02S — Edition 07.2009 Pressing needle bearing -A- into clutch housing Pressing needle bearing out of reverse shaft support Pressing needle bearing into reverse shaft support… -
Page 188: Final Drive — Differential
Golf Variant 2007 ➤ , Golf Variant 2010 ➤ , Jetta 2005 ➤ 6-speed manual gearbox 02S — Edition 07.2009 39 – Final drive — differential Renewing flange shaft oil seals with gearbox installed Renewing oil seal for left flange shaft…
-
Page 189: Distinguishing Seals For Right Flange Shaft
Golf Variant 2007 ➤ , Golf Variant 2010 ➤ , Jetta 2005 ➤ 6-speed manual gearbox 02S — Edition 07.2009 – Raise drive shaft as high as possible and secure. Take care not to damage paint on drive shaft in the process.
-
Page 190: Renewing Seal (Two-Part Seal And Sleeve For Right Flange Shaft)
Golf Variant 2007 ➤ , Golf Variant 2010 ➤ , Jetta 2005 ➤ 6-speed manual gearbox 02S — Edition 07.2009 There are different versions. Seal -1- and sleeve -2- are two parts. Identification: notches along circumference of sleeve -arrow-. Renew seal ⇒…
-
Page 191
Golf Variant 2007 ➤ , Golf Variant 2010 ➤ , Jetta 2005 ➤ 6-speed manual gearbox 02S — Edition 07.2009 ♦ Torque wrench -V.A.G 1331- 1.3.1 Removing – Remove noise insulation ⇒ General body repairs, exterior; Rep. Gr. 50 ; Noise insulation . -
Page 192
Golf Variant 2007 ➤ , Golf Variant 2010 ➤ , Jetta 2005 ➤ 6-speed manual gearbox 02S — Edition 07.2009 1.3.2 Installing – Drive in new seal to stop, being careful not to cant seal. – Half-fill space between sealing lip and dust lip with sealing grease -G 052 128 A1- . -
Page 193: Renewing Seal And Sleeve Together (One-Piece Seal And Sleeve For Right Flange Shaft)
Golf Variant 2007 ➤ , Golf Variant 2010 ➤ , Jetta 2005 ➤ 6-speed manual gearbox 02S — Edition 07.2009 1.3.3 Torque setting Flange shaft to gearbox (countersunk bolt) ⇒ Item 12 (page 195) Renewing seal and sleeve together (one-piece seal and sleeve for right…
-
Page 194
Golf Variant 2007 ➤ , Golf Variant 2010 ➤ , Jetta 2005 ➤ 6-speed manual gearbox 02S — Edition 07.2009 ♦ Drip tray for workshop hoist -VAS 6208- 1.4.1 Removing – Remove noise insulation ⇒ General body repairs, exterior; Rep. Gr. 50 ; Noise insulation . -
Page 195
Golf Variant 2007 ➤ , Golf Variant 2010 ➤ , Jetta 2005 ➤ 6-speed manual gearbox 02S — Edition 07.2009 1.4.2 Installing – Clean seat for seal in gearbox. – Pull in seal and sleeve together. A — Screw spindle of assembly tool -3066- into threaded piece of differential. -
Page 196: Adjustment Overview
Golf Variant 2007 ➤ , Golf Variant 2010 ➤ , Jetta 2005 ➤ 6-speed manual gearbox 02S — Edition 07.2009 Adjustment overview Note If repairs have been carried out to the gearbox, it is necessary to adjust the input shaft, output shaft or differential only if compo‐…
-
Page 197: Differential
Golf Variant 2007 ➤ , Golf Variant 2010 ➤ , Jetta 2005 ➤ 6-speed manual gearbox 02S — Edition 07.2009 Differential Dismantling and assembling differential Special tools and workshop equipment required ♦ Tapered roller bearing pull‐ er -V.A.G 1582- ♦ Adapter -V.A.G 1582/3- ♦…
-
Page 198
Golf Variant 2007 ➤ , Golf Variant 2010 ➤ , Jetta 2005 ➤ 6-speed manual gearbox 02S — Edition 07.2009 ♦ Press tool -VW 408 A- ♦ Thrust piece -VW 473- ♦ Thrust plate -30 — 205- ♦ Sleeve -3144- ♦… -
Page 199
Golf Variant 2007 ➤ , Golf Variant 2010 ➤ , Jetta 2005 ➤ 6-speed manual gearbox 02S — Edition 07.2009 Note Heat tapered roller bearing inner race to 100° C before installing. ♦ Always renew both tapered roller bearings together as a set. -
Page 200
Golf Variant 2007 ➤ , Golf Variant 2010 ➤ , Jetta 2005 ➤ 6-speed manual gearbox 02S — Edition 07.2009 12 — Countersunk bolt, 25 Nm ❑ Screw into threaded piece ⇒ Item 20 (page 196) 13 — Flange shaft ❑… -
Page 201
Golf Variant 2007 ➤ , Golf Variant 2010 ➤ , Jetta 2005 ➤ 6-speed manual gearbox 02S — Edition 07.2009 Pressing tapered roller bearing outer race into clutch housing No shim is installed in the clutch housing end. Pulling off tapered roller bearing inner races –… -
Page 202
Golf Variant 2007 ➤ , Golf Variant 2010 ➤ , Jetta 2005 ➤ 6-speed manual gearbox 02S — Edition 07.2009 Pressing tapered roller bearing outer race into gearbox housing – Fit shim under outer race. – Support gearbox housing directly below bearing mounting us‐… -
Page 203
Golf Variant 2007 ➤ , Golf Variant 2010 ➤ , Jetta 2005 ➤ 6-speed manual gearbox 02S — Edition 07.2009 Removing spring pin without circumferential groove (long spring pin); pressing out differential pinion pin When pressed out, spring pin will be sheared off. -
Page 204: Adjusting Differential
Golf Variant 2007 ➤ , Golf Variant 2010 ➤ , Jetta 2005 ➤ 6-speed manual gearbox 02S — Edition 07.2009 Installation position of thrust washer for tapered ring -1-. The shoulder -arrow- points towards spring -B-. Some gearboxes have lugs -A-.
-
Page 205
Golf Variant 2007 ➤ , Golf Variant 2010 ➤ , Jetta 2005 ➤ 6-speed manual gearbox 02S — Edition 07.2009 It is necessary to readjust the differential when the following com‐ ponents are renewed: ♦ Gearbox housing ♦ Clutch housing ♦… -
Page 206
Golf Variant 2007 ➤ , Golf Variant 2010 ➤ , Jetta 2005 ➤ 6-speed manual gearbox 02S — Edition 07.2009 Bearing play Shim 0.303 … 0.449 0.650 0.450 … 0.499 0.700 0.500 … 0.549 0.750 0.550 … 0.599 0.800 0.600 … 0.649 0.850…
Volkswagen Golf V / Golf Plus / Jetta / Touran с бензиновыми двигателями: BCA/BKG/BLN 1.4 л FSI/TSI (1390 см³) 75-90-170 л.с./55-66-125 кВт, BGU/BSE/BSF 1.6 л (1595 см³) 102 л.с./75 кВт, BAG/BLF/BLP 1.6 л FSI (1598 см³) 115 л.с./85 кВт, AXW/BLR/BLX/BLY/AXX/BPY 2.0 л FSI/TSI (1984 см³) 150-200 л.с./110-147 кВт и дизельными BRU/AVQ/BJB/BKC/BLS 1.9 л TDI (1896 см³) 90-105 л.с./66-77 кВт, BDK/AZV/BKD/BMM 2.0 л SDI/TDI (1968 см³) 75-136-140-170 л.с./55-100-103-125 кВт; Руководство по эксплуатации, техническому обслуживанию и ремонту, полные технические характеристики, устройство, цветные электросхемы, диагностика, ремонт, особенности конструкции. Производственно-практическое издание Фольксваген Гольф 5 (1K1), Гольф плюс (1KP), Джетта (1K2) и Туран (1T1) модели выпуска с 2003 года
ЕСЛИ ВЫ ВИДИТЕ ОШИБКУ 406 Not Acceptable и не видите документ, то скорей всего у Вас IP РФ и его надо сменить, на любой другой страны, с помощью VPN ( Scribd и SlideShare блокируют посетителей с Российским IP).
Видео VW Golf V/ Golf Plus/ Jetta/ Touran замена ремня ГРМ и стекла зеркала заднего вида/ guide for removing the wing mirror glass (Гольф 5/+ и Туран 2003)
Volkswagen Golf Mark V / Golf Plus / Jetta / Touran общая информация (Фольксваген Гольф 5, Гольф плюс, Джетта и Туран)
Данное Руководство предназначено для того, чтобы автолюбитель мог грамотно обсудить и спланировать ремонт автомобиля с профессиональным механиком или выполнить его своими силами. Руководство поможет Вам определить, какую необходимо сделать работу (даже если вы решите, что Вам могут выполнить ее в мастерской), провести диагностику и предоставить информацию о техническом состоянии, определить последовательность действий и диагностики при обслуживании или ремонте. Тем не менее, надеемся, что Вы воспользуетесь данным Руководством именно для самостоятельного выполнения работ.
Проведение простых работ займет намного меньше времени, чем обслуживание автомобиля в мастерской, куда необходимо дважды приехать, чтобы оставить и забрать автомобиль. И, конечно же, самое главное, можно с:экономить немного денег, которые уйдут на оплату работы.
Для проведения технического обслуживания и ремонта необходимо иметь хороший набор метрических гаечных ключей, отверток и измерительных щупов, так как эти простейшие ручные инструменты используются при выполнении большинства работ. Иногда для ремонта необходимы спец инструменты или специальная подготовка. Об этом говорится в предупреждениях, изложенных в данном руководстве.
В Руководство включены рисунки и описания, показывающие функцию различных деталей и их расположение. Работы описываются и фотографируются в поэтапной последовательности, благодаря чему может выполнить даже новичок. Руководство состоит из 11 Разделов. Разделы поделены на Части и Главы. Имеется много иллюстраций, особенно в тех частях, где приводится детальная последовательность операций, которые нужно выполнит. Текст сопровождается пояснительными иллюстрациями. Они пронумерованы десятичными числами в соответствии с номером Главы и номером пункта в ней, например: 6.4 — иллюстрация относится к пункту 4 Главы 6. В начале Руководства дается подробное Содержание, по которому можно легко найти интересующий Вас вопрос.
«Лево» или «право» автомобиля рассматривается относительно человека, который сидит на сидении водителя лицом вперед. Если не оговорено чего-либо другое, гайки и болты отвинчиваются поворачиванием против часовой стрелки и закручиваются поворотом по часовой стрелке. Производители постоянно модифицируют автомобили, внося изменения в спецификации, технические условия и рекомендации и при уведомлении мы как можно быстрее вносим их в наше Руководство.
Пятый модельный ряд автомобилей VW Golf был представлен покупателю в сентябре 2003 года. Этот модельный ряд включает автомобили с кузовом «седан», Golf Plus и Jetta. Со сменой модельного ряда происходит почти вынужденное увеличение размеров кузова. Golf пятого поколения также стал больше в сравнении со своим предшественником. Он стал длиннее предыдущей модели на 55 мм, шире на 24 мм и выше на 41 мм при габаритах 4204 мм в длину и 1759 мм в ширину. VW Golf имеет объемную систему пассивной безопасности, элементам и которой являются подушки безопасности водителя, переднего пассажира, боковые подушки безопасности и подушки в подголовниках, натяжители ремней безопасности на передних сиденьях.
Автомобили серийно оборудуются системой стабилизации устойчивости (ESP) и усилителем тормозной системы. Усилитель тормозной системы предназначен для экстренной остановки автомобиля в случае аварийной ситуации благодаря гидравлическому приводу. Устройство увеличивает тормозное усилие даже при легком нажатии на педаль тормоза и таким образом сокращает тормозной путь в экстренных ситуациях. Автомобили Golf оснащаются разными по мощности, рабочему объему и конструкции бензиновыми и дизельными двигателями. Этим обеспечивается возможность выбора между экономичными или мощными спортивными автомобилями в соответствии с персональными потребностями и запросами. Мощность двигателя реализуется как на привод только передних колес, так и полный привод всех четырех колес.
Golf Plus
Golf Plus появился: в продаже в январе 2005 года. В сравнении с автомобилями с кузовом «Седан» он выше, а задние фонари оборудованы светодиодными лампочками.
Jetta
Автомобили Jetta в продаже с августа 2005 года. Заднее стекло имеет плавный наклон, что придаёт автомобилю контур седана. Задние фонари, как и у Golf Plus комплектуются светодиодными лампочками.
Touran
В марте 2003 года в продажу поступил компактный вэн Touran. В салоне Touran установлены пять сидений, а при необходимости может дополнительно устанавливаться шестое. Преимуществом Touran является возможность изменения конфигурации салона и его большая вместимость, составляющая 1989 литров.
Коллектив создателей данного Руководства благодарит Вас за покупку книги и желает успехов в обслуживании и ремонте Вашего автомобиля. Убеждены, что книга окажется Вам полезной.
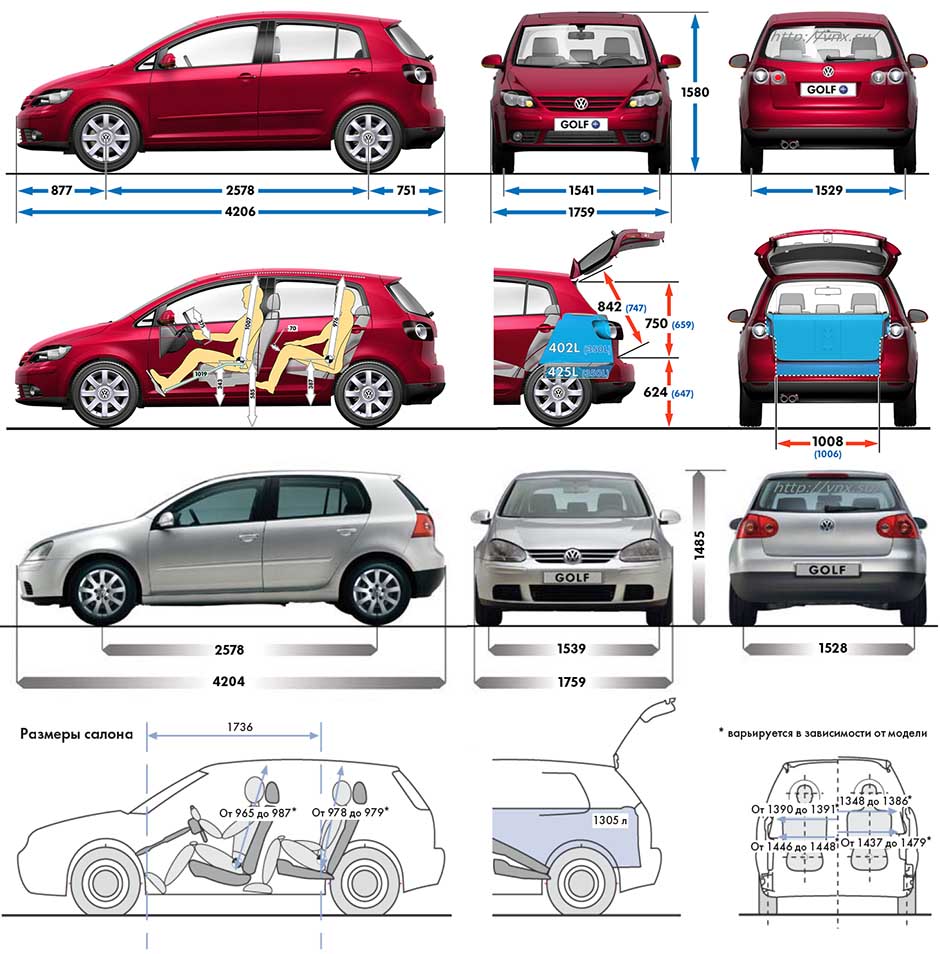
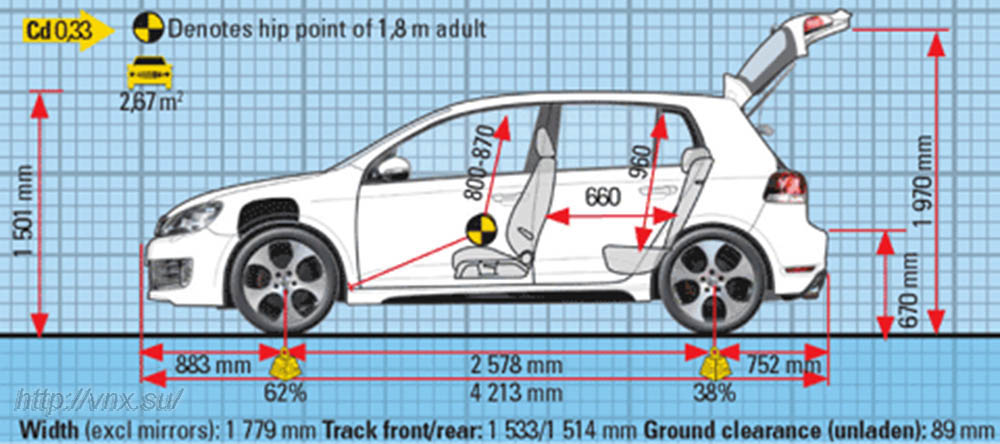
| № | Спецификация / Specs | Данные |
| Габариты (мм/mm) и масса (кг/kg) / Dimensions and Weight | ||
| 1 | Длина / Length | 4204 (4213-4216 GTI) |
| 2 | Ширина (без/с зеркалами) / Width | 1759 (1759-1779 GTI) |
| 3 | Высота (загружен/пустой) / Height | 1485 (1501 GTI) |
| 4 | Колёсная база / Wheelbase | 2578 |
| 5 | Дорожный просвет (клиренс) / Ground clearance | 115 (89 GTI) |
| 6 | Снаряжённая масса / Total (curb) weight | 1335 |
| Полная масса / Gross (max.) weight | 1860 | |
|
Двигатель / Engine |
||
| 7 | Тип / Engine Type, Code | Бензиновый, жидкостного охлаждения, четырехтактный, AXX |
| 8 | Количество цилиндров / Cylinder arrangement: Total number of cylinders, of valves | 4-цилиндровый, 16V, рядный, DOHC с верхним расположением двух распределительных валов |
| 9 | Диаметр цилиндра / Bore | 82.5 мм |
| 10 | Ход поршня / Stroke | 92.8 мм |
| 11 | Объём / Engine displacement | 1984 см³ |
| 12 | Система питания / Fuel supply, Aspiration | Непосредственный впрыск топлива, TSI, Motronic MED 9.1 |
| Двухступенчатый турбонаддув и промежуточное охлаждение наддувочного воздуха | ||
| 13 | Степень сжатия / Compression ratio | 10.5:1 |
| 14 | Максимальная мощность / Max. output power kW (HP) at rpm | 147 кВт (200 л.с.) при 5100-6000 об/мин |
| 15 | Максимальный крутящий момент / Max. torque N·m at rpm | 280 Нм при 1800-5000 об/мин |
|
Трансмиссия / Transmission |
||
| 16 | Сцепление / Clutch type | Однодисковое, сухое, с диафрагменной нажимной пружиной и гасителем крутильных колебаний, постоянно замкнутого типа |
| 17 | КПП / Transmission type | МКПП 6 шестиступенчатая механическая, двухвальная, с синхронизаторами на всех передачах переднего хода |
О Книге
- Название: Volkswagen Golf V / Golf Plus / Jetta / Touran Руководство по ремонту и эксплуатации
- Бензиновые двигатели: BCA/BKG/BLN 1.4 л FSI/TSI (1390 см³) 75-90-170 л.с./55-66-125 кВт, BGU/BSE/BSF 1.6 л (1595 см³) 102 л.с./75 кВт, BAG/BLF/BLP 1.6 л FSI (1598 см³) 115 л.с./85 кВт, AXW/BLR/BLX/BLY/AXX/BPY 2.0 л FSI/TSI (1984 см³) 150-200 л.с./110-147 кВт и дизельными BRU/AVQ/BJB/BKC/BLS 1.9 л TDI (1896 см³) 90-105 л.с./66-77 кВт, BDK/AZV/BKD/BMM 2.0 л SDI/TDI (1968 см³) 75-136-140-170 л.с./55-100-103-125 кВт
- Выпуск с 2003 года
- Серия: «Авторемонт»
- Год издания: 2007
- Автор: Коллектив авторов
- Издательство: «Ассоциация независимых издателей»
- Формат: PDF
- Страниц в книге: 264
- Размер: 57.09 МБ
- Язык: Русский
- Количество электросхем: 28