Мы прекратили активную разработку программы Encore. Версия Encore CS6 была последней.
Решения для исправления ошибки, связанной со сбоем при установке, приведены в разделе Ошибка: «Сбой установки» настольного приложения Creative Cloud. Чтобы устранить другие проблемы, связанные с загрузкой, установкой и обновлением, обратитесь к этому руководству по устранению проблем загрузки и установки.
Мы прекратили активную разработку программы Encore, пробная версия больше не доступна.
Чтобы восстановить доступ к своей учетной записи, ознакомьтесь с этими простыми решениями для распространенных проблем, связанными с Adobe ID и регистрацией.
Вы можете установить приложение Encore только на два компьютера. Если вы хотите установить приложение на третий компьютер, потребуется деактивировать его на одном из двух предыдущих компьютеров. Узнайте больше об активации и деактивации приложений Adobe.
Войдите в систему на странице учетной записи Adobe с помощью своего идентификатора Adobe ID и пароля. После этого перейдите на вкладку Конфиденциальность и защита и щелкните Изменить в разделе Пароль. Дополнительные сведения об изменении пароля и других данных учетной записи приведены в разделе Управление учетной записью Adobe ID.
См. раздел «Обработка кредитной карты и данных для выписки счетов».
Сменить тариф Creative Cloud очень просто. Следуйте этим пошаговым инструкциям, чтобы обновить или изменить тариф.
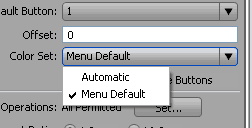
Необходимо связать Encore с подпиской на Creative Cloud. Узнайте, почему программа Encore запрашивает серийный номер при запуске.
Загрузите содержимое библиотеки и свяжите его с Encore. См. разделы Библиотека, шаблоны заголовков, шаблоны проектов отсутствуют и Загрузка полного содержимого библиотеки для Encore.
Функция Dynamic Link больше не работает в Premiere Pro. Тем не менее, вы можете импортировать содержимое из Premiere Pro в Encore несколькими способами.
Проект может быть поврежден. Решение возникшей проблемы описано в разделе Восстановление поврежденных проектов в Encore в Windows.
Дополнительные сведения приведены в PDF-файле справки по Encore.
- Создание полноценного меню и настройка его цветов
- Создание анимированных кнопок
- Субтитры и меню выбора звуковой дорожки
1. Создание полноценного меню и настройка его цветов
Как вы помните, в первой части вы создали самый простой DVD-видео диск с одной-единственной ссылкой. Несмотря на его работоспособность, получился он неказистым. А ведь воображение растет, как и желание сделать что-нибудь эдакое: так, чтоб всем на зависть!
Более сложный диск будет содержать не только одну ссылку «Play» или «Начать просмотр«, а несколько подменю, и их необходимо сначала создать. Начнем с того, что у вас уже есть начальный или сохраненный проект, в который импортированы клипы, разбитые на главы. Есть в нем и основное меню с единственной ссылкой. Поэтому сделайте еще три меню, которым вы дадите имена чуть позже.
Теперь присвойте кнопкам ссылки. Выделите первую кнопку «Начать просмотр» и присвойте ей ссылку на первую главу — Chapter 1.

Таким же образом присвойте ссылки остальным пунктам меню. Для того, чтобы проще было работать, в окне Projects поменяйте названия всех созданных вами меню на те, которые вас устраивают — к примеру, на названия ссылок.
Теперь при создании ссылок вам ничего менять не придется. Кстати, хорошо было бы переименовать и все остальные пункты в окне Projects, в частности, дать имя таймлинии.
Настало время протестировать проект — выполните команду File->Preview или нажмите кнопку Preview.
Если сразу после запуска у вас начал проигрываться фильм — не расстраивайтесь! Это произошло потому, что в свойствах диска первым заданием стоит — проигрывать диск. Для того, чтобы это проверить, щелкните в пустом месте окна Project левой кнопкой и обратите внимание на окно свойств диска.

Вас должна интересовать строка First play. Измените ее содержимое на «Главное меню» и запустите Preview. Откроется окно Project preview.
Поводите по экрану курсором мыши, и вы увидите, что текст подчеркивается при наведении мышки, а также появляется линия. Но выглядит это на первый взгляд немного нелепо. Почему? Да потому что: вспомните названия слоев в кнопках. В частности, в названиях присутствуют такие символы как (=Х). Что же это означает? Сейчас увидим.
Откройте окно редактирования цветовой гаммы проекта, выполнив команду Menu->Edit Menu Color Set…
Заметьте — для каждого меню существуют свои настройки Color Set. Поэтому, прежде чем начать работу, выберите необходимое меню.
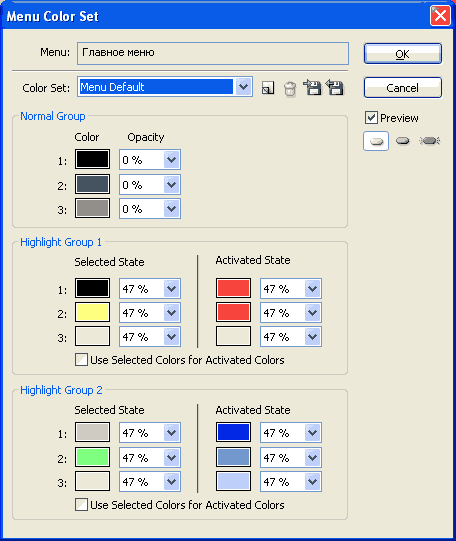
Всегда проверяйте, с каким меню вы работаете — его название отображается в верхней части окна в строке Menu. Выберите в графе Color Set параметр Menu Default, это настройка, которую можно изменить, а потом, вдобавок ко всему, еще и сохранить. После того, как вы выберете Menu Default, у вас появится возможность изменять цвета. В данном окне вы видите три группы: Normal Group, Highlight group 1 и Highlight group 2. По названию несложно догадаться, что это группы цветовых настроек. Рассмотрим для примера группу Normal. Она обозначает те цвета, которые будут иметь кнопки в нормальном, не активированном и не выделенном состоянии. А вот подгруппы 1, 2, 3 обозначают тот самый Х в выражении (=Х). Рядом с цветом можно также поставить прозрачность — это прозрачность цвета для текста или объекта. То есть, если прозрачность нулевая (0%), то какой бы вы цвет ни выбрали, на экране вы ничего не увидите. Далее вы видите две группы Highlight. Вообще достаточно было бы одной такой группы, вторая добавлена лишь ради того, чтобы добавить возможности при работе с цветами. В настройках же самого меню, а именно в окне Basic, вы можете выбрать в строке Color Set цветовые настройки (Automatic или Menu Default, или свои настройки, те самые, которые вы создали и сохранили).
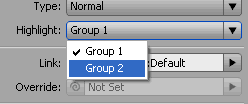
Выберите Automatic, затем щелкните по любой кнопке и обратите внимание на окно свойств, где вы ставили ссылки. Там теперь активна строка Highlight, в которой вы можете выбрать группу (либо Group1, что соответствует Highlight Group 1, либо Group2 — Highlight Group 2).
Итак, вернитесь к установкам цветовых настроек. В примере в главном меню воспользуйтесь первой группой и настройте ее по вашему желанию. Если вы хотите, чтобы выделенная и активированная ссылки были одинаковых цветов, то просто отметьте флажком пункт Use Selected Colors for Activated, после чего настройте цвета. Теперь эти цвета станут одинаковы для обоих состояний.
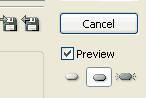
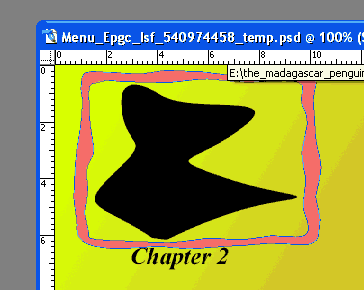
Итак, в примере текст имеет цифру 1 (=1), и, чтобы в выделенном состоянии текст не менял свой цвет, выберите тот же цвет, что и у текста вашей ссылки. В примере использовался черный, поэтому измените цвета на черный. Цифра 2 соответствует цвету линии. Изначально в примере цвет линии желтый. Поставьте синий, а прозрачность оставьте на том же уровне, то есть 47%. Интересно посмотреть, что же получилось. Сейчас необязательно запускать Preview, достаточно отметить флажком пункт Preview и пощелкать по кнопкам, отображающим состояния кнопок меню в разное время. И на экране вы увидите то же самое, что и при просмотре меню в режиме Preview.
Обратите внимание: в силу того, что линии, подчеркивающей текст, вы присвоили прозрачность 47%, произошло смешение цветов фона и тех, которые вы установили.
Основное преимущество одновременной работы с Photoshop в данном случае в том, что вы можете создавать абсолютно любые фигуры и формы, которые по вашему желанию могут появляться исчезать. К сожалению, есть и минусы. Так, если у вас в качестве кнопки присутствует цветная картинка, состоящая из множества разных цветов, и вы при этом выбрали определенный цвет для состояния «выделено», то при переходе в это состояние вся картинка потеряет все свои начальные цвета, став одноцветной. Чтобы этого избежать, попробуйте в том же Photoshop разбить картинку на составляющие по цветам, каждую составляющую перенесите в свой слой и назначьте им разные подгруппы цвета. И последнее замечание, группы цветов 1 и 2 можно присваивать не всему меню, а выбрать их для каждой кнопки отдельно, но, как было уже сказано, цветовая гамма останется для всего меню в целом одинаковая. Основное меню готово. Что же дальше?2. Создание анимированных кнопок
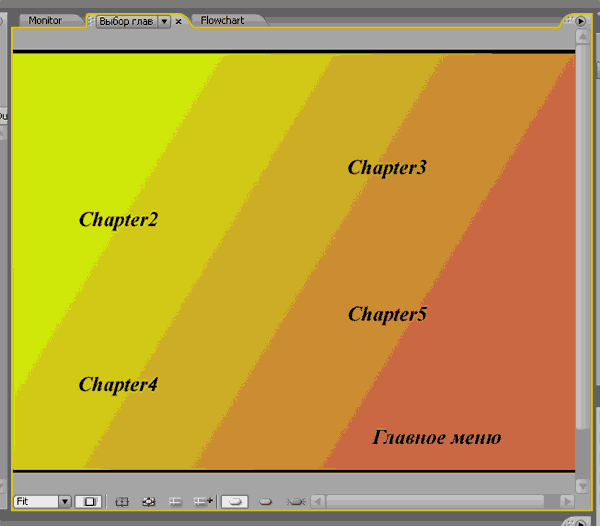
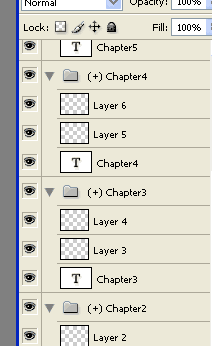
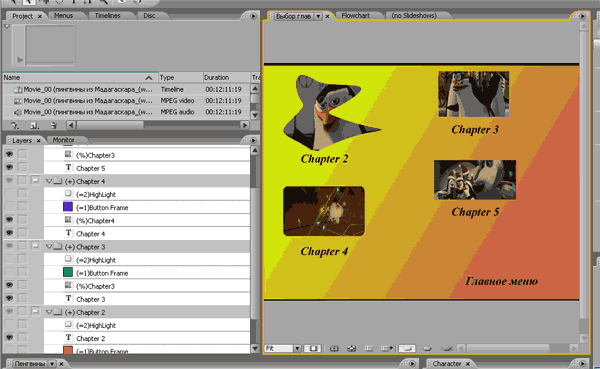
А дальше перейдите в созданное вами меню «Выбор глав«, где вы сейчас создадите двигающееся меню, то есть меню с анимированными кнопками. Меню «Выбор глав» можно выбрать путем двойного щелчка левой кнопкой мыши по нему в окнах Project или Menu. Для создания оригинальных окошек нужно снова воспользоваться Photoshop. Откройте меню для редактирования в Photoshop или нажмите Shift+Сtrl+M. Создайте в Photoshop фон. Создание анимационных кнопок очень похоже на создание обычных кнопок, за исключением некоторых нюансов. Напишите названия всех глав. В примере их пять, под названиями Сhapter1 — Сhapter5 (вы же можете работать с теми именами, которые вы им дали ранее). Вернитесь в Encore.
Из каждого текста сделайте кнопки, то есть выделите текст, нажмите Object->Convert to Button, как вы это проделывали в предыдущем меню, и снова вернитесь в Photoshop. Создайте еще по два слоя в каждой из получившихся групп.
Теперь выберите слой в группе Chapter2. Нарисуйте прямоугольник или любую другую фигуру (фигура должна быть сплошной) над или под текстом.
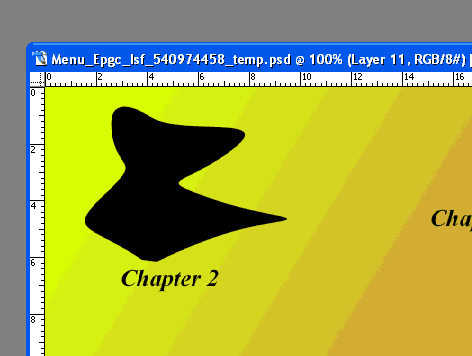
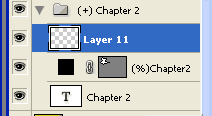
Переименуйте тот слой, на котором у Вас нарисована фигура. Обозначьте его, скажем, Chapter 2, но перед названием вставьте символы (%).
Далее в другом слое нарисуйте обычный прямоугольник вокруг той фигуры, которая уже есть.
Назовите его (=1)Button Frame, далее создайте третий слой и назовите его (=2)HighLight. Перейдите в Encore и присвойте кнопке ссылку на Chapter 2. Вместо фигуры должен появиться фрагмент фильма. И, если вы правильно выбрали Color Set — Manual default и настроили цвета, у вас получится следующее:
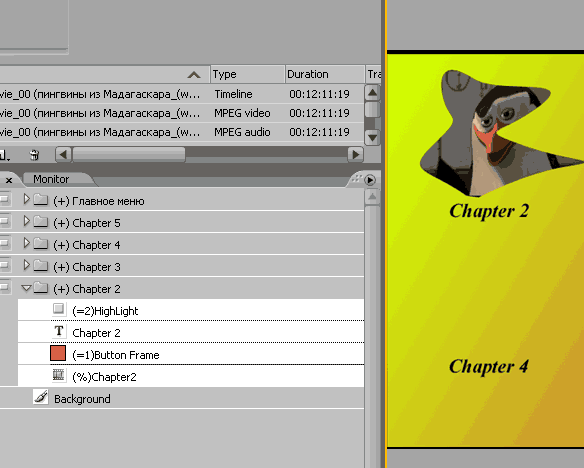
Проделайте то же самое для остальных четырех кнопок, для разнообразия можно нарисовать фигуру и рядом с текстом «Главное меню».
Вернитесь в Encore. Для того чтобы анимировать кнопки (заставить видео проигрываться в них), вы должны попасть в окно свойств меню, а именно — во вкладку Motion.
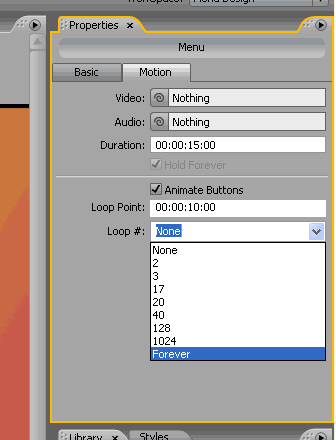
Здесь нужно отметить флажком пункт Animate Buttons, и выбрать длительность показа клипов в строке Duration (для всех кнопок длительность будет одинаковой), выбрать количество повторов проигрывания клипа (от двух до бесконечности), а также точку начала проигрывания клипа — Loop Point. Если в здесь стоит ноль, то началом проигрывания будет начало главы, что не всегда желательно — ведь, как правило, смонтированный материал имеет начальные титры или заставки.
Верхние строки Video и Audio относятся к Background video и audio, то есть к фоновым видео и аудио. Теперь вы должны просчитать (отрендерить) готовое меню. Нажмите File->Render->Motion Menus.
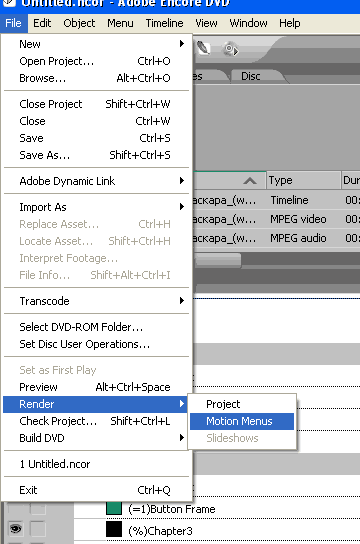
Encore начнет обрабатывать анимированное меню.
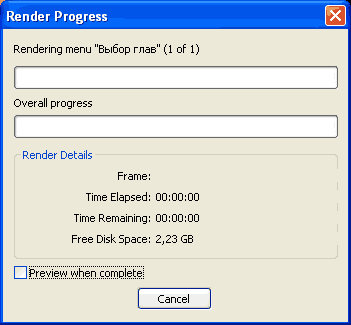
После того как, как просчет закончится, запустите Preview для проверки работы ваших ссылок и анимированного меню.3. Субтитры и меню выбора звуковой дорожки
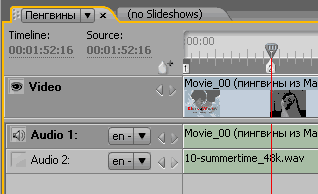
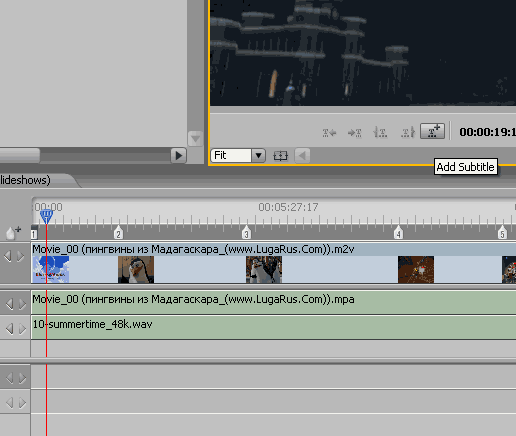
Помните, ранее вы создали еще два меню, для звуковых настроек и настроек субтитров? Вот теперь они нам и пригодятся. Задача: сделать фоновый звук на одном меню, фоновое видео — на втором, а также присвоить ссылки на настройку звука и субтитров. Итак, откройте пустое пока меню звука. Импортируйте какой-нибудь звуковой файл в окно Project. Простым движением мышки перенесите импортированный звуковой файл на таймлинию (ту, с которой вы работаете).
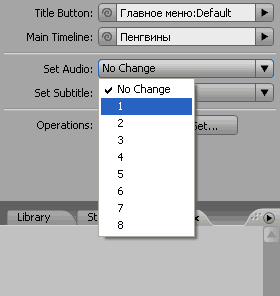
Теперь войдите в свойства будущего диска, то есть щелкните по пустому месту в окне Project и выберите в строке Set Audio тот трек, который станет проигрываться по умолчанию при запуске диска.
Далее создайте в Photoshop для меню звука фон и несколько ссылок, а именно «Трек 1«, «Трек 2«, ну, и «Главное меню» (по желанию), затем вернитесь в Encore и превратите текст в кнопки. Можно также, вернувшись в Photoshop, нарисовать галочки, которые будут появляться при выборе того или иного пункта (вы это уже проделывали в предыдущих меню). Теперь нужно присвоить кнопкам ссылки, сначала сделайте это для кнопки «Главное меню«. Для того, чтобы присвоить кнопке ссылку на трек, вы должны выделить кнопку и в окне выбора ссылок нажать Specify Link.
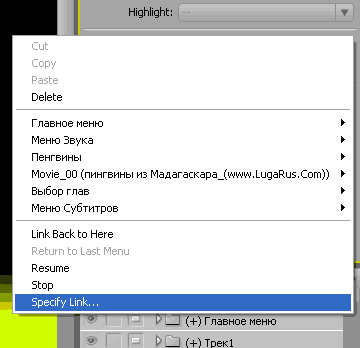
В появившемся окне выберите в строке Audio ту дорожку, которая будет установлена при активации этой кнопки, в примере — это первая дорожка . Выше установите второе действие, которое будет происходить — например, возврат в Главное меню.
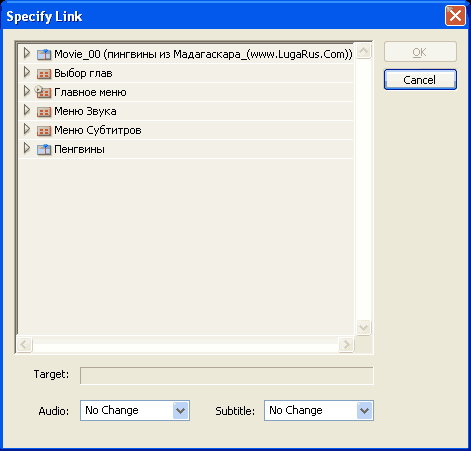
В строке Target вы увидите конечный результат ссылки.
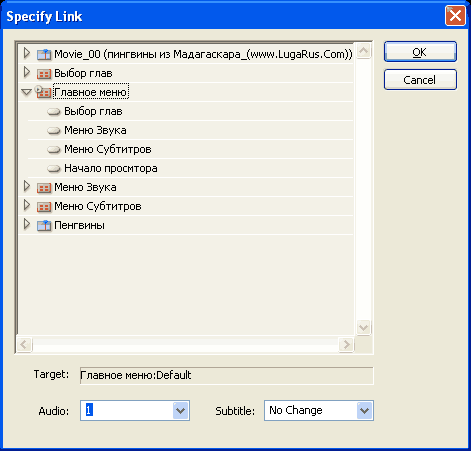
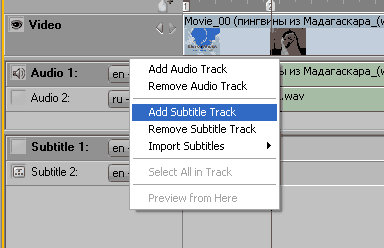
После всего проделанного нажмите ОК, название ссылки может смениться, но его всегда можно изменить на исходное. Произведите те же операции со второй кнопкой, но ссылку присвойте уже на второй трек. После того, как вы все сделали, в строке Link окна свойств кнопки, помимо ссылки на Главное меню, появятся символы A1 или А2, означающие номер аудио трека. То же самое проделайте и с меню субтитров, за исключением того, что вместо Audio нужно выбрать дорожку субтитров, или ON и OFF для их включения или выключения. Для того, чтобы создать дорожку субтитров, нужно на таймлинии щелкнуть правой кнопкой мыши и выбрать Add subtitle track.
Для того, чтобы создать субтитры, выберите нужный фрагмент на таймлинии и нажмите кнопку Add Subtitle.
На мониторе появится окно и курсор, где вы можете смело вписывать текст. Здесь вам может понадобиться окно Character.
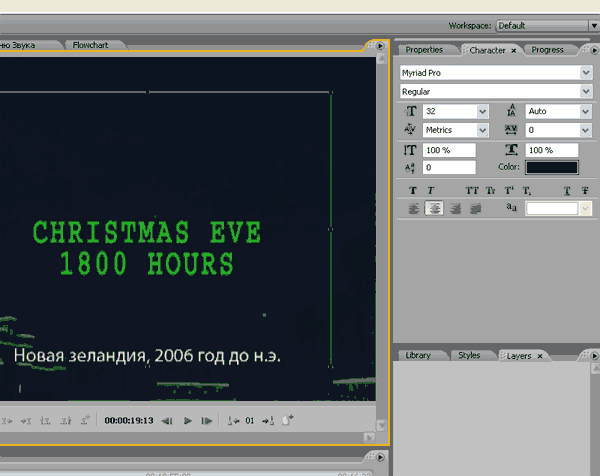
В этом окне вы можете настроить расположение текста, выбрать шрифт, его цвет и т.д. Длительность субтитра создается автоматически, изменить ее можно на той же таймлинии простым движением мыши.
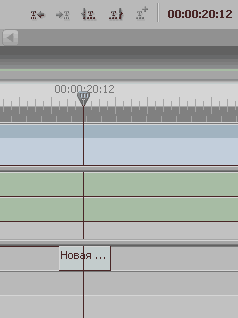
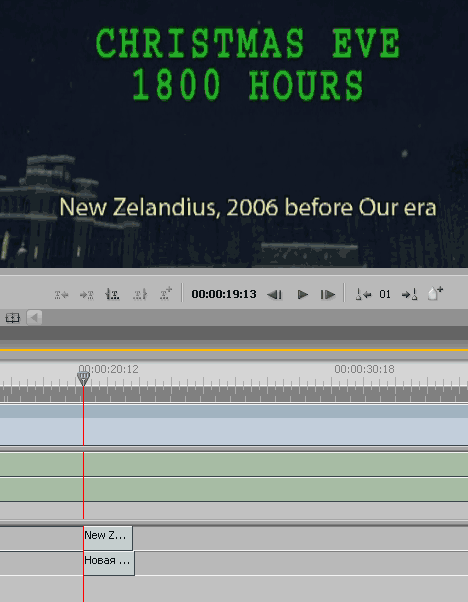
На второй линейке субтитров создайте вторые субтитры, например, на английском языке.
Перейдите к настройке меню. Создайте, как и в меню звука, несколько ссылок. Например, субтитры Off, Субтитры 1 и Субтитры 2. Далее создайте кнопки, а затем присвойте им ссылки.
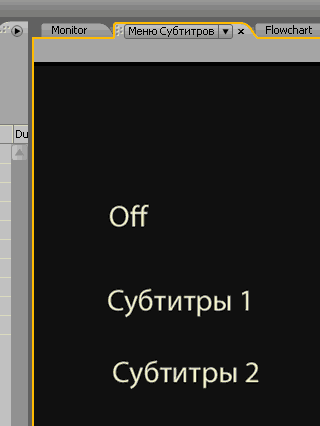
Кнопке «Субтитры 1» нужно присвоить ссылку на трек1 и на Главное меню, кнопке «Субтитры 2» — на трек2 и Главное меню, ну а кнопке «Off«, соответственно — Off и опять же Главное меню. Итак, в строке Link окна свойств должны появиться символы S1 и S2. Настройка субтитров готова.
Выполните вторую часть задачи, а именно: к меню звука добавьте фоновую музыку. Для этого щелкните по меню звука кнопкой мыши и в окне свойств перейдите во вкладку Motion. Как уже говорилось выше, в данной вкладке присутствуют две строки: Audio и Video. Щелкните и удерживайте левой кнопкой мыши значок рядом со строкой Audio и перетяните мышь на требуемый звуковой файл.
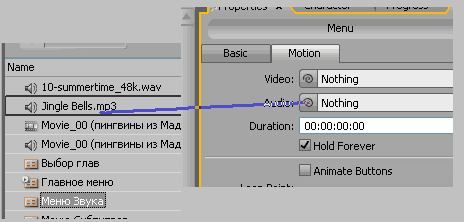
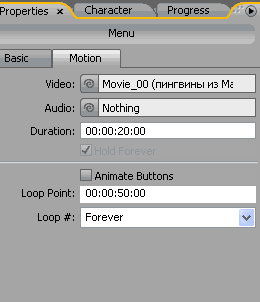
После этого в строке Audio появится название вашего файла. Не забудьте выставить длину звукового файла, а также точку начала проигрывания и количество повторений. Абсолютно таким же образом создается фоновый видеоклип для меню субтитров. Только не забудьте все-таки задать клипу приемлемую длительность, иначе объем получившегося DVD вас неприятно удивит. Для субтитров меню Motion будет выглядеть так.
Прежде чем наслаждаться результатом своих трудов, не забудьте повторить Render motion menus. Иначе вы просто ничего не увидите. Результат, как всегда, можно посмотреть, используя Preview.
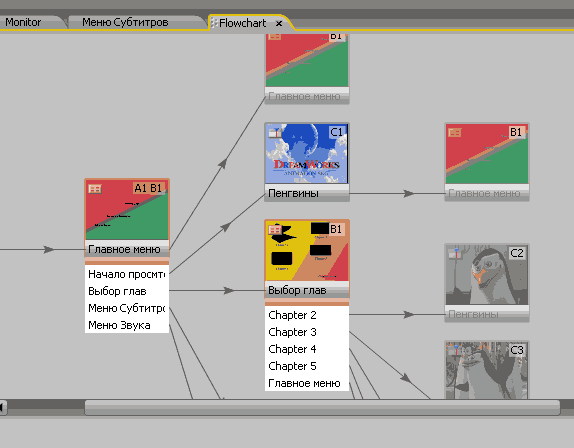
Напоследок обратим внимание на вкладку Flowchart (схема проекта). Очень полезная вещь. Данный инструмент позволит вам полностью удостовериться в правильности ваших ссылок. Здесь наглядно видно, что за чем следует, здесь можно добавить ссылки или убрать лишние элементы.
Вот ваш проект и готов, осталось лишь его скомпилировать и записать на диск, однако предварительно хорошо было бы его проверить. Нажмите File-> Check Project.

Появится окно проверки проекта.
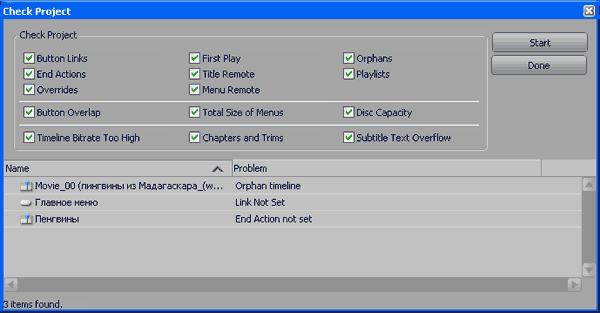
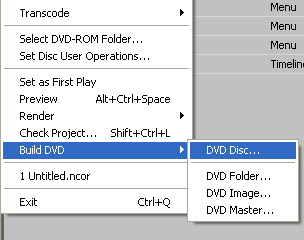
Нажмите кнопку Start, и у вас могут появиться сообщения об ошибках. Исправив все ошибки, например проставив недостающие ссылки, можно приступать к компиляции проекта. Encore позволяет создать папку с файлами DVD-видео, образ диска, или сразу записать диск. Для этого щелкните File->Build DVD->, далее выберите подходящее действие по вашему усмотрению.
В примере создадим DVD-Folder. При выборе нужного действия появится окно.
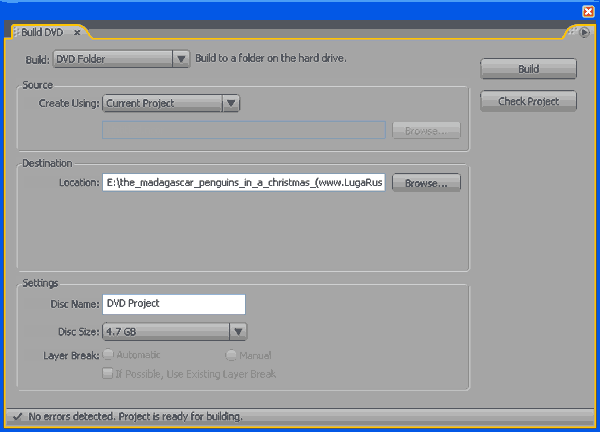
Укажите в строке Location путь к папке, где будут созданы файлы. Нажмите кнопку Build и ждите готовности проекта.
Теперь ваш DVD-видео диск полнофункционален и похож на лицензионный — действительно всем на зависть!
- Manuals
- Brands
- Adobe Manuals
- Software
- ENCORE 2
- Manual
-
Contents
-
Table of Contents
-
Bookmarks
Quick Links
Related Manuals for Adobe ENCORE 2
Summary of Contents for Adobe ENCORE 2
-
Page 1
Chapter 1: Copyright… -
Page 2
The content of this guide is furnished for informational use only, is subject to change without notice, and should not be construed as a commitment by Adobe Systems Incorpo- rated. -
Page 3: Table Of Contents
…………….. . 30 Chapter 4: Adobe Bridge and Stock Photos The basics of Bridge .
-
Page 4
Creating button subpictures in Adobe Encore DVD …….. -
Page 5
Chapter 12: Testing and building DVDs Testing DVD projects …………..186 Security and additional content . -
Page 6: Chapter 1: Getting Started
Registering your product also gives you access to the wealth of tips, tricks, and tutorials in Resource Center and access to Adobe Studio Exchange, an online community where users download and share thousands of free actions, plug-ins, and other content for use with Adobe products.
-
Page 7: Adobe Help Center
“To view support documents” on page 3 To check for updates Adobe periodically provides updates to software and to topics in Adobe Help Center. You can easily obtain these updates through Adobe Help Center. An active Internet connection is required.
-
Page 8: Using Help
The complete documentation for using your Adobe product is available in Help, a browser-based system you can access through Adobe Help Center. Help topics are updated periodically, so you can always be sure to have the most recent information available. For details, see “To check for updates” on page 2.
-
Page 9
To search Help topics Search using words or phrases to quickly find topics. You can search Help for one product or for all Adobe products you’ve installed. If you find a topic that you may want to view again, bookmark it for quick retrieval. -
Page 10: Tips, Training, And Other Resources
To change the view By default, Adobe Help Center opens in Full view. Full view gives you access to the Product Help, Expert Support, and More Resources sections. Switch to Compact view when you want to see only the selected Help topic and you want to keep the Help window on top of your product workspace.
-
Page 11
Resource Center provides a wealth of tips, tricks, tutorials, and instructional content in video, PDF, and HTML formats, authored by experts from Adobe and its publishing partners. You can search the entire collection or sort by product, topic, date, and type of content; new content is added monthly. Resource Center is available in English, French, German, and Japanese. -
Page 12
Adobe software certification programs; and more. • Visit the Adobe user forums, where users share tips, ask questions, and find out how others are getting the most out of their software. User forums are available in English, French, German, and Japanese from the main Support page of your local Adobe website. -
Page 13: New Features
Use XMP metadata to identify assets quickly or to automate tasks. View and edit XMP XMP metadata support metadata from within the Project panel in Adobe Encore DVD, or use metadata keywords to search for files in Adobe Bridge. (See “About XMP metadata” on page 71.) Use playlists to create different play orders without duplicating content.
-
Page 14: Chapter 2: Workflow And Workspace
Workflow and workspace basics Workflow overview Adobe Encore DVD lets you create many different kinds of DVDs. Whether the content is a feature film, a wedding, a training course, or an art collection, the basic steps of creating a DVD are the same.
-
Page 15
Simple sketch of intended navigation scheme Import assets Prepare your source material (assets) for the DVD, and import them into Adobe Encore DVD. The assets include any video, still images, audio, and subtitles for your project. Before you import your content into Adobe Encore… -
Page 16
Project panel containing audio asset (A) and video asset (B) being added to timeline element Create menus The menus give the viewer access to the DVD content. You can create menus directly in Adobe Encore DVD, customize predesigned menus included with the application, or create and edit menus in Adobe Photoshop . -
Page 17
If you imported video and audio files that aren’t DVD-compatible, Adobe Encore DVD transcodes the files before you burn the DVD. You can let Adobe Encore DVD determine the best settings for transcoding or select the options you feel are best for your project. For more information, see “About transcoding” on page 28. -
Page 18
ADOBE ENCORE DVD 2.0 User Guide Right-clicking asset (B) in Project panel (A) and choosing preset from Transcode Settings submenu (C) Preview the project You should preview and check a project throughout the authoring process, especially before you burn the DVD. -
Page 19
Burn the DVD You can build or burn, the DVD directly from Adobe Encore DVD. Or, if you plan to use a replication facility, you can write to a DLT drive, prepare a folder, or create a DVD image to give to the replicator. For more information, see… -
Page 20
As you rearrange panels, the other panels resize automatically to fit the window. You can use floating windows to create a workspace more like those in previous versions of Adobe applications, or to place panels on multiple monitors. -
Page 21
A. Application window B. Grouped panels C. Panels About menus In addition to the menus at the top of your screen, Adobe Encore DVD also provides context, panel, and viewer menus. Context menus contain commands relative to the active tool or selection. Panel menus contain commands relevant to the active panel. -
Page 22: Customizing The Workspace
Flowchart. It also contains shortcuts for editing a menu in Adobe Photoshop and previewing a project. (See “About text in menus” on page 95, “About subtitles” on page 154, and “Using Photoshop to create Adobe Encore DVD menus”…
-
Page 23
ADOBE ENCORE DVD 2.0 User Guide Grouping The drop zone in the middle of a panel or group, as well as the zone along the tab area of a panel, are grouping zones. Grouping a panel adds it to an existing group, placing it at the top of the stacking order. Grouping a panel does not resize other groups. -
Page 24
You can open a panel in a floating window. You can add panels to the floating window or otherwise modify it, as you do the application window. You can use floating windows to create a workspace like those in earlier versions of Adobe applications, or to make use of a secondary monitor. ❖… -
Page 25: Predefined Workspaces
Predefined workspaces To use an Adobe workspace Each Adobe video and audio application includes several workspaces for various tasks. For example, Adobe Encore ® DVD has workspaces for editing in the Timeline and for designing slideshows, menus, and navigation. You can choose a workspace at any time.
-
Page 26
ADOBE ENCORE DVD 2.0 User Guide To create or modify a workspace As you modify a workspace, the application tracks changes, saving any modifications with the project. The next time you open the project, the most recent version of the workspace is used. You can also choose to restore the original layout of the workspace. -
Page 27: Chapter 3: Planning The Project
Chapter 3: Planning the project Planning the DVD About planning The first task of authoring a DVD is planning. This planning can be as minimal as deciding to use a template to organize your family’s vacation photos and video, or as robust as using project management software to coordinate a production team creating an interactive kiosk.
-
Page 28: Balancing File Size And Quality
This balance is achieved by manipulating the video content’s data rate—either automatically (by letting Adobe Encore DVD set the data rate) or directly (by setting the transcoding settings or using a third-party application).
-
Page 29
Determining disc size Before you can prepare a bit budget, you must determine the size of DVD on which to distribute your project. Adobe Encore DVD can create projects for a variety of DVD sizes. The size you choose is based on the amount of video and the replication method. -
Page 30
For video assets, the Adobe Encore DVD transcode presets use data rates ranging from 4 to 9 Mbps. You can edit the presets’ data rates, but you cannot exceed 9.0 Mbps, nor can you go below the Adobe Encore DVD minimum data rate of 2.0 Mbps. -
Page 31: Bit Budgeting
For large, complex projects, though, bit budgeting becomes much more important to the authoring process, providing a check against the actual data rates achieved. Generally, for projects with less than two hours of video, you can skip bit budgeting and let Adobe Encore DVD set the data rate automatically.
-
Page 32
ADOBE ENCORE DVD 2.0 User Guide Average asset size Use the following averages for bit budgeting: If compressed using the Dolby Digital Stereo standard, audio is generally 192,000 bps (0.192 Mbps). Use 0.192 Audio Mbps or reference the settings for the audio encoder you plan to use. -
Page 33: Transcoding
DVD-compliant elements that will be burned to the disc. (Files that are already DVD- compliant do not require transcoding.) The transcoding feature of Adobe Encore DVD is flexible enough for a variety of users. New users unfamiliar with transcoding can let the application manage the process entirely, while those with more experience can control it precisely.
-
Page 34
You can assign transcode settings and transcode assets directly from the Project panel. Upon transcoding a file, Adobe Encore DVD updates the project link so that it points to the transcoded file. Consequently, unless you delete the original file, you can revert transcoded assets to their original version. Adobe Encore DVD transcodes in the background, so you can continue to work while transcoding. -
Page 35: Presets
ADOBE ENCORE DVD 2.0 User Guide To transcode an asset Right-click the asset you want to transcode. Choose Transcode Now. The asset is transcoded, and the Transcode Status column displays Transcoded. The transcoded asset is now used for authoring, previewing, and building.
-
Page 36
ADOBE ENCORE DVD 2.0 User Guide The Project Transcode Settings dialog box displays the Source or Ouput image (A) and the preset settings (B). See also “About transcoding” on page 28 Preset options for video Depending on the preset you’ve selected, the Video tab of the Project Transcode Presets dialog box contains some or all of the following options: Specifies the encoding quality. -
Page 37
MainConcept MPEG Audio uses MPEG-1Layer II audio in stereo. • PCM (Pulse-Code Modulation) Audio is a lossless audio format sampled at 48 kHz in Adobe Encore DVD. Files of this format tend to be large, occupying more disc space than the other encoder formats. -
Page 38
ADOBE ENCORE DVD 2.0 User Guide Click either the Audio or Video tab and adjust an option as desired. (See “Preset options for video” on page 31 and “Preset options for audio” on page 32.) When you are finished adjusting the options, click the Save button Type a name for your preset, and click OK. -
Page 39: Chapter 4: Adobe Bridge And Stock Photos
Bridge to organize, browse, and locate the assets you need to create content for print, the web, television, DVD, film, and mobile devices. Bridge keeps native Adobe files (such as PSD and PDF) as well as non-Adobe appli- cation files available for easy access.
-
Page 40
For example, if you choose File > Browse from within Adobe Premiere and then double-click a Photoshop file, the file is added to the Premiere Project panel, not opened in Photoshop. -
Page 41
ADOBE ENCORE DVD 2.0 User Guide To use Bridge in Compact mode Switch to Compact mode when you want to shrink the Bridge window. In Compact mode, the panels are hidden and the content area is simplified. A subset of common Bridge commands remains available from the pop-up menu at the upper right portion of the window. -
Page 42
You can save the current Bridge layout (that is, the work area configuration) as a workspace and reuse it later. By saving Bridge in various configurations, you can work in (and quickly switch between) different layouts of the work area. For instance, you might use one workspace to sort new photos and another to work with Adobe InDesign files. -
Page 43
Look In menu. Sets the language used in the Bridge interface. Language Opens camera raw files in the Adobe Camera Raw dialog box in Double-Click Edits Camera Raw Settings In Bridge Bridge. Places the two cache files created for each folder you view in a centralized folder. A Use A Centralized Cache File centralized cache is generally easier to use than a distributed cache. -
Page 44: Files And Folders In Bridge
Depending on the view you’re in, you can display extra file information by positioning the pointer over a thumbnail in the content area. For files in Version Cue projects (Adobe Creative Suite 2 only), you can also choose File >…
-
Page 45
Show Folders to display folders as well as individual files. • Show All Files to display all files regardless of type, even non-Adobe files that Bridge doesn’t normally display. • Show Graphic Files Only to display only files in graphic file formats, such as EPS, JPEG, BMP, PS, TIFF, and GIF. -
Page 46
Note: If you have Adobe Creative Suite 2, you can also use Adobe Version Cue from Bridge to manage files you author. You can create and manage revisions to files kept in Version Cue projects. Version Cue is also a convenient environment for collaborative file management in workgroups. -
Page 47
ADOBE ENCORE DVD 2.0 User Guide Select the files and drag them onto the desktop or into another folder. This action moves To drag files out of Bridge the file onto the desktop or folder. Select one or more files on the desktop, in a folder, or in another application that supports To drag files into Bridge drag and drop, and drag them into the content area in Bridge. -
Page 48
(Optional) Select Include All Subfolders to expand the search to any subfolders in the source folder. (Optional) Select Search Past Versions Of Version Cue Files to include past versions of Adobe Version Cue files, as well as current ones, in the search (Adobe Creative Suite 2 only). -
Page 49: Running Automated Tasks With Bridge
The Tools menu contains submenus for various commands available in the different Adobe applications. For instance, if you have Adobe Photoshop installed, you can use the commands under the Tools > Photoshop submenu to make picture packages and create Photomerge panoramas using photos you select in Bridge. Running these tasks from Bridge saves time because you don’t have to open each file individually.
-
Page 50: Metadata In Bridge
Extensible Metadata Platform (XMP) standard on which Adobe Bridge and the Adobe Creative Suite applications are built. XMP is built on XML, and in most cases the information is stored in the file so that it cannot be lost. If it is not possible to store the information in the file itself, XMP metadata is stored in a separate file called a sidecar file.
-
Page 51
Displays settings applied by the Camera Raw plug-in. Camera Raw Keeps a log of changes made to images with Photoshop. Edit History Lists information about images obtained from Adobe Stock Photos. Adobe Stock Photos Lists any Version Cue version information about the file. Version Cue Note: Depending on the applications you are using, custom panels for various properties may appear here as well. -
Page 52
Displays read-only information about the camera and settings used to take the photo, such as make, Camera Data 1 model, shutter speed, and f-stop. The Camera Data 1 option appears only if Adobe Photoshop or Production Studio is installed. Lists read-only file information about the photo, including pixel dimensions and resolution. The Camera Data 2 Camera Data 2 option appears only if Adobe Photoshop or Production Studio is installed. -
Page 53
You can modify the metadata in the File Info dialog box and save it as a template for use with other files. Create a new file using an Adobe Creative Suite or Production Studio application. This creates a file without metadata from any other source. -
Page 54
Bridge, select the keyword and then choose Persistent from the context menu. • To find a file using the keyword, choose Find from the panel menu. Note: You can’t modify keywords in search results for Adobe Stock Photos. See also “To search for files and folders with Bridge” on page 43… -
Page 55: Adobe Stock Photos
Stock Photos and Adobe applications, you can download images from Adobe Stock Photos directly into many Adobe applications. In the design process, you need the flexibility to try different images before deciding which one you want. Adobe Stock Photos gives you the option to download low-resolution, complimentary (comp) versions of images you’re considering.
-
Page 56
“To view file and folder thumbnails in Bridge” on page 39 To search for stock photos In Bridge, click Adobe Stock Photos in the Favorites pane. In the text box at the top of the screen, type the word or phrase that describes the subject of the photos you want to search for. -
Page 57
Note: The currency displayed in the Price & Keywords dialog box may not be the native currency of your billing country; it is the supported currency for purchases made from your country. When you purchase photos from Adobe Stock Photos, your credit card will be billed in the supported currency. -
Page 58: Comp Images
Buying stock photos It’s simple to buy images through Adobe Stock Photos. When you find the photos you want to buy, put them in your shopping cart. The photos remain in your cart until you’re ready to complete your purchase. When you finish browsing, you can check out and have your images automatically downloaded to your computer.
-
Page 59
• If you have an Adobe account, enter your ID and password. • If you want to open an Adobe account, click Set Up An Account. You are prompted to enter your billing and account information. • If you want to buy the images without an account, click Continue As Guest. You are prompted to enter your billing information. -
Page 60: Stock Photos Accounts
Stock Photos Accounts Benefits of Stock Photos accounts Creating an Adobe account makes purchasing photos quick and easy. When you log in with your e-mail address and password, you can work with your account in several ways: After you complete the registration process, modify your account information anytime by Manage your profile clicking the Your Account link in the navigation bar.
-
Page 61
• To sign up to get e-mail from Adobe Stock Photos about promotions or other special information, select the check box. To confirm your changes, click Save. To go back to the main Your Account page without saving changes, click Return To Your Account. -
Page 62
In the Your Order History page, click the order number (highlighted in blue) of the photo you want to download again. In the Order Detail page, click the arrow under Download. The photo is downloaded. By default, purchased images are located at My Documents/AdobeStockPhotos/Purchased Images (Windows) or Documents/Adobe- StockPhotos/Purchased Images (Mac OS). -
Page 63
Country menu. The currency displayed next to the Billing Country menu may not be the native currency of that country (not all currencies are supported). Instead, it’s the currency Adobe allows for that country. Your credit card is billed in the supported currency. -
Page 64: Chapter 5: Creating Projects And Importing Assets
About projects Adobe Encore DVD files are called projects. A project stores links to all the content that you intend to include on the DVD, as well as the menus and timelines (which combine video or stills, audio, and subtitles). Adobe Encore DVD creates a folder for your project in the same location as the project file.
-
Page 65: Aspect Ratios
1.22, and as a regular 4:3 screen if it contains nonsquare pixels with a ratio of .9. Adobe Encore DVD lets you specify the pixel aspect ratio…
-
Page 66
Occasionally, an asset may contain incorrect information which, in turn, prevents Adobe Encore DVD from identifying it correctly. If you need to change an asset’s pixel aspect ratio, you can use the Interpret Footage command to specify it. -
Page 67
The screen aspect ratio is determined by two factors: the resolution of the image and the size of the pixels within it, or the pixel aspect ratio. As the resolution for a given asset is constant, (for example 720 x 480), Adobe Encore DVD sets screen aspect ratios based on the asset’s pixel aspect ratio. -
Page 68: Importing
To specify the screen aspect ratio Adobe Encore DVD determines the screen aspect ratio for you. You can, however, change it if necessary. The type of asset determines how you specify the screen aspect ratio. For menus, and timelines containing still images but no video, you specify the screen aspect ratio in the Properties panel.
-
Page 69
Also, because the content is already DVD-compliant, the time it takes to build the project will be reduced. Note: In certain instances, Adobe Encore DVD needs to transcode DVD-compliant files. For example, if the data rate of a DVD-compliant file is too high for the amount of content, the program transcodes the file to bring its data rate down. -
Page 70
To import as a timeline You can import an asset and create a timeline for it in one step. When you import an asset as a timeline, Adobe Encore DVD places both the asset and its timeline in the Project panel. The timeline also appears in the Timeline panel. -
Page 71
Importing from Adobe After Effects You can import a file from Adobe After Effects either as a discrete movie file, or as an Adobe Dynamic Link. The Adobe Dynamic Link option provides the most workflow-friendly import. It lets you import an After Effects compo- sition without rendering it. -
Page 72: Adobe Dynamic Link
To create a new Library set, choose New Set from the Library menu. Type a name for the new set, and click OK. Adobe Dynamic Link About Adobe Dynamic Link (Adobe Production Studio only) Until now, sharing media assets among post-production applications has required you to render your work in one application before importing it into another—an inefficient and time-consuming workflow.
-
Page 73
In Adobe Premiere Pro, you can preview the linked composition in the Source Monitor, set In and Out points, add it to a sequence, and use any of the Adobe Premiere Pro tools to edit it. When you add a linked composition that contains both footage and audio layers to a sequence, Adobe Premiere Pro inserts linked video and audio clips in the timeline. -
Page 74
Adobe Premiere Pro or Adobe Encore DVD project. (If After Effects is already running, it creates a new compo- sition in the current project.) The new composition name is based on the Adobe Premiere Pro or Adobe Encore DVD project name, followed by “Linked Comp [x]. -
Page 75
Note: If you change the name of the composition in After Effects after you’ve created a dynamic link to it from Adobe Premiere Pro, Adobe Premiere Pro doesn’t update the linked composition name in the Project panel, but retains the dynamic link. -
Page 76: Xmp Metadata
In Adobe Encore DVD, choose File > Transcode Now. You can temporarily suppress a linked clip in Adobe Premiere Pro by selecting the clip and choosing Clip > Enable. To relink the clip, choose Clip > Enable again (a check mark next to the command indicates that the clip is enabled).
-
Page 77: Working In The Project Panel
The Project panel contains all the audio, video, and still-image assets you can use for a project. It also lists the timelines, menus, slide shows, playlists, and chapter playlists created for the project. Each asset you bring into Adobe Encore DVD is identified by a representative icon in the asset list. The list can be customized to group assets into various categories, and to group them into folders you create.
-
Page 78
Displays date and time of the last modification to the file. Last Modified Displays the system location of the asset. This column is blank if Adobe Encore DVD can’t find the asset. File Path (See “To locate a missing asset” on page 74.) To customize the Project Panel You can customize the Project panel columns to best suit your working style and needs. -
Page 79
A. Play/Pause B. Current-time indicator Note: If a still image (such as a TIFF file) doesn’t match the project aspect ratio, Adobe Encore DVD crops or mattes it to fit the project’s frame size. Using the Still Clip Properties panel, you can control how the image is placed in a timeline, such as whether it is scaled and cropped or matted with black. -
Page 80: Chapter 6: Menus
Chapter 6: Menus Menu basics About menus Menus contain navigation buttons that give viewers access to the DVD contents. Menu buttons can play a movie or individual chapter, jump to other menus, set active audio and subtitle tracks, or play back special features on the DVD.
-
Page 81
ADOBE ENCORE DVD 2.0 User Guide DVD menu A. Buttons lead to DVD content B. Subpicture highlights button when selected or activated C. Background A menu can include text, still images, motion footage, and audio. Depending on its composition, a menu is considered either a still menu or a motion menu: A menu composed of static images. -
Page 82
Adobe’s predesigned menus and buttons include subpictures. You can let Adobe Encore DVD create subpictures for you by using the Create Subpicture command or the Convert To Button command. In Adobe Photoshop, you can design your own subpictures. (See ““Using Photoshop to create Adobe Encore DVD menus” on page 114”.) See also “About button subpictures”… -
Page 83
Library panel so that menus and designs that you use frequently are right at hand. Visit Resource Center on the Adobe website to view a tutorial about using the menus in the Library. Items in the Library panel are organized into thematic sets, such as Education, Corporate, or Wedding. You can create your own sets or add to the existing sets. -
Page 84
You can use the predesigned buttons and backgrounds included in the Predesigned buttons and backgrounds Library panel to create menus right in Adobe Encore DVD. (See “To create a menu using backgrounds and other predesigned items” on page 81.) You can compose a menu using any visual asset that you import into your project. You can use Assets from projects both still and moving images for either the background or buttons. -
Page 85
ADOBE ENCORE DVD 2.0 User Guide Properties panel for selected menu (left) and selected button (right) Select the menu in the Project panel or Menus panel. In the Properties panel, select the current name and type a new name. In the Description box, type any notes about the menu. -
Page 86: Creating Menus
Set links from the buttons to other submenus or to items in the Project panel. (See “About buttons and navigation” on page 173.) Note: For a tutorial on creating menus using the Library panel, go to Resource Center on the Adobe website. See also “Using Photoshop to create Adobe Encore DVD menus”…
-
Page 87
If you want to change the menu design after you create and edit a menu, you can use the Replace Menu command. When you replace a menu, Adobe Encore DVD preserves menu settings, including button links, button order, and loop count. -
Page 88: Adding Objects To Menus
Drag the object (such as a video file, timeline, or menu) from the Project panel to the menu in the Menu Viewer. If you drag an object such as a timeline or slide show to a blank area, Adobe Encore DVD creates a button (based on the default button in the currently active set in the Library panel) and links it to the destination.
-
Page 89
Choose Object > Convert To Button (or click the Button column next to the image layer in the Layers panel). Adobe Encore DVD creates a layer set with the prefix denoting a button set (+) attached to the name. It places the object into the layer set and creates a subpicture for the button. -
Page 90: Editing Menu Objects
ADOBE ENCORE DVD 2.0 User Guide Editing menu objects Selection tools The toolbox contains two selection tools for objects: Selects an entire button set (a button, its text, and subpictures together) so that it can be manipu- Selection tool lated as a unit.
-
Page 91
Each object you add to a menu appears on a separate layer in the Layers panel in Adobe Encore DVD. Selecting objects in the Menu Viewer is sometimes easier when you use the Layers panel. Regardless of where an object is in the stacking order, you can quickly select it by selecting its layer in the Layers panel. -
Page 92
In the Rename Layer dialog box, type the new name and click OK. Note: In Adobe Encore DVD, you can’t change the layer name prefixes of a button layer set (+), subpicture layers (=1), (=2), or (=3), replacement layers (!), or thumbnail layers (%). You can edit the prefixes in Photoshop. -
Page 93: Transforming Menu Objects
In the Layers panel, open the layer set into which you want to add the object, and select any object in the layer set. Choose Edit > Paste. Adobe Encore DVD adds the object to the top layer of the layer set. You can also use the Object > Arrange commands to change the order of objects.
-
Page 94
Using the Align command, you can easily align buttons and subpictures with each other or with other design elements in a menu. Adobe Encore DVD gives you several options for aligning objects. You can align the left, center, or right edges on the vertical axis; or you can align the top, middle, or bottom on the horizontal axis. You can either align the objects relative to each other or align them to the title safe area. -
Page 95
ADOBE ENCORE DVD 2.0 User Guide To distribute menu objects If you want a series of buttons or objects to be evenly spaced, you don’t need to calculate the appropriate distance between them. The distribute options can place them evenly apart for you, either horizontally or vertically. You can choose to distribute them between the two outermost objects or between the borders of the Title Safe area. -
Page 96
If you apply a drop shadow to a button or layer set, Adobe Encore DVD applies it to the bottommost layer. -
Page 97: Predefined Styles
Spread When editing the menu in Photoshop, you can edit the drop shadow applied to a menu object in Adobe Encore DVD. Drop shadows applied using Object > Drop Shadow may be replaced or removed when you apply a predefined style.
-
Page 98
ADOBE ENCORE DVD 2.0 User Guide Styles panel A. Name of currently displayed set B. Preview of selected style C. Panel menu with additional options D. Buttons to display different types of styles: Image, Text, and Shape E. Apply Style F. Add Style G. Delete Style The Styles panel divides styles into three categories: Image, Text, and Shape. -
Page 99: Using Guides In Menus
A. Zero point of menu B. Horizontal guide C. Vertical guide The guides you create are specific to that menu. They are saved in the menu and transfer with a menu between Adobe Encore DVD and Photoshop. Any changes you make to the guides in either program transfer with the menu.
-
Page 100: Adding Text To Menus
In addition to providing standard control over the appearance of the type, Adobe Encore DVD also lets you transform a text block as if it were an object. You can edit the text you add to a menu in either Adobe Encore DVD or Photoshop.
-
Page 101
ADOBE ENCORE DVD 2.0 User Guide To resize the text bounding box Open the menu containing the text block. Select either the Vertical or Horizontal Text tool from the toolbox. Click an insertion point in the text. The text bounding box appears. -
Page 102
Character panel Adobe Encore DVD gives you advanced typographic control over your text. Using the Character panel, you can kern, track, shift the baseline, and scale text. You can set type attributes before you enter characters, or you can restyle and reformat existing text. -
Page 103
ADOBE ENCORE DVD 2.0 User Guide Character panel with Asian text options displayed A. Fonts and font attributes B. Font Style buttons C. Alignment options D. Asian Text options E. Character panel menu F. Text Antialias Mode options Fonts and font attributes The Character panel gives you precise control over individual characters including font, size, color, leading, kerning, tracking, and baseline shift. -
Page 104
Sets the leading (the amount of space between lines of type measured baseline to baseline). Auto sets the leading at 120% of the font size of the text. If characters on a line have different settings, Adobe Encore DVD uses the largest leading value for the entire line. -
Page 105
Determines line breaks in Japanese type. Characters that cannot begin a line or end a line are known Kinsoku Shori as kinsoku characters. Adobe Encore DVD includes weak and maximum kinsoku sets. The option None turns off the use of kinsoku shori. The options JIS Weak or JIS Maximum prevent the following characters from beginning or… -
Page 106
Characters that can’t end a line Characters that can’t end a line Determines spacing between punctuation, symbols, numbers, and other character classes in Japanese Mojikumi type. Adobe Encore DVD includes several predefined mojikumi sets. • None turns off the use of mojikumi. •… -
Page 107
ADOBE ENCORE DVD 2.0 User Guide Original text (left) and text with rotation applied (right) (Also called kumimoji and renmoji) Changes the orientation of the characters from vertical to Tate-chuu-yoko horizontal. The characters rotate 90 degrees as a group. You can select, edit, and format the rotated text just as you do the vertically-oriented characters. -
Page 108: Chapter 7: Menus: Beyond The Basics
(See “Controlling menu display time and looping” on page 107.) If you want a smaller image, consider resizing or masking the video in a video-editing application, such as Adobe Premiere Pro, or masking a portion of the video with a layer in the menu.
-
Page 109: Video Thumbnail Buttons
If the image is not rectangular, Adobe Encore DVD calculates the smallest rectangle in which the image could fit. The video remains rectangular regardless of the shape of the image layer.
-
Page 110
ADOBE ENCORE DVD 2.0 User Guide Video thumbnail button and corresponding button layers in Layers panel See also “To add a video background to a menu” on page 103 To customize video thumbnail buttons The easiest way to create a video thumbnail button is to drag a button from the Library panel into your menu and then edit the button. -
Page 111
Repeat steps 3 through 6 for any additional thumbnail buttons you want to create. In Photoshop, choose File > Save, and then choose File > Close. Photoshop saves the changes and updates the menu in Adobe Encore DVD. See also “To specify a link”… -
Page 112: Menu Display Time And Looping
In the Properties panel, click the Motion tab and select Animate Buttons. The Animate Button property controls the state of all the video thumbnail buttons on the menu. You cannot set them individually. Adobe Encore DVD composites the video into the button during the build process. See also “Controlling menu display time and looping”…
-
Page 113
ADOBE ENCORE DVD 2.0 User Guide About Loop # and Duration You can set the display time of a menu to a specific amount (called Duration). For motion menus, the Duration setting determines how long the menu plays before either repeating itself (called Loop #) or triggering the end action. -
Page 114: Menu Templates
User Guide A Loop Point is often used when a menu has been animated in Adobe After Effects. For example, you can create a video in After Effects in which the button images fly in from different points and settle into position after 15 seconds.
-
Page 115
When creating a menu template, you can select the Self-Contained option, which determines how the menu template is saved in the folder structure on disk. If you select this option, Adobe Encore DVD creates a folder in the same location as the menu template (EM) file with the same name as the EM file. This folder includes the Photoshop (PSD) file and any assets used in the menu background, making the menu template easy to transfer to a different computer. -
Page 116: Replacement Layers
You can add replacement layers to the Library panel, where they’re sorted in their own category. (See “To add items or sets to the Library” on page 67.) To create a replacement layer in Adobe Encore DVD In the Menu Viewer, open the menu to which you want to add the replacement layer.
-
Page 117: Chapter Indexes
In the Menu Viewer, select the layer you want to convert. Choose Object > Convert To Replacement Layer. Adobe Encore DVD creates a layer set with the (!) prefix, which indicates a replacement layer. See also “To convert a button or replacement layer to an object” on page 84…
-
Page 118
User Guide Automatically generated submenus For a tutorial on creating a chapter index, visit Resource Center on the Adobe website. To create a chapter index Create or open the menu to use as the basis for the chapter index menu. -
Page 119: Using Photoshop To Create Menus
Adobe Encore DVD automatically recognizes button sets, button subpictures, replacement layers, and video thumb- nails. Once imported, you can edit or modify the menu as you would any menu created in Adobe Encore DVD, or jump back into Photoshop to fine tune it using Photoshop’s extensive design tools.
-
Page 120
Understanding layer name prefixes for Photoshop menus For Adobe Encore DVD to recognize the components of a menu from Photoshop, you must add predefined prefixes to the layer names. The prefixes identify the layers as button sets, video thumbnails, replacement layers, and button subpictures. -
Page 121
ADOBE ENCORE DVD 2.0 User Guide Layers panel in Photoshop (left) compared to the same layers in Layers panel in Adobe Encore DVD (right) The following layer-name prefixes identify the components of your menu: Menu item Photoshop component Layer-name prefix… -
Page 122
Once the copy is saved, you can also save changes to the original file by choosing File > Save As in Photoshop or Menu > Save Menu As File in Adobe… -
Page 123: Using After Effects To Enhance Menus
Loop Point to initially disable buttons. In After Effects you can also create a menu from a composition and then import it as a menu into Adobe Encore DVD. The After Effects Create Button command lets you assign button subpicture layers and a video thumbnail layer for each button set.
-
Page 124
Animating menus using Create After Effects Composition command A. Create complete version of menu. B. In After Effects, animate menu. C. In Adobe Encore DVD, hide layers so that they don’t appear over background video (only button subpictures should remain visible). D. Link menu in Adobe Encore DVD with animated background from After Effects. -
Page 125: Creating Button Subpictures In Adobe Encore Dvd
After Effects directly from Adobe Encore DVD to make adjustments if necessary. Open the menu in Adobe Encore DVD, and choose File > Import As Asset. Select the video you created in After Effects, and click Open.
-
Page 126
In the Properties panel, select a color group from the Highlight pop-up menu. Adobe Encore DVD assigns the selected Color Group to the button. (See “About color sets for menus” on page 125.) Note: If the Highlight pop-up menu is dimmed, the menu is using the Automatic color set. (See “To base a new color set on the Automatic color set”… -
Page 127: Creating Subpictures Outside Adobe Encore Dvd
ADOBE ENCORE DVD 2.0 User Guide Creating subpictures outside Adobe Encore DVD Button subpicture requirements A DVD player uses subpictures to highlight buttons. The subpicture is like a transparent overlay that sits on top of the menu. Subpictures can be difficult to understand, especially if you are accustomed to creating rollovers for web pages.
-
Page 128
Automatic color set generated from layers subpicture overlay, Adobe Encore DVD does create a color set based on those values. By applying the colors you want for the selected state of the button to the three layers, you are able to design the highlight color in Photoshop and save time editing the color set in Adobe Encore DVD. -
Page 129
Note: When you import a menu into Adobe Encore DVD, it creates a copy of the menu. The Edit In Photoshop command opens this copy, not the original file. Photoshop saves any changes to the copy. If you want to update the original as well, it is important to first save the copy so that your project contains the revised menu. -
Page 130: Menu Color Sets
Adobe Encore DVD includes a predefined color set and generates an automatic color set when you import a menu. (See “Automatic color set” on page 127.) You can modify the default set or create your own sets. Once defined, you can save color sets and use them in other projects.
-
Page 131
Repeat steps 5 through 10 for any color you want to change. Click OK when you have defined all the colors to your satisfaction. Adobe Encore DVD applies the new color set to the currently open menu. Menu Color Set options… -
Page 132
Upon import, Adobe Encore DVD not only generates the automatic color set, it also applies the appropriate highlight group to each button. If the subpicture colors in a button do not match either of the two highlight groups, Adobe Encore DVD assigns Highlight Group 1 to them. -
Page 133
ADOBE ENCORE DVD 2.0 User Guide Note: If you choose the Automatic color set, Adobe Encore DVD generates a unique color set based on the colors used in the subpicture layers of each individual menu. (See “Automatic color set” on page 127.) To change the color group of buttons In the Menus panel, select the appropriate menu. -
Page 134: Setting Remote Control Buttons
To renumber buttons Adobe Encore DVD assigns each button a number. Viewers can select buttons by using the remote control. You can renumber buttons within a menu. Button numbers must start at one and be sequential (no gaps between numbers).
-
Page 135: Creating Styles For Menu Elements
Click the Show Button Routing button at the bottom of the Menu Viewer. Adobe Encore DVD displays a routing icon in each button. In the Properties panel, click Automatically Route Buttons to deselect it. Place the Selection tool over the routing arrow you want to modify. The Selection tool changes from a pointer to a hand.
-
Page 136
(so that the visible effects are added to the layers but don’t replace all the effects). Choose File > Save. Name the file using the name you want to appear in the Adobe Encore DVD Styles panel. If you have created a style that adds to existing effects, put a plus sign at the beginning of the name so it matches the… -
Page 137
User Guide To add a new style to the Styles panel In the Adobe Encore DVD Styles panel, select the set to which you want to add the style. Click the New Item button Locate the PSD file containing the style you want to add, and click OK. -
Page 138: Chapter 8: Timelines
Chapter 8: Timelines Timeline basics About timelines DVDs can contain multiple features, such as movies or slide shows. For example, a wedding DVD might have separate videos of the bride and groom getting ready, the ceremony, and highlights of the reception, along with a slide show of wedding photos.
-
Page 139
ADOBE ENCORE DVD 2.0 User Guide Note: All timelines in a project are written to disc, even if they aren’t linked to anything. Make sure to delete any orphaned (unlinked) timelines you do not want to use. Timeline Viewer A. Add Chapter button B. Current-time indicator C. Chapter point D. GOP header E. Poster frame F. Timeline tab displaying current timeline G. -
Page 140
ADOBE ENCORE DVD 2.0 User Guide Moves the current-time indicator to the previous or next video clip, audio clip, still Previous and Next buttons image, or subtitle clip and selects it in the timeline. About the Monitor panel The Monitor panel lets you view and play the content of the current timeline or slideshow, as well as add and edit subtitles and chapter points. -
Page 141: Adding Assets To Timelines
Adobe Encore DVD positions a video clip at the beginning of the timeline, regardless of where in the timeline you release the mouse. To add additional video clips to the timeline, drag the video from the Project panel or Adobe Bridge to the video track.
-
Page 142: Moving Around In The Timeline
Drag any additional still images from the Project panel to the video track. Adobe Encore DVD positions each still adjacent to the next and adds a chapter point to the beginning of each still image. You can reposition a still image and its chapter point as needed.
-
Page 143
ADOBE ENCORE DVD 2.0 User Guide • Use the subtitle, skip, or chapter-point navigation buttons in the Monitor panel. • Change the timecode values in the Timeline Viewer. To move to a different frame using the current-time indicator The Monitor and Timeline Viewer panels give you several shortcuts to move to another frame. Besides simply dragging the current-time indicator in the ruler, you can skip forward or back to the next subtitle, GOP header, or chapter point. -
Page 144: Chapter Points
Pictures (GOPs), which range from 4 to 20 frames per group. Playback of any frames within the GOP must begin from the start of the GOP, the GOP header. For this reason, when you insert a chapter point, Adobe Encore DVD places it at the closest GOP header prior to the current frame.
-
Page 145
ADOBE ENCORE DVD 2.0 User Guide Note: Adobe Premiere Pro and Adobe After Effects can export markers in AVI and MPEG-2 files. Adobe Encore DVD uses the markers to create chapter points. (See “Importing from Adobe Premiere Pro” on page 66.) Open the timeline to which you want to add chapter points. -
Page 146: Editing Assets In Timelines
In point or Out point of a clip, but if you need to remove a section from the middle of a clip or make more advanced edits, use the Edit Original command to edit the clip in Adobe Premiere Pro or Adobe After Effects.
-
Page 147
ADOBE ENCORE DVD 2.0 User Guide Difference between clearing and ripple-deleting clips A. Middle clip selected B. Clip cleared C. Clip ripple-deleted Note: Ripple deleting can cause audio and subtitle clips to go out of sync with video clips. Deleting a video or audio clip removes the item from the timeline, but the item is not deleted from the Project panel. -
Page 148
A. Do Nothing B. Scale And Apply Matte (default) C. Scale And Crop Edges Note: Adobe Encore DVD scales or crops the image as a clip in the timeline. It does not effect the original clip in the project or on your hard drive. Each instance of the image in a timeline can have different scale settings. -
Page 149
To save frames as still images You can save a frame as a still image, and then edit that still in Adobe Photoshop. When you save a frame as a still image, Adobe Encore DVD exports the still as a Photoshop file (.psd). -
Page 150
ADOBE ENCORE DVD 2.0 User Guide Note: The Encoded option shows the size of the clip after transcoding or the estimated size if not yet transcoded. See also “About closed captions” on page 169… -
Page 151: Chapter 9: Slide Shows
Chapter 9: Slide shows Slide show basics About slide shows A slide show contains a set of still images that viewers can play from a DVD. After you create a slide show, use the Slideshow Viewer to add still images. Supported file types include BMP, GIF, JPEG, PNG, PSD, and TIFF. In the Slideshow Viewer, you can also reorder slides, add audio clips, determine the duration of the slides, and change other settings.
-
Page 152
ADOBE ENCORE DVD 2.0 User Guide • To create a slide show from assets in the Project panel, select the still images and audio clips, right-click the selected images, and choose New > Slideshow. Still images appear in the Slides area, and audio clips appear in the Audio area. -
Page 153: Formatting Slide Shows
ADOBE ENCORE DVD 2.0 User Guide Formatting slide shows Changing individual slide settings The options in the Slideshow Viewer and Properties panel affect all slides in the slide show, as long as no individual slides are selected. By selecting one or more slides in the Slideshow Viewer, the options you change in the Slideshow Viewer or Properties panel affect only the selected slides.
-
Page 154
To apply a random pan and zoom effect to all slides in the slide show, select Random Pan & Zoom in the Slideshow Viewer. Adobe Encore DVD randomly assigns a pan and zoom setting to each slide. You can keep the settings as assigned or modify them for individual slides in the Properties panel. -
Page 155
ADOBE ENCORE DVD 2.0 User Guide To create subtitles for slides Adding subtitles to your slide show is easy. Use the name or description of each slide as the subtitle. You can change other options, such as the color group, stroke, and position of the subtitle. The starting time and duration of the subtitle match those of the slide. -
Page 156
ADOBE ENCORE DVD 2.0 User Guide From the Scale menu, choose one of the following: Proportionally scales the slide so that the entire image fits the frame, applying a matte as Scale And Apply Matte necessary to fill any blank area of the frame. -
Page 157: Chapter 10: Working With Multiple Audio And Subtitle Tracks
Chapter 10: Working with multiple audio and subtitle tracks Audio and subtitle basics About audio tracks and subtitles While a DVD can include as many as eight audio tracks and 32 subtitle tracks (16 subtitle tracks for widescreen video), a DVD player can play only one of each type of track at a time (one video, one audio, and one subtitle track). Traditionally, audio track 1 is used for the soundtrack of the video.
-
Page 158: Audio Clips
You can use an audio-editing appli- cation, such as Adobe Audition, to combine audio sound effects, music, and dialog into a single audio clip. Timeline with multiple audio tracks You can place audio files on separate tracks, or you can place multiple audio files on the same track.
-
Page 159: Subtitle Basics
ADOBE ENCORE DVD 2.0 User Guide If you are adding audio in different languages, choose the appropriate language code from the Language menu on the left side of the track in the Timeline Viewer. Add as many audio tracks as necessary (as many as 8 per timeline). You can add multiple audio clips to a single track, or you can add them to separate tracks.
-
Page 160
ADOBE ENCORE DVD 2.0 User Guide To create subtitles manually Using the Monitor panel, you can step through your video and type subtitles where needed. Just as when you type text on a menu, you can enter subtitle text either freely or constrained to a bounding box. If you first create a bounding box for the subtitles, the lines of text automatically wrap to the next line when they reach the edge of the box. -
Page 161
To edit, reformat, or move subtitles You can edit subtitles that you typed in Adobe Encore DVD or imported from a text subtitle script. You can change the text, reposition or resize the bounding box, apply new colors, or change the character settings. You can modify either individual clips or all the clips on a track. -
Page 162
Subtitles that you import into a timeline come with preset start and end times within the video. When you type subtitles in Adobe Encore DVD, the default display time is initially set to 2 seconds. You can change the display time by dragging the subtitle clips in the Timeline Viewer, trimming the subtitle in the Monitor panel, or editing the Duration value in the Properties panel. -
Page 163: Importing Subtitles
About importing script files You import subtitles using a script file. Adobe Encore DVD accepts three different types of script files: Text Scripts, Image Scripts, and FAB Image Scripts. Scripts specify the start and end timecode of the subtitles. The big difference between them is that text scripts contain the subtitle text, whereas the two types of image scripts instead reference predesigned and formatted image files.
-
Page 164
ADOBE ENCORE DVD 2.0 User Guide To import text script files Open the timeline to which you want to add subtitles. Choose Timeline > Import Subtitles > Text Script. You can import directly from the timeline by right-clicking the Subtitle track header and choosing the appropriate import option from the menu. -
Page 165
ADOBE ENCORE DVD 2.0 User Guide Import Subtitles dialog box A. Subtitle within bounding box B. Text formatting and alignment options C. Coordinates of the text bounding box D. Options for formatting Chinese, Japanese, and Korean (CJK) characters E. Subtitle track and language F. Color set options G. Timecode offset options H. Text orien- tation I. -
Page 166
You can import subtitle image files using two different types of scripts: image scripts and FAB image scripts. Both types reference image files that contain subtitles, simple graphics (such as pointers or masks), or both. Because the image files are preformatted and prepositioned, you cannot edit them in Adobe Encore DVD. Importing subtitles Although many professionals obtain image files from a subtitling house or service, you can create your own. -
Page 167: Creating And Editing Script Files
Color 2). Note: Any additional colors in the image become transparent. Click OK. Adobe Encore DVD displays the Import Subtitles dialog box. In the Subtitle Settings area, specify the appropriate settings for the following options, and click OK: •…
-
Page 168
Timecode in a script should match the timecode format of the project so that the subtitles sync correctly with the audio and video. While Adobe Encore DVD can convert non-drop frame timecode to drop frame, you get the best results if you specify the appropriate timecode for a project. -
Page 169
ADOBE ENCORE DVD 2.0 User Guide See also “To import text script files” on page 159 Structure of image scripts In image scripts, the first line designates the screen position, in pixel coordinates, of all image files. The second line includes a path to the folder containing the image files. -
Page 170: Subtitle Colors
You can save color sets and use them in other projects. • If you edit a color set, Adobe Encore DVD automatically updates all timelines that use that color set. To define a color set for subtitles Open the timeline containing the subtitle colors you want to change.
-
Page 171
Click the Export To Color Set File button Type a new name for the color set, browse for the appropriate folder in which to save it, and click Save. Adobe Encore DVD saves the color set, adding the extension .cs to the file name. -
Page 172: Setting Navigation To Select Audio And Subtitle Tracks
ADOBE ENCORE DVD 2.0 User Guide To change the color group applied to a subtitle clip You can use color groups to vary the subtitles depending upon the background or to help identify or distinguish between subtitles (such as to identify speakers).
-
Page 173
ADOBE ENCORE DVD 2.0 User Guide • If your project includes subtitle tracks, choose the track you want as the default from the Set Subtitle pop-up menu. The default setting, No Change, leaves the subtitle track as set in the DVD player. -
Page 174: Closed Captions Basics
Only the NTSC television standard accepts closed captions; PAL does not. You create closed captions using a third-party captioning application, exporting them as SCC files. You select the SCC file in Adobe Encore DVD, using the Video Clip Properties panel. To select closed captions In the Timeline Viewer, select the video track you want to add closed captions to.
-
Page 175: Chapter 11: Creating And Managing Links
Link types Adobe Encore DVD lets you link to practically any destination in the project, whether it be a menu, timeline, slide show, playlist, or chapter playlist. (ROM content is the exception. ROM content must be accessed via a computer’s desktop.) You can set the following types of links to create navigation:…
-
Page 176
End Action of Timeline 1 so that it returns to the menu. Link options All links in Adobe Encore DVD point to a menu, a timeline, a playlist, a chapter playlist, or a slide show. (Buttons can contain a link transition attribute.) Elements allows for specific link types as follows:… -
Page 177: Setting Navigation And Properties
“dissolves” into the submenu. This dissolve is achieved by playing a video asset that contains the transition frames. Typically, the transition frames are created in an application such as Adobe After Effects or Adobe Premiere Pro, where they’re rendered as movie files.
-
Page 178
In the Description field, type any notes about the project, such as client information, revision notes, and reminders. Select a destination for First Play. Often, this will be an FBI warning or other copyright information. Adobe Encore DVD automatically sets the First Play to the first DVD element you create—generally, you’ll need to reset it. -
Page 179
, not the Direct Select tool, so that you select the entire button set.) In the Properties panel, specify a destination for Link. Adobe Encore DVD displays the new link in the Properties panel using the format Menu:Button or Timeline:Chapter. -
Page 180: Working With Playlists And Chapter Playlists
ADOBE ENCORE DVD 2.0 User Guide In the Properties panel, specify a destination for End Action. For more information about end actions, see “Link types” on page 170. Select a destination for Menu Remote. For more information about the Menu Remote, see “Link types” on page 170.
-
Page 181
To add an element such as a timeline, slide show, playlist, or chapter playlist to a playlist, drag the pick whip to the element in the Project tab or any other tab that allows the pick whip. Adobe Encore DVD adds the element to the end of the playlist. -
Page 182
Choose File > New > Chapter Playlist or choose Timeline > New Chapter Playlist. If a timeline is selected, a chapter playlist is created from it. If no timeline is selected, Adobe Encore DVD prompts you to choose one. In the Chapter Playlist panel, select the chapters you want to work with and click the Add button , drag them to the Chapter list on the right, or double-click them. -
Page 183: Managing Links And Modifying Elements
In the Timelines panel, you can select the timelines you want to change, and then reassign the end action to Events in the Properties panel. Adobe Encore DVD changes the end action for all selected timelines. Selecting multiple menus, timelines, or buttons lets you make global changes to their properties.
-
Page 184: Working In The Flowchart
In the Properties panel, change the settings or links as necessary. Adobe Encore DVD resets the values for all the selected items. Properties that are not alike indicate the number of different values among the selected items (for example, “<<2 values>>”).
-
Page 185
The lines joining the element thumbnails also convey useful link information. By noting the line style, you can differ- entiate between normal links, links that have been overridden, and other useful link attributes. Visit Resource Center on the Adobe website to view a tutorial about using the Flowchart. Flowchart thumbnails Thumbnails provide visual clues about elements and links. -
Page 186
ADOBE ENCORE DVD 2.0 User Guide Audio track is set to audio track [n]. A[n] Subtitle track is set to subtitle track [n]. S[n] Subtitle track is off. Link to chapter [n]. C[n] Link lines The appearance of link lines informs you of the relationship between elements, and the arrow indicates the direction of the link. -
Page 187
Choose Window > Flowchart if you don’t see the Flowchart. The first DVD element you imported is already linked to the DVD disc icon. (Adobe Encore DVD automatically sets the project’s First Play link to first imported DVD element.) The remaining, unused elements appear in the lower portion of the Flowchart. -
Page 188
• Drag a file (or multiple files) from Windows Explorer, or an item from the Encore Library, to the Flowchart. Adobe Encore DVD places the item in the Flowchart, creating a DVD element from the imported asset or library item. -
Page 189: User Operations
To manage links in the Flowchart, select the element whose link you want to modify. In the Properties panel, drag the pick whip for the link to the element representing the new link destination. Adobe Encore DVD updates the link and refreshes the Flowchart panel appropriately. You can also manage links via drag-and-drop. (See “To set navigation in the Flowchart”…
-
Page 190
ADOBE ENCORE DVD 2.0 User Guide • Lets the viewer play a specific chapter. Play Chapter Note: Disabling Play Chapter also disables the Search For Chapter operation. • Lets the viewer search for a specific chapter. Search For Chapter •… -
Page 191: Chapter 12: Testing And Building Dvds
For example, if Adobe Premiere Pro creates a conformed audio file, and you import media with that audio into Adobe Encore DVD, Encore uses the file from Premiere Pro, instead of creating a new conformed file. The media cache database informs Encore of the conformed…
-
Page 192
187.) Note: Projects without First Play actions require you to click Play to start the preview. Adobe Encore DVD warns you if no First Play action exists. (See “To set disc properties and navigation” on page 173.) Project Preview panel A. -
Page 193
ADOBE ENCORE DVD 2.0 User Guide The menu displays the available audio tracks and their language code, highlighting the currently Audio Track selected track. Toggles the subtitle on and off. The menu displays the available subtitle tracks and their Toggle Subtitle Display language code, highlighting the currently selected one. -
Page 194
Choose File > Check Project. Deselect any problems you do not want to identify. For example, if you have not set any overrides, you don’t need to check for problems with them. Adobe recommends using the default setting, which checks for all possible problems. -
Page 195: Security And Additional Content
This method is intended to prevent playing back digital copies of protected data. The encryption keys are processed at the replication level, not by Adobe Encore DVD.
-
Page 196
ADOBE ENCORE DVD 2.0 User Guide An analog copy protection scheme intended to prevent playing back recordings made from DVD to Macrovision analog video devices, such as VCRs. Macrovision-encoded data sends electronic pulses to the analog device to disrupt recording sync, thereby scrambling the recorded image. -
Page 197: Building The Finished Project
(See “To set copy protection” on page 190 and “To set region coding” on page 191.) Adobe Encore DVD checks for problems before building the disc. If the program encounters errors, it notifies you and lets you view the errors or continue on. For more information, see “To check a project” on page 189.
-
Page 198
Opens the Set Layer Transition dialog box. Set the layer break at either a chapter point or a specific frame Manual (per the timecode.) Adobe Encore DVD lists the choices for each option. Creating a layer break at a chapter point can result in a brief pause as the DVD player moves from one layer to the next. -
Page 199
User Guide Replicating DVDs To produce multiple copies of your DVD, you can burn them yourself, either in Adobe Encore DVD or by using a third-party mastering application. Producing them in Adobe Encore DVD works best for limited quantities and requires the appropriate hardware or software. -
Page 200: Chapter 13: Keyboard Shortcuts
Using keyboard shortcuts About keyboard shortcuts Adobe Encore DVD provides a set of keyboard shortcuts. Because many commands and buttons have keyboard equivalents, you can create a DVD with minimal use of the mouse. To find the keyboard shortcut for a tool, button, or menu command ❖…
-
Page 201
ADOBE ENCORE DVD 2.0 User Guide Result Shortcut Nudge selection 1 pixel right Right Arrow Nudge selection 10 pixels down Shift+Down Arrow Nudge selection 10 pixels left Shift+Left Arrow Nudge selection 10 pixels right Shift+Right Arrow Nudge selection 10 pixels up… -
Page 202
Press the number of the button you want to activate Zoom in Ctrl + “+” (plus) Zoom out Ctrl + “-” (minus) Keys for resetting application defaults Result Shortcut Reset keys in registry file Ctrl+Shift while Adobe Encore DVD starts… -
Page 203
This is not a complete list of keyboard shortcuts. This table lists only those shortcuts that are not displayed in menu commands or tool tips. Result Shortcut Open Adobe Bridge from other Creative Suite appli- Control + Alt + O, Control + Shift + O cation Switch to previous Bridge window Shift + Control + ~ Switches to the next view (As Thumbnails. -
Page 204
ADOBE ENCORE DVD 2.0 User Guide Result Shortcut Launch File Bridge in maximized state and auto-hide Control-click the Open Bridge icon in the options bar palettes Open File Info dialog box Control + Alt + Shift + I Display Help… -
Page 205: Index
Adobe Version Cue previewing timeline 137 unlinking compositions 71 in Bridge 34 removing tracks 154 Adobe Encore DVD After Effects. See Adobe After Effects setting default track 167 workflow overview 9 aligning supported formats 63 Adobe Expert Support 2 menu objects 89…
-
Page 206
Bridge Center 34 distributed 38 compact mode 36 Bridge window calculating a bit budget 27 Compact view, in Adobe Help Center 5 adjusting 36 camera data, adding to files 47 compositions main components 35 camera raw files offline, with Adobe Dynamic Bridge. -
Page 207
7 color sets 128, 166 about 91 frame rate Extensible Metadata Platform adding to buttons 91 NTSC 59 (XMP) 45 adding to objects 91 PAL 59 drop zones Full view, in Adobe Help Center 5 about 17 replacement layers 111… -
Page 208
23.98 fps files 65 moving to other computers 110 storing assets in 67 24 fps files 65 Menu Viewer 77 Lightbox command 36 Adobe Premiere Pro files 66 menus, creating links After Effects files 66 about 75 about 170 color sets 128, 166… -
Page 209
47 Paste command replacing 48 in Bridge 41 specifying types to display in PCM Audio 32 Metadata panel 47, 48 objects Persistent command 49 templates 48 aligning 89 Photoshop. See Adobe Photoshop viewing 46 changing stacking order 88… -
Page 210
Bridge 37 rectangular pixels 114 RSS feeds 3, 7 prefixes, for menu names 115 Refresh command 40 Premiere. See Adobe Premiere Pro region coding 191 presets registration, product 1 Save Frame As File command 144 options for audio 32… -
Page 211
156 items in folders 73 creating 56 removing tracks 154 preview thumbnails 73 signing in 56 repositioning 157 sidecar files 45 Stock Photos. See Adobe Stock subtitles, importing slide shows Photos about 158 about 146 styles editing script files 162… -
Page 212
99 video noise reduction filter 33 properties of assets in 144 anti-aliasing 100 views using 133 attributes 97 in Adobe Help Center 5 timelines color 98 about 133 entering 95 adding chapter points 139, 140 formatting 97 widescreen, presenting on fullscreen… -
Page 213
INDEX 208 zooming Menu Viewer 77 timeline 138…
Мы не можем отрицать, что спрос на DVD за последние годы сократился. Одной из причин этого является доступность современного хранилища, которое намного удобнее и совместимо с ноутбуками, экранами телевизоров и даже телефонами. Но вот в чем дело, DVD намного надежнее, если вы хотите предотвратить повреждение данных. Конечно, когда на карту поставлены ваши записанные на камеру воспоминания, вы не хотите, чтобы произошла нежелательная ситуация. Верно?
Оставайтесь с нами, и мы поможем вам как сделать DVD с Adobe Encore.
- Часть 1. Как сделать DVD с помощью Adobe Encore
- Часть 2. Лучшая альтернатива Adobe Encore
- Часть 3. Часто задаваемые вопросы о создании DVD с помощью Adobe Encore
Часть 1. Как сделать DVD с помощью Adobe Encore
Если вы приобрели Adobe Premiere Pro, вы также получите Adobe Encore как часть пакета. Многие рассматривают эту автономную программу как конкурента другим первоклассным инструментам для создания DVD. С другой стороны, он содержит функцию перетаскивания, которая позволяет более эффективно маневрировать вашим проектом.
Далее, если вы хотите создать меню DVD, вы можете сделать это с помощью Encore и Photoshop. Но для этой статьи рассмотрите приведенные ниже шаги по записи файлов на DVD.
Шаг 1
Если ваши видео находятся в Premiere Pro, вам следует сначала экспортировать их. Перейти к Файл > Динамическая ссылка Adobe > Отправить на бис сделать это.
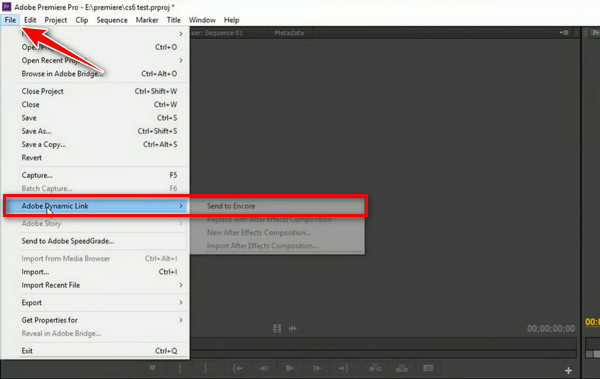
Шаг 2
Затем, когда Adobe Encore запустится, укажите, где вы хотите разместить свой вывод, и поместите заголовок. С другой стороны, отметьте DVD Как ваш Авторский режим. Затем измените Телевизионный стандарт в зависимости от вашей страны, и когда все настроено, нажмите OK.
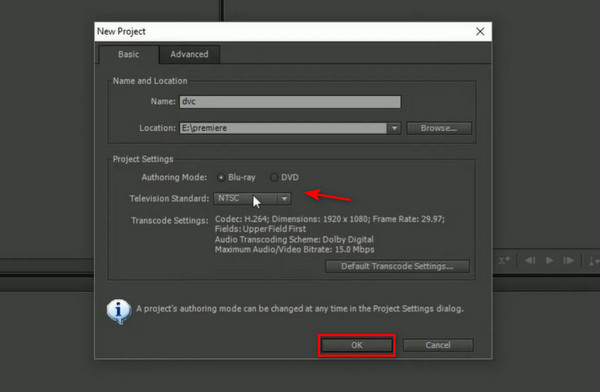
Шаг 3
На этот раз вы уже должны увидеть свой контент из Premiere, загруженный на временную шкалу Adobe Encore. Чтобы начать процесс транскодирования, перейдите в Файл > Экспортировать > Медиа.
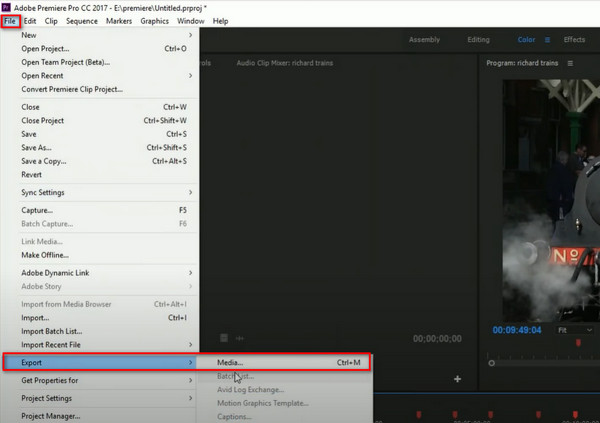
После этого на Настройки экспорта, опустите Формат , а затем выбрать MPEG2-DVD. Сделайте то же самое на Предустановленная и выберите свои предпочтения в опциях. Если вас интересует битрейт, вы также можете изменить его. Когда закончите, нажмите Экспортировать кнопку в нижней части интерфейса.
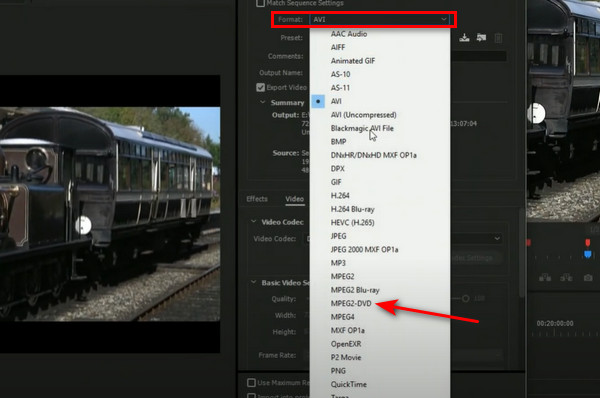
Шаг 4
После перекодирования файла перезапустите Encore и запустите Новый проект. На этот раз вы будете импортировать ранее преобразованные файлы. После загрузки их на временную шкалу перейдите к строить раздел и установите диск на лоток. Затем нажмите на строить кнопку, и процесс начнется.
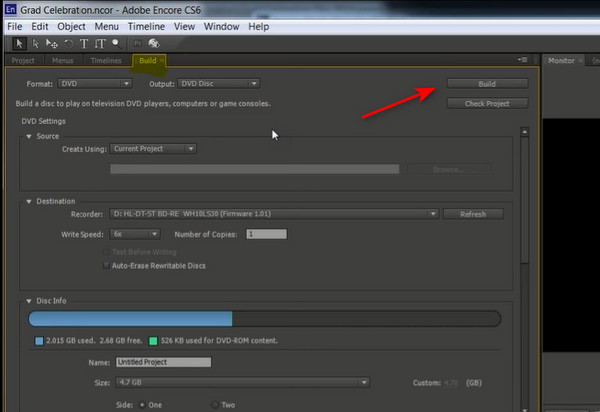
Несомненно, любая программа, выпущенная командой Adobe, отлично подходит для профессиональных услуг. По мере того, как вы будете исследовать дальше, вы обнаружите множество замечательных функций, которыми обладает Adobe Encore. Однако, поскольку этот инструмент больше не является пакетом Adobe Premiere Pro CC, вы не хотите импульсивно обновляться и тратить много денег.
Часть 2. Лучшая альтернатива Adobe Encore
Наоборот, вы можете попробовать инструмент, который одновременно занимается авторингом и редактированием видео. В этом отношении, AnyMP4 DVD Creator это надежный инструмент, который вы можете иметь. Он известен своим удобным интерфейсом, и большинству новичков нравится его опыт. С другой стороны, он поддерживает сотни видеоформатов, включая MOV, MP4, MPEG, AVI FLV и другие, и записывает их на DVD/ISO или Blu-ray.
Еще одна вещь: эта автономная программа также может настроить меню DVD, чтобы сделать ваш DVD более интерактивным и уникальным. AnyMP4 DVD Creator предоставляет вам различные шаблоны, подходящие для любого случая. Ниже наша команда предоставила простые способы записи DVD с использованием лучшего альтернативного инструмента для Adobe Encore.
Шаг 1
Установите лучший альтернативный инструмент
Прежде всего, нажмите кнопку «Бесплатная загрузка» ниже, чтобы получить AnyMP4 DVD Creator. После этого следуйте указаниям мастера установки, чтобы установить программу на свое устройство.
Шаг 2
Импорт файлов для записи
Когда программа запустится, нажмите кнопку DVD-диск как тот, над которым вы будете работать. После этого нажмите на Добавить файл мультимедиа в центре интерфейса. Когда появятся всплывающие окна, выберите файлы, которые вы хотите записать, из папки вашего компьютера и импортируйте их в программу.
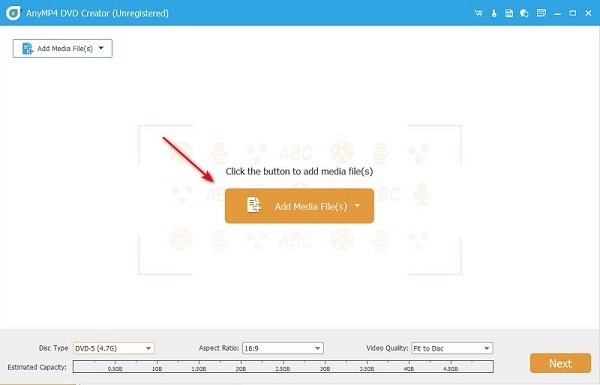
Шаг 3
Настройте DVD
Убедитесь, что вы не пропустите эту часть. В нижней части интерфейса есть индикатор размера файла, который понадобится вашему видео для записи DVD. Поэтому выберите Тип диска соответствует емкости вашего диска (DVD 5 или DVD 9). С другой стороны, вы можете придерживаться значения по умолчанию в Соотношение сторон и Качество видео. После этого нажмите Следующая.
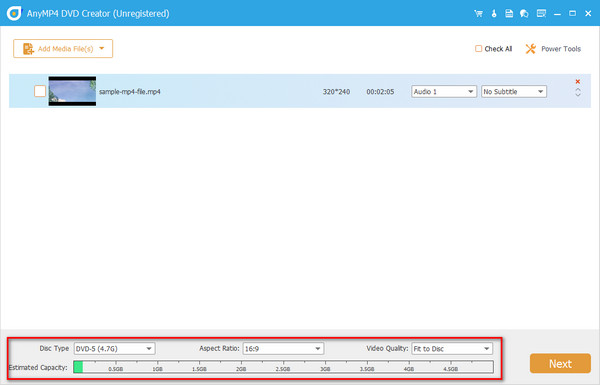
Шаг 4
Настройка меню DVD (необязательно)
Теперь вы окажетесь в разделе, где вы можете создать меню DVD. Если вы хотите его для себя, изучите этот интерфейс и выберите нужный шаблон. Если он вам не нужен, просто отметьте вкладку меню «Нет». После этого нажмите на Гореть кнопку.
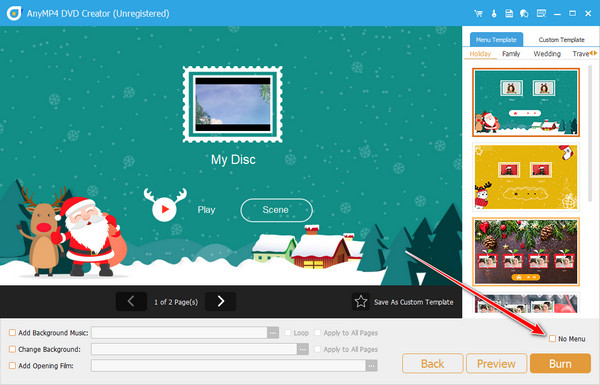
Шаг 5
Начать процесс записи
Наконец, настройте параметры процесса разработки. На Телевизор Стандартный, выберите, используете ли вы PAL or NTSC. Кроме того, выберите, хотите ли вы начать с меню или заголовка. С другой стороны, установите диск на лоток DVD и проверьте, распознает ли его программа. Когда закончите, нажмите Start.
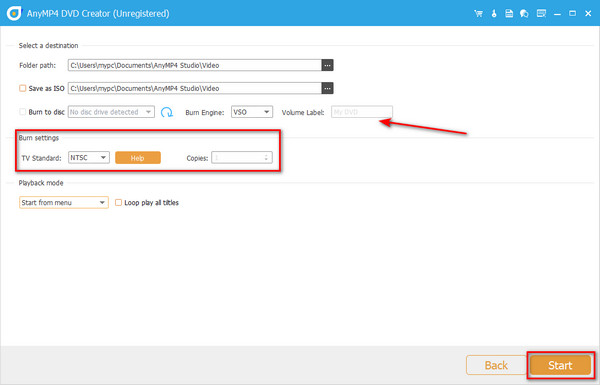
Дальнейшее чтение:
FLV to DVD Creator — Как записать FLV файлы на DVD с легкостью
Как создать DVD из Adobe Premiere Pro (для начинающих)
Часть 3. Часто задаваемые вопросы о создании DVD с помощью Adobe Encore
Могу ли я записать DVD без Encore?
К сожалению, Adobe encore больше не поставляется вместе с Adobe Premiere CC. Однако вы можете создавать видео, пробуя альтернативные приложения.
Могу ли я экспортировать видео из Premiere в Encore?
Определенно да! Вы можете экспортировать свой контент в Premiere, чтобы создавать его в Adobe Encore. На самом деле вам также понадобится Adobe Encoder для преобразования ваших файлов в DVD-совместимый формат, такой как MPEG-2.
В чем разница между NTSC и PAL?
возможно, вы постоянно видите эти две опции в телевизионном стандарте. Выбор того, какой из них выбрать, зависит от страны, в которой вы живете. Обычно NTSC используется в Америке, а PAL — в Азии и Европе.
Заключение
Вуаля! К этому времени вы научились как создать DVD с Adobe Encore и с AnyMP4 DVD Creator. Хотя оба имеют разные функции, вы можете решить, какой из них использовать. Если вы новичок и считаете Encore довольно сложным, вы можете выбрать AnyMP4 DVD Creator. Эта автономная программа очень проста и не требует большого технического мастерства. С другой стороны, если вы получите пакет программ Adobe, как было сказано некоторое время назад, улучшение ваших навыков редактирования видео в Premiere может стать хорошим началом.
Что вы думаете об этом посте.
- 1
- 2
- 3
- 4
- 5
Прекрасно
Рейтинг: 4.9 / 5 (295 голосов)
инструкцияAdobe Encore CS5

Using
ADOBE
®
ENCORE
®
CS5
Посмотреть инструкция для Adobe Encore CS5 бесплатно. Руководство относится к категории Лицензии на программное обеспечение и дополнения, 1 человек(а) дали ему среднюю оценку 7.5. Руководство доступно на следующих языках: английский. У вас есть вопрос о Adobe Encore CS5 или вам нужна помощь? Задайте свой вопрос здесь
- Legal notices
- Contents
- Chapter 1: What’s new
- Chapter 2: Workflow and workspace
- Chapter 3: Planning the project
- Chapter 4: Creating projects and importing assets
- Chapter 5: Menus
- Chapter 6: Timelines and slide shows
- Chapter 7: Audio and subtitles
- Chapter 8: Creating and managing links
- Chapter 9: Testing and building the final product
- Chapter 10: Keyboard shortcuts
Нужна помощь?
У вас есть вопрос о Adobe а ответа нет в руководстве? Задайте свой вопрос здесь Дай исчерпывающее описание проблемы и четко задайте свой вопрос. Чем детальнее описание проблемы или вопроса, тем легче будет другим пользователям Adobe предоставить вам исчерпывающий ответ.
Количество вопросов: 0

Главная
| Adobe | |
| Encore CS5 | |
| Лицензия на программное обеспечение и дополнения | |
| английский | |
| Руководство пользователя (PDF) |
Не можете найти ответ на свой вопрос в руководстве? Вы можете найти ответ на свой вопрос ниже, в разделе часто задаваемых вопросов о Adobe Encore CS5.
Инструкция Adobe Encore CS5 доступно в русский?
Не нашли свой вопрос? Задайте свой вопрос здесь
Нет результатов

LevelOne FCS-9900-CH
инструкция141 страниц(ы)

Corel CAD 2016
инструкция29 страниц(ы)

Telestream Switch 2 Pro Win
инструкция86 страниц(ы)

Tandberg Data 5014-ACC
инструкция87 страниц(ы)

Dell Wyse WES7 conversion kit for Z class
инструкция20 страниц(ы)

Avira AntiVir Server
инструкция65 страниц(ы)

Avira AntiVir Sharepoint
инструкция32 страниц(ы)

Avira AntiVir UNIX WebGate
инструкция52 страниц(ы)

Parallels Management Suite SCCM
инструкция156 страниц(ы)

AMX IS-SPX-XPRESS-P
инструкция128 страниц(ы)
Посмотреть все Adobe руководства Посмотреть все Adobe Лицензия на программное обеспечение и дополнения руководства