Welcome! This guide is for those who has no prior experience with coding and has never typed out a single line of code before in any language. This is the absolute beginners guide and will introduce the most basic coding concepts and also limited building skills.
Note that this guide is focused on teaching the reader the main principles of scripting in Roblox and a way to get started with it, not to confuse the reader with complicated terms and being precise or exact. However, the learning curve in this article is still quite high, so if you have trouble understanding some parts, look for tutorials on YouTube.
Just keep in mind the following few things:
- Know the difference between active and passive learning. You can read through all the scripting tutorials, but you cannot truly master Roblox Lua until you practice coding yourself using Roblox Studio. It is very much like learning a spoken language; it’s a skill that is acquired through consistent and rigorous practice and making mistakes, not something that you learn by simply reading.
- Making a game takes a long time and a lot of work. Between building, programming and animating, making a good game could easily be a year-long project. This is why most Roblox games are generally of low-quality compared to Minecraft and Fortnite: most of them are minors, so they do not have the time, skills or willpower to spend years on their projects, meaning they will cut corners. This isn’t meant to deter you from coding; it’s only to warn you of the workload it takes to create a great game.
- Do not be discouraged by the mistakes you make. I guarantee you that the front-page developers have made many errors and bugs and have had to solve them in order to get to where they are.
- Start small. If you are looking for ideas for a first project, I highly recommend you do a basic project (like an obby or tycoon), not a big project like most games on the front page. If you are still learning the basics, it is unlikely that you will be able to create the next Jailbreak.
- Once you master the language, to save time, avoid writing your own scripts from scratch. You’ll be a lot more efficient if you use a free model or found a script online, then modify the script to suit your needs.
script.Parent.Touched:Connect(function(whoTouched)
    local hum = whoTouched.Parent:FindFirstChild("Humanoid")
        if hum then
            hum.health = 0
        end
    end
end)
However, this code isn’t perfect, so you may want to modify it if you want to make it work better.
What is Scripting?
For those of you who are unfamiliar with the concept of coding, try out this game from Google. In this game, you give detailed directions to guide the bunny to the carrots. Notice that you can’t just tell the bunny to «go to the carrots.» You have to give it commands it understands, such as «move forward,» «turn left» and «turn right.»
Although this is more of a video game than actual coding, real coding uses the same concept. Coding, also known as programming or scripting, is when you tell a computer what to do using directions it can understand. Your Roblox game will likely be made up of hundreds or thousands of moving parts, all of which have their own purpose and you need to code them to do what you want. For example, a lava brick in an obby game will kill the player when they touch it. You can’t just tell the brick, «Kill the player.» You have to give them detailed directions that allows them to kill the player, like this one below:
script.Parent.Touched:Connect(function(whoTouched)
    local hum = whoTouched.Parent:FindFirstChild("Humanoid")
        if hum then
            hum.health = 0
        end
    end
end)
Different programs use different languages, but the language used in Roblox is called Roblox Lua. This is a modified form of the existing language, Lua. Roblox Lua is very unique because it is one of the only text-based languages that are meant for educational purposes. This language allows you to type out your programs so you feel you are actually coding, but some of the heavy lifting is done for you. With Roblox Lua, you have to worry about spelling and punctuation, but you don’t have to worry about things like creating a jumping mechanic or realistic physics.
There are generally three types of coding languages, though these categories are unofficial.
- Educational languages: These languages are for children and are meant to teach kids the basics of coding. With most of these, such as Scratch and Blockly, you drag around coloured blocks to code instead of typing them out. Although they’re easy to pick up, they are extremely basic and limiting, so do not expect to create a professional game with an educational language.
- Professional languages: These languages are the types where your favourite video games come from. Minecraft uses Java, Fortnite uses C++ and the Roblox platform is coded with the original Lua. These languages are free and allow you to make almost whatever you want, but at the same time they are designed to be as easy and efficient as possible.
- Esoteric languages: These languages are meant to be as difficult as possible. They are meant as a sort of brain teaser for very skilled programmers, so you aren’t meant to create any full-on games with them.
Roblox Lua falls under the educational languages category, as it is meant to introduce you to text-based coding while doing most of the heavy lifting. Although a handful of Roblox developers have successfully made a living from Roblox, this is not feasible for most people as Roblox takes a significant amount (more than half) of the money you make. Therefore, if you want to pursue coding as a career, after learning this language it is best to move on to another language.
Roblox Studio Basics
We use a program called «Roblox Studio.» If you play any Roblox game, the application will automatically be added to your device. Open the application and create a new place.
At the center of the screen is known as the viewport. It shows the «space» of your game, and what the player will see when they enter the game. As you can tell, the viewport consists of three dimensions. This is known as Euclidean space, and any location in the space can be measured with three axes: the X, Y, and Z axes.
Look at the top of your screen. It should look like this, assuming dark mode is turned off. It may look different due to updates, but the image below shows what it would look like as of June 25, 2021.

Let me explain the basics:
There are five tabs at the top: Home, Model, Test, View and Plugins.
- The Home tab contains the most basic functions needed, such as creating parts and changing its color.
- The Model tab is reserved for functions needed for creating more complex models, like unions and negates. However, we will not focus too much on this tab.
- The Test tab contains functions used to test your game to look for bugs.
- The View tab allows you to open certain windows in the game.
- The Plugins tab allows you to use Plugins, which are downloadable tools to help with building and scripting, sort of like mods in other games.
For this tutorial, we will focus on the Home tab.
On the sides of your screen you should have some windows. If not, go to the View Tab on the top, and open the following windows:
- Explorer. This is basically a list of all the objects inside the game. The objects in the Explorer window are called instances.
- Properties. This is a window that manages and lets you manipulate the properties of an object. I will explain them in the beginner series.
- Output: This is a window that posts error messages whenever there is a problem with your scripts.
These are what the windows should look something like. See if you can locate them on your screen.
Explorer window
Properties window
")
Output window
You can drag the windows around however you like, but I like to keep the Explorer window on the right of the screen, and the Properties and Output on the left.
The Home Tab
Let’s focus on the functions of the Home Tab.
Tools
There are four functions under the Tools section, which help you manipulate objects in your viewport. These are Select, Move, Scale and Rotate.
- Select is a tool used to select and move parts around the studio. To use this tool, simply click the part to select it and drag it to where you want to go.
- Move is a more accurate tool used for moving parts, where you can move a part along a certain axis. Drag the arrows to move them.
- Scale is used to resize parts; that is, making a part bigger or smaller. Drag on the balls to resize the part.
- Rotate is used to rotate the part; that is, to turn a part in a circular direction around a certain point. You can drag along the circles to rotate the part.
- Transform combines all four of the above tools so that you would not have to toggle between the tools individually. However, it is quite difficult to use, so I recommend using each tool individually.
The Terrain Editor is used to add terrain to your world, such as dirt, snow, water and grass. It is far easier to add terrain using the Terrain Editor than to build the terrain out of blocks.
Insert
There are 3 functions under the Insert section: Toolbox, Part, and UI.
- The Toolbox opens a window that allows you to access free models, which are basically models created by other players that you are free to insert into your game. However, avoid using this feature excessively, and watch out for malicious codes inside the models that can ruin your game.
- The Part function adds a block into the game. This is more commonly known as a Part, but they are officially called Base Parts. If you click on the ▼, you will see that there are 4 shapes you can make: Block, Sphere, Wedge and Cylinder. Clicking on any of these options will spawn a base part into the :
- The Block shape is a rectangular prism, characterized by six rectangular faces. These are recommended for building walls and floors as they have six flat surfaces.
- The Sphere shape is a ball, characterized by one. These are best for building round things like sports balls, tear drops or boulders.
- The Corner Wedge is the shape you’re probably going to use the least, but it’s still good to have. You can use them alongside a wedge to get a bending slope. Also, if you place four of them next to each other, you can get a pyramid.
- The Wedge shape is a triangular prism. These are best for building ramps, roofs, and other sloped surfaces.
- The Cylinder shape is, well, a cylinder! It contains a circular base, which proves helpful for building pipes, bars, and wires, as well as flat round things like puddles or fried eggs.
- The UI function adds a GUI, which we will explain in greater detail in a future tutorial.
A model of a house using all five part shapes.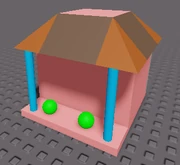
Play around with the parts, making use of as many shapes and tools as you can. See what you can build using the different shapes. To the right is a small house I built using all five shapes.
Edit
Under the Edit section, we will focus on Material and Color.
Material affects the texture of a base part, or the general look of a part’s surface. By default, the material is Smooth Plastic, meaning that there are no creases or marks on the part. To change the material, select the part in the viewport. Then, click on the ▼ under Material, and select any material in the dropdown menu.
Take a look at your build. The parts are all Smooth Plastic, which is a little boring. Change the material of some of your parts. If you want your house to be made of marble, set the texture to Marble. If you want a realistic-looking rug or wool sweater, change the texture to Fabric.
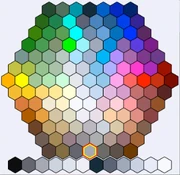
Color is self-explanatory; it affects the part’s color. By default, the color is Medium stone grey. Clicking on the ▼ gives you the palette on the right.
Click on any color to change the color.
Now, go back to the build you just made. You’ve added texture, but your parts are all grey. Add some colour to make it more lively.
Test
There are just two functions under Test: Play and Stop. Play will allow you to play the game you created as if you were in a live server. Stop will return you to the viewport.
(If you cannot figure out what each tool does, a detailed tutorial for Roblox Studio can be found here.)
Within the tutorial after this one, we will learn to create a script that activates once the part it is in is touched.
Writing a script
Insert a part into the viewport. Then, go to the Explorer window and find that part under the Workspace. Hover over the Part in the Explorer window, click on the +, then click on Script. Your Explorer window should now look like this.
-


Workspace
-
Part
-
Script
-
-
But what do the indents mean? How is the Explorer Window structured?
The Explorer Window + Basic Scripting
Suppose you were in a library. How would you tell someone how to find a specific book in the entire library? A good set of instructions would start big and broad, then slowly be more and more specific. For example:
«Go to the Harlington Library, then go to the second floor. Then find the children’s section, go to the fiction area, and then the «Fantasy» shelf. There you will find the book The Adventures of Flimflam.»
Just like how a book could be hidden in a specific shelf in a specific area of a specific section on a specific floor of a library, an object in the Explorer window could be hidden inside a part inside a model inside a folder inside the Workspace. Therefore, if you want to refer to anything in the Explorer window, you have to tell the script exactly where to find it.
Let’s take the example below. How would you tell the script you wanted to access the part?
-
Workspace
-
Folder
-
Model
-
Part
-
-
-
We always start with the word game. Type the word game into the script below.
Then, we work our way down, separated by periods. The order should be Workspace > Folder > Model > Part. So, the script would look like this.
game.Workspace.Folder.Model.Part
Congratulations! You have succesfully created your first path. To practice, try accessing the Part in the three examples below.
Example 1
-
Workspace
-
Model
-
Folder
-
Part
-
-
-
Example 2
-
Workspace
-
Folder1
-
Folder2
-
Model
-
Part
-
-
-
Example 3
-
ReplicatedStorage
-
Folder
-
Part
-
-
Here are the answers. If you got them right, it means you now understand how to create a path! Congratulations!
game.Workspace.Model.Folder.Part
game.Workspace.Folder2.Model.Part
game.ReplicatedStorage.Folder.Part
Parent and Child
What is a parent and a child in a family tree? Well, your father and mother are your parents, meaning they are a step above you in your family tree. Similarly, because you are their child, you are a step below them in the family tree. A similar rule applies in the Explorer window. When an instance is one step above another instance, they are called the parent. If an instance is a step below another instance, it is considered the child. Here’s an example.
-
Part
-
Script
-
In the above case, the part is the parent of the script, and the script is the child of the part.
Here’s another way to write a path. If you want a script to refer to itself, you can simply write the word «script.»
Now, if you want to refer to the script’s parent, you simply type, «.Parent.»
Practice! How would you create a path to the Part, each path starting with script?
Example 1
-
Workspace
-
Part
-
Folder
-
Script
-
-
-
Example 2
-
Workspace
-
Part
-
Script
-
Example 3
-
Workspace
-
Part
-
Model
-
Folder
-
Script
-
-
-
Here are the answers. They may have been tricky!
script.Parent.Parent
script.Parent.Part
script.Parent.Parent.Parent.Part
Creating a Statement
Last part of this tutorial! We’ve successfully referred to the object, but it’s an incomplete statement because it doesn’t do anything to the object.
It’s a lot like the sentence, «The tomato.» We know what a tomato is, but it’s an incomplete sentence because it provides no information of use. To create a full statement, we might want to say something like «The tomato is red» or «The tomato has a stem.»
The same thing applies to scripting. We want to tell the script what to do with the object. Here’s another incomplete statement.
-
Part
-
Script
-
This script refers to the part, but doesn’t tell the script what to do with it. One thing we can do is to rename it. Here’s how to do it.
script.Parent.Name = "Brick"
Hit the Play button (the green ▶) at the top of the screen. You will see that the part will be renamed to «Brick.» If you want to change the name, you just have to replace «Brick» with something else. However, it must be wrapped in quotation marks («»). Here are some successful examples:
script.Parent.Name = "Dog"
script.Parent.Name = "Hello"
script.Parent.Name = "12345"
And here’s a bad one that will not work.
script.Parent.Name = Apple
To run your script, click the green ‘Play’ button at the top of your screen. If the script’s name changed to whatever you entered it to be, then congratulations! Your script works!
That’s all for this tutorial! Go on to the Beginner guide to continue on! Remember to take breaks and stay curious!
Наверх

Для того что бы сделать и разместить начальное место в Роблокс Студио, необходимо перейти во вкладку View и активировать инструмент …

Существует несколько разновидностей надписей которые можно сделать в Роблокс студио. В зависимости от ваших целей они могут быть стилизованы по …

Для того что бы сделать прозрачный блок в Роблокс, необходимо выделить блок инструментом Select и изменить параметр Transparency на 1 …

Бейджи или же значки это награда которую могут получить игроки за особые заслуги внутри плейса, например если найдут тайное место, …

Во время создания карты и редактирования ландшафта декоративная текстура травы может только мешать или даже не нужна вовсе (например если …

В этой статье я покажу Вам стандартные эффекты, которые можно будет применить к блокам и другим текстурам в Роблокс Студио. …

Из этой статьи вы узнаете как можно сделать бег с любой скоростью в Роблокс Студио. Для этого необходимо будет воспользоваться …

Роблокс Студио автоматически устанавливается вместе с игрой Роблокс и находится в той же папке. Обычно после установке на рабочем столе …
Роблокс студио как и любое другое ПО может выдавать ошибки при запуске. Они могут быть связанны с техническими сбоями самой …

При создании собственной игры в Роблокс очень часто возникает необходимость создания меню в котором игроки смогут просматривать разные разделы, открывать …
Знакомство с интерфейсом
Глава 1. Первое окно, Baseplate и вкладка Home
В этой главе Вам предстоит начать с основ. Прежде чем создавать те или иные объекты, анимации и игры, нужно знать и понимать как работает программа Roblox Studio и за что отвечают панели и кнопки в интерфейсе.
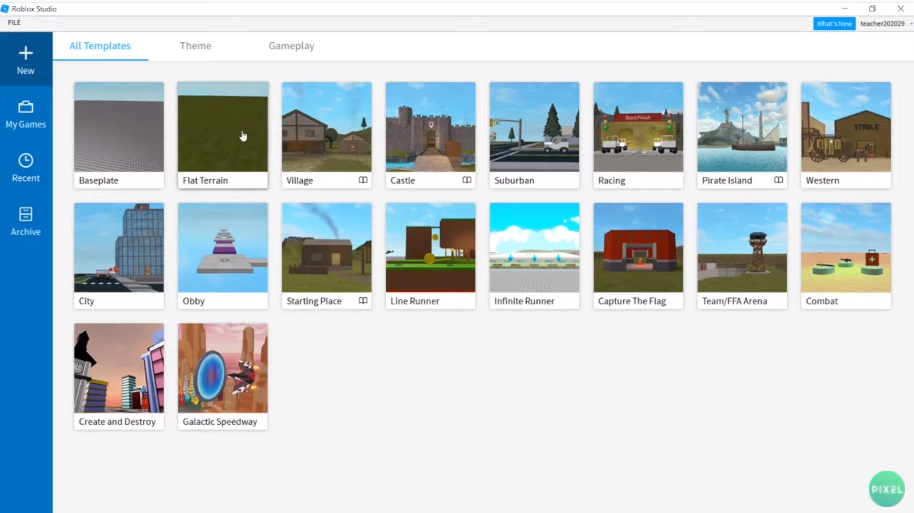
При открытии Roblox Studio перед Вами появится окно (Рис.1) в котором будет несколько вкладок:

(Рис.1)
Слева, находится голубая панель с 4 вкладками:
-
New/Новый
-
My Games/Мои игры
-
Recent/Недавнее
-
Archive/Архив
Вкладка New
Подразумевает под собой создание нового мира. В ней также есть 3 панели сверху:
-
All Templates/Все шаблоны
-
Theme/Тема
-
Gameplay/Игровой процесс
All Templates, позволяет выбрать уже существующий шаблон мира, который любезно нам предоставляет Roblox Studio.
Theme, позволяет выбрать шаблон мира на определенную тематику из представленных Roblox Studio.
Gameplay, позволяет выбрать шаблон мира с определенным уже готовым игровым процессом.
Вкладка My Games
В этой вкладке Вы можете просмотреть уже созданные Вами игры. Также, в ней есть 3 панели сверху:
-
My Games/Мои игры
-
Group Games/Групповые игры
-
Shared With Me/Поделились со мной
My Games, отображает созданные Вами игры.
Group Games, отображает игры которые созданы от имени Вашей группы на аккаунте Roblox.
Shared With Me, отображает те игры, в которые Вы были приглашены чтобы редактировать их или создавать вместе с другим пользователем.
!Группа в Roblox!
На аккаунте в Roblox можно создать свою группу и от ее имени создавать игры, аксессуары для аватара и прочее. Чтобы создать свою группу в Roblox, нужно открыть nav menu (три полоски в левом верхнем углу сайта Roblox), далее выбрать Groups и нажать на кнопку Create Group. Создание группы не бесплатное, цена — 100 Robux.
Вкладка Recent
В ней будут отображаться те миры, в которые Вы недавно заходили.
Вкладка Archive
В ней будут отображаться те миры, которые Вы перенесли в архив. Обычно, там находятся миры которые временно не редактируются, заброшены и прочее.
Переходим в Baseplate
Изучив меню, давайте создадим наш первый мир. Переходим во вкладку New и выбираем любой из предложенных. Рекомендую выбрать Baseplate.
Как только Вы выберете один из предложенных миров, перед Вами откроется новый интерфейс (Рис.2):
(Рис.2)
Изначально может показаться что в Roblox Studio очень много панелей и все они совершенно не понятны. Но, если немного разобраться не так все и страшно.
Начнем с простого управления мышью:
-
Зажатая ПКМ — позволяет вращать камеру в любую сторону
-
Зажатая ЛКМ — позволяет выделить объекты, которые уже есть в мире
-
WASD или стрелки — позволяют передвигать камеру в любую сторону
-
Прокрутка колесика — приближает и отдаляет камеру
Теперь, перейдем к самому интерфейсу. Начнем с самой верхней панели (Рис.3):
(Рис.3)
Вкладка Home/Дом
С этой вкладкой Вы будете работать чаще всего. Разберем ее подробнее.
-
Select/Выбрать
-
Move/Двигать
-
Scale/Масштаб
-
Rotate/Вращать
-
Editor/Редактор
-
Toolbox/Ящик инструментов
-
Part/Часть
-
UI/ПИ (Пользовательский Интерфейс)
-
Import 3D/Импортировать 3Д объект
-
Material Manager/Менеджер по материалам
-
Color/Цвет
-
Play/Играть
-
Resume/Возобновить
-
Stop/Остановить
-
Game Settings/Настройки игры
-
Team Test/Командный тест
-
Exit Game/Выйти из игры
Select, позволяет выбрать любой объект просто кликнув по нему. Если объект выбран, он будет подсвечен голубой рамкой (Рис.4). Горячее сочетание клавиш Ctrl+1.
(Рис.4)
Move, позволяет двигать выбранный объект с помощью осей X, Y, Z (Рис.5). Горячее сочетание клавиш Ctrl+2.
(Рис.5)
Ось X — красные стрелки
Ось Y — зеленые стрелки
Ось Z — синие стрелки
Scale, позволяет менять масштаб/размер выбранного объекта по осям X, Y, Z (Рис.6). Горячее сочетание клавиш Ctrl+3.
(Рис.6)
Ось X — красные круги
Ось Y — зеленые круги
Ось Z — синие круги
Rotate, позволяет вращать объект по осям X, Y, Z (Рис.7). Горячее сочетание клавиш Ctrl+4.
(Рис.7)
Ось X — красный обруч
Ось Y — зеленый обруч
Ось Z — синий обруч
Editor, позволяет изменять местность Вашего мира. (Об Editor Вы узнаете в следующих уроках)
Toolbox, позволяет брать уже готовые модели, картинки, аудио и т.д. от других пользователей или самого Roblox Studio.
Part, позволяет создать в мире любой из 5 представленных форм. А именно:
-
Block/Блок
-
Sphere/Сфера
-
Wedge/Клин
-
Corner Wedge/Угловой клин
-
Cylinder/Цилиндр
UI, позволяет создать такие вещи как меню, кнопки играть или настройки, кнопку пожертвования (донат) и т.д.
Import 3D, позволяет импортировать объекты из других программ в Roblox Studio. Например, можно создать объект в Blender и импортировать его в Roblox Studio.
Material Manager, позволяет выбрать материал для Вашей модели или блока. Например стекло, асфальт или кирпичная кладка.
Color, позволяет выбрать любой цвет для Вашей модели или блока.
Play, позволяет зайти в режим игры чтобы Вы могли провести тест того, что создали.
Resume, позволяет возобновить игру там, где Вы остановились.
Stop, позволяет остановить режим игры и возвращает Вас в редактор.
Game Settings, позволяет настроить уже готовую игру. Например, изменить главный аватар, добавить бейджи/достижения, добавить описание и название для игры и и т.д.
Team Test, позволяет включить режим группового теста. Т.е. Вы можете создавать мир вместе с другими приглашенными пользователями или пригласить этого пользователя поиграть в тестовом режиме.
Exit Game, позволяет выйти из тестового режима игры когда Вы находитесь в групповом тесте.
Учимся.
Roblox – мощная платформа, на которой разработчики реализуют самые разные задумки и создают свои игры.
Вся разработка происходит в специальной программе – Roblox Studio. Если вы хотите научиться создавать игры для Роблокс, то мы собрали самые популярные уроки в одном посте.
Режимы Роблокс: во что поиграть в Roblox, лучшие режимы, какой режим выбрать
Скачать Роблокс Студио
- Перейдите на официальный сайт Роблокс Студио (roblox.com/create)
- Нажмите на кнопку Start Creating
- После небольшого ожидания сайт сгенерирует ссылку на скачивание актуальной версии Роблокс Студио
- Нажмите на кнопку Download Studio, сама программа бесплатна
Как сделать свою игру в Роблокс – видеоуроки
При помощи следующей подборки вы сможете научиться:
- Создавать карту в Роблокс
- Изучите основы языка Lua
- Создадите игровые уровни Роблокс
- Научитесь создавать диалоги в Роблокс
- Нарисуете графический интерфейс игры
- Научитесь создавать 3D-игры
- Закрепите изученное и повторите обучение программированию в Роблокс Студио
* * *
Теперь вы знаете, где начать в создании игры для Роблокс при помощи Roblox Studio. Удачи!
Коды на песни в Роблокс: от Моргенштерна до гимна СССР
Моды Роблокс, какие есть – взломанная версия Роблокс
Напоминаем, что у нас есть раздел со скидками, в котором вы сможете найти Промокоды Нетология.
Игровая вселенная Роблокс уже давно покорила детей и подростков со всего мира: сегодня на платформе можно найти порядка 40 миллионов игр в любом жанре и для любого возраста.
А еще в Роблокс можно создать свою игру и поделиться ими с друзьями. Роблокс можно легко запустить не только на компьютере, но также на телефоне, планшете или игровой приставке.
К тому же игровая платформа регулярно подогревает к себе интерес коллаборациями с известными мировыми брендами и популярными исполнителями. Роблокс стала первой игровой платформой, где свои игровые миры создали такие компании как Gucci, Ralph Lauren, Hyundai и даже Пэрис Хилтон.
А еще Роблокс открыла возможность разработчикам игр зарабатывать на создании игрового контента. Только за 2021 год отчисления создателям игр для онлайн-платформы составили порядка 500 миллионов долларов.
Все это сделало Роблокс не только самой популярной игровой песочницей, но и самой востребованной среди профессионального игрового сообщества. Потенциал Роблокс настолько велик, что в первый же день торгов на бирже общая стоимость компании оценивалась в 45 миллиардов долларов.
Так что же именно так привлекает в Роблокс?
Роблокс сочетает в себе игровые функции с творческой составляющей. По сути, это онлайн-платформа, которая поможет ребенку воплотить любые творческие идеи с помощью языка программирования Lua.
Например, посмотрите, как в Роблокс можно воссоздать целые города и отдельные достопримечательности.
Нью-Йорк в Роблокс
Красная площадь в Роблокс
Игровой мир Hyundai в Роблокс
Именно возможность безграничного творчества и привлекает детей со всего мира в Роблокс. А где еще, как не в Роблокс, можно реализовать любую идею по созданию игрового мира с нуля?!
Воссоздание крушения Титаника (также в Роблокс)
Программирование на LUA в Роблокс
В Роблокс используется язык Lua – сравнительно простой для изучения язык, который легко могут освоить даже дети. Для чего используется язык Lua?
Также как и Python, Lua относится к высокоуровневым языкам программирования, но по возможностям и реализации Lua ближе всего к JavaScript.
Помимо создания игрового контента, язык Lua используется для написания тиражируемого программного обеспечения, например, на этом языке написан графический редактор Adobe Photoshop Lightroom.
Программируя на Lua в Роблокс, дети изучают алгоритм составления кода, переменные, синтаксис и возможности этого языка в игре. А в будущем изучение более сложных языков программирования будет даваться им намного легче.
Какие возможности открывает язык Lua в Роблокс

Язык программирования Lua
С помощью Lua в Роблокс дети научатся блочному моделированию, разработке игровых локаций, начнут программировать собственные скрипты и постепенно создадут мультиплеерные игры, которые уже можно загружать в интернет-магазин игр платформы.
Онлайн-маркет игр и аватаров (персонажей) в Роблокс
Как создать свою 3D-игру на Lua в Роблокс
1. Для начала создадим учетную запись на https://www.roblox.com/
и установим Роблокс Студио.

Игровая платформа Roblox.com
Далее в вашем профиле будут сохранены все выбранные игровые миры и предметы, полученные в играх.
Смотрите подробное видео по установке здесь.
2. Теперь попробуем запустить Роблокс Студио на своем компьютере и спроектировать карту для игры.
Интерфейс Роблокс Студио

Знакомимся с инструментами, позволяющими менять текстуру поверхности и добавлять на нее разные объекты
Подробнее про создание карты смотрите видеоурок здесь.
3. Наконец-то приступаем к созданию игры! Но для начала пробуем создать свой первый 3D-объект в языке Lua!
3D-моделирование в Роблокс Студио
Чтобы вывести на экран куб, достаточно написать эти строчки в коде.
Подробнее про 3D-моделирование смотрите здесь.
Теперь можно приступать к созданию игры. В основном меню Роблокс Студио выбираем карту Line Runner.
Карта Line Runner
Нажимаем на верхнюю кнопку Play и запускаем игру.
Далее останавливаем игру и создаем новые уровни для нее. Для этого в верхнем боковом меню выбираем создание новых уровней и располагаем их на карте.

Не забудьте сохранить ваш проект! Подробнее о создании уровней в игре смотрите здесь.
4. Теперь с помощью скрипта на Lua попробуем создать трамплин с условными операторами.
Для этого напишем скрипт и запустим его: попадая на определенную ступень, персонаж начинает подпрыгивать.

Подробнее про условных операторов в Lua для выполнения команд смотрите здесь.
5. Пропишем диалоги для персонажей в игре.
В этой же игре выберем функции диалога и добавим их в общий скрипт.

У нас должен получиться обмен сообщениями.

Подробнее о функции диалогов смотрите здесь.
6. Создаем самостоятельно игру в жанре Capture the flag.
Начнем с проработки карты и создания стен. Необходимые инструменты вы найдете в правом боковом меню.

Далее создаем лестницу. Для этого нужно копировать и вставить блок Part несколько раз.

После этого добавим элементы воды на уровень, воспользуемся левым нижним меню.

Далее пропишем условия для персонажа и запустим игру.

Как только персонаж достигнет желтого куба на верхнем уровне, игра будет окончена.

Подробнее про создание игры смотрите здесь.
Чтобы начать программировать в Роблокс, детям не нужно знать языки программирования или иметь навыки моделирования трехмерных объектов. Игровая платформа Роблокс поможет каждому создать с нуля свою 3D-игру с помощью встроенных игровых шаблонов и легких в освоении скриптов.
Роблокс – это современный виртуальный конструктор, который к тому же развивает логическое мышление и воображение.
Для ребенка это возможность для творческой самореализации, а для родителей – обучающая платформа.
Если ваш ребенок только учится познавать виртуальный мир, то познакомьте его с онлайн-платформой Роблокс. Тогда вы сможете обеспечить ему не только интересный, но и приятный досуг.