TinyMCE documentation

This project maintains the documentation for TinyMCE at
https://www.tiny.cloud/docs. If you have any
modifications you wish to contribute, fork this project, make the changes
and submit a pull request. You will need to sign the contributors license
agreement, which will be emailed to you upon creating the pull request.
This project is built using Antora.
Contributing to the TinyMCE Documentation
If you would like to contribute to the TinyMCE project please read the TinyMCE Documentation Contributor’s Guide at either:
- TinyMCE Documentation — Contributor’s Guide.
- GitHub — Contributing to the TinyMCE developer documentation.
Working on TinyMCE documentation
Compiling or building the documentation
The following procedure assists with building (or compiling) the documentation locally. Tiny recommends testing and reviewing changes locally prior to submitting a pull request.
Installing Prerequisites
Linux users
You need the following programs installed on your computer:
First time set up
Once you have installed any missing prerequisites, in a terminal or on a command prompt:
-
Clone the git repository:
git clone git@github.com:tinymce/tinymce-docs.git -
Change directory into the cloned git repository:
-
Run yarn install
Run the development version of the documentation
To create a development version of the documentation, run:
To view the documentation; in a web browser, navigate to http://127.0.0.1:4000.
Note: The development version of the documentation will update automatically when you save changes locally.
The yarn build step will download the latest TinyMCE package and generate new API reference content from source code. To change the version of TinyMCE API, open the _scripts/api-reference.sh file and edit the API_VERSION to the TinyMCE version you would like to generate API docs for. Alternatively, to build using a local version of TinyMCE, yarn build-local ../path/to/local/TinyMCE.
Note: The development server does not need to be stopped prior to running the
yarn buildcommand, antora should pick up the new changes generated by the build step.
TinyMCE API documentation
The TinyMCE API documentation is maintained within the TinyMCE project repository and compiled for the documentation site using MoxieDoc.
To update the published API documentation:
- Change the version in
.api-version. - Run
yarn build. - Commit the changes.
Running yarn build downloads the TinyMCE package specified in .api-version and generates new API reference content from source.
Note: The API documentation should never be edited manually.
Prerequisites
- Node.js.
Live Demos
New live demos can be added to the modules/ROOT/examples/live-demos directory. It then can be referenced in your doc with the following code:
liveDemo::{sub-directory-name}[]
Overriding the tinymce URL in live demos
All live demos usually get their tinymce.min.js URL from the tinymce_live_demo_url setting in the antora.yml file.
However, there are some instances where you wish to override this, e.g.
- You want to push/deploy a branch for a new feature that’s only on the ‘dev’ channel.
- You want to run the site locally, but test out the live demos in a different channel.
To help with this, there are two mechanisms for overriding the tinymce.min.js URL.
-
Change the URL for all live demos by setting the
tinymce_live_demo_urlattribute inantora-playbook-dev.yml. For example:asciidoc attributes: tinymce_live_demo_url: URL_to_script_file -
Change the URL for an individual live demo by setting
script_url_overrideattribute in the live demo markup. For example:liveDemo::{sub-directory-name}[script_url_override='URL_to_script_file']- This is useful if you want to deploy the develop branch for a feature only in the ‘dev’ channel.
- This only overrides the URL for one live demo.
- Don’t use this in more than one live demo on a page.
- Don’t use this long-term — when the feature is fully rolled-out, use the standard channel.
Знакомство с великим и могучим текстовым редактором на JS
Как вы уже поняли, редактор является платформенным Javascript редактором HTML кода, т.е. WYSIWYG редактором для сайтов и веб приложений. Разработчиком этого полезного продукта является компания Moxiecode Systems AB. К ключевым особенностям программы относятся: поддержка темшаблонов, языковая поддержка и возможность подключения плагинов. HTML редактор TinyMCE используется во многих системах управления и движках сайтов, в том числе и в системе управления BIT company CMS v 1.01. Мы можем отметить программу как отличный и широкофункциональный инструмент для редактирования HTML кода, вставки видео, текстово-графической информации, таблиц и графиков. Правда так же отметим и скудность русскоязычной информации о методах и свойствах JS редактора TinyMCE( но вам повезло! Здесь вы найдете ответы на базовые вопросы и научитесь работать с редактором TinyMCE).
Как видно из титульного изображения выше, JS редактор очень похож на текстовый редактор в офисных приложения — принцип работы у редактора TinyMCE аналогичный. Для пользователей не знакомых с возможностями html и css есть графический интерфейс редактора. Для пользователей которые владеют языком программирования html и css есть так же расширенный редактор HTML. Данный редактор позволяет решить практически любые задачи, связанные с оформление страниц.
Инструкция полностью применима для редактора версии 3.5.11. Для более поздних версий методология работы с редактором так же должна быть аналогичной.
1. Скачиваем свежую версию редактора здесь и распаковываем.
2. Копируем содержимое архива в нужную вам директорию сайта.
3. Подключаем редактор к нашему сайту путем вставки кода на нужную страницу:
<script type="text/javascript" src="/path/to/tiny_mce.js"></script>4. Инициализируем редактор при помощи JavaScript кода:
<!-- TinyMCE -->
<script type="text/javascript">
tinyMCE.init({
    mode : "textareas",
    theme : "simple"
 });
</script>
<!-- /TinyMCE -->
<textarea></textarea>
5. Готово! Теперь вы вставили и инициализировали простейший TinyMCE редактор.
Как вы заметили подключение и инициализация JS редактора проходит в 3 логических шага:
- подключение библиотеки к странице сайта
- инициализация объекта
- вставка тега textarea, который и становится графическим html редактором.
Инициализация редактора и его параметры
Редактор TinyMCE возможно инициализировать с различными параметрами, темами, плагинами. В данном разделе мы рассмотрим некоторые параметры и их значения. Вот пример инициализации редактора в системе управления BIT company CMS V 1.01:
<!-- TinyMCE -->
<script type="text/javascript">
    tinyMCE.init({
        // General options
        mode : "exact",
        elements: "content_editor",
        theme : "advanced",
        language:"ru",
        plugins : "autolink,lists,spellchecker,pagebreak,style,layer,table,save,advhr,advimage,advlink,emotions,iespell,inlinepopups,insertdatetime,preview,media,searchreplace,print,contextmenu,paste,directionality,fullscreen,noneditable,visualchars,nonbreaking,xhtmlxtras,template,precode,uploads_image",

        // Theme options
        theme_advanced_buttons1 : "save,newdocument,|,bold,italic,underline,strikethrough,|,justifyleft,justifycenter,justifyright,justifyfull,|,styleselect,formatselect,fontselect,fontsizeselect",
        theme_advanced_buttons2 : "cut,copy,paste,pastetext,pasteword,|,search,replace,|,bullist,numlist,|,outdent,indent,blockquote,|,undo,redo,|,link,unlink,preCode,anchor,image,uploads_image,cleanup,help,code,|,insertdate,inserttime,preview,|,forecolor,backcolor",
        theme_advanced_buttons3 : "tablecontrols,|,hr,removeformat,visualaid,|,sub,sup,|,charmap,emotions,iespell,media,advhr,|,print,|,ltr,rtl,|,fullscreen",
        theme_advanced_buttons4 : "insertlayer,moveforward,movebackward,absolute,|,styleprops,spellchecker,|,cite,abbr,acronym,del,ins,attribs,|,visualchars,nonbreaking,template,blockquote,pagebreak,|,insertfile,insertimage",
        theme_advanced_toolbar_location : "top",
        theme_advanced_toolbar_align : "left",
        theme_advanced_statusbar_location : "bottom",
        theme_advanced_resizing : true,

        // Skin options
        skin : "o2k7",
        skin_variant : "silver",

        // Drop lists for link/image/media/template dialogs
        template_external_list_url : "js/template_list.js",
        external_link_list_url : "js/link_list.js",
        external_image_list_url : "js/image_list.js",
        media_external_list_url : "js/media_list.js",

        // Replace values for the template plugin
        template_replace_values : {  username : "Some User",  staffid : "991234"  }
    });
    </script>
<!-- /TinyMCE -->
mode [textareas|exact|specific_textareas|none] — определяет какие html экхемляры будут преобразованы в графические редакторы TinyMCE.
- textareas — преобразовывает все теги <textarea> к виду редактора
- specific_textareas — преобразуются только элементы имеющие, указанный в параметре editor_selector селектор или не имеющие селектор, указанный в editor_deselector
<script type="text/javascript">
        tinyMCE.init ({
            mode : "specific_textareas",
            editor_selector : "editme",
            language:"ru",
            theme : "simple"
        });
    </script>
<textarea id="content" class="editme" name="content"></textarea>- exact — преобразуются только элементы, идентификаторы которых перечислены в параметре elements(пример из BIT company CMS).
- none — элементы не преобразуются
theme [simple|advanced] — определяет режим инициализации редактора.
- simple — режим, включающий базовые функции и запрещающий гибкую настройку
- advanced — режим, позволяющий гибкую настройку плагинов, кнопок редактора, темы редактора и т.д.
language — указывает код языкового пакета графического редактора TinyMCE.
plugins — список плагинов, инициализируемых вместе с редактором, разделенные запятыми.
theme_advanced_buttons<1-n> — содержит список элементов управления для вставки в панели инструментов, где <1-n> строка в панели инструментов.
theme_advanced_toolbar_location — указывает, где должны располагаться панели инструментов: top — сверху, bottom — снизу.
theme_advanced_toolbar_align — позволяет задать выравнивание панели инструментов: по левому краю, по правому и по центру.
theme_advanced_statusbar_location — задает положение статусбара (top — вверху, bottom — внизу), либо указывает на его отсуствие — none.
theme_advanced_resizing — включает — true или выключает — false возможность изменять размеры окна редактора. Не работает, если значение theme_advanced_statusbar_location установлено в none.
skin — указывает какой скин данной темы необходимо использовать.
skin_variant — указывает какой вариант скина необходимо использовать.
content_css — подключает пользовательский css-файл(либо набор файлов, перечисленных через запятую), который будет использоваться в редакторе.
relative_urls — устанавливает, будут ли ссылки в редакторе относительные (true) или абсолютные (false).
template_replace_values — преобразование элемента страницы в графический редактор html кода с параметрами.
template_replace_values : { username : "Some User", staffid : "991234" }Вот мы и подытожим с вопросом подключения и инициализации графического редактора html кода TinyMCE для сайта. Всем спасибо!
- Главная
- Блоги
- Блог Макс К.
Главные вкладки
- Просмотр(активная вкладка)
- Реакции
![]()
26 октября 2007 в 13:00
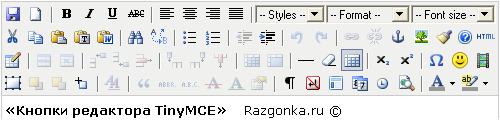
Часто на Drupal сайты ставят визуальный html-редактор TinyMCE.
Этот редактор поддерживает до 80 Word-подобных кнопок и у него гораздо более широкие возможности для html-редактирования, чем у Word.
Я написал инструкцию для пользователей по использованию кнопочек редактора и работе с иллюстрациями.
Оглавление инструкции по TinyMCE
- Типовые кнопки (Жирный текст, Сдвиг абзаца влево, Сдвиг абзаца вправо, Маркированный список, Нумерованный список, Отмена предыдущего действия, Возврат отмененного действия).
- Простановка и изменение ссылки
- Удаление ссылки
- Вставка картинки с другого сайта
- Подготовка и поиск картинок
- Надежное размещение картинок
- Копирайты картинок
- Спецсимволы
- Вставка текста из редактора Word
- Линия раздела
- Проверка орфографии на лету
- Типографика
Ссылки:
- Прочитать полный текст инструкции
- Перепробовать все кнопочки
- Установить модуль TinyMCE
This is the second part of two posts dedicated to WordPress editors. The first post was all about WordPress text editor, while in this post we will dissect the WordPress TinyMCE editor, and we will bend it to our will. Follow along below as we will show you how to:
- Add custom styles to WordPress TinyMCE editor
- Activate hidden buttons
- Enhance WordPress TinyMCE editor with existing plugins
- Develop custom WordPress TinyMCE plugins
- Use a free WordPress plugin to add styles and buttons to TinyMCE
WordPress TinyMCE editor
Update: WordPress 5.0 will change the way we write and publish content. Make sure you take a look at our guide: What’s New in WordPress 5.0 (How to Prepare for Gutenberg)
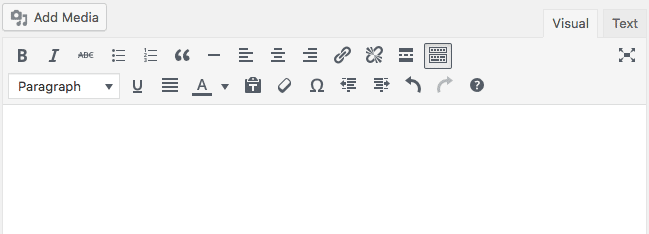
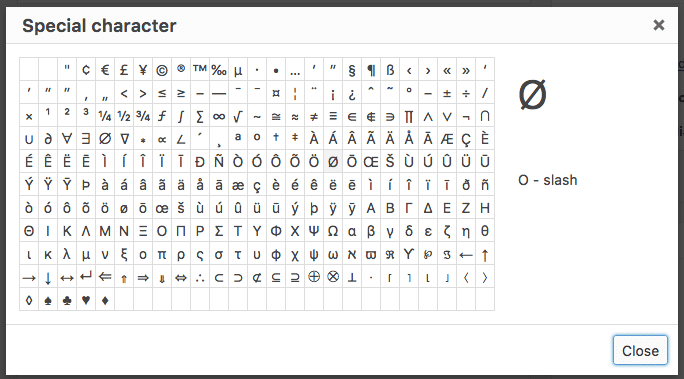
By default, WordPress the TinyMCE editor provides two rows of buttons to create, edit and format post content. The first row (the primary toolbar) includes styling and formatting functionalities. Additional controls allow to add, edit and remove anchors, add the <!–more–> tag, activate the distraction-free mode. All these buttons should look pretty familiar to anyone with basic knowledge of a word processor.
The Toolbar Toggle button toggles the Advanced editor toolbar (the second row of buttons), which provides a pulldown menu of text elements (paragraph, headings and preformatted text), more styling controls, and some additional features (Paste as text, Clear formatting, Special characters, Undo and Redo) that come in handy in many ways.
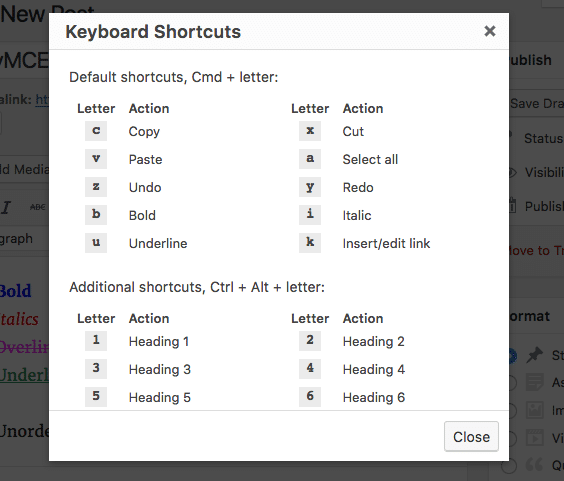
Finally, the question mark button provides a list of keyboard shortcuts which improve the user writing experience.
Now add and style your content into the visual editor, then switch to the text editor. You’ll find the corresponding HTML structure as WordPress will preserve your input when switching from visual to text mode.
Default primary and advanced toolbars provide a good number of functionalities which can be extended with additional buttons and controls. Many of these buttons are available out of the box in TinyMCE, and we just need to activate them to put them in action. Moreover, we can add a good number of advanced functionalities by installing one or more of the existing plugins.
And if all these buttons are not enough, we can enhance the editor with your coolest functionalities, by developing custom plugins.
That being said, let’s start diving from the easiest and most common usage of the API.
Adding custom styles to WordPress TinyMCE editor
Assume you need to provide an easy way to add custom styles into post content from TinyMCE. It’s a two step procedure:
- first, we need to activate a hidden pulldown menu named Styleselect,
- then we have to define each style we want to add to the Styleselect menu.
We can accomplish the first task by filtering the array of TinyMCE buttons. The default toolbar shows one or two rows of buttons, but we can enable up to four toolbar rows thanks to the following filters:
- mce_buttons filters the primary toolbar buttons (the first row), which is always visible;
- mce_buttons_2 filters the advanced toolbar buttons (the second row), which can be toggled on/off by the user;
- mce_buttons_3 inactive by default;
- mce_buttons_4 inactive by default.
We can hook a callback function to one of these filters to show/hide existing buttons, like the Styleselect pulldown menu. The following function enables the menu in the second row:
function my_mce_buttons_2( $buttons ) {
	array_unshift( $buttons, 'styleselect' );
	return $buttons;
}
add_filter( 'mce_buttons_2', 'my_mce_buttons_2' );
The array_unshift PHP function prepends the styleselect element to the front of the $buttons array.

Now that the button has been activated, we can register our custom styles by filtering an array of TinyMCE configuration parameters through the tiny_mce_before_init filter.
Consider the following function:
function my_tiny_mce_before_init( $mceInit ) {
	$style_formats = array(
		array(
			'title' => 'PHP',
			'block' => 'code',
			'classes' => 'language-php'
		)
	);
	$mceInit['style_formats'] = json_encode( $style_formats );
	return $mceInit;
}
add_filter( 'tiny_mce_before_init', 'my_tiny_mce_before_init' );
The style_formats element is a JSON encoded array of elements. Each element sets the configuration parameters of a single menu item. The function above replaces default styles with a single custom element which wraps the selected text in a code.language-php element.

In our example, we set three properties for a single menu item:
- title: the title for the menu item;
- block: the block element to produce;
- classes: space separated list of CSS classes to apply to selection.
We added the code element as block, so that it will be applied only once to the full selection. Adding it as inline element would apply the code tag to each selected line.
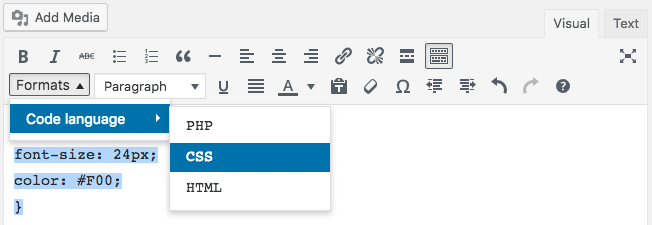
We can add more items and group them by category, as shown in the following example:
function my_tiny_mce_before_init( $mceInit ) {
	$style_formats = array(
		array(
			'title' => 'Code language',
			'items' => array(
				array(
					'title' => 'PHP',
					'block' => 'code',
					'classes' => 'language-php'
				),
				array(
					'title' => 'CSS',
					'block' => 'code',
					'classes' => 'language-css'
				),
				array(
					'title' => 'HTML',
					'block' => 'code',
					'classes' => 'language-html'
				)
			)
		)
	);

	$mceInit['style_formats'] = json_encode( $style_formats );

	return $mceInit;
}
add_filter( 'tiny_mce_before_init', 'my_tiny_mce_before_init' );
The style_formats element is a multi-dimentional array of parameters. In this example, we’ve added a first level item (Code language) and three sub items (PHP, CSS, HTML). The image below shows the resulting menu.
TinyMCE applies the styles to the selected elements, but is not aware of these styles, so they won’t be applied to the content in the editor. If a real-time preview is needed, we’ll have to register a custom stylesheet with the add_editor_style() function:
/**
 * Registers an editor stylesheet for a custom theme.
 */
function my_theme_add_editor_styles() {
	add_editor_style( 'css/my-editor-style.css' );
}
add_action( 'admin_init', 'my_theme_add_editor_styles' );
This function registers a stylesheet that will be used by WordPress TinyMCE to style content into the editor.
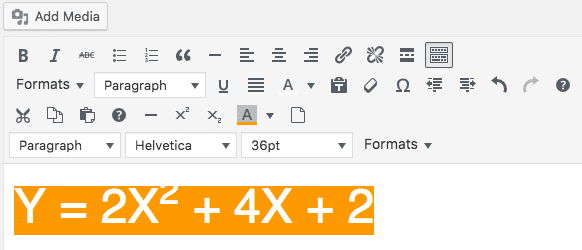
As an example, let’s suppose we’d like to apply different colors to PHP, CSS and HTML code. To accomplish this task, we’ll add the following declarations into css/my-editor-style.css stylesheet:
.language-php{ color: red; }
.language-css{ color: green; }
.language-html{ color: blue; }
TinyMCE will produce the output shown in the following image.

Note: We’ve looked at just few configuration settings, but TinyMCE API gives developers a great control over the editor. See TinyMCE documentation for the full list of elements and properties with some examples of usage.
We can add buttons to the visual editor in several ways. In many cases we are not required to build a custom button because TinyMCE provides a good number of hidden buttons we can easily activate.
One of these buttons is the Styleselect dropdown menu, but we have a long list of inactive buttons we can activate by filtering the arrays of buttons through one of the mce_buttons_{n} filters (see TinyMCE docs for the full list of available buttons).
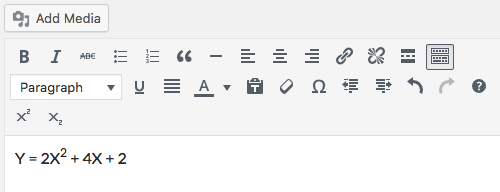
Consider the following example:
function my_mce_buttons_3( $buttons ) {
	$buttons[] = 'superscript';
	$buttons[] = 'subscript';
	return $buttons;
}
add_filter( 'mce_buttons_3', 'my_mce_buttons_3' );
The callback function above adds the superscript and subscript elements to the end of the array $buttons.
Here is a list of hidden buttons available in WordPress TinyMCE:
- cut
- copy
- paste
- hr
- formatselect
- fontselect
- fontsizeselect
- styleselect
- subscript (previously sub)
- superscript (previously sup)
- backcolor
- newdocument
If none of these buttons suits our needs, we can provide the editor with more functionalities, thanks to a good number of official plugins.
Enhancing the visual editor with TinyMCE plugins
Suppose your goal is to include the TinyMCE Table button into the visual editor through a WordPress plugin.
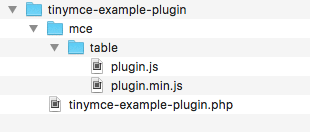
First, you have to download the Dev Package from TinyMCE website. Unpack the zip file and get the plugin.min.js file from /js/tinymce/plugin/table folder.
Create the following folders in /wp-content/plugins:
- /wp-content/plugins/tinymce-example-plugin/
- /wp-content/plugins/tinymce-example-plugin/mce/table
When you’re done, create a new tinymce-example-plugin.php file into the plugin root folder, and upload the plugin.min.js file into the table folder (see the image below).
Now add the following lines into tinymce-example-plugin.php:
<?php
/**
 * @package TinyMCE_example_plugin
 * @version 1.0
 */
/*
Plugin Name: TinyMCE example plugin
Plugin URI: http://wordpress.org/extend/plugins/#
Description: This is an example plugin
Author: Your Name
Version: 1.0
Author URI: http://yourdomain.com/
*/
In order to include the Table button into the WordPress TinyMCE editor we just need two filters:
mce_buttons adds new buttons to TinyMCE primary toolbar (we can use any of mce_buttons_{n} filters, depending on the row where the button has to be shown)
mce_external_plugins loads an external TinyMCE plugin.
Here is the code of the plugin file:
function example_plugin_register_buttons( $buttons ) {
   $buttons[] = 'table';
	return $buttons;
}
// add new buttons
add_filter( 'mce_buttons', 'example_plugin_register_buttons' );

function example_plugin_register_plugin( $plugin_array ) {
   $plugin_array['table'] = plugins_url( '/mce/table/plugin.min.js', __FILE__ );
   return $plugin_array;
}
// Load the TinyMCE plugin
add_filter( 'mce_external_plugins', 'example_plugin_register_plugin' );
The first function adds a new button to the primary toolbar, while the second function loads a plugin from the specified URL. The plugins_url() function retrieves the absolute URL to the specified file under the plugin directory (read more on the Codex).
Now we can save the file and activate the plugin. The image below shows the enhanced toolbar.

That’s all. Following the same procedure, we can add any existing TinyMCE plugins to the WordPress visual editor.
You can download the plugin .zip file, or view the PHP code of this example on Gist.
Building a TinyMCE plugin
Finally, we can build our TinyMCE custom plugin. Suppose you want to add a button to allow users to wrap the selected content in the following tags:
<pre><code>Selected text</code></pre>We can even decide to add a CSS class to the <code> tag, to provide support for Prism code highlighter. We need to:
- register a custom TinyMCE button and plugin in a WordPress plugin;
- develop the TinyMCE plugin;
We already know how to register a plugin and add a button in WordPress TinyMCE:
function example_plugin_register_buttons( $buttons ) {
	$buttons[] = 'prism';
	return $buttons;
}
// add new buttons
add_filter( 'mce_buttons', 'example_plugin_register_buttons' );

function example_plugin_register_plugin( $plugin_array ) {
	$plugin_array['prism'] = plugins_url( '/mce/prism/plugin.js', __FILE__ );
	return $plugin_array;
}
// Load the TinyMCE plugin
add_filter( 'mce_external_plugins', 'example_plugin_register_plugin' );
This is exactly the same code as the previous example, with the only difference that now we’re are registering a custom plugin named prism.
Now let’s create the following plugin.js file:
(function() {
	var languages = ['css', 'php', 'html', 'javascript'];

	tinymce.PluginManager.add( 'prism', function( editor ){

		var items = [];

		tinymce.each( languages, function( languageName ){
			items.push({
				text: languageName,
				onclick: function(){
					var content = tinyMCE.activeEditor.selection.getContent();
					editor.insertContent( '<pre><code class="language-' + languageName + '">' + content + '</code></pre>' );
				}
			});
		});

		editor.addButton( 'prism', {
			type: 'menubutton',
			text: 'Prism',
			icon: 'code',
			menu: items
		});

	});
})();
This code is also available on Gist.
It’s not in our goals to dive into TinyMCE APIs, and you’ll find all you need to know in TinyMCE docs for developers.
This file should be placed in /mce/prism/ subfolder of our plugin directory. The JS function iterates among the elements of the languages array and pushes a new object into the items array for each language. The addButton method creates the Prism menu button, and adds a menu item for each element of the items array.
Save, upload and refresh, and your gorgeous dropdown menu button will pop up in all its beauty.

Any further information on how to develop TinyMCE plugins can be found in the online documentation for developers.
TinyMCE Advanced plugin for WordPress
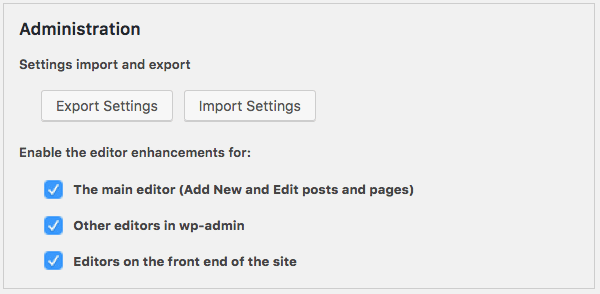
If you’re not a developer, you can enhance the visual editor as well. TinyMCE Advanced is a free WordPress plugin which brings the functionalities of fifteen TinyMCE plugins to the default visual editor.
Thanks to TinyMCE Advanced users will add, remove, rearrange buttons on the four rows of the editor toolbar. In addition, the plugin provides an option to enable a menu above the toolbar.
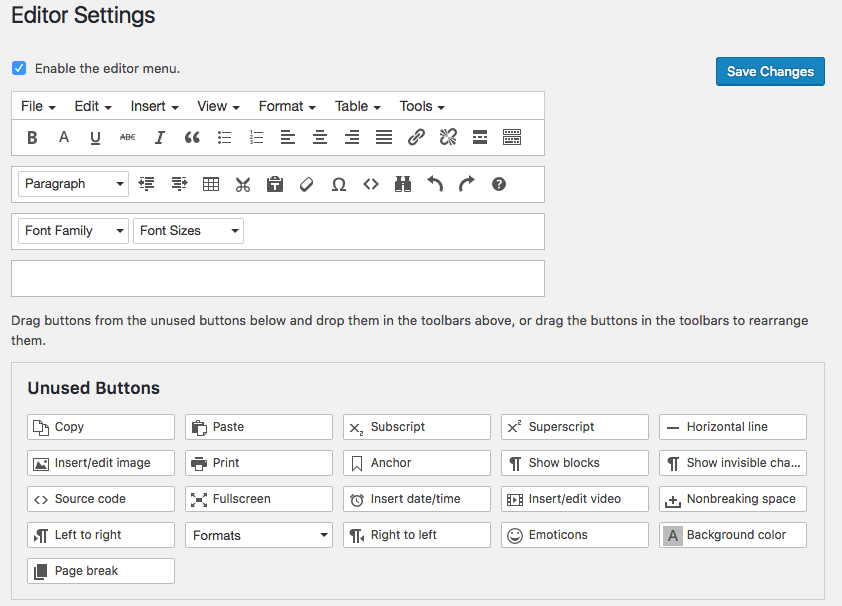
From the plugin options page we can enable several advanced features, like the Table button, the Font Family and Font Size menus, the Show blocks and Show invisible characters buttons.
Other options allow users to determine the editor that will be affected by new settings, and more.
Conclusions
TinyMCE API provides a lot of stuff to play with. We can activate hidden functionalities or register external plugins. And if none of the available features is enough for us, we can have fun with the API and build custom extentions. Do you have any further ideas to enhance the WordPress TinyMCE editor?
Время на прочтение
11 мин
Количество просмотров 56K
Здравствуйте, меня зовут Константин, я работаю front-end-разработчиком на информационно-развлекательном портале, основную долю контента которого составляют новости и статьи. И, конечно же, нам было крайне важно организовать удобную работу с порталом для наших редакторов. О том, каких успехов мы добились на данном поприще, и будет эта статья.
У себя на портале для редактирования новостей и статей мы используем WYSIWYG-редактор TinyMCE версии 4.2.4. Он показал себя с наилучшей стороны среди всех WYSIWYG-редакторов как по стабильности работы, так и по качеству формируемой HTML-разметки. К тому же он оказался наиболее простым в освоении для людей, привыкших работать с офисными приложениями.
Но одних его базовых возможностей не хватает для того, чтобы реализовать все потребности редакции. Я не стану описывать процесс конфигурирования TinyMCE: во-первых, нужды у всех разные, а во-вторых, этот момент очень хорошо освещен в документации. Зато я расскажу о решениях, которые для многих могут оказаться полезными и которые не так просто найти в интернете.
А пойдет сегодня речь о:
- работе с изображениями;
- форматировании HTML-разметки при вставке текста из внешних источников;
- типографике.
Работа с изображениями
В последнее время количество иллюстраций в наших статьях заметно возросло. И потому одной из важнейших задач для нас стала реализация простого и удобного механизма работы с изображениями.
Вот важнейшие моменты, которые мы для себя определили:
- простая загрузка изображений;
- простая вставка изображений в текст;
- ресайз изображений до размеров, заданных в тексте;
- простое создание ссылки на увеличенное изображение.
В интернете есть немало плагинов к TinyMCE для работы с графикой (в том числе и его родной, платный плагин MoxieManager), которые имитируют файловые менеджеры. Однако, как показала практика, все эти богатые возможности «а-ля» проводник Windows редакторам совсем не нужны. И потому мы решили отказаться от данной концепции и максимально упростить загрузку иллюстраций и добавление их в статью.
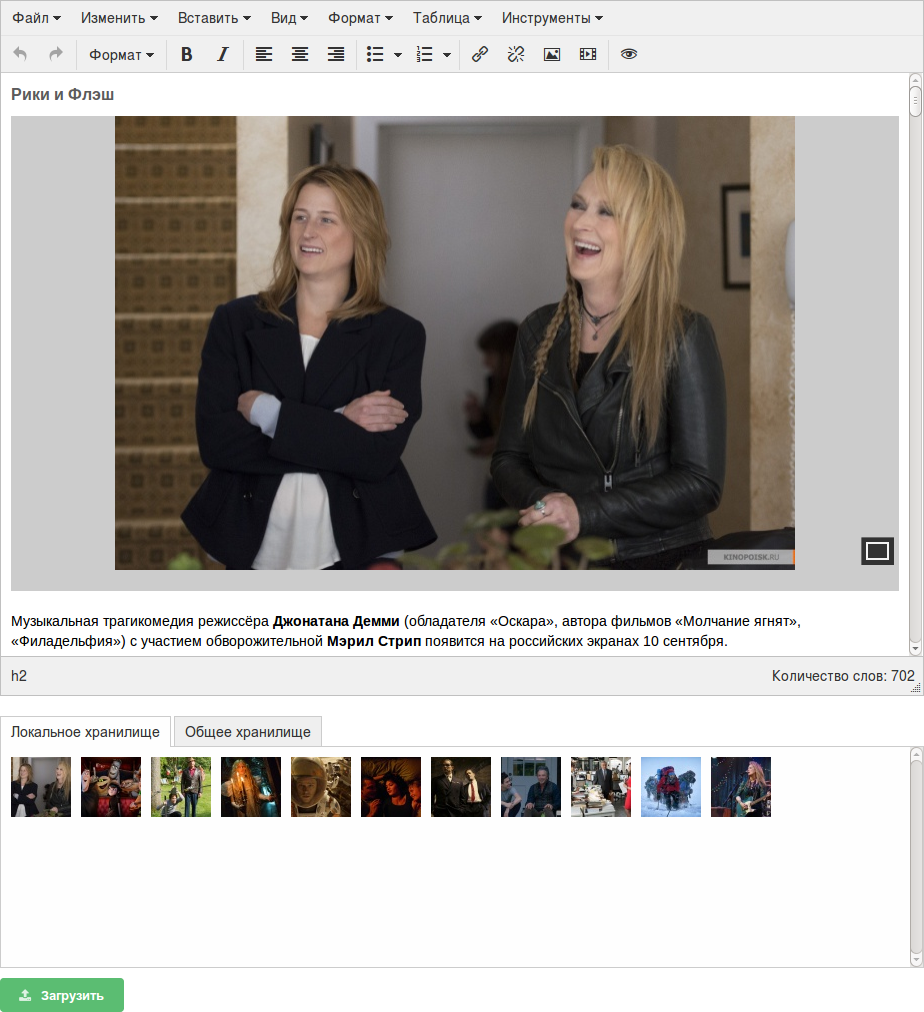
Для этого мы расположили под окном TinyMCE дополнительную панель конкретно для работы с изображениями. Мы решили, что когда кто-либо правит определенный текст, он должен видеть лишь те изображения, которые непосредственно относятся к этой статье. Их будет не так много, и каталогизировать изображения не придется. Также, на всякий случай, мы добавили в панель и вторую вкладку — для работы с глобальными иллюстрациями, которые могут быть доступны во всех статьях (но ей до сих пор не воспользовались).
Для загрузки изображений мы использовали плагин Dropzone.js. Он обладает следующими особенностями:
- поддержка Drag’n’Drop;
- мультизагрузка через Ajax;
- простая кастомизация;
- и никаких зависимостей — только ванильный JS.
Его конфигурация, также как и конфигурация TinyMCE, хорошо описана в документации. Я уверен — вы с легкостью сможете заточить его работу под себя, и поэтому не буду заострять на нем внимание. Вы так же можете использовать любой другой подобный плагин, благо их сейчас достаточно много.
Благодаря такому подходу мы получили возможность хранить изображения на сервере так, как нам вздумается, и упростили процесс их загрузки. Но нашей конечной целью является все-таки добавление изображений в текст статьи.
Итак, мы имеем некую панель, на которой отображается список всех доступных для статьи изображений, и нам необходимо, чтобы при клике по этим изображениям они вставлялись в текст. Этого нам поможет добиться функция редактора TinyMCE execCommand:
tinymce.activeEditor.execCommand('mceInsertContent', false, img);
Но это далеко не все — тут как раз начинается самая интересная часть. Действуя подобным образом, мы получаем богатые возможности по контролю над добавляемыми элементами.
К примеру, у нас на портале строго ограничена ширина контентной области, отведенной под статью. И если загруженное изображение намного шире — оно будет уменьшено до необходимых размеров и вставлено вместе с ссылкой на оригинал. При этом достаточно большие изображения у нас вставляются в обертке, которая растягивается на всю ширину статьи и заливается по краям средним цветом с помощью jQuery-плагина.
Определение соответствующего поведения происходит на стадии добавления иллюстрации в текст. Но как же быть, если пользователи будут редактировать изображения стандартными средствами управления TinyMCE? Чтобы не потерять контроль над элементами, добавим обработчик события NodeChange для редактора (мы делаем это в момент конфигурирования TinyMCE):
tinymce.init({
    /* Конфигурация редактора */

    setup: function (editor) {
        editor.on('NodeChange', function (e) {
            if (e.element.nodeName === 'IMG' && e.element.classList.contains('mce-object') === false) {
                /* Ваш код */
            }
        });
    }
});
Так как различные встраиваемые элементы (iframe, embedded) в TinyMCE заменяются изображением-заглушкой, проводим дополнительную проверку на отсутствие класса mce-object, чтобы отличить их от обычных иллюстраций.
Отловив событие изменения элемента и определив, что этот элемент является изображением, мы возвращаем себе контроль над ним. Мы можем проверить, не вышли ли его размеры (установленные размеры будут переданы в объекте события: e.width, e.height) за допустимые пределы, не нарушены ли пропорции (и такое бывало) и т.д… Рекомендую сохранять оригинальные размеры изображений в data-* атрибутах элементов.
Вы можете возразить, сказав, что для отлова ресайза изображений в редакторе достаточно использовать события ObjectResizeStart и ObjectResized. Однако данные события не сработают, если размеры иллюстрации будут изменены с помощью инструмента вставки/редактирования изображения.
Еще одна хитрость — чтобы не дать изображению растягиваться больше заданных пределов (это могут быть как ограничения контентной области, так и максимальные размеры самого изображения), задайте для него свойства max-width и max-height в атрибуте style при вставке.
Таким образом мы решили несколько пунктов нашей первоначальной задачи, но нас все еще волнует ресайз изображений до размеров, заданных в статье на стороне сервера, чтобы посетителям портала не пришлось загружать большие (тяжелые) иллюстрации, которые бы лишь визуально уменьшались.
Данная проблема решается довольно просто, если для редактирования текста вы используете bb-коды — вы просто выполняете ресайз изображений в момент обработки команды вставки их в текст. В случае с WYSIWYG-редакторами у вас есть два варианта: парсить сформированный HTML или же использовать специальные ссылки. Мы выбрали второй.
Независимо от того, на чем написан ваш бэкенд, вы сможете сделать так, чтобы по определенным параметрам в ссылке формировалось подходящее изображение и помещалось в кэш. При вставке элемента в редактор сгенерировать соответствующую ссылку достаточно просто, а в момент редактирования изображения нам на помощь вновь придёт обработчик события NodeChange. Главное помнить, что при изменении атрибута src элемента необходимо будет поменять еще и атрибут data-mce-src.
Вот такой обработчик используется у нас (для работы с DOM здесь применяется jQuery):
resizeImage = function ($image, width, height) {
    var originalWidth = parseInt($image.data('originalWidth'), 10),
        originalHeight = parseInt($image.data('originalHeight'), 10),
        ratio,
        defaultWidth,
        defaultHeight,
        link = $image.attr('src'),
        linkParams;

    if (typeof width === 'undefined' || width === null) {
        width = parseInt($image.attr('width'), 10);
    }

    if (typeof height === 'undefined' || height === null) {
        height = parseInt($image.attr('height'), 10);
    }

    defaultWidth = width;
    defaultHeight = height;

    /* Для старых изображений, без сохраненных оригинальных размеров */
    if (isNaN(originalWidth) || originalWidth === 0 || isNaN(originalHeight) || originalHeight === 0) {
        $image
            .attr({
                width: '',
                height: ''
            })
            .css({
                maxWidth: 'none',
                maxHeight: 'none'
            });

        originalWidth = $image.width();
        originalHeight = $image.height();

        ratio = originalWidth / originalHeight;

        var maxWidth = Math.min(originalWidth, pageWidth),
            maxHeight = (maxWidth === originalWidth ? originalHeight : Math.round(maxWidth / ratio));

        $image
            .attr({
                width: width,
                height: height,
                'data-original-width': originalWidth,
                'data-original-height': originalHeight
            })
            .css({
                maxWidth: maxWidth,
                maxHeight: maxHeight
            });
    } else {
        ratio = originalWidth / originalHeight;
    }

    width = Math.min(originalWidth, pageWidth, width);
    height = (width === originalWidth ? originalHeight : Math.round(width / ratio));

    if (link.substr(0, 7) === 'http://') {
        linkParams = link.substr(7).split('/');
    } else {
        linkParams = link.split('/');
    }

    /* Проверка соответсвия ссылки определенной структуре, и обновление ее */
    if (linkParams.length === 6 && linkParams[0] === window.location.host && (linkParams[1] === 'r' || linkParams[1] === 'c') &&
        isDecimal(linkParams[2]) && isDecimal(linkParams[3])) {
        link = 'http://' + linkParams[0] + '/' + linkParams[1] + '/' + width + '/' + height + '/' + linkParams[4] + '/' + linkParams[5];
        $image.attr({
            src: link,
            'data-mce-src': link
        });
    }

    if (width !== defaultWidth || height !== defaultHeight) {
        $image.attr({
            width: width,
            height: height
        });
    }
}

tinymce.init({
    /* Конфигурация редактора */

    setup: function (editor) {
        editor.on('NodeChange', function (e) {
            if (e.element.nodeName === 'IMG' && e.element.classList.contains('mce-object') === false) {
                resizeImage($(e.element), e.width, e.height);
            }
        });
    }
});
Как видите, даже если оригинальные размеры изображения не указаны в data-* атрибутах, функция пытается вычислить их самостоятельно и выполнить все необходимые проверки. Такой подход позволяет обеспечить совместимость с уже накопленным ранее материалом на портале.
Форматирование HTML-разметки
Именно эта задача вызвала у нас больше всего трудностей.
После тщательного изучения документации по TinyMCE было обнаружено, что нет никакой возможности сконфигурировать редактор так, чтобы он очищал HTML-разметку от различного мусора при вставке текста из Word’а или же с других сайтов, и при этом бы не урезал функциональные возможности пользователей. Готовых решений, удовлетворяющих нашим потребностям, в интернете мы также не нашли.
Пришлось справляться собственными силами, и вот что у нас получилось github.com/WEACOMRU/html-formatting.
Представленная в репозитории функция проверяет соответствие содержимого переданного ей контейнера определенным правилам и избавляется от всего лишнего. Она написана на чистом JS и не требует никаких зависимостей и распространяется по лицензии MIT.
Для форматирования разметки в момент вставки текста в TinyMCE необходимо задать обработчик события paste_postprocess:
tinymce.init({
    /* Конфигурация редактора */
    paste_postprocess: function (plugin, args) {
        var
            valid_elements = {
                /* Конфигурация правил форматирования */
            };
        htmlFormatting(args.node, valid_elements);
    }
});
С принципами конфигурирования правил вы можете ознакомиться на гитхабе, я же расскажу о том, как эта функция работает.
Если смотреть на уже готовое решение, все оказывается достаточно элементарно: в цикле перебираем все дочерние элементы HTML-контейнера и для каждого запускаем отдельную обработку. Функцию выполняем рекурсивно до тех пор, пока не достигнем самого глубокого уровня вложенности.
process = function (node, valid_elements) {
    var taskSet = [],
        i;

    for (i = 0; i < node.childNodes.length; i++) {
        processNode(node.childNodes[i], valid_elements, taskSet);
    }

    doTasks(taskSet);
}
В процессе обработки отдельного элемента прежде всего проверяем, с чем мы имеем дело: с HTML-элементом или же с текстом.
processNode = function (node, valid_elements, taskSet) {
    var rule;

    if (node.nodeType === 1) {
        /* HTML-элемент */
    } else if (node.nodeType === 3) {
        /* Текстовый элемент */
    }
}
Текстовые элементы обрабатываются по-своему — из них удаляются все неразрывные пробелы.
processText = function (node) {
    node.nodeValue = node.nodeValue.replace(/xa0/g, ' ');
}
Это вызвано тем, что наши редакторы испытывали трудности из-за сохраняющихся неразрывных пробелов в скопированном тексте, которые ломали переносы в статье. Данная процедура решает эту проблему, однако она может оказаться нежелательной для вас, если это так — подправьте исходный код функции под свои нужды.
Обработка HTML-элементов выполняется в соответствии с заданными правилами.
getRule = function (node, valid_elements) {
    var re = new RegExp('(?:^|,)' + node.tagName.toLowerCase() + '(?:,|$)'),
        rules = Object.keys(valid_elements),
        rule = false,
        i;

    for (i = 0; i < rules.length && !rule; i++) {
        if (re.test(rules[i])) {
            rule = valid_elements[rules[i]];
        }
    }

    return rule;
}
...
processNode = function (node, valid_elements, taskSet) {
    var rule;

    if (node.nodeType === 1) {
        rule = getRule(node, valid_elements);
        ...
    } else if (node.nodeType === 3) {
        processText(node);
    }
}
Если правило для данного элемента не найдено — он распаковывается, т.е. все его дочерние элементы выносятся на уровень выше и заменяют данный элемент.
unpack = function (node) {
    var parent = node.parentNode;

    while (node.childNodes.length > 0) {
        parent.insertBefore(node.childNodes[0], node);
    }
}
...
if (rule) {
    if (typeof rule.valid_elements === 'undefined') {
        process(node, valid_elements);
    } else {
        process(node, rule.valid_elements)
    }
    ...
} else {
    process(node, valid_elements);

    if (node.hasChildNodes()) {
        taskSet.push({
            task: 'unpack',
            node: node
        });
    }

    taskSet.push({
        task: 'remove',
        node: node
    })
}
При наличии соответствующего правила элемент сохраняется, если он не пуст (непустым считается контейнер, содержащий хоть один текстовый элемент на любом уровне вложенности, состоящий не только из пробелов) или же в правиле нет установки удалять пустые элементы (no_empty).
isEmpty = function (node) {
    var result = true,
        re = /^s*$/,
        i, child;

    if (node.hasChildNodes()) {
        for (i = 0; i < node.childNodes.length && result; i++) {
            child = node.childNodes[i];

            if (child.nodeType === 1) {
                result = isEmpty(child);
            } else if (child.nodeType === 3 && !re.test(child.nodeValue)) {
                result = false;
            }
        }
    }

    return result;
}
...
if (rule.no_empty && isEmpty(node)) {
    taskSet.push({
        task: 'remove',
        node: node
    });
} else {
    ...
}
В зависимости от конфигурации правила проверяются стили и классы элемента.
checkStyles = function (node, valid_styles) {
    var i, re;

    if (typeof valid_styles === 'string' && node.style.length) {
        for (i = node.style.length - 1; i >= 0; i--) {
            re = new RegExp('(?:^|,)' + node.style[i] + '(?:,|$)');

            if (!re.test(valid_styles)) {
                node.style[node.style[i]] = '';
            }
        }

        if (!node.style.cssText) {
            node.removeAttribute('style');
        }
    }
}

checkClasses = function (node, valid_classes) {
    var i, re;

    if (typeof valid_classes === 'string' && node.classList.length) {
        for (i = node.classList.length - 1; i >= 0; i--) {
            re = new RegExp('(?:^|\s)' + node.classList[i] + '(?:\s|$)');

            if (!re.test(valid_classes)) {
                node.classList.remove(node.classList[i]);
            }
        }

        if (!node.className) {
            node.removeAttribute('class');
        }
    }
}
...
checkStyles(node, rule.valid_styles);
checkClasses(node, rule.valid_classes);
Тут же проверяется необходимость конвертации и его дополнительной обработки и удаляется идентификатор.
if (rule.convert_to) {
    taskSet.push({
        task: 'convert',
        node: node,
        convert_to: rule.convert_to
    });
} else if (node.id) {
    node.removeAttribute('id');
}

if (typeof rule.process === 'function') {
    taskSet.push({
        task: 'process',
        node: node,
        process: rule.process
    });
}
Надо отметить, что при конвертации создается новый элемент, в который помещаются все дочерние элементы текущего контейнера, также, при наличии, переносятся стили и классы, после чего контейнер замещается этим новым элементом.
convert = function (node, convert_to) {
    var parent = node.parentNode,
        converted = document.createElement(convert_to);

    if (node.style.cssText) {
        converted.style.cssText = node.style.cssText;
    }
    if (node.className) {
        converted.className = node.className;
    }

    while (node.childNodes.length > 0) {
        converted.appendChild(node.childNodes[0]);
    }

    parent.replaceChild(converted, node);
}
Как вы уже, наверное, заметили, все манипуляции с DOM ставятся в очередь и выполняются по завершении текущего цикла по элементам, дабы не нарушать его.
doTasks = function (taskSet) {
    var i;

    for (i = 0; i < taskSet.length; i++) {
        switch (taskSet[i].task) {
            case 'remove':
                taskSet[i].node.parentNode.removeChild(taskSet[i].node);
                break;

            case 'convert':
                convert(taskSet[i].node, taskSet[i].convert_to);
                break;

            case 'process':
                taskSet[i].process(taskSet[i].node);
                break;

            case 'unpack':
                unpack(taskSet[i].node);
                break;
        }
    }
}
Демо работы функции вы найдете в репозитории. Я надеюсь, что данное описание поможет вам видоизменять функцию под ваши конкретные нужды, если в чистом виде она вас не удовлетворит, или хотя бы послужит идейным вдохновением.
Типографика
Ну и напоследок остается самое простое — внедрение типографа. Мы использовали замечательный скрипт Дениса Селезнева hcodes github.com/typograf/typograf.
Все, что нужно — это написать маленький плагин к TinyMCE:
tinymce.PluginManager.add('typograf', function (editor, url) {
    'use strict';

    var scriptLoader = new tinymce.dom.ScriptLoader(),
        tp,
        typo = function () {
            if (tp) {
                editor.setContent(tp.execute(editor.getContent()));
                editor.undoManager.add();
            }
        };

    scriptLoader.add(url + '/typograf.min.js');

    scriptLoader.loadQueue(function () {
        tp = new Typograf({
            lang: 'ru',
            mode: 'name'
        });
    });

    editor.addButton('typograf', {
        text: 'Типографика',
        icon: 'blockquote',
        onclick: typo
    });

    editor.addMenuItem('typograf', {
        context: 'format',
        text: 'Типографика',
        icon: 'blockquote',
        onclick: typo
    });
});
Как видите, скрипт типографа размещен в папке с плагином и подгружается асинхронно средствами редактора https://www.tinymce.com/docs/api/class/tinymce.dom.scriptloader/. Вы же можете загружать скрипт отдельно от TinyMCE, если планируете использовать типограф и в других функциях.
Когда скрипт загружен, происходит инициализация переменной tp. Доступ к контенту редактора осуществляется с помощью методов getContent() и setContent(). Ну и, конечно, после применения типографики нужно добавить еще один уровень отката изменений, используя undoManager.
В качестве иконки для кнопки и пункта меню мы использовали шрифтовую иконку редактора для цитат. С перечнем доступных иконок в TinyMCE вы можете ознакомиться в файле skin.css — (классы .mce-i-*).
На этом все, надеемся наш опыт поможет вам в реализации собственных идей и сократит время поиска решений.