
2
Глава 2 Введение в AVerTV 6
С помощью данного устройства и программного приложения AVerTV 6 вы сможете
смотреть ТВ, слушать радио, записывать любимые передачи на компьютер, а также
многое другое. Превратите свой компьютер в настоящий мультимедийный центр
развлечений!
Отныне Вы никогда не пропустите свою любимую игру, сериал или шоу, т.к. функция
«Сдвиг во времени» произведет фоновую запись ТВ программы и позволит Вам
вернуться и продолжить просмотр программы с того места, на котором Вы остановились.
Изделие AVerMedia® призвано обеспечить превосходное качество ТВ и радио программ.
Пожалуйста, обратите внимание на то, что функции пульта дистанционного управления,
описанные в этом руководстве, могут отличаться в зависимости от модели и места
покупки.
-
Contents
-
Table of Contents
-
Bookmarks
Quick Links
AVerTV 6
User Manual
English
DISCLAIMER
All the screen shots in this documentation are only example images. The images may vary depending on the product and software version.
Information presented in this documentation has been carefully checked for reliability; however, no responsibility is assumed for inaccuracies.
The information contained in this documentation is subject to change without notice.
COPYRIGHT
© 2007 by AVerMedia TECHNOLOGIES, Inc. All rights reserved. No part of this publication may be reproduced, transmitted, transcribed, stored
in a retrieval system, or translated into any language in any form by any means without the written permission of AVerMedia TECHNOLOGIES,
Inc.
AP-6.0.11
200709
Summary of Contents for Avermedia AVerTV 6
 Loading…
![]()
AVerTV 6
User Manual  English
DISCLAIMER
All the screen shots in this documentation are only example images. The images may vary depending on the product and software version. Information presented in this documentation has been carefully checked for reliability; however, no responsibility is assumed for inaccuracies. The information contained in this documentation is subject to change without notice.
COPYRIGHT
© 2008 by AVerMedia TECHNOLOGIES, Inc. All rights reserved. No part of this publication may be reproduced, transmitted, transcribed, stored in a retrieval system, or translated into any language in any form by any means without the written permission of AVerMedia TECHNOLOGIES, Inc.
AP-6.0.18 200808

|
AVerTV 6 |
|||
|
Table of Contents |
|||
|
Chapter 1 |
Device Introduction………………………………………………… |
1 |
|
|
Chapter 2 AVerTV 6 Introduction ……………………………………………. |
7 |
||
|
Chapter 3 Introducing the AVerTV 6 Application……………………… |
8 |
||
|
3.1 |
Launching the AVerTV 6 Application ………………………………………………………………………. |
8 |
|
|
3.2 |
Running the AVerTV 6 Application for the First Time ……………………………………………….. |
9 |
|
|
3.2.1 Scanning for Analog Programs………………………………………………………………………………………. |
9 |
||
|
3.2.2 Scanning for Digital Programs …………………………………………………………………………………….. |
11 |
||
|
3.2.3 Scanning for Digital Satellite Programs ………………………………………………………………………… |
12 |
||
|
3.3 |
Introducing the User Interface ………………………………………………………………………………… |
14 |
|
|
3.4 |
The Control Panel…………………………………………………………………………………………………. |
15 |
|
|
3.5 |
Remote Control (Optional) …………………………………………………………………………………….. |
17 |
|
|
3.5.1 Remote Control Buttons (Model 1) ………………………………………………………………………………. |
17 |
||
|
3.5.2 Remote Control Buttons (Model 2) ………………………………………………………………………………. |
18 |
||
|
3.5.3 Remote Control Buttons (Model 3) ………………………………………………………………………………. |
20 |
||
|
3.5.4 Remote Control Buttons (Model 4) ………………………………………………………………………………. |
22 |
||
|
3.5.5 Remote Control Buttons (Model 5) ………………………………………………………………………………. |
24 |
||
|
3.5.6 Remote Control Buttons (Model 6) ………………………………………………………………………………. |
25 |
||
|
3.6 |
Changing TV Monitor Resolution …………………………………………………………………………… |
28 |
|
|
3.7 |
Resizing the TV Monitor Window ………………………………………………………………………….. |
28 |
|
|
3.8 |
Changing Display Aspect Ratio………………………………………………………………………………. |
28 |
|
|
3.9 |
Always on Top……………………………………………………………………………………………………… |
28 |
|
|
3.10 |
Setting Windows® Power Options…………………………………………………………………………… |
29 |
|
|
3.11 |
Setting Time for Turning on the Application ……………………………………………………………. |
30 |
|
|
3.12 |
Minimize the Application ………………………………………………………………………………………. |
31 |
|
|
3.13 |
Changing Video Renderer ……………………………………………………………………………………… |
31 |
|
|
Chapter 4 |
TV………………………………………………………………………… |
32 |
|
|
4.1 |
Analog TV …………………………………………………………………………………………………………… |
32 |
|
|
4.1.1 Scanning Channels …………………………………………………………………………………………………….. |
32 |
||
|
4.1.2 Scanning Channels (For Advanced Users) …………………………………………………………………….. |
33 |
||
|
4.1.3 Customize Video Recording Settings……………………………………………………………………………. |
34 |
||
|
4.1.4 Fine Tuning Color and Display Quality ………………………………………………………………………… |
38 |
||
|
i |

|
AVerTV 6 |
||
|
4.1.5 |
Enhancing the Video Quality……………………………………………………………………………………….. |
39 |
|
4.2 |
Digital Satellite TV……………………………………………………………………………………………….. |
40 |
|
4.2.1 |
Scanning channels (Importing a Frequency Table) …………………………………………………………. |
40 |
|
4.2.2 |
Scanning channels (Adding Frequencies Manually) ……………………………………………………….. |
44 |
|
4.2.3 |
Editing or Removing Frequencies ………………………………………………………………………………… |
45 |
|
4.2.4 |
Scanning Channels (For Advanced Users) …………………………………………………………………….. |
45 |
|
4.3 |
Digital TV……………………………………………………………………………………………………………. |
46 |
|
4.3.1 |
Scanning Channels …………………………………………………………………………………………………….. |
46 |
|
4.3.2 |
Scanning Channels (For Advanced Users) …………………………………………………………………….. |
48 |
|
4.3.3 |
Customize Video Recording Settings……………………………………………………………………………. |
49 |
|
4.3.4 |
Using the EPG Function ……………………………………………………………………………………………… |
53 |
|
4.3.5 |
Fine Tuning Color and Display Quality ………………………………………………………………………… |
53 |
|
4.3.6 |
Enabling the Subtitle Function …………………………………………………………………………………….. |
54 |
|
4.4 |
Adding and Deleting Channel Groups……………………………………………………………………… |
55 |
|
4.5 |
Selecting a TV/ Digital Radio Channel ……………………………………………………………………. |
56 |
|
4.6 |
Adding and Deleting Program Grouping List……………………………………………………………. |
57 |
|
4.7 |
Adjusting Volume…………………………………………………………………………………………………. |
58 |
|
4.8 |
Specifying a Channel Name or Description ……………………………………………………………… |
58 |
|
4.9 |
Modifying a Program List Name…………………………………………………………………………….. |
58 |
|
4.10 |
Removing Unwanted Channels ………………………………………………………………………………. |
59 |
|
4.11 |
Using the OverScan Function…………………………………………………………………………………. |
59 |
|
4.12 |
16-Channel Preview………………………………………………………………………………………………. |
60 |
|
4.13 |
Changing the OSD Attributes…………………………………………………………………………………. |
61 |
|
4.14 |
Changing Signal Source ………………………………………………………………………………………… |
62 |
|
4.15 |
Sound Controlling (Optional) …………………………………………………………………………………. |
63 |
|
Chapter 5 AM/FM Radio ……………………………………………………….. |
64 |
|
|
5.1 |
AM/FM Radio Controls…………………………………………………………………………………………. |
64 |
|
5.2 |
How to Auto Scan AM/FM Radio Channels …………………………………………………………….. |
65 |
|
5.3 |
Manually Scanning Specific AM/FM Channels………………………………………………………… |
65 |
|
5.4 |
Selecting a Channel ………………………………………………………………………………………………. |
66 |
|
5.5 |
Skipping Unwanted Channels…………………………………………………………………………………. |
66 |
|
5.6 |
Adding a Radio Frequency …………………………………………………………………………………….. |
66 |
|
5.7 |
Modifying a Channel Name……………………………………………………………………………………. |
66 |
|
ii |

|
AVerTV 6 |
|||
|
5.8 |
Adding and Deleting Channel Groups……………………………………………………………………… |
67 |
|
|
5.9 |
Customizing Audio Recording Settings …………………………………………………………………… |
67 |
|
|
Chapter 6 |
TimeShift ……………………………………………………………… |
69 |
|
|
6.1 |
TimeShift Controls ……………………………………………………………………………………………….. |
69 |
|
|
6.2 |
Customizing TimeShift Recording Settings ……………………………………………………………… |
70 |
|
|
6.3 |
Customizing TimeShift Video Quality Settings (Analog TV only) ……………………………… |
70 |
|
|
6.4 |
Using the TimeShift Function ………………………………………………………………………………… |
71 |
|
|
Chapter 7 |
PVR ……………………………………………………………………… |
72 |
|
|
7.1 |
PVR Controls……………………………………………………………………………………………………….. |
72 |
|
|
7.2 |
Recording Settings………………………………………………………………………………………………… |
73 |
|
|
7.3 |
Using the Recording Function ………………………………………………………………………………… |
73 |
|
|
7.4 |
Playing the Recorded Programs………………………………………………………………………………. |
73 |
|
|
7.5 |
Picture-in-Picture Display ……………………………………………………………………………………… |
74 |
|
|
Chapter 8 |
Image Capture ……………………………………………………… |
76 |
|
|
8.1 |
Before Capturing ………………………………………………………………………………………………….. |
76 |
|
|
8.2 |
Capturing a TV/ Video Image ………………………………………………………………………………… |
76 |
|
|
8.3 |
Multiple Image Sequence Capture…………………………………………………………………………… |
78 |
|
|
Chapter 9 Teletext / MHEG-5…………………………………………………. |
79 |
||
|
9.1 |
MHEG-5 Support (UK Digital Teletext Service) ………………………………………………………. |
79 |
|
|
9.2 |
Teletext |
……………………………………………………………………………………………………………….. |
80 |
|
9.2.1 Customize the Display Mode……………………………………………………………………………………….. |
80 |
||
|
9.2.2 |
Overview ………………………………………………………………………………………………………………….. |
81 |
|
|
9.2.3 |
Toolbar ………………………………………………………………………………………………………….Buttons |
82 |
|
|
9.2.4 |
LED …………………………………………………………………………………………………………………Lamp |
82 |
|
|
9.2.5 |
Using ……………………………………………………………………………………………………………Teletext |
83 |
|
|
Chapter 10 ……………………………………………………………. |
Scheduler |
85 |
|
|
10.1 |
Schedule ……………………………………………………………………………………………Management |
85 |
|
|
10.2 |
Adding Schedules …………………………………………………………………………………………………. |
86 |
|
|
Chapter 11 ……………………………………………………………… |
Hot Keys |
88 |
|
|
Chapter 12 ………………………………………………… |
Customer Service |
89 |
|
|
Appendix ……………………………………………………………………………….. |
90 |
||
|
Satellite ……………………………………………………………………………………….Internet Access |
90 |
||
|
Universal ………………………………………………………………………………………..DVB Plug-in |
92 |
||
|
iii |

|
AVerTV 6 |
||
|
Video Gaming Plug-in (for Microsoft Vista MCE only) ……………………………………….. |
92 |
|
|
Video Quality Enhancement Plug-in (for Microsoft Vista MCE only) …………………… |
93 |
|
|
Common Interface for Conditional Access (optional) …………………………………………… |
94 |
iv

AVerTV 6
Chapter 1 Device Introduction
Thanks for purchasing AVerMedia’s product. The table below lists an overview of the product you purchased. From this table, you can quickly learn about your product features and know which chapter you need to read. Please do read this table before using AVerTV 6 application.
Product Name:
AVerTV Volar AX
AVerTV Hybrid Volar HX
AVerTV Volar Lite
AVerTV DVB-T Volar X
1

AVerTV 6
|
Product Name |
AVerTV Volar AX |
|||||||
|
Model No. |
A827A |
|||||||
|
TV System |
Digital TV ( DVB-T ATSC DVB-S) |
|||||||
|
; Analog TV (; NTSC ; PAL ; SECAM) |
||||||||
|
Audio Mode |
; Stereo ; Mono ; SAP |
|||||||
|
AM/FM Radio |
; Support Not Support |
|||||||
|
Remote Control |
; Support ( Model 1 Model 2 Model 3 ; Model 4 |
|||||||
|
; Model 5 Model 6) |
||||||||
|
Not Support |
||||||||
|
External Signal |
; S-Video ; Composite |
|||||||
|
Source |
||||||||
|
Others |
; Teletext MHEG-5 |
|||||||
|
EPG ; iEPG (USA only) |
||||||||
|
; Closed Caption |
Digital Subtitle |
|||||||
|
CI/CA |
||||||||
|
Reference |
; Chapter 1 |
|||||||
|
Chapter |
; Chapter 2 |
|||||||
|
; Chapter 3 (;3.1 |
; 3.2.1 ;3.3 — 3.4 ;3.5.4-3.5.5 ;3.6 — |
|||||||
|
3.13) |
||||||||
|
; Chapter 4 (;4.1 ;4.4 — 4.15) |
||||||||
|
; Chapter 5 |
||||||||
|
; Chapter 6 |
||||||||
|
; Chapter 7 |
||||||||
|
; Chapter 8 |
||||||||
|
; Chapter 9 |
||||||||
|
; Chapter 10 |
||||||||
|
; Chapter 11 |
||||||||
|
; Chapter 12 |
||||||||
|
Appendix |
Satellite Internet Access (Window XP only) |
|||||||
|
Universal DVB Plug-in |
(for Microsoft XP / Vista MCE only) |
|||||||
|
; Video Gaming Plug-in |
(for Microsoft Vista MCE only) |
|||||||
|
;Video Quality Enhancement Plug-in (for Microsoft Vista |
||||||||
|
2 |
||||||||

AVerTV 6
|
MCE only) |
||||||
|
Common Interface for Conditional Access (optional) |
||||||
|
Product Name |
AVerTV Hybrid Volar HX |
|||||
|
Model No. |
A827 |
|||||
|
TV System |
; Digital TV (; DVB-T ATSC DVB-S) |
|||||
|
; Analog TV (; NTSC ; PAL ; SECAM) |
||||||
|
Audio Mode |
; Stereo ; Mono ; SAP |
|||||
|
AM/FM Radio |
; Support Not Support |
|||||
|
Remote Control |
; Support (; Model 1 Model 2 Model 3 Model 4 ; |
|||||
|
Model 5 Model 6) |
||||||
|
Not Support |
||||||
|
External Signal |
; S-Video ; Composite |
|||||
|
Source |
||||||
|
Others |
; Teletext ; MHEG-5 |
|||||
|
; EPG ; iEPG (USA only) |
||||||
|
; Closed Caption ;Digital Subtitle |
||||||
|
CI/CA |
||||||
|
Reference |
; Chapter 1 |
|||||
|
Chapter |
; Chapter 2 |
|||||
|
; Chapter 3 (;3.1 ;3.2.1-3.2.2 ;3.3 – 3.4 ;3.5.1 ; 3.5.5 |
||||||
|
;3.6 — 3.13) |
||||||
|
; Chapter 4 (;4.1 ; 4.3 — 4.15) |
||||||
|
; Chapter 5 |
||||||
|
; Chapter 6 |
||||||
|
; Chapter 7 |
||||||
|
; Chapter 8 |
||||||
|
; Chapter 9 |
||||||
|
; Chapter 10 |
||||||
|
; Chapter 11 |
||||||
|
; Chapter 12 |
||||||
|
Appendix |
Satellite Internet Access (Window XP only) |
|||||
|
3 |
||||||

AVerTV 6
Universal DVB Plug-in (for Microsoft XP / Vista MCE only)
;Video Gaming Plug-in (for Microsoft Vista MCE only)
;Video Quality Enhancement Plug-in (for Microsoft Vista MCE only)
Common Interface for Conditional Access (optional)
|
Product Name |
AVerTV Volar Lite |
|||||
|
Model No. |
A827A |
|||||
|
TV System |
Digital TV ( DVB-T ATSC DVB-S) |
|||||
|
; Analog TV (; NTSC ; PAL ; SECAM) |
||||||
|
Audio Mode |
; Stereo ; Mono ; SAP |
|||||
|
AM/FM Radio |
; Support Not Support |
|||||
|
Remote Control |
; Support ( Model 1 Model 2 Model 3 ; Model 4 |
|||||
|
; Model 5 Model 6) |
||||||
|
Not Support |
||||||
|
External Signal |
S-Video Composite |
|||||
|
Source |
||||||
|
Others |
; Teletext MHEG-5 |
|||||
|
EPG ; iEPG (USA only) |
||||||
|
; Closed Caption Digital Subtitle |
||||||
|
CI/CA |
||||||
|
Reference |
; Chapter 1 |
|||||
|
Chapter |
; Chapter 2 |
|||||
|
; Chapter 3 (;3.1 ;3.2.1 ;3.3 — 3.4 ;3.5.4 — 3.5.5 ;3.6 — |
||||||
|
3.13) |
||||||
|
; Chapter 4 (;4.1 ;4.4 — 4.15) |
||||||
|
; Chapter 5 |
||||||
|
; Chapter 6 |
||||||
|
; Chapter 7 |
||||||
|
; Chapter 8 |
||||||
|
; Chapter 9 |
||||||
|
; Chapter 10 |
||||||
|
4 |
||||||

|
AVerTV 6 |
||||||||
|
; Chapter 11 |
||||||||
|
; Chapter 12 |
||||||||
|
Appendix |
Satellite Internet Access (Window XP only) |
|||||||
|
Universal DVB Plug-in |
(for Microsoft XP / Vista MCE only) |
|||||||
|
Video Gaming Plug-in |
(for Microsoft Vista MCE only) |
|||||||
|
Video Quality Enhancement Plug-in (for Microsoft Vista |
||||||||
|
MCE only) |
||||||||
|
Common Interface for Conditional Access (optional) |
||||||||
|
Product Name |
AVerTV DVB-T Volar X |
|||||||
|
Model No. |
A815 |
|||||||
|
TV System |
; Digital TV (; DVB-T ATSC DVB-S) |
|||||||
|
Analog TV ( NTSC PAL SECAM) |
||||||||
|
Audio Mode |
; Stereo ; Mono ; SAP |
|||||||
|
AM/FM Radio |
Support ; Not Support |
|||||||
|
Remote Control |
; Support ( Model 1 ; Model 2 Model 3 Model 4 ; |
|||||||
|
Model 5 Model 6) |
||||||||
|
Not Support |
||||||||
|
External Signal |
S-Video Composite |
|||||||
|
Source |
||||||||
|
Others |
; Teletext ; MHEG-5 |
|||||||
|
; EPG iEPG (USA only) |
||||||||
|
Closed Caption ; Digital Subtitle |
||||||||
|
CI/CA |
||||||||
|
Reference |
; Chapter 1 |
|||||||
|
Chapter |
; Chapter 2 |
|||||||
|
; Chapter 3 (;3.1 ; 3.2.2 ; 3.3 -3.4 ; 3.5.2 ;3.5.5 ;3.6 |
||||||||
|
— 3.13) |
||||||||
|
; Chapter 4 (; 4.2 — 4.14) |
||||||||
|
Chapter 5 |
||||||||
|
; Chapter 6 (; 6.1 — 6.2 ; 6.4) |
||||||||
|
; Chapter 7 |
||||||||
|
5 |
||||||||
![]()
AVerTV 6
|
; Chapter 8 |
||
|
; Chapter 9 |
||
|
; Chapter 10 |
||
|
; Chapter 11 |
||
|
; Chapter 12 |
||
|
Appendix |
Satellite Internet Access (Window XP only) |
|
|
Universal DVB Plug-in |
(for Microsoft XP / Vista MCE only) |
|
|
Video Gaming Plug-in |
(for Microsoft Vista MCE only) |
|
|
Video Quality Enhancement Plug-in (for Microsoft Vista |
||
|
MCE only) |
||
|
Common Interface for Conditional Access (optional) |
||
6

AVerTV 6
Chapter 2 AVerTV 6 Introduction
Now, with this product, you can watch TV, listen to the radio, record your favorite programs and enjoy other features on your PC. Turn your computer system into a real multimedia entertainment center.
You’ll never miss your favorite ball games, soaps or game shows anymore because the TimeShift function performs background recording of a TV program. This means you can return and watch from the part of the program where you left off.
To enjoy high quality TV or radio programs, AVerMedia® product is your best choice.
Please be noted that the functions or the remote control mentioned in this manual may vary depending on the product you purchase and the area you live.
7
AVerTV 6
Chapter 3 Introducing the AVerTV 6
Application
The AVerTV 6 application allows you to watch TV, listen to the radio, record programs, and capture still images while you work on your computer.
3.1 Launching the AVerTV 6 Application
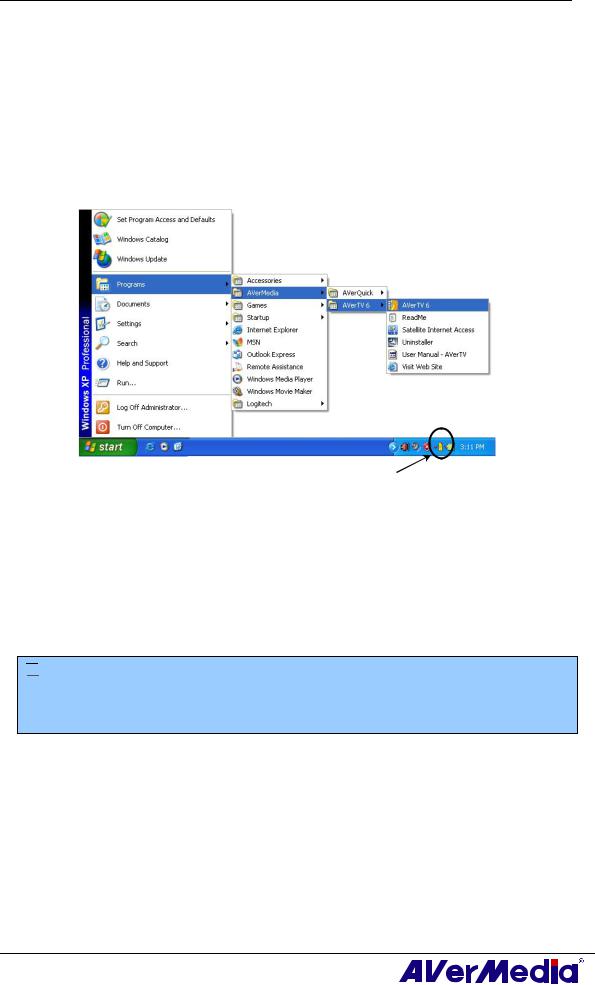
Run the AVerTV 6 application from the Programs menu.
AVerQuick
To run the application, click Start, point to Programs, choose AVerMedia, AVerTV 6, and then click AVerTV 6. Another way is to double-click the AVerTV 6 program icon
“ ”on the desktop. Or, you can double-click the AVerQuick launcher located in the lower right corner of the screen.
 Note: AVerQuick allows to set the desired default application, which means you can choose either AVerTV 6 or AVer MediaCenter as the default application when
double clicking AVerQuick icon . To do this, right click AVerQuick, choose “Setting”, and select the preferred application in the “Application” tab.
8

AVerTV 6
3.2 Running the AVerTV 6 Application for the First Time
If this is your first time running the application, the Setup dialog box will appear to prompt you to scan for channels. (For details, please refer to the section Scanning Channels).
3.2.1Scanning for Analog Programs
1.Select Analog TV (or Programs) on the left pane of the Setup dialog box.
 Note: Before choosing the signal input, please make sure that your country/region is correct. For more information, please refer to “Scanning Channels” in Chapter 4.
a.First, select an available AVermedia device in the left pane.
b.From the Region/Country drop-down list, select your country or region.
c.Click Apply to save the settings.
(This picture is only for reference.)
2.On this page, choose the TV option to search only for air channels or select CATV to scan for cable channels.
3.Click New and the Program List dialog box will appear. Type in the desirable name and click OK.
4. Click Program Scan for searching for available channels/programs in your area.
9

AVerTV 6
5.After scanning, the active TV channels will be listed inside the box. Click Apply to save the scanned channels.
6.To exit the current dialog box, click OK.
 Note: After Media Center Edition scan, you may not be able to lock channels with AVerTV 6. Please restart the computer to make it function normally.
10

AVerTV 6
3.2.2Scanning for Digital Programs
1.Select Digital TV (or Programs) on the left pane of the Setup dialog box.
2. Click New and the Program List dialog box will appear. Type in the desirable name and click OK.
3.Click Program Scan for searching for available channels/programs in your area.
4.After scanning, the active TV channels will be listed inside the box. Click Apply to save the scanned channels.
5.To exit the current dialog box, click OK.
 Note:
Note:
1.This can only supports DVB-T Radio Broadcasts, not the Digital Audio Broadcast system.
2.When scanning digital signals and if your country broadcasts logical channel data, the scanned channel will be allocated based on the assigned logical channel number.
11

AVerTV 6
3.2.3Scanning for Digital Satellite Programs
1.Select Digital TV on the left pane of the Setup dialog box.
(This picture is only for reference.)
2.Choose the switch type that is used by your satellite system.
3.From the Satellite drop-down list under Input 1, choose the correct satellite. If you cannot find the satellite you want but the input port DOES receive satellite signals, choose Custom…. Otherwise, choose None.
4.Click Edit to configure the satellite information.
5.In the Satellite Information dialog box, type in the satellite’s name in the Satellite box.
(This picture is only for reference.)
6. Specify the frequencies that you want to scan for available satellite programs.
There are two ways to do this:
12

AVerTV 6
Import the existing frequency data: refer to the section 4.2.1 Scanning Channels (Importing a Frequency Table) for details.
Manually add frequencies: refer to 4.2.2 Scanning Channels (Adding Frequencies Manually) for details. If you add frequencies manually, please make sure you specify the correct longitude data.
7.Click OK to exit the Satellite Information dialog box.
8.From the LNB drop-down list, choose the appropriate setting.
•None: If you do not use any LNB device, choose this option.
•Universal Ku Band LNB or C Band LNB: Choose this option if your LNB device is this type.
•Custom: When you choose this option, click Edit to configure your own LNB information, such as specifying an LNB name, its frequency type, input range, etc. For related data, refer to the documentation that comes with your LNB device.
9.Repeat steps 1 to 8 if you need to configure Input 2, Input 3, etc. Then click Apply to save the settings.
10.Select Programs under the Digital TV icon on the left pane, and click Program Scan to start the scanning process.
11.Click Apply to save the scanning results.
 Note: After Media Center Edition scan, you may not be able to lock channels with AVerTV 6. Please restart the computer to make it function normally.
13

AVerTV 6
3.3 Introducing the User Interface
The TV monitor allows you to watch live TV or video.
|
1 |
Panel On / Off |
8 |
Channel Up/Down |
|
2 |
Playback Seek Slider |
9 |
Resize Window |
|
3 |
Play / Pause |
10 |
Show / Hide Video Frame |
|
4 |
Stop |
11 |
Minimize |
|
5 |
TimeShift |
12 |
Full Screen |
|
6 |
Record |
13 |
Exit |
|
7 |
Volume |
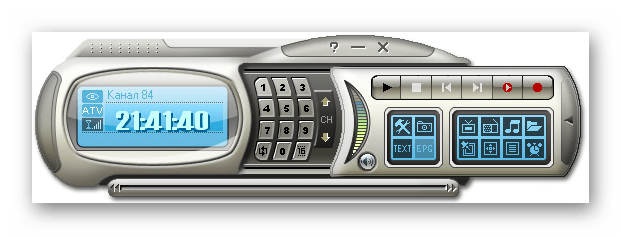
The Control Panel provides button controls for selecting channels, adjusting volume, capturing images, and more. It has a panel display that shows the current channel number and channel name.
|
To display or hide the Control Panel, click the button |
located in the lower left |
|
corner of the TV Monitor. |
14

AVerTV 6
3.4 The Control Panel
30 29 28 27 26 25 24 23
1
|
2 |
3 |
4 |
5 |
6 |
7 |
8 |
9 |
10 11 12 13 14 15 16 |
31
(This picture is only for reference.)
The table below describes functions of the buttons on the Control Panel.
|
BUTTON |
FUNCTION |
|||||
|
1 |
Signal Status / |
TV/Radio mode: Display the current signal status. |
||||
|
Enable or disable Repeat |
Playback mode: Right click and enable the Repeat function. The |
|||||
|
Play |
system will continuously playback the files in the playlist. |
|||||
|
2 |
Signal Strength |
Display signal strength. |
||||
|
3 |
Backward |
Move backwards in intervals. |
||||
|
4 |
Channel Loop |
Return to previously accessed channel. |
||||
|
5 |
16-Channel Preview |
Display 16 consecutive TV channels on the TV Monitor |
||||
|
window. |
||||||
|
6 |
Channel Up/ Down |
Go to the next upper or lower active channel. |
||||
|
7 |
Mute |
Turn off the sound. |
||||
|
8 |
Setup |
Allows you to: |
||||
|
* Scan channels. |
||||||
|
* Set the Windows power options. |
||||||
|
* Configure snapshot settings. |
||||||
|
* Customize recording settings. |
||||||
|
* Customize the TimeShift function. |
||||||
|
9 |
Teletext |
View Teletext/MHEG-5/Closed Caption information |
||||
|
10 |
EPG |
View EPG information. |
||||
|
11 |
Snapshot |
Capture a single image or a sequence of images. |
||||
|
12 |
Forward |
Skip forward in intervals. |
||||
|
13 |
Always on Top |
Make the TV monitor float over the top of other program |
||||
|
windows. |
||||||
|
14 |
Full Screen |
Show TV/Video programs in full screen. |
||||
|
15 |
Program List |
Display the program list. |
||||
|
16 |
Audio Mode |
Switch between available audio modes. |
||||
|
17 |
Schedule |
Display Schedule dialog box. |
||||
|
18 |
Play List |
Create a playlist of video files to playback. |
||||
|
15 |
||||||
![]()
|
AVerTV 6 |
||||
|
19 |
Show/ Hide Numeric |
Toggle between displaying or hiding the Numeric Panel. |
||
|
Panel |
||||
|
20 |
Radio Source |
Switch to radio mode. (AM/FM or Digital Radio) |
||
|
21 |
Change Video Source |
Switch between available video sources. |
||
|
22 |
Record |
Record the current program. |
||
|
23 |
TimeShift / Pause |
Performs background recording of the live program. This |
||
|
function lets you view the recorded parts, while at the same |
||||
|
time, recording is in progress. / Freeze the TimeShift |
||||
|
temporarily. |
||||
|
24 |
Next File |
Play the next file in the playlist. |
||
|
25 |
Previous File |
Play the previous file in the playlist. |
||
|
26 |
Stop |
Stop the playback, recording, TimeShift, etc. |
||
|
27 |
Play / Pause |
Play back recorded video files. / Freeze the playback |
||
|
temporarily. |
||||
|
28 |
Volume Control |
Drag your mouse up/down to increase/decrease the volume |
||
|
level. |
||||
|
29 |
Help |
View User’s Manual. |
||
|
30 |
Numeric Buttons |
Select channels/programs. |
||
|
31 |
Playback Seek |
Drag the slider tab to move to any part of the recorded TV |
||
|
program. |
||||
16

AVerTV 6
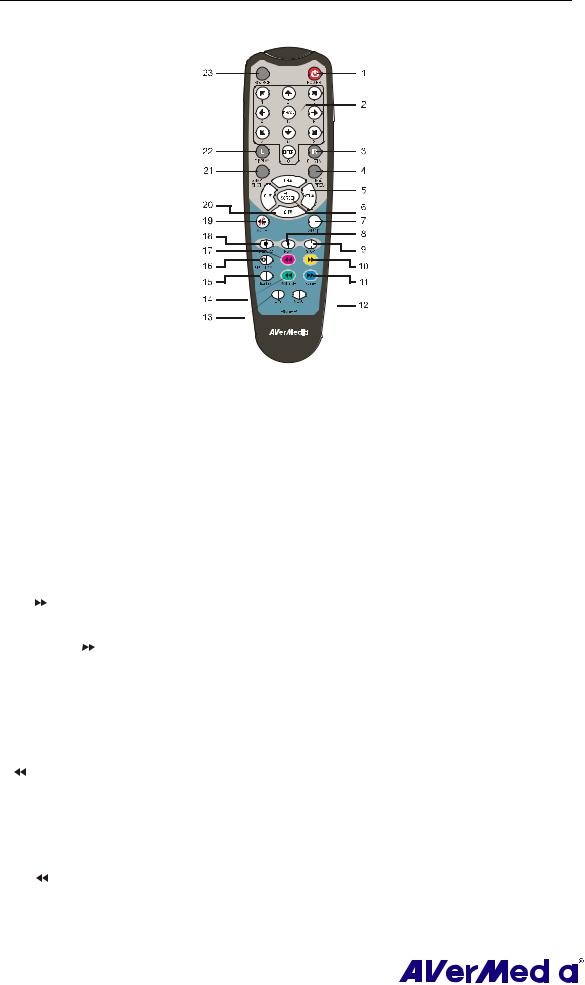
3.5 Remote Control (Optional)
After installing drivers and applications, you can use remote control to turn on/off the programs, select channels, adjust volume and so on.
(The remote control can only be used on AVerMedia AVerTV 6 application.)
 Note: To control two or more than two cards/devices with a remote control, it is recommended to enable the multiple infrared receiver function first. To do this,
right click AVerQuick icon  at the lower right corner of the screen, choose “Setting”, “Remote control” tab and select check boxes next to the device name. Please check your supported remote control model before activating this function.
3.5.1 Remote Control Buttons (Model 1)
|
Button |
Description |
|
|
1. |
Power |
Turn on/off the application |
|
2. |
VOL +/- |
Volume up/down. |
|
3. |
Source |
Switch between available signal sources. |
|
4. |
Numeric Buttons |
Select a TV channel. |
|
5. |
MUTE |
Turn on/off the sound. |
|
6. |
CH ▲/▼ |
Go up or down to the next active channel. |
|
7. |
CH RTN |
Go to the previously selected channel. |
17
AVerTV 6
3.5.2 Remote Control Buttons (Model 2)
|
Button |
Description |
|||||||||||||
|
1. |
Power |
Turn on/off the application |
||||||||||||
|
2. |
Numeric Buttons |
— Select a TV channel. |
||||||||||||
|
— Under the 16-Channel preview mode, use↑↓← → to highlight the |
||||||||||||||
|
intended channel. |
||||||||||||||
|
3. |
CH RTN |
Go to the previously selected channel. |
||||||||||||
|
4. |
16-CH PREV |
16-Channel Preview. |
||||||||||||
|
5. |
VOL▲/▼ |
Volume up/down. |
||||||||||||
|
6. |
FULL SCREEN |
Display TV in full screen. |
||||||||||||
|
7. |
AUDIO |
Switch between available audio modes. |
||||||||||||
|
8. |
► (Play) |
Play the last recorded or played file. |
||||||||||||
|
9. |
■ (Stop) |
— End the Playback or recording. |
||||||||||||
|
— End the TimeShift mode and return to real-time TV or Radio |
||||||||||||||
|
mode. |
||||||||||||||
|
10. |
(Forward) |
— Advance the playback. |
||||||||||||
|
— Jump to the Teletext page of the corresponding color according |
||||||||||||||
|
to this button. |
||||||||||||||
|
11. SLEEP |
— Go to the next file in the playlist. |
|||||||||||||
|
— Set the time to put your computer in Stand By or Hibernate |
||||||||||||||
|
mode. |
||||||||||||||
|
— Jump to the Teletext page of the corresponding color according |
||||||||||||||
|
to this button. |
||||||||||||||
|
12. MENU |
Display or hide the Control Panel. |
|||||||||||||
|
13. EPG |
Launch the Electronic Programme Guide. |
|||||||||||||
|
14. WAKE UP |
— Go to the previous file in the playlist. |
|||||||||||||
|
— Set the time to bring your computer out of Stand By or Hibernate |
||||||||||||||
|
mode. |
||||||||||||||
|
— Jump to the Teletext page of the corresponding color according |
||||||||||||||
|
to this button. |
||||||||||||||
|
15. TELETEXT |
View Teletext/MHEG-5/ Closed Caption information. |
|||||||||||||
|
16. TIMESHIFT |
— Freeze the playback. |
|||||||||||||
|
/PAUSE |
— Switch from real-time TV or Radio to TimeShift mode. |
|||||||||||||
|
17. |
(Rewind) |
— Rewind the playback. |
||||||||||||
|
— Jump to the Teletext page of the corresponding color according |
||||||||||||||
|
to this button. |
||||||||||||||
|
18 |
||||||||||||||

|
AVerTV 6 |
|||
|
18. |
● (Record) |
Switch to PVR mode and record the current program or video into |
|
|
your hard drive. |
|||
|
19. |
MUTE |
Turn on/off the sound. |
|
|
20. |
CH ▲/▼ |
Go up or down to the next active channel. |
|
|
21. |
SNAPSHOT |
Capture the on-screen image to a bitmap file. |
|
|
22. |
DISPLAY |
Display information. |
|
|
23. |
Source |
Switch between available signal sources. |
19

AVerTV 6
3.5.3 Remote Control Buttons (Model 3)
|
Button |
Description |
|||||||||
|
1. |
Power |
Turn on/off the application |
||||||||
|
2. |
Numeric Buttons |
— Select a TV channel. |
||||||||
|
— Under the 16-Channel preview mode, use↑↓← → to highlight the |
||||||||||
|
intended channel. |
||||||||||
|
3. |
CH RTN |
Go to the previously selected channel. |
||||||||
|
4. |
16-CH PREV |
16-Channel Preview. |
||||||||
|
5. |
VOL▲/▼ |
Volume up/down. |
||||||||
|
6. |
FULL SCREEN |
Display TV in full screen. |
||||||||
|
7. |
AUDIO |
Switch between available audio modes. |
||||||||
|
8. |
► (Play) |
Play the last recorded or played file. |
||||||||
|
9. |
■ (Stop) |
— End the Playback or recording. |
||||||||
|
— End the TimeShift mode and return to real-time TV or Radio |
||||||||||
|
mode. |
||||||||||
|
10. |
(Rewind) |
— Rewind the playback. |
||||||||
|
— Jump to the Teletext page of the corresponding color according |
||||||||||
|
to this button. |
||||||||||
|
11. |
(Forward) |
— Advance the playback. |
||||||||
|
— Jump to the Teletext page of the corresponding color according |
||||||||||
|
to this button. |
||||||||||
|
12. |
(Next File) |
— Go to the next file in the playlist. |
||||||||
|
— Jump to the Teletext page of the corresponding color according |
||||||||||
|
to this button. |
||||||||||
|
13. |
(Previous File) |
— Go to the previous file in the playlist. |
||||||||
|
— Jump to the Teletext page of the corresponding color according |
||||||||||
|
to this button. |
||||||||||
|
14. TELETEXT |
View Teletext/MHEG-5/ Closed Caption information. |
|||||||||
|
15. TIMESHIFT |
— Freeze the playback. |
|||||||||
|
— Switch from real-time TV or Radio to TimeShift mode. |
||||||||||
|
16. ● (Record) |
Switch to PVR mode and record the current program or video into |
|||||||||
|
your hard drive. |
||||||||||
|
20 |
||||||||||

AVerTV 6
|
17. |
MUTE |
Turn on/off the sound. |
|
18. |
EPG |
Launch the Electronic Program Guide. |
|
19. |
CH ▲/▼ |
Go up or down to the next active channel. |
|
20. |
DISPLAY |
Display information. |
|
21. |
Source |
Switch between available signal sources. |
21

AVerTV 6
3.5.4 Remote Control Buttons (Model 4)
|
1. |
POWER |
Turn on/off the application |
|
2. |
SOURCE |
Switch between available signal sources. |
|
3. |
Numeric Buttons |
— Select a TV channel. |
—Under the 16-Channel preview mode, use↑↓← → to highlight the intended channel.
|
4. |
CH RTN |
Go to the previously selected channel. |
||
|
5. |
16-CH PREV |
16-Channel Preview. |
||
|
6. |
VOL▲/▼ |
Volume up/down. |
||
|
7. |
FULL SCREEN |
Display TV in full screen. |
||
|
8. |
AUDIO |
Switch between available audio modes. |
||
|
9. |
MENU |
Display or hide the Control Panel. |
||
|
10.PIP |
Display or hide the PIP window. |
|||
|
11.SLEEP |
— Go to the next file in the playlist. |
|||
—Set the time to put your computer in Stand By or Hibernate mode.
—Jump to the Teletext page of the corresponding color according to this button.
|
12.WAKE UP |
— Go to the previous file in the playlist. |
—Set the time to bring your computer out of Stand By or Hibernate mode.
—Jump to the Teletext page of the corresponding color according to this button.
|
13.■ (Stop) |
— End the Playback or recording. |
—End the TimeShift mode and return to real-time TV or Radio mode.
|
14. |
► (Play) |
Play the last recorded or played file. |
|
15. |
● (Record) |
Switch to PVR mode and record the current program or video into |
|
your hard drive. |
||
|
16.TIMESHIFT |
— Freeze the playback. |
|
|
/PAUSE |
— Switch from real-time TV or Radio to TimeShift mode. |
|
|
17. |
(Rewind) |
— Rewind the playback. |
—Jump to the Teletext page of the corresponding color according to this button.
|
18. (Forward) |
— Advance the playback. |
—Jump to the Teletext page of the corresponding color according to this button.
|
19.TELETEXT |
View Teletext/MHEG-5/ Closed Caption information. |
22

AVerTV 6
|
20.EPG |
Launch the Electronic Program Guide. |
|
21.MUTE |
Turn on/off the sound. |
|
22.CH ▲/▼ |
Go up or down to the next active channel. |
|
23.SNAPSHOT |
Capture the on-screen image to a bitmap file. |
|
24.DISPLAY |
Display information. |
23
AVerTV 6
3.5.5 Remote Control Buttons (Model 5)
|
Button |
Description |
|||
|
1. |
SOURCE |
Switch between available signal sources. |
||
|
2. |
FULL SCREEN |
Display TV in full screen. |
||
|
3. |
● (Record) |
Switch to PVR mode and record the current program or video into |
||
|
your hard drive. |
||||
|
4. |
(Rewind) |
Rewind the playback. |
||
|
5. |
■ (Stop) |
— End the Playback or recording. |
||
|
— End the TimeShift mode and return to real-time TV or Radio |
||||
|
mode. |
||||
|
6. |
DISPLAY |
Display information. |
||
|
7. |
VOL / |
Volume up/down. |
||
|
8. |
Numeric Buttons |
— Select a TV channel. |
||
|
— Under the 16-Channel preview mode, use 2 4 6 8 to highlight the |
||||
|
intended channel. |
||||
|
9. |
CH RTN |
Go to the previously selected channel. |
||
|
10. |
MUTE |
Turn on/off the sound. |
||
|
11. |
CH ▲/▼ |
Go up or down to the next active channel. |
||
|
12. |
EPG |
Launch the Electronic Program Guide. (DVB-T only) |
||
|
13. |
► (Play) |
/ |
Play the last recorded or played file. / Freeze the playback. |
|
|
PAUSE |
||||
|
14. |
(Forward) |
Advance the playback. |
||
|
15. |
AUDIO |
Switch between available audio modes. |
||
|
16. |
POWER |
Turn on/off the application |
24

AVerTV 6
3.5.6 Remote Control Buttons (Model 6)
|
Button |
Description |
|||||
|
(1) |
Turn on/off the application. |
|||||
|
(2) |
Turn off/on the sound. |
|||||
|
(3) |
Use numeric buttons to select a channel. |
|||||
|
(4) |
Live TV: Watch live TV |
|||||
|
Fullscreen: Display TV in full screen. |
||||||
|
(5) |
Change between available audio modes. |
|||||
|
(6) |
MCS: Main Screen: Use the arrow button to navigate all on-screen items. |
|||||
|
Use OK to confirm the selection. |
||||||
|
PIP Mode: Change size or position of the selected screen by the arrow |
||||||
|
buttons. |
||||||
|
(7) |
Volume up / Volume down. |
|||||
|
25 |
||||||
 04:32
04:32
AverTV Express HD DVR Review
 04:11
04:11
Гибридный TV-тюнер и FM-тюнер AVerTV Hybrid Express.
 02:11
02:11
AVerMedia AVerTV Express HD DVR 720p MPG Video
![Видео Мне принесли железку. Обзор [AverTV Studio 203] (автор: Captain Strannik)](https://i.ytimg.com/vi/5kNqACCQLME/mqdefault.jpg) 09:41
09:41
Мне принесли железку. Обзор [AverTV Studio 203]
 09:58
09:58
Обзор — AVerMedia AVerTV Hybrid Volar T2
 02:19
02:19
AVerMedia AVerTV Express HD DVR 1080i MPG Video
 02:06
02:06
AVerMedia AVerTV Express HD DVR 1080i H.264 Video
AVerTV 6.2
Руководство пользователя
Русский
ЗАЯВЛЕНИЕ ОБ ОГРАНИЧЕНИИ ОТВЕТСТВЕННОСТИ
Все скриншоты приведены в данном документе в качестве примера. Изображения могут отличаться в зависимости от изделия и
версии программного обеспечения. Информация, представленная в этом документе, была тщательно проверена, однако компания не
несет ответственности за возможные неточности. Информация, содержащаяся в этом документе, может быть изменена без
предварительного уведомления.
АВТОРСКОЕ ПРАВО
© 2008 AVerMedia TECHNOLOGIES, Inc. Все права защищены. Никакая часть данной публикации не может быть воспроизведена,
передана, переписана, сохранена в поисковых системах или переведена на любой язык в любой форме и любым способом без
письменного разрешения AVerMedia TECHNOLOGIES, Inc.
AP-6.2.4
200803


1
Глава 1 Введение
Благодарим вас за покупку изделия AVerMedia. В таблице ниже приводится его краткое
описание. В этой таблице вы сможете ознакомиться с возможностями модели, а также найти
список глав для подробного изучения. Убедительная просьба изучить данную таблицу перед
началом использования приложения AVerTV 6.
Название изделия
AVerTV Hybrid Express
Номер модели
A577
ТВ система
;
Цифровое ТВ (; DVB-T
☐ ATSC ☐ DVB-S)
;
Аналоговое ТВ (; NTSC ; PAL ;
☐ SECAM)
Аудио режим
;
Стерео ; Моно ; SAP
FM-радио
;
Поддерживает
☐ Не поддерживает
Пульт ДУ
;
Поддерживает (
☐ Модель 1 ; Модель 2 ☐ Модель 3 ☐
Модель 4)
☐ Не поддерживает
Внешний источник
сигнала
;
S-Video ; Композитный
Прочее
;
Телетекст ; MHEG-5 (только для UK)
;
EPG
☐ iEPG
;
Субтитры (только для USA) ; Цифровые субтитры
Справочная глава
;
Глава 1
;
Глава 2
;
Глава 3 (;3.1 — 3.4 ;3.5.2 ;3.6 — 3.12)
;
Глава 4 (;4.2 — 4.12)
;
Глава 5
;
Глава 6
;
Глава 7
;
Глава 8
;
Глава 9
;
Глава 10
;
Глава 11
;
Глава 12
Примечание

2
Название изделия AVerTV
Express
Номер модели A577A
ТВ система
Цифровое ТВ ( DVB-T ATSC DVB-S)
;
Аналоговое ТВ (; NTSC ; PAL ; SECAM-B/G ; SECAM-
D/K)
Аудио режим
;
Стерео ; Моно ; SAP
FM-радио
;
Поддерживает Не поддерживает
Пульт ДУ
;
Поддерживает ( Модель 1 ; Модель 2 Модель 3
Модель 4)
Не поддерживает
Внешний источник
сигнала
;
S-Video ; Композитный
Прочее
;
Телетекст MHEG-5 (только для UK)
EPG iEPG
Субтитры (только для USA) Цифровые субтитры
Справочная глава
;
Глава 1
;
Глава 2
;
Глава 3 (;3.1 — 3.4 ;3.5.2 ;3.6 — 3.12)
;
Глава 4 (;4.2 — 4.12)
;
Глава 5
;
Глава 6
;
Глава 7
;
Глава 8
;
Глава 9
;
Глава 10
;
Глава 11
;
Глава 12
Примечание

3
Глава 2 Введение в AVerTV 6
С помощью данного устройства и программного приложения AVerTV 6 вы сможете смотреть ТВ,
слушать радио, записывать любимые передачи на компьютер, а также многое другое.
Превратите свой компьютер в настоящий мультимедийный центр развлечений!
Отныне Вы никогда не пропустите свою любимую игру, сериал или шоу, т.к. функция
«Сдвиг во времени» произведет фоновую запись ТВ программы и позволит Вам
вернуться и продолжить просмотр программы с того места, на котором Вы остановились.
Изделие AVerMedia® призвано обеспечить превосходное качество ТВ и радио программ.
Пожалуйста, обратите внимание на то, что функции пульта дистанционного управления,
описанные в этом руководстве, могут отличаться в зависимости от модели и места покупки.

Глава 3 введение в приложение avertv, 1 запуск приложения avertv 6, 2 запуск приложения avertv 6 в первый раз
Запуск приложения avertv 6, Запуск приложения avertv 6 в первый раз
- Изображение
- Текст
4
Глава 3 Введение в приложение AVerTV
Приложение AVerTV 6 позволит Вам смотреть ТВ и видео, захватывать кадры и
записывать видео на Ваш компьютер, не отрываясь от работы.
3.1
Запуск приложения AVerTV 6
Запустите приложение AVerTV 6
из меню «Программы»
.
Для запуска приложений нажмите
Пуск
, выберите
Программы,
затем
AVerMedia,
AVerTV 6
,
и кликните AVerTV 6
.
Другой способ – дважды кликнуть на иконке AVerTV 6 на
рабочем столе. Или дважды кликните на иконке AVer
Quick
в правом нижнем углу экрана.
Примечание
: AVerQuick позволяет выбрать приложение по умолчанию, т.е Вы
можете выбрать AVerTV 6 или AVerMediaCenter запускаемую двойным
щелчком на иконке AVerQuick
Чтобы сделать это, щелкните правой кнопкой
мыши на иконке AVerQuick
Выберите «Настройки», а затем желаемое
приложение, выполняемое двойным щелчком мыши.
3.2
Запуск приложения AVerTV 6 в первый раз
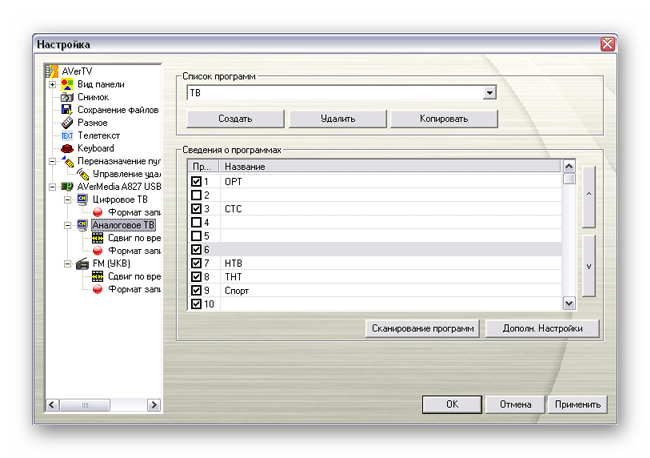
При первом запуске приложения появится диалоговое окно Настройка, в котором будет
предложено просканировать каналы. (Подробности смотрите в разделе Сканирование
каналов)
1.
Выберите предпочитаемый входной сигнал (Цифровое ТВ, Аналоговое ТВ или FM
радио) на левой панели диалогового окна Настройка.
Примечание: Перед выбором входного сигнала убедитесь, что установки
страны/региона верны. Дополнительную информацию смотрите в разделе
«Сканирование каналов», Глава 3.
AVerQuick

5
2.
Затем, если на шаге 1 было выбрано «Аналоговое ТВ», необходимо выбрать опцию
ТВ для поиска только эфирных каналов или Кабельное ТВ для сканирования
кабельных каналов.
(Данное изображение приводится в качестве примера.)
3.
Нажмите Создать, после чего появится диалоговое окно Список программ. Наберите
желаемое имя и нажмите OK.
4.
Нажмите Сканирование программ для поиска доступных каналов/программ в своем
регионе.
(
Данное изображение приводится в качестве примера.
)
5.
После сканирования активные каналы будут перечислены в окне. Нажмите
Применить, чтобы сохранить просканированные каналы.

3 введение в интерфейс пользователя, Введение в интерфейс пользователя
Страница 10
- Изображение
- Текст
6
Примечание: Цифровые каналы, отмеченные красным шрифтом, являются защищенными
каналами (например каналами для взрослых).
6.
Для выхода из текущего диалогового окна нажмите OK.
7.
Если на шаге 1 было выбрано «Цифровое ТВ» или «FM-радио», просто повторите
шаги 3 – 6 для завершения поиска программ.
3.3
Введение в интерфейс пользователя
Видео экран
позволяет вам смотреть видео в режиме реального времени и ТВ программы.
1
Включение и выключение панели
8
Следующий/предыдущий канал
2
Ползунок воспроизведения
9
Размер окна
3
Воспроизведение
/
пауза
10
Отобразить/скрыть окно просмотра
4
Стоп
11
Свернуть
5
Сдвиг во времени
12
Полный экран
6
Запись
13
Выход
7
Громкость
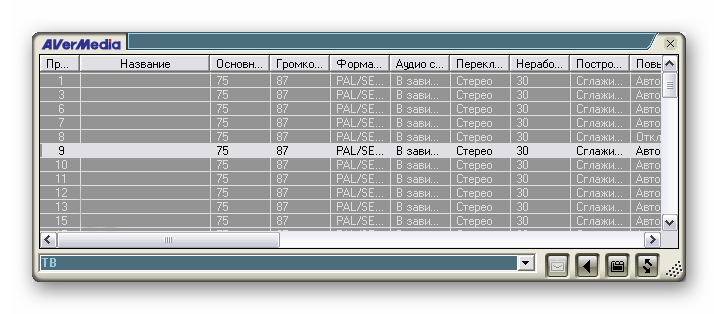
Панель управления
позволяет с помощью кнопок выбирать каналы, регулировать
громкость, захватывать кадры и многое другое. Она снабжена индикаторной панелью,
которая показывает номер текущего канала и его имя.
Для того чтобы отобразить
Панель управления
, нажмите кнопку, находящуюся в нижнем
левом углу ТВ-экрана.

Комментарии
Содержание
- Кнопки управления
- Сдвиг во времени
- Сканирование каналов
- Качество потока
- Запись
- Аналоговый сигнал
- Редактирование каналов
- Поддержка FM
- Достоинства
- Недостатки
- Вопросы и ответы

Производитель мультимедийного оборудования AVerMedia предоставляет ПО для просмотра ТВ на компьютере. Программа AverTV6 для отображения видео использует подключение тюнера к ПК. Предустановленный драйвер определяет устройство, после чего воспроизводит видео. Ряд настроек позволит вам отредактировать найденные объекты, а также отсортировать их исходя из ваших соображений. В интерфейсе данного софта предоставляется функция записи трансляций, а запечатлённые моменты вы сможете просмотреть в любое время.
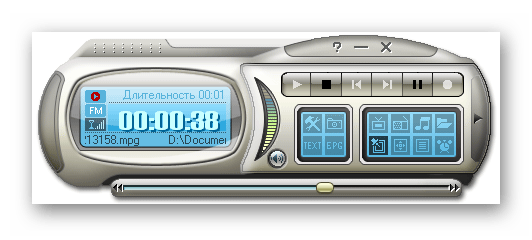
Кнопки управления
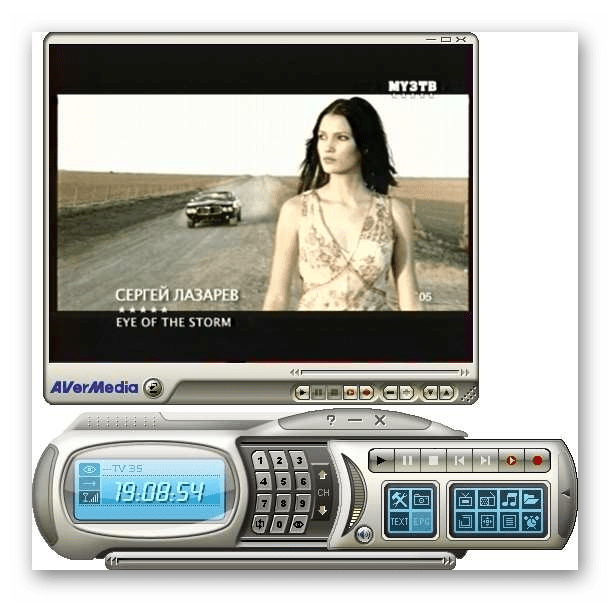
Панель, из которой осуществляется контроль, имеет вид пульта. На нёй происходит переключение между телепрограммами, воспроизведение/остановка потока, а также его запись в отдельный файл. Кроме того, есть функция, позволяющая делать снимки нужных фрагментов. Отображение времени в цифровом формате находится на экране блока. Пульт представлен в отдельном окне, а поэтому перемещается в любую область монитора.
Кнопки цифр разработчики посчитали нужным убрать из компактного положения данной панели. Таким образом, перейти в такой режим можно благодаря соответствующей кнопке с изображением стрелки.
Сдвиг во времени
Полоса прокрутки в нижней области позволяет проматывать рекламные моменты или находить нужные вам. К перемотке добавлены две кнопки по обе стороны, но также присутствует ручной режим, с помощью курсора.

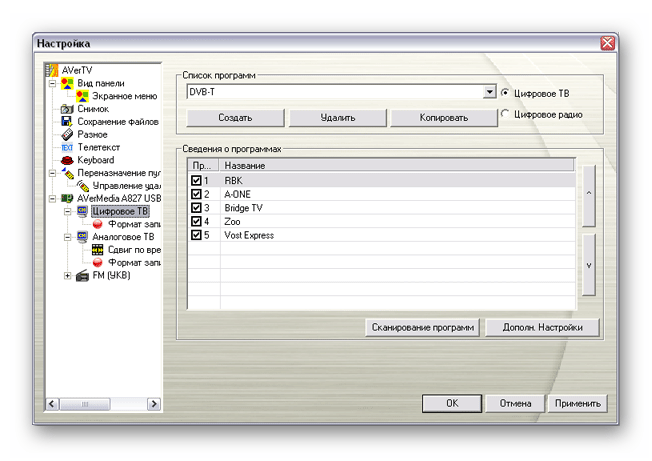
Сканирование каналов
Поиск каналов осуществляется в параметрах на вкладке «Цифровое ТВ». Софт сам определит ТВ-потоки, установив их наименования. В верхнем рядке будет указано название устройства, с которого транслируется изображение.
Качество потока
Качество приема является высоким, так как в интерфейсе AverTV6 мы получаем цифровую передачу картинки.
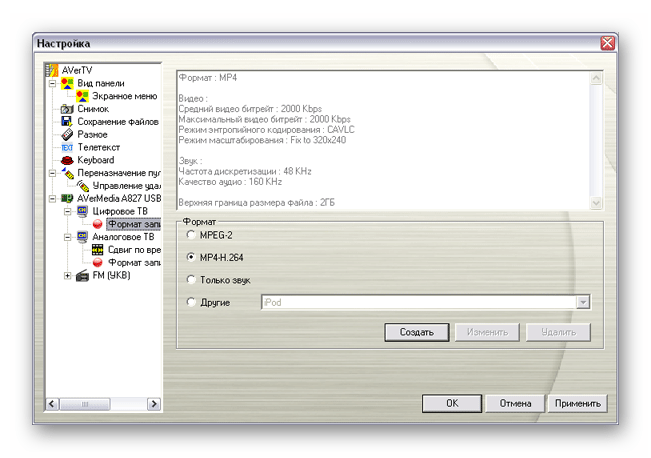
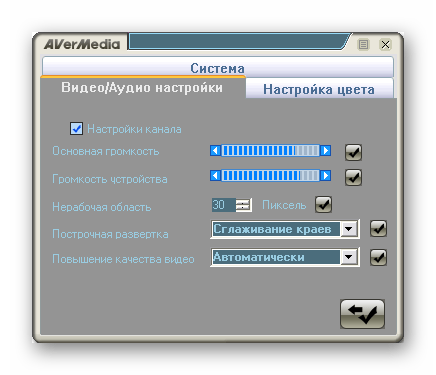
Запись
Управлять опциями записи можно в настройках. Это касается выбора формата, в среду которых добавлены различные варианты, сюда включается и воспроизведение на таких устройствах, как iPod. В окне будут выводиться данные о воспроизводимом качестве аудио и видео, а также ограниченные значения объема. При этом, вариантом источника в данном случае служит не только видео и аудио, но и исключительно звук.
Аналоговый сигнал
Кроме цифровой передачи присутствует и аналоговая. Естественно, в таком случае сканирование объектов предоставляет большее их количество, но здесь дело касается непосредственно качества.

Редактирование каналов
В рассматриваемом софте присутствует поддержка изменения различных опций телеканалов. В таком случае, каждый отдельный из них может быть настроен пользователем, а уж основываться он будет на своих предпочтениях. Среди опций есть такие, как нумерация, наименование, параметры аудио и многие другие.
Для проведения таких операций, запустится несколько окон, из которых первое – это сам список, а все остальные – параметры. При таком раскладе редактирование объекта происходит в окне настроек, а его выбор — в области с отображением списка.
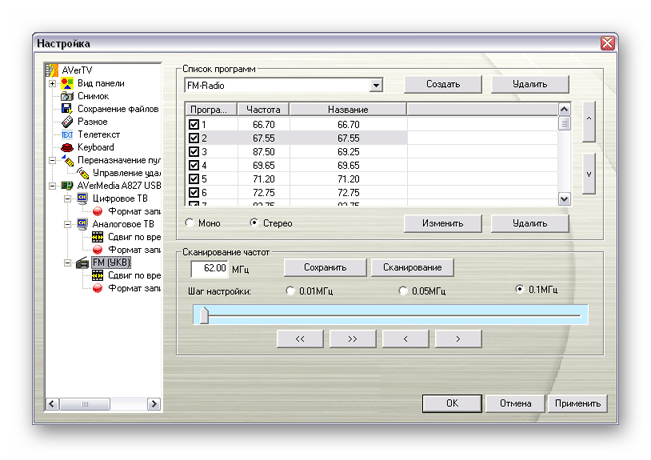
Поддержка FM
AverTV6 позволяет принимать радиостанции, диапазон частот которых 62-108 МГц. Процесс сканирования FM аналогичен проверке каналов, а поэтому вы увидите нумерованный список. Необходимо отметить, что принимаются радиостанции в режиме стерео.
Достоинства
- Множество параметров;
- Функция записи эфира;
- Русскоязычный интерфейс.
Недостатки
- Не поддерживается разработчиком.
Благодаря такому решению как AverTV6, вы сможете просматривать телепрограммы в цифровом и аналоговом качестве. Кроме всего прочего, в программном продукте реализована функция FM-радио, которое поддерживает множество станций. Таким образом, подключенное медиаустройство к вашему ПК, позволит вам использовать его как полноценный телевизор.
Похожие программы и статьи:
AverTV6
Рейтинг:
3.88 из 5
(113 голосов)
Система: Windows 7, XP, Vista
Категория: Обзоры программ
Размер: 50 MB
Язык: Русский
Версия: 6.3.1
AverTV6 — программа предназначенная для воспроизведения телевидения на компьютере. Функционал позволяет применять различные изменения к каждому отдельному каналу.
|
10 898 торговых марок |
Скачайте инструкцию БЕСПЛАТНО! Diplodocs позволяет скачать несколько типов инструкций для наилучшего использования AVERMEDIA AVERTV 6.3 |

|
Вам требуется помощь по использованию изделия? Все инструкции по категориям |
инструкция по эксплуатации AVERMEDIA AVERTV 6.3Diplodocs поможет скачать инструкцию AVERMEDIA AVERTV 6.3 .
Введите модель изделия AVERMEDIA…
Фрагмент инструкции: руководство пользователя AVERMEDIA AVERTV 6.3
|

Copyright © 2005 — 2012 — Diplodocs —
Все права защищены.
Торговые марки принадлежат их соответствующим владельцам.
This application allows you to watch television programs and movies with the help of a TV tuner device. There are flexible image enhancement instruments.
Developer:
AverMedia Technologies, Inc.
Windows version:
Windows XP, Windows Vista, Windows 7, Windows 8, Windows 8.1, Windows 10, Windows 11
AVerTV is a Windows utility for viewing TV shows and other content on the computer. There is support for various AverMedia hardware.
How it works
The main window contains standard playback controls and a volume slider. There are buttons for capturing the video to the hard drive. Like in PowerVCR II, users can schedule future recordings with the help of the included electronic program guide.
TV settings
This software offers you tools for improving the picture quality by adjusting the contrast and tuning the brightness. Additionally, there is an option to automatically boost up the colors.
Users can scan various frequencies to detect all available channels. It is possible to preview up to 64 broadcasts on the same screen. The picture-in-picture functionality is supported.
Advanced options
The Settings menu lets you change the visual appearance of the main interface by choosing one of the included themes. The text scrolling speed is configurable as well. Recording parameters include the maximum capture duration and filename format. You can change the default target directory as well.
Features
- lets you watch television shows and movies with the help of a compatible TV tuner;
- free to download and use;
- there is support for multiple AverMedia devices;
- it is possible to adjust various image quality parameters;
- users can capture TV programs to the hard drive and schedule future recordings;
- compatible with all modern versions of Windows.
![]() ImageMixer SE
ImageMixer SE
Windows XP, Windows Vista, Windows 7, Windows 8, Windows 8.1, Windows 10, Windows 11 Free
This update file allows you to install a patch for the ImageMixer media management application. It fixes technical errors found in the previous version.
ver 3.1
![]() Quicken
Quicken
Windows 7, Windows 8, Windows 8.1, Windows 10, Windows 11 Paid software
With the help of this professional software users can manage personal finances, track the value of various assets and generate detailed banking reports.
ver R48.15
![]() QuickVerse
QuickVerse
Windows XP, Windows Vista, Windows 7, Windows 8, Windows 8.1, Windows 10, Windows 11 Free
This program provides tools for studying various Bible texts. There are multiple translations of the scripture, dictionaries and other reference materials.
ver 13.0.4.1
![]() KX TE Maintenance Console
KX TE Maintenance Console
Windows XP, Windows Vista, Windows 7, Windows 8, Windows 8.1, Windows 10, Windows 11 Free
This specialized software allows users to install and configure Panasonic KX TES824 and TEM824 PBX systems. It is possible to add custom phone extensions.
ver 3.003
![]() WebEx Recorder
WebEx Recorder
Windows XP, Windows Vista, Windows 7, Windows 8, Windows 8.1, Windows 10, Windows 11 Free
With the help of this application users can record audio and video conferences, business meetings, presentations, webinars and online training sessions.
ver 3.17
![]() eFilm Workstation
eFilm Workstation
Windows XP, Windows Vista, Windows 7, Windows 8, Windows 8.1, Windows 10, Windows 11 Free
This medical image viewer is designed for use in radiology. It allows you to open and export DICOM pictures. There are tools for measuring individual fragments.
ver 4.2
![]() Subtitle Edit
Subtitle Edit
Windows 7, Windows 8, Windows 10, Windows 11 Free
Thanks to this comprehensive utility, users are able to modify movie and TV show subtitles. Additionally, it is possible to adjust delay time and other settings.
ver 3.6
![]() Profound Meditation Program
Profound Meditation Program
Windows XP, Windows Vista, Windows 7, Windows 8, Windows 10, Windows 11 Free
With the help of this audio collection, users have the ability to practice meditation at home. Additionally, it is possible to choose from a wide range of products.
ver 3.0