- Manuals
- Brands
- Adobe Manuals
- Software
- Photoshop CS6
- User manual
-
Contents
-
Table of Contents
-
Bookmarks
Quick Links
ADOBE
PHOTOSHOP
®
Help and tutorials
Related Manuals for Adobe Photoshop CS6
Summary of Contents for Adobe Photoshop CS6
-
Page 1
ADOBE PHOTOSHOP ® Help and tutorials… -
Page 2
What’s new To learn more, view these recommended resources online. Using Content-Aware Move and Extend Lynda.com (May. 7, 2012) video-tutorial Recompose images with these simple steps. Vector Shapes Infinite Skills (Oct. 7, 2012) video-tutorial Drawing shapes in CS6 Wide-angle lens correction Kelby (Oct. -
Page 3
video-tutorial Genuine vector shapes, type styles, and more. Preset migration and sharing Kelby (May. 7, 2012) video-tutorial Apply common settings across workgroups. Streamlined 3d controls Lynda.com (May. 7, 2012) video-tutorial Expand creative possibilities into another dimension. Using Content-Aware Patch Lynda.com (May. 7, 2012) video-tutorial Seamlessly repair imperfections. -
Page 4
To the top Adobe Creative Cloud only If you’re a subscriber to Adobe Creative Cloud, the following additional features are available. For new CS6 features that are not Adobe Creative Cloud only, scroll down the page. Click the following link to view a video on the new Creative Cloud features by Adobe evangelist, Julieanne Kost. -
Page 5
3D enhancements and changes There are numerous new 3D features and enhancements in the Creative Cloud version of Photoshop CS6. For information about the updates, see 3D workflow in Photoshop Extended CS6 and view a video on New Possibilities in Support for big JPEGs Photoshop can now open and save JPEG documents up to 65,535 pixels in width or height. -
Page 6
The following new features are available to all Photoshop CS6 users and are not Adobe Creative Cloud only. To the top Retouching and transforming Content-Aware Move tool The Content-Aware Move tool lets you quickly recompose images without complex layering or slow, precise selections. Extend mode convincingly expands or contracts objects such as hair, trees, or buildings. -
Page 7
For detailed instructions, see 3D workflow in Photoshop CS6. To the top Automation Photoshop CS6 lets you record tools such as the brush tool in your action. To enable this feature, choose Allow Tool Recording from the Actions panel menu. For more information, see Recording tools in actions. -
Page 8
Color Dynamics remain consistent for each stroke by default. Color Dynamics settings automatically vary color as you paint. In previous versions of Photoshop, dynamics settings changed color for each distinct tip stamp in a stroke. In Photoshop CS6, however, dynamic changes occur once at the beginning of each stroke. -
Page 9
Extend your creativity beyond Photoshop CS6 with Adobe Touch and Photoshop companion apps (sold separately). Design, edit, and elegantly present your work using six Adobe Touch apps designed for your tablet, including Photoshop Touch, Adobe Kuler, and Adobe Debut. Transfer files through Adobe Creative Cloud for further refinement in Photoshop CS6—or to view, access, and share from almost anywhere. -
Page 10
Productivity enhancements (JDI’s) in CS6 Photoshop CS6 contains over 60 productivity enhancements, also known as Just Do It (JDI) features. These small improvements address longtime customer requests and collectively can greatly increase your productivity. For information on major Photoshop CS6 new features, see What’s New in CS6. -
Page 11
Increased stability by prequalifying detected GPUs before use To the top Image resizing Bicubic Automatic option auto-selects the best resample method based on the type of resize To the top Importing (Mac OS) ImageKit scanner and camera support to import images from more devices To the top Layers Added Interpolation menu to options bar for Free Transform command… -
Page 12: User Interface
Edit > Color Settings, and click More Options at right. The default setting, 1.45, blends text more correctly than previous Photoshop versions, better matching other applications. Note: When you select Blend Text Colors Using Gamma, text layers from Photoshop CS6 will look different in earlier versions of Photoshop. To the top…
-
Page 13
Export final video with the Adobe Media Encoder Choose File > Export > Render Video. From the first pop-up menu, select Adobe Media Encoder to choose from the following Format options: DPX (Digital Picture Exchange) format is designed primarily for frame sequences that you plan to incorporate into professional video projects using an editor such as Adobe Premiere Pro. -
Page 14
Import a video file; it’s automatically added as a new Video Group. To create an empty group for adding content to, click a filmstrip icon on the left of the Timeline panel, and choose New Video Group from the pop-up menu. Edit a Video Group To reposition clips, drag them in the Timeline. -
Page 15
Twitter™ and Facebook posts are not covered under the terms of Creative Commons. Legal Notices Online Privacy Policy… -
Page 16
Arabic and Hebrew type (CS6) Enable Middle Eastern features Text direction Digit Types Legacy font support Default fonts Automatic Kashida insertion Ligatures (OpenType fonts) Hyphenation Diacritical marks Justification alternates For a tutorial on Arabic and Hebrew type features, see this video from Photoshop expert David Mohr. -
Page 17
When you install a Middle Eastern or North African version, the default typing font is set to the installation-specific language, by default. For example, if you have installed the English/Arabic-enabled version, the default typing font is set to Adobe Arabic. Similarly, if you have installed the English/Hebrew-enabled version, the default typing font is set to Adobe Hebrew (or Myriad Hebrew in Photoshop). -
Page 18
Justification alternates can be turned on at a character level, but only if a font supports this feature. At the bottom of the Character panel, select Justification Alternates. These Arabic fonts contain justification alternates: Adobe Arabic, Myriad Arabic, and Adobe Naskh. These Hebrew fonts contain justification alternates: Adobe Hebrew and Myriad Hebrew. -
Page 19
To the top Updated 3D features for Creative Cloud only In addition to the 3D features in Photoshop CS6 described in the following sections, there are these additional 3D enhancements in the Creative Cloud version: 32-bit color pickers can now be used when specifying colors for materials, lines, surfaces, or lights in the Properties panel. -
Page 20
In the streamlined 3D panel, select specific elements you want to edit: 1. At the top of the 3D panel, select Scene , Meshes , Materials , or Lights 2. Select an individual element (such as Current View in the Scene section). Or select multiple elements to apply uniform properties. 3. -
Page 21
To edit the original path, type, or image layer, selected the related mesh in the 3D panel, and click Edit Source in the Properties panel. Note: The Photoshop Extended CS5 Repousse feature is called 3D Extrusion in CS6. To the top Define ground planes for imported objects Quickly create perspective planes with the Vanishing Point filter, and snap an imported object to them. -
Page 22
3D-like effects and save your own styles for use in other images. Note: The Lighting Effects filter works only on RGB images. You must have a supported video card to use Lighting Effects. For more information, Photoshop CS6 GPU FAQ. 1. Choose Filter > Render > Lighting Effects. -
Page 23
Spot Casts an elliptical beam of light. The line in the preview window defines the light direction and angle, and the handles define the edges of the ellipse. To the top Adjust a Point light in the preview window 1. In the Properties panel, choose Point from the top menu. 2. -
Page 24
Soft Direct Lights Two unfocused white and blue directional lights. White has a soft (20) intensity. Blue has a medium (67) intensity. Soft Omni A soft omni light of medium (50) intensity. Soft Spotlight A white spotlight of full (98) intensity with a wide (100) focus. Three Down Three white spotlights of soft (35) intensity with a wide (96) focus. -
Page 25
Blur gallery (Field, Iris, Tilt-Shift) Liquify Crop tool Adaptive Wide Angle This list covers some of the most helpful shortcuts for new and udpated Photoshop CS6 features. To the top Print To clear print settings, hold down the spacebar while selecting File > Print. -
Page 26
Y: Polygon Constraint tool M: Move tool H: Hand tool Z: Zoom tool Control shortcuts P: Preview W: Show Constraint E: Show Mesh T: Correction S: Scale F: Focal Length R: Crop Factor A: As Shot Hidden shortcuts not visible in interface L: Toggle transparent matte X: Temorary zoom E: Revert the last-added polygon corner… -
Page 27
Video import formats .264* 3GP, 3GPP* AVC* F4V* FLV* MOV (QuickTime) MPE* MPEG-1 MPEG-4 MPEG-2 if a decoder is installed (for example, with an Adobe video suite) MTS* MXF* R3D* VOB* Video export formats DPX* MOV (QuickTime) Graphic file formats Photoshop PSD… -
Page 28
PICT Resource (Mac only, can open only) Radiance 3D-related formats 3D Studio (import only) DAE (Collada) Flash 3D* (export only) JPS* (JPEG Stereo) KMZ (Google Earth 4) MPO* (Multi-Picture format) Wavefront|OBJ Twitter™ and Facebook posts are not covered under the terms of Creative Commons. Legal Notices Online Privacy Policy… -
Page 29
Take image tones from vivid to surreal. Companion apps for Photoshop 12.0.4 or later Mix color swatches, select and manage Photoshop tools, and paint watercolor images using three iPad apps. See Using Adobe Color Lava, Using Adobe Nav, and Using Adobe Eazel. -
Page 30
sharpen images with minimal artifacts. See Correct lens distortions in Camera Raw, Sharpening, noise reduction, and process version in Camera Raw, and Vignette and grain effects in Camera Raw. Dozens of customer-inspired productivity enhancements Boost your efficiency with countless workflow improvements. Selected highlights let you: Create layers by dragging files from Windows or Mac OS. -
Page 31
Photoshop getting started tutorials To learn more, view these recommended resources online. Learn Photoshop CS6 video tutorials Adobe TV (Jul. 11, 2012) video-tutorial Layers 101 Infinite Skills (Aug. 9, 2012) video-tutorial Introduction to layers and the Layers panel What is Photoshop? Lynda.com (May. -
Page 32
Adobe Photoshop CS5/CS6 tutorials Essential Photoshop tutorials and learning resources for getting started and new features. To the top New content for CS6 Learn Photoshop CS6 video tutorials Getting started and what’s new content To the top Getting started with CS5… -
Page 33
Correct perspective with the Crop tool (video 3:12) Saving and printing File saving options (HTML) Optimize web graphics (HTML) Optimize your prints (HTML), CS4-CS5 All tutorials on Adobe.com Twitter™ and Facebook posts are not covered under the terms of Creative Commons. Legal Notices Online Privacy Policy… -
Page 34
Workspace and workflow To learn more, view these recommended resources online. How to tune Photoshop CS6 for peak performance Jeff Tranberry (Oct. 18, 2012) article Background-save and Auto-recover Kelby (May. 7, 2012) video-tutorial Protect precious image data. Preset migration and sharing Kelby (May. -
Page 35: Workspace Basics
You create and manipulate your documents and files using various elements, such as panels, bars, and windows. Any arrangement of these elements is called a workspace. The workspaces of the different applications in Adobe® Creative Suite® 5 share the same appearance so that you can move between the applications easily.
-
Page 36
If you are using a Mac and prefer the traditional, free-form user interface, you can turn off the Application frame. In Adobe Illustrator®, for example, select Window >… -
Page 37
(Illustrator) Adjust panel brightness In User Interface preferences, move the Brightness slider. This control affects all panels, including the Control panel. Reconfigure the Tools panel You can display the tools in the Tools panel in a single column, or side by side in two columns. (This feature is not available in the Tools panel in Fireworks and Flash.) In InDesign and InCopy, you also can switch from single-column to double-column (or single-row) display by setting an option in Interface preferences. -
Page 38
Navigator panel now in its own dock You can prevent panels from filling all the space in a dock. Drag the bottom edge of the dock up so it no longer meets the edge of the workspace. Move panels As you move panels, you see blue highlighted drop zones, areas where you can move the panel. For example, you can move a panel up or down in a dock by dragging it to the narrow blue drop zone above or below another panel. -
Page 39
To rearrange panels in a group, drag a panel’s tab to a new location in the group. To remove a panel from a group so that it floats freely, drag the panel by its tab outside the group. To move a group, drag the title bar (the area above the tabs). Stack floating panels When you drag a panel out of its dock but not into a drop zone, the panel floats freely. -
Page 40
Note: In Dreamweaver, Designer is the default workspace. 2. For Fireworks (Windows), delete these folders: Windows Vista \Users<username>AppDataRoamingAdobeFireworks CS4 Windows XP \Documents and Settings<username>Application DataAdobeFireworks CS4 3. (Photoshop, InDesign, InCopy) Select Window > Workspace > Reset [Workspace Name]. (Photoshop) Restore a saved workspace arrangement In Photoshop, workspaces automatically appear as you last arranged them, but you can restore the original, saved arrangement of panels. -
Page 41
When you position the pointer over most tools and options, descriptions appear in tool tips by default. If you find tool tips visually distracting, you can hide them. In the Interface preferences, deselect Show Tool Tips. Note: Tool tips are not available in some dialog boxes. More Help topics Adobe Bridge Legal Notices Online Privacy Policy… -
Page 42
Panels and menus Enter values in panels, dialog boxes, and the options bar Working with sliders Working with pop-up panels Display and define menus To the top Enter values in panels, dialog boxes, and the options bar Do any of the following: Type a value in the text box, and press Enter (Windows) or Return (Mac OS). -
Page 43
down the Shift key while dragging accelerates the scrubbing by a factor of 10. Hovering over the title of a slider or pop-up slider shows the scrubby slider To the top Working with pop-up panels Pop-up panels provide easy access to available options for brushes, swatches, gradients, styles, patterns, contours, and shapes. You can customize pop-up panels by renaming and deleting items and by loading, saving, and replacing libraries. -
Page 44
Display context menus Context menus display commands relevant to the active tool, selection, or panel. They are distinct from the menus across the top of the workspace. Viewing the context menu for the Eyedropper tool 1. Position the pointer over an image or panel item. 2. -
Page 45
2. In the Keyboard Shortcuts & Menus dialog box, choose a set of menus from the Set menu. 3. Click the Delete Set icon Temporarily show hidden menu items It’s possible to temporarily show items that you’ve hidden in a menu. After the menu closes, the items return to their hidden state. Do one of the following: From a menu with hidden items, choose Show All Menu Items. -
Page 46
Tools Tool galleries Selecting and displaying tools Using the options bar Tool presets When you start Photoshop, the Tools panel appears at the left of the screen. Some tools in the Tools panel have options that appear in the context-sensitive options bar. You can expand some tools to show hidden tools beneath them. -
Page 47
row, and single column edged), and magnetic (snap- using an adjustable round selections. to) selections. brush tip The Magic Wand tool selects similarly colored areas. Crop and slice tools gallery The Crop tool trims images. The Slice tool creates slices. The Slice Select tool selects slices. -
Page 48
The Magic Eraser tool erases The Blur tool blurs hard The Sharpen tool sharpens The Smudge tool smudges solid-colored areas to edges in an image. soft edges in an image. data in an image. transparency with a single click. The Dodge tool lightens The Burn tool darkens areas The Sponge tool changes the areas in an image. -
Page 49
The path selection tools The type tools create type on The type mask tools create a The pen tools let you draw make shape or segment an image. selection in the shape of type. smooth-edged paths. selections showing anchor points, direction lines, and direction points. -
Page 50
rotates the object around its x- rotates the object around its z- the object in the x or y when you drag horizontally, or axis. axis. direction. forward and back when you drag vertically. The 3D Object Scale tool The 3D Rotate Camera tool The 3D Roll Camera tool The 3D Pan Camera tool scales the object larger or… -
Page 51
Each default pointer has a different hotspot, where an effect or action in the image begins. With most tools, you can switch to precise cursors, which appear as cross hairs centered around the hotspot. In most cases, the pointer for a tool is the same as the icon for that tool; you see that pointer when you select the tool. The default pointer for the marquee tools is the cross-hair pointer ;… -
Page 52
To choose a tool preset, click the Tool Preset picker in the options bar, and select a preset from the pop-up panel. You can also choose Window > Tool Presets and select a preset in the Tools Presets panel. Viewing the Tool Preset picker A. -
Page 53
About preferences Numerous program settings are stored in the Adobe Photoshop CS5 Prefs file, including general display options, file-saving options, performance options, cursor options, transparency options, type options, and options for plug-ins and scratch disks. Most of these options are set in the Preferences dialog box. -
Page 54
Blur gallery (Field, Iris, Tilt-Shift) Liquify Crop tool Adaptive Wide Angle This list covers some of the most helpful shortcuts for new and udpated Photoshop CS6 features. To the top Print To clear print settings, hold down the spacebar while selecting File > Print. -
Page 55
Y: Polygon Constraint tool M: Move tool H: Hand tool Z: Zoom tool Control shortcuts P: Preview W: Show Constraint E: Show Mesh T: Correction S: Scale F: Focal Length R: Crop Factor A: As Shot Hidden shortcuts not visible in interface L: Toggle transparent matte X: Temorary zoom E: Revert the last-added polygon corner… -
Page 56
Do one of the following: To install an Adobe Systems plug-in module, use the plug-in installer, if provided. In Windows, you can also install or copy the module into the appropriate Plug-ins folder in the Photoshop program folder. In Mac OS, drag a copy of the module to the appropriate Plug-Ins folder in the Photoshop program folder. -
Page 57
In general, when you change a preset, Photoshop prompts you to save the changes as a new preset so that both the original and changed preset remain available. Each type of library has its own file extension and default folder. Preset files are installed on your computer inside the Presets folder in the Adobe Photoshop application folder. -
Page 58
Windows XP: [Drive]:Document and Settings<user>Application DataAdobeAdobePhotoshop CS5Presets. Windows Vista: [Drive]:Users<user>AppDataRoamingAdobeAdobe Photoshop CS5Presets. 2. Presets that ship with Adobe Photoshop are stored in the Photoshop program folder. Displaying Hidden Files in Windows The default locations for saving/loading/replacing presets are hidden by default in Windows. -
Page 59
c. Click OK. 2. To display hidden files in Windows Vista: a. Go to Start > Control Panel > Appearance and Personalization > Folder Options. b. In the View tab, under Hidden files and folders, select Show hidden files and folders. c. -
Page 60
Show or hide non-printing Extras Show or hide Extras To the top Show or hide Extras Guides, grids, selection edges, slices, and text baselines are examples of nonprinting Extras that help you select, move, or edit objects. You can enable or disable any combination of Extras without affecting the image. You can also show or hide enabled Extras to clean up the workspace. Do one of the following: To show or hide all enabled Extras, choose View >… -
Page 61
Positioning elements with snapping Use snapping To the top Use snapping Snapping helps with precise placement of selection edges, cropping marquees, slices, shapes, and paths. However, if snapping prevents you from correctly placing elements, you can disable it. Enable or disable snapping Choose View >… -
Page 62
Positioning with the Ruler tool Position with the Ruler tool To the top Position with the Ruler tool The Ruler tool helps you position images or elements precisely. The Ruler tool calculates the distance between any two points in the workspace. -
Page 63
Columns help you position images or elements precisely. The New, Image Size, and Canvas Size commands let you specify image width in terms of columns. Using columns is convenient when you plan to import an image into a page-layout program, such as Adobe InDesign®, and you want the image to fit exactly within a certain number of columns. -
Page 64
Rulers About rulers Change a ruler’s zero origin Change the unit of measurement To the top About rulers Rulers help you position images or elements precisely. When visible, rulers appear along the top and left side of the active window. Markers in the ruler display the pointer’s position when you move it. -
Page 65
Legal Notices Online Privacy Policy… -
Page 66
Undo and history Use the Undo or Redo commands Revert to the last saved version Restore part of an image to its previously saved version Cancel an operation Receive notification when an operation is completed Using the History panel Make a snapshot of an image Paint with a state or snapshot of an image To the top Use the Undo or Redo commands… -
Page 67
You can also use the History panel to delete image states and, in Photoshop, to create a document from a state or snapshot. To display the History panel, choose Window > History, or click the History panel tab. Photoshop History panel A. -
Page 68
If you need to prove that the log file hasn’t been tampered with, keep the edit log in the file’s metadata, and then use Adobe Acrobat to digitally sign the log file. -
Page 69
Make a snapshot of an image The Snapshot command lets you make a temporary copy (or snapshot) of any state of the image. The new snapshot is added to the list of snapshots at the top of the History panel. Selecting a snapshot lets you work from that version of the image. Snapshots are similar to the states listed in the History panel, but they offer additional advantages: You can name a snapshot to make it easy to identify. -
Page 70: Customizing Keyboard Shortcuts
Customizing keyboard shortcuts Define new keyboard shortcuts Clear shortcuts from a command or tool Delete a set of shortcuts View a list of current shortcuts Photoshop lets you view a list of all shortcuts, and edit or create shortcuts. The Keyboard Shortcuts dialog box serves as a shortcut editor, and includes all commands that support shortcuts, some of which aren’t addressed in the default shortcut set.
-
Page 71
To the top View a list of current shortcuts To view a list of current shortcuts, export them to an HTML file, which you can display or print with a web browser. 1. Choose Edit > Keyboard Shortcuts. 2. From the Shortcuts For menu, choose a shortcut type: Application Menus, Panel Menus, or Tools. 3. -
Page 72: Default Keyboard Shortcuts
Default keyboard shortcuts Keys for selecting tools Keys for viewing images Keys for Puppet Warp Keys for Refine Edge Keys for the Filter Gallery Keys for Liquify Keys for Vanishing Point Keys for the Camera Raw dialog box Keys for the Black-and-White dialog box Keys for Curves Keys for selecting and moving objects Keys for transforming selections, selection borders, and paths…
-
Page 73
Elliptical Marquee tool Lasso tool Polygonal Lasso tool Magnetic Lasso tool Magic Wand tool Quick Selection tool Crop tool Slice tool Slice Select tool † Eyedropper tool Color Sampler tool Ruler tool Note tool Count tool Spot Healing Brush tool Healing Brush tool Patch tool Red Eye tool… -
Page 74
Rounded Rectangle tool Ellipse tool Polygon tool Line tool Custom Shape tool 3D Object Rotate tool* 3D Object Roll tool* 3D Object Pan tool* 3D Object Slide tool* 3D Object Scale tool* 3D Camera Rotate tool* 3D Camera Roll tool* 3D Camera Pan tool* 3D Camera Walk tool* 3D Camera Zoom*… -
Page 75
mode) Simultaneously pan multiple documents Shift-drag Shift-drag simultaneously with Hand tool Switch to Zoom In tool Control + spacebar Command + spacebar Switch to Zoom Out tool Alt + spacebar Option + spacebar Move Zoom marquee while dragging with Spacebar-drag Spacebar-drag the Zoom tool Apply zoom percentage, and keep zoom… -
Page 76: Keys For The Filter Gallery
Cycle (backward) through preview modes Shift + F Shift + F Toggle between original image and selection preview Toggle between original selection and refined version Toggle radius preview on and off Toggle between Refine Radius and Erase Shift + E Shift + E Refinements tools To the top…
-
Page 77
density, pressure, rate, or turbulent jitter Density, Pressure, Rate, or Turbulent Density, Pressure, Rate, or Turbulent † † by 1 Jitter text box Jittertext box Decrease/increase brush size by 2, or Left Arrow/Right Arrow with Brush Size, Left Arrow/Right Arrow with Brush Size, density, pressure, rate, or turbulent jitter Density, Pressure, Rate, or Turbulent Density, Pressure, Rate, or Turbulent Jitter… -
Page 78: Keys For The Camera Raw Dialog Box
Constrain selection to a 15° rotation Alt + Shift to rotate Option + Shift to rotate Select a plane under another selected Control-click the plane Command-click the plane plane Create 90 degree plane off parent plane Control-drag Command-drag Delete last node while creating plane Backspace Delete Make a full canvas plane, square to the…
-
Page 79
Hue Targeted Adjustment tool Ctrl+Alt+Shift+H Command+Option+Shift+H Saturation Targeted Adjustment tool Ctrl+Alt+Shift+S Command+Option+Shift+S Luminance Targeted Adjustment tool Ctrl+Alt+Shift+L Command+Option+Shift+L Grayscale Mix Targeted Adjustment tool Ctrl+Alt+Shift+G Command+Option+Shift+G Last-used Targeted Adjustment tool Adjustment Brush tool Graduated Filter tool Increase/decrease brush size ] / [ ] / [ Increase/decrease brush feather Shift + ] / Shift + [… -
Page 80
(Filmstrip mode) Add purple label Ctrl+Shift+0 Command+Shift+0 Camera Raw preferences Ctrl + K Command + K Deletes Adobe Camera Raw preferences Ctrl + Alt (on open) Option + Shift (on open) To the top Keys for the Black-and-White dialog box Result… -
Page 81: Keys For Selecting And Moving Objects
Result Windows Mac OS Open the Curves dialog box Control + M Command + M Select next point on the curve + (plus) + (plus) Select the previous point on the curve — (minus) — (minus) Select multiple points on the curve Shift-click the points Shift-click the points Deselect a point…
-
Page 82
† † Up Arrow, or Down Arrow Up Arrow, or Down Arrow Move selection 1 pixel Move tool + Right Arrow, Left Arrow, Up Move tool + Right Arrow, Left Arrow, Up †‡ †‡ Arrow, or Down Arrow Arrow, or Down Arrow Move layer 1 pixel when nothing selected Control + Right Arrow, Left Arrow, Up Command + Right Arrow, Left Arrow, Up… -
Page 83
Switch from Pen tool or Freeform Pen tool Option to Convert Point tool when pointer is over anchor or direction point Close path Magnetic Pen tool-double-click Magnetic Pen tool-double-click Close path with straight-line segment Magnetic Pen tool + Alt-double-click Magnetic Pen tool + Option-double-click To the top Keys for painting This partial list provides shortcuts that don’t appear in menu commands or tool tips. -
Page 84
Cycle through blending modes Shift + + (plus) or – (minus) Shift + + (plus) or – (minus) Normal Shift + Alt + N Shift + Option + N Dissolve Shift + Alt + I Shift + Option + I Behind (Brush tool only) Shift + Alt + Q Shift + Option + Q… -
Page 85
Keys for selecting and editing text This partial list provides shortcuts that don’t appear in menu commands or tool tips. Result Windows Mac OS Move type in image Control-drag type when Type layer is Command-drag type when Type layer is selected selected Select 1 character left/right or 1 line… -
Page 86
†† †† Decrease or increase leading 2 points or Alt + Down Arrow or Up Arrow Option + Down Arrow or Up Arrow pixels †† Decrease or increase baseline shift 2 Shift + Alt + Down Arrow or Up Arrow Shift + Option + Down Arrow or Up ††… -
Page 87
Turn current modal control on and toggle Alt-click Option-click all other modal controls Change action or action set options Alt + double-click action or action set Option + double-click action or action set Display Options dialog box for recorded Double-click recorded command Double-click recorded command command Play entire action… -
Page 88
Expand and collapse list of layers Alt + click Option + click on list triangles Jump to the next/previous whole second Hold down the Shift key when clicking the Hold down the Shift key when clicking the in timeline Next/Previous Frame buttons (on either Next/Previous Frame buttons (on either side of the Play button). -
Page 89
Toggle airbrush option Shift + Alt + P Shift + Option + P To the top Keys for the Channels panel If you prefer channel shortcuts starting with Ctrl/Command + 1 for red, choose Edit > Keyboard Shortcuts, and select Use Legacy Channel Shortcuts. -
Page 90: Keys For The Info Panel
Display Color Bar menu Right-click color bar Control-click color bar Cycle through color choices Shift-click color bar Shift-click color bar To the top Keys for the History panel Result Windows Mac OS Create a new snapshot Alt + New Snapshot Option + New Snapshot Rename snapshot Double-click snapshot name…
-
Page 91
Select top layer Alt + . (period) Option + . (period) Select bottom layer Alt + , (comma) Option + , (comma) Add to layer selection in Layers panel Shift + Alt + [ or ] Shift + Option + [ or ] Select next layer down/up Alt + [ or ] Option + [ or ]… -
Page 92
Create layer mask that hides all/selection Alt-click Add Layer Mask button Option-click Add Layer Mask button Create vector mask that reveals all/path Control-click Add Layer Mask button Command-click Add Layer Mask button area Create vector mask that hides all or Control + Alt-click Add Layer Mask button Command + Option-click Add Layer Mask displays path area… -
Page 93
Set swatch color as background color Control-click swatch Command-click swatch Delete swatch Alt-click swatch Option-click swatch To the top Keys for 3D tools (Photoshop Extended) Result Windows Mac OS Enable 3D object tools Enable 3D camera tools Hide nearest surface Alt + Ctrl + X Option + Command + X Show all surfaces… -
Page 94
Extend/shorten selected measurement in Shift + Ctrl + left/right arrow key Shift +Command + left/right arrow key increments Rotate selected measurement Ctrl + up/down arrow key Command + up/down arrow key Rotate selected measurement in Shift + Ctrl + up/down arrow key Shift + Command + up/down arrow key increments To the top… -
Page 95: Function Keys
Highlight entire image Control + Delete Command + Delete Fill foreground area and preview Shift-click with Fill tool selected Shift-click with Fill tool selected extraction Move mask when Edge Touchup tool is Control-drag Command-drag selected Add opacity when Cleanup tool is selected Alt-drag Option-drag Toggle Show menu options in preview…
-
Page 96
Undo/Redo Copy Paste Show/Hide Brush panel Show/Hide Color panel Show/Hide Layers panel Show/Hide Info panel Show/Hide Actions panel Option + F9 Revert Fill Shift + F5 Shift + F5 Feather Selection Shift + F6 Shift + F6 Inverse Selection Shift + F7 Shift + F7 Legal Notices Online Privacy Policy… -
Page 97
Grid and guides Position with guides and the grid To the top Position with guides and the grid Guides and the grid help you position images or elements precisely. Guides appear as nonprinting lines that float over the image. You can move and remove guides. -
Page 98
Move a guide 1. Select the Move tool , or hold down Ctrl (Windows) or Command (Mac OS) to activate the Move tool. 2. Position the pointer over the guide (the pointer turns into a double-headed arrow). 3. Move the guide in any of the following ways: Drag the guide to move it. -
Page 99
Run Photoshop in 32-bit mode (64-bit Mac OS only) In 64-bit versions of Mac OS 10.5 and later, some older, optional plug-ins are available only if Photoshop is running in 32-bit mode: 1. In the Finder, choose Go > Applications. 2. -
Page 100
Image and color basics… -
Page 101
The vector objects you create using the drawing and shape tools in Adobe Creative Suite are examples of vector graphics. You can use the Copy and Paste commands to duplicate vector graphics betweenCreative Suite components. -
Page 102
Save As and convert a copy of the image file so the original file retains the full 16-bpc image data. Adobe recommends Have a tutorial you would like to share? Understanding bit depth Martin Evening Learn more with this excerpt from Adobe Photoshop for Photographers. To the top Convert between bit depths Do any of the following: To convert between 8 bpc and 16 bpc, Choose Image >… -
Page 103: Image Size And Resolution
View the print size on-screen | CS5 and CS6 Resampling Change pixel dimensions of an image Change the print dimensions and resolution What affects file size? Adobe recommends Have a tutorial you would like to share? Video tutorial: Resizing images Chris Orwig These key concepts help you produce optimal results.
-
Page 104
Pixel dimensions equal document (output) size times resolution. A. Original dimensions and resolution B. Decreasing the resolution without changing pixel dimensions (no resampling) C. Decreasing the resolution at same document size decreases pixel dimensions (resampling). Quickly display the current image size If you want to quickly display a document’s current image size, use the information box at the bottom of the document window. -
Page 105
A 620- by 400-pixel image displayed on monitors of various sizes and resolutions. When preparing images for viewing on-screen, you should consider the lowest monitor resolution that your photo is likely to be viewed on. To the top About printer resolution Printer resolution is measured in ink dots per inch, also known as dpi. -
Page 106
Draft Produces a resolution that is the same as the screen frequency (no lower than 72 pixels per inch). Good Produces a resolution 1.5 times the screen frequency. Best Produces a resolution 2 times the screen frequency. To the top View the print size on-screen | CS5 and CS6 Do one of the following: Choose View >… -
Page 107
Bicubic Smoother A good method for enlarging images based on Bicubic interpolation but designed to produce smoother results. Bicubic Sharper A good method for reducing the size of an image based on Bicubic interpolation with enhanced sharpening. This method maintains the detail in a resampled image. If Bicubic Sharper oversharpens some areas of an image, try using Bicubic. You can specify a default interpolation method to use whenever Photoshop resamples image data. -
Page 108
Legal Notices Online Privacy Policy… -
Page 109: Acquiring Images From Cameras And Scanners
Use theGet Photos From Camera command in Adobe® Bridge® to download photos, and to organize, rename, and apply metadata to them. If your camera or the card reader appears as a drive on your computer, copy images directly to your hard disk or into Adobe Bridge.
-
Page 110
8. Click Preview. If necessary, drag the handles of the bounding box to adjust the size of the crop. 9. Click Scan. The scanned image is saved in BMP format. More Help topics Get photos from a digital camera or card reader into Adobe Bridge Navigate, open, and save images in Camera Raw Legal Notices Online Privacy Policy… -
Page 111
To the top Open files You can open files using the Open command and Open Recent command. You can also open files into Photoshop from Adobe Bridge or Adobe® Photoshop® Lightroom™. When opening certain files, such as camera raw and PDF, you specify settings and options in a dialog box before the files completely open in Photoshop. -
Page 112
Open PDF files Adobe Portable Document Format (PDF) is a versatile file format that can represent both vector and bitmap data. It has electronic document search and navigation features. PDF is the primary format for Adobe Illustrator and Adobe Acrobat. -
Page 113
Encapsulated PostScript (EPS) can represent both vector and bitmap data and is supported by virtually all graphic, illustration, and page-layout programs. The Adobe application that primarily produces PostScript artwork is Adobe Illustrator. When you open an EPS file containing vector art, it is rasterized—the mathematically defined lines and curves of the vector artwork are converted into the pixels or bits of a bitmap image. -
Page 114: Viewing Images
Viewing images Change the screen mode View another area of an image Use the Rotate View tool Disable trackpad gestures (Mac OS) Use the Navigator panel Zoom in or out To the top Change the screen mode You can use the screen mode options to view images on your entire screen. You can show or hide the menu bar, title bar, and scroll bars. Press the F key to quickly cycle through screen modes.
-
Page 115
Click or drag the circular Set Angle of Rotation control. 3. To restore the canvas to the original angle, click Reset View. For a video on the Rotate View tool and other workspace tips, see www.adobe.com/go/lrvid4001_ps. (Discussion of the Rotate View tool begins at the 5:10 mark.) -
Page 116
Note: Some Zoom tool preferences require OpenGL. If Enable OpenGL Drawing is unavailable, your video card does not support this technology. 2. In the General preferences, select any of the following: Animated Zoom Enables continuous zooming while holding down the Zoom tool Zoom Resizes Windows See Automatically resize the window when zooming. -
Page 117
If the entire image originally fit within the document window, the image zooms in to fit the window. If only a portion of the image was originally visible, the image zooms out. Drag the zoom marquee to magnify a different part of the image. -
Page 118: Image Information
Image information Work with the Info panel Display file information in the document window To the top Work with the Info panel The Info panel shows the color values beneath the pointer and, depending on the tool in use, gives other useful information. The Info panel also displays a hint on using the selected tool, gives document status information, and can display 8-bit, 16-bit, or 32-bit values.
-
Page 119
Document Sizes Displays information on the amount of data in the image. The number on the left represents the printing size of the image —approximately the size of the saved, flattened file in Adobe Photoshop format. The number on the right indicates the file’s approximate size including layers and channels. -
Page 120
Document Sizes Information on the amount of data in the image. The number on the left represents the printing size of the image— approximately the size of the saved, flattened file in Adobe Photoshop format. The number on the right indicates the file’s approximate size, including layers and channels. -
Page 121
Add swatches from HTML CSS and SVG | Creative Cloud You can add colors specified in an HTML, CSS, or SVG document to the Swatches panel. If a color value is repeated in a document, only one instance of the color is added not duplicates. This feature recognizes the following HTML/CSS color syntax: #112233, #123, rgb(1,2,3), rgba(1,2,3,4), hsb(1,2,3), and hsba(1,2,3,4). -
Page 122
Choosing colors in the Color and Swatches panels Color panel overview Select a color in the Color panel Select a color in the Swatches panel To the top Color panel overview The Color panel (Window > Color) displays the color values for the current foreground and background colors. Using the sliders in the Color panel, you can edit the foreground and background colors using different color models. -
Page 123
To choose a foreground color, click a color in the Swatches panel. To choose a background color, Ctrl-click (Windows) or Command-click (Mac OS) a color in the Swatches panel. Note: Change how swatches are displayed by choosing an option from the Swatches panel menu. More Help topics Legal Notices Online Privacy Policy… -
Page 124
Viewing multiple images View images in multiple windows Match zoom and location in multiple images To the top View images in multiple windows The document window is where your images appear. You can open multiple windows to display different images or different views of the same one. -
Page 125
Without Match All command (top), and with Match All command (bottom) selected 4. Select the Zoom tool or the Hand tool. 5. Select one of the images, hold down the Shift key, and click in or drag an area of an image. The other images are magnified to the same percentage and snap to the area you clicked. -
Page 126
Adding a conditional mode change to an action Add a conditional mode change to an action To the top Add a conditional mode change to an action You can specify conditions for a mode change so that the conversion can occur during an action, which is a series of commands applied sequentially to a single file or a batch of files. -
Page 127
Save and load color tables You use the Save and Load buttons in the Color Table dialog box to save your indexed color tables for use with other Adobe Photoshop images. After you load a color table into an image, the colors in the image change to reflect the color positions they reference in the new color table. -
Page 128
Save and load color tables You use the Save and Load buttons in the Color Table dialog box to save your indexed color tables for use with other Adobe Photoshop images. After you load a color table into an image, the colors in the image change to reflect the color positions they reference in the new color table. -
Page 129: About Color
About color Understanding color Color models, spaces, and modes Adjusting color hue, saturation, and brightness To the top Understanding color Knowing how colors are created and how they relate to each other lets you work more effectively in Photoshop. Instead of achieving an effect by accident, you’ll produce consistent results thanks to an understanding of basic color theory.
-
Page 130
A color space is a variant of a color model and has a specific gamut (range) of colors. For example, within the RGB color model are a number of color spaces: Adobe RGB, sRGB, ProPhoto RGB, and so on. Each device, like your monitor or printer, has its own color space and can only reproduce colors in its gamut. When an image moves from one device to another, image colors may change because each device interprets the RGB or CMYK values according to its own color space. -
Page 131
HSB color model H. Hue S. Saturation B. Brightness More Help topics Understanding color management Legal Notices Online Privacy Policy… -
Page 132: Choosing Colors
A. Default Colors icon B. Switch Colors icon C. Foreground color box D. Background color box To change the foreground color, click the upper color selection box in the toolbox, and then choose a color in the Adobe Color Picker.
-
Page 133
Photoshop Extended users can access an HDR (high dynamic range) picker to choose colors for use in HDR images. The Color field in the Adobe Color Picker displays color components in HSB color mode, RGB color mode, and Lab color mode. If you know the numeric value of the color you want, you can enter it into the text fields. -
Page 134
1. In the Adobe Color Picker, select the H option and then enter a numeric value in the H text box or select a hue in the color slider. 2. Adjust the saturation and brightness by clicking in the color field, moving the circular maker, or entering numeric values in the S and B text boxes. -
Page 135
Select web-safe colors in the Adobe Color Picker Select the Only Web Colors option in the lower left corner of the Adobe Color Picker. Any color you pick with this option selected is web-safe. Change a non-web color to a web-safe color If you select a non-web color, an alert cube appears next to the color rectangle in the Adobe Color Picker. -
Page 136
1. Open the Adobe Color Picker, and click Color Libraries. The Custom Colors dialog box displays the color closest to the color currently selected in the Adobe Color Picker. 2. For Book, choose a color library. See below for descriptions of the color libraries. -
Page 137
High dynamic range images About high dynamic range images Take photos for HDR images Features that support 32-bpc HDR images Merge images to HDR Adjust displayed dynamic range for 32-bit HDR images About the HDR Color Picker Paint on HDR images To the top About high dynamic range images The dynamic range (ratio between dark and bright regions) in the visible world far exceeds the range of human vision and of images that are… -
Page 138
HDR image. You can output the merged image as a 32-, 16-, or 8-bpc file. However, only a 32-bpc file can store all the HDR image data. HDR merging works best when photos are optimized for the process. For recommendations, see Take photos for HDR images. Adobe recommends Have a tutorial you would like to share? -
Page 139
1. Do one of the following: (Photoshop) Choose File > Automate > Merge To HDR Pro. (Bridge) Select the images you want to use and choose Tools > Photoshop > Merge To HDR Pro. Skip to step 5. 2. In the Merge To HDR Pro dialog box, click Browse to select specific images, click Add Open Files, or choose Use > Folder. (To remove a particular item, select it in files list, and click Remove.) 3. -
Page 140
About the HDR Color Picker The HDR Color Picker allows you to accurately view and select colors for use in 32-bit HDR images. As in the regular Adobe Color Picker, you select a color by clicking a color field and adjusting the color slider. The Intensity slider allows you to adjust the brightness of a color to match the intensity of the colors in the HDR image you’re working with. -
Page 141
Use the Intensity slider to adjust the brightness of the color. The color value plus the intensity value are converted to 32-bit floating point number values in your HDR document. 1. Select a color by clicking in the color field and moving the color slider, or by entering HSB or RGB numeric values, as in the Adobe Color Picker. -
Page 142
To the top Paint on HDR images You can edit and add effects to HDR/32-bpc images using any of the following Photoshop tools: Brush, Pencil, Pen, Shape, Clone Stamp, Pattern Stamp, Eraser, Gradient, Blur, Sharpen, Smudge, and History Brush. You can also use the Text tool to add 32-bpc text layers to an HDR image. When editing or painting on HDR images, you can preview your work at different exposure settings using either the 32-Bit Exposure slider in the document info area or the 32-Bit Preview Options dialog box (View >… -
Page 143
Blending modes Blending mode descriptions Blending mode examples The blending mode specified in the options bar controls how pixels in the image are affected by a painting or editing tool. It’s helpful to think in terms of the following colors when visualizing a blending mode’s effect: The base color is the original color in the image. -
Page 144
To the top Blending mode examples These examples show the result of painting part of the image’s face using each blending mode. For a video on blending modes, see www.adobe.com/go/vid0012. Original Image Normal, 100% opacity Normal, 50% opacity… -
Page 145
Color Burn Linear Burn Lighten Screen Color Dodge Linear Dodge (Add) Overlay Soft Light Hard Light Vivid Light Linear Light Pin Light Hard Mix Difference Exclusion Subtract Divide Saturation Color Luminosity, 80% opacity Lighter Color Darker Color Legal Notices Online Privacy Policy… -
Page 146: Color Modes
Lab as a color reference to predictably transform a color from one color space to another color space. The Lab Color mode has a lightness component (L) that can range from 0 to 100. In the Adobe Color Picker and Color panel, the a component (green-red axis) and the b component (blue-yellow axis) can range from +127 to –128.
-
Page 147
than in 8-bit images. Grayscale values can also be measured as percentages of black ink coverage (0% is equal to white, 100% to black). Grayscale mode uses the range defined by the working space setting that you specify in the Color Settings dialog box. To the top Bitmap mode Bitmap mode uses one of two color values (black or white) to represent the pixels in an image. -
Page 148: Converting Between Color Modes
Converting between color modes Convert an image to another color mode Convert an image to Bitmap mode Convert a color photo to Grayscale mode Convert a Bitmap mode image to Grayscale mode Convert a grayscale or RGB image to indexed color To the top Convert an image to another color mode You can change an image from its original mode (source mode) to a different mode (target mode).
-
Page 149
commonly use an 85-line screen. Magazines use higher resolution screens, such as 133-lpi and 150-lpi. Check with your print shop for correct screen frequencies. Enter a value for the screen angle in degrees from -180 to +180. The screen angle refers to the orientation of the screen. Continuous- tone and black-and-white halftone screens commonly use a 45°… -
Page 150
Number Of Colors For the Uniform, Perceptual, Selective, or Adaptive palette, you can specify the exact number of colors to be displayed (up to 256) by entering a value for Colors. The Colors text box controls only how the indexed color table is created. Adobe Photoshop still treats the image as an 8-bit, 256-color image. -
Page 151
Transparency is selected; otherwise, all transparent areas are filled with 100% white. The image must have transparency for the Matte options to be available. Dithering Unless you’re using the Exact color table option, the color table may not contain all the colors used in the image. To simulate colors not in the color table, you can dither the colors. -
Page 152
To the top Change the Color Picker Instead of using the Adobe Color Picker, you can choose colors from your computer operating system’s standard Color Picker or from a third party Color Picker. 1. Choose Edit > Preferences > General (Windows) or Photoshop > Preferences > General (Mac OS). -
Page 153
Load or replace a library of swatches Choose one of the following from the Swatches panel menu: Load Swatches Adds a library to the current set of swatches. Select the library file you want to use, and click Load. Replace Swatches Replaces the current list with a different library. Select the library file you want to use, and click Load. Photoshop gives your the option of saving the current set of swatches before replacing them. -
Page 154
A color management system translates colors with the help of color profiles. A profile is a mathematical description of a device’s color space. For example, a scanner profile tells a color management system how your scanner “sees” colors. Adobe color management uses ICC profiles, a format defined by the International Color Consortium (ICC) as a cross-platform standard. -
Page 155
To the top Do you need color management? Without a color management system, your color specifications are device-dependent. You might not need color management if your production process is tightly controlled for one medium only. For example, you or your print service provider can tailor CMYK images and specify color values for a known, specific set of printing conditions. -
Page 156
Layers To learn more, view these recommended resources online. Layers 101 Infinite Skills (Aug. 9, 2012) video-tutorial Introduction to layers and the Layers panel… -
Page 157: Layer Basics
Anderson shows you the basic options and features Kost shares the top 10 enhancements in the of the Layers panel. Layers Panel in Photoshop CS6. To the top About layers Photoshop layers are like sheets of stacked acetate. You can see through transparent areas of a layer to the layers below. You move a layer to position the content on the layer, like sliding a sheet of acetate in a stack.
-
Page 158
Video layers You can use video layers to add video to an image. After importing a video clip into an image as a video layer, you can mask the layer, transform it, apply layer effects, paint on individual frames, or rasterize an individual frame and convert it to a standard layer. Use the Timeline panel to play the video within the image or to access individual frames. -
Page 159
However, you can convert a background into a regular layer, and then change any of these attributes. When you create a new image with transparent content, the image does not have a background layer. The bottommost layer is not constrained like the background layer;… -
Page 160
1. In Windows, choose Edit > Preferences > Transparency & Gamut; in Mac OS, choose Photoshop > Preferences > Transparency & Gamut. 2. Choose a size and color for the transparency checkerboard, or choose None for Grid Size to hide the transparency checkerboard. 3. -
Page 161: Managing Layers
Managing layers Rename a layer or group Assign a color to a layer or group Rasterize layers Delete a layer or group Export layers Merging layers To the top Rename a layer or group As you add layers to an image, it’s helpful to give them names that reflect their content. Descriptive names make layers easy to identify in the panel.
-
Page 162
Deleting layers you no longer need reduces the size of your image file. To quickly delete empty layers, choose File > Scripts > Delete All Empty Layers. 1. Select one or more layers or groups from the Layers panel. 2. Do one of the following: To delete with a confirmation message, click the Delete icon . -
Page 163
Flatten all layers Flattening reduces file size by merging all visible layers into the background and discarding hidden layers. Any transparent areas that remain are filled with white. When you save a flattened image, you cannot revert back to the unflattened state; the layers are permanently merged. Note: Converting an image between some color modes flattens the file. -
Page 164
Selecting, grouping, and linking layers Select layers Group and link layers Show layer edges and handles To the top Select layers You can select one or more layers to work on them. For some activities, such as painting or making color and tonal adjustments, you can work on only one layer at a time. -
Page 165
1. Select multiple layers in the Layers panel. 2. Do one of the following: Choose Layer > Group Layers. Alt-drag (Windows) or Option-drag (Mac OS) layers to the folder icon at the bottom of the Layers panel to group the layers. 3. -
Page 166
Moving, stacking, and locking layers Change the stack order of layers and groups Move the content of layers Rotate a layer Lock layers To the top Change the stack order of layers and groups Do one of the following: Drag the layer or group up or down in the Layers panel. Release the mouse button when the highlighted line appears where you want to place the layer or group. -
Page 167
2. Click the Lock All option in the Layers panel. Note: Layers in a locked group display a dimmed lock icon Partially lock a layer 1. Select a layer. 2. Click one or more lock options in the Layers panel. Lock Transparent Pixels Confines editing to the opaque portions of the layer. -
Page 168: Nondestructive Editing
Nondestructive editing Techniques for nondestructive editing To the top Techniques for nondestructive editing Nondestructive editing allows you to make changes to an image without overwriting the original image data, which remains available in case you want to revert to it. Because nondestructive editing doesn’t remove data from an image, the image quality doesn’t degrade when you make edits. You can perform nondestructive editing in Photoshop in several ways: Working with adjustment layers Adjustment layers apply color and tonal adjustments to an image without permanently changing pixel values.
-
Page 169
Copy CSS from layers | Creative Cloud Copy CSS generates Cascading Style Sheet (CSS) properties from shape or text layers. It captures values for size, position, fill color (including gradients), stroke color, and drop shadow. For text layers, Copy CSS also captures values for font family, font size, font weight, line height, underline, strikethrough, superscript, subscript, and text alignment. -
Page 170
Load selections from a layer or layer mask’s boundaries Loading a layer or layer mask’s boundaries as a selection You can select all the non-transparent areas on a layer, or, if a layer mask exists, all the unmasked areas. Selecting these areas is useful when you want to select text or image content that is surrounded by or contains transparent areas, or to create a selection that excludes masked areas on a layer. -
Page 171
Editing layer masks 1. In the Layers panel, select the layer containing the mask you want to edit. 2. Do one of the following: (CS6) Click the Mask thumbnail in the Layers panel (CS5) Click the Pixel Mask button in the Masks panel 3. -
Page 172
Masking layers with vector masks Add and edit vector masks A vector mask is a resolution independent path that clips out the contents of the layer. You create vector masks with the pen or shapes tools. For more information on working with the pen or shapes tools, see Drawing. Add a vector mask that shows or hides the entire layer 1. -
Page 173
More Help Topics About masks and alpha channels Applying filters video Twitter™ and Facebook posts are not covered under the terms of Creative Commons. Legal Notices Online Privacy Policy… -
Page 174
Combining multiple images into a group portrait You can use the Auto-Align Layers command from the Edit menu to make a composite photo from a pair of nearly identical images that may contain some unwanted areas. For example, one shot of a group portrait is ideal except that one of the subjects has her eyes closed. In another shot her eyes are open. -
Page 175
Revealing layers with clipping masks A clipping mask lets you use the content of a layer to mask the layers above it. The masking is determined by the content of the bottom or base layer. The non-transparent content of the base layer clips (reveals), the content of the layers above it in the clipping mask. All other content in the clipped layers is masked out. -
Page 176
Legal Notices Online Privacy Policy… -
Page 177: Masking Layers
Masking layers About layer and vector masks Add layer masks Unlinking layers and masks Disable or enable a layer mask Apply or delete a layer mask Select and display the layer mask channel Change the layer mask rubylith color or opacity Adjusting mask opacity and edges You can add a mask to a layer and use the mask to hide portions of the layer and reveal the layers below.
-
Page 178
A vector mask creates a sharp-edged shape on a layer and is useful anytime you want to add a design element with clean, defined edges. After you create a layer with a vector mask, you can apply one or more layer styles to it, edit them if needed, and instantly have a usable button, panel, or other web-design element. -
Page 179
To duplicate the mask, Alt-drag (Windows) or Option-drag (Mac OS) the mask to other layer. To the top Unlinking layers and masks By default, a layer or group is linked to its layer mask or vector mask, as indicated by the link icon between the thumbnails in the Layers panel. -
Page 180
Both the color and opacity settings affect only the appearance of the mask and have no effect on how underlying areas are protected. For example, you may want to change these settings to make the mask more easily visible against the colors in the image. 4. -
Page 181
Knockout to reveal content from other layers Create a knockout To the top Create a knockout Knockout options let you specify which layers “punch through” to reveal content from other layers. For example, you can use a text layer to knock out a color adjustment layer and reveal a portion of the image using the original colors. -
Page 182
Legal Notices Online Privacy Policy… -
Page 183
6. Select Seamless Tones And Colors to adjust the color and tonality for blending. 7. Click OK. For a video on using Auto-Align and Auto-Blend to create a panorama and increase depth of field, see www.adobe.com/go/lrvid4120_ps. More Help topics Legal Notices… -
Page 184
Aligning layers Align objects on different layers Distribute layers and groups evenly Automatically align image layers To the top Align objects on different layers You can align the content of layers and groups using the Move tool . (See Move the content of layers.) 1. -
Page 185
After auto-aligning, you can use Edit > Free Transform to fine tune the alignment or make tonal adjustments to even out exposure differences between layers, then combine the layers into one composite image. For a video on using Auto-Align and Auto-Blend to create a panorama and increase depth of field, see www.adobe.com/go/lrvid4120_ps. More Help topics… -
Page 186
Create and manage layers and groups Create layers and groups View layers and groups within a group Show or hide a layer, group, or style To the top Create layers and groups A new layer appears either above the selected layer or within the selected group in the Layers panel. Create a new layer or group 1. -
Page 187
Choose Layer > New > Layer Via Cut to cut the selection and paste it into a new layer. Note: You must rasterize Smart Objects or shape layers to enable these commands. To the top View layers and groups within a group Do one of the following to open the group: Click the triangle to the left of the folder icon Right-click (Windows) or Control-click (Mac OS) the triangle to the left of the folder icon and choose Open This Group. -
Page 188
To the top Apply a Smart Filter For a video on applying smart filters, see www.adobe.com/go/vid0004. 1. Do one of the following: To apply a Smart Filter to an entire Smart Object layer, select the layer in the Layers panel. -
Page 189
To the top Edit a Smart Filter If a Smart Filter contains editable settings, you can edit it at any time. You can also edit blending options for Smart Filters. Note: When you edit a Smart Filter, you can’t preview filters stacked above it. After you finish editing the Smart Filter, Photoshop again displays the filters stacked above it. -
Page 190
Mask Smart Filter effects 1. Click the filter mask thumbnail in the Layers panel to make it active. A border appears around the mask thumbnail. 2. Select any of the editing or painting tools. 3. Do one of the following: To hide portions of the filter, paint the mask with black. -
Page 191
Create Smart Objects About Smart Objects Create Smart Objects Duplicate a Smart Object Edit the content of a Smart Object Replace the contents of a Smart Object Export the contents of a Smart Object Convert a Smart Object to a layer To the top About Smart Objects Smart Objects are layers that contain image data from raster or vector images, such as Photoshop or Illustrator files. -
Page 192
Paste artwork from Illustrator into a Photoshop document, and choose Smart Object in the Paste dialog box. For the greatest flexibility, enable both PDF and AICB (No Transparency Support) in the File Handling & Clipboard section of the Preferences dialog box in Adobe Illustrator. -
Page 193
applied to the original Smart Object. More Help topics Legal Notices Online Privacy Policy… -
Page 194
From the Layers panel, choose an option from the Blend Mode pop-up menu. Choose Layer > Layer Style > Blending Options, and then choose an option from the Blend Mode pop-up menu. For a video on using blending modes, see www.adobe.com/go/vid0012. To the top Group blend effects By default, layers in a clipping mask are blended with the underlying layers using the blending mode of the bottommost layer in the group. -
Page 195
However, you can choose to have the blending mode of the bottommost layer apply only to that layer, allowing you to preserve the original blending appearance of the clipped layers. (See Mask layers with clipping masks.) You can also apply the blending mode of a layer to layer effects that modify opaque pixels, such as Inner Glow or Color Overlay, without changing layer effects that modify only transparent pixels, such as Outer Glow or Drop Shadow. -
Page 196
Note: To view blending options for a text layer, choose Layer > Layer Style > Blending Options, or choose Blending Options from the Add A Layer Style button at the bottom of the Layers panel menu. 2. From the Advanced Blending area of the Layer Style dialog box, deselect any channels you do not want to include when the layer is blended. -
Page 197
Blending modes Blending mode descriptions Blending mode examples The blending mode specified in the options bar controls how pixels in the image are affected by a painting or editing tool. It’s helpful to think in terms of the following colors when visualizing a blending mode’s effect: The base color is the original color in the image. -
Page 198
To the top Blending mode examples These examples show the result of painting part of the image’s face using each blending mode. For a video on blending modes, see www.adobe.com/go/vid0012. Original Image Normal, 100% opacity Normal, 50% opacity… -
Page 199
Color Burn Linear Burn Lighten Screen Color Dodge Linear Dodge (Add) Overlay Soft Light Hard Light Vivid Light Linear Light Pin Light Hard Mix Difference Exclusion Subtract Divide Saturation Color Luminosity, 80% opacity Lighter Color Darker Color Legal Notices Online Privacy Policy… -
Page 200: Layer Comps
Layer comps About layer comps Create a layer comp Apply and view layer comps Change and update a layer comp Clear layer comp warnings Delete a layer comp Export layer comps To the top About layer comps Designers often create multiple compositions or comps of a page layout to show clients. Using layer comps, you can create, manage, and view multiple versions of a layout in a single Photoshop file.
-
Page 201
In the Layer Comp panel, do any of the following: To view a layer comp, you first need to apply it. Click the Apply Layer Comp icon next to a selected comp. To cycle through a view of all layer comps, use the Previous and Next buttons at the bottom of the panel. -
Page 202
Layer effects and styles About layer effects and styles Apply preset styles Layer Style dialog box overview Apply or edit a custom layer style Layer style options Modify layer effects with contours Set a global lighting angle for all layers Display or hide layer styles Copy layer styles Scale a layer effect… -
Page 203
Click a style in the Styles panel to apply it to the currently selected layers. Drag a style from the Styles panel onto a layer in the Layers panel. Drag a style from the Styles panel to the document window, and release the mouse button when the pointer is over the layer content to which you want to apply the style. -
Page 204
To edit an existing style, double-click an effect displayed below the layer name in the Layers panel. (Click the triangle next to the Add a Layer Style icon to display the effects contained in the style.) 3. Set effect options in the Layer Style dialog box. See Layer style options. 4. -
Page 205
apply a glow that emanates from the inside edges of the layer’s content. Spread Expands the boundaries of the matte prior to blurring. Style Specifies the style of a bevel: Inner Bevel creates a bevel on the inside edges of the layer contents; Outer Bevel creates a bevel on the outside edges of the layer contents;… -
Page 206
Using global light gives the appearance of a common light source shining on the image. Do one of the following: Choose Layer > Layer Style > Global Light. In the Global Light dialog box, enter a value or drag the angle radius to set the angle and altitude, and click OK. -
Page 207
1. In the Layers panel, expand the layer style to see its effects. 2. Drag the effect to the Delete icon Remove a style from a layer 1. In the Layers panel, select the layer containing the style you want to remove. 2. -
Page 208
Save a set of preset styles as a library 1. Do one of the following: Choose Save Styles from the Styles panel menu. Select Styles on the left side of the Layer Style dialog box. Then choose Save Styles from the pop-up menu. When using a shape or Pen tool, click the layer style thumbnail in the options bar. -
Page 209
Selecting To learn more, view these recommended resources online. Selecting areas of a photo video2brain (May. 7, 2012) video-tutorial Discover the basic building block of image editing. Refine a selection Infinite Skills (Aug. 9, 2012) video-tutorial Refine a selection or mask edge… -
Page 210: Making Selections
Making selections About selecting pixels Select, deselect, and reselect pixels To the top About selecting pixels A selection isolates one or more parts of your image. By selecting specific areas, you can edit and apply effects and filters to portions of your image while leaving the unselected areas untouched.
-
Page 211: Adjusting Pixel Selections
Adjusting pixel selections Move, hide, or invert a selection Adjust selections manually Expand or contract a selection by a specific number of pixels Create a selection around a selection border Expand a selection to include areas with similar color Clean up stray pixels in a color-based selection Refine selection edges Soften the edges of selections Remove fringe pixels from a selection…
-
Page 212
You can use the selection tools to add to or subtract from existing pixel selections. Before manually adding to or subtracting from a selection, you may want to set the feather and anti-aliasing values in the options bar to the same settings used in the original selection. -
Page 213
The Refine Edge option improves the quality of selection edges, letting you extract objects with ease. You can also use Refine Edge options to refine a layer mask. (See Adjust mask opacity or edges.) Adobe recommends Have a tutorial you’d like to share? Video tutorial: Extracting objects in Video tutorial: Precisely selecting portraits… -
Page 214
You can define feathering for the Marquee tools, the Lasso tool, the Polygonal Lasso tool, or the Magnetic Lasso tool as you use the tool, or you can add feathering to an existing selection. Note: Feathering effects become apparent only after you move, cut, copy, or fill the selection. Adobe recommends Have a tutorial you would like to share? Video tutorial: Flexible feathering… -
Page 215
2. Enter a value for the Feather Radius, and click OK. Note: A small selection made with a large feather radius may be so faint that its edges are invisible and thus not selectable. If you see the message “No pixels are more than 50% selected,” either decrease the feather radius or increase the size of the selection. Or click OK to accept the mask at its current setting and create a selection in which you cannot see the edges. -
Page 216
Moving, copying, and deleting selected pixels Move a selection Copy selections Copy between applications Delete selected pixels To the top Move a selection 1. Select the Move tool 2. Move the pointer inside the selection border, and drag the selection to a new position. If you have selected multiple areas, all move as you drag. -
Page 217
Dragging a selection into another image Create multiple copies of a selection within an image 1. Select the Move tool , or hold down Ctrl (Windows) or Command (Mac OS) to activate the Move tool. 2. Copy the selection: Hold down Alt (Windows) or Option (Mac OS), and drag the selection. To copy the selection and offset the duplicate by 1 pixel, hold down Alt or Option, and press an arrow key. -
Page 218
Using the Paste Into command A. Window panes selected B. Copied image C. Paste Into command D. Layer thumbnails and layer mask in Layers panel E. Pasted image repositioned 4. Select the Move tool , or hold down the Ctrl (Windows) or Command (Mac OS) key to activate the Move tool. Then drag the source contents until the part you want appears through the mask. -
Page 219
Shape Layer Creates a new shape layer that uses the path as a vector mask. Note: When copying artwork from Adobe Illustrator, the default clipboard preferences in Illustrator may prevent the Paste dialog box from appearing in Photoshop. Select AICB in the File Handling and Clipboard area of the Preferences dialog box in Illustrator if you want the Paste options to appear when you paste the artwork into Photoshop. -
Page 220
Saving selections and alpha channel masks About masks and alpha channels Create and edit alpha channel masks Save and load selections To the top About masks and alpha channels When you select part of an image, the area that is not selected is masked, or protected from editing. So, when you create a mask, you isolate and protect areas of an image as you apply color changes, filters, or other effects to the rest of the image. -
Page 221
Adobe recommends Have a tutorial you would like to share? Book excerpt: Using the Masks panel Conrad Chavez Quickly fine-tune masks with one consolidated set of options. Create an alpha channel mask using current options 1. Click the New Channel button at the bottom of the Channels panel. -
Page 222
2. Choose Select > Save Selection. 3. Specify the following in the Save Selection dialog box, and click OK: Document Chooses a destination image for the selection. By default, the selection is placed in a channel in your active image. You can choose to save the selection to a channel in another open image with the same pixel dimensions or to a new image. -
Page 223
In Photoshop CS6, you can also select skin tones, and automatically detect faces to select them. To create a selection that preserves skin tones while you adjust the color of everything else, select Invert below the eyedropper samplers. -
Page 224
Increasing fuzziness expands selection If you selected Localized Color Clusters, use the Range slider to control how far or near a color must be from the sample points to be included in the selection. For example, your image contains a patch of yellow flowers in both the foreground and the background, but you want to select just the foreground flowers. -
Page 225
Making quick selections Select with the Quick Selection tool Select with the Magic Wand tool To the top Select with the Quick Selection tool You can use the Quick Selection tool to quickly “paint” a selection using an adjustable round brush tip. As you drag, the selection expands outward and automatically finds and follows defined edges in the image. -
Page 226
2. Specify one of the selection options in the options bar. The Magic Wand tool’s pointer changes depending on which option is selected. Selection options A. New B. Add To C. Subtract From D. Intersect With 3. In the options bar, specify any of the following: Tolerance Determines the color range of selected pixels. -
Page 227
Selecting with the lasso tools Select with the Lasso tool Select with the Polygonal Lasso tool Select with the Magnetic Lasso tool To the top Select with the Lasso tool The Lasso tool is useful for drawing freeform segments of a selection border. 1. -
Page 228
If the pointer is not over the starting point, double-click the Polygonal Lasso tool pointer, or Ctrl-click (Windows) or Command-click (Mac OS). 7. (Optional) Click Refine Edge to further adjust the selection boundary. See Refine selection edges. To the top Select with the Magnetic Lasso tool When you use the Magnetic Lasso tool , the border snaps to the edges of defined areas in the image. -
Page 229
8. To switch temporarily to the other lasso tools, do one of the following: To activate the Lasso tool, hold down Alt (Windows) or Option (Mac OS), and drag with the mouse button depressed. To activate the Polygonal Lasso tool, hold down Alt (Windows) or Option (Mac OS), and click. 9. -
Page 230
Selecting with the marquee tools The marquee tools let you select rectangles, ellipses, and 1-pixel rows and columns. 1. Select a marquee tool: Rectangular Marquee Makes a rectangular selection (or a square, when used with the Shift key). Elliptical Marquee Makes an elliptical selection (or a circle, when used with the Shift key). -
Page 231
Twitter™ and Facebook posts are not covered under the terms of Creative Commons. Legal Notices Online Privacy Policy… -
Page 232
Duplicate, split, and merge channels Duplicate channels Split channels into separate images Merge channels To the top Duplicate channels You can copy a channel and use it in the current image or another image. Duplicate a channel If you are duplicating alpha channels between images, the channels must have identical pixel dimensions. You cannot duplicate a channel to a Bitmap-mode image. -
Page 233
If you are working with DCS files that have accidentally lost their links (and so cannot be opened, placed, or printed), open the channel files, and merge them into a CMYK image. Then re-save the file as a DCS EPS file. 1. -
Page 234
Create a temporary quick mask Creating and editing a quick mask Change Quick Mask options To the top Creating and editing a quick mask To use Quick Mask mode, start with a selection and then add to or subtract from it to make the mask. You can also create the mask entirely in Quick Mask mode. -
Page 235
Painting in Quick Mask mode A. Original selection and Quick Mask mode with green chosen as mask color B. Painting with white in Quick Mask mode adds to the selection C. Painting with black in Quick Mask mode subtracts from the selection 5. -
Page 236
Legal Notices Online Privacy Policy… -
Page 237
Channel basics About channels Channels panel overview Show or hide a channel Show color channels in color Select and edit channels Rearrange and rename alpha and spot channels Delete a channel To the top About channels Channels are grayscale images that store different types of information: Color information channels are created automatically when you open a new image. -
Page 238
To the top Show or hide a channel You can use the Channels panel to view any combination of channels in the document window. For example, you can view an alpha channel and the composite channel together to see how changes made in the alpha channel relate to the entire image. Click in the eye column next to the channel to show or hide that channel. -
Page 239
Drag the channel name in the panel to the Delete icon. Choose Delete Channel from the Channels panel menu. Click the Delete icon at the bottom of the panel, and then click Yes. Note: When you delete a color channel from a file with layers, visible layers are flattened and hidden layers are discarded. This is done because removing a color channel converts the image to Multichannel mode, which does not support layers. -
Page 240: Channel Calculations
Channel calculations Blending layers and channels Blend channels with the Apply Image command Blend channels with the Calculations command Add and Subtract blending modes To the top Blending layers and channels You can use the blending effects associated with layers to combine channels within and between images into new images. You can use either the Apply Image command (on single and composite channels) or the Calculations command (on single channels).
-
Page 241
6. Choose the second source image, layer, and channel, and specify options. 7. For Blending, choose a blending mode. For information on the Add and Subtract options, see Add and Subtract blending modes. For information on other blending options, see Blending mode descriptions. -
Page 242
Extract an object from its background Use the more effective and flexible Refine Edge command Use the older, optional Extract plug-in (Windows only) When you extract an object, Photoshop erases its background to transparency. Pixels on the edge of the object lose the color components derived from the background, so they can blend with a new background without producing a color halo. -
Page 243
Force Foreground Select this option if the object is especially intricate or lacks a clear interior. 4. Select the Edge Highlighter tool , and draw to define the edge of the object you want to extract. Drag so that the highlight slightly overlaps both the foreground object and its background. -
Page 244
Image adjustments To learn more, view these recommended resources online. Using adjustment layers video2brain (May. 7, 2012) video-tutorial Change color and tone with total flexibility. Auto color corrections Kelby (May. 7, 2012) video-tutorial One-click corrections to common image issues. -
Page 245: Understanding Color Adjustments
Understanding color adjustments Before making color and tonal adjustments Correcting images Adjustments panel overview Color adjustment commands Make a color adjustment Save adjustment settings Reapply adjustment settings Correcting colors in CMYK and RGB Identify out-of-gamut colors To the top Before making color and tonal adjustments The powerful tools in Photoshop can enhance, repair, and correct the color and tonality (lightness, darkness, and contrast) in an image.
-
Page 246
To adjust the tonality in just shadow and highlight areas, use the Shadow/Highlight command. See Improve shadow and highlight detail. 5. (Optional) Make other color adjustments. After you correct the overall color balance of your image, you can make optional adjustments to enhance colors or produce special effects. 6. -
Page 247
Save and apply adjustment presets In CS5, the Adjustments panel has a list of presets for common color and tonal adjustments. In CS6, the Properties panel has a Preset menu with the adjustment presets for the tool that you clicked in the Adjustments panel. Additionally, you can save and apply presets for Levels, Curves, Exposure, Hue/Saturation, Black &… -
Page 248
Preset pop-up menu from a different location. To remove default presets, navigate to the following folders, move the presets out of the folders, and restart Photoshop. Windows: [startup drive]/Program Files/Adobe/Adobe Photoshop CS5/Presets/[adjustment type]/[preset name] Mac OS: [startup drive]/Applications/Adobe Photoshop CS5/Presets/[adjustment type]/[preset name]… -
Page 249
To the top Identify out-of-gamut colors A gamut is the range of colors that a color system can display or print. A color that can be displayed in RGB could be out of gamut, and therefore unprintable, for your CMYK setting. In RGB mode, you can tell whether a color is out of gamut in the following ways: In the Info panel, an exclamation point appears next to the CMYK values whenever you move the pointer over an out-of-gamut color. -
Page 250: Viewing Histograms And Pixel Values
Viewing histograms and pixel values About histograms Histogram panel overview View the histogram for a multilayered document Preview histogram adjustments Refresh the histogram display View color values in an image View color information while adjusting color Adjusting color samplers To the top About histograms A histogram illustrates how pixels in an image are distributed by graphing the number of pixels at each color intensity level.
-
Page 251
Adjust the view of the Histogram panel Choose a view from the Histogram panel menu. Expanded View Displays the histogram with statistics. It also displays: controls for choosing the channel represented by the histogram, viewing options in the Histogram panel, refreshing the histogram to display uncached data, and choosing a specific layer in a multilayered document. Compact View Displays a histogram with no controls or statistics. -
Page 252
By default, the Histogram panel displays statistics in the Expanded View and All Channels View. 1. Choose Show Statistics from the Histogram panel menu. 2. Do one of the following: To view information about a specific pixel value, place the pointer in the histogram. To view information about a range of values, drag in the histogram to highlight the range. -
Page 253
Click the Cached Data Warning icon Click the Uncached Refresh button Choose Uncached Refresh from the Histogram panel menu. For information about cache level, see Histogram panel overview. To the top View color values in an image You can use the Info panel to see the color value of pixels as you make color corrections. When you work with the Adjustments panel (CS5) or Properties panel (CS6), the Info panel displays two sets of color values for the pixels under the pointer. -
Page 254
To the top Adjusting color samplers Once you’ve added a color sampler, you can move or delete it, hide it, or change the color sampler information displayed in the Info panel. Move or delete a color sampler 1. Select the Color Sampler tool 2. -
Page 255
High dynamic range images About high dynamic range images Take photos for HDR images Features that support 32-bpc HDR images Merge images to HDR Adjust displayed dynamic range for 32-bit HDR images About the HDR Color Picker Paint on HDR images To the top About high dynamic range images The dynamic range (ratio between dark and bright regions) in the visible world far exceeds the range of human vision and of images that are… -
Page 256
HDR image. You can output the merged image as a 32-, 16-, or 8-bpc file. However, only a 32-bpc file can store all the HDR image data. HDR merging works best when photos are optimized for the process. For recommendations, see Take photos for HDR images. Adobe recommends Have a tutorial you would like to share? -
Page 257
1. Do one of the following: (Photoshop) Choose File > Automate > Merge To HDR Pro. (Bridge) Select the images you want to use and choose Tools > Photoshop > Merge To HDR Pro. Skip to step 5. 2. In the Merge To HDR Pro dialog box, click Browse to select specific images, click Add Open Files, or choose Use > Folder. (To remove a particular item, select it in files list, and click Remove.) 3. -
Page 258
About the HDR Color Picker The HDR Color Picker allows you to accurately view and select colors for use in 32-bit HDR images. As in the regular Adobe Color Picker, you select a color by clicking a color field and adjusting the color slider. The Intensity slider allows you to adjust the brightness of a color to match the intensity of the colors in the HDR image you’re working with. -
Page 259
Use the Intensity slider to adjust the brightness of the color. The color value plus the intensity value are converted to 32-bit floating point number values in your HDR document. 1. Select a color by clicking in the color field and moving the color slider, or by entering HSB or RGB numeric values, as in the Adobe Color Picker. -
Page 260
To the top Paint on HDR images You can edit and add effects to HDR/32-bpc images using any of the following Photoshop tools: Brush, Pencil, Pen, Shape, Clone Stamp, Pattern Stamp, Eraser, Gradient, Blur, Sharpen, Smudge, and History Brush. You can also use the Text tool to add 32-bpc text layers to an HDR image. When editing or painting on HDR images, you can preview your work at different exposure settings using either the 32-Bit Exposure slider in the document info area or the 32-Bit Preview Options dialog box (View >… -
Page 261
You can also tint the grayscale by applying a color tone to the image, for example to create a sepia effect. Black & White functions like the Channel Mixer, which also converts color images to monochrome while allowing you to adjust color channel input. To view a video on converting color images to black & white by Adobe Senior Creative Director Russell Brown, click here. -
Page 262
Overview of adjusting image color and tone in CS6 Two ways to adjust image tone and color are to use adjustment layers or to edit in Adobe Camera Raw. Both offer a wide range of control and flexibility, without permanently altering or damaging the original image information. The integrity of your original images is preserved. This nondestructive editing gives you the flexibility to make further changes, start over with a different editing approach, or undo the adjustments even after you’ve saved the edits. -
Page 263
Photoshop Tutorial: Open a JPEG in Camera Raw by Brodie Butler Amazing Wonders of Adobe Camera Raw 7.0 in Photoshop CS6 by Russell Preston Brown In addition to the two workflows described above, you can also use Smart Objects for editing layers nondestructively. Watch an… -
Page 264
The Exposure and HDR Toning adjustments are primarily designed for 32-bit HDR images, but you can also apply them to 16- and 8-bit images to create HDR-like effects. For a video about applying HDR effects to16- or 8-bit images, see www.adobe.com/go/lrvid5011_ps_en Adjust HDR exposure Exposure works by performing calculations in a linear color space (gamma 1.0) rather than the current color space. -
Page 265
3. In the Adjustments panel (CS5) or the Properties panel (CS6), double-click the Set Gray Point tool 4. In the Adobe Color Picker, verify that the currently selected color has identical R, G, and B values for a neutral gray (for example, 128,128,128). -
Page 266
Twitter™ and Facebook posts are not covered under the terms of Creative Commons. Legal Notices Online Privacy Policy… -
Page 267
Curves adjustment Curves overview Adjust image color and tone with Curves Add contrast to the midtones of a photo with Curves Keyboard shortcuts: Curves To the top Curves overview In the Curves adjustment, you adjust points throughout an image’s tonal range. Initially, the image’s tonality is represented as a straight diagonal line on a graph. -
Page 268
Note: Choosing Image > Adjustments > Curves applies the adjustment directly to the image layer and discards image information. 2. (Optional) To adjust the color balance, in the Adjustments panel (CS5) or the Properties panel (CS6), choose the channel you want to adjust from the menu to the left of the Auto button. -
Page 269
Detailed Grid Displays gridlines in 10% increments. Show Channel Overlays Displays color channel curves superimposed on the composite curve. Histogram Displays a histogram of the original image tonal values behind the graph. Baseline Displays the original image color and tonality as a 45-degree angle line for reference, Intersection Line Displays horizontal and vertical lines to help you align control points as your drag them relative to the histogram or grid. -
Page 270
Twitter™ and Facebook posts are not covered under the terms of Creative Commons. Legal Notices Online Privacy Policy… -
Page 271
Adjust shadow and highlight detail Improve shadow and highlight detail To the top Improve shadow and highlight detail The Shadow/Highlight command is one method for correcting photos with silhouetted images due to strong backlighting or correcting subjects that have been slightly washed out because they were too close to the camera flash. The adjustment can also be used for brightening areas of shadow in an otherwise well-lit image. -
Page 272
much, try reducing Shadow Tone Width toward zero so that only the darkest regions are lightened. If, however, you want to brighten the midtones as well as the shadows, increase Shadows Tonal Width toward 100% Radius Controls the size of the local neighborhood around each pixel. Neighboring pixels are used to determine whether a pixel is in the shadows or highlights. -
Page 273
Adjusting hue and saturation Apply a Hue/Saturation adjustment Adjust color saturation using Vibrance Adjust color saturation in image areas Hue/Saturation lets you adjust the hue, saturation, and lightness of a specific range of colors in an image or simultaneously adjust all the colors in an image. -
Page 274
black to a color). Values can range from -100 (percentage of black) to +100 (percentage of white). Note: Click the Reset button to undo a Hue/Saturation setting in the Adjustments panel (CS5) or the Properties panel (CS6). Specify the range of colors adjusted using Hue/Saturation 1. -
Page 275
To the top Adjust color saturation using Vibrance Vibrance adjusts the saturation so that clipping is minimized as colors approach full saturation. This adjustment increases the saturation of less- saturated colors more than the colors that are already saturated. Vibrance also prevents skintones from becoming over saturated. 1. -
Page 276: Adjusting Image Sharpness And Blur
Adjusting image sharpness and blur Sharpening recommendations Sharpen using Smart Sharpen Sharpen using Unsharp Mask Sharpen selectively Add lens blur Blur image areas Sharpen image areas To the top Sharpening recommendations Sharpening enhances the definition of edges in an image. Whether your images come from a digital camera or a scanner, most images can benefit from sharpening.
-
Page 277
4. Adjust sharpening of dark and light areas using in the Shadow and Highlight tabs. (Click the Advanced button to display the tabs). If the dark or light sharpening halos appear too strong you can reduce them with these controls, which are only available for 8-bits and 16-bits-per- channel images: Fade Amount Adjusts the amount of sharpening in the highlights or shadows. -
Page 278
value of 4 or more, on a scale of 0 to 255. So, if adjacent pixels have tonal values of 128 and 129, they are not affected. To avoid introducing noise or posterization (in images with flesh tones, for example), use an edge mask or try experimenting with Threshold values between 2 and 20. -
Page 279
to retouch the final edge mask. Setting the black point high in Levels to eliminate random pixels in the edge mask Choose Filter > Blur > Gaussian Blur to feather the edges. Note: The Maximum, the Median, and the Gaussian Blur filters soften the edge mask so that the sharpening effects blend better in the final image. -
Page 280
2. Do the following in the options bar: Choose a brush tip and set options for the blending mode and strength in the options bar. Select Sample All Layers in the options bar to blur using data from all visible layers. Deselect this option and the tool uses data from only the active layer. -
Page 281
Levels adjustment Levels overview Adjust tonal range using Levels Adjust color using Levels Add contrast to a photo with Levels To the top Levels overview You use the Levels adjustment to correct the tonal range and color balance of an image by adjusting intensity levels of image shadows, midtones, and highlights. -
Page 282
2. (Optional) To adjust tones for a specific color channel, choose an option from the Channel menu. 3. (Optional) To edit a combination of color channels at the same time, Shift-select the channels in the Channels panel before choosing the Image >… -
Page 283
Image layer doesn’t extend to the ends of the graph, indicating that the image is not using the full tonal range. A. Shadow Input slider B. Highlight Input slider For more information Adjusting image tone and color in CS6 Twitter™ and Facebook posts are not covered under the terms of Creative Commons. Legal Notices Online Privacy Policy… -
Page 284
Quickly adjust black and white points Adjust black and white points with the Auto option To the top Adjust black and white points with the Auto option The Auto option for Levels and Curves and the Auto Tone command automatically adjust the black point and white point in an image. This clips a portion of the shadows and highlights in each channel and maps the lightest and darkest pixels in each color channel to pure white (level 255) and pure black (level 0). -
Page 285
2. In the Adjustments panel (CS5) or Properties panel (CS6), choose the filter color, either a custom filter or a preset. For a custom filter, select the Color option, click the color square, and use the Adobe Color Picker to specify a color for a custom color filter. For a preset filter, select the Filter option and choose one of the following presets from the Filter menu: Warming Filter (85 and LBA) and Cooling Filter (80 and LBB) Color conversion filters that tune the white balance in an image. -
Page 286
More Help topics Adjusting image color and tone in CS6 Legal Notices Online Privacy Policy… -
Page 287
Apply a Brightness/Contrast adjustment Apply the Brightness/Contrast adjustment To the top Apply the Brightness/Contrast adjustment The Brightness/Contrast adjustment lets you make simple adjustments to the tonal range of an image. Moving the brightness slider to the right increases tonal values and expands image highlights, to the left decreases values and expands shadows. The contrast slider expands or shrinks the overall range of tonal values in the image. -
Page 288
Dodge or burn image areas The Dodge tool and the Burn tool lighten or darken areas of the image. These tools are based on a traditional darkroom technique for regulating exposure on specific areas of a print. Photographers hold back light to lighten an area on the print (dodging) or increase the exposure to darken areas on a print (burning). -
Page 289: Adjustment And Fill Layers
Adjustment and fill layers About adjustment and fill layers Create and confine adjustment and fill layers Edit or merge adjustment and fill layers To the top About adjustment and fill layers An adjustment layer applies color and tonal adjustments to your image without permanently changing pixel values. For example, rather than making a Levels or Curves adjustment directly to your image, you can create a Levels or Curves adjustment layer.
-
Page 290
Create an adjustment layer Do one of the following: Click the New Adjustment Layer button at the bottom of the Layers panel, and choose an adjustment layer type. Choose Layer > New Adjustment Layer, and choose an option. Name the layer, set layer options, and click OK. (Photoshop CS5) Click an adjustment icon or select an adjustment preset in the Adjustments panel. -
Page 291
9. Modify the adjustment as needed in the Adjustments panel (CS5) or Properties panel (CS6). The adjustment is only applied to the unmasked (or partially masked) areas of the image. If necessary click Color Range again to make further adjustments to the adjustment layer mask. To the top Edit or merge adjustment and fill layers Editing adjustment and fill layers… -
Page 292: Applying Special Color Effects To Images
Applying special color effects to images Desaturate colors Invert colors Create a two-valued black and white image Posterize an image Apply a gradient map to an image To the top Desaturate colors The Desaturate command converts a color image to grayscale values, but leaves the image in the same color mode. For example, it assigns equal red, green, and blue values to each pixel in an RGB image.
-
Page 293
the image back to the previous color mode, and replace the various gray tones with the colors you want. 1. Do one of the following: Click the Posterize icon in the Adjustments panel. Choose Layer > New Adjustment Layer > Posterize. Note: You can also choose Image >… -
Page 294
Making quick tonal adjustments Apply the Auto Contrast adjustment Remove a color cast using Auto Color Set Auto adjustment options Using the Equalize command Adjust black and white points with the Auto option To the top Apply the Auto Contrast adjustment The Auto Contrast command adjusts image contrast automatically. -
Page 295
Auto Color command also uses the Snap Neutral Midtones option. Adobe recommends Have a tutorial you would like to share? Auto Corrections Corey Barker Photoshop expert Corey Barker explains how to use Auto Corrections in Photoshop CS6 to process your images faster. To the top Using the Equalize command… -
Page 296
Keep in mind that the Equalize command applies adjustments directly to the image layer and deletes image information. For nondestructive adjustments, use adjustment layers or edit in Adobe Camera Raw. 1. (Optional) Select an area of the image to equalize. -
Page 297
Matching, replacing, and mixing colors Matching colors Replacing colors Mixing colors selectively To the top Matching colors Match the color in different images The Match Color command matches colors between multiple images, between multiple layers, or between multiple selections. It also lets you adjust the colors in an image by changing the luminance, changing the color range, and neutralizing a color cast. -
Page 298
For less flexibility but a convenient grouping of options, use the Replace Color dialog box. For speed but less precision, try the Color Replacement tool. Adobe recommends Have a tutorial you would like to share? Video tutorial: Comparing color… -
Page 299
Saturation settings are relative to existing color, so they have no effect.) 8. (Optional) Click Save to store settings you will later load for other images. For a video on dodging and burning with the Replace Color command, see www.adobe.com/go/lrvid4119_ps. (Discussion of Replace Color begins at the 5:30 mark.) Use the Color Replacement tool The Color Replacement tool paints over a targeted color with a replacement color. -
Page 300
Book excerpt: Using the Color Replacement tool Elaine Weinmann and Peter Lourekas Walk through the process step by step. 1. Select the Color Replacement tool . (If the tool isn’t visible, access it by holding down the Brush tool.) 2. In the options bar, choose a brush tip. Generally, you should keep the blending mode set to Color. 3. -
Page 301
5. Drag the sliders to increase or decrease the components in the selected color. You can also save the settings you make for the Selective Color adjustment and reuse the settings on other images. More Help topics Legal Notices Online Privacy Policy… -
Page 302: Targeting Images For Press
Targeting images for press Setting highlight and shadow target values Using Levels to preserve highlight and shadow details for printing Set target values using the eyedroppers To the top Setting highlight and shadow target values Assigning (targeting) highlight and shadow values of an image is necessary because most output devices (usually printing presses) cannot print detail in the blackest shadow values (near level 0) or the whitest highlight values (near level 255).
-
Page 303
darkest points you want to preserve. This method does not work if the Curves adjustment is set to the CMYK composite channel. When identifying the lightest highlight details that you want targeted to a printable (lower) value, don’t include specular highlights. Specular highlights such as the highlight glint in jewelry or a spot of glare are meant to be the brightest points in an image. -
Page 304
Camera Raw To learn more, view these recommended resources online. Camera Raw 7 plug-in Kelby (May. 7, 2012) video-tutorial Tap into the latest noise, color, and dynamic range controls. Enhancing Raw images video2brain (May. 7, 2012) video-tutorial Draw upon the full range of image data. -
Page 305: Introduction To Camera Raw
You must have Photoshop or After Effects installed to open files in the Camera Raw dialog box from Adobe Bridge. However, if Photoshop or After Effects is not installed, you can still preview the images and see their metadata in Adobe Bridge. If another application is associated with the image file type, it’s possible to open the file in that application from Adobe Bridge.
-
Page 306
2. Open the image files in Camera Raw. You can open camera raw files in Camera Raw from Adobe Bridge, After Effects, or Photoshop. You can also open JPEG and TIFF files in Camera Raw from Adobe Bridge. (See Open images.) -
Page 307
F. Histogram G. Camera Raw Settings menu H. Zoom levels I. Workflow options J. Navigation arrows K. Adjustment sliders Note: Some controls, such as the Workflow Options link, that are available when you open the Camera Raw dialog box from Adobe Bridge or Photoshop are not available when you open the Camera Raw dialog box from After Effects. -
Page 308
Adobe Bridge cache stores data for the file thumbnails, metadata, and file information. Caching this data shortens the loading time when you return to a previously viewed folder in Adobe Bridge. The Camera Raw cache speeds the opening of images in Camera Raw and rebuilds of previews in Adobe Bridge when image settings change in Camera Raw. -
Page 309
The most convenient way to work with multiple camera raw images is to use the Filmstrip view in Camera Raw. Filmstrip view opens by default when you open multiple images in Camera Raw from Adobe Bridge. Note: The Filmstrip view is not available when importing multiple images into After Effects. -
Page 310
You can also click Open Image to open a copy of the adjusted image in Photoshop. To process JPEG or TIFF images in Camera Raw, select one or more JPEG or TIFF files in Adobe Bridge, and then choose File > Open In Camera Raw or press Ctrl+R (Windows) or Command+R (Mac OS). -
Page 311
TIFF Saves copies of the camera raw files as TIFF (Tagged-ImageFile Format) files. Specify whether to apply no compression, or LZW or ZIP file compression. TIFF is a flexible bitmap image format supported by virtually all paint, image-editing, and page-layout applications. TIFF provides greater compression and compatibility with other applications than does PSD format. -
Page 312
Process versions in Camera Raw The process version is the technology that Camera Raw uses to adjust and render photos. Depending on which process version you use, different options and settings area available to you in the Basic tab and when you make local adjustments. Process Version 2012 Images edited for the first time in Camera Raw 7 use process version 2012. -
Page 313
Make color and tonal adjustments in Camera Raw Histogram and RGB levels Preview highlight and shadow clipping White balance controls Adjust tone Fine-tune tone curves Clarity, Vibrance, and Saturation controls HSL / Grayscale controls Adjust color or tone using the Targeted Adjustment tool Tone a grayscale image Editing HDR images in Camera Raw To the top… -
Page 314
To the top White balance controls To adjust the white balance, identify which objects in the image you want to be neutral-colored (white or gray), and then adjust the colors to make those objects neutral. A white or gray object in a scene takes on the color cast by the ambient light or flash used to shoot the picture. When you use the White Balance tool to specify an object that you want white or gray, Camera Raw can determine the color of the light in which the scene was shot and then adjust for scene lighting automatically. -
Page 315
On the other hand, you can always try clicking Auto and then undo the adjustments if you don’t like them. Previews in Adobe® Bridge use the default image settings. If you want the default image settings to include automatic tone adjustments, select Apply Auto Tone Adjustments in the Default Image settings section of the Camera Raw preferences. -
Page 316
To the top Fine-tune tone curves Use the controls in the Tone Curve tab to fine-tune images after you’ve made tone adjustments in the Basic tab. The tone curves represent changes made to the tonal scale of an image. The horizontal axis represents the original tone values of the image (input values), with black on the left and progressively lighter values toward the right. -
Page 317
Dragging up or right increases values; dragging down or left decreases values. Sliders for more than one color may be affected when you drag with the Targeted Adjustment tool. Selecting the Grayscale Mix Targeted Adjustment tool converts the image to grayscale. 2. -
Page 318
Make local adjustments in Camera Raw About local adjustments Apply local adjustments with the Adjustment Brush tool in Camera Raw Apply local adjustments with the Graduated Filter tool in Camera Raw Save and apply local adjustment presets To the top About local adjustments The controls in the image adjustment tabs of Camera Raw affect the color and tone of an entire photo. -
Page 319
Moiré Reduction (PV2012) Removes moiré artifacts, or color aliasing. Defringe (PV2012) Removes fringe colors along edges. See Remove local color fringes. Color (All) Applies a tint to the selected area. Select the hue by clicking the color sample box to the right of the effect name. Click the Plus icons (+) or the Minus icons (-) to increase or decrease the effect by a preset amount. -
Page 320
Tint (PV2012) Compensates for a green or magenta color cast. Exposure (All) Sets the overall image brightness. Applying an Exposure graduated filter can achieve results similar to traditional dodging and burning. Highlights (PV2012) Recovers detail in overexposed highlight areas of an image. Shadows (PV2012) Recovers detail in underexposed shadow areas of an image. -
Page 321
appear in the Local Adjustment Settings menu and can be applied to any image that is opened in Camera Raw. Delete “preset name” Deletes the selected local adjustment preset. Rename “preset name” Renames the selected local adjustment preset. Type a name and click OK. Preset name Select a preset to apply its settings with the Adjustment Brush tool or the Graduated Filter tool. -
Page 322: Rotate Images
(or press L). Click the Rotate Image 90° Clockwise button (or press R). Note: Using commands in the Edit menu, you can also rotate images in Adobe Bridge without opening the Camera Raw dialog box. To the top Straighten images 1.
-
Page 323
2. Select one of the following from the Type menu: Heal Matches the texture, lighting, and shading of the sampled area to the selected area. Clone Applies the sampled area of the image to the selected area. 3. (Optional) In the tool options under the Histogram, drag the Radius slider to specify the size of the area that the Spot Removal tool affects. 4. -
Page 324
Exif metadata that identifies the camera and lens that captured the photo, and the profiles compensate accordingly. To the top From an expert: Russell Brown demonstrates how to apply by Russell Brown lens corrections and noise reduction in Camera Raw 6 (05:55)..Read More Contribute your expertise to http://av.adobe.com/russellbrown/ACRWhatsNew_… Adobe Community Help… -
Page 325
For a list of supported lenses, see the support article Lens profile support | Lightroom 3, Photoshop CS5, Camera Raw 6. To create custom profiles, use the Adobe Lens Profile Creator. 3. If desired, customize the correction applied by the profile by using the Amount sliders: Distortion The default value 100 applies 100% of the distortion correction in the profile. -
Page 326
In the Color tab of the Lens Correction panel, select the Remove Chromatic Aberration checkbox. Remove global purple/magenta and green fringes In the Color tab of the Lens Correction panel, adjust the purple and green Amount sliders. The higher the amount, the more color defringing. Take care not apply an adjustment that affects purple or green objects in your image. -
Page 327
Sharpening and noise reduction in Camera Raw Sharpen photos Reduce noise To the top Sharpen photos The sharpening controls on the Detail tab adjust edge definition in the image. The Adjustment Brush tool and Graduated Filter tool use the Radius, Detail, and Masking values when local sharpening is applied. Use the Apply Sharpening To option in the Camera Raw preferences to specify whether sharpening is applied to all images or just to previews. -
Page 328
For video tutorials about reducing noise in Camera Raw, see: Better noise reduction in Photoshop® CS5 by Matt Kloskowski Lens correction and noise reduction with Adobe® Camera Raw by Russell Brown Photoshop CS5 — Camera Raw 6.0 by Justin Seeley Twitter™… -
Page 329
Camera Profile pop-up menu displays only profiles for your camera. If the only profile in the Camera Profilemenu is Embedded, it means that you have selected a TIFF or JPEG image. Adobe Standard and Camera Matching profiles work only with raw images. -
Page 330
The DNG Profile Editorand documentation for it are available on Adobe Labs. Important: Leave the Camera Calibration tab sliders set to 0 when adjusting camera profiles with the DNG Profile Editor. -
Page 331
Default Image Settings section of the Camera Raw preferences. Presets appear by name in the Presets tab, in the Edit > Develop Settings menu in Adobe Bridge, in the context menu for camera raw images in Adobe Bridge, and in the Apply Presets submenu of the Camera Raw Settings menu in the Camera Raw dialog box. -
Page 332
1. In Adobe Bridge or in the Camera Raw dialog box, select one or more files. 2. In Adobe Bridge, choose Edit > Develop Settings, or right-click a selected file. Or, in the Camera Raw dialog box, click the Camera Raw Settings menu 3. -
Page 333
Applying a preset Note: You can also apply presets from the Presets tab. To the top Export Camera Raw settings and DNG previews If you store file settings in the Camera Raw database, you can use the Export Settings To XMP command to copy the settings to sidecar XMP files or embed them in DNG files. -
Page 334
5-1/8 inches. You can also use the Image Size command to adjust resolution in Photoshop. Sharpen For Allows you to apply output sharpening for Screen, Matte Paper, or Glossy Paper. If you apply output sharpening, you can change the Amount pop-up menu to Low or High to decrease or increase the amount of sharpening applied. In most cases, you can leave the Amount set to the default option, Standard. -
Page 335
Vignette and grain effects in Camera Raw Simulate film grain Apply a postcrop vignette To the top Simulate film grain The Grain section of the Effects tab has controls for simulating film grain for a stylistic effect reminiscent of particular film stocks. You can also use the Grain effect to mask enlargement artifacts when making large prints. -
Page 336
Paint Overlay Applies the postcrop vignette by blending original image colors with black or white. Appropriate when a soft effect is desired but may reduce highlight contrast. 3. Refine the effect by adjusting any of the following sliders: Amount Positive values lighten the corners, negative values darken them. Midpoint Higher values restrict the adjustment to the area closer to the corners, lower values apply the adjustment to a larger area away from the corners. -
Page 337
Repair and restoration To learn more, view these recommended resources online. Using Content-Aware Move and Extend Lynda.com (May. 7, 2012) video-tutorial Recompose images with these simple steps. Using Content-Aware Patch Lynda.com (May. 7, 2012) video-tutorial Seamlessly repair imperfections. -
Page 338
Content aware patch and move | CS6 Content-Aware Patch Content-Aware Move For information about using the Patch tool in previous versions, see Patch an area. To the top Content-Aware Patch The patch tool is used to remove unwanted image elements. The Content-Aware option in the Patch tool synthesizes nearby content for seamless blending with the surrounding content. -
Page 339
3. Select an area to move or extend. You can use the Move tool to draw a selection, or use any of the other Selection tools as well. 4. Drag the selection over to the area you want to place the object. Learn More: Content-Aware Move video tutorial by Lesa Snider. -
Page 340: Retouching And Repairing Images
See also Cloning content in video and animation frames (Photoshop Extended) For a video on the Clone Source panel, see www.adobe.com/go/vid0011. To the top Retouch with the Clone Stamp tool The Clone Stamp tool paints one part of an image over another part of the same image or over another part of any open document that has the same color mode.
-
Page 341
4. Set the sampling point by positioning the pointer in any open image and Alt-clicking (Windows) or Option-clicking (Mac OS). Note: Make sure you are not working on an adjustment layer. The Clone Stamp tool does not work on adjustment layers. 5. -
Page 342
In the Clone Source panel, select the source you want to use and enter the x and y pixel values for the Offset option. To the top Retouch with the Healing Brush tool The Healing Brush tool lets you correct imperfections, causing them to disappear into the surrounding image. Like the cloning tools, you use the Healing Brush tool to paint with sampled pixels from an image or pattern. -
Page 343
Brush automatically samples from around the retouched area. Using the Spot Healing Brush to remove a blemish For retouching a large area or for more control over the source sampling, you can use the Healing Brush instead of the Spot Healing Brush. 1. -
Page 344
Patched image Repair an area using sampled pixels 1. Select the Patch tool 2. Do one of the following: Drag in the image to select the area you want to repair, and select Source in the options bar. Drag in the image to select the area from which you want to sample, and select Destination in the options bar. Note: You can also make a selection prior to selecting the Patch tool. -
Page 345
Twitter™ and Facebook posts are not covered under the terms of Creative Commons. Legal Notices Online Privacy Policy… -
Page 346: Correcting Image Distortion And Noise
If you find no matching lens profile, click Search Online to acquire additional profiles created by the Photoshop community. To store online profiles for future use, click the pop-up menu , and choose Save Online Profile Locally. To create your own profiles, download the free Adobe Lens Profile Creator from the Adobe website.
-
Page 347
Manually correct image perspective and lens flaws You can apply manual correction alone or use it to refine automatic lens correction. 1. Choose Filter > Lens Correction. 2. In the upper-right corner of the dialog box, click the Custom tab. 3. -
Page 348
Set a lens default. If your image has EXIF metadata for the camera, lens, focal length, and f-stop, you can save the current settings as a lens default. To save the settings, click the Set Lens Default button. When you correct an image that matches the camera, lens, focal length, and f-stop, the Lens Default option becomes available in the Settings menu. -
Page 349
Reshaping and transforming To learn more, view these recommended resources online. Correcting perspective video2brain (May. 7, 2012) video-tutorial Fix photo angles fast. Straightening a crooked image video2brain (May. 7, 2012) video-tutorial Define the horizon line. New Crop tool Lynda.com (Oct. 7, 2012) video-tutorial Interactive previews help you precisely trim images down to size. -
Page 350
Right-click the Crop box and access common crop options from the context menu. 4. Press Enter (Windows) or Return (Mac OS) to crop the photo. For information on cropping and straightening, see Newly redesigned Crop tool in Photoshop CS6 by Julieanne Kost. To the top… -
Page 351
Updates to the Crop tool include numerous bug fixes and enhancements, including: Front Image and new presets in the Aspect Ratio menu. Clicking the double-arrow icon changes the crop orientation by swapping the Width and Height values. This icon replaces the Rotate Crop Box button. -
Page 352
Steps to transform perspective A. Original image B. Adjust cropping marquee to match the object’s edges C. Final image 1. To correct image perspective, hold down the Crop tool and select the Perspective Crop tool 2. Draw a marquee around the distorted object. Match the edges of the marquee to the rectangular edges of the object. 3. -
Page 353
Transforming objects Apply transformations Select an item to transform Set or move the reference point for a transformation Scale, rotate, skew, distort, apply perspective, or warp Flip or rotate precisely Repeat a transformation Duplicate an item when transforming it Transform freely Warp an item Puppet Warp To the top… -
Page 354
horizontally, vertically, or both horizontally and vertically. Rotate Turns an item around a reference point. By default, this point is at the center of the object; however, you can move it to another location. Skew Slants an item vertically and horizontally. Distort Stretches an item in all directions. -
Page 355
If you chose Distort, drag a corner handle to stretch the bounding box. If you chose Perspective, drag a corner handle to apply perspective to the bounding box. If you chose Warp, choose a warp from the Warp Style pop-up menu in the options bar, or to perform a custom warp, drag the control points, a line, or an area within the mesh to change the shape of the bounding box and mesh. -
Page 356
3. Do one or more of the following: To scale by dragging, drag a handle. Press Shift as you drag a corner handle to scale proportionately. To scale numerically, enter percentages in the Width and Height text boxes in the options bar. Click the Link icon to maintain the aspect ratio. -
Page 357
1. Select what you want to warp. 2. Do one of the following: Choose Edit > Transform > Warp. If you chose a different transform command or the Free Transform command, click the Switch Between Free Transform And Warp Modes button in the options bar. -
Page 358
3. In the options bar, adjust the following mesh settings: Mode Determines the overall elasticity of the mesh. Choose Distort for a highly elastic mesh good for warping wide-angle images or texture maps. Density Determines the spacing of mesh points. More Points increases precision but requires more processing time; Fewer Points does the opposite. -
Page 359
Press Alt (Windows) or Option (Mac OS) to rotate the mesh around a selected pin. Twitter™ and Facebook posts are not covered under the terms of Creative Commons. Legal Notices Online Privacy Policy… -
Page 360
Adjusting crop, rotation, and canvas Crop images Transform perspective while cropping | CS5 Crop and straighten scanned photos Straighten an image Rotate or flip an entire image Change the canvas size Make a frame To the top Crop images Cropping is the process of removing portions of an image to create focus or strengthen the composition. You can crop an image using the Crop tool and the Crop command. -
Page 361
Shield The cropping shield shades the image area that will be deleted or hidden. When Shield is selected, you can specify color and opacity for the shield. When Shield is deselected, the area outside the cropping marquee is revealed. 6. Do one of the following: To complete the crop, press Enter (Windows) or Return (Mac OS), click the Commit button in the options bar, or double-click inside the cropping marquee. -
Page 362
to precisely match the object’s edges. 5. Drag the side handles to extend the cropping bounds while preserving the perspective. Do not move the center point of the cropping marquee. The center point needs to be in its original position in order to perform perspective correction. -
Page 363
Choose Image > Image Rotation, and choose one of the following commands from the submenu: 180° Rotates the image by a half-turn. 90° CW Rotates the image clockwise by a quarter-turn. 90° CCW Rotates the image counterclockwise by a quarter-turn. Arbitrary Rotates the image by the angle you specify. -
Page 364
Make a frame You can make a photo frame by increasing the canvas size and filling it with a color. You can also use one of the prerecorded actions to make a styled photo frame. It’s best work on a copy of your photo. 1. -
Page 365
Spherical layout option is recommended. This option stitches the images and transforms them as if they were mapped to the inside of a sphere, which simulates the experience of viewing a 360 degree panorama. For a video overview of Photomerge, see www.adobe.com/go/vid0013. To the top Take pictures for Photomerge Your source photographs play a large role in panoramic compositions. -
Page 366
Choose File > Automate > Photomerge. In Adobe® Bridge, choose Tools > Photoshop > Photomerge from the Bridge menu bar. Skip to step 5. Note: In Bridge, choosing the Photomerge command uses all images currently displayed in Bridge. If you only want specific images used, select them before choosing the Photomerge command. -
Page 367
If you photographed with a fisheye lens, select the Auto layout and Geometric Distortion Correction. If Photoshop cannot automatically identify your lens, download the free Adobe Lens Profile Creator from the Adobe website. 4. (Optional) Select Vignette Removal or Geometric Distortion for the Lens Correction. -
Page 368
A. Original image B. Scaled narrower C. Scaled narrower, using content-aware scaling For a video on content-aware scaling, see www.adobe.com/go/lrvid4120_ps. (Discussion of this feature begins at the four-minute mark.) To the top Preserve visual content when scaling images 1. -
Page 369
1. Make a selection around the content you want to protect and then, in the Channels panel, click Save Selection As Channel 2. (Optional) Choose Select > All if you’re scaling a Background layer. 3. Choose Edit > Content-Aware Scale. 4. -
Page 370: Liquify Filter
Tools, options, and an image preview for the Liquify filter are available in the Liquify dialog box. To display the dialog box, choose Filter > Liquify. In CS6, select Advanced Mode to access more options. Adobe recommends Have a tutorial you would like to share?
-
Page 371
Another enhancement to the Liquify filter is an added behavior for the Reconstruct tool. If you hold down the alt (Windows) or Option (Mac OS) key while dragging the tool across a warp, the Reconstruct tool smooths a warp rather than scaling back or removing it. To the top Applying Liquify as a smart filter | Creative Cloud only The Liquify filter supports Smart Objects, including Smart Object video layers, and is applied as a smart filter. -
Page 372
Use other tools to change the image in new ways. 6. Do one of the following: Click OK to close the Liquify dialog box and apply the changes to the active layer. Click Cancel to close the Liquify dialog box without applying changes to the layer. Hold down Alt (Windows) or Option (Mac OS) and click Reset to revert all distortions to the preview image and reset all options to their defaults. -
Page 373
To apply a saved distortion mesh, click Load Mesh, select the mesh file you want to apply, and click Open. If the image and distortion mesh aren’t the same size, the mesh is scaled to fit the image. (CS6) To apply the last saved distortion mesh, click Load Last Mesh. (Creative Cloud) Meshes are automatically saved in your document. -
Page 374
Remove all distortions Click Restore All in the Reconstruct Option area of the dialog box. This removes distortions even in frozen areas. Reconstruct part of a distorted image 1. Freeze areas you want to keep distorted. 2. Select the Reconstruct tool and specify brush options in the Tool Options area of the dialog box. -
Page 375
Free transformations of images, shapes, and paths Transform freely To the top Transform freely The Free Transform command lets you apply transformations (rotate, scale, skew, distort, and perspective) in one continuous operation. You can also apply a warp transformation. Instead of choosing different commands, you simply hold down a key on your keyboard to switch between transformation types. -
Page 376
Legal Notices Online Privacy Policy… -
Page 377
Photoshop Extended users can also measure objects in an image, and export 3D information and measurements to DXF and 3DS formats for use in 3D applications. For a video on using Vanishing Point, see www.adobe.com/go/vid0019. To the top Vanishing Point dialog box overview The Vanishing Point dialog box (Filter >… -
Page 378
Vanishing Point dialog box A. Vanishing Point menu B. Options C. Toolbox D. Preview of vanishing point session E. Zoom options Vanishing Point tools Vanishing Point tools behave like their counterparts in the main Photoshop toolbox. You can use the same keyboard shortcuts for setting tool options. -
Page 379
To the top Work in Vanishing Point 1. (Optional) Prepare your image for work in Vanishing Point. Before choosing the Vanishing Point command, do any of the following: To place the results of your Vanishing Point work in a separate layer, first create a new layer before choosing the Vanishing Point command. Placing the Vanishing Point results in a separate layer preserves your original image and you can use the layer opacity control, styles, and blending modes. -
Page 380
6. Click OK. Grids can be rendered to Photoshop by choosing Render Grids To Photoshop from the Vanishing Point menu before you click OK. For detailed information, see Render grids to Photoshop. To the top Export measurements, textures, and 3D information 3D information (planes), textures, and measurements created in Vanishing Point can be exported to a format for use in CAD, modeling, animation, and special effects applications. -
Page 381
Create related perspective planes After creating a plane in Vanishing Point, you can create (tear off) additional planes that share the same perspective. Once a second plane is torn off from the initial perspective plane, you can tear off additional planes from the second plane and so forth. You can tear off as many planes as you want. -
Page 382
Note: Selections temporarily show when they are resized or repositioned even if Show Edges is turned off. Adjust the spacing of the perspective plane grid Do any of the following: Select the Edit Plane or the Create Plane tool, and then enter a Grid Size value in the tool options area. (Photoshop Extended only) Select the Measure tool and then select Link Measurements To Grid in the tool options area. -
Page 383
Copying a selection and moving a selection from one perspective plane to another Make selections in Vanishing Point 1. Select the Marquee tool. 2. (Optional) In the tool options area, enter values for any of the following settings before making the selection: Feather Specifies how much to blur the edges of the selection. -
Page 384
To rotate a floating selection, select the Transform tool and move the pointer near a node. When the pointer changes to a curved double arrow, drag to rotate the selection. You can also select the Flip option to flip the selection horizontally along the vertical axis of the plane or select the Flop option to flip the selection vertically along the horizontal axis of the plane. -
Page 385
2. Alt-drag (Windows) or Option-drag (Mac OS) the selection with the Marquee tool to create a copy of the selection and its image pixels. The copy becomes a floating selection, which seems to hover above the main image. You can move a floating selection, or you can select the Transform tool to scale or rotate the floating selection. -
Page 386
To paint and blend the strokes with the lighting of the surrounding pixels while retaining the selected color, choose Luminance. To paint and blend with the colors, lighting, and shading of the surrounding pixels, choose On. 5. (Optional) Specify the paint application options: To paint continuously, automatically conforming to the perspective from one plane to another, open the Vanishing Point menu and choose Allow Multi-Surface Operations. -
Page 387
Note: Once you start creating a measurement from within a plane, it’s possible to continue drawing the measurement beyond the plane boundaries. 2. With a measurement selected, enter a Length value to set its measured length. 3. (Optional) Draw additional measurements. The size of these measurements are scaled to the size of your initial measurement. -
Page 388
Transforming objects Apply transformations Select an item to transform Set or move the reference point for a transformation Scale, rotate, skew, distort, apply perspective, or warp Flip or rotate precisely Repeat a transformation Duplicate an item when transforming it Transform freely Warp an item Puppet Warp To the top… -
Page 389
horizontally, vertically, or both horizontally and vertically. Rotate Turns an item around a reference point. By default, this point is at the center of the object; however, you can move it to another location. Skew Slants an item vertically and horizontally. Distort Stretches an item in all directions. -
Page 390
If you chose Distort, drag a corner handle to stretch the bounding box. If you chose Perspective, drag a corner handle to apply perspective to the bounding box. If you chose Warp, choose a warp from the Warp Style pop-up menu in the options bar, or to perform a custom warp, drag the control points, a line, or an area within the mesh to change the shape of the bounding box and mesh. -
Page 391
3. Do one or more of the following: To scale by dragging, drag a handle. Press Shift as you drag a corner handle to scale proportionately. To scale numerically, enter percentages in the Width and Height text boxes in the options bar. Click the Link icon to maintain the aspect ratio. -
Page 392
1. Select what you want to warp. 2. Do one of the following: Choose Edit > Transform > Warp. If you chose a different transform command or the Free Transform command, click the Switch Between Free Transform And Warp Modes button in the options bar. -
Page 393
3. In the options bar, adjust the following mesh settings: Mode Determines the overall elasticity of the mesh. Choose Distort for a highly elastic mesh good for warping wide-angle images or texture maps. Density Determines the spacing of mesh points. More Points increases precision but requires more processing time; Fewer Points does the opposite. -
Page 394
Press Alt (Windows) or Option (Mac OS) to rotate the mesh around a selected pin. Twitter™ and Facebook posts are not covered under the terms of Creative Commons. Legal Notices Online Privacy Policy… -
Page 395
Drawing and painting To learn more, view these recommended resources online. Vector Shapes Infinite Skills (Oct. 7, 2012) video-tutorial Drawing shapes in CS6… -
Page 396
Understanding shapes and paths Drawing in Adobe Photoshop involves creating vector shapes and paths. In Photoshop, you can draw with any of the shape tools, the Pen tool, or the Freeform Pen tool. Options for each tool are available in the options bar. -
Page 397
A. Shape Layers B. Paths C. Fill Pixels More Help Topics Twitter™ and Facebook posts are not covered under the terms of Creative Commons. Legal Notices Online Privacy Policy… -
Page 398: Drawing Shapes
Drawing shapes Create a shape on a shape layer Creating, editing, and working with shape layers Draw multiple shapes in a layer Draw a wheel shape Draw a custom shape Save a shape or path as a custom shape Create a rasterized shape Shape tool options Edit shapes The shape tools provide an easy way to create buttons, navigation bars, and other items used on web pages.
-
Page 399
For more information, see Drawing and type tools gallery. To the top Draw multiple shapes in a layer You can draw separate shapes on a layer, or use the Add, Subtract, Intersect, or Exclude options to modify the current shape on a layer. 1. -
Page 400
1. Select a layer. You cannot create a rasterized shape on a vector-based layer (for example, a type layer). 2. Select a shape tool, and click the Fill Pixels button in the options bar. 3. Set the following options in the options bar: Mode Controls how the shape will affect the existing pixels in the image. -
Page 401
To change stroke width for other shape tools, choose Layer > Layer Style > Stroke. (See Apply or edit a custom layer style.) To the top Edit shapes A shape is a fill layer linked to a vector mask. You can easily change the fill to a different color, a gradient, or a pattern by editing the shape’s fill layer. -
Page 402: Painting Tools
About painting tools, presets, and options Adobe Photoshop provides several tools for painting and editing image color. The Brush tool and the Pencil tool work like a traditional drawing tool applying color with brush strokes. Tools like the Eraser tool, Blur tool, and Smudge tool modify the existing colors in the image. In the options bar for each of these painting tools, you can set how color is applied to an image and choose from preset brush tips.
-
Page 403
Opacity Sets the transparency of color you apply. As you paint over an area, the opacity does not exceed the set level no matter how many times you move the pointer over the area, until you release the mouse button. If you stroke over the area again, you apply additional color, equivalent to the set opacity. -
Page 404: Brush Presets
Brush presets Select a preset brush Change how preset brushes are displayed Load, save, and manage brush presets Create a new preset brush A preset brush is a saved brush tip with defined characteristics, such as size, shape, and hardness. You can save preset brushes with the characteristics you use often.
-
Page 405
You can save the library anywhere. However, if you place the library file in the Presets/Brushes folder in the default preset location, the library name will appear at the bottom of the Brush Presets panel menu after you restart Photoshop. Rename a preset brush Do one of the following: Select a brush in the Brush Presets panel, and choose Rename Brush from the panel menu. -
Page 406: Creating And Modifying Brushes
Creating and modifying brushes Brush panel overview Create a brush tip from an image Create a brush and set painting options Standard brush tip shape options Bristle tip shape options Erodible tip options | CS6 Airbrush tip options | CS6 Brush pose options | CS6 Other brush options Brush scattering…
-
Page 407
2. Select an option set on the left side of the panel. The available options for the set appear on the right side of the panel. Click the check box to the left of the option set to enable or disable the options without viewing them. To the top Create a brush tip from an image 1. -
Page 408
Flipping a brush tip on its x axis. A. Brush tip in its default position B. Flip X selected C. Flip X and Flip Y selected Flip Y Changes the direction of a brush tip on its y axis. Flipping a brush tip on its y axis. A. -
Page 409
To the top Bristle tip shape options For a video about bristle tips, see www.adobe.com/go/lrvid5009_ps_en Bristle tips let you specify precise bristle characteristics, creating highly realistic, natural-looking strokes. Set the following brush tip shape options in the Brush panel: Shape Determines the overall arrangement of bristles. -
Page 410
Granularity Controls how grainy the paint drops look. Spatter Size Controls the size of the paint droplets. Spatter Amount Controls the number of paint droplets. Spacing Controls the distance between the droplets. If this option is deselected, the speed of the cursor determines the spacing. Brush preview Shows brush tip that reflects changes to settings above, as well as current pressure and stroke angle. -
Page 411
Note: If you increase the count without increasing the spacing or scattering values, painting performance may decrease. Count Jitter and Control Specifies how the number of brush marks varies for each spacing interval. To specify the maximum percentage of brush marks applied at each spacing interval, enter a value. To specify how you want to control the count variance of brush marks, choose an option from the Control pop-up menu: Specifies no control over the count variance of brush marks. -
Page 412
Blending modes Blending mode descriptions Blending mode examples The blending mode specified in the options bar controls how pixels in the image are affected by a painting or editing tool. It’s helpful to think in terms of the following colors when visualizing a blending mode’s effect: The base color is the original color in the image. -
Page 413
To the top Blending mode examples These examples show the result of painting part of the image’s face using each blending mode. For a video on blending modes, see www.adobe.com/go/vid0012. Original Image Normal, 100% opacity Normal, 50% opacity… -
Page 414
Color Burn Linear Burn Lighten Screen Color Dodge Linear Dodge (Add) Overlay Soft Light Hard Light Vivid Light Linear Light Pin Light Hard Mix Difference Exclusion Subtract Divide Saturation Color Luminosity, 80% opacity Lighter Color Darker Color Legal Notices Online Privacy Policy… -
Page 415
Creating textured brushes Textured brush options Copy textures between tools Dual brushes To the top Textured brush options A textured brush uses a pattern to make strokes look as if they are painted on textured canvas. Brush strokes without texture (left) and with texture (right) Click the pattern sample, and select a pattern from the pop-up panel. -
Page 416
second brush tip from the Dual Brush section of the Brush panel, and set any of the following options. A. Primary brush tip stroke (hard round 55). B. Secondary brush tip stroke (grass). C. Dual brush stroke (using both). Mode Sets a blending mode to use when combining brush marks from the primary tip and the dual tip. -
Page 417
Adding dynamic elements to brushes Adding brush dynamics Color dynamics brush options Transfer brush options To the top Adding brush dynamics The Brush panel provides many options for adding dynamic (or changing) elements to preset brush tips. For example, you can set options that vary the size, color, and opacity of brush marks over the course of a stroke. -
Page 418
pressure, pen tilt, position of the pen thumbwheel, or rotation of the pen. Initial Direction Bases the angle of brush marks on the initial direction of the brush stroke. Direction Bases the angle of brush marks on the direction of the brush stroke. Roundness Jitter and Control Specifies how the roundness of brush marks varies in a stroke. -
Page 419
Brush strokes without paint dynamics (left) and with paint dynamics (right) Opacity Jitter and Control Specifies how the opacity of paint varies in a brush stroke, up to (but not exceeding) the opacity value specified in the options bar. To specify a percentage by which the opacity of the paint can vary, type a number or use the slider to enter a value. To specify how you want to control the opacity variance of brush marks, choose an option from the Control pop-up menu: Specifies no control over the opacity variance of brush marks. -
Page 420
Drawing or painting with a graphics tablet Change brush size and opacity with pen pressure If you work with a graphics drawing tablet, such as the Wacom® tablet, you can control painting tools with pen pressure, angle, rotation, or the stylus wheel. -
Page 421
The pickup well receives paint only from the canvas; its contents are continuously mixed with canvas colors. For a video about the Mixer Brush, see www.adobe.com/go/lrvid5001_ps_en 1. Select the Mixer Brush tool . (If necessary, click and hold the standard Brush tool to reveal the Mixer Brush.) 2. -
Page 422
To draw a straight line, click a starting point in the image. Then hold down Shift, and click an ending point. When using the Brush tool as an airbrush, hold down the mouse button without dragging to build up color. More Help Topics Twitter™… -
Page 423
Painting with a pattern Set the following in the options bar. Options available vary with each tool. To the top Paint with a pattern The Pattern Stamp tool paints with a pattern. You can select a pattern from the pattern libraries or create your own patterns. 1. -
Page 424
Painting stylized strokes with the Art History Brush The Art History Brush tool paints with stylized strokes, using the source data from a specified history state or snapshot. By experimenting with different paint style, size, and tolerance options, you can simulate the texture of painting with different colors and artistic styles. Like the History Brush tool, the Art History Brush tool uses a specified history state or snapshot as the source data. -
Page 425
Erasing parts of an image Erase with the Eraser tool Change similar pixels with the Magic Eraser tool Change pixels to transparent with the Background Eraser tool Auto Erase with the Pencil tool To the top Erase with the Eraser tool The Eraser tool changes pixels to either the background color or to transparent. -
Page 426
To the top Change pixels to transparent with the Background Eraser tool The Background Eraser tool erases pixels on a layer to transparency as you drag. You can erase the background while maintaining the edges of an object in the foreground. By specifying different sampling and tolerance options, you can control the range of the transparency and the sharpness of the boundaries. -
Page 427
Managing pattern libraries and presets You can keep your patterns organized in libraries that you can load or remove from pattern pop-up panels. Load a library of patterns Choose one of the following from a Pattern pop-up panel menu: Load Patterns to add a library to the current list. Select the library file you want to use, and click Load. Replace Patterns to replace the current list with a different library. -
Page 428
Creating patterns A pattern is an image that is repeated, or tiled, when you use it to fill a layer or selection. Photoshop comes with various preset patterns. You can create new patterns and save them in libraries for use with different tools and commands. Preset patterns are displayed in pop-up panels in the options bar for the Paint Bucket, Pattern Stamp, Healing Brush, and Patch tools, as well as in the Layer Style dialog box. -
Page 429
Draw a path that snaps to defined edges Draw using the magnetic pen options To the top Draw using the magnetic pen options The Magnetic Pen is an option of the Freeform Pen tool that lets you draw a path that snaps to the edges of defined areas in your image. You can define the range and sensitivity of the snapping behavior, as well as the complexity of the resulting path. -
Page 430: Drawing With The Pen Tools
Pen Tool 101 Andy Anderson A comprehensive video overview on how to use the Pen Tool in Photoshop CS6. For more information about the modes in which you can draw with the Pen tools, see Drawing modes. To the top Draw straight line segments with the Pen tool The simplest path you can draw with the Pen tool is a straight line, made by clicking the Pen tool to create two anchor points.
-
Page 431
The last anchor point you add always appears as a solid square, indicating that it is selected. Previously defined anchor points become hollow, and deselected, as you add more anchor points. 5. Complete the path by doing one of the following: To close the path, position the Pen tool over the first (hollow) anchor point. -
Page 432
To leave the path open, you can also select a different tool, or choose Select > Deselect in Illustrator or Edit >Deselect All in InDesign. For a video on using the Pen tool in Illustrator, see www.adobe.com/go/vid0037. To the top… -
Page 433
Drawing a straight segment followed by a curved segment (part 1) A. Straight segment completed B. Positioning Pen tool over endpoint (the Convert Point icon appears only in Illustrator and InDesign) C. Dragging direction point 3. Position the pen where you want the next anchor point; then click (and drag, if desired) the new anchor point to complete the curve. Drawing a straight segment followed by a curved segment (part 2) A. -
Page 434
The Magnetic Pen is an option of the Freeform Pen tool that lets you draw a path that snaps to the edges of defined areas in your image. You can define the range and sensitivity of the snapping behavior, as well as the complexity of the resulting path. The Magnetic Pen and Magnetic Lasso tools share many of the same options. -
Page 435: Editing Paths
Editing paths Path segments, components, and points Select a path Adjust path segments Add or delete anchor points Convert between smooth points and corner points Adjust path components To the top Path segments, components, and points A path consists of one or more straight or curved segments. Anchor points mark the end points of the path segments. On curved segments, each selected anchor point displays one or two direction lines, ending in direction points.
-
Page 436
Separate path components selected To the top Select a path Selecting a path component or path segment displays all of the anchor points on the selected portion, including any direction lines and direction points if the selected segment is curved. Direction points appear as filled circles, selected anchor points as filled squares, and unselected anchor points as hollow squares. -
Page 437
Drag the anchor point, or drag the direction point. Note: In Photoshop CS6, adjusting a path segment also adjusts the related segments, letting you intuitively transform path shapes. To only edit segments between the selected anchor points, similar to earlier Photoshop versions, select Constrain Path Dragging in the options bar. -
Page 438
1. Using the Pen tool, position the pointer over the endpoint of the open path that you want to connect to another path. The pointer changes when it’s precisely positioned over the endpoint. 2. Click the endpoint. 3. Do one of the following: To connect the path to another open path, click an endpoint on the other path. -
Page 439
You can also use the Copy and Paste commands to duplicate vector objects between a Photoshop image and an image in another application, such as Adobe Illustrator. Change the overlap mode for the selected path component 1. -
Page 440
Dragging a path to a new location Note: If you drag a path so that the move pointer is over another open image, the path is copied to that image. Reshape a path component 1. Select the path name in the Paths panel, and use the Direct Selection tool to select an anchor point in the path. -
Page 441
Alignment options A. Top B. Vertical Centers C. Bottom D. Left E. Horizontal Centers F. Right To distribute components, select at least three components you want to distribute. Then, in CS6, choose an option from the Path Arrangement drop-down menu in the options bar, or in CS5, select a distribute option from the options bar. Distribute options A. -
Page 442: Adding Color To Paths
Adding color to paths Fill paths with color Stroke paths with color To the top Fill paths with color A path created with the Pen tool does not become an image element until you stroke or fill it. The Fill Path command fills a path with pixels using a specified color, a state of the image, a pattern, or a fill layer.
-
Page 443
completing the steps below. (You cannot stroke a path when a mask, text, fill, adjustment, or Smart Object layer is active.) Path selected (left) and stroked (right) Stroke a path using the current Stroke Path options 1. Select the path in the Paths panel. 2. -
Page 444: Converting Between Paths And Selection Borders
Converting between paths and selection borders Convert paths to selection borders Convert a selection to a path To the top Convert paths to selection borders Paths provide smooth outlines that you can convert into precise selection borders. You also can convert selection borders into paths, using the Direct Selection tool for fine-tuning.
-
Page 445
Tolerance values can range from 0.5 to 10 pixels and determine how sensitive the Make Work Path command is to slight changes in the selection shape. The higher the tolerance value, the fewer the anchor points used to draw the path and the smoother the path. If the path is used as a clipping path and you have problems printing the image, use a higher tolerance value. -
Page 446
Filling and stroking selections, layers, and paths Fill with the Paint Bucket tool Fill a selection or layer with color Content-aware, pattern, or history fills Fill the work canvas Stroke a selection or layer with color Draw a circle or square You can fill the inside of a selection, path, or layer with a color or pattern. -
Page 447
Adobe recommends Have a tutorial you would like to share? Video tutorial: Content-aware fill Scripted Patterns in CS6 Chris Orwig Dave Cross Seamlessly replace image elements. Easily create geometric pattern fills. 1. Select the part of the image you want to fill. -
Page 448
5. In the Stroke dialog box, type a value for Width, and then click the color swatch to display the Adobe Color Picker. 6. In the Adobe Color Picker, locate the color range you want using the triangle sliders on the color spectrum bar, and then click the desired color in the color field. -
Page 449
Generate a pattern using the Pattern Maker Pattern Maker is an optional plug-in that you can download for Windows The Pattern Maker filter slices and reassembles an image to make a pattern. The Pattern Maker works in two ways: Fills a layer or selection with a pattern. The pattern can be made of one large tile, or multiple duplicate tiles. Creates tiles that you can save as a pattern preset and use with other images. -
Page 450
Tile History buttons A. Save Preset Pattern B. First Tile C. Previous Tile D. Next Tile E. Last Tile F. Delete icon 10. When you are satisfied with a pattern preview and you have saved the tiles that you might want to use in the future, click OK to fill the layer or selection. -
Page 451
Gradients Apply a gradient fill Manage gradient presets Gradient Editor overview Create a smooth gradient Specify the gradient transparency Create a noise gradient To the top Apply a gradient fill The Gradient tool creates a gradual blend between multiple colors. You can choose from preset gradient fills or create your own. Note: The Gradient tool cannot be used with bitmap or indexed-color images. -
Page 452
Specify a blending mode and opacity for the paint. (See Blending modes.) To reverse the order of colors in the gradient fill, select Reverse. To create a smoother blend with less banding, select Dither. To use a transparency mask for the gradient fill, select Transparency. (See Specify the gradient transparency.) 6. -
Page 453
Gradient Editor dialog box A. Panel menu B. Opacity stop C. Color stops D. Adjust values or delete the selected opacity or color stop E. Midpoint To the top Create a smooth gradient 1. Select the Gradient tool 2. Click inside the gradient sample in the options bar to display the Gradient Editor dialog box. 3. -
Page 454
15. To save the gradient as a preset, click New after you have finished creating the gradient. Note: New presets are saved in a Preferences file. If this file is deleted or damaged, or if you reset presets to the default library, the new presets will be lost. -
Page 455: Managing Paths
Managing paths Paths panel overview Create a new path in the Paths panel Create a new work path Manage paths To the top Paths panel overview The Paths panel (Window > Paths) lists the name and a thumbnail image of each saved path, the current work path, and the current vector mask. Turning thumbnails off can improve performance.
-
Page 456
(Mac OS) to temporarily select the Subtract From Path Area option. To the top Manage paths When you use a pen or shape tool to create a work path, the new path appears as the work path in the Paths panel. The work path is temporary; you must save it to avoid losing its contents. -
Page 457
Text… -
Page 458: Creating Type
Convert between point type and paragraph type Type in Adobe Photoshop consists of vector-based type outlines—mathematically defined shapes that describe the letters, numbers, and symbols of a typeface. Many typefaces are available in more than one format, the most common formats being Type 1 (also called PostScript fonts), TrueType, OpenType, New CID, and CID nonprotected (Japanese only).
-
Page 459
words to your image. Paragraph type uses boundaries to control the flow of characters, either horizontally or vertically. Entering text this way is useful when you want to create one or more paragraphs, such as for a brochure. Type entered as point type (top) and in a bounding box (bottom) Type on a path flows along the edge of an open or a closed path. -
Page 460
and Height, and click OK. 3. Select additional type options in the options bar, Character panel, Paragraph panel, or Layer > Type submenu. 4. Enter the characters. To begin a new paragraph, press Enter (Windows) or Return (Mac OS). If you enter more type than can fit in the bounding box, the overflow icon appears on the bounding box. -
Page 461
Legal Notices Online Privacy Policy… -
Page 462: Editing Text
Editing text Edit text Specify curly or straight quotes Apply anti-aliasing to a type layer Check and correct spelling Find and replace text Assign a language for text Scaling and rotating type Change the orientation of a type layer Rasterize type layers To the top Edit text 1.
-
Page 463
Note: When you use anti-aliasing, type may be rendered inconsistently at small sizes and low resolutions (such as the resolution used for web graphics). To reduce this inconsistency, deselect the Fractional Width option in the Character panel menu. 1. Select the type layer in the Layers panel. 2. -
Page 464
Change All Searches for and replaces all occurrences of the found text. Change/Find Replaces the found text with the revised text, and then searches for the next occurrence. To the top Assign a language for text Photoshop uses language dictionaries to check hyphenation. Language dictionaries are also used to check spelling. Each dictionary contains hundreds of thousands of words with standard syllable breaks. -
Page 465
Original type (left) and type without vertical rotation (right) 1. Select the vertical type you want to rotate or unrotate. 2. Choose Standard Vertical Roman Alignment from the Character panel menu. A check mark indicates that the option is selected. Note: You cannot rotate double-byte characters (full-width characters available only in Chinese, Japanese, and Korean fonts). -
Page 466: Creating Type Effects
Video tutorial: Create type on a path Book excerpt: Create type on a path Infinite Skills — Andy Anderson Adobe Photoshop Classroom in a Book Get a visual overview of several approaches. Walk through the process step-by-step. You can enter type that flows along the edge of a work path created by a pen or a shape tool. When you enter type along a path, the type flows in the direction that anchor points were added to the path.
-
Page 467
Select the Horizontal Type tool or the Vertical Type tool Select the Horizontal Type Mask tool or the Vertical Type Mask tool 2. Position the pointer so that the baseline indicator of the type tool is on the path and click. After you click, an insertion point appears on the path. -
Page 468
Example of type warped with Fish style. Warp type 1. Select a type layer. 2. Do one of the following: Select a type tool, and click the Warp button in the options bar. Choose Type > Warp Text (CS6) or Layer > Type > Warp Text (CS5). Note: You can use the Warp command to warp text in a type layer. -
Page 469
To the top Add a drop shadow to text Add a drop shadow to give depth to text in an image. 1. In the Layers panel, select the layer containing the text to which you want to add a drop shadow. 2. -
Page 470: Formatting Characters
Formatting characters Select characters Character panel overview About Dynamic Shortcuts Specify type size Change the type color Change the color of individual letters Underline or strike through text Apply all caps or small caps Specify superscript or subscript characters Character styles | CS6 Specifying default type styles | Creative Cloud only You can set type attributes before you enter characters or reset them to change the appearance of selected characters in a type layer.
-
Page 471
Character panel A. Font Family B. Font Size C. Vertical Scale D. Set Tsume option E. Tracking F. Baseline Shift G. Language H. Font Style I. Leading J. Horizontal scale K. Kerning Note: Select Show Asian Text Options in the Type preferences for the Set Tsume option to appear in the Character panel. You can access additional commands and options in the Character panel menu. -
Page 472
5. In the Adobe Color Picker, locate the color range you want using the triangle sliders on the color spectrum bar, and then click the desired color in the color field. The color you select appears in the top half of the color swatch in the Adobe Color Picker. The original color remains in the bottom half. -
Page 473
Type styles are hierarchical: Manual overrides supersede any applied character styles, which in turn replace applied paragraph styles. This hierarchical approach lets you combine the efficiency of styles with the flexibility to customize your designs. For a video overview, see Paragraph and Character Styles in Photoshop CS6 by Julieanne Kost. Create a character style 1. -
Page 474
1. Do any of the following: Choose Type > Load Default Type Styles. In the Character Styles or the Paragraph Styles panel, choose Load Default Type Styles from the panel menu. 2. If you are loading the default type styles into a document that already has an existing type style, the Import Paragraph Styles dialog box appears. -
Page 475: Line And Character Spacing
Line and character spacing Set leading Kern and track Shift the baseline Turn fractional character widths off or on To the top Set leading The vertical space between lines of type is called leading (rhymes with sledding). For Roman type, leading is measured from the baseline of one line of text to the baseline of the line above it.
-
Page 476
Kerning and tracking options A. Original text B. Text with optical kerning C. Text with manual kerning between W and a D. Text with tracking E. Cumulative kerning and tracking You can also use manual kerning, which is ideal for adjusting the space between two letters. Tracking and manual kerning are cumulative, so you can first adjust individual pairs of letters, and then tighten or loosen a block of text without affecting the relative kerning of the letter pairs. -
Page 477
By default, the software uses fractional character widths between characters. This means that the spacing between characters varies, and will sometimes use only fractions of whole pixels. In most situations, fractional character widths provide the best spacing for type appearance and readability. However, for type in small sizes (less than 20 points) displayed online, fractional character widths could cause type to run together or have too much extra space, making it difficult to read. -
Page 478: Formatting Paragraphs
Formatting paragraphs Format paragraphs Paragraph panel overview Specify alignment Specify justification for paragraph type Adjust word and letter spacing in justified text Indent paragraphs Adjust paragraph spacing Specify hanging punctuation for Roman fonts Adjust hyphenation automatically Prevent words from breaking Composition methods Paragraph styles | CS6 To the top…
-
Page 479
1. Do one of the following: Select a type layer if you want all the paragraphs in that type layer to be affected. Select the paragraphs you want affected. 2. In the Paragraph panel or options bar, click an alignment option. The options for horizontal type are: Left Align Text Aligns type to the left, leaving the right edge of the paragraph ragged. -
Page 480
3. Enter values for Word Spacing, Letter Spacing, and Glyph Scaling. The Minimum and Maximum values define a range of acceptable spacing for justified paragraphs only. The Desired value defines the desired spacing for both justified and unjustified paragraphs: Word Spacing The space between words that results from pressing the spacebar. -
Page 481
The appearance of type on the page depends on a complex interaction of processes called composition. Using the word spacing, letterspacing, glyph spacing, and hyphenation options you’ve selected, Adobe applications evaluate possible line breaks and choose the one that best supports the specified parameters. -
Page 482
For a video overview, see Paragraph and Character Styles in Photoshop CS6 by Julieanne Kost. (Creative Cloud only) You can specify character and paragraph styles as default types styles. For more information see Specifying default type styles | Creative Cloud only. -
Page 483
Arabic and Hebrew type (CS6) Enable Middle Eastern features Text direction Digit Types Legacy font support Default fonts Automatic Kashida insertion Ligatures (OpenType fonts) Hyphenation Diacritical marks Justification alternates For a tutorial on Arabic and Hebrew type features, see this video from Photoshop expert David Mohr. -
Page 484
When you install a Middle Eastern or North African version, the default typing font is set to the installation-specific language, by default. For example, if you have installed the English/Arabic-enabled version, the default typing font is set to Adobe Arabic. Similarly, if you have installed the English/Hebrew-enabled version, the default typing font is set to Adobe Hebrew (or Myriad Hebrew in Photoshop). -
Page 485
Justification alternates can be turned on at a character level, but only if a font supports this feature. At the bottom of the Character panel, select Justification Alternates. These Arabic fonts contain justification alternates: Adobe Arabic, Myriad Arabic, and Adobe Naskh. These Hebrew fonts contain justification alternates: Adobe Hebrew and Myriad Hebrew. -
Page 486
To the top About fonts A font is a complete set of characters—letters, numbers, and symbols—that share a common weight, width, and style, such as 10 -pt Adobe Garamond Bold. Typefaces (often called type families or font families) are collections of fonts that share an overall appearance, and are designed to be used together, such as Adobe Garamond. -
Page 487
The Font Family menu in both the Character panel and the options bar shows a preview of available fonts. You can choose a font family and style by typing its name in the text box. As you type, the name of the first font or style beginning with that letter appears. -
Page 488
OpenType fonts may include an expanded character set and layout features to provide richer linguistic support and advanced typographic control. OpenType fonts from Adobe that include support for central European (CE) languages include the word “Pro,” as part of the font name in application font menus. -
Page 489: Asian Type
Asian type Display and set Asian type options Reduce spacing around Asian type characters Specify how leading is measured in Asian type Use tate-chu-yoko Align Asian characters with mojisoroe Specify left and right underlining with Asian type Set Asian OpenType font attributes Asian OpenType options Choose a mojikumi set Set kinsoku shori options…
-
Page 490
Asian OpenType fonts may include a number of features that aren’t available in current PostScript and TrueType fonts. It is usually best to use any weights of KozMinPro and KozGoPro OpenType fonts. These fonts have the largest collection of glyphs of the Asian fonts produced by Adobe. -
Page 491
(Windows) From the Windows Start menu, choose Programs > Accessories > System Tools > Character Map. (Mac OS) From the Input pop-up menu at the right side of the menu bar, choose Show Character Viewer. Note: (Mac OS) If the Input menu does not display in the menu bar, choose Apple menu > System Preferences > Language & Text, then click Input Sources, and select Keyboard &… -
Page 492
Japanese Traditional Substitutes the standard glyph with the traditional-variant glyph. Proportional Metrics Substitutes the half-width and the full-width glyphs with the proportional glyph. Kana Substitutes the standard kana glyph with the horizontally optimized kana glyph for horizontal layout. However, the differences are often very subtle. -
Page 493
Kinsoku shori specifies line breaks for Japanese text. Characters that cannot begin a line or end a line are known as kinsoku characters. Photoshop includes weak and maximum kinsoku sets based on the Japanese Industrial Standard (JIS) X 4051-1995. Weak kinsoku sets omit long vowel symbols and small hiragana characters. -
Page 494
Video and animation To learn more, view these recommended resources online. Video workflow Kelby (May. 7, 2012) video-tutorial Intuitive editing for video DSLRs and other sources. -
Page 495
Export final video with the Adobe Media Encoder Choose File > Export > Render Video. From the first pop-up menu, select Adobe Media Encoder to choose from the following Format options: DPX (Digital Picture Exchange) format is designed primarily for frame sequences that you plan to incorporate into professional video projects using an editor such as Adobe Premiere Pro. -
Page 496
Import a video file; it’s automatically added as a new Video Group. To create an empty group for adding content to, click a filmstrip icon on the left of the Timeline panel, and choose New Video Group from the pop-up menu. Edit a Video Group To reposition clips, drag them in the Timeline. -
Page 497
Twitter™ and Facebook posts are not covered under the terms of Creative Commons. Legal Notices Online Privacy Policy… -
Page 498
After making edits, you can save the document as a PSD file (that can be played back in other Adobe applications such as Premiere Pro and After Effects or accessed as a static file in other applications), or you can render it as a QuickTime movie or image sequence. -
Page 499
Animation panel overview For a video on the Animation panel, see www.adobe.com/go/vid0023. An animation is a sequence of images, or frames, that is displayed over time. Each frame varies slightly from the preceding frame, creating the illusion of movement or other changes when the frames are viewed in quick succession. -
Page 500
In frame mode, the Animation panel includes the following controls: Looping Options Sets the number of times an animation plays when exported as an animated GIF file. Frame Delay Time Sets the duration of a frame during playback. Tween Animation Frames Adds a series of frames between two existing frames, interpolating (varying) the layer properties evenly between the new frames. -
Page 501
To select units to display, choose Panel Options from the Animation panel menu and select Frame Numbers or Timecode. To toggle between units, Alt-click (Windows) or Option-click (Mac OS) the current-time display in the upper-left corner of the timeline. Show or hide layer properties in the timeline (Photoshop Extended) In Photoshop Extended, as you add layers to a document, they appear as tracks in the timeline. -
Page 502
Set the timeline area to preview(Photoshop Extended) Understanding the timeline mode video Twitter™ and Facebook posts are not covered under the terms of Creative Commons. Legal Notices Online Privacy Policy… -
Page 503: Creating Frame Animations
Creating frame animations Frame animation workflow Add frames to an animation Select animation frames Edit animation frames Unifying layer properties in animation frames Copy frames with layer properties Create frames using tweening Add a new layer for each new frame Hide layers in animation frames Specify a delay time in frame animations Choose a frame disposal method…
-
Page 504
Change layer opacity to make content fade in or out. Change the blending mode of layers. Add a style to layers. Photoshop provides tools for keeping characteristics of a layer the same across frames. See Unifying layer properties in animation frames. 7. -
Page 505
To the top Edit animation frames 1. In the Animation panel (in frame animation mode), select one or more frames. 2. Do any of the following: To edit the content of objects in animation frames, use the Layers panel to modify the layers in the image that affect that frame. To change the position of an object in an animation frame, select the layer containing the object in the Layers panel and drag it to a new position. -
Page 506
image; however, only the pasted layers are visible in the destination frames (the existing layers are hidden). Paste Over Selection Adds the contents of the pasted frames as new layers in the image. When you paste frames into the same image, using this option doubles the number of layers in the image. -
Page 507
Last Frame Adds frames between the first frame and last frame. This option is available only if you select the first frame in the Animation panel. 8. In the Frames To Add box, enter a value, or use the Up or Down Arrow key to choose the number of frames. (This option is not available if you selected more than two frames.) 9. -
Page 508
4. Choose a disposal method: Automatic Determines a disposal method for the current frame automatically, discarding the current frame if the next frame contains layer transparency. For most animations, the Automatic option (default) yields the desired results. Note: To enable Photoshop to preserve frames that include transparency, select the Automatic disposal option when you are using the Redundant Pixel Removal optimization option. -
Page 509
In addition to letting Photoshop interpolate frames in an animation, you can also create a hand-drawn frame-by-frame animation by painting on a blank video layer. If you want to create a SWF format animation, use Adobe Flash, Adobe After Effects, or Adobe Illustrator. To create a timeline-based animation in Photoshop Extended, use the following general workflow. -
Page 510
You can save the animation as an animated GIF using the Save For Web& Devices command, or as an image sequence or video using the Render Video command. You can also save it in PSD format, which can be imported into Adobe After Effects. -
Page 511
or to set or remove keyframes. When the keyframe navigator diamond is active (yellow), the current-time indicator lies precisely at a keyframe for that layer property. When the keyframe navigator diamond is inactive (gray), the current-time indicator lies between keyframes. When arrows appear on each side of the keyframe navigator box, other keyframes for that property exist on both sides of the current time. -
Page 512
To the top Insert, delete, or duplicate blank video frames (Photoshop Extended) A blank video frame can be added to or removed from a blank video layer. You can also duplicate existing (painted) frames in blank video layers. 1. In the Animation panel, select the blank video layer and then move the current-time indicator to the desired frame. 2. -
Page 513
To the top Open a multilayer animation You can open animations that were saved in older versions of Photoshop as multilayer Photoshop (PSD) files. The layers are placed in the Animation panel in their stacking order, with the bottom layer becoming the first frame. 1. -
Page 514: Creating Images For Video
Preview your document on a video monitor. For more information on FireWire (IEEE 1394), see Apple’s website. Other considerations Both Adobe AfterEffects and Adobe Premiere Pro support PSD files created in Photoshop. However, if you’re using other film and video applications, you might consider these details when you create images for use in video: Some video-editing programs can import individual layers from a multilayer PSD file.
-
Page 515
Note: When copying or importing images into a nonsquare pixel document, Photoshop automatically converts and scales the image to the pixel aspect ratio of the document. Images imported from Adobe Illustrator are also properly scaled. Pixel and frame aspect ratios A. -
Page 516
Circle in NTSC DV (720 x 480 pixels) document viewed on computer (square pixel) monitor with Pixel Aspect Ratio Correction turned on (top) and Pixel Aspect Ratio Correction turned off (bottom) You can simultaneously view an image with the Pixel Aspect Ratio Correction turned on and off. With the nonsquare pixel image open and Pixel Aspect Ratio Correction enabled, choose Window >… -
Page 517
Reset the pixel aspect ratios 1. With the document open, choose View > Pixel Aspect Ratio > Reset Pixel Aspect Ratios. 2. In the dialog box, choose one of the following: Append Replaces the current pixel aspect ratios with the default values plus any custom pixel aspect ratios. This option is useful if you deleted a default value and want to restore it to the menu but also want to retain any custom values. -
Page 518
PSD files. If you’re not rendering your work to video, then saving the file as PSD is best because it preserves the edits and saves the file in a format that’s supported by Adobe digital video applications and many motion picture editing applications. -
Page 519
An animation format for playback of computer-generated animations on workstations, Windows, and Mac OS. This format is also referred to as FLI. Flash Video (FLV) Adobe® Flash® Video is the Adobe format for streaming audio and video over the web and other networks. (To use this format, you must first install an FLV QuickTime encoder). QuickTime Movie The Apple Computer multimedia architecture that includes a number of codecs. -
Page 520
don’t choose a data rate higher than the available bandwidth. Optimized For Specifies the intended delivery method if you choose H.264 from the Video Format menu, click Video Options, and select Best Quality. This setting tells the codec how much the data rate can vary above and below the data rate you choose. Image Size Specifies a standard for sending the file to a mobile phone. -
Page 521
Key Frame Every Specifies the key frame frequency. A higher key frame rate (lower number) improves video quality, but increases the file size. With some compressors, an additional key frame is inserted automatically if too much of the image has changed from one frame to the next. -
Page 522
choose MP4 from the File Format menu, choose H.264 from the Video Format menu, click Video Options, and select Best Quality. Image Size Specifies the pixel dimensions of your exported video. Current maintains the source material size. To specify a size not listed in the Image Size menu, choose Custom. -
Page 523
its file size. If you are using the same codec to capture and export, and you’ve rendered previews of a sequence, you can save rendering time by matching the export quality setting with your original capture quality setting. Increasing quality above the original capture quality does not increase quality, but may result in longer rendering times. -
Page 524
You can create new video layers by adding a video file as a new layer or creating a blank layer. For a video on working with video layers, see www.adobe.com/go/vid0027 Open a video file Choose File > Open, select a video file, and click Open. -
Page 525
Layers (In timeline mode) with the layer duration bar selected to drag Move the current-time indicator to the frame you want as the new In or Out point, and from the Animation panel menu, choose Trim Layer Start To Current Time or Trim Layer End To Current Time. This shortens the layer duration by hiding the frames between the current-time indicator and either the start or the end of the layer. -
Page 526
You can also group a group of layers. Besides nesting your layers in a more complex hierarchy, grouping a group of layers lets you simultaneously animate the opacity of all the grouped layers. The Animation panel displays a group of grouped layers with a common opacity layer property. Grouping video layers in Photoshop is similar to precomposing in Adobe After Effects. -
Page 527
In the Layers panel, select two or more layers and do one of the following: Choose Layer > Group Layers. Choose Layer > Smart Objects > Convert to Smart Object. To the top Rasterize video layers (Photoshop Extended) When you rasterize video layers, the selected layer is flattened to a composite of the current frame selected in the Animation panel. Although it’s possible to rasterize more than one video layer at a time, you’ll only be able to specify the current frame for the topmost video layer. -
Page 528
2. In the Open dialog box, for Files Of Type (Windows) or Enable (Mac OS), choose either All Readable Documents or QuickTime Movie. 3. Select a video file and then click Open. You can also open video directly from Bridge: select a video file and then choose File > Open With > Adobe Photoshop. To the top Import image sequences (Photoshop Extended) When you import a folder of sequenced image files, each image becomes a frame in a video layer. -
Page 529
4. Click the Commit Transform button in the options bar to place the file. You can also place video directly from Adobe Bridge. Select the video file and then choose File > Place > In Photoshop. To the top Reload footage in a video layer (Photoshop Extended) If the source file for a video layer is modified in a different application, Photoshop Extended generally reloads and updates the footage, when you open the document containing the video layer referencing the changed source file. -
Page 530
Item with premultiplied channels (top) appears with a black halo when interpreted as Straight-Unmatted (lower-left). When interpreted as Premultiplied-Matte with black specified as background color, halo does not appear (lower-right). More Help topics About missing and mismatched color profiles Working with Image Sequences Legal Notices Online Privacy Policy… -
Page 531
You can lock in the source frame you first sampled, or enter a frame offset value to change the source to a different frame, relative to the frame you first sampled. For a video on cloning frames, see www.adobe.com/go/vid0025. Clone video or animation content 1. -
Page 532
Photoshop document, you may need to make adjustments. For example, a standard definition video movie may be in SDTV 601 NTSC, while the Photoshop Extended document is in Adobe RGB. Your final exported video or document might not have the colors you expect due to the color space mismatch. -
Page 533
Previewing video and animations Preview a frame animation Set the timeline area to preview (Photoshop Extended) Previewing video or timeline animations (Photoshop Extended) Preview your document on a video monitor To the top Preview a frame animation 1. Do one of the following: Click the Play button in the Animation panel. -
Page 534
To see a more accurate preview of an animation created for the web, preview the animation in a web browser. Use the browser’s Stop and Reload commands to stop or replay the animation. Open the Save For Web & Devices dialog box, and click the Preview In Browser button. Preview audio for video layers (Photoshop Extended) When you enable audio previews for video layers, Photoshop Extended includes the audio in files exported to QuickTime Movie format. -
Page 535
6. Select the Apply Pixel Aspect Ratio To Preview check box to display the image using the document’s (nonsquare) pixel aspect ratio. Deselect this option to display the image as it appears on your computer (square pixel) monitor. By default, the Apply Pixel Aspect Ratio To Preview check box is selected to maintain the image’s pixel aspect ratio. In general, you would deselect this option if the document’s pixel aspect ratio is assumed to be square and you want to view the image as it would appear on a computer (square pixel) monitor. -
Page 536
Filters and effects To learn more, view these recommended resources online. Blur gallery overview Kelby (May. 7, 2012) video-tutorial Quick, creative control in a dedicated blur workspace. Using the new three-part Blur Gallery Lynda.com (May. 7, 2012) video-tutorial Focus the eye with precisely placed blurs. -
Page 537
Photographic blur gallery | CS6 Blur gallery Applying Blur gallery effects as smart filters | Creative Cloud only Blur effects Use the Blur gallery to quickly create three distinct photographic blur effects with intuitive on-image controls. Add Field Blur, Iris Blur, or a Tilt-Shift effect to a picture. Each blur tool provides intuitive overlay controls to apply and control the blur effect. With the blur adjustments complete, use the Bokeh controls to style the overall blur effect. -
Page 538
A. Sharp area B. Fade area C. Blur area 2. Drag the handles to move them to redefine the various areas. 3. Drag the blur handle to increase or decrease the blur. You can also use the Blur Tools panel to specify a blur value. Press the M key, to view the blur mask applied to the image. -
Page 539
To the top Blur effects You can enhance the overall picture, by controlling the appearance of out-of-focus or blurred parts. Specify the bokeh parameters to ensure an overall pleasing effect. In the Blur Effects panel, specify a value for the following: Light Bokeh Brightens the out of focus, or blurred areas in the picture Bokeh Color… -
Page 540
Adaptive wide angle filter | CS6 Use the Adaptive Wide Angle filter to correct lens distortions due to using wide angle lenses. You can quickly straighten lines that appear curved in panoramas, or photos taken with fish-eye and wide angle lenses. For example, buildings seem to be leaning inwards when captured using a wide- angle lens. -
Page 541
Twitter™ and Facebook posts are not covered under the terms of Creative Commons. Legal Notices Online Privacy Policy… -
Page 542
3D-like effects and save your own styles for use in other images. Note: The Lighting Effects filter works only on RGB images. You must have a supported video card to use Lighting Effects. For more information, Photoshop CS6 GPU FAQ. 1. Choose Filter > Render > Lighting Effects. -
Page 543
Spot Casts an elliptical beam of light. The line in the preview window defines the light direction and angle, and the handles define the edges of the ellipse. To the top Adjust a Point light in the preview window 1. In the Properties panel, choose Point from the top menu. 2. -
Page 544
Soft Direct Lights Two unfocused white and blue directional lights. White has a soft (20) intensity. Blue has a medium (67) intensity. Soft Omni A soft omni light of medium (50) intensity. Soft Spotlight A white spotlight of full (98) intensity with a wide (100) focus. Three Down Three white spotlights of soft (35) intensity with a wide (96) focus. -
Page 545: Filter Basics
You can use filters to clean up or retouch your photos, apply special art effects that give your image the appearance of a sketch or impressionistic painting, or create unique transformations using distortions and lighting effects. The filters provided by Adobe appear in the Filter menu. Some filters provided by third-party developers are available as plug-ins.
-
Page 546
To the top Filter Gallery overview The Filter Gallery provides a preview of many of the special effects filters. You can apply multiple filters, turn on or off the effect of a filter, reset options for a filter, and change the order in which filters are applied. When you are satisfied with the preview, you can then apply it to your image. Not all filters in the Filter menu are available in the Filter Gallery. -
Page 547
To rearrange applied filters, drag the filter to a new position in the applied filter list in the lower right corner of the Filter Gallery dialog box. To remove applied filters, select a filter in the applied filter list, and click the Delete Layer icon 6. -
Page 548
Legal Notices Online Privacy Policy… -
Page 549: Filter Effects Reference
Other filters Digimarc filters Vanishing Point Note: Complete information on using some filters is available in other sections. Search Adobe Help for information on the sharpening, blurring, Lens Correction, Lens Blur, Noise Reduction, Liquify, and Vanishing Point filters. To the top Artistic filters Filters from the Artistic submenu help you achieve painterly and artistic effects for a fine arts or commercial project.
-
Page 550
Before (left) and after (right) using the Lens Blur filter; the background is blurred but the foreground stays sharp. Note: To apply a Blur filter to the edges of a layer, deselect the Lock Transparent Pixel option in the Layers panel. Average Finds the average color of an image or selection, and then fills the image or selection with the color to create a smooth look. -
Page 551
blacks. To the top Distort filters The Distort filters geometrically distort an image, creating 3D or other reshaping effects. Note that these filters can be very memory-intensive. The Diffuse Glow, Glass, and Ocean Ripple filters can be applied through the Filter Gallery. Diffuse Glow Renders an image as though it were viewed through a soft diffusion filter. -
Page 552
Facet Clumps pixels of solid or similar colors into blocks of like-colored pixels. You can use this filter to make a scanned image look hand-painted or to make a realistic image resemble an abstract painting. Fragment Creates four copies of the pixels in the selection, averages them, and offsets them from each other. Mezzotint Converts an image to a random pattern of black-and-white areas or of fully saturated colors in a color image. -
Page 553
color for dark areas and the background color for light areas. For a truer effect, change the foreground color to one of the common Conté Crayon colors (black, sepia, or sanguine) before applying the filter. For a muted effect, change the background color to white, add some of the foreground color to the white background, and then apply the filter. -
Page 554: Other Filters
replace the discarded lines by duplication or interpolation. NTSC Colors Restricts the gamut of colors to those acceptable for television reproduction, to prevent oversaturated colors from bleeding across television scan lines. To the top Other filters Filters in the Other submenu let you create your own filters, use filters to modify masks, offset a selection within an image, and make quick color adjustments.
-
Page 555
Smudge image areas The Smudge tool simulates the effect you see when you drag a finger through wet paint. The tool picks up color where the stroke begins and pushes it in the direction you drag. 1. Select the Smudge tool 2. -
Page 556
Oil Paint filter | CS6 Use the Oil Paint filter in Photoshop CS6 to give an image the look of a classic painting. 1. Choose Filter > Oil Paint. 2. Experiment with the Brush and Lighting options. 3. Click OK to apply the filter. -
Page 557
Add Lighting Effects (CS5) Run Photoshop in 32-bit mode (64-bit Mac OS only)p Apply the Lighting Effects filter Lighting Effects types Adjust an Omni light Adjust directional light using the preview window Adjust the spotlight using the preview window Lighting Effects styles Add or delete a light Create, save, or delete a Lighting Effects style Use the Texture Channel in the Lighting Effects… -
Page 558
You can choose from several lighting types: Omni Shines light in all directions from directly above the image—like a light bulb over a piece of paper. Directional Shines light from far away so that the light angle doesn’t change—like the sun. Spotlight Casts an elliptical beam of light. -
Page 559
Five Lights Down/Five Lights Up Five white spotlights, down or up, of full (100) intensity with a wide (60) focus. Flashlight An omni yellow light of medium (46) intensity. Flood Light A white spotlight of medium (35) intensity with a wide (69) focus. Parallel Directional A directional blue light of full (98) intensity with no focus. -
Page 560: Applying Specific Filters
Applying specific filters Load images and textures for filters Set texture and glass surface controls Defining undistorted areas Apply the Dust And Scratches filter Apply the Displace filter Apply the Color Halftone filter Apply the Extrude filter Apply the Trace Contour filter Create a Custom filter To the top Load images and textures for filters…
-
Page 561
If the map has more than one channel, the first channel controls the horizontal displacement, and the second channel controls the vertical displacement. The filter creates displacement maps using a flattened file saved in Adobe Photoshop format. (Bitmap mode images are unsupported.) 1. Choose Filter > Distort > Displace. -
Page 562
Use the Info panel in Grayscale mode to identify a color value that you want traced. Then enter the value in the Level text box. To the top Create a Custom filter 1. Choose Filter > Other > Custom. The Custom dialog box displays a grid of text boxes into which you can enter numeric values. 2. -
Page 563
Layer effects and styles About layer effects and styles Apply preset styles Layer Style dialog box overview Apply or edit a custom layer style Layer style options Modify layer effects with contours Set a global lighting angle for all layers Display or hide layer styles Copy layer styles Scale a layer effect… -
Page 564
Click a style in the Styles panel to apply it to the currently selected layers. Drag a style from the Styles panel onto a layer in the Layers panel. Drag a style from the Styles panel to the document window, and release the mouse button when the pointer is over the layer content to which you want to apply the style. -
Page 565
To edit an existing style, double-click an effect displayed below the layer name in the Layers panel. (Click the triangle next to the Add a Layer Style icon to display the effects contained in the style.) 3. Set effect options in the Layer Style dialog box. See Layer style options. 4. -
Page 566
apply a glow that emanates from the inside edges of the layer’s content. Spread Expands the boundaries of the matte prior to blurring. Style Specifies the style of a bevel: Inner Bevel creates a bevel on the inside edges of the layer contents; Outer Bevel creates a bevel on the outside edges of the layer contents;… -
Page 567
Using global light gives the appearance of a common light source shining on the image. Do one of the following: Choose Layer > Layer Style > Global Light. In the Global Light dialog box, enter a value or drag the angle radius to set the angle and altitude, and click OK. -
Page 568
1. In the Layers panel, expand the layer style to see its effects. 2. Drag the effect to the Delete icon Remove a style from a layer 1. In the Layers panel, select the layer containing the style you want to remove. 2. -
Page 569
Save a set of preset styles as a library 1. Do one of the following: Choose Save Styles from the Styles panel menu. Select Styles on the left side of the Layer Style dialog box. Then choose Save Styles from the pop-up menu. When using a shape or Pen tool, click the layer style thumbnail in the options bar. -
Page 570
Saving and exporting… -
Page 571: Saving Images
Save a file Set file saving preferences Save large documents Export layers to files Testing Photoshop images for mobile devices with Adobe Device Central (CS5) Create mobile content with Adobe Device Central and Photoshop (CS5) To the top Save a file Use the Save command to save changes to the current file or the Save As command to save changes to a different file.
-
Page 572
7. Click Run. To the top Testing Photoshop images for mobile devices with Adobe Device Central (CS5) Device Central enables Photoshop users to preview how Photoshop files will look on a variety of mobile devices. Creative professionals can create Photoshop files specifically for mobile devices and easily test the files. Users can create a document in… -
Page 573
For example, a user interface designer might use Photoshop to create mock-ups. The designer can test the mock-ups on a variety of handsets, make necessary adjustments, and pass the improved mock-ups to developers. To the top Create mobile content with Adobe Device Central and Photoshop (CS5) 1. Start Photoshop. 2. Select File > New. -
Page 574: File Formats
File formats Choosing a file format About file compression Maximize compatibility for PSD and PSB files Photoshop format (PSD) Photoshop 2.0 format Photoshop DCS 1.0 and 2.0 formats Photoshop EPS format Photoshop Raw format Digital Negative format (DNG) BMP format Cineon format DICOM format JPEG format…
-
Page 575
Because of the tight integration between Adobe products, other Adobe applications, such as Adobe Illustrator, Adobe InDesign, Adobe Premiere, Adobe After Effects, and Adobe GoLive, can directly import PSD files and preserve many Photoshop features. For more information, see Help for the specific Adobe applications. -
Page 576
The Camera Raw plug-in can save camera raw image data in the DNG format. For more information about the Digital Negative (DNG) file format, visit www.adobe.com and search on the term “Digital Negative.” You’ll find comprehensive information and a link to a user forum. -
Page 577: Jpeg Format
PDF also supports JPEG and ZIP compression, except for Bitmap-mode images, which use CCITT Group 4 compression. Standard PDF files Created when Preserve Photoshop Editing Capabilities is deselected in the Save Adobe PDF dialog box, or by using another application such as Adobe Acrobat or Illustrator. Standard PDF files can contain multiple pages and images.
-
Page 578
To the top PICT Resource (Mac OS) A PICT resource is a PICT file but takes a name and resource ID number. The PICT Resource format supports RGB images with a single alpha channel, and Indexed Color, Grayscale, and Bitmap mode images without alpha channels. You can use the Import command or the Open command to open a PICT resource. -
Page 579
TIFF format supports CMYK, RGB, Lab, Indexed Color, and Grayscale images with alpha channels and Bitmap mode images without alpha channels. Photoshop can save layers in a TIFF file; however, if you open the file in another application, only the flattened image is visible. Photoshop can also save notes, transparency, and multiresolution pyramid data in TIFF format. -
Page 580
Video import formats .264* 3GP, 3GPP* AVC* F4V* FLV* MOV (QuickTime) MPE* MPEG-1 MPEG-4 MPEG-2 if a decoder is installed (for example, with an Adobe video suite) MTS* MXF* R3D* VOB* Video export formats DPX* MOV (QuickTime) Graphic file formats Photoshop PSD… -
Page 581
PICT Resource (Mac only, can open only) Radiance 3D-related formats 3D Studio (import only) DAE (Collada) Flash 3D* (export only) JPS* (JPEG Stereo) KMZ (Google Earth 4) MPO* (Multi-Picture format) Wavefront|OBJ Twitter™ and Facebook posts are not covered under the terms of Creative Commons. Legal Notices Online Privacy Policy… -
Page 582
Photoshop and most recent applications can read files using either IBM PC or Macintosh byte order. Save Image Pyramid Preserves multiresolution information. Photoshop does not provide options for opening multiresolution files; the image opens at the highest resolution within the file. However, Adobe InDesign and some image servers provide support for opening multiresolution formats. -
Page 583
Format Options Specifies the format of your JPEG file. Baseline (“Standard”) uses a format recognized by most web browsers. Baseline Optimized creates a file with optimized color and a slightly smaller file size. Progressive displays a series of increasingly detailed versions of the image (you specify how many) as it downloads. -
Page 584
JPEG Compresses the file by discarding some image data. You can choose the amount of JPEG compression from very little (JPEG Maximum Quality) to a lot (JPEG Low Quality). Files with JPEG encoding can be printed only on Level 2 (or later) PostScript printers and may not separate into individual plates. -
Page 585: Saving Pdf Files
PDF document. For more information, see PDF compatibility levels. 4. (Optional) Select General in the left pane of the Save Adobe PDF dialog box to set general PDF file saving options. For details of each option, see General options for Adobe PDF.
-
Page 586
9. (Optional) If you want to reuse the PDF save settings, click Save Preset and save your settings as a PDF preset. The new preset appears in the Adobe PDF Preset menu the next time you save a Photoshop PDF file and in any product in the Adobe Creative Suite. See also Save an Adobe PDF preset. -
Page 587
PDF archiving are PDF/A-1a, and PDF/A-1b (for less stringent requirements). Note: For more information on PDF/X and PDF/A, see the ISO website and the Adobe website. To the top PDF compatibility levels When you create PDFs, you need to decide which PDF version to use. You can change the PDF version by switching to a different preset or choosing a compatibility option when you save as PDF or edit a PDF preset. -
Page 588
Color Management is on or off and which PDF standard is selected. Color Conversion Specifies how to represent color information in the Adobe PDF file. When you convert color objects to RGB or CMYK, also select a destination profile from the pop-up menu. All spot color information is preserved during color conversion; only the process color equivalents convert to the designated color space. -
Page 589
In Photoshop, you can save the preset using the Adobe PDF Presets command or clicking the Save Preset button in the Save Adobe PDF dialog box. Adobe PDF presets are saved as files with a .joboptions extension. This is useful, for example, if you want your vendor or printer to send you a .joboptions file with the Adobe PDF presets that work best with their workflow. -
Page 590
To save settings as a new preset, click the New button, specify settings in the New PDF Preset dialog box, and click OK. To edit an Adobe PDF preset, select the preset in the Preset window, click the Edit button, and change settings in the Edit PDF Preset dialog box. -
Page 591
Web photo gallery style tokens To create web galleries with Photoshop CS5, see Create a web photo gallery in Adobe Bridge Help. To use the older, optional Web Photo Gallery plug-in described in the topics below, first download and install it for Windows… -
Page 592
Making sure that your colors match If you work with photos in a wide-gamut color working space such as ProPhoto RGB or Adobe RGB, image colors may change when viewed in a web gallery by a browser that doesn’t read embedded color profiles. If this happens, try converting the image profiles to sRGB (which most browsers use as a default) before optimizing them or including them in a Web Photo Gallery. -
Page 593
Custom Colors Options for colors of elements in the gallery. To change the color of an element, click its color swatch and then select a new color from the Adobe Color Picker. You can change the background color of each page (Background option) and of the banner (Banner option). -
Page 594
%CHARSET% Determines the character set used on each page. %CONTACTINFO% Determines the contact information for the gallery, such as phone number and location. %CONTENT_GENRATOR% Expands to “Adobe Photoshop CS5 Web Photo Gallery.” %COPYRIGHT% Inserts the copyright information for a caption from the file information. -
Page 595
%CREDITS% Inserts the credits for a caption from the file information. %CURRENTINDEX% Determines the link for the current home page. %CURRENTINDEXANCHOR% Resides in SubPage.htm and points to the first index page. %DATE% Determines the date that appears on the banner. %EMAIL% Determines the e-mail address contact information for the gallery. -
Page 596
Digimarc copyright protection Read a Digimarc watermark Adding digital copyright information Before adding a digital watermark Embed a watermark Using the Watermark Durability setting Check the signal strength meter Note: Digimarc plug-ins require a 32-bit operating system. They are unsupported in 64-bit versions of Windows and Mac OS. To the top Read a Digimarc watermark 1. -
Page 597
To the top Embed a watermark To embed a digital watermark, you must first register with Digimarc Corporation—which maintains a database of artists, designers, and photographers and their contact information—to get a unique Digimarc ID. You can then embed the Digimarc ID in your images, along with information such as the copyright year or a restricted-use identifier. -
Page 598
Printing… -
Page 599
Printing from Photoshop CS6 Printing basics About desktop printing Print images Position and scale images Print part of an image Print vector data To the top Printing basics Whether you are printing an image to your desktop printer or sending it to a prepress facility, knowing a few basics about printing makes the print job go more smoothly and helps ensure that the finished image appears as intended. -
Page 600
1. Choose File > Print. 2. Select the printer, number of copies, and layout orientation. 3. In the preview area at left, visually adjust the position and scale of the image relative to the selected paper size and orientation. Or to the right, set detailed options for Position And Size, Color Management, Printing Marks, and so on. -
Page 601
include vector data, Photoshop sends the printer a separate image for each type layer and each vector shape layer. These additional images are printed on top of the base image, and clipped using their vector outline. Consequently, the edges of vector graphics print at the printer’s full resolution, even though the content of each layer is limited to the resolution of your image file. -
Page 602
Printing from Photoshop CS5 Printing basics About desktop printing Print images Position and scale images Print vector data To the top Printing basics Whether you are printing an image to your desktop printer or sending it to a prepress facility, knowing a few basics about printing makes the print job go more smoothly and helps ensure that the finished image appears as intended. -
Page 603
Print dialog box A. Preview print B. Set printer and print job options C. Set paper orientation D. Position and scale image E. Specify prepress output options F. Specify color management and proofing options 2. Select the printer, number of copies, and paper orientation. In Mac OS, send 16-bit data to the printer to produce the highest possible quality in subtle graduated tones, such as bright skies. -
Page 604
Note: The Print dialog box may not reflect accurate values for Scale, Height, and Width if you set a scaling percentage in the Print Settings dialog box. To avoid inaccurate scaling, specify scaling using the Print dialog box rather than the Print Settings dialog box; do not enter a scaling percentage in both dialog boxes. -
Page 605
Printing with color management in Photoshop CS6 Let Photoshop determine printed colors Let printer determine printed colors Print a hard proof To better understand color management concepts and workflows, see Understanding Color Management. To the top Let Photoshop determine printed colors If you have a custom color profile for a specific printer, ink, and paper combination, letting Photoshop manage colors often produces better results than letting the printer manage colors. -
Page 606
Note: The Document Profile entry shows the profile embedded in the image. 3. For Color Handling, choose Printer Manages Colors. 4. (Optional) For Rendering Intent, specify how to convert colors to the destination color space. A summary of each option appears in the Description area at bottom. -
Page 607
Printing with color management | CS5 Let Photoshop determine printed colors Let printer determine printed colors Print a hard proof To better understand color management concepts and workflows, see Understanding Color Management. To the top Let Photoshop determine printed colors If you have a custom color profile for a specific printer, ink, and paper combination, letting Photoshop manage colors often produces better results than letting the printer manage colors. -
Page 608
Choose Color Management to display additional options. 3. Select Document. The profile is displayed in parentheses on the same line. 4. For Color Handling, choose Printer Manages Colors. 5. (Optional) Choose a rendering intent for converting colors to the destination color space. Many non-PostScript printer drivers ignore this option and use the Perceptual rendering intent. -
Page 609
The profile that appears in parentheses, should match the proof setup you selected earlier. 5. For Color Handling, choose Photoshop Manages Colors. 6. For Printer Profile, select the profile for your output device. 7. (Optional) Set any of the following options. Proof Setup This option is available if you select Proof from the Print area. -
Page 610
(Bridge) Select a folder of images or specific image files. From the Bridge menu, choose Tools > Photoshop > Contact Sheet II. Unless you select specific images, the contact sheet will include all the images currently displayed in Adobe Bridge. You can select a different images after the Contact Sheet II dialog box opens. -
Page 611
Duotones About duotones Convert an image to duotone Modify the duotone curve for a given ink Specifying overprint colors Adjust the display of overprint colors Saving and loading duotone settings View the individual colors of a duotone image Printing duotones Exporting duotone images to other applications To the top About duotones… -
Page 612
the vertical axis. You can specify up to 13 points on the curve. When you specify two values along the curve, Photoshop calculates intermediate values. As you adjust the curve, values are automatically entered in the percentage text boxes. The value you enter in the text box indicates the percentage of the ink color used to represent the grayscale value in the original image. For example, if you enter 70 in the 100% text box, a 70% tint of that ink color is used to print the 100% shadows. -
Page 613
Exporting duotone images to other applications To export a duotone image to a page-layout application, you must first save the image in EPS or PDF format. (However, if the image contains spot channels, convert it to Multichannel mode and save it in DCS 2.0 format.) Remember to name custom colors using the appropriate suffix so that the importing application can recognize them. -
Page 614
Print photos in a picture package layout Create a contact sheet To create contact sheets in Photoshop CS5, see Create a PDF contact sheet in Adobe Bridge Help. You can also download the older, optional Picture Package and Contact Sheet plug-ins for Windows To the top… -
Page 615
Click a placeholder in the Picture Package preview layout, then browse to select an image. Drag an image from the desktop or a folder into a placeholder. Add an image to a picture package by dragging the image from the desktop into a placeholder. You can change any image in the layout by clicking a placeholder and browsing to select an image. -
Page 616
Create contact sheets with Adobe Bridge The image search and sorting capabilities of Adobe Bridge make it easy to create contact sheets. In Bridge, the Adobe Output Module creates contact sheets in PDF format, which any recipient can review, annotate, and print using the free Adobe Reader. -
Page 617
layer and each caption is on a separate text layer. 6. In the Thumbnails area, specify layout options for the thumbnail previews. For Place, choose whether to arrange thumbnails across first (from left to right, then top to bottom) or down first (from top to bottom, then left to right). -
Page 618: Printing Images To A Commercial Printing Press
These adjustments should be very minor. Flatten the file if necessary, then send the CMYK file to the professional printer. Place your RGB or CMYK image in Adobe InDesign or Adobe Illustrator. In general, most images printed on a commercial press are not printed directly from Photoshop but from a page-layout program like Adobe InDesign or an illustration program like Adobe Illustrator.
-
Page 619
Page marks A. Gradient tint bar B. Label C. Registration marks D. Progressive color bar E. Corner crop mark F. Center crop mark G. Description H. Star target 1. Choose File > Print. 2. Choose Output from the pop-up menu. 3. -
Page 620
Note: If you are printing an image from another application and want to print spot channels to spot color plates, you must first save the file in DCS 2.0 format. DCS 2.0 preserves spot channels. This format is supported by applications such as Adobe InDesign and QuarkXPress. -
Page 621
Trapping to correct misalignment A. Misregistration with no trap B. Misregistration with trap Trapping is intended to correct the misalignment of solid colors. In general, you don’t need traps for continuous-tone images such as photographs. Excessive trapping may produce an outline effect. These problems may not be visible on-screen and might show up only in print. Photoshop uses standard rules for trapping: All colors spread under black. -
Page 622: Printing Spot Colors
Printing spot colors About spot colors Create a new spot channel Convert an alpha channel to a spot channel Edit a spot channel to add or remove color Change a spot channel’s color or solidity Merge spot channels Adjust overlapping spot colors To the top About spot colors Spot colors are special premixed inks used instead of, or in addition to, the process color (CMYK) inks.
-
Page 623
Solidity at 100% and solidity at 50%. Note: The Solidity and color choice options affect only on-screen previews and composite prints. They have no effect on printed separations. To the top Convert an alpha channel to a spot channel 1. If a selection is active in the image, choose Select > Deselect. 2. -
Page 624
To the top Adjust overlapping spot colors To prevent overlapping spot colors from either printing over or knocking out the underlying spot color, remove one of the spot colors where they overlap. Use a printed sample of the overprinted inks to adjust your screen display to help you predict how colors will look when printed. Note: In some cases, such as when you use varnish and bump plates, you may want colors to overprint. -
Page 625
Automation To learn more, view these recommended resources online. Batch Actions Infinite Skills (Aug. 9, 2012) video-tutorial… -
Page 626
About actions and the Actions panel About actions Actions panel overview For more information about actions To the top About actions An action is a series of tasks that you play back on a single file or a batch of files—menu commands, panel options, tool actions, and so on. For example, you can create an action that changes the size of an image, applies an effect to the image, and then saves the file in the desired format. -
Page 627
Legal Notices Online Privacy Policy… -
Page 628: Creating Actions
Creating actions Guidelines for recording actions Record an action Record a path Insert a stop Change settings when playing an action Exclude commands from an action Insert a non-recordable menu command Edit and rerecord actions To the top Guidelines for recording actions Keep in mind the following guidelines when recording actions: You can record most—but not all—commands in an action.
-
Page 629
Record a path The Insert Path command lets you include a complex path (a path created with a pen tool or pasted from Adobe Illustrator) as part of an action. When the action is played back, the work path is set to the recorded path. You can insert a path when recording an action or after it has been recorded. -
Page 630
To exclude or include all commands or actions in an action or set, click the check mark to the left of the action or set name. To exclude or include all commands except the selected command, Alt-click (Windows) or Option-click (Mac OS) its check mark. To indicate that some of the commands within the action are excluded, in Photoshop the check mark of the parent action turns red;… -
Page 631
Playing and managing actions Play an action on a file Specify playback speed Manage actions Manage action sets For more information about actions To the top Play an action on a file Playing an action executes the action’s recorded commands in the active document. (Some actions require that you make a selection before playing;… -
Page 632
Alt-drag (Windows) or Option-drag (Mac OS) the action or command to a new location in the Actions panel. When the highlighted line appears in the desired location, release the mouse button. Select an action or command. Then choose Duplicate from the Actions panel menu. Drag an action or command to the Create New Action button at the bottom of the Actions panel. -
Page 633
2. Click OK to replace the current actions in the Actions panel with the default set, or click Append to add the set of default actions to the current actions in the Actions panel. Organize action sets To help you organize your actions, you can create sets of actions and save the sets to disk. You can organize sets of actions for different types of work—such as print publishing and online publishing—and transfer sets to other computers. -
Page 634: Processing A Batch Of Files
Processing a batch of files Convert files with the Image Processor Process a batch of files Create a droplet from an action Batch and droplet processing options To the top Convert files with the Image Processor TheImage Processor converts and processes multiple files. Unlike the Batch command, the Image Processor lets you process files without first creating an action.
-
Page 635
Opened Files Processes all open files. Bridge Processes selected files in Adobe Bridge. If no files are selected, the files in the current Bridge folder are processed. 4. Set processing, saving, and file naming options. For descriptions of the Batch dialog box settings see Batch and droplet processing options. -
Page 636
Actions are the basis for creating droplets—you must create the desired action in the Actions panel before creating a droplet. (See Creating actions.) 1. Choose File > Automate > Create Droplet. 2. Specify where to save the droplet. Click Choose in the Save Droplet In section of the dialog box and navigate to the location. 3. -
Page 637
include at least one field that is unique for every file (for example, filename, serial number, or serial letter) to prevent files from overwriting each other. Starting Serial Number specifies the starting number for any serial number fields. Serial letter fields always start with the letter “A” for the first file. -
Page 638
VB Script. In Mac OS, you can use languages such as AppleScript that allow you to send Apple events. These languages are not cross-platform but can control multiple applications such as Adobe Photoshop, Adobe Illustrator, and Microsoft Office. In Mac OS, you can also use Apple’s Photoshop Actions for Automator to control tasks in Photoshop. -
Page 639
Creating data-driven graphics Define variables Rename a variable Define a data set Preview or apply a data set Generate graphics using data sets Creating data sets in external files Import a data set Data-driven graphics make it possible to produce multiple versions of an image quickly and accurately for print or web projects. For example, you can produce 100 versions of a web banner with different text and images, all based on a template design. -
Page 640
content of a layer. Pixel Replacement variables replace the pixels in the layer with pixels from another image file. Text Replacement variables replace a string of text in a type layer. Note: GoLive recognizes all text and visibility variables, but not Pixel Replacement variables. Two versions of an image based on the same template A. -
Page 641
1. Choose Image > Variables > Define. 2. Choose the layer that contains the variable from the Layer pop-up menu. 3. To rename the variable, enter a name in the Name text box. Variable names must begin with a letter, underscore, or colon and cannot contain spaces or special characters (except for periods, hyphens, underscores, and colons). -
Page 642
Value1-2<sep>Value2-2<sep><sep>ValueN-2<nl> Value1-M<sep>Value2-M<sep><sep>ValueN-M<nl> All the variable names are listed on the first line, in the order that the values are given in subsequent lines. Each subsequent line represents one data set, with the values for each variable given. To create multiple lines of text in a single line of text in a data set, enclose the text in double quotes and insert hard returns in the tab- or comma-separated file where you want the breaks to occur. -
Page 643
Adding conditional actions | Creative Cloud Conditional actions let you build actions that choose what to do based on one of several different conditions. First, you choose a condition and then, optionally specify an action that plays if the document meets the condition. Then, you optionally specify an action that plays if the document does not meet the condition. -
Page 644
Recording tools in actions | CS6 Photoshop CS6 lets you record tools such as the brush tool in your action. To enable this feature, choose Allow Tool Recording from the Actions panel menu. A couple items to keep in mind: When recording a tool, choose your brush as part of the action or Photoshop uses the currently selected brush. -
Page 645
Adding a conditional mode change to an action Add a conditional mode change to an action To the top Add a conditional mode change to an action You can specify conditions for a mode change so that the conversion can occur during an action, which is a series of commands applied sequentially to a single file or a batch of files. -
Page 646
Web graphics… -
Page 647
Web photo gallery style tokens To create web galleries with Photoshop CS5, see Create a web photo gallery in Adobe Bridge Help. To use the older, optional Web Photo Gallery plug-in described in the topics below, first download and install it for Windows… -
Page 648
Making sure that your colors match If you work with photos in a wide-gamut color working space such as ProPhoto RGB or Adobe RGB, image colors may change when viewed in a web gallery by a browser that doesn’t read embedded color profiles. If this happens, try converting the image profiles to sRGB (which most browsers use as a default) before optimizing them or including them in a Web Photo Gallery. -
Page 649
Custom Colors Options for colors of elements in the gallery. To change the color of an element, click its color swatch and then select a new color from the Adobe Color Picker. You can change the background color of each page (Background option) and of the banner (Banner option). -
Page 650
%CHARSET% Determines the character set used on each page. %CONTACTINFO% Determines the contact information for the gallery, such as phone number and location. %CONTENT_GENRATOR% Expands to “Adobe Photoshop CS5 Web Photo Gallery.” %COPYRIGHT% Inserts the copyright information for a caption from the file information. -
Page 651
%CREDITS% Inserts the credits for a caption from the file information. %CURRENTINDEX% Determines the link for the current home page. %CURRENTINDEXANCHOR% Resides in SubPage.htm and points to the first index page. %DATE% Determines the date that appears on the banner. %EMAIL% Determines the e-mail address contact information for the gallery. -
Page 652: Working With Web Graphics
Create web animations with the Animation panel, then export them as animated GIF images or QuickTime files. See Creating frame animations. Use Adobe Bridge to create a web photo gallery to quickly turn a set of images into an interactive web site, using a variety of professional- looking templates.
-
Page 653
Set the foreground color using the Color panel, the Swatches panel, or the Adobe Color Picker. From the Color panel menu, choose Copy Color As HTML or Copy Color’s Hex Code. In the Save For Web dialog box, click the color swatch or choose Matte > Other. In the Adobe Color Picker, right-click the hexadecimal value, and choose Copy. -
Page 654
Slicing web pages Slice types Slice a web page Convert auto and layer-based slices to user slices View slices and slice options Slices divide an image into smaller images that are reassembled on a web page using an HTML table or CSS layers. By dividing the image, you can assign different URL links to create page navigation, or optimize each part of an image using its own optimization settings. -
Page 655
Slice a web page You can use the slice tool to draw slice lines directly on an image, or design your graphic using layers, and then create slices based on the layers. Create a slice with the Slice tool 1. Select the Slice tool . -
Page 656
between slices: Slice lines Define the boundary of the slice. Solid lines indicate that the slice is a user slice or layer-based slice; dotted lines indicate that the slice is an auto slice. Slice colors Differentiate user slices and layer-based slices from auto slices. By default, user slices and layer-based slices have blue symbols, and auto slices have gray symbols. -
Page 657
Modifying slice layout Select one or more slices Move, resize, and snap user slices Divide user slices and auto slices Duplicate slices Copy and paste a slice Combine slices Change the stacking order of slices Align and distribute user slices Delete a slice Lock all slices To the top… -
Page 658
Dreamweaver, right-click (Windows) or Ctrl+click (Mac OS) the image and choose Design Notes, then locate the FilePathSrc field on the All Info tab. For a tutorial on copying and pasting between different applications, including Dreamweaver and Photoshop, see www.adobe.com/go/vid0193. To the top Combine slices You can combine two or more slices into a single slice. -
Page 659
To the top Change the stacking order of slices When slices overlap, the last slice you create is the top slice in the stacking order. You can change the stacking order to gain access to underlying slices. You can specify which slice is on the top and bottom of the stack and move slices up or down in the stacking order. Note: You cannot arrange the stacking order of auto slices. -
Page 660
Slice Options dialog box. 2. In the Slice Options dialog box, select a background color from the Background Color pop-up menu. Select None, Matte, White, Black, or Other (using the Adobe Color Picker). To the top Assign URL link information to an Image slice Assigning a URL to a slice makes the entire slice area a link in the resulting web page. -
Page 661
2. In the Slice Options dialog box, enter a URL in the URL text box. You can enter a relative URL or absolute (full) URL. If you enter an absolute URL, be sure to include the proper protocol (for example, http://www.adobe.com, not www.adobe.com). For more information on using relative and full URLs, see an HTML reference. -
Page 662
Legal Notices Online Privacy Policy… -
Page 663: Optimizing Images
Optimizing images About optimization Save For Web & Devices overview Preview image gamma at different values Optimize an image for the web Save or delete optimization presets Work with slices in the Save For Web & Devices dialog box Compress a web graphic to a specific file size Resize artwork while optimizing Generate CSS layers for web graphics Preview optimized images in a web browser…
-
Page 664
Save For Web & Devices dialog box (Photoshop version) A. Display options B. Toolbox C. Optimize pop-up menu D. Color Table pop-up menu E. Animation controls (Photoshop only) F. Zoom text box G. Preview In Browser menu H. Original image I. Optimized image Preview images in the dialog box Click a tab at the top of the image area to select a display option: Original Displays the image with no optimization. -
Page 665
To reset optimization settings to the last saved version, press Alt (Windows) or Option (Mac OS), and click Reset. To keep the same settings the next time you open the Save For Web & Devices dialog box, press Alt/Option and click Remember. For a video on saving files for the web in Illustrator, see www.adobe.com/go/vid0063. To the top Save or delete optimization presets You can save optimization settings as a named set and apply the settings to other images. -
Page 666
Visible Creates a visible CSS layer in the resulting HTML file. Hidden Creates a hidden CSS layer in the resulting HTML file. CSS layers are the same as GoLive layers. Using Adobe GoLive, you can animate a CSS layer and use built-in JavaScript actions to create interactive effects. -
Page 667
To the top Preview optimized images in a web browser You can preview an optimized image in any web browser installed on your system from the Save For Web & Devices dialog box (File > Save For Web & Devices). The browser preview displays the image with a caption listing the image’s file type, pixel dimensions, file size, compression specifications, and other HTML information. -
Page 668
Copy CSS from layers | Creative Cloud Copy CSS generates Cascading Style Sheet (CSS) properties from shape or text layers. It captures values for size, position, fill color (including gradients), stroke color, and drop shadow. For text layers, Copy CSS also captures values for font family, font size, font weight, line height, underline, strikethrough, superscript, subscript, and text alignment. -
Page 669: Output Settings For Web Graphics
Output settings for web graphics Set output options HTML output options Slice output options Background output settings Saving Files output settings Include title and copyright information with an image To the top Set output options Output settings control how HTML files are formatted, how files and slices are named, and how background images are handled when you save an optimized image.
-
Page 670
Generate Table Aligns slices using an HTML table rather than a cascading stylesheet. Empty Cells Specifies how empty slices are converted to table cells. Select GIF, IMG W&H to use a 1-pixel GIF with width and height values specified on the IMG tag. Select GIF, TD W&H to use a 1-pixel GIF with width and height values specified on the TD tag. Select NoWrap, TD W&H to place a nonstandard NoWrap attribute on the table data and also place width and height values specified on the TD tags. -
Page 671: Web Graphics Optimization Options
SWF—are resolution-independent and can be scaled up or down without losing any image quality. The vector formats can also include raster data. You can export from Save For Web & Devices to SVG and SWF in Adobe Illustrator only. To the top JPEG optimization options JPEG is the standard format for compressing continuous-tone images such as photographs.
-
Page 672
are blended with the selected color. To the top GIF and PNG-8 optimization options GIF is the standard format for compressing images with flat color and crisp detail, such as line art, logos, or illustrations with type. Like the GIF format, the PNG-8 format efficiently compresses solid areas of color while preserving sharp detail. -
Page 673
Pattern Applies a halftone-like square pattern to simulate any colors not in the color table. Noise Applies a random pattern similar to the Diffusion dither method, but without diffusing the pattern across adjacent pixels. No seams appear with the Noise dither method. Transparency and Matte Determines how transparent pixels in the image are optimized. -
Page 674
Example of Pattern Transparency dithering (left) and applied to a web page background (right) Interlace Displays a low-resolution version of the image in a browser while the full image file is downloading. Interlacing can make downloading time seem shorter and can assure viewers that downloading is in progress. However, interlacing also increases file size. Web Snap Specifies a tolerance level for shifting colors to the closest web palette equivalents (and prevent the colors from dithering in a browser). -
Page 675
Sort By Hue sorts by the location of the color on the standard color wheel (expressed as a degree from 0 to 360). Neutral colors are assigned a hue of 0 and located with the reds. Sort By Luminance sorts by the lightness or brightness of a color. Sort By Popularity sorts by the colors’… -
Page 676
1. Select Save Color Table from the Color Table palette menu. 2. Name the color table and choose a location where it will be saved. By default, the color table file is given the extension .act (for Adobe Color Table). -
Page 677
1. Select Load Color Table from the Color Table palette menu. 2. Navigate to a file containing the color table you want to load—either an Adobe Color Table (.act) file, an Adobe Color Swatch (.aco) file, or a GIF file (to load the file’s embedded color table). -
Page 678
SVG file is dynamic (such as server-generated text or user-interactive text). Font Type Specifies how fonts are exported. Adobe CEF Uses font hinting for better rendering of small fonts. This font type is supported by the Adobe SVG Viewer but may not be supported by other SVG viewers. -
Page 679
(UTF-8 is an 8-bit format; UTF-16 is a 16-bit format.) ISO 8859-1 and UTF-16 encoding don’t preserve file metadata. Optimize For Adobe SVG Viewer Optimizes images for Adobe SVG Viewer. More Help topics… -
Page 680
3D and technical imaging To learn more, view these recommended resources online. Streamlined 3d controls Lynda.com (May. 7, 2012) video-tutorial Expand creative possibilities into another dimension. New 3D reflections and dragable shadows Lynda.com (May. 7, 2012) video-tutorial Add realism with ease. -
Page 681
To the top Updated 3D features for Creative Cloud only In addition to the 3D features in Photoshop CS6 described in the following sections, there are these additional 3D enhancements in the Creative Cloud version: 32-bit color pickers can now be used when specifying colors for materials, lines, surfaces, or lights in the Properties panel. -
Page 682
In the streamlined 3D panel, select specific elements you want to edit: 1. At the top of the 3D panel, select Scene , Meshes , Materials , or Lights 2. Select an individual element (such as Current View in the Scene section). Or select multiple elements to apply uniform properties. 3. -
Page 683
To edit the original path, type, or image layer, selected the related mesh in the 3D panel, and click Edit Source in the Properties panel. Note: The Photoshop Extended CS5 Repousse feature is called 3D Extrusion in CS6. To the top Define ground planes for imported objects Quickly create perspective planes with the Vanishing Point filter, and snap an imported object to them. -
Page 684
Essential 3D concepts and tools (Photoshop CS5 Extended) Understanding and displaying 3D files (Photoshop Extended) 3D object and camera tools (Photoshop Extended) 3D Axis (Photoshop Extended) To the top Understanding and displaying 3D files (Photoshop Extended) Photoshop lets you position and animate 3D models, edit textures and lighting, and choose from several render modes. 3D fundamentals 3D files consist of the following components: Meshes… -
Page 685
3D object tools and options A. Return to initial object position B. Rotate C. Roll D. Pan E. Slide F. Scale G. Position menu H. Save current position I. Delete current position J. Position coordinates In the Tools panel, click a 3D object tool, and hold down the mouse button to select from the following types: Hold down Shift as you drag to constrain the Rotate, Pan, Slide, or Scale tool to a single direction of movement. -
Page 686
view. Change or create 3D camera views Do one of the following: Select a preset camera view of the model from the View menu. Note: All preset camera views use orthographic projection. To add a custom view, place the 3D camera in the desired position using the 3D camera tools, then click Save in the options bar. To return to the default camera view, select a 3D camera tool, and click the Return To Initial Camera Position icon in the options bar. -
Page 687
To resize the item, drag the center cube in the 3D Axis up or down. To compress or elongate the item along an axis, drag one of the colored transform cubes either toward or away from the center cube. To constrain movement to an object plane, move the mouse pointer into the area where two axes intersect, near the center cube. A yellow plane icon appears between two axes. -
Page 688
3D panel settings (Photoshop CS5 Extended) 3D panel overview (Photoshop Extended) 3D Scene settings (Photoshop Extended) 3D Mesh settings (Photoshop Extended) 3D Materials settings (Photoshop Extended) 3D Lights settings (Photoshop Extended) To the top 3D panel overview (Photoshop Extended) When you select a 3D layer, the 3D panel shows the components of the associated 3D file. The top section of the panel lists the meshes, materials, and lights in the file. -
Page 689
Choose Window > Workspace > Advanced 3D. Filter the 3D options displayed Click the Scene, Mesh, Materials, or Lights button at the top of the 3D panel. Show or hide a 3D mesh or light Click the eye icon next to the mesh or light entry in the top section of the 3D panel. Note: You cannot turn material display on or off from the 3D panel. -
Page 690
Render Settings Specifies the render preset for the model. To customize options, click Edit. For more information, see Change 3D render settings (Photoshop Extended). Quality Choose a setting which provides the best display quality while maintaining good performance: Interactive (Painting) Renders with OpenGL using the GPU on the video card, producing high-quality results, but lacking detailed reflections and shadows. -
Page 691
3. At the top of the dialog box, click the currently unselected Cross Section button By default all render settings are turned off for the alternate cross section, making it appear invisible. 4. Choose render options for the alternate cross section, and click OK. To the top 3D Mesh settings (Photoshop Extended) Each mesh in the 3D model appears on a separate line in the top section of the 3D panel. -
Page 692
A selected material and its associated texture maps. A. Displays Materials options B. Selected material C. Materials picker D. Material Drop and Select tools E. Texture map menu icon F. Texture map types For a selected material in the top section of the 3D panel, the lower section shows the particular texture maps used by that material. Some texture types, such as Diffuse and Bump, commonly rely on 2D files to supply a particular color or pattern that creates the texture. -
Page 693
Illumination Defines a color that doesn’t rely on lighting to display. Creates the effect that the 3D object is lit from within. Gloss Defines the amount of light from a source that reflects off the surface and back to the viewer. You can adjust glossiness by entering a value in the field or using the scrubby slider. -
Page 694
Click the material preview to display the preset pop-up panel. 1. In the 3D panel, click the material preview. 2. In the preset pop-up panel, do any of the following: To apply a preset, double-click a thumbnail preview. To create a preset from the current texture settings, click the pop-up menu icon , and choose New Material. -
Page 695
2. In the Color Picker, set brightness to 50%, and set R, G, and B values to equal values. Click OK. 3. In the 3D panel, click the folder icon next to Bump. 4. Choose New Texture. 5. Choose the following settings in the New dialog box: For Color Mode, choose Grayscale For Background Contents, choose Background Color. -
Page 696
Adjust light properties 1. In the Lights section of the 3D panel, select a light from the list. 2. In the lower half of the panel, set the following options: Preset applies a saved group of lights and settings. (See Save, replace, or add groups of lights.) Light Type… -
Page 697
Light Guides: A. Point light B. Spot light C. Infinite light Save, replace, or add groups of lights To store groups of lights for later use, save them as a preset. To include the preset in other projects, either add to or replace the existing lights. From the 3D panel menu , select any of the following: Save Lights Preset… -
Page 698
3D rendering and saving (Photoshop CS5 Extended) Change 3D render settings (Photoshop Extended) Render a 3D file for final output (Photoshop Extended) Saving and exporting 3D files (Photoshop Extended) To the top Change 3D render settings (Photoshop Extended) Render settings determine how 3D models are drawn. Photoshop installs several presets with common settings. Customize settings to create your own presets. -
Page 699
3. (Optional) To see the effect of new settings as you make changes, select Preview. Or, deselect this option to slightly improve performance. To specify unique settings for each half of a cross section, click the cross section buttons at the top of the dialog box. 4. -
Page 700
Parallax Adjusts the distance between the two stereo cameras. Higher settings increase three-dimensional depth but reduce depth of field, making items ahead or behind the focal plane appear out of focus. Lenticular Spacing For vertically interlaced images, specifies how many lines per inch the lenticular lens has. Focal Plane Determines the position of the focal plane relative to the center of the model’s bounding box. -
Page 701
U3D and KMZ support JPEG or PNG as texture formats. DAE and OBJ support all Photoshop-supported image formats for textures. 3. (Optional) If exporting to U3D format, choose an encoding option. ECMA 1 is compatible with Acrobat 7.0; ECMA 3 is compatible with Acrobat 8.0 and later and provides some mesh compression. -
Page 702
The Exposure and HDR Toning adjustments are primarily designed for 32-bit HDR images, but you can also apply them to 16- and 8-bit images to create HDR-like effects. For a video about applying HDR effects to16- or 8-bit images, see www.adobe.com/go/lrvid5011_ps_en Adjust HDR exposure Exposure works by performing calculations in a linear color space (gamma 1.0) rather than the current color space. -
Page 703
Create 3D animations (Photoshop Extended) To the top Create 3D repoussé (Photoshop Extended) Note: In Photoshop CS6 Extended the repousse feature has changed and is now called 3D Extrusion. See Create and adjust 3D Extrusions. The term repoussé describes a metalworking technique in which object faces are shaped and patterned by hammering on the opposite side. In Photoshop, the Repoussé… -
Page 704
Scene Settings Lights in the form of a spherical panorama shine onto the object; choose a style of lights from the menu. Render Settings control how object surfaces look. (See Select a render preset.) Higher Mesh Quality settings increase mesh density, improving appearance but reducing processing speed. -
Page 705
Create a 3D volume. For a video about creating 3D content from 2D layers, see www.adobe.com/go/lrvid4006_ps. Create a 3D postcard You can add a 3D postcard to an existing 3D scene to create a surface that displays shadows and reflections from other objects in the scene. -
Page 706
1. Open a 2D image and select the layer you want to convert to a postcard. 2. Choose 3D > New 3D Postcard From Layer. The 2D layer is converted to a 3D layer in the Layers panel. The 2D layer content is applied as a material to both sides of the postcard. The original 2D layer appears in the Layers panel as the Diffuse texture map for the 3D postcard object. -
Page 707
2D layer). When two texture maps reference the same file, the file appears only once in the Layers panel. To the top Create 3D animations (Photoshop Extended) Using the Photoshop Animation timeline, you can create 3D animations that move a 3D model through space and change the way it displays over time. -
Page 708
3D painting (Photoshop Extended) Reveal surfaces to paint on Set the paint falloff angle Identify paintable areas You can use any Photoshop painting tools to paint directly on a 3D model just as you would on a 2D layer. Use selection tools to target specific model areas or let Photoshop identify and highlight paintable areas. -
Page 709
curves away, the falloff angle increases, up to 90 degrees at the edges of the ball. A. Eye/camera angle B. Minimum angle C. Maximum angle D. Paint fade start E. Paint fade end 1. Choose 3D > 3D Paint Falloff 2. -
Page 710
3D texture editing (Photoshop Extended) Edit a texture in 2D format Display or hide a texture Create UV overlays Reparameterize a texture map Create a tile for a repeating texture You can use the Photoshop painting and adjustment tools to edit the textures contained in a 3D file, or to create new textures. Textures are imported as 2D files with the 3D model. -
Page 711
To the top Create UV overlays A diffuse texture file used by multiple materials on a 3D model can group several content areas that are applied to different surfaces on the model. The process called UV mapping matches coordinates in the 2D texture map with specific coordinates on the 3D model. UV mapping allows the 2D texture to be painted correctly onto the 3D model. -
Page 712
A repeating texture is composed of identical tiles in a grid pattern. A repeating texture can provide more realistic surface coverage of the model, use less storage, and improve rendering performance. You can convert any 2D file into a tiled painting. After previewing how multiple tiles interact in the painting, you save one tile for use as a repeating texture. -
Page 713
Combining and converting 3D objects (Photoshop Extended) Combine 3D objects (Photoshop Extended) Combine 3D and 2D layers (Photoshop Extended) Convert a 3D layer to a 2D layer (Photoshop Extended) Convert a 3D layer to a Smart Object (Photoshop Extended) To the top Combine 3D objects (Photoshop Extended) Merging 3D layers allows you to combine multiple 3D models in one scene. -
Page 714
To the top Convert a 3D layer to a 2D layer (Photoshop Extended) Converting a 3D layer to a 2D layer rasterizes the 3D content in its current state. Convert a 3D layer to a regular layer only if you no longer want to edit the 3D model position, render mode, textures, or lights. -
Page 715
Counting objects in an image (Photoshop Extended) Manually count items in an image Automatic counting using a selection You can use the Count Tool to count objects in an image. To count objects manually, you click the image with the Count tool and Photoshop tracks the number of clicks. -
Page 716
4. In the Selections area, select the Count data point and click OK. 5. Choose Window > Measurement Log. 6. Choose Analysis > Record Measurements, or click Record Measurements in the Measurement Log. (If this option isn’t available, select a tool other than the Count tool.) Photoshop counts the selection areas and enters the number in the Count column in the Measurement Log. -
Page 717
To the top About DICOM files (Photoshop Extended) For a video about DICOM files, see www.adobe.com/go/vid0028. DICOM (an acronym for Digital Imaging and Communications in Medicine) is the most common standard for receiving medical scans. Photoshop Extended allows you to open and work with DICOM (.dc3, .dcm, .dic, or no extension) files. DICOM files can contain multiple “slices” or frames, which represent different layers of a scan. -
Page 718
To save the 3D volume, you can export the 3D layer or save the file in PSD format. See Saving and exporting 3D files (Photoshop Extended). For a video about creating a 3D volume from DICOM frames, see www.adobe.com/go/lrvid4006_ps. (Discussion of DICOM frames begins at the 1:30 mark.) -
Page 719
You can also use the Timeline panel to animate a 3D volume created from a DICOM file. See Creating 3D objects and animations (Photoshop Extended). For a video about animating DICOM files, see www.adobe.com/go/vid0028. (Discussion of animation begins at the 2:30 mark.) More Help topics… -
Page 720
Image Stacks (Photoshop Extended) About image stacks Creating an image stack Use a script to create an image stack To the top About image stacks An image stack combines a group of images with a similar frame of reference, but differences of quality or content across the set. Once combined in a stack, you can process the multiple images to produce a composite view that eliminates unwanted content or noise. -
Page 721
Kurtosis kurtosis = ( sum( (value — mean) ) over A measure of peakedness or flatness non-transparent pixels ) / ( ( number of compared to a normal distribution. The non-transparent pixels — 1 ) * (standard kurtosis for a standard normal distribution deviation) ). -
Page 722
Legal Notices Online Privacy Policy… -
Page 723
Measurement data is recorded in the Measurement Log panel. You can customize the Measurement Log columns, sort data within columns, and export data from the log to a tab-delimited, Unicode text file. For a video on measurement features, see www.adobe.com/go/vid0029. Measurement scale Setting a measurement scale sets a specified number of pixels in the image equal to a number of scale units, such as inches, millimeters, or microns. -
Page 724
You can set the marker length in logical units, include a text caption indicating the length, and set the marker and caption color to black or white. For a video on measurement features, see www.adobe.com/go/vid0029. Create a scale marker 1. -
Page 725
1. Open an existing document. 2. Choose Analysis > Set Measurement Scale and choose a measurement scale preset for the document (see Set the measurement scale (Photoshop Extended)), or choose Custom and set a custom measurement scale. Measurements are computed and recorded in the Measurement Log using the scale units in effect when a measurement is recorded. If no measurement scale exists, the default scale is 1 pixel = 1 pixel. -
Page 726
When you measure an object, a new row appears in the Measurement Log. You can reorder columns in the log, sort data in columns, delete rows or columns, or export data from the log to a comma-delimited text file. For a video on measurement features, see www.adobe.com/go/vid0029. Display the Measurement Log Do one of the following: Choose Analysis >… -
Page 727
Reorder, resize, or sort columns in the log Do one of the following: Drag selected columns to reorder them in the log. The column position is indicated by a double black line. To resize a column, click the column header and then drag the separator. To sort data in a column, click the column header to change the sort order, or right-click the header and choose Sort Ascending or Sort Descending. -
Page 728
Photoshop and MATLAB (Photoshop Extended) About Photoshop and MATLAB Set up MATLAB and Photoshop Connect/disconnect to Photoshop from MATLAB Using MATLAB Help MATLAB commands Create a document in MATLAB To the top About Photoshop and MATLAB MATLAB is a high-level technical computing language and interactive environment for algorithm development, data visualization, data analysis, and numeric computation. -
Page 729
To the top Using MATLAB Help MATLAB’s Help system includes examples of a MATLAB/Photoshop workflow. 1. Choose Help > Full Product Family Help. You see a Photoshop Toolbox with submenu items, including Examples for getting started. If you don’t see the Photoshop Toolbox, try the following steps. -
Page 730
Color Management… -
Page 731
A color management system translates colors with the help of color profiles. A profile is a mathematical description of a device’s color space. For example, a scanner profile tells a color management system how your scanner “sees” colors. Adobe color management uses ICC profiles, a format defined by the International Color Consortium (ICC) as a cross-platform standard. -
Page 732
To the top Do you need color management? Without a color management system, your color specifications are device-dependent. You might not need color management if your production process is tightly controlled for one medium only. For example, you or your print service provider can tailor CMYK images and specify color values for a known, specific set of printing conditions. -
Page 733: Keeping Colors Consistent
About color management in Adobe applications Adobe color management helps you maintain the appearance of colors as you bring images in from external sources, edit documents and transfer them between Adobe applications, and output your finished compositions. This system is based on conventions developed by the International Color Consortium, a group responsible for standardizing profile formats and procedures so that consistent and accurate color can be achieved throughout a workflow.
-
Page 734
(See Synchronize color settings across Adobe applications.) If you use only one Adobe application, or if you want to customize advanced color management options, you can change color settings for a specific application. (See Set up color management.) 5. -
Page 735
Managing process and spot colors When color management is on, any color you apply or create within a color-managed Adobe application automatically uses a color profile that corresponds to the document. If you switch color modes, the color management system uses the appropriate profiles to translate the color to the new color model you choose. -
Page 736: Color Settings
To view a description of any profile, select the profile and then position the pointer over the profile name. The description appears at the bottom of the dialog box. RGB Determines the RGB color space of the application. In general, it’s best to choose Adobe RGB or sRGB, rather than the profile for a specific device (such as a monitor profile).
-
Page 737
Acrobat Help. Adobe applications ship with a standard set of working space profiles that have been recommended and tested by Adobe Systems for most color management workflows. By default, only these profiles appear in the working space menus. To display additional color profiles that you have installed on your system, select Advanced Mode (Illustrator and InDesign) or More Options (Photoshop). -
Page 738
In general, it is best to use the default rendering intent for the selected color setting, which has been tested by Adobe Systems to meet industry standards. For example, if you choose a color setting for North America or Europe, the default rendering intent is Relative Colorimetric. If you choose a color setting for Japan, the default rendering intent is Perceptual. -
Page 740: Working With Color Profiles
For example, R=127, G=12, B=107 is just a set of numbers that different devices will display differently. But when tagged with the Adobe RGB color space, these numbers specify an actual color or wavelength of light–in this case, a specific color of purple.
-
Page 741
Managing color with profiles A. Profiles describe the color spaces of the input device and the document. B. Using the profiles’ descriptions, the color management system identifies the document’s actual colors. C. The monitor’s profile tells the color management system how to translate the document’s numeric values to the monitor’s color space. -
Page 742
To embed a color profile in a document you created in Illustrator, InDesign, or Photoshop, you must save or export the document in a format that supports ICC profiles. 1. Save or export the document in one of the following file formats: Adobe PDF, PSD (Photoshop), AI (Illustrator), INDD (InDesign), JPEG, Photoshop EPS, Large Document Format, or TIFF. -
Page 743
not want to color-manage the document. After you remove the profile from a document, the appearance of colors is defined by the application’s working space profiles, and you can no longer embed a profile in the document. Assign Current Working Space [working space] Assigns the working space profile to the document. Assign Profile Lets you select a different profile. -
Page 744
When you color-manage documents that will be viewed exclusively on the web, Adobe recommends that you use the sRGB color space. sRGB is the default working space for most Adobe color settings, but you can verify that sRGB is selected in the Color Settings dialog box (Photoshop, Illustrator, InDesign) or the Color Management preferences (Acrobat). -
Page 745
Printing with color management Color management options for printing let you specify how you want Adobe applications to handle the outgoing image data so the printer will print colors consistent with what you see on your monitor. Your options for printing color-managed documents depend on the Adobe application you use, as well as the output device you select. -
Page 746
Color-managing PDFs for printing When you create Adobe PDFs for commercial printing, you can specify how color information is represented. The easiest way to do this is using a PDF/X standard; however, you can also specify color-handling options manually in the Output section of the PDF dialog box. For more information about PDF/X and how to create PDFs, search Help. -
Page 747
CMYK workflow by changing the CMYK color policy back to Preserve Numbers (Ignore Linked Profiles). You can override safe CMYK settings when you print a document or save it to Adobe PDF. However, doing so may cause colors to be reseparated. -
Page 749: Proofing Colors
Proofing colors About soft-proofing colors Soft-proof colors Save or load a custom proof setup (Photoshop, InDesign) Soft-proof colors (Acrobat) To the top About soft-proofing colors In a traditional publishing workflow, you print a hard proof of your document to preview how its colors will look when reproduced on a specific output device.
-
Page 750
Custom soft-proof options Device To Simulate Specifies the color profile of the device for which you want to create the proof. The usefulness of the chosen profile depends on how accurately it describes the device’s behavior. Often, custom profiles for specific paper and printer combinations create the most accurate soft proof. -
Page 751
the default location. To load a custom proof setup, click Load. To the top Soft-proof colors (Acrobat) 1. Do one of the following, depending on your version of Acrobat: (Acrobat 9) Choose Advanced > Print Production > Output Preview. (Acrobat X) Choose Tools > Print Production > Output Preview. 2.
Обновление: Александра Шпак
Я рассказал, как ориентироваться в программе Photoshop, о принципах работы, разобрал основные функции и инструменты. Оно подойдет тем, кто не знаком с программой совсем или хочет лучше в ней разобраться – копирайтерам, менеджерам, маркетологам, начинающим дизайнерам. Руководство поможет лучше доносить свои идеи в презентациях, делать иллюстрации для статей и постов в соцсетях, качественно обрабатывать фотографии.

Как читать. Если вы осваиваете Photoshop с нуля, прочитайте руководство целиком, по порядку. При этом прочитанное лучше сразу закреплять на практике — в программе. Если же вы хотите закрыть пробелы в знаниях, находите нужную информацию с помощью оглавления.
В чем преимущество. В этом руководстве, в отличие от видеоуроков, вы быстро найдете нужную информацию с помощью поиска по странице и оглавления. Преимущество, по сравнению с официальным гидом Adobe или профессиональными учебниками, в том, что:
- собрана только самая важная информация,
- текст написан простым языком,
- контент понятно структурирован.
А еще это руководство будет обновляться по мере выхода новых версий Photoshop — следите за датой публикации материала выше, под заголовком.
Photoshop − это графический редактор для работы с растровыми изображениями. Они состоят из пикселей – квадратиков, которые вы видите при увеличении любой картинки.
Для чего нужен. Photoshop подходит для цветокоррекции и ретуши фотографий, создания коллажей и иллюстраций.
Для чего не подойдет. Для верстки многостраничной печатной продукции и сайтов эта программа не годится, так как перегружает систему. Полиграфию удобнее создавать в InDesign, а веб – в Figma или Sketch. Логотипы, иконки и все, что в дальнейшем нужно будет масштабировать, лучше рисовать в программах, предназначенных для работы с вектором. Созданные в них изображения сохраняют качество, так как не состоят из пикселей, а являются неделимыми фигурами (до сохранения в jpeg или растрирования).
Разработаем вам фирменный стиль
Быстро и красиво!
Подробнее
Настройки перед началом работы
Перед началом работы настройте программу так, чтобы повысилась ее производительность, а вам было удобнее ею пользоваться. Это поможет сэкономить время и улучшить результат.
Интерфейс
При желании можно выбрать один из четырех цветов интерфейса (возле цифры 1 на изображении ниже (далее будем использовать просто цифру в скобках)). Для этого зайдите в настройки интерфейса, в меню «Редактирование». Там выберите светло-серый фон, если важна точность цветов на картинке. Если вы используете Mac, то зайдите в меню «Photoshop», далее в «Настройки», в выпадающем меню выберите пункт «Интерфейс». Слишком темное или светлое окружение будет искажать восприятие цветов. По сравнению с черным интерфейсом, изображения будут казаться светлее и насыщеннее, а по сравнению с белым – наоборот. К тому же, выбрав светло-серый, вы будете читать темный шрифт на светлом фоне – это привычнее, чем на выворотке.
По той же причине стоит выбрать средний серый цвет заливки окрестностей вокруг картинки (2). Серый не будет мешать правильному восприятию цветов.

Выберите внешний вид интерфейса
Производительность
Определитесь, сколько места предоставить Photoshop. Сделать это можно в том же окне, в разделе «Производительность». Для нормальной работы достаточно 8 Гб. Но не отдавайте под него все место – оставьте 10-20 % для других программ.
Когда места для работы не хватает, временно ненужная информация сбрасывается на жесткий диск и подгружается при необходимости. Если она будет сбрасываться на системный диск (в большинстве случаев это диск «C»), то работоспособность программы может снижаться. Поэтому в разделе «Временные диски» убедитесь, что у вас выбран не диск «C». Если у вас есть SSD, то лучше поставить его – программа будет работать быстрее.


Смотреть галерею
Отведите на работу Photoshop побольше места и выберите несистемный диск для сброса информации
Курсоры
Инструменты в Photoshop делятся на два вида: для рисования и все остальные. Перейдите во вкладку «Курсоры». Для первого вида выберите «Нормальный кончик кисти» (1). При этом будет отображаться кружок, определяющий границы мазка – это наиболее естественное представление о кисти.
Для второго вида поставьте галочку напротив пункта «Точный» (2). Вместо иконки инструмента будет отображаться точный курсор. Используя его, легче понять, какой вы участок выбираете.

Выберите отображение курсора
Отображение инструментов
Некоторыми командами вы пользоваться не будете. В разделе «Меню», находящемся в пункте «Редактирование», их можно выключить, чтобы не отвлекали. Для этого уберите значок глазика с ненужных команд. Те же, которыми вы будете пользоваться чаще всего, например, «Сохранить» или «Открыть», пометьте цветом, чтобы их было легче находить. Если отключенная операция вдруг понадобится, вы можете выбрать внизу любого пункта «Показывать все пункты меню». Вернуть настройки по умолчанию можно в этом же окне.

Скройте ненужные команды и выделите наиболее востребованные
Единицы измерения
В разделе «Единицы измерения и линейки» поставьте привычные вам миллиметры вместо дюймов.

Выберите привычные единицы измерения
Комбинации
В пункте «Редактирование» зайдите в раздел «Меню» и перейдите во вкладку «Клавиатурные сокращения». Напротив большинства команд стоят комбинации клавиш, которыми они вызываются. Их можно переназначить, кликнув на существующее назначение, или задать, если оно отсутствует. С помощью комбинаций горячих клавиш можно вызывать команды гораздо быстрее, чем методом поиска в меню. Поэтому выучите те, которыми пользуетесь наиболее часто – это существенно сэкономит время. Чтобы первое время было проще, распечатайте наиболее популярные комбинации горячих клавиш и подглядывайте в эту шпаргалку при необходимости.

Пользуйтесь клавиатурными сокращениями
Обзор программы
Основная проблема при работе с Photoshop − найти нужный инструмент или команду. Но если знать, что и где искать, работать будет гораздо быстрее и приятнее. Чтобы свободно ориентироваться в программе, разберем три основных органа управления.

Основные органы управления Photoshop
Основное меню
Строка основного меню находится сверху и состоит из одиннадцати пунктов. В каждый из них входят команды, сгруппированные по определенным признакам.
Файл. В пункте «Файл» собраны все опции, отвечающие за взаимодействие программы с внешним миром: «Сохранить», «Открыть изображение», «Экспортировать», «Распечатать» и т.д.
Редактирование. Здесь сгруппированы команды, которым не нашлось места в других пунктах. Например, «Отменить», «Повторить», «Трансформирование слоя», а еще «Меню», «Настройки» и «Клавиатурные сокращения».
Изображение. Сюда собраны команды для коррекции изображений. Здесь можно изменить размер, яркость или подкорректировать цвета.
Слои. Так как основная работа в Photoshop связана именно со слоями, это самое большое ниспадающее меню. В нем собраны все команды, касающиеся слоев.
Текст. В этот пункт собраны команды для работы с текстом. Скорее всего, заглядывать сюда вы будете редко. Так как основные текстовые настройки находятся в окнах «Символ» и «Абзац».
Выделение. Если вы ищете команды, связанные с выделением участков изображения, то это здесь. В этом пункте можно отменить все выделения, инвертировать, деформировать, растушевать границы или сохранить.
Фильтры. Здесь находится набор фильтров, которые можно накладывать на изображения. Если существующих покажется мало, дополнительные фильтры можно найти в интернете.
3D. Photoshop умеет создавать несложные 3D-модели и обрабатывать созданные в других программах. Например, в 3ds Max. Функциональность простая: можно вращать модели, натягивать на них поверхности, освещать с разных сторон. Учтите, что работа в этом режиме перегружает память, отчего Photoshop может подвисать. Для 3D существуют более подходящие программы. Поэтому не будем в этой статье касаться данного пункта.
Просмотр. В пункте «Просмотр» находятся функции, которые меняют не саму картинку, а ее отображение на экране. Вам — сюда, если надо уменьшить или увеличить фотографию, поменять режимы экрана, включить или выключить отображение вспомогательных элементов, таких как направляющие, линейки, границы выделения.
Окно. В этом пункте сгруппированы команды для работы с окнами. Отсюда можно вызвать любое окно и менять отображение открытых в программе картинок: показывать их во вкладках или одновременно выводить на экран.
Окна
Где находятся и как добавлять. Собраны они в правой части экрана. Включаются в пункте «Окно», который находится в основном меню.
Какие окна нужны. Это зависит от задач. Для начала подойдет и набор по умолчанию, который по необходимости можно корректировать.
Как расставлять. Включив окно в основном меню, вы увидите его в отдельной вкладке. Его можно сворачивать, растягивать и сжимать.

Сворачивайте и меняйте размер
Связывайте между собой. Для этого перетащите одно окно к другому за ярлык с названием до появления синей полоски. Теперь они будут сворачиваться и перетаскиваться вместе. Если нужно вставить третье окно между ними, перетащите его к их стыку. Чтобы окна открывались в одном окне и переключались с помощью вкладок, перетаскивайте не на стык, а накладывайте одно на другое
Связывайте
Объединяйте
Прикрепите отдельные окна к панели окон, чтобы они не загораживали рабочую область. Для этого перетащите их к правому краю до появления синей полоски.
Сгруппируйте нужные окна на правой панели
Как сохранить. Чтобы сохранить расположение окон, перейдите во вкладку «Рабочая среда» в пункте «Окно», выберите «Новая рабочая среда» и нажмите «Сохранить». Вместе с окнами там можно сохранить клавиатурные сокращения, вкладки в пунктах меню и состояние панели инструментов. По умолчанию предлагается несколько рабочих сред для разных целей. Например, для рисования или обработки фотографий.
К сохраненной среде можно вернуться, выбрав ее в том же вложенном меню и нажав «Сбросить».

После настройки сохраните расположение окон, инструментов и горячие клавиши, чтобы вернуться к ним позже
Инструменты и опции
Панель инструментов находится слева (1). Сюда собраны все инструменты ручного редактирования. Выбрав один из инструментов, вы увидите его настройки на панели «Опции» (2), находящейся под основным меню. Большинство иконок на панели содержат вложенные инструменты со схожими функциями (3), например, вместе с «Кистью» находится «Микс-кисть» и «Карандаш». Чтобы их вызвать, кликните правой мышью по иконке.
Панель инструментов в Photoshop
Навигация
Открытие изображения
Чтобы открыть изображение, в пункте «Файл» нажмите «Открыть» и выберите картинку на компьютере или воспользуйтесь сокращением «Ctrl+O» (На Mac: «Cmd+O»). Во вложенном меню «Последние документы» находятся картинки, которые вы недавно открывали. Их количество можно увеличить в настройках, выбрав больший период запоминания.
Откройте файл для работы
Изменение масштаба
Масштаб изображения изменяется четырьмя основными способами:
- С помощью команд в пункте «Просмотр».
- Колесиком мыши при зажатой клавише Alt (кнопка Option на Mac).
- Комбинациями «Ctrl -» и «Ctrl +» (на Mac: «Cmd -» и «Cmd +».
- В окне «Навигатор».
Если нужно быстро вернуться к общему виду, нажмите «Ctrl + 0» (на Mac «Cmd + 0») − изображение займет всю рабочую область.
Также масштабировать можно с помощью «Увеличительного стекла», которое вызывается из панели инструментов либо с помощью модификатора «Ctrl + пробел» (на Mac: «Cmd + пробел»). Отличие модификаторов от клавиатурных сокращений заключается в том, что они не выполняют какую-либо команду, а временно меняют назначение курсора.
Масштабируйте работу горячими клавишами
Перемещение по изображению
Быстро перемещаться по увеличенному изображению поможет инструмент «Рука». Для этого зажмите пробел и передвигайтесь с помощью мыши. Это самый удобный способ. Также для этого можно использовать окно «Навигатор» и полосы прокрутки, появляющиеся внизу и справа при приближении.
Перемещайтесь по картинке с помощью «Руки» − так быстрее
Отмена и возврат действий
Чтобы быстро отменить действие, нажмите «Ctrl + Z» (на Mac «Cmd + Z»), а при повторном нажатии комбинация вернет внесенное до этого изменение. Чтобы переключиться на несколько шагов назад, используйте сокращение «Alt + Ctrl + Z» (на Mac «Option + Cmd + Z») , вперед – «Shift + Ctrl + Z» (на Mac «Shift + Cmd + Z»). Вернуться сразу на много действий можно в окне «История».
«Alt + Ctrl + Z» − несколько шагов назад, «Shift + Ctrl + Z» − несколько шагов вперед
Окно «История» − сразу вернуться на много действий
Размеры и разрешение
Размер изображения
Чтобы редактировать размер и разрешение, в пункте «Изображение» выберите «Размер изображения» и задайте нужную ширину и высоту(1). Чтобы картинка менялась пропорционально при изменении одной из сторон, нажмите на иконку цепочки (2). А если хотите с размерами менять и разрешение (3), то снимите галочку с пункта «Ресамплинг» (4).

Меняйте размер и разрешение в окне «Размер изображения»
Рамка
С помощью инструмента «Рамка» можно добавлять фон, обрезать или наклонять картинку. Если нужно обрезать ее до конкретных размеров, введите их в специальные поля на панели «Опции» или выберите в контекстном меню, всплывающем по правому клику на изображение.
Используйте «Рамку», чтобы расширить или обрезать края картинки
Если нужно растянуть фон с учетом содержимого, в «Опциях» нажмите на соответствующую иконку.
Добавьте фон с помощью «Рамки»

Создание изображений для соцсетей: размеры, вотермарки, инструменты, примеры
Слои
Работа в Photoshop похожа на создание аппликаций, только вместо слоев бумаги в нем используются виртуальные слои. Благодаря им вы можете удалять, редактировать, передвигать отдельные объекты или участки изображения, а также точечно на них воздействовать, не боясь задеть другие картинки на прочих слоях.

Окно «Слои»
Действия со слоями
В программе «Слои» находятся на правой панели (1). Если нет, то включите их в пункте «Окно» в основном меню. Чтобы изменить или переместить слой, кликните по нему левой кнопкой.
Создать. Создавайте новый слой каждый раз, когда совершаете новое действие с фотографией. Для этого либо нажмите на иконку (2) внизу окна, либо выберите команду в пункте «Слои», либо воспользуйтесь комбинацией «Ctrl + Shift + N» (на Mac «Cmd + Shift + N»).
Назвать. Когда слоев несколько, в них легко ориентироваться. Когда же их накапливается много, можно запутаться, какой элемент на картинке к какому слою относится. Чтобы было удобно искать нужный слой, им можно давать названия. Для этого кликните два раза по существующему названию слоя.
Удалить. Удалить слой можно при помощи кнопки Delete в контекстном меню, которое вызывается кликом правой мыши по слою, либо перенеся его на значок корзины (3).
Переместить. Чтобы подвинуть слой в плоскости картинки, используйте инструмент «Перемещение».
Поменять порядок. Перетащите слой с помощью мыши.
Меняйте слои местами с помощью левой кнопки мыши
Скопировать. Чтобы скопировать слой, воспользуйтесь быстрыми клавишами «Ctrl + J» (на Mac «Cmd + J») или перетащите его на иконку создания нового слоя (2). Если неудобно лезть в окно со слоями, выберите инструмент «Перемещение», зажмите Alt (на Mac — Option) и перетащите слой с картинки в сторону с помощью мыши.
Скопируйте слой, перенеся на значок «Создать новый слой»
Сделать прозрачным. Регулировать прозрачность слоя (9) можно с помощью двух полей: «Непрозрачность» и «Заливка». «Непрозрачность» регулирует слой вместе с наложенными на него эффектами. А «Заливка» − непосредственно сам слой. Например, уменьшая показатель в заливке, тень или обводка, наложенные на слой, будут оставаться без изменений.
«Заливка» отвечает за слой без эффектов, «Непрозрачность» − за весь
Объединить. Слои удобно объединять, когда они относятся к одному объекту на картинке, и если изменять их по отдельности вы больше не собираетесь. Чтобы объединить, выделите нужные, правым кликом по слоям вызовите контекстное меню и нажмите «Объединить». А чтобы связать слои временно, нажмите «Связать».
Залить цветом. Выберите нужные цвета на панели инструментов, возьмите инструмент «Заливка» и нажмите «Alt + Backspace» (на Мас «Option + Backspace»), чтобы залить основным цветом, или «Ctrl + Backspace» (на Mac «Cmd + Backspace»), чтобы залить фоновым.
Деформировать. Нажмите «Ctrl + T» (на Мас «Cmd + T»), чтобы трансформировать слой. Правым щелчком мыши вызовите контекстное меню и выберите один из четырнадцати способов деформации. С помощью мыши изменяйте его размер, перемещайте и искажайте. Если хотите, чтобы слой сохранял пропорции при уменьшении или увеличении, зажмите Shift.
Наложить эффекты. Правым кликом мыши по слою вызовите меню и выберите «Параметры наложения». В этом окне можно задать обводку и тени, создать тиснение, наложить градиент или свечение. Чтобы включить эффект, поставьте галочку напротив его названия. Чтобы изменить его параметры − кликните по названию эффекта. Если рядом с названием есть значок плюсика, значит эффект можно дублировать: на один слой наложить несколько одинаковых эффектов с разными настройками. Например, это полезно, когда нужно сделать несколько теней для одного объекта, который освещается несколькими источниками света. Также эффекты можно включить и через меню, скрывающееся за иконкой fx (4) − оно полностью дублирует «Параметры наложения».
Накладывайте эффекты на слои в «Параметрах наложения»
Изменить режим наложения. Photoshop позволяет выбирать, как будет накладываться верхний слой по отношению к нижнему. Для этого в окне со слоями существует поле «Режимы наложения» (8). Эти режимы делают изображение прозрачным, более контрастным или просвечивающими в определенных тонах.
Эта функция дает возможность добиваться наложения любых эффектов или фильтров на верхний слой, меняя нижний. А рисуя кистью в одном из параметров, можно создавать свет, тени и блики. Для наложения тени выберите режим «Умножение», «пипеткой» возьмите образец цвета предмета, на котором должна быть тень, уменьшите непрозрачность и жесткость кисти − она будет рисовать мазками похожими на тень. Чтобы наложить свет, рисуйте кистью в режиме «Экран». Для бликов используйте «Мягкий свет» и белую кисть.
Используйте разные режимы наложения, чтобы накладывать эффекты, например, блики
Наложить маску. «Встаньте» на нужный слой и нажмите на иконку, похожую на японский флаг (5). Рядом со слоем появится его маска. Теперь черной кистью можно скрыть часть слоя в маске, а белой – вернуть обратно. Если вырезать область или стереть ее с помощью «Стерки», то это действие можно будет вернуть только отменой.
Наложите маску, чтобы спрятать часть слоя
Создать обтравочную маску из слоя. Эта команда позволяет накладывать верхний слой на нижний. То есть нижний становится окном в верхний, к которому вы применили маску. Так, например, на текст накладывается фон.
Закрепить. Закрепите слой, если хотите, чтобы ни одно действие с картинкой его не коснулось. Для этого «встаньте» на нужный слой и нажмите на иконку с замочком (7). Вы не сможете его двигать, перемещать, рисовать на нем или накладывать эффекты – для программы он будет неприкосновенен.
Виды слоев
Обычный растровый слой. Это просто элемент изображения, находящийся на отдельном слое. Его можно редактировать и проделывать с ним все, что описано выше.
Фоновый. Самый нижний закрепленный слой (с замочком). Его можно сделать обычным, сняв замочек по клику. Также любой слой можно сделать фоновым, переместив в самый низ и закрепив.
Текстовый. Текст, написанный на картинке, автоматически становится новым слоем. С ним можно проделывать все действия, что и с обычным, плюс те, которые описаны в разделе «Текст».
Корректирующий. Это прозрачный слой, не являющийся каким-либо эффектом. Он накладывается поверх обычного слоя, выполняя функцию цветного стекла, помещенного над картинкой. Чтобы его создать, нажмите на иконку, похожую на «Инь-ян» (6), и выберите слой с нужным видом коррекции. Он нужен для создания фильтров и цветокоррекции (подробнее об этом в следующем разделе).
Смарт-объект. Превратите растровый слой в смарт-объект (или наоборот) в контекстном меню слоя. После этого он как бы пакуется в папку. Чтобы воздействовать на слой, кликните по нему дважды. Он откроется отдельно в новой вкладке в Photoshop. После изменений в слое сохраните их с помощью сочетания клавиш «Ctrl + S» (на Мас «Cmd + S»), чтобы они вступили в силу на основном изображении. Это удобно, когда требуется более детальная работа с областью. Например, при создании мокапов.
Слой-заливка. Позволяет залить слой цветом, градиентом или узором. Слой-заливка является отдельным слоем, к которому можно отдельно применить режимы наложения.
Редактируйте смарт-слой в отдельной вкладке, например, для создания мокапа
Цветокоррекция
В этом разделе я расскажу, как настраивать яркость и контрастность фотографий, убирать лишние оттенки и корректировать цветовой баланс.
Все настройки цветокоррекции есть в пункте «Изображение». Но, по возможности, пользуйтесь корректирующими слоями. Они накладывают коррекцию отдельным слоем, который удобно скрывать и редактировать (как создавать корректирующие слои – в разделе «Слои»).
Кривая
Что такое кривая. Вызвав инструмент «Кривые», вы видите график. На оси X показывается яркость: от самого темного участка к самому светлому, слева направо. На оси Y показывается количество пикселей на картинке, соответствующих яркости по оси X.
Зависимость графика от изображения. Определив, какие участки на графике каким областям изображения соответствуют, вы поймете, в каком месте и куда двигать кривую. Сделать это можно по трем параметрам:
- По яркости. Чем ярче область на фотографии, тем ближе она к правому краю графика.
- По соотношению площади участка к высоте пиков на графике. Если на фото есть большой темный участок, скорее всего, он относится к пику слева.
- По ширине столбца. Ширина столбца говорит о количестве пикселей одной яркости. Пики графиков соответствуют однородным по яркости областям, равнины − областям с большим разбросом.
Соотнести график с фотографией поможет инструмент, скрывающийся за иконкой руки. Выбрав его и передвигая курсор по фотографии, вы будете видеть, как перемещается ползунок на кривой. Он и будет соответствовать той части фото, на которую наведен курсор. По клику на месте ползунка появится точка. С ее помощью можно изменять яркость соответствующего участка. Такие опорные точки можно ставить и по клику на саму кривую. Чтобы их убрать, просто перетащите точки за пределы графика, захватив мышью.

Определите, как график соотносится с картинкой
Как кривая меняет картинку. Есть четыре базовых правила, описывающих работу кривой:
- Если кривая проходит ниже − фотография затемняется (чем ниже, тем сильнее).

- Если выше − наоборот становиться светлее.

Что происходит, если выше
- Если кривую круто изогнуть в виде буквы S, то темные участки станут еще темнее, светлые − светлее. Чем круче кривая, тем больше контраст.

Иллюстрация влияния кривой в виде буквы S
- Если S-образную кривую изогнуть в другую сторону, то фото станет менее контрастным. Чем больше степень изгиба, тем меньше контраст.

Так меняется контраст
Чтобы воздействовать на картинку в областях с определенной яркостью, с помощью опорных точек зафиксируйте кривую на участке, который не нужно менять.

Меняйте только определенные участки фотографии с помощью опорных точек
Полноконтрастность фотографии. Открывая график с кривой на некоторых изображениях, видно, что пиксели занимают не всю ось X: крайние правый и левый участки графика остаются пустыми. Это значит, что фотография не полноконтрастная: недостаточно насыщенная, блеклая. Чтобы это исправить, приведите ее к полноконтрастному виду. Для этого:
- Найдите самую черную точку на картинке. Зажмите Alt и двигайте левый ползунок вдоль оси X вправо, пока не появится самый темный участок. Затем возьмите пипетку для установки точки черного и кликните по этому участку.
- Также найдите самую белую точку, только теперь передвигая правый ползунок влево. Выберите пипетку для установки точки белого и кликните на самую светлую область.
Сделайте фотографию полноконтрастной для придания глубины фотографии
Удаление лишних оттенков. Удалите с фотографии оттенки, которых там не должно быть. Для этого переключитесь на другие цветовые каналы (красный, зеленый или синий) в окне со свойствами кривой и корректируйте ее там. Например, когда фото желтит, перейдите в синий канал и немного поднимите кривую.
Уберите лишние оттенки в цветовых каналах
Чтобы сравнить изменения, переключайтесь между было/стало с помощью иконки глазика внизу. А если изменения не понравились, то с помощью стрелочки, что слева от иконки с глазиком, сбросьте все изменения на кривой.
Цветовой тон и насыщенность
Выбрав «Цветовой тон/Насыщенность», в окне вы увидите три шкалы: «Цветовой тон», «Насыщенность» и «Яркость». Изменения, вызванные в цветах перемещением ползунков на любой из шкал, будут отображаться на самой нижней полоске (1). Полоса над ней показывает изначальные цвета для сравнения.
«Цветовой тон» (2) позволяет смещать цвета по цветовому кругу. С помощью него можно перекрасить любой одноцветный участок на снимке.
Ползунок насыщенности (3) изменяет фото от черно-белого до кислотно-цветного.
Регулировка яркости (4) позволяет затемнять и осветлять фотографию.
В поле вверху, где по умолчанию стоит «Все» (5), можно выбрать, какой конкретно цвет на фотографии будут менять три шкалы ниже. Оттенки этого цвета можно корректировать с помощью пипеток (6) и ползунков, появляющихся на полоске снизу.
При выборе цвета учитывается не весь цветовой круг, а его часть. Пипеткой выделите на картинке цвет, который надо подкорректировать, и работайте со шкалами. Если вместе с нужным участком изменился цвет другого, сдвиньте ползунки внизу ближе к нужному цвету и подальше от того, который менять не хотите.

Все настраиваемые элементы
Настройте цветовой тон и насыщенность
Сочность
Чтобы увеличить насыщенность цветов, используйте инструмент «Сочность».
Придайте картинке сочность
Цветовой баланс
В свойствах этого инструмента – три регулятора (1). При смещении ползунка к определенному цвету изменяются тона на фотографии. Переместили в сторону желтого − картинка желтеет. К красному − краснеет. Причем в поле (2), которое над ползунками, можно выбирать, в каких тонах изменять цвета: в тенях, светах или средних тонах. Но цвет на тона накладывается очень неточно, захватывая почти весь спектр. Поэтому для коррекции этот инструмент не подойдет. Он понадобится для стилизации и тонировки, например, чтобы наложить какой-нибудь оттенок на фото.

Регуляторы цветбаланса
Наложите цветной фильтр на изображение для стилизации фотографии
Тени и свет
Этого инструмента нет в корректирующих слоях. Чтобы его выбрать, зайдите в пункт «Изображение» и в выпадающем меню «Коррекция» выберите вкладку «Тени / Света». С помощью этого инструмента отдельно затемняйте и осветляйте темные (1) и светлые (2) области. В настройках каждой из них существует три шкалы: «Эффект» (3), «Тон» (4) и «Радиус» (5). «Тон» отвечает за затемнение и осветление. «Радиус» − за растушевку света или тени. «Эффект» − за прозрачность эффекта, вызванного двумя предыдущими настройками.

Здесь можно настраивать тени и свет
Настройте темные и светлые области
Когда открываете любой инструмент цветокоррекции, каждый ползунок выкручивайте до крайних точек, чтобы понять, какой за что отвечает.
Выделение
Сделать коллаж, удалить или переместить объект, наложить эффект на часть картинки… − без выделений в Photoshop не обойтись. Поэтому инструментов и способов выделения в нем много. Рассмотрим основные восемь из них.
Области
Инструмент «Области» выделяет с помощью фигур: овалов, прямоугольников, линий. Им удобно быстро выделять объекты на однородном фоне, геометрически простую фигуру или когда с предметом можно захватить немного фона.
Выделяйте с помощью областей предметы на однородном фоне
Лассо
Есть три вида лассо: «Обычное», «Прямолинейное» и «Магнитное». «Обычным» очерчивайте произвольный участок, будто в руках карандаш или кисть. «Прямолинейным» выделяйте линиями: с помощью него можно обвести геометрическую фигуру любой формы. «Магнитным» выделяйте по границе любого предмета: при обведении выделение будет липнуть к его контуру. Им удобно обводить сложные объекты на однородном фоне. Если фон сложный, «Магнитное лассо» может неправильно распознать границы предмета, соответственно, неправильно выделить.
«Магнитным лассо» выделяете, когда нужно точно обвести предмет на однородном фоне
Волшебная палочка
«Волшебная палочка» обводит области похожего цвета. Для этого инструмента важно, чтобы выделяемый объект сильно отличался от фона по цвету. Допустимое отклонение цвета настройте в опциях этого инструмента в поле «Допуск»: чем больше в нем цифра, тем более неоднородную область выделит программа.
«Волшебной палочкой» выделяйте однородные по цвету области
Быстрое выделение
«Быстрое выделение» работает по тому же принципу, что и «Волшебная палочка». Отличие в том, что область выделения можно регулировать. Меняя назначение курсора, создавайте выделение или убирайте, если захватили лишнее и нужно скорректировать область. Меняя величину курсора, регулируете, насколько большая площадь будет выделяться вокруг него.
«Быстрым выделением» выделяйте и корректируйте однородные участки
Выделение цвета
Инструмент «Цветовой диапазон» находится в пункте «Выделения» в меню. Он позволяет выделить участки на фотографии по цвету. Для этого с помощью курсора выберите нужный цвет. Пипеткой с плюсом дополнительно добавляйте оттенки, с минусом − удаляйте. Чтобы увеличить или уменьшить разброс допустимых цветов для выделения, переставляйте ползунок на шкале «Разброс». Также можно выделять цвета не на всей фотографии, а лишь в диапазоне. Для этого поставьте галочку напротив «Локализованные наборы цветов» и отрегулируйте площадь выделения на шкале «Диапазон». Таким способом можно выделять сложные объекты типа травы или деревьев, которые сильно отличаются по оттенкам и разбросаны по картинке.
С помощью инструмента «Цветовой диапазон» выделите нужные цвета
Перо
«Перо» (P) − это не прямой инструмент выделения. С помощью пера создайте «Фигуру» или «Контур» (выбирается в опциях инструмента), а после – выделите.
«Перо» − лучший инструмент выделения по двум причинам. Первая: после построения области ее можно как угодно изменять с помощью опорных точек на контуре, которые добавляются кликом по нему. Вторая причина в том, что границы области, выделенной «Пером», плавные и не имеют рваных краев.
Есть три вида пера: «Обычное», «Свободное» и «Перо кривизны». «Обычное» обводит прямыми линиями. «Свободное» очерчивает область как карандаш. «Перо кривизны» скругляет все узлы, делая их плавными. Чтобы переключиться между ними, кликните правой кнопкой мыши по иконке «Пера» и выберите нужный вид.
Также у инструмента есть три функции: «Добавить опорную точку», «Удалить опорную точку» и «Угол». Находятся они также в выпадающем меню «Пера». Первые две добавляют и удаляют опорные точки. Третья делает из всех закругленных узлов углы: если с помощью четырех точек очертить пером круг, то «Углом» можно сделать из него квадрат.
Также на опорные точки можно воздействовать инструментом «Выделение узла». По клику на точку появляется что-то вроде усиков или рычажков. Они позволяют более гибко изменять фигуру.
Если нужно плавно и точно выделить предмет сложной формы, воспользуйтесь «Пером»
Быстрая маска
«Быстрая маска» дает возможность тонко редактировать границы и прозрачность выделения с помощью кисти. Для ее наложения нажмите на значок в самом низу панели инструментов. С помощью «Быстрой маски» можно создавать выделение с нуля либо работать с уже выделенной областью. В этом режиме черная кисть добавляет участок к выделению, белая − удаляет. Для создания разной прозрачности выделений используйте разные оттенки серого: чем светлей − тем прозрачнее. Чем меньше прозрачность выделения, тем слабее будет проявляться эффект, наложенный на изображение. Это пригодится для цветокоррекции, например, когда некоторые участки нужно затемнить меньше, чем остальные.
Создавайте, редактируйте и меняйте прозрачность выделения с помощью «Быстрой маски»
Что делать с выделенными областями
Трансформировать. Нажмите «Трансформировать выделенную область» в пункте «Выделение» или в контекстном меню выделенной области. Кликните правой кнопкой мыши по выделению и выберите нужный режим. Например, с помощью «Искажения» можно сделать тень. Для этого выделите объект, который будет ее отбрасывать, «положите» выделение на поверхность и затемните.
Деформируйте выделение
Менять режимы наложения. В опциях большинства инструментов выделения можно выбрать один из четырех режимов наложения. Первый режим: создавая новое выделение, старое исчезает. Второй (Shift): выделения накладываются друг на друга. Третий (Alt или Option): выделение перекрывает предыдущее. Четвертый (Shift + Alt или Shift + Option): при наложении одного на другое, остается выделенной только область их пересечения.
Создавайте сложные выделения, меняя режимы наложения
Модифицировать. Можно растушевать границы, увеличить или уменьшить площадь выделения на заданные пиксели. Для этого перейдите в раздел «Модификация» в пункте меню «Выделение».
Модифицируйте края выделения
Выделить смежные пиксели. Добавьте к существующему выделению участки, окрашенные примерно в тот же цвет. Сделать это можно с помощью команды «Смежные пикселы» в пункте «Выделение».
Выделите пиксели, окрашенные примерно в тот же цвет
Сделать инверсию. Кликните на выделение правой кнопкой мыши, затем в контекстном меню выберите «Инверсия выделенной области». Все, что было не выделено, выделится вместо изначальной области.
Инвертируйте выделение
Переместить. Выделите область и нажмите «Ctrl + T» (на Mac «Cmd + T») или «Трансформировать выделенную область» в контекстном меню. Теперь участок можно двигать и изменять его размер.
Скопировать или вырезать. Выделите область и нажмите «Ctrl + C» (на Мас «Cmd + C») или «Ctrl + X» (на Мас «Cmd+ X»), чтобы скопировать или вырезать. А затем − «Ctrl + V» (на Мас «Cmd + V»), чтобы вставить участок на новый слой.
Залить. В контекстном меню выберите «Выполнить заливку», чтобы залить выделенную область. Сделать это можно выбранным цветом или с учетом фона. Также в открывшемся окне можно регулировать прозрачность заливки и режим ее наложения.
Залейте выделенную область цветом
Обвести. В контекстном меню слоя выберите «Выполнить обводку», чтобы обвести выделение. В открывшемся окне можно выбрать цвет, расположение обводки, а также прозрачность и режим наложения.
Текст
Как написать
Вызовите инструмент «Текст» (T), кликните левой мышью по изображению или выделите участок и начните писать. Когда закончите редактировать, нажмите Enter, чтобы сохранить результат или ESC, чтобы отменить. Измените написанное, кликнув левой кнопкой мыши по тексту, или переместите (при этом в руках должен быть инструмент «Текст»).
Как настроить
Настройте типографику в окнах «Абзац», «Символ» и «Глифы». Если их нет на правой панели, вызовите в пункте «Окно».
Символы. В окне «Символ» выберите шрифт (1) и его начертание (2). Настройте размер шрифта (3), межбуквенное (4) и межстрочное расстояние (5). Выберите цвет (7). В декоративных целях шрифт можно растянуть по ширине или высоте (6) − этой функцией пользуйтесь с осторожностью, сохраняйте читаемость. В настройках ниже (8) можно изменить регистр, подчеркнуть или зачеркнуть текст.

Настройте текст в окне «Символ»
Абзацы. В окне абзац регулируются настройки, связанные с абзацем: выравнивание (1), отступы (2) и переносы (3).

Укажите, как выровнять текст, настройте отступы и переносы в окне «Абзац»
Глифы. В окне «Глифы» находятся спецсимволы, знаки пунктуации и смайлики.

Дополнительные символы выберите в окне «Глифы»
Сохранение настроек. Если планируете тиражировать текст с одинаковыми настройками, сохраните их — не настраивайте каждый раз по новой. В окне «Стили абзацев» сохраните настройки, связанные с абзацами, нажав «Создать новый стиль абзаца». В «Стилях символов» − с помощью команды «Создать новый стиль символов». Чтобы применить сохраненный стиль к тексту, выделите текст и укажите нужный стиль в тех же окнах.
Действия с текстом
С текстовым слоем можно проделывать все то же, что и с обычным (подробнее в разделе «Слои») плюс еще несколько действий.
Деформировать. Выберите «Деформировать» в контекстном меню текстового слоя. В открывшемся окне выберите вид деформации (дугой, волной, надутый, закрученный) и настройки (степень деформации, создать искажение по горизонтали или вертикали).
Создавайте композиции из текста с помощью «Деформации»
Написать по контуру или вписать в фигуру. Создайте фигуру любой формы (подробнее в разделе «Фигуры»). Чтобы вписать текст в фигуру, выберите инструмент «Текст» и кликните по ее области. Чтобы писать по контуру фигуры, нажмите на ее границу.
Вписывайте текст в фигуру или пишите по ее контуру

Как выбрать и использовать шрифт: 10 советов
Цвета и градиенты
В этом разделе поговорим о том, где брать цвета, как выбрать оттенок, сохранять свои образцы, накладывать и настраивать градиент.

Окна для работы с цветом
Основной и фоновый цвета
В Photoshop есть основной и фоновый цвет (1). Находятся они на панели инструментов. Основной цвет нужен для рисования, заливки, обводки, стирания слоя в режиме маски. Фоновый − для заполнения стираемых областей, восстановления слоя в режиме маски и обводки фигуры.
По умолчанию в качестве основного и фонового цветов используются черный и белый. Чтобы к ним вернуться, кликните по их иконке (7).
Как выбрать цвет
Скопировать с изображения. Выберите инструмент «Пипетка» (5) и кликните на тот цвет, который хотите выбрать. В опциях инструмента, в поле «Размер образца», изначально выбран пункт «Точка». Применив «Пипетку», вы скопируете цвет пикселя, на который попали курсором. Этот цвет может сильно отличаться от того, который вы видите. Поэтому поменяйте настройку в поле «Размер образца» на «Среднее 5 x 5». Пипетка будет копировать средний цвет области, состоящей из 25 пикселей.
В палитре. Два раза щелкните по иконке с основным или фоновым цветом для вызова палитры цветов. Чтобы добиться нужного оттенка, в открывшемся окне перемещайте курсор на поле (2) и отрегулируйте ползунок на шкале справа.
С помощью кода цвета. Если известно точное значение цвета, введите его в соответствующее поле (3).
Найти код нужного оттенка можно на сайте color.adobe.com. Найдите цвет по ключевым словам. Допустим, если вам нужен цвет, чтобы нарисовать огонь, введите fire в строку поиска. Найдя нужный, нажмите «Редактировать копию» и скопируйте число из поля HEX.
Ищите нужные цвета на сайте Adobe
Из библиотеки цветов (4). Здесь цвета из цветового круга разложены на шкале. Кликните на ее участок и выберите нужный оттенок с помощью цветовых образцов слева.
Из образцов. Откройте окно «Образцы» (6) и выберите один из предложенных вариантов или последних используемых − они отображаются на самой верхней полоске. Сохраняйте сюда свои цвета или загружайте, скачанные с color.adobe.com.
Как наложить градиент
Градиент можно создать двумя способами. Первый: выберите инструмент «Градиент» (1), зажмите левую кнопку мыши и потяните ее в нужном направлении. После наложения эффекта на слой отредактировать его будет нельзя − только накладывать новый или отменять действие.
Растяните градиент в нужном направлении
Второй способ: нажмите на нужный слой правой кнопкой мыши, выберите «Параметры наложения» и перейдите во вкладку «Наложение градиента» (2). Градиент, наложенный таким способом, будет отображаться как эффект в окне «Слои». Его можно скрыть, в любой момент отредактировать или наложить еще один поверх. Поэтому пользуйтесь этим вариантом.

Накладывайте градиент через «Параметры наложения»
В настройках выберите режим (3), стиль (6) (расположение цветов в градиенте относительно друг друга) и угол (7) наложения градиента. Отрегулируйте непрозрачность (4) и масштаб (8). Кстати, чем больше масштаб, тем больше рассеяна граница цветов. Кликните на поле «Градиент» (5) и в открывшемся окне настройте цвета, их соотношение и прозрачность.

Отредактируйте параметры градиента
Выберите один из готовых (9) или создайте свой с помощью шкалы (10). На ней нижние ползунки (11) отвечают за цвет и его долю в градиенте. Верхние (12) − за непрозрачность. Для добавления нового ползунка кликните на границу шкалы или перенесите ползунок за границу, чтобы удалить.
Кисти
Выберите нужный цвет (подробнее — в разделе «Цвета и градиенты»), инструмент «Кисть» (1), и можно рисовать. Читайте дальше, и узнаете, как менять форму кисти, ее размер, прозрачность, границы мазка и другие настройки.
Настройки
«Кисть» настраивается с помощью двух органов управления: в опциях инструмента (та панель, что ниже основного меню) и в окне «Настройки кисти».

Настройки и опции кисти
Настройки. В окне «Настройки кисти» настраивайте форму (8) и размер (10) (размер удобнее регулировать клавишами «[»− уменьшить, «]» − увеличить), жесткость мазка (11) и интервалы между отпечатками кисти (13). Меняйте угол наклона мазка (12). Выбирайте эффекты (9): изменение формы отпечатков, их наклона и границ, наложение шума и текстур на мазок. При этом смотрите, как будет меняться кисть в окне, предназначенном для демонстрации мазка (14).
Опции. Половина настроек в «Опциях» дублируется из «Настроек кисти».
Набор кистей. За иконкой с формой кисти (2) скрываются уже знакомые нам настройки. Интересен в этом окне только большой набор кистей.
Режимы наложения. Такие же, как и у обычного слоя.
Непрозрачность (3). Делает мазок более или менее прозрачным.
Нажатие (4). То же, что и «Непрозрачность». Отличие будет заметно, если снизить показатель нажатия и провести кистью несколько раз в одном и том же месте. Этот участок с каждым мазком будет закрашиваться все сильнее. А при сниженной непрозрачности мазки не будут накладываться друг на друга.
Сделайте мазок прозрачнее в поле «Непрозрачность» или «Нажатие»
Сглаживание (5). Показатель влияет на плавность линий. На минимуме линия получится такой, какой вы ее нарисуете. На максимуме все изгибы будут плавными.
Настройте плавность линий
Симметрия. Чтобы включить функцию симметрии, нужно нажать на значок бабочки на панели «Параметры». Там вы сможете выбрать один из доступных типов симметрии: вертикальная, горизонтальная, двухосевая, диагональная, волнистая, круговая, спиральная, параллельные линии, радиальная или мандала.
Создавайте красивые узоры или паттерны с помощью симметрии
Создание своей кисти
Создайте свою форму кисти. Для этого откройте изображение, которое хотите сделать кистью, перейдите в пункт «Редактирование» и нажмите «Определить кисть»: вся картинка запомнится как кисть. Если нужно запомнить определенный участок, перед тем как нажать «Определить кисть», выделите его любым инструментом. После сохранения новая кисть появится в наборах.
Создавайте свои отпечатки для кистей
Фигуры
Создание
Выберите любую фигуру и растяните ее как угодно мышкой. Чтобы создавать равносторонние фигуры и ровные линии, растягивайте с зажатой клавишей Shift: из овала получится круг, из прямоугольника – квадрат.
В наборе есть шесть фигур: «Прямоугольник», «Прямоугольник со скругленными углами», «Эллипс», «Линия», «Многоугольник» и «Произвольная фигура». Если с первыми четырьмя все понятно, разберем две последние.
Многоугольник будет создаваться с количеством сторон по умолчанию или последним выбранным. Чтобы выбрать число сторон, нажмите левой кнопкой мыши по картинке и впишите цифру в соответствующее поле.
Выберите количество сторон и нарисуйте многоугольник
Инструмент «Произвольная фигура» предлагает на выбор шаблоны: стрелочки, галочки, сердечки, формы диалога и т. д. Чтобы выбрать их, вызовите окно с набором, щелкнув правой кнопкой мыши по изображению.
Выберите один из шаблонов в «Произвольной фигуре»
Деформация
Деформируйте фигуру. Для этого создайте любую, возьмите инструмент «Перо» или «Выделение узла» и изменяйте с помощью опорных точек. Принципы такие же, как и с трансформацией выделений (подробнее в разделе «Выделение»). С помощью «Пера» можно не только изменять, но и создавать фигуру с нуля. Для этого в его опциях в поле, где написано «Контур», выберите «Фигура». Так можно создавать области любой формы.
Деформируйте фигуры, чтобы создавать разные формы
Настройки фигур

Изменяйте фигуру и ее расположение на панели с опциями
Настраивается фигура в опциях инструмента и в окне «Свойства». Выберите, каким цветом (1) или градиентом ее залить, какого цвета (2), толщины (3), типа (4) (прямая или пунктирная) будет обводка. В полях «ширина» и «высота» задайте размеры в пикселях (5). Выберите, как фигуры будут накладываться друг на друга (6). Выровняйте фигуру относительно фотографии (7). Переместите слой с фигурой на нужное место относительно других слоев (8).
Удаление и перемещение элементов
С помощью инструментов коррекции удаляйте с изображения объекты, людей, тексты или водяные знаки. Я выделил пять, на мой взгляд, наиболее удобных инструментов коррекции: «Штамп», «Восстанавливающая кисть», «Заплатка», «Перемещение с учетом содержимого» и «Волшебный ластик».
Штамп
«Штамп» (S) позволяет скопировать участок изображения и добавить его в другую область. Выберите инструмент, зажмите Alt (на Мас — Option) и обведите, какой участок следует скопировать. Опции «Штампа» похожи на опции «Кисти»: размер курсора, форма, жесткость, прозрачность, нажатие.
Перенесите «Штампом» фрагмент картинки в другое место
Восстанавливающие кисти
Восстанавливающих кистей существует два вида: «Обычная» и «Точечная». «Обычная» восстанавливает с учетом выбранной области. «Точечная» восстанавливает закрашенную область с учетом ее фона.
Удаляйте ненужные фрагменты с помощью восстанавливающих кистей
Заплатка
С помощью «Заплатки» или любого инструмента для выделения обведите определенный участок, затем замените его другой областью картинки.
Выделите область на фото и с помощью «Заплатки» замените ее соседней
Перемещение с учетом содержимого
Выделите нужный объект, перенесите в другое место и нажмите Enter. Область, откуда был вырезан этот объект, автоматически заполнится с учетом фона. Как и предыдущий инструмент «Перемещение с учетом содержимого» работает с любыми выделениями.
Чтобы вырезать объект, выделите его и переместите в другое место с помощью «Перемещения с учетом содержимого»
Волшебный ластик
Если нужно вырезать какой-то объект на однородном фоне, воспользуйтесь инструментом «Волшебный ластик».
Вырежьте объект с однородного фона «Волшебным ластиком»
Подготовка и сохранение файлов
Как сохранить
Чтобы сохранить файл, откройте пункт «Файл» в меню. Существуют три команды для сохранения: «Сохранить», «Сохранить как» и «Экспортировать».
«Сохранить» (Ctrl + S или для Мас Cmd + S). Картинка автоматически сохраняется вместо своей изначальной версии.
«Сохранить как…» (Ctrl + Shift + S или для Мас Cmd + Shift + S). Открывается окно, в котором можно выбрать формат файла, название и путь.
«Экспортировать как…» (Alt + Ctrl + Shift + W или для Мас Option + Cmd + Shift + W). Эта команда позволяет перед сохранением поменять формат, качество картинки, размер, название и путь.
Что следует проверить перед сохранением
Перед сохранением проверьте шесть параметров: размер, разрешение, глубину цвета, цветовую модель, цветовой профиль и формат файла.
Размер и разрешение. Поменяйте разрешение в пункте «Изображение», разделе «Размер изображения». Если сохраняете картинку для соцсетей, поставьте разрешение 72 пикселя на дюйм − некоторые соцсети не пропускают изображения с большим расширением. Для сайта выберите значение 120–150 − изображение с большим разрешением будет слишком тяжелым. Для печати − не менее 300 пикселей/дюйм, а размеры выставьте в мм или см.
Глубина цвета. В окне «Режим» выберите глубину цвета. Сохраняйте в системе 8 бит/канал, когда картинка готова для печати или интернета и не требует дальнейших изменений. Больше бит на канал − это неоправданно большой размер и невозможность сохранить в jpeg. Сохраняйте в 16-канальной системе исходники, если планируете дальше с ними работать.
Цветовая модель. В окне «Режим» выберите и цветовую модель. Для печати − CMYK. Если картинку будут смотреть с мониторов − RGB.
Цветовой профиль. Эта настройка влияет на цветопередачу изображения. Чтобы настроить цветовой профиль, в пункте «Редактирование» перейдите во вкладку «Настройки цветов». Чтобы цвета отображались примерно одинаково и правильно на большинстве мониторов, в поле настройки выберите «Универсальные настройки для Европы 3».
Формат файла. Сохраняйте в jpeg готовую картинку для интернета. Она совсем немного потеряет в качестве, зато будет гораздо легче, чем в png. В psd сохраняйте, чтобы в дальнейшем файл можно было открыть в программе и доработать − это формат Photoshop. В tiff − когда собираетесь отдавать в типографию: он нужен для высококачественной печати.
Adobe Photoshop – самый популярный в мире графический редактор, предоставляющий пользователю огромное множество инструментов как для создания рисунков с нуля, так и для обработки фотографий. С его помощью можно ретушировать снимки, избавляться от лишних предметов на фото или заменять объекты. Если говорить о ручном рисовании, то Фотошоп станет отличным решением для художников, поскольку он полностью совместим с графическими планшетами и подходит для создания рисунков.
Давайте познакомимся с этой программой поближе.
Создание проекта в Phooshop
Предлагаю сразу перейти к инструкции по использованию редактора. Для начала вам понадобится приобрести программу или загрузить ее пробную версию с официального сайта, что не займет много времени и не является чем-то сложным, поэтому детально об этом говорить не буду.
Сразу после инсталляции можно запускать Фотошоп и дожидаться появления приветственного окна. Оно показывается при запуске (если это не отключено в настройках), отображает недавние документы с возможностью фильтрации, позволяет открыть проект для работы или создать новый.
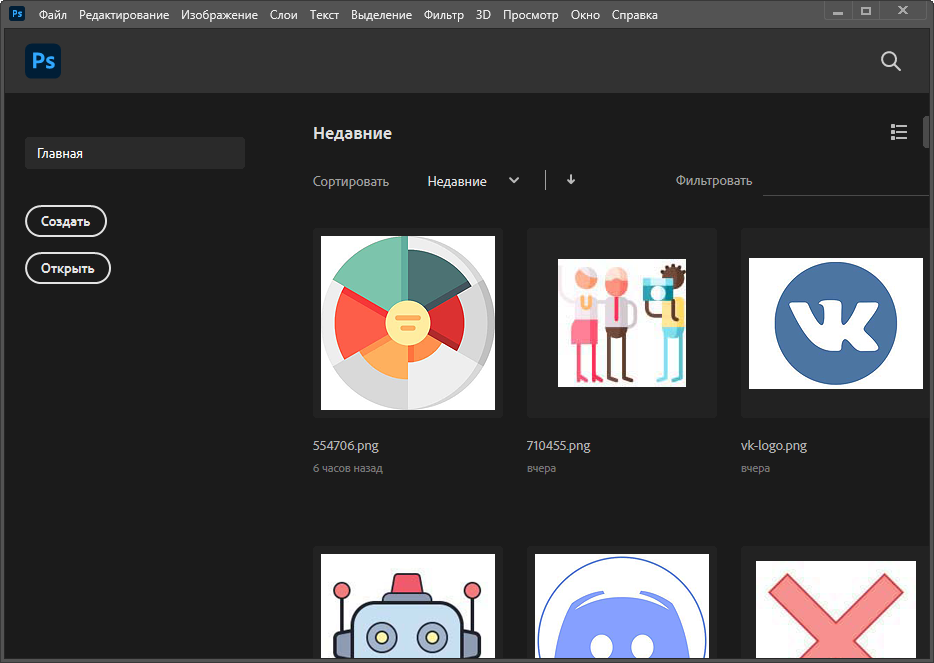
Если нажать кнопку «Создать», отобразится другое окно с названием «Создать документ». В нем присутствует несколько заготовленных шаблонов с ориентацией холста, его размером и остальными параметрами. То есть вы можете использовать данные настройки для редактирования параметров стиля документа. Например, для оформления значков нужен холст фиксированного размера (например – 64×64 пикселя), для листовок это может быть формат A4 или любой другой стандартный. Все это можно указать при создании документа и сразу начинать работу с правильно подобранными пропорциями.
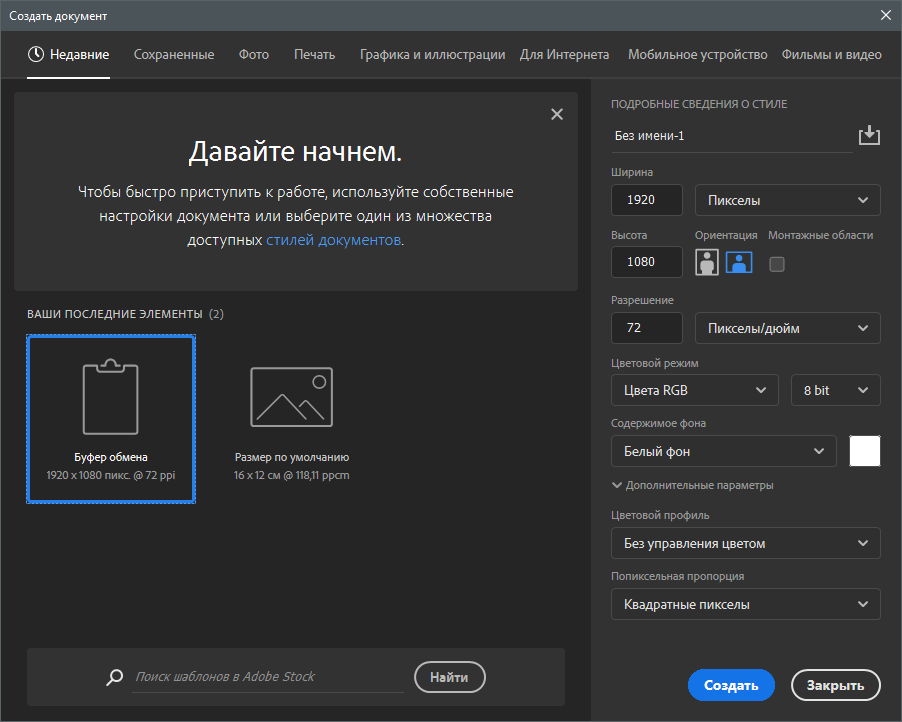
Комьюнити теперь в Телеграм
Подпишитесь и будьте в курсе последних IT-новостей
Подписаться
Основные элементы интерфейса
Не получится быстро освоиться в программе такого уровня, если нет представления об общих элементах интерфейса, с которыми придется взаимодействовать в любом случае. Я разделил их на категории, чтобы было проще понимать предназначение каждого и запомнить функции, которые можно вызвать с их помощью.
Верхняя панель
Больше всего разных пунктов, параметров и функций находится в меню на верхней панели. Списки меню отображаются при нажатии по нему левой кнопкой мыши – так, можно ознакомиться с присутствующими настройками и вызвать одну из них. Давайте по порядку разберем все присутствующие меню на верхней панели.
Сначала идет «Файл» – по названию этого меню уже понятно его предназначение. Через него вы можете приступить к созданию нового проекта, открыть уже существующий, закрыть тот, с которым сейчас идет работа, или сохранить изменения. Если запомните горячие клавиши, расположенные напротив каждого пункта, это значительно ускорит рабочий процесс, ведь нажать сочетание гораздо проще, нежели кликать несколько раз мышкой.
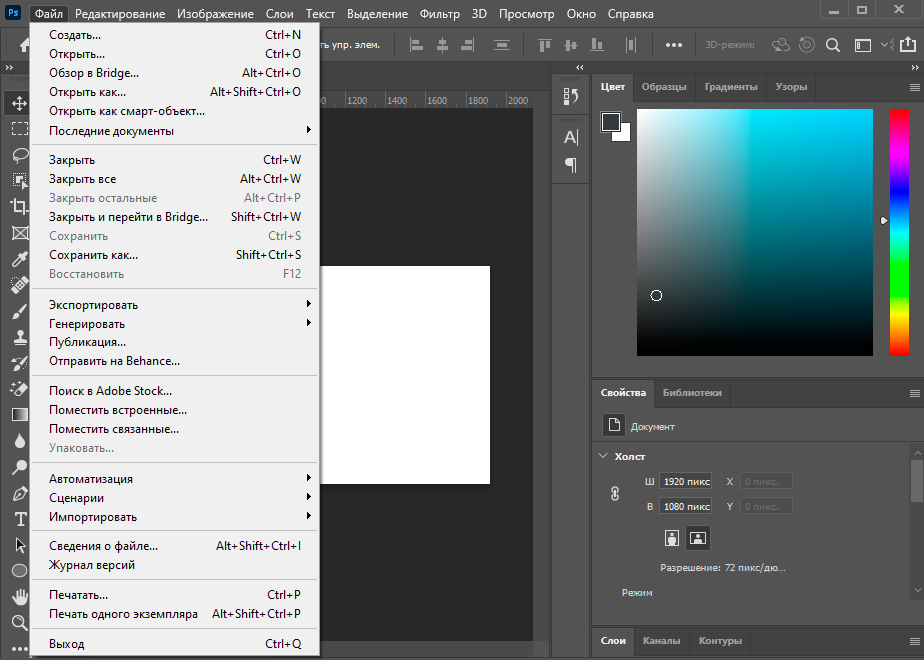
В меню «Редактирование» чаще всего используются функции «Отменить» или «Повторить», для которых тоже назначены горячие клавиши. Однако здесь присутствуют и другие стандартные действия: «Вставить», «Вырезать» или «Копировать». Не забудьте о том, что для вставки или копирования какой-то объект изначально должен быть выделенным. Обратите внимание и на специфические возможности, например, «Замена неба» или «Деформация перспективы». Первый инструмент автоматически определяет на фотографии небо и позволяет редактировать его цвет. При использовании второго вы самостоятельно выделяете область для изменения перспективы и вращаете ее при помощи булавки, изменяя угол представления элементов на фотографии.
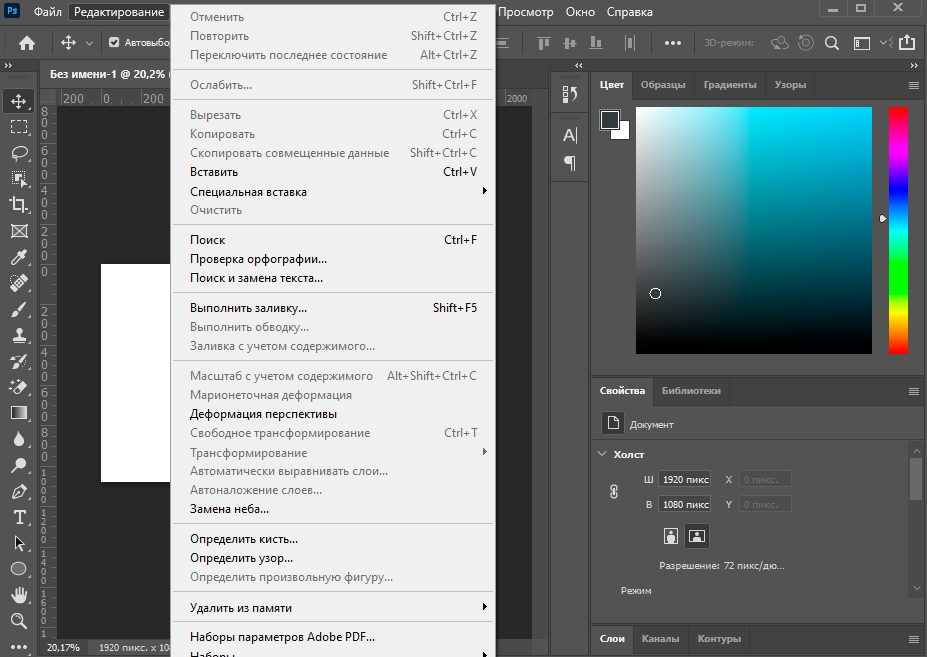
Об «Изображение» я расскажу детальнее в другом разделе статьи, когда речь пойдет о ретушировании изображения и изменении его внешнего вида. Однако знайте, что через это же меню вы можете изменить размер холста (при этом изображение будет обрезано, если оно больше заданных параметров) или провернуть то же самое со всем изображением. Здесь же присутствуют функции для вращения картинки или создания ее дубликата.
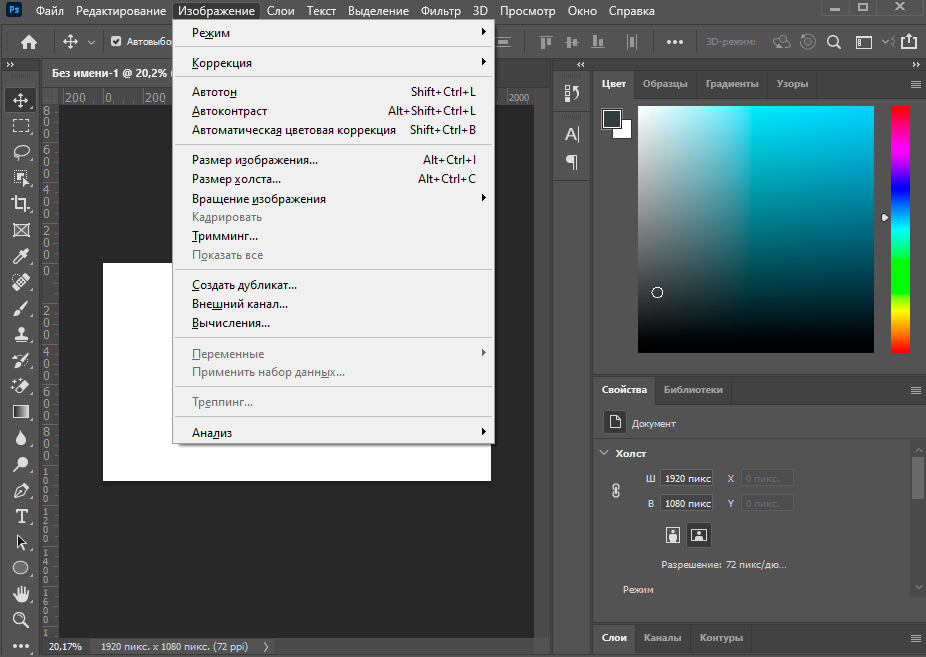
Перечень функций «Слои» редко используется для работы со слоями, поскольку это проще сделать через отдельно выделенное окно, о котором я тоже расскажу немного позже. Большинство присутствующих здесь инструментов предназначены для опытных пользователей, поскольку вряд ли начинающему нужно создавать смарт-объект или слой видео. Отмечу, что через это же меню вы можете быстро экспортировать текущий слой в PNG или любой другой подходящий формат.
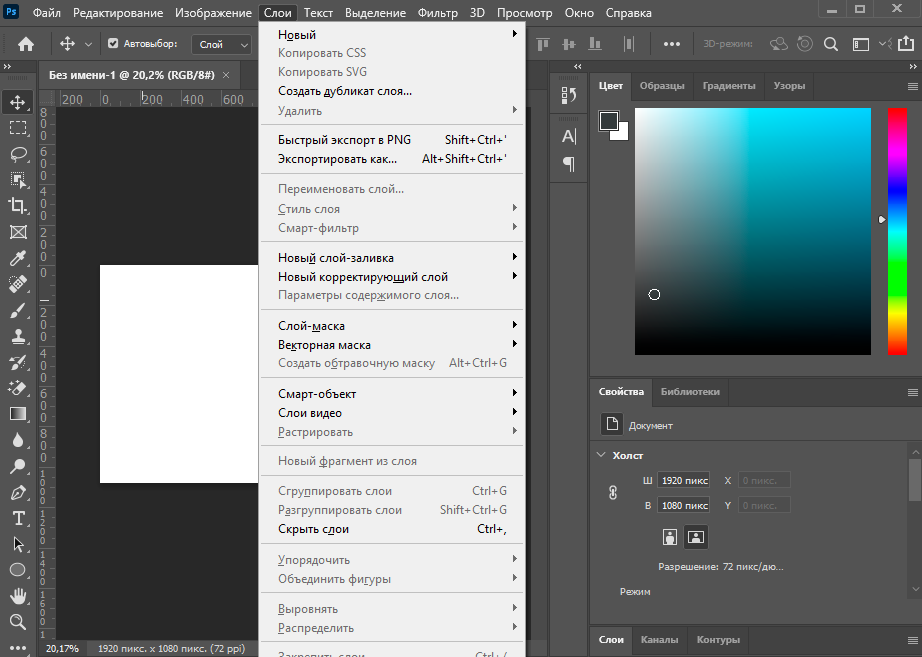
Для работы с текстом используется отдельная панель, появляющаяся при выборе соответствующего инструмента, однако в одноименном меню вы можете получить больше возможностей, чтобы загрузить больше официальных шрифтов, настроить ориентацию, сглаживание, перевести слой в 3D или поменять языковые параметры, если установленные по умолчанию вас не устраивают.
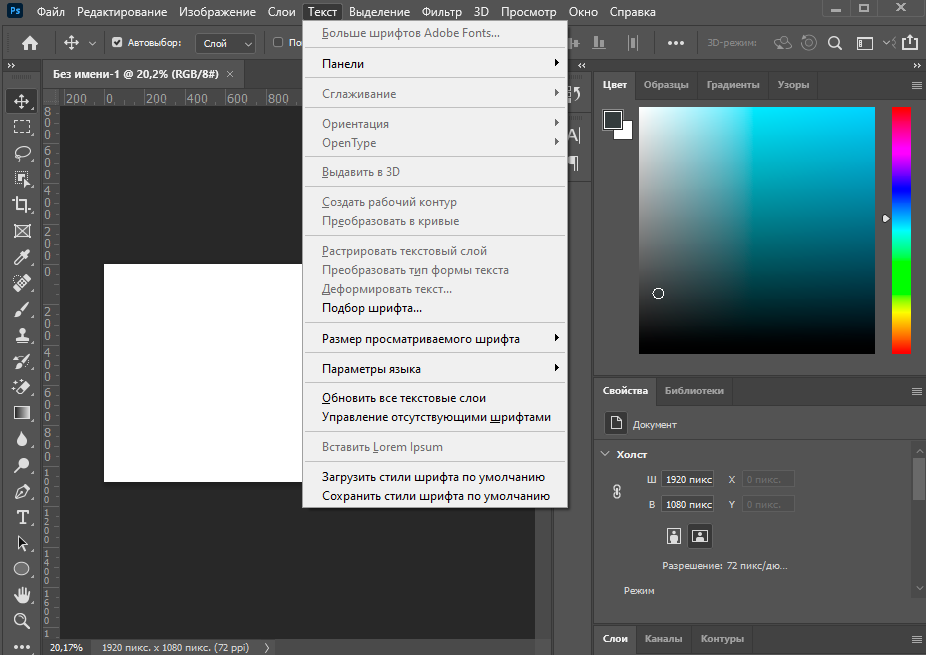
При работе с разными объектами в Adobe Photoshop часто используется выделение, которое не получается быстро снять. Для этого вы можете использовать функцию в меню «Выделение», которое пригодится и для выполнения других задач. С его помощью осуществляется выделение конкретного предмета, неба или цветового диапазона. Благодаря встроенным алгоритмам все это осуществляется в автоматическом режиме.
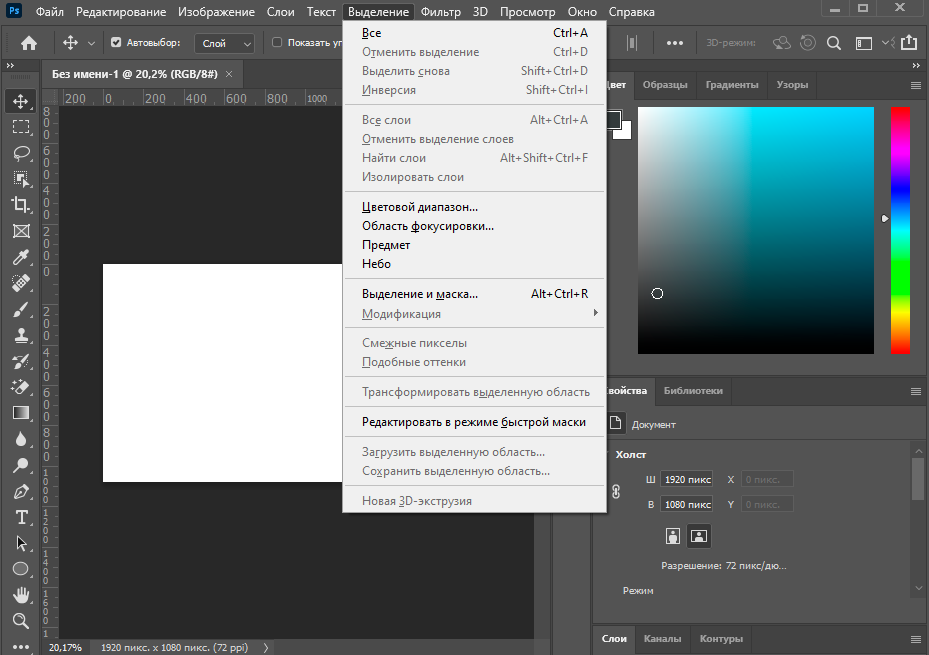
Доступные функции в «Фильтр» пригодятся, если вы занимаетесь обработкой фотографий. С их помощью можно настроить искажение, изменить размытие, стилизацию, устранить шумы или исправить перспективу. Взаимодействие с каждым фильтром интуитивно понятно, поэтому вам остается только выбрать подходящий и в новом окне изменить параметры, что скажется на отображении снимка.
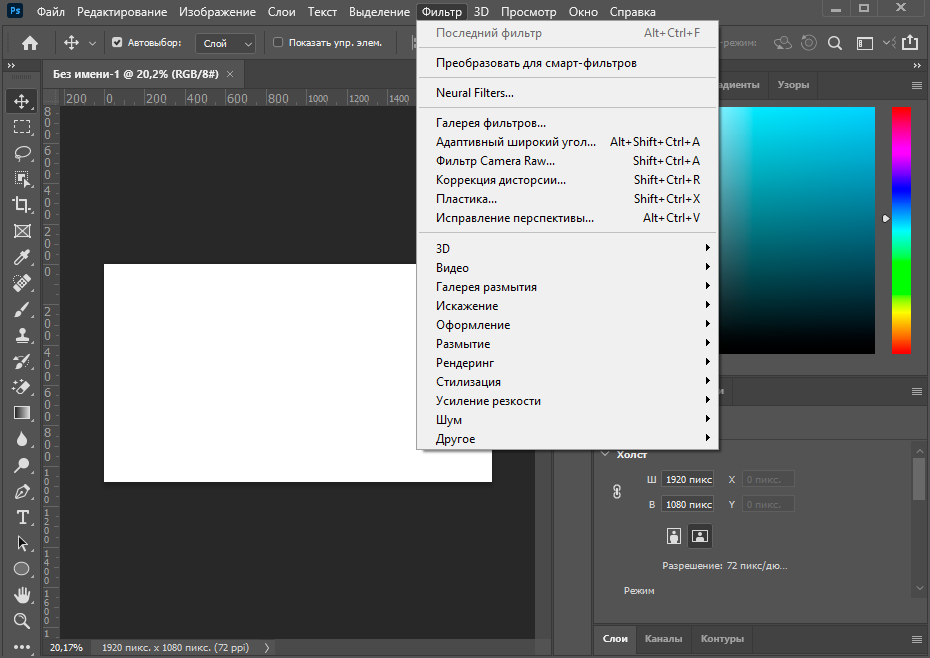
В меню «Окно» осуществляется управление всеми доступными окнами в Фотошопе. Галочка напротив пункта означает, что сейчас он отображается в рабочей среде. Со временем к вам придет понимание того, каких окон вам не хватает, а пока можно использовать список доступных шаблонов из пункта «Рабочая среда», выбрав там вариант под определенный тип деятельности.
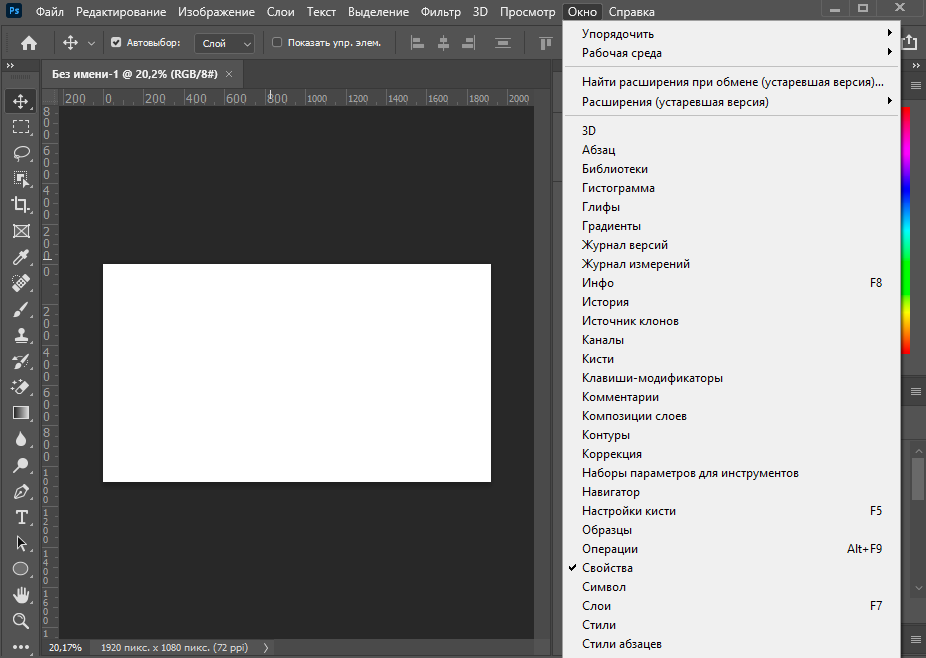
Панель с параметрами инструмента
Вкратце расскажу о панели ниже, куда выводятся все доступные параметры для выбранного инструмента. Их отображение как раз и зависит от того, выбрали ли вы кисть, текст или любую другую функцию на панели слева. Соответственно, все настройки индивидуальны, и рассказать обо всех них в рамках одной статьи не получится, поэтому я буду упоминать лишь самые важные при разборе конкретных инструментов в одном из следующих разделов.

Панель инструментов
Про элементы панели инструментов речь пойдет далее, а сначала хотелось бы просто рассказать о ее существовании. Вы всегда видите ее слева, и на ней отображаются практически все доступные инструменты, которые используются как при создании рисунка с нуля, так и при редактировании фотографии. Если нажать левую кнопку мыши на каждом инструменте, откроются его дополнительные свойства, например, можно выбрать не просто лассо, а магнитное или прямолинейное (в зависимости от потребностей в выделении фигуры).

Окна
Отдельно поговорим о разновидности окон, которые отображаются в установленной по умолчанию рабочей среде. Конечно, вы можете менять их расположение или вообще отключить, если вы не используете выбор цвета или не работаете со свойствами объекта. Это осуществляется через меню на верхней панели, о котором я уже рассказывал ранее.
Первое окно – «Цвет» – предназначено для выбора цвета при использовании заливки, рисовании кистью или добавлении фигуры. Вы можете изменять как основной, так и вторичный цвет, переключаясь между соответствующими плитками. Это окно имеет несколько вкладок, переключением между которыми происходит выбор образцов цвета, добавление градиентов или узоров на рисунок. Все доступные варианты отсортированы по группам, поэтому поиск подходящего не займет много времени.
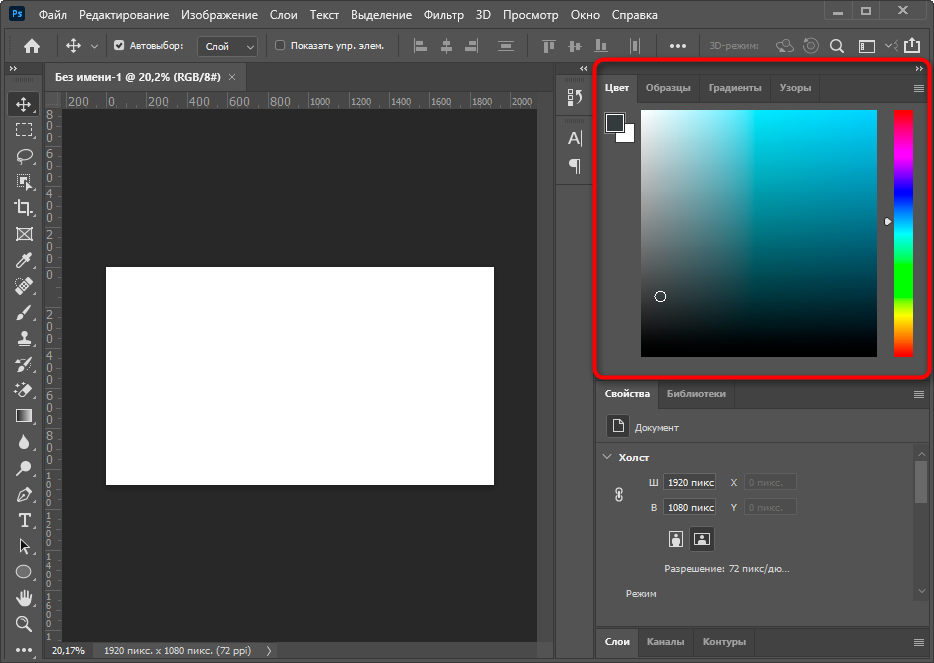
Окно «Свойства» становится доступным только после выбора конкретного объекта. На следующем скриншоте вы видите, что сейчас активен слой с эллипсом (он обведен в рамку с булавками), для него доступны изменения перспективы и внешнего вида. Используйте «Заполнить», если хотите изменить цвет объекта, и «Обводка», когда нужно добавить контур. Кстати, для обводки есть несколько параметров, позволяющих выбрать ее разновидность, размер и тип линии.
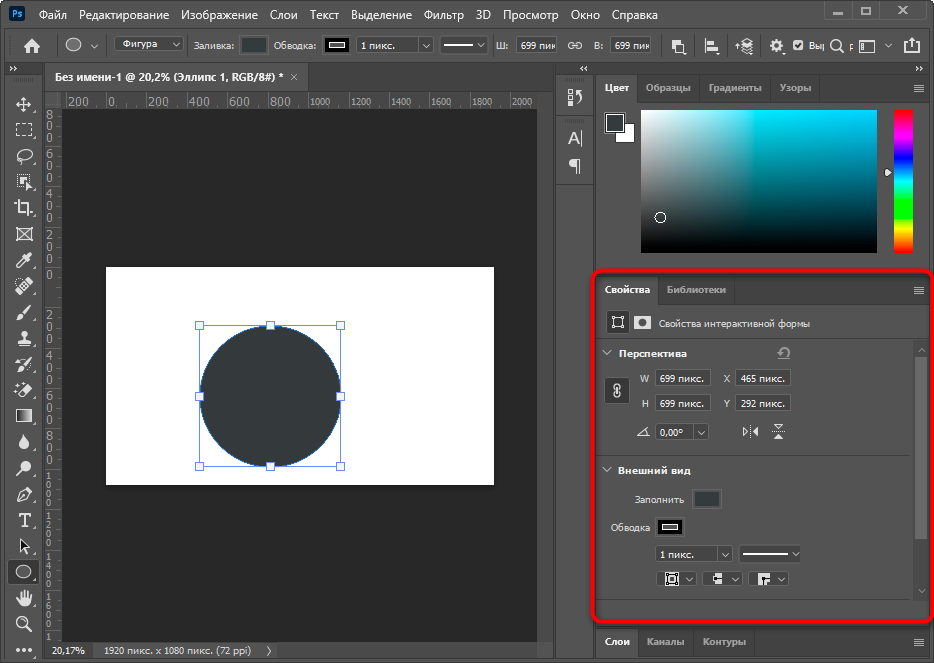
Еще одно основное окно – «Слои». Каждый элемент на холсте создается как отдельный слой, но ими можно управлять и вручную, например, когда речь идет об обработке фотографии. Фон закрепляется и недоступен для перемещения, а все остальные слои, наложенные поверх него, редактируются в соответствии с потребностями пользователя. Если щелкнуть правой кнопкой мыши по слою, появится дополнительное меню, позволяющее удалить его, создать дубликат, наложить маску или перейти к параметрам наложения.

Основные инструменты Photoshop
Приступим к разбору предназначения основных инструментов Фотошопа. Рассказать детально о каждом не получится, поэтому остановимся исключительно на принципе работы, а вы сможете проверить их действие самостоятельно, создав для этого тестовый проект.
По умолчанию выбран инструмент «Перемещение», его название как раз и говорит об основном предназначении. Выберите любой слой и используйте данную функцию, чтобы переместить его в нужное место на холсте. Обратите внимание на направляющие, выделенные розовым цветом – они позволяют соблюдать пропорции относительно самого холста или других расположенных на нем объектов.
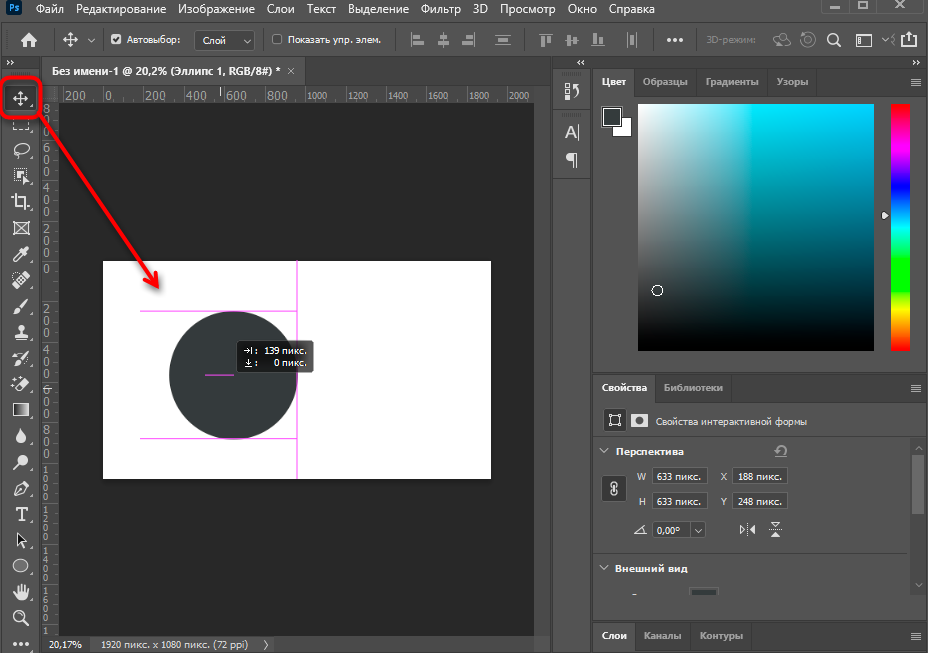
Следом идет «Прямоугольная область». Если зажать левую кнопку мыши на данном инструменте, то можно выбрать другой тип выделения: овалом, вертикальной или горизонтальной строкой. Суть его функционирования заключается в том, что вы выделяете произвольную область в виде указанной фигуры на слое и можете скопировать ее, вырезать или заняться другим редактированием, например, залить цветом при помощи другого инструмента или использовать ластик, когда нельзя, чтобы предмет выходил за границы выделенного.
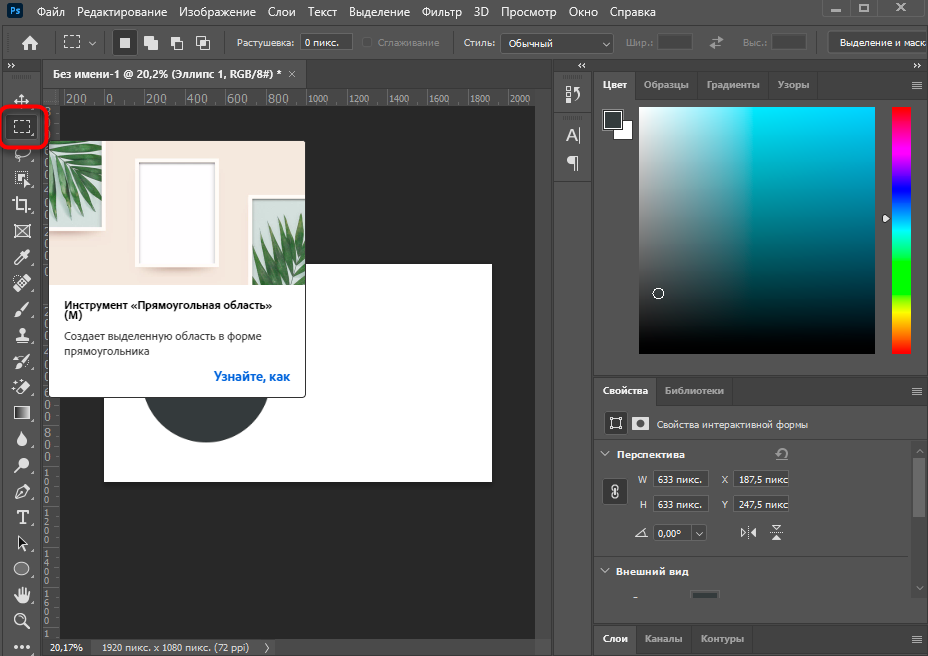
Если речь идет о произвольной рамке выделения, для этого идеально подойдет «Лассо» и все его типы. Им можно рисовать выделение по точкам, использовать магнитный тип для прикрепления точек на стыке цветов или применять только прямые линии.
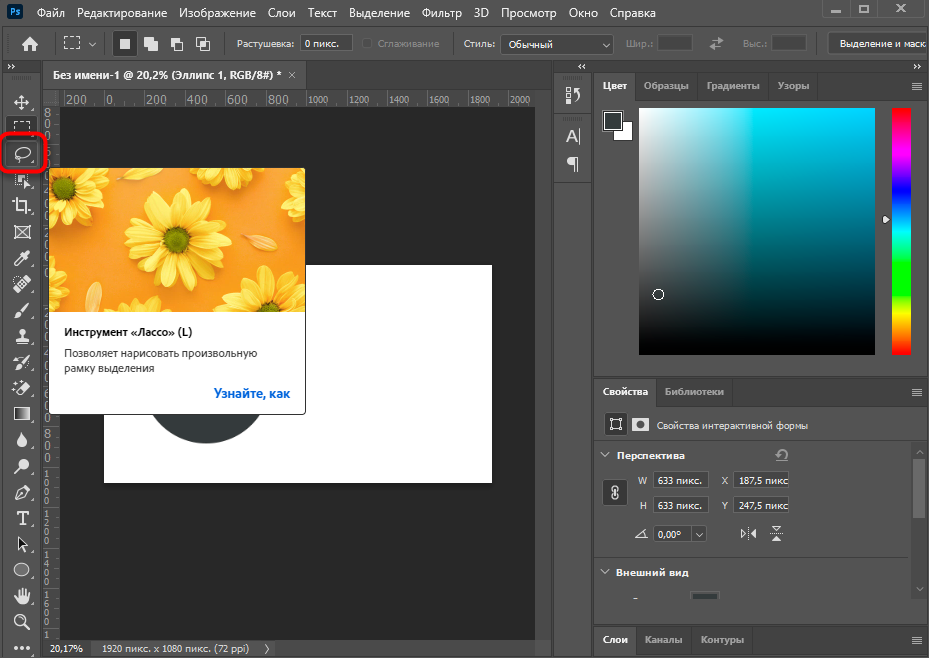
На следующем изображении вы видите доступные типы данного инструмента, которые появляются при вызове контекстного меню.
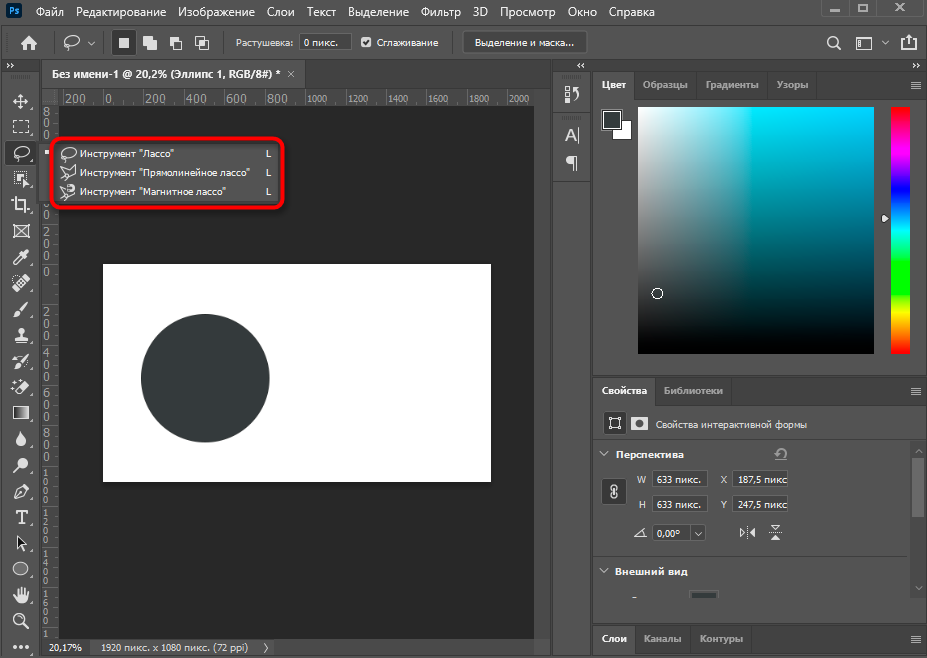
Еще ниже представлен вариант выделения фигуры при помощи «Магнитного лассо». Как видно, автоматически сформированные точки покрывают исключительно эллипс и не выходят за его границы. Это позволит свободно переместить выделенный объект, клонировать его или вырезать.
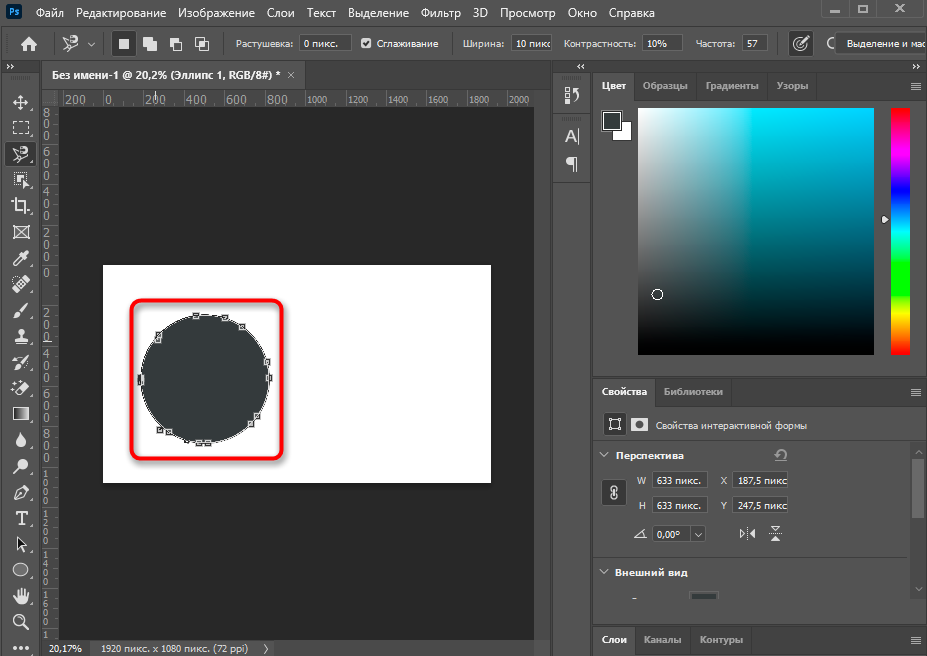
Если при работе с фотографией выяснилось, что ее нужно обрезать, поскольку присутствует лишнее по краям или есть другие нежелательные детали, от которых нужно избавиться, используйте для этого инструмент «Рамка». Он добавляет на холст рамку, которую можно редактировать, изменяя активную область. После нажатия по клавише Enter все то, что находится за пределами рамки, удаляется.
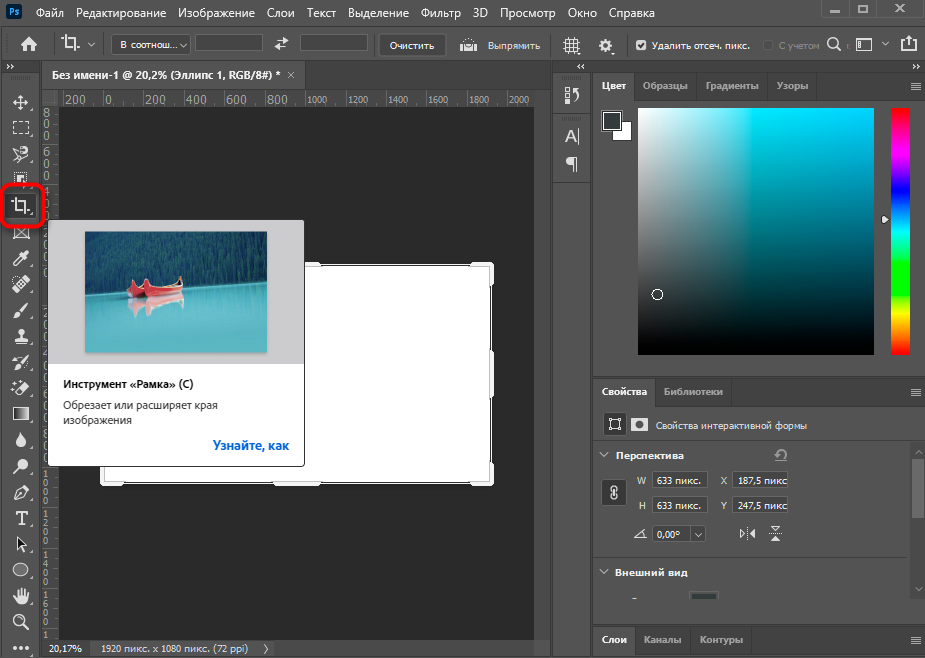
Функция «Кадр» предназначена для заполнения выделенной области другим кадром. На следующем скриншоте вы видите, что в качестве примера используется кружка, внутри которой поместили изображение с океаном, при этом края идеально соблюдены и ничего за них не вылазит. Сделано это при помощи данного инструмента, которым сначала выделили область для местозаполнителя, а затем перенесли туда кадр. Все делается буквально за одну минуту.
Попробуйте! Я уверен, что у вас все получится с первого раза.
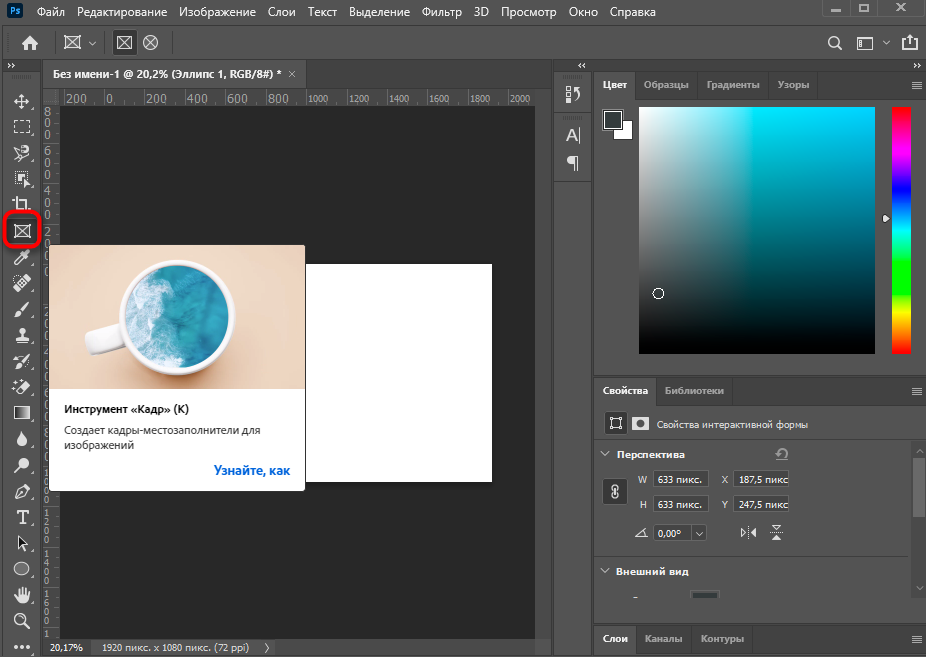
Графический редактор предоставляет еще один интересный инструмент – «Пипетка». Он предназначен для взятия образца цвета из изображения. Это пригодится, когда вы хотите закрасить определенный участок в желаемый цвет, но не можете выбрать его на палитре. Тогда временно переместитесь на холст изображение с нужным цветом, выберите пипетку и нажмите ЛКМ в нужном участке. Вы сразу увидите, как на палитре выбрался точно такой же оттенок.

Пропущу инструмент «Точечная восстанавливающая кисть» и расскажу о нем вместе с другим похожим инструментом, поскольку они часто применяются в одних и тех же условиях – при обработке фотографий, когда одни объекты заменяются другими, копируются или вовсе удаляются. Сейчас же остановимся на кистях, которых в Photoshop существует огромное множество.
Понятно, что они предназначены для рисования, и почти каждый знает, как именно ими управлять, поскольку хотя бы раз работал в том же Paint. На панели инструментов вверху, о которой я уже говорил ранее, можно выбрать тип кисти, ее размер, режим рисования, непрозрачность и нажим, что будет крайне полезно для обладателей графических планшетов, которые в Фотошопе рисуют с нуля. Кстати, дополнительные настройки кисти появляются при нажатии в любой области холста правой кнопкой мыши. Так тоже можно быстро настроить ее размер, жесткость и тип.
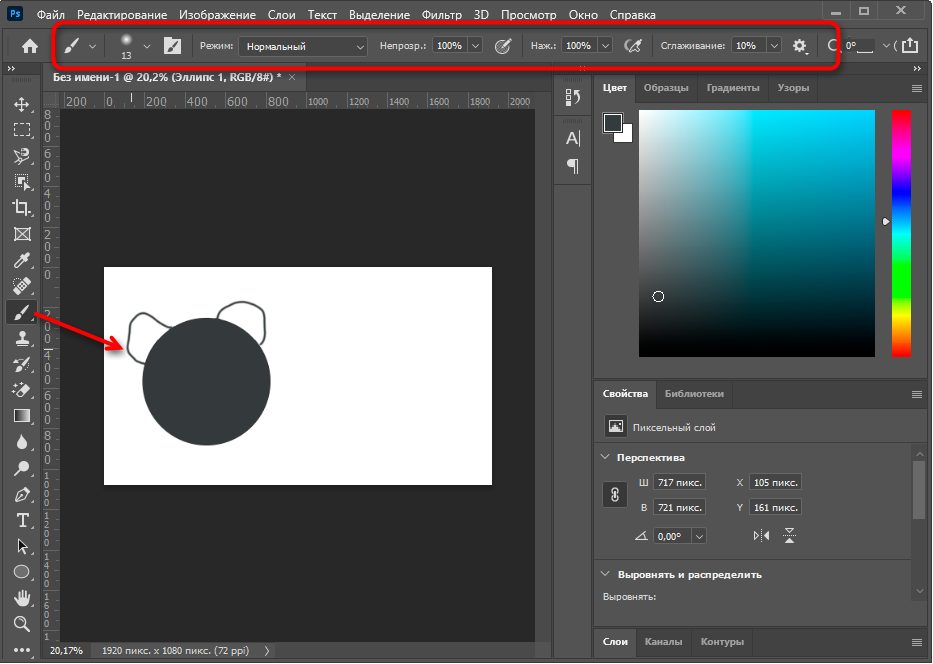
«Штамп» – как раз тот инструмент, который я хочу объединить в одном блоке с «Точечной восстанавливающей кистью». Первый предназначен для копирования пикселей из одной области изображения в другую. То есть вам нужно зажать ALT + ЛКМ (кликнуть по нужному участку), после чего им можно рисовать в другой области изображения, клонируя или закрашивая участок в тот же цвет, устраняя проблемные участки лица или заменяя объекты на снимке.
Восстанавливающей кистью нужно провести по участку, который должен замениться. То есть объект будет закрашен в цвет, который находится рядом. Так можно удалить родинки или пигменты на лице, сделать небо на фотографии чище или избавиться от других мелких деталей, которые находятся на однородном фоне.

После применения предыдущих инструментов может потребоваться «Архивная кисть». Она восстанавливает предыдущее состояние выделенного ею фрагмента, то есть уберет все зарисовки, наложения или замененные объекты, возвращая слой к тому состоянию, в котором он находился по умолчанию.
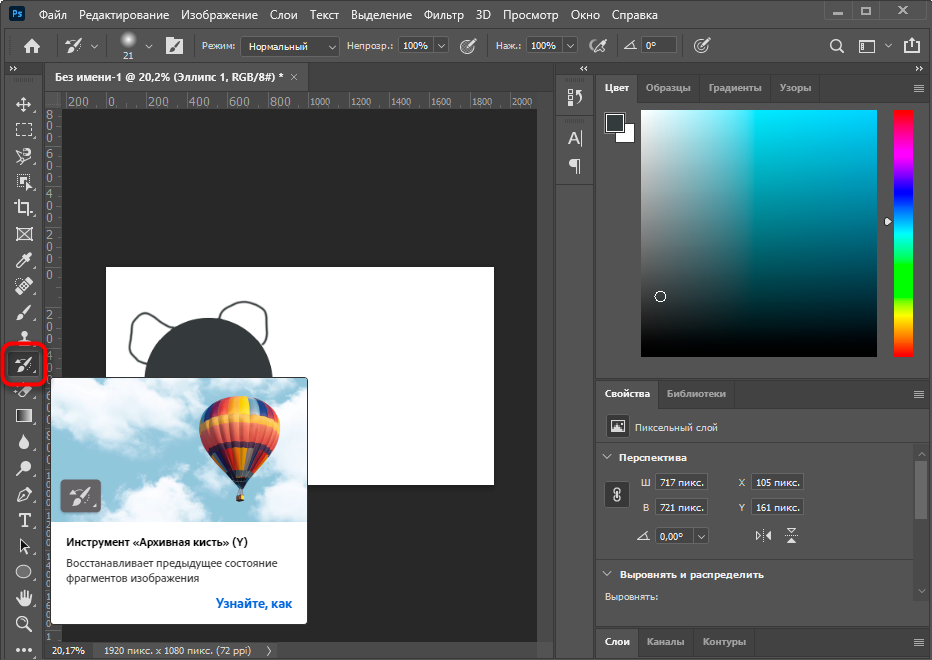
Немного иначе работает «Ластик», который представлен в трех типах. Первый тип просто делает пиксели прозрачными, второй предназначен для закраски их в фоновый цвет, а третий позволяет умно удалить какой-либо объект. Он находит контуры и полностью стирает их, оставляя другие объекты. Одно из самых популярных применений этого инструмента – удаление однотонного фона, на котором расположен объект.
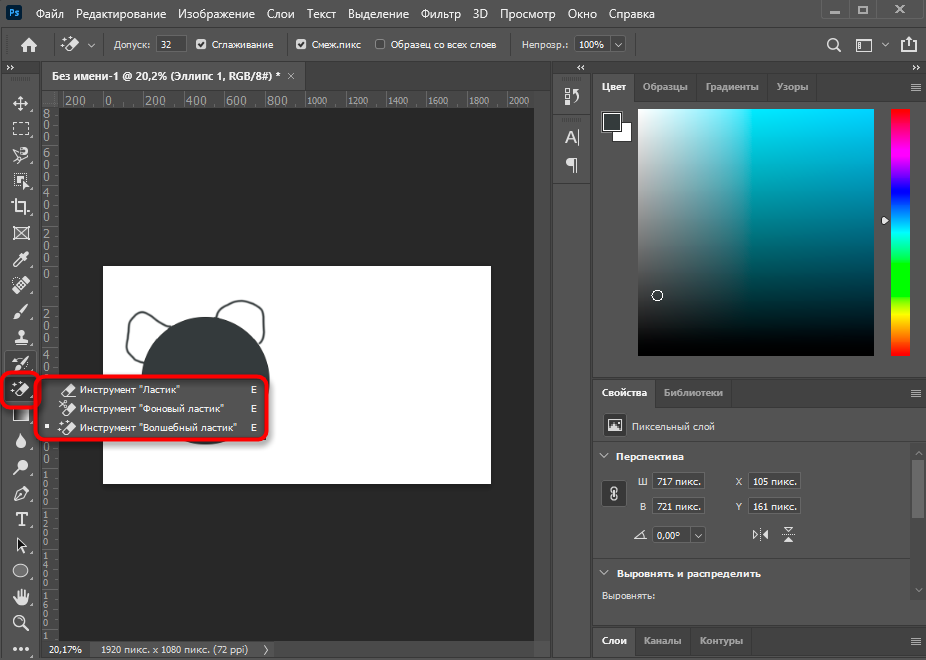
«Текст» тоже используется довольно часто, поскольку Фотошоп позволяет не только рисовать или обрабатывать фото, но и заниматься графическим дизайном, делать презентации, верстать мокапы и другие проекты, где обязательно присутствуют надписи. Все установленные в ОС шрифты подхватываются автоматически, создается новый слой с текстом, а все основные настройки вы увидите на верхней панели. После выбора инструмента нажмите в произвольной области и начните вводить текст. Если он уже создан, но нуждается в редактировании, сначала выделите его, а после изменяйте параметры.
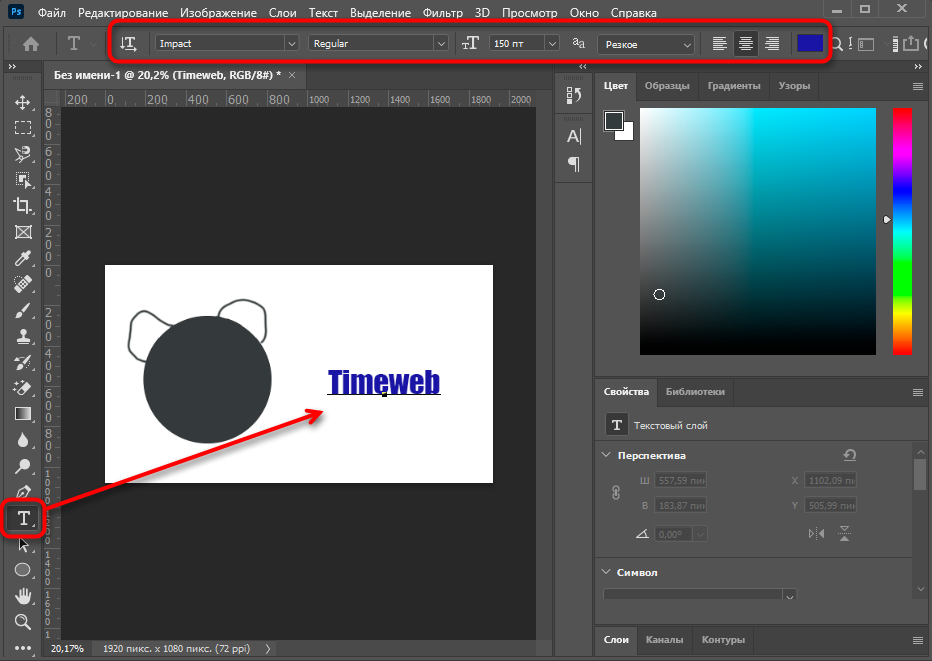
Отдельно затрону тему выбора геометрических фигур. В Photoshop их пять, но каждую можно редактировать при помощи точек так, чтобы создалась новая, уникальная фигура. Чаще всего их рисование как раз и нужно для презентаций. Используйте окно «Свойства» после выбора объекта, чтобы сделать его прозрачным и оставить только контур или произвести другие изменения, о которых я уже говорил при разборе данного окна.
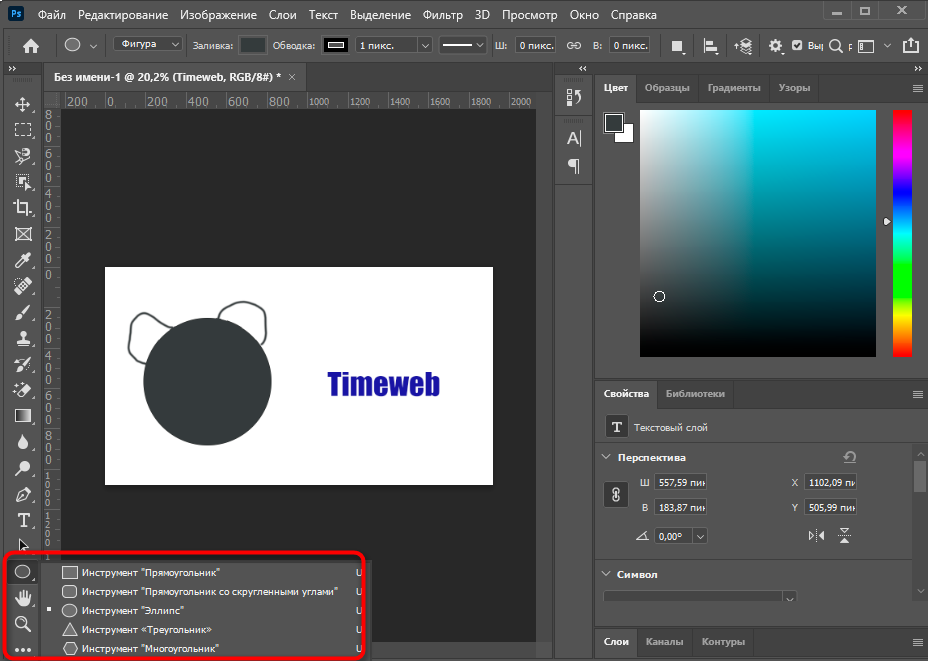
Примеры действий в Photoshop
Конечно, формат одной статьи не подразумевает обучению Фотошопу в полном представлении, поскольку существуют тысячи разных действий, которые можно в нем выполнить. В качестве примеров я приведу всего два, как мне кажется, основных действия, а вы, основываясь на их примерах, сможете приступить к работе со своими проектами или хотя бы понять, в каком направлении следует двигаться при изучении данной программы.
Использование параметров наложения
Выше я рассказал, как создать надпись, поэтому на ее примере и покажу, как работают параметры наложения, применимые к отдельным слоям с различными объектами. Это может быть любая фигура, текст или даже фотография.
-
Для начала найдите необходимый слой в соответствующем окне и кликните по нему правой кнопкой мыши.

-
Из появившегося контекстного меню выберите первый пункт – «Параметры наложения».
-
Откроется окно «Стиль слоев», в котором и присутствуют все доступные опции. Из их названия уже понятно предназначение, поэтому описывать детально каждый стиль не буду. Отметьте галочкой тот, который хотите активировать, а затем нажмите по его строке, чтобы посмотреть на дополнительные параметры.
-
В качестве примера возьмем «Тень». Для нее можно настроить режим наложения, установить уровень прозрачности, смещение, размер и размах, а также добавить шумы.
-
На следующем скриншоте вы видите, как применилась тень после выполненных настроек. Так же она отобразится и при работе с другими фигурами.
-
Еще я добавил внешнюю обводку, задал для нее другой цвет и получилось вот что.
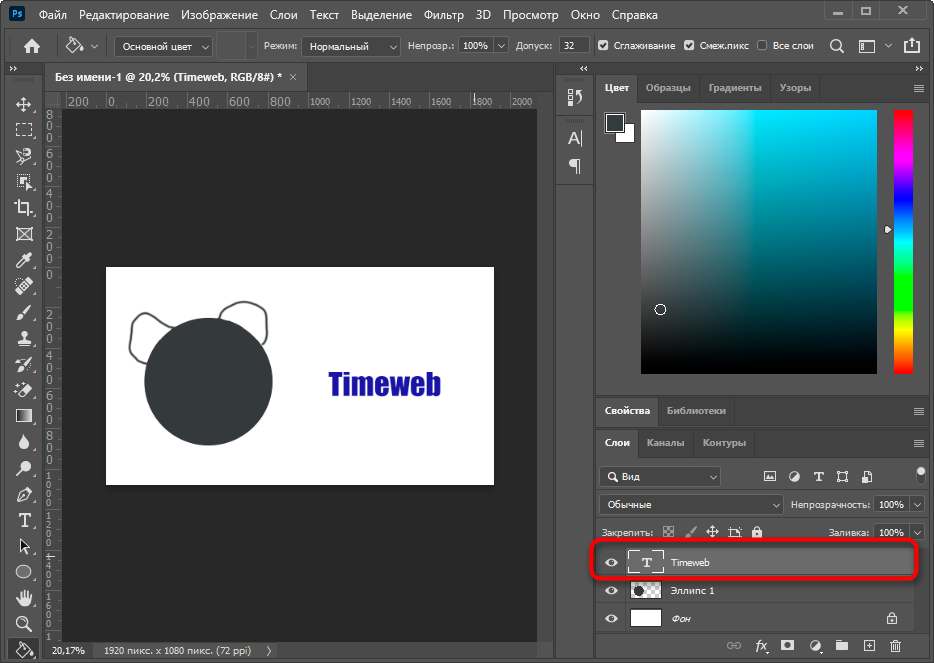
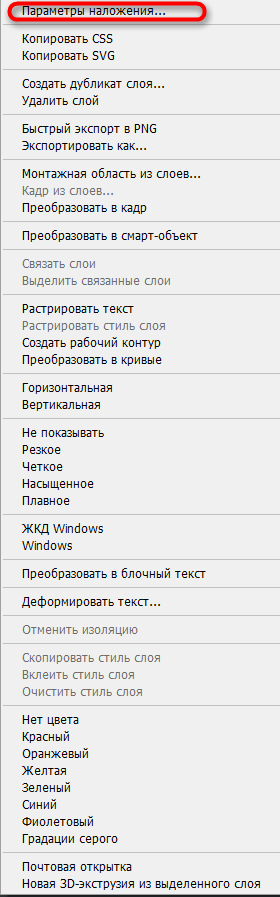
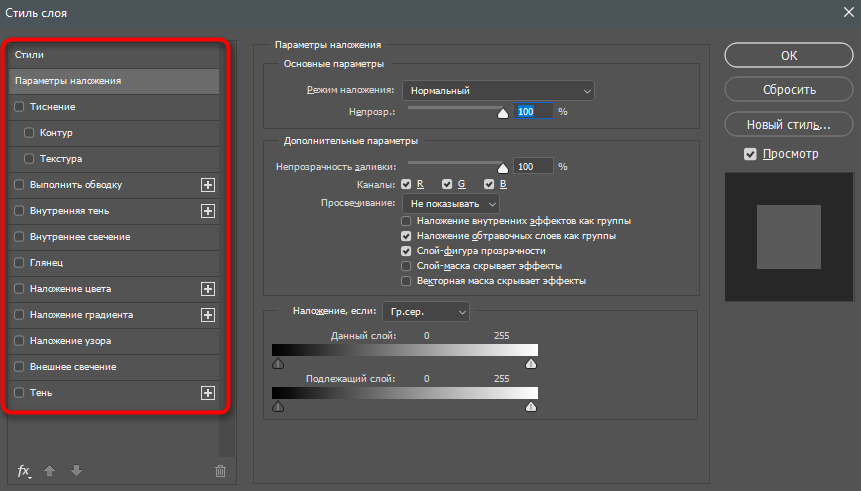
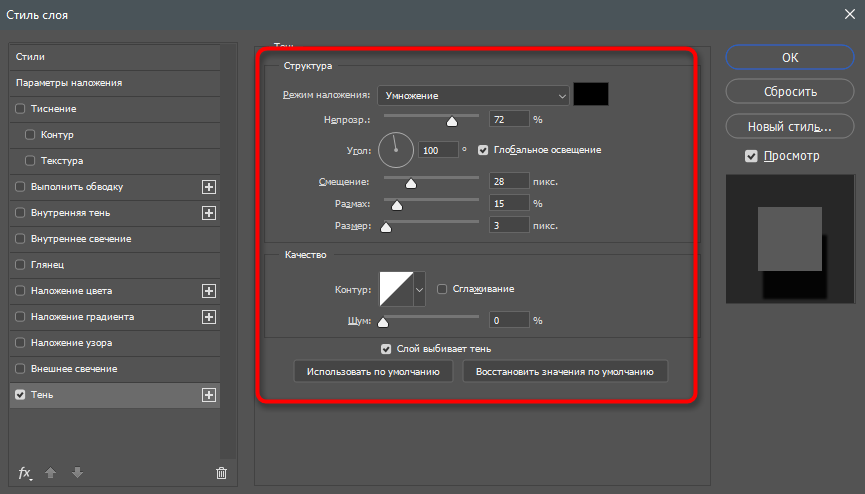
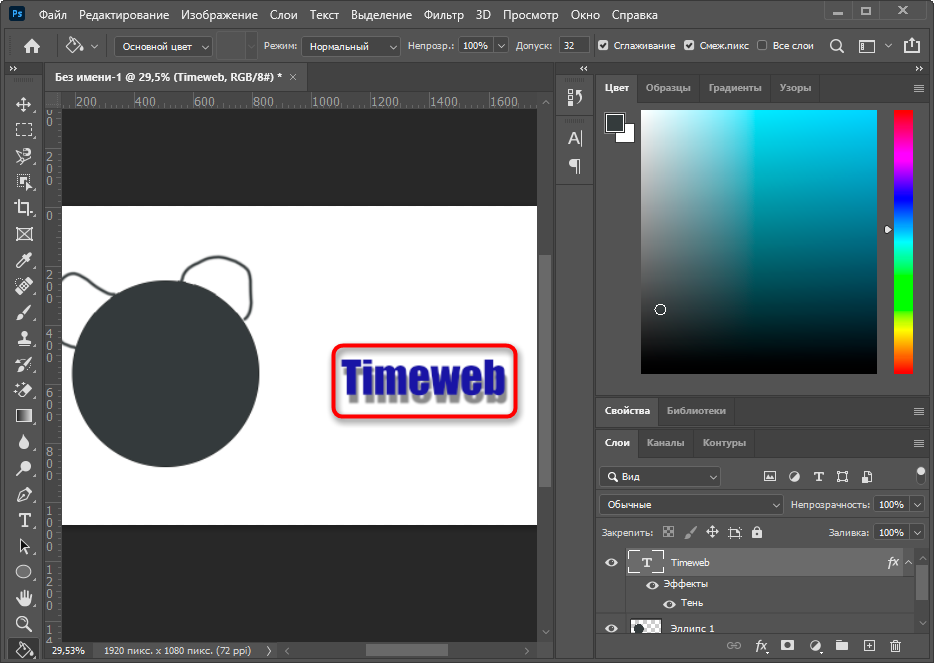
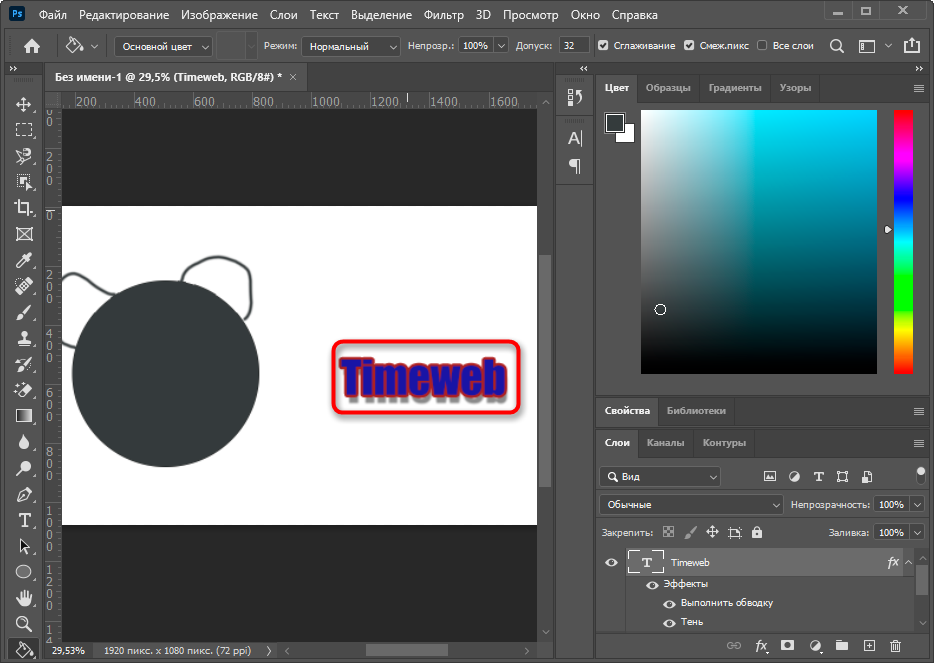
Это самый банальный и простой пример. При помощи параметров наложения можно добавлять свечение, красить фигуру в глянец или изменять ее цвет, добавляя даже градиенты. Все это выполняется через описанное меню «Стиль слоя».
Ретушь фотографий
Ретушь фотографий в Фотошопе – сложный процесс, требующий специальных знаний и понимания того, как должен выглядеть снимок в итоге. Я продемонстрирую одну из настроек, которую вы можете взять за пример и самостоятельно понять, как изменяется внешний вид фотографии.
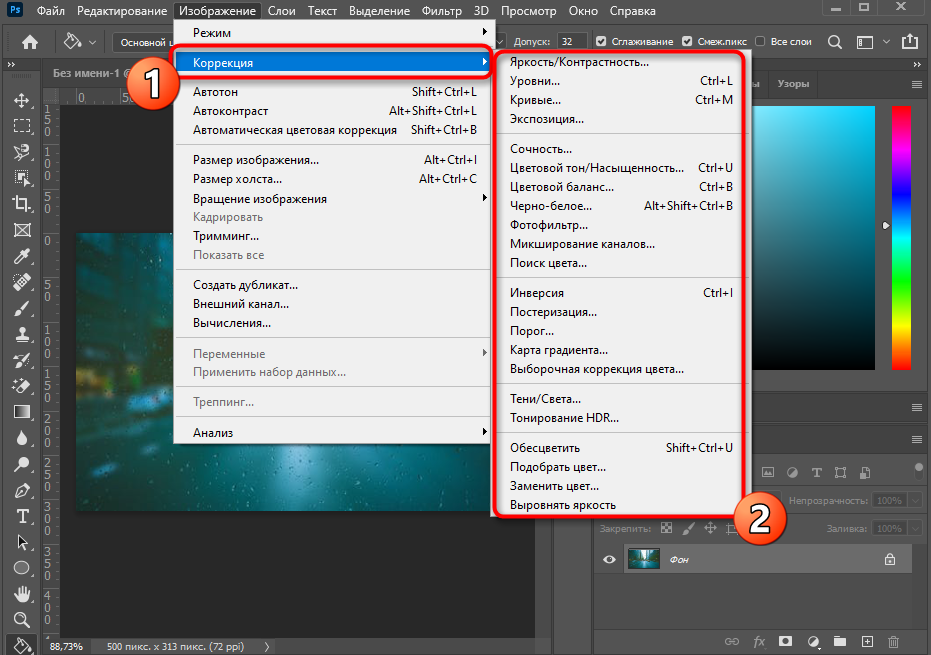
Используйте уже знакомый элемент верхней панели «Изображение», вызвав тем самым перечень доступных параметров. Я немного отредактирую кривые при помощи соответствующего параметра в разделе «Коррекция». Если вы думаете, что изображение слишком яркое или ему не хватает контраста, выбирайте другие настройки и регулируйте их при помощи ползунков.
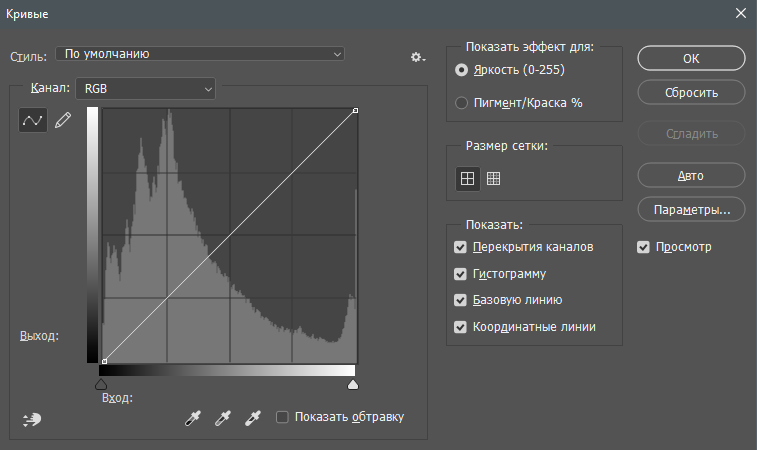
В новом окне выберу цветовой канал «RGB» и немного уменьшу зеленый, поскольку график показывает, что его больше всего. Ориентируйтесь на него, чтобы понять, какие цвета представлены на изображении и нужно ли какой-то из них выкрутить еще больше.
Сохранение проекта
Расскажу о том, как сохранить свой проект по завершении работы, чтобы в дальнейшем открыть его и внести изменения. Для этого выполните простой алгоритм действий:
-
Откройте уже знакомое меню «Файл» и выберите пункт «Сохранить как». Если использовать просто «Сохранить», проект будет сохранен в формате PSD. Для него можно выбрать любое место на компьютере.
-
При открытии окна Проводника задайте имя файла и из выпадающего списка выберите подходящий для него формат. Он зависит от того, для каких целей создавался проект.
-
Учитывайте, что при выборе JPG или других форматов файлов при следующем открытии в Фотошопе слои не отобразятся и не будут доступны для редактирования. Чтобы этого избежать, используйте фирменный формат PSD.

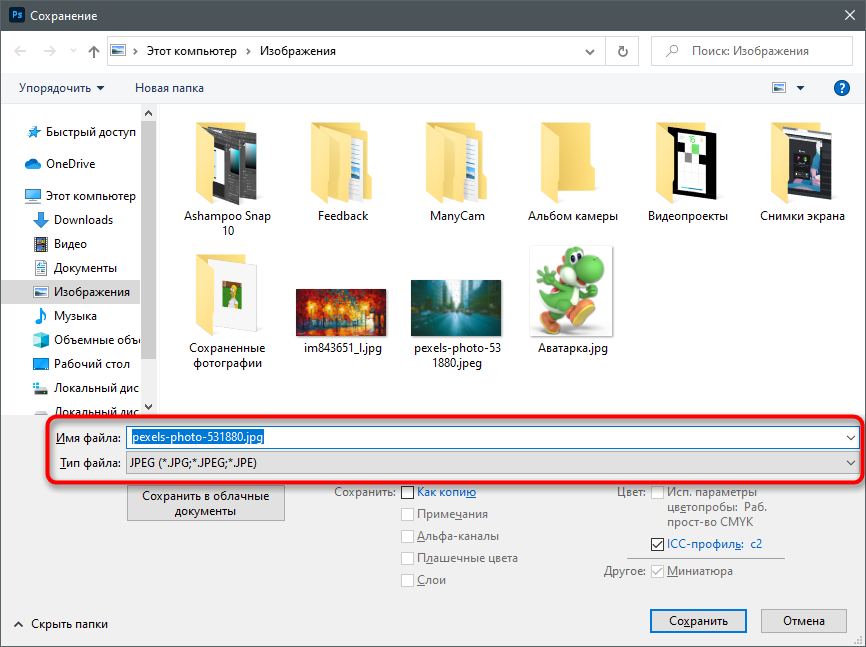
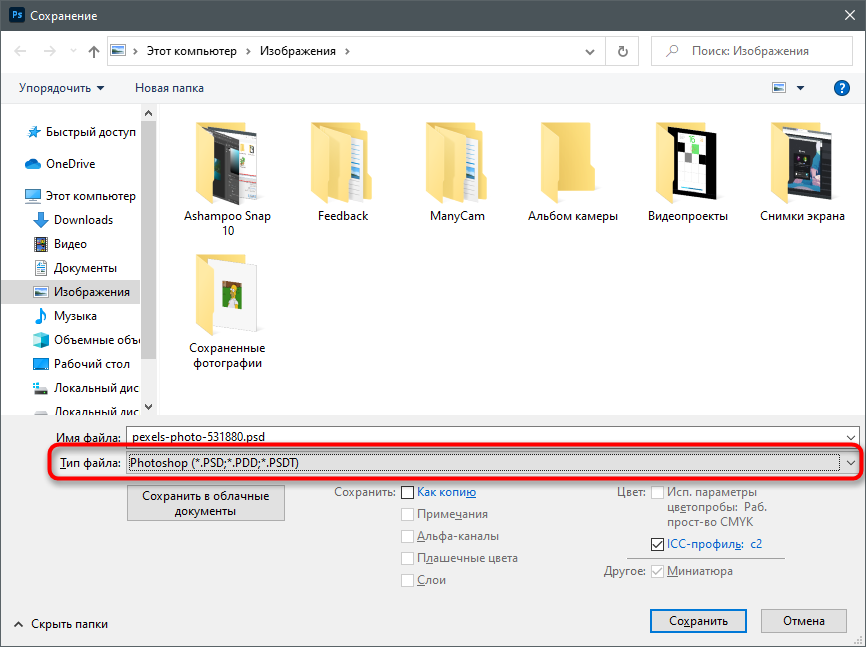
В рамках этой статьи вы узнали, как работает Photoshop и какие функции в нем есть. Конечно, нельзя назвать эту статью универсальной инструкцией, поскольку я лишь описал самые важные моменты, которые используются при взаимодействии с данным продуктом. Всю остальную информацию предлагаю черпать из авторитетных источников или даже книг, где рассказывается о работе с программой.
Совет. Чтобы подсветить новые возможности в меню Photoshop, выберите «Окно» > «Рабочая среда» > «Новое в CS6».
Только для пользователей Adobe Creative Cloud
Для подписчиков Adobe Creative Cloud доступны следующие дополнительные функции. Чтобы познакомиться с новыми функциями CS6, которые доступны не только для пользователей Adobe Creative Cloud, прокрутите страницу вниз.
Усовершенствования фильтра «Пластика»
В обновлении Creative Cloud для Photoshop фильтр «Пластика» работает значительно быстрее, чем предыдущие версии. Теперь фильтр «Пластика» поддерживает смарт-объекты, включая слои видео смарт-объектов, и применяется в качестве смарт-фильтра.
Другим усовершенствованием фильтра «Пластика» является добавленное поведение для инструмента «Реконструировать». Если удерживать нажатой клавишу «Alt» (Windows) или «Option» (Mac OS) при перемещении инструмента через деформацию, инструмент «Реконструировать» сгладит деформацию, вместо того чтобы уменьшить или удалить ее.
Дополнительные сведения см. в статьеФильтр «Пластика».
Применение эффектов «Галерея размытия» как смарт-фильтров
Фотографические эффекты размытия в галерее размытий теперь поддерживают смарт-объекты и могут быть применены как смарт-фильтры без негативных последствий. Эта функция также поддерживает слои видео смарт-объекта.
Дополнительные сведения см. в статьях Галерея размытия фотографий CS6, Применение смарт-фильтров.
Копирование свойств CSS из слоев-фигур или текстовых слоев
Команда Копировать CSS обеспечивает создание свойств каскадных таблиц стилей (CSS) из слоев фигуры или текста. Она позволяет получить значения размера, положения, цвета заливки (включая градиенты), цвета обводки и тени. Для текстовых слоев команда Копировать CSS также получает значения семейства шрифтов, размера и толщины шрифта, высоты линии, подчеркивания, зачеркнутого текста, надстрочного и подстрочного индексов, а также выравнивания текста. Код CSS копируется в буфер обмена и может быть вставлен в таблицу стилей.
Условные операции
Условные операции позволяют создавать операции, в которых можно выбрать необходимое действие на основе одного из нескольких различных условий. Во-первых, выбирается условие и затем дополнительно указывается операция, выполняемая, если документ удовлетворяет условию. Далее следует дополнительно указать операцию, выполняемую, если документ не удовлетворяет условию.
Поддержка мониторов с высоким разрешением
В Photoshop добавлена поддержка мониторов с высоким разрешением, например, на мониторах Retina. Одним из усовершенствований работы с мониторами с высоким разрешением является быстрый просмотр документов при выборе масштаба 200 %. Чтобы просмотреть документ в масштабе 200 %, выполните любое из следующих действий.
- Выберите Вид > 200 %.
- Удерживая клавишу «Ctrl» (Windows) или «Cmd» (Mac OS), дважды щелкните значок инструмента Масштаб.
- Удерживая клавиши «Shift»-«Ctrl» (Windows) или «Shift»-«Cmd» (Mac OS), щелкните значок инструмента Масштаб для просмотра всех открытых документов в масштабе 200 %.
Изменения в параметрах вида
На панели параметров инструментов Масштаб и Рука кнопка для просмотра изображение в его реальном размере была переименована в 100 %. Кроме того, на панелях параметров обоих инструментов больше нет кнопки Размер оттиска. В дополнение, команда Реальный размер в меню «Вид» изменена на 100 %.
Изменения и усовершенствования инструмента «Рамка»
Обновления инструмента Рамка включают в себя различные улучшения и исправления ошибок, в том числе:
- Изображение и новые наборы в меню «Пропорции».
- При нажатии двунаправленной стрелки изменяется ориентация кадрирования путем перестановки местами значений Ширина и Высота. Этот значок заменяет кнопку Повернуть рамку кадрирования.
- Выбор параметра Ш x В x разрешение в меню «Пропорции» приводит к отображению поля Разрешение на панели параметров и автозаполнению полей Ширина и Высота.
- При нажатии кнопки Очистить значения полей Ширина и Высота на панели параметров удаляются. Если значение в поле Разрешение присутствует, оно также удаляется.
- Клавиатурное сокращение для параметра Изображение изменилось с F на I как для инструмента Рамка, так и для инструмента Рамка с перспективой.
A. Меню «Пропорции» B. Поменять местами ширину и высоту C. Параметры наложения
Стили шрифта по умолчанию
Стили символов и абзацев документа можно сохранять как стили шрифта по умолчанию. Эти стандартные стили автоматически загружаются на панели Стиль символа и Стиль абзаца при создания нового документа Photoshop. В любой существующий документ также можно загрузить стандартные стили с помощью команды Загрузить стили шрифта по умолчанию.
Усовершенствования определения лиц в цветовом диапазоне
Команда выбора цветового диапазона теперь сохраняет выбранные телесные тона в качестве набора. Она также может сохранить настройку параметра Определять лица при выборе параметров Телесные тона или По образцам.
Дополнительные сведения см. в разделах Сохранение параметров «Телесные тона» как наборов, Выбор цветового диапазона в изображении или в видеоролике Выбор телесных тонов в Photoshop CS6, подготовленном экспертом Photoshop, Мэттом Клосковским (Matt Kloskowski).
Чтение образцов из файлов CSS, HTML и SVG
Можно добавить цвета, указанные в документе HTML, CSS или SVG, на панель Образцы. Если цветовое значение повторяется в документе, будет добавлен только один экземпляр цвета, чтобы исключить наличие дубликатов. Данная функция распознает следующий синтаксис цветов HTML/CSS: #112233, #123, rgb (1, 2, 3), rgba (1, 2, 3, 4), hsb (1, 2, 3) и hsba (1, 2, 3, 4).
Усовершенствования и изменения в работе с 3D
Photoshop CS6 версии Creative Cloud имеется множество новых возможностей и усовершенствований в работе с 3D. Дополнительные сведения об обновлениях см. в разделе Рабочий процесс 3D.
Поддержка больших JPEG-файлов
Photoshop может теперь открывать и сохранять документы JPEG до 65,535 пикселов в ширину или высоту.
Панель «Цвет» изменяемого размера
Теперь можно изменять размер панели «Цвет».
Новые возможности для всех пользователей Photoshop CS6
Следующие новые возможности доступны для всех пользователей Photoshop CS6, а не только для подписчиков Adobe Creative Cloud.
Ретуширование и трансформирование
Инструмент «Перемещение с учетом содержимого»
Инструмент Перемещение с учетом содержимого позволяет быстро компоновать изображения без сложной работы со слоями или трудоемких процедур точного выбора. В режиме расширения можно наглядно удлинить или сжать такие объекты, как волосы, деревья и здания. В режиме перемещения можно переместить объекты в новое положение (наибольшая эффективность достигается, если фон остается похожим). На панели инструментов удерживайте нажатым инструмент Точечная восстанавливающая кисть ![]() и выберите инструмент Перемещение с учетом содержимого
и выберите инструмент Перемещение с учетом содержимого ![]() .
.
Дополнительные сведения см. в разделе Перемещение с учетом содержимого.
Инструмент «Заплатка с учетом содержимого»
Обновленная Заплатка содержит параметр С учетом содержимого, который эффективно заменяет нежелательные элементы изображения, синтезируя соседнее содержимое. Можно получить такие же имеющие естественный вид результаты, как и при использовании заливки с учетом содержимого, но инструмент Заплатка также позволяет выбрать область, на основе которой отрисовывается заливка. На панели инструментов удерживайте нажатым инструмент Точечная восстанавливающая кисть ![]() и выберите инструмент Заплатка
и выберите инструмент Заплатка ![]() .
.
Дополнительные сведения см. в разделе Заплатка с учетом содержимого.
Модернизированные инструменты «Рамка»
Модернизированный инструмент Рамка обеспечивает интерактивный просмотр, благодаря чему можно лучше визуализировать результаты. Упрощенный набор параметров панели инструментов включает в себя полезный инструмент «Выпрямление» и элементы управления пропорциями, которые можно настроить, пока в окне изображения активен режим кадрирования. (Чтобы сохранить текущие пропорции или разрешение, щелкните изображение правой кнопкой мыши для доступа к дополнительным параметрам.)
- Чтобы кадрировать изображение, выберите инструмент Рамка на панели инструментов. Затем настройте границы кадрирования по умолчанию в окне изображения или выполните перетаскивание в окне для задания определенных границ.
- Чтобы исправить перспективу изображения, удерживайте инструмент Рамка и выберите инструмент Перспективное кадрирование
Дополнительные сведения см. в разделе Кадрирование и выравнивание фотографий.
Фильтры
Коррекция широкоугольных объективов
Выберите Фильтр > Адаптивный широкий угол, чтобы быстро выровнять линии, которые кажутся кривыми на панорамах или фотографиях, снятых с помощью широкоугольных объективов и объективов типа «рыбий глаз». Фильтр использует физические характеристики отдельных объективов, чтобы автоматически исправлять изображения.
Дополнительные сведения см. в разделе Адаптивный широкоугольный фильтр или посмотрите видео Коррекция фото с учетом объектива, подготовленное RC Conception.
Галерея размытия фотографий
Выберите Фильтр > Размытие по полю, Размытие по диафрагме или Сдвиг-наклон, чтобы быстро создать три разных фотоэффекта размытия с помощью интуитивно понятных элементов управления в изображении. Для добавления эффектов «боке» к изображениям используйте элементы управления эффектами размытия.
Дополнительные сведения см. в разделе Галерея размытия.
Галерея эффектов освещения
Повысьте производительность и улучшите результаты с помощью новой 64-разрядной галереи эффектов освещения. В специальной рабочей среде доступны элементы управления на холсте и изображения предварительно просмотра, упрощающие визуализацию улучшений освещения.
Дополнительные сведения см. в разделе Добавление эффектов освещения.
Фильтр «Масляная краска»
Выберите Фильтр > Масляная краска, чтобы с легкостью создать вид рисунка в классическом стиле.
Дополнительные сведения см. в разделе Фильтр «Масляная краска».
Видео
Модернизированная панель Временная шкала на основе функций обрезки содержит переходы и эффекты, которые позволяют создавать видеоролики профессионального класса. С легкостью изменяйте длительность и скорость воспроизведения клипа, а также применяйте эффекты движения к тексту, неподвижным изображениям и смарт-объектам.
Группы видео объединяют несколько видеоклипов и содержимое, например текст, изображения и фигуры, на одной дорожке временной шкалы. Отдельные аудиозаписи позволяют с легкостью выполнять редактирование и корректировку.
Модернизированная подсистема обработки видео также поддерживает более широкий диапазон форматов импорта. Когда видео подготовлено для экспорта, Photoshop обеспечивает полезные наборы и параметры для форматов DPX, H.264 и QuickTime.
Примечание. В Windows необходимо отдельно установить QuickTime.
Дополнительные сведения см. в разделе Редактирование видео.
Коррекция цвета и тона
Выделение телесных тонов и определение лиц
Выберите Выделить > Цветовой диапазон. Затем во всплывающем меню диалогового окна «Цветовой диапазон» выберите Телесные тона, чтобы без труда изолировать эти тона. Для более точного выделения телесных тонов установите флажок Определять лица, а затем скорректируйте Разброс, чтобы указать, насколько низкий или высокий диапазон цветов будет выделен.
Посмотрите видеообзор Изменения функции «Цветовой диапазон» в CS6. Дополнительные сведения см. в разделе Выбор цветового диапазона.
Улучшенные автоматические исправления
Доведите до совершенства свои изображения одним действием, используя улучшенные параметры Авто для коррекции по направлениям Уровни, Кривые и Яркость/контрастность.
3D (только для Photoshop Extended)
Интуитивно создайте трехмерный объект с помощью упрощенного интерфейса, который предлагает редактирование сцены на холсте. Легко перетащите тени в требуемое место, анимируйте трехмерные объекты, придайте трехмерным объектам вид эскизов или мультфильмов и выполняйте другие задачи.
Дополнительные инструкции см. в разделе Процесс работы с 3D-графикой.
Автоматизация
Photoshop CS6 позволяет записывать инструменты, такие как «Кисть» в операции. Чтобы активировать эту функцию, выберите Разрешить запись инструмента в меню панели «Операции».
Дополнительные сведения см. в разделе Запись инструментов в операциях.
Рисование и узоры
Размываемые кончики кисти
Эрозийные карандаши и пастели по мере использования стираются естественным образом. Настройте параметры Форма отпечатка кисти: параметр Сглаживание управляет скоростью стирания, Форма содержит параметры для выбора формы кисти от прямой до скругленной, а Острый кончик обеспечивает возврат к исходной четкости. В процессе рисования степень изнашивания можно оценить в разделе динамического просмотра кончика кисти, который находится в левом верхнем углу изображения.
Выберите Окно > Параметры кисти, чтобы быстро получить доступ к новым размываемым кончикам кисти, или Окно > Кисть, чтобы настроить их. Дополнительные сведения см. в разделе Параметры размываемого кончика.
Кончики аэрографа
Кончики аэрографа копируют аэрозольные баллончики с трехмерным коническим разбрызгиванием. Настройте такие параметры меню Форма отпечатка кисти, как Степень детализации, Разбрызгивание, Жесткость и элементы управления Искажение. С помощью пера можно настроить размах аэрографа, изменяя нажим пера.
Выберите Окно > Параметры кисти, чтобы быстро получить доступ к новым кончикам аэрографа, или Окно > Кисть, чтобы настроить их. Дополнительные сведения см. в разделе Параметры кончиков аэрографа.
Положение кисти
Задайте наклон пера, поворот и нажим. Выберите Окно > Кисть, а затем Положение кисти для раскрашивания с указанным наклоном, поворотом и нажимом. Используйте перо, чтобы изменить обводку, относящуюся к стандартному положению, или выберите параметры Аннулировать, чтобы сохранить статическое положение. Дополнительные сведения см. в разделе Параметры положения кисти.
Проекция кисти
Используйте проекцию кисти, чтобы применить наклон и поворот пера к формам кончика. Выберите Окно > Кисть и выберите Динамика формы в списке слева. В нижней части списка параметров справа выберите Проекция кисти. По мере рисования пером при изменении наклона и поворота изменяется форма кончика. См. раздел Параметры динамики формы кисти.
Динамика цвета кисти
Динамика цвета по умолчанию остается неизменной для каждой обводки. Параметры Динамика цвета позволяют автоматически изменять цвет по мере рисования. В предыдущих версиях Photoshop параметры динамики изменяли цвет для каждого отдельного отпечатка кончика в обводке. Однако в Photoshop CS6 изменения динамики происходят один раз в начале каждой обводки. Эта функция позволяет изменять цвет между обводками, а не в каждой отдельной обводке.
Чтобы восстановить поведение предыдущих версий, выберите Окно > Кисть и выберите Динамика цвета в списке слева. В верхней части раздела параметров справа выберите Применить для кончика. См. раздел Параметры кисти с динамикой цвета.
Узоры на основе сценариев
Выберите Редактирование > Заполнить, выберите пункт «Узор» в меню «Использовать», а затем выберите «Узоры по сценарию» для выбора одного из нескольких геометрических параметров. Создавайте сложные проекты, используя эти сценарии вместе с наборами «Заказной узор» и режимами смешивания.
Рисование
Векторные слои
Инструменты Линия и Фигура теперь позволяют создать объекты полностью на основе векторной графики. Применяйте обводки и заливки с помощью панели параметров. Объекты обводки с пунктирными линиями и другими объектами оформления. Заполняйте объекты заранее заданными или пользовательскими градиентами, цветами и узорами.
Чтобы впоследствии исправить настройки обводки и заливки, просто выберите слой объекта, а затем выберите инструмент «Выделение контура» ![]() или «Выделение узла»
или «Выделение узла» ![]() .
.
Подробнее: видеоролик, посвященный слоям фигур на основе векторов.
Интуитивное редактирование контура По умолчанию при перетаскивании с использованием инструмента «Стрелка» ![]() выполняется настройка нескольких связанных сегментов, что позволяет быстро трансформировать формы контуров. Чтобы отредактировать только сегменты между выбранными опорными точками, как в предыдущих версиях Photoshop, выберите параметр «Ограничить перетаскивание контура» на панели параметров.
выполняется настройка нескольких связанных сегментов, что позволяет быстро трансформировать формы контуров. Чтобы отредактировать только сегменты между выбранными опорными точками, как в предыдущих версиях Photoshop, выберите параметр «Ограничить перетаскивание контура» на панели параметров.
Чтобы уменьшить сглаживание краев, убедитесь, что векторные объекты имеют максимальную резкость, а затем выберите Выровнять края на панели параметров.
Рабочая среда и рабочий процесс
Благодаря многочисленным улучшениям рабочего процесса общие задачи можно выполнять более эффективно.
Графический модуль Mercury
Испытайте молниеносную скорость взаимодействия при выполнении ресурсоемких команд, таких как Пластика, Деформация, Марионеточная деформация и Рамка.
Обновленный вид
Работайте с новым изящным интерфейсом, который содержит улучшения, перечисленные ниже.
- Выберите один из четырех уровней яркости: выберите Редактирование > Установки (Windows) или Photoshop > Установки (Mac OS). В разделе Интерфейс выберите образец Цветовая тема.
Примечание. Чтобы быстро уменьшить яркость интерфейса, нажмите клавиши «SHIFT»+«F1». Чтобы увеличить яркость, нажмите SHIFT+F2. (Пользователи ноутбуков Mac также должны нажать клавишу FN.)
- Виды изображения уведомляют пользователя при работе с избранными инструментами путем отображения размеров для выделенных областей, углов для трансформаций и других действий. Чтобы скорректировать размещение этих значений, в установках Интерфейс выберите параметр в меню Показать значения преобразования.
- Новая галерея Mini Bridge предлагает более легкий доступ к изображениям и документам. Выберите Окно > Расширения > Mini Bridge.
- Чтобы максимально увеличить область экрана, функции, которые ранее находились на панели приложения, были перемещены в другие разделы. Для переключения стандартного и полноэкранного режимов нажимайте кнопку в нижней части панели инструментов.
Усовершенствования панели «Слои»
Новые параметры фильтрации, доступные в верхней части панели «Слои», помогают быстро находить основные слои в сложных документах. Отображайте подмножества слоев на основе имени, типа, эффекта, режима, атрибута или метки цвета. С помощью панели «Свойства» можно быстро изменять компоненты слоя, выделенные на панели «Слои».
Выберите Редактирование > Установки > Миграция, чтобы с легкостью переместить стили, рабочие среды, установки и параметры из Photoshop CS3 и более поздних версий в Photoshop CS6. Выберите Редактирование > Установки > Установки экспорта/импорта, чтобы разрешить общий доступ к выборочной установке на всех компьютерах в рабочей группе.
Дополнительные сведения см. в разделе Перенос наборов из более ранних версий Photoshop.
Фоновое сохранение
Благодаря сохранению в фоновом режиме можно продолжить работу после выбора команд сохранения, не дожидаясь завершения сохранения.
Примечание. Если требуется обеспечивать производительную работу Photoshop при частом сохранении больших файлов, отключите функцию Сохранять в фоновом режиме в настройках Обработка файлов.
Автоматическое восстановление
Функция автоматического восстановления сохраняет сведения для восстановления после сбоев через заданные интервалы времени. По умолчанию интервал равен десяти минутам. Если приложение завершает работу в аварийном режиме, проделанная работа восстанавливается при следующем запуске приложения.
Чтобы настроить интервал времени для сохранения информации для автоматического восстановления, выберите Редактирование > Установки > Обработка файлов (Windows) или Photoshop > Установки > Обработка файлов (Mac OS).
Выберите Сохранять в фоновом режиме, а затем выберите интервал в меню Автоматически сохранять информацию о восстановлении.
Текст
Стили абзацев и символов
На панели Окно > Стили абзацев создайте, сохраните и повторно примените характеристики групп выделенных предложений. На панели Окно > Стили символов укажите внешний вид выбранных букв, слов или фраз.
Дополнительные сведения см. в разделах Стили абзацев и Стили символов.
См. видеообзор Джулианны Кост (Julieanne Kost) Стили абзаца и символа в Photoshop CS6.
Добавлено новое меню «Текст», через которое можно вызвать большинство функций, связанных с текстом и шрифтами. Например, можно вызвать панели «Символ» и «Абзац» из меню «Текст» > «Панели».
Совместимость с Adobe Touch и сопутствующими приложениями Photoshop
Расширьте свой творческий потенциал за пределами Photoshop CS6 с помощью программного обеспечения Adobe Touch и сопутствующих приложений Photoshop (продаются отдельно). Оформляйте, редактируйте и изящно представляйте свою работу с помощью шести приложений Adobe Touch, предназначенных для планшетного ПК, включая Photoshop Touch, Adobe Kuler и Adobe Debut. Передавайте файлы через службу Adobe Creative Cloud для дальнейшего усовершенствования в Photoshop CS6 или для просмотра, доступа и совместного использования практически из любого места. Можно также непосредственно связаться с Photoshop CS6 по беспроводной сети с помощью сопутствующих приложений Photoshop компании Adobe и сообщества разработчиков.
Внешний модуль Camera Raw 7
Упрощенные стандартные элементы управления на вкладке Доработка улучшают рендеринг светов и теней. Новые локальные исправления доступны для баланса белого, светов, теней, уменьшения шумов и муара.
Новые стандартные ползунки и параметры локальных коррекций появляются при обработке новых изображений или преобразовании ранее обработанных изображений в версию Process Version 2012 (PV2012). Чтобы преобразовать изображение, щелкните значок с восклицательным знаком в правом нижнем углу области просмотра изображения.
Дополнительные сведения см. в разделах Коррекция цвета и тона в Camera Raw и Локальная коррекция в Camera Raw.
Видеообзор: см. это руководство от Iceflow Studios.
Хотите быстро научиться пользоваться Фотошоп CS6 и создавать яркие проекты? Любое дело необходимо осваивать с азов, поэтому ознакомьтесь с классическими инструментами. Откройте программу и просмотрите две перпендикулярные панели (горизонтальную и вертикальную), на которых расположены основные инструменты. Наведите курсор на любой из них, тогда увидите описание ваших «помощников».
Как пользоваться инструментами?
Щёлкните на значок инструмента, и он станет активным. Теперь вы сможете использовать его при работе. При этом откроется множество функций, которые помогут сделать более точечную редактуру. Пример: у инструмента «Кисть» есть регуляторы силы нажатия, цвета и много других полезных компонентов, которые легко настраиваются.
На нижней панели расположены дополнительные инструменты, присмотритесь и изучите этот треугольник. Также при нажатии правой кнопкой мыши появляются дополнительные функции, которые украсят вашу работу.

Меню программы содержит самые важные опции, без которых вы просто не сможете начать и закончить оформление фотографии: там вы откроете файл и сохраните его после обработки. Инструменты по редактированию проекта также находятся в меню, и помогут вам в создании фото, текста и других элементов.
Как совершить свои первые шаги по редактированию фото?
Для этого нужно выбрать изображение и открыть его с помощью элемента «Файл», расположенного в меню. Теперь можем приступать к обработке. Справа от фотографии вы найдёте множество вкладок, которые необходимы при создании слоёв. Они помогут, потому что каждый эффект рекомендуется накладывать на новый слой.
Зачем нужны слои?
Слои спасают исходник и служат дубликатами в случае, если вы захотите исправить какие-то ошибки или внести изменения. Они помогают в наложении нескольких эффектов на одну фотографию. Чтобы добиться некоторых преображений, требуется «многослойность». Профессионалы часто используют её в работе и создают магию на снимках.
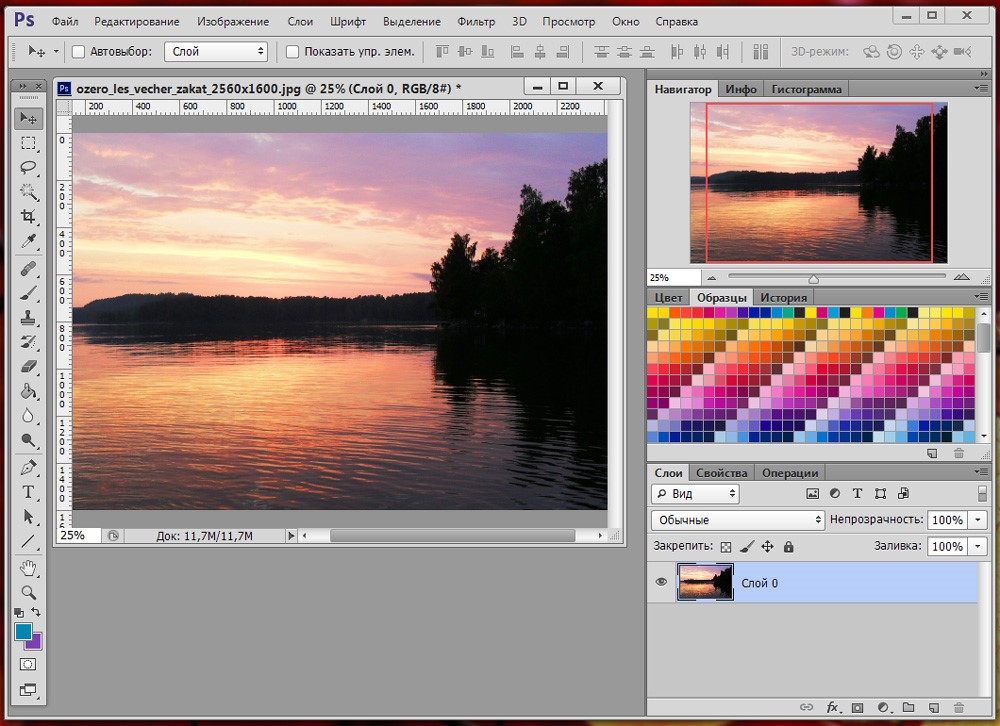
Их можно делать прозрачными и полупрозрачными, выставляя их видимость на любой процент от 0 до 100. Далее необходимо поработать с детализацией накладываемого эффекта, придавая пикантность фотообработке. Чтобы сделать из фото слой, необходимо разблокировать его путём нажатия на значок «Фон», расположенный справа.
В чём отличия Фотошоп CS6 от других версий программы?
Многие функции и элементы в разных версиях этой программы совершенно похожи, поэтому новичку не нужно долго выбирать меж двух огней. Все они одинаково просты и сложны вначале работы, поэтому с помощью любой из них можно научиться создавать замечательные проекты.
Но в версии CS6 есть одно важное отличие по расположению инструментов. Сразу о нём поговорим, чтобы это не сбивало с толку, если вы вдруг решили перейти именно в эту программу из любой другой версии. Все эффекты для редактирования и цвета расположены на горизонтальной панели и во вкладках со слоями, которые появляются при щелчке правой кнопки мыши в разделе «Свойства». Обновлённые версии программ также имеют дополнительные свойства и характеристики, с которыми вы легко можете ознакомиться на панели инструментов.

Версии Фотошоп CS6 и СС устанавливаются только на x64 ОС. Этот 64-разрядный вариант считается более мощным, особенно если сравнивать оперативную память.
Сложно ли научиться работать в Фотошоп?
Многие новички боятся, что не потянут освоение программы и не смогут достойно в ней работать. Но дело только в том, как активно вы начнёте разбираться в системе и прокачивать свой навык, потому что в Фотошоп реально научиться оформлять проекты любому человеку. Главное – желание. Любое новое дело надо начинать с простых шагов, постепенно переходя к более трудным.
Для начала научитесь обесцвечивать и обрезать фотоэлементы, создавать надписи, редактировать свет и цвет. Это база, на основе которой вы сможете в дальнейшем выполнять более сложные функции. Чтобы добиться высот, необходимо постараться. Настройте себя на продуктивную работу, и всё получится!
На чтение 9 мин Просмотров 1.3к.
 Специалисты в сфере компьютерных технологий стремятся изобрести множество программ. В свою очередь, пользователи ПК идут в ногу с новинками и стараются их изучить. Одним из самых востребованных и знаменитых изобретений является Adobe Photoshop. Мощный графический редактор позволяет создавать самые разнообразные изображения. Но чтобы работать с такой программой, следует знать все возможности и уметь ими пользоваться.
Содержание
- Где применяется фотошоп?
- Основные инструменты
- Первые шаги фотоманипуляции
- Для чего предназначены слои
- Отличие фотошопа CS6 от всех версий Adobe Photoshop
- Сложный ли в освоении фотошоп
- Пример обработки фотографии
- Звезды
- Подсветка объектов
- Второстепенные источники света
Где применяется фотошоп?
Многие пользователи задаются вопросом: «с чего начать изучение фотошопа?» Это прекрасная программа, позволяющая воплотить фантазию в реальность. Вот, к примеру, на Adobe Photoshop CS6 можно выполнять такие манипуляции:
- Ни один дизайнер не обходится без редактора. Поэтому можно с легкостью создавать различные проекты.
- Для большинства художников фотошоп расширяет пространство для творчества. Многие таланты, которые приспособились к программе, создают красивые шедевры и зарабатывают на этом. Такая категория людей называется графическими художниками.
 PC") Если есть фантазия, то можно делать цепляющие рекламы. На фоторедакторе делаются буклеты, постеры, календари и афиши. Для этого надо знать макетирование, цветопередачу и цветовые профили.
Если есть фантазия, то можно делать цепляющие рекламы. На фоторедакторе делаются буклеты, постеры, календари и афиши. Для этого надо знать макетирование, цветопередачу и цветовые профили.- Все фотографы обрабатывают изображения на фотошопе и предпочитают исключительно цветокоррекцию. Более продвинутые могут устранить лишний жир и ненужные фрагменты на фото.
 PC")
На редакторе можно создавать комиксы, макеты, коллажи, рисование, ретуширование, делать комиксы и инфографики, оптимизировать изображения и заниматься конвертированием форматов. Теперь становится ясно, для чего нужен фотошоп.
Советуем Вам также почитать статью о способах замены цвета в Фотошопе.
Основные инструменты
Как самостоятельно изучить фотошоп и с чего начать работу? Ответ простой: с базовых инструментов. Изначально запускается установленный фотошоп. После того как откроется программа, следует обратить внимание на верхнюю горизонталь и боковую вертикаль. Здесь располагается панель инструментов. Их надо изучить в первую очередь. Достаточно навести на значок курсором мыши, и всплывет подсказка.
Чтобы привести инструмент, например: кисть, в активное состояние, рекомендуется сделать щелчок левой кнопкой мыши на значок. При выбранном инструменте изменится горизонтальная панель, и появятся множество возможностей именно для кисти — сила нажатия, прозрачность, цвет и многое другое. Специалисты, занимающиеся профессиональным редактированием фотографий, уже знают настройки параметров к определенной манипуляции, например: ретушь.
 В самом низу экрана находится дополнительный набор инструментов, поэтому необходимо обратить внимание на расположенный там треугольник. При нажатии правой кнопкой мыши откроются вспомогательные опции.
Меню фотошопа CS6 — это неотъемлемый элемент, без которого невозможно выполнять фотоманипуляцию. Изначально необходимо клацнуть на меню и открыть файл. В нем содержится перечень изображений, которые подлежат обработке. После сделанной работы не стоит забывать о сохранении. Функция также находится в меню.
Все остальные опции предназначены для редактирования фото. Они начинаются после «файла» и заканчиваются «справкой».
Первые шаги фотоманипуляции
Программа осваивается только при помощи выбранного изображения. Делается все просто — надо зайти в меню и нажать на «файл». Затем откроется список картинок и остается выбрать понравившуюся фотографию. К работе следует приступать после добавления принта в окно редактирования фотошопа.
С правой стороны от фотографии образуется мелкое окно с вкладками. При каждом новом действии, к примеру: режим наложения, рекомендуется создавать новые слои. Не стоит выполнять редактирование всего лишь на исходном фото.
Сразу не получится выполнять манипуляцию, ведь картинка блокируется по умолчанию программы и находится в фоновом режиме. Чтобы снять блокировку и сделать из фото «слой», рекомендуется дважды клацнуть на «фон», которое находится с правой стороны окна — вкладка «слои». После чего, фото станет активным и можно приступать к работе.
Для чего предназначены слои
В Adobe Photoshop CS6 невозможно редактировать фотографии без использования слоев. Созданный дубликат слоя послужит запасным вариантом картинки. Все фотошоперы сталкиваются с неудачными действиями с изображением, поэтому очень просто сделать повторяющуюся картинку без вреда для исходника.
 Слои помогают с нанесением новых эффектов. Вот к примеру, на свадебном фото делается надпись и создаются голуби в полупрозрачном виде. Чтобы выполнить подобную манипуляцию делается новый слой, который располагается поверх главного изображения. Затем последуют два варианта: голубей можно нарисовать при помощи кисти или выбрать из файла фото и вставить на новый слой.
Слоям можно придать полупрозрачный и прозрачный тон. Достаточно переместить ползунок и выставить «прозрачность» на 50%. Таким образом, те же голуби не будут броскими. После вставки полупрозрачной картинки следует придать большей детализации, например, сделать светотень и прорисовать перья с помощью кисти.
Отличие фотошопа CS6 от всех версий Adobe Photoshop
Придать рисунку нужный эффект и цвет можно только за счет горизонтальных инструментов и вкладки со слоями, на которые следует нажать правой кнопкой мыши, после чего появятся «свойства». Все программы Adobe Photoshop практически ничем не отличаются друг от друга и новичку, по сути, нет разницы, на которой из них заниматься.
К примеру, фотошоп 5 или CS6 почти идентичны. По этой причине для не разбирающегося человека в фоторедакторе подойдет любая версия. Например, галерея фильтров и режим цвета, одинаковые, это стандартные функции. В новых поколениях программ могут быть дополнения, но незначительные.
Сложный ли в освоении фотошоп
Зачастую многие новички интересуются: трудно ли освоить программу? Не существует точного ответа на этот вопрос. Все зависит от сообразительности. Adobe Photoshop — это инструмент, как и любое другое оборудование, к примеру: «стиральная машина» требует освоения. Поэтому механизм надо изучать, чтобы понимать все возможности. Через некоторое время новичок станет специалистом, если начнет вникать в суть фотошопа. Но есть одно правило — тренироваться надо от легкого к тяжелому. Например, фотографию нужно:
- обесцветить;
- обрезать;
 создать надпись;
- отзеркалить;
- выполнить коррекцию цвета.

Вначале следует поэкспериментировать с такими простейшими функциями, а в дальнейшем учиться обрисовывать изображение, создавать светотень, делать коллажи и творить поистине уникальные рисунки. При помощи графического планшета можно рисовать принты с нуля. На то, чтобы полностью освоить программу, потребуется потратить много времени и быть действительно усидчивым.
Важно! 64-разрядная версия фотошопа более мощная, особенно касается оперативной памяти. Следует знать, что Photoshop CS6 и CC устанавливаются исключительно на x64 Mac O. S. .
Пример обработки фотографии
Важно понимать, как работать с фотографиями в фотошопе, поэтому надо изучить пример обработки изображения. Не всегда удается отыскать определенную идеальную картинку, на которой можно воплотить задуманную манипуляцию. К примеру, есть желание сделать ночной пейзаж, но многие фотографии уже были отредактированы или чересчур темные. Выход есть всегда. При помощи Photoshop можно легко превратить дневной пейзаж в ночной.
Поэтапный процесс превращения дневного снимка в ночной вариант:
 Необходимо скачать файл и открыть в фоторедакторе. Из инструментов выбирается «волшебная палочка» с допуском: 100. При высоком допуске легко работать с объектами на земле и небом. Необходимо выделить небо.
- Чтобы увидеть выделение, следует выбрать режим «быстрая маска». При помощи кисти закрашиваются только те области, которые не относятся к небу. Основной цвет инструмента — черный, не выделяемые объекты приобретут красный цвет.
- Задний план на фотографии тоже должен быть под цвет неба, к примеру: горы. Их также надо выделить.
- Далее нужно выйти из опции «быстрая маска» и перейти в меню выделения, чтобы уточнить край. Необходимо подобрать нужный эффект и выполнить коррекцию данного участка.
- Затем ставится галка на «умный радиус». Ползунок перетягивается в правую сторону. Важно добиться желаемого результата.
- Теперь осуществляется переход в меню «окно» и «коррекция». Выбирается насыщенность и цветовой тон.
- На этом шаге корректирующий слой отсекается от нижнего слоя, который с небом. Верх фотографии делается темным, но не полностью черного цвета. Для этого выполняется регулировка ползунком яркости.
- Каждый слой содержит свою маску. Необходимо клацнуть на маску и активировать. Непрозрачность регулируется с помощью закрашивания маски: если используются темные цвета, то области станут невидимыми, при белом цвете — видимыми, а для полупрозрачности применяются серые оттенки.
- Слева выбирается «градиент». Цвет — бело-серый.
- Градиент протягивается сверху внизу и накладывается на маску. Верх изображения станет белым, а низ — бледно-серый.
 Фоновый слой нужно затемнить. Поэтому следует перейти на панель коррекции и отыскать кнопку «фотофильтр». Выбираются темно-синие оттенки.
- Затем снимается галка. Необходимо сохранить свечение и усилить эффект с помощью Preserve Luminosity.
- Небо слегка окрашивается в синий оттенок. Добавляется слой «фотофильтр» с более насыщенными и светлыми цветами. Важно отделить слой, где расположено небо.
- Нижний слой затемняется сильнее, чем небо. Потому что здания немного темнее неба. Делается дублирование фотофильтра и уменьшается непрозрачность до нужного уровня.


Звезды
Чтобы небу придать большего эффекта, следует сделать звезды.
Процесс:
- Поверх всех слоев создается новый. Он заполняется черным цветом, а применяется инструмент «заливка». Затем добавляется функция «шум», которая расположена в меню «фильтр». Усиливается черно-белый шум (Amount).
- В галерее фильтров выбирается «эскиз линогравюра». Для желаемого эффекта надо поиграть с настройками.
- Для правильного расположения звезд применяется инструмент «перемещение».
- На слое со звездами нужно настроить режим наложения (Blending Options).
- Далее для этого же слоя добавляется маска. Цвет градиента — черно-белый. Низ делается невидимым и, регулируя, выполняется повышение непрозрачности до определенной степени.
Подсветка объектов
Фотошоп СS6


Для лучшего эффекта фотографии желательно сделать окна подсвеченными.
Процесс:
- При помощи инструмента «прямолинейное лассо» выбираются окна. Чтобы сделать многократное выделение без сброса предыдущих выделений, рекомендуется удерживать клавишу Shift.
- Далее выполняется дубль выделенных объектов и установить копию поверх слоев.
- Затем выбираются режимы наложения (Blending Options). Ставится галка на цвет (Color Overlay). Объект должен приобрести светло-оранжевый оттенок.
- Чтобы улучшить эффект, рекомендуется полистать в меню пункты цветового наложения и выбрать тон (Hue).
- Напротив (Outer Glow) устанавливается галочка — это внешнее свечение.
- Можно снова поиграть с пунктами наложения и выбрать подходящий оттенок.
Второстепенные источники света
Необходимо отразить падающий свет от окон на землю и стены.
Процесс:
- Надо выбрать «кисть» и сделать непрозрачность 20%. Создается новый слой.
- Далее выбирается цвет окна при помощи инструмента «пипетка».
- Кистью намечаются оттенки на земле и стенах. Свет должен быть рассеивающимся.
- Насыщенность регулируется при помощи непрозрачности слоя.
Для того чтобы правильно распределять светотень, рекомендуется ознакомиться с их рефлексами. Надо понимать, как скользит свет по тому, или иному объекту. Металл гладкий, а дерево шероховатое. Это очень влияет на создание качественного реалистичного изображения.
adslot
инструкцияAdobe Photoshop CS6

ADOBE
®
PHOTOSHOP
Help and tutorials
February 2013
Посмотреть инструкция для Adobe Photoshop CS6 бесплатно. Руководство относится к категории Фото / видео программы, 18 человек(а) дали ему среднюю оценку 7.8. Руководство доступно на следующих языках: английский. У вас есть вопрос о Adobe Photoshop CS6 или вам нужна помощь? Задайте свой вопрос здесь
- Contents
- What’s new
- Photoshop getting started tutorials
- Workspace and workflow
- Image and color basics
- Layers
- Selecting
- Image adjustments
- Camera Raw
- Repair and restoration
- Reshaping and transforming
- Drawing and painting
- Text
- Video and animation
- Filters and effects
- Saving and exporting
- Printing
- Automation
- Web graphics
- 3D and technical imaging
- Color Management
Нужна помощь?
У вас есть вопрос о Adobe а ответа нет в руководстве? Задайте свой вопрос здесь Дай исчерпывающее описание проблемы и четко задайте свой вопрос. Чем детальнее описание проблемы или вопроса, тем легче будет другим пользователям Adobe предоставить вам исчерпывающий ответ.
Количество вопросов: 0


Главная
| Adobe | |
| Photoshop CS6 | 65158277 | |
| Фото / видео программа | |
| 5051254524229 | |
| английский | |
| Руководство пользователя (PDF) |
Лицензия
| Количество лицензий | 1 лицензия(и) |
| Количество лет | — лет |
| Тип ПО | Коробочная версия |
| Версия языка | Нидерландский |
Системные требования
| Минимальный объём жесткого диска | 1024 MB |
| Минимальный объём ОЗУ | 1024 MB |
| Минимальный процессор | Intel Pentium 4 / AMD Athlon 64 |
| Минимальные системные требования | 512MB VRAM, OpenGL 2.0 |
| Совместимые операционные системы | Microsoft Windows XP (SP3), Windows 7 (SP1) |
| Поддерживаемые операционные системы Windows | Да |
| Поддерживаемые операционные системы Mac | Нет |
| 64-битные вычисления | Да |
| Платформа | ПК |
показать больше
Не можете найти ответ на свой вопрос в руководстве? Вы можете найти ответ на свой вопрос ниже, в разделе часто задаваемых вопросов о Adobe Photoshop CS6.
Какая операционная система в Adobe Photoshop CS6 используется?
Инструкция Adobe Photoshop CS6 доступно в русский?
Не нашли свой вопрос? Задайте свой вопрос здесь
Нет результатов

Adobe Photoshop CC
инструкция1061 страниц(ы)

Adobe Photoshop CS5
инструкция693 страниц(ы)

Adobe Photoshop CS4
инструкция784 страниц(ы)

Adobe Photoshop CS3
инструкция681 страниц(ы)

Adobe Photoshop Lightroom 5
инструкция236 страниц(ы)

Adobe InDesign CS6
инструкция710 страниц(ы)

Adobe Photoshop Elements 11
инструкция407 страниц(ы)

Adobe Photoshop Elements 12
инструкция427 страниц(ы)

Adobe Photoshop Lightroom 4
инструкция231 страниц(ы)

Adobe Illustrator CC
инструкция545 страниц(ы)
Посмотреть все Adobe руководства Посмотреть все Adobe Фото / видео программа руководства