-
Contents
-
Table of Contents
-
Troubleshooting
-
Bookmarks
Quick Links
FORD FIESTA Owner’s Manual
Related Manuals for Ford Fiesta
Summary of Contents for Ford Fiesta
-
Page 1
FORD FIESTA Owner’s Manual… -
Page 2
No part of this publication may be reproduced, transmitted, stored in a retrieval system or translated into any language in any form by any means without our written permission. Errors and omissions excepted. © Ford Motor Company 2012 All rights reserved. Part Number: CG3582en 10/2012 20121021190047… -
Page 3: Table Of Contents
Table of Contents Creating a MyKey……….31 Introduction Clearing All MyKeys……..32 About This Manual………..5 Checking MyKey System Status….32 Symbols Glossary……….5 MyKey Troubleshooting…….32 Replacement Parts Recommendation………7 Locks Mobile Communications Equipment…………7 Locking and Unlocking………34 Data Recording……….8 Manual Liftgate……….36 Keyless Entry…………36 At a Glance At a Glance…………9 Security Passive Anti-Theft System……39…
-
Page 4
Table of Contents Windows and Mirrors Storage Compartments Power Windows……….52 Cup Holders…………92 Exterior Mirrors……….53 Bottle Holder………..92 Interior Mirror………..54 Starting and Stopping the Global Opening and Closing……55 Engine Instrument Cluster General Information……..93 Ignition Switch……….93 Gauges…………..57 Keyless Starting……….93 Warning Lamps and Indicators….58 Steering Wheel Lock……..95 Audible Warnings and Indicators….61 Starting a Petrol Engine……95… -
Page 5
Table of Contents Stability Control Fuses Principle of Operation……..114 Fuse Box Locations……..134 Using Stability Control………114 Fuse Specification Chart……135 Changing a Fuse……….141 Parking Aids Maintenance Principle of Operation……..115 Parking Aid…………115 General Information……..142 Rear View Camera………117 Opening and Closing the Bonnet…142 Under Bonnet Overview — 1.0L EcoBoost………….144 Cruise Control Under Bonnet Overview — 1.25L… -
Page 6
Table of Contents Technical Specifications……165 SYNC Applications and Services..222 Using SYNC With Your Media Player…………225 Vehicle Care SYNC Troubleshooting……229 Cleaning the Exterior……..168 Cleaning the Interior……..168 Appendices Repairing Minor Paint Damage….169 Electromagnetic compatibility….236 Cleaning the Alloy Wheels……169 End User Licence Agreement….237 Wheels and Tyres General Information……..170 Temporary Mobility Kit…….170… -
Page 7: Introduction
Introduction ABOUT THIS MANUAL Thank you for choosing Ford. We recommend that you take some time to get to know your vehicle by reading this manual. The more that you know about it, the greater the safety and pleasure you will get from driving it.
-
Page 8
Introduction Battery acid Explosive gas Brake fluid — non petroleum Fan warning based Fasten seat belt Brake system Front airbag Cabin air filter Front fog lamps Check fuel cap Fuel pump reset Child safety door lock or unlock Fuse compartment Child seat lower anchor Hazard warning flashers Child seat tether anchor… -
Page 9: Replacement Parts Recommendation
Windscreen wash and wipe benefit from a Ford Warranty. Damage caused to your vehicle as a result of the failure of non-Ford parts may not be covered by the Ford Warranty. For REPLACEMENT PARTS additional information, refer to the terms and conditions of the Ford Warranty.
-
Page 10: Data Recording
Introduction appropriately used, particularly in • Vehicle reactions in particular driving emergency situations. Safety must be situations (e.g. inflation of an airbag, paramount when using mobile activation of the stability regulation communications equipment to avoid system). negating these benefits. Mobile •…
-
Page 11: At A Glance
At a Glance Front Exterior Overview See Locking and Unlocking (page 34). See Keyless Entry (page 36). See Active City Stop (page 122). See Changing the Wiper Blades (page 153). See Maintenance (page 142). See Towing Points (page 128). See Changing a Bulb (page 159). Tyre pressures.
-
Page 12
At a Glance Vehicle Interior Overview See Transmission (page 107). See Locking and Unlocking (page 34). See Power Windows (page 52). See Exterior Mirrors (page 53). See Head Restraints (page 84). See Fastening the Seat Belts (page 22). See Rear Seats (page 89). See Manual Seats (page 85). -
Page 13
At a Glance Instrument Panel Overview Left-Hand Drive… -
Page 14
At a Glance Right-Hand Drive Air vents. See Air Vents (page 77). Direction indicators. See Direction Indicators (page 50). Main beam. See Lighting Control (page 47). Instrument cluster. See Gauges (page 57). See Warning Lamps and Indicators (page 58). Start button. See Starting and Stopping the Engine (page 93). Wiper lever. -
Page 15
At a Glance Heated windscreen switch. See Climate Control (page 77). Parking aid switch. See Parking Aids (page 115). Heated seat switches. See Heated Seats (page 89). Start-stop switch. See Start-Stop (page 99). Ignition switch. See Ignition Switch (page 93). Cruise control switches. -
Page 16
At a Glance Rear Exterior Overview See Changing a Bulb (page 159). See Changing the Wiper Blades (page 153). See Changing a Bulb (page 159). See First Aid Kit (page 132). See Warning Triangle (page 132). See Temporary Mobility Kit (page 170). Spare wheel, jack and wheel brace. See Changing a Road Wheel (page 175). -
Page 17: Child Safety
Child Safety INSTALLING CHILD SEATS WARNINGS Do not modify child seats in any way. Do not hold a child on your lap when the vehicle is moving. Do not leave unattended children in your vehicle. If your vehicle has been involved in an accident, have the child seats checked by an authorised dealer.
-
Page 18: Child Safety
Child Safety Child Safety Seat WARNINGS You must reinstall the head restraint following the removal of the child seat. See Head Restraints (page 84). Booster Seat (Group 2) Secure children that weigh between 29 and 40 pounds (13 and 18 kilogrammes) in a child safety seat (Group 1) on the rear seat.
-
Page 19
Child Safety Top Tether Anchor Points Booster Cushion (Group 3) Attaching a Child Seat with Top ISOFIX Anchor Points Tethers WARNING WARNINGS Use an anti-rotation device when Do not attach a tether strap to using the ISOFIX system. We anything other than the correct recommend the use of a top tether tether anchor point. -
Page 20: Child Seat Positioning
Child Safety CHILD SEAT POSITIONING WARNINGS See an authorised dealer for the latest details relating to our recommended child seats. Extreme Hazard! Do not use a rearward facing child seat on a seat protected by an air bag in front of it! When using a child seat with a support leg, the support leg must rest securely on the floor.
-
Page 21
Child Safety Mass group categories Seating positions Up to 22 Up to 29 20 — 40 lbs 33 — 55 lbs 46 — 79 lbs lbs (10 kg) lbs (13 kg) (9 — 18 kg) (15 — 25 kg) (22 — 36 kg) Front passenger seat UF¹… -
Page 22
Child Safety Mass group categories Seating positions Rear facing Forward facing Up to 29 lbs (13 kg) 20 — 40 lbs (9 — 18 kg) Seat type IL, IUF Rear centre seat Size class Not ISOFIX equipped Seat type IL Suitable for particular ISOFIX child restraints systems of the semi-universal category. Please consult child restraints systems suppliers’ vehicle recommendation lists. -
Page 23: Child Safety Locks
Child Safety CHILD SAFETY LOCKS WARNING You cannot open the doors from inside if you have put the child safety locks on. Left-Hand Side Turn anticlockwise to lock and clockwise to unlock. Right-Hand Side Turn clockwise to lock and anticlockwise to unlock.
-
Page 24: Seat Belts
Seat Belts Press the red button on the buckle to FASTENING THE SEAT BELTS release the belt. Hold the tongue and let it retract completely and smoothly to its WARNINGS stowed position. Insert the tongue into the buckle until you hear a distinct click. You have Using Seat Belts During Pregnancy not fastened the seat belt correctly if you do not hear a click.
-
Page 25: Seat Belt Minder
Seat Belts Turning the Seat Belt Minder Off See an authorised dealer. Adjust the height of the shoulder belt so the belt rests across the middle of your shoulder. To adjust the shoulder belt height, press the button and slide the height adjuster up or down.
-
Page 26: Supplementary Restraints System
Supplementary Restraints System PRINCIPLE OF OPERATION DRIVER AIRBAG WARNINGS Do not modify the front of your vehicle in any way. This could adversely affect deployment of the airbags. Original text according to ECE R94.01: Extreme Hazard! Do not use a rearward facing child restraint on a seat protected by an airbag in front of it! Wear a seat belt and keep sufficient distance between yourself and the…
-
Page 27: Side Airbags
Supplementary Restraints System The airbag will deploy during significant When you switch the ignition on, check that frontal collisions or collisions that are up the airbag deactivation warning lamp to 30 degrees from the left or the right. The illuminates. airbag will inflate within a few thousandths Switching the Passenger Airbag of a second and deflate on contact with…
-
Page 28: Knee Airbag
Supplementary Restraints System The airbag will deploy during significant KNEE AIRBAG lateral collisions. It will also deploy during significant frontal angled collisions. The WARNING curtain airbag will not deploy in minor Do not attempt to open the airbag lateral and frontal collisions, rear collisions, cover.
-
Page 29: Keys And Remote Controls
Keys and Remote Controls Programming a New Remote GENERAL INFORMATION ON Control RADIO FREQUENCIES Turn the ignition key from position 0 to Note: Changes or modifications not position II four times within six expressly approved by the party responsible seconds. for compliance could void the user s 2.
-
Page 30: Keys And Remote Controls
Keys and Remote Controls Changing the Remote Control Battery Make sure that you dispose of old batteries in an environmentally friendly way. Seek advice from your local authority regarding recycling. Remote Control With a Folding Key Blade 3. Twist the screwdriver in the position shown to separate the two halves of the remote control.
-
Page 31
Keys and Remote Controls Remote Control Without a Folding Key Blade 4. Twist the screwdriver in the position shown to separate the two halves of the remote control. Press and hold the buttons on the edges to release the cover. Carefully remove the cover. -
Page 32: Replacing A Lost Key Or Remote Control
Keys and Remote Controls REPLACING A LOST KEY OR REMOTE CONTROL Replacement or additional keys or remote controls can be purchased from an authorised dealer. Your dealer can program the remote controls for your vehicle or you may be able to program them yourself. See Remote Control (page 27).
-
Page 33: Mykey
MyKey (If Equipped) Optional Settings PRINCIPLE OF OPERATION These settings can be configured MyKey allows you to program keys with immediately after a MyKey is first created restricted driving modes to promote good or changed later using an admin key: driving habits.
-
Page 34: Clearing All Mykeys
MyKey (If Equipped) All programmed keys can be cleared within 2. Scroll to Clear All and press the OK the same key cycle in which a key was button. programmed, otherwise an admin key is 3. Hold the OK button until ALL required to clear the keys.
-
Page 35
MyKey (If Equipped) Condition Potential Causes No keys are programmed to the vehicle. See Creating a MyKey (page 31). I cannot clear the restricted keys. Key in the ignition does not have admin priv- ileges. No restricted keys are programmed to the vehicle. -
Page 36: Locks
Locks Locking the Doors LOCKING AND UNLOCKING Press the button to lock all the Remote Control doors. The direction indicators will flash twice. The remote control can be used any time your vehicle is not running. Press the button again within three seconds to confirm that all the doors are Unlocking the Doors closed.
-
Page 37
Locks Locking and Unlocking the Doors Emergency Locking with the Key From Inside Press the button to lock and unlock all the doors. For item location: See At a Glance (page 9). The lamp illuminates with the doors locked. Locking and Unlocking the Doors with the Key Note: Do not leave your keys in your vehicle. -
Page 38: Manual Liftgate
Locks Press the button located in the top of the MANUAL LIFTGATE liftgate pull cup handle to unlatch the liftgate, then pull on the outside handle. WARNINGS It is extremely dangerous to ride in Opening With the Remote Control the cargo area, inside or outside of Press the button twice within your vehicle.
-
Page 39: Passive Key
Locks Note: If the system does not function, you WARNING will need to use the key blade to lock and Your vehicle does not lock itself unlock your vehicle. automatically. If you do not press a The system allows you to operate your locking button your vehicle will vehicle without the use of a key or remote remain unlocked.
-
Page 40: Disabled Keys
Locks All passive keys will then be enabled if you switch the ignition on or you start your vehicle with a valid key. Locking and Unlocking the Doors With the Key Blade Press a locking button once. Note: A valid passive key must be located within the detection range of that door.
-
Page 41: Security
Security If you are unable to start the engine with a PASSIVE ANTI-THEFT correctly coded key, and the message SYSTEM Immobiliser malfunction Service now is shown in the display, this indicates a Principle of Operation malfunction. Have the immobiliser checked immediately.
-
Page 42
Security The sensors act as a deterrent against Note: This may result in false alarms if unauthorised intrusion by sensing any animals or moving objects are inside your movement within your vehicle. vehicle. Battery Back-up Sounder Reduced Guard The battery back-up sounder is an extra In reduced guard, the interior sensors are alarm system which will sound a siren off when you arm the alarm. -
Page 43
Security Disarming the Alarm Vehicles Without Keyless Entry Perimeter Alarm Disarm and silence the alarm by unlocking the doors with the key and switching the ignition on with a correctly coded key or unlocking the doors with the remote control. Category One Alarm Disarm and silence the alarm by unlocking the doors with the key and switching the… -
Page 44: Steering Wheel
Steering Wheel ADJUSTING THE STEERING WHEEL WARNING Do not adjust the steering wheel when your vehicle is moving. Note: Make sure that you are sitting in the correct position. See Sitting in the Correct Position (page 84). 3. Lock the steering column. AUDIO CONTROL Select the required source on the audio unit.
-
Page 45: Voice Control
Steering Wheel CRUISE CONTROL Volume down Seek down, previous or accept call Seek, Next or Previous Press the seek button to: • tune the radio to the next or previous stored preset • play the next or the previous track. Press and hold the seek button to: •…
-
Page 46: Wipers And Washers
Wipers and Washers Intermittent Wipe WINDSCREEN WIPERS Note: Fully defrost the windscreen before switching on the windscreen wipers. Note: Make sure the windscreen wipers are switched off before entering a car wash. Note: Install new wiper blades as soon as they begin to leave bands of water and smears on the windscreen.
-
Page 47: Windscreen Washers
Wipers and Washers To reduce smearing we recommend the WINDSCREEN WASHERS following: Note: Do not operate the washers when • Lower the sensitivity of the autowipers. the washer reservoir is empty. This may • Switch to normal or high speed wipe. cause the washer pump to overheat.
-
Page 48
Wipers and Washers Reverse Gear Wipe The rear wiper will turn on automatically when selecting reverse gear if: • the rear wiper is not already switched • the wiper lever is in position A, B, C or • the front wiper is operating (when set to position B). -
Page 49: Lighting
Lighting GENERAL INFORMATION LIGHTING CONTROL Condensation in Lamp Assemblies Lighting Control Positions Exterior lamps have vents to accommodate normal changes in air pressure. Condensation can be a natural by-product of this design. When moist air enters the lamp assembly through the vents, there is a possibility that condensation can occur when the temperature is cold.
-
Page 50: Autolamps
Lighting Main Beams Note: It may be necessary to switch your headlamps on manually in severe weather conditions. Note: If you have autolamps on, you can only switch the main beam on once autolamps has switched the headlamps on. Note: If you switch autolamps on in conjunction with autowipers, dipped beam headlamps will illuminate automatically when the rain sensor activates the…
-
Page 51: Daytime Running Lamps
Lighting DAYTIME RUNNING LAMPS REAR FOG LAMPS WARNING Always remember to switch your headlamps on in low light situations or during inclement weather. The system does not turn on the tail lamps and may not provide adequate lighting during these conditions. Failure to switch the headlamps on under these conditions may result in a collision.
-
Page 52: Direction Indicators
Lighting You can adjust the level of the headlamp beams according to your vehicle load. Recommended Headlamp Levelling Switch Positions Load Load in luggage Switch position compartment Front seats Second row seats See Vehicle Identification Plate (page 183). Van only INTERIOR LAMPS DIRECTION INDICATORS Courtesy Lamp…
-
Page 53
Lighting If you set the switch to position B, the courtesy lamp will illuminate when you unlock or open a door or the liftgate. If you leave a door open with the ignition switched off, the courtesy lamp will go off automatically after some time to prevent your vehicle battery from losing charge. -
Page 54: Windows And Mirrors
Windows and Mirrors Window Lock POWER WINDOWS WARNINGS Do not leave children unattended in your vehicle and do not let them play with the power windows. They may seriously injure themselves. When closing the power windows, you should verify they are free of obstructions and make sure that children and pets are not in the proximity of the window openings.
-
Page 55: Exterior Mirrors
Windows and Mirrors 2. Close the window a third time to the EXTERIOR MIRRORS point of resistance. The bounce-back feature is now disabled and you can Power Exterior Mirrors close the window manually. The window will go past the point of WARNING resistance and you can close it fully.
-
Page 56: Interior Mirror
Windows and Mirrors Fold-Away Exterior Mirrors The mirrors will fold automatically when you lock your vehicle with the key, the Push the mirror toward the door window remote control or a keyless entry system glass. Make sure that you fully engage the request.
-
Page 57: Global Opening And Closing
Windows and Mirrors Global Closing GLOBAL OPENING AND CLOSING Vehicles Without Keyless Entry You can also operate the power windows WARNING with the ignition off using the global Take care when using global closing. opening and global closing function. In an emergency, press the lock or Note: Global opening will only operate for unlock button immediately to stop.
-
Page 58
Windows and Mirrors WARNING Take care when using global closing. In an emergency, touch a door handle lock sensor to stop. Note: Global closing can be switched on using the driver s door handle. Global opening and closing can also be switched on using the buttons on the passive key. -
Page 59: Instrument Cluster
Instrument Cluster GAUGES Tachometer Information display and engine coolant temperature gauge Speedometer Fuel gauge Tripmeter reset button Fuel Gauge Engine Coolant Temperature Gauge Switch the ignition on. The fuel gauge will indicate approximately how much fuel is left in the fuel tank. The fuel gauge may vary slightly when your vehicle is moving or on a gradient.
-
Page 60: Warning Lamps And Indicators
Instrument Cluster WARNING LAMPS AND WARNING INDICATORS Driving your vehicle with the warning lamp on is dangerous. A significant The following warning lamps and decrease in braking performance indicators will alert you to a vehicle may occur. It will take you longer to stop condition that may become serious.
-
Page 61: Instrument Cluster
Instrument Cluster If it stays on after starting or WARNING illuminates when driving, this Have this checked immediately. indicates a malfunction. Stop your vehicle as soon as it is safe to do so and switch the engine off. Check the coolant level.
-
Page 62
Instrument Cluster Glow Plug Indicator Seat Belt Minder Warning Lamp If it illuminates, wait until it It will illuminate and a chime will extinguishes before starting. sound to remind you to fasten your seat belt. See Seat Belt Minder (page 23). Headlamp Indicator Shift Indicator It will illuminate when you switch… -
Page 63: Audible Warnings And Indicators
Instrument Cluster AUDIBLE WARNINGS AND INDICATORS Automatic Transmission Sounds when you open the driver’s door and do not move the transmission selector lever to position P. Key Outside Car Vehicles With Keyless System Sounds when you close the door, the engine is running and the system does not detect a passive key inside your vehicle.
-
Page 64: Information Displays
Information Displays Information Display Controls GENERAL INFORMATION WARNING Driving while distracted can result in loss of vehicle control, accident and injury. We strongly recommend that you use extreme caution when using any device or feature that may take your focus off the road.
-
Page 65: Information Displays
Information Displays SYNC-Phone Dial a number Redial Phonebook Call history Speed Dial Text messaging BT Devices Phone settings Menu Ford EcoMode SYNC-Settings Bluetooth on Set defaults Master reset Install on SYNC System info Voice settings SYNC-Apps Navigation Route options Map display…
-
Page 66
Information Displays Menu DSP settings DSP equalizer Traffic News Alt. frequency RDS Regional DAB Service link Bluetooth Vehicle settings Traction Control Active City Stop Deflation detection Hill start assist Park lock control Alarm system Rain sensor Powerfold mirrors Indicator Ambient light Chimes Clock settings Auto time (GPS) -
Page 67: Clock
Information Displays Menu Language Dimming MyKey create MyKey Traction control Active City Stop Speed limit Speed warning Volume limit Information clear all MyKeys MyKey active Information System Check TRIP COMPUTER All active warnings will display first if applicable. The system check menu may appear different based upon equipment options and current vehicle status.
-
Page 68: Personalised Settings
Information Displays Trip Odometer Average Speed Registers the distance travelled Indicates the average speed of individual journeys. calculated since the function was last reset. Distance Odometer Distance to Empty Registers the total distance your Indicates the approximate vehicle has travelled. distance your vehicle will travel on the fuel remaining in the tank.
-
Page 69
Information Displays Certain messages need to be confirmed before you can access the menus. The message indicator illuminates to supplement some messages. It will be red or amber depending on the severity of the message and will remain on until the cause of the message has been rectified. -
Page 70
Information Displays Alarm Message indic- Message Action ator Alarm triggered amber See Security (page 39). Check vehicle Interior Scan amber See Security (page 39). deactivated Alarm system Have your vehicle checked by an authorised malfunction dealer as soon as possible. Service required Doors Open Message indic-… -
Page 71
Information Displays Message indic- Message Action ator open Passenger side rear door amber Vehicle not moving. Close. open Boot amber Vehicle not moving. Close. open Bonnet Vehicle not moving. Close. See Opening amber open and Closing the Bonnet (page 142). Engine Message indic- Message… -
Page 72
Information Displays Keyless System Message indic- Message Action ator amber See Keyless Entry (page 36). not detected amber See Keyless Entry (page 36). outside car Battery low amber See Remote Control (page 27). Replace battery Turn ignition off amber See Keyless Starting (page 93). Use POWER button Press brake See Keyless Starting (page 93). -
Page 73
Information Displays Maintenance Message indic- Message Action ator Brake fluid See Brake and Clutch Fluid Check (page Level low 152). Service now Brake system Have your vehicle checked by an authorised malfunction dealer as soon as possible. Stop safely Engine oil pressure low See Engine Oil Check (page 151). -
Page 74
Information Displays Message indic- Message Action ator MyKey Check speed Displays when MyKey is active. Drive safely MyKey Displays when a MyKey is in use and the Vehicle near MyKey speed limit is reached. top speed Buckle up to Displays when a MyKey is in use and Belt- unmute audio Minder is activated. -
Page 75
Information Displays Message indic- Message Action ator Have your vehicle checked by an authorised malfunction amber dealer as soon as possible. Service now Have your vehicle checked by an authorised malfunction dealer as soon as possible. Next service See Using Stability Control (page 114). Starting and Stopping the Engine Message indic- Message… -
Page 76
Information Displays Start-stop Message indic- Message Action ator Auto StartStop Switch the ignition off before leaving your Switch vehicle if the system has shut down the ignition off engine. See Start-Stop (page 99). Auto StartStop The engine needs to be restarted, press a Press a pedal pedal to start. -
Page 77: Tyre Pressure Monitoring System Display
Information Displays Tyre pressure monitoring system Message indic- Message Action ator Check tyre The pressure in one or more tyres has amber pressures dropped. Check as soon as possible. Tyre pressure sys Permanent malfunction. Have your vehicle malfunction amber checked by an authorised dealer. Service required Tyre monitor Permanent malfunction.
-
Page 78
Information Displays Message indic- Message Action ator Press brake See Starting and Stopping the Engine to start (page 93). See Automatic Transmission (page 107). Select N See Starting and Stopping the Engine to start (page 93). See Automatic Transmission (page 107). Door open See Starting and Stopping the Engine apply brake… -
Page 79: Climate Control
Climate Control Warming the Interior PRINCIPLE OF OPERATION Direct the air toward your feet. In cold or Outside Air humid weather conditions, direct some of the air toward the windscreen and the door Keep the air intakes in front of the windows.
-
Page 80: Manual Climate Control
Climate Control MANUAL CLIMATE CONTROL Fan speed control: Controls the volume of air circulated in your vehicle. Adjust to select the desired fan speed or switch off. If you switch the fan off, the windscreen may fog up. Recirculated air: Press the button to switch between outside air and recirculated air.
-
Page 81: Automatic Climate Control
Climate Control AUTOMATIC CLIMATE CONTROL Fan speed: Controls the volume of air circulated in your vehicle. Rotate the control to select the desired fan speed. The setting is shown in the display. Instrument panel: Press the button to distribute air through the instrument panel air vents.
-
Page 82: Hints On Controlling The Interior Climate
Climate Control Recirculated air: Press the button to switch between outside air and recirculated air. The air currently in the passenger compartment recirculates. This can reduce the time needed to cool the interior and reduce unwanted odours from entering your vehicle. Off button: Press the button to switch the system off.
-
Page 83: Climate Control
Climate Control Automatic Climate Control Note: When the system is in AUTO mode and the interior and exterior temperatures Note: Do not adjust the settings when your are high, the system automatically selects vehicle interior is extremely hot or cold. The recirculated air to maximize cooling of the system automatically adjusts to the interior.
-
Page 84
Climate Control Cooling the Interior Quickly Vehicles With Manual Climate Control Vehicles With Automatic Climate Control Adjust the fan speed to the highest Press the AUTO button. speed setting. Adjust the temperature control setting Adjust the temperature control setting to low. to low. -
Page 85: Heated Windows And Mirrors
Climate Control Side Window Defogging in Cold Weather Vehicles With Manual Climate Control Vehicles With Automatic Climate Control Adjust the air distribution control to the Press the windscreen defrosting and instrument panel and footwell air vents defogging button. positions. Press the A/C button. Adjust the temperature control to the desired setting.
-
Page 86: Seats
Seats • Adjust the head restraint so that the SITTING IN THE CORRECT top of it is level with the top of your POSITION head and as far forward as possible. Make sure that you remain WARNINGS comfortable. Do not recline the seatback too far •…
-
Page 87: Manual Seats — 3-Door
Seats Removing the Head Restraints Rear Centre Head Restraint Front Head Restraint Press the locking buttons and remove the head restraint. MANUAL SEATS — 3-DOOR Press and hold the locking button. 2. Using a suitable implement release the WARNINGS retaining clip. Do not adjust the driver seat when your vehicle is moving.
-
Page 88
Seats Moving the Seat Backward and Forward WARNING Rock the seat backward and forward after releasing the lever to make sure that it is fully engaged in its catch. A seat which is not fully engaged in its catch could move when your vehicle is moving. This may result in the loss of control of your vehicle, serious personal injury or death. -
Page 89: Manual Seats — 5-Door
Seats Adjusting the Height of the Driver Seat Push the seatback to slide the tilted Recline Adjustment seat to the end stop (memory position) or desired seating position. 2. Fold the seatback to the upright position. Adjusting the Lumbar Support MANUAL SEATS — 5-DOOR WARNING Do not adjust the driver seat when…
-
Page 90
Seats Moving the Seat Backward and Adjusting the Lumbar Support Forward WARNING Rock the seat backward and forward after releasing the lever to make sure that it is fully engaged in its catch. A seat which is not fully engaged in its catch could move when your vehicle is moving. -
Page 91: Rear Seats
Seats Recline Adjustment 2. Push the seatback forward. Note: Do not attempt to fold the rear seat cushion forward. Note: Lower the head restraints. See Head Restraints (page 84). Unfolding the Seatback WARNINGS When folding the seatbacks up, make sure that the seat belts are visible to an occupant and not caught behind the seat.
-
Page 92
Seats Do not do the following: • Place heavy objects on the seat. • Operate the heated seat if water or any other liquid is spilled on the seat. Allow the seat to dry thoroughly. • Operate the heated seats unless the engine is running. -
Page 93: Auxiliary Power Points
30 minutes. Note: Do not hang any type of accessory or Note: Use only Ford accessory connectors accessory bracket from the plug. or connectors specified for use with SAE standard sockets.
-
Page 94: Storage Compartments
Storage Compartments CUP HOLDERS WARNING Do not place hot drinks in the cup holders when your vehicle is moving. BOTTLE HOLDER…
-
Page 95: Starting And Stopping The Engine
Starting and Stopping the Engine GENERAL INFORMATION IGNITION SWITCH If you disconnect the battery, your vehicle may exhibit some unusual driving characteristics for approximately 5 miles (8 kilometres) after you reconnect it. This is because the engine management system must realign itself with the engine. You can disregard any unusual driving characteristics during this period.
-
Page 96: Starting And Stopping The Engine
Starting and Stopping the Engine Starting a Diesel Engine Note: A valid key must be located inside your vehicle to switch the ignition on and Note: Engine cranking will not commence start the engine. until the engine glow plug indicator has extinguished.
-
Page 97: Steering Wheel Lock
Starting and Stopping the Engine Stopping the Engine When Your Vehicles Without Keyless Starting Vehicle is Stationary To lock the steering wheel: Note: The ignition, all electrical circuits Remove the key from the ignition warning lamps and indicators will be switch.
-
Page 98: Starting A Diesel Engine
Starting and Stopping the Engine Engine Idle Speed after Starting Note: Releasing the clutch pedal while the engine is starting will stop the engine The speed at which the engine idles cranking and return to ignition on. immediately after starting is optimised to Fully depress the clutch pedal.
-
Page 99: Diesel Particulate Filter
Starting and Stopping the Engine Regeneration Note: Releasing the clutch pedal while the engine is starting will stop the engine WARNINGS cranking and return to ignition on. Do not park or idle your vehicle over Fully depress the clutch pedal. dry leaves, dry grass or other 2.
-
Page 100: Switching Off The Engine
Starting and Stopping the Engine You must carry out occasional trips with the following conditions to assist the regeneration process: • Drive your vehicle in more favourable conditions, which you will find at higher vehicle speeds in normal driving, on a main road or motorway for a minimum of 20 minutes.
-
Page 101: Unique Driving Characteristics
Unique Driving Characteristics START-STOP Note: For vehicles with start-stop the battery requirement is different. It must be Note: When the start-stop indicator flashes replaced by one of exactly the same amber, move the transmission selector lever specification as the original. to neutral or depress the clutch pedal.
-
Page 102
Unique Driving Characteristics To Re-Start the Engine Note: The transmission selector lever must be in neutral. Depress the clutch pedal. The system may automatically restart the engine under certain conditions, for example: • Low battery voltage. • To maintain the interior climate. -
Page 103: Fuel And Refuelling
Fuel and Refuelling • Automotive fuels can be harmful or SAFETY PRECAUTIONS fatal if swallowed. Fuel such as petrol is highly toxic and if swallowed can WARNINGS cause death or permanent injury. If fuel Do not overfill the fuel tank. The is swallowed, call a doctor pressure in an overfilled tank may immediately, even if no symptoms are…
-
Page 104: Fuel Quality — Petrol
Fuel and Refuelling FUEL QUALITY — PETROL WARNINGS Use diesel that meets the specification defined by EN 590 or WARNINGS the relevant national specification. Do not mix petrol with oil, diesel or other liquids. This could cause a chemical reaction. Note: We recommend that you use only high quality fuel.
-
Page 105: Catalytic Converter
Fuel and Refuelling Refilling With a Portable Fuel 4. When done, clean the funnel or Container properly dispose of it. Extra funnels can be purchased from your authorised WARNINGS dealer if you choose to dispose of the funnel. Do not insert the nozzle of portable fuel containers or aftermarket funnels into the capless fuel system.
-
Page 106: Fuel And Refuelling
Fuel and Refuelling WARNINGS Do not use any kind of flames or heat near the fuel system. The fuel system is under pressure. There is a risk of injury if the fuel system is leaking. If you use a high pressure spray to wash your vehicle, only spray the fuel filler flap briefly from a distance not less than 8 inches (200 millimetres).
-
Page 107: Fuel Consumption
Fuel and Refuelling They are intended as a comparison between makes and models of vehicles. They are not intended to represent the real world fuel consumption you may get from your vehicle. Real world fuel consumption is governed by many factors including: driving style, high speed driving, stop-start driving, air conditioning usage, the accessories fitted, payload, towing, etc.
-
Page 108: Technical Specifications
Fuel and Refuelling 3. After at least three to five tank fill ups, Keep a record for at least one month and fill the fuel tank and record the current record the type of driving (city or odometer reading. motorway). This provides an accurate estimate of your vehicle’s fuel economy 4.
-
Page 109: Transmission
Transmission Selector Lever Positions MANUAL TRANSMISSION Selecting Reverse Gear Do not engage reverse gear when your vehicle is moving. This can cause damage to the transmission. Park Reverse On some vehicles it is necessary to raise Neutral the collar when you select reverse gear. Drive AUTOMATIC TRANSMISSION Sport mode and manual shifting…
-
Page 110
Transmission Select drive to shift automatically through WARNINGS the forward gears. Apply the parking brake and move the transmission selector lever to The transmission will select the park before leaving your vehicle. appropriate gear for optimum performance Make sure that the transmission selector based on ambient temperature, road lever is latched in position. -
Page 111
Transmission Hints on Driving With an Emergency Park Position Release Automatic Transmission Lever WARNING WARNINGS Do not drive your vehicle until you Do not idle the engine for long verify that the brake lamps are periods of time in drive with the working. -
Page 112: Hill Start Assist
Transmission The system makes it easier to pull away when your vehicle is on a slope without the need to use the parking brake. When the system is active, your vehicle will remain stationary on the slope for two to three seconds after you release the brake pedal.
-
Page 113
Transmission Your vehicle comes with the system already enabled. If desired, you can disable the feature: See General Information (page 62). -
Page 114: Brakes
Brakes GENERAL INFORMATION HINTS ON DRIVING WITH ANTI-LOCK BRAKES WARNING Note: When the system is operating, the The system does not relieve you of brake pedal will pulse and may travel your responsibility to drive with due further. Maintain pressure on the brake care and attention.
-
Page 115
Brakes All Vehicles Note: Do not press the release button while pulling the lever up. To apply the parking brake: Press the foot brake pedal firmly. 2. Pull the parking brake lever up to its fullest extent. To release the parking brake: Press the brake pedal firmly. -
Page 116: Stability Control
Stability Control Stability Control Warning Lamp PRINCIPLE OF OPERATION While driving, it flashes when the system Electronic Stability Program is operating. See Warning Lamps and Indicators (page 58). WARNING The system does not relieve you of USING STABILITY CONTROL your responsibility to drive with due care and attention.
-
Page 117: Parking Aids
Parking Aids Note: The outer sensors may detect the PRINCIPLE OF OPERATION side walls of a garage. If the distance between the outer sensor and the side wall WARNINGS remains constant for three seconds, the The system does not relieve you of tone will switch off.
-
Page 118
Parking Aids Note: If your vehicle sustains damage to The system detects certain objects when the bumper or fascia, leaving it misaligned you move the transmission selector lever or bent, the sensing zone may be altered to position R (reverse): causing inaccurate measurement of •… -
Page 119: Rear View Camera
Parking Aids • An alternating audible warning sounds from the front and rear if there are objects at both bumpers that are closer than 12 inches (30 centimetres). • If a stationary or receding object is detected further than 12 inches (30 centimetres) from the side of your vehicle, the audible warning sounds for only three seconds.
-
Page 120
Parking Aids WARNINGS Marks are for general guidance only, and are calculated for vehicles in maximum load conditions on an even road surface. The lines show the distance from the outer edge of the front tyre plus two inches (51 millimetres) and the rear bumper. -
Page 121: Switching The Rear View Camera Off
Parking Aids Green — 24 — 35 inches (0.6 — 0.9 metre) Black — centre line of the projected vehicle path Note: The green line is extended from 35 inches (0.9 metre) up to a distance of 126 inches (3.2 metres). Note: When reversing with a trailer, the lines on the screen are not shown.
-
Page 122: Cruise Control
Cruise Control PRINCIPLE OF OPERATION WARNING The system does not relieve you of your responsibility to drive with due care and attention. Cruise control allows you to control your speed using the switches on the steering wheel. You can use cruise control when you exceed approximately 20 mph (30 km/h).
-
Page 123
Cruise Control Resuming the Set Speed Press and release RES. Switching Cruise Control Off Note: You will erase the set speed if you switch the system off. Press and release OFF or switch the ignition off. -
Page 124: Driving Aids
Driving Aids ACTIVE CITY STOP WARNINGS If you install a windscreen not General Information approved by us, the system may not function correctly. WARNINGS If the engine stops after the system The system does not relieve you of has been switched on, the hazard your responsibility to drive with due warning flashers will turn on.
-
Page 125: Driving Aids
Driving Aids Laser Sensor Information In certain situations it is advisable to disable the system, for example: • Driving off road when objects may cover the windscreen. • Driving through a car wash facility. You can switch the system off and on using the information display.
-
Page 126: Load Carrying
Load Carrying The load floor can be placed in either GENERAL INFORMATION position on shelves located at the rear of the luggage compartment trim. WARNINGS Use load securing straps to an approved standard, e.g. DIN. Make sure that you secure all loose items properly.
-
Page 127: Towing
Towing Steep Gradients TOWING A TRAILER WARNING WARNINGS The anti-lock braking system does Do not exceed 62 mph (100 km/h). not control the overrun brake on the trailer. The rear tyre pressures must be increased by 3 psi (0.2 bar) above Change down a gear before you reach a specification.
-
Page 128
Towing Unlocking the Tow Ball Arm Mechanism Remove the protecting cap. 2. Insert the key and turn it clockwise to unlock. 3. Hold the tow ball arm. Pull the handwheel out and turn it clockwise until it clicks. Note: The red mark on the handwheel must Note: Pull out the plug. -
Page 129
Towing Note: Unhitch the trailer. Remove the protecting cap. Press the cap into the key bow. Insert the key and unlock. 2. Hold the tow ball arm. Pull the handwheel out, turn it clockwise against the stop. 3. Remove the tow ball arm. 4. -
Page 130: Towing Points
Towing Maintenance Push the cover. 2. Release the cover. WARNING Remove the tow ball arm and protect the seat with the plug before steam cleaning your vehicle. Keep the system clean. Periodically lubricate bearings, sliding surfaces, and locking balls with resin-free grease or oil and the lock with graphite.
-
Page 131
Towing WARNINGS The brake and steering assistance will not operate unless the engine is running. Press the brake pedal harder and allow for increased stopping distances and heavier steering. Too much tension in the tow rope could cause damage to your vehicle or the vehicle that is towing. -
Page 132: Driving Hints
Driving Hints RUNNING-IN WARNINGS Engine damage can occur if water Tyres enters the air filter. WARNING In an emergency, you can drive your vehicle New tyres need to be run-in for through water to a maximum depth of 8 approximately 300 miles (500 inches (200 millimetres) and at a kilometres).
-
Page 133: Driving Hints
Driving Hints WARNINGS WARNINGS Always use floor mats that are Failure to properly follow floor mat designed to fit the foot well of your installation or attachment vehicle. Only use floor mats that instructions can potentially cause leave the pedal area unobstructed. Only interference with pedal operation causing use floor mats that are firmly secured to loss of control of vehicle.
-
Page 134: Roadside Emergencies
Roadside Emergencies To Connect the Booster Cables HAZARD WARNING FLASHERS Note: Depending on applicable laws and regulations in the country for which your vehicle was originally built, the hazard warning flashers may flash if you brake heavily. For item location: See At a Glance (page FIRST AID KIT Space is provided in the luggage compartment.
-
Page 135: Roadside Emergencies
Roadside Emergencies 4. Connect the negative (-) terminal of vehicle B to the ground connection of vehicle A (cable D). WARNINGS Do not connect directly to the negative (–) terminal of the flat battery. Make sure that the cables are clear of any moving parts and fuel delivery system parts.
-
Page 136: Fuses
Fuses Passenger Compartment Fuse Box FUSE BOX LOCATIONS This fuse box is located behind the glove Engine Compartment Fuse Box box. Open the glove box and empty the contents. Press the sides inwards and swivel the glove box downward.
-
Page 137: Fuse Specification Chart
Fuses FUSE SPECIFICATION CHART Engine Compartment Fuse Box Fuse Fuse rating Circuits protected 40 A Anti-lock braking system module Anti-lock braking system, electronic stability program 30 A module 60 A Cooling system fan high speed 40 A Cooling system fan 30 A Cooling system fan low speed 30 A…
-
Page 138
Fuses Fuse Fuse rating Circuits protected 30 A Body control module 60 A Passenger compartment fuse box supply (ignition) 50 A Automatic transmission 60 A Heated windscreen Not used 30 A Starter relay 10 A Main beam left-hand relay 10 A Main beam right-hand relay 10 A Water pump… -
Page 139
Fuses Fuse Fuse rating Circuits protected 20 A Horn, battery saver, keyless vehicle module 20 A Heated rear window 20 A Fuel pump relay, diesel fuel heater 15 A Category one alarm system 7.5A Automatic transmission controller 25 A Front door module left-hand side 25 A Front door module right-hand side 25 A… -
Page 140
Fuses Passenger Compartment Fuse Box Fuse Fuse rating Circuits protected Ignition, autowipers, heated 7.5 A windscreen, dome lamp, interior mirror 10 A Stop lamps 7.5 A Reversing lamp 7.5 A Headlamp levelling 20 A Windscreen wipers… -
Page 141
Fuses Fuse Fuse rating Circuits protected 15 A Rear window wiper 15 A Washer pump Not used 15 A Passenger heated seat 15 A Driver heated seat Not used 10 A Airbag module Ignition, electric power assisted steering, instrument 10 A cluster, passive anti-theft system, anti-lock braking system… -
Page 142
Fuses Fuse Fuse rating Circuits protected Heated windscreen left- 30 A hand side Heated windscreen right- 30 A hand side High quality power supply 30 A (vehicles with Start-Stop) 20 A Rear power point Cigar lighter, front auxiliary 20 A power point Not used Not used… -
Page 143: Changing A Fuse
Fuses Relay Circuits switched Ignition Cigar lighter, front auxiliary power point Not used Active city stop Not used Keyless entry (accessory) Keyless entry (ignition) Rear auxiliary power point Not used Not used Not used Not used If electrical components in your vehicle are not working, a fuse may have blown.
-
Page 144: Maintenance
Have your vehicle serviced regularly to help • Tyre pressures (when cold). See maintain its roadworthiness and resale Technical Specifications (page 179). value. There is a large network of Ford • Tyre condition. See Wheels and Tyres authorised repairers that are there to help (page 170).
-
Page 145
Maintenance 2. Move the catch to the left. 3. Open the bonnet and support it with the bonnet strut. Closing the Bonnet Remove the bonnet strut from the catch and secure correctly after use. 2. Lower the bonnet and allow it to drop from under its own weight for the last 8 — 11 inches (20 –… -
Page 146: Under Bonnet Overview — 1.0L Ecoboost
Maintenance UNDER BONNET OVERVIEW — 1.0L ECOBOOST Engine coolant reservoir : See Engine Coolant Check (page 152). Brake and clutch fluid reservoir (right-hand drive) : See Brake and Clutch Fluid Check (page 152). Engine oil filler cap : See Engine Oil Check (page 151). Battery: See Changing the 12V Battery (page 153).
-
Page 147: Under Bonnet Overview — 1.25L Duratec-16V (Sigma)
Maintenance UNDER BONNET OVERVIEW — 1.25L DURATEC-16V (SIGMA) Engine coolant reservoir : See Engine Coolant Check (page 152). Brake and clutch fluid reservoir (right-hand drive) : See Brake and Clutch Fluid Check (page 152). Engine oil filler cap : See Engine Oil Check (page 151). Battery: See Changing the 12V Battery (page 153).
-
Page 148: Under Bonnet Overview — 1.4L Duratec-16V (Sigma)
Maintenance UNDER BONNET OVERVIEW — 1.4L DURATEC-16V (SIGMA) Engine coolant reservoir : See Engine Coolant Check (page 152). Brake and clutch fluid reservoir (right-hand drive) : See Brake and Clutch Fluid Check (page 152). Engine oil filler cap : See Engine Oil Check (page 151). Battery: See Changing the 12V Battery (page 153).
-
Page 149: Under Bonnet Overview — 1.6L Duratec-16V (Sigma)
Maintenance UNDER BONNET OVERVIEW — 1.6L DURATEC-16V (SIGMA) Engine coolant reservoir : See Engine Coolant Check (page 152). Brake and clutch fluid reservoir (right-hand drive) : See Brake and Clutch Fluid Check (page 152). Engine oil filler cap : See Engine Oil Check (page 151). Battery: See Changing the 12V Battery (page 153).
-
Page 150: Under Bonnet Overview — 1.5L Duratorq-Tdci (67Kw/91Ps)
Maintenance UNDER BONNET OVERVIEW — 1.5L DURATORQ-TDCI (67KW/91PS) Engine coolant reservoir : See Engine Coolant Check (page 152). Brake and clutch fluid reservoir (right-hand drive) : See Brake and Clutch Fluid Check (page 152). Engine oil filler cap : See Engine Oil Check (page 151). Battery: See Changing the 12V Battery (page 153).
-
Page 151: Under Bonnet Overview — 1.6L Duratorq-Tdci (Dv) Diesel
Maintenance UNDER BONNET OVERVIEW — 1.6L DURATORQ-TDCI (DV) DIESEL Engine coolant reservoir : See Engine Coolant Check (page 152). Brake and clutch fluid reservoir (right-hand drive) : See Brake and Clutch Fluid Check (page 152). Engine oil filler cap : See Engine Oil Check (page 151). Battery: See Changing the 12V Battery (page 153).
-
Page 152: Engine Oil Dipstick — 1.0L Ecoboost
Maintenance ENGINE OIL DIPSTICK — 1.0L ENGINE OIL DIPSTICK — 1.4L ECOBOOST DURATEC-16V (SIGMA) Minimum Minimum Maximum Maximum ENGINE OIL DIPSTICK — 1.6L ENGINE OIL DIPSTICK — 1.25L DURATEC-16V TI-VCT (SIGMA) DURATEC-16V (SIGMA) Minimum Minimum Maximum Maximum…
-
Page 153: Engine Oil Dipstick — 1.5L Duratorq-Tdci (67Kw/91Ps)
Do not remove the filler cap when the engine is running. Failure to take care may result in personal injury. Remove the filler cap. Minimum 2. Add oil that meets Ford specifications. Maximum See Technical Specifications (page 165). ENGINE OIL CHECK 3.
-
Page 154: Engine Coolant Check
Maintenance 2. Add a 50/50 mixture of coolant and ENGINE COOLANT CHECK water using fluid that meets the Ford specifications. See Technical WARNING Specifications (page 165). Do not allow the fluid to touch your 3. Replace the filler cap. Turn it until you skin or eyes.
-
Page 155: Changing The 12V Battery
Maintenance For information on fluid dilution, refer to CHANGING THE WIPER the product instructions. BLADES CHANGING THE 12V BATTERY Windscreen Wiper Blades Changing the Windscreen Wiper Blades WARNING For vehicles with start-stop the battery requirement is different. You must replace the battery with one of exactly the same specification.
-
Page 156: Removing A Headlamp
Maintenance 5. Install in the reverse order. Note: When fitting the headlamp, make sure that you fully engage the headlamp in Note: Make sure that the wiper blade locks the retaining clips. into place. CHANGING A BULB — 3-DOOR REMOVING A HEADLAMP WARNINGS Open the bonnet.
-
Page 157
Maintenance Direction Indicator 3. Turn the bulb anticlockwise and remove it. Remove the headlamp. See Note: Do not touch the glass of the bulb. Removing a Headlamp (page 154). Headlamp Dipped Beam Remove the headlamp. See Removing a Headlamp (page 154). 2. -
Page 158
Maintenance 3. Remove the bulb and bulb holder. 3. Remove the bulb holder. Remove the bulb. 4. Remove the bulb. Front Fog Lamps Side Repeater Note: You cannot separate the fog lamp bulb from the bulb holder. Using a suitable implement, remove the cover. -
Page 159
Maintenance 2. Lift up the luggage compartment seal. 4. Disconnect the electrical connector. 5. Turn the bulb holder anticlockwise and remove it. Rear Lamps 3. Remove the carpet. Remove the screws. -
Page 160
Maintenance Licence Plate Lamp Carefully release the spring clip. 2. Remove the lamp. 4. Remove the wing nut. 3. Turn the bulb anticlockwise and 5. Disconnect the electrical connector. remove it. 6. Turn the bulb holder anticlockwise and Interior Lamp remove it. -
Page 161: Changing A Bulb — 5-Door
Maintenance Reading Lamps WARNINGS Let the bulb cool down before removing it. Do not touch the glass of the bulb. Note: Only fit bulbs of the correct specification. Note: The following instructions describe how to remove the bulbs. Fit replacements in the reverse order unless otherwise stated.
-
Page 162
Maintenance Side Lamp Remove the headlamp. See Removing a Headlamp (page 154). 2. Remove the headlamp main beam and daytime running lamp. 2. Remove the cover. 3. Disconnect the electrical connector. 4. Release the clip and remove the bulb. Note: Do not touch the glass of the bulb. Headlamp Main Beam 3. -
Page 163
Maintenance Front Fog Lamps 3. Gently press the bulb into the bulb holder, turn it anticlockwise and remove it. Side Repeater Remove the retaining clips to gain access to the lamp assembly. Press the side of the cover to release the clips. -
Page 164
Maintenance 2. Lift up the luggage compartment seal. 5. Disconnect the electrical connector. 6. Turn the bulb holder anticlockwise and remove it. Rear Lamps 3. Remove the carpet. Remove the screws. -
Page 165
Maintenance Licence Plate Lamp Carefully release the spring clip. 2. Remove the lamp. 4. Remove the wing nut. 3. Turn the bulb anticlockwise and 5. Disconnect the electrical connector. remove it. 6. Turn the bulb holder anticlockwise and Interior Lamp remove it. -
Page 166: Bulb Specification Chart
Maintenance Reading Lamps Luggage Compartment Lamp, Footwell Lamp and Liftgate Lamp Carefully remove the lamp. 2. Turn the bulb holder anticlockwise and remove it. 3. Remove the bulb. Carefully prise out the lamp. 2. Remove the bulb. BULB SPECIFICATION CHART Lamp Specification Power (watt)
-
Page 167: Technical Specifications
ISO 4925 Class 6 Brake Fluid Your engine has been designed to be used with Castrol and Ford Engine Oil, which gives a fuel economy benefit whilst maintaining the durability of your engine. Adding oil: If you are unable to find an oil that meets the specification defined by WSS-M2C913-C or WSS-M2C948-B (petrol engines only), you must use SAE 5W-30 that meets the specification defined by ACEA A5/B5.
-
Page 168
Maintenance Variant Item Capacity in gallons (litres) Windsscreen and 0.6 (2.5) rear window washer system Engine cooling 1.3 (5.8) system Fuel tank 12.4 (56.4) 1.0L EcoBoost Engine lubrication 0.9 (4.1) system — including the oil filter 1.0L EcoBoost Engine lubrication 0.9 (4.0) system — excluding the oil filter… -
Page 169
Maintenance Variant Item Capacity in gallons (litres) 1.5L Duratorq-TDCi Engine lubrication 0.9 (3.9) system — including the oil filter 1.5L Duratorq-TDCi Engine lubrication 0.8 (3.5) system — excluding the oil filter 1.6L Duratorq-TDCi Engine lubrication 0.9 (3.9) system — including the oil filter 1.6L Duratorq-TDCi Engine lubrication… -
Page 170: Vehicle Care
Vehicle Care Cleaning the Chrome Trim CLEANING THE EXTERIOR WARNINGS WARNINGS Do not use abrasives or chemical If you use a car wash with a waxing solvents. Use soapy water. cycle, make sure that you remove the wax from the windscreen. Do not apply cleaning product to hot surfaces and do not leave cleaning Prior to using a car wash facility…
-
Page 171: Repairing Minor Paint Damage
Remove particles such as bird droppings, We recommend that you use Ford service tree sap, insect deposits, tar spots, road wheel cleaner. Make sure that you read salt and industrial fallout before repairing and follow the manufacturer’s instructions.
-
Page 172: Wheels And Tyres
Wheels and Tyres GENERAL INFORMATION WARNINGS Do not use the kit on run flat tyre. A decal with tyre pressure data is located in the driver’s door opening. Do not try to seal damage to the Check and set the tyre pressure at the tyre’s sidewall.
-
Page 173
Wheels and Tyres • Park your vehicle at the roadside so WARNINGS that you do not obstruct the flow of If the tyre inflation pressure does not traffic and so that you are able to use reach 26 psi (1.8 bar) within 10 the kit without being in danger. -
Page 174
Wheels and Tyres Note: When pumping in the sealant through Repair kit hose the tyre valve, the pressure may rise up to Pressure relief valve 87 psi (6 bar) but will drop again after about 30 seconds. Remove the kit from the wrapping. Note: After you have switched the 2. -
Page 175: Tyre Care
Wheels and Tyres Attach the kit and read the tyre TYRE CARE pressure from the pressure gauge E. 20. Adjust it to the specified pressure. See Technical Specifications (page 179). Once you have inflated the tyre to its correct tyre pressure, move the compressor switch G to position 0, remove the power plug F from the socket, unscrew the hose C and…
-
Page 176: Using Snow Chains
Wheels and Tyres If winter tyres are used, you must make WARNINGS sure that you use the correct tyre The system will only provide a low pressures. See Technical Specifications tyre pressure warning. It will not (page 179). inflate the tyres. Do not drive on significantly USING SNOW CHAINS under-inflated tyres.
-
Page 177: Changing A Road Wheel
Wheels and Tyres Note: The system will still function WARNINGS correctly, but there may be an increased Do not carry out any tyre repairs on detection time. a spare wheel. System Reset Do not drive through an automatic car wash. Note: Do not reset the system when your vehicle is moving.
-
Page 178
Wheels and Tyres Jacking and Lifting Points Vehicles without a Temporary Mobility WARNING Your vehicle jack, wheel brace, screw-in Use only the specified jacking points. towing eye and wheel trim remover are If you use other positions, you may located in the spare wheel well. damage the body, steering, suspension, engine, braking system or the fuel lines. -
Page 179
Wheels and Tyres Assembling the Wheel Brace WARNING The screw-in towing eye has a left-hand thread. Turn it anticlockwise to install it. Make sure that the towing eye is fully tightened. Insert the screw-in towing eye into the wheel brace. Removing the Wheel Trim Vehicles with Side Skirts Insert the wheel trim remover. -
Page 180
Wheels and Tyres Note: Make sure that you pull the wheel trim remover at right angles to the trim. Removing a Road Wheel WARNINGS Park your vehicle in such a position that neither the traffic nor you are hindered or endangered. Set up a warning triangle. -
Page 181: Technical Specifications
Wheels and Tyres 2. Install the wheel nuts finger tight. WARNINGS 3. Install the locking wheel nut key. Make sure there is no lubrication (grease or oil) on the threads or the surface between the wheel studs and nuts. This can cause the wheel nuts to loosen while driving.
-
Page 182
Wheels and Tyres Tyre Pressures (Cold Tyres) Up to 50mph (80km/h) Vehicle Load Normal Full Tyre Position Front Rear Front Rear Variant Tyre Size psi (bar) psi (bar) psi (bar) psi (bar) Temporary spare wheel 175/65 R14-T 46 psi 46 psi 46 psi 46 psi when it differs from the… -
Page 183
Wheels and Tyres Vehicle Load Normal Full Tyre Position Front Rear Front Rear Variant Size psi (bar) psi (bar) psi (bar) psi (bar) 1.25L Duratec-16V and 32 psi 26 psi 38 psi 46 psi 195/45 R16 1.4L Duratec-16V (2.2 bar) (1.8 bar) (2.6 bar) (3.2 bar) -
Page 184
Wheels and Tyres Continuous Speed in Excess of 100mph (160km/h) Vehicle Load Normal Full Tyre Position Front Rear Front Rear Variant Size psi (bar) psi (bar) psi (bar) psi (bar) All petrol engines with 30 psi 26 psi 38 psi 46 psi 175/65 R14 manual transmission… -
Page 185: Capacities And Specifications
Capacities and Specifications Note: Your vehicle identification plate VEHICLE IDENTIFICATION design may vary to that shown. PLATE (IF EQUIPPED) Note: The information shown on the vehicle identification plate is dependant upon market requirements. Model Variant Engine designation Emission level Vehicle identification number Gross vehicle weight Gross train weight Maximum front axle weight…
-
Page 186: Vehicle Identification Number
Capacities and Specifications The vehicle identification number is VEHICLE IDENTIFICATION stamped into the floor panel on the NUMBER right-hand side, beside the front seat. It is also shown on the left-hand side of the instrument panel. TECHNICAL SPECIFICATIONS Vehicle dimensions Dimension description Dimension in inches (mm) Maximum length…
-
Page 187: Capacities And Specifications
Capacities and Specifications Towing equipment dimensions Item Dimension description Dimension in inches (mm) Bumper – end of tow ball 4.9 (124) Attachment point – centre of tow ball 0.3 (7) Wheel center – centre of tow ball 29.9 (761) Centre of tow ball – side member 20.2 (512)
-
Page 188
Capacities and Specifications Item Dimension description Dimension in inches (mm) Distance between side members 40.3 (1024) Centre of tow ball – centre 1. attachment 12.5 (317) point Centre of tow ball – centre 2. attachment 23 (584) point… -
Page 189: Audio System
WMA disc playback: MP3 and may not function correctly when used in WMA track mode (system default) and Ford CD players. MP3 and WMA folder mode. Note: CDs with homemade paper • MP3 and WMA track mode ignores any…
-
Page 190: Audio Unit — Vehicles With: Am/Fm/Cd
Audio System • MP3 and WMA folder mode represents In track mode, the system displays and a folder structure consisting of one plays the structure as if it were only one level of folders. The CD player numbers level deep (all .mp3 and WMA files are all MP3 and WMA tracks on the disc played, regardless of being in a specific (noted by the .mp3 or .
-
Page 191
Audio System Eject: Press the button to eject a CD. Cursor arrows: Press a button to scroll through on-screen choices. CD slot: Where you insert a CD. OK: Press the button to confirm on-screen selections. INFO: Press the button to access radio, CD, USB and IPod information. TA: Press the button to turn traffic announcements on or off and cancels announcements during an active announcement. -
Page 192
Audio System MENU: Press the button to access different audio system features. SOUND: Press the button to adjust the sound settings for bass, treble, middle, balance and fade. AUX: Press the button to access the AUX and SYNC features, it will also cancel the menu or list browsing. -
Page 193
Audio System 3. Press and hold one of the preset When traffic information is broadcast, it buttons. A progress bar and message will automatically interrupt normal radio will appear. When the progress bar or CD playback and Traffic completes the station has been stored. announcement will appear in the display. -
Page 194
Audio System Press the MENU button and select When selected, the unit continually AUDIO or AUDIO SETTINGS. evaluates signal strength and if a better signal becomes available, the unit will 2. Select AVC LEVEL or ADAPTIVE switch to that alternative. It mutes while VOL. -
Page 195: Audio Unit — Vehicles With: Am/Fm/Cd/Bluetooth
Audio System 2. Select AUDIO or AUDIO SETTINGS. Note: An integrated multi function display is situated above the unit. This shows 3. Scroll to RDS REGIONAL and turn on important information regarding control of or off with the OK button. your system.
-
Page 196
Audio System Eject: Press the button to eject a CD. Cursor arrows: Press a button to scroll through on-screen choices. CD slot: Where you insert a CD. OK: Press the button to confirm on-screen selections. INFO: Press the button to access radio, CD, USB and IPod information. TA: Press the button to turn traffic announcements on or off and cancels announcements during an active announcement. -
Page 197
Audio System Function button 3: Press the button to select different functions of the audio system depending on which mode (i.e. radio or CD) you are in. Seek up: Press the button to go to the next station up the radio frequency band or the next track on a CD. -
Page 198
Audio System You can use the selector to return to radio reception when you have been listening to another source. Alternatively, press the left arrow button to display the available wavebands. Scroll to the required waveband and press OK. Station Tuning Control DAB Service Linking Note: The system does not automatically turn on every time you switch the ignition… -
Page 199
Audio System Traffic Information Control Press function button 3. 2. Use the seek buttons to scan up or Many stations that broadcast on the FM down the selected waveband. waveband have a TP code to signify that 3. Press function button 3 again or OK they carry traffic program information. -
Page 200
Audio System Alternative Frequencies Ending Traffic Announcements The audio unit will return to normal The majority of programs that broadcast operation at the end of each traffic on the FM waveband have a program announcement. To end the announcement identification code, it can be recognised by prematurely, press TA or TRAFFIC during audio units. -
Page 201: Audio Unit — Vehicles With: Sony Am/Fm/Cd
Audio System large network may be broken down into a 4. Press the MENU button to return. number of smaller regional networks, typically centred on major towns or cities. AUDIO UNIT — VEHICLES WITH: When the network is not split into regional SONY AM/FM/CD variants, the whole network caries the same programming.
-
Page 202
Audio System On, Off: Press the button to switch the audio system on or off. DISPLAY: Press the button to turn on the display into idle mode. Numeric keypad: Press the button to recall a previously stored station. To store a favourite station press and hold until the sound returns. CD slot: Where you insert a CD. -
Page 203
Audio System MUTE: Press the button to turn the sound off, press again to turn the sound TA: Press the button to turn traffic announcements on or off and cancels announcements during an active announcement. Function button 4: Press the button to select different functions of the audio system depending on which mode (i.e. -
Page 204
Audio System You can use the selector to return to radio 2. Use the seek buttons to scan up or reception when you have been listening to down the selected waveband. another source. 3. Press function button 3 again or OK to continue listening to a station. -
Page 205: Automatic Volume Control
Audio System Traffic Information Control Ending Traffic Announcements The audio unit will return to normal Many stations that broadcast on the FM operation at the end of each traffic waveband have a TP code to signify that announcement. To end the announcement they carry traffic program information.
-
Page 206
Audio System 3. Scroll to the required digital signal When selected, the unit continually processing function. evaluates signal strength and, if a better signal becomes available, the unit will 4. Use the up and down arrow buttons to switch to that alternative. It mutes while select the required setting. -
Page 207: Digital Audio Broadcasting
Audio System 2. Select AUDIO or AUDIO SETTINGS. Station Tuning Control 3. Scroll to RDS REGIONAL and turn on Note: When you reach the first or last or off with the OK button. station within an ensemble, further tuning will skip to the next ensemble. There may 4.
-
Page 208: Auxiliary Input Socket
Audio System Select a station. If you leave the coverage area of a frequency, this feature allows the system 2. Press function button 3. to switch automatically to a corresponding 3. Press a seek button to begin the scan. frequency, e.g. from Digital to FM. 4.
-
Page 209: Audio Troubleshooting
Audio System The auxiliary input jack allows you to 3. Switch the radio on. Select either a connect and play music from your portable tuned FM station or a CD. music player through your vehicle speakers. 4. Adjust the volume as desired. You can use any portable music player 5.
-
Page 210: Sync
For further support see an authorised • use emergency assistance dealer. For more information visit the • access phonebook contacts and music regional Ford website. using voice commands • stream music from your connected mobile phone • select pre-defined text messages…
-
Page 211: Using Voice Recognition
SYNC Safety Information retains an index of supported media content. The system also records a short WARNING development log of approximately 10 minutes of all recent system activity. The Driving while distracted can result in log profile and other system data may be loss of vehicle control, collision and used to improve the system and help injury.
-
Page 212
SYNC Before giving a voice command, wait for You can interrupt the system at anytime the system announcement to finish while it is speaking by pressing the voice followed by a single beep. Any command button. You can also cancel a voice session spoken prior to this does not register with at any time by pressing and holding the the system. -
Page 213
SYNC Confirmation prompts are short questions command phone is correct. the system asks when it is not sure of your Press the voice button to change the request or when there is more than one confirmation prompt setting. Say «Voice possible response to your request. -
Page 214: Using Sync With Your Phone
Make sure the Bluetooth feature on compatibility, refer to your device’s manual your mobile phone is switched on or visit the regional Ford website. before starting the search. Refer to your device’s manual if necessary. Pairing a Mobile Phone For the First Time 2.
-
Page 215
SYNC The system may prompt you with mobile phone as the primary mobile phone, questions such as setting the current downloading your phonebook, etc. Mobile Phone Voice Commands «Phone» «Go to privacy» «Call <name>» «Hold» «Call <name> at home» «Join» «Call <name>… -
Page 216
SYNC «Dial» «112» (one-one-two), etc. «700» (seven hundred) «800» (eight hundred) «900» (nine hundred) «Pound», (#) «Number <0-9>» «Asterisk» (*) «Clear» (deletes all entered digits) «Delete» (deletes one digit) «Plus» «Star» Note: To exit dial mode, press and hold the phone button or any button on the audio unit. -
Page 217: Making A Call
SYNC Making a Call Receiving a Call Press the voice button and when When receiving a call, you can: prompted say «call <name>» or «dial» • Answer the call by pressing the accept followed by a number. call button on the steering wheel or by selecting the accept call option in the 2.
-
Page 218
SYNC When You Select You Can 3. Scroll to the option to join calls and press the OK button. Phonebook Access your phonebook contacts. 1. Select the option for more. 2. Scroll to the option for phonebook and press the OK button. -
Page 219: Text Messaging
SYNC When You Select You Can Access any previously dialled, received or missed calls. Call History 1. Press the OK button to select. 2. Scroll to select either incoming calls, outgoing calls or missed calls. Press the OK button to make your selection. 3.
-
Page 220
SYNC • Press the voice button and say «Read • Delete allows you to delete current text message». text messages from the system (not your mobile phone). The audio display • Select the more option and use the indicates when all your text messages arrow buttons to scroll through further have been deleted. -
Page 221
SYNC When You Select You Can Set as master If this option is checked, the system will use this mobile phone as the master when there is more than one mobile phone paired to the system. This option can be changed for all paired mobile phones (not only for the active one) using the Bluetooth devices menu. -
Page 222
SYNC When You Select You Can When automatic download is switched off, your phone- book will not be downloaded when your mobile phone connects to the system. Your phonebook, call history and text messages can only be accessed when your paired mobile phone is connected to the system. -
Page 223
SYNC When You Select You Can The system attempts to connect with the primary mobile phone every time you switch the ignition on. When a mobile phone is selected as primary, it appears first in the list and is marked with an asterisk. Conn. -
Page 224
SYNC When You Select You Can Install on SYNC Install applications or software updates you have down- loaded. Select this option and confirm when Install on SYNC appears in the audio display. There must be a valid SYNC application or update available on the USB thumb drive in order to finish an installation successfully. -
Page 225
European country or region where SYNC 2. Select the emergency assistance emergency assistance can call the local option and press OK. emergency services. Visit the regional Ford 3. Select the option you require and press website for details. Display Options If you turn this feature on, a confirmation message will be shown in the display. -
Page 226
SYNC In the Event of a Collision During a call: • Emergency assistance uses your Note: Not every collision will deploy an vehicle GPS or mobile network airbag or trigger the fuel pump shut off information when available to (which may turn on emergency assistance). determine the most appropriate However, if emergency assistance is language to use. -
Page 227: Using Sync With Your Media Player
To Connect Using Voice Commands Herzegovina, Macedonia, Netherlands, Ukraine, Moldova and Russia. Plug the device into your vehicle’s USB port. Visit the regional Ford website for latest details. 2. Press the voice button and when prompted, say «USB». Emergency Assistance Privacy Notice 3.
-
Page 228
SYNC What is Playing? Press Browse. Now you can scroll through the list: At any time during playback, you can press • Play all. the voice button and ask the system what • Playlists. is playing. The system reads the metadata tags (if populated) of the track being •… -
Page 229
SYNC Voice Command Guide «Search genre» or «Play The system searches all the data from your indexed music genre» and if available, begins to play the chosen type of music. You can only play genres of music which are present in the genre metadata tags that you have on your media player. -
Page 230
SYNC When You Select You Can Shuffle playlist and Repeat Choose to shuffle or repeat your music. Once these track selections are turned on, they will remain on until turned off. Similar music You can play similar types of music to the current playlist from the USB port. -
Page 231: Sync Troubleshooting
Your SYNC system is easy to use. However, You can access these menus using the should questions arise, please refer to the audio display. See Using SYNC With tables below. Your Phone (page 212). To check your mobile phone’s compatibility, visit the regional Ford website.
-
Page 232
SYNC Mobile Phone Issues Issue Possible Cause Possible Solution A lot of back- The audio control Refer to your mobile phone’s manual ground noise settings on your mobile regarding audio adjustments. during a phone phone may be affecting call. SYNC performance. During a call, I Possible mobile phone Try turning your mobile phone off, resetting… -
Page 233
SYNC Mobile Phone Issues Issue Possible Cause Possible Solution Turn off the auto download setting. Text messaging This is a mobile phone- Check your mobile phone’s compatibility. is not working dependent feature. Try turning your mobile phone off, resetting on SYNC. Possible mobile phone it or removing the battery, then trying again. -
Page 234
SYNC USB and Media Issues Issue Possible Cause Possible Solution Make sure that the device does not have an auto-install program or active security settings. SYNC does not This is a device limitation. Make sure you are not leaving the device in recognise my your vehicle during very hot or cold device when I… -
Page 235
SYNC Voice Command Issues Issue Possible Cause Possible Solution SYNC does not You may be using the Review the mobile phone voice commands understand wrong voice commands. and the media voice commands at the what I am You may be speaking too beginning of their respective sections. -
Page 236
SYNC Voice Command Issues Issue Possible Cause Possible Solution You can also use the mobile phone and media suggestion lists to get a list of possible suggestions when the system cannot fully understand you. See Using Voice Recognition (page 209). The SYNC voice Foreign names are SYNC applies the phonetic pronunciation… -
Page 237
SYNC Voice Command Issues Issue Possible Cause Possible Solution SYNC offers several new voice control features for a wide range of languages. Dialling a contact name directly from the phonebook without pre-recording (for example, “call John Smith”) or selecting a track, artist, album, genre or playlist directly from your media player (for example,»… -
Page 238: Appendices
Appendices ELECTROMAGNETIC WARNINGS The radio frequency transmitter COMPATIBILITY equipment (e.g. mobile telephones, amateur radio transmitters etc.) may WARNINGS only be fitted to your vehicle if they keep Your vehicle has been tested and to the parameters shown in the table certified to legislations relating to below.
-
Page 239: End User Licence Agreement
«online» or electronic END USER LICENCE documentation («FORD SOFTWARE») are protected by international AGREEMENT intellectual property laws and treaties. The FORD SOFTWARE is licenced, not SYNC® End User Licence sold. All rights reserved. Agreement (EULA) • You have acquired a device («DEVICE»)
-
Page 240
(e.g., in the user FORD MOTOR COMPANY or its third documentation and in the software). party software and service providers. Even if you receive multiple EULAs, you are licenced to use only one (1) copy of the SOFTWARE. -
Page 241
SOFTWARE Transfer: You may • Consent to Use of Data: You agree permanently transfer your rights under that MS, Microsoft Corporation, FORD this EULA only as part of a sale or MOTOR COMPANY, third party transfer of the DEVICE, provided you… -
Page 242
Components»). MS, Microsoft Corporation, their affiliates and/or their designated If FORD MOTOR COMPANY or third party agent. Neither MS nor Microsoft software and services suppliers provide or Corporation nor their affiliates nor their… -
Page 243
All title and intellectual property rights in you any rights in connection with any and to the SOFTWARE (including but not trademarks or service marks of FORD limited to any images, photographs, MOTOR COMPANY, MS, Microsoft animations, video, audio, music, text and Corporation, third party software or service «applets»… -
Page 244
Do not change software that is licenced to Manufacturer system settings or enter data non-verbally FORD MOTOR COMPANY by an affiliate (using your hands) while driving. Stop the of Microsoft Corporation pursuant to a vehicle in a safe and legal manner before licence agreement. -
Page 245
Appendices Use of Speech Recognition Functions: Potential Map Inaccuracy: Maps used Speech recognition software is inherently by this system may be inaccurate because a statistical process which is subject to of changes in roads, traffic controls or errors. It is your responsibility to monitor driving conditions. -
Page 246
Appendices places you in an unsafe situation, or directs any termination or expiration of this you into an area that you consider to be Agreement. You agree that you will use the unsafe, do not follow such instructions; (c) TeleNav Software only for your personal do not input destinations, or otherwise business or leisure purposes, and not to manipulate the TeleNav Software, unless… -
Page 247
Appendices 4. Disclaimers 5. Limitation of Liability To the fullest extent permissible pursuant TO THE EXTENT PERMITTED UNDER to applicable law, in no event will TeleNav, APPLICABLE LAW, UNDER NO its licensors and suppliers, or agents or CIRCUMSTANCES SHALL TELENAV OR employees of any of the foregoing, be ITS LICENSORS AND SUPPLIERS BE liable for any decision made or action… -
Page 248
Appendices 8. Miscellaneous Commercial Arbitration Rules of the American Arbitration Association, and the judgment upon the award rendered by the arbitrator may be entered by any court This Agreement constitutes the entire having jurisdiction. Note that there is no agreement between TeleNav and you with judge or jury in an arbitration proceeding respect to the subject matter hereof. -
Page 249
Appendices installed, copied, or used the Data, you must contact your retailer or NAVTEQ If any provision herein is held North America, LLC («NT») within thirty unenforceable, then such provision will be (30) days of purchase for a refund of your modified to reflect the intention of the purchase price. -
Page 250
Appendices reproduce, copy, modify, decompile, WARNING disassemble or reverse engineer any This Data may contain inaccurate or portion of this Data, and may not transfer incomplete information due to the or distribute it in any form, for any purpose, passage of time, changing except to the extent permitted by circumstances, sources used and the mandatory laws. -
Page 251
Appendices OR SAVINGS, OR ANY OTHER DIRECT, Severability: You and NT agree that if any INDIRECT, INCIDENTAL, SPECIAL OR portion of this agreement is found illegal CONSEQUENTIAL DAMAGES ARISING or unenforceable, that portion shall be OUT OF YOUR USE OF OR INABILITY TO severed and the remainder of the USE THIS DATA, ANY DEFECT IN THIS Agreement shall be given full force and… -
Page 252
Appendices This Data is a commercial item as defined The software from Gracenote (the in FAR 2.101 «Gracenote Software») enables this device to do disc and music file identification and and is subject to the End User Licence obtain music-related information, including Agreement under name, artist, track, and title information which this Data was provided. -
Page 253
Appendices become liable for any payment to you for WARRANTIES EXPRESS OR IMPLIED, any information that you provide, including INCLUDING, BUT NOT LIMITED TO, any copyrighted material or music file IMPLIED WARRANTIES OF information. You agree that Gracenote MERCHANTABILITY, FITNESS FOR A may enforce its respective rights, PARTICULAR PURPOSE, TITLE, AND collectively or separately, under this… -
Page 255
Index Audio Troubleshooting……207 Audio unit — Vehicles With: AM/FM/CD/Bluetooth……193 Alternative Frequencies……..198 See: Climate Control……….77 Automatic Volume Control……198 About This Manual………..5 Autostore Control……….197 Protecting the Environment…….5 News Broadcasts……….198 Regional Mode…………198 See: Brakes………….112 Sound Button…………196 ABS driving hints Station Preset Buttons……..197 See: Hints on Driving With Anti-Lock Station Tuning Control……..196 Brakes…………..112 Traffic Information Control……197… -
Page 256
Index Autowipers…………44 Changing a Road Wheel……175 Auxiliary Input Socket…….206 Assembling the Wheel Brace……177 Auxiliary Power Points……..91 Installing a Road Wheel……..178 12 Volt DC Power Point……..91 Jacking and Lifting Points……..176 Location…………..91 Removing a Road Wheel……..178 Removing the Wheel Trim……..177 Vehicle Jack…………175 Vehicles with a Spare Wheel……175 Bonnet Lock Wheel Nuts…………175… -
Page 257
Index Cup Holders…………92 Event Data Recording See: Data Recording……….8 Exterior Mirrors……….53 Electric Folding Mirrors……..53 Data Recording……….8 Fold-Away Exterior Mirrors…….54 Daytime Running Lamps……49 Power Exterior Mirrors……..53 Diesel Particulate Filter……..97 Regeneration…………97 Digital Audio Broadcasting……205 Fastening the Seat Belts……22 ………………205 Direction Indicators……..50 Using Seat Belts During Pregnancy….22 First Aid Kit…………132 Flat Tyre Inflation See: Diesel Particulate Filter……97… -
Page 258
Index Global Opening and Closing……55 Information Displays……..62 Global Closing…………55 General Information……….62 Information Messages………66 Global Opening………….55 Installing Child Seats……..15 Attaching a Child Seat with Top Tethers…………..17 Handbrake Booster Seats…………16 See: Parking Brake……….112 Child Seats for Different Mass Groups..15 Hazard Warning Flashers……132 ISOFIX Anchor Points………..17 Headlamp Exit Delay……..48 Top Tether Anchor Points……..17… -
Page 259
Index Manual Transmission……..107 Selecting Reverse Gear……..107 Message Centre Lighting Control……….47 See: Information Displays………62 Headlamp Flasher……….48 Mirrors Lighting Control Positions………47 See: Heated Windows and Mirrors….83 Main Beams…………48 See: Windows and Mirrors……..52 Parking Lamps…………47 Mobile Communications Equipment..7 Lighting……………47 MyKey…………..31 General Information……….47 Principle of Operation……….31 Load Carrying……….124 MyKey Troubleshooting…….32 General Information……….124… -
Page 260
Index Power Windows……….52 Running-In…………130 Accessory Delay…………53 Brakes and Clutch……….130 Bounce-Back…………52 Engine…………..130 One-Touch Down……….52 Tyres…………….130 Running Out of Fuel……..102 One-Touch Up…………52 Window Lock…………52 Refilling With a Portable Fuel Container…………103 Rear Fog Lamps……….49 Rear Seats…………89 Safety Precautions……..101 Seat Belt Height Adjustment…..22 Folding the Seatback………89 Seat Belt Minder……….23 Unfolding the Seatback……..89 Rear Under Floor Storage……124… -
Page 261
Index Supplementary Restraints System..24 Tyre Pressure Monitoring System…174 Principle of Operation………24 System Reset…………175 Switching Off the Engine……98 Tyre Repair Kit Vehicles With a Turbocharger……98 See: Temporary Mobility Kit……170 Symbols Glossary……….5 Tyres SYNC Applications and Services..222 See: Wheels and Tyres……..170 In the Event of a Collision…….224 Setting Emergency Assistance On….223 SYNC Emergency Assistance……222 SYNC… -
Page 262: Using Sync With Your Phone
Index Using SYNC With Your Phone…..212 Accessing Features Through the Mobile Phone Menu………….216 Warning Lamps and Indicators….58 Accessing Your Mobile Phone Anti-lock Braking System Warning Settings………….218 Lamp…………..58 Bluetooth Devices……….220 Brake System Warning Lamp……58 Making a Call…………215 Cruise Control Indicator……..58 Mobile Phone Options During an Active Direction Indicator……….58 Call…………..215 Door Ajar Warning Lamp……..58…
-
Page 264
CG3582en…
 Loading…

FORD FIESTA Руководство пользователя

Информация, содержащаяся в этой публикации, являлась верной на момент сдачи в печать. В интересах непрерывного развития компания оставляет за собой право в любой момент вносить изменения в технические характеристики, конструкцию или комплектацию своей продукции без предварительного уведомления и без каких-либо обязательств. Ни одна из частей данной публикациинеможетбытьвоспроизведена,переданаилисохраненавинформационно-поисковых системах, а также переведена на тот или иной язык в любой форме и любыми средствами без письменного согласия компании. Ошибки и пропуски информации исключены.
© Ford Motor Company 2015
Все права защищены.
Номер по каталогу: GE8J-19A321-AXA 03/2015 20150408213121

Содержание
|
Введение |
|
|
О данном руководстве………………………….. |
7 |
|
Словарь символов………………………………….. |
7 |
|
Регистрация данных……………………………… |
9 |
|
Рекомендация о замене деталей…….. |
10 |
|
Оборудование мобильной связи………. |
11 |
|
Быстрый обзор |
|
|
Быстрый обзор……………………………………….. |
12 |
|
Безопасность детей |
|
|
Установка детского сиденья……………… |
19 |
|
Установка детского сиденья…………….. |
22 |
|
Замки с функцией блокировки от |
|
|
открывания детьми…………………………. |
26 |
|
Ремни безопасности |
|
|
Пристегивание ремней |
|
|
безопасности……………………………………… |
27 |
|
Регулировкавысотыкрепленияремня |
|
|
безопасности…………………………………….. |
28 |
|
Система напоминания о |
|
|
непристегнутом ремне |
|
|
безопасности…………………………………….. |
28 |
|
Дополнительная система |
|
|
пассивной безопасности |
|
|
Принципы работы………………………………… |
30 |
|
Подушка безопасности |
|
|
водителя………………………………………………. |
31 |
|
Подушка безопасности |
|
|
пассажира……………………………………………. |
31 |
|
Боковые подушки безопасности………. |
31 |
|
Нижняя подушка безопасности |
|
|
водителя……………………………………………… |
32 |
|
Боковые подушки безопасности……… |
32 |
|
Замена утерянного ключа или пульта |
|
|
дистанционного управления………… |
37 |
|
MyKey™ |
|
|
Принципы работы………………………………… |
38 |
|
Создание системы MyKey…………………… |
39 |
|
Программирование функции |
|
|
MyKey……………………………………………………. |
40 |
|
Удаление информации всех ключей |
|
|
системы MyKey………………………………….. |
40 |
|
Проверка состояния системы |
|
|
MyKey……………………………………………………. |
40 |
|
Использование функции MyKey с |
|
|
системамидистанционногозапуска |
|
|
двигателя…………………………………………….. |
41 |
|
Функция MyKey, поиск и устранение |
|
|
неисправностей………………………………… |
42 |
|
Замки |
|
|
Блокировка и разблокировка |
|
|
замков………………………………………………….. |
43 |
|
Задняя поднимающаяся дверь с |
|
|
ручным управлением………………………. |
45 |
|
Система управления замками без |
|
|
помощи ключа………………………………….. |
46 |
|
Безопасность |
|
|
Пассивная противоугонная |
|
|
система………………………………………………… |
50 |
|
Противоугонная сигнализация……….. |
50 |
|
Рулевое колесо |
|
|
Регулировка положения рулевого |
|
|
колеса………………………………………………….. |
54 |
|
Управление аудиосистемой……………… |
54 |
|
Голосовое управление………………………… |
55 |
|
Управление скоростью………………………. |
55 |
|
Ключи и пульты дистанци- |
Стеклоочистителиистекло- |
||
|
онного управления |
омыватели |
||
|
Общая информация о |
Очистители ветрового стекла…………. |
56 |
|
|
радиочастотах…………………………………… |
34 |
Автоматические |
|
|
Дистанционное управление……………… |
34 |
стеклоочистители…………………………….. |
57 |
|
1 |
Fiesta (CCN) Russia, Vehicles Built From: 27-04-2015, GE8J-19A321-AXA ruRUS, Edition date: 03/2015, First Printing

Содержание
|
Омыватели ветрового стекла………….. |
58 |
|
Очиститель и омыватели заднего |
|
|
стекла…………………………………………………… |
59 |
|
Осветительное |
|
|
оборудование |
|
|
Общая информация…………………………… |
60 |
|
Органы управления осветительным |
|
|
оборудованием…………………………………. |
60 |
|
Автоматическое управление |
|
|
включением внешнего |
|
|
освещения…………………………………………… |
61 |
|
Регулятор яркости подсветки панели |
|
|
приборов…………………………………………….. |
62 |
|
Задержка выключения фар……………… |
62 |
|
Световое оборудование дневного |
|
|
времени……………………………………………….. |
62 |
|
Передние противотуманные |
|
|
фары……………………………………………………. |
63 |
|
Задние противотуманные |
|
|
фонари………………………………………………… |
63 |
|
Коррекция наклона световых пучков |
|
|
фар……………………………………………………….. |
63 |
|
Указатели поворота……………………………. |
64 |
|
Плафоны внутреннего |
|
|
освещения………………………………………….. |
64 |
|
Окна и зеркала |
|
|
Электрические |
|
|
стеклоподъемники…………………………… |
66 |
|
Полное открывание/ закрывание…… |
68 |
|
Наружные зеркала заднего вида…… |
69 |
|
Внутреннее зеркало заднего |
|
|
вида……………………………………………………….. |
71 |
|
Щиток приборов |
|
|
Указатели………………………………………………… |
72 |
|
Сигнализаторы и индикаторы………….. |
73 |
|
Сигнализаторы и индикаторы — 1.6L |
|
|
EcoBoost™…………………………………………… |
77 |
|
Звуковые предупреждения и |
|
|
индикаторы……………………………………….. |
80 |
2
|
Информационные |
|
|
дисплеи |
|
|
Общая информация…………………………… |
82 |
|
Часы…………………………………………………………. |
85 |
|
Маршрутный компьютер……………………. |
86 |
|
Персональные настройки………………….. |
87 |
|
Информационные сообщения…………. |
87 |
|
Органы управления |
|
|
микроклиматом |
|
|
Принципы работы………………………………… |
99 |
|
Вентиляционные дефлекторы………… |
99 |
|
Ручной режим управления |
|
|
микроклиматом……………………………….. |
100 |
|
Автоматический режим управления |
|
|
микроклиматом……………………………….. |
102 |
|
Советы по контролю внутреннего |
|
|
климата……………………………………………… |
104 |
|
Окна и зеркала с обогревом…………… |
108 |
|
Сиденья |
|
|
Сидение в правильном |
|
|
положении………………………………………… |
109 |
|
Подголовники……………………………………… |
109 |
|
Сиденья с ручной регулировкой…….. |
110 |
|
Задние сиденья…………………………………….. |
111 |
|
Сиденья с обогревом………………………….. |
112 |
|
Дополнительные электри- |
|
|
ческие розетки |
|
|
Дополнительные электрические |
|
|
розетки………………………………………………… |
114 |
|
Прикуриватель……………………………………… |
114 |
|
Отделения для хранения |
|
|
предметов |
|
|
Подставки для стаканов……………………. |
116 |
|
Запуск и остановка |
|
|
двигателя |
|
|
Общая информация…………………………… |
117 |
Fiesta (CCN) Russia, Vehicles Built From: 27-04-2015, GE8J-19A321-AXA ruRUS, Edition date: 03/2015, First Printing

Содержание
|
Выключатель зажигания…………………… |
117 |
|
Пуск без помощи ключа…………………….. |
118 |
|
Блокировка рулевого колеса………….. |
120 |
|
Блокировка рулевого колеса — В |
|
|
комплектацию автомобиля входит: |
|
|
Система ‘бесключевого’ входа |
|
|
автомобиля………………………………………. |
120 |
|
Пуск бензинового двигателя………….. |
120 |
|
Уникальныехарактеристики |
|
|
модификаций |
|
|
автомобилей |
|
|
Авто-Старт-Стоп…………………………………. |
123 |
|
Топливо и заправка |
|
|
Меры предосторожности…………………. |
125 |
|
Качество топлива — Бензиновый……. |
126 |
|
Полная выработка топлива…………….. |
126 |
|
Каталитический нейтрализатор……. |
128 |
|
Заправка топливом……………………………. |
128 |
|
Расход топлива…………………………………… |
130 |
|
Коробка передач |
|
|
Механическая коробка передач…….. |
132 |
|
Автоматическая коробка |
|
|
передач………………………………………………. |
132 |
|
Система помощи при трогании на |
|
|
подъеме……………………………………………… |
136 |
|
Тормоза |
|
|
Общая информация………………………….. |
138 |
|
Советы по управлению автомобилем |
|
|
с антиблокировочной системой |
|
|
тормозов……………………………………………. |
138 |
|
Стояночный тормоз……………………………. |
139 |
|
Система динамической |
|
|
стабилизации |
|
|
Принципы работы………………………………. |
140 |
|
Использование системы |
|
|
динамической стабилизации……… |
140 |
3
|
Системы помощи при |
|
|
парковке |
|
|
Принципы работы………………………………… |
141 |
|
Система помощи при парковке……….. |
141 |
|
Управление скоростью |
|
|
Принципы работы………………………………. |
146 |
|
Использование системы |
|
|
круиз-контроля……………………………….. |
146 |
|
Системы помощи |
|
|
водителю |
|
|
Active City Stop……………………………………… |
148 |
|
Перевозка груза |
|
|
Общая информация…………………………. |
150 |
|
Вещевой отсек под полом задка…… |
150 |
|
Крышки багажного отделения………… |
151 |
|
Буксировка |
|
|
Точки крепления буксировочного |
|
|
оборудования…………………………………… |
152 |
|
Буксировка автомобиля с опорой на |
|
|
четыре колеса………………………………….. |
153 |
|
Советы по вождению |
|
|
Обкатка………………………………………………….. |
155 |
|
Меры предосторожности при |
|
|
движении в холодную погоду……… |
155 |
|
Преодоление водной преграды…….. |
155 |
|
Напольные коврики……………………………. |
156 |
|
Аварийные принад- |
|
|
лежности |
|
|
Аварийная световая |
|
|
сигнализация…………………………………… |
158 |
|
Аптечка………………………………………………….. |
158 |
|
Знак аварийной остановки………………. |
158 |
|
Запуск автомобиля от внешнего |
|
|
источника………………………………………….. |
158 |
Fiesta (CCN) Russia, Vehicles Built From: 27-04-2015, GE8J-19A321-AXA ruRUS, Edition date: 03/2015, First Printing

Содержание
|
Плавкие предохранители |
|
|
Расположение блоков плавких |
|
|
предохранителей…………………………….. |
161 |
|
Таблица характеристик плавких |
|
|
предохранителей……………………………. |
162 |
|
Замена плавкого |
|
|
предохранителя………………………………. |
170 |
|
Обслуживание |
|
|
Общая информация…………………………… |
171 |
|
Открывание и закрывание |
|
|
капота………………………………………………….. |
172 |
|
Общий вид моторного отсека — 1.6L |
|
|
Duratec-16V Ti-VCT (Sigma)…………… |
173 |
|
Щуп для проверки моторного масла |
|
|
— 1.6L Duratec-16V Ti-VCT |
|
|
(Sigma)……………………………………………….. |
174 |
|
Проверка моторного масла……………… |
174 |
|
Проверка охлаждающей жидкости |
|
|
двигателя…………………………………………… |
175 |
|
Проверка уровня тормозной |
|
|
жидкости и рабочей жидкости |
|
|
гидропривода сцепления…………….. |
176 |
|
Проверка омывающей жидкости……. |
177 |
|
Замена аккумуляторной батареи 12 В |
|
|
……………………………………………………………….. |
177 |
|
Проверка щеток |
|
|
стеклоочистителей…………………………. |
178 |
|
Замена щеток |
|
|
стеклоочистителей…………………………. |
178 |
|
Снятие фары………………………………………… |
179 |
|
Замена ламп — 4-дверный………………… |
179 |
|
Замена ламп — 5-дверный………………… |
185 |
|
Таблица технических характеристик |
|
|
ламп…………………………………………………….. |
192 |
|
Технические характеристики…………… |
192 |
|
Технические характеристики — 1.6L |
|
|
Duratec-16V Ti-VCT (Sigma)………….. |
198 |
|
Уход за автомобилем |
|
|
Очистка автомобиля снаружи………. |
200 |
|
Очистка салона…………………………………… |
201 |
4
|
Устранение мелких повреждений |
|
|
лакокрасочного покрытия……………. |
201 |
|
Очистка легкосплавных дисков…….. |
201 |
|
Колеса и шины |
|
|
Общая информация…………………………. |
203 |
|
Комплект для ремонта шин……………. |
203 |
|
Обслуживание шин…………………………… |
207 |
|
Использование зимних шин…………… |
208 |
|
Использование цепей |
|
|
противоскольжения……………………… |
208 |
|
Замена колеса…………………………………….. |
208 |
|
Технические характеристики — 1.6L |
|
|
Duratec-16V Ti-VCT (Sigma)………….. |
214 |
|
Заправочные объемы и |
|
|
технические характе- |
|
|
ристики |
|
|
Табличка с идентификационным |
|
|
номером автомобиля…………………….. |
216 |
|
Идентификационный номер |
|
|
автомобиля……………………………………….. |
217 |
|
Данные по потреблению топлива — |
|
|
1.6L Duratec-16V Ti-VCT (Sigma), |
|
|
Механическая КПП………………………….. |
217 |
|
Данные по потреблению топлива — |
|
|
1.6L Duratec-16V Ti-VCT (Sigma), |
|
|
6-ступенчатая коробка передач |
|
|
PowerShift (DPS6/6DCT250)……….. |
218 |
|
Технические характеристики — |
|
|
4-дверный…………………………………………. |
219 |
|
Технические характеристики — |
|
|
5-дверный…………………………………………. |
219 |
|
Аудиосистема |
|
|
Общая информация…………………………. |
220 |
|
Аудиоблок — В комплектацию |
|
|
автомобиля входит: AM/FM/CD….. |
222 |
|
Аудиоблок — В комплектацию |
|
|
автомобиля входит: AM/FM/CD/ |
|
|
Система Bluetooth /SYNC…………….. |
228 |
Fiesta (CCN) Russia, Vehicles Built From: 27-04-2015, GE8J-19A321-AXA ruRUS, Edition date: 03/2015, First Printing

Содержание
|
Аудиоблок — В комплектацию |
|
|
автомобиля входит: AM/FM/CD/ |
|
|
Система Bluetooth /Навигационная |
|
|
система………………………………………………. |
235 |
|
Аудиоблок — В комплектацию |
|
|
автомобиля входит: Sony AM/FM/ |
|
|
CD………………………………………………………… |
242 |
|
Аудиоблок — В комплектацию |
|
|
автомобилявходит: Навигационная |
|
|
система/Sony AM/FM/CD…………….. |
250 |
|
Цифровое радиовещание……………… |
258 |
|
Гнездо аудиовхода……………………………. |
260 |
|
USB-порт……………………………………………….. |
261 |
|
Устранение неполадок в работе |
|
|
аудиосистемы…………………………………… |
261 |
|
SYNC™ |
|
|
Общая информация…………………………. |
262 |
|
Использование функции |
|
|
распознавания речи……………………… |
264 |
|
Использование SYNC™ на вашем |
|
|
телефоне………………………………………….. |
267 |
|
Приложения и службы SYNC™………. |
282 |
|
Использование SYNC™ на |
|
|
медиаплеере вашего |
|
|
автомобиля………………………………………. |
287 |
|
SYNC™, поиск и устранение |
|
|
неисправностей………………………………. |
297 |
|
Навигационная система |
|
|
Навигационная система…………………… |
310 |
|
Приложения |
|
|
Электромагнитная |
|
|
совместимость…………………………………. |
321 |
|
Лицензионное соглашение с |
|
|
конечным пользователем……………. |
322 |
5
Fiesta (CCN) Russia, Vehicles Built From: 27-04-2015, GE8J-19A321-AXA ruRUS, Edition date: 03/2015, First Printing

6
Fiesta (CCN) Russia, Vehicles Built From: 27-04-2015, GE8J-19A321-AXA ruRUS, Edition date: 03/2015, First Printing
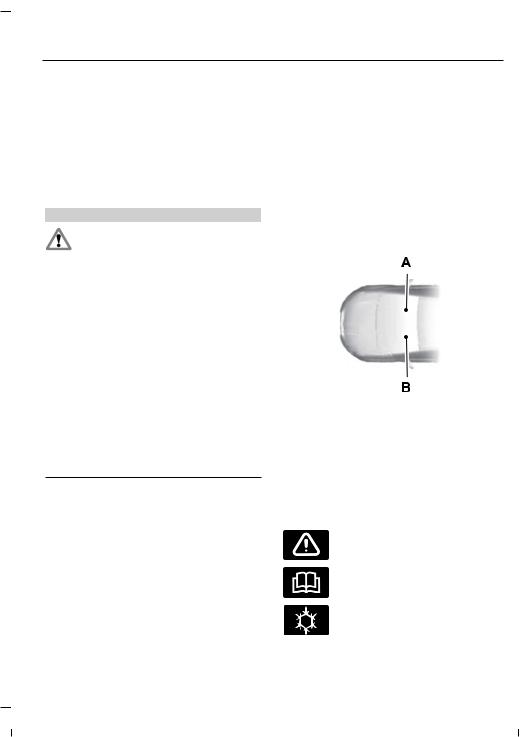
Введение
О ДАННОМ РУКОВОДСТВЕ
Благодарим вас за то, что вы остановили свой выбор на автомобиле Ford. Рекомендуем уделить время и лучше ознакомиться с возможностями вашего автомобиля с помощью данного руководства. Чем лучше вы знаете свой автомобиль, тем безопаснее и приятнее вождение.
ПРЕДУПРЕЖДЕНИЕ
Вождение с отвлеченным вниманием может привести к потере контроля над
автомобилем, аварии и телесным повреждениям. Мы настоятельно рекомендуем соблюдать крайнюю осторожность при использовании любых устройств, которые могут отвлечь ваше внимание от дороги. Вашапервоочереднаяответственность
— безопасная эксплуатация вашего автомобиля. Мы рекомендуем воздержатьсяотиспользованиялюбых портативных устройств во время вожденияипризываемповозможности использовать системы с голосовым управлением. Обязательно ознакомьтесь с применимым местным законодательством, регулирующим использованиеэлектронныхустройств во время вождения.
Примечание: В данном руководстве описаны функции и дополнительные варианты для всего ряда доступных моделей, иногда даже до того, как они станут доступны повсеместно. Кроме того, руководство может содержать описание систем, которыми не оборудован приобретенный вами автомобиль.
Примечание: Некоторые рисунки в данном руководстве используются для различныхмоделей,такчтоизображение можетотличатьсяотвашегоавтомобиля.
7
Примечание: Строго соблюдайте все действующие правила и законы при пользовании автомобилем.
Примечание: В случае продажи автомобиля данное руководство необходимопередатьновомувладельцу. Оно является неотъемлемой принадлежностью автомобиля.
В данном руководстве некоторые элементы конструкции могут иметь определение «левый» и «правый». Сторона определяется из положения сидя на сиденье «лицом вперед».
E154903
A С правой стороны.
BС левой стороны.
СЛОВАРЬ СИМВОЛОВ
Ниже приведены несколько символов, которые вы можете увидеть на вашем автомобиле.
Предупреждение об опасности
См. руководство по эскплуатации
Система воздушного кондиционирования
Fiesta (CCN) Russia, Vehicles Built From: 27-04-2015, GE8J-19A321-AXA ruRUS, Edition date: 03/2015, First Printing

Введение
Антиблокировочная система тормозов
Не допускайте курения, искр и открытого пламени
Аккмулятор
Кислота для аккумуляторной батареи
Тормозная жидкость не на нефтяной основе
Система тормозов
Фильтр салона
Проверьтетопливнуюкрышку
Включение/выключение функцииблокировкидвериот открывания детьми
Нижний анкер детского сиденья
Анкер привязных ремней детского сиденья
Система круиз-контроля
E71340
Не открывайте в горячем состоянии
Воздушный фильтр двигателя
8
Охлаждающая жидкость двигателя
Температура охлаждающей жидкости двигателя
Моторное масло
Взрывоопасный газ
Предупреждение о работающем вентиляторе
Пристегните ремень безопасности
Передняя надувная подушка безопасности
Контрольная лампа передних противотуманных фар
Сброс топливного насоса
Плавкий предохранитель
Мигающее предупреждение об опасности
Обогревательзаднегостекла
Лобовое стекло с обогревом
Внутренняяручкаоткрывания багажного отделения
Домкрат
Fiesta (CCN) Russia, Vehicles Built From: 27-04-2015, GE8J-19A321-AXA ruRUS, Edition date: 03/2015, First Printing
![]()
Введение
Хранить в месте, недоступном для детей
Управление освещением
Предупреждение о низком давлении воздуха в шинах
Поддерживайте правильный уровень жидкости
Изучите инструкции по эксплуатации
Предупредительная
сигнализация
датчики системы помощи при парковке
E139213
Стояночный тормоз
Рабочая жидкость гидроусилителя рулевого управления
Окна с электроприводом стекол (передние/задние)
Блокировка окон с электроприводом стекол
Скоро потребуется сервисное обслуживание двигателя
Боковые подушки безопасности
Наденьте защитные очки
Система поддержания устойчивости
Стеклоомыватель и стеклоочиститель ветрового стекла
РЕГИСТРАЦИЯ ДАННЫХ
Большое количество электронных компонентов автомобиля содержит модули хранения данных, которые временно или постоянно хранят технические данные о состоянии автомобиля, событиях и неисправностях.
Как правило, эта техническая информация документирует следующие состояния деталей, модулей, систем или окружающей среды.
•Условияэксплуатациикомпонентов системы (например, уровни заправки).
•Сообщенияосостоянииавтомобиля
и его отдельных компонентов (например, числооборотов/угловая скорость колес, замедление, поперечное ускорение).
•Неисправности и дефекты важных компонентов системы (например, системы освещения и тормозной системы).
•Реакции автомобиля в определенныхситуацияхдвижения (например, срабатываниенадувной подушки безопасности, активация системы курсовой устойчивости).
•Условия окружающей среды (например, температура).
9
Fiesta (CCN) Russia, Vehicles Built From: 27-04-2015, GE8J-19A321-AXA ruRUS, Edition date: 03/2015, First Printing

Введение
Эти данные являются исключительно техническими и служат для идентификации и коррекции ошибок наряду с оптимизацией функций автомобиля. При помощи этих данных невозможно создание профилей движения, определяющих маршрут поездки.
При проведении техобслуживания (например, ремонтныхработ, процедур технического обслуживания, гарантийных ремонтов, работ по обеспечению качества) сотрудники сервисной сети (включая производителей) имеют возможность считывания такой технической информациимодулейхраненияданных о событиях и ошибках при помощи специальных диагностических устройств. При необходимости, вы получите дополнительную информацию. После устранения ошибки эти данные удаляются из модуля хранения ошибок или происходит постоянная перезапись данных.
При использовании автомобиля могут возникать ситуации, в которых эти технические данные, относящиеся к другому типу информации (отчет об аварии, повреждения автомобиля, свидетельские показания и т. д.), могут быть связаны с конкретным человеком, возможно, с привлечением экспертов.
Дополнительные функции, указанные в договоре с клиентом (например, местонахождение автомобиля в экстренных случаях), позволяют передавать конкретные данные по автомобилю с этого же автомобиля.
10
РЕКОМЕНДАЦИЯ О ЗАМЕНЕ ДЕТАЛЕЙ
Ваш автомобиль изготовлен в соответствии с самыми высокими стандартами с использованием деталей высокого качества. При прохождении планового технического обслуживания или ремонта мы рекомендуемтребоватьиспользование только оригинальных запасных частей
Ford и Motorcraft. Оригинальные запасные части Ford и Motorcraft легко распознать по изображению торговых марок Ford, FoMoCo или Motorcraft как на самих запасных частях, так и на их упаковке.
Плановое техническое обслуживание и ремонты механической части
Одним из самых оптимальных вариантов поддержания вашего автомобиля в исправном состоянии — техническое обслуживание в соответствии с нашими рекомендациями с использованием запасных частей, соответствующих техническим требованиям, указанным в руководстве по эксплуатации. Оригинальные запасные части Ford и Motorcraft соответствуют или превосходят эти технические требования.
Послеаварийные ремонты
Мы надеемся, вам удастся избежать аварий, однако они все же случаются. ОригинальныезапасныечастиFord для послеаварийных ремонтов соответствуют самым строгим требованиям по размерам, лакокрасочному покрытию, прочности, коррозионной стойкости и сопротивлению вдавливанию. При создании наших автомобилей мы
Fiesta (CCN) Russia, Vehicles Built From: 27-04-2015, GE8J-19A321-AXA ruRUS, Edition date: 03/2015, First Printing

Введение
закладываем такой уровень качества этих деталей, который обеспечивает предусмотренный уровень защиты автомобиля как единой системы. Оптимальный способ обеспечения такогоуровнязащиты—использование оригинальных запасных частей Ford для послеаварийных ремонтов.
Гарантия на запасные части
ГарантияFord распространяетсятолько на оригинальные запасные части Ford и Motorcraft. Гарантия Ford может не распространяться на повреждения вашего автомобиля вследствие неисправности неоригинальной запасной части. Дополнительная информация приведена в условиях гарантии Ford.
ОБОРУДОВАНИЕ МОБИЛЬНОЙ СВЯЗИ
Использование устройств мобильной связистановитсявсеболееважнымпри ведении бизнеса и личных дел. Однако при использовании такого оборудования не следует идти на компромисс в отношении обеспечения собственной безопасности или безопасности других. При правильном использованиимобильнаясвязьможет повысить личную безопасность и защиту, особенно в чрезвычайных ситуациях. Безопасность должна быть первостепенной при использовании оборудования мобильной связи, чтобы не свести к нулю данные выгоды. Оборудование мобильной связи включает в себя, помимо прочего, мобильные телефоны, пейджеры, портативные устройства для работы с электронной почтой, устройства для отправки текстовых сообщений и портативные приемопередающие радиоустановки.
ПРЕДУПРЕЖДЕНИЕ
Вождение с отвлеченным вниманием может привести к потере контроля над
автомобилем, аварии и телесным повреждениям. Мы настоятельно рекомендуем соблюдать крайнюю осторожность при использовании любых устройств, которые могут отвлечь ваше внимание от дороги. Вашапервоочереднаяответственность
— безопасная эксплуатация вашего автомобиля. Мы рекомендуем воздержатьсяотиспользованиялюбых портативных устройств во время вожденияипризываемповозможности использовать системы с голосовым управлением. Обязательно ознакомьтесь с применимым местным законодательством, регулирующим использованиеэлектронныхустройств во время вождения.
11
Fiesta (CCN) Russia, Vehicles Built From: 27-04-2015, GE8J-19A321-AXA ruRUS, Edition date: 03/2015, First Printing
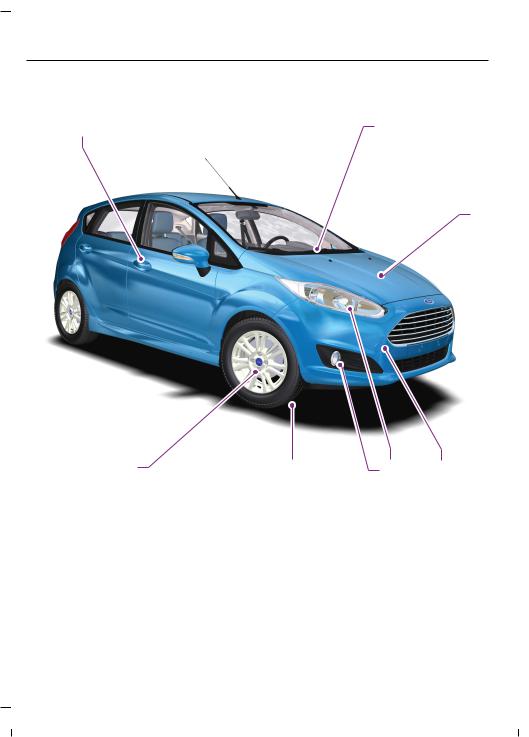
Быстрый обзор
Обзор передней наружной части автомобиля
A B
C
G F E D
E151918
AСм. Блокировка и разблокировка замков (стр. 43). См. Система управления замками без помощи ключа (стр. 46).
BСм. Замена щеток стеклоочистителей (стр. 178).
CСм. Обслуживание (стр. 171).
D См. Точки крепления буксировочного оборудования (стр. 152).
EСм. Замена ламп (стр. 185).
F Давление в шинах. См. Технические характеристики (стр. 214).
GСм. Замена колеса (стр. 208).
12
Fiesta (CCN) Russia, Vehicles Built From: 27-04-2015, GE8J-19A321-AXA ruRUS, Edition date: 03/2015, First Printing
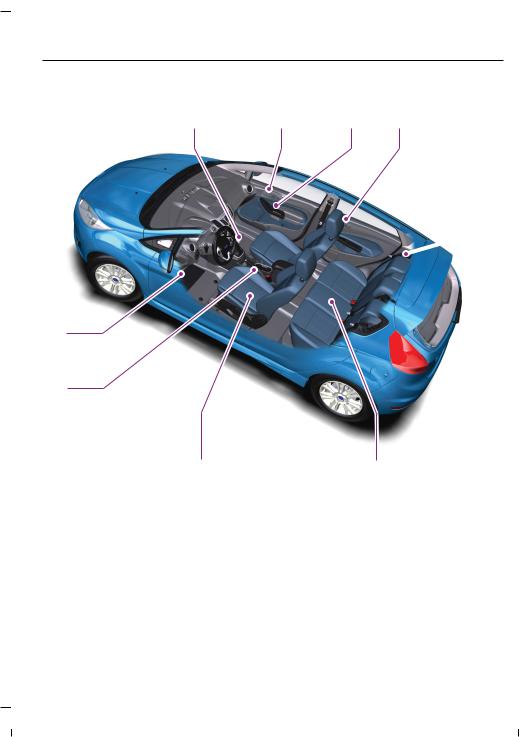
Быстрый обзор
Обзор салона автомобиля
A B C D
 E
E
I
H
AСм. Коробка передач (стр. 132).
BСм. Блокировка и разблокировка замков (стр. 43).
CСм. Электрические стеклоподъемники (стр. 66). См. Наружные зеркала заднего вида (стр. 69).
DСм. Подголовники (стр. 109).
E См. Пристегивание ремней безопасности (стр. 27).
FСм. Задние сиденья (стр. 111).
GСм. Сиденья с ручной регулировкой (стр. 110).
13
Fiesta (CCN) Russia, Vehicles Built From: 27-04-2015, GE8J-19A321-AXA ruRUS, Edition date: 03/2015, First Printing

Быстрый обзор
HСм. Стояночный тормоз (стр. 139).
IСм. Открывание и закрывание капота (стр. 172).
Обзор панели приборов
Автомобиль с левосторонним управлением
A B C D E F G H
V U T S R Q P O N M L K J I
E156625
14
Fiesta (CCN) Russia, Vehicles Built From: 27-04-2015, GE8J-19A321-AXA ruRUS, Edition date: 03/2015, First Printing

Быстрый обзор
Автомобиль с правосторонним управлением
H G F B D C E A
I J K L M N T S R Q P O U V
E156626
AСопла системы вентиляции См. Вентиляционные дефлекторы (стр. 99).
BУказатели поворота См. Указатели поворота (стр. 64). Дальний свет.
См. Органы управления осветительным оборудованием (стр. 60).
CПанель приборов См. Указатели (стр. 72). См. Сигнализаторы и индикаторы (стр. 73).
DКнопка пуска. См. Запуск и остановка двигателя (стр. 117).
EПодрулевой переключатель очистителей и омывателей стекол См.
Стеклоочистители и стеклоомыватели (стр. 56).
FИнформационно-развлекательный дисплей См. Информационные дисплеи (стр. 82).
GАудиоблок. См. Аудиосистема (стр. 220).
HКнопка электрического замка двери. См. Блокировкаиразблокировка замков (стр. 43).
15
Fiesta (CCN) Russia, Vehicles Built From: 27-04-2015, GE8J-19A321-AXA ruRUS, Edition date: 03/2015, First Printing

Быстрый обзор
IКнопка аварийной световой сигнализации См. Аварийная световая сигнализация (стр. 158).
JПредупреждающаялампасистемыподушекбезопасности. См. Подушка безопасности пассажира (стр. 31).
KОрганы управления микроклиматом. См. Органы управления микроклиматом (стр. 99).
KВыключатель электробогрева заднего стекла См. Органы управления микроклиматом (стр. 99).
KПереключатель обогреваемого ветрового стекла. См. Органы управления микроклиматом (стр. 99).
LПереключатель системы помощи при парковке. См. Системы помощи при парковке (стр. 141).
MВыключатели подогрева сидений. См. Сиденья с обогревом (стр. 112).
NКнопка запуска/останова двигателя. См. Авто-Старт-Стоп (стр. 123).
OЗамок (выключатель) зажигания См. Выключатель зажигания (стр. 117).
PПереключатели круиз-контроля. См. Использование системы круиз-контроля (стр. 146).
QПодушка безопасности для коленей водителя. См. Нижняя подушка безопасности водителя (стр. 32).
RЗвуковой сигнал
SРычаг механизма регулировки рулевого колеса. См. Регулировка положения рулевого колеса (стр. 54).
TОрганы управления аудиосистемой. См. Аудиосистема (стр. 220). Голосовое управление. См. Голосовое управление (стр. 55).
UРычаг отпирания капота. См. Открывание и закрывание капота (стр. 172).
VВыключатель осветительных приборов См. Осветительное оборудование (стр. 60).
16
Fiesta (CCN) Russia, Vehicles Built From: 27-04-2015, GE8J-19A321-AXA ruRUS, Edition date: 03/2015, First Printing

Быстрый обзор
Обзор задней наружной части автомобиля
A B C
H
G  D
D
F E
E151922
AСм. Замена ламп (стр. 185).
B См. Замена щеток стеклоочистителей (стр. 178).
CСм. Замена ламп (стр. 185).
DСм. Аптечка (стр. 158). См. Знак аварийной остановки (стр. 158). См.
Комплект для ремонта шин (стр. 203). Запасное колесо, домкрат и баллонныйключ. См.Заменаколеса(стр.208). Буксировочнаяпроушина.
См. Точки крепления буксировочного оборудования (стр. 152).
EСм. Точки крепления буксировочного оборудования (стр. 152).
FДавление в шинах. См. Технические характеристики (стр. 214).
17
Fiesta (CCN) Russia, Vehicles Built From: 27-04-2015, GE8J-19A321-AXA ruRUS, Edition date: 03/2015, First Printing

Быстрый обзор
GСм. Замена колеса (стр. 208).
HСм. Заправка топливом (стр. 128).
18
Fiesta (CCN) Russia, Vehicles Built From: 27-04-2015, GE8J-19A321-AXA ruRUS, Edition date: 03/2015, First Printing
![]()
Безопасность детей
УСТАНОВКА ДЕТСКОГО СИДЕНЬЯ
E161855
E68916
ПРЕДУПРЕЖДЕНИЯ
Используйте одобренное к применениюдетскоесиденьедля обеспечения безопасности детей
ростомменьше150 cm, перевозимыхна заднем сиденье.
Чрезвычайно опасно! Не используйте детское сиденье, в котором ребенок сидит лицом
против хода движения, на сиденье, надувная подушка безопасности которогонеотключена! Ребенокможет получить серьезные травмы или погибнуть.
ПРЕДУПРЕЖДЕНИЯ
Ознакомьтесь с инструкциями производителя и соблюдайте их при установке детского сиденья.
Не вносите никаких изменений в детские сиденья.
Не держите ребенка на коленях во время движения.
Не оставляйте детей в автомобиле без присмотра.
Если автомобиль попал в ДТП, проверьте детские сиденья у авторизованного дилера.
Примечание: Требования по использованию детских сидений могут быть различными в зависимости от страны.
Только сиденья, сертифицированные в соответствии со стандартом ЕСЕ-R44.03 (или более поздними стандартами), были проверены и одобрены для использования в этом автомобиле. Разнообразные сиденья представлены на выбор у авторизованных дилеров.
Детские сиденья для разных весовых категорий
Используйте правильно подобранное детское сиденье в соответствии с данными указаниями:
19
Fiesta (CCN) Russia, Vehicles Built From: 27-04-2015, GE8J-19A321-AXA ruRUS, Edition date: 03/2015, First Printing
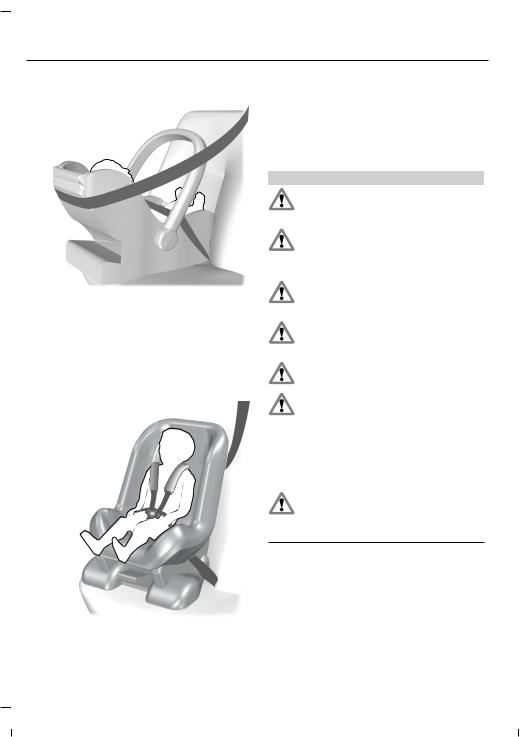
Безопасность детей
Детское сиденье для младенцев
E68918
Безопасная перевозка детей весом менее 13 kg должна осуществляться в детском сиденье для младенцев, обращенном спинкой вперед (группа 0+) и устанавливаемом на заднем сиденье.
Детское сиденье
E68920
Безопасная перевозка детей весом между 13 kg и 18 kg должна осуществляться в детском сиденье (Группа 1) на заднем сиденье автомобиля.
Детские автокресла-подушки
ПРЕДУПРЕЖДЕНИЯ
Не устанавливайте детское кресло-подушкутолькоспоясным ремнемилиремнембезопасности.
Не устанавливайте детское кресло-подушку с провисающим или перекрученным ремнем
безопасности.
Не располагайте ремень безопасности под рукой ребенка или за его спиной.
Нельзя использовать книги, подушки или полотенца для того, чтобы посадить ребенка повыше.
Убедитесь, что ребенок сидит прямо.
Если детское сиденье установлено на заднем сиденье, оно должно быть плотно
закреплено на сиденье автомобиля. Ононедолжнокасатьсяподголовника. Если необходимо, снимите подголовник. См. Подголовники (стр. 109).
Вы можете вновь установить подголовник после снятия детского кресла. См.
Подголовники (стр. 109).
20
Fiesta (CCN) Russia, Vehicles Built From: 27-04-2015, GE8J-19A321-AXA ruRUS, Edition date: 03/2015, First Printing

Безопасность детей
Детскоекресло-подушка(группа2)
E70710
Безопасная перевозка детей с весом более 15 kg, но ростом ниже 150 cm должна осуществляться на дополнительных сиденьях или подушках.
Рекомендуется использовать дополнительное кресло со спинкой вместо дополнительной подушки. Поднятоеположениесиденьяпозволит расположить плечевую лямку ремня безопасностипоцентруплечаребенка, а поясной ремень — плотно вокруг бедер.
Детская подушка (группа 3)
E68924
Скобы крепления ISOFIX
ПРЕДУПРЕЖДЕНИЕ
Систему ISOFIX следует использовать вместе с устройствомдляпредотвращения
вращения. Мы рекомендуем использовать верхний шнур или опорную стойку.
Примечание: При покупке сиденья ISOFIX обязательно ознакомьтесь с надлежащей весовой категорией и классом размеров ISOFIX для предполагаемого расположения сиденья. См. Установка детского сиденья (стр. 22).
Автомобиль оснащен скобами крепления ISOFIX, которые подходят для всемирно одобренных детских сидений ISOFIX.
СистемаISOFIX состоитиздвухжестких кронштейнов на детском кресле, которые крепятся к соответствующим скобам крепления на задних крайних сиденьях в месте соединения подушки и спинки. Скобы крепления стропа для сидений с верхним стропом расположены за задними крайними сиденьями.
21
Fiesta (CCN) Russia, Vehicles Built From: 27-04-2015, GE8J-19A321-AXA ruRUS, Edition date: 03/2015, First Printing

Безопасность детей
Скобы крепления верхнего стропа
E87145
E87146
Установка детского сиденья с верхними стропами крепления
ПРЕДУПРЕЖДЕНИЯ
Прикрепляйте ремень только к соответствующей точке крепления.
Убедитесь в отсутствии провисания или перекручивания верхней лямки и в ее правильном
расположении относительно точки крепления.
Примечание: Еслиприменимо, снимите крышку багажного отделения, чтобы облегчить установку. См. Крышки багажного отделения (стр. 151).
1.Проведите ремень к точке крепления.
22
2.С усилием сдвиньте детское кресло в обратном направлении, для того чтобы зафиксировать нижние крепления ISOFIX.
3.Затяните шнур в соответствии с инструкциями изготовителя.
УСТАНОВКА ДЕТСКОГО СИДЕНЬЯ
ПРЕДУПРЕЖДЕНИЯ
Получите консультацию у авторизованного дилера по вопросу последних уточнений относительно рекомендуемых детских
сидений.
Чрезвычайно опасно! Не используйте детское сиденье, в котором ребенок сидит лицом
против хода движения, на сиденье, надувная подушка безопасности которого не отключена. Ребенок может получить серьезные травмы или погибнуть.
Fiesta (CCN) Russia, Vehicles Built From: 27-04-2015, GE8J-19A321-AXA ruRUS, Edition date: 03/2015, First Printing

Безопасность детей
ПРЕДУПРЕЖДЕНИЯ
При использовании детского сиденья с поддержкой для ног убедитесь в надежности
крепления поддержки для ног на полу.
При использовании детского сиденья с ремнем безопасности проследите, чтобы ремень не
провисал и не перекручивался.
ПРЕДУПРЕЖДЕНИЯ
Требуется, чтобыдетскоесиденье вплотную примыкало к сиденью автомобиля. Оно не должно
касаться подголовника. Если необходимо, снимите подголовник. См.
Подголовники (стр. 109).
Вы можете вновь установить подголовник после снятия детского кресла. См.
Подголовники (стр. 109).
Размещение на сиде-  ньях
ньях
Сиденье переднего пассажираснадувной подушкой безопасности в режиме
АКТИВИРОВАНА
Сиденье переднего пассажираснадувной подушкой безопасности в режиме
ОТКЛЮЧЕНА
 Задние сиденья
Весовые категории (вес и возраст ребенка)
|
0 |
0+ |
1 |
2 |
3 |
|
До 10 кг |
До 13 кг |
9–18 кг |
15–25 кг |
22–36 кг |
|
(22 |
(29 |
(20–40 |
(33–55 |
(46–79 |
|
фунта) |
фунтов) |
фунтов) |
фунтов) |
фунтов) |
X X UF¹ UF¹ UF¹
|
U¹ |
U¹ |
U¹ |
U¹ |
U¹ |
|
U |
U |
U |
U |
U |
X Не подходит для детей данной весовой категории.
U Подходит для универсальных детских сидений для детей данной весовой категории.
U¹ Подходит для универсальных детских сидений для детей данной весовой категории. Однако мы рекомендуем использовать одобренное детское сиденье и крепить его на заднем сиденье.
UF¹ Подходит для универсальных детских сидений, в которых ребенок располагается лицом вперед, соответствующих для детей данной весовой категории. Однако мы рекомендуем использовать одобренное детское сиденье и крепить его на заднем сиденье.
23
Fiesta (CCN) Russia, Vehicles Built From: 27-04-2015, GE8J-19A321-AXA ruRUS, Edition date: 03/2015, First Printing

Безопасность детей
Примечание: При использовании детского сиденья на переднем сиденье пассажира последнее необходимо перевести в крайнее заднее положение. Если поясную часть ремня безопасности не удается затянуть без слабины, установите спинку сиденья в полностью вертикальное положение и увеличьте высоту сиденья. См. Сиденья (стр. 109).
Детские кресла ISOFIX
Размещение на сиденьях
|
Переднее сиденье |
Размерный |
|
класс |
|
|
Тип сиденья |
|
|
Заднее крайнее сиденье |
Размерный |
|
с системой ISOFIX |
класс |
|
Тип сиденья |
24
Весовые категории (вес и возраст ребенка)
|
0+ |
1 |
|
Лицом назад |
Лицом вперед |
|
До 13 кг (29 |
9–18 кг (20–40 |
|
фунтов) |
фунтов) |
Не оборудованное системой ISOFIX
|
E1 |
B, B11 |
|
IL** |
IL, IUF*** |
Fiesta (CCN) Russia, Vehicles Built From: 27-04-2015, GE8J-19A321-AXA ruRUS, Edition date: 03/2015, First Printing

Безопасность детей
|
Весовые категории (вес и возраст |
||||
|
ребенка) |
||||
|
Размещение на сиденьях |
0+ |
1 |
||
|
Лицом назад |
Лицом вперед |
|||
|
До 13 кг (29 |
9–18 кг (20–40 |
|||
|
фунтов) |
фунтов) |
|||
|
Заднее центральное |
Размерный |
|||
|
сиденье |
класс |
Не оборудованное системой ISOFIX |
 Тип сиденья
IL Подходит для определенных систем безопасности для детей ISOFIX полууниверсальной категории. Ознакомьтесь с перечнем автомобильных рекомендаций поставщиков по системам безопасности для детей.
IUF Подходит для систем безопасности ISOFIX универсальной категории с расположением детей лицом вперед, одобренных для детей данной весовой категории и размерного класса ISOFIX.
1Размерный класс ISOFIX для обеих систем детских сидений, универсальной и полууниверсальной, определяется прописными буквами от A до G. Идентификационные буквы указываются на системах детских сидений ISOFIX.
**На время публикации рекомендуемое детское безопасное сиденья ISOFIX группы
O+ — сиденье Britax Romer Baby Safe. Получите консультацию у авторизованного дилера по вопросу последних уточнений относительно рекомендуемых детских сидений.
***НавремяпубликациирекомендуемоедетскоебезопасноесиденьяISOFIX группы 1 — сиденье Britax Romer Duo. Получите консультацию у авторизованного дилера по вопросу последних уточнений относительно рекомендуемых детских сидений.
25
Fiesta (CCN) Russia, Vehicles Built From: 27-04-2015, GE8J-19A321-AXA ruRUS, Edition date: 03/2015, First Printing

Безопасность детей
ЗАМКИ С ФУНКЦИЕЙ БЛОКИРОВКИ ОТ ОТКРЫВАНИЯ ДЕТЬМИ
ПРЕДУПРЕЖДЕНИЕ
Если включена блокировка дверей от открывания детьми, открыть задние двери изнутри
невозможно.
E156821
Левая сторона
Поверните против часовой стрелки, чтобы закрыть, и по часовой стрелке, чтобы открыть.
Правая сторона
Поверните по часовой стрелке, чтобы закрыть, и против часовой стрелки, чтобы открыть.
26
Fiesta (CCN) Russia, Vehicles Built From: 27-04-2015, GE8J-19A321-AXA ruRUS, Edition date: 03/2015, First Printing

Ремни безопасности
ПРИСТЕГИВАНИЕ РЕМНЕЙ БЕЗОПАСНОСТИ
ПРЕДУПРЕЖДЕНИЯ
Вставляйте язычок в замок до характерного щелчка. Если ремень безопасности пристегнут
неправильно, вы не услышите щелчок.
Убедитесь, что ремень безопасности полностью убран и не остался снаружи автомобиля
после закрытия двери.
E74124
E85817
Плавно вытяните ремень из катушки. Если вы резко потянете за ленту ремня, или автомобиль стоит на наклонной плоскости, ремень может заклинить.
Для отсоединения ремня нажмите красную кнопку на его замке. Удерживая за язычок, дайте ремню плавно и полностью втянуться.
Особенности использования ремня безопасности для беременных женщин
E68587
27
Fiesta (CCN) Russia, Vehicles Built From: 27-04-2015, GE8J-19A321-AXA ruRUS, Edition date: 03/2015, First Printing

Ремни безопасности
ПРЕДУПРЕЖДЕНИЕ
Расположите ремень так, чтобы обеспечить свою безопасность и безопасность своего ребенка.
Нельзяпользоватьсятолькоплечевым или только поясным ремнем.
Беременнымженщинамследуетвсегда держать ремень безопасности застегнутым. Поясную часть комбинированной системы наплечных ремней безопасности необходимо располагать внизу поперек бедер и ниже живота, натянув максимально туго, но так, чтобы это не причиняло неудобств. Наплечный ремень должен проходить через середину плеча и центр груди.
РЕГУЛИРОВКА ВЫСОТЫ КРЕПЛЕНИЯ РЕМНЯ БЕЗОПАСНОСТИ
ПРЕДУПРЕЖДЕНИЕ
Установите регуляторы высоты ремня безопасности так, чтобы ремень проходил посредине
вашего плеча. Неправильная регулировкаремнябезопасностиможет снизить эффективность ремня безопасности и увеличивает риск получения травм при аварии.
28
E104440
Установите высоту наплечного ремня безопасности так, чтобы ремень проходил посредине вашего плеча.
Чтобы отрегулировать высоту наплечного ремня, нажмите кнопку и сдвиньте регулятор высоты ремня безопасностивверхиливниз.Отпустите кнопку и нажмите на регулятор высоты, чтобы убедиться, что он зафиксировался на месте.
СИСТЕМАНАПОМИНАНИЯО НЕПРИСТЕГНУТОМ РЕМНЕ БЕЗОПАСНОСТИ
ПРЕДУПРЕЖДЕНИЕ
Данная система обеспечивает безопасность только при правильно пристегнутом ремне
безопасности.
Fiesta (CCN) Russia, Vehicles Built From: 27-04-2015, GE8J-19A321-AXA ruRUS, Edition date: 03/2015, First Printing
![]()
Ремни безопасности
Предупреждающая лампа загорается и звуковой сигнал раздается при следующих условиях:
•Непристегнутременьбезопасности водителя.
•автомобиль превышает относительно низкую скорость движения.
Предупреждение включается также в том случае, когда в движущемся автомобиле не пристегнут водительский ремень безопасности.
Если ремень безопасности остается непристегнутым, звуковоеивизуальное предупреждения автоматически отключатсяпримерночерезпятьминут.
Выключение устройства напоминания о необходимости пристегнуть ремень безопасности
Обратитеськавторизованномудилеру.
29
Fiesta (CCN) Russia, Vehicles Built From: 27-04-2015, GE8J-19A321-AXA ruRUS, Edition date: 03/2015, First Printing

Дополнительная система пассивной безопасности
ПРИНЦИПЫ РАБОТЫ
ПРЕДУПРЕЖДЕНИЯ
Чрезвычайно опасно! Не используйте детское сиденье, в котором ребенок сидит лицом
против хода движения, на сиденье, надувная подушка безопасности которогонеотключена! Ребенокможет получить серьезные травмы или погибнуть.
Не вносите никакие изменения в конструкциюпередкаавтомобиля. Это может ухудшить
эффективностьсрабатыванияподушек безопасности. Несоблюдение данного предупреждения может привести к серьезной травме или смертельному исходу.
Пристегивайтесь ремнем безопасности и поддерживайте безопасное расстояние между
вами и рулевым колесом. Только правильно использование ремня безопасности может удержать ваше тело в положении, при котором обеспечивается максимальное раскрытие надувной подушки безопасности. См. Сидение в правильном положении (стр. 109).
Несоблюдение данного предупреждения может привести к серьезной травме или смертельному исходу.
Ремонт рулевого колеса, рулевой колонки, сидений, подушек и ремней безопасности должен
проводитьсятолькоуавторизованного дилера. Несоблюдение данного предупреждения может привести к серьезной травме или смертельному исходу.
30
ПРЕДУПРЕЖДЕНИЯ
Не закрывайте область перед подушкой безопасности какими-либо предметами. Не
прикрепляйте никаких предметов к накладке подушки безопасности. При аварии твердые предметы могут стать причиной серьезной травмы или смертельного исхода.
Не прокалывайте сиденья острыми предметами. Это может привести к повреждению и
ухудшить эффективность срабатывания подушек безопасности. Несоблюдение данного предупреждения может привести к серьезной травме или смертельному исходу.
Используйте чехлы, предназначенные для сидений, оборудованных боковыми
подушками безопасности. Надевать их следует у авторизованного дилера. Несоблюдение данного предупреждения может привести к серьезной травме или смертельному исходу.
Примечание: При раскрытии подушки безопасности вы услышите громкий хлопок и увидите облако безвредного порошка. Это нормальное явление, на которое можно не обращать внимания.
Примечание: Протирайте крышки модулей подушки безопасности только влажной тряпкой.
Fiesta (CCN) Russia, Vehicles Built From: 27-04-2015, GE8J-19A321-AXA ruRUS, Edition date: 03/2015, First Printing

Дополнительная система пассивной безопасности
|
ПОДУШКА БЕЗОПАСНОСТИ |
ПОДУШКА БЕЗОПАСНОСТИ |
|
ВОДИТЕЛЯ |
ПАССАЖИРА |
|
E74302 |
E74302 |
|
Подушка безопасности срабатывает |
Подушка безопасности срабатывает |
|
при сильном лобовом ударе или |
при сильном лобовом ударе или |
|
столкновении, произошедшим под |
столкновении, произошедшим под |
|
угломдо30 градусовслеваилисправа. |
угломдо30 градусовслеваилисправа. |
|
Онанадуваетсязанесколькотысячных |
Онанадуваетсязанесколькотысячных |
|
долей секунды и сдувается при |
долей секунды и сдувается при |
|
контактеспассажирамииливодителем, |
контактеспассажирамииливодителем, |
|
амортизируя, такимобразом, движение |
амортизируя, такимобразом, движение |
|
телавперед. Прислабыхфронтальных, |
телавперед. Прислабыхфронтальных, |
|
задних и боковых столкновениях, или |
задних и боковых столкновениях, или |
|
переворотах подушка безопасности |
переворотах подушка безопасности |
|
может не сработать. |
может не сработать. |
БОКОВЫЕ ПОДУШКИ БЕЗОПАСНОСТИ(при наличии)
ПРЕДУПРЕЖДЕНИЕ
Используйте чехлы, предназначенные для сидений, оборудованных боковыми
подушками безопасности. Надевать их следует у авторизованного дилера.
31
Fiesta (CCN) Russia, Vehicles Built From: 27-04-2015, GE8J-19A321-AXA ruRUS, Edition date: 03/2015, First Printing

Дополнительная система пассивной безопасности
E72658
Подушки безопасности установлены в спинках передних сидений. Об этом свидетельствует табличка на торце спинки сиденья.
Подушка безопасности срабатывает присерьезныхбоковыхстолкновениях. Она также может сработать при сильном фронтальном столкновении. Подушка безопасности не сработает при незначительных боковых, фронтальных и задних столкновениях или при переворотах.
НИЖНЯЯ ПОДУШКА БЕЗОПАСНОСТИВОДИТЕЛЯ
(при наличии)
ПРЕДУПРЕЖДЕНИЕ
Не пытайтесь открыть крышку надувной подушки безопасности.
Надувная подушка безопасности срабатывает при лобовом ударе или при ударе под углом до 30 градусов слеваилисправа. Подушканадувается за несколько тысячных долей секунды и сдувается при контакте с водителем, смягчаятакимобразомвзаимодействие коленей водителя и рулевой колонки. При переворотах, задних и боковых столкновениях коленная подушка безопасностиводителянесрабатывает.
Чтобыузнатьрасположениеэлементов:
См. Быстрый обзор (стр. 12).
Примечание:Даннаянадувнаяподушка безопасности имеет более низкий порог срабатывания, чем передние подушки безопасности.Принезначительномударе возможно срабатывание только надувной подушки безопасности для коленей.
БОКОВЫЕ ПОДУШКИ БЕЗОПАСНОСТИ(при наличии)
E75004
Надувные подушки безопасности располагаются над передними и задними боковыми окнами.
32
Fiesta (CCN) Russia, Vehicles Built From: 27-04-2015, GE8J-19A321-AXA ruRUS, Edition date: 03/2015, First Printing

Дополнительная система пассивной безопасности
Подушка безопасности срабатывает присерьезныхбоковыхстолкновениях. Он также приводится в действие при значительных фронтальных столкновениях под углом. Боковой занавессистемыподушекбезопасности не сработает при незначительных боковых, фронтальных и задних столкновениях или при переворотах.
33
Fiesta (CCN) Russia, Vehicles Built From: 27-04-2015, GE8J-19A321-AXA ruRUS, Edition date: 03/2015, First Printing

Ключи и пульты дистанционного управления
ОБЩАЯ ИНФОРМАЦИЯ О РАДИОЧАСТОТАХ
Примечание: Внесение изменений или модификаций без разрешения соответствующихрегулирующихорганов может привести к лишению пользователя права на эксплуатацию данного оборудования.
Примечание: Пульт управления содержитчувствительныеэлектрические компоненты. Воздействие влаги или удара может вызвать серьезные повреждения.
ДИСТАНЦИОННОЕ
УПРАВЛЕНИЕ
Стандартная дальность действия передатчикасоставляетпримерно10 m.
Уменьшение дальности работы может быть вызвано:
•погодными условиями
•находящимися поблизости радиомачтами
•зданиями и сооружениями вокруг автомобиля
•другими машинами, стоящими рядом с вашим автомобилем.
Радиочастота, используемая для дистанционной разблокировки и блокировки замков, может также использоваться для работы других радиоустройств (например, любительских радиоприемников и передатчиков, медицинского оборудования, беспроводных наушников, пультов дистанционного управления, мобильных телефонов, зарядных устройств, систем сигнализацииидругихприборов). Если частота недоступна из-за помех, вы не сможете воспользоваться пультом дистанционного управления блокировкой замков. Для открывания изапираниядверейпонадобитсяключ.
Примечание: Убедитесь, что автомобильзаперт, преждечемоставить его без присмотра.
Примечание: В пределах рабочей дальности пульт дистанционного управления будет работать и при случайном нажатии кнопки.
34
На своем автомобиле вы можете запрограммировать не более восьми пультов дистанционного управления. В это число входит и пульт, который вы получили вместе с машиной. Во время программирования пульты дистанционного управления должны находиться внутри автомобиля. Застегните передние ремни безопасности и закройте все двери, чтобы при программировании не мешали звуковые сигналы.
Программирование нового пульта дистанционного управления
1.Поверните ключ зажигания из положения 0 в положение II четыре раза в течение шести секунд.
2.Установитеключвзамкезажигания в положение 0. Звучит сигнал, указывающий, что теперь можно запрограммировать ПДУ.
Примечание: Если звуковой сигнал не раздается, повторите шаг 1, в этот раз повернув ключ зажигания из положения 0 в положение II 8 раз в течение 10 секунд, завершив в положении 0. Звучит сигнал, указывающий, чтотеперьможно запрограммировать ПДУ.
3.Нажмите любую кнопку на новом ПДУ и удерживайте ее в течение 10 секунд. Прозвучит подтверждающий сигнал.
Fiesta (CCN) Russia, Vehicles Built From: 27-04-2015, GE8J-19A321-AXA ruRUS, Edition date: 03/2015, First Printing

Ключи и пульты дистанционного управления
4.Повторите шаг три в течение 10 секунд для каждого нового ПДУ. Не вынимайте ключ из зажигания при нажатии кнопки на ПДУ.
5.Вновь включите зажигание (положение II) или подождите 10 секунд, не программируя другой ПДУ, чтобы закончить программирование ключа. Теперь замки автомобиля можно отпереть и запереть только при помощи тех пультов, которые вы только что запрограммировали.
Перепрограммирование функции разблокировки
Примечание: Нажатие кнопки разблокирования открывает либо все двери, либо только дверь водителя и заднюю поднимающуюся дверь. Повторное нажатие на кнопку разблокировки, разблокируетзамкивсех дверей.
Одновременнонажмитеиудерживайте кнопкиблокировкииразблокировкина пульте дистанционного управления не менеечетырехсекундпривыключенном зажигании. Указатели поворота дважды мигнут, подтверждая, что изменение внесено.
Для восстановления первоначальной функцииразблокировкиповторитеэтот процесс.
Замена элемента питания пульта дистанционного управления
Утилизацию использованных аккумуляторов следует выполнять в соответствии с
действующими нормами и правилами. Для выполнения утилизации обратитесь за консультацией в уполномоченный местный орган.
35
Пульт дистанционного управления с убирающимся стержнем ключа
 1
1
E74383
1.Вставьте отвёртку до конца в прорезь на боковой поверхности пульта и нажмите ей на стержень ключа, чтобы демонтировать его.
2
E74384
2.Начните разъединение двух половин корпуса пульта, поворачивая отвёртку в месте, указанном на рисунке.
Fiesta (CCN) Russia, Vehicles Built From: 27-04-2015, GE8J-19A321-AXA ruRUS, Edition date: 03/2015, First Printing

Ключи и пульты дистанционного управления
 3
3
E74385
3.Окончательно разъедините две половины корпуса пульта, поворачивая отвёртку в месте, указанном на рисунке.
4
E126280
Примечание: Не касайтесь отвёрткой поверхности батарейки или печатной платы.
4.Осторожно извлеките элемент питания отверткой.
5.Установите новую батарейку (3V CR 2032) положительным + выводом вниз.
6.Соберите корпус пульта дистанционного управления.
7.Установите стержень ключа.
36
Пульт дистанционного управления без убирающегося стержня ключа
 2
2
1
1.Нажмите и удерживайте нажатыми кнопки по краям, чтобы освободить крышку. Аккуратноснимитекрышку.
2.Извлеките ключ.
 3
3
E105362
3.Начните разъединение двух половин корпуса пульта, поворачивая отвёртку в месте, указанном на рисунке.
Fiesta (CCN) Russia, Vehicles Built From: 27-04-2015, GE8J-19A321-AXA ruRUS, Edition date: 03/2015, First Printing

Ключи и пульты дистанционного управления
4
E119190
4.Окончательно разъедините две половины корпуса пульта, поворачивая отвёртку в месте, указанном на рисунке.
 5
5
ЗАМЕНА УТЕРЯННОГО КЛЮЧА ИЛИ ПУЛЬТА ДИСТАНЦИОННОГО УПРАВЛЕНИЯ
У авторизованных дилеров вы можете приобрести запасные или дополнительные ключи, а также устройства дистанционного управления. Ваш дилер может запрограммировать пульты дистанционного управления автомобиля, или вы можете сделать это сами. См. Дистанционное управление (стр. 34).
Дляперепрограммированияпассивной противоугонной системы обратитесь к авторизованному дилеру.
E125860
Примечание: Не касайтесь отвёрткой поверхности батарейки или печатной платы.
5.Осторожно извлеките элемент питания отверткой.
6.Установите новую батарейку (3V CR 2032) положительным + выводом вниз.
7.Соберите корпус пульта дистанционного управления.
8.Установите стержень ключа.
37
Fiesta (CCN) Russia, Vehicles Built From: 27-04-2015, GE8J-19A321-AXA ruRUS, Edition date: 03/2015, First Printing

MyKey™(при наличии)
ПРИНЦИПЫ РАБОТЫ
Данная система обеспечивает возможность программирования ключей с определенными ограничениямирежимовдвижения,что стимулирует формирование навыков правильноговождения. Определенные ограничениярежимовдвиженияможно запрограммировать на все ключи, кроме одного.
Любой ключ, который не был запрограммирован, являются ключом администратора или админ. ключом. Они могут быть использованы в следующих целях:
•для создания ключа MyKey;
•программированиядополнительных настроек MyKey
•для удаления всех функций MyKey.
ПослепрограммированияключаMyKey вы можете получить доступ к следующей информации при помощи информационного дисплея.
•Количествоадмин.ключейиMyKeys, запрограммированныхдляданного автомобиля.
•Общий пробег вашего автомобиля после активации системы MyKey.
Примечание: Чтобы использовать данную систему необходимо включить зажигание.
Примечание: Все ключи MyKey
программируются с одинаковыми настройками. Возможность индивидуального программирования не предусмотрена.
38
Стандартные настройки
Приведенные ниже настройки не могут быть изменены.
•Система напоминания о непристегнутых ремнях безопасности. Вы не можете отключить эту функцию. Активация данной функции приведет к приглушению звука аудиосистемы.
•Предупреждение о низком уровне топлива. Когда уровень топлива станет низким, на дисплее будет отображаться предупреждающее сообщение с последующим звуковым сигналом.
•Функции помощи водителю, например, навигационная система исистемыпомощиприпарковке.Эти системы будут включаться автоматически при каждом включении зажигания.
Дополнительные настройки
Программирование настроек системы MyKey возможно при первом программировании системы MyKey. Кроме того, предусмотрена последующаявозможностьизменения настроек при помощи админ. ключа.
Fiesta (CCN) Russia, Vehicles Built From: 27-04-2015, GE8J-19A321-AXA ruRUS, Edition date: 03/2015, First Printing
![]()
MyKey™(при наличии)
При помощи админ. ключа можно запрограммировать следующие настройки.
•Различные величины ограничения скорости. При достижении автомобилем заданной скорости на дисплее будут отображаться предупреждающие сообщения с последующим звуковым сигналом. Отмена установленного режима ограничения скорости при помощи полного нажатия педали акселератора не предусмотрена.
•Различные сигналы напоминания о режиме ограничения скорости. При превышенииавтомобилемзаданной скорости на дисплее будут отображаться предупреждающие сообщения с последующим звуковым сигналом.
•Максимальный режим громкости аудиосистемы на уровне 45 %. Если предпринимается попытка превыситьэтувеличину, надисплее будет отображаться соответствующее сообщение. Функция автоматической регулировки уровня громкости будет отключена.
•Настройка «Включено постоянно». Если установлен этот параметр настройки, отключение функции «Экстренная помощь» или «Не беспокоить» невозможно.
Автомобили с системой бесключевого входа
СОЗДАНИЕСИСТЕМЫMYKEY
Автомобили без системы бесключевого запуска
1.Вставьте ключ, который вы намерены запрограммировать, в зажигание.
2.Включите зажигание.
3.Войдите в главное меню при помощиинформационногодисплея. Выберите пункт MyKey и нажмите OK или кнопку со стрелкой вправо.
4.Выберите Создать MyKey и нажмите OK.
5.При появлении запроса нажмите и удерживайте OK до появления сообщения с инструкцией пометить данный ключ как ключ MyKey. Предусмотренные ограничения начнутдействоватьприследующем использовании этого ключа.
Примечание: Обязательно помечайте ключ MyKey, чтобы иметь возможность отличать его от админ. ключей.
Автомобили с системой бесключевого запуска
1.Включите зажигание при помощи админ. ключа.
2.Войдите в главное меню при помощиинформационногодисплея. Выберите пункт MyKey и нажмите OK или кнопку со стрелкой вправо.
Если в автомобиле находится ключ MyKey иадмин. ключ, автомобильбудет распознавать только админ. ключ.
39
Fiesta (CCN) Russia, Vehicles Built From: 27-04-2015, GE8J-19A321-AXA ruRUS, Edition date: 03/2015, First Printing

MyKey™(при наличии)
E162402
3.Удерживайте ключ, который вы намерены запрограммировать, у рулевой колонки точно так, как показано на рисунке.
4.Выберите Создать MyKey и нажмите OK.
5.При появлении запроса нажмите и удерживайте OK до появления сообщения с инструкцией пометить данный ключ как ключ MyKey. Предусмотренные ограничения начнутдействоватьприследующем использовании этого ключа.
Примечание: Обязательно помечайте ключ MyKey, чтобы иметь возможность отличать его от админ. ключей.
ПРОГРАММИРОВАНИЕ ФУНКЦИИ MYKEY
Дополнительные настройки
2.Войдите в главное меню при помощиинформационногодисплея. Выберите пункт MyKey и нажмите OK или кнопку со стрелкой вправо.
3.Для прокрутки до дополнительных функций воспользуйтесь кнопками со стрелками.
4.Для прокрутки через все пункты настройки нажмите OK или кнопку со стрелкой вправо.
5.ДлявыборанажмитеOKиликнопку со стрелкой вправо.
УДАЛЕНИЕ ИНФОРМАЦИИ ВСЕХ КЛЮЧЕЙ СИСТЕМЫ
MYKEY
Примечание: Удаление информации всех ключей системы MyKey приведет к возврату настроек по умолчанию админ. ключа и обнулению пробега системы
Mykey.
1.Включите зажигание при помощи админ. ключа.
2.Войдите в главное меню при помощиинформационногодисплея. Выберите пункт MyKey и нажмите OK или кнопку со стрелкой вправо.
3.Выполните прокрутку до пункта
Удалить все данные и нажмите
OK.
4.Нажмите и удерживайте OK до появления сообщения об удалении информации со всех ключей MyKey.
ПРОВЕРКА СОСТОЯНИЯ СИСТЕМЫ MYKEY
1.Включите зажигание при помощи админ. ключа.
Информацию о запрограммированных для вашего автомобиля ключах системы MyKey вы можете найти при помощи информационного дисплея.
40
Fiesta (CCN) Russia, Vehicles Built From: 27-04-2015, GE8J-19A321-AXA ruRUS, Edition date: 03/2015, First Printing

MyKey™(при наличии)
Пробег при использовании системы MyKey
Отслеживает пробег, когда водитель использует систему MyKey. Единственный способ, с помощью которого можно удалить значение пробега, — это выполнить очистку всех ключей MyKey с использованием административного ключа MyKey. Если отслеживание пробега выполняется некорректно, соответствующий пользователь,возможно,неиспользует MyKey или владелец административного ключа недавно выполнил сброс и повторное создание
MyKey.
Количество ключей MyKey
Количество админ. ключей
Предназначено для отображения количества админ. ключей, запрограммированных для вашего автомобиля. С помощью этой функции можно определить, сколько административных ключей запрограммировано для вашего автомобиля, а также узнать, был ли запрограммирован дополнительный ключ MyKey.
ИСПОЛЬЗОВАНИЕФУНКЦИИ MYKEY С СИСТЕМАМИ ДИСТАНЦИОННОГО ЗАПУСКА ДВИГАТЕЛЯ
Показывает количество ключей MyKey, запрограммированных для вашего транспортного средства. С помощью этой функции можно определить, сколько ключей MyKey запрограммировано для вашего автомобиля, а также узнать, были ли удалены все ключи MyKey.
Система MyKey несовместима с нештатными системами дистанционного запуска двигателя, которые не получили одобрение компании Ford. Если вы хотите установить систему дистанционного запуска двигателя, обратитесь к авторизованному дилеру, чтобы получить информацию о системах дистанционного запуска, получивших одобрение компании Ford.
41
Fiesta (CCN) Russia, Vehicles Built From: 27-04-2015, GE8J-19A321-AXA ruRUS, Edition date: 03/2015, First Printing

MyKey™(при наличии)
ФУНКЦИЯMYKEY,ПОИСКИУСТРАНЕНИЕНЕИСПРАВНОСТЕЙ
Все автомобили
Неисправность  Возможные причины
Невозможность програмКлюч, используемый для запуска двигателя автомо-
|
мирования системы |
биля, не является ключом администратора. |
|
MyKey. |
Ключ, используемый для запуска двигателя автомо- |
|
биля, является единственным. Необходимо наличие |
|
|
не менее одного админ. ключа. |
ЯнемогузапрограммироКлюч, используемый для запуска двигателя автомо-
|
вать конфигурируемые |
биля, не является ключом администратора. |
|
параметры. |
КлючейMyKey, программируемыхдлявашегоавтомо- |
|
биля, не выявлено. См. Создание системы MyKey |
|
|
(стр. 39). |
|
|
Невозможно удалить |
Ключ, используемый для запуска двигателя автомо- |
|
информацию ключей |
биля, не является ключом администратора. |
|
MyKey. |
КлючейMyKey, программируемыхдлявашегоавтомо- |
|
биля, не выявлено. См. Создание системы MyKey |
|
|
(стр. 39). |
|
|
Единственный админ. |
Приобретите новый ключ у авторизованного дилера. |
|
ключ утерян. |
|
|
Утерян ключ. |
Запрограммируйте запасной ключ. См. Пассивная |
|
противоугонная система (стр. 50). |
|
|
Пробегавтомобиляпосле |
Ключ MyKey не используется предусмотренным |
|
программирования |
пользователем. |
системыMyKeyнесуммируИнформация ключей MyKey удалена. См. Удаление
|
ется. |
информации всех ключей системы MyKey (стр. |
|
40). |
Автомобили с кнопкой запуска двигателя
Неисправность  Возможные причины
Невозможность програмОтсутствует админ. ключ. См. Создание системы мирования системы MyKey (стр. 39).
MyKey.
Режимы движения MyKey Присутствиеадмин. ключапривключениизажигания. отсутствуют КлючейMyKey, программируемыхдлявашегоавтомо-
биля, не выявлено. См. Создание системы MyKey
(стр. 39).
42
Fiesta (CCN) Russia, Vehicles Built From: 27-04-2015, GE8J-19A321-AXA ruRUS, Edition date: 03/2015, First Printing

Замки
БЛОКИРОВКА И РАЗБЛОКИРОВКА ЗАМКОВ
Пульт дистанционного управления
Пульт дистанционного управления можно использовать всегда, когда автомобиль не двигается.
Разблокировка дверей.
Примечание: Дверь водителя можно отпереть ключом. Воспользуйтесь им, когда не работает пульт дистанционного управления.
Примечание: Пульт дистанционного управления отключится, если оставить машину запертой в течение нескольких недель. Автомобиль следует разблокировать и запустить двигатель с помощью ключа. Разблокирование и однократныйзапускдвигателявключают пульт дистанционного управления.
Разблокировка в один этап
Примечание: Это настройка по умолчанию пульта дистанционного управления.
Нажмите кнопку, чтобы разблокировать все двери.
Загорятся указатели поворота.
Разблокировка в два этапа
Нажмите эту кнопку, чтобы отпереть дверь водителя.
Нажмите эту же кнопку еще раз и удерживайте в течение трех секунд, чтобы разблокировать все двери.
Загорятся указатели поворота.
43
Перепрограммирование функции разблокировки
При помощи пульта дистанционного управленияфункциюотпиранияможно перепрограммировать таким образом, чтобы отпиралась только дверь водителя. Это приведет к включению разблокировки в два этапа. См.
Дистанционноеуправление(стр.34).
Блокирование дверей
Нажмите кнопку, чтобы заблокировать все двери. Указатели поворота дважды
мигнут.
Нажмитекнопкуещеразвтечениетрех секунд, чтобы подтвердить закрытие всех дверей. Двери заблокируются снова и, если закрылись все двери и багажноеотделение,сигналыповорота дважды мигнут.
Примечание: Указатели поворота не будут мигать, если не закрыта одна из дверей, багажное отделение, или капот автомобиля, оснащенного противоугонной сигнализацией или системой дистанционного запуска двигателя.
Двойное запирание
ПРЕДУПРЕЖДЕНИЕ
Не используйте режим двойной блокировки, когда в салоне автомобиля находятся люди или
животные. После двойной блокировки разблокировать замки дверей со стороны салона невозможно.
Двойная блокировка — это мера противоугонной защиты, не позволяющая открыть двери изнутри. Если обе передние двери закрыты, вы можете произвести только двойную блокировку дверей.
Fiesta (CCN) Russia, Vehicles Built From: 27-04-2015, GE8J-19A321-AXA ruRUS, Edition date: 03/2015, First Printing

Замки
Нажмите кнопку два раза в течение трех секунд.
Автоматическая повторная блокировка
Если вы не открываете какую-либо дверь в течение 45 секунд после разблокировки дверей с помощью дистанционного управления, то все двери заблокируются автоматически. Двери заблокируются и сигнализация вернется к предыдущему состоянию.
Блокировка и разблокировка замков дверей снаружи автомобиля
Нажмите кнопку, чтобы заблокировать и разблокировать все двери.
Расположение индикатора: См.
Быстрый обзор (стр. 12). лампочка загорается при заблокированных дверях.
Блокировка и разблокировка дверей с помощью ключа
Примечание: Не оставляйте ключи в автомобиле.
Блокирование с помощью ключа
Поверните верхнюю секцию ключа в направлении передней части автомобиля.
Двойное блокирование с помощью ключа
В течение трех секунд дважды поверните ключ в положение блокирования.
Разблокировка с помощью ключа
Разблокировка дверей внутренними ручками
Вы можете разблокировать дверь, потянув за соответствующую внутреннююручкунаней. Еслипотянуть за внутреннюю ручку двери водителя, будут отпираться все двери.
Экстренная блокировка с помощью ключа
E112203
Левая сторона
Поверните по часовой стрелке, чтобы заблокировать.
Правая сторона
Поверните против часовой стрелки, чтобы заблокировать.
Поверните верхнюю секцию ключа в направлениизаднейчастиавтомобиля.
44
Fiesta (CCN) Russia, Vehicles Built From: 27-04-2015, GE8J-19A321-AXA ruRUS, Edition date: 03/2015, First Printing

Замки
Примечание: Если потянуть ручку внутри салона, когда включена блокировка от открывания дверей детьми, это отключит только экстренную блокировку, а первая блокировка будет продолжать действовать. Двери можно открыть только с помощью наружной ручки двери.
Примечание: Если дверибылиотперты этим способом, до момента восстановления работоспособности центрального замка потребуется раздельно запирать двери.
Примечание: Если система централизованного запирания не действует, двери можно заблокировать раздельно с помощью ключа, используя положение, показанноенаиллюстрации.
ЗАДНЯЯПОДНИМАЮЩАЯСЯ ДВЕРЬ С РУЧНЫМ УПРАВЛЕНИЕМ
ПРЕДУПРЕЖДЕНИЯ
Перемещатьсявгрузовомотсеке, снаружи или внутри автомобиля чрезвычайно опасно. При
столкновении риск получения серьезной травмы или смертельного исхода более высок для людей, находящихся в этих зонах. Не позволяйте людям находиться в какой-либо зоне автомобиля, не оснащенной сиденьями и ремнями безопасности. Убедитесь, что все пассажиры автомобиля находятся на сиденьях и используют ремни безопасности надлежащим образом. Несоблюдение данного предупреждения может привести к серьезной травме или смертельному исходу.
45
ПРЕДУПРЕЖДЕНИЯ
Во избежание проникновения выхлопных газов в салон убедитесь в том, что задняя
поднимающаяся дверь закрыта на замок. Кроме того, это предотвратит выпадение груза или пассажиров. При необходимости движения с открытой задней поднимающейся дверью держите вентиляционные отверстия или окна открытыми, чтобы воздух снаружи мог поступать в салон. Несоблюдение этого предупреждения может привести к серьезным травмам.
Примечание: Для предотвращения повреждения задней поднимающейся двери соблюдайте осторожность при ее открывании в гараже или других закрытых помещениях.
Примечание: Не допускайте, чтобы перевозимые предметы, например, стойка для перевозки велосипеда, выступали за стекло или заднюю поднимающуюся дверь. Это может привести к поломке задней поднимающейся двери или ее компонентов.
Примечание: Во время движения не оставляйте заднюю поднимающуюся дверь открытой. Это может привести к поломке задней поднимающейся двери или ее компонентов.
Fiesta (CCN) Russia, Vehicles Built From: 27-04-2015, GE8J-19A321-AXA ruRUS, Edition date: 03/2015, First Printing

Замки
Открытие и закрытие задней поднимающейся двери
Открытие задней поднимающейся двери
E138632
Нажмитекнопку,расположеннуювверху ручки задней поднимающейся двери, чтобы разблокировать дверь, и затем потяните за внешнюю ручку.
Открытие с помощью пульта дистанционного управления
Нажмите кнопку два раза в течение трех секунд.
Закрытие задней поднимающейся двери
E89132
Для облегчения закрывания на внутренней стороне задней поднимающейся двери имеется утопленная ручка.
СИСТЕМА УПРАВЛЕНИЯ ЗАМКАМИ БЕЗ ПОМОЩИ КЛЮЧА
Общие сведения
ПРЕДУПРЕЖДЕНИЕ
Система может не функционировать, если ключ располагается рядом с
металлическими предметами или электроннымиустройствами,например, рядом с сотовыми телефонами.
Система будет не будет работать в следующих случаях:
•Аккумуляторная батарея автомобиля разряжена.
•Помехи на рабочей частоте пассивного ключа.
•Разряд батареи пассивного ключа.
46
Fiesta (CCN) Russia, Vehicles Built From: 27-04-2015, GE8J-19A321-AXA ruRUS, Edition date: 03/2015, First Printing

Замки
Примечание:Еслисистеманеработает, Блокировка автомобиля. для блокирования и разблокирования автомобиля используйте ключ.
Система позволяет управлять автомобилембезиспользованияключа или пульта дистанционного управления.
E78276
Для «пассивной» блокировки и разблокировки замков действующий пассивный ключ должен находиться в однойизтрёхзонснаружиавтомобиля. Эти зоны расположены на расстоянии приблизительнополутораметров(пяти футов) от ручек передних дверей и задней поднимающейся двери.
Пассивный ключ
Автомобиль можно запереть и открыть с помощью пассивного ключа. Пассивный ключ можно использовать в качестве пульта дистанционного управления. См. Блокировка и разблокировка замков (стр. 43).
47
E87384
ПРЕДУПРЕЖДЕНИЕ
Автомобиль не блокируется автоматически. Если не нажать кнопку блокировки, автомобиль
остается незапертым.
Кнопки запирания предусмотрены на каждой передней двери.
Нажмите один раз кнопку блокировки для активации центрального замка и сигнализации.
Нажмите два раза кнопку блокировки для активации двойной блокировки и сигнализации.
Примечание: Автомобиль будет оставаться заблокированным на протяженииприблизительнотрехсекунд. По окончанию периода задержки двери можно снова открыть при условии, что пассивный ключ находится в соответствующей зоне действия.
Двукратное кратковременное мигание указателей поворота подтверждает, что все двери и задняя поднимающаяся дверь были заблокированы и сигнализация включена.
Fiesta (CCN) Russia, Vehicles Built From: 27-04-2015, GE8J-19A321-AXA ruRUS, Edition date: 03/2015, First Printing

Замки
Задняя поднимающаяся дверь
Примечание: Если пассивный ключ находится в багажном отделении при запертых дверях, заднюю поднимающуюся дверь нельзя закрыть, и она снова поднимается.
Однократноедолговременноемигание указателей поворота подтверждает, что все двери и задняя поднимающаяся дверь были разблокированы и сигнализация отключена.
Примечание: Если в радиусе действия задней поднимающейся двери присутствует второй признанный пассивный ключ, заднюю поднимающуюся дверь закрыть можно.
Разблокировка автомобиля.
Примечание:Еслиавтомобильостается заблокированным на протяжении более трех дней, система перейдет в энергосберегающий режим. Это предотвращает разрядку аккумуляторной батареи. Если автомобиль не заблокирован при нахождении в этом режиме, время реагированиясистемыможетбытьболее продолжительным. Для отключения энергосберегающего режима разблокируйте автомобиль.
Разблокирование только двери водителя
Если функция разблокирования перепрограммирована так, что разблокируются только дверь водителя и задняя поднимающаяся дверь. См. Дистанционное управление (стр. 34). Обратите внимания на следующее:
Если первой из дверей была открыта водительская, остальные двери останутся заблокированными. Все остальные двери могут быть разблокированы изнутри автомобиля спомощьюкнопкиразблокированияна панели приборов. Чтобы узнать расположение элементов: См.
Быстрый обзор (стр. 12).
Отключенные ключи
E87384
Нажмите один раз на кнопку блокировки.
Примечание:Действующийпассивный ключ должен находиться в зоне его действия по отношению к открываемой двери.
48
Любые ключи, оставленные внутри автомобиля, будут отключены после блокирования автомобиля.
Спомощьюотключенногоключанельзя включить зажигание или запустить двигатель.
Все пассивные ключи должны быть включеныснова,чтобыимиможнобыло пользоваться.
Длявключениявсехпассивныйключей разблокируйтеавтомобильспомощью пассивного ключа или пульта дистанционного управления.
Все пассивные ключи будут включены при включении зажигания или запуске автомобиля с помощью действующего ключа.
Fiesta (CCN) Russia, Vehicles Built From: 27-04-2015, GE8J-19A321-AXA ruRUS, Edition date: 03/2015, First Printing
Ford Fusion 1.4 МКПП

Cubexx
Был 2 дня назад
Антон Иванов, 30 лет
Я езжу на Ford Fusion 1.4 МКПП (до этого — LADA 2109)
Самара, Россия

Полный размер
Собрал три руководства по Ford Fusion / Fiesta
Руководство «За Рулём»
Руководство «Третий Рим»
Руководство «Для СТО»
Скачать с Google Диск
20 октября 2020
Метки: аксессуары
13
Ранее Коврик в багажник
Далее Замена катушки зажигания и свечей
Разместить рекламу
Реклама
Машины в продаже

Шахты
Ford Fusion, 2006
385 000 ₽

Сальск
Ford Fusion, 2008
549 900 ₽

Волгодонск
Ford Fusion, 2008
399 900 ₽

Шахты
Ford Fusion, 2007
490 000 ₽
Посмотреть больше машин на Дроме
Комментарии
13
Войдите или зарегистрируйтесь, чтобы писать комментарии, задавать вопросы и участвовать в обсуждении.
Войти
Зарегистрироваться

ko0tyara
Я езжу на Ford Fiesta (Mk V)
где бы такую книгу найти в электронном виде…
3 месяца

Wan4ester90
Я езжу на Ford Fusion
Огромное Вам спасибо!
1 год

KimIV
Я езжу на Ford Kuga (2G)
Благодарчик!
1 год

AlexRak
Я езжу на Volkswagen Transporter T4
👍👌👍спасибо
2 года

Part08
Я езжу на Honda Accord (7G)
👍👍👍
2 года

Crabad
Я езжу на Ford Fusion
Спасибо.
2 года

OleksK
Я езжу на Ford Fusion
Thanks!
2 года

sukinsyn13
Я езжу на LADA 21074
Спасибо! 👍
2 года

alhray
Я езжу на Ford Fusion
спасибо большое)
2 года

koly4ui
Я езжу на Ford Fusion
А можно на другой ресурс виложить? А то не хочет Украина качать с ВК((
2 года

Cubexx
Автор
Я езжу на Ford Fusion
Да, конечно. Залил на Google Диск:
drive.google.com/drive/fo…gecekbnciz1XZ?usp=sharing
2 года
koly4ui
Я езжу на Ford Fusion
Спасибо
2 года

Motorymoran
Я езжу на Ford Fusion
Отлично, сохраняем!)
2 года

- Manuals
- Brands
- Ford Manuals
- Automobile
- FIESTA 2017
- Owner’s manual
-
Contents
-
Table of Contents
-
Troubleshooting
-
Bookmarks
Quick Links
2017 OWNER’S MANUAL
owner.ford.com
ford.ca
October 2016
First Printing
Owner’s Manual
Fiesta
Litho in U.S.A.
HE8J 19A321 AA
Related Manuals for Ford FIESTA 2017
Summary of Contents for Ford FIESTA 2017
-
Page 1
2017 OWNER’S MANUAL owner.ford.com ford.ca October 2016 First Printing Owner’s Manual Fiesta Litho in U.S.A. HE8J 19A321 AA… -
Page 2
No part of this publication may be reproduced, transmitted, stored in a retrieval system or translated into any language in any form by any means without our written permission. Errors and omissions excepted. © Ford Motor Company 2016 All rights reserved. Part Number: HE8J 19A321 AA 201607 20160804082629… -
Page 3: Table Of Contents
Symbols Glossary……….7 Driver and Passenger Airbags….38 Data Recording……….9 Front Passenger Sensing System….39 California Proposition 65……11 Side Airbags…………41 Perchlorate…………11 Driver Knee Airbag………42 Ford Credit…………11 Side Curtain Airbags……..43 Replacement Parts Recommendation……..12 Crash Sensors and Airbag Indicator..44 Special Notices……….12 Airbag Disposal……….45 Mobile Communications Equipment………….13…
-
Page 4
Table of Contents Audio Control………..67 Climate Control Voice Control………..68 Manual Climate Control……95 Cruise Control……….68 Automatic Climate Control……96 Hints on Controlling the Interior Wipers and Washers Climate…………97 Heated Windows and Mirrors….100 Windshield Wipers……..69 Cabin Air Filter……….100 Windshield Washers……..69 Rear Window Wiper and Washers…70 Seats Lighting Sitting in the Correct Position….102… -
Page 5
Table of Contents Fuel Consumption………121 Load Limit…………148 Emission Control System……122 Towing Transmission Towing a Trailer……….154 Manual Transmission……..125 Transporting the Vehicle……154 Automatic Transmission……126 Towing the Vehicle on Four Wheels..154 Brakes Driving Hints General Information……..131 Breaking-In…………157 Hints on Driving With Anti-Lock Economical Driving……..157 Brakes…………131 Driving Through Water……..157 Parking Brake……….132… -
Page 6
Table of Contents Opening and Closing the Hood….182 Cleaning the Interior……..214 Under Hood Overview — 1.0L Cleaning the Instrument Panel and EcoBoost ……….184 Instrument Cluster Lens……215 Under Hood Overview — 1.6L Duratec-16V Cleaning Leather Seats……215 Ti-VCT (Sigma)……..185 Repairing Minor Paint Damage….216 Engine Oil Dipstick — 1.0L Cleaning the Wheels……..216 EcoBoost… -
Page 7
Table of Contents Audio System Ford Protect General Information……..257 Ford Protect……….394 Audio Unit — Vehicles With: AM/FM/ CD…………..258 Scheduled Maintenance Audio Unit — Vehicles With: AM/FM/CD/ General Maintenance Information..396 SYNC…………262 Normal Scheduled Maintenance..399 Audio Unit — Vehicles With: Sony Audio Special Operating Conditions Scheduled System/Touchscreen Display….266… -
Page 8
Fiesta (CCT) Canada/United States of America, HE8J 19A321 AA enUSA, Edition date: 201607, First Printing… -
Page 9: Introduction
Introduction ABOUT THIS MANUAL Thank you for choosing Ford. We recommend that you take some time to get to know your vehicle by reading this manual. The more that you know about your vehicle, the greater the safety and pleasure you will get from driving it.
-
Page 10
Introduction Cabin air filter Front airbag E67017 Front fog lamps Check fuel cap Fuel pump reset Child safety door lock or unlock Fuse compartment Child seat lower anchor Hazard warning flashers Child seat tether anchor Heated rear window Cruise control E71340 Heated windshield Do not open when hot… -
Page 11: Data Recording
In order to properly diagnose and service your vehicle, Ford Motor Company Power window lockout (Ford of Canada in Canada), and service and repair facilities may access or share among them vehicle diagnostic information received through a direct…
-
Page 12
Ford of Canada privacy policy at is recorded by the event data recorder www.ford.ca, including our U.S. data under normal driving conditions and no storage and use of service providers in personal data or information (e.g., name,… -
Page 13: California Proposition 65
Terms and Conditions. See SYNC (page 276). US Only Ford Credit offers a full range of financing and lease plans to help you acquire your vehicle. If you have financed or leased your vehicle through Ford Credit, thank you for your business.
-
Page 14: Replacement Parts Recommendation
A great way to know for sure you are getting this level Call 1-800-727-7000. of protection is to use genuine Ford For more information about Ford Credit replacement collision parts. and access to the Account Manager, go to Warranty on Replacement Parts www.fordcredit.com.
-
Page 15: Mobile Communications Equipment
We do not recommend appropriately used, particularly in or endorse the use of aftermarket plug-in emergency situations. Safety must be devices unless approved by Ford. The paramount when using mobile vehicle Warranty will not cover damage communications equipment to avoid caused by an aftermarket plug-in device.
-
Page 16
Introduction recommendations and specifications that are unique to your vehicle. This Owner’s Manual is written primarily for the U.S. and Canadian Markets. Features or equipment listed as standard may be different on units built for export. Refer to this Owner’s Manual for all other required information and warnings. -
Page 17: Environment
Environment PROTECTING THE ENVIRONMENT You must play your part in protecting the environment. Correct vehicle usage and the authorized disposal of waste, cleaning and lubrication materials are significant steps toward this aim. Fiesta (CCT) Canada/United States of America, HE8J 19A321 AA enUSA, Edition date: 201607, First Printing…
-
Page 18: Child Safety
Child Safety GENERAL INFORMATION WARNINGS Technician (CPST) to make sure that you See the following sections for directions properly install the child restraint in your on how to properly use safety restraints vehicle and that you consult your for children. pediatrician to make sure you have a child restraint appropriate for your child.
-
Page 19: Installing Child Restraints
Child Safety Recommendations for Safety Restraints for Children Child Child size, height, weight, or age Recommended restraint type Use a child safety seat Infants or Children weighing 40 lb (18 kg) or less (sometimes called an toddlers (generally age four or younger). infant carrier, convertible seat, or toddler seat).
-
Page 20
Child Safety Use a child safety seat (sometimes called • Place your vehicle seat back in the an infant carrier, convertible seat, or upright position. toddler seat) for infants, toddlers, or • Put the safety belt in the automatic children weighing 40 pounds (18 locking mode. -
Page 21
Child Safety E142530 E142875 3. While holding the shoulder and lap belt 5. To put the retractor in the automatic portions together, route the tongue locking mode, grasp the shoulder through the child seat according to the portion of the belt and pull downward child seat manufacturer’s instructions. -
Page 22
1 inch (2.5 centimeters) of movement anchor, if a top tether strap has been for proper installation. provided with your child seat. Ford recommends checking with a NHTSA Certified Child Passenger Safety Technician (CPST) to make certain the child restraint is properly installed. In Canada, check with your local St. -
Page 23
Child Safety Use of Inboard Lower Anchors from the Outboard Seating Positions (Center Seating Use) WARNING The standardized spacing for LATCH lower anchors is 11 inches (28 centimeters) center to center. Do not use LATCH lower anchors for the center seating position unless the child seat manufacturer’s instructions permit and specify using anchors spaced at least as… -
Page 24
Child Safety Combining Safety Belt and LATCH Perform the following steps to install a Lower Anchors for Attaching Child child safety seat with tether anchors: Safety Seats Note: If you install a child seat with rigid LATCH attachments, do not tighten the When used in combination, either the tether strap enough to lift the child seat off safety belt or the LATCH lower anchors… -
Page 25: Booster Seats
E142539 and the child restraint manufacturer 3. Clip the tether strap to the anchor as recommends its use, Ford also shown. recommends its use. 4. Tighten the child safety seat tether Five Door strap according to the manufacturer’s instructions.
-
Page 26
Child Safety Types of Booster Seats recommended by your child restraint manufacturer). Many state and provincial laws require that children use approved booster seats until they reach age eight, a height of 4 feet 9 inches (1.45 meters) tall, or 80 pounds (36 kilograms). Booster seats should be used until you can answer YES to ALL of these questions when seated without a booster seat:… -
Page 27: Child Restraint Positioning
Child Safety Children and booster seats vary in size and the ideal fit (center) to a shoulder belt shape. Choose a booster that keeps the uncomfortably close to the neck and a lap belt low and snug across the hips, shoulder belt that could slip off the never up across the stomach, and lets you shoulder.
-
Page 28
Child Safety WARNINGS WARNINGS the way back. When possible, all children Never let a passenger hold a child on age 12 and under should be properly his or her lap while your vehicle is restrained in a rear seating position. If all moving. -
Page 29: Child Safety Locks
Child Safety Recommendations for attaching child safety restraints for children Use any attachment method as indicated below by X LATCH LATCH Safety belt Safety belt Safety belt Combined (lower (lower and top and LATCH only Restraint weight of anchors anchors tether (lower Type…
-
Page 30
Child Safety E156821 Left-Hand Side Turn counterclockwise to lock and clockwise to unlock. Right-Hand Side Turn clockwise to lock and counterclockwise to unlock. Fiesta (CCT) Canada/United States of America, HE8J 19A321 AA enUSA, Edition date: 201607, First Printing… -
Page 31: Seatbelts
Seatbelts PRINCIPLE OF OPERATION WARNINGS When possible, all children 12 years old and under should be properly WARNINGS restrained in a rear seating position. Always drive and ride with your Failure to follow this could seriously seatback upright and the lap belt increase the risk of injury or death.
-
Page 32: Fastening The Seatbelts
Seatbelts The safety belt pretensioners at the front seating positions are designed to tighten the safety belts when activated. In frontal and near-frontal crashes, the safety belt pretensioners may be activated alone or, if the crash is of sufficient severity, together with the front airbags.
-
Page 33
Seatbelts All safety restraints in the vehicle are combination lap and shoulder belts. The driver seatbelt has the first type of locking mode, and the front outboard passenger and rear seat seatbelts have both types of locking modes described as follows: Vehicle Sensitive Mode This is the normal retractor mode, which allows free shoulder belt length… -
Page 34: Seatbelt Height Adjustment
Seatbelts How to Use the Automatic Locking SEATBELT HEIGHT Mode ADJUSTMENT WARNING Position the safety belt height adjuster so that the belt rests across the middle of your shoulder. Failure to adjust the safety belt properly could reduce the effectiveness of the safety belt and increase the risk of injury in a crash.
-
Page 35: Seatbelt Reminder
Seatbelts Conditions of operation If… Then… The driver’s safety belt is not buckled The safety belt warning light illuminates 1- before the ignition switch is turned to the 2 minutes and the warning chime sounds on position… 4-8 seconds. The driver’s safety belt is buckled while the The safety belt warning light and warning indicator light is illuminated and the chime turn off.
-
Page 36
Seatbelts If… Then… You and the front seat passenger buckle The Belt-Minder feature will not activate. your safety belts before you switch the ignition on or less than 1–2 minutes elapse after you switch the ignition on… You or the front seat passenger do not The Belt-Minder feature activates, the buckle your safety belts before your vehicle safety belt warning light illuminates and a… -
Page 37: Child Restraint And Seatbelt Maintenance
Safety be used with Ford seatbelts. Ask your belt assemblies not in use during a crash authorized dealer if your extension is should also be inspected and replaced if…
-
Page 38: Personal Safety System
Personal Safety System How Does the Personal Safety The Personal Safety System provides an System Work? improved overall level of frontal crash protection to front seat occupants and is The Personal Safety System can adapt the designed to help further reduce the risk of deployment strategy of the safety devices airbag-related injuries.
-
Page 39: Supplementary Restraints System
Supplementary Restraints System The airbags are a supplemental restraint PRINCIPLE OF OPERATION system and are designed to work with the safety belts to help protect the driver and WARNINGS right front passenger from certain upper Airbags do not inflate slowly or body injuries.
-
Page 40: Driver And Passenger Airbags
Supplementary Restraints System Proper Driver and Front Passenger DRIVER AND PASSENGER Seating Adjustment AIRBAGS WARNING WARNINGS National Highway Traffic Safety Never place your arm or any objects Administration (NHTSA) over an airbag module. Placing your recommends a minimum distance arm over a deploying airbag can of at least 10 inches (25 centimeters) result in serious arm fractures or other between an occupant’s chest and the…
-
Page 41: Front Passenger Sensing System
Supplementary Restraints System WARNINGS between the seat and the center console. Check the passenger airbag off or pass airbag off indicator lamp for proper airbag status. Failure to follow these instructions may interfere with the front passenger seat sensing system. Any alteration or modification to the front passenger seat may affect the performance of the front passenger…
-
Page 42
Supplementary Restraints System The front passenger sensing system is • When the front passenger sensing designed to disable (will not inflate) the system enables the front passenger front passenger frontal airbag when a rear frontal airbag (may inflate), the facing infant seat, a forward-facing child indicator lamp will be unlit and stay restraint, or a booster seat is detected. -
Page 43: Side Airbags
If it is necessary to modify an advanced front airbag system to accommodate a • Rear passenger feet and knees resting person with disabilities, contact the Ford or pushing on the seat. Customer Relationship Center. See The conditions listed above may cause the…
-
Page 44: Driver Knee Airbag
Supplementary Restraints System The system consists of the following: WARNINGS • A label or embossed side panel Do not lean your head on the door. indicating that side airbags are fitted The side airbag could injure you as it to your vehicle. deploys from the side of the seatback.
-
Page 45: Side Curtain Airbags
Supplementary Restraints System In certain sideways crashes, the side SIDE CURTAIN AIRBAGS curtain airbag on the side affected by the crash will be inflated. The side curtain WARNINGS airbags are mounted to the roof side-rail Do not place objects or mount sheet metal, behind the headliner, above equipment on or near the headliner each row of seats.
-
Page 46: Crash Sensors And Airbag Indicator
Supplementary Restraints System The design and development of the side The lamp will not illuminate curtain airbags included recommended immediately when you switch testing procedures that were developed the ignition on. E67017 by a group of automotive safety experts • The lamp will either flash or remain on.
-
Page 47: Airbag Disposal
Supplementary Restraints System • The knee airbag may deploy based on crash severity and occupant conditions. • The design of the side airbags and side curtain airbags is to deploy in certain side impact crashes. These devices may deploy in other types of crashes if your vehicle experiences sufficient sideways motion or deformation.
-
Page 48: Keys And Remote Controls
Keys and Remote Controls Note: If you are in range, the remote control GENERAL INFORMATION ON will operate if you press any button RADIO FREQUENCIES unintentionally. Note: The remote control contains sensitive This device complies with Part 15 of the electrical components.
-
Page 49
Keys and Remote Controls Note: Your vehicle s back-up keys came with a security tag that provides important vehicle key cut information. Keep the tag in a safe place for future reference. Programming a New Integrated Keyhead Transmitter Turn the ignition key from position 0 to position II 8 times within 10 seconds. -
Page 50
Keys and Remote Controls To return to the original unlocking function, repeat the process. Replacing the Battery Note: Refer to local regulations when disposing of transmitter batteries. Note: Do not wipe off any grease on the battery terminals or on the back surface of the circuit board. -
Page 51
Keys and Remote Controls 5. Assemble the two halves of the remote Intelligent Access Transmitter control. 6. Install the key blade. Integrated Keyhead Transmitter E138619 E87964 Twist a thin coin in the slot of the transmitter near the key ring to remove Press and hold the buttons on the the battery cover. -
Page 52: Replacing A Lost Key Or Remote Control
Keys and Remote Controls Car Finder Press the button twice within three seconds. The horn will sound and the turn signals will E138623 flash. We recommend you use this method to locate your vehicle, rather than using the panic alarm. Note: If locking was not successful or if any door or the liftgate is open, or if the hood is open on vehicles with a perimeter alarm or…
-
Page 53: Mykey
MyKey (If Equipped) Configurable Settings PRINCIPLE OF OPERATION You can configure certain MyKey settings MyKey allows you to program keys with when you first create a MyKey. You can restricted driving modes to promote good also change the settings afterward with driving habits.
-
Page 54: Creating A Mykey
MyKey (If Equipped) 2. Switch the ignition on. CREATING A MYKEY 3. Access the main menu on the Use the information display to create a information display controls. Use the MyKey: arrow keys to get to the following menu selections: Insert the key you want to program into the ignition.
-
Page 55
MyKey (If Equipped) Switch the ignition on using an admin key or fob. To clear all MyKeys of all MyKey settings, access the main menu and scroll to: Message Action and Description Settings Press the OK button. MyKey Press the OK button. Clear MyKey Press and hold the OK button until the following message displays. -
Page 56: Checking Mykey System Status
If you choose to install a intended user is not using the MyKey, or an remote start system, please see an admin key user recently cleared and then authorized dealer for a Ford-approved recreated a MyKey. remote start system. Number of MyKeys Indicates the number of MyKeys programmed to your vehicle.
-
Page 57
MyKey (If Equipped) Condition Potential causes · No MyKeys have been created. See Creating a MyKey (page 52). I cannot clear the MyKeys. · The key or transmitter used to start the vehicle does not have admin privileges. · No MyKeys are programmed to the vehicle. See Creating a MyKey (page 52). -
Page 58: Doors And Locks
Doors and Locks Press the button again within three LOCKING AND UNLOCKING seconds to confirm that all the doors are closed. The doors will lock again, the Remote Control direction indicators will flash and the horn will sound, if all the doors and the luggage Unlocking the Doors compartment are closed.
-
Page 59: Smart Unlocks For Integrated Keyhead Transmitter
Doors and Locks Unlocking the Doors With the When you lock your vehicle using the Interior Door Handles power door lock control (with the door open, vehicle in park (P) and ignition off), You can unlock individual doors by pulling your vehicle will search for an intelligent the relevant interior door handle.
-
Page 60: Emergency Locking With The Key
Doors and Locks Auto Unlock Feature Emergency Locking With the Key The auto unlock feature will unlock all the Note: If the child safety locks are on and doors when all of the following conditions you pull the interior handle, you will only have been met: turn off the emergency locking, not the child safety lock.
-
Page 61: Manual Liftgate
Doors and Locks Opening and Closing the Liftgate MANUAL LIFTGATE To Open the Liftgate WARNINGS It is extremely dangerous to ride in a cargo area, inside or outside of a vehicle. In a crash, people riding in these areas are more likely to be seriously injured or killed.
-
Page 62: Keyless Entry
Doors and Locks Passive Key KEYLESS ENTRY Your vehicle can be locked and unlocked General Information with the passive key. You can use the passive key as a remote control. See WARNING Locking and Unlocking (page 56). The system may not function if the Locking Your Vehicle key is close to metal objects or electronic devices such as cell…
-
Page 63
Doors and Locks Note: If a second valid passive key is If the unlocking function is reprogrammed located within the luggage compartment so that only the driver door and the luggage detection range, the luggage compartment compartment are unlocked the following can be closed. -
Page 64: Interior Luggage Compartment Release
Doors and Locks Locking and Unlocking the Doors WARNINGS With the Key Blade Do not leave children or animals unattended in the vehicle. On hot days, the temperature in the trunk or vehicle interior can rise very quickly. Exposure of people or animals to these high temperatures for even a short time can cause death or serious heat-related injuries, including brain damage.
-
Page 65
Doors and Locks The handle is located inside the luggage compartment either on the luggage compartment door (lid) or near the tail lamps. It is composed of a material that will glow for hours in darkness following brief exposure to ambient light. Pull the handle and push up on the luggage compartment door (lid) to open from within the luggage compartment. -
Page 66: Security
Note: Your vehicle comes equipped with two integrated keyhead transmitters or two Note: The system is not compatible with intelligent access keys. non-Ford aftermarket remote start systems. The integrated keyhead transmitter Use of these systems may result in vehicle functions as a programmed ignition key…
-
Page 67: Anti-Theft Alarm
Security You must have two previously Programming a Spare Intelligent programmed coded keys and the new Access Key unprogrammed key readily accessible. See See your authorized dealer to have your authorized dealer to have the spare additional keys programmed to your key programmed if two previously vehicle.
-
Page 68
Security Vehicles with Keyless Entry Note: A valid passive key must be located within the detection range of that door for keyless entry. See Keyless Entry (page 60). Disarm and silence the alarm by unlocking the doors and switching the ignition on or unlocking the doors with the remote control. -
Page 69: Steering Wheel
Steering Wheel ADJUSTING THE STEERING WHEEL WARNING Do not adjust the steering wheel when your vehicle is moving. Note: Make sure that you are sitting in the correct position. See Sitting in the Correct Position (page 102). E95179 3. Lock the steering column. AUDIO CONTROL (If Equipped) Select the required source on the audio…
-
Page 70: Voice Control
Steering Wheel You can operate the following functions VOICE CONTROL (If Equipped) with the control: E141530 E141533 Volume up Press the button to select or deselect voice control. See SYNC (page 276). Seek up, next or end call Volume down CRUISE CONTROL (If Equipped) Seek down, previous or accept…
-
Page 71: Wipers And Washers
Wipers and Washers Note: If you press and hold the wiper lever WINDSHIELD WIPERS in position A, the wipers will continue to wipe until you release the wiper lever. Note: Fully defrost the windshield before you switch the windshield wipers on. Intermittent Wipe Note: Make sure you switch the windshield wipers off before entering a car wash.
-
Page 72: Rear Window Wiper And Washers
Wipers and Washers Push the button to operate the washers. When you release the button, the wipers will operate for a short time. REAR WINDOW WIPER AND WASHERS Intermittent Wipe E102053 Pull the lever toward you to operate the washers. They will operate for a maximum of 10 seconds.
-
Page 73: Lighting
Lighting GENERAL INFORMATION LIGHTING CONTROL Condensation in Lamp Assemblies Lighting Control Positions Exterior lamps have vents to accommodate normal changes in air pressure. Condensation can be a natural by-product of this design. When moist air enters the lamp assembly through the vents, there is a possibility that condensation can occur when the temperature is cold.
-
Page 74: Autolamps
Lighting High Beams When the lighting control is in the autolamps position, the headlamps automatically turn on in low light situations or when the wipers turn on. The headlamps will remain on for a period of time after you switch the ignition off. Use the information display controls to adjust the period of time that the headlamps remain on.
-
Page 75: Instrument Lighting Dimmer
Lighting INSTRUMENT LIGHTING DAYTIME RUNNING LAMPS DIMMER Equipped) WARNING The daytime running lamps system does not activate the rear lamps and may not provide adequate lighting during low visibility driving conditions. Also, the autolamps switch position may not activate the headlamps in all low visibility conditions, such as daytime fog.
-
Page 76: Front Fog Lamps
Lighting FRONT FOG LAMPS INTERIOR LAMPS (If Equipped) Front Interior Lamps E156878 Door contact E156823 Pull the control to switch the fog lamps on Reading lamps or off. You cannot switch the fog lamps on when the lighting control is in the off or autolamps position.
-
Page 77: Ambient Lighting
Lighting AMBIENT LIGHTING (If Equipped) The ambient lighting system illuminates the interior with a choice of several colors. The ambient lighting control is located on the instrument panel. E170600 Reading lamps. When the switch is set to the door contact position, the courtesy lamp will illuminate when you unlock or open a door or the liftgate.
-
Page 78: Windows And Mirrors
Windows and Mirrors One-Touch Up POWER WINDOWS (If Equipped) Lift the control fully and release it. Press WARNINGS or lift it again to stop the window. Do not leave children unattended in Window Lock your vehicle and do not let them play with the power windows.
-
Page 79: Exterior Mirrors
Windows and Mirrors Accessory Delay Close the window twice until it reaches (If Equipped) the point of resistance and let it You can use the window controls for reverse. several minutes after switching off the 2. Close the window a third time to the ignition or until opening either front door.
-
Page 80: Interior Mirror
Windows and Mirrors Move the controller in the direction of the arrows to adjust the mirror. Fold-Away Exterior Mirrors Push the mirror toward the door window glass. Make sure that you fully engage the mirror in its support when returning it to its original position.
-
Page 81: Moonroof
Windows and Mirrors Note: Do not clean the housing or glass of any mirror with harsh abrasives, fuel or other petroleum or ammonia-based cleaning products. You can adjust the interior mirror to your preference. Some mirrors also have a second pivot point. This lets you move the mirror head up or down and from side to side.
-
Page 82: Instrument Cluster
Instrument Cluster GAUGES E102660 Tachometer Information display and engine coolant temperature gauge Speedometer Fuel gauge Tripmeter reset button Compass (If Equipped) Displays the vehicle’s heading direction. To calibrate and set the compass zone use the information display menu. See Information Displays (page 85). Use the diagram to determine your magnetic zone.
-
Page 83: Warning Lamps And Indicators
Instrument Cluster Engine Coolant Temperature WARNING LAMPS AND Gauge INDICATORS The following warning lamps and indicators alert you to a vehicle condition that may become serious. Some lamps illuminate when you start your vehicle to E140760 make sure they work. If any lamps remain on after starting your vehicle, refer to the Displays the temperature of the engine respective system warning lamp for further…
-
Page 84
Instrument Cluster It illuminates when you engage If it illuminates when the engine is running the parking brake and the this indicates a malfunction. Drive in a E138644 ignition is on. moderate fashion (avoid heavy acceleration and deceleration). Continuing If it illuminates when your vehicle is to drive your vehicle may cause reduced moving, make sure the parking brake is power or the engine to stop. -
Page 85
Instrument Cluster Front Fog Lamp Indicator Oil Pressure Warning Lamp It illuminates when you switch WARNING the front fog lamps on. If it illuminates when you are driving do not continue your journey, even if the oil level is correct. Have your Headlamp High Beam Indicator vehicle checked. -
Page 86: Audible Warnings And Indicators
Instrument Cluster AUDIBLE WARNINGS AND WARNINGS Do not sit on top of a fastened safety INDICATORS belt to prevent the safety belt minder from coming on. The occupant Exterior Lamps On protection system will only provide Sounds when you remove the key from the optimum protection when you use the ignition and open the driver door, and you safety belt correctly.
-
Page 87: Information Displays
Phone book electronic devices while driving. Call History Information Display Controls Speed Dial Text Messaging BT device Phone settings Ford EcoMode SYNC-Settings Bluetooth on Set defaults Master reset E103626 Install on SYNC Use the information display controls on the steering wheel to adjust various system System info settings on your vehicle.
-
Page 88: Clock
Information Displays Reset all settings Max Speed Audio settings Adaptive volume Speed warning Sound MyKey Volume limit Nav audio mixing Information DSP settings Clear MyKeys DSP equaliser Traffic CLOCK News Type 1 Alt. frequency To adjust the clock, switch the ignition on RDS regional and press buttons H or M on the information and entertainment display as…
-
Page 89: Personalized Settings
Information Displays Distance Odometer The Trip Computer Includes the Following Information Displays Records the total distance traveled by your vehicle. Trip Odometer Records the distance traveled on individual journeys. PERSONALIZED SETTINGS Measure Units Distance to Empty To swap between imperial and metric Indicates the approximate units, scroll to this display and press the distance your vehicle will travel…
-
Page 90
Information Displays Press the OK button to acknowledge and A system-specific symbol with a message remove some messages from the indicator may supplement some information display. The information messages. display will automatically remove other Note: Depending on your vehicle options messages after a short period of time. -
Page 91: Fiesta (Cct) Canada/United States Of America, He8J 19A321 Aa Enusa, Edition Date: 201607, First Printing
Information Displays Engine Immobilizer Message Message Indic- Action ator Immobiliser malfunction Have your vehicle checked as soon as Service now possible. Fuel System Message Message Indic- Action ator Displays if the fuel fill inlet did not fully Check Fuel Fill Inlet close.
-
Page 92: Fiesta (Cct) Canada/United States Of America, He8J 19A321 Aa Enusa, Edition Date: 201607, First Printing
Information Displays Message Message Indic- Action ator See Remote Control (page 46). Switch ignition off Press Displays if you switch the ignition on ENGINE Start/Stop Amber without starting the engine. button See Keyless Starting (page 111). Close trunk or use spare See Keyless Entry (page 60).
-
Page 93: Fiesta (Cct) Canada/United States Of America, He8J 19A321 Aa Enusa, Edition Date: 201607, First Printing
Information Displays MyKey Message Message Indic- Action ator Displays when a MyKey is in use and the MyKey Vehicle at Top Amber MyKey speed limit is reached. Speed See MyKey (page 51). Displays when MyKey is active. MyKey active Drive Safely See MyKey (page 51).
-
Page 94: Fiesta (Cct) Canada/United States Of America, He8J 19A321 Aa Enusa, Edition Date: 201607, First Printing
Information Displays Parking Brake Message Message Indic- Action ator Park brake applied Displays if you have not released the parking brake and your vehicle reaches 6 mph (10 km/h). If the warning message remains on after you have released the parking brake, the Park brake applied Amber system has detected a fault that requires…
-
Page 95: Fiesta (Cct) Canada/United States Of America, He8J 19A321 Aa Enusa, Edition Date: 201607, First Printing
Information Displays Message Message Indic- Action ator See Starting and Stopping the Engine (page 111). Steering System Message Message Indic- Action ator You will continue to have full steering but Steering assist fault will need to exert greater force on the Amber Service required steering wheel.
-
Page 96: Fiesta (Cct) Canada/United States Of America, He8J 19A321 Aa Enusa, Edition Date: 201607, First Printing
Information Displays Transmission Message Message Indic- Action ator Transmission Malfunc- Have your vehicle checked as soon as tion Service Now possible. The transmission is overheating and needs Transmission Over to cool. Stop your vehicle as soon as it is Temperature Stop Safely safe to do so, switch the engine off and allow the transmission to cool.
-
Page 97: Climate Control
Climate Control MANUAL CLIMATE CONTROL E158234 Fan speed control: Adjust the volume of air circulated in the vehicle. Air distribution control: Adjust the control to turn airflow from the windshield, instrument panel, or footwell vents on or off. You can distribute air through any combination of these vents.
-
Page 98: Automatic Climate Control
Climate Control AUTOMATIC CLIMATE CONTROL (If Equipped) E158263 Fan speed: Adjust the volume of air circulated in the vehicle. Air distribution control: Adjust the control to turn airflow from the windshield, instrument panel, or footwell vents on or off. You can distribute air through any combination of these vents.
-
Page 99: Hints On Controlling The Interior Climate
Climate Control Recirculated air: Press the button to switch between outside air and recirculated air. The air currently in the passenger compartment recirculates. This can reduce the time needed to cool the interior and reduce unwanted odors from entering your vehicle. Note: Recirculated air may also turn on and off automatically in instrument panel or instrument panel and floor airflow modes during hot weather to improve cooling efficiency.
-
Page 100
Climate Control Manual Climate Control Note: When the system is switched off, outside air is prevented from entering your Note: To reduce fogging of the windshield vehicle. during humid weather, adjust the air Note: When you select AUTO mode and distribution control to the windshield air the interior and exterior temperatures are vents position. -
Page 101
Climate Control Cooling the Interior Quickly Vehicles With Manual Climate Control Vehicles With Automatic Climate Control Adjust the fan speed to the highest Press the MAX A/C button. setting. Adjust the temperature control setting to MAX A/C. Adjust the air distribution control to the instrument panel air vents position. -
Page 102: Heated Windows And Mirrors
Climate Control Side Window Defogging in Cold Weather Vehicles With Manual Climate Control Vehicles With Automatic Climate Control Adjust the fan speed to the highest Press the MAX defrost button. setting. Adjust the temperature control to the highest setting. Adjust the air distribution control to the windshield position.
-
Page 103
Climate Control Note: Make sure you have a cabin air filter installed at all times. This prevents foreign objects from entering the system. Running the system without a filter in place could result in degradation or damage to the system. The particulate filtration system gives you and your passengers the following benefits:… -
Page 104: Seats
Seats We recommend that you follow these SITTING IN THE CORRECT guidelines: POSITION • Sit in an upright position with the base of your spine as far back as possible. WARNINGS • Do not recline the seat backrest more Do not recline the seat backrest too than 30 degrees.
-
Page 105
Seats Rear seat center head restraint WARNINGS Install the head restraint properly to help minimize the risk of neck injury in the event of a crash. Note: Adjust the seat backrest to an upright driving position before adjusting the head restraint. -
Page 106: Manual Seats
Seats Adjusting the Lumbar Support Installing the Head Restraint Equipped) Align the steel stems into the guide sleeves and push the head restraint down until it locks. MANUAL SEATS WARNING Do not adjust the driver seat when your vehicle is moving. Moving the Seat Backward and Forward E142199…
-
Page 107: Rear Seats
Seats Recline Adjustment E156656 E70731 Press the unlock buttons down and hold them there. REAR SEATS 2. Push the seatback forward. Folding the Seatback WARNING When folding the seatback down, take care not to get your hands caught between the seatback and the frame, catches or mechanism.
-
Page 108: Heated Seats
Seats 3. Stow the safety belt in the belt WARNINGS stowage clip. This prevents the safety Do not place anything on the seat belt from getting caught in the seat that insulates against heat, for latch. example; blankets or cushions. This Note: Do not attempt to fold the rear seat may cause the heated seat to overheat.
-
Page 109
Seats Press the required switch to turn the seat heating on. The lamp inside the switch will illuminate. Press the switch again to turn the seat heating off. The seat heaters will only turn on with the ignition turned on. Note: You should avoid using the seat heaters unless the engine is running. -
Page 110: Auxiliary Power Points
Auxiliary Power Points 12 Volt DC Power Point To prevent the battery from running out of charge: WARNINGS • Do not use the power point longer than Do not plug optional electrical necessary when the vehicle is not accessories into the cigar lighter running.
-
Page 111
Auxiliary Power Points E103382 Press the element in to use the cigar lighter. It will pop out automatically. Fiesta (CCT) Canada/United States of America, HE8J 19A321 AA enUSA, Edition date: 201607, First Printing… -
Page 112: Storage Compartments
Storage Compartments CENTER CONSOLE OVERHEAD CONSOLE Stow items in the cup holder carefully as items may become loose during hard braking, acceleration or crashes, including hot drinks which may spill. Available console features include: E131605 Press near the rear edge of the door to open it.
-
Page 113: Starting And Stopping The Engine
Starting and Stopping the Engine GENERAL INFORMATION IGNITION SWITCH WARNINGS Extended idling at high engine speeds can produce very high temperatures in the engine and exhaust system, creating the risk of fire or other damage. Do not park, idle or drive your vehicle on dry grass or other dry ground E180794 cover.
-
Page 114
Starting and Stopping the Engine Starting with Automatic Note: The ignition will automatically switch Transmission off when you leave your vehicle unattended. This is to prevent your vehicle battery Note: Releasing the brake pedal while the running out of charge. engine is starting will stop the engine Note: A valid key must be located inside cranking and return to ignition on. -
Page 115: Starting A Gasoline Engine
Starting and Stopping the Engine If the engine does not crank when the STARTING A GASOLINE clutch pedal has been fully depressed and ENGINE the button is pressed: Fully depress both the clutch and brake Note: You can only operate the starter for pedals.
-
Page 116: Switching Off The Engine
Starting and Stopping the Engine Move the transmission selector lever The idle speed varies depending on certain to position P or N. factors. These include vehicle component and ambient temperatures as well as 2. Start the engine. electrical and climate system demands. All Vehicles Failure to Start If the engine does not start within 10…
-
Page 117
Starting and Stopping the Engine • Make sure the heater, heater cord and WARNINGS extension cord are firmly connected. Do not fully close the hood, or allow • Check for heat anywhere in the it to drop under its own weight when electrical hookup once the system has using the engine block heater. -
Page 118: Fuel And Refueling
Fuel and Refueling • Automotive fuels can be harmful or SAFETY PRECAUTIONS fatal if swallowed. Fuel such as gasoline is highly toxic and if WARNINGS swallowed can cause death or Do not overfill the fuel tank. The permanent injury. If fuel is swallowed, pressure in an overfilled tank may call a physician immediately, even if no cause leakage and lead to fuel spray…
-
Page 119: Fuel Quality
Fuel and Refueling • Fuels containing metallic-based FUEL QUALITY additives, including manganese-based compounds. Choosing the Right Fuel • Fuels containing the octane booster additive, methylcyclopentadienyl manganese tricarbonyl (MMT). • Leaded fuel (using leaded fuel is prohibited by law). The use of fuels with metallic compounds such as methylcyclopentadienyl manganese tricarbonyl (commonly known as MMT), which is a manganese-based…
-
Page 120
Fuel and Refueling Filling a Portable Fuel Container When refueling the vehicle fuel tank from a fuel container, do the following: Use the following guidelines to avoid Fully open the fuel tank filler door until electrostatic charge build-up, which can it engages. -
Page 121: Catalytic Converter
Fuel and Refueling CATALYTIC CONVERTER WARNINGS The fuel system may be under pressure. If you hear a hissing sound WARNING near the fuel filler door, do not refuel Do not park or idle your vehicle over until the sound stops. Otherwise, fuel may dry leaves, dry grass or other spray out, which could cause serious combustible materials.
-
Page 122
Fuel and Refueling E206911 Left-hand side. To open the fuel filler door, press the center rear E139202 edge of the fuel filler door and Note: When you insert the correct size fuel then release. pump nozzle a spring loaded inhibitor will Right-hand side. -
Page 123: Fuel Consumption
Fuel and Refueling 5. Insert a fuel pump nozzle or the fuel filler funnel provided with your vehicle in to the fuel tank filler pipe opening. This action should dislodge any debris that may be preventing the fuel filler inlet from fully closing. Note: If this action corrects the problem the message may not reset immediately.
-
Page 124: Emission Control System
Fuel and Refueling Calculating Fuel Economy • Fuel economy may decrease with lower temperatures. Do not measure fuel economy during the • Fuel economy may decrease when first 1,000 mi (1,600 km) of driving (this is driving short distances. your engine’s break-in period). A more •…
-
Page 125
Fuel and Refueling If you use anything other than Ford, When the service engine soon Motorcraft or Ford-authorized parts for indicator illuminates, the OBD-II maintenance replacements or for service system has detected a of components affecting emission control, malfunction. Temporary malfunctions may… -
Page 126
Fuel and Refueling Readiness for Inspection and 15 minutes of steady driving on an Maintenance (I/M) Testing expressway or highway followed by 20 minutes of stop-and-go driving with at Some state and provincial and local least four 30-second idle periods. governments may have 2. -
Page 127: Transmission
Transmission Make sure the parking brake is fully set MANUAL TRANSMISSION and shift the gearshift lever to the neutral position. Using the Clutch 2. Fully depress the clutch pedal then Note: Failure to fully depress the clutch start the engine. pedal to the floor may cause increased shift 3.
-
Page 128: Automatic Transmission
Transmission Reverse WARNINGS Do not apply the brake and Note: Do not shift the gearshift lever to accelerator pedals simultaneously reverse gear when your vehicle is moving. for more than three seconds as this This can cause damage to the transmission. limits engine rpm and labors the Fully depress the clutch pedal to transmission.
-
Page 129
Transmission WARNINGS You must move the transmission selector lever to position P and fully apply the parking brake before you leave your vehicle. Failure to leave your vehicle securely parked may lead to an accident or injury. Your vehicle will not move while the transmission selector lever is in P. -
Page 130
Transmission D (Drive) Gears may be skipped by pressing the + or — buttons repeatedly at short intervals. With the transmission selector lever in D, We recommend you upshift according to your vehicle will shift automatically the following guide to achieve the best fuel through the forward gears. -
Page 131
Transmission Emergency Park Position Release Moving off Lever Press the brake pedal to apply the brakes. WARNINGS 2. Move the transmission selector lever Do not drive your vehicle until you to R, D or S. verify that the brake lamps are working. -
Page 132
Transmission E142214 4. Press the brake pedal. Using a suitable tool rotate the lever forward while pulling the transmission selector lever out of the P position. Note: The emergency P position release lever is pink. Note: See an authorized dealer as soon as possible if you use procedure. -
Page 133: Brakes
Brakes Emergency Brake Assist GENERAL INFORMATION Brake assist detects when you rapidly WARNING brake by measuring the rate at which you press the brake pedal. It provides The system does not relieve you of maximum braking efficiency as long as you your responsibility to drive with due press the pedal.
-
Page 134: Parking Brake
Brakes Press the brake pedal firmly. PARKING BRAKE 2. Pull the lever up slightly. Vehicles With Automatic 3. Press the release button and push the Transmission lever down. WARNING HILL START ASSIST (If Equipped) Always set the parking brake fully and leave your vehicle with the transmission selector lever in WARNINGS…
-
Page 135
Brakes The system will activate automatically on any slope that will cause significant vehicle rollback. For vehicles with a manual transmission, you can switch this feature off using the information display. See Information Displays (page 85). The system will remain on or off depending on how it was last set. -
Page 136: Traction Control
Traction Control Using the Information Display PRINCIPLE OF OPERATION Controls The traction control system helps avoid You can switch this feature off or on in the drive wheel spin and loss of traction. information display. See General If your vehicle begins to slide, the system Information (page 85).
-
Page 137: Stability Control
Stability Control (If Equipped) PRINCIPLE OF OPERATION Electronic Stability Program WARNINGS The system does not relieve you of your responsibility to drive with due care and attention. Failure to drive with due care and attention could lead to loss of vehicle control. Vehicle modifications involving braking system, aftermarket roof racks, suspension, steering system,…
-
Page 138: Using Stability Control
Stability Control (If Equipped) USING STABILITY CONTROL Note: The system automatically turns on each time you switch the ignition on. You can switch the traction control system off and on . See Using Traction Control (page 134). Fiesta (CCT) Canada/United States of America, HE8J 19A321 AA enUSA, Edition date: 201607, First Printing…
-
Page 139: Parking Aids
Only use the Ford approved trailer obstacles or false alerts. wiring kit (including the trailer wiring module) when towing with your REAR PARKING AID vehicle.
-
Page 140
Parking Aids (If Equipped) WARNINGS The parking aid system may not prevent contact with small or moving objects that are close to the ground. The parking aid system gives an audible warning when it detects a large object helping to avoid damage to your vehicle. To help avoid personal injury you must take care when using the parking aid system. -
Page 141: Front Parking Aid
Parking Aids (If Equipped) When the parking aid system sounds a FRONT PARKING AID (If Equipped) tone, the audio system may reduce the set volume. When the warning ends, the audio WARNINGS system will return to the previously set To help avoid personal injury, please volume.
-
Page 142: Rear View Camera
Parking Aids (If Equipped) The system detects objects when you shift • You will hear an alternating audible into reverse (R) or you press the parking warning from the front and rear audio aid button and: system speakers if large objects are less than 12 in (30 cm) from the front •…
-
Page 143
Parking Aids (If Equipped) The system may not correctly operate in WARNINGS any of the following conditions: Do not switch the camera features • Dark areas. on or off when your vehicle is moving. • Intense light areas. The operation of the camera may •… -
Page 144: Switching The Rear View Camera Off
Parking Aids (If Equipped) Green — Zone. Black — center line of the projected vehicle path. Distance markers are only a guide and are calculated for unloaded vehicles on an even road surface. Switching the Rear View Camera Shift from reverse (R). E142132 Red — Zone.
-
Page 145: Cruise Control
Cruise Control (If Equipped) Note: Cruise control will disengage if your PRINCIPLE OF OPERATION vehicle speed decreases more than 10 mph (16 km/h) below your set speed while WARNING driving uphill. The system does not relieve you of Switching Cruise Control On your responsibility to drive with due care and attention.
-
Page 146: Switching Cruise Control Off
Cruise Control (If Equipped) Resuming the Set Speed Press and release RES. The indicator displays in the instrument cluster. Switching Cruise Control Off Press and release OFF when the system is in stand by mode or switch the ignition off. Note: You erase the set speed when you switch the system off.
-
Page 147: Driving Aids
Driving Aids Anticipation ECO MODE (If Equipped) Adjust your vehicle speed and the distance This system assists you in driving more to other vehicles to avoid the need for efficiently by constantly monitoring heavy braking or acceleration to improve characteristics of gear changing, fuel economy.
-
Page 148
Driving Aids If your vehicle loses electrical power while you are driving, electric power steering assistance is lost. The steering system still operates and you can steer your vehicle manually. Manually steering your vehicle requires more effort. Extreme continuous steering may increase the effort required for you to steer your vehicle. -
Page 149: Load Carrying
Load Carrying REAR UNDER FLOOR CARGO NETS (If Equipped) STORAGE (If Equipped) Installing and Removing the Cargo Adjustable Load Floor Installing the Cargo Net E159476 Upper position E156757 Lower position Raise the rear outer head restraints. See Head Restraints (page 102). The load floor can be placed in either 2.
-
Page 150: Load Limit
Load Carrying Removing the Cover following terms for determining your vehicle’s weight rating, with or without a trailer, from the vehicle’s Tire and Loading Information label or Safety Compliance Certification label. Tire and Loading Label Information Example: E174241 LOAD LIMIT Vehicle Loading — with and without a Trailer This section guides you in the…
-
Page 151
Load Carrying Payload PAYLOAD E143816 WARNING Payload is the combined weight of cargo and passengers that your The appropriate loading vehicle is carrying. The maximum capacity of your vehicle can payload for your vehicle appears be limited either by volume on the Tire and Loading label. -
Page 152
Load Carrying The total load on each axle must WARNING never exceed its Gross Axle Exceeding the Safety Weight Rating. Compliance Certification label vehicle weight limits can GVWR (Gross Vehicle Weight adversely affect the performance Rating) and handling of your vehicle, GVWR is the maximum allowable cause vehicle damage and can weight of the fully loaded vehicle. -
Page 153
Load Carrying be used for safe control of towed 2. Determine the combined vehicles and for trailers where the weight of the driver and Gross Combined Weight of the passengers that will be riding towing vehicle plus the trailer in your vehicle. exceed the Gross Vehicle Weight 3. -
Page 154
Load Carrying Helpful examples for calculating — 1200 = — 240 pounds. No, you do the available amount of cargo not have enough cargo capacity and luggage load capacity to carry that much weight. In metric units, the calculation would Suppose your vehicle has a be: 635 kilograms — (2 x 99 1400-pound (635-kilogram) cargo… -
Page 155
Load Carrying Special Loading Instructions for Owners of Pick-up Trucks and Utility-type Vehicles WARNING When loading the roof racks, we recommend you evenly distribute the load, as well as maintain a low center of gravity. Loaded vehicles, with higher centers of gravity, may handle differently than unloaded vehicles. -
Page 156: Towing
Do not tow with a WARNING slingbelt. Ford Motor Company has not approved a slingbelt towing procedure. If Your vehicle is not approved the vehicle is towed incorrectly, or by any for trailer towing.
-
Page 157
Towing You may do this under the following Vehicles with an Automatic conditions: Transmission — with Ignition Switch • Your vehicle is facing forward so that Note: There must be battery power to it is towed in a forward direction. properly move the transmission s internal •… -
Page 158
Towing 2. Switch the ignition on by pressing the keyless start button, but do not apply the brake pedal. 3. Press the brake pedal, then move the gearshift to the neutral position. Release the brake pedal. 4. Wait for a message indicating that the transmission is ready in the information and entertainment display, then switch the ignition off by pressing the keyless… -
Page 159: Driving Hints
Driving Hints There are also some things you may want BREAKING-IN to avoid doing because they reduce your fuel economy: You need to break in new tires for approximately 300 miles (480 • Avoid sudden or hard accelerations. kilometers). During this time, your vehicle •…
-
Page 160: Floor Mats
Driving Hints WARNINGS Always make sure that the floor mats are properly attached to the retention posts in the carpet that are supplied with your vehicle. Floor mats must be properly secured to both retention posts to make sure mats do not shift out of position.
-
Page 161: Installation Procedure
Driving Hints E142666 To install floor mats, position the floor mat so that the eyelet is over the retention post and press down to lock in. To remove the floor mat, reverse the installation procedure. Fiesta (CCT) Canada/United States of America, HE8J 19A321 AA enUSA, Edition date: 201607, First Printing…
-
Page 162: Roadside Emergencies
Towing — independent service contractors, if not prohibited by state, To fully assist you should you have a local or municipal law, shall tow Ford vehicle concern, Ford Motor Company of eligible vehicles to an authorized dealer Canada, Limited offers a complimentary within 35 mi (56 km) of the roadside assistance program.
-
Page 163: Hazard Warning Flashers
Canadian customers who require roadside repair fuel leaks after a collision may assistance, call 1-800-665-2006. increase the risk of fire and serious injury. Ford Motor Company recommends Vehicles Sold in Canada: Using that the fuel system be inspected by an Roadside Assistance authorized dealer after any collision.
-
Page 164: Jump Starting The Vehicle
Roadside Emergencies Note: When you try to restart your vehicle Note: Do not disconnect the battery of the after a fuel shutoff, the vehicle makes sure disabled vehicle as this could damage the that various systems are safe to restart. vehicle electrical system.
-
Page 165
Roadside Emergencies Jump Starting Start the engine of the booster vehicle and rev the engine moderately, or press the accelerator gently to keep your engine speed between 2000 and 3000 RPM, as shown in your tachometer. 2. Start the engine of the disabled vehicle. 3. -
Page 166
Roadside Emergencies 2. Remove the jumper cable on the negative (-) terminal of the booster vehicle battery. 3. Remove the jumper cable from the positive (+) terminal of the booster vehicle battery. 4. Remove the jumper cable from the positive (+) terminal of the disabled vehicle battery. -
Page 167: Customer Assistance
Mailing address perform a repair after taking your vehicle to the authorized dealer. Repairs will be Customer Relationship Centre made using Ford or Motorcraft® parts, or Ford Motor Company of Canada, Limited remanufactured or other parts that are P.O. Box 2000 authorized by Ford.
-
Page 168: In California (U.s. Only)
In some states within the United States, conform the vehicle to its applicable you must directly notify Ford in writing express warranties if, within the first 18 before pursuing remedies under your months of ownership of a new vehicle or…
-
Page 169: The Better Business Bureau (Bbb) Auto Line Program (U.s. Only)
BBB AUTO LINE During mediation, a representative of the 3033 Wilson Boulevard, Suite 600 BBB will contact both you and Ford Motor Arlington, Virginia 22201 Company to explore options for settlement of the claim. If an agreement is not reached…
-
Page 170: Utilizing The Mediation/Arbitration Program (Canada Only)
Before exporting your vehicle to a foreign Canadian dealers. In those cases where country, contact the appropriate foreign you continue to feel that the efforts by Ford embassy or consulate. These officials can of Canada and the authorized dealer to…
-
Page 171: Ordering Additional Owner’s Literature
(VIN) and new ORDERING ADDITIONAL address with Ford Global Trade Services OWNER’S LITERATURE by emailing, expcso@ford.com. If you are in another foreign country, To order the publications in this portfolio, contact the nearest authorized dealer.
-
Page 172: Reporting Safety Defects (U.s. Only)
However, Obtaining a French Owner’s NHTSA cannot become involved Manual in individual problems between you, your dealer, or Ford Motor French Owner’s Manual can be obtained Company. from your authorized dealer or by contacting Helm, Incorporated using the…
-
Page 173
Customer Assistance Transport Canada Contact Information Website www.tc.gc.ca/eng/motorvehiclesafety/safevehicles- defectinvestigations-index-76.htm (English) Website www.tc.gc.ca/fra/securiteautomobile/VehiculesSecuritaires- Enquetes-index-76.htm (French) Phone 1–800–333–0510 Ford of Canada Contact Information Website www.ford.ca Phone 1–800–565-3673 Fiesta (CCT) Canada/United States of America, HE8J 19A321 AA enUSA, Edition date: 201607, First Printing… -
Page 174: Fuses
Fuses FUSE SPECIFICATION CHART Engine Compartment Fuse Box E206972 E206971 Fuse Number Fuse Rating Protected Component Anti-lock brake system module. Stability assist. Fiesta (CCT) Canada/United States of America, HE8J 19A321 AA enUSA, Edition date: 201607, First Printing…
-
Page 175
Fuses Fuse Number Fuse Rating Protected Component Anti-lock brake system module. Cooling fan relay. High-speed cooling fan relay. Passenger compartment fuse box. Body control module. Power door locks. Not used. Blower motor relay. Blower motor. Not used. Not used. Front fog lamp relay. 7.5A Headlamp high beam relay. -
Page 176
Fuses Fuse Number Fuse Rating Protected Component Ignition coil. Ignition coil. Variable camshaft timing. Evaporative emission canister purge valve. R57, R45 and R50 relay coil. 7.5A ECSS system. Active grille shutter. Water pump. Air conditioning control module. Not used. Not used. Not used. -
Page 177
Fuses Fuse Number Fuse Rating Protected Component Air conditioning clutch. Powertrain control module. 7.5A Transmission control module. Evaporative emission canister purge valve. Left-hand front fog lamp. Right-hand front fog lamp. Left-hand high beam. Right-hand high beam. 1.0L EcoBoost. 1.0L and 1.6L EcoBoost. 1.6L Sigma. -
Page 178: Passenger Compartment Fuse Box
Fuses Relay Number Protected Component Reversing lamp. Cooling fan relay. 1.0L and 1.6L EcoBoost. Open the glove compartment and Passenger Compartment Fuse Box empty the contents. 2. Press the sides inward and swivel the The fuse box is behind the glove glove compartment downward.
-
Page 179
Fuses E156756 Fiesta (CCT) Canada/United States of America, HE8J 19A321 AA enUSA, Edition date: 201607, First Printing… -
Page 180
Fuses Fuse Number Fuse Rating Protected Component Ignition switch. Auto-dimming interior mirror. 7.5A Autowipers. Heater relay control. 7.5A Instrument cluster. Passenger airbag deactivation switch. 7.5A Passenger sensing system. Secondary on-board diagnostic control module. Reversing lamps. Instrument cluster. 7.5A Information and entertainment display. 7.5A Moonroof. -
Page 181
Fuses Fuse Number Fuse Rating Protected Component Ignition. Windshield wipers. Passive anti-theft system. Accelorator position sensor. Powertrain control module. 7.5A Anti-lock brake system. Stability assist. 7.5A Transmission control unit. 7.5A Audio unit. 7.5A Heated exterior mirrors. 7.5A Central locking system. Not used. -
Page 182: Changing A Fuse
Fuses Relay Number Protected Component Accessory mode remote keyless starting. Ignition mode remote keyless starting. Battery back-up sounder. Battery saver. Accessory delay. CHANGING A FUSE Fuses WARNING Always replace a fuse with one that has the specified amperage rating. E217331 Using a fuse with a higher amperage If electrical components in the vehicle are rating can cause severe wire damage and…
-
Page 183
Fuses Fuse Types E207206 Callout Fuse Type Micro 2 Micro 3 Maxi Mini M Case J Case J Case Low Profile Fiesta (CCT) Canada/United States of America, HE8J 19A321 AA enUSA, Edition date: 201607, First Printing… -
Page 184: Maintenance
Maintenance Working with the Engine On GENERAL INFORMATION WARNING Have your vehicle serviced regularly to help maintain its roadworthiness and resale To reduce the risk of vehicle damage value. There is a large network of and/or personal burn injuries, do not authorized dealers that are there to help start your engine with the air cleaner you with their professional servicing…
-
Page 185: Closing The Hood
Maintenance E163236 3. Move the catch to the left to release the hood. E87786 4. Open the hood and support it with the hood strut. Closing the Hood Remove the hood strut from the catch and secure it correctly in the clip. 2.
-
Page 186: Under Hood Overview — 1.0L Ecoboost
Maintenance UNDER HOOD OVERVIEW — 1.0L ECOBOOST E163005 Engine coolant reservoir : See Engine Coolant Check (page 188). Engine oil filler cap : See Engine Oil Check (page 186). Battery: See Changing the 12V Battery (page 193). Brake and clutch fluid reservoir : See Brake Fluid Check (page 192).
-
Page 187: Under Hood Overview — 1.6L Duratec-16V Ti-Vct (Sigma)
Maintenance UNDER HOOD OVERVIEW — 1.6L DURATEC-16V TI-VCT (SIGMA) E163006 Engine coolant reservoir : See Engine Coolant Check (page 188). Engine oil filler cap : See Engine Oil Check (page 186). Battery: See Changing the 12V Battery (page 193). Brake and clutch fluid reservoir : See Brake Fluid Check (page 192). Engine compartment fuse box: Windshield and rear window washer fluid reservoir: See Washer Fluid Check (page 193).
-
Page 188: Engine Oil Dipstick — 1.0L Ecoboost
Maintenance Make sure the parking brake is on. Make ENGINE OIL DIPSTICK — 1.0L sure the transmission is in park (P) or ECOBOOST neutral (N). 2. Run the engine until it reaches normal operating temperature. 3. Make sure that your vehicle is on level ground.
-
Page 189: Oil Change Indicator Reset
5. After 25 seconds, a message Turn it counterclockwise and remove confirming that the reset is complete will be displayed. 3. Add engine oil that meets Ford 6. Release the accelerator and brake specifications. See Capacities and pedals. Specifications (page 250). You may…
-
Page 190: Engine Cooling Fan
Maintenance Maintain coolant concentration within ENGINE COOLING FAN 48% to 50%, which equates to a freeze point between -30°F (-34°C) and -34°F WARNING (-37°C). Coolant concentration should be Keep your hands and clothing clear checked using a refractometer. We do not of the engine cooling fan.
-
Page 191
Maintenance Note: Coolants marketed for all makes and Note: In case of emergency, you can add a models may not be approved to Ford large amount of water without coolant in specifications and may cause damage to order to reach a vehicle service location. -
Page 192
Maintenance Severe Climates A warning lamp illuminates and a message may appear in the If you drive in extremely cold climates: information display. • It may be necessary to increase the coolant concentration above 50%. • A coolant concentration of 60% provides improved freeze point If the engine reaches a preset protection. -
Page 193
Maintenance Your vehicle has limited engine power At this time, you may notice the coolant when in the fail-safe mode, drive your temperature gauge moves toward the red vehicle with caution. Your vehicle does not zone and a message may appear in the maintain high-speed operation and the information display. -
Page 194: Automatic Transmission Fluid Check
Only use brake fluid from a sealed container. Contamination with dirt, Only use fluid that meets Ford water, petroleum products or other specifications. See Capacities and materials may result in brake system Specifications (page 243).
-
Page 195: Washer Fluid Check
Maintenance WASHER FLUID CHECK WARNINGS Battery posts, terminals and related Note: The reservoir supplies the front and accessories contain lead and lead rear washer systems. compounds. Wash hands after handling. When adding fluid, use a mixture of washer fluid and water to help prevent freezing in For vehicles with Auto-Start-Stop cold weather and improve the cleaning the battery requirement is different.
-
Page 196: Checking The Wiper Blades
If a replacement battery is required, we or arcing. recommend you use a Ford replacement Note: Make sure the battery cable terminals battery that matches the electrical are fully tightened. requirements of your vehicle.
-
Page 197: Changing The Front Wiper Blades
Maintenance CHANGING THE FRONT WIPER BLADES Note: Do not hold the wiper blade when lifting the wiper arm. Note: Make sure that the wiper arm does not spring back against the glass when the wiper blade is not attached. E130060 2.
-
Page 198
Maintenance Headlamp Aiming Target E142465 4. On the wall or screen you will observe E142592 a flat zone of high intensity light located at the top of the right hand 8 feet (2.4 meters) portion of the beam pattern. If the top Center height of lamp to ground edge of the high intensity light zone is 25 feet (7.6 meters) -
Page 199: Removing A Headlamp
Maintenance 5. Locate the vertical adjuster on each headlamp. Using a Phillips #2 screwdriver, turn the adjuster either clockwise or counterclockwise in order to adjust the vertical aim of the headlamp. The horizontal edge of the brighter light should touch the horizontal reference line.
-
Page 200
Maintenance Headlamp Note: Remove the covers to gain access to the bulbs. E159827 Side marker Headlamp low beam E146803 Headlamp high beam 2. Remove the cover. Direction indicator 3. Disconnect the electrical connector. 4. Release the clip and remove the bulb. Side Marker Note: Do not touch the glass of the bulb. -
Page 201
Maintenance Side Direction Indicator 3. Turn the bulb counterclockwise and remove it. Note: Do not touch the glass of the bulb. Direction Indicator Remove the headlamp. See Removing a Headlamp (page 197). E112777 Press the side of the cover to release the clips. -
Page 202: Rear Lamps
Maintenance Front Fog Lamps E161665 Remove the retaining clips to gain access to the lamp assembly. E161670 5. Disconnect the electrical connector. 6. Turn the bulb holder counterclockwise and remove it. Rear Lamps Brake, Tail and Direction Indicator Lamps Remove the trim and disconnect the electrical connector.
-
Page 203
Maintenance Remove the trim panel and disconnect the electrical connector. E161816 3. Unclip the bulb holder and remove it. 4. Remove the bulb. E161817 2. Loosen the wing nut and carefully pull out the rear lamp. E161793 Reversing Lamp E163004 3. -
Page 204
Maintenance License Plate Lamp Reading Lamps E72789 Carefully release the spring clip. E99453 2. Remove the lamp. Carefully remove the lamp. 3. Turn the bulb counterclockwise and 2. Turn the bulb holder counterclockwise remove it. and remove it. Interior Lamp 3. -
Page 205: Changing A Bulb — 5-Door
Maintenance CHANGING A BULB — 5-DOOR WARNINGS Switch the lamps and the ignition off. Let the bulb cool down before removing it. Do not touch the glass of the bulb. Note: Only fit bulbs of the correct specification. E161707 Note: The following instructions describe 2.
-
Page 206
Maintenance Headlamp High Beam Remove the headlamp. See Removing a Headlamp (page 197). E146805 2. Turn the bulb holder counterclockwise and remove it. E146804 3. Gently press the bulb into the bulb holder, turn it counterclockwise and 2. Remove the cover. remove it. -
Page 207
Maintenance Press the side of the cover to release the clips. 2. Remove the cover. E161667 Note: You cannot separate the fog lamp bulb from the bulb holder. E112778 2. Using a suitable implement, remove 3. Remove the bulb and bulb holder. the cover. -
Page 208
Maintenance 5. Disconnect the electrical connector. 6. Turn the bulb holder counterclockwise and remove it. Rear Lamps E146871 4. Gently press the bulb into the bulb holder, turn it counterclockwise and remove it. A. Indicator B. Tail and brake E102854 C. -
Page 209: Luggage Compartment Lamp
Maintenance Interior Lamp Carefully remove the lamp. 2. Turn the bulb holder counterclockwise and remove it. 3. Remove the bulb. Luggage Compartment Lamp, Footwell Lamp and Liftgate Lamp E99452 Carefully remove the lamp. 2. Turn the bulb holder counterclockwise and remove it. 3.
-
Page 210: Bulb Specification Chart
Maintenance BULB SPECIFICATION CHART Exterior Lamps Lamp Specification Power (watt) Front direction indicator. PY27/7 27/7 Headlamp low beam. Headlamp high beam. H1LL Front fog lamp. Side direction indicator. WY5W Rear lamp, brake lamp and rear direc- PY27/7 27/7 tion indicator. Reversing lamp.
-
Page 211: Changing The Engine Air Filter
Maintenance Vehicles with 1.0L EcoBoost and 1.6L CHANGING THE ENGINE AIR EcoBoost Engine FILTER WARNING To reduce the risk of vehicle damage and personal burn injuries, do not start your engine with the air cleaner removed and do not remove it while the engine is running.
-
Page 212: Drive Belt Routing — 1.0L Ecoboost
Maintenance 5. Install a new air filter element. Be careful not to crimp the filter element edges between the air filter housing and cover. This could cause filter damage and allow unfiltered air to enter the engine if not correctly seated. 6.
-
Page 213: Vehicle Care
Vehicle Care For best results, use the following products CLEANING PRODUCTS or products of equivalent quality: Materials Name Specification Motorcraft® Bug and Tar Remover (U.S.) Motorcraft® Bug and Tar Remover / Dissolvant de goudron et éliminateur d’insectes (Canada) ZC-42 (U.S. & Canada) Motorcraft®…
-
Page 214: Cleaning The Exterior
Vehicle Care Name Specification Motorcraft® Wheel and Tire Cleaner (U.S.) Wheel and Tire Cleaner / Nettoyant pour roues et pneus (Canada) ZC-37-A (U.S. & Canada) Exterior Chrome Parts CLEANING THE EXTERIOR • Apply a high quality-cleaning product to bumpers and other chrome parts. Wash your vehicle regularly with cool or Follow the manufacturer’s instructions.
-
Page 215: Waxing
Vehicle Care Note: Holding the pressure washer nozzle • Do not allow wax to come in contact at an angle to the vehicle’s surface may with any non-body (low-gloss black) damage graphics and cause the edges to colored trim. The wax will discolor or peel away from the vehicle’s surface.
-
Page 216: Cleaning The Windows And Wiper Blades
Vehicle Care • Never wash or rinse any ignition coil, CLEANING THE INTERIOR spark plug wire or spark plug well, or the area in and around these locations. WARNINGS • Cover the battery, power distribution Do not use cleaning solvents, bleach box, and air filter assembly to prevent or dye on the vehicle’s safety belts, water damage when cleaning the…
-
Page 217: Cleaning The Instrument Panel And Instrument Cluster Lens
Vehicle Care Wipe up spilled liquid using a clean, CLEANING THE INSTRUMENT soft cloth as quickly as possible. PANEL AND INSTRUMENT 2. Use Motorcraft Premium Leather and CLUSTER LENS Vinyl Cleaner or a commercially available leather cleaning product for WARNING automotive interiors.
-
Page 218: Repairing Minor Paint Damage
You should repair paintwork damage have completed the cleaning process. caused by stones from the road or minor We recommend that you use Ford service scratches as soon as possible. A choice of wheel cleaner. Make sure that you read products are available from an authorized and follow the manufacturer’s instructions.
-
Page 219
Vehicle Care General • With your foot on the brake, shift through all the gears while the engine • Store all vehicles in a dry, ventilated is running. place. • We recommend that you change the • Protect from sunlight, if possible. engine oil before you use your vehicle again. -
Page 220
Vehicle Care Miscellaneous • Make sure all linkages, cables, levers and pins under your vehicle are covered with grease to prevent rust. • Move vehicles at least 25 ft (7.5 m) every 15 days to lubricate working parts and prevent corrosion. Removing Vehicle From Storage When your vehicle is ready to come out of storage, do the following:… -
Page 221: Wheels And Tires
Wheels and Tires Note: Your vehicle s warranty does GENERAL INFORMATION not cover these types of damage. Tires should always be kept at the A decal with tire pressure data is located in the driver’s door opening. correct inflation pressures and extra caution should be taken when Check and set the tire pressure at the operating on rough roads to avoid…
-
Page 222
Transportation Tire quality to lowest are AA, A, B, and C. The grades: The U.S. Department of grades represent the tire’s ability Transportation requires Ford to stop on wet pavement as Motor Company to give you the measured under controlled… -
Page 223
Wheels and Tires test wheel. Sustained high *Extra load: A class of P-metric temperature can cause the or Metric tires designed to carry a material of the tire to degenerate heavier maximum load at 42 psi and reduce tire life, and excessive (2.9 bar). -
Page 224
Wheels and Tires * Tread area of the tire: Area of Information on P Type Tires the perimeter of the tire that contacts the road when mounted on the vehicle. *Rim: The metal support (wheel) for a tire or a tire and tube assembly upon which the tire beads are seated. -
Page 225
Wheels and Tires B. 215: Indicates the nominal Note: You may not find this width of the tire in millimeters information on all tires because it from sidewall edge to sidewall is not required by federal law. edge. In general, the larger the number, the wider the tire. -
Page 226
Wheels and Tires the tire size code and the last four *Treadwear The treadwear grade numbers represent the week and is a comparative rating based on year the tire was built. For the wear rate of the tire when example, the numbers 317 mean tested under controlled conditions the 31st week of 1997. -
Page 227
Wheels and Tires that meets the door-latch post, A. LT: Indicates a tire, designated next to the driver’s seating by the Tire and Rim Association position), or Tire Label which is (T&RA), that is intended for located on the B-Pillar or the edge service on light trucks. -
Page 228
Inflate all tires to the edge. In general, the larger the inflation pressure recommended number, the wider the tire. by Ford Motor Company. Fiesta (CCT) Canada/United States of America, HE8J 19A321 AA enUSA, Edition date: 201607, First Printing… -
Page 229
Ford post, next to the driver’s seating recommends the use of a digital position), or Tire Label which is… -
Page 230
Wheels and Tires When weather temperature 3. Add enough air to reach the changes occur, tire inflation recommended air pressure. pressures also change. A 10°F Note: If you overfill the tire, release (6°C) temperature drop can air by pressing on the metal stem cause a corresponding drop of 1 in the center of the valve. -
Page 231
Wheels and Tires Inspecting Your Tires and Tire Wear Wheel Valve Stems Periodically inspect the tire treads for uneven or excessive wear and remove objects such as stones, nails or glass that may be wedged in the tread grooves. Check the tire and valve stems for holes, cracks, or cuts that may permit air leakage and repair or replace the… -
Page 232
Wheels and Tires or suspected have the tire U.S. DOT Tire Identification inspected by a tire professional. Number (TIN) Tires can be damaged during Both U.S. and Canada Federal off-road use, so inspection after regulations require tire off-road use is also manufacturers to place recommended. -
Page 233
20 psi (1.38 bar) and wheels that are the same greater than the maximum size, load index, speed rating and pressure, a Ford dealer or other type (such as P-metric versus tire service professional should do LT-metric or all-season versus the mounting. -
Page 234
The use of wheels or tires not you may eventually have a flat tire recommended by Ford Motor on the highway. Drive slowly to the Company may affect the closest safe area out of traffic. -
Page 235
Wheels and Tires Tire and Wheel Alignment Note: Your vehicle may be equipped with a dissimilar spare A bad jolt from hitting a curb or wheel and tire assembly. A pothole can cause the front end dissimilar spare wheel and tire of your vehicle to become assembly is defined as a spare misaligned or cause damage to… -
Page 236: Using Summer Tires
Wheels and Tires Sometimes irregular tire wear can USING WINTER TIRES be corrected by rotating the tires. WARNING USING SUMMER TIRES When you use winter tires on your vehicle, you must make sure that you Summer tires provide superior use the correct lug nuts. performance on wet and dry roads.
-
Page 237
Wheels and Tires As an added safety feature, your vehicle This device complies with Part 15 of the has been equipped with a Tire Pressure FCC Rules and with Industry Canada Monitoring System (TPMS) that license-exempt RSS standard(s). illuminates a low tire pressure telltale Operation is subject to the following two when one or more of your tires is conditions:… -
Page 238
Wheels and Tires Understanding Your Tire Pressure When Your Temporary Spare Tire is Monitoring System Installed When one of your road tires needs to be The tire pressure monitoring system replaced with the temporary spare, the measures pressure in your four road tires system will continue to identify an issue to and sends the tire pressure readings to remind you that the damaged road wheel… -
Page 239
Wheels and Tires Low tire pressure Possible cause Customer action required warning light Solid warning light Tire(s) under-inflated Make sure tires are at the proper pres- sure. See Inflating your tires in this chapter. After inflating your tires to the manufacturer’s recommended pressure as shown on the Tire Label (located on the edge of driver’s door or the B-Pillar),… -
Page 240: Changing A Road Wheel
Ford Tire Mobility Kit sealant should be and wheels that were originally provided used. The tire pressure monitoring system by Ford. If the dissimilar spare tire or wheel sensor and valve stem on the wheel must is damaged, it should be replaced rather be replaced by an authorized dealer after than repaired.
-
Page 241
Wheels and Tires 1. T-type mini-spare: This spare tire The usage of a full-size dissimilar spare begins with the letter T for tire size and wheel and tire assembly can lead to may have Temporary Use Only molded in impairment of the following: the sidewall. -
Page 242
Wheels and Tires WARNINGS Do not attempt to change a tire on the side of the vehicle close to moving traffic. Pull far enough off the road to avoid the danger of being hit when operating the jack or changing the wheel. Always use the jack provided as original equipment with your vehicle. -
Page 243
Wheels and Tires E145908 Indentations in the sills show the location of the jacking points. E90589 Remove the jack and fully tighten the lug nuts in the order shown. See Technical Specifications (page 242). Stowing the Flat Tire E142553 The full-size road wheel can be stowed in Remove the lug nuts with the lug the spare tire compartment. -
Page 244: Technical Specifications
Ib-ft (Nm) M12 x 1.5 100 (135) Torque specifications are for nut and bolt threads free of dirt and rust. Use only Ford recommended replacement fasteners. Retighten the lug nuts to the specified torque within 100 miles (160 kilometers) after any wheel disturbance (such as tire rotation, changing a flat tire, wheel removal).
-
Page 245: Capacities And Specifications
Capacities and Specifications ENGINE SPECIFICATIONS — ENGINE SPECIFICATIONS — 1.0L ECOBOOST 1.6L DURATEC-16V TI-VCT (SIGMA) Specification Specification Cubic inches. Cubic inches. Compression ratio. 10:1 Compression ratio. 11:1 Spark plug gap. 0.026–0.030 in (0.65–0.75 mm) Spark plug gap. 0.028–0.031 in (0.7–0.8 mm) Required fuel.
-
Page 246: Transmission Specifications — 1.6L Duratec-16V Ti-Vct (Sigma), Automatic Transmission
Capacities and Specifications TRANSMISSION SPECIFICATIONS — 1.6L DURATEC-16V TI-VCT (SIGMA), AUTOMATIC TRANSMISSION Gear Ratios Item Ratio 1st gear 3.917:1 2nd gear 2.429:1 3rd gear 1.436:1 4th gear 1.021:1 5th gear 0.867:1 6th gear 0.702:1 Reverse gear 3.507:1 Final drive: 1st, 2nd, 5th and 6th gears 4.105:1 Final drive: 3rd, 4th and reverse gears 4.588:1…
-
Page 247: Transmission Specifications — 5-Speed Manual Transmission
Capacities and Specifications TRANSMISSION SPECIFICATIONS — 5-SPEED MANUAL TRANSMISSION Gear Ratios Item Ratio 1st gear 3.846:1 2nd gear 2.038:1 3rd gear 1.281:1 4th gear 0.951:1 5th gear 0.756:1 Reverse gear 3.615:1 Final drive 4.07:1 Fiesta (CCT) Canada/United States of America, HE8J 19A321 AA enUSA, Edition date: 201607, First Printing…
-
Page 248: Motorcraft Parts — 1.0L Ecoboost
MOTORCRAFT PARTS — 1.0L ECOBOOST Incorrect component use can cause damage not covered by the vehicle Warranty. The Ford Warranty may not We recommend that you demand the use cover damage caused to your vehicle as a of genuine Ford and Motorcraft parts result of failed non-Ford parts.
-
Page 249: Motorcraft Parts — 1.6L Duratec-16V Ti-Vct (Sigma)
DURATEC-16V TI-VCT (SIGMA) Incorrect component use can cause damage not covered by the vehicle Warranty. The Ford Warranty may not We recommend that you demand the use cover damage caused to your vehicle as a of genuine Ford and Motorcraft parts result of failed non-Ford parts.
-
Page 250: Vehicle Identification Number
Capacities and Specifications VEHICLE IDENTIFICATION NUMBER The vehicle identification number is located on the left-hand side of the instrument panel. E142477 World manufacturer identifier Brake system, Gross Vehicle Weight Rating, Restraint Devices and their locations Make, vehicle line, series, body type Engine type Check digit…
-
Page 251: Vehicle Certification Label
Capacities and Specifications VEHICLE CERTIFICATION TRANSMISSION CODE LABEL DESIGNATION E167469 The National Highway Traffic Safety Administration Regulations require that a Safety Compliance Certification Label be E142806 affixed to a vehicle and prescribe where The transmission code is on the Safety the Safety Compliance Certification Label Compliance Certification Label.
-
Page 252: Capacities And Specifications — 1.0L Ecoboost
Capacities and Specifications CAPACITIES AND WARNING SPECIFICATIONS — 1.0L The air conditioning refrigerant system contains refrigerant under ECOBOOST high pressure. Only qualified personnel should service the air conditioning refrigerant system. Opening the air conditioning refrigerant system can cause personal injury. Capacities Item Capacity…
-
Page 253
Capacities and Specifications Name Specification XO-5W20-QFS (U.S.) CXO-5W20-LFS12 (Canada) Motorcraft® Orange Prediluted Antifreeze/Coolant (U.S.) WSS-M97B44-D2 Orange Prediluted Antifreeze/Coolant / Antigel/liquide de refroidissement prédilué orange (Canada) VC-3DIL-B (U.S.) CVC-3DIL-B (Canada) Motorcraft® Dual Clutch Transmission Fluid (U.S.) WSS-M2C200-D2 Dual Clutch Transmission Fluid / Huile pour boîtes embrayage double (Canada) XT-11-QDC (U.S. -
Page 254
Capacities and Specifications Motor oils of the recommended viscosity Note: Do not use more than 1.1 qt (1 L) of grade that meet API SN requirements and the alternative engine oil between display the API Certification Mark for scheduled service intervals. gasoline engines are also acceptable. -
Page 255: Capacities And Specifications — 1.6L Duratec-16V Ti-Vct (Sigma)
Capacities and Specifications E240522 CAPACITIES AND SPECIFICATIONS — 1.6L DURATEC-16V TI-VCT (SIGMA) WARNING The air conditioning refrigerant system contains refrigerant under high pressure. Only qualified personnel should service the air conditioning refrigerant system. Opening the air conditioning refrigerant system can cause personal injury.
-
Page 256
Capacities and Specifications Item Capacity Air conditioning refrigerant compressor oil fill capacity. 5.1 fl oz (150 ml) Fuel tank fill capacity. 12.4 gal (47 L) Washer system fill capacity. 0.7 gal (2.5 L) Adding Engine Oil Quantity 0.7 qt (0.7 L) The quantity of engine oil required to raise the indicated level on the dipstick from minimum to maximum. -
Page 257
Capacities and Specifications Name Specification CYN-16-R (Canada) Motorcraft® PAG Refrigerant Compressor Oil (U.S.) WSH-M1C231-B PAG Refrigerant Compressor Oil / Huile PAG pour compresseur frigorifique (Canada) YN-12-D (U.S. & Canada) Motorcraft® Premium Windshield Wash Concentrate with Bitterant WSS-M14P19-A (U.S.) Premium Quality Windshield Washer Fluid / Liquide lave-glace de haute qualité… -
Page 258
Capacities and Specifications Alternative Engine Oil for Extreme Do not use supplemental engine oil Cold Climates additives because they are unnecessary and could lead to engine damage that may To improve engine cold start performance, not be covered by the vehicle Warranty. we recommend that you use the following alternative engine oil in extreme cold climates, where the ambient temperature… -
Page 259: Audio System
There are two different modes for MP3 compact discs may not function correctly and WMA disc playback: MP3 and when used in Ford CD players. WMA track mode (system default) and Note: Do not insert CDs with homemade MP3 and WMA folder mode.
-
Page 260: Audio Unit — Vehicles With: Am/Fm/Cd
Audio System • MP3 and WMA folder mode represents In track mode, the system displays and a folder structure consisting of one plays the structure as if it were only one level of folders. The CD player numbers level deep (all MP3 and WMA files play, all MP3 and WMA tracks on the disc regardless of being in a specific folder).
-
Page 261
Audio System E156613 Eject: Press the button to eject a CD. Cursor arrows: Press a button to scroll through on-screen choices. CD slot: Where you insert a CD. OK: Press the button to confirm on-screen selections. Clock: Press to set the time. Use the H and M buttons outside the audio display to adjust the hours and minutes. -
Page 262
Audio System On, Off and Volume: Press the button to switch the audio system on or off. Turn the dial to adjust the volume. Seek down: Press the button to go to the next station down the radio frequency band or the previous track on a CD. MENU: Press the button to access different audio system features. -
Page 263
Audio System 4. Press OK to continue listening to a 2. Select Spd. Comp. Vol. station. 3. Use the left or right arrow button to adjust the setting. Station Preset Buttons 4. Press the OK button to confirm your This feature allows you to store your selection. -
Page 264: Audio Unit — Vehicles With: Am/Fm/Cd/Sync
Audio System Note: An integrated multi function display AUDIO UNIT — VEHICLES WITH: is situated above the unit. This shows AM/FM/CD/SYNC important information regarding control of your system. Additionally, there are various WARNING icons placed around the display screen which light up when a function is active, for Driving while distracted can result in example CD, Radio or Aux.
-
Page 265
Audio System Eject: Press the button to eject a CD. Cursor arrows: Press a button to scroll through on-screen choices. CD slot: Where you insert a CD. OK: Press the button to confirm on-screen selections. INFO: Press the button to access radio, CD, USB and IPod information. TUNE -: Press the button to manual tune down the waveband. -
Page 266
Audio System You can use the selector to return to radio reception when you have been listening to another source. Alternatively, press the left arrow button to display the available wavebands. Scroll to the required waveband and press OK. Station Tuning Control Seek Tuning Select a waveband and briefly press one of the seek buttons. -
Page 267
Audio System Alternative Frequencies 3. Press and hold one of the preset buttons. A progress bar and message The majority of programs that broadcast will appear. When the progress bar on the FM waveband have a program completes the station has been stored. identification code, it can be recognized by The audio unit will also mute audio units. -
Page 268: Audio Unit — Vehicles With: Sony Audio System/Touchscreen Display
Audio System AUDIO UNIT — VEHICLES WITH: WARNING SONY AUDIO SYSTEM/ Driving while distracted can result in loss of vehicle control, crash and TOUCHSCREEN DISPLAY injury. We strongly recommend that you use extreme caution when using any device that may take your focus off the road.
-
Page 269
Audio System E156663 On, Off: Press the button to switch the audio system on or off. CD Slot Where you insert a CD. TUNE +: In radio mode, press this button to manually search forward through the radio frequency band. In SIRIUS mode, press this button to find the next available satellite radio station. -
Page 270: Audio Unit — Vehicles With: Touchscreen Display
Audio System SOUND: Press the button to adjust the sound settings for bass, treble, middle, balance and fade. Volume Turn the dial to adjust the volume. TUNE -: In radio mode, press this button to manually search backward through the radio frequency band. In SIRIUS mode, press this button to find the previous available satellite radio station.
-
Page 271: Digital Radio
Audio System E156662 TUNE: Press these buttons when in radio mode to manually search up or down through the radio frequency band. In SIRIUS mode, press these buttons to find the next or previous available satellite radio station. Eject: Press the button to eject a CD. DISP: Press the button to turn the display into idle mode.
-
Page 272
Audio System than analog broadcasts with free, When HD Radio broadcasts are active, you crystal-clear audio and no static or can access the following functions: distortion. For more information, and a • Scan allows you to hear a brief guide to available stations and sampling of all available stations. -
Page 273
Audio System In order to provide the best possible technology. Independent entities own and experience, use the contact form to report operate each station. These stations are any station issues found while listening to responsible for ensuring all audio streams a station broadcasting with HD Radio and data fields are accurate. -
Page 274: Satellite Radio
SIRIUS® broadcasts a variety of music, HD Radio logos are proprietary trademarks news, sports, weather, traffic and of iBiquity Digital Corp. Ford Motor entertainment satellite radio channels. For Company and iBiquity Digital Corp. are not more information and a complete list of…
-
Page 275
Audio System SIRIUS satellite radio is a For more information on extended subscription-based satellite radio service subscription terms (a service fee is that broadcasts a variety of music, sports, required), the online media player and a news, weather, traffic and entertainment complete list of SIRIUS satellite radio programming. -
Page 276: Audio Input Jack
Audio System Message Condition Action Questions? Call Your satellite service is no Contact SIRIUS at 1-888- longer available. 539-7474 to resolve 1-888-539-7474 subscription issues. None found All the channels in the Use the channel guide to selected category are either turn off the Lock or Skip Check Channel Guide skipped or locked.
-
Page 277: Usb Port
Audio System 4. Adjust the volume as desired. The USB port allows you to plug in media playing devices, memory sticks and charge 5. Switch your portable music player on devices (if supported). See Using and adjust its volume to half its SYNC With Your Media Player (page maximum level.
-
Page 278: Sync
SYNC (If Equipped) GENERAL INFORMATION E198355 • Text message. SYNC is an in-vehicle communications system that works with your • Use the advanced voice recognition Bluetooth-enabled cellular phone and system. portable media player. This allows you to: • Charge your USB device (if your device •…
-
Page 279
SYNC (If Equipped) Monday-Saturday, 8:30am-9:00pm EST. When using SYNC: • Do not operate playing devices if the Sunday, 10:30am-7:30pm EST. power cords or cables are broken, split In the United States, call 1-800-392-3673. or damaged. Place cords and cables In Canada, call 1-800-565-3673. out of the way, so they do not interfere with the operation of pedals, seats, Times are subject to change due to… -
Page 280: Using Voice Recognition
Make sure the interior of your vehicle is vehicle’s SYNC module. Ford Motor as quiet as possible. Wind noise from Company and Ford of Canada will not open windows and road vibrations may access the system data for any purpose…
-
Page 281
SYNC (If Equipped) Voice command If you want the system to carry out the following Voice Settings | Voice Adjust the level of voice interaction and feedback. Preferences Help Hear a list of voice commands available in the current mode. You can say any of the voice commands that appear within open and close brackets that are separated by |. -
Page 282
SYNC (If Equipped) Confirmation prompts are short questions correct?». If turned off, the system simply the system asks when it is not sure of your makes a best guess as to what you request or when there are multiple possible requested and may ask you to confirm responses to your request. -
Page 283: Using Sync With Your Phone
SYNC (If Equipped) Other features, such as text messaging USING SYNC WITH YOUR using Bluetooth and automatic phonebook PHONE download, are cell phone-dependent features. To check your cell phone’s Hands-free calling is one of the main compatibility, see your cell phone’s manual features of SYNC.
-
Page 284
SYNC (If Equipped) Pairing Subsequent Cell Phones Depending on your cell phone’s capability and your market, the system may prompt Note: To scroll through the menus, press you with questions, such as setting the the up and down arrows on your audio current cell phone as the primary cell system. -
Page 285
SYNC (If Equipped) Voice Command You can also say any of the following: [Phone] Settings [Message] Notification Voice Command Call ___ [Phone] Settings [Message] Notification Call ___ at Home [Phone] Settings [Set] Phone Ringer Call ___ at Work [Phone] Settings [Set] Ringer 1 Call ___ in Office [Phone] Settings [Set] Ringer 2 Call ___ on Mobile… -
Page 286
SYNC (If Equipped) Making a Call Press the voice button and when prompted say: Voice Command Action and Description Call ___ This command is not available until your cell phone informa- tion is completely downloaded using Bluetooth. Dial Use to enter a phone number digit by digit. When the system confirms the number say one of the following commands: Dial To confirm the number and initiate the call. -
Page 287
SYNC (If Equipped) Message Action and Description Press the phone button. 2. Access the desired contact through SYNC or use voice commands to place the second call. Once actively in the second call, press MENU. 3. Scroll to Join Calls, and press the OK button. Wait until the following message appears. -
Page 288
SYNC (If Equipped) Press the phone button to enter the Phone Menu, then scroll to: Message Action and Description PHONE REDIAL Press the OK button to redial the last number called. Press the OK button again to confirm. PHONE REDIAL Access any previously dialed, received or missed calls after you connect your Bluetooth-enabled cell phone to SYNC. -
Page 289
SYNC (If Equipped) Message Action and Description Repeat entering letters to narrow your search. When you are satisfied with your entry press the right arrow key on the bezel. SYNC will jump to the phonebook contact name that matches your entry. Press OK. -
Page 290
SYNC (If Equipped) Message Action and Description SYS SETTINGS Access Bluetooth Devices menu listings and advanced menu listings. EXIT MENU Press the OK button to exit the phone menu. This is a cell phone-dependent feature. This is a cell phone-dependent and speed-dependent feature. This is an optional feature and available in the United States only. -
Page 291
6. Press the OK button again when the system asks if you would like to send the message. The system sends each text message with the following signature: This message was sent from my Ford. Fiesta (CCT) Canada/United States of America, HE8J 19A321 AA enUSA, Edition date: 201607, First Printing… -
Page 292
SYNC (If Equipped) Message Action and Description DOWNLOAD MSG Allows you to download your unread messages to SYNC. To download the messages, press the OK button to select. The display indicates the system is downloading your messages. When downloading is complete, SYNC returns you to the inbox. -
Page 293
SYNC (If Equipped) Message Action and Description Press the OK button then select one of the following and press the OK button again to confirm. MSG NTFY ON MSG NTFY OFF MODIFY Modify the contents of your phone book (such as add, delete, down- PHONEBOOK load). -
Page 294
SYNC (If Equipped) Press the Phone button to enter the Phone Menu, then scroll to: Message Action and Description SYS SETTINGS Press the OK button. BT DEVICES Press the OK button. Select one of the following: ADD DEVICE See Using SYNC With Your Phone (page 281). -
Page 295
SYNC (If Equipped) Advanced and set prompts, languages, defaults, perform a master reset, install an The Advanced menu allows you to access application and view system information. To access the advanced menu, press the phone button to enter the Phone Menu, the scroll to: Message Action and Description… -
Page 296: Sync Applications And Services
SYNC (If Equipped) Message Action and Description CONFIRM REBOOT? Press OK to select. You only need to press the OK button once. SYNC will be unre- sponsive for 2-4 minutes while it is rebooting. Wait 2-4 minutes before attempting to execute a SYNC command INSTALL APP Install applications you have downloaded.
-
Page 297
SYNC (If Equipped) Note: Before setting this feature on, make If a crash deploys an airbag (excluding sure that you read the 911 Assist Privacy knee airbags and rear inflatable safety Notice later in this section for important belts [if equipped]) or activates the fuel information. -
Page 298
SYNC (If Equipped) • A connected Bluetooth-enabled phone 911 Assist May Not Work If must have adequate network coverage, • Your cellular phone or 911 Assist battery power and signal strength. hardware sustains damage in a crash. • The vehicle must have battery power •… -
Page 299
Action and Description Vehicle Health (Report) The system will run a vehicle health report of your vehicle’s diagnostic systems and send the results to Ford where it combines with scheduled maintenance information, open recalls, other field service actions and vehicle inspection items that still need servicing by an authorized dealer. -
Page 300
Run Report Press the OK button for SYNC to run a health report of your vehicle’s diagnostic systems and send the results to Ford where it combines with scheduled maintenance information, open recalls, other field service actions and vehicle inspection items that still need servicing by an authorized dealer. -
Page 301
Maps www.SYNCMyRide.com. If you do not want used by this system may be inaccurate Ford or its service providers to collect your because of errors, changes in roads, traffic vehicle travel information or other conditions or driving conditions. -
Page 302
SYNC (If Equipped) Voice command Action and Description Services To return to the Services main menu. help Receive system help. You can say any of the voice commands that appear within open and close brackets that are separated by |. For example, where (options | choices) appears you say either; options or choices. -
Page 303
SYNC (If Equipped) Receiving Turn-by-Turn Directions When connected to SYNC Services, press the voice button and when prompted say: Voice command Action and Description Directions To receive directions to a location. Once you select your destination, the system uploads your current vehicle location, calculates a route based on current traffic conditions and sends it back to your vehicle. -
Page 304: Sync Applink
SYNC (If Equipped) Disconnecting from SYNC Services To disconnect from SYNC services, say: Voice command Action and Description Goodbye From the SYNC Services main menu, or press and hold the phone button on the steering wheel. SYNC Services quick tips SYNC Services quick tips Personalizing You can personalize your Services feature to provide quicker…
-
Page 305
SYNC (If Equipped) To Access Using the Phone Menu For more information, please visit: Press the phone button to access the Website SYNC phone menu on-screen. You can then scroll to: www.SYNCMyRide.com Menu item To Access Using the Media Menu Mobile Apps Press OK to access a list Press the AUX button on the center… -
Page 306: Player
SYNC (If Equipped) To Access Using Voice Commands Press the voice button and when prompted say: Voice command Action and description Mobile Apps Say the name of the application after the tone. The app should start. While an app is running through SYNC, you can press the voice button and speak commands specific to the app, for example, «Playlist Road Trip».
-
Page 307
SYNC (If Equipped) To Connect Using the System Menu USB Port (page 275). Press the AUX button, then the Menu Plug the device into the USB port. See button to enter the Media Menu. You can then scroll to: Message Action and Description SELECT SRC Press the OK button. -
Page 308
SYNC (If Equipped) Press the voice button and when prompted say: Voice command Action and Description Whats This? | Whats The system reads the metadata tags of the playing track, Playing? and if the metadata tags are populated, the system will tell you what track is playing. -
Page 309
SYNC (If Equipped) Bluetooth Audio Command Guide Voice command Press the voice button and say: Search The system searches for a Track ___ specific artist/track/album Voice command | Search from the music indexed Song ___ through the USB port. Bluetooth Audio Refine This allows you to make You can then say any of the following:… -
Page 310
SYNC (If Equipped) You can then scroll to: Message Action and Description PLAY MENU Play your music by artist, album, genre, playlists, tracks, similar music or to simply, play all. You can also choose to Explore USB to view the supported digital music files on your playing device. -
Page 311
SYNC (If Equipped) Message Action and Description APPLICATIONS Interact with SYNC-capable mobile applications on your smartphone. SYS SETTINGS Access available Bluetooth Device menu listings as well as Advanced menu listings. EXIT MENU Press OK to exit the media menu. The time required to complete this depends on the size of the media the system needs to index. -
Page 312
SYNC (If Equipped) Message Action and Description ARTISTS Sort all indexed media by artist. Once selected, the system lists and then plays all artists and tracks alphabetically. If there are fewer than 255 indexed artists, the system lists them alphabetically in flat file mode. If there are more than 255, the system categorizes them alphabetically. -
Page 313
SYNC (If Equipped) Message Action and Description EXPLORE USB Explore all supported digital media on your media device connected to the USB port. You can only view media content which is compatible with SYNC; other files saved are not visible. Press the OK button. -
Page 314
SYNC (If Equipped) Message Action and Description Press the OK button. When find SYNC appears in the display, press the OK button again. 2. Follow the directions in your phone’s manual to put your phone into discovery mode. A six-digit PIN appears in the display. -
Page 315
SYNC (If Equipped) You can then scroll to: Message Action and Description SYS SETTINGS Press the OK button. ADVANCED Press the OK button. You can then select one of the following: PROMPTS Have SYNC guide you by asking questions, helpful hints or ask you for a specific action. -
Page 316: Sync Troubleshooting
SYNC (If Equipped) Use the website at any time to check your SYNC TROUBLESHOOTING phone’s compatibility, register your account and set preferences as well as Your SYNC system is easy to use. However, access a customer representative via an should questions arise, see the tables online chat (during certain hours).
-
Page 317
SYNC (If Equipped) Phone issues Issue Possible cause(s) Possible solution(s) Depending upon your phone, you may have to grant SYNC permission to access your phonebook contacts. Make sure to confirm when prompted by your phone during the phonebook download. I am having trouble This is a phone-dependent Go to the website to review connecting my phone to… -
Page 318
SYNC (If Equipped) USB and media issues Issue Possible cause(s) Possible solution(s) I am having trouble This may be a possible Try turning off the device, connecting my device. device malfunction. resetting the device, removing the device’s battery, then trying again. Make sure you are using the manufacturer’s cable. -
Page 319
SYNC (If Equipped) Vehicle Health Report and Services (Traffic, Directions and Information) issues Issue Possible cause(s) Possible solution(s) I received a text that I did You did not activate your This is a free feature, but you not activate Vehicle Health account on the website. -
Page 320
SYNC (If Equipped) Voice command issues Issue Possible cause(s) Possible solution(s) SYNC does not understand You may be using the wrong Review the phone voice what I am saying. voice commands. commands and the media You may be speaking too voice commands at the soon or at the wrong time. -
Page 321
SYNC (If Equipped) Voice command issues Issue Possible cause(s) Possible solution(s) The system may not be Make sure you are saying the reading the name the same contacts exactly as they are way you are saying it. listed. For example, if you Contacts in your phonebook save a contact as Joe may be very short and… -
Page 322
AppLink. Also, some may have a «Ford SYNC» setting, so check the app’s settings menu on the phone. My phone is connected, my Sometime apps do not… -
Page 323
SYNC (If Equipped) AppLink issues Issue Possible cause(s) Possible solution(s) On an iPhone with iOS7+, to force close an app, double tab the home button then swipe up on the app to close it. Tab the home button again, then select the app again to restart it. -
Page 324
SYNC phone listed in SYNC’s bluetooth ports apps can to find. If the app has a «Ford Mobile Apps Menu. use to connect. If you have SYNC» setting, disable that more AppLink apps on your… -
Page 325: General Information
SYNC Getting to Know Your System GENERAL INFORMATION The SYNC 3 system allows you to interact WARNING with a variety of features using the touchscreen and voice commands. By Driving while distracted can result in integrating with your Bluetooth-enabled loss of vehicle control, crash and phone, the touchscreen provides easy injury.
-
Page 326
SYNC Item Menu Item Action and Description Status Bar This bar displays icons and messages pertaining to current system activities including climate settings, voice commands and phone functions such as text messages. Home This button is available on the main screens. Pressing it takes you to the home screen view. -
Page 327
SYNC E223058 Callout Item Description Microphone Mute This icon displays when your phone’s microphone is muted. A caller cannot hear you. Mute This icon displays when the audio system is muted. Download This icon displays when SYNC 3 has received a soft- ware update. -
Page 328
SYNC Callout Item Description 911 Assist Off This icon displays when 911 Assist is set to off and your phone is connected to SYNC. Bluetooth Alert This icon displays when there is an active Bluetooth alert. Bluetooth This icon displays to show an active Bluetooth connection. -
Page 329
SYNC Cleaning the Touchscreen SEEK NEXT: • While in radio mode, press to seek You can remove fingerprints with a dry, between memory presets. clean, soft cloth. • While in USB, Bluetooth Audio or CD If dirt or fingerprints are still on the screen, mode, press to seek between songs or apply a small amount of alcohol to the press and hold to fast seek. -
Page 330
Website Do not wait for 911 Assist to make an emergency call if you can do it www.owner.ford.com yourself. Dial emergency services www.syncmyride.ca immediately to avoid delayed response www.syncmaroute.ca time which could increase the risk of serious injury or death after a crash. -
Page 331
SYNC To make sure that 911 Assist works If you do not cancel the call, and SYNC correctly: makes a successful call, a pre-recorded message plays for the 911 operator, and • SYNC must be powered and working then the occupant(s) in your vehicle is able properly at the time of the incident and to talk with the operator. -
Page 332
SYNC Safety Information • Do not leave playing devices in your vehicle during extreme conditions as it WARNING could cause them damage. See your device’s user guide for further Driving while distracted can result in information. loss of vehicle control, crash and •… -
Page 333
Visit the website to sign up and register. You can choose to download the update onto a USB drive or use Wi-Fi to deliver Website automatic updates. www.owner.ford.com www.syncmyride.ca USB Updates www.syncmaroute.ca To use the USB update you need to log… -
Page 334
SYNC You will need an empty USB drive. Please You must also give the system permission check the website for minimum to update automatically. Upon vehicle requirements. Once you have inserted the delivery, the System asks you if you would USB drive into your computer, choose to like to use the automatic update feature. -
Page 335
Times are subject to change due to access to your vehicle’s SYNC 3 module. holidays. Ford Motor Company and Ford of Canada Privacy Information do not access the system data for any purpose other than as described absent… -
Page 336: Home Screen
SYNC HOME SCREEN E207616 Item Tile Home screen display Audio Shows the active media source. If your vehicle does not have navigation, this space contains the compass. Phone The name of the connected phone appears on the screen. The status of the phone features also appear. This includes signal strength, battery charge, 911 assist setting state (On or Off), text messaging and roaming.
-
Page 337: Using Voice Recognition
SYNC Item Tile Home screen display If your vehicle does not have navigation, this space contains the audio information. If equipped. You can access each feature controlled by You can touch any of the feature displays SYNC 3 through a variety of commands. to access that feature.
-
Page 338
SYNC Audio Voice Commands Included here are some of the most popular commands for each SYNC 3 ___ is a dynamic listing, meaning that for feature. audio voice commands it can be the name of a Sirius channel or a channel number, a radio frequency number, or the name of a artist, album, song or a genre. -
Page 339
SYNC Phone Voice Commands You can use voice commands to connect your Bluetooth-enabled phone to the Pairing a Phone system. To pair your phone, press the voice button and when prompted, say: Voice command Description Pair Phone Follow the on-screen instructions to complete the pairing process. -
Page 340
SYNC Text Message Voice Commands To access text message options, press the voice button and say: Voice command Description Listen to Message Listen to text message ___ You can say the number of the message you would like to hear. Reply to Message ___ is a dynamic listing, meaning that for Navigation Voice Commands… -
Page 341
SYNC In addition, you can say these commands when a route is active: Voice command Description Cancel Route Cancels the current route. Detour Allows you to select an alternate route. Repeat Instruction Repeats the last guidance prompt. Show Route Repeats the last guidance prompt. Where Am I Provides current location. -
Page 342
SYNC SiriusXM Traffic and Travel Link SiriusXM Traffic and Travel Link may not Voice Commands be available in all markets. Activation and (If Equipped) a subscription are required. You can say the following commands to access SiriusXM Traffic and Travel Link: Voice command Description Show Traffic… -
Page 343: Entertainment
SYNC Note: Depending on the current climate To disable this automatic fan speed control settings, the fan speed may reduction feature during voice sessions, automatically go down while issuing voice press and hold the climate control AC and commands or while making and receiving Recirculated air buttons simultaneously, phone calls via SYNC to reduce the amount release and then increase fan speed within…
-
Page 344
SYNC You can access these options using the touchscreen or voice commands. Message Message and description Sources Sources Press this button to select the source of Direct Tune media you want to listen to. Presets Menu item SIRIUS The name of the USB that is plugged in displays here. Bluetooth Stereo Apps If you have SYNC 3 compatible apps on your connected smart phone, they… -
Page 345
This includes canceling, moving or adding particular channels, and its prices, at any time, with or without notice to you. Ford Motor Company shall not be responsible for any such programming changes. Note: This receiver includes the eCos real-time operating system. -
Page 346
SYNC Menu item Action and description Replay Replay audio on the current channel. You can replay approx- imately 45 minutes of audio as long as you remain tuned to the current station. Changing stations erases the previous audio. Live When you are in replay mode, you are not able to select a different preset until you return to live audio. -
Page 347
SYNC Troubleshooting tips Message Cause Action Acquiring Signal Radio requires more than two No action required. This seconds to produce audio for message should disappear the selected channel. shortly. Satellite antenna fault There is an internal module or If this message does not clear system failure present. -
Page 348
SYNC HD Radio technology is the digital The HD logo is grey when acquiring a digital evolution of analog AM/FM radio. Your station, and then changes to orange when system has a special receiver that allows digital audio is playing. When this logo is it to receive digital broadcasts (where available, you may also see Title and Artist available) in addition to the analog… -
Page 349
SYNC HD Radio Reception and Station Troubleshooting Potential reception issues Reception area If you are listening to a multicast station and you are on the fringe of the reception area, the station may mute due to weak signal strength. If you are listening to HD1, the system changes back to the analog broadcast until the digital broadcast is available again. -
Page 350
HD Radio and the HD and http://www.ibiquity.com/automotive/ HD Radio logos are proprietary trademarks report_radio_station_experiences of iBiquity Digital Corp. Ford Motor Company and iBiquity Digital Corp. are not responsible for the content sent using HD Radio technology. Content may be… -
Page 351
SYNC Bluetooth Stereo or USB access media that you store on your Bluetooth device or USB device such as Bluetooth Stereo and USB allow you to music, audio books or podcasts. The following buttons are available for Bluetooth and USB: Button Function Repeat… -
Page 352
SYNC Button Function Composers A-Z Jump This button allows you to choose a specific letter to view within the category you are browsing. Explore Device If available, this allows you to browse the folders and files on your USB device. Supported Media Players, Formats USB Ports and Metadata Information… -
Page 353: Phone
SYNC 4. Confirm that the six-digit number PHONE appearing on your phone matches the six-digit number on the touchscreen. WARNING 5. The touchscreen indicates when the Driving while distracted can result in pairing is successful. loss of vehicle control, crash and 6.
-
Page 354: Phone Menu
To check your phone’s compatibility, see your phone’s manual or visit the Phone Menu website: This menu becomes available after pairing Websites a phone. owner.ford.com E205447 Item Menu Item Action and Description Recent Call Displays your recent calls. List You can place a call by selecting an entry from this list.
-
Page 355
SYNC Item Menu Item Action and Description You can also sort the calls by selecting the drop down menu at the top of the screen. You can choose: Incoming Outgoing Missed Contacts All of your contacts from your phone display in alphabetical order. -
Page 356
SYNC To call a number in your contacts, To accept the call, select: select: Menu Item Menu Item Action and Description Accept Contacts You can then select the Note: You can also accept the call by name of the contact you pressing the phone button on the steering want to call. -
Page 357
SYNC Item Item Privacy Transfer the call to End Call Immediately end a the cell phone or phone call. You can back to SYNC 3. also press the button on the Text Messaging steering wheel. Note: Downloading and sending text Keypad Press this to access messages using Bluetooth are cell… -
Page 358: Navigation
SYNC 2. Select Apple CarPlay on the To disable this feature from the touchscreen. Settings screen, select: To disable this feature from the Menu Item Settings screen, select: Android Auto Preferences Menu Item Your device is listed if SYNC detects Apple CarPlay Preferences Android Auto.
-
Page 359
SYNC 3D city models are complete 3D models Re-center the map by pressing of entire city areas including navigable this icon whenever you scroll the roads, parks, rivers and rendered buildings. map away from your vehicle’s 3D landmarks and city models appear in current location. -
Page 360
SYNC Destination Mode To set a destination, press: Menu Item Description Destination Enter a navigation destination in any of the following formats: Search Street Address (number, street, city, state) For example «12 Mainstreet Dearborn MI» Partial Address (number, street) if searching in current state (number, street and zip code (or postal code in Canada)) if searching out of state You can enter unique addresses that contain door number prefixes… -
Page 361
SYNC Menu Item Description Delete Select this option to remove all previous destinations. Home Select to navigate to your set Home destination. The time it takes to travel from your current location to Home displays. To set your Home, press: Home A prompt appears asking if you would like to create a favorite for home. -
Page 362
SYNC Menu Item Description See All Press to view additional categories. Once you have selected a category, follow the menus to find what you are looking for. Inside of these categories you can search by: Nearby Along Route Near Destination In a City Once you have chosen your destination, press: Menu Item… -
Page 363
SYNC Menu Item Action and Description The navigation map shows your estimated time of arrival, remaining travel time and the distance to your destination. SYNC 3 may not always announce vehicle arrival at the exact point of your destination and you may have to cancel a route manually. During active navigation, touch the bottom Navigation Menu of the screen to view the menu and other… -
Page 364
SYNC Button Navigation Press this button to adjust your preferences. See Settings (page 367). Settings Where Am I? Provides your current location city and the nearest road. The following are only available on the menu during an active navigation route: Cancel Route The system asks for confirmation and then returns you to the map mode screen. -
Page 365
SYNC Menu Item Add Waypoint The waypoint list then appears and you are able to re-order all of your waypoints by selecting the menu icon on the right hand side of the location. You can select up to five waypoints. You can also have the system set the order Optimize Order for you by pressing:… -
Page 366: Apps
Note: We encourage you to review the www.here.com/mapcreator. HERE smartphone app s terms of service and evaluates all reported map errors and privacy policies because Ford is not responds with the result of their responsible for your app or its use of data. investigation by e-mail.
-
Page 367
AppLink is only possible when Android Auto select a mobile app using the system. or Apple CarPlay are disabled. Some apps Note: Ford reserves the right to limit may only be accessible in the car through functionality or deactivate mobile apps at Applink and others only through Android any time. -
Page 368
We recommend by SiriusXM Traffic and Travel Link. against the use of any hand-held device Note: Neither Sirius nor Ford is responsible while driving and encourage the use of for any errors or inaccuracies in the SiriusXM voice-operated systems when possible. -
Page 369: Settings
SYNC Menu Item Action and Description Area Select to choose from a listing of weather locations. Sports Info Touch this button to view scores and schedules from a variety of sports. You can also save up to 10 favorite teams for easier access.
-
Page 370
SYNC Media Player device is the active audio source. Pressing the button allows you to access the This button is available when a media following options for active devices only. device such as a Bluetooth Stereo or USB Menu Item Action and Description Podcast Speed For some Apple devices, SYNC 3 can adjust the playback speed of… -
Page 371
SYNC Menu Item Action and Description Clock Format Select how time displays. Auto Time Zone When active, the clock adjusts to time zone changes. Update This feature is only available in vehicles with navigation. Reset Clock to When selected, the vehicle clock resets to GPS satellite time. GPS Time Bluetooth The system automatically saves any… -
Page 372
4. The touchscreen indicates when the pairing is successful. Website 5. Your phone may prompt you to give owner.ford.com the system permission to access www.syncmyride.ca information. To check your phone’s www.syncmaroute.ca compatibility, see your phone’s manual or visit the website. -
Page 373
SYNC Menu Item Action and Description First Name Last Name Re-download Select this option to re-download your contact list manually. Contacts Delete Contacts Select this option to delete the in vehicle contact list. Deleting the in vehicle list does not erase the contact list on the connected phone. Menu Item Action and Description Set Phone Ringtone… -
Page 374
SYNC You can enable and disable the following options as well: Menu Item Action and Description Mute Audio in When enabled, vehicle audio (such as radio or apps) is muted for the Privacy duration of the phone call even when the phone call is in privacy. Roaming When enabled, an alert displays that your phone is roaming when Warning… -
Page 375
SYNC Menu Item Action and Description FM HD Radio Activation of this feature allows you to listen to HD radio broadcasts. AM HD Radio (Dependent on current radio source, If Avail- able) Radio Text This feature is available when FM Radio is your active media source. Activate this feature to have the system display radio text. -
Page 376
SYNC Route Preferences Menu Item Second Level Messages, Actions and Descriptions Route Preferences Then select any of the following: Preferred Route Choose to have the system display your chosen route type. Shortest Fastest Always Use ___ Bypass route selection in destination programming. The system only Route calculates one route based on your preferred route setting. -
Page 377
Note: All Mobile Apps may not be Mobile Apps compatible with the system. Note: Standard data rates will apply. Ford You can enable the control of compatible is not responsible for any additional charges mobile apps running on your Bluetooth or you may receive from your service provider, USB device on SYNC 3. -
Page 378
Note: Ford is not responsible or liable for General any damages or loss of privacy relating to usage of an app, or dissemination of any… -
Page 379
SYNC Menu Item Automatic System Updates When you activate this option, the system automatic- ally updates when you have an available Internet connection through a Wi-Fi network or mobile connection. About Information pertaining to the system and its software. Software Licenses Documentation of the software license for the system. -
Page 380
SYNC Door Keypad Code enter the five-digit factory set code. You can find this code on the owner’s wallet Select this button to add or erase a card in the glove box or from your personal door keypad code. To add or authorized dealer. -
Page 381: Sync 3 Troubleshooting
PIN, please contact To check your cell phone’s compatibility, the Customer Relationship Center. visit the Ford website. United States: 1-800-392-3673 Canada: 1-800-565-3673 Fiesta (CCT) Canada/United States of America, HE8J 19A321 AA enUSA, Edition date: 201607, First Printing…
-
Page 382
SYNC Website Website www.syncmyride.ca owner.ford.com www.syncmaroute.ca Cell phone issues Issue Possible cause Possible solution There is back- The audio control ground noise settings on your cell Refer to your device’s manual about audio during a phone phone may be affecting adjustments. -
Page 383
SYNC Cell phone issues Issue Possible cause Possible solution You must switch on your cell phone and the automatic phonebook download feature on SYNC 3. This is a cell phone- Check your cell phone’s compatibility. dependent feature. Try switching your cell phone off, resetting it or removing the battery, then try again. -
Page 384
SYNC Cell phone issues Issue Possible cause Possible solution Replying to text messages using SYNC 3 is not supported by iPhone. Text messages from WhatsApp and Face- book Messenger are not supported. Your cell phone must support downloading This is a cell phone- text messages through Bluetooth to receive dependent feature. -
Page 385
SYNC USB and Bluetooth Stereo issues Issue Possible cause Possible solution This is a device- Bluetooth audio Make sure you connect the device to SYNC dependent feature. does not 3 and that you have started the media The device is not stream. -
Page 386
SYNC Wi-Fi Issues Issue Possible cause Possible solution Failed connection. Password error. Verify password. Weak signal. Check for a poor Wi-Fi signal. Multiple Access points Use a unique name for your within range with the same SSID, don’t use the default SSID. -
Page 387
SYNC Wi-Fi Issues Issue Possible cause Possible solution SYNC 3 is not seen when SYNC 3 does not currently SYNC 3 currently does not searching for Wi-Fi networks provide a hotspot. provide a hotspot from your phone or other devices. Software download takes Poor signal strength, too far Check the signal quality… -
Page 388
AppLink. Also, some may have a «Ford SYNC» setting, so check the app’s settings menu on the phone. Closing and restarting apps may help SYNC 3 find the application if you cannot discover it inside the vehicle. -
Page 389
SYNC AppLink issues Issue Possible cause(s) Possible solution(s) On an iPhone with iOS7+, to force close an app, double tap the home button then swipe up on the app to close it. Tap the home button again, then select the app again to restart it. -
Page 390
3 to find. If the app has a I can only see some of the can use to connect. If you «Ford SYNC» setting, disable AppLink apps running on my have more AppLink apps on that setting in the app’s… -
Page 391
SYNC Voice command issues Issue Possible cause Possible solution You may be using the Review the media voice commands at the wrong voice commands. beginning of the media section. Say the song or artist name exactly as it is displayed on your device. For example, say «Play Artist Prince»… -
Page 392
SYNC Voice command issues Issue Possible cause Possible solution The SYNC 3 voice control system is having SYNC 3 applies the phonetic pronunciation trouble recog- rules of the selected language to the names You may be saying the nizing foreign stored on your media player or USB flash foreign names using the tracks, artists,… -
Page 393
5 seconds the screen will go black. Allow 1-2 minutes for the system reset to complete. You may then resume using the SYNC 3 system. For additional assistance with SYNC 3 troubleshooting please call or visit the Ford Website. Ford Support… -
Page 394: Accessories
Contact an • Graphics kit. authorized Ford dealer for the manufacturer’s limited warranty details, • Rear spoiler. and request a copy of the Ford Licensed • Side window deflectors. Accessories product limited warranty from • Splash guards. the accessory manufacturer.
-
Page 395
• If you or an authorized dealer add any non-Ford electrical or electronic accessories or components to your vehicle, you may adversely affect the performance of other electrical systems in the vehicle. -
Page 396: Ford Protect
If you bring your car into your dealer for Vehicle Limited Warranty coverage. When service, we’ll give you a loaner to use for you visit your Ford Dealer, Insist on Ford the day. Protect Extended Service Plans! Extended Rental Benefits…
-
Page 397
Ford Protect Extended This information is subject to change. For Service Plan specialists at 800-367-3377. more information; visit your local Ford of Ford Protect Extended Service Plan Canada dealer or www.ford.ca to find the P.O. Box 321067… -
Page 398: Scheduled Maintenance
If you do not use Ford authorized parts they you sell or trade it. Keep all receipts for may not meet our specifications and completed maintenance with your vehicle.
-
Page 399
(800 kilometers) of the ENGINE OIL Additives and Chemicals CHANGE DUE NEXT SERVICE or OIL CHANGE REQUIRED message appearing. This owner’s manual and the Ford The oil minder system must be reset after Workshop Manual list the recommended each oil change. See Oil Change additives and chemicals for your vehicle. -
Page 400
Scheduled Maintenance Check every month Engine oil level. Function of all interior and exterior lights. Tires (including spare) for wear and proper pressure. Windshield washer fluid level. Check every six months Battery connections. Clean if necessary. Body and door drain holes for obstructions. Clean if necessary. Cooling system fluid level and coolant strength. -
Page 401: Normal Scheduled Maintenance
Scheduled Maintenance Multi-Point inspection Accessory drive belt(s) Hazard warning system operation Battery performance Horn operation Clutch operation (manual transmission Radiator, cooler, heater and air conditioning only) hoses Engine air filter Suspension components for leaks or damage Exhaust system Steering and linkage Exterior lamps operation Tires (including spare) for wear and proper pressure…
-
Page 402
Scheduled Maintenance Every 10000 miles (16000 kilometers) or 12 months Change engine oil and filter. Rotate the tires. Perform a multi-point inspection (recommended). Inspect the automatic transmission fluid level. Consult your dealer for requirements. Inspect the brake pads, shoes, rotors, drums, brake linings, hoses and parking brake. Inspect the engine cooling system strength and hoses. -
Page 403
Scheduled Maintenance Other maintenance items Replace timing belt (1.0L, 1.6L engine). Replace oil pump drive belt (1.0L engine). Additional maintenance items can be performed within 3000 miles (4800 kilometers) of the last engine oil and filter change. Do not exceed the designated distance for the interval. -
Page 404: Special Operating Conditions Scheduled Maintenance
Scheduled Maintenance perform additional maintenance as SPECIAL OPERATING indicated. If you operate your vehicle CONDITIONS SCHEDULED occasionally under any of these conditions, MAINTENANCE it is not necessary to perform the additional maintenance. For specific If you operate your vehicle primarily in any recommendations, see your dealership of the following conditions, you need to service advisor or technician.
-
Page 405
1800 miles (3000 kilometers). useful life. Ford Motor Company, however, urges you to have all recommended Engine Air Filter and Cabin Air Filter maintenance services performed at the… -
Page 406: Scheduled Maintenance Record
Scheduled Maintenance SCHEDULED MAINTENANCE RECORD Dealer stamp Repair Order #: Distance: Engine hours (optional): Multi-point inspection (recommended): Signature: E146852 Dealer stamp Repair Order #: Distance: Engine hours (optional): Multi-point inspection (recommended): Signature: E146852 Fiesta (CCT) Canada/United States of America, HE8J 19A321 AA enUSA, Edition date: 201607, First Printing…
-
Page 407
Scheduled Maintenance Dealer stamp Repair Order #: Distance: Engine hours (optional): Multi-point inspection (recommended): Signature: E146852 Dealer stamp Repair Order #: Distance: Engine hours (optional): Multi-point inspection (recommended): Signature: E146852 Fiesta (CCT) Canada/United States of America, HE8J 19A321 AA enUSA, Edition date: 201607, First Printing… -
Page 408
Scheduled Maintenance Dealer stamp Repair Order #: Distance: Engine hours (optional): Multi-point inspection (recommended): Signature: E146852 Dealer stamp Repair Order #: Distance: Engine hours (optional): Multi-point inspection (recommended): Signature: E146852 Fiesta (CCT) Canada/United States of America, HE8J 19A321 AA enUSA, Edition date: 201607, First Printing… -
Page 409
Scheduled Maintenance Dealer stamp Repair Order #: Distance: Engine hours (optional): Multi-point inspection (recommended): Signature: E146852 Dealer stamp Repair Order #: Distance: Engine hours (optional): Multi-point inspection (recommended): Signature: E146852 Fiesta (CCT) Canada/United States of America, HE8J 19A321 AA enUSA, Edition date: 201607, First Printing… -
Page 410
Scheduled Maintenance Dealer stamp Repair Order #: Distance: Engine hours (optional): Multi-point inspection (recommended): Signature: E146852 Dealer stamp Repair Order #: Distance: Engine hours (optional): Multi-point inspection (recommended): Signature: E146852 Fiesta (CCT) Canada/United States of America, HE8J 19A321 AA enUSA, Edition date: 201607, First Printing… -
Page 411
Scheduled Maintenance Dealer stamp Repair Order #: Distance: Engine hours (optional): Multi-point inspection (recommended): Signature: E146852 Dealer stamp Repair Order #: Distance: Engine hours (optional): Multi-point inspection (recommended): Signature: E146852 Fiesta (CCT) Canada/United States of America, HE8J 19A321 AA enUSA, Edition date: 201607, First Printing… -
Page 412
Scheduled Maintenance Dealer stamp Repair Order #: Distance: Engine hours (optional): Multi-point inspection (recommended): Signature: E146852 Dealer stamp Repair Order #: Distance: Engine hours (optional): Multi-point inspection (recommended): Signature: E146852 Fiesta (CCT) Canada/United States of America, HE8J 19A321 AA enUSA, Edition date: 201607, First Printing… -
Page 413
Scheduled Maintenance Dealer stamp Repair Order #: Distance: Engine hours (optional): Multi-point inspection (recommended): Signature: E146852 Dealer stamp Repair Order #: Distance: Engine hours (optional): Multi-point inspection (recommended): Signature: E146852 Fiesta (CCT) Canada/United States of America, HE8J 19A321 AA enUSA, Edition date: 201607, First Printing… -
Page 414
Scheduled Maintenance Dealer stamp Repair Order #: Distance: Engine hours (optional): Multi-point inspection (recommended): Signature: E146852 Dealer stamp Repair Order #: Distance: Engine hours (optional): Multi-point inspection (recommended): Signature: E146852 Fiesta (CCT) Canada/United States of America, HE8J 19A321 AA enUSA, Edition date: 201607, First Printing… -
Page 415
Scheduled Maintenance Dealer stamp Repair Order #: Distance: Engine hours (optional): Multi-point inspection (recommended): Signature: E146852 Dealer stamp Repair Order #: Distance: Engine hours (optional): Multi-point inspection (recommended): Signature: E146852 Fiesta (CCT) Canada/United States of America, HE8J 19A321 AA enUSA, Edition date: 201607, First Printing… -
Page 416: Appendices
COMPANY nor its suppliers shall be include software licensed or owned by liable for any damages arising out of Ford Motor Company and its affiliates errors in the speech recognition («FORD MOTOR COMPANY»). Those process. It is your responsibility to…
-
Page 417
• Single EULA: The end user • Additional Software/Services: The documentation for the DEVICES and SOFTWARE may permit FORD MOTOR related systems and services may COMPANY, third party software and contain multiple EULAs, such as service suppliers, its affiliates and/or… -
Page 418
DEVICES. electronic form, you may print one copy of UPGRADES AND RECOVERY MEDIA: such electronic documentation. If the SOFTWARE is provided by FORD EXPORT RESTRICTIONS: You MOTOR COMPANY separate from the acknowledge that the SOFTWARE is DEVICES on media such as a ROM chip, subject to U.S. -
Page 419
Should you have any questions concerning are driving. Pull over in a safe and legal this EULA, or if you desire to contact FORD manner before attempting to access a MOTOR COMPANY for any other reason,… -
Page 420
Appendices substitute for your personal judgment. Your Responsibilities and Assumptions of Any route suggestions made by this Risk system should never replace any local • You agree to each of the following:(a) traffic regulations or your personal Any use of the SOFTWARE while judgment or knowledge of safe driving driving an automobile or other vehicle practices. -
Page 421
«AS IS» AND “AS AVAILABLE”, WITH ALL COMPANY SHALL BE FOUND IN THE FAULTS AND WITHOUT WARRANTY OF WARRANTY INFORMATION INCLUDING ANY KIND, AND FORD MOTOR COMPANY WITH YOUR OWNER GUIDE. TO THE HEREBY DISCLAIMS ALL WARRANTIES EXTENT THAT THERE IS ANY CONFLICT… -
Page 422
Consumer-Related Disputes will also litigate any dispute in small claims court apply. To commence arbitration, submit a in your county of residence or FORD Commercial Arbitration Rules Demand for MOTOR COMPANY’S principal place of Arbitration form to the AAA. You may… -
Page 423
AAA’s and arbitrator’s fees and court (Section c) or in arbitration (Section expenses. If you reject FORD MOTOR d). The one-year period begins when the COMPANY’S last written settlement claim or dispute first could be filed. If such… -
Page 424
Appendices 1. Safe and Lawful Use 2. Account Information You acknowledge that devoting attention You agree: (a) when registering the to the TeleNav Software may pose a risk TeleNav Software, to provide TeleNav with of injury or death to you and others in true, accurate, current, and complete situations that otherwise require your information about yourself, and (b) to… -
Page 425
Appendices distribute, sublicense or otherwise is dependent on the accuracy of transfer the TeleNav Software to navigation, as the maps or functionality others, except as part of your of the TeleNav Software are not permanent transfer of the TeleNav intended to support such high risk Software;… -
Page 426
Appendices REASON WHATSOEVER (INCLUDING, to the exclusive jurisdiction of the WITHOUT LIMITATION, ALL DAMAGES courts of the County of Santa Clara, REFERENCED HEREIN AND ALL California. The United Nations DIRECT OR GENERAL DAMAGES IN Convention on Contracts for the CONTRACT, TORT (INCLUDING International Sale of Goods shall not NEGLIGENCE) OR OTHERWISE), THE apply. -
Page 427
Appendices conferred by implication, statute, inducement, estoppel or otherwise, and The headings in this Agreement are for TeleNav and its suppliers and licensors convenience of reference only, will not be hereby reserve all of their respective rights deemed to be a part of this Agreement, other than the licenses explicitly granted and will not be referred to in connection in this Agreement. -
Page 428
Appendices HERE holds a non-exclusive license from Restrictions. Except where you have been the United States Postal Service® to specifically licensed to do so by Telenav, publish and sell ZIP+4® information. and without limiting the preceding paragraph, you may not use this Data (a) ©United States Postal Service®… -
Page 429
Appendices PARTICULAR PURPOSE OR export laws, rules or regulations prohibit NON-INFRINGEMENT. Some States, HERE from complying with any of its Territories and Countries do not allow obligations hereunder to deliver or certain warranty exclusions, so to that distribute Data, such failure shall be extent the above exclusion may not apply excused and shall not constitute a breach to you. -
Page 430
Appendices B. Canada Data. The following provi- NOTICE OF USE sions apply to the Data for Canada, CONTRACTOR (MANUFACTURER/ which may include or reflect data from SUPPLIER) NAME: HERE third party licensors (“Third Party Data”), including Her Majesty the Queen CONTRACTOR (MANUFACTURER/ in Right of Canada (“Her Majesty”), SUPPLIER) ADDRESS: c/o Nokia, 425… -
Page 431
Appendices 2. Copyright Notice: In connection with either express or implied, arising by each copy of all or any portion of the law or otherwise, including but not Data for the Territory of Canada, Client limited to, effectiveness, complete- shall affix in a conspicuous manner the ness, accuracy or fitness for a following copyright notice on at least particular purpose. -
Page 432
Appendices A. Third Party Notices. Any and all copies II. Mexico. The following provision applies of the Data and/or packaging relating to the Data for Mexico, which includes thereto shall include the respective Third certain data from the Instituto Nacional Party Notices set forth below and used de Estadística y Geografía (“INEGI”): as described below corresponding to… -
Page 433
Appendices is conditioned on Client’s obtaining prior V. Europe Territory written consent from Kartografie a.s.; (c) such license for selling or distributing A. Use of Certain Traffic Codes in Europe with respect to Data for the Territory of Switzerland is conditioned on Client’s 1. -
Page 434
Appendices Austria “© Bundesamt für Eich- Spain “Información geográfica und Vermessungswesen” propiedad del CNIG” Croatia Sweden “Based upon electronic Cyprus, data © National Land Estonia, Survey Sweden.” Latvia, Switzerland “Topografische Lithuania, Grundlage: © Bundesamt Moldova, für Landestopographie. Poland, Slovenia E. Respective Country Distribution. Client and/or acknowledges that HERE has not Ukraine… -
Page 435
Appendices with or in communication with any Product incorporates data which is © positioning devices or any mobile or 20XX Telstra Corporation Limited, GM wireless-connected electronic or computer Holden Limited, Intelematics Australia devices, including without limitation Pty Ltd and Continental Pty Ltd. cellular phones, palmtop and handheld B. -
Page 436
Appendices No Other Warranty: Export Control EXCEPT FOR THE LMITED WARRANTY You agree not to export to anywhere any SET FORTH ABOVE AND TO THE EXTENT part of the Data provided to you or any PERMITTED BY APPLICABLE LAW, NAV2 direct product thereof except in AND ITS LICENSORS (INCLUDING THEIR compliance with, and with all licenses and… -
Page 437
Appendices 2000-2007 Gracenote. Gracenote or any Gracenote Data (except in a Tag Software, copyright © 2000-2007 associated with a music file) to any third Gracenote. This product and service may party. YOU AGREE NOT TO USE OR practice one or more of the following U.S. EXPLOIT GRACENOTE CONTENT, Patents 5,987,525;… -
Page 438
Appendices GRACENOTE SERVERS OR GRACENOTE (1) This device may not cause harmful CONTENT. GRACENOTE COLLECTIVELY interference, and AND SEPARATELY RESERVE THE RIGHT (2) this device must accept any TO DELETE DATA AND/OR CONTENT interference received, including FROM THE COMPANIES’ RESPECTIVE interference that may cause undesired SERVERS OR, IN THE CASE OF operation. -
Page 439
Appendices We will use reasonable endeavours to provide the SUNA Traffic Channel 24 hours Website a day, 365 days a year. The SUNA Traffic www.sunatraffic.com.au/termsandcon- Channel may occasionally be unavailable ditions/ for technical reasons or for planned maintenance. We will try to perform maintenance at times when congestion is 2. -
Page 440
Appendices WARNING Driving while distracted can result in loss of vehicle control, crash and injury. We strongly recommend that you use extreme caution when using any device that may take your focus off the road. Your primary responsibility is the safe operation of your vehicle. -
Page 441
Index Audio Input Jack………..274 Audio System……….257 General Information……….257 Audio Unit — Vehicles With: AM/FM/CD/ See: Climate Control………..95 SYNC………….262 About This Manual………..7 Alternative Frequencies……..265 Automatic Volume Control……265 See: Brakes………….131 Autostore Control……….265 ABS driving hints Sound Button…………264 See: Hints on Driving With Anti-Lock Station Preset Buttons……..264 Brakes…………..131 Station Tuning Control……..264… -
Page 442
Index Bonnet Lock Front Fog Lamps……….205 See: Opening and Closing the Hood…182 Headlamp………….203 Booster Seats……….23 Interior Lamp…………207 Types of Booster Seats……..24 License Plate Lamp……….206 Brake Fluid Check………192 Luggage Compartment Lamp, Footwell Brakes…………..131 Lamp and Liftgate Lamp……207 General Information………..131 Reading Lamps………..207 Breaking-In…………157 Rear Lamps…………206 Bulb Specification Chart……208… -
Page 443
Index Cleaning the Windows and Wiper Blades…………214 Clearing All MyKeys……..52 Eco Mode…………145 Climate Control……….95 Resetting Eco Mode………..145 Clock…………..86 Type 1……………145 Type 1…………….86 Economical Driving……..157 Type 2……………86 Emission Control System……122 Clutch Fluid Check — Manual On-Board Diagnostics (OBD-II)….123 Transmission……….192 Readiness for Inspection and Maintenance Coolant Check (I/M) Testing…………124 See: Engine Coolant Check……188… -
Page 444
Ford Credit…………11 Away From Home……….165 US Only…………..11 Ford Protect………..394 Ford Protect Extended Service Plan (CANADA ONLY)……….395 Handbrake Ford Protect Extended Service Plans (U.S. See: Parking Brake……….132 Only)…………..394 Hazard Warning Flashers……161 Front Fog Lamps……….74 Headlamp Adjusting Front Parking Aid……….139 See: Adjusting the Headlamps……195 Sensing System Audible Warnings….140… -
Page 445
Index Maximum Cooling Performance in Instrument Panel or Instrument Panel and Footwell Positions…….100 Keyless Entry………..60 Recommended Settings for Cooling …99 Disabled Keys…………61 Recommended Settings for Heating…98 General Information………..60 Side Window Defogging in Cold Locking and Unlocking the Doors With the Weather…………100 Key Blade…………62 Vehicle Stationary for Extended Periods… -
Page 446
Index Smart Unlocks for Integrated Keyhead Transmitter…………57 Smart Unlocks for Intelligent Access Navigation…………356 Keys……………57 cityseeker…………..363 Unlocking the Doors With the Interior Door Destination Mode……….358 Handles……………57 Map Mode…………356 Luggage Covers……….147 Navigation Map Updates…….364 Removing the Cover……….148 Navigation Menu……….361 Lug Nuts SiriusXM Traffic and Travel Link….364 See: Changing a Road Wheel…….238 Waypoints…………362 Normal Scheduled Maintenance..399… -
Page 447
Index Phone…………..351 Reprogramming the Unlocking During a Phone Call……….354 Function…………..47 Making Calls…………353 Sounding a Panic Alarm……..50 Removing a Headlamp…….197 Pairing Your Cell Phone for the First Repairing Minor Paint Damage….216 Time…………..351 Replacement Parts Phone Menu…………352 Recommendation……..12 Receiving Calls…………354 Smartphone Connectivity……355 Collision Repairs…………12 Text Messaging………..355 Scheduled Maintenance and Mechanical… -
Page 448
Index Seatbelt Height Adjustment……32 Engine Idle Speed after Starting….114 Seatbelt Reminder………33 Failure to Start…………114 Belt-Minder …………33 Flooded Engine………….114 Seatbelts…………29 Starting and Stopping the Engine….111 Principle of Operation……..29 General Information……….111 Seatbelt Warning Lamp and Indicator Steering…………145 Chime……………32 Electric Power Steering……..145 Steering Wheel……….67 Conditions of operation……..33 Seats…………..102 Storage Compartments……110… -
Page 449
Index Information Contained on the Tire Using Stability Control…….136 Using Summer Tires……..234 Sidewall…………222 Using SYNC With Your Media Temperature A B C……….220 Player…………304 Traction AA A B C……….220 Treadwear…………220 Accessing Your Play Menu……309 Tire Pressure Monitoring System…234 Connecting Your Digital Media Player to the Changing Tires With a Tire Pressure USB Port…………304 Monitoring System……..235… -
Page 450
Index Vehicle Certification Label…….249 Washers Vehicle Identification Number….248 See: Cleaning the Exterior……..212 Vehicle Storage……….216 See: Wipers and Washers………69 Waxing…………..213 Battery…………..217 Wheel Nuts Body……………..217 Brakes…………..217 See: Changing a Road Wheel…….238 Wheels and Tires……….219 Cooling system………….217 Engine…………..217 General Information……….219 Fuel system…………217 Technical Specifications………242 Windows and Mirrors……..76 General…………..217 Windshield Washers……..69…