Change country/region:
© 2023 Porsche (China) Motors Ltd. Legal notice 中文 MIIT ICP No. 10013326 Open Source Software Notice. Whistleblower System
![]()
Shanghai Public Security No. 31011502014993
China strongly recommends to purchase cars and parts from authorised
Porsche
Centres only.
Please click here for more information.
Environmental information disclosure
- Manuals
- Brands
- Porsche Manuals
- Automobile
- Cayenne 2020
- Owner’s manual
-
Contents
-
Table of Contents
-
Bookmarks
Quick Links
Cayenne
Good to know – Owner’s Manual
WKD 9Y0 00 21 21
Related Manuals for Porsche Cayenne 2020
Summary of Contents for Porsche Cayenne 2020
-
Page 1
Cayenne Good to know – Owner’s Manual WKD 9Y0 00 21 21… -
Page 3
08/2020 them could result in serious mechanical failure, seri- ous personal injury or death. Dr. Ing. h.c. F. Porsche AG is the owner of numerous Different types of warnings and symbols are used in trademarks, both registered and unregistered, in- this Owner’s Manual. -
Page 4
> Indicates where you can find more information on a topic. -
Page 5
Structure of the Manual Owner’s Manual – Digital Table of Contents Safety and Driving Pleasure Overviews The Owner’s Manual is available in Get an overview and find the infor- Find out how you can play your part in Get to know the various components digital form on-board in the vehicle mation you want. -
Page 6
Owner’s Manual – Digital Further information about your vehicle is available (depending on country) in the on-board Owner’s Manual in your vehicle and in the Porsche «Good to know» app: Video instructions, interactive graphics, practical tips and functions in detail. -
Page 7: Table Of Contents
Towing …………….270 Driving and Driver Assistance Systems Instrument Cluster …………139 Washer fluid …………..315 Active Lane Keeping …………36 Porsche Communication Management (PCM) … 215 Wheels and Tires …………316 Adaptive Cruise Control (ACC) ……..41 Trip Information Display ……….281 Technical data Adaptive Cruise Control (ACC) with Porsche Vehicle Settings …………285…
-
Page 8
Index …………….356… -
Page 9: Safety And Driving Pleasure
TTY for hearing impaired: Administrator, NHTSA, Your Porsche is intended to be used in a safe manner 1-888-675-6863 1200 New Jersey Ave, obeying the local traffic laws and in the light of driv- or contact Transport Canada by mail at: SE, Washington, DC 20590.
-
Page 10
Porsche dealer, as they site for your driving pleasure – Undamaged aerodynamic components have trained technicians and the necessary parts In order for your Porsche to achieve its full potential, – Intact wiper blades and tools. the vehicle requires your attention and care. -
Page 11
316. e Make sure that the settings in the TPMS menu Service and modifications to the vehicle must be performed by an authorized Porsche dealer correspond to the tires fitted on the vehicle and its payload. > Please see chapter «Vehicle Settings» on page 285. -
Page 12
If other spare parts or accessories are used, Porsche Severe injuries can occur at speeds as low as down or damage the battery (exhaustive discharge) does not accept any liability for damages caused by 20 mph (30 km/h) if a seat belt is not worn. -
Page 13
Also provide your passengers with all information regarding safety measures. Airbag systems can only perform their protective For correctly loading your Porsche and stowing function if all occupants have their seat belts fas- An unsecured or incorrectly positioned load in the items: >… -
Page 14
Only use child restraint systems approved for e Always drive defensively. e Expect the unexpected. your Porsche. Children often cannot judge dangers correctly and e Before using a child restraint system: Read and e Use signals to indicate turns and lane changes. -
Page 15
For your safety, some func- leaving a car wash, the brake disks are coated with a authorized Porsche dealer, as they have trained tions are only available when the vehicle is water film, the braking action may be delayed and technicians and the necessary parts and tools. -
Page 16
Night assist > p. 198 ParkAssist, rear view camera, Surround View, Active Parking Your Porsche is equipped with driver assistance Support, Maneuvering Assist, systems for driving comfort. Rear Cross Traffic Alert (RCTA), None of these systems can overcome the limits set… -
Page 17
Therefore, assume your social re- When driving off-road with your Porsche, you must sponsibility and respect nearby residents, espe- adapt your driving style to avoid accidents, injury cially at night. -
Page 18
Safety and Driving Pleasure Toxic exhaust gases that you can respond correctly to the warnings. Used engine oil contains chemicals that have caused Stop driving if necessary. cancer in laboratory animals. > Please see chapter «Warning and Information e Only work on the vehicle outdoors or in wellven- Messages»… -
Page 19
Have the fire extinguisher checked by an au- An improperly parked vehicle can roll away in an un- thorized Porsche dealer every one or two years. e Have the fire extinguisher refilled after use. controlled manner, endangering persons or causing vehicle damage. -
Page 20
Safety and Driving Pleasure e Always have work performed on the vehicle by an e Never tow-start or push-start the vehicle. an authorized Porsche dealer, as they have e Before towing your vehicle or having your vehicle authorized Porsche dealer. Porsche recommends… -
Page 21
Safety and Driving Pleasure Breaking in new brake pads practical, while still maintaining full vehicle All components of the hybrid system are marked control. with warning stickers. The high-voltage cables are e Adjust the inside and outside rear view mirrors. orange-colored. -
Page 22
Safety and Driving Pleasure – A plug connection of the hybrid system is Driving on racetracks puts high pressure on brake If you plan to take your Porsche outside the conti- disconnected. pads and brake disks. nental limits of the United States or Canada, there is… -
Page 23
Electronic control units have data memories that can ice network personnel and may be sent to Porsche in vehicle, the surrounding area and other systems. You temporarily or permanently store technical informa-… -
Page 24
Porsche has no influ- ence on the data exchanged in these cases. Given this, please request information from the relevant… -
Page 25
Overview Illustrations On the following pages you will find overviews of all areas of the vehicle, with a brief explanation. Further information can be found on the specified pages. -
Page 26: Porsche Advanced Cockpit
Adaptive cruise control (ACC) with Por- sche InnoDrive (PID) > p. 156 Lane Keep Assist > p. 227 Porsche Hill Control (PHC) Phone controls, Speed & Assist display > p. 141 > p. 141 K Phone controls, Car & Info display > p. 195 Mode switch >…
-
Page 27: Driver’s Cockpit
Driver’s Cockpit Driver’s Cockpit > p. 327 A Power windows and tailgate B Door opener > p. 206 C Memory buttons for personal settings > p. 159 D Light control panel > p. 261 Ignition lock, steering lock > p. 27 Overhead console >…
-
Page 28: Control Panel
Rotary push button (for controlling the PCM) > p. 159 Emergency flasher > p. 195 G SPORT mode > p. 212 H Porsche Active Suspension Management (PASM) > p. 228 Porsche Stability Management (PSM) > p. 76 Electric parking brake > p. 195 K INDIVIDUAL mode >…
-
Page 29: Overhead Console
Overhead Console Overhead Console > p. 146 A Interior lighting B Hands-free microphone > p. 129 C Garage door opener/HomeLink ® D Passenger compartment monitoring sensors > p. 239 Sunblind > p. 146 Reading lights > p. 54 G PASS AIR BAG OFF/ON warning light H Orientation lighting >…
-
Page 30: Rear
Rear Rear > p. 62 A Air vents > p. 85 B Central locking > p. 85 C Door opener > p. 327 D Power windows Map pocket > p. 59 Air conditioning system > p. 255 G Ashtray/storage compartment H USB charge port >…
-
Page 31: Air-Conditioning Control Panel In The Rear
Air-Conditioning Control Panel in the Rear Air-Conditioning Control Panel in the Rear > p. 253 A Seat heating > p. 253 B Seat ventilation > p. 63 C Air distribution > p. 60 D Temperature and air flow > p. 61 Switching on automatic mode…
-
Page 32: Engine Compartment Filler Openings
Engine compartment filler openings Engine compartment filler openings > p. 315 A Washer fluid > p. 75 B Brake fluid > p. 102 C Coolant > p. 117 D Engine oil…
-
Page 33
Practical Tips On the following pages you will find practical tips for the selected area of your vehicle. -
Page 34: Practical Tips Practical Tips
Practical Tips Practical Tips General Operation of Porsche Advanced Cockpit and Porsche Communication Management (PCM) Topic Operating assistance systems Assistance systems can be switched on and off via the touch display in the dashboard by selecting ASSIST e Options Preliminary settings for the assistance systems can be configured under ASSIST Assistance system settings.
-
Page 35
Practical Tips Topic Activating voice control button on the left-hand control lever on the steering wheel initiates different functions depending on the application: – Brief press: PCM voice control is enabled. – Longer press: Siri voice recognition is activated (only in conjunction with Apple CarPlay) Switching between two connected If a cellphone is already connected to the PCM, a second cellphone can also be connected to the PCM and the cellphones… -
Page 36
Practical Tips Central Locking Topic Only one door is unlocked when the vehicle is The setting for locking and unlocking the doors has been changed. All doors can be unlocked irrespective of the unlocked. selected setting. e Press button on the vehicle key twice within 5 seconds. e CONTROL e Vehicle e Locking. -
Page 37
Topics On the following pages, the content is arranged in topics in alphabetical order. -
Page 38: Driving And Driver Assistance Systems Active Lane Keeping
Active Lane Keeping Active Lane Keeping e Keep your hands on the steering wheel at all passive at any time. e Drive with extreme care. times order to always be ready to steer. e Always be ready to take over driving tasks General safety instructions e Always hold the steering wheel with both hands.
-
Page 39
Porsche dealer. Porsche recommends an risk of accidents the driver does not feel a strong steering torque on authorized Porsche dealer, as they have trained the steering wheel immediately after the system is There are some driving situations in which the sys- technicians and the necessary parts and tools. -
Page 40
A Active Line Keeping status display Lane Keep Assist is active, e.g. when may be decelerated to a standstill. B The ACC status display with desired speed and vehicle > Please see chapter «Porsche Active Safe (PAS)» ACC status is «Ready». ahead on page 208. -
Page 41
Active Lane Keeping Switching Active Lane Keeping on and off Active Lane Keeping can be switched on and off in the PCM. e ASSIST e Active Lane Keeping Information Active Lane Keeping can only be activated when Adaptive Cruise Control (ACC) is activated. The driver can deactivate Active Lane Keeping at any time by pressing the brake or by oversteering. -
Page 42
Active Lane Keeping Additional information Comparison of Lane Keep Assist and Active Lane Keeping Function Lane Keep Assist Active Lane Keeping Lane Keep Assist + Active Lane Keeping Status icon Lane center guidance Lane departure warning Steering intervention to prevent lane departure (lane edge guidance) approx. -
Page 43: Adaptive Cruise Control (Acc)
Stationary or slow-moving vehicles are only of the Adaptive Cruise Control. set distance. Adaptive Cruise Control will cause the e Visit an authorized Porsche dealer. Porsche rec- detected to a limited extent by ACC. vehicle to brake if the distance from the vehicle in e You should intervene as necessary.
-
Page 44
Adaptive Cruise Control (ACC) Operating Adaptive Cruise Control surface, fog, stone chippings, heavy rain or Adaptive Cruise Control actively keeps the vehicle in (ACC) aquaplaning). a stationary position. – Switch off ACC temporarily when driving on When the vehicle in front drives off, the automatic turn-off lanes, highway exits or in areas with speed and distance control can start again. -
Page 45
Adaptive Cruise Control (ACC) Desired speed is stored and a vehicle has Adaptive Cruise Control (ACC) standby been detected ahead. Speed and distance control is deactivated after the brakes are applied or when the control lever is pressed down (position 3, CANCEL). Switching Adaptive Cruise Control The desired speed setting and the selected distance (ACC) on and off… -
Page 46
Adaptive Cruise Control (ACC) Displaying the distance from the vehicle The desired speed is automatically maintained ahead provided that a slower vehicle is not detected ahead. If a vehicle is detected ahead, the vehicle symbol C appears on the instrument cluster and in the status Information display B. -
Page 47
Adaptive Cruise Control (ACC) Following too close the vehicle has stopped and automatic speed and moving and if no stationary objects are detected in WARNING distance control can start again. front. e Press the control lever on the steering wheel Driving too close to the vehicle in front may result in Adaptive Cruise Control (ACC) active upward (position 4, RESUME). -
Page 48
Adaptive Cruise Control (ACC) A – Erratic/weaving vehicles The status display B changes from gray to red. – When driver’s door is open and seat belt is not fastened on the driver side. The vehicle is only detected if it is completely in its –… -
Page 49
Adaptive Cruise Control (ACC) Restricted detection of a WARNING stationary vehicle Stationary vehicles may only detected to a restricted extent by the Adaptive Cruise Control (ACC) radar sensor e Particular attentiveness is required while driving. e Brake if necessary. Fig. 8: Vehicles with large projecting loads E –… -
Page 50: Adaptive Cruise Control (Acc) With Porsche Innodrive (Pid)
Porsche Fig. 9: Radar sensor position e Do not use Porsche InnoDrive in heavy traffic, InnoDrive detects speed limits and road features where there are road works, in built-up areas, on such as inclines or bend radii on the route before the private or field tracks, or in play streets.
-
Page 51
– Do not use Porsche InnoDrive during trailer op- parts and tools. distance control. eration as the system does not adapt to the al- –… -
Page 52
Display of forthcoming event Speed limits known in advance are displayed (Fig. 12) A and D. In this case, Porsche InnoDrive reduces the vehicle speed at an early stage. Speed limits that are not known in advance are not dis- played. -
Page 53
Adaptive Cruise Control (ACC) with Porsche InnoDrive (PID) > Please see chapter «Changing the desired speed» The gray status display appears on the instru- – The configured maximum speed is only exceeded ment cluster. Porsche InnoDrive is passive. when the driver increases the desired speed on page 51. -
Page 54
Adaptive Cruise Control (ACC) with Porsche InnoDrive (PID) Discard the desired speed setting (RESUME) however increase or decrease the speed individually The status display A changes from red to gray. e At the preset desired speed, press the control based on the detected speed limit, e.g. -
Page 55
Adaptive Cruise Control (ACC) with Porsche InnoDrive (PID) The vehicle regulates the desired speed of The vehicle regulates the speed to the de- 60 mph (100 km/h) set by the driver. tected speed limit of 60 mph (100 km/h) in AUTO mode. -
Page 56: Airbag Systems
Airbag Systems Airbag Systems Seat Belts and Safe Storage of Objects DANGER DANGER Positioning The vehicle is equipped with airbags and lap/shoul- der belts at both front and rear seating positions. Objects and load have to be stored securely to keep Airbags are most effective when occupants wear The airbags are a supplemental restraint at those from causing injury.
-
Page 57
Porsche dealer. multaneously damping the motion of the driver and e Using accessories not approved by Porsche can stances, including: passenger in the impact direction in the event of a –… -
Page 58
1- the seat is occupied by a person when it is not. 800-PORSCHE prior to having your vehicle child restraint system on the seat. Wet towels or e Never use cushions, pillows, blankets or similar modified. -
Page 59
In the following cases you should immediately continuously illuminated when the ignition is switched on and/or the engine is running. consult an authorized Porsche dealer in order to assure the airbag system is functioning Passenger airbag switched on properly: If the front passenger seat is occupied with an adult –… -
Page 60
Airbag Systems – If the warning light appears while driving. Information Further information on the airbag system can be found on stickers attached to the sun visors, as well as on all airbag components. For special recommendations on the use of child restraints: >… -
Page 61: Air Conditioning (2/4-Zone Air Conditioning)
Air Conditioning (2/4-Zone Air Conditioning) Air Conditioning (2/4-Zone Air Conditioning) Brief Overview – Air Conditioning Front control panel This brief overview does not replace the compre- hensive descriptions. Safety messages and warn- ings, in particular, are not replaced by this brief overview.
-
Page 62
Air Conditioning (2/4-Zone Air Conditioning) What do I want to do? What do I have to do? Where? > p. 63 Adjust the air distribution e AIR CLIMATE > p. 64 Defrost windshield Press button D. > p. 65 Switch on heated rear screen/door mirror Press button E. -
Page 63
Air Conditioning (2/4-Zone Air Conditioning) What do I want to do? What do I have to do? Where? > p. 62 Set air flow Press button B for the left side or button F for the right side. > p. 63 Adjust the air distribution Air at head level for left or right side: Press button Air to central and side vents for left or right side: Press button… -
Page 64
Air Conditioning (2/4-Zone Air Conditioning) Setting air flow Increasing and reducing air flow e Press button for the relevant air-conditioning zone upward or downward. The selected air flow is shown in a bar display above button . The more bars that are dis- played, the more air flows into the vehicle interior. -
Page 65
Air Conditioning (2/4-Zone Air Conditioning) Switching Eco mode on and off The air flows from the center vent and NOTICE from the air vents in the door pillars. When Eco mode is switched on, the air conditioning The air flows into the footwell and from system operates particularly energy efficiently. -
Page 66
Air Conditioning (2/4-Zone Air Conditioning) Setting rear air-conditioned areas air-recirculation mode is deactivated automatically Information from front to prevent the windows from misting. When the cooling function is switched off manually Touch display in dashboard: In the case of 4-zone air conditioning, the air-con- or automatically, air-recirculation mode ends after ditioned areas in the rear can be adjusted using the e CLIMATE… -
Page 67
Air Conditioning (2/4-Zone Air Conditioning) e Press button Switching on heated rear screen and door Vehicles with windshield heating also have a strip of on the front mirror heating metal foil in the windshield and heating wires on the control panel again to end the function. b b Engine is running. -
Page 68
Air Conditioning (2/4-Zone Air Conditioning) e TIMER 1. CLIMATE Setting the required temperature Information 2. Select Pre-cool/heat timer. e TIMER e Options The precooling/heating system is used to heat the 1. CLIMATE Extended pre-conditioning e Temperature battery at low temperatures. If the battery is cold, 3. -
Page 69: Opening And Locking Alarm System
Alarm System Alarm System Switching off the alarm system Preventing theft after the alarm has been triggered Before leaving the vehicle, always: The alarm system monitors the following alarm e Close the windows and the Panoramic roof sys- e Unlock the vehicle contacts: tem.
-
Page 70: Navigation And Connectivity Apple Carplay
The use of a flat-rate data plan is recommended. For information on operating the Porsche Communication Management system (PCM): > Please see chapter «Porsche Communication Fig. 26: USB port (type C) in the armrest b b iPhone 7 or later, iOS 12.2 or higher.
-
Page 71
Apple CarPlay For information on voice control: After you have connected the iPhone once, Ap- > Please see chapter «Voice control» on page 287. ple CarPlay starts automatically when you get into the vehicle. You can leave the cellphone in your bag Switching between Apple CarPlay or trouser pocket, for example. -
Page 72: Auto Start Stop Function
Auto Start Stop Function Auto Start Stop Function Information Information When the vehicle stops, e.g. at a traffic light or in a The HOLD function can be activated by flooring the If Adaptive Cruise Control (ACC) is active, the engine traffic jam, the engine automatically stops, provided pressed brake pedal while the vehicle is stationary.
-
Page 73
CAR e DRIVE e Start/Stop e Have the fault repaired by an authorized Porsche The automatic engine shut-off is suppressed. – PSM switched off or in SPORT mode dealer. Porsche recommends an authorized Por- sche dealer, as they have trained technicians and –… -
Page 74: Mobility And Minor Repairs Battery
Porsche recommends an authorized you an electric shock. Working on the vehicle’s First aid Porsche dealer, as they have trained technicians electrical system can cause a short circuit. The short If electrolyte fluid splashes into your eye, and the necessary parts and tools.
-
Page 75
The battery will run down even if the vehicle is out of placed with a lithium battery explicitly intended operation. by Porsche for this vehicle. The use of other lith- e To maintain its function, charge the battery ap- ium or lead-acid batteries results in significant… -
Page 76
Battery technicians and the necessary parts and tools. e Observe the disposal instructions for lithium batteries. Power interruption Following a temporary power interruption, some equipment must be reinitialized. 1. Store the final position of the power windows. > Please see chapter «Windows» on page 327. 2. -
Page 77: Brake Fluid
Do not change the brake fluid yourself. continue driving. e Visit an authorized Porsche dealer. Porsche rec- Visit an authorized Porsche dealer. Porsche rec- ommends an authorized Porsche dealer, as they ommends an authorized Porsche dealer, as they…
-
Page 78: Brakes
Brakes Brakes Automatically releasing the parking brake Information b b Engine running/vehicle ready for operation (E- Electric parking brake If automatic engagement of the electric parking Hybrid vehicles). b b Driver’s door closed. brake is interrupted through manual release, the The electric parking brake acts on the rear wheels function is only available after the door has been b b Driver’s seat belt fastened or operating mode D,…
-
Page 79
Footbrake Brake system function be required. e Allow a greater braking distance from the vehicle Porsche cars are equipped with a power assisted Obstructed pedals WARNING hydraulic dual circuit brake system with disk brakes in front and «brake» the brakes dry at intervals. -
Page 80
The values quoted by Porsche are based on normal use in line with general traffic conditions. Wear in- creases significantly if the vehicle is used on race tracks or if a forceful driving style is adopted. -
Page 81: Car Care
Always turn off the engine and allow it to cool for the full period: Contact an authorized Porsche dealer. The dealer will prepare a condition report and down before working in the engine Chemical cleaners WARNING will certify the level of care of the vehicle.
-
Page 82
Repairing paint damage Have minor paint damage (cracks, scratches or Paint care stone chips) repaired immediately, before corrosion begins. Visit an authorized Porsche dealer. Porsche recommends an authorized Porsche dealer, as they NOTICE have trained technicians and the necessary parts and tools. -
Page 83
This coating is subject to natural wear and Contact an authorized Porsche dealer. e Never use other chemical cleaning agents or can be renewed. e Visit an authorized Porsche dealer. Porsche rec- solvents. Cleaning decorative films ommends an authorized Porsche dealer, as they… -
Page 84
1. Blot the entire seat and backrest surface using a Porsche Tequipment. suitable care product. clean, absorbent sponge and distilled water. To protect carpets, the Porsche range of accessories Make sure that perforated leather does not get Leather care includes the correct size of floor mats with the ap- wet on its reverse side. -
Page 85
If you intend to store your vehicle for a prolonged e Do not use cleaning agents or other liquids in the observe the following: period: Contact an authorized Porsche dealer. They e Use mild detergent for soiled seat belts. will be glad to give you information and advice about area of the airbags. -
Page 86
Car Care System). meeting SAE Standard J2842 HFO-1234yf and e Porsche recommends an authorized Porsche R744 Design Criteria and Certification for OEM Mo- bile Air Conditioning Evaporator and Service dealer, as they have trained technicians and the Replacements. necessary parts and tools. -
Page 87: Central Locking
«Central Lock- ing» chapter. Safety messages and warnings, in particular, are not replaced by this brief overview. Fig. 32: Vehicle key Fig. 33: Porsche Comfort Access What do I want to do? What do I have to do? What happens? Where? >…
-
Page 88
Information locked and locked either with the vehicle key or started by unauthorized third parties, the Comfort without a key by means of Porsche Confort Access. This section describes the vehicle’s factory settings. Access functions can be temporarily deactivated You can set whether only the driver’s door and filler using the vehicle key. -
Page 89
Automatic unlocking The vehicle is automatically unlocked when a door is opened. Fig. 35: Unlocking doors with Porsche Comfort Access Locking doors b b Vehicles with Porsche Comfort Access b b The driver must be carrying the vehicle key, e.g. -
Page 90
Information Fig. 36: Locking the doors with Porsche Comfort Access Locking doors from inside The vehicle cannot be fully locked if the doors, hood b b Vehicles with Porsche Comfort Access and tailgate are not fully closed. -
Page 91
Central Locking Emergency unlocking and emer- The vehicle is locked automatically when a speed of approx. 45° counter-clockwise on the left rear gency locking of doors approx. 9 mph (15 km/h) is exceeded. door. > Please see chapter «Vehicle Settings» on >… -
Page 92
6. With the door open, turn the emergency key repaired. clockwise to the first point of noticeable resist- e Visit an authorized Porsche dealer. Porsche rec- Information ance and then turn it further to the stop using a ommends an authorized Porsche dealer, as they certain amount of force. -
Page 93: Charging
Do not charge the high-voltage battery via the the Porsche charging equipment. braking, direction changes or in the event of an e Do not work in or on the vehicle during the vehicle charge port during a thunderstorm.
-
Page 94
1. Refer to the separate instructions for the Por- vehicle, the vehicle plug remains locked. and legislation. sche charging equipment and instructions for – Porsche recommends using the Porsche Univer- the vehicle charging cable used. – The ignition can be switched on after charging starts. -
Page 95
Charging Programming and activating the departure Information Meaning timer – Observe the specified sequence for charging the The departure timer is programmed and activated lights Vehicle plug inserted and high-voltage battery. via the PCM. locked. The high-voltage flashes – End the charging process before disconnecting Each departure timer can be set to start once (single battery is being charged. -
Page 96
Charging Deactivating the departure timer Domestic electrical outlet If no departure timer is programmed, the light indi- cator in button A flashes three times and then goes e TIMER 1. HYBRID out when the button is pressed. Connection Charging Charging standard time at time at… -
Page 97
(e. 1. Lever off the DVD changer trim panel using a e Visit an authorized Porsche dealer. Porsche rec- g. screwdriver) and remove it. suitable object (e.g. screwdriver) and remove it. ommends an authorized Porsche dealer, as they have trained technicians and the necessary parts and tools. -
Page 98
3. Disconnect the vehicle plug from the vehicle charge port. To test the release of the vehicle plug: e Visit an authorized Porsche dealer. Porsche rec- ommends an authorized Porsche dealer, as they have trained technicians and the necessary parts… -
Page 99: Child Restraint Systems (Child Seats)
Up to 29 lbs. (13 kg) tions for the child restraint system provided by tested and adjusted to the interior of your Porsche Children of this weight must be transported in a re- the manufacturer of the child restraint for in- and the appropriate child weight groups.
-
Page 100
Seek appropriate advice from your authorized In this case: ized Porsche dealer. Porsche dealer about the possible installation of e Install child restraint system on the rear seats. a Porsche child restraint system. e Have the fault remedied at your nearest author-… -
Page 101
These systems have been tested and adjusted to point the locking mechanism is activated. the interior of your Porsche and the appropriate 4. Insert the seat belt tongue into the buckle and child weight groups. make certain that it is properly latched. Make no Other systems have not been tested and could more adjustments to the seat. -
Page 102
Child Restraint Systems (Child Seats) Upper anchorage points for child restraint The retaining lugs A for the L.A.T.C.H. child seat an- systems with L.A.T.C.H. top tether chorage can be found under the lower section of the backrest. Misuse of Child Restraint WARNING Anchorages Child restraint anchorages are designed to with-… -
Page 103
Child Restraint Systems (Child Seats) 4. Fasten L.A.T.C.H. top tether B to the attachment point on the rear side of the backrest and tighten the strap. -
Page 104: Coolant
Never attempt to add coolant. 140 °F/60 °C. e Visit an authorized Porsche dealer. Porsche rec- When working in the engine compartment, hands, ommends an authorized Porsche dealer, as they fingers, articles of clothing, necklaces or long hair…
-
Page 105
Find the cause and have it repaired immediately. Visit an authorized Porsche dealer. Porsche rec- ommends an authorized Porsche dealer, as they have trained technicians and the necessary parts and tools. -
Page 106: Cruise Control
Using cruise control can lead to an accident if the prevailing traffic situation does not allow you to drive – Porsche Stability Management (PSM) is active. Changing the speed at a sufficient distance to the car in front and at a e To increase speed, press the control lever on the Resuming the stored speed –…
-
Page 107
Cruise Control Cruise control accelerates/decelerates the ve- hicle to the stored speed. Switching off cruise control e Press button R on the control lever. The memory is cleared and the readiness symbol disappears. Information The stored speed is cleared when the ignition is switched off. -
Page 108: Device Manager
Select in the header (depending on – Data: Data connection established via access the connection status) e Options point. Please see chapter «Porsche Connect» on page 223. – Phone: Please see chapter «Mobile Phone» on page 177. – App: App connected via WiFi.
-
Page 109: Luggage And Transport Drink Holders
Drink Holders Drink Holders Rear drink holders Spilling hot drinks CAUTION Hot drinks can cause scalding if spilled. e Only use containers that fit. e Never put overfull containers in the drink holder. e Do not use hot drinks. e Keep the drink holders closed while driving. NOTICE Fig.
-
Page 110: Electrical Sockets
Electrical Sockets Electrical Sockets – Under the glove compartment – Front center console Electric shock, short cir- DANGER – Luggage compartment side trim panel on left in cuit or fire direction of travel Touching conductive parts of the vehicle can lead to an electric shock.
-
Page 111: Emergency Call Systems
Due to technical or organizational restrictions that lie If the light indicator flashes, but the emergency call outside the area of influence of Porsche (e.g. no center cannot be heard via the loudspeaker, the roaming or no activated SIM card), it is possible that loudspeaker may be defective, for example.
-
Page 112
– Vehicle identification number – Vehicle type (e.g. hybrid vehicle) Fig. 61: Breakdown call button 1. Select breakdown call A. Visit an authorized Porsche dealer. Porsche recommends an authorized Porsche dealer, as they have trained technicians and the necessary parts and tools. -
Page 113: Emergency Starting
Emergency Starting Emergency Starting Performing emergency starting cable manufacturer. e The vehicles must not touch, otherwise current The 12-volt lithium battery is automatically discon- may flow as soon as the positive terminals are nected from the vehicle electrical system if the bat- connected.
-
Page 114
Emergency Starting positive terminal of the donor battery first, then from the positive terminal for emergency start- ing +. 11.Close the cap on the positive terminal for emer- gency starting +. -
Page 115: Emergency Stop Function
Active Lane Keeping, Adaptive Cruise Control Assist is active and the driver does not react to To drive off again, select operating mode D or R. (ACC) or Porsche InnoDrive (PID) are accessible the takeover prompts from Lane Keep Assist. on a limited basis.
-
Page 116
Emergency Stop Function Overriding the emergency stop function The emergency stop function can be overridden while driving. This temporarily deactivates the sys- tem. This also happens when the driver acts un- knowingly. Override the emergency stop function by: e Move the steering wheel. –… -
Page 117: Emission Control System
To reduce these e Do not continue to operate your vehicle under To assure efficient operation of the Emission pollutants, your Porsche is equipped with a precisely these conditions, since raw fuel might reach the Control System:…
-
Page 118
Emission Control System – Wheels should be properly aligned. – Tires should be inflated to the correct pressure. e Always monitor your fuel consumption. e Drive smoothly, avoid abrupt changes in speed as much as possible. e Avoid “jack rabbit” starts and sudden stops. e Do not drive longer than necessary in the lower gears. -
Page 119: Engine Oil
Engine Oil Engine Oil b b The engine is at operating temperature and has The oil pressure warning light indicates serious en- gine damage may be occuring when lit, if engine rpm been stopped for at least one minute. It is important to perform oil changes regularly in is above idle speed.
-
Page 120
If a sticker showing details of an approved engine oil is affixed in the engine compartment, this specification has priority over the specifications in this manual. If in doubt and to find out the current approval status, please contact an authorized Porsche dealer. -
Page 121
4.0 liter V8 biturbo engine – – – For information on the correct engine oil, contact an authorized Porsche dealer. If engine oil needs to be added, use this engine oil. Adding engine oil Engine Oil Cancer Risk Engine compartment… -
Page 122
Make sure to note the following points: temperature, the engine-compartment blowers may haust system become very hot when the engine is – Use only engine oils approved by Porsche. Ob- continue to run or start to run. running. serve the service intervals. -
Page 123: Flat Tire
4. Activate the transmission parking lock using the sche dealer as soon as possible. Inform the au- immediately. P button on the selector lever. thorized Porsche dealer that the tire contains tire 5. Straighten the front wheels. sealant. e Tire repairs are not permissible. Replace dam- 6.
-
Page 124
Flat Tire In the event of contact 1. Pull plug B and pressure hose C out of compres- CAUTION with the tire sealant sor A. 2. Screw pressure hose C onto the sealant bottle Irritation or allergic reactions after contact with tire flange D. -
Page 125
Changing tires > Please see chapter «Wheels and Tires» on If the collapsible spare wheel is defective: e Visit an authorized Porsche dealer. Porsche rec- page 316. ommends an authorized Porsche dealer, as they Updating the Tire Pressure Monitoring Sys-… -
Page 126: Fuses
10 A and tools. nents except the fuses listed here (e.g. relays). e Go to a qualified specialized repair shop. Porsche Blue 15 A recommends an authorized Porsche dealer, as they have trained technicians and the necessary…
-
Page 127
Fuses Opening fuse box on the 1. Remove cover on the fastening screw using a flat Load dashboard screwdriver. 2. Unscrew upper part of the footrest using a Torx Instrument cluster screwdriver, fold it towards the seats and remove Operator control unit for multimedia system Right-hand drive vehicles Light switch… -
Page 128
Fuses Load Load Load Oxygen sensors Air-conditioning control unit Front right reversible seat-belt pretensioner Clutch actuator — E-Hybrid Engine mount, thermal management valve Front heater fan Row D Driver assistance control Motor relay Thermal management control unit — E- Load Thermal oil level sensor Hybrid, starter DIA_15 (mirror with automatic dimming,… -
Page 129
Load Vehicles with DVD changer: HV PTC, thermal management valves/ Left headlight e Visit an authorized Porsche dealer. Porsche rec- sensors, radiator shutter (E-Hybrid) ommends an authorized Porsche dealer, as they Row E have trained technicians and the necessary parts Air suspension and tools. -
Page 130
Fuses Row D Load Differential lock Load eAWS SCR heater (not for E-Hybrid) High-voltage battery Row C High-voltage battery water pump Load Power electronics — E-Hybrid Assistance systems control unit Brake booster — E-Hybrid Cellphone coupling antenna/booster Seat fans Lane Change Assist Air-conditioning compressor — E-Hybrid Entertainment system 48-volt system… -
Page 131: Garage Door Opener (Homelink ® )
HomeLink system with the original remote control: ® – or – WARNING e Contact an authorized Porsche dealer. impact through operated Systems with rolling code system: > Visit www.homelink.com or call the toll-free equipment The light indicator A on the button flashes green.
-
Page 132
Garage door opener (HomeLink ® Using the garage door opener b b Ignition is switched on. b b Vehicle is within the receiver range. e Press and hold the relevant HomeLink button on ® the overhead console. The light indicator A lights up green during signal transmission. -
Page 133: Instrument Cluster And Pcm Head-Up Display
Head-up Display Head-up Display The head-up display (HUD) supplements the instru- ment cluster as a display instrument. It projects im- portant messages and selected information onto the windshield, where the driver can see it. This allows the driver to read the information without taking his eyes off the road.
-
Page 134: Hold Function: Standstill Management
HOLD Function: Standstill Management HOLD Function: Standstill Operating principle Information Management As an assistance function, the HOLD function sup- The HOLD function is disabled: ports the driver when stopping the vehicle and driv- – In operating mode P and N: If the Tiptronic S op- ing off on steep gradients.
-
Page 135
HOLD Function: Standstill Management Information When the HOLD function is active, the driver may feel a difference in the brake pedal and hydraulic noises may be heard. This behavior is typical of the system. There is no fault. -
Page 136: Hood
Hood Hood Opening and closing the hood Opening the hood NOTICE If the windshield wipers are folded forward when you open the hood, the wipers or the hood can be Fig. 73: Opening the hood damaged. e Make sure that the windshield wipers are not 3.
-
Page 137: Hybrid Vehicle
Hybrid Vehicle Hybrid Vehicle Hybrid operating modes Starting the vehicle b b Vehicle plug not inserted in the vehicle charge The parallel plug-in hybrid drive allows the vehicle to Warning stickers run in the following hybrid operating modes: port. – Driving powered by the electric machine. 1.
-
Page 138
Hybrid Vehicle Displaying E-consumption on the instrument – The brake pedal is pressed and either the driver’s Touch display in dashboard: cluster door is closed or the driver’s seat belt is fastened. e HYBRID e E-FLOW – or – E-consumption shows the average electric con- –… -
Page 139
Hybrid Vehicle E-CHARGE mode The light indicator for the selected driving pro- If the prerequisites of the E-POWER driving program gram lights up and the driving program is dis- are not met (e.g. high-voltage battery not suffi- In E-CHARGE mode, the high-voltage battery can be played in the digital speedometer. -
Page 140
Hybrid Vehicle Off-road driving programs The combustion engine is always in operation in the off-road driving programs. The high-voltage battery is charged to a minimum level to provide the boost function. -
Page 141: Instrument Cluster
Instrument Cluster Instrument Cluster Fig. 75: Instrument cluster A – Speed & Assist display B – Tachometer D – Car & Info display Information on the outside temperature, speed and The start of the red zone on the tachometer scale is Information on the vehicle status, driver assistance assistance systems is shown in tubes 1 and 2.
-
Page 142
Consult an authorized Porsche dealer in the follow- If the coolant temperature is too high, the coolant ing cases: temperature gage moves to the maximum mark. A F –… -
Page 143
Emission control warning light (Check Engine) All-wheel warning light In the event of malfunctions (e.g. engine Porsche Active Safe (PAS) warning light misfiring) that could increase pollutant emissions or cause consequential dam- Lane Change Assist light indicator age the warning light may flash or light… -
Page 144
Instrument Cluster E — Scrolling to and selecting menus and functions in the Car & Info 2 display e Scrolling: Turn rotary push button E up or down. e Select/Enter: Press rotary push button E. F — Opening a saved function e Press the ◊… -
Page 145
Assistance screen > p. 41 Set and display Adaptive Cruise Control (ACC). > p. 48 Set and display Adaptive Cruise Control (ACC) with Porsche InnoDrive (PID). > p. 151 Display Lane Change Assist. > p. 156 Display Lane Keep Assist. -
Page 146
Where? > p. 256 Display speed limiter. > p. 227 Display Porsche Hill Control. e E-Drive Assist > p. 135 Display the current share of electric drive power (green area). The combustion engine is switched on at the power threshold E max. -
Page 147
Instrument Cluster Tube Display What can I do?/What is displayed? Where? e Map – Display and adjust the map display. e Night View Assist > p. 188 Display Night View Assist with thermal image detection. e Time and date – Display the time and date. -
Page 148: Interior Lighting
Interior Lighting Interior Lighting – After switching off the ignition and unfastening the driver’s seat-belt buckle Adjusting brightness The interior lighting is switched off again in the fol- lowing situations: e CAR e CONTROL e Vehicle settings e – After all the doors have been closed Light and visibility e Interior lighting e –…
-
Page 149
Interior Lighting Setting the brightness in individual areas of the vehicle interior e CONTROL e Ambient lighting 1. CAR 2. Select Roof, Doors, Center console or Footwell. 3. Set the desired brightness value. -
Page 150: Intersection Assist
Intersection Assist Intersection Assist Information display Functional limitations Intersection Assist monitors the areas around the In the event of a possible collision, a visual warning is – People and animals may not be detected. front and sides of the vehicle at intersections and displayed on the instrument cluster and PCM.
-
Page 151: Jack And Lifting Platform
Jack and Lifting Platform Jack and Lifting Platform Inadequate securing of WARNING vehicle An unsecured or incorrectly secured vehicle can move unintentionally or tip or fall off lifting equip- ment such as a jack or lifting platform. This can cause serious injuries and damage. e Raise the vehicle using a jack on a solid and flat surface only.
-
Page 152
Jack and Lifting Platform 3. Place one wedge each directly in front of and Lowering: e To lower the jack, fit the opposite side of the behind the diagonally opposite wheel. ratchet D onto the hexagon socket wrench C. Raising vehicle with the jack After lowering the vehicle, remove the jack. -
Page 153: Lane Change Assist (Lca)
Lane Change Assist (LCA) Lane Change Assist (LCA) Lack of attention owing to the small differences in speed between WARNING your vehicle and moving or stationary objects, Lane Change Assist warns the driver about vehicles fixed objects (e.g. a metal post) may also trigger that are approaching from the rear or are located in The Lane Change Assist and Rear Turn Assist are not a warning or that slow-moving vehicles will not…
-
Page 154
If your own calculated driving path crosses function of Lane Change Assist. e Visit an authorized Porsche dealer. Porsche rec- that of a detected vehicle on the side of the vehicle on which the turn signal has been activated, the re-… -
Page 155
Lane Change Assist (LCA) Information stage Vehicles approaching fast Information If the turn signal is not set, Lane Change Assist in- – The faster a vehicle is approaching, the earlier forms you about detected vehicles that are consid- the warning indicator on the door mirror lights ered critical for a possible lane change. -
Page 156
Lane Change Assist (LCA) Vehicles approaching slowly Vehicles falling back quickly briefly several times. Lane Change Assist is inform- ing you that you may have overlooked a vehicle. Vehicles falling back slowly Fig. 89: Vehicle approaching slowly Fig. 91: Vehicle falling back fast A –… -
Page 157
Lane Change Assist (LCA) Starting to turn off lights up. This warns you of a potential collision with a vehicle that may have been overlooked. Cornering When driving around a bend, Lane Change Assist may react to a vehicle driving in the next lane but one and the warning indicator in the door mirror may light up. -
Page 158: Lane Keep Assist
If a warning appears on the instrument cluster, Porsche recommends an authorized Porsche Other road structures or objects may be incorrectly take over control of the vehicle immediately.
-
Page 159
Lane Keep Assist Controls conditions, oncoming headlights or driving close marking and is in danger of leaving the driving lane. to the vehicle ahead). However, the driver can override this steering inter- vention at any time. – The quality of the lane markings is not suffi- ciently good for activation of Lane Keep Assist. -
Page 160
Lane Keep Assist Display elements 1. Press button R on the control lever. Lane Keep Status Meaning The driver assistance systems are switched on. Assist display display 2. Press button S on the control lever. The available driver assistance systems are dis- No display Lane Keep Assist is played on the instrument cluster. -
Page 161: Lights
What do I have to do? Where? > p. 160 e Press button Switch on automatic headlights Automatic headlights and the Porsche Dynamic Light System (PDLS/PDLS Plus) are switched on. e Press button – Switch on parking light License plate light, instrument lighting, and parking light are switched on.
-
Page 162
PDLS Plus also includes the PDLS functions. rear fog light manually. switched on for the duration of the off delay. > Please see chapter «Porsche Dynamic Light Sys- > Please see chapter «Vehicle Settings» on tem (PDLS)» on page 160. -
Page 163
Lights High beam assist (USA only) – Where there are poorly lit road users, such as switched from full high beam illumination to low cyclists. beam when the camera detects street lighting. – On narrow curves, steep crests or hollows. Lack of attention when WARNING –… -
Page 164
Lights Operating turn signal and high draws the direction of vision onto the lane being The light indicator comes on. beam lever driven on. The driver is less dazzled by the oncoming Switching off traffic. e Press the lever once to pressure point 4. Signage glare reduction (Canada only) The light indicator goes out. -
Page 165
Switching the parking light on and off pairs, move the car well off the road. Switch on ried out by an authorized Porsche dealer, using a b b Ignition is switched off. the emergency flasher and mark the car with suitable adjustment tool. -
Page 166: Luggage Compartment
Luggage Compartment Luggage Compartment changes or in accidents. NOTICE e Never transport objects that are not secured Stowing Loads (accidents, braking, corners). Danger of damage to the rear and side windows. e Always transport loads in the cargo area, never in e Make sure that the load cannot damage the rear Inhalation of toxic ex- DANGER…
-
Page 167
Luggage Compartment Opening and closing the cargo area floor Fig. 102: Removing the tool box (without collapsible spare Fig. 103: Removing the tool box (with collapsible spare wheel) wheel) A Compressor A Ratchet Fig. 101: Opening the cargo area floor B Tire sealant (Tire Mobility System –… -
Page 168
Luggage Compartment Removing compressor and tire sealant (Tire Pulling out and retracting the luggage com- Removing luggage compartment cover Mobility System – TMS) partment cover Unlocking/Removing luggage compartment cover The compressor and the tire sealant (Tire Mobility System – TMS) are located under the cargo area floor. -
Page 169
Luggage Compartment Installing luggage compartment cover Detaching/Removing luggage compartment cover Fig. 107: Removing luggage compartment cover 3. Pull the luggage compartment cover out of the Fig. 108: Installing luggage compartment cover Fig. 106: Disengaging luggage compartment cover latching mechanism in direction of arrow. b b All Cayenne models except Cayenne Coupé… -
Page 170
Luggage Compartment Storing snowboard or skis in the ski bag Fig. 109: Installing luggage compartment cover Fig. 110: Engaging luggage compartment cover b b Cayenne Coupé 3. Lift up the luggage compartment cover. Fig. 111: Using the ski bag 1. Insert the luggage compartment cover into the 4. -
Page 171
Luggage Compartment Using tie-down rings Inserting and adjusting the telescopic rod Inserting and adjusting the strap reel Fig. 113: Using the telescopic rod Fig. 114: Using the strap reel Fig. 112: Using tie-down rings 1. Press button B on the end element and insert in 1. -
Page 172
Luggage Compartment Using the luggage compartment Installing luggage compartment partition net at the Installing luggage compartment partition net at the partition net rear front The luggage compartment partition net prevents light objects from being thrown into the vehicle interior. Fig. 116: Installing luggage compartment partition net at Fig. -
Page 173
Luggage Compartment Removing luggage compartment partition net 1. Use the tie-down belt loosener C to loosen the belt strap. 2. Detach the luggage compartment partition net from the upper rings and bottom hooks. -
Page 174: Entertainment And Communication Media
This brief overview does not replace the compre- hensive descriptions. Safety messages and warn- ings, in particular, are not replaced by this brief overview. For information on operating the Porsche Communication Management system (PCM): > Please see chapter «Porsche Communication Management (PCM)» on page 215.
-
Page 175
Technical data on supported media and file formats: Storing and editing a favorite > Please see chapter «Porsche Communication The PCM additionally receives digital programs from HD Radio™ stations in the FM/AM band provided Management (PCM)» on page 351. -
Page 176
Media Adding favorite content from SiriusXM band ® to favorite list e MEDIA e PLAY e Call up media sources e SiriusXM e Select Add The Icon is displayed when the favorite content is played. Organizing favorites e FAV 1. MEDIA 2. -
Page 177: Mirrors
Mirrors Mirrors Adjusting door mirrors NOTICE Incorrect assessment of WARNING traffic situation due to Risk of damage to the door mirrors when washing distorted representation the vehicle in car washes. of surroundings in door e Fold in door mirrors before using the car wash. mirrors e Do not fold electrical folding door mirrors in and out manually.
-
Page 178
Mirrors e Press button D (Fig. 119). Using automatic dimming of the Swiveling mirror glass downward automatically mirrors The door mirrors fold in or out. e Do not fold the door mirrors in by hand. b b Ignition is switched on. The door and interior mirrors each automatically b b Function activated. -
Page 179: Mobile Phone
This brief overview does not replace the compre- hensive descriptions. Safety messages and warn- ings, in particular, are not replaced by this brief overview. For information on operating the Porsche Communication Management system (PCM): > Please see chapter «Porsche Communication Management (PCM)» on page 215.
-
Page 180
106. – You will find an overview of compatible cell- the driver losing control of the vehicle. phones on the Porsche website for your country e Only make or receive calls using hands-free e Search for new phone under: Models e Your model (e.g. 911 Carrera) e 1. -
Page 181
® For information about the data connection: the following displays are possible in the header: activated. > Please see chapter «Porsche Connect» on b b The PCM Bluetooth function is activated. No phone connected. ®… -
Page 182
Mobile Phone e Adding a new call (enter number or select Organizing favorites numbers contained in the messages for making contact) e phone calls if the cellphone supports this function. It e FAV 1. PHONE is possible that the cellphone supports the text 2. -
Page 183
Mobile Phone Replying to or forwarding a text message/e- – Details: Use content from the message (e.g. in- This transmitter must not be collocated or operating mail cluded number). in conjunction with any other antenna or transmitter. – Delete: Delete selected message. e MESSAGE e Text messages/ 1. -
Page 184
Mobile Phone Metallic objects in the https://www.ic.gc.ca/eic/site/smt-gst.nsf/eng/h_ Information CAUTION smartphone tray sf06136.html An alternating magnetic field is used during wireless – CPC-2-1 – Fixed and Land Mobile Metallic objects located between the cellphone and charging. Interactions are possible, such as irritation –… -
Page 185
Mobile Phone – Anti-oscillation to detect and mitigate any unin- Les changements ou modifications non approuvés tended oscillations in uplink and downlink fre- expressément par Molex peuvent entraîner la cadu- quency bands, cité de l’autorisation d’utiliser l’équipement. FCC ID: RK7MBC-NAR2 –… -
Page 186: Navigation
NAV e Enter destination e Select Start route guidance – Start/End route guidance or Stop e NAV e FAV e Stored destinations – Select a stored destination Prerequisite: Data connection is established. Online navigation and Porsche Connect services are activated.
-
Page 187
NAV e Options e Intelligent detour > p. 223 b b Data connection is established. Porsche Connect services are activated. Further information Use Porsche Connect services (e.g. online map update) on Porsche Connect can be found at > www.porsche.com/connect. -
Page 188
3. Select the desired smart route from the list of traffic notices. – Auto zoom: Activate or deactivate Auto zoom suggestions. function in the map. – Google Earth: Show or hide satellite view on the 4. Select Start map. Prerequisite: Data connection is established. Porsche Connect services are activated. -
Page 189
Navigation Avoiding traffic disruptions displayed automatically in the event of a naviga- Attach the toll device at the marked position on the tion event. inside of the windshield in order to guarantee opti- Traffic disruptions can be automatically avoided or mum reception. -
Page 190: Night View Assist
Pedestrian warning ually and acoustically. The camera image is dis- played with the person marked in red. On vehicles with Porsche Dynamic Light System Plus, the en- dangered person flashes in order to enhance recognition. Prior to an impending collision with wild animals outside urban areas, a warning is also issued within the limits of the system.
-
Page 191
Night View Assist e ASSIST e Assistance system set- Animal warning tings e Night View Assist Night View Assist status display Symbol Instrument Meaning cluster Speed & Night View Assist is Assist active in the display background. Car & Info Indicates when the camera image is dis- display… -
Page 192: Off-Road Driving
Always drive with the engine running. Power stresses than normal driving on roads. Porsche rec- to accidents or vehicle damage. ommends that you inspect the vehicle after off-road e Have regular professional inspections and serv- steering is active only with the engine running.
-
Page 193
Do not perform manual gear changes when driv- appropriately control the speed, gently apply the footbrake. ing and avoid stopping if possible. e Activate Porsche Hill Control (PHC). e Avoid high engine speeds. When driving on downhill gradients, always remem- Increasing traction on uphill ber the following: e Activate a suitable off-road driving program. -
Page 194
Off-Road Driving e Do not perform manual gear changes when driv- The water depth must not exceed the wading Moving off in water can be difficult due to the ing and avoid stopping if possible. high resistance and the loose surface depth specified in the technical data. -
Page 195
Off-Road Driving Crossing obstacles deep and the vehicle’s ground clearance is sufficient. e Always bear in mind the vehicle’s ground NOTICE clearance. e If you need to stop the vehicle on sand, choose a There is a risk of damage to the underbody and downward slope if possible to allow you to drive chassis parts if you do not drive properly over off again more easily. -
Page 196: Off-Road Driving Programs
Off-road Driving Programs Off-road Driving Programs Discrepancies in display Information CAUTION The vehicle features various driving programs for After the ignition is switched off, the selected driv- driving on unpaved roads. Depending on equipment, The accuracy of the tilt indicator depends on the ing program automatically switches back to the the following drive and chassis systems are adapted current driving situation and may differ from the ac-…
-
Page 197: On-Road Driving Programs
On-road Driving Programs On-road Driving Programs Selecting driving program Selecting driving program using the mode switch Depending on equipment, the vehicle offers various b b Vehicles with Sport Chrono package driving programs for a sportier overall setup when Information driving on paved roads. For information on off-road NORMAL driving mode is automatically active once driving programs: >…
-
Page 198
On-road Driving Programs Storing settings under INDIVIDUAL Deactivating SPORT Response mode b b SPORT Response mode active e DRIVE 1. Select e Press the SPORT Response button on the mode switch again. 2. Select the required settings in the touch dis- The vehicle returns to the previously selected play. -
Page 199
On-road Driving Programs Driving program NORMAL/HYBRID SPORT SPORT PLUS Backfire Not active Active Active Performance Start Cannot be activated Cannot be activated Activatable Auto Start Stop Active Not active Not active Sport exhaust system NORMAL During everyday driving, the control systems function in a balance between comfort and fuel economy. SPORT Adjusts the control systems more toward emotionality and dynamics during everyday driving. -
Page 200: Parkassist
ParkAssist ParkAssist System limitations Distance measurement The system cannot detect the following: General safety instructions – Sound-absorbing obstacles (e.g. wintery condi- tions, powder snow, clothing made from fabric, Lack of attention WARNING hide or fur). – Sound-reflecting obstacles (e.g. glass surfaces, flat enameled surfaces).
-
Page 201
There is no indication in the touch display in the mation is displayed. dashboard. It is not possible to manually re-acti- vate indication in the touch display in the For information on operating the Porsche dashboard. Communication Management system (PCM): > Please see chapter «Porsche Communication Setting ParkAssist Management (PCM)»… -
Page 202
ParkAssist Surround View Scope of functions Surround View is active, the courtesy lights are switched on for better illumination. The rear view camera facilitates monitoring of the area behind the vehicle during parking maneuvers. Activating Surround View The picture from the rear view camera is displayed Automatically on the touch display in the dashboard. -
Page 203
ParkAssist > Please see chapter «Rear view camera» on – Objects that move quickly into the detection area Information page 199. (e.g. other road users). Guide lines are superimposed on the front and rear > Please see chapter «Surround View» on e For further information, see: camera views. -
Page 204
ParkAssist – Parking forward into parking spaces perpendic- When a parking space is found, it appears orange A message appears when the vehicle reaches the ular to the road, when the front of the vehicle is in the PCM. If several parking directions are pos- target position. -
Page 205
ParkAssist e For further information, see: Interrupting the parking procedure visual signals in the PCM. In the event of an im- > Please see chapter «General safety instruc- pending collision, the system automatically applies To interrupt parking briefly: the brakes and brings the vehicle to a standstill. tions»… -
Page 206
Rear Cross Traffic Alert switched on. e Drive with extreme care. The system is no substitute for the attentiveness of b b Porsche Stability Management (PSM) switched e Always pay attention to the traffic situation and the vehicle occupants. -
Page 207
ParkAssist System limitations door panel of the relevant door will light up until the The setting remains stored even after the vehicle is danger passes. switched off. Vehicles cannot or may not be detected in time in The previously selected setting is automatically the following situations: Indicator elements stored in the selected account and paired with the… -
Page 208: Personal Settings
Personal Settings Personal Settings Storing and retrieving comfort – Edit driver settings – Delete driver (via the Edit driver menu item) Storing and retrieving personal – Activate driver settings Storing comfort settings – Activate personalization e When the ignition is switched off, the settings –…
-
Page 209
Personal Settings b b Driver’s or passenger’s door open. e Briefly press the relevant memory button 1, 2 or The settings will be automatically adjusted. -
Page 210: Porsche Active Safe (Pas)
– If brake lights are defective. vehicle handling, distance from the vehicle in functions – If there is a fault in Porsche Stability Manage- front, speed, etc. The driver is always responsible – Warning and braking functions ment or the airbag control unit.
-
Page 211
– PAS may be restricted or unavailable in bends. up to a speed of 53 mph (85 km/h) and about ve- If Porsche Active Safe detects that the driver is not – Reflective objects such as crash barriers or tun- hicles up to a speed of 156 mph (250 km/h). -
Page 212
20 mph (30 km/h) or through an If Porsche Active Safe detects a safety hazard due to – When towing a trailer, the braking behavior of automatic brake intervention initiated by the vehicle. -
Page 213: Porsche Active Suspension Management (Pasm)
Porsche Active Suspension Management (PASM) Porsche Active Suspension 1. Switch on ignition. Management (PASM) 2. Press button repeatedly. The button lights up as follows: PASM is a system for the active adjustment of shock – No light indicator illuminates when «Normal»…
-
Page 214: Porsche Active Suspension Management (Pasm) With Air Suspension And Leveling System
Porsche Active Suspension Management (PASM) with air suspension and leveling system Porsche Active Suspension The button lights up as follows: Information Management (PASM) with air – No light indicator comes on when “Normal” (de- – The height of the vehicle is automatically kept fault setting) is selected.
-
Page 215
Porsche Active Suspension Management (PASM) with air suspension and leveling system mode, Medium height can be selected manually in Low level is adopted automatically in «Sport Plus» the PCM using the DRIVE menu. chassis mode. Terrain level Information Terrain level increases ground clearance by approx. -
Page 216
Porsche Active Suspension Management (PASM) with air suspension and leveling system The rear of the vehicle is raised to its initial level The automatic leveling system must be switched off and the light indicator goes off. when driving onto a lifting platform or when raising the vehicle using the jack (car jack mode). -
Page 217: Porsche Communication Management (Pcm)
Porsche Communication Management (PCM) Porsche Communication Management (PCM) Brief overview — PCM This brief overview does not replace the complete information provided in this section. Safety messages and warnings, in particular, are not replaced by this brief overview. Fig. 145: PCM rotary push button and volume control Fig.
-
Page 218
PCM. e SET e Set-up wizard > p. 223 e SET e Porsche Connect e Private mode e Activate/deactivate Private mode Activate private mode/Deactivate private mode > p. 285 e CAR… -
Page 219
Porsche Communication Management (PCM) Touch display in dashboard Fig. 147: Touch display controls in dashboard A – Main menu C – Home screen D – Back Factory set and individually set functions are B – Submenu E – Context dependent search displayed. -
Page 220
1. Turn the rotary push button until the desired B – Long press function is highlighted. The Porsche Communication Management (PCM) is Press the touch display with your finger for longer. 2. Press the rotary push button to activate the the central control unit. -
Page 221
Porsche Communication Management (PCM) Settings and further functions of the relevant Making entries using the rotary push button menu are displayed. 1. Turn the rotary push button (Fig. 149) until the desired letter or character is highlighted. 2. Press rotary push button to apply the highlighted Setting display of time or letter or character. -
Page 222
3. Swipe in the tile to select the desired contents. – USB hubs are not supported. – Porsche will not assume any liability for damaged 4. If you wish to remove a tile from the left-hand or lost files or media. -
Page 223
To load the CD/DVD in a particular position, Inserting and removing a SIM card press the relevant position button C and push the > Please refer to the Chapter «Porsche Connect» in CD/DVD into the CD/DVD slot A. the on-board Owner’s Manual. -
Page 224
Porsche Communication Management (PCM) Removing a CD/DVD 1. Press button 2. Press the button of the CD/DVD to be ejected. 3. Remove CD/DVD. 4. To eject all CDs/DVDs, press button keep it pressed for approx. 3 seconds. -
Page 225: Porsche Connect
Additional costs may be incurred for currently active data connection is displayed in the the data connection (e.g. due to data roaming). status line of the PCM and in the Device Manager. > Please see chapter «Porsche Communication Information NOTICE Management (PCM)» on page 215.
-
Page 226
WiFi hotspot into the PCM b b There is no SIM card in the SIM card reader. The Porsche ID is linked to the PCM using a pairing Using Porsche Connect b b Vehicles with embedded SIM card (availability code. -
Page 227
The app is started. features: Switch PCM phone on or off. b b The cellphone WiFi function is activated. – The Porsche Connect services (including the Car – Activate or deactivate Private mode. b b The PCM WiFi function is activated. -
Page 228
When private mode is activated, communication – Exterior and interior images of your vehicle page 223. between the vehicle and app as well as My Porsche – Keyword search function (index search) is suppressed. No vehicle-specific information is Detailed information on installation and app func- –… -
Page 229: Porsche Hill Control (Phc)
Press the brake or accelerator pedal. switched on (button R). – or – Porsche Hill Control (PHC) is an assistance system e Press the control lever forward (Fig. 158) 1 (in- 1. Press button S. that helps the driver when driving slowly downhill (e.
-
Page 230: Porsche Stability Management (Psm)
Porsche Stability Management (PSM) Porsche Stability Manage- Automatic brake differential (ABD) ABS control range. e Always leave PSM Sport switched off during ment (PSM) If one wheel on a driven axle starts to spin, it is braked so that the other wheel on the same axle can «normal»…
-
Page 231
Porsche Stability Management (PSM) > Please see chapter «Warning and Information PSM is switched off after a brief delay. warned to adapt the driving speed to the road con- Messages» on page 293. ditions by a pulsing brake pedal and a «juddering The light indicator on the button and the PSM noise». -
Page 232
Porsche Stability Management (PSM) – When the driver significantly depresses the ac- celerator pedal. – When the braking pressure exerted by the driver on the brake pedal is stronger than the brake pressure applied by the system. -
Page 233: Porsche Vehicle Tracking System
– or – Information activation e Via the Porsche Connect smartphone app or at PVTS is tested by the authorized Porsche dealer and Note for Belgium / Luxembourg: www.porsche.com/connect before transporting activated together with the vehicle owner.
-
Page 234
Contact the Security Operating Center (SOC) before having the vehicle serviced and after the vehicle has been serviced. e When your vehicle is being serviced, please in- form the relevant employee at the authorized Porsche dealer that your vehicle is equipped with PVTS. -
Page 235: Rear Spoiler
Adapt your driving style and speed to the altered matic car wash. vehicle handling. e Have the fault repaired by an authorized Porsche The rear spoiler can be extended and retracted dealer. Porsche recommends an authorized Por- manually via the PCM for manual cleaning purposes.
-
Page 236: Refueling
DANGER (known as the «odor of rotten eggs»). Porsche is not The engine is designed for unleaded fuels without responsible for this circumstance and it does not The RF energy from a cellphone can cause sparking metallic additives.
-
Page 237
Refueling Filling with fuel The fuel type to be used for the vehicle is printed on a sticker on the inside of the filler flap. NOTICE 2. Slowly unscrew and remove the gas cap. 3. Place the gas cap in the holder. E-Hybrid vehicles: 4. -
Page 238
Refueling Emergency release of filler flap is parked at an incline or in any other nonlevel position. Vapor control system and storage When the fuel tank is filled, vapors are collected in the evaporation chamber by a vent line leading the vapors to the carbon canister where they are stored as long as the engine does not run. -
Page 239: Roof Spoiler
Have the fault repaired by an authorized Porsche dealer. Porsche recommends an authorized Por- sche dealer, as they have trained technicians and…
-
Page 240: Roof System
Roof system Roof system necessary. Information e Make sure that no one can be injured, pinched or Opening and closing the – The roof system has a force limiter. If the roof is WARNING crushed. roof system obstructed during the closing operation, it will open again immediately.
-
Page 241
Roof system Opening and closing sunblind The process stops when the button is released. The sunblind closes to its final position after the roof system has reached its final position. Stage two – automatic operation e Press or pull the switch all the way to the second Storing final positions of roof sys- setting in the relevant direction. -
Page 242
Closing the roof system in the event of failure of the roof mechanism To have the roof system repaired: e Go to a qualified specialized repair shop. Porsche recommends an authorized Porsche dealer, as they have trained technicians and the necessary parts and tools. -
Page 243: Roof Transport System
Unsecured or incorrectly WARNING driving and cause serious accidents. secured roof transport tested and approved by Porsche. It is not possi- e Secure the load so that it cannot move during the system or individual ble to fit commercially available roof rack journey.
-
Page 244
Roof transport system 1. Unlock the covers counter-clockwise using the 4. Identify the front and rear carrier bars based on key. the sticker and carefully place them onto the roof rails. Ensure that the sticker is located on the left in the direction of travel. -
Page 245
The roof transport system should only be fitted 3. Fold up the cover flaps until they audibly engage. for the first time by an authorized Porsche dealer. Visit an authorized Porsche dealer. Porsche rec- ommends an authorized Porsche dealer, as they Fig. -
Page 246
Roof transport system Information e Re-tighten the fastenings after a short journey and check them again at regular intervals. e The screw connections must be checked more frequently on bad roads. Loosening or loss of mounting components can result in serious accidents. -
Page 247
Roof transport system 1. Remove the cover trim from the T-groove. 2. Insert the mounting components into the T- groove provided. 3. Close the covers and lock them clockwise using the key. 4. Always read the relevant installation instructions for fitting and securing accessories. -
Page 248: Seat Belts
Seat Belts Seat Belts serious personal injury in case of an accident. Please see your authorized Porsche dealer im- e The shoulder belt should always rest on your mediately after detecting a fault or damage. If Unfastened or incor- DANGER upper body.
-
Page 249
Seat Belts Observe the seat belt warning When the speed of the vehicle reaches approxi- The height of the belt outlets for the front seats can light and warning message mately 15 mph (24 km/h), a warning signal also be adjusted. e Adjust the height of the belt outlet so that the sounds and the red warning symbol D in the in-… -
Page 250
Seat Belts after fastening the seat belt, always pull the di- agonal part of the belt upwards. For pregnant women: Position the lap belt so that it is as far down on the lap as possible and not pressing against the abdomen. 7. -
Page 251: Seats
Seats Seats minimized in the event of a crash. The height and fore-and-aft position of the headr- e Adjust the backrest’s inclination such that the ests on the front seats can be adjusted (depending Choosing the correct seat position on type of seat). The height of the headrests on the occupant is seated upright and the headrest is in rear seats can be adjusted.
-
Page 252
Seats Storing seat settings Rear seat backrest angle NOTICE adjustment For information on storing and retrieving the seat settings: Risk of damage from objects on the rear seats. > Please see chapter «Personal Settings» on e Do not place objects on the seats when folding page 206. -
Page 253
Seats > Please see chapter «Adjusting headrests on e Fold up the seat backrest until it locks with an Folding the backrest on the center rear seat forward rear seats» on page 252. audible click. Make sure that the seat belts are not trapped. 2. -
Page 254
Seats Forward Lowering e Pull headrest forward until the desired position is e Press button B and at the same time push the reached. headrest downward until the desired setting is reached. Backward e Press button A and push the headrest back at To improve your view to the rear, the headrest on the center rear seat can be moved to a storage position the same time until the desired position is… -
Page 255
Seats It should no longer be possible to pull the head- The number of illuminated light indicators show rest out of the seat backrest. the selected setting. 4. Adjust and engage the rear seat backrest. Switching seat heating/seat ventilation off e Press button A (seat heating) or B (seat ventila- Using seat heating/seat tion) –… -
Page 256
Seats e Close the driver’s door and switch on the ignition. Disabling controls in the rear – Automatic adjustment of CAUTION the driver’s seat child protection The driver’s seat and steering wheel move to the stored position. If persons are behind the seat when the driver’s seat is automatically adjusted, they may become trapped. -
Page 257: Smoker’s Package
Smoker’s Package Smoker’s Package Using the rear ashtray Using the ashtray Fire hazard due to flam- WARNING mable objects Paper in the ashtray can catch fire. e Do not put any flammable objects into the ashtray. Fig. 199: Using the cigarette lighter Using the front ashtray The cigarette lighter is ready for use regardless of Fig.
-
Page 258: Speed Limiter
Speed Limiter Speed Limiter Setting, storing and increasing Interrupting speed limiter – maximum speed CANCEL The speed limiter helps you to stay below an indi- e Press the control lever on the steering wheel vidual stored speed. Variant 1 down (Fig. 158) 3. 1.
-
Page 259
Speed Limiter Information The stored maximum speed should only be re- called if traffic and road conditions are conducive to driving at that speed. Deactivating the speed limiter e Press button R on the control lever. The memory is cleared and the readiness symbol disappears. -
Page 260: Sport Chrono Stopwatch
Sport Chrono Stopwatch Sport Chrono Stopwatch Stopwatch on the dashboard Stopwatch in the PCM The Sport Chrono stopwatch can be used to record and evaluate various times. The lap time can be displayed on the stopwatch on the dashboard, on the touch display and on the in- strument cluster.
-
Page 261
Sport Chrono Stopwatch Ending lap/starting new lap Resetting reference lap larger length deviations are not included in the evaluation. A maximum of 99 laps can be stored for each e CAR e CHRONO e Reset reference lap recording. e CAR e CHRONO e Options e Sport… -
Page 262
Sport Chrono Stopwatch Analog Clock on the Dashboard Continuing timing b b Timing has been stopped. e Sport Chrono e Continue Ending lap/starting new lap When the stopwatch is running, the current stop- watch time is stored as the lap time. A maximum of 99 laps can be stored for each recording. -
Page 263: Starting And Stopping The Engine
Starting and Stopping the Engine Starting and Stopping the > Please see chapter «Starting the vehicle with Information Engine discharged vehicle key battery or radio interfer- If no consumers are switched on for 10 minutes ence» on page 283. after the ignition has been switched on, the ignition Ignition lock Switching off the engine has to be switched on again.
-
Page 264: Steering Wheel
Steering Wheel Steering Wheel Switching the heated steering Adjusting the steering wheel electrically wheel on and off Uncontrolled retrieval of Adjusting the steering wheel CAUTION the memory settings Steering wheel adjust- WARNING If persons or animals are within the range of move- ment while driving ment of the steering wheel, there is a risk of parts of the body being pinched or crushed when you adjust…
-
Page 265: Storage
Storage Storage Opening and closing the glove compartment Stowing objects Opening the glove compartment e Pull the handle. Unsecured or incorrectly WARNING positioned objects The glove compartment opens automatically. Closing the glove compartment An unsecured or incorrectly positioned load can slide e Close the cover by pressing on it.
-
Page 266: Sun Visors
Sun Visors Sun Visors the sliding cover is open. e Keep the sliding cover closed while driving. Adjusting sun visor Fig. 211: Preventing side glare Glare from the side: 1. Disengage the sun visor from the inner bracket. Fig. 212: Opening vanity mirror 2.
-
Page 267: Tailgate
– or – e deactivate Porsche Comfort Access. Fig. 213: Tailgate unlocking button b b Vehicle unlocked (vehicles without Porsche Comfort Access). – or – b b Vehicle key is carried (vehicles with Porsche Comfort Access). e Press the button.
-
Page 268
29.5 in. (75 cm). tailgate when the vehicle is at its highest level. Locking > Please see chapter «Porsche Active Suspension 1. Stand in a central position behind the vehicle. 2. Move your foot toward the vehicle and back in… -
Page 269
If the tailgate cannot be released using the vehicle B Close the tailgate and lock the vehicle (Porsche Comfort key (e.g. if the vehicle key battery is discharged): Press one of the following buttons to immediately Access) 1. -
Page 270
Tailgate Fig. 217: Emergency unlocking of the tailgate If the tailgate still cannot be opened (e.g. if the ve- hicle battery is discharged), emergency release must be performed: 1. Fold rear seat backrests forward. 2. Get into the luggage compartment over the folded rear seats. -
Page 271: Test Stand Measurement
The vehicle jack is not suitable for this purpose. e Never start the engine when the vehicle is raised. Engine vibrations can cause the vehicle to fall. Power measurement Porsche does not authorize power measurements on roller-type test stands.
-
Page 272: Towing
Deactivate PAS. it on all 4 wheels. > Please see chapter «Porsche Active Safe e Tie the vehicle down only at its wheels. Never (PAS)» on page 208. attach tension straps to the towing hook.
-
Page 273
Towing Re-engaging the transmission parking lock Using a towing bar e Do not attach the towing bar diagonally between NOTICE the vehicles. Pulling out a vehicle that has be- Risk of damage when re-engaging the transmission parking lock. come stuck e Do not turn the socket wrench back. -
Page 274
> Please see chapter «Alarm System» on on the lower edge until it engages. page 67. 4. Store the towing hook in the tool box. e Activate Porsche Vehicle Tracking System trans- Using flat bed port mode if necessary. > Please see chapter «Porsche Vehicle Tracking Pulling vehicle onto flat bed System»… -
Page 275: Traffic Sign Detection
Traffic Sign Detection Traffic Sign Detection Lack of attention Information WARNING Traffic sign recognition is restricted in the following Responsibility while driving, e.g. choosing an appro- situations, for example: priate speed, remains with the driver even when us- – Camera heavily soiled, iced-up or covered (e.g. ing traffic sign recognition.
-
Page 276
Traffic Sign Detection Displaying speed limits and bend Setting maximum speed for trailer Information ahead warning The maximum permitted speed can be set for the – In traffic-calmed areas or play streets, the dis- trailer, depending on the type of trailer. If no value is play shows «3 mph (5 km/h)». -
Page 277: Trailer Hitch
Check that the plug of the trailer is plugged into Porsche dealer. Porsche recommends an authorized use an appropriate adapter. the towing vehicle. Porsche dealer, as they have trained technicians and e Check that all the lights work. the necessary parts and tools. Preparing for trailer operation e Always observe permitted specifications for towed weight, tongue weight and rear-axle load.
-
Page 278
Have the vehicle checked regularly by an authorized braking effect. trailer e Do not drive with the towing vehicle empty and Porsche dealer. the trailer loaded. If this unfavorable situation is A hitched trailer has a significant effect on vehicle unavoidable, drive particularly slowly. -
Page 279: Transmission
The operating mode can only be changed if the re- Information lease button (1) on the selector lever has been Driving with Porsche Tiptronic S The transmission parking lock is also engaged in D, pressed. In addition to the release button, the brake…
-
Page 280
Transmission e Only select the desired operating mode for driv- Stopping the vehicle When the engine is running, the operating modes e For a brief stop (e.g. at traffic lights), leave the and the engaged gear are displayed. ing off (D, M or R) when the engine is idling and keep the brake pedal pressed while doing so. -
Page 281
NORMAL driving mode selected. b b Operating mode D selected. Fig. 229: Upshift indicator A b b Porsche Stability Management (PSM) active. The fuel economy-oriented upshift indicator A helps b b Cruise control mode not active. you to develop a fuel-saving driving style. Depending b b Adaptive Cruise Control (ACC) not active. -
Page 282
Operating mode D selected. Information b b Porsche Stability Management (PSM) active. b b Cruise control mode not active. Stresses on components increase significantly when b b Adaptive Cruise Control (ACC) not active. -
Page 283: Trip Information Display
Trip Information Display Trip Information Display Customizing trip A large range of trip information, e.g. the trip time, e Trip e Options e Customize 1. CAR the distance traveled, the average speed or the trip average fuel consumption, can be displayed on the touch display and on the instrument cluster.
-
Page 284: Vehicle Key
Only use the vehicle key when the vehicle is in Removing emergency key your sight. The Porsche Crest on the vehicle key lights up when the buttons are pressed. The Crest may also light up when driving without any of the buttons being pressed on the vehicle key.
-
Page 285
Teach all vehicle keys belonging to the vehicle a message appears on the instrument display. The again. Porsche Crest on the vehicle key no longer lights up when buttons are pressed on the vehicle key. Information A total of eight vehicle keys can be taught. -
Page 286
Vehicle Key Information e If a vehicle key is lost or stolen, have an author- ized Porsche dealer disable this vehicle key in the vehicle and change the mechanical locks if necessary. e You should notify your insurance company of the loss or theft of vehicle keys or of the production of additional or replacement keys. -
Page 287: Vehicle Settings
Vehicle Settings Vehicle Settings Different vehicle settings can be made depending on model, country and equipment. The vehicle settings listed here may not be available in all models, countries and equipment. For safety reasons, some functions are only available when the vehicle is stationary. The vehicle settings are saved even when the ignition is switched off.
-
Page 288
Vehicle Settings What do I want to do? What should I select? Where? You can select from many items of vehicle information for display in four fields via drag & drop. One item of vehicle information cannot be assigned to several fields. e CAR e CONTROL e System e Date and time… -
Page 289: Voice Control
> Please see chapter «Porsche Communication Ending voice control b b Voice control is active. Management (PCM)» on page 215. Using Porsche Connect services in the voice e Press the button on the control lever. control system A fading acoustic signal sounds.
-
Page 290
Voice control Notes on communication using voice control – Help texts: Commands that can be spoken are – Cancel displayed. – Dialog-related voice commands are needed as Note the following points when using voice control: soon as a dialog is conducted with the PCM, e.g. –… -
Page 291
Voice control Global voice commands for media What do I want to do? What do I have to say? Note Use natural voice commands Examples: Play something from the SD card. As an alternative to actual commands, the PCM can I want to hear rock music. -
Page 292
Voice control What do I want to do? What do I have to say? Note Call stored contact If the contact is not clear, the command leads to the Call e.g. Doe (private/work/general) dialog. The first name, last name or both can be spo- ken. -
Page 293
(e.g. search for point of interest, airport). Search for a destination online Online search/Internet search The service is not available in all languages and markets. > Please see chapter «Porsche Connect» on page 223. Select country Enter country/change country Select state… -
Page 294
Voice control Global voice commands for air conditioning What do I want to do? What do I have to say? Note Use natural voice commands Examples: I’m cold. As an alternative to actual commands, the PCM can It’s too hot. recognize natural voice commands (not available in all languages). -
Page 295: Warning And Information Messages
Airbag system Airbag system is faulty. e Adapt your driving style to the situation. error e Have the fault rectified at an authorized Porsche dealer.* Visit workshop Airbag system error Airbag system is faulty. e Adapt your driving style to the situation.
-
Page 296
Stop when it is safe to do so. e Do not continue driving. (USA) e Have the fault rectified at an authorized Porsche dealer.* (USA) Power steering has failed or is faulty. e Stop when it is safe to do so. -
Page 297
Rain or light Rain/light sensor is defective. e Switch on the windshield wipers and lights manually. sensor faulty e Have the fault rectified at an authorized Porsche dealer.* Service necessary Example: The indicated cornering light is faulty. e Check relevant light. -
Page 298
High beam assist temporarily unavailable due to camera fault. e Clean the windshield if necessary. not available No camera view If the fault persists: e Have the fault rectified at an authorized Porsche dealer.* Clean windshield if necessary Headlight beam Headlight leveling is faulty. -
Page 299
Pedestrian protec- Pedestrian protection is faulty. e Have the fault rectified at an authorized Porsche dealer.* tion system error Driving permitted Service necessary * Porsche recommends an authorized Porsche dealer, as they have trained technicians and the necessary parts and tools. -
Page 300
Add oil if necessary. > Please see chapter «Engine Oil» on page 117. e Have the fault rectified at an authorized Porsche dealer.* Oil level too high Oil level above maximum. e Have the fault rectified at an authorized Porsche dealer.*… -
Page 301
> Please see chapter «Engine Oil» on page 117. e Do not continue driving if the warning message is displayed even when the oil level is correct. e Have the fault rectified at an authorized Porsche dealer.* Oil pressure mea- Oil pressure measurement is faulty. -
Page 302
Engine control system is faulty. fault Possible to drive on. e Have the fault rectified at an authorized Porsche dealer.* Driving permitted Visit workshop * Porsche recommends an authorized Porsche dealer, as they have trained technicians and the necessary parts and tools. -
Page 303
Immediately stop when it is safe to do so. Park vehicle safely e Do not continue driving. e Have the fault rectified at an authorized Porsche dealer.* Engine run req. Vehicle electrical system is faulty. e Stop when it is safe to do so. -
Page 304
Reverse gear may not be available. Possibly no reverse gear Possible to drive on with restricted gearshift comfort. e Have the fault rectified at an authorized Porsche dealer.* Additional transmission servicing is necessary. Service notification transmission Possible to drive on. -
Page 305
If the fault persists after the engine has been re-started: Spoiler control e Have the fault rectified at an authorized Porsche dealer.* fault Adapted driving permitted * Porsche recommends an authorized Porsche dealer, as they have trained technicians and the necessary parts and tools. -
Page 306
Possible to drive on. permitted e Adapt your driving style to the situation. See owner’s manual. e Have the fault rectified at an authorized Porsche dealer.* The chassis system is faulty. Chassis system fault The vehicle handling may change. Visit workshop Possible to drive on. -
Page 307
Porsche Stability Management (PSM) is not available. Possible to drive on. lights up e Adapt your driving style to the situation. Adapted driving e Have the fault rectified at an authorized Porsche dealer.* permitted PSM activated Porsche Stability Management (PSM) was switched on automatically. lights up… -
Page 308
Meaning and action required e Have the fault rectified at an authorized Porsche dealer.* permitted Rear differential Porsche Torque Vectoring Plus (PTV Plus) has failed or is faulty. lock failure Possible to drive on. e Adapt your driving style to the situation. -
Page 309
Message Meaning and action required if necessary If the fault persists: e Have the fault rectified at an authorized Porsche dealer.* System error One or more electrical systems may not be available. e Adapt your driving style to the situation. -
Page 310
Warning and Information Messages Display Message Meaning and action required Porsche Active Safe (PAS) may be impaired due to weather conditions or dirt on the sensor in the vehicle. WBA restricted e Adapt your driving style to the situation. e Clean the windshield if necessary. -
Page 311
Clean front camera and ACC sensor. Sensor dirty, please If the fault persists: clean sensor e Have the fault rectified at an authorized Porsche dealer.* Emergency stop Emergency stop assist function is faulty. e Have the fault rectified at an authorized Porsche dealer.*… -
Page 312
Lane Keep Assist is not available. e Adapt your driving style to the situation. not available e Have the fault rectified at an authorized Porsche dealer.* Driving permitted Service necessary Lane Keep Assist is temporarily unavailable due to weather conditions or Lane Keep Assist dirt on the windshield. -
Page 313
Warning and Information Messages Display Message Meaning and action required Clean windshield If the fault persists: e Have the fault rectified at an authorized Porsche dealer.* if necessary Lane Keep Assist Lane Keep Assist is temporarily unavailable. restricted If the fault persists: e Have the fault rectified at an authorized Porsche dealer.*… -
Page 314
Park vehicle, lock trailer hitch If the fault persists: e Have the fault rectified at an authorized Porsche dealer.* * Porsche recommends an authorized Porsche dealer, as they have trained technicians and the necessary parts and tools. E-Hybrid vehicles Display Message… -
Page 315
Stop when it is safe to do so and switch off the engine. Let vehicle cool down e Do not continue driving. e Have the fault rectified at an authorized Porsche dealer.* Vehicle electrical system error Vehicle electrical system is faulty. -
Page 316
> Please see chapter «Refueling» on page 234. Driving permitted e Have the fault rectified at an authorized Porsche dealer.* Visit workshop * Porsche recommends an authorized Porsche dealer, as they have trained technicians and the necessary parts and tools. -
Page 317: Washer Fluid
– Dilutability 1:100 – Phosphate-free – Suitable for plastic headlights For information on window cleaner concentrates approved by Porsche: Contact an authorized Porsche dealer. If the washer fluid level is too low, a warning symbol appears on the instrument cluster.
-
Page 318: Wheels And Tires
Wheels and Tires Wheels and Tires e Use only plastic valve caps. e Check the tire pressure at least monthly when e For safety reasons, do not use tire inflating the tires are cold. In addition to correct tire inflation pressure and cor- bottles.
-
Page 319
Have defective tires replaced immediately. Con- equipped with a Tire Pressure Monitoring System pressure. sult an authorized Porsche dealer. Porsche rec- The yellow tire pressure warning is displayed for (TPMS) that causes a tire pressure warning light to ommends an authorized Porsche dealer, as they… -
Page 320
Wheels and Tires start-ups as long as the malfunction exists. When Tire pressure that is too low or too high destroys the Displaying pressure difference the malfunction indicator is illuminated, the system tire and wheel, extends the braking distance and may not be able to detect or signal low tire pressure significantly increases the risk of an accident. -
Page 321
Porsche dealer, as they have trained techni- cians and the necessary parts and tools. Comfort pressure e Only use tires and wheels approved by Porsche. Standard pressure is activated. e Adjust tire pressures to comfort pressure or e CAR… -
Page 322
Wheels and Tires Tire Abuse Tread driving habits, service practices and differences in WARNING road characteristics and climate. The portion of the tire that comes in contact with > Please see chapter «Checking tire tread» on the road. The temperature grade for this tire is established for page 324. -
Page 323
Wheels and Tires > Please see chapter «Loading information» on Inflating tires The tire is inflated. page 334. 4. Check inflation pressure using the pressure gage Hot pressure hose CAUTION and reduce tire pressure or continue filling as Overloading required. Check the inflation pressure again. The compressor pressure hose can become hot 5. -
Page 324
If in doubt, have the tire, especially the inner side, F – Radial checked by an expert. Go to a qualified special- ized repair shop. Porsche recommends an au- The identification indicates whether the tire has a radial structure. -
Page 325
Only authorized Porsche dealers may install tires. valve caps damage. e Use only genuine Porsche valves for the Tire Visit an authorized Porsche dealer. Porsche rec- ommends an authorized Porsche dealer, as they Pressure Monitoring System (TPMS). -
Page 326
Wheels and Tires e Only use snow chains approved by Porsche so M+S designation or the snowflake symbol, de- suitable when their tread depth falls below 5/32 that sufficient clearance between the wheel well in. (4 mm). pending on the country, on the tire sidewall. Ob- e In the United States, state laws may govern the and chain is assured. -
Page 327
TA: Contact an ® the installation according to these markings. e Only use wheels/tires with approved dimensions authorized Porsche dealer. Do not use any other grease or paste. for the relevant axle. > Please refer to the vehicle registration docu- ments or the «Technical data»… -
Page 328
Wheels and Tires Changing a wheel Changing PCCB. e When changing a wheel, screw in the assembly Preparing the vehicle aids. 1. Activate the transmission parking lock using the 2. Remove the remaining wheel bolts. P button on the selector lever. >… -
Page 329: Windows
Windows Windows Stage one – manual operation Information e Press or pull the relevant rocker switch to the Opening and closing windows If a window is blocked by an obstruction when clos- first stage until the required position is reached. ing, the window stops and opens again a few The process stops when the switch is released.
-
Page 330
Windows Disabling controls in the rear – Using the roll-up sunblind on the Information child protection rear side window When opening a rear side window when the roll-up sunblind is lowered, the sunblind is raised automati- Information cally before the rear side window opens. The roll-up sunblinds on the rear side windows can be raised or lowered only when the rear side win- dows are closed. -
Page 331: Windshield Wipers
Windshield Wipers Windshield Wipers Brief Overview — Windshield Wipers This brief overview does not replace the compre- hensive descriptions provided in the «Windshield Wipers» chapter. Safety messages and warnings, in particular, are not replaced by this brief overview. Fig. 249: Windshield wiper lever Fig.
-
Page 332
Windshield Wipers Operating windshield wipers Undesired wiping The washer system wipes and sprays while the WARNING lever is pulled toward the steering wheel. When the wiper lever is released, a few drying wipes are In rain sensor mode, the windshield wipers wipe au- performed. -
Page 333
Windshield Wipers Wiper blades Information Information – If the wiper lever is already in position 1 when the The rear wiper interval is adjusted depending on the NOTICE ignition is switched on, the rain sensor is acti- driving speed. vated at speeds above approx. 2.5 mph (4 km/h). If the wiper arms accidentally fall back onto the –… -
Page 334
Information Removing wiper blade 1. Lift the wiper arm slightly. If necessary visit an authorized Porsche dealer to 2. Grasp the wiper blade and press it upward have this work carried out. Porsche recommends an slightly at the mounting A with your index finger. -
Page 335: Technical Data
Technical Data On the following pages you will find technical data for your vehicle.
-
Page 336: Technical Data
The safety compliance sticker is your assurance that The tire pressure plate is fixed to the door sill area of your new Porsche complies with all applicable Fed- the driver’s door. eral Motor Vehicle Safety Standards which were in Vehicle data carrier effect at the time the vehicle was manufactured.
-
Page 337
Technical Data Overloading Vehicle For determining the compatibility of the tire and ve- Steps for determining correct load limit: DANGER hicle load capabilities: 1. Locate the statement “The combined weight of > Please see chapter «Wheels and Tires» on occupants and cargo should never exceed XXX kg Overloading will lead to dangerous vehicle reactions page 316. -
Page 338
Technical Data Engine data Cayenne Cayenne S Cayenne GTS Cayenne Turbo Number of cylinders Displacement 2,995 cm 2,894 cm 3,996 cm 3,996 cm Max. engine power 250 kW (335 hp) 324 kW (434 hp) 338 kW (452 hp) 404 kW (541 hp) at rpm 5,300 –… -
Page 339
Technical Data Cayenne E-Hybrid Combustion engine Electric machine Combined Engine oil consumption up to 0.8 l/1,000 km – – Maximum permitted engine speed 6,500 1/min – – Cayenne Turbo S E-Hybrid Combustion engine Electric machine Combined Number of cylinders – –… -
Page 340
Technical Data Height with tailgate open 2,123 mm – 2,188 mm Maximum wading depth (steel suspension) at DIN kerb weight 500 mm (480 mm) Maximum wading depth (air suspension, Normal Level) 475 mm (465 mm) Maximum wading depth (air suspension, Special Terrain Level) 530 mm (520 mm) Cayenne E-Hybrid models: Maximum wading depth (steel suspension) at DIN kerb weight… -
Page 341
Maximum wading depth (air suspension, Normal Level) 225 mm Maximum wading depth (air suspension, Special Terrain Level) 280 mm Filling quantities e Use only fluids and fuels approved by Porsche. For further information: Contact an authorized Porsche dealer. Cayenne Cayenne S Cayenne GTS Cayenne Turbo Approx. -
Page 342
Only use roof transport systems that are from the Porsche Tequipment product line or that have been tested and approved by Porsche. e Do not drive at a speed of more than 81 mph (130 km/h) when the roof transport system is loaded. -
Page 343
Technical Data Cayenne Cayenne S Cayenne GTS Cayenne Turbo Maximum towed weight, 7,716 lbs. (3,500 kg) 7,716 lbs. (3,500 kg) 7,716 lbs. (3,500 kg) 7,716 lbs. (3,500 kg) braked Maximum towed weight, 1,653 lbs. (750 kg) 1,653 lbs. (750 kg) 1,653 lbs. -
Page 344
Technical Data Cayenne E-Hybrid Cayenne Turbo S E-Hybrid vehicles with 19-inch/20-inch/21- vehicles with 19-inch/20-inch/21- inch tires inch tires Towing a trailer up to 60 mph (100 km/h)– USA/Canada Maximum axle load, rear 4,045 lbs. (1,835 kg) 3,968 lbs. (1,800 kg) Maximum towed weight, braked 7,716 lbs. -
Page 345
Technical Data Cayenne Coupé Cayenne Coupé S Cayenne Coupé GTS Cayenne Coupé Turbo The combined weight of occupants and cargo should never exceed the weight shown on the tire pressure plate in the Vehicle load capacity vehicle. Maximum axle load, front 3,109 lbs. -
Page 346
Wheel and tire sizes Tires approved by Porsche are the best possible tires for your vehicle. The load capacity index (e.g. «105») and classification letter (e.g. «Y») for maximum permitted speed are minimum requirements. When fitting new tires or changing tires: >… -
Page 347
Technical Data Tire type Fitting snow chains Tire size Wheel size Collapsible spare wheel 195/65-20 108P 6.5B x 20, RO 28 Cayenne models with 6-cylinder engines FA: 255/55 ZR 19 XL (111Y) FA: 8.5J x 19, RO 47 RA: 275/50 ZR 19 XL (112Y) RA: 9.5J x 19, RO 54 FA: 275/45 ZR 20 XL (110Y) FA: 9.0J x 20, RO 50… -
Page 348
Technical Data Tire type Fitting snow chains Tire size Wheel size FA: 285/40 ZR 21 XL (109Y) FA: 9.5J x 21, RO 46 RA: 315/35 ZR 21 XL (111Y) RA: 11.0J x 21, RO 58 Summer tires FA: 10.0J x 22, RO 48 FA: 285/35 ZR 22 XL (106Y) RA: 315/30 ZR 22 XL (107Y) RA: 11.5J x 22, RO 61… -
Page 349
FA = front axle, RA = rear axle, RO = rim offset Standard tire pressure — Cayenne models These tire pressures apply only to the tire makes and types approved by Porsche for cold tires at 68 °F (20 °C). E-Hybrid models only. -
Page 350
Technical Data e Set the load condition of the vehicle in Tire Pressure Monitoring System (TPMS). Adapt the tire pressure to suit the vehicle load. > Please see chapter «Setting Tire Pressure Monitoring (TPM)» on page 318. Vehicles with 6-cylinder engines Part load Full load… -
Page 351
Vehicles with «Comfort pressure» setting in the Tire Pressure Monitoring System (TPMS) and speed threshold «100 mph (160 km/h)». These tire pressures apply only to the tire makes and types approved by Porsche for cold tires at 68 °F (20 °C). -
Page 352
Technical Data Tire pressure too low WARNING The «Comfort tire pressure» selection option is country-dependent and is not available in all country versions. Driving at high speed and low tire pressure damages the tires. e Comfort tire pressure in the tires must only be set on vehicles with the «Comfort tire pressure» selection option in the Tire Pressure Monitoring System (TPMS). Vehicles with 6-cylinder engines FA = front axle, RA = rear axle 2.2 bar / 220 kPa / 32 psi… -
Page 353
Technical Data Porsche Communication Management (PCM) Technical data: Audio and video files Supported SD cards up to 128 GB media DVD Drive Audio CDs up to 80 min., CD-ROMs up to 700 MB, DVD±R/RW, Standard Video DVD, Video DVD compatible DVD Audio Portable players MTP Player, USB 2.0 devices of «USB Device Subclass 1 and 6″… -
Page 354
Technical Data Technical data: Connectivity Mobile networks GSM/GPRS/EDGE: Quad Band, 850/900 MHz/1,800/1,900 MHz UMTS/HSPA+: Triple band, 850 MHz (band V)/AWS (band VI)/1,900 MHz (band II) LTE: Quad band, 700 MHz (band 17)/850 MHz (band 5) /AWS (band 4)/1,900 MHz (band 2) WiFi IEEE 802.11a/b/g/n (2.4 GHz) Bluetooth… -
Page 355
Changes or modifications made to the equipment The manufacturer is not responsible for any radio or USA: FCC-ID 2ACC7TRANSCVRP01 not expressly approved by Porsche may void the FCC TV interference caused by unauthorized modifica- Canada: IC 11980A-TRANSCVRP01 authorization to operate the equipment. -
Page 356
Technical Data This device complies with Industry Canada licence- WARNING: The transmitter has been tested and – Belgium – Belize – Bolivia – Bonaire – Bosnia and exempt RSS standard(s). Operation is subject to the complies with FCC and ISED rules. Changes or Herzegovina –… -
Page 357
«normal» scrap or waste or put into any other form of end storage. For further information on correct disposal: e Contact your Porsche partner. Old batteries Old batteries must not be disposed of as «normal»… -
Page 358
Alloy wheels Porsche InnoDrive ……. . 48 Blind ……….328 Care instructions . -
Page 359
Identification for location of charge port door ..140 Porsche Connect ……. . 223 Alloy wheels . -
Page 360
Emergency stop function ……113 Locking with Porsche Comfort Access ….88 Operating principle . -
Page 361
Index Washer fliud ……..339 High-voltage battery charge and locking status on vehicle Sport Chrono stopwatch. -
Page 362
Tuning to/storing stations ……172 Porsche Dynamic Light System (PDLS) … . . 160 Off-road driving. -
Page 363
Porsche Connect ……..223… -
Page 364
Porsche InnoDrive ……..48… -
Page 365
Index Spare wheel ……… 123 Switching on telephone function . -
Page 366
Windshield wiper Locking with Porsche Comfort Access ….88 Voice commands for apps ……292 Cleaning the rear window.
Дорогие друзья!
Ниже Вы можете загрузить руководство по покупке second-hand Porsche Cayenne и инструкции к Porsche Cayenne (большинство файлов — на английском языке!).
Руководсвто по покупке second-hand Porsche Cayenne — загрузить.
Расшифровка опций для автомобилей Porsche Cayenne официально продающихся на территории России (русский язык) — загрузить.
Официальный прайс-лист и опции Porsche 2007 год (русский язык) — загрузить.
Инструкция к Porsche Cayenne S 2004 — 2007 годы (русский язык, размер файла — 131 Мб) — загрузить.
Инструкция к Porsche Cayenne S и Turbo 2004 год — загрузить.
Инструкция к Porsche Cayenne S 2005 год — загрузить.
Инструкция к Porsche Cayenne Turbo 2005 год — загрузить.
Инструкция к Porsche Cayenne S 2006 год — загрузить.
Инструкция к Porsche Cayenne Turbo 2006 год — загрузить.
Инструкция к Porsche Cayenne S 2007 год — загрузить.
Инструкция к Porsche Cayenne Turbo 2007 год — загрузить.
Инструкция к Porsche Cayenne 2010+ год (S, Turbo, Diesel, Hybrid) (русский язык) — загрузить.
Инструкция к аудио/навигационной системе (Becker) Porsche Cayenne — загурзить.
Прайс-лист и опции Porsche Cayenne S USA 2004 год — загрузить.
Посмотреть инструкция для Porsche Cayenne (2017) бесплатно. Руководство относится к категории Автомобили, 2 человек(а) дали ему среднюю оценку 8.6. Руководство доступно на следующих языках: английский. У вас есть вопрос о Porsche Cayenne (2017) или вам нужна помощь? Задайте свой вопрос здесь
Не можете найти ответ на свой вопрос в руководстве? Вы можете найти ответ на свой вопрос ниже, в разделе часто задаваемых вопросов о Porsche Cayenne (2017).
Как перевести мили в километры?
Где я могу узнать идентификационный номер транспортного средства Porsche?
Что такое идентификационный номер транспортного средства (VIN)?
Когда транспортному средству Porsche требуется техническое обслуживание?
Когда следует заменять тормозную жидкость на Porsche?
В чем разница между топливом E10 и E5?
Одна или несколько дверей не открываются изнутри. Что мне делать?
Автомобильный радиоприемник не включается, что делать?
Инструкция Porsche Cayenne (2017) доступно в русский?
Не нашли свой вопрос? Задайте свой вопрос здесь
- Manuals
- Brands
- Porsche Manuals
- Automobile
- CAYENNE 2011
- Owner’s manual
-
Contents
-
Table of Contents
-
Bookmarks
Quick Links
Related Manuals for Porsche Cayenne 2011
Summary of Contents for Porsche Cayenne 2011
-
Page 1
® Cayenne Owner’s Manual… -
Page 2
Information Porsche. Ignoring them could result in serious Additional information, tips and instructions are mechanical failure, serious personal injury or indicated by the word “Information”. Please read death. -
Page 3
Porsche. Porsche. Remember however, as with any vehicle, you Your Porsche is intended to be used in a safe For U.S. only: should take time to familiarize yourself with your manner obeying the local laws and in the light of If you believe that your vehicle has a fault which Porsche and its performance characteristics. -
Page 4
Setting or operating the on-board computer, of printing. cause cancer and birth defects or other radio, navigation system, telephone or other It has always been Porsche’s policy to reproductive harm. equipment when driving could distract you from continuously improve its products. Porsche, In addition, certain fluids contained in vehicles and the traffic. -
Page 5
If in doubt, have these checks performed and side member trim are painted and located The values communicated by Porsche are based by your authorized Porsche dealer. lower on the vehicle. Off-road driving can seriously on normal operation adapted to traffic. -
Page 6
In the driver’s seat… On the road… See that all windows are clear and unobstructed. Check operation of the horn. Never drive after you have consumed alcohol Check air intake slots and area between Position seat for easy reach of foot pedals and or drugs. -
Page 7
The following tips will be helpful in obtaining devices to alert other motorists. Do not park car has covered several hundred miles or km. optimum performance from your new Porsche. or operate the vehicle in areas where the hot The slightly reduced braking ability must be… -
Page 8: Table Of Contents
Table of Contents Overview Illustrations……9 Lights, Turn Signals and Windshield Automatic Anti-Dazzle Interior Mirror ….56 Steering Wheel ……….57 Wipers ……….90 Driver’s Cockpit ……….10 Heated Steering Wheel ……..57 Steering Wheel and Instrument Cluster … 11 Light Switch ……….91 Steering Wheel Adjustment ……58 Dashboard ………..
-
Page 9
How Emission Control Works …… 249 Selector-Lever Positions ……181 Fuel Economy ……….250 Trailer Coupling ……….220 Driving Programs for On-Road and Off-Road Operating Your Porsche in other Countries… 251 Loading Information ……..221 Driving …………184 Fuel…………251 Transmission and Chassis Control Systems .. 188 Fuel Can ………… -
Page 10
Minor Repairs ……..261 Tire Pressure and Technical Data ..306 Exercise Extreme Caution when Working Vehicle Identification Data ……307 on your vehicle ……….. 262 Engine Data……….308 Warning triangle………. 263 Wheels, Tires……….309 First aid kit ……….264 Tire Pressure for Cold Tires 68 °F (20 °C) ..310 Tool kit ………… -
Page 11: Overview Illustrations
Overview Illustrations Driver’s Cockpit ……….. 10 Steering Wheel and Instrument Cluster… 11 Dashboard……….. 12 Front Center Console ……..13 Overhead Operating Console……14 Rear…………15 Overview Illustrations…
-
Page 12: Driver’s Cockpit
Driver’s Cockpit A Inner door handle See page 30. B Vehicle setting memory buttons See page 38. C Reset button for trip counter display/ Dimming of instrument illumination See page 106. D Ignition lock/steering lock See page 148. E Overhead operating console See page 14.
-
Page 13: Steering Wheel And Instrument Cluster
Steering Wheel and Instrument Cluster A Turn signals See page 94. B Engine oil pressure gauge See page 106. C Engine oil temperature gauge See page 105. D Speedometer See page 105. E Tachometer See page 105. F Multi-purpose display See page 108.
-
Page 14: Dashboard
Dashboard A Compass See page 108. B Porsche Communication Management (PCM) See page 178. C Air vents See page 75. D Glove box See page 215. E Front center console See page 13. F Front cupholder See page 216. G Cigarette lighter See page 218.
-
Page 15: Front Center Console
See page 94. B Air conditioning, left/right See page 65. C Seat heating/seat ventilation, left/right See page 43. D Porsche Active Suspension Management (PASM) chassis setup See page 197. E Driving programs, differential locks See page 184. F Sport mode See page 186.
-
Page 16: Overhead Operating Console
Overhead Operating Console A Rear interior lighting See page 96. B Dimming ambient lighting See page 97. C ParkAssist off button See page 226. D Passenger compartment monitoring See page 234. E Sliding/lifting roof See page 83. Panorama roof system See page 85.
-
Page 17: Rear
Rear A Air vents See page 75. B Air conditioning See page 65. C Seat heating/seat ventilation See page 43. Central locking See page 29. D Reading light See page 96. E Inner door handle See page 30. F Rear ashtray See page 218.
-
Page 18: Opening And Locking
Opening and Locking Never invite car theft! ……..17 Notes on the Key and Central Locking System 18 Central Locking System …….. 19 Brief Overview – Opening and Locking From Outside …………20 Opening and Locking From Outside ….21 Tailgate…………
-
Page 19: Never Invite Car Theft
A steering wheel lock and a gong alarm are the key while you are driving or as the car is rolling Close windows. standard equipment in your Porsche. The gong to a stop. You will not be able to steer the car. Close sliding/lifting roof or Panorama roof…
-
Page 20: Notes On The Key And Central Locking System
Porsche dealer. All keys belonging to the vehicle Third parties can still operate the mechanical must also be reported again.
-
Page 21: Central Locking System
Slide in the key until the release button audibly engages. Any changes or modifications not expressly approved by Porsche could void the user’s authority to operate this equipment. Opening and Locking…
-
Page 22: Brief Overview — Opening And Locking From Outside
Brief Overview – Opening and Locking From Outside The Porsche Entry & Drive option can be recognized by the buttons A in the door handles. This brief overview does not replace the information provided under “Opening and Locking From Outside”. Warnings, in particular, are not replaced by this brief overview.
-
Page 23: Opening And Locking From Outside
Porsche Entry & You simply have to carry the key with you, e.g. in Drive.
-
Page 24
(driver’s side, The emergency flasher flashes once. passenger’s side) that you wish to open together Operational readiness of Porsche Entry & Drive is The driver’s door is unlocked. with the key. switched off after 96 hours for the driver’s door 2. -
Page 25
1. Close the door. Information the car through an automatically locked door, 2. Briefly press the Porsche Entry & Drive locking remember the following procedure to open the The vehicle cannot be locked if the driver’s button A on the door handle. -
Page 26: Tailgate
Exhaust gases can enter the passenger Information compartment when the tailgate is open and render Risk of being locked out of vehicles with Porsche the occupants unconscious if longterm exposure Entry & Drive. occurs, resulting in an accident. In a stopped Do not leave the key in the vehicle if the vehicle vehicle, carbon monoxide can also lead to death.
-
Page 27
Open or close the tailgate only when there are by warning tones. no persons, animals or objects within its On vehicles with Porsche Entry & Drive, You can have the warning tones activated/ movement range. the tailgate can no longer be opened when the car deactivated at your authorized Porsche dealer. -
Page 28
The vehicle need not be unlocked on vehicles display. with Porsche Entry & Drive. You simply have to For information on locking and unlocking settings Information carry the car key with you, e.g. in your pocket. -
Page 29
– in the rear area and – outside the vehicle. A — Closing the powerlift tailgate without Porsche Entry & A warning message appears on the multi-purpose Drive display of the instrument panel if these conditions A and B — Closing and locking the powerlift tailgate with have not been met. -
Page 30
Detection of obstacles during opening Automatic stop in the event of unintentional tailgate movement The tailgate will stop moving and close slightly if opening is blocked by an obstacle. A warning If the tailgate is moved too abruptly or lowers signal then sounds. -
Page 31: Opening And Locking From Inside
Opening and Locking From Inside Malfunctions of the tailgate drive The automatic function is not active if the vehicle The factory settings of the vehicle are described battery voltage is too low. in this section. If a button is pressed, the tailgate lock is unlocked In the multi-purpose display of the instrument and three brief warning signals sound.
-
Page 32
Unlocking doors Press the front or rear central locking button. The indicator light on the button goes out. All vehicle doors will be unlocked. Automatic with Auto Unlock The vehicle is automatically unlocked when the ignition key is removed. Information If the vehicle was locked using the car key or the emergency key, it cannot be unlocked with the central locking button. -
Page 33: Opening And Closing The Engine Compartment Lid
Opening and Closing the Engine Compartment Lid Opening Unsecured Engine DANGER Compartment Lid If the engine compartment lid is not secured properly, it could fly up, blocking your vision and causing loss of control. Should you notice at any time while driving that one of the lids is not secured properly, please stop immediately in a suitable place and close NOTICE…
-
Page 34: Malfunctions When Opening And Locking
1. Lower lid and let it fall into the lock. and vehicle in the case of Porsche and unlocking the doors and tailgate. You can If necessary, push the lid closed with the Entry &…
-
Page 35
Please see the chapter “NOT ALL VEHICLE DOORS ARE LOCKED” on page 33. Have faults in the central locking system repaired at an authorized Porsche dealer. The vehicle cannot be unlocked Unlock the driver’s door with the emergency key in the door lock: 1. -
Page 36: Seats, Mirrors, Steering Wheel And Sun Protection
Seats, Mirrors, Steering Wheel and Sun Protection Seat and Headrest Adjustment……. 35 Front Seats ……….37 Storing Vehicle Settings …….. 38 Easy Entry Function ……..40 Rear Seats ……….. 40 Fire Extinguisher ……….. 42 Seat Heating and Ventilation ……43 Safety Belts……….
-
Page 37: Seat And Headrest Adjustment
Seat and Headrest Adjustment Adjusting headrests CAUTION Seat Adjustment Improper Safety Belt If persons or animals are in the movement range DANGER Removing Headrests DANGER of the seat during seat adjustment, parts of the Driving with removed headrests will cause serious body could get trapped or crushed.
-
Page 38
Removing Press button B and, at the same time, pull the headrest completely out. Removal of or Failure to DANGER Adjust Headrest Driving with removed headrests, improperly positioned headrests or improperly installed headrests can cause serious personal injury or death in an accident. Adjust the headrests so that the upper edge of the headrest is brought to eye level or higher. -
Page 39: Front Seats
Front Seats Adjusting the seat Seat position Seat Adjustment While WARNING Driving An ergonomically correct sitting position is important for safe and fatigue-free driving. We The seat may move further than desired if you recommend the following procedure for adjusting attempt to adjust it while driving.
-
Page 40: Storing Vehicle Settings
C Seat cushion depth adjustment. Driver’s door memory buttons (driver memory or Passenger’s door memory buttons (comfort memory) comfort memory) D Seat cushion side bolster adjustment. Comfort memory E Backrest side bolster adjustment. Storing Vehicle Settings On vehicles with the comfort memory package, F Fore-and-aft adjustment.
-
Page 41
2. Press memory button (on vehicles with Porsche Entry & Drive), press buttons or button The indicator light on the button lights up. -
Page 42: Easy Entry Function
Porsche Entry & Drive, the ignition is switched on, crushed when you adjust the seat. the seat and steering wheel move to the stored Switch off the Easy Entry function if persons position.
-
Page 43
Folding outer seat backrests forward 1. Slide the headrest down. Please see the chapter “ADJUSTING HEADRESTS” on page 35. 2. Disengage retractable cover from the seat. Please see the chapter “RETRACTABLE COVERS” on page 208. 3. Pull up release lever B and fold the backrest forward. -
Page 44: Fire Extinguisher
Adjusting middle seat backrest to vertical position 1. Fold up the backrest until it locks with an audible click. 2. If the red marking on the release button is still visible, the seat is not locked properly. 3. Make sure that the middle safety belt is not trapped.
-
Page 45: Seat Heating And Ventilation
Information Check the final inspection date on the fire extinguisher. If the fire extinguisher is used after its inspection interval has elapsed, it may not work properly. Always read the operating instructions on the fire extinguisher. The fire extinguisher should be checked to ensure correct operation by a specialist workshop every 1–2 years.
-
Page 46: Safety Belts
Safety belts must be positioned on the body as anchor points of the belts should be checked. system only by an authorized Porsche dealer. to restrain the upper body and lap from sliding If safety belts do not work properly, see your Smoke is released when the belt tensioners are forward.
-
Page 47
4. Insert the belt tongue into the appropriate buckle on the inboard side of the seat until it locks securely with an audible click. 5. Make sure that belts are not trapped or twisted and that they are not rubbing on sharp edges. 6. -
Page 48: Airbag Systems
Airbag Systems The front airbags are located under the padded Safety Belts and DANGER steering wheel panel on the driver’s side and in the Positioning The vehicle is equipped with airbag and lap/ dashboard on the passenger’s side. shoulder belt at both front seating positions. The Airbags only can offer protection, if all occupants The side airbags of the front seats (optional for airbags are a supplemental restraint at those…
-
Page 49
Porsche dealer. injury, airbags must inflate extremely rapidly. Such and head airbags. Doing so may adversely Using accessories not approved by Porsche high speed inflation has a negative but affect the functioning of the airbag system or can cause the occupant sensing to be… -
Page 50
1-800-PORSCHE prior to having your airbag. – In response to a request of police or other vehicle modified. -
Page 51
Information in the case of heavier children that the passenger bench immediately. If you sell your Porsche, notify the purchaser that airbag is active or, in the case of very light adults Have the fault remedied at your nearest the vehicle is equipped with airbags, and refer or young persons, that the passenger airbag is authorized Porsche dealer. -
Page 52: Child Restraint Systems
Improper Use of Child DANGER systems Restraint Porsche recommends that all infants and children According to accident statistics, children are safer be restrained in child restraint systems at all times Follow all child restraint instructions and when properly restrained in the rear seating while the vehicle is in motion in accordance with warnings in this manual.
-
Page 53
(for example, while driving to the doctor or to a authorized Porsche dealer for evaluation. system. hospital). The following instructions are provided In this case: to you solely for that purpose. -
Page 54
Seek appropriate advice from your authorized the child restraint, applying increased pressure to Porsche dealer about the possible installation of a the seat, and cause the “PASSENGER AIRBAG Porsche child restraint system. OFF” indicator lamp to go off and activate the airbag system. -
Page 55: Latch Child Seat System
LATCH child seats are the best option for If your child restraint seat or seats require the use harnesses. mounting a child seat in your Porsche. Such of a tether strap, you will want to use the anchor Do not misuse the child restraint anchorages.
-
Page 56: Door Mirrors
Door Mirrors The convex mirror glass on the passenger’s side and the aspherical mirror glass on the driver’s side provide a larger field of view. Judging Distance in WARNING Convex Side Mirror Vehicles or objects appear smaller in convex mirrors and further away than they are in reality. Bear this distortion in mind when estimating the distance of vehicles behind you and when reversing into a parking space.
-
Page 57
Press and hold the button on the car key for at least 1 second. On vehicles with Porsche Entry & Drive, press and hold the locking button in the handle on the driver’s door for at least 1 second. The door mirrors fold in. -
Page 58: Automatic Anti-Dazzle Interior Mirror
Door mirror heating Switching off automatic anti-dazzle function Door mirror heating is activated automatically Press button B. when the heated rear window is switched on while the engine is running. The indicator light A goes out. For information on switching on the heated rear The anti-dazzle function switches off window: automatically if:…
-
Page 59: Steering Wheel
The steering wheel heating can be switched on Tiptronic S shift buttons and off with the button on the rear of the steering Porsche Tiptronic S is an eight-speed wheel when the ignition is switched on. transmission with an automatic and a manual selection mode.
-
Page 60: Steering Wheel Adjustment
Steering Wheel Adjustment The steering wheel can be adjusted manually or electrically in four directions depending on the vehicle equipment. Steering Wheel WARNING Adjustment While Driving The steering wheel may move further than desired if you attempt to adjust it when driving. You may lose control of the vehicle.
-
Page 61: Multi-Function Steering Wheel
Depending on the equipment in your vehicle, you Press rotary knob can use the function keys of the multi-function Go to submenu or activate selected steering wheel to operate the following Porsche function. communication systems: Operational readiness of the – Telephone…
-
Page 62: Sun Visors
Sun Visors Make-up Mirror If you are dazzled from the side: 1. Unclip the sun visor from the inner bracket. Swivel the sun visor down to prevent dazzle The make-up mirror on the rear of the sun visor is 2. Swivel the sun visor around so that it is in front from the front.
-
Page 63: Roll-Up Sunblinds, Rear Side Windows
Roll-Up Sunblinds, Rear Side Windows Information The roll-up sunblinds on the rear side windows can be raised or lowered only when the rear side windows are closed. The roll-up sunblinds move automatically to the correct end position. If child protection is activated, the roll-up sunblinds on the rear side windows can only be operated using the power window buttons in the driver’s door.
-
Page 64: Air Conditioning, Parking Heater And Heated Rear Window
Air Conditioning, Parking Heater and Heated Rear Window Brief Overview – Front Control Panel ……..63 Brief Overview – Rear Control Panel (4-Zone Air-Conditioning)..64 Overview of Air Conditioning ……65 General Functions ……… 66 Automatically Controlled Air-Conditioning ..70 Heated Rear Window/Door Mirror Heating ..
-
Page 65: Brief Overview — Front Control Panel
Brief Overview – Front Control Panel This brief overview does not replace the information provided under “Automatically Controlled Air-Conditioning”. Warnings, in particular, are not replaced by this brief overview. What do I want to do? What do I have to do? Switch on automatic air-conditioning Press button F for the left side or button L for the right side.
-
Page 66: Rear Control Panel (4-Zone Air-Conditioning)
Brief Overview – Rear Control Panel (4-Zone Air- Conditioning) This brief overview does not replace the information provided under “Automatically Controlled Air-Conditioning”. Warnings, in particular, are not replaced by this brief overview. What do I want to do? What do I have to do? Switch on automatic air-conditioning Press button E for the left side or button K for the right side.
-
Page 67: Overview Of Air Conditioning
Overview of Air Conditioning Rear air-conditioning control panel Interior temperature sensor (4-zone air-conditioning) Sensors The following air-conditioning system types may Automatic 4-zone air-conditioning be installed, depending on your vehicle To avoid impairing the performance of the The air-conditioning system controls the preset equipment: air-conditioning system: interior temperature completely automatically.
-
Page 68: General Functions
General Functions Deactivating the function Press button on the front control panel. The indicator light on the button goes out. Information Additional settings relating to the climate type and Switch on ignition. extended ventilation panel can be adjusted in the The indicator light on the button indicates the multi-purpose display on the instrument panel: previous setting.
-
Page 69
Switching on AC mode If you wish to cool the passenger compartment to a temperature lower than the outside temperature, AC mode must be activated. Press button The indicator light on the button lights up. The air-conditioning compressor is switched on. Press button for the left or right climate zone. -
Page 70
Information on 4-zone air-conditioning The air flows to the windshield and the front side windows. A lock symbol appears in the displays on the operating unit for the rear air-conditioned areas. Air-conditioning settings cannot be modified. Defrosting the windshield Accepting settings for driver’s side for the entire vehicle Activating defrosting function The MONO function allows the air-conditioning… -
Page 71
Setting automatic air-recirculation mode Information on air-conditioning compressor In automatic air-recirculation mode, the fresh air supply is adjusted depending on the air quality. The air-conditioning compressor: – Can switch off briefly to ensure sufficient Automatic air-recirculation mode can be switched engine cooling if the engine is operating under on and off on the multi-purpose display. -
Page 72: Automatically Controlled Air-Conditioning
A — Air-recirculation mode B — Defrost windshield C — MONO mode D — AC MAX mode E — Heated rear window/door mirror heating F — AC mode Front control panel, right air-conditioned area G — Air-conditioning display, right side H — Temperature, right side I — Air quantity, right side J — Air to windshield, right side…
-
Page 73
Rear control panel, left air-conditioned area A — Air-conditioning display, left side B — Temperature, left side C — Air quantity, left side D — Air to door vents, central vents and to footwell, left side E — Air to door vents and central vents, left side F — AUTO mode, left side (automatic mode) G — Air to door vents and footwell, left side Rear control panel, right air-conditioned area… -
Page 74
Information – If one air-conditioned area is set to LO or HI, the other air-conditioned areas are also set to LO or HI. Pressing the button for the relevant air- conditioned area selects the preset temperature. – The air-conditioning system always cools and heats the passenger compartment to the preset temperature at maximum cooling or heating temperature. -
Page 75
Setting air quantity The selected air quantity is shown in a bar display above the button . The more bars that are displayed, the more air flows into the passenger compartment. Increasing air quantity Press button for the air quantity to the relevant air-conditioned area upwards. -
Page 76
Canceling manual air distribution Press the relevant air distribution button again. The indicator light on the button goes out. Press button for the relevant air- conditioned area. The indicator light on the button lights up. Air quantity and distribution are controlled automatically and variations are compensated. -
Page 77
Extended ventilation panel Information The extended ventilation panel on top of the The function is ended automatically approximately dashboard can be activated or deactivated 4 seconds after the last settings are adjusted. separately in the multi-purpose display on the REAR disappears from the display. instrument panel. -
Page 78: Heated Rear Window/Door Mirror Heating
Air-conditioning settings on the multi-purpose display Additional settings relating to vehicle air- conditioning can be adjusted in the multi-purpose display on the instrument panel. For information on air-conditioning settings on the multi-purpose display: Please see the chapter “SETTING AIR CONDITIONING” on page 135. Air flow Three air flow settings are available in automatic mode:…
-
Page 79: Parking Heater
Parking Heater Operational readiness Operating the parking heater The parking heater can be used regardless of The parking heater is operated using the parking The parking heater can be used to heat the interior the ignition lock position: heater button in the center console or using the of the vehicle and defrost the windshield without –…
-
Page 80
Switching parking heater on/off in the multi-purpose display The parking heater can be switched on and off in the multi-purpose display when the ignition is switched on. Please see the chapter “OPERATING PARKING HEATER ON THE MULTI-FUNCTION DISPLAY” on page 115. The indicator light on the parking heater button in the center console lights up when the parking heater is activated. -
Page 81: Windows And Sliding Roofs
Windows and Sliding Roofs Power Windows……….80 Sliding/Lifting Roof……..83 Panorama Roof System …….. 85 Emergency Operation of Sliding/Lifting Roof or Panorama Roof System ……88 Windows and Sliding Roofs…
-
Page 82: Power Windows
Always remove ignition key when leaving the vehicle or switch ignition off on vehicles with Porsche Entry & Drive. Always take the ignition key with you when leaving the vehicle. Uninformed persons could injure themselves by operating the power windows.
-
Page 83
Manual Functioning of WARNING Power Windows If one-touch operation is disabled after the window is blocked, the window will close with its full closing force when the manual closing function is used. Take care to ensure that nobody can be injured when the windows close. -
Page 84
Storing end position of the door windows after connecting the vehicle battery The end positions of the door windows are lost when the battery is disconnected and reconnected. One-touch operation of the windows is disabled. Perform these steps for all windows: 1. -
Page 85: Sliding/Lifting Roof
Always remove ignition key when leaving the vehicle or switch ignition off on vehicles with Opening sliding/lifting roof fully Porsche Entry & Drive. Always take the ignition Actuate the button again in opening Operating sliding/lifting roof key with you when leaving the vehicle.
-
Page 86
Storing end position of the sliding/lifting Emergency operation of sliding/lifting roof roof The end positions of the sliding/lifting roof are lost If the sliding/lifting roof is defective, it can be if the vehicle battery is disconnected/reconnected closed or opened manually using a hexagon key. or flat, after emergency starting with jumper Please see the chapter “EMERGENCY cables, the electrical fuse for the sliding/lifting… -
Page 87: Panorama Roof System
Panorama roof system. Always remove ignition key when leaving the vehicle or switch ignition off on vehicles with Porsche Entry & Drive. Always take the ignition key with you when leaving the vehicle. Uninformed persons (e.g. children) could injure themselves by operating the Panorama roof system.
-
Page 88
Storing end position of the Panorama roof Storing Roof End WARNING Information system Position The Panorama roof system does not function at The end positions of the Panorama roof system When storing the end position, the force limiter is extremely high vehicle speeds or at extremely low are lost if the vehicle battery is disconnected/ not available and the Panorama roof system will temperatures. -
Page 89
To open the roll-up sunblind: Storing end position of the roll-up sunblind Press rocker switch back. The end positions of the roll-up sunblind are lost if the vehicle battery is disconnected/reconnected To close the roll-up sunblind: or flat, after emergency starting with jumper Press rocker switch forward. -
Page 90: Emergency Operation Of Sliding/Lifting Roof Or Panorama Roof System
Emergency Operation of Sliding/ The vehicle must be stationary in order to store the end position of the roll-up sunblind. Lifting Roof or Panorama Roof The Panorama roof system and roll-up sunblind System must be closed. 1. Switch on ignition. WARNING Roof Operation 2.
-
Page 91
6. Remove the key and put it back in its storage a downward direction using your finger or position. a screwdriver and fold it down. 7. Clip in the overhead operating console and clip-on frame. Have the fault remedied at your authorized Porsche dealer. Windows and Sliding Roofs… -
Page 92: Lights, Turn Signals And Windshield Wipers
Lights, Turn Signals and Windshield Wipers Light Switch ……….91 Automatic Driving Light Assistant ….91 Instrument Lighting ……..93 Turn Signal/High Beam/Headlight Flasher Stalk …………94 Emergency Flasher ……..94 Light Fault or Failure ……..95 Interior Lighting ……….96 Brief Overview –…
-
Page 93: Light Switch
Low beam/driving light Only with ignition on. The automatic driving light assistant is a comfort function. Your Porsche’s driving light (low beam) is Fog lights switched on and off automatically depending Pull switch to first click in low beam or on the ambient brightness.
-
Page 94
In the event of a fault in the automatic driving light vehicle speeds of more than approx. 90 mph off), the daytime driving lights come on assistant/Porsche Dynamic Lighting System (140 km/h) in daylight conditions and when automatically when the ignition is switched on. -
Page 95: Instrument Lighting
In addition, when the vehicle lighting is switched LIGHTS” on page 132. on, the instrument and switch brightness can be Porsche Dynamic Lighting System (PDLS) adjusted manually. Turn adjustment button A in the appropriate Static cornering light direction and hold until the desired brightness The static cornering light is activated in darkness has been reached.
-
Page 96: Turn Signal/High Beam/Headlight Flasher Stalk
Parking light The parking light can only be switched on when the ignition is switched off. Move the stalk up or down to switch on the right or left parking light. If the parking light is switched on, the message “Parking light on”…
-
Page 97: Light Fault Or Failure
Light Fault or Failure Automatic activation of emergency DANGER Emergency Stopping flasher in the event of an accident A message will appear on the multi-purpose Other vehicles could collide with your vehicle if you The emergency flasher is activated automatically display of the instrument panel if a vehicle light are parked in a dangerous position.
-
Page 98: Interior Lighting
A — Button for rear interior light Dimming (brightness adjustment) E — Button for rear reading and interior lights B — Button for front interior lights Press button B for the front interior light or Dimming (brightness adjustment) C — Button for front reading light, left button E for the relevant rear interior light and Press button C or D for the front reading light D — Button for front reading light, right…
-
Page 99
16 minutes after the engine stops to preserve the automatically when the vehicle is locked. Porsche Entry & Drive. vehicle battery. – switched off when the door or tailgate is In daylight conditions, interior lights that were closed, after a delay of approx. -
Page 100: Brief Overview — Windshield Wipers
Brief Overview – Windshield Wipers This brief overview does not replace the information provided under “windshield wiper/ washer stalk”. Warnings, in particular, are not replaced by this brief overview. Windshield wiper stalk Rain sensor switch What do I want to do? What do I have to do? Wipe automatically at front Press the stalk to detent position 1.
-
Page 101: Windshield Wiper/Washer Stalk
Windshield Wiper/Washer Stalk Always switch off windshield wipers before opening the engine compartment lid (wiper CAUTION switch in position 0). If the wiper arms are not Cleaning Windshield in their end position, they will automatically The windshield wipers can start wiping move to this position when the engine unintentionally when switched on.
-
Page 102
3 – Front windshield wipers – fast To switch the rain sensor on again: Move wiper stalk upwards to the third click. Move wiper stalk to position 0 and then to 4 – One-touch operation position 1. Front windshield wipers Switch-on is confirmed by one wipe of the Move wiper stalk downwards. -
Page 103
Clean the wiper blades with window cleaner at regular intervals, especially after washing the vehicle in a car wash. We recommend Porsche window cleaner. If the Rear window wiper Headlight washer system wiper blades are very dirty (e.g. soiled with… -
Page 104: Instrument Panel And Multi-Purpose Display
Instrument Panel and Multi-Purpose Display Instrument Panel USA Models …… 103 Instrument Panel Canada Models….104 Compass on the Dashboard ……108 Operating the Multi-Purpose Display on the Instrument Panel………108 Vehicle Information……..112 Audio Menu ……….116 Navigation Menu ………116 Map Menu ……….
-
Page 105: Instrument Panel Usa Models
Warning and indicator lights HOLD function indicator light Tire pressure warning light PDLS warning light Low beam indicator light Trailer turn signal indicator light Rear fog light indicator light Electric parking brake (EPB) warning light Emission control warning light (Check Engine) Airbag warning light Instrument Panel USA Models L Digital speedometer…
-
Page 106: Instrument Panel Canada Models
Warning and indicator lights HOLD function indicator light Tire pressure warning light PDLS warning light Low beam indicator light Trailer turn signal indicator light Rear fog light indicator light Electric parking brake (EPB) warning light Emission control warning light (Check Engine) Airbag warning light Instrument Panel Canada Models L Digital speedometer…
-
Page 107
If the cooling system is in any way faulty, coolant level is too low. purpose display of the instrument panel if the consult your authorized Porsche dealer. The warning message “Check coolant level” also engine oil temperature is too high. -
Page 108
Have the fault corrected at an authorized Please see the chapter “ADAPTING Porsche dealer. APPEARANCE OF MULTI-PURPOSE DISPLAY” on page 126. As the engine is equipped with a boost pressure control feature, the boost pressure is variable. -
Page 109
(50 km), a warning message appears on the multi- (e.g. catalytic converter): Do not continue driving. purpose display of the instrument panel and the Please see your authorized Porsche dealer. Have the fault remedied at your nearest warning light in the fuel gauge comes on. authorized Porsche dealer. -
Page 110: Compass On The Dashboard
Operating the Multi-Purpose NOTICE Display on the Instrument Panel Risk of damage to the emission control system. On the multi-purpose display, you can view If the warning light on the instrument panel information relating to the relevant vehicle continues flashing even when you have eased off equipment, operate the audio source (radio, CD, the accelerator pedal, the emission control iPod, etc.), check the oil level, check the tire…
-
Page 111
For information on individual assignment of the MFS button: Please see the chapter “OVERVIEW OF WARNING MESSAGES” on page 139. For information on Porsche Communication Management (PCM): Please refer to the separate PCM operating instructions. Operating principle on vehicles with… -
Page 112
Title area with menu indicator The menu item currently selected is displayed in the title area. The menu indicator on the right shows the position of the current menu item in the overall menu and displays the number of other menu items on this menu level. -
Page 113
Info Messages Upper line Oil level Vehicle menu Service intervals Limits Lower line Level Aux. heater Menu scope Ø Consumption PCM display Settings Audio Limit 1/Limit 2 Brightness Station/track Shift request Activate/Deactivate now Time Destination input Timer 1/2/3 Date Start/Stop route guidance Summer time Display System on… -
Page 114: Vehicle Information
Displaying vehicle information Pending warning messages, information on forthcoming service intervals, the current chassis setting and the average fuel consumption can be viewed in the “Info” submenu of the “Vehicle” main menu area. 1. Main menu: Select “Vehicle” > “Info” and confirm.
-
Page 115
Displaying service intervals Resetting average fuel consumption Display and measurement of the engine oil level The internal mileage counter indicates when the 1. Main menu: Select “Vehicle” next vehicle service is due. > “Info” NOTICE The oil service can be scheduled with a fixed or >… -
Page 116
Have the oil quantity corrected at the next Under no circumstances add engine oil. authorized Porsche dealer. If the bottom segment is filled in (illustration B), the oil level has reached the minimum mark. The message “Oil level minimum reached”… -
Page 117
Setting a speed limit Operating parking heater on the multi-function display Information 1. Main menu: Select “Vehicle” There is no time or date stored when you start Switching parking heater on/off > “Limits” programming for the first time. The first numeric The parking heater can be switched on and off in 2. -
Page 118: Audio Menu
Clearing the timer For information on adjusting audio menu settings: Starting route guidance Please see the chapter “ADAPTING DISPLAY If route guidance is inactive and you have entered 1. Main menu: Select “Vehicle” CONTENTS OF AUDIO MAIN MENU” on a new navigation destination you can then start >…
-
Page 119: Map Menu
Map Menu Phone Menu Enlarging and reducing map display The zoom factor of the map display can be In the “Map” main menu, you can view and modify In the “Phone” main menu, you can retrieve adapted individually. the map display on the navigation system. telephone numbers stored in the phonebook or in lists of most recently dialled or received calls.
-
Page 120: Trip Information
Making multiple calls simultaneously Displaying driving data During an active telephone conversation, you have There are three driving data displays available. the option of starting another telephone 1. Select “Trip” in the main menu. conversation. You can have a separate conversation with the 2.
-
Page 121: Tire Pressure Monitoring (Tpm)
Driving the vehicle with low tire pressure increases workshop. pressure recommended by Porsche on the tire the risk of a tire failure and resulting loss of Defective tires must be replaced immediately inflation pressure label.
-
Page 122
The warning light in the instrument panel lights up: Warning light – When a loss in pressure has been detected. – In the event of a defect in Tire Pressure Monitoring or a temporary fault. Attention to TPM WARNING – When learning new fitted wheels/wheel Malfunction Indicator transmitters, as long as the vehicle’s own Your vehicle has also been equipped with a TPM… -
Page 123
The tire pressure to be corrected (refill pressure) Selecting “Charge” in the Tire pressure is indicated on the displayed wheel. menu Example: If “–1.5 psi / –0.1 bar / –10 kPa” is 1. Select “Tire pressure” in the main menu. displayed for the rear right tire, 1.5 psi / 0.1 bar / 10 kPa must be added to this tire. -
Page 124
For speeds up to 100 mph (160 km/h), the tire pressures can be reduced to increase driving comfort. The Tire Pressure Monitoring system must be set to the applicable tire pressure (comfort pressure or standard pressure). If you selected “Comfort press.”, the TPM system automatically uses lower pressure values when monitoring tire pressures. -
Page 125
3. Select “Summer tires” or speed of the respective tire. missing information should be added to the “Winter tires” or Porsche recommends obeying all traffic laws multi-purpose display. “All-season” at all times to maintain the safety of yourself Please see your authoized Porsche dealer. -
Page 126
System learning The warning can be acknowledged when the ignition is switched on. Tire Pressure Monitoring begins to “learn” the The tire pressure warning light on the instrument wheels after a wheel change, wheel transmitter panel goes out only when the tire pressure has replacement or update of the tire settings. -
Page 127
Monitoring are missing. condition of the wheel transmitters should be – During the learning phase after the tire settings checked at an authorized Porsche dealer. have been updated. Switch off the ignition when changing a wheel. – After a wheel change without updating the The tire settings on the multi-purpose display must tire settings. -
Page 128: Vehicle Settings On The Multi-Purpose Display
Vehicle Settings on the Resetting to factory settings Adapting appearance of multi-purpose display Multi-Purpose Display All settings made in the multi-purpose display can be reset to the factory settings. The contents and appearance of the multi-purpose Different settings can be adjusted in the multi- display can be adapted individually.
-
Page 129
Please observe the separate operating manual destination), “Dst: Trip time” (driving time to You can select four of the many items of vehicle for the Porsche communication system PCM destination), “Dst: Arrival” (arrival time at information for display in the “Vehicle” menu and or CDR-31. -
Page 130
You can configure the multi-purpose display to temperature to the lower status area B in the temporarily display different items of information multi-purpose display. 1. Main menu: Select “Vehicle” relating to Porsche Communication Management > “Settings” 1. Main menu: Select “Vehicle” (PCM). > “Display”… -
Page 131
Information > “Settings” to encourage a more fuel-efficient driving style. > “Date/Time” On vehicles with Porsche Communication 1. Main menu: Select “Vehicle” > “Time” Management (PCM), the date and time are set > “Settings”… -
Page 132
Setting time zone Setting the date format Setting summer time The time zone and vehicle time can be adjusted The date format can be adjusted. The vehicle clock can be configured to change to individually. summer time. 1. Main menu: Select “Vehicle” 1. -
Page 133
Prewarning on Lane Change Assist (LCA) The latent and prewarning functions are switched The Porsche “Active Safe” functions can be The brightness of the warning indicator on the off by default. The acute warning function is completely or partly disabled. -
Page 134
(Porsche Dynamic Lighting System) 1. Main menu: Select “Vehicle” purpose display: > “Settings” On vehicles with the Porsche Dynamic Lighting Please see the chapter “OVERVIEW OF > “Light & Visibility” System, you can adjust the headlights for left or WARNING MESSAGES”… -
Page 135
Adjusting interior lights Setting interior lighting off delay Setting rain sensor activation Interior light functions on the vehicle can be The off delay for the lighting in the passenger Activation of the rain sensor for the windshield adapted individually in the “Interior lights” menu. compartment after closing the vehicle doors can wipers on the windshield in wiper stalk position 1 be adapted individually. -
Page 136
Setting activation of the rear wiper when Lowering door mirror on passenger’s side Locking settings reverse gear is engaged when parking The locking and unlocking settings on the vehicle You can configure the rear wiper to automatically You can configure the door mirror on the can be adjusted. -
Page 137
Setting door locking Switching Comfort Entry on and off Setting air conditioning You can configure the doors to remain unlocked or You can configure the driver’s seat and steering The automatic air conditioning can be changed lock automatically after a delay on entering the wheel to move back automatically and allow the individually. -
Page 138
Switching extended ventilation panel Changing button assignment on Available instrument cluster functions: on and off multi-function steering wheel – “Vehicle menu” Display vehicle menu. The extended ventilation panel on top of the The assignment of the MFS button on the multi- –… -
Page 139
Adjusting volume of warning and Adjusting volume of warning tones Setting speedometer and compass units information tones The volume of the warning tones can be adjusted The units used for speed and distance information individually. on the speedometer and compass display can be The volume of the warning tones and ParkAssist adjusted. -
Page 140
Setting unit for Tire Pressure Monitoring Setting unit for fuel consumption display display The unit can be set for the fuel consumption The measurement unit for the Tire Pressure display. Monitoring display can be changed. 1. Select “Vehicle” 1. Select “Vehicle” >… -
Page 141: Overview Of Warning Messages
Oil level above maximum Visit an authorized Porsche dealer at the next opportunity and have the oil drained to the correct level. Oil temperature display defective The oil temperature is no longer monitored automatically. Have the fault corrected at an authorized Porsche dealer.
-
Page 142
There is a problem with the selector-lever. It is not possible to engage a gear without pressing the display flashes brake. Have the fault corrected immediately at an authorized Porsche dealer. Gearbox temperature too high Transmission temperature is too high. Engine torque will be reduced. Do not hold the vehicle with the accelerator on a hill, for example. -
Page 143
Warning Stop immediately in a suitable place. Do not continue driving. Brake fluid level Have the fault corrected at an authorized Porsche dealer. Warning Brake force distribution Stop immediately in a suitable place. Do not continue driving. Have the fault corrected at an authorized Porsche dealer. -
Page 144
PSM on Porsche Stability Management was switched on. PSM turned on automatically Porsche Traction Management is overloaded. Reduce load. Or air spring, PDCC or rear differential lock fault. Contact an authorized Porsche dealer if the fault persists. Speed too high An off-road driving program can only be engaged at a speed of less than 20 mph (30 km/h). -
Page 145
Fasten seat belt All vehicle occupants must fasten their safety belts. Airbag warning light failure Have the fault corrected at an authorized Porsche dealer. Steering locked The steering wheel lock is faulty. Have the fault corrected at an authorized Porsche dealer. -
Page 146
PDCC failure The lateral inclination of the vehicle is significantly greater when cornering. Drive carefully at an appropriate speed to the nearest authorized Porsche dealer. Tire pressure! Tire Pressure Monitoring detects a pressure loss of more than 7 psi / 0.5 bar / 50 kPa at a speed of less than 100 mph (160 km/h) and more than 6 psi / 0.4 bar / 40 kPa at a speed of more than… -
Page 147
Distance! Please brake! Insufficient distance from vehicle in front. ACC/PAS unavailable Adapt your speed and driving style. Have the adaptive cruise control or Porsche “Active Safe” fault corrected at an authorized Porsche dealer. Fault Turn signal tones, acoustic warning and distance signals Instrument cluster/ (e.g. -
Page 148
Acoustic warning and distance signals for ParkAssist are not available. ParkAssist Please remember this when parking, for example. Have the fault corrected at an authorized Porsche dealer. Limit 1 or 2 exceeded Preset speed limit 1 or 2 has been exceeded. -
Page 149: Driving And Driving Safety
Transmission and Chassis Control Systems.. 188 Air Suspension with Leveling System and Height Adjustment ……..195 Porsche Active Suspension Management (PASM) …………197 Porsche Dynamic Chassis Control (PDCC) ..198 Off-Road Driving ……… 198 Driving Systems for Off-Road Driving … 199 Driving and Driving Safety…
-
Page 150: Ignition Lock, Steering Lock
2 — Start engine Stop the vehicle. steering wheel. On vehicles with Tiptronic S: On vehicles with Porsche Entry & Drive, you no Information Move Tiptronic selector lever to position P. longer have to insert the key into the ignition lock, The vehicle battery discharges if the ignition key is Switch ignition off.
-
Page 151
It is unlocked automatically when the alarm system is disabled using the key, when the driver’s door is opened with Porsche Entry & Drive or when the ignition is switched on. Emergency operation with Porsche Entry &… -
Page 152: Starting And Stopping The Engine
Starting and Stopping the Engine Exhaust System Fire WARNING Hazard The immobilizer can be deactivated and the engine started only using an authorized Exhaust fumes and the exhaust system are very ignition key. hot when the engine is running. The exhaust Please see the chapter “IMMOBILIZER”…
-
Page 153
Turn the ignition key or control unit (Porsche turned off. (in traffic jams, in city traffic or in queues). Entry & Drive) to ignition lock position 2. -
Page 154: Auto Start Stop Function
Auto Start Stop Function Starting the engine Exceptions for the Auto Start Stop function The Auto Start Stop function starts the engine: The engine stops automatically when the vehicle is In Tiptronic selector-lever position D, N or The Auto Start Stop function is not available in stopped, e.g.
-
Page 155
The Auto Start Stop function is available with Auto Start Stop function display limited functionality in the following situations, Stopping the engine automatically for example: and restart readiness – If the air conditioning or passenger If the engine was stopped automatically by the compartment heating is operated at a high Auto Start Stop function and if the driver is setting or if the defrost function is run for long… -
Page 156: Electric Parking Brake
Have the Auto Start Stop system checked the The warning light on the instrument panel goes next time you visit your authorized Porsche dealer. If the driver’s door is not closed or the driver’s…
-
Page 157: Brakes
Emergency braking function Brake system function If the conventional brake system has failed, the Your Porsche is equipped with a power assisted Make it a habit to check the operation of your vehicle can be decelerated quickly and braked to hydraulic dual circuit brake system with disk brakes before driving.
-
Page 158
(if the brake pedal travel has WARNING Wet Brakes Your authorized Porsche dealer will be glad to increased) one of the two brake circuits has failed. Driving through water may reduce the traction. offer you floor mats of the correct size… -
Page 159
Your car has excellent brakes, but they are still Unsuitable or incorrectly installed floor mats or checked by experts at an authorized Porsche subject to wear. The rate at which they wear objects can obstruct the movement of the brake dealer. -
Page 160: Cruise Control
Vehicles with Tiptronic S Maintaining and storing speed Downshifts are carried out to help maintain the 1. Accelerate or decelerate to the desired speed pre-selected speed (especially when driving using the accelerator pedal. downhill). 2. Push the control stalk on the steering wheel forward (position 1).
-
Page 161
Pull the control stalk on the steering wheel for longer than 60 seconds (e.g. gradients). towards the steering wheel and keep it pulled Information – If Porsche Stability Management (PSM) (position 2). On upward or downward slopes, the set speed intervenes for longer than 0.5 seconds. -
Page 162: Adaptive Cruise Control
Adaptive Cruise Control Radiofrequency WARNING radiation exposure Adaptive cruise control maintains any selected speed between approx. 20–100 mph This equipment complies with FCC radiation (30–160 km/h) when driving on open roads exposure limits set forth for an uncontrolled without you having to use the accelerator. environment.
-
Page 163
Changes or modifications made to this equipment automatically maintain a set distance from the not expressly approved by Porsche may void the vehicle in front. FCC authorization to operate this equipment. If the vehicle in front stops, adaptive cruise control… -
Page 164
“ACC” main menu Examples: The adaptive cruise control display on the multi- If adaptive cruise control is switched on, purpose display can be selected permanently and no desired speed is stored, the using the buttons on the multifunction steering cruise control symbol appears but the wheel or the control stalk at the bottom right of desired speed field remains blank. -
Page 165
Operating states when adaptive cruise Setting and changing the desired speed Increasing the desired speed control is switched on Push the control stalk on the steering wheel Preconditions forward (position 1). There are three possible operating states when – Adaptive cruise control is switched on. The desired speed is increased in steps adaptive cruise control is switched on. -
Page 166
Possible distance settings Information Suitable for fast driving in lines of The distance depends on the driving speed. traffic. The time gap is 1 second. The slower the vehicle is traveling, the shorter the This corresponds to 36 yd. (33 meters) distance and the faster the vehicle is traveling, the at a speed of 75 mph (120 km/h). -
Page 167
Automatic braking to a stop Driving off again Interrupting and resuming cruise control and distance control If the vehicle in front stops, your vehicle will slow The vehicle can be driven off again after being down and come to a stop within the control limits stopped and speed and distance control will be Interrupting cruise control and distance of the system if adaptive cruise control is active. -
Page 168
– “Selector position!” than 20 %. – “PHC active” Adaptive cruise control was deactivated – When Porsche Hill Control (PHC) is active Porsche Hill Control (PHC) is active or on because the Tiptronic selector lever is not in (or on standby). -
Page 169
Traffic situations in which vehicles cannot be reliably detected The radar sensor for adaptive cruise control scans a narrow, cone-shaped area in front of your vehicle. Detection can be limited or unreliable, depending on the traffic situation and the size of the vehicle in front. -
Page 170
Information or adaptive cruise control will react to vehicles in vehicle in front brakes, a latent warning appears – All Porsche “Active Safe” functions are active adjacent lanes. on the multi-purpose display to warn the driver. for speeds of more than 20 mph (30 km/h). -
Page 171
(e.g. indicating the driver’s intention to overtake). – When adaptive cruise control is on, the Porsche “Active Safe” warnings are inactive. There is no need for these warnings because adaptive cruise control decelerates in good time and the visual and acoustic overtake request “Distance! Please brake!”… -
Page 172: Lane Change Assist (Lca)
This form of cause undesired operation. display is called the warning stage. Changes or modifications made to this equipment not expressly approved by Porsche may void the Radiofrequency WARNING FCC authorization to operate this equipment.
-
Page 173
Switching on and off Lane Change Assist WARNING Switching on Risk Press button A. Even when using the Lane Change Assist, the The indicator light in the button comes on. driver is still responsible for taking due care when changing lanes and assessing the traffic situation. Switching off Please bear in mind that the sensors will not Press button A again. -
Page 174
If the side windows in the driver’s or passenger’s Operating principle The brightness of the information stage is door are darkened with tinted film, the driver may deliberately weak so as not to distract you while Lane Change Assist measures the distance and not be able to see the warning indicator on the driving without intending to change lanes and speed difference of the detected vehicles… -
Page 175
C – Warning indicator flashes in warning stage When you set the turn signal in driving situation B, the warning indicator on the door mirror will flash brightly several times. Lane Change Assist is telling you that you may have overlooked a vehicle. -
Page 176
C – Warning indicator flashes in warning stage When you set the turn signal in driving situation B, the warning indicator on the door mirror will flash brightly several times. Lane Change Assist is telling you that you may have overlooked a vehicle. -
Page 177
Setting display brightness on door mirror Information The brightness of the warning indicator for both – Lane Change Assist is not active while you are the information stage and warning stage is adjusting the brightness. The warning indicator automatically adjusted according to the ambient lights up briefly only to help you to set the brightness. -
Page 178: Car Audio Operation/Tips
Equipment which has not been tested and an electronic dead spot, such as static or for example, always have the Lane Change approved by Porsche may impair radio reception. multipath area, interrupts the original signal, Assist system checked out at a specialist some-times the stronger second signal will be workshop for safety reasons.
-
Page 179
Any portable telephone or radio transmitter which sunlight. Reception quality is used in a Porsche must be properly installed in Leaving the disk on the dashboard in the sun The reception quality of your car telephone will accordance with the technical requirements of can damage the disk. -
Page 180: Usb/Ipod ® And Aux
Porsche Communication Satellite radio Management (PCM) You must have the satellite radio activated before you can put it into operation. You will need a Operation of On-Board WARNING contract with a provider in order to use this radio. Systems Refer to the separate radio operating instructions before putting into operation.
-
Page 181: Voice Control
Voice Control Manual Transmission, Clutch If the red zone is reached during acceleration, fuel feed is interrupted. Porsche Communication Management (PCM) can Obstructed Clutch WARNING be operated by spoken commands using the voice Pedal NOTICE control system.
-
Page 182: Tiptronic S
Tiptronic S Starting The engine can be started only in selector-lever Porsche Tiptronic S is an 8-speed automatic position P or N with the brake pedal pressed. transmission and features an “automatic” and a “manual” gearshift mode. Driving off In automatic selection mode (selector-lever Select the desired position for moving off position D), gear changing is automatic.
-
Page 183: Selector-Lever Positions
Selector-Lever Positions D – Automatic selection mode (D – Normal mode) P – Parking lock Select selector-lever position D for “normal” When the selector lever is in position P, the drive driving. wheels are mechanically locked. The gears are shifted automatically according Engage parking lock only when the vehicle is to the accelerator position and speed.
-
Page 184
D – Off-road mode Kickdown The transmission switches to an off-road gear- The kickdown function is active in selector-lever changing map. position D and M. For optimum acceleration, e.g. when The gear-changing points are chosen to achieve overtaking, press the accelerator pedal the best possible vehicle control on difficult beyond the full-throttle point (kickdown). -
Page 185
Press the accelerator pedal beyond the full- Have the fault corrected at an authorized throttle point (kickdown). Porsche dealer. Stopping Information Normal and Sport mode For a brief stop (e.g. at a traffic light), leave… -
Page 186: Driving Programs For On-Road And Off-Road Driving
ABS, off-road ABS, PSM, etc.) are provided in Operate the footbrake and engage the Please see the chapter “FRONT ASHTRAY/ your Porsche to ensure the best possible driving selector lever properly. STORAGE COMPARTMENT” on page 217. dynamics combined with maximum driving safety: 2.
-
Page 187
Selecting driving program The required driving program can be set using the rocker switch. The rocker switch is located in the center console of the vehicle. It features a multi-step function and can be operated in both directions. Information – The number of differential locks that can be engaged in the off-road driving program depends on your vehicle equipment. -
Page 188
This makes it is switched on. easier for the vehicle to keep moving if, for Interventions by the Porsche control systems are example, both wheels on the front axle lose intentionally shifted towards greater agility and traction on a soft surface. -
Page 189
In addition, the selected chassis setup is of the instrument panel. shown on the multi-purpose display of the instrument panel for approx. 12 seconds. Please see the chapter “PORSCHE ACTIVE SUSPENSION MANAGEMENT (PASM)” on page 197. Please see the chapter “PORSCHE DYNAMIC CHASSIS CONTROL (PDCC)”… -
Page 190: Transmission And Chassis Control Systems
Transmission and Chassis Control Systems Your Porsche features a complex integrated system made up of all control systems acting in power transmission and in the chassis. All control systems are networked with the aim of combining the best possible driving performance with maximum safety.
-
Page 191
These systems cannot reduce the risk of – Best possible traction and lane-holding ability Porsche Torque Vectoring Plus (PTV Plus) accidents due to inappropriate speed. in all driving situations – even on road surfaces… -
Page 192
Function – Brake system prefilling: Automatic brake differential (ABD) The brake system is prepared for possible PSM intervenes and corrects the course if the The ABD system controls the front and rear axles subsequent emergency braking if the actual direction of motion deviates from the separately. -
Page 193
Switching off PSM The automatic brake differential (ABD) remains on. changed conditions. Press button Consult your authorized Porsche dealer. PSM is switched off after a short delay. Switching PSM back on Collapsible spare wheel The light-emitting diode in the button is lit up. -
Page 194
The ABS must be checked immediately at your 1. Hold the vehicle securely on the slope with Function authorized Porsche dealer in order to prevent the footbrake. The decisive advantage of ABS lies in the driving the occurrence of further faults with The engine must be running. -
Page 195
CAUTION Limits of HOLD Function Vehicle Roll-back Porsche Hill Control is an assistance system that The limits set by the physics of driving cannot be If the vehicle comes to a standstill on a steep helps the driver when driving slowly downhill at overcome, even with the HOLD function. -
Page 196
Switching off PHC Decelerating Press the PHC button again. Pull the control stalk on the steering wheel The indicator light on the button goes out. towards the steering wheel and keep it pulled (position 2). The desired speed is reduced and stored when Information you release the stalk. -
Page 197: Air Suspension With Leveling System And Height Adjustment
Air Suspension with Leveling Terrain level (High level I) Low level System and Height Adjustment This level is intended for off-road driving, field This level is intended for high-speed driving. tracks, forest paths, etc. From a speed of approx. 85 mph (138 km/h), On vehicles with air suspension, the driver can set The vehicle is raised by around 1.1 in.
-
Page 198
– Doors are closed. Raising the vehicle modified conditions. Briefly press rocker switch forward Contact an authorized Porsche dealer in order The vehicle is raised one level. Information to correct a system fault. The last selected level is stored in the memory Lowering the vehicle after the ignition is switched off. -
Page 199: Porsche Active Suspension Management (Pasm)
Switching the leveling system back on To remedy the fault, consult an authorized 1. Switch on ignition. Porsche dealer. 2. Press rocker switch forward for Porsche Active Suspension 10–15 seconds Management (PASM) drive off in the vehicle. Three different chassis setups can be selected at The leveling system switches on automatically.
-
Page 200: Porsche Dynamic Chassis Control (Pdcc)
NOTICE system. To remedy the fault, consult an authorized After selection of a chassis setup in Porsche Porsche dealer. Risk of damage. Front, rear and side member Active Suspension Management (PASM): trims are painted on vehicles with the SportDesign Checking hydraulic fluid –…
-
Page 201: Driving Systems For Off-Road Driving
Replace a damaged tire if Always keep the sliding/lifting roof or necessary. Panorama roof system and the side windows Have any damage to your vehicle repaired by closed while driving. an authorized Porsche dealer without delay. Driving and Driving Safety…
-
Page 202
Activate Porsche Hill Control (PHC). floor assembly, tires, body structure, steering system, chassis and exhaust system for signs Please see the chapter “PORSCHE HILL CONTROL (PHC)” on page 193. of damage. Information After driving for an extended period through… -
Page 203
Humps Impaired Braking / WARNING Information Pay attention to the ground clearance of the Soiling Activate the off-road driving program and vehicle. Soiling can impair the braking action. engage differential lock(s) if necessary. Check and clean the brakes if they are soiled. Switch the air-conditioner off. -
Page 204
Driving on sand Off-road driving on track ruts Information Other vehicles leave ruts on many off-road tracks The vehicle requires a particularly thorough check or gravel roads. Information after driving through water. Pay attention to the ground clearance of the Activate the off-road driving program and Remove mud from the tire tread. -
Page 205: Storage, Luggage Compartment And Roof Transport System
Storage, Luggage Compartment and Roof Transport System Loadspace ……….204 Cargo Management System ……205 Luggage Compartment Cover ….. 208 Luggage Safety Net ……..209 Ski Bag …………. 211 Roof Transport System……. 212 Storage…………. 215 Cupholder……….216 Front Ashtray/Storage Compartment … 217 Rear Ashtray……….
-
Page 206: Loadspace
Loadspace Tie-down rings 2. Unclip support arm B and insert it into fixing recess C in the loadspace floor. You can secure the load in the luggage The maximum permissible load on the loadspace compartment to prevent it from slipping. Tie-down Closing the loadspace floor floor is 880 lbs (400 kg).
-
Page 207: Cargo Management System
Cargo Management System The cargo management system is a variable system for securing objects in the luggage compartment. It comprises two telescopic rails integrated in the loadspace, a telescopic bar, four tie-down rings as well as a strap reel and a reversible mat. The reversible mat has an anti-slip structure on the underside.
-
Page 208
Inserting strap reel on one rail 3. Insert the two end elements of the strap reel in 2. Insert one end element of the strap reel in the the openings A of the mounting rails. opening A of a mounting rail, press down and 1. -
Page 209
Inserting and adjusting tie-down rings Tie-down straps, the luggage net or the luggage safety net can be fastened to the tie-down rings. Make sure that all rings are equally loaded when securing a load. The tie-down rings are not designed to restrain loads in serious accidents. -
Page 210: Luggage Compartment Cover
Luggage Compartment Cover Items in the luggage compartment may be hidden from view by using the luggage compartment cover. Always pull out the luggage compartment cover when transporting objects in the luggage compartment. The luggage compartment cover is not designed to carry objects. Do not hang bags or objects on the support brackets.
-
Page 211: Luggage Safety Net
Porsche First disengage the retractable covers from 2. Insert the cover on the right side down into dealer.
-
Page 212
Installing luggage safety net 2. Position the tie-down rings in the loadspace Seat backrests folded over floor in such a way that they are the same Fold backrests forward: distance from the end of the rail. It must be Please see the chapter “FOLDING REAR SEAT Information possible to tension the net vertically and the BACKRESTS FORWARD”… -
Page 213: Ski Bag
Stowing the ski bag 1. Empty the ski bag and pull it into the passenger compartment. 2. Adjust the middle seat backrest to vertical position: Please see the chapter “ADJUSTING MIDDLE SEAT BACKREST TO VERTICAL POSITION” on page 42. 3. Only fold up the ski bag when it is dry and store it in the gear bag.
-
Page 214: Roof Transport System
Roof due to the higher center of gravity and the and approved by Porsche. It is not possible to greater wind resistance. You should adapt your Transport System.
-
Page 215
A — Front carrier bar 1. Secure the carrier bars in the marked areas 2. Open the cover on the supports in order to fit B — Rear carrier bar only. There is one bore at the inside of each the carrier bars. -
Page 216
3. Before fitting the carrier bars, unscrew the 5. Then tighten the tensioning screws in all the 6. Close all covers and lock the locks. To do this, fastening screws as far as they will go. supports to 6 ftlb. (8 Nm) one after the other turn the key clockwise to the vertical position 4. -
Page 217: Storage
Storage WARNING Unsecured Loads Unsecured or incorrectly positioned loads can slip and endanger the occupants in the event of braking, changes in direction or in an accident. Do not transport items of luggage or objects unsecured in the passenger compartment. Do not transport any heavy objects in open storage trays.
-
Page 218: Cupholder
Other storage options There are other storage options available, depending on the vehicle equipment: – Storage compartment and bottle holder in the front and rear door panel – Storage compartment in the center console (instead of the ashtray) – Map pockets –…
-
Page 219: Front Ashtray/Storage Compartment
Opening Press briefly on the ashtray lid. Emptying To release the ashtray insert, open the ashtray and press the ashtray lid down. Pull the ashtray insert up to remove it. After emptying the ashtray, replace the insert and push it down until it clicks into place. Cupholders in the rear armrest Front Ashtray/Storage Compartment…
-
Page 220: Rear Ashtray
Rear Ashtray Front cigarette lighter Rear cigarette lighter Using the cigarette lighter Cigarette Lighter WARNING Ashtray Fire Risk Press the lighter into the receptacle. When the The cigarette lighters are ready for use regardless Never use ashtray for waste paper disposal, element is red hot, the lighter will jump back to of the ignition lock position.
-
Page 221: Trailer Hitch
Trailer Hitch Trailer Coupling………. 220 Loading Information……..221 Trailer Hitch…
-
Page 222: Trailer Coupling
Please see the chapter “WEIGHTS” on Electrical connection page 312. Your Porsche is equipped with a 7-pin connector A Unhitching trailer for the electrical connection to the trailer. Always turn the alarm system off before…
-
Page 223: Loading Information
Loading Information The Gross Axle Weight Rating is the maximum DANGER Riding in a Cargo Area load limit for the front or the rear axle. This Definitions Injuries are much more likely in an accident if information is located on the safety comliance The towing capacity (gross weight of the trailer) persons ride in the cargo area.
-
Page 224
3. Subtract the combined weight of the driver and passengers from XXX pounds or XXX kilograms. 4. The resulting figure equals the available amount of cargo and luggage load capacity. For example, if the “XXX” amount equals 1400 lbs. and there will be five — 150 lb passengers in your vehicle, the amount of available cargo and luggage load capacity is 650 lbs. -
Page 225
Stowing load in the vehicle If the rear seats are not occupied, the Driving backrests can be additionally secured with the The car’s handling changes depending on the WARNING Shifting Cargo Loads safety belts. Simply cross the outer safety vehicle loading. Adapt your driving style to the belts and insert each into the opposite buckle. -
Page 226
Towing a trailer Door mirrors Slow down immediately if the trailer starts to If the width of the trailer obstructs your view of sway. Do not countersteer; brake if necessary. Safe Driving with a WARNING the traffic behind the trailer, you must have Never attempt to straighten out the car-trailer Trailer additional door mirrors fitted. -
Page 227: Parking
Parking ParkAssist ……….226 Rearview Camera ……..228 Swivelling Down Mirror Glass as Parking Aid. 229 Garage Door Opener ……..229 Parking…
-
Page 228: Parkassist
The ParkAssist visual display appears on the closest obstacle: WARNING ParkAssist Limits central screen of the Porsche communication – Range behind the vehicle: approx. 71 in. Responsibility for parking and for assessing the system. (180 cm) risk to persons around the vehicle lies completely –…
-
Page 229
Instead, the ParkAssist visual display will Press button A on the overhead operating appear on the central screen of the Porsche console. communication system. The indicator light on the button lights up. -
Page 230: Rearview Camera
Have the fault corrected at an authorized immediately if you even suspect that a person, Porsche dealer. and especially a child, might be behind you. Towing a trailer The rearview camera is located on the underside The ParkAssist rear monitoring area is switched of the tailgate.
-
Page 231: Swivelling Down Mirror Glass As Parking Aid
C. On vehicles with driver Parking Aid memory or comfort memory, this setting is stored The garage door opener of your Porsche replaces on the car key or the person buttons on the up to three original remote controls used to When reverse gear is engaged, the mirror on the driver’s side.
-
Page 232
Deleting programmed signals from the keys Garage Door Opener WARNING This process deletes the standard factory-set codes. Do not repeat this process if you want to When opening and closing the equipment being assign additional signals to the buttons. operated, parts of the body could become Keep the two outer buttons trapped or crushed. -
Page 233
Your authorized You now have 5 minutes to teach the button. Porsche dealer has a list of all garage door 3. Hold the original remote control approx. 12 in. opener signals that can be adapted. -
Page 234
Reprogramming an individual button on the keypad 1. Press and hold the button you want to program on the overhead operating console keypad (approx. 20 seconds) until the indicator light A on the button starts to flash slowly. You now have 5 minutes to teach the button. 2. -
Page 235: Alarm System And Theft Protection
Alarm System and Theft Protection Alarm System and Passenger Compartment Monitoring ……….234 Immobilizer……….237 Steering Column Lock …….. 237 Theft Protection ……… 237 Alarm System and Theft Protection…
-
Page 236: Alarm System And Passenger Compartment Monitoring
The following alarm contacts are Information monitored Compartment Monitoring Any changes or modifications not expressly – Alarm contacts in doors, tailgate, engine approved by Porsche could void the user’s compartment lid and headlights USA: KR55WK50138 authority to operate this equipment. – Passenger compartment monitoring:…
-
Page 237
The emergency flasher flashes slowly once. The indicator light for the alarm system will start to flash after 10 seconds. On vehicles with Porsche Entry & Drive Using the rocker switch The doors are locked but can be opened from… -
Page 238
Alarm system is activated Information – The indicator lights flash quickly while you are If the ignition is switched on after pressing the locking the vehicle, then flash normally. rocker switch, the passenger compartment Alarm system is activated, passenger monitoring system and inclination sensor are compartment monitoring and inclination activated again. -
Page 239: Immobilizer
Close the tailgate. door Lock all doors. open the driver’s door using Porsche Entry & Drive switch on ignition. Locking the steering column automatically Open the driver’s door (with the ignition switched off) or lock the vehicle.
-
Page 240: Maintenance And Car Care
Changing Particle Filter ……. 248 Wiper Blades ……….248 Emission Control System……249 How Emission Control Works ……. 249 Fuel Economy……….250 Operating Your Porsche in other Countries … 251 Fuel …………251 Fuel Can…………. 253 Fuel Recommendations ……. 254 Fuel Evaporation Control ……254 Car Care Instructions ……..
-
Page 241: Exercise Extreme Caution When Working On Your Vehicle
Exercise Extreme Caution when WARNING WARNING Exhaust Gas Inhalation Moving Engine Parts Working on your vehicle Engine exhaust is dangerous if inhaled. Take great care to ensure that hands, fingers, The engine compartment of any motor vehicle is Engine exhaust fumes have many compo-nents articles of clothing (e.g.
-
Page 242
Tiptronic selector lever in position P or N. Only use genuine Porsche spare parts for your vehicle. Please make enquiries before driving Always support your car with safety stands if it vehicle or spare parts of similar quality which abroad. -
Page 243: Engine Oil
Performance test It is important to perform oil changes regularly in Porsche parts or approved parts, or the use of accordance with the intervals specified in your Performance tests on roller-type test stands are accessories not approved by Porsche may Maintenance Schedule.
-
Page 244: Checking Engine Oil Level
Specification 0W = Viscosity specification for If you suspect an oil leak in the engine have low temperatures (winter). your authorized Porsche dealer check it out Specification 40 = Viscosity specification for immediately. high temperatures.
-
Page 245
We recommend that you have the engine oil WARNING Engine Moving Parts changed at your authorized Porsche dealer. – Oils approved by Porsche can be mixed with Take great care to ensure that hands, fingers, each other. articles of clothing (e. g. ties, sleeves, etc.), –… -
Page 246: Checking Coolant Level And Adding Coolant
Observe the following points: Keep coolant out of children’s reach. Use only antifreeze authorized by Porsche. Also, keep coolant away from your pets. They Check the coolant level regularly. can be attracted to it should there be a spill, or to used coolant left in an open container.
-
Page 247: Brake Fluid
A significant loss of coolant indicates a leak in the cooling system. The cause must be eliminated without delay. Please see your authorized Porsche dealer. Radiator fans The radiators and radiator fans are in the front of the vehicle.
-
Page 248: Washer Fluid
– Suitable for plastic headlight lenses. Stop immediately in a suitable place. We recommend window cleaner concentrates Do not continue driving. approved by Porsche. Your authorized Porsche Please have the fault remedied at your nearest dealer will be pleased to advise you. authorized Porsche dealer.
-
Page 249: Power Steering
1. Open cap on washer fluid reservoir. Observe the following points: 2. Add washer fluid. Only use genuine Porsche hydraulic fluid or 3. Close cap carefully. hydraulic fluid of similar quality that has been approved according to Porsche specifications and production requirements.
-
Page 250: Changing Air Cleaner
Check whether the wiper blades are seated securely. Please read the separate instructions provided by the wiper blade manufacturer. We recommend that you get your authorized Porsche dealer to replace the wiper blades. Maintenance and Car Care…
-
Page 251: Emission Control System
These hydrocarbons (HC), when Your Porsche is equipped with such a system. after the vehicle is turned off. Flammable material released into the air, contribute to undesirable Porsche warrants the Emission Control System in pollution.
-
Page 252: Fuel Economy
Fuel Economy Catalytic converters The EPA estimated miles per gallon (mpg) is to be used for comparison purposes, actual The catalytic converters are efficient “clean-up” Fuel economy will vary depending on where, mileage may be different from the estimated devices built into the exhaust system of the when and how you drive, optional equipment mpg, depending on your driving speed, vehicle.
-
Page 253: Operating Your Porsche In Other Countries
98 RON/88 MON is used. Fire, open flame and smoking are prohibited If you plan to take your Porsche outside the If unleaded fuels with octane ratings of less than when handling fuel.
-
Page 254
4. Add the fuel additive recommended by gasoline fumes present when you get back out of 2. Open the filler flap by pressing on the rear Porsche if necessary. the vehicle and touch the fuel nozzle. part of the filler flap (arrow). -
Page 255: Fuel Can
Fuel Can 6. Operate the pump nozzle and refuel the vehicle. Transporting Filled Fuel Do not add further fuel once the correctly DANGER Containers operated automatic pump nozzle has switched off. Fuel could spray back or could flow over If the fuel can is damaged in an accident and fuel when heated.
-
Page 256: Fuel Recommendations
2, that is written as: vehicle. When the fuel tank is filled, vapors are collected in Porsche also recognizes that these fuels may not RON+MON the evaporation chamber by a vent line leading the always be available. Be assured that your vehicle…
-
Page 257: Car Care Instructions
Only use spot removing fluids in a well – Rearview camera. vented area. A Porsche that is well-cared for can look like new Always read the operating instructions Do not clean the underside of chassis, for years. It all depends on the amount of care the provided by the equipment manufacturer.
-
Page 258
– Wheels (the wider the rim and the lower the tire lighter colors. height, the greater the risk of damage). Do not wash your Porsche in direct sunlight or Please consult the operator before using when its body is hot. -
Page 259
Always observe a minimum distance of 21 in. General Notes or stone damage) repaired immediately by (50 cm). your authorized Porsche dealer before Never rub a dusty vehicle with a dry cloth, Always cover the lid of the brake fluid reservoir corrosion begins. -
Page 260
Clean the wiper blades with window cleaner at Your authorized Porsche dealer is familiar with the the winter to prevent salt from causing any lasting regular intervals, especially after washing the bodyseal treatment procedures and has the damage. -
Page 261
Stainless steel tailpipes can discolor due to We recommend Porsche cleaner for alloy rims. soiling, strong heat and combustion residues. If possible, wash the wheels every two weeks Clean all types of leather regularly to remove with a sponge or washing brush. -
Page 262
If you wish to keep your Porsche off the road for the instrument panel, front seats, roof pillars, a lengthy period, we recommend that you contact… -
Page 263: Minor Repairs
Minor Repairs Exercise Extreme Caution when Working on your vehicle……….. 262 Warning triangle ……… 263 First aid kit ……….264 Tool kit…………264 Tires and Wheels……..265 Jack…………274 Spacers ………… 274 Wheel Bolts ……….275 Changing Wheels……..275 Fixing a Flat Tire……… 276 Inflating Tires ……….
-
Page 264: Exercise Extreme Caution When Working On Your Vehicle
Exercise Extreme Caution when WARNING WARNING Exhaust Gas Inhalation Moving Engine Parts Working on your vehicle Engine exhaust is dangerous if inhaled. Take great care to ensure that hands, fingers, The engine compartment of any motor vehicle is Engine exhaust fumes have many compo-nents articles of clothing (e.g.
-
Page 265: Warning Triangle
Withdraw ignition keys (switch ignition off in vehicles that have Porsche Entry & Drive). Minor Repairs…
-
Page 266: First Aid Kit
Please see the chapter “USING TIRE SEALANT” full-size spare wheel as standard. Your authorized Porsche dealer will be pleased to advise you. on page 277. Minor Repairs…
-
Page 267: Tires And Wheels
– The use of wheel rims and wheel bolts that do nearest Porsche or tire dealer to have your not meet specifications of the original factory vehicle or tire(s) inspected. installed equipment will affect the safe…
-
Page 268
Treadwear Temperature A, B, C Tire pressures The treadwear grade is a comparative rating The temperature grades are A (the highest), B and DANGER Low Tire Pressure based on the wear rate of the tire when tested C, representing the tire’s resistance to the under controlled conditions on a specific generation of heat and its ability to dissipate heat Driving the vehicle with low tire pressure increases… -
Page 269
Please see the chapter “TIRE PRESSURE FOR When tires are warm, the tire pressure is Overloading COLD TIRES 68 °F (20 °C)” on page 310. increased. DANGER Overloading Tires Never let air out of hot tires. This could cause Each tire, including the spare (if provided), should the tire pressure to fall below the prescribed Overloading can lead to dangerous vehicle be checked monthly when cold and inflated to the… -
Page 270
Tire wear The original equipment tires on your Porsche have built-in tire wear indicators. They are molded into the bottom of the tread grooves and will appear as approximately 1/2 in. -
Page 271
CLEANING EQUIPMENT, STEAM CLEANERS” Porsche. wheel alignment. It can be the result of individual on page 255. If you do not use a Porsche recommended driving habits such as cornering at high speeds. If replacement tire, make sure that you DANGER… -
Page 272
TPM. The fitting and replacement specifications affect car handling and tire life. Check this with your authorized Porsche must be observed for metal valves. Only the specified weights may be used for wheel dealer. -
Page 273
Do not exceed the snow tire speed rating. Use Porsche approved snow tires for grip on snow Example: FR (front right), FL, RR and RL. and ice. Always fit the wheels in accordance with the… -
Page 274
Risk of damage to body, axle or brake components. Use only the fine-link snow chains recommended and authorized by Porsche so that sufficient clearance between the wheel well and the chain is assured. Please see the chapter “WHEELS, TIRES” on page 309. -
Page 275
C – Tire ply composition and material Speed code letters The number of layers in the tread and sidewalls The speed code letter Y indicates the maximum and their material composition. permitted speed for the tire. This code letter is shown on the tire sidewall. D –… -
Page 276: Jack
Use the spacers only together with wheels For information on wheel changing: loadspace floor at the left. approved by Porsche. Please see the chapter “CHANGING WHEELS” Please see the chapter “TOOL KIT” on Before having spacers fitted, find out about the on page 275.
-
Page 277: Wheel Bolts
Changing Wheels Replace damaged wheel bolts. sink into the ground. Only use genuine Porsche wheel bolts Set the electric parking brake and block the assigned especially to this model or wheel DANGER…
-
Page 278: Fixing A Flat Tire
5. Straighten the front wheels. Sequence of operation 6. Remove the ignition key, or the control unit on A — Wedges vehicles with Porsche Entry & Drive, in order to WARNING Working Under Vehicle lock the steering and prevent the engine from…
-
Page 279
Using tire sealant Tire Sealant WARNING The tire sealant can be used to seal small cuts, Flammability especially in the tire tread. The sealant is highly flammable and harmful to Sealing the tire with the tire sealant is only an health. -
Page 280
150 kPa is indicated, correct the pressure to B — Filler hose the prescribed value. C — Filler hose plug D — Valve turner 16.Please consult your authorized Porsche E — Valve insert dealer. F — Tire valve Also follow the separate operating instructions Filling in sealant for the tire sealing compound. -
Page 281
Raising vehicle with the jack Information WARNING Jacking Hazards The jacking point for the jack on the vehicle must If the vehicle is not secured, or incorrectly be free of dirt. secured, during a wheel change, it could move 1. Slightly loosen the wheel bolts on the wheel to unexpectedly or fall from the car jack. -
Page 282
Changing a wheel Screw in one assembly aid on vehicles without PCCB Screw in two assembly aids on vehicles with PCCB 2. Screw in assembly aids instead of wheel bolts. 3. Remove the remaining wheel bolts. 1. Remove 1 or 2 wheel bolts (see corresponding figure). -
Page 283
10.Immediately after changing a wheel, use Changing a wheel and removing 0.67 in. a torque wrench to check the prescribed (17 mm) spacers tightening torque of the wheel bolts Collapsible Spare WARNING (118 ftlb. (160 Nm)). Spacer Removal Always remove 0.67 in. (17 mm) spacers Information before fitting the collapsible spare wheel On vehicles with Tire Pressure Monitoring,… -
Page 284
8. Inflate the tire if necessary. Information on tire pressure can be found under “Technical data” in this Owner’s Manual: Please see the chapter “TIRE PRESSURE FOR COLD TIRES 68 °F (20 °C)” on page 310. 9. Lower the vehicle and remove the jack. 10.Tighten wheel bolts in diagonally opposite sequence. -
Page 285
(webs in the tire Tightening torque: 118 ftlb. (160 Nm) grooves, 1/16 in. (1.6 mm) high). Place plastic covers on the steel nuts. Never deactivate the Porsche Stability Management (PSM) system. Avoid hard acceleration and high cornering Information speeds. -
Page 286
– The collapsible spare wheel must be repaired only by the manufacturer. If there is a fault on the collapsible spare wheel: Please consult your authorized Porsche dealer. Spare wheel WARNING Full-Size Spare Hazards The wheel size, tire size and tire quality of the spare wheel and normal wheel can differ. -
Page 287: Inflating Tires
Inflating Tires CAUTION Inflating Tires The compressor with pressure gauge is located The compressor’s filler hose can become hot under the loadspace floor at the right in the during the inflation process. luggage compartment. Wear gloves. Please read the operating instructions on the 4.
-
Page 288: Electrical System
Electrical System 4. Replace only with fuses of the same rating. Information We recommend that you use genuine Porsche In order to avoid damage and faults in electrical or fuses for replacement. – The maximum electrical load of a socket is…
-
Page 289
Opening fuse-box lid in engine compartment 2. Turn twist-locks of the fuse-box lid 90° Fuse box on left side of dashboard anti-clockwise with a screwdriver and remove 1. Remove cover. Opening fuse box cover at the left and right the lid. of the dashboard 1. -
Page 290
Fuse box on left side of dashboard No. Designation Hybrid engine: Single Power Pack No. Designation (hydraulic pump), steering Seat memory control unit, Hybrid engine: Air-conditioning seat adjustment switch for left seat compressor Parking heater control unit Central locking control unit/power Relay for two-tone horn windows, rear left door Front wiper motor… -
Page 291
Fuse box in right side of dashboard Fuse and relay carriers in engine No. Designation compartment Cigarette lighter, storage tray socket, No. Designation socket under glove box No. Fuse carrier A PDCC control unit Rear sockets, PASM control unit V6/V8: Starter relay socket in luggage compartment Rear differential lock control unit V6/V8 engine: SLP relay… -
Page 292: Battery
Before touching the battery, discharge any static electricity by touching the vehicle. The battery is located in the battery box under the left front seat. Have the battery removed and installed only by your authorized Porsche dealer. Minor Repairs…
-
Page 293
The battery must be charged, i.e. connected the vehicle or winter begins. to a charger, approximately every 6 weeks switch off the ignition on vehicles with Porsche in order to preserve battery function. Entry & Drive. Information Store a battery that has been removed in Avoid using the Porsche Communication a dark, cool place that is not exposed to frost. -
Page 294: External Power Supply, Emergency Starting With Jumper Cables
86. To do this, turn the ignition key or the control The flat battery must be connected correctly to unit (on vehicles with Porsche Entry & Drive) to the vehicle’s electrical system. ignition lock position 2 twice. Please see the chapter “BATTERY” on 2.
-
Page 295
We recommend that the battery voltage be tested by Battery Charging and DANGER your authorized Porsche dealer who has the Jumping Hazards appropriate equipment. Improper use of booster battery to start a If the car is not driven for prolonged periods, the vehicle may cause an explosion. -
Page 296: Changing The Remote Control Battery
Replacing Bulbs Your authorized Porsche dealer will be pleased to advise you about a suitable charger. Headlight High Voltage Always observe the instructions provided by WARNING Hazard the charger manufacturer. When charging the battery, ensure adequate The headlights are under high voltage when ventilation.
-
Page 297
6. Press back the release tab of the connector key, or pull out the control unit on vehicles with and pull off connector. Porsche Entry & Drive. 7. Pull headlight out completely. 2. Open the engine compartment lid. 3. Take a socket wrench out of the tool kit. -
Page 298
Halogen headlights Installing headlights 2. Press the headlight to the rear and simultaneously turn the socket wrench in 1. Insert headlight into the guide rails, attach the Changing bulb (H7) for low beam/high beam direction of arrow. connector and then slide the headlight fully into headlight You should feel and hear the headlight locking the fender. -
Page 299
Changing bulb for static cornering light 3. Turn the bulb socket counter-clockwise and 4. Remove defective bulb and replace it. remove it. (H11) 5. Insert bulb socket and turn in clockwise 1. Remove the headlight. direction. Please see the chapter “REMOVING Make sure that the bulb is installed in the HEADLIGHTS”… -
Page 300
Changing bulb (H7) for auxiliary 3. Turn the bulb socket counter-clockwise and 4. Pull both release tabs on the connector apart, remove it. and pull connector out of bulb socket. high-beam headlight 5. Replace defective bulb. 1. Remove the headlight. Make sure that the bulb is installed in the Please see the chapter “REMOVING correct position. -
Page 301
Side marker light 3. Turn the bulb socket counter-clockwise and 4. Remove defective bulb and replace it. remove it. Changing bulb (W5W) 5. Insert bulb socket and turn in clockwise direction. 1. Remove screws in the wheel housing trim Make sure that the bulb is installed in the using a Torx screwdriver. -
Page 302
Replacement of the long-life bulbs involves a greater amount of installation work. Have defective light-emitting diodes and long- life bulbs replaced at your authorized Porsche dealer. License plate lights 4. Pull the bulb socket straight out. -
Page 303: Headlight Adjustment
Headlight Adjustment Adjustment Distance The adjustment is made with the vehicle ready to Visual aim shall be performed at not less than Check tire pressure and adjust if necessary. drive and the fuel tank completely filled. 24.6 ft. (7.5 m) (this value is a rounded down Please see the chapter “TIRE PRESSURE FOR conversion from the 25-foot distance typical of The driver’s seat must be loaded by a person or a…
-
Page 304: Towing
Exercise extreme care when your vehicle is Flat bed towing is the preferred type of towing to being towed. be used on Porsche vehicles. Under certain When the engine is not running, adequate circumstances, wheel lifts may be used when lubrication of the transmission is not guaranteed.
-
Page 305
If towing distances are greater, the vehicle must be transported with a car transporter or Porsche cannot be held responsible for damage must be transported with a car transporter or on a trailer. -
Page 306
Towing hook Removing the towing hook Pulling vehicle onto flat bed 1. Unscrew the towing hook A. 1. Position wooden ramps at the base of the flat The towing hook is stored with the tool kit under 2. Insert plastic cover at the lower edge of the bed to reduce the angle of the pull. -
Page 307
5. Secure straps to front of flat bed. 6. Release tension on hoist cable, but do not disconnect. Use hoist cable as safety cable. Transporting the vehicle on car trains, ferries and car transporters Tie the vehicle down only at its wheels. Deactivate passenger compartment monitoring system and the inclination sensor. -
Page 308: Tire Pressure And Technical Data
Tire Pressure and Technical Data Vehicle Identification Data……307 Engine Data……….308 Wheels, Tires……….309 Tire Pressure for Cold Tires 68 °F (20 °C) ..310 Weights…………312 Filling Capacities………313 Driving Performance ……..314 Dimensions ……….314 Tire Pressure and Technical Data…
-
Page 309: Vehicle Identification Data
Vehicle Identification Data the left. The safety compliance sticker is your assurance When ordering spare parts or making inquiries, that your new Porsche complies with all applicable always quote the vehicle identification number. Federal Motor Vehicle Safety Standards which Vehicle data bank…
-
Page 310: Engine Data
Engine Data Cayenne Cayenne S Cayenne Turbo Type 6-cylinder V-engine 8-cylinder V-engine 8-cylinder V-engine Number of cylinders Displacement 219.5 cu. in. (3598 cm 293.3 cu. in. (4806 cm 293.3 cu. in. (4806 cm Max. engine output 300 hp (220 kW) 400 hp (294 kW) 500 hp (368 kW) as per 80/1269/EEC…
-
Page 311: Wheels, Tires
Wheels, Tires Approval of tire and wheel sizes is granted based on extensive testing. Your authorized Porsche dealer will be pleased to advise you about the current approval status. By fitting tires that have been approved by Porsche, you can be sure that you have the best possible tires for your Porsche.
-
Page 312: Tire Pressure For Cold Tires 68 °F (20 °C)
Tire Pressure for Cold Tires 68 °F (20 °C) These tire pressures apply only to the tire makes and types approved by Porsche. Standard tire pressure Cayenne, Cayenne S Cayenne Turbo Part load Full load Part load Full load 37 psi /…
-
Page 313
Comfort tire pressure for summer, snow and all-season tires up to 100 mph (160 km/h) The comfort tire pressure speed threshold permitted for your vehicle depends on the national type standardisation and is displayed under “Comfort pressure” in the “Tire pressure” menu on the multi-purpose display on the on-board computer. Comfort tire pressure is only available on vehicles with Tire Pressure Monitoring (TPM). -
Page 314: Weights
Note: If additional accessories are installed, the maximum load will be correspondingly less. Only use roof transport systems from the Porsche Tequipment product range for your car or roof transport systems that have been tested and approved by Porsche. Tire Pressure and Technical Data…
-
Page 315: Filling Capacities
Filling Capacities Only use fluids and fuels approved by Porsche. Your authorized Porsche dealer will be pleased to advise you. Cayenne Cayenne S Cayenne Turbo Engine oil change quantity with oil filter approx. 7.29 quarts (6.9 liters) approx. 9.51 quarts (9.0 liters) approx.
-
Page 316: Driving Performance
Driving Performance The specifications refer to a vehicle with DIN curb weight without performance-reducing additional equipment (e.g. special tires). Cayenne Cayenne Cayenne S Cayenne Turbo manual transmission Tiptronic S Tiptronic S Tiptronic S 160 mph (258 km/h) 173 mph (278 km/h) Top track speed 143 mph (230 km/h) 143 mph (230 km/h)
-
Page 317
Cayenne, Cayenne S Cayenne Turbo Height at DIN empty weight, steel suspension Height at DIN empty weight 67.13 in. (1705 mm) Height at DIN empty weight (roof rails) 67.87 in. (1724 mm) Height at DIN empty weight 71.65 in. (1820 mm) (basic roof transport system carrier) Height at DIN curb weight with tailgate open 86.26 in. -
Page 318: Index
Operating principle ……….. 161 Information on air-conditioning compressor ..69 Armrest Operating states ……….163 Parking heater ………..77 Opening rear storage compartment ….217 Porsche Active Safe ……… 168 Rear control panel ……….71 Ashtray Radar sensor ……….. 160 Setting air distribution………73 Front ……………217 Setting the desired distance……
-
Page 319
Procedure after connection …….292 Low beam …………92 Changing bulb for number plate light ….300 Replacing…………291 Porsche Dynamic Lighting System (PDLS) …. 91 Vehicle electrical system voltage indication..107 Static cornering light ………. 93 Winter driving………..291 Switching on …………91 Before driving off ………….3… -
Page 320
Locking vehicle door with car key (remote control) 23 Cockpit Engaging rear differential lock ……185 Locking vehicle door with Porsche Entry & Drive .. 23 Adjusting lighting ……….93 Dimensions …………..314 Opening and locking vehicle door from inside ..29 Engine oil temperature gauge……105… -
Page 321
Entry & Drive Switching child lock for rear doors on/off …. 30 Dynamic cornering light……….93 Locking vehicle door with Porsche Entry & Drive .. 23 Unlocking with car key (remote control)….22 Switching off interior surveillance with Porsche Unlocking with Porsche Entry & Drive (keyless)..22 Entry &… -
Page 322
HomeLink (garage door opener) Interior surveillance …………. 236 Programming signal (changeable code system) .. 231 Deleting programmed signals……230 Switching off with button in door handle (Porsche Entry & Drive)……….235 Programming signal (fixed code system)…. 230 Functional description……..229 Switching off with car key……… 235 Gear display for Tiptronic S ………. -
Page 323
Vehicle door with car key (remote control) ..21, 23 Tiptronic selector lever emergency operation..184 Headlight flasher ……….94 Vehicle door with Porsche Entry & Drive (keyless) .23 When opening and locking ……..32 Switching on Welcome Home function….93… -
Page 324
Locking vehicle door with car key (remote control) 23 Engaging center differential lock……185 Air-conditioning system……..68 Locking vehicle door with Porsche Entry & Drive .. 23 Engaging rear differential lock ……185 Motion sensor (interior surveillance) Opening and locking vehicle door from inside ..29 Rules for off-road driving……..199… -
Page 325
Functional description……… 77 Overview …………188 Protection against towing (inclination sensor) Operation …………77 Selecting chassis setup ……..197 Switching off with Porsche Entry & Drive … 235 Programming……….. 115 Warning message……….197 Switching off with remote control …… 235 Parking/pulling out Porsche Ceramic Composite Brake (PCCB) PSM (Porsche Stability Management) Functional description, ParkAssist ….. -
Page 326
Reversing camera …………228 Spare wheel Switching off…………43 Roll stabilization Collapsible spare wheel in the luggage Switching on …………43 Porsche Dynamic Chassis Control (PDCC)..198 compartment ……….283 Seats…………….37 Roll-up blind …………..61 General information ……… 284 Adjusting seat position……..37 Cleaning function ………. -
Page 327
Data (bar/psi) ……….310 Standstill management Switching off operational readiness Fill info …………121 Functional description……..192 Vehicles with Porsche Entry & Drive …..22 Selecting comfort pressure ……122 Start Stop function …………152 Switching on air-recirculation mode Speed warning ……….122 Starting Air-conditioning system ……..69… -
Page 328
Care instructions ……….257 (remote control) ……….22 Opening/closing……….75 Closing with button in door handle (with Porsche Unlocking vehicle door with Porsche Entry & Drive 22 Vertical coupling load ………..221 Entry & Drive)………… 82 Unlocking vehicle door with Porsche Entry & Drive Voice control ……………179… -
Page 329
Windshield washer system Adding washer fluid ………. 246 Antifreeze …………246 Filling capacity ……….313 Windshield wiper, washer stalk……..99 Rain sensor adjustment ……..100 Switching on rain sensor……..99 Windshield wiper/washer system ……. 100 Windshield, fast wiping ……..100 Windshield, slow wiping ……..
2. Эксплуатация автомобиля
Открывание и закрывание дверей автомобиля снаружи
Примечание:
В зависимости от комплектации Вы можете отпирать и запирать Ваш автомобиль с помощью ключа автомобиля или системы Porsche Entry&Drive.
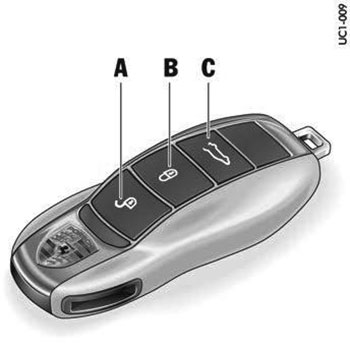
A— Отпирание автомобиля
B— Запирание автомобиля
C— Отпирание крышки багажника и дверей
Примечание:
В этой главе описаны заводские настройки автомобиля.
На многофункциональном дисплее можно изменять настройки, а при наличии сидений с пакетом памяти настроек — сохранять их в памяти соответствующего ключа автомобиля.
Примечание:
В случае отпирания двери водителя аварийным ключом в течение 15 секунд после открывания двери нужно включить зажигание (положение замка зажигания «1»), чтобы не сработала охранная сигнализация. Другие двери автомобиля остаются закрытыми. Если дверь водителя не открывается втечение 30 секунд, то автомобиль автоматически запирается ключом от автомобиля.
Для отпирания и запирания автомобиля используйте кнопки на ключе от автомобиля.
Система Porsche Entry&Drive
Автомобили с системой Porsche Entry&Drive можно отпирать и запирать без помощи ключа автомобиля. При этом необходимо иметь ключ от автомобиля при себе, например в кармане одежды.
Примечание:
Во избежание отрицательного воздействия на работоспособность системы Porsche Entry&Drive не рекомендуется хранить ключ автомобиля вместе с включенными электронными приборами, например мобильным телефоном, ноутбуком, карточкой водителя/дистанционным управлением (система Porsche Vehicle Tracking Plus).

Разблокировка и открывание дверей
Автомобиль вновь автоматически запирается через 30 секунд, если ни одна дверь или крышка багажника после отпирания машины не была открыта. Охранная сигнализация активируется. Контроль пространства салона и датчик крена после автоматического повторного запирания отключены (ограниченная защита от кражи).
Двери можно открыть изнутри, потянув за ручку в салоне.
Примечание:
Обратите внимание людей, оставшихся в салоне, на то, что, если они откроют дверь, сработает сигнализация. При повторном запирании автомобиля система защиты салона и датчик крена снова включаются.
Настройка отпирания дверей
Если при отпирании автомобиля необходимо разблокировать только дверь водителя и крышку багажника или все двери, можно внести соответствующие настройки.
Независимо от настройки можно разблокировать все двери:
Два раза нажмите кнопку 
на ключе автомобиля в течение 5 секунд.
Отпирание с помощью ключа автомобиля
1. Нажмите кнопку  . Световая аварийная сигнализация мигнет один раз. Двери разблокированы.
2. Потяните за ручку.
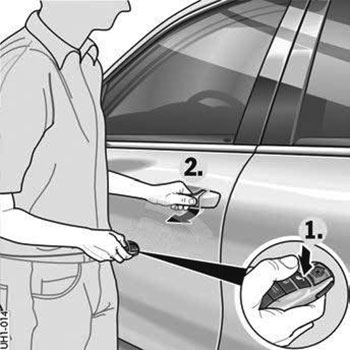
Отпирание с помощью системы Porsche Entry&Drive (без использования ключа)
На стороне, с которой находится ключ автомобиля, можно разблокировать двери.
1. Возьмитесь за ручку. Световая аварийная сигнализация мигнет один раз. Двери разблокированы.
2. Потяните за ручку.
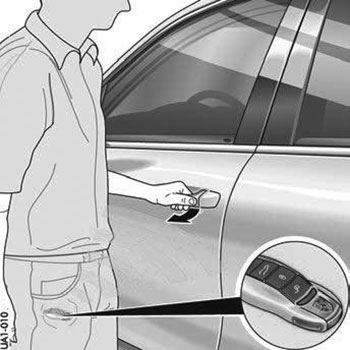
Запирание дверей
Функция «SAFE»
Если автомобиль заперт, функция «SAFE» отключает ручки дверей и кнопку 
центрального замка в салоне, чтобы осложнить тем самым попытки взлома автомобиля.
При запирании автомобиля снаружи в салоне не должно быть людей или животных, поскольку при этом двери и окна невозможно открыть изнутри (функция «SAFE»). Запертые двери усложняют спасателям доступ в салон автомобиля в случае аварии.
Примечание:
Следите за тем, чтобы при запирании автомобиля внутри не находились люди или животные.
Примечание:
•Если водительская дверь была закрыта не полностью, запереть автомобиль невозможно. Световая аварийная сигнализация мигнет лишь после того, как будут закрыты все двери, крышка моторного отсека и крышка багажника.
•При запирании только с закрытой дверью водителя автомобиль предварительно блокируется. Следите за тем, чтобы ключ автомобиля при закрывании остальных открытых дверей или крышки багажника находился не в автомобиле.
Если ключ останется в автомобиле, его можно будет отпереть только с помощью второго ключа.
Запирание с помощью ключа автомобиля
1. Закройте дверь.
2. Нажмите кнопку 
один раз. Световая аварийная сигнализация мигнет два раза. Двери нельзя открыть ни снаружи, ни из салона.
Если в автомобиле остаются люди или животные, нажмите дважды в течение 2 секунд кнопку 
. Световая аварийная сигнализация мигнет один раз. Двери можно открыть изнутри, потянув за ручку двери в салоне.
3. Обратите внимание людей, оставшихся в салоне, на то, что, если они откроют дверь, сработает сигнализация.
Блокировка с помощью системы Porsche Entry&Drive (без использования ключа)
При этом необходимо иметь ключ от автомобиля при себе, например в кармане одежды.
1. Закройте дверь.
2. Нажмите кнопку блокировки (A) в ручке двери. Световая аварийная сигнализация мигнет два раза. Двери нельзя открыть ни снаружи, ни из салона.
Если в автомобиле остаются люди или животные, в течение 2 секунд два раза нажмите кнопку блокировки (A) в ручке двери. Световая аварийная сигнализация мигнет один раз. Двери можно открыть изнутри, потянув за ручку двери в салоне.
3. Обратите внимание людей, оставшихся в салоне, на то, что, если они откроют дверь, сработает сигнализация.
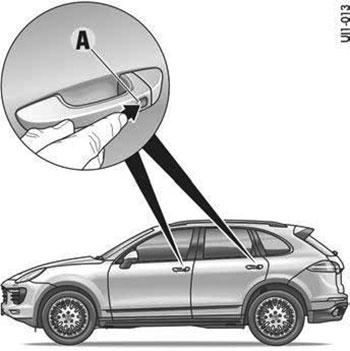
Примечание:
•Если одна дверь или крышка багажника была закрыта не полностью, закрыть автомобиль невозможно.
В салоне раздается предупредительный сигнал и на многофункциональном дисплее появляется предупреждение.
•При запирании дверей ключ автомобиля должен находиться вне автомобиля, в противном случае двери запереть нельзя.
•Если ключ автомобиля находится вне зоны действия, двери после запирания открыть невозможно.
Автоматическая крышка багажника
Примечание:
Крышка багажника имеет электрический привод (Powerlift и доводчик).
Автоматическое открывание и закрывание крышки багажника
При открытой крышке багажника и работающем двигателе ядовитые отработанные газы могут попасть в салон автомобиля.
При работающем двигателе крышка багажника должна быть полностью закрыта. Существует опасность получения травм вследствие неконтролируемого открытия или закрытия автоматической крышки багажника.
Открывайте и закрывайте крышку багажника только на неподвижном автомобиле.
Открывайте и закрывайте крышку багажника только в том случае, если в зоне ее движения не находятся люди, животные или посторонние предметы.
Обязательно следите за открыванием или закрыванием крышки багажника, чтобы в случае опасности можно было сразу же прервать начавшийся процесс.
Опасность повреждений вследствие неконтролируемого открытия или закрытия автоматической крышки багажника.
При открывании или закрывании крышка багажника может удариться о потолок гаража или задеть багаж, выступающий за пределы багажника, а также систему для перевозки багажа на крыше.
За автомобилем и над ним должно быть достаточно свободного места (например, до системы для перевозки багажа на крыше, до потолка гаража).
Багаж не должен выступать за погрузочную кромку багажника.
Автоматическое открывание крышки багажника
Примечание:
Крышка багажника открывается на заданную высоту.
Существует три варианта открывания крышки багажника:
Вариант 1
•Нажмите кнопку (стрелка) разблокировки. При этом автомобиль должен быть разблокирован.
В автомобилях с системой Porsche Entry&Drive автомобиль не должен быть разблокирован. При этом необходимо иметь ключ от автомобиля при себе, например в кармане одежды.
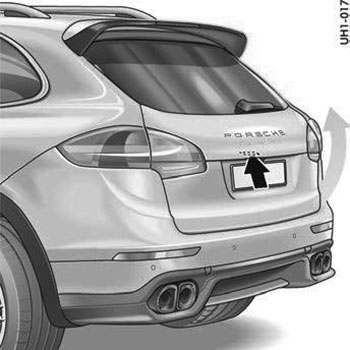
Вариант 2
•При выключенном зажигании нажмите кнопку 
на ключе автомобиля.
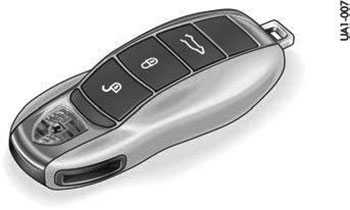
Примечание:
При запертом автомобиле после разблокировки задней крышки в зависимости от настроек на многофункциональном дисплее отпирается дверь водителя или весь автомобиль.
Вариант 3
•Нажмите кнопку 
в двери водителя.
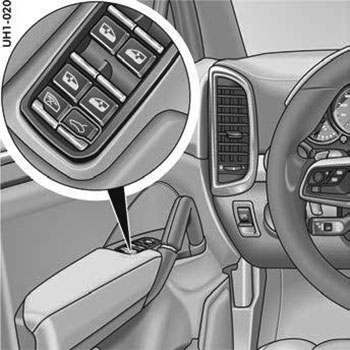
Примечание:
При эксплуатации автомобиля с прицепом или прочими навесными устройствами (например, систем для перевозки велосипедов) с подключенным разъемом прицепа крышку багажника можно открыть только клавишей разблокировки на крышке багажника.
Автоматическое закрывание крышки багажника
После опускания крышки багажника она автоматически запирается.
•Следите за тем, чтобы под крышку не попали пальцы.
•Следите за тем, чтобы в зоне подвижных частей доводчика (поворотные задвижки в замке) не находились посторонние предметы или конечности.
•Не оставляйте детей в автомобиле без присмотра.
Есть два варианта закрывания крышки багажника:
Вариант 1
•При включенном зажигании удерживайте кнопку 
в двери водителя нажатой. Звучит предупредительный сигнал, и крышка багажника закрывается.

Вариант 2
•Нажмите на кнопку (A) в облицовке крышки багажника. Крышка багажника закроется.
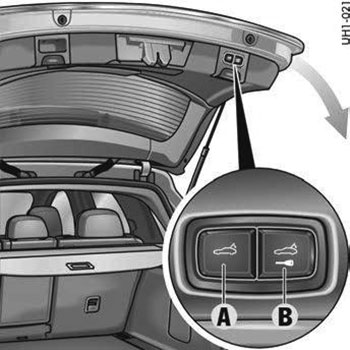
A— Автоматическое закрывание крышки багажника
B— Автоматическое закрывание и запирание крышки багажника с помощью системы Porsche Entry&Drive
Открывание и закрывание крышки моторного отсека
Открывание
Опасность повреждения крышки моторного отсека или стеклоочистителей. Если при открывании крышки моторного отсека рычаги стеклоочистителей будут откинуты вперед, то это может привести к их повреждению или к повреждению крышки моторного отсека.
•Следите за тем, чтобы при открывании крышки моторного отсека стеклоочистители не были откинуты вперед.
•Прежде чем открывать крышку моторного отсека, всегда выключайте стеклоочистители (положение «0»). Если стеклоочистители находятся не в конечном положении, то, как только будет открыт капот, они автоматически встанут в это положение, даже если зажигание выключено.
Стеклоочистители останутся в этом положении до тех пор, пока капот не будет закрыт, а стеклоочистители не будут выключены ивключены снова.
1. Откройте дверь водителя.
2. Потяните рычаг отпирания крышки моторного отсека (стрелка). Крышка моторного отсека отперта.
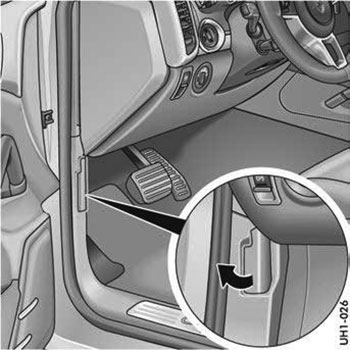
3. Нажмите на ручку разблокировки (стрелка).
4. Полностью откройте крышку моторного отсека.
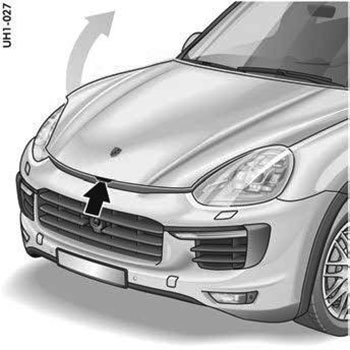
Закрывание
1. Прикройте крышку и с некоторой высоты отпустите ее, дав ей возможность по инерции захлопнуться в замке. При необходимости прижмите крышку ладонью, нажав на нее в месте нахождения замка.
2. Проверьте надежность фиксации крышки в замке, и находится ли рычаг отпирания крышки моторного отсека в исходном положении.
Если крышка моторного отсека закрыта не полностью, то при движении автомобиля на многофункциональном дисплее появится сообщение.
Неполадки при открывании и закрывании
Крышка багажника не отпирается
Если крышка багажника не разблокируется с помощью ключа автомобиля (например, из-за разряженного элемента питания в ключе автомобиля):
1. Отоприте дверь водителя с помощью аварийного ключа и откройте ее.
2. В течение 15 секунд включите зажигание, чтобы охранная сигнализация не сработала.
3. Нажмите кнопку 
в обшивке передней двери или на центральной консоли сзади. Крышка багажника отперта, ее можно открыть с помощью кнопки разблокировки.
Примечание:
В зависимости от экспортного исполнения время до срабатывания системы сигнализации может различаться.
Аварийная разблокировка крышки багажника
Если крышка багажника все равно не открывается (например, из-за разряженного аккумулятора автомобиля), то нужно выполнить аварийную разблокировку:
1. Сложите спинки задних сидений.
2. Влезьте в багажник через откинутые спинки задних сидений.
3. С помощью подходящего инструмента (например, отвертки) снимите облицовку аварийного привода на внутренней стороне обшивки крышки багажника.
4. Для разблокировки крышки багажника подходящим предметом (например, отверткой) нажмите на замок в направлении стрелки. Вы услышите, как разблокируется замок задней крышки.
5. Теперь крышку багажника можно открыть рукой.
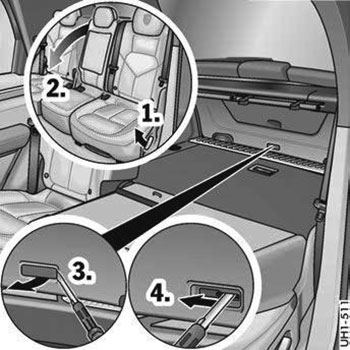
Указания по ключу автомобиля и центральному замку
Ключ от автомобиля
В каждый ключ автомобиля встроен аварийный ключ. Эти ключи автомобиля подходят ко всем его замкам.
•Обращайтесь с ключами от автомобиля аккуратно и отдавайте их в чужие руки только в исключительных случаях.
•Даже если Вы выходите из автомобиля ненадолго, выньте ключ и возьмите его с собой.
•Не оставляйте ключ в автомобиле.
•Проинформируйте страховую компанию об утере или краже ключей от автомобиля, а также о факте заказа дополнительного или запасного ключа.
•При потере или краже ключей автомобиля поручите партнеру Porsche заблокировать код данного ключа в блоке управления автомобиля и при необходимости заменить механические замки.
Примечание:
При определенной комплектации во время запирания в память соответствующего ключа записываются многочисленные варианты настроек автомобиля.
Замена элемента питания в пульте дистанционного управления автомобильного ключа
При слишком малой емкости элемента питания пульта дистанционного управления на многофункциональном дисплее появляется предупреждение «Заменить батарею в ключе зажиг.». В этом случае АКБ следует заменить.
Замена элемента питания (CR 2032, 3В)
1. Извлеките аварийный ключ.
2. С помощью подходящего предмета (например, аварийного ключа) откройте крышку на обратной стороне корпуса ключа.
3. Замените элемент питания (соблюдая полярность).
4. Установите крышку и нажмите на нее.
5. Вставьте аварийный ключ.

Руководство по эксплуатации и техническому обслуживанию автомобиля Porshe Cayenne с 2002 года выпуска.
- Автор: —
- Издательство: Монолит
- Год издания: —
- Страниц: 318
- Формат: —
- Размер: —
Руководство по эксплуатации и техническому обслуживанию автомобиля Porshe Cayenne с 2007 года выпуска.
- Автор: —
- Издательство: Монолит
- Год издания: —
- Страниц: 316
- Формат: —
- Размер: —
Руководство по эксплуатации, техническому обслуживанию и ремонту автомобилей Porshe Cayenne/Cayenne S/Turbo 2002-2007 годов выпуска с бензиновыми двигателями объемом 3,2/4,5 л.
- Автор: —
- Издательство: Легион-Автодата
- Год издания: —
- Страниц: 654
- Формат: —
- Размер: —
Руководство по эксплуатации и ремонту автомобиля Porshe Cayenne с 2002 года выпуска с бензиновыми двигателями объемом 3,2/4,5 л.
- Автор: —
- Издательство: Монолит
- Год издания: —
- Страниц: 420
- Формат: —
- Размер: —
Руководство по эксплуатации и ремонту автомобиля Porshe Cayenne с 2007 года выпуска с бензиновыми двигателями объемом 3,6/4,8 л.
- Автор: —
- Издательство: Монолит
- Год издания: —
- Страниц: 422
- Формат: —
- Размер: —
Руководство по эксплуатации и ремонту автомобиля Porshe Cayenne с 2011 года выпуска с бензиновыми и дизельными двигателями.
- Автор: —
- Издательство: Монолит
- Год издания: —
- Страниц: 454
- Формат: —
- Размер: —
Руководство по эксплуатации и техническому обслуживанию автомобилей Porshe Cayenne/Cayenne S 2004-2007 годов выпуска.
- Автор: —
- Издательство: —
- Год издания: —
- Страниц: 352
- Формат: PDF
- Размер: 123,0 Mb

2. Эксплуатация автомобиля
Открывание и закрывание дверей автомобиля снаружи
Примечание:
В зависимости от комплектации Вы можете отпирать и запирать Ваш автомобиль с помощью ключа автомобиля или системы Porsche Entry&Drive.
A— Отпирание автомобиля
B— Запирание автомобиля
C— Отпирание крышки багажника и дверей
Примечание:
В этой главе описаны заводские настройки автомобиля.
На многофункциональном дисплее можно изменять настройки, а при наличии сидений с пакетом памяти настроек — сохранять их в памяти соответствующего ключа автомобиля.
Примечание:
В случае отпирания двери водителя аварийным ключом в течение 15 секунд после открывания двери нужно включить зажигание (положение замка зажигания «1»), чтобы не сработала охранная сигнализация. Другие двери автомобиля остаются закрытыми. Если дверь водителя не открывается втечение 30 секунд, то автомобиль автоматически запирается ключом от автомобиля.
Для отпирания и запирания автомобиля используйте кнопки на ключе от автомобиля.
Система Porsche Entry&Drive
Автомобили с системой Porsche Entry&Drive можно отпирать и запирать без помощи ключа автомобиля. При этом необходимо иметь ключ от автомобиля при себе, например в кармане одежды.
Примечание:
Во избежание отрицательного воздействия на работоспособность системы Porsche Entry&Drive не рекомендуется хранить ключ автомобиля вместе с включенными электронными приборами, например мобильным телефоном, ноутбуком, карточкой водителя/дистанционным управлением (система Porsche Vehicle Tracking Plus).
Разблокировка и открывание дверей
Автомобиль вновь автоматически запирается через 30 секунд, если ни одна дверь или крышка багажника после отпирания машины не была открыта. Охранная сигнализация активируется. Контроль пространства салона и датчик крена после автоматического повторного запирания отключены (ограниченная защита от кражи).
Двери можно открыть изнутри, потянув за ручку в салоне.
Примечание:
Обратите внимание людей, оставшихся в салоне, на то, что, если они откроют дверь, сработает сигнализация. При повторном запирании автомобиля система защиты салона и датчик крена снова включаются.
Настройка отпирания дверей
Если при отпирании автомобиля необходимо разблокировать только дверь водителя и крышку багажника или все двери, можно внести соответствующие настройки.
Независимо от настройки можно разблокировать все двери:
Два раза нажмите кнопку
на ключе автомобиля в течение 5 секунд.
Отпирание с помощью ключа автомобиля
1. Нажмите кнопку . Световая аварийная сигнализация мигнет один раз. Двери разблокированы.
2. Потяните за ручку.
Отпирание с помощью системы Porsche Entry&Drive (без использования ключа)
На стороне, с которой находится ключ автомобиля, можно разблокировать двери.
1. Возьмитесь за ручку. Световая аварийная сигнализация мигнет один раз. Двери разблокированы.
2. Потяните за ручку.
Запирание дверей
Функция «SAFE»
Если автомобиль заперт, функция «SAFE» отключает ручки дверей и кнопку
центрального замка в салоне, чтобы осложнить тем самым попытки взлома автомобиля.
При запирании автомобиля снаружи в салоне не должно быть людей или животных, поскольку при этом двери и окна невозможно открыть изнутри (функция «SAFE»). Запертые двери усложняют спасателям доступ в салон автомобиля в случае аварии.
Примечание:
Следите за тем, чтобы при запирании автомобиля внутри не находились люди или животные.
Примечание:
•Если водительская дверь была закрыта не полностью, запереть автомобиль невозможно. Световая аварийная сигнализация мигнет лишь после того, как будут закрыты все двери, крышка моторного отсека и крышка багажника.
•При запирании только с закрытой дверью водителя автомобиль предварительно блокируется. Следите за тем, чтобы ключ автомобиля при закрывании остальных открытых дверей или крышки багажника находился не в автомобиле.
Если ключ останется в автомобиле, его можно будет отпереть только с помощью второго ключа.
Запирание с помощью ключа автомобиля
1. Закройте дверь.
2. Нажмите кнопку
один раз. Световая аварийная сигнализация мигнет два раза. Двери нельзя открыть ни снаружи, ни из салона.
Если в автомобиле остаются люди или животные, нажмите дважды в течение 2 секунд кнопку
. Световая аварийная сигнализация мигнет один раз. Двери можно открыть изнутри, потянув за ручку двери в салоне.
3. Обратите внимание людей, оставшихся в салоне, на то, что, если они откроют дверь, сработает сигнализация.
Блокировка с помощью системы Porsche Entry&Drive (без использования ключа)
При этом необходимо иметь ключ от автомобиля при себе, например в кармане одежды.
1. Закройте дверь.
2. Нажмите кнопку блокировки (A) в ручке двери. Световая аварийная сигнализация мигнет два раза. Двери нельзя открыть ни снаружи, ни из салона.
Если в автомобиле остаются люди или животные, в течение 2 секунд два раза нажмите кнопку блокировки (A) в ручке двери. Световая аварийная сигнализация мигнет один раз. Двери можно открыть изнутри, потянув за ручку двери в салоне.
3. Обратите внимание людей, оставшихся в салоне, на то, что, если они откроют дверь, сработает сигнализация.
Примечание:
•Если одна дверь или крышка багажника была закрыта не полностью, закрыть автомобиль невозможно.
В салоне раздается предупредительный сигнал и на многофункциональном дисплее появляется предупреждение.
•При запирании дверей ключ автомобиля должен находиться вне автомобиля, в противном случае двери запереть нельзя.
•Если ключ автомобиля находится вне зоны действия, двери после запирания открыть невозможно.
Автоматическая крышка багажника
Примечание:
Крышка багажника имеет электрический привод (Powerlift и доводчик).
Автоматическое открывание и закрывание крышки багажника
При открытой крышке багажника и работающем двигателе ядовитые отработанные газы могут попасть в салон автомобиля.
При работающем двигателе крышка багажника должна быть полностью закрыта. Существует опасность получения травм вследствие неконтролируемого открытия или закрытия автоматической крышки багажника.
Открывайте и закрывайте крышку багажника только на неподвижном автомобиле.
Открывайте и закрывайте крышку багажника только в том случае, если в зоне ее движения не находятся люди, животные или посторонние предметы.
Обязательно следите за открыванием или закрыванием крышки багажника, чтобы в случае опасности можно было сразу же прервать начавшийся процесс.
Опасность повреждений вследствие неконтролируемого открытия или закрытия автоматической крышки багажника.
При открывании или закрывании крышка багажника может удариться о потолок гаража или задеть багаж, выступающий за пределы багажника, а также систему для перевозки багажа на крыше.
За автомобилем и над ним должно быть достаточно свободного места (например, до системы для перевозки багажа на крыше, до потолка гаража).
Багаж не должен выступать за погрузочную кромку багажника.
Автоматическое открывание крышки багажника
Примечание:
Крышка багажника открывается на заданную высоту.
Существует три варианта открывания крышки багажника:
Вариант 1
•Нажмите кнопку (стрелка) разблокировки. При этом автомобиль должен быть разблокирован.
В автомобилях с системой Porsche Entry&Drive автомобиль не должен быть разблокирован. При этом необходимо иметь ключ от автомобиля при себе, например в кармане одежды.
Вариант 2
•При выключенном зажигании нажмите кнопку
на ключе автомобиля.
Примечание:
При запертом автомобиле после разблокировки задней крышки в зависимости от настроек на многофункциональном дисплее отпирается дверь водителя или весь автомобиль.
Вариант 3
•Нажмите кнопку
в двери водителя.
Примечание:
При эксплуатации автомобиля с прицепом или прочими навесными устройствами (например, систем для перевозки велосипедов) с подключенным разъемом прицепа крышку багажника можно открыть только клавишей разблокировки на крышке багажника.
Автоматическое закрывание крышки багажника
После опускания крышки багажника она автоматически запирается.
•Следите за тем, чтобы под крышку не попали пальцы.
•Следите за тем, чтобы в зоне подвижных частей доводчика (поворотные задвижки в замке) не находились посторонние предметы или конечности.
•Не оставляйте детей в автомобиле без присмотра.
Есть два варианта закрывания крышки багажника:
Вариант 1
•При включенном зажигании удерживайте кнопку
в двери водителя нажатой. Звучит предупредительный сигнал, и крышка багажника закрывается.
Вариант 2
•Нажмите на кнопку (A) в облицовке крышки багажника. Крышка багажника закроется.
A— Автоматическое закрывание крышки багажника
B— Автоматическое закрывание и запирание крышки багажника с помощью системы Porsche Entry&Drive
Открывание и закрывание крышки моторного отсека
Открывание
Опасность повреждения крышки моторного отсека или стеклоочистителей. Если при открывании крышки моторного отсека рычаги стеклоочистителей будут откинуты вперед, то это может привести к их повреждению или к повреждению крышки моторного отсека.
•Следите за тем, чтобы при открывании крышки моторного отсека стеклоочистители не были откинуты вперед.
•Прежде чем открывать крышку моторного отсека, всегда выключайте стеклоочистители (положение «0»). Если стеклоочистители находятся не в конечном положении, то, как только будет открыт капот, они автоматически встанут в это положение, даже если зажигание выключено.
Стеклоочистители останутся в этом положении до тех пор, пока капот не будет закрыт, а стеклоочистители не будут выключены ивключены снова.
1. Откройте дверь водителя.
2. Потяните рычаг отпирания крышки моторного отсека (стрелка). Крышка моторного отсека отперта.
3. Нажмите на ручку разблокировки (стрелка).
4. Полностью откройте крышку моторного отсека.
Закрывание
1. Прикройте крышку и с некоторой высоты отпустите ее, дав ей возможность по инерции захлопнуться в замке. При необходимости прижмите крышку ладонью, нажав на нее в месте нахождения замка.
2. Проверьте надежность фиксации крышки в замке, и находится ли рычаг отпирания крышки моторного отсека в исходном положении.
Если крышка моторного отсека закрыта не полностью, то при движении автомобиля на многофункциональном дисплее появится сообщение.
Неполадки при открывании и закрывании
Крышка багажника не отпирается
Если крышка багажника не разблокируется с помощью ключа автомобиля (например, из-за разряженного элемента питания в ключе автомобиля):
1. Отоприте дверь водителя с помощью аварийного ключа и откройте ее.
2. В течение 15 секунд включите зажигание, чтобы охранная сигнализация не сработала.
3. Нажмите кнопку
в обшивке передней двери или на центральной консоли сзади. Крышка багажника отперта, ее можно открыть с помощью кнопки разблокировки.
Примечание:
В зависимости от экспортного исполнения время до срабатывания системы сигнализации может различаться.
Аварийная разблокировка крышки багажника
Если крышка багажника все равно не открывается (например, из-за разряженного аккумулятора автомобиля), то нужно выполнить аварийную разблокировку:
1. Сложите спинки задних сидений.
2. Влезьте в багажник через откинутые спинки задних сидений.
3. С помощью подходящего инструмента (например, отвертки) снимите облицовку аварийного привода на внутренней стороне обшивки крышки багажника.
4. Для разблокировки крышки багажника подходящим предметом (например, отверткой) нажмите на замок в направлении стрелки. Вы услышите, как разблокируется замок задней крышки.
5. Теперь крышку багажника можно открыть рукой.
Указания по ключу автомобиля и центральному замку
Ключ от автомобиля
В каждый ключ автомобиля встроен аварийный ключ. Эти ключи автомобиля подходят ко всем его замкам.
•Обращайтесь с ключами от автомобиля аккуратно и отдавайте их в чужие руки только в исключительных случаях.
•Даже если Вы выходите из автомобиля ненадолго, выньте ключ и возьмите его с собой.
•Не оставляйте ключ в автомобиле.
•Проинформируйте страховую компанию об утере или краже ключей от автомобиля, а также о факте заказа дополнительного или запасного ключа.
•При потере или краже ключей автомобиля поручите партнеру Porsche заблокировать код данного ключа в блоке управления автомобиля и при необходимости заменить механические замки.
Примечание:
При определенной комплектации во время запирания в память соответствующего ключа записываются многочисленные варианты настроек автомобиля.
Замена элемента питания в пульте дистанционного управления автомобильного ключа
При слишком малой емкости элемента питания пульта дистанционного управления на многофункциональном дисплее появляется предупреждение «Заменить батарею в ключе зажиг.». В этом случае АКБ следует заменить.
Замена элемента питания (CR 2032, 3В)
1. Извлеките аварийный ключ.
2. С помощью подходящего предмета (например, аварийного ключа) откройте крышку на обратной стороне корпуса ключа.
3. Замените элемент питания (соблюдая полярность).
4. Установите крышку и нажмите на нее.
5. Вставьте аварийный ключ.

|
|
#1 |
|
Регистрация: 06.02.2007 Сообщений: 5,084 Адрес: Москва
Сказал(а) спасибо: 57 Поблагодарили 427 раз(а) в 134 сообщениях
|
Пока в таком виде. По порядку только первые 3 страницы, потом идут сначала нечетные, потом четные. На первых страницах есть содержание, так что найти нужную страницу не составит особого труда.
__________________ |

|
|


|
|
#2 |
|
Новичок Регистрация: 07.11.2011 Сообщений: 8 Адрес: Днепропетровск Сказал(а) спасибо: 0 Поблагодарили 3 раз(а) в 3 сообщениях
|
Как сюда залить инструкцию? Я переделал твою, теперь она по порядку страницами. Правда в ней ты не делал 5,7,9 страницы — на них обзорные иллюстрации. |
|
|
|
|
Пользователь сказал cпасибо: |
|
 G_A
G_A|
|
#3 |
||||||
|
Регистрация: 06.02.2007 Сообщений: 5,084 Адрес: Москва
Сказал(а) спасибо: 57 Поблагодарили 427 раз(а) в 134 сообщениях
|
Сюда не получится, т.к. файл слишком большой. Добавлено через 1 минут(ы) 40 секунд(ы)
Странно, добавлю после выходных.
__________________ |
||||||
|
|
|

|
|
#4 |
|
Новичок Регистрация: 07.11.2011 Сообщений: 8 Адрес: Днепропетровск Сказал(а) спасибо: 0 Поблагодарили 3 раз(а) в 3 сообщениях
|
Тогда скинешь Мне эти страницы — Я добавлю и залью сразу. |
|
|
|
|
|
#5 |
|
Новичок Регистрация: 07.11.2011 Сообщений: 8 Адрес: Днепропетровск Сказал(а) спасибо: 0 Поблагодарили 3 раз(а) в 3 сообщениях
|
Пока не отправили мне страницы с иллюстрациями. Оставлю пока без них. |
|
|
|
|
Пользователь сказал cпасибо: |
|
|
#6 |
|
Иногда заходит
Регистрация: 17.02.2013 Сообщений: 91 Адрес: Москва Сказал(а) спасибо: 0 Поблагодарили 4 раз(а) в 3 сообщениях
|
А кто-нибудь может выложить парт-номер рус. инструкции? |
|
|
|

|
|
#7 |
|
Новичок
Регистрация: 27.09.2007 Сообщений: 19,641 Адрес: Санкт-Петербург Сказал(а) спасибо: 1,283 Поблагодарили 3,832 раз(а) в 2,919 сообщениях
|
wkd 948 369 13 — новая. |
|
|
|

|
|
#8 |
||||||
|
Новичок Регистрация: 22.03.2013 Сообщений: 1 Адрес: Красноярск Сказал(а) спасибо: 0 Поблагодарили 0 раз(а) в 0 сообщениях
|
Здравствуйте, можно поподробнее о вышенаписанном? или прямую ссылку на новый мануал ? |
||||||
|
|
|
|
|
#9 |
|
Новичок
Регистрация: 27.09.2007 Сообщений: 19,641 Адрес: Санкт-Петербург Сказал(а) спасибо: 1,283 Поблагодарили 3,832 раз(а) в 2,919 сообщениях
|
А что я могу сказать? |
|
|
|
|
|
#10 |
|
Иногда заходит
Регистрация: 19.11.2013 Сообщений: 73 Адрес: Тверь Сказал(а) спасибо: 2 Поблагодарили 4 раз(а) в 4 сообщениях
|
приветствую !нет ЕЁ случайно? |
|
|
|
2. Эксплуатация автомобиля
Открывание и закрывание дверей автомобиля снаружи
Примечание:
В зависимости от комплектации Вы можете отпирать и запирать Ваш автомобиль с помощью ключа автомобиля или системы Porsche Entry&Drive.
A— Отпирание автомобиля
B— Запирание автомобиля
C— Отпирание крышки багажника и дверей
Примечание:
В этой главе описаны заводские настройки автомобиля.
На многофункциональном дисплее можно изменять настройки, а при наличии сидений с пакетом памяти настроек — сохранять их в памяти соответствующего ключа автомобиля.
Примечание:
В случае отпирания двери водителя аварийным ключом в течение 15 секунд после открывания двери нужно включить зажигание (положение замка зажигания «1»), чтобы не сработала охранная сигнализация. Другие двери автомобиля остаются закрытыми. Если дверь водителя не открывается втечение 30 секунд, то автомобиль автоматически запирается ключом от автомобиля.
Для отпирания и запирания автомобиля используйте кнопки на ключе от автомобиля.
Система Porsche Entry&Drive
Автомобили с системой Porsche Entry&Drive можно отпирать и запирать без помощи ключа автомобиля. При этом необходимо иметь ключ от автомобиля при себе, например в кармане одежды.
Примечание:
Во избежание отрицательного воздействия на работоспособность системы Porsche Entry&Drive не рекомендуется хранить ключ автомобиля вместе с включенными электронными приборами, например мобильным телефоном, ноутбуком, карточкой водителя/дистанционным управлением (система Porsche Vehicle Tracking Plus).
Разблокировка и открывание дверей
Автомобиль вновь автоматически запирается через 30 секунд, если ни одна дверь или крышка багажника после отпирания машины не была открыта. Охранная сигнализация активируется. Контроль пространства салона и датчик крена после автоматического повторного запирания отключены (ограниченная защита от кражи).
Двери можно открыть изнутри, потянув за ручку в салоне.
Примечание:
Обратите внимание людей, оставшихся в салоне, на то, что, если они откроют дверь, сработает сигнализация. При повторном запирании автомобиля система защиты салона и датчик крена снова включаются.
Настройка отпирания дверей
Если при отпирании автомобиля необходимо разблокировать только дверь водителя и крышку багажника или все двери, можно внести соответствующие настройки.
Независимо от настройки можно разблокировать все двери:
Два раза нажмите кнопку
на ключе автомобиля в течение 5 секунд.
Отпирание с помощью ключа автомобиля
1. Нажмите кнопку . Световая аварийная сигнализация мигнет один раз. Двери разблокированы.
2. Потяните за ручку.
Отпирание с помощью системы Porsche Entry&Drive (без использования ключа)
На стороне, с которой находится ключ автомобиля, можно разблокировать двери.
1. Возьмитесь за ручку. Световая аварийная сигнализация мигнет один раз. Двери разблокированы.
2. Потяните за ручку.
Запирание дверей
Функция «SAFE»
Если автомобиль заперт, функция «SAFE» отключает ручки дверей и кнопку
центрального замка в салоне, чтобы осложнить тем самым попытки взлома автомобиля.
При запирании автомобиля снаружи в салоне не должно быть людей или животных, поскольку при этом двери и окна невозможно открыть изнутри (функция «SAFE»). Запертые двери усложняют спасателям доступ в салон автомобиля в случае аварии.
Примечание:
Следите за тем, чтобы при запирании автомобиля внутри не находились люди или животные.
Примечание:
•Если водительская дверь была закрыта не полностью, запереть автомобиль невозможно. Световая аварийная сигнализация мигнет лишь после того, как будут закрыты все двери, крышка моторного отсека и крышка багажника.
•При запирании только с закрытой дверью водителя автомобиль предварительно блокируется. Следите за тем, чтобы ключ автомобиля при закрывании остальных открытых дверей или крышки багажника находился не в автомобиле.
Если ключ останется в автомобиле, его можно будет отпереть только с помощью второго ключа.
Запирание с помощью ключа автомобиля
1. Закройте дверь.
2. Нажмите кнопку
один раз. Световая аварийная сигнализация мигнет два раза. Двери нельзя открыть ни снаружи, ни из салона.
Если в автомобиле остаются люди или животные, нажмите дважды в течение 2 секунд кнопку
. Световая аварийная сигнализация мигнет один раз. Двери можно открыть изнутри, потянув за ручку двери в салоне.
3. Обратите внимание людей, оставшихся в салоне, на то, что, если они откроют дверь, сработает сигнализация.
Блокировка с помощью системы Porsche Entry&Drive (без использования ключа)
При этом необходимо иметь ключ от автомобиля при себе, например в кармане одежды.
1. Закройте дверь.
2. Нажмите кнопку блокировки (A) в ручке двери. Световая аварийная сигнализация мигнет два раза. Двери нельзя открыть ни снаружи, ни из салона.
Если в автомобиле остаются люди или животные, в течение 2 секунд два раза нажмите кнопку блокировки (A) в ручке двери. Световая аварийная сигнализация мигнет один раз. Двери можно открыть изнутри, потянув за ручку двери в салоне.
3. Обратите внимание людей, оставшихся в салоне, на то, что, если они откроют дверь, сработает сигнализация.
Примечание:
•Если одна дверь или крышка багажника была закрыта не полностью, закрыть автомобиль невозможно.
В салоне раздается предупредительный сигнал и на многофункциональном дисплее появляется предупреждение.
•При запирании дверей ключ автомобиля должен находиться вне автомобиля, в противном случае двери запереть нельзя.
•Если ключ автомобиля находится вне зоны действия, двери после запирания открыть невозможно.
Автоматическая крышка багажника
Примечание:
Крышка багажника имеет электрический привод (Powerlift и доводчик).
Автоматическое открывание и закрывание крышки багажника
При открытой крышке багажника и работающем двигателе ядовитые отработанные газы могут попасть в салон автомобиля.
При работающем двигателе крышка багажника должна быть полностью закрыта. Существует опасность получения травм вследствие неконтролируемого открытия или закрытия автоматической крышки багажника.
Открывайте и закрывайте крышку багажника только на неподвижном автомобиле.
Открывайте и закрывайте крышку багажника только в том случае, если в зоне ее движения не находятся люди, животные или посторонние предметы.
Обязательно следите за открыванием или закрыванием крышки багажника, чтобы в случае опасности можно было сразу же прервать начавшийся процесс.
Опасность повреждений вследствие неконтролируемого открытия или закрытия автоматической крышки багажника.
При открывании или закрывании крышка багажника может удариться о потолок гаража или задеть багаж, выступающий за пределы багажника, а также систему для перевозки багажа на крыше.
За автомобилем и над ним должно быть достаточно свободного места (например, до системы для перевозки багажа на крыше, до потолка гаража).
Багаж не должен выступать за погрузочную кромку багажника.
Автоматическое открывание крышки багажника
Примечание:
Крышка багажника открывается на заданную высоту.
Существует три варианта открывания крышки багажника:
Вариант 1
•Нажмите кнопку (стрелка) разблокировки. При этом автомобиль должен быть разблокирован.
В автомобилях с системой Porsche Entry&Drive автомобиль не должен быть разблокирован. При этом необходимо иметь ключ от автомобиля при себе, например в кармане одежды.
Вариант 2
•При выключенном зажигании нажмите кнопку
на ключе автомобиля.
Примечание:
При запертом автомобиле после разблокировки задней крышки в зависимости от настроек на многофункциональном дисплее отпирается дверь водителя или весь автомобиль.
Вариант 3
•Нажмите кнопку
в двери водителя.
Примечание:
При эксплуатации автомобиля с прицепом или прочими навесными устройствами (например, систем для перевозки велосипедов) с подключенным разъемом прицепа крышку багажника можно открыть только клавишей разблокировки на крышке багажника.
Автоматическое закрывание крышки багажника
После опускания крышки багажника она автоматически запирается.
•Следите за тем, чтобы под крышку не попали пальцы.
•Следите за тем, чтобы в зоне подвижных частей доводчика (поворотные задвижки в замке) не находились посторонние предметы или конечности.
•Не оставляйте детей в автомобиле без присмотра.
Есть два варианта закрывания крышки багажника:
Вариант 1
•При включенном зажигании удерживайте кнопку
в двери водителя нажатой. Звучит предупредительный сигнал, и крышка багажника закрывается.
Вариант 2
•Нажмите на кнопку (A) в облицовке крышки багажника. Крышка багажника закроется.
A— Автоматическое закрывание крышки багажника
B— Автоматическое закрывание и запирание крышки багажника с помощью системы Porsche Entry&Drive
Открывание и закрывание крышки моторного отсека
Открывание
Опасность повреждения крышки моторного отсека или стеклоочистителей. Если при открывании крышки моторного отсека рычаги стеклоочистителей будут откинуты вперед, то это может привести к их повреждению или к повреждению крышки моторного отсека.
•Следите за тем, чтобы при открывании крышки моторного отсека стеклоочистители не были откинуты вперед.
•Прежде чем открывать крышку моторного отсека, всегда выключайте стеклоочистители (положение «0»). Если стеклоочистители находятся не в конечном положении, то, как только будет открыт капот, они автоматически встанут в это положение, даже если зажигание выключено.
Стеклоочистители останутся в этом положении до тех пор, пока капот не будет закрыт, а стеклоочистители не будут выключены ивключены снова.
1. Откройте дверь водителя.
2. Потяните рычаг отпирания крышки моторного отсека (стрелка). Крышка моторного отсека отперта.
3. Нажмите на ручку разблокировки (стрелка).
4. Полностью откройте крышку моторного отсека.
Закрывание
1. Прикройте крышку и с некоторой высоты отпустите ее, дав ей возможность по инерции захлопнуться в замке. При необходимости прижмите крышку ладонью, нажав на нее в месте нахождения замка.
2. Проверьте надежность фиксации крышки в замке, и находится ли рычаг отпирания крышки моторного отсека в исходном положении.
Если крышка моторного отсека закрыта не полностью, то при движении автомобиля на многофункциональном дисплее появится сообщение.
Неполадки при открывании и закрывании
Крышка багажника не отпирается
Если крышка багажника не разблокируется с помощью ключа автомобиля (например, из-за разряженного элемента питания в ключе автомобиля):
1. Отоприте дверь водителя с помощью аварийного ключа и откройте ее.
2. В течение 15 секунд включите зажигание, чтобы охранная сигнализация не сработала.
3. Нажмите кнопку
в обшивке передней двери или на центральной консоли сзади. Крышка багажника отперта, ее можно открыть с помощью кнопки разблокировки.
Примечание:
В зависимости от экспортного исполнения время до срабатывания системы сигнализации может различаться.
Аварийная разблокировка крышки багажника
Если крышка багажника все равно не открывается (например, из-за разряженного аккумулятора автомобиля), то нужно выполнить аварийную разблокировку:
1. Сложите спинки задних сидений.
2. Влезьте в багажник через откинутые спинки задних сидений.
3. С помощью подходящего инструмента (например, отвертки) снимите облицовку аварийного привода на внутренней стороне обшивки крышки багажника.
4. Для разблокировки крышки багажника подходящим предметом (например, отверткой) нажмите на замок в направлении стрелки. Вы услышите, как разблокируется замок задней крышки.
5. Теперь крышку багажника можно открыть рукой.
Указания по ключу автомобиля и центральному замку
Ключ от автомобиля
В каждый ключ автомобиля встроен аварийный ключ. Эти ключи автомобиля подходят ко всем его замкам.
•Обращайтесь с ключами от автомобиля аккуратно и отдавайте их в чужие руки только в исключительных случаях.
•Даже если Вы выходите из автомобиля ненадолго, выньте ключ и возьмите его с собой.
•Не оставляйте ключ в автомобиле.
•Проинформируйте страховую компанию об утере или краже ключей от автомобиля, а также о факте заказа дополнительного или запасного ключа.
•При потере или краже ключей автомобиля поручите партнеру Porsche заблокировать код данного ключа в блоке управления автомобиля и при необходимости заменить механические замки.
Примечание:
При определенной комплектации во время запирания в память соответствующего ключа записываются многочисленные варианты настроек автомобиля.
Замена элемента питания в пульте дистанционного управления автомобильного ключа
При слишком малой емкости элемента питания пульта дистанционного управления на многофункциональном дисплее появляется предупреждение «Заменить батарею в ключе зажиг.». В этом случае АКБ следует заменить.
Замена элемента питания (CR 2032, 3В)
1. Извлеките аварийный ключ.
2. С помощью подходящего предмета (например, аварийного ключа) откройте крышку на обратной стороне корпуса ключа.
3. Замените элемент питания (соблюдая полярность).
4. Установите крышку и нажмите на нее.
5. Вставьте аварийный ключ.
Change country/region:
© 2023 Porsche (China) Motors Ltd. Legal notice 中文 MIIT ICP No. 10013326 Open Source Software Notice. Whistleblower System
![]()
Shanghai Public Security No. 31011502014993
Porsche
China strongly recommends to purchase cars and parts from authorised
Porsche
Centres only.
Please click here for more information.
Environmental information disclosure
|
14.02.2018, 14:37 |
#1 |
|
Владимир Маркин
|
Инструкция по эксплуатации на автомобиль PORSCHE CAYENNE (E2 II) во вложении… Вложения: |
|
24.01.2022, 02:59 |
#2 |
|
Каен2012
|
Подскажите где можно найти Руководство по ремонту Porsche Cayenne (958) в электронном формате/онлайн ? |
|
24.01.2022, 12:52 |
#3 |
|
Владимир Маркин
|
Сообщение от Каен2012 Подскажите где можно найти Руководство по ремонту Porsche Cayenne (958) в электронном формате/онлайн ? А чем не подходит тот вариант что выше в этой теме? |

|
25.01.2022, 01:17 |
#4 |
|
Каен2012
|
Тот что в этой теме — это книга с описанием кнопок и за что они отвечают. Я ищу книгу по ремонту. |
|
25.01.2022, 11:35 |
#5 |
|
Владимир Маркин
|
Сообщение от Каен2012 Тот что в этой теме — это книга с описанием кнопок и за что они отвечают. Ясно Сообщение от Каен2012 Я ищу книгу по ремонту. Таких нет в открытом доступе |
|
18.02.2023, 10:52 |
#6 |
|
MirZaur
|
Спасибо за выложеную инструкцию! Очень полезно! |

Powered by vBulletin® Version 3.8.7
Copyright ©2000 — 2023, vBulletin Solutions, Inc. Перевод: zCarot
Все права на материалы, находящиеся на сайте, охраняются в соответствии с законодательством РФ.
При любом использовании материалов сайта, письменное согласие обязательно.
Торговые марки, логотипы и марки услуг, размещенные на данном сайте, являются собственностью их владельцев.
CayService.ru не связан с Porsche AG или PCNA. ©2023 CayService.ru. Все права защищены.
")
Посмотреть инструкция для Porsche Cayenne (2012) бесплатно. Руководство относится к категории Автомобили, 2 человек(а) дали ему среднюю оценку 9.6. Руководство доступно на следующих языках: английский. У вас есть вопрос о Porsche Cayenne (2012) или вам нужна помощь? Задайте свой вопрос здесь
Не можете найти ответ на свой вопрос в руководстве? Вы можете найти ответ на свой вопрос ниже, в разделе часто задаваемых вопросов о Porsche Cayenne (2012).
Как перевести мили в километры?
Где я могу узнать идентификационный номер транспортного средства Porsche?
Что такое идентификационный номер транспортного средства (VIN)?
Когда транспортному средству Porsche требуется техническое обслуживание?
Когда следует заменять тормозную жидкость на Porsche?
В чем разница между топливом E10 и E5?
Одна или несколько дверей не открываются изнутри. Что мне делать?
Автомобильный радиоприемник не включается, что делать?
Инструкция Porsche Cayenne (2012) доступно в русский?
Не нашли свой вопрос? Задайте свой вопрос здесь