- ru
- UE50AU8000UXRU
- UE50AU8000U
- 113
- 1
- 999
- page-support-detail
- support product detail
Решения и советы
Фильтр
Закрыть
-
TV_Прочее -
Аксессуары -
Звук -
Изображение -
Использование -
Каналы -
Питание -
Приложения Samsung -
Программное обеспечение -
Сеть / Интернет -
Технические характеристики -
Установка / Подключение -
Функции / Особенности
-
Установка / Подключение
Что делать, если нет сигнала при подключении по HDMI на телевизоре SamsungЧасто задаваемые вопросы о технике Телевизоры Samsung. Узнайте подробнее о ‘Что делать, если нет сигнала при подключении по HDMI на телевизоре Samsung’ с помощью службы поддержки Samsung.
-
Использование
Как использовать HDMI ARC в телевизорах Samsung Smart TVЧасто задаваемые вопросы о телевизорах Samsung. Обратитесь в службу поддержки Samsung, чтобы получить дополнительную информацию о том, как использовать HDMI ARC в телевизорах Samsung Smart TV.
-
Установка / Подключение
Как подключить компьютер к телевизоруКак подключить компьютер к телевизору: простая и понятная инструкция. Универсальные методы.
-
Использование
Как включить игровой режим на телевизоре Samsung?Часто задаваемые вопросы о технике Телевизоры Samsung. Узнайте подробнее о ‘Как включить игровой режим на телевизоре Samsung?’ с помощью службы поддержки Samsung.
-
Аксессуары
Как подключить интеллектуальный пульт к телевизору SamsungЧасто задаваемые вопросы о технике Телевизоры Samsung. Узнайте подробнее о ‘Как подключить интерактивный пульт Smart Touch Control к телевизору Samsung’ с помощью службы поддержки Samsung.
-
Сеть / Интернет
Как подключить телевизор Samsung к интернету по Wi-FiЧасто задаваемые вопросы о технике Телевизоры Samsung. Узнайте подробнее о ‘Как подключить телевизор Samsung к интернету по Wi-Fi’ с помощью службы поддержки Samsung.
-
Приложения Samsung
Не работает приложение в Smart Hub на телевизоре SamsungНе открывается приложение в Smart Hub на телевизоре? Читайте рекомендации от производителя в этой статье.
-
Сеть / Интернет
Как подключить телевизор Samsung к интернету по кабелю (проводу)Часто задаваемые вопросы о технике Телевизоры Samsung. Узнайте подробнее о ‘Как подключить телевизор Samsung к интернету по кабелю (проводу)’ с помощью службы поддержки Samsung.
-
Использование
Как устранить неисправность телевизора Samsung, который непрерывно включается сам по себеЧасто задаваемые вопросы о телевизорах Samsung. Узнайте больше о том, как устранить неполадки телевизора Samsung, который включается сам по себе, в службе поддержки Samsung.
-
Изображение
Размытое, нечеткое изображение на экране телевизора SamsungРазмытое изображение на телевизоре Samsung? Пошаговая инструкция от производителя в этой статье.
-
Изображение
Линии, полосы, темные пятна, разводы на экране телевизора SamsungРекомендации, если на экране телевизора Samsung линии, полосы, темные пятна, разводы
-
Звук
Нет звука на телевизоре SamsungПропал звук на телевизоре Samsung? Здесь рекомендации от производителя.
-
Питание
Что делать, если телевизор Samsung не включаетсяТелевизор Samsung не включается? Читайте рекомендации от производителя в этой статье
-
Питание
Загорается экран на выключенном телевизоре Samsung. Телевизор сам включаетсяЧасто задаваемые вопросы о технике Телевизоры Samsung. Узнайте подробнее о ‘Загорается экран на выключенном телевизоре Samsung. Телевизор сам включается’ с помощью службы поддержки Samsung.
-
Использование
Что делать, если телевизор Samsung не включается и зависает на логотипе Smart TVЧасто задаваемые вопросы о технике Телевизоры Samsung. Узнайте подробнее о ‘Что делать, если телевизор Samsung не включается и зависает на логотипе Smart TV’ с помощью службы поддержки Samsung.
-
TV_Прочее
Что делать, если не работает пульт от телевизора Samsung?Часто задаваемые вопросы о технике Мобильные устройства Samsung. Узнайте подробнее о ‘Что делать, если не работает пульт от телевизора Samsung?’ с помощью службы поддержки Samsung.
-
Использование
Как установить родительский контроль (заблокировать каналы) на телевизоре SamsungЧасто задаваемые вопросы об аудио и видео технике Samsung. Узнайте подробнее о ‘Как установить родительский контроль (заблокировать каналы) на телевизоре Samsung’ с помощью службы поддержки Samsung.
-
Использование
Как создать учетную запись (Samsung Account) на телевизоре SamsungЧасто задаваемые вопросы об аудио и видео технике Samsung. Узнайте подробнее о ‘Как создать учетную запись на телевизоре Samsung’ с помощью службы поддержки Samsung.
-
Использование
Как использовать Bixby на телевизоре Samsung Smart TVЧастые вопросы Smart TV, как использовать Bixby на Samsung Smart TV
-
Использование
Как настроить управление несколькими устройствами с помощью пульта Smart ControlЧасто задаваемые вопросы об аудио и видео технике Samsung. Узнайте подробнее о ‘Как настроить управление несколькими устройствами с помощью пульта Smart Control’ с помощью службы поддержки Samsung.
-
Использование
Как войти в аккаунт YouTube на телевизоре SamsungЧасто задаваемые вопросы об аудио и видео технике Samsung. Узнайте подробнее о ‘Как войти в аккаунт YouTube на телевизоре Samsung’ с помощью службы поддержки Samsung.
-
Использование
Как транслировать видео из приложения YouTube на телевизор SamsungЧасто задаваемые вопросы об аудио и видео технике Samsung. Узнайте подробнее о ‘Как транслировать видео из приложения YouTube на телевизор Samsung’ с помощью службы поддержки Samsung.
-
Использование
Как отключить панель быстрого доступа, появляющуюся при включении телевизора SamsungЧасто задаваемые вопросы об аудио и видео технике Samsung. Узнайте подробнее о ‘Как отключить панель быстрого доступа, появляющуюся при включении телевизора Samsung с помощью службы поддержки Samsung.
-
Использование
Как добавить приложение на панель быстрого доступа в телевизоре SamsungЧасто задаваемые вопросы об аудио и видео технике Samsung. Узнайте подробнее о ‘Как добавить приложение на панель быстрого доступа в телевизоре Samsung’ с помощью службы поддержки Samsung.
-
Программное обеспечение
Где скачать прошивку для телевизора SamsungЧасто задаваемые вопросы о технике Телевизоры Samsung. Узнайте подробнее о ‘Где скачать прошивку для телевизора Samsung’ с помощью службы поддержки Samsung.
-
Использование
Как настроить управление голосом через Google Assistant на телевизоре SamsungЧасто задаваемые вопросы о технике Телевизоры Samsung. Узнайте подробнее о ‘Как показывать часы и уведомления на экране блокировки Samsung Galaxy’ с помощью службы поддержки Samsung.
-
Установка / Подключение
Как подключить внешнее устройство через тюльпаны (RCA) к телевизору SamsungЧасто задаваемые вопросы о технике Мобильные устройства Samsung. Узнайте подробнее о ‘Как подключить внешнее устройство через тюльпаны (RCA) к телевизору Samsung’ с помощью службы поддержки Samsung.
-
Установка / Подключение
Как подключить ТВ-приставку (ресивер) кабелем HDMI к телевизору SamsungЧасто задаваемые вопросы о технике Мобильные устройства Samsung. Узнайте подробнее о ‘Как подключить приставку (ресивер) кабелем HDMI к телевизору Samsung’ с помощью службы поддержки Samsung.
-
Каналы
Как найти и настроить спутниковые каналы на телевизоре Samsungавтонастройка, найти каналы, настроить каналы, как найти каналы самсунг, как настроить каналы самсунг, нет каналов, пропали каналы на самсунге, телевизор ничего не показывает, спутниковые каналы
-
Звук
Что делать, если прерывается звук на телевизоре SamsungЧасто задаваемые вопросы о SmartThings. Узнайте подробнее о ‘Что делать, если прерывается звук на телевизоре Samsung’ с помощью службы поддержки Samsung.
-
Сеть / Интернет
Как посмотреть MAC-адрес на телевизоре SamsungЧасто задаваемые вопросы о технике Телевизоры Samsung. Узнайте подробнее о ‘Как посмотреть MAC-адрес на телевизоре Samsung’ с помощью службы поддержки Samsung.
-
Звук
Как настроить или отключить звуковые сигналы на телевизоре SamsungЧасто задаваемые вопросы о технике Телевизоры Samsung. Узнайте подробнее о ‘Как настроить или отключить звуковые сигналы на телевизоре Samsung’ с помощью службы поддержки Samsung.
-
Программное обеспечение
Как обновить прошивку Smart-телевизора Samsung через интернетЧасто задаваемые вопросы о технике Телевизоры Samsung. Узнайте подробнее о ‘Как обновить прошивку телевизора Samsung через интернет’ с помощью службы поддержки Samsung.
-
Программное обеспечение
Как обновить прошивку на телевизоре Samsung через флешку (по USB)Часто задаваемые вопросы о технике Телевизоры Samsung. Узнайте подробнее о ‘Как обновить прошивку на телевизоре Samsung через флешку (по USB)’ с помощью службы поддержки Samsung.
-
Каналы
Как удалить ненужные каналы на телевизоре SamsungЧасто задаваемые вопросы о технике Телевизоры Samsung. Узнайте подробнее о ‘Как удалить ненужные каналы на телевизоре Samsung’ с помощью службы поддержки Samsung.
-
Использование
Как сделать сброс настроек на телевизоре SamsungЧасто задаваемые вопросы о технике Телевизоры Samsung. Узнайте подробнее о ‘Как сделать сброс настроек на телевизоре Samsung’ с помощью службы поддержки Samsung.
-
Каналы
Как настроить порядок каналов на телевизоре SamsungЧасто задаваемые вопросы о телевизорах Samsung. Узнайте подробнее о ‘Как настроить порядок каналов на телевизоре Samsung’ с помощью службы поддержки Samsung.
-
Использование
Как настроить дату и время на телевизоре SamsungЧасто задаваемые вопросы о технике Телевизоры Samsung. Узнайте подробнее о ‘Как настроить дату и время на телевизоре Samsung’ с помощью службы поддержки Samsung.
-
TV_Прочее
Как включить голосовое сопровождение на телевизоре SamsungЧасто задаваемые вопросы о Телевизорах Samsung.Узнайте подробнее о ‘Как включить голосовое сопровождение на телевизоре Samsung’ с помощью службы поддержки Samsung.
-
Использование
Как изменить PIN-код на телевизоре SamsungЧасто задаваемые вопросы о технике Телевизоры Samsung. Узнайте подробнее о ‘Как изменить PIN-код на телевизоре Samsung’ с помощью службы поддержки Samsung.
-
Использование
Как подключить Bluetooth-наушники к телевизору SamsungЧасто задаваемые вопросы о Телевизорах Samsung. Узнайте подробнее о ‘Как подключить Bluetooth-наушники к телевизору Samsung’ с помощью службы поддержки Samsung.
-
Каналы
Как записывать ТВ программы на телевизоре SamsungИщете инструкцию по записи каналов на телевизоре Samsung? Подробная информация от производителя в этой статье.
-
Использование
Как снять защитную плёнку с телевизора SamsungЧасто задаваемые вопросы о технике Телевизоры Samsung. Узнайте подробнее о ‘Как снять транспортировочную плёнку с телевизора Samsung’ с помощью службы поддержки Samsung.
-
Использование
Как заменить батарейки в пульте ДУ от телевизора Samsung?Часто задаваемые вопросы о Телевизорах Samsung. Узнайте подробнее о ‘Как заменить батарейки в пульте ДУ от телевизора Samsung?’ с помощью службы поддержки Samsung.
-
Изображение
Как запустить тест изображения на телевизоре SamsungПодробное руководство по тестированию изображения на телевизоре Samsung
-
Звук
Как запустить звуковой тест на телевизоре SamsungПошаговая инструкция с фотографиями: как запустить звуковой тест на телевизоре Samsung
-
Использование
Как настроить телевизор Samsung T-серии (2020 год) в первый разЧасто задаваемые вопросы о технике Телевизоры Samsung. Узнайте подробнее о ‘Как выполнить первоначальную настройку телевизора Samsung T-серии (2020 год)’ с помощью службы поддержки Samsung.
-
Использование
Как устранить неисправность телевизора Samsung, который непрерывно выключается сам по себеЧасто задаваемые вопросы о телевизорах Samsung. Узнайте больше о том, как устранить неполадки телевизора Samsung, который выключается сам по себе, в службе поддержки Samsung.
-
Каналы
Как посмотреть информацию о цифровом сигнале на телевизоре SamsungЧасто задаваемые вопросы о Телевизорах Samsung. Узнайте подробнее о ‘Как посмотреть информацию о цифровом сигнале на телевизоре Samsung’ с помощью службы поддержки Samsung.
-
Использование
Сообщение о несоответствии сертификата безопасности на телевизоре SamsungЧасто задаваемые вопросы о технике Телевизоры Samsung. Узнайте подробнее о ‘Сообщение о несоответствии сертификата безопасности на телевизоре Samsung’ с помощью службы поддержки Samsung.
-
TV_Прочее
Не работает Smart Hub на телевизоре SamsungЧасто задаваемые вопросы о Телевизорах Samsung. Узнайте подробнее о ‘Не работает Smart Hub на телевизоре Samsung’ с помощью службы поддержки Samsung.
-
Изображение
Что делать, если на телевизоре Samsung изображение распадается на квадраты на цифровых каналахЧасто задаваемые вопросы о Телевизорах Samsung. Узнайте подробнее о ‘Что делать, если на телевизоре Samsung изображение распадается на квадраты на цифровых каналах’ с помощью службы поддержки Samsung.
-
TV_Прочее
Что делать, если забыл PIN-код от телевизора SamsungЧасто задаваемые вопросы о технике Телевизоры Samsung. Узнайте подробнее о ‘Что делать, если забыл пин-код от телевизора Samsung’ с помощью службы поддержки Samsung.
-
Изображение
Что делать, если на телевизоре Samsung появляется реклама и изменяются настройкиЧасто задаваемые вопросы о технике Телевизоры Samsung. Узнайте подробнее о ‘Что делать, если на телевизоре Samsung появляется реклама и изменяются настройки’ с помощью службы поддержки Samsung.
-
Каналы
Что делать, если телевизор Samsung не видит CAM-модульЧасто задаваемые вопросы о Бытовой технике Samsung. Узнайте подробнее о ‘Что делать, если телевизор Samsung не видит CAM-модуль’ с помощью службы поддержки Samsung.
-
Использование
Что делать, если не воспроизводятся видео с USB на телевизоре SamsungЧасто задаваемые вопросы о технике Телевизоры Samsung. Узнайте подробнее о ‘Что делать, если не воспроизводятся видео с USB на телевизоре Samsung’ с помощью службы поддержки Samsung.
-
Использование
Что делать, если пропадает соединение между Bluetooth-пультом и телевизором SamsungЧасто задаваемые вопросы о технике Телевизоры Samsung. Узнайте подробнее о ‘Что делать, если пропадает соединение между Bluetooth-пультом и телевизором Samsung’ с помощью службы поддержки Samsung.
-
Использование
Что делать, если не работают кнопки на пульте Smart Control от телевизора SamsungЧасто задаваемые вопросы о технике Телевизоры Samsung. Узнайте подробнее о ‘Что делать, если не работают кнопки на пульте Smart Touch Control’ с помощью службы поддержки Samsung.
-
Изображение
Что делать, если изображение на телевизоре Samsung слишком тёмноеЧасто задаваемые вопросы о Телевизорах Samsung. Узнайте подробнее о ‘Что делать, если изображение на телевизоре Samsung слишком тёмное’ с помощью службы поддержки Samsung.
-
Изображение
Что делать, если периодически пропадает изображение на телевизоре SamsungЧасто задаваемые вопросы о Телевизорах Samsung. Узнайте подробнее о ‘Что делать, если периодически пропадает изображение на телевизоре Samsung’ с помощью службы поддержки Samsung.
-
Изображение
Что делать, если на телевизоре Samsung искажены пропорцииЧасто задаваемые вопросы о Телевизорах Samsung. Узнайте подробнее о ‘Что делать, если на телевизоре Samsung искажены пропорции’ с помощью службы поддержки Samsung.
-
TV_Прочее
Что делать, если телевизор Samsung начал самостоятельно озвучивать все действияЧасто задаваемые вопросы о Телевизорах Samsung. Узнайте подробнее о ‘Что делать, если телевизор начал озвучивать все действия’ с помощью службы поддержки Samsung.
-
Использование
Что делать, если отсутствует приложение на телевизоре в Samsung AppsЧасто задаваемые вопросы о Телевизорах Samsung. Узнайте подробнее о ‘Что делать, если отсутствует приложение на телевизоре в Samsung Apps’ с помощью службы поддержки Samsung.
-
Каналы
Как найти и настроить эфирные и кабельные каналы на телевизоре SamsungЧасто задаваемые вопросы о технике Телевизоры Samsung. Узнайте подробнее о ‘Как найти и настроить эфирные и кабельные каналы на телевизоре Samsung’ с помощью службы поддержки Samsung.
-
Технические характеристики
Как узнать серию и год выпуска телевизора SamsungЧасто задаваемые вопросы о технике Мобильные устройства Samsung. Узнайте подробнее о ‘Как узнать серию и год выпуска телевизора Samsung’ с помощью службы поддержки Samsung.
-
Программное обеспечение
Как посмотреть версию прошивки на телевизоре SamsungЧасто задаваемые вопросы о технике Телевизоры Samsung. Узнайте подробнее о ‘Как посмотреть версию прошивки на телевизоре Samsung’ с помощью службы поддержки Samsung.
-
Использование
Как включить субтитры на цифровых каналах на телевизоре SamsungЧасто задаваемые вопросы об аудио и видео технике Samsung. Узнайте подробнее о ‘Как включить субтитры на цифровых каналах на телевизоре Samsung’ с помощью службы поддержки Samsung.
-
Приложения Samsung
Что делать, если не хватает памяти при установке приложения на телевизоре SamsungЧасто задаваемые вопросы об аудио и видео технике Samsung. Узнайте подробнее о ‘Как установить приложение для телевизора Samsung на USB-накопитель’ с помощью службы поддержки Samsung.
-
Использование
Как установить приложение для телевизора Samsung на USB-накопительЧасто задаваемые вопросы об аудио и видео технике Samsung. Узнайте подробнее о ‘Как установить приложение для телевизора Samsung на USB-накопитель’ с помощью службы поддержки Samsung.
-
Использование
Что делать, если звук отстает от видео на телевизоре Samsung при подключении аудиоустройств через HDMIЧасто задаваемые вопросы об аудио и видео технике Samsung. Узнайте подробнее о ‘Что делать, если звук отстает от видео на телевизоре Samsung при подключении аудиоустройства через HDMI’ с помощью службы
-
Звук
Что делать, если уровень громкости изменяется при переключении каналов на телевизоре SamsungЧасто задаваемые вопросы об аудио и видео технике Samsung. Узнайте подробнее о ‘Что делать, если уровень громкости изменяется при переключении каналов на телевизоре Samsung’ с помощью службы поддержки
-
Использование
Как установить возрастные ограничения (родительский контроль) на просмотр цифровых каналов в телевизоре SamsungЧасто задаваемые вопросы об аудио и видео технике Samsung. Узнайте подробнее о ‘Как установить возрастные ограничения (родительский контроль) на телевизоре Samsung’ с помощью службы поддержки Samsung.
-
Использование
Как добавить канал в список «Избранное» на телевизоре SamsungЧасто задаваемые вопросы об аудио и видео технике Samsung. Узнайте подробнее о ‘Как добавить канал в список «Избранное» на телевизоре Samsung’ с помощью службы поддержки Samsung.
-
Использование
Как использовать мышь или клавиатуру в браузере на телевизоре SamsungЧасто задаваемые вопросы об аудио и видео технике Samsung. Узнайте подробнее о ‘Как использовать мышь или клавиатуру в браузере на телевизоре Samsung’ с помощью службы поддержки Samsung.
-
Программное обеспечение
На экране телевизора Samsung появилась картинка «Подключите USB-накопитель»Часто задаваемые вопросы об аудио и видео технике Samsung. Узнайте подробнее о ‘Что делать, если на экране телевизора Samsung отображается картинка с просьбой подключить USB-устройство’ с помощью службы
-
Использование
Как установить приложение на телевизор SamsungЧасто задаваемые вопросы о технике Телевизоры Samsung. Узнайте подробнее о ‘Как установить приложение на телевизор Samsung’ с помощью службы поддержки Samsung.
-
Изображение
Что делать, если мерцает изображение на телевизоре SamsungЧасто задаваемые вопросы о технике Телевизоры Samsung. Узнайте подробнее о ‘Что делать, если мерцает изображение на телевизоре Samsung’ с помощью службы поддержки Samsung.
-
Использование
Что делать, если телевизор Samsung теряет сеть Wi-FiЧасто задаваемые вопросы о технике Телевизоры Samsung. Узнайте подробнее о ‘Что делать, если телевизор Samsung теряет сеть Wi-Fi’ с помощью службы поддержки Samsung.
-
Использование
Что делать, если не удается подключиться по AirPlay 2 к телевизору SamsungЧасто задаваемые вопросы о технике Телевизоры Samsung. Узнайте подробнее о ‘Что делать, если не удается подключиться по AirPlay 2 к телевизору Samsung ‘ с помощью службы поддержки Samsung.
-
Использование
Как очистить экран телевизора SamsungЧасто задаваемые вопросы об аудио и видео технике Samsung. Узнайте подробнее о ‘Как очистить экран телевизора Samsung’ с помощью службы поддержки Samsung.
-
Использование
Как дублировать экран iOS-устройства на телевизор Samsung по AirPlay 2Часто задаваемые вопросы о телевизорах Samsung. Узнайте подробнее о «Как дублировать экран iOS-устройства на телевизор Samsung по AirPlay 2» с помощью службы поддержки Samsung.
-
TV_Прочее
Что делать, если телевизор Samsung зависЧасто задаваемые вопросы о Телевизорах Samsung. Узнайте подробнее о ‘Что делать, если телевизор Samsung завис’ с помощью службы поддержки Samsung.
-
TV_Прочее
Как подключить Яндекс Алису к телевизору SamsungЧасто задаваемые вопросы о технике Телевизоры Samsung. Узнайте подробнее о ‘Как подключить Яндекс Алису к телевизору Samsung’ с помощью службы поддержки Samsung.
-
Изображение
Что делать, если искажаются цвета на телевизоре SamsungЧасто задаваемые вопросы о технике Телевизоры Samsung. Узнайте подробнее о ‘Что делать, если искажаются цвета на телевизоре Samsung’ с помощью службы поддержки Samsung.
-
Установка / Подключение
Как снять подставку на телевизоре Samsung K-серии (2016)Часто задаваемые вопросы о телевизорах Samsung. Узнайте подробнее о ‘Как снять подставку на телевизоре Samsung K-серии (2016)’ с помощью службы поддержки Samsung.
-
Использование
Как отличить сертифицированный телевизор?Как отличить сертифицированный телевизор?
-
TV_Прочее
Что делать, если слышен писк от телевизора SamsungЧасто задаваемые вопросы о технике Телевизоры Samsung. Узнайте подробнее о ‘Слышен шум, свист, гудение, гул, писк из телевизора Samsung’ с помощью службы поддержки Samsung.
-
TV_Прочее
Почему могут быть слышны щелчки от корпуса телевизора SamsungЧасто задаваемые вопросы о Телевизорах Samsung. Узнайте подробнее о ‘Почему могут быть слышны щелчки от корпуса телевизора Samsung’ с помощью службы поддержки Samsung.
- ru
- UE50AU8000UXRU
- UE50AU8000U
- {«softwares»:[{«description»:»Файл с обновлением (USB тип)»,»fileName»:»T-NKLADEUC.zip»,»fileModifiedDate»:»2022″,»fileModifiedDateCalendar»:1670344080000,»fileVersion»:»2111.1″,»fileSize»:»1391.5″,»contentsTypeCode»:»FM»,»filePath»:»FM/202212/20221207102817449/T-NKLADEUC.zip»,»fileID»:8140664,»viewCount»:0,»downloadUrl»:»https://org.downloadcenter.samsung.com/downloadfile/ContentsFile.aspx?CDSite=UNI_RU&OriginYN=N&ModelType=N&ModelName=UE50AU8000U&CttFileID=8140664&CDCttType=FM&VPath=FM%2F202212%2F20221207102817449%2FT-NKLADEUC.zip»,»osList»:[{«code»:»010″,»orgCode»:»010″,»name»:»All OS»}],»areaList»:[{«code»:»EU»,»orgCode»:»EU»},{«code»:»CB»,»orgCode»:»CB»}],»languageList»:[{«code»:»ST»,»orgCode»:»ST»,»name»:»MULTI LANGUAGE»}]},{«description»:»Firmware Update User Manual»,»fileName»:»2021_TV_firmware_Upgrade_Instruction_T-NKLADEUC.pdf»,»fileModifiedDate»:»2022″,»fileModifiedDateCalendar»:1670344080000,»fileVersion»:»1.0″,»fileSize»:»0.65″,»contentsTypeCode»:»FM»,»filePath»:»FM/202212/20221207102817449/2021_TV_firmware_Upgrade_Instruction_T-NKLADEUC.pdf»,»fileID»:8141259,»viewCount»:0,»downloadUrl»:»https://org.downloadcenter.samsung.com/downloadfile/ContentsFile.aspx?CDSite=UNI_RU&OriginYN=N&ModelType=N&ModelName=UE50AU8000U&CttFileID=8141259&CDCttType=FM&VPath=FM%2F202212%2F20221207102817449%2F2021_TV_firmware_Upgrade_Instruction_T-NKLADEUC.pdf»,»osList»:[{«code»:»010″,»orgCode»:»010″,»name»:»All OS»}],»areaList»:[{«code»:»EU»,»orgCode»:»EU»},{«code»:»CB»,»orgCode»:»CB»}],»languageList»:[{«code»:»ST»,»orgCode»:»ST»,»name»:»MULTI LANGUAGE»}]}],»manuals»:[{«description»:»Quick Guide»,»fileName»:»BN68-11773A-02_QSG_Q60A AU8000 43-50inch_CIS_L05_210202.0.pdf»,»fileModifiedDate»:»2021″,»fileModifiedDateCalendar»:1618479300000,»fileVersion»:»2102020″,»fileSize»:»0.43″,»contentsTypeCode»:»EM»,»filePath»:»EM/202104/20210416033534001/BN68-11773A-02_QSG_Q60A AU8000 43-50inch_CIS_L05_210202.0.pdf»,»fileID»:8086220,»viewCount»:0,»downloadUrl»:»https://org.downloadcenter.samsung.com/downloadfile/ContentsFile.aspx?CDSite=UNI_RU&OriginYN=N&ModelType=N&ModelName=UE50AU8000U&CttFileID=8086220&CDCttType=EM&VPath=EM%2F202104%2F20210416033534001%2FBN68-11773A-02_QSG_Q60A+AU8000+43-50inch_CIS_L05_210202.0.pdf»,»osList»:null,»areaList»:[{«code»:»RU»,»orgCode»:»RU»}],»languageList»:[{«code»:»EN»,»orgCode»:»EN»,»name»:»ENGLISH»},{«code»:»RU»,»orgCode»:»RU»,»name»:»RUSSIAN»}]},{«description»:»Quick Guide»,»fileName»:»BN68-11773A-02_QSG_Q60A AU8000 43-50inch_CIS_L05_210202.0.pdf»,»fileModifiedDate»:»2021″,»fileModifiedDateCalendar»:1618479300000,»fileVersion»:»2102020″,»fileSize»:»0.43″,»contentsTypeCode»:»EM»,»filePath»:»EM/202104/20210416033535001/BN68-11773A-02_QSG_Q60A AU8000 43-50inch_CIS_L05_210202.0.pdf»,»fileID»:8086221,»viewCount»:0,»downloadUrl»:»https://org.downloadcenter.samsung.com/downloadfile/ContentsFile.aspx?CDSite=UNI_RU&OriginYN=N&ModelType=N&ModelName=UE50AU8000U&CttFileID=8086221&CDCttType=EM&VPath=EM%2F202104%2F20210416033535001%2FBN68-11773A-02_QSG_Q60A+AU8000+43-50inch_CIS_L05_210202.0.pdf»,»osList»:null,»areaList»:[{«code»:»RU»,»orgCode»:»RU»}],»languageList»:[{«code»:»EN»,»orgCode»:»EN»,»name»:»ENGLISH»},{«code»:»RU»,»orgCode»:»RU»,»name»:»RUSSIAN»},{«code»:»UK»,»orgCode»:»UK»,»name»:»UKRAINIAN»},{«code»:»KK»,»orgCode»:»KK»,»name»:»KAZAKH»},{«code»:»UZ»,»orgCode»:»UZ»,»name»:»UZBEK»}]},{«description»:»User Manual»,»fileName»:»BN68-12466G-00_AU7000-9000 Q60-90_RU_ENRU_210723.0.pdf»,»fileModifiedDate»:»2021″,»fileModifiedDateCalendar»:1629626940000,»fileVersion»:»2107230″,»fileSize»:»0.36″,»contentsTypeCode»:»EM»,»filePath»:»EM/202108/20210823040855001/BN68-12466G-00_AU7000-9000 Q60-90_RU_ENRU_210723.0.pdf»,»fileID»:8281468,»viewCount»:0,»downloadUrl»:»https://org.downloadcenter.samsung.com/downloadfile/ContentsFile.aspx?CDSite=UNI_RU&OriginYN=N&ModelType=N&ModelName=UE50AU8000U&CttFileID=8281468&CDCttType=EM&VPath=EM%2F202108%2F20210823040855001%2FBN68-12466G-00_AU7000-9000+Q60-90_RU_ENRU_210723.0.pdf»,»osList»:null,»areaList»:[{«code»:»RU»,»orgCode»:»RU»}],»languageList»:[{«code»:»EN»,»orgCode»:»EN»,»name»:»ENGLISH»},{«code»:»RU»,»orgCode»:»RU»,»name»:»RUSSIAN»}]},{«description»:»Remote control»,»fileName»:»BN68-11642F-02_Leaflet-Remote_AU8000_RU_L02_220304.0.pdf»,»fileModifiedDate»:»2022″,»fileModifiedDateCalendar»:1646996580000,»fileVersion»:»2203040″,»fileSize»:»0.24″,»contentsTypeCode»:»EM»,»filePath»:»EM/202203/20220312050329001/BN68-11642F-02_Leaflet-Remote_AU8000_RU_L02_220304.0.pdf»,»fileID»:8513391,»viewCount»:0,»downloadUrl»:»https://org.downloadcenter.samsung.com/downloadfile/ContentsFile.aspx?CDSite=UNI_RU&OriginYN=N&ModelType=N&ModelName=UE50AU8000U&CttFileID=8513391&CDCttType=EM&VPath=EM%2F202203%2F20220312050329001%2FBN68-11642F-02_Leaflet-Remote_AU8000_RU_L02_220304.0.pdf»,»osList»:null,»areaList»:[{«code»:»RU»,»orgCode»:»RU»}],»languageList»:[{«code»:»EN»,»orgCode»:»EN»,»name»:»ENGLISH»},{«code»:»RU»,»orgCode»:»RU»,»name»:»RUSSIAN»}]},{«description»:»Quick Guide»,»fileName»:»BN68-13669A-00_QSG_Q60A AU8000 43-50inch_CIS_L05_220405.0.pdf»,»fileModifiedDate»:»2022″,»fileModifiedDateCalendar»:1650449040000,»fileVersion»:»2204050″,»fileSize»:»0.47″,»contentsTypeCode»:»EM»,»filePath»:»EM/202204/20220421040338001/BN68-13669A-00_QSG_Q60A AU8000 43-50inch_CIS_L05_220405.0.pdf»,»fileID»:8588480,»viewCount»:0,»downloadUrl»:»https://org.downloadcenter.samsung.com/downloadfile/ContentsFile.aspx?CDSite=UNI_RU&OriginYN=N&ModelType=N&ModelName=UE50AU8000U&CttFileID=8588480&CDCttType=EM&VPath=EM%2F202204%2F20220421040338001%2FBN68-13669A-00_QSG_Q60A+AU8000+43-50inch_CIS_L05_220405.0.pdf»,»osList»:null,»areaList»:[{«code»:»RU»,»orgCode»:»RU»}],»languageList»:[{«code»:»EN»,»orgCode»:»EN»,»name»:»ENGLISH»}]},{«description»:»Compatible Device»,»fileName»:»Compatible_Camera-00_WEB_Leaflet-USB_Camera_WW_L45_210527.1.pdf»,»fileModifiedDate»:»2021″,»fileModifiedDateCalendar»:1622662200000,»fileVersion»:»1.0″,»fileSize»:»0.49″,»contentsTypeCode»:»UM»,»filePath»:»UM/202106/20210603132831800/Compatible_Camera-00_WEB_Leaflet-USB_Camera_WW_L45_210527.1.pdf»,»fileID»:8170443,»viewCount»:0,»downloadUrl»:»https://org.downloadcenter.samsung.com/downloadfile/ContentsFile.aspx?CDSite=UNI_RU&OriginYN=N&ModelType=N&ModelName=UE50AU8000U&CttFileID=8170443&CDCttType=UM&VPath=UM%2F202106%2F20210603132831800%2FCompatible_Camera-00_WEB_Leaflet-USB_Camera_WW_L45_210527.1.pdf»,»osList»:null,»areaList»:[{«code»:»AE»,»orgCode»:»AE»},{«code»:»AL»,»orgCode»:»AL»},{«code»:»AM»,»orgCode»:»AM»},{«code»:»AT»,»orgCode»:»AT»},{«code»:»AZ»,»orgCode»:»AZ»},{«code»:»BA»,»orgCode»:»BA»},{«code»:»BE»,»orgCode»:»BE»},{«code»:»BG»,»orgCode»:»BG»},{«code»:»BY»,»orgCode»:»BY»},{«code»:»CH»,»orgCode»:»CH»},{«code»:»CY»,»orgCode»:»CY»},{«code»:»CZ»,»orgCode»:»CZ»},{«code»:»DE»,»orgCode»:»DE»},{«code»:»DK»,»orgCode»:»DK»},{«code»:»EE»,»orgCode»:»EE»},{«code»:»ES»,»orgCode»:»ES»},{«code»:»FI»,»orgCode»:»FI»},{«code»:»FR»,»orgCode»:»FR»},{«code»:»GB»,»orgCode»:»GB»},{«code»:»GE»,»orgCode»:»GE»},{«code»:»GP»,»orgCode»:»GP»},{«code»:»GR»,»orgCode»:»GR»},{«code»:»HR»,»orgCode»:»HR»},{«code»:»HU»,»orgCode»:»HU»},{«code»:»IE»,»orgCode»:»IE»},{«code»:»IL»,»orgCode»:»IL»},{«code»:»IT»,»orgCode»:»IT»},{«code»:»JE»,»orgCode»:»JE»},{«code»:»KG»,»orgCode»:»KG»},{«code»:»KZ»,»orgCode»:»KZ»},{«code»:»LT»,»orgCode»:»LT»},{«code»:»LU»,»orgCode»:»LU»},{«code»:»LV»,»orgCode»:»LV»},{«code»:»MA»,»orgCode»:»MA»},{«code»:»MC»,»orgCode»:»MC»},{«code»:»MD»,»orgCode»:»MD»},{«code»:»ME»,»orgCode»:»ME»},{«code»:»MK»,»orgCode»:»MK»},{«code»:»MN»,»orgCode»:»MN»},{«code»:»MQ»,»orgCode»:»MQ»},{«code»:»MT»,»orgCode»:»MT»},{«code»:»NL»,»orgCode»:»NL»},{«code»:»NO»,»orgCode»:»NO»},{«code»:»PF»,»orgCode»:»PF»},{«code»:»PL»,»orgCode»:»PL»},{«code»:»PT»,»orgCode»:»PT»},{«code»:»RE»,»orgCode»:»RE»},{«code»:»RO»,»orgCode»:»RO»},{«code»:»RS»,»orgCode»:»RS»},{«code»:»RU»,»orgCode»:»RU»},{«code»:»SE»,»orgCode»:»SE»},{«code»:»SG»,»orgCode»:»SG»},{«code»:»SI»,»orgCode»:»SI»},{«code»:»SK»,»orgCode»:»SK»},{«code»:»TJ»,»orgCode»:»TJ»},{«code»:»TM»,»orgCode»:»TM»},{«code»:»TR»,»orgCode»:»TR»},{«code»:»UA»,»orgCode»:»UA»},{«code»:»UY»,»orgCode»:»UY»},{«code»:»UZ»,»orgCode»:»UZ»},{«code»:»XK»,»orgCode»:»XK»}],»languageList»:[{«code»:»EN»,»orgCode»:»EN»,»name»:»ENGLISH»},{«code»:»SQ»,»orgCode»:»SQ»,»name»:»ALBANIAN»},{«code»:»BG»,»orgCode»:»BG»,»name»:»BULGARIAN»},{«code»:»HR»,»orgCode»:»HR»,»name»:»CROATIAN»},{«code»:»CS»,»orgCode»:»CS»,»name»:»CZECH»},{«code»:»DA»,»orgCode»:»DA»,»name»:»DANISH»},{«code»:»NL»,»orgCode»:»NL»,»name»:»DUTCH»},{«code»:»ET»,»orgCode»:»ET»,»name»:»ESTONIAN»},{«code»:»FI»,»orgCode»:»FI»,»name»:»FINNISH»},{«code»:»FR»,»orgCode»:»FR»,»name»:»FRENCH»},{«code»:»DE»,»orgCode»:»DE»,»name»:»GERMAN»},{«code»:»EL»,»orgCode»:»EL»,»name»:»GREEK»},{«code»:»HU»,»orgCode»:»HU»,»name»:»HUNGARIAN»},{«code»:»IT»,»orgCode»:»IT»,»name»:»ITALIAN»},{«code»:»KK»,»orgCode»:»KK»,»name»:»KAZAKH»},{«code»:»LV»,»orgCode»:»LV»,»name»:»LATVIAN»},{«code»:»LT»,»orgCode»:»LT»,»name»:»LITHUANIAN»},{«code»:»MK»,»orgCode»:»MK»,»name»:»MACEDONIAN»},{«code»:»MN»,»orgCode»:»MN»,»name»:»MONGOLIAN»},{«code»:»NO»,»orgCode»:»NO»,»name»:»NORWEGIAN»},{«code»:»PL»,»orgCode»:»PL»,»name»:»POLISH»},{«code»:»PT»,»orgCode»:»PT»,»name»:»PORTUGUESE»},{«code»:»RO»,»orgCode»:»RO»,»name»:»ROMANIAN»},{«code»:»RU»,»orgCode»:»RU»,»name»:»RUSSIAN»},{«code»:»SR»,»orgCode»:»SR»,»name»:»SERBIAN»},{«code»:»SK»,»orgCode»:»SK»,»name»:»SLOVAK»},{«code»:»SL»,»orgCode»:»SL»,»name»:»SLOVENIAN»},{«code»:»ES»,»orgCode»:»ES»,»name»:»SPANISH»},{«code»:»SV»,»orgCode»:»SV»,»name»:»SWEDISH»},{«code»:»UK»,»orgCode»:»UK»,»name»:»UKRAINIAN»},{«code»:»UZ»,»orgCode»:»UZ»,»name»:»UZBEK»}]},{«description»:»e-Manual»,»fileName»:»OSNDVBEUA-7.2.0_EM_OSCAR_EU_ENG_210910.0.pdf»,»fileModifiedDate»:»2021″,»fileModifiedDateCalendar»:1631213340000,»fileVersion»:»1.0″,»fileSize»:»10.11″,»contentsTypeCode»:»UM»,»filePath»:»UM/202109/20210910124253866/OSNDVBEUA-7.2.0_EM_OSCAR_EU_ENG_210910.0.pdf»,»fileID»:8306462,»viewCount»:0,»downloadUrl»:»https://org.downloadcenter.samsung.com/downloadfile/ContentsFile.aspx?CDSite=UNI_RU&OriginYN=N&ModelType=N&ModelName=UE50AU8000U&CttFileID=8306462&CDCttType=UM&VPath=UM%2F202109%2F20210910124253866%2FOSNDVBEUA-7.2.0_EM_OSCAR_EU_ENG_210910.0.pdf»,»osList»:null,»areaList»:[{«code»:»AE»,»orgCode»:»AE»},{«code»:»AL»,»orgCode»:»AL»},{«code»:»AM»,»orgCode»:»AM»},{«code»:»AT»,»orgCode»:»AT»},{«code»:»AZ»,»orgCode»:»AZ»},{«code»:»BA»,»orgCode»:»BA»},{«code»:»BE»,»orgCode»:»BE»},{«code»:»BG»,»orgCode»:»BG»},{«code»:»BY»,»orgCode»:»BY»},{«code»:»CH»,»orgCode»:»CH»},{«code»:»CY»,»orgCode»:»CY»},{«code»:»CZ»,»orgCode»:»CZ»},{«code»:»DE»,»orgCode»:»DE»},{«code»:»DK»,»orgCode»:»DK»},{«code»:»EE»,»orgCode»:»EE»},{«code»:»ES»,»orgCode»:»ES»},{«code»:»FI»,»orgCode»:»FI»},{«code»:»FR»,»orgCode»:»FR»},{«code»:»GB»,»orgCode»:»GB»},{«code»:»GE»,»orgCode»:»GE»},{«code»:»GP»,»orgCode»:»GP»},{«code»:»GR»,»orgCode»:»GR»},{«code»:»HR»,»orgCode»:»HR»},{«code»:»HU»,»orgCode»:»HU»},{«code»:»IE»,»orgCode»:»IE»},{«code»:»IL»,»orgCode»:»IL»},{«code»:»IT»,»orgCode»:»IT»},{«code»:»JE»,»orgCode»:»JE»},{«code»:»KG»,»orgCode»:»KG»},{«code»:»KZ»,»orgCode»:»KZ»},{«code»:»LT»,»orgCode»:»LT»},{«code»:»LU»,»orgCode»:»LU»},{«code»:»LV»,»orgCode»:»LV»},{«code»:»MA»,»orgCode»:»MA»},{«code»:»MC»,»orgCode»:»MC»},{«code»:»MD»,»orgCode»:»MD»},{«code»:»ME»,»orgCode»:»ME»},{«code»:»MK»,»orgCode»:»MK»},{«code»:»MN»,»orgCode»:»MN»},{«code»:»MQ»,»orgCode»:»MQ»},{«code»:»MT»,»orgCode»:»MT»},{«code»:»NL»,»orgCode»:»NL»},{«code»:»NO»,»orgCode»:»NO»},{«code»:»PF»,»orgCode»:»PF»},{«code»:»PL»,»orgCode»:»PL»},{«code»:»PT»,»orgCode»:»PT»},{«code»:»RE»,»orgCode»:»RE»},{«code»:»RO»,»orgCode»:»RO»},{«code»:»RS»,»orgCode»:»RS»},{«code»:»RU»,»orgCode»:»RU»},{«code»:»SE»,»orgCode»:»SE»},{«code»:»SG»,»orgCode»:»SG»},{«code»:»SI»,»orgCode»:»SI»},{«code»:»SK»,»orgCode»:»SK»},{«code»:»TJ»,»orgCode»:»TJ»},{«code»:»TM»,»orgCode»:»TM»},{«code»:»TR»,»orgCode»:»TR»},{«code»:»UA»,»orgCode»:»UA»},{«code»:»UY»,»orgCode»:»UY»},{«code»:»UZ»,»orgCode»:»UZ»},{«code»:»XK»,»orgCode»:»XK»}],»languageList»:[{«code»:»EN»,»orgCode»:»EN»,»name»:»ENGLISH»}]},{«description»:»e-Manual»,»fileName»:»OSNDVBEUA-7.2.0_EM_OSCAR_EU_RUS_210910.0.pdf»,»fileModifiedDate»:»2021″,»fileModifiedDateCalendar»:1631213340000,»fileVersion»:»1.0″,»fileSize»:»10.18″,»contentsTypeCode»:»UM»,»filePath»:»UM/202109/20210910124253866/OSNDVBEUA-7.2.0_EM_OSCAR_EU_RUS_210910.0.pdf»,»fileID»:8306485,»viewCount»:0,»downloadUrl»:»https://org.downloadcenter.samsung.com/downloadfile/ContentsFile.aspx?CDSite=UNI_RU&OriginYN=N&ModelType=N&ModelName=UE50AU8000U&CttFileID=8306485&CDCttType=UM&VPath=UM%2F202109%2F20210910124253866%2FOSNDVBEUA-7.2.0_EM_OSCAR_EU_RUS_210910.0.pdf»,»osList»:null,»areaList»:[{«code»:»AE»,»orgCode»:»AE»},{«code»:»AL»,»orgCode»:»AL»},{«code»:»AM»,»orgCode»:»AM»},{«code»:»AT»,»orgCode»:»AT»},{«code»:»AZ»,»orgCode»:»AZ»},{«code»:»BA»,»orgCode»:»BA»},{«code»:»BE»,»orgCode»:»BE»},{«code»:»BG»,»orgCode»:»BG»},{«code»:»BY»,»orgCode»:»BY»},{«code»:»CH»,»orgCode»:»CH»},{«code»:»CY»,»orgCode»:»CY»},{«code»:»CZ»,»orgCode»:»CZ»},{«code»:»DE»,»orgCode»:»DE»},{«code»:»DK»,»orgCode»:»DK»},{«code»:»EE»,»orgCode»:»EE»},{«code»:»ES»,»orgCode»:»ES»},{«code»:»FI»,»orgCode»:»FI»},{«code»:»FR»,»orgCode»:»FR»},{«code»:»GB»,»orgCode»:»GB»},{«code»:»GE»,»orgCode»:»GE»},{«code»:»GP»,»orgCode»:»GP»},{«code»:»GR»,»orgCode»:»GR»},{«code»:»HR»,»orgCode»:»HR»},{«code»:»HU»,»orgCode»:»HU»},{«code»:»IE»,»orgCode»:»IE»},{«code»:»IL»,»orgCode»:»IL»},{«code»:»IT»,»orgCode»:»IT»},{«code»:»JE»,»orgCode»:»JE»},{«code»:»KG»,»orgCode»:»KG»},{«code»:»KZ»,»orgCode»:»KZ»},{«code»:»LT»,»orgCode»:»LT»},{«code»:»LU»,»orgCode»:»LU»},{«code»:»LV»,»orgCode»:»LV»},{«code»:»MA»,»orgCode»:»MA»},{«code»:»MC»,»orgCode»:»MC»},{«code»:»MD»,»orgCode»:»MD»},{«code»:»ME»,»orgCode»:»ME»},{«code»:»MK»,»orgCode»:»MK»},{«code»:»MN»,»orgCode»:»MN»},{«code»:»MQ»,»orgCode»:»MQ»},{«code»:»MT»,»orgCode»:»MT»},{«code»:»NL»,»orgCode»:»NL»},{«code»:»NO»,»orgCode»:»NO»},{«code»:»PF»,»orgCode»:»PF»},{«code»:»PL»,»orgCode»:»PL»},{«code»:»PT»,»orgCode»:»PT»},{«code»:»RE»,»orgCode»:»RE»},{«code»:»RO»,»orgCode»:»RO»},{«code»:»RS»,»orgCode»:»RS»},{«code»:»RU»,»orgCode»:»RU»},{«code»:»SE»,»orgCode»:»SE»},{«code»:»SG»,»orgCode»:»SG»},{«code»:»SI»,»orgCode»:»SI»},{«code»:»SK»,»orgCode»:»SK»},{«code»:»TJ»,»orgCode»:»TJ»},{«code»:»TM»,»orgCode»:»TM»},{«code»:»TR»,»orgCode»:»TR»},{«code»:»UA»,»orgCode»:»UA»},{«code»:»UY»,»orgCode»:»UY»},{«code»:»UZ»,»orgCode»:»UZ»},{«code»:»XK»,»orgCode»:»XK»}],»languageList»:[{«code»:»RU»,»orgCode»:»RU»,»name»:»RUSSIAN»}]}]}
- https://org.downloadcenter.samsung.com/downloadfile/ContentsFile.aspx
Руководства и загрузки
-
{{file.description}}
- Версия {{file.fileVersion}}
- {{file.fileSize}} MB
- {{file.fileModifiedDate}}
- {{file.osNames}}
{{file.languageName}}
{{file.allLanguageNames}}
ДОПОЛНИТЕЛЬНАЯ ИНФОРМАЦИЯ
Информация о гарантии
Узнайте, что входит в гарантийные обязательства


Индивидуальная поддержка
Получите помощь от официальных центров поддержки


Новости и уведомления
Обьявления о важных продуктах и услугах


Контакты
Онлайн
Есть несколько способов связаться с нами через чат, мессенджеры и т.д.
Позвонить
Поговорить с одним из наших экспертов
Сервисные центры
Независимо от того, находится ли ваш продукт на гарантии или нет, мы всегда готовы помочь
Сервисная поддержка на жестовом языке
Сервисная поддержка на жестовом языке с 8:00 до 20:00 (МСК)
Служба поддержки клиентов по вопросам приложений и услуг
Samsung Health Monitor : 8-800-555-55-55
Samsung Pay : 8-800-555-55-55
Показать больше
-
Contents
-
Table of Contents
-
Troubleshooting
-
Bookmarks
Quick Links
LED TV
user manual
E-MANUAL
imagine the possibilities
Thank you for purchasing this Samsung product.
To receive more complete service, please register
your product at
www.samsung.com/register
Model _____________ Serial No. _____________
Related Manuals for Samsung 8000 Series
Summary of Contents for Samsung 8000 Series
-
Page 1: User Manual
LED TV user manual E-MANUAL imagine the possibilities Thank you for purchasing this Samsung product. To receive more complete service, please register your product at www.samsung.com/register Model _____________ Serial No. _____________…
-
Page 2
SAMSUNG will additionally provide Warranty Repair Service in the United States on SAMSUNG products purchased in Canada, and in Canada on SAMSUNG products purchased in the United States, for the warranty period originally specified, and to the Original Purchaser only. -
Page 3: Accessories
Accessories ✎ Please make sure the following items are included with your TV. If any items are missing, contact your dealer. ✎ The items’ colors and shapes may vary depending on the model. ✎ Check that there are no accessories hidden behind or under packing materials when you open the box. y QWERTY Remote (BN59-01134B) &…
-
Page 4
Viewing the Control Panel ✎ The product color and shape may vary depending on the model. ✎ There are control buttons in rear of TV. When you touch the button, control icons appears. ✎ Any object (an electric wire, etc.) near the control panel may cause unintended activation of the OSD menu. TV Side Remote control sensor Aim the remote control towards this spot on the TV. -
Page 5
Install the Stand See the separate stand installation guide for more detailed instructions. (M4 X L8) Stand (1EA) Guide Stand (1EA) Screws (8EA) Follow the steps below to connect the TV to the stand. 7RS 9LHZ X4 (M4 X L8) )URQW $77(17,21 5HDU… -
Page 6: Installing Wall Mount
Do not fasten the screws too firmly. This may damage the product or cause the product to fall, leading to personal injury. Samsung is not liable for these kinds of accidents. Samsung is not liable for product damage or personal injury when a non-VESA or non-specified wall mount is used or the consumer fails to follow the product installation instructions.
-
Page 7
QWERTY Remote (RMC-QTD1) Remote Side View Displays and selects the available video POWER SOURCE ON/OFF sources. Turns the remote control light on or Turns the TV on and off. off. When on, the buttons become illuminated for a moment when pressed. (Using the remote control with this button set to On will reduce the battery usage time.) -
Page 8
QWERTY Side View Displays the characters the user typed in. When the user presses ENTER(, all characters on the screen are removed. OFN(Optical Finger Navigation) Sensor ‘ “ In full browser function, ENTER it can be used as the & <… -
Page 9
Connecting to an Antenna or Cable Connection Connecting the power cord and an antenna or cable connection VHF/UHF Antenna $QWHQQD &DEOH 1RW 6XSSOLHG Cable ANT OUT ✎ For the best cable connections to this product, be sure to use cables no thicker than 0.55 inches (14mm). Maximum thickness — 0.55 inches (14mm) (QJOLVK … -
Page 10
Plug & Play (Initial Setup) When you turn the TV on for the first time, a sequence of on-screen prompts will assist in configuring basic settings. To turn on the TV, press the POWER3 button. ✎ Plug & Play is available only when the Source is set to TV. ✎… -
Page 11
Connecting to an AV Device Using an HDMI or an HDMI to DVI Cable: HD connection (up to 1080p) We recommend using the HDMI connection for the best quality HD picture. Available devices: DVD player, Blu-ray player, HD cable box, HD STB (Set-Top-Box) satellite receiver Device +’0, &DEOH 1RW 6XSSOLHG HDMI OUT… -
Page 12
Using a Component (up to 1080p) or an Audio/Video (480i only) Cable Available devices: DVD player, Blu-ray player, cable box, STB satellite receiver, VCR :KLWH %OXH *UHHQ :KLWH <HOORZ Device Device AUD O OUT V DEO OUT AUDIO OUT COMPONENT OUT R AUDIO L R AUD O L Device… -
Page 13
Connecting to an Audio Device Using an Optical (Digital) or an Audio (Analog) Cable Connection Available devices: Digital Audio System, Amplifier, DVD home theater Digital Audio System 2SWLFDO &DEOH 1RW 6XSSOLHG OPTICAL Amplifier / AUDIO IN DVD home theater R AUD O L 5HG :KLWH $XGLR &DEOH 1RW 6XSSOLHG ✎… -
Page 14
PC Display Modes (D-Sub and HDMI to DVI Input) Optimal resolution is 1920 X 1080 @ 60 Hz. You can also select one of the standard resolutions listed in the Resolution column. The TV will automatically adjust to the resolution you choose. Horizontal Frequency Vertical Frequency Pixel Clock Frequency… -
Page 15: Edit Name
Changing the Input Source Edit Name Edit Name lets you associate a device name to an input source. To access Edit Name, press the TOOLS button In Source Source. The following selections appear under Edit Name: Use to select TV or an external input ■…
-
Page 16
If you select Pure High-throughput (Greenfield) 802.11n mode and the Encryption type is set to WEP, TKIP or TKIP AES (WPS2Mixed) on your AP or wireless router, Samsung TVs will not support a connection in compliance with new Wi-Fi certification specifications. -
Page 17
Network Connection — Wired There are two main ways to connect your TV to your network using cable, depending on your network setup. They are illustrated below: TV Rear Panel The Modem Port on the Wall Extternal Modem (ADSL / VDSL / Cable TV) Modem Cable (Not Supplied) LAN Cable (Not Supplied) The LAN Port on the Wall… -
Page 18
How to view the e-Manual You can fi nd instructions for your TV’s features in the e-Manual in your TV. To use the e-Manual, press E- M ANUAL button on your remote. Move the cursor using the X / G / O / E-MANUAL buttons to highlight a category, then a topic, and then press the ENTER( button. -
Page 19
Method 1 Method 2 1. Select Try Now, if you want to execute the 1. Press the ENTER( button when a topic is displayed. corresponding menu(s). “Do you want to execute this?” appears. Select Yes, and then press the ENTER( button. The OSD window 2. -
Page 20
If the TV seems to have a problem, first review this list of possible problems and solutions. Also review the Troubleshooting section in the e-Manual. If none of the troubleshooting tips apply, visit “www.samsung.com,” and then click on Support, or call Samsung customer service at 1-800-SAMSUNG. -
Page 21
4. Verify all connections are properly secured. Periodically check the connections for any sign of fatigue or failure. If you have any doubt about the security of your connections, contact a professional installer. To purchase the TV-Holder Kit, contact Samsung Customer Care –… -
Page 22
fire or a problem with the TV caused by an increase in its internal temperature. ✎ When using a stand or wall-mount, use parts provided by Samsung Electronics only. If you use parts provided by another manufacturer, it may result in a problem with the product or an injury due to the product falling. -
Page 23
For information about the power supply, and more about power consumption, refer to the label attached to the product. Dispose unwanted electronics through an approved recycler. To find the nearest recycling location, go to our website: www.samsung.com/recyclingdirect Or call, (877) 278 — 0799 (QJOLVK … -
Page 24
NOTE: All drawings are not necessarily to scale. Some dimensions are subject to change without prior notice. Refer to the dimensions prior to performing installation of your TV. Not responsible for typographical or printed errors. © 2011 Samsung Electronics America, Inc (QJOLVK … -
Page 25
Notice FCC Statement Federal Communication Commission Interference Statement This equipment has been tested and found to comply with the limits for a Class B digital device, pursuant to Part 15 of the FCC Rules. These limits are designed to provide reasonable protection against harmful interference in a residential installation. This equipment generates, uses and can radiate radio frequency energy and, if not installed and used in accordance with the instructions, may cause harmful interference to radio communications. -
Page 26
7KLV SDJH LV LQWHQWLRQDOO OHIW EODQN… -
Page 27
6DPVXQJ (OHFWURQLFV &DQDGD ,QF &XVWRPHU 6HUYLFH 6WDQGLVK &RXUW 0LVVLVVDXJD 2QWDULR /5 % &DQDGD 86$ 6$0681* ZZZVDPVXQJFRP 6DPVXQJ (OHFWURQLFV $PHULFD ,QF &KDOOHQJHU 5RDG 5LGJH¿ HOG 3DUN 1- © 2011 Samsung Electronics Co., Ltd. All rights reserved. %1$… -
Page 35
E-MANUAL imagine the possibilities Thank you for purchasing this Samsung product. To receive more complete service, please register your product at www.samsung.com/register Model _____________ Serial No. _____________… -
Page 36: Table Of Contents
Photos • Smart Hub — Additional Functions • Using the Channel Menu • Wired Network Setting • Using Samsung Apps • Using the Favorite Channels • Wireless Network Setting • Widget Gallery • Memorizing Channels • Setting the Time •…
-
Page 37: Channel Menu
Channel Menu ❑ Using the Channel Menu To access the Channel menu, press the Search SMART HUB button on your remote. After Recommended Smart Hub appears, use the arrow buttons on your remote to select Channel, and then press Favorites Channel Videos Photos…
-
Page 38
Using the Timer Viewing You can set the TV to display a desired channel automatically on a day and at a time of your choice. → You must set the current time first using the Time Clock function in the System menu to use this function. -
Page 39
● Antenna: Select or Cable. ● Channel: Select the desired channel. You can only select memorized channels. ● Repeat: Select Once, Manual, Sat~Sun, Mon~Fri or Everyday. If you select Manual, you can set the day you want. mark indicates a day you selected. Date: You can set a desired date. -
Page 40
● Time: You can set the start time you want. Start You can only select memorized channels. On the Information screen, you can change or cancel a scheduled viewing. ● Cancel Schedules: Cancel a scheduled viewing. ● Edit: Change a a scheduled viewing. ●… -
Page 41: Channel List
■ Channel List Channel List contains the channels your Channel List Added Channels TV displays (Added Channels) when you press TV #6 the CH LIST button on your remote. On the No Information List, you can view TV #10 Channel Added Channels, TV #11…
-
Page 42
● Channels: Shows all added channels. Added ● Favorites 1-5: Shows all favorite channels, in up to five groups. Each group has a separate screen. If you want to view the list of favorite channels, press the CH LIST button, and then press the Mode) button to display Favorites 1-5. -
Page 43
● Mode): Toggles between the Favorites list (if you have added favorites using Favorites) and the Edit Added Channels. ● (Watch): Press to watch the channel you selected. ● (Page): Scrolls the to the next or previous page. Channel List Channel Status Display Icons Icon Operations… -
Page 44
How to use Timer Viewing Channel List (digital channels only) You can use Timer Viewing in the Channel List to schedule a digital channel program for viewing. The TV will turn on and display the digital channel program when the program begins. To schedule a digital program, follow these steps: 1. -
Page 45
3. Press the buttons to select the desired program, and then press the INFO button. 4. Press the buttons to select Viewing, and then press the Timer ENTERE button. 5. Press RETURN twice to exit. If you want to cancel Timer Viewing, follow Steps 1 through 3, and then select… -
Page 46
■ Channel SMART HUB → → Channel ENTERE Using the Channel function, you can add Channel All Channels channels, delete Added channels, set Favorite 10-1 TV #13 TV #6 channels, use the program guide for digital 10-2 TV #14 broadcasts and change between the TV #9 TV #10 13-1… -
Page 47
● Antenna: Toggle between or Cable. To access the Antenna function, use the arrow buttons to move the cursor to the icon on the top right Antenna corner of the screen. ● Edit Mode: Add channels to the Favorites list and delete channels from Channel list. -
Page 48
● Mode: Setting channels you watch frequently as favorites. Edit 1. Select the Edit Mode icon on the upper right of your screen, and then press the ENTERE button. 2. Press the arrow buttons to select a channel as a favorite, and then press ENTERE. -
Page 49
4. Highlight a group on the Favorites list, and then press ENTERE. Edit Favorites screen has five groups (Favorites 1, Favorites 2, etc.). You can add a favorite channel to any one of the groups. Select a group using the up and down arrows on your remote. 5. -
Page 50
● Using to Delete a Channel from the Channel List Edit Mode 1. Select the Edit Mode icon on the upper right of your screen, and then press the ENTERE button. 2. Select Delete at the bottom of your screen, and then press ENTERE. A pop-up appears asking if you want to delete the item. -
Page 51
4. Select OK, press ENTERE, and then press again. The ENTERE channel is deleted from the list. Channel 5. Press again to exit ENTERE Edit Mode. The Deselect function that appears with the Delete function lets you deselect all selected channels. ◀… -
Page 52
Using the TOOLS button with Channel To use the TOOLS button functions, highlight a channel in the Added Ch. list All Channels list, and then press the TOOLS button. ● Add / Delete: Add a channel to or delete a channel from the Added Ch. -
Page 53
a channel using the TOOLS button in Channel, follow these steps: 1. Use the arrow buttons to select Channels, and then press ENTERE. All Channels will be at the very top or bottom of the screen. 2. On the All Channels screen, select a greyed out channel. -
Page 54
a channel using the TOOLS button in Channel, follow these steps: Delete 1. Use the arrow buttons to select Added Ch., and then press ENTERE. Added Ch. will be at the very top or bottom of the screen. 2. On the Added Ch. -
Page 55
NOTE ● Your TV lists all available channels, both added and deleted, on the menu. All Channels ● A gray-colored channel indicates the channel has been deleted. ● only appears if you have selected a deleted channel on the Channel list. -
Page 56
● Favorites: Setting channels you watch frequently as favorites. Edit To set channels as favorites, follow these steps: 1. Highlight a channel in the Added Ch. list or All Channels list, and then press the TOOLS button. 2. Select Edit Favorites in the TOOLS menu, and then press the ENTERE button. -
Page 57
● Favorites: Removing a channel from list of favorites using the TOOLS Edit buton. To remove a channel from the list of favorites, follow these steps: 1. Highlight a favorite channel in the list or list, Added Ch. All Channels and then press the TOOLS button. -
Page 58
● (Appears only if you have selected an analog channel.): Channel Name Edit Assign a name of up to five characters to a channel. For example, Hist, Food, Golf, etc. This makes it easier to find and select the channel. ●… -
Page 59: Using The Favorite Channels
❑ Using the Favorite Channels ■ Favorites SMART HUB → → Favorites ENTERE View all of your favorite channels. Your favorite channels are organized in up to five groups (Favorites 1-5). If you want to change from one favorite group to another, follow these steps: 1.
-
Page 60
Functions on the Favorites Screen To access the functions listed below, use the arrow buttons to move the cursor to the icon of your choice on the top right corner of the screen, and then press ENTERE. ● View Mode: Toggles between the Text view and Thumbnail view of your favorite channels. -
Page 61
To use Antenna, or Sorting, select the appropriate icon as described View Mode, above, and then press ENTERE. Use the left or right arrow button to make your selection, and then press ENTERE. Using Edit Mode to Delete a Favorite 1. -
Page 62
4. Select OK, press ENTERE, and then press again. The channel is ENTERE deleted from Favorites. 5. Press again to exit ENTERE Edit Mode. The Deselect function that appears with the Delete function lets you deselect all selected channels. If you have assigned a channel to more than one favorite group (say Favorite 1 and Favorite 2), you must repeat this process in both groups to remove a channel entirely from your Favorites. -
Page 63: Memorizing Channels
❑ Memorizing Channels → → MENUm Channel ENTERE ■ Antenna (Air / Cable) Your TV memorizes channels and adds the memorized channels to the Channel List. Before your TV can memorize channels, you must specify the signal source, either or Cable. If you select cable, when you start Auto Program, you must also specify the cable system type,…
-
Page 64
To select or Cable, follow these steps: → → 1. Push MENUm Channel ENTERE on your remote. 2. Select Antenna, and then press ENTERE. 3. Select the source of your TV signal, or Cable, and then press the RETURN button. ◀… -
Page 65
■ Auto Program Scans for channels automatically and stores them in the TV’s memory. To start Auto Program, follow these steps: → → 1. Push MENUm Channel ENTERE on your remote. 2. Select Auto Program, and then press ENTERE. 3. Select Cable or both by highlighting and then pressing ENTERE. -
Page 66
5. If you selected Cable, the Cable System screen appears. Select Digital, and then press ENTERE. If you selected only, starts. Antenna Auto Program 6. Select or IRC, and then press ENTERE. STD, HRC, 7. Repeat for Analog. 8. Select NEXT, and then press ENTERE. starts. -
Page 67: Other Features
❑ Other Features → → MENUm Channel ENTERE ■ Clear Scrambled Channel This function filters out scrambled channels after Auto Program is completed. This process may take up to minutes. How to Stop the Clear Scrambled Channels function ◀ ▶ 1.
-
Page 68
■ Fine Tune (analog channels only) If the reception is clear, you do not have to fine tune the channel, as this is done automatically during the search and store operation. If the signal is weak or distorted, fine tune the channel manually. Scroll to the left or right until the image is clear. -
Page 69: Basic Features
Basic Features Picture Menu ❑ Changing the Preset Picture Mode → → → MENUm Picture Picture Mode ENTERE ■ Picture Mode Picture modes apply preset adjustments to the picture. Select a mode using the up and down arrow keys, and then press the ENTERE button.
-
Page 70: Adjusting Picture Settings
❑ Adjusting Picture Settings → → MENUm Picture ENTERE ■ Backlight / Cell Light / Contrast / Brightness / Sharpness / for LED TV for PDP TV Color / Tint (G/R) Your television has several options for adjusting picture quality. Select an option using the up and down arrow keys, and then press ENTERE.
-
Page 71
When you make changes to Backlight / Cell Light, Contrast, Brightness, (G/R), the OSD will be adjusted accordingly. Sharpness, Color Tint mode, you can only make changes to Backlight / Cell Light, Contrast, Brightness, and Sharpness. You can adjust and store Settings for each external device connected to the TV. Lowering picture brightness reduces power consumption. -
Page 72: Changing The Picture Size
❑ Changing the Picture Size → → → MENUm Picture Screen Adjustment ENTERE ■ Screen Adjustment Screen Adjustment provides various picture size and aspect ratio options. Select an option using the arrow keys, and then press ENTERE. Use the arrow keys to select an option in the sub-menu, and then press ENTERE. ●…
-
Page 73
Zoom1: Use for moderate magnification. Cuts off the top and sides. Zoom2: Use for a stronger magnification. Wide Fit: Enlarges the aspect ratio of the picture so it fits the entire screen. Available with HD 1080i / 720p signals in 16:9 mode. 4:3: Sets the picture to basic (4:3) mode. -
Page 74
Fit: When your TV inputs HDMI (720p / 1080i / 1080p) or Component Screen (1080i / 1080p) signals, displays the full image without any cut-off. Smart View 1: Reduces the 16:9 picture by 50%. for LED TV 2: Reduces the 16:9 picture by 25%. Smart View for LED TV Smart View 1… -
Page 75
To use the function after selecting Fit, follow Position Zoom1, Zoom2 Wide these steps: 1. Press the button to select Position. 2. Press the button. ENTERE 3. Press the button to move the picture up or down. 4. Press the button. -
Page 76
To use the function after selecting in HDMI (1080i/1080p) Position Screen Fit or Component (1080i/1080p), follow these steps: 1. Press the button to select Position. 2. Press the button. ENTERE 3. Press the u, d, button to move the picture. 4. -
Page 77
● HD (High Definition): 16:9 — 1080i/1080p (1920×1080), 720p (1280×720) ● You can adjust and store settings for each external device you have connected to an input on the TV. ● Picture Sizes available by Input Source: Input Source Picture Size ATV, AV, Component (480i, 480p) 16:9, Zoom1, Zoom2, 4:3 HDMI (720p, 1080i, 1080p) -
Page 78: Changing The Picture Options
❑ Changing the Picture Options ■ Advanced Settings → → → MENUm Picture Advanced Settings ENTERE Advanced Settings are available in the Standard Advanced Settings Movie modes. In mode, you can only Black Tone make changes to Gamma White Balance. To Dynamic Contrast use, select an option using the up and down arrow Gamma…
-
Page 79
● Darkest): Select the black level to adjust the Black Tone (Off / Dark / Darker / screen depth. ● High): Adjusts the screen contrast. Dynamic Contrast (Off / Low / Medium / ● : Increases the brightness of Shadow Detail (-2~+2) for LED 7000 Series and above dark images. -
Page 80
Pattern2: This test screen demonstrates the effect of the display settings on colors. After selecting Pattern1 or Pattern2, you can adjust any of the advanced settings for desired effect. While the Expert Pattern is running, the TV does not output sound. Only enabled in DTV, Component, and HDMI modes. -
Page 81
● Custom): Adjusts the range and variety of colors Color Space (Auto / Native / (the color space) available to create images. To adjust and Reset, set Color, Red, Green, Blue Color Space Custom. ● White Balance: Adjusts the color temperature for a more natural picture. R-Offset / G-Offset / B-Offset: Adjusts each color’s (red, green, blue) darkness. -
Page 82
● On): Controls the white balance in 10 point intervals 10p White Balance (Off / by adjusting the red, green, and blue brightness. Available when the picture mode is set to and when the external Movie input is set to all input. Some external devices may not support this function. -
Page 83
● Tone: Emphasizes pink “Flesh Tone.” Flesh ● Edge Enhancement (Off / On): Emphasizes object boundaries. ● Motion Lighting (Off / On): Reduces power consumption by reducing screen brightness when the picture on the screen is in motion. is not supported. When you change the Backlight / Cell Light… -
Page 84
◀ ▶ ● LED Motion Plus (Off / Normal / Cinema / Ticker) for LED 7900 and 8000 Series Removes blur and judder from scenes with large amounts of rapid movement to provide a clearer picture. English… -
Page 85: Picture Options
■ Picture Options → → → MENUm Picture Picture Options ENTERE Select an option using the up and down arrow keys, and the press ENTERE. Use the arrow keys to change the setting, and then press ENTERE. In PC mode, you can only make changes to Color Picture Options Tone.
-
Page 86
● Digital Noise Filter (Off / Low / Medium / High / Auto / Auto Visualization): If the broadcast signal received by your TV is weak, you can activate the Digital Noise Filter feature to reduce any static and ghosting that may appear on the screen. -
Page 87
● Normal): Lets you adjust the screen depth by HDMI Black Level (Low / selecting a black level. Available only in HDMI mode. ● ): Sets the TV Film Mode (Off / Auto1 / Auto2 / Cinema Smooth for PDP TV so that it senses and then processes film signals from all sources automatically and adjusts the picture for optimum quality. -
Page 88
● Auto Motion Plus (Off / Clear / Standard / Smooth / Custom / : Removes blur and Translate from scenes with larger amounts Demo) For LED TV of rapid movement to provide a clearer picture. The info screen on your TV displays the resolution and frequency of the incoming video signal (60 Hz). -
Page 89
Reset: Reset the custom settings. ● Smart LED (Off / Low / Standard / High / Demo) for LED 7900 and 8000 Series Controls the LED backlight to maximize picture clarity. Demo: Displays the difference between on and off modes. -
Page 90
■ Reset Picture (Yes / No) Resets your current picture mode to its default settings. ◀ ▶ English… -
Page 91: Using The Tv With Your Pc
❑ Using the TV with Your PC Set the input source to PC. ■ Auto Adjustment → → → MENUm Picture Auto Adjustment ENTERE Automatically adjusts the picture’s frequency, position, and fine tune settings in the PC mode. Available in mode only.
-
Page 92
■ PC Screen Adjustment → → → → MENUm Picture Screen Adjustment PC Screen Adjustment ENTERE Available in PC mode only. ● Coarse / Fine: Removes or reduces picture noise. If the noise is not removed by Fine-tuning alone, use the function to adjust the frequency as best Coarse as possible (Coarse) and Fine-tune again. -
Page 93
Depending on your version of Windows and your video card, the procedure on your PC will probably differ slightly from the procedure presented here. However, the same basic information will apply in most cases. (If not, contact your computer manufacturer or Samsung Dealer.) ◀ ▶… -
Page 94
1. Click “Control Panel” on the Windows start menu. 2. Click “Appearance and Themes” in the “Control Panel” window. A display dialog- box appear. 3. Click “Display”. Another display dialog box appears. 4. Click the the “Settings” tab on the display dialog-box. ●… -
Page 95: Changing The Preset Sound Modes
Sound Menu ❑ Changing the Preset Sound Modes → → → MENUm Sound Sound Mode ENTERE ■ Sound Mode Use the up and down arrow keys to select an option, and then press ENTERE. ● Standard: Selects the normal sound mode. ●…
-
Page 96: Adjusting Sound Settings
❑ Adjusting Sound Settings → → MENUm Sound ENTERE ■ Sound Effect Speaker Select is set to External Speaker, Sound Effect is disabled. Available only when Sound Mode is set to Standard. ● SRS TruSurround HD (Off / On) t: This function provides a virtual 5.1 channel surround sound experience through a pair of speakers using HRTF ◀…
-
Page 97
● Equalizer: The Equalizer displays a series of sliders. Use the up and down arrow keys to select a slider. Use the left and right arrow keys to change the slider’s value. To Reset Equalizer, select Reset and press ENTERE, then select and press ENTERE. -
Page 98
■ 3D Audio (Off / Low / Medium / High) 3D audio technology provides the immersive sound corresponding to the pop-up effect of 3D video by audio depth control in perspective. Available only when watching 3D image. ◀ ▶ English… -
Page 99
■ Broadcast Audio Options ● Preferred Language (digital channels only) Use the up and down arrow keys to select a language, and then press ENTERE. Digital-TV broadcasts can simultaneously transmit many audio tracks (for example, simultaneous translations of the program into foreign languages). ◀… -
Page 100
● Multi-Track Sound (MTS) (analog channels only) Select an option using the up and down arrow keys, and the press ENTERE. Mono: Choose for channels that are broadcasting in mono or if you are having difficulty receiving a stereo signal. Stereo: Choose for channels that are broadcasting in stereo. -
Page 101
■ SPDIF Output SPDIF (Sony Philips Digital Interface) provides digital audio output to speakers and various digital devices such as A/V Receivers and Home Theaters which reduces interference and distortion. ● Digital): You can select the Digital Audio output Audio Format (PCM / Dolby (SPDIF) format. -
Page 102
■ Speaker Settings ● Speaker Select (External Speaker / TV Speaker) If you are listening to the sound track of a broadcast or movie through an external receiver, you may hear a sound echo caused by the difference in decoding speed between the TV’s speakers and the speakers attached to your audio receiver. -
Page 103
NOTE ● When you set Speaker Select External Speaker, the TV’s speakers are turned off. You will hear sound through the external speakers only. When you set Speaker Select TV Speaker both the TV’s speakers and the external speakers are on. You will hear sound through both. ●… -
Page 104
● Auto Volume (Off / Normal / Night) Normal equalizes the volume level on each channel, so that when you change channels, the volume level is the same. Night equalizes and decrease the volume level on each channel, so each channel is quieter. -
Page 105
■ Reset Sound (Yes / No) Reset all sound settings to the factory defaults. Select Reset Sound, press ENTERE, select in the pop-up, and then press ENTERE again. ◀ ▶ English… -
Page 106: Preference Features
Preference Features ❑ Wired Network Setting ■ Connecting to a Wired Network There are three ways to attach your TV to your LAN using cable: ● You can attach your TV to your LAN by connecting the LAN port on the back of your TV to an external modem using a LAN cable.
-
Page 107
● You can attach your TV to your LAN by connecting the LAN port on the back of your TV to an IP Sharer which is connected to an external modem. Use LAN cable for the connection. See the diagram below. The Modem Port on the Wall External Modem… -
Page 108
● Depending on how your network is configured, you may be able to attach your TV to your LAN by connecting the LAN port on the back of your TV directly to a network wall outlet using a LAN cable. See the diagram below. Note that the wall outlet is attached to a modem or router elsewhere in your house. -
Page 109
● If you have a Dynamic Network, you should use an ADSL modem or router that supports the Dynamic Host Configuration Protocol (DHCP). Modems and routers that support DHCP automatically provide the IP address, subnet mask, gateway, and DNS values your TV needs to access the Internet so you do not have to enter them manually. -
Page 110
■ Network Settings → → → MENUm Network Network Settings ENTERE Set the network connection to use various Internet services such as Smart Hub, AllShare™ and perform software upgrades. ■ Network Status → → → MENUm Network Network Status ENTERE You can check the current network and Internet status. -
Page 111
AllShare Settings ENTERE Selects whether to use the call arrivals text message contents and schedules set on the network. For details on set up options, refer to the “AllShare™” instructions. ■ SWL (Samsung Wireless Link) → → → MENUm Network… -
Page 112
■ Automatic Network Setup Use the Automatic Network Settings when connecting your TV to a network that supports DHCP. To set up your TV’s cable network connection automatically, follow these steps: How to set up automatically 1. Go to the Network Settings screen. -
Page 113
If the connection process fails, check the Network Setting LAN port connection. Wired network and Internet connection completed. MAC Address 00:12:fb:2b:56:4d If the automatic process cannot find the IP Address 192.168.11.4 Anterior Subnet Mask 255.255.255.0 Gateway 192.168.11.1 network connection values or if you want to Ajustes IP DNS Server 192.168.11.1… -
Page 114
■ Manual Network Setup Use the Manual Network Setup when connecting your TV to a network that requires a Static IP address. Getting the Network Connection Values To view the Network connection values on most Windows computers, follow these steps: 1. -
Page 115
How to set up manually To set up your TV’s cable network connection manually, follow these steps: 1. Go to the Network Settings screen. IP Settings (MENUm → → Network Network Settings IP Mode Manual → ENTERE) IP Address 0 . 0 . 0 . 0 2. -
Page 116
4. Select the field at the top, press ENTERE, and then set to Manual. IP Mode 5. Press the button on your remote to go to the IP Address entry field, and then press ENTERE. 6. Enter the first portion of the (for example, 105) into the first entry IP Address field using the number keys on your remote. -
Page 117
9. When done entering the Address, press ENTERE. 10. Press the down arrow key to go to the Subnet Mask fields, and then press ENTERE. 11. Repeat the same entry process for Gateway, and Subnet Mask, Server. 12. When done, select at the bottom of the page, and then press ENTERE. -
Page 118: Wireless Network Setting
❑ Wireless Network Setting ■ Connecting to a Wireless Network You can connect your TV to your LAN through a standard wireless router or modem. Wireless IP sharer The LAN Port on the Wall (router having DHCP server) ◀ ▶ LAN Cable English…
-
Page 119
This TV supports the IEEE 802.11a/b/g and n communication protocols. Samsung recommends using IEEE 802.11n. When you play video over a IEEE 802.11b/g connection, the video may not play smoothly. NOTE ● To use a wireless network, your TV must be connected to a wireless IP sharer (either a router or a modem). -
Page 120
If you select the Pure High-throughput (Greenfield) 802.11n mode and the Encryption type is set to WEP, TKIP or TKIP AES (WPS2Mixed) on your AP or wireless router, Samsung TVs will not support a connection in compliance with new Wi-Fi certification specifications. -
Page 121
Connection Methods: You can set up the wireless network connection in six ways: – Auto Setup (Using the Auto Network Search function) – Manual Setup – WPS(PBC) – One Foot Connection – Plug & Access ◀ ▶ – SWL (Samsung Wireless Link) English… -
Page 122
■ Automatic Network Setup Most wireless networks have an optional security system that requires devices that access the network to transmit an encrypted security code called an Access or Security Key. The Security Key is based on a Pass Phrase, typically a word or a series of letters and numbers of a specified length you were asked to enter when you set up security for your wireless network. -
Page 123
How to set up automatically 1. Go to the Network Settings screen. Network Settings (MENUm → → Network Network Select a network connection type. Wired → ENTERE. Settings Wireless (General) Previous WPS(PBC) Set up wireless network by 2. Select Wireless (General), press Next selecting your Wireless Router. -
Page 124
5. If the Enter Security Key screen appears, go Network Settings to step 6. If you select a wireless router that Enter security key 0 entered does not have security, go to step 8. Previous 6. If the router has security, enter the Security Next Cancel… -
Page 125
8. The network connection screen appears and the verification process starts. When the connection has been verified, the “Internet connection successful.” message appears. If the network does not accept the Security key (Security key or PIN), select Retry or select IP Settings to enter the settings manually. -
Page 126
■ Manual Network Setup Use the Manual Network Setup when connecting your TV to a network that requires a Static IP address or if the automatic connection process has failed. Getting the Network Connection Values To view the Network connection values on most Windows computers, follow these steps: 1. -
Page 127: Network Settings
How to set up manually To set up your TV’s cable network connection manually, follow these steps: 1. Go to the Network Settings screen. IP Settings → → (MENUm Network Network Settings IP Mode Manual → ENTERE) IP Address 0 . 0 . 0 . 0 Subnet Mask 0 .
-
Page 128
4. In the list of networks, press the button to select a network, and then press the button twice. ENTERE If the wireless router is set to Hidden (Invisible), you have to select Network and enter the correct network Name (SSID) and Security key to establish the connection. -
Page 129
6. Enter the Security key (Security key or PIN). When you enter the Security key (Security key or PIN), use the buttons on your remote to select number/characters. Press ENTERE enter the characters. You can also enter numbers by pressing the number buttons on your remote. -
Page 130
8. The network connection screen appears and the verification process starts. Press to cancel. Select on the network connection ENTERE IP Settings screen. The IP Settings screen appears. 9. Select the field on the top, press ENTERE, and then set IP Mode to Manual. -
Page 131
13. Repeat the entry process for each field in the Address. If you make a mistake when entering a number, re-enter the number to correct it. You can also press the button to change the number one unit at a time. 14. -
Page 132
■ WPS(PBC) Network Setup How to set up using WPS(PBC) If your router has a WPS(PBC) button, follow these steps: 1. Go to screen. Network Setting Network Settings (MENUm → → Network Network Select a network connection type. Wired → ENTERE). Settings Wireless (General) Previous… -
Page 133
AP through the TV. When connected to a mobile device, you can use files on the device or connect to the Internet using the AllShare or Multimedia function. This function is available when SWL (Samsung Wireless Link) is set to Off. How to set up using Ad hoc ◀… -
Page 134
3. Select hoc. The message “Ad hoc service supports a direct connection with Wi-Fi compatible devices like a cell phone or PC. Other network services may be limited. Do you want to change the network connection?” is displayed. 4. Select OK, and press ENTERE. The TV searches for the mobile device. 5. -
Page 135
■ SWL (Samsung Wireless Link) This function lets you connect a Samsung device that supports WPS(PBC) to your TV wirelessly. You can connect devices to the TV even if the TV is not connected to a sharer (a router or modem). -
Page 136
WPS(PBC) directly to the TV. This function is only available when you set SWL (Samsung Wireless Link) How to connect using Samsung Wireless Link To connect a device to the TV using SWL, follow these steps: → → 1. Go to the Network Settings screen. -
Page 137
3. Select by using the button and press the button. Connect SWL ENTERE 4. If the “Press the WPS(PBC) button on your Wireless Router within 120 seconds.” message appears, press the WPS(PBC) button on the device you want to connect. A countdown timer also appears on the screen. For more information, refer to the wireless network setup manual of the device. -
Page 138
■ One Foot Connection Network Setup One Foot Connection function lets you connect your Samsung TV automatically to a Samsung wireless routers. If your wireless router does not support Connection, you must connect using one of the other One Foot methods. -
Page 139
How to set up using One Foot Connection 1. Turn on the Samsugn wireless router and the TV. 2. Go to screen. Network Settings Network Settings → → (MENUm Network Network Settings Select a network connection type. Wired → ENTERE). Wireless (General) Previous WPS(PBC) -
Page 140
4. Place the wireless router in parallel with your TV set (if you do not need to use the adapter), and no farther away than 25cm (about 9 3/4 inches). does not connect your TV to your Router, a pop- One Foot Connection up screen appears on the screen notifying you of the failure. -
Page 141
Plug & Access function lets you easily connect your Samsung TV to your Samsung wireless router by using a USB memory stick to transfer the setup information from the router to the TV. If your non-Samsung wireless router does not support Plug &… -
Page 142
How to set up using the Plug & Access function 1. Turn on the Samsung wireless router and your TV. 2. Insert a USB memory stick into the USB port in your Samsung wireless router. Check the router’s LED’s to make sure it is on (Blinking → on). -
Page 143
5. The network connection screen appears, and the network setup is done. 6. Place the wireless router in a desired location. If the wireless router’s settings change or you install a new wireless router, you must perform the procedure again, beginning from Step Plug &… -
Page 144
This Priority QOS function is unique to Samsung wireless routers. You can connect a Samsung wireless router to many devices, such as laptops, mobile phones, BD players etc. But, when you connect a Samsung TV to a Samsung wireless router, the Samsung wireless router gives the Samsung TV a priority connection. -
Page 145
The internet connection may fail because of a firewall problem. If this is the case, contact your Internet service provider. If you cannot connect to the Internet even after you have followed the procedures of your Internet service provider, please contact Samsung Electronics at 1-800-SAMSUNG. English… -
Page 146: Setting The Time
❑ Setting the Time → → → MENUm System Time ENTERE ■ Time The current time will appear every time you press the INFO button. ● Clock: Set the clock to use the various various timer features of the TV. If you disconnect the power cord, you have to set the clock again.
-
Page 147
Manual: Set the current time manually. Depending on the broadcast station and signal, the auto time set up may not be correct. In this case, set the time manually. – Clock Set: Set the Date and Time. Select Clock Set. Select Date or Time, and then press ENTERE. -
Page 148
– Zone: Select your time zone. Time This function is only available when the Clock Mode is set to Auto. – DST (Off / On): Switches the DST (Daylight Saving Time) function on or off. This function is only available when the Clock Mode is set to Auto. -
Page 149
Setting the On / Off Timer → → → MENUm System Time ENTERE On Timer so that your TV turns on On Timer 1 automatically at a time and on a day of your Setup choosing. ● Timer: You can set up three separate On Time 12:00 am Volume… -
Page 150
Setup: Select or Manual. Off, Once, Everyday, Mon~Fri, Mon~Sat, Sat~Sun If you select Manual, you can choose the days you want On Timer to turn on your TV. mark indicates days you’ve selected. Time: Set the hour, minute, am/pm. Use the number buttons or the up and down arrow keys to enter numbers. -
Page 151
Source: Select TV or USB. Select TV and the TV will display broadcast or cable TV programs when it turns on automatically. Select USB and the TV will play content from a USB device when the TV turns on automatically. (You can select USB only when a USB device is connected to the TV) Antenna (when the… -
Page 152
NOTE ● If there is no music file on the USB device or you don’t select a folder containing a music file, the Timer function does not operate correctly. ● If there is only one photo file in the USB, the Slide Show will not play. ●… -
Page 153
● Timer: You can set up three separate Off Off Timer 1 Timer configurations. (Off Timer 1, Off Timer Setup 2, Off Timer You must set the clock before you can Time 12:00 am Timer. Setup: Select Off, Once, Everyday, Close or Manual. -
Page 154: Blocking Programs
❑ Blocking Programs → → → MENUm System Security ENTERE ■ Security Every time you access the Security functions, the PIN screen will appear and you must enter that PIN. The PIN screen closes and the Security menu appears. ● Program Rating Lock (Off / On): When turned on, the Program Rating Lock…
-
Page 155
Rating: You can block TV programs based on their ratings. This function allows you to control what your children can watch. TV Rating displays a grid with locks. The following categories are on the left side: – TV-Y: Young children / TV-Y7: Children 7 and over / TV-G: General audience / TV-PG: Parental guidance / TV-14: Viewers 14 and over / MA: Mature audience ◀… -
Page 156
The following categories are on top: – ALL: Lock all TV ratings. / FV: Fantasy violence / V: Violence / S: Sexual situation / L: Adult Language / D: Sexually Suggestive Dialog To block certain content, you select a lock, and press ENTERE (That is, you “click it”.). -
Page 157
To unblock a category, click the lock. To unblock all the categories in a row, click the lock under ALL. To watch a blocked program, you must enter the Security code when requested. Movie Rating (MPAA): You can block movies based on their MPAA rating. The Motion Picture Association of America (MPAA) has implemented a rating system that provides parents or guardians with advanced information on which films are appropriate for children. -
Page 158
displays a column with locks and the following ratings Movie Rating categories: – G: General audience (no restrictions). / PG: Parental guidance suggested. / PG-13: Parents strongly cautioned. / R: Restricted. Children under 17 should be accompanied by an adult. / NC-17: No children under age 17. / X: Adults only. -
Page 159
Rating: You can block TV programs based on their Canadian English Anglophone Canadian rating. Canadian English Rating displays a column with locks and the following ratings categories: – C: Programming intended for children under age 8. / C8+: Programming generally considered acceptable for children 8 years and over to watch on their own. -
Page 160
To block certain content, you select a lock, and press (That ENTERE is, you “click it”.). For example, click the 18+ lock and you block all TV programs rated 18+. The rating categories are also grouped so that clicking one category blocks all the categories a parent would block along with it. -
Page 161
Rating: You can block TV programs based on their French Canadian French Canadian rating. Canadian French Rating displays a column with locks and the following ratings categories: – G: General / ans+: Programming generally considered acceptable for children 8 years and over to watch on their own. / ans+: Programming may not be suitable for children under the age of 13. -
Page 162
To block certain content, you select a lock, and press (That ENTERE is, you “click it”.). For example, click the 18 ans+ lock and you block all TV programs rated ans+. The rating categories are also grouped so that clicking one category blocks all the categories a parent would block along with it. -
Page 163
NOTE ● If information is not downloaded from the broadcasting station, Downloadable U.S. Rating menu is deactivated. ● Parental restriction information is automatically downloaded while you watch DTV channels. It may take several seconds. ● Downloadable U.S. Rating menu is available for use after information is downloaded from the broadcasting station. -
Page 164
● Even if you set the on-screen display to another language, the Downloadable U.S. Rating menu will appear in English only. ● Blocking one rating level will automatically block other categories that deal with more sensitive material. ● The rating titles (For example: Humor Level..etc) and TV ratings (For example: DH, MH, H..etc) may differ depending on the broadcasting station. -
Page 165
● PIN: The screen will appear. Choose any 4 digits for your Change Change PIN PIN and enter it in PIN. Re-enter the same 4 digits in Enter New Confirm New PIN. When the Confirm screen disappears, press the Close button. -
Page 166: Economical Solutions
❑ Economical Solutions ■ Eco Solution → → → MENUm System Eco Solution ENTERE ● Energy Saving (Off / Low / Medium / High / Picture Off): Lets you adjusts the brightness of the TV in order to reduce power consumption. If you select Picture Off, the screen is turned off, but the sound remains on.
-
Page 167
: When is On, Min Backlight / Min Cell Light Eco sensor for LED TV for PDP TV you can manually adjust the minimum screen brightness. Eco Sensor is On, the display brightness may change (become slightly darker or brighter) depending on the surrounding light intensity. You can control the screen’s minimum brightness with the Min Backlight function. -
Page 168
■ Auto Protection Time (Off / 2 hours / 4 hours / 8 hours / 10 hours) for LED TV If the screen displays a still image for a certain period of time you define, the TV activates the screen saver to prevent the formation of burnt in ghost images on the screen. -
Page 169
■ Screen Burn Protection for PDP TV To reduce the possibility of screen burn, this unit is equipped with Pixel Shift screen burn prevention technology. Pixel Shift moves the picture slightly on the screen. The Pixel Shift Time setting allows you to program the time between movements of the picture in minutes. -
Page 170
● On): Using this function, you can set the TV to move pixels Pixel Shift (Off / minutely on the PDP screen in a horizontal or vertical direction to minimize after images on the screen. Available Pixel Shift Settings and Optimum Settings Optimum Settings for Available Settings TV/AV/Component/HDMI/PC… -
Page 171
● hour): If the screen Auto Protection Time (Off / 10 min / 20 min / 40 min / 1 displays a still image for a certain period of time you define, the TV activates the screen saver to prevent the formation of burnt in ghost images on the screen. ●… -
Page 172
■ General ● Game Mode (Off / On): When you have connected a game console such as a PlayStation™ or Xbox™ to the TV, you can enjoy a more realistic gaming experience if you set Game Mode on. Precautions and limitations for Game Mode: –… -
Page 173
● On): Provides the optimal picture quality for Samsung DVD, BD Wise (Off / Blu-ray and Home Theater products which support Wise. When Wise is turned On, the picture mode is automatically changed to the optimal resolution. Available when you connect Samsung products that support BD Wise through an HDMI cable to the TV. -
Page 174
● On): Displays the Samsung logo when the TV is turned on. Boot Logo (Off / ● Light Effect (Off / In Standby / Watching TV / Always) : You For LED 8000 series can turn the LED on the TV’s front panel on or off. Turn it off to save power or if the LED is too bright for you. -
Page 175
■ Anynet+(HDMI-CEC) For details on set up options, refer to the “What is Anynet+?” instructions. ◀ ▶ English… -
Page 176
■ DivX® Video On Demand Shows the registration code authorized for the TV. If you connect to the DivX web site and register using that code, you can download the VOD registration file. If you activate the VOD registration using Smart Hub, the registration is completed. For more information about DivX®… -
Page 177
■ Network Remote Control (On / Off) Turn on/off or give permission to Samsung mobile phone devices to connect with and control the TV. You must have a Samsung Mobile phone/device which supports Wireless Remote Control. For more details, refer to each device’s manual. -
Page 178: Picture In Picture (Pip)
❑ Picture In Picture (PIP) → → → MENUm System ENTERE ■ You can watch a program whose signal has passed through the TV’s tuner and video from one external video source simultaneously. For example, if you have a cable box connected to the Cable In jack, you can use PIP to watch programs from the cable box and a movie from a Blu-ray player attached to the HDMI In jack.
-
Page 179
NOTE ● For PIP sound, refer to the Sound Select instructions. ● If you turn the TV off while watching in the PIP mode, the PIP function is reset to off. When you turn your TV on, you must turn PIP on again to watch in the PIP mode. -
Page 180
● PIP Settings The picture from the external video source will be in the main screen and the picture from the TV’s tuner will be in the PIP sub-picture screen. Main picture Sub picture Component, HDMI, PC ◀ ▶ English… -
Page 181
● On): Activate or deactivate the PIP function. PIP (Off / ● Air/Cable (Air / Cable): Select either Cable as the input source for the sub-screen. ● Channel: Select the channel for the sub-screen. ● (õ / Œ): Select a size for the subpicture. Size ã… -
Page 182: Other Features
❑ Other Features → → MENUm System ENTERE ■ Menu Language Set the menu language. 1. Select Menu Language, and then press the ENTERE button. 2. Choose a language, and then press the ENTERE button. Choose from English, Español, and Français. ◀…
-
Page 183
■ Caption (On-Screen Text Messages) ● Caption (Off / On): You can switch the caption function on or off. If captions are not available, they will not be displayed on the screen. Caption feature does not work with devices connected to the TV through the Component, HDMI or PC input jacks. -
Page 184
Text1~Text4: (digital channels Default / Service1~Service6 / CC1~CC4 / only) The Digital Captions function works with digital channels. Service1~6 may not be available in digital caption mode depending on the broadcast. ● Digital Caption Options: (digital channels only) Adjusts the each option. When done, select Close. -
Page 185
Color: You can change the background color of the caption. Background Options include Default, White, Black, Red, Green, Blue, Yellow, Magenta and Cyan. The default is Black. Foreground Opacity: This adjusts the opacity of text. Options include Default, Transparent, Translucent, Solid and Flashing. Opacity: This adjusts the opacity of the caption background. -
Page 186
NOTE ● Digital Caption Options are available only when you can select Default Service1 ~ Service6 Caption mode. ● The availability of captions depends on the program being broadcast. ● setting follows the standards set by the broadcaster. Default ● You cannot set the Foreground Background… -
Page 187: Support Menu
Support Menu ❑ Support Menu → → MENUm Support ENTERE ■ Legal Notice Legal Notice may differ depending on the country. ◀ ▶ English…
-
Page 188
■ e-Manual The e-Manual is built into your TV. Open the e-Manual to learn how to use your TV’s many features. For the detailed information about the e-Manual Screen, refer to “How to view the e-Manual” in the Users Manual. ◀… -
Page 189
Yes: Select if the test picture does not appear or there is noise or distortion in the test picture. There may be a problem with the TV. Contact Samsung’s Call Center for assistance. No: Select if the test picture displays properly. -
Page 190
▶ speaker during the sound test. There may be a problem with the TV. Contact Samsung’s Call Center for assistance. No: Select No if you can hear sound from the speakers. There may be a problem with your external equipment. Please check your connections. If the problem persists, refer to the external device’s user manual. -
Page 191
● Information: (digital channels only) The reception quality of over-the-air Signal HD channels is either perfect or the channels are unavailable. Signal Information displays HD channel signal strength so you can adjust your antenna to increase signal strength and receive HD channels. ●… -
Page 192
■ Software Upgrade The Software Upgrade menu lets you upgrade your TV’s software to the latest version. ● Current Version: This is the software version already installed in the TV. ◀ ▶ English… -
Page 193
Upgrading to the Latest Version You can upgrade in four ways: ● By USB ● By Online ● Alternative Software ● Standby Mode Upgrade The four methods are explained in the following pages. ◀ ▶ Be careful not to turn off the power until the upgrade is complete. The TV will turn off and on automatically after completing the software upgrade. -
Page 194
By USB To upgrade by USB, follow these steps: 1. Visit www.samsung.com. 2. Download the latest USB software upgrade exe archive to your computer. ● The displayed image may differ depending on the 3. Extracts the exe archive to your computer. -
Page 195
By Online By Online function lets you download the upgrade software directly from the Internet into your TV and then upgrade the software in one operation. To use By Online, you must have configured your TV to connect to your network and the TV must be connected to the Internet. -
Page 196
4. If you select Now, the TV upgrades the software, turns off, and then Upgrade turns on automatically. 5. If you do not make a selection in one minute or select Later, the TV Upgrade stores the new upgrade software. You can upgrade the software later using the Alternative Software function. -
Page 197
Alternative Software Alternative Software option lets you upgrade using a file the TV downloaded earlier, but you decided not to install immediately, or a file downloaded by the TV in Standby Mode (See Standby Mode Upgrade on the next page). To upgrade By Alternative Software, follow these steps:… -
Page 198
Standby Mode Upgrade You can set the Standby Mode Upgrade function so that the TV downloads new upgrade software when it is in Standby mode. In Standby mode, the TV is off, but its Internet connection is active. This allows the TV to download upgrade software automatically, when you are not using it. -
Page 199
To set Upgrade, follow these steps: Standby Mode 1. Press the arrow buttons to select Standby Mode Upgrade in Software upgrade menu, and then press the button. ENTERE 2. Select or Off. ● Off: If you select Off, the TV will notify you with a pop up message when newupgrade software is available. -
Page 200
■ Contact Samsung View this information when your TV does not work properly or when you want to upgrade the software. You can find information regarding our call centers and how to download products and software. ◀ ▶ English… -
Page 201: Advanced Features
■ Using the 3D function This exciting new feature enables you to view 3D content. To fully enjoy this feature, you must purchase a pair of Samsung 3D Active Glasses (SSG-3100GB, SSG-3300GR, SSG-3300CR, SSG-3700CR) to view 3D video. Samsung 3D Active Glasses are sold separately.
-
Page 202
IMPORTANT HEALTH AND SAFETY INFORMATION FOR 3D PICTURES. Read and understand the following safety information before using the TV’s 3D function. WARNING ● Some viewers may experience discomfort while viewing 3D TV such as dizziness, nausea and headaches. If you experience any such symptom, stop viewing 3D TV, remove the 3D Active Glasses and rest. -
Page 203
● A responsible adult should frequently check on children who are using the 3D function. If there are any reports of tired eyes, headaches, dizziness, or nausea, have the child stop viewing 3D TV and rest. ● Do not use the 3D Active Glasses for other purposes (such as general eyeglasses, sunglasses, protective goggles, etc.) ●… -
Page 204
● Mode: Select the 3D input format. If you want to experience the 3D effect fully, put the 3D Active Glasses on first, and then select the 3D Mode from the list below that provides the best 3D viewing experience. 3D Mode may differ depending on the input signal. -
Page 205
3D Mode Operation Checker Board Displays the images for the left and right eye alternately in pixels. for LED 7000 Series and above Frame Sequential Displays the images for the left and right eye alternately in frames. for LED 7000 Series and above Some file formats may not support the “2D →… -
Page 206
● : Adjust 3D effects like perspective and 3D Effect for LED 7000 Series and above depth to your preference. 3D Effect (Auto / Manual) – Auto: Automatically adjust the perspective and depth settings in accordance with the 3D input source. –… -
Page 207
3D Mode ● 3D Auto View (Off / Message Notice / On): for LED 7000 / PDP 8000 Series and above If you set to On, TV will switches the TV to 3D automatically. 3D Auto View If you set… -
Page 208
When you access some application (such as etc.), TV Smart Hub, Yahoo, will do not switch to 3D. In this case, you should to use the 3D, after exiting the application. ● 3D Optimize : Automatically adjusts the picture overall to provide an for LED TV optimal 3D effect. -
Page 209
How to watch the 3D images Some 3D modes may not be available depending on the format of the image source. To watch in 3D, you must wear 3D Active Glasses and turn the glasses on by pressing the power button. 1. -
Page 210
3. Use the button to select Mode, and then press the button. ENTERE 4. Using the buttons on your remote control, select the 3D Mode of the image 3D Mode you want to view. Cancel ● The displayed image may differ depending on the model. -
Page 211
Supported formats and operating specifications for Standard HDMI 3D The 3D formats listed below are recommended by the HDMI association and must be supported by 3D TVs. Source signal format Standard HDMI 1.4 3D 1920x1080p@24Hz x 2 1920x2205p@24Hz 1280x720p@60Hz x 2 1280x1470p@60Hz ◀… -
Page 212
Read These Notes Before Using the 3D Function… NOTE ● 3D Mode is set to automatically when you access Smart Hub e-Manual functions. ● 3D Mode is set to its memorized configuration value automatically when you change the input source. ◀… -
Page 213
● is not supported in mode. ● 3D Active Glasses from Samsung’s previous product (IR type) or other manufacturers are not be supported. ● When the TV is initially powered on, it may take some time until the 3D display is optimized. -
Page 214
● Be sure to stay within the viewing angle and optimum TV viewing distance when watching 3D pictures. Otherwise, you may not be able to see 3D effects properly. ● The ideal 3D viewing distance is three times or more the height of the screen. -
Page 215: Smart Hub
Smart Hub ❑ Smart Hub Using Smart Hub, you can stream movies, Search videos, and music from the Internet, access Recommended various for pay or free-of-charge applications and view them on your TV. Application content Favorites Channel Videos Photos Music Web Browser includes news, sports, weather forecasts, stock ◀…
-
Page 216
TV. Enter a keyword to Exit: Exits the SMART HUB. search for media, various Search Samsung Apps : You can applications, or online information that you can download various for pay or use on the TV. -
Page 217
NOTE ● Samsung Electronics takes no legal responsibility for any interruption of the Smart Hub service caused by the service provider for any reason. ● The Smart Hub service downloads and processes data via the Internet so that you can enjoy the Internet contents on your TV screen. If the Internet connection is unstable, the service may be delayed or interrupted. -
Page 218
● For more information about a Smart Hub service, visit the web site of the applicable service provider. ● The services provided are subject to change by the Smart Hub service provider without notice. ● The Smart Hub service contents may differ depending on the player’s firmware version. -
Page 219
Starting Smart Hub for the First Time To start Smart Hub for the first time, follow these steps : 1. Press the SMART HUB button. 2. The screen appears. In a few cases, the screen appears Smart Hub Country immediately after. 3. -
Page 220
5. The screen appears. Press the buttons to select Internet Privacy Policy Agree, then press the button. ENTERE 6. The screen appears and installs a number of services and Service Update applications. When done, it closes. The applications and services downloaded are displayed on the Smart Hub screen. -
Page 221
Using the Keypad Pressing the – button on the remote while you are using the Screen Keypad enables you to change the text fields to lower case, capitalized case, upper case, numbers and icons. You can use this Screen Keypad in a several Smart Hub applications. -
Page 222
4. Press the – button on the remote 4 times to change the input mode from numbers to upper case. 5. Press the 2 button on the remote 3 times to input C. 6. Press the – button on the remote 3 times to change the input mode from upper case to lower case. -
Page 223
4. Press the – button on the remote 4 times to change the input mode from numbers to upper case. 5. Press numbers in sequence: 2, 4, 2, 6, 4. A window will appear displaying a list of words that can be entered using the selected numbers. Select “Chang” from the list. -
Page 224
Creating an Account To establish your own, exclusive, configuration of Smart Hub, create your own Smart Hub account. Note ● You must use an e-mail address as an ID. ● You can register up to 10 User Accounts. ● You do not need an account to use Smart Hub. -
Page 225
To create an account, follow these steps: 1. Press the button on your remote control. The Login screen appears. 2. Press the buttons to select Create Account, and then press the button. ENTERE 3. On the next screen, select Account, and then press the Smart Hub ENTERE button. -
Page 226
5. When done, press the button. The Login screen re-appears. ENTERE 6. Select Password, and then press the ENTERE button. The Password screen and a keyboard appear. 7. Use the keypad to enter a password. The password can be any combination of letters, numbers, and symbols. -
Page 227
8. When done, press the button. ENTERE 9. Select Confirm password and then press the ENTERE button. 10. Repeat Steps 7 and 8. 11. When the Login screen re-appears, select Create Account, and then press the button. The Confirmation screen appears. ENTERE 12. -
Page 228
14. The Register Service Account screen appears. If you have existing accounts with any of the listed providers, you can associate the provider account and the provider account password with your Smart Hub account. Registration makes it easier to access the providers web site. For registration instructions, go to Step 2 in Account Management under… -
Page 229
Account Log In To log in to your Smart Hub account, follow these steps: 1. With the Smart Hub main screen displayed on your TV, press the button on your remote. The Login screen appears. 2. Select the next to the field, and then press the Smart TV ID ENTERE… -
Page 230
4. Select Password, and then press the button. The Password screen ENTERE and a keypad appears. 5. Using the keypad and your remote, enter your password. When done, press ENTERE button. If you want Smart Hub to enter your password automatically, select Remember my Smart TV ID and password after you have entered your password, and then press the… -
Page 231: Setting Up Smart Hub
❑ Setting up Smart Hub ■ Settings The Settings Menu Screen gives you access to account management, account reset, and account properties functions. To access the Settings Menu, and then select a menu item, follow these steps: 1. Press the button on your remote.
-
Page 232
The functions on the Menu screen are described below. Settings ● Account Management Account Management Menu contains Settings functions that let you register your service Account Management provider accounts, change your Smart Hub Service Manager Reset password, and delete or deactivate your Properties Smart Hub account. -
Page 233
Account: If you have existing accounts with any of the Register Service providers listed by the Register Service Account function, you can associate the provider account and the provider account password with your Smart Hub account. If you associate the account, you will be able to log onto the account through Smart Hub easily, without entering your account name or password. -
Page 234
Service Provider you want to associate with your Smart Hub account, and then press the ENTERE button. If you have a Samsung account and you want to use the Samsung Apps function in Smart Hub, you must register your Samsung Apps account here. -
Page 235
4. If you have entered the ID and password correctly, the Registered message appears, asking you if you want to add another Successfully. service provider. If you do, press the ENTERE button. If not, press the RETURN button and return to the Settings Menu. 5. -
Page 236
3. On the next screen, enter a new password on the first line. Enter it again on the second line to confirm. 4. The message screen appears. Press the Changing Password Completed ENTERE button or wait for the screen to close — about 5 seconds. Remove from TV Account List: The Remove from TV Account List… -
Page 237
● Service Manager Ticker Autorun: You can set Ticker Autorun to come on when powering on the function allows you to view content from the current input source Ticker and ticker data at the same time. Depending on your country, the Ticker application may have a different service or not be supported. -
Page 238
● Reset: The function initializes all downloaded applications, erases all Reset user accounts and settings from the TV, and resets all Smart Hub settings to the factory default settings. It then restarts Smart Hub as if it were starting for the first time. -
Page 239
2. Enter the your security password. The default password set is “0-0-0-0.” If you forget the password you created, press the following sequence of remote control buttons to reset the password to “0-0-0-0”: POWER (off) → MUTE → 8 → 2 → 4 → POWER (on). 3. -
Page 240
● Properties The Properties menu item lists three functions that display information about Smart Hub : Detail: Lists information about Smart Hub including version number, the number of services installed, memory usage, and the unique product ID. Terms of Service Agreement: Display the Terms of Service Agreement. -
Page 241
■ Edit Mode The functions in the Edit Mode menu let you manipulate the applications in the My Applications section of the Smart Hub screen. Using these functions, you can lock and unlock access to some applications, create folders and move applications to them, rename folders, delete applications, and change the position of applications on the screen. -
Page 242
The functions in the Menu bar are described below. Edit Mode NOTE ● Some menu items may not appear on the screen. To see these items, press to move to the screen edge, and then press one more time to reveal the items. -
Page 243
● Move Move function lets you change the screen position of an application. To use the Move function, follow these steps: 1. Press the button on your remote. 2. Select an application, and then press the ENTERE button. A appears above the application. -
Page 244
● Move to Folder Move to Folder function lets you move an application to a folder. To use Move to Folder function, follow these steps: 1. Press the button on your remote. 2. Select an application, and then press the ENTERE button. -
Page 245
To access an application in a Folder 1. Close the Edit Mode menu. 2. In My Applications, press the to select a folder, and then press the ENTERE button. The folder opens. 3. Select an application, and then press the ENTERE button. -
Page 246
To Edit Items in a Folder Select a folder, and then press the ENTERE button. The folder opens. Press button on your remote. The Edit buttons appear at the bottom of the screen. These buttons work the same as the Edit Mode menu buttons on the main screen. -
Page 247
● New Folder New Folder function lets you create and name new folders. Once you have created a folder, you can move applications into it. To use the New Folder function, follow these steps: 1. Press the button on your remote. 2. -
Page 248
● Rename Folder Rename Folder function lets you rename folders. To use the Rename Folder function, follow these steps: 1. Press the button on your remote. 2. Press the to select a folder, and then press the ENTERE button. 3. Press the to select Rename Folder, and then press the… -
Page 249
● Lock Lock function lets you lock some application in My Applications so they can not be opened without entering the password. To use the Lock function, follow these steps: 1. Press the button on your remote. 2. Press the to select an application, and then press the button. -
Page 250
● Unlock 1. Press the button on your remote. 2. Press the to select a locked application, and then press the button. ENTERE 3. Press the to select Unlock, and then press the ENTERE button. The Lock Service screen appears. 4. -
Page 251
● Delete Delete function lets you delete application from My Applications. To use Delete function, follow these steps: 1. Press the button on your remote. 2. Press the to select an application, and then press the ENTERE button. 3. Press the to select Delete, and then press the ENTERE button. -
Page 252
■ Sort by The functions in the Sort Menu let you sort the applications in My Applications by Name, Date, Frequency (of use), and Category. If you manually change the position of an application, the Sort menu is set to User Defined automatically. To sort the applications in My Applications, follow these steps: 1. -
Page 253: Using Smart Hub
❑ Using Smart Hub Enjoy photos, music and/or movie files saved Search on a USB Mass Storage Class (MSC) device Recommended and/or your PC. 1. Press the SMART HUB button. Favorites Channel Videos Photos Music Web Browser 2. Press the button to select Videos, Schedule Ma…
-
Page 254: Connecting A Usb Device
❑ Connecting a USB Device 1. Turn on your TV. TV Rear Panel 2. Connect a USB device containing photo, music and/or movie files to the USB port on the back or side panel of the TV. USB Drive 3. When a USB device is connected to the TV, Connected Device screen appears.
-
Page 255
Read this information before using Smart Hub with a USB device. ● The USB function might not work properly with unlicenced multimedia files. ● MTP (Media Transfer Protocol) is not supported. ● The file system supports FAT16, FAT32 and NTFS. ●… -
Page 256
● Before connecting your device to the TV, please back up your files to prevent them from damage or loss of data. SAMSUNG is not responsible for any data file damage or data loss. ● Connect a USB HDD to the dedicated USB 1 (HDD) port. -
Page 257
● The TV cannot play MP3 files with DRM that have been downloaded from a for pay site. Digital Rights Management (DRM) is a technology that supports the creation, distribution, and management of digital content in an integrated and comprehensive way, including protecting the rights and interests of content providers, preventing illegal copying of contents, and managing billings and settlements. -
Page 258
● If the TV has no input during the time set in Time, the Auto Protection Screensaver will run. ● The power-saving mode of some external hard disk drives may be released automatically when you connect them to the TV. ●… -
Page 259
❑ Connecting to a PC through a network You can play pictures, music, and videos saved in your PC through a network connection in the AllShare mode. For more information on how to configure your TV and connect it to your network, see ‘Network Connection’. -
Page 260
The following Smart Hub functions are not supported when you are playing media from a PC connected through a network: ● functions. Background Music Background Music Setting ● Sorting files by preference in the Music, and folders. Photos, Videos ● (REW) or (FF) button while a movie is playing. -
Page 261
Depending on the Internet server, when you use through a network Smart Hub connection: ● The sorting method may vary. ● function may not be supported. Scene Search ● function which resumes playing of a video, may not be supported. Resume –… -
Page 262: Screen Display
❑ Screen Display Move to the file you want to play using the up/down/right/left buttons, and then press the ENTERE (Play) button. The file is played. � Home: Return to content Music Device name: Displays the home name of the connected Change Contents/Device: device.
-
Page 263: Videos
■ Videos Playing a Video 1. Press the button to select the Play 1:02:15 / 2:04:10 desired video in the file list. Movie 1.avi 2. Press the ENTERE button or �(Play) button. ● The file name appears on the top with its ◀…
-
Page 264
● You can use the (REW), (FF), Pause, Stop, and Play buttons on the π µ bottom of your remote during playback. ● Press the RETURN button to exit the movie ● Supported Video Subitle Formats (for language subtiles, etc.) Name File extension Format… -
Page 265: Supported Video Formats
● Supported Video Formats Frame rate Bit rate File Extension Container Video Codec Resolution Audio Codec (fps) (Mbps) Divx 3.11 / 4.x / 5.1 / 6.0 1920×1080 6 ~ 30 MP3 / AC3 XviD 1920×1080 6 ~ 30 *.avi / LPCM / H.264 BP / MP / HP 1920×1080 6 ~ 30…
-
Page 266
Frame rate Bit rate File Extension Container Video Codec Resolution Audio Codec (fps) (Mbps) H.264 BP / MP / HP 1920×1080 6 ~ 30 ADPCM / *.3gp 3GPP AAC / HE- MPEG4 SP / ASP 1920×1080 6 ~ 30 MPEG1 352×288 24 / 25 / 30 AC3 / MPEG… -
Page 267
Other Restrictions NOTE ● Video content will not play, or not play correctly, if there is an error in the content or the container. ● Sound or video may not work if the contents have a standard bitrate/frame rate above the compatible Frame/sec listed in the table above. ●… -
Page 268
● The menu may take longer to appear if the video’s bit rate exceeds 10Mbps. ● Some USB/digital camera devices may not be compatible with the player. Video Decoder Audio Decoder • • Supports up to H.264, Level 4.1 Supports up to WMA 7, 8, 9, STD •… -
Page 269
Using the Play Continuously Function (Resume Play) If you exit a movie when it is playing, you can play the movie later from the point where you stopped it. Resume function does not support multiple users. (It will only memorize the point where the most recent user stopped playing.) 1. -
Page 270
Using the Scene Search function Scene Search divides a video into five chapters during playback. You can then re- start playback from the chapter you select. If the index information is damaged or unsupported, you will not be able to use the Scene Search function. -
Page 271: Music
■ Music Playing Music 1. Press the button to select the Playlist Musi desired music file in the file list. No S No S Singe I Love You Musi Musi i c_2 Ming No Sing g er Musi sic_3 Love No S S inge inge…
-
Page 272
Creating My Playlist 1. On the Music screen in the Smart Hub menu, press the button to select Edit Mode, and then press the ENTERE button. A check box appears to the left of the files. 2. Press the button to select the tracks you want to add, and then press the ENTERE button. -
Page 273
4. Press the button to select Add to My Playlist. Note that selecting Clear My Playlist will return My Playlist to the default playlist and remove all the tracks you added. 5. Press the button. The message “Selected items were added to My ENTERE Playlist.”… -
Page 274
Playing Selected Music Files 1. On the Music screen in the Smart Hub menu, press the button to select Edit Mode on the far right side of the screen, and then press the ENTERE button. 2. Press the button to select the desired music file in the file list, and then ENTERE button. -
Page 275: Photos
■ Photos Viewing a Photo (or Slide Show) 1. Press the button to select the Normal Friends.jpg 1024 X 768 2011/01/03 desired file in the file list. 2. Press the ENTERE button. ● To view files manually, one at a time, press the left or right arrow buttons.
-
Page 276
When you press the (Play) button in the file list, the slide show will start � immediately. During a Show, press the TOOLS button to access additional functions Slide such as Slide Show Speed, Background Music, Zoom, and Rotate. You can add background music to a slide show if you have music files on your USB device or PC by setting Background Music to On in the Tools menu, and then selecting music files to play. -
Page 277: Additional Functions
❑ Smart Hub — Additional Functions Sorting the file lists To sort files in the file lists, select the (Sorting) icon in the top right of the screen by using the button. Then, press the ENTERE button. The checks below indicate which media the sort criteria apply to. Sort Criteria Operation Videos…
-
Page 278
Sort Criteria Operation Videos Music Photos Artist Sorts the music file by artist in alphabetical order. > Album Sorts the music file by album in alphabetical order. > Genre Sorts music files by the Genre. > Monthly Sorts and shows photo files by month. >… -
Page 279
Videos/Music/Photos Play Option menu When playing video or photo files, you can press the TOOLS button to display an Options menu. Below are a series of tables listing the options available and the media each option applies to. Option Name Operations Videos Music… -
Page 280
Option Name Operations Videos Music Photos You can use the Scene Search function during Scene Search playback to view or start a movie from the scene > of your choice. You can move directly to another Title. Title Search > You can search the movie using buttons Time Search… -
Page 281
Option Name Operations Videos Music Photos Picture Mode You can change the Picture Mode. > > Sound Mode You can change the Sound Mode. > > > You can enjoy video in one of supported languages. The function is enabled only when you Audio Language >… -
Page 282
Option Name Operations Videos Music Photos Slide Show Effect You can set various slide show effects. > Background Music You can start or stop background music. > On / Off You can set and select background music when Background Music >… -
Page 283: Using Samsung Apps
❑ Using Samsung Apps ■ Samsung Apps Samsung Apps is a store from which you can download applications to use on Samsung TV/AV equipment. You can enjoy a variety of contents such as videos, music, photos, games, useful information etc. using the downloaded applications.
-
Page 284
Using the colored buttons with Samsung Apps. ● Red (Login): To log in to the Internet What’s New? Welcome to Samsung Apps! More apps are in store for you to enjoy. What’s New? service. Accu Weather Video TV store Test User001… -
Page 285
Using Samsung Apps by category The following categories are available: ● New?: Displays newly registered applications. What’s ● Video: Displays apps that provide video media such as movies, TV shows and short length videos. ● Game: Displays various game apps such as sudoku and chess. -
Page 286
Account: Displays the application list and your App cash balance. Starting in the middle of 2010 (US and Korea only), you can purchase cybercash that you can use to buy applications through tv.samsungapps.com. ● Help: If you have questions about Samsung Apps, check this section first. ◀ ▶ English… -
Page 287
■ Social TV (May not be available, depending on your country.) Share your TV viewing experience with your friends via social networking services (SNS). Using the Social TV function provided by the Smart Hub, you can use an SNS function such as Twitter, Facebook or Google Talk while watching TV in the same way you use it on a PC. -
Page 288
1. To open TV, press the buttons to select Social Social and then press the button. ENTERE 2. Enjoy your social network service through Social TV Using the colored and function buttons with Social TV ● (Log in / Logout): To log into or logout of the Smart Hub account. ●… -
Page 289
■ Search (May not be available, depending on your country.) Easily search for and access content from diverse sources (e.g. applications, Your Video, AllShare) 1. To open Search, press the buttons to select Search, and ◀ ▶ then press the ENTERE button. -
Page 290
Video: Personalize your movie-watching with a customized video on demand Your (VOD) recommendation service. Searched: You can search for a video by selecting a key word in the key Most word list. The key word list displays words you frequently use for searches. Application: You can search top video applications and services for a video. -
Page 291
■ Your Video (May not be available, depending on your country.) 1. To open Your Video, press the buttons to select Your Video, and then press the ENTERE button. 2. Enjoy your movie watching with a customized video on demand (VOD) ◀… -
Page 292
■ Web Browser (May not be available, depending on your country.) Using the Web Browser function provided by the Smart Hub, you can surf the Internet on your TV. 1. To open Browser, press the buttons to select ◀ ▶ Browser, and then press the ENTERE button. -
Page 293
When the Web Browser opens, the cursor is in Tab Mode. In Tab Mode, the cursor highlights text or objects, or surrounds them with a blue rectangle. To move the cursor in Tab Mode, use the buttons. Press ENTERE to select. To scroll the screen down, use the buttons. -
Page 294
has a series of icons across the top of the screen. With these Web Browser icons, you can easily use the Browser. The icons are described below, starting with the icon on the far left of the screen. ● Back: Moves to the previous web page. If there is no saved previous web page, this icon will not work. -
Page 295
● Zoom: You can select a zoom level of 50%, 75%, 100%, 125%, 150%, 200%, 400% Fit to Screen. ● Favorite: Displays the screen. You can set the current page as Favorites List a Favorite or select a favorite page to visit from the Favorites page list. ●… -
Page 296
● URL: Shows the URL of the current page. If you press the button, ENTERE the URL pop-up appears. Press again and you can key in a new a ENTERE URL directly. You can also select a page to visit on the displayed Page list. In addition, you can sort the Page list by Date, Name, or Frequency. -
Page 297
● Search: Lets you search the web. When you access the entry field and Search press ENTERE, the Browser displays a pop-up with a text entry keyboard and a text entry field on the right. The keyboard functions much like a cell phone texting keypad. -
Page 298
Using the colored and function buttons with the Web Browser ● Red (Back): Moves to previous page. If there is no saved previous web page, this button will not work. ● Green (Zoom): You can select a screen size of 50%, 75%, 100%, 125%, 150%, 200%, 400% Fit to… -
Page 299
● TOOLS (Options): Displays the icons from the top of the page in a toolbar in the middle of the screen. Press RETURN to close. ● Down): You can scroll the page up or down. (Scroll Up / πµ ● RETURN: Return to the previous screen or close the Browser. -
Page 300
● Tools: Provides an easy-to-read page by enlarging the main text. Reading ● Clean Site: When Clean Site is on, you can only access the web pages registered in Site. Use Clean Site to restrict your children’s access to Clean appropriate web pages. -
Page 301
● Site: Lets you add the currently displayed web site to the Clean Add Current Site list. Manage: Lets you key in URLs to add to the List and Clean Site Clean Site delete sites from the Clean Site List. If you turn Clean Site on and have not added any sites to the… -
Page 302
● Options: You can configure options. Web Browser Home Settings: You can set the home page. – Most Visited Sites: Set the most frequently visited URL as the home page. – CurrentPage: Sets the current page as the home page. –… -
Page 303
– Off): Turns the on or off. Advertisement Block (On / Advertisement Block – Block Current Site: Adds the current page to the blocked list. – Manage Advertisement Block: Displays the Advertisement Block Site screen. You can add a website for which advertisements Management should be blocked by directly keying in the URL, or you can delete a website from the list. -
Page 304
Encoding: You can set the Encoding setting for webpages to Automatic or Manual. – Automatic Selection (On / Off): Select the Encoding settings for webpages automatically. – Settings: Select the Encoding settings for webpages manually. Select an encoding format from the encoding format list. Pointer: You can set the speed of the cursor when the cursor is set to Pointer Mode. -
Page 305
Buy and use the TV camera (SAMSUNG only). ● The displayed image may differ depending on the model. Other company’s TV Cameras are not ◀ ▶ compatible with Skype on your TV. For more information, download the Skype user’s manual from “www.samsung. com.” English… -
Page 306
[Legal Statement] Due to the various capabilities of products featuring the Samsung Smart Hub — Content Service, as well as limitations in the available content, certain features, applications, and services may not be available on all devices or in all territories. -
Page 307
■ Yahoo Smart Hub provides an integrated Internet and television experience powered by the Yahoo!® Widget Engine. You can monitor stocks, stocks, share photos with friends and family, and track news and weather all through the Yahoo!® Widget Engine. When running Smart Hub for the first time, you will be prompted to configure the basic settings. -
Page 308
Screen Display ● Dock Mode Welcome Banner: Shows your profile. Hello John! 5:15 AM Mon January 19th ● Blue (Viewport): Toggles between Viewport Viewport Edit Snippet Overlay modes. ● Yellow (Edit Snippet): To edit snippets with a help window. N In Viewport mode, the TV or video plays in a scaled-down area with graphics outside. -
Page 309
● Sidebar Mode FINANCE Widget logo and Current menu. My Stocks Contents List: The current selection is highlighted To remove a stocks symbol, please select it from the in blue. Displays the current page and number of list below. ^DJI total pages. -
Page 310
Editing Snippets in the Dock 1. Edit a snippet by selecting it in the dock and pressing the Yellow button. 2. The snippet moves to the Second position and its tile slides up to show the following help text: ● Move Snippet: To rearrange snippets. -
Page 311
■ PROFILE Widget Set up user profiles through PROFILE Widget. You can set up multiple profiles, each with its own list of widgets. Use the Switch Profile option to switch to a different user profile. There must be at least two registered profiles. For instructions on adding a profile, refer to Administrative Controls. -
Page 312
● Use the option to customize and protect your profile. Profile Settings – User profiles can be customized with a unique name PROFILE and avatar (a picture used to represent your profile). Signed in as – Your profile’s name and avatar are displayed in the John profile snippet in the dock. -
Page 313
● option limits access to the profile’s widgets. Profile Settings – If you forget your Profile PIN, answer your profile’s Security Question. – New widgets cannot be added to profiles with the Limit Profile indicator enabled. must be set to use this feature. For instructions on setting Owner PIN Owner PIN, refer to… -
Page 314
– resets all widget settings and information. Restore Factory Settings When you cannot run Restore Factory Settings normally or you can not install/run the specific widgets normally, press the remote control buttons in the following sequence, which resets the Yahoo Service: POWER (on) →… -
Page 315
● Sign into Yahoo!® from Widget using your PROFILE Yahoo! – If you have a Yahoo! ID, you can access personalized content using Yahoo! TV widgets. – You will be automatically signed-in to all installed Yahoo! TV widgets with your profile’s Yahoo! ID. –… -
Page 316: Widget Gallery
❑ Widget Gallery Use Yahoo!® Widget Gallery to add more widgets to your TV. View available TV widgets in the following categories: ● Featured: Displays recommended widgets. ● Latest: Displays the most recent widgets. ● Widgets: Displays all widgets. ● Categories: Displays all widgets by category.
-
Page 317
● Settings: Press the Green button. Widget Gallery – About Yahoo! Widget Gallery…: You can view brief information for the Widget Gallery, Copyright Policy, Terms of Service, and Privacy Policy. – Software: Displays the current version of the system software TV Widget and installed widgets. -
Page 318: Troubleshooting For Smart Hub
❑ Troubleshooting for Smart Hub Problem Possible Solution Some application contents only The Application content language may be different from the appear in English. How can I change application user interface language. the language? The ability to change the language depends on the service provider.
-
Page 319
■ Troubleshooting for Web Browser 1. To open Browser, press the buttons to select Browser, and then press the ENTERE button. The Web Browser may be displayed differently with PC. 2. The is not compatible with a Java application. Web Browser 3. -
Page 320
7. Scrolling a web page that allows only part (and not the whole) of the page to be scrolled may cause corrupted characters. 8. ActiveX is not supported. 9. Some options cannot be accessed in Tab mode. (To access such options, switch to Pointer mode.) 10. -
Page 321
14. When writing emails or posting messages, some functions (Such as changing the size or colours.) may not be supported. 15. The number of bookmarks and logs that can be saved is limited. 16. The maximum number of windows that can open at the same time may vary depending on the browsing condition or TV model. -
Page 322
21. When you import or export the bookmark, the folder tree is not included. 22. If you import the bookmark file to a Computer from a TV, the bookmark file will be saved in “Samsung SmartTV Bookmark” folder. 23. If the time is not set in the menu (System →… -
Page 323
IS WITH YOU. THE DEVICE AND ALL THIRD PARTY CONTENT AND SERVICES ARE PROVIDED “AS IS” WITHOUT WARRANTY OF ANY KIND, EITHER EXPRESS OR IMPLIED. SAMSUNG EXPRESSLY DISCLAIMS ALL WARRANTIES AND CONDITIONS WITH RESPECT TO THE DEVICE AND ANY CONTENT ◀… -
Page 324
◀ ▶ device. Samsung may impose limits on the use of or access to certain services or content, in any case and without notice or liability. Samsung is neither responsible nor liable for customer service related to the content and services. Any question or request for service relating to the content or services should be made directly to the respective content and service providers. -
Page 325: Allshare
(such as your PC) by controlling them on the TV via the network. Additionally, you can use your TV for browsing web pages on your mobile phones. For more information, visit “www.samsung.com” or contact the Samsung call ◀ ▶…
-
Page 326
All Share If your Samsung TV connects to a non-Samsung DLNA server, a compatibility issue may occur during video playback. By connecting your Samsung TV to a network via AllShare™, you can use Samsung’s original functions as follows: – Playback of various video formats (DivX,XVID, MP4, 3GPP, AVI, ASF, MKV, etc.) -
Page 327: Setting Up Allshare
❑ Setting Up AllShare™ MENU → → → Network AllShare Settings ENTERE ■ AllShare Settings ● Media (On / Off): Enables or disables the media AllShare Settings function. When the media function is on, you can Media control Media contents play using mobile phones or other devices that support DLNA DMC.
-
Page 328
■ Media Shows a list of mobile phones or connected devices which have been set up to use the Media function with this TV. The Media function is available in all devices which support DLNA DMC. ● Allowed / Denied: Allows/Blocks the devices. ●… -
Page 329
Using the Media Function An alarm window appears informing you that media contents (videos, photos, music) sent from a mobile phone will be displayed on your TV. The contents are played automatically 3 seconds after the alarm window appears. If you press the RETURN or EXIT button when the alarm window appears, the media contents are not played. -
Page 330
● To turn off media contents transmissions from a mobile phone, set Media in the AllShare Settings. ● Contents may not play on your TV depending on their resolution and format. ● buttons may not work depending on the type of ENTERE media content. -
Page 331: Anynet+(Hdmi-Cec)
■ What is Anynet+? Anynet+ is a function that enables you to control all connected Samsung devices that support Anynet+ with your Samsung TV’s remote. The Anynet+ system can be used only with Samsung devices that have the Anynet+ feature. To be sure your Samsung device has this feature, check if there is an Anynet+ logo on it.
-
Page 332
● For instructions explaining how to connect Anynet+ external devices, refer to the device’s user manual You must connect an Anynet+ device using an HDMI cable. Some HDMI cables may not support Anynet+ functions. ● Anynet+ works when the AV device supporting Anynet+ is in the standby or on status. -
Page 333
● However, you can connect only one Anynet+ Home Theater. To connect an Anynet+ Home Theate, connect the Home Theater to the TV using an HDMI cable then: – To hear sound from the Home Theater’s Front, Left and Right speakers and the subwoofer only, connect a Digital Optical cable between the DIGITAL AUDIO OUT (OPTICAL) jack on your TV and the Digital Audio Input on the Home Theater. -
Page 334
Anynet+ Menu The Anynet+ menu changes depending on the type and status of the Anynet+ devices connected to the TV. Anynet+ Menu Description • Changes Anynet+ mode to TV broadcast mode. View TV • Shows the Anynet+ device list. Device List •… -
Page 335: Setting Up Anynet
❑ Setting Up Anynet+ → → → MENUm System Anynet+ (HDMI-CEC) ENTERE ■ Anynet+ (HDMI-CEC) (Off / On) To use the Anynet+ Function, Anynet+ (HDMI-CEC) must be set to On. When the Anynet+ (HDMI-CEC) function is disabled, all the Anynet+ related operations are deactivated.
-
Page 336
■ Auto Turn Off (No / Yes) Set an Anynet+ Device to turn off automatically when the TV is turned off. Auto Turn Off is set to Yes, running external devices will turn off at the same time as the TV powers off. May not be enabled depending on the device. -
Page 337
❑ Switching between Anynet+ Devices 1. Press the TOOLS button, select Anynet+ (HDMI-CEC), and then press ENTERE. 2. Select Device List, and then press the ENTERE button. If you cannot find a device you want, select Refresh to refresh the list. 3. -
Page 338
menu appears only when you set Device List Anynet+ (HDMI-CEC) in the menu. System ● Switching to the selected device may take up to 2 minutes. You cannot cancel the switching operation while switching is in progress. ● If you have selected an Anynet+ device by pressing the SOURCE button and then selecting its input source, you cannot use the Anynet+ function. -
Page 339: Listening Through A Receiver
❑ Listening through a Receiver You can listen to sound through a receiver (i.e Home Theater) instead of the Speaker. 1. Select Receiver and set to On. 2. Press the EXIT button to exit. If your receiver supports audio only, it may not appear in the device list. The receiver will work when you have properly connected the optical in jack ◀…
-
Page 340
Using the ARC function You can listen to sound through a receiver connected using an HDMI cable without connecting a separate optical cable. 1. Select and set to On. Receiver 2. Press the EXIT button to exit. To use the ARC function, a receiver which supports the HDMI-CEC and ARC features must be connected to the HDMI IN 2 (ARC) port. -
Page 341: Troubleshooting For Anynet
❑ Troubleshooting for Anynet+ Problem Possible Solution • Check if the device is an Anynet+ device. The Anynet+ system Anynet+ does not work. supports Anynet+ devices only. • You can connect only one receiver (home theater). • Check if the Anynet+ device power cord is properly connected. •…
-
Page 342
• Check if the Anynet+ device is properly connected to the TV and I want to start Anynet+. check if the Anynet+ (HDMI-CEC) is set to in the Anynet+ Setup menu. • Press the TOOLS button to display the Anynet+ menu and select a menu you want. -
Page 343
• Check whether or not the device supports Anynet+ functions. The connected device is not displayed. • Check whether or not the HDMI cable is properly connected. • Check whether Anynet+ (HDMI-CEC) is set to in the Anynet+ setup menu. •… -
Page 344: Other Information
❑ Troubleshooting If your TV seems to have a problem, first review this list of issues and solutions. If none of these troubleshooting tips apply, please visit “www. samsung.com,” and then click on Support, or contact the Samsung call center.
-
Page 345
Issues Solutions and Explanations • The compression of video contents may cause picture distortion especially The picture is distorted: macro block error, small in fast moving pictures such as sports and action movies. block, dots, pixelization • A weak or bad quality signal can cause picture distortion. This is not a TV issue. -
Page 346
Issues Solutions and Explanations • If the picture size is set to Fit, change it to 16:9. Screen There is a dotted line on the edge of the screen. • Change the cable/satellite box resolution. • If you are using an AV composite input, connect the video cable (yellow) to The picture is black and white. -
Page 347
Issues Solutions and Explanations • Make sure the glasses are turned on. The 3D Active Glasses are not working correctly • The 3D Active Glasses may not work properly if there is any other 3D product or electronic devices turned on near the glasses or TV. •… -
Page 348
Issues Solutions and Explanations Sound Problem First, perform the Sound Test to determine if your TV audio is operating properly. • Go to MENU — Support Self Diagnosis Sound Test) If the audio is OK, the sound problem may caused by the source or signal. •… -
Page 349
Issues Solutions and Explanations • Check cable connections. Make sure a video cable is not connected to an The speakers are making an inappropriate noise. audio input. • For antenna or cable connections, check the signal information. A low signal level may cause sound distortion. -
Page 350
Issues Solutions and Explanations RF (Cable/Antenna) Connection • Make sure the coaxial cable is connected securely. The TV is not receiving all channels. • Auto Program to add available channels to the channel list. Go to MENU — Channel Auto Program then select Auto and make sure to select the correct Cable TV signal type. -
Page 351
Issues Solutions and Explanations PC Connection • Set your PC’s output resolution so it matches a resolution supported by the A “Mode Not Supported” message appears. • This is normal. “PC” is always shown in the source list, regardless of whether “PC”… -
Page 352
Issues Solutions and Explanations Others • Remove the left and right audio connections from the set-top-box. If the Purple/green rolling horizontal bars and buzzing buzzing stops, this indicates that the set-top-box has a grounding issue. noise from the TV speakers Replace the Component video cables with an HDMI connection. -
Page 353
Issues Solutions and Explanations • HD channels will have black bars on either side of the screen when The picture won’t display in full screen. displaying up scaled SD (4:3) contents. • Black bars will appear on the top and bottom of the screen when you watch movies that have aspect ratios different from your TV. -
Page 354
Issues Solutions and Explanations • This smell is normal and will dissipate over time. There is a plastic smell from the TV. • This function is only available for digital channels the TV receives from an The TV Signal Information is unavailable in the Self Antenna / RF/Coax connection. -
Page 355
Issues Solutions and Explanations • Check the cable connections and reconnect them. You have intermittent loss of audio or video. • Loss of audio or video can be caused by using overly rigid or thick cables. Make sure the cables are flexible enough for long term use. If mounting the TV to a wall, we recommend using cables with 90 degree connectors. -
Page 356: Anti-Theft Kensington Lock
Refer to the manual provided with the Kensington Lock for additional information on proper use. The Kensington Lock is not supplied by Samsung. Please find a “K” icon on the rear of the TV. The Kensington slot is beside the “K”…
-
Page 357
To lock the product, follow these steps: 1. Wrap the Kensington Lock cable around a large, stationary object such as desk or chair. 2. Slide the end of the cable with the lock attached through the looped end of the Kensington Lock cable. -
Page 358: License
❑ License TheaterSound, SRS and the symbol are trademarks of SRS Labs, Inc. TheaterSound technology is incorporated under license from SRS Labs, Inc. Manufactured under license from Dolby Laboratories. Dolby and the double-D symbol are trademarks of Dolby Laboratories. Manufactured under license under U.S. Patent #’s: 5,451,942; 5,956,674; 5,974,380; 5,978,762;…
-
Page 359
DivX Certified® to play DivX® video up to HD 1080p, including premium content. DivX®, DivX Certified® and associated logos are trademarks of DivX, Inc. and are used under license. ABOUT DIVX VIDEO: DivX® is a digital video format created by DivX, Inc. This is an official DivX Certified® device that plays DivX video. -
Page 360
Getting started with Skype To sign in with an existing account: Creating new account Skype™ Screen display Adding a contact for Samsung TV To call a contact Receiving History Skype Options * Images and colors can be changed without prior notice. -
Page 361: Getting Started With Skype
The ring bell rings when someone calls to you while you watch the TV or operate the Skype application. Buy and use the TV camera of the SAMSUNG only. The TV Camera of the other companies is incompatible with your TV.
-
Page 362: To Sign In With An Existing Account
To sign in with an existing account: When running Skype on your TV for the first time, enter your Skype Name Password Create Account. If you can’t login, check the network connection. Enter your Skype Name. Welcome to Skype! Skype Name Password Enter your Password.
-
Page 363: Creating New Account
Creating new account Welcome to Skype! Press Create Account. Skype Name Password Sign In Create Account Sign me in when Skype starts Sign me in when the TV powers on Enter the each option(s). Select Agree. ◦ Select one of the terms to see more information. ◦…
-
Page 364: Screen Display
Screen display Your contact list. You can select Skype Credit Video call, Voice call Chat Your Skype Name, online mode. status, mood message and profile picture. Select from the menu items Contact, Chat, History, Call phones and Settings. From the menu item press ENTERE and scroll to the desired option.
-
Page 365: Adding A Contact
Adding a contact Press Add a Contact. Select one. ◦ Add a Skype contact : Enter the person’s Skype name, full name or e-mail. ◦ Add a phone number : Enter the name and phone number.
-
Page 366: To Call A Contact
To call a contact Press Video Call Voice Call. ◦ The display may differ depending on models. Video Call Voice Call…
-
Page 367: Receiving
Receiving When in a video or voice call. Rejects Call. Video Call Voice Call. ■ : Hang up the call. ■ Mic. Vol.: Adjusts the microphone volume. ■ Hold / Resume: Hold/ Resume the call. ✎ A Skype contact will see a notification message when they are put on hold.
-
Page 368: History
History Shows the history of calls you’ve made, listed from most recent to oldest, top to bottom respectively. Each call has an icon next to it: Icons Meaning Incoming call Outgoing call Missed call Incoming voicemail Missed voicemail Incoming conference call Missed conference call ◦…
-
Page 369: Skype Options
Skype Options Change the each option(s). ◦ General settings: Select whether you want Skype to launch automatically when you turn on the ◦ Video settings: Adjust the privacy settings for video. Choose who you will receive video from by selecting Anyone, Only people in my Contact list one.
SAMSUNG AU8000 Crystal UHD 4K Смарт

SAMSUNG AU8000 Crystal UHD 4K Смарт
Благодарим вас за покупку этого продукта Samsung.
Для получения более полного обслуживания зарегистрируйте продукт на www.samsung.com

Свяжитесь с SAMSUNG ПО ВСЕМУ МИРУ
Если у вас есть какие-либо вопросы или комментарии, касающиеся продуктов Samsung, обратитесь в сервисный центр Samsung.
| Страна | Сервисный центр Samsung | Web Сайт |
| СИНГАПУР | 1800 7267864 | 1800-САМСУНГ | www.samsung.com/sg/support |
| АВСТРАЛИЯ | 1300 362 603 | www.samsung.com/au/support |
| Новая Зеландия | 0800 726 786 | www.samsung.com/nz/support |
| ВЬЕТНАМ | 1800 588 889 | www.samsung.com/vn/support |
| Мьянма | +95-1-2399-888 | www.samsung.com/mm/support |
| КАМБОДЖА | 1800-20-3232 (бесплатный) | www.samsung.com/th/support |
| ЛАОС | +856-214-17333 | |
| Малайзия | 1800-88-9999
+ 603-7713 7420 (для связи за границей) |
www.samsung.com/my/support |
| ФИЛИППИНЫ | 1-800-10-726-7864 [бесплатный звонок PLDT]
1-800-8-726-7864 [глобус стационарный и мобильный] 02-8-422-2111 [стандартный стационарный] |
www.samsung.com/ph/support |
| ИНДИЯ | 1800 40 SAMSUNG (1800 40 7267864) (бесплатно)
1800 5 SAMSUNG (1800 5 7267864) (бесплатно) |
www.samsung.com/in/support |
| Непал | 16600172667 (бесплатно только для NTC)
9801572667 (бесплатно для пользователей Ncell) |
|
| БАНГЛАДЕШ | 08000-300-300 (бесплатный)
09612-300-300 |
|
| Шри-Ланка | 011 САМСУНГ (011 7267864) | |
| ИРАН | 021-8255 [CE] | www.samsung.com/iran/support |

Перед чтением данного руководства пользователя
К телевизору прилагается данное руководство пользователя и встроенное электронное руководство (> Настройки> электронное руководство). На webсайт (www.samsung.com), вы можете загрузить руководства и просмотреть их содержимое на своем ПК или мобильном устройстве.
Важные инструкции по безопасности
Внимание! Перед использованием телевизора прочтите инструкции по безопасности. В таблице ниже приведены пояснения к символам, которые могут быть на вашем изделии Samsung. Важные инструкции по безопасности Перед использованием телевизора прочтите инструкции по безопасности. Обратитесь к таблице ниже для пояснения символов, которые могут быть на вашем продукте Samsung.
Питания
- Не допускайте перегрузки настенных розеток, удлинителей или адаптеров сверх их объема.tagе и емкость. Это может вызвать возгорание или поражение электрическим током. См. Раздел технических характеристик питания в руководстве и / или этикетку источника питания на продукте, чтобы узнать объемtagе и ampсрочная информация.
- Шнуры питания должны быть размещены так, чтобы по ним нельзя было наступить или зажать предметы, помещенные на них или напротив них. Обратите особое внимание на шнуры на вилке, в розетках и в местах выхода из прибора.
- Никогда не вставляйте какие-либо металлические предметы в открытые части этого устройства. Это может вызвать поражение электрическим током.
- Во избежание поражения электрическим током никогда не прикасайтесь к внутренней части устройства. Только квалифицированный специалист должен открывать это устройство.
- Обязательно вставляйте шнур питания в розетку до упора. Вынимая вилку кабеля питания из розетки, всегда тяните за вилку. Никогда не отключайте его, потянув за шнур питания. Не прикасайтесь к шнуру питания мокрыми руками.
- Если это устройство не работает нормально, в частности, если от него исходят какие-либо необычные звуки или запахи, немедленно отключите его от сети и обратитесь к авторизованному дилеру или в сервисный центр Samsung.
- Чтобы защитить это устройство от грозы или оставить его без присмотра и долгое время (особенно, когда ребенок, пожилой человек или инвалид), обязательно отключите его от розетки и отсоедините антенну. или кабельная система.
- Скопившаяся пыль может вызвать поражение электрическим током, утечку тока или возгорание из-за образования искр и нагрева на шнуре питания или из-за ухудшения изоляции.
- Используйте только правильно заземленные вилку и розетку.
- Неправильное заземление может вызвать поражение электрическим током или повреждение оборудования. (Только для оборудования класса I.)
- Чтобы полностью отключить это устройство, отключите его от розетки. Чтобы при необходимости можно было быстро отключить это устройство, убедитесь, что розетка и вилка легко доступны.
Установка
- Не размещайте это устройство рядом с батареей отопления или обогревателем, над ними, а также там, где на него попадают прямые солнечные лучи.
- Не ставьте на устройство сосуды (вазы и т. Д.) С водой, так как это может привести к возгоранию или поражению электрическим током.
- Не подвергайте устройство воздействию дождя или влаги.
- Обязательно обратитесь в авторизованный сервисный центр Samsung для получения информации, если вы собираетесь установить телевизор в месте с сильной запыленностью, высокими или низкими температурами, высокой влажностью, химическими веществами или где он будет работать 24 часа в сутки, например в аэропорту. , железнодорожный вокзал и т. д. Несоблюдение этого требования может привести к серьезному повреждению вашего телевизора.
- Не подвергайте это устройство воздействию капель или брызг.
Крепление телевизора на стене
Если вы устанавливаете этот телевизор на стену, точно следуйте инструкциям производителя. Если он установлен неправильно, телевизор может соскользнуть или упасть и причинить серьезную травму ребенку или взрослому и серьезно повредить телевизор.
- Чтобы заказать комплект для настенного крепления Samsung, обратитесь в сервисный центр Samsung.
- Samsung Electronics не несет ответственности за какие-либо повреждения продукта или травмы себе или окружающим, если вы решите установить настенное крепление самостоятельно.
- Компания Samsung не несет ответственности за повреждение продукта или получение травм в результате использования настенного крепления, не соответствующего стандарту VESA или не указанного в спецификации, или в случае несоблюдения пользователем инструкций по установке продукта.
- Вы можете установить настенное крепление на прочную стену перпендикулярно полу. Перед установкой настенного крепления на поверхности, отличные от гипсокартона, обратитесь к ближайшему дилеру за дополнительной информацией. Если вы установите телевизор на потолке или наклонной стене, он может упасть и нанести серьезную травму.
- При установке комплекта для настенного монтажа мы рекомендуем вам затянуть все четыре винта VESA.
- Если вы хотите установить комплект для настенного монтажа, который крепится к стене только двумя верхними винтами, обязательно используйте комплект для настенного монтажа Samsung, который поддерживает этот тип установки. (Возможно, вы не сможете приобрести этот тип набора для настенного монтажа в зависимости от географического региона.)
- Не устанавливайте телевизор под наклоном более 15 градусов.
- Стандартные размеры комплектов для настенного монтажа показаны в таблице в Руководстве по быстрой установке. Не устанавливайте комплект для настенного крепления, когда телевизор включен. Это может привести к поражению электрическим током. Не используйте винты, длина которых превышает стандартный размер, или винты, не соответствующие требованиям стандарта VESA. Слишком длинные винты могут повредить внутреннюю часть телевизора.
- Длина винтов для настенного крепления, не соответствующего требованиям стандарта VESA, может отличаться в зависимости от технических характеристик настенного крепления.
- Не затягивайте винты слишком сильно. Это может привести к повреждению продукта или его падению, что может привести к травме. Samsung не несет ответственности за подобные происшествия.
- Всегда попросите двух человек прикрепить телевизор к стене.
- Для моделей с диагональю 82 дюйма или больше попросите четырех человек прикрепить телевизор к стене.
Обеспечение надлежащей вентиляции для вашего телевизора
При установке телевизора сохраняйте расстояние не менее 10 см между телевизором и другими объектами (стенами, стенками шкафа и т. Д.), Чтобы обеспечить надлежащую вентиляцию. Несоблюдение надлежащей вентиляции может привести к возгоранию или неисправности изделия из-за повышения его внутренней температуры.
- При установке телевизора на подставку или настенное крепление мы настоятельно рекомендуем использовать только детали, предоставленные Samsung Electronics. Использование деталей, предоставленных другим производителем, может вызвать проблемы с изделием или привести к травмам, вызванным его падением.
Техника безопасности
Внимание: Если тянуть, толкать телевизор или забираться на него, он может упасть. В частности, убедитесь, что ваши дети не вешают телевизор и не дестабилизируют его. Это может привести к опрокидыванию телевизора, что может стать причиной серьезных травм или смерти. Соблюдайте все меры предосторожности, указанные в листовке по безопасности, прилагаемой к телевизору. Для дополнительной устойчивости и безопасности вы можете приобрести и установить устройство защиты от падения, обращаясь к разделу «Предотвращение падения телевизора».
ПРЕДУПРЕЖДЕНИЕ: Никогда не ставьте телевизор в неустойчивом месте. Телевизор может упасть, что приведет к серьезным травмам или смерти. Многие травмы, особенно у детей, можно избежать, приняв простые меры предосторожности, такие как:
- Всегда используйте шкафы, подставки или методы монтажа, рекомендованные Samsung.
- Всегда используйте мебель, которая может безопасно поддерживать телевизор.
- Всегда следите за тем, чтобы телевизор не выступал за край поддерживающей мебели.
- Всегда рассказывайте детям об опасности забираться на мебель, чтобы дотянуться до телевизора или его органов управления.
- Всегда прокладывайте шнуры и кабели, подключенные к телевизору, так, чтобы их нельзя было споткнуться, потянуть или схватить.
- Никогда не ставьте телевизор в неустойчивом месте.
- Никогда не ставьте телевизор на высокую мебель (например,ampшкафы или книжные шкафы), не закрепляя мебель и телевизор на подходящей опоре.
- Никогда не кладите телевизор на ткань или другие материалы, которые могут находиться между телевизором и поддерживающей мебелью.
- Никогда не кладите предметы, которые могут побудить детей забраться, например игрушки и пульт дистанционного управления, на верхнюю часть телевизора или мебель, на которой установлен телевизор. Если существующий телевизор будет сохранен и перемещен, следует учесть те же соображения, что и выше.
- Если вам необходимо переместить или поднять телевизор для замены или чистки, не вытягивайте подставку.
Предотвращение падения телевизора

- С помощью соответствующих шурупов надежно прикрепите к стене комплект кронштейнов. Убедитесь, что винты надежно прикреплены к стене.
- В зависимости от типа стены вам могут понадобиться дополнительные материалы, например, анкеры.
- Используя винты подходящего размера, надежно прикрепите к телевизору комплект кронштейнов.
- Технические характеристики винтов см. В части стандартного винта в таблице в Руководстве по быстрой установке.
- Соедините кронштейны, прикрепленные к телевизору, и кронштейны, прикрепленные к стене, с помощью прочной, прочной веревки, а затем плотно завяжите ее.
- Установите телевизор рядом со стеной, чтобы он не упал назад.
- Закрепите шнур так, чтобы кронштейны, прикрепленные к стене, находились на той же высоте или ниже, чем кронштейны, прикрепленные к телевизору.
Эксплуатация
- В этом аппарате используются батарейки. В вашем районе могут существовать экологические нормы, которые требуют от вас правильной утилизации этих батарей. Свяжитесь с местными властями для получения информации об утилизации или переработке.
- Храните аксессуары (пульт дистанционного управления, батарейки и т. Д.) В недоступном для детей месте.
- Не роняйте и не ударяйте изделие. Если продукт поврежден, отключите шнур питания и обратитесь в сервисный центр Samsung.
- Не бросайте пульт дистанционного управления или батарейки в огонь.
- Не допускайте короткого замыкания, разборки и перегрева батарей.
- ВНИМАНИЕ: При замене батареек, используемых в пульте дистанционного управления, батареи неправильного типа существует опасность взрыва. Заменяйте только на такой же или аналогичный.
- ПРЕДУПРЕЖДЕНИЕ — ДЛЯ ПРЕДОТВРАЩЕНИЯ ПОЖАРА НЕ ДОПУСКАЙТЕ СВЕЧИ И ДРУГИЕ ПРЕДМЕТЫ ОТКРЫТОГО ОГНЯ ОТ ДАННОГО ИЗДЕЛИЯ ВСЕГДА.
Уход за телевизором
- Чтобы очистить это устройство, отсоедините шнур питания от розетки и протрите изделие мягкой сухой тканью. Не используйте химические вещества, такие как воск, бензол, спирт, разбавители, инсектициды, освежители воздуха, смазки или моющие средства. Эти химические вещества могут испортить внешний вид телевизора или стереть печать на продукте.
- Во время чистки внешняя поверхность и экран телевизора могут поцарапаться. Обязательно протрите внешнюю поверхность и экран мягкой тканью, чтобы не поцарапать.
- Не распыляйте воду или другие жидкости прямо на телевизор. Любая жидкость, попавшая в изделие, может вызвать отказ, пожар или поражение электрическим током.
Что в коробке?
Убедитесь, что в комплект поставки вашего телевизора входят следующие предметы. Если что-то отсутствует, обратитесь к своему дилеру.
- Пульт дистанционного управления и батарейки (в зависимости от страны и модели)
- Интеллектуальный пульт дистанционного управления Samsung и аккумуляторы (в зависимости от страны и модели)
- Руководство пользователя
- Адаптер AV IN (в зависимости от страны и модели)
- Гарантийный талон / Нормативное руководство (недоступно в некоторых странах)
- Кабель питания телевизора
- Адаптер карты CI (в зависимости от страны и модели)
- Тип батареи может различаться в зависимости от модели.
- Цвет и форма предметов могут отличаться в зависимости от модели.
- Не включенные кабели можно приобрести отдельно.
- При открытии коробки проверьте, нет ли каких-либо аксессуаров, спрятанных за упаковочными материалами или внутри них.
Внимание! Экраны могут быть повреждены прямым давлением при неправильном обращении. Мы рекомендуем поднимать телевизор за края, как показано на рисунке. Дополнительные сведения об обращении см. В Руководстве по быстрой установке, прилагаемом к данному продукту.
Начальная настройка
Когда вы включаете телевизор в первый раз, он сразу же запускает начальную настройку. Следуйте инструкциям, отображаемым на экране, и настройте основные параметры телевизора в соответствии с вашими потребностями. viewокружающая среда.
Использование ТВ-контроллера
Вы можете включить телевизор с помощью кнопки TV Controller в нижней части телевизора, а затем использовать меню управления. Меню управления появляется при нажатии кнопки контроллера ТВ, когда телевизор включен.
- Экран может потускнеть, если не снять защитную пленку на логотипе SAMSUNG или на нижней части телевизора. Удалите защитную пленку.

- Меню управления
- Кнопка ТВ-контроллера / Датчик пульта ДУ
Настройка звукового датчика
- Эта функция поддерживается только в серии Q7 * A / Q8 * A / QN8 * A / QN9 * A.


Вы можете включить или выключить звуковой датчик, используя его кнопку в нижней части телевизора.
При включенном телевизоре нажмите кнопку влево (или назад), чтобы включить звуковой датчик, или вправо (или вперед), чтобы выключить его. Посмотрите всплывающее окно на телевизоре, чтобы проверить, включен ли звуковой датчик.
- Положение и форма звукового датчика могут отличаться в зависимости от модели.
- Во время анализа с использованием данных со звукового датчика данные не сохраняются.
Устранение неисправностей и обслуживание
Для получения дополнительной информации см. «Устранение неполадок» или «Часто задаваемые вопросы» в электронном руководстве. > Настройки> Электронное руководство> Устранение неполадок или часто задаваемые вопросы. Если ни один из советов по устранению неполадок не подходит, перейдите на страницу «www.samsung.com»И щелкните« Поддержка »или обратитесь в сервисный центр Samsung.
- Эта светодиодная панель TFT состоит из субпикселей, для производства которых требуются сложные технологии. Однако на экране может быть несколько ярких или темных пикселей. Эти пиксели не повлияют на производительность продукта.
- Чтобы поддерживать телевизор в оптимальном состоянии, обновите программное обеспечение до последней версии. Используйте функции «Обновить сейчас» или «Автообновление» в меню телевизора ( > «Настройки» > «Поддержка» > «Обновление ПО» > «Обновить сейчас» или «Автообновление»).
Телевизор не включается.
- Убедитесь, что кабель питания переменного тока надежно подключен к телевизору и сетевой розетке.••
- Убедитесь, что сетевая розетка исправна, а датчик пульта ДУ в нижней части телевизора горит непрерывным красным светом.
- Попробуйте нажать кнопку TV Controller в нижней части телевизора, чтобы убедиться, что проблема не в пульте дистанционного управления. Если телевизор включается, обратитесь к разделу «Пульт дистанционного управления не работает».
Пульт дистанционного управления не работает.
- Убедитесь, что датчик дистанционного управления в нижней части телевизора мигает, когда вы нажимаете кнопку питания на пульте дистанционного управления.
- Серия АС: Если он не мигает, замените батарейки в пульте дистанционного управления. Убедитесь, что батареи установлены с правильной полярностью (+/–). Щелочные батареи рекомендуются для более длительного срока службы батареи.
- Серия Q: Когда батарея пульта разряжена, зарядите батарею с помощью USB-порта для зарядки или переверните пульт, чтобы на солнечный элемент попал свет.
- Попробуйте направить пульт прямо на телевизор с расстояния 1.5–1.8 м.
- Если ваш телевизор поставляется с интеллектуальным пультом дистанционного управления Samsung (Bluetooth Remote), обязательно подключите его к телевизору. Чтобы выполнить сопряжение с интеллектуальным пультом ДУ Samsung, одновременно нажмите кнопки + и удерживайте их в течение 10 секунд.
Датчик Eco и яркость экрана
Eco Sensor автоматически регулирует яркость телевизора. Эта функция измеряет освещенность в вашей комнате и автоматически оптимизирует яркость телевизора для снижения энергопотребления. Если вы хотите отключить это, перейдите в> Настройки> Общие> Энергия и энергосбережение> Оптимизация яркости.
- Эко-датчик расположен в нижней части телевизора. Не закрывайте датчик какими-либо предметами. Это может снизить яркость изображения.
Технические характеристики и другая информация
Разрешение дисплея
3840 х 2160
Название модели
UA43AU7000 UA50AU7000 UA55AU7000 UA58AU7000 UA65AU7000 UA70AU7000 UA75AU7000 UA43AU7100 UA50AU7100 UA55AU7100 UA58AU7100 UA65AU7100 UA75AU7100 UA43AU7200 UA50AU7200 UA55AU7200 UA58AU7200 UA65AU7200 UA75AU7200 UA43AU7500 UA50AU7500 UA55AU7500 UA65AU7500 UA43AU7700 UA50AU7700 UA55AU7700 UA65AU7700 UA70AU7700 UA75AU7700 UA43AU8000 UA50AU8000 UA55AU8000 UA60AU8000 UA65AU8000 UA70AU8000 UA75AU8000 UA85AU8000 UA50AU8080 UA55AU8080 UA65AU8080 UA43AU8100 UA50AU8100 UA55AU8100 UA60AU8100 UA65AU8100 UA70AU8100 UA75AU8100 UA85AU8100 UA43AU8200 UA55AU8200 UA65AU8200 UA75AU8200 UA43AU9000 UA50AU9000 UA55AU9000 UA65AU9000 UA75AU9000 UA43AU9070 UA55AU9070 UA65AU9070 UA43AUE60 UA50AUE60 UA55AUE60 UA58AUE60 UA65AUE60 UA43AUE70 UA50AUE70 UA55AUE70 UA58AUE70 UA65AUE70 QA43Q60A
QA50Q60A QA55Q60A QA65Q60A QA75Q60A QA85Q60A QA43Q65A QA50Q65A QA55Q65A QA65Q65A QA75Q65A QA85Q65A QA55Q70A QA65Q70A QA75Q70A QA85Q70A QA50Q80A QA55Q80A QA65Q80A QA55QN85A QA65QN85A QA75QN85A QA85QN85A QA55QS85A QA65QS85A QA75QS85A QA85QS85A QA43QN90A QA50QN90A QA55QN90A QA65QN90A QA75QN90A QA85QN90A QA98QN90A
(Только Сингапур: UA43AU7000K UA50AU7000K UA55AU7000K UA58AU7000K UA65AU7000K UA70AU7000K UA70AU8000K UA75AU7000K UA43AU8000K UA50AU8000K UA55AU8000K UA60AU8000K UA65AU8000K UA75AU8000K UA85AU8000K UA43AU8100K UA50AU8100K UA55AU8100K UA60AU8100K UA65AU8100K UA70AU8100K UA75AU8100K UA85AU8100K UA43AU9000K UA50AU9000K UA55AU9000K UA65AU9000K QA43Q60AAK QA50Q60AAK QA55Q60AAK QA65Q60AAK QA75Q60AAK QA85Q60AAK QA43Q60ABK QA50Q60ABK QA55Q60ABK QA65Q60ABK QA75Q60ABK QA85Q60ABK QA55Q70AAK QA65Q70AAK QA75Q70AAK QA85Q70AAK QA50Q80AAK QA55Q80AAK QA65Q80AAK QA55QN85AAK QA65QN85AAK QA75QN85AAK QA85QN85AAK QA50QN90AAK QA55QN90AAK QA65QN90AAK QA75QN90AAK QA85QN90AAK QA98QN90AAK)
Звук (выход)
- Серия AU7 / AU8 / AU9 / Q6 * A / Q7 * A: 20 Вт
- Серия Q8 * A (50 дюймов): 40 Вт
- Серия Q8 * A (55 ″ -85 ″) / Серия QN8 * A: 60 Вт
- Серия QN9 * A (43 ″): 20 Вт
- Серия QN9 * A (50 ″): 40 Вт, серия QN9 * A (55 ″ -98 ″): 60 Вт
- Рабочая температура от 50 °F до 104 °F (от 10 °C до 40 °C) Рабочая влажность
- от 10 % до 80 %, без конденсации Температура хранения
- От -4 °F до 113 °F (от -20 °C до 45 °C) Влажность при хранении
- От 5% до 95%, без конденсации
Заметки
- Это цифровое устройство класса B.
- Для получения информации об источнике питания и дополнительной информации о потребляемой мощности обратитесь к информации на этикетке, прикрепленной к продукту.
- На большинстве моделей этикетка прикреплена к задней части телевизора. (На некоторых моделях этикетка находится внутри клеммы крышки.)
- Для подключения кабеля LAN используйте кабель CAT 7 (тип * STP). (100/10 Мбит / с)
- Экранированная витая пара
(Недоступно в некоторых странах и моделях)
- Экранированная витая пара
- Изображения и технические характеристики в Руководстве по быстрой установке могут отличаться от реального продукта.
Снижение энергопотребления
Когда вы выключаете телевизор, он переходит в режим ожидания. В режиме ожидания он продолжает потреблять небольшое количество энергии. Чтобы снизить энергопотребление, отсоединяйте шнур питания, если вы не собираетесь использовать телевизор в течение длительного времени.

Термины HDMI и HDMI High-Definition Multimedia Interface, а также логотип HDMI являются товарными знаками или зарегистрированными товарными знаками HDMI Licensing Administrator, Inc. в США и других странах. Только для Индии Этот продукт соответствует требованиям RoHS. Эта маркировка на изделии, принадлежностях или документации указывает на то, что изделие и его электронные принадлежности не следует утилизировать вместе с другими бытовыми отходами по окончании срока их службы. Чтобы предотвратить возможный вред для окружающей среды или здоровья человека из-за неконтролируемой утилизации отходов, отделяйте эти предметы от других видов отходов и ответственно перерабатывайте их, чтобы способствовать устойчивому повторному использованию материальных ресурсов.
Для получения дополнительной информации о безопасной утилизации и переработке посетите наш webсайт www.samsung.com/in или позвоните на нашу горячую линию: 1800 40 SAMSUNG (1800 40 7267864) (бесплатно)
Ресурсы для скачивания в формате PDF
- Смарт-телевизор SAMSUNG AU8000 Crystal UHD 4K [pdf] Руководство пользователя
- Прочитайте больше: https://manuals.plus/samsung/au8000-crystal-uhd-4k-smart-tv-manual#ixzz7cufQB5EI
FAQ’S
В чем разница между UHD и FHD?
UHD или Ultra High Definition — это новый стандарт разрешения, который в четыре раза превышает текущий стандарт Full HD. FHD или Full HD — это 1920x1080p.
В чем разница между UHD и HDTV?
UHD или Ultra High Definition имеет разрешение 3840 x 2160p, а HDTV имеет разрешение 1920 x 1080p.
Как настроить 3D viewна моем телевизоре?
к view 3D-контент с внешних устройств, подключенных к телевизору через порты HDMI 1 или HDMI 2, необходимо сначала подключить телевизор к внешнему устройству с помощью кабеля HDMI, а затем настроить 3D viewна телевизоре, выполнив следующие действия:
Включите внешнее устройство и телевизор.
Установите внешнее устройство в режим вывода 3D (см. руководство пользователя внешнего устройства).
Выберите внешнее устройство, подключенное к порту HDMI 1 или HDMI 2, в качестве источника входного сигнала на телевизоре.
Выберите [3D] в качестве viewна вашем телевизоре.
View 3D-контент с внешнего устройства, подключенного к телевизору через порт HDMI 1 или HDMI 2, выбрав [3D] в качестве viewна вашем телевизоре.
Поддерживает ли этот продукт воспроизведение в формате 24P?
Да, этот продукт поддерживает воспроизведение 24P с 24P-совместимыми проигрывателями Blu-ray Disc и DVD-плеерами с цветовыми субдисплеями YCC601.ampling через соединение HDMI только при частоте кадров 50/60 Гц.
В чем разница между 4K, UHD и Crystal?
Crystal UHD — это торговая марка, используемая Samsung для своих стандартных телевизоров 4K. В результате, вместо того, чтобы ссылаться на новую технологию панелей, Crystal UHD просто относится к «Ultra HD», что определяется как что-либо с разрешением более 3840 x 2160 пикселей (4K).
Crystal TV лучше, чем 4K?
UHD в Crystal UHD относится к сверхвысокому разрешению. Это означает, что телевизор имеет разрешение 3840*2160 пикселей. Эта комбинация пикселей обычно называется «4K» или примерно в четыре раза превышает разрешение HD.
Samsung Smart TV — это андроид?
В отличие от своих телефонов, Samsung не использует Android ни на одном из своих умных телевизоров и никогда не использовала. Если у вас есть телевизор Samsung, он либо работает под управлением ОС Tizen компании, либо более старой ОС Orsay.
Как подключить телефон к Samsung Smart TV?
Откройте приложение SmartThings на своем мобильном телефоне.
Если вы видите всплывающее окно, нажмите ДОБАВИТЬ СЕЙЧАС, чтобы подключить мобильный телефон к телевизору. Нет всплывающего окна? Откройте «Устройства» и выберите свой телевизор. Откройте приложение SmartThings и коснитесь своего телевизора на панели инструментов. показать больше. Просмотрите рекомендации от Universal Guide на мобильном телефоне. показать больше.
Где Bluetooth на телевизоре Samsung?
В настройках телевизора выберите «Звук», а затем выберите «Вывод звука». Если появится опция Список динамиков Bluetooth, ваш телевизор поддерживает Bluetooth.
Есть ли в телевизорах Samsung камеры?
Многие Smart TV, в том числе новейшие версии Samsung Smart TV, недавно начали использовать встроенную камеру и микрофон, которые могут делать замечательные вещи на собраниях.
Поставляются ли телевизоры Samsung с крепежными винтами?
Нет, винты НЕ включены, что странно. По словам Samsung, винты должны быть M8 — длиной 43-45 мм. Извините, возникла проблема.
Документы / Ресурсы
 |
Смарт-телевизор SAMSUNG AU8000 Crystal UHD 4K [pdf] Руководство пользователя AU8000, AU8000 Crystal UHD 4K Smart TV, Crystal UHD 4K Smart TV, 4K Smart TV, Smart TV, TV |
 |
Смарт-телевизор SAMSUNG AU8000 Crystal UHD 4K [pdf] Руководство пользователя AU8000, Crystal UHD 4K Smart TV, 4K Smart TV, Crystal UHD Smart TV, Smart TV, TV |

GT-N8000
Руководство
пользователя

О данном руководстве
Благодарим за приобретение планшета Samsung. Это
мощное портативное устройство с лучшими возможностями
в сфере веб-технологий и мобильных вычислений на
оптимизированной универсальной платформе, которая
идеально подходит для активного образа жизни. Планшет
Samsung на базе операционной системы Google Android
— это удобное средство для работы с тысячами полезных
и интересных приложений, которые откроют вам новые
возможности мобильного Интернета.
Интегрированная функция беспроводного доступа и
чувствительный сенсорный экран позволяют читать в пути
книги и газеты, быть в курсе новостей, спортивных событий и
прогнозов погоды, работать и развлекаться, а также искать в
Интернете карты, адреса компаний и другую информацию.
Сначала прочтите следующую
информацию
Перед использованием устройства внимательно прочтите
●
все инструкции по безопасности и данное руководство
пользователя для правильной и безопасной работы с
устройством впоследствии.
Описания, приведенные в этом руководстве, основаны на
●
параметрах устройства по умолчанию.
Изображения и снимки экрана, приведенные в данном
●
руководстве, могут отличаться от реального вида
устройства.
Содержание данного руководства пользователя зависит
●
от модели устройства и программного обеспечения,
поставляемого операторами мобильной связи
или поставщиками услуг, и может изменяться без
предварительного уведомления. Обновленные руководства
пользователя см. на веб-сайте
www.samsung.com
.

Доступные функции и дополнительные услуги зависят от
●
модели устройства, программного обеспечения и оператора
мобильной связи.
Данное руководство создано для пользователей ОС
●
Google Android. При использовании других ОС некоторые
приведенные инструкции могут быть неточными.
Приложения и их возможности зависят от страны, региона
●
и характеристик оборудования. Компания Samsung не несет
ответственности за сбои в работе устройства, вызванные
приложениями сторонних разработчиков.
Samsung не несет ответственности за нарушения
●
быстродействия или совместимости, возникшие вследствие
редактирования настроек в реестре или внесения
изменений в операционную систему. Попытки изменить
настройки операционной системы могут привести к
перебоям в работе устройства или приложений.
Обновления ПО для устройства можно найти на веб-сайте
●
www.samsung.com
.
Лицензия на программное обеспечение, звуковые
●
файлы, обои, изображения и другое содержимое,
предустановленное на планшет, предусматривает
ограниченное использование между компанией Samsung
и их соответствующими владельцами. Копирование и
использование этих материалов в коммерческих целях
является нарушением авторского права. Компания Samsung
не несет ответственности за нарушение пользователями
авторских прав.
Сохраните руководство пользователя для использования в
●
будущем.

Обозначения, используемые в данном
руководстве
Перед началом работы ознакомьтесь с обозначениями,
используемыми в данном руководстве.
Предупреждение — ситуации, в которых
пользователь или кто-либо другой может получить
травмы
Внимание! — ситуации, которые могут привести к
повреждению устройства или другого оборудования
Примечание — примечания, советы или
дополнительные сведения
►
См. — отсылка к страницам с соответствующей
информацией, например:
► стр. 12 (означает «смотри
стр. 12»)
→
Следующий шаг — последовательность выбора
опций или пунктов меню для выполнения
определенного действия; например: Откройте
список приложений и выберите пункт Настройки
→
Об устройстве (соответствует последовательному
выбору пунктов Настройки и Об устройстве)
Авторские права
© Samsung Electronics, 2013.
Данное руководство пользователя защищено
международными законами об авторских правах.
Запрещается воспроизводить, распространять, переводить
или передавать какие-либо части данного руководства
пользователя в любой форме или любым способом,
электронным или механическим, включая фотокопирование,
запись или хранение в любой системе хранения и поиска
информации, без предварительного письменного разрешения
компании Samsung Electronics.

Товарные знаки
SAMSUNG и логотип SAMSUNG являются
●
зарегистрированными товарными знаками компании
Samsung Electronics.
Логотип Android, Поиск Google
●
™
, Google Maps
™
,
Google Mail
™
, YouTube
™
, Google Play
™
Store, и Google Talk
™
являются товарными знаками компании Google, Inc.
Bluetooth
●
®
является зарегистрированным товарным знаком
Bluetooth SIG, Inc. во всем мире.
Wi-Fi
●
®
, Wi-Fi Protected Setup
™
, Wi-Fi Direct
™
логотип Wi-Fi
CERTIFIED
™
, и логотип Wi-Fi являются зарегистрированными
товарными знаками Wi-Fi Alliance.
DivX
●
®
, DivX Certified
®
и
соответствующие эмблемы
являются зарегистрированными
товарными знаками компании
Rovi Corporation и используются в
соответствии с лицензией.
Остальные авторские права и товарные знаки являются
●
собственностью их владельцев.

О данном руководстве
6
ВИДЕО В ФОРМАТЕ DIVX
DivX
®
— формат цифрового видео, созданный компанией DivX
LLC, дочерней компанией корпорация Rovi. Данное устройство
сертифицировано компанией DivX для воспроизведения
видео DivX
®
. Дополнительные сведения, а также приложения
для конвертации файлов в формат DivX вы можете найти на
веб-сайте
www.divx.com
.
ВИДЕО ПО ЗАПРОСУ В ФОРМАТЕ DIVX
Чтобы данное устройство, сертифицированное компанией
DivX
®
, могло воспроизводить фильмы в формате DivX
Video-on-Demand (VOD — видео по запросу), его следует
зарегистрировать. Чтобы получить код регистрации,
перейдите в раздел DivX VOD в меню настройки устройства.
Дополнительные сведения о регистрации см. на сайте
vod.divx.com
.
Данное устройство сертифицировано
®
для воспроизведения
видео DivX
®
в разрешении до 720p (HD), включая
высококачественное содержимое.
Возможно воспроизведение файлов DivX
®
в разрешении до
1080p (HD).

Содержание
7
Сборка устройства ……………………………………….. 12
Комплект поставки ………………………………………………………………………. 12
Установка SIM- или USIM-карты ……………………………………………….. 12
Зарядка аккумулятора ………………………………………………………………… 13
Установка карты памяти (дополнительно) …………………………… 15
Начало работы …………………………………………….. 18
Включение и выключение планшета …………………………………….. 18
Общие сведения о планшете ……………………………………………………. 19
Использование S Pen и сенсорного экрана …………………………. 23
Знакомство с главным экраном ………………………………………………. 25
Работа с приложениями …………………………………………………………….. 31
Индивидуальная настройка планшета ………………………………….. 32
Ввод текста ……………………………………………………………………………………… 39
Специальные возможности ………………………… 42
Основные действия с S Pen ………………………………………………………….42
Дополнительные действия с пером S Pen ………………………………43
Замена наконечника пера S Pen ………………………………………………..44
Распознавание движений …………………………………………………………….45
Рукописный ввод …………………………………………………………………………….47
Заметки S Note …………………………………………………………………………………51
Использование быстрых заметок ……………………………………………..60
Календарь …………………………………………………………………………………………61
Знакомство с функцией «Быстрые команды» ………………………..64
Функция Air View для пера S Pen ………………………………………………..65
Фиксация области экрана ……………………………………………………………66
Содержание

Интернет ………………………………………………………. 67
Интернет …………………………………………………………………………………………. 67
Game Hub ……………………………………………………………………………………….. 72
Play Books ………………………………………………………………………………………… 72
Play Movies ……………………………………………………………………………………… 72
Play Маркет …………………………………………………………………………………….. 73
YouTube ……………………………………………………………………………………………. 74
Video Hub ………………………………………………………………………………………… 74
Карты ………………………………………………………………………………………………… 75
Локатор ……………………………………………………………………………………………. 76
Адреса ……………………………………………………………………………………………… 77
Навигация ……………………………………………………………………………………….. 77
Samsung Apps ………………………………………………………………………………… 78
S Suggest …………………………………………………………………………………………. 79
Google ………………………………………………………………………………………………. 79
Learning Hub …………………………………………………………………………………… 80
Связь ……………………………………………………………. 81
Вызовы …………………………………………………………………………………………….. 81
Сообщения ……………………………………………………………………………………… 92
Google Mail ……………………………………………………………………………………… 94
E-mail ………………………………………………………………………………………………… 96
Google Talk ……………………………………………………………………………………. 100
ChatON ………………………………………………………………………………………….. 101
Чат …………………………………………………………………………………………………… 101
Google+ …………………………………………………………………………………………. 101
Развлечения ……………………………………………….. 102
Музыка ………………………………………………………………………………………….. 102
Music Hub ……………………………………………………………………………………… 105
Камера …………………………………………………………………………………………… 105
Видеоплеер …………………………………………………………………………………. 115

Галерея ………………………………………………………………………………………….. 118
Paper Artist ……………………………………………………………………………………. 122
Видеоредактор …………………………………………………………………………… 122
Личные данные ………………………………………….. 126
Контакты ………………………………………………………………………………………. 126
Возможности передачи данных …………………. 130
Подключение к ПК …………………………………………………………………….. 130
Wi-Fi ………………………………………………………………………………………………… 132
Wi-Fi Direct ……………………………………………………………………………………. 135
AllShare Cast …………………………………………………………………………………. 136
AllShare Play …………………………………………………………………………………. 137
Group Cast …………………………………………………………………………………….. 140
Bluetooth ………………………………………………………………………………………. 141
Общий доступ к мобильной сети …………………………………………. 143
GPS ………………………………………………………………………………………………….. 145
Подключение к ТВ ……………………………………………………………………… 146
VPN-соединения ………………………………………………………………………… 148
Инструменты ……………………………………………… 150
Будильник …………………………………………………………………………………….. 150
Калькулятор ………………………………………………………………………………… 151
Загрузки ………………………………………………………………………………………… 151
Dropbox ………………………………………………………………………………………… 152
Мои файлы …………………………………………………………………………………… 153
Polaris Office …………………………………………………………………………………. 155
PS Touch ………………………………………………………………………………………… 156
Голосовой поиск ………………………………………………………………………… 157
S Voice ……………………………………………………………………………………………. 157
Мировое время ………………………………………………………………………….. 158

Содержание
10
Настройки ………………………………………………….. 159
Работа с меню настроек …………………………………………………………… 159
Wi-Fi ………………………………………………………………………………………………… 159
Bluetooth ………………………………………………………………………………………. 159
Использование данных …………………………………………………………… 159
Дополнительные настройки ………………………………………………….. 160
Режим блокировки ……………………………………………………………………. 162
Звук ………………………………………………………………………………………………… 162
Дисплей ………………………………………………………………………………………… 163
Память …………………………………………………………………………………………… 164
Энергосбережение …………………………………………………………………… 164
Батарея ………………………………………………………………………………………….. 164
Диспетчер приложений ………………………………………………………….. 165
Местоположение ………………………………………………………………………. 165
Экран блокировки …………………………………………………………………….. 165
Безопасность ………………………………………………………………………………. 166
Язык и ввод ………………………………………………………………………………….. 168
Cloud ………………………………………………………………………………………………. 170
Резервное копирование и сброс ………………………………………….. 170
Добавить уч. запись ………………………………………………………………….. 171
Движения ……………………………………………………………………………………… 171
S Pen ……………………………………………………………………………………………….. 171
Аксессуары ………………………………………………………………………………….. 172
Дата и время ……………………………………………………………………………….. 172
Специальные возможности …………………………………………………… 173
Параметры разработчика ………………………………………………………. 174
Об устройстве …………………………………………………………………………….. 176

Содержание
11
Устранение неполадок ……………………………….. 177
Алфавитный указатель ………………………………. 182
Сборка устройства
Комплект поставки
В комплект поставки входят
Планшет
●
Краткое руководство
●
Используйте только аксессуары, рекомендованные
компанией Samsung. Гарантия производителя не
распространяется на повреждения или неисправности
в работе устройства, возникшие в результате
использования пиратского или нелегального
программного обеспечения.
Состав комплекта поставки и наличие аксессуаров
●
зависит от региона или оператора мобильной связи.
Дополнительные аксессуары можно приобрести у
●
местных дилеров Samsung.
Рекомендуется использовать с планшетом аксессуары,
●
входящие в комплект поставки.
Аксессуары, не входящие в комплект поставки, могут
●
быть несовместимы с данным устройством.
Установка SIM- или USIM-карты
При заключении договора об оказании услуг мобильной
связи вы получаете SIM-карту, PIN-код, а также информацию о
дополнительных услугах. Чтобы пользоваться услугами UMTS
и HSDPA, необходимо приобрести универсальный модуль
идентификации абонента (USIM-карту).
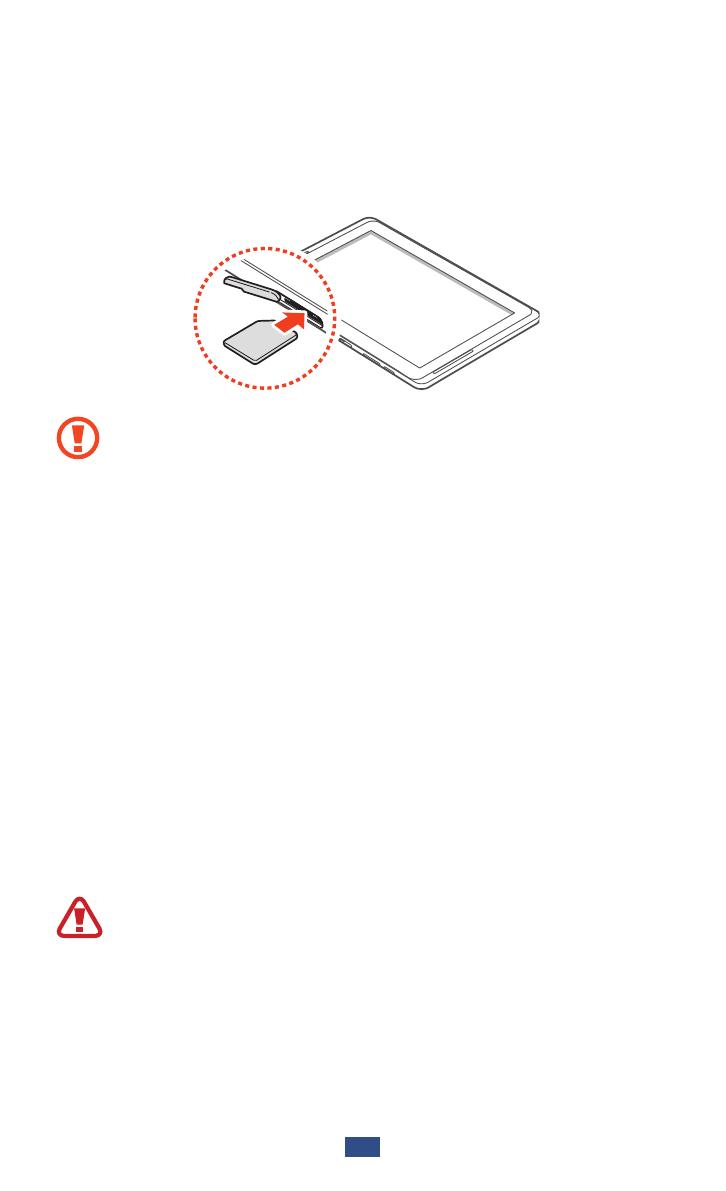
Чтобы установить SIM- или USIM-карту, выполните следующие
действия.
Откройте крышку разъема SIM-карты.
1
Вставьте SIM- или USIM-карту в устройство золотистыми
2
контактами вниз.
Не вставляйте карту памяти в разъем для SIM-карты.
●
Если карта памяти застряла в разъеме для SIM-карты,
обратитесь в сервисный центр Samsung, чтобы извлечь
карту.
Данный разъем предназначен только для
●
стандартных SIM-карт. Установка micro-SIM-карты
или использование micro-SIM-карты с держателем
нерекомендуемого типа может повредить разъем для
SIM-карт.
Закройте крышку разъема SIM-карты.
3
Зарядка аккумулятора
Планшет оснащен встроенным аккумулятором. Перед
использованием устройства впервые или после
продолжительного периода, в течение которого батарея не
использовалась, необходимо зарядить батарею.
Используйте только зарядные устройства,
рекомендованные компанией Samsung. Использование
несовместимых зарядных устройств может привести к
взрыву аккумуляторов или повреждению устройства.
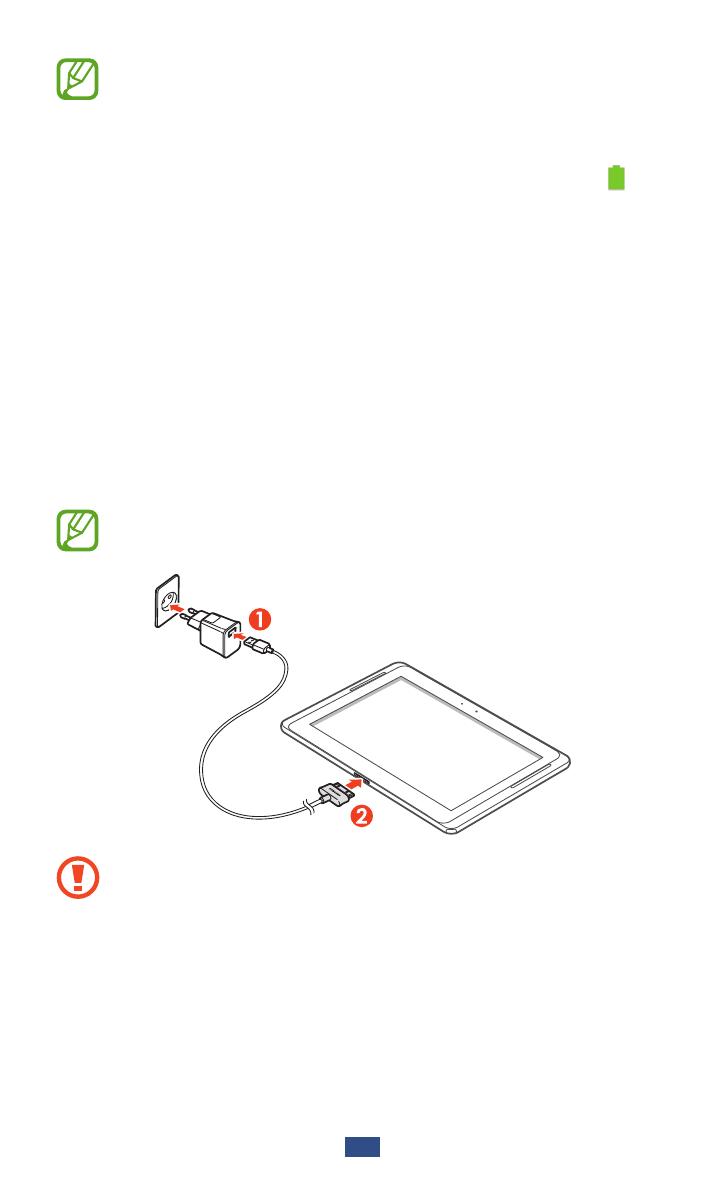
Используйте только зарядное устройство. Заряжать
●
аккумулятор с помощью USB-кабеля нельзя.
При низком уровне заряда аккумулятора подается
●
предупредительный звуковой сигнал и появляется
сообщение о его разрядке. Значок аккумулятора
показывает, что аккумулятор разряжен. Если уровень
заряда слишком низкий, устройство выключается
автоматически. Чтобы включить устройство,
необходимо зарядить аккумулятор.
Если аккумулятор полностью разряжен, включить
●
устройство невозможно (даже если подключен
USB-адаптер питания). Чтобы включить устройство,
подождите, пока аккумулятор зарядится, в течение
нескольких минут.
Подключите USB-кабель одним концом к USB-адаптеру
1
питания, а другим — к многофункциональному разъему.
Внешний вид USB-адаптера питания зависит от региона.
Неправильное подключение USB-кабеля может
привести к серьезному повреждению устройства или
USB-адаптера питания. Гарантия не распространяется
на любые повреждения, возникшие в результате
неправильного использования устройства и аксессуаров.

Подключите USB-адаптер питания к розетке сети
2
переменного тока.
Во время зарядки аккумулятора можно пользоваться
●
устройством, но процесс зарядки при этом
замедляется.
Во время зарядки устройства сенсорный экран может
●
не реагировать на касания в силу нестабильной
подачи энергии. В этом случае выключите USB-адаптер
питания из розетки или отключите USB-кабель от
устройства.
Во время зарядки устройство может нагреваться.
●
Это нормальный процесс, который не влияет на срок
службы или работоспособность устройства.
При нарушении нормальной работы устройства или
●
зарядного устройства обратитесь в сервисный центр
Samsung.
Когда аккумулятор будет полностью заряжен, сначала
3
отключите USB-адаптер питания и USB-кабель от
устройства, а потом от розетки.
В целях экономии электроэнергии отключайте USB-
адаптер питания, если он не используется. USB-адаптер
питания не оснащен выключателем, поэтому в целях
экономии энергии необходимо отключать USB-адаптер
питания от розетки, когда он не используется. При
использовании зарядное устройство должно плотно
прилегать к розетке.
Установка карты памяти (дополнительно)
Устройство поддерживает карты памяти максимальной
емкостью 64 ГБ. Некоторые карты могут быть несовместимы с
данным устройством в зависимости от изготовителя или типа.
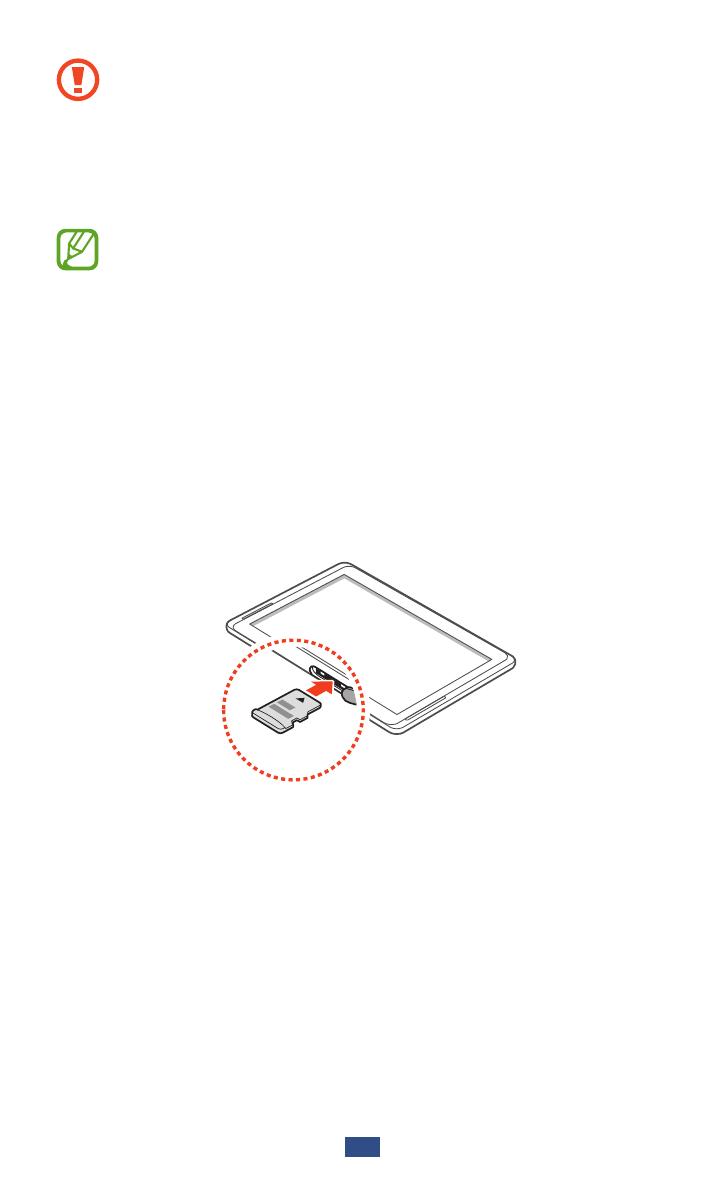
Компания Samsung обеспечивает поддержку
промышленных стандартов для карт памяти, тем
не менее карты некоторых производителей могут
быть несовместимы с устройством. Использование
несовместимой карты памяти может повредить
устройство, саму карту или данные, хранящиеся на ней.
Планшет поддерживает только файловую систему
●
FAT. Если вставить карту памяти с отличной от
FAT файловой системой, появится запрос на
форматирование карты.
При частом удалении и записи данных срок службы
●
карты памяти сокращается.
При установке карты памяти файлы, содержащиеся на
●
ней, будут находиться в папке extSdCard во внутренней
памяти.
Откройте крышку разъема карты памяти.
1
Вставьте карту памяти золотистыми контактами вниз.
2
Осторожно нажмите на карту до щелчка.
3
Закройте крышку разъема карты памяти.
4
›
Извлечение карты памяти
Во избежание потери данных отключите карту памяти перед ее
извлечением.
Откройте список приложений и выберите пункт
1
Настройки
→
Память
→
Отключить карту памяти
→
Да.
Откройте крышку разъема карты памяти.
2
Осторожно нажмите на карту до щелчка.
3
Достаньте карту памяти из устройства.
4
Закройте крышку разъема карты памяти.
5
Не извлекайте карту памяти во время передачи и
получения данных, так как это может привести к потере
данных и/или повреждению карты или планшета.
›
Форматирование карты памяти
После форматирования на ПК карты памяти могут
неправильно работать при установке в планшет. Форматируйте
карты памяти только с помощью планшета.
Откройте список приложений и выберите пункт Настройки
→
Память
→
Форматировать карту памяти SD
→
Формат.
карту памяти SD
→
Удалить все.
Перед форматированием карты памяти рекомендуется
создать резервную копию всех важных данных,
хранящихся в памяти устройства. Гарантия
производителя не распространяется на потерю данных,
вызванную действиями пользователя.

Начало работы
Включение и выключение планшета
Чтобы включить устройство, нажмите и удерживайте
клавишу питания. При первом включении планшета следуйте
инструкциям на экране, чтобы подготовить планшет к
использованию.
Для выключения планшета нажмите и удерживайте клавишу
питания и выберите пункт Выключение
→
Да.
В местах, где запрещено использование беспроводных
●
устройств (самолеты, больницы и т. п.), следуйте всем
предупреждающим табличкам и указаниям персонала.
Чтобы использовать только несетевые функции
●
устройства, переключитесь в автономный режим.
Переключение планшета в автономный режим
›
В автономном режиме можно отключить все беспроводные
соединения планшета и использовать не требующие
подключения к сети функции в местах, где запрещено
использование беспроводных устройств, например в самолете
или больнице.
Чтобы включить или отключить автономный режим, перейдите
в меню Настройки
→
Дополнительные настройки, а
затем поставьте или снимите флажок рядом с настройкой
Автономный режим.
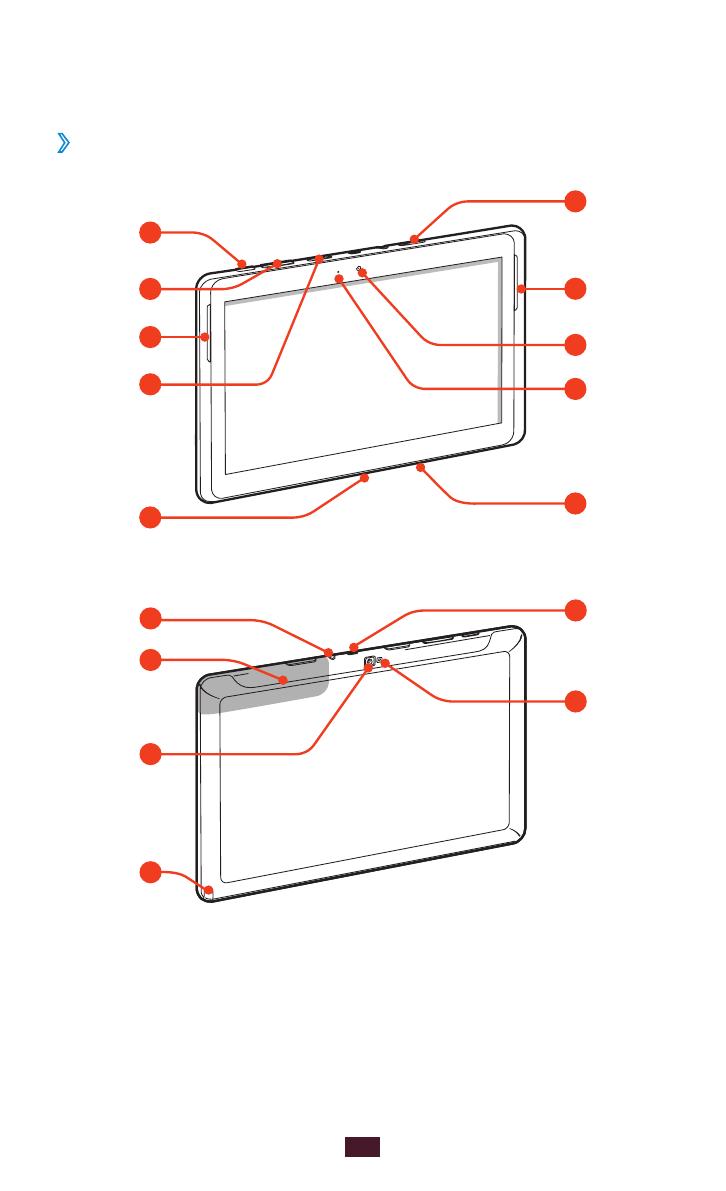
Общие сведения о планшете
›
Внешний вид устройства
Номер Функция
1
Клавиша питания/перезагрузки/блокировки
2
Клавиша громкости
3
Внешний динамик
4
Разъем для карт памяти
5
Многофункциональный разъем
6
Гнездо SIM-карты
7
Объектив фронтальной камеры
8
Датчик внешней освещенности
9
Микрофон
10
Разъем для гарнитуры
1
11
Встроенная антенна
12
Объектив основной камеры
13
Гнездо для пера S Pen
14
ИК-порт
15
Вспышка
1. Неправильное подключение гарнитуры к устройству может
повредить разъем для наушников или гарнитуру.
 02:37
02:37
Обзор Samsung S8000 Jet
 06:45
06:45
Samsung S8000 Jet — part 1 of 2
 17:05
17:05
Samsung S8000 Jet — разборка, замена тачскрина (сенсора)
 11:07
11:07
Samsung JET S8000 unboxing video
 09:35
09:35
Reseña del Samsung Jet (GT-S8000)
 02:07
02:07
Samsung GT-S8000 Disassembly
 05:37
05:37
Сенсор Samsung GT-S8000 Jet и проверка.Лента защиты на пороги авто. Микки Маус на кроксы.
 02:04
02:04
HARD RESET NO SAMSUNG GT-I8000L
S8000
Руководство
пользователя

ii
О данном
руководстве
Данное руководство пользователя
предназначено для ознакомления с
функциями и возможностями телефона.
Чтобы сразу приступить к использованию
телефона, смотрите разделы «Знакомство с
телефоном», «Подготовка телефона к работе»
и «Основные функции».
Обозначения
Перед началом работы ознакомьтесь с
обозначениями, принятыми в данном
руководстве.
Предупреждение
— ситуации,
которые могут привести к получению
травмы вами или кем-либо из
окружающих.
Внимание
— ситуации, которые
могут привести к повреждению
устройства или другого
оборудования.
Примечание
— примечания, советы
или дополнительная информация.

О да нном руко во дс тв е iii Сведения об авторских правах…
Страница 3
- Изображение
- Текст
О
да
нно
м
руко
во
дс
тв
е
iii
Сведения об авторских правах
Права на все технологии и изделия в составе
данного устройства являются собственностью
соответствующих владельцев.
• Bluetooth
®
является международной
зарегистрированной торговой маркой
Bluetooth SIG, Inc. Bluetooth QD ID:
B015189.
• Java™ является торговой маркой
корпорации Sun Microsystems, Inc.
• Windows Media Player
®
является
зарегистрированной торговой маркой
Microsoft Corporation.
•
и
являются товарными
знаками корпорации SRS Labs, Inc.
Гарнитура CS и технологии WOW HD
зарегистрированы согласно лицензии SRS
Labs, Inc.
X
См.
— смотрите страницу с
дополнительной информацией,
например: X стр.12 (означает
«смотрите страницу 12»).
→
Следующий шаг
—
последовательность операций,
которую надо воспроизвести для
выполнения определенного действия;
например: В режиме ожидания
выберите Сообщения
→ Создать
сообщение (это означает, что в меню
Сообщения нужно выбрать подменю
Создать сообщение).
[ ]
Квадратные скобки
— клавиши
телефона, например: [
] (означает
клавишу вкл./выкл. питания и выхода
из меню).

iv
О
дан
ном
ру
ко
вод
ств
е
• Wi-Fi
®
, сертифицированный логотип Wi-Fi и
логотип Wi-Fi являются
зарегистрированными товарными знаками
Wi-Fi Alliance.
• DivX
®
– зарегистрированная
торговая марка компании DivX,
Inc., которая используется в
соответствии с лицензией.
ВИДЕО В ФОРМАТЕ DIVX
DivX
®
– это цифровой формат видео,
разработанный компанией DivX, Inc. Данное
устройство официально сертифицировано
компанией DivX и может воспроизводить
видео в формате DivX. Устройство
воспроизводит видео в формате DivX
®
разрешением до 320×240.
ВИДЕО ПО ЗАПРОСУ В ФОРМАТЕ DIVX
Чтобы данное сертифицированное DivX
®
устройство могло воспроизводить
содержимое DivX Video-on-Demand (VOD –
видео по запросу), это устройство должно
быть зарегистрировано DivX. Сначала
необходимо сгенерировать для своего
устройства регистрационный код DivX VOD и
отправить его при регистрации.
[Внимание! Содержимое DivX VOD защищено
системой управления цифровыми правами
DivX DRM, которая разрешает
воспроизведение только на
зарегистрированных устройствах,
сертифицированных DivX. При попытке
воспроизведения содержимого DivX VOD, не
авторизованного для вашего устройства,
появится сообщение «Ошибка авторизации» и
содержимое воспроизводиться не будет].
Дополнительные сведения см. на веб-узле
http://vod.divx.com.

v Содержание Охрана здоровья и техника безопасности ………..
Страница 5
- Изображение
- Текст

vi Соде ржа ние Основные функции …………………………
Страница 6
- Изображение
- Текст

Содержан ие vii Активация и отправка экстренного сообщения ….
Страница 7
- Изображение
- Текст

Охрана здоровья и техника безопасности, Предупреждения о безопасности
Страница 8
- Изображение
- Текст
2
Охрана
здоровья и
техника
безопасности
Для обеспечения наилучшей работы телефона,
а также во избежание опасных ситуаций или
нарушения закона, ознакомьтесь со
следующими мерами предосторожности.
Храните телефон в местах,
недоступных для детей и домашних
животных
Во избежание несчастных случаев храните
мелкие детали телефона и аксессуары в
местах, недоступных для детей и домашних
животных.
Берегите слух
Предупреждения о
безопасности
Продолжительное воздействие
чрезмерно громкого звука может
вызвать нарушения слуха. Прежде чем
подключать наушники к источнику
звука, обязательно следует уменьшить
громкость. Уровень громкости не
должен превышать минимально
необходимый для разговора или
прослушивания музыки.

Охра
на
здо
ровья
и
техник
а бе
зо
па
сности
3
Правильная установка мобильного
телефона и аксессуаров в автомобиле
Убедитесь, что мобильные телефоны или
аксессуары, установленные в автомобиле,
надежно закреплены. Не помещайте телефон
и его аксессуары в зоне раскрытия подушки
безопасности или рядом с ней. Неправильная
установка оборудования для беспроводной
связи может привести к серьезным травмам в
случае срабатывания подушки безопасности.
Аккуратное использование и
утилизация аккумуляторов и зарядных
устройств
• Используйте только рекомендованные
компанией Samsung аккумуляторы и
зарядные устройства, предназначенные
для вашего телефона. Несовместимые
аккумуляторы и зарядные устройства могут
привести к серьезным травмам и
повреждению вашего телефона.
• Никогда не утилизируйте аккумулятор или
телефон путем сожжения. Соблюдайте все
местные правила утилизации
использованных аккумуляторов и
устройств.
• Никогда не помещайте аккумуляторы и
телефоны внутрь или на поверхность
нагревательных приборов, например
микроволновых печей, электрических плит
или радиаторов. При перегреве
аккумуляторы могут взорваться.
• Никогда не разбивайте и не прокалывайте
аккумуляторы. Не подвергайте аккумулятор
высокому внешнему давлению, которое
может привести к короткому замыканию или
перегреву.

Охр ана зд ор овья и те хника бе зо па сн ос ти Меры пре…
Страница 10
- Изображение
- Текст
4
Охр
ана
зд
ор
овь
я и
те
хника
бе
зо
па
сн
ос
ти
Меры предосторожности при
использовании кардиостимуляторов
Во избежание радиопомех сохраняйте
дистанцию не менее 15 см между
мобильными телефонами и
кардиостимуляторами, как рекомендуют
производители и независимая
исследовательская группа Wireless Technology
Research. При появлении малейших
признаков радиопомех в работе
кардиостимулятора или другого медицинского
прибора немедленно выключите телефон и
проконсультируйтесь с производителем
кардиостимулятора и медицинского прибора.
Выключайте телефон в потенциально
взрывоопасной среде
Не пользуйтесь телефоном на
автозаправочных станциях (станциях
техобслуживания), а также вблизи емкостей с
топливом или химическими веществами.
Выключайте телефон в местах, где этого
требуют соответствующие предупреждающие
знаки и инструкции. Телефон может стать
причиной взрыва или пожара в
непосредственной близости от объектов
хранения топлива или химических веществ, а
также в местах выполнения взрывных работ.
Не храните и не перевозите горючие
жидкости, газы или взрывчатые вещества
вместе с телефоном, его компонентами или
принадлежностями.
