-
Инструкции по эксплуатации
1

SONY DSC-RX100 инструкция по эксплуатации
(108 страниц)
- Языки:Русский
-
Тип:
PDF -
Размер:
5.26 MB -
Описание:
Цифровая фотокамера
Просмотр
На NoDevice можно скачать инструкцию по эксплуатации для SONY DSC-RX100. Руководство пользователя необходимо для ознакомления с правилами установки и эксплуатации SONY DSC-RX100. Инструкции по использованию помогут правильно настроить SONY DSC-RX100, исправить ошибки и выявить неполадки.
-
Contents
-
Table of Contents
-
Bookmarks
Quick Links
Cyber-shot User Guide
Before Use
Shooting
Viewing
Using MENU items (Shooting)
Using MENU items (Viewing)
Changing settings
Viewing images on a TV
Using with your computer
Printing
Troubleshooting
Precautions/About this camera
Contents list
DSC-RX100
User Guide
Use this manual if you encounter any problems, or have any questions about the camera.
Copyright 2012 Sony Corporation
1
Search
Search
Top page
Back to top
Summary of Contents for Sony DSC-RX100 Cyber-shot
D-032-100-41(1)
DSC-RX100
Digital Still Camera / Instruction Manual GB
Цифровой фотоаппарат / Инструкция по эксплуатации
RU
Цифровий фотоапарат / Посібник з експлуатації UA
If the product number of your camera is within
the range below, refer to the following URL.
3010001 — 9000000
9330001 — 9999000
http://helpguide.sony.net/dsc/rx100/
d035100411.pdf
GB
2
For question regarding your product or for the Sony Service Center nearest you,
call 1-800-222-SONY (7669).
Declaration of Conformity
Trade Name: SONY
Model: DSC-RX100
Responsible Party: Sony Electronics Inc.
Address: 16535 Via Esprillo, San Diego, CA 92127 U.S.A.
Telephone Number: 858-942-2230
This device complies with part 15 of the FCC rules. Operation is subject to the following
two conditions: (1) This device may not cause harmful interference, and (2) this device
must accept any interference received, including interference that may cause undesired
operation.
English
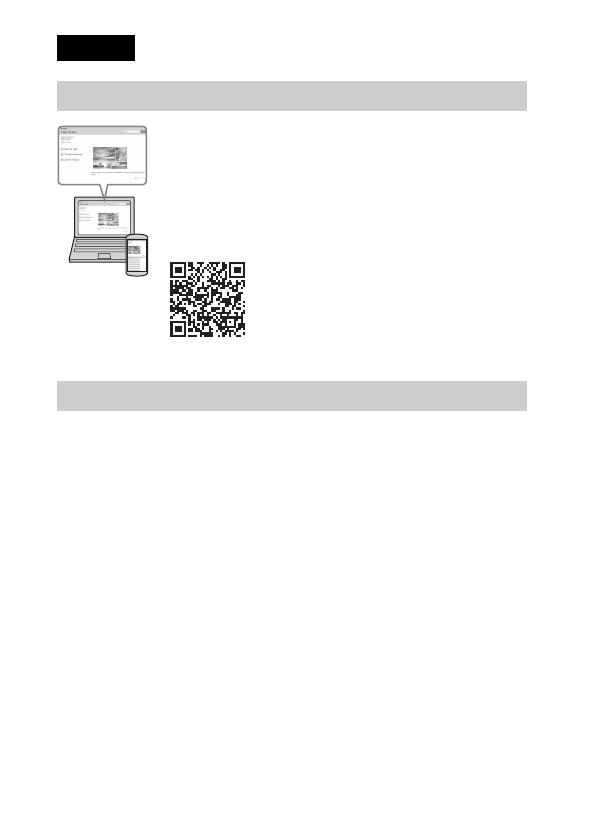
Learning more about the camera (“Help Guide”)
“Help Guide” is an on-line manual. You can read the “Help
Guide” on your computer or smartphone.
Refer to it for in-depth instructions on the many functions of
the camera.
URL:
http://rd1.sony.net/help/dsc/1740/h_zz/
For Customers in the U.S.A.
GB
3
GB
The number in parentheses indicates the number of pieces.
• Camera (1)
• Rechargeable Battery Pack NP-BX1 (1)
• Micro USB Cable (1)
• AC Adaptor (1)
• Power Cord (mains lead) (supplied in some countries/regions) (1)
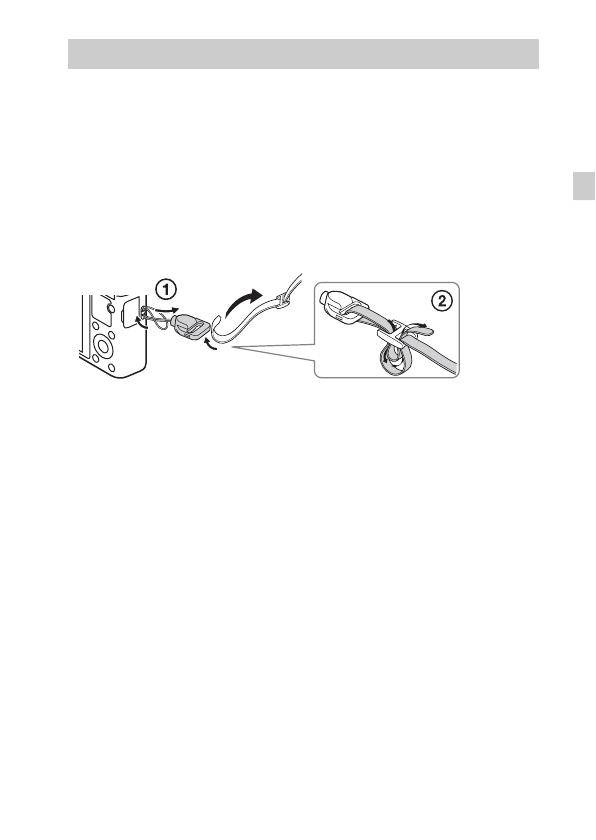
• Wrist Strap (1)
• Strap adapter (2)
(Strap adapters are used to attach the shoulder strap (sold separately), as
illustrated.)
• Instruction Manual (this manual) (1)
• Reference Guide (1)
About language setting
Change the screen language before using the camera if necessary (page 11).
Checking the supplied items
GB
4
A ON/OFF (Power) button
B Power/Charge lamp
C Shutter button
D Mode dial
(Intelligent Auto)/
(Superior Auto)/
(Program Auto)/
(Aperture Priority)/
(Shutter Priority)/
(Manual Exposure)/
(Memory recall)/
(Movie)/ (Sweep
Panorama)/ (Scene
Selection)
E For shooting: W/T (zoom) lever
For viewing: (Index) lever/
Playback zoom lever
F Self-timer lamp/Smile Shutter
lamp/AF illuminator
G Flash
• Do not cover the flash with your
finger.
• When using the flash, the flash
pops up automatically. If not
using the flash, press it down
manually.
H Microphone
I Hook for strap
J Control ring
K Lens
L Speaker
M Light sensor
N Monitor
O Fn (Function) button
P MOVIE (Movie) button
Q Micro USB connector
R MENU button
S Control wheel
Identifying parts

GB
5
GB
T Center button
U (Playback) button
V / (In-Camera Guide/Delete)
button
W Battery insertion slot
X Battery lock lever
Y Tripod socket hole
• Use a tripod with a screw less
than 5.5 mm (7/32 inches) long.
Otherwise, you cannot firmly
secure the camera, and damage to
the camera may occur.
Z Access lamp
wj Memory card slot
wk HDMI micro jack
wl Battery/Memory card cover
Inserting the battery pack
1
Open the cover.
2
Insert the battery pack.
• While pressing the battery lock lever, insert the battery pack as
illustrated. Make sure that the battery lock lever locks after insertion.
• Closing the cover with the battery inserted incorrectly may damage the
camera.
Battery lock lever
GB
6
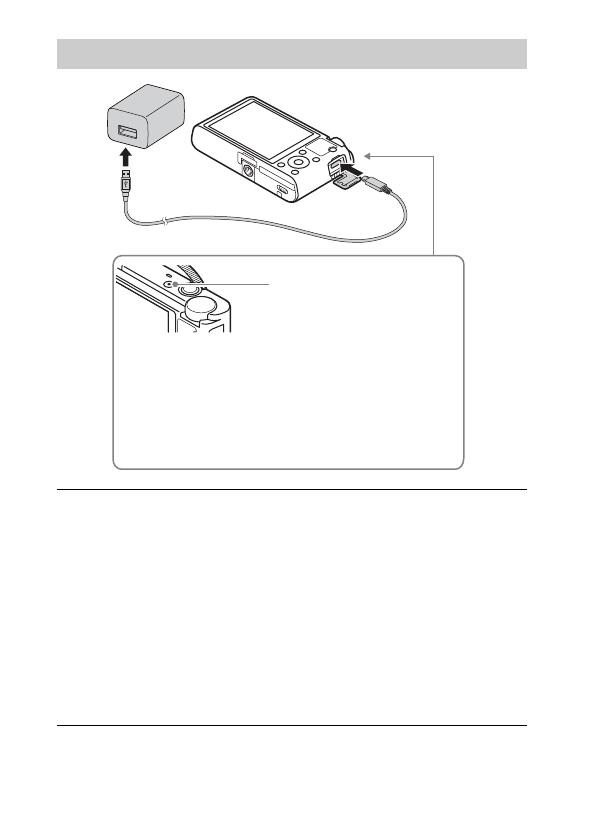
Charging the battery pack
1
Connect the camera to the AC Adaptor (supplied),
using the micro USB cable (supplied).
2
Connect the AC Adaptor to the wall outlet (wall socket).
The power/charge lamp lights orange, and charging starts.
• Turn off the camera while charging the battery.
• You can charge the battery pack even when it is partially charged.
• When the power/charge lamp flashes and charging is not finished,
remove and re-insert the battery pack.
• For some countries/regions, connect the power cord (mains lead) to the
AC Adaptor, and connect the AC Adaptor to the wall outlet (wall
socket).
Lit (green): Power ON
Lit (orange): Charging
Off: Charging finished
Flashing (orange): Charging error or charging
paused temporarily because the camera is not
within the proper temperature range
Power/Charge lamp
GB
7
GB
• If the power/charge lamp on the camera flashes when the AC Adaptor is connected
to the wall outlet (wall socket), this indicates that charging is temporarily stopped
because the temperature is outside the recommended range. When the temperature
gets back within the appropriate range, the charging resumes. We recommend
charging the battery pack in an ambient temperature of between 10°C to 30°C
(50ºF to 86ºF).
• The battery pack may not be effectively charged if the terminal section of the
battery is dirty. In this case, wipe any dust off lightly using a soft cloth or a cotton
swab to clean the terminal section of the battery.
• When charging is finished, disconnect the AC Adaptor from the wall outlet (wall
socket).
• Be sure to use only genuine Sony brand battery packs, micro USB cable (supplied)
and AC Adaptor (supplied).
x
Charging time (Full charge)
The charging time is approximately 155 min. using the AC Adaptor
(supplied). The power/charge lamp lights up and then turns off immediately
when the battery pack is fully charged.
• The above charging time applies when charging a fully depleted battery pack at a
temperature of 25°C (77°F). Charging may take longer depending on conditions of
use and circumstances.
x
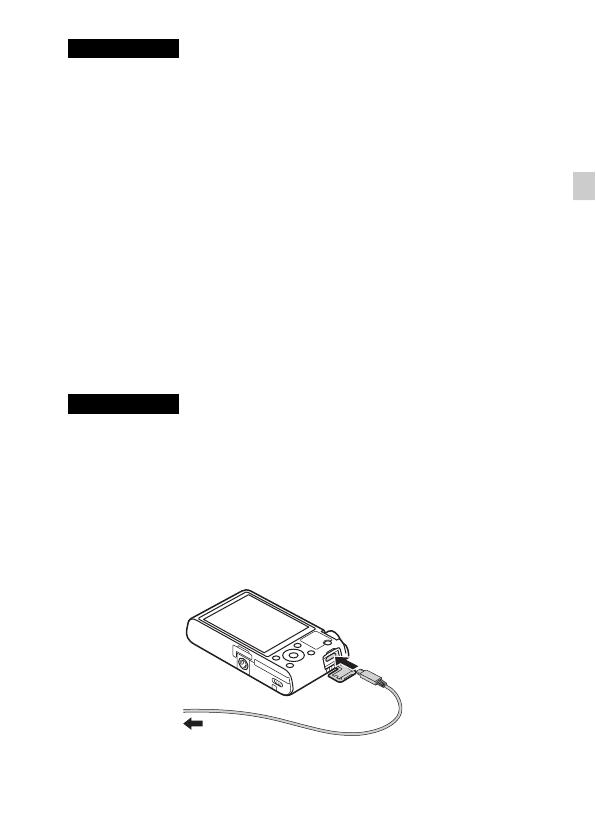
Charging by connecting to a computer
The battery pack can be charged by connecting the camera to a computer using
a micro USB cable. Connect the camera to the computer with the camera
turned off.
Notes
Notes
To a USB jack
GB
8
• If the camera is connected to a laptop computer that is not connected to a power
source, the laptop battery level decreases. Do not charge for an extended period of
time.
• Do not turn on/off or restart the computer, or wake the computer to resume from
sleep mode when a USB connection has been established between the computer
and the camera. That may cause the camera to malfunction. Before turning on/off,
or restarting the computer or waking the computer from sleep mode, disconnect
the camera and the computer.
• No guarantees are made for charging using a custom-built computer or a modified
computer.
x
Battery life and number of images that can be
recorded and played back
• The above estimates for battery life and number of recordable images apply when
the battery pack has been fully charged. The battery life and number of images
may decrease depending on the conditions of use.
• The battery life and number of recordable images are estimates based on shooting
with the default settings under the following conditions:
– Using the battery pack at an ambient temperature of 25°C (77°F).
– Using Sony Memory Stick PRO Duo (Mark2) media (sold separately)
• The numbers for “Shooting (still images)” are based on the CIPA standard and
shooting under the following conditions:
(CIPA: Camera & Imaging Products Association)
– One picture is taken every 30 seconds.
– The power is turned on and off once every ten times.
– The flash strobes once every two times.
– The zoom is switched alternately between the W and T ends.
• The number of minutes for movie shooting is based on the shooting under the
following conditions:
– The image quality is set to AVCHD 60i 17M(FH)/50i 17M(FH)
– Battery life based on non-stop shooting until the limit (29 minutes) has been
reached, and then continued by pressing the MOVIE (Movie) button again.
Other functions, such as zooming, are not operated.
Notes
Battery life Number of images
Shooting (still images) Approx. 165 min. Approx. 330 images
Viewing (still images) Approx. 250 min. Approx. 5000 images
Shooting (movies) Approx. 80 min. —
Notes
GB
9
GB
x
Supplying power
The camera can be supplied with power from the wall outlet (wall socket) by
connecting to the AC Adaptor (supplied), using the micro USB cable
(supplied). This way, you do not need to worry about draining the battery
when shooting or playing back for extended periods of time.
Shooting and playback are possible without a battery pack in the camera.
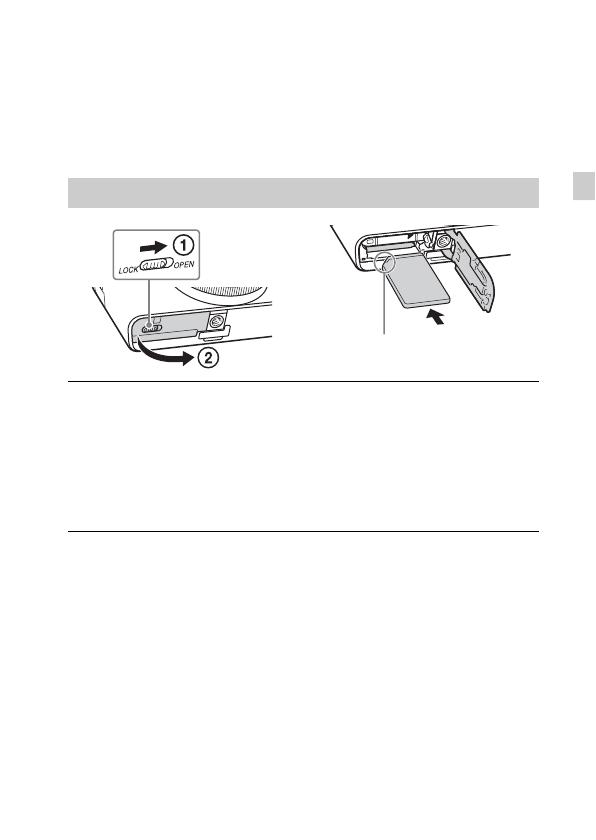
Inserting a memory card (sold separately)
1
Open the cover.
2
Insert the memory card.
• With the notched corner facing as illustrated, insert the memory card
until it clicks into place.
3
Close the cover.
Ensure the notched corner
faces correctly.
GB
10
x
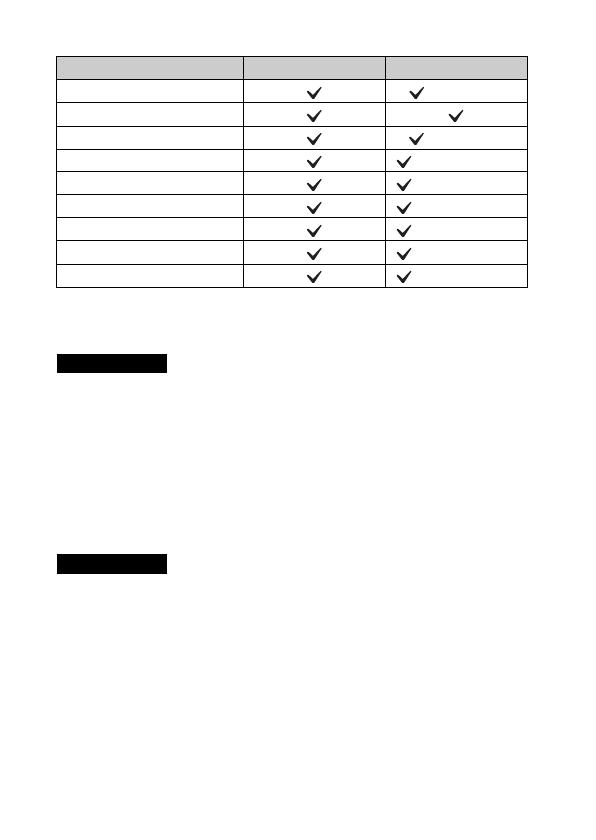
Memory cards that can be used
• For details on the number of recordable still images and recordable duration of
movies, refer to page 22. Check the tables to select a memory card with the desired
capacity.
• Not all memory cards are guaranteed to operate correctly. For memory cards
produced by manufacturers other than Sony, consult the manufacturers of the
products.
• When using Memory Stick Micro media or microSD memory cards with this
camera, make sure to use with the appropriate adaptor.
x
To remove the memory card/battery pack
Memory card: Push the memory card in once to eject the memory card.
Battery pack: Slide the battery lock lever. Be sure not to drop the battery pack.
• Never remove the memory card/battery pack when the access lamp (page 5) is lit.
This may cause damage to data in the memory card.
Memory card For still images For movies
Memory Stick PRO Duo (Mark2 only)
Memory Stick PRO-HG Duo
Memory Stick Micro (M2) (Mark2 only)
SD memory card (Class 4 or faster)
SDHC memory card (Class 4 or faster)
SDXC memory card (Class 4 or faster)
microSD memory card (Class 4 or faster)
microSDHC memory card (Class 4 or faster)
microSDXC memory card (Class 4 or faster)
Notes
Notes
GB
11
GB
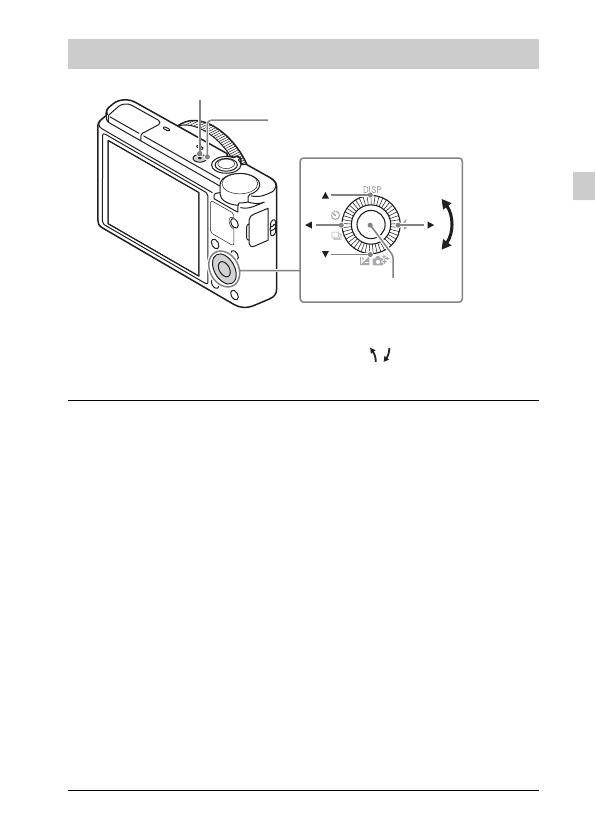
Setting the language and the clock
1
Press the ON/OFF (Power) button.
Language setting screen is displayed when you turn on the camera for the
first time.
• It may take time for the power to turn on and allow operation.
2
Select a desired language, then press the center of the
control wheel.
Date & Time setting screen is displayed.
3
When the message [Set Area/Date/Time.] is displayed,
select [Enter] and press the center.
4
Select a desired geographic location by following the
on-screen instructions, then press the center.
5
Set [Daylight Savings], [Date/Time] and [Date Format],
then press the center.
• When setting [Date/Time], midnight is 12:00 AM, and noon is
12:00 PM.
6
Check that [Enter] is selected, then press the center.
Control wheel
ON/OFF (Power)
Select items: v/V/b/B
Set the numeric value of date and
time:
v/V//
Set: Center button
Center button
Power/Charge lamp (green)

GB
12
Shooting still images
Shooting movies
Shooting still images/movies
1
Press the shutter button halfway down to focus.
When the image is in focus, a beep sounds and the focus indicator (z)
lights.
• When the camera cannot focus automatically, the focus indicator
flashes.
2
Press the shutter button fully down to shoot an image.
1
Press the MOVIE (Movie) button to start recording.
• Use the W/T (zoom) lever to change the zoom scale.
• Press the shutter button to shoot still images while continuing to record
the movie.
2
Press the MOVIE button again to stop recording.
Mode dial
Shutter button
: Intelligent Auto
: Movie
MOVIE
W/T (zoom)
lever
W: zoom out
T: zoom in
GB
13
GB
• Do not pull up the flash manually. This may cause a malfunction.
• When using the zoom function while shooting a movie, the sound of the camera
operating will be recorded. The sound of the MOVIE button operating may also be
recorded when movie recording is finished.
• Continuous movie shooting is possible for a maximum of approximately
29 minutes at one time with the camera’s default settings and when the ambient
temperature is approximately 25°C (77°F). When movie recording is finished, you
can restart recording by pressing the MOVIE button again. Recording may stop to
protect the camera depending on the ambient temperature.
x
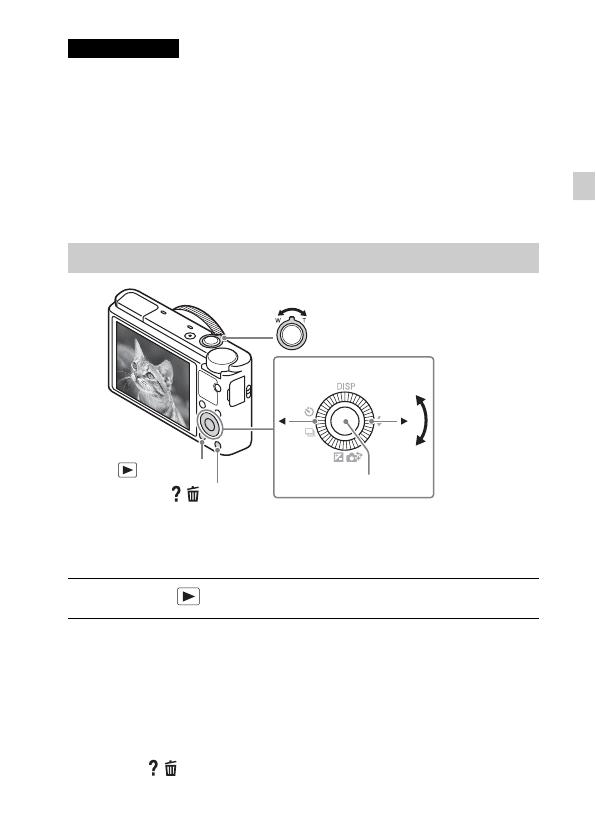
Selecting next/previous image
Select an image by pressing B (next)/b (previous) on the control wheel or by
turning the control wheel. Press the center of the control wheel to view
movies.
x
Deleting an image
1 Press the / (Delete) button.
2 Select [Delete] with v on the control wheel, then press the center.
Notes
Viewing images
1
Press the (Playback) button.
/ (Delete)
Control wheel
(Playback)
W: zoom out
T: zoom in
Select images: B (next)/b (previous) or
turn the control wheel
Set: Center button
Center button

GB
14
x
Rotating an image
Press the Fn (Function) button.
x
Returning to shooting images
Press the shutter button halfway down.
This camera is equipped with a built-in instruction guide.
In-Camera Guide
The camera displays explanations for MENU items and the setting values.
Shooting Tip
The camera displays shooting tips for the shooting mode selected.
Viewing the Guide
1
Press the MENU button.
2
Select the desired MENU item, then press
/ (In-Camera Guide) button.
1
Press / (In-Camera Guide) button in shooting mode.
2
Select the desired shooting tip, then press the center of
the control wheel.
The shooting tip is displayed.
• You can scroll the screen using v/V and change shooting tips using
b/B.
/ (In-Camera Guide)
MENU
GB
15
GB
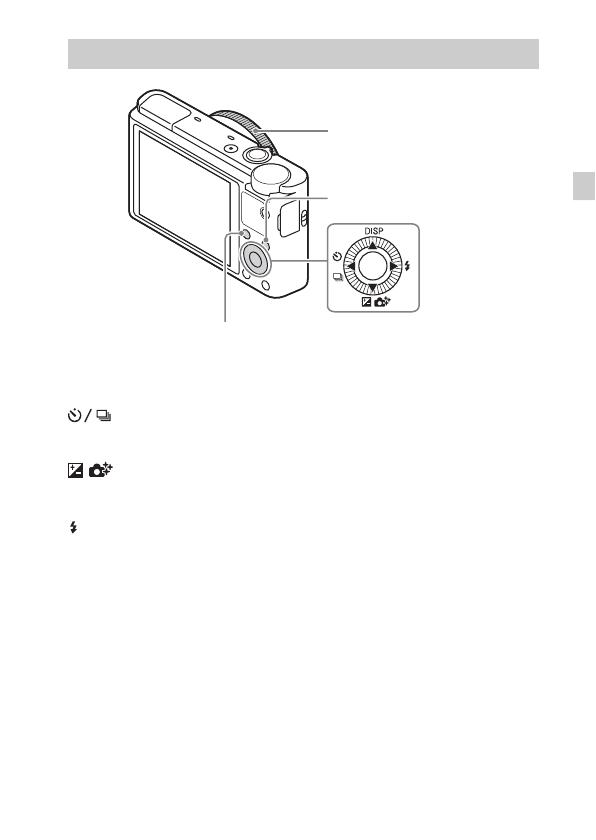
x
Control wheel
DISP (Display contents): Allows you to change the screen display.
(Drive Mode): Allows you to switch between shooting methods, such
as single shooting, continuous shooting, self-timer shooting or bracket
shooting.
/ (Exposure Comp./Photo Creativity): Allows you to adjust image
brightness./Allows you to operate the camera intuitively and shoot creative
images easily.
(Flash Mode): Allows you to select a flash mode for still images.
Center button (Standard): If you press this key when the [Focus Area] is set to
[Flexible Spot], you can change the position of the focus area by pressing v/
V/b/B on the control wheel. Depending on the options selected in [Focus
Area] or [Center Lock-on AF], the available functions varies when pressing
the key.
x
Fn (Function) button
Allows you to register 12 functions and recall those functions when shooting.
1 Press the Fn (Function) button.
2 Select the desired function by pressing v/V/b/B on the control wheel.
3 Select the setting value by turning the control wheel or the control ring.
Introduction of other functions
Control ring
Control wheel
Fn (Function)
MENU
GB
16
x
Control ring
Your favorite functions can be assigned to the control ring. When shooting,
established settings can be changed just by turning the control ring.
x
Menu Items
(Camera Settings)
Image Size Selects the size of still images.
Aspect Ratio Selects the aspect ratio for still images.
Quality Sets the image quality for still images.
Img. Size(Dual Rec)
Sets the size of still images shot when recording a
movie.
Panorama: Size Selects the size of panoramic images.
Panorama: Direction Sets the shooting direction for panoramic images.
File Format Selects the movie file format.
Record Setting Selects a frame-rate and bit-rate for the movie.
Drive Mode Sets the drive mode, such as for continuous shooting.
Flash Mode Sets the flash settings.
Flash Comp. Adjusts the intensity of flash output.
Red Eye Reduction Reduces the red-eye phenomenon when using flash.
Focus Mode Selects the focus method.
Focus Area Selects the area of focus.
AF Illuminator
Sets the AF illuminator, which provides light for a
dark scene to aid focusing.
Exposure Comp. Compensates for the brightness of the entire image.
ISO Sets the ISO sensitivity.
Metering Mode Selects the method for measuring brightness.
White Balance Adjusts color tones of an image.
DRO/Auto HDR
Compensates automatically for brightness and
contrast.
Creative Style
Selects the desired image processing. You can also
adjust contrast, saturation and sharpness.
GB
17
GB
Picture Effect
Selects the desired effect filter to achieve a more
impressive and artistic expression.
Focus Magnifier
Enlarges the image before shooting so that you can
check the focus.
Long Exposure
NR
Sets noise reduction processing for shots with a
shutter speed of 1/3 second or longer.
High ISO NR
Sets noise reduction processing for high-sensitivity
shooting.
Center Lock-on AF
Sets the function to track a subject and continue
focusing when pressing the center button in the
shooting screen.
Smile/Face Detect.
Selects to detect faces and adjust various settings
automatically. Sets to automatically release the
shutter when a smile is detected.
Soft Skin Effect Sets the Soft Skin Effect and the effect level.
Auto Obj.
Framing
Analyzes the scene when capturing faces, close-ups,
or subjects tracked by Lock-on AF function, and
automatically trims and saves another copy of the
image with a more impressive composition.
Scene Selection
Selects pre-set settings to match various scene
conditions.
Movie
Selects the exposure mode to suit your subject or
effect.
SteadyShot
Sets SteadyShot for shooting still images. Reduces
blur from camera shake when shooting while holding
the camera.
SteadyShot Sets SteadyShot for shooting movies.
Color Space Changes the range of reproducible colors.
Audio Recording Sets whether to record audio when shooting a movie.
Wind Noise Reduct. Reduces wind noise during movie recording.
Shooting Tip List Accesses all shooting tips.
Memory recall
Selects a setting registered in advance when the mode
dial is set to MR (Memory recall). Optical zoom scale,
etc. can be registered.
Memory Registers the desired modes or camera settings.
GB
18
(Custom Settings)
(Playback)
MF Assist Displays an enlarged image when focusing manually.
Focus Magnif. Time
Sets the length of time the image will be shown in an
enlarged form.
Grid Line
Sets a grid line display to enable alignment to a
structural outline.
Auto Review
Sets auto review to display the captured image after
shooting.
DISP Button
Sets the type of information to be displayed on the
monitor by pressing DISP on the control wheel.
Peaking Level
Enhances the outline of in-focus ranges with a
specific color when focusing manually.
Peaking Color Sets the color used for the peaking function.
Zoom Setting
Sets whether to use the Clear Image Zoom and Digital
Zoom when zooming.
Face Registration
Registers or changes the person to be given priority in
the focus.
Write Date
Sets whether to record a shooting date on the still
image.
Function Menu Set.
Customizes the functions displayed when the Fn
(Function) button is pressed.
Custom Key Settings
Assigning functions to the various keys allows you to
perform operations more quickly by pressing the keys
when shooting images.
MOVIE Button Sets whether to always activate the MOVIE button.
Delete Deletes an image.
View Mode
Sets the way in which images are grouped for
playback.
Image Index Displays multiple images at the same time.
Display Rotation Sets the playback direction of the recording image.
Slide Show Shows a slide show.

GB
19
GB
(Setup)
Protect Protects the images.
Specify Printing Adds a print order mark to a still image.
Monitor Brightness Sets the monitor brightness.
Volume Settings Sets the volume for movie playback.
Audio signals Sets the operating sound of the camera.
Upload Settings
Sets the upload function of the camera when using an
Eye-Fi card.
Mode Dial Guide
Turns the mode dial guide (the explanation of each
shooting mode) on or off.
Pwr Save Start Time
Sets the length of time until the camera turns off
automatically.
Demo Mode Sets demonstration playback of a movie to on or off.
HDMI Settings Sets the HDMI settings.
USB Connection Sets the USB connection method.
USB LUN Setting
Enhances compatibility by limiting the functions of
the USB connection. Set to [Multi] in normal
conditions and to [Single] only when the connection
between the camera and a computer or AV
component cannot be established.
USB Power Supply
Sets whether to supply power via USB connection
when the camera is connected to a computer or USB
device using a micro USB cable.
Language Selects the language.
Date/Time Setup Sets date and time, and daylight savings.
Area Setting Sets the location of use.
Format Formats the memory card.
File Number
Sets the method used to assign file numbers to still
images and movies.
Select REC Folder
Changes the selected folder for storing still images
and movies (MP4).

GB
20
Installing the following software to your computer will make your camera
experience more convenient.
• PlayMemories Home: Imports images to your computer and lets you use
them in different ways (page 21).
• Image Data Converter: Displays RAW images and processes them.
You can download and install this software to your computer from the
following URLs.
New Folder
Creates a new folder for storing still images and
movies (MP4).
Recover Image DB
Recovers the image database file and enables
recording and playback.
Display Media Info.
Displays the remaining recording time of movies and
the recordable number of still images on the memory
card.
Version Displays the camera software version.
Setting Reset Restores settings to their defaults.
Using software
1
Using the Internet browser on your computer, go to one
of the following URLs, and then follow the instructions
on the screen to download the desired software.
Windows:
http://www.sony.co.jp/imsoft/Win/
Mac:
http://www.sony.co.jp/imsoft/Mac/
• An Internet connection is required.
• For details on operation, refer to the support page or Help page of the
software.