Что же нам нужно для создания первого приложения? Во-первых, нужен текстовый редактор, в котором мы будем писать исходный код. Во-вторых, нам понадобится компилятор, который преобразует исходный код в исполняемый файл (например, .exe-файл в операционной системе Windows). В-третьих, нужен фреймворк .NET, который необходим для компиляции и запуска приложения — о фреймворке .NET мы говорили в предыдущей статье.
Все элементы, необходимые для создания первого приложения, объединены в специальной программе IDE (англ. Integrated Development Environment), а именно:
- Кодовый редактор
- Транслятор (компилятор и/или интерпретатор)
- Средства автоматизированной сборки
- Отладчик
Также IDE может включать в себя средства для интеграции с системами управления версиями и разнообразные инструменты для упрощения конструирования графического интерфейса пользователя. И это ещё не всё. Как правило, каждая IDE предназначена для нескольких языков программирования. Для разработки на языке C# можно выделить следующие среды разработки:
- Visual Studio. Разработана компанией Microsoft (так же, как и язык C#), поэтому является основной для создания приложений на C#.
- Project Rider. Это кроссплатформенная интегрированная среда разработки программного обеспечения для платформы .NET, разрабатываемая компанией JetBrains.
- Sharp Developer. Свободная среда разработки для языка C#, альтернатива Visual Studio .NET.
- Eclipse. Данная IDE предназначена в основном для разработки Java-приложений, но и на C# также можно создавать приложения.
- Visual Studio Code. Редактор исходного кода, разработанный Microsoft для Windows, Linux и macOS. Позиционируется как «лёгкий» редактор кода для кроссплатформенной разработки веб- и облачных приложений.
Создавать первое приложение на C# мы будем в интегрированной среде разработки Visual Studio. На официальном сайте доступны три версии продукта:
- Community – полнофункциональная, расширяемая и бесплатная версия интегрированной среды разработки для создания современных приложений Android, iOS и Windows, а также веб-приложений и облачных служб.
- Professional – платная версия, содержащая профессиональные инструменты и службы для индивидуальных разработчиков или небольших команд.
- Enterprise – платная версия, представляющая интегрированное комплексное решение для команд любого размера с высокими требованиями к качеству и масштабу.
Для создания приложений на C# будем использовать бесплатную и полнофункциональную среду разработки — Visual Studio Community 2019.
Установка Visual Studio
После загрузки необходимо запустить установщик. В открывшемся окне нам предложат выбрать те компоненты, которые мы хотим установить вместе с Visual Studio. Стоит отметить, что Visual Studio — очень функциональная среда разработки и позволяет разрабатывать приложения с помощью множества языков и платформ.
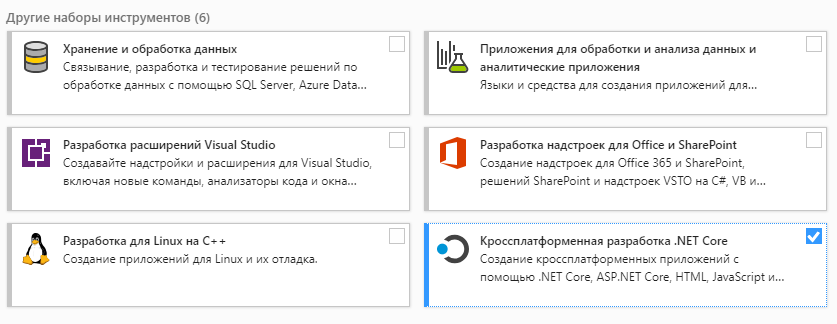
В нашем случае интересен прежде всего C# и .NET Core, поэтому в наборе рабочих нагрузок можно выбрать только пункт «Кроссплатформенная разработка .NET Core». Можно выбрать и больше опций или вообще все опции, однако стоит учитывать свободный размер на жёстком диске — чем больше опций будет выбрано, тем больше места на диске будет занято.
При инсталляции Visual Studio на ваш компьютер будут установлены все необходимые инструменты для разработки программ, в том числе фреймворк .NET Core. Установка успешна? Начинаем писать программу!
Создание проекта в Visual Studio
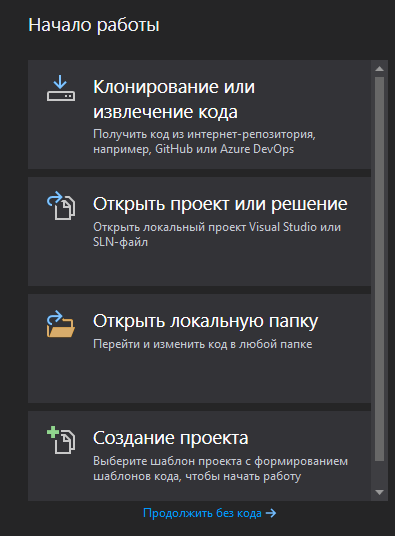
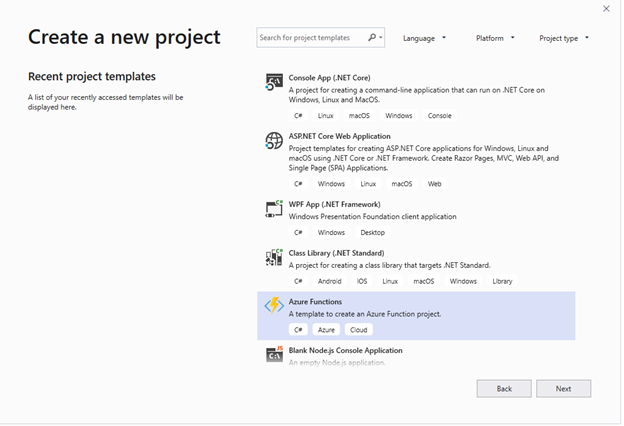
Откройте Visual Studio и на стартовом экране выберите пункт «Создание проекта».
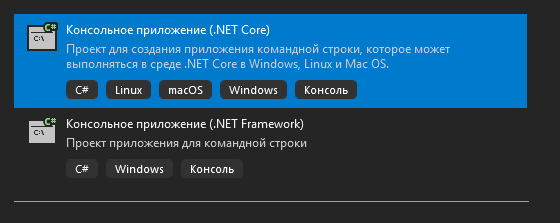
На следующем окне в качестве типа проекта нужно выбрать Консольное приложение (.NET Core). Это значит, что мы будем создавать приложение командной строки на языке C#.
В следующем окне зададим название проекта. Пусть будет HelloWorld. На этом этапе также можно указать папку, где будет располагаться проект. После этого нажмите кнопку «Создать».
Visual Studio создаст и откроет проект. Окно будет выглядеть так:
В нашем редакторе в центре находится сгенерированный по умолчанию код C#. Впоследствии мы изменим его на свой. Слева находится обозреватель решений, в котором можно увидеть структуру нашего проекта. В данном случае в обозревателе сгенерирована структура по умолчанию. В узле «Зависимости» содержатся сборки, которые добавлены в проект по умолчанию — классы библиотеки .NET, которые будет использовать C#. Однако не всегда все сборки нужны. Лишнее содержимое отсюда потом можно удалить. Или, наоборот, добавить какую-нибудь нужную библиотеку — именно в этом узле она будет размещена.
Hello world
Под узлом «Зависимости» расположен непосредственно сам файл кода программы — Program.cs. Как раз он и открыт в центральном окне. Вначале разберёмся, что весь этот код собой представляет:
В начале файла мы видим директиву using, после которой идёт название подключаемого пространства имён. Пространства имён необходимы для организации классов в общие блоки. Например, в первой строке подключается пространство имён System, которое содержит фундаментальные и базовые классы платформы .NET.
C# имеет C-подобный синтаксис, и каждая строка завершается точкой с запятой, а каждый блок кода помещается в фигурные скобки. Далее начинается уже наше пространство имён HelloWorld, которое будет создавать отдельную сборку или исполняемую программу. Сначала идёт ключевое слово namespace, после которого следует название пространства имён. По умолчанию Visual Studio даёт ему название проекта. Далее внутри фигурных скобок идёт блок пространства имён.
Пространство имён может включать другие пространства или классы. В нашем случае по умолчанию сгенерирован один класс — Program. Классы объявляются похожим способом: сначала идёт ключевое слово class, а потом название класса, и далее блок самого класса в фигурных скобках.
Класс может содержать различные переменные, методы, свойства, прочие инструкции. В данном случае объявлен один метод Main. В программе на C# метод Main является входной точкой программы, с него начинается всё управление. Это обязательный элемент любой программы.
Слово static указывает, что метод Main статический, а слово void — что он не возвращает никакого значения. Далее в скобках у нас идут параметры метода. string[] args — это массив с именем args, который хранит значения типа string, то есть строки. В данном случае они нам пока не нужны, но в реальной программе это те параметры, которые передаются при запуске программы из консоли.
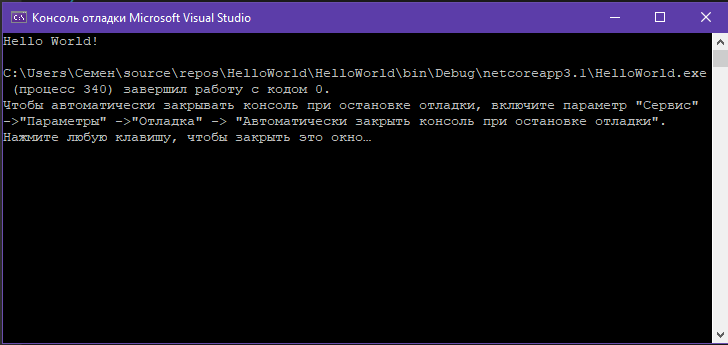
Внутри метода располагаются действия, которые этот метод выполняет. По умолчанию он содержит одно действие: Console.WriteLine(«Hello World!»); — выводит в консоль строку «Hello World!».
Теперь мы можем запустить программу на выполнение с помощью клавиши F5 или с панели инструментов, нажав на зелёную стрелку. И если вы все сделали правильно, то при запуске приложения увидите заветную строку.
Интерактивное приложение на C#
Теперь сделаем всё поинтересней — изменим код на следующий:
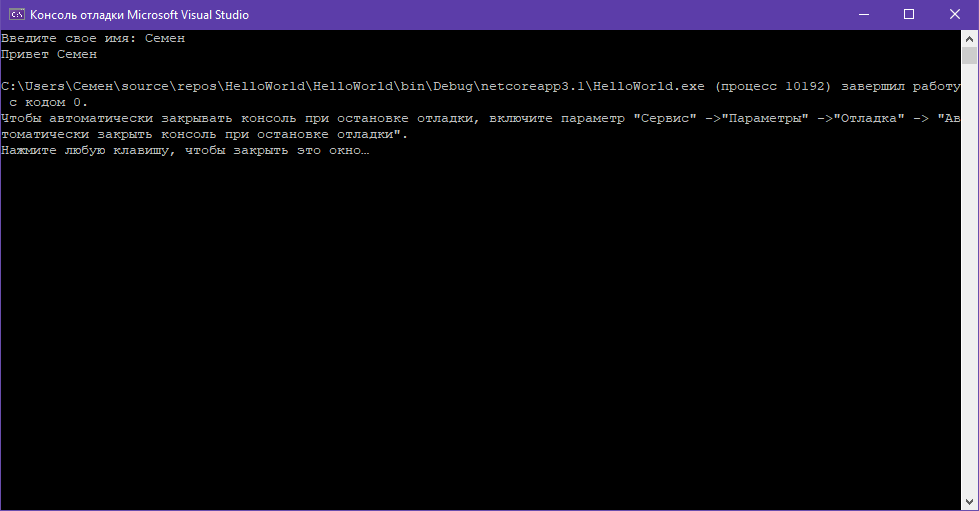
По сравнению с автоматически сгенерированным кодом были внесены несколько изменений. Теперь в методе Main первой строкой выводится приглашение к вводу.
Класс Console, метод которого мы вызываем, находится в пространстве имён System. Это пространство подключено в начале с помощью директивы using. Без подключения пространства имён System невозможно было бы использовать класс Console.
Однако нам необязательно подключать пространство имён. Мы можем даже удалить первую строку, но в этом случае мы тогда должны будем указать полный путь до используемого класса:
Во второй строке определяется строковая переменная name (тип string), в которую пользователь вводит информацию с консоли:
Мы обозначили, что помощью метода ReadLine() можем считать с консоли строку.
Затем введённое имя выводится на консоль:
Чтобы задать вывод значения переменной name в выводимой на консоль строке, применяются фигурные скобки . При выводе строки на консоль выражение будет заменяться на значение переменной name — введённое имя.
Знак доллара ($) обозначает, что внутри строки таким образом можно выводить значения переменных. Теперь протестируем проект, запустив его выполнение.
Поздравляю, мы создали первое приложение! Исполняемый файл вы можете найти на жёстком диске в папке проекта в каталоге bin/Debug. Оно будет называться так же, как проект, и иметь расширение .exe. Этот файл можно запускать без Visual Studio, а также переносить для доработки на другие компьютеры, где есть .NET Core.
Как создать проект в visual studio 2019 c

I installed Visual Studio 2019 and I want to create a C project. Not C++ and not C# There is no option for a C solution But the doc says VS is both a C and a C++ compiler. I see no option for a C solution. There is a doc on the net explaining how to create C project in console from command line. But I want to create a «normal» project.
What should I do ?
4 Answers 4
I’ll summarize what was explained in the video someone linked under your question, as I was able to reproduce the steps and create a working C project in Visual Studio. Kudos to the video creator and kiner_shah for sharing.
As a precondition, you shall be able to create C++ project in VS, so make sure you have the right extensions installed.
Create a new project ( Shift + Ctrl + N ), select Visual C++ and Console App. This will create a new console app with a default c++ main file. Remove that file and put in a main.c file. This can be compiled, and works just fine.
Как создать свое первое приложение Windows Forms (Winforms) в Visual Studio?

Изучение
Освойте Microsoft Visual Studio и разрабатывайте собственные приложения с помощью Windows Forms практически без написания кода.
Windows Forms — это платформа, доступная в Visual Studio, которая позволяет создавать настольные приложения с помощью графического пользовательского интерфейса. Это позволяет вам щелкать и перетаскивать виджеты, такие как кнопки или метки, прямо на холст и управлять свойствами каждого виджета, такими как размер шрифта, цвет или граница.
В этой статье простой конвертер градусов Цельсия в градусы Фаренгейта будет использоваться в качестве примера для изучения основ настройки приложения Windows Form. В этом руководстве используется Visual Studio 2019 Community Edition.
Как создать проект Windows Forms в Visual Studio
Сначала создайте проект в Visual Studio.
- Откройте Visual Studio и выберите Создать новый проект.
- Visual Studio предоставит вам список шаблонов проектов, из которых вы можете выбрать.
- Чтобы создать приложение Windows Forms, найдите приложение Windows Formи выберите его из списка шаблонов. Как только это будет выбрано, нажмите » Далее».

- Добавьте имя и местоположение для проекта и нажмите » Далее». Расположение — это каталог, в котором будут храниться файлы кода.
- На следующем экране сохраните выбор по умолчанию.NET Core 3.1.
- Щелкните Создать.
- Когда Visual Studio завершит создание проекта, он откроется.


Как добавить элементы на холст проекта
Холст — это белая область, расположенная в верхнем левом углу экрана. Нажмите и перетащите точки в нижней, правой или нижней правой части холста, чтобы изменить его размер, если это необходимо.
Чтобы создать пользовательский интерфейс приложения, добавьте на холст такие виджеты, как кнопки или текстовые поля.
- Откройте вкладку «Вид» в верхней части окна и выберите » Панель инструментов «.

- Это добавит панель инструментов в левую часть приложения. Выберите значок булавкив правом верхнем углу панели инструментов, чтобы закрепить его там навсегда.
- Здесь вы можете перетащить любой виджет из панели инструментов на холст. Выделите кнопку на панели инструментов и перетащите ее на холст.

- Перетащите на холст еще два текстовых поля вместе с тремя метками (две метки для каждого текстового поля и одна метка для заголовка в верхней части приложения).

- Каждый виджет на холсте имеет связанные с ним свойства. Выделите виджет, чтобы отобразить окно свойствв правом нижнем углу Visual Studio, в котором перечислены все свойства этого виджета. Эти свойства могут включать текст, имя, размер шрифта, границу или выравнивание выделенного виджета.
- На данный момент текст этих виджетов по-прежнему говорит label1, label2или button1. Выберите виджет label1и отредактируйте свойство Text в окне свойств, указав «Цельсий в Фаренгейт». Измените размер шрифта на 22pt.

- Аналогичным образом отредактируйте свойства других виджетов на холсте, чтобы они были следующими:


Виджет
Имущество
Новое значение
Как обрабатывать события и писать код в коде программной части
Виджеты на холсте можно привязывать к событиям. События могут включать в себя такие вещи, как нажатие кнопки, изменение текста внутри текстового поля или выбор определенного переключателя. Когда происходят эти события, это может привести к срабатыванию части кода в программном коде.
C# — это язык, используемый при создании Windows Forms. Если вы еще не использовали C#, есть много практических причин для изучения программирования на C#.
Для этого конкретного приложения добавьте событие к кнопке » Рассчитать «, чтобы инициировать выполнение части кода при нажатии этой кнопки.
1. Дважды щелкните кнопку » Рассчитать«, чтобы автоматически открыть Form1.cs с новым методом Event:
2. Здесь вы добавите код, который будет выполнять расчет градусов Цельсия по Фаренгейту и отображать результат в текстовом поле Фаренгейта. Для этого вам нужно иметь возможность прочитать значение из текстового поля Цельсия и изменить текстовое поле Фаренгейта, чтобы отобразить результат.
3. Вернитесь на холст и повторно отредактируйте свойства, как показано ранее. На этот раз отредактируйте свойство Nameдля текстовых полей Цельсия и Фаренгейта. Эти имена можно использовать для ссылки на текстовые поля в коде.
| Виджет | Имущество | Новое значение |
| Текстовое поле Цельсия | Имя | ЦельсияTextBox |
| Текстовое поле Фаренгейта | Имя | по ФаренгейтуTextBox |
4. Вернитесь к функции calculateButton_Click в Form1.cs.
5. Теперь на текстовое поле Celsius можно ссылаться в коде, используя имя «celsiusTextBox». Введенное пользователем значение Цельсия сохраняется в его свойстве Text. Однако, поскольку это строка, разберите ее на двойную, чтобы включить ее в будущие расчеты по Фаренгейту.
private void calculateButton_Click(object sender, EventArgs e)
// Get the value that the user entered in the Celsius Text Box
double celsiusValue = Double.Parse(celsiusTextBox.Text);
>
6. Переменная celsiusValue теперь хранит значение, введенное пользователем в текстовом поле Celsius. Формула для преобразования градусов Цельсия в градусы Фаренгейта: (celsiusValue * 9 / 5) + 32.Таким образом, результат теперь можно рассчитать и сохранить в текстовом поле Фаренгейта.
private void calculateButton_Click(object sender, EventArgs e)
// Get the value that the user entered in the Celsius Text Box
double celsiusValue = Double.Parse(celsiusTextBox.Text);
// Apply the calculation
double result = (celsiusValue * 9 / 5) + 32;
// Store the result in the Fahrenheit Textbox
fahrenheitTextBox.Text = result.ToString();
>
Как запускать и отлаживать программу Windows Forms
Запуск программы Windows Forms в Visual Studio
Теперь, когда пользовательский интерфейс и логика кода настроены, запустите программу, чтобы увидеть, как она работает.

1. Чтобы запустить программу, выберите зеленую стрелку вверху панели инструментов в Visual Studio.

2. После загрузки проекта добавьте значение в текстовое поле Цельсия и нажмите кнопку » Рассчитать». Это добавит результат в текстовое поле по Фаренгейту.
3 Если программа размыта во время выполнения, вероятно, ваше приложение не поддерживает DPI. Это может вызвать проблемы с масштабированием и разрешением, поэтому его необходимо включить.
4. Щелкните правой кнопкой мыши проект TemperatureConverterв обозревателе решений. Выберите Добавить, затем выберите Новый элемент.

5. Найдите файл манифеста приложения и нажмите » Добавить «.
6. Скопируйте следующий код в новый файл app.manifest как дочерний элемент тега сборки (если код уже сгенерирован, просто раскомментируйте его).
7. Чтобы это изменение вступило в силу, перезапустите программу. Нажмите красную кнопку остановки в верхней части панели инструментов, затем снова нажмите зеленую кнопку воспроизведения.
Отладка программы Windows Forms
Вы можете отладить программу, если логика вашего приложения Windows Forms не работает должным образом.

- Вернитесь к функции calculateButton_Click в Form1.cs и щелкните в любом месте серой полосы в крайнем левом углу экрана. Это добавит точку останова, которая обозначена красным кружком.
- Нажмите кнопку «Рассчитать» еще раз, чтобы запустить этот метод. Программа приостановится, когда достигнет точки останова, чтобы показать все значения, хранящиеся в переменных в этой точке.
- Чтобы продолжить работу программы, нажмите зеленую стрелку » Продолжить» в верхней части панели инструментов.
Запуск программы с помощью исполняемого файла
Если вы не хотите запускать свою программу через Visual Studio, используйте автономный исполняемый файл для программы. Это автоматически генерируется.
Перейдите к исполняемому файлу, который можно найти здесь:
Нажмите на исполняемый файл, чтобы запустить программу напрямую.
Добавление дополнительных элементов в форму Windows
Надеюсь, теперь у вас есть общее представление об основной структуре приложения Windows Form. Вы можете продолжить изучение дополнительных функций Windows Forms, поэкспериментировав с новыми виджетами и углубившись в другие различные события, которые можно обрабатывать.
Как только вы лучше познакомитесь с Windows Forms, вы сможете приступить к созданию более сложных приложений. Вы также можете изучить многие другие способы создания приложений на рабочем столе Windows.
This page is a comprehensive guide on the IT topic of Visual Studio 2019. It covers the basics of Visual Studio 2019 and provides valuable information for those looking to improve their skills in the field of IT. The article highlights the importance of downloading PDFs for reference and provides tips and tricks for effective learning. The practice exercises and beginner and advanced tutorials help to cater to different levels of understanding. The page concludes by emphasizing the opportunities for growth and development that Visual Studio 2019 provides, making it an essential technology for anyone looking to advance their IT skills. Download free PDFs, follow tips and tricks, practice exercises, and master beginner or advanced tutorials. Enhance your IT skills today!
Introduction to Visual Studio 2019
Visual Studio 2019 is an IT topic that has gained a lot of popularity in recent times. It is a crucial technology for professionals and individuals who are looking to improve their skills in the field of IT. Whether you are a beginner or an advanced user, Visual Studio 2019 provides ample opportunities for growth and development. In this page, we will delve into the basics of Visual Studio 2019, including tips and tricks, practice and exercises, and beginner and advanced tutorials.
Download Visual Studio 2019 PDFs
One of the best ways to get started with Visual Studio 2019 is to download PDFs. These resources provide comprehensive information on the topic and can be used as a reference guide. There are many websites that offer free PDFs on Visual Studio 2019. These resources can be downloaded easily and used to learn the basics of Visual Studio 2019.
Tips and Tricks for Visual Studio 2019
In order to get the most out of Visual Studio 2019, it is important to understand some tips and tricks. Some of the key tips and tricks include:
- Practice regularly
- Use online resources
- Join forums and communities
- Get hands-on experience
Visual Studio 2019 Practice and Exercises
One of the best ways to improve your skills in Visual Studio 2019 is to practice regularly. There are many practice exercises available online that can help you hone your skills. Some of the best practices and exercises include:
- Complete tutorials
- Practice coding
- Take online quizzes
- Work on projects
Visual Studio 2019 Beginner and Advanced Tutorials
Whether you are a beginner or an advanced user, there are tutorials available to suit your needs. Beginner tutorials provide a comprehensive introduction to Visual Studio 2019 and are designed to help you understand the basics. Advanced tutorials, on the other hand, are designed for those who have a good understanding of the technology and are looking to improve their skills further.
Conclusion
Visual Studio 2019 is an essential technology for anyone looking to improve their skills in the field of IT. With a range of resources available, including PDFs, tips and tricks, practice and exercises, and beginner and advanced tutorials, anyone can learn Visual Studio 2019. So, download your resources today and get started on your journey to becoming an expert in Visual Studio 2019.
Free Online tutorials
Visual Basic VB.NET Tutorial for Beginners
Learning Visual Studio 2019 Tutorials in PDF
Numerous excellent tutorials, books, Exercises on Visual Studio 2019
and other resources are available online. I have compiled a list of the top ones for your convenience. Let us begin without further ado!
Introduction to Visual Studio and C#
The Introduction to Visual Studio and C# is a beginner level PDF e-book tutorial or course with 49 pages. It was added on December 26, 2013 and has been downloaded 12742 times. The file size is 1 MB. It was created by Hans-Petter Halvorsen.
Introduction to Visual Studio and C#
The Introduction to Visual Studio and C# is a beginner level PDF e-book tutorial or course with 48 pages. It was added on October 20, 2015 and has been downloaded 19747 times. The file size is 970.55 KB. It was created by HANS-PETTER HALVORSEN.
Beginning Excel 2019
The Beginning Excel 2019 is a beginner level PDF e-book tutorial or course with 225 pages. It was added on December 9, 2021 and has been downloaded 17946 times. The file size is 7.88 MB. It was created by Noreen Brown, Barbara Lave, Hallie Puncochar, Julie Romey, Mary Schatz, Art Schneider, and Diane Shingledecker.
Introduction to Visual Basic.NET
The Introduction to Visual Basic.NET is a beginner level PDF e-book tutorial or course with 66 pages. It was added on December 9, 2012 and has been downloaded 11123 times. The file size is 1.63 MB. It was created by Abel Angel Rodriguez.
Visual C# Programming Basics
The Visual C# Programming Basics is a beginner level PDF e-book tutorial or course with 19 pages. It was added on December 28, 2016 and has been downloaded 4244 times. The file size is 369.14 KB. It was created by Davide Vitelaru.
Introduction to ASP.NET Web Development
The Introduction to ASP.NET Web Development is level PDF e-book tutorial or course with 36 pages. It was added on December 11, 2012 and has been downloaded 4768 times. The file size is 792.33 KB.
Data Acquisition in C#
The Data Acquisition in C# is an advanced level PDF e-book tutorial or course with 77 pages. It was added on November 24, 2018 and has been downloaded 6023 times. The file size is 1.84 MB. It was created by Hans-Petter Halvorsen.
Portable Visual Basic.NET
The Portable Visual Basic.NET is an advanced level PDF e-book tutorial or course with 15 pages. It was added on September 17, 2014 and has been downloaded 5779 times. The file size is 512.11 KB.
Web Services with Examples
The Web Services with Examples is a beginner level PDF e-book tutorial or course with 49 pages. It was added on October 21, 2015 and has been downloaded 4168 times. The file size is 1.95 MB. It was created by Hans-Petter Halvorsen.
Getting started with MVC3
The Getting started with MVC3 is a beginner level PDF e-book tutorial or course with 81 pages. It was added on December 26, 2013 and has been downloaded 3897 times. The file size is 1.8 MB. It was created by Scott Hanselman.
Introduction to VB.NET manual
The Introduction to VB.NET manual is level PDF e-book tutorial or course with 327 pages. It was added on December 9, 2012 and has been downloaded 13623 times. The file size is 3.17 MB.
Beginners Guide to C# and the .NET
The Beginners Guide to C# and the .NET is a beginner level PDF e-book tutorial or course with 58 pages. It was added on December 26, 2013 and has been downloaded 8321 times. The file size is 618.34 KB. It was created by Gus Issa (GHI Electronics, LLC).
ASP.NET Web Programming
The ASP.NET Web Programming is a beginner level PDF e-book tutorial or course with 38 pages. It was added on October 21, 2015 and has been downloaded 4612 times. The file size is 1.15 MB. It was created by Hans-Petter Halvorsen.
ASP.NET and Web Programming
The ASP.NET and Web Programming is a beginner level PDF e-book tutorial or course with 38 pages. It was added on October 13, 2014 and has been downloaded 6742 times. The file size is 1.73 MB. It was created by Telemark University College.
ASP.Net for beginner
The ASP.Net for beginner is level PDF e-book tutorial or course with 265 pages. It was added on December 11, 2012 and has been downloaded 7488 times. The file size is 11.83 MB.
Using SQL Server in C# with Examples
The Using SQL Server in C# with Examples is an intermediate level PDF e-book tutorial or course with 21 pages. It was added on October 20, 2015 and has been downloaded 10424 times. The file size is 303.45 KB. It was created by Hans-Petter Halvorsen.
Visual C++ 2012 Tutorial
The Visual C++ 2012 Tutorial is a beginner level PDF e-book tutorial or course with 10 pages. It was added on March 13, 2014 and has been downloaded 5705 times. The file size is 453.65 KB. It was created by Y. Daniel Liang.
Visual Basic .NET Notes for Professionals book
The Visual Basic .NET Notes for Professionals book is a beginner level PDF e-book tutorial or course with 149 pages. It was added on June 11, 2019 and has been downloaded 8153 times. The file size is 1.72 MB. It was created by GoalKicker.com.
Visual Basic
The Visual Basic is a beginner level PDF e-book tutorial or course with 260 pages. It was added on October 16, 2014 and has been downloaded 42207 times. The file size is 1.15 MB. It was created by wikibooks.
.NET Tutorial for Beginners
The .NET Tutorial for Beginners is a beginner level PDF e-book tutorial or course with 224 pages. It was added on June 25, 2016 and has been downloaded 9475 times. The file size is 1.63 MB. It was created by India Community Initiative.
Adobe Spark Getting Started
The Adobe Spark Getting Started is a beginner level PDF e-book tutorial or course with 23 pages. It was added on October 2, 2019 and has been downloaded 920 times. The file size is 644.41 KB. It was created by Kennesaw State University.
Visual C++ 2010 Tutorial
The Visual C++ 2010 Tutorial is a beginner level PDF e-book tutorial or course with 16 pages. It was added on March 13, 2014 and has been downloaded 8230 times. The file size is 918.35 KB.
Excel Analytics and Programming
The Excel Analytics and Programming is an advanced level PDF e-book tutorial or course with 250 pages. It was added on August 29, 2014 and has been downloaded 39547 times. The file size is 3.12 MB. It was created by George Zhao.
Excel 2013: Accessibility
The Excel 2013: Accessibility is an advanced level PDF e-book tutorial or course with 32 pages. It was added on October 20, 2015 and has been downloaded 7081 times. The file size is 1.14 MB. It was created by Kennesaw State University.
OOP in Visual Basic .NET
The OOP in Visual Basic .NET is level PDF e-book tutorial or course with 86 pages. It was added on December 9, 2012 and has been downloaded 10179 times. The file size is 464.27 KB.
Accessibility Features In Microsoft Excel 2010
The Accessibility Features In Microsoft Excel 2010 is an advanced level PDF e-book tutorial or course with 21 pages. It was added on October 19, 2015 and has been downloaded 2245 times. The file size is 700.28 KB. It was created by Kennesaw State University.
Designing Real-Time 3D Graphics
The Designing Real-Time 3D Graphics is a beginner level PDF e-book tutorial or course with 272 pages. It was added on December 9, 2013 and has been downloaded 5824 times. The file size is 1.75 MB. It was created by James Helman.
Excel 2016 — Advanced Functions & Modifying Spreadsheets
The Excel 2016 — Advanced Functions & Modifying Spreadsheets is an advanced level PDF e-book tutorial or course with 24 pages. It was added on September 2, 2016 and has been downloaded 8570 times. The file size is 751.26 KB. It was created by Kennesaw State University.
Excel 2013: Advanced Functions and Modifying Spreadsheets
The Excel 2013: Advanced Functions and Modifying Spreadsheets is an advanced level PDF e-book tutorial or course with 26 pages. It was added on October 20, 2015 and has been downloaded 9475 times. The file size is 665.65 KB. It was created by Kennesaw State University.
Visual Basic and .NET Gadgeteer
The Visual Basic and .NET Gadgeteer is an advanced level PDF e-book tutorial or course with 125 pages. It was added on September 17, 2014 and has been downloaded 7559 times. The file size is 3.17 MB. It was created by Sue Sentance, Steven Johnston, Steve Hodges, Jan Kučera, James Scott, Scarlet Schwiderski-Grosche.
Introduction
Today, Microsoft released its developer IDE, Visual Studio 2019. In this article, we will go through the steps to download and install VS 2019 and create a simple ASP.NET Core Web application.
Visual Studio 2019 Community edition is free.
Once you download, the installer will start installing and will show you the below workloads. We can choose “ASP.NET and web development” for now.
This workload will install the following packages by default. You can add or remove any optional package from the list.
After choosing the desired packages, just click the “Install” button to proceed.
Please note that the current workloads need a total of 1.33 GB data to be downloaded.
It will take some time to download depending on the selected packages and your internet speed. If you check the Programs, you can see the below packages are installed on your machine.
Please note all the required files are installed in the following directory.
The total file size of the above-selected workload (for ASP.NET web app development) is shown below.
Once the installation is completed, we can launch Visual Studio 2019. There should be an icon or a menu added to Windows. Search for Visual Studio 2019 and run it.
It will load your existing Visual Studio profile. It may also ask you to log in to your Microsoft account. If you do not have a Microsoft account, you can create a new account.
We can see a newly designed landing page of Visual Studio where we see a list of recent projects. We can also clone or check out the code from GitHub and Azure DevOps. We can open a project or solution and a folder. Also, we can create a new project.
Click “Create a new project” to create a new project.
You can see various project types there. Choose “ASP.NET Core Web Application” project type for now.
Give a valid name to your project and select a path for it.
Now, choose any one of the listed project templates. I chose MVC template. Please note, I have chosen ASP.NET Core 2.2 with this project. This is the current stable version of .NET Core. The new version 3.0 is still under preview mode only (As of April 2, 2019).
This template will create a Home Controller and two Views along with it. The project structure is shown below.
Now, build and run the application. I have made some minor changes in the view pages.
Conclusion
In this post, we have seen how to download the latest Visual Studio 2019 version and install the ASP.NET web development workload. We also created a simple «Hello World» ASP.NET Core web application.
You will learn more new features of Visual Studio 2019 in my upcoming articles.
- Download source — 950.8 KB
Introduction
In our previous article, we have seen how to download and install the Visual Studio 2019 RC and also explained how to started working with Visual Studio 2019 RC. In this part, we will see in more detail what project templates are available and see more details on what’s new in Visual Studio 2019. We will also see how to work with ASP.NET Core Model View Control with simple Login using SQL Server.
Background
Working with New Project Templates
Hope you all have installed the Visual Studio 2019 RC version or if the present month is crossed, on April 2nd 2019, you might have upgraded or installed Visual Studio 2019. If not, then read our previous article which explained in detail how to download and install Visual Studio 2019 on your computer.
Now here in this article, we will start with creating our new Project on Visual Studio 2019.
To start Visual Studio 2019, click Windows Start and search for Visual Studio 2019, You can see the Visual Studio 2019 RC or Visual Studio 2019, click on that.

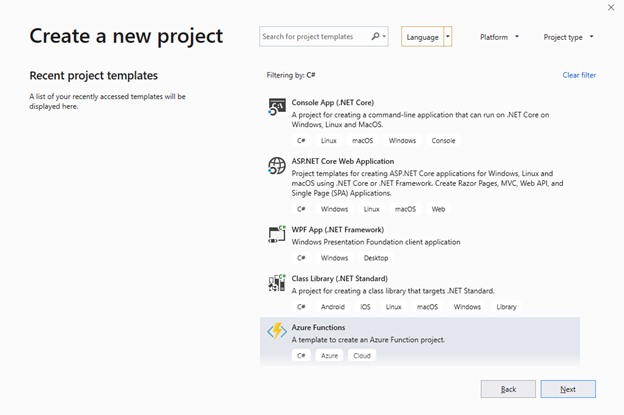
You can see Visual Studio 2019 RC will be opened like the image below, you can see on the left side as recent opened project list will be displayed. To create a new Project, we click on create a new project.

We can see a list of installed projects for working with Visual Studio 2019.
Here, the new Project window has a new design than our previous Visual Studio 2017.
Language Combobox at the Top
We can see a new Language Combobox at the top center of the New Project window.
We can see the Language Combobox has the options given below:
- All Languages
- C++
- C#
- Java
- F#
- JavaScript
- Python
- Query Language
- TypeScript
- Visual Basic
By default, All Languages has been selected and if the user selects C#, all the project templates related to C# will be displayed and users can select their project kind and start developing. Here, when we select C#, we can see the Filter by option has been set as C# and list of projects related to C# has been loaded.
In our previous versions like Visual Studio 2017, all the projects will be loaded under the language as treeview on the left side like the below images.
The below image is a new project creation window of VS 2017. For the differences between 2017 and 2019, I have added the below image:
Platform Combobox
We can see new feature called Platform selection has been added in Visual Studio 2019. We can filter the available projects by platform, if we select Android as Platform, we can see all the list of available projects to work with Android application using Visual Studio 2019.

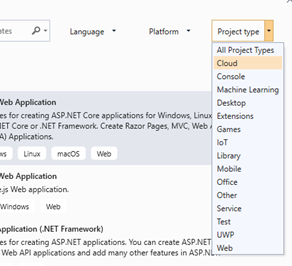
Project Type Combobox
We can see new feature as Project Type selection has been added in Visual Studio 2019. We can filter the available projects by Project Type, if we select Android as Platform, we can see all the list of available projects to work with Android application using Visual Studio 2019.
Working with Visual Studio 2019 Web Application Projects
First, we start working with creating a Web Applications in Visual Studio 2019.
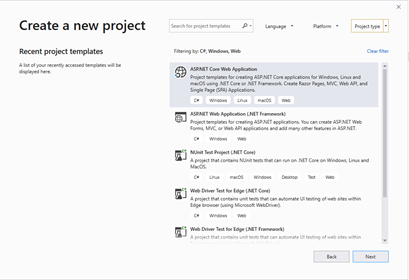
Here, we have selected the Language as C#, Platform as Windows and Project Type as Web from the top selection, you can see in Filtering by: C#, Windows, Web in the below image.

We can see ASP.NET Core Web Application with supported platform as Windows, Linux and Mac OS to creating MVC, Web API and SPA applications. And one more web project which used to create ASP.NET Web Application for .NET Framework, also we can create other NUnit test Project for .NET Core.
Working with Web Application
Here, we will see how to work with ASP.NET Core Web application in Visual Studio 2019.
From the project template, we select the ASP.NET Core Web Application and Click on Next.

Here, we select our project solution location path and click create to create a new ASP.NET Core Project.
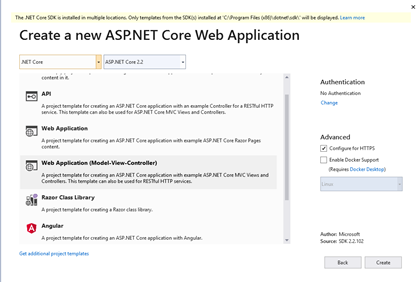
On the next page, we can select our .NET Core versions, also we can see the list of available project templates for ASP.NET Core as:
- Empty: For creating empty Template for ASP.NET Core application
- API: For working with ASP.NET Core WEB API.
- Web Application: To create ASP.NET Core web application using Razor pages
- Web Application (Model-View-Controller): To work with ASP.NET Core MVC View Controller and WEB API
- Razor Class Library: To work with Razor class library
- Angular: To create web application using ASP.NET Core and Angular
- React.js: To create web application using ASP.NET Core and React.js
- React.js and Redux: To create web application using ASP.NET Core and React.js and Redux
Apart from this, if we need more project template for working with ASP.NET Core, then we can also install from the link below by clicking on the “Get additional Projects” link. When we click on the link, we can see a new web page opened and display all available templates for dotnet.
In our next article, we will see in depth about Installing and working with ASP.NET Core Blazor using .NET Core 3.0 in Visual Studio 2019.
Now we will create our simple ASP.NET Core web Application using the Model, View and Controller with User Login.
Using the Code
Creating Our First ASP.NET Core Web Application
Select Web Application (Model-View-Controller):
Click Change near Authentication and select Individual User Account and click on Ok.

Click Create to create your web project. We can see that our first ASP.NET Core MVC web project has been created successfully using Visual Studio 2019.
We can see LoginPartial.cshtml page under Views/Shared folder for new members Register and Login.
Changing Connection String
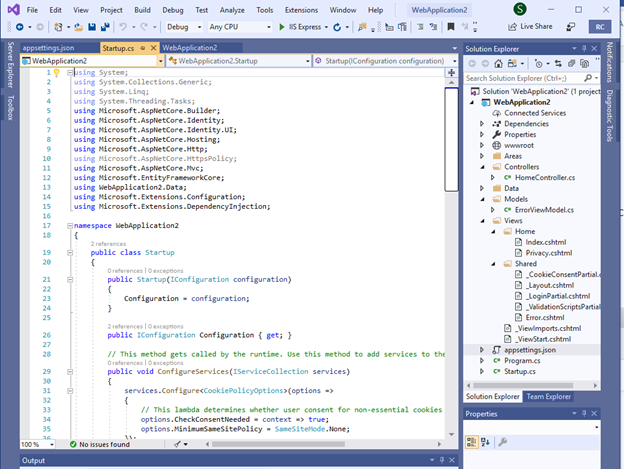
Here, we will be using our SQL Server to store the ASP.NET Identity user registration to store the values in the SQL database. For this, we open the appsettings.json file and add the connection string.
Change the SQL Server name to your SQL server name and change the UID and password to your local SQL Server.
"ConnectionStrings": {
    "DefaultConnection": "Server=YourSQLSERVERNAME;Database=aspnetVS2019;
     Trusted_Connection=True;MultipleActiveResultSets=true;User Id=YOUR SQL UID;
     password=YOURSQLPASSWORD"
  },
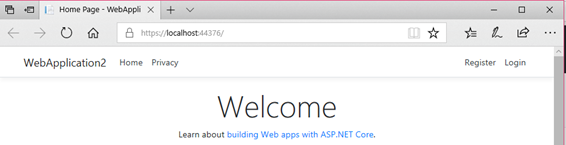
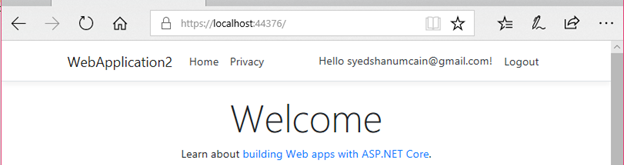
When we run the application, we can see the output with user Login and registration link.
Once everything is fine till this place, then we are good to start building our own web site using ASP.NET Core MVC and WEB API.
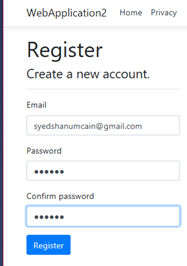
First, we can register a new user by clicking on Register link at the top.
When we click on Register for the first time, the website will be asked to migrate like the below screen:
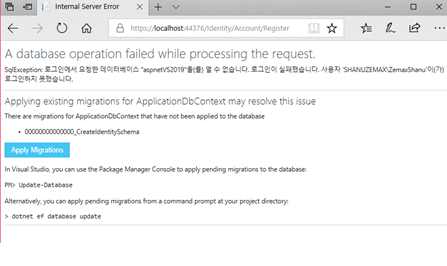
Once we click on Apply Migration, we can see new database has been created in our SQL server with ASP.NET Identity tables.

Now again, we can click on the register link and register a new user. From now onwards, all the registered users details will be stored in the above database.
We can click on the Login link and login with our new user registered id and password. We can see the screen below with the user logged into the web site.
In our upcoming articles, we will see in more detail about working with ASP.NET Core MVC web application.
More New Features of Visual Studio 2019
Now we will see few new interesting features available in Visual Studio 2019.
- Advance Search
New Visual Studio 2019 has better search facility than the previous versions. In VS 2019, the Search result is dynamic and whenever we type something on VS 2019, the dynamic search will be display immediately.

When we click on the Search text box, we can see Try with sample as “New Project”,” Theme”, etc. Now here, we will test by typing “New Project”. We can see from the below image as the search results displaying dynamically also with filter tab as All//Menus/Components and Templates.
In Visual Studio 2017, we can’t see this same feature in search. In VS 2017, the search is very simple as very normal. Here, we have displayed the same search functionality in VS 2017.
- Easy to work with Projects
We have already seen as now it’s much simpler and easier to start with existing project or Clone or start new Project with more filter functionality.
- Easy to Clone Projects
Now it’s easier to clone and check out projects from our GitHub repository or from Azure DevOps.
- Start or Join Live Session Sharing
Now you can share your code live with Team, Customer or friends to work together or to edit the code with all other suggestions. This is simple and good cool option to work with projects in team works.
We can see Live Share button on top right side of the Visual Studio 2019 IDE.
We can also Start Live Sharing or join the Live Sharing from the File Menu.
When we click on Live Share, we can see that as our Live sharing is started with link. We can send the link to our Team or friends to join our Live code session to work with. Team members or Friends can join the live stream and work together with us to edit the project and also Teams or Friends can leave the Live Sharing Session and also, we can end the Live Stream Session any time. The below image clearly explains the entire process in detail.


Points of Interest
In this article, we have seen few new features available in VS 2019 and creating an Individual Login ASP.NET Core Web application using SQL Server to store the ASP.NET Identity tables in our selected database. You can use the same database to create your own web site. In our next article, we will be seeing how to work with .NET Core and ASP.NET Core Blazor using VS 2019.
History
- 2019/03/06: Initial version VS2019.zip
Introduction
In this article, let’s see how to get started with Visual Studio 2019 RC. Microsoft has just released Visual Studio 2019 Release Candidate and now its available for download. You can download VS 2019 RC here: https://visualstudio.microsoft.com/downloads/
By the time you’re reading this article, Microsoft probably just released its production/public release of Visual Studio 2019. In any case, both versions are pretty much the same.
This article iss planned to be a two-part series. In Part 1, we will see how to download and install Visual Studio 2019 RC. The article also shows you how to get started with Visual Studio 2019 RC. In Part 2, we will see various project templates and learn what’s new in Visual Studio 2019.
Visual Studio 2019 comes as 3 editions:
- Community: Community edition is for the students, open-source contributors, and individuals.
- Professional: Professional edition if for the small teams and individual developers and is best when you have the Visual Studio Professional subscription.
- Enterprise: Enterprise edition if for any team size and best when you have the Visual Studio Enterprise subscription.
If you don’t have Visual Studio Subscription, then it’s good to download VS 2019 Community Edition. In my case, I will be installing the Enterprise edition.
When you click on the download link, you can see the confirmation screen as Thank you for downloading Visual Studio.
Install VS 2019 version

Wait for a few seconds to start installing VS 2019 on your computer. Now, you will see the final installation screen with Workloads, Individual components, Language Packs, and Installation locations.

From the Workloads tab, we can select our needed installation components of VS 2019, if you want to work with Windows Applications, UWP, ASP.NET Node.JS and Mobile Application development then we can select only that for now and start installations.
I have selected the following options:
- .NET desktop development
- Node.js development
- Mobile development with .NET
- Visual Studio extension development
- .NET Core cross-platform development
Language Pack
For my development, I have selected one more additional language as Korean. By selecting this additional language, we can see our VS 2019 in English or Korean languages. If you need any additional languages to be used, you can check from the list of available languages.

At the bottom of the installer, we can see the total space required to install our selected workloads and language pack.

Click the Install button and you can see the installation window and its progress.

After installation is completed, a restart needs to reflect the new VS 2019 installation.

Wait for few minutes to complete the VS 2019 installation on your computer.
Opening Visual Studio 2019 RC
Once Installation is completed you can open the Visual Studio 2019 RC to create your .NET Applications. Click Windows Start and enter Visual Studio 2019, You can see the Visual Studio 2019 RC, Click on that.

You can see Visual Studio 2019 RC will be opened like the image below. In the left side, you will see Open Recent projects.

In the right side, we can see few new features added in VS 2019 including
- Clone or check our code
- Open a Project or Solution
- Open a local folder
- Create a new Project
- Continue without code
Clone or check our code
This option is new in Visual Studio 2019. This tab is used to get the code from the online repository like GitHub or Azure DevOps. If you have repositories on GitHub or Azure DevOps, now it’s possible to clone or check out using Visual Studio 2019.
Click on the Clone or Check our code to add your GitHub or Azure DevOps URL to connect with your online repos.

Here for testing purposes, I’ve added a repository project to clone. We can see from GitHub repository, the project is loading.

We can see as our project has been opened from the GitHub repository URL.

Open a Project or Solution
To open existing project or solution, we can click on this tab on the right side and open our project or solution to work on it.
Open a local folder
This is a new feature added in VS 2019. If we want to edit any code or .NET application from a folder, we can click on this tab to open a folder or browse a to select a file.
Continue without code
This is a new feature added in VS 2019 IDE. When we click on the Continue without code, we can see empty solution is created. This is where we can add our own projects and files.

Create a new Project
By Clicking on the Create a new project, we will see a new screen with a list of project templates available to work with our .NET applications.

We can select a project template to work on, create our project and start working on it.
Conclusion
In this article, I discussed how to download and install the Visual Studio 2019 RC and how to get started with VS 2019 RC project templates. In my next article, I will discuss various project templates and new features of VS 2019.