Данная статья является переводом. Ссылка на оригинальную статью.
API — это набор определений и протоколов. API нужны для разработки и интеграции приложений, поскольку облегчают обмен данными между двумя частями программного обеспечения, например, поставщиком информации (сервером) и пользователем.
API определяют содержимое, доступное клиенту, выполняющему вызов от производителя, возвращающего ответ. Программы используют API для взаимодействия, получения информации или выполнения функций.
API выступает в роли посредника между пользователями (клиентами) и ресурсами (серверами).
Когда пользователи делают запросы к API или посещают интернет-магазин, они ожидают быстрого ответа. Поэтому необходимо оптимизировать Magento TTFB (Time To First Byte) или использовать другие стратегии повышения производительности, которые лучше работают для выбранной CMS.
Причины для интеграции API:
- оптимизация обмена ресурсами и информацией;
- контроль доступа с помощью аутентификации и определения прав;
- безопасность;
- отсутствие необходимости разбираться в специфике ПО;
- согласованное взаимодействие между сервисами, даже если сервисы используют разные технологии.
2. Обзор REST API
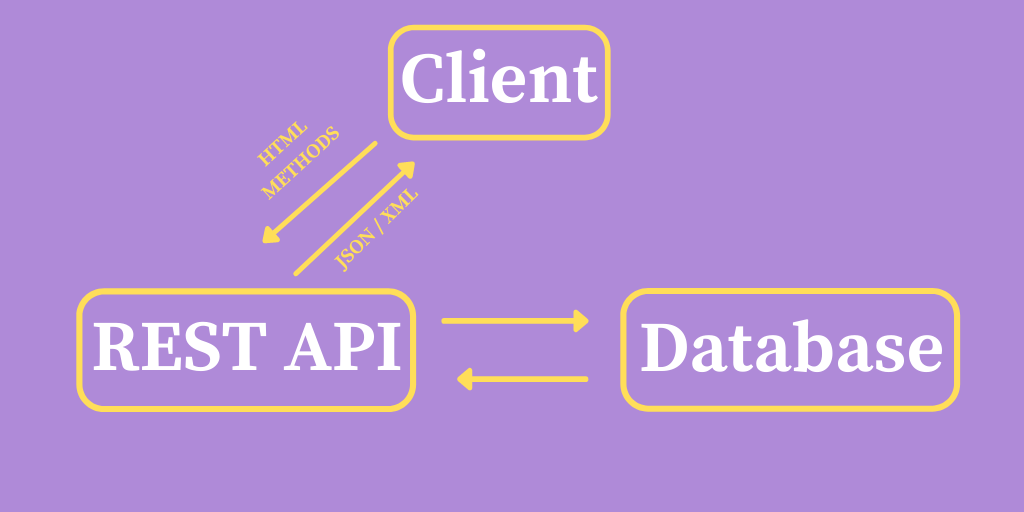
RESTful относится к программной архитектуре, которая расшифровывается как Representational State Transfer (Передача репрезентативного состояния). Эта архитектура известна в контексте стандартизации использования систем обмена информацией (веб-сервисов).
Эти веб-сервисы используют протокол без статического состояния, чтобы сделать текстовые представления онлайн-ресурсов доступными для чтения и обработки. Клиент выполняет действия на основе HTTP, такие как выборка, обновление и удаление.
REST создан в 2000 году с целью повышения производительности, масштабируемости и простоты за счёт введения ограничений на API. Ниже приведены некоторые цели использования API REST.
2.1. Использование интернета
Для REST нет специальной клиентской технологии, поскольку REST подходит для различных проектов, таких как:
- Веб-разработка.
- iOS-приложения.
- IoT-устройства.
- Windows Phone приложения.
Поскольку не требуется придерживаться конкретного клиентского стека, допустимо построить любую инфраструктуру для своей компании.
2.2. Приложения в облаке
Вызовы REST API подходят для облачных приложений благодаря отсутствию состояния. Если возникнут проблемы, компоненты без сохранения состояния разворачиваются повторно и могут расширяться, чтобы управлять сдвигами трафика.
2.3. Облачные вычисления
Соединение API с сервисом требует управления декодированием URL-адреса. Поэтому REST стал полезным в облачных сервисах. Архитектура RESTful API станет стандартом в будущем благодаря облачным вычислениям и микросервисам.
3. Как работают REST API?
Данные (такие как изображения, видео и текст) воплощают ресурсы в REST. Клиент посещает URL-адрес и отправляет серверу запрос, чтобы получить ответ.
4. Концепции REST API
Запрос (URL, к которому обращаетесь) содержит четыре компонента:
- Конечная точка, являющаяся URL-адресом со структурой
root-endpoint/?. - Метод с типом (GET, POST, PUT, PATCH, DELETE).
- Заголовки, выполняющие функции аутентификации, предоставление информации о содержимом тела (допустимо использовать параметр
-Hили--headerдля отправки заголовков HTTP) и т. д. - Данные (или тело) – это то, что отправляется на сервер с помощью опции
-dили--dataпри запросах POST, PUT, PATCH или DELETE.
HTTP-запросы разрешают работать с базой данных, например:
- POST-запрос для создания записей.
- GET-запрос на чтение или получение ресурса (документа или изображения, набора других ресурсов) с сервера.
- PUT и PATCH-запросы для обновления записей.
- DELETE-запрос на удаление ресурса с сервера.
Эти операции обозначают четыре возможных действия CRUD: создание, чтение, обновление и удаление.
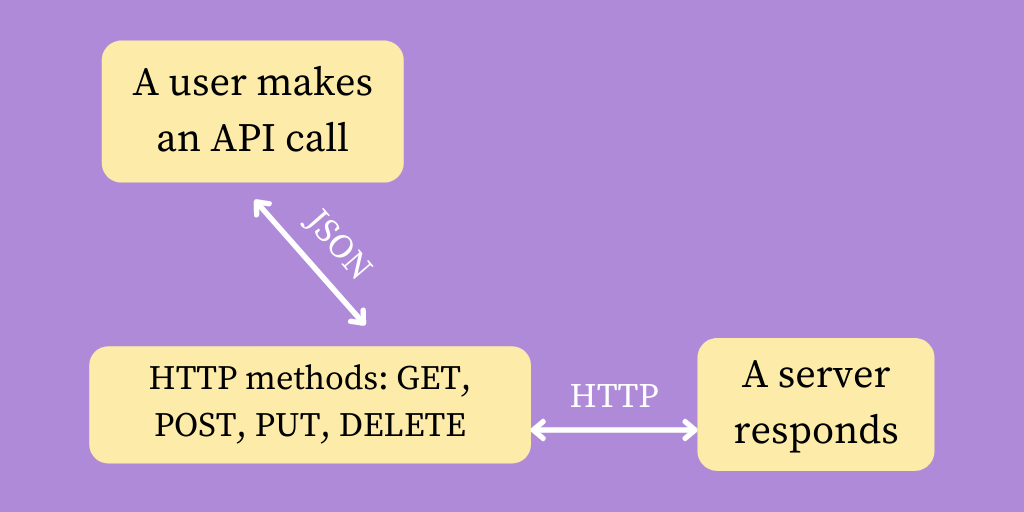
Сервер отправляет данные клиенту в формате:
- HTML.
- JSON (распространённый формат благодаря независимости от компьютерных языков и доступности для людей и машин).
- XLT.
- PHP.
- Python.
- Текст.
5. Зачем использовать REST API?
Преимущество REST над другими API, такими как SOAP в масштабируемости, гибкости, переносимости и независимости.
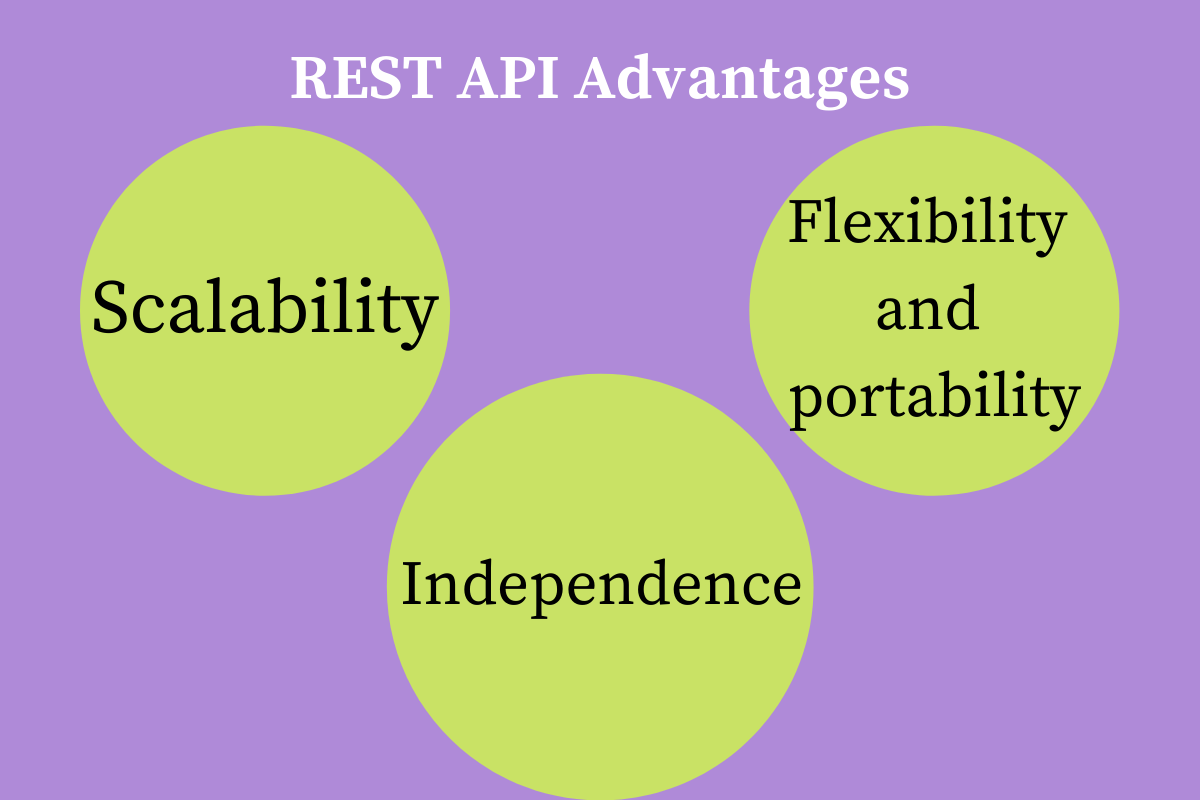
5.1. Не полагаться на структуру проекта
Раздельная работа клиента и сервера означает, что разработчики не привязаны к каким-либо частям проекта. Благодаря адаптивным REST API, разработчики могут развивать каждый аспект, не влияя на другой.
5.2. Портативность и адаптивность
REST API работают, когда данные запроса доставлены. REST API разрешают мигрировать с одного сервера на другой и обновлять базу данных, когда потребуется.
5.3. Масштабирование проекта в будущем
Поскольку клиент и сервер действуют независимо, программисты могут быстро разработать продукт.
6. Особенности стиля архитектуры RESTful
Разработчикам приходится учитывать жёсткую структуру некоторых API, таких как SOAP или XML-RPC. Но REST API — это другое. REST API поддерживают широкий спектр типов данных и могут быть написаны практически на любом языке программирования.
Шесть архитектурных ограничений REST являются принципами разработки решения и заключаются в следующем:
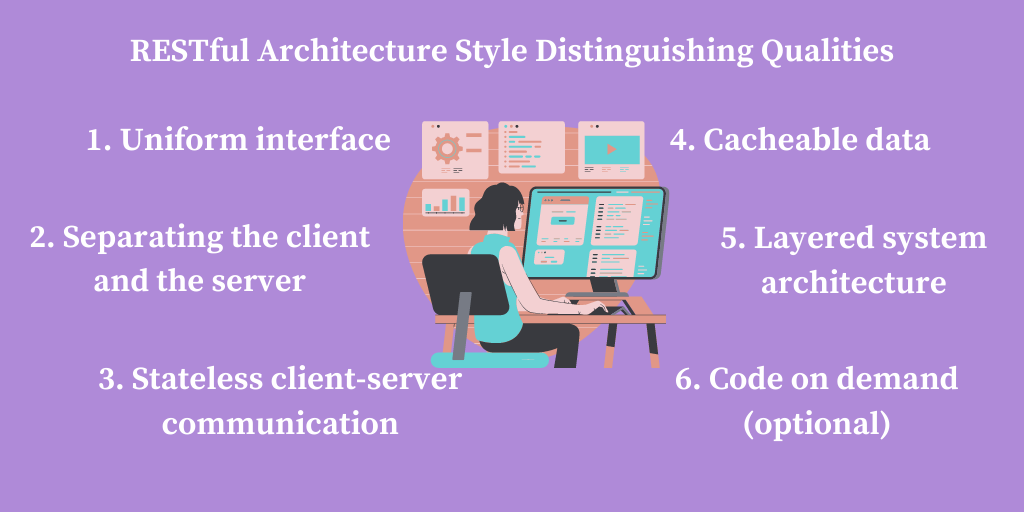
6.1. Унифицированный интерфейс (последовательный пользовательский интерфейс)
Эта концепция диктует, что запросы API к одному и тому же ресурсу, независимо от происхождения, должны быть идентичными, то есть на одном конкретном языке. Один универсальный идентификатор ресурса (URI) ассоциируется с одними и теми же данными, такими как имя пользователя или адрес электронной почты.
Другой принцип унифицированного интерфейса гласит, что сообщения должны быть информативными. Сообщения должны быть понятны серверу, чтобы определить, как с ними обращаться (например, тип запроса, MIME-типы и т. д.).
6.2. Разделение клиента и сервера
Архитектурный стиль REST использует особый подход к реализации клиента и сервера. Дело в том, что клиент и сервер могут работать независимо и не обязаны знать друг о друге.
Например, у клиента только универсальный идентификатор запрошенного ресурса (URI) и не может общаться с серверной программой другим способом. Однако, сервер не должен влиять на клиентское ПО. Поэтому сервер отправляет данные по HTTP. Это означает что, если клиентский код изменится, это не повлияет на работу сервера.
Серверный код в той же лодке: изменение серверной части не повлияет на работу клиента.
Клиентские и серверные программы могут быть модульными и независимыми до тех пор, пока каждая сторона знает, какой формат сообщения доставлять другой. Отделение пользовательского интерфейса от ограничений хранения данных улучшает гибкость интерфейса на разных платформах и повышает масштабируемость.
Кроме того, каждый компонент выигрывает от разделения, поскольку может развиваться независимо. Интерфейс REST помогает клиентам:
- Иметь доступ к одним и тем же конечным точкам REST.
- Выполнять одинаковые действия.
- Получать одинаковые ответы.
6.3. Нестационарная связь между клиентами и серверами
Системы на основе REST не имеют состояния, то есть состояние клиента остаётся неизвестным для сервера и наоборот. Это ограничение разрешает серверу и клиенту понимать отправленное сообщение, даже если они не видели предыдущие.
Чтобы обеспечить соблюдение этого ограничения без статичности, требуется использовать ресурсы, а не команды. Это имена существительные в сети. Их цель – описать объект, который требуется сохранить или передать другим службам.
Допустимо контролировать, изменять и повторно использовать компоненты, затрагивая систему частично, поэтому преимущества этого ограничения включают достижение:
- стабильности;
- скорости;
- масштабируемости RESTful-приложений.
Обратите внимание, что каждый запрос должен содержать всю информацию, необходимую для выполнения. Клиентские приложения должны сохранять состояние сессии, поскольку серверные приложения не должны хранить данные, связанные с клиентским запросом.
6.4. Кэшируемые данные
REST требует кэширования ресурсов на стороне клиента или сервера везде, где это возможно. Кэширование данных и ответов имеет решающее значение, поскольку обеспечивает высокую производительность на стороне клиента.
Хорошо управляемое кэширование может уменьшить или устранить некоторые взаимодействия клиент-сервер.
Это также даёт серверу больше возможностей масштабирования благодаря меньшей нагрузке на сервер. Кэширование увеличивает скорость загрузки страниц и разрешает получить доступ к ранее просмотренному контенту без подключения к интернету.
6.5. Архитектура многоуровневой системы
Следующее обсуждаемое ограничение — это многоуровневая структура RESTful. Этот принцип включает в себя группировку слоёв с определёнными функциями.
Слои REST API имеют свои обязанности и располагаются в иерархическом порядке. Например, один слой может отвечать за хранение данных на сервере, второй — за развёртывание API на другом сервере, а третий — за аутентификацию запросов на другом сервере.
Эти слои действуют как посредники и предотвращают прямое взаимодействие между клиентскими и серверными приложениями. В результате клиент не знает, к какому серверу или компоненту обращается.
Когда каждый слой выполняет заданную функцию до передачи данных следующим, что повышает общую безопасность и гибкость API, так как добавление, изменение, удаление API не влияет на другие компоненты интерфейса.
6.6. Кодирование по требованию (необязательно)
Предоставление статических представлений ресурсов в формате XML или JSON — популярный сценарий использования REST API.
Однако этот архитектурный стиль разрешает пользователям загружать и выполнять код в виде апплетов или сценариев (например, JavaScript). Например, клиенты могут получить код рендеринга для виджетов пользовательского интерфейса, обратившись к API.
7. Проблемы, которые следует ожидать при использовании REST API
С пониманием дизайна REST API и архитектурного ограничения, необходимо знать о проблемах, которые следует ожидать при использовании этого архитектурного стиля:
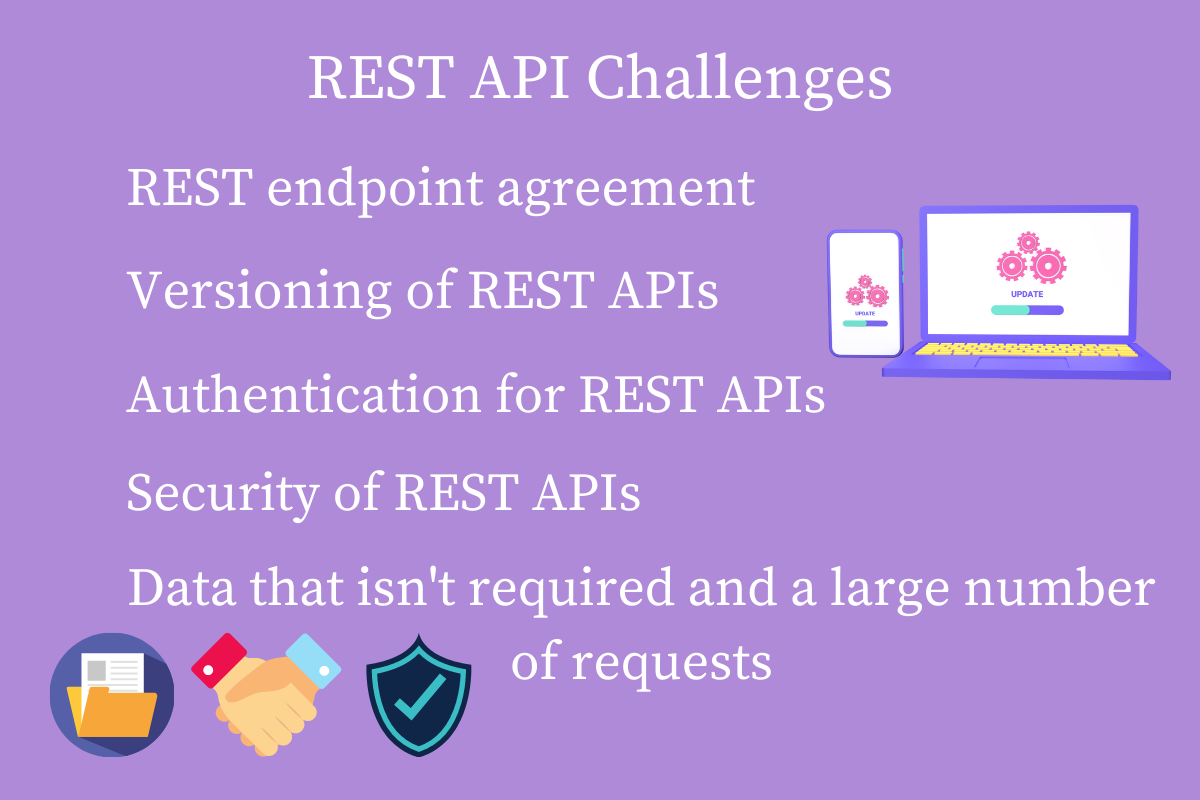
7.1. Соглашение по конечным точкам REST
API-интерфейсы должны оставаться единообразными независимо от конструкции URL. Но с ростом возможных комбинаций методов становится труднее поддерживать единообразие в больших кодовых базах.
7.2. Версионность как свойство REST API
API требуют регулярного обновления или версионирования, чтобы предотвратить проблемы с совместимостью. Однако старые конечные точки остаются работоспособными, что увеличивает рабочую нагрузку.
7.3. Множество методов аутентификации
Допустимо определить, какие ресурсы доступны тем или иным типам пользователей. Например, определить, какие сторонние службы получают доступ к адресам электронной почты клиентов или другой конфиденциальной информации, и что эти службы делают с этими переменными.
Но 20 методов авторизации могут затруднить первоначальный вызов API. Поэтому разработчики не продолжают проект из-за первоначальных трудностей.
7.4. Уязвимости безопасности REST API
Хотя RESTful API имеют многоуровневую структуру, могут возникнуть некоторые проблемы с безопасностью. Например, если приложение недостаточно защищено из-за отсутствия шифрования, то приложение может раскрыть конфиденциальные данные.
Или хакер может отправлять тысячи запросов API в секунду, вызывая DDoS-атаку или другие неправомерные действия службы API, которые приведут к краху сервера.
7.5. Чрезмерный сбор данных и запросы
Сервер может вернуть запрос с данными, которые могут быть ненужными. Или может понадобиться выполнить несколько запросов, чтобы получить необходимую информацию.
***
Подведение итогов
Неудивительно, что API в будущем упорядочат веб-коммуникации. Их цель — позволить любым веб-приложениям взаимодействовать и обмениваться данными. Например, они помогают растущим онлайн-компаниям разрабатывать надёжные, масштабируемые и необычные системы.
Материалы по теме
- Как превратить базу данных в RESTful API
- 🛠 Хватит использовать REST для API!
- Разбираем по косточкам компьютерные сети: HTTP, TCP, REST
- 😎✔️ 15 лучших практик разработки и проектирования REST API

Ever wondered how login/signup on a website works on the back-end? Or how when you search for «cute kitties» on YouTube, you get a bunch of results and are able to stream off of a remote machine?
In this beginner friendly guide, I will walk you through the process of setting up a RESTful API. We’ll declassify some of the jargon and have a look at how we can code a server in NodeJS. Let’s dive a bit deeper into JavaScript!
Get that jargon away
So, what is REST? According to Wikipedia:
Representational state transfer (REST) is a software architectural style that defines a set of constraints to be used for creating Web services. RESTful Web services allow the requesting systems to access and manipulate textual representations of Web resources by using a uniform and predefined set of stateless operations
Let’s demystify what that means (hopefully you got the full form). REST is basically a set of rules for communication between a client and server. There are a few constraints on the definition of REST:
- Client-Server Architecture: the user interface of the website/app should be separated from the data request/storage, so each part can be scaled individually.
- Statelessness: the communication should have no client context stored on server. This means each request to the server should be made with all the required data and no assumptions should be made if the server has any data from previous requests.
- Layered system: client should not be able to tell if it is communicating directly with the server or some intermediary. These intermediary servers (be it proxy or load balancers) allow for scalability and security of the underlying server.
Okay, so now that you know what RESTful services are, here are some of the terms used in the heading:
- REST Client: code or an app that can access these REST services. You are using one right now! Yes, the browser can act as an uncontrolled REST client (the website handles the browser requests). The browser, for a long time, used an in-built function called XMLHttpRequest for all REST requests. But, this was succeeded by FetchAPI, a modern, promise based approach to requests. Others examples are code libraries like axios, superagent and got or some dedicated apps like Postman (or an online version, postwoman!), or a command line tool like cURL!.
- REST Service: the server. There are many popular libraries that make creation of these servers a breeze, like ExpressJS for NodeJS and Django for Python.
- REST API: this defines the endpoint and methods allowed to access/submit data to the server. We will talk about this in great detail below. Other alternatives to this are: GraphQL, JSON-Pure and oData.
So tell me now, how does REST look?
In very broad terms, you ask the server for a certain data or ask it to save some data, and the server responds to the requests.
In programming terms, there is an endpoint (a URL) that the server is waiting to get a request. We connect to that endpoint and send in some data about us (remember, REST is stateless, no data about the request is stored) and the server responds with the correct response.
Words are boring, let me give you a demonstration. I will be using Postman to show you the request and response:
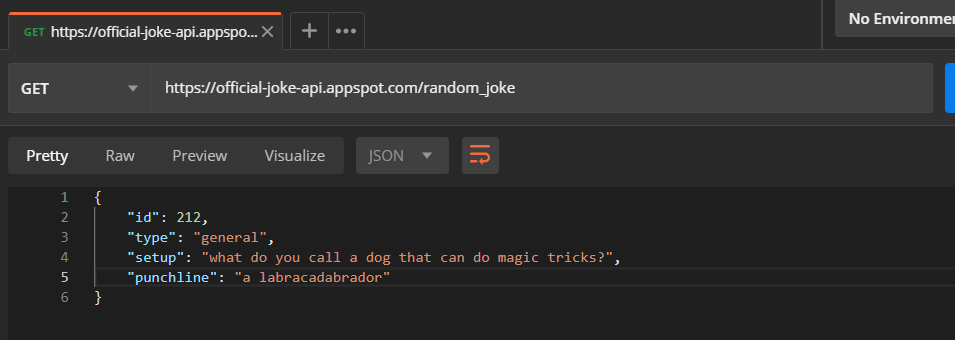
The returned data is in JSON (JavaScript Object Notation) and can be accessed directly.
Here, https://official-joke-api.appspot.com/random_joke is called an endpoint of an API. There will be a server listening on that endpoint for requests like the one we made.
Anatomy of REST:
Alright, so now we know that data can be requested by the client and the server will respond appropriately. Let’s look deeper into how a request is formed.
- Endpoint: I have already told you about this. For a refresher, it is the URL where the REST Server is listening.
- Method: Earlier, I wrote that you can either request data or modify it, but how will the server know what kind of operation the client wants to perform? REST implements multiple ‘methods’ for different types of request, the following are most popular:
— GET: Get resource from the server.
— POST: Create resource to the server.
— PATCH or PUT: Update existing resource on the server.
— DELETE: Delete existing resource from the server. - Headers: The additional details provided for communication between client and server (remember, REST is stateless). Some of the common headers are:
Request:
— host: the IP of client (or from where request originated)
— accept-language: language understandable by the client
— user-agent: data about client, operating system and vendor
Response:
— status: the status of request or HTTP code.
— content-type: type of resource sent by server.
— set-cookie: sets cookies by server - Data: (also called body or message) contains info you want to send to the server.
Enough with the details – show me the code.
Let’s begin coding a REST Service in Node. We will be implementing all the things we learnt above. We will also be using ES6+ to write our service in.
Make sure you have Node.JS installed and node and npm are available in your path. I will be using Node 12.16.2 and NPM 6.14.4.
Create a directory rest-service-node and cd into it:
mkdir rest-service-node
cd rest-service-node
Initialize the node project:
npm init -yThe -y flag skips all the questions. If you want to fill in the whole questionnaire, just run npm init.
Let’s install some packages. We will be using the ExpressJS framework for developing the REST Server. Run the following command to install it:
npm install --save express body-parserWhat’s body-parser there for? Express, by default, is incapable of handling data sent via POST request as JSON. body-parser allows Express to overcome this.
Create a file called server.js and add the following code:
const express = require("express");
const bodyParser = require("body-parser");

const app = express();

app.use(bodyParser.json());

app.listen(5000, () => {
  console.log(`Server is running on port 5000.`);
});
The first two lines are importing Express and body-parser.
Third line initializes the Express server and sets it to a variable called app.
The line, app.use(bodyParser.json()); initializes the body-parser plugin.
Finally, we are setting our server to listen on port 5000 for requests.
Getting data from the REST Server:
To get data from a server, we need a GET request. Add the following code before app.listen:
const sayHi = (req, res) => {
  res.send("Hi!");
};

app.get("/", sayHi);
We have created a function sayHi which takes two parameters req and res (I will explain later) and sends a ‘Hi!’ as response.
app.get() takes two parameters, the route path and function to call when the path is requested by the client. So, the last line translates to: Hey server, listen for requests on the ‘/’ (think homepage) and call the sayHi function if a request is made.
app.get also gives us a request object containing all the data sent by the client and a response object which contains all the methods with which we can respond to the client. Though these are accessible as function parameters, the general naming convention suggests we name them res for response and req for request.
Enough chatter. Let’s fire up the server! Run the following server:
node server.jsIf everything is successful, you should see a message on console saying: Server is running on port 5000.
Note: You can change the port to whatever number you want.

Open up your browser and navigate to http://localhost:5000/ and you should see something like this:

There you go! Your first GET request was successful!
Sending data to REST Server:
As we have discussed earlier, let’s setup how we can implement a POST request into our server. We will be sending in two numbers and the server will return the sum of the numbers. Add this new method below the app.get :
app.post("/add", (req, res) => {
  const { a, b } = req.body;
  res.send(`The sum is: ${a + b}`);
});
Here, we will be sending the data in JSON format, like this:
{
    "a":5,
    "b":10
}
Let’s get over the code:
On line 1, we are invoking the .post() method of ExpressJS, which allows the server to listen for POST requests. This function takes in the same parameters as the .get() method. The route that we are passing is /add, so one can access the endpoint as http://your-ip-address:port/add or in our case localhost:5000/add. We are inlining our function instead of writing a function elsewhere.
On line 2, we have used a bit of ES6 syntax, namely, object destructuring. Whatever data we send via the request gets stored and is available in the body of the req object. So essentially, we could’ve replaced line 2 with something like:
const num1 = req.body.a;
const num2 = req.body.b;
On line 3, we are using the send() function of the res object to send the result of the sum. Again, we are using template literals from ES6. Now to test it (using Postman):
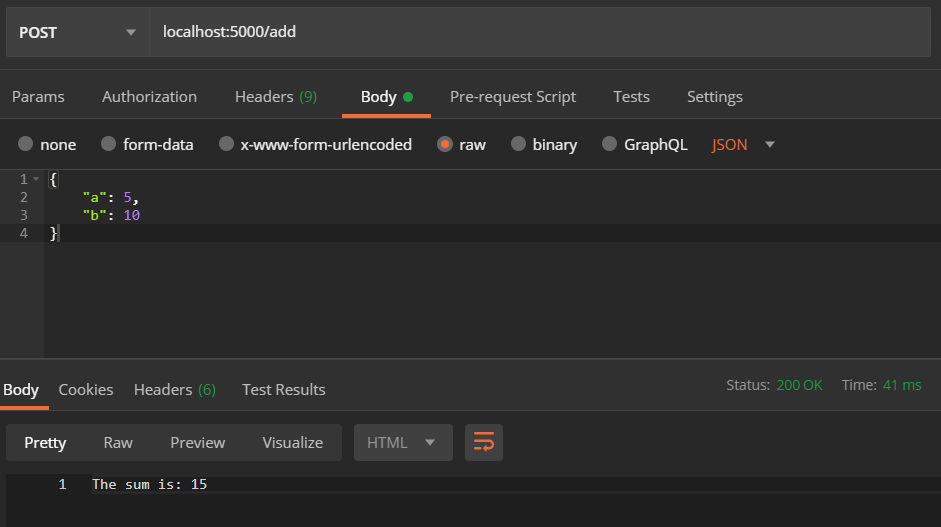
So we have sent the data 5 and 10 as a and b using them as the body. Postman attaches this data to the request and sends it. When the server receives the request, it can parse the data from req.body , as we did in the code above. The result is shown below.
Alright, the final code:
const express = require("express");
const bodyParser = require("body-parser");

const app = express();

app.use(bodyParser.json());

const sayHi = (req, res) => {
  res.send("Hi!");
};

app.get("/", sayHi);

app.post("/add", (req, res) => {
  const { a, b } = req.body;
  res.send(`The sum is: ${a + b}`);
});

app.listen(5000, () => {
  console.log(`Server is running on port 5000.`);
});
Okay, we have created a server, but how do we access it from our website or webapp? Here the REST client libraries will come in handy.
We will be building a webpage which will contain a form, where you can enter two numbers and we will display the result. Let’s start.
First, let’s change the server.js a bit:
const path = require("path");
const express = require("express");
const bodyParser = require("body-parser");

const app = express();

app.use(bodyParser.json());

app.get("/", (req, res) => {
  res.sendFile(path.join(__dirname, "index.html"));
});

app.post("/add", (req, res) => {
  const { a, b } = req.body;
  res.send({
    result: parseInt(a) + parseInt(b)
  });
});

app.listen(5000, () => {
  console.log(`Server is running on port 5000.`);
});
We imported a new package path, which is provided by Node, to manipulate path cross-platform. Next we changed the GET request on ‘/’ and use another function available in res, ie. sendFile, which allows us to send any type of file as response. So, whenever a person tries to navigate to ‘/’, they will get our index.html page.
Finally, we changed our app.post function to return the sum as JSON and convert both a and b to integers.
Let’s create an html page, I will call it index.html, with some basic styling:
<!DOCTYPE html>
<html lang="en">
  <head>
    <meta charset="UTF-8" />
    <meta name="viewport" content="width=device-width, initial-scale=1.0" />
    <title>REST Client</title>
  </head>
  <style>
    * {
      margin: 0;
      padding: 0;
      box-sizing: border-box;
    }
    .container {
      height: 100vh;
      font-family: -apple-system, BlinkMacSystemFont, "Segoe UI", Roboto, Helvetica, Arial, sans-serif, "Apple Color Emoji", "Segoe UI Emoji", "Segoe UI Symbol";
      display: flex;
      flex-direction: column;
      justify-content: center;
      align-items: center;
    }
    form {
      display: flex;
      flex-direction: column;
      margin-bottom: 20px;
    }
    label,
    input[type="submit"] {
      margin-top: 20px;
    }
  </style>
  <body>
    <div class="container">
      <h1>Simple POST Form</h1>
      </h1>
      <form>
        <label>Number 1:</label>
        <input id="num1" type="number" />
        <label>Number 2:</label>
        <input id="num2" type="number" />
        <input type="submit" value="Add"/>
      </form>
      <div class="result">Click Add!</div>
    </div>
  </body>
</html>
Let’s add a script tag just before the closing body tag, so we don’t need to maintain a .js file. We will begin by listening for the submit event and call a function accordingly:
<script>
	document.addEventListener("submit", sendData);
</script>
First we need to prevent page refresh when the ‘Add’ button is clicked. This can be done using the preventDefault() function. Then, we will get the value of the inputs at that instant:
function sendData(e) {
    e.preventDefault();
    const a = document.querySelector("#num1").value;
    const b = document.querySelector("#num2").value;
}
Now we will make the call to the server with both these values a and b. We will be using the Fetch API, built-in to every browser for this.
Fetch takes in two inputs, the URL endpoint and a JSON request object and returns a Promise. Explaining them here will be out-of-bounds here, so I’ll leave that for you.
Continue inside the sendData() function:
fetch("/add", {
        method: "POST",
        headers: {
            Accept: "application/json",
            "Content-Type": "application/json"
        },
        body: JSON.stringify({
            a: parseInt(a),
            b: parseInt(b)
        })
    })
    .then(res => res.json())
    .then(data => {
        const {
            result
        } = data;
        document.querySelector(
            ".result"
        ).innerText = `The sum is: ${result}`;
    })
    .catch(err => console.log(err));
First we are passing the relative URL of the endpoint as the first parameter to fetch. Next, we are passing an object which contains the method we want Fetch to use for the request, which is POST in this case.
We are also passing headers, which will provide information about the type of data we are sending (content-type) and the type of data we accept as response (accept).
Next we pass body. Remember we typed the data as JSON while using Postman? We’re doing kind of a similar thing here. Since express deals with string as input and processes it according to content-type provided, we need to convert our JSON payload into string. We do that with JSON.stringify(). We’re being a little extra cautious and parsing the input into integers, so it doesn’t mess up our server (since we haven’t implemented any data-type checking).
Finally, if the promise (returned by fetch) resolves, we will get that response and convert it into JSON. After that, we will get the result from the data key returned by the response. Then we are simply displaying the result on the screen.
At the end, if the promise is rejected, we will display the error message on the console.
Here’s the final code for index.html:
<!DOCTYPE html>
<html lang="en">
  <head>
    <meta charset="UTF-8" />
    <meta name="viewport" content="width=device-width, initial-scale=1.0" />
    <title>REST Client</title>
  </head>
  <style>
    * {
      margin: 0;
      padding: 0;
      box-sizing: border-box;
    }
    .container {
      height: 100vh;
      font-family: -apple-system, BlinkMacSystemFont, "Segoe UI", Roboto, Helvetica, Arial, sans-serif, "Apple Color Emoji", "Segoe UI Emoji", "Segoe UI Symbol";
      display: flex;
      flex-direction: column;
      justify-content: center;
      align-items: center;
    }
    form {
      display: flex;
      flex-direction: column;
      margin-bottom: 20px;
    }
    label,
    input[type="submit"] {
      margin-top: 20px;
    }
  </style>
  <body>
    <div class="container">
      <h1>Simple POST Form</h1>
      </h1>
      <form>
        <label>Number 1:</label>
        <input id="num1" type="number" />
        <label>Number 2:</label>
        <input id="num2" type="number" />
        <input type="submit" value="Add"/>
      </form>
      <div class="result">Click Add!</div>
    </div>
    <script>
      document.addEventListener("submit", sendData);
      function sendData(e) {
        e.preventDefault();
        const a = document.querySelector("#num1").value;
        const b = document.querySelector("#num2").value;

        fetch("/add", {
          method: "POST",
          headers: {
            Accept: "application/json",
            "Content-Type": "application/json"
          },
          body: JSON.stringify({
            a: parseInt(a),
            b: parseInt(b)
          })
        })
          .then(res => res.json())
          .then(data => {
            const { result } = data;
            document.querySelector(
              ".result"
            ).innerText = `The sum is: ${result}`;
          })
          .catch(err => console.log(err));
      }
    </script>
  </body>
</html>
I have spun up a little app on glitch for you to test.
Conclusion:
So in this post, we learnt about REST architecture and the anatomy of REST requests. We worked our way through by creating a simple REST Server that serves GET and POST requests and built a simple webpage that uses a REST Client to display the sum of two numbers.
You can extend this for the remaining types of requests and even implement a full featured back-end CRUD app.
I hope you have learned something from this. If you have any questions, feel free to reach out to me over twitter! Happy Coding!
Learn to code for free. freeCodeCamp’s open source curriculum has helped more than 40,000 people get jobs as developers. Get started
tl;dr
This is a guide with the goal of laying down foundational knowledge that is required when speaking about building REST API’s. The following topics are covered:
- REST Constraints
- Richardson Maturity Model
- REST in Practice (Some practical guidelines)
- Example project (Written in C# using .Net Core 3.1) called Ranker
The main points that I would like to summarize with regards to REST are listed as follows:
- REST IS an architectural style used to describe web architecture
- REST IS protocol agnostic
- REST IS about web architecture (REST != API)
- REST IS NOT a design pattern
- REST IS NOT a standard. However standards can be used to implement REST.
1. REST Fundamentals
This sections covers REST essentials. The goal of this section is to make the reader comfortable with the notion of REST. It is also intended to provide the minimum required theory to start talking about REST and building HTTP services that incorporate a REST architectural style.
Introduction
REST (REpresentational State Transfer) is an architectural style that was defined by Roy Thomas Fielding in his PhD dissertation «Architectural Styles and the Design of Network-based Software Architectures».
According to Fielding,
The name “Representational State Transfer” is intended to evoke an image of how a well-designed Web application behaves: a network of web pages (a virtual state-machine), where the user progresses through the application by selecting links (state transitions), resulting in the next page (representing the next state of the application) being transferred to the user and rendered for their use.
(Fielding, 2000) pg 109
Why REST?
If you’re someone that builds HTTP services for distributed systems, then understanding and applying REST principles will help you build services that are more:
- scalable
- reliable
- flexible
- portable
By building services based on REST principles, one is effectively building services that are more web friendly. This is because REST is an architectural style that describes web architecture.
REST Architectural Constraints
Fielding describes REST as a hybrid style that is derived from several network-based architectural styles (Chapter 3) combined with a number of additional constraints. In this section, the six architectural constraints as applied to REST are discussed. The key takeaway is that these constraints encourage design that will result in applications that easily scale, are faster, and more reliable.
The 6 architectural REST constraints are as follows:
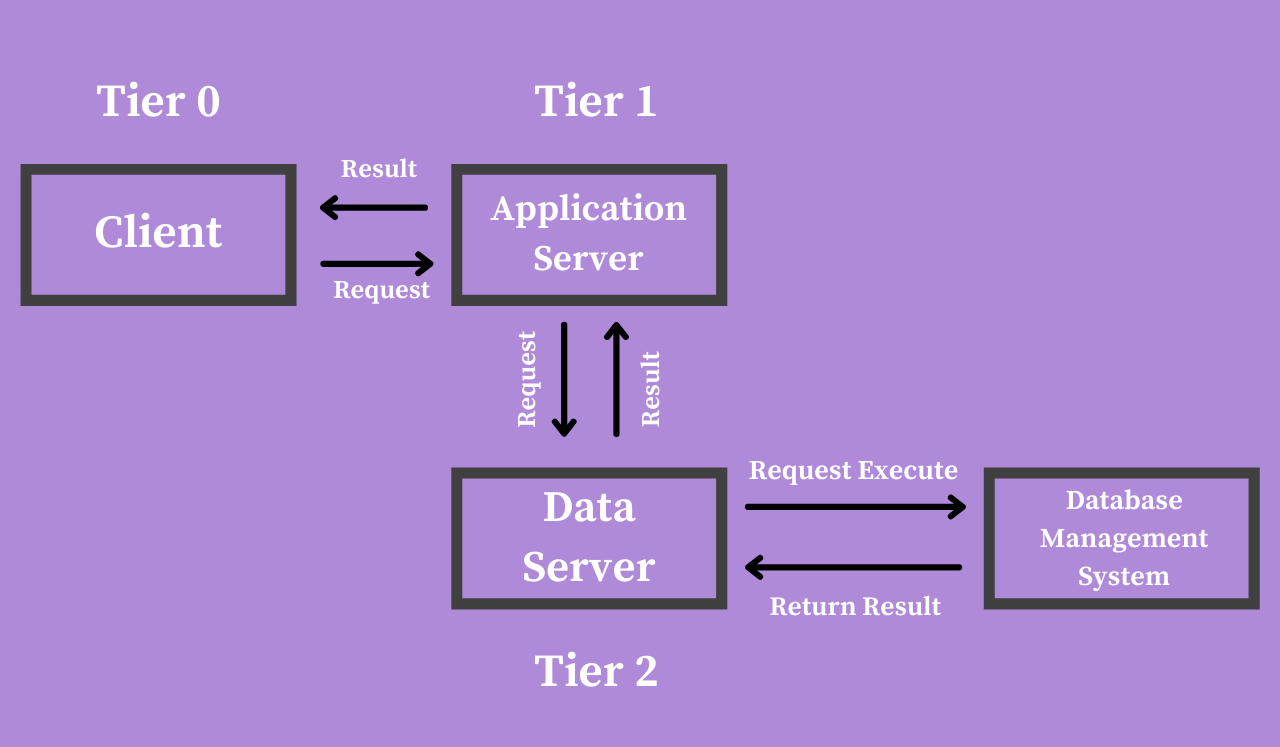
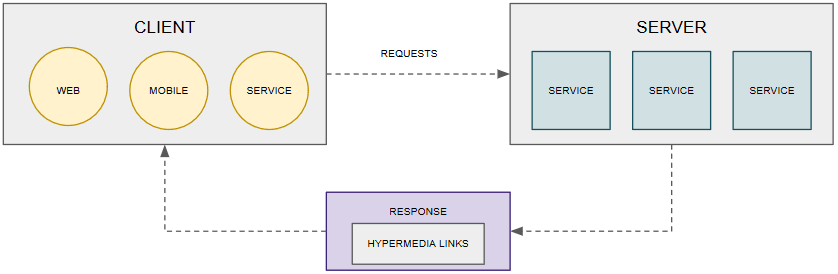
1. Client-Server
A guiding principle of Client-Server is the separation of concerns. It’s all about achieving high cohesion and loose coupling in order to improve portability and flexibility. It also allows systems to evolve independently of each other. As can be seen by the diagram below, a Client sends a request, and a Server receives the request.

2. Statelessness
A Server must not store any state during communications. All information required to understand a request must be contained within the Request. Therefore, every Request should be able to execute on its own and be self-contained. Also, a Client must maintain it’s own state. The benefit of this approach is as follows:
- Visibility — Everything required to understand the Request is within the Request. This makes monitoring a request easier.
- Reliability — Recovering from failures is easier because the Server does not need to track/rollback/commit state because all the state is essentially captured within the message. If a Request fails, it can be as simple as resending the Request.
- Scalability — Because there is no need to manage state and resources between requests, and because all Requests are isolated,scalability is improved and simplified.
- Aligned with web architecture (the internet is designed this way)

A disadvantage of this approach is that it decreases network efficiency because the Requests need to contain all the information required for that interaction. The more information, the larger the Request size, and therefore the more bandwidth is used. This will have a negative effect on latency as well.
3. Cache
The primary reason for the Cache constraint is to improve network efficiency. As noted above in the Stateless constraint, the size of Requests can decrease network efficiency due to the need for more bandwidth. Through caching, it is possible to reduce and sometimes remove the need for a Client to interact with the Server. In other words it’s possible to reduce and/or eliminate the need for Requests. Therefore, the Cache constraint states that a Server must include additional data in the response to indicate to the client whether the Request is cacheable and for how long. A network Client can then decide the appropriate action based on provided cache information in Response.
Caching can improve performance. However, it comes with a number of disadvantages that impact the reliability of the system. For example:
- Data Integrity — Response data could be inaccurate due to stale or expired data
- Complexity — The implementation and use of caching mechanisms is renowned for it’s complexity in the Computer Science world
4. Uniform Interface
At the core of this constraint is the principle of generality which is closely related to the principle of anticipation. It stems from the fact that it is impossible to build the exact required interface for all network clients of a server service. Therefore, by providing a generic interface, one is able to provide a simplified interface with higher visibility that is able to satisfy the requirements of more clients. A disadvantage of this approach is that because the interface is so general, one is not able to satisfy specific client requirements. In other words, providing a generic interface can lead to a sub-optimal interface for many clients.
There are four additional constraints that form part of the Uniform Interface and are listed as follows:
-
Identification of resources
A key abstraction of REST is a resource. According to Fielding (Resources and Resource Identifiers), a resource is any information that can be named. Furthermore, I personally like to think of a resource as a «Noun».
Noun — a word (other than a pronoun) used to identify any of a class of people, places, or things ( common noun ), or to name a particular one of these ( proper noun ).
It is also better to think of a single resource as a collection of resources. For example, if we were to provide an API to allow a Client to submit or retrieve a «rating», one would typically identify the resource as follows:
GET /ratingsGenerally, there should only be a single way to access a resource. But this is more a guideline than a rule.
-
Manipulation of resources through representations
This constraint states that the client should hold the representation of a resource that has enough information to create, modify or delete a resource. It’s important that the representation of a resource is decoupled from the way the resource is identified. A resource can be represented in multiple formats or representations such as JSON, XML, HTML, PNG etc. A client should be able to specify the desired representation of a resource for any interaction with the server. Therefore, a Client can specify to receive a resource in JSON format, but send the resource as input in XML format.
For example:
For the retrieval of an Employees resource, we use XML format
by specifying a «Accept: application/xml» header.GET /ratings Accept: application/xml <ratings> <rating> <id>7337</id> <userId>98765</userId> <movieId>12345</movieId> <score>6</score> </rating> </ratings>For the creation of an Employees resource, we use
JSON format by specifying a «Content-Type: application/json» headerPOST /ratings Content-Type: application/json { "userId": 98765, "movieId": 12345, "score": 6 }Should a specific format not be supported, it is important for the Server to provide an appropriate response to indicate that a specific format is not supported. For example:
- Return a 406 Not Acceptable status code to indicate that the client specified a request with an Accept header format that the Server is unable to fulfill. [See here for more information]
- Return a 415 Unsupported Media Type when a response is specified in an unsupported content type. [See here for more information]
-
Self descriptive messages
Self descriptive messages enable intermediary communication by allowing intermediary components to transform the content of the message. In other words, the semantics of the message are exposed to the intermediaries. The implication of this constraint is that interactions are stateless, standard methods and media types are used to expose the semantics of message, and responses indicate cacheability.
-
Hypermedia as the engine of application state (HATEOAS)
A key concept about HATEOAS is that it implies that a Response sent from a Server should include information that informs the Client on how to interact with the Server.

The advantages of HATEOAS are as follows:
- Improves discoverability of resources through published set of links (provided with response)
- Indicates to Clients what actions can be taken next. In other words, without HATEOAS, a Client only has access to the data but no idea about what actions may be taken with that data
5. Layered System
The key principle of this constraint is that the Client cannot make any assumptions that it is communicating directly with the Server. This constraint relates to the Client-Server constraint (discussed above) in such a way that Client and Server are decoupled. Therefore the Client makes no assumptions about any kind of hidden dependencies and this enables us to insert components and entire sub-systems between the Client and the Server. This allows one to add load balancers, DNS, caching servers and security (authentication and authorization) between Client and Server without disrupting the interaction.
Layering allows one to evolve and improve ones architecture to improve scalability and reliability ones system.
6. Code On Demand
This is an optional constraint. The key concept about this constraint is that when a Client makes a request to a resource on a Server, it will receive the resource as well as the code to execute against that resource. The Client knows nothing about the composition of the code and only needs to know how to execute it. Javascript is an example of where this is done.
Richardson Maturity Model
The Richardson Maturity Model is a heuristic maturity model that can be used to better understand how mature a service is in terms of the REST architectural style.
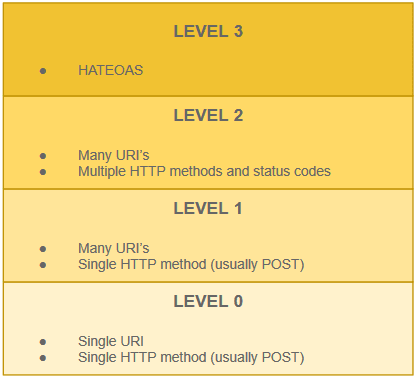
- Level 0
Services at this level are described as having a single URI, and using a single HTTP verb (usually POST). This is very characteristic of most Web Services (WS-*) in that this services would have a single URI accepting an HTTP POST request having an XML payload.
- Level 1
Services at this level are described as having many URIs with a single HTTP verb. The primary difference between Level 0 and Level 1 is that Level 1 services expose multiple logical resources as opposed to a single resource.
- Level 2
Services at this level are described as having many URI-addressable resources. Each addressable resource supports both multiple HTTP verbs and HTTP status codes.
- Level 3
Services at this level are like Level 2 services that additionally support Hypermedia As The Engine Of Application State (HATEOAS). Therefore, representations of a resource will also contain links to other resources (the actions that can be performed relating to current resource).
When thinking about the RMM applies to your API, please refrain from thinking in terms of having a Level 2 or Level 3 REST API. According to this model, an API cannot be called a REST API unless it at least satisfies a Level 3 of the RMM. Therefore, it would be better to think of ones API as an HTTP API that satisfies a Level 1,2, or 3 on the RMM.
2. REST in Practice
I have developed a simple Http Api to demonstrate some of the concepts that I discussed in Part 1 of this guide.
- Ranker
A REST API guide with and example project written in C# using .Net Core 3.1
I’ve also started another project that I plan to use to demonstrate various technology concepts like REST API’s.
- Chinook
A playground for demonstrating concepts such as architecture, design, dotnet core, typescript, react, database and docker
2. Defining A Contract
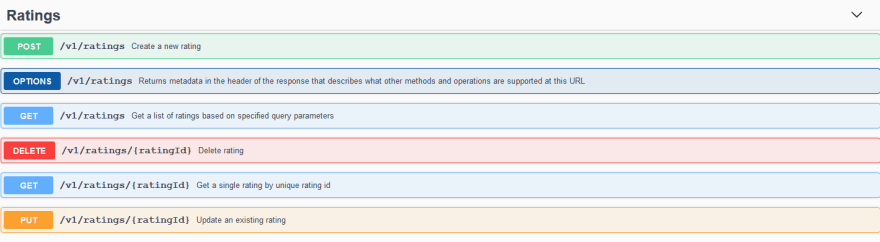
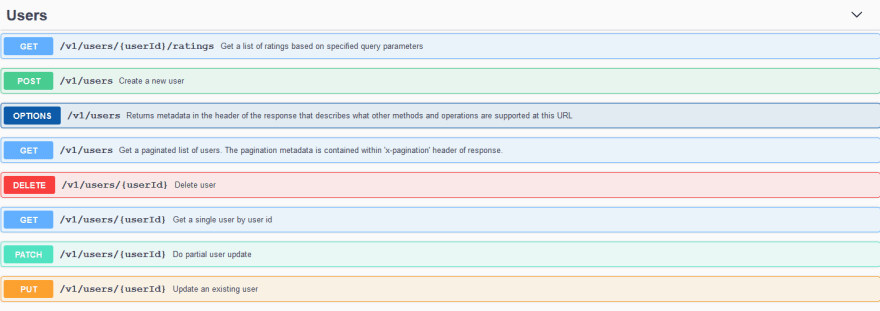
In this example, we are going to define contracts for 3 types of resources:
- Users
- Movies
- Ratings
There are 5 important aspects to defining a contract:
- Naming a resource
- Http methods used to interact with resource
- Status codes used to describe the state of an interaction
- Content Negotiation
- Be consistent
2.1 Naming Guidelines
- Resources should have names that are represented by nouns and not actions (behaviors)
  # Incorrect naming

  /getUsers
  /getUserById/{userId}

  # Correct Naming

  /users
  /users/{userId}
Enter fullscreen mode
Exit fullscreen mode
- Resources should be named using plural form
  # Incorrect naming

  /user
  /movie
  /rating

  # Correct naming

  /users
  /movies
  /ratings
Enter fullscreen mode
Exit fullscreen mode
- Mapping RPC style methods to resources
The naming guidelines seem to suit naming resources very well. However, what happens when one needs to name something that is more a behavior than a resource? For example, let’s say we want to compute the average rating for a movie. How would we structure our naming?
/movies/{movieId}/averageRating
Enter fullscreen mode
Exit fullscreen mode
I don’t think there is 100% consensus on what the correct naming strategy is for a scenario such as this one. However, when faced with defining a contract for something that feels more about behavior than resources, I like to define contracts based on the outcomes of those behaviors. Therefore, for the example above:
  /averageMovieRatings
  /averageMovieRatings/{movieId}
Enter fullscreen mode
Exit fullscreen mode
But what if we try to define a contract for a calculator? This is clearly an example of where defining a contract around a behavior is very difficult and «unnatural» to REST. The reason why it feels unnatural is because REST is an architectural style for describing web architecture. So if you imagined every endpoint as a webpage, then clearly the behaviors for a calculator don’t map very well. My suggestion is to use an alternative technology like gRPC if you are building API’s that are more about behavior than resources.
- Represent hierarchy
  /users/{userId}
  /users/{userId}/ratings
  /users/{userId}/ratings/{ratingId}

  /movies/{movieId}
  /movies/{movieId}/ratings
  /movies/{movieId}/ratings/{ratingId}
Enter fullscreen mode
Exit fullscreen mode
- Filtering, searching and sorting are not part of naming
For filtering:
  # Incorrect
  /users/firstName/{firstName}

  # Correct
  /users?firstName={firstName}
Enter fullscreen mode
Exit fullscreen mode
For searching:
  # Incorrect
  /users/search/{query}

  # Correct
  /users?q={query}
Enter fullscreen mode
Exit fullscreen mode
For ordering:
  # Incorrect
  /users/orderBy/{firstName}

  # Correct
  /users?order={firstName}
Enter fullscreen mode
Exit fullscreen mode
2.2 Http Methods
| Http Method | Request Body | Uri | Response |
|---|---|---|---|
| GET | — | /users | List of users |
| GET | — | /users/{userId} | Single user |
| POST | Single user | /users | Single user |
| PUT | Single user | /users/{userId} | — |
| PATCH | Json Patch Document for user | /users/{userId} | — |
| DELETE | — | /users/{userId} | — |
| HEAD | — | /users | — |
| HEAD | — | /users/{userId} | — |
| OPTIONS | — | /users | — |
2.3 Status Codes
In this section, a list of commonly used status codes is provided. Status codes help convey meaning in client/server interactions. They also help achieve consistency in terms of defining a contract.
Level 200 — Success
- 200 Ok — Request succeeded
- 201 Create — Request succeeded and resource created
- 204 No Content — Request succeeded and there is no additional content to send in response body
Level 300 — Redirection Responses
- 301 Moved Permanently — The URL of requested resourced has changed permanently. The new URL is provided in response
- 302 Found — Indicates that the URI of requested resource changed, and can therefore use the same URI for future requests
- 304 Not Modified — Used for caching. Indicates that the resource has not changed and that the same cached version can be used
Level 400 — Client Mistake
- 400 Bad Request — The request could not be understood by the server due to malformed syntax. The client should not repeat the request without modifications
- 401 Unauthorized — Request failed due to authentication failure
- 403 Forbidden — Request failed due to authorization failure
- 404 Not Found — The requested resource could not be found
- 405 Method Not Allowed — The request method is understood by server but not supported. In other words, the server doesn’t have an endpoint supporting requested method.
- 406 Not Acceptable — When a request is specified in an unsupported content type using the Accept header
- 409 Conflict — Indicates a conflict in terms of requested resource state. For a POST, it could mean that a resource already exists. For a PUT, it could mean that the state of resource changed thereby making current request data stale.
- 415 Unsupported Media Type — When a response is specified in an unsupported content type
- 422 Unprocessable Entity — Indicates the the request was correct and understood by server, but the data contained within request is invalid.
Level 500 — Server Mistake
- 500 Internal Server Error — Indicates that something went wrong on the server that prevent the server from fulfilling the request.
- 503 Service Unavailable — Indicates that the server is functional but not able to deliver requested resource. This is usually a result of a server being overloaded, server is under maintenance, or a client side issue relating to DNS server (DND server could be unavailable).
- 504 Gateway Timeout — Indicates that a proxy server did not receive a timely response from the origin (upstream) server.
2.4 Content Negotiation
Implies the type of representation (Media Type) that will be used for request and response. The Media Type is specified in header of request. Two popular Media Type formats that are used with Http Api’s are:
- application/json
- application/xml
Typically, I would support at least the two aforementioned formats. For any media type format that is not supported, the Api should return a 406 Not Acceptable status code.
Examples:
# Send POST request to create a a new user.
# The request will use 'application/json' as input, but XML in return (application/xml)

POST /users
Accept: application/xml
Content-Type: application/json

{
  "firstName": "Bob",
  "lastName": "TheBuilder"
}

# The response is returned as XML

<User>
  <Id>112233</Id>
  <FirstName>Bob</FirstName>
  <LastName>TheBuilder</LastName>
</User>
Enter fullscreen mode
Exit fullscreen mode
3. Example Project
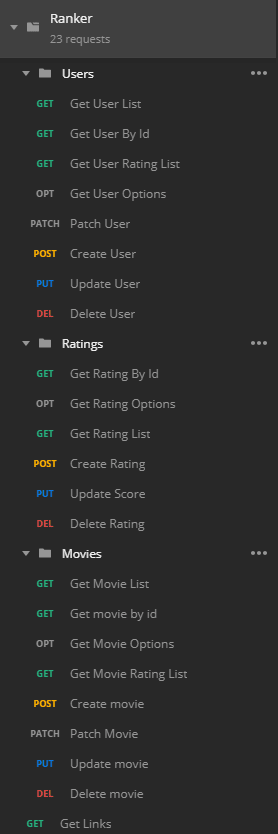
To illustrate some of the topics that have been discussed, I created an example project called Ranker.
Ranker is an API that has been designed by using REST as a guide. In terms of the Richardson Maturity Model, I have implemented all endpoints to be at least a Level 2. However, I have implemented some endpoints to a Level 3 (with HATEOAS). Conceptually, Ranker provides the following features:
- Interface to manage Users (with HATEOAS)
- Interface to manage Movies
- Interface to manage Ratings
In the following sections I provide more detail about the project and how to get started.
Architecture
Although the focus of this example project is to illustrate an implementation of REST, I decided to provide a basic architecture to also illustrate a good separation of concerns so that the Api layer (Controllers) are kept very clean.
I’ve chosen a architecture based on the Onion Architecture. Below, I provide 2 different views of what equates to exactly the same architecture.
Layered Architecture

Onion Architecture
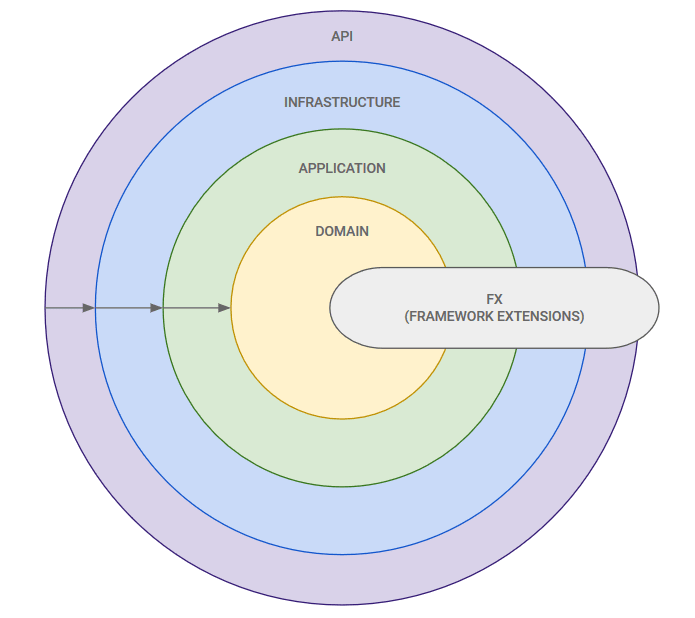
- API
Primary Responsibility: Provides a distributed interface that gives access to application features
This API has been implemented as a number of HTTP services based on REST guidelines. The API itself is based on an MVC (Model, View, and Controllers) architecture. The Controllers are essentially the public facing API contract.
- Infrastructure
Primary Responsibility: Provide the core of the system an interface to the «world».
This layer is all about defining and configuring external dependencies such as:
- database access
- proxies to other API’s
- logging
- monitoring
-
dependency injection
- Application
Primary Responsibility: Application logic.
This layer is typically where you would find «Application «Services».
- Domain
Primary Responsibility: Enterprise domain logic.
All domain logic relating to domain models and domain services are handled in this layer.
API Contract
The API has been implemented with the Open Api Specification (OAS). Once you have the API up and running, you can browse to the following Url to get access to the OAS Swagger Document.
http://localhost:5000
Enter fullscreen mode
Exit fullscreen mode
The Swagger document will look something like below:

Pagination
For this project, any endpoint returning a collection of items has been implemented with paging. Use the following query parameters to control paging:
- page — the page number
- limit — the number of items per page
Pagination has been implemented in two ways for this example project.
- Pagination in Header
  GET http://localhost:5000/v1/movies?page=2&limit=5

  Header: X-Pagination

  {
      "CurrentPageNumber": 2,
      "ItemCount": 9742,
      "PageSize": 5,
      "PageCount": 1949,
      "FirstPageUrl": "http://localhost:5000/v1/movies?page=1&limit=5",
      "LastPageUrl": "http://localhost:5000/v1/movies?page=1949&limit=5",
      "NextPageUrl": "http://localhost:5000/v1/movies?page=3&limit=5",
      "PreviousPageUrl": "http://localhost:5000/v1/movies?page=1&limit=5",
      "CurrentPageUrl": "http://localhost:5000/v1/movies?page=2&limit=5"
  }
Enter fullscreen mode
Exit fullscreen mode
- Pagination as links (HATEOAS)
  GET http://localhost:5000/v1/users?page=1&limit=1

  {
    .
    .
    .
    "links": [
        {
            "href": "http://localhost:5000/v1/users?page=1&limit=1",
            "method": "GET",
            "rel": "current-page"
        },
        {
            "href": "http://localhost:5000/v1/users?page=2&limit=1",
            "method": "GET",
            "rel": "next-page"
        },
        {
            "href": "",
            "method": "GET",
            "rel": "previous-page"
        },
        {
            "href": "http://localhost:5000/v1/users?page=1&limit=1",
            "method": "GET",
            "rel": "first-page"
        },
        {
            "href": "http://localhost:5000/v1/users?page=610&limit=1",
            "method": "GET",
            "rel": "last-page"
        }
    ]
  }
Enter fullscreen mode
Exit fullscreen mode
Filtering
Where practical, I’ve tried to provide a filter per resource property. I’ve implemented filtering using 3 techniques:
1. Basic
   // filter users by last name and age

   GET http://localhost:5000/v1/users?last-name=doe&gender=male
Enter fullscreen mode
Exit fullscreen mode
2. Range
For numeric resource (and date) properties, I’ve implemented range filters as follows:
   // Possible input for age could be:
   // age=gt:30
   // age=gte:30
   // age=eq:30
   // age=lt:30
   // age=lte:30

   GET http://localhost:5000/v1/users?age=gte:30
Enter fullscreen mode
Exit fullscreen mode
3. Multiple (comma separated values)
   // get a list of movies for the genres animation and sci-fi

   GET http://localhost:5000/v1/movies?genres=animation,sci-fi
Enter fullscreen mode
Exit fullscreen mode
Ordering
I’ve chosen to keep ordering parameters very succinct. Therefore, ordering for a collection of resources may be executed in the following ways:
- Order by a single resource property in ascending order
  // order by last name ascending

  GET http://localhost:5000/v1/users?order=last-name
Enter fullscreen mode
Exit fullscreen mode
- Order by a single resource property in descending order
  // order by age descending

  GET http://localhost:5000/v1/users?order=-age
Enter fullscreen mode
Exit fullscreen mode
- Order by multiple resource properties using mixed sort orders
Notice that we use comma separated values for the order.
  // order by last-name ascending then by age descending

  GET http://localhost:5000/v1/users?order=last-name,-age
Enter fullscreen mode
Exit fullscreen mode
Caching
I have implemented some basic client side caching behavior.
For example:
The following endpoints use response caching where the cache expires after 10 seconds.
GET http://localhost:5000/v1/users

GET http://localhost:5000/v1/movies
GET http://localhost:5000/v1/movies/{movieId}

GET http://localhost:5000/v1/ratings
GET http://localhost:5000/v1/ratings/{ratingId}
Enter fullscreen mode
Exit fullscreen mode
The following endpoint uses caching with an ETag.
GET http://localhost:5000/v1/users/{userId}
Enter fullscreen mode
Exit fullscreen mode
HATEOAS
The following endpoints have been implemented to return links as part of response.
// Get links available from root

GET http://localhost:5000/v1

[
    {
        "href": "http://localhost:5000/v1",
        "method": "GET",
        "rel": "self"
    },
    {
        "href": "http://localhost:5000/v1/movies",
        "method": "GET",
        "rel": "movies"
    },
    {
        "href": "http://localhost:5000/v1/movies",
        "method": "POST",
        "rel": "create-movie"
    },
    {
        "href": "http://localhost:5000/v1/ratings",
        "method": "GET",
        "rel": "ratings"
    },
    {
        "href": "http://localhost:5000/v1/ratings",
        "method": "POST",
        "rel": "create-rating"
    },
    {
        "href": "http://localhost:5000/v1/users",
        "method": "GET",
        "rel": "users"
    },
    {
        "href": "http://localhost:5000/v1/users",
        "method": "POST",
        "rel": "create-user"
    }
]
Enter fullscreen mode
Exit fullscreen mode
// Get as single user, including a list of navigational links

GET http://localhost:5000/v1/users

{
    "userId": 10,
    "age": 30,
    "firstName": "Durham",
    "lastName": "Franks",
    "gender": "male",
    "email": "durhamfranks@kog.com",
    "links": [
        {
            "href": "http://localhost:5000/v1/users/10",
            "method": "DELETE",
            "rel": "delete-user"
        },
        {
            "href": "http://localhost:5000/v1/users/10",
            "method": "GET",
            "rel": "self"
        },
        {
            "href": "http://localhost:5000/v1/users?Page=1&Limit=10",
            "method": "GET",
            "rel": "users"
        },
        {
            "href": "http://localhost:5000/v1/users",
            "method": "OPTIONS",
            "rel": "options"
        },
        {
            "href": "http://localhost:5000/v1/users/10",
            "method": "PATCH",
            "rel": "patch-user"
        },
        {
            "href": "http://localhost:5000/v1/users",
            "method": "POST",
            "rel": "create-user"
        },
        {
            "href": "http://localhost:5000/v1/users/10",
            "method": "PUT",
            "rel": "update-user"
        },
        {
            "href": "http://localhost:5000/v1/users/10/ratings",
            "method": "GET",
            "rel": "ratings"
        }
    ]
}
Enter fullscreen mode
Exit fullscreen mode
And for a collection of users (with links), we can use the request below. Please take note of the paging information that is returned as part of response
// Get list of users (with links), and paging links

GET http://localhost:5000/v1/users

{
    "users": [
        {
            "userId": 23,
            "age": 40,
            "firstName": "Michele",
            "lastName": "Jacobs",
            "gender": "female",
            "email": "michelejacobs@kineticut.com",
            "links": [
                {
                    "href": "http://localhost:5000/v1/users/23",
                    "method": "DELETE",
                    "rel": "delete-user"
                },
                {
                    "href": "http://localhost:5000/v1/users/23",
                    "method": "GET",
                    "rel": "self"
                },
                {
                    "href": "http://localhost:5000/v1/users?Page=1&Limit=10",
                    "method": "GET",
                    "rel": "users"
                },
                {
                    "href": "http://localhost:5000/v1/users",
                    "method": "OPTIONS",
                    "rel": "options"
                },
                {
                    "href": "http://localhost:5000/v1/users/23",
                    "method": "PATCH",
                    "rel": "patch-user"
                },
                {
                    "href": "http://localhost:5000/v1/users",
                    "method": "POST",
                    "rel": "create-user"
                },
                {
                    "href": "http://localhost:5000/v1/users/23",
                    "method": "PUT",
                    "rel": "update-user"
                },
                {
                    "href": "http://localhost:5000/v1/users/23/ratings",
                    "method": "GET",
                    "rel": "ratings"
                }
            ]
        },
        {
            "userId": 33,
            "age": 40,
            "firstName": "Barnett",
            "lastName": "Griffith",
            "gender": "male",
            "email": "barnettgriffith@corpulse.com",
            "links": [
                {
                    "href": "http://localhost:5000/v1/users/33",
                    "method": "DELETE",
                    "rel": "delete-user"
                },
                {
                    "href": "http://localhost:5000/v1/users/33",
                    "method": "GET",
                    "rel": "self"
                },
                {
                    "href": "http://localhost:5000/v1/users?Page=1&Limit=10",
                    "method": "GET",
                    "rel": "users"
                },
                {
                    "href": "http://localhost:5000/v1/users",
                    "method": "OPTIONS",
                    "rel": "options"
                },
                {
                    "href": "http://localhost:5000/v1/users/33",
                    "method": "PATCH",
                    "rel": "patch-user"
                },
                {
                    "href": "http://localhost:5000/v1/users",
                    "method": "POST",
                    "rel": "create-user"
                },
                {
                    "href": "http://localhost:5000/v1/users/33",
                    "method": "PUT",
                    "rel": "update-user"
                },
                {
                    "href": "http://localhost:5000/v1/users/33/ratings",
                    "method": "GET",
                    "rel": "ratings"
                }
            ]
        }
    ],
    "links": [
        {
            "href": "http://localhost:5000/v1/users?order=-age&page=1&limit=2",
            "method": "GET",
            "rel": "current-page"
        },
        {
            "href": "http://localhost:5000/v1/users?order=-age&page=2&limit=2",
            "method": "GET",
            "rel": "next-page"
        },
        {
            "href": "",
            "method": "GET",
            "rel": "previous-page"
        },
        {
            "href": "http://localhost:5000/v1/users?order=-age&page=1&limit=2",
            "method": "GET",
            "rel": "first-page"
        },
        {
            "href": "http://localhost:5000/v1/users?order=-age&page=305&limit=2",
            "method": "GET",
            "rel": "last-page"
        }
    ]
}
Enter fullscreen mode
Exit fullscreen mode
4. Technology Used
OS
I have developed and tested Ranker on the following Operating Systems.
- Ubuntu 18.04 LTS
Ubuntu is an open source software operating system that runs from the desktop, to the cloud, to all your internet connected things.
- Windows 10 Professional
In addition to developing Ranker on Windows 10, I have also tried and tested Ranker using Windows Subsystem For Linux. Specifically, I have used [WSL-Ubuntu]. See more about WSL below.
-
Windows Subsystem For Linux
The Windows Subsystem for Linux lets developers run a GNU/Linux environment — including most command-line tools, utilities, and applications — directly on Windows, unmodified, without the overhead of a virtual machine.
-
Windows Subsystem For Linux 2
NOTE: I have not tested Ranker on WSL2 yet. I mention it here because I want to be clear that I’ve only tested on WSL.
WSL 2 is a new version of the architecture in WSL that changes how Linux distros interact with Windows. WSL 2 has the primary goals of increasing file system performance and adding full system call compatibility. Each Linux distro can run as a WSL 1, or a WSL 2 distro and can be switched between at any time. WSL 2 is a major overhaul of the underlying architecture and uses virtualization technology and a Linux kernel to enable its new features.
Code
- Visual Studio Code
Visual Studio Code is a source code editor developed by Microsoft for Windows, Linux and macOS. It includes support for debugging, embedded Git control, syntax highlighting, intelligent code completion, snippets, and code refactoring.
- Visual Studio Community Edition
A fully-featured, extensible, FREE IDE for creating modern applications for Android, iOS, Windows, as well as web applications and cloud services.
Database
- Kept things simple and only used an in-memory database
5. Getting Started
Before getting started, the following frameworks must be installed on your machine:
- Dotnet Core 3.1
Get The Code
Clone ‘ranker’ repository from GitHub
# using https
git clone https://github.com/drminnaar/ranker.git

# or using ssh
git clone git@github.com:drminnaar/ranker.git
Enter fullscreen mode
Exit fullscreen mode
Build The Code
# change to project root
cd ./ranker

# build solution
dotnet build
Enter fullscreen mode
Exit fullscreen mode
Running the API
Run the API from the command line as follows:
# change to project root
cd ./ranker/Ranker.Api

# To run 'Ranker Api' (http://localhost:5000)
dotnet watch run
Enter fullscreen mode
Exit fullscreen mode
Open Postman Collection
I have provided a postman collection for the Ranker API. Please find the Postman collection _’Ranker.postman_collection’_at the root of the solution.