
I
TL-WR740N
TL-WR741ND
Беспроводной маршрутизатор серии N со
скоростью передачи данных до 150 Мбит/с
REV1.1.1
1910010816

-
Contents
-
Table of Contents
-
Bookmarks
Quick Links
TL-WR740N
TL-WR741ND
150Mbps Wireless N Router
REV 6.0.0
1910011370
Related Manuals for TP-Link TL-WR740N
Summary of Contents for TP-Link TL-WR740N
-
Page 1
TL-WR740N TL-WR741ND 150Mbps Wireless N Router REV 6.0.0 1910011370… -
Page 2
Specifications are subject to change without notice. is a registered trademark of TP-LINK TECHNOLOGIES CO., LTD. Other brands and product names are trademarks or registered trademarks of their respective holders. No part of the specifications may be reproduced in any form or by any means or used to make any derivative such as translation, transformation, or adaptation without permission from TP-LINK TECHNOLOGIES CO., LTD. -
Page 3: Fcc Statement
FCC STATEMENT This equipment has been tested and found to comply with the limits for a Class B digital device, pursuant to part 15 of the FCC Rules. These limits are designed to provide reasonable protection against harmful interference in a residential installation. This equipment generates, uses and can radiate radio frequency energy and, if not installed and used in accordance with the instructions, may cause harmful interference to radio communications.
-
Page 4: Ce Mark Warning
CE Mark Warning This is a class B product. In a domestic environment, this product may cause radio interference, in which case the user may be required to take adequate measures. Canadian Compliance Statement This device complies with Industry Canada license-exempt RSS standard(s). Operation is subject to the following two conditions: (1) This device may not cause interference, and (2)This device must accept any interference, including interference that may cause undesired…
-
Page 5: Safety Information
NCC Notice & BSMI Notice 注意! 依據 低功率電波輻射性電機管理辦法 第十二條 經型式認證合格之低功率射頻電機,非經許可,公司、商號或使用者均不得擅自變更頻 率、加大功率或變更原設計之特性或功能。 第十四條 低功率射頻電機之使用不得影響飛航安全及干擾合法通行;經發現有干擾現象時,應立 即停用,並改善至無干擾時方得繼續使用。前項合法通信,指依電信規定作業之無線電信。低功率 射頻電機需忍受合法通信或工業、科學以及醫療用電波輻射性電機設備之干擾。 減少電磁波影響,請妥適使用。 安全諮詢及注意事項 ●請使用原裝電源供應器或只能按照本產品注明的電源類型使用本產品。 ●清潔本產品之前請先拔掉電源線。請勿使用液體、噴霧清潔劑或濕布進行清潔。 ●注意防潮,請勿將水或其他液體潑灑到本產品上。 ●插槽與開口供通風使用,以確保本產品的操作可靠並防止過熱,請勿堵塞或覆蓋開口。 ●請勿將本產品置放於靠近熱源的地方。除非有正常的通風,否則不可放在密閉位置中。 ●請不要私自打開機殼,不要嘗試自行維修本產品,請由授權的專業人士進行此項工作。 Продукт сертифіковано згідно с правилами системи УкрСЕПРО на відповідність вимогам нормативних документів та вимогам, що передбачені чинними законодавчими актами України.
-
Page 6
This product can be used in the following countries:… -
Page 7: Declaration Of Conformity
TP-LINK TECHNOLOGIES CO., LTD DECLARATION OF CONFORMITY For the following equipment: Product Description: 150Mbps Wireless N Router Model No.: TL-WR740N/TL-WR741ND Trademark: TP-LINK We declare under our own responsibility that the above products satisfy all the technical regulations applicable to the product within the scope of Council Directives:…
-
Page 8: Table Of Contents
CONTENTS Package Contents ……………………..1 Chapter 1. Introduction ……………………2 Overview of the Router ………………..2 Conventions ……………………3 Main Features ……………………. 3 Panel Layout ……………………4 1.4.1 The Front Panel ………………..4 1.4.2 The Rear Panel ………………..5 Chapter 2. Connecting the Router ………………..6 System Requirements ………………..
-
Page 9
4.8.2 DHCP Clients List ………………… 44 4.8.3 Address Reservation………………45 Forwarding ……………………46 4.9.1 Virtual Servers………………..46 4.9.2 Port Triggering ………………..48 4.9.3 DMZ ……………………50 4.9.4 UPnP ……………………. 50 4.10 Security ……………………. 51 4.10.1 Basic Security ………………..52 4.10.2 Advanced Security ……………….. 53 4.10.3 Local Management ………………. -
Page 10
4.18.3 Firmware Upgrade ……………….. 91 4.18.4 Factory Defaults ………………..92 4.18.5 Backup & Restore ………………… 92 4.18.6 Reboot ………………….. 93 4.18.7 Password ………………….93 4.18.8 System Log ………………….. 94 4.18.9 Statistics ………………….96 4.19 Logout ……………………… 98 Appendix A: FAQ ……………………..99 Appendix B: Configuring the PCs ……………….. -
Page 11: Package Contents
TL-WR740N/TL-WR741ND 150Mbps Wireless N Router Package Contents The following items should be found in your package: TL-WR740N/TL-WR741ND 150Mbps Wireless N Router DC Power Adapter for TL-WR740N/TL-WR741ND 150Mbps Wireless N Router Quick Installation Guide Ethernet Cable Resource CD for TL-WR740N/TL-WR741ND 150Mbps Wireless N Router, including: …
-
Page 12: Chapter 1. Introduction
Incredible Speed The TL-WR740N/TL-WR741ND 150Mbps Wireless N Router provides up to 150Mbps wireless connection with other 802.11n wireless clients. The incredible speed makes it ideal for handling multiple data streams at the same time, which ensures your network stable and smooth. The performance of this 802.11n wireless Router will give you the unexpected networking experience…
-
Page 13: Conventions
TL-WR740N/TL-WR741ND 150Mbps Wireless N Router without any explanation. Note: The two devices of TL-WR740N and TL-WR741ND share this User Guide. For simplicity, we will take TL-WR740N for example throughout this Guide. The difference between them is: TL-WR740N has one fixed antenna.
-
Page 14: Panel Layout
TL-WR740N/TL-WR741ND 150Mbps Wireless N Router Panel Layout 1.4.1 The Front Panel Figure 1-1 Front Panel sketch The Router’s LEDs and the WPS button are located on the front panel (View from left to right). Name Status Indication Power is off.
-
Page 15: The Rear Panel
POWER: The Power socket is where you will connect the power adapter. Please use the power adapter provided with this TL-WR740N/TL-WR741ND 150Mbps Wireless N Router. WAN: This WAN port is where you will connect the DSL/cable Modem, or Ethernet.
-
Page 16: Chapter 2. Connecting The Router
TL-WR740N/TL-WR741ND 150Mbps Wireless N Router Chapter 2. Connecting the Router System Requirements Broadband Internet Access Service (DSL/Cable/Ethernet) One DSL/Cable Modem that has an RJ45 connector (which is not necessary if the Router is connected directly to the Ethernet.) PCs with a working Ethernet Adapter and an Ethernet cable with RJ45 connectors …
-
Page 17
TL-WR740N/TL-WR741ND 150Mbps Wireless N Router Figure 2-1 Hardware Installation Verify that the hardware connection is correct by checking these LEDs. -
Page 18: Chapter 3. Quick Installation Guide
TL-WR740N/TL-WR741ND 150Mbps Wireless N Router Chapter 3. Quick Installation Guide This chapter will show you how to configure the basic functions of your TL-WR741ND 150Mbps Wireless N Router using Quick Setup Wizard within minutes. TCP/IP Configuration The default domain name of the TL-WR741ND 150Mbps Wireless N Router is http://tplinkwifi.net, the default IP address is 192.168.0.1, and the default Subnet Mask is 255.255.255.0.
-
Page 19: Quick Installation Guide
TL-WR740N/TL-WR741ND 150Mbps Wireless N Router Figure 3-2 Failure result of Ping command Please check the connection following these steps: Is the connection between your PC and the Router correct? Note: The 1/2/3/4 LEDs of LAN ports which you link to on the Router and LEDs on your PC’s adapter should be lit.
-
Page 20
TL-WR740N/TL-WR741ND 150Mbps Wireless N Router Login the Router Figure 3-3 After a moment, a login window will appear, similar to Figure 3-4. Enter admin for the User Name and Password, both in lower case letters. Then click the Login button or press the Enter key. -
Page 21
TL-WR740N/TL-WR741ND 150Mbps Wireless N Router Figure 3-6 Choose WAN Connection Type The router provides Auto-Detect function and supports five popular ways PPPoE, Dynamic IP, Static IP, L2TP and PPTP to connect to the Internet. It’s recommended that you make use of the Auto-Detect function. -
Page 22
TL-WR740N/TL-WR741ND 150Mbps Wireless N Router Figure 3-8 Quick Setup — Static IP IP Address — This is the WAN IP address as seen by external users on the Internet (including your ISP). Your ISP will provide you with the IP address you need to enter here. -
Page 23
TL-WR740N/TL-WR741ND 150Mbps Wireless N Router Check the radio button of Dynamic/Static IP to activate the secondary connection if your ISP provides an extra Connection type such as Dynamic/Static IP to connect to a local area network. If the connection type detected is L2TP/ Russian L2TP, the next screen will appear as shown in Figure 3-10. -
Page 24
TL-WR740N/TL-WR741ND 150Mbps Wireless N Router If the connection type detected is PPTP/Russian PPTP, the next screen will appear as shown in Figure 3-11. Configure the following parameters and then click Next to continue. Figure 3-11 Quick Setup – L2TP/Russia L2TP User Name/Password — Enter the User Name and Password provided by your ISP. -
Page 25
TL-WR740N/TL-WR741ND 150Mbps Wireless N Router Figure 3-12 Quick Setup – Wireless Wireless Radio — Enable or disable the wireless radio by choosing from the drop-down list. Wireless Network Name (also called SSID) — Enter a value of up to 32 characters. The … -
Page 26
TL-WR740N/TL-WR741ND 150Mbps Wireless N Router Please also note the key is case sensitive, which means that upper and lower case keys will affect the outcome. It would also be a good idea to write down the key and all related wireless security settings. -
Page 27: Chapter 4. Configuring The Router
TL-WR740N/TL-WR741ND 150Mbps Wireless N Router Chapter 4. Configuring the Router This chapter will show each Web page’s key functions and the configuration way. Login After your successful login, you will see the main menus on the left of the Web-based utility. On the right, there are the corresponding explanations and instructions.
-
Page 28: Quick Setup
TL-WR740N/TL-WR741ND 150Mbps Wireless N Router Figure 4-1 Router Status Quick Setup Please refer to 3.2 Quick Installation Guide. This section will guide you to add a new wireless device to an existing network quickly by WPS (Wi-Fi Protected Setup) function.
-
Page 29
TL-WR740N/TL-WR741ND 150Mbps Wireless N Router Figure 4-2 WPS WPS Status — Enable or disable the WPS function here. Current PIN — The current value of the Router’s PIN displayed here. The default PIN of the Router can be found in the label or User Guide. -
Page 30
TL-WR740N/TL-WR741ND 150Mbps Wireless N Router Figure 4-3 Figure 4-4 Add A New Device Step 2: Press and hold the WPS button of the client device. Step 3: The Wi-Fi Protected Setup LED flashes for two minutes during the Wi-Fi Protected Setup process. -
Page 31: Network
TL-WR740N/TL-WR741ND 150Mbps Wireless N Router Use this method if your client device asks for the router’s PIN number. Step 1: On the client device, enter the PIN number listed on the router’s Wi-Fi Protected Setup screen, shown in (It is also labeled on the bottom of the router).
-
Page 32
TL-WR740N/TL-WR741ND 150Mbps Wireless N Router Figure 4-7 WAN — Dynamic IP This page displays the WAN IP parameters assigned dynamically by your ISP, including IP address, Subnet Mask, Default Gateway, etc. Click the Renew button to renew the IP parameters from your ISP. Click the Release button to release the IP parameters. -
Page 33
TL-WR740N/TL-WR741ND 150Mbps Wireless N Router Figure 4-8 WAN — Static IP IP Address — Enter the IP address in dotted-decimal notation provided by your ISP. Subnet Mask — Enter the subnet Mask provided by your ISP in dotted-decimal notation. -
Page 34
TL-WR740N/TL-WR741ND 150Mbps Wireless N Router Figure 4-9 WAN — PPPoE User Name/Password — Enter the User Name and Password provided by your ISP. These fields are case-sensitive. Confirm Password — Re-enter the Password provided by your ISP to ensure the Password … -
Page 35
TL-WR740N/TL-WR741ND 150Mbps Wireless N Router Time-based Connecting — The connection will only be established in the period from the start time to the end time (both are in HH:MM format). Note: Only when you have configured the system time on System Tools -> Time page, will the Time-based Connecting function can take effect. -
Page 36
TL-WR740N/TL-WR741ND 150Mbps Wireless N Router Detect Online Interval — The Router will detect Access Concentrator online at every interval. The default value is “0”. You can input the value between “0”and “120”. The value “0” means no detect. DNS IP address — If your ISP does not automatically assign DNS addresses to the Router … -
Page 37
TL-WR740N/TL-WR741ND 150Mbps Wireless N Router MTU Size — The normal MTU (Maximum Transmission Unit) value for most Ethernet networks is 1500 Bytes. It is not recommended that you change the default MTU Size unless required by your ISP. Connect on Demand — In this mode, the Internet connection can be terminated automatically … -
Page 38
TL-WR740N/TL-WR741ND 150Mbps Wireless N Router Figure 4-12 WAN –L2TP User Name/Password — Enter the User Name and Password provided by your ISP. These fields are case-sensitive. Dynamic IP/ Static IP — Choose either as you are given by your ISP. Click the Connect button … -
Page 39
TL-WR740N/TL-WR741ND 150Mbps Wireless N Router you want your Internet connection to remain active at all times, enter «0» in the Max Idle Time field. Otherwise, enter the number in minutes that you wish to have the Internet connecting last unless a new link is requested. -
Page 40: Mac Clone
TL-WR740N/TL-WR741ND 150Mbps Wireless N Router Connect on Demand — You can configure the Router to disconnect from your Internet connection after a specified period of inactivity (Max Idle Time). If your Internet connection has been terminated due to inactivity, Connect on Demand enables the Router to automatically re-establish your connection as soon as you attempt to access the Internet again.
-
Page 41: Lan
TL-WR740N/TL-WR741ND 150Mbps Wireless N Router Figure 4-14 MAC Address Clone Some ISPs require that you register the MAC Address of your adapter. Changes are rarely needed here. WAN MAC Address — This field displays the current MAC address of the WAN port. If your …
-
Page 42: Wireless
TL-WR740N/TL-WR741ND 150Mbps Wireless N Router Subnet Mask — An address code that determines the size of the network. Normally use 255.255.255.0 as the subnet mask. IGMP Proxy — If you want to watch TV through IGMP, please Enable it.
-
Page 43
TL-WR740N/TL-WR741ND 150Mbps Wireless N Router Wireless Network Name (also called SSID) — Enter a value of up to 32 characters. The same name of SSID (Service Set Identification) must be assigned to all wireless devices in your network. Considering your wireless network security, the default SSID is set to be TP-LINK_XXXX (XXXX indicates the last unique four numbers of each Router’s MAC… -
Page 44: Wireless Security
TL-WR740N/TL-WR741ND 150Mbps Wireless N Router Enable SSID Broadcast — When wireless clients survey the local area for wireless networks to associate with, they will detect the SSID broadcast by the Router. If you select the Enable SSID Broadcast checkbox, the Wireless Router will broadcast its name (SSID) on the air.
-
Page 45
TL-WR740N/TL-WR741ND 150Mbps Wireless N Router Figure 4-18 Disable Security — If you do not want to use wireless security, select this check box, but it’s strongly recommended to choose one of the following modes to enable security. WPA/WPA2-Personal(Recommended) — It’s the WPA/WPA2 authentication type based on … -
Page 46
TL-WR740N/TL-WR741ND 150Mbps Wireless N Router Figure 4-19 Password — You can enter ASCII characters between 8 and 63 characters or 8 to 64 • Hexadecimal characters. Group Key Update Period — Specify the group key update interval in seconds. The value •… -
Page 47: Wireless Mac Filtering
TL-WR740N/TL-WR741ND 150Mbps Wireless N Router Figure 4-21 Type — you can choose the type for the WEP security on the drop-down list. The default • setting is Automatic, which can select Open System or Shared Key authentication type automatically based on the wireless station’s capability and request.
-
Page 48
TL-WR740N/TL-WR741ND 150Mbps Wireless N Router Figure 4-22 Wireless MAC address Filtering To filter wireless users by MAC Address, click Enable. The default setting is Disable. MAC Address — The wireless station’s MAC address that you want to filter. Status — The status of this entry either Enabled or Disabled. -
Page 49
TL-WR740N/TL-WR741ND 150Mbps Wireless N Router Click the Modify in the entry you want to modify. If you want to delete the entry, click the Delete. Modify the information. Click the Save button. Click the Enable All button to make all entries enabled. -
Page 50: Wireless Advanced
TL-WR740N/TL-WR741ND 150Mbps Wireless N Router 4.6.4 Wireless Advanced Choose menu “Wireless→Wireless Advanced”, and then you can configure the advanced settings of your wireless network. Figure 4-24 Wireless Advanced Transmit Power — Here you can specify the transmit power of router. You can select …
-
Page 51: Wireless Statistics
TL-WR740N/TL-WR741ND 150Mbps Wireless N Router Enable Short GI — This function is recommended for it will increase the data capacity by reducing the guard interval time Enabled AP Isolation — This function can isolate wireless stations on your network from …
-
Page 52: Guest Network
TL-WR740N/TL-WR741ND 150Mbps Wireless N Router Guest Network Figure 4-26 The Guest Network menu 4.7.1 Wireless Settings Choose menu “Guest Network → Wireless Settings”, you can configure the Guest Network Wireless Settings on the page as shown in Figure 4-27. Figure 4-27 Guest Network Wireless Settings Allow Guest To Access My Local Network — If enabled, guests can communicate with …
-
Page 53: Dhcp
TL-WR740N/TL-WR741ND 150Mbps Wireless N Router Wireless Security — You can configure the security of Guest Network here. Access Time — During this time the wireless stations could accessing the AP. Note: The range of bandwidth for Guest Network is calculated according to the setting of Bandwidth Control on the page “Bandwidth Control->Control Settings”.
-
Page 54: Dhcp Clients List
TL-WR740N/TL-WR741ND 150Mbps Wireless N Router Start IP Address — Specify an IP address for the DHCP Server to start with when assigning IP addresses. 192.168.0.100 is the default start address. End IP Address — Specify an IP address for the DHCP Server to end with when assigning IP …
-
Page 55: Address Reservation
TL-WR740N/TL-WR741ND 150Mbps Wireless N Router You cannot change any of the values on this page. To update this page and to show the current attached devices, click the Refresh button. 4.8.3 Address Reservation Choose menu “DHCP→Address Reservation”, and then you can view and add a reserved address for clients via the next screen (shown in ).
-
Page 56: Forwarding
TL-WR740N/TL-WR741ND 150Mbps Wireless N Router Click the Save button. Click the Enable/ Disable All button to make all entries enabled/disabled Click the Delete All button to delete all entries Click the Next button to go to the next page and Click the Previous button to return to the previous page.
-
Page 57
TL-WR740N/TL-WR741ND 150Mbps Wireless N Router Internal Port — The Internal Service Port number of the PC running the service application. You can leave it blank if the Internal Port is the same as the Service Port, or enter a specific port number when Service Port is a single one. -
Page 58: Port Triggering
TL-WR740N/TL-WR741ND 150Mbps Wireless N Router Click the Next button to go to the next page and click the Previous button to return to the previous page. Note: If you set the service port of the virtual server as 80, you must set the Web management port on Security –>…
-
Page 59
TL-WR740N/TL-WR741ND 150Mbps Wireless N Router Figure 4-37 Add or Modify a Triggering Entry Trigger Port — The port for outgoing traffic. An outgoing connection using this port will trigger this rule. Trigger Protocol — The protocol used for Trigger Ports, either TCP, UDP, or All (all … -
Page 60: Dmz
TL-WR740N/TL-WR741ND 150Mbps Wireless N Router When necessary, the external host will be able to connect to the local host using one of the ports defined in the Incoming Ports field. Note: When the trigger connection is released, the corresponding opened ports will be closed.
-
Page 61: Security
TL-WR740N/TL-WR741ND 150Mbps Wireless N Router Figure 4-39 UPnP Setting Current UPnP Status — UPnP can be enabled or disabled by clicking the Enable or Disable button. This feature is enabled by default. Current UPnP Settings List — This table displays the current UPnP information.
-
Page 62: Basic Security
TL-WR740N/TL-WR741ND 150Mbps Wireless N Router 4.10.1 Basic Security Choose menu “Security → Basic Security”, and then you can configure the basic security in the screen as shown in Figure 4-41. Figure 4-41 Basic Security Firewall — A firewall protects your network from the outside world. Here you can enable or …
-
Page 63: Advanced Security
TL-WR740N/TL-WR741ND 150Mbps Wireless N Router gateway to support address and port translation for certain application layer «control/data» protocols such as FTP, TFTP, H323 etc. FTP ALG — To allow FTP clients and servers to transfer data across NAT, click Enable.
-
Page 64: Local Management
TL-WR740N/TL-WR741ND 150Mbps Wireless N Router Note: Dos Protection will take effect only when the Traffic Statistics in “System Tool → Statistics” is enabled. Enable ICMP-FLOOD Attack Filtering — Enable or Disable the ICMP-FLOOD Attack Filtering. ICMP-FLOOD Packets Threshold (5~3600) — The default value is 50. Enter a value …
-
Page 65: Remote Management
TL-WR740N/TL-WR741ND 150Mbps Wireless N Router Figure 4-43 Local Management By default, the radio button “All the PCs on the LAN are allowed to access the Router’s Web-Based Utility” is checked. If you want to allow PCs with specific MAC Addresses to access the Setup page of the Router’s Web-Based Utility locally from inside the network, check the radio button “Only the PCs listed can browse the built-in web pages to perform Administrator…
-
Page 66: Parental Control
TL-WR740N/TL-WR741ND 150Mbps Wireless N Router Web Management Port — Web browser access normally uses the standard HTTP service port 80. This Router’s default remote management web port number is 80. For greater security, you can change the remote management web port to a custom port by entering that number in the box provided.
-
Page 67
Address of Child PC field, or you can choose the MAC address from the All MAC Address in Current LAN drop-down list. Give a description (e.g. Allow TP-LINK) for the website allowed to be accessed in the Website Description field. -
Page 68: Access Control
For example: If you desire that the child PC with MAC address 00-11-22-33-44-AA can access www.tp-link.com on Saturday only while the parent PC with MAC address 00-11-22-33-44-BB is without any restriction, you should follow the settings below. Click “Parental Control” menu on the left to enter the Parental Control Settings page. Check Enable and enter the MAC address 00-11-22-33-44-BB in the MAC Address of Parental PC field.
-
Page 69: Rule
TL-WR740N/TL-WR741ND 150Mbps Wireless N Router There are four submenus under the Access Control menu as shown in Figure 4-48: Rule, Host, Target and Schedule. Click any of them, and you will be able to configure the corresponding function. 4.12.1 Rule Choose menu “Access Control →…
-
Page 70
TL-WR740N/TL-WR741ND 150Mbps Wireless N Router Move — You can change the entry’s order as desired. Enter in the first box the ID number of the entry you want to move and in the second box another ID number, and then click the Move button to change the entries’… -
Page 71
Domain Name — Here you can enter 4 domain names, either the full name or the keywords (for example, tp-link). Any domain name with keywords in it (www.tp-link.com) will be blocked or allowed. Click Next when finishing creating the access target entry, and the next screen will appear as… -
Page 72
TL-WR740N/TL-WR741ND 150Mbps Wireless N Router Figure 4-52 Quick Setup – Create an Advanced Schedule Entry Schedule Description — In this field, create a description for the schedule. Note that this description should be unique (e.g. Schedule_1). Day — Choose Select Days and select the certain day (days), or choose Everyday. -
Page 73
For example: If you desire to allow the host with MAC address 00-11-22-33-44-AA to access www.tp-link.com only from 18:00 to 20:00 on Saturday and Sunday, and forbid other hosts in the LAN to access the Internet, you should follow the settings below: Click the submenu Rule of Access Control in the left to return to the Rule List page. -
Page 74: Host
Click the submenu Target of Access Control in the left to enter the Target List page. Add a new entry with the Target Description is Target_1 and Domain Name is www.tp-link.com. Click the submenu Schedule of Access Control in the left to enter the Schedule List page.
-
Page 75: Target
TL-WR740N/TL-WR741ND 150Mbps Wireless N Router 2) In LAN IP Address field, enter the IP address. If you select MAC Address, the screen shown is Figure 4-57. 1) In Host Description field, create a unique description for the host (e.g. Host_1).
-
Page 76
TL-WR740N/TL-WR741ND 150Mbps Wireless N Router Figure 4-58 Target Settings Target Description — Here displays the description about the target and this description is unique. Information — The target can be IP address, port, or domain name. Modify — To modify or delete an existing entry. -
Page 77: Schedule
2) In Domain Name field, enter the domain name, either the full name or the keywords (for example, tp-link) in the blank. Any domain name with keywords in it (www.tp-link.com) will be blocked or allowed. You can enter 4 domain names.
-
Page 78
TL-WR740N/TL-WR741ND 150Mbps Wireless N Router Figure 4-61 Schedule Settings Schedule Description — Here displays the description of the schedule and this description is unique. Day — Here displays the day(s) in a week. Time — Here displays the time period in a day. -
Page 79: Advanced Routing
TL-WR740N/TL-WR741ND 150Mbps Wireless N Router For example: If you desire to restrict the internet activities of host with MAC address 00-11-22-33-44-AA to access www.tp-link.com only from 18:00 to 20:00 on Saturday and Sunday, you should first follow the settings below: 1) Click Add New…
-
Page 80: System Routing Table
TL-WR740N/TL-WR741ND 150Mbps Wireless N Router Figure 4-65 Add or Modify a Static Route Entry Enter the following data: Destination Network — The Destination Network is the address of the network or host that you want to assign to a static route.
-
Page 81: Bandwidth Control
TL-WR740N/TL-WR741ND 150Mbps Wireless N Router Figure 4-66 System Routing Table Destination Network — The Destination Network is the address of the network or host to which the static route is assigned. Subnet Mask — The Subnet Mask determines which portion of an IP address is the network …
-
Page 82: Rules List
TL-WR740N/TL-WR741ND 150Mbps Wireless N Router Figure 4-68 Bandwidth Control Settings Enable Bandwidth Control — Check this box so that the Bandwidth Control settings can take effect. Line Type — Select the right type for you network connection. If you don’t know how to choose, …
-
Page 83: Ip & Mac Binding Setting
TL-WR740N/TL-WR741ND 150Mbps Wireless N Router Figure 4-70 Bandwidth Control Rule Settings Click the Save button. 4.15 IP & MAC Binding Setting Figure 4-71 the IP & MAC Binding menu There are two submenus under the IP &MAC Binding menu (shown in Figure 4-71): Binding Settings and ARP List.
-
Page 84
TL-WR740N/TL-WR741ND 150Mbps Wireless N Router Bind — Check this option to enable ARP binding for a specific device. Modify — To modify or delete an existing entry. When you want to add or modify an IP & MAC Binding entry, you can click the Add New… button or Modify button, and then you will go to the next page. -
Page 85: Arp List
TL-WR740N/TL-WR741ND 150Mbps Wireless N Router Click the Delete All button to delete all entries. 4.15.2 ARP List To manage the computer, you could observe the computers in the LAN by checking the relationship of MAC address and IP address on the ARP list, and you could also configure the items on the ARP list.
-
Page 86: Comexe Ddns
TL-WR740N/TL-WR741ND 150Mbps Wireless N Router name no matter what your IP address is. Before using this feature, you need to sign up for DDNS service providers such as www.comexe.cn, dyn.com/dns../Downloads/www.dyndns.org, or www.noip.com. The Dynamic DNS client service provider will give you a password or key.
-
Page 87: No-Ip Ddns
TL-WR740N/TL-WR741ND 150Mbps Wireless N Router Figure 4-77 Dyndns.org DDNS Settings To set up for DDNS, follow these instructions: Enter the User Name for your DDNS account. Enter the Password for your DDNS account. Enter the Domain Name you received from dynamic DNS service provider.
-
Page 88: Ipv6 Support
TL-WR740N/TL-WR741ND 150Mbps Wireless N Router Figure 4-78 No-ip.com DDNS Settings To set up for DDNS, follow these instructions: Enter the User Name for your DDNS account. Enter the Password for your DDNS account. Enter the Domain Name you received from dynamic DNS service provider.
-
Page 89: Ipv6 Status
TL-WR740N/TL-WR741ND 150Mbps Wireless N Router 4.17.1 IPv6 Status Figure 4-80 IPv6 Status The IPv6 Status page displays the router’s current IPv6 status and configuration. All information is read-only. Connection Type — The IPv6 connection way for WAN. • IPv6 Address — The WAN IPv6 address.
-
Page 90: Ipv6 Setup
TL-WR740N/TL-WR741ND 150Mbps Wireless N Router 4.17.2 IPv6 Setup Figure 4-81 Enable/Disable IPv6 Enable IPv6 — Tick the checkbox to enable the IPv6 function. It’s enabled by default. WAN Connection Type — Choose the correct WAN connection type based on your ISP …
-
Page 91
TL-WR740N/TL-WR741ND 150Mbps Wireless N Router SLAAC Figure 4-82 SLAAC IPv6 Address — The IPv6 address assigned by your ISP dynamically. IPv6 Address Prefix — Display the IPv6 Prefix Length in dotted-decimal notation provided by your ISP. Default Gateway — Display the default gateway in colon-hexadecimal notation provided by … -
Page 92
TL-WR740N/TL-WR741ND 150Mbps Wireless N Router Note: If you get Address not found error when you access a Web site, it is likely that your DNS servers are set up improperly. You should contact your ISP to get DNS server addresses. -
Page 93
TL-WR740N/TL-WR741ND 150Mbps Wireless N Router If your ISP gives you one or two DNS IPv6 addresses, select Use the following IPv6 DNS Servers and enter the Primary IPv6 DNS and Secondary IPv6 DNS into the correct fields. Otherwise, leave the default selection Get IPv6 DNS Server Automatically, and the DNS servers will be assigned from ISP dynamically. -
Page 94
TL-WR740N/TL-WR741ND 150Mbps Wireless N Router Static IPv6 Figure 4-84 Static IPv6 IPv6 Address — Enter the IPv6 address in dotted-decimal notation provided by your ISP. Default Gateway — Enter the default gateway in dotted-decimal notation provided by your ISP. -
Page 95
TL-WR740N/TL-WR741ND 150Mbps Wireless N Router Click the Save button to save your settings. PPPoEv6 Figure 4-85 PPPoEv6 PPPoE Session — The PPP session type for IPv6 connection. There are two types: Share with PPPoEv4 — The PPPoEv6 and PPPoEv4 use the same PPP session. -
Page 96
TL-WR740N/TL-WR741ND 150Mbps Wireless N Router Secondary DNS — Enter another DNS IPv6 address in dotted-decimal notation provided by your ISP. Connection Mode — The way to connect the ISP. Alway On — Connect automatically. • Connect Manual — Connect by the user manually. -
Page 97: System Tools
TL-WR740N/TL-WR741ND 150Mbps Wireless N Router Tunnel Address — The 6to4 tunnel address created by the device to access to the IPv6 network. MTU Size — The normal MTU (Maximum Transmission Unit) value for most Ethernet networks is 1480 Bytes. For some ISPs, you may need to modify the MTU. But this is rarely required, and should not be done unless you are sure it is necessary for your ISP connection.
-
Page 98: Time Settings
TL-WR740N/TL-WR741ND 150Mbps Wireless N Router Password, System Log and Statistics. Click any of them, and you will be able to configure the corresponding function. The detailed explanations for each submenu are provided below. 4.18.1 Time Settings Choose menu “System Tools→Time Settings”, and then you can configure the time on the following screen.
-
Page 99: Diagnostic
TL-WR740N/TL-WR741ND 150Mbps Wireless N Router Enter the Date in Month/Day/Year format. Enter the Time in Hour/Minute/Second format. Click Save. To set time automatically: Select your local time zone. Enter the address or domain of the NTP Server I or NTP Server II.
-
Page 100
TL-WR740N/TL-WR741ND 150Mbps Wireless N Router Figure 4-90 Diagnostic Tools Diagnostic Tool — Check the radio button to select one diagnostic too. Ping — This diagnostic tool troubleshoots connectivity, reachability, and name resolution to a given host or gateway. -
Page 101: Firmware Upgrade
The Router will reboot while the upgrading has been finished. Note: New firmware versions are posted at http://www.tp-link.com and can be downloaded for free. There is no need to upgrade the firmware unless the new firmware has a new feature you want to…
-
Page 102: Factory Defaults
TL-WR740N/TL-WR741ND 150Mbps Wireless N Router use. However, when experiencing problems caused by the Router rather than the configuration, you can try to upgrade the firmware. When you upgrade the Router’s firmware, you may lose its current configurations, so before upgrading the firmware please write down some of your customized settings to avoid losing important settings.
-
Page 103: Reboot
TL-WR740N/TL-WR741ND 150Mbps Wireless N Router Click the Backup button to save all configuration settings as a backup file in your local computer. To upgrade the Router’s configuration, follow these instructions. Click the Browse button to find the configuration file which you want to restore.
-
Page 104: System Log
TL-WR740N/TL-WR741ND 150Mbps Wireless N Router Figure 4-96 Password It is strongly recommended that you should change the factory default user name and password of the Router, because all users who try to access the Router’s Web-based utility or Quick Setup will be prompted for the Router’s default user name and password.
-
Page 105
TL-WR740N/TL-WR741ND 150Mbps Wireless N Router Mail Settings — Set the receiving and sending mailbox address, server address, validation information as well as the timetable for Auto Mail Feature, as shown in Figure 4-98. Figure 4-98 Mail Account Settings •… -
Page 106: Statistics
TL-WR740N/TL-WR741ND 150Mbps Wireless N Router Log Type — By selecting the log type, only logs of this type will be shown. Log Level — By selecting the log level, only logs of this level will be shown. Refresh — Refresh the page to show the latest log list.
-
Page 107
TL-WR740N/TL-WR741ND 150Mbps Wireless N Router Statistics Table: IP/MAC Address The IP and MAC address are displayed with related statistics. Packets The total number of packets received and transmitted by the Router. Total Bytes The total number of bytes received and transmitted by the Router. -
Page 108: Logout
TL-WR740N/TL-WR741ND 150Mbps Wireless N Router 4.19 Logout Click the Logout tab at the bottom of the main menu, and then the web-page will be logged out and return to the login window.
-
Page 109: Appendix A: Faq
TL-WR740N/TL-WR741ND 150Mbps Wireless N Router Appendix A: FAQ How do I configure the Router to access Internet by ADSL users? First, configure the ADSL Modem configured in RFC1483 bridge model. Connect the Ethernet cable from your ADSL Modem to the WAN port on the Router. The telephone cord plugs into the Line port of the ADSL Modem.
-
Page 110
TL-WR740N/TL-WR741ND 150Mbps Wireless N Router How do I configure the Router to access Internet by Ethernet users? Login to the Router, click the “Network” menu on the left of your browser, and click «WAN» submenu. On the WAN page, select “Dynamic IP” for «WAN Connection Type», finish by clicking “Save”. -
Page 111
TL-WR740N/TL-WR741ND 150Mbps Wireless N Router Figure A-5 Add or Modify a Virtual server Entry Note: Your opposite side should call your WAN IP, which is displayed on the “Status” page. How to enable DMZ Host: Log in to the Router, click the “Forwarding” menu on the left of your browser, and click «DMZ»… -
Page 112
TL-WR740N/TL-WR741ND 150Mbps Wireless N Router Figure A-7 Basic Security I want to build a WEB Server on the LAN, what should I do? Because the WEB Server port 80 will interfere with the WEB management port 80 on the Router, you must change the WEB management port number to avoid interference. -
Page 113
TL-WR740N/TL-WR741ND 150Mbps Wireless N Router Log in to the Router, click the “Forwarding” menu on the left of your browser, and click the «Virtual Servers» submenu. On the «Virtual Servers» page, click Add New…, then on the “Add or Modify a Virtual Server” page, enter “80” into the blank next to the “Service Port”, and your IP address next to the “IP Address”, assuming 192.168.0.169… -
Page 114: Appendix B: Configuring The Pcs
TL-WR740N/TL-WR741ND 150Mbps Wireless N Router Appendix B: Configuring the PCs In this section, we’ll introduce how to install and configure the TCP/IP correctly in Windows 7. First make sure your Ethernet Adapter is working, refer to the adapter’s manual if needed.
-
Page 115
TL-WR740N/TL-WR741ND 150Mbps Wireless N Router Figure B-2 The following TCP/IP Properties window will display and the IP Address tab is open on this window by default. Now you have two ways to configure the TCP/IP protocol below: Setting IP address automatically… -
Page 116
TL-WR740N/TL-WR741ND 150Mbps Wireless N Router Figure B-3 Setting IP address manually Select Use the following IP address radio button. And the following items available If the router’s LAN IP address is 192.168.0.1, specify the IP address as 192.168.0.x (x is from 2 to 254), and Subnet mask is 255.255.255.0. -
Page 117
TL-WR740N/TL-WR741ND 150Mbps Wireless N Router Figure B-4… -
Page 118: Appendix C: Specifications
TL-WR740N/TL-WR741ND 150Mbps Wireless N Router Appendix C: Specifications General IEEE 802.3, IEEE 802.3u, IEEE802.11n, IEEE802.11b, IEEE Standards 802.11g Protocols TCP/IP, PPPoE, DHCP, ICMP, NAT, SNTP One 10/100M Auto-Negotiation WAN RJ45 port, Four 10/100M Ports Auto-Negotiation LAN RJ45 ports supporting Auto MDI/MDIX 10BASE-T: UTP category 3, 4, 5 cable (maximum 100m) EIA/TIA-568 100Ω…
-
Page 119: Appendix D: Glossary
TL-WR740N/TL-WR741ND 150Mbps Wireless N Router Appendix D: Glossary 802.11n — 802.11n builds upon previous 802.11 standards by adding MIMO (multiple-input multiple-output). MIMO uses multiple transmitter and receiver antennas to allow for increased data throughput via spatial multiplexing and increased range by exploiting the spatial diversity, perhaps through coding schemes like Alamouti coding.
-
Page 120
TL-WR740N/TL-WR741ND 150Mbps Wireless N Router SSID — A Service Set Identification is a thirty-two character (maximum) alphanumeric key identifying a wireless local area network. For the wireless devices in a network to communicate with each other, all devices must be configured with the same SSID. This is typically the configuration parameter for a wireless PC card.
На чтение 10 мин Просмотров 7.1к.

Юлия Дьякова
Системный администратор с навыками работы инженера-программиста.
TP-Link TL-WR740N – однодиапазонный бюджетный и надежный маршрутизатор. Рассмотрим способы настройки роутера TP-Link TL-WR740N. Приведем пошаговую инструкцию, которая также подойдет и к модели TL-WR741ND.
Содержание
- Особенности и технические характеристики
- Индикаторы и разъемы
- Подключение
- Вход в настройки роутера
- Автоматическая настройка
- Ручная настройка
- Настройка через мобильное приложение
- Подключение и параметры Wi-Fi
- Настройка IPTV
- Смена пароля
- Режим повторителя
- Обновление прошивки
- Сброс настроек
Особенности и технические характеристики
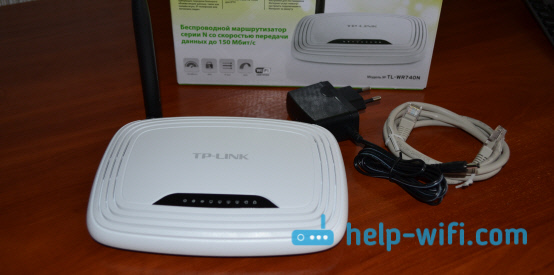
У маршрутизатора ТП Линк TL-WR740 стандартная комплектация. В нее входит: роутер, 9В адаптер питания, сетевой кабель RJ-45 и диск с ПО.

Корпус устройства выполнен из матового белого пластика. Информационная панель вынесена на верхнюю часть корпуса, на дне вентиляционные отверстия. Здесь же прорезиненные ножки, предотвращающие скольжение устройства по столу, и выемки для крепления на стену.
Технические характеристики:
- 4 LAN и 1 WAN порт с пропускной способностью до 100 Мбит/с;
- Wi-Fi с одним диапазоном — 2,4 ГГц и пропускной способностью до 150 Мбит/с;
- 1 внешняя несъемная антенна с усилителем сигнала 5 dbi.
Особенности:
- поддержка технологии CCA, которая не допускает конфликта каналов и повышает производительность беспроводной сети.
- защита беспроводной сети от возможных угроз протоколами WPA/WPA2;
- упрощенная настройка с компакт-диском;
- настройка пропускной способности по IP адресу устройства.
простота настройки;
русскоязычное меню;
широкий радиус действия сети wi-fi.
слабый сигнал;
несъемная антенна;
нет гостевой сети wi-fi.
Разница между роутерами TP-Link серии TL-WR740N и TL-WR741ND заключается в типе антенн. В первой модели они несъемные, а во второй — съемные. Остальные характеристики беспроводных маршрутизаторов абсолютно идентичны.
Индикаторы и разъемы
На информационной панели расположено 9 индикаторов. Значения слева направо:
- питание;
- состояние подключения;
- Wi-Fi;
- 4 индикатора LAN портов;
- связь с провайдером;
- QSS.

Разъемы и кнопки маршрутизатора стандартно располагаются на задней панели:
- reset – сброс на заводские настройки;
- питание;
- включение/отключение устройства;
- 4 LAN порта;
- 1 WAN порт;
- QSS;
- антенна.

Подключение
Установите роутер на постоянное место и выполните следующие действия по алгоритму:
- Подключите адаптер питания сначала к роутеру, а затем к электросети.
- Включите питание.
- Вставьте кабель провайдера в разъем WAN. При подключении маршрутизатора в качестве репитера для DSL модема вставьте в WAN разъем идущий от него LAN кабель.
- Соедините роутер с компьютером или ноутбуком. Используйте для этого сетевой кабель из комплекта. Один конец вставьте в LAN порт маршрутизатора, а второй — в разъем сетевой карты.

Если вы планируете настраивать роутер по беспроводной сети, игнорируйте пункт 4. Вместо этого подключитесь к сети вайфай и авторизуйтесь в ней. Название сети и пароль для доступа указан на информационной наклейке, расположенной на дне корпуса устройства.
Вход в настройки роутера
Чтобы войти в настройки TP-Link TL-WR740N, откройте браузер и наберите в адресной строке символьный или цифровой адрес 192.168.0.1. Оба указаны на информационной наклейке на нижней части устройства. При входе в веб конфигуратор роутер запросит логин и пароль для авторизации.

По умолчанию используется комбинация admin admin. Если войти не получается, значит, требуется проверить настройки протокола TCP/IP на ПК.
Алгоритм действий для Windows 10:
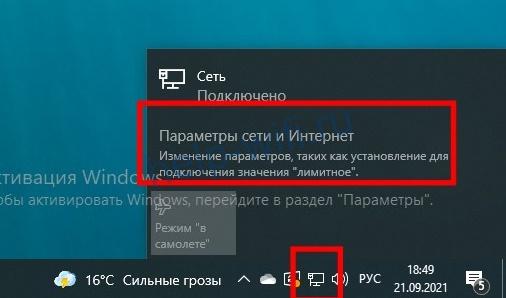
- В нижнем правом углу (трее) кликаем на значок интернета. Далее выбираем пункт «Параметры сети и Интернет».

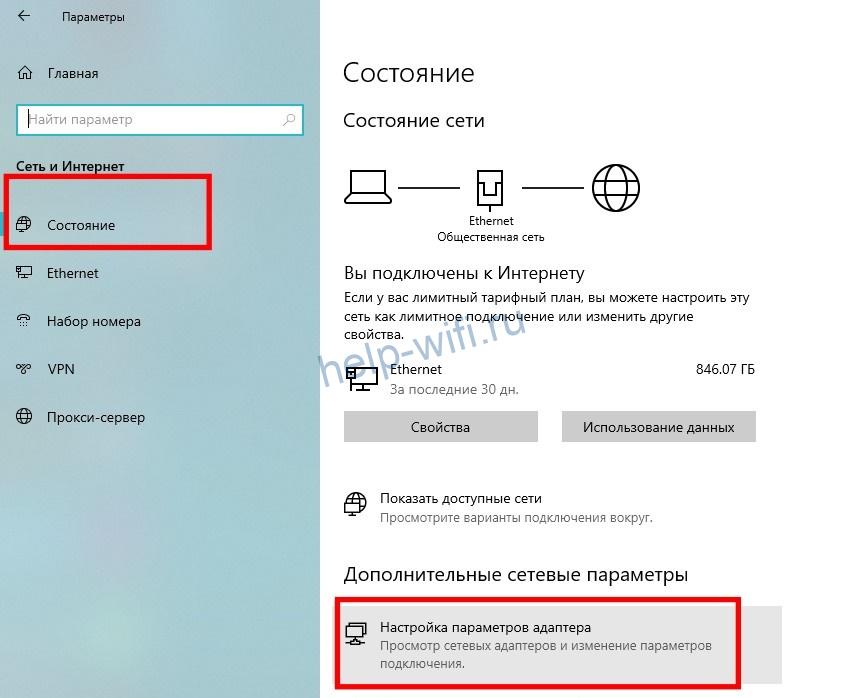
- В разделе «Состояние» выбираем «Настройка параметров адаптера»

- Выберите активное подключение, щелкните по нему правой кнопкой мыши и откройте свойства.

- Выбираем IP версии 4 и открываем свойства.

- Выставляем автоматическое получение IP и DNS.Сохраняем настройки.


Автоматическая настройка
Для настройки маршрутизатора в автоматическом режиме используйте CD-диск из комплектации.
Пошаговое руководство:
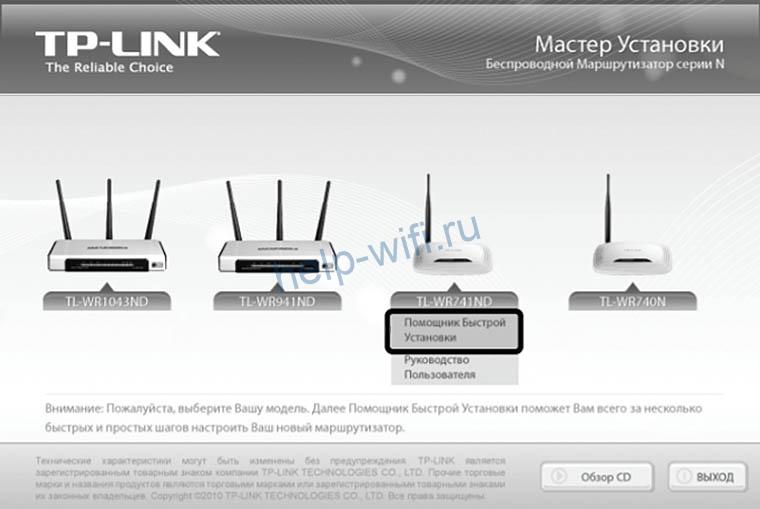
- Вставьте диск в дисковод, и дождитесь запуска мастера установки.

- Нажмите левой кнопкой мыши на наименование настраиваемой модели, и выберите пункт «Мастер быстрой настройки».
- Выберите язык установки, и нажмите кнопку «Начало».
- Завершите установку, следуя подсказкам мастера установки.
Настройка завершена, проверьте выход в интернет.
Если у вас нет дисковода, настроить роутер TP-Link TL WR740N самостоятельно можно в веб конфигураторе устройства.
Пошаговая инструкция:
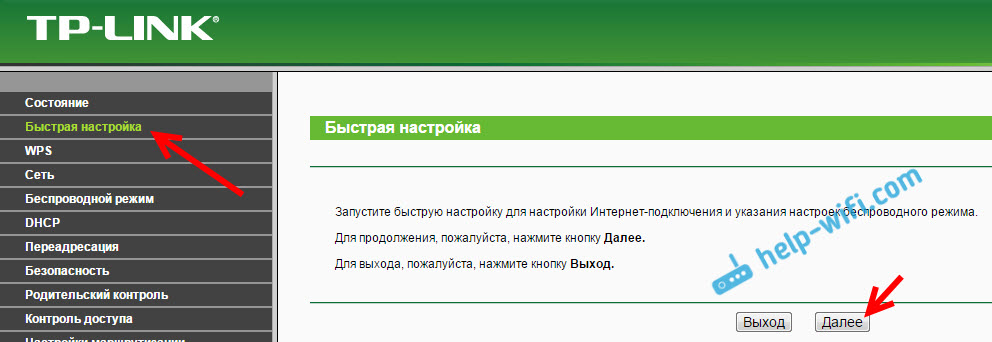
- Войдите в настройки роутера.
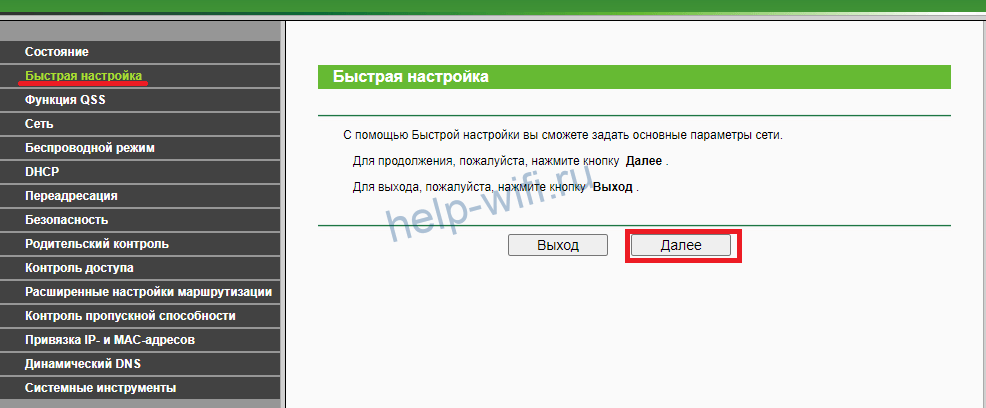
- В меню справа выберите пункт «Быстрая настройка» и нажмите «Далее».

- Если вы не знаете, какую технологию использует провайдер, выберите пункт «Автоопределение» и нажмите «Далее». В некоторых версиях нет этого пункта, просят указать страну, регион и выбрать провайдера.

- Дождитесь окончания процесса автоопределения и заполните необходимые поля.
- Следующим шагом настраивается беспроводной режим. Вписываем имя сети и пароль.

- По завершении процесса настройки проверьте, есть ли интернет.


Тип подключения и необходимые настройки должны быть в договоре с провайдером.
Если вы знаете, какой тип подключения использует провайдер, можете настроить роутер вручную.
Ручная настройка
Инструкция на примере PPPoE (Ростелеком):
- Войдите в настройки роутера.
- В меню слева раскройте ветку «Сеть», выберите пункт «WAN».
- В правой части окна выберите «Тип подключения WAN».

- Заполните необходимые поля. Для подключения типа PPPoE это логин и пароль, который указывается дважды. Если провайдер присвоил вам статический IP-адрес, активируйте соответствующее окно, поставив рядом с ним точку.

Заполните появившиеся поля: IP-адрес, Маска подсети, Шлюз и DNS. - Сохраните настройки и попробуйте выйти в интернет.

Аналогичным образом настраивается модель TL-WR741ND.
Настройка через мобильное приложение
Если провайдер не требует указания IP-адреса для подключения, настроить роутер TP-Link TL WR740N можно через мобильное приложение. Для этого требуется предварительно установить на смартфон или планшет TP-link Tether. Оно доступно для устройств на ОС Андроид и iOS.
Инструкция по настройке:
- Запустите приложение и создайте учетную запись, следуя всплывающим на экране подсказкам. Подключитесь к сети роутера.
- Выберите роутер и выполните вход в настройки, указав логин и пароль. По умолчанию оба параметра одинаковы — admin.

- Вызовите меню и выберите пункт «Подключение к Интернет».

- В поле сверху выберите тип подключения, заполните необходимые поля, и нажмите «Сохранить».

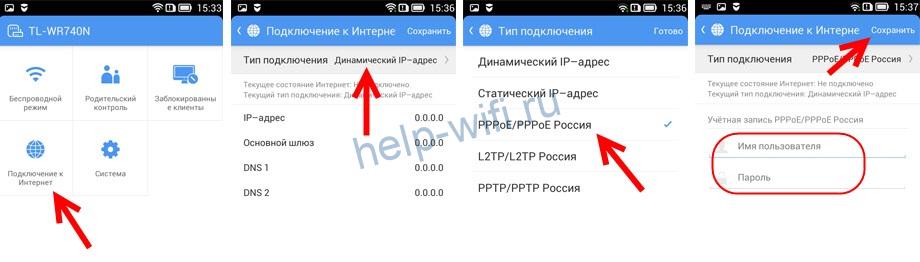
Если тип подключения и данные для авторизации указаны верно, роутер начнет раздавать интернет. Если будут ошибки, сеть появится, но без доступа в интернет.
Подключение и параметры Wi-Fi
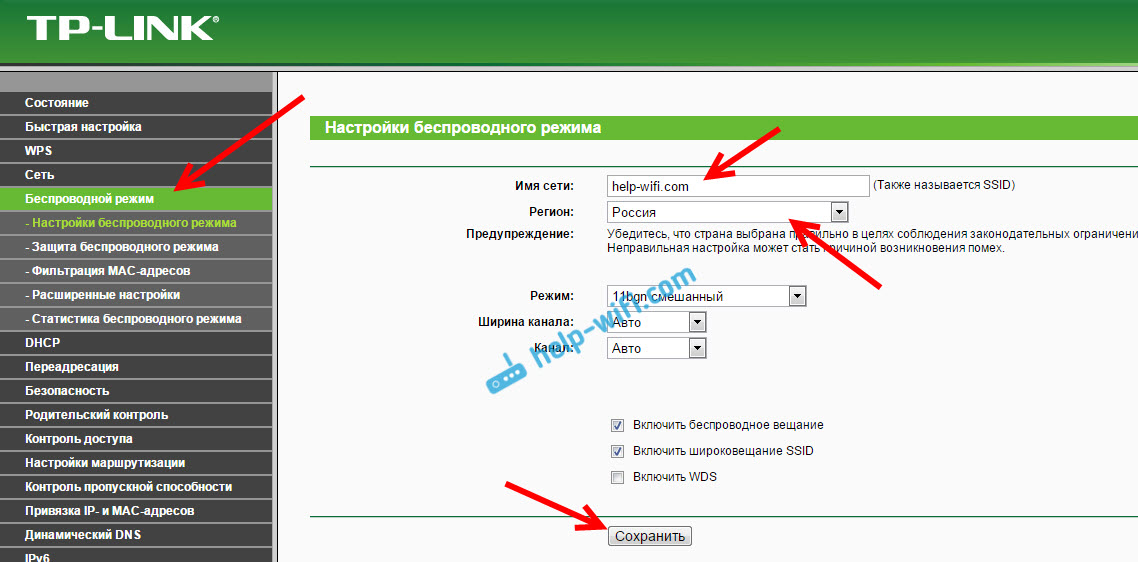
Для настройки беспроводной сети роутера TP-Link TL WR740N зайдите в его настройки, выберите пункт «Беспроводной режим» и далее пошагово:
- Подпункт «Настройки беспроводного режима».

- Вводим желаемое имя сети, ставим галочки, как на скриншоте.
- Сохраняем настройки.
- Зайдите в следующий подпункт и настройте защиту вайфая, следуя инструкциям на картинке.


После сохранения пароля потребуется заново подключиться к беспроводной сети.
Настройка IPTV
Для настройки IPTV запустите и авторизуйтесь в веб-конфигураторе устройства и следуйте наглядной инструкции:
- Раскройте ветку «Сеть», выберите раздел «IPTV».
- IGMP Proxy должен быть включен. Ставим режим мост и выбираем порт для подключения приставки.
- Не забудьте сохранить настройки.
Если провайдер использует VLAN ID, следуйте этой инструкции:
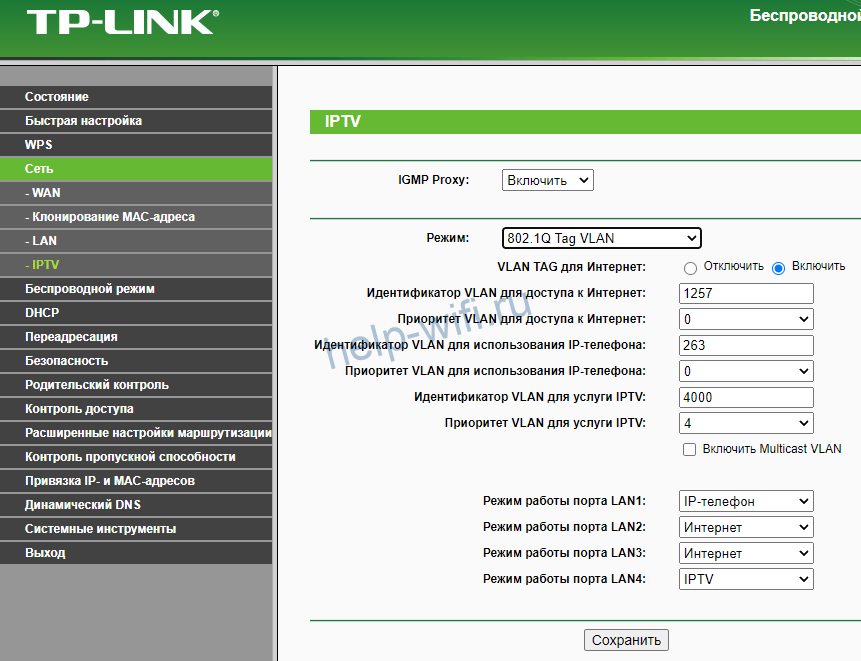
- В разделе IPTV выберите режим Tag VLAN.
- Заполните поля, которые выдал провайдер.
- Выберите порт для приставки.
- Сохраните настройки.
Смена пароля
Смена установленного по умолчанию пароля осуществляется в веб конфигураторе маршрутизатора.
Инструкция:
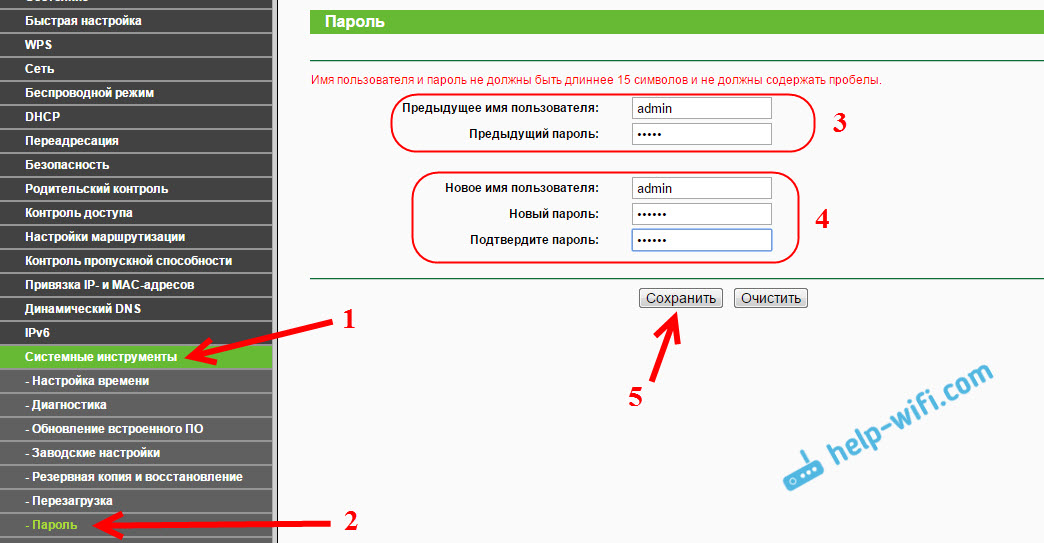
- Раскрыть раздел «Системные инструменты».
- Выберите пункт «Пароль».
- Укажите действующие логин и пароль.
- Введите новые логин, пароль и его подтверждение.

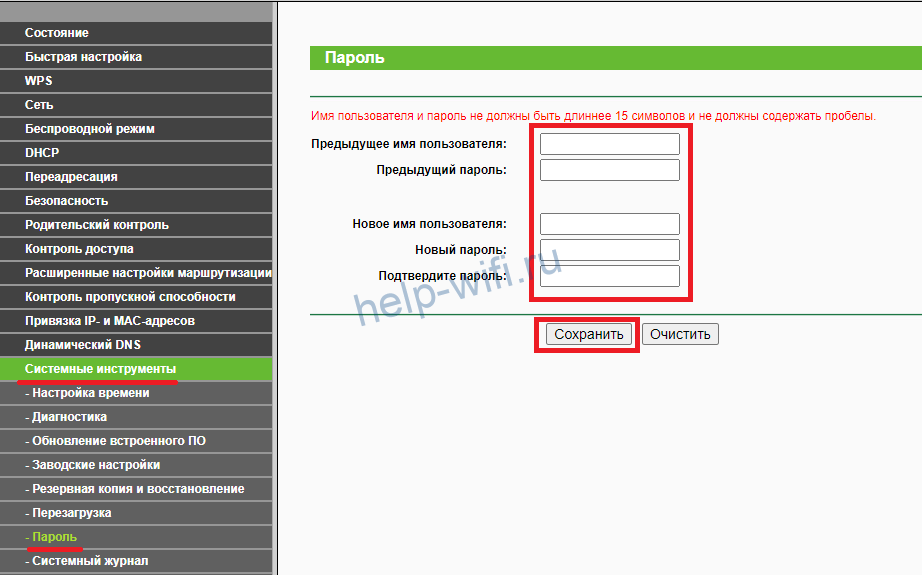
Не забудьте новый пароль, без него вы не сможете попасть в веб конфигуратор.
Режим повторителя
Настройка устройства в режиме репитера начинается с указания на главном маршрутизаторе статического канала для беспроводной сети. На роутерах ТП Линк это делается следующим образом:
- Войдите в настройки роутера.
- В меню слева выберите пункт «Беспроводной режим».
- В окне справа в поле «Канал» выберите номер.
- Сохраните настройки и закройте веб конфигуратор.


Теперь нужно настроить второй роутер в режиме повторителя.
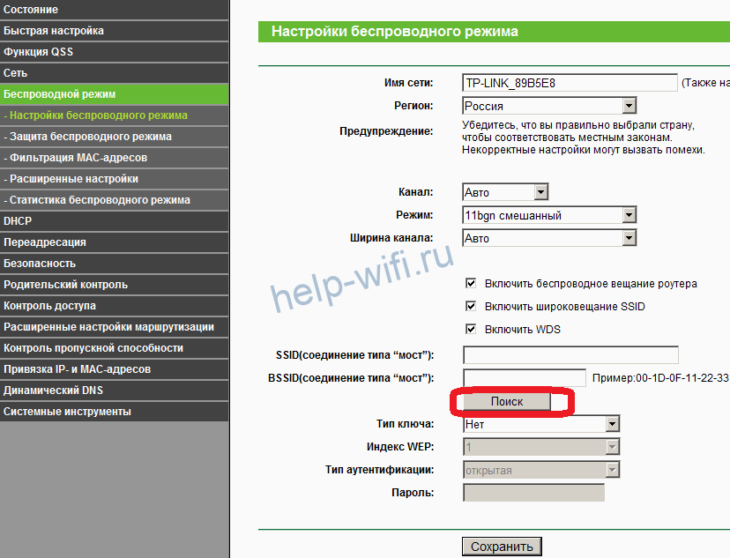
Пошаговая инструкция:
- Войдите в настройки и выберите пункт «Сеть», подпункт «LAN».
- В окне справа смените IP-адрес. Для правильной настройки роутера в режиме ретранслятора оба устройства должны находиться в одной подсети. Если на главном установлен IP-адрес 192.168.1.1 или 192.168.0.1, то на втором пропишите такой же, но на одну цифру больше — 192.168.1.2 или 192.168.0.2 соответственно.
- Далее в меню слева выберите «Беспроводной режим», справа укажите номер канала, такой же как на основном роутере.
- Поставьте галочку в окне «Включить WDS», после чего нажмите на кнопку «Поиск».


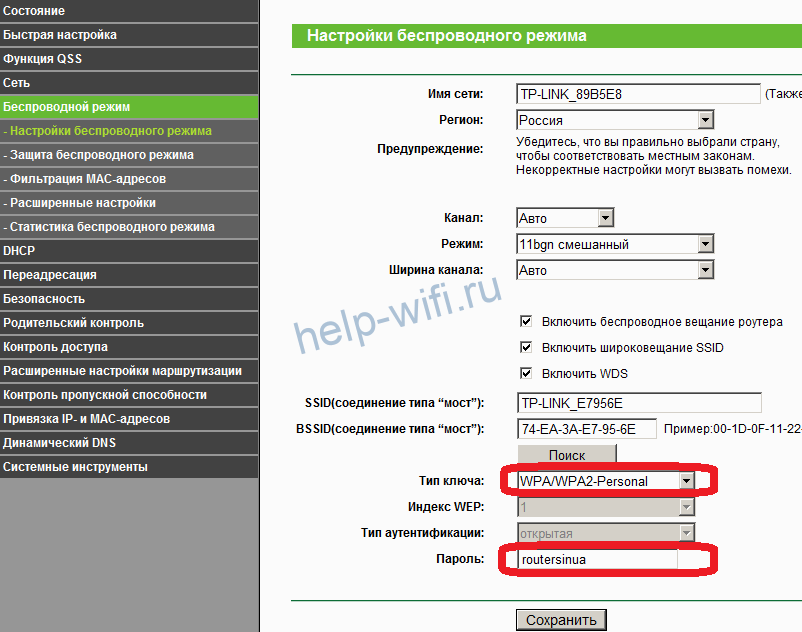
- В появившемся списке найдите сеть, сигнал которой требуется усилить, и нажмите на «Подключение».

- Выберите тип ключа, укажите пароль от создаваемой беспроводной сети и сохраните настройки.

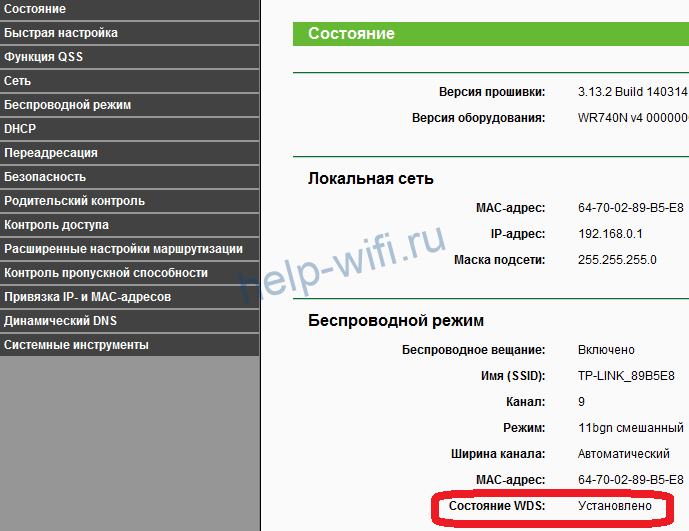
- Перезагрузите роутер и снова зайдите в настройки по установленному адресу.
- Выберите пункт «Состояние» в меню слева.
- В окне справа проверьте строку «Состояние WDS». Если рядом надпись «Установлено», значит роутер уже подключился к основному маршрутизатору и может раздавать интернет.

- Настройте защиту сети, поэтапно выполнив указанные на картинке действия.


Роутер в режиме ретранслятора настроен.
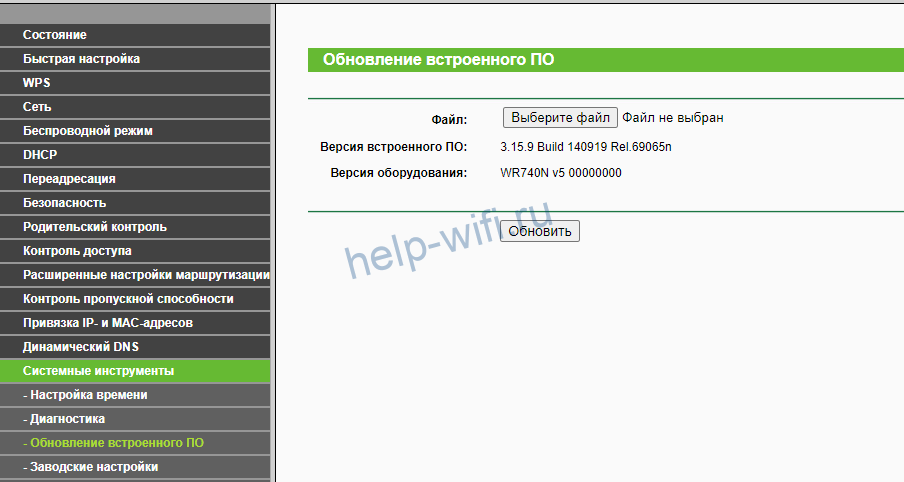
Обновление прошивки
Скачать актуальную прошивку роутера можно на официальном сайте.
Чтобы перепрошить TP-Link TL WR740N, следуйте инструкции:
- В системных инструментах выбираем пункт «Обновление встроенного ПО».
- Выберите файл, нажав на кнопку, укажите путь к файлу прошивки.
- Выделите его и нажмите «Открыть».
- Нажмите «Обновить».

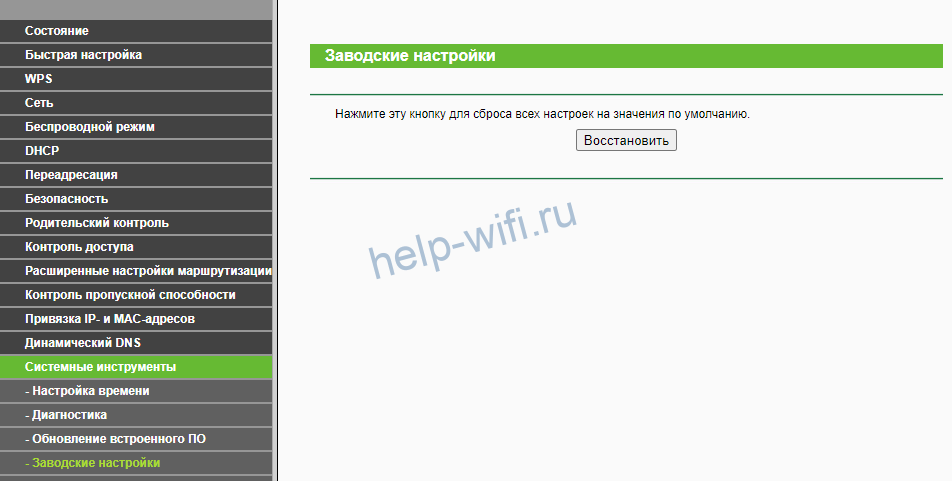
Сброс настроек
На роутерах ТП Линк существует два способа сброса настроек:
- физический;
- программный.
При использовании первого нажмите и удерживайте кнопку Reset на роутере в течение нескольких секунд. Для этого пригодится тонкий предмет.
Для второго выполните следующее:
- Войдите в настройки роутера.
- Выберите пункт «Системные инструменты», подпункт «Заводские настройки».
- В окне справа нажмите кнопку «Восстановить».

- Дождитесь окончания процесса и перезагрузки маршрутизатора.
В этой инструкции мы с вами будем настраивать роутер TP-Link TL-WR740N. Это очень популярный маршрутизатор, который пользуется большим спросом из-за небольшой цены и качества. У многих моих знакомых установлен именно TP-Link TL-WR740N, который отлично справляется со своей задачей. А создан он исключительно для домашнего использования. И то, если у вас дома много устройств, и сам дом большой, то TL-WR740N может не справится со своей работой. Это нормально, ведь это бюджетный маршрутизатор.
Но, даже несмотря на его небольшую цену, выглядит он просто отлично. Красивый дизайн, матовый корпус, есть возможность повесить роутер на стену, все это несомненно плюсы. Конечно же хотелось бы еще увидеть кнопку включения/отключения питания, и отдельную кнопку для отключения Wi-Fi, но их к сожалению нет. Единственная проблема, это когда при подключении большого количества устройств, в онлайн играх, при загрузке торрентов, может пропадать интернет. И роутер придется частенько перезагружать. Писал об этом здесь. Но это вполне нормально для бюджетной модели.
Выпускается эта модель очень давно, уже есть 6 аппаратных версий, а это значит, что уже шесть раз его дорабатывали и что-то обновляли (в плане железа). Этот маршрутизатор получил очень много наград и выиграл много конкурсов. По настоящему народная модель.
Сейчас я покажу как настроить TP-Link TL-WR740N. Это будет полная инструкция по настройке интернета, Wi-Fi сети, и установке пароля на беспроводную сеть. Ну и рассмотрим процесс подключения роутера. Не важно, новый у вас маршрутизатор только что с магазина, или им уже пользовались, инструкция для вас подойдет. Впрочем, эта инструкция подойдет и для Tp-Link TL-WR741ND.
Если роутер уже пробовали настроить, то неплохо бы сделать сброс настроек TP-Link TL-WR740N. Для этого включите питание, и на 10 секунд зажмите кнопку WPS/RESET, которая находится на задней стороне роутера.

Можете смотреть на индикаторы, они должны все загореться. После этого можно отпускать кнопку.
Подключаем роутер TP-Link TL-WR740N
Берем адаптер питания, и подключаем к роутеру. Подключаем его к электросети. Дальше, в WAN разъем (он синий) на роутере подключаем интернет. Сетевой кабель от интернет-провайдера. А если у вас интернет через ADSL модем, то соединяем TP-Link TL-WR740N с модемом. На роутере кабель в WAN разъем, а на модеме в LAN.

Теперь вам нужно определится, с какого устройства вы будете настраивать роутер. Если с компьютера, или ноутбука, то я советую подключится к роутеру по кабелю, который идет в комплекте. Подключаем кабель в LAN разъем (желтый), а на компьютере в разъем сетевой карты.
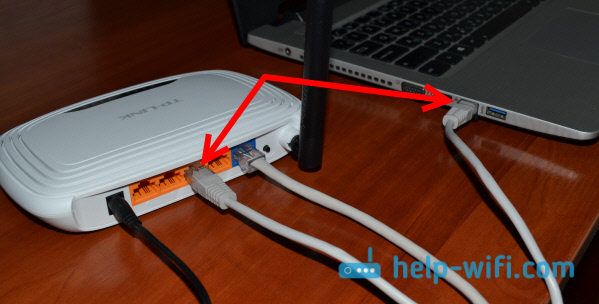
А если вы хотите настраивать свой TL-WR740N по Wi-Fi, то просто подключитесь к его Wi-Fi сети. Если роутер новый, то она будет иметь стандартное название. Например, у меня такое: «TP-LINK_9C00». А для подключения используйте стандартный пароль, который указан снизу роутера на наклейке.

Просто подключитесь к беспроводной сети. Если будет статус «без доступа к интернету», то это нормально. Это значит, что нужно просто настроить подключение к провайдеру. Чем мы сейчас и займемся.
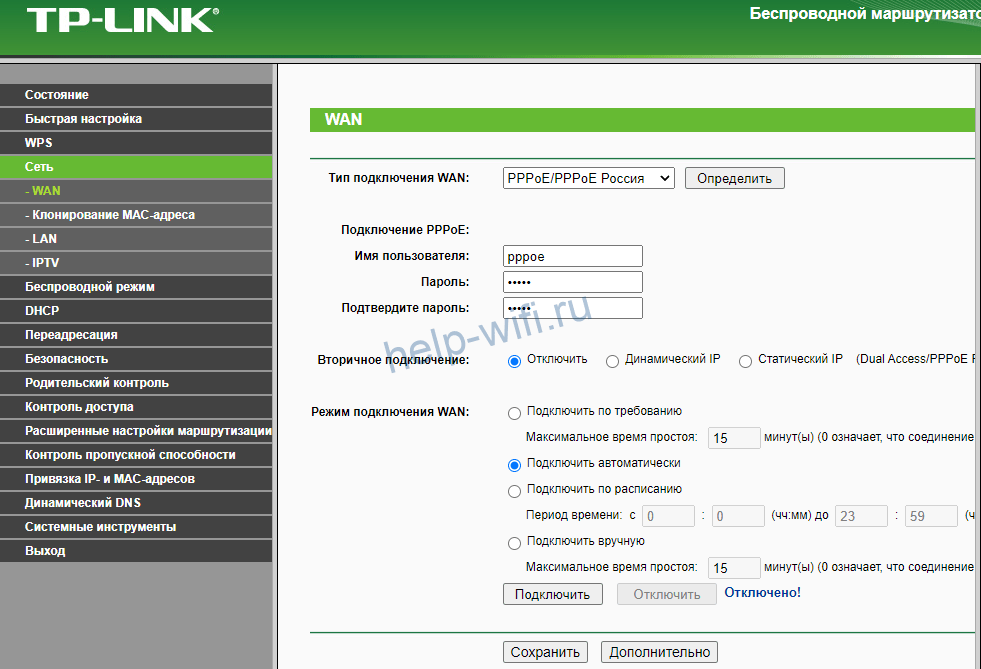
TL-WR740N: настройка подключения к интернету (WAN)
1. Если для подключения к интернету нужно было запускать высокоскоростное подключение, то теперь оно не нужно. Его можно удалить. Это подключение будет устанавливать роутер, после настройки.
2. Если у вас на компьютере уже интернет работает через роутер, без запуска разных подключений, то скорее всего у вас провайдер использует технологию соединения Динамический IP, и вам не нужно настраивать подключение к интернету. Можете сразу переходить к настройке Wi-Fi сети (смотрите ниже).
Нам нужно зайти в панель управления.
Вход в настройки роутера TP-Link TL-WR740N
Если вы уже подключены к маршрутизатору, то просто откройте любой браузер, в адресной строке введите адрес 192.168.0.1 (на более старых версиях может быть 192.168.1.1), или http://tplinkwifi.net, и перейдите по нему. Введите имя пользователя и пароль. Если вы их не меняли, то это admin и admin. Ну а если меняли и забыли, то сделаем сброс настроек.

Возможно вам еще пригодится более подробная статья по входу в панель управлении Tp-Link, и совет по решению проблемы, когда не получается зайти в настройки.
Настройки у меня на русском языке. Думаю, у вас тоже. Если же у вас все на английском, и нет русской прошивки на сайте Tp-Link, то напишите в комментариях, добавлю названия разделов меню на английском.
Настройка PPPoE, L2TP, PPTP
Вы обязательно должны знать какой тип подключения использует ваш интернет-провайдер. И все необходимые данные для подключения: имя пользователя, пароль, IP (если нужно). Эту информацию можно уточнить у самого провайдера, или в документах, который вы получили при подключении.
Перейдите в настройках на вкладку Сеть – WAN. В меню Тип подключения WAN нам нужно выбрать тип подключения.
Если у вас Динамический IP, то выбираем его и сразу нажимаем на кнопку Сохранить. Там больше никаких параметров задавать не нужно. Разве что, если ваш провайдер делает привязку по MAC адресу (но это редко бывает). После этого интернет через маршрутизатор должен заработать.

А если у вас PPPoE, PPTP, или L2TP, то нужно будет задать необходимые параметры для подключения, которые выдал провайдер.

Если таким способом у вас не получилось настроить интернет, то перейдите на вкладку Быстрая настройка, и попробуйте настроить все с помощью пошаговой инструкции. Там можно просто выбрать страну, провайдера, и т. д. Возможно, так вам будет легче.
К настройке Wi-Fi переходите только тогда, когда интернет через роутер уже будет работать.
Настройка Wi-Fi и пароля на TP-Link TL-WR740N
Переходим к настройке беспроводной сети и установке пароля на Wi-Fi. В панели управления откройте вкладку Беспроводной режим.
Здесь нам нужно сменить название Wi-Fi сети, выбрать наш регион, и нажать на кнопку Сохранить.
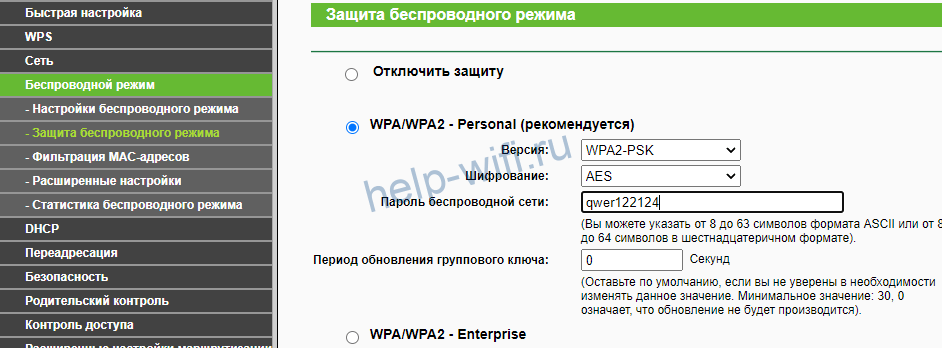
Для установки пароля переходим сразу на вкладку Беспроводной режим – Защита беспроводного режима.
Здесь нужно выделить пункт WPA/WPA2 — Personal (рекомендуется), выставить остальные параметры как у меня на скриншоте ниже, и в поле Пароль беспроводной сети придумать и записать пароль, которым будет защищен ваш Wi-Fi. Пароль должен быть минимум из 8 символов. Нажмите на кнопку Сохранить, и можете сразу нажать на ссылку «Нажмите здесь», что бы перезагрузить роутер.

После перезагрузки нужно будет заново подключить устройства, которые вы подключали по Wi-Fi. Уже с новым паролем, и к сети с новым названием, если вы его сменили.
Смена пароля admin для входа в настройки
Советую еще зайти в настройки, и на вкладке Система – Пароль сменить пароль который используется для входа в настройки роутера со стандартного admin на какой-то более сложный. Для этого нужно будет указать старое имя пользователя и старый пароль, и задать новые. Имя пользователя можете оставить admin, а вот пароль придумайте другой.
Запишите пароль, что бы не забыть его. А если забудете, то нужно будет сбрасывать настройки к заводским, и настраивать все заново, так как не сможете попасть в панель управления.
Настроить TP-Link TL-WR740N самому совсем не сложно. Точно не сложнее чем другие модели этого производителя. Главное, что бы интернет заработал через роутер, и на компьютере пропал статус «Без доступа к интернету», о котором я писал в этой статье.
Настраивать можно как с компьютера (не важно, Windows 10 у вас, Windows 7, или другая ОС), так и с мобильного устройства (смартфона, планшета). А если у вас TL-WR740N аппаратной версии 5 и выше, то для настройки и управления роутером можно использовать фирменную программу TP-LINK Tether. Все работает, проверял.
Если у вас остались какие-то вопросы по настройке этого маршрутизатора, то задавайте их в комментариях.