
- Manuals
- Brands
- SCHUBERTH Manuals
- Motorcycle Accessories
- C3 PRO
- Manual
-
Contents
-
Table of Contents
-
Bookmarks
Quick Links
Related Manuals for SCHUBERTH C3 PRO
Summary of Contents for SCHUBERTH C3 PRO
-
Page 1
MANUAL… -
Page 2
Please play particular attention to: With the SCHUBERTH C3 PRO, you have made an excellent choice. The C3 PRO is the result of enhancing the multi-award winning C3 Caution: safety instructions flip-up helmet. -
Page 3: Table Of Contents
Accessories and spare parts Face shield with integrated anti-fog lens Communication systems Sun visor Accessories and spare parts Inner lining Ordering original SCHUBERTH parts Ventilation systems Additional safety features SCHUBERTH service Repair service Putting on the helmet and taking it off…
-
Page 4: Standard G
Inner lining Please note that this C3 PRO with ECE approval is not certified for the USA, Visor mechanics Canada or any other EU countries. It is only permitted for use in countries Outer shell where the ECE standard is valid.
-
Page 5: Aerodynamics
SCHUBERTH’s own wind tunnel under precisely defined scientific performance of the helmet. The motorcycle fairing should be adjusted conditions. The C3 PRO is specifically designed for a touring or sport-touring so that the turbulence created does not reach the bottom surface of riding posture and remains stable in the air current.
-
Page 6: Wind Deflector
The C3 PRO is equipped with a chin bar that pivots up and can be easily locking position. opened and closed by means of the operating element located in the middle of the chin bar.
-
Page 7: Chinstrap With Micro-Lock Ratchet Fastener H
To close the chinstrap fastener, slide the ratchet tongue step by step into the locking buckle. If you find that the chinstrap fits too loosely around your chin, The C3 PRO comes with a ratchet fastener. slide the ratchet tongue one step further into the locking buckle.
-
Page 8: Face Shield With Integrated Anti-Fog Lens
The anti-fog lens may only be used in conjunction with the Never ride without making sure that the chinstrap is correctly fastened SCHUBERTH main face shield that has been specially designed and adjusted and properly positioned. If the chinstrap is not correctly for this purpose.
-
Page 9
C. THE HELMET REPLACING THE VISOR SHIELD 2. The face shield will then audibly lock into place when you press it gently Changing the face shield is easy to do without tools using the convenient towards the helmet with a simultaneous EasyChange mechanism. -
Page 10
C. THE HELMET 3. The anti-fog lens should now be 2. To reduce the pretensioning of the anti- positioned in the face shield with its fog lens slightly if necessary, use the lower edge parallel to the lower edge of balls of your thumbs to carefully bend the face shield. -
Page 11: Sun Visor
C. THE HELMET 12. SUN VISOR Caution: As a result of the double lens structure, there is a possibility of greater light reflection in the face schield, especially when riding at night. As a SUN VISOR rule, such light reflection is regarded as uncritical due to the absence of fog with this type of visor.
-
Page 12
C. THE HELMET Removing the sun visor Note: Only use the slide to operate the sun visor. 1. Open and lock the chin section in Caution: place. Never ride in the dark or in conditions of poor visibility with the sun 2. -
Page 13: Inner Lining
3. Pull the plastic bar out of the mounting and remove the crown liner. The replaceable inner lining of the C3 PRO is washable and ensures both an excellent fit and improved ventilation of the helmet. The high-comfort cheek pads ensure that the helmet fits comfortably around the cheeks, and the headband pad provides an optimal fit all around the head.
-
Page 14
C. THE HELMET 3. Unzip the zipper. 3. Reinsert the neck collar by first inserting the guide pins into the front plugs and sockets on the lower helmet edge on both sides and then mount the neck collar piece by piece into the guide gap. -
Page 15
C. THE HELMET 3. Zip up the zipper. Note: Ensure that the A.R.O.S. straps are not twisted. Note: When inserting the crown liner, make sure that the headband ventilation cut-outs are positioned over the ventilation channels at the back of the helmet and that the crown liner runs centrally between the two ventilation channels. -
Page 16: Ventilation Systems
Moving the slide backwards to the first locking position produces partial ventilation, The C3 PRO has a face shield that adjusts to several positions. Depending moving it further back opens the air inlet to its full on your road speed and the tendency of the face shield to mist up, open the extent.
-
Page 17: Additional Safety Features I
If the helmet is plain ventilation function that ensures a constant supply (no decoration), the SCHUBERTH name also appears on the front and back of fresh air. The air entering in this way is regulated of the helmet in a reflective film.
-
Page 18: Putting On The Helmet And Taking It Off
D. PUTTING THE HELMET ON AND TAKING IT OFF 2. TAKING OFF THE HELMET Note: Please note the information on the handling of the chin strap. 1. Open and lock the chin bar. Make sure the sun visor is retracted into the helmet shell.
-
Page 19: Before Every Journey
E. BEFORE EVERY JOURNEY For your safety, check the following points before every journey: Caution: Never ride with the chinstrap unfastened or incorrectly adjusted. The chinstrap should fit correctly and should not become loose when 1. CHECKING THE HELMET pulled. The fastener is not correctly closed if the chinstrap becomes loose when pulled.
-
Page 20: For Your Safety
F. FOR YOUR SAFETY 1. SAFETY ADVICE CONCERNING THE HELMET Any helmet that has been subjected to a violent impact should be replaced. Motorcycling is associated with particular risks and dangers for the No helmet provides absolute protection from all conceivable impacts. rider and passenger.
-
Page 21: Safety Advice Concerning The Face Shield / Sun Visor
Alterations to the strap buckle are not permitted. In particular, you should not oil or grease the metal components of the chin section lock. Repairs may only be carried out by the SCHUBERTH Repair Service. 3. SAFETY ADVICE CONCERNING MODIFICATIONS / ACCESSORIES 3.
-
Page 22: Inner Lining
(we recommend a microfibre cloth). Do not use any cleaning agents. 4. INNER LINING The inner lining of the C3 PRO can be removed completely. The head and Note: cheek pads can be washed by hand using a mild soap solution (e.g. with Only use tepid water (<…
-
Page 23: Ventilation
G. MAINTENANCE AND CARE 5. VENTILATION 6. RETENTION SYSTEM The metal components of the retention system do not require maintenance. VENTILATION COWL When necessary, the head ventilation system’s air inlet cowl can be removed to clean the ventilation mechanism. 7. STORING THE HELMET 1.
-
Page 24: Accessories And Spare Parts
Your C3 PRO is supplied ready for installation of the SCHUBERTH from these or other institutions (e.g. on the general suitability of SRC-System™ as standard. The C3 PRO is already fitted with two integrated communication systems for use in motorcycle helmets) is of no ®…
-
Page 25
P r o Owner’s Manual How to choose and use your helmet properly. Warning: This helmet is not a toy. To avoid suffocation or other dangers, keep this helmet, its packaging and all parts delivered with the product, away from babies and children. Dispose all plastic bags immediately. -
Page 26
Pay particular attention to points highlighted as follows: You have made an excellent choice with the SCHUBERTH C3 Pro. The C3 Pro is the result of the latest development and Warning: production methods. -
Page 27
Storing the helmet Inner lining Accessories and spare parts Ventilation systems Additional safety features Communication systems Ordering Original SCHUBERTH Parts Putting the helmet on and taking it off After sales service Putting on the helmet Taking off the helmet Limited warranty… -
Page 28: Read First
C. rEAD FIrST Warning: Warning: No helmet is as safe as riding safely! Any helmet that has been subjected to a violent impact should be replaced! Motorcycle riding has special personal hazards. The risks that are being taken by riding a motorcycle can be reduced but Your helmet is designed to distribute the force incurred not eliminated by wearing a helmet.
-
Page 29
4. Check helmet for deterioration. If you find deterioration in an accident. Always use approved SCHUBERTH parts when any part of a component, either replace that component replacing shields, screws, or any other parts. A weakened or get a new helmet. -
Page 30: Conformance To Standards
C. rEAD FIrST D. THE HELMET 1. CONFORMANCE TO STANDARDS Warning: Do not repaint the helmet! The helmet conforms to the DOT 218 Standard and the ECE R 22.05 Repainting of your helmet is not recommended. Paint and standard. These test standards guarantee conformity to defined thinner can damage the helmet and reduce its ability to safety standards in respect of impact absorption, penetration provide head protection in an accident.
-
Page 31: Anatomy The Helmet
Pinlock ® visor Sun visor in the air current. Even when traveling at high speeds, the C3 Pro generates practically no upward lift. Enhanced characteristics of Inner lining Visor mechanics the C3 Pro are improved air resistance and optimised directional Outer shell stability.
-
Page 32: Wind Deflector
D. THE HELMET Note: 8. WIND DEFLECTOR With faired motorcycles, strong eddy currents occur at the edges of the wind shadow. These may significantly reduce The wind deflector prevents the unpleasant effect of the wind the aeroacoustic performance of the helmet. The motorcycle created as you ride flowing into the helmet.
-
Page 33
Important: The mechanically optimised system reduces the force need to The C3 Pro’s chin bar mechanism is equipped with a safety operate the two locks to a comfortable 16 N, although the safety- feature which prevents the chin bar from opening of its own relevant overall locking force is many times this amount. -
Page 34: Chinstrap With Micro-Lock Ratchet Fastener
Opening and closing To close the chinstrap fastener, slide the ratchet tongue step by The C3 Pro comes with a ratchet fastener. This step into the locking buckle. If you find that the chinstrap fits locking system is easy to use and…
-
Page 35: Pinlock ® Visor
The Pinlock ® lense may only be used in conjunction with the SCHUBERTH main face shield that has been specially designed for this purpose. Other face shields must not be fitted. REPLACING THE VISOR SHIELD Opening the face shield…
-
Page 36
D. THE HELMET Removing the face shield 2. The face shield will then audibly lock into place when you press it gently towards the helmet with a 1. Move the face shield into the simultaneous closing movement. uppermost locked position. 3. -
Page 37
D. THE HELMET Removal 2. Now grasp the other side of the Pinlock ® lense by its upper and 1. Before starting to remove the lower transverse edges and use Pinlock ® lense, first lay the face your index finger to gently press shield on a soft, clean cloth so the end of the visor into a slight that its top edge is facing you. -
Page 38: Tinted Sun Visor
D. THE HELMET Note: Caution: In view of the strong air pressure acting on the silicone seal Petrol, solvent and fuel vapours can cause cracking of the when travelling with an open face shield, we recommend Face Shield. Make sure that the Face Shield is never exposed riding with a closed face schield at all times to prevent any to such vapours! Never place the helmet on the tank of your dirt or moisture from getting inside the helmet.
-
Page 39
D. THE HELMET Removing the sun visor Caution: Never ride in the dark or in conditions of poor visibility with 1. Pivot the sun visor down. the sun visor down. Always raise the sun visor before entering 2. Bend the middle snap connection a tunnel. -
Page 40: Inner Lining
D. THE HELMET 13. INNER LINING Removing the lining The replaceable inner lining of the C3 Pro is washable and ensures 1. Undo the snaps on the front straps both an excellent fit and improved ventilation of the helmet. of the neck collar and pull the…
-
Page 41
D. THE HELMET 3. Pull the plastic bar out of the 3. Reinsert the neck collar by first mounting and remove the crown inserting the guide pins into the liner. front plugs and sockets on the lower helmet edge on both sides and then mount the neck collar piece by piece into the guide gap. -
Page 42
D. THE HELMET Mounting the cheek pad 2. Remove the cheek pad by pulling the three snaps out of the red plugs and sockets. 1. Push the A.R.O.S. strap through the neck strap channel as far as the chinstrap padding opening. 3. -
Page 43
D. THE HELMET Note: When inserting the crown liner, make sure that the headband 4. Mount the cheek pad using the ventilation cut-outs are positioned over the ventilation three pins on the red plugs and channels at the back of the helmet and that the crown liner sockets. -
Page 44
Ventilation device 1 – face shield setting system on the top of the helmet shell The C3 Pro has a face shield that adjusts to several positions. for ventilating the top of your head. Depending on your road speed and the tendency of the face… -
Page 45: Additional Safety Features
The anti-roll-off system specially developed by SCHUBERTH and head vent is directed via the air provided as a safety feature in every SCHUBERTH motorcycle hel- channels in the inner shell to the met ensures that, when the chinstrap is fastened (see section back of the helmet.
-
Page 46: Putting The Helmet On And Taking It Off
If the helmet is plain (no decoration), the SCHUBERTH name also appears on the front and 1. Open and lock the chin bar. Make sure the sun visor back of the helmet in a reflective film.
-
Page 47: Taking Off The Helmet
E. PUTTING THE HELMET oN AND TAKING F. BEForE EVErY JoUrNEY IT oFF 2. TAkING OFF THE HELMET For your safety, check the following points before every journey: 1. CHECkING THE HELMET 1. Open and lock the chin bar. Make sure the sun visor is retracted into the helmet shell.
-
Page 48: Checking The Face Shield And Sun Visor
F. BEForE EVErY JoUrNEY G. For YoUr SAFETY 3. CHECkING THE FACE SHIELD AND SUN VISOR 1. SAFETY ADVICE CONCERNING THE HELMET Before every journey, check that the mechanisms of the Face Warning: Shield and sun visor are working properly and that the Face Never ride without a helmet! Shield and sun visor will provide sufficiently clear visibility.
-
Page 49
Never ride with the helmet hanging from the helmet holder, accident. Always use approved SCHUBERTH parts when and do not hang the helmet from angled supports such as replacing shields, screws, or any other parts. A weakened a mirror. -
Page 50: Safety Advice Concerning The Faceshield / Sun Visor
The protective film fastened to the faceshield to protect it Use only replacement parts and accessories expressly made from scratches in transit must be removed before use. for your helmet by SCHUBERTH! Warning: Warning: keep the helmet away from aggressive substances.
-
Page 51: Maintenance And Care
Please check the functionality of the chin part at regular intervals. Caution: Alterations to the strap buckle are not permitted. In particular, you should not oil or grease the metal components of the chin section lock. Repairs may only be carried out by the SCHUBERTH Repair Service.
-
Page 52: Face Shield And Sun Visor
Face Shield or sun visor with petrol, solvent, a window or glass cleaner or other cleaning agents containing The inner lining of the C3 Pro can be removed completely. The alcohol. head and cheek pads can be washed by hand using a mild soap solution (e.g.
-
Page 53: Ventilation
H. MAINTENANCE AND CArE 5. VENTILATION 6. LOCkING SYSTEM Ventilation cowl Ratchet fastener When necessary, the head ventilation system’s air inlet cowl can The metal components of the locking system do not require be removed to clean the ventilation mechanism. maintenance.
-
Page 54: Accessories And Spare Parts
EU member state. Any Your C3 Pro is supplied ready for installation of the SCHUBERTH other form of information from these or other institutions SRC-System™…
 Loading…
![]()
G E B R A U C H S A N L E I T U N G
P O W E R E D B Y
|
MAN00097 QG SRC-S2_C3 J 009.indd 1 |
7/18/12 5:37 PM |
||

|
INHALT |
7.. KOPPELN UND NUTZEN VON GERÄTEN: MOBILTELEFON, GPS NAVI ODER MP3 . . |
13 |
||
|
1.. EINLEITUNG . . . . . . . . . . . . . . . . . . . . . . . . . . . . . . . . . . . . . . . . . . . . . . . . . . . . . . . . . . . . |
3 |
7.1 MOBILTELEFON.. . . . . . . . . . . . . . . . . . . . . . . . . . . . . . . . . . . . . . . . . . . . . . . . . . . |
13 |
|
|
2.. LIEFERUMFANG . . . . . . . . . . . . . . . . . . . . . . . . . . . . . . . . . . . . . . . . . . . . . . . . . . . . . . . . . |
4 |
7.2 GPS NAVIGATION. . . . . . . . . . . . . . . . . . . . . . . . . . . . . . . . . . . . . . . . . . . . . . . . . . |
14 |
|
|
3.. AUFLADEN DES SRC SYSTEM™ HEADSETS . . . . . . . . . . . . . . . . . . . . . . . . . . . . . . . . . . |
5 |
7.3 AUDIO WIEDERGABE. . . . . . . . . . . . . . . . . . . . . . . . . . . . . . . . . . . . . . . . . . . . . . . |
15 |
|
|
4.. BASISEINSTELLUNGEN UND KONFIGURATIONEN . . . . . . . . . . . . . . . . . . . . . . . . . . . . |
5 |
7.3a DRAHTLOSE OPTION — A2DP . . . . . . . . . . . . . . . . . . . . . . . . . . . . . . . . . . . . . . . |
15 |
|
|
4.1 HAUPTFUNKTIONEN. . . . . . . . . . . . . . . . . . . . . . . . . . . . . . . . . . . . . . . . . . . . . . . |
5 |
7.3b AUDIOQUELLE ÜBER AUX ANSCHLIESSEN . . . . . . . . . . . . . . . . . . . . . . . . . . . |
16 |
|
|
4.2 LEUCHTANZEIGEN (LEDS) . . . . . . . . . . . . . . . . . . . . . . . . . . . . . . . . . . . . . . . . . . |
5 |
8.. INTEGRIERTES UKW RADIO . . . . . . . . . . . . . . . . . . . . . . . . . . . . . . . . . . . . . . . . . . . . . . . |
16 |
|
|
4.3 SOFTWARE AKTUALISIERUNG . . . . . . . . . . . . . . . . . . . . . . . . . . . . . . . . . . . . . . |
6 |
9.. INTERKOM . . . . . . . . . . . . . . . . . . . . . . . . . . . . . . . . . . . . . . . . . . . . . . . . . . . . . . . . . . . . . . |
17 |
|
|
4.4 ANPASSEN DER EINSTELLUNGEN. . . . . . . . . . . . . . . . . . . . . . . . . . . . . . . . . . . . |
6 |
9.1 EINLEITUNG . . . . . . . . . . . . . . . . . . . . . . . . . . . . . . . . . . . . . . . . . . . . . . . . . . . . . . |
17 |
|
|
4.5 SPRACHMENÜ . . . . . . . . . . . . . . . . . . . . . . . . . . . . . . . . . . . . . . . . . . . . . . . . . . . . |
6 |
9.2 INTERKOM KOMPATIBILITÄT. . . . . . . . . . . . . . . . . . . . . . . . . . . . . . . . . . . . . . . . |
17 |
|
|
4.6 AUDIOQUELLEN UND PRIORITÄTEN. . . . . . . . . . . . . . . . . . . . . . . . . . . . . . . . . . |
6 |
9.3 VOR INBETRIEBNAHME DES INTERKOMS. . . . . . . . . . . . . . . . . . . . . . . . . . . . . |
17 |
|
|
4.7 ZURÜCKSETZEN DES HEADSETS („RESET“) . . . . . . . . . . . . . . . . . . . . . . . . . . . |
6 |
9.4 VERWENDUNG DER INTERKOM-FUNKTION MIT ANDEREN |
||
|
5.. S2 MONTAGEANLEITUNG . . . . . . . . . . . . . . . . . . . . . . . . . . . . . . . . . . . . . . . . . . . . . . . . . |
7 |
SRC SYSTEM™ -HEADSETS . . . . . . . . . . . . . . . . . . . . . . . . . . . . . . . . . . . . . . . . |
18 |
|
|
5.1 AUSBAU DES VORHANDENEN AKUSTIKKRAGENS. . . . . . . . . . . . . . . . . . . . . . |
7 |
9.5 AUFNAHME VON INTERKOM-ANRUFEN . . . . . . . . . . . . . . . . . . . . . . . . . . . . . . |
19 |
|
|
5.2 ANSCHLUSS DES ANTENNEN KABELS. . . . . . . . . . . . . . . . . . . . . . . . . . . . . . . . |
7 |
9.6 ANNAHME VON INTERKOM-ANRUFEN . . . . . . . . . . . . . . . . . . . . . . . . . . . . . . . |
19 |
|
|
5.3 EINBAU DES SRC-SYSTEM™-HEADSETS. . . . . . . . . . . . . . . . . . . . . . . . . . . . . . |
8 |
9.7 SPRACHBEFEHL-MODUS (VOX). . . . . . . . . . . . . . . . . . . . . . . . . . . . . . . . . . . . . . |
19 |
|
|
5.4 POSITIONIEREN DER LAUTSPRECHER . . . . . . . . . . . . . . . . . . . . . . . . . . . . . . . . |
8 |
9.8 RESET: ZURÜCKSETZEN EINER KOPPLUNG |
||
|
5.5 POSITIONIEREN DES MIKROFONS . . . . . . . . . . . . . . . . . . . . . . . . . . . . . . . . . . . |
8 |
(WIEDERHERSTELLUNG DER WERKSEINSTELLUNG) . . . . . . . . . . . . . . . . . . |
19 |
|
|
5.6 AUSBAU DES SRC SYSTEM™ HEADSETS AUS DEM HELM . . . . . . . . . . . . . . . |
8 |
9.9 WICHTIGE ANMERKUNGEN. . . . . . . . . . . . . . . . . . . . . . . . . . . . . . . . . . . . . . . . . |
20 |
|
|
5.7 AUFSETZEN UND ABNEHMEN DES HELMS. . . . . . . . . . . . . . . . . . . . . . . . . . . . |
9 |
9.10 STÖRUNGSBEHEBUNG DES INTERKOM-SYSTEMS. . . . . . . . . . . . . . . . . . . . . |
20 |
|
|
5.8 REINIGEN DES SRC SYSTEM™ HEADSETS . . . . . . . . . . . . . . . . . . . . . . . . . . . . |
9 |
10. CLICK-TO-LINK® (CTL) . . . . . . . . . . . . . . . . . . . . . . . . . . . . . . . . . . . . . . . . . . . . . . . . . . . . |
20 |
|
|
6.. C3 PRO MONTAGEANLEITUNG .. . . . . . . . . . . . . . . . . . . . . . . . . . . . . . . . . . . . . . . . . . . . |
9 |
11. KUNDENSERVICE . . . . . . . . . . . . . . . . . . . . . . . . . . . . . . . . . . . . . . . . . . . . . . . . . . . . . . . . |
21 |
|
|
6.1 AUSBAU DES VORHANDENEN AKUSTIKKRAGENS. . . . . . . . . . . . . . . . . . . . . . |
9 |
12. HINWEISE . . . . . . . . . . . . . . . . . . . . . . . . . . . . . . . . . . . . . . . . . . . . . . . . . . . . . . . . . . . . . . |
22 |
|
|
6.2 ANSCHLUSS DES ANTENNEN KABELS. . . . . . . . . . . . . . . . . . . . . . . . . . . . . . . . |
9 |
|||
|
6.3 EINBAU DES SRC-SYSTEM™-HEADSETS . . . . . . . . . . . . . . . . . . . . . . . . . . . . . . |
10 |
|||
|
WICHTIG: Dies ist Version 2.0 der Gebrauchsanleitung. Unter www.schuberth.com/fileadmin/ |
||||
|
6.4 POSITIONIEREN DER LAUTSPRECHER . . . . . . . . . . . . . . . . . . . . . . . . . . . . . . . . |
11 |
|||
|
6.5 POSITIONIEREN DES MIKROFONS |
11 |
downloads/SRC/SRC-System_Manual-1.pdf finden Sie stets die jeweils aktuelle Version |
||
|
(Updates) in verschiedenen Sprachen, inkl. Erklärungen der neusten Funktionen und Features Ihres |
||||
|
6.6 AUSBAU DES SRC SYSTEM™ HEADSETS AUS DEM HELM . . . . . . . . . . . . . . . |
12 |
SRC System™ Headsets. |
||
|
6.7 AUFSETZEN UND ABNEHMEN DES HELMS. . . . . . . . . . . . . . . . . . . . . . . . . . . . |
12 |
Bitte prüfen Sie jetzt und auch in Zukunft, ob Sie die aktuellste Version haben und laden Sie stets |
||
|
6.8 REINIGEN DES SRC SYSTEM™ HEADSETS |
12 |
die neueste Version in Ihrer bevorzugten Sprache herunter. |
||
2
|
MAN00097 QG SRC-S2_C3 J 009.indd 2 |
7/18/12 5:37 PM |
||

1. EINLEITUNG
Herzlichen Glückwunsch und vielen Dank, dass Sie sich für das Schuberth Rider Communication-System™ (SRC System™) Bluetooth® Headset für Schuberth Motorradhelme entschieden haben.
Diese Gebrauchsanleitung soll Ihnen bei der Nutzung des Headsets behilflich sein. Vor Inbetriebnahme machen Sie sich bitte mit den Bluetooth® Funktionen ihres Mobiltelefons und/oder ihres Navigationsgerätes vertraut.
Die Box des SRC System™ enthält eine Headseteinheit.
IHR SRC SYSTEM™ KANN WIE FOLGT VERWENDET WERDEN :
1.Als Bluetooth® Headset für Mobiltelefon-Kommunikation (unterstützt Bluetooth® Headset, Handsfree* und A2DP Profile mit bis zu 10 Meter Reichweite)
2.Als Bluetooth® Stereoheadset für kabellosen Musikempfang (unterstützt die Bluetooth® A2DP und AVRCP Profile und ist kompatibel mit einer großen Auswahl von MP3-Playern, Adaptern und anderen Audiogeräten)
3.Als 2-Weg bzw. 3-Weg Bike-to-Bike Interkom für Voll Duplex** Konferenzgespräche mit bis zu zwei anderen SRC System™-Headsets mit bis zu 700 Meter Reichweite (geländeabhängig)
4.Als Fahrer-zu-Sozius-Interkom
5.Click-to-Link® für spontane Interkom-Kommunikation mit SRC System™— Geräten oder , scala rider G4 oder G9 Einheiten in unmittelbarer Umgebung
6.Als Bluetooth® Headset zum Empfang von Navigationsanweisungen und Audiostreaming von kompatiblen Navigationsgeräten.
7.Eingebautes UKW-Radio mit 6 Senderspeichern und automatischem Sendersuchlauf
8.Als Stereo-Headset zum Musikempfang über kabelverbundene Audiogeräte (wie z.B. MP3-Player ohne Bluetooth®, iPods®)
WEITERE SPEZIALFUNKTIONEN :
AGC Technologie (Automatic Gain Control) ausgerüstet, einer automatischen Lautstärkenanpassung an Umweltlärm und Fahrtgeschwindigkeit. Die Lautstärke kann allerdings auch jederzeit manuell eingestellt werden. Der AGC-Empfindlichkeitsgrad kann ebenfalls individuell geregelt werden.
VOX Technologie für sichere und freihändige Bedienung von Schlüsselfunktionen (Sprachwahl, Anrufe empfangen, Anrufe abweisen). Der VOX -Empfindlichkeitsgrad kann auch individuell eingestellt werden.
PLC Technologie (Packet Loss Concealment) für digitale Überbrückung von Audio-Datenverlust in Echtzeit. PLC optimiert die Klangqualität in besonders lauten Umgebungen.
Software Aktualisierungen über jeden PC mit Windows® XP™, Vista™
bzw. Windows® 7 Betriebssystem, um stets die neusten Features und Verbesserungen für Ihr SRC System™ herunterzuladen.
Statusansagen, um stets zu wissen mit wem, oder mit welchem Gerät Sie gerade verbunden sind.
Wir wünschen Ihnen viel Freude mit Ihrem SRC System™ und sind bei Fragen und Anregungen gerne für Sie da. Schreiben Sie uns einfach an:
Kundenservice@schuberth.com
Nicole Prell
Bereichsleiterin Vertrieb/ Marketing
SCHUBERTH GmbH
Unter www.schuberth.com/src2-tutorial/de finden Sie eine interaktive Anwendung, die Ihnen alle Funktionen des SRC System™ noch einmal erklärt. Alle Funktionen können Sie dort auch selbstständig ausprobieren.
____________________
* Bei Mobiltelefonen, die das Bluetooth® Handsfree Profil nicht unterstützen, sind bestimmte Funktionen evtl. nicht verfügbar
**” Voll Duplex” ermöglicht gleichzeitiges Hören und Sprechen mit Ihrem Gesprächspartner.
|
MAN00097 QG SRC-S2_C3 J 009.indd 3 |
7/18/12 5:37 PM |
||
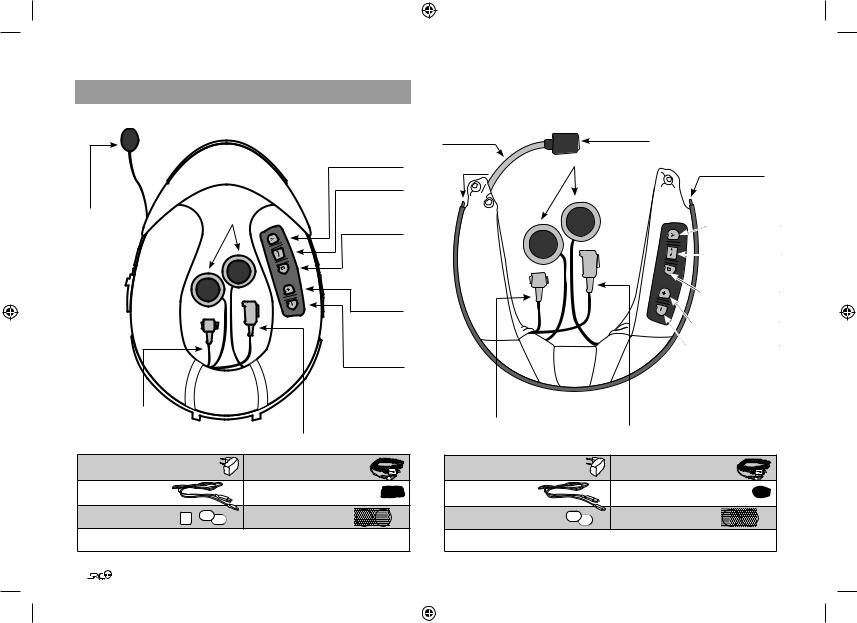
2.LIEFERUMFANG
SRC SYSTEM™ FÜR S2 HELME (Das Gerät ist in verschiedenen Größen erhältlich)
Kabelgebundenes Mikrofon
Zwei
Lautsprecher
Antennen-
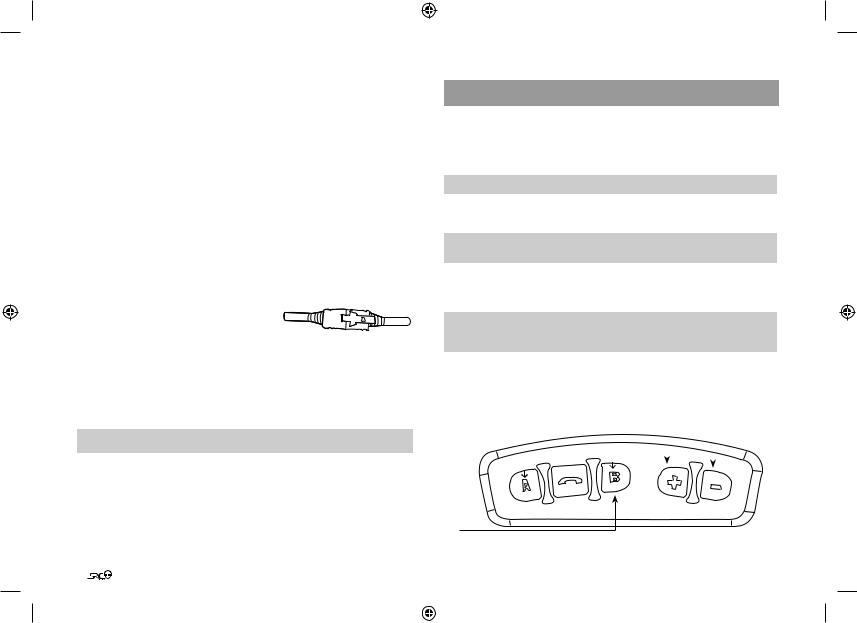
anschluss
Kanal A Taste •Verbinde mit Biker A
• MP3-Taste
Handy Taste
Kanal B Taste
• Verbinde mit Biker B
• UKW Radio Taste
Lautstärke
Auf / Vorwärts
Taste
Lautstärke Ab /
Rückwärts Taste
USB Ladebuchse •Buchse für Ladekabel
• zum Anschluss an einen PC
• AUX
.
|
Ladegerät |
MP3-Verbindungskabel |
|
USB.Verbindungskabel |
Windschutz.für.Mikrofon |
|
Klettpolster. |
Lautsprecher.Unterlage |
Gebrauchsanleitung.und.Sticker
4
SRC SYSTEM™ FÜR C3 PRO HELME (Das Gerät ist in verschiedenen Größen erhältlich)
|
Schwanenhals |
Mikrofon |
|
|
Pin |
Zwei |
Pin |
|
Lautsprecher |
||
|
Kanal A Taste |
||
|
•Verbinde mit |
||
|
Biker A |
||
|
• MP3-Taste |
||
|
Handy Taste |
||
|
Kanal B Taste |
||
|
• Verbinde mit |
||
|
Biker B |
||
|
• UKW Radio Taste |
||
|
Lautstärke Auf / |
||
|
Vorwärts Taste |
||
|
Lautstärke Ab / |
||
|
Rückwärts Taste |
||
|
Antennen- |
USB Ladebuchse |
|
|
•Buchse für Ladekabel |
||
|
anschluss |
||
|
• zum Anschluss an einen PC |
||
|
• AUX |
||
|
. |
||
|
Ladegerät |
MP3-Verbindungskabel |
|
|
USB.Verbindungskabel |
Windschutz.für.Mikrofon |
|
|
Klettpolster. |
Lautsprecher.Unterlage |
Gebrauchsanleitung.und.Sticker
|
MAN00097 QG SRC-S2_C3 J 009.indd 4 |
7/18/12 5:37 PM |
||

3.AUFLADEN DES SRC SYSTEM™ HEADSETS
Bitte beachten Sie: Ihr Headset muss vor der ersten Inbetriebnahme mindestens 4 Stunden lang aufgeladen werden.
1. Heben Sie die Kappe an.
2. Das USB Kabel in die Ladebuchse einstecken.
3.USB-Steckerende (anderes Ende des USB-Kabels) an einem freien USB-Port am Computer oder am
Wandladegerät einstecken.
4. Während des Ladevorgangs leuchtet die LED rot und erlischt nach Beendigung des Ladevorgangs.
Das USB Verbindungskabel hat zwei Verwendungszwecke:
1.Zum Aufladen Ihres Headsets über eine Steckdose oder über einen USB Anschluss Ihres PC´s
2.Zum Herunterladen von Software-Updates über einen PC mit Windows® XP™, Vista™ oder Windows® 7 Betriebssysteme (s. Absatz 4.3 für weitere Informationen).
WICHTIG:
Um ein Eindringen von Feuchtigkeit zu verhindern, sollten Sie die Ladebuchse stets fest mit der Kappe verschließen.
13.
4.BASISEINSTELLUNGEN UND KONFIGURATIONEN
4.1HAUPTFUNKTIONEN
|
Gewünschtes |
Nötige |
|
Ergebnis |
Schritte |
|
Gerät EIN/AUS |
Betätigen und halten Sie die Handy-Taste mindestens 3 Sekunden |
|
lang gedrückt |
|
|
• AN: 3 x blaues Blinken + aufsteigender Ton |
|
|
• AUS: 3 rotes Blinken + absteigender Ton |
|
|
Lautstärke |
Betätigen Sie die Lautstärke Auf / Ab Taste (bei aktivem Audio Signal) |
|
Auf/Ab |
|
|
Stummschalten |
Betätigen Sie kurz und gleichzeitig die Lautstärke Auf und |
|
Lautstärke Ab Tasten (bei aktivem Audio Signal). |
|
|
Akku |
Betätigen Sie die Lautstärke Auf Taste mindestens drei Sekunden |
|
Ladeanzeige |
lang: |
•Blaues Licht = Akku ist voll
•Blau/rotes Licht = Akku ist halb leer
•Rotes Licht = Akku ist fast leer
4.2LEUCHTANZEIGEN (LEDS)
|
LED Anzeige |
Status |
|
Keine |
Headset ist ausgeschaltet |
|
Ein blaues Blinken |
Standby – Kein Gespräch |
|
alle 3 Sekunden |
|
|
Zwei blaue Blinker |
Mobilgespräch, Radio oder Audioquelle aktiv |
|
alle 3 Sekunden |
|
|
Ein rotes Blinken |
Standby – Geringe Akkuladung |
|
alle 3 Sekunden |
|
|
Zwei rote Blinker |
Geringe Akkuladung während eines Anrufs oder beim |
|
alle 3 Sekunden |
Hören von Radio oder MP3-Player |
|
Permanent rot |
Akku wird geladen |
|
MAN00097 QG SRC-S2_C3 J 009.indd 5 |
7/18/12 5:37 PM |
||
4.3 SOFTWARE AKTUALISIERUNG
Um Ihr SRC System™ optimal zu nutzen, vergewissern Sie sich bitte, dass die neueste Software installiert ist. Zum Herunterladen des neuesten SoftwareUpdates und zur individuellen Einstellungen über 
den Rechner, registrieren Sie sich bitte online unter: www.schuberth.com/register/de. .
Halten Sie dazu Ihre Produktseriennummer bereit. (Seriennummer auf der Rückseite des SRC System™ und auf der Box).
Nach Herunterladen des SRCS-Upgrades-Programms verbinden Sie Ihr SRC System™ über das als Zubehör mitgelieferte USB-Kabel mit Ihrem Computer. Sobald Ihr Gerät mit dem Computer verbunden ist, können Sie dessen Einstellungen komfortabel entsprechend der auf dem Bildschirm angezeigten Anweisungen anpassen.
Zukünftige Software-Updates und Programmkorrekturen halten die Software Ihrer SRC System™-Einheit auf dem neuesten Stand und erweitern Ihr Gerät um zusätzliche Funktionen, Statusansagen und andere nützliche Möglichkeiten. Updates sind nur für Windows®-basierte PCs mit den Betriebssystemen Windows XP™, Vista™ bzw. Windows 7 verfügbar.
4.4 ANPASSEN DER EINSTELLUNGEN
Das SRC System™ bietet verschiedene individuell justierbare Einstellungen, mit denen das Gerät je nach persönlichen Präferenzen angepasst werden kann Sie haben u. a. folgende Möglichkeiten:
•Aktivieren/Deaktivieren gesprochener Statusmitteilungen über Ihren Verbindungsstatus, d. h. ob Sie sich im Mobiltelefonoder im InterkomModus befinden, und Bestätigung der Modusänderungen. Diese Funktion ist standardmäßig eingeschaltet.
•Einstellen der Empfindlichkeitsgrade für AGC und VOX je nach persönlichem Wunsch.
DIE EINSTELLUNGEN DES SRC SYSTEM™-HEADSETS KÖNNEN AUF ZWEI ARTEN ANGEPASST WERDEN:
•Über die kostenlos erhältliche SRC System™ Upgrades-Software, die über www.schuberth.com/register/de heruntergeladen werden kann (PC und
Kabelverbindung zum Gerät erforderlich, Kabel im Lieferumfang enthalten). Siehe Abschnitt 4.3.
6
•Über das Sprachmenü für die Anpassung der Einstellungen und der Tasten an Ihrer SRC System™-Headseteinheit (s. unten).
4.5SPRACHMENÜ
Eingabe über das Sprachmenü für die Anpassung der Einstellungen an Ihrem
SRC System™:
Das Sprachmenü für die Anpassung der Einstellungen ist auf eine der verfügbaren Sprachen konfigurierbar.
Hierzu die Tasten KANAL „A“ und KANAL „B“ im Bereitschaftsmodus gleichzeitig betätigen, und drei Sekunden gedrückt halten. Bestätigen Sie Ihre Wahl mit der Kanal
„A“ Taste in dem Moment der Ansage.
4.6 AUDIOQUELLEN UND PRIORITÄTEN
Die verschiedenen Audioquellen, die mit dem SRC System™ verbunden sind, werden priorisiert, d.h. eine höher priorisierte Quelle wird immer eine niedrig priorisierte Quelle deaktivieren. Beispiele: Ein eingehender Mobiltelefonanruf wird z.B. ein in diesem Augenblick geführtes Interkomgespräch unterbrechen. Ein eingehender Interkomanruf wird Übertragungen vom eingebauten UKW Radio unterbrechen.
Hohe Priorität
Niedrige Priorität
1. Mobiltelefon oder GPS Navi Gerät (gerätespezifisch)
2.Interkom / Click-to-Link®
3.A2DP Audioquelle
4.UKW Radio (eingebaut)
5.AUX-Buchse (für kabelverbundene Geräte wie z.B. MP3-Player)
*GPS Navi Anweisungen von Smartphone Apps werden wie A2DP Audio priorisiert
4.7 ZURÜCKSETZEN DES HEADSETS („RESET“)
Falls Ihr Headset trotz wiederholter Versuche nicht reagiert, können Sie eine Rücksetzung veranlassen, indem Sie es einfach zehn Sekunden lang über die Steckdose aufladen und dann erneut anschalten. Danach sollte das Gerät wieder normal funktionieren.
|
MAN00097 QG SRC-S2_C3 J 009.indd 6 |
7/18/12 5:37 PM |
||

5.S2 MONTAGEANLEITUNG
(Siehe Abschnitt 6. für das Modell C3 Pro)
5.1 AUSBAU DES VORHANDENEN AKUSTIKKRAGENS
Entfernen.Sie.den.bestehenden.Akustikkragen.vom.Helm.wie.folgt:
Entfernen.Sie.den.vorhandenen.Akustikkragen.durch.behutsames.Herausziehen.von.
vorn.beginnend.vom.Helm.
5.2 ANSCHLUSS DES ANTENNEN KABELS
Das.SRC-System™.verfügt.über.ein.Antennenkabel,.welches.an.die.integrierte.Antenne. des.Helms.angeschlossen.werden.muss,.um.einen.Radioempfang.zu.ermöglichen.
.
HINWEIS: Stellen Sie sicher, dass die Schutzkappe des USB-Anschlusses korrekt befestigt ist und verstauen Sie diesen anschließend in der dafür vorgesehenen Tasche
im Nackenbereich des SRC-System™.
1..Ziehen.Sie.den.Antennenanschluss.(welcher.durch.einen.roten.Anhänger. gekennzeichnet.ist).aus.dem.hinteren.Bereich.des.Helms.heraus.
|
Antennenanhänger |
Antennenanschluss |
|
wird sichtbar |
herausziehen |
|
2.. Bewegen.Sie.die.beiden.Verschlüsse.für. |
A. |
B. |
||
|
die.Schutzkappe.des.Antennenanschlus- |
Deutsch |
|||
|
ses.am.Headset.nach.unten.und.entfernen. |
||||
|
Sie.anschließend.die.Schutzkappe. |
||||
|
3.. Entfernen.Sie.die.Schutzabdeckung. |
A. |
|||
|
vom.Antennenanschluss.des.Helms. |
B. |
|||
4..Verbinden.Sie.beide.Antennenanschlüsse.miteinander.und.verriegeln.Sie.diese.mit.
Hilfe.der.Verschlüsse..
5...Verstauen.Sie.die.verbundenen.
Anschlüsse.in.der.dafür.vorgesehenen.
Tasche.im.Nackenbereich.
7
|
MAN00097 QG SRC-S2_C3 J 009.indd 7 |
7/18/12 5:37 PM |
||

5.3EINBAU DES SRC SYSTEM™ HEADSETS
1..Stellen.Sie.sicher,.dass.sich.die.Lautsprecher.und.das.Mikrofon.im.Innern.des.
Helms.befinden.
2..Positionieren.Sie.das.SRC-System™.mittig.im.hinteren.Bereich.des.Helms.und. drücken.Sie.dieses.schrittweise.in.den.Spalt.an.der.Helmunterkante.
HINWEIS: Die zusätzlichen Lautsprecherunterlagen können verwendet werden, um die Lautsprecher Ihren persönlichen Wünschen entsprechend näher am Ohr zu positionieren und somit eine optimale Lautstärke zu gewährleisten.
Platzieren Sie die Unterlagen direkt auf den Klettpolstern und anschließend die Lautsprecher direkt auf den Unterlagen.
5.5 POSITIONIEREN DES MIKROFONS
Befestigen.Sie.das.Klettpolster.mittig.auf.Mundhöhe.im.Kinnbereich..Setzen.Sie. anschließend.das.Mikrofon.auf.das.Klettpolster.
1..Entfernen.Sie.die.Schutzfolie.von.der.Klebefläche.des.Klettpolsters.und.
bringen.Sie.dieses.gegenüber.ihres.Mundes.an.
2..Befestigen.Sie.das.Mikrofon.am.Klettpolster.
|
5.4 POSITIONIEREN DER LAUTSPRECHER |
|
Um.eine.optimale.Audioleistung.zu.erzielen,.sollten.beide.Lautsprecher. |
|
möglichst.nahe.an.den.Ohren.positioniert.sein. |
FÜHREN SIE FOLGENDE SCHRITTE AUF BEIDEN SEITEN DURCH:
1..Lösen.Sie.die.Wangenpolster.durch.Herausziehen.des.jeweils.hinteren.Pins.
aus.den.rot.markierten.Steckvorrichtungen..
2..Positionieren.Sie.die.Klettpolster.in.den.dafür.vorgesehenen.Ausschnitten.an.der.EPSSchale..Platzieren.Sie.anschließend.die.Lautsprecher.passig.auf.den.Klettpolstern.
3..Knöpfen.Sie.die.Wangenpolster.mit.Hilfe.der.Pins.an.die.rot.markierten.Steckvorrichtungen.an..
3..Verstauen.Sie.überschüssiges.Kabel.unter.dem.Wangenpolster.
5.6AUSBAU DES SRC SYSTEM™ HEADSETS AUS DEM HELM
1.. Lösen.Sie.beide.Lautsprecher.und.das.Mikrofon.vom.Klettpolster.am.Helm.
WICHTIG: Ziehen Sie niemals am Antennenanschluss.
2..Lösen.Sie.die.Steckverbindung.zwischen.Antenne.und.SRC-System™.
3..Lösen.Sie.das.SRC-System™.durch.behutsames.Ziehen.aus.der.Fixierung.. Beginnen.Sie.dabei.im.vorderen.Helmbereich.
8
|
MAN00097 QG SRC-S2_C3 J 009.indd 8 |
7/18/12 5:37 PM |
||

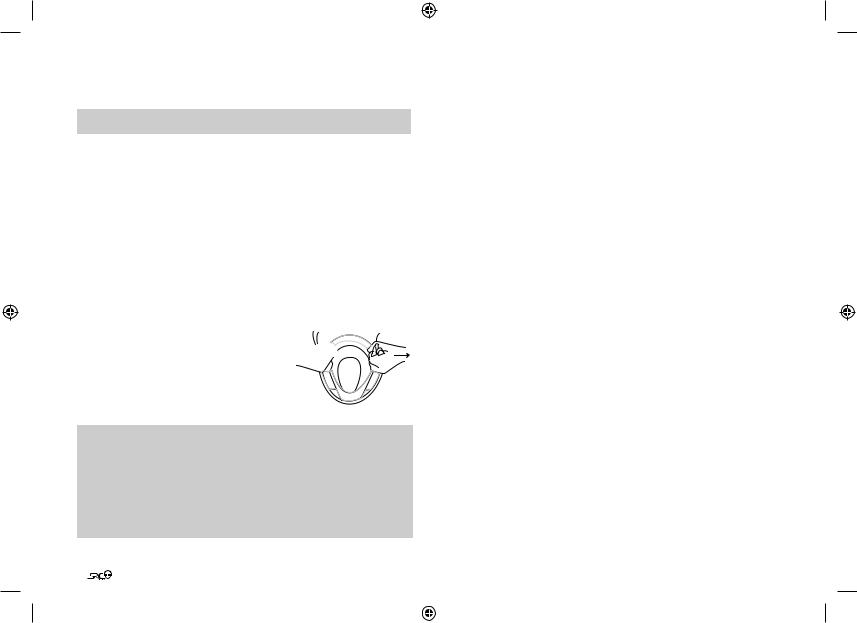
5.7 AUFSETZEN UND ABNEHMEN DES HELMS
Die elektronischen Komponenten Ihres Headsets sind innerhalb des SRC System™ Akustikkragens sicher untergebracht. Um das Aufsetzen bzw. Abnehmen Ihres Helms möglichst einfach zu vollziehen, empfehlen wir wie folgt vorzugehen
1.Greifen und ziehen Sie kräftig beide Kinnriemen auseinander, um so eine möglichst weite Helmöffnung zu erzielen.
2. Während Sie die Riemen auseinanderziehen, 


 ziehen Sie den Helm über Ihren Kopf, beginnend


 vom Hinterkopf her.
3. Zum Abnehmen des Helms ziehen Sie die Kinnriemen erneut auseinander und ziehen Sie dann den Helm nach oben ab.
HINWEIS:
Ihr SRC System™ wurde für höchsten Komfort entwickelt. Da dieses umfangreiche Bauteile enthält, kann es vorkommen, dass Sie das Aufsetzen bzw. Abnehmen des Helms mit eingebauten SRC System™ anders als gewohnt wahrnehmen.
Durch das regelmäßige Aufund Absetzen des Helms, wird der Akustikkragen des SRC System™ mit der Zeit flexibler.
5.8 REINIGEN DES SRC SYSTEM™ HEADSETS
Zum Reinigen des Akustikkragens schließen Sie zuerst die USB-Kappe des SRC System™. Benutzen Sie danach beim Reinigen ein nur leicht und lauwarm angefeuchtetes Tuch und vermeiden Sie es, den Akustikkragen in Wasser oder andere Flüssigkeiten zu tauchen. Mikrofon und Lautsprecher sollten nicht in Kontakt mit Flüssigkeiten kommen
6.C3 PRO MONTAGEANLEITUNG
(Siehe Abschnitt 5 für S2 Montageanleitung)
6.1 AUSBAU DES VORHANDENEN AKUSTIKKRAGENS
Entfernen Sie zuerst den bestehenden Akustikkragen vom Helm wie folgt:
1. Öffnen Sie beide Druckknöpfe.
2. Lösen Sie den Akustikkragen beginnend von hinten aus der Fixierung.
3. Ziehen Sie die Pins am vorderen Bereich des Akustikkragens aus den Öffnungen heraus.
6.2 ANSCHLUSS DES ANTENNEN KABELS
Ihr SRC-System™ verfügt über ein
Antennenkabel, welches mit dem eingebauten Antennenanschluss im SchuberthHelm verbunden werden muss.
HINWEIS: Stellen Sie sicher, dass die Schutzkappe des USB-Anschlusses korrekt befestigt ist und verstauen Sie diesen anschließend in der dafür vorgesehenen Tasche im Nackenbereich des SRC System™.
Deutsch
9
|
MAN00097 QG SRC-S2_C3 J 009.indd 9 |
7/18/12 5:37 PM |
||

.1…Ziehen.Sie.den.Antennenanschluss.(welcher.durch.einen.roten.Anhänger. gekennzeichnet.ist).aus.dem.hinteren.Bereich.des.Helms.heraus.
|
Antennenanhänger |
Antennenanschluss |
|
|
wird sichtbar |
herausziehen |
|
|
2…Bewegen.Sie.die.beiden.Verschlüsse.für.die. |
||
|
Schutzkappe.des.Antennenanschlusses.am.Headset. A. |
B. |
nach.unten.und.entfernen.Sie.anschließend.die.
Schutzkappe.
3…Entfernen.Sie.die.Schutzabdeckung.vom.
Antennenanschluss.des.Helms.
A.
4…Verbinden.Sie.beide.Antennenanschlüsse. miteinander.und.verriegeln.Sie.diese.mit.Hilfe.der. 


 B. Verschlüsse..
10
5…Verstauen.Sie.die.verbundenen.Anschlüsse.in. der.dafür.vorgesehenen.Tasche.im.Nackenbereich.
6.3 EINBAU DES SRC SYSTEM™ HEADSETS
1…Stellen.Sie.sicher,.dass.sich.die.Lautsprecher.und.das.Mikrofon.im.Innern.des. Helms.befinden.
2…Stecken.Sie.den.am.SRC-System™.vorhandenen.Stift.in.die.dafür.vorgesehene. runde.Öffnung.unter.der.Helmunterkante.des.Helms.und.schließen.Sie.den. Druckknopf.
Pin
3…Wiederholen.Sie.den.vorigen.Schritt.für.die.gegenüberliegende.Seite.
4…Schieben.Sie.das.SRC-System™.beginnend.vom.hinteren.Bereich.schrittweise. in.den.Führungsspalt.der.Helmunterkante. 
5…Prüfen.Sie.den.korrekten.Sitz.des.Schwanenhals-Mikrofons.im.Helm.
|
MAN00097 QG SRC-S2_C3 J 009.indd 10 |
7/18/12 5:37 PM |
||
![]()
|
Schwanenhals-Mikrofon |
Druckknopf |


 Druckknopf
6.4 POSITIONIEREN DER LAUTSPRECHER
Um eine optimale Audioleistung zu erzielen, sollten beide Lautsprecher möglichst nah an den Ohren positioniert sein.
FÜHREN SIE FOLGENDE SCHRITTE AUF BEIDEN SEITEN DURCH:
1.Lösen Sie die Wangenpolster durch Herausziehen des jeweils hinteren Pins aus den rot markierten Steckvorrichtungen.
2.Positionieren Sie die Klettpolster in den dafür vorgesehenen Ausschnitten an der EPS-Schale. Platzieren Sie anschließend die Lautsprecher passig auf den Klettpolstern.
3. Knöpfen Sie die Wangenpolster mit Hilfe der Pins an die rot markierten Steckvor-
|
richtungen an. |
Deutsch |
|
|
HINWEIS: Die zusätzlichen Lautsprecherunterlagen können verwendet werden, |
||
|
um die Lautsprecher Ihren persönlichen Wünschen entsprechend näher am Ohr zu |
||
|
positionieren und somit eine optimale Lautstärke zu gewährleisten. |
||
|
Platzieren Sie die Unterlagen direkt auf den Klettpolstern und anschließend die |
||
|
Lautsprecher direkt auf den Unterlagen. |
||
|
6.5 POSITIONIEREN DES MIKROFONS |
||
|
Um das schwenkbare Kinnteil des Helms auch über dem Schwanenhals-Mikrofon |
||
|
leicht schließen zu können, sollten Sie zuerst das dreieckige Anti-Noise-Pad |
||
|
ablösen. |
||
|
Danach verfahren Sie wie folgt: |
1.Justieren Sie den Schwanenhals, wie auf der Abbildung dargestellt.
2.Ziehen Sie das Mikrofon bis auf Berührungsnähe an den Mund heran, wobei die flache Mikrofonseite fast auf den Lippen aufliegt.
3.Schwenken Sie dann das Kinnteil bis zum Einrasten herunter.
4.Bei geschlossenem Kinnteil und offenem Visier justieren Sie erneut mit der Hand die Mikrofonposition, indem Sie es nun nach vorne drücken, so dass es gegenüber des Mundes auf der Innenseite des Kinnteils sitzt. Die obigen
Schritte können am besten mit beiden Händen vollzogen werden. Führen Sie diese Schritte niemals beim Fahren durch.
11
|
MAN00097 QG SRC-S2_C3 J 009.indd 11 |
7/18/12 5:37 PM |
||
6.6AUSBAU DES SRC SYSTEM™ HEADSETS AUS DEM HELM
1.Lösen Sie beide Lautsprecher vom Klettpolster am Helm. .
WICHTIG: Ziehen Sie niemals am Antennenanschluss.
2.Lösen Sie die Steckverbindung zwischen Antenne und SRC-System™.
3.Lösen Sie das SRC-System™ durch behutsames Ziehen aus der Fixierung. Beginnen Sie dabei im vorderen Helmbereich.
4.Ziehen Sie die Stifte an den vorderen Enden des Akustikkragens aus den Öffnungen heraus.
5.Öffnen Sie beide Druckknöpfe.
6.7AUFSETZEN UND ABNEHMEN DES HELMS
Die elektronischen Komponenten Ihres Headsets sind innerhalb des SRC System™ Akustikkragens sicher untergebracht. Um das Aufsetzen bzw. Abnehmen Ihres Helms möglichst einfach zu vollziehen, empfehlen wir wie folgt vorzugehen
1.Greifen und ziehen Sie kräftig beide Kinnriemen auseinander, um so eine möglichst weite Helmöffnung zu erzielen.
2. Während Sie die Riemen auseinanderziehen, 


 ziehen Sie den Helm über Ihren Kopf, beginnend


 vom Hinterkopf her.
3. Zum Abnehmen des Helms ziehen Sie die Kinnriemen erneut auseinander und ziehen Sie dann den Helm nach oben ab.
HINWEIS:
Ihr SRC System™ wurde für höchsten Komfort entwickelt. Da dieses umfangreiche Bauteile enthält, kann es vorkommen, dass Sie das Aufsetzen bzw. Abnehmen des Helms mit eingebautem SRC System™ anders als gewohnt wahrnehmen.
Durch das regelmäßige Aufund Absetzen des Helms, wird der Akustikkragen des SRC System™ mit der Zeit flexibler.
12
6.8 REINIGEN DES SRC SYSTEM™ HEADSETS
Zum Reinigen des Akustikkragens schließen Sie zuerst die USB-Kappe des SRC System™. Benutzen Sie danach beim Reinigen ein nur leicht und lauwarm angefeuchtetes Tuch und vermeiden Sie es, den Akustikkragen in Wasser oder andere Flüssigkeiten zu tauchen. Mikrofon und Lautsprecher sollten nicht in Kontakt mit Flüssigkeiten kommen.
|
MAN00097 QG SRC-S2_C3 J 009.indd 12 |
7/18/12 5:37 PM |
||
7.KOPPELN UND NUTZEN VON GERÄTEN: MOBILTELEFON, GPS NAVI ODER MP3
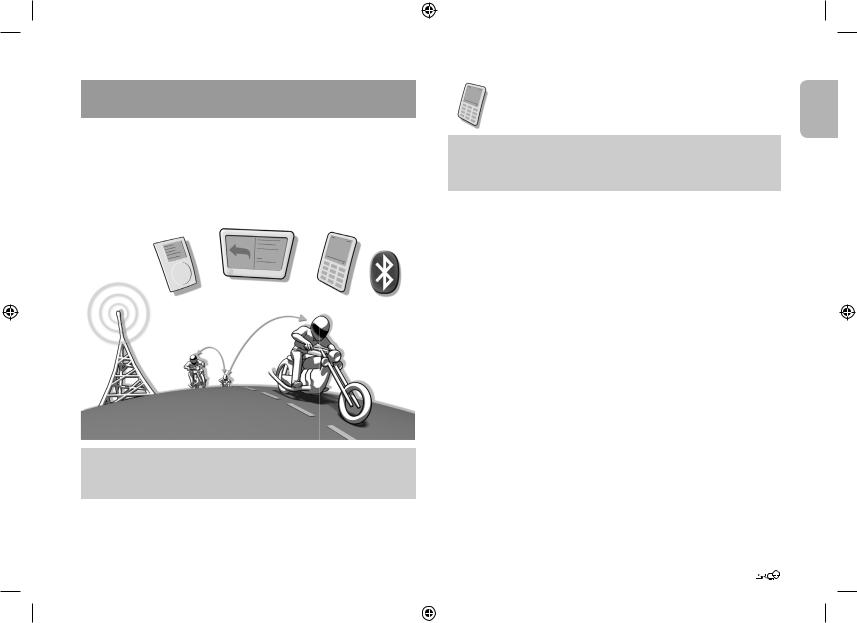
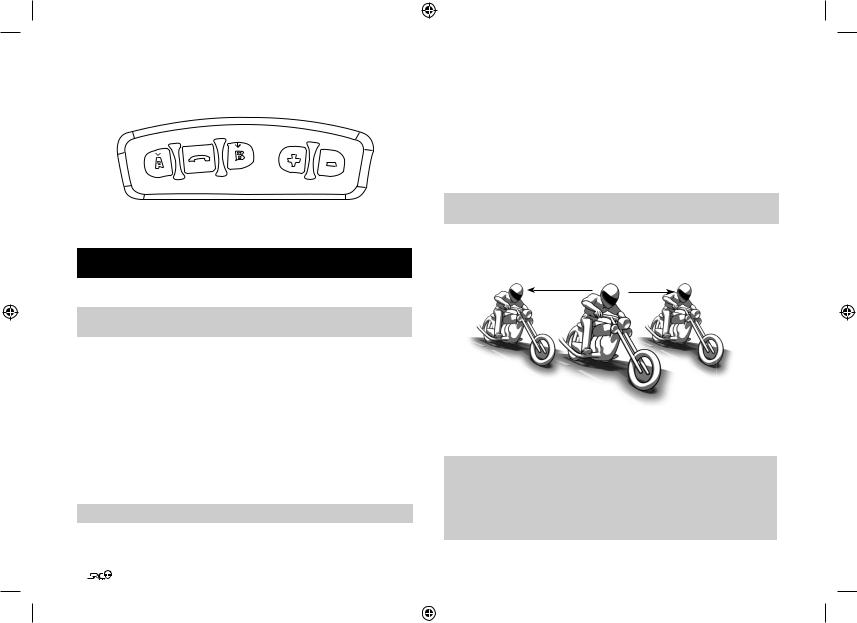
Multiple Device Connectivity («MDC») mit Bluetooth® fähigen Geräten.
Dank.MDC.Technologie.können.der.SRC-System™.folgende.parallele. Verbindungen.aufgebaut.werden:
.Interkom.mit.bis.zu.zwei.anderen.SRC-System™.Geräten.Mobiltelefon./.GPS.Navi.Gerät.A2DP.fähiger.MP3.Player
|
Navigationsgerät |
Mobiltelefon und |
|
|
MP3-Player |
||
|
A2DP Verbindung |
||
700 m Reichweite (geländeabhängig)
Integriertes
UKW Radio
HINWEIS: Wenn Sie gleichzeitig ein Mobiltelefon und ein Navigationsgerät nutzen wollen, muss Ihr Mobiltelefon mit dem Navigationsgerät und nicht mit dem SRC-System™ gekoppelt werden.
* Bitte lesen Sie auch die unter Abschnitt 9.4b angeführten Einschränkungen.
|
7.1 MOBILTELEFON |
Deutsch |
|
|
Um.ihr.Mobiltelefon.mit.dem.SRC-System™.zu.verwenden,.muss. |
||
|
dieses.vorher.mit.dem.Mobiltelefon.gekoppelt.werden. |
HINWEIS: Falls Sie neben dem Mobiltelefon auch ein Navigationsgerät nutzen, müssen Sie Ihr Mobiltelefon statt mit dem SRC-System™ direkt mit dem Navigationsgerät koppeln. In solchem Falle überspringen Sie den folgenden Abschnitt und fahren direkt mit Abschnitt 7.2. fort.
Koppeln.(Pairing).muss.prinzipiell.nur.einmal.vollzogen.werden..Nachdem.ein.
Headset.mit.einem.bestimmten.Mobiltelefon.gekoppelt.ist,.können.sich.die.
Geräte.automatisch.erkennen,.sobald.sie.sich.in.Reichweite.befinden.
Sobald.die.Verbindung.zwischen.Mobiltelefon.und.Headset.unterbrochen.wurde,.
betätigen.Sie.die.Handy-Taste,.um.die.Verbindung.wieder.herzustellen.
MOBILTELEFON KOPPELN
1..Schalten.Sie.Ihr.Mobiltelefon.und.SRC-System™.ein.und.stellen.Sie.sicher,.dass. die.Bluetooth®-Funktion.Ihres.Mobiltelefons.aktiviert.ist
2..Halten.Sie.die.Handy-Taste.des.Headsets.mindestens.sechs.Sekunden.lang. gedrückt,.bis.die.roten.und.blauen.Leuchtanzeigen.(LED).abwechselnd.rasch. blinken..Jetzt.ist.das.Gerät.im.Pairing-Modus,.d.h..zum.Kopplungsprozess.bereit.
3..Suchen.Sie.gemäß.der.Anleitung.Ihres.Mobiltelefons.auf.Ihrem.Mobiltelefon- Display.nach.Bluetooth®-Geräten.
4..Nach.wenigen.Sekunden.führt.Ihr.Mobiltelefon.das.„SRCS”.(samt Kennzeichnung der Software Version).als.erkanntes.Gerät.auf..Wählen.und.bestätigen. Sie.dieses..Folgen.Sie.dann.den.Mobiltelefon-Anleitungen,.um.das.Koppeln.
(Pairing).zu.vollziehen.
5..Geben.Sie.bei.der.Eingabeaufforderung.0000.(vier.Nullen).als.PIN.bzw.. Passwort.ein.
6..Sobald.Ihr.Mobiltelefon.bestätigt,.dass.das.Pairing.erfolgreich.war,.beginnt.
das.Headset.langsam.blau.zu.blinken..
13
|
MAN00097 QG SRC-S2_C3 J 009.indd 13 |
7/18/12 5:37 PM |
||

HINWEIS:
1.Falls das Koppeln nicht innerhalb von zwei Minuten abgeschlossen ist, schaltet sich das Headset automatisch wieder in den Standby-Modus.
2.Nicht alle Bluetooth® Mobiltelefons können auch Bluetooth® Stereo-Musik (A2DP) übertragen, selbst wenn das Mobiltelefon über einen eingebauten MP3-Player verfügt. Schauen Sie diesbezüglich in die Gebrauchsanleitung Ihres Mobiltelefons. In Verbindung mit einigen Mobiltelefontypen ist es evtl. erforderlich, dass Sie — auch nachdem das Koppeln durchgeführt wurde — die Handy-Taste des SRC-System™ betätigen müssen, um die Verbindung zwischen Mobiltelefon und Headset herzustellen. Ihr SRC-System™ wird sich automatisch mit jenem Mobiltelefon verbinden, mit dem es zuletzt verbunden war.
MOBILTELEFONANRUFE AUFNEHMEN UND EMPFANGEN
Grundfunktionen
|
Anrufe empfangen |
Bei.Klingelton.betätigen.Sie.die.Handy-Taste.oder.sprechen. |
|
Sie.laut.ein.beliebiges.Wort.aus. |
|
|
Anrufe abweisen |
Schweigen.Sie.beim.Klingelton,.bis.dieser.verstummt.oder. |
|
betätigen.Sie.die.Handy-Taste.für.3.Sek. |
|
|
Gespräch beenden |
Betätigen.Sie.während.des.Gesprächs.kurz.die.Handy-Taste. |
|
oder.überlassen.Sie.das.Auflegen.Ihrem.Gesprächspartner |
|
|
Sprachwahl (falls |
Betätigen.Sie.während.des.Standby-Modus.die.Handy- |
|
vom Mobiltelefon |
Taste.und.sprechen.Sie.laut.den.Namen.der.Person.aus,.die. |
|
unterstützt) |
Sie.anrufen.wollen.. |
Wahlwiederholung* Betätigen.Sie.während.des.Standby.Modus.zwei.Mal.die.
Handy.Taste
ERWEITERTE FUNKTIONEN FÜR 3-WEG KOMMUNIKATION
Hinzufügen bzw. Betätigen.Sie.während.eines.Mobiltelefongesprächs.die. Abtrennen des Kanal.“A”.Taste
Kanal “A” Headsets vom laufenden Mobiltelefongespräch
Hinzufügen bzw. Betätigen.Sie.während.eines.Mobiltelefongesprächs.die. Abtrennen des Kanal.“B”.Taste.
Kanal “B” Headsets vom laufenden Mobiltelefongespräch
*Diese Funktion ist während Interkom oder Mobiltelefonanrufen nicht verfügbar
14
Während.laufender.Mobiltelefongespräche.werden.eingehende.Interkom-
Anrufe.automatisch.abgewiesen..Nach.Beenden.des.Mobiltelefongesprächs.ist.
das.Headset.wieder.aufnahmebereit.für.eingehende.Interkom.Anrufe.
7.2 GPS NAVIGATION
In.Verbindung.mit.einem.Navigationsgerät.können.Sie.über. Ihr.SRC-System™.Headset.Navigationsanweisungen.und.Audio. empfangen.
Zur.Verbindungsherstellung.zwischen.einem.Bluetooth®.fähigen.Navigationsgerät. und.Ihrem.SRC-System™.müssen.diese.zuerst.gekoppelt.werden.
HINWEIS: Nicht alle Bluetooth-GPS-Geräte lassen Anbindungen an Bluetooth— Audio-Geräte zu. Sehen Sie auch die Bedienungsanleitung des Navigerätes für weitere Informationen ein.
KOPPELN MIT EINEM NAVIGATIONSGERÄT:
1..Bei.eingeschaltetem.Zustand.halten.Sie.die.Lautstärke.Auf.Taste.des.Headsets. mindestens.sechs.Sekunden.gedrückt,.bis.die.roten.und.blauen.LEDs.gleichzeitig.rasch.blinken.
2..Suchen.Sie.auf.dem.Navigationsgerät.nach.Bluetooth®.Headsets.und.folgen.Sie. dabei.den.Anweisungen.
3..Nach.einigen.Sekunden.führt.Ihr.Navigationsgerät.das.„SRCS”.(samt Kennzeichnung der Software Version).als.erkanntes.Gerät.auf..Wählen. und.bestätigen.Sie.dieses..Folgen.Sie.den.Navigations-Anleitungen,.um.das. Koppeln.(Pairing).zu.vollenden.
4..Wenn.Ihr.Navigationsgerät.zur.Eingabe.einer.PIN.oder.eines.Passworts.auffordert,.geben.Sie.0000.(vier.Nullen).ein.
5..Ihr.Navigationsgerät.bestätigt.nun.durch.langsames.blaues.Blinken,.dass.der. Kopplungsvorgang.(das.Pairing).erfolgreich.durchgeführt.wurde.
WICHTIG: Falls Sie ein Bluetooth®-Mobiltelefon dazu verwenden möchten, Anrufe über Ihr Headset zu tätigen und entgegenzunehmen, müssen Sie nun
Ihr Mobiltelefon mit dem Navigationsgerät koppeln. Folgen Sie bitte den
Gebrauchsanleitungen Ihres Navigationsgeräts bzw. Mobiltelefons.
|
MAN00097 QG SRC-S2_C3 J 009.indd 14 |
7/18/12 5:37 PM |
||

HINWEIS:
1.Falls das Koppeln nicht innerhalb von zwei Minuten abgeschlossen ist, schaltet sich das Headset automatisch wieder in den Standby Modus.
2.Die Proritäten für ihr Headset sind so eingerichtet, dass eingehende Interkomgespräche eine Navigations-Sprachanweisung nicht unterbrechen. In diesem Fall wird der Anrufer über Interkom ein Besetzt-Signal hören. Sie hören gleichzeitig zwei Pieptöne, um zu verdeutlichen, dass ein Interkomteilnehmer versucht, Sie zu erreichen (s. Absatz 4.6 für weitere Informationen zu den AudioPrioritäten der gekoppelten Geräte.)
7.3 AUDIO WIEDERGABE
7.3a DRAHTLOSE OPTION A2DP
Ihr.Headset.ist.empfangsbereit.für.kabellose.Stereomusik.von.A2DP.Quellen.(z.B.. MP3).und.Smartphones,.die.Bluetooth®.Protokolle.A2DP.und.AVRCP.unterstützen.. Nutzung.eines.Bluetooth®.Gerätes.mit.AVRCP.ermöglicht.Ihnen.den.Betrieb.der. wichtigsten.A2DP.Funktionen.direkt.vom.Headset.
HINWEIS: Das SRC-System™ Headset kann über das beigefügte Kabel auch Audiosignale von MP3-Playern und Audioquellen ohne Bluetooth® Profil empfangen (s. Absatz 7.3b)
Auch.bei.Musikempfang.über.Ihre.A2DP.Quelle.bleiben.Sie.für.eingehende. Mobiltelefon-.und.Interkomanrufe.erreichbar..Bei.eingehendem.Anruf.werden. auch.Radio-.bzw..MP3-Empfang.automatisch.stummgeschaltet,.es.wird.dem. eingehenden.Anruf.Vorrang.gegeben..Beachten.Sie.bitte,.dass.bestimmte.Geräte. nach.Stummschaltung.den.Radio-.bzw..MP3-Empfang.nicht.automatisch.wieder. aufnehmen..In.solchen.Fällen.muss.dieser.manuell.reaktiviert.werden.
VORBEREITEN DES MP3-PLAYERS FÜR Bluetooth® STEREO A2DP ÜBERTRAGUNGEN.
Um.über.einen.Bluetooth®.Stereo.(A2DP).fähigen.MP3-Player.zu.hören,.muss. dieser.zuerst.mit.dem.Headset.gekoppelt.werden.
KOPPELN MIT EINEM MP3-PLAYER
|
Deutsch |
|
|
HINWEIS: Falls Sie eine A2DP Quelle nutzen, die in Ihrem Mobiltelefon eingebaut ist, |
|
|
muss die Kopplung mit dem Headset wie in Absatz 7.1 beschrieben vollzogen werden. |
|
1..Schalten.Sie.Ihren.MP3-Player.ein.und.stellen.Sie.sicher,.dass.die.Bluetooth®. Funktion.aktiviert.ist.
2..Bei.eingeschaltetem.Headset.betätigen.und.halten.Sie.die.Handy-Taste. mindestens.sechs.Sekunden,.bis.die.roten.und.blauen.Leuchtsignale.schnell. abwechselnd.blinken.
3..Suchen.Sie.mit.ihrem.MP3-Player.nach.dem.Bluetooth®.Headset.und.folgen.Sie. dabei.der.Gebrauchanleitung.Ihres.Gerätes.
4..Nach. .einigen.Sekunden.wird.Ihr.MP3-Player.„SRCS”.(samt Kennzeichnung der Software Version).als.gefundenes.Gerät.auflisten..Wählen.Sie.dieses.und.folgen. Sie.der.Gebrauchanleitung.des.MP3-Players,.um.das.Koppeln.durchzuführen.
5..Wenn.Ihr.MP3-Player.eine.PIN.oder.ein.Passwort.verlangt,.geben.Sie.0000. (vier.Nullen).ein.
6..Wenn.das.Koppeln.abgeschlossen.ist,.wird.Ihr.MP3-Player.ihnen.dieses.ggf.. bestätigen.und.die.LED.des.Headsets.wird.gleichmäßig.blau.blinken.
HINWEIS: Wenn das Koppeln der Geräte nicht innerhalb von zwei Minuten abgeschlossen ist, wird das Headset in den Standby Modus zurückschalten.
BETRIEB IHRER A2DP QUELLE DIREKT VOM HEADSET
Wiedergabe Betätigen.und.halten.Sie.die.MP3-Taste.im.Laufe.von.3.Sek.
|
Pause / Stopp* |
Betätigen.und.halten.Sie.die.MP3-Taste.im.Laufe.von.3.Sek. |
|
Vorwärts |
Betätigen.und.halten.Sie.die.Lautstärke Auf-Taste.im.Laufe.von.3.Sek. |
|
Rückwärts** |
Betätigen.und.halten.Sie.die.Lautstärke Ab-Taste.im.Laufe.von.3.Sek. |
*Unterschiedlich je nach Mobiltelefonmodell
**Bei einigen Mobiltelefons muss dieser Schritt evt. wiederholt werden
15
|
MAN00097 QG SRC-S2_C3 J 009.indd 15 |
7/18/12 5:37 PM |
||
ZWISCHEN A2DP AUDIO QUELLEN UMSCHALTEN
Wenn ein Musik-Player gekoppelt ist, wird ihr SRC System™ es als Standard A2DP Audio-Quelle nutzen.
1.Musikwiedergabe vom aktuellen Gerät beenden.
2.Wiedergabe am anderen Gerät starten.
7.3b AUDIOQUELLE ÜBER AUX ANSCHLIESSEN
Nutzen Sie die AUX Buchse, um eine Kabelverbindung herzustellen
Ihr SRC System™ Headset verfügt über eine AUX-Buchse zum Anschluss von Geräten, die nicht über Bluetooth® verfügen. Diese Geräte werden über das beigefügte Mini-USB Kabel verbunden.
1.Stellen Sie sicher, dass sich das Headset im Standby-Modus befindet und die blaue LED gleichmäßig blinkt.
2.Geben Sie das MP3-Kabel in die Kopfhörerbuchse ihres MP3 Players bzw. Audio Gerätes und das andere Ende in die AUX
Buchse des SRC-Systems™.
3.Bedienen Sie den MP3-Player über die eigenen Steuertasten (FF/REW/PLAY/PAUSE).
Die Lautstärke kann über den MP3-Player oder über die Lautstärke-Tasten am Headset reguliert werden.
Jede andere Audioverbindung wird den MP3-Player automatisch stumm stellen. Das Audiosignal wird erst dann aufgenommen, wenn sich das Headset erneut im Standby Modus befindet.
HINWEIS: Während des Betriebs des MP3-Players ist die VOX Funktion nicht verfügbar.
16
8.INTEGRIERTES UKW RADIO
Ihr SRC System™ ist mit einem UKW Stereo Radiomodul ausgerüstet. Dank der RDS Funktion und auch um Ihnen das Justieren von Radiofrequenzen bei schneller Fahrt zu ersparen, wählt Ihr Headset stets automatisch das stärkste Signal, das für den UKWSender Ihrer Wahl verfügbar ist.
|
Ein-/Ausschalten |
Betätigen Sie die Kanal “B” Taste für 3 Sekunden. |
|
Zum nächsten |
Während des Radioempfangs betätigen Sie kurz die Kanal |
|
programmierten |
“B” Taste, um zwischen den sechs vorprogrammierten |
|
Sender wechseln |
Sendern zu navigieren. |
|
Einleiten eines |
Während des Radioempfangs beginnen Sie einfach laut |
|
Interkom-Gesprächs |
zu sprechen. |
|
Einleiten von |
Während des Radioempfangs betätigen Sie die Handy- |
|
Sprachwahl über |
Taste und sprechen Sie laut den Namen der Person, die Sie |
|
Mobiltelefon |
anrufen möchten. Für diese Funktion muss das Mobiltele- |
|
fon die Sprachwahl Funktion unterstüzen. |
|
|
Einleiten von |
Während des Radioempfangs betätigen Sie zwei Mal kurz |
|
Wahlwiederholung |
die Handy-Taste |
|
über Mobiltelefon |
|
|
RDS EIn/Aus |
Während des Radioempfangs betätigen Sie die Lautstärke- |
|
tasten (Auf/Ab) gleichzeitig im Laufe von 3 Sekunden. |
|
RDS An / Aus (bei laufendem Radioempfang gleichzeitig 3 Sek. lang betätigen)
|
Kanal «A» |
Kanal «B» |
||||
|
Taste |
Taste |
||||
•Radio Ein / Aus (3 Sekunden gedrückt halten)
•Zwischen gespeicherten Sendern pendeln (kurz betätigen)
|
MAN00097 QG SRC-S2_C3 J 009.indd 16 |
7/18/12 5:37 PM |
||
NEUE SENDER SUCHEN UND SPEICHERN
Die Sender-Voreinstellungen können über die SRCS PC-Software oder direkt von Ihrem SRC System™ gespeichert werden.
Sie haben zwei Möglichkeiten, neue Radiosender auf Ihrem SRC System™ zu suchen:
SUCHEN UND ABSPEICHERN: (NÄCHSTEN UKW-RADIOSENDER FINDEN)
1. Die Lautstärke Auf oder Ab — Taste 3 Sekunden lang gedrückt halten.
• Lautstärke Auf sucht nach oben (höhere Frequenzen) Radiosender ab
• Lautstärke Ab sucht nach unten (niedrigere Frequenzen) Radiosender ab
2.Tippen Sie innerhalb von 20 Sekunden auf die Kanal „B”-Taste, um den gefundenen UKW-Sender auf dem aktuellen Senderplatz zu speichern.
SCAN UND SPEICHERN: UKW-RADIOSENDER ABSUCHEN
1.Die Lautstärke Auf Taste 6 Sekunden lang gedrückt halten. Das SRC System™ sucht nach oben (höhere Frequenzen) Radiosender. Wenn ein Sender gefunden wurde, wird er ein paar Sekunden lang angespielt.
2.Scan bei diesem Sender abbrechen: Lautstärke Auf Taste antippen.
3.Tippen Sie innerhalb von 20 Sekunden auf die Kanal „B”-Taste, um den gefundenen UKW-Sender auf dem aktuellen Senderplatz zu speichern.
4.Scan fortsetzen: Auf den nächsten Sender warten.
HINWEIS: Während des Scans die Kanal „B”-Taste antippen, um den aktuellen UKWSender auf dem aktuellen Sendeplatz abzuspeichern.
AUTOMATISCHE RADIOSENDERSUCHE
Diese Funktion erzeugt automatisch eine temporäre Liste von 6 Radiosendern.
1.Radio einschalten.
2.Die Lautstärke Ab Taste 6 Sekunden lang gedrückt halten.
3.Das SRC System™ wird aufwärts (höhere Frequenz) vom aktuellen Sender suchen und die nächsten gefundenen 6 UKW-Sender temporär abspeichern.
4.Nach Wunsch von Schritt 2 an wiederholen, um die nächsten 6 UKW-Sender als temporär zu speichern.
HINWEIS: Diese 6 temporären Sender sind nicht permanent gespeichert und ersetzen
|
nicht die vorher gespeicherten Sender auf den Sendeplätzen. |
Deutsch |
|
Beim Ausschalten des SRC System™ werden die automatisch gesuchten |
|
|
Radiosender gelöscht und die UKW-Sendeplätze wiederhergestellt. |
9. INTERKOM
9.1 EINLEITUNG
Ihr SRC System™ ermöglicht Voll-Duplex Interkombetrieb mit anderen SRC System™ Nutzern in einer Reichweite von bis zu 700 Meter (geländeund verkehrsbedingt)
Um eine oder zwei Interkom Verbindungen herzustellen, sollten Sie zuerst Ihr SRC System™ mit den anderen Headsets koppeln.
Das Koppeln (“Pairing”) muss prinzipiell nur ein Mal durchgeführt werden. Nach Abschluss des Prozesses bleiben die Headsets gekoppelt und erkennen einander automatisch, sobald sie in Reichweite sind.
Ihr Headset verfügt über zwei Interkom-Kanäle für Headset-zu-Headset- Verbindungen. Daher kann Ihr SRC System™ simultan mit bis zu zwei anderen Headsets kommunizieren.
9.2 INTERKOM KOMPATIBILITÄT
Sie können Ihr SRC System™ als Interkom mit Nutzern von anderen SRCS Geräten und von Headsets der Cardo scala rider Reihe betreiben. Für weitere Informationen, siehe www.cardosystems.com/SRC.
9.3 VOR INBETRIEBNAHME DES INTERKOMS
Ihr SRC-System™ֳ-Headset verfügt über zwei Tasten, die zur Verbindungsaufnahme mit zwei weiteren Headsets dienen. Diese anderen Headsets werden hier als KANAL “A” und KANAL “B“ bezeichnet.
Vor Beginn des Bike-to-Bike Interkombetriebs mit einem oder zwei weiteren Geräten müssen alle teilnehmenden Headsets untereinander gekoppelt werden.
17
|
MAN00097 QG SRC-S2_C3 J 009.indd 17 |
7/18/12 5:37 PM |
||
|
Kanal «A» |
Kanal «B» |
|
|
Taste |
Taste |
|
9.4VERWENDUNG DER INTERKOM FUNKTION MIT ANDEREN SRC SYSTEM™ HEADSETS
|
INTERKOM KANAL |
KOPPLUNGS- / |
KOPPLUNGSMODUS |
|
VERBINDUNGSTASTE |
LED-ANZEIGE |
|
|
KANAL.“A” |
KANAL.“A”.-.TASTE |
Schnelles.Blinken.der. |
|
ROTEN.LED |
||
|
KANAL.“B” |
KANAL.“B”.-.TASTE |
Schnelles.Blinken.der. |
|
BLAUEN.LED |
||
9.4a ZWEI WEG INTERKOM
Verwendung.von.zwei.SRC-System™.Headsets
1..Schalten.Sie.beide.Headsets.EIN,.indem.Sie.deren.jeweilige.Handy-Taste.so. lange.gedrückt.halten,.bis.die.blauen.Leuchtanzeigen.(LED).dreimal.kurz. blinken.
2..Stellen.Sie.sicher,.dass.beide.Headsets.jetzt.langsam.blau.blinken.
3..Wählen.Sie.einen.verfügbaren.Kanal,.den.Sie.zum.Koppeln.der.Headsets. benutzen.wollen.(KANAL.“A”.oder.KANAL.“B”).
HINWEIS: Die Wahl eines bereits belegten Kanals wird diesen überschreiben.
18
4..Halten.Sie.die.gewünschte.Kanaltaste.(“A”.oder.“B”).auf.Ihrem.Gerät. mindestens.sechs.Sekunden.gedrückt,.bis.die.BLAUE.oder.ROTE.LED.des. Headsets.schnell.blinkt..Dadurch.wird.angezeigt,.dass.der.InterkomKopplungsmodus.aktiv.ist..(s..obige.Tabelle)
5..Wiederholen.Sie.Schritt.3-4.für.das.zweite.SRC-System™-Headset.
6..Innerhalb.weniger.Sekunden.leuchten.beide.Headsets.zwei.Sekunden. konstant..Dadurch.wird.angezeigt,.dass.beide.Headsets.jetzt.miteinander. verbunden.und.einsatzbereit.sind.
HINWEIS: Falls der Kopplungsprozess nicht innerhalb von 2 Minuten abgeschlossen ist, schaltet das Headset automatisch wieder in den Bereitschaftsmodus.
9.4b. DREI WEG INTERKOM
Das.SRC-System™.ermöglicht.einen.Interkom.Konferenzmodus.zwischen.drei.
|
Bikern |
Über Kanal “A” |
Über Kanal “B” |
Biker “1”
In.dieser.Konfiguration.ist.Biker.“1”.sowohl.mit.Biker.“2”.als.auch.mit.Biker.“3”.
verbunden.und.dient.daher.als.Verbindungsbrücke,.die.den.Konferenzmodus.
ermöglicht.
WICHTIG: Da Biker “1” zwei Bluetooth® Verbindungen beansprucht, wird er von seinem Mobiltelefon bzw. Navigationsgerät getrennt, bis das Konferenzgespräch beendet ist. Nach Beendigung des Konferenzmodus wird Biker “1” automatisch wieder mit seinem Mobiltelefon bzw. Navigationsgerät verbunden.
Biker “2” und “3“ bleiben mit ihren Mobiltelefonen bzw. Navigationsgeräten während des Konferenzgesprächs verbunden.
|
MAN00097 QG SRC-S2_C3 J 009.indd 18 |
7/18/12 5:37 PM |
||

Zum Koppeln von drei SRC System™-Headsets wiederholen Sie mit einem dritten SRC System™-Headset den in Abschnitt 9.4a dargestellten Ablauf (allerdings über einen anderen Kanal).
1.Koppeln Sie Ihr SRC System™ mit dem zweiten SRC System™, wie in Abschnitt 9.4a beschrieben (mittels KANAL “A”).
2.Koppeln Sie Ihr SRC System™ mit dem dritten SRC System™, wie in Abschnitt 9.4a beschrieben (mittels KANAL “B”).
9.5 AUFNAHME VON INTERKOM-ANRUFEN
Kopplungsprozess (Pairing) erfolgreich abgeschlossen? Dann fahren Sie jetzt mit diesem Abschnitt fort. Falls nicht, bitte erst obige Tabelle einsehen und Kopplungspräferenz wählen und durchführen.
Es gibt zwei Möglichkeiten einen Interkom -Anruf mit Headsets aufzunehmen, die mit Ihrem SRC System™ gekoppelt sind (stellen Sie sicher, dass Sie im Bereitschaftsmodus sind) :
SPRACHVERBINDUNG:
Vorzugsweise für relative kurze Gespräche, da hier der Kanal nach 30 Sekunden Stille in den Bereitschaftsmodus umschaltet.
Beginnen Sie laut zu sprechen
Sobald Sie laut sprechen, wird automatisch ein Interkom-Gespräch mit beiden gekoppelten Headsets, KANAL «A» und KANAL «B», aufgebaut (falls beide gekoppelt und verfügbar sind).
Das Interkom-Gespräch wird aufrechterhalten, bis alle Teilnehmer 30 Sekunden lang schweigen (gilt für 2-Wege Kommunikation).
VERBINDUNG ÜBER DIE KANAL-TASTE:
Vorzugsweise für längere Gespräche, da hier der Kanal offen und aktiv bleibt.
Betätigen Sie einmal kurz die KANAL «A» –Taste, um das KANAL «A»
-Headset zu einem Interkom-Gespräch hinzuzufügen oder zu entfernen.
Betätigen Sie einmal kurz die KANAL «B» –Taste, um das KANAL «B» -Headset zu einem Interkom-Anruf hinzuzufügen oder zu entfernen.
HINWEIS: Während das Interkom in Betrieb ist, sind die Wiederwahl und Sprachsteuerungsfunktionen nicht verfügbar.
9.6 ANNAHME VON INTERKOM-ANRUFEN
Sobald ein anderes gekoppeltes Headset versucht, Sie über Interkom anzurufen, wird das Gespräch sofort aufgebaut.
HINWEIS: Der werkseitige Prioritätsmodus des Headsets verhindert Unterbrechungen von bereits begonnenen Mobiltelefongesprächen oder Navigationsanweisungen durch eingehende Interkom-Anrufe. Bei laufenden Gesprächen oder Navigationsanweisungen hört der Interkom-Anrufer ein Besetzt-Zeichen und Sie einen doppelten Piepton (siehe Abschnitt 4.6 für Details zu den Prioritätseinstellungen von gekoppelten Geräten).
9.7 SPRACHBEFEHL-MODUS (VOX)
Das SRC System™ bietet auch VOX Technologie für sichere und freihändige Bedienung von Schlüsselfunktionen.
Der VOX -Empfindlichkeitsgrad kann individuell eingestellt werden. Sie können zwischen ‘Normal’ (Standard), ‘Niedrig’ und ‘Hoch’ VOX-Empfindlichkeit wählen. Wenn Sie Schwierigkeiten mit einem Gespräch mittels VOX haben, ändern Sie die Einstellung auf “Hoch”. Dies kann entweder über die SRCS-Upgrades Software (siehe Abschnitt 4.3), oder direkt über Ihr SRC System™ Sprach-Menü (siehe Abschnitt 4.4) erfolgen.
EIN- / AUSSCHALTEN VOX: Die VOX Aktivierung für Interkom Anrufe kann auch vollständig ausgeschaltet werden. Während das Gerät im Bereitschaftsmodus ist, halten Sie die Tasten „Lautstärke Auf“ und „Lautstärke Ab“ gleichzeitig drei Sekunden gedrückt, bis Sie einen Piepston hören. Werkseitig ist die Funktion
„Sprachverbindung“ aktiviert.
HINWEIS: Das Ein-/Ausschalten der Funktion Sprachverbindung hat nur Auswirkungen auf die Interkom-Funktionen
9.8RESET: ZURÜCKSETZEN EINER KOPPLUNG (WIEDERHERSTELLUNG DER WERKSEINSTELLUNG)
Dieser Abschnitt ist erst nach Abschluss des Kopplungsprozesses relevant.
Sie können jederzeit alle gekoppelten Geräte abkoppeln. Verfahren Sie dazu wie folgt:
1.Bei eingeschaltetem SRC System™ halten Sie die Handy-Taste mindestens sechs Sekunden gedrückt, bis die rote und blaue LEDs (Leuchtanzeigen) abwechselnd blinken.
2.Halten Sie die Taste „Lautstärke Auf“ drei Sekunden gedrückt.
|
MAN00097 QG SRC-S2_C3 J 009.indd 19 |
7/18/12 5:37 PM |
||

3.Nun blinken die roten und blauen LEDs fünf Mal und das Headset schaltet sich aus. Damit ist der erfolgreiche Abschluss des Rücksetzens bestätigt.
9.9WICHTIGE ANMERKUNGEN
1. BESETZT-STATUS
Wenn Sie über das Headset ein Interkom-Gespräch mit einem Teilnehmer beginnen möchten, der bereits ein Telefonat oder Interkom-Gespräch führt oder Navigationsanweisungen hört, werden Sie als Besetztzeichen einen doppelten Piepston hören.
2. AUTOMATISCHE INTERKOM-WIEDERVERBINDUNG
Falls das SRC System™ und ein anderes gekoppeltes Headset außer Reichweite geraten und voneinander getrennt werden, wird sich das SRC System™ automatisch wieder mit dem anderen Headset verbinden (vorausgesetzt, Sie sind wieder innerhalb der Reichweite).
Im Bereitschaftsmodus (Standby) können Sie das Interkom-Gespräch erneut manuell aufnehmen. Betätigen Sie lediglich die KANAL “A” oder KANAL “B”-Taste, um eine getrennte Verbindung wieder herzustellen.
3. EINSCHRÄNKUNGEN BEIM KONFERENZMODUS
Im Interkom-Konferenzmodus zwischen Ihnen und zwei weiteren Teilnehmern (Drei-Weg Interkom) dient einer der Teilnehmer als Verbindungsbrücke und kann daher im Laufe des Konferenzmodus weder Mobiltelefon-Anrufe noch GPSNachrichten empfangen (siehe Details in Abschnitt 9.4b)
9.10 STÖRUNGSBEHEBUNG DES INTERKOM-SYSTEMS
Stellen Sie zuerst sicher, dass sich Ihr Mikrofon direkt in der Mitte vor Ihrem Mund befindet. Beachten Sie auch folgendes: Da das SRC System™ zur Nutzung in besonders lauter Umgebung entwickelt wurde, sollten Sie die InterkomFunktion auch in entsprechend lauter Umgebung testen, wie etwa in der Nähe eines Motorrads im Leerlauf und nicht im Haus. Vergewissern Sie sich auch, dass die Headsets korrekt miteinander gekoppelt wurden. Lesen Sie hierzu die Anweisungen in den entsprechenden Konfigurations-Abschnitten.
20
10. CLICK-TO-LINK® (CTL)
Click-to-Link® ist eine Schnellfunktion, mit der Sie ohne jegliche Vorbereitungen Interkomkontakt aufnehmen können. Click-to-Link® ermöglicht spontanes Initiieren von Interkom-Gesprächen mit anderen SRC System™-Nutzern in unmittelbarer Umgebung ohne vorheriges Durchlaufen des Kopplungsvorgangs. Sie erhalten sozusagen einen eigenen Kanal von Motorrad zu Motorrad, über den Sie unterwegs an der Ampel oder während der Fahrt mit anderen SRC System™ Nutzern spontan kommunizieren können. Die Funktion Click-to-Link® kann jederzeit ausgeschaltet werden, um die Möglichkeit schneller Verbindungen mit anderen SRC System™-Nutzern zu unterbinden.
NUTZUNG DER CLICK-TO-LINK®-FUNKTION
CTL-Funktion aktivieren/deaktivieren: Die Funktion kann über das Menü für die Anpassung der Einstellungen einbzw. ausgeschaltet werden (siehe Abschnitt 4.3). Die Funktion ist werkseitig deaktiviert.
AUDIOQUELLEN UND PRIORITÄTEN
Die verschiedenen Audioquellen, die mit dem SRC System™ verbunden sind, werden priorisiert, d. h. eine höher angesetzte Quelle deaktiviert grundsätzlich eine niedrige Quelle.
So werden beispielsweise aktuell laufende Click-to-Link®-Anrufe durch eingehende Mobiltelefonanrufe und Navi-Anweisungen unterbrochen, während ein aktiver Radioempfang wiederum von eingehenden Click-to-Link®-Anrufen unterbrochen wird usw.
Die Funktion Click-to-Link® lässt Anrufe und Interkomgespräche zwischen Quellen mit gleicher Priorität zu: Während eine der Quellen verwendet wird, kann die andere nicht unterbrechen. Daher können aktuell laufende Interkomgespräche nicht durch Click-to-Link® unterbrochen werden und umgekehrt.
|
MAN00097 QG SRC-S2_C3 J 009.indd 20 |
7/18/12 5:37 PM |
||
![]()
Hohe Priorität
Niedrige Priorität
1.Mobiltelefon oder GPS Navigation Gerät (gerätespezifisch)
2.Interkom / Click-to-Link®
3.A2DP Audioquelle
4.UKW Radio (eingebaut)
5.AUX-Buchse (für kabelverbundene Geräte wie z.B. MP3-Player)
*GPS Navigation Anweisungen von Smartphone Apps werden wie A2DP Audio priorisiert
IC (Interkom) Rufton: Wenn Sie ein Click-to-Link®-Gespräch führen, und Fahrer „A“ bzw. Fahrer „B“ versucht, mit Ihnen ein IC-Gespräch zu führen, hören Sie einen
Signalton, während der andere Teilnehmer ein Besetzt-Signal hört.
Wenn Ihre Click-to-Link®-Verbindung aus irgendeinem Grund unterbrochen wird und andere SRC System™-Benutzer in der Nähe sind, können neue
SRC System™-Verbindungen zu anderen Teilnehmern als demjenigen hergestellt werden, zu dem die ursprüngliche Verbindung bestanden hat.
ALLGEMEINE FUNKTIONEN
|
Gewünschtes |
Aktion |
|
|
Resultat |
||
|
CTL . |
CTL Anrufanfrage starten |
Taste Kanal „A” Doppelklicken |
|
Anrufe tätigen |
(Suche dauert bis zu |
|
|
10 Sekunden) |
||
|
CTL Anruf beenden / |
Taste Kanal „A” anklicken |
|
|
CTL Anrufanfrage abbrechen |
||
|
CTL Anrufe |
CTL-Anruf annehmen |
Bei Hören des CTL Rufsignals: |
|
empfangen |
Tippen Sie auf die Kanal „A” Taste oder |
|
|
sprechen sie ein Wort deutlich aus, um |
||
|
VOX zu aktivieren |
||
|
CTL-Anruf ablehnen |
Bei Hören des CTL Rufsignals: |
|
|
Nicht sprechen bis das Rufsignal beendet |
||
|
ist |
||
HINWEIS: Durch Click-to-Link®-Verbindungen werden keine bestehenden
|
Interkom-Kopplungen zwischen Fahrer A und Fahrer B ersetzt oder geändert. Die |
Deutsch |
|
Funktion Click-to-Link® nutzt einen separaten Kanal für die Verbindung zu Ihrem |
|
|
Click-to-Link®-Gesprächspartner. |
11. KUNDENSERVICE
Weitere Informationen erhalten Sie auf unserer Website. www.schuberth.com
Für technische Unterstützung wenden Sie sich bitte an Ihren SCHUBERTH Fachhähandler, oder kontaktieren Sie uns unter
Kundenservice@schuberth.com
Unsere Rufnummer 0391 8106-555
International: +49 391-8106-555
Für die neuesten Informationen über Softwareaktualisierungen, besuchen Sie bitte unsere Internetseite unter
www.schuberth.com/de/motorcycle/service/src-systemtm.html und registrieren Sie Ihr Gerät online.
WICHTIG:
ÖFFNEN DES SRC System™ REIßVERSCHLUSSES ANNULLIERT GEWÄHRLEISTUNGSRECHTE
Die elektronischen Bauteile Ihres Gerätes sind unter einem versiegelten Reisverschluss verstaut. Bitte öffnen Sie den Reisverschluss unter keinen Umständen. Bei Zuwiderhandlung entfallen etwaige Gewährleistungsangprüche sowie etwaige.
sonstige Ersatzansprüche.
21
|
MAN00097 QG SRC-S2_C3 J 009.indd 21 |
7/18/12 5:37 PM |
||

12. HINWEISE
Wichtige Hinweise:
Während des Fahrens auf einem Motorrad, Motorroller, Cruiser, Moped, Geländefahrzeug, Quad oder jeglichem anderen Fahrzeug ist Ihre vollständige und ungeteilte Aufmerksamkeit erforderlich. Sie haben sicherzustellen, dass Sie alle erforderlichen Vorsichtsmassnahmen treffen, um auch während der Benutzung des Gerätes zu jeder Zeit den gegebenen Situationen des Verkehrs und den Witterungsbedingungen einschließlich des Zustands der Straße angemessen Rechnung tragen zu können. Bevor Sie einen Anruf tätigen oder annehmen, sollten Sie ihr Fahrzeug am Straßenrand anhalten. Alle Veröffentlichungen, Anzeigen, Bekanntmachungen oder ähnliche Mitteilungen, die sich darauf beziehen, dass das Gerät während der Fahrt verwendet werden kann, betreffen lediglich dessen technische Möglichkeiten und sind nicht als entsprechende Aufforderung zu verstehen.
Sie haben zu klären und zu beachten, ob die Benutzung des Geräts — abhängig vom lokalen Einsatzgebiet — einen Verstoß gegen Gesetze oder Vorschriften darstellen könnte. Jegliche Benutzung des Geräts erfolgt insoweit ausschließlich auf eigenes Risiko und in einer Verantwortung.
Zu den Grundanforderungen der sicheren Nutzung gehört unter anderem, dass Sie körperlich dazu in der Lage sind, das Gerät zu benutzen und das Sie nicht unter einer Krankheit leiden bzw. Einschränkungen unterliegen, die Ihre Fähigkeit zur sicheren Nutzung des Gerätes und der Teilnahme am Verkehr beeinträchtigen könnten. Des Weiteren müssen Sie für das Fahrzeug
über eine gültige Fahrerlaubnis verfügen. Unter keinen Umständen dürfen vor oder während der Nutzung des Gerätes Alkohol oder bewusstseinsverändernde Drogen, die Ihre Aufmerksamkeit beeinträchtigen könnten, konsumiert werden.
FCC-Erklärung 15.21
Sie werden hiermit darauf hingewiesen, dass alle seitens des Herstellers nicht ausdrücklich genehmigten Änderungen oder Modifizierungen an diesem Gerät die Berechtigung des Nutzers zum Betrieb dieses Gerätes ungültig machen können.
15.105(b)
Dieses Gerät wurde geprüft und es wurde festgestellt, dass es die Anforderungen von Teil 15 der FCC-Vorschriften für ein digitales Gerät der Klasse B erfüllt. Diese Beschränkungen dienen zum angemessenen Schutz gegen schädliche Interferenzen, bei Anschluss an eine stationäre Anlage. Dieses Gerät erzeugt Hochfrequenzenergie und könnte diese ausstrahlen. Wird es nicht gemäß den Anweisungen installiert und verwendet, kann es schädliche Interferenzen im Funkverkehr verursachen. Es kann jedoch nicht gewährleistet werden, dass bei einer Einrichtung keine Interferenzen auftreten. Falls dieses Gerät schädliche Interferenzen bei Funkoder TV-Empfang ver-
22
ursacht, die durch Einund Ausschalten des Gerätes festgestellt werden können, kann der Nutzer versuchen die Interferenzen durch eine der folgenden Maßnahmen zu korrigieren:
•Die Empfangsantenne verstellen oder neu positionieren.
•Den Abstand zwischen Gerät und Empfänger erhöhen.
•Das Gerät an einen anderen Stromkreislauf, unabhängig vom Stromkreislauf des Empfängers, anschließen.
•Den Händler oder einen erfahrenen Radio-/TV-Techniker zu Rate ziehen.
Der Betrieb des Gerätes unterliegt den folgenden zwei Bedingungen:
1)Dieses Gerät darf keine schädlichen Interferenzen verursachen und
2)dieses Gerät muss jede empfangene Interferenz entgegennehmen, einschließlich solcher Interferenzen, die einen unerwünschten Betrieb verursachen könnten.
FCC-Erklärung zur HF-Strahlenbelastung:
Dieses Gerät erfüllt die Bedingungen der FCC RF Radiation Exposure Limits auch unter unkontrollierbaren Umweltbedingungen. Endnutzer müssen die spezifischen Betriebsanweisungen befolgen, um die Bedingungen entsprechend einzuhalten. Dieser Sender darf nicht in der Nähe von oder zusammen mit anderen Antennen oder Sendern angebracht werden.
CE-Mitteilung
Das SRC System™ Headset (das “Produkt” oder das „Gerät“) entspricht den folgenden wesentlichen Anforderungen der EG-Richtlinie 1999/5/EC (hier “R&TTE-Richtlinie” genannt): Artikel 3.1a, 3.1.b und 3.2. Das Produkt wurde in Übereinstimmung mit dem Anhang II zur oben genannten Richtlinie hergestellt.
Konformitätserklärung
Das SRC System™ Headset ist im Einklang mit und entspricht den Richtlinien der Bluetooth® Spezifikation 2.1 und hat alle Tests zur Interfunktionsfähigkeit, die in der Bluetooth® Spezifikation festgelegt sind, bestanden. Die Interfunktionsfähigkeit zwischen dem Gerät und anderen Bluetooth®-fähigen Produkten ist jedoch nicht gewährleistet.
VERZICHTSERKLÄRUNG UND HAFTUNGSFREISTELLUNG (nicht für Länder der Europäischen Union)
Mit der Inbetriebnahme des SRC System™ Headsets (nachstehend auch das “Gerät” genannt) verzichten Sie auf wesentliche Rechte, einschließlich des Klagerechts. Bitte lesen Sie vor Inbetriebnahme des Geräts sorgfältig den folgenden Abschnitt. Falls Sie nicht alle Bedingungen dieser Vereinbarung akzeptieren, sollten Sie das Produkt sofort zurückgeben. Wir werden Ihnen in solchem Falle den vollen Kaufpreis zurückerstatten. Falls Sie das Gerät jedoch in Betrieb nehmen, sind Sie an diese Vereinbarung gebunden und verzichten u. a. auch auf jegliches Klagerecht. Während des Fahrens auf einem Motorrad, Motorroller, Cruiser, Moped,
|
MAN00097 QG SRC-S2_C3 J 009.indd 22 |
7/18/12 5:38 PM |
||

Geländefahrzeug, Quad oder jeglichem anderen Fahrzeug, ob auf der Strasse, im Wasser oder in der Luft (nachstehend “Fahrzeug” genannt) ist Ihre vollständige und ungeteilte Aufmerksamkeit erforderlich. Die Schuberth GmbH und Cardo Systems, Inc., deren Management, Direktoren, Tochtergesellschaften, Muttergesellschaft, Vertreter, Bevollmächtigte, Auftragnehmer, Sponsoren, Mitarbeiter, Lieferanten und Wiederverkäufer (nachstehend “Firma” genannt), weisen Sie ausdrücklich darauf hin, dass Sie alle erforderlichen Vorsichtsmassnahmen treffen müssen und sich während der Benutzung des Gerätes einschließlich aller Modelle des Gerätes, ungeachtet deren Handelsoder Markennamen, zu jeder Zeit des Verkehrs, den Witterungsbedingungen und dem Zustand der Strasse bewusst sein müssen. Bevor Sie einen Anruf tätigen oder annehmen, sollten Sie Ihr Fahrzeug am Straßenrand anhalten. Alle Veröffentlichungen, Anzeigen, Bekanntmachungen oder ähnliche Mitteilungen, die sich darauf beziehen, dass
das Gerät während der Fahrt verwendet werden kann, betreffen lediglich dessen technische Möglichkeiten und sind nicht als Aufforderung gedacht, das Gerät im direkten Straßenverkehr zu benutzen. Mit dem Kauf des Gerätes und dem Verzicht auf Rückerstattung des Kaufpreises (siehe unten), stellen Sie die Firma unwiderruflich von allen Haftungsansprüchen, Verlusten, Forderungen und anderen Ansprüchen jeglicher Art (einschließlich der Anwaltskosten) im Zusammenhang mit der Verwendung des Geräts frei und verpflichten sich die Firma nicht für irgendwelche Körperverletzungen, Schäden oder Tod, sowie für Warenverluste und –Schäden an Fahrzeugen, einschließlich Ihres eigenen Fahrzeugs, oder jeglichen anderen Schäden an Sie oder an Dritten, ungeachtet der Umstände oder Bedingungen zu belangen und die Firma in jedem Falle schadlos zu halten. Sie akzeptieren hiermit auch, dass die Firma keinerlei Verantwortung für körperliche Schäden irgendwelcher Art, unabhängig von Gründen, Zuständen oder Umständen, einschließlich eines Funktionsfehlers des Gerätes trägt. Alle Risiken die mit dem Betrieb des Gerätes einhergehen, liegen ausschließlich und vollständig beim Benutzer des Gerätes, ungeachtet dessen, ob das Gerät vom ursprünglichen Käufer oder Dritten benutzt wird. Die Firma setzt Sie hiermit davon in Kenntnis, dass dieses Gerät außerdem einen Verstoß gegen örtliche, Bundes-, Staatsoder nationale Gesetze oder Vorschriften darstellen könnte und dass jegliche Benutzung des Geräts ausschließlich auf eigenes Risiko und eigene Verantwortung erfolgt.
1.Sie, Ihre Erben, Rechtsvertreter, Nachfolger oder Abtretungsempfänger verzichten hiermit freiwillig und auf ewig auf jegliche Ansprüche, Forderungen, gerichtliche Schritte und Haftungsansprüche, die direkt oder indirekt durch die Nutzung des Gerätes entstehen könnten, ungeachtet der Umstände und UNABHÄNGIG DAVON, OB DIES DURCH FAHRLÄSSIGKEIT ODER ANDERWEITIG UMSTÄNDE VERURSACHT WURDEN und diese Schäden Ihnen zu einem späteren Zeitpunkt als Ergebnis der Nutzung dieses Gerätes zugefügt werden könnten, und Sie entlasten, entbinden und halten die Firma davon schadlos, soweit dies gesetzlich zugelassen ist.
2.Sie verstehen und übernehmen das Risiko, dass mit der Nutzung des Gerätes verbunden ist, einschließlich des Risikos fahrlässiger Handlungen oder Unterlassungen seitens Dritter.
|
3. Sie bestätigen, dass Sie körperlich dazu in der Lage sind, das Gerät zu benutzen und das Sie |
||
|
nicht unter einer Krankheit leiden bzw. Einschränkungen unterliegen, die Ihre Fähigkeit zur |
Deutsch |
|
|
sicheren Nutzung des Gerätes beeinträchtigen könnten. Sie bestätigen, dass Sie mindestens |
||
|
achtzehn (18) Jahre alt sind und dass Sie hinsichtlich der Risiken, die mit der Nutzung des |
||
|
Gerätes verbunden sind, informiert wurden. Sie stimmen weiterhin zu, dass Sie vor oder wäh- |
||
|
rend der Nutzung des Gerätes weder Alkohol noch irgendwelche bewusstseinsverändernden |
||
|
Drogen zu sich nehmen werden die Ihre Aufmerksamkeit beeinträchtigen könnten. |
||
|
4. Sie bestätigen unsere Warnungen verstanden zu haben, dass: (a) bei der Nutzung des Geräts |
||
|
im Straßenverkehr Risiken und Gefahren bestehen, einschließlich aber nicht nur in Bezug auf |
||
|
Verletzungen oder Krankheiten, Zerrungen, Brüche, Teilund/oder Totallähmung, Tod, oder |
||
|
andere Leiden, die zu ernsthaften Behinderungen führen könnten; (b) diese Risiken und |
||
|
Gefahren durch die Fahrlässigkeit des Herstellers oder dessen Vertreter oder Dritten verursacht |
||
|
sein könnten, die an der Konstruktion oder Herstellung dieses Geräts beteiligt waren; (c) diese |
||
|
Risiken durch vorhersehbare oder unvorhersehbare Ursachen hervorgerufen werden könnten. |
||
|
Sie übernehmen hiermit alle Risiken und Gefahren sowie alle Verantwortung für alle Verluste |
||
|
und/oder Schäden, unabhängig davon ob sie ausschließlich oder teilweise durch die Fahrlässig- |
||
|
keit oder das Verhalten anderer, einschließlich seitens der Firma verursacht wurden. |
||
|
5. Sie bestätigen, dass Sie diese Haftungsfreistellung gelesen haben, ihre Bedingungen vollstän- |
||
|
dig verstehen und dass Sie mit dem Verzicht auf Rückgabe des Gerätes gegen Rückerstattung |
||
|
des Kaufpreises auch auf jegliche Forderungen verzichten. |
Garantieverzicht
SCHUBERTH ÜBERNIMMT WEDER AUSDRÜCKLICHE NOCH STILLSCHWEIGENDE GARANTIEN HINSICHTLICH DES BEIGEFÜGTEN GERÄTES, EINSCHLIESSLICH JEGLICHEN IMPLIZITEN GARANTIEN HINSICHTLICH DER EIGNUNG FÜR EINEN BESTIMMTEN ZWECK ODER SONSTIGE ABSICHTEN DES KÄUFERS. DAS GERÄT SAMT ZUBEHÖR WERDEN AUF EINER “AS IS”-BASIS (D. H. OHNE MÄNGEL GEWÄHR), UND AUF “AS AVAILABLE”-BASIS ANGEBOTEN AUSSCHLIESSLICH JEGLICHER GARANTIEN, DIE ÜBER DIE IN DER BEILIEGENDEN GEBRAUCHSANLEITUNG ERWÄHNTEN GARANTIEN HINAUSGEHEN.
Haftungsbeschränkung
SCHUBERTH IST IN KEINEM FALL FÜR IRGENDWELCHE BESONDEREN, INDIREKTEN ODER FOLGESCHÄDEN MIT STRAFCHARAKTER ODER IRGENDWELCHE ANDEREN SCHÄDEN DIE AUS DER VERWENDUNG DES GERÄTES ENTSTEHEN HAFTBAR, UNGEACHTET OB ES SICH UM EINEN VERTRAGSBRUCH, EIN DELIKT (EINSCHLIESSLICH FAHRLÄSSIGKEIT), PRODUKTHAFTUNG ODER EINEN ANDEREN UMSTAND HANDELT, AUCH WENN AUF DIE MÖGLICHKEIT DIESER SCHÄDEN HINGEWIESEN WURDE. HIERMIT BESTÄTIGEN UND STIMMEN SIE ZU, DASS ES SICH BEI DEN VORHER ERWÄHNTEN BESCHRÄNKUNGEN UM GRUNDLEGENDE BESTANDTEILE DIESER VEREINBARUNG HANDELT UND DASS DAS GERÄT IHNEN OHNE DIESE BESCHRÄNKUNGEN NICHT ZUR VERFÜGUNG GESTELLT WÜRDE.
23
|
MAN00097 QG SRC-S2_C3 J 009.indd 23 |
7/18/12 5:38 PM |
||

Rückerstattung des Kaufpreises
FALLS SIE MIT DIESEN BEDINGUNGEN NICHT UNEINGESCHRÄNKT EINVERSTANDEN SIND, BITTEN WIR SIE, DASS GERÄT AN die Firma MIT VOLLER KAUFPREISRÜCKERSTATTUNG ZURÜCKZUGEBEN, VORAUSGESETZT, DASS SIE DIESES INNERHALB VON 7 ARBEITSTAGEN NACH ERWERB DES GERÄTES TUN (Kaufbeleg erforderlich) UND DAS GERÄT SOWIE ALLE ZUBEHÖRTEILE UNVERSEHRT SIND. BEZIEHEN SIE SICH BEI DER RÜCKGABE AUF DIESE BESTIMMUNGEN. BEI NICHT-RÜCKGABE INNERHALB DES VORGENANNTEN ZEITRAUMS BEFINDEN SIE SICH AUSDRÜCKLICH IN UNEINGESCHRÄNKTER ZUSTIMMUNG MIT ALLEN OBEN ANGEFÜHRTEN BEDINGUNGEN UND VERZICHTEN AUF ALLE ZUKÜNFTIGEN ANSPRÜCHE UND FORDERUNGEN GEGENÜBER SCHUBERTH.
www.schuberth.com
24
|
MAN00097 QG SRC-S2_C3 J 009.indd 24 |
7/18/12 5:38 PM |
||
U S E R M A N U A L
P O W E R E D B Y
|
MAN00097 QG SRC-S2_C3 J 009.indd 25 |
7/18/12 5:38 PM |
||

TABLE OF CONTENTS
1. INTRODUCTION . . . . . . . . . . . . . . . . . . . . . . . . . . . . . . . . . . . . . . . . . . . . . . . . . . . . . . . . . . 27 2. CONTENTS OF THE RETAIL BOX . . . . . . . . . . . . . . . . . . . . . . . . . . . . . . . . . . . . . . . . . . . . 28 3. CHARGING THE HEADSET . . . . . . . . . . . . . . . . . . . . . . . . . . . . . . . . . . . . . . . . . . . . . . . . . 29 4. BASIC SETUP AND CONFIGURATION . . . . . . . . . . . . . . . . . . . . . . . . . . . . . . . . . . . . . . . . 29 4.1 BASIC FUNCTIONS. . . . . . . . . . . . . . . . . . . . . . . . . . . . . . . . . . . . . . . . . . . . . . . . . 29 4.2 STATUS LIGHTS. . . . . . . . . . . . . . . . . . . . . . . . . . . . . . . . . . . . . . . . . . . . . . . . . . . . 29 4.3 SOFTWARE UPGRADES AND SETTINGS. . . . . . . . . . . . . . . . . . . . . . . . . . . . . . . 30 4.4 SETTINGS CUSTOMIZATION. . . . . . . . . . . . . . . . . . . . . . . . . . . . . . . . . . . . . . . . . 30 4.5 VOICE MENU. . . . . . . . . . . . . . . . . . . . . . . . . . . . . . . . . . . . . . . . . . . . . . . . . . . . . . 30 4.6 AUDIO SOURCES AND PRIORITIES . . . . . . . . . . . . . . . . . . . . . . . . . . . . . . . . . . . 30 4.7 RESETTING YOUR HEADSET. . . . . . . . . . . . . . . . . . . . . . . . . . . . . . . . . . . . . . . . . 30
5. S2 INSTALLATION . . . . . . . . . . . . . . . . . . . . . . . . . . . . . . . . . . . . . . . . . . . . . . . . . . . . . . . . 31 5.1 REMOVING THE EXISTING ACOUSTIC COLLAR . . . . . . . . . . . . . . . . . . . . . . . . . 31 5.2 CONNECTING THE ANTENNA CABLE. . . . . . . . . . . . . . . . . . . . . . . . . . . . . . . . . . 31 5.3 ATTACHING THE SRC-SYSTEM™ . . . . . . . . . . . . . . . . . . . . . . . . . . . . . . . . . . . . . 32 5.4 POSITIONING THE SPEAKERS . . . . . . . . . . . . . . . . . . . . . . . . . . . . . . . . . . . . . . . 32 5.5 POSITIONING THE MICROPHONE . . . . . . . . . . . . . . . . . . . . . . . . . . . . . . . . . . . . 32 5.6 REMOVING THE SRC SYSTEM™ FROM YOUR HELMET . . . . . . . . . . . . . . . . . . 32 5.7 WEARING AND REMOVING THE HELMET. . . . . . . . . . . . . . . . . . . . . . . . . . . . . . 33 5.8 CLEANING THE SRC-SYSTEM™ ACOUSTIC COLLAR . . . . . . . . . . . . . . . . . . . . . 33
6. C3 PRO INSTALLATION . . . . . . . . . . . . . . . . . . . . . . . . . . . . . . . . . . . . . . . . . . . . . . . . . . . . 33 6.1 REMOVING THE EXISTING ACOUSTIC COLLAR . . . . . . . . . . . . . . . . . . . . . . . . . 33 6.2 CONNECTING THE ANTENNA CABLE.. . . . . . . . . . . . . . . . . . . . . . . . . . . . . . . . . 33 6.3 ATTACHING THE SRC-SYSTEM™ . . . . . . . . . . . . . . . . . . . . . . . . . . . . . . . . . . . . . 34 6.4 POSITIONING THE SPEAKERS . . . . . . . . . . . . . . . . . . . . . . . . . . . . . . . . . . . . . . . 35 6.5 POSITIONING THE MICROPHONE . . . . . . . . . . . . . . . . . . . . . . . . . . . . . . . . . . . . 35 6.6 REMOVING THE SRC SYSTEM™ FROM YOUR HELMET . . . . . . . . . . . . . . . . . . 35
26
6.7 WEARING AND REMOVING THE HELMET . . . . . . . . . . . . . . . . . . . . . . . . . . . . . 36 6.8 CLEANING THE SRC-SYSTEM™ ACOUSTIC COLLAR. . . . . . . . . . . . . . . . . . . . . 36 7. CONNECTING MOBILE PHONES, GPS AND MP3 PLAYERS . . . . . . . . . . . . . . . . . . . . . . 36 7.1 MOBILE PHONE . . . . . . . . . . . . . . . . . . . . . . . . . . . . . . . . . . . . . . . . . . . . . . . . . . . 37 7.2 GPS DEVICE . . . . . . . . . . . . . . . . . . . . . . . . . . . . . . . . . . . . . . . . . . . . . . . . . . . . . . 38 7.3 MP3 MUSIC. . . . . . . . . . . . . . . . . . . . . . . . . . . . . . . . . . . . . . . . . . . . . . . . . . . . . . . 38
8. BUILT-IN FM RADIO . . . . . . . . . . . . . . . . . . . . . . . . . . . . . . . . . . . . . . . . . . . . . . . . . . . . . . 39 9. USING THE INTERCOM . . . . . . . . . . . . . . . . . . . . . . . . . . . . . . . . . . . . . . . . . . . . . . . . . . . . 41 9.1 INTRODUCTION.. . . . . . . . . . . . . . . . . . . . . . . . . . . . . . . . . . . . . . . . . . . . . . . . . . . 41 9.2 INTERCOM COMPATIBILITY. . . . . . . . . . . . . . . . . . . . . . . . . . . . . . . . . . . . . . . . . 41 9.3 BEFORE STARTING THE INTERCOM. . . . . . . . . . . . . . . . . . . . . . . . . . . . . . . . . . . 41
9.4 USING THE SRC SYSTEM™ FOR INTERCOM WITH OTHER
SRC SYSTEM™ HEADSETS. . . . . . . . . . . . . . . . . . . . . . . . . . . . . . . . . . . . . . . . . 41 9.5 MAKING INTERCOM CALLS . . . . . . . . . . . . . . . . . . . . . . . . . . . . . . . . . . . . . . . . . 42 9.6 RECEIVING INTERCOM CALLS . . . . . . . . . . . . . . . . . . . . . . . . . . . . . . . . . . . . . . . 42 9.7 VOICE CONNECT FEATURE (VOX).. . . . . . . . . . . . . . . . . . . . . . . . . . . . . . . . . . . . 42 9.8 RESET PAIRING (RESTORING DEFAULT CONFIGURATION). . . . . . . . . . . . . . . 43 9.9 NOTEWORTHY ISSUES . . . . . . . . . . . . . . . . . . . . . . . . . . . . . . . . . . . . . . . . . . . . . 43 9.10 TROUBLESHOOTING THE INTERCOM . . . . . . . . . . . . . . . . . . . . . . . . . . . . . . . . 43
10. CLICK-TO-LINK® (CTL) . . . . . . . . . . . . . . . . . . . . . . . . . . . . . . . . . . . . . . . . . . . . . . . . . . . . 43 11. SUPPORT . . . . . . . . . . . . . . . . . . . . . . . . . . . . . . . . . . . . . . . . . . . . . . . . . . . . . . . . . . . . . . 44 12. NOTICES . . . . . . . . . . . . . . . . . . . . . . . . . . . . . . . . . . . . . . . . . . . . . . . . . . . . . . . . . . . . . . . 45
IMPORTANT: This is version 1.0 of the User Manual. Please note, that our manual is updated
periodically on our website in order to include the very latest features as well the new options and functions of your new SRC-System. Please visit www.schuberth.com/ fileadmin/downloads/SRC/SRC-System_Manual-1.pdf to check now if the
manual you are holding is the most updated version and download the website manual version in your preferred language.
|
MAN00097 QG SRC-S2_C3 J 009.indd 26 |
7/18/12 5:38 PM |
||

1. INTRODUCTION
Congratulations and thank you for choosing the Schuberth Rider CommunicationSystem™ (SRC-System™) Headset for motorcycle helmets.
This manual will help you operate the headset, but you should first familiarize yourself with the Bluetooth® functionality of your mobile phone and/or GPS device before using the SRC System™.
The retail box contains one SRC System™. When paired with another SRC System™, the units can be used for Intercom at a range of up to 700 m/ 2,300 ft (subject to terrain).
YOUR SRC-SYSTEM OFFERS THE FOLLOWING CONNECTIVITY OPTIONS:
1.Mobile phone communication (supporting Bluetooth® Handsfree* and A2DP and AVRCP profiles at a 10 m / 33 ft. range)
2.Wireless music-streaming (supporting the Bluetooth® Stereo A2DP and AVRCP profiles and compatible with a variety of MP3 Players, adapters and other audio devices)
3.2-way or 3-Way Bike-to-Bike Intercom for conference calls with other SRC System™ headsets (up to 700 m/ 2,300 ft) in Full Duplex** mode
4.Driver-to-Passenger Intercom
5.Click-to-Link® for spontaneous intercom communication with any nearby
SRC System™, scala rider G4 or G9
6.GPS Navigation instructions and Streaming Audio from compatible Bluetooth® devices
7.Built-in FM Radio with 6 station presets and automatic tuning
8.As a stereo headset for listening to cable-connected audio devices, (such as non-Bluetooth® MP3 Players and iPods®)
ADDITIONAL SPECIAL FEATURES:
AGC technology (Automatic Gain Control), allowing the automatic adjustment
|
of volume according to ambient noise and driving speed. You can also control |
English |
|
|
the volume level manually. AGC sensitivity levels can be customized to suit |
||
|
your personal preferences. |
||
|
VOX technology for safe and hands-free operation of some key functions |
||
|
(Voice Dial, Answer Call, Reject Call). VOX sensitivity levels can be customized |
||
|
to suit your personal preferences. |
||
|
PLC software (Packet Loss Concealment) for real-time compensation of audio |
||
|
losses in challenging environments. |
||
|
Advanced software which you should update while in standby mode, via any |
||
|
PC running Windows® XP™, Vista™ or Windows 7. |
||
|
Spoken status announcements, so that you always know to whom or what |
||
|
device you are connected to at any given time. |
||
|
We wish you a great riding experience and remain available for any inquiries you |
||
|
may have. Just write us at service@schuberth.com |
Nicole Prell
Head of Sales and Marketing
SCHUBERTH GmbH
Visit www.schuberth.com/src2-tutorial/en to experience an interactive demonstration of the SRC System™ functions.
_______________________
*Mobile phones that do not support the Bluetooth® Handsfree profile may prevent you from using certain advanced features
**“Full Duplex” lets you to speak and hear the other party simultaneously, similar to mobile or landline phone conversations and unlike walkie-talkie communications
27
|
MAN00097 QG SRC-S2_C3 J 009.indd 27 |
7/18/12 5:38 PM |
||

2.CONTENTS OF THE RETAIL BOX
SRC SYSTEM™ FOR S2 HELMETS (offered in different sizes)
Channel A Button
• Connect to Rider A
• MP3
|
Corded |
Mobile Button |
|
Microphone |
Channel B Button
• Connect to Rider B
• FM Radio
2 Speakers
|
Volume Up / |
|
|
Forward |
|
|
Button |
|
|
Volume Down / |
|
|
Rewind Button |
|
|
Antenna |
|
|
Connector |
USB Connector |
|
• Charging Jack |
|
|
• Software Download Port |
|
|
• AUX |
.
|
Wall.charger.plug |
MP3.cable |
|
USB.adapter.cable |
Microphone.sponge |
|
Velcro®.pads. |
Speaker.pads |
User.Manual,.stickers
28
SRC SYSTEM™ FOR C3 PRO HELMETS (offered in different sizes)
|
Flexible Boom |
Microphone |
|
|
Pin |
2 Speakers |
Pin |
|
Channel A Button |
||
|
• Connect to Rider A |
||
|
• MP3 |
||
|
Mobile Button |
||
|
Channel B Button |
||
|
• Connect to Rider B |
||
|
• FM Radio |
||
|
Volume Up / Forward |
||
|
Button |
||
|
Volume Down / Rewind |
||
|
Button |
|
Antenna |
USB Connector |
|
|
• Charging Jack |
||
|
Connector |
||
|
• Software Download Port |
||
|
• AUX |
||
|
. |
||
|
Wall.charger.plug |
MP3.cable |
|
|
USB.adapter.cable |
Microphone.sponge |
|
|
Velcro®.pads. |
Speaker.pads |
|
|
User.Manual,.stickers |
|
MAN00097 QG SRC-S2_C3 J 009.indd 28 |
7/18/12 5:38 PM |
||
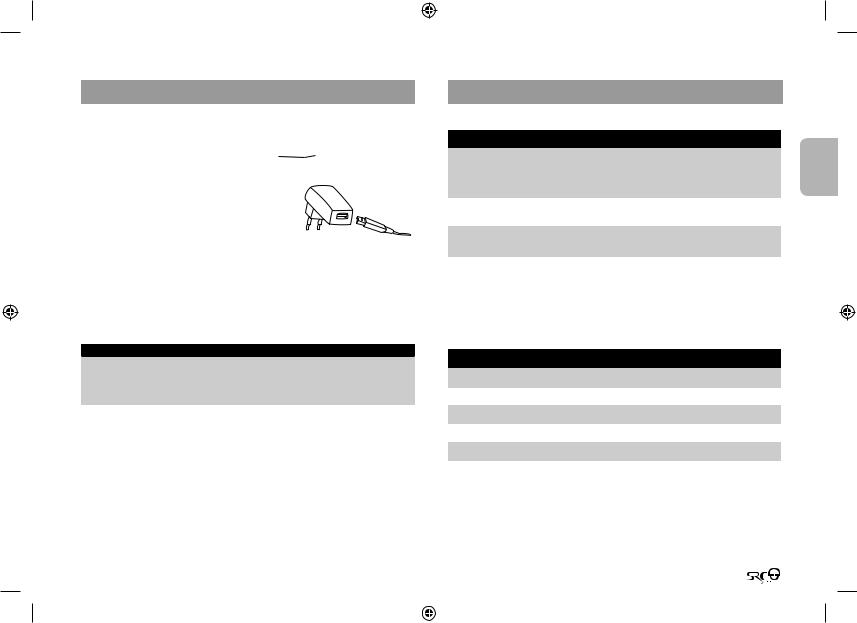
3.CHARGING THE HEADSET
Make sure that your headset is fully charged for at least four hours before initial use.
1.Open the cover protecting the Charging Jack.
2.Insert the USB cable into the Charging Jack. 


3.Insert the other end of the USB cable into the wall charger or a computer’s USB port.
4. While charging, the red LED turns on. When charging is complete, the red LED will turn off.
Your wall charger and USB adaptor cable serve two purposes:
1.Charging your headset from any A/C wall socket or from a USB port on your computer (charging time from computer takes longer)
2.Downloading software upgrades from any PC running Windows® XP™, Vista™ or Windows 7. (see section 4.3 for details).
IMPORTANT:
The cover protecting the micro USB Connector should be kept tightly closed at all times to prevent moisture from entering the device.
4.BASIC SETUP AND CONFIGURATION
4.1BASIC FUNCTIONS
|
DESIRED RESULT |
REQUIRED ACTION |
||||
|
Turn On / Off |
Press and hold the Mobile Button for at least 3 seconds |
English |
|||
|
On: Three blue flashes and Ascending tone |
|||||
|
Off: Three red flashes and Descending tone |
|||||
|
Adjust the volume of the |
Tap either the Volume Up or Volume Down Button . |
||||
|
current audio source |
(sets and saves the volume per source) |
||||
|
Mute |
Simultaneously tap Volume Up and Volume Down while |
||||
|
any audio is on |
|||||
|
Battery Level Indicator |
While on standby, press and hold the Volume Up Button |
||||
|
for 3 seconds |
|||||
|
Blue light = Battery is fully charged |
|||||
|
Red/blue light = Battery is half full |
|||||
|
Red light = Battery is almost empty |
|||||
4.2 STATUS LIGHTS
|
LED Indication |
Status |
|
None |
Headset is off |
|
1 blue flash every 3 seconds |
Standby – No call is in progress |
|
2 blue flashes every 3 seconds |
Audio active |
|
1 red flash every 3 seconds |
Standby – Battery is low |
|
2 red flashes every 3 seconds |
Low battery while audio active |
|
Solid red |
Charging |
29
|
MAN00097 QG SRC-S2_C3 J 009.indd 29 |
7/18/12 5:38 PM |
||

4.3 SOFTWARE UPGRADES AND SETTINGS
To make the most of your SRC-System™, make sure that it is running the latest software. To download the latest software updates and take advantage of customizing settings via the computer, register online 
at: www.schuberth.com/register/en and have your product serial number ready.
After downloading the SRCS Upgrades program, use the USB cable included in the retail box to connect the SRC-System™ to your computer.
Once connected to your computer, you will easily be able to customize the settings on your SRC-System™ following the on-screen instructions.
Future software upgrades and program patches will ensure the software of your SRC-System™ is kept up-to-date and will include additional features, status announcements and other valuable functions.
Please note that until further notice, upgrades will only be available for PCs running Windows XP™, Vista™ or Windows 7 operating systems.
4.4 SETTINGS CUSTOMIZATION
The SRC-System™ offers various customizable settings which allow you to personalize the device based on your preferences. Among these settings, you can:
•Enable/Disable Spoken Status Announcements which provide your connectivity status, i.e. whether you are in mobile phone or intercom mode, and confirm changes of such modes. By default the feature is ON.
•Set custom AGC and VOX sensitivity levels suited to your specific riding style and conditions.
SRC-SYSTEM SETTINGS CAN BE CUSTOMIZED IN TWO WAYS:
•Via the free SRC-System™ Upgrades software available for download from www.schuberth.com/register/en. Requires PC and cable-connected device (cable included). See section 4.3.
•Via the Voice Menu and the buttons on your SRC-System™ unit – see below.
30
4.5 VOICE MENU
The Voice Menu is available in several languages.
1.Press and hold the Channel “A” button and Channel “B” button simultaneously for 3 seconds while on standby.
2.After entering the menu, follow the voice instructions in English or choose your preferred language
4.6 AUDIO SOURCES AND PRIORITIES
The different audio sources connected to the SRC System™ are prioritized as shown below, i.e. the higher priority source will always override and interrupt the lower one.
For example, incoming phone calls will interrupt ongoing Intercom calls, while incoming intercom calls will interrupt the audio from the built-in FM Radio etc.
|
Higher Priority |
1. Mobile Phone audio or GPS instructions* |
|
|
|
2. Intercom / Click-to-Link® |
|
|
3. A2DP (Stereo Bluetooth) audio |
||
|
4.5. FMAUXRadio(for corded(Built-connectionin) |
i.e. Music Players) |
|
|
Lower Priority |
*GPS instructions from Smartphone GPS Apps are |
|
|
prioritized like A2DP audio |
4.7 RESETTING YOUR HEADSET
If your SRC System™ fails to respond despite repeated attempts, you can reset your headset by charging it. After approximately 10 seconds, remove the headset from the charger and turn it on again. It should now respond as expected.
20.
|
MAN00097 QG SRC-S2_C3 J 009.indd 30 |
7/18/12 5:38 PM |
||
![]()
5.S2 INSTALLATION
(See section 6 for C3PRO installation instructions)
5.1 REMOVING THE EXISTING ACOUSTIC COLLAR
First,.remove.the.existing.Acoustic.Collar.from.your.helmet.as.follows:
Pull.out.and.remove.the.Acoustic.Collar.from.the.front.at.its.bent.center.
5.2 CONNECTING THE ANTENNA CABLE
Your.SRC-System™.has.an.antenna.cable.which.must.be.connected.to.the.built-
in.antenna.cable.connector.in.the.Schuberth.helmet.
.
NOTE: Make sure to close the cover of the USB connector, and then tuck it away into the USB connector pocket.
1..Pull.out.the.antenna.connector.(marked.with.a.red.tag).which.is.tucked.inside. the.back.rim.of.the.helmet.
|
Antenna tag visible |
Antenna connector |
|
pulled out |
|
2.. On.the.SRC.collar.open.the.two.fasteners. |
A. |
B. |
|
|
on.the.antenna.connector.and.remove.the. |
|||
|
protective.plastic.cover. |
|||
|
3.. On.the.helmet.remove.the.rubber. |
A. |
English |
|
|
protector.from.the.antenna. |
|||
|
connector. |
B.
4..Align.the.two.connector.heads.and.snap.the.two.fasteners.back.into.place.to.
lock.the.connector.in.a.closed.position..
5..The.antenna.connector.can.now.be.
safely.stowed.away.inside.the.antenna.
connector.pocket.on.the.center.of.the.
SRC-System™.
31
|
MAN00097 QG SRC-S2_C3 J 009.indd 31 |
7/18/12 5:38 PM |
||

5.3 ATTACHING THE SRC SYSTEM™
1..Make.sure.to.place.the.speaker.and.microphone.cords.inside.the.helmet,.and. then.secure.the.SRC-System™.into.place.
2..Push.and.insert.the.SRC-System™.starting.from.the.back.of.the.helmet.area.. Do.the.same.for.the.sides.of.the.SRC-System™.and.then.the.front.of.the. helmet.area.to.secure.the.SRC-System™.into.place.
3.. Close.the.red.button,.making.sure.it.is.still.inside.its.black.holding.ring..
NOTE: Optional speaker pads are provided to boost the speaker volume if needed by bringing the speakers closer to your ears.
To use, simply place the speaker pad between the Velcro pad in the helmet indentation and the speaker.
5.5 POSITIONING THE MICROPHONE
Locate.the.spot.on.the.internal.padding.of.the.helmet,.opposite.your.mouth,.
where.the.microphone.will.be.placed.
1..Peel.the.cover.from.the.adhesive.Velcro.pad.and.place.it.on.the.chosen.
location.opposite.your.mouth.
2..Attach.the.microphone.to.the.Velcro,.as.shown.in.illustration.
5.4 POSITIONING THE SPEAKERS
For.best.audio.results,.make.sure.that.both.of.your.speakers.are.placed.as.closely.
as.possible.just.opposite.your.ears..
The following applies to both sides of the SRC-System™:
1..Open.the.rear.red.button.located.under.the.interior.lining.that.covers.the.cheek.  pads.(the.button.is.held.by.a.black.ring)..Lift.the.lining.slightly.
3..If.there.is.any.excess.microphone.cable,.tuck.it.under.the.cheek.pads.
2..Attach.the.corresponding.oval.Velcro.pads.to.the.speaker-shaped.indentations.
|
on.the.EPS.(expanded.polystyrene).and.position.the.speakers.on.the.Velcro.pads. |
5.6 REMOVING THE SRC SYSTEM™ FROM YOUR HELMET |
1.. Detach.both.speakers.and.the.microphone.from.the.Velcro.on.the.helmet..
IMPORTANT: Make sure not to pull on the Antenna connector.
2.. Pull.out.the.Antenna.connector.from.its.pocket.and.carefully.disconnect.it.
3.. Lift.and.push.the.collar’s.arch.from.the.front.helmet.area.to.carefully.remove.
the.SRC-System™.from.the.helmet..
32
|
MAN00097 QG SRC-S2_C3 J 009.indd 32 |
7/18/12 5:38 PM |
||

5.7 WEARING AND REMOVING THE HELMET
The electronic components of SRC System™ are safely embedded inside an Acoustic Collar. To avoid discomfort while you put on your helmet or while removing it, we recommend that you proceed as follows:
1.Expand the helmet opening by firmly holding the chin straps and pulling them forcefully apart.
2. While pulling the straps apart, slide the helmet over your head.
3. To remove the helmet, proceed along the same lines by first pulling the straps apart and then pushing the entire helmet upwards.
NOTE: Your SRC System™ Acoustic Collar is designed for maximum comfort. However, since it contains an entire electronic kit within, it will have a slight a bulge. Therefore, putting your SRC equipped helmet on or taking it off may feel different than what you are used to with a standard Acoustic Collar. Remember: The more you pull the helmet straps apart when putting on your helmet or taking it off, the smoother the process will be, allowing the Acoustic Collar to soften.
5.8 CLEANING THE SRC-SYSTEM™ ACOUSTIC COLLAR
To clean the SRC System™ Acoustic Collar, first make sure the USB connector is tightly closed. Use only a slightly damp cloth. Avoid soaking the Acoustic Collar with water or any other fluid. Never submerge it and refrain from letting water come in contact with the speakers or the microphone. Allow the unit to dry at room temperature.
6.C3 PRO INSTALLATION
(See section 5 for S2 installation instructions)
6.1 REMOVING THE EXISTING ACOUSTIC COLLAR
|
First, remove the existing Acoustic Collar from |
English |
|
your helmet as follows: |
1. Open both snap buttons.
2. Pull out the Acoustic Collar from the rear at its bended center.
3. Release the collar’s pins from their corresponding indentations inside the helmet’s rim.
6.2 CONNECTING THE ANTENNA CABLE
Your SRC-System™ has an antenna cable which must be connected to the builtin antenna cable connector in the Schuberth helmet.
NOTE: Make sure to close the cover of the USB connector, and then tuck it away into the USB connector pocket.
33
|
MAN00097 QG SRC-S2_C3 J 009.indd 33 |
7/18/12 5:38 PM |
||

.1…Pull.out.the.antenna.connector.(marked.with.a.red.tag).which.is.tucked.inside. the.back.rim.of.the.helmet.
|
Antenna tag visible |
Antenna connector |
||
|
pulled out |
|||
|
2…On.the.SRC.collar.open.the.two.fasteners.on.the. |
A. |
B. |
antenna.connector.and.remove.the.protective.
plastic.cover.
3…On.the.helmet.remove.the.rubber.protector.
from.the.antenna.connector.
A.
4…Align.the.two.connector.heads.and.snap.the.two. 

 fasteners.back.into.place.to.lock.the.connector.

 B. in.a.closed.position..
34
5…The.antenna.connector.can.now.be.safely. stowed.away.inside.the.antenna.connector. pocket.on.the.center.of.the.SRC-System™.
6.3 ATTACHING THE SRC SYSTEM™
1…Make.sure.to.place.the.speaker.cords.inside.the.helmet,.and.then.secure.the. SRC-System™.into.place.
2…Slide.and.insert.the.pin.located.at.the.edge.of.the.control.panel.into.its. corresponding.indentation.on.the.helmet.and.close.the.snap.button.
Pin
3…Insert.the.other.pin.on.the.opposite.side.of.the.Acoustic.Collar.into.place.and. close.the.second.snap.button.
4…Push.and.insert.the.Acoustic.Collar.starting.from.the.center.area.to.the.back.of. the.helmet.area..Do.the.same.for.the.remaining.parts.to.secure.the.Acoustic. Collar.into.place. 
5…Make.sure.that.both.snap.buttons.remain.fastened,.and.that.the.microphone. boom.is.located.on.the.inner.side.of.your.helmet.(between.the.SRC-System™. and.the.inner.padding.of.the.helmet).
|
MAN00097 QG SRC-S2_C3 J 009.indd 34 |
7/18/12 5:38 PM |
||

|
Microphone Boom |
Snap Button |

 Snap Button
6.4 POSITIONING THE SPEAKERS
For best audio results, make sure that both of your speakers are placed as closely as possible just opposite your ears.
The following applies to both sides of the SRC-System™:
1.Open the rear red button located under the interior lining that covers the cheek pads (the button is held by a black ring). Lift the lining slightly.
2.Attach the corresponding oval Velcro pads to the speaker-shaped indentations on the EPS (expanded polystyrene) and position the speakers on the Velcro pads.
3. Close the red button, making sure it is still inside its black holding ring.
NOTE: Optional speaker pads are provided to boost the speaker volume if needed by bringing the speakers closer to your ears.
To use, simply place the speaker pad between the Velcro pad in the helmet indentation and the speaker.
6.5 POSITIONING THE MICROPHONE
To assure smooth closing (flip-down) of the helmet’s chin section, first remove its triangular Anti-Noise Pad and proceed as follows:
1.Bend the flexible microphone boom as shown in the image.
2.Press the microphone towards the center of your mouth.
3.Flip-down and close the chin section of your helmet. You may need to use both hands to close the chin section properly.
4.While the chin section is closed and the visor is open, insert your hand into the opening of the visor and push the microphone away, towards the center of the chin section directly opposite your mouth.
6.6REMOVING THE SRC SYSTEM™ FROM YOUR HELMET
1.Detach both speakers from the Velcro on the helmet. .
IMPORTANT: Make sure not to pull on the Antenna connector.
2.Pull out the Antenna connector from its pocket and carefully disconnect it.
3.Carefully lift and push the Acoustic Collar’s arch from the center.
4.Release the Acoustic Collar’s pins from their corresponding indentations inside the helmet’s rim.
5.Open both snap buttons.
|
MAN00097 QG SRC-S2_C3 J 009.indd 35 |
7/18/12 5:38 PM |
||

6.7 WEARING AND REMOVING THE HELMET
The.electronic.components.of.SRC-System™.are.safely.embedded.inside.an. Acoustic.Collar..To.avoid.discomfort.while.you.put.on.your.helmet.or.while. removing.it,.we.recommend.that.you.proceed.as.follows:.
1…Expand.the.helmet.opening.by.firmly.holding.the.chin.straps.and.pulling.them. forcefully.apart..
2…While.pulling.the.straps.apart,.slide.the.helmet. over.your.head.
3…To.remove.the.helmet,.proceed.along.the.same. lines.by.first.pulling.the.straps.apart.and.then. pushing.the.entire.helmet.upwards.
NOTE: Your SRC-System™ Acoustic Collar is designed for maximum comfort. However, since it contains an entire electronic kit within, it will have a slight a bulge. Therefore, putting your SRC equipped helmet on or taking it off may feel different than what you are used to with a standard Acoustic Collar. Remember: The more you pull the helmet straps apart when putting on your helmet or taking it off, the smoother the process will be, allowing the Acoustic Collar to soften.
6.8 CLEANING THE SRC SYSTEM™ ACOUSTIC COLLAR
To.clean.the.SRC-System™.Acoustic.Collar,.first.make.sure.the.USB.connector.is. tightly.closed..Use.only.a.slightly.damp.cloth..Avoid.soaking.the.Acoustic.Collar. with.water.or.any.other.fluid..Never.submerge.it.and.refrain.from.letting.water. come.in.contact.with.the.speakers.or.the.microphone..Allow.the.unit.to.dry.at. room.temperature.
7.CONNECTING MOBILE PHONES, GPS AND MP3 PLAYERS
MULTIPLE DEVICE CONNECTIVITY (“MDC”) WITH BLUETOOTH® COMPATIBLE DEVICES
Thanks.to.MDC.technology.the.SRC-System™.offers.parallel.connectivity.as. follows*:
Intercom.with.up.to.two.other.SRC-System™.headsets
Bluetooth.enabled.Mobile.Phone./.GPS.device
A2DP.enabled.MP3.Player
Built-in FM radio
MP3 player
Up to 700 m / 2,300 ft. Bike-to-Bike Intercom Range*
|
GPS |
Mobile phone |
|
& A2DP connectivity |
NOTE: If you plan to use your mobile phone while using a Bluetooth® GPS device, then you should pair your mobile phone to the GPS and not to the SRC-System™ headset.
* see restrictions under 9.4 b
36
|
MAN00097 QG SRC-S2_C3 J 009.indd 36 |
7/18/12 5:38 PM |
||

7.1 MOBILE PHONE
To.use.your.Bluetooth®.mobile.phone.with.the.SRC-System™,.you.must. first.pair.the.two.devices.
NOTE: If you plan to use a GPS device in parallel with your mobile phone, then you should pair your mobile phone to the GPS device and not to the SRC-System™. In such case, skip this section and proceed directly with section 7.2.
Pairing.is.a.one.time.process..Once.the.headset.is.paired.to.a.specific.mobile. phone,.they.will.remain.paired.and.automatically.recognize.each.other.whenever. they.are.within.range.
If.the.connection.between.the.phone.and.headset.is.lost,.tap.the.Mobile.Button. on.your.headset.to.reconnect.the.devices.
PAIRING A MOBILE PHONE:
1..Turn.on.your.phone.and.make.sure.its.Bluetooth®.function.is.activated..Turn.on. your.headset.by.pressing.the.Mobile Phone.Button.for.at.least.three.seconds. resulting.in.three.blue.flashes.
2..With.the.SRC-System™.turned.ON,.press.and.hold.the.Mobile.Button.for.at. least.six.seconds.until.the.Red.and.Blue.Lights.begin.rapidly.alternating.
3..Search.for.Bluetooth®.devices.on.your.phone.by.following.the.phone’s.instructions..Consult.your.phone’s.User.Manual.for.more.information.
4..After.a.few.seconds.the.phone.will.list “SRCS” (incl. its software version). as.a.discovered.device..Select.it.and.follow.your.phone’s.instructions.to.accept. the.pairing.
5..When.prompted,.enter.0000.(four.zeros).as.your.PIN.or.passkey.
6..Your.phone.will.confirm.that.pairing.has.succeeded.and.the.headset.will.begin.
flashing.slowly.in.Blue.
NOTES:
1.With some mobile phones, you may need to tap the Mobile Button to connect the headset to the phone after pairing is complete. The SRC-System™ will automatically connect to the last phone connected to the headset.
2.If the pairing process is not completed within two minutes the headset will return to Standby mode
MAKING AND RECEIVING MOBILE PHONE CALLS
BASIC FUNCTIONS
|
Answer a call |
Tap.the.Mobile.Button.or.speak.loudly.any.word.of.your.choice |
|
Reject a call |
Remain.silent.for.15.seconds,.or.press.and.hold.the.Mobile. |
|
Button.for.3.seconds.during.an.incoming.call |
|
|
End a call |
Tap.the.Mobile.Button.during.a.call,.or.let.the.other.party. |
|
terminate.the.call |
|
|
Voice Dial |
During.Standby,.tap.the.Mobile.Button.and.pronounce.loudly. |
|
(if.supported.by. |
the.name.of.the.person.you.wish.to.call.. |
|
mobile.phone) |
|
|
Redial* |
During.Standby,.tap.the.Mobile.Button.twice |
|
ADVANCED FUNCTIONS FOR 3 WAY COMMUNICATION: |
|
|
Add/Remove |
Tap.the.CHANNEL.“A”.button.while.on.a.phone.call |
|
CHANNEL “A” headset |
|
|
to/from phone call |
|
|
Add/Remove |
Tap.the.CHANNEL.“B”.button.while.on.a.phone.call |
|
CHANNEL “B” headset |
|
|
to/from phone call |
|
*.This.feature.is.not.available.during.intercom.or.mobile.phone.calls.
When.the.headset.is.on.an.active.phone.call,.any.Intercom.call.request.will.be.
automatically.rejected.
Once.the.phone.call.ends,.you.can.make.and.accept.Intercom.calls.again.
Not.all.Bluetooth®.mobile.phones.can.broadcast.Bluetooth®.Stereo.music.(A2DP),. even.if.the.phone.has.an.MP3.player.application..Consult.your.mobile.phone’s. User.Manual.for.more.information.
|
MAN00097 QG SRC-S2_C3 J 009.indd 37 |
7/18/12 5:38 PM |
||

7.2 GPS DEVICE
To.use.a.Bluetooth®.enabled.GPS.device.with.the.SRC-System™,.you. must.first.pair.the.two.devices..This.will.allow.your.GPS.to.transmit. navigation.instructions.and.audio.to.the.speakers.of.your.headset.
NOTE: Not all Bluetooth® GPS devices allow connections to Bluetooth® audio devices. Please consult your GPS User Guide for more information.
PAIRING THE HEADSET TO A GPS DEVICE:
1..Turn.on.your.GPS.and.turn.on.your.headset..
2..With.the.SRC-System™.turned.ON,.press.and.hold.the.Volume Up.Button.for.at. least.six.seconds.until.the.Red.and.Blue.Lights.begin.flashing.simultaneously.
3..Search.for.Bluetooth®.devices.on.your.GPS.by.following.the.instructions.in. the.GPS.User.Guide..After.a.few.seconds.the.GPS.will.list.“SRCS” (incl. its software version).as.a.discovered.device..Select.it.and.follow.your.GPS’s. instructions.to.accept.the.pairing.
4..If.your.GPS.device.prompts.for.a.PIN.or.Passkey.enter.0000.(four.zeros).
5..Your.GPS.device.will.confirm.that.pairing.has.succeeded..Your.SRC-System™. will.begin.flashing.slowly.in.Blue..
IMPORTANT
If you wish to use a Bluetooth® mobile phone to make and receive calls through the headset, you should pair your mobile phone to your GPS device by following the instructions in your GPS User Guide.
NOTES:
1.If the pairing process is not completed within two minutes the headset will return to Standby mode
2.The priority schedule of your SRC-System™ has been set in a way to avoid incoming intercom calls to interrupt GPS instructions in progress. In such case the intercom caller will hear a busy signal and you will hear two beeps, indicating that an intercom caller is trying to page you (see section 4.6 for details on audio priorities of paired devices).
38
MAN00097 QG SRC-S2_C3 J 009.indd 38
7.3 MP3 MUSIC
7.3a WIRELESS A2DP
Your.headset.is.designed.to.receive.wireless.stereo.music.from.A2DP.sources.and. mobile.phones.that.support.the.Bluetooth®.A2DP.and.AVRCP.profiles.(mostly.3rd. generation.devices)..
Using.a.Bluetooth®.device.that.supports.the.AVRCP.profile.will.allow.you.to. operate.all.major.A2DP.source.functions.directly.from.your.headset.
NOTE: The SRC-System™ can also receive audio via the enclosed cable from non- Bluetooth® MP3 Players or audio sources as described in section 7.3b
While.listening.to.music.from.an.A2DP.source,.you.will.not.miss.any.mobile.or. intercom.calls,.as.the.headset.will.automatically.stop.the.music.giving.preference. to.the.incoming.call..However,.after.you.terminate.your.call,.some.MP3.sources. may.not.automatically.continue.but.require.manual.re-activation..
SETTING UP YOUR MP3 PLAYER FOR BLUETOOTH STEREO A2DP TRANSMISSION
To.use.a.Bluetooth®.Stereo.(A2DP).enabled.MP3.Player.to.listen.to.stereo.music,. you.must.first.pair.the.device.to.your.headset..
PAIRING THE HEADSET TO AN MP3 PLAYER
NOTE: If your A2DP source is integrated inside your Mobile Phone, then you should pair it with your headset as described in section 7.1 above
1..Turn.on.your.MP3.Player.and.make.sure.that.its.Bluetooth®.function.is.activated.
2..With.the.SRC-System™.headset.turned.ON,.press.and.hold.the.Mobile.Button. for.at.least.six.seconds.until.the.Red.and.Blue.Lights.begin.alternating.rapidly:
3..Search.for.Bluetooth®.headsets.on.your.MP3.Player.by.following.the.device’s. instructions.
4..After.a.few.seconds.the.MP3.Player.will.list.“SRCS” (incl. its software version).as.a.discovered.device..Select.it.and.follow.your.MP3.Player’s. instructions.to.accept.the.pairing.
7/18/12 5:38 PM 

5.If your MP3 player prompts for a PIN or Passkey enter 0000 (four zeros).
6.Once pairing is complete, your MP3 Player may confirm that pairing has succeeded, and the headset will begin flashing slowly in Blue.
NOTE: If the Pairing process is not completed within two minutes the headset will return to Standby mode.
OPERATING YOUR A2DP SOURCE FROM YOUR HEADSET
|
Play |
Press the MP3 Button for 3 seconds |
|
Pause / Stop* |
Press the MP3 Button for 3 seconds |
|
Forward |
Press the Volume Up Button for 3 seconds |
|
Rewind** |
Press the Volume Down Button for 3 seconds |
*Varies depending on your mobile phone
**With some phones you may need to repeat this action once more
SWITCHING BETWEEN A2DP AUDIO SOURCES
If a Music Player is paired, the SRC System™ will use it as the default A2DP audio source.
1.Stop the music playback from the current device.
2.Start music playback from the other device.
7.3b CABLE-CONNECTED MP3 PLAYER VIA THE AUX
Your headset allows you to connect non-Bluetooth® audio sources, such as MP3 players to the headset by using the enclosed cable.
1.Make sure the headset is on Standby mode, flashing slowly in Blue.
2.Connect the MP3 cable to your MP3 player/audio source’s headset jack and insert the other end of the cable into the
micro USB Connector.
3.Operate the MP3 Player device by using its
own buttons as usual (FF / REW / PLAY / PAUSE).
Volume can be adjusted through the MP3 Player or the Volume Buttons of the headset.
Any other audio connection will automatically mute the MP3 Player. The audio signal will return only when headset is once again in Standby mode.
NOTE: While listening to your MP3 player, the VOX feature is disabled
8. BUILT-INFMRADIO
The SRC System™ is equipped with an FM stereo radio receiver and RDS (Radio Data System) technology.
|
Radio On / Off |
Press and hold the CHANNEL “B” button for 3 seconds |
|
Switch to next |
While listening to the Radio, tap the CHANNEL “B” button |
|
preset station |
to cycle through the 6 Preset FM Stations |
|
Start Intercom call |
While listening to the Radio, start talking loudly |
|
Initiate Voice Dial |
While listening to the Radio, tap the Mobile Button and |
|
from your Mobile |
pronounce loudly the name of the person you wish to |
|
Phone |
call. This feature is supported only by mobile phones that |
|
include the Voice Dial feature |
|
|
Initiate Redial from |
While listening to the Radio, tap the Mobile Button twice |
|
your Mobile Phone |
|
|
RDS ON/OFF |
While the Radio is on, press and hold Volume Up and |
|
(Default: OFF) |
Volume Down Buttons simultaneously for 3 seconds |
Thanks to the RDS feature, your headset will automatically select the strongest signal available for the FM station you wish to listen to, no matter where you are riding.
|
MAN00097 QG SRC-S2_C3 J 009.indd 39 |
7/18/12 5:38 PM |
||

RDS ON/OFF (press simultaneously 3 seconds while Radio is on)
|
Channel “A“ |
Channel “B“ |
|
|
Button |
Button |
|
•FM Radio ON / OFF (press 3 sec.)
•Switch among pre-saved stations (tap briefly)
There are two ways to search for a new radio station on your SRC System™: Seek and Save: (Find the next FM station)
1. Press and hold the Volume Up or Volume Down Button for 3 seconds.
• Pressing Volume Up searches upwards (higher frequency) for a station
• Pressing Volume Down searches downwards (lower frequency) for a station
2.Tap the Channel “B” button within 20 seconds of finding the FM station to save it as the current Preset.
Scan and Save: Scan through FM stations
1.Press and hold the Volume Up button for 6 seconds. The SRC System™ will search upwards (higher frequency) for a station. When a station is found, it can be heard for a few seconds.
2.To stop the scan on this station: Tap the Volume Up Button.
3.Tap the Channel “B” button within 20 seconds of finding the FM station to save it as the current Preset.
4.To continue scan: Wait for the next station to be found.
40
NOTE: During Scan, tap the Channel “B” button to Fast Save the current FM station as the current Preset.
AUTOMATIC RADIO TUNING
This feature makes finding new stations fast and easy by automatically creating a temporary list of 6 “on-the-go” radio stations.
1.Turn on the Radio.
2.Press and hold the Volume Down button for 6 seconds.
3.Your SRC System™ will search upwards (higher frequency) from the current station and store the next 6 FM stations it discovers as “on the go” stations.
4.If desired, repeat from Step 2 to store the next 6 FM stations as “on the go” stations.
NOTE: These 6 temporary “on the go” stations cannot be saved and do not replace the FM Presets you may have saved.
Turning off your SRC System™ will clear the Automatic Radio Tuning stations and restore the FM Presets.
|
MAN00097 QG SRC-S2_C3 J 009.indd 40 |
7/18/12 5:38 PM |
||
![]()
9.USING THE INTERCOM
9.1INTRODUCTION
Your SRC System™ allows you to connect to other bikers using SRC headsets within a range of up to 700 meters / 2,300 ft. (subject to terrain). To set up one or two Intercom Bluetooth® connections, you must first pair your SRC System™ headset with the other headsets.
Pairing is a one time process. Once completed, the headsets will remain paired and automatically recognize each other whenever they are within range.
Your headset has two Intercom channels available for headset-to-headset connections. Therefore, your SRC System™ can communicate simultaneously in conference mode with up to two other SRC headsets.
9.2 INTERCOM COMPATIBILITY
You can use your SRC System™ headset for Intercom communication with any other SRC System™ headset and with cardo scala rider headsets. For further details visit www.cardosystems.com/SRC.
9.3 BEFORE STARTING THE INTERCOM
Your SRC System™ headset has two buttons designated for quick connection to two other headsets. These other headsets are referred to as CHANNEL “A” and
CHANNEL “B”.
|
Channel “A“ |
Channel “B“ |
|
|
Button |
Button |
|
Before you can begin using the intercom for Bike-to-Bike communication with one or two other headsets, all units must first be paired.
9.4USING THE SRC SYSTEM™ FOR INTERCOM WITH OTHER SRC SYSTEM™ HEADSETS
|
INTERCOM CHANNEL |
PAIRING / CONNECTION |
PAIRING MODE LED |
|
BUTTON |
INDICATORS |
|
|
CHANNEL “A” |
CHANNEL “A” BUTTON |
Rapid RED flashing |
|
CHANNEL “B” |
CHANNEL “B” BUTTON |
Rapid BLUE flashing |
9.4a. TWO-WAY INTERCOM
Using two SRC System™ headsets
1.While both headsets are turned OFF, turn them ON by pressing and holding the Mobile Buttons until the Blue Lights flash three times.
2.Make sure that both headsets are now flashing slowly in Blue.
3.Choose an available CHANNEL you wish to use to pair the headset (CHANNEL “A” or CHANNEL “B”).
NOTE: Selecting a CHANNEL that is already in use will override the paired headset on that CHANNEL with the newly paired headset.
4.On the SRC System™ headset, press and hold the assigned CHANNEL BUTTON (“A” or “B”) for at least six seconds until the headset’s BLUE or RED Light begins flashing rapidly, indicating it is in Intercom Pairing mode. (See Intercom Channel Table for Pairing LED indication for each CHANNEL).
5.Repeat Step 3-4 for the second SRC System™.
6.Within a few seconds, both headsets will show a solid light for two seconds, indicating that the two headsets are now paired, connected and ready for use.
NOTE: If the Pairing process is not completed within two minutes the headset will return to Standby mode.
|
MAN00097 QG SRC-S2_C3 J 009.indd 41 |
7/18/12 5:38 PM |
||

9.4b. THREE WAY INTERCOM
The.SRC-System™.offers.three-way.intercom.conference.connectivity.as.follows:
|
Use Channel “A” |
Use Channel “B” |
||
Rider “1”
In.this.configuration.Rider.“1”.is.paired.to.Rider.“2”.and.to.Rider.“3”.
IMPORTANT: Since Rider “1” uses two Bluetooth® connections during the conference mode, Rider “1” will be disconnected from the mobile phone or GPS device until the conference mode ends. Then, Rider “1” will automatically re-connect to his mobile phone or GPS. Riders “2” and “3” remain connected to their mobile phones or GPS devices during the 3-way intercom call.
Pairing.three.SRC-System™.headsets.is.achieved.by.simply.repeating.the.procedure.in. the.above.section.9.4a.with.a.third.SRC-System™.headset.(in.a.different.CHANNEL).
1..Pair.your.SRC-System™.with.the.second.SRC-System™.as.described.in. section.9.4a.(Using.CHANNEL.“A”).
2..Pair.your.SRC-System™.with.the.third.SRC-System™.as.described.in. section.9.4a.(Using.CHANNEL.“B”)
42
9.5 MAKING INTERCOM CALLS
There.are.two.ways.to.start.an.Intercom.call.with.headsets.that.are.paired.to.your.
SRC-System™.(make.sure.you.are.in.Standby.mode):
VOICE CONNECT (VOX):
Preferred for relatively brief conversations as it takes the channel into standby mode after 30 seconds of silence
Start talking loudly
Once.you.start.talking.loudly,.an.Intercom.call.will.be.
established.with.both.paired.headsets,.CHANNEL.“A”. and.CHANNEL.“B”.(if.both.are.available)..
The.Intercom.call.will.stay.on.until.all.participants. remain.silent.for.30.seconds..(Applicable.for.2-way. communication)
CHANNEL BUTTON CONNECT:
Preferred for extended conversations as it leaves the channel open and active
Tap CHANNEL “A” or “B” Button.once.to.add.or. remove.the.other.headset. from.an.Intercom.call.
NOTE: While the Intercom is on, the Redial and Voice Dial functions will be disabled.
9.6 RECEIVING INTERCOM CALLS
When.a.paired.headset.calls.you.via.intercom,.the.call.will.begin.almost.instantly.
NOTE: The headsets preset priority modes have been set in a way to avoid incoming intercom calls from interrupting mobile phone calls and GPS instructions in progress. In such case the intercom caller will hear a busy signal and you will hear two beeps, indicating that an intercom caller is trying to page you. (see section 4.6 for details on audio priorities of paired devices).
9.7 VOICE CONNECT FEATURE (VOX)
The.SRC-System™.also.offers.VOX.technology.for.safe.and.hands-free.operation.
of.some.key.functions.
The.VOX.feature.can.be.customized.to.adjust.its.sensitivity.level..You.can.choose.
between.‘Regular’.(default),.‘Low’.and.‘High’.VOX.sensitivity..If.you.experience.
difficulty.starting.a.conversation.using.VOX,.change.the.setting.to.’High’.via.the.
PC.software.(see.section.4.3).or.directly.on.your.SRC-System™.headset.via.the.
Settings Customization Menu.(see.Section.4.4).
|
MAN00097 QG SRC-S2_C3 J 009.indd 42 |
7/18/12 5:38 PM |
||

ENABLE/DISABLE VOX: VOX activation for Intercom calls can also be disabled completely. While on standby press the Volume Up and Volume Down Buttons simultaneously for 3 seconds until you hear a beep. (Default: VOX enabled).
NOTE: The Enable/Disable Voice Connect feature affects only the Intercom functionality.
9.8 RESET PAIRING (RESTORING DEFAULT CONFIGURATION)
This section is only relevant once you have completed a pairing process.
You can delete all of your paired devices at any time as follows:
1.With the SRC System™ headset turned ON, press and hold the Mobile Button for at least six seconds until the Red and Blue Lights begin rapidly alternating.
2.Press and hold the Volume Up Button for three seconds.
3.The Red and Blue Lights will flash five times simultaneously and then the headset will turn off, confirming that Reset was successfully completed.
9.9NOTEWORTHY ISSUES
1.Busy Status (When using a SRC System™ headset)
When attempting an Intercom call with a headset that is already on a Phone/ GPS/ Intercom call, you will hear two beeps indicating the other headset is busy.
2. Automatic Reconnection of the Intercom
If the SRC System™ and another paired headset go out of range and disconnect from each other, the SRC System™ will immediately try to reconnect to the other headset.
You can manually reconnect the intercom call while the headset is in Standby mode by pressing the CHANNEL “A” or the CHANNEL “B” Button to connect to the respective lost connection.
3. Conference Mode Limitations
Whenever you enter the Intercom Conference mode among three participants (including yourself), the participants who maintain simultaneously two active connections will not be able to receive mobile phone calls or GPS messages as long as the conference call is in progress (see details in sections 9.4 b).
9.10 TROUBLESHOOTING THE INTERCOM
First, make sure your microphone is located properly in front of the center of your mouth.
|
The SRC System™ is designed for use in loud environments. Therefore, you |
|
|
should test the Intercom functionality only in a noisy environment, such as next |
|
|
to an idling motorcycle and not indoors. Please also verify that the headsets |
English |
|
were paired together properly by following the instructions in the relevant Setup |
|
|
sections. |
10. CLICK-TO-LINK® (CTL)
Click-to-Link® is the spontaneous “social” nature of your SRC System™. This unique feature will enable you to instantly initiate one-to-one intercom calls with other SRC System™ users in the near vicinity without going through a pairing process in advance. Think of it as a private bike-to-bike channel that you can set up on-the-fly with other SRC System™ users that you spot at a traffic light or on the road.
The Click-to-Link® feature can of course be disabled at any time, blocking any attempt by other users to establish a spontaneous link.
ENABLE/DISABLE CLICK-TO-LINK®
The feature can be turned on or off via the Settings Customization Menu (see Section 4.4). By default, this feature is DISABLED.
AUDIO SOURCES AND PRIORITIES
The different audio sources connected to the SRC System™ are prioritized as shown below, i.e. the higher priority source will always override and interrupt the lower one.
For example, incoming mobile phone calls and GPS navigation instructions will interrupt ongoing Click-to-Link® calls, while incoming Click-to-Link® calls will interrupt the audio from the built-in FM Radio etc.
Click-to-Link® established calls and Intercom calls have the same priority: If one is in use, the other is unable to interrupt. Therefore, a Click-to-Link® request cannot interrupt an Intercom call in progress, and vice-versa.
43
|
MAN00097 QG SRC-S2_C3 J 009.indd 43 |
7/18/12 5:38 PM |
||

|
Higher Priority |
1. Mobile Phone audio or GPS instructions* |
|
|
2. Intercom / Click-to-Link® |
|
3. A2DP (Stereo Bluetooth) audio |
|
|
4. FM Radio (Built-in) |
|
|
5. AUX (for corded connection i.e. Music Players) |
|
|
Lower Priority |
*GPS instructions from Smartphone GPS Apps are prioritized like A2DP audio |
IC (Intercom) Request Tone: If you are on a Click-to-Link® call and Rider A or Rider B try to connect to you for an IC Call, you will hear an IC Request Tone while the other party will hear a rejection beep.
If other Click-to-Link®-enabled units are nearby, new Click-to-Link® connections may randomly connect to any of them.
GENERAL FUNCTIONS
USING Click-to-Link®
|
If you want to… |
Perform this action: |
|
|
Make |
Start a CTL call request |
Double tap the Channel“A” Button |
|
CTL calls |
(search lasts up to 10 seconds) |
|
|
End a CTL call / |
Tap the Channel “A” Button |
|
|
Cancel a CTL call request |
||
|
Receive |
Accept a CTL call |
When hearing the CTL ringtone: |
|
CTL calls |
Tap the Channel “A” Button or Speak |
|
|
any word loudly to answer by VOX |
||
|
Reject a CTL call |
While hearing the CTL ringtone: |
|
|
Remain silent until the ring tone |
||
|
stops |
||
NOTE: Click-to-Link® connections will not replace or change your current Rider A and Rider B intercom pairings. Click-to-Link® uses a separate temporary channel to connect to a Click-to-Link® conversation partner.
44
11. SUPPORT
For additional information please visit our website at www.schuberth.com
For technical support please contact us at: service@schuberth.com
Phone: +49-391-8106-555
For the latest information on Software upgrades please visit our website at www.schuberth.com/en/motorcycle/service/src-systemtm.html and register on-line.
IMPORTANT:
OPENING ACOUSTIC COLLAR ZIPPER VOIDS WARRANTY!
The electronic components inside the Acoustic Collar of the SRC System™ are closed by a sealed zipper. Please do not tamper with or open the zipper as this will void your warranty.
21.
|
MAN00097 QG SRC-S2_C3 J 009.indd 44 |
7/18/12 5:38 PM |
||

- Manuals
- Brands
- SCHUBERTH Manuals
- Motorcycle Accessories
- C3 PRO
- Manual
-
Contents
-
Table of Contents
-
Bookmarks
Quick Links
P r o
Manual
DE
deutsch
EN
english
FR
français
IT
158 — 209
italiano
NL
nederlands
ES
español
CZ
314
DK
315
FI
RU
316
GR
317
HU
318
NO
319
2 — 53
54 — 105
106 — 157
210 — 261
262 — 313
PT
320
PL
321
322
SE
323
SL
324
TR
325
Related Manuals for SCHUBERTH C3 PRO
Summary of Contents for SCHUBERTH C3 PRO
-
Page 1
P r o Manual deutsch 2 — 53 english 54 — 105 français 106 — 157 158 — 209 italiano nederlands 210 — 261 español 262 — 313… -
Page 2: Die Richtige Benutzung Der Gebrauchsanweisung
Um keinen für Ihre Sicherheit relevanten Aspekt außer Acht zu Kompliment! lassen, empfehlen wir Ihnen, diese Gebrauchsanweisung in der vorgegebenen Reihenfolge zu lesen. Sie haben mit dem SCHUBERTH C3 Pro eine ausgezeichnete Wahl Bitte achten Sie besonders auf: getroffen. Der C3 Pro ist das Ergebnis der Weiterentwicklung des Warnung: Sicherheitshinweise mehrfach ausgezeichneten Klapphelms C3.
-
Page 3: Table Of Contents
Kinnriemen mit Micro-Lock-Ratschenschloss Zubehör und Ersatzteile ……..49 ® Pinlock -Visier Kommunikationssysteme Sonnenvisier Zubehör und Ersatzteile Innenausstattung Bezug von SCHUBERTH Originalteilen Belüftungssysteme Zusätzliche Sicherheitsausstattung SCHUBERTH Service ……….51 Reparaturservice Auf- und Absetzen ……….37 Gewährleistung Aufsetzen des Helms Absetzen des Helms Wie Sie uns erreichen ……..
-
Page 4: Der Helm
C. DEr HElM 1. NORM 3. ANATOMIE DES HELMS Kopfbelüftung Der C3 Pro erfüllt die Norm ECE-R 22.05. Diese Prüfnorm gewähr- Integrierte Antennen Innenschale leistet die Einhaltung von definierten Sicherheitsstandards hin- Visier sichtlich Stoßdämpfung, Visier, Rückhaltesystem sowie Sichtfeld. Reflexaugen Diese Zulassung gilt in Ländern der europäischen Union und in Pinlock ®…
-
Page 5: Aerodynamik
Alle SCHUBERTH Motorrad- und Rennsporthelme werden im lieren Sie diese anhand Ihres Tachometers. SCHUBERTH eigenen Windkanal unter wissenschaftlich genau definierten Bedingungen entwickelt und optimiert. Der C3 Pro Achtung: ist speziell für die Touren- und Sporttourenfahrer-Sitzhaltung Bei verkleideten Motorrädern treten im Rand be reich des er- eingestellt und liegt ruhig im Luftstrom.
-
Page 6: Windabweiser
Halstuches. 9. KINNTEIL 2. Die Bowdenzugmechanik gibt beide Schlösser frei und Sie Der C3 Pro ist mit einem hochschwenkbaren Kinnteil ausgerüstet, können das Kinnteil nach oben welches sich mit Hilfe des mittig am Kinnteil platzierten Bedie- in die Endrastung schwenken.
-
Page 7: Kinnriemen Mit Micro-Lock-Ratschenschloss 12 H
10. KINNRIEMEN MIT MICRO-LOCK-RATSCHENSCHLOSS Öffnen und Schließen Das Kinnriemenschloss wird geschlossen, indem Sie die Der C3 Pro wird mit einem Ratschenschloss Ratschen zunge stufenweise in das Schloss einschieben. ausgeliefert. Dieses Verschluss-System Sollte der Kinnriemen zu locker am Kinn anliegen, schieben ermöglicht bei jedem Aufsetzen…
-
Page 8: Pinlock ® -Visier 14
Kinnriemens kann sich, im Falle Die Pinlock ® -Linse darf nur in Verbindung mit speziell eines Unfalls, der Helm vom Kopf lösen. dafür vorgesehenen SCHUBERTH Visierscheiben gefahren werden. Eine Anbringung auf anderen Visieren ist nicht Warnung: gestattet. Eine geschlossene Komfort-Kinnriemenunterlage bietet keinen Schutz.
-
Page 9
C. DEr HElM Öffnen Sie hierzu das Visier 2. Betätigen Sie das Federelement unterhalb der Visiermechanik • hierbei wird die Stadtstellung in der Regel zunächst über- in Richtung Visieröffnung. sprungen Anschließend das Federelement • mit einer Abwärts b ewegung des Visiers kann diese dann auf der anderen Seite betätigen. einfach eingestellt werden. Das Visier kann jederzeit unab- hängig von der Stellung des Sonnen visiers betätigt werden. -
Page 10
C. DEr HElM 3. Überprüfen Sie die Funktion der 3. Die Pinlock ® -Linse sollte nun Visiermechanik, indem Sie das im Außen visier aufliegen, wobei Visier einmal bis zum Anschlag die Unterkante der Pinlock ® öffnen. Linse parallel zur Unterkante des Haupt visiers verlaufen sollte. -
Page 11
C. DEr HElM 3. Greifen Sie nun mit Zeige- und Dunkel heit). In der Regel werden diese Lichtreflexe aufgrund Mittelfinger hinter die Pinlock ® der Be schlagfreiheit dieses Visiertyps als unkritisch betrachtet. Linse und heben diese von der Sollten Sie aber dennoch, z. B. aufgrund einer höheren indivi- Außenscheibe ab. -
Page 12: Sonnenvisier
C. DEr HElM 12. SONNENVISIER Warnung: Fahren ohne Visier oder mit geöffnetem Visier kann Schäden SCHEIBE der Augen und des Gesichts durch Steine, Staub, Insekten und andere herumfl iegende Teile zur Folge haben. Ein abge- Das Sonnenvisier ist grau getönt und 3D-geformt. Aufgrund der senktes Sonnenvisier bietet zwar einen gewissen Schutz gegen Visierstärke von 1,5 mm kann das Sonnenvisier auch beim Fahren leichten Steinschlag oder Insekten, kann aber nicht alle…
-
Page 13: Innenausstattung
3. Führen Sie zur Sicherheit eine Funktionsüberprüfung des Sonnenvisier-Bedienmechanis- mus durch. 13. INNENAUSSTATTUNG Die auswechselbare und waschbare Innenausstattung des C3 Pro 2. Lösen Sie die hinteren beiden gewährleistet neben einer hervorragenden Passform auch gleich- Knöpfe des Wangenpolsters zeitig eine bessere Be- und Entlüftung des Helms.
-
Page 14
C. DEr HElM 3. Setzen Sie das Nackenpolster wieder 3. Ziehen Sie die Kunststoffleiste aus ein, indem Sie die Führungspins der Fixierung und entnehmen Sie zuerst beidseitig in den vorderen das Kopfband-Polster. Steckvorrichtungen an der Helm- unterkante einstecken und an- schließend das Nackenpolster Stück für Stück in den Führungsspalt ein- setzen. -
Page 15
C. DEr HElM Einbau Komfort-Wangenpolster 2. Lösen Sie die Wangenpolster durch Herausziehen der drei Pins aus den rot markierten Steckvorrichtungen. 1. Schieben Sie die Schlaufe des Nackenbandes durch den Nackenbandkanal bis zur Öffnung der Kinnriemenunterlage hindurch. 3. Öffnen Sie den Reißverschluss. 2. -
Page 16
C. DEr HElM 4. Knöpfen Sie das Wangenpolster mit Warnung: Hilfe der Pins an die rot markierten Fahren Sie niemals, wenn Teile der Innenausstattung ent- Steckvorrichtungen an. Achten Sie fernt sind. darauf, dass die Kunststofflasche Warnung: mit runder Lochung Große Hitzeeinwirkungen (z. B. Auspuffhitze) können zu Kopfband-Polsters über den Beschädigungen der Innenausstattung führen! hinteren Pin des Wangenpolsters… -
Page 17: Belüftungssysteme
Oberseite der Belüftung 1 — Visiereinstellung Helm schale eine große Lufteinlass- Der C3 Pro besitzt ein mehrstufig verstellbares Visier. Öffnen Sie haube mit 3 stufig regelbarem Be- das Visier – in Abhängigkeit von Ge schwin digkeit und Beschlag- lüftungs system.
-
Page 18: Zusätzliche Sicherheitsausstattung
Frischluft wird über die ANTI-ROLL-OFF-SYSTEM (A.R.O.S.) Luftkanäle der Innenschale weit über den Hinterkopf zur Helmrück- Das speziell von SCHUBERTH entwickelte und auch in jedem seite geführt. Der auf der Helm- SCHUBERTH Motorradhelm als Sicherheitsaus rüstung enthaltene rückseite herrschende Unterdruck Anti-Roll-Off-System bewirkt, dass bei geschlossenem und sorgt für einen permanenten Abzug…
-
Page 19: Auf- Und Absetzen
1. Öffnen und arretieren Sie das Kinnteil. Achten Sie darauf, dass Erkennbarkeit des Motorradfahrers. Bei einfarbigen Helmen das Sonnenvisier in der Helmschale versenkt ist. (ohne Dekor) sind außerdem die SCHUBERTH Schriftzüge auf 2. Öffnen Sie den Kinnriemen und die Komfort-Kinnriemen- Stirn- und Rückseite des Helms aus Reflexfolie gefertigt.
-
Page 20: Absetzen Des Helms
D. AUF- UND ABSETZEN E. Vor JEDEr FAHrT 2. ABSETZEN DES HELMS Kontrollieren Sie zu Ihrer Sicherheit vor jeder Fahrt die folgenden Punkte: 1. Öffnen und arretieren Sie das Kinnteil. Achten Sie darauf, dass das Sonnenvisier in der Helmschale versenkt ist. 1.
-
Page 21: Kontrolle Von Visier Und Sonnenvisier
E. Vor JEDEr FAHrT F. Für IHrE SICHErHEIT 1. SICHERHEITSHINWEISE HELM Warnung: Nie ohne geschlossenen und richtig eingestellten Kinnriemen Benutzen Sie nur einen Helm, der richtig sitzt und passt! fahren! Der Kinnriemen muss korrekt sitzen und darf unter Zug nicht nachgeben. Nur wenn der Kinnriemen nicht nach- Beim Motorradfahren existieren spezielle Gesundheitsrisiken gibt, ist der Verschluss richtig geschlossen.
-
Page 22: Sicherheitshinweise Visier/Sonnenvisier
Versicherungsansprüche. und Helm innen schale führen. Der Helm darf nicht mit der- artigen Substanzen in Kontakt gebracht werden! Auch nicht Verwenden Sie nur Original-Zubehör und Ersatzteile sowie für Reinigungszwecke. Zubehör, das von SCHUBERTH für Ihren Helm ausdrücklich freigegeben ist!
-
Page 23: Wartung Und Pflege
Insbesondere dürfen die Metallteile des Kinnteil- schlosses nicht geölt und nicht gefettet werden. Reparaturen Achtung: dürfen nur durch den SCHUBERTH Reparaturservice ausgeführt Zur Reinigung nur lauwarmes Wasser (< 20 ° C) verwenden. werden. Reinigen Sie die Visiere keinesfalls mit Benzin, Lösungs- mitteln, Fenster- bzw.
-
Page 24: Innenausstattung
Belüftungshaube mit einer schädigungen am Visier hervorrufen. Hebelbewegung nach oben. 4. INNENAUSSTATTUNG Die Innenausstattung des C3 Pro ist komplett herausnehmbar. Die Kopf- und Wangenpolster können mittels Handwäsche unter 3. Befestigen Sie die Belüftungshaube Verwendung einer milden Seifenlauge (z. B. mit stark verdünn- nach dem Reinigen wieder durch tem, handelsüblichem Feinwaschmittel) bei maximal 30°…
-
Page 25: Verschluss-System
4. Zum Schluss das Bedienelement 1. KOMMUNIKATIONSSYSTEME durch die Belüftungshaube in die Ihr C3 Pro ist standardmäßig für die Ausrüstung mit dem Mechanik einstecken. SCHUBERTH SRC-System™ vorbereitet. Um Ihnen einen optimalen Radioempfang zu gewährleisten, ist der C3 Pro bereits mit zwei integrierten Antennen zur Empfangsverstärkung sowie…
-
Page 26: Zubehör Und Ersatzteile
1. REPARATURSERVICE Warnung: Der Einbau von Kommunikationssystemen (dazu gehören auch Sie besitzen mit dem C3 Pro ein SCHUBERTH Qualitätsprodukt, einfache Head-Sets) in einen Helm stellt grundsätzlich eine welches nach den modernsten Entwicklungs- und Fertigungs- Modifikation des Helms dar. Daher müssen die jeweiligen methoden konstruiert und gebaut wurde.
-
Page 27: Wie Sie Uns Erreichen
J. WIE SIE UNS ErrEICHEN Firmensitz Telefonzentrale Anschrift +49 (0)391 8106-0 SCHUBERTH GMBH Stegelitzer Str. 12 39126 Magdeburg Deutschland Internet www.schuberth.de…
-
Page 28
With the SCHUBERTH C3 Pro, you have made an excellent choice. Please play particular attention to: The C3 Pro is the result of enhancing the multi-award winning Caution: C3 flip-up helmet. -
Page 29
® Pinlock visor Communication systems Sun visor Accessories and spare parts Inner lining Ordering original SCHUBERTH parts Ventilation systems Additional safety features SCHUBERTH service ……….103 Repair service Putting on the helmet and taking it off ….. 89 Warranty Putting on the helmet Taking off the helmet How to contact us ………. -
Page 30: The Helmet
Visor mechanics that are important in the event of a claim. Outer shell Please note that this C3 Pro with ECE approval is not certified for Head ventilation the USA, Canada or any other EU countries. It is only permitted Retention system for use in countries where the ECE standard is valid.
-
Page 31: Aerodynamics
Even when traveling at high speeds, the C3 Pro generates practically no upward lift. Enhanced characteristics of…
-
Page 32: Wind Deflector
C. THE HELMET 8. WIND DEFLECTOR optimised system reduces the force need to operate the two locks to a comfortable 16 N, although the safety-relevant overall The wind deflector prevents the unpleasant effect of the wind locking force is many times this amount. created as you ride flowing into the helmet.
-
Page 33: Chinstrap With Micro-Lock Ratchet Fastener
C. THE HELMET Important: Adjusting the chinstrap The C3 Pro’s chin bar mechanism is equipped with a safety The length of the chinstrap is adjusted by increasing or reducing feature which prevents the chin bar from opening of its own the length of strap pulled through the metal buckles.
-
Page 34: Pinlock ® Visor
® lense may only be used in conjunction with the provide adequate protection. The chinstrap must always be SCHUBERTH main face shield that has been specially designed fully fastened. for this purpose. Other face shields must not be fi tted.
-
Page 35
C. THE HELMET • When you push the face shield open, it may well travel beyond 2. Press the spring underneath the the urban position face shield mechanism on one side towards the face shield opening, • but it is easy to find this position by moving it downwards then do the same with the spring again. The face shield mechanism requires no additional on the other side. -
Page 36
C. THE HELMET 3. Make sure that the face shield 3. The Pinlock ® lense should now be mechanism is functioning properly positioned in the face shield with by opening the face shield once to its lower edge parallel to the lower its maximum extent. -
Page 37
C. THE HELMET 3. Now grip the back of the Pinlock ® However, if this light reflection should cause you difficulties — lense with your index and middle because of particular sensitivity to it, for example — you should fingers and lift it off the face refrain from using the Pinlock ®… -
Page 38: Sun Visor
C. THE HELMET 12. SUN VISOR Caution: Riding without the face shield or with an open face shield Sun visor can result in injury to the eyes and face from stones, dust, insects and other fl ying objects. The sun visor, when lowered, The sun visor is tinted grey and has a 3D shape.
-
Page 39: Inner Lining
3. For safety, check that the sun visor mechanism is functioning correctly 13. INNEr lINING The replaceable inner lining of the C3 Pro is washable and ensures both an excellent fi t and improved ventilation of the helmet. 2. Undo the two rear snaps of the…
-
Page 40
C. THE HELMET 3. Pull the plastic bar out of the 3. Reinsert the neck collar by first inserting the guide pins into the mounting and remove the crown liner. front plugs and sockets on the lower helmet edge on both sides and then mount the neck collar piece by piece into the guide gap. -
Page 41
C. THE HELMET Mounting the cheek pad 2. Remove the cheek pad by pulling the three snaps out of the red plugs and sockets. 1. Push the A.R.O.S. strap through the neck strap channel as far as the chinstrap padding opening. 3. -
Page 42
C. THE HELMET 4. Mount the cheek pad using the Caution: three pins on the red plugs and Never ride when parts of the inner lining have been removed. sockets. Ensure that the head Caution: strap cushion’s plastic strap with Excessive heat (e.g. -
Page 43: Ventilation Systems
Ventilation device 1 – face shield setting system on the top of the helmet shell The C3 Pro has a face shield that adjusts to several positions. for ventilating the top of your head. Depending on your road speed and the tendency of the face…
-
Page 44: Additional Safety Features
The anti-roll-off system specially developed by SCHUBERTH and head vent is directed via the air provided as a safety feature in every SCHUBERTH motorcycle channels in the inner shell to the helmet ensures that, if the chinstrap is fastened and correctly back of the helmet.
-
Page 45: Putting On The Helmet And Taking It Off
If the helmet is plain (no decoration), the SCHUBERTH name also appears on the front and 1. Open and lock the chin bar. Make sure the sun visor back of the helmet in a reflective film.
-
Page 46: Taking Off The Helmet
D. PUTTING THE HELMET ON AND TAKING E. BEFORE EVERY JOURNEY IT OFF 2. TakING oFF THE HElMET For your safety, check the following points before every journey: 1. Open and lock the chin bar. Make sure the sun visor is retracted 1.
-
Page 47: Checking The Face Shield And Sun Visor
E. BEFORE EVERY JOURNEY F. FOR YOUR SAFETY 3. CHECKING THE FACE SHIELD AND SUN VISOR 1. SAFETY ADVICE CONCERNING THE HELMET Before every journey, check that the mechanisms of the face Make sure your helmet is always correctly positioned and fits shield and sun visor are working properly and that the face your head properly! shield and sun visor will provide sufficiently clear visibility.
-
Page 48: Safety Advice Concerning The Face Shield / Sun Visor
ECE certification and all warranty and insurance claims invalid. the helmet does not come into contact with such substances, even for cleaning purposes. Use only original parts, replacement parts and accessories that SCHUBERTH has expressly approved for your helmet!
-
Page 49: Maintenance And Are
Alterations to the strap buckle are not permitted. In particular, you should not oil or grease the metal components of the chin Note: section lock. Repairs may only be carried out by the SCHUBERTH Only use tepid water (< 20 °C) for cleaning. Never on any account Repair Service.
-
Page 50: Inner Lining
4. INNER LINING 3. On completion of the cleaning, The inner lining of the C3 Pro can be removed completely. The fix the ventilation cowl back in head and cheek pads can be washed by hand using a mild soap place by hooking it into the front solution (e.g.
-
Page 51: Retention System
6. RETENTION SYSTEM 1. COMMUNICATION SYSTEMS Ratchet fastener Your C3 Pro is supplied ready for installation of the SCHUBERTH SRC-System™ as standard. The C3 Pro is already fitted with The metal components of the retention system do not require two integrated antennas to amplify reception and a Bluetooth maintenance.
-
Page 52: Accessories And Spare Parts
1. REPAIR SERVICE Caution: The installation of a communication system (including basic The C3 Pro is a SCHUBERTH quality product that has been designed headsets) constitutes a modification to the helmet. For this and manufactured using the latest development and production reason it is necessary for any communication system and methods.
-
Page 53: How To Contact Us
J. HOW TO CONTACT US Headquarters Phone Address +49 (0)391 8106-0 SCHUBERTH GMBH Stegelitzer Str. 12 39126 Magdeburg Germany Internet www.schuberth.com…
-
Page 54
Vous avez fait un excellent choix en optant pour le SCHUBERTH C3 suit : Pro. Le C3 Pro est la version améliorée du C3, le casque modulable Avertissement : qui a reçu plusieurs récompenses. Le C3 Pro est fabriqué avec des consignes de sécurité… -
Page 55
® Visière Pinlock Systèmes de communication Pare-soleil Accessoires et pièces de rechange Coiffe Achat des pièces d’origine SCHUBERTH Systèmes d’aération Equipement de sécurité supplémentaire Service clientèle SCHUBERTH ……155 Service de réparation Enfiler et retirer le casque ……… 141 Garantie… -
Page 56: Le Casque
C. LE CASqUE 1. NORME 3. ANATOMIE DU CASQUE Le casque C3 Pro est conforme à la norme ECE-R 22.05. Cette Aération de la tête Antennes intégrées norme de contrôle garantit le respect de standards de sécurité Calotte intérieure Visière définis concernant l’amortissement des chocs, la visière, le…
-
Page 57: Aérodynamique 112
6. AÉRODYNAMIQUE Attention : Pour les motos carénées, de forts tourbillons d’air Tous les casques de course et de moto SCHUBERTH sont étudiés et environnent la zone protégée du vent. Ceux-ci peuvent optimisés dans la soufflerie de SCHUBERTH, dans des conditions réduire considérablement les performances aéro-acoustiques…
-
Page 58: Coupe-Vent
C. LE CASqUE 8. COUPE-VENT MaNIEMENT du SYSTÈME Le coupe-vent empêche les flux de vent indésirables de pénétrer La mentonnière peut être ouverte ou fermée à tout moment, dans le casque. De plus, ce système permet de réduire fortement, indépendamment de la position de la visière ou du pare-soleil. à…
-
Page 59: Jugulaire À Crémaillère Micro-Lock
Si la jugulaire est trop lâche sous le menton, poussez la languette à crémaillère d’un Le casque C3 Pro est livré avec une attache cran supplémentaire dans l’attache. à crémaillère. Ce système de fermeture permet d’adapter aisément la…
-
Page 60
® ne doivent être utilisés qu’avec Avertissement : un écran principal SCHUBERTH prévu à cet effet. Ils ne doivent Même s’il est fermé, le rembourrage confort de la jugulaire pas être utilisés avec d’autres visières. Ceci vaut explicitement n’offre pas une protection suffi sante. L’ensemble de la pour les autres variantes de visières. -
Page 61
C. LE CASqUE Ouvrir la visière 2. Actionnez l’élément-ressort, situé sous le mécanisme de visière, en • Vous passerez généralement la position ville. position Ouverture de la visière. Ensuite, actionnez l’élément- • Grâce au mouvement vers l’arrière, vous pourrez effectuer ce ressort se trouvant de l’autre côté. réglage sans aucune difficulté. La visière peut à tout moment être utilisée, indépendamment du système pare-soleil. -
Page 62: Visière Pinlock
C. LE CASqUE 3. Vérifiez que le mécanisme de 3. La visière Pinlock ® doit reposer à visière fonctionne correctement en l’intérieur de la visière extérieure. ouvrant la visière jusqu’à la butée. Le bord inférieur de la visière Pinlock ® doit être parallèle au bord inférieur de la visière principale.
-
Page 63
C. LE CASqUE 3. Avec l’index et le majeur, attrapez Avertissement : la partie derrière la visière En raison de sa construction, une visière à double écran Pinlock ® afin de la soulever de entraîne une augmentation des reflets dans la visière (surtout l’écran extérieur. -
Page 64: Pare-Soleil
C. LE CASqUE 12. PARE-SOLEIL Avertissement : En cas de conduite sans visière ou avec la visière ouverte, L’écran les cailloux, la poussière, les insectes et autres particules volantes risquent de vous blesser les yeux et le visage. Certes, La visière solaire est pourvue d’un fi lm formé 3D teinté gris. l’utilisation du pare-soleil offre une certaine protection contre Avec une épaisseur de 1,5 mm, la visière solaire peut aussi les petits gravillons ou les insectes mais elle ne supprime pas…
-
Page 65: Coiffe
13. COIFFE La coiffe interchangeable et lavable du casque C3 Pro garantit non seulement une excellente forme anatomique mais aussi une amélioration de la ventilation et de l’aération du casque. Les coussinets de joue confort assurent un rembourrage douillet 2.
-
Page 66
C. LE CASqUE 3. Ôter les barrettes de la fixation et 3. Remettre la protection de la nuque en insérant les broches guides retirer la doublure de la tête. dans les deux sections avant de la partie inférieure du casque, puis en faisant doucement glisser la doublure de la nuque dans la fente. -
Page 67
C. LE CASqUE Montage des coussinets de confort des joues 2. Défaire les coussinets des joues en tirant les trois broches des fentes indiquées en rouge. 1. Faire passer la dragonne de la sangle de la nuque dans la bande jusqu’à… -
Page 68
C. LE CASqUE Attention : 4. Attacher les coussinets des joues avec les broches sur les fixations Lors de la mise en place de la coiffe, veillez à ce que indiquées en rouge. Vérifier que la les découpes de ventilation du tour de tête se trouvent dragonne en plastique avec le trou au-dessus des canaux de ventilation dans la partie arrière du rond soit bien insérée… -
Page 69: Systèmes D’aération
Ventilation 1 – réglage de la visière de ventilation réglable à 3 paliers La visière du casque C3 Pro est réglable en plusieurs paliers. assure la ventilation du cuir chevelu. En fonction de la vitesse et de la formation de buée, ouvrez la L’air pénétrant dans le casque par…
-
Page 70: Equipement De Sécurité Supplémentaire
Le système anti-roll-off a été conçu spécialement par et l’air arrivant par le système de SCHUBERTH. Cet équipement de sécurité est utilisé dans tous les ventilation de la tête est conduit vers casques de moto SCHUBERTH. Lorsque la jugulaire est fermée et l’arrière du casque par les canaux…
-
Page 71: Enfiler Et Retirer Le Casque
C. LE CASqUE D. ENFILER ET RETIRER LE CASqUE 1. ENFIlER lE caSQuE Zones réfléchissantes Deux zones réfléchissantes situées à gauche et à droite sous Attention : l’écran de visière permettent au motocycliste d’être mieux vu, en Utilisation de la jugulaire / du système de fermeture, voir particulier en cas de mauvaises conditions de visibilité.
-
Page 72: Retirer Le Casque
D. ENFILER ET RETIRER LE CASqUE E. AVANT DE DÉMARRER 2. RETIRER LE CASQUE Afin d’assurer votre sécurité, merci de contrôler les points suivants : 1. Ouvrez et arrêtez la mentonnière. Veillez à ce que le pare-soleil 1. cONTRÔlE du caSQuE soit entièrement rentré…
-
Page 73: Contrôle De La Visière Et Du Pare-Soleil
E. AVANT DE DÉMARRER F. POUR VOTRE SÉCURITÉ 3. CONTRÔLE DE LA VISIÈRE ET DU PARE-SOLEIL 1. CONSIGNE DE SÉCURITÉ — CASQUE Avant de démarrer, vérifiez toujours que la visière et le pare- Merci de toujours utiliser un casque adapté à votre taille. soleil assurent une bonne visibilité, ainsi que le bon fonctionnement de la visière et du mécanisme du pare-soleil.
-
Page 74: Consignes De Sécurité Visière / Pare-Soleil
à néant et a pour effet telles substances, pas même pour son nettoyage. d’annihiler l’homologation ECE, ainsi que les droits à garantie et à assurance. Utilisez uniquement des pièces et des accessoires d’origine ou des accessoires expressément agréés par SCHUBERTH.
-
Page 75: Entretien Et Soin
être effectuées uniquement par le service de réparations de Si l’extérieur de la visière est très sale, merci de ne pas la SCHUBERTH. plonger dans l’eau car cela risquerait de fortement réduire le niveau de résistance du revêtement anti-rayure et de…
-
Page 76: Coiffe
4. cOIFFE La coiffe du C3 Pro est entièrement amovible. Les coussinets de 3. Après l’avoir nettoyée, fixez la rembourrage de crâne et de joue peuvent être lavés à la main, prise d’air en l’accrochant dans à…
-
Page 77: Système De Fermeture
RECHANGE 6. SYSTÈME DE FERMETURE 1. SYSTÈME DE COMMUNICATION Votre C3 Pro est préparé et adapté, en série, aux équipements Attache à crémaillère de SCHUBERTH SRC-System™. Afin de vous garantir une réception Les parties métalliques du système de fermeture ne nécessitent radio optimale, le C3 Pro dispose déjà…
-
Page 78: Accessoires Et Pièces De Rechange
à être intégrés dans un casque de moto) ou les renseignements Votre casque C3 Pro est un produit de qualité SCHUBERTH, issu de fournis par d’autres institutions n’ont aucune valeur et le procédés de développement et de fabrication ultramodernes. S’il casque est alors considéré…
-
Page 79: Comment Nous Contacter
SERVICE CLIENTÈLE SCHUBERTH J. COMMENT NOUS CONTACTER Siège de la sociètè Standard téléphonique Adresse +49 (0)391 8106-0 SCHUBERTH GMBH Stegelitzer Str. 12 39126 Magdeburg Allemange Internet www.schuberth.com…
-
Page 80: Uso Corretto Del Manuale
Complimenti! attentamente le istruzioni nell’ordine in cui esse sono riportate. Presta particolare attenzione a: Con SCHUBERTH il C3 Pro Lei ha fatto una scelta eccellente. Il Avvertenza: Indicazioni di sicurezza C3 Pro è il risultato del perfezionamento del pluripremiato casco integrale con visiera C3.
-
Page 81: Indice
Parasole Accessori e pezzi di ricambio Imbottitura Richiesta pezzi originali SCHUBERTH Sistemi di ventilazione Dispositivi supplementari di sicurezza Servizio assistenza SCHUBERTH ……207 Servizio riparazioni Mettere e levare il casco ……..193 Garanzia Mettere il casco Levare il casco Come contattarci ……….208 Prima di mettersi in viaggio ……
-
Page 82: Il Casco
Paesi che riconoscano le normative ECE e garantisce, tra l’altro, Meccanica della visiera Decorazione interna la copertura assicurativa in caso di incidente. Il casco C3 Pro Guscio esterno con omologazione ECE non è omologato per l’uso negli USA, in Aerazione della testa Canada o in eventuali altri Paesi non appartenenti all’Unione…
-
Page 83: Aerodinamica
Anche alle velocità più elevate il casco C3 Pro non sviluppa, di fatto, alcuna spinta statica. Caratteristiche perfezionate di C3 Pro sono una migliore resistenza all’aria e una…
-
Page 84: Deflettore
c. Il cAsco 8. DEFLETTORE Comando del sistema Il deflettore impedisce un afflusso indesiderato dell’aria nel La mentoniera può essere aperta o chiusa in qualsiasi momento casco. Può inoltre ridurre ulteriormente i rumori della strada indipendentemente dalla posizione della visiera o del parasole. Il all’interno del casco.
-
Page 85: Cinturino Con Chiusara Micrometrica
Controllare regolarmente la lunghezza del sottogola (vedere capitolo E.2. Controllo del sottogola). 10. CINTURINO CON ChIUSURA MICROMETRICA Il casco C3 Pro è provvisto di un sistema di chiusura Apertura e chiusura a molla. Dopo aver indossato il casco, questo Il cinturino del sottogola si chiude inserendo gradualmente la sistema di chiusura consente di regolare linguetta del sistema di aggancio nell’apposita serratura.
-
Page 86: Visiera Pinlock
Gli schermi Pinlock possono essere usati solo con gli appositi Avvertenza: schermi per visiera SCHUBERTH. Non è consentito il loro uso su L’imbottitura del sottogola, anche se chiusa, non offre alcuna altri tipi di visiere. protezione. Chiudere sempre completamente il sottogola prima di mettersi in viaggio.
-
Page 87
c. Il cAsco Aprire la visiera 2. Azionare l’elemento a molla sotto al meccanismo della visiera in • così si salta temporaneamente la posizione da città direzione dell’apertura. Ripetere l’operazione con l’elemento a • la stessa posizione può essere poi facilmente reimpostata, molla sull’altro lato. spingendo la visiera verso il basso. La visiera può essere aperta o chiusa in ogni momento, indipendentemente dalla posizione del parasole. -
Page 88
c. Il cAsco 3. Controllare il funzionamento della visiera Pinlock ® , flettere con visiera, aprendola finché non si cautela la visiera con i palmi delle blocca. mani, fino a far spostare la visiera Pinlock ® di conseguenza. 4. Controllare l’aderenza uniforme della guarnizione di silicone sulla visiera. -
Page 89
c. Il cAsco 4. A questo punto è possibile estrarre Avvertenza: la visiera Pinlock ® dalla visiera. Qualora l’umidità dovesse penetrare nella zona a tenuta stagna tra i due schermi da visiera, smontare Attenzione: ® immediatamente la visiera Pinlock , così da evitare • Per evitare graffi sulla visiera, smontare e montare lo impedimenti alla corretta visione. -
Page 90: Parasole
c. Il cAsco 12. PARASOLE Avvertenza: Viaggiare senza visiera o con la visiera aperta può causare VISIERA danni agli occhi o al viso provocati da sassi, polvere, insetti o altri elementi presenti nell’aria. Il parasole abbassato offre Il parasole è realizzato in una tonalità di grigio e formata in una certa protezione nei confronti di piccoli sassi o insetti, 3D.
-
Page 91: Imbottitura
3. Eseguire una prova funzionale del dispositivo di comando del parasole. 13. IMBOTTITURA L’imbottitura estraibile e lavabile del casco C3 Pro assicura, oltre a una maggiore adattabilità alla conformazione della testa, anche una migliore ventilazione del casco. 2. Sbottonare entrambi i bottoni L’imbottitura per le guance assicura un morbido contatto,…
-
Page 92
c. Il cAsco 3. Liberare l’asticella di plastica dal 3. Reinserire l’imbottitura del collo incastrando prima i perni guida fissaggio ed estrarre l’imbottitura della fascia della testa. su entrambi i lati nei dispositivi ad innesto anteriori nello spigolo inferiore del casco e poi inserire gradualmente l’imbottitura del collo nella fessura di guida. -
Page 93
c. Il cAsco Montare l’imbottitura comfort per le guance 2. Staccare l’imbottitura delle guance estraendo i tre perni dai dispositivi a innesto contrassegnati in rosso. 1. Spingere l’occhiello della fascia del collo attraverso il canale della fascia del collo fino al foro del supporto della cinghia del mento. -
Page 94
c. Il cAsco Attenzione: 4. Abbottonare l’imbottitura delle guance con l’aiuto dei perni sui Inserendo l’imbottitura interna, fare attenzione che gli incavi dispositivi ad innesto contrassegnati di ventilazione del nastro siano sopra i canali di ventilazione in rosso. Accertarsi che la linguetta nella parte posteriore del casco e che il nastro sia posizionato di plastica con foratura circolare centralmente tra i due canali di ventilazione. -
Page 95: Sistemi Di Ventilazione
Presa di ventilazione 1 – regolazione della visiera testa, il lato superiore del casco è Il casco C3 Pro è dotato di una visiera regolabile in più posizioni. dotato di un efficace sistema di presa/ Aprire la visiera secondo la velocità e il grado di umidità, fino a estrazione dell’aria, con regolazione…
-
Page 96: Dispositivi Supplementari Di Sicurezza
Lo speciale sistema di sicurezza anti roll-off sviluppato da canali di aerazione del guscio interno. SCHUBERTH e montato su tutti i caschi SCHUBERTH assicura che, La depressione che si crea nella a casco chiuso e sottogola correttamente regolato: parte posteriore del casco assicura l’eliminazione costante dell’aria,…
-
Page 97: Mettere E Levare Il Casco
1. Aprire e bloccare la mentoniera. Fare attenzione che il parasole identificazione del motociclista nel traffico. Nei caschi tinta sia rientrato nel casco. unita (senza decorazione) anche le scritte SCHUBERTH anteriori e 2. Aprire il sottogola e il sistema comfort. posteriori sono realizzate in pellicola riflettente.
-
Page 98: Levare Il Casco
d. mettere e levAre Il cAsco e. PrImA dI mettersI In vIAGGIo 2. LEVARE IL CASCO Per la tua sicurezza, prima di metterti in viaggio controlla sempre i seguenti punti: 1. Aprire e bloccare la mentoniera. Fare attenzione che il parasole sia rientrato nel casco.
-
Page 99: Controllo Della Visiera E Del Parasole
e. PrImA dI mettersI In vIAGGIo F. Per lA tUA sIcUrezzA 1. INDICAZIONI DI SICUREZZA SUL CASCO Avvertenza: Non viaggiare mai con il cinturino del sottogola aperto o mal Usa esclusivamente un casco ben posizionato e della tua regolato! Il sottogola deve essere posizionato correttamente misura! e, se teso, non deve allentarsi.
-
Page 100: Indicazioni Di Sicurezza Su Visiera/Parasole
Non mettere mai il casco a contatto con queste sostanze! Nemmeno a scopo di pulizia. Per questo casco possono essere utilizzati solo gli accessori e le parti originali espressamente autorizzati da SCHUBERTH!
-
Page 101: Manutenzione E Cura
(si consiglia il panno in microfibra). Non Non modificare la chiusura. Le riparazioni vanno eseguite usare mai sostanze detergenti. esclusivamente dal servizio riparazioni SCHUBERTH. Attenzione: Per la pulizia utilizzare solo acqua tiepida (< 20 °C). Non pulire mai la visiera e il parasole con benzina, soluzioni, detergenti per vetri o altri detergenti a base di alcool.
-
Page 102: Imbottitura
4. IMBOTTITURA 3. Dopo la pulizia, rimontare la presa innestandola prima di tutto sulla L’imbottitura del casco C3 Pro è completamente scaccabile. Le parte frontale del meccanismo imbottiture della testa e delle guance possono essere lavate a di aerazione, premendola quindi mano, utilizzando acqua tiepida e sapone neutro (per es.
-
Page 103: Sistema Di Chiusura
H. AccessorI e PezzI dI rIcAmBIo 6. SISTEMA DI CHIUSURA 1. SISTEMI DI COMUNICAZIONE Questo casco C3 Pro ha una predisposizione di serie per lo SRC- Chiusura micrometrica System™ di SCHUBERTH. Per garantire una ricezione wireless Le parti metalliche del sistema di chiusura non richiedono ottimale, il casco C3 Pro è…
-
Page 104: Accessori E Pezzi Di Ricambio
1. SERVIZIO RIPARAZIONI Avvertenza: l’inserimento nel casco di un sistema di comunicazione (per Acquistando uno SCHUBERTH C3 Pro sei entrato in possesso di sistema di intende anche un semplice headset), rappresenta un prodotto di qualità, frutto di tecnologie di progettazione sempre e comunque una modifica del casco stesso.
-
Page 105: Come Contattarci
J. come contAttArcI Sede dell’azienda Centralino Indirizzo +49 (0)391 8106-0 SCHUBERTH GMBH Stegelitzer Str. 12 39126 Magdeburg Germania Internet www.schuberth.com…
-
Page 106
Gefeliciteerd! nemen zodat u geen enkel veiligheidsrelevant aspect buiten acht laat. U hebt met de SCHUBERTH C3 Pro een uitstekende keuze gemaakt. Let in het bijzonder op: De C3 Pro is het resultaat van een verbeterde productie van Waarschuwing: Veiligheidsinstructie de meermaals bekroonde systeemhelm C3. -
Page 107
Accessoires en reserveonderdelen ….. 257 ® Pinlock -vizier Communicatiesystemen Zonnevizier Accessoires en reserveonderdelen Interne bekleding SCHUBERTH-service ……….. 259 Ventilatiesystemen Bijkomende veiligheidsuitrusting Reparatieservice Garantie Op- en afzetten ……….245 De helm opzetten Hoe u ons kunt bereiken ……..260 De helm afzetten Voor elke rit …………. -
Page 108: De Helm
C. DE HElm 1. NORM 3. ANATOMIE VAN DE HELM Hoofdventilatie De C3 Pro voldoet aan de norm ECE-R 22.05. Deze keuringsnorm Geïntegreerde antennes Binnenschaal garandeert dat bepaalde veiligheidsstandaarden met betrekking Vizier tot schokdemping, vizier, bevestigingssysteem en gezichtsveld in Reflexogen acht genomen zijn.
-
Page 109: Aërodynamica
Bij motoren met beplating ontstaan aan de rand van de geoptimaliseerde omstandigheden ontwikkeld en verfijnd. platen sterke luchtwervelingen. Deze kunnen de aero- De C3 Pro is speciaal op de zithouding van toer- en akoestische eigenschappen van de helm aanzienlijk sporttoerrijders afgestemd en heeft een lage luchtweerstand.
-
Page 110: Winddeflector
C. DE HElm 8. WINDDEFLECTOR Systeembediening Het kingedeelte kan altijd onafhankelijk van de positie van De winddeflector voorkomt ongewild instromen van wind in het vizier of de zonneklep worden geopend resp. gesloten. De de helm. Bovendien worden de rijgeluiden in de helm verder harde en veilige eindvergrendeling zorgt ervoor dat het omhoog gereduceerd.
-
Page 111: Kinriem Met Micro-Lock-Ratelsluiting
Controleer regelmatig de afstelling van de kinriemlengte (zie 10. KINRIEM MET MICRO-LOCK-RATELSLUITING hoofdstuk E.2 de kinriem controleren). De C3 Pro wordt met een ratelsluiting geleverd. Openen en sluiten Dankzij dit sluitsysteem kan de kinriem bij het opzetten van de helm eenvoudig aan…
-
Page 112: Pinlock ® Vizier
De Pinlock ® -lens mag alleen gebruikt worden in combinatie met speciaal hiervoor uitgevoerde SCHUBERTH-vizierruiten en Waarschuwing: mag niet op andere vizieren aangebracht worden. Een gesloten comfort-kinriemkussen biedt geen bescherming. De kinriem moet steeds compleet gesloten zijn.
-
Page 113
C. DE HElm Open hiertoe het vizier 2. Duw het veerelement onder het viziermechanisme in de richting • hierbij wordt de stadsstand gewoonlijk overgeslagen van de vizieropening. Duw vervolgens op het veerelement • door het vizier naar beneden te bewegen, kan deze eenvoudig aan de andere kant. ingesteld worden. Het vizier kan te allen tijde bediend worden, ongeacht de stand van het zonnevizier. -
Page 114
C. DE HElm 3. Controleer de werking van het 3. De Pinlock ® -lens moet nu in het viziermechanisme door het vizier buitenvizier liggen. De onderkant een maal tot tegen de aanslag te van de Pinlock ® -lens moet openen. evenwijdig met de onderkant van het hoofdvizier lopen. -
Page 115
C. DE HElm Opgelet: 2. Om de voorspanning van de Pinlock ® -lens een beetje te Druk de bevestigingsbouten niet met de vingers uit het vizier verminderen, kunt u het vizier omdat de bouten daarbij kunnen breken. met de handpalmen voorzichtig Waarschuwing: uiteenbuigen tot de Pinlock ®… -
Page 116: Zonnevizier
C. DE HElm 12. ZONNEVIZIER Waarschuwing: Rijden zonder of met geopend vizier kan verwondingen aan Ruit de ogen en het gezicht door stenen, stof, insecten en andere rondvliegende delen tot gevolg hebben. Een uitgeklapt Het zonnevizier heeft een grijze tint en is 3D-gevormd. Vanwege zonnevizier biedt weliswaar bescherming tegen lichte de vizierdikte van 1,5 mm kan het zonnevizier ook bij het rijden steenslag of insecten maar kan niet alle gevaren vermijden.
-
Page 117: Interne Bekleding
3. Controleer veiligheidshalve of het bedieningsmechanisme van het zonnevizier goed werkt. 12. INTERNE BEKLEDING De vervangbare en wasbare interne bekleding van de C3 Pro 2. Maak de achterste twee verzekert naast een uitstekende pasvorm eveneens een betere drukkers van de wangstukken ver- en ontluchting van de helm.
-
Page 118
C. DE HElm 3. Trek de kunststofband los en 3. Zet de nekrand er weer in door de geleidingspennen eerst aan neem de binnenvoering eruit. beide zijden in de voorste houders aan de onderkant van de helm in te steken en vervolgens de nekrand stuk voor stuk in de geleidingsspleet te stoppen. -
Page 119
C. DE HElm Vastmaken comfort wangstukken (gevoerd) 2. Maak de wangstukken los door de drie pennen uit de rood gemarkeerde houders te trekken. 1. Schuif de lus van de nekband door het nekbandkanaal tot aan de uitsparing van de kinbandsteun. 3. -
Page 120
C. DE HElm 4. Knoop het wangstuk met behulp Waarschuwing: van de pennen aan de rood Rijd nooit als er delen van de interne bekleding ontbreken. gemarkeerde houders vast. Zorg Waarschuwing: ervoor dat de kunststof lus met Grote hitte-inwerking (bijv. hitte van de uitlaat) kan de ronde perforatie van de interne bekleding beschadigen! -
Page 121: Ventilatiesystemen
Voor de ventilatie van het hoofd Ventilatie 1 — Vizierinstelling beschikt de helmschaal bovenaan De C3 Pro heeft een vizier dat in meerdere standen verstelbaar over een grote luchtinlaatkap met is. Open het vizier — afhankelijk van de snelheid en de neiging…
-
Page 122: Bijkomende Veiligheidsuitrusting
Anti-roll-off-systeem (A.R.O.S.) binnenschaal langs het achterhoofd naar de achterkant van de helm Het speciaal door SCHUBERTH ontwikkelde en in elke SCHUBERTH- geleid. De onderdruk aan de motorhelm als veiligheidsuitrusting gebruikte anti-roll-off- achterkant van de helm zorgt voor…
-
Page 123: Op- En Afzetten
(zonder versiering) bestaan bovendien de 2. Open de kinriem en de comfort-kinriemsteun. SCHUBERTH-logo’s voor en achter aan de helm uit reflecterende folie. 3. Neem de uiteinden van de kinriem vast en trek deze uiteen.
-
Page 124: Voor Elke Rit
D. OP- EN AFZETTEN E. VOOR ElKE RIT 2. HELM AFZETTEN Controleer voor uw eigen veiligheid voor elke rit de volgende punten: 1. Open en vergrendel het kingedeelte. Zorg ervoor dat de 1. DE HELM CONTROLEREN zonneklep is weggeklapt in de schaal van de helm. Controleer regelmatig of de helm beschadigd is.
-
Page 125: Vizier En Zonnevizier Controleren
E. VOOR ElKE RIT F. VOOR UW VEIlIGHEID 3. VIZIER EN ZONNEVIZIER CONTROLEREN 1. VEILIGHEIDSAANWIJZINGEN HELM Controleer voor elke rit de goede werking van het vizier- en Gebruik alleen een helm die goed past! zonneviziermechanisme en of het vizier of zonnevizier voldoende Motorrijden brengt speciale risico’s en gevaren voor de zicht biedt.
-
Page 126: Veiligheidsaanwijzingen Vizier/Zonnevizier
De helm mag niet in contact worden gebracht met zulke Gebruik uitsluitend originele accessoires en reserveonderdelen substanties. Ook niet voor reinigingsdoeleinden. die door SCHUBERTH uitdrukkelijk goedgekeurd zijn voor uw helm.
-
Page 127: Onderhoud En Verzorging
Herstellingen mogen alleen worden uitgevoerd door de venster- of glasreinigers of andere reinigingsmiddelen die herstellingsdienst van SCHUBERTH. alcohol bevatten. Opgelet: Het vizier mag ook bij sterke verontreiniging van de…
-
Page 128: Interne Bekleding
4. INTERNE BEKLEDING De interne bekleding van de C3 Pro kan compleet verwijderd worden. De hoofd- en wangkussens kunnen met de hand worden 3. Bevestig de ventilatiekap na gewassen in een mild zeepsop (bijv. met sterk verdund, in de het reinigen weer door deze handel verkrijgbaar fijnwasmiddel) op maximaal 30°…
-
Page 129: Sluitsysteem
1. COMMUNICATIESYSTEMEN 4. Steek ten slotte het bedienings- element door de ventilatiekap in Uw C3 Pro is standaard voorzien om uitgerust te worden met het mechanisme. het SRC-systeem™ van SCHUBERTH. Voor een optimale radio- ontvangst beschikt de C3 Pro reeds over twee geïntegreerde antennes die als versterker dienen en over een Bluetooth ®…
-
Page 130: Accessoires En Reserveonderdelen
1. REPARATIESERVICE Waarschuwing: De montage van communicatiesystemen (waaronder ook U hebt met de C3 Pro een kwaliteitsproduct van SCHUBERTH gewone headsets) in een helm vormt in principe een modifi- in huis, dat volgens de modernste ontwikkelings- en catie van de helm. Daarom moeten de betreffende communi- productiemethoden geconstrueerd werd.
-
Page 131: Hoe U Ons Kunt Bereiken
J. HOE U ONS KUNT BEREIKEN Zetel Telefooncentrale Adres +49 (0)391 8106-0 SCHUBERTH GMBH Stegelitzer Str. 12 39126 Magdeburg Duitsland Internet www.schuberth.com…
-
Page 132
Ha tomado una muy buena decisión al escoger el SCHUBERTH C3 Advertencia: Indicaciones de seguridad Pro. El C3 Pro es el resultado de desarrollar el casco abatible C3, Atención: Indicaciones premiado en múltiples ocasiones. El C3 Pro se fabrica con los métodos de producción más avanzados y además de disponer… -
Page 133
® Visor Pinlock Accesorios y piezas de repuesto Visera parasol Sistemas de comunicación Equipamiento interior Adquisición de piezas SCHUBERTH originales Sistemas de ventilación Equipamiento de seguridad adicional Servicio postventa SCHUBERTH ……311 Servicio de reparación Colocación y extracción ……..297 Garantía… -
Page 134: El Casco
1. NORMATIVA 3. ANATOMÍA DEL CASCO EL C3 Pro cumple la Normativa ECE-R 22.05. Esa norma de ensayo Ventilación cabeza Antenas integradas garantiza el cumplimiento de estándares de seguridad definidos Calota interior Visera en cuanto a la amortiguación, el visor, el sistema de retención y Aireación cabeza…
-
Page 135: Aerodinámica
El C3 Pro se ha casco. El revestimiento de la moto debería ajustarse de diseñado con fines deportivos y resiste sin problemas el impacto manera que la turbulencia saliente no afecte directamente a del aire.
-
Page 136: Deflector
c. el cAsco 8. DEFLECTOR dos cierres a unos cómodos 16 N, aunque la fuerza de cierre total, relevante desde el punto de vista de la seguridad, sea un elevado El deflector evita que el aire de circulación entre en el casco. múltiplo de dicho valor.
-
Page 137
10. CARRILLERA CON CIERRE RÁPIDO DE BOTÓN abriendo el cierre. Saque después la lengüeta del cierre. El C3 Pro se suministra con un sistema de cierre rápido de botón. Este sistema de cierre permite ajustar la longitud de la carrillera de… -
Page 138: Visor Pinlock
Atención: No abra nunca la carrillera durante la marcha. . ® La pantalla Pinlock solamente se puede emplear con las pantallas de visor SCHUBERTH preparadas. No está permitido ® instalarla en otros visores. 11. VISOR PINLOCK ® El visor Pinlock es un visor de doble pantalla anti vaho.
-
Page 139
c. el cAsco Abra para ello el visor 2. Accione el resorte situado debajo del mecanismo hacia la abertura • por lo general la posición para ciudad se salta. del visor. A continuación accione el • moviendo hacia abajo el visor se puede ajustar con facilidad. resorte del otro lado. El visor puede activarse en cualquier momento, independientemente de la posición de la visera parasol. -
Page 140
c. el cAsco ® 3. La pantalla Pinlock debería estar 3. Compruebe que el mecanismo del colocada en el visor exterior, visor funciona abriendo el visor debiendo el canto inferior de la hasta el tope. ® pantalla Pinlock estar paralelo al canto inferior del visor principal. -
Page 141
c. el cAsco Sin embargo, en caso de dificultades, p.ej. debido a una ® 3. Agarrar la pantalla Pinlock mayor sensibilidad personal a estos destellos, se recomienda detrás con el dedo índice y el abstenerse de seguir usando el visor de doble pantalla. corazón y levantarla de la pantalla exterior. -
Page 142: Visera Parasol
c. el cAsco 12. VISERA PARASOL Advertencia: Si se viaja sin visor o con el mismo abierto, podrán sufrir Pantalla daños los ojos y la cara debido a piedras, polvo, insectos y otros objetos que fl oten en el ambiente. Una visera parasol La pantalla es de color gris y está…
-
Page 143: Equipamiento Interior
13. EQUIPAMIENTO INTERIOR El equipamiento interior intercambiable y lavable del modelo C3 Pro también garantiza, junto a una extraordinaria adaptación una mejor ventilación y aireación del casco. El acolchado de las almohadillas consigue un acolchamiento 2. Desabroche los dos botones…
-
Page 144
c. el cAsco 3. Vuelva a introducir el acolchado de la nuca metiendo en primer 3. Extraiga la tira de plástico de la lugar los pines de guiado en fijación y retire la almohadilla de ambos lados de los mecanismos la cinta de la cabeza. -
Page 145
c. el cAsco Montaje del acolchado confort 2. Libere las almohadillas para las mejillas sacando los tres pines fuera de los mecanismos de 1. Deslice la hebilla de la cinta de sujeción marcados en rojo. la nuca a través del conducto para la cinta de la nuca hasta la abertura de la base del barboquejo. -
Page 146
c. el cAsco Atención: 4. Abroche los botones de la almohadilla para la mejilla con ayuda de los pines A la hora de colocar el acolchado para la cabeza tenga en los mecanismos de sujeción cuidado de que las entalladuras de ventilación estén sobre marcados en rojo. -
Page 147: Sistemas De Ventilación
El C3 Pro dispone de un visor ajustable de forma progresiva. para ventilar la cabeza. El aire que entra Abra el visor — dependiendo de la velocidad y del posible por estos dispositivos se distribuye de empañamiento, –…
-
Page 148
Ventilación 4 — Aireación de la cabeza al empañamiento en el visor y una sobreconcentración de CO2, incluso El C3 Pro se suministra con un cuando el casco está completamente innovador sistema de aireación. El cerrado. aire fresco que entra por la ventilación frontal se desvía por los canales de… -
Page 149: Colocación Y Extracción
En los cascos de un solo color (sin decoración), se ha colocado el logotipo de SCHUBERTH en la 2. Abra la carrillera y el apoyo de la misma.
-
Page 150: Extracción Del Casco
d. colocAciÓn Y eXtrAcciÓn e. Antes de cAdA ViAJe 2. EXTRACCIÓN DEL CASCO Por su propia seguridad, compruebe los puntos siguientes antes de cada viaje: 1. Abra y bloquee la pieza para la barbilla. Asegúrese de que la visera parasol se haya introducido en la calota del casco. 1.
-
Page 151: Comprobar El Visor Y La Visera Parasol
e. Antes de cAdA ViAJe F. PArA sU seGUridAd 1. INDICACIONES DE SEGURIDAD: CASCO Advertencia: ¡No conduzca jamás sin haber cerrado y ajustado bien antes ¡Emplee sólo cascos que se adapten correctamente! la carrillera! Es imprescindible que no ceda la carrillera y que se asiente de forma correcta.
-
Page 152: Indicaciones De Seguridad: Modificación/Accesorios
¡El casco no debe entrar en contacto con sustancias efecto protector del casco, comportando la pérdida de su de este tipo! Ni siquiera para limpiarlo. homologación ECE, así como la garantía y el seguro. ¡Para su casco, emplee sólo piezas originales y accesorios expresamente autorizados por SCHUBERTH!
-
Page 153: Cuidado Y Mantenimiento
Las reparaciones Atención: solo podrán ser llevadas a cabo por el servicio técnico de Limpie solo con agua templada (< 20 °C). No limpie nunca SCHUBERTH. los visores con gasolina, disolvente, limpiacristales u otros limpiadores que contengan alcohol. Atención: Aunque esté…
-
Page 154: Equipamiento Interior
4. EQUIPAMIENTO INTERIOR El equipamiento interior del C3 Pro es totalmente extraíble. El 3. Tras la limpieza, vuelva a sujetar lmohadillas y la cinta para la cabeza pueden lavarse a mano con la cubierta de ventilación un jabón suave (p.
-
Page 155: Sistema De Cierre
H. Accesorios Y PieZAs de rePUesto 6. SISTEMA DE CIERRE 1. SISTEMAS DE COMUNICACIÓN Su C3 Pro está preparado de serie para ser equipado con el Sistema de cierre rápido con botón sistema SCHUBERTH SRC-System™. Para garantizarles una Las piezas metálicas del sistema de cierre no precisan manteni- recepción óptima de la señal de radio, el C3 Pro dispone de…
-
Page 156: Accesorios Y Piezas De Repuesto
UE. Cualquier información de otro tipo Con el C3 Pro, usted posee un producto de calidad SCHUBERTH, que ofrezcan dichas entidades (p. ej., sobre la aptitud en que fue producido y montado según los métodos más modernos…
-
Page 157: Cómo Contactarnos
J. cÓmo contActArnos Sede de la empresa Central telefónica Dirección +49 (0)391 8106-0 SCHUBERTH GMBH Stegelitzer Str. 12 39126 Magdeburg Alemania Internet www.schuberth.com…
-
Page 158
Helma, kterou jste si koupili, je velmi kvalitním výrobkem firmy SCHUBERTH. Aby byla Hjelmen, du har købt, er et produkt af høj kvalitet fra firmaet SCHUBERTH. For at kunne poskytnuta dostatečná ochrana, musí helma dobře sedět a být spolehlivě upevněná. Helma garantere tilstrækkelig beskyttelse, skal hjelmen passe godt og være spændt sikkert fast. -
Page 159
Υποδείξεις ασφαλείας Ostamasi kypärä on laadullisesti korkealuokkainen SCHUBERTH-yhtiön tuote. Voidakseen Το κράνος που αγοράσατε είναι ένα προϊόν υψηλής ποιότητας του Οίκου SCHUBERTH. taata riittävän turvan, kypärän täytyy sopia hyvin ja olla varmasti kiinnitetty. Kaatumisen tai Για να διασφαλιστεί επαρκής προστασία το κράνος πρέπει να εφαρμόζει καλά και να έχει… -
Page 160
Sikkerhetsforskrifter Az Ön által megvásárolt bukósisak a SCHUBERTH cég egyik kiváló minőségű terméke. Fontos, Hjelmen du har kjøpt er et høykvalitetsprodukt fra firmaet SCHUBERTH. For å kunne gi hogy mindig megfelelő méretű és megfelelően becsatolt bukósisakot viseljen, mivel csak az tilstrekkelig beskyttelse må… -
Page 161
Cliente. A apresentação da cópia do talão de compra original é o requisito essencial para a reivindicação do direito de garantia. A SCHUBERTH reserva-se o direito de decidir, se as peças Utrata roszczeń gwarancyjnych następuje w szczególności w przypadku: użytkowania danificadas serão reparadas, substituídas ou o se o seu valor será… -
Page 162
Säkerhetsanvisningar Купленный Вами шлем — это высококачественный продукт фирмы SCHUBERTH. Чтобы Du har köpt en högkvalitativ hjälm från företaget SCHUBERTH. För att hjälmen ska kunna обеспечить достаточную защиту, шлем должен подходить по размеру и быть хорошо erbjuda tillräckligt skydd måste den ha bra passform och sitta fast ordentligt. Efter ett fall eller закреплен. -
Page 163
Predložitev kopije originalnega veya müşteri hattıyla mutabakat sonrası üretici tarafından yürütülmektedir. Garanti talebi için dokazila o nakupu je predpogoj za pravico do garancije. SCHUBERTH si pridržuje pravico do orijinal faturanın fotokopisinin ibraz edilmesi önkoşuldur. SCHUBERTH kusurlu parçaların odločitve, ali bo poškodovane dele popravil, zamenjal ali upošteval kot dobropis.
Посмотреть инструкция для Schuberth C3 Pro бесплатно. Руководство относится к категории Мотоциклетные шлемы, 2 человек(а) дали ему среднюю оценку 7.9. Руководство доступно на следующих языках: английский. У вас есть вопрос о Schuberth C3 Pro или вам нужна помощь? Задайте свой вопрос здесь
Не можете найти ответ на свой вопрос в руководстве? Вы можете найти ответ на свой вопрос ниже, в разделе часто задаваемых вопросов о Schuberth C3 Pro.
Инструкция Schuberth C3 Pro доступно в русский?
Не нашли свой вопрос? Задайте свой вопрос здесь
- Home
- Brands
- SCHUBERTH
- Motorcycle Accessories
- C3 PRO
- Manual
Manual for SCHUBERTH C3 PRO Motorcycle Accessories (177 pages)
Specifications:
|
SCHUBERTH C3 PRO: Read PDF Manual Online
Accompanying Data:
SCHUBERTH C3 PRO Motorcycle Accessories PDF Manual (Updated: Monday 19th of December 2022 04:24:37 AM)
Rating: 4.9 (rated by 91 users)
Compatible devices: BER 80, E1, SC1, SRC system 9049100303, SC10UA, S1 Pro, F 220, F120 Pro.
Recommended Documentation:
SCHUBERTH C3 PRO: Text of Manual
(Ocr-Read Version Summary of Contents, UPD: 19 December 2022)
-
87, 172 173 it aliano Aprire la visiera • cosìsisaltatemporaneamentelaposizionedacittà • lastessaposizionepuòesserepoifacilmentereimpostata, spingendo la visiera verso il basso. La visiera può essere aperta o chiusa in ogni momento, indipendentemente dalla posizione del parasole. Chiusura della visiera Pe…
-
156, 310 311 español válido si ha sido emitido por una entidad homologadora oficial de un país de la UE. Cualquier información de otro tipo que ofrezcan dichas entidades (p. ej., sobre la aptitud en general de sistemas de comunicación para su uso en cascos de motos) o cualquier información de otras entidades no poseen ninguna relevancia y el casco perderá su hom…
-
99, 196 197 it aliano Avvertenza: Non viaggiare mai con il cinturino del sottogola aperto o mal regolato! Il sottogola deve essere posizionato correttamente e, se teso, non deve allentarsi. Solo un cinturino che non si allenti quando è teso è chiuso correttamente. 3. CONTROLLO DELLA VISIERA E DEL PARASOLE Prima di ogni partenza, controllare la perfetta funzionalità meccanica di visiera …
-
74, 146 147 français Le mécanisme de protection du casque décrit ci-dessus peut également provoquer des petites fissurations dans la calotte même si le casque est tombé d’une faible hauteur (< 1 m). Tout casque ayant subi un choc violent doit être remplacé ! Aucun casque n’assume une protection contre toutes sortes de chocs. Ce casque a été conçu …
-
81, 160 161 español nederlands italiano français english deutsch F. Per la tua sicurezza ……………………………………. 197 1. Indicazioni di scurezza sul casco 197 2. Indicazioni di sicurezza su visiera/parasole 199 3. Indicazioni di sicurezza su modifica/accessori 199 G. Manutenzione e cura ………………………………… 200 1. Calotta 200 2. La Mentoni…
-
96, 190 191 it aliano durante i mesi autunnali e invernali è possibile ridurre o deviare il fl usso dell’aria, talvolta estremamente pungente, coprendo i canali di ventilazione con l’imbottitura per la testa. Per fare ciò, sollevare leggermente la striscia centrale dell’imbottitura della testa e allargare la pattella posta sotto l’imbottitura della parte frontale. Presa di venti…
-
131, 260 261 nederlands Zetel Telefooncentrale Adres +49 (0)391 8106-0 SCHUBERTH GMBH Stegelitzer Str. 12 39126 Magdeburg Duitsland Internet www.schuberth.com J. HOE U ONS KUNT BEREIKEN
… -
132, 263 nederlands italiano français english deutsch 262 español Por favor lea este manual atentamente, para que su casco le proteja cuando circule en moto. Para no descuidar ningún aspecto relevante para la seguridad, le recomendamos leer estas instrucciones de uso en el orden indicado. Por favor preste especial atención a: Advertencia: Indicaciones de seguridad Atención: Indicaciones…
-
139, 276 277 español Abra para ello el visor • porlogenerallaposiciónparaciudadsesalta. • moviendohaciaabajoelvisorsepuedeajustarconfacilidad. El visor puede activarse en cualquier momento, independientemente de la posición de la visera parasol. Cerrar el visor El visor se cierra apretando desde arriba el tab de la derecha o …
-
80, 159 español nederlands français english deutsch 158 it aliano Leggi attentamente queste istruzioni per sfruttare correttamente la protezione offerta dal casco durante la guida. Per non trascurare alcun aspetto riguardante la tua sicurezza, leggi attentamente le istruzioni nell’ordine in cui esse sono riportate. Presta particolare attenzione a: Avvertenza: Indicazioni di sicurezza A…
-
36, 70 71 english 3. The Pinlock ® lense should now be positioned in the face shield with its lower edge parallel to the lower edge of the face shield. If you need to change the positioning of the Pinlock ® lense, use the balls of your thumbs to gently bend the face shield apart until the inner visor can be adjusted as required. 4. Check all around the Pinl…
-
57, 112 113 français Attention : Pour les motos carénées, de forts tourbillons d’air environnent la zone protégée du vent. Ceux-ci peuvent réduire considérablement les performances aéro-acoustiques du casque. Veiller à ce que le carénage ne dirige pas précisément la couche turbulente sur la partie inférieure du casque. Coussinets antibruit Les coussinets antibruit, brevetés…
-
104, 206 207 it aliano Avvertenza: l’inserimento nel casco di un sistema di comunicazione (per sistema di intende anche un semplice headset), rappresenta sempre e comunque una modifica del casco stesso. I diversi sistemi di comunicazione e gli headset dovranno dunque essere testati e omologati per ogni modello di casco, secondo la relativa normativa europea ECE…
DOC-7ceff96e:
SCHUBERTH C3 PRO: Recommended Instructions
139.53724, 140, KR-FH, Cadence 920, URC10820N


-
©Copyright 9/9/2014 AR-Rev01-GABAULETTO LATERALE MONOKEY — MONOKEY SIDE CASE — VALISES LATÉRALES MONOKEY MONOKEY SEITENKOFFER — MALETA TRASERA MONOLOCK — MALA TRASEIRA MONOLOCK1/2ISTRUZIONI DI MONTAGGIO — MOUNTING INSTRUCTIONS INSTRUCTIONS DE MONTAGE — BAUANLEITUNG INSTRUCCIONES DE MONTAJE — INSTRUÇÕES DE MONTAGEME22NPER APRIRE IL BAULETTO — TO OPEN THE CASE — POU …
E22N 2
-
OPERATOR’S MANUALM12™ FOUR BAY SEQUENTIAL CHARGERM12™ LITHIUM-ION BATTERY PACKSNew batteries must be charged before first use.TO REDUCE THE RISK OF INJURY, USER MUST READ AND UNDERSTAND OPERATOR’S MANUAL.Cat. No.M12C4Cat. No.M12BM12B2Cat. No.M12BXM12B4 …
M12 Series 8
-
Page 1 of 24 LP0293 R&G Unit 1, Shelley’s Lane, East Worldham, Alton, Hampshire, GU34 3AQ Tel: +44 (0)1420 89007 Fax: +44 (0)1420 87301 www.rg-racing.com Email: [email protected] FITTING INSTRUCTIONS FOR LP0293BK LICENCE PLATE BRACKET YAMAHA XTZ 700 (TENERE) 2019- FITTED WITH PANNIER RACK (FOR USE WITH STANDARD AND R&G MINI INDICATORS (8mm)) …
LP0293 24
-
IAN 292272FORSTSCHUTZHELM, FORESTRY SAFETY HELMET, CASQUE FORESTIER FFSH 3 A1 CASQUE FORESTIERTraduction des instructions d’origine FORSTSCHUTZHELMOriginalbetriebsanleitung FORESTRY SAFETY HELMETTranslation of the original instructionsLESNICKÁ PŘILBAPřeklad originálního provozního návoduCAPACETE DE PROTEÇÃO FLORESTALTradução do manual de instruções originalCASCO FORESTAL …
FFSH 3 A1 48
-
Instructions > PMI PODREMOVAL FROM SERVICEThe PMI POD provides the protection you need working in a vertical rope world. It features a Kevlar shell giving your head maximum protection. It meets ANSI Z89.1, Type 1 Fully adjustable three point chinstrap and ratchet system provide a perfect fi t. Weight: 1.25 lbs (567 g)If any of the following occur, this helmet mu …
POD 2
-
CONTENTSNOTE: It is necessary to obtain Suzuki P/N 990A0-75045 Touring Backrest w/Pad (w/o studs) prior to assembly. This can be obtained from your authorized Suzuki dealer.P.NoPart No. Description Q.ty①- BACKREST MOUNTING BRACKET,LEFT 1②- BACKREST MOUNTING BRACKET,RIGHT 1③- MOUNTING SPACER,FR (12mm) 2④- MOUNTING SPACER,RR (41mm) 2⑤- BUTTON HEAD BOLT (M8 × 85mm) 2⑥- BUTTON HEAD …
99000-99074-81N 15
-
EN 12492:2012HP 10 200 00WHP 10 200 00BHP 10 200 00RHP 10 200 00OCasque d’alpinisme et d’escalade / Climbing and mountaineering safety helmet / Bergsteiger- und Kletterhelm / Casco de alpinismo y de escalada / Casco per alpinismo e scalataKRATOS SAFETY689 Chemin du Buclay38540 Heyrieux — FRANCETel : +33 (0)4 72 48 78 27Fax : +33 (0)4 72 48 58 3 …
HP 10 200 00W 16
-
www.rtechmx.comVia Sottorive, 5333048 San Giovanni al Natisone (UD) — ItaliaTel. +39 0432 [email protected] IN ITALYHP16,9x5x27pompa frizioneclutch pumpMaguraHusqvarnaTE / FE 2018-196,7x5x4,6pompa frizioneclutch pumpBremboKtm / Sherco / Beta HusqvarnaTE / FE < 2017M5x416x20Montare il paramano al supporto, non serrare completamente le vitiAssemble the handguards …
HP1 2
-
SUZUKI V-STROM 650 ’12KIT SIDEMASTERS0VS62SFBACDAABCD231D2DCONSEJO PARA UN CORRECTO MONTAJE DEL KIT: No apretar los tornillos del todo hasta asegurarse que el KIT esté correctamente colocado yalineado.PROPER KIT ASSEMBLY: do not tighten the screws until ascertaining that the kit is properly positioned and aligned.CONSEIL POUR UN MONTAGE CORRECT DU KIT: s’assurer que le kit es …
KIT SIDEMASTER S0VS62SF 2
-
Rev. 02 del 01/02/2018 0412060436 (IT) NOTA INFORMATIVA CALZATURE DI PROTEZIONE PER MOTOCICLISTI Gentile Cliente, La ringraziamo per aver scelto Dainese ! Il prodotto da Lei acquistato è stato progettato grazie alla collaborazione con i più grandi campioni del motociclismo. I loro consigli ed alcune prestigiose collaborazioni a livello nazionale ed internazionale, unitamente alle più …
AXIAL D1 144
Additional Information:
Popular Right Now:
Operating Impressions, Questions and Answers:
Table of Contents for SCHUBERTH C3 PRO:
-
5 Visier und Sonnenblende / Face shield and sun visor / Visière et pare-soleil / Visiera e visiera parasole / Pantalla y parasol Belüftung / Ventilation / Aération / Ventilazione / Ventilación
-
7 Kommunikationssysteme / Communication systems systems / Système de communication / Sistemi di comunicazione / Sistemas de comunicación Als Zubehör verfügbar, fragen Sie Ihren Fachhändler. As accessories available, ask your specialist supplier. Disponible comme accessoire, demandez à votre revendeur spécialisé. Come accessori disponibili, consultate il vostro rivenditore. Para accesorios, consulte a su distribuidor.
-
Wir empfehlen Ihnen, die Gebrauchsanweisung zusätzlich zum Quick Start Guide ausführlich zu lesen, um alle Funktionen sowie die korrekte Handhabung zu verstehen. Das vollständige Handbuch nden Sie im Internet unter: We recommend you to read the operating instructions carefully in addition the Quick Start Guide, in order to understand all the functions and the correct operation. To nd the complete manual please go to: Après lecture du Quick Start Guide, nous vous recommendons de lire intégralement l
-
2 Registrieren Sie sich online für die 5 YEARS SCHUBERTH STANDARD GUARANTEE. Die Seriennummer Ihres Helms nden Sie hier: Register yourself online for the 5 YEARS SCHUBERTH STANDARD GUARANTEE. You can nd the serial number of your helmet here: Enregistrez-vous sur notre site internet pour le 5 YEARS SCHUBERTH STANDARD GUARANTEE. Vous trouvez le numéro de série de votre casque ici: Registratevi online per la 5 YEARS SCHUBERTH STANDARD GUARANTEE
-
QUICK START GUIDE C3 PRO
-
3 Visier / Face shield / Visière / Visiera / Pantalla Sonnenblende / Sun visor / Pare-soleil / Visiera parasole / Parasol Belüftung / Ventilation / Aération / Ventilazione / Ventilación Önungstaste / Chin bar release / Commande d’ouverture / Pulsante per l’apertura / Botón de aperture Kinnriemen / Chin strap / Jugulaire / Cinturino di chiusura / Correa Schieber der Sonnenblende / Slide for sun
-
QUICK START GUIDE Sie haben mit dem SCHUBERTH C3 PRO eine ausgezeichnete Wahl getroen. Ein Universaltalent in Sachen Funktionalität, Komfort und Schutz. Der C3 Pro ist ein Klapphelm, der für lange Touren ebenso geeignet ist wie für schnellere Passagen. Wir wünschen Ihnen eine sichere Fahrt. With the SCHUBERTH C3 PRO, you have made an excellent choice. Universally adept with regards to functionality, comfort and protection. The C3 Pr
-
4 Kinnriemen einstellen / Adjusting the chin strap / Réglage de la jugulaire / Regolazione del cinturino / Ajuste de la correa Kinnteil / Chin bar / Mentonnière / Mentoniera / Mentonera Kinnriemen / Chin strap / Jugulaire / Cinturino di chiusura / Correa
Questions, Opinions and Exploitation Impressions:
You can ask a question, express your opinion or share our experience of SCHUBERTH C3 PRO device using right now.
Смотреть руководство для Schuberth C3 Pro ниже. Все руководства на ManualsCat.com могут просматриваться абсолютно бесплатно. Нажав кнопку «Выбор языка» вы можете изменить язык руководства, которое хотите просмотреть.

MANUALSCAT | RU
Вопросы и ответы
У вас есть вопрос о Schuberth C3 Pro, но вы не можете найти ответ в пользовательском руководстве? Возможно, пользователи ManualsCat.com смогут помочь вам и ответят на ваш вопрос. Заполните форму ниже — и ваш вопрос будет отображаться под руководством для Schuberth C3 Pro. Пожалуйста, убедитесь, что вы опишите свои трудности с Schuberth C3 Pro как можно более детально. Чем более детальным является ваш вопрос, тем более высоки шансы, что другой пользователь быстро ответит на него. Вам будет автоматически отправлено электронное письмо, чтобы проинформировать вас, когда кто-то из пользователей ответит на ваш вопрос.
Задать вопрос о Schuberth C3 Pro
Страница: 1
322 323
Инструкция по безопасности Säkerhetsanvisningar
Du har köpt en högkvalitativ hjälm från företaget SCHUBERTH. För att hjälmen ska kunna
erbjuda tillräckligt skydd måste den ha bra passform och sitta fast ordentligt. Efter ett fall eller
övrig stark kraftpåverkan (slag eller liknande) måste hjälmen bytas ut. För att inte påverka
visirets (och solvisirets) slaghållfasthet och för att undvika skråmor bör ytskiktet rengöras
endast med en mjuk trasa och vatten (<20°C). Visirets insida bör endast rengöras med mjuk
trasa. Vi rekommenderar trasor i mikrofiber. Undvik att gnida på visiret. Rengör aldrig visiret
med lösningsmedel, bensin o.dyl., fönster- och glasputs eller polityr. Använd inte lack,
självhäftande etiketter, lim eller liknande aggressiva ämnen som kan skada polykarbonatet i
visiret och därmed försämra visirets mekanik och funktion. Av säkerhetsskäl måste visiret
bytas ut när det är mycket repigt eller har andra skador. Använd aldrig tonade eller
återspeglande visir under dåliga siktförhållanden (dimma, regn) eller vid körning på natten
och i tunnlar.
Observera! Hjälmen får inte behandlas med färg, bensin eller lösningsmedel. Klistra heller
aldrig fast etiketter på hjälmen.
Observera! Denna hjälm får inte användas i USA eller Kanada. Hjälmen har testats och
godkänts i enlighet med den europeiska ECE-standarden och uppfyller inte krav och
föreskrifter som gäller i USA eller Kanada. Den får därför inte användas i dessa länder. Hjälmen
får endast användas i länder där ECE-standarden tillämpas. USA och Kanada hör inte till dessa
länder. Om du använder hjälmen i dessa länder har du i fall av skada ingen rätt att göra
anspråk på ersättning i domstolar i USA, Kanada eller i länder som inte tillämpar ECE-stan-
darden.
Vi förbehåller oss rätten att utan föregående meddelande göra ändringar på produkten för
att anpassa den till den senaste tekniska utvecklingen. Garantitiden för denna hjälm är två år
från och med inköpsdatumet vid korrekt användning. Garantifall behandlas av det behöriga
importföretaget i respektive land eller av tillverkaren efter överenskommelse med kundtjänst.
Garantin gäller endast om du kan visa upp originalkvittot för köpet. SCHUBERTH förbehåller
sig rätten att själv avgöra om de felaktiga komponenterna ska repareras, bytas ut eller
gottskrivas.
Garantin upphör att gälla om produkten används på fel sätt, överbelastas eller ändras av
kunden, om tillverkarens rekommendationer inte följs samt vid normalt slitage.
Купленный Вами шлем — это высококачественный продукт фирмы SCHUBERTH. Чтобы
обеспечить достаточную защиту, шлем должен подходить по размеру и быть хорошо
закреплен. После падения или прочего сильного мощного воздействия (удар и т. д.)
шлем подлежит замене. Для того чтобы щиток (включая противосолнечный) как можно
дольше сохранял способность не запотевать и стойкость к появлению царапин,
используйте для чистки его наружной поверхности только мягкую ткань и воду (<20 °C).
Внутренняя сторона щитка должна очищаться исключительно мягкой тканью. Мы
рекомендуем для этого микрофазную ткань. Избегайте сильное трение. Ни в коем случае
не чистите поверхность растворителями, бензином и схожими жидкостями, а также
средствами для чистки оконных стекол или полировками. Также нельзя использовать
лаки, наклейки, клеи или другие агрессивные материалы, которые могли бы повредить
поликарбонат, из которого изготовлен щиток, и вследствие этого ухудшить обзор,
функциональность и механику. В целях безопасности сильно оцарапанный или
поврежденный щиток подлежит замене. Никогда не используйте тонированные или
блестящие щитки при плохих условиях видимости (например, туман, дождь), а также при
ночных поездках и в туннелях.
Внимание! Не допускается обработка шлема красящими средствами, бензином или
растворителями. Так же ничего не наклейвайте на его поверхность.
Внимание! Шлем не предназначен для использования в США и Канаде. Шлем испытан и
допущен к использованию согласно стандартам европейской нормы ЕСЕ, и поэтому он
не соответствует американским и канадским предписаниям и требованиям и не допущен
для использования в США и Канаде. Он может применяться только в странах, в которых
действует европейская норма ЕСЕ. Эта норма не касается, в числе прочих, США и Канады.
Использование продукта в этих странах на дает прав на компенсацию убытков в судах
США и Канады в случае повреждения, а также в судах третьих стран, не связанных
нормой ЕСЕ.
Мы оставляем за собой право изменять продукт в соответствии с техническим
прогрессом, в том числе без предварительного уведомления об этих изменениях.
Гарантийный срок для приобретенного Вами шлема составляет при правильной
эксплуатации 2 года с даты покупки. Гарантийное обслуживание осуществляется
авторизированным импортером в соответствующей стране или непосредственно
производителем после договоренности по горячей линии. Рекламации принимаются на
основании копии документа покупки. SCHUBERTH оставляет за собой право
самостоятельно решать, подлежат ли дефектные части ремонту, обмену или
компенсации их стоимости.
Рекламации не принимаются при ненадлежащем употреблении и чрезмерной нагрузке
на продукт, при изменениях продукта клиентом, несоблюдении рекомендаций
производителя и при обычном износе.
RU SE