
Некоторое время назад я уже рассказывал вам о способе борьбы с остаточным изображением, путём наложения цветовых фильтров.
Если пропустили, повторю, что остаточное изображение появляется на дисплеях смартфонов Xiaomi (и не только) на месте статичных элементов интерфейса из-за долговременного нагрева матрицы и софтовых проблем.
То есть, если долгое время держать яркость дисплея на максимуме, на месте кнопок управления, клавиатуры, часов или индикатора батареи в шторке, может появится этот неприятный эффект.
Позже ситуация может ухудшиться и остаточное изображение проявит себя в других элементах системного интерфейса, практически сводя на нет удобство использования смартфона.
К чему я это всё ? Весна наступила, солнца становится больше с каждым днём, а в смартфонах под управлением MIUI, есть одна полезная (на первый взгляд) функция — автоматическое повышение контрастности экрана при попадании прямых лучей, для улучшения читаемости.
Но помимо очевидных плюсов, такое запредельное повышение яркости и контраста дисплея неизбежно влечёт за собой нагрев, многократно повышающий шанс появления остаточного изображения.
Если вы зайдёте в «Настройки» —> Экран —> Цветовая схема, вы скорее всего увидите, что по умолчанию выставлен режим «Авто (рекомендуется)»
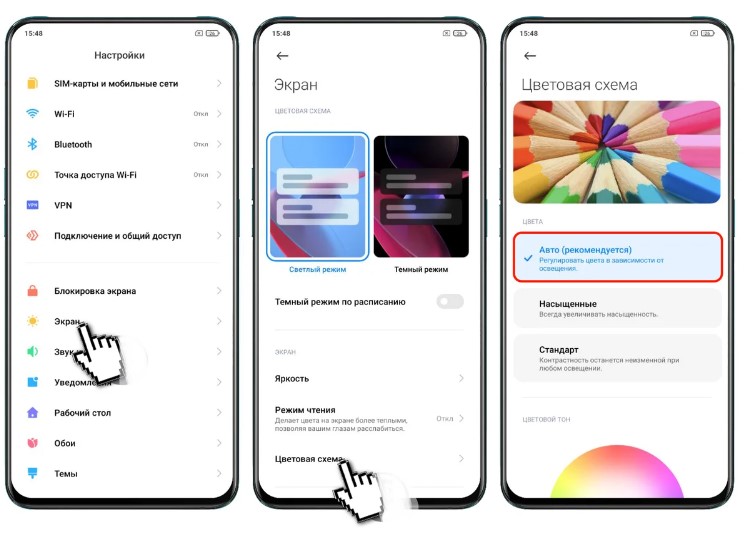
Именно в этом режиме, смартфон может самостоятельно управлять цветами и контрастностью дисплея в яркий, солнечный день. Поэтому я рекомендую сначала зайти в пункт «Яркость», чтобы отключить «Дневной режим», после активировать режим «Стандарт», а затем включить «Режим чтения», который защитит ваш гаджет от появления неприятного эффекта.
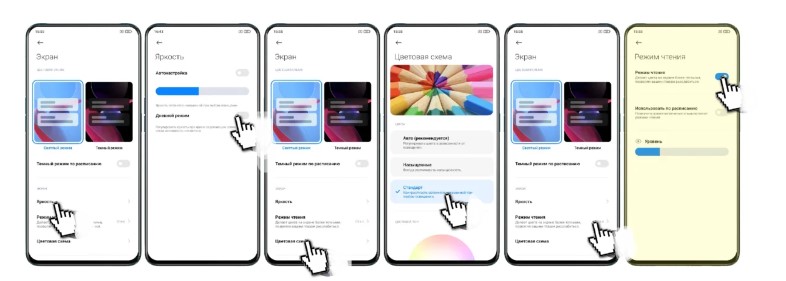
Но, как только вы сделаете это, вы заметите, что экран смартфона стал жёлтым и пользоваться таким (пусть и во благо) не представляется возможным. При этом регулировка цветового тона дисплея в этом режиме отключена и мы не можем подстроить цветопередачу под себя.
Как быть ?
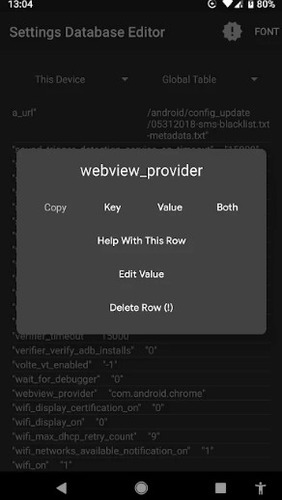
По ссылке в конце статьи, вам нужно скачать и установить приложение Settings Database Editor (Set Edit), после запуска которого, вы увидите следующую картину.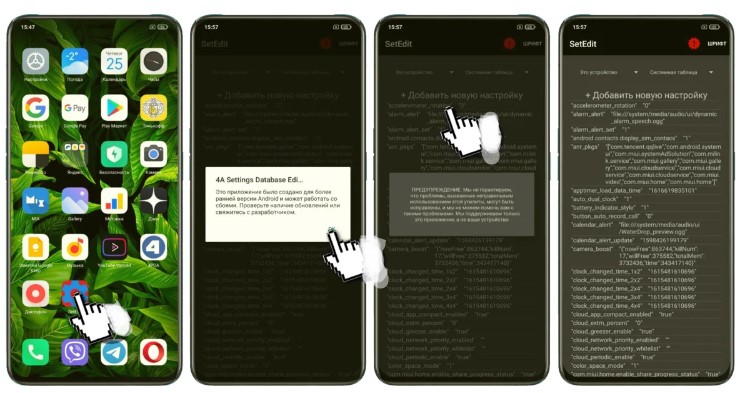
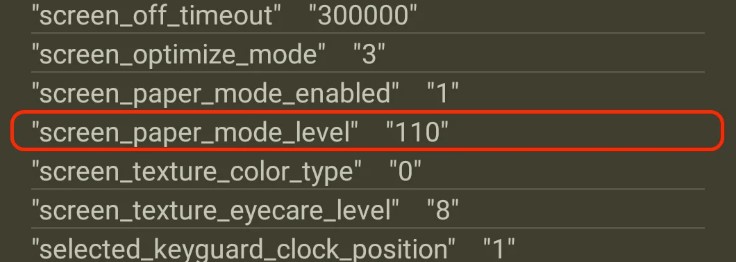
Пугаться предупреждений и непонятных символов не нужно, следуйте инструкции и просто найдите в меню строчку «screen_paper_mode_level», значения в которой могут и должны отличаться в зависимости от модели смартфона (у меня 110).
Нажимаете на эту строчку и выбираете пункт «Изменить значение», после чего выставляете любое число от 1 до 30, а затем нажмите на «Сохранить изменения».
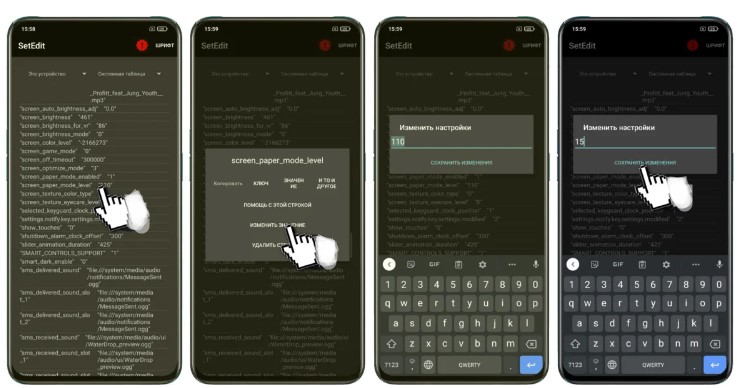
У меня идеальная цветопередача появилась при значении 15
Таким образом, подбирая оптимальное значение для получения правильной цветопередачи на вашем смартфоне, вы получите приятные цвета на экране и защиту от появления остаточного изображения.
Если вы хотите чтобы я рассказал о других полезных возможностях этого приложения, напишите об этом ниже.
Скачать: SetEdit
Best Comments
Step 1: download the app Settings Database Editor: https://play.google.com/store/apps/details?id=by4a.setedit22
Step 2: Open the app and make sure in the dropdown menu on the top right is «System Table» selected.
Step 3: Scroll down untill you find: «op_custom_unlock_animation_style»
Step 4: Click it then select «Edit Value», change it to «3» and click in save changes.
You’re done!
Edit: I think it doesn’t work for the T-Mobile version.
Download the Settings database editor.
Scroll down until you find „op_custom_unlock_animation_style“, click on that and then click on edit value.
If you change the value to 3 you get the mclaren animation, which works the best imo (no reboot required).
Edit the Value to 4 and then reboot your phone to get no animation.
Root is not required.
I just discovered the solution. Hallelujah!
Download the Settings Database Editor app on Google Play:
[url]https://play.google.com/store/apps/details?id=by4a.setedit22[/url]
In the System Table screen, scroll down to the bottom towards the ‘T’ section and find «Touch Disable Mode 1». Tap on it and change it to 0 to turn it off and hit save.
Get a much better fingerprint sensor by using the mclaren unlock design. Its MUCH faster and MUCH more reliable
«All you need is Settings Database Editor from Google Play (https://play.google.com/store/apps/details?id=by4a.setedit22) doesn’t require root.
If you’re already using fingerprint scanner just find «op_custom_unlock_animation_style» and change it’s value from 1 to 3, in case you aren’t using fingerprint scanner simply add new setting called op_custom_unlock_animation_style with the value of 3 and enable your fingerprint scanner. Enjoy your better animation and faster unlocking speed (at least in my case it’s faster now and more consistent). I’ve seen this on XDA 6T forums.»
I just discovered the solution. Hallelujah!
Download the Settings Database Editor app on Google Play:
[url]https://play.google.com/store/apps/details?id=by4a.setedit22[/url]
In the System Table screen, scroll down to the bottom towards the ‘T’ section and find «Touch Disable Mode 1». Tap on it and change it to 0 to turn it off and hit save.
Try to do it using this app and select system table. But first, make sure you are set to 120hz. Then look for refresh rate or something that sounds like it in the list and has a value of 120 and replace it with 90. Not sure if it will work but that’s the workaround for the Poco X3 NFC.
Get a much better fingerprint sensor by using the mclaren unlock design. Its MUCH faster and MUCH more reliable
«All you need is Settings Database Editor from Google Play (https://play.google.com/store/apps/details?id=by4a.setedit22) doesn’t require root.
If you’re already using fingerprint scanner just find «op_custom_unlock_animation_style» and change it’s value from 1 to 3, in case you aren’t using fingerprint scanner simply add new setting called op_custom_unlock_animation_style with the value of 3 and enable your fingerprint scanner. Enjoy your better animation and faster unlocking speed (at least in my case it’s faster now and more consistent). I’ve seen this on XDA 6T forums.»
Download Set edit app and set Peak refresh rate to 59.99 then all your apps will run at 120hz. No root needed. But it resets after every reboot so set manually again.
Refer this
YouTube and TikTok tell the OS to dial down the refresh rate to 60hz so that the content you are viewing actually maschera you screen refresh rate resulting in a smoother video playback.
Though you can force all apps to run at 120hz using SetEdit app selecting system table at the top right and navigating to «user_refresh_rate» and changing the value to 1.
Note this is temporary and it may reverted back to it’s original state if your phone thermal throttles so changes it’s refresh rate to 60hz overwriting the value you have edited.
It also resets when you change the refresh rate from the settings app and opening the camera app and rebooting your device.
Download SetEdit
Find «deviceLevelList», tap on it and edit value.
Change “v:1,c:1,g:1” to “v:1,c:3,g:3” and tap on Save Changes.
You might need to reboot the phone after this.
Oh alright. I don’t own any pixel devices but I believe it’s possible to enable the rotation button with setedit on both of ours. The problem is I don’t know the required setting name and value ;-;
Alright, here’s a more complex method then since I can’t think of anything else
https://play.google.com/store/apps/details?id=by4a.setedit22
Download this app that I linked called setedit. Go to system table and check the value of accessbilty_button_targets
To edit this you’ll need to give the app permission with adb(can be computer or just wireless if you’re android 11+).
Now leave the value as blank with the app. Try this even if you don’t see the option in system table by adding it yourself with the add button
First you need to download SetEdit app after what turn on 120hz in settings and go to SetEdit app. There find setting «user_refresh_rate». There value will be 120. Change 120 to 1 and almost all apps will go on 120hz. After restarting system you need to repeat this. Probably you have already found a solution to this problem, but I hope somehow I helped you
SetEdit — https://play.google.com/store/apps/details?id=by4a.setedit22
You can change it with SetEdit.
Open the app and find ‘status_bar_custom_carrier0’, it’s somewhere at the bottom.
Click on it and press edit value then type in anything you want and save changes. You should see changes immediately.
Download SetEdit from google play, look for «user_refresh_rate», tap on it, and edit the value to «1». If it doesn’t work, consider doing a factory reset. Back up your files first.
Hi, I had this issue when I got my Poco X3 NFC new too. Apparently, if you had used an Android phone in the past that is linked with your current Google account, the settings to turn off Haptic Feedback carries over.
There is a very useful application called SetEdit (Play Store link here) that could help you fix this issue. Just install it, give it ADB permissions and then follow the tutorial below:
1) Click on «System Table» and choose «Global Table» here.
2) Scroll down until you find «low_power_trigger_level» or something similar to that. It should be set to 75.
3) Change that level to something that you could probably live with, like 30 or 20. I personally use 30.
4) If it says «SetEdit does not currently support editing this table», you have not given proper ADB permissions.
Here is how you can give permissions:
adb shell pm grant by4a.setedit22 android.permission.WRITE_SECURE.SETTINGS
Restart your phone. Everything should work properly now.
You can get back the old gestures by downloading the app setEdit and changing «op_gesture_button_side_enabled» to 0.
This toggles a hidden setting on your device and shouldn’t cause any problems. The animations and even the guides in settings are all still part of the OS, and this feature works just like it’s actually supported
Quoting this saved comment from somewhere:
>This was copy pasted from forums (the user didn’t say where on xda he found it)
How to return old gestures, post from xda
No root required
1. Download this Settings Editor app https://play.google.com/store/apps/details?id=by4a.setedit22
2. Open it
3. Choose «System Table»
4. Search for «op_gesture_button_side_enabled»
5. Set its value to «0»
To revert you’ll have to set «1» to that property
DO NOT, I repeat DO NOT modify anything else, you might just break something.
Quoting this saved comment from somewhere:
>This was copy pasted from forums (the user didn’t say where on xda he found it)
>How to return old gestures, post from xda
>No root required
>1. Download this Settings Editor app https://play.google.com/store/apps/details?id=by4a.setedit22
2. Open it
3. Choose «System Table»
4. Search for «op_gesture_button_side_enabled»
5. Set its value to «0»
>To revert you’ll have to set «1» to that property
>DO NOT, I repeat DO NOT modify anything else, you might just break something.
This was copy pasted from forums (the user didn’t say were on xda he found it)
How to return old gestures, post from xda
No root required
- Download this Settings Editor app https://play.google.com/store/apps/details?id=by4a.setedit22
- Open it
- Choose «System Table»
- Search for «op_gesture_button_side_enabled»
- Set its value to «0»
To revert you’ll have to set «1» to that property
DO NOT, I repeat DO NOT modify anything else, you might just break something.
From this post:
> I found this really useful app, SetEdit, that allows to change many MIUI flags not visible in the settings. One of them was «lock_to_app_enabled»: setting it to 0 disabled screen pinning, solving my issue.
Saved you a click
Step 1: Go to Google Play Store and download SetEdit app (Settings Database Editor).
Step 2: Fire up the app and select System Table.
Step 3: Search for “op_camera_notch_ignore.”
Step 4: Tap on it and set the value to “1.”
Step 5: Save.
Step 6: After your notch is hidden, you can even opt to uninstall the app.
I should of been more specific. I was thinking of the Verizon models, where you don’t need to reload your software and you just go into your Developer options to enable it. I never thought of using a autoloader to load the SK version as much effort either, but I know that is just me.
Instructions for the KeyOne:
(Video Tutorial: https://www.youtube.com/watch?v=0U3j2LaWZ4M )
-
Download https://play.google.com/store/apps/details?id=by4a.setedit22&hl=en
-
run in ADB: adb shell pm grant by4a.setedit22 android.permission.WRITE_SECURE_SETTINGS
-
Go to the app. Global mode. Add the following values:
touch_keyboard_mode_switch_enabled (Value = 1)
If you want the currency key to enable the cursor on or off:
touch_keyboard_mode_switch_on_currency_key (Value = 1)
Or mute key, this should work:
touch_keyboard_mode_switch_on_mute_key (Value = 1)
You don’t even need adb, all you need is to download this app
Then find the
«op_custom_unlock_animation_style»
And set it to 3 : done
You can try this app. But be careful because you can mess stuff up if you don’t know what you’re doing.
Get SetEdit and set «lock_to_app_enabled» in the System Table to 0. It will hide the screen pinning option.
Download SetEdit, UserRefreshRate edit value to 90
My phone doesn’t have this problem, however I found a possible fix here. It involves installing the SetEdit app (open-source version on F-Droid), give it WRITE_SECURE_SETTINGS permission through ADB, and then change the phone’s Hide_Pocket_Mode value with it. Please note that I haven’t tried this myself.
Download SetEdit from the Google play store and change «miui_recents_show_recommend» from ‘1’ to ‘0’.
Install SetEdit, search for «UserRefreshRate», click on it, edit value and set it to 90. Works on my mi 11
You can. Install SetEdit, search for «UserRefreshRate», click on it, edit value and set it to 90. Works on my mi 11
Quoting this saved comment from somewhere:
>This was copy pasted from forums (the user didn’t say where on xda he found it)
>How to return old gestures, post from xda
>No root required
>1. Download this Settings Editor app https://play.google.com/store/apps/details?id=by4a.setedit22
2. Open it
3. Choose «System Table»
4. Search for «op_gesture_button_side_enabled»
5. Set its value to «0»
>To revert you’ll have to set «1» to that property
>DO NOT, I repeat DO NOT modify anything else, you might just break something.


Работает так, к примеру нужно для начало открыть, если на английском, то описание другое. Где нужно нажать на Add new Setting, и в последствии добавляем значение как приме ro.min.fling_velocity, затем ниже кнопка, и на ее жмем и сохраняем. Но это не все, так как появляется автоматически следующие, точнее 2 окно, где нужно прописать значение, к примеру 8000 и остается опять нажать на сохранить, но это будет завершенное.
Если у вас несколько тритов, то после как второе окно закрыли, то больше не появится, где обратно вызываем и проделываем аналогично. Как все прописали, то остается перезагрузить аппарат, и смотреть отличие, на некоторых Android аппараты не происходит изменение, вероятно они старые, и не все триты походят, так как считаю они написаны под новые телефоны.
Давай 2 твита выставим, но для начало скачайте SetEdit на русском, что закреплен за постом, где установка стандартная, как у остальных приложений, где при загрузки со всем соглашаемся, если будет просить.
Отзывы о приложение:

Полное название:

Скачиваемый МОД с Русским описанием или на буржуйском:
Переходим к твикам:
1. Эти 4 твика отвечают за увеличение плавности и отзывчивости вашего смартфона.
[info]windowsmgr.max_events_per_sec
150
[/info][info]ro.min.fling_velocity
8000
[/info][info]ro.max.fling_velocity
12000
[/info][info]ro.min_pointer_dur
8
[/info]2. Если у вас на устройстве меньше 4 Гб оперативной памяти, то рекомендую добавить данное значение.
[info]touch.presure.scale
0.001
[/info]
[info]dev.pm.dyn_samplingrate
1
[/info]
Как понимаете, что под одну функцию можно добавлять несколько значений, но у каждого значение идет свои знаки, что ставим на второе окно, и завершаем сохранением. Как пример, прописали Твик, и завершаем 0, это означает, что мы функцию закрываем, а 1 идет на активацию, что а каждого Твика свое значение.
Твики взяты сайта 4pda.to
Видео обзор для понимание работы SetEdit:
Создаем полный доступ к скрытым настройка графики в телефоне, а также к закрытым разделам приложения, и все при помощи этой небольшого приложение, под названием SetEdit, который может перевернуть значение функций и дизайна телефона.
К материалу закреплен русифицированный SetEdit в приложение
Также можете с Google Play скачать
Сама программа, приложение весит меньше 1 MB, это о чем, ведь если все пропишите и у вас появится, то что хотели, то вам не нужно сносить данное приложение, ведь если вы снесете его, то автоматически вы сносите все настройки, которые ранее прописывали. Так, что кнопку берем и выставляем в край экрана иди в сборке, чтоб не отсвечивала, а когда нужно вы всегда можете ее расчехлить.
Также аналогичные функции прописывал в теме делаем плавную прокрутку страницы, только не сильно функционал направление было, а только задание и все кратко по приложению.
P.S. — Здесь буду стараться рабочие Твики закидывать, с начало проверять, но на старой версии не точная проверка, где остается на комментариях основание делать.
Также приложение SetEdit закреплено за данным постом, где вы можете его скачать, и установить на смартфон. По умолчанию он идет на английском языке, но там все более понятно.
Преимущество Android перед другими операционными системами заключается в представленных пользователям широких возможностей функций и конфигураций системы.
Можно ли настроить устройство на ОС Android используя значения из базы данных?Однозначный ответ на этот вопрос – да. И поможет в этом приложение SetEdit SettingsDatabaseEditor, которое можно скачать на сайте Apkshki.com. Это приложение — «палочка-выручалочка», которой уже давно пользуются программные специалисты.
SetEdit встретить юзера таблицей значений конфигураций устройства вместо привычного графического интерфейса. Здесь доступны все настройки устройства от выделения сегмента памяти для конкретных задач до звуковых конфигураций для каждой отдельной ситуации.
Плюс ко всему SetEdit позволяет создавать новые настройки, чтобы пользователь имел мог устанавливать авторские конфигурации. Главный нюанс программы — узкопрофильная направленность. С приложением лучше работать только тем, кто разбирается в тонкостях ОС Android. Поэтому если вы обладаете лишь поверхностными знаниями об этой системе, лучше позвольте произвести требуемые действия специалисту, чтобы не нанести фатальные повреждения программному обеспечению устройства. Стоит иметь в виду, что разработчики не гарантируют возможность решения проблем, которые могут произойти по причине неправильного использования программы.
Подробная информацияПо умолчанию ОС протекции Android на даёт возможность редактировать таблицы GLOBAL и SECURE. Если работа производится на Jellybean (или же более поздней версии), пользователь может из оболочки ADB снять данную защиту. Сделать это можно введя команду «pm grant by4a.setedit22 android.permission.WRITE_SECURE_SETTINGS». Удаление защиты на более ранней версии возможно исключительно на корневом устройстве, инсталлировав приложение в системный раздел.Начиная с Android Q пользователю будут поступать запросы «проверить наличие обновлений». Пропускайте эту плашку, так при удалении этого окна снизиться функциональность SetEdit, по этой причине устранение запроса не рекомендуется.
Особенности приложения:
- Регулярные обновления и мониторинг ошибок
- Лёгкий способ обхода стандартной системы протекции
- Настройки доступны в виде грамотно составленной таблицы
- Стандартный процесс инсталляции
- Бесплатное скачивание
Подводя итоги — для тех, кто работает на ОС Android, приложение SetEdit должно быть в инструментарии специалиста.
SetEdit SettingsDatabaseEditor на APKshki.com скачали 147 раз. SetEdit SettingsDatabaseEditor распространяется бесплатно в расширении .
Все приложения и игры на нашем сайте проходят обязательную проверку антивирусом с последними сигнатурами.
SetEdit
The open source version of 4A Settings Database Editor.

WARNING I do not guarantee that problems caused by the improper use of this utility can be fixed, and we are unable to help you with any such problems. We support only this app, not your device’s system software. Settings Database Editor (SetEdit) is invaluable if you need it, but if you’re not careful you’re very likely to mess something up.
By default, for your protection, Android prevents you from modifying the SECURE and GLOBAL tables. If you have Android Jellybean or later, you can remove this protection from an ADB shell using the following command
pm grant io.github.muntashirakon.setedit android.permission.WRITE_SECURE_SETTINGS
On earlier versions, you can only remove this protection on a rooted device by installing SetEdit to the system partition.
Both WRITE_SETTINGS and WRITE_SECURE_SETTINGS permissions are optional if you do not need to edit any items.
License
GNU General Public License v3.0
Credits
SetEdit by 4A