-
Contents
-
Table of Contents
-
Troubleshooting
-
Bookmarks
Quick Links
DIGITAL MULTIFUNCTIONAL SYSTEM
OPERATION GUIDE
MODEL: AR-6020
AR-6023
AR-6020D
AR-6023D
AR-6020N
AR-6023N
AR-6026N
AR-6031N
Related Manuals for Sharp AR-6020
Summary of Contents for Sharp AR-6020
-
Page 1: Operation Guide
MODEL: AR-6020 AR-6023 AR-6020D AR-6023D AR-6020N AR-6023N AR-6026N AR-6031N DIGITAL MULTIFUNCTIONAL SYSTEM OPERATION GUIDE…
-
Page 3: Table Of Contents
SETTING THE NUMBER OF COPIES ..48 REQUIREMENTS ……….9 INSTALLING THE SOFTWARE …… 10 REDUCTION/ENLARGEMENT/ZOOM … 48 l AR-6020/AR-6023/AR-6020D/AR-6023D ..10 l AUTOMATIC RATIO SELECTION….48 l FOR A MODEL THAT HAS THE NETWORK l MANUAL RATIO SELECTION……. 49 FUNCITON AS A STANDARD FEATURE OR…
-
Page 4
PRINTER FUNCTIONS USER SETTINGS BASIC PRINTING ……….66 ADJUSTING THE AUTOMATIC EXPOSURE l OPENING THE PRINTER DRIVER FROM THE LEVEL………….. 89 «Start» BUTTON ……….68 TONER SAVE MODE AND HIGH IMAGE PRINTER DRIVER SETTING SCREEN… 69 QUALITY MODE……….90 SETTING ADVANCED PRINT FUNCTIONS..70 CUSTOMISING SETTINGS (System Settings) .. -
Page 5
ROUTINE MAINTENANCE WEB FUNCTIONS IN THE MACHINE CHECKING THE TOTAL OUTPUT COUNT AND ABOUT THE WEB PAGES ……127 TONER LEVEL ……….120 l HOW TO ACCESS THE WEB PAGE AND l CHECKING THE TOTAL OUTPUT COUNT ..120 VIEW HELP ……….127 l CHECKING THE TONER LEVEL ….121 CHECKING THE IP ADDRESS IN THE WEB PAGE …………. -
Page 6: Introduction
To get full use of all machine features, be sure to familiarise yourself with this manual and the machine. For quick reference during machine use, SHARP recommends printing out this manual and keep it in a handy location.
-
Page 7: Conventions Used In This Manual
Note performance, operation and such, that may be useful to the user. RSPF This manual refers to the Reversing Single Pass Feeder as the «RSPF». DIFFERENCES BETWEEN MODELS This manual covers the following models. AR-6020 AR-6020D AR-6020N AR-6026N Model AR-6023…
-
Page 8: Setup
This manual refers to the CD-ROM that accompanied the machine simply as «CD-ROM». SOFTWARE The CD-ROM that accompanies the machine contains the following software: AR-6020/AR-6023/AR-6020D/AR-6023D MFP driver Printer driver The printer driver enables you to use the printer function of the machine.
-
Page 9: Software For Windows
Systems Incorporated. * The PS3 expansion kit is required. HARDWARE AND SOFTWARE REQUIREMENTS Check the following hardware and software requirements before installing the software. AR-6020/AR-6023/AR-6020D/AR-6023D AR-6020N/AR-6023N/AR-6026N/AR-6031N IBM PC/AT or compatible computer equipped IBM PC/AT or compatible computer equipped Computer type with a 10BASE-T/100BASE-TX LAN with a USB 2.0…
-
Page 10: Installing The Software
INSTALLING THE SOFTWARE • AR-6020/AR-6023/AR-6020D/AR-6023D: this page • AR-6020N/AR-6023N/AR-6026N/AR-6031N: page 14 • When the network expansion kit or the printer expansion kit is installed : page 14 • The screen images in this manual are mainly for Windows 7. With other versions of Windows, some screen Note images may be different from those in this manual.
-
Page 11
Follow the on-screen instructions. The USB interface on the machine complies with the USB 2.0 (Hi-Speed) standard. When «The installation of the SHARP software is Please purchase a shielded USB cable. complete.» appears, click the «OK» button and go to the next step. -
Page 12
SETUP Follow the instructions in the Plug and Play window to install the driver. Follow the on-screen instructions. If you are using Windows Vista/7/8 If a security warning window appears, be sure Caution to click «Install this driver software anyway». This completes the installation of the software. -
Page 13: Using The Machine As A Shared Printer
SETUP USING THE MACHINE AS A SHARED PRINTER If the machine will be used as a shared printer on a Windows network, follow these steps to install the printer driver in the client computer. To configure the appropriate settings in the print server, see the operation manual or help file of your operating Note system.
-
Page 14: For A Model That Has The Network
SETUP FOR A MODEL THAT HAS THE NETWORK FUNCITON AS A STANDARD FEATURE OR WHEN THE NETWORK EXPANSION KIT IS INSTALLED Installing the printer driver When the machine is connected to a network Insert the LAN cable into the LAN Double-click the «Setup»…
-
Page 15
SETUP Click the «Printer Driver» button. Printers connected to the network are detected. Select the machine and click the «Next» button. • This screen is not displayed when only 1 device is found in the search results. Note • If the machine is not found, make sure that Click the «Standard installation»… -
Page 16
SETUP When the machine will be connected with a USB cable (When the network expansion kit or the printer expansion kit is installed) Perform steps 2 through 6 in «When Follow the on-screen instructions. the machine is connected to a network»… -
Page 17
SETUP Connect the machine to your computer with a USB cable. (1) Make sure that the machine is powered (p.37) (2) Connect the cable to the USB connector (B type) on the machine. The USB interface on the machine complies with the USB 2.0 (Hi-Speed) standard. -
Page 18
SETUP When installing the PS printer driver or PPD driver Installation is possible even after the USB cable has been connected. Click the «Printer Driver» button. When the printer driver selection window appears, remove the «PCL6» checkmark and select the printer driver to be installed, and then click the «Next»… -
Page 19: Installing The Printer Status Monitor
For the procedures for using the Printer Status Monitor, see the Help file. Follow these steps to view the Help file: Click the Windows «start» button, select «All Programs», select «SHARP Printer Status Monitor» and then select «Help». In Windows 8/Server 2012, right-click in the startup window (or swipe upward from the bottom edge), then select «Taskbar»…
-
Page 20: Installing The Scanner Driver
Click the «start» button, select «All the machine is connected to a Programs», select «SHARP MFP network» (p.14). TWAIN AC» («SHARP MFP TWAIN K» on a network connection), and then select «Select Device». Click the «Scanner Driver (TWAIN) » button.
-
Page 21
SETUP Select the IP address of the machine from the «Address» menu and click the «OK» button. • Be sure to ask your system administrator (network administrator) for the IP address of the machine. • The name (host name) or IP address of the machine can be directly entered in «Address». -
Page 22: Installing The Ps Display Fonts
SETUP INSTALLING THE PS DISPLAY FONTS Fonts that can be used by the PS printer driver are contained on the «PRINTER UTILITIES» CD-ROM that accompanies the PS3 expansion kit. Install these fonts as needed for the PS printer driver. To install on Mac OS, see ReadMe on the “PRINTER UTILITIES» CD-ROM that is included in the PS3 expansion Note kit.
-
Page 23: Configuring The Printer Driver
Þ «Printers». Right-click the «SHARP AR-xxxx» printer driver icon, and then click «Printer properties». In Windows Vista click the «SHARP AR-xxxx» printer driver icon and select «Properties» from the «Organize» menu. Click the «Configuration» tab and set the printer configuration based on the Click the «OK»…
-
Page 24: Setting Up Button Manager
Þ «Printers». ScanMenu u SC1: Right-click the «SHARP AR-xxxx» icon and select «Scan properties». In Windows Vista click the «SHARP AR-xxxx» icon and select «Properties». In the «Properties» screen, click the «Events» tab. Select «ScanMenu SC1:» from the «Select an event» pull-down menu.
-
Page 25: Troubleshooting
«Other Serial Bus controllers». devices». Two items should appear: your controller chipset If «SHARP AR-xxxx» appears, select and delete type and Root Hub. If these items appear, you the item. can use the USB port. If the «Universal Serial Bus controllers»…
-
Page 26: Removing The Software
SETUP Removing the software If you need to remove the software, follow these steps. Click the «start» button and then click «Control Panel». In Windows 8/Server 2012, right-click in the startup window (or swipe upward from the bottom edge), then select «Taskbar» Þ «All Applications» Þ «Control Panel».
-
Page 27: Setup In A Macintosh Environment
SETUP IN A MACINTOSH ENVIRONMENT This chapter explains how to install the PPD file to enable printing from a Macintosh and how to configure the printer driver settings. • The printer expansion kit and PS3 expansion kit are required to use the machine as a printer in a Macintosh environment. In addition, the machine must be connected to a network.
-
Page 28
SETUP The License Agreement window will When the installation completed appear. Make sure that you screen appears, click the «Close» understand the contents of the license button. agreement and then click the «Continue» button. This completes the installation of the software. Next, configure the printer driver settings. -
Page 29
SETUP Configure the printer driver. Click the «Option & Supplies» button and click the «Driver» tab. If you wish to use the IPP function, see «Printing using the IPP function» (p.30) to configure the printer driver settings. Click the «Default» icon. If you are using Mac OS X v10.4, click the «Default Browser»… -
Page 30: Printing Using The Ipp Function
Printer Software») from «Print Using» and click the PPD file for your model. If you are using Mac OS X v 10.5 to 10.7, select «Sharp» in «Print Using» and click the PPD file of your model. Click the «Add» button.
-
Page 31: Before Using The Machine
This chapter contains basic information that should be read before using the machine. PART NAMES AND FUNCTIONS A model that has the network function as standard feature AR-6020/AR-6023 AR-6020D/AR-6023D Glass cleaner (when the RSPF is installed) Paper trays Use to clean the original scanning glass.
-
Page 32
BEFORE USING THE MACHINE USB 2.0 connector Fusing unit release levers Connect to your computer to use the printer and To remove a paper misfeed from the fusing unit, push scanner functions. down on these levers and remove the paper. (p.115) 10BASE-T/100BASE-TX LAN connector The fusing unit is hot. -
Page 33: Operation Panel
BEFORE USING THE MACHINE OPERATION PANEL SCAN MENU key ID CARD COPY key/indicators Use to scan by means of the provided Button Press to use ID Card copy. (p.65) Manager software and Scan to USB. (p.81) Zoom key ( ORIGINAL TO COPY key ( Hold down when the machine is not in use to display the Press to select duplex copy.
-
Page 34
BEFORE USING THE MACHINE AUTO/TEXT/PHOTO key ( Light and Dark keys ( ) / indicators AUTO indicators The selected exposure level indicator lights up. Use to select the exposure mode: (p.47) «AUTO», «TEXT», or «PHOTO». (p.47) Audit clear key ( ACC.#-C ONLINE key ( ) / indicator… -
Page 35: Display
BEFORE USING THE MACHINE DISPLAY ] Maintenance indicator (p.111) Original size auto detection indicator ] Toner cartridge replacement required Lights up when the original size is detected indicator (p.111) automatically. ] Developer replacement required ] Misfeed indicator (p.111) indicator (p.111) Paper tray indicator The number of copies display Blinks when the tray has run out of paper.
-
Page 36: Notification Indicator
BEFORE USING THE MACHINE NOTIFICATION INDICATOR The data notification indicator ( ) and the error indicator ( ) lights solidly or blinks to indicate the status of the machine. Data notification indicator ( ) (green) Tray Error indicator ( ) (red) Pattern1 Pattern2 Errors that do not stop…
-
Page 37: Power On And Off
POWER ON AND OFF The power switch is located on the left side of the machine. POWER ON POWER OFF Make sure that the machine is not in Turn the power switch to the «ON» operation and then turn the power switch position.
-
Page 38: Loading Paper
There are many varieties of special paper available on the market, and some cannot be used with this machine. Before using special paper, contact your authorised service representative. l Before using other than SHARP recommended paper, make a test copy to see if the paper is suitable.
-
Page 39: Loading Paper
BEFORE USING THE MACHINE LOADING PAPER Make sure that the machine is not copying or printing, and then follow these steps to load paper. Loading the paper tray Gently pull out the paper tray until it • Do not load paper higher than the line on Note stops.
-
Page 40: Loading The Bypass Tray
• When loading envelopes, make sure that they are straight and flat and do not have loosely glued construction flaps (not the closure flap). • Special papers except SHARP recommended transparency film, labels, and envelopes must be fed one sheet at a time through the bypass tray.
-
Page 41: Changing A Tray’s Paper Size Setting
BEFORE USING THE MACHINE Envelopes Do not use the following envelopes, as misfeeds will occur. • Envelopes with metal tabs, clasps, strings, holes, or windows. • Envelopes with rough fibres, carbon paper, or glossy surfaces. • Envelopes with two or more flaps. •…
-
Page 42: Changing The Paper Type In A Tray
BEFORE USING THE MACHINE Metric (AB series) and inch series reference Press the [START] key ( ) and then Metric series Inch series (inch) the [PAPER] key. (AB series) (mm) To change the paper size 5-1/2″ x 8-1/2″ (Invoice) 140 x 216 setting of another tray, 8-1/2″…
-
Page 43: Operation In Copy, Printer, And Scanner Modes
BEFORE USING THE MACHINE Perform steps 1 to 5 of «CHANGING A After pressing the [START] key ( TRAY’S PAPER SIZE SETTING» (p.41), press the [PAPER] key to exit the and select the tray whose paper type settings. you want to change. To change the paper size setting of another tray, repeat steps 2 to 5 after…
-
Page 44: Copy Functions
Chapter 3 COPY FUNCTIONS This chapter explains how to use the copy functions. NORMAL COPYING This section explains how to make a regular copy. If «Auditing mode» has been enabled (p.97), enter your 3-digit account number. Copying from the document glass Open the document cover/RSPF, and Specify the size of the original with place the original.
-
Page 45: Copying From The Rspf
COPY FUNCTIONS Copying from the RSPF Make sure that an original has not Press the [START] key ( ) to begin been left on the document glass. copying. Close the RSPF. The copy is delivered to the paper output tray. The default output mode Adjust the original guides to the size for copying from the…
-
Page 46
COPY FUNCTIONS Auto paper select mode (when there are two or more paper trays) When the AUTO PAPER SELECT indicator lights up, «Auto paper select mode» is enabled. This function automatically selects the paper that is the same size as the original A5, B5, B5R, A4, A4R, B4, A3 (5-1/2″ x 8-1/2″, 8-1/2″… -
Page 47: Making A Copy Darker Or Lighter
COPY FUNCTIONS MAKING A COPY DARKER OR LIGHTER Automatic exposure adjustment is initially enabled. This function automatically adjusts the copy image according to the original being copied. If you wish to select the exposure level yourself, follow the steps below. (Select from two original types and five exposure levels for each original type.) The exposure level used in automatic exposure adjustment can also be changed.
-
Page 48: Setting The Number Of Copies
COPY FUNCTIONS SETTING THE NUMBER OF COPIES Press the numeric keys to set the number of copies. Important note when making a large number of copies When the maximum number of pages (about 250 pages) that can be held in the paper output tray are output, copying will temporarily stop.
-
Page 49: Manual Ratio Selection
COPY FUNCTIONS Press the [ZOOM] key ( Set the number of copies and other copy settings, and then press the [START] key ( The AUTO IMAGE indicator ( ) lights up The copy will be delivered to the paper output and the appropriate ratio tray.
-
Page 50: Selecting The Vertical And Horizontal Copy Ratios Separately (Xy Zoom Copying)
COPY FUNCTIONS SELECTING THE VERTICAL AND HORIZONTAL COPY RATIOS SEPARATELY (XY ZOOM Copying) The XY ZOOM feature allows the horizontal and vertical copy ratios to be changed independently. Example: Reduction only in the horizontal direction. Original Copy • This feature cannot be used with the 2 IN 1 or 4 IN 1 feature. (p.61) Note •…
-
Page 51
COPY FUNCTIONS Use the [Copy ratio] keys ( ) to change the copy ratio in the horizontal direction. Press the [Copy ratio] keys ( ) to adjust the ratio in increments of 1%. The ratio appears in the display. Press the [START] key ( The selected ratio for the horizontal direction will be entered and the number of copies can be set in the display. -
Page 52: Automatic Two-Sided Copying (Model That Has The Duplex Copy Print Function As Standard Feature Only.)
AUTOMATIC TWO-SIDED COPYING (Model that has the duplex copy print function as standard feature only.) Two originals placed on the document glass can be copied onto each side of a single sheet of paper. In addition, an RSPF can be used to copy two originals onto one sheet of paper, or one two-sided original onto two sheets of paper, or one two-sided original onto each side of one sheet of paper.
-
Page 53: Using The Document Glass
COPY FUNCTIONS Using the document glass Using the RSPF Place the original that you wish to Place originals in the RSPF. (p.45) copy onto the front side of the paper on the document glass and close the If you place an odd number of originals for one-sided to two-sided copying, the last page will document cover.
-
Page 54: Image Rotation In Duplex Copying
COPY FUNCTIONS IMAGE ROTATION IN DUPLEX COPYING This function is used to invert the top and bottom of the image on the front side of the paper during two-sided copying. Hold down the [ORIGINAL TO COPY] key ( ) until the ( ) indicator blinks.
-
Page 55: Two-Sided Copying Using The Bypass Tray
TWO-SIDED COPYING USING THE BYPASS TRAY To perform manual two-sided copying, follow these steps. Example: Copying originals A and B onto each side of one sheet of paper Copy Original A Original B Copy original A. Turn the copy of original A over, and without changing the position of the edge closest to you, insert it in the bypass tray.
-
Page 56: Dual Page Copying
DUAL PAGE COPYING A dual page original can be automatically separated into two pages during copying. This feature is convenient for making copies of books and other dual page originals on individual sheets of paper. Original Copy • A4 (8-1/2″ x 11″) paper is used for dual page copying. Note •…
-
Page 57: Interrupting A Copy Run (Interrupt Copying)
INTERRUPTING A COPY RUN (Interrupt Copying) A copy run can be temporarily interrupted to allow another copy job to be performed. When the other job is finished, the copy run will resume using the original copy settings. Sort/group/rotate sort copying, 2 IN 1 / 4 IN 1 copying, two-sided copying, or ID card copying cannot be performed Note as an interrupt copy job.
-
Page 58: Convenient Copy Functions
CONVENIENT COPY FUNCTIONS This section explains major convenient copy functions. ROTATING THE IMAGE 90 DEGREES (Rotation Copy) When «Auto paper select mode» or «automatic ratio selection» are in operation and the original is placed in a different orientation (vertical or horizontal) than the paper, the original image will be automatically rotated 90 degrees to enable correct copying onto the paper.
-
Page 59: Sort Copy/Group Copy/Rotate Sort
COPY FUNCTIONS SORT COPY/GROUP COPY/ROTATE SORT When copying a multi-page original, you can select the output method. • The machine can scan standard originals (A4 (8-1/2″ x 11″)) with approximately 160 pages, however, the Note number will vary for photos and other types of originals. Less pages can be scanned for interrupt copying. •…
-
Page 60
COPY FUNCTIONS Using the document glass Using the RSPF Place the first original. (p.44) Place the originals. (p.45) Sort mode is normally the default output mode, Select the original size. (p.44) and thus the RSPF and SORT indicators light up. •… -
Page 61: Copying Multiple Originals Onto A Single Sheet Of Paper
COPY FUNCTIONS COPYING MULTIPLE ORIGINALS ONTO A SINGLE SHEET OF PAPER (2 IN 1 / 4 IN 1 Copy) Multiple originals can be copied onto a single sheet of paper in a selected layout pattern. This function is convenient for compiling multi-page reference materials into a compact format, or for providing an overview of all pages of a document on a single page.
-
Page 62: Setting The Layout Pattern
COPY FUNCTIONS Using the RSPF Place the originals. (p.45) • To cancel 2 IN 1 / 4 IN 1 copying, press the Note [CLEAR] key • To cancel 2 IN 1 / 4 IN 1 copy mode, press Press the [2 IN 1 / 4 IN 1] key ( ) to the [2 IN 1 / 4 IN 1] key ( ) repeatedly…
-
Page 63: Creating Margins When Copying (Margin Shift)
COPY FUNCTIONS CREATING MARGINS WHEN COPYING (Margin Shift) The MARGIN SHIFT feature, in its initial setting, automatically shifts the text or image to increase the margin by approximately 10mm (1/2″). The location of the margin to be increased can be selected to be either at the left edge or the top of the page. Margin Margin Original…
-
Page 64: Erasing Shadows Around The Edges
COPY FUNCTIONS ERASING SHADOWS AROUND THE EDGES OF A COPY (Erase Copy) l This feature is used to erase shadows that appear around the edges of copies of books and other thick originals. (EDGE ERASE) l The feature can also erase the shadow that appears down the centre of books and other originals that open up. (CENTRE ERASE) l The factory default setting for the width of the erasure is approximately 10 mm (1/2″).
-
Page 65: Id Card Copy
COPY FUNCTIONS ID CARD COPY You can copy the front and back sides of ID card onto a page through this function. The specified patterns of ID card copy are shown as follows. Pattern 1 Pattern 2 Front Centre Line Back •…
-
Page 66: Printer Functions
Before printing, make sure that the correct size of paper for your document has been loaded in the machine. Make sure that the ONLINE indicator Make sure that «SHARP AR-xxxx» is on the operation panel is lit. selected as the printer.
-
Page 67: If The Tray Runs Out Of Paper During Printing
PRINTER FUNCTIONS If the tray runs out of paper during printing Add paper to the tray or press the [TRAY] key to select a different tray, and then press the [ONLINE] key ( ) to resume printing. Note that if the «Auto tray switching» setting in the system settings is enabled on a model that has two or more paper trays and there is the same size of paper in another tray, the machine will automatically switch to the other tray and continue printing.
-
Page 68: Opening The Printer Driver From The «Start» Button
[Control Panel] Þ Þ [Hardware and Sound] [Devices and Printers] [Printers]. Right-click the «SHARP AR-xxxx» printer driver icon, and then click «Printer properties». In Windows Vista, select «Properties» from the «Organize» menu. Click the «Preferences» button in the «General» tab.
-
Page 69: Printer Driver Setting Screen
PRINTER DRIVER SETTING SCREEN Some restrictions exist on the combinations of settings that can be selected in the printer driver setup screen. When a restriction is in effect, an information icon ( ) will appear next to the setting. Click the icon to view an explanation of the restriction.
-
Page 70: Setting Advanced Print Functions
SETTING ADVANCED PRINT FUNCTIONS This section explains major advanced print functions. The explanations assume that the paper size and other basic settings have already been selected. For the basic procedure for printing and the steps for opening the printer driver, see «BASIC PRINTING»…
-
Page 71: Fitting The Printed Image To The Paper (Fit To Paper Size)
PRINTER FUNCTIONS FITTING THE PRINTED IMAGE TO THE PAPER (Fit To Paper Size) The printer driver can adjust the size of the printed image to match the size of the paper loaded in the machine. Follow the steps shown below to use this function. The explanation below assumes that you intend to print an A3 or Ledger size document on A4 or Letter size paper.
-
Page 72: Enlarging/Reducing The Print Image (Zoom)
PRINTER FUNCTIONS ENLARGING/REDUCING THE PRINT IMAGE (Zoom) This function is used to enlarge or reduce the image to a selected percentage. This allows you to enlarge a small image or add margins to the paper by slightly reducing an image. Note The «Zoom»…
-
Page 73: Adjusting The Brightness And Contrast Of The Image (Image Adjustment)
PRINTER FUNCTIONS ADJUSTING THE BRIGHTNESS AND CONTRAST OF THE IMAGE (Image Adjustment) The brightness and contrast can be adjusted in the print settings when printing a photo or other image. These settings can be used for simple corrections when you do not have image editing software installed on your computer.
-
Page 74: Two-Sided Printing (Model That Has Duplex Copy / Print Function As Standard Feature Only)
PRINTER FUNCTIONS TWO-SIDED PRINTING (Model that has duplex copy / print function as standard feature only) The machine can print on both sides of the paper. This function is useful for many purposes, and is particularly convenient when you want to create a simple pamphlet. Two-sided printing also helps conserve paper. Note When using two-sided printing, select a source other than «Bypass Tray»…
-
Page 75: Saving Frequently Used Print Settings
SAVING FREQUENTLY USED PRINT SETTINGS Settings configured on each of the tabs at the time of printing can be saved as user settings. Saving frequently used settings or complex colour settings under an assigned name makes it easy to select those settings the next time you need to use them.
-
Page 76: Outline Of The Print Status Window
OUTLINE OF THE PRINT STATUS WINDOW When printing begins, the Print Status Window automatically opens. The Print Status Window is a utility that monitors the machine and shows the name of the document being printed and any error messages that occur. Status window Provides information on the current status of the Click a tab to bring it to the front.
-
Page 77: Basic Printing (Macintosh)
BASIC PRINTING (MACINTOSH) l AR-6020/AR-6023/AR-6020D/AR-6023D The network expansion kit and the PS3 expansion kit must be installed and the machine must be connected to a network. l AR-6020N/AR-6023N/AR-6026N/AR-6031N The printer expansion kit and the PS3 expansion kit must be installed and the machine must be connected to a network.
-
Page 78: Scanner Functions
Chapter 5 SCANNER FUNCTIONS This chapter explains how to use the scanner functions. • Scanning is not possible when the front or side cover is opened for machine maintenance, or when a misfeed Note occurs or the machine runs out of paper or toner, or when the drum cartridge reaches its replacement time. •…
-
Page 79: Scanning Using The Keys On The Machine
SCANNING USING THE KEYS ON THE MACHINE USING BUTTON MANAGER When scanning is performed by this method, the application that has been set in Button Manager will automatically start and the scanned image will be pasted into the application. For the steps to allocate applications using the Button Manager or other settings, see «BUTTON MANAGER SETTINGS»…
-
Page 80: Outline Of Button Manager
SCANNER FUNCTIONS OUTLINE OF BUTTON MANAGER Button Manager is a software utility that allows you to use the scanner function at the machine. Button Manager allows you to configure six sets of scanning settings as a scan menu on the machine. To view Help for a setting, click the button in the upper right-hand corner of the window and then click the setting.
-
Page 81: Button Manager Settings
If the Button Manager icon does not appear Note on the task bar, click the «Start» button, select «All Programs», select «Sharp Button Manager AC», and then click «Button Manager» to start Button Manager. Click the tab of the scan menu that you want to set up.
-
Page 82: Sending An Image In Usb Memory Mode
SENDING AN IMAGE IN USB MEMORY MODE SENDING AN IMAGE IN USB MEMORY MODE When you are using the network expansion kit or the AR-6020N/AR-6023N/AR-6026N/AR-6031N, you can send an image in USB memory mode. Store the scan settings in a SCAN MENU key in advance, and then connect a USB memory device to the machine to scan an image into the USB memory.
-
Page 83: Scanning From Your Computer
SCANNING FROM A TWAIN-COMPLIANT APPLICATION The SHARP scanner driver is compatible with the TWAIN standard, allowing it to be used with a variety of TWAIN-compliant applications. Depending on your system, «SHARP MFP Place the original(s) that you wish to Note TWAIN 1.0 (32-32)»…
-
Page 84: Scan Preferences
SCANNER FUNCTIONS Click the «Preview» button. The preview image will appear. • If the angle of the image is not correct, reset Note the original, and click the «Preview» button again. • If the preview image is not oriented correctly, click the «Rotate» button in the preview screen.
-
Page 85: Scanner Driver Settings
SCANNER FUNCTIONS Scanner driver settings The scanner driver setup screen consists of the «Set-up screen», which lets you select scan settings, and the «Preview screen», which shows the scanned image. For details on the scan settings, click the «Help» button in the preview screen to display Help.
-
Page 86
SCANNER FUNCTIONS Preview screen Preview screen «Auto Scan Area Judgement» button Click the «Preview» button in the Set-up screen to Click when the preview screen is displayed to display the scanned image. You can specify the automatically set the scanning area to the entire scanning area by dragging the mouse inside the preview image. -
Page 87: Scanning From A Wia-Compliant Application (Windows Vista/7/8)
Note the original size in «Page installed in your computer, the «Select Device» size». screen will open. Select «SHARP AR-xxxx» and click the «OK» button. • If you select «Document Feeder» for the Note «Paper source» and click the «Preview»…
-
Page 88
SCANNER FUNCTIONS Click the «Scan» button. Scanning begins and the image is acquired into Paint. Use «Save» in your application to specify a file name and folder for the scanned image, and save the image. To cancel a scanning job after clicking the «Scan» button, click the «Cancel»… -
Page 89: User Settings
Chapter 6 USER SETTINGS This chapter explains how to set the automatic exposure level, toner save mode/high image quality mode, network settings through your web browser, and the system settings, which are custom settings that control fine points of the machine’s operation.
-
Page 90: Toner Save Mode And High Image Quality Mode
TONER SAVE MODE AND HIGH IMAGE QUALITY MODE Toner save mode can be enabled to reduce toner consumption by about 10%. (The amount of the saved toner varies depending on the type of original.) The high image quality mode improves copy image quality in the automatic and manual exposure modes by increasing copy density with a slight increase of toner consumption.
-
Page 91: Customising Settings (System Settings)
CUSTOMISING SETTINGS (System Settings) The system settings allow you to customise the machine to match your needs. SYSTEM SETTINGS Setting codes Program Program name (factory default setting Explanation number appears in bold) 1: OFF • «Auto clear time» automatically returns the copy 2: 10 sec.
-
Page 92
USER SETTINGS Setting codes Program Program name (factory default setting Explanation number appears in bold) • If the paper runs out during printing and there is paper of the same size and orientation in another tray, Auto tray 0: OFF this function automatically switches to that tray switching 1: ON… -
Page 93
USER SETTINGS Setting codes Program Program name (factory default setting Explanation number appears in bold) • When this function is enabled, printing in printer Use close 0: OFF mode will automatically continue using a different size paper size 1: ON of paper if the specified size of paper runs out in all trays. -
Page 94: Selecting A Setting For A System Setting
USER SETTINGS SELECTING A SETTING FOR A SYSTEM SETTING Hold down the [Light] key ( ) until Enter the desired setting code by the alarm indicators ( , pressing a numeric key. blink. • For the setting codes, «SYSTEM The number of copies SETTINGS».
-
Page 95: Setting The Ip Address Of The Machine By System Settings
SETTING THE IP ADDRESS OF THE MACHINE BY SYSTEM SETTINGS To set the IP address of the machine, perform the program number (37) in the system settings (p.91). ENABLING/DISABLING DHCP Use this setting to have the IP address obtained automatically using DHCP (Dynamic Host Configuration Protocol). When this setting is enabled, it is not necessary to manually enter an IP address.
-
Page 96: Setting The Ip Address
USER SETTINGS SETTING THE IP ADDRESS This section explains how to set the IP address on the machine. Refer to the system settings Press the [START] key ( procedure on page 100 to enter setting code «37», and press the The leftmost 3 digits of the subnet mask are finalized.
-
Page 97: Settings For Auditing Mode
SETTINGS FOR AUDITING MODE AUDITING MODE When «Auditing mode» is enabled, a count is kept of the number of copies made by each account (up to 20 accounts can be established), and the counts can be displayed and totalled as necessary. In «Auditing mode», the number of copies display shows «- — -«, and this indicates that a 3-digit account number must be entered in order to use the machine for copying.
-
Page 98: Selecting Auditing Mode Settings
USER SETTINGS SELECTING AUDITING MODE SETTINGS Hold down the [Light] key ( ) until Press the [Light] key ( ) to complete the alarm indicators ( , the settings. blink. The alarm indicators ( , ) go off and the display returns to the number of copies The number of copies display.
-
Page 99
USER SETTINGS Auditing mode Account number deletion (program No.10) (program No.13) Press the [1] key to enable «Auditing Use this procedure to delete account numbers. mode» or the [0] key to disable it, and then A single account number can be deleted, or all account press the [START] key ( numbers at once. -
Page 100: Resetting Account
USER SETTINGS Resetting account Copying when «Auditing mode» is enabled (program No.15) The copy count of a single account or all accounts can When «Auditing mode» is enabled, «- — -» appears in the be reset to 0. If no account numbers have been number of copies display.
-
Page 101: Troubleshooting
Chapter 7 TROUBLESHOOTING If you experience difficulty using the machine, check the following troubleshooting guide before calling for service. Many problems can be easily resolved by the user. If you are unable to solve the problem using the troubleshooting guide, turn off the power switch and unplug the machine, and contact your authorised service representative. TROUBLESHOOTING MACHINE/COPYING PROBLEMS The machine does not operate.
-
Page 102: Troubleshooting
TROUBLESHOOTING MACHINE/COPYING PROBLEMS The following problems are related to the general operation of the machine and copying. Problem Cause and solution Page The machine is not plugged into a power outlet. – → Plug the machine into a grounded outlet. Power switch OFF.
-
Page 103: Paper Misfeed
TROUBLESHOOTING Problem Cause and solution Page Misfeed occurs. → To remove the misfeed, see «MISFEED REMOVAL». The paper is outside of the specified size and weight range. → Use copy paper within the specified range. Paper curled or damp. → Do not use curled or crimped paper. Replace with dry copy paper. –…
-
Page 104: A Copy Job Stops Before It Is Finished
TROUBLESHOOTING Problem Cause and solution Page The paper output tray is full. → Long copy runs are automatically paused every 250 copies. Remove the copies in the paper output tray and press the [START] key ( ) to resume copying. «FUL»…
-
Page 105: Printing And Scanning Problems
Þ «Control Panel» Þ «Hardware and Sound» Þ «Devices and Printers» Þ «Printers». 2 If the «SHARP AR-xxxx» printer driver icon is shown but you still cannot print, the printer driver may not have been installed correctly. In this case, delete the software and then reinstall it.
-
Page 106: A Notice Page (Np-001) Has Been Printed, But The Print Data Has Not Been Printed Completely
TROUBLESHOOTING Problem Cause and solution Page A print job containing more data than can be held in the print memory is sent to the machine. A Notice Page (NP-001) has been → Disable the ROPM function on the «Configuration» tab of the printed, but the print data has not printer driver setup screen.
-
Page 107: Poor Scanning Quality
TROUBLESHOOTING Problem Cause and solution Page The document glass or the underside of the document cover/RSPF is dirty. → Clean regularly. Original smudged or blotchy. – → Use a clean original. You have not specified a suitable resolution. → Make sure that the resolution setting in the scanner driver is –…
-
Page 108: Unable To Scan The Image
TROUBLESHOOTING Problem Cause and solution Page If scanning is not possible, shut down your computer, turn off the machine’s power switch, and unplug the machine’s power cord. Next, start your computer, restore – power to the machine, and try scanning again. If scanning is still not possible, check the following items.
-
Page 109: Networking Problems
→ When choosing «Print» from the «File» menu located in applications, be sure – you have selected «SHARP AR-xxxx» (where xxxx is the model name of your Print jobs are not machine) printer displayed in the «Print» dialog box.
-
Page 110: The Start Indicator Is Not Lit In The Usb Memory Scan Mode
TROUBLESHOOTING Problem Cause and solution Page The START indicator is The USB memory is not recognized or not inserted, or any device not lit in the USB – other than USB memory is inserted in the USB port. → Check the USB port of the Network expansion kit. Memory Scan mode.
-
Page 111: Indicators And Display Messages
Developer replacement Misfeed indicator required indicator The number of copies display Indication Cause and solution Page Service by an authorised SHARP service technician is Maintenance indicator Steadily lit – required. Developer Developer is required. Contact your authorised service replacement required Steadily lit –…
-
Page 112: Misfeed Removal
MISFEED REMOVAL When a misfeed occurs, the misfeed indicator ( ) and a misfeed location indicator ( ) will blink and the machine will automatically stop. Check the blinking misfeed location indicator to identify the location of the misfeed and remove it. The paper may tear when you remove a misfeed.
-
Page 113: Misfeed In The Bypass Tray
TROUBLESHOOTING Open and close the RSPF to make the Section C Remove the misfed original from the exit area. misfeed location indicator stop blinking. You can also make the misfeed indicator stop blinking by opening and closing the feeding roller cover.
-
Page 114: Misfeed In The Machine
TROUBLESHOOTING MISFEED IN THE MACHINE Open the bypass tray and the side Check the misfeed location. Remove cover. the misfed paper following the instructions for each location in the illustration below. If paper is misfed here, go to «B. Misfeed in the fusing area».
-
Page 115
TROUBLESHOOTING B. Misfeed in the fusing area Push gently on both ends of the front Lower the fusing unit release levers, cover and open it. to return them to their operating positions. Turn the roller rotating knob in the direction of the arrow. Close the front cover and side cover. -
Page 116
TROUBLESHOOTING C. Misfeed in the transport area Open the fusing paper guide by pressing down the green-labeled projection on the guide and remove the misfed paper. Be careful not to tear the misfed paper during removal. The fusing unit is hot. Do not touch Warning the fusing unit when removing misfed paper. -
Page 117: Misfeed In The Upper Paper Tray
TROUBLESHOOTING MISFEED IN THE UPPER PAPER TRAY Note Make sure that there is no misfeed paper in the tray before pulling it out. (p.114) Lift and pull out the upper paper tray and remove the misfeed paper. Be careful not to tear the misfeed paper during removal.
-
Page 118: Misfeed In The Lower Paper Tray
TROUBLESHOOTING MISFEED IN THE LOWER PAPER TRAY Note Make sure that there is no misfeed paper in the tray before pulling it out. (p.114) Open the lower side cover. Close the lower paper tray. Grasp the handle to open the lower side cover. Remove the misfeed paper.
-
Page 119: Replacing The Toner Cartridge
REPLACING THE TONER CARTRIDGE When the toner cartridge replacement required indicator ( ) lights up, the toner cartridge will need replacement soon. Obtain a new cartridge. When the toner cartridge replacement required indicator ( ) blinks, the toner cartridge must be replaced before copying can be resumed. Replace the toner cartridge by following the procedure below.
-
Page 120: Routine Maintenance
Chapter 8 ROUTINE MAINTENANCE This chapter explains how to keep the machine operating smoothly, including viewing copy count/scan count/the toner level indicator, cleaning the machine and resetting the network settings of the machine. CHECKING THE TOTAL OUTPUT COUNT AND TONER LEVEL CHECKING THE TOTAL OUTPUT COUNT When «Auditing mode»…
-
Page 121: Checking The Toner Level
ROUTINE MAINTENANCE CHECKING THE TONER LEVEL The toner level is indicated by a 6-level display. Use it as a guideline for replacing the toner cartridge. Hold down the [Light] key ( ) until Hold down the [ZOOM] key ( ) for the alarm indicators ( , more than 5 seconds.
-
Page 122: Routine Maintenance
ROUTINE MAINTENANCE CLEANING THE DOCUMENT GLASS AND RSPF/DOCUMENT COVER If the document glass, underside of the document cover/RSPF, or the scanner for originals coming from the RSPF (the long narrow glass surface on the left side of the document glass) become dirty, the dirt may appear on copies. Always keep these parts clean.
-
Page 123: Cleaning The Bypass Tray Paper Feed Roller
ROUTINE MAINTENANCE CLEANING THE BYPASS TRAY PAPER FEED ROLLER If misfeeds such as those of postcards, envelopes, or heavy paper fed from the bypass tray occur frequently, wipe the surface of the bypass tray feeding roller with a soft clean cloth moistened with alcohol or water. Paper feed roller CLEANING THE ORIGINAL FEED ROLLER If lines or other dirt appear on the scanned original when the automatic document feeder is used, wipe the surface of…
-
Page 124: Appendix
PERIPHERAL DEVICES As a part of our policy of continuous improvement, SHARP reserves the right to make design and specification Note changes for product improvement without prior notice. The performance specification figures indicated are nominal values of production units.
-
Page 125: 500-Sheet Paper Feed Unit
APPENDIX 500-SHEET PAPER FEED UNIT These paper feed units provide the convenience of increased paper capacity for the copier and a greater choice of paper sizes readily available for copying. Part names 500 paper feed unit (MX-CS12/MX-CS13) Side cover Tray Setting the plate Remove the plate from the tray.
-
Page 126: Storage Of Supplies
STORAGE OF SUPPLIES Standard supplies for this product that are to be replaced by the user are paper and toner cartridge. For best copying results, be sure to use only SHARP products. Only genuine SHARP consumables carry the Genuine Supplies label.
-
Page 127: Web Functions In The Machine
Chapter 10 WEB FUNCTIONS IN THE MACHINE ABOUT THE WEB PAGES This model that has the network function as standard feature or the Network expansion kit includes a built-in Web server. The Web server is accessed using a Web browser on your computer. The Web pages include both pages for users and pages for the administrator.
-
Page 128: Checking The Ip Address In The Web Page
CHECKING THE IP ADDRESS IN THE WEB PAGE The settings of the IP address, Subnet Mask, and Default Gateway can be checked in the Web page. • To acquire the IP address automatically, set «DHCP» to «Enable». Note • When «DHCP» settings are changed, the change will take effect after the machine is restarted. Click [Network Status] in the menu Check «IP Address», «Subnet Mask», frame of the Web page.
-
Page 129: About The Web Pages (For Users)
ABOUT THE WEB PAGES (FOR USERS) When you access the user Web pages in the machine, the following page will appear in your browser. A menu frame appears on the left side of the page. When you click an item in the menu, a screen appears in the right frame that allows you to configure settings for that item.
-
Page 130: Configuring The Printer Condition Settings
CONFIGURING THE PRINTER CONDITION SETTINGS The printer condition settings allow basic printer settings to be configured. The following items can be set: «Default Settings» (p.131): Basic settings that are mainly used when the printer driver is not used. «PCL Settings» (p.132): PCL symbol set, font, line feed code, and other settings.
-
Page 131: Printer Condition Setting Menu
WEB FUNCTIONS IN THE MACHINE PRINTER CONDITION SETTING MENU Click on a setting to view an explanation of the setting. Condition Settings Condition Settings Default Settings Factory default settings PCL Settings Factory default settings Copies Symbol Set PC-8 Orientation Portrait Font 0: Courier (internal font) Default Paper Size…
-
Page 132: Pcl Settings
WEB FUNCTIONS IN THE MACHINE PCL Settings Item Selections Description Symbol Set Select one of 35 This specifies which country’s characters (PCL symbol set) are sets. assigned to certain of the symbols in the character code list. The factory default setting is [PC-8]. Font Select one internal This specifies which PCL font to use for printing.
-
Page 133: About The Web Pages (For The Administrator)
ABOUT THE WEB PAGES (FOR THE ADMINISTRATOR) In addition to the menus that appear for users, other menus that can only be used by the administrator appear in the administrator Web pages. A menu frame appears on the left side of the page. When you click an item in the menu, a screen appears in the right frame that allows you to configure settings for that item.
-
Page 134: Protecting Information Programmed In The Web Page ([Passwords])
When establishing a password for the first time, • Be sure to enter the same password in enter «Sharp» in «Admin Password». «Confirm Password» as you did in «New Password». Be sure to enter «S» in upper case and Note «harp»…
-
Page 135: Administrator Settings
ADMINISTRATOR SETTINGS The administrator settings are used to prohibit changes to the [Condition Settings] and to configure interface settings. «Default settings» (p.135) Select the setting for which you wish to prohibit changes. «Interface settings» (p.135) Enable monitoring of data sent to the network port and set restrictions. CONFIGURING A SETTING IN THE ADMINISTRATOR SETTINGS Click [Administrator Settings] in the…
-
Page 136: Ssl Settings
SSL SETTINGS SSL is a protocol that enables the encryption of information transmitted over a network. Encrypting data makes it possible to transmit and receive sensitive information safely. Click [SSL Setttings] in the menu frame. The «SSL Setttings» screen will appear. Configure settings for SSL Settings.
-
Page 137: E-Mail Status And E-Mail Alert Settings
E-MAIL STATUS AND E-MAIL ALERT SETTINGS These functions send information on machine use (print count, copy count, etc.) and error conditions (paper misfeed, out of paper, out of toner, etc.) via e-mail to the administrator of the machine or the dealer. INFORMATION SETUP Machine identification information for the status and alert e-mail functions is configured in the «Information Setup»…
-
Page 138: Status Message Setup
WEB FUNCTIONS IN THE MACHINE STATUS MESSAGE SETUP Use the status message function to send the current counter information, including the copy count, print count, and total output count, based on the specified schedule. The destinations can be set for administrators and dealers respectively.
-
Page 139
OPERATION GUIDE AR6031N-EX1…
 05:48
05:48
How to remove and service sharp AR-5316 drum cartridge and developer
 13:42
13:42
Sharp ar 6020d F2-40 change devoloper .
 03:15
03:15
SHARP AR-6020 первый запуск
 08:16
08:16
How to refill sharp AR toner cartridge
 10:42
10:42
How To Operating Sharp AR 6020v , AR 6023v AR 6026v (NEW )
 02:56
02:56
sharp ar 6026n settings ip address
 06:36
06:36
HOW TO CLEANING DRUM UNIT Sharp AR Series, Sharp MX Series.
 04:53
04:53
Заправка картриджа Sharp AR-016 // Cartridge refill Sharp AR-016
• ПОДГОТОВКА К РАБОТЕ
• ИЗГОТОВЛЕНИЕ КОПИЙ
• ПРЕДУПРЕЖДАЮЩИЕ ИНДИКАТОРЫ
• ОБЩИЕ СВЕДЕНИЯ
• ДОПОЛНИТЕЛЬНЫЕ ПРИНАДЛЕЖНОСТИ
2
13
29
37
57
ЦИФРОВОЙ КОПИР
РУКОВОДСТВО ДЛЯ ПОЛЬЗОВАТЕЛЯ
МОДЕЛЬ
AR-206
Стр.

Õ‚Àflœ‚А›!
∆ФН˘УНПК˙ ХНБ ЩН ОПКУ¬П¯Ъ¯˝К¯ ˆÓÎÊÏÓËÍÔÒ˝У˘У НООНПНЪН ВКП˙˜ SHARP. –П¯≈¯, ¸¯˙ Х˜ ˝Н¸˝¯Ъ¯
ПН¬УЪНЪТ, ОУ≈ÍÔÈıÁÚÍ, ОПУ¸ЪКЪ¯ БФ¯И√ЫК¯ П¯ˆУ˙¯˝Н˚КК.
1. ·ЪУ Ú͈ӯ Ъ¯‰˝К¸¯БˆУ¯ У¬БФИ≈КЛН˝К¯?
’ФН ЪУ˘У, ¸ЪУ¬˜ ЛБ¯˘Н ОУФИ¸НЪТ ‰УПУМК¯ ˆÓÎÊÊ, НООНПНЪ ЪП¯¬И¯Ъ БУУЪЛ¯ЪБЪЛИ√Ы¯˘У У¬БФИ≈КЛН˝К˛
ˆËÍÔÊÂÊ˚КПУЛН˝˝˜˙ Б¯ПЛКБ˝˜˙ К˝≈¯˝¯ПУ˙. ’Ф˛ ¸¯˘У ˝И≈˝У Ъ¯‰˝К¸¯БˆУ¯ У¬БФИ≈КЛН˝К¯?
…УЪУОПУЛУ˛ЫКı ¬НПН¬Н˝, ОПУ˛ЛКЪ¯ФТ К ПИ˘К¯ ИБЪН˝УЛФ¯˝˝˜¯ Л НООНПНЪ¯ ¸НБЪК К˙¯√Ъ
БУ¬БЪЛ¯˝˝˜¯ ÁÏÓˆÊ БФИ≈¬˜ К УФ≈˝˜ ¬˜ЪТ ЩН˙¯˝¯˝˜ ˝УЛ˜˙К ОУ УБЪК≈¯˝КК ˆУ˝˚Н ÁÏÓˆÍ БФИ≈¬˜.
¤ПУ˙¯ ЪУ˘У, ¯БФК Х˜ ¯ФН¯Ъ¯ ˆÓÎÊÊ ФКЪ¯ФТ˝У¯ ЛП¯˙˛, ˝¯ˆÓÚÓϘ¯ ¯ЪНФК НООНПНЪН КЩ˝НМКЛН√ЪБ˛ К
Л˝ИЪПК ˙У≈¯Ъ ˝ÍˆÍÎÔÊËÍÚÒÁ˛ О˜ФТ. –УщЪУ˙И НООНПНЪ ˝И≈Н¯ЪБ˛ Л ÎÏÓÂÊÔ͈Úʸ¯БˆУ˙
У¬БФИ≈КЛН˝КК, Л ОПУ˚¯ББ¯ ˆÓÚÓÏÓ˘У БО¯˚КНФКБЪ ОУ Б¯ПЛКБИ ЩН˙¯˝˛¯Ъ ¸НБЪК КФК ОПУЛ¯П˛¯Ъ,
П¯˘ИФКПИ¯Ъ К У¸КЫН¯Ъ НООНПНЪ, ¸ЪУ ОУЩЛУФКЪ КЩ˘УЪУЛФ˛ЪТ ‰УПУМК¯ ˆÓÎÊÊ БЪН¬КФТ˝У˘У ˆН¸¯БЪЛН.
‡КˆФ У¬БФИ≈КЛН˝К˛ ˛ЛФ˛¯ЪБ˛ ПНЩФК¸˝˜˙ ФН ПНЩ˝˜‰ ˙У¯Ф¯ı ˆÓÎÊÏÓËÍÔÒ˝˜‰ НООНПНЪУЛ.
2. ГКБЪ¯˙Н У¬БФИ≈КЛН˝К˛ К П¯˘КБЪПН˚КК ÎÓˆÈΈÊ
–Ó≈ÍÔÈıÁÚÍ, ЪЫНЪ¯ФТ˝У ПНББОПУБКЪ¯ ХНМ¯˘У КФ¯ПН У БКБЪ¯˙¯ У¬БФИ≈КЛН˝К˛ К У¬ ИБФУЛК˛‰
˘НПН˝ЪКК, ˆÓÚÓÏͲ ПНБОПУБЪПН˝˛¯ЪБ˛ ˝Н ХНБ, Н ЪНˆ≈¯ БОПУБКЪ¯ У ˙¯БЪУ˝Н‰У≈¯˝КК ¬ФК≈НıМ¯˘У ˆ
ХН˙ Б¯ПЛКБ˝У˘У ˚¯˝ЪПН. ’Ф˛ ЪУ˘У, ¸ЪУ¬˜ ХН˙ ¬˜ФУ ОПУБЪУ БУУ¬ЫКЪТ Н˝˝˜¯ У¬ НООНПНЪ¯ Л БФИ¸Н¯
ОУ˛ЛФ¯˝К˛ ˝¯КБОПНЛ˝УБЪК, ОУ≈ÍÔÈıÁÚÍ, БУ‰ПН˝˛ıЪ¯ ЪНФУ˝ П¯˘КБЪПН˚КК ÎÓˆÈΈÊ, ˆÓÚÓϘı ОПУБКЪ¯
У¬˛ЩНЪ¯ФТ˝У ЩНОУФ˝КЪТ ОПК ОУФИ¸¯˝КК НООНПНЪН.
Х ˝¯ˆÓÚÓϘ‰ П¯˘КУ˝Н‰ ОУФУ≈¯˝К˛ О¯П¯ˆФ√¸НЪ¯Ф˛ ØPowerø У¬УЩ˝Н¸¯˝˜ ШIш К Ш
ш Л˙¯БЪУ ØONø Ê ØOFFø.
ГК˙ЛУФ Ш
ш УЩ˝Н¸Н¯Ъ, ¸ЪУ ОПК ˝Н‰У≈¯˝КК О¯П¯ˆФ√¸НЪ¯Ф˛ ØPowerø Л Н˝˝Уı ОУЩК˚КК ˆÓÎÊÏ ÓÚˆÔ√¸¯˝
˝¯ОУФ˝УБЪТ√ К ˝Н‰УКЪБ˛ Л П¯≈К˙¯ У≈КН˝К˛ ØStand-byш.
›БФК ˙ÍψÊÏÓËˆÍ ХНМ¯˘У ˆÓÎÊÏÍ БУУЪЛ¯ЪБЪЛИ¯Ъ Л˜М¯ÈˆÍÙÍ˝˝Уı, ЪУ БК˙ЛУФ ШIш БУУЪЛ¯ЪБЪЛИ¯Ъ ØONø
(ХˆФ√¸¯˝У), Н Ш
ш — ØOFFø (Õ˜ˆФ√¸¯˝У).
Х‚Àflœ‚А›:
’Ф˛ ОУФ˝У˘У Л˜ˆФ√¸¯˝К˛ ˆÓÎÊÏÍ ˝¯У¬‰УК˙У ÓÚˆÔ√¸КЪТ ¯˘У УЪ Б¯ЪК.
¤УОКП ˝¯У¬‰УК˙У ПНБОУФН˘НЪТ ОУ¬ФКЩУБЪК УЪ Б¯Ъ¯ЛУı ПУЩ¯ЪˆК, УБЪИО ˆ ˆÓÚÓÏÓı УФ≈¯˝
¬˜ЪТ БЛУ¬У˝˜˙.
А‚…”PMA‡À„ O CEPTÀ…À¤œ‡ÀÀ –PO’Œ¤‡АА
ъ‘›¤◊—”Г◊œ◊А·›Г¤”›
¤”–А—”Хœ‘ч‚”› ŒГ◊—”⁄Г◊Х”
fl”’›‘÷
AR-206
“œ—–
CeÏÚÊÂÊ˚КПУЛН˝ ¤У˙ОН˝К¯ı POCTECT — MOC¤Õœ
OВК˚КНФТ˝˜˙ ОП¯БЪНЛКЪ¯Ф¯˙ fi”ÃÃ◊œ‚’œ—◊œ —УББКК
Модель AR-206 ШАРП
БУУЪЛ¯ЪБЪЛИ¯Ъ ЪП¯¬УЛН˝К˛˙
˝УП˙НЪКЛ˝˜‰ УˆИ˙¯˝ЪУЛ:
ОУ ¬¯ЩУОНБ˝УБЪК —
ГОСТ Р 50377-92
,
—
ГОСТ 12.2.007.0-85
ОУ úflà —
ГОСТ P 51318.14.1-99
— fi”Ã◊ P 50033-92

Ñòpaía-èçãoòoâèòeëú: Ïpoèçâeäeío в Китае
Ôèpìa-èçãoòoâèòeëú: ШАРП Êopïopeéøí
Þpèäè÷åñêèé адрес изготовителя:
22-22 Нагайке-чо, Абено-ку,
Осака 545-8522, Япония
Во исполнение Статьи 5 Закона Российской Федерации «О
защите прав потребителей», а также Указа Правительства
Российской Федерации ¹720 от 16 июня 1997г. устанавливается
срок службы данной модели — 7 лет с момента производства при
условии исполъзования в строгом соответствии с инструкцией
по зксплуатации и применяемыми техническими стандартами.

ŽÎÑÒÎÐÎÆÍÎ
•При использовании копировального аппарата следует соблюдать следующие меры безопасности.
●
Блок термозакрепления является горячим. Будьте внимательны при удалении застрявшей бумаги.
●
Запрещается смотреть прямо на источник света. •Это может повредить Ваши глаза.
●
•Распологайте копировальный аппарат на твердой ровной поверхности.
●
•Не устанавливайте копировальный аппарат во влажном или пыльном месте.
●
Если копировальный аппарат не будет использоваться в течение длительного времени, сле-
дует отключить аппарат с помощью выключателя питания и вынуть кабель питания из розетки.
●
•При перемещении копировального аппарата обязательно выключите выключатель
питания и выньте кабель питания из розетки.
●
Не накрывайте копировальный аппарат пылезащитной крышкой, тканью или пластиковой
когда включено питание.•Это может препятствовать отводу тепла.
●
•Применение регулировок и настроек или выполнение процедур, отличающихся от тех,
которые здесь указаны, может привести к опасному радиоактивному облучению.
Ž
Осторожно лазер
Длина волны 785 нм ± 15 нм
Длина импульса (8.141 мкс ± 10 нс)/7 мм
Выходная мощность 0,2 мВт ± 0,02 мВт
cover2ex.p65 11/01/01, 15:30
2

GETTING ST AR TED STA TUS INDICA T ORS MAKING COPIES GENERA…
Страница 5
- Изображение
- Текст
1
GETTING ST
AR
TED
ST
A
TUS
INDICA
T
ORS
MAKING COPIES
GENERAL INFORMA
TION
OPTIONAL EQ
UIPMENT
СОДЕРЖАНИЕ
Стр.
ПОДГОТОВКА К РАБОТЕ
●
ВВЕДЕНИЕ
. . . . . . . . . . . . . . . . . . . . . . . . . . . . . . . . . 2
●
ОСНОВНЫЕ ХАРАКТЕРИСТИКИ
. . . . . . . . . . . . . . . 3
●
НАИМЕНОВАНИЕ УЗЛОВ И ФУНКЦИЙ КОПИРА
. . . 4
–
Общий вид копира
. . . . . . . . . . . . . . . . . . . . . . . . . . 4
–
Панель управления
. . . . . . . . . . . . . . . . . . . . . . . . 6
●
УСТАНОВКА КОПИРА
. . . . . . . . . . . . . . . . . . . . . . 8
●
МЕРЫ ПРЕДОСТОРОЖНОСТИ ПРИ РАБОТЕ
. . . . 9
●
ЗАГРУЗКА КОПИРА БУМАГО
Й . . . . . . . . . . . . 10
ИЗГОТОВЛЕНИЕ КОПИЙ
●
АУДИТОРСКИЙ УЧЕТ
. . . . . . . . . . . . . . . . . . . 13
●
СТАНДАРТНОЕ КОПИРОВАНИЕ
. . . . . . . . . . . . . 14
●
УМЕНЬШЕНИЕ/УВЕЛИЧЕНИЕ/МАСШТАБИРОВАНИЕ
16
●
ПОДАЧА ИЗ ДОПОЛНИТЕЛЬНОГО УСТРОЙСТВА (спец. виды бумаг)
18
●
ДВУСТРОРОННЕЕ КОПИРОВАНИЕ
. . . . . . . . . . . . . . 20
●
XY МАСШТАБИРОВАНИЕ
. . . . . . . . . . . . . . . . . . . . . 22
●
КОПИРОВАНИЕ НЕГАТИВНЫХ ИЗОБРАЖЕНИЙ
. . . . . 24
●
КОПИРОВАНИЕ С РАЗВОРОТА СТРАНИЦ . . . . . . 25
●
ПРЕРЫВАНИЕ ПРОЦЕССА КОПИРОВАНИЯ . . . .
. . . 26
●
НАСТРОЙКА АВТОМАТИЧЕСКОЙ РЕГУЛИРОВКИ ЭКСПОЗИЦИИ
27
●
РЕЖИМ ЭКОНОМИИ ТОНЕРА . . . . . . . . . . . . . . . 28
ПРЕДУПРЕЖДАЮЩИЕ ИНДИКАТОРЫ
●
ЗАМЕНА ТОНЕР-КАРТРИДЖА . . .
. . . . . . . . . 29
●
ИЗВЛЕЧЕНИЕ ЗАСТРЯВШЕГО ЛИСТА
. . . . . . . . . . 31
●
ЗАМЕНА ДЕВЕЛОПЕРА
. . . . . . . . . . . . . . . . . . . . . 36
●
ВЫЗОВ СПЕЦИАЛИСТА
. . . . . . . . . . . . . . . . . . . 36
ОБЩИЕ СВЕДЕНИЯ
●
ПРОГРАММЫ ПОЛЬЗОВАТЕЛЯ
. . . . . . . . . . . . . . . . . . 37
–
Установка номеров счетов пользователей
. . . . . . . . . 40
●
ЭНЕРГОСБЕРЕГАЮЩИЕ РЕЖИМЫ
. . . . . . . . . . . . 44
●
УХОД КОПИРОМ
. . . . . . . . . . . . . . . . . . . . . . . . . . 46
●
НЕИСПРАВНОСТИ?
. . . . . . . . . . . . . . . . . . . . . . . . . . . .
49
●
РАСХОДНЫЕ МАТЕРИАЛЫ
. . . . . . . . . . . . . . . . . . . . . .
52
–
Типы и форматы копировальных бумаг
. . . . . . . . . .
52
–
Подтверждение подлинности расходных материалов
. . .
53
●
СПЕЦИФИКАЦИЯ
. . . . . . . . . . . . . . . . . . . . . . . . . . . .
54
ДОПОЛНИТЕЛЬНЫЕ ПРИНАДЛЕЖНОСТИ
●
ПОСТРОЕНИЕ СИСТЕМЫ
. . . . . . . . . . . . . . . . . .
58
●
УСТРОЙСТВО ПОЛИСТНОЙ ПОДАЧИ
(AR-SP2)/
РЕВЕРСИВНОЕ ПОЛИСТНОЕ УСТРОЙСТВО ПОДАЧИ
(AR-RP1) .
59
●
БЛОК ЭЛЕКТРОННОЙ СОРТИРОВКИ
(AR-EB3) . . . . . . .
66
–
Сортировка/группировка
. . . . . . . . . . . . . . . . . . . . . . . .
67
–
Функции копирования <2 â 1> è <4 â 1>
. . . . . . . . . .
68
–
Стирание изображения
. . . . . . . . . . . . . . . . . . . . . .
71
–
Смещение корешкового поля
. . . . . . . . . . . . . . . . . . .
73
●
УЗЕЛ ПОДАЧИ БУМАГИ НА 250 ЛИСТОВ
(AR-DE5)/
УЗЕЛ ПОДАЧИ БУМАГИ (2×250 ЛИСТОВ)
(AR-DE6) . . . . .
74
ПРИЛОЖЕНИЕ
. . . . . . . . . . . . . . . . . . . . . . . . . . .
77

2
П
О
ДГ
О
ТОВК
А К Р
АБО
ТЕ
ВВЕДЕНИЕ
Данная модель копира разработана с целью обеспечить максимально простое
использование различных функций копирования в помещении офиса. Для того,
чтобы полностью узнать возможности функций копира, внимательно
ознакомьтесь с настоящим руководством и самим устройством.
Для того, чтобы быстро получить необходимые сведения во время работы,
храните руководство поблизости от места установки копира.
Копир при установке дополнительных опций может быть использован в качестве лазерного
принтера и факс-аппарата. В данном руководстве приводится описание только
копировальных функций. По поводу описания функций принтера и факс-аппарата обратитесь
к соответствующим руководствам.
onvens used in this manual
В данном руководстве приводятся следующие условные
изображения для обозначения сведений различного рода,
относящихся к использованию копира.
Предупреждает пользователя об опасности для здоровья
или о возможности повреждения копира в случае
отступлений от информации, приведенной в тексте данного
предупреждения.
Сообщает о возможности поломки копира или отдельного
узла в случае несоблюдения рекомендаций, отмеченных
данным указателем.
Указывает сведения, связанные со спецификациями,
функциональными возможностями, особенностями
использования и содержит прочую полезную для
пользования информацию.
Обозначает букву, появляющуюся на дисплее количества
копий.
Указатели, используемые в тексте
Введение

3
П
О
ДГ
О
ТОВК
А К Р
АБО
ТЕ
ОСНОВНЫЕ ХАРАКТЕРИСТИКИ
Высокоскоростное лазерное копирование
●
Время изготовления первой копии составляет всего 7,2 секунды (за исключением случаев использования
энергосберегающего режима и копирования сразу после включения питания).
●
Скорость работы составляет 20 копий/мин., что значительно повышает эффективность работы в офисе.
Цифровое изображение высокого качества
●
Высококачественное копирование при разрешении 600 dpi.
●
В дополнение к режиму автоматической регулировки экспозиции предусмотрен пятиступенчатый режим
ручной регулировки.
●
Функция режима «фото» позволяет четко воспроизводить полутоновые изображения оригиналов (черно-
белые или цветные фотографии). Регулировка режима осуществляется пятиступенчатым методом.
Основные возможности копировального процесса
●
Масштаб копий может изменяться от 50% до 200% с шагом в 1%.
●
С одного оригинала за один цикл может быть получено до 99 копий.
●
Могут быть использованы специальные функции, такие как раздельное масштабирование по горизонтали
и вертикали, негативное копирование и копирование с разворота страниц.
●
Расход тонера может быть снижен приблизительно на 10% при активизации режима экономии тонера.
●
Программы пользователя позволяют осуществить установку/модификацию функций по желанию
пользователя. Эти программы также позволяют контролировать работу встроенного аудитрона.
●
Может выполняться автоматическое двустороннее копирование.
Однократное сканирование/Многократная печать (только одностороннее копирование)
●
В копировальном аппарате имеется буферная память на 1 страницу. Эта память позволяет копировальному
аппарату сканировать оригинал один раз и выполнять до 99 копий. Эта функция позволяет улучшить
рабочий процесс, уменьшить шум в процессе эксплуатации копировального аппарата, а также снизить
естественный износ сканирующего механизма, что обеспечивает высокую надежность.
Дополнительные возможности
●
Дополнительное устройство полистной подачи бумаги (SPF) позволяет автоматически осуществить
подачу до 30 листов бумаги.
●
Дополнительное реверсивное устройство полистной подачи (RSPF) позволяет автоматически осуществить
подачу до 30 двусторонних оригиналов.
●
Дополнительно поставляемый блок электронной сортировки дает возможность использовать множество
полезных функций. Различные варианты подборки многостраничных копий могут быть осуществлены
без помощи дополнительного сортировщика, при этом каждый комплект будет смещен относительно
предыдущего. Возможна активизация также функций стирания по краю и по центру, смещения
корешкового поля, «4 в 1» и «2 в 1». (Для использования функций «2 в 1» и «4 в 1», а также сортировки/
группировки необходимо наличие дополнительного устройства полистной подачи или реверсивного
устройства полистной подачи.)
●
При установке дополнительного комплекта принтера копир может быть использован в качестве лазерного
принтера.
●
При установке дополнительного комплекта факс-аппарата копир может быть использован в качестве
факсимильного аппарата.
Конструкция, обеспечивающая компактность и снижение потребления энергии
●
Выводной лоток установлен внутри корпуса с целью экономии пространства.
●
Режим предварительного прогрева и режим автоматического отключения питания предусмотрены для
сокращения потребления электроэнергии в режиме ожидания.
Некоторые опции могут быть недоступны в ряде стран.
Данное изделие соответствует рекомендациям стандарта «Energy Star».
Основные характеристики

4
П
О
ДГ
О
ТОВК
А К Р
АБО
ТЕ
Крышка оригиналодержателя (приобретается
отдельно)
Поместите оригинал на стол оригиналодержателя
и перед началом копирования закройте крышку.
Стол оригиналодержателя
Поместите на стол копируемый документ.
Ручки
Используются при перемещении копира.
Переключатель
Включает и выключает питание копира.
Панель управления
Для упрощения работы все органы управления
копиром расположены на данной панели.
Лоток вывода копий
Готовые комплекты копий размещаются в
выводном лотке.
Передняя крышка корпуса
Открывается при извлечении застрявшего листа
и при сервисном обслуживании.
Лотки подачи бумаги
Каждый лоток вмещает до 250 листов
копировальной бумаги.
Боковая крышка корпуса
Открывается при извлечении застрявшего листа
и при сервисном обслуживании.
Ручка боковой крышки корпуса
Позволяет поднять и вытащить боковую крышку
корпуса копира при ее открывании.
Направляющие дополнительного устройства
подачи
Регулируются по ширине подаваемых листов.
Лоток дополнительного устройства подачи
С данного лотка могут подаваться специальные
виды бумаги (включая прозрачную пленку), а
также стандартная бумага.
Выдвижная плоскость лотка
дополнительного устройства подачи
Выдвигается при необходимости подачи бумаги
формата В4 и А3.
Приспособление для чистки коротрона
Используется при чистке коротрона переноса.
НАИМЕНОВАНИЕ УЗЛОВ И
ФУНКЦИЙ КОПИРА
Общий вид
копира
Наименование узлов и функций копира
П
О
ДГ
О
ТОВК
А К Р
АБО
ТЕ

5
GETTING ST
AR
TED
НАИМЕНОВАНИЕ УЗЛОВ И ФУНКЦИИ КОПИРА
Ручка освобождения тонер-картриджа (ТК)
Позволяет разблокировать ТК для его извлечения.
Тонер-Картридж (ТК)
Содержит внутри порошок тонера.
Фотопроводящий барабан
Изображение оригинала формируется на барабане.
Ручка вращения валика
Вращая валик, извлекаете застрявший лист.
P
art names and functions
GETTING ST
AR
TED
Рычажки фиксатора узла закрепления тонера
Облегчают извлечение застрявшего листа.
Узел закрепления тонера — горячий!
Будьте осторожны при извлечении листа.
Направляющая листа
Открывается при извлечении застрявшего листа.
Дополнительные принадлежности
Руководство для пользователя . . . . . . . . . . 1
Устройство для чистки коротрона . . 1
П О ДГ О ТОВКА К Р АБО ТЕ Кнопка и индикатор ПРЕРЫВАНИЕ …
Страница 10
- Изображение
- Текст
6
П
О
ДГ
О
ТОВК
А К Р
АБО
ТЕ
Кнопка и индикатор ПРЕРЫВАНИЕ (
) (стр. 26)
Позволяют прервать процесс копирования.
Дисплей количества копий
Показывает установленное количество копий при
подготовке к работе и остающееся количество
копий при копировании. См. также п.п. и .
Индикатор МАСШТАБИРОВАНИЕ (стр. 17)
Загорается при установке масштаба копирования.
Кнопка дисплея масштаба копии (
) (стр. 17)
Нажатие и удерживание кнопки в режиме
готовности «standby» позволяет увидеть значение
масштаба на дисплее количества копий.
Кнопки масштабирования (стр. 17)
Позволяют установить масштаб копии от 50% до
200% с шагом в 1%.
Кнопка УСТАНОВКА ФОРМАТА БУМАГИ
(
) (стр. 12)
Позволяет установить формат бумаги в лотке.
Кнопка СБРОС РЕЖИМА АУДИТА (
)
(стр. 13)
Закрывает открытый счет пользователя.
Индикаторы ФОРМАТ БУМАГИ
Загораются при демонстрации выбранного формата бумаги.
Предупреждающие индикаторы
: Необходим вызов специалиста (стр.36)
: Необходима замена тонер-картриджа (стр. 29)
: Необходима замена девелопера (стр. 36)
: Необходима загрузка бумаги (стр. 10)
: Застревание листа (стр. 31)
Индикатор ЭНЕРГОСБЕРЕГАЮЩИЕ
РЕЖИМЫ ( ) (стр. 44)
Загорается при входе в энергосберегающий режим.
Индикатор подключения SPF (стр. 60)
Загорается при установке оригинала в лоток
дополнительного устройства подачи SPF.
Индикатор заполнения выводного лотка (стр. 67)
Указывает на необходимость извлечения готовых
копий из выводного лотка.
Кнопка и индикатор НЕГАТИВНОЕ
КОПИРОВАНИЕ (
) (стр. 24)
При нажатии копия получается в негативном по
отношению к оригиналу изображении.
Кнопка и индикатор МАСШТАБИРОВАНИЕ ПО
ГОРИЗОНТАЛИ И ВЕРТИКАЛИ ( ) (стр. 22)
При нажатии независимо друг от друга устанавливается
масштаб копии по горизонтали и вертикали.
Кнопка и индикаторы СОРТИРОВКА/
ГРУППИРОВКА (
/
) (стр. 67)
Если установлены блок электронной сортировки
и SPF èëè RSPF, то данной кнопкой выбирается
режим сортировки или группировки.
Индикатор ДАННЫЕ ОРИГИНАЛА (
)
Мигает при переполнении памяти копира
данными сканируемого оригинала.
(Используется только при установке блока
электронной сортировки и SPF èëè RSPF).
Кнопка и индикаторы режимов «2 В 1» /
«4 В 1» (
/
) (стр. 69)
При нажатии на кнопку выбирается режим «2 в
1» и «4 в 1». (Используется только при установке
блока электронной сортировки и SPF èëè RSPF).
Кнопка и индикаторы АВТО/РУЧНОЙ/ФОТО
(
/
/ ) (стр. 14)
Используется для последовательного выбора
режимов АВТО, РУЧНОЙ или ФОТО.
Кнопки и индикаторы «Светлее» (
) и
«Темнее» ( ) (стр. 15)
Используются для регулировки экспозиции в
режиме РУЧНОЙ или ФОТО.
Цифровая клавиатура
Кнопки используются для установки количества
копий или параметров программы пользователя.
Кнопка нуля
Используется как цифровая кнопка при установке коли-
чества копий. При нажатии в режиме
мультикопирования на дисплее показывается текущее
количество копий с копируемого оригинала. В режиме
«standby» нажатие на кнопку демонстрирует общее
количество копий, полученных на данном копире за
весь срок его работы.
Панель
управления
НАИМЕНОВАНИЕ УЗЛОВ И ФУНКЦИЙ КОПИРА
Наименование узлов и функций копира
П
О
ДГ
О
ТОВК
А К Р
АБО
ТЕ
Не для функций копира

Комментарии
 Contents:
Note for Servicing
1. Product Outline.
2. Specifications.
3. Consumable Parts.
4. External View and Internal Structure.
5. Adjustments.
6. Simulation.
7. Troubleshooting.
8. Firmware Update.
9. Maintenance.
10. Disassembly and Assembly.
11. Operational Descriptions.
12. Electrical Section.
13. Service Web Page.
14. Tool List.
Download Service Manual
Теги: sharp, ar-6031n, ar-6026n, ar-6023n, ar-6023d, ar-6023, ar-6020n, ar-6020d, ar-6020, 6031, 6026, 6023, 6020
Отзыв об этом товаре пока никто не оставлял. Вы можете стать первым.
ВНИМАНИЕ!
1. Для начала работы МФУ Sharp Nova L AR-6020 (в том числе русификация устройства и постановка на официальную гарантию) необходим обязательный запуск устройства сертифицированным сервисным инженером Sharp.
2. Данная позиция имеет артикул AR6020VE. Также данная модель ранее имела артикул AR6020. Разные артикулы обозначают разные ревизии, которые, как правило, не имеют существенных различий.
Сравнительная таблица характеристик МФУ Sharp серии AR-6020
 |
 |
 |
| Sharp AR-6020 | Sharp AR-6020D | Sharp AR-6020NR |
| МФУ (принтер, сканер, копир) | ||
| монохромная печать и копирование со скоростью: 20 страниц A4 в минуту; 11 страниц A3 в минуту |
||
| стандартно: поддержка SPLC, эмуляция PCL 6; опционально: эмуляция PostScript 3 |
стандартно: поддержка SPLC; опционально: эмуляция PCL 6, эмуляция PostScript 3 |
|
| опционально: двусторонний реверсивный АПД | стандартно: дуплекс; опционально: двусторонний реверсивный АПД |
|
| стандартно: печать с USB, сканирование на USB; опционально: сетевая печать, двустороннее сканирование, сетевое сканирование |
стандартно: двусторонняя печать, печать с USB, сканирование на USB; опционально: сетевая печать, двустороннее сканирование, сетевое сканирование |
стандартно: двусторонняя печать, сетевая печать, печать с USB, сетевое сканирование, сканирование на USB; опционально: двустороннее сканирование |
Возможные опции Sharp AR-6020
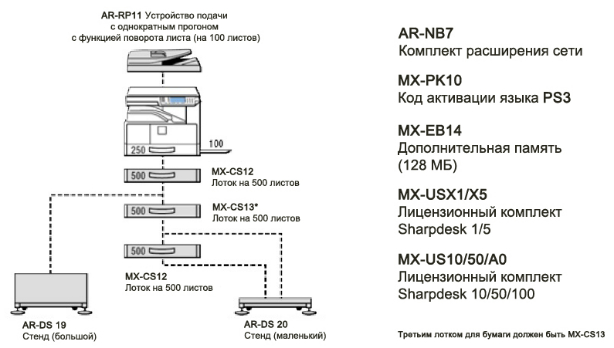
На изображении представлены основные опции Sharp AR-6020. Для подбора конфигурации под свои задачи вы всегда можете обратиться в отдел продаж Принтер-Плоттер.ру.
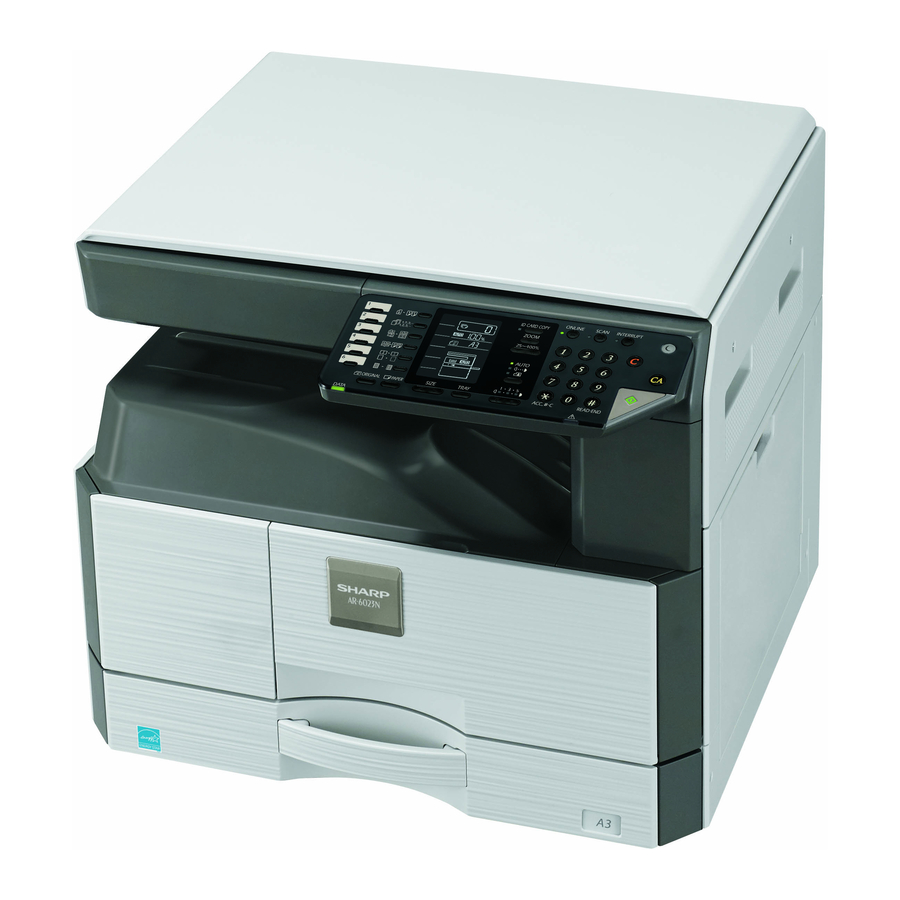
Описание Sharp AR-6020
Sharp AR-6020 — быстрое монохромное МФУ формата A3 с гибкими возможностями модернизации. Устройство предлагает высокое качество и целый ряд функций повышения производительности в пределах небольшой рабочей группы. Аппарат идеально подходит для выполнения ежедневных задач ч/б печати, цветного сканирования и копирования.

Особенности Sharp AR-6020
- Монохромное лазерное многофункциональное устройство для малых рабочих групп
- Максимальный объем печати в месяц до 15000 страниц
- Печать, копирование, сканирование
- Скорость печати: 20 стр/мин
- Емкость лотков подачи: 350 листов, максимум 1850 листов
- Цветное сканирование, сортировка поворотом в стандартной комплектации
- Технология SPLC в стандартной комплектации для ускорения передачи данных и повышения производительности печати в целом
- Опция сетевой печати Sharpdesk Mobile
- Опция реверсивного податчика документов (RSPF) на 100 листов для повышения эффективности работы

Качество изображения
Усовершенствованное цифровое автоматическое управление экспозицией обеспечивает оптимальный контраст каждой копии. Доступны три режима экспозиции: «AUTO», «TEXT» и «PHOTO». Когда выбраны «TEXT» или «PHOTO», экспозиция может быть скорректирована вручную до 5 уровней. Тона от светлых по полутонов в изображениях воспроизводятся настолько близко к оригинальным, насколько это вообще возможно.

Благодаря разрешению 600 DPI и 256 градациям полутонов воспроизводятся даже самые мелкие детали изображения. Результат:
- текст воспроизводится четким и резким;
- качество воспроизводимых изображений впечатляет.
Дружественный интерфейс панели управления
МФУ Sharp AR-6020 оснащено большим ч/б ЖК-экраном. Интуитивно понятный интерфейс панели управления существенно упрощает для пользователя доступ к настройкам и функциям МФУ. Все функциональные клавиши обеспечивают быстрый доступ к наиболее часто используемым функциям. Два цветных светодиода на передней кромке панели — один красный (индикатор ошибки) и другой зеленый (обработка данных) четко оповещают пользователей о состоянии аппарата.

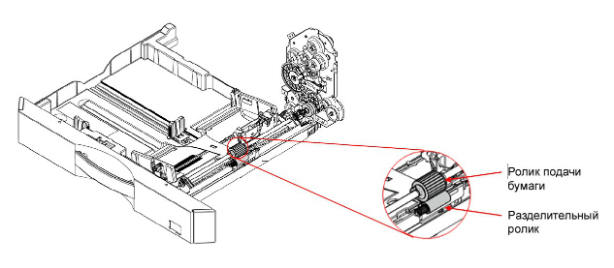
Надежная система подачи бумаги
Высокая стабильность в системе подачи бумаги достигается с помощью разделительного ролика. Этот ролик, как правило, используется в более дорогих моделях и обеспечивает быструю печать и существенно снижает количество замятий бумаги.
Производительность
Sharp AR-6020 печатает со скоростью 20 страниц в минуту, что удовлетворит потребности небольшого офиса. Язык описания страниц со сжатием (SPLC), созданный Sharp, входит в стандартную комплектацию, что гарантирует более быструю передачу данных и расширенную пропускную способность. Оптимизация производительности печати достигается и с помощью опций — дополнительных лотков подачи бумаги с возможностью увеличения их суммарной емкости до 1850 листов.
Копирование выполняется также быстро и просто, как и печать. Время выхода первой копии 6,4 секунды позволяет сократить нежелательные задержки при печати нескольких «коротких» работ. Оптимизированная технология «Однократного сканирования/Многократной печати» упрощает печать «длинных» тиражей. Встроенный сканер формата A3 позволяет одним нажатием кнопки сканировать в цвете документы напрямую в популярные офисные приложения.

Важные функции сканирования и печати
Сканируй один раз — печатай сколько хочешь
Функция «сканируй один раз — печатай сколько хочешь» (ROPM) помогает эффективно обрабатывать задания, быстро освобождая компьютер для других задачи и сокращая время передачи данных. Оригиналы сканируются один раз и сохраняются в памяти. Все копии затем печатаются из памяти.
- Меньше визитов к МФУ для того, чтобы сделать очередную копию
- Устройство меньше изнашивается
Быстрая печать благодаря технологии SPLC
SPLC (Sharp Printer Language with Compression) эффективно уменьшает размер данных в заданиях печати, что ускоряет процесс и повышает общий уровень производительности.

Сканирование в цвете
Сканирование бумажных документов на рабочий стол пользователя.
- Сканирование в цвете оригиналов размером до A3
- Максимальное разрешение 600 DPI для Button Manager и сканирование на USB
- Разрешение 50-9600 DPI для TWAIN
- Сканирование по сети (с использованием сетевого TWAIN)
- Сканирование на USB (используя TWAIN)
- Button Manager
- Опциональное ПО управления документами Sharpdesk

Сканирование на USB
Сканирование документов напрямую на USB-накопитель повышает эффективность работы.
Экономия бумаги
Копирование 2-в-1 или 4-в-1
- Два или четыре оригинала могут быть скопированы на один лист бумаги
- Эффективное использование бумаги для копирования и экономия энергии
- С помощью системных установок можно задать различные варианты раскладки

Сортировка
Электронная сортировка
Электронная сортировка входит в стандартную комплектацию, позволяя этим МФУ распечатывать несколько отсортированных комплектов документов. Встроенный сортировщик со смещением помогает разделить комплекты и упростить их распределение.
Сортировка со смещением
Каждый комплект документов, полученный путем копирования или печати, может быть отсортирован путем выдачи горизонтально или вертикально. При этом бумагу надо уложить в два различных лотка — из одного бумага должна подаваться длинной кромкой, а из другого — короткой.

Sharpdesk Mobile
Sharpdesk Mobile — это мощное приложение мобильной печати и сканирования. Приложение использует беспроводной интерфейс для подключения поддерживаемых МФУ и популярных мобильных устройств — iPhone, iPad, Android.
Пользователи могут импортировать отсканированные документы на свои мобильные устройства для просмотра и сохранения. Файлы с мобильных устройств могут быть распечатаны на МФУ, переданы в сообщениях электронной почты или использованы другими приложениями.

Экологическая ответственность
Основные экологические характеристики
- Соответствие требованиям Energy Star
- Соответствие требованиям WEEE
- Соответствие требованиям RoHS
Режим автоматического выключения питания
Этот режим выключает устройство после того, как он оставался в режиме ожидания в течение предварительно заданного- желаемого- периода времени. Устройство может также автоматически переключаться в режим автоматического выключения питания после завершения печати. Потребляемая мощность и эксплуатационные расходы сокращаются, износ — уменьшается.
Режим предварительного нагрева
Эта функция автоматически переключает аппарат в состояние с более низкой потребляемой мощностью, если по истечении установленного интервала времени аппарат не используется. Нормальная работа возобновится автоматически при нажатии клавиши на панели управления, получении задания на печать или сканирование с компьютера.
Купить Sharp AR-6020

Магазин Принтер-Плоттер.ру является официальным поставщиком продукции Sharp. В магазине вы можете купить Sharp AR-6020 на выгодных условиях — звоните или напишите нам.
Специалисты Принтер-Плоттер.ру всегда будут рады помочь подобрать оптимальное оборудование для ваших задач!
Основные характеристики
Печать
20 стр/мин (A4), 11 стр/мин (A3)
Емкость лотка вывода бумаги:
Емкость лотка для подачи бумаги:
Сканирование
двусторонний реверсивный (RADF) (опция); крышка сканера (опция)
Двустороннее сканирование:
Сканирование с компьютера:
Факс
Характеристики памяти
Дисплей
Дополнительные
Нагрузка в месяц (пиковая), стр.:
20 стр/мин (A4), 11 стр/мин (A3)
Требования к электросети:
Габариты, вес, комплектация
Button Manager, Sharpdesk