
130
Информационно-развлекательная система
Информационно-
развлекательная
система
Введение ……………………………. 130
Радиоприемник …………………… 130
Система воспроизведения
звука …………………………………… 131
Информационно-
развлекательная система на
задних сиденьях ………………….. 131
Телефон ……………………………… 132
Введение
Порядок работы
Порядок работы информационно-
развлекательной системы описан
в ее руководстве.
Радиоприемник
Прием радиосигналов
При радиоприеме возможны шипе‐
ние, свист, искажения или пере‐
рывы в вещании из-за
■ изменения расстояния до пере‐
датчика,
■ многократного приема отражен‐
ных сигналов,
■ экранирования.
Назад
к
обзору
Инструкция по эксплуатации OPEL Zafira A (18 мб., RUS)
Скачать
Инструкция по эксплуатации OPEL Zafira A (32 мб., RUS)
Скачать
Интерактивная инструкция по эксплуатации и обслуживанию OPEL Zafira A (265 мб., RUS)
Скачать
Инструкция по эксплуатации OPEL Zafira B (160 мб. RUS)
Скачать
Инструкция по эксплуатации OPEL Zafira B (2.5 мб. RUS)
Скачать
Информационный буклет Opel Zafira B (11 мб., RUS)
Скачать
Технические данные для OPEL Zafira B (на русском языке)
Скачать
Технические данные для OPEL Zafira Tourer (на русском языке)
Скачать
Инструкция по эксплуатации OPEL Zafira Tourer (10 мб. RUS)
Скачать
Каталог фирменных аксессуаров для OPEL Zafira Tourer (4 мб. ENG)
Скачать
Информационный буклет Opel Zafira Tourer (15 мб., RUS)
Скачать
РАЗНОЕ
Расшифровка кодов диагностики OBD-2 (на русском языке)
Скачать
TIS 2004 (только схемы, RUS, 282 мб. )
Скачать
EPC 2008 (полная русская версия)
Часть 1 (512 мб.) Скачать
Часть 2 (512 мб.)Скачать
Часть 3 (512 мб.)Скачать
Часть 4 (512 мб.)Скачать
Часть 5 (512 мб.)Скачать
Часть 6 (429 мб.)Скачать
AutoData 2004 (ENG)
Скачать
OPEL TIS 2009 v.106 RUS
Часть 1 (700 мб.) Скачать
Часть 2 (700 мб.)Скачать
Часть 3 (700 мб.)Скачать
Часть 4 (700 мб.)Скачать
Часть 5 (464 мб.)Скачать
Скачать инструкцию по эксплуатации автомагнитолы CD 30 MP3
Скачать
Скачать инструкцию по эксплуатации автомагнитолы VDO 2005
Скачать
Прошивка для штатных систем навигации CD70 и DVD90 автомобилей OPEL (русский голос)
Скачать
Калькулятор ключей для магнитолы CCR-600
Скачать
Скачать инструкцию по эксплуатации автомагнитолы CD 500 (DVD800)
Скачать
Инструкция по эксплуатации штатной навигационной системы Navi 600 (RUS)
Скачать
Инструкция по эксплуатации для штатной магнитолы CD 400 (RUS)
Скачать
Исправление для систем Navi 600/900 (лечение самостоятельных перезагрузок) (RUS)
Скачать
Точки расположения камер для Navi 600 и Navi 900 (вся Россия)
Скачать
Диагностическая программа для адаптера OP-COM (полностью на русском)
Скачать
Диагностическая программа и драйвера для адаптера OP-COM (английский язык, самоустановочный архив)
Скачать
Инструкция и примеры программирования для OP-COM (rus)
Скачать
Справочник автомобилиста (подборка юридических документов и нормативных актов)
Скачать
——————————————————————————————————————
Архиватор для работы с архивами RAR и ZIP
Скачать
Программа Adobe Reader для работы с файлами формата PDF
Скачать
Программа для работы с файлами формата djvu
Скачать
==============================================================
Всем спасибо что со мной)
Ну и не забываем про лайки. Вам не долго, а мне приятно))
Удачи всем!
Подписывайтесь и увидите еще много интересного!))
228 страниц подробных инструкций и пользовательских руководств по эксплуатации
 07:36
07:36
Opel Zafira — самый популярный минивэн
 10:41
10:41
Опель Зафира ВЕРНУЛСЯ! Теперь это конкурент Фольксваген Мультивен. Лиса рулит
 12:42
12:42
Opel Zafira Family / Подержанные автомобили
 19:34
19:34
OPEL ZAFIRA LIFE / Большой тест-драйв
 17:50
17:50
Opel Zafira B. Место много а как едет? (Опель Зафира Б)
 16:09
16:09
Тест-драйв Chevrolet Orlando против Opel Zafira Tourer
 05:01
05:01
¨Главная дорога или Секонд тест¨ — «OPEL ZAFIRA 201214
 11:59
11:59
Тест-драйв Opel Zafira Tourer. Что мы от неё ожидаем?
Информационно-развлекательная система
131
Система
воспроизведения звука
Дополнительные устройства
Ко входу AUX с помощью штыре‐
вого концентрического штекера
диаметром 3,5 мм можно подклю‐
чить внешний источник аудиосиг‐
нала, например, переносной про‐
игрыватель компакт-дисков.
Следите, чтобы вход AUX был чис‐
тым и сухим.
Информационно-
развлекательная
система на задних
сиденьях
Аудиосистема на задних
сиденьях
Twin Audio позволяет выбирать
между источником звукового сиг‐
нала информационно-развлека‐
тельной системы и другим источ‐
ником звукового сигнала. Управ‐
лять можно только таким источни‐
ком звукового сигнала, который не
включен в информационно-
развлекательной системе.
Предусмотрено два гнезда для
подключения наушников с раз‐
дельной регулировкой громкости.
Назад
к
обзору

Телефон, Мобильные телефоны и cb-радиоаппаратура, 132 информационно-развлекательная система
Мобильные телефоны и cb- радиоаппаратура
- Изображение
- Текст
132
Информационно-развлекательная система
Телефон
Мобильные телефоны и CB-
радиоаппаратура
Инструкции по установке
и рекомендации по
эксплуатации
При установке и работе с мобиль‐
ным телефоном следует руковод‐
ствоваться специальными инструк‐
циями изготовителей мобильного
телефона и системы громкой связи
по их установке и эксплуатации на
автомобиле. Несоблюдение этих
указаний может привести к аннули‐
рованию разрешения на эксплуа‐
тацию данного типа транспортного
средства (директива Европейского
Союза 95/54/EC).
Как обеспечить безотказную ра‐
боту:
■ используйте профессионально
смонтированную внешнюю ан‐
тенну, обеспечивающую макси‐
мальную дальность действия;
■ максимальная мощность пере‐
дачи не должна превышать10 Вт;
■ устанавливайте телефон в под‐
ходящем месте, см. соответ‐
ствующее Примечание 3 66.
Для получения сведений по реко‐
мендуемым местам установки на‐
ружной антенны или держателей
оборудования, а также о возмож‐
ности использования передатчи‐
ков мощностью более 10 Вт необ‐
ходима отдельная консультация.
Использования устройства гром‐
кой связи с телефонами стандар‐
тов GSM 900/1800/1900 и UMTS
без наружной антенны допускается
только в том случае, если макси‐
мальная излучаемая мощность мо‐
бильного телефона не превышает
2 Вт для GSM 900, а в остальных
случаях — 1 Вт.
Из соображений безопасности не
пользуйтесь телефоном во время
движения. Даже разговор через
устройство громкой связи может
отвлекать водителя во время дви‐
жения.
9 Предупреждение
Не соответствующие вышеука‐
занным стандартам мобильные
телефоны и радиоаппаратура
могут использоваться только
с антенной, установленной сна‐
ружи автомобиля.
Внимание
Если не соблюдать упомянутых
выше предписаний, включение
мобильных телефонов и радио‐
аппаратуры в салоне при отсут‐
ствии внешней антенны может
привести к нарушению работо‐
способности электронной сис‐
темы автомобиля.
Назад
к
обзору

Система управления климатом, Системы управления климатом, Обогреватель и вентиляционная система
Распределением воздуха, Температурой, Скоростью вращения вентилятора, Система управления, Климатом
- Изображение
- Текст
Система управления климатом
133
Система
управления
климатом
Системы управления
климатом …………………………….. 133
Сопла обдува ……………………… 141
Техническое обслуживание …. 142
Системы управления
климатом
Обогреватель
и вентиляционная система
Органы управления:
■ Распределением воздуха
■ Температурой
■ Скоростью вращения вентиля‐
тора
Обогреваемое заднее стекло Ü
3
48.
Распределением воздуха
L
= к области головы и нише для
ног
M
= к области головы
l
= к ветровому стеклу и стек‐
лам передних дверей
J
= к ветровому стеклу, стеклам
передних дверей и нише для
ног
K
= к нише для ног
Возможны промежуточные поло‐
жения.
Температурой
красный = теплее
синий
= холоднее
Эффективный обогрев не возмо‐
жен, пока двигатель не достигнет
своей нормальной рабочей темпе‐
ратуры.
Скоростью вращения
вентилятора
Регулирует воздушный поток, пе‐
реключая вентилятор на соответ‐
ствующую скорость.
Назад
к
обзору

Удаление влаги и инея со стекол, Система кондиционирования воздуха, Охлаждение n
Система рециркуляции воздуха 4, 134 система управления климатом
- Изображение
- Текст
134
Система управления климатом
Удаление влаги и инея со
стекол
■ Установите регулятор распреде‐
ления воздуха в положение l.
■ Установите регулятор на самую
высокую температуру.
■ Установите наибольшую ско‐
рость вентилятора.
■ Включите обогрев заднего
стекла Ü.
■ При необходимости, откройте
боковые вентиляционные отвер‐
стия и направьте их рефлекторы
на боковые стекла.
■ Для одновременного обогрева
ниши для ног установите распре‐
делитель воздуха в положе‐
ние J.
Система
кондиционирования воздуха
Дополнительно к системе обогрева
и вентиляции, система кондицио‐
нирования воздуха позволяет
обеспечить:
n
= охлаждение
4
= рециркуляцию воздуха
Охлаждение n
Управляется кнопкой n и работает
только тогда, когда работают дви‐
гатель и вентилятор.
Кондиционер охлаждает воздух
и удаляет из него влагу (осушает),
когда наружная температура пре‐
вышает заданный уровень. Обра‐
зовавшийся конденсат может ка‐
пать из-под автомобиля.
Если охлаждение или осушение не
требуется, для экономии топлива
систему рекомендуется выклю‐
чить.
Система рециркуляции
воздуха 4
Включается с помощью
кнопки 4.
Назад
к
обзору

Максимальное охлаждение, Удаление влаги и инея со стекол, Автоматическая система управления климатом
Система управления климатом 135
- Изображение
- Текст
Система управления климатом
135
9 Предупреждение
В режиме рециркуляции умень‐
шается объем поступающего
в салон с улицы воздуха. Если
рециркуляция включена без ох‐
лаждения, влажность воздуха
повышается, и возможно запо‐
тевание стекол. Качество воз‐
духа в салоне со временем
ухудшается, что может вызы‐
вать у пассажиров чувство сон‐
ливости.
Подача воздуха к l: Рециркуляция
воздуха отключена.
Максимальное охлаждение
Откройте ненадолго окна, чтобы
быстро вытянуть горячий воздух.
■ Включите охлаждение n.
■ Включите режим циркуляции воз‐
духа 4.
■ Установите регулятор распреде‐
ления воздуха в положение M.
■ Установите регулятор темпера‐
туры на самый холодный уро‐
вень.
■ Установите наибольшую ско‐
рость вентилятора.
■ Откройте все вентиляционные
отверстия.
Удаление влаги и инея со
стекол
■ Включите охлаждение n.
■ Установите регулятор распреде‐
ления воздуха в положение l.
■ Установите регулятор на самую
высокую температуру.
■ Установите наибольшую ско‐
рость вентилятора.
■ Включите обогрев заднего
стекла Ü.
■ При необходимости, откройте
боковые вентиляционные отвер‐
стия и направьте их рефлекторы
на боковые стекла.
■ Для одновременного обогрева
ниши для ног установите распре‐
делитель воздуха в положе‐
ние J.
Автоматическая система
управления климатом
Органы управления:
■ Распределением воздуха
■ Температурой
■ Скоростью вращения вентиля‐
тора
n
= охлаждение
4
= рециркуляцию воздуха
V
= удаление влаги и инея
Обогреваемое заднее стекло Ü
3
48.
Назад
к
обзору

Автоматический режим, Распределением воздуха, Предварительная установка температуры
Скоростью вращения вентилятора, Охлаждение n, Система рециркуляции воздуха 4, 136 система управления климатом
- Изображение
- Текст
136
Система управления климатом
Предустановленная температура
поддерживается автоматически.
В автоматическом режиме ско‐
рость вентилятора автоматически
регулирует поток воздуха.
Автоматический режим
Базовая установка, обеспечиваю‐
щая максимальный комфорт:
■ Установите регулятор вентиля‐
тора на A.
■ Установите регулятор распреде‐
ления воздуха в желаемое поло‐
жение.
■ Установите температуру на же‐
лаемый уровень.
■ Включите охлаждение n.
■ Откройте все вентиляционные
отверстия.
Распределением воздуха
L
= к области головы и нише для
ног
M
= к области головы
l
= к ветровому стеклу и стек‐
лам передних дверей
J
= к ветровому стеклу, стеклам
передних дверей и нише для
ног
K
= к нише для ног
Возможны промежуточные поло‐
жения.
Предварительная установка
температуры
Установите регулятор темпера‐
туры в желаемое положение. Воз‐
можны промежуточные положе‐
ния.
Для обеспечения комфортных ус‐
ловий изменяйте температуру
только малыми шагами.
В крайних положениях темпера‐
тура не регулируется. Кондицио‐
нер работает на максимальной
мощности охлаждения или обо‐
грева.
Эффективный обогрев не возмо‐
жен, пока двигатель не достигнет
своей нормальной рабочей темпе‐
ратуры.
Скоростью вращения
вентилятора
В автоматическом режиме A за
счет изменения скорости вентиля‐
тора автоматически регулируется
воздушный поток. При необходи‐
мости, поток воздуха можно на‐
строить вручную.
Охлаждение n
Управляется кнопкой n и работает
только тогда, когда работают дви‐
гатель и вентилятор.
Кондиционер охлаждает воздух
и удаляет из него влагу (осушает),
когда наружная температура пре‐
вышает заданный уровень. Обра‐
зовавшийся конденсат может ка‐
пать из-под автомобиля.
Если охлаждение или осушение не
требуется, для экономии топлива
систему рекомендуется выклю‐
чить.
Система рециркуляции
воздуха 4
Режим рециркуляции воздуха
включается и выключается кноп‐
кой 4.
Назад
к
обзору

Максимальное охлаждение, Удаление влаги и инея со стекол, Электронная система управления климатом
Система управления климатом 137
- Изображение
- Текст
Система управления климатом
137
9 Предупреждение
В режиме рециркуляции умень‐
шается объем поступающего
в салон с улицы воздуха. Если
рециркуляция включена без ох‐
лаждения, влажность воздуха
повышается, и возможно запо‐
тевание стекол. Качество воз‐
духа в салоне со временем
ухудшается, что может вызы‐
вать у пассажиров чувство сон‐
ливости.
Максимальное охлаждение
На короткий промежуток времени
откройте окна, чтобы нагретый воз‐
дух мог быстро выйти наружу.
■ Включите охлаждение n.
■ Установите регулятор распреде‐
ления воздуха в положение M.
■ Установите регулятор темпера‐
туры на необходимое значение.
■ Установите регулятор вентиля‐
тора на A.
■ Откройте все вентиляционные
отверстия.
Автоматический климат-контроль
наиболее эффективно охлаждает
воздух до заданной температуры.
Если регулятор температуры уста‐
новлен на минимум, система не‐
прерывно работает при макси‐
мальном охлаждении. При вклю‐
ченном кондиционировании воз‐
духа система автоматически вклю‐
чает его рециркуляцию.
Удаление влаги и инея со
стекол
■ Включите охлаждение n.
■ Нажмите кнопку V: в положении
A вентилятор автоматически пе‐
реключается на наибольшую
частоту вращения, воздух на‐
правляется на ветровое стекло.
■ Установите регулятор на самую
высокую температуру.
■ Включите обогрев заднего
стекла Ü.
Электронная система
управления климатом
Органы управления:
■ температурой
■ распределением воздуха и выбо‐
ром меню
■ скоростью вращения вентиля‐
тора
AUTO = Автоматический режим
4
= Рециркуляция воздуха
V
= Удаление влаги и инея
Обогреваемое заднее стекло Ü
3
48.
Назад
к
обзору

Автоматический режим, Предварительная установка температуры, Скоростью вращения вентилятора
Удаление влаги и инея со стекол, 138 система управления климатом
- Изображение
- Текст
138
Система управления климатом
Предустановленная температура
поддерживается автоматически.
В автоматическом режиме ско‐
рость вентилятора и распределе‐
ние воздуха автоматически регули‐
руют поток воздуха.
Система может быть настроена
вручную с помощью регуляторов
распределения и потока воздуха.
Данные выводятся на Info-Display.
Изменения установок на короткое
время выводятся на Info-Display
поверх выводимого на дисплей
меню.
Электронная система климат-конт‐
роля полностью работает только
при работающем двигателе.
Для сохранения эффективности
работы системы не закрывайте
датчик на приборной панели.
Автоматический режим
Базовая установка, обеспечиваю‐
щая максимальный комфорт:
■ Нажмите кнопку AUTO.
■ Откройте все вентиляционные
отверстия.
■ Включите Air conditioning
(кондиционирование воздуха).
■ Установите желаемую темпера‐
туру.
Предварительная установка
температуры
Можно установить нужное значе‐
ние температуры.
Для обеспечения комфортных ус‐
ловий изменяйте температуру
только малыми шагами.
Если установлена минимальная
температура, на дисплее появля‐
ется Lo, и электронная система
климат-контроля работает при мак‐
симальном охлаждении.
Если установлена максимальная
температура, на дисплее появля‐
ется Hi, и электронная система кли‐
мат-контроля работает на режиме
максимального обогрева.
скоростью вращения
вентилятора
Выбранная скорость вентилятора
выводится в виде x и числа на дис‐
плее.
Если вентилятор выключен, конди‐
ционирование воздуха отклю‐
чается.
Для возврата к автоматическому
режиму: Нажмите кнопку AUTO.
Удаление влаги и инея со
стекол
Нажмите кнопку V, на дисплее по‐
явится V.
Назад
к
обзору

Ручные настройки в меню climate, Распределением воздуха, Охлаждение
Система управления климатом 139
- Изображение
- Текст
Система управления климатом
139
Температура и распределение воз‐
духа устанавливаются автомати‐
чески, вентилятор работает на вы‐
сокой скорости.
Возврат в автоматический режим:
нажмите кнопку V или AUTO.
Включите обогрев заднего
стекла Ü.
Ручные настройки в меню
Climate
Параметры системы климат-конт‐
роля можно изменять с помощью
среднего регулятора, кнопок и ото‐
бражаемых на дисплее меню.
Для просмотра меню нажмите на
центральный регулятор. На дис‐
плее появится меню Climate
(климат).
Вращая центральный регулятор,
отметьте отдельные пункты меню,
их можно выбрать, нажав на регу‐
лятор.
Для выхода из меню поворачи‐
вайте центральный регулятор,
пока не появится Return (назад)
или Main (главн.), и сделайте вы‐
бор.
Распределением воздуха
Поверните центральный регуля‐
тор. Включится меню Air distribut.
(распределение воздуха), в кото‐
ром выведены возможные на‐
стройки распределения воздуха:
Верх
= к ветровому стеклу
и стеклам передних
дверей
Середина = к пассажирам авто‐
мобиля.
Низ
= к нише для ног
Меню Air distribut. (распределение
воздуха) может быть вызвать и че‐
рез меню Climate (климат).
Возврат к автоматическому рас‐
пределению воздуха: Отключите
соответствующую установку или
нажмите кнопку AUTO.
охлаждение
В меню Climate (климат) выберите
пункт меню AC (система
кондиционирования) и включите
или отключите охлаждение.
Кондиционер охлаждает воздух
и удаляет из него влагу (осушает),
когда наружная температура пре‐
вышает заданный уровень. Обра‐
зовавшийся конденсат может ка‐
пать из-под автомобиля.
Если нет необходимости в охлаж‐
дении и осушении, для экономии
топлива выключите охлаждение,
на дисплее появится Eco.
Назад
к
обзору

Ручной режим управления рециркуляцией воздуха, Вспомогательный отопитель, Отопитель
Подогреватель охлаждающей жидкости, 140 система управления климатом
- Изображение
- Текст
140
Система управления климатом
Регулировка скорости
вентилятора в автоматическом
режиме
Параметры регулировки обдува
в автоматическом режиме можно
настроить.
Из меню Climate (климат) выберите
пункт Automatic blower (автом.
вентилятор) и желаемую настройку
вентилятора.
Ручной режим управления
рециркуляцией воздуха
Ручной режим рециркуляции воз‐
духа включается и выключается
кнопкой 4.
9 Предупреждение
В режиме рециркуляции умень‐
шается объем поступающего
в салон с улицы воздуха. Если
рециркуляция включена без ох‐
лаждения, влажность воздуха
повышается, и возможно запо‐
тевание стекол. Качество воз‐
духа в салоне со временем
ухудшается, что может вызы‐
вать у пассажиров чувство
сонливости.
Кондиционирование воздуха
при неработающем двигателе
Когда зажигание выключено, для
управления климатом в салоне мо‐
гут использоваться сохранившиеся
в системе тепло или холод.
Нажмите кнопку AUTO при выклю‐
ченном зажигании. На дисплее на
короткое время появится надпись
Residual air conditioning on
(включено кондиционирование
остаточного воздуха).
Управление климатом на остаточ‐
ном тепле или холоде возможно
только ограниченное время. Для
выхода нажмите кнопку AUTO.
Вспомогательный отопитель
Отопитель
Нагреватель ускоренного обогрева
— это электрический вспомогатель‐
ный нагреватель воздуха, который
ускоренно автоматически прогре‐
вает пассажирский салон.
Подогреватель охлаждающей
жидкости
Дизельные автомобили оснащены
работающим на том же топливе,
что и двигатель, вспомогательным
подогревателем охлаждающей
жидкости, нагревающим охлаж‐
дающую жидкость во время работы
двигателя.
Назад
к
обзору

Комментарии
На чтение 4 мин Опубликовано 11.04.2017
Обновлено 21.09.2022
Здравствуйте! В данной статье описаны основные пункты меню кнопок управления «Settings» и «Sound» на информационно-развлекательной системе автомобиля Opel . Разобран порядок активации пунктов меню «Audio» бортового компьютера Астры, которые регулируют работу музыкальной системы, отвечают за настройку звучания таких параметров как: баланс громкости колонок; режим эквалайзера; автоматический режим громкости; режим воспроизведения музыкальных композиций в случайной последовательности; громкость воспроизведения сигнала от внешнего источника. О том, как снять динамики расположенные в передних дверях Опель Астра можно посмотреть здесь.
Для отображения параметров настройки и корректировки основных функций бортового компьютера Астры;
необходимо включить магнитолу и нажать кнопку «Settings»

На дисплее отобразится меню с настройками «Audio» и «System». Настройки пункта меню «System» описаны здесь.

выбор строчки меню осуществляем клавишами ◄ и ► на информационно-развлекательной системе. Активация пункта выполняется нажатием кнопки «OK».
Изменяем значение клавишами ◄ и ►.
1. «Fader»— громкость передних и задних колонок.

2. «Balance»— громкость левых и правых колонок.

3. «Sound»— выбор режима эквалайзера.

Активирует настройки эквалайзера для звучания в стилях Рок, Диско и т.п.

4. «TA Volume»— громкость приема дорожных сообщений. При активной функции TA, при обнаружении радиоприемником трансляции дорожного сообщения, магнитола переходит на прием радиостанции которая передает дорожное сообщение. После окончания передачи радиоприемник возвращается на ранее установленные настройки.

5. «SDVC»— функция регулирования громкости в зависимости от скорости движения. Дает возможность отрегулировать уровень компенсации дорожного шума.

6. «Ext In Volume»— (external in volume) громкость воспроизведения сигнала от внешнего источника (телефон и другие).

7. «On Volume»— максимальная громкость при включении музыкальной системы.

8. «PTY»— выбор программы по типу передаваемых сообщений. Некоторые радиостанции передают код PTY указывающий тип передаваемой программы, например; новости, спорт, рок-музыка, поп-музыка и т.п.. Перемещение клавишами ◄ и ►.

Выход из режима настройки осуществляется активацией команды «Main»

Кнопка «Sound», на информационно-развлекательной системе, позволяет изменять основные настройки звука без активации кнопки «Settings».

Включает в себя следующие функции:
— Fader — громкость передних и задних колонок
— Balance — громкость левых и правых колонок
— Bass — уровень низких частот
— Treble — уровень высоких частот
— Sound — принимает значения «Off» ►»Rock»►»Disco»►»Classic»►»Jazz»►»Vocal».
Система CD30 MP3 имеет возможность настройки воспроизведения музыкальных композиций как по порядку, так и в случайной последовательности. Данная функция реализуется путем троекратного нажатия клавиши CD/MP3.

На экране дисплея кратковременно высветится надпись «Random». Каждое последующее нажатие меняет значение функции.
Для компакт-дисков формата МРЗ;
— Random Album воспроизведение в случайной последовательности записей текущего альбома;
— Random CD воспроизведение в случайной последовательности записей из всех альбомов записанных на данном диске;
— Random Off отмена функции — воспроизведение записей в обычной последовательности.

В тестовом режиме BC, если нажать клавишу «FM», можно просмотреть дополнительную информацию по частоте передающей радиостанции и значениях установленных настроек.
Как настроить магнитолу на приём радиостанций можно узнать из статьи «Настройка магнитолы Опель Астра«
Удачи на дороге!
-
Contents
-
Table of Contents
-
Bookmarks
Related Manuals for Opel Zafira Tourer
Summary of Contents for Opel Zafira Tourer
-
Page 1
Opel Zafira Tourer Infotainment System… -
Page 3
Contents Introduction ……..4 Radio ……….. 28 CD Player ……..44 AUX input ……..50 USB port ……..52 Digital picture frame ….. 56 Navigation ……..59 Speech recognition ….104 Phone ……..119 Index ………. 140… -
Page 4: Table Of Contents
Introduction Introduction General information to your destination, and, if desired, will automatically avoid traffic jams or The Infotainment system provides other traffic problems. you with state-of-the-art in-car Optionally, the Infotainment system infotainment. General information ……. 4 can be operated using controls on the For the AM, FM and DAB (not steering wheel, or via the speech Theft-deterrent feature ….
-
Page 5: Radio
Introduction Theft-deterrent feature 9 Warning 9 Warning The Infotainment system is equipped The usage of the navigation In some areas one-way streets with an electronic security system for system (only Navi 600 / Navi 900) and other roads and entrances the purpose of theft deterrent.
-
Page 6: Control Elements Overview
Introduction Control elements overview Instrument panel Navi 600 / Navi 900…
-
Page 7
Introduction RADIO (BAND) ….. 28 Search forward …… 28 11 TP ……… 37 Activate radio or change Radio: search forward … 28 Activate or deactivate waveband ……28 radio traffic service ….37 CD/MP3/WMA: skip track CD/AUX …….. 44 12 CD ejection ……46 forward …….. -
Page 8
Introduction 15 Multifunction knob ….16 21 NAV ……..60 Turn: mark menu options Press once: Display map ..60 or set numeric values … 16 Press twice: Navigation Press (the outer ring): menu ……..60 select/activate the marked option; confirm set value; switch function on/off …. -
Page 9
Introduction Instrument panel CD 400… -
Page 10
Introduction RADIO (BAND) ….. 28 FAV (1/2/3) ……30 12 INFO ……..6 Activate radio or change Lists of favourites (preset Radio: information on the waveband ……28 radio stations) ……. 30 currently played station ..28 CD ……… 44 AS (1/2) ……… -
Page 11
Introduction 18 AUX ……..50 Change to external audio source ……..50… -
Page 12
Introduction Instrument panel CD 300… -
Page 13
Introduction RADIO (BAND) ….. 28 Radio station buttons 1…6 … 29 14 INFO ……..6 Activate radio or change Long press: save station ..29 Radio: information on the waveband ……28 currently played station ..28 Short press: select station ..29 CD ……… -
Page 14: Cd Player
Introduction 20 AUX ……..50 Steering wheel audio controls If radio active: turn upwards/downwards to Change to external audio select next/previous source ……..50 preset radio station ….28 If CD player active: turn upwards/downwards to select next/previous CD/ MP3/WMA track ….46 If Phone portal active: turn upwards/downwards to select next/previous entry…
-
Page 15: Usage
Introduction Usage Setting the volume To cancel mute again: turn the X knob or press the v/G button again Turn the X knob. The current setting (if Phone portal available: press for Control elements is shown on the display. a few seconds). The Infotainment system is operated When the Infotainment system is via function buttons, multifunctional…
-
Page 16: Aux Input
Introduction Audio players Press the multifunction knob to open BACK button a submenu with options for the input Press the CD/AUX button to open the Press the BACK button briefly to: or selection of numbers. CD, USB, iPod or AUX menus (if ■…
-
Page 17
Introduction Turn the multifunction knob to move Setting a value Switching a function on or off the cursor (= coloured background) to the desired option. Press the multifunction knob to select the marked option. Submenus An arrow on the right-hand edge of the menu indicates that after selection of the option a submenu with further options will be opened. -
Page 18: Phone
Introduction Entering a character sequence CD 400 Activating a setting Selecting an option To enter character sequences, e.g. Turn the multifunction knob to mark telephone numbers or road names: the desired setting. Turn the multifunction knob to move the cursor (= coloured background) to Turn the multifunction knob to select Press the multifunction knob to the desired option.
-
Page 19
Introduction Setting a value Switching a function on or off Entering a character sequence Turn the multifunction knob to change Turn the multifunction knob to mark For the input of character sequences, the current value of the setting. the function to be switched on or off. e.g. -
Page 20
Introduction CD 300 The arrow pointing to the right 3 Setting a value indicates: the first submenu level is Menu elements and symbols active (two arrows = second submenu level active). The down arrow 4 indicates: further options are available in the active submenu. -
Page 21: Tone Settings
Introduction Tone settings Switching a function on or off Entering a character sequence Navi 600 / Navi 900 In the tone settings menu the tone characteristic can be set differently for each radio waveband and each audio player source. Press the multifunction knob to open Press the multifunction knob to open the corresponding settings menu.
-
Page 22
Introduction Setting bass, middle and treble Setting the volume distribution Setting the volume distribution between front — rear between right — left Select Bass, Middle or Treble. Select Fader. Select Balance. Set the desired value for the option selected. Set the desired value. Set the desired value. -
Page 23
Introduction Optimising the tone for the style of Select Bass:, Midrange: or Treble:. music Set the desired value for the selected option. Setting the volume distribution between front — rear Press the TONE button to open the tone menu. Select EQ (Equalizer). Setting bass, middle and treble The displayed options offer optimised bass, middle and treble presettings… -
Page 24: Volume Settings
Introduction Volume settings Setting the volume distribution Optimizing the tone for the style of between right — left music Navi 600 / Navi 900 Maximum startup volume Select Balance:. Select EQ: (Equalizer). Set the desired value. The displayed options offer optimized bass, middle and treble presettings Setting an individual setting to “0”…
-
Page 25
Introduction Speed dependent volume Volume of the traffic announcements CD 300 / CD 400 (TA) Maximum startup volume The volume of the traffic announcements can be increased or reduced proportionately to the normal audio volume. Press the CONFIG button to open the system settings menu. -
Page 26: Personalisation
Introduction Personalisation Speed compensated volume Volume of the traffic announcements (TA) (only CD 400) The volume of the traffic Various Infotainment system settings announcements can be increased or can be separately memorised for reduced proportionately to the normal each vehicle key (driver) of the car. audio volume.
-
Page 27
Introduction ■ last position in Audio/MP3 CD including track number and folder ■ state of shuffle songs setting (CD player) ■ state of TP (Traffic Programme) setting ■ cursor position for each menu on the display Activating/deactivating personalization Press the CONFIG button to open the system settings menu. -
Page 28: Station Search
Radio Radio Usage Station search Control buttons Automatic station search The most important buttons for Briefly press the button s or u Usage ………. 28 control of the radio are as follows: to play the next station in the station Station search ……
-
Page 29: Autostore Lists
Radio Note DAB waveband Note Manual station search: If the radio The currently received station is (not available for CD 300) does not find a station, it switches highlighted. Press the multifunction knob to open automatically to a more sensitive the DAB menu and select DAB CD 400: search level.
-
Page 30: Favourite Lists
Radio Automatic station storing Retrieving a station 6 stations can be stored in each favourite list. The number of available Keep the AS button pressed until an Briefly press the AS button to open an favourite lists can be set (see below). autostore message is displayed.
-
Page 31
Radio Defining the number of available CD 300 / CD 400 To store the station in a list position: favourite lists press the corresponding station button 1…6 until a confirmation message is displayed. Retrieving a station Briefly press the FAV button to open a favourite list or to switch to another favourite list. -
Page 32: Waveband Menus
Radio Press the CONFIG button. Navi 600 / Navi 900 Select Radio settings and then Radio favourites. Select the desired number of available favourite lists. Waveband menus Alternative facilities for station selection are available via waveband specific menus. With the radio main menu active Select the required station.
-
Page 33
Radio Turn the multifunction knob. Updating station lists once in the station list at a sudden change in reception area. In such If the stations stored in a waveband- All receivable DAB stations 3 41 in circumstances the updating of the specific station list can no longer be the current reception area are station lists can be accelerated using… -
Page 34
Radio The currently received DAB service (programme) is interrupted when any announcements of previously activated categories are pending. Activating announcement categories Select DAB announcements in the DAB menu. A list of programme types available at Select the required station. the moment is displayed. The category list is also updated Select desired programme type. -
Page 35
Radio CD 300 / CD 400 All receivable DAB stations 3 41 in the current reception area are displayed. Note If no station list has been created beforehand, the Infotainment system performs an automatic station search. Select the required station. Note Favourites list The currently received station is… -
Page 36
Radio If the stations stored in a waveband- The Infotainment system stores these specific station list can no longer be stations, sorted by programme type, received: in the corresponding category list. Select the corresponding command To search for a programme type to update a station list. -
Page 37: Radio Data System (Rds)
Radio Radio data system (RDS) The currently received DAB service Navi 600 / Navi 900 (programme) is interrupted when any RDS is a service of FM stations that announcements of previously considerably facilitates the finding of activated categories are pending. the desired station and its fault-free Activating announcement categories reception.
-
Page 38
Radio If regionalization is switched off, Radio traffic service alternative frequencies of the stations (TP = Traffic Programme) are selected without regard to Radio traffic service stations are RDS regional programmes. stations that broadcast traffic news. RDS scrolling text Switching the radio traffic service on Some RDS stations use the lines for and off indicating the name of the… -
Page 39
Radio ■ If the radio traffic service is CD 300 / CD 400 switched on, CD/MP3 replay is interrupted for the duration of the traffic announcement. Listening to traffic announcements only Switch on the radio traffic service and completely turn down the volume of the Infotainment system. -
Page 40
Radio At certain times some RDS stations being played at the moment are ■ If a radio traffic service station has broadcast regionally different displayed below the programme been found, [TP] is displayed in the programmes on different frequencies. name. radio main menu. -
Page 41: Digital Audio Broadcasting
Radio EON (Enhanced Other Networks) Navi 600 / Navi 900: General information With EON you can listen to radio ■ With DAB, several radio traffic announcements even if the programmes (services) can be station you have set does not broadcast on a single frequency broadcast its own radio traffic service.
-
Page 42: Configuring Dab
Radio ■ Interference caused by stations Configuring DAB can be raised to a point where the that are on nearby frequencies (a quiet sounds are audible, without Navi 600 / Navi 900 phenomenon that is typical of AM the loud sounds being too loud. and FM reception) does not occur ■…
-
Page 43
Radio The following options are available in ■ Frequency band: after selection of the configuration menu: this option it can be defined which DAB wavebands are to be received ■ Auto ensemble linking: with this by the Infotainment system. function activated, the device switches over to the same service (programme) on another DAB ensemble (frequency, if available) -
Page 44
CD Player CD Player General information ■ Self-recorded CD-Rs and CD-RWs are more vulnerable to mishandling than prerecorded CDs. Correct Navi 600 / Navi 900 handling, especially in the case of The Infotainment system’s CD player self-recorded CD-Rs and CD-RWs, General information ….. -
Page 45
CD Player Maximum folder structure depth: 11 Important information about audio names and folder names may not levels. CDs and MP3/WMA CDs be displayed correctly. Maximum number of MP3/WMA ■ Audio CDs with copy protection, Caution files that can be saved: 1000. which are not in compliance with the audio CD standard, may not WMA files with Digital Rights… -
Page 46: Cd/Aux
CD Player Usage ■ Dirt and liquids on CDs can smear The Audio CD or Audio MP3 menu is the lens of the CD player inside the opened and CD replay is started. device and cause faults. Navi 600 / Navi 900 Depending on the data stored on the ■…
-
Page 47
CD Player Selecting tracks using the audio CD During MP3 replay or MP3 menu During audio CD replay Depending on the amount of tracks saved, the search process may take Press the multifunction knob to open several minutes. the MP3 related menu. Select a search option and then Press the multifunction knob to open To play all tracks in random order: set… -
Page 48
CD Player CD 300 / CD 400 Inserting a CD Selecting tracks using the audio CD or MP3 menu Insert a CD with the printed side facing up into the CD slot until it is During audio CD replay drawn in. Changing the standard page view (only CD 300) During audio CD or MP3 replay: press… -
Page 49
CD Player During MP3 replay To open a menu with additional options for track search and selection: select Search. What options are available depends on the data saved on the MP3 CD. The search process on the MP3 CD may take several minutes. During this time the station last played will be received. -
Page 50: Aux Input
AUX input AUX input General information In the centre console on a hinged panel there is an AUX socket for the connection of external audio sources. General information ….. 50 Usage ………. 51 CD 300 / CD 400: Navi 600 / Navi 900: It is possible, for example, to connect a portable CD player with a 3.5 mm jack plug to the AUX input.
-
Page 51
AUX input Note The socket must always be kept clean and dry. Usage Press the CD/AUX button once or several times to activate the AUX mode. Navi 600 / Navi 900: An audio source that is connected to the AUX input can be operated only via the control elements of the audio source. -
Page 52: Usb Port
USB port USB port General information Navi 600 / Navi 900 In the centre console on a hinged panel there is a USB socket for the connection of external audio data General information ….. 52 sources. Playing saved audio files ….. 54 Note The socket must always be kept clean and dry.
-
Page 53
USB port Important information Applicable playlist Note extensions: .m3u, .pls The socket must always be kept MP3 player and USB drives clean and dry. ■ The MP3 players and USB drives Playlist entries must be in the form connected must comply with the of relative paths. -
Page 54
USB port Playing saved audio files iPod iPod functions Navi 600 / Navi 900 MP3 player / USB drives Press the CD/AUX button once or Depending on the data saved, there several times to activate the audio are various options for the selection iPod mode. -
Page 55
USB port CD 300 / CD 400 Operation and the screen displays The search process on the USB are described for USB drives only. device may take several minutes. Operation of other devices like iPod During this time the station last played or Zune is mainly the same. -
Page 56
Digital picture frame Digital picture frame General information ■ Only pictures in JPEG standard format (file extensions, e.g., .jpg Using the digital picture frame or .jpeg) are supported. function (only Navi 600 / Navi 900) Example: «F:myPicture.jpg», you can view your favourite pictures General information ….. -
Page 57: Displaying Pictures
Digital picture frame Press the CONFIG button, select Display settings, and then select Picture frame. The menu shown below is displayed. The menu shows a list with the file Select max. 10 pictures that you want names of all pictures (note the to be downloaded (added) to the restrictions described in «Important Infotainment system’s memory or…
-
Page 58
Digital picture frame Press the CONFIG button, select As long as a picture stays selected in Display settings, select Picture the Picture selection menu, it can be frame, and then select Picture displayed at any time using the selection. The menu shown below is INFO button. -
Page 59
Navigation Navigation General information Caution The navigation system will reliably guide you to your destination without The usage of the navigation the need to read maps, even if you system does not release the driver General information ….. 59 have no local knowledge whatsoever. from the responsibility for Usage ………. -
Page 60: Usage
Navigation Usage The system will also work with poor If there is a traffic problem during GPS reception, however, the active route guidance, depending on accuracy of the determination of the the pre-settings, a message appears Control elements position will be reduced. as to whether the route should be The most important navigation- changed.
-
Page 61
Navigation The map of the current location is Information on the display A compass symbol that indicates shown on the display. the north direction. Route guidance not active If no GPS signal is available at the Route guidance messages current position, a crossed «GPS» In addition to the visual instructions symbol is displayed below the on the display (see «Information on… -
Page 62
Navigation Information in the top line ■ Below the arrow symbol: the name of the current street to follow. ■ Above the arrow symbol: the name of the street to follow after the next intersection. ■ While driving on highways: If the option Highway lane guidance is activated in the Display route guidance menu (see chapter… -
Page 63
Navigation Information on the map display On the map the following information is shown: ■ The route as a blue line. ■ The current position as a red triangle. ■ The final destination as a chequered flag. ■ Various symbols (see chapter «Symbols overview»… -
Page 64
Navigation Sort criteria Import individual POIs Select whether traffic messages are Only applicable if a USB drive with to be displayed in an order based on points of interest (POI) data stored on distance or street name. it is connected to the USB port 3 52 of the Infotainment system. -
Page 65
Navigation Note Using this menu option you can memory of the Infotainment It is not possible to directly remove activate and set up the myPOIs system, see below. individual imported points of interest announcer of the Infotainment ■ Favourite destination addresses from the myPOIs memory. -
Page 66
Navigation ■ Imported POIs: favourite journey or business trip in separate Exporting POI data to a USB drive destination addresses that were submenus. Connect a USB drive to the USB port previously stored on a USB drive of the Infotainment system, see See «Organizing the POI data in and then imported to the myPOIs chapter «USB port»… -
Page 67
Navigation Select Start export to store the Importing POI data from a USB drive Brief description: address data of the selected type(s) Connect a USB drive with POI data 1. Create the text files for the POI on the connected USB drive. stored on it (details see above) to the data. -
Page 68
Navigation The text files can be created, e.g., by Communication, (18) News & Example: 7.0350000, 50.6318040, using a simple text editor software. broking, (19) Government office, (20) «Michaels Home», «Bonn — Hellweg 6», General. «02379234567», see image above. Note The GPS coordinates need to be The text editor must support the Entering POI data into the text files expressed in decimal degrees. -
Page 69
Navigation After the import is finished, the imported POIs are selectable as destinations via the Enter destination menu, see chapter «Destination input» below. myPOIs announcer (only Navi 900) Via the myPOIs announcer you can be notified via a message on the display (see image below) and a beep when the vehicle approaches a point of interest (POI) stored in the myPOIs… -
Page 70
Navigation Detailed descriptions on POIs stored in the myPOIs memory, see «Exporting and importing POI data» above and chapter «Destination input» below. If route guidance is active, you are notified only when the vehicle approaches a POI which is located next to a road on the calculated route. -
Page 71: Destination Input
Navigation After selecting the desired option, the ■ Address book: selection of list of POI categories is displayed a destination address stored in the again. address book. See «Selecting an address from the address book» If you selected Announce POIs early below.
-
Page 72
Navigation Infotainment system. See «Selecting a point of interest» below. ■ Select from map: selection of a destination from the map display using the eight-way switch 3 6. See «Selecting a destination from the map» below. ■ Latitude / Longitude: selection of a destination using geographic coordinates. -
Page 73
Navigation Description on route guidance, see chapter «Guidance» 3 89. Entering an address directly Press the DEST button and then select Enter address to open the menu shown below. Select the desired country. Using the multifunction knob, successively mark and accept the Entering an address using the speller letters for the desired city. -
Page 74
Navigation j : List function — once two letters After completing the address, select have been entered (in some cases just one letter), all names available The Navigation menu is displayed. with these letters are displayed. The more letters are entered, the shorter Starting route guidance becomes the list. -
Page 75
Navigation The Store menu is displayed, see Select the desired option. A menu «Storing an address in the address with various sorting options is book or myPOIs memory» below. displayed. Selecting an address stored in the myPOIs memory Press the DEST button and then select myPOIs to open the menu shown below. -
Page 76
Navigation Selecting a point of interest Press the DEST button and then select Points of Interest. A menu with various options for the selection of points of interest (e.g. restaurants, petrol stations, hospitals etc.) is displayed. Select the desired category. Below the list detailed information on the currently marked point of interest A menu with a list of all available… -
Page 77
Navigation Select Petrol station. A menu is displayed that provides options for further refinement of the petrol station search. Below the list detailed information on The number of petrol stations can be the currently marked petrol station is reduced by marking at least one displayed: the approximate direction petrol station brand/chain. -
Page 78
Navigation After marking the desired fuel types: Along freeway select Start search with selected Selection of motorway related points filters or, for further refinement of the of interest (e.g. petrol stations or search, select Continue with next service areas) along the route. Only filter (petrol station brands/chains). -
Page 79
Navigation Search by name Once the entry is specific enough, a list with possible points of interest is Selection of points of interest by displayed. Sometimes it may be entering a name. necessary to select j for displaying After selecting the option, a country the list. -
Page 80
Navigation Description on route guidance, see Description on route guidance, see chapter «Guidance» 3 89. chapter «Guidance» 3 89. Storing the address Storing the address Select Store if you want to store the Select Store if you want to store the displayed address in the address displayed address in the address book or myPOIs memory. -
Page 81
Navigation Entering the Longitude coordinate Storing an address in the 1. Select Longitude. address book or myPOIs memory 2. Turn the multifunction knob to select W or E (west or east of the The Infotainment system provides prime meridian in Greenwich). two separate memory areas where you can store your favourite 3. -
Page 82
Navigation destinations), see regarding A telephone number can be entered Select OK to store the destination descriptions on address input or optionally. address in the address book using the selection above. displayed name and category. The default category Private can be After entering or selecting the desired changed to Business: A maximum of 100 destination… -
Page 83
Navigation Editing or deleting a stored The following options are available: by simply saying the assigned name, see chapter «Speech address ■ Address: opens the Enter address recognition». menu. You can edit the displayed Address data (including the category address using the speller function, ■… -
Page 84
Navigation Editing or deleting Individual POIs ■ Or you can import updated address Setting the home address Select Individual POIs, select the data from a USB drive, see Before you can set an address as desired sorting option (e.g. Vicinity «Exporting and importing POI data»… -
Page 85
Navigation If you want to set the address of an Various options for the selection of imported POI as home address: points of interest based on travel guide criteria (e.g. accommodation, You first need to store the address in sights, leisure etc.) are displayed. the address book or as an individual point of interest. -
Page 86
Navigation Adding a tour Adding intermediate destinations to the tour Accept the entered name using OK. The name is displayed on the Tours After selecting New tour, enter menu. a name for the tour using the speller Select the new tour and then Add new function 3 71. -
Page 87
Navigation Select an option for destination input Starting a tour and then select/enter the desired intermediate destination 3 71. A menu is displayed that shows the address data of the selected/entered intermediate destination. By default new waypoints are added at the end of the list. If another Select a tour in the Tours menu. -
Page 88
Navigation To start route guidance: select Start Editing a tour To insert the cut out destination at the tour. All predefined intermediate end of the list: press the multifunction Select a tour in the Tours menu and destinations are taken into account knob again. -
Page 89: Guidance
Navigation Guidance ■ Edit: change/edit the displayed address, see «Editing or deleting Press the NAVI button and then the a stored address» in chapter multifunction knob to display the «Destination input» above. navigation main menu. ■ Route criteria: set/change criteria Depending on whether the route for route calculation, see guidance is currently inactive or…
-
Page 90
Navigation Select a TMC traffic message to Note For each trip the following data will display detailed information on the The logbook function of the automatically be recorded: related traffic issue. Infotainment system meets no ■ A unique serial number for the trip official legal requirements. -
Page 91
Navigation any time to a USB drive connected to a «1», see «Sample logbook data» ■ Export logbook: exports all the USB port 3 52 of the Infotainment below. recorded trip data currently stored in the Infotainment system’s system. ■ Set filename: using the speller memory to a USB drive connected Logbook settings: function (see chapter «Destination… -
Page 92
Navigation Description of the individual data Route criteria items: ■ 0000000023 = serial number ■ N 52° 07′ 01″; E 009° 53′ 31″ = start position in geographic coordinates (Latitude; Longitude) ■ 22.09.2011; 13:53 = start date; time ■ 013550 = odometer reading at start position ■… -
Page 93
Navigation Select Dynamic guidance to activate/ If desired select one or several of the Using the Highway lane guidance deactivate dynamic route guidance. following options in the Route option, you can determine which type criteria menu: of illustration should be displayed If dynamic route guidance is when reaching a highway activated:… -
Page 94
Navigation Using the Popup information option, Select between map orientation you can select whether route (North up/Head up) and dimension guidance information from the (2D/3D) on the map display (3D only navigation should be displayed in available for Navi 900). popup windows in other operating Select Map options and then Show modes (e.g. -
Page 95
Navigation ■ Latitude Functions for active route Select whether All traffic messages or only Traffic messages along route guidance ■ Longitude should be displayed in the TMC ■ Map display messages list, see below. Stop navigation The current position can be copied to After selecting Stop navigation, the Navigation options the address book or myPOIs memory… -
Page 96
Navigation ■ Destination information Destination information Route blocking Description, see «Functions with The following options are available to ■ Overview current route route guidance inactive» above. manually exclude certain areas/route Route list sections from the route guidance: Overview current route The following information on the current route is displayed: All streets on the calculated route are… -
Page 97: Dynamic Guidance
Navigation By distance Remove all route blockages By setting a distance the section of After selecting this option, all areas/ route from the current position to the route sections previously selected as set distance can be excluded from the to be excluded from the route route guidance.
-
Page 98: Maps
Infotainment system is based on data Opel Service Partner. be better to recalculate the route or that the system receives via the RDS- Replacing a map SD card, see below .
-
Page 99
Navigation ■ Do not bend the SD card. Do not Fold down the panel. Inserting the SD card use any SD card that is bent or Removing the SD card cracked. ■ Do not put any sticker or write anything on either surface. ■… -
Page 100
Navigation Symbols overview… -
Page 101
Navigation Explanation Explanation Explanation Current position Caution/warning Sight Destination Closed road Sport & leisure not available Dense traffic Going out not available Traffic jam Museum not available Narrow lanes Car rental Open list Travel information Road works Closed list Leisure activity Slippery road Shopping centre Provision of services… -
Page 102
Navigation… -
Page 103
Navigation Explanation Explanation Chemist Petrol station Cinema Service area Airport Restaurant Amusement park City Historical monument Bank Hospital Traffic message Emergency Ferry Police Border Harbour Tunnel Mountain pass Kiosk Public place Grocery Related to the car Hotel/motel Garage Motorway exit Cemetery Car park Park &… -
Page 104
Speech recognition Speech recognition General information from this, the speech recognition acknowledges important commands The speech recognition of the and will enquire if necessary. Infotainment system enables you to To ensure that conversations inside operate various functions of the General information ….104 the vehicle do not lead to navigation system (only Navi 900;… -
Page 105: Navigation Control
Speech recognition To be able to enter voice Note most important commands currently commands in English, you first If you change the language shown available is shown on the display, see need to activate the phone main on the Infotainment system’s «Help menus»…
-
Page 106
Speech recognition Cancelling a dialogue sequence Afterwards, the current dialogue Help menus sequence will be continued Dependent on the currently active There are various possibilities to automatically. mode of operation (radio, CD player, deactivate the speech recognition navigation etc.), a help menu with the and to cancel a dialogue sequence: Important notes on voice input most important available voice… -
Page 107
Speech recognition ■ One of the commands shown on Example: General help menu (main You can simply try out if there are the help menu. commands) shortened variants available for The general help menu primarily certain commands. ■ One of the additional commands shows the commands required to available for the radio mode, see ■… -
Page 108
Speech recognition <87.5..108.0>», you need to Example: Autostore lists On-screen messages and acoustic exchange «<87.5..108.0>» for prompts / feedback a specific figure between 87.5 and During dialogue sequences you are 108.0. You could say, often prompted via on-screen e.g., «Frequency 96 dot 3». messages (see image below) and voice output messages, which kind of Help messages… -
Page 109
Speech recognition As soon as you hear a beep and the System: «Radio». Selecting a preset station symbol in the upper right corner of the Action: the user wants to select System: activates the radio mode. on-screen message (see image a station stored in the second To perform a certain radio function via above) has changed its colour from… -
Page 110
Speech recognition After assigning a name to a station, Selecting a preset station via the Selecting a track on an audio CD you can select that station by simply assigned name User: activates speech recognition. saying the assigned name. User: «All tracks». Note Action: the user wants to assign If you use a name which was… -
Page 111
Speech recognition User: «Points of interest». Entering an address Action: user wants to enter the System: shows a list with search destination address for an upcoming options. trip. User: «Nearby». User: activates speech recognition. System: shows a list with points of User: «Enter destination»… -
Page 112
Speech recognition Note System: displays an alphabetically destination» to store the displayed The last calculated destination ordered list of street names that address in the address book or possibly has no valid address sound similar to the name the user myPOIs memory, see chapter elements available that can be used said. -
Page 113
Speech recognition Example: the language of the Afterwards you can select one of Note Infotainment system is set to English, these destination addresses by If you change the language shown Country is set to «GERMANY (D)», simply saying the assigned name. on the Infotainment system’s and you want to enter the city display, all names currently… -
Page 114: Phone Control
Speech recognition You need to manually activate Cancelling a dialogue Main commands another mode of operation by using There are various possibilities of After activation of the speech the corresponding button on the deactivating the speech recognition recognition a short tone signals that Infotainment system (e.g.
-
Page 115
Speech recognition ■ «Yes»: a suitable action is triggered ■ «Verify»: the inputs are repeated by User: «Dial» depending on the context. the voice output. Voice output: «The number is being ■ «No»: a suitable action is triggered ■ «Star»: An asterisk «*» is entered. dialled»… -
Page 116
Speech recognition Starting a second call User: «Send» To be able to use the voice tag independently of the location, i.e. A second call can be started during an Redialing including other countries, all active telephone call. To do so, press The number last dialled is redialled telephone numbers should be the button w. -
Page 117
Speech recognition Voice output: «Saving the nametag» Saving a mobile phone to or deleting Selecting a mobile phone from the it from the device list device list Deleting With the command «Pair» a mobile Using the «Select device» command, A previously saved voice tag is phone can be saved to or deleted a mobile phone can be selected in the deleted with the command «Delete». -
Page 118
Speech recognition Voice feedback Each voice input is answered or commented on by the Infotainment system by way of a voice output that is adapted to the situation. To switch the voice output on or off, enter «Voice feedback» or press the button w. -
Page 119
Phone Phone General information Important information for operation and traffic safety The Phone portal provides you with the possibility of having mobile phone 9 Warning conversations via a vehicle General information ….119 microphone and the vehicle Mobile phones have effects on Connection ……… -
Page 120
Phone You will find further information about Operating the speech 9 Warning the specification on the Internet at recognition http://www.bluetooth.com. Do not use the speech recognition in Use of the hands-free facility while Additionally, the Phone portal emergencies, because in stress driving can be dangerous because supports SIM Access Profile (SAP). -
Page 121: Connection
Phone q, w: take call, activate speech Telephone specific adapters First, lower the front side of the adapter as shown in the above figure. recognition. If you are using a telephone specific adapter, the mobile phone is n, x: end/reject call, deactivate operated via the external antenna.
-
Page 122
Phone Then lower the top edge. An engaging sound must be audible when the mobile phone engages. To remove, press the unlocking button on the adapter and lift the top edge of the phone first. Mobile phones with connection interface on the lateral edge Installing the adapter Fasten the adapter to the base plate. -
Page 123: Bluetooth Connection
Phone Inserting the mobile phone Information such as a telephone book, call lists, the network operator’s name and field strength can be transferred. The functionality can be restricted depending on the telephone type. To be able to set up a Bluetooth connection with the Phone portal, the Bluetooth function of the mobile phone has to be activated and the…
-
Page 124
Phone Navi 600 / Navi 900 Device list Handsfree mode When the mobile phone is added as When a mobile phone is connected to Bluetooth menu a handsfree device the user can the Phone portal via Bluetooth for the make or receive calls and use other first time, the mobile phone is saved functions via the Phone portal. -
Page 125
Phone Connecting a mobile phone as a handsfree device As soon as the Phone portal has Select Change Bluetooth code. On detected the mobile phone, the the menu displayed, edit the actual connection set-up can be confirmed. Bluetooth code and accept the Select Add device (Handsfree). -
Page 126
Phone Enter the displayed SAP passcode in Connecting a mobile phone saved in the mobile phone (without spaces). the device list The mobile phone PIN code is shown on the Infotainment display. If the PIN request function is active, the user will have to enter the PIN code of the SIM card in the mobile phone. -
Page 127
Phone Removing a mobile phone from the The security dialogue is displayed. ■ Call diverting: select diverting device list options depending on the situation. Activating/Deactivating PIN request Select the desired mobile phone from ■ Call barring: configure call barring Select PIN request On or Off. the device list. -
Page 128
Phone CD 300 / CD 400 Device list Handsfree mode When a mobile phone is connected to When the mobile phone is added as Bluetooth menu the Phone portal via Bluetooth for the a handsfree device the user can first time, the mobile phone is stored make or receive calls and use other in the device list. -
Page 129
Phone Connecting a mobile phone as a handsfree device As soon as the Phone portal has Select Change Bluetooth code. On detected the mobile phone, the the menu displayed, edit the actual connection set-up can be confirmed. Bluetooth code and accept the Select Add device (Handsfree). -
Page 130
Phone Enter the displayed SAP passcode in Connecting a mobile phone saved in the mobile phone (without spaces). the device list The mobile phone PIN code is shown on the Infotainment display. If the PIN request function is active, the user will have to enter the PIN code of the SIM card in the mobile phone. -
Page 131
Phone Removing mobile phone from device The security dialogue is displayed. ■ Call diverting: select diverting list options depending on the situation. Activating/Deactivating PIN request Select the desired mobile phone from ■ Call barring: configure call barring Select PIN request On or Off. the device list. -
Page 132: Introduction
Phone Emergency call Answer when the service personnel 9 Warning questions you about the emergency. 9 Warning Bear in mind that you can make 9 Warning and receive calls with the mobile Connection setup cannot be phone, if it is in a service area with Do not end the call until you are guaranteed in all situations.
-
Page 133
Phone Note Navi 600 / Navi 900 Using the Phone off command the In the handsfree mode mobile phone connected phone can be detached Setting the volume for hands-free operation continues to be possible, from the Phone portal. facility e. g. taking a call or adjusting the Entering a number manually volume. -
Page 134
Phone card or same telephone is concerned. On the Search menu displayed, After having performed the During this period any newly added select the desired first letter range to preselection: select the desired entry entries are not displayed. start a preselection of the telephone in the telephone book to display the book entries that you want to have numbers saved under this entry. -
Page 135
Phone To start a dialling process: select the To compose a message: select Write ■ Detach call: detach the connection desired call list, an entry in the call list new message. to a conference participant in and finally the desired telephone a telephone conference. -
Page 136
Phone Dialling a telephone number Entering a number manually If the SIM card or telephone are different, the telephone book is reloaded. This process can take a few minutes depending on the phone model. Selecting a telephone number from the telephone book With the telephone main menu active, Select Enter number and then enter press the multifunction knob to open… -
Page 137
Phone Call lists Note When the mobile phone is paired Telephone book entries are carried using the SAP mode, the user can Via the menu Call lists the user can over as they are transferred from the view, compose and send messages view incoming, outgoing and missed mobile phone. -
Page 138: Mobile Phones And Cb Radio Equipment
Phone Incoming call ■ Switch calls: switch between calls, ■ Installation of the phone in if there are several calls. a suitable spot, consider relevant When there is an incoming call Note in the Owner’s manual, a menu is displayed to accept or ■…
-
Page 139
Phone 9 Warning Operation of radio equipment and mobile telephones which fail to meet above mentioned mobile telephone standards is only permitted using an antenna located outside of the vehicle. Caution Mobile telephones and radio equipment may lead to malfunctions in the vehicle electronics when operated inside the vehicle with no exterior antenna, unless the above… -
Page 140: Config
Index Digital audio broadcasting…. 41 Dynamic guidance……97 Activating CD player….. 46 Activating speech recognition……….105, 114 Emergency call……132 Activating the navigation system. . 60 Enhanced Other Networks… 37 Activating the radio……. 28 EON……….37 Address book…….. 71 Address input……..
-
Page 141
volume of the traffic Home address……71 announcements……24 importing/exporting POIs… 60 Personalisation……26 volume settings……24 Logbook……..89 Phone map SD card……98 adjusting ring tones….123 myPOIs……..71 Bluetooth……… 119 Maps ……….98 myPOIs announcement…. 60 Bluetooth connection….123 Map SD card navigation display….. -
Page 142
Digital audio broadcasting Speller function……71 (DAB)……..41 Starting CD replay……46 Voice recognition……104 favourite lists……30 Station search……. 28 Volume for voice output..105, 114 selecting the waveband…. 28 Storing stations……. 29, 30 Volume settings……24 station lists…….. 32 Switching the Infotainment station search…… -
Page 143
Copyright by ADAM OPEL AG, Rüsselsheim, Germany. The information contained in this publication is effective as of the date indicated below. Adam Opel AG reserves the right to make changes to the technical specifications, features and design of the vehicles relative to the information in this publication as well as changes to the publication itself.
Обновлено: 22.04.2023

Руководство по эксплуатации и техническому обслуживанию Opel Zafira B, оборудованных бензиновыми двигателями: 1.6 — Z16XEP (1598см3, мощность двигателя 77 кВт), 1.6 — Z16XER (1598см3, мощность двигателя 88 кВт), 1.6 — Z16XE1 (1598см3, мощность двигателя 77 кВт), 1.6 CNG — Z16YNG(1598см3, природный газ/бензин, мощность двигателя 69 кВт), 1.8 — Z18XER (1796см3, мощность двигателя 103 кВт), 2.0 Turbo — Z20LER (1998см3, мощность двигателя 147 кВт), 2.0 Turbo — Z20LEH (1998см3, мощность двигателя 177 кВт), 2.2 — Z22YH (2198см3, мощность двигателя 110 кВт) и дизельными двигателями: 1.7 — A17DTJ (1686см3, мощность двигателя 81 кВт), 1.7 — A17DTR (1686см3, мощность двигателя 92 кВт), 1.9 CDTI — Z19DTL (1910см3, мощность двигателя 74 кВт), 1.9 CDTI — Z19DT (1910см3, мощность двигателя 88 кВт), 1.9 CDTI — Z19DTH (1910см3, мощность двигателя 110 кВт).
Если Вы оформили заявку с 9:00 до 18:00, мы перезвоним Вам в течение 30 минут.
Если Вы оформили заявку после 18:00, мы перезвоним на следующий день до 11:00.
Если Вы оформили заявку с 9:00 до 18:00, мы перезвоним Вам в течение 30 минут.
Если Вы оформили заявку после 18:00, мы перезвоним на следующий день до 11:00.
предварительно сделав заказ
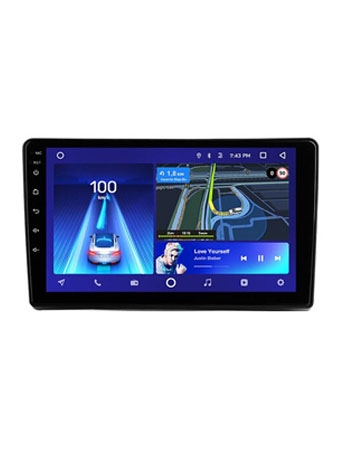
Современное головное устройство для автомобиля Opel Zafira B (2005-2014), с которым вы можете ощутить высочайшее качество звука, многофункциональность магнитолы, поражающее скоростью работы системы Android.

Поддержка SIM карт всех мобильных операторов. Модем с технологией 4G обеспечивает быструю работу с веб страницами.

Главный экран: Движение + Навигатор + Проигрыватель. Разделение экран на 2 части в приложениях позволяет не отвлекаться от просмотра видео и одновременно использовать навигатор.

Быстрые и современные процессоры с частотой 1.8Гц и объемом оперативной и внутренней памяти 2+32Гб / 3+32Гб / 4+64Гб / 6+128Гб

ADAU1701 или двойной (CC3) + ROHM32107, а так же 32 полосный эквалайзер + временные задержки + усиленные басы

Повышает безопасность и комфорт вождения. Изображение с камеры TEYES (заднего или переднего вида) может быть достуно в любое время движения автомобиля

Операционная система Android 10.0 (CC3/CC2 Plus/sPRO Plus) обеспечивает быструю работу устройства и позволяет пользоваться современными программами.


Возможность дополнительной установки и подключения датчиков давления в шинах для удобства и безопастности пользования

Наилучшее соотношение цены и качества, данная автомагнитола удовлетворит в себе высокие требования к звуку и скорости работы устройства.
- Доступная цена является отличительной особенностью головного устройства Teyes.
- Универсальная архитектура позволяет подключать к магнитоле дополнительные устройства, такие как видеорегистратор, фронтальную камеру, датчики давления в шинах, OBD диагностику.
- Головное устройство
- Модельная переходная рамка
- Антенна GPS
- Антенна 4G (в модификациях с 4G)
- Кабель питания (модельный)
- Провода аудио/видео
- USB провод
- Тройной информационный дисплей. На экране вам будет доступно время, температура наружного воздуха и панель настройки аудиосистемы;
- Бортовой информационный дисплей. Вам будет доступна информация о времени, температуре воздуха, день недели, а также данные с бортового компьютера. На экране вы можете изменить настройки информационно-развлекательной системы;
- Графический информационный дисплей. Здесь вам будут доступны различные настройки системы, температура воздуха, а также информация о работе системы климат-контроля.
- сведения с бортового компьютера;
- с контрольной системы;
- опции и настройки радиоприемника;
- состояние системы климат-контроля;
- дата, время и температура воздуха.
- Опель вектра а замена личинки замка зажигания
- Что лучше бмв х4 или ауди q5
- Установка кнопок на руль bmw x3 f25
- Ремонт заднего суппорта ауди а4 б6
- Замена радиатора кондиционера ауди а4 б6
| CC2 Plus | sPRO Plus | CC3 | |
|---|---|---|---|
| Версия Android | Android 10 | Android 10 | Android 10 |
| Процессор CPU | 8 ядер / 1.8Ghz 64bit Unisoc UMS512 2*A75+6*A55 ARM 12NM | 8 ядер / 1.8Ghz 64bit Unisoc UMS512 2*A75+6*A55 ARM 12NM | 8 ядер / 1.8Ghz 64bit Unisoc UMS512 2*A75+6*A55 ARM 12NM |
| Внутренняя и оперативная память | 3+32Gb 4+64Gb |
3+32Gb 4+64Gb |
3+32Gb 4+64Gb 6+128Gb |
| Интернет | 4G+Wi-Fi(2.4G+5G) | 4G+Wi-Fi(2.4G+5G) | 4G+Wi-Fi(2.4G+5G) |
| Экран | QLED+2.5D | IPS+2.5D | QLED+2.5D |
| Разрешение экрана | 1280×720 | 1280×720 | 1280×720 |
| Усилитель звука | TDA7851 | TDA7851 | TDA7851 |
| DSP | ROHM32107 независимый модуль | ROHM32107 независимый модуль | Двойной DSP ADAU1701 + ROHM32107 |
| Carplay / Android Auto | опционально | опционально | Поддерживает беспроводной Carplay / проводной Android Auto |
| Временные задержки | Есть | Есть | Есть |
| Эквалайзер | 16*2 полосы | 16*2 полосы | 27 полос |
| Линейный выход, RCA | 4+1 (опционально) | 4+1 (опционально) | 4+1 (в комплекте) |
| Выносной слот SIM | опционально | опционально | в комплекте |
| Внешний микрофон | Поддерживает | Поддерживает | Поддерживает |
| Многофункциональный главный экран | Есть | Нет | Есть |
| Разделение экрана | Поддерживает | Поддерживает | Поддерживает |
| Кулер охлаждения | Есть | Нет | Есть |
| Поддерживаемые аксессуары | USB видеорегистратор Teyes X5 CarPlay OBD |
USB видеорегистратор Teyes X5 CarPlay OBD |
USB видеорегистратор Teyes X5 CarPlay OBD |
Отзывы Штатная магнитола Opel Zafira B (2005-2014)
Мы готовы привести веские доводы преимущества покупки у нас. Тезисы ориентированы на каждого клиента, который сомневается. Читать полностью
Сравнение головных устройств Teyes CC2L, sPRO, CC2 и CC3. Ответим на вопросы: В чем разница? Что выбрать? Cравнение характеристик Читать полностью
Система CD30 является аудиосистемой новейшего поколения. Панель управления устройства не вызывает у пользователя сложностей, поскольку в инструкции четко обозначены клавиши и их опции. Штатная магнитола CD30 рассчитана для линейки автомобилей Опель.
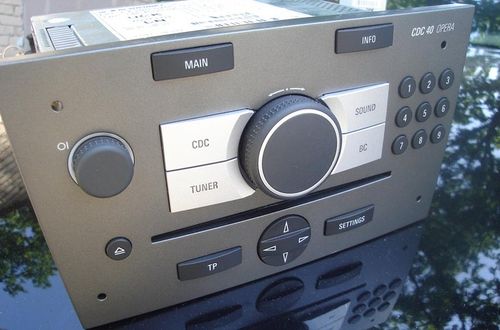
Штатная магнитола
Общие сведения
Магнитола CD30 MP3 признана революционным устройством для пользователей. В ней удачно сочетаются характеристики цены и качества. Магнитола имеет встроенный радиоприемник, который фиксирует 9 частот настроенных вручную и автоматически. Рабочий диапазон – FM, AM. Устройство обладает функцией RDS, облегчающей поиск радиосигнала и гарантирующей качественный прием.
На фото представлены все функциональные клавиши устройства. С помощью имеющегося CD проигрывателя вы можете прослушать любимые композиции в MP3 и CD формате. Смарт система сама регулирует уровень звука в зависимости от скорости движения машины. Также вы можете изменить степень компенсации городского шума.
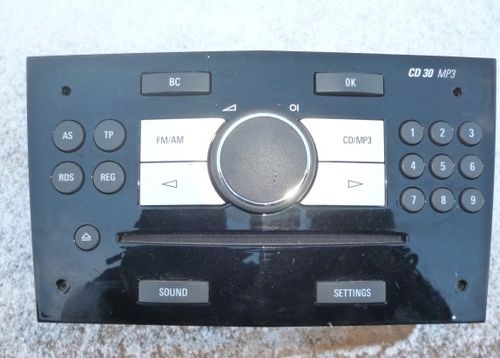
Автомагнитола CD30 MP3
С помощью магнитолы CD30 осуществляется доступ к бортовому компьютеру. Более подробную информацию по этой опции вы можете узнать из Руководства пользователя.
Система обладает возможностью подключения внешнего источника звука, к примеру ваш MP3. Также система обладает функцией дистанционного управления или системой Twin Audio. Комплектация устройства может включать оборудование Mobile Phone Portal.
Штатная магнитола CD30 на Opel имеет легкий продуманный дизайн, удобную ручку включения/выключения, а также удобство при регулировке громкости. Все это значительно упрощает эксплуатацию. Кроме этого, система оснащена защитой от хищения. Если даже произошла кража, то ваша магнитола CD30 не будет работать в автомобиле похитителя.
В инструкции по эксплуатации производитель делает акцент на том, что пользование магнитолой не должно мешать управлению автомобилем. Если по дороге возникли неполадки, остановитесь и настройте информационную систему.
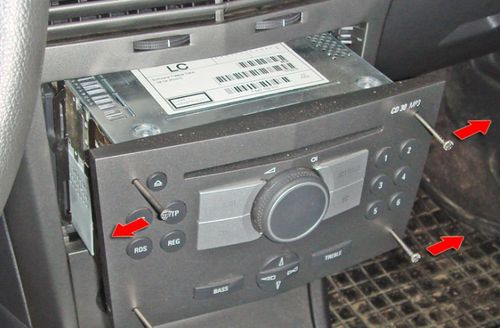
Съём магнитолы
Формат дисплея
Магнитола CD30 MP3 имеет опцию для самостоятельной настройки формата дисплея. В зависимости от выбранных параметров, экран может быть:
На всех трех видах дисплея вы можете посмотреть текущее время, температуру, а также настроить интерфейс по своему желанию.
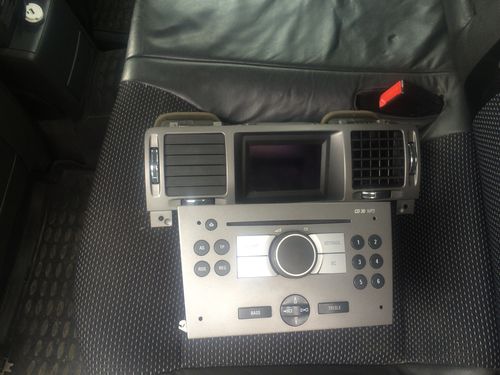
Последняя модификация CD MP3
Как пользоваться системой
Чтобы начать эксплуатацию магнитолы CD30 MP3, вам нужно освоить его основную функцию включение/выключение. Для включения системы нажмите на ручке кнопку включения и ожидайте несколько секунд. Для облегченного пользования вы можете настроить функцию автоматического включения. В этом случае система активируется вместе с зажиганием.
Вообще, автоматическое включение относится к заводской настройке, но ее можно сделать неактивной. Если вы все же решили деактивировать такую функцию, то сделать ее снова активной вам поможет загрузка компакт-диска или простая активация на ручке включения. Также деактивация функции может произойти из-за прерванного питания магнитолы.
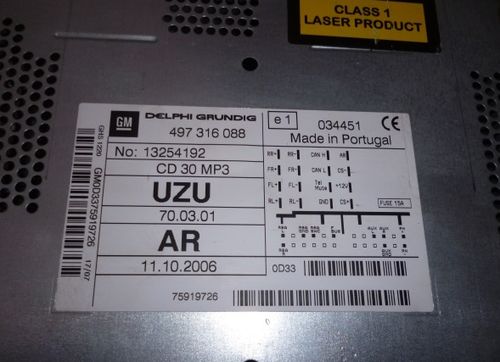
Система штатной магнитолы CD30 имеет функцию автоматического отключения. К примеру, если вы активировали систему при выключенном питании, то магнитола сама выключится через час.
Что отображается на экране
Дисплей магнитолы CD30 имеет мягкую для глаз подсветку. На экране устройства отображается такая информация:
Более подробную информацию вы можете получить из руководства пользователя системой.

Экран штатной магнитолы CD30
Когда вы включаете магнитолу CD30, вас приветствует звук находящегося в памяти последнего аудиосигнала.
Органы управления системой
Если к системе подключена функция Mobile Phone Portal, то органы управления немного изменяют свои функции. Подробнее об этом вы можете прочесть в инструкции по эксплуатации. Органы управления системой штатной магнитолы для вашего комфорта расположены на рулевом колесе.
Одной из главной опции считается вращающийся переключатель. Им легко можно настроить радиостанции. Для этого достаточно просто вращать его ручку вверх и вниз, чтобы найти подходящую волну. Если вы используете переключатель для настройки бортового компьютера, то функция радиоприемника становится недоступной.
Кроме этого, на кнопках поиска можно настроить радиоприемник и воспроизведение CD/MP3. Выполнить эту опцию можно с помощью стрелок вверх/вниз. Вращающийся переключатель регулирует громкость устройства.
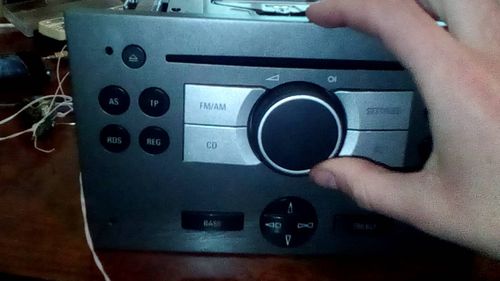
Функция Twin Audio
Магнитола CD30 для Опеля оснащена системой Twin Audio, которая предназначена для пользования пассажирами. Производитель предупреждает, что слишком высокий уровень звука вредит вашему слуху. В аудиосистему встроены 2 гнезда, которые подходят для подключения наушников стандартного разъема. Система оснащена регулировкой звука для каждой пары наушников отдельно.
Twin Audio позволяет управлять только тем источником, который используется в качестве основного. Также при включенной функции TP смарт система позволяет выбрать другую программу. Кроме этого, вы не можете поменять порядок воспроизводимых файлов.
Главное меню
Основное меню становится доступным при включенной информационно-развлекательной системе. На экране у вас отобразится информация:
Читайте также: