 02:54
02:54
Machine guide: Janome Jem Platinum 760
 10:10
10:10
Janome 760 Sewing Machine Review (Part-1)
 03:04
03:04
Janome Sewing Machine Threading
 09:41
09:41
Janome 760 Sewing Machine Review (Part-2)
 04:28
04:28
JP760 stretch stitch balance adjustment
 01:33
01:33
JP760 needle to hook timing
ИНСТРУКЦИЯ ПО ЭКСПЛУАТАЦИИ
JANOME JP 760

Важные инструкции по безопасности, Опасно, Внимание
Сохраняйте эти инструкции
- Изображение
- Текст
ВАЖНЫЕ ИНСТРУКЦИИ ПО БЕЗОПАСНОСТИ
При использовании электрического прибора следует выполнять основные правила техники безопасности,
которые заключаются в следующих разделах.
Перед началом работы внимательно прочитайте инструкцию.
ОПАСНО
–
Во избежание риска удара электрическим током:
1. Никогда не оставляйте включенную в сеть машину без присмотра. Всегда отключайте прибор от сети
после работы и перед началом чистки.
2. Всегда отключайте от сети при замене лампочки. Вставляйте лампочку такого же типа на 15 Ватт.
ВНИМАНИЕ
–
Во избежание ожогов, пожара, удара электрическим током или нанесения
повреждений пользователю:
1. Не позволяйте играть с машиной. Будьте внимательны при работе, если в помещении находятся дети.
2. Используйте прибор только по его прямому назначению, описанному в этой инструкции. Используйте
приспособления, только рекомендуемые производителем и описанные в инструкции.
3. Не используйте машину, если у нее поврежденный шнур или вилка, в случае, если она падала, была
повреждена, попала в воду или работает неправильно. Отнесите машину к ближайшему
авторизированному дилеру для ремонта или наладки.
4. Машина должна работать только с открытыми вентиляционными отверстиями. Периодически чистите
вентиляционные области машины и ножную педаль от пыли, грязи и остатков материи.
5. Ничего не кидайте и не вставляйте в вентиляционные отверстия.
6. Работайте на машине только в помещении.
7. Не работайте в помещении, где распылялись аэрозоли или использовался кислород.
8. Чтобы отключить питание, поставьте все выключатели в положение ВЫКЛ.(«0»). Затем вытащите вилку из
розетки.
9. Не тяните вилку из розетки за шнур, берите вилку за корпус.
10. Будьте осторожны при работе с движущимися частями машины. Особое внимание уделяйте рабочей
области вокруг иглы.
11. Используйте только оригинальную игольную пластину. Из за неправильной пластины может сломаться
игла.
12. Не используйте гнутые иглы.
13. Не тяните и не толкайте ткань при шитье, может сломаться игла.
14. Всегда отключайте машину и ставьте выключатель на «0» при регулировке или замене деталей в области
работы иглы: заправке нити в иглу, смене иглы, заправке нижней нити, смене прижимной лапки и т.д.
15. Всегда отключайте машину от электрической розетки при проведении профилактических работ, снятии
панелей и других процедур, описанных в этой инструкции.
СОХРАНЯЙТЕ ЭТИ ИНСТРУКЦИИ
Дизайн и спецификация машины могут быть изменены без предварительного уведомления.

ОСНОВНЫЕ ЧАСТИ Названия частей . . . . . . . . . . . . . . …
Страница 3
- Изображение
- Текст
СОДЕРЖАНИЕ
1
ОСНОВНЫЕ ЧАСТИ
Названия частей . . . . . . . . . . . . . . . . . . . . . . . . . . . . 2
Установка катушечного стержня . . . . . . . . . . . . . . 2
Стандартные аксессуары . . . . . . . . . . . . . . . . . . . . 3
Выдвижной столик . . . . . . . . . . . . . . . . . . . . . . . . . . 3
ПОДГОТОВКА К ШИТЬЮ
Подключение машины к сети . . . . . . . . . . . . . . . . . 4
Работа с кнопкой Старт/Стоп . . . . . . . . . . . . . . . . . 4
Работа с ножной педалью . . . . . . . . . . . . . . . . . . . . 4
Контроль скорости шитья . . . . . . . . . . . . . . . . . . . . 5
Регулятор контроля скорости. . . . . . . . . . . . . . . 5
Ножная педаль . . . . . . . . . . . . . . . . . . . . . . . . . . . 5
Функциональные кнопки . . . . . . . . . . . . . . . . . . . . . 6
Кнопка Старт/Стоп . . . . . . . . . . . . . . . . . . . . . . . . 6
Реверс . . . . . . . . . . . . . . . . . . . . . . . . . . . . . . . . . . 6
Автоматическая закрепка . . . . . . . . . . . . . . . . . . 6
Кнопка подъема/опускания иглы. . . . . . . . . . . . 6
Кнопка изменения ширины зигзага. . . . . . . . . . 7
Кнопка изменения длины стежка. . . . . . . . . . . . 7
Кнопки прямого выбора строчек . . . . . . . . . . . . 7
Отключение транспортера ткани . . . . . . . . . . . . . . 8
Смена прижимной лапки . . . . . . . . . . . . . . . . . . . . . 8
Держатель лапки . . . . . . . . . . . . . . . . . . . . . . . . . . . 8
Подъем и опускание прижимной лапки . . . . . . . . 9
Баланс натяжения верхней нити . . . . . . . . . . . . . . 9
Замена игл. . . . . . . . . . . . . . . . . . . . . . . . . . . . . . . . 10
Таблица соотношений игл и ниток . . . . . . . . . . . 10
Намотка шпульки . . . . . . . . . . . . . . . . . . . . . . . . . . 11
Удаление шпульки . . . . . . . . . . . . . . . . . . . . . . . 11
Установка катушки . . . . . . . . . . . . . . . . . . . . . . . 11
Заправка нити для намотки шпульки . . . . . . . 12
Дополнительный катушечный стержень. . . . . 12
Установка шпульки. . . . . . . . . . . . . . . . . . . . . . . 13
Заправка верхней нити . . . . . . . . . . . . . . . . . . . . . 14
Нитевдеватель . . . . . . . . . . . . . . . . . . . . . . . . . . . . 15
Вытягивание нижней нити. . . . . . . . . . . . . . . . . . . 16
ОСНОВНЫЕ ШВЕЙНЫЕ ТЕХНИКИ
Прямой стежок . . . . . . . . . . . . . . . . . . . . . . . . . . . . 17
Изменение направления строчки . . . . . . . . . . 17
Завершение строчки . . . . . . . . . . . . . . . . . . . . . 17
Изменение длины стежка . . . . . . . . . . . . . . . . . 18
Изменение позиции иглы . . . . . . . . . . . . . . . . . 18
Прямые строчки и рекомендуемые лапки . . . . . 20
Зигзаг . . . . . . . . . . . . . . . . . . . . . . . . . . . . . . . . . . . . 21
Изменение ширины зигзага . . . . . . . . . . . . . . . 21
Изменение длины стежка . . . . . . . . . . . . . . . . . 21
РАБОЧИЕ СТРОЧКИ
Обработка края зигзагом . . . . . . . . . . . . . . . . . . . 22
Сложный зигзаг (стежок трико) . . . . . . . . . . . . . . 22
Разновидности петель . . . . . . . . . . . . . . . . . . . . . . 23
Квадратная петля . . . . . . . . . . . . . . . . . . . . . . . . 23
Изменение ширины петли . . . . . . . . . . . . . . . . 26
Изменение плотности петли . . . . . . . . . . . . . . 26
Двухслойная петля . . . . . . . . . . . . . . . . . . . . . . . 26
Петля с глазком и закругленная петля . . . . . . 27
Изменение ширины петли . . . . . . . . . . . . . . . . 27
Трикотажная петля . . . . . . . . . . . . . . . . . . . . . . . 28
Зажгутованная петля . . . . . . . . . . . . . . . . . . . . . 29
Автоматическая петля . . . . . . . . . . . . . . . . . . . . 30
Пришивание пуговиц . . . . . . . . . . . . . . . . . . . . . . . 31
Втачивание молнии . . . . . . . . . . . . . . . . . . . . . . . . 32
Потайная строчка . . . . . . . . . . . . . . . . . . . . . . . . . . 34
Глазок . . . . . . . . . . . . . . . . . . . . . . . . . . . . . . . . . . . . 35
ДЕКОРАТИВНЫЕ СТРОЧКИ
Аппликация . . . . . . . . . . . . . . . . . . . . . . . . . . . . . . . 36
Пэчворк . . . . . . . . . . . . . . . . . . . . . . . . . . . . . . . . . . 36
Сборки . . . . . . . . . . . . . . . . . . . . . . . . . . . . . . . . . . . 37
Шов ракушка. . . . . . . . . . . . . . . . . . . . . . . . . . . . . . 38
Декоративные атласные стежки . . . . . . . . . . . . . 38
Мережка. . . . . . . . . . . . . . . . . . . . . . . . . . . . . . . . . . 39
Стежок крестом . . . . . . . . . . . . . . . . . . . . . . . . . . . 39
Комбинация стежков . . . . . . . . . . . . . . . . . . . . . . . 40
Баланс стежков стреч . . . . . . . . . . . . . . . . . . . . . . 40
УХОД ЗА МАШИНОЙ
Чистка челнока и транспортера ткани . . . . . . . . 41
Замена шпуледержателя . . . . . . . . . . . . . . . . . . . 41
Проблемы и предупреждающие сигналы. . . . . . 42
Устранение неисправностей . . . . . . . . . . . . . . . . 43

ОСНОВНЫЕ ЧАСТИ
Названия частей
1
Кнопки прямого выбора строчек
2
Окно выбора строчки
3
Стопор намотки шпульки
4
Шпиндель намотки шпульки
5
Катушечный стержень (в наборе с
аксессуарами)
6
Нитенаправитель намотки шпульки
7
Нитенаправитель
8
Рычаг нитепритягивателя
9
Регулятор натяжения нити
!0
Лицевая панель
!1
Нитеобрезатель
!2
Нитевдеватель
!3
Игольная пластина
!4
Выдвижной столик (отсек для хранения
аксессуаров)
!5
Пластина челночного отсека
!6
Кнопка освобождения пластины
челночного отсека
!7
Регулятор контроля скорости
!8
Кнопка изменения ширины стежка
!9
Кнопка изменения длины стежка
@0
Кнопка Старт/Стоп
@1
Реверс
@2
Кнопка автоматической закрепки
@3
Кнопка подъема/опускания иглы
@4
Держатель лапки
@5
Винт игольного стержня
@6
Игла
@7
Лапка А для зигзага
@8
Ручка для переноса
@9
Отверстие для дополнительного
катушечного стержня
#0
Маховое колесо
#1
Регулятор изменения баланса стежка
#2
Выключатель питания
#3
Разъем машины
#4
Разъем педали
#5
Рычаг отключения транспортера ткани
#6
Свободный рукав
#7
Рычаг петли
#8
Рычаг подъема прижимной лапки
#9
Швейный советник
Установка катушечного стержня
Установите катушечный стержень в
отверстие как показано на рисунке.
(Катушечный стержень находится в наборе
с аксессуарами.)
1 Катушечный стержень
2 Отверстие
2
q
w
e
r
t
!9
!8
!7
#9
!6
!5
y
u
i
o
!0
!1
!2
!3
!4
@37
@27
@1
@0
@5
@6
@44
@7
#8
@8
#7
#6
#5
@9
#0
#4
#3
#2
#1
q
w
2

Стандартные аксессуары
1
Иглы
2
Шпульки
3
Отвертка
4
Вспарыватель
5
Держатель катушки
6
Катушечный стержень
7
Дополнительный катушечный стержень
8
Фетровая прокладка
9
Лапка F для атласных строчек
!0
Лапка R для автоматической петли
!1
Инструкция
!2
Электрический шнур
!3
Педаль
q
w
e
r
t
y
u
i
o
!0
!1
!2
!3
3
3
q
w
e
r
Выдвижной столик
Выдвижной столик обеспечивает дополнительное
рабочее пространство. Он легко снимается для
работы со свободным рукавом.
В столике хранятся стандартные аксессуары.
Чтобы снять столик, вытяните его влево.
Чтобы установить столик, сопоставьте выступы с
отверстиями на машине и пристегните столик,
надавив на него.
1 Дополнительный столик
2 Выступ
3 Отверстие
4 Отсек для хранения аксессуаров
Свободный рукав
Для того, чтобы работать со свободным рукавом,
отсоедините от машины выдвижной столик. Это
позволит вам легко штопать носки или наносить
заплатки на области колен, локтей или любую
детскую одежду.

ПОДГОТОВКА К ШИТЬЮ
Подключение машины к сети
ПРИМЕЧАНИЕ:
Перед подключением машины убедитесь, что
напряжение машины соответствует напряжению
Вашей электросети.
Работа с кнопкой старт/стоп
Отключите питание.
Вставьте шнур питания в разъем машины.
Вставьте вилку питания в электрическую розетку на
стене. Включите машину.
1 Кнопка старт/стоп
2 Выключатель питания
3 Шнур питания
4 Разъем питания машины
5 Вилка питания
6 Розетка на стене
Работа с ножной педалью
Отключите питание.
Вставьте штекер педали в разъем машины.
Вставьте шнур питания в разъем машины.
Вставьте вилку шнура питания машины в разъем
машины. Вставьте вилку питания в электрическую
розетку на стене. Включите машину.
1 Выключатель питания
2 Штекер педали
3 Разъем подключения педали
4 Шнур питания
5 Разъём питания машины
6 Вилка питания
7 Розетка на стене
ПРИМЕЧАНИЕ:
Если подключена ножная педаль, кнопка
старт/стоп
не работает.
При включении машины в окне выбора строчек
появится тест, а затем высветится строчка 01.
ВНИМАНИЕ:
Во время работы внимательно следите за
областью шитья и движущимися частями машины,
такими как рычаг нитеводителя, маховое колесо
или игла.
Всегда отключайте питание и вытаскивайте вилку
из розетки, если:
оставляете машину без присмотра,
устанавливаете или снимаете какие нибудь
части машины,
чистите машину.
Ничего не кладите на ножную педаль, иначе
машина может заработать неожиданно.
Инструкции по пользованию:
Символ «0» на выключателе машины означает, что
питание отключено.
q
w
e
r
t
y
q
w
e
r
t
y
u
4
While

Контроль скорости шитья Регулятор контроля скорости Вы може…
Страница 7
- Изображение
- Текст
5
Контроль скорости шитья
Регулятор контроля скорости
Вы можете ограничить максимальную скорость шитья
при помощи регулятора контроля скорости.
Ножная педаль
Скорость шитья регулируется ножной педалью.
Чем сильнее нажимать на педаль, тем быстрее
работает машина.
ПРИМЕЧАНИЯ:
Максимальная скорость машины ограничивается
регулятором, даже если педаль полностью нажата.
Не храните педаль в запыленных местах, следите,
чтобы в нее не попадала грязь и обрезки
материала. Ничего не кладите сверху на педаль.

Функциональные кнопки
1 Кнопка старт/стоп
Нажмите на эту кнопку для пуска и останова машины.
Пока эта кнопка нажата, машина будет строчить
медленно. Как только кнопка отпущена, машина
начнет работать с установленной скоростью, или
остановится.
ПРИМЕЧАНИЕ:
Если подсоединена педаль, кнопка старт/стоп не
работает.
2 Реверс
При выборе строчек 01, 05 или 10
машина будет делать обратную строчку, пока
удерживается кнопка реверса.
Если Вы нажмете на кнопку реверса при работе с
другими строчками, машина немедленно сделает
стежки закрепки и автоматически остановится.
Если при работе со строчками 01, 05 или 10
Вы нажмете кнопку реверса, а педаль при этом не
подключена, машина будет строчить в обратном
направлении, пока Вы не отпустите кнопку реверса.
3 Автоматическая закрепка
При выборе строчек 01, 05или 10
машина
немедленно прошьет несколько стежков закрепки и
автоматически остановится при нажатии на кнопку
закрепки.
При выборе других строчек и при нажатии на кнопку
закрепки машина будет выполнять закрепочные
стежки в конце прошитого образца и автоматически
останавливаться.
4 Кнопка подъема/опускания иглы
При нажатии на эту кнопку игла поднимается в
верхнее или опускается в нижнее положение.
При нажатии на кнопку машина остановит иглу либо в
верхнем, либо в нижнем положении в зависимости от
указаний.
0
he
0
he
0
he
r
e
w
q
6

Кнопка изменения ширины стежка При нажатии на эту кнопку на…
Страница 9
- Изображение
- Текст
5 Кнопка изменения ширины стежка
При нажатии на эту кнопку на дисплее появится
значение ширины стежка и в левом верхнем углу
загорится зеленая лампочка.
Для изменения ширины стежка воспользуйтесь
кнопками «+» или « ». Ширину стежка также можно
редактировать в процессе работы.
6 Кнопка изменения длины стежка
При нажатии на эту кнопку на дисплее появится
значение длины стежка и внизу слева загорится
зеленая лампочка.
Для изменения длины стежка воспользуйтесь
кнопками «+» или « ».
Длину стежка также можно редактировать в
процессе работы.
789!
0
Кнопки прямого выбора строчек
Есть четыре кнопки выбора строчек.
Нажмите на одну из кнопок и удерживайте ее, пока
на дисплее не появится цифра нужного образца.
7 Кнопкой 01 выбираются строчки с №01 до №15.
8 Кнопкой 16 выбираются строчки с №16 до №30.
9 Кнопкой 31 выбираются строчки с №31 до №45.
!
0
Кнопкой 46 выбираются строчки с №46 до №60.
ПРИМЕЧАНИЕ:
При выборе строчек не забудьте поднять иглу
в наивысшее положение.
y
u
t
i
o
!0
7

Отключение транспортера ткани Для пришивания пуговиц и други…
Страница 10
- Изображение
- Текст
Отключение транспортера ткани
Для пришивания пуговиц и других работ,
транспортер ткани должен быть отключен.
Чтобы отключить, передвиньте рычаг отключения
транспортера ткани вправо.
Чтобы включить, передвиньте рычаг влево. Когда
машина будет включена, транспортер поднимется.
1 Поднят
2 Опущен
3 Транспортер ткани (зубчатая рейка)
4 Маховое колесо
ПРИМЕЧАНИЕ:
При обычной работе транспортер ткани должен
быть подключен. Поверните на себя маховое
колесо и проверьте, поднялся ли транспортер
ткани после того, как рычаг был передвинут
вправо.
Смена прижимной лапки
ВНИМАНИЕ:
Перед сменой лапки ОТКЛЮЧИТЕ питание
машины. Используйте только рекомендованную
лапку для выбранной строчки. Из за неверной
лапки может сломаться игла. Не тяните рычаг
вниз, чтобы не сломать его.
Как отстегнуть лапку:
Поднимите иглу и лапку. Нажмите на рычаг позади
держателя прижимной лапки. Лапка отскочит.
1 Рычаг
Как пристегнуть лапку:
Расположите выбранную лапку так, чтобы
перекладина на лапке находилась прямо под
желобком держателя лапки. Опустите рычаг
подъема лапки вниз и пристегните лапку.
2
Желобок
3 Перекладина
Каждая лапка имеет буквенную маркировку.
4 Буква
Держатель лапки
ВНИМАНИЕ:
ОТКЛЮЧИТЕ питание машины перед установкой и
демонтажем держателя лапки.
Чтобы снять держатель лапки, отверните
установочный винт отверткой против часовой
стрелки. Снимите держатель лапки.
1 Установочный винт
2 Держатель лапки
Чтобы установить держатель лапки, сопоставьте
отверстия на держателе и прижимном стержне.
Установите винт. Затяните его по часовой стрелке.
3 Отверстие
4 Отверстие в стержне
r
e
w
q
w
q
8
r
e
w
q
r
e
w
q

Комментарии
Посмотреть инструкция для Janome 760 Jem Platinum бесплатно. Руководство относится к категории Швейные машины, 3 человек(а) дали ему среднюю оценку 7.7. Руководство доступно на следующих языках: английский. У вас есть вопрос о Janome 760 Jem Platinum или вам нужна помощь? Задайте свой вопрос здесь
Не можете найти ответ на свой вопрос в руководстве? Вы можете найти ответ на свой вопрос ниже, в разделе часто задаваемых вопросов о Janome 760 Jem Platinum.
Какой размер иглы лучше всего использовать?
Какой срок службы у швейной иглы?
Что может повредить иглу при шитье?
Инструкция Janome 760 Jem Platinum доступно в русский?
Не нашли свой вопрос? Задайте свой вопрос здесь
 Loading…
![]()
INSTRUCTION BOOK
Model JP760

IMPORTANT SAFETY INSTRUCTIONS
When using an electrical appliance, basic safety precautions should always be followed, including the followings:
Read all instructions before using this appliance.
DANGER— To reduce the risk of electric shock:
1.An appliance should never be left unattended when plugged in. Always unplug this sewing machine from the electric outlet immediately after using and before cleaning.
WARNING— To reduce the risk of burns, fire, electric shock, or injury to persons:
1.Do not allow children to play with the machine. The machine is not intended for use by children or infirmed persons without proper supervision.
Do not allow to be used as a toy. Close attention is necessary when this sewing machine is used by or near children.
2.Use this appliance only for its intended use as described in this owner’s manual.
Use only attachments recommended by the manufacturer as contained in this instruction book.
3.Never operate this sewing machine if it has a damaged cord or plug, if it is not working properly, if it has been dropped or damaged, or dropped into water.
Return this sewing machine to the nearest authorized dealer or service center for examination, repair, electrical or mechanical adjustment.
4.Never operate the appliance with any air opening blocked. Keep ventilation openings of this sewing machine and foot controller free from accumulation of lint, dust and loose cloth.
5.Never drop or insert any object into any opening.
6.Do not use outdoors.
7.Do not operate where aerosol (spray) products are being used or where oxygen is being administered.
8.To disconnect, turn all controls to the off (“O”) position, then remove plug from outlet.
9.Do not unplug by pulling on cord. To unplug, grasp the plug, not the cord.
10.Keep fingers away from all moving parts. Special care is required around the sewing machine needle.
11.Always use the proper needle plate. The wrong plate can cause the needle to break.
12.Do not use bent needles.
13.Do not pull or push fabric while stitching. It may deflect the needle causing it to break.
14.Switch this sewing machine off (“O”) when making any adjustment in the needle area, such as threading the needle, changing the needle, threading the bobbin or changing the presser foot, and the like.
15.Always unplug this sewing machine from the electrical outlet when removing covers, lubricating, or when making any other adjustments mentioned in this owner’s manual.
SAVE THESE INSTRUCTIONS
The design and specifications are subject to change without a prior notice.
|
KNOW YOUR MACHINE |
|
|
Name of Parts ………………………………………………….. |
2 |
|
Setting the Spool Pin…………………………………………. |
2 |
|
Standard Accessories ……………………………………….. |
3 |
|
Extention Table …………………………………………………. |
3 |
|
GETTING READY TO SEW |
|
|
Connecting the Power Supply ……………………………. |
4 |
|
Using the start/stop button …………………………………. |
4 |
|
Using the foot control ………………………………………… |
4 |
|
Controlling Sewing Speed …………………………………. |
5 |
|
Speed control slider ……………………………………… |
5 |
|
Foot control …………………………………………………. |
5 |
|
Function Buttons ………………………………………………. |
6 |
|
Start/stop button …………………………………………… |
6 |
|
Reverse button ……………………………………………. |
6 |
|
Auto-lock button …………………………………………… |
6 |
|
Up/down needle button …………………………………. |
6 |
|
Stitch width adjusting button ………………………….. |
7 |
|
Stitch length adjusting button ………………………… |
7 |
|
Direct pattern selection buttons ……………………… |
7 |
|
Dropping the Feed Dog …………………………………….. |
8 |
|
Changing the Presser Foot ………………………………… |
8 |
|
Detaching and Attaching the Foot Holder …………….. |
8 |
|
Raising and Lowering the Presser Foot ………………. |
9 |
|
Balancing Thread Tension …………………………………. |
9 |
|
Changing Needles ………………………………………….. |
10 |
|
Needle and Thread Chart…………………………………. |
10 |
|
Winding the Bobbin …………………………………………. |
11 |
|
Removing the bobbin ………………………………….. |
11 |
|
Setting the spool ………………………………………… |
11 |
|
Threading for bobbin winding ………………………. |
12 |
|
Additional spool pin ……………………………………. |
12 |
|
Inserting the bobbin ……………………………………. |
13 |
|
Threading the Machine ……………………………………. |
14 |
|
Needle Threader …………………………………………….. |
15 |
|
Drawing Up the Bobbin Thread ………………………… |
16 |
|
BASIC STITCHES |
|
|
Straight Stitch ………………………………………………… |
17 |
|
Changing sewing direction ………………………….. |
17 |
|
Securing a seam ………………………………………… |
17 |
|
Altering the stitch length ……………………………… |
18 |
|
Altering the needle drop position ………………….. |
18 |
|
Variety of Straight Stitches |
|
|
and Recommended Feet …………………………….. |
20 |
|
Zigzag Stitch ………………………………………………….. |
21 |
|
Altering the stitch width ……………………………….. |
21 |
|
Altering the stitch length ……………………………… |
21 |
|
UTILITY STITCHES |
|
|
Overcasting with Zigzag Stitch …………………………. |
22 |
|
Multiple Zigzag Stitch (Tricot Stitch) ………………….. |
22 |
|
Buttonholes ……………………………………………………. |
23 |
|
Variety of buttonholes …………………………………. |
23 |
|
Square buttonhole ……………………………………… |
23 |
|
Altering the buttonhole width ……………………….. |
26 |
|
Altering the buttonhole stitch density …………….. |
26 |
|
Double layer buttonhole ………………………………. |
26 |
|
Round end and keyhole buttonholes …………….. |
27 |
|
Altering the buttonhole width ………………………… |
27 |
|
Knit buttonhole …………………………………………… |
28 |
|
Corded buttonhole ……………………………………… |
29 |
|
Auto buttonhole ………………………………………….. |
30 |
|
Button Sewing ………………………………………………… |
31 |
|
Zipper Sewing ………………………………………………… |
32 |
|
Blind Hemming ……………………………………………….. |
34 |
|
Eyelet ……………………………………………………………. |
35 |
|
DECORATIVE SEWING |
|
|
Applique ………………………………………………………… |
36 |
|
Patchwork ……………………………………………………… |
36 |
|
Smocking ………………………………………………………. |
37 |
|
Scallop Stitch …………………………………………………. |
38 |
|
Decorative Satin Stitches…………………………………. |
38 |
|
Fagoting ………………………………………………………… |
39 |
|
Cross Stitch ……………………………………………………. |
39 |
|
Pattern Combination ……………………………………….. |
40 |
|
Correcting Distorted Stretch Patterns ………………… |
40 |
|
CARE AND MAINTENANCE |
|
|
Cleaning the Hook Race and Feed Dogs …………… |
41 |
|
Replacing the Bobbin Holder ……………………………. |
41 |
|
Problems and Warning Signals ………………………… |
42 |
|
Troubleshooting ……………………………………………… |
43 |
1

yt
u
i
o
!0
!1
!2
!3
!6
|
!4 |
!5 |
|
|
@4 |
||
|
@5 |
||
|
@6 |
||
|
@7 |
@8
@9
#0
#1
#2
#3
#4
q 
w
r
e
w
q
!9
!8
!7
#9
@37
@27
@1
@0
#8
#7
#6
#5
KNOW YOUR MACHINE
Name of Parts
q Direct pattern selection buttons w Indicator window
e Bobbin winder stopper r Bobbin winder spindle
t Spool pin (included in accessory bag) y Bobbin winding thread guide
u Thread guide
i Thread take-up lever o Tension regulating dial !0Face plate
!1Thread cutter !2Needle threader !3Needle plate
!4Extension table (accessory storage) !5Hook cover plate
!6Hook cover plate release button !7Speed control slider
!8Stitch width adjusting button !9Stitch length adjusting button @0Start/stop button @1Reverse button
@2Auto-lock button @3Up/down needle button @4Foot holder
@5Needle clamp screw @6Needle
@7Zigzag foot A @8Carrying handle
@9Hole for additional spool pin #0Hand wheel
#1Stitch balance adjusting dial #2Power switch
#3Machine socket #4Power inlet #5Drop-feed lever #6Free arm #7Buttonhole lever #8Presser foot lifter #9Reference chart
Setting the Spool Pin
Insert the spool pin into the hole as shown.
(The spool pin is in the accessory bag.) q Spool pin
w Setting hole
2

|
r |
t |
y |
|
|
u |
i |
o |
|
|
!0 |
!1 |
e
w
q
r
Standard Accessories
q Needles
w Bobbin
e Screwdriver r Seam ripper t Spool holder y Spool pin
u Additional spool pin i Felt
o Satin stitch foot
!0Automatic buttonhole foot
!1Instruction book
!2Power supply cord
!3Foot control
Extention Table
The extension table provides an extended sewing area and can be easily removed for free arm sewing.
The accessories can be stored in the table.
Detaching the table:
Pull the table away from the machine, as illustrated.
Attaching the table:
Push the extension table, inserting the tab into the slot until the table snaps into the machine.
q Extension table w Tab
e Slot
r Accessory storage
Free arm sewing
Free arm sewing is useful for darning socks or mending knees, elbows or areas of wear in children’s clothes.
3

|
w |
||
|
q |
||
|
r |
e |
y |
|
t |


 e q
e q
w
r
t
u
y
GETTING READY TO SEW
Connecting the Power Supply
NOTE:
Before connecting to the power supply, make sure the voltage shown on the machine conforms to your electrical power.
Using the start/stop button
Turn off the power switch.
Insert the machine plug into the power inlet. Insert the power supply plug into the wall outlet. Turn on the power switch.
q Start/stop button w Power switch e Machine plug r Power inlet
t Power supply plug y Wall outlet
Using the foot control
Turn off the power switch.
Insert the foot control plug into the machine socket. Insert the machine plug into the machine socket. Insert the power supply plug into the wall outlet. Turn on the power switch.
q Power switch
w Foot control plug e Machine socket r Machine plug
t Power inlet
y Power supply plug u Wall outlet
NOTE:
The start/stop button does not work when the foot control is connected.
When the power is turned on, the indicator window will show a test pattern then will indicate 01.
 WARNING:
While in operation, always keep your eyes on the sewing area, and do not touch any moving parts such as the thread take-up lever, handwheel or needle. Always turn off the power switch and unplug from the power supply:
—when leaving the machine unattended.
—when attaching or removing parts.
—when cleaning the machine.
Do not place anything on the foot control, otherwise the machine will run intermittently.
Operating Instructions:
The symbol «O» of a switch indicates the «off» position of a switch.
For appliances with a polarized plug (one blade wider than the other). To reduce the risk of electric shock, this plug is intended to fit in a polarized outlet only one way. If it does not fit fully in the outlet, reverse the plug. If it still does not fit, contact a qualified electrician to install the proper outlet. Do not modify the plug in any way.
4

Controlling Sewing Speed
Speed control slider
You can limit the maximum sewing speed with the speed control slider according to your sewing needs.
To increase sewing speed, slide it to the right.
To decrease sewing speed, slide it to the left.
Foot control
Pressing on the foot control can vary sewing speed. The harder you press the foot control, the faster the machine runs.
NOTES:
The machine runs at the maximum speed set by the speed control slider when the foot control is fully depressed.
Keep the foot control free from accumulation of lint, dust and loose cloth.
Do not place anything on the foot control.
Operating Instructions:
Foot controller Model 21249 is for use with sewing machine model JP760.
5

Function Buttons
|
q Start/stop button |
||||
|
Press this button to start or to stop the machine. |
||||
|
The machine will run slowly as long as this button is |
||||
|
pressed, and will start running at the speed set by the |
||||
|
speed control lever, or stop when the button is |
||||
|
released. |
||||
|
NOTE: |
||||
|
r |
The start/stop button does not work when the foot |
|||
|
control is connected. |
||||
|
e |
||||
|
w |
w Reverse button |
|||
|
q |
When sewing the stitch pattern #01, #05 or #10 |
|||
|
the machine will sew in reverse as long as the |
||||
|
reverse button is pressed. |
||||
|
If you press the reverse button when sewing any |
||||
|
other stitches, the machine will immediately sew |
||||
|
locking stitches and automatically stop. |
||||
|
If you press the reverse button when stitch pattern |
||||
|
#01, #05 or #10 |
has been selected and the |
foot control is not connected, the machine will start sewing in reverse as long as the button is pressed and the machine will stop when the button is released.
|
e Auto-lock button |
|
|
When stitch pattern #01, #05 or #10 |
has |
been selected, the machine will immediately sew locking stitches and automatically stop when the auto-lock button is pressed.
When sewing any other stitches, the machine will sew locking stitches at the end of the pattern being sewn and automatically stop.
r Up/down needle button
Press this button to bring the needle up or down. The machine will stop with the needle up or down depending on the needle position determined by this button.
6

t Stitch width adjusting button
When pressing this button,the stitch width of the selected pattern will be indicated and the green light on the top left will light up.
To alter the stitch width, press on the «+» or «–» sign. The stitch width can be altered while stitching
.
t
y Stitch length adjusting button
When pressing this button,the stitch length of the selected pattern will be indicated and the green light on the bottom left will light up.
To alter the stitch length, press on the «+» or «–» sign. The stitch length can be altered while stitching.
y
|
Direct pattern selection buttons |
|||||
|
There are 4 buttons for selecting stitch patterns. |
|||||
|
Press one of the buttons until the pattern number of |
|||||
|
the desired stitch pattern is indicated. |
|||||
|
u Button 01 will select the patterns #01 to #15. |
|||||
|
u |
i |
o |
!0 |
i Button 16 will select the patterns #16 to #30. |
|
|
o Button 31 will select the patterns #31 to #45. |
|||||
!0Button 46 will select the patterns #46 to #60.
7

|
Dropping the Feed Dog |
|||
|
The feed dog can be lowered with the drop-feed lever |
|||
|
w |
for sewing on buttons etc. |
||
|
e |
Shift the drop-feed lever to the right to lower the feed |
||
|
q |
dog. |
||
|
q |
Shift the lever to the left to raise the feed dog, it will |
||
return to the up position when the machine is started.
|
w |
q Up position |
|
|
w Down position |
||
|
e Feed dog |
||
|
r |
r Hand wheel |
|
|
NOTE: |
||
|
The feed dog should be in the up position for regular |
||
|
sewing. Turn the handwheel toward you to check if |
||
|
the feed dog comes up after setting the lever in the |
||
|
up position. |
||
|
Changing the Presser Foot |
||
|
CAUTION: |
||
|
Turn OFF the power switch before changing the foot. |
||
|
q |
Always use the proper foot for the selected pattern. |
|
|
The wrong foot can cause the needle to break. |
||
|
Do not push the lever down to prevent it from being |
||
|
broken. |
||
|
To snap off: |
||
|
Raise the needle and presser foot. |
||
|
Press the lever on the back of the foot holder and the |
||
|
foot will drop. |
||
|
w |
e |
q Lever |
|
r |
To snap on: |
|
|
Place the presser foot so the pin on the foot lies just |
||
|
under the groove of the foot holder. |
||
|
Lower the foot holder to lock the foot in place. |
||
|
w Groove |
||
|
e Pin |
||
|
Each foot is marked with a letter for identification. |
||
|
r Identification Letter |
||
|
Detaching and Attaching the Foot Holder |
||
|
q |
WARNING: |
|
|
Turn OFF the power switch before detaching or |
||
|
attaching the foot holder. |
||
|
w |
To detach: |
|
|
Raise the presser bar and turn the setscrew |
||
|
counterclockwise to remove the foot holder. |
||
|
q Setscrew |
||
|
w Foot holder |
||
|
To attach: |
||
|
Align the hole in the foot holder with the threaded |
||
|
hole in the presser bar and insert the setscrew |
||
|
r |
through the hole. |
|
|
e |
Tighten the setscrew by turning it clockwise. |
|
|
e Hole |
||
|
r Threaded hole |
8
![]()
|
Raising and Lowering the Presser Foot |
|||
|
The Presser foot lifter raises and lowers the presser |
|||
|
foot. |
|||
|
You can raise the presser foot about 6 mm (1/4″) |
|||
|
higher than the normal up position by exerting more |
|||
|
pressure when lifting the presser foot lifter. This |
|||
|
e |
allows for easy removal of the presser foot and helps |
||
|
you to place thick fabric under the foot. |
|||
|
q Presser foot lifter |
|||
|
w |
w |
w Normal up position |
|
|
e Extra lift |
|||
|
e |
q |
|
Balancing Thread Tension |
|||
|
q |
The thread tension should be adjusted depending on |
||
|
the sewing materials, layers of fabric and sewing |
|||
|
method. |
|||
|
To adjust the thread tension, turn the tension dial. |
|||
|
w |
q Tension regulating dial |
||
|
w Setting mark |
|||
|
Balanced tension: |
|||
|
The ideal straight stitch has threads locked between |
|||
|
t |
two layers of fabric. |
||
|
y |
For an ideal zigzag stitch, the bobbin thread does not |
||
|
show on the right side of the fabric, and the needle |
|||
|
e |
thread shows slightly on the wrong side of the fabric. |
||
|
e Needle thread |
|||
|
r Bobbin thread |
|||
|
t Right side of the fabric |
|||
|
y Wrong side of the fabric |
r
|
y |
||
|
t |
Needle thread tension is too tight: |
|
|
–if the bobbin thread appears on the right side of the |
||
|
fabric. |
||
|
Loosen the needle thread tension by moving the dial |
||
|
to a lower number. |
||
|
t |
y |
Needle thread tension is too loose: |
|
–if the needle thread appears on the wrong side of |
||
|
the fabric. |
||
|
Tighten the needle thread tension by moving the dial |
||
|
to a higher number. |
9

|
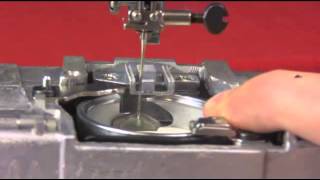
Changing Needles |
||
|
WARNING: |
||
|
Always make sure to turn the power switch off and |
||
|
disconnect the machine from power supply before |
||
|
q |
w |
changing the needle. |
|
Raise the needle by turning the handwheel and lower |
||
|
the presser foot. |
||
|
Turn off the power switch. |
||
|
e |
z Loosen the needle clamp screw by turning it |
|
|
counterclockwise. |
||
|
Remove the needle from the clamp. |
||
|
q Needle clamp screw |
x Insert a new needle into the needle clamp with the flat side of the needle to the rear.
When inserting the needle into the needle clamp, push it up against the stopper pin and tighten the needle clamp screw firmly.
w Stopper pin e Flat side
|
To check needle straightness, place the flat side of the |
||||||||||||
|
r |
needle onto something flat (a needle plate, glass etc.) |
|||||||||||
|
The gap between the needle and the flat surface |
||||||||||||
|
should be consistent. |
||||||||||||
|
Never use a blunt needle. |
||||||||||||
|
r Gap |
||||||||||||
|
Needle and Thread Chart |
||||||||||||
|
WEIGHT |
FABRIC |
TYPE of NEEDLE |
NEEDLE SIZE |
|||||||||
|
Very Light |
Chiffon, Georgette, Fine Lace, Organdy |
Universal |
9 (65) |
|||||||||
|
Net, Tulle |
Ball Point |
9 (65) |
||||||||||
|
Light |
Batiste, Voile, Lawn, Pure Silk, Crepe de Chine, |
Blue Tipped Needle |
11 (75) |
|||||||||
|
Sheer Crepe, Chambray, Handkerchief Linen, |
Universal |
11 (75) |
||||||||||
|
Gingham, Challis, Percale, Wool Crepe, Peau de |
12 |
(80) |
||||||||||
|
Soie, Taffeta, Satin, Silk Surah, Satin-backed |
||||||||||||
|
Crepe, Qiana |
||||||||||||
|
Single Knits, Jersey, Swimwear, and Tricot |
Blue Tipped Needle |
11 (75) |
||||||||||
|
Ball Point |
11 (75) |
|||||||||||
|
Leather, Suede |
Wedge Point |
11 (75) |
||||||||||
|
Leather Needle |
||||||||||||
|
Medium |
Flannel, Velour, Velvet, Muslin, Velveteen, |
Universal |
14 |
(90) |
||||||||
|
Poplin, Corduroy, Broadcloth, Linen, Chintz, |
||||||||||||
|
Gabardine, Felt, Terry, Burlap, Quilted Fabrics |
||||||||||||
|
Double Knits, (synthetic and natural) Stretch |
Ball Point |
14 |
(90) |
|||||||||
|
Velour, Stretch Terry, Sweater Knits |
||||||||||||
|
Leather, Vinyl, Suede |
Wedge Point |
14 |
(90) |
|||||||||
|
Leather Needle |
||||||||||||
|
Heavy |
Denim, Sailcloth, Ticking |
Denim Needle |
16 |
(100) |
||||||||
|
Double Faced Wool, Heavy Coating, Fake Fur, |
Universal |
16 |
(100) |
|||||||||
|
Drapery Fabrics |
||||||||||||
|
Leather, Suede |
Wedge Point |
16 |
(100) |
|||||||||
|
Leather Needle |
18 |
(110) |
||||||||||
|
Very Heavy |
Canvas, Duck, Upholstery Fabrics |
Universal |
16 |
(100) |
||||||||
|
Topstitching for Special Finishes |
Topstitching Needle |
14 |
(90) |
10

|
Winding the Bobbin |
|
|
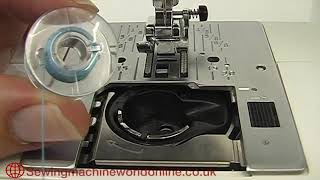
Removing the bobbin |
|
|
q |
Push the hook cover plate release button to the |
|
right and remove the cover plate. |
|
|
q Hook cover plate release button |
|
|
w Hook cover plate |
w
Lift out the bobbin. e Bobbin
e
|
Setting the spool |
||
|
Place a spool of thread on the spool pin with the |
||
|
w |
thread coming off the spool as illustrated. |
|
|
q Spool of thread |
||
|
q |
||
|
w Spool pin |
||
|
Press the spool holder firmly against the spool of |
||
|
thread. |
||
|
e Spool holder |
e
11

Threading for bobbin winding
Set the speed control lever at 
 .
.
|
z q |
z Hold the thread with both hands and pass the thread |
|
under the thread guide. |
|
|
q Thread guide |
w
x Draw the thread toward you and guide the thread x  around the bobbin winding thread guide.
w Bobbin winding thread guide
|
c |
c Pass the thread through the hole in the bobbin |
|
from the inside to the outside. Put the bobbin on |
|
|
the bobbin winder spindle. |
|
v |
v Push the bobbin winder spindle to the right. |
||
|
The indicator will show |
. |
||
|
b |
b Hold the free end of the thread in your hand and |
||
|
start the machine. |
|||
|
Stop the machine when the bobbin has been |
|||
|
wound a few layers, and cut the thread close to |
|||
|
the bobbin. |
|||
|
n |
n Start the machine again. When the bobbin |
||
|
is fully wound, it will stop automatically. |
|||
|
Stop the machine and return the bobbin |
|||
|
winder spindle to its original position by moving it |
|||
|
to the left, and cut the thread with a pair of |
|||
|
scissors. Remove the bobbin from the bobbin |
|||
|
winder spindle. |
|||
|
NOTE: |
|||
|
The machine will not sew until the spindle has been |
|||
|
returned to the left. |
|||
|
Additional spool pin |
|||
|
The additional spool pin is for bobbin winding without |
|||
|
unthreading the machine. |
|||
|
w |
Insert the additional spool pin into the hole. |
||
|
Place the felt and a spool on the pin. |
|||
|
q |
|||
|
q Additional spool pin |
|||
|
e |
|||
|
w Spool pin felt |
e Spool pin hole
12
California Proposition 65
WARNING
This product contains chemicals known to the State of California to cause cancer and birth defects or other reproductive harm.
Attention California residents: California�s Proposition 65 entitles California consumers to special warnings for products that contain chemicals known to the State of California to cause cancer and birth defects or other reproductive harm if those products expose consumers to such chemicals above certain threshold levels. We know you�re concerned about product safety, and Target takes all necessary steps to comply with all applicable safety and health requirements.
On SewingMachinesPlus.com, we provide a Prop 65 link for each item that requires the Prop 65 warning. If a Prop 65 link does not appear in the product info section for the product you wish to purchase, the supplier of the product has indicated that it does not require the Prop 65 warning.
Смотреть руководство для Janome 760 Jem Platinum ниже. Все руководства на ManualsCat.com могут просматриваться абсолютно бесплатно. Нажав кнопку «Выбор языка» вы можете изменить язык руководства, которое хотите просмотреть.

MANUALSCAT | RU
Вопросы и ответы
У вас есть вопрос о Janome 760 Jem Platinum, но вы не можете найти ответ в пользовательском руководстве? Возможно, пользователи ManualsCat.com смогут помочь вам и ответят на ваш вопрос. Заполните форму ниже — и ваш вопрос будет отображаться под руководством для Janome 760 Jem Platinum. Пожалуйста, убедитесь, что вы опишите свои трудности с Janome 760 Jem Platinum как можно более детально. Чем более детальным является ваш вопрос, тем более высоки шансы, что другой пользователь быстро ответит на него. Вам будет автоматически отправлено электронное письмо, чтобы проинформировать вас, когда кто-то из пользователей ответит на ваш вопрос.
Задать вопрос о Janome 760 Jem Platinum
- Бренд:
- Janome
- Продукт:
- Швейные машины
- Модель/название:
- 760 Jem Platinum
- Тип файла:
- Доступные языки:
- английский