Цена вопроса: 0 ₽
Пробег: 0 км
Войдите или зарегистрируйтесь, чтобы писать комментарии, задавать вопросы и участвовать в обсуждении.
Мультимедийное руководство по техническому обслуживанию и ремонту автомобилей Peugeot 307 и Peugeot 607.
- Автор: —
- Издательство: —
- Год издания: —
- Страниц: —
- Формат: —
- Размер: 164,7 Mb
Руководство по эксплуатации и ремонту автомобиля Peugeot 607 с 1999 года выпуска с бензиновыми и дизельными двигателями.
- Автор: —
- Издательство: Гуси-Лебеди
- Год издания: 2009
- Страниц: 493
- Формат: DjVu
- Размер: 113,1 Mb
Инструкция по эксплуатации автомобиля Peugeot 607.
- Автор: —
- Издательство: Peugeot
- Год издания: —
- Страниц: 166
- Формат: PDF
- Размер: 2,7 Mb

- Manuals
- Brands
- PEUGEOT Manuals
- Automobile
- 607
- Manual
-
Contents
-
Table of Contents
-
Bookmarks
Quick Links
2
YOUR
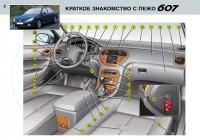
AT A GLANCE
15-07-2002
Related Manuals for PEUGEOT 607
Summary of Contents for PEUGEOT 607
-
Page 1
YOUR AT A GLANCE 15-07-2002… -
Page 2
11 — Passenger air bag. — Front lighter. 12 — Glove compartment. 23 — Gear lever. 13 — Side adjustable 24 — RM2 audio system or RT2 heating/ventilation vents and audio/telephone system with air flow regulation. PEUGEOT call button. 15-07-2002… -
Page 3: The Remote Control Key
‘zero’ of the 607 a risk that you could render it badge. inoperative. It would then be nec- THE REMOTE CONTROL essary to reprogramme it.
-
Page 4: Starting
OK indicator light does not come trol, disarming of passenger air on. Do not start your vehicle. bag, etc.). Contact a PEUGEOT dealer. The corresponding warning lights are Afterwards, if the passenger airbag displayed in succession on the instru- Starting a diesel engine is disarmed, the corresponding ment panel screen.
-
Page 5: Steering Wheel Stalks
YOUR AT A GLANCE Front and rear fog lamps (ring B) STEERING WHEEL Front fog lamps. STALKS LIGHTS Neutral position of the Front and rear lights (ring A) ring. Lights off. Windsreen wipers Rear fog lamps. 3 Rapid wipe 2 Normal wipe Side lights.
-
Page 6: Electric Windows/Rear View Mirrors
YOUR AT A GLANCE ELECTRIC WINDOWS 1 — Driver’s electric window. 2 — Passenger’s electric window. 3 — Rear right electric window. 4 — Rear left electric window. STEERING WHEEL 5 — Disarming the rear window controls. HEIGHT AND DEPTH Manual mode: ADJUSTMENT Press or pull the switch lightly.
-
Page 7: Manual/Electric Front Seats
YOUR AT A GLANCE THE SEATS Manual front seats 1 — Forwards-backwards adjustment. 2 — Seat angle adjustment*. 3 — Seat height adjustment*. 4 — Seat back angle adjustment. 5 — Lumbar adjustment*. 6 — Head restraint height and tilt adjust- ment (press the tab to slide it down).
-
Page 8: Rear Parking Assistance
REAR PARKING sage ‘Tyre(s) pressure are not being detected. low’, have the tyre pressure ASSISTANCE Contact a PEUGEOT dealer to checked as soon as possible. This system, installed in the rear replace the faulty sensor(s). bumper, detects any obstacle (per- son, vehicle, tree, gate, kerb…)
-
Page 9
YOUR AT A GLANCE AUTOMATIC GEARBOX Moving Off ‘PORSCHE TIPTRONIC system’ With the engine running, to move off from position P: it is essential to press the brake pedal to exit position P, The four speed automatic gearbox offers a choice between the comfort of integral automatic operation, enhanced by a sport programme and select function R, D or M, then a snow programme, or the pleasure of manual gear changing. -
Page 10
CRUISE CONTROL the message ‘Air bag faulty’, contact Cruise control enables the vehi- PEUGEOT dealer to have the cle to maintain a steady speed FRONT AIR BAGS system checked. programmed by the driver, with- accelerator… -
Page 11
YOUR AT A GLANCE No. Symbol Function Air conditioning on/off. AUTOMATIC AIR CONDITIONING Front visibility programme. Air intake control. Rear screen demisting. Switching off. Passenger setting Passenger comfort programme. Passenger air distribution setting. Air flow adjustment. Driver Do not cover the sunshine / brightness sensor located air distribution in the centre of the fascia. -
Page 12
YOUR AT A GLANCE RM2 AUDIO SYSTEM RT2 AUDIO/TELEPHONE SYSTEM 15-07-2002… -
Page 13
YOUR AT A GLANCE FUEL FILLER FLAP Opening / Closing: Locking and unlocking of the fuel filler flap, the doors and boot is simultane- ous (except when selective unlocking is initialised; in this case press the unlocking button of the remote control once). -
Page 14
PEUGEOT SERVICING The maintenance cycle of your 607 is based on level A (including the replacement of the engine oil, the oil filter and a set of checks) and level C services [service level A + workshop operations carried out every 40,000 miles (60 000 km)] in accordance with the tables on the following pages. -
Page 15
It is to be carried out between two services. A Peugeot professional will carry out a quick check and will top up the levels if necessary (oil, coolant, screen wash up to 2 litres). -
Page 16
PEUGEOT SERVICING SERVICE INDICATOR A few seconds after the ignition is The service is overdue. switched on, the total distance Each time the ignition is switched on Located on the instrument panel with recorder resumes normal operation and for a few seconds, the symbol… -
Page 17
(60 000km) or every two years. Switch off the ignition, • The pollen filter must be checked at each service by a PEUGEOT dealer Press and hold the trip recorder re- (services and intermediate visits) or more often, depending on the environ- set button, ment (dust, pollution, etc.). -
Page 18
This cycle consists of alternating 2 types of service A and C, intermediate visits and a few additional operations specific to your vehicle; these correspond to key stages in the life of your 607. At your first and each subsequent service, your dealer will advise you of the type and content of the next service due. -
Page 19
PEUGEOT SERVICING MAINTENANCE CYCLE FOR YOUR 607 TURBO DIESEL HDI Turbo diesel HDI: service every 2 years or 12,000 miles (20 000 km) maximum (unless the service indicator shows it is required before this). MILES (KM) 36,000 (60 000) 1st service at 6,000 miles (10 000 km) or 6 months*. -
Page 20
– countries whose lubricants or fuels do not conform to our recommendations. Recommendations: – replace the air filter every 24,000 miles (40 000 km) for petrol engines and every 27,000 miles (45 000 km) for diesel engines, – to replace the timing belt: contact a PEUGEOT dealer. 15-07-2002… -
Page 21
— Condition and pressure of tyres (including spare wheel). — Emission control check according to current legislation (petrol). — Smoke opacity (diesel). — Pollen filter (according to specification). — Visual check of the whole vehicle by a Peugeot technician. SERVICE — Courtesy vehicle ROAD TEST… -
Page 22
TRADE NAMES OF APPROVED AND RECOMMENDED LUBRICANTS IN EUROPE (1) P E T R O L D I E S E L D I E S E L P E T R O L (1) Minimum grade: Petrol engines: ACEA A3 and API SH/SJ; diesel engines: ACEA B3 and API CF/CD ACEA = Association de Constructeurs Européens Automobiles (Association of European Automobile Manufacturers) API = American Petroleum Institute If oil is used which does not conform to ACEA A3-B3 standard, this requires the ‘Arduous conditions’ servicing schedule to be followed, which involves shorter intervals between services. -
Page 23
ESSO GEAR OIL BV TOTAL TRANSMISSION BV gearbox 75W 80 Part no. 9736.41 75W 80 Do not hesitate to ask for advice from a PEUGEOT dealer to maintain Automatic ONLY driving pleasure and to minimise the gearbox ATF 4HP20-AL4 maintenance cost of your vehicle. -
Page 24
INSTRUMENTS AND CONTROLS 17 — Warning/status screen. 18 — Illumination button +. 19 — Illumination button -. 20 — Engine oil level indicator. -Engine oil temperature indicator. INSTRUMENT PANEL DIALS: PETROL 1 — Handbrake indicator light. 9 — Front fog lamps indicator light. 10 — ABS anti-lock braking system 2 — Main beam headlamps indicator warning light. -
Page 25
INSTRUMENTS AND CONTROLS 17 — Warning/status screen. 18 — Illumination button +. 19 — Illumination button -. 20 — Engine oil level indicator. -Engine oil temperature indicator. INSTRUMENT PANEL DIALS: DIESEL 1 — Handbrake indicator light. 9 -Front fog lamps indicator light. 10 — ABS anti-lock braking system 2 — Main beam headlamps warning light. -
Page 26
OK indicator light. You can start your vehicle; however, contact a PEUGEOT dealer as soon as possible. If a ‘major’ malfunction has been detected: the corresponding warning light comes on. Certain indicator lights showing the status of vehicle functions may also come on. -
Page 27: List Of Warning Symbols
If there is a lack of oil in the lubrication circuit, top up the level. If a warning or a change of status occurs during the CHECK mode, the Contact a PEUGEOT dealer as soon as possible. corresponding indicator lights will be Coolant temperature warning light displayed at the end of this mode.
-
Page 28
Display of this warning light, accompanied by an audible signal and the message ‘Braking system faulty’ on the multi-func- tion display indicates a malfunction of the brake force distribution system. Stop immediately in both cases. Contact a PEUGEOT dealer. Dynamic stability control (ESP/ASR) warning light Display of this warning light, accompanied by an audible signal and the message ‘ESP/ASR system faulty’ on the multi-function display indicates a system malfunction. -
Page 29
In the event of breakdown and to prevent the risk of scalding, unscrew the cap by two turns to allow the pressure to drop. When the pressure has dropped, remove the cap and top up the level. Contact a PEUGEOT dealer. Seat belt not fastened warning light Display of this warning light is accompanied by an audible signal and the message ‘Seat belt not fastened’ on the multi-function display. -
Page 30
Display of this warning light is accompanied by an audible signal and the message ‘Brake pads worn’ on the multi- function display. For your safety, have the pads replaced by a PEUGEOT dealer as soon as the warning light comes on. Low fuel level warning light Display of this warning light is accompanied by an audible signal and the message ‘Fuel level low’ on the multi- function display. -
Page 31
(60 km/h) or more for at least five minutes (until the warning light goes out). If the light remains on, contact a PEUGEOT dealer. Note: After prolonged operation of the vehicle at a very low speed or at idle, you may sometimes notice steam coming from the exhaust during acceleration. -
Page 32
If the warning light remains on, or comes on at over 8 mph (12 km/h), this indicates a malfunction of the ABS. However, the vehicle retains conventional servo-assisted braking. Contact a PEUGEOT dealer. Automatic headlamp adjustment warning light Display of this warning light is accompanied by an audible signal and the message ‘Automatic adjustment of headlamps faulty’ on the multi-function display. -
Page 33: List Of Status Indicator Lights
Display of this light is accompanied by an audible signal and the message ‘Passenger air bag disarmed’ on the multi-function display. If the passenger air bag is disarmed, the indicator light comes on when the ignition is switched on (2nd notch). In all cases, if the indicator light flashes, contact a PEUGEOT dealer. *According to country 15-07-2002…
-
Page 34
INSTRUMENTS AND CONTROLS Automatic headlamps disarming indicator light Display of this light is accompanied by an audible signal. The light comes on when the function is disarmed. Automatic headlamps indicator light Display of this light is accompanied by an audible signal. The indicator light comes on when the function is activated. -
Page 35
INSTRUMENTS AND CONTROLS Automatic gearbox selector lever position indicator lights ‘Park’ indicator lights ‘Reverse’ indicator lights ‘Neutral’ indicator lights ‘Drive’ indicator lights Note: the letter S and the symbol linked to the above indicator lights correspond respectively to the Sport and Snow oper- ating programmes. -
Page 36
When the needle is in zone D, the oil remove the cap and top up the level. level is incorrect. Total distance recorder function Contact a PEUGEOT dealer. There is a risk of damage to the The total distance is displayed on the engine. -
Page 37
By day, the setting cannot be altered. At night, the brightness can be increased by means of button B. A PEUGEOT dealer is able to cancel automatic operation if you prefer manual operation. Manual operation… -
Page 38
YOUR 607 IN DETAIL THE MULTI-FUNCTION The control pad DISPLAY This enables the functions, controls and parameters displayed to be selected General and validated. It is located next to the display. The multifunction, monochrome C or Dial; This has two functions:… -
Page 39
YOUR 607 IN DETAIL Monochrome screen C The colour screen Setting the parameters From ‘general menu’, ‘Display configuration’ menu allows you to access the following parameters: – setting the video brightness and display, – setting the date and time, General menu –… -
Page 40
YOUR 607 IN DETAIL General information Setting the parameters Language To modify a parameter, press the dial or Select the required language, then The ‘General information’ function the mode button. displays an information summary on confirm and record the modification. -
Page 41
YOUR 607 IN DETAIL Carry out this operation with the engine running to prevent activa- tion of the vehicle’s energy economy mode and therefore cutting off of the electrical supplies during loading of the data. Changing the colours Changing the brightness… -
Page 42
YOUR 607 IN DETAIL Changing the brightness Select the ‘Day’ function, then con- firm: Select the ‘Brightness’ function, then confirm: – turn the dial clockwise to scroll for- wards through the days, or turn it – turn the dial clockwise to increase, anti-clockwise to scroll backwards –… -
Page 43
YOUR 607 IN DETAIL Videos Video sockets may be used what- ever the position of the key. It is impossible to use the video when driving above 20 mph (30 km/h). You have three cinch (RCA) points, located in the glove box, for connect- ing a camcorder, a DVD drive, etc.:… -
Page 44
YOUR 607 IN DETAIL AUDIO RM2 Stalk movement Function 1 — Upwards Increase volume 2 — Downwards Decrease volume 3 — Forwards Automatic search of higher frequencies (radio) Press for more than 2 seconds, repeat until button is released: manual search of… -
Page 45
YOUR 607 IN DETAIL Button Function ON/VOL Radio on/off Adjustment of volume. Selection of the radio . Selection of FM1, FM2, FMast and AM wavebands. Press for more than 2 seconds: automatic storing of stations in the memory (autostore). Selection of cassette. Reversal of the direction of play. -
Page 46
YOUR 607 IN DETAIL AUDIO/TELEPHONE RT2 Stalk movement Function 1 — Upwards Increase volume 2 — Downwards Decrease volume 3 — Forwards Automatic search of higher frequencies (radio) Press for more than 2 seconds, repeat until button is released: manual search of… -
Page 47
Press for more than 2 seconds: forwards accelerated play (CD). Selection of following page (Tel.) — Press for more than 2 seconds: selection of last page (Tel.) HELP ‘PEUGEOT’ direct line (if option and service are available). Replace handset. Return to previous menu. Cancel. Refuse call. -
Page 48
YOUR 607 IN DETAIL GENERAL FUNCTIONS On/off With the ignition key in the accessories position (1st notch) or with the ignition on (2nd notch), press button A to switch the set on or off. The set can operate for 30 minutes without the vehicle ignition being switched on. -
Page 49
YOUR 607 IN DETAIL Adjusting the bass When ‘BASS’ is displayed, press button F or H to vary the setting: – ‘BASS -9’ for a minimum bass setting, – ‘BASS 0’ for a normal setting, – ‘BASS +9’ for a maximum bass setting. -
Page 50
YOUR 607 IN DETAIL Adjusting the left/right sound distribution (Balance) When ‘BAL’ is displayed, press button F or H to vary the setting. Button F increases the volume on the right-hand side. Button H increases the volume on the left-hand side. -
Page 51
YOUR 607 IN DETAIL If the TA traffic programme is selected, only stations broadcasting this type of programme are selected. Searching for a station occurs first in ‘LO’ sensitivity (selection of the most powerful transmitters) during scanning of the waveband, then in ‘DX’ sensitivity (selection of the weakest and most distant transmitters). -
Page 52
YOUR 607 IN DETAIL Automatic storing of FM stations in the memory (autostore) Press button B for more than two seconds, to automatically store the 6 stations with the strongest signal in FM. These stations are stored in the FMast waveband. -
Page 53
YOUR 607 IN DETAIL Traffic information programme RM2 audio: press the ‘TA’ button to switch the function on or off. RT2 audio: press the ‘# k k TA’ button to switch the function on or off. The display will show: –… -
Page 54
YOUR 607 IN DETAIL PTY function This allows you to listen to stations broadcasting a specific type of programme (news, culture, sport, rock etc.) RM2 audio: with FM selected, press the ‘TA’ button to switch the function on or off. -
Page 55
YOUR 607 IN DETAIL CASSETTE: Audio RM2 Selecting cassette mode When a cassette is inserted, the cassette player will start automatically. If a cassette is already inserted, press button C. Ejecting the cassette Press button E to eject the cassette from the drive. -
Page 56
YOUR 607 IN DETAIL CD CHANGER: Audio RM2 and RT2 Selecting CD changer mode. Press button D. Selecting a disc Press one of the buttons ‘1’ to ‘6’ to select the corresponding disc. Selecting a track Press button M to select the next track. -
Page 57
YOUR 607 IN DETAIL CD CHANGER: Audio RM2 and RT2 This is located inside the boot, in the storage compartment on the left hand side. It holds up to 6 discs. To insert a disc into the changer: – open the storage compartment panel, –… -
Page 58
YOUR 607 IN DETAIL TELEPHONE: Audio/Telephone RT2 This function is a GSM 900 MHZ telephone incorporated in the audio system. It possesses a ‘hands free’ function, provided by a microphone located in the front courtesy light and a steering column remote control which allows access to most of the functions. -
Page 59
YOUR 607 IN DETAIL Selecting telephone mode / Entering a number / Switching off the microphone To change to telephone mode, press the ‘TEL’ button or for more than 2 seconds on the steering column remote control. Insert your SIM card fully into the slot at the front (use only the new generation 3V SIM card with bank card format). -
Page 60
To call PEUGEOT’s Customer Contact Centre and access the services available: – press button O then confirm by pressing O again or the ‘OK’ button, – or, press button O to display the «Services» menu, select the »Peugeot Service»* function then confirm (see paragraph on »Services»). -
Page 61
– »Technical assistance»* for contacting the call centre controlling the PEUGEOT breakdown service, – »Peugeot Service»* to contact directly the PEUGEOT customer contact centre and access the services offered. IMPORTANT: as is the case for all telephones, your on-board telephone operates using cellular and terrestrial networks. -
Page 62
YOUR 607 IN DETAIL Storing numbers in the telephone directory (SIM) In the ‘PHONEBOOK’ menu, validate the ‘New Entry’ function with the ‘OK’ button. Using the alphanumerical keypad input the name, telephone number and address (the memory number) or keep the one suggested. -
Page 63
YOUR 607 IN DETAIL Sending a mini message Note: Before typing your first message, check that your SMS service centre number is correctly stored in the sub-menu ‘SMS parameters’. If it is not correctly stored, any message you have typed before inputting this number will be deleted and not sent. -
Page 64
YOUR 607 IN DETAIL ‘CALL SETTINGS’ Network search: if the automatic mode is active, your telephone will automatically select the cellular network available which is compatible with your SIM card. In manual mode, you must choose from the list of networks the one which matches the operator who supplied you with your SIM card. -
Page 65
YOUR 607 IN DETAIL USING THE ALPHANUMERIC KEYPAD To go from inputting in upper case to inputting in lower case, press and hold one of the keypad buttons numbered 0 to 9. Buttons H and F of the keypad allow you to move the cursor to the left or right respectively, when you are inputting. -
Page 66: Audio System
(RM2 and RT2) Presentation Your 607 is fitted with a JBL Audio Hi-Fi system, designed specifically for the vehicle’s passenger compartment. At the heart of the system, a 240 Watt multi-function amplifier (1), located in the boot, independently controls 12 high–definition acoustic speakers.
-
Page 67
YOUR 607 IN DETAIL SATELLITE NAVIGATION The control pad SYSTEM This lets you select and confirm the functions, controls and programmes dis- played. It is located by the side of the screen. Dial; this has two functions: Introduction – Rotation of the dial:… -
Page 68
YOUR 607 IN DETAIL The CD-ROM drive The last voice message and route change recall control A brief press on the button on the end of the lights stalk repeats the last voice infor- mation and if necessary pro- vides more detailed voice and graphic information on the route ahead. -
Page 69
YOUR 607 IN DETAIL Satellite navigation system with monochrome screen C General remarks regarding the display When using menus, the functions which appear at the bot- During guidance, the screen displays various information, tom of the screen are presented in various ways: depending on the manoeuvres to be carried out: 1 –… -
Page 70
YOUR 607 IN DETAIL Main menu The ‘Navigation/Guidance’ menu offers various possibili- ties for activating guidance: – by inputting the address of a new destination, Switch on the ignition. – by selecting a service (hotel, station, airport…) available Press the ‘Menu’ button to access the ‘Main menu’. -
Page 71
YOUR 607 IN DETAIL Inputting a new destination Input the name of the street. Select the ‘Validate’ func- tion, then press the dial. The last town input is displayed. Note: guidance can be activated as soon as the town is input, without the street name or number. -
Page 72
YOUR 607 IN DETAIL The complete destination is displayed. Select the ‘Vali- Select a criterion from the list offered, then confirm (press date’ function then press the dial. the dial). When the criterion of your choice is selected, select the ‘Validate’ function, then press the dial. -
Page 73
YOUR 607 IN DETAIL Selecting a service The address of the service required is displayed. Information on the right-hand side of the screen (e.g. 1/50) The last destination address input is displayed. indicates whether there are several establishments (50 There are 3 ways of defining the location in which you wish… -
Page 74
YOUR 607 IN DETAIL Storing an address in a directory. Selecting a destination stored in the memory When a new address is input, you can store it in the mem- ory by selecting the ‘Archive’ function. Using the dial, select the directory in which the address you are looking for is stored, then press the dial. -
Page 75
YOUR 607 IN DETAIL Navigation options Guidance tools From the main menu, ‘Navigation options’ gives you Access to the ‘Guidance tools’ menu is by pressing the access to the following programmes: dial at any time during guidance. – management of the directories. This allows details of a… -
Page 76
YOUR 607 IN DETAIL Satellite navigation system – compare the «System» versions with colour screen installed (Multi-function display-D or Navigation-D) with those of the CD-Rom in the drive; if a software Updating the software version of the CD-ROM (or both) is… -
Page 77
YOUR 607 IN DETAIL Main menu Navigation / guidance The »Navigation/Guidance» con- – Switch on the ignition, text menu offers the following possi- – Place the mapping CD-ROM in the bilties: drive (if absent), – selecting a destination, – Press the ‘Menu’ button to access the Main menu, –… -
Page 78
YOUR 607 IN DETAIL Selecting a destination Inputting an address Access a list by the selecting the The last guidance address input is The menu »Selecting a destina- «List» function when inputting the displayed. tion» offers various ways for reach- town or road. -
Page 79
YOUR 607 IN DETAIL Selecting a service GPS details The details of your current location (longitude and latitude To select a service: shown in degrees, minutes and seconds). You can store • select the location. The last destination appears; you can them to activate guidance to this location later. -
Page 80
YOUR 607 IN DETAIL Centering the vehicle This function permits activation of the automatic map movement mode. The map moves over the screen, follow- ing the direction of the vehicle. Depending on the pro- gramming, the top of the screen represents either the North or the direction followed by the vehicle. -
Page 81
YOUR 607 IN DETAIL Map configuration Details of the route This function offers various possibilities to optimise and At all times during guidance, the sub-menu ‘Details of the enhance the display of the route: route’ gives you access to the following functions: –… -
Page 82
YOUR 607 IN DETAIL Guidance options Voice synthesis adjustment The sub-menu ‘Guidance options’ offers various possibil- ities for improving guidance: – calculation criteria, – voice synthesis adjustment, – managing the directories, – clearing the directories. Calculation criteria Select the criteria which interest you from the proposed list, then confirm. -
Page 83
YOUR 607 IN DETAIL Managing the directories Stopping/resuming guidance – Stopping guidance This allows a stored address to be renamed or deleted, by During guidance, select this function, then confirm. selecting the directory then the details to be modified. The guidance will then be interrupted. -
Page 84
YOUR 607 IN DETAIL 15-07-2002… -
Page 85
YOUR 607 IN DETAIL VENTILATION 1 — Windscreen de-icing or demisting vents 2 — Front window de-icing or demisting vents 3 — Side vents 4 — Centre vents 5 — Air outlet to the front passengers’ feet 6 — Air outlet to the rear passengers’ feet… -
Page 86
YOUR 607 IN DETAIL AUTOMATIC AIR CONDITIONING 1 — Driver’s side adjustment Located on the centre console, the control panel is between the multi-function display and the audio system. 2 — Passenger’s side adjustment The required value is displayed (from 15 to 30: comfort value = 22). -
Page 87
YOUR 607 IN DETAIL 5 — Visibility Manual adjustment Note: when programme 5 (following programme page) is being used, button 7 does You may, if you wish, make a differ- not operate; it causes temporary ent selection from the one offered by… -
Page 88
YOUR 607 IN DETAIL 9 — Switching off 11 — Air intake/ 12 — Demisting the system Recirculation rear screen Press ‘OFF’ Press this button to Press this button, button. recirculate the inte- with engine rior air. running, to demist… -
Page 89
YOUR 607 IN DETAIL THE SEATS Manual front seats 1 — Forwards-backwards adjustment Lift the lever and slide the seat forwards or backwards. 2 — Seat cushion angle adjustment* Raise the catch while pressing on or easing off the seat back to obtain the required height. -
Page 90
YOUR 607 IN DETAIL Electric front seats A — Forwards-backwards adjustment Push the control forwards or backwards to slide the seat. B — Seat cushion angle adjustment Tilt the front of the control upwards or downwards to obtain the required angle. -
Page 91
YOUR 607 IN DETAIL Memorising using the buttons To memorise: Place the ignition key in the ‘run- ning’ position (2nd notch), Adjust your seat and mirrors, Press button M, then button 1 (first driving position) or button 2 (second driving position) within four seconds. -
Page 92
YOUR 607 IN DETAIL Front armrest To fold down the seat back REAR SEATS The unlocking controls are located in To obtain a resting or driving posi- Rear seat the boot. tion: The seat back in the rear is folded… -
Page 93
YOUR 607 IN DETAIL The special child seat approved by »Isofix» mountings* Ski flap PEUGEOT is the KIDDY Isofix seat. Available on the one third side of the It can be used in the rearwards fac- Lower the armrest to access the… -
Page 94
YOUR 607 IN DETAIL CHILD SEATS Although one of PEUGEOT’s main concerns when designing your vehicle, the safety of your children also depends on you. For maximum safety, please follow these precautions: – All children under the age of 10* must travel in a special approved child seat*, adapted to their weight, in a seat fitted with a seat belt. -
Page 95
YOUR 607 IN DETAIL From 3 to 10 years (15 to 36 kg) Never leave a child or an »Recaro start»: installed in the rear with a three–point seat belt. animal in a vehicle which is exposed to the sun and The height and width of the seat back must be adjusted according to the has the windows closed. -
Page 96
YOUR 607 IN DETAIL In accordance with European regulations (Directive 2000/3), the table below indicates to what extent each seat in your vehicle may be fitted with a child seat: Weight range Seat < 13 kg 9 — 18 kg… -
Page 97
YOUR 607 IN DETAIL Front seat belts with To be effective, a seat pre-tensioner and force limiter belt must be tightened as Safety in the event of a frontal impact close to the body as pos- has been improved by the introduc- sible. -
Page 98
Note: the function that controls fold- approximately two seconds). ing back of the exterior mirrors can Opening the boot with the be disarmed by a PEUGEOT dealer. remote control key Press and hold button C. Note: this also unlocks the doors or… -
Page 99
(2nd notch). work carried out by a PEUGEOT display, accompanied by an audible WARNING: your vehicle is no longer dealer on the system. This code is… -
Page 100
When buying a second-hand car: – Ensure that you are given the confidential card; – Have the key codes memorised by a PEUGEOT dealer, to ensure that the keys in your possession are the only ones which can start your vehicle. -
Page 101
Set the alarm within five minutes of getting out of the vehicle, by Note: if the alarm has been triggered Contact a PEUGEOT dealer to have locking or deadlocking using the while you were away from your car, the system checked. -
Page 102
YOUR 607 IN DETAIL DOORS Locking / unlocking from the inside – Using button A of the centre con- sole : Opening the doors This allows the doors, the boot and the fuel filler flap to be locked or from outside Child safety unlocked. -
Page 103
YOUR 607 IN DETAIL THE BOOT Vehicle unlocked SUNROOF Control the sunroof: Press and hold button C of the Opening the boot – manually: lightly press the switch; remote control key or press push- the roof stops as soon as the button A. -
Page 104
YOUR 607 IN DETAIL The engine and the ignition must be switched off when filling with fuel : Open the fuel filler flap by press- ing its front right hand edge, Unscrew the cap and hook it over the tab located on the inside of the flap. -
Page 105
YOUR 607 IN DETAIL Dipped / main Direction indicators beam change (flashers) Pull the stalk fully towards you. Left : downwards. Right : upwards Note : with the ignition and the auto- matic lights function switched off, on opening the driver’s door a buzzer sounds if you have left your lights on. -
Page 106
(the lights come on) and the dipped the lights remain on for approximate- beam headlamps indicator light on ly thirty seconds or until the vehicle is the instrument panel flashes. locked. Contact a PEUGEOT dealer to have the system checked. 15-07-2002… -
Page 107
YOUR 607 IN DETAIL Screenwash/headlamp wash low Maintenance position This position enables the wiper When the minimum level of blades to be removed. the reservoir is reached, this In the minute following switching off warning light comes on, of the ignition, any action on the stalk… -
Page 108
In cases of malfunction, the driver is informed by the message ‘Rain sensor faulty’ on the multi-function display. In position 1, the windscreen wiper will operate on intermittent wipe. Contact a PEUGEOT dealer to have the system checked. 15-07-2002… -
Page 109
YOUR 607 IN DETAIL THE TRIP COMPUTER Colour screen Pressing the button located at the end of the windscreen wiper control displays in turn: Monochrome screen – ‘Route 1’ with: • the route number, • the time which has elapsed since the last zero re-set of the route, •… -
Page 110
YOUR 607 IN DETAIL The routes Distance travelled After re-setting the trip computer to zero, the range data become signif- Routes 1 and 2 are independent but icant only after a few seconds of have identical application. use. Route 1, for example, allows you… -
Page 111
YOUR 607 IN DETAIL Specific features of the colour Distance remaining to be travelled screen ‘Trip computer’ context menu Briefly press the ‘MODE’ button to select one of the following functions: – Route 1, – Route 2, – Enter the distance to the destina- tion (when guidance is not activat- ed;… -
Page 112
YOUR 607 IN DETAIL ELECTRIC WINDOWS 1 — Driver’s electric window switch. 2 — Passenger’s electric window switch. 3 — Rear right electric window switch. 4 — Rear left electric window switch. 5 — Neutralisation of the rear lighter and the rear electric windows (child… -
Page 113
YOUR 607 IN DETAIL Automatically adjustable The driver’s mirror is con- mirrors for parking vex in order to eliminate the ‘blind spot’ (area at These allow you to see the ground edge defined by a dotted (kerb, wall…) when carrying out park- line). -
Page 114
YOUR 607 IN DETAIL Manual interior mirror The interior mirror has two positions: – day (normal), – night (anti-dazzle). To change from one to the other, push or pull the lever on the lower edge of the mirror. Areas for toll cards /… -
Page 115
YOUR 607 IN DETAIL Manual adjustment of the HAZARD WARNING LIGHTS Steering wheel height and headlamps depth adjustment Press the button, the direction indi- cators flash. When the vehicle is stationary, Depending on the load in your vehi- unlock the steering wheel by… -
Page 116
YOUR 607 IN DETAIL Sill illumination The sill light is at the bottom of each door trim. The light comes on automatically when the door is opened and goes off automatically when the door is closed. COURTESY LIGHTS 1 — Front courtesy light… -
Page 117
YOUR 607 IN DETAIL CENTRE CONSOLE Storage compartment Front lighter Press and wait for a few moments until it springs out automatically. Front ashtray Press the cover to open the ashtray. To release the ashtray for emptying, open it then push the cover Ventilated glove box downwards. -
Page 118
YOUR 607 IN DETAIL Rear sunblind The blind, fitted to the rear parcel shelf, is intended to protect occu- pants from the glare of the sun and the lights of cars behind. Rear armrest Sunblind operation: This provides access to the ski flap Storage compartments from the passenger compartment. -
Page 119
YOUR 607 IN DETAIL PORSCHE TIPTRONIC system’ AUTOMATIC GEARBOX Moving Off The four speed automatic gearbox offers a choice between the comfort of inte- With the engine running, to move off gral automatic operation, enhanced by a sport and a snow programme, or the from position P: pleasure of manual gear changing. -
Page 120
For immediate maximum acceleration off the programme you are in. Do not exceed 60 mph (100 km/h). without touching the gear lever, press Contact a PEUGEOT dealer as soon as the accelerator pedal down as far as it Manual operation possible. -
Page 121
YOUR 607 IN DETAIL ABS ANTI-LOCK BRAKING EMERGENCY BRAKING SYSTEM ASSISTANCE SYSTEM The ABS with Electronic Brake Force emergency, this system Distribution (EBFD) increases the sta- enables the optimum braking pres- bility and manoeuvrability of your sure to be reached more quickly, vehicle, particularly on poor or slip- thus reducing the stopping distance. -
Page 122
Contact a PEUGEOT dealer to have the the ESP system acts automatically system checked. on the engine and on the brake of… -
Page 123
YOUR 607 IN DETAIL Selecting the SPORT position Press switch 1, the SPORT indi- cator light will come on, accompanied by an audible signal. In this position, the suspen- sion is maintained in the SPORT position. To return to automatic opera- tion Press switch 1 again. -
Page 124
YOUR 607 IN DETAIL Operation Changing a memorised speed Place the ring of switch 1 in the ON To memorise a speed higher than position. The indicator light the previous one: will come on accompanied keep stalk 1 pressed upwards;… -
Page 125
YOUR 607 IN DETAIL REAR PARKING ASSISTANCE This system consists of four proximity sensors, located in the rear bumper, and a special speaker fitted under the rear parcel shelf. It detects any obstacle (person, vehicle, tree, gate, pavement etc.) behind the vehicle. -
Page 126
Air bags only operate when the function display, contact a ignition is switched on. The air bag warning light on the PEUGEOT dealer to have the sys- instrument panel is lit throughout Note: the gas escaping from the air tem checked. -
Page 127
YOUR 607 IN DETAIL In the «OFF» position, the passenger SIDE AIR BAGS AND air bag will not be triggered in the CURTAIN AIR BAGS event of an impact. The side air bags are incorporated soon child seat into the frame of the front seat back, removed, turn the air bag slot to the on the door side. -
Page 128
This could hinder the operation of the air bags or injure the occupants. • All work on the air bag system is strictly prohibited unless it is carried out by an approved PEUGEOT dealer. • After an accident or if the vehicle has been stolen or broken into, have the air bag systems checked. -
Page 129
PRACTICAL INFORMATION 2 litre 16 V petrol engine 3 — Coolant reservoir. 7 — Battery. 4 — Dipstick. 1 — Windscreen / headlamp wash 8 — Fuse box. reservoir. 5 — Engine oil filler cap. 2 — Power steering reservoir. 6 — Air filter. -
Page 130
PRACTICAL INFORMATION 2.2 litre 16 V petrol engine 4 — Dipstick. 7 — Battery. 1 — Windscreen / headlamp wash 8 — Fuse box. reservoir. 5 — Engine oil filler cap. 2 — Power steering. 3 — Coolant reservoir. 6 — Air filter. 9 — Brake and clutch fluid reservoir. -
Page 131
PRACTICAL INFORMATION 24V V6 petrol injection engine 4 — Dipstick. 7 — Battery. 1 — Windscreen / headlamp wash reservoir. 5 — Engine oil filler cap. 8 — Fuse box. 2 — Power steering. 3 — Coolant reservoir. 6 — Air filter. 9 — Brake and clutch fluid reservoir. -
Page 132
PRACTICAL INFORMATION 2 litre 16V turbo diesel HDI 4 — Dipstick. 7 — Battery. 1 — Windscreen / headlamp wash reservoir. 8 — Fuse box. 5 — Engine oil filler cap. 2 — Power steering. 3 — Coolant reservoir. 6 — Air filter. 9 — Brake and clutch fluid reservoir. -
Page 133
PRACTICAL INFORMATION 2.2 litre 16V turbo 3 — Coolant reservoir. 7 — Battery. diesel HDI 4 — Dipstick. 1 — Windscreen / headlamp wash 8 — Fuse box. 5 — Engine oil filler cap. reservoir. 2 — Power steering. 6 — Air filter. 9 — Brake and clutch fluid reservoir. -
Page 134
– If the level drops substantially, ment panel or the dipstick. products approved by PEUGEOT contact a PEUGEOT dealer imme- diately. (reservoir capacity 4 litres or 6.5 Dipstick litres with headlamp wash). -
Page 135
At the start of winter, have your bat- handbrake should be adjusted, even tery checked by a PEUGEOT dealer. between services. Have the system checked by a PEUGEOT dealer. Air filter and pollen filter… -
Page 136
When this warning light Contact a PEUGEOT dealer to or to drive responsibly. comes on, accompanied by replace the faulty sensor(s). an audible signal and the… -
Page 137
PRACTICAL INFORMATION CHANGING A WHEEL Tools available Removal For vehicles with alloy wheels fit- Park the vehicle on level, stable The following tools are located in the ted with wheel trims, pull the and non-slippery ground. polystyrene holder in the centre of centre trim by using tool 6 in one the spare wheel: Apply the handbrake, engage first… -
Page 138
Fold the jack and remove it. vehicle (the nearest one to the and the tyre pressure checked wheel to be changed). Fully tighten the bolts using the by a PEUGEOT dealer as soon wheelbrace. as possible. Extend the jack, first by hand, pul- – have… -
Page 139
If you fit snow tyres mounted on steel enable you to obtain duplicate anti- wheels to your vehicle, it is essential theft sockets from a Peugeot dealer. to use special bolts available from your PEUGEOT dealer. * According to model and destination. -
Page 140: Changing A Bulb
1 — Dipped beam headlamps: H7-55W or Xenon bulb. change it. WARNING: RISK OF ELECTROCUTION 4 — Direction indicators: PY 21 W (amber). Xenon bulbs must be replaced by a PEUGEOT Turn the bulb holder a quarter turn and remove it. dealer. Change the bulb.
-
Page 141
PRACTICAL INFORMATION Rear lights Unclip the side trim. Direction indicator repeaters: WY 5 W (amber). Remove the two butterfly nuts Rear wing lights securing the light. Push the repeater forwards or backwards release 1 — Direction indicators: Remove the eyelet. assembly. -
Page 142
PRACTICAL INFORMATION Boot lid lights Turn the bulb holder a quarter Number plate lights: W 5 W. turn. Remove the transparent cover 1 — Reversing lights: P 21 W. Change the faulty bulb. using a screwdriver blade. 2 — Fog lamps: P 21 W. Change the faulty bulb. -
Page 143
PRACTICAL INFORMATION CHANGING A FUSE Fascia panel fuse box The fuse boxes are located under Loosen the screw a quarter turn the fascia panel and in the engine with a coin and tilt the cover to compartment. access the fuses. The replacement fuses and pliers A are fixed to the inside of the fas- cia panel fuse box cover. -
Page 144
PRACTICAL INFORMATION Fuse no. Rating Functions 10 A Switches, rear lighter illumination, front courtesy light, rear courtesy light, rear lighter, number plate lighting, headlamp height adjustment. 10 A Diagnostic connector, headlamp height adjustment control unit, HF locking receiver, passenger compartment air temperature sensor, HF tyre under-inflation receiver. 20 A Headlamp wash. -
Page 145
PEUGEOT dealer. the cover. PEUGEOT will not accept respon- After carrying out the work, close sibility for the cost incurred in cover very carefully repairing your vehicle or for rectify- replace the style cover. -
Page 146
PRACTICAL INFORMATION Fuse N° Rating Functions 20 A Automatic headlamp lighting control unit. 70 A Built-in systems interface. 70 A Ignition supply (+ve accessories / ignition controlled +ve). 20 A Automatic headlamp lighting control unit. 15 A Double injection relay supply. Not used. -
Page 147
PRACTICAL INFORMATION CHANGING A WINDSCREEN These functions are automatically reactivated next time the vehicle is WIPER BLADE driven. Placing the wiper blades in the Note: if the telephone is being used maintenance position when economy mode starts, it will Less than one minute after switch- still be possible to finish the call. -
Page 148
Refit the style cover. experienced after this, please contact a PEUGEOT dealer. To start the vehicle from another battery: Remove the style cover to gain access to the battery, Connect the red cable to the positive (+) terminals of both batteries,… -
Page 149: Vehicles Fitted With Two Batteries
These are special batteries. If one of them needs to be replaced, connect the other end of the green contact a PEUGEOT dealer. or black cable to an earth point on the vehicle which has broken To charge the starter battery with…
-
Page 150
PRACTICAL INFORMATION Special features of the automatic gearbox When towing with four wheels on the ground, the following rules must be obeyed: – lever in position N, – tow the vehicle at less than 30 mph km/h) over maximum distance of 30 miles (50 km). –… -
Page 151
CARAVAN, BOAT ETC… Manual adjustment Note: in certain cases of particularly Only use original PEUGEOT tow arduous use (towing the maximum Adjust your headlamps so as not to bars which have been tested and load up a steep slope in high tem-… -
Page 152
For your PEUGEOT only use accessories and original parts approved by the manufacturer. These accessories and parts are all adapted to your PEUGEOT, after being tested and approved for reliability and safe- ty, which PEUGEOT cannot guarantee for other products. -
Page 153
TECHNICAL DATA PETROL ENGINES MODELS: Model codes 9DRFNB 9D3FZB 9D3FZE 9DXFXB 9DXFXE ENGINES 2 litre 16V 2.2 litre 16V 24V V6 Injection Capacity (cm 1997 2230 2946 Bore x stroke (mm) 85×88 86×96 87×82.6 Number of valves Max. power: EU standard (KW) Max. -
Page 154
TECHNICAL DATA DIESEL ENGINES MODELS: Model codes 9DRHZB 9DRHSB 9D4HXB 9D4HXE ENGINES Turbo diesel Turbo diesel 2 litre HDI 2.2 litre 16V HDI Capacity (cm 1997 2179 Bore x stroke (mm) 85×88 85×96 Number of valves Max. power : EU standard (KW) Max. -
Page 155
TECHNICAL DATA Consumption As per directive 99/100 in MPG (litres/100km) Engine Gearbox Model Urban Extra-urban Mixed Emission codes driving driving driving by mass of CO 2 2 litre 16V Manual 9DRFNB 22.9 (12.3)* 2.8 (6.6)* 32.8 (8.6)* 205 g/km* 2.2 litre 16V Manual 9D3FZB 22.2 (12.7) -
Page 156
TECHNICAL DATA WEIGHTS AND TOWING LOADS (in kg) Engines 2 litre 2.2 litre 2.2 litre V6 injection V6 injection Gearbox Manual Manual Auto. Manual Auto. Model codes: 9DRFNB 9D3FZB 9D3FZE 9DXFXB 9DXFXE • Kerb weight 1436 1455 1475 1560 1580 •… -
Page 157
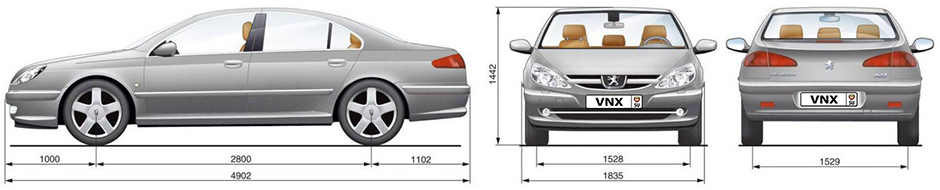
TECHNICAL DATA DIMENSIONS (in mm) 15-07-2002… -
Page 158: Identification Features
TECHNICAL DATA THE IDENTIFICATION FEATURES OF YOUR 607 A. Manufacturer’s plate. B. Serial number on the bodywork. C. Serial number on the fascia. D. Tyres. Label D on the inside of the fuel filler flap indicates : – the dimensions of the rims and tyres, –…
This manual is also suitable for:
2002 607
|
Peugeot 607Электронные книги Peugeot 607 для автомобилистов бесплатно
Руководство по ремонту, эксплуатации и техническому обслуживанию Peugeot 607 СКАЧАТЬ 291 Мб Руководство по ремонту Peugeot 607 в фотографиях СКАЧАТЬ 128 Mб Секреты ремонта Peugeot 607 СКАЧАТЬ 132 Мб Подробная схема электрооборудования Peugeot 607 СКАЧАТЬ 88 Мб Каталог деталей Peugeot 607 СКАЧАТЬ 36 Мб Руководство по ремонту двигателя Peugeot 607 СКАЧАТЬ 53 Мб Руководство по ремонту трансмиссии Peugeot 607 СКАЧАТЬ 154 Мб Коды неисправностей Peugeot 607 СКАЧАТЬ 50 Мб Мультимедийное Руководство по тюнингу Peugeot 607 СКАЧАТЬ 51 Мб Руководства по ремонту Peugeot 607
Peugeot 607 |


Мультимедийное руководство по техническому обслуживанию и ремонту автомобилей Peugeot 307 и Peugeot 607.
- Автор: —
- Издательство: —
- Год издания: —
- Страниц: —
- Формат: —
- Размер: 164,7 Mb
Руководство по эксплуатации и ремонту автомобиля Peugeot 607 с 1999 года выпуска с бензиновыми и дизельными двигателями.
- Автор: —
- Издательство: Гуси-Лебеди
- Год издания: 2009
- Страниц: 493
- Формат: DjVu
- Размер: 113,1 Mb
Инструкция по эксплуатации автомобиля Peugeot 607.
- Автор: —
- Издательство: Peugeot
- Год издания: —
- Страниц: 166
- Формат: PDF
- Размер: 2,7 Mb
Цена вопроса: 0 ₽
Пробег: 0 км
Войдите или зарегистрируйтесь, чтобы писать комментарии, задавать вопросы и участвовать в обсуждении.
Руководство по ремонту и эксплуатации Peugeot 607

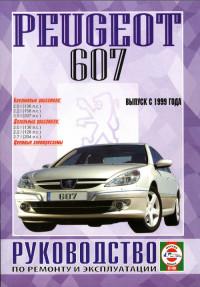
Название: Peugeot 607, бензин/дизель, выпуск с 1999 года. Руководство по ремонту и эксплуатации. Цветные электросхемы.
Издательство: УП «Гуси-Лебеди»
Год: 2009
ISBN: 985-455-069-9
Кол-во страниц: 496
Формат: DjVu
Размер: 113.65Мб
Язык: Русский
Peugeot 607, руководство по ремонту и эксплуатации.
Бензиновые двигатели:
EW10J4 2.0 л. / 100 кВт (136 л.с.) Magneti Marelli DCM 4.8P;
EW12J4 2.2 л. / 116 кВт (158 л.с.) Magneti Marelli DCM 4MP;
ES9A / ES9J4 3.0 л. / 152 кВт (207 л.с.) Bosch ME 7.47 / ME 7.46.
Дизельные двигатели:
DW10BTED4 2.0 л. / 100 кВт (136 л.с.) Siemens Sid 803;
DW12TED4 2.2 л. / 94 кВт (128 л.с.) Bosch EDC 15C2;
DT17TED4 2.7 л. / 150 кВт (204 л.с.) Siemens Sid 201 PSW.
Цель данного Руководства: стать простой и понятной инструкцией, которая позволит грамотно обсудить и спланировать ремонт Вашего автомобиля с профессиональным механиком или выполнить его своими силами. В Руководстве даются рисунки и описания, показывающие функцию различных деталей и их расположение. Работы описываются и фотографируются в поэтапной последовательности, так что их может выполнить даже новичок.
peugeot-club.net — Peugeot_607.rar
Peugeot 607 была создана французскими разработчиками, как модель бизнес-класса. Во внешнем виде 607 можно сразу подметить характерную особенность Peugeot – низкая посадка, которая дает знать о себе при парковке. Салон Peugeot 607, как правило, включает в себя опцию кожи и может быть выполнен в четырех контрастных стилях.
Модель Peugeot 607 для России поставляется с двумя типами двигателей. Это 2,2-литровый с мощностью 160 л.с. и 3,0-литровый V6 мощностью 211 л.с. Стоит отметить, что последний тип двигателя также устанавливается и на 407-ю серию. Расход у 607 приемлемый, даже с учетом агрессивной езды: около 10-12 литров по трассе, и 14-16 литров при движении в черте крупного города.
При самостоятельном техническом обслуживании рекомендуется иметь под рукой книгу по ремонту и эксплуатации для Peugeot 607, которые доступны на нашем сайте.
Обновление цен:
23.04.2023
Диапазон цен:
920 — 1754 руб.
libcats.org
Главная →

Peugeot 607, бензин/дизель, выпуск с 1999 года.. Руководство по ремонту и эксплуатации. Цветные электросхемы.
Гусь Сергей Васильевич
Скачать книгу бесплатно (djvu, 113.08 Mb)
Читать «Peugeot 607, бензин/дизель, выпуск с 1999 года.. Руководство по ремонту и эксплуатации. Цветные электросхемы.»
Популярные книги за неделю:
#1
![]()
Ф.И.Бурдейный, Н.В.Казанский. Карманный справочник радиолюбителя-коротковолновика (1959, DjVu)
440 Kb
#2
![]()
Я.Войцеховский. Радиоэлектронные игрушки (1977, djvu)
13.76 Mb
#3
![]()
Подготовка саперов, подразделений специального назначения по разминированию
Категория: Научно-популярная литература (разное)
1.49 Mb
#4

128 советов начинающему программисту
Очков В.Ф., Пухначев Ю.В.
Категория: computers, computers, prog
8.91 Mb
#5
Английский язык в картинках
I.A. Richards; Christine M. Gibson
Категория: Иностранные языки
5.77 Mb
#6

Красота в изгнании. Королевы подиума
Александр Васильев
Категория: Исторические
21.01 Mb
#7
Ограждение участка. Ограды. Заборы. Калитки. Ворота
В.И.Рыженко
Категория: Строительство
1.23 Mb
#8

Эти загадочные зеркала
В. Правдивцев
Категория: Религия. Эзотерика
88.19 Mb
#9
Самоделки школьника
Тарасов Б.В.
Категория: science, science, technical, hobby, oddjob
41.91 Mb
#10
![]()
Наука и жизнь.Маленькие хитрости
Категория: E_Engineering, EM_Mechanics of elastic materials
3.50 Mb
Только что пользователи скачали эти книги:
#1
![]()
Словарь терминов московской концептуальной школы
Пеппершнейн Павел
Категория: Хобби и ремесла
261 Kb
#2
![]()
Ю.П.Алексеев. Бытовая радиоприемная и звукозаписывающая аппаратура (МРБ-1133, 1989, djvu)
6.46 Mb
#3
![]()
300 полезных советов по домоводству
29 Kb
#4
Колебательные спектры и строение силикатов
Лазарев А.Н.
4.68 Mb
#5
Практическая энциклопедия — домашнее устройство и домоводство, ч.1
Битнер
304 Kb
#6
Практическая энциклопедия — домашнее устройство и домоводство, ч.2
Битнер
711 Kb
#7

Пошив изделий по индивидуальным заказам
Силаева М.А.
Категория: hobby, fancy, house, personal
21.98 Mb
#8
Аутсорсинг в продажах
Эрин Андерсон, Боб Тринкл
Категория: money
17.04 Mb
#9
Самоисполняющиеся сказки (практикум), или ОК’сЮМОРон в действии
Лисси Мусса
Категория: ПСИХОЛОГИЯ, ЭЗОТЕРИКА
61.72 Mb
#10
Советы на каждый день: Домоводство.Кулинария. Лечебник
Зуев В.М.
Категория: КНИГИ ДОМ и СЕМЬЯ
6.08 Mb

Книга по ремонту, техническому обслуживанию и эксплуатации Peugeot 607 с 1999 г. выпуска, оборудованных бензиновыми двигателями рабочим объемом 2,0, 2,2, 3,0 л. и дизельными двигателями рабочим объемом 2,0, 2,2, 2,7 л.
Бензиновые двигатели:
EW10J4 2,0 л. / 100 кВт (136 л.с.) Magneti Marelli DCM 4.8P,
EW12J4 2,2 л. / 116 кВт (158 л.с.) Magneti Marelli DCM 4MP,
ES9A / ES9J4 3,0 л. / 152 кВт (207 л.с.) Bosch ME 7.47 / ME 7.46.
Дизельные двигатели:
DW10BTED4 2,0 л. / 100 кВт (136 л.с.) Siemens Sid 803,
DW12TED4 2,2 л. / 94 кВт (128 л.с.) Bosch EDC 15C2,
DT17TED4 2,7 л. / 150 кВт (204 л.с.) Siemens Sid 201 PSW.
Пособие охватывает детальную информацию, необходимую для того, чтобы провести качественный ремонт узлов и агрегатов автомобиля Пежо 607. В книжке подробно нарисован ремонт двигателя Peugeot 607, системы питания, системы выпуска отработавших газов, сцепления, коробки передач, подвесок, рулевого управления, тормозов, колес и шин, кузова, электрооборудования. В руководство включены цветные схемы электрооборудования (электросхемы) Peugeot 607.
Год выпуска: 2009
Жанр:Руководство по ремонту и эксплуатации
Формат: DjVu
Качество: Сканированные страницы
Количество страниц: 493
Язык : Русский
Peugeot 607 с бензиновыми двигателями: EW10 J4 (RFN) 2.0 л (1997 см³) 136 л.с./100 кВт, EW12 J4 (3FZ) 2.2 л (2230 см³) 158 л.с./116 кВт, 10FJ3P ES9A/ES9J4 (XFV/XFX) 3.0 л (2946 см³) 207 л.с./152 кВт и дизельными DW10 BTED4 (RHR) 2.0 л (1997 см³) 136 л.с./100 кВт, DW12 TED4 (4HX/4HZ) 2.2 л (2179 см³) 128 л.с./94 кВт, DT17 TED4 (UHZ) 2.7 л (2720 см³) 204 л.с./150 кВт; Руководство по эксплуатации, техническому обслуживанию и ремонту. Технические характеристики, цветные электросхемы, устройство, диагностика, особенности конструкции. Иллюстрированное практическое пособие легковой автомобиль бизнес-класса (E) Пежо 607 с цельнометаллическими несущими кузовами четырёхдверный седан переднеприводные модели (включая рестайлинг в ноябре 2004) выпуска с октября 1999 по 2012 год
ЕСЛИ ВЫ ВИДИТЕ ОШИБКУ 406 Not Acceptable и не видите документ, то скорей всего у Вас IP РФ и его надо сменить, на любой другой страны, с помощью VPN ( Scribd и SlideShare блокируют посетителей с Российским IP).
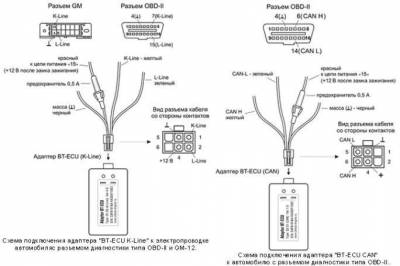
Видео Peugeot 607 замена помпы системы охлаждения и стартера (Пежо 607 99-12)
Peugeot 607 общая информация (Пежо 607 1999-2012)
Водяной насос — снятие и установка
Автомобили с бензиновым двигателем EW12J4
Снятие
1) Отсоедините клемму провода «массы» (-) от отрицательного полюса аккумулятора.
2) Слейте охлаждающую жидкость.
3) Снимите правый приводной вал, а также зубчатый ремень газораспределительного механизма.
4) Снимите теплоотражательный щиток водяного насоса, отвинтив гайки его крепления.
5) Вывинтите болты и крепления водяного насоса и снимите водяной насос, отсоединив трубопровод.
Внимание! Болты крепления крышки водяного насоса не вывинчивайте.
Установка
Убедитесь, что посадочные штифты водяного насоса на блоке цилиндров находятся на своих местах. При необходимости установите новые штифты.
6) Нанесите на патрубок водяного насоса, к которому подсоединяется трубопровод, герметик и установите водяной насос на монтажное место.
7) Затяните болты креплений насоса, действуя в порядке их нумерации, за три прохода:
■ 1-й проход — затяните болты с усилием 3 Нм;
■ 2-й проход — затяните болты с усилием 8 Нм;
■ 3-й проход — затяните болты с усилием 14 Нм.
Установите теплоотражательный щиток и затяните гайки его крепления с усилием 6 Нм.
9) Установите правый приводной вал.
10) Уложите зубчатый ремень газораспределительного механизма.
11) Залейте охлаждающую жидкость и прокачайте систему.
Автомобили с бензиновым двигателем ES9J4S
Снятие
12) Отсоедините клемму провода «массы» (-) от отрицательного полюса аккумулятора.
13) Слейте охлаждающую жидкость.
14) Снимите зубчатый ремень газораспределительного механизма.
15) Снимите заднюю защитную крышку привода газораспределительного механизма.
16) Снимите натяжной ролик ремня привода вспомогательных агрегатов, а затем вывинтите болты и снимите водяной насос вместе с уплотнительной прокладкой.
При установке водяного насоса старая прокладка подлежит замене на новую.
Установка
17) Установите водяной насос с новой уплотнительной прокладкой на монтажное место, не повредив при этом прокладку насоса.
Внимание! Если устанавливается новый водяной насос, то болт крепления задней защитной крышки. привода газораспределительного механизма следует заменить на новый.
18) Закрепите насос болтами, затянув их рукой. Затем затяните болты крепления водяного насоса за несколько проходов, действуя в порядке нумерации болтов:
• 1-й проход — затяните болты с усилием 5 Нм;
• 2-й проход — затяните болты с усилием 8 Нм;
19) Установите натяжной ролик, затянув болт его крепления с усилием 8 Нм.
20) Установите заднюю защитную крышку привода газораспределительного механизма и закрепите ее болтами, затянув их с усилием 6 Нм.
21) Уложите зубчатый ремень газораспределительного механизма.
22) Залейте охлаждающую жидкость и прокачайте систему.
Автомобили с дизельным двигателем DW12TED4
Снятие
23) Слейте охлаждающую жидкость.
24) Снимите зубчатый ремень газораспределительного механизма.
25) Вывинтите болты крепления и снимите водяной насос и его уплотнение.
Установка
26) Почистите уплотняемые, поверхности водяного насоса чистящим средством Decapjoint.
Внимание! Чистка поверхностей абразивными средствами не допускается.
27) Установите водяной насос на монтажное место, заменив прежнее уплотнение на новое.
28) Затяните болты крепления водяного насоса с усилием 15 Нм.
29) Уложите зубчатый ремень и установите демонтировавшиеся для этого компоненты.
30) Залейте охлаждающую жидкость и удалите воздух из системы охлаждения.
Автомобили с дизельным двигателем DT17TED4
Снятие
31) Снимите верхнюю защитную крышку двигателя.
32) Снимите брызговик двигателя.
33) Слейте охлаждающую жидкость.
34) Снимите ремень привода вспомогательных агрегатов, предварительно обозначив направление его вращения (если будет устанавливаться прежний ремень).
35) Застопорите шкив привода водяного насоса от проворачивания с помощью упорного валика, вставив его в отверстие на шкиве.
36) Вывинтите три болта крепления шкива водяного насоса и снимите шкив.
37) Извлеките упорный валик, которым стопорился шкив водяного насоса, вывинтите три болта крепления насоса и снимите водяной насос с блока цилиндров.
Установка
38) Проверьте состояние и ход натяжного и направляющего роликов, а также водяного насоса и убедитесь, что они вращаются плавно, без заеданий и шумов, и на них нет следов выхода смазки.
39) Замените прежнюю уплотнительную прокладку водяного насоса на новую и установите водяной насос на монтажное место.
40) Закрепите водяной насос на блоке цилиндров болтами, затянув их с усилием 10 Нм.
41) Установите шкив водяного насоса, затянув болты его крепления с усилием 20 Нм. Для исключения проворачивания шкива при ввинчивании болтов застопорьте шкив упорным валиком, вставив его в соответствующее отверстие.
42) Извлеките упорный валик и уложите ремень привода вспомогательных агрегатов, убедившись, что ребра ремня плотно заходят в канавки всех шкивов.
43) Залейте охлаждающую жидкость и удалите воздух из системы охлаждения.
44) Установите брызговик двигателя и его верхнюю защитную крышку двигателя.
Основные технические характеристики (General technical specifications) Peugeot 607 модель 2003 9DXFXE с мотором 3.0 литра
| № | Спецификация / Specs | Данные |
| Габариты (мм/mm) и масса (кг/kg) / Dimensions and Weight | ||
| 1 | Длина / Length | (4871 до 2004) 4902 |
| 2 | Ширина (без/с зеркалами) / Width | 1835 |
| 3 | Высота (загружен/пустой) / Height | 1442 (1460 до 2004) |
| 4 | Колёсная база / Wheelbase | 2800 |
| 5 | Дорожный просвет (клиренс) / Ground clearance | 140 |
| 6 | Снаряжённая масса / Total (curb) weight | 1580 |
| Полная масса / Gross (max.) weight | 2160 | |
|
Двигатель / Engine |
||
| 7 | Тип / Engine Type, Code | Бензиновый, жидкостного охлаждения, четырехтактный, 10FJ3P ES9J4S (XFX) |
| 8 | Количество цилиндров / Cylinder arrangement: Total number of cylinders, of valves | 6-цилиндровый, 24V, V-образный, DOHC с верхним расположением двух распределительных валов |
| 9 | Диаметр цилиндра / Bore | 87.0 мм |
| 10 | Ход поршня / Stroke | 82.6 мм |
| 11 | Объём / Engine displacement | 2946 см³ |
| 12 | Система питания / Fuel supply, Aspiration | Распределенный впрыск топлива Bosch ME 7.46 |
| Атмосферный | ||
| 13 | Степень сжатия / Compression ratio | 10.9:1 |
| 14 | Максимальная мощность / Max. output power kW (HP) at rpm | 152 кВт (207 л.с.) при 6500 об/мин |
| 15 | Максимальный крутящий момент / Max. torque N·m at rpm | 285 Нм при 3780 об/мин |
|
Трансмиссия / Transmission |
||
| 16 | Сцепление / Clutch type | Гидротрансформатор/ Torque Converter |
| 17 | КПП / Transmission type | 4HP20 (AG) АКПП 4 Автоматическая, четырёхступенчатая, гидромеханическая, адаптивная |
О Книге
- Название: Peugeot 607 Руководство по ремонту и эксплуатации
- Бензиновые двигатели: EW10 J4 (RFN) 2.0 л (1997 см³) 136 л.с./100 кВт, EW12 J4 (3FZ) 2.2 л (2230 см³) 158 л.с./116 кВт, 10FJ3P ES9A/ES9J4S (XFV/XFX) 3.0 л (2946 см³) 207 л.с./152 кВт и дизельными DW10 BTED4 (RHR) 2.0 л (1997 см³) 136 л.с./100 кВт, DW12 TED4 (4HX/4HZ) 2.2 л (2179 см³) 128 л.с./94 кВт, DT17 TED4 (UHZ) 2.7 л (2720 см³) 204 л.с./150 кВт
- Выпуск с 1999 года
- Серия: «Ремонт Автомобилей»
- Год издания: 2009
- Автор: Коллектив авторов
- Издательство: «Ассоциация независимых издателей»
- Формат: PDF
- Страниц в книге: 493
- Размер: 145.91 МБ
- Язык: Русский
- Количество электросхем: 19
We have 6 Peugeot
607 manuals
covering a total of 1 years of production.
In the table below you can see 0
607 Workshop Manuals,0
607 Owners Manuals and 1 Miscellaneous
Peugeot 607 downloads.
Our most popular manual is the
2002-2004 2.2 HDI Peugeot 607 Electrical Wiring Diagram
.
This (like all of our manuals) is available to download for free in PDF format.
How to download a Peugeot 607
Repair Manual (for any year)
These 607 manuals have been provided by our users,
so we can’t guarantee completeness. We’ve checked the years that the manuals cover
and we have Peugeot 607 repair manuals
for the following years; 2002, 2002 and 2003.
Go through the 6 different PDF’s that are displayed below,
for example this one. You’ll then be shown the first 10 pages of this specific
document, you can then scroll down and click ‘show full PDF’. Then you can click
download you’ve got a totally free car manual, forever!
What topics does the Peugeot 607
Service/Repair Manual cover?
In total, that’s over 695 pages of content dedicated to your
Peugeot 607. Here’s a non exhaustive list
of what’s covered;
- Peugeot 607 service manual for roadside repairs
- Peugeot 607 owners manual covering weekly checks
- Peugeot 607 workshop manual covering Lubricants, fluids and tyre pressures
- Peugeot 607 service PDF’s covering routine maintenance and servicing
- Detailed Peugeot 607 Engine and Associated Service Systems (for Repairs and Overhaul) (PDF)
- Peugeot 607 Transmission data Service Manual PDF
- Peugeot 607 Brakes and suspension PDF
- Peugeot 607 Wiring Diagrams
Looking for a Free Peugeot 607 Haynes /
Peugeot 607 Chilton Manuals?
We get a lot of people coming to the site looking to get themselves a free
Peugeot 607 Haynes
manual. There are two things you need to know; firstly it’s illegal, and secondly —
there are much better ways of servicing and understanding your
Peugeot 607 engine than
the Haynes manual. That’s essentially what we’re here for — to give you an
alternative to the Haynes and Chilton, online and totally for free.
Show more
Show less
Книга по ремонту, техническому обслуживанию и эксплуатации Peugeot 607 с 1999 г. выпуска, оборудованных бензиновыми двигателями рабочим объемом 2,0, 2,2, 3,0 л. и дизельными двигателями рабочим объемом 2,0, 2,2, 2,7 л.
Бензиновые двигатели:
EW10J4 2,0 л. / 100 кВт (136 л.с.) Magneti Marelli DCM 4.8P,
EW12J4 2,2 л. / 116 кВт (158 л.с.) Magneti Marelli DCM 4MP,
ES9A / ES9J4 3,0 л. / 152 кВт (207 л.с.) Bosch ME 7.47 / ME 7.46.
Дизельные двигатели:
DW10BTED4 2,0 л. / 100 кВт (136 л.с.) Siemens Sid 803,
DW12TED4 2,2 л. / 94 кВт (128 л.с.) Bosch EDC 15C2,
DT17TED4 2,7 л. / 150 кВт (204 л.с.) Siemens Sid 201 PSW.
Пособие охватывает детальную информацию, необходимую для того, чтобы провести качественный ремонт узлов и агрегатов автомобиля Пежо 607. В книжке подробно нарисован ремонт двигателя Peugeot 607, системы питания, системы выпуска отработавших газов, сцепления, коробки передач, подвесок, рулевого управления, тормозов, колес и шин, кузова, электрооборудования. В руководство включены цветные схемы электрооборудования (электросхемы) Peugeot 607.
Год выпуска: 2009
Жанр:Руководство по ремонту и эксплуатации
Формат: DjVu
Качество: Сканированные страницы
Количество страниц: 493
Язык : Русский
- Главная
- Peugeot
- 607
- Полное руководство по ремонту Peugeot 607 2000 — 2006 г.в.
Год выпуска:
2000 — 2006 гг.
Быстро купить книгу в оригинальной качественной версии PDF от издательства
Купить бумажную версию книги с доставкой по вашему адресу
Скачать руководство с предоставленного файлообменника
Представляем вашему вниманию руководство по эксплуатации, техническому сервису и наладке автомобиля Peugeot 607. Французское авто производилось с 2000 года, проходило модификацию с 2004 года. Peugeot 607 укомплектовывалось такими бензиновыми двигателями: на четыре цилиндра, рядный, объемом 2.0 литра, 16V (136 л.е., EW10J4); на четыре цилиндра, рядный, объемом 2.2 литра 16V (158 л.е., EW12J4); на шесть цилиндров, V-образный, объемом 3.0 литра 24V (207 л.с., ES9J4 или 211 л.е., ES9A). Еще транспортное средство марки Peugeot 607 укомплектовывалось такими дизелями: турбодизели HDi с непосредственным впрыском common rail, на четыре цилиндра, рядный, объемом 2.0 литра 16V (136 л.е., DW10BTED4); на четыре цилиндра рядный объемом 2.2 литра 16V (133 л.с., DW12TED4), на шесть цилиндров, V-образный, объемом 2.7 литра 24V (204 л.с., DT17TED4).
Коробки передач у данного автомобиля пяти или шести ступенчатая механическая, четырех или шести ступенчатая автоматическая. Руководство включает в себя подробную информацию по эксплуатации и техническому сервису машины, конфигурации двигателя. Есть подробные характеристики трансмиссии, устройство ходовой части, конструкция рулевого механизма, обзор устройств тормозной системы, приборы электрооборудования и кузова.
Эксплуатация Peugeot 607
Похожие руководства на сайте
Руководство по ремонту и эксплуатации Peugeot 607
Название: Peugeot 607, бензин/дизель, выпуск с 1999 года. Руководство по ремонту и эксплуатации. Цветные электросхемы.
Издательство: УП «Гуси-Лебеди»
Год: 2009
ISBN: 985-455-069-9
Кол-во страниц: 496
Формат: DjVu
Размер: 113.65Мб
Язык: Русский
Peugeot 607, руководство по ремонту и эксплуатации.
Бензиновые двигатели:
EW10J4 2.0 л. / 100 кВт (136 л.с.) Magneti Marelli DCM 4.8P;
EW12J4 2.2 л. / 116 кВт (158 л.с.) Magneti Marelli DCM 4MP;
ES9A / ES9J4 3.0 л. / 152 кВт (207 л.с.) Bosch ME 7.47 / ME 7.46.
Дизельные двигатели:
DW10BTED4 2.0 л. / 100 кВт (136 л.с.) Siemens Sid 803;
DW12TED4 2.2 л. / 94 кВт (128 л.с.) Bosch EDC 15C2;
DT17TED4 2.7 л. / 150 кВт (204 л.с.) Siemens Sid 201 PSW.
Цель данного Руководства: стать простой и понятной инструкцией, которая позволит грамотно обсудить и спланировать ремонт Вашего автомобиля с профессиональным механиком или выполнить его своими силами. В Руководстве даются рисунки и описания, показывающие функцию различных деталей и их расположение. Работы описываются и фотографируются в поэтапной последовательности, так что их может выполнить даже новичок.
peugeot-club.net — Peugeot_607.rar